Dark Tales: Edgar Allan Poe's The Gold Bug Walkthrough, Guide, & Tips
Dark Tales: Edgar Allan Poe’s The Gold Bug Walkthrough

Welcome to the Dark Tales: Edgar Allan Poe’s The Gold Bug Walkthrough
Dupin needs your help solving the mystery of the gold bug. Crack the codes and follow the clues to one man’s obsession with an old legend.
Whether you use this document as a reference when things get difficult or as a road map to get you from beginning to end, we’re pretty sure you’ll find what you’re looking for here.
This document contains a complete Dark Tales: Edgar Allan Poe’s The Gold Bug game walkthrough featuring annotated screenshots from actual gameplay!
We hope you find this information useful as you play your way through the game. Use the walkthrough menu below to quickly jump to whatever stage of the game you need help with.
Remember to visit the Big Fish Games Forums if you find you need more help. Have fun!
This walkthrough was created by BrownEyedTigre, and is protected under US Copyright laws. Any unauthorized use, including re-publication in whole or in part, without permission, is strictly prohibited.
General Tips

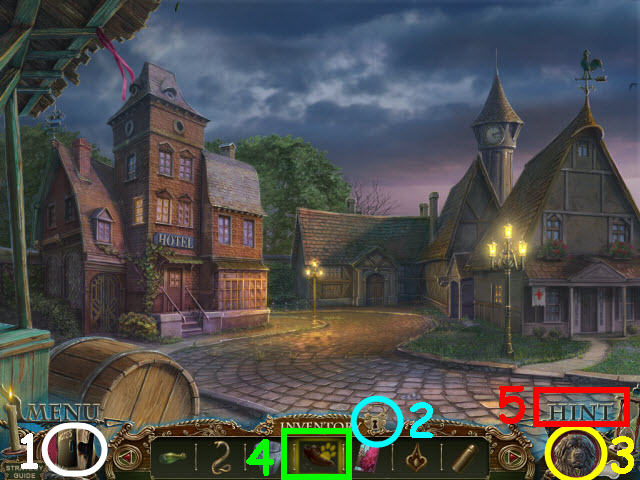
- This is the official guide to Dark Tales: Edgar Allan Poe’s The Gold Bug.
- Select Options to adjust the Sound, Music and Voice Volume. You can also adjust Full-Screen, Wide-Screen, Custom Wide Screen and Custom Cursor.
- You can review the notes and story updates in the Note book on the lower left (1).
- Hidden object scenes are referred to as HOS throughout the guide. Items written in orange in HOS require an extra step before they can be obtained.
- The objects in the find list are random except for the orange ones. Your list may be different from the guide.
- Puzzles may be skipped and some can be reset.
- Move your cursor to the bottom of the screen to raise the instruction bar for the puzzles. Move your cursor down to the bottom of the screen to raise the Inventory bar. The bar may be locked in place by locking the padlock in the center (2).
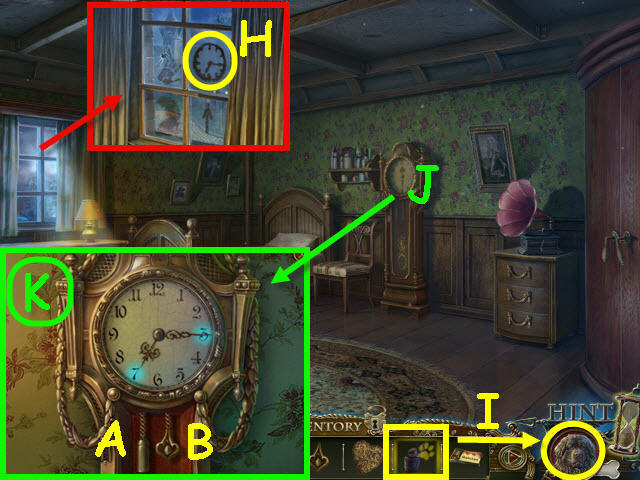
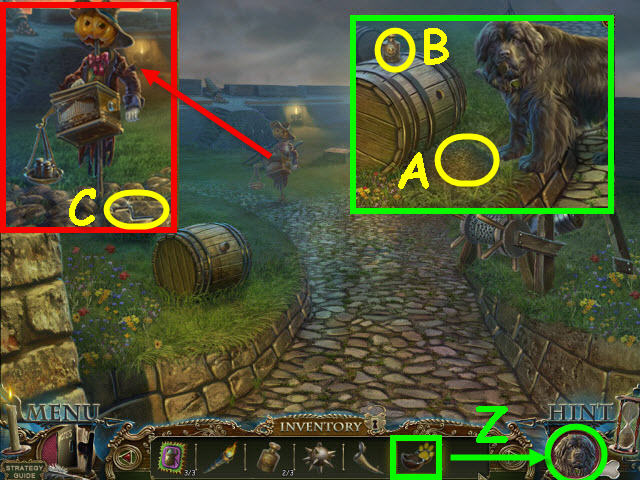
- You will acquire Arthur (3), a dog, during your quest. Some inventory items will be highlighted with paw prints (4) when you are in the correct scene, requiring you to give that item to Arthur to sniff.
- Select the Hint button (5) on the bottom right to get a hint in HOS and in the main quest.
- In order to trigger the Hidden Object Scenes, some actions are required first. If you do not have a HOS where they are located in the guide, please check the guide to see what you may have missed.
- Inventory items will be marked in all CAPS in the strategy guide.
Chapter 1: Mr. LeGrand
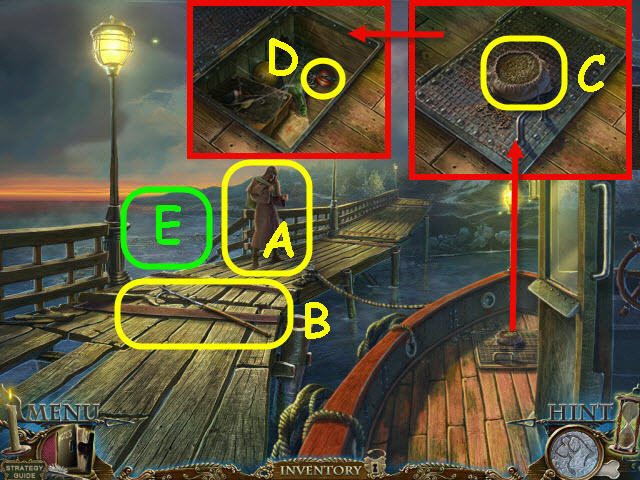
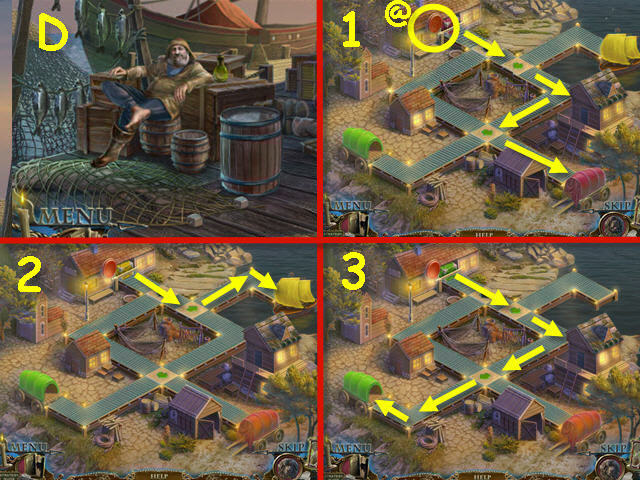
- Speak to the gentleman on the boat.
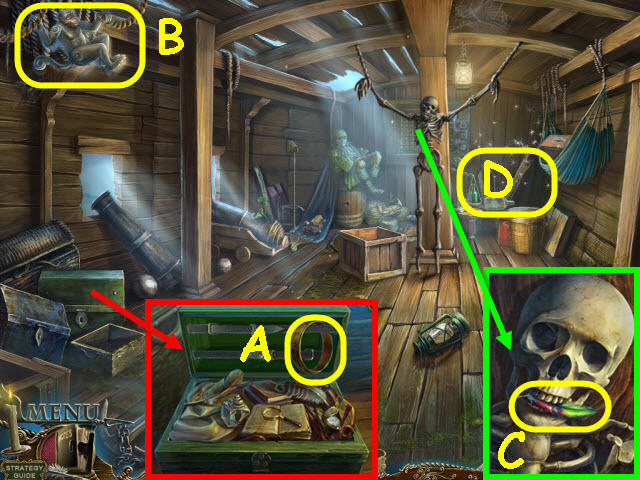
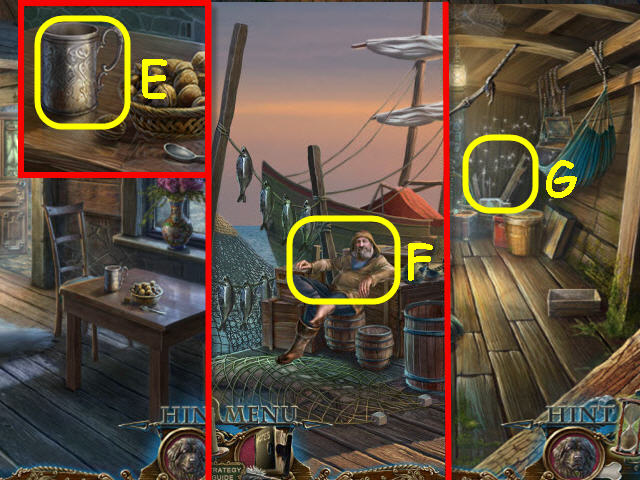
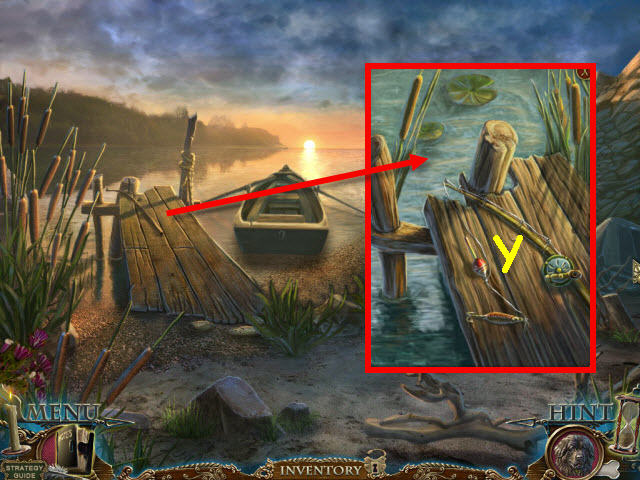
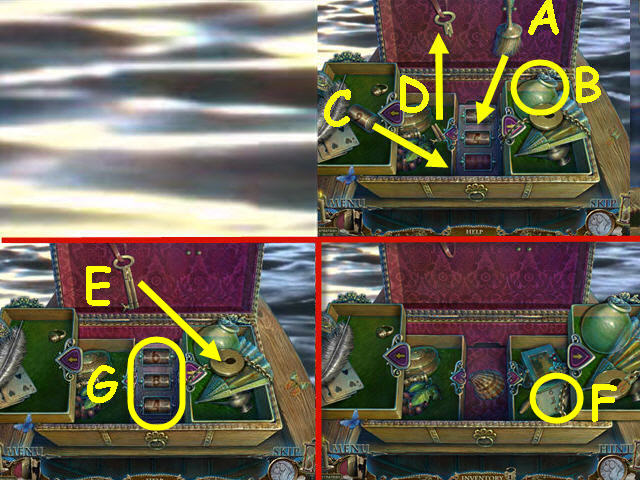
- Speak to the masked man (A).
- Take the BOATHOOK (B).
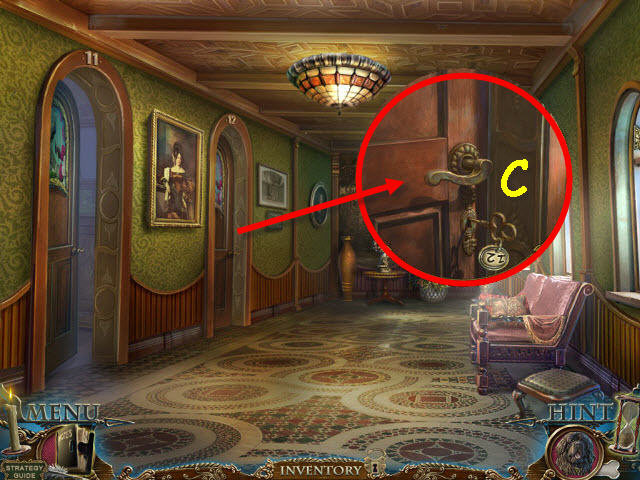
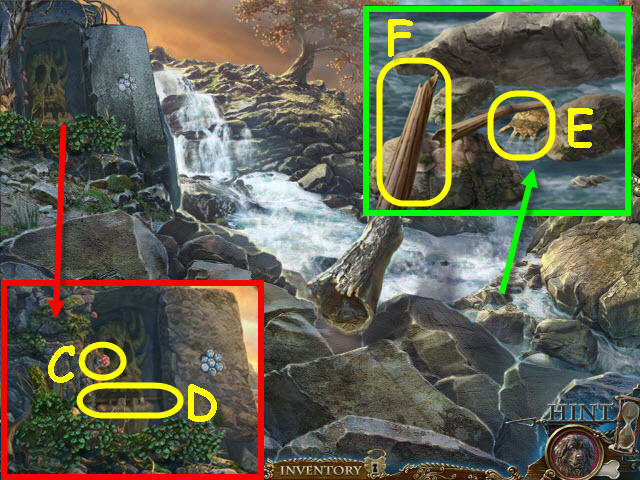
- Examine the hatch; take the BAG OF MILLET (C).
- Open the hatch; take the RED MECHANICAL BUG (D).
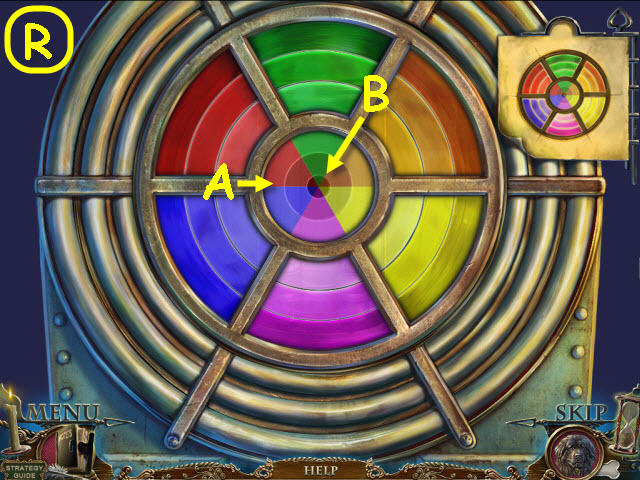
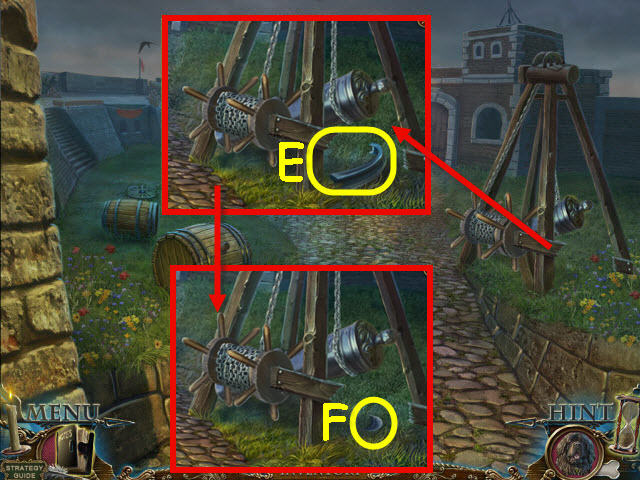
- Examine the opening on the pier (E).
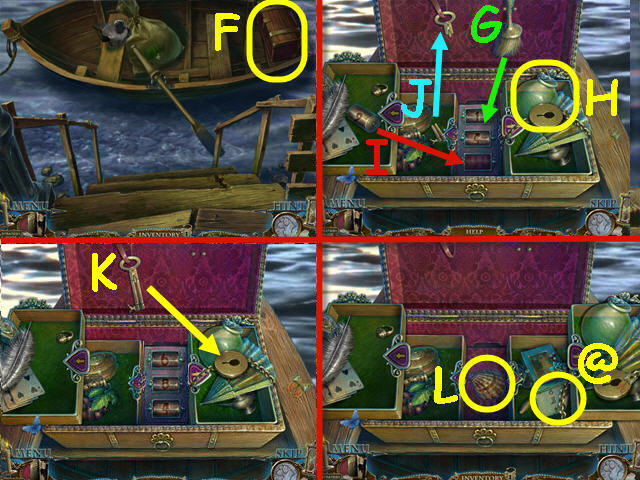
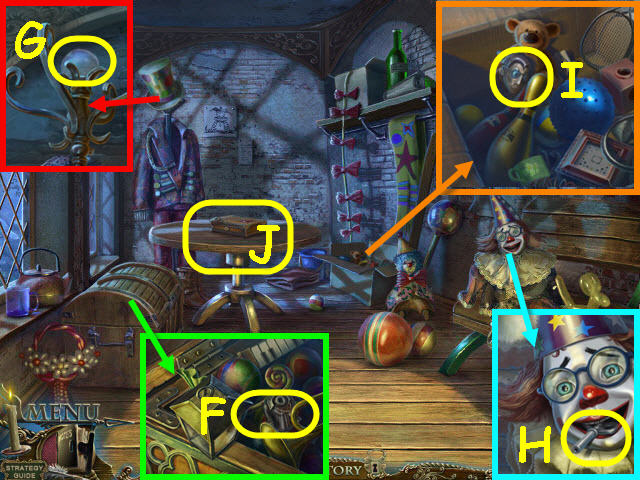
- Use the BOATHOOK on the boat; open the chest and examine it (F).
- Use the brush on the sand (G).
- Take the cork off the glass container (H).
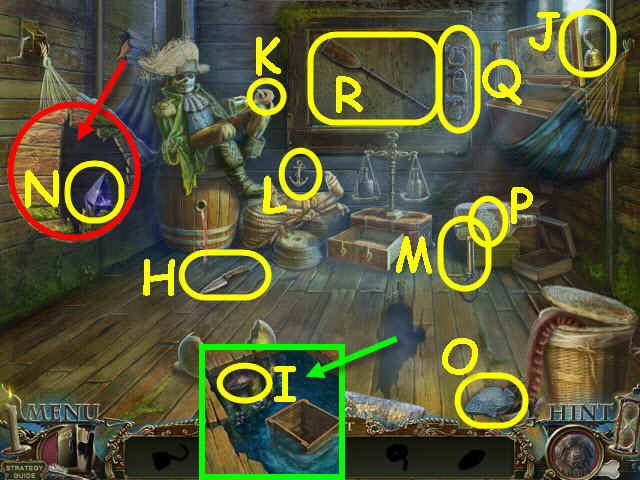
- Move the items on the upper left; place the tumbler in the bottom center slot (I).
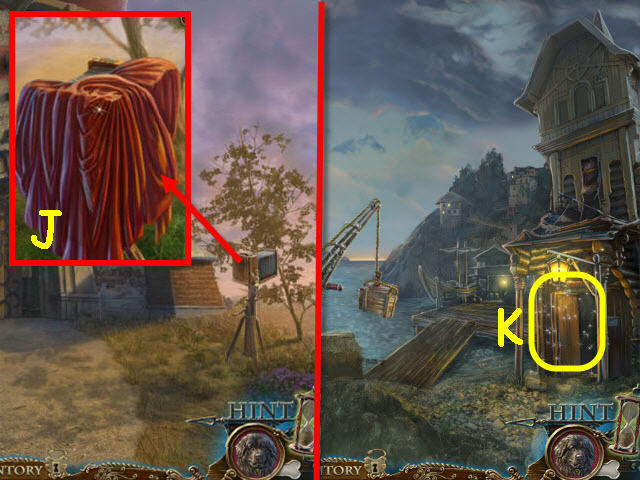
- Select the left purple arrow; move the items and place the key half on the upper key half (J).
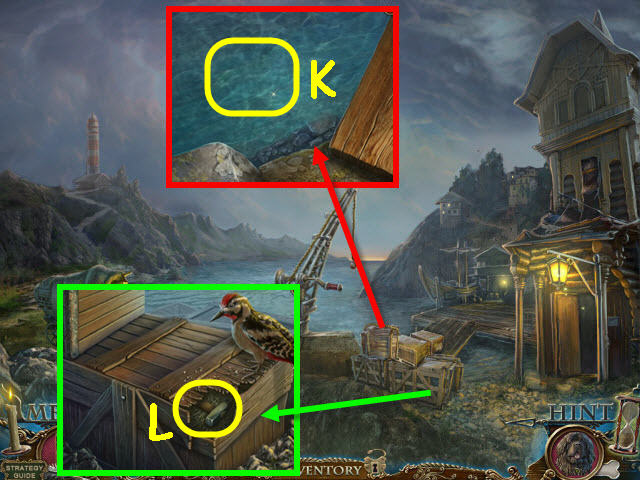
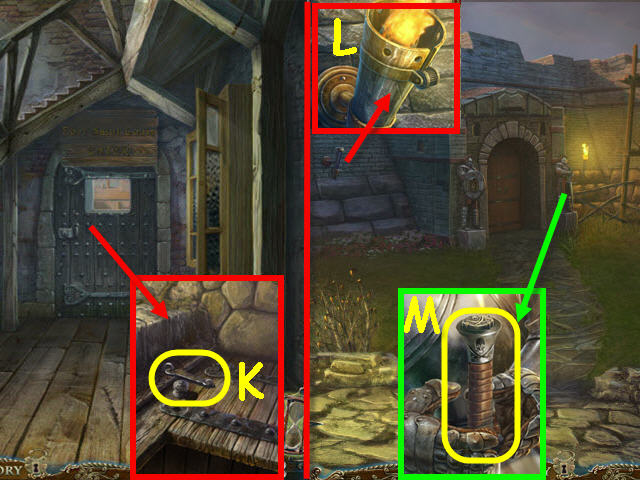
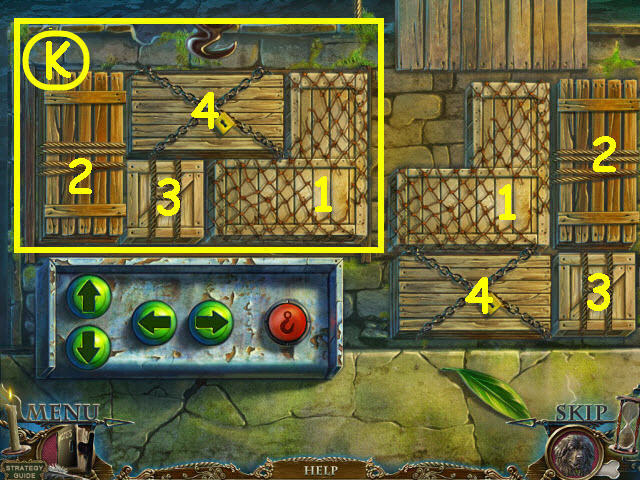
- Take the key and use it on the right lock; press the right arrow (K).
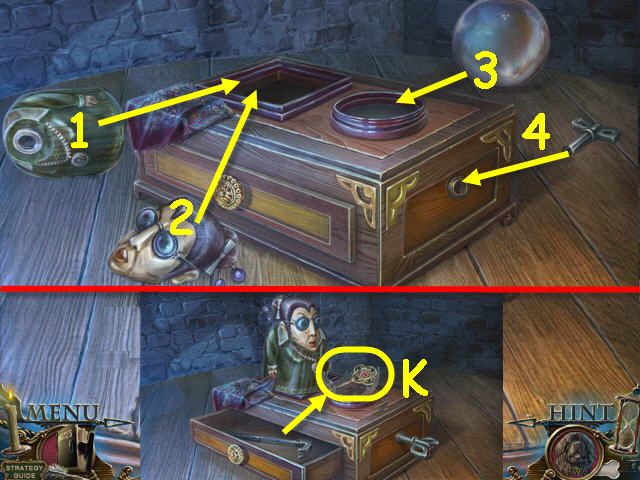
- Slide the paper out to get the code for the center lock; 6-8-4 (@).
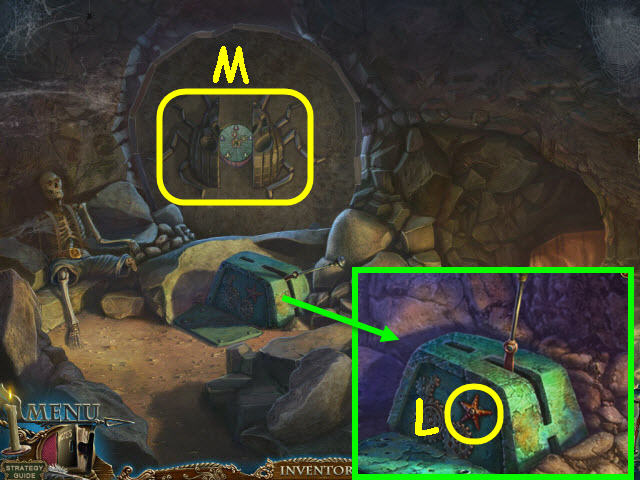
- Enter the code, 6-8-4 on the center lock; take the SHARP SHELL (L).
- Examine the sack; use the SHARP SHELL on the rope and take the PUPPY DOG (M).
- Take the YELLOW GECKO (N).
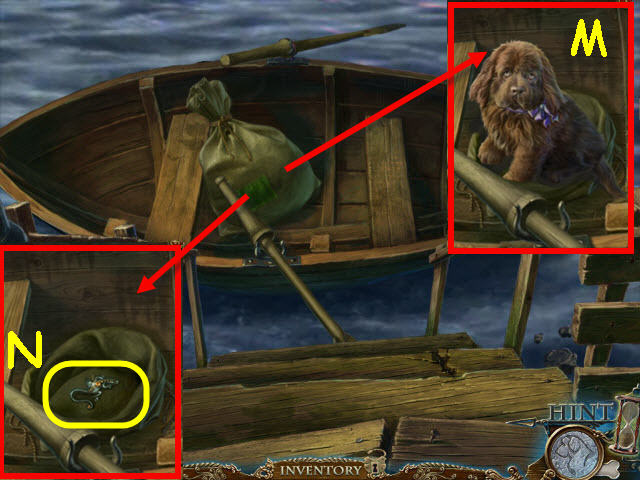
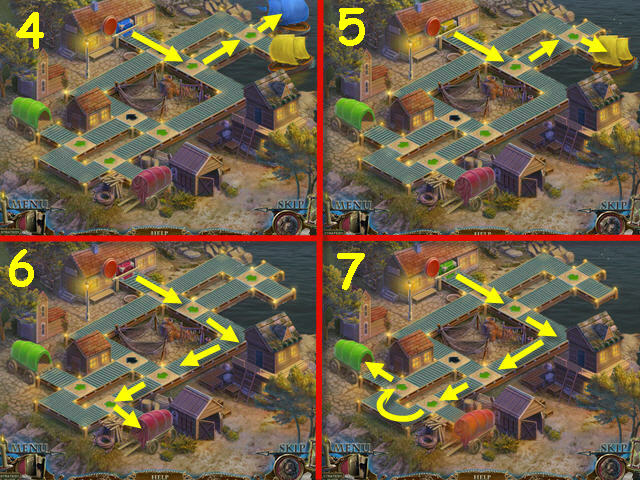
- Back out and go forward.
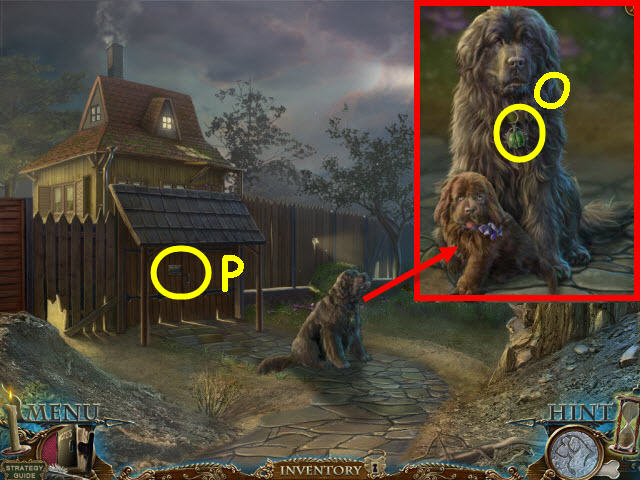
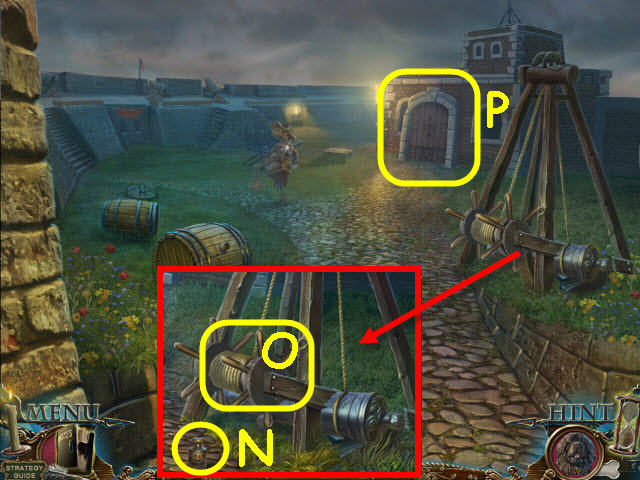
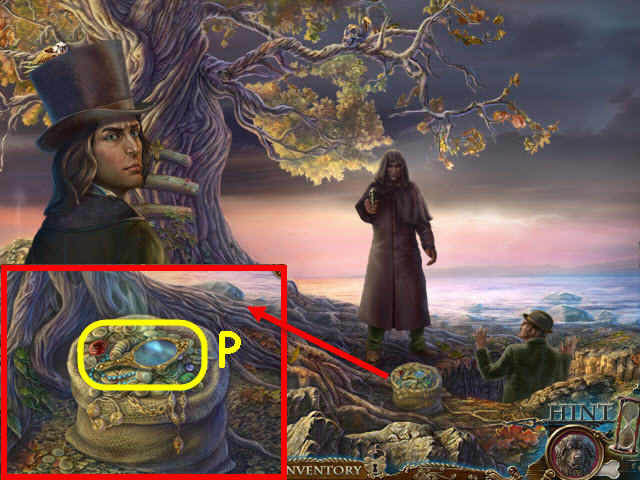
- Examine the dog; give the PUPPY DOG to it and take the GREEN MECHANICAL BUG (O).
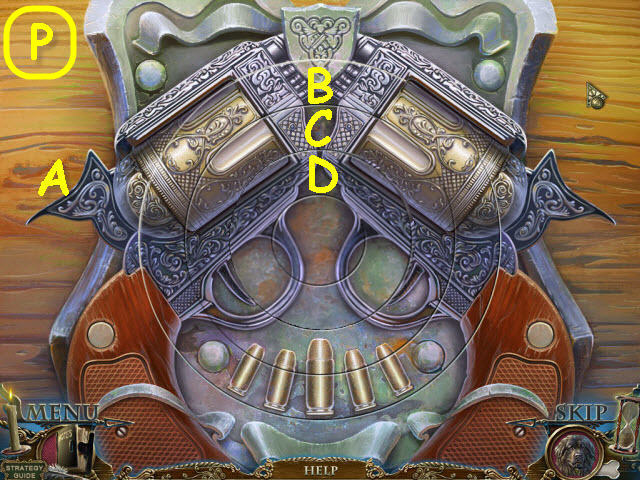
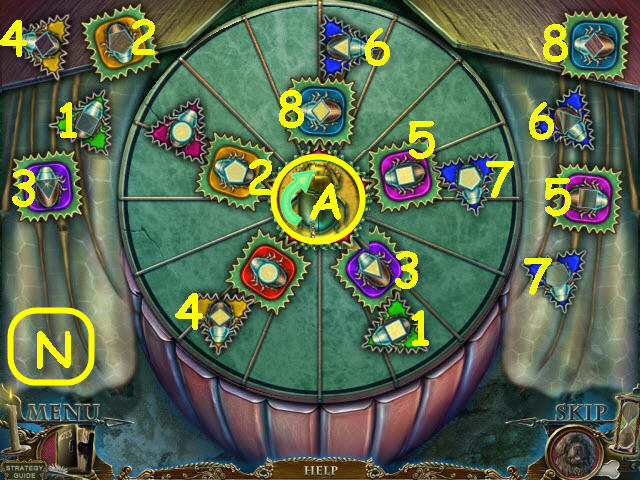
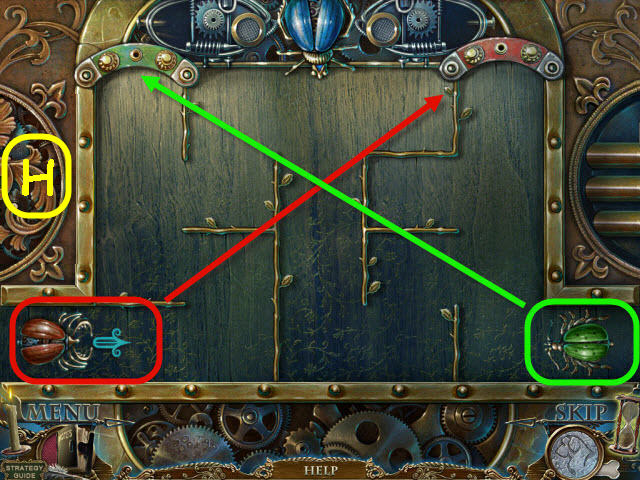
- Examine the gate and place the RED MECHANICAL BUG and GREEN MECHANICAL BUG on it to trigger a puzzle (P).

- Lead the bug to its same colored slot.
- To solve the puzzle, select and move the bugs in this order: Red-right, up, left, green-up, left, down, left, up, red, right, up, right, down, right, up, right, up, left, green-left, down, left, up, red-right, and up (Q).
- Go through the newly-opened gate.
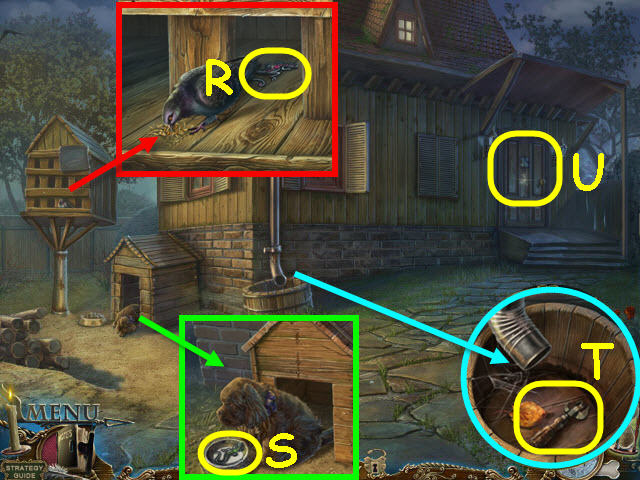
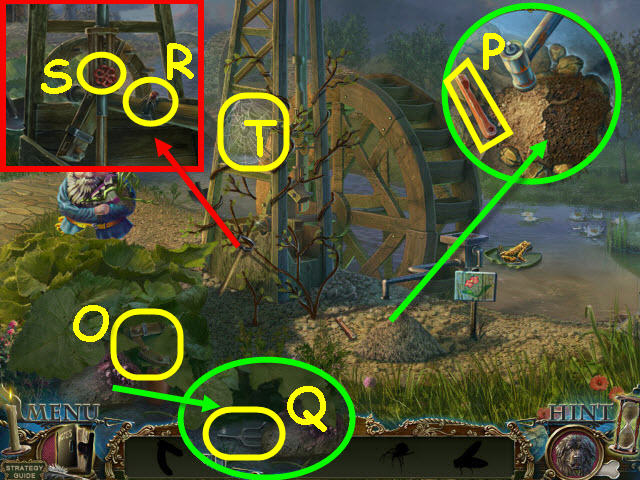
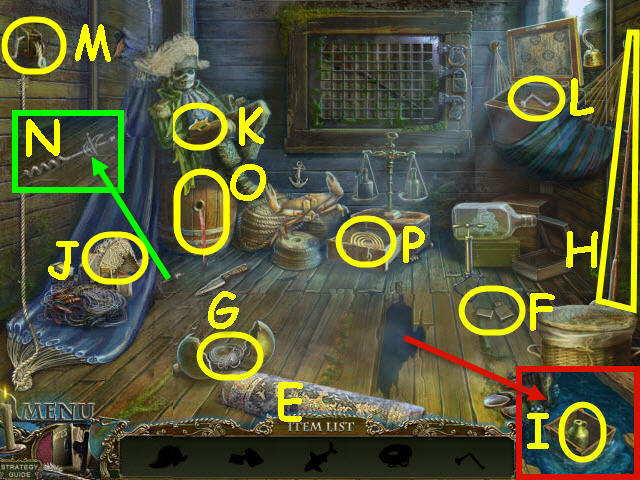
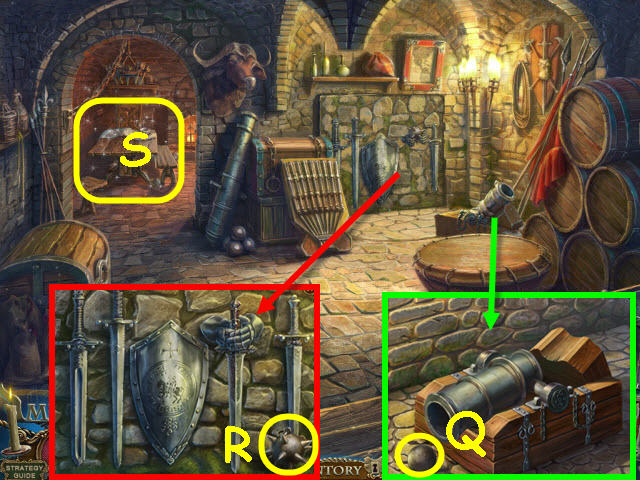
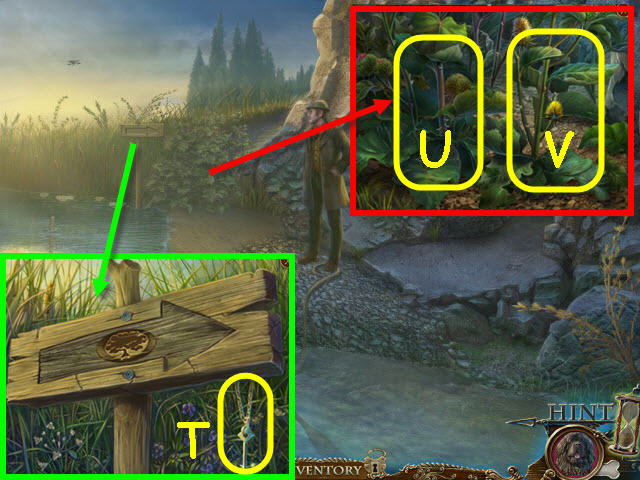
- Examine the pigeon house and use the BAG OF MILLET on it; take the RED GECKO (R).
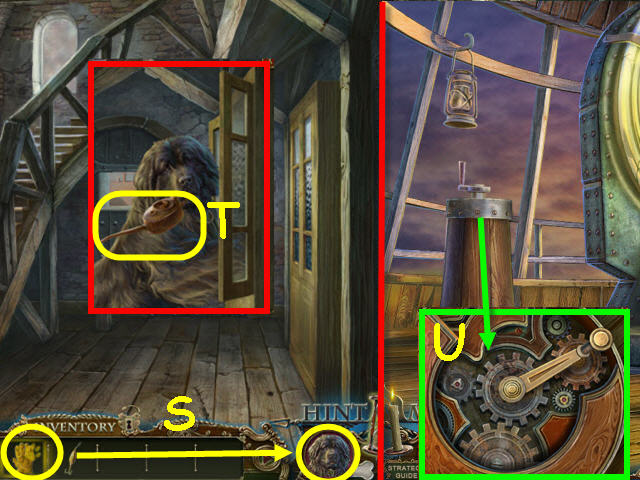
- Examine the doghouse and select the bowl; take the GREEN GECKO (S).
- Examine the drainpipe and move the leaf; take the CAN OPENER (T).
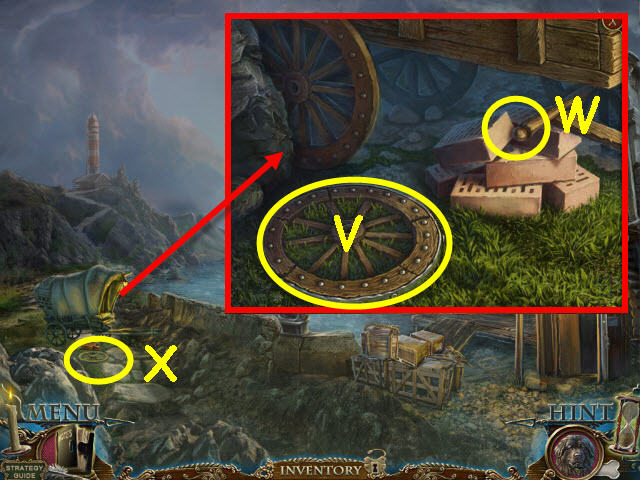
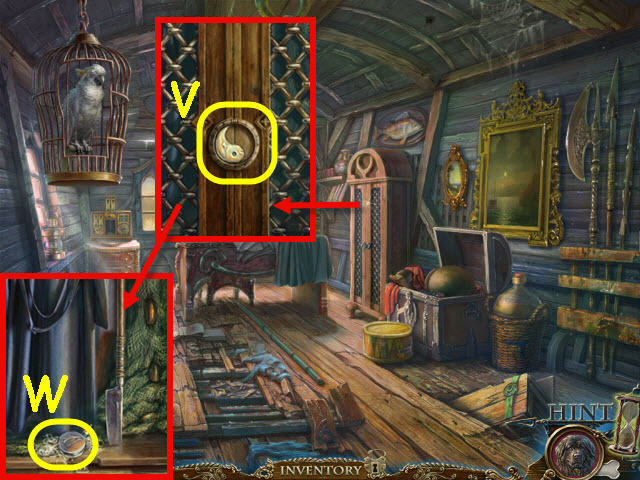
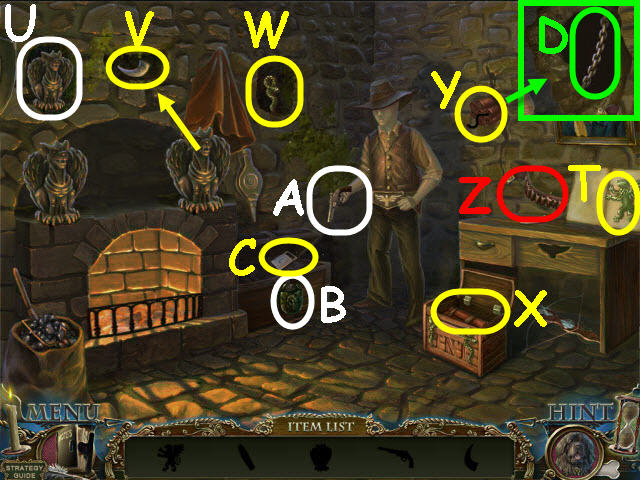
- Examine the front door and place the GREEN, RED, and YELLOW GECKO on it to trigger a puzzle (U).
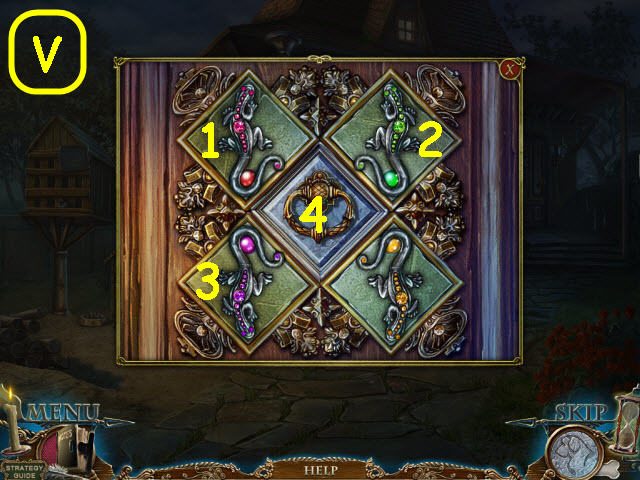
- Uncurl all the gecko tails.
- To solve the puzzle, select the following geckos: Red (1), green (2), and pink (3). Select the center knob (4) when complete (V).
- Enter the house.
- Speak to Mr. LeGrand.
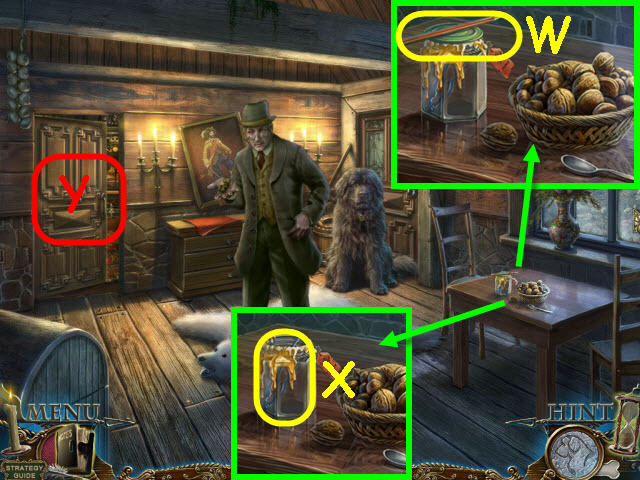
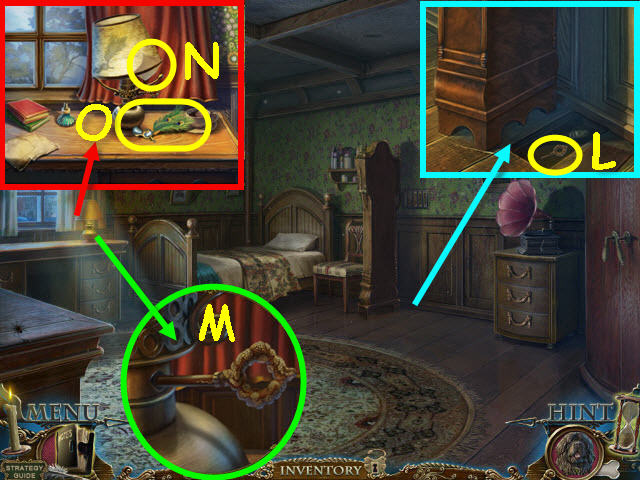
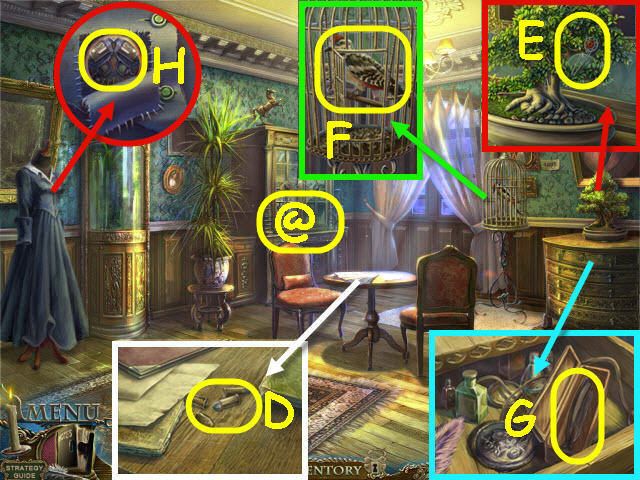
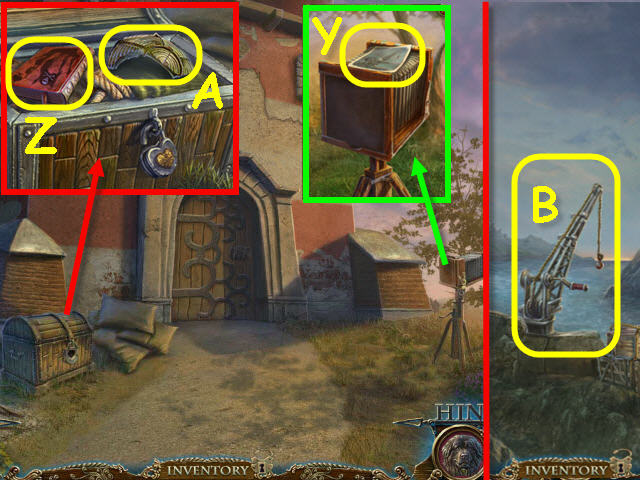
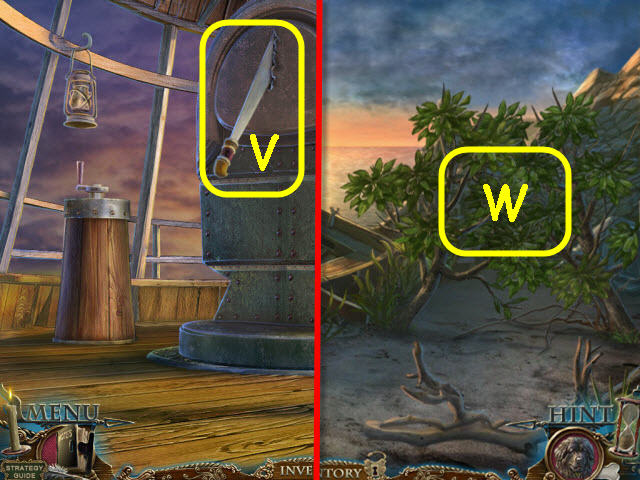
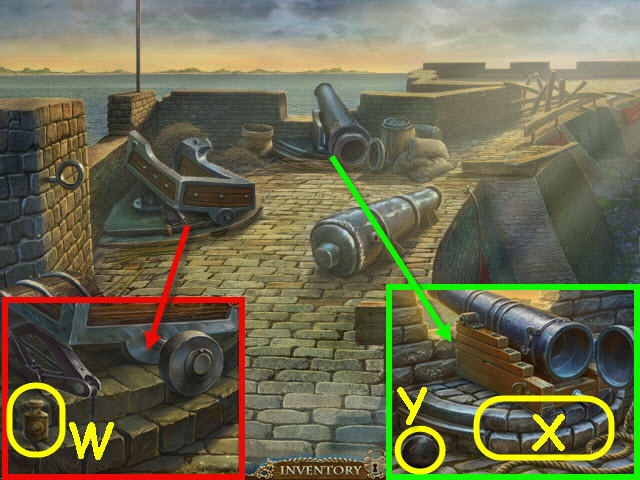
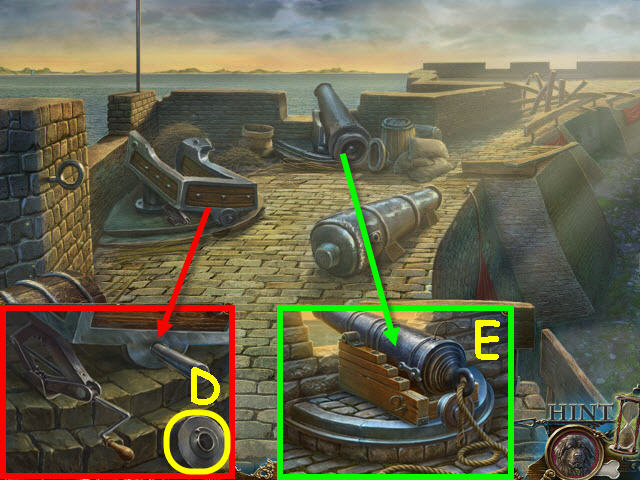
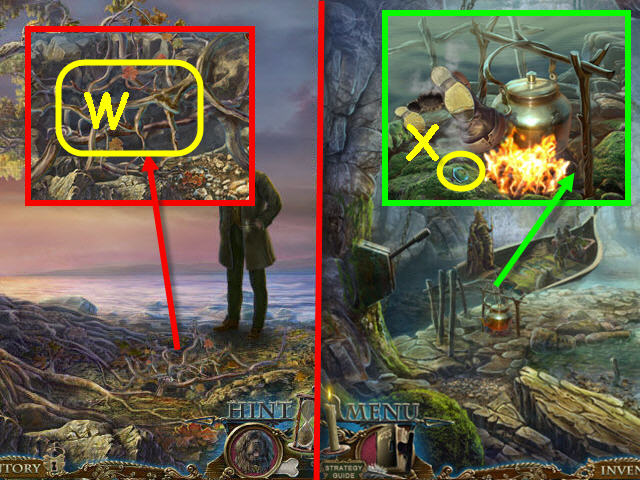
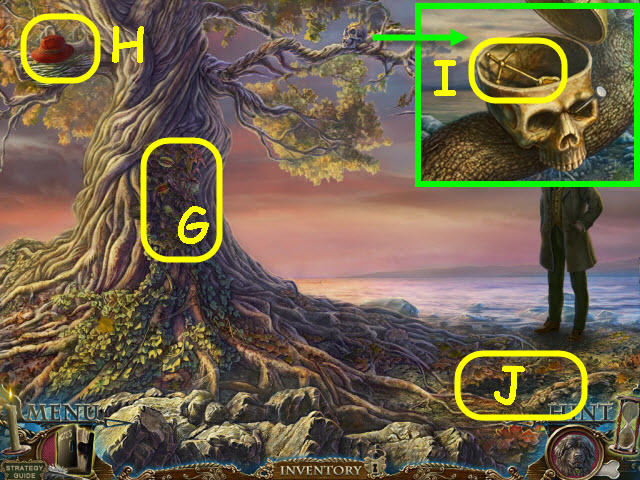
- Examine the table; take the pencil (W).
- Use the CAN OPENER on the jar lid; take the PLIERS (X).
- Go through the door on the back left (Y).
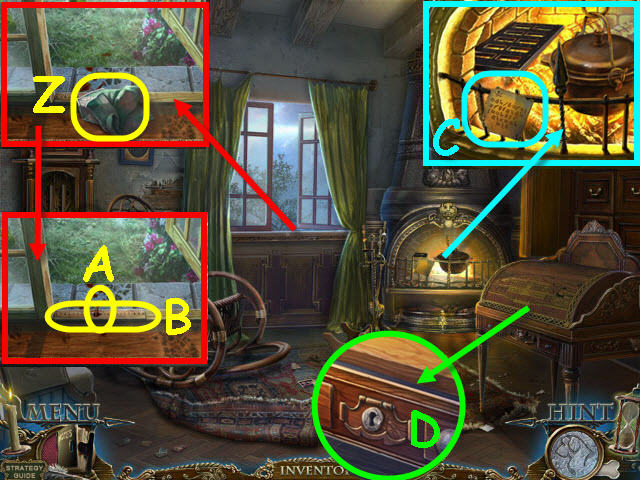
- Examine the window; take the HANDKERCHIEF (Z).
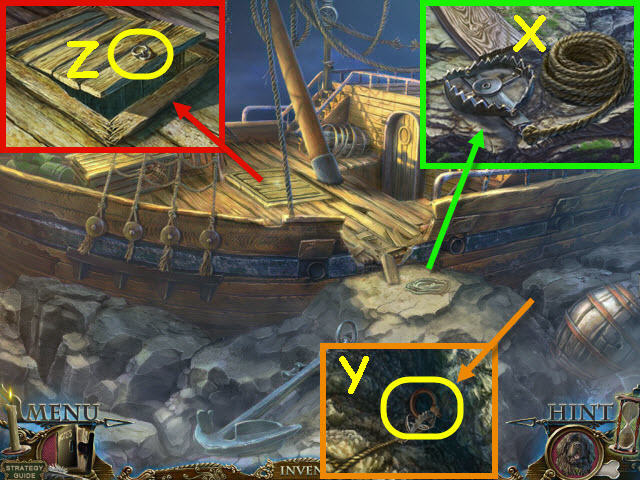
- Use the PLIERS to get the BLOODY NAIL (A) and take the RULER (B).
- Examine the fireplace; take the PARCHMENT (C).
- Examine the roll top desk and use the RULER on the lid (D).
- Examine the opened desk and place the PARCHMENT on it to trigger a puzzle.
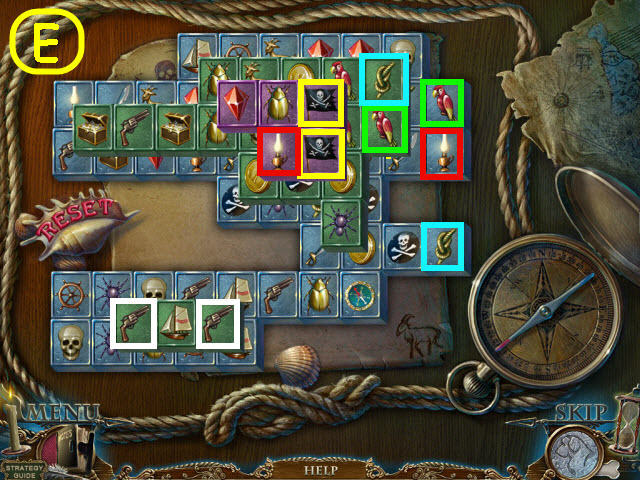
- Clear the board by matching available pairs.
- See screenshot for examples (E).
- Take the DECIPHERED PARCHMENT.
- Back out.
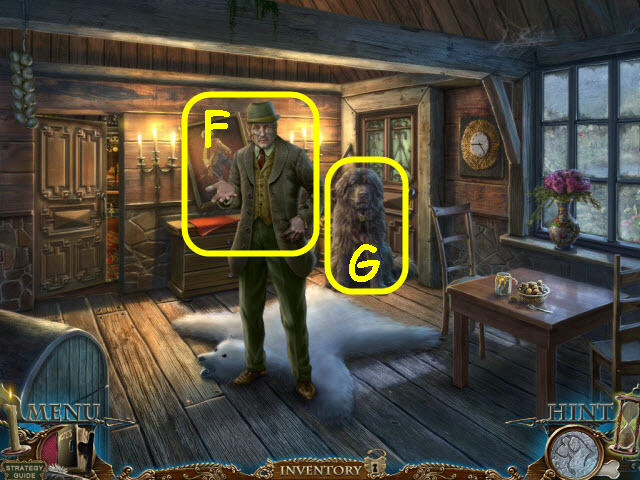
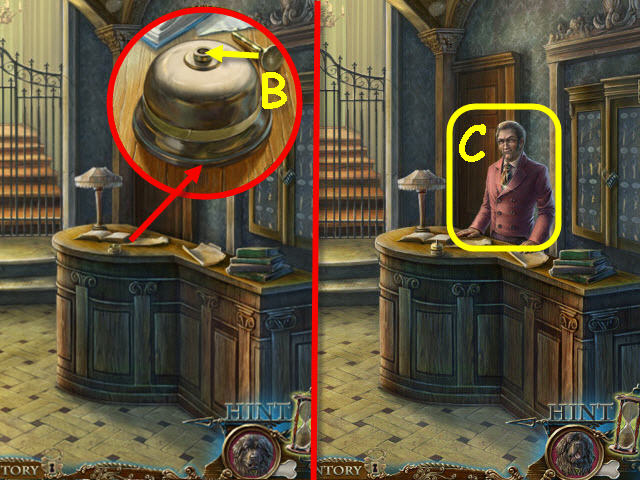
- Give the DECIPHERED PARCHMENT to Mr. LeGrand (F).
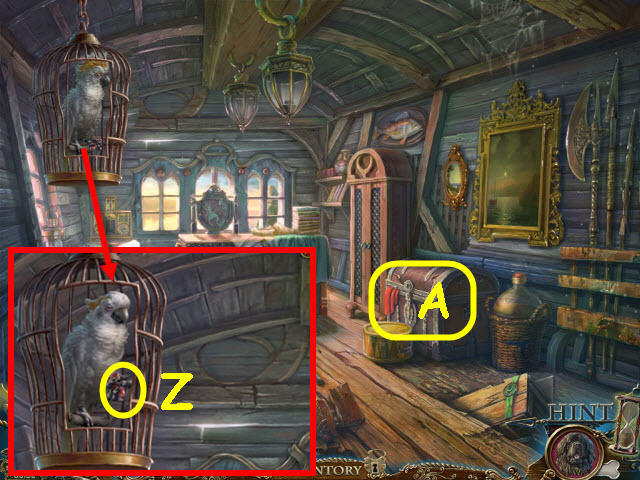
- Pet Arthur the dog and he will be added to your toolbar (G). He will be able to assist you in sniffing items in your inventory that have a paw print.
- Go through the door on the right.
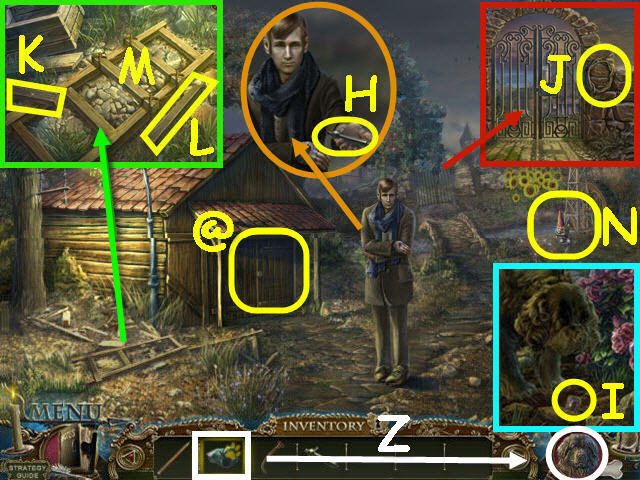
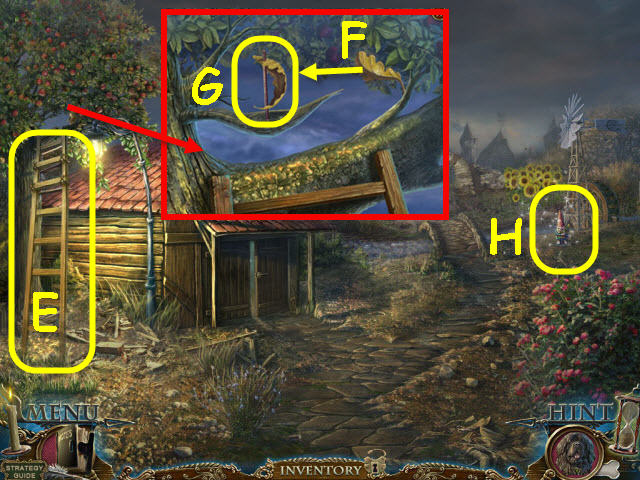
- Speak to the gardener; take the BARN DOOR HANDLE (H).
- Examine the barn door and place the BARN DOOR HANDLE on it; turn the handle (@).
- Drag the HANDKERCHIEF to Arthur the dog (Z). Examine the barn door and place the BARN DOOR HANDLE on it; turn the handle (@).
- Take the INSECT GEAR 1/3 (I).
- Examine the gate; take the ROPE (J).
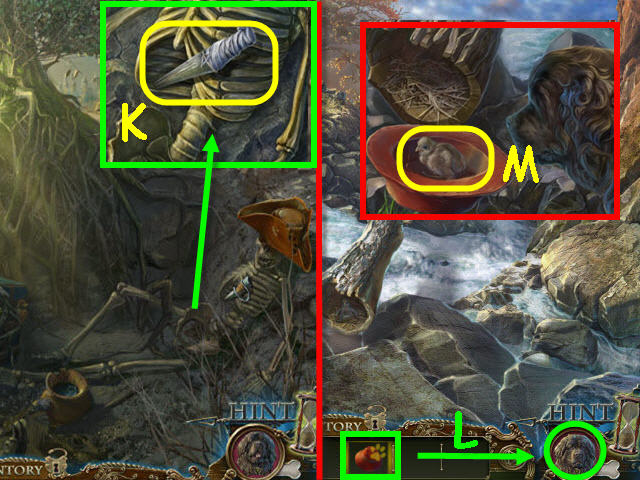
- Examine the broken ladder; place the boards (K-L) on the ladder and fasten with the ROPE. Take the repaired LADDER (M).
- Examine the gnome to access a HOS (N).
- Find the items pictured.
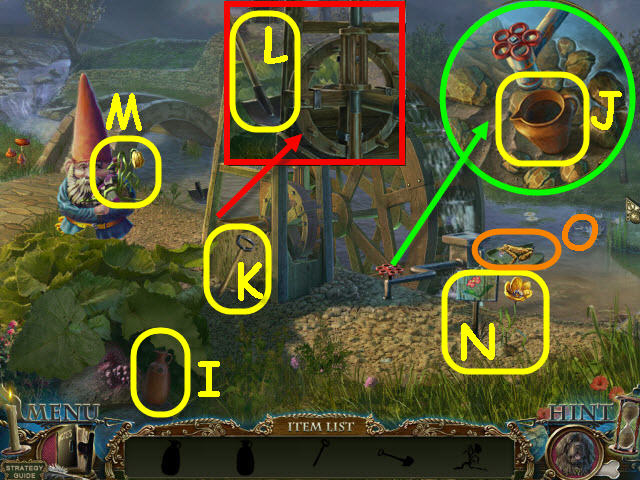
- Move the leaf; take the wheel segment (O).
- Examine the sand pile; take the rake handle (P).
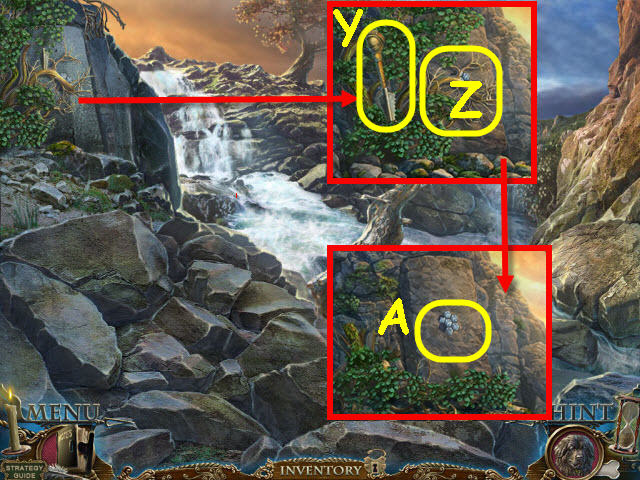
- Move the leaf the wheel segment was found on and move the mushroom pile underneath. Examine the rake head and place the rake handle on it (Q); take the rake.
- Examine the shovel handle and use the rake on the ivy; take the spider (R) and the valve (S).
- Examine the web and place the spider on it to trigger a puzzle (T).
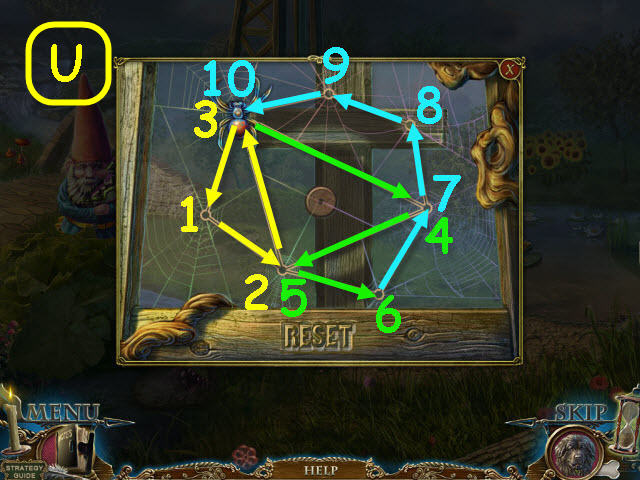
- Move the spider so that it covers each line once.
- See screenshot for order of moves (U).
- Take the fly from the center when complete.
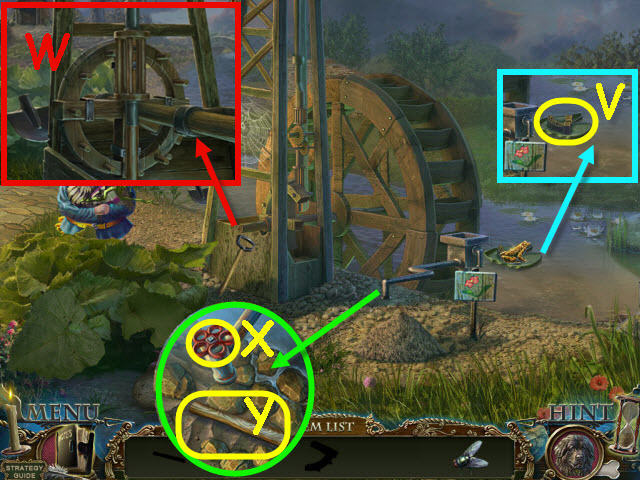
- Give the fly to the frog; take the 2nd wheel segment (V).
- Examine the spindle and place the 2 wheel segments on the broken wheel (W).
- Examine the pipe and place the valve on it; turn the valve (X).
- Take the HAMMER HANDLE (Y).
- Enter the barn.
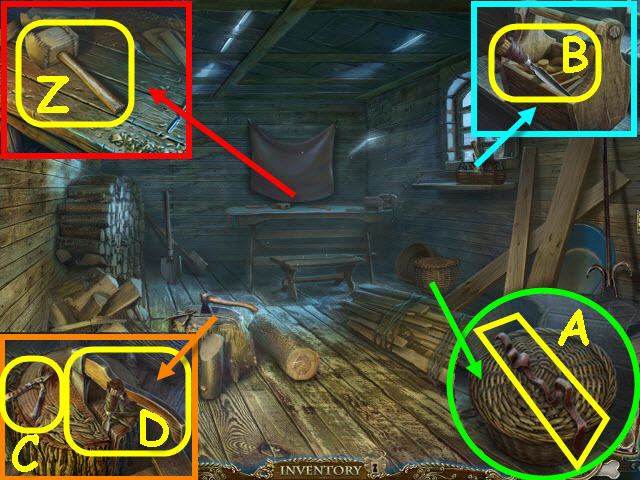
- Examine the workbench; place the HAMMER HANDLE on the hammerhead and take the HAMMER (Z).
- Examine the basket; take the LEATHER BELT (A).
- Examine the window shelf and place the LEATHER BELT on the chisel handle; take the CHISEL (B).
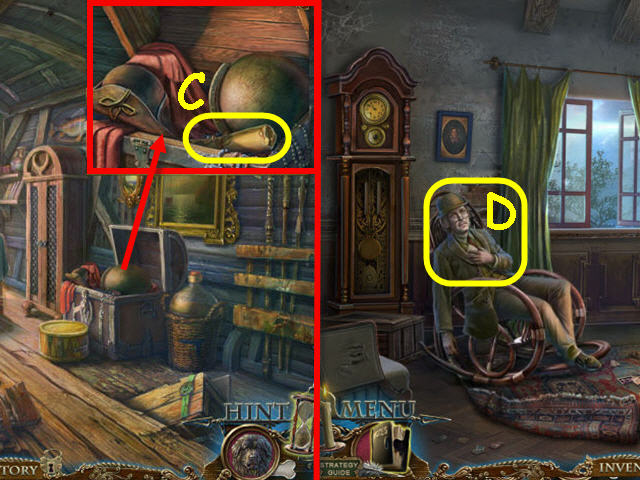
- Examine the axe; take the BLOODY PRUNER (C).
- Place the CHISEL in the slit and use the HAMMER on it; take the AXE (D).
- Back out.
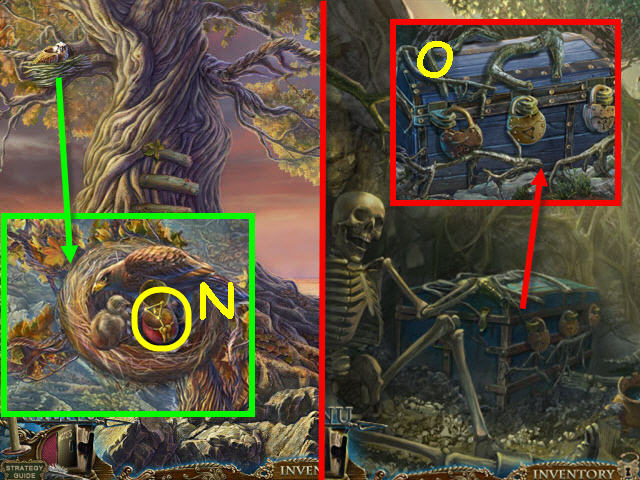
- Place the LADDER on the tree (E).
- Examine the tree branch; place the PENCIL on the branch and place the leaf on the pencil (F).
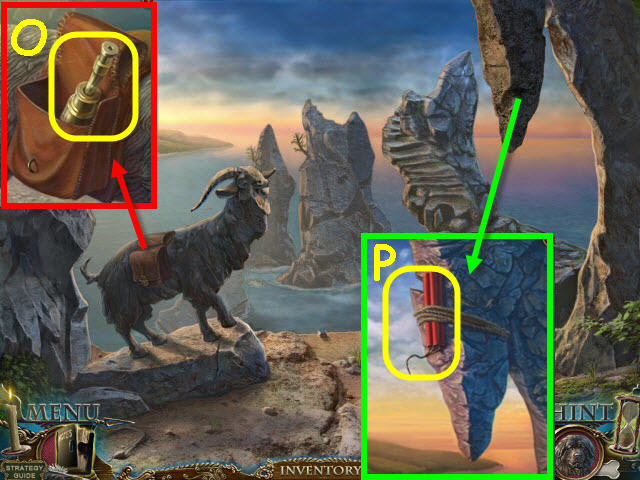
- Use the AXE on the branch to get a SHIP (G).
- Examine the gnome to access a HOS (H).
- Move the mushroom pile; take the jug (I).
- Examine the faucet and place the jug underneath; turn the valve and take the jug with water (J).
- Take the shovel handle (K).
- Examine the shovel head and place the shovel handle on it; take the shovel (L).
- Take the flower (M).
- Use the shovel by the sign; place the flower in the hole and use the jug with water on the flower (N).
- Examine the frog to trigger a puzzle (O).
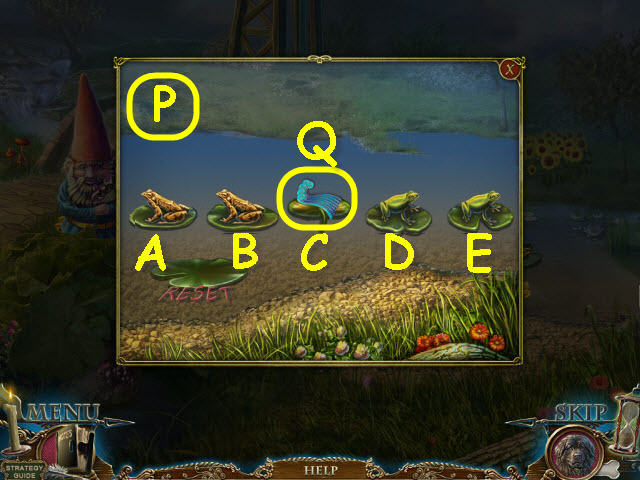
- Switch the frogs.
- To solve the puzzle, select the following frogs: B, D, E, C, A, B, D, and C (P).
- Take the WAVE PIECE (Q).
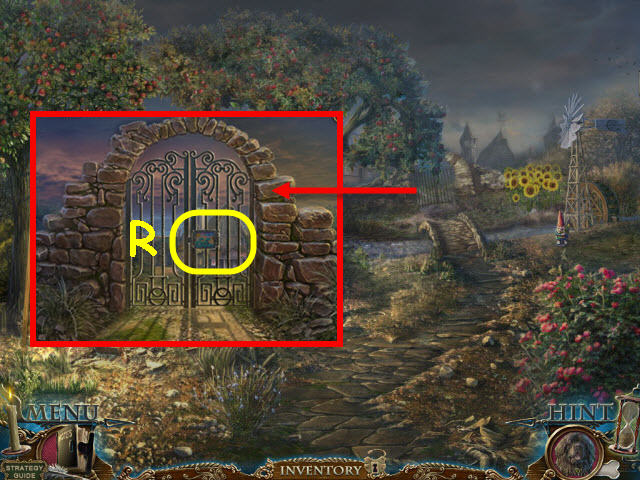
- Examine the gate.
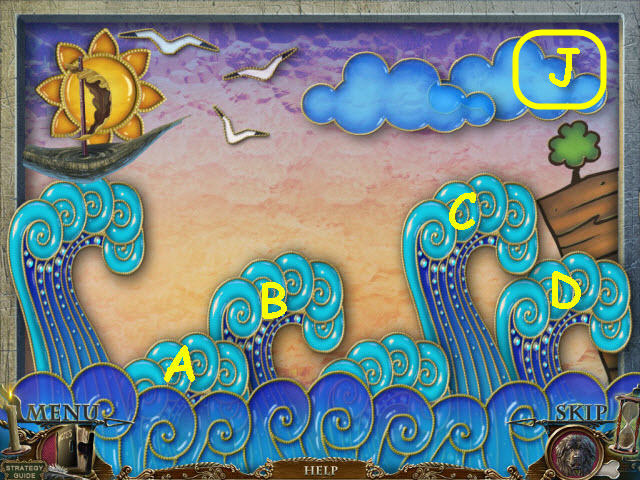
- Zoom into the lock and place the SHIP and WAVE PIECE on it to trigger a puzzle (R).
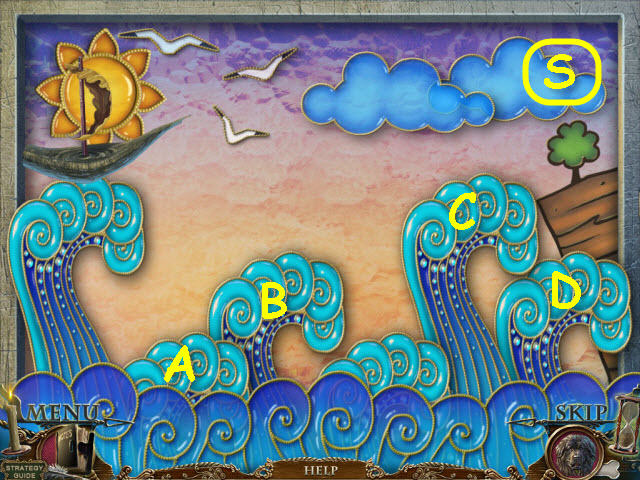
- Raise and lower the waves to get the boat across.
- To solve the puzzle, select the following waves: A x 2, B x 2, B, C x 2, and D x 2 (S).
- Go forward through the newly-opened gate.
Chapter 2: Town Square
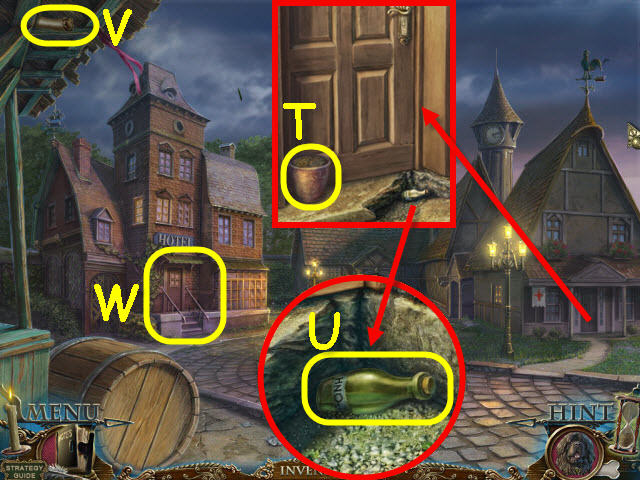
- Examine the clinic door; take the FLOWERPOT (T).
- Remove the broken step; examine the bottle and take the ACID (U).
- Select the SCROLL and then take it from Dupin and it will be added to your notes (V).
- Enter the hotel (W).
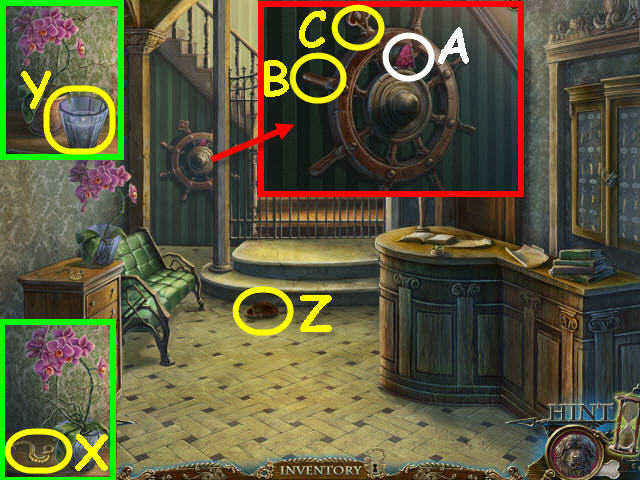
- Examine the top of the chest of drawers; take the SNAKE (X).
- Place the FLOWERPOT next to the vase of flowers; move the flowers to the FLOWERPOT and take the VASE WITH WATER (Y).
- Take the SHOE (Z).
- Examine the ship’s wheel; take the PIECE OF STAINED GLASS (A), the WEIGHT (B), and the 2nd WEIGHT (C).
- Back out.
- Give the SHOE to Arthur (D).
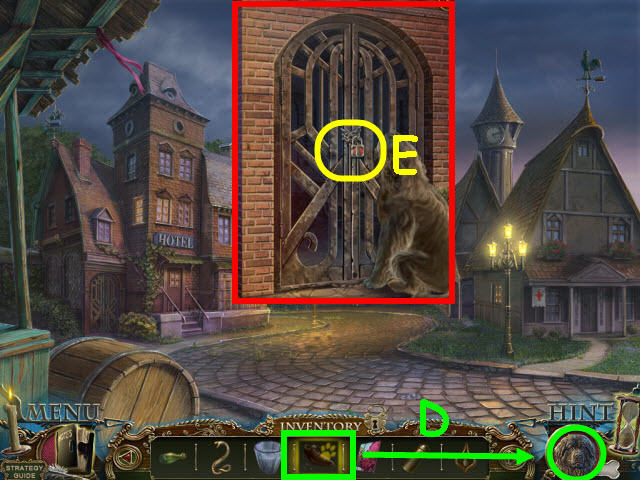
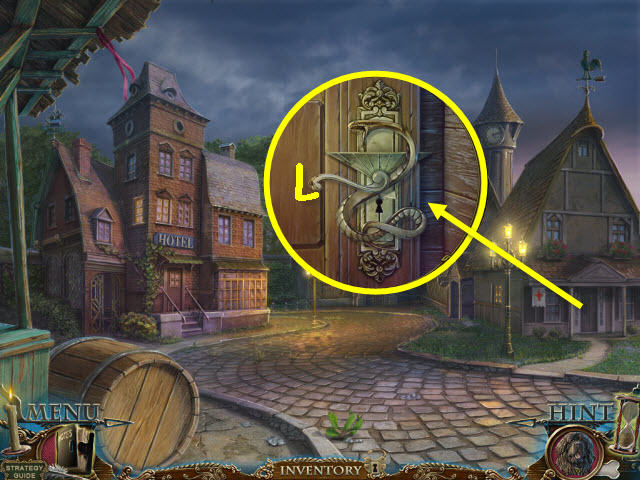
- Examine the lock and use the ACID on it (E).
- Enter into the newly-opened room.
- Open the chest and zoom in; move the lantern and take the FORTUNE-TELLER’S BODY (F).
- Examine the hat and remove it; take the MAGIC BALL (G).
- Examine the clown; take the WINDUP KEY (H).
- Examine the box; move the blue ball and take the FORTUNE-TELLERS HEAD (I).
- Examine the table; place the WINDUP KEY, FORTUNE-TELLERS BODY, FORTUNE-TELLERS HEAD, and MAGIC BALL on it (J).
- Place the body, head, and ball on the top of the box (1-3).
- Place the key in the hole and turn it (4).
- Use the hammer on the ball; take the DOCTOR’S KEY (K).
- Back out.
- Examine the clinic’s door and zoom into the lock; place the SNAKE on the lock (L).
- Place the DOCTOR’S KEY in the lock and turn it.
- Enter through the newly-opened door.
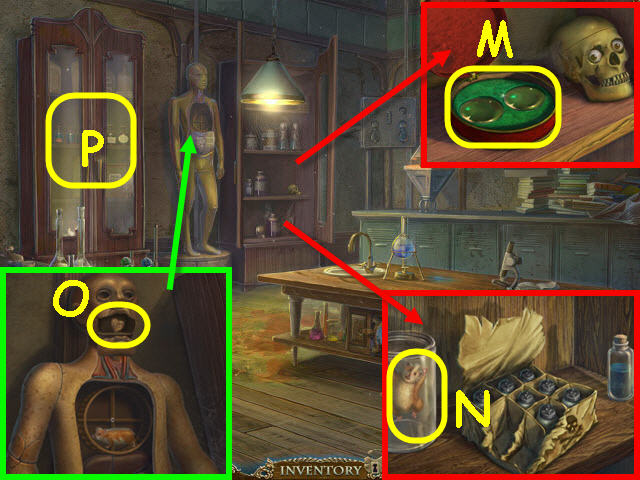
- Open the cabinet on the right and zoom in; open the container and take the LENSES (M).
- Examine the lower shelf; remove the lid of the jar and take the HAMSTER (N).
- Examine the dummy and place the HAMSTER in the wheel; take the RUSTY HEART (O).
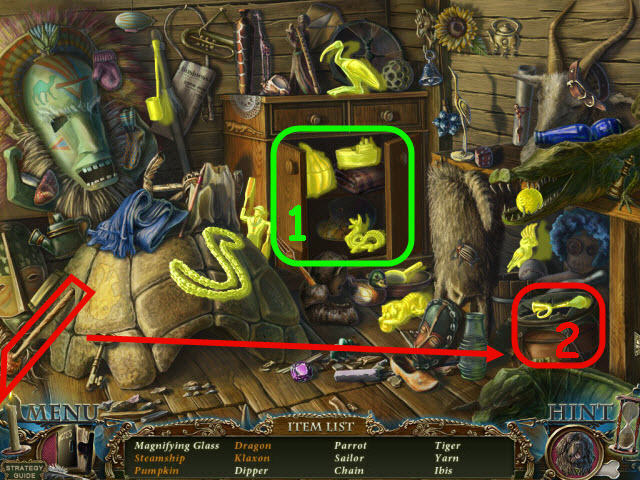
- Open the left cabinet and examine it to access a HOS (P).
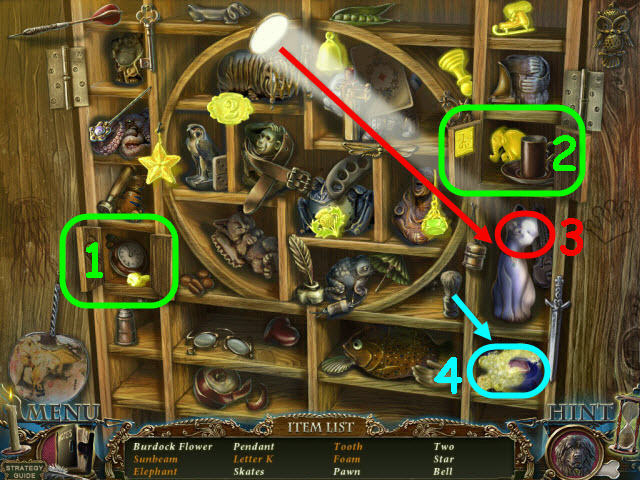
- Find the items listed.
- Open the cabinet doors to get the elephant, letter K and tooth (1-2).
- Move the mirror twice to get the sunbeam (3).
- Use the brush on the soap to get foam (4).
- You will earn an ELEPHANT.
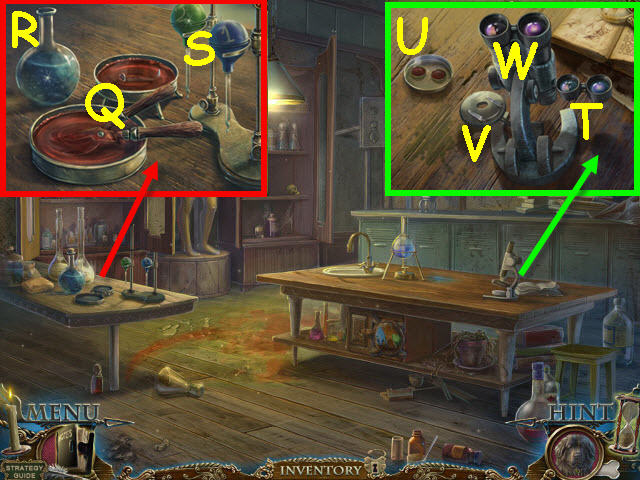
- Examine the left table and place the BLOODY NAIL and BLOODY PRUNER in the dishes (Q).
- Remove the cork from the beaker and use the liquid from the beaker in the dishes (R).
- Use pipette 1 on the nail dish and pipette 2 on the pruner dish to get 2 PIPETTES WITH BLOOD (S).
- Examine the microscope and empty the 2 PIPETTES WITH BLOOD in the dish (U).
- Place the LENSES in the holder and select them (T).
- Place the dish on the tray and move the tray (V).
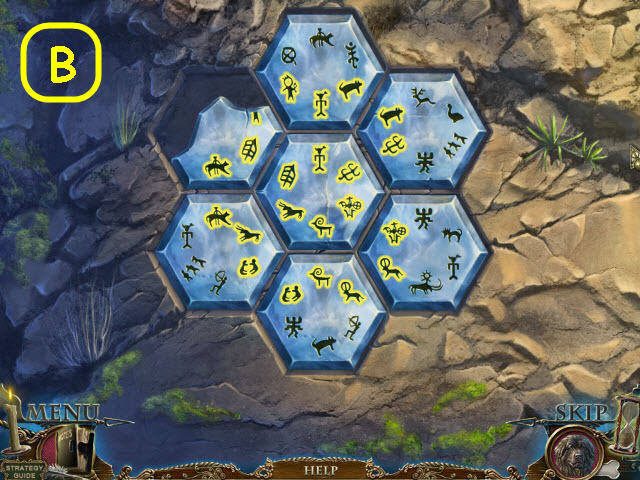
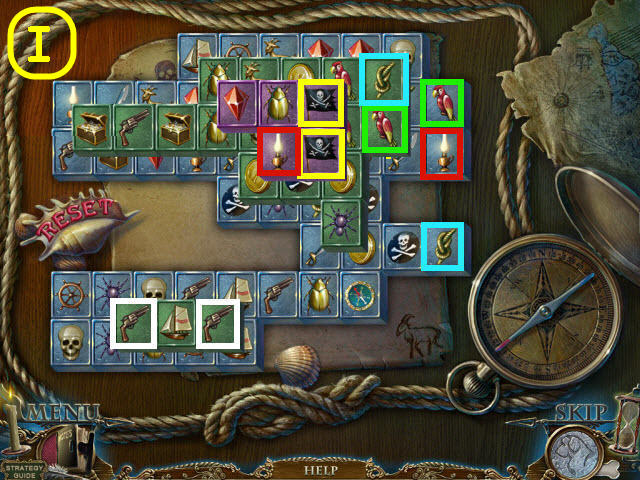
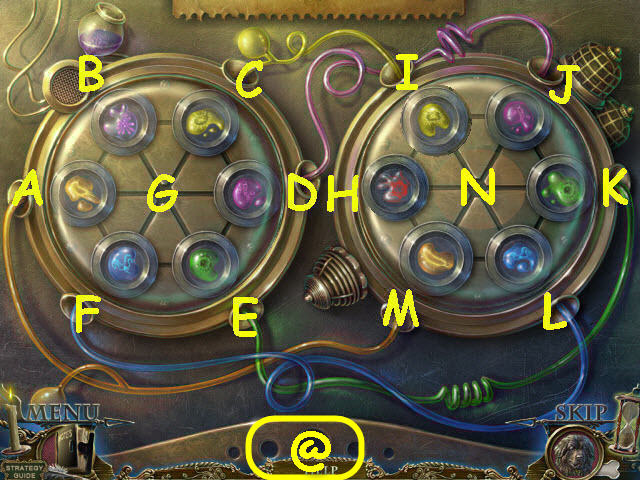
- Look into the scope to trigger a puzzle (W).
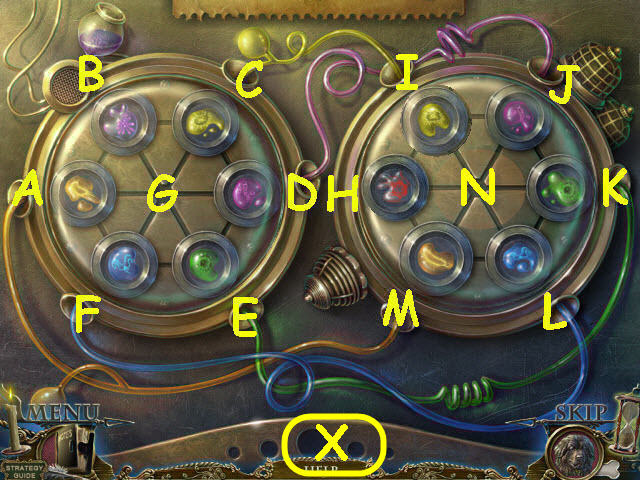
- Arrange the samples to their matching colored samples.
- To solve the puzzle select the following samples: Left Side – B, A, G, D, E, F, A, B, C, D, E, F, A, and G. Right side – J, I, H, M, L, K, J, I, H, M, L, K, J, I, and H (X).
- Take the INSTRUCTIONS.
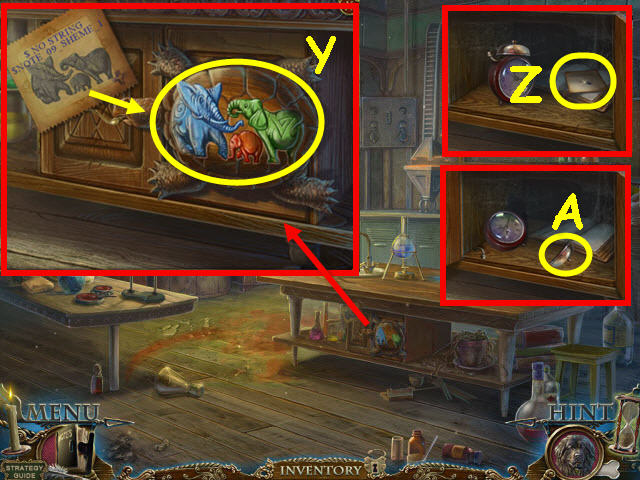
- Examine the cabinet and place the INSTRUCTIONS on the left and the ELEPHANT in slot; drag the elephant heads to match the instructions (Y).
- Open the cabinet and take the NOTE (Z).
- After the cutscene tap the alarm clock; take the BELL (A).
- Back out and enter the hotel.
- Examine the front desk; place the BELL on the bell bottom and drag the bell button on the top (B).
- Ring the bell.
- Give the NOTE to the concierge (C).
- Go forward up the stairs.
- Take the VEIL (D).
- Examine the table at the end of the hall to access a HOS (E).
- Find the items listed.
- Move the flowers to get the matches (1).
- Pull the popper to get snow (2).
- You will earn MATCHES.
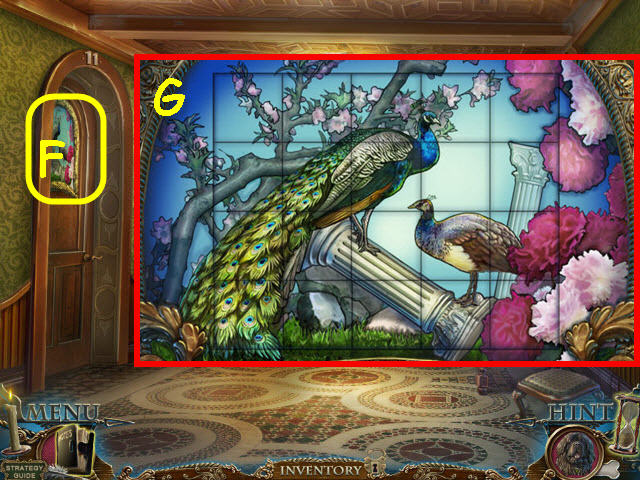
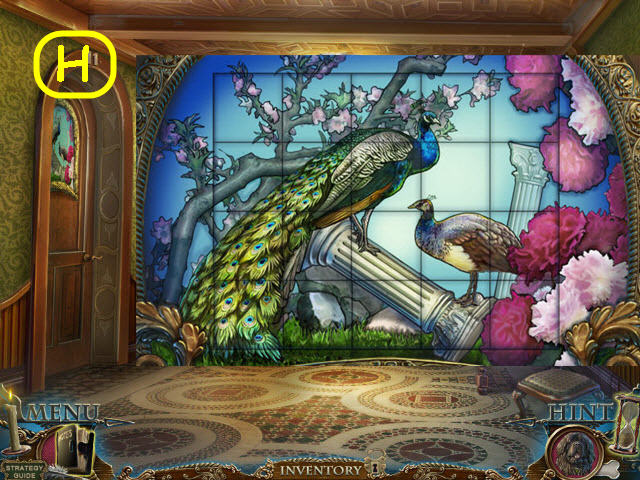
- Examine the door and place the PIECE OF STAINED GLASS on it to trigger a puzzle (F).
- Hold and drag the puzzle pieces to their correct positions.
- See screenshot for solution (G).
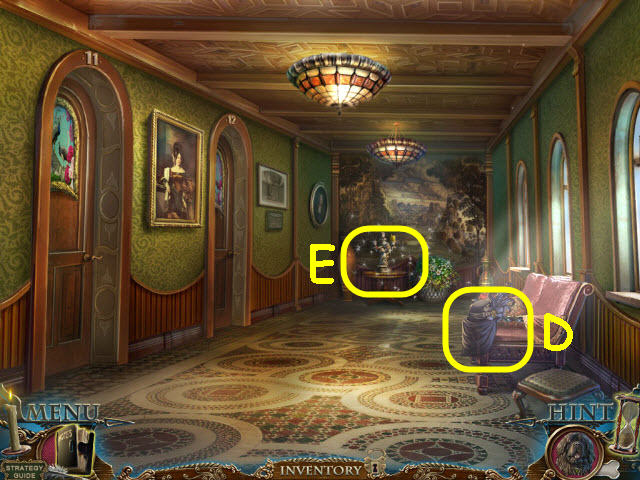
- Go left into room 11.
- Examine the top window panes and select the hole in the glass; note the time, 7:15 (H).
- Give the VEIL to Arthur (I).
- Back out of the close-up and examine the clock face; place the 2 WEIGHTS on the chains to trigger a puzzle (J).
- Set the correct time by pulling the chains.
- To solve the puzzle, select the following chains: B x 3, A x 8 (K).
- Examine the floor and remove the floor board; take the LAMP VALVE (L), and note the poison bottle.
- Zoom into the desk lamp twice and place the LAMP VALVE in the hole; turn the valve (M).
- Move the lampshade; take the NOTE (N).
- After the cutscene take the RINGER BIRD’S HEAD (O).
- Back out three times.
- Examine the junk shop door; use the VASE WITH WATER and the RINGER BIRD’S HEAD on the top of the ringer (P).
- Use the MATCHES on the burner (Q).
- Enter the junk shop.
Chapter 3: Shipping Dock
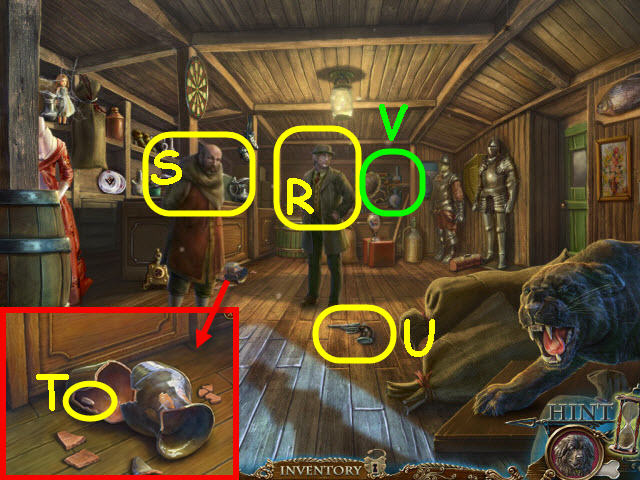
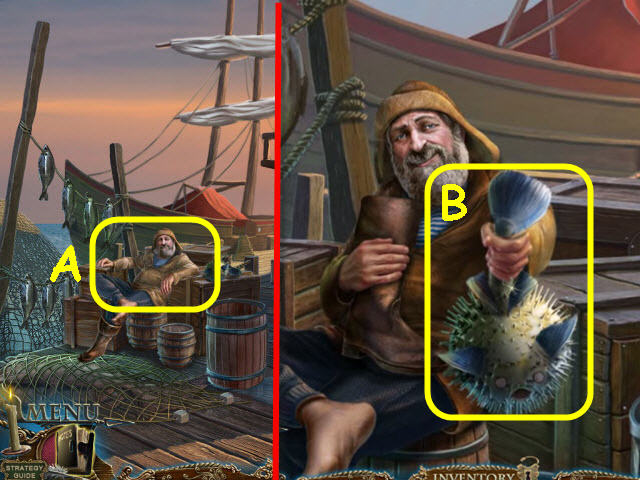
- Speak to LeGrand (R).
- Give the NOTE to the junk dealer (S).
- Examine the broken vase; take the BULLET 1/2 (T).
- Take the GUN (U).
- Examine the back wall to access a HOS (V).
- Find the items listed.
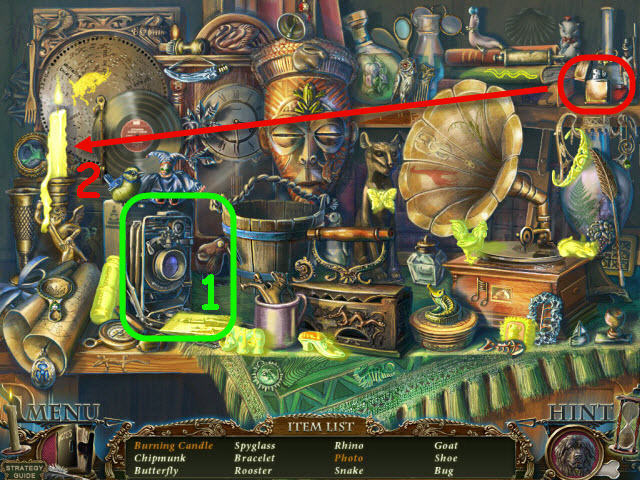
- Select the camera to get a photo (1).
- Use the matches on the candle to get a burning candle (2).
- You will earn an INSECT GEAR 2/.
- Go out the door on the right.
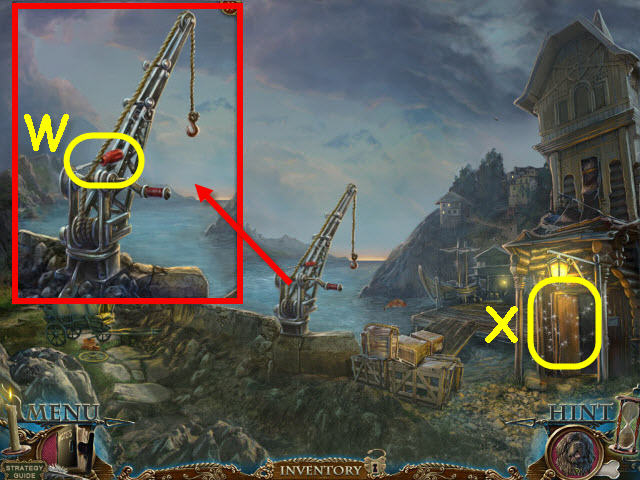
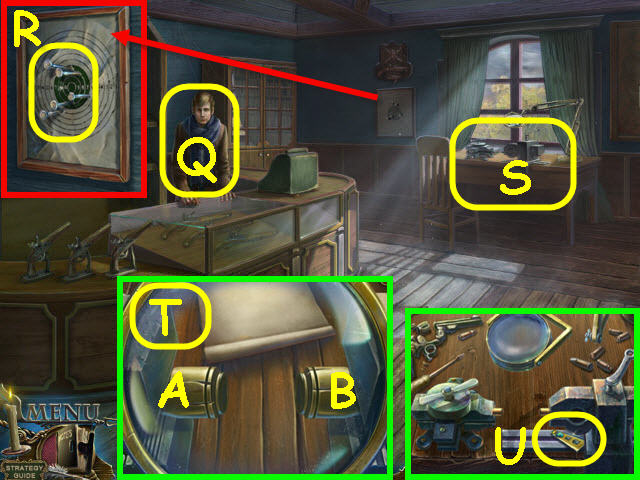
- Examine the crane; take the SCREWDRIVER (W).
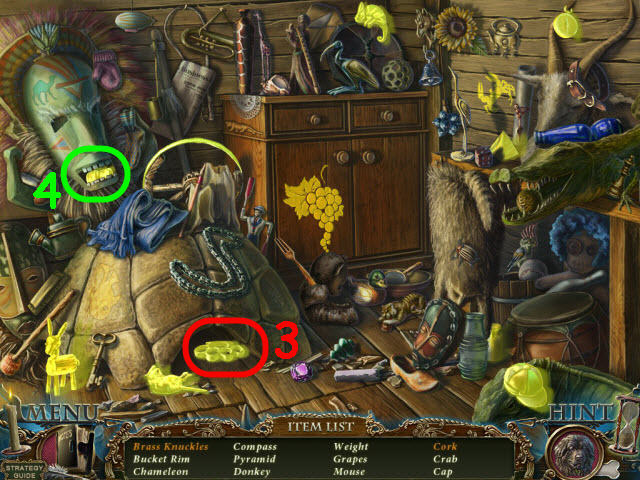
- Examine the building entrance on the right to access a HOS (X).
- Find the items listed.
- Move the skull to get the brass knuckles (3).
- Open the mask jaw to get the cork (4).
- You will earn an IRON RIM.
- Back out twice and enter the hotel; go upstairs.
- Examine the end of the hall to access a HOS.
- Find the items listed.
- Move the clouds to get the sun (5).
- Put the lens in the frame to get glasses (6).
- You will earn BINOCULARS.
- Go left into room 11.
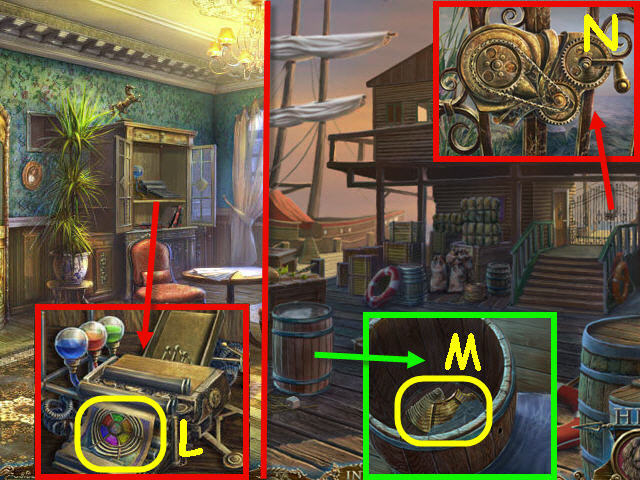
- Examine the grate on the wall and use the SCREWDRIVER on it; take the INSECT GEAR 3/3 (Y).
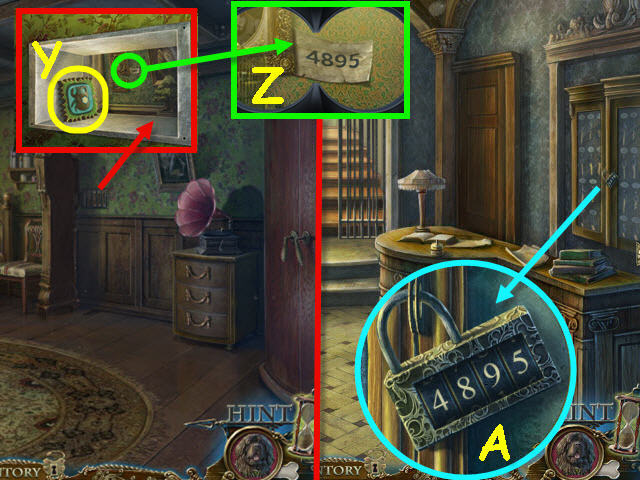
- Use the BINOCULARS on the code (Z).
- Back out twice.
- Zoom into the key cabinet twice and enter the code from the upstairs; 4895 (A).
- Open the cabinet to trigger a puzzle.
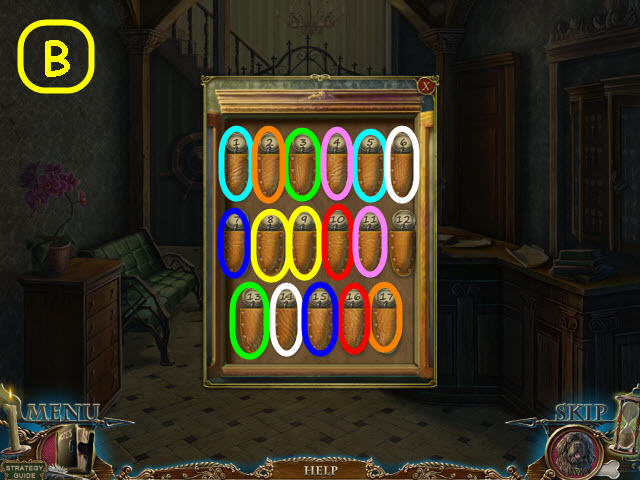
- Find the pairs of keys.
- See screenshot for solution (B).
- You will earn the HEAD WAITER’S KEY.
- Go forward up the stairs.
- Examine the room 12 door on the left; use the HEAD WAITER’S KEY on the lock and turn the key (C).
- Enter room 12.
- Examine the table and take the pictures and BULLET 2/2 (D).
- Examine the bonsai tree; take the PIN (E).
- Examine the birdcage and use the PIN on the lock; take the WOODPECKER (F).
- Open the drawer and zoom in; open the box and take the RAZOR (G).
- Examine the dress and use the RAZOR on the patch; take the GUN SHOP PART (H).
- Open and examine the right cabinet (@).
- Back out three times.
- Examine the smoking doorway (I).
- Go forward into the junk shop.
- Examine the rear wall to access a HOS (J).
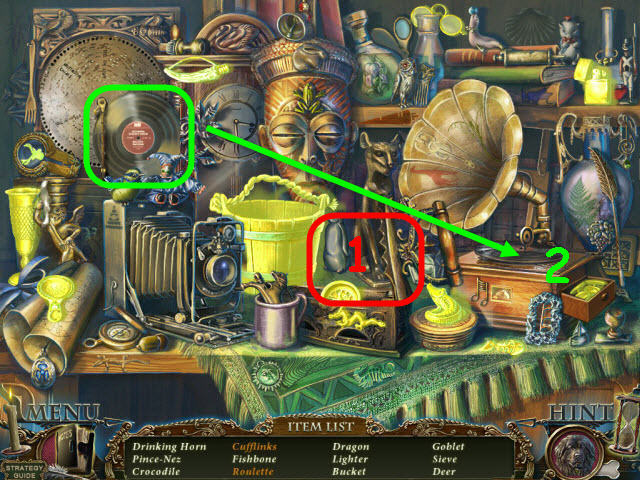
- Find the items listed.
- Open the iron to get the roulette (1).
- Place the record on the phonograph to get cufflinks (2).
- You will earn an EMPTY BUCKET.
- Go out the door on the right.
- Examine the top crate; use the EMPTY BUCKET on the water to get a BUCKET WITH WATER (K).
- Examine the bottom right crate and place the WOODPECKER on it; take the HAMMER (L).
- Back out twice.
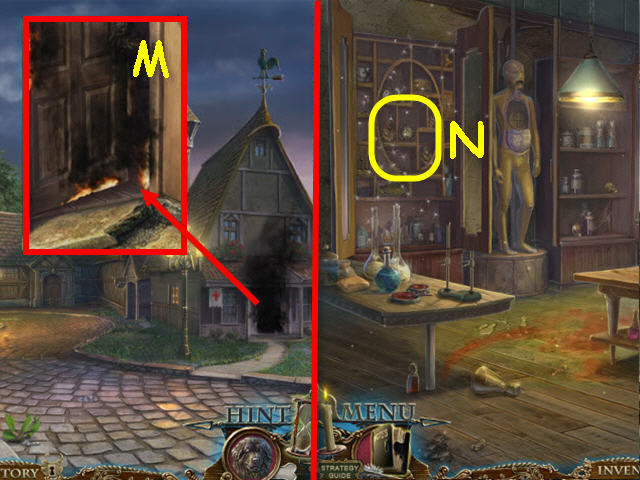
- Examine the smoking doorway and use the BUCKET WITH WATER on the flames (M).
- Enter into the doctor’s lab.
- Examine the left cabinet to access a HOS (N).
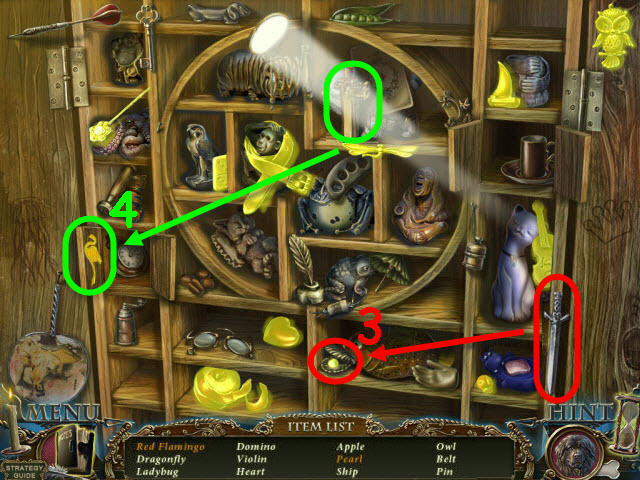
- Find the items listed.
- Use the knife on the shell to get a pearl (3).
- Use the red lipstick on the flamingo to get a red flamingo (4).
- You will earn a BELT.
- Back out.
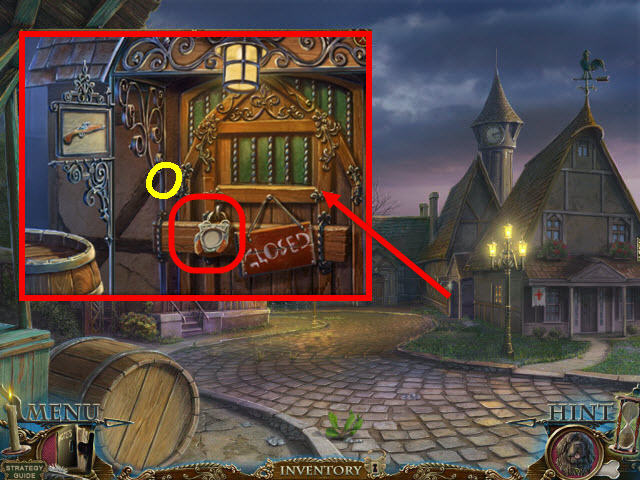
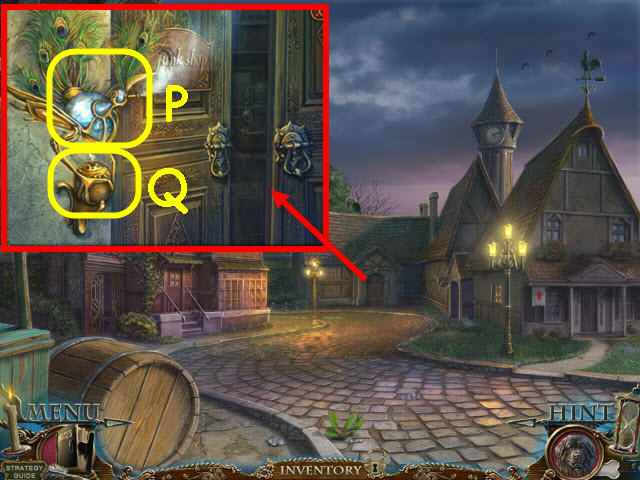
- Zoom into the gun shop door twice.
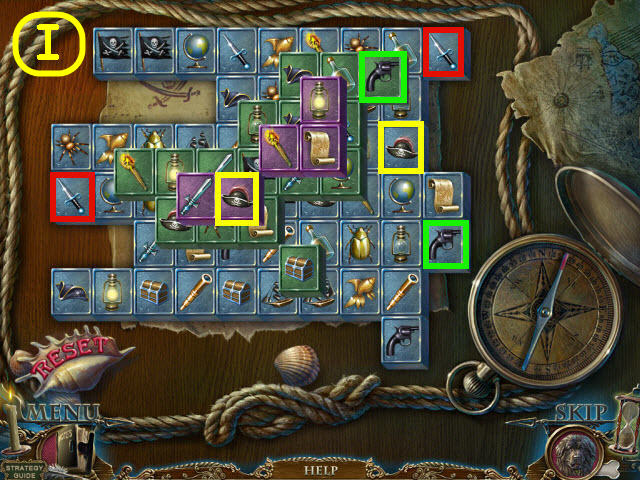
- Place the GUN SHOP PART on the lock to trigger a puzzle (O).
- Complete the image.
- To complete the image select the following: B, A x 2, C, A x 6, D, A x 2 (P).
- Enter the gun shop.
- Give the GUN to Mike, the gun shop clerk (Q).
- Examine the picture; take the NAILS (R).
- Examine the desk and place the 2 BULLETS on the vise; select the magnifying glass to trigger a puzzle (S).
- Match the grooves on the bullets.
- To solve the puzzle, rotate the following bullets; A, A, B, A, B, A, and B (T).
- Take the LIGHTHOUSE DOOR PART 1/2 (U).
- Back out; go forward through the junk shop and then right out the door.
- Examine the wagon and use the IRON RIM, NAILS and HAMMER on the broken wheel; take the WHEEL (V).
- Place the WHEEL on the axle (W).
- Take the WHEEL (X).
- Go up the cleared path on the left.
Chapter 4: The Lighthouse
- Examine the camera; take the crane instructions (Y) which will go in your notes.
- Examine the chest and place the RUSTY HEART on the lock; take the PIRATE BOOK (Z), and the LIGHTHOUSE LENS PART 1/3 (A).
- Back out.
- Examine the crane; place the WHEEL and BELT on it to trigger a puzzle (B).
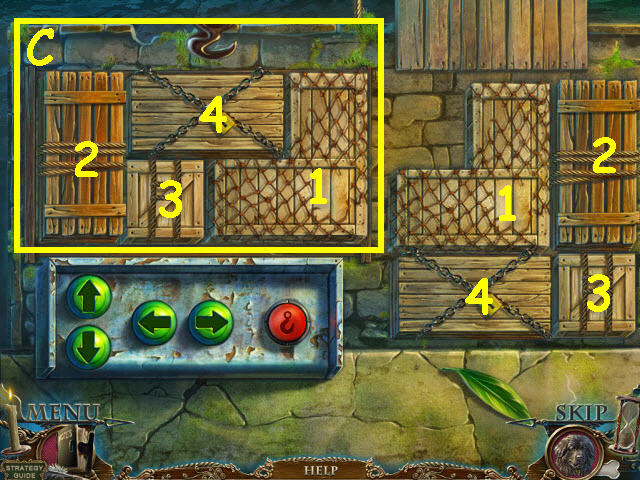
- Move the crates to the rectangle.
- To solve the puzzle, use the arrows and hook to pick up and move the crates in the position marked in the screenshot (C).
- Go forward across the plank.
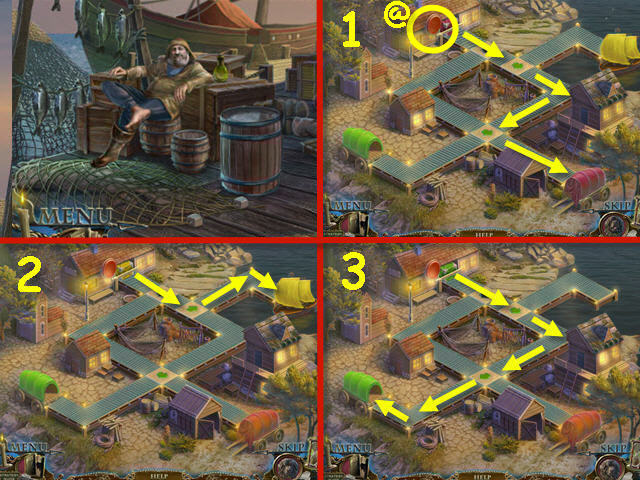
- Give the PIRATE BOOK to the fisherman to trigger a puzzle (D).
- Guide the packages to their matching colored destination.
- Press the red button after the arrows are set to send the boxes through (@).
- See screenshot for the first set (1-3).

- See screenshot for the second set (4-7).
- You will earn a LIGHTHOUSE DOOR PART 2/2.
- Back out and go up the left path to the lighthouse.
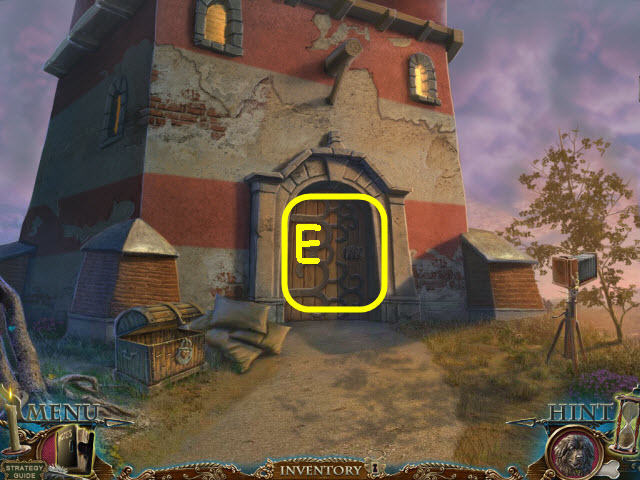
- Examine the lighthouse door (E).
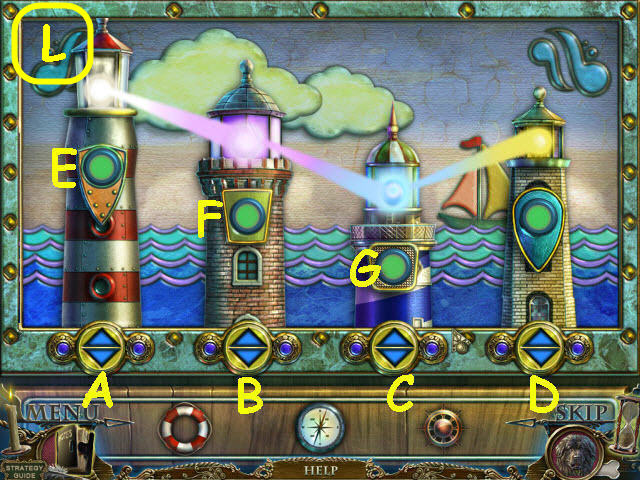
- Place the 2 LIGHTHOUSE DOOR PARTS on it to trigger a puzzle.
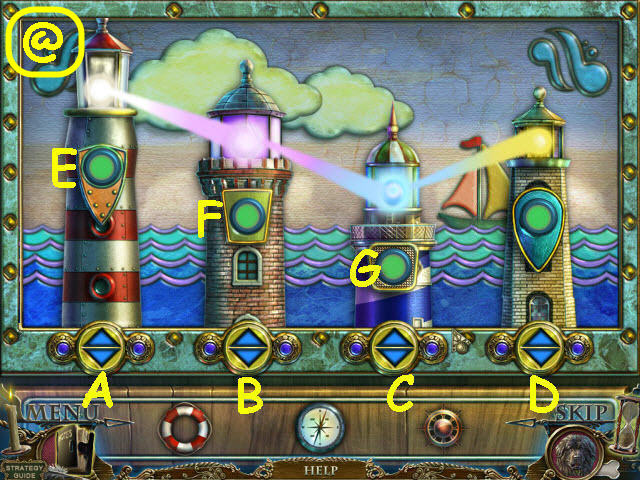
- Adjust the lighthouses and match the colored beams.
- To solve the puzzle, select the following buttons: E x 2, B up, A up, C down, D down, F, and G x 2 (@).
- Go forward into the lighthouse.
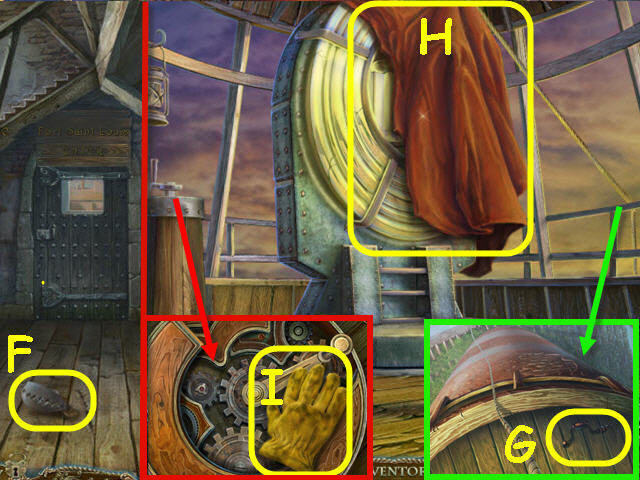
- Touch the trap to snap it closed and then take the TRAP (F).
- Go up the stairs.
- Examine the rope by the railing; take the DRILL (G).
- Take the THICK CLOTH (H) and then examine the lens underneath.
- Examine the pedestal; take the DIRTY GLOVE (I).
- Back out twice.
- Examine the camera and place the THICK CLOTH over it; remove the THICK CLOTH to get a PHOTO PLATE (J).
- Back out.
- Examine the doorway on the right to access a HOS (K).
- Find the items listed.
- Open the cabinet to get the steamship, pumpkin and dragon (1).
- Use the drumstick on the drum to get a klaxon (2).
- You will earn a CHAIN.
- Go to room 12 in the hotel.
- Examine the cabinet and place the PHOTO PLATE in the developer; take the LIGHTHOUSE INSTRUCTIONS (L).
- Go back to the crane and cross the plank to the fisherman.
- Examine the barrel and use the DRILL on it; take the LIGHTHOUSE LENS PART 2/3 (M).
- Examine the gate and place the CHAIN on it; turn the handle (N).
- Go forward through the newly-opened gate.
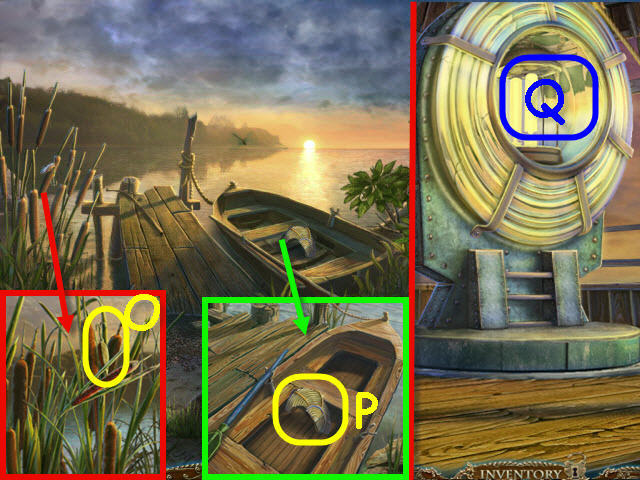
- Examine the cattails and move them; take the BAIT (O).
- Examine the boat; take the LIGHTHOUSE LENS PART 3/3 (P).
- Back out twice and go up the path into the lighthouse; go up the stairs.
- Examine the lens; place the 3 LIGHTHOUSE LENS PARTS and the LIGHTHOUSE INSTRUCTIONS on it to trigger a puzzle (Q).
- Assemble the lens to match the instructions.
- To solve the puzzle, follow these steps: Step one – place the lens pieces in the frame by selecting them to turn them. They will snap into place when correct.
- Step Two: Move the three outer rings in place by selecting two side by side pieces to switch them.
- For step three, select the rings in the following order; A x 2, and B x 2 (R).
- Back out.
- Give the DIRTY GLOVE to Arthur (S).
- Take the OIL CAN (T).
- Go upstairs.
- Examine the pedestal and use the OIL CAN on the gears; turn the handle (U).
- Take the MACHETE (V).
- Back out three times; go forward twice to the fishing pier.
- Use the MACHETE on the bushes (W).
- Go up the right path.
Chapter 5: Pirate Ship
- Examine the rope and place the TRAP on it; select the rope to fasten it and take the TRAP ROPE (X).
- Examine the crevice and use the TRAP ROPE in it; pull the rope to get a RING HANDLE (Y).
- Examine the hatch and place the RING HANDLE on it (Z).
- Go down the hatch.
- Examine the trunk and open it; unbuckle the belt and take THE RING WITH SYMBOLS (A).
- Take the IRON MONKEY (B).
- Examine the skeleton; take the FEATHER (C).
- Examine the right rear to access a HOS (D).
- Find the items pictured.
- Roll up the carpet (E). Take the lighter (F). Use the lighter on the bomb; take the fishing line (G).
- Use the fishing line on the pole; take the rod (H).
- Examine the hole in the floor and use the rod in it to get a bottle (I).
- Take the tricorn (J). Place the tricorn on the pirate’s head; take the shark (K).
- Place the shark on the box; take the winch (L).
- Place the winch on the pulley (M); take the rapier (N).
- Use the rapier and bottle on the barrel (O); get a full bottle.
- Place the full bottle on the scales; take the spring (P). You will earn a SPRING.
- Back out.

- Examine the door and place the IRON MONKEY on it to trigger a puzzle (Q).
- Turn all the rings green.
- To solve the puzzle, select the following rings: A, D, C, and B (R).
- Enter the newly-opened door to the captain’s quarters.

- Give the FEATHER to Arthur (S); Arthur will uncover the bird cage (T).
- Examine the desk; open the tin and take the CRACKER BOX (U).
- Examine the game and place THE RING WITH SYMBOLS in the left slot and the SPRING by the key. Turn the key; take the WINGS (V).
- Back out and go down the hatch on the ship.
- Give the CRACKER BOX to Arthur (W).
- Take a CRACKER (X).
- Examine the cannon; place the WINGS on the dragon and take the EMERALD (Y).
- Back out and enter the captain’s quarters.
- Examine the birdcage; give Polly a CRACKER and take the RUBY (Z).
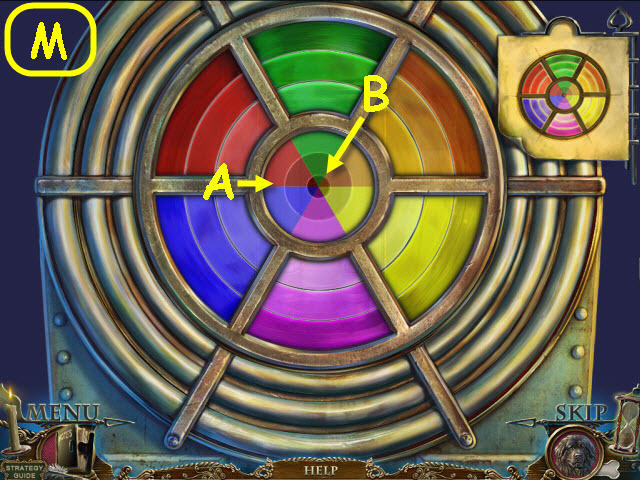
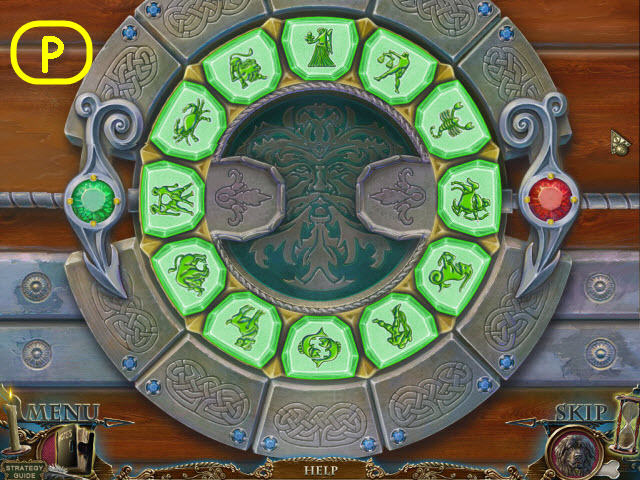
- Zoom into the trunk twice and place the RUBY and EMERALD on the lock to trigger a puzzle (A).

- Place the astrological signs on top of their matching symbols.
- See screenshot for solution (B).
- Examine the chest; take the PARCHMENT (C).
- Back out 8 times and go straight through the door to LeGrand’s office.
- Give the PARCHMENT to LeGrand (D); you will receive an ANTIDOTE RECIPE.
- Back out.
- Examine the table; take the MUG (E).
- Go to the fisherman on the dock.
- Give the ANTIDOTE RECIPE to the fisherman (F).
- Go to the ship and down the hatch into the hold.
- Examine the far right corner of the hold to access a HOS (G).
- Find the objects pictured.
- Take the knife (H). Examine the hole; use the knife to get the mussel (I).
- Take the hook (J). Give the hook to the pirate; take the patch (K).
- Use the patch on the crab; take the anchor (L).
- Take the pump (M). Examine the cracked wall and use the pump on the balloon; take the crystal (N).
- Give the mussel to the octopus; take the fish (O).
- Use the crystal on the ship in a bottle; take the ship (P).
- Examine the grate locks; place the anchor, ship and fish on their matching shaped locks (Q).
- Take the oar (R).
- You will earn an OAR.
- Back out twice.

- Examine the boat and place the OAR in it (S).
- Go forward.
- Examine the sign; take the FISH AMULET (T).
- Examine the skeleton hand; take the PIRATE RING (U).
- Go back to the captain’s quarters in the ship.
- Examine the cabinet and place the FISH AMULET on the lock (V).
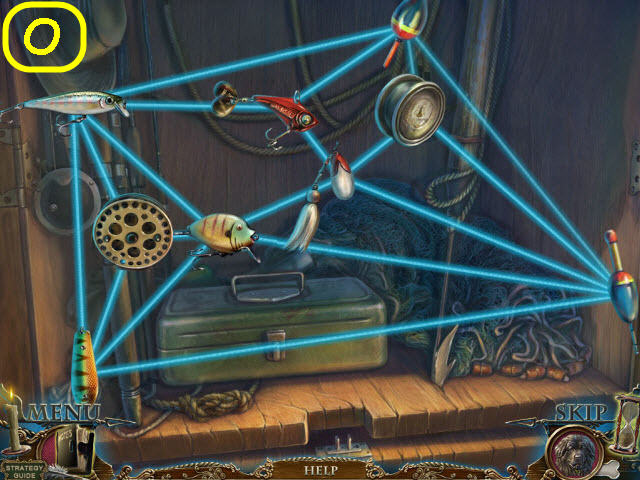
- Examine the fishing line to trigger a puzzle (W).
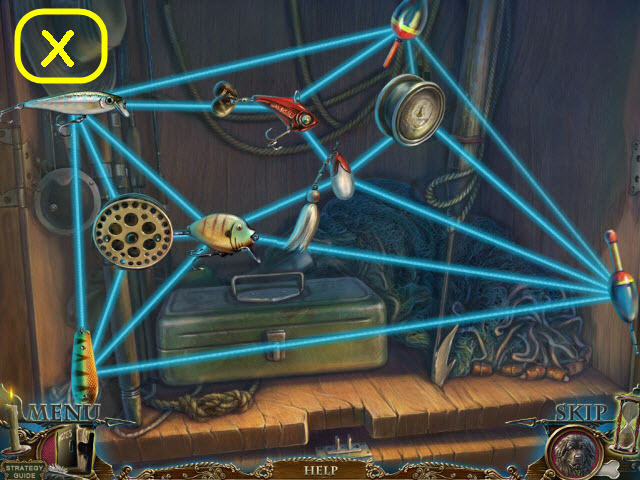
- Untangle the fishing line.
- See screenshot for solution (X).
- Take the FISHING LINE.
- Back out twice.
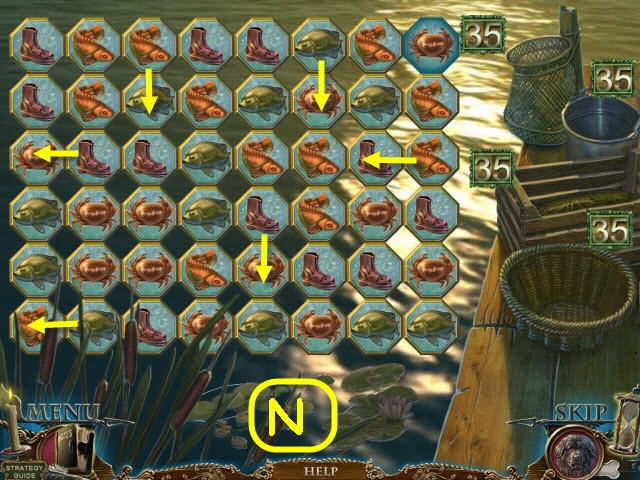
- Examine the dock and place the BAIT and FISHING LINE on the pole (Y).
- Select the pole to trigger a puzzle.
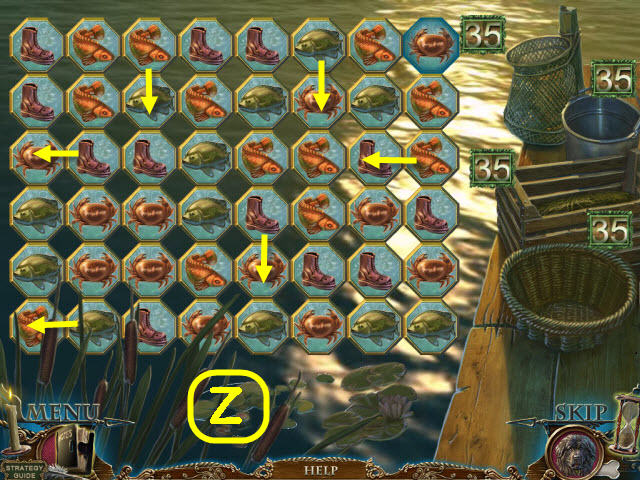
- Make sets of 3 until the numbers on the right are all zero.
- The starting layout is random.
- See screenshot for examples (Z).
- You will earn a BOOT.
- Back out.
- Give the BOOT to the fisherman (A).
- Take the FISH (B).
- Go to LeGrand’s office.
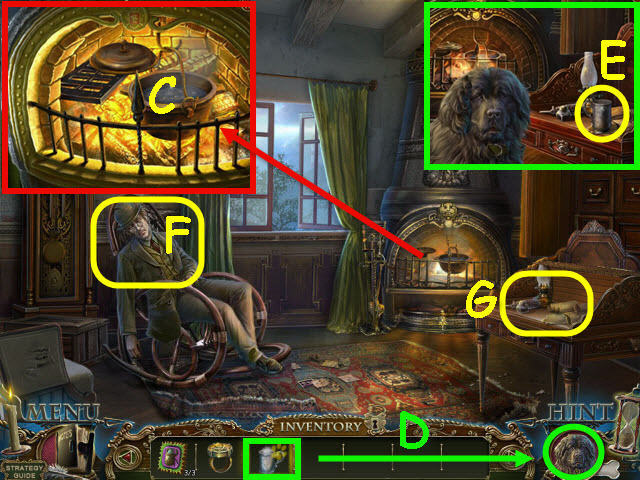
- Examine the fireplace; remove the pot lid (C).
- Place the FISH in the pot and use the MUG on the potion; get a HOT ANTIDOTE.
- Give the HOT ANTIDOTE to Arthur (D).
- Take the ANTIDOTE (E).
- Give the ANTIDOTE to LeGrande (F).
- You will get a PARCHMENT.
- Examine the desk and place the PARCHMENT on it to trigger a puzzle (G).

- Clear the board by matching available pairs.
- See screenshot for examples (H).
- Take the DECIPHERED PARCHMENT.
- Give the DECIPHERED PARCHMENT to LeGrand (I).
- Take the CANE (J).
- Go to the first floor of the lighthouse.
Chapter 6: Armory
- Examine the door; use the CANE on the latch to open the door (K).
- Go forward through the newly-opened door.
- Examine the torch and select it to light it. Take the lit TORCH (L).
- Examine the guard on the right; place the PIRATE RING on the sword and take the SWORD (M).
- Go forward through the doors.
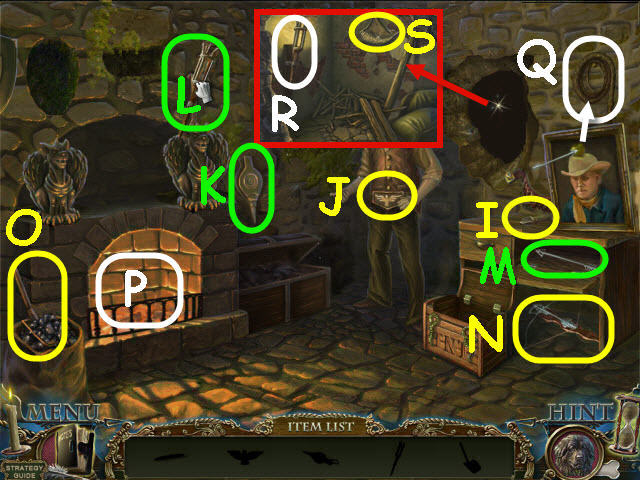
- Examine the cannon; take the WEIGHT 1/3 (N).
- Turn the winch and see the rope break (O).
- Go forward into the armory on the right (P).
- Examine the cannon and attempt to take it; take the CANNONBALL (Q).
- Examine the swords; place the SWORD in the hands and take the MACE (R).
- Examine the table to access a HOS (S).
- Find the items pictured.
- Open the book; take the lion (T). Place the lion on the crest; take the gargoyle (U).
- Place the gargoyle on the mantle; take the horn (V). Place the horn on the bison; take the snake (W).
- Place the snake on the chest; take the dynamite (X).
- Place the dynamite in the crack (Y).
- Examine the belt; take the bullet (Z).
- Examine the gun; place the bullet in it and get the revolver (A).
- Use the revolver on the lock (B).
- Take the matches (C).
- Use the matches on the dynamite; take the chain (D).
- You will earn a CHAIN.
- Back out.
- Examine the cannon and place the CHAIN on the roller; take the RAIL (E), and the MOON AMULET (F), from underneath the rail.
- Go into the armory on the right.
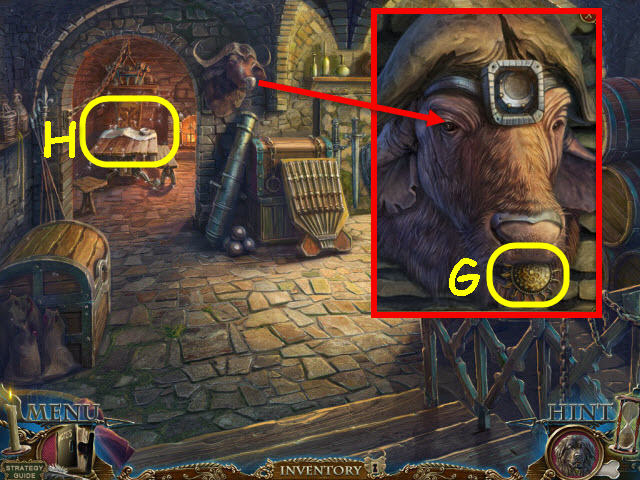
- Examine the buffalo and place the MOON AMULET in the slot; take the SUN AMULET (G).
- Examine the table to access a HOS (H).
- Find the items pictured.
- Take the knife (I). Use the knife on the buckle to get the eagle (J).
- Take the bellows (K). Remove the cloth; take the torch (L).
- Place the eagle on the drawer; take the arrow (M).
- Place the arrow on the crossbow; take the arbalest (N).
- Take the coal shovel (O). Use the coal shovel, bellows, and torch in the fireplace (P); get a torch fire.
- Use the arbalest on the apple; take the whip (Q).
- Examine the hole and place the torch fire in the holder (R).
- Use the whip to get the gunpowder (S).
- You will earn an EMPTY GUNPOWDER HORN.
- Back out twice.
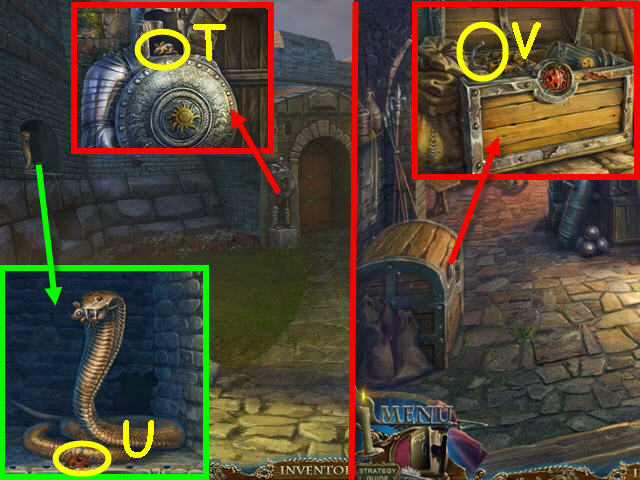
- Examine the left guard and place the SUN AMULET on the shield; take the TOY MOUSE (T).
- Examine the snake and give it the TOY MOUSE; take the HALF LADYBUG (U).
- Go forward twice into the armory.
- Examine the chest and place the HALF LADYBUG on the lock; take the FUSE (V).
- Back out and go forward between the two steps.
- Examine the gun carriage; take the WEIGHT 2/3 (W).
- Examine the cannon and place the RAIL on the stones (X).
- Open and then take the BROKEN CANNONBALL (Y).
- Back out.
- Give the BROKEN CANNONBALL to Arthur (Z).
- Use the EMPTY GUNPOWDER HORN on the gunpowder to get GUNPOWDER (A).
- Take the WEIGHT 3/3 (B).
- Examine the hurdy-gurdy and place the 3 WEIGHT’S on the scale; take the HANDLE (C).
- Go forward to the cannons.
- Examine the broken gun carriage and use the HANDLE on the jack; take the WHEEL (D).
- Examine the cannon; place the FUSE, CANNONBALL, GUNPOWDER, and WHEEL on the cannon (E).
- Use the TORCH on the fuse and watch the cutscene.
- Go to the rowboat and use it to go forward to the cave entrance.
Chapter 7: Cave
- Enter the cave (F).
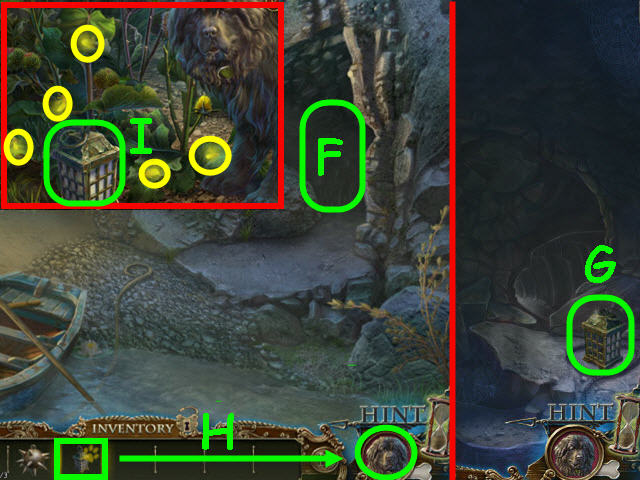
- Examine the lantern; take the EMPTY LAMP (F).
- Back out.
- Give the EMPTY LAMP to Arthur (H).
- Place the 5 fireflies (circled in yellow) in the EMPTY LAMP; take the LAMP WITH FIREFLIES (I).
- Enter the cave.
- Examine and place the LAMP WITH FIREFLIES back on the stone where you found it.
- Examine the skeleton; take the BOOT (J), and the STICK (K).
- Examine the lever; open the panel and take the BOLT (L).
- Go right to go further into the cave (M).
- Examine the kettle; take the SMOLDERING EMBER (N).
- Examine the winch; take the PIRATE FLAG (O).
- Place the BOLT on the chain (P).
- Examine the lever and hang the MACE on the hook (Q).
- Examine the raised boat to access a HOS (R).
- Find the items pictured.
- Take the hook (S).
- Use the hook on the bucket; take the trident (T).
- Take the net (U).
- Place the trident on the pole (V).
- Take the knife (W).
- Use the knife on the sack; take the rune (X).
- Use the net on the fish (Y).
- Use the fish on the octopus; take the 2nd rune (Z).
- Place the 2 runes on the lid of the chest; take the ice axe (A).
- You will earn an ICE AXE.
- Examine the water and move the stone. Use the ICE AXE on the starfish; take the STONE STARFISH (B).
- Examine the raised boat to access a HOS (C).
- Find the items pictured.
- Take the bucket (D). Use the bucket on the algae; take the dragon head (E).
- Remove the net; take the head (F). Place the head on the warrior; take the dragon (G).
- Place the dragon head on the front of the boat; take the helmet (H).
- Place the helmet on the Valkyrie; take the hammer (I).
- Use the hammer on the shield; take the 2nd dragon (J).
- Place the 2 dragons on the front of the chest; take the dynamite (K).
- You will earn DYNAMITE.
- Back out.
- Examine the lever; place the STONE STARFISH in the slot and pull the lever (L).
- Examine the bug and place the 3 INSECT GEARS on it to trigger a puzzle (M).
- Place the bugs on their matching shaped pegs.
- Rotate the platform so that the shapes will fit.
- To solve the puzzle, rotate and place the following: A, 1, 2, A, 3, 4, A, 5, 6, A, 7, and 8 (N).
- Go forward through the new opening.
- Examine the pack and open it. Place the small lens on the larger one; take the SPYGLASS (O).
- Examine the overhanging rock and place the DYNAMITE on it. Use the SMOLDERING EMBER on the dynamite (P).
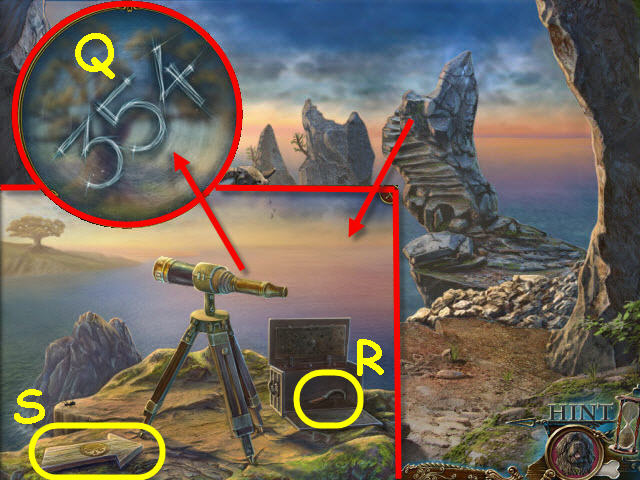
- Examine the end of the path; place the SPYGLASS on the tripod and look through to get the code, 354 (Q).
- Examine the chest and punch in the code from the spyglass, 354; take the SICKLE (R).
- Take the SIGN (S).
- Back out twice.
- Examine the sign and place the SIGN on it; take the KEY (T).
- Examine the bushes and use the SICKLE on them (U-V).
- Go forward up the newly cleared path; go forward again to the large tree.
- Examine the ground; take the DRY WOOD (W).
- Back out twice; go into the cave and down to the inner chamber. .
- Examine the kettle; place the DRY WOOD underneath. Place the BOOT by the bottom of the kettle; take the AMULET (X).
- Back out twice and go forward.
- Examine the bush; place the STICK on the saw blade and take the SAW (Y).
- Use the SAW on the branches (Z).
- Examine the amulets and place the AMULET by them to trigger a puzzle (A).
- Swap the disks so that matching symbols are together.
- See screenshot for solution (B).
- Take the AMANITA FUNGUS (C), and the MOP (D).
- Examine the rocks and use the MOP on them; take the GOLD HAND (E) and SHOVEL HANDLE (F).
- Go forward.
- Examine the plants and give them the AMANITA FUNGUS (G).
- Examine the hat; take the OLD HAT (H).
- Examine the skull and place the GOLD HAND on it; take the 2nd KEY (I).
- Examine the hole; place the SHOVEL HANDLE on the shovel head to dig a hole (J).
- Go into the hole.
- Examine the skeleton on the right and attempt to take the saber; place the PIRATE FLAG on the hilt and take the SABER (K).
- Back out twice.
- Give the OLD HAT to Arthur (L).
- Take the LITTLE BIRD (M).
- Go forward to the tree.
- Examine the bird and give the LITTLE BIRD to it; open the egg and take the 3rd KEY (N).
- Go into the hole.
- Examine the chest and use the SABRE on the vines; place the 3 KEYS on their matching locks (O).
- Examine the sack; move the MIRROR (P).
- Congratulations! You have successfully completed Dark Tales: Edgar Allan Poe’s The Gold Bug.
Bonus Puzzles
- Use the brush on the sand (A).
- Take the cork off the glass container (B).
- Move the items on the upper left; place the tumbler in the bottom center slot (C).
- Select the left purple arrow; move the items and place the key half on the upper key half (D).
- Take the key and use it on the right lock; press the right arrow (E).
- Slide the paper out to get the code for the center lock; 6-8-4 (F).
- Enter the code, 6-8-4 on the center lock (G).
- Lead the bug to its same colored slot.
- To solve the puzzle, select and move the bugs in this order: Red-right, up, left, green-up, left, down, left, up, red, right, up, right, down, right, up, right, up, left, green-left, down, left, up, red-right, and up (H).
- Clear the board by matching available pairs.
- See screenshot for examples (I).
- Raise and lower the waves to get the boat across.
- To solve the puzzle, select the following waves: A x 2, B x 2, B, C x 2, and D x 2 (J).
- Arrange the samples to their matching colored samples.
- To solve the puzzle select the following samples: Left Side: B, A, G, D, E, F, A, B, C, D, E, F, A, and G. Right side: J, I, H, M, L, K, J, I, H, M, L, K, J, I, and H (@).
- Drag the puzzle pieces to their correct positions.
- See screenshot for solution (H).
- Clear the board by matching available pairs.
- See screenshot for examples (I).

- Complete the image.
- To complete the image select the following: B, A x 2, C, A x 6, D, A x 2 (J).
- Move the crates to the rectangle.
- To solve the puzzle, use the arrows and hook to pick up and move the crates in the position marked in the screenshot (K).
- Adjust the lighthouses and match the colored beams.
- To solve the puzzle, select the following buttons: E x 2, B up, A up, C down, D down, F, and G x 2 (L).
- Assemble the lens to match the instructions.
- To solve the puzzle, follow these steps: Step one – place the lens pieces in the frame by selecting them to turn them. They will snap into place when correct.
- Step Two: Move the three outer rings in place by selecting two side by side pieces to switch them.
- For step three, select the rings in the following order; A x 2, and B x 2 (M).
- Guide the packages to their matching colored destination.
- Press the red button after the arrows are set to send the boxes through (@).
- See screenshot for the first set (1-3).
- See screenshot for the second set (4-7).
- Make sets of 3 until the numbers on the right are all 0.
- See screenshot for examples (N).
- Untangle the fishing line.
- See screenshot for solution (O).
- Place the astrological signs on top of their matching symbols.
- See screenshot for solution (P).


 Subliminal Realms: The Masterpiece Walkthrough, Guide, & Tips
 Dark Mysteries: The Soul Keeper Walkthrough, Guide, & Tips
 New York Mysteries: High Voltage Walkthrough, Guide, & Tips
 Scratches: The Director's Cut Walkthrough, Guide, & Tips
 Princess Isabella: Return of the Curse Walkthrough, Guide, & Tips