Cursed Fates: The Headless Horseman Walkthrough, Guide, & Tips
Cursed Fates: The Headless Horseman Walkthrough

Welcome to the Cursed Fates: The Headless Horseman Walkthrough
A terrible legend has become reality. The legend of a terrifying creature returned from hell.
Whether you use this document as a reference when things get difficult or as a road map to get you from beginning to end, we’re pretty sure you’ll find what you’re looking for here.
This document contains a complete Cursed Fates: The Headless Horseman game walkthrough featuring annotated screenshots from actual gameplay!
We hope you find this information useful as you play your way through the game. Use the walkthrough menu below to quickly jump to whatever stage of the game you need help with.
Remember to visit the Big Fish Games Forums if you find you need more help. Have fun!
This walkthrough was created by Lucky Smile, and is protected under US Copyright laws. Any unauthorized use, including re-publication in whole or in part, without permission, is strictly prohibited.
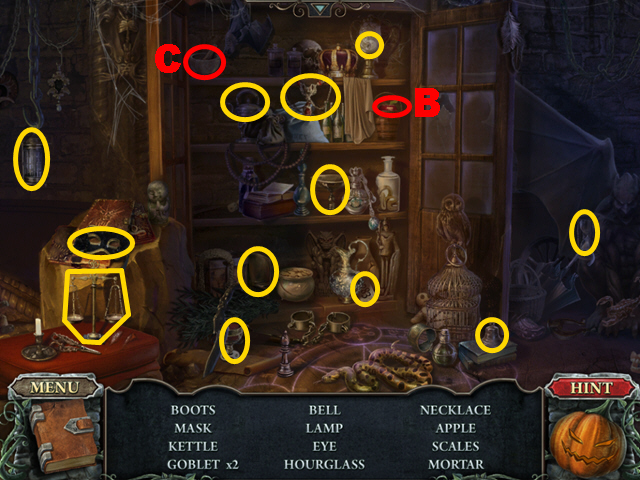
General Tips


- This is the official guide for Cursed Fates: The Headless Horseman.
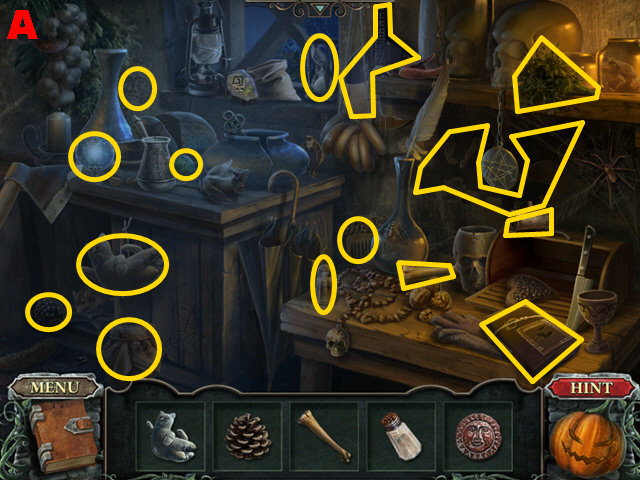
- Select the menu (A) to leave the game and to adjust sound or display mode.
- There are two modes to choose from: Easy and Difficult.
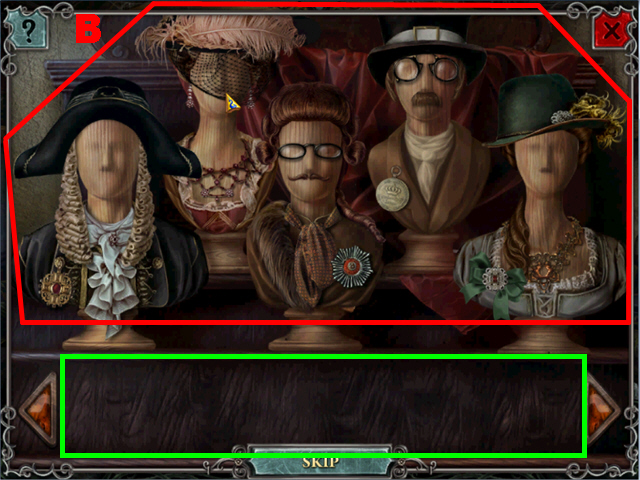
- Access the journal (B) to review the story and what you have discovered.
- Once in while you will need to combine two inventory items to create a new item. To do so, take the first item and put it into the window (C), and then take the second item and put it into the window.
- Collected items will automatically go into the inventory section (D).
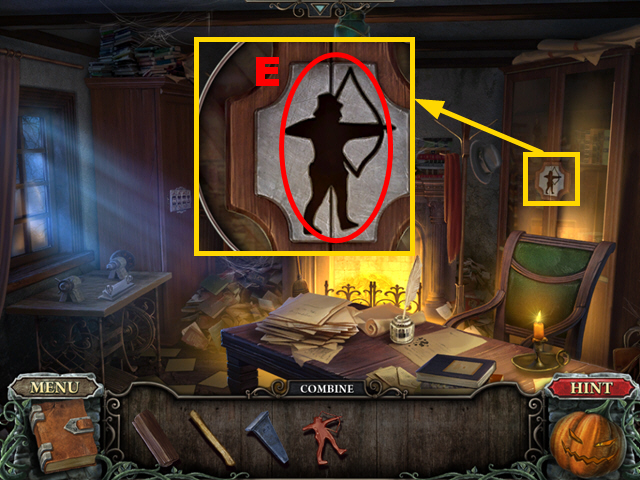
- Press the button (E) to get a hint if you need help at any time.
- Hidden-object scenes will be referred to as HOS throughout the guide.
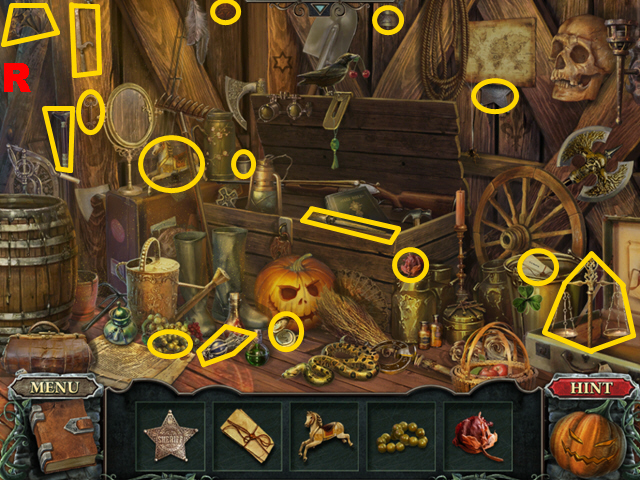
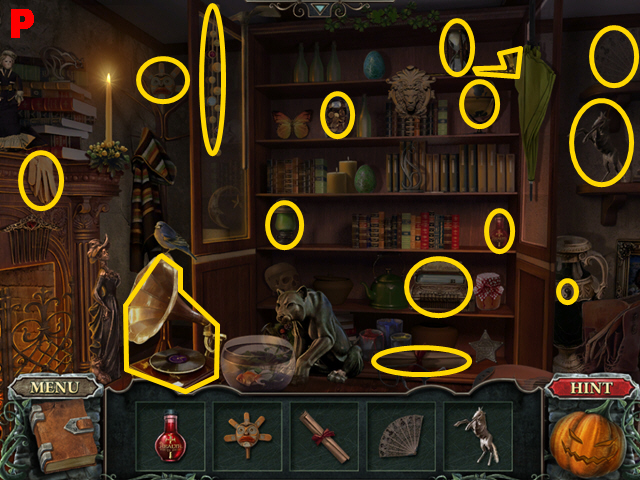
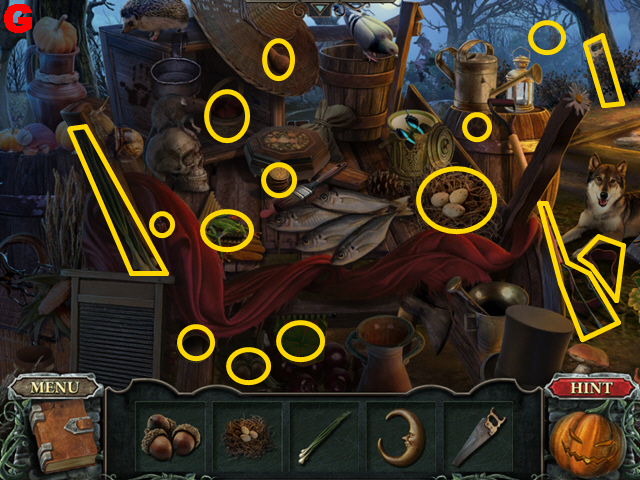
Chapter 1
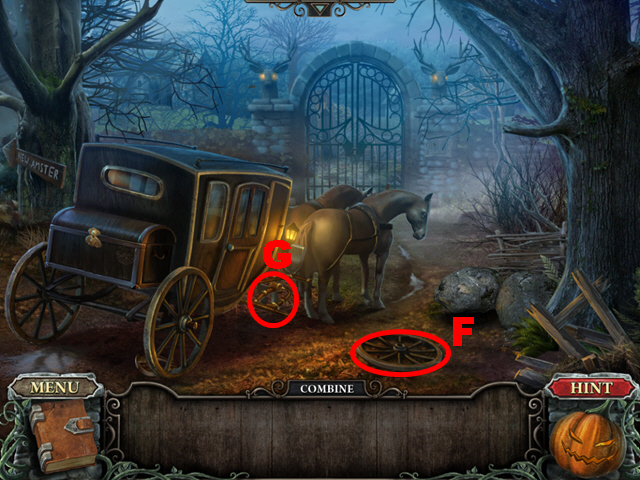
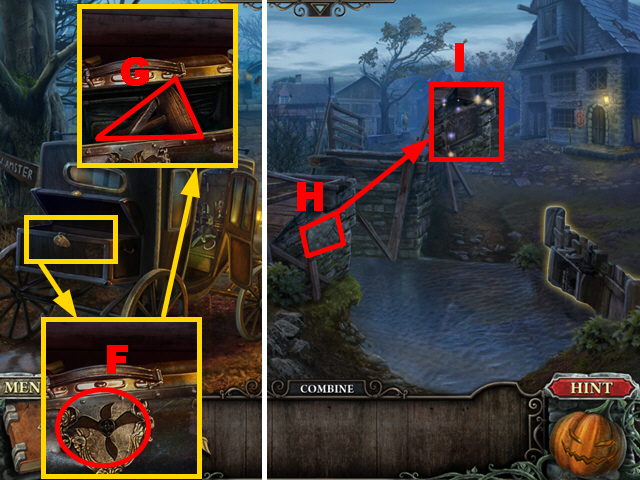
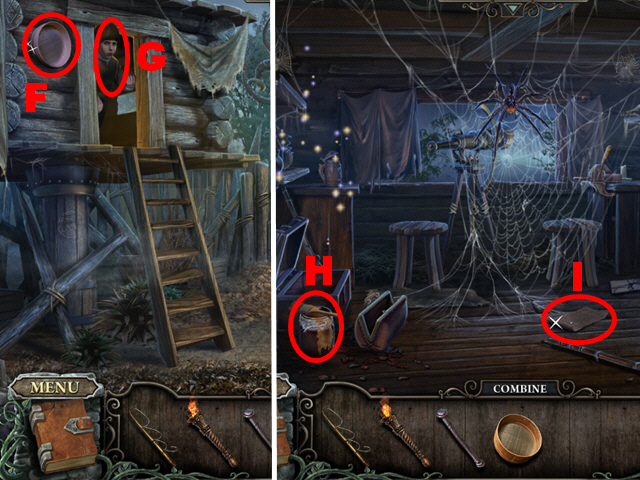
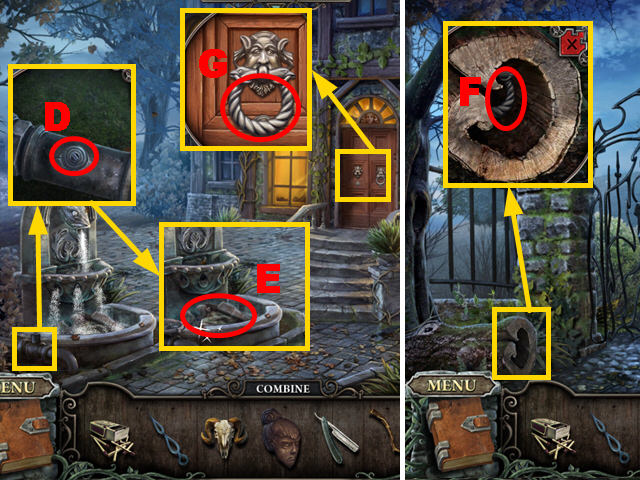
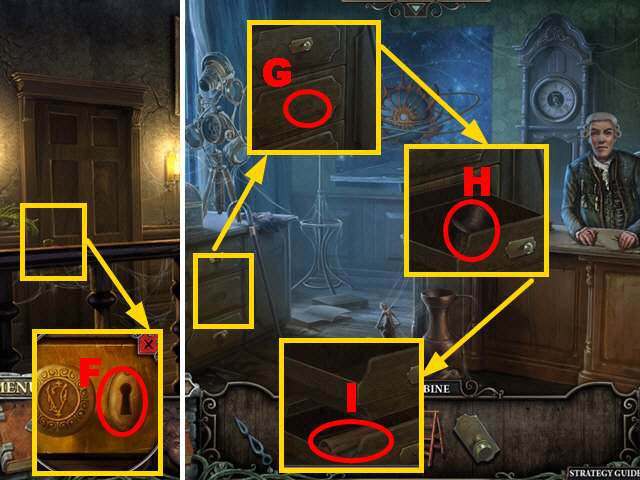
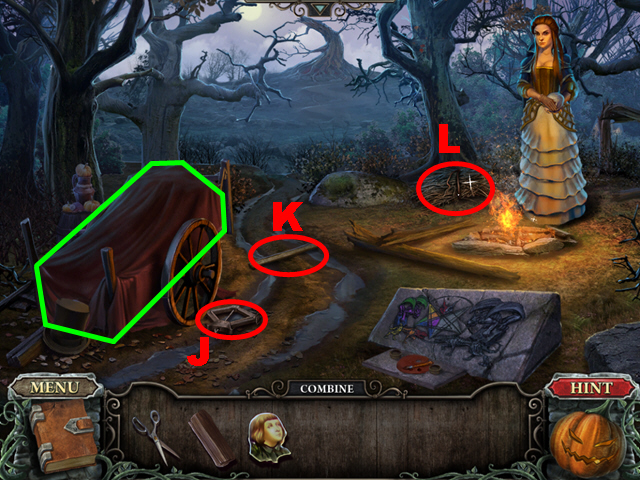
- Take the WHEEL (F).
- Put the WHEEL on the carriage (G).
- Play the HOS.
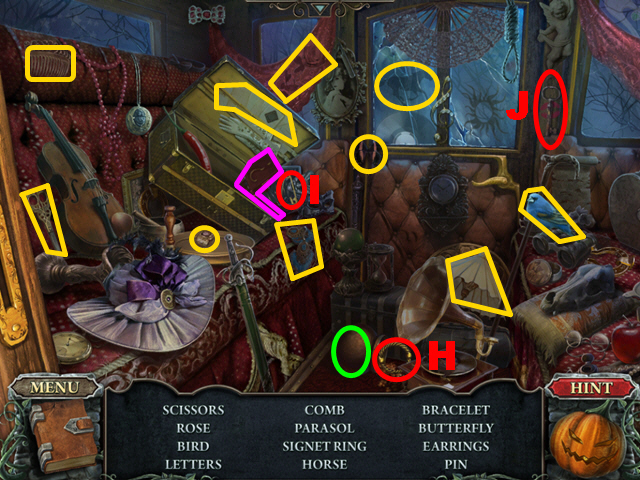
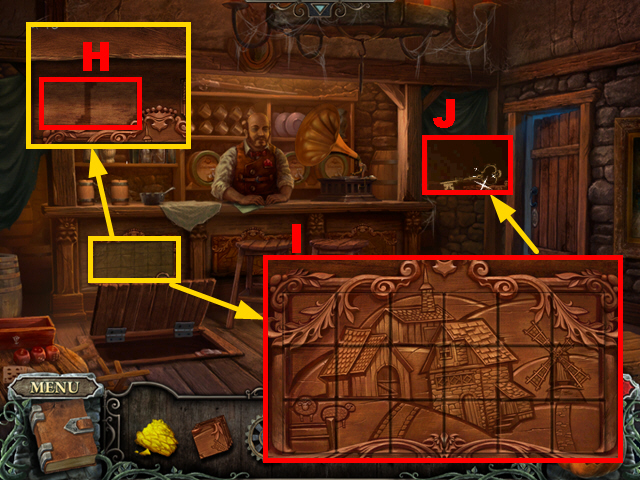
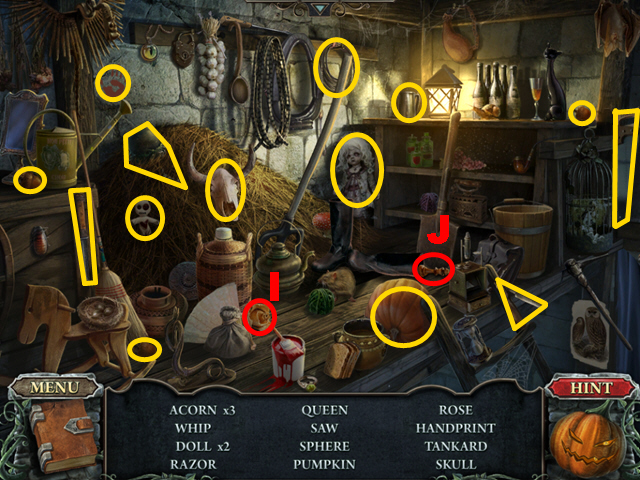
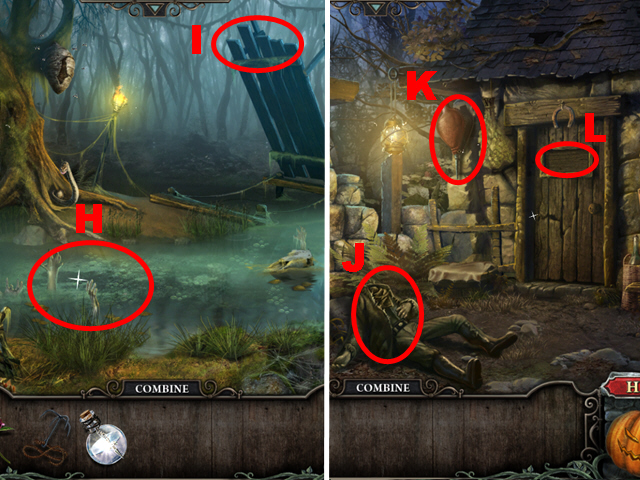
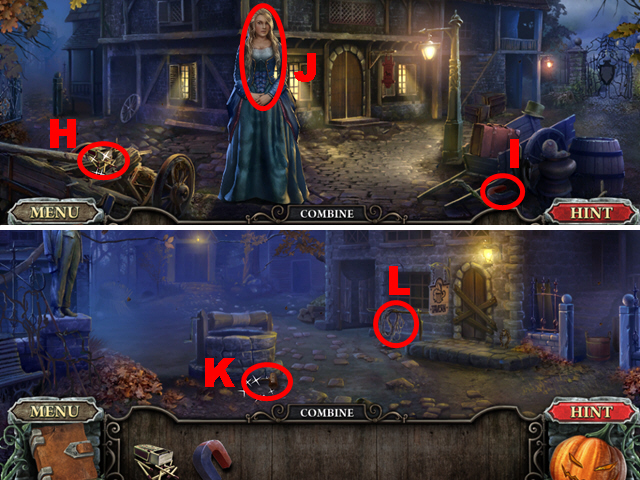
- Push the pot marked in green and take the bracelet (H).
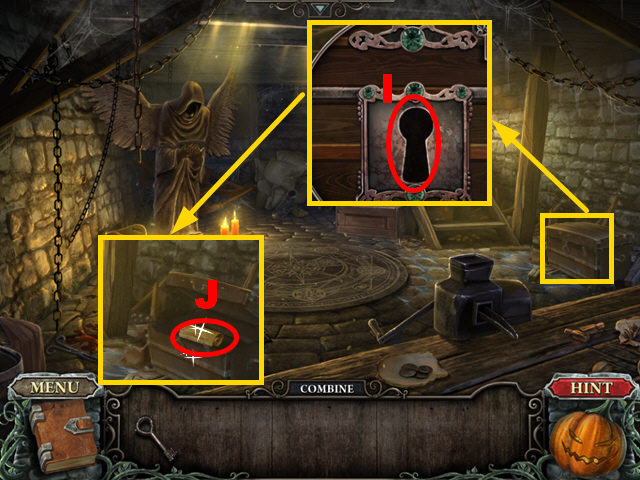
- Open the box marked in purple and take the pin (I).
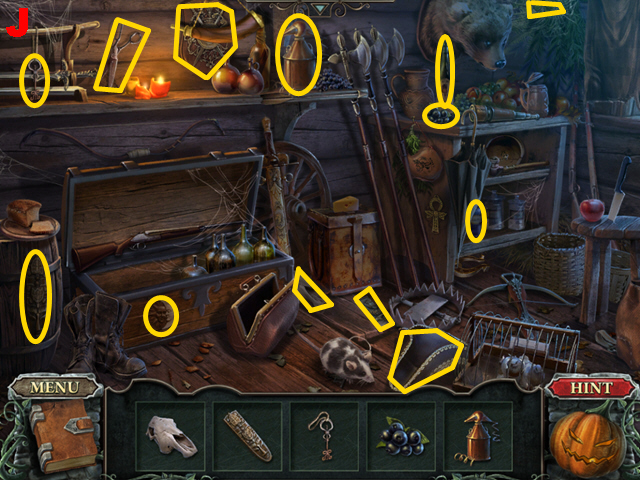
- Take the key (J).
- You will receive the KEY TO THE TRUNK.
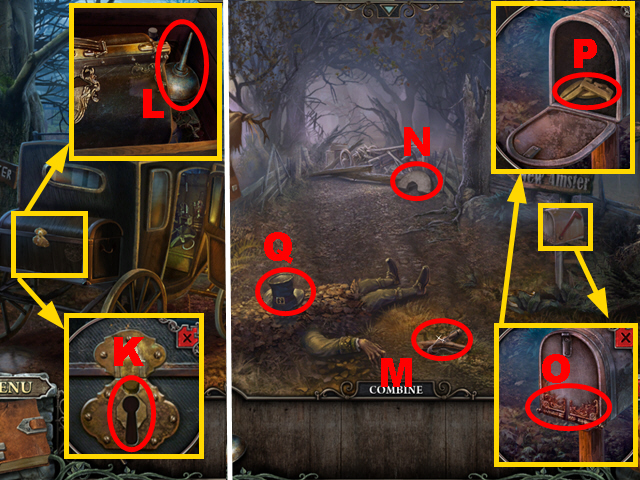
- Zoom into the trunk; put the KEY TO THE TRUNK into the lock (K) and turn it once.
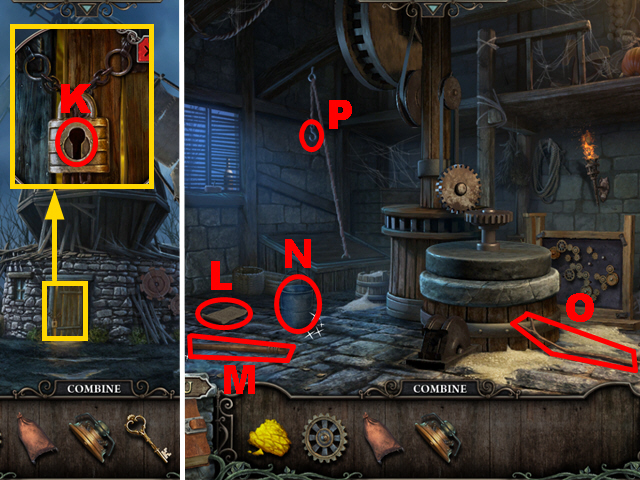
- Zoom into the trunk again; take the OIL CAN (L).
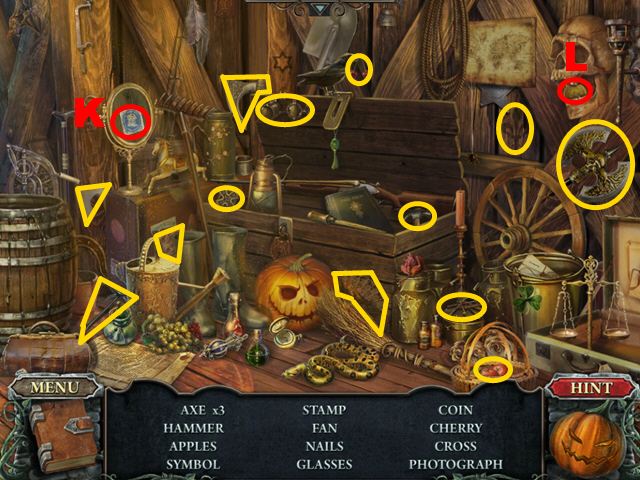
- Turn left.
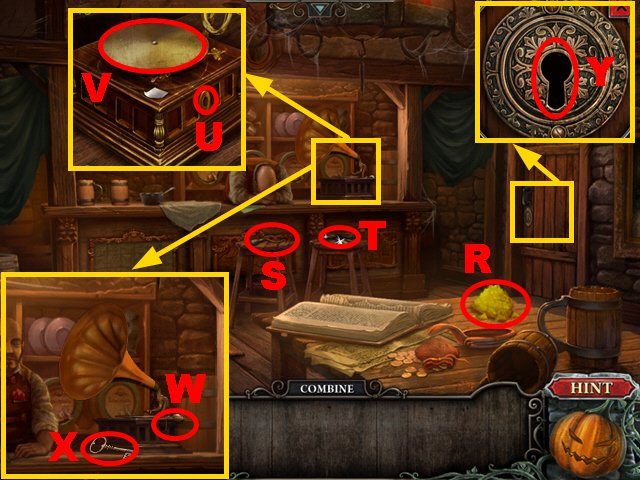
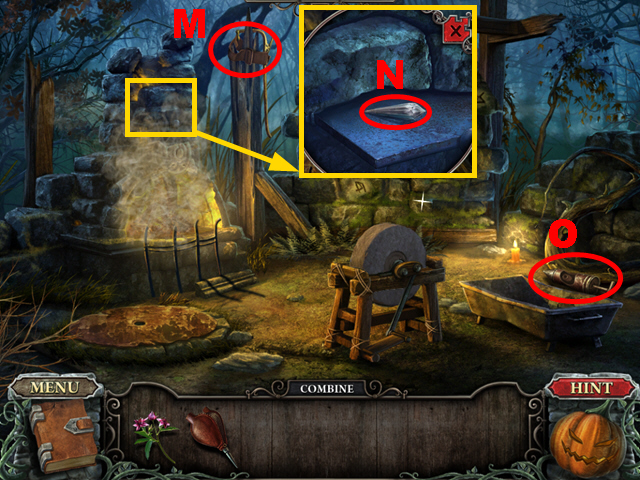
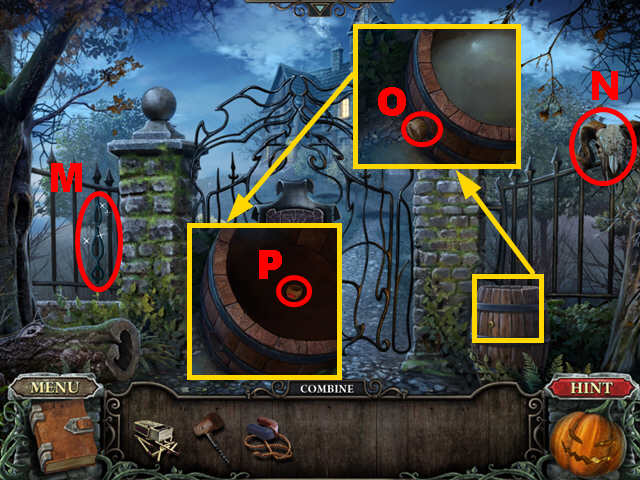
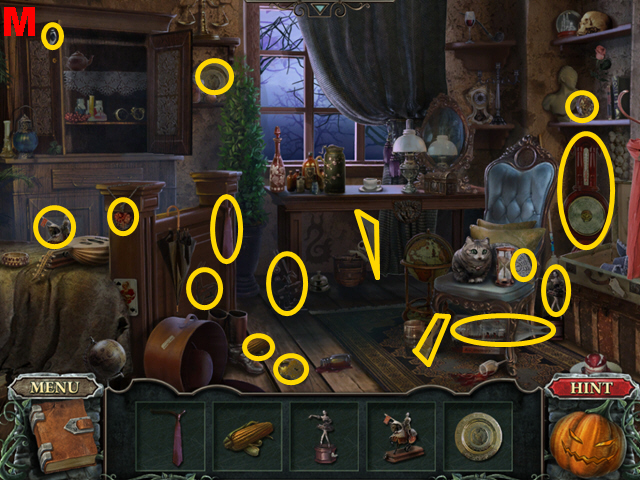
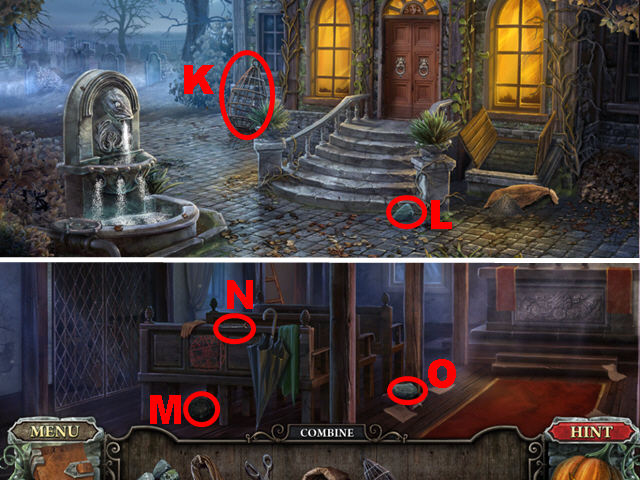
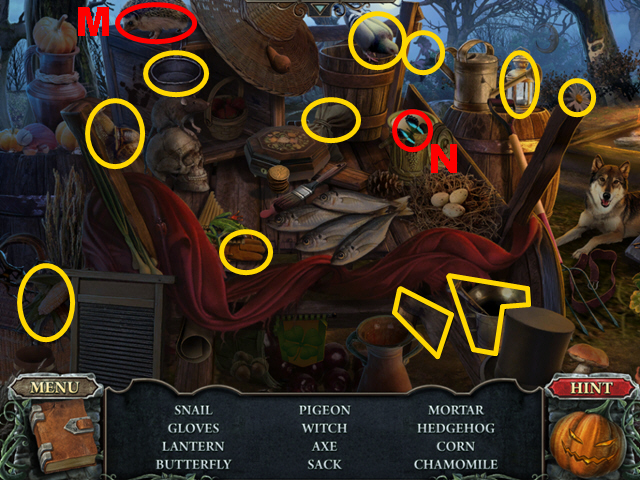
- Take the SLINGSHOT (M) and the GRINDSTONE (N).
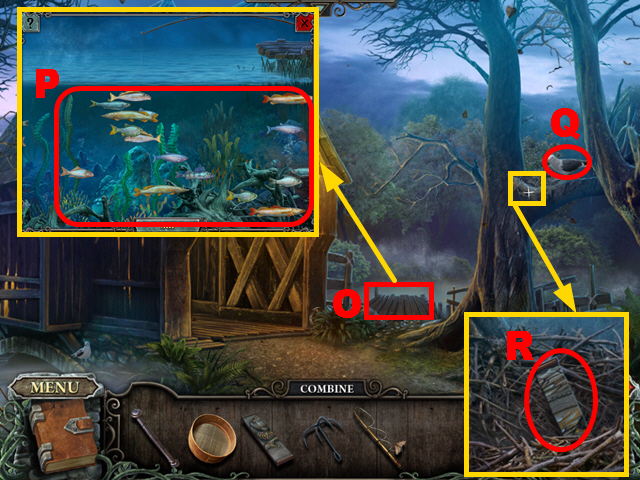
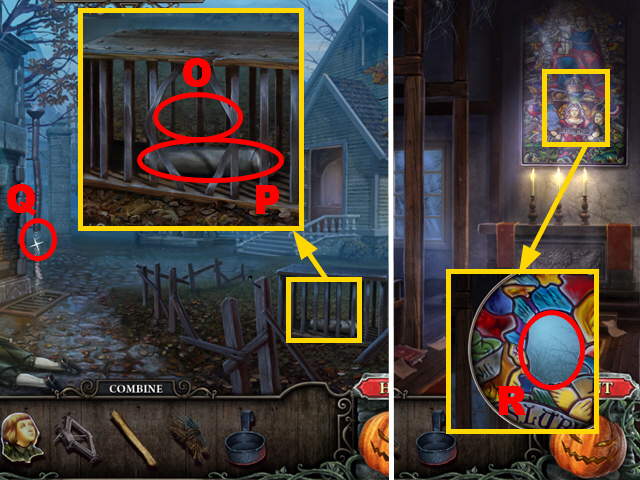
- Zoom into the mailbox; pour the OIL CAN over the hinges (O).
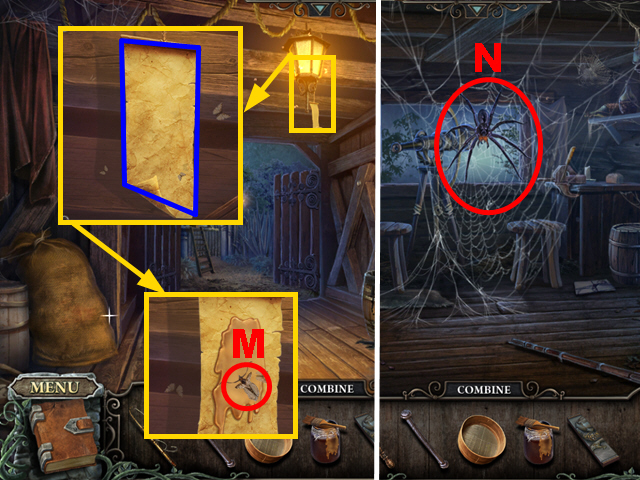
- Open the mailbox and take the LETTERS (P).
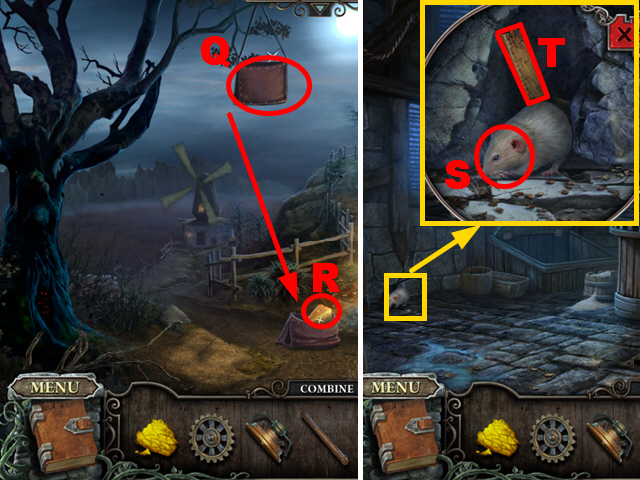
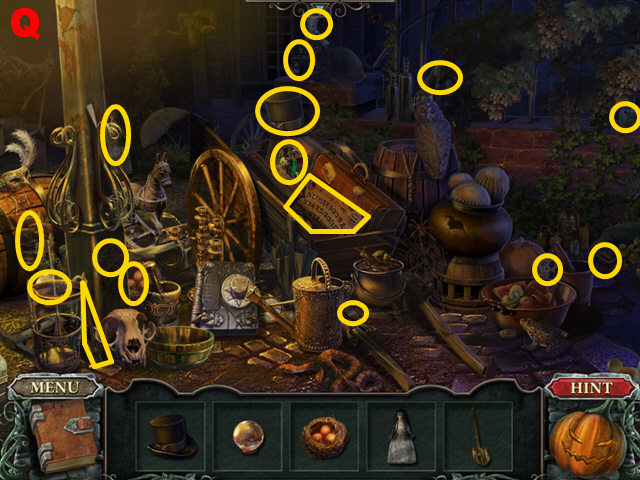
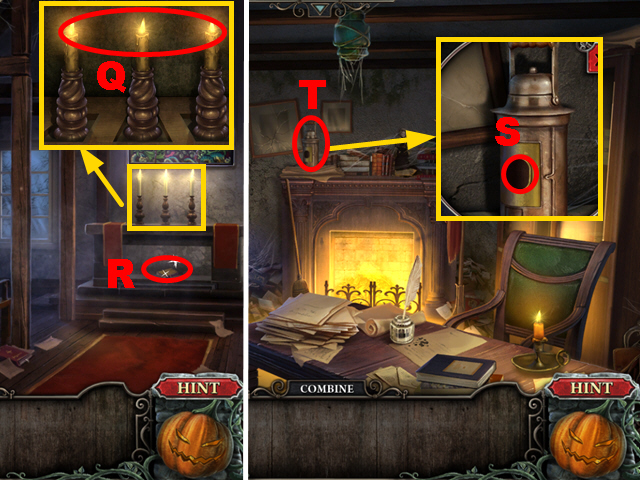
- Tip the top hat (Q).
- Turn right and move forward.
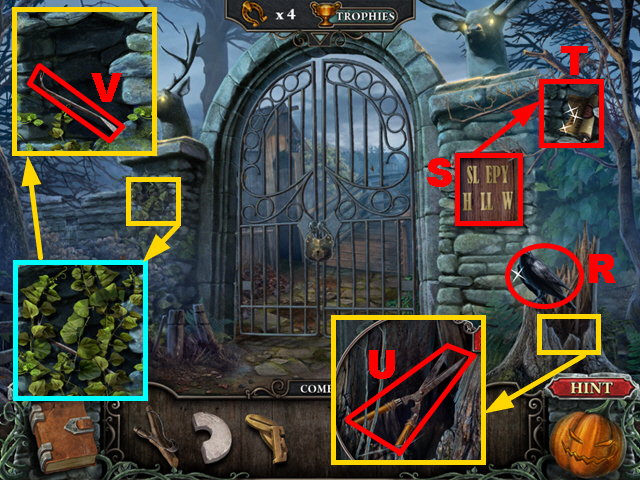
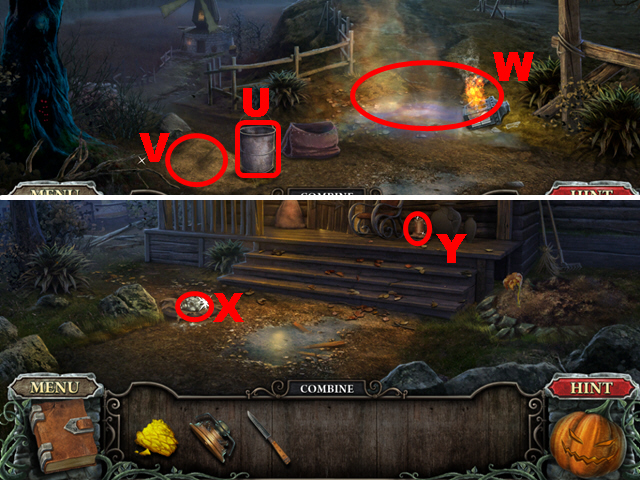
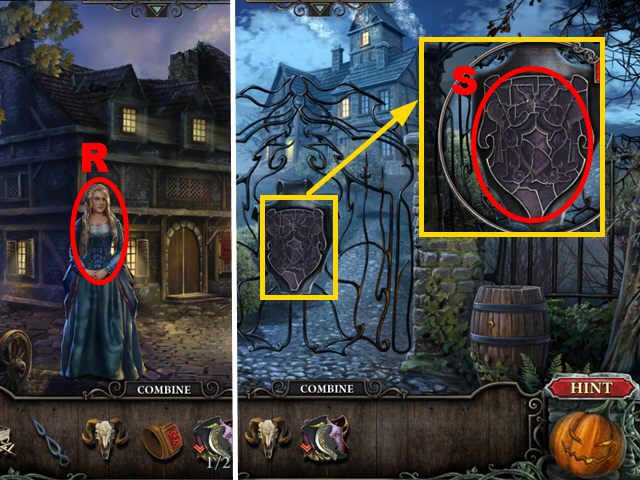
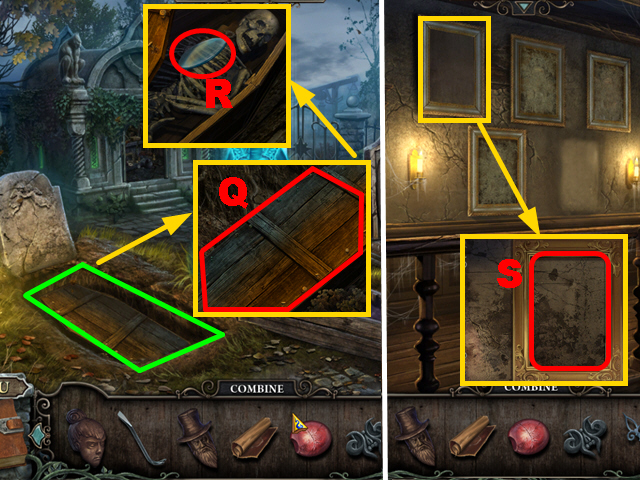
- Use the SLINGSHOT to chase away the crow (R).
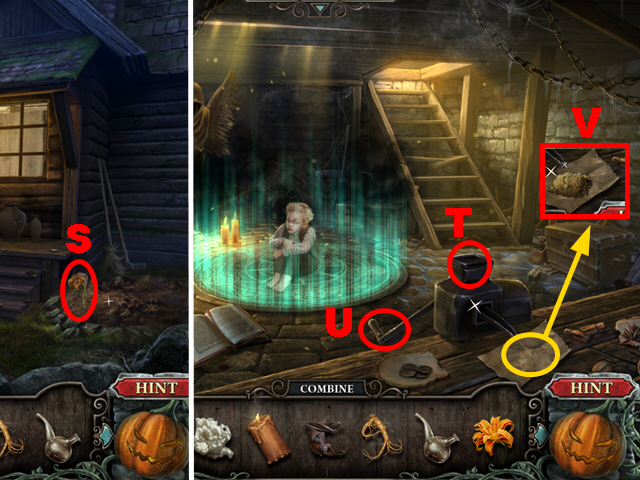
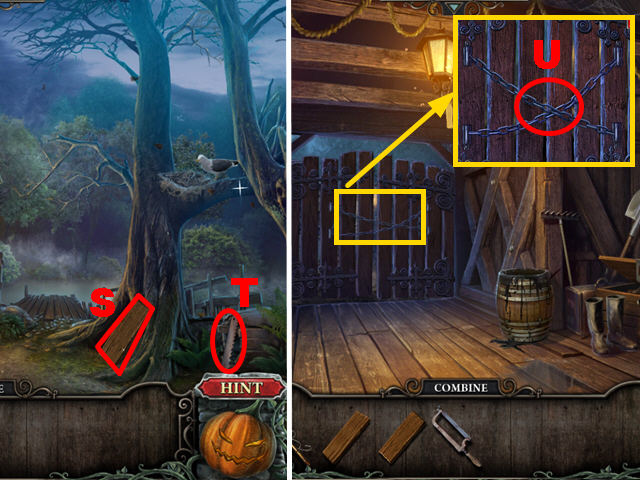
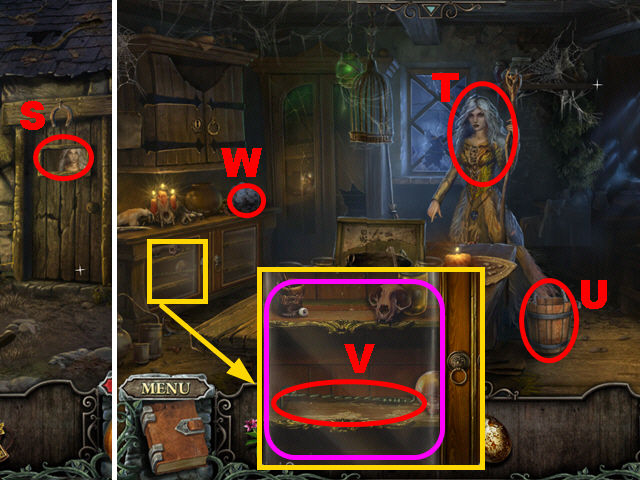
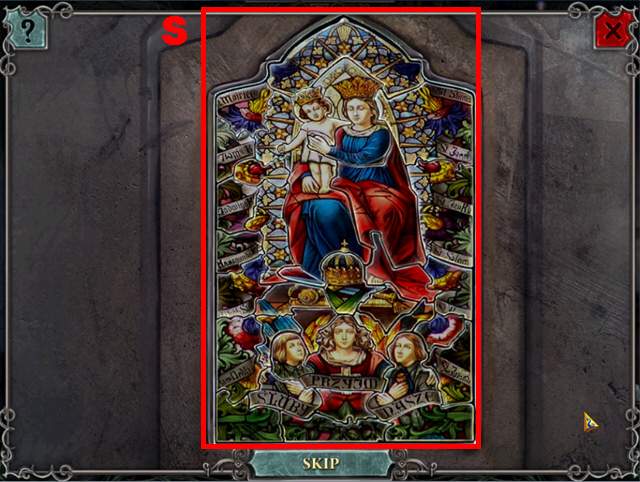
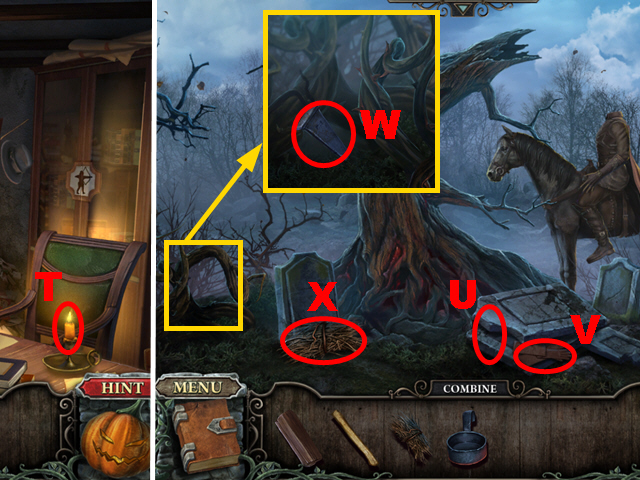
- Put the LETTERS on the sign (S) and take the SECOND PART OF THE WILL (T).
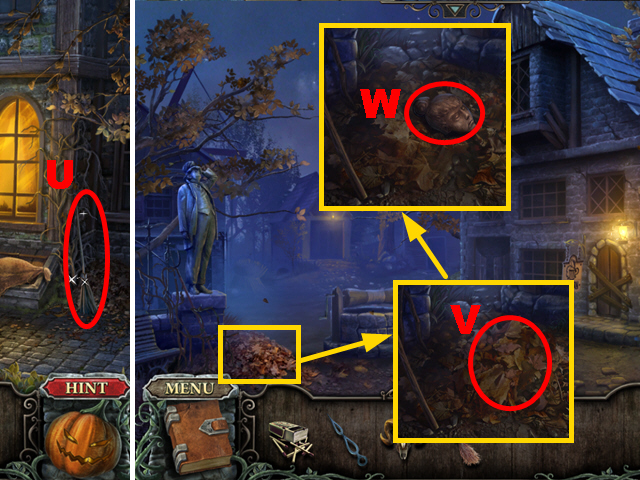
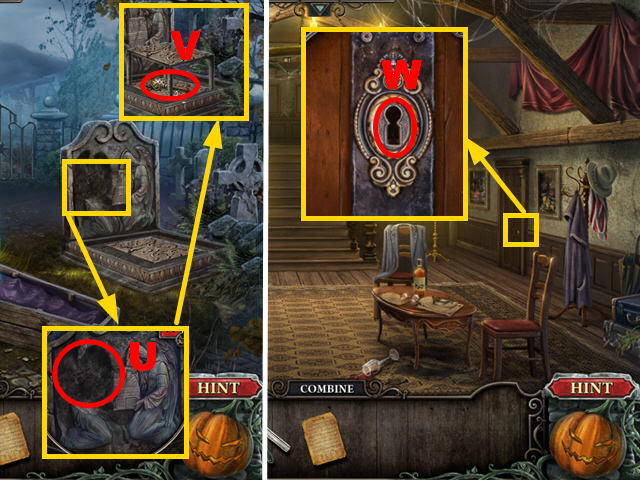
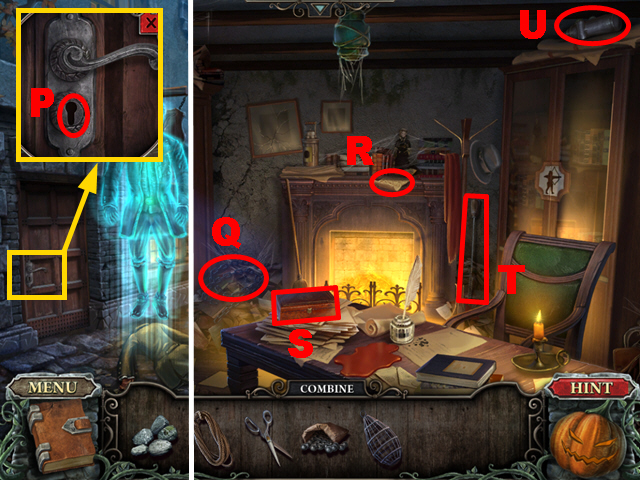
- Zoom into stump; take the RUSTY PRUNERS (U).
- Combine the GRINDSTONE and the RUSTY PRUNERS to create the SHARPENED PRUNERS.
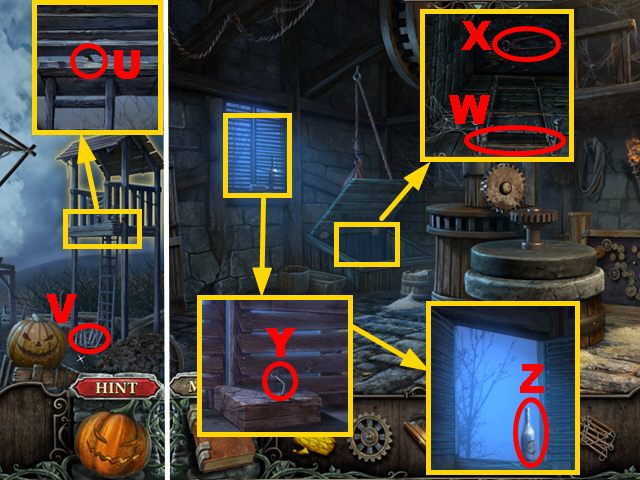
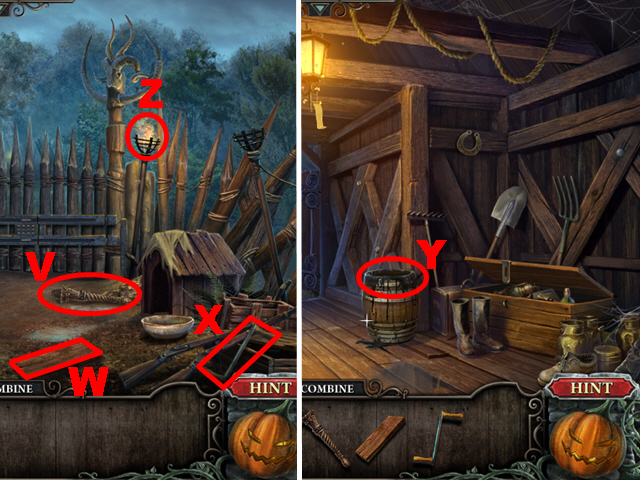
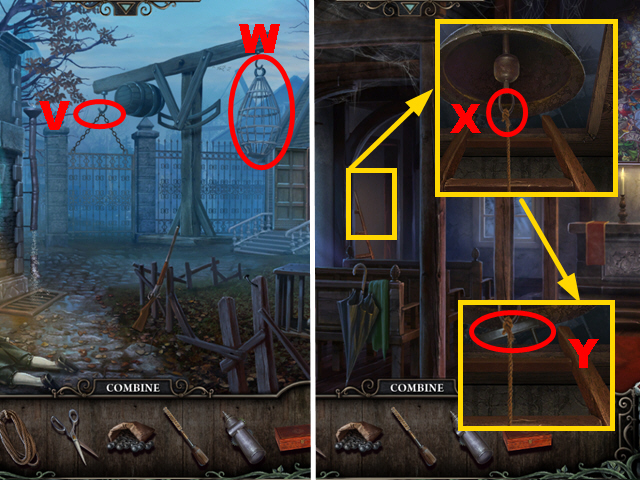
- Zoom into the leaves; use the SHARPENED PRUNERS three times on the leaves marked in blue and take the CROWBAR (V).
- Walk down.
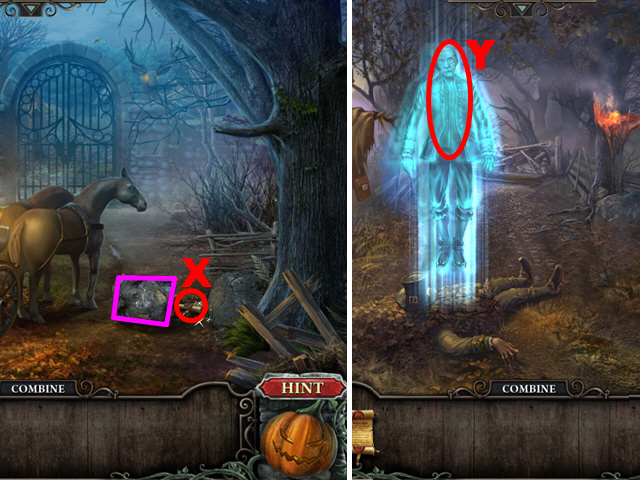
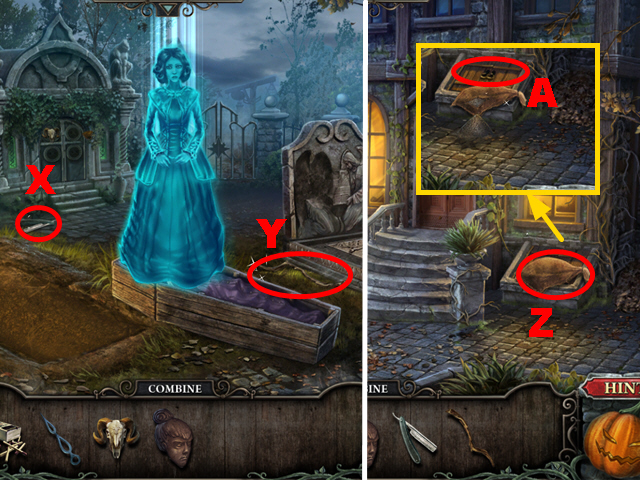
- Use the CROWBAR to remove the stone marked in purple and take the FIRST PART OF THE WILL (X).
- Combine the FIRST PART OF THE WILL and the SECOND PART OF THE WILL to create the WILL.
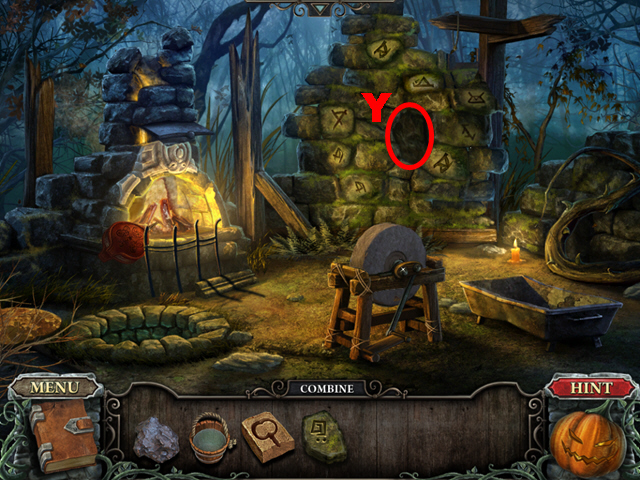
- Turn left.
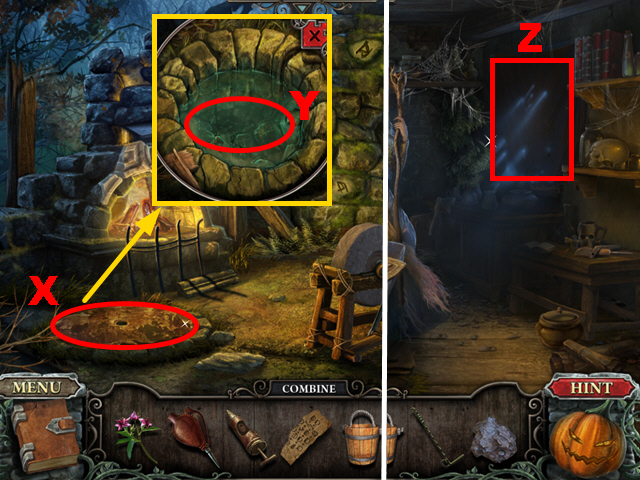
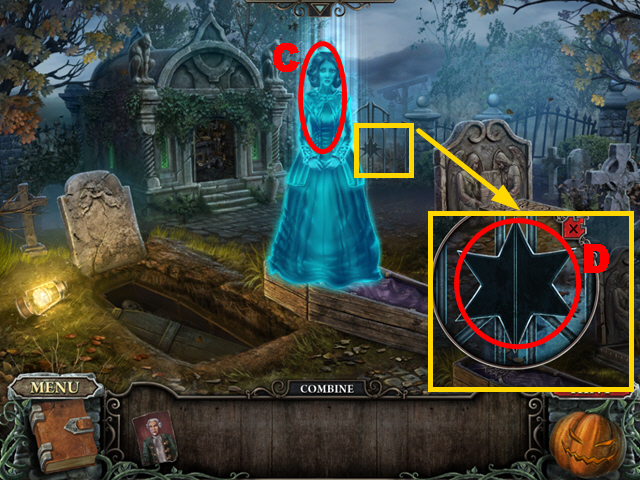
- Give the WILL to the ghost (Y).
- You will receive the KEY TO THE GATES.
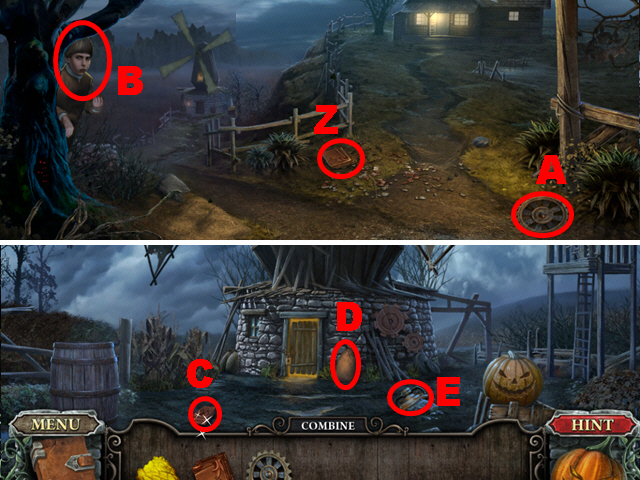
- Turn right and move forward.
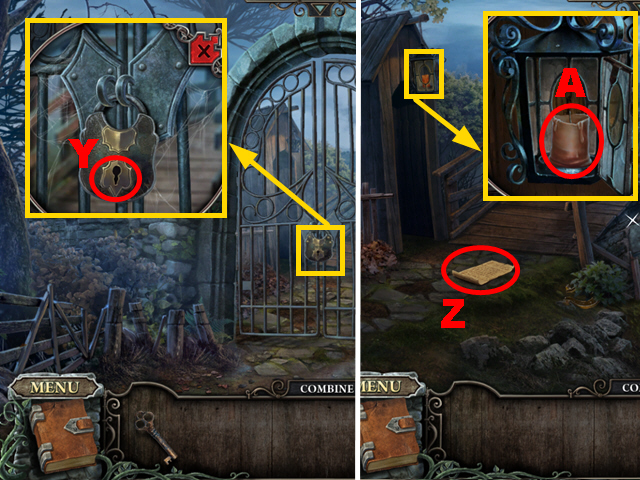
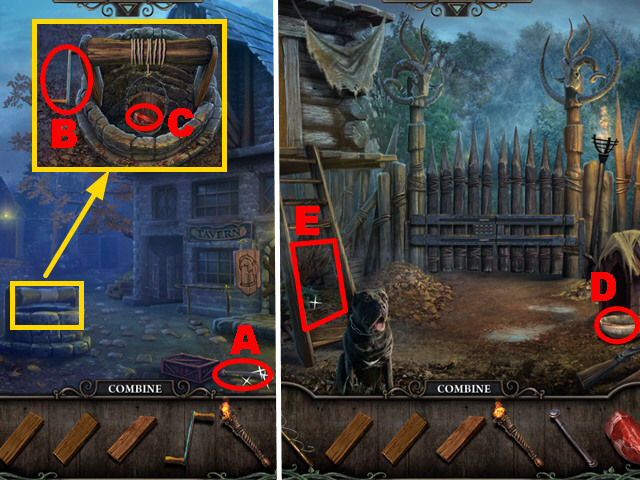
- Zoom into the gate; put the KEY TO THE GATES into the padlock (Y) and turn it once.
- Move forward.
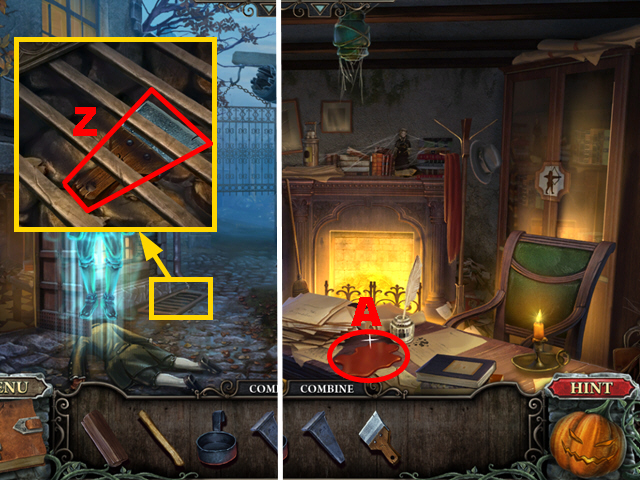
- Take the page (Z).
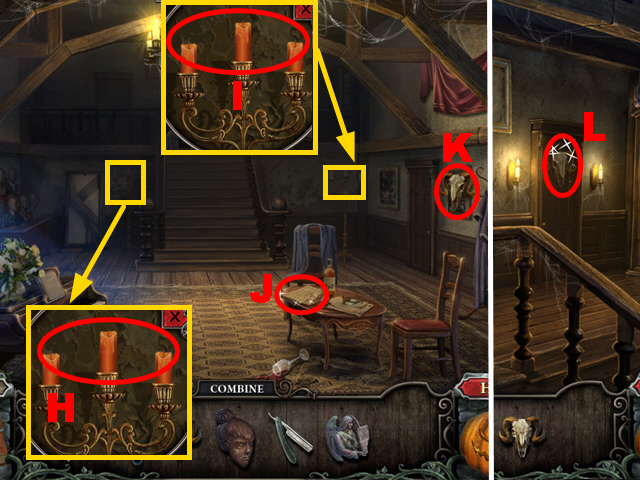
- Zoom into the lantern; open it and take the CANDLE (A).
- Walk down twice and turn left.
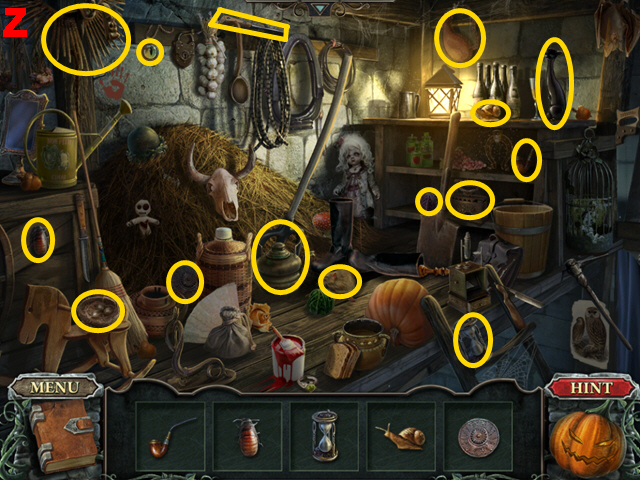
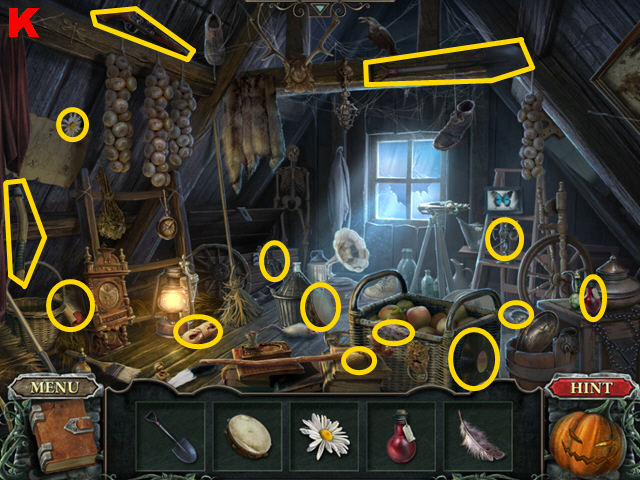
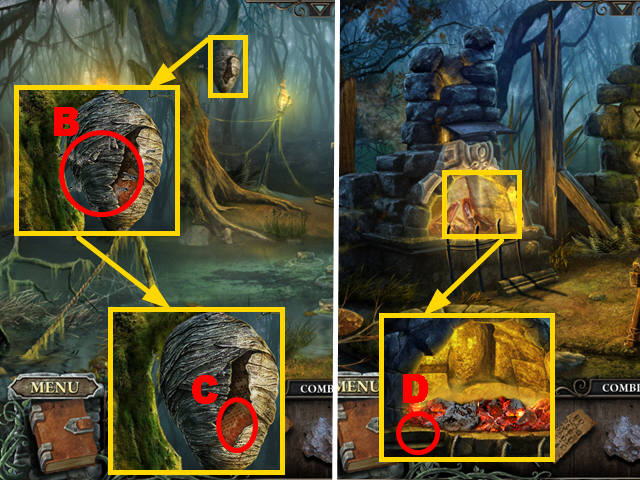
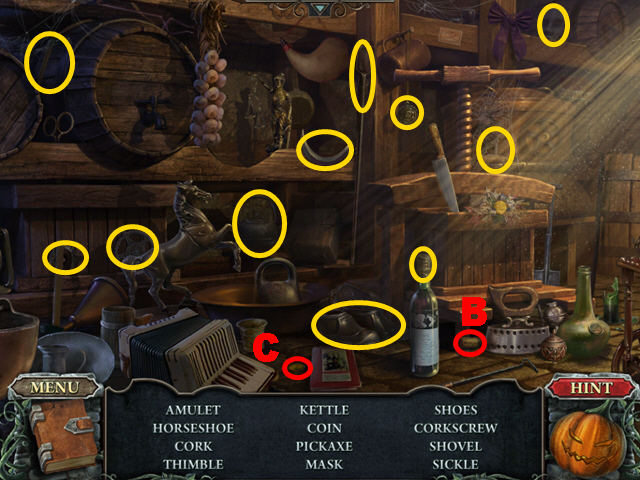
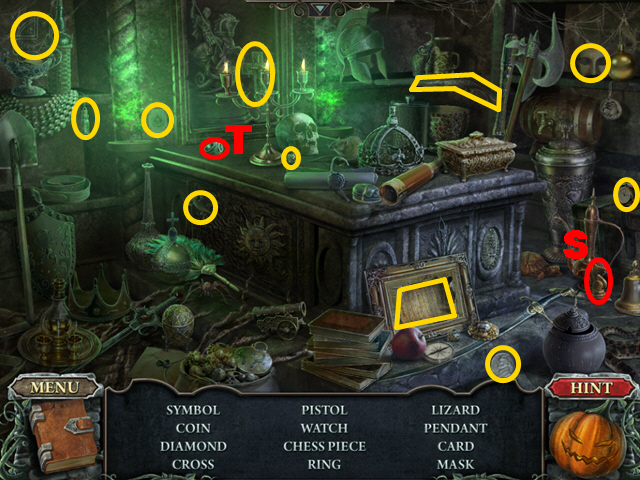
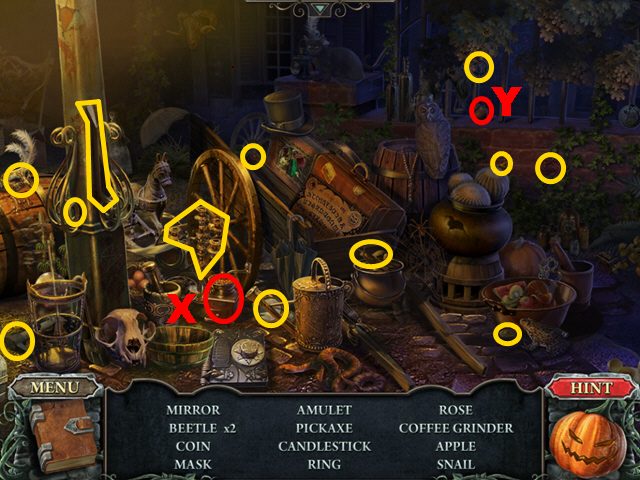
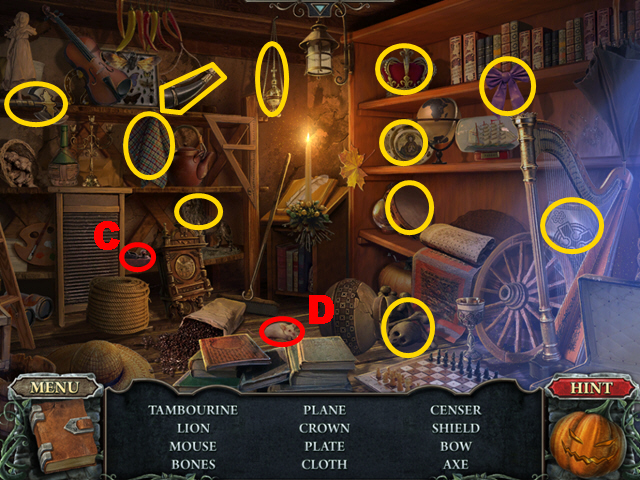
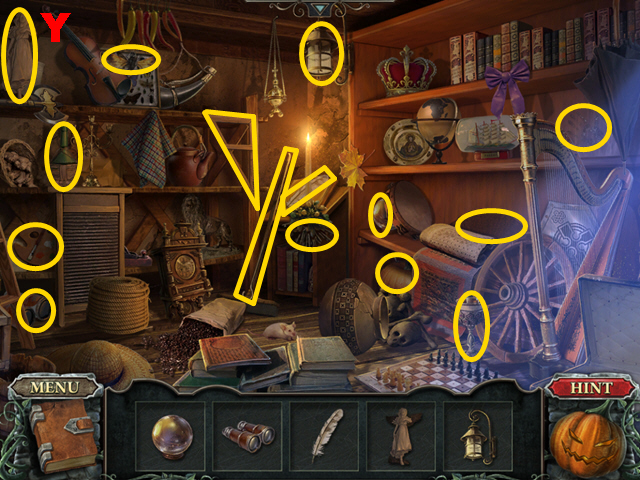
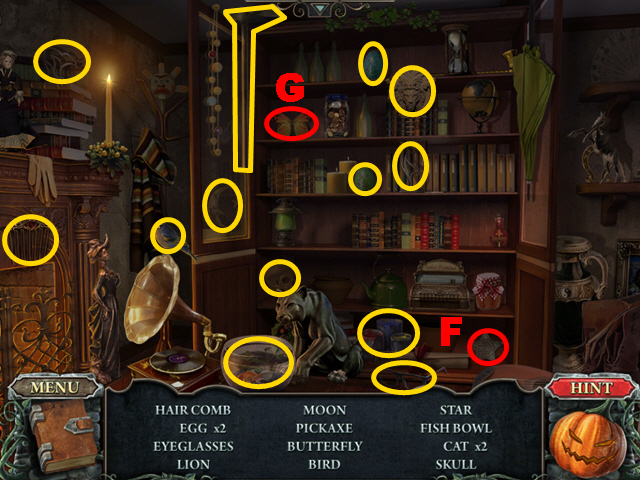
- Play the HOS.
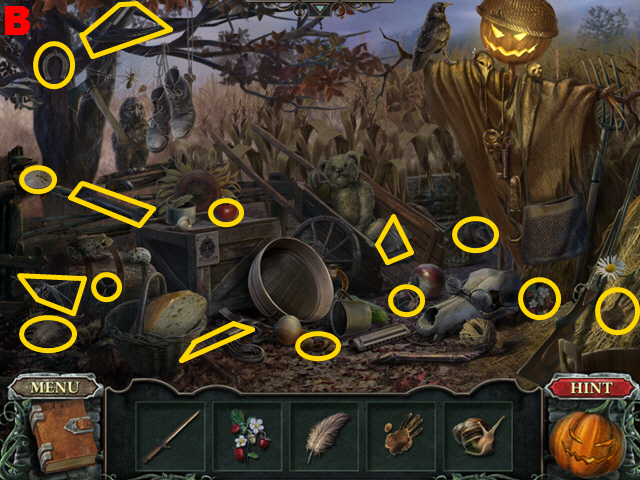
- Find the 15 items marked in yellow (B).
- You will receive the CROSSPIECE.
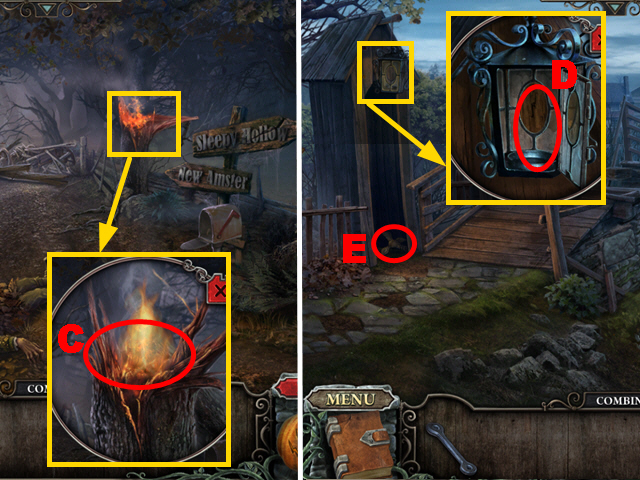
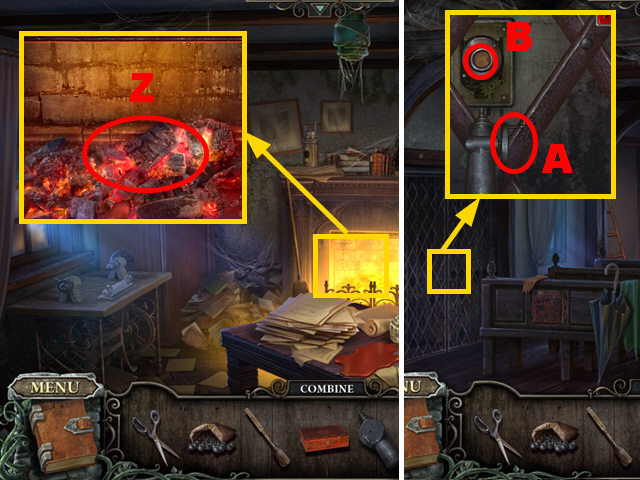
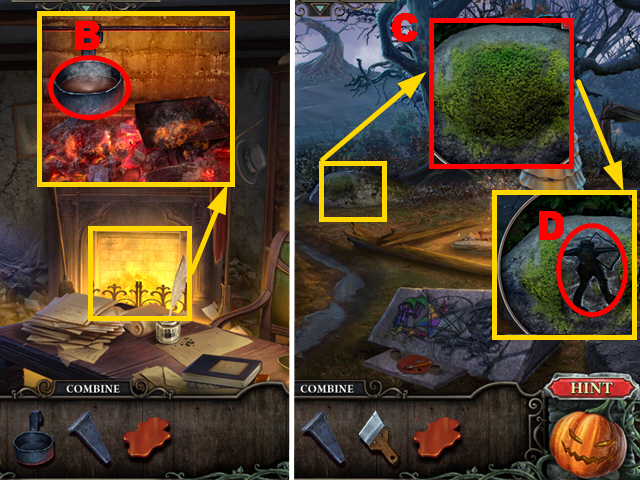
- Zoom into the flames; hold down the CANDLE (C) to receive A LIT CANDLE.
- Turn right and move forward twice.
- Zoom into the lantern; put down A LIT CANDLE (D) and take the TRAVELLING BAG KEY (E).
- Walk down twice.
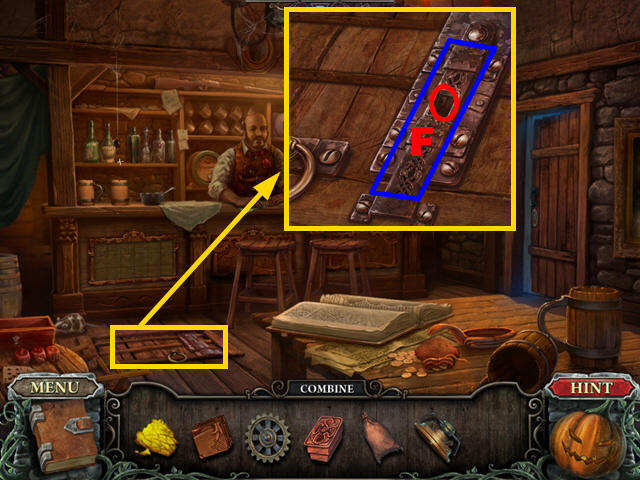
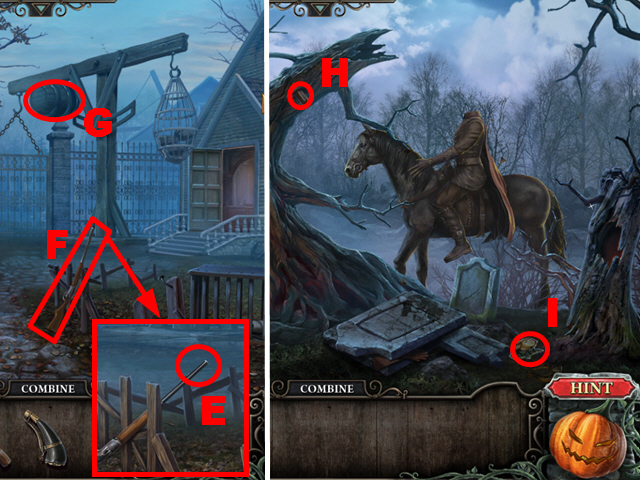
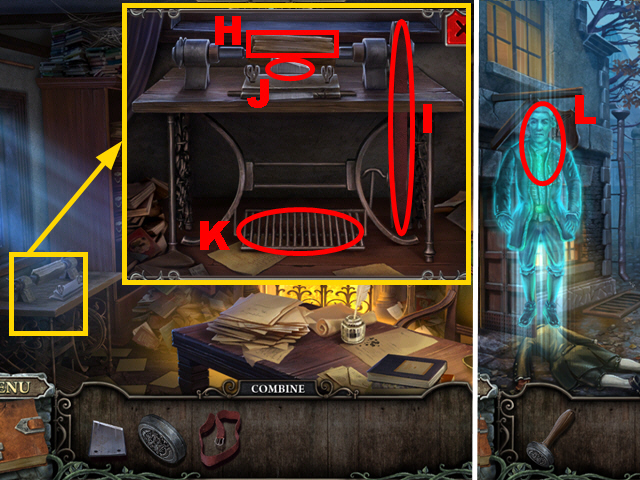
- Zoom into the trunk; put the TRAVELLING BAG KEY into the niche (F) and take the MASON’S TOOLS (G).
- Move forward twice.
- Use the MASON’S TOOLS to remove the stone (H).
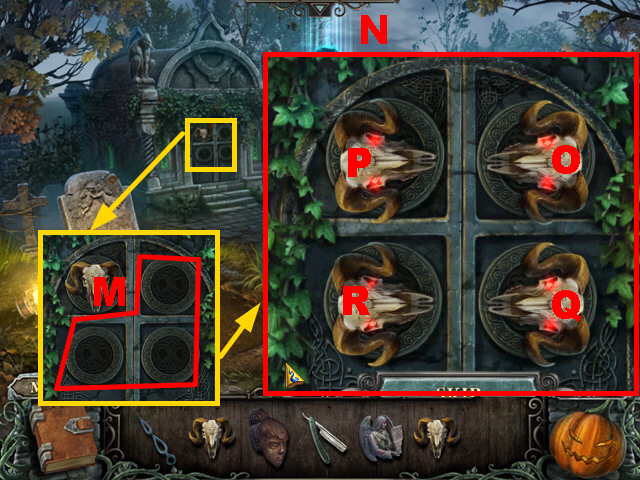
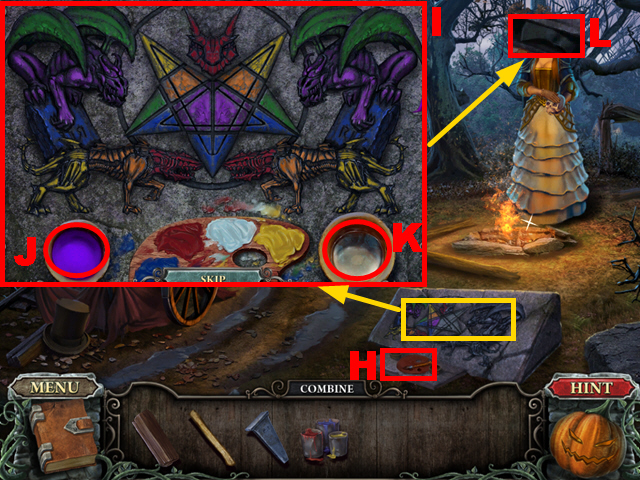
- Zoom into the opening (I) to play a mini-game.
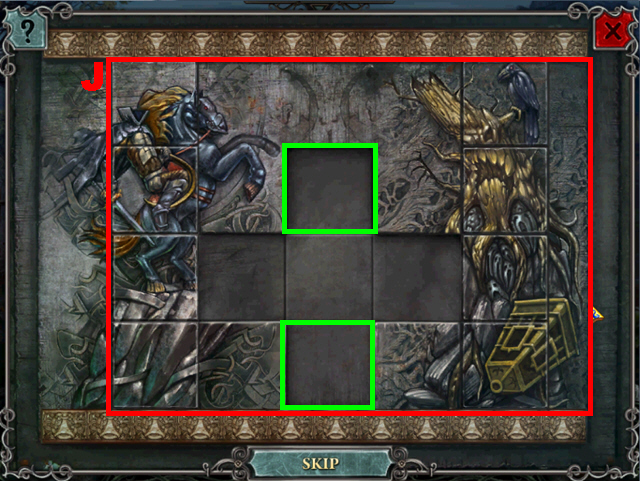
- To solve this puzzle (J), move around the tiles to recreate the correct picture.
- Use the spots marked in green to place tiles out of the way.
- You will receive the CRUCIFORM LEVER.
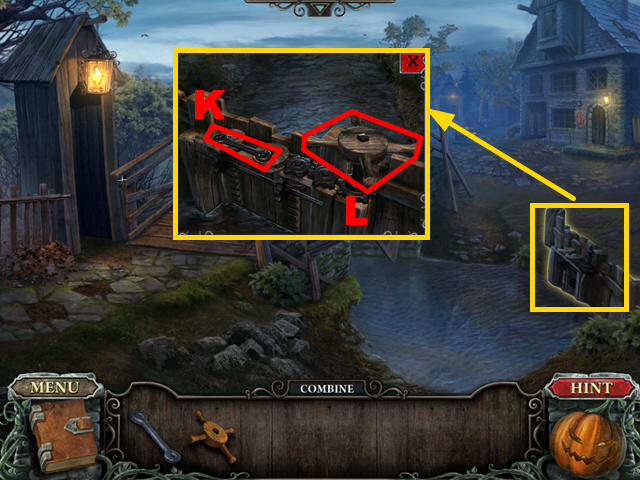
- Zoom into the lifting mechanism; put down the CROSSPIECE (K) and the CRUCIFORM LEVER (L).
- Turn the cruciform lever.
- Move forward.
Chapter 2
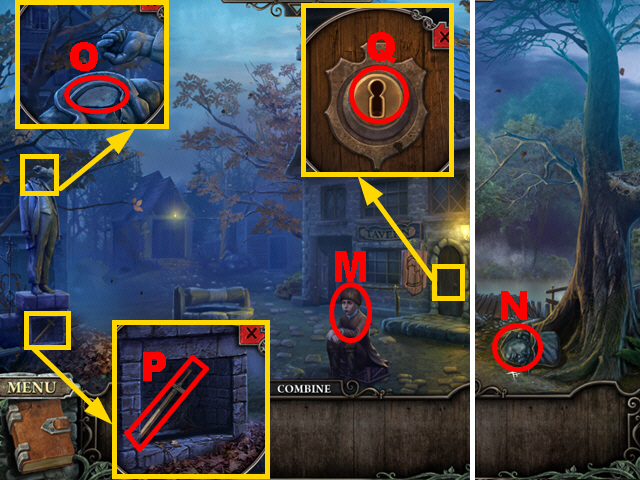
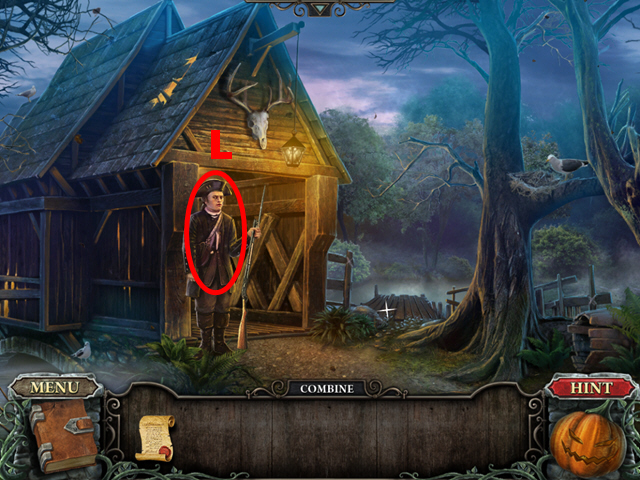
- Talk to the boy (M).
- Move forward.
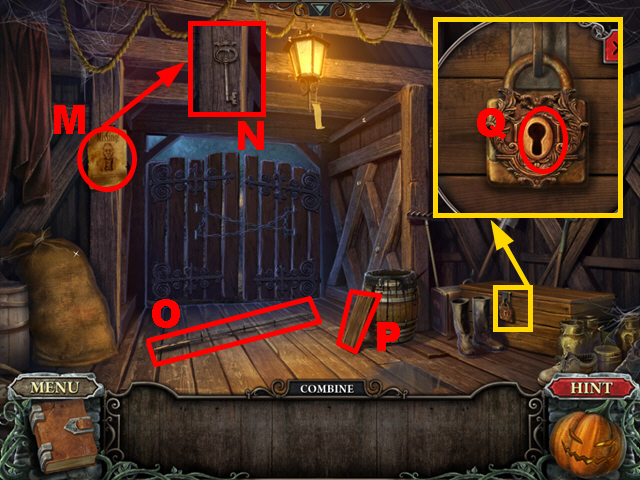
- Take the STATUE HEAD (N).
- Turn right.
- Zoom into the statue; put down the STATUE HEAD (O).
- Zoom into the compartment; take the SWORD (P). Give the SWORD to the boy.
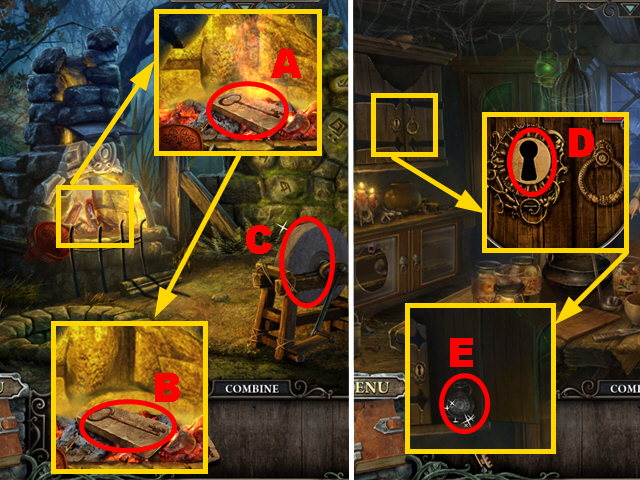
- You will receive the TAVERN KEY.
- Zoom into the door; put the TAVERN KEY into the lock (Q) and turn it twice.
- Enter the tavern.
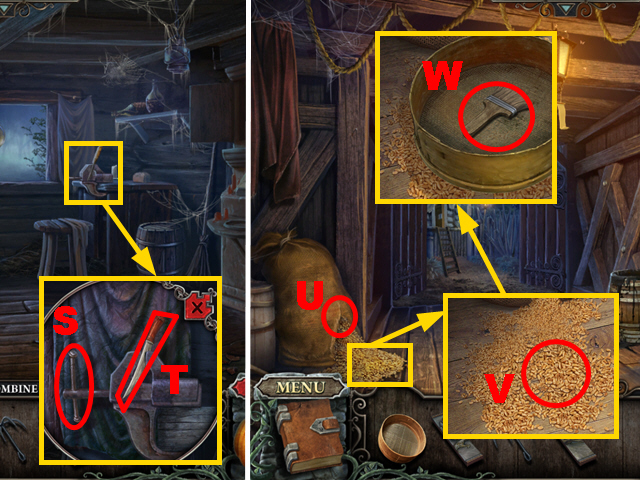
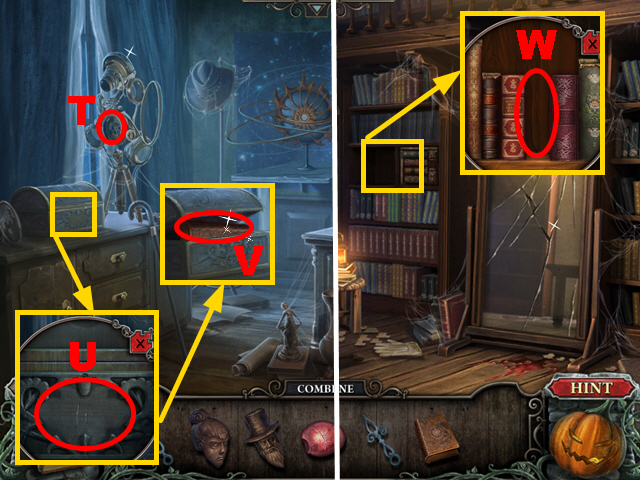
- Take the SULFUR (R), the PHONOGRAPH CRANK (S), and the VINYL RECORDS (T).
- Zoom into the gramophone; put the PHONOGRAPH CRANK into the slot (U) and put down the VINYL RECORDS (V).
- Turn the crank (W) and take the KEY TO THE BACKDOOR (X).
- Zoom into the door; put the KEY TO THE BACKDOOR into the lock (Y) and turn it twice.
- Turn right.
- Take the TABLEAUX PIECE (Z) and the GEAR WHEEL (A).
- Try to move towards the cottage.
- Talk to the boy (B).
- Go towards the mill.
- Take the LATCH (C), the SACK (D), and the LAMP PART (E).
- Walk down twice.
- Zoom into the trapdoor; put the LATCH into the slot (F).
- Move the latch marked in blue.
- Play the HOS.
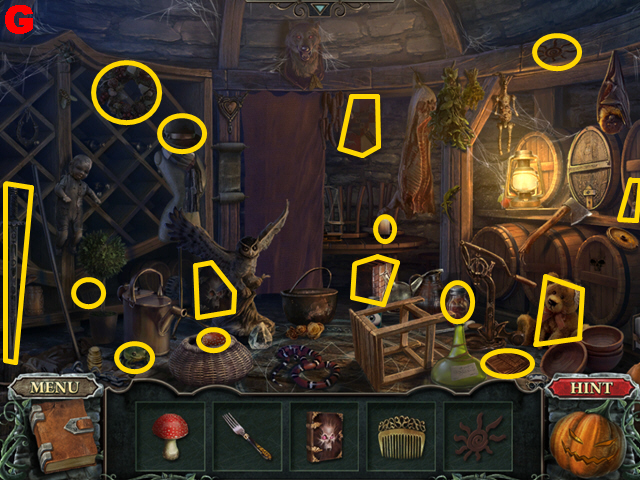
- Find the items marked in yellow (G).
- You will receive the TABLEAUX PIECE.
- Zoom into the board; put down the 2 TABLEAUX PIECES (H).
- Zoom into the board again to play a mini-game.
- To solve this puzzle (I), pick up pieces and put them on the board to create the correct picture.
- Right-click to rotate any piece you are currently holding.
- Take the KEY TO THE MILL (J).
- Turn right and move forward.
- Zoom into the door; put the KEY TO THE MILL into the lock (K) and turn it twice.
- Enter the mill.
- Take the page (L), the HANDLE (M), the BUCKET (N), and the STICK (O).
- Connect the SACK to the hook (P).
- Walk down twice.
- Grab the bag (Q) with the STICK.
- Take the CHEESE (R).
- Move forward twice.
- Zoom into the mouse; give the CHEESE to the mouse (S) and take the RULER (T).
- Walk down.
- Zoom into the ladder; use the RULER to remove the lock (U).
- Take the ROPE LADDER (V).
- Move forward.
- Zoom into the crate; put down the ROPE LADDER (W) and take the NAIL PULLER (X).
- Zoom into the window; use the NAIL PULLER to remove the nail (Y).
- Take the EMPTY BOTTLE (Z).
- Walk down three times.

- Put the EMPTY BOTTLE into the shelf (A).
- Zoom into the shelf to play a mini-game.
- Tip the bottles in sequence, from B-H, to solve the puzzle.
- You will receive the GEAR WHEEL.
- Turn right and move forward twice.
- Play the HOS.
- Remove the fan and take the rose (I).
- Turn down the boot and take the queen (J).
- You will receive the KNIFE.
- Walk down.
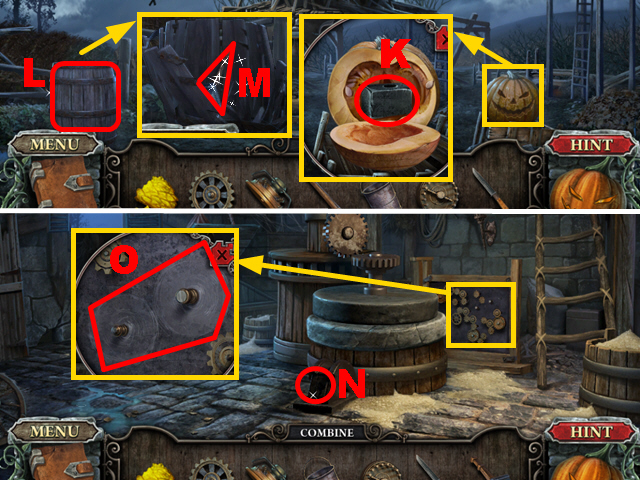
- Zoom into the pumpkin; use the KNIFE to cut open the pumpkin and take the HAMMER HEAD (K).
- Combine the HANDLE and the HAMMER HEAD to create the SLEDGEHAMMER.
- Use the SLEDGEHAMMER to crush the barrel (L); take the GEAR LEVER (M).
- Move forward.
- Put the GEAR LEVER into the slot (N).
- Zoom into the gear wheels; put down the 2 GEAR WHEELS (O).
- Push the gear lever and zoom into the gear wheels to play the mini-game.
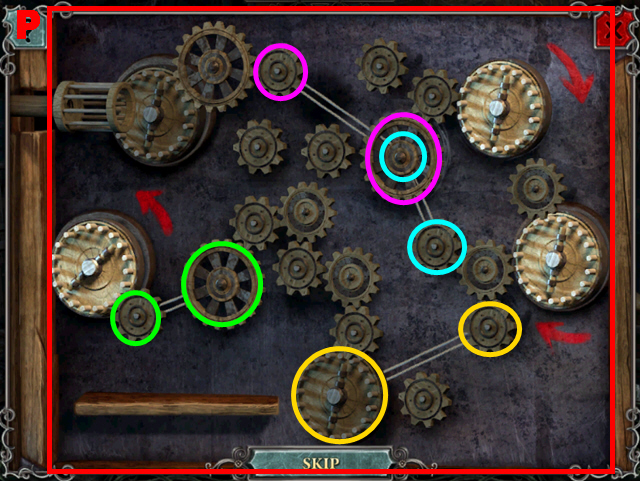
- To solve this puzzle (P), use the ropes to connect four pairs of gears indicated by the colored frames.
- You will receive the PULLEY.
- Walk down.
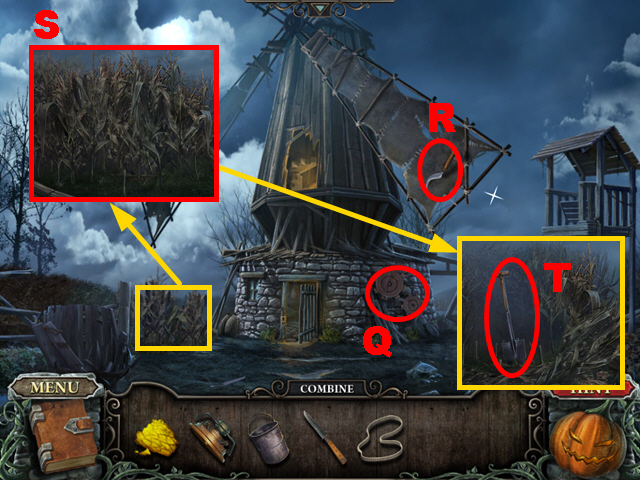
- Put the PULLEY on the gears (Q) and take the SICKLE (R).
- Zoom into the corn; use the SICKLE on the corn (S) three times and take the SHOVEL (T).
- Walk down.
- Put down the BUCKET (U) and use the SHOVEL to fill the sand (V) into the bucket.
- Take the BUCKET OF SAND.
- Use the BUCKET OF SAND to extinguish the fire (W).
- Move towards the cottage.
- Take the NITER (X) and the UNLIT CANDLE (Y).
- Walk down, go towards the mill, and move forward.
- Play the HOS.
- Find the 15 items marked in yellow (Z).
- You will receive the SCREWDRIVER.
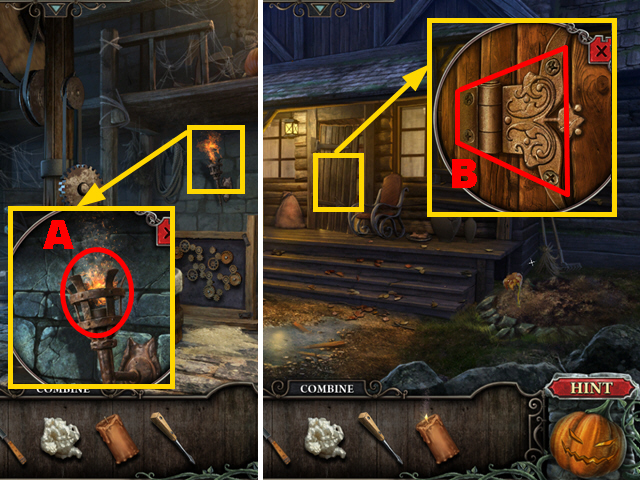
- Zoom into the torch; hold the UNLIT CANDLE next to the torch (A) to acquire the LIT CANDLE.
- Walk down twice and go towards the cottage.
- Zoom into the door; remove the lock (B) with the SCREWDRIVER.
- Move forward.
- Move the body (C) to talk to the ghost.
- Take the FISHING NET (D) and the PENCIL (E).
- Remove the carpet marked in purple.
- Cut the cloth with the KNIFE (F).
- Walk down.
- Use the FISHING NET to catch the bat (G); you will receive the BAT.
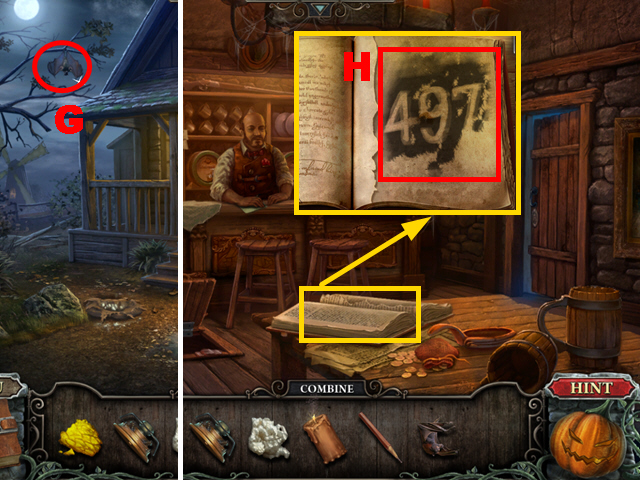
- Walk down twice.
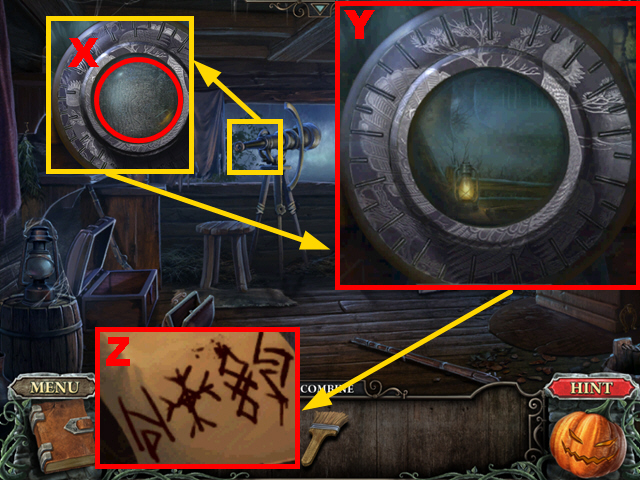
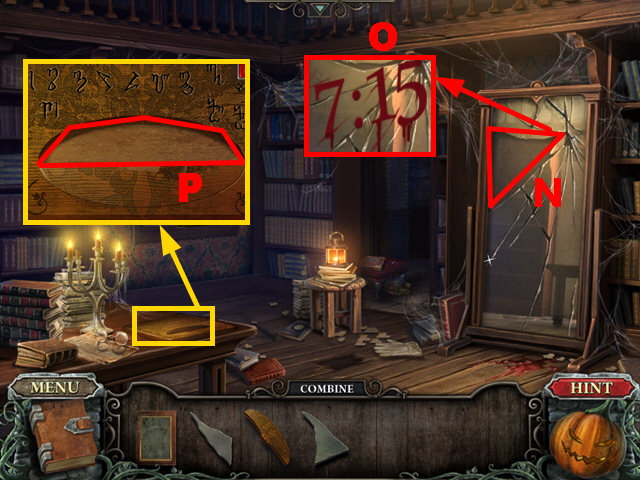
- Zoom into the book; use the PENCIL to draw on the page (H); you will discover the code ’497′.
- Turn right, go towards the cottage, and move forward.
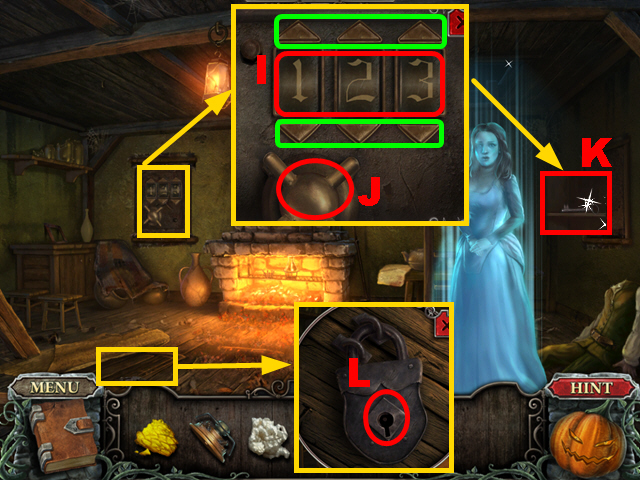
- Zoom into the safe; enter the code ’497′ into the panel (I) by pressing the buttons marked in green and then turn the handle (J).
- Take the BASEMENT KEY (K).
- Zoom into the basement door; put the BASEMENT KEY into the lock (L) and turn it twice.
- Go down into the basement.
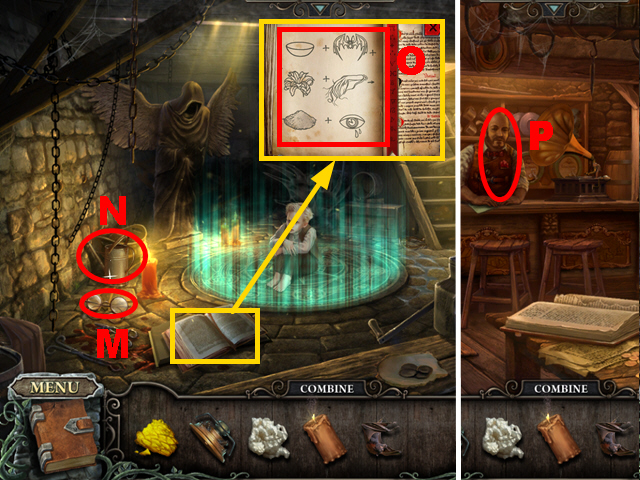
- Take the BARMAN’S SPECTACLES (M) and the WATERING POT (N).
- Zoom into the book; read the notes (O).
- Go upstairs and walk down three times.
- Give the BARMAN’S SPECTACLES to the barman (P); you will receive the GINSENG ROOT.
- Play the HOS.
- Move aside the curtain and take the chalice (Q).
- Remove the barrel lid and take the purse (R).
- You will receive the RETORT.
- Turn right and go towards the cottage.
- Pour the WATERING CAN over the lily (S) and take the LILY FLOWER.
- Move forward and enter the basement.
- Put the GINSENG ROOT into the device (T) and press the handle (U) three times.
- Take the POWDERED GINSENG ROOT (V).
- Go upstairs.
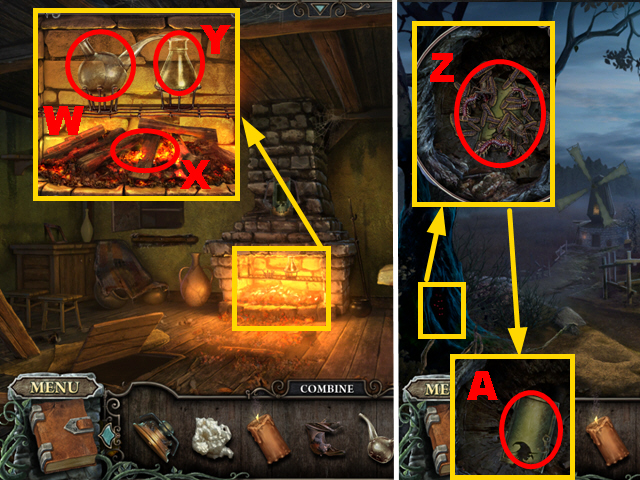
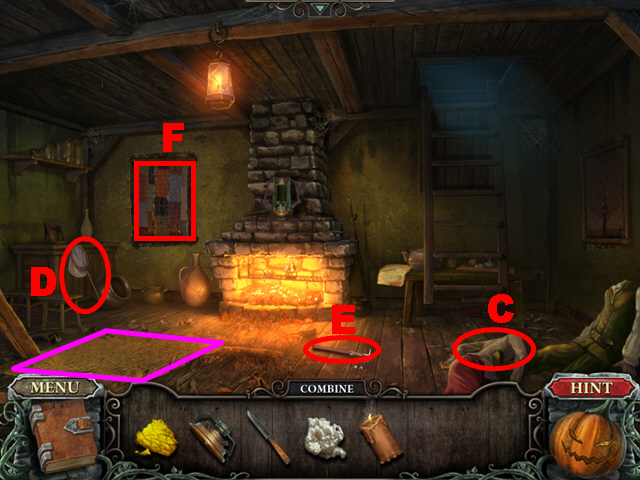
- Zoom into the fireplace; put down the RETORT (W).
- Place the SULFUR and the NITER into the retort.
- Hold the LIT CANDLE next to the firewood (X).
- Take the SULFURIC ACID (Y).
- Walk down twice.
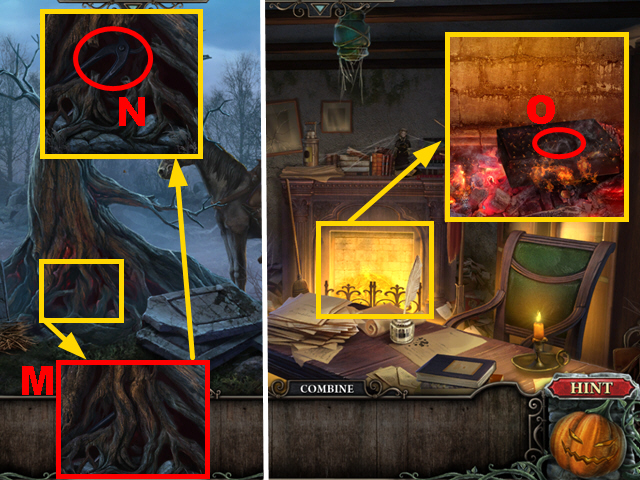
- Zoom into the tree; pour the SULFURIC ACID over the insects (Z) and take the LAMP PART (A).
- Go towards the cottage and move forward.
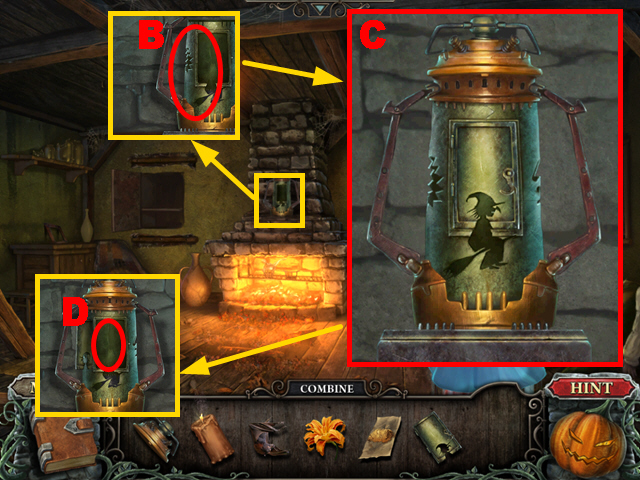
- Zoom into the lamp; put down the 2 LAMP PARTS (B).
- Zoom into the lamp again to play the mini-game.
- To solve this puzzle (C), pick up the lamp parts and arrange them so that the lamp is reassembled correctly.
- Zoom into the lamp again; open it and put the LIT CANDLE inside of it (D).
- Play the HOS.

- Remove the hat and take the butterfly (E).
- Remove the leaves and take the compass (F).
- You will receive the RITUAL BOWL.
- Go down into the basement.
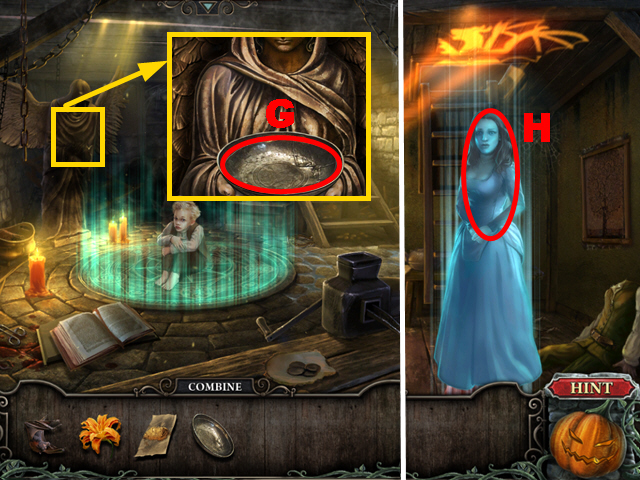
- Zoom into the statue; put the RITUAL BOWL into the statue’s hands (G).
- Put the BAT, the LILY FLOWER, and the POWDERED GINSENG ROOT into the ritual bowl.
- You will receive the BOY’S TOY.
- Go upstairs.
- Give the BOY’S TOY to the ghost (H).
- You will receive the CHEST KEY.
- Go down into the basement.
- Zoom into the chest; put the CHEST KEY into the lock (I) and turn the key once.
- Take the PASS FRAGMENT (J).
- Go upstairs.
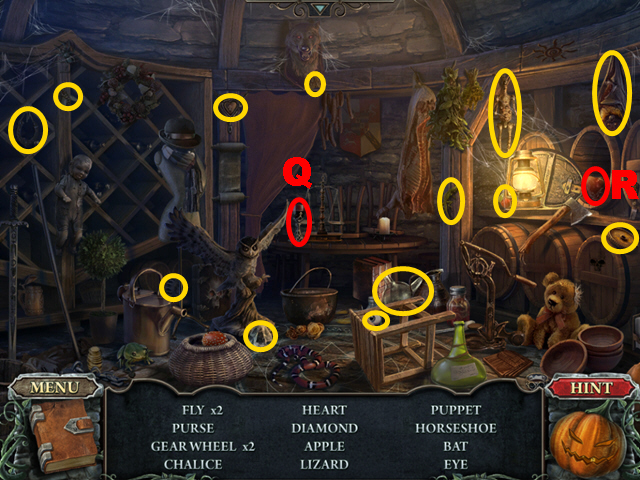
- Play the HOS.
- Find the 15 items marked in yellow (K).
- You will receive the PASS FRAGMENT.
- Combine the 2 PASS FRAGMENTS to create the PASS.
- Walk down four times and move forward.
- Give the PASS to the guard (L).
- Enter the barn.
Chapter 3
- Remove the poster (M) and take the KEY (N).
- Take the FISHING ROD (O) and the PLANK (P).
- Zoom into the chest; put the KEY into the lock (Q) and turn it once.
- Play the HOS.
- Find the 15 items marked in yellow (R).
- You will receive the HANDSAW HANDLE.
- Walk down.
- Take the PLANK (S) and the HANDSAW BLADE (T).
- Combine the HANDSAW BLADE and the HANDSAW HANDLE to create the HANDSAW.
- Move forward.
- Zoom into the chain; use the HANDSAW to cut the chain (U) twice.
- Move forward.
- Take the TORCH (V), the PLANK (W), and the BENT LEVER (X).
- Walk down.
- Dip the TORCH into the barrel (Y) to acquire the TORCH DIPPED IN PITCH.
- Move forward.
- Hold the TORCH DIPPED IN PITCH next to the fire (Z) to acquire the BURNING TORCH.
- Walk down twice and turn right.
- Take the LEVER (A).
- Zoom into the well; connect the BENT LEVER to the fountain (B), turn it twice, and take the MEAT (C).
- Move forward, turn left, and move forward.
- Put the MEAT into the dog’s bowl (D).
- Put the 3 PLANKS into the ladder (E).
- Remove the blanket, take the SIEVE (F), and talk to the boy (G).
- Go up the ladder.
- Take the GLUE (H) and the page (I).
- Play the HOS.
- Collect the 13 items marked in yellow (J).
- You will receive the STRANGE ITEM.
- Walk down twice.
- Play the HOS.
- Flip the mirror and take the stamp (K).
- Open the skull’s mouth and take the coin (L).
- You will receive the HOOK.
- Zoom into the lantern; spread the GLUE over the paper marked in blue and take the MOTH (M).
- Move forward twice.
- Use the BURNING TORCH to remove the spider and the cobweb (N).
- Combine the FISHING ROD and the MOTH to create the FISHING ROD WITH BAIT.
- Walk down three times.
- Put down the FISHING ROD WITH BAIT (O) and play the mini-game.
- Catch pairs of identical fish (P) to complete this mini-game.
- You will receive the FRESH FISH.
- Give the FRESH FISH to the seagull (Q).
- Zoom into the nest; take the STRANGE ITEM (R).
- Turn left, move forward, and go up the ladder.
- Zoom into the device; connect the LEVER to the device (S), turn the lever twice, and take the KNIFE (T).
- Walk down twice.
- Cut open the sack (U) with the KNIFE.
- Zoom into the grain; use the 3 times SIEVE to sift the grain (V) and take the BRUSH (W).
- Move forward and go up the ladder.
- Zoom into the telescope; clean the glass with the BRUSH (X).
- Rotate the circle pieces to create a coherent picture (Y).
- Make note of the code (Z).
- Walk down.
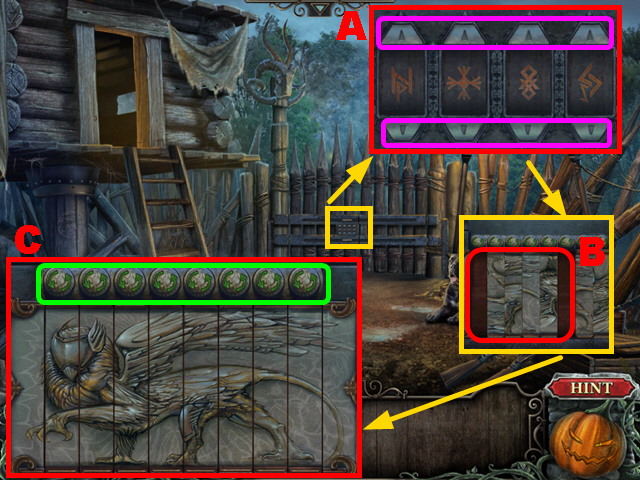
- Zoom into the wooden gate; enter the correct code (A) by pressing the buttons marked in purple.
- Put down the 2 STRANGE ITEMS (B).
- Zoom into the wooden gate; swap and turn around the puzzle pieces to recreate the correct picture (C).
- Individual pieces can be turned around by pressing the buttons marked in green.
- Move forward.

- Take the ROPE (D), the PHIAL OF WATER (E), and the SWAMP FLOWER (F).
- Combine the ROPE and the HOOK to create the GRAPPLING HOOK.
- Walk down and go up the ladder.
- Put the PHIAL OF WATER on the altar (G) and take the HOLY WATER.
- Walk down and move forward.
- Pour the HOLY WATER into the swamp (H).
- Pull down the bridge with the GRAPPLING HOOK (I).
- Turn right.
- Move the corpse (J) to talk to the ghost.
- Take the BELLOWS (K).
- Open the hatch (L) to talk to the woman.
- Turn left.
- Take the SNAKE CATCHER (M) and the SPRAYER (O).
- Zoom into the fireplace; pull the knob and take the DIAMOND (N).
- Walk down twice.
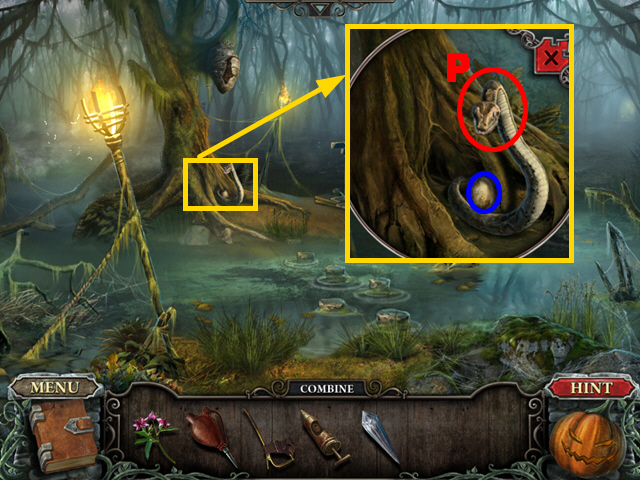
- Zoom into the snake; use the SNAKE CATCHER to remove the snake (P). Take the SNAKE EGG marked in blue.
- Walk down and go up the ladder.
- Play the HOS.
- Push the bear head marked in green and take the acorn (Q).
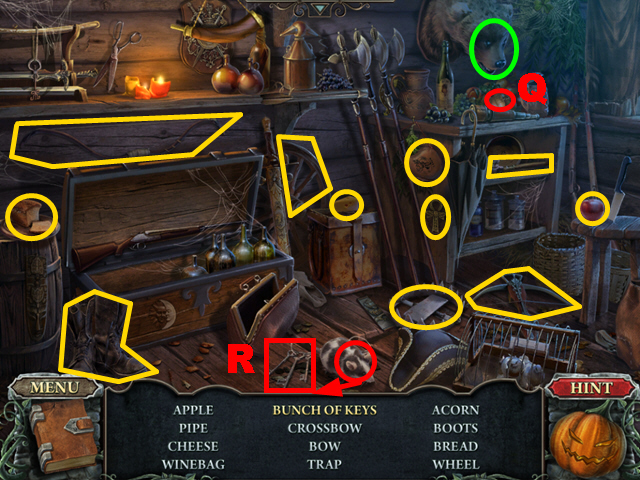
- Chase away the mouse and take the bunch of keys (R).
- You will receive the HUNTER’S AMULET.
- Walk down and move forward twice.
- Open the hatch and give the HUNTER’S AMULET to the woman (S).
- Turn right.
- Talk to the woman (T) and give the SNAKE EGG to her. You will receive the RECIPE PART.
- Take the EMPTY BUCKET (U).
- Zoom into the cabinet; cut the glass marked in purple with the DIAMOND and take the OPENER (V).
- Take the IRON (W).
- Walk down and turn left.
- Use the OPENER to open the latch (X).
- Zoom into the well; put the EMPTY BUCKET into the water (Y) to acquire the BUCKET OF WATER.
- Walk down and turn right.
- Remove the curtain (Z).
- Play the HOS.
- Find the 15 items marked in yellow (A).
- You will receive the POWDER.
- Combine the SPRAYER and the POWDER to create the BEE SPRAY.
- Walk down twice.
- Zoom into the beehive; use the BEE SPRAY to chase away the bees (B) and take the HONEYCOMB (C).
- Turn right and then turn left.
- Zoom into the fireplace; put down the BELLOWS (D) and use it three times.
- Walk down and turn right.
- Zoom into the table; put the SWAMP FLOWER into the jar (E) and put the HONEYCOMB into the jar (F).
- Put down the RECIPE PART (G).
- Walk down.
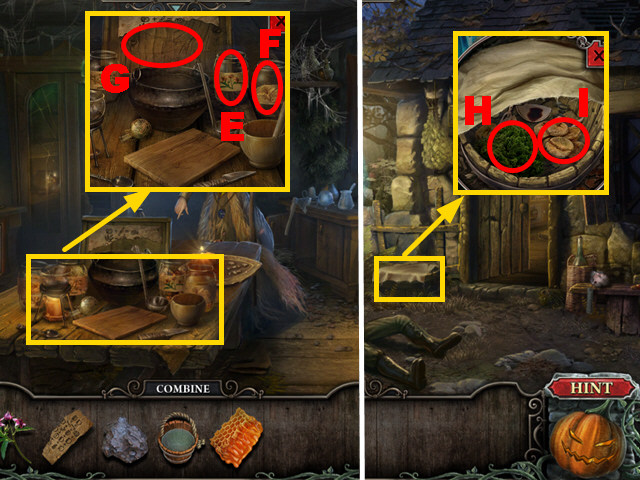
- Zoom into the basket and remove the blanket; take the MOSS (H) and the FIGS (I).
- Turn right.

- Zoom into the table; put the MOSS into the jar (J) and put the FIGS into the jar (K).
- Zoom into the table once more to play a mini-game.
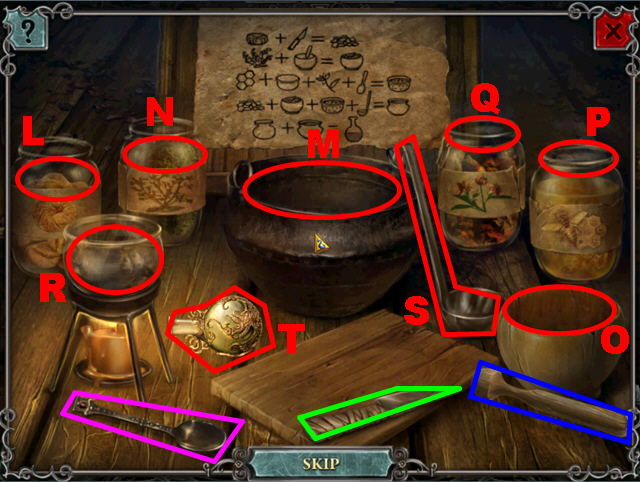
- Put the figs (L) on the board and cut them twice with the knife (green).
- Place the figs into the pot (M).
- Place the moss (N) into the mortar (O) and use the pestle (blue) to crush the moss.
- Place the moss into the pot.
- Place the honey (P) and the swamp flower (Q) into the small jar (R).
- Use the spoon marked in purple to mix the ingredients; place the mixture into the pot.
- Use the ladle (S) in the pot and dip the flask (T) into the pot.
- You will acquire the POTION.
- Walk down.
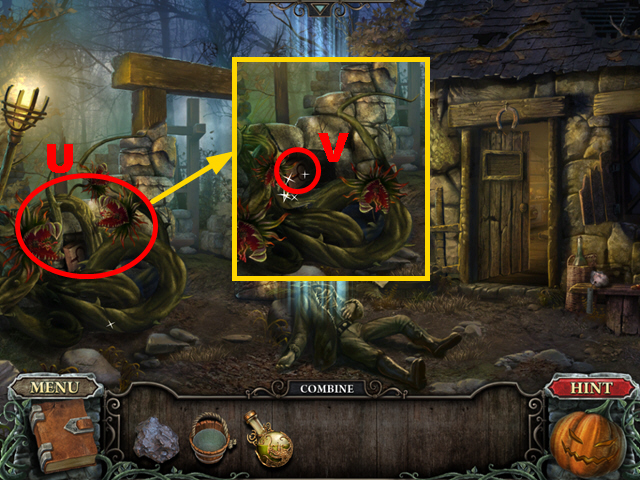
- Pour the POTION over the plant (U) and take the MOLD PART (V).
- Turn right.
- Play the HOS.
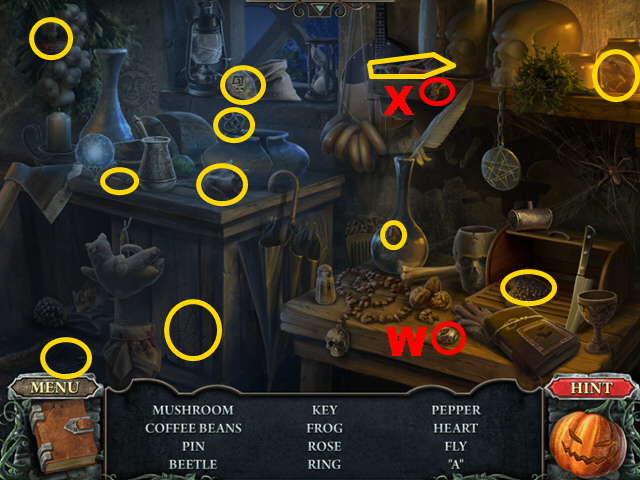
- Remove the glove and take the ring (W).
- Move aside the feather and take the fly (X).
- You will receive the STRANGE STONE.
- Walk down and turn left.
- Put the STRANGE STONE into the wall (Y).
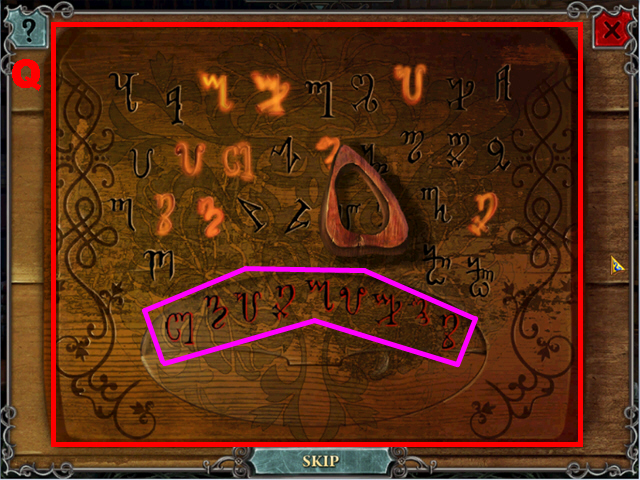
- Zoom into the wall to play a mini-game.
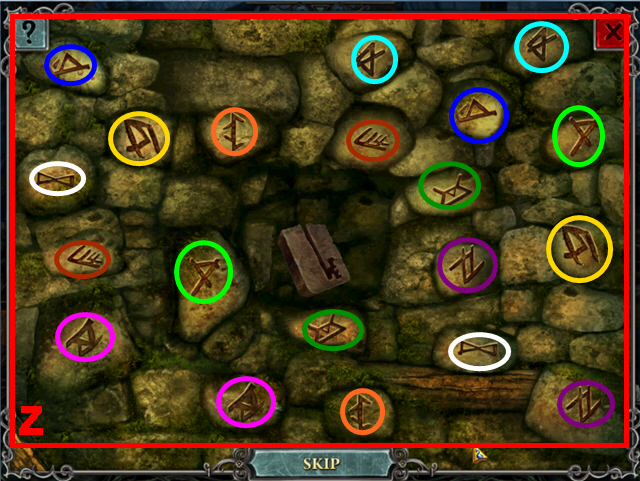
- To solve this puzzle (Z), you have find pairs of identical runes.
- Pairs of runes have been marked with matching colors. This solution is random.
- You will receive the MOLD PART.
- Combine the 2 MOLD PARTS to create the MOLD.
- Zoom into the fireplace; put down the MOLD (A).
- Put the IRON into the mold.
- Pour the BUCKET OF WATER over the mold. Take the RAW KEY (B).
- Hold the RAW KEY next to the grindstone (C) to acquire the KEY.
- Walk down and turn right.
- Zoom into the cabinet; put the KEY into the lock (D) and turn the key twice.
- Take the POCKET WATCH (E).
- Walk down.
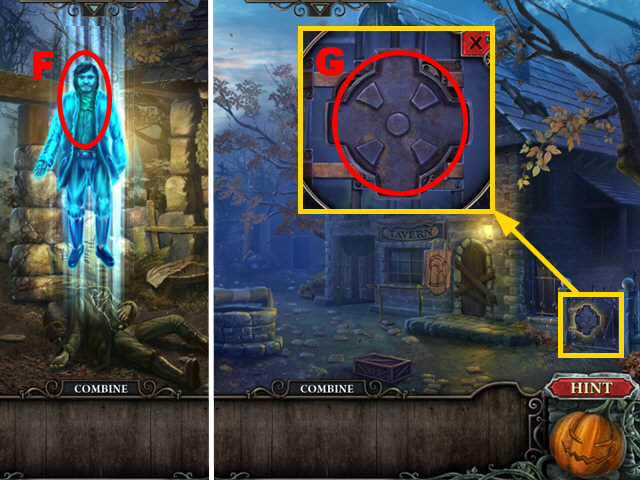
- Give the POCKET WATCH to the ghost (F).
- You will receive the STRANGE KEY.
- Walk down four times and turn right.
- Zoom into the small gate; put the STRANGE KEY into the lock (G).
- Turn right.
Chapter 4
- Take the MATCHES (H) and the MAGNET (I).
- Talk to the woman (J).
- Turn left.
- Take the CORKSCREW (K) and the ROPE (L).
- Combine the MAGNET and the ROPE to create the MAGNET ON A ROPE.
- Move forward.
- Walk down and turn right twice.
- Take the CLOCK HAND (M) and the SKULL (N).
- Zoom into the barrel; use the CORKSCREW to remove the cork (O).
- Hold down the MAGNET ON A ROPE to acquire the RING (P).
- Walk down.
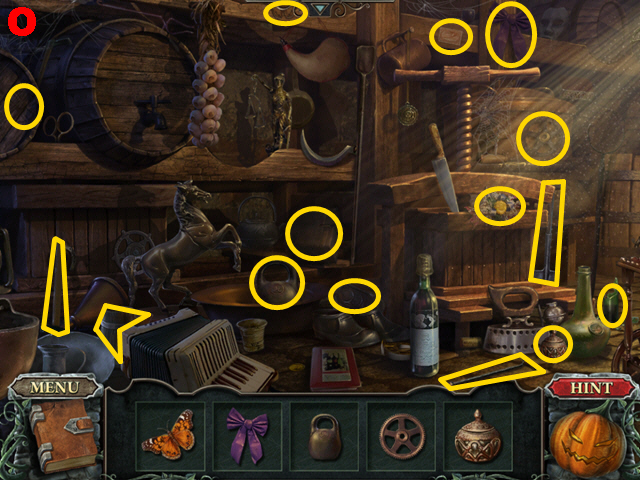
- Play the HOS.
- Find the 15 items marked in yellow (Q).
- You will receive the 1/2 COAT OF ARMS FRAGMENT.
- Give the RING to the woman (R).
- You will receive the 2/2 COAT OF ARMS FRAGMENT.
- Turn right.
- Zoom into the gate; put down the 2 COAT OF ARMS FRAGMENTS (S).
- Zoom into the gate again to play the mini-game.
- To solve this puzzle (T), put each puzzle piece back into its correct place.
- Move forward.
- Take the BROOM (U).
- Walk down twice and turn left.
- Zoom into the leaves and use the BROOM on them four times (V); take the STATUE PART (W).
- Turn right twice, move forward, and turn left.
- Take the RAZOR BLADE (X) and the STICK (Y).
- Walk down.
- Cut open the sack (Z) with the RAZOR BLADE.
- Open the trapdoor (A).
- Play the HOS.
- Move aside the iron and take the cork (B).
- Move aside the book and take the coin (C).
- You will receive the VALVE.
- Zoom into the pipe; put the VALVE into the slot (D) and turn it twice. Take the ANGEL (E).
- Walk down.
- Zoom into the trunk; use the STICK to pull out the DOOR KNOCKER (F).
- Move forward. Talk to the boy.
- Zoom into the door and place the DOOR KNOCKER on it (G) and then turn it.
- Move forward.
- Zoom into the left candlestick; use the MATCHES to light all the 3 candles (H).
- Zoom into the right candlestick; use the MATCHES to light all the 3 candles (I).
- Take the note (J) and the SKULL (K).
- Move forward.
- Take the SKULL (L).
- Walk down twice and turn left.
- Zoom into the door; put down the 3 SKULLS (M).
- To solve this puzzle (N), rotate the skulls in the following sequence: Q, O, Px4, Q, and Rx6.
- Play the HOS.
- Move aside the bell and take the chess piece (S).
- Move aside the feather and take the ring (T).
- You will receive the SHEET MUSIC.
- Zoom into the tombstone; place the ANGEL into the niche (U) and take the KEY (V).
- Walk down and enter the mansion.
- Zoom into the door; put the KEY into the lock (W) and turn the key twice.
- Walk down three times.
- Play the HOS.
- Remove the book and take the coffee grinder (X).
- Move aside the branch and take the apple (Y).
- You will receive the NAIL PULLER.
- Move forward three times and turn right.
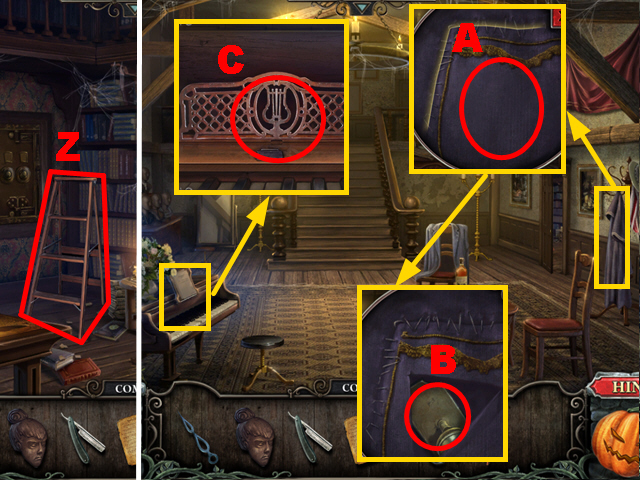
- Take the LADDER (Z).
- Turn left.
- Zoom into the coat; cut open the pocket (A) with the RAZOR BLADE and take the DRAWER KNOB (B).
- Zoom into the piano; put down the SHEET MUSIC (C).
- Zoom into the piano again to play the mini-game.
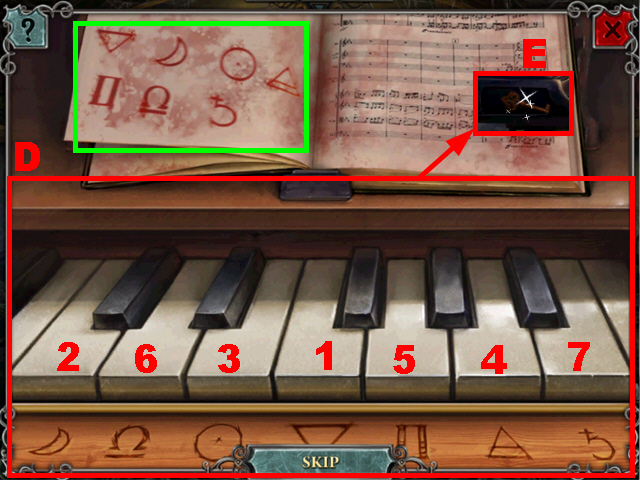
- To solve this puzzle (D), press the organ keys in the right sequence (1-7). The symbols marked in green indicate the correct sequence.
- Take the KEY (E).
- Move forward.
- Zoom into the left door; put the KEY into the lock (F) and turn the key once. Enter the room.
- Talk to the man.
- Zoom into the drawers; put the DRAWER KNOB on the broken drawer (G) and open that drawer.
- Take the STATUE PART (H).
- Open the lower drawer and take the CANVAS (I).
- Walk down.
- Put down the LADDER (K).
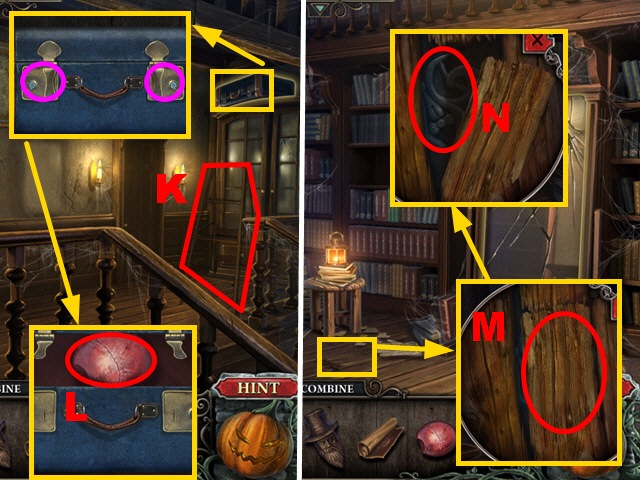
- Zoom into the suitcase; open the two latches marked in purple and take the RED STONE (L).
- Walk down and turn right.
- Zoom into the floor; remove the board with the NAIL PULLER (M) and take the STRANGE PATTERN (N).
- Walk down twice.
- Play the HOS.
- Collect the 15 items marked in yellow (O).
- You will receive the SHOVEL.
- Turn left.
- Play the HOS.
- Find the 16 items marked in yellow (P).
- You will receive the CLOCK HAND.
- Use the SHOVEL to remove the soil in the grave (green).
- Zoom into the coffin; use the NAIL PULLER to remove the cover (Q); take the LENS (R).
- Walk down and move forward twice.
- Zoom into the empty frame; put the CANVAS into the frame (S).
- Turn left.
- Put the LENS into the optical device (T).
- Zoom into the casket; put the STRANGE PATTERN into the niche (U) and take the BOOK (V).
- Walk down twice and turn right.
- Zoom into the shelf; put down the BOOK (W).
- Zoom into the shelf again to play the mini-game.
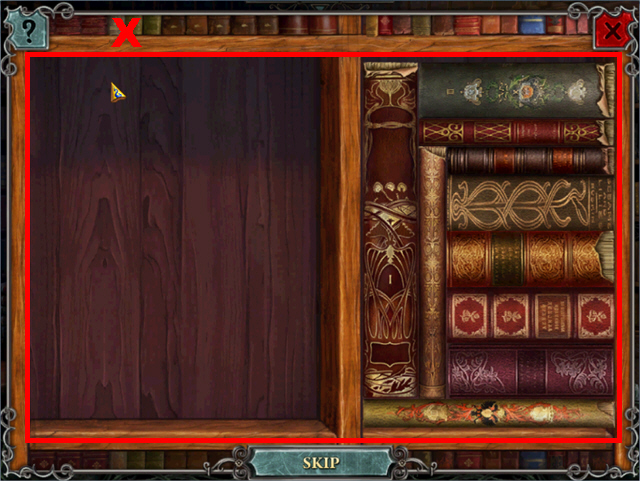
- To solve this puzzle (X), move each book from the left side to the right side.
- Any book can be rotated by right-clicking while holding it.
- Move forward.
- Take the PAINTING (Y) and the MIRROR SHARD (Z).
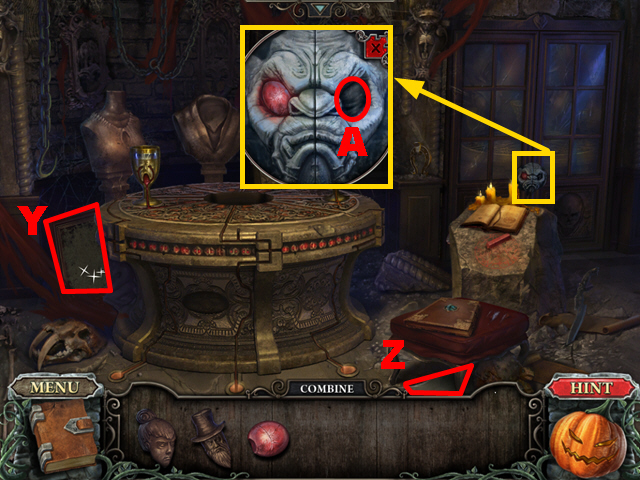
- Zoom into the head; put the RED STONE into the niche (A).
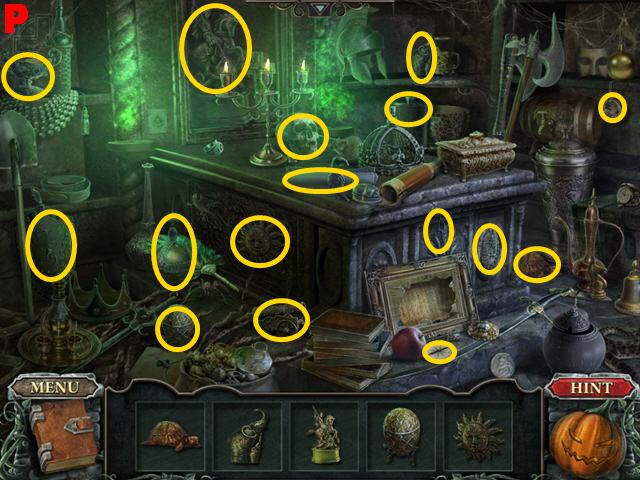
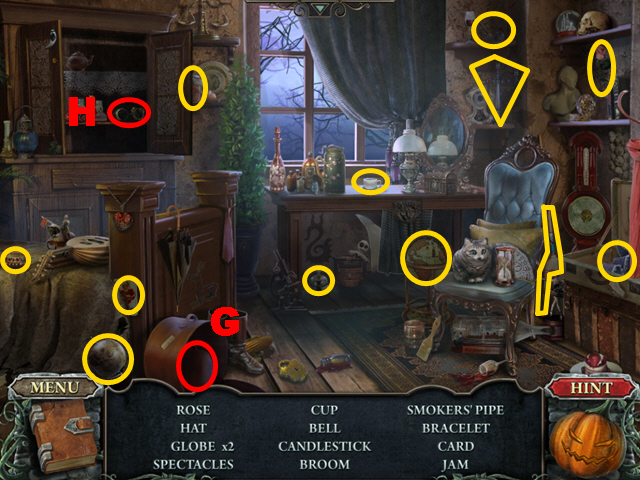
- Play the HOS.
- Remove the blanket and take the apple (B).
- Remove the branches and take the mortar (C).
- You will receive the CODE.
- Walk down.
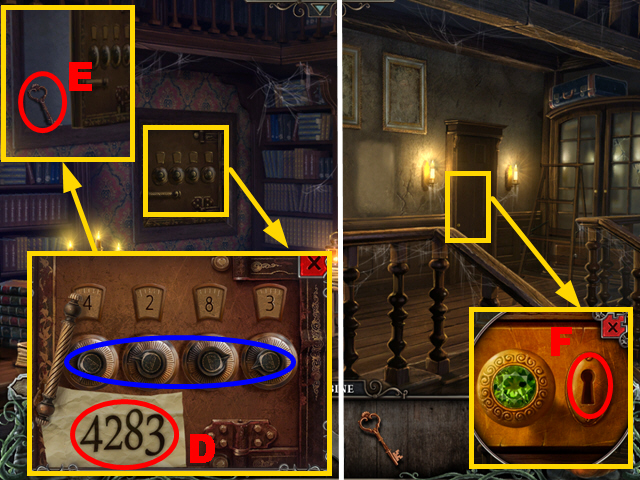
- Zoom into the safe; put down the CODE (D) and enter the code ’4283′ by turning the knobs marked in blue.
- Take the KEY (E).
- Turn left and move forward.
- Zoom into the right door; put the KEY into the lock (F) and turn the key once.
- Play the HOS.
- Open the box and take the hat (G).
- Open the cupboard and take the spectacles (H).
- You will receive the STRAP.
- Enter the left room.
- Use the STRAP on the curtain (I).
- Take the STATUE PART (J).
- Walk down twice and turn right twice.
- Put down the 3 STATUE PARTS (K) and take the ROUND KEY PART (L).
- Walk down, turn left, and move forward.
- Play the HOS.
- Find the 16 items marked in yellow (M).
- You will receive the MIRROR SHARD.
- Walk down and turn right.
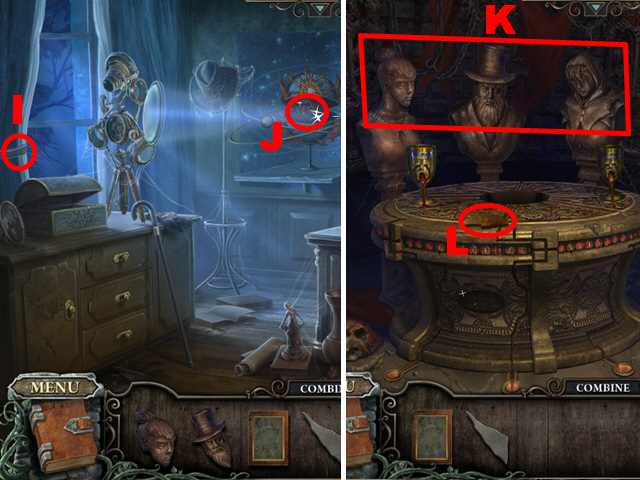
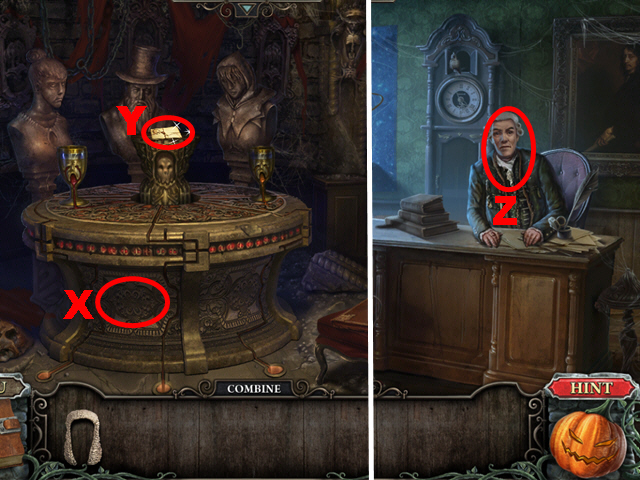
- Put the 2 MIRROR SHARDS into the mirror (N).
- Make note of the time (O).
- Zoom into the board; put the ROUND KEY PART into the niche (P).
- Zoom into the board again to play the mini-game.
- To solve this puzzle (Q), activate the glowing symbols according to the sequence marked in purple.
- You will receive the ROUND KEY.
- Turn left, move forward, and enter the left room.
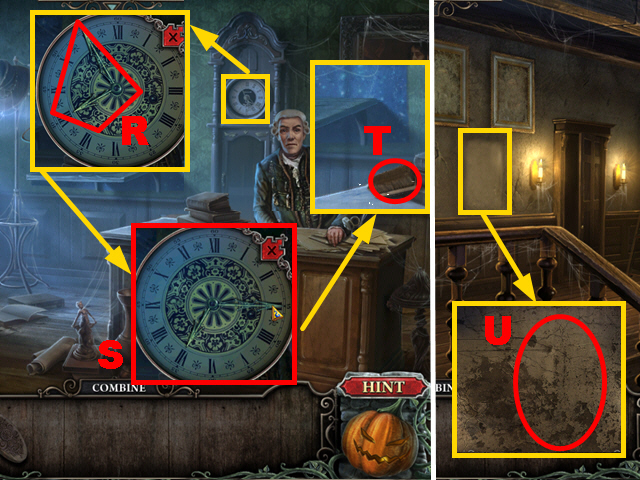
- Zoom into the clock; put down the 2 CLOCK HANDS (R) and turn them so that they display the time ’7:15′ (S).
- Take the BRUSH (T).
- Walk down.
- Zoom into the empty spot; put down the PAINTING (U).
- Zoom into all the five paintings and clean them with the BRUSH (V).
- Walk down and turn right twice.
- Play the HOS.
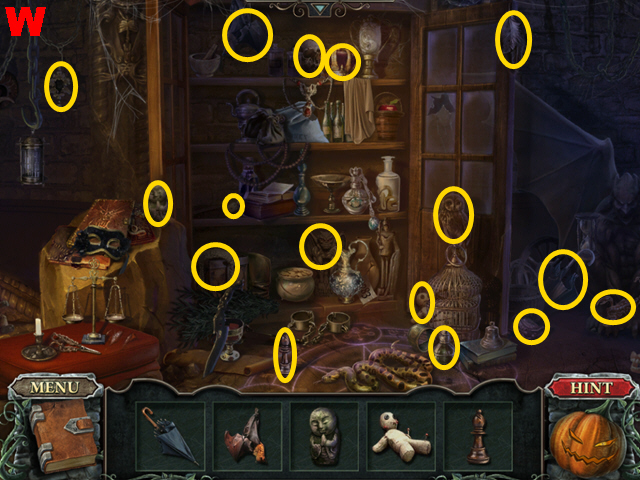
- Find the 16 items marked in yellow (W).
- You will receive the WIG.
- Put the ROUND KEY into the niche (X).
- Take the LETTERS (Y).
- Walk down, turn left, move forward, and enter the left room.
- Give the LETTERS to the man (Z).
- You will receive the PORTRAIT FRAGMENT.
- Walk down twice.
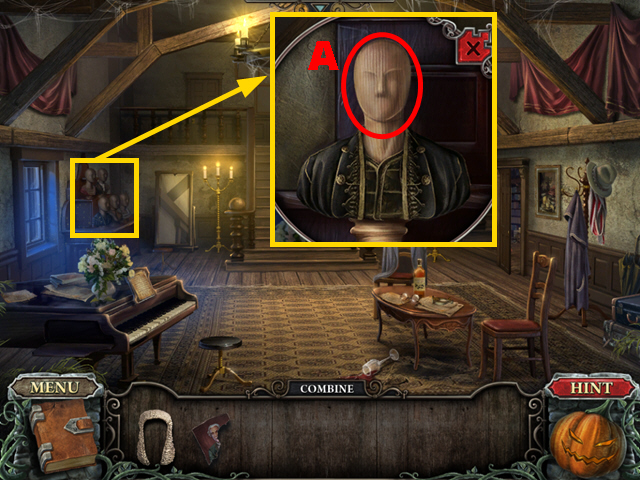
- Zoom into the mannequin; put down the WIG (A).
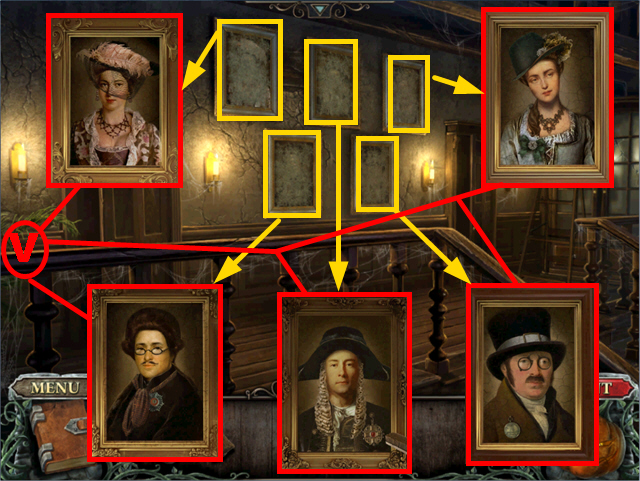
- Zoom into the mannequin again to play the mini-game.
- To solve this puzzle (B), dress the mannequins according to the portraits from the wall.
- Clothes and accessories can be picked up from the section marked in green; correctly placed items will flash and lock in place.
- You will receive the PORTRAIT FRAGMENT.
- Combine the 2 PORTRAIT FRAGMENTS to create the PORTRAIT.
- Walk down and turn left.
- Give the PORTRAIT to the ghost (C).
- You will receive the STAR-SHAPED KEY.
- Zoom into the gate; put the STAR-SHAPED KEY into the niche (D).
- Move forward.
Chapter 5

- Take the 1/5 PEBBLE (E), the ROPE (F), and the SCISSORS (G).
- Move the body (H) to talk to the ghost.
- Walk down.
- Take the 2/5 PEBBLE (I) and the PELLETS (J).
- Walk down.
- Take the CAGE (K) and the 3/5 PEBBLE (L).
- Move forward twice and turn right.
- Take the 4/5 PEBBLE (M), the HAIRPIN (N), and the 5/5 PEBBLE (O).
- Walk down.
- Zoom into the door; put the HAIRPIN into the lock (P) and press the handle to open the door.
- Turn left.
- Take the CHAIN (Q), the note (R), the WOODEN CASKET (S), the RAMROD (T), and the TELESCOPIC MECHANISM (U).
- Walk down.
- Connect the CHAIN to the left hook (V) and the CAGE to the right hook (W).
- Put the 5 PEBBLES into the cage.
- Turn right.
- Zoom into the ladder; connect the ROPE to the bell (X) and pull the rope.
- Take the PART (Y).
- Combine the TELESCOPIC MECHANISM and the PART to create the TELESCOPIC MECHANISM.
- Walk down and turn left.
- Zoom into the fireplace; put down the WOODEN CASKET (Z).
- Walk down and turn right.
- Zoom into the grid; put down the TELESCOPIC MECHANISM and turn the handle (A) to press the button (B).
- Play the HOS.
- Remove the board and take the plane (C).
- Turn over the vase and take the mouse (D).
- You will receive the POWDER HORN.
- Walk down.
- Zoom into the rifle; pour the POWDER HORN into the rifle, place the PELLETS into the rifle, and put the RAMROD into the rifle (E).
- Take the RIFLE (F).
- Shoot the RIFLE at the barrel (G).
- Move forward twice.
- Take the CHUNK OF WOOD (H) and the STAINED GLASS FRAGMENT (I).
- Walk down.
- Take the JACK (J), the AXE HANDLE (K), and the BRUSHWOOD (L).
- Use the SCISSORS to cut the blanket marked in green.
- Play the HOS.
- Move aside the straw hat and take the hedgehog (M).
- Open the container and take the butterfly (N).
- You will receive the METAL PAN.
- Walk down.
- Zoom into the trap; put down the JACK (O) and take the PIPE (P).
- Use the PIPE to repair the gutter (Q).
- Turn right.
- Zoom into the window; put the STAINED GLASS FRAGMENT into the niche (R).
- Zoom into the window again and play the mini-game.
- To solve this puzzle (S), put all the pieces into the correct slots.
- You will receive the SOAKED PAPER.
- Walk down and turn left.
- Hold the SOAKED PAPER above the candle (T) to acquire the first half of a code ’56xx’.
- Walk down and move forward twice.
- Put down the JACK (U) and take the GLOVES (V).
- Zoom into the bush; use the GLOVES to remove the thorny branches and take the WEDGE (W).
- Put down the BRUSHWOOD (X).
- Walk down twice and turn right.
- Play the HOS.
- Find the 16 items marked in yellow (Y).
- You will receive the HOOK.
- Walk down.
- Zoom into the drain; use the HOOK to pull out the SCRAPER (Z).
- Turn left.
- Use the SCRAPER to loosen the wax (A); take the SEALING WAX.
- Zoom into the fireplace and put down the METAL PAN (B). Put the SEALING WAX into the metal pan.
- Take the MOLTEN WAX.
- Walk down and move forward.
- Zoom into the stone; use the SCRAPER to remove the moss (C) and place the MOLTEN WAX into the mold (D).
- Take the CAST out of the mold.
- Walk down and turn left.
- Zoom into the cabinet; put the CAST into the niche (E).
- Play the HOS.
- Remove the lute and take the star (F).
- Remove the wreath and take the butterfly (G).
- You will receive the PAINTS.
- Walk down and move forward.
- Put down the PAINTS (H) and zoom into the stone plate to play the mini-game.
- To solve this puzzle (I), dip the brush into the various paints and apply those colors to the right spots on the painting.
- Use the pot (J) to combine colors and use the other pot (K) to remove a color from your brush.
- Combine red and yellow to create orange, combine red and blue to create purple, and combine blue and yellow to create green.
- Take the AXE HEAD (L).
- Combine the AXE HANDLE and the AXE HEAD to create the LOOSE AXE.
- Combine the LOOSE AXE and the WEDGE to create the AXE.
- Move forward.
- Zoom into the roots and use the AXE on them (M) three times; take the TONGS (N).
- Walk down twice and turn left.
- Zoom into the fireplace; use the TONGS to get the NUMBERED TUBE (O).
- Play the HOS.
- Find the 15 items marked in yellow (P).
- You will receive the CANDLE SNUFFER.
- Walk down and turn right.
- Zoom into the candles; use the CANDLE SNUFFER to put out the three candles (Q).
- Take the MATCHES (R).
- Walk down and turn left.
- Zoom into the lantern; use the MATCHES to light the lantern (S) and take the LANTERN (T).
- Walk down and move forward twice.
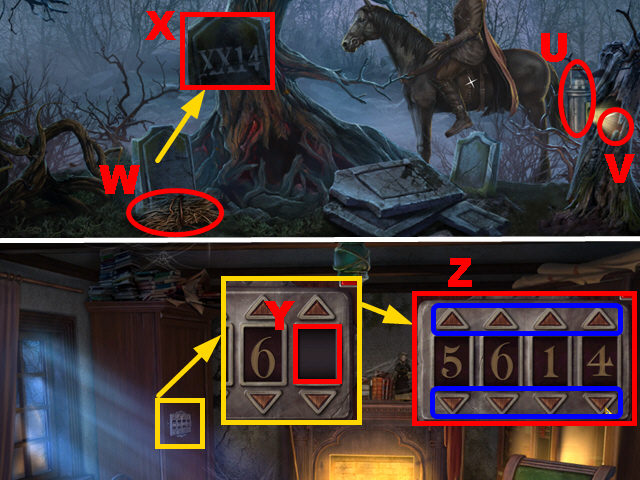
- Use the LANTERN to illuminate the tree hollow (U) and take the BLADE (V).
- Use the MATCHES to light the brushwood (W).
- Make note of the second half of the code ‘xx14′ (X).
- Walk down twice and turn left.
- Zoom into the cabinet; put down the NUMBERED TUBE (Y) and enter the code ’5614′ (Z) by pressing the buttons marked in blue.
- Play the mini-game.
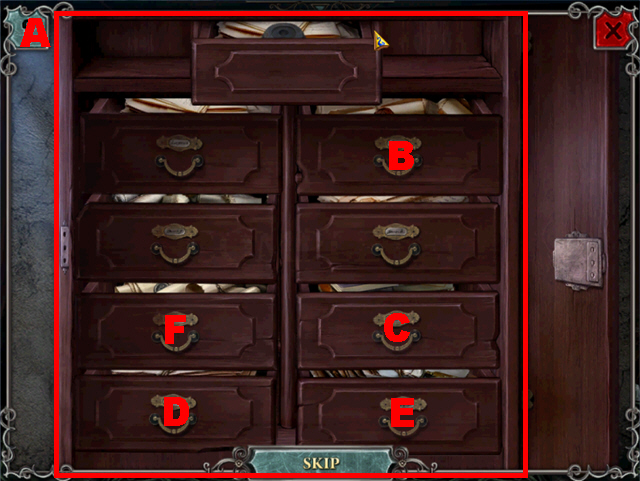
- Open all the drawers to complete this puzzle (A).
- Open the drawers in the following sequence: B, C, D, E, F, and B.
- You will acquire the STAMP HEAD.
- Walk down and move forward.
- Play the HOS.
- Find the 15 items marked in yellow (G).
- You will receive the BELT.
- Walk down and turn left.
- Zoom into the carpenter’s lathe; put down the CHUNK OF WOOD (H), the BELT (I), and the BLADE (J).
- Press the plate (K) and take the STAMP HANDLE (H).
- Combine the STAMP HEAD and the STAMP HANDLE to create the STAMP.
- Walk down.
- Give the STAMP to the ghost (L).
- You will receive the COMBUSTIBLE POWDER.
- Move forward.
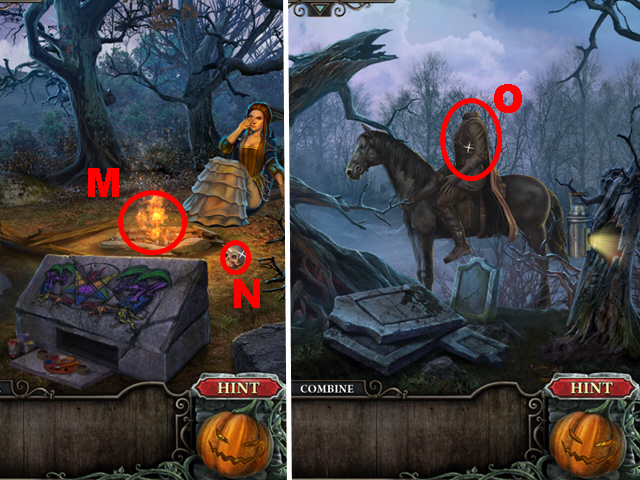
- Throw the COMBUSTIBLE POWDER into the fire (M).
- Take the HORSEMAN’S SKULL (N).
- Move forward.
- Give the HORSEMAN’S SKULL to the horseman (O).
- Congratulations, you have completed Cursed Fates: The Headless Horseman


 Haunted Halls: Nightmare Dwellers Walkthrough, Guide, & Tips
 Romance of Rome Walkthrough, Guide, & Tips
 Alice in Wonderland Walkthrough, Guide, & Tips
 Urban Legends: The Maze Walkthrough, Guide, & Tips
 Mystery Trackers: Raincliff Walkthrough, Guide, & Tips