Urban Legends: The Maze Walkthrough, Guide, & Tips
Urban Legends: The Maze Walkthrough

Welcome to the Urban Legends: The Maze Walkthrough!
During the finale of The Maze, the transmission is mysteriously stopped. Now it’s up to you to find the missing contestants!
Whether you use this document as a reference when things get difficult or as a road map to get you from beginning to end, we’re pretty sure you’ll find what you’re looking for here.
This document contains a complete Urban Legends: The Maze game walkthrough featuring annotated screenshots from actual gameplay!
We hope you find this information useful as you play your way through the game. Use the walkthrough menu below to quickly jump to whatever stage of the game you need help with.
Remember to visit the Big Fish Games Forums if you find you need more help. Have fun!
This walkthrough was created by prpldva, and is protected under US Copyright laws. Any unauthorized use, including re-publication in whole or in part, without permission, is strictly prohibited.
General Tips

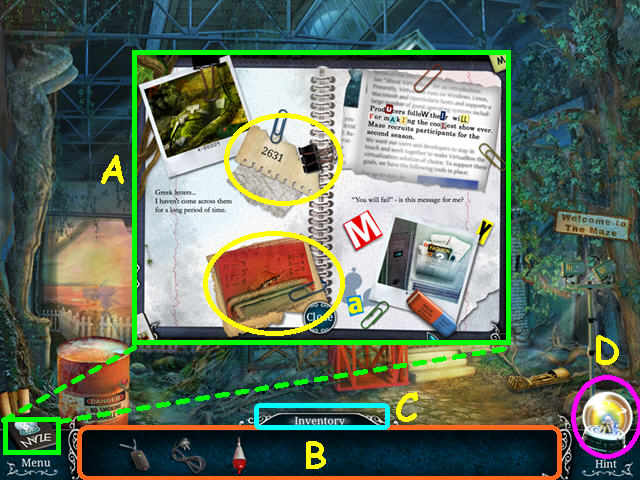
- Hidden Object Scenes and mini-games are often randomized – your solutions may vary.
- Hidden Object Scenes will be referred to as ‘HOS’ in this walkthrough.
- Inside the journal you will find notes and clues such as combinations (A).
- Your inventory is in the bottom panel – click on an item to select it for use (B).
- The inventory will auto-hide when not in use; move your mouse over the ‘Inventory’ sign to reveal the panel (C).
- Hints are unlimited, but you must wait for the snow globe to recharge (D).

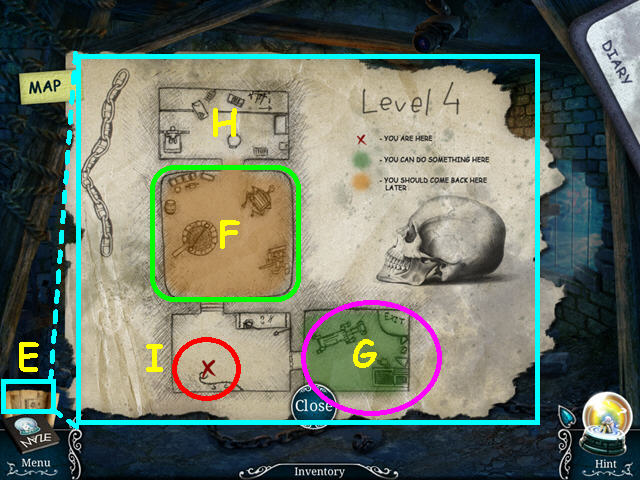
- Click on the map icon just above the journal for a helpful map (E).
- Rooms will appear on the map once you have visited there.
- Rooms highlighted in green indicate that there are things available to do now (F).
- Rooms highlighted in brown indicate that there will eventually be something to do there (G).
- White rooms are complete (H).
- The red ‘X’ indicates your current position (I).
- Click on a room to travel to that location.
Level 1: Reception

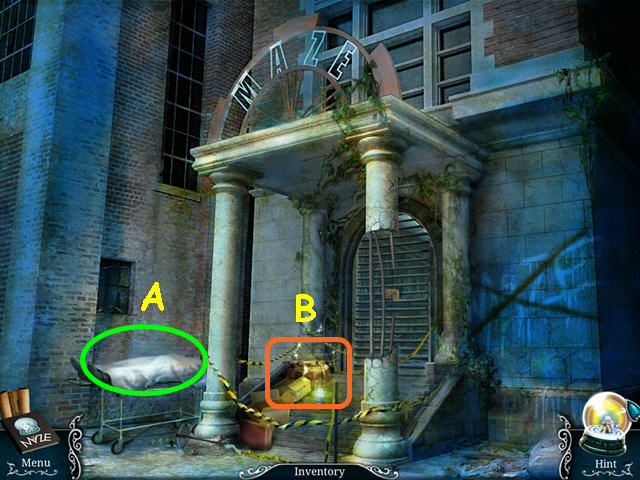
- You will have the option of some interactive help.
- Look at the body on the gurney (A).
- Select the bag on the steps for a HOS (B).

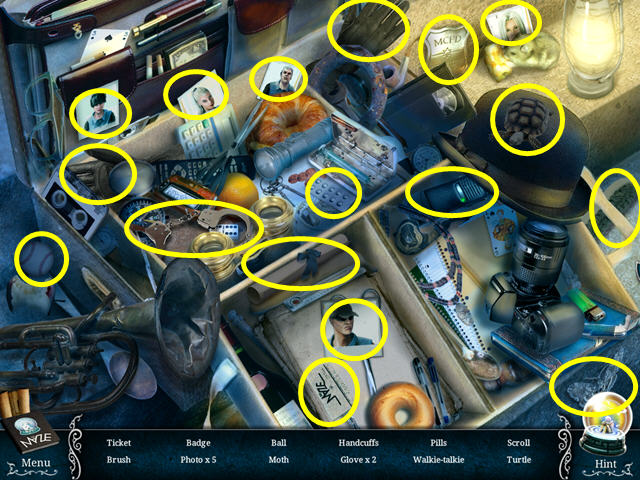
- Locate all the items on the list.
- You will earn the TICKET.

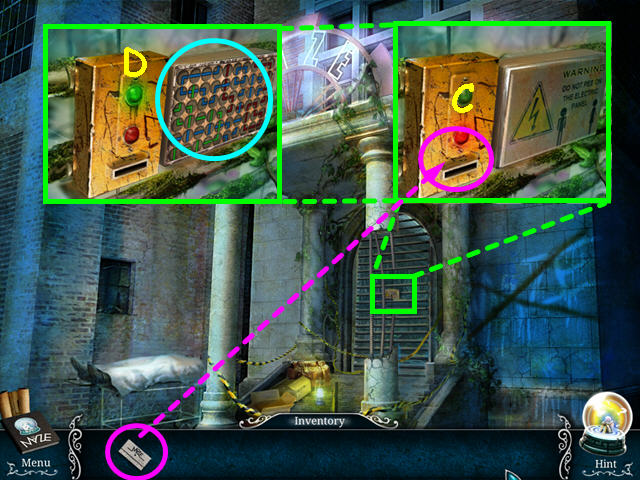
- Look at the door and use the TICKET in the slot on the electronic lock (C).
- Select the area to the right of the lock for a mini-game (D).

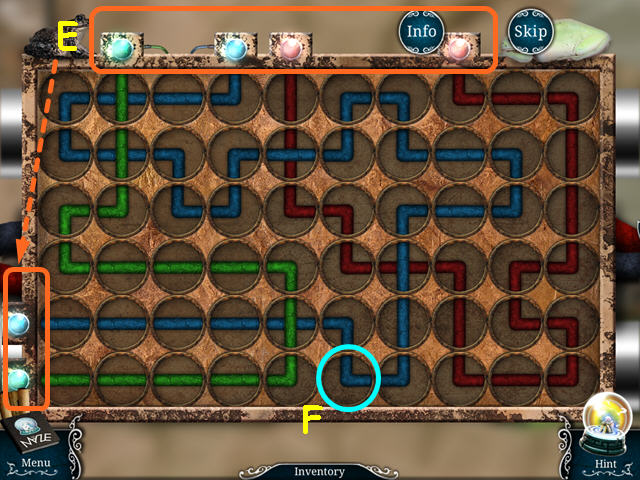
- Connect the colored wires until all the lights are on (E).
- Click on a circle to rotate a connection (F).
- Walk forward and enter the building.

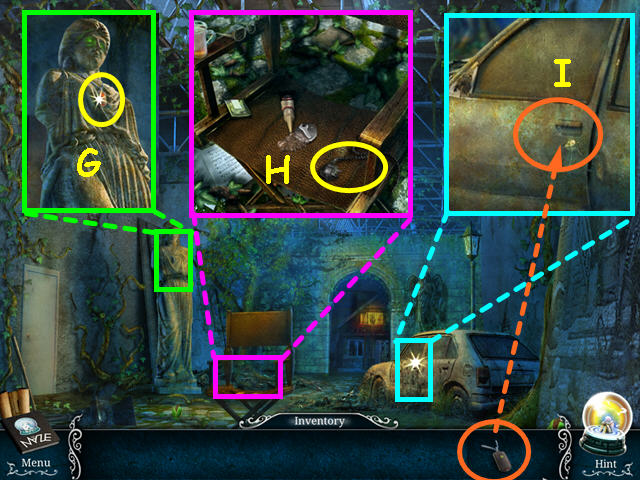
- Look at the statue and take the CAR REMOTE (G).
- Look at the chair and take the POWER CORD (H).
- Look at the car door and use the CAR REMOTE (I).
- Select the car for a HOS.

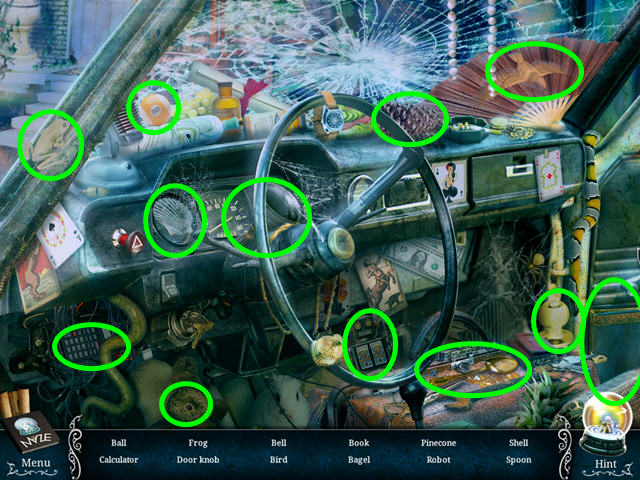
- Locate all the items on the list.
- You will earn the DOOR KNOB.

- Note the archway at the end of the room (J).
- Look at the door on the left and use the DOOR KNOB on the hole (K).
- Walk left to the corridor.

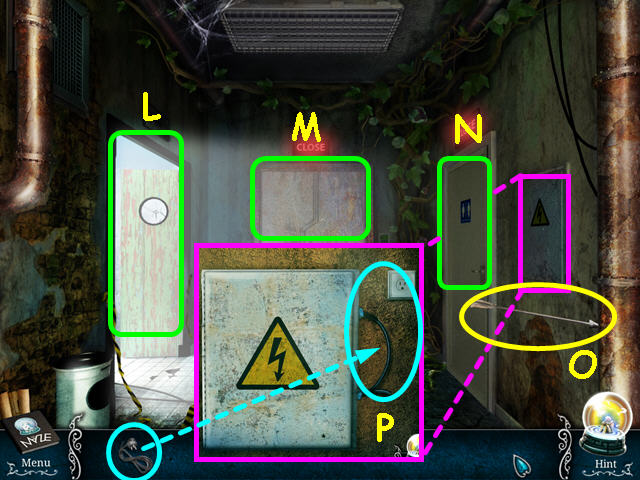
- Click anywhere on the screen for a cut scene.
- Note the hall to pavilion 2 (L).
- Note the door to reception (M).
- Note the door to the bathroom (N).
- Take the ARROW (O).
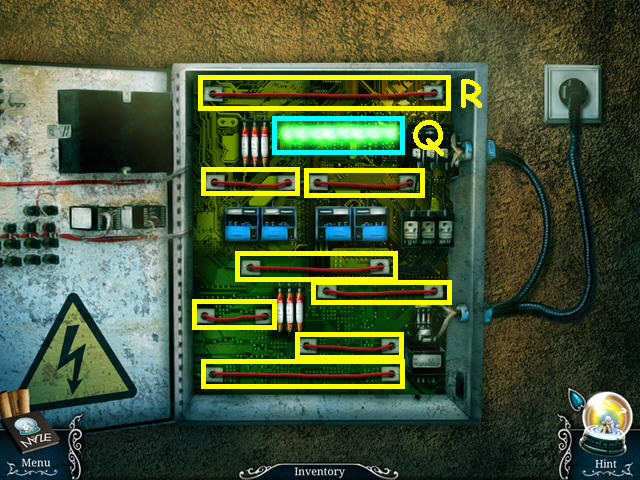
- Look at the electric panel and use the POWER CORD to trigger a mini-game (P).


- Move the wires to complete all the connections and illuminate the lights (Q).
- Click on a wire to take it and click it over another wire to change positions.
- There are 8 wires to move; it is best to start with the widest connection at the top (R).

- Walk left to pavilion 2.
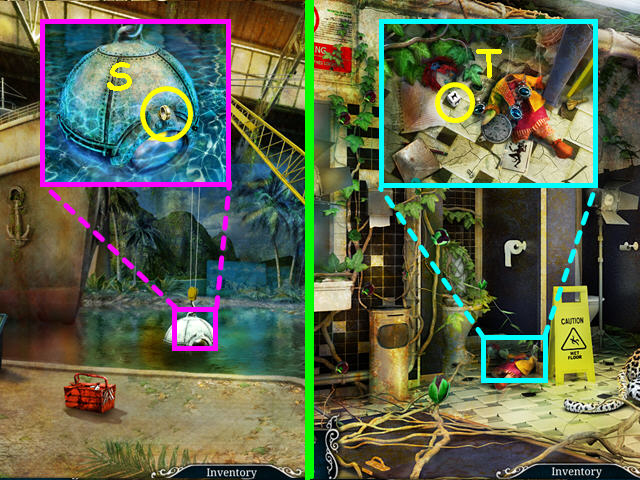
- Look at the bathyscaphe and take the RING (S).
- Walk down to the corridor, then enter the bathroom on the right.
- Look at the floor in the left stall and take the DIE (T).
- Exit the bathroom, then walk forward to reception.

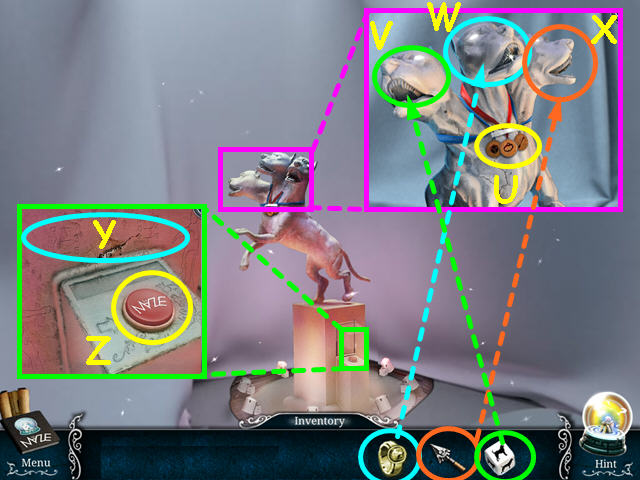
- Look at the 3-headed dog and read the collar tags (U).
- Place the DIE in the mouth of the left head (V).
- Place the RING in the mouth of the center head (W).
- Place the ARROW in the mouth of the right head (X).
- Look at the side of the pedestal and note the code; it will record in your diary automatically (Y).
- Press the red button (Z).

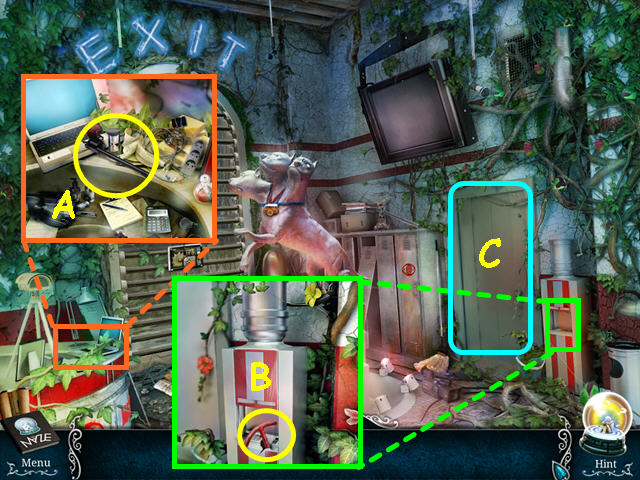
- Look at the desk and take the EMPTY GUN (A).
- Look at the water cooler and take the 1/3 PART OF VALVE (B).
- Enter the lift (C).

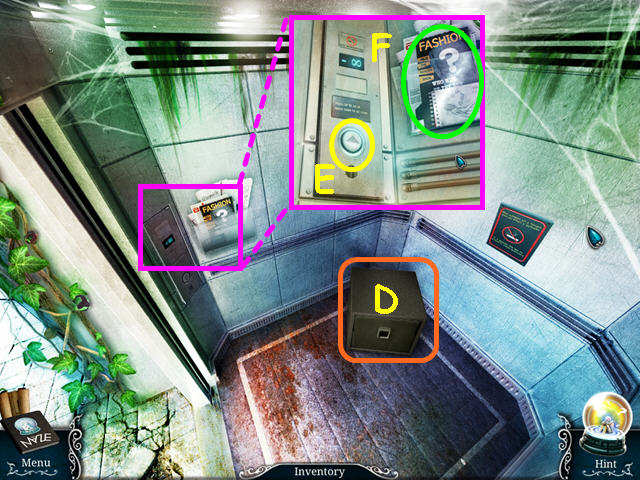
- Note the safe is missing some buttons (D).
- Look at the controls and take the LIFT BUTTON (E).
- Read the magazine note (F).
- Exit the lift and walk down twice to return to pavilion 1.
- Walk forward to the house.

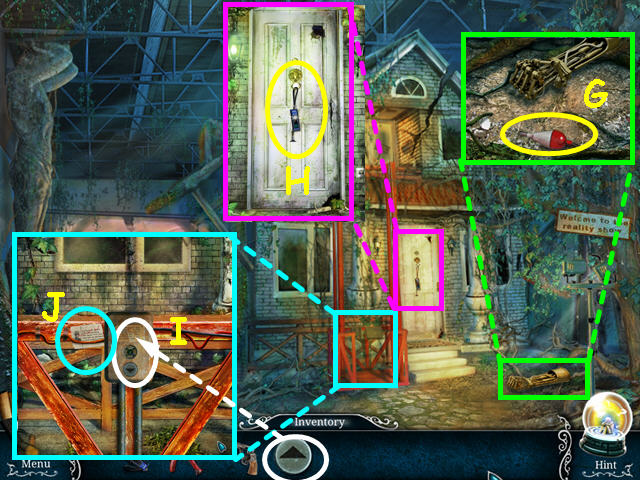
- Look at the mechanical arm and take the FLOAT (G).
- Look at the front door and take the STETHOSCOPE (H).
- Try to open the front door.
- Look at the lift and place the LIFT BUTTON in the control (I).
- Read the clipping (J).
- Press the ‘up’ button on the control.
- Walk forward to enter the room.

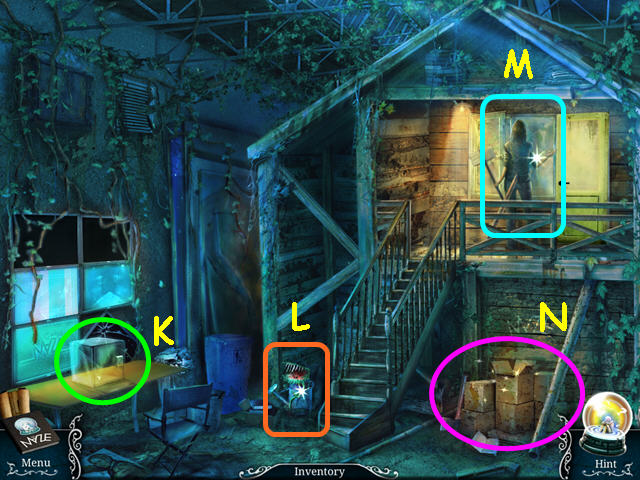
- Note the safe on the table (K).
- Note the carnivorous plant (L).
- Note the dummy in the window (M).
- Select the boxes area for a HOS (N).

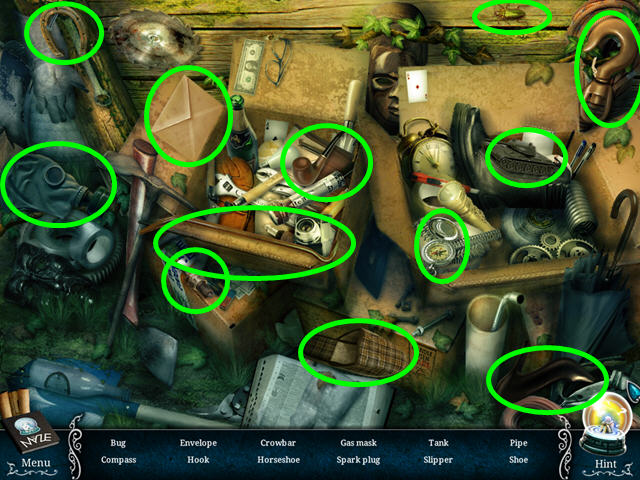
- Locate all the items on the list.
- You will earn the CROWBAR.
- Walk forward to exit the house, then press the down button in the lift.
- Walk down twice, then go left into the corridor and enter reception.

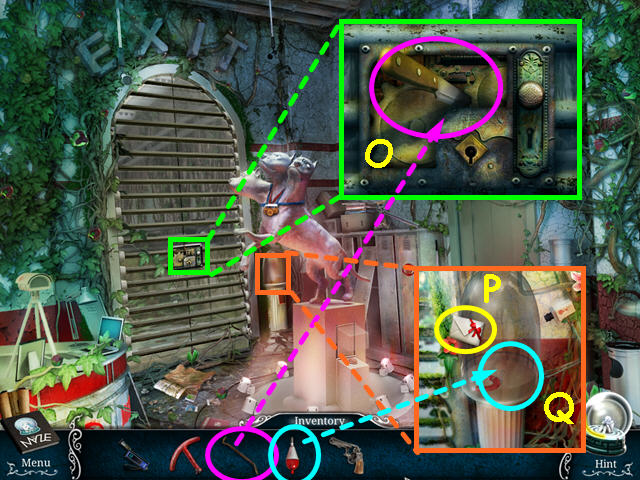
- Look at the lock on the gate and use the CROWBAR to take the KNIFE (O).
- Look at the glass dome and take the note (P).
- Use the FLOAT on the magnet (Q).
- Return to the front of the house.

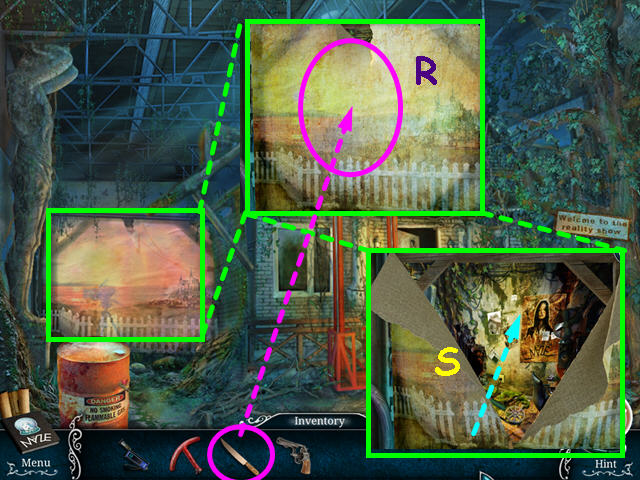
- Look at the painted backdrop; use the KNIFE to cut it open (R).
- Walk forward through the backdrop (S).

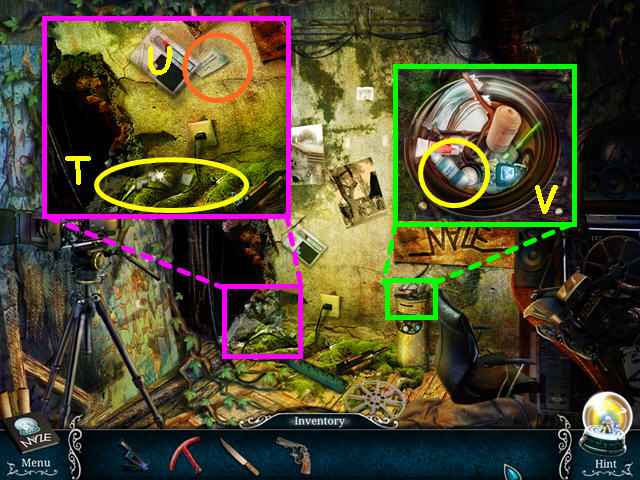
- Look at the corner by the plug and take the BUTTONS (T).
- Read the note for a code (U).
- Look at the bin and take the SOLVENT (V).
- Walk down twice to pavilion 1.

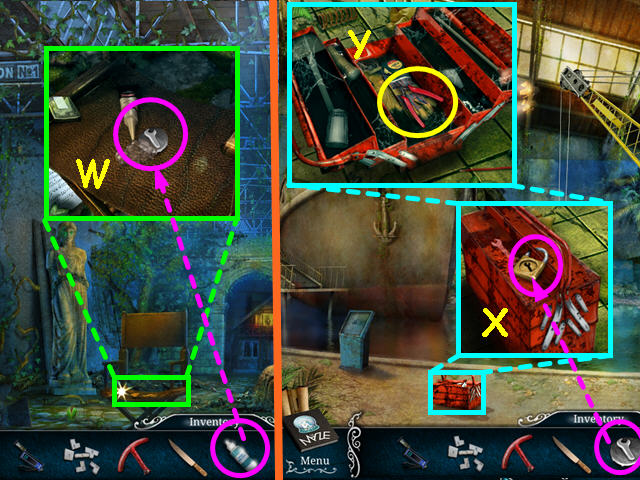
- Look at the chair and use the SOLVENT to retrieve the key (W).
- Walk left, then go left to pavilion 2.
- Look at the toolbox and use the KEY to unlock it (X).
- Take the CLIPPERS (Y).
- Exit pavilion 2, enter reception and walk to the lift.

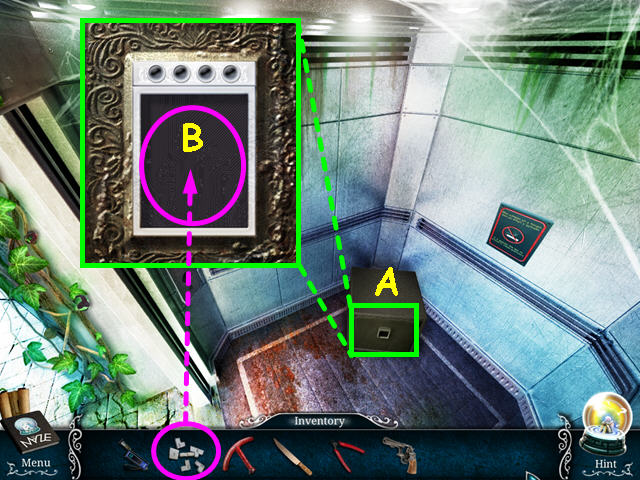
- Look at the safe on the floor (A).
- Use the BUTTONS on the control to trigger a mini-game (B).

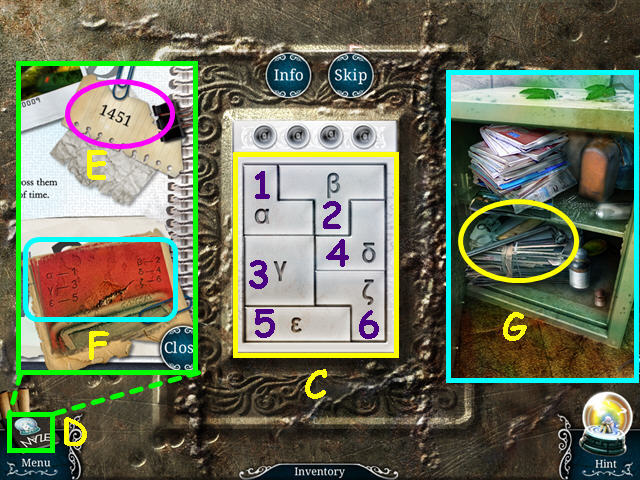
- You must first fit the buttons into the rectangular area (C).
- Refer to your diary for the 2 clues to entering the code (D).
- Note – this code is randomly generated – you must use the numbers from the note in the secret room when you found the buttons (E).
- The other clue was found scratched around the button on the 3-headed dog (F).
- Press the symbols that match the numbers in the code.
- Take the RATCHET TOOL from inside the safe (G).
- Return to the front of the house.

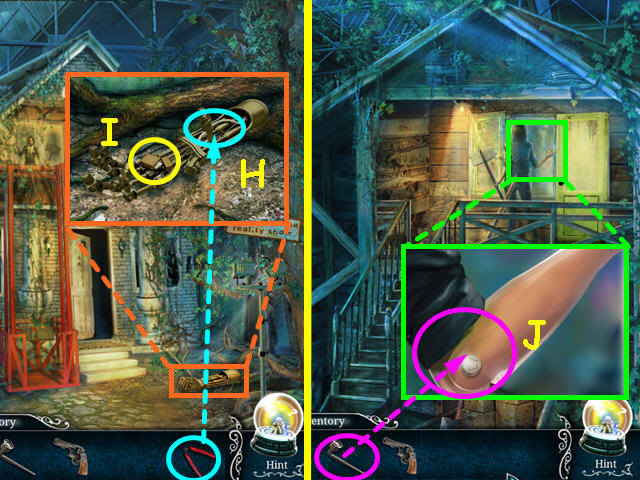
- Look at the mechanical are and use the CLIPPERS on the wires (H).
- Take the LIGHTER (I).
- Take the lift up and enter the house.
- Look at the dummy and use the RATCHET TOOL to remove the ARM (J).
- Return to pavilion 2.

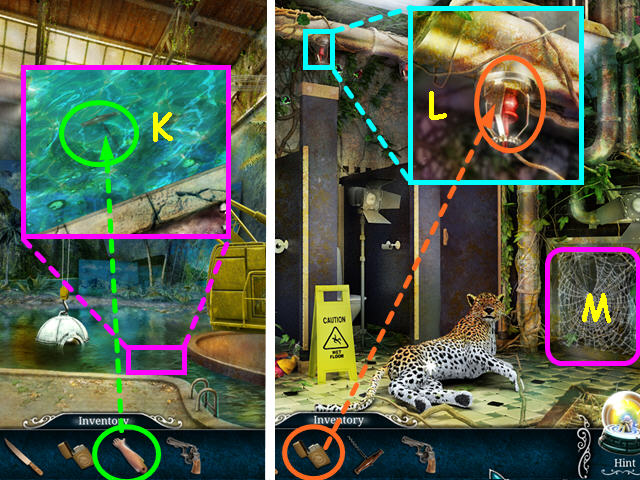
- Look in the pool and use the ARM to collect the CORKSCREW (K).
- Return to the bathroom.
- Look at the sprinklers and use the LIGHTER to start them (L).
- Once the big cat leaves, select the large vent for a HOS (M).

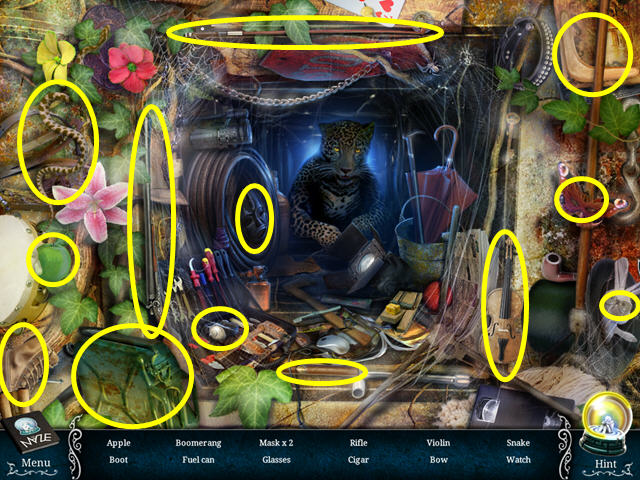
- Locate all the items on the list.
- You will earn the EMPTY FUEL CAN.
- Exit the bathroom and return to the front of the house.

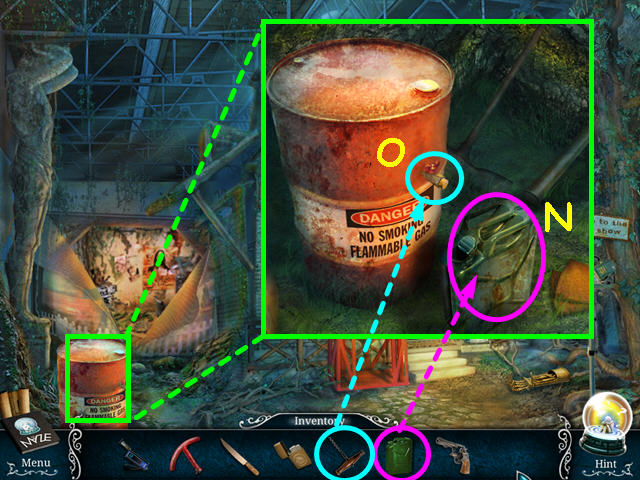
- Look at the fuel barrel and place the EMPTY FUEL CAN next to it (N).
- Use the CORKSCREW on the tap to remove the cork, then click on the tap (O).
- Take the FILLED FUEL CAN.
- Return to pavilion 2.

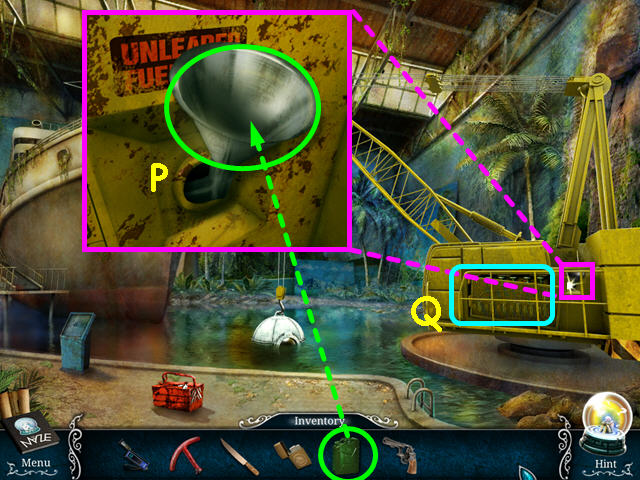
- Look at the crane and use the FULL CANISTER on the funnel (P).
- Select the crane control for a mini-game (Q).

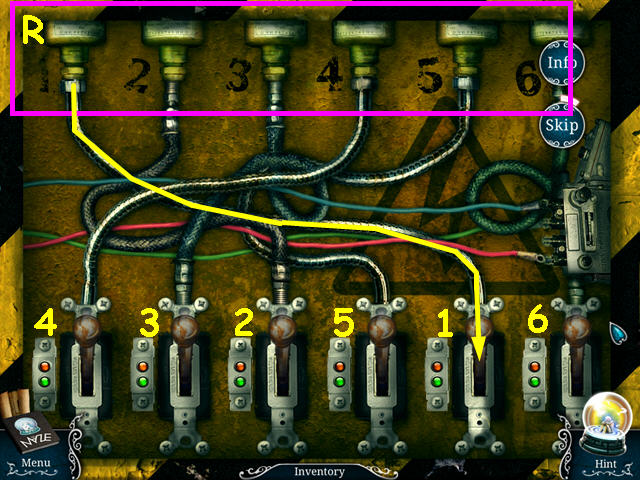
- Follow the hoses from the top to find the correct order of the levers (R).
- Pull the levers down in numerical order (1-6).
- Should you pull down the wrong lever, all other levers will turn off and you must start over.

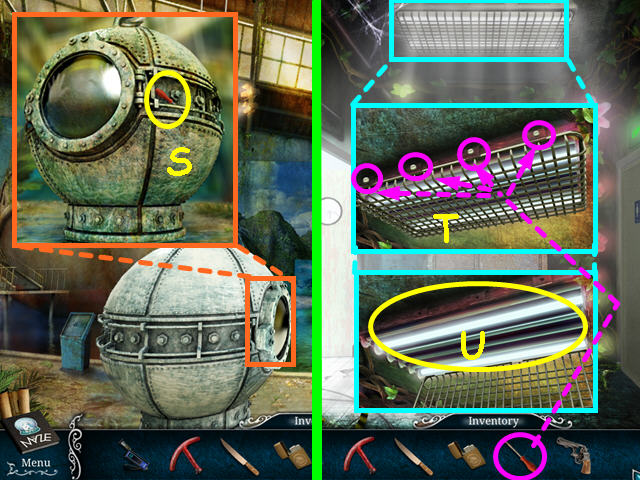
- Look at the bathyscaphe and take the SCREWDRIVER (S).
- Exit to the corridor and look at the ceiling light.
- Use the SCREWDRIVER to remove the 4 screws (T).
- Take the FLUORESCENT BULBS (U).
- Return to the secret room.

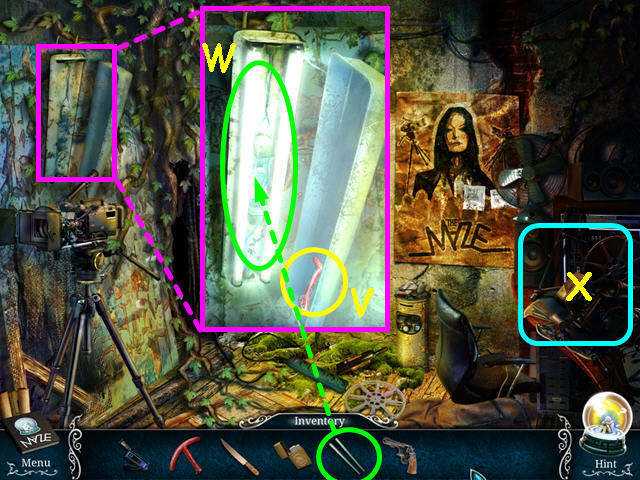
- Look at the broken light fixture and take the 2/3 PART OF VALVE (V).
- Place the FLUORESCENT BULBS into the fixture (W).
- Select the desk for a HOS (X).

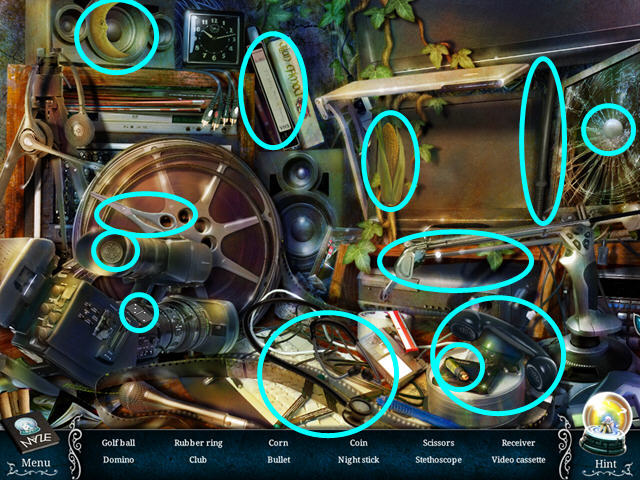
- Locate all the items on the list.
- You will earn the BULLET, which will automatically combine with the EMPTY GUN to make the LOADED GUN.
- Travel to the bathroom.

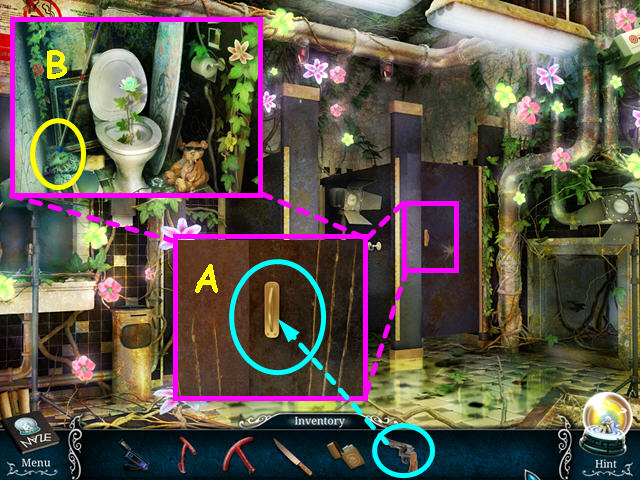
- Look at the stall door and use the LOADED GUN to blast the door open (A).
- Look inside the stall and take the PLANT KILLER (B).
- Return to the house, take the lift up and enter the room.

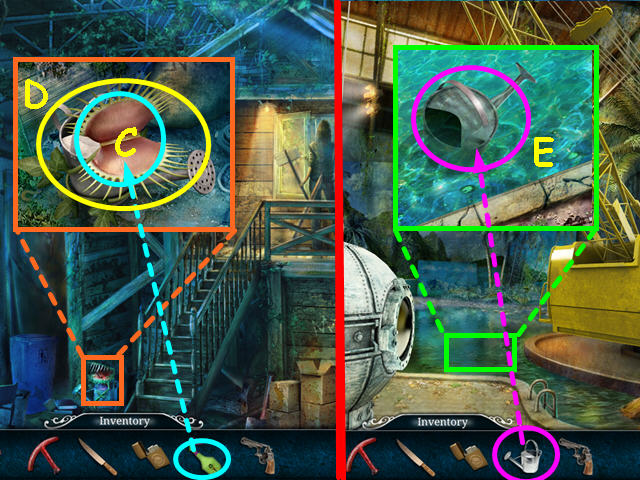
- Look at the plant and use the PLANT KILLER on the plant (C).
- Take the EMPTY WATERING CAN (D).
- Exit and return to pavilion 2.
- Look at the pool and use the EMPTY WATERING CAN on the water to get the FULL WATERING CAN (E).
- Travel to reception.

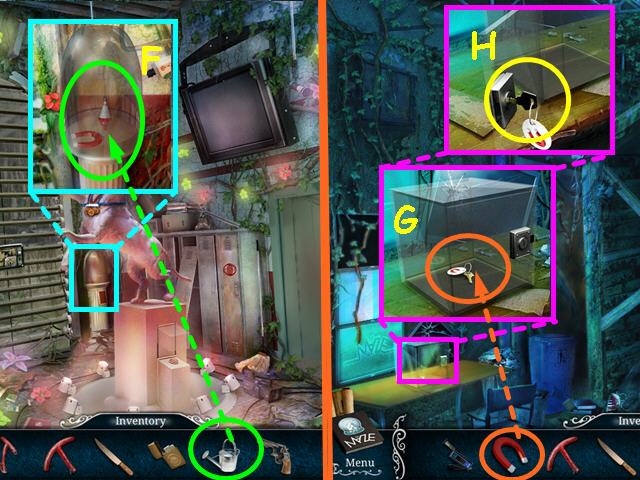
- Look at the glass dome and use the FULL WATERING CAN to fill it (F).
- You will receive the MAGNET.
- Return to the room with the dummy.
- Look at the safe and use the MAGNET to unlock the safe (G).
- Take the KEY (H).
- Travel to reception.

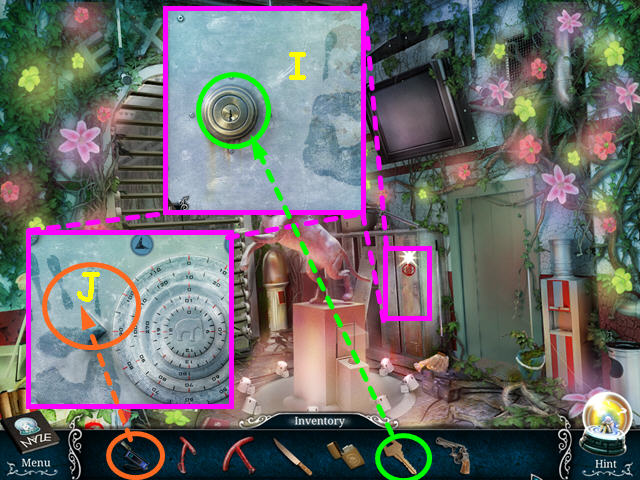
- Look at the locker and use the KEY on the lock (I).
- Use the STETHOSCOPE near the safe dial to trigger a mini-game (J).

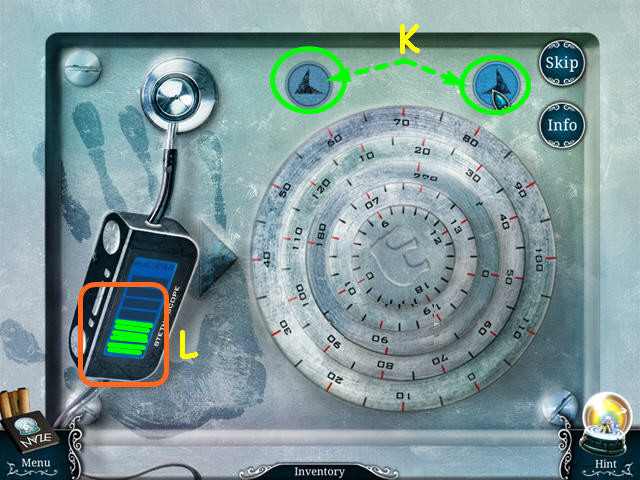
- Click on one of the rings in the dial, then use the right or left arrows (K) to rotate until the stethoscope flashes green (L) or you hear a louder click.
- You must do this for each of the 5 dials.
- This mini-game is randomized – your solution may vary.
- Select the locker for a HOS.

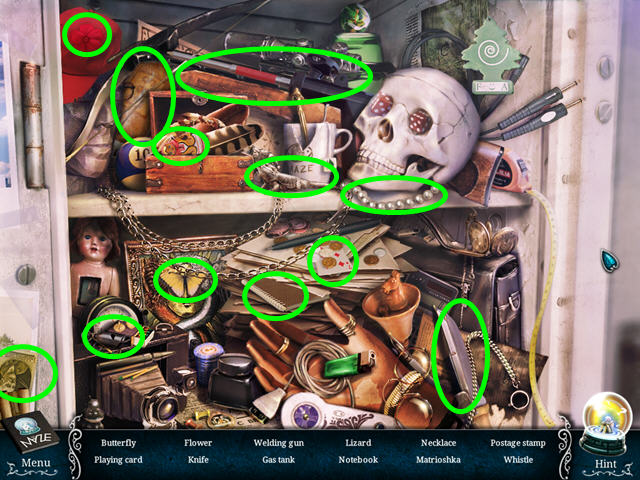
- Locate all the items on the list.
- You will earn the WELDING GUN.
- Walk to pavilion 2.

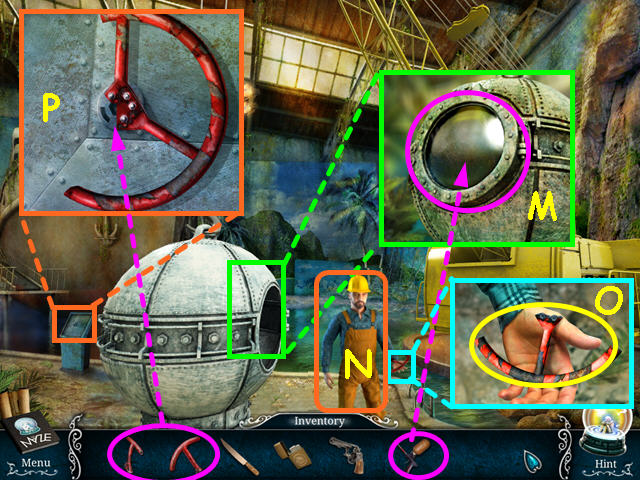
- Look at the bathyscaphe and use the WELDING GUN on the hatch (M).
- Talk to Jim (N).
- Look at Jim’s hand and take the 3/3 PART of VALVE (O).
- Look at the bridge control panel and place the 3 PART of VALVES into the notch for a mini-game (P).

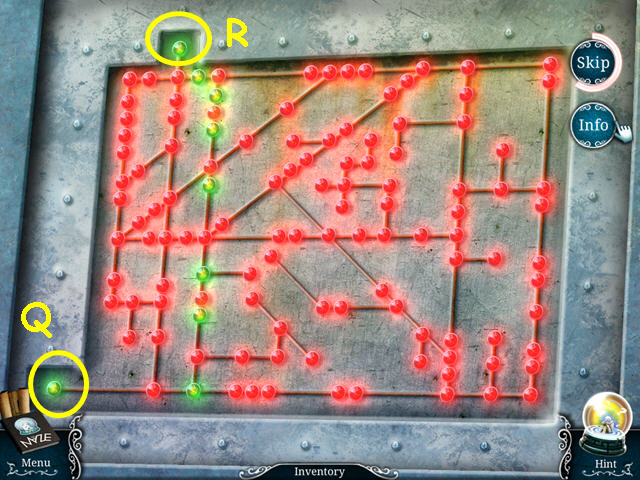
- Light a path from the start (Q) to the finish (R).
- You must click on every other light.
- There are numerous solutions for this mini-game; the screenshot shows on possibility.
Level 2: The Ship

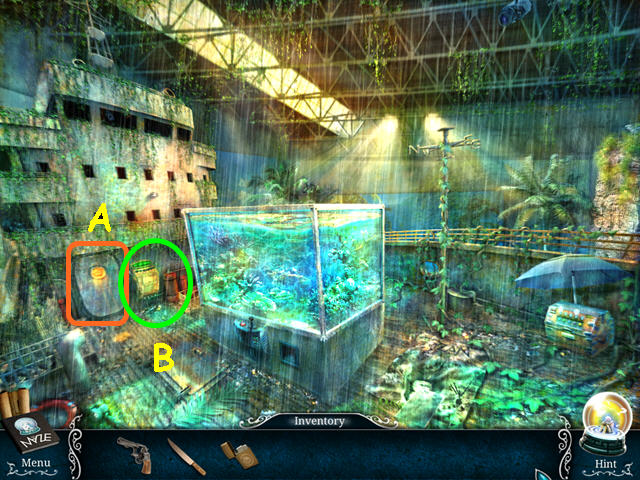
- Note the door to the makeup room (A).
- Select the weather machine for a mini-game (B).

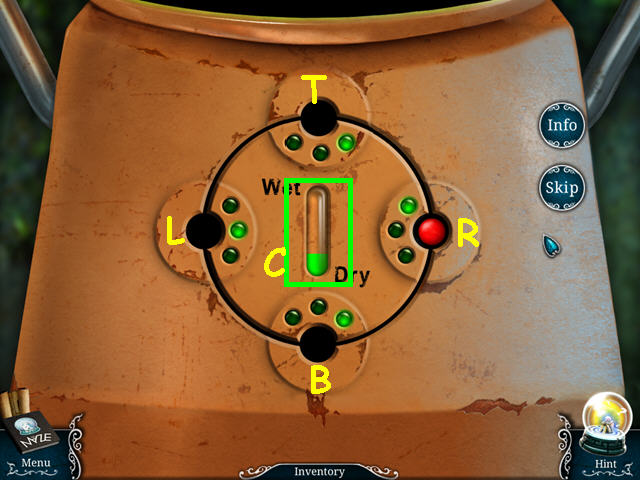
- Move the ball to change the lights so the center gauge is empty (C).
- Click on an adjacent location to move the red ball to that position.
- The lights at each location either fill, do nothing, or empty the gauge.
- Move the ball around the 4 positions so the lights match the positions shown in the screenshot.
- Our solution was: R-T-R-B-L-B-L-T-L-T.
- Enter the makeup room.

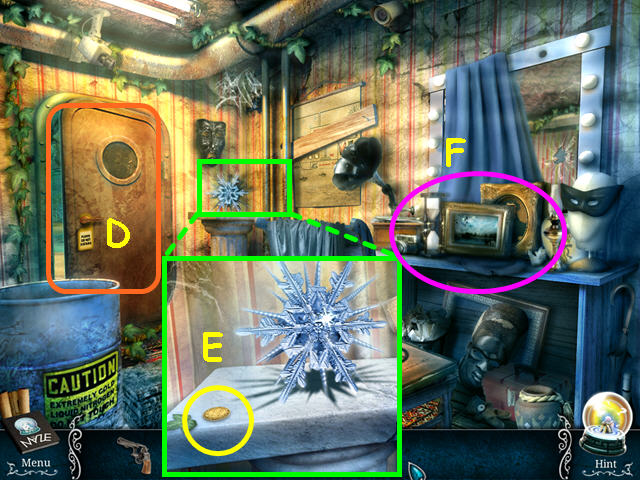
- Note the door to the helicopter deck (D).
- Look at the pedestal in the corner and take the 1/3 COIN (E).
- Look at the table for a HOS (F).

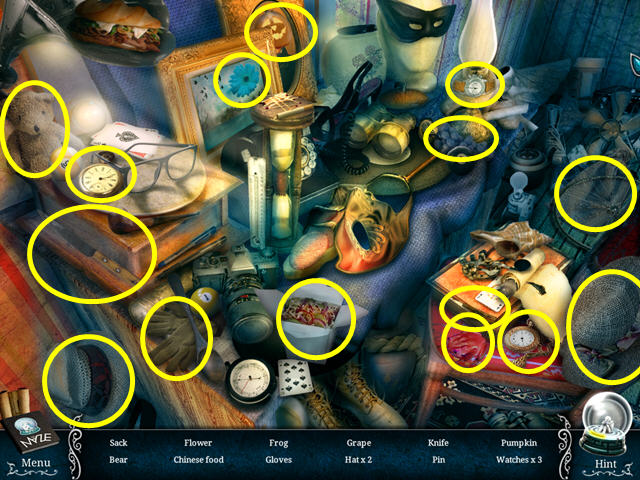
- Locate all the items on the list.
- You will earn the SACK.
- Walk to the helicopter deck.

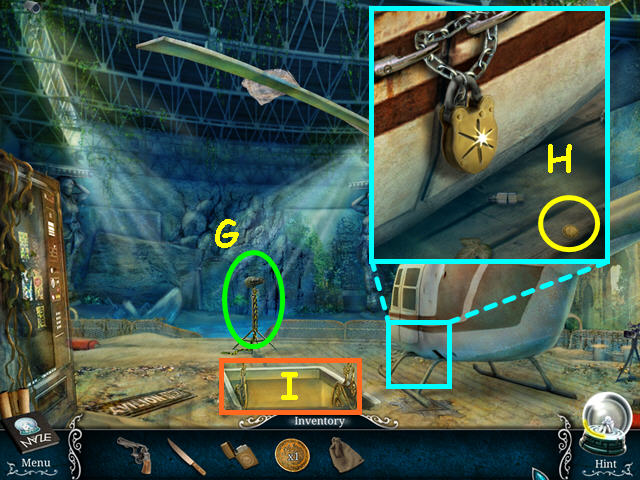
- Look at the spyglass (G).
- Look at the helicopter and take the 2/3 COIN (H).
- Enter the hatch to the main hall (I).

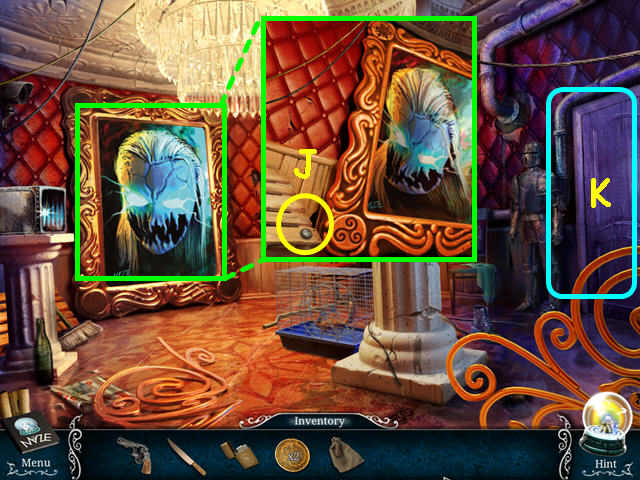
- Look at the portrait and take the 3/3 COIN (J).
- Note the door to the boiler room (K).
- Walk down to return to the helicopter deck.

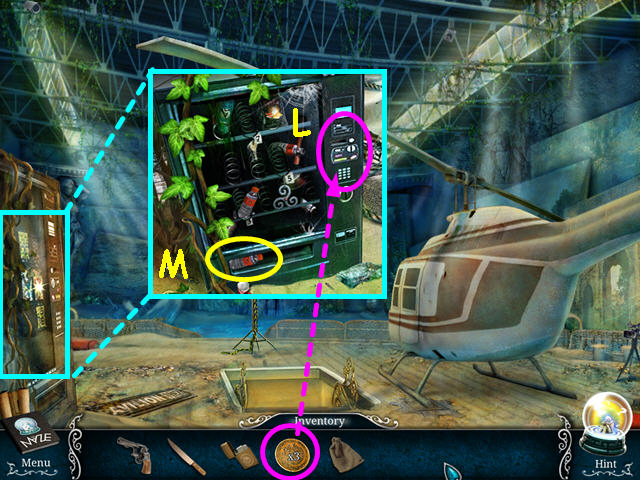
- Look at the vending machine and use the 3 COINS on the slot (L).
- Take the BOTTLE of WATER (M).
- Enter the hatch to the main hall, then walk to the boiler room.

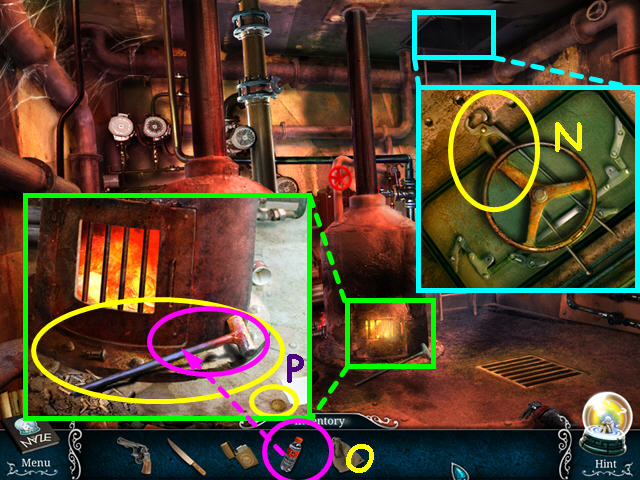
- Look at the upper hatch and take the TONGS (N).
- Look at the small oven and use the BOTTLE of WATER on the HAMMER (O).
- Take the cooled HAMMER and the 1/5 COIN (P).
- Return to the main hall.

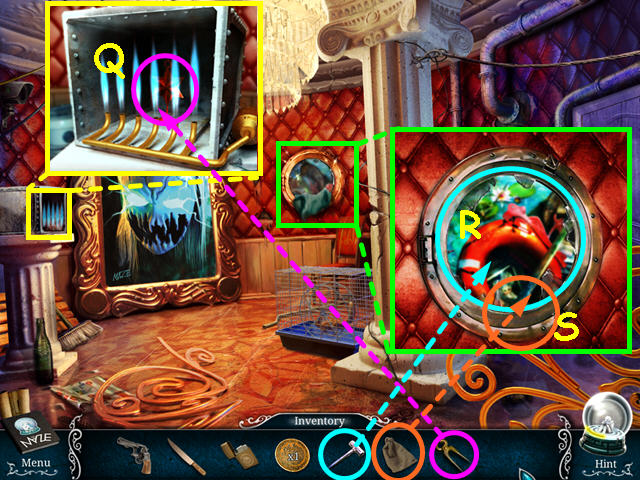
- Look at the metal box and use the TONGS to take the STRANGE FIGURE star (Q).
- Look at the porthole/window and use the HAMMER 3 times to break the glass (R).
- Place the SACK over the jagged glass (S).
- Select the window for a HOS.

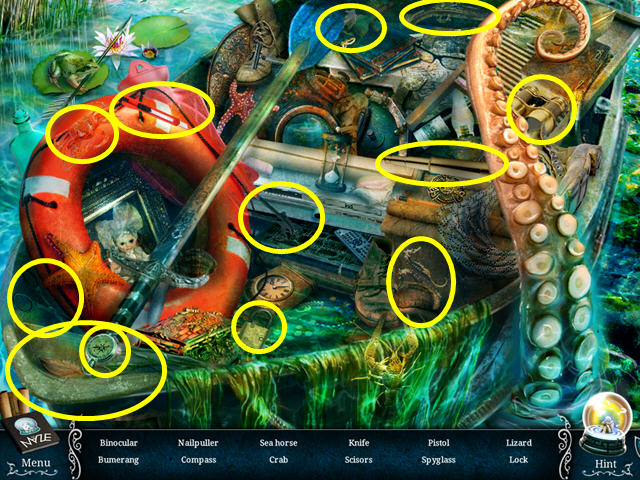
- Locate all the items on the list.
- You will earn the NAIL PULLER.
- Travel to the makeup room.

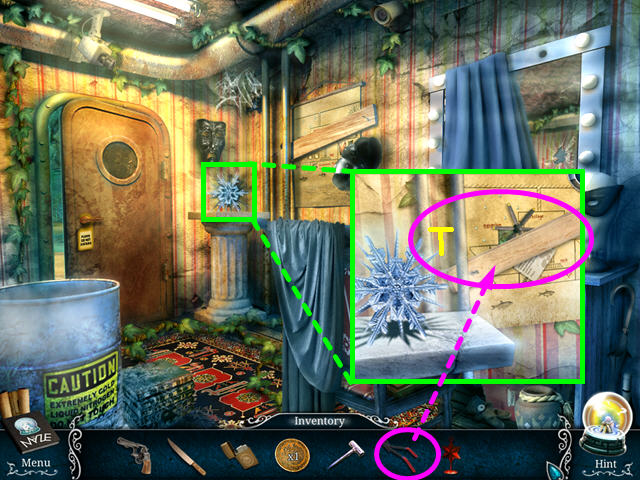
- Look at the snowflake area and use the NAIL PULLER on the board (T).
- You will automatically receive the PROPELLER KEY.
- Travel to the helicopter deck.

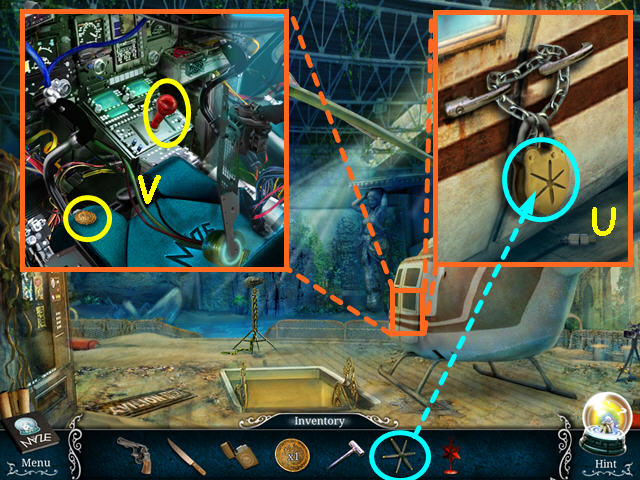
- Look at the helicopter door and use the PROPELLER KEY on the lock (U).
- Look inside the helicopter and take the 2/5 COIN and the JOYSTICK (V).
- Return to the front deck.

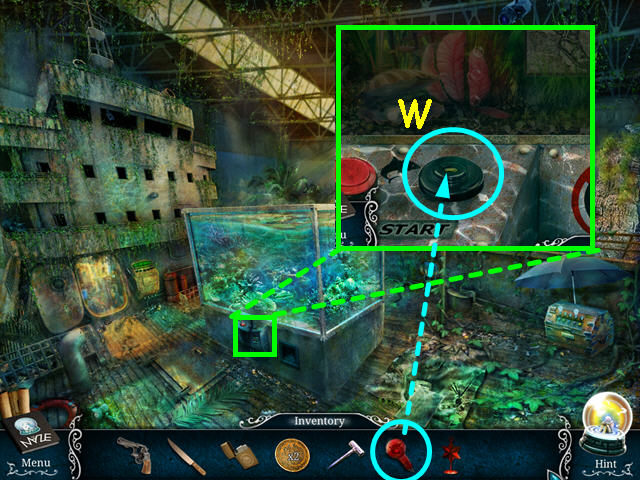
- Look at the aquarium and place the JOYSTICK into the control (W).
- This will trigger a mini-game.

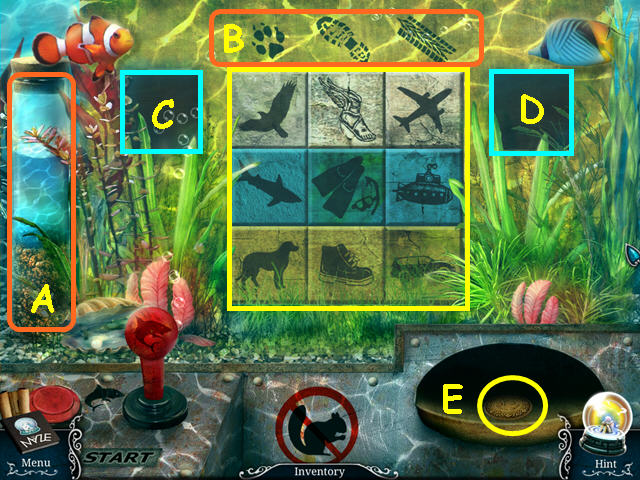
- Move the tiles to the correct position.
- The bottle on the left tells us that the top row should be air-related, the middle will be water-related, and the bottom will be ground-related (A).
- The symbols above the tiles indicate that animals should be in the left column, footwear in the center column, and machines in the right column (B).
- Click on two tiles to move their location.
- The first tile will go into the left box (C), and will return to the first open spot once a second tile is selected.
- The second tile clicked will go to the right box, then will return to the last open spot (D).
- Note that gravity will cause the upper tiles to fall if a lower tile is taken.
- Take the 3/5 COIN from the return (E).
- Return to the boiler room.

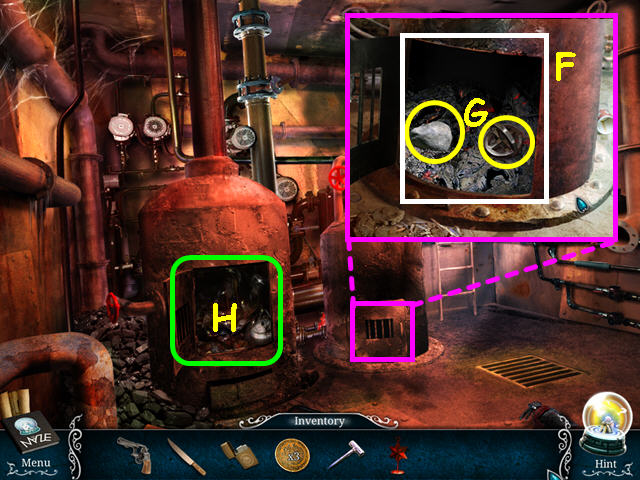
- Look at the small oven and open the grate (F).
- Take the STONE and the STRANGE FIGURE circle (G).
- Select the big oven for a HOS (H).

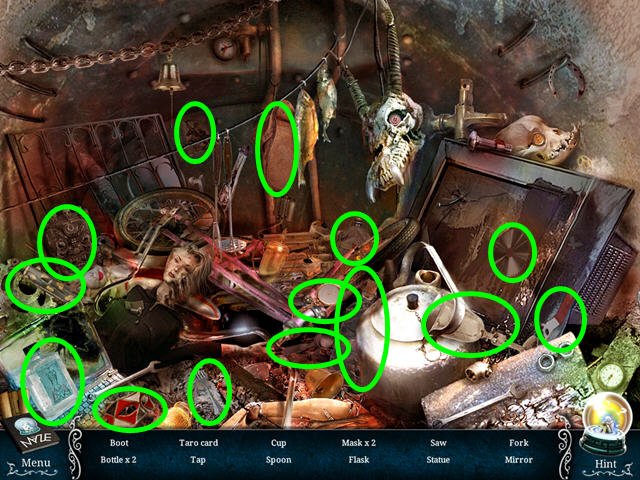
- Locate all the items on the list.
- You will earn the TAP.
- Travel to the helicopter deck.

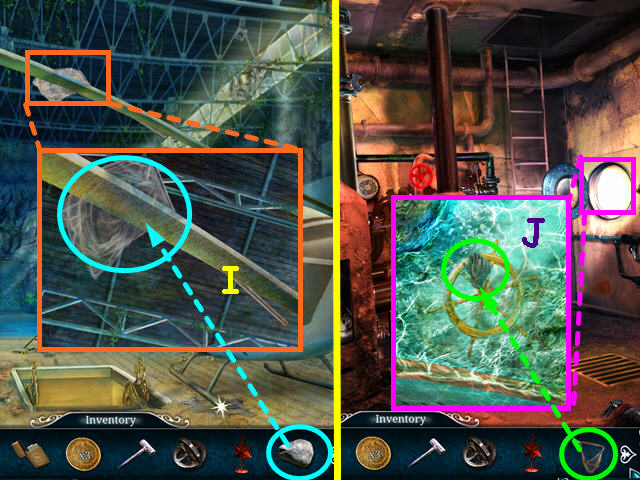
- Look at the helicopter blade and use the ROCK to get the NET (I).
- Return to the boiler room.
- Look out the port hole and use the NET to collect the GLOVES (J).
- Travel to the makeup room.

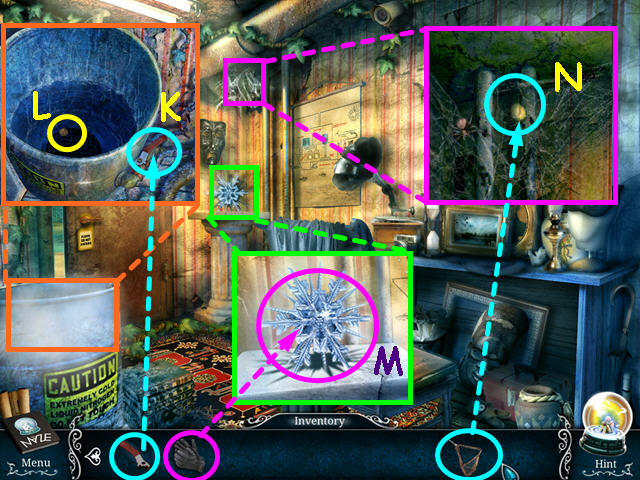
- Look at the barrel and use the TAP on the side control (K).
- Take the 4/5 COIN (L).
- Look in the corner and use the GLOVES to take the STRANGE FIGURE snowflake (M).
- Look in the upper corner and use the NET to get the 5/5 COIN (N).
- Return to the helicopter deck.

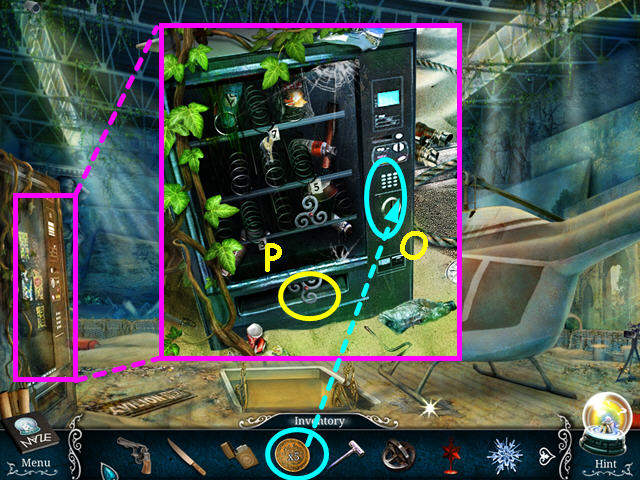
- Look at the vending machine and use the 5 COINS in the slot (O).
- Take the STRANGE FIGURE swirls (P).
- Return to the main hall and look at the painting.

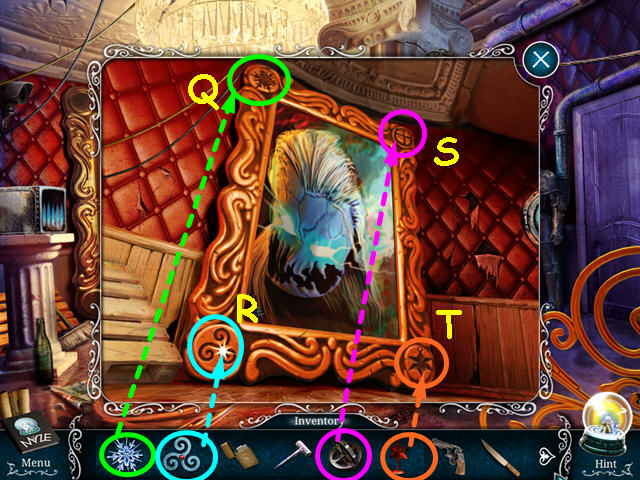
- Place each of the STRANGE FIGURES into the matching slot on the painting.
- Place the snowflake STRANGE FIGURE in the upper left corner (Q).
- Place the swirls STRANGE FIGURE in the lower left corner (R).
- The circle STRANGE FIGURE belongs in the upper right corner (S).
- Place the star STRANGE FIGURE in the lower right corner (T).
- Walk through the painting to the submarine.

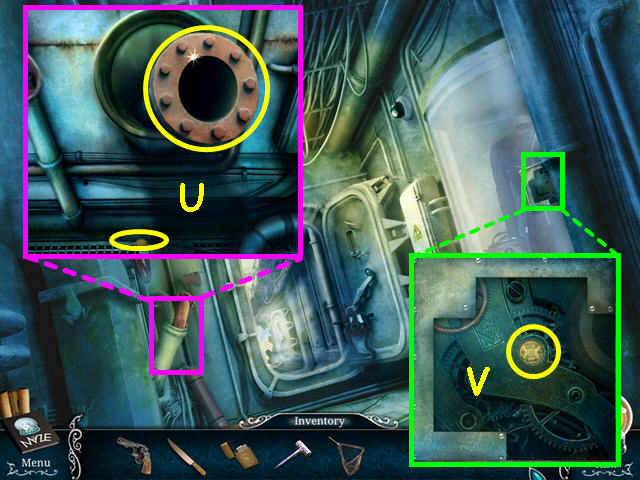
- Look at the area on the left and take the PIPE and the 1/7 COIN (U).
- Look at the door control on the right and take the 2/7 COIN (V).
- Walk forward to the shore.

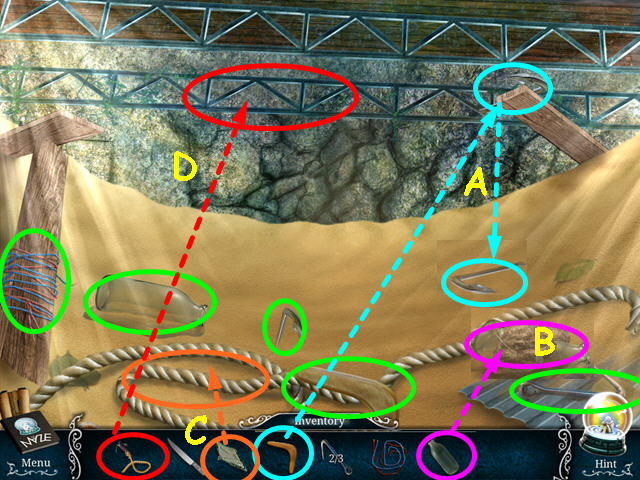
- Take the WIRES, GLASS BOTTLE, 1/3 HOOK, BOOMERANG, and the 2/3 HOOK (circled in green).
- Use the BOOMERANG to knock down the 3/3 HOOK, then take it (A).
- Break the GLASS BOTTLE on the rock, then take the GLASS SHARD (B).
- Use the GLASS SHARD to cut the ROPE (C).
- The ROPE, 3 HOOKS and the wire will automatically combine to make the GRAPPLING HOOK.
- Aim the GRAPPLING HOOK at the scaffolding, then climb out of the sand (D).

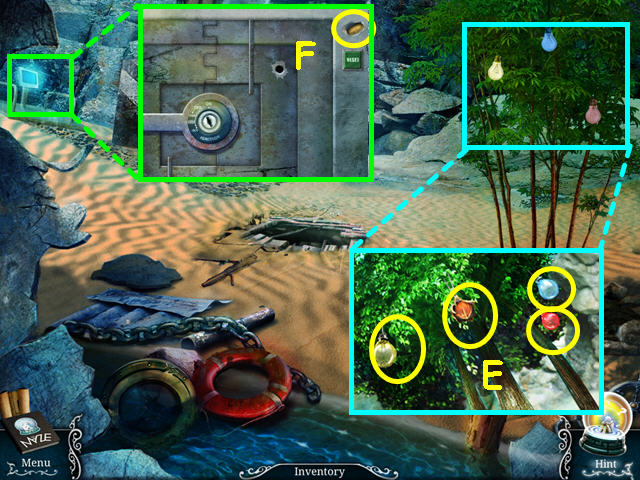
- Look at the tree and take the 3 BULBS and the NUT (E).
- Look at the terminal and take the 3/7 COIN (F).
- Return to the main hall.

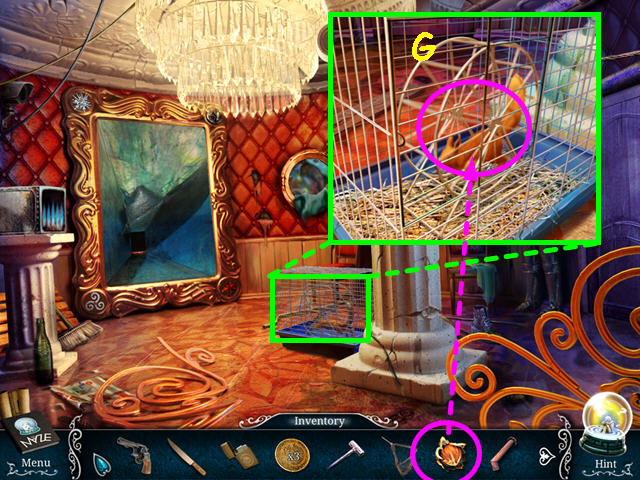
- Look at the squirrel and use the NUT to capture him (G).
- Travel to the front deck.

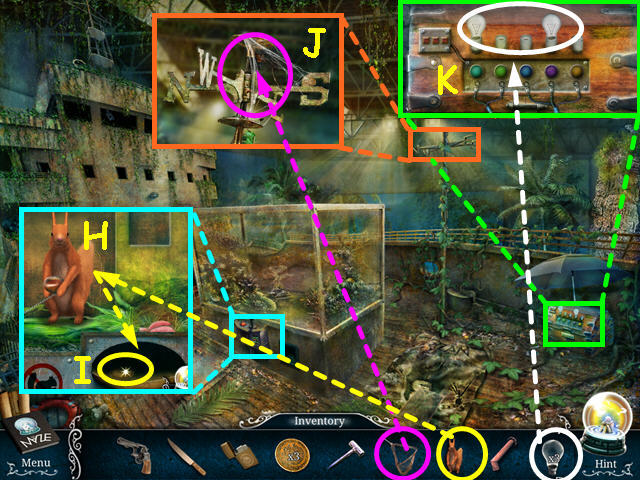
- Look at the aquarium and place the SQUIRREL in the change return. (H).
- Take the 4/7 COIN (I).
- Look at the weather-vane and use the NET to get the 5/7 COIN (J).
- Look at the casket and use the 3 BULBS on the top to trigger a mini-game (K).

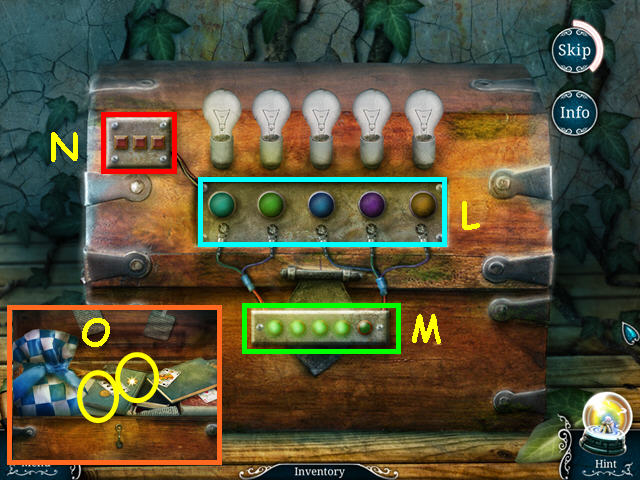
- Watch the sequence of lights, then press the colored buttons to repeat the sequence (L).
- You will need to copy 5 sets of sequences – they are tracked in the lower panel (M).
- After 3 mistakes, the mini-game will restart – mistakes are noted in the upper left panel (N).
- Our sequences were: blue-yellow, blue-blue-blue, blue-green-blue-purple, yellow-aqua-green-purple-yellow, and purple-aqua-blue-purple-blue-yellow.
- Take the 6/7 and 7/7 COINS from inside the chest (O).
- Travel to the helicopter deck.

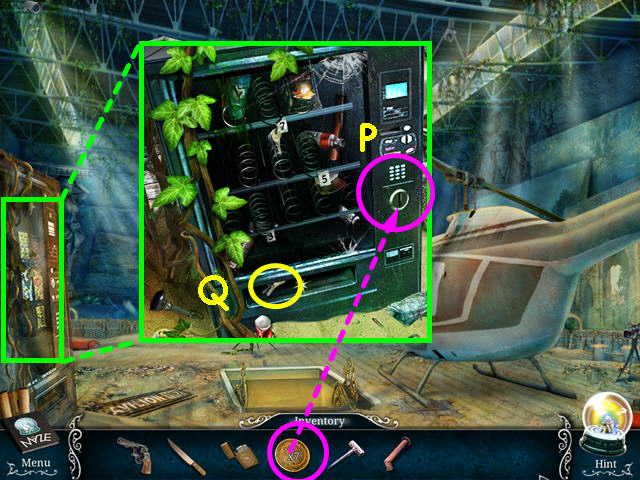
- Look at the vending machine and use the 7 COINS on the slot (P).
- Take the IGNITION KEY (Q).
- Travel to the coast.

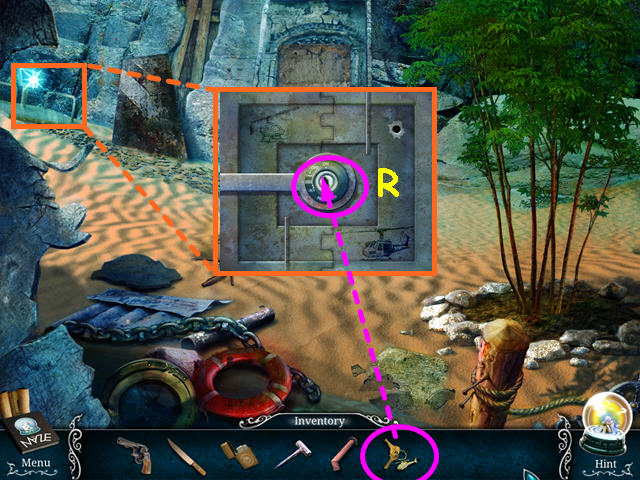
- Look at the terminal and use the IGNITION KEY on the keyhole (R).
- Click on the key to turn it and it will trigger a mini-game.

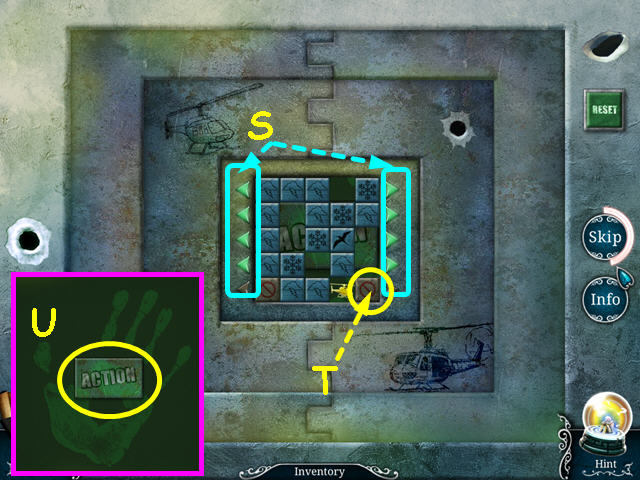
- Slide the rows of tiles back and forth so the helicopters can rise.
- Click on the green arrows to slide the rows (S).
- The ‘stop’ symbol means that a row cannot move any further in that direction (T).
- There are 3 levels to solve.
- Levels 2 and 3 have multiple helicopters; you may move one to the top at a time.
- Press the green action button (U).

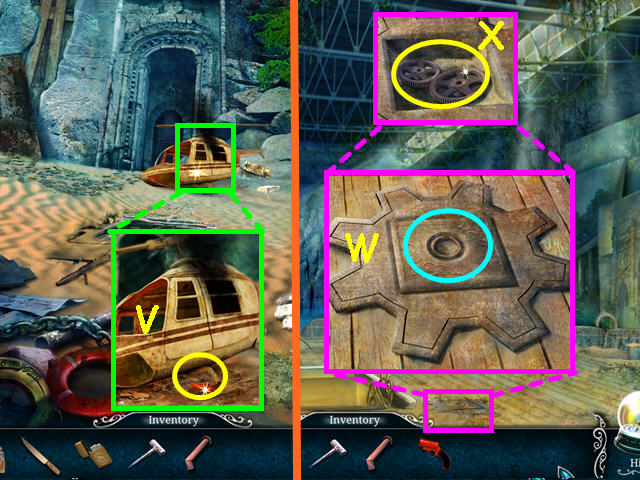
- Look at the crashed helicopter and take the FLARE GUN (V).
- Return to the helicopter deck.
- Look at the hatch, then click on the handle (W).
- Take the GEARS (X).
- Return to the submarine.

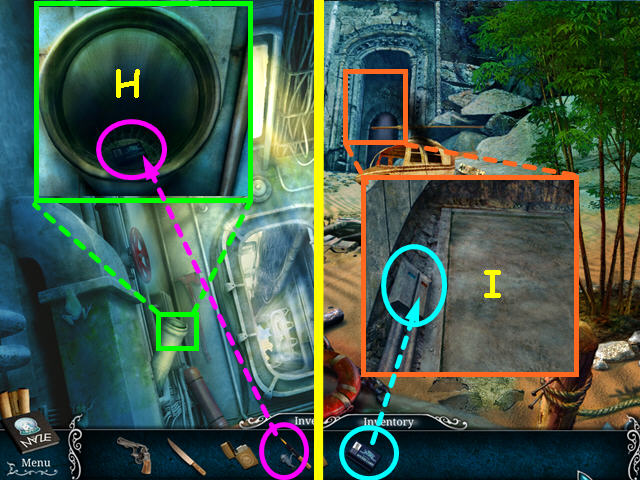
- Look at the door control and add the GEARS (A).
- Press the button (B).
- Take the SCUBA GEAR from the compartment (C).
- Travel to the boiler room.

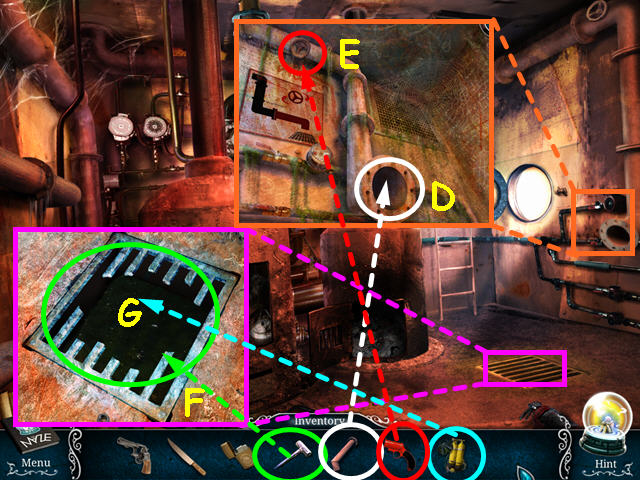
- Look at the right wall and connect the PIPE to the pipe on the wall (D).
- Use the FLARE GUN on the valve (E).
- Look at the floor grate and use the HAMMER to break it open (F).
- Use the SCUBA GEAR on the water in the hole (G).
- Select the hatch for a HOS.

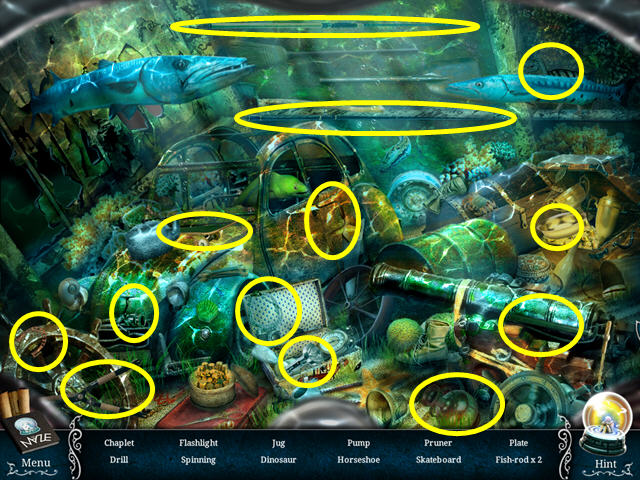
- Locate all the items on the list.
- You will earn the ROD.
- Return to the submarine.


- Look at the pipe and use the ROD to get the ACCESS CARD (H).
- Travel to the shore.
- Look at the cave door and use the ACCESS CARD on the reader (I).
- Walk forward.
Level 3: The Dome

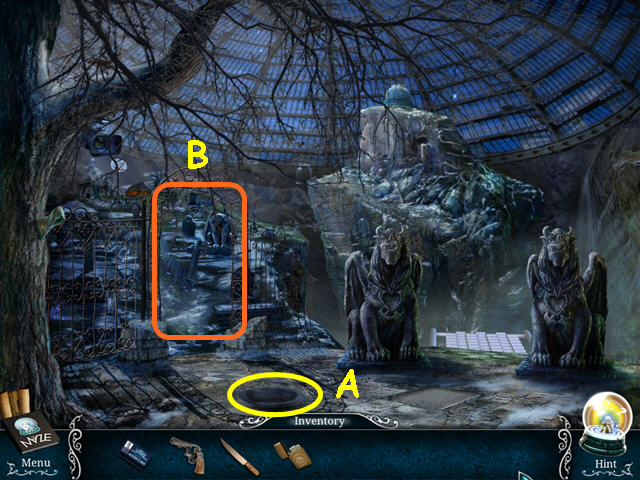
- Take the BOWL (A).
- Walk forward to the cemetery (B).

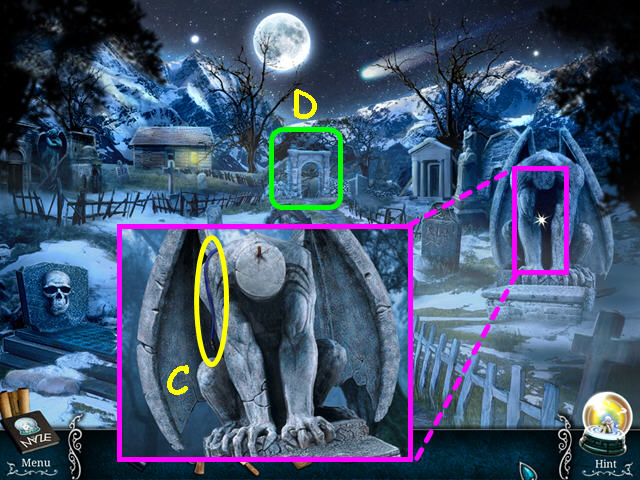
- Look at the statue and take the CORD (C).
- Walk forward to the house (D).

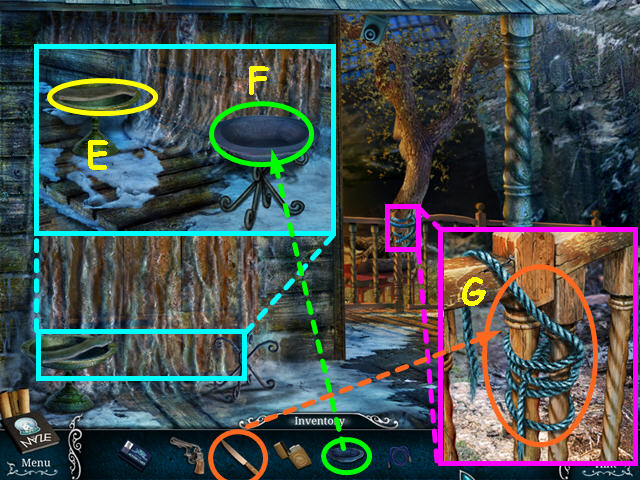
- Look at the door and take the AXE HANDLE (E).
- Pace the BOWL in the stand (F).
- Look at the gate and use the KNIFE to cut the rope (G).
- Walk down twice to return to the ways area.

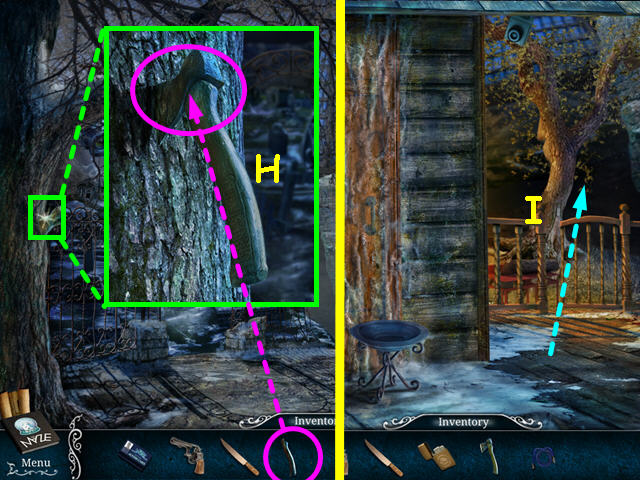
- Look at the tree and use the AXE HANDLE on the axe head to take the AXE (H).
- Return to the house, then walk forward through the gate on the right (I).

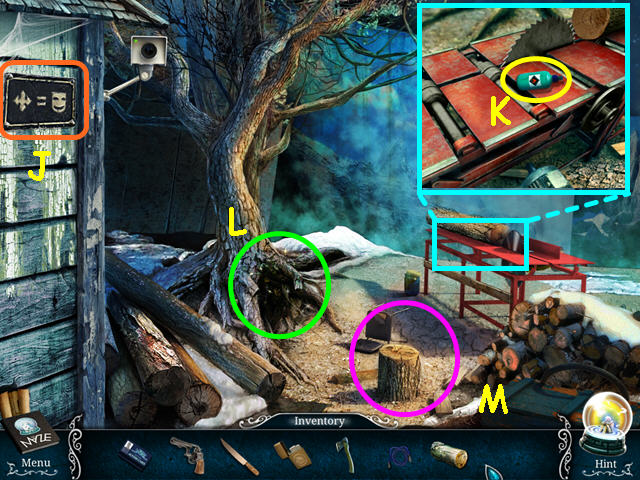
- Note the symbols on the sign (J).
- Look at the sawmill and take the LIGHTER FLUID (K).
- Note the roots of the tree (L).
- Look at the chopping block (M).

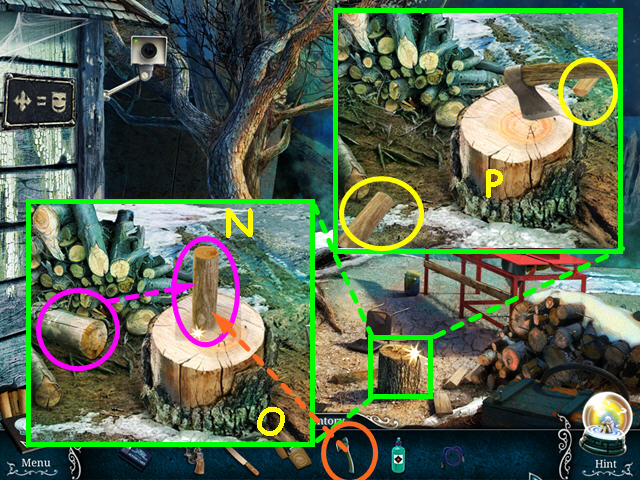
- Take the LOG and place it on the block (N).
- Use the AXE on the log (O).
- Take the 2 FIREWOOD (P).
- Select the roots for a HOS.

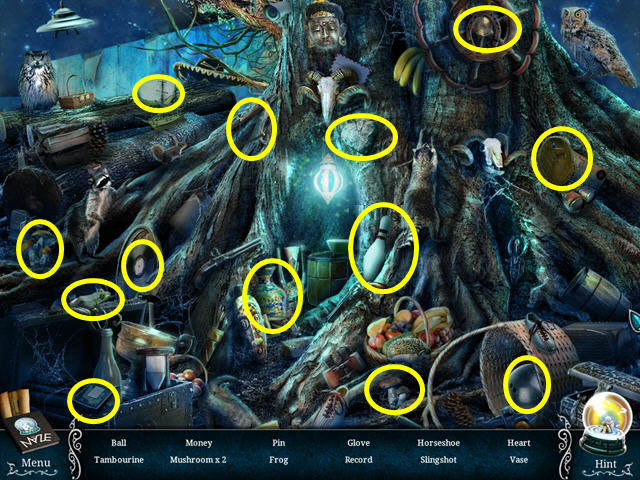
- Locate all the items on the list.
- You will earn the 1/2 HEART.
- Walk down to return to the front of the house.

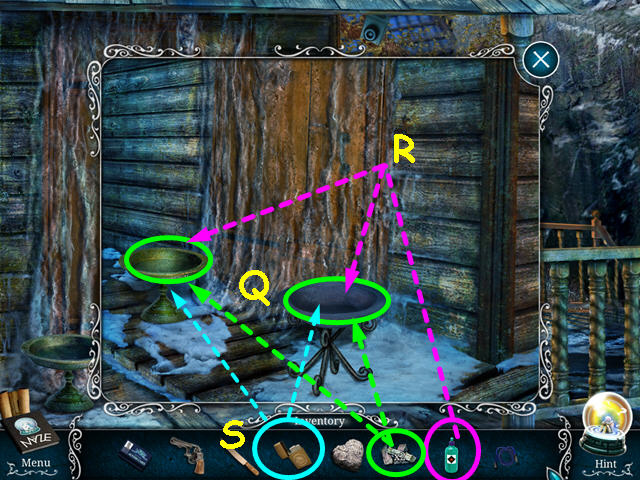
- Look at the braziers and place FIREWOOD in each bowl (Q).
- Use the LIGHTER FLUID on each bowl (R).
- Use the LIGHTER on each bowl (S).
- Enter the house.

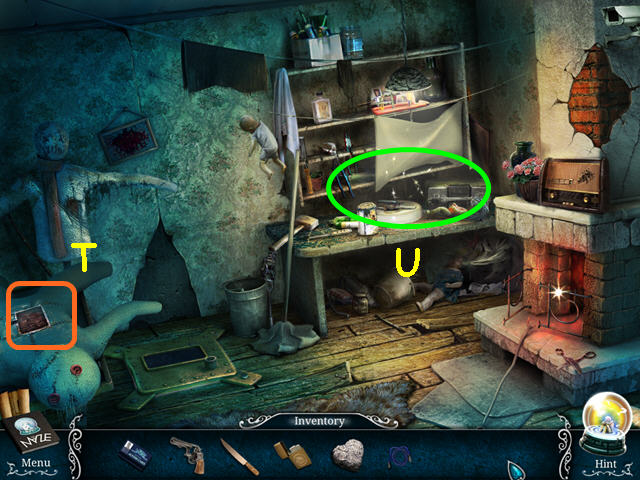
- Note the puppet stomach (T).
- Select the desk for a HOS (U).

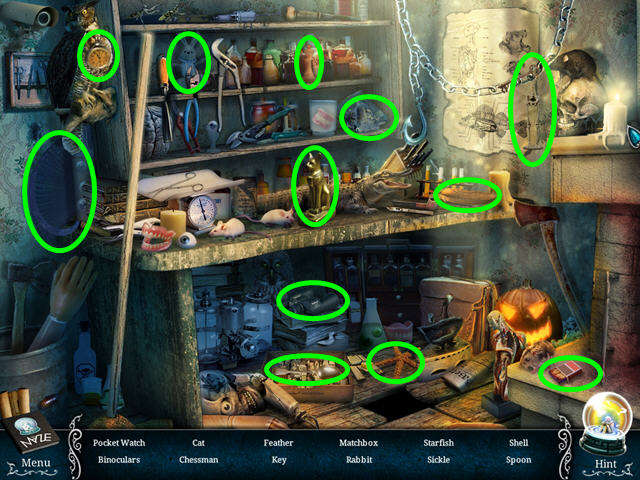
- Locate all the items on the list.
- You will earn the KEY (leg bones).
- Exit the house and walk down to the cemetery.

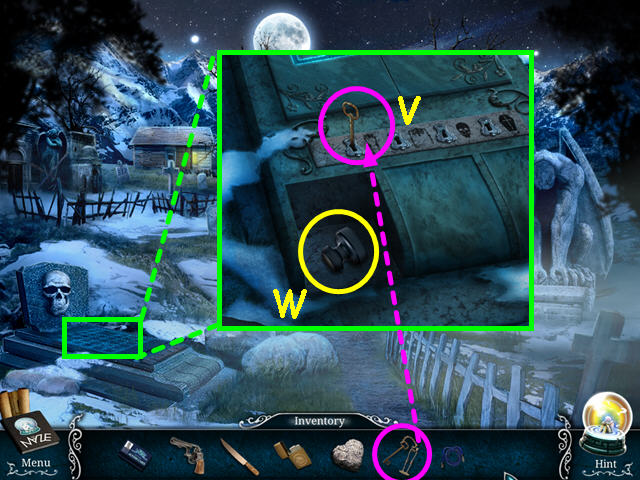
- Look at the headstone and use the KEY (leg bones) in the left keyhole (V).
- Take the MAGNET from the compartment (W).
- Return to the house and look at the puppet stomach.

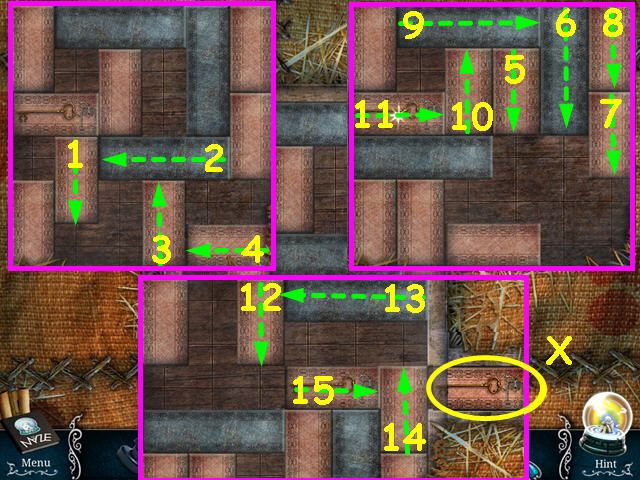
- Use the MAGNET to move the pieces and slide the key to the right.
- Move the blocks in numerical order as far as possible in the direction indicated (1-15).
- Take the KEY (torso) from the slot (X).
- Return to the cemetery.

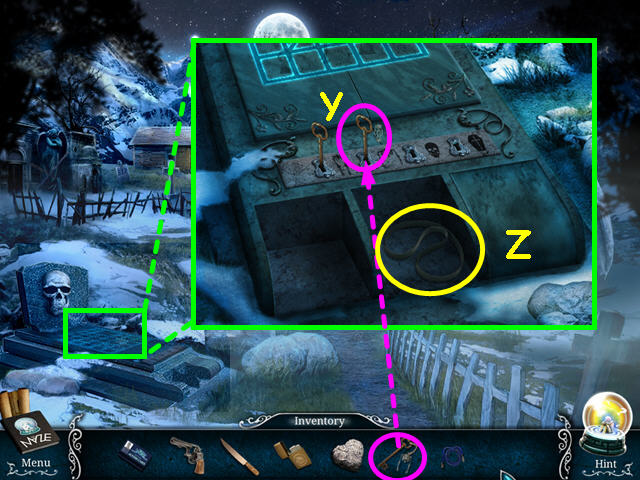
- Look at the headstone and use the KEY (torso) in the second from the left keyhole (Y).
- Take the BELT from the compartment (Z).
- Travel to the backyard.

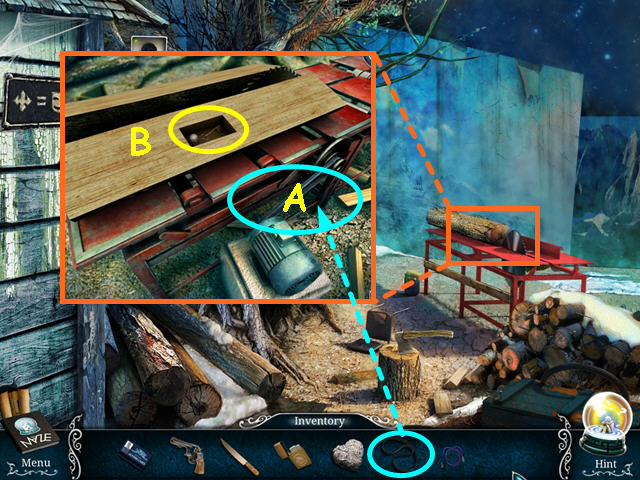
- Look at the sawmill and place the BELT on the motor (A).
- Take the KEY (skull) from the cut log (B).
- Return to the cemetery.

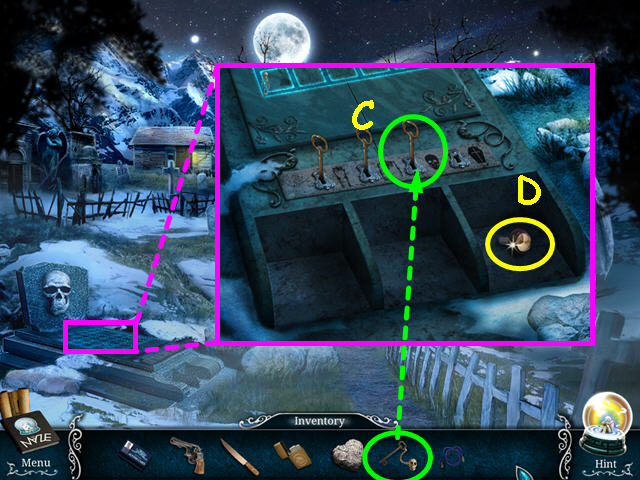
- Look at the headstone and use the KEY (skull) in the third from the left keyhole (C).
- Take the KNOB from the compartment (D).
- Travel to inside the house.

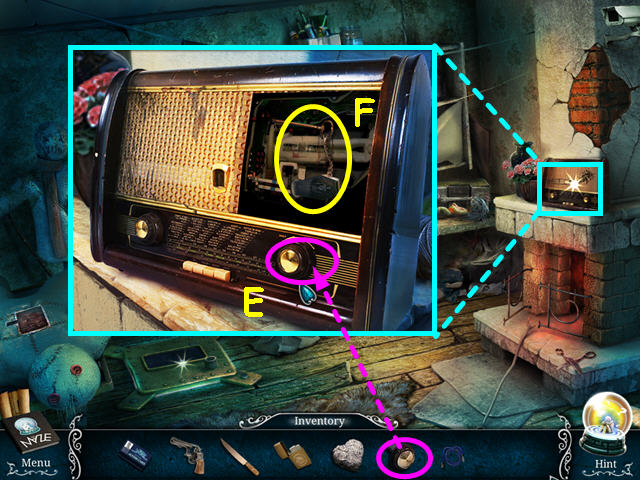
- Look at the radio ans place the KNOB on the spindle (E).
- Take the KEY (casket) from inside the radio (F).
- Return to the cemetery.

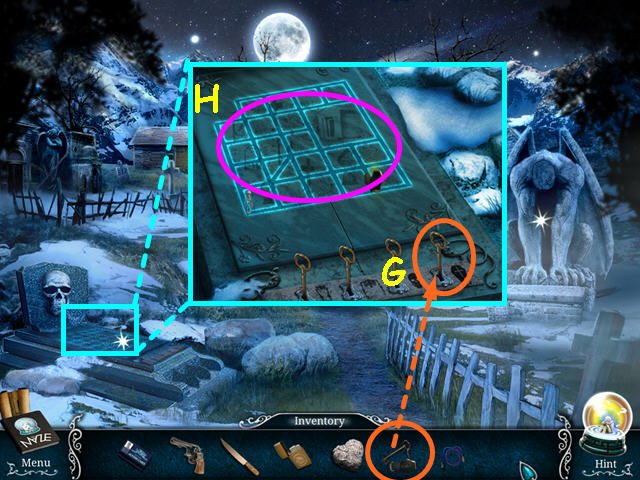
- Look at the headstone and use the KEY (casket) in the right keyhole (G).
- This will trigger a mini-game above the keys (H).

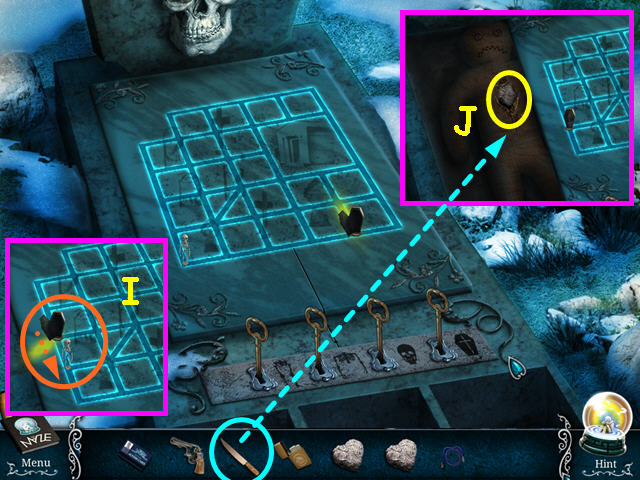
- Capture the skeleton with the casket (I).
- Move the casket one space at a time until you land on the same spot as the skeleton.
- Click on the adjacent intersection to where you wish to move the casket.
- Our moves were: L-L-U-U-L-D-R-D-U-U-U-U-L-D-U-L-D-R-R-D-D-L-L-D-R-U-DIAG-L.
- Use the KNIFE on the doll to get the 2/2 HEART (J).
- Walk down to the ways area.

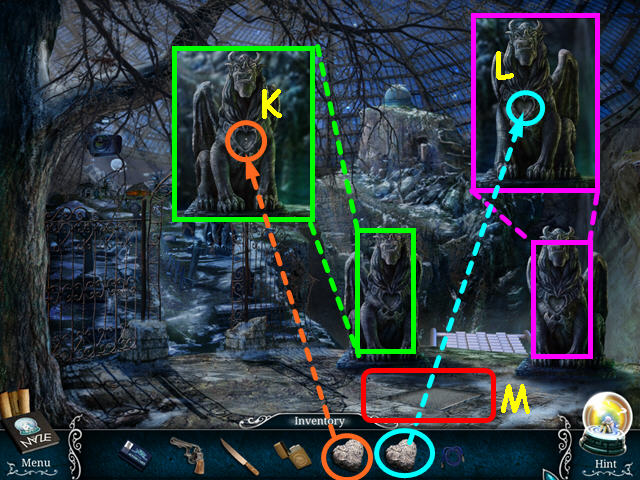
- Look at the left statue and place a HEART in the niche (K).
- Look at the right statue and place a HEART in the niche (L).
- Look at the tile on the ground for a mini-game (M).

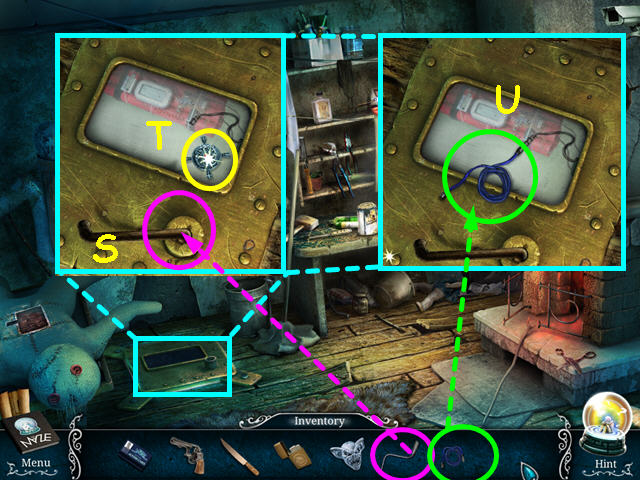
- Slide the tiles to reform the carving.
- The 4 inner tiles do not move (N).
- Tiles will tint blue when in the correct position.
- Walk across the bridge in-between the two statues to the mountain pass.

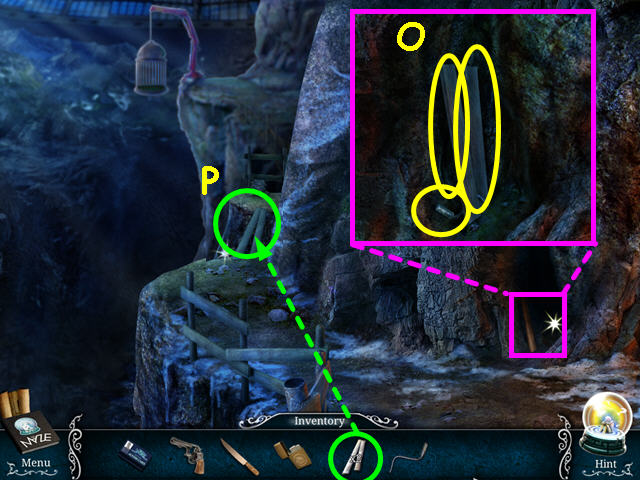
- Look in the crack and take the 2 PLANKS and the CRANK (O).
- Place the 2 PLANKS over the abyss (P).
- Cross the abyss on the planks.

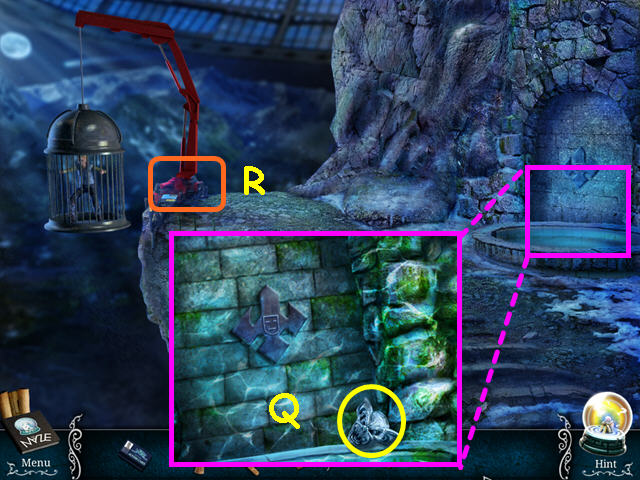
- Look in the fountain and take the GARGOYLE HEAD (Q).
- Note the crane is missing a control (R).
- Return to inside the house.


- Look at the hatch and use the CRANK to open the screen (S).
- Take the ORNATE KEY (T).
- Attach the CORD to the wire (U).
- Travel to the cemetery.

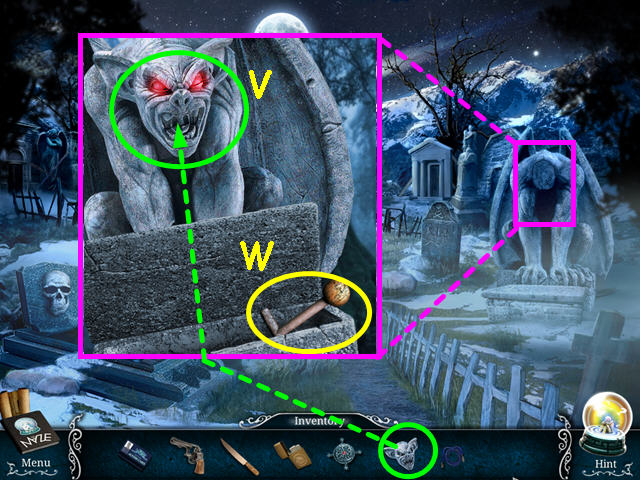
- Look at the statue and place the GARGOYLE HEAD on the neck (V).
- Take the LEVER from the stone box (W).
- Return to the crane and the cage.

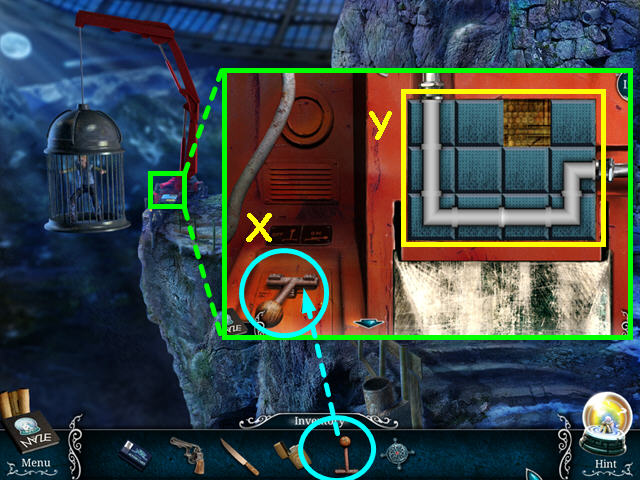
- Look at the crane and place the LEVER in the control (X).
- Click on the lever to open the panel.
- Move the tiles so that all the pipes are connected (Y).

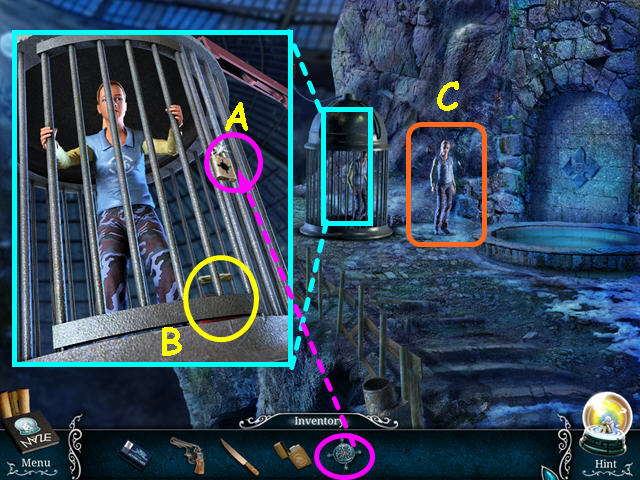
- Look at the cage and use the ORNATE KEY in the lock (A).
- Take the DETONATOR (B).
- Look at the girl, then click on her to talk (C).
- Travel back to inside the house.

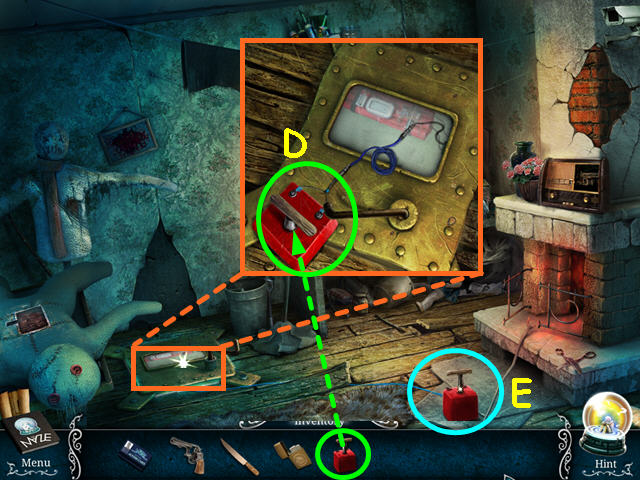
- Look at the hatch and attach the DETONATOR to the cord (D).
- Click on the detonator to open the back, then look inside for a mini-game (E).

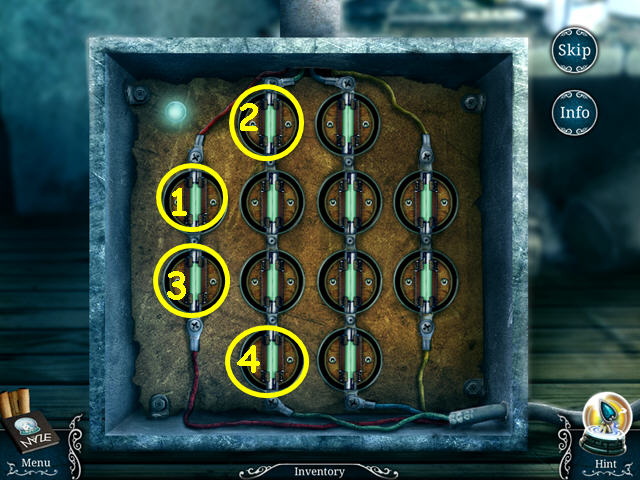
- Turn all the fuses to the vertical position.
- Turning a fuse will effect the surrounding fuses.
- Click on the fuses in numerical order (1-4).
- Press the plunger on the detonator, then select the hatch for a HOS.

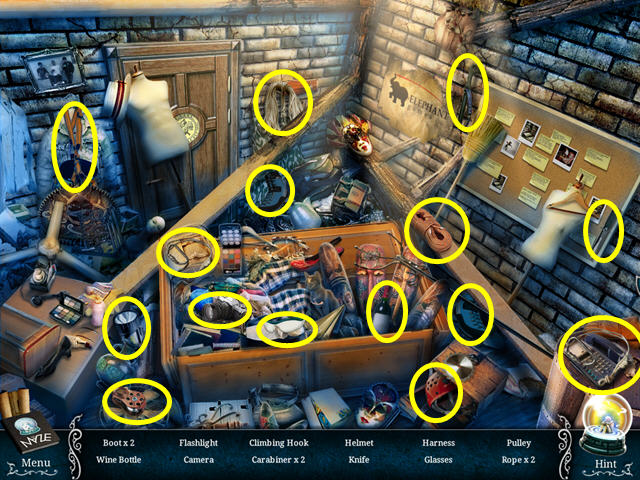
- Locate all the items on the list.
- You will earn the CLIMBING GEAR.
- Return to the area with the cage.

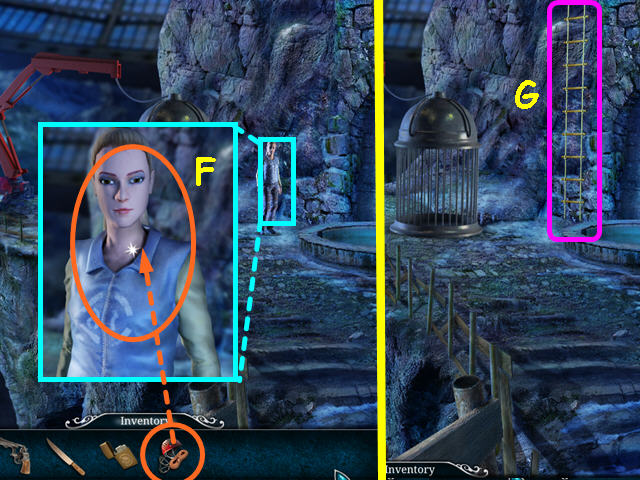
- Look at the girl and give her the CLIMBING GEAR (F).
- Climb up the rope ladder (G).

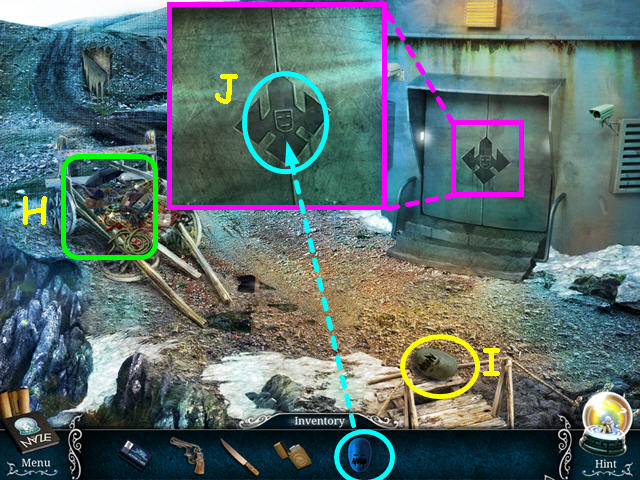
- Note the broken cart (H).
- Take the MASK (I).
- Look at the doors and use the MASK on the symbol for a mini-game (J).

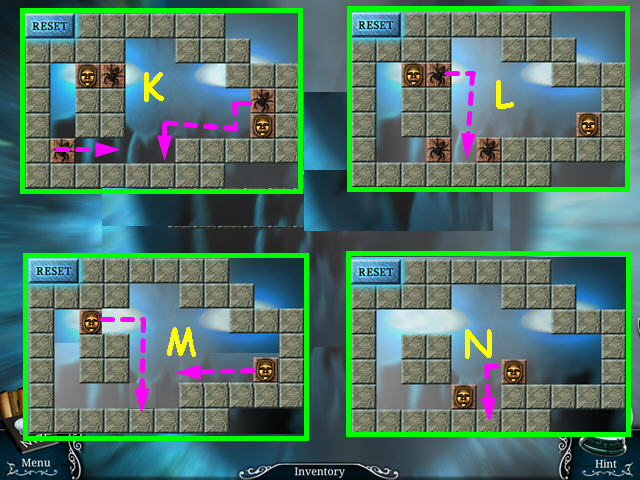
- Move like tiles together so they explode.
- Move the left and right spider tiles within one space of each other (K).
- Drag the third spider tie off the ledge and between the other two spiders tiles (L).
- Move the 2 face tiles together (M, N).
- Select the broken cart for a HOS.

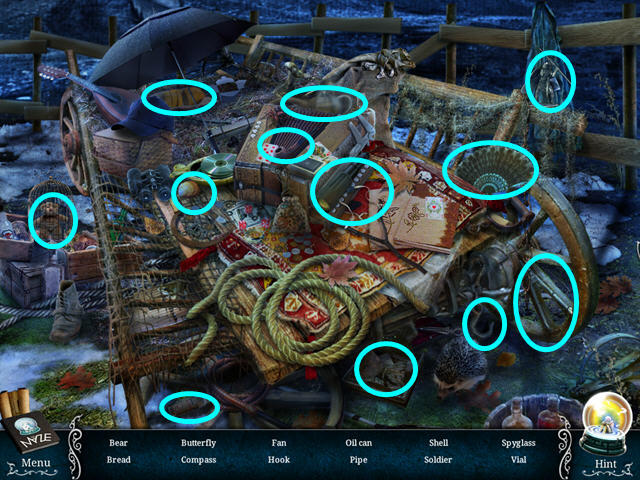
- Locate all the items on the list.
- You will earn the OIL CAN.
- Return to the cage area.

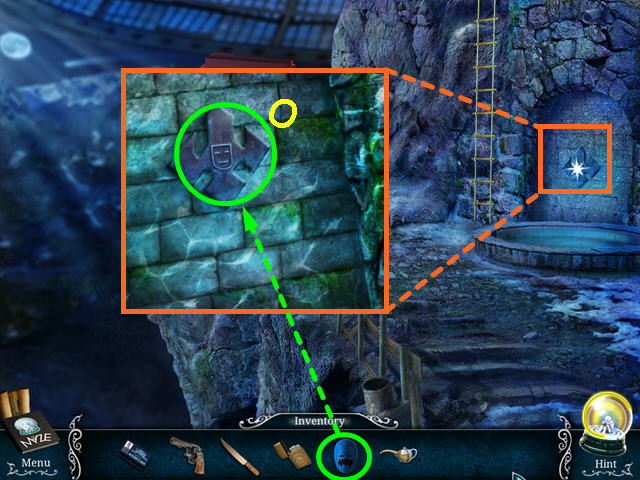
- Look at the fountain and use the MASK on the symbol (O).
- This will trigger a mini-game.

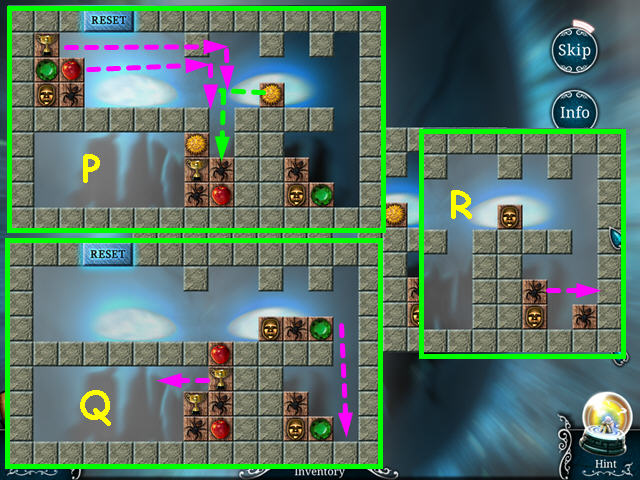
- Move like tiles together so they explode.
- First move the upper sun to the left so it falls in the hole and explodes, then move the upper trophy and apples tiles right to fill the hole (P).
- Move the upper gem, spider and face tiles to the right so they pass the hole.
- Move the upper trophy to the left to explode, then do the same for the spider tile in that area; the apple will automatically fall and explode (Q).
- Move the upper green gem to the right so it falls and explodes, then finish with the spider and face tiles (R).
- Select the area behind the fountain for a HOS.

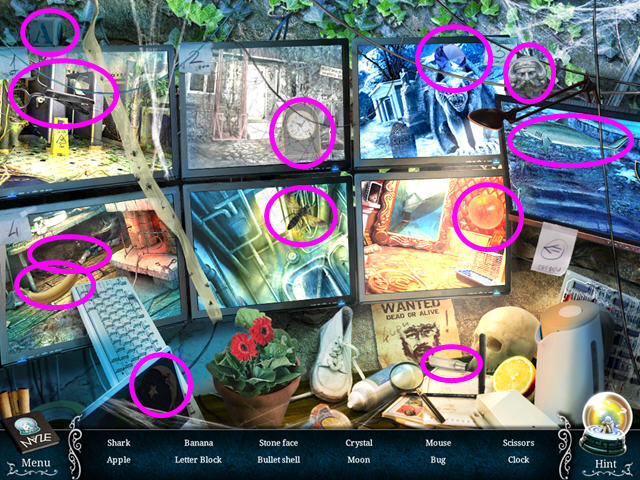
- Locate all the items on the list.
- You will earn the MONITOR.
- Return to the inside of the house.

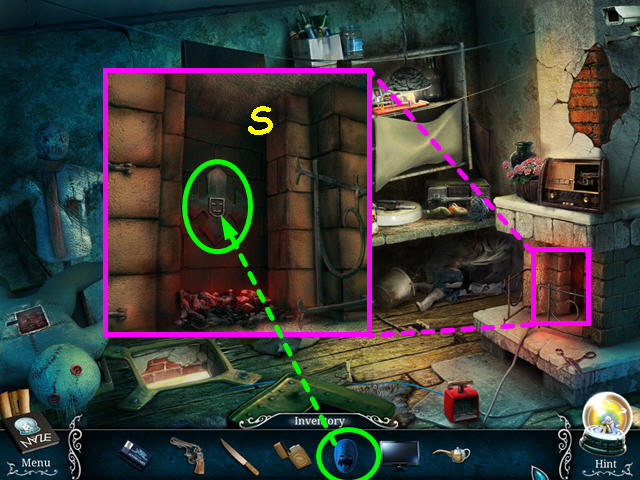
- Look at the fireplace and use the MASK on the symbol (S).
- This will trigger a mini-game.

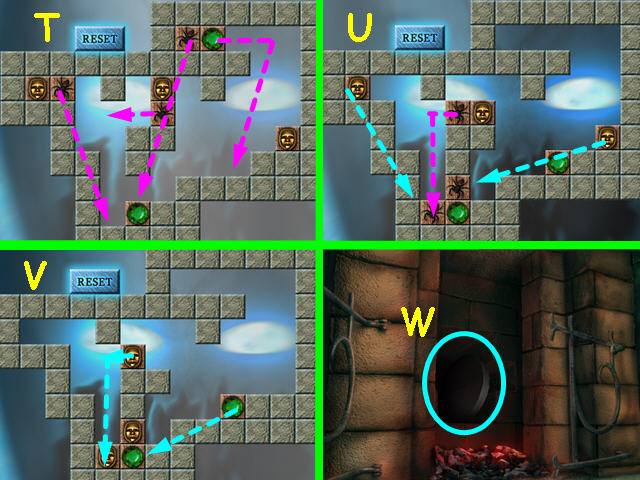
- First, move the upper gem out of the way, but do not make a match.
- Then move the left and right spiders to the lower gem as shown (T).
- Move the middles spider to the left and down to meet the other 2 spiders (U).
- Move the left and right face tiles to the same positions the spiders were in, then drop the middle face tile to make the match (V).
- Move the upper gem left to the other gem.
- Take the LENS from inside the fireplace (W).
- Travel to the area with the broken cart then enter the observatory.

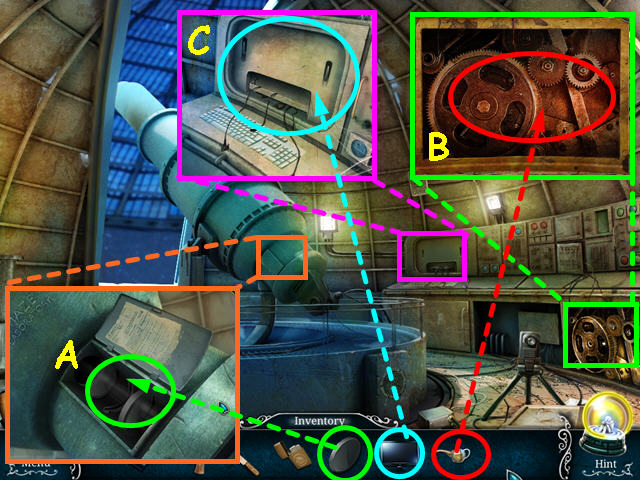
- Look at the telescope, open the cover ans place the LENS inside (A).
- Look at the gears and use the OIL CAN (B).
- Look at the console and place the MONITOR in the niche for a mini-game (C).

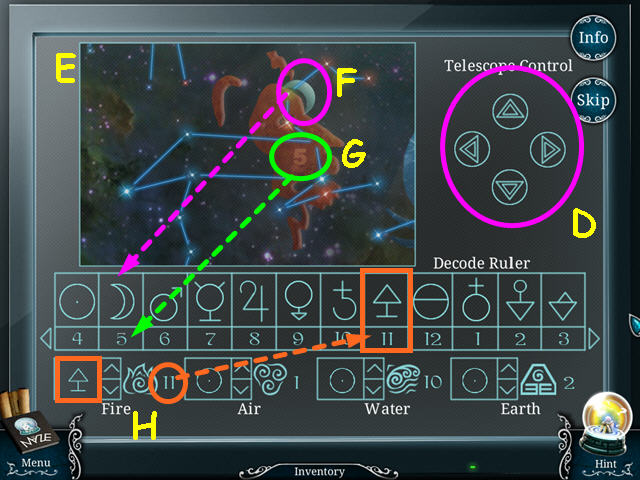
- Use the telescope control buttons to find the constellations (D).
- Four of the constellations have both a number and a symbol (E).
- Find the symbol on the ruler (F).
- Move the numbers so that the number on the constellation is below the symbol (G).
- This constellation is Leo, which is an Fire sign.
- Look at the bottom section to see the Fire section wants the symbol for 11 (H).
- Look at the ruler and find the symbol over 11, then use the arrows in the Fire section to change to that symbol.

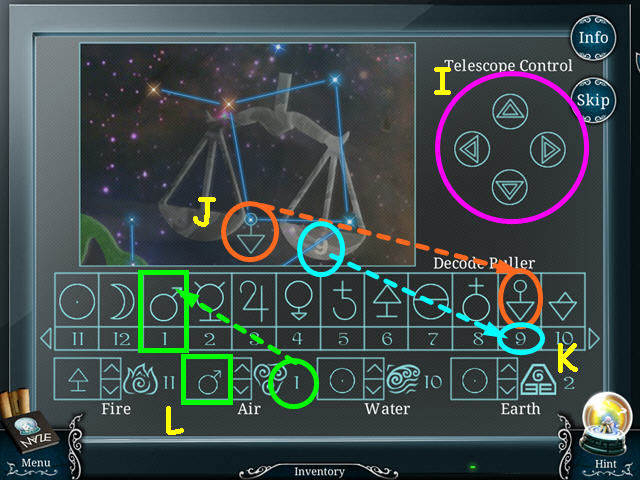
- Use the telescope control buttons to find another constellation (I).
- Find the symbol on the ruler (J).
- Move the numbers so that the number on the constellation is below the symbol (K).
- This constellation is Libra, which is an Air sign.
- Look at the bottom section to see the Air section wants the symbol for 1 (L).
- Look at the ruler and find the symbol over 1, then use the arrows in the Air section to change to that symbol.

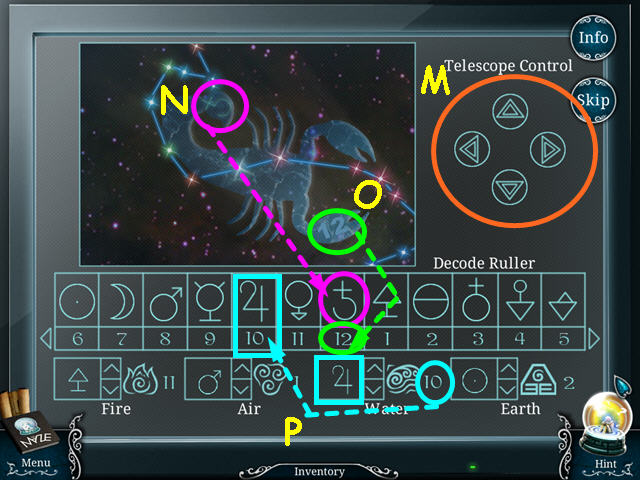
- Use the telescope control buttons to find another constellation (M).
- Find the symbol on the ruler (N).
- Move the numbers so that the number on the constellation is below the symbol (O).
- This constellation is Scorpio, which is a Water sign.
- Look at the bottom section to see the Water section wants the symbol for 10 (P).
- Look at the ruler and find the symbol over 10, then use the arrows in the Water section to change to that symbol.

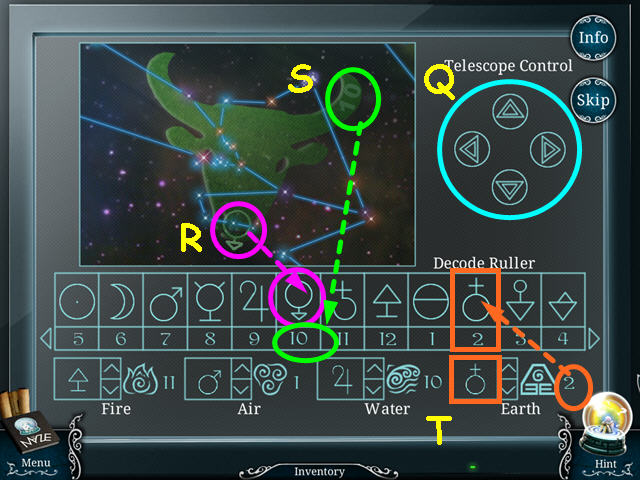
- Use the telescope control buttons to find another constellation (Q).
- Find the symbol on the ruler (R).
- Move the numbers so that the number on the constellation is below the symbol (S).
- This constellation is Taurus, which is an Earth sign.
- Look at the bottom section to see the Earth section wants the symbol for 2 (T).
- Look at the ruler and find the symbol over 2, then use the arrows in the Earth section to change to that symbol.

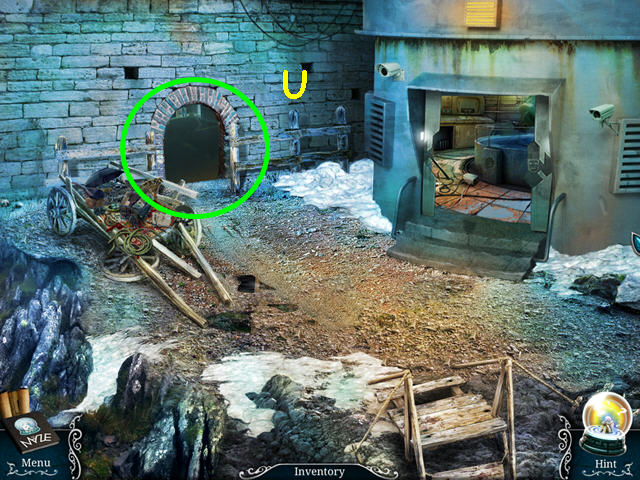
- Exit the observatory.
- Walk forward through the stone archway (U).
Level 4: The Dungeon

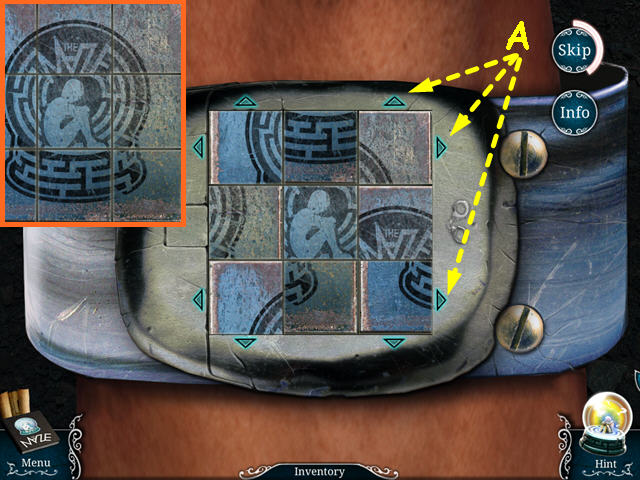
- Using the arrows, move the tiles to restore the logo (A).
- Our solution was: left column down, bottom row right x2, top row right, right column up, bottom row left, and top row left.

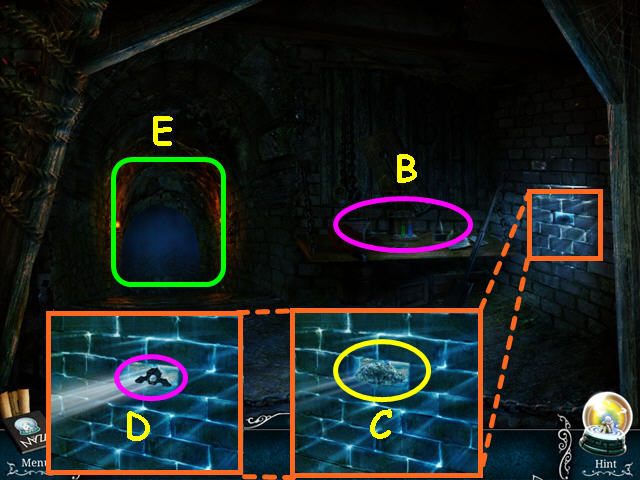
- Note the work table (B).
- Look at the wall and take the ROCK (C).
- Note the figure stuck in the hole (D).
- Walk forward to the well area (E).

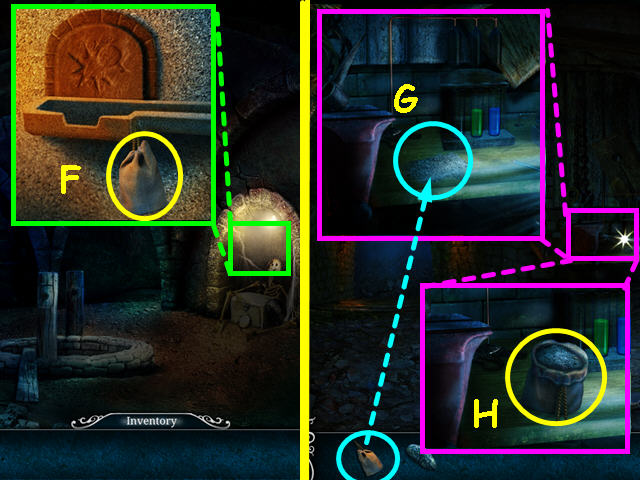
- Look in the alcove and take the POUCH (F).
- Walk down to the first room.
- Look at the work bench and use the POUCH on the powder (G).
- Take the POWDER (H).
- Walk forward to the well area.

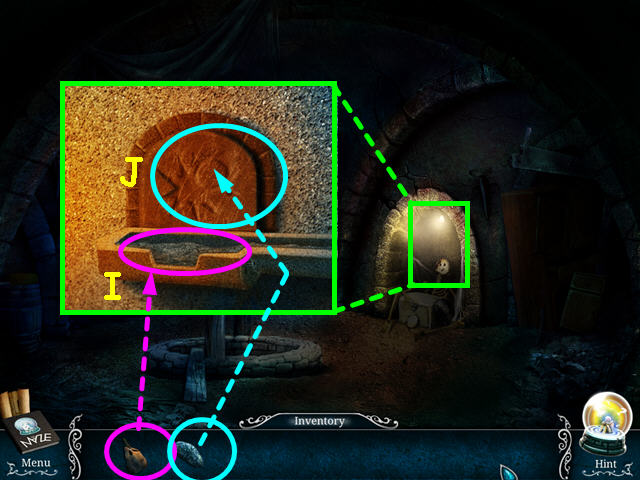
- Look at the alcove and use the POWDER in the trough (I).
- Use the ROCK on the panel to light the powder (J).

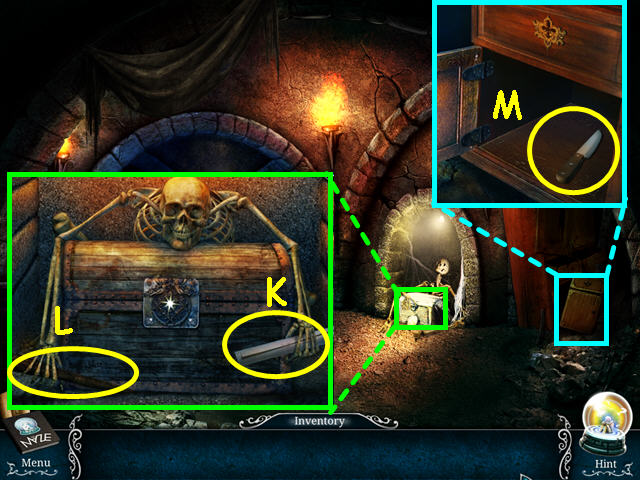
- Look at the skeleton and take the map (K).
- Take the PICKAXE HANDLE (L).
- Look at the nightstand, open the cabinet door and take the KNIFE (M).
- Return to the workbench area.

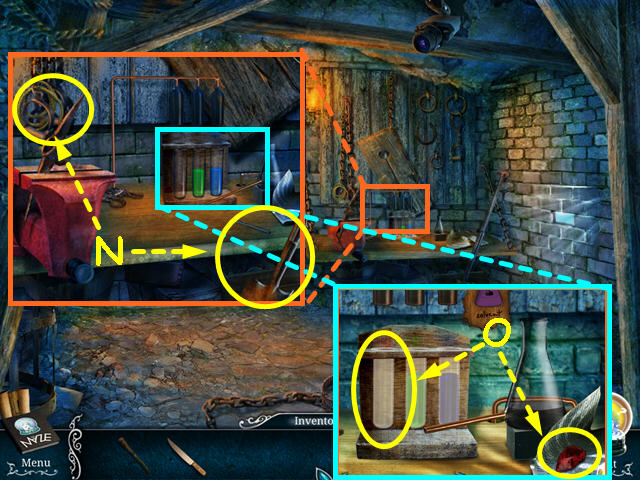
- Look at the workbench and take the ROPE and SHOVEL (N).
- Look at the chemicals and take the RUBY and the EMPTY VIAL (O).
- Exit the close-ups, then walk to the well area.

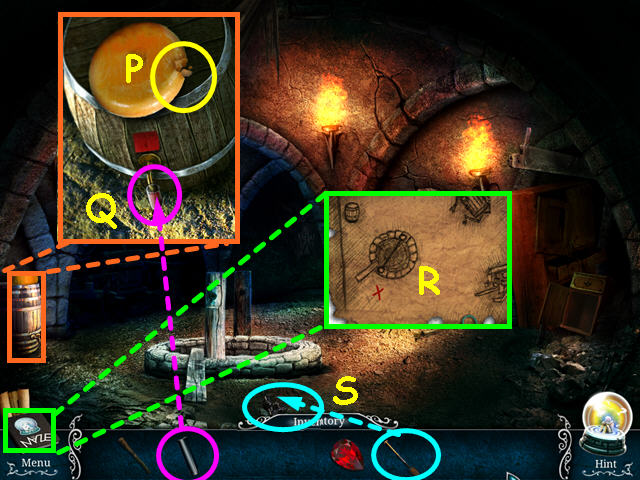
- Look at the barrel and take some CHEESE (P).
- Use the EMPTY VIAL on the spigot, then take the FULL VIAL (Q).
- Look at the map in the diary to learn where to dig (R).
- Use the SHOVEL to dig a hole, then take the 1/2 LOCK PART (S).
- Walk down to the other room.

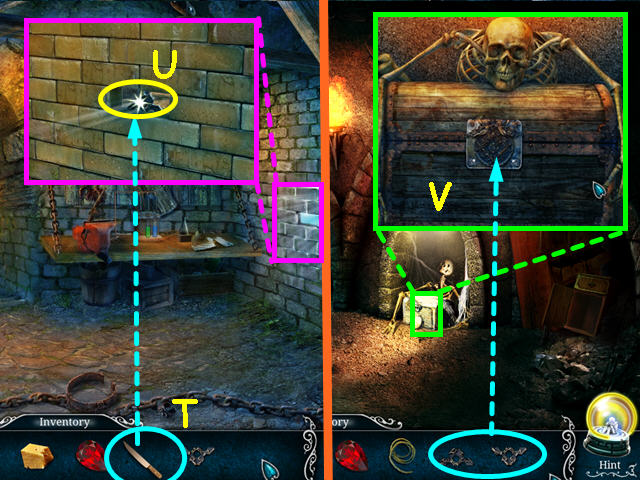
- Look at the wall and use the KNIFE to loosen the item in the hole (T).
- Take the 2/2 LOCK PART (U).
- Return to the well area and look at the skeleton.
- Look at the lock on the chest and place the 2 LOCK PARTS in the lock for a mini-game (V).

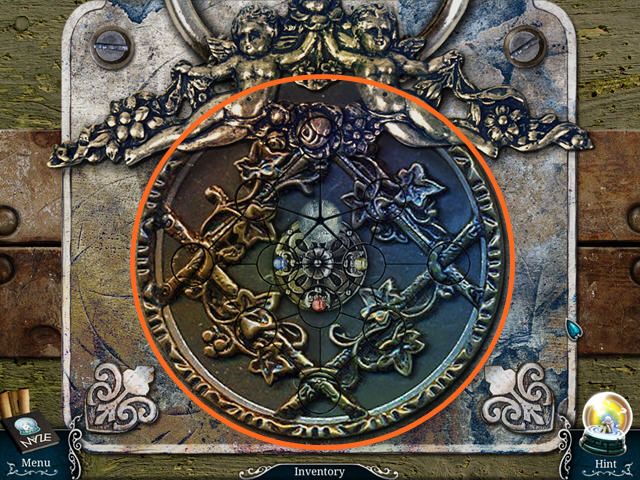
- Slide the circular tiles around the grid to reform the design.
- The tiles can move from 3-5 directions; click, hold and drag the tiles into position.
- Select the skeleton’s chest for a HOS.

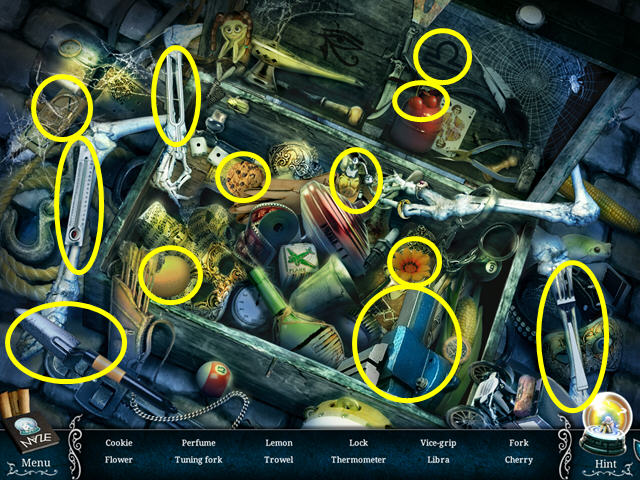
- Locate all the items on the list.
- You will earn the VICE HANDLE.
- Travel to the room with the work bench.

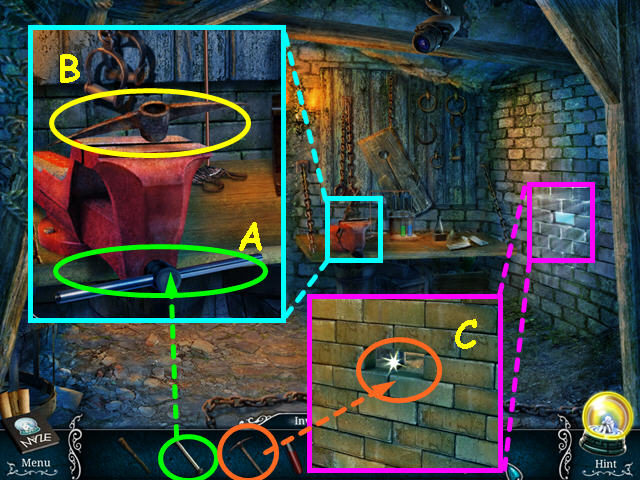
- Look at the work bench and use the VICE HANDLE on the vice (A).
- Take the PICKAXE HEAD and it will automatically combine with the PICKAXE HANDLE to become the PICKAXE (B).
- Look at the brick wall and use the PICKAXE to make a hole (C).
- Walk through the hole to the smithy.

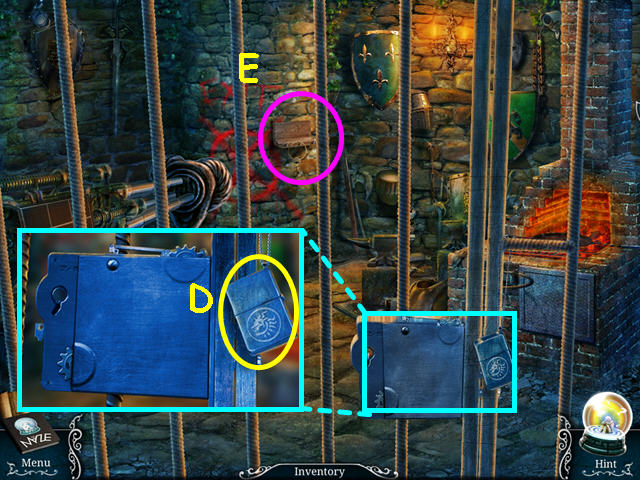
- Look at the lock and take the lighter (D).
- Note the key on the far wall (E).
- Travel to the well area.

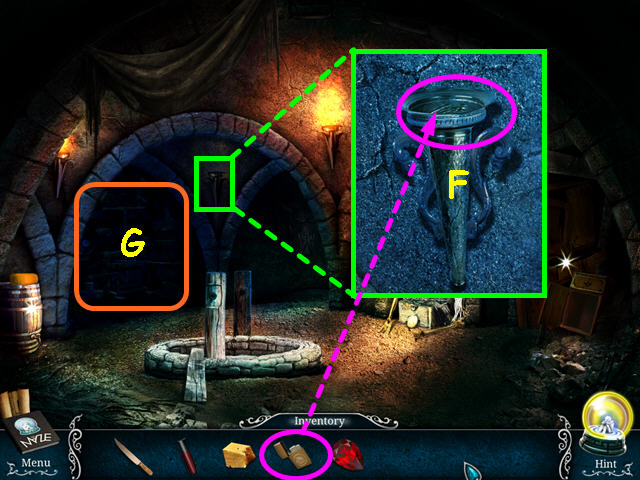
- Look at the unlit torch and use the LIGHTER on it (F).
- Select the barrels in the alcove for a HOS (G).

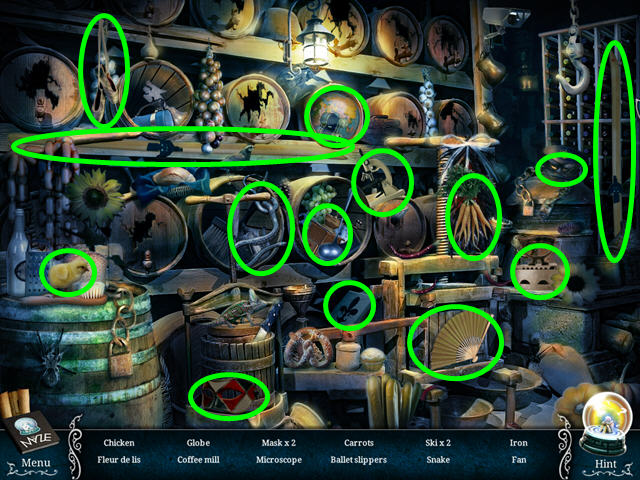
- Locate all the items on the list.
- You will earn the MOLD FORM.

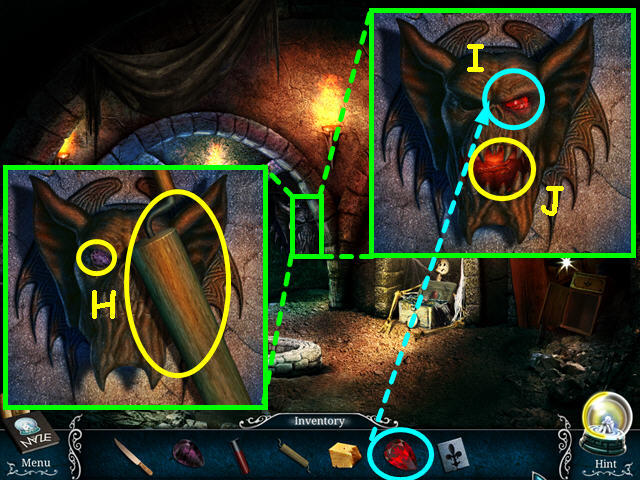
- Look at the carved head and take the DIRTY RUBY and the WINCH (H).
- Place the RUBY in the eye of the head (I).
- Take the HOOK which will automatically combine with the ROPE to make the GRAPPLING HOOK (J).
- Return to the smithy.

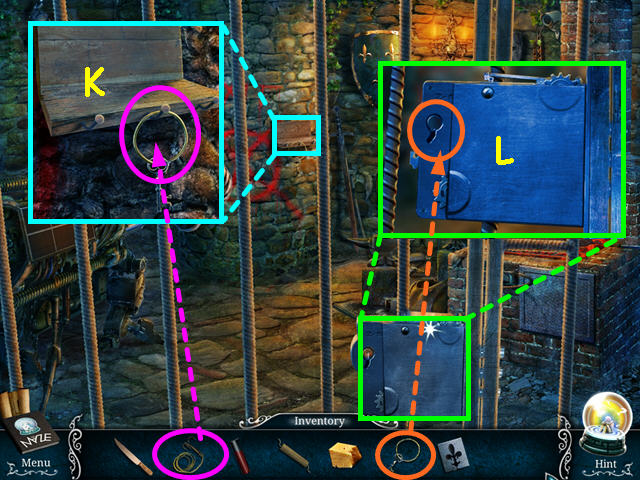
- Look at the shelf and use the GRAPPLING HOOK to get the KEY (K).
- Look at the lock and use the KEY to trigger a mini-game (L).

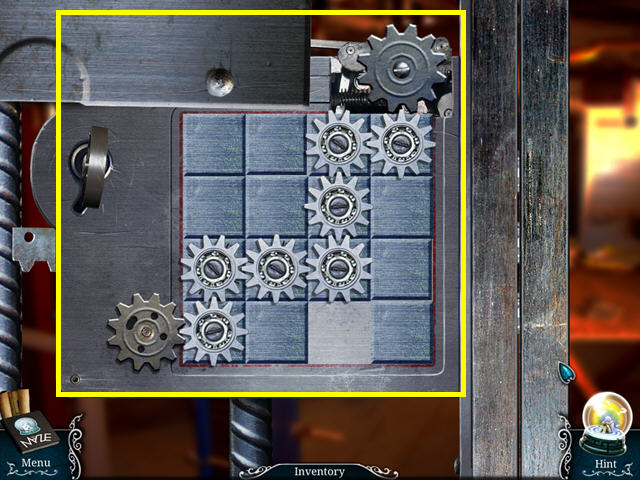
- Move the tiles so all the gears are moving.
- Click and drag the gears into position as shown in the screenshot.

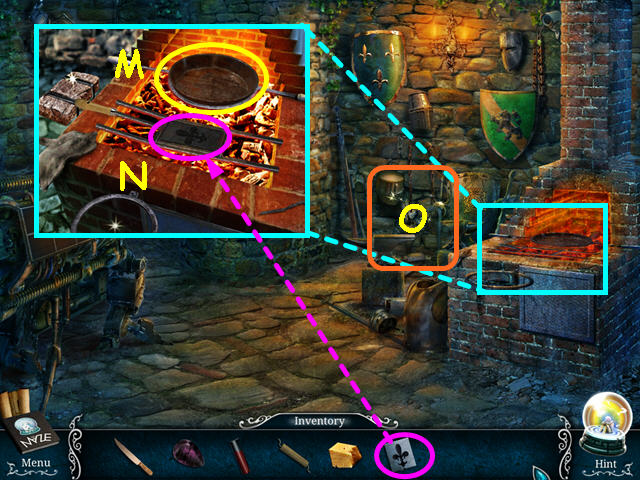
- Look at the craft area and take the PAN (M).
- Place the MOLD FORM into the rectangle (N).
- Select the smith stuff for a HOS (O).

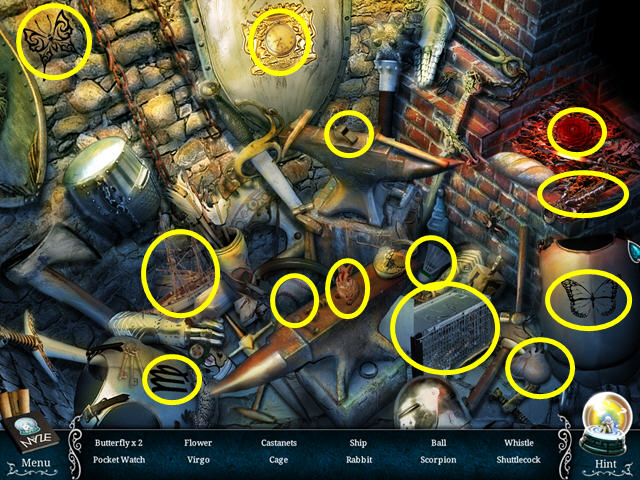
- Locate all the items on the list.
- You will earn the CAGE.
- Exit the room, look at the workbench and select the chemical lab.

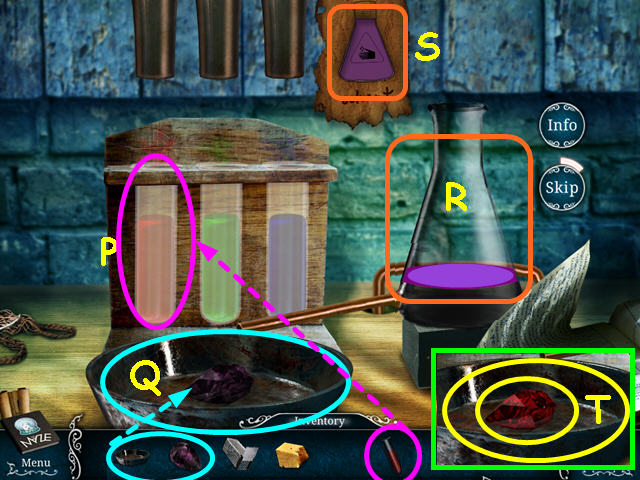
- Place the FULL VIAL in the stand (P).
- Place the PAN on the counter, the place the DIRTY RUBY inside (Q).
- Use the 3 vials to mix a solvent in the beaker (R).
- The color needs to match the color shown in the symbol (S).
- Add these colors to the beaker: red x2, green, and blue x2.
- Take the RUBY from the pan, then take the PAN (T).

- Walk forward to the well area.
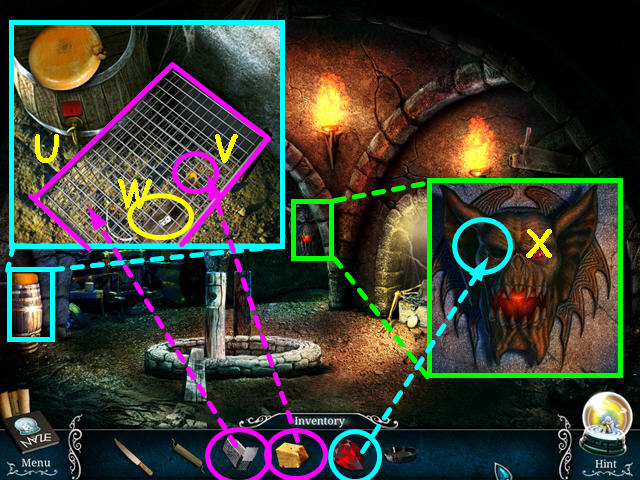
- Look at the barrel with the cheese and place the CAGE on the ground (U).
- Place the CHEESE in the cage (V) and take the 1/4 DOMINO from the rat (W).
- Look at the carved head and place the RUBY in the eye (X).
- Walk forward to the torture area.

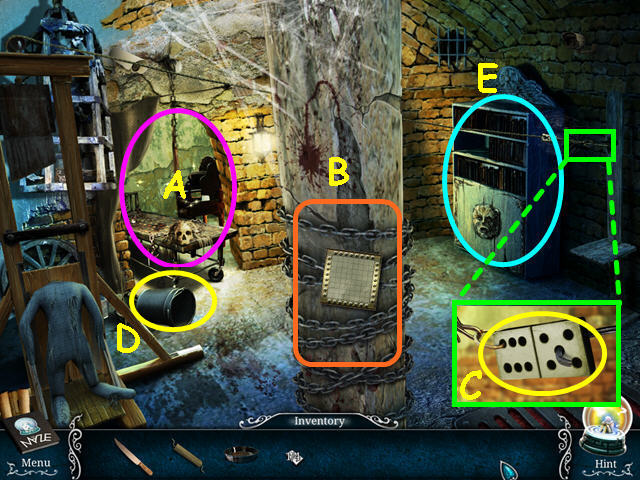
- Note the torture room (A).
- Note the chain lock on the pole (B).
- Look at the rope and take the 2/4 DOMINO (C).
- Take the BUCKET (D).
- Select the bookcase for a mini-game (E).

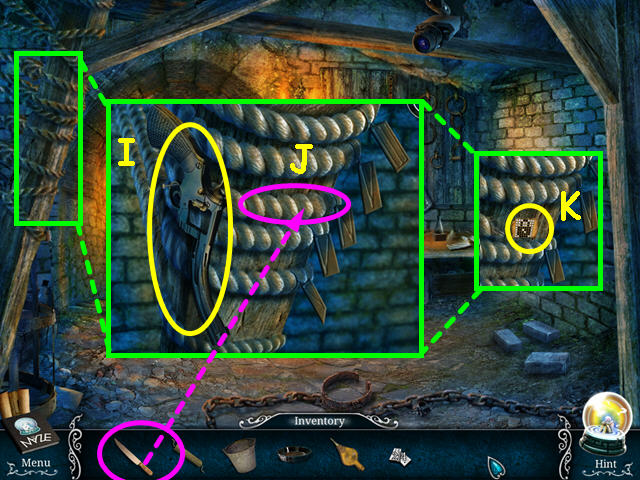
- Place the books so the bars on the bindings match (F).
- Note the notches in the bookcase to help you get started (G).
- The symbol ‘N’ will glow when all the books are in the correct position (H).
- Select the torture room for a HOS.

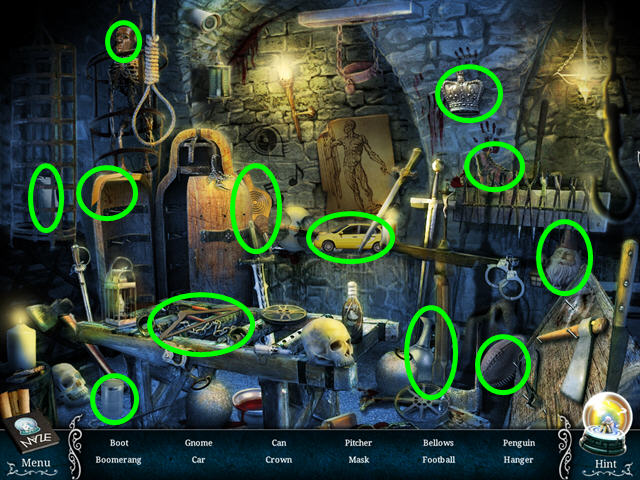
- Locate all the items on the list.
- You will earn the BELLOWS.
- Return to the area with the workbench.


- Look at the beam and take the BROKEN GUN (I).
- Use the KNIFE to cut the rope with the symbol ‘N’ (J).
- Take the LOCK SOLUTION (K).
- Return to the torture area and look at the chain lock.

- Use the LOCK SOLUTION on the grid to trigger a mini-game (L).
- Slide the columns and rows to recreate the lock shown in the solution.
- Our solution was: 7D, 8D, 1L, 6D, 6D, 7D, 7D, 2L, 2L, 3L, 3L, 4L, 8U, 4L, 5R, 8U, 4L, 4D, 6L, 4U, 6D, 6L, 6L, 6U, 8D, 6R, 6R, 6R, 8U, 6L, 6L, 7R, 8U, 7R, 7R, 8D, 7L, 8D, 7L, 8R, 8R.
- Take the CHAIN from the pole (M).
- Exit the room.

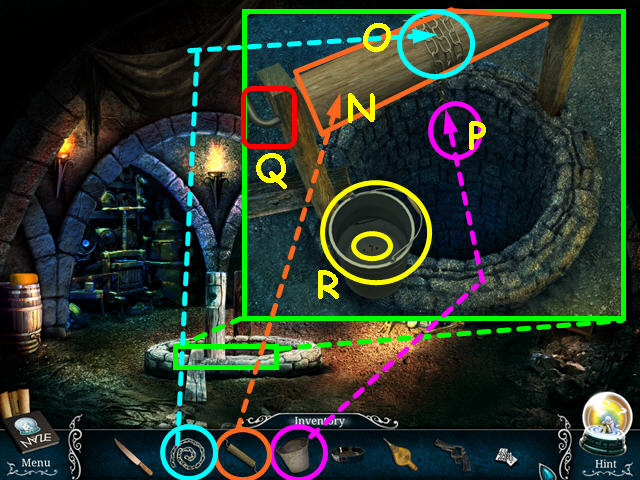
- Look at the well and place the WINCH on the poles (N).
- Place the CHAIN on the winch (O).
- Place the BUCKET on the chain (P).
- After the bucket hits the bottom, click on the winch handle (Q).
- Take the 3/4 DOMINO from inside the bucket, then take the FULL BUCKET (R).
- Travel to the smithy area.


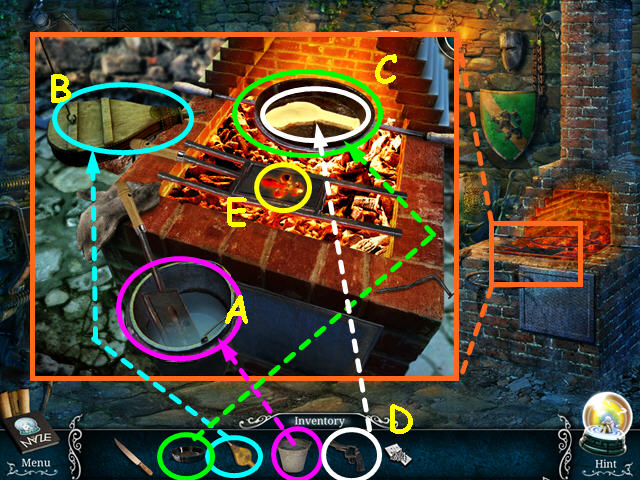
- Place the BUCKET into the holder (A).
- Place the BELLOWS on the left stand (B).
- Place the PAN in the ring over the fire (C).
- Place the BROKEN GUN in the pan (D).
- Once the gun turns yellow, click on it to pour in the mold.
- Click on the mold so it dunks in the bucket.
- Click on the mold in the bucket to return it to the frame, then take the FLEUR-DE-LIS (E).
- Return to the well area.

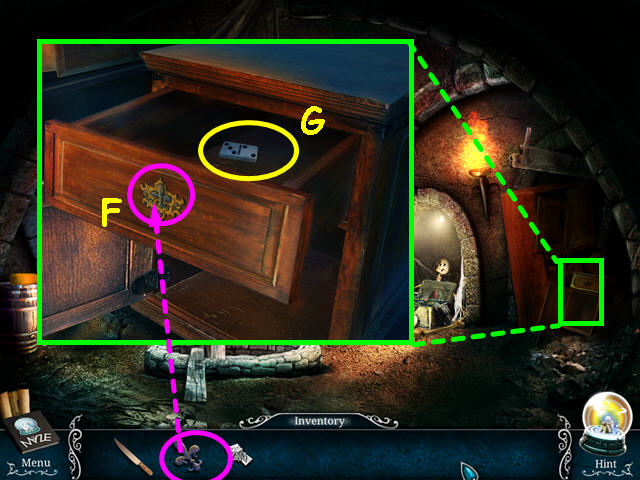
- Look at the furniture and use the FLEUR-DE-LIS in the drawer lock (F).
- Take the 4/4 DOMINO (G).
- Return to the smithy area.

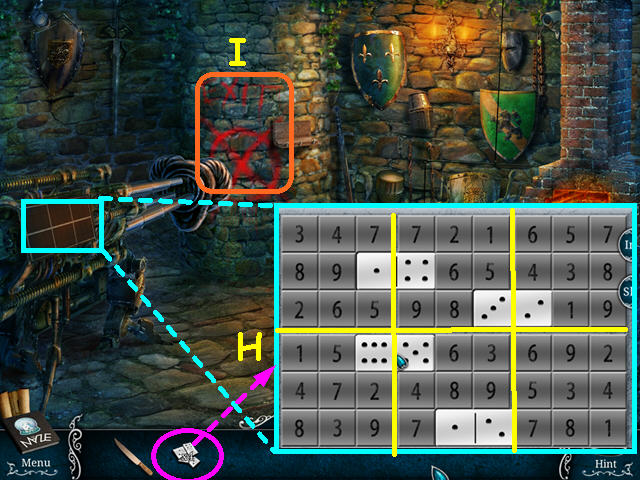
- Look at the battering ram and place the 4 DOMINOES on the grid for a mini-game (H).
- Place the dominoes in the empty spaces so that each 3×3 block of numbers has the digits 1-9.
- Walk forward through the hole in the wall (I).
Level 5: The Plane Yard

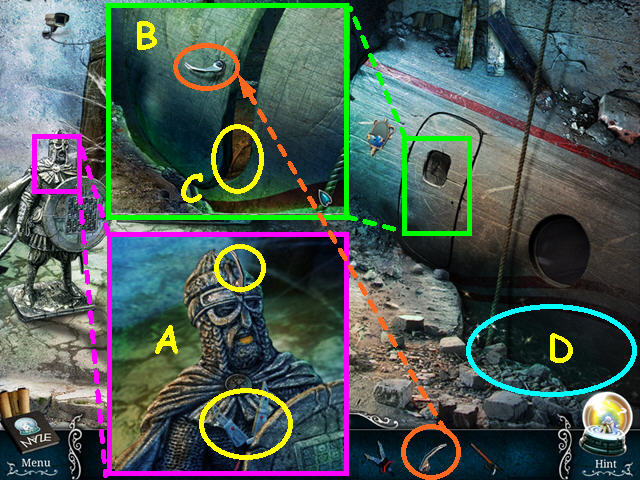
- Look at the statue and take the DOOR HANDLE and the METAL JAW (A).
- Look at the plane door and use the DOOR HANDLE to open the door (B).
- Take the WRENCH (C).
- Select the hole under the plane for a HOS (D).

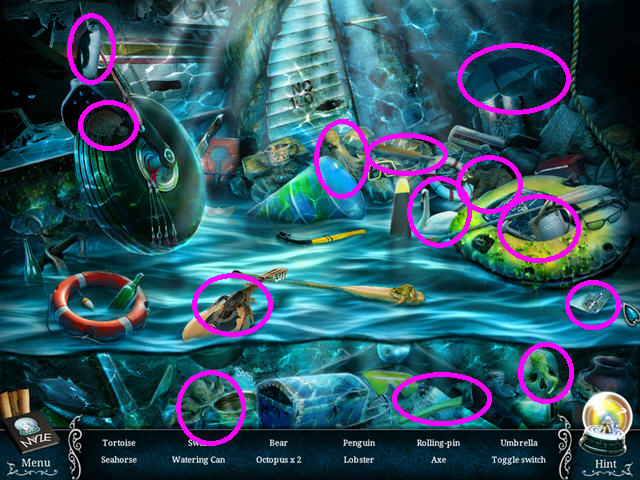
- Locate all the items on the list.
- You will earn the 1/2 TOGGLE SWITCH.

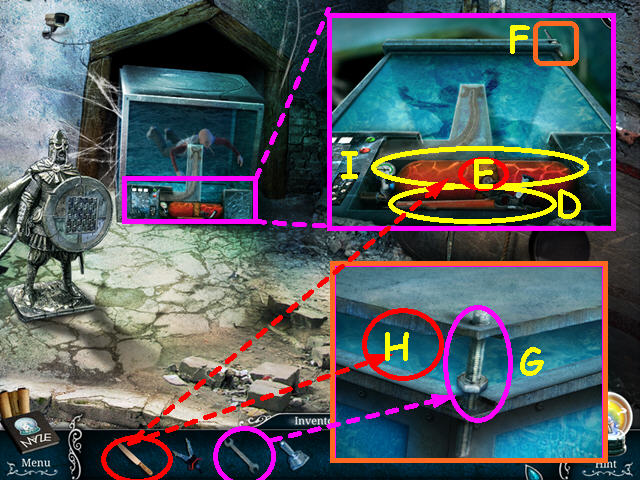
- Look at the tank and take the SPEAR GUN (D).
- Use the WRENCH to undo the strap on the air tank (E).
- Look at the upper right corner of the tank (F).
- Use the WRENCH to undo the bolt (G).
- Slide the KNIFE into the tank (H).
- Take the air tank, which will combine with the METAL JAW to make the MECHANICAL JAW (I).

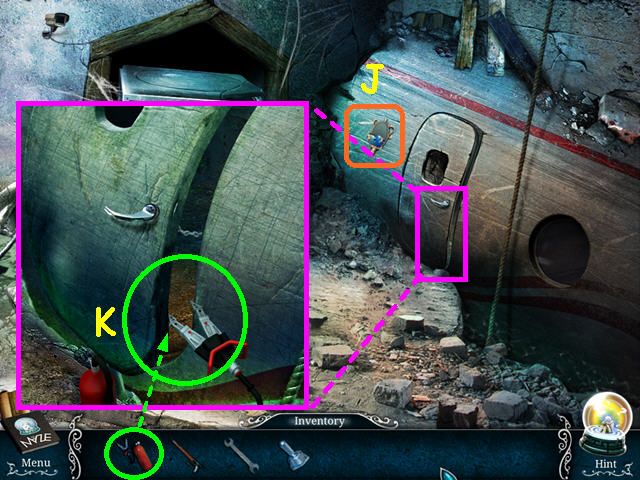
- Note the egg on the side of the plane (J).
- Look at the plane door and use the MECHANICAL JAW (K).
- Enter the plane.

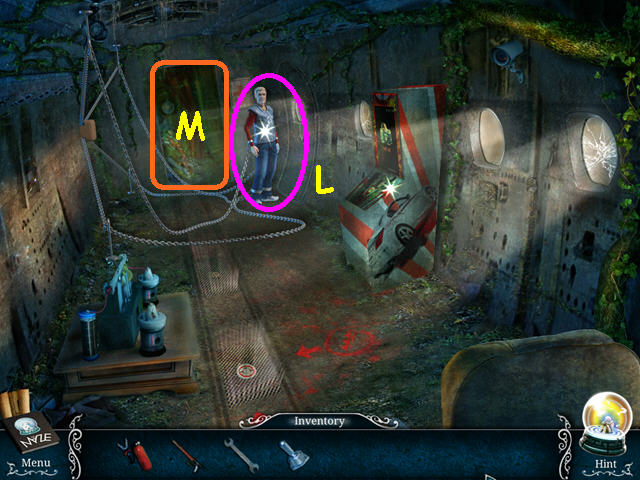
- Talk to the chained man to learn he is hungry (L).
- Select the rear area for a HOS (M).

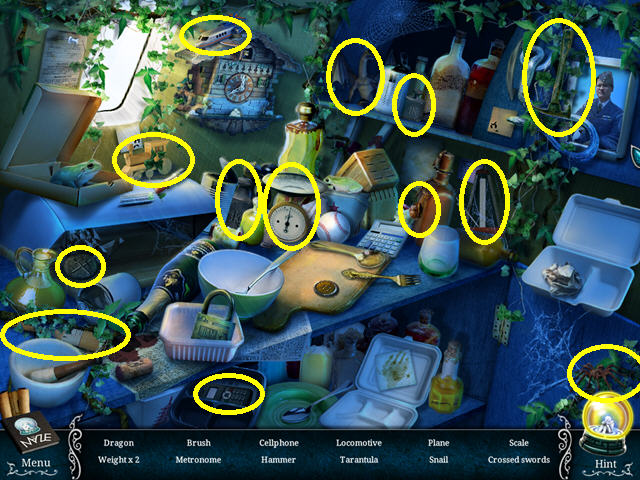
- Locate all the items on the list.
- You will earn the CROSSED SWORDS.
- Walk down to exit the area.

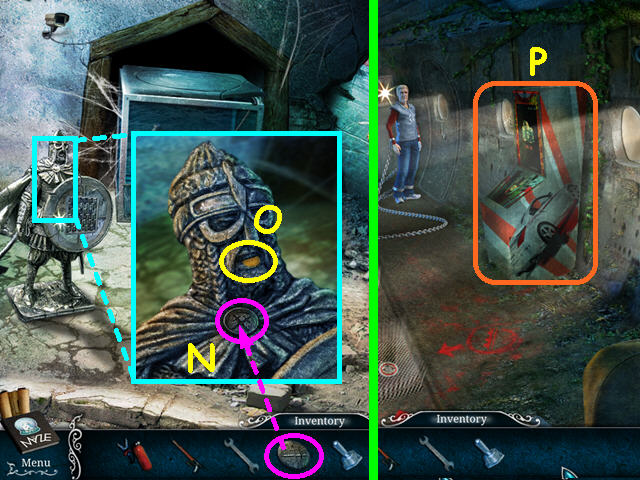
- Look at the statue and use the CROSSED SWORDS on the matching symbol (N).
- Take the COIN (O).
- Return to the plane and select the video game (P).

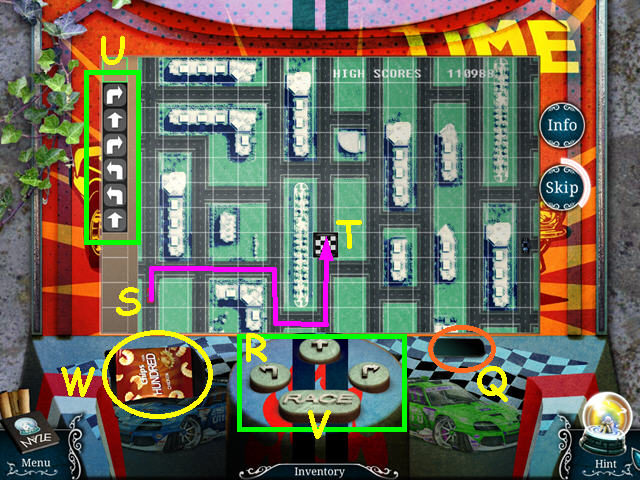
- Use the COIN on the slot to trigger the mini-game (Q).
- Press the buttons (R) to create a path for the car (S) to follow to the flag (T).
- The path is shown on the left (U).
- Press the ‘Race’ button to begin the race (V).
- Take the FOOD (W).

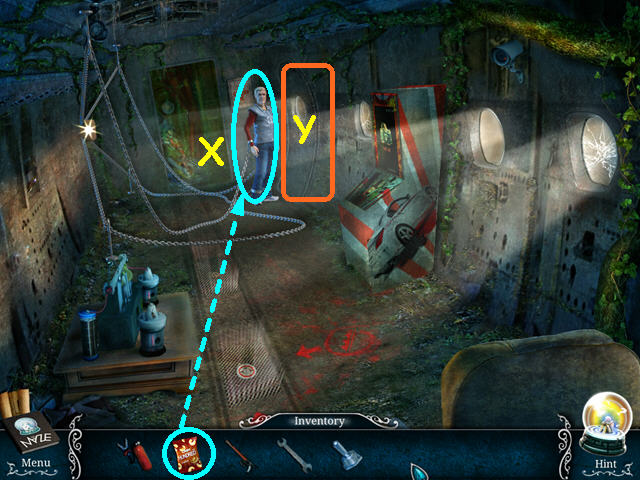
- Give the FOOD to the man (X).
- Walk right to the plane graveyard (Y).

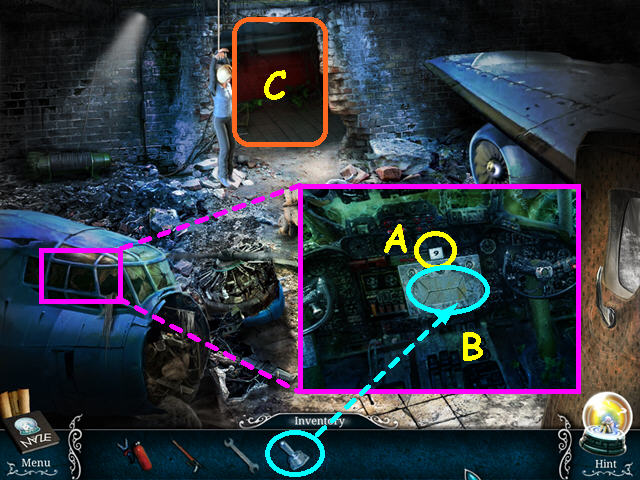
- Look in the airplane cabin and take the NUMBER 9 (A).
- Place the 1/2 TOGGLE SWITCH on the panel (B).
- Exit the cabin and walk forward to reception (C).

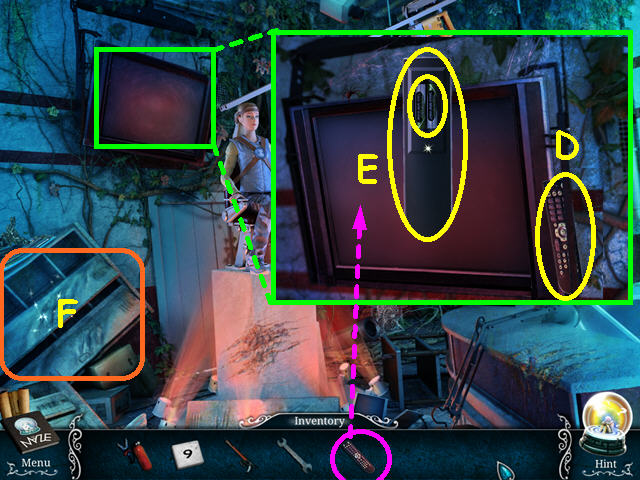
- Look at the TV and take the REMOTE (D).
- Use the REMOTE on the TV; then take the BATTERIES and the EMPTY REMOTE (E).
- Select the lockers for a HOS (F).

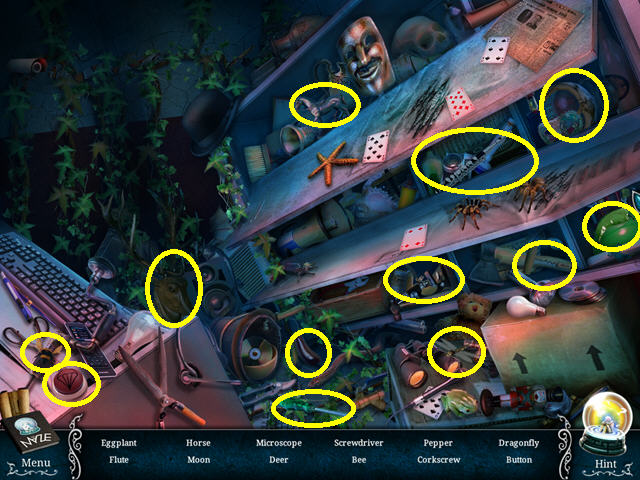
- Locate all the items on the list.
- You will earn the PARACHUTE BUTTON.
- Return to the plane graveyard.

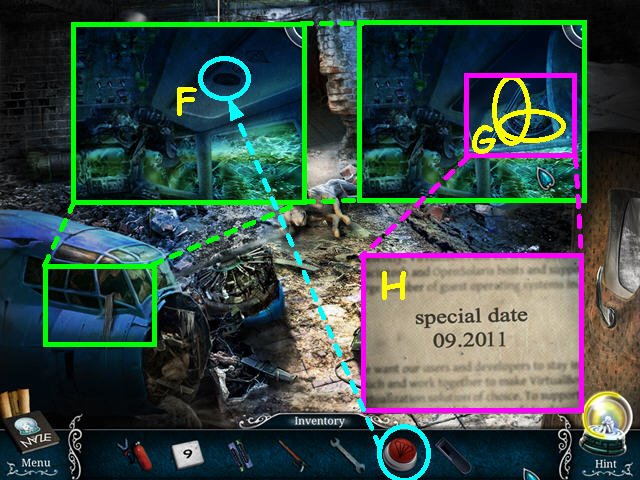
- Look in the airplane cabin and place the PARACHUTE BUTTON in the hole (F).
- Press the button to open the compartment.
- Take the AIRPLANE ROD and 1/2 LOCK PART (G).
- Make sure to look at the newspaper (H).
- Exit the close-up and walk down to enter the plane.

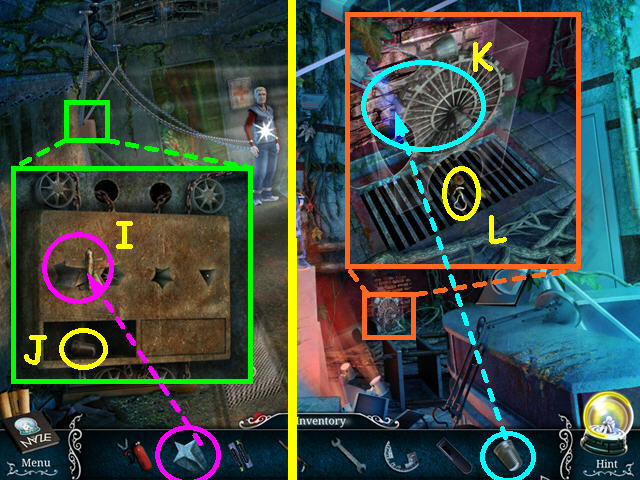
- Look at the chains control and use the AIRPLANE ROD in the left spot (I).
- Take the THIMBLE (J).
- Return to reception.
- Look at the water wheel and use the THIMBLE to repair it (K).
- Take the KEY (L).
- Return to the plane.

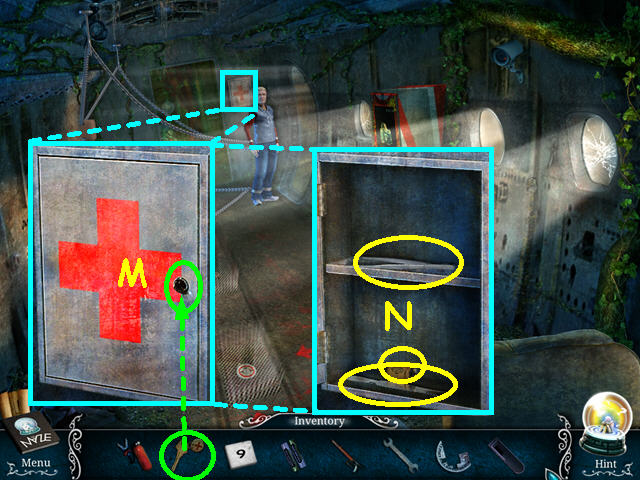
- Look at the medicine chest and use the KEY to unlock it (M).
- Take the TWEEZERS, SCALPEL, and the 1/2 CAPACITOR (N).
- Return to reception.

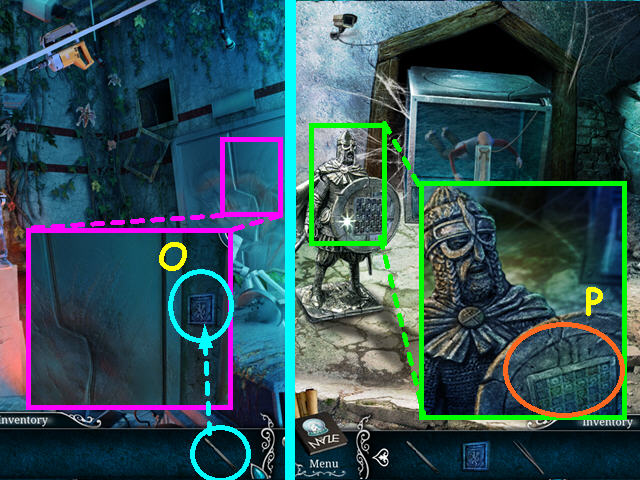
- Look at the door and use the SCALPEL to loosen the SHIELD (O).
- Take the SHIELD, then travel to the aquarium area.
- Look at the statue then click on the shield for a mini-game (P).

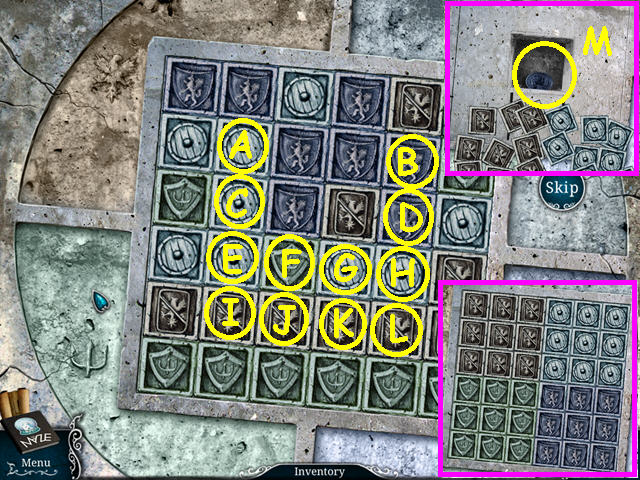
- Use the SHIELD on the grid to trigger a mini-game.
- Move the tiles to the matching quadrants indicated by color and symbol.
- Click on a tile to rotate the surrounding tiles clockwise – note that the tiles on the outer edge will not work.
- This mini-game is randomly generated – your solution may vary.
- Our solution was: Ex4, Ax4, Hx3, Fx2, Ex1, Gx1, Ex2, Cx2, Ix1, Cx2, Hx2, Bx4, Gx2, Fx1, Hx1, Ex1, Gx1, Ex4, Kx1, Ix2, Kx1, Jx1, Kx1, Lx1, Jx2, Kx2, Hx1, Dx6, Lx6, Kx2, Bx2, Lx1, Bx1, Hx1, Bx2, Dx4, Lx1, Hx3, Lx4, Dx4, and Hx4.
- Click on the square in the center of the slab and take the DOG MEDALLION (M).
- Travel to the plane graveyard.

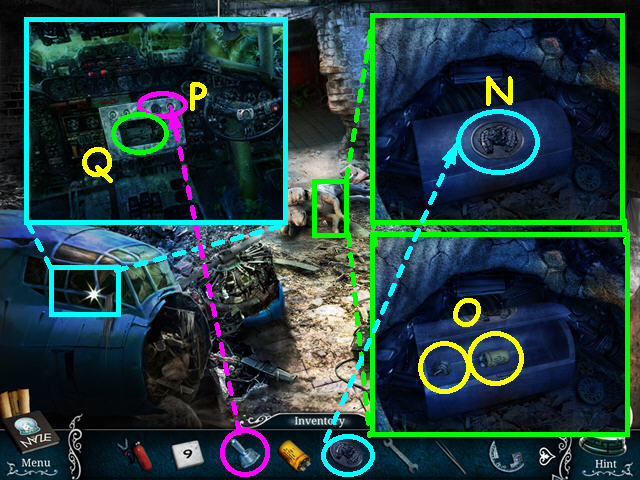
- Look at the Cerberus and use the DOG MEDALLION on the case (N).
- Take the 2/2 TOGGLE SWITCH and the 2/2 CAPACITOR (O).
- Look in the airplane cabin and use the 2/2 TOGGLE SWITCH on the panel (P).
- Click on the panel for a mini-game (Q).

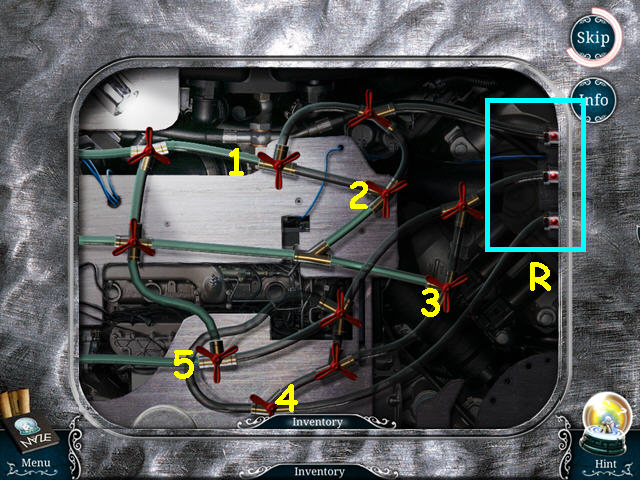
- Stop the fuel supply to all 3 exits on the right (R).
- Click on the valves to open/close them, noting that the pressure may cause other valves to open or close.
- The tube will turn black when no fuel is present.
- Click on the valves in numerical order (1-5).

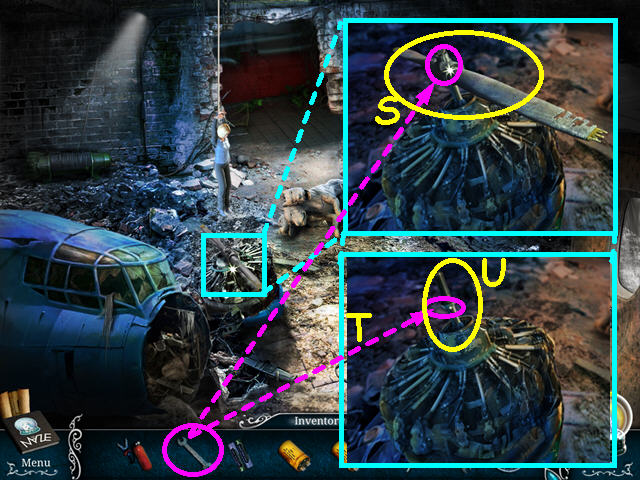
- Look at the engine, use the WRENCH then take the PROPELLER (S).
- Use the WRENCH on the shaft again (T).
- Take the BOLT ROD (U).
- Return to the plane.

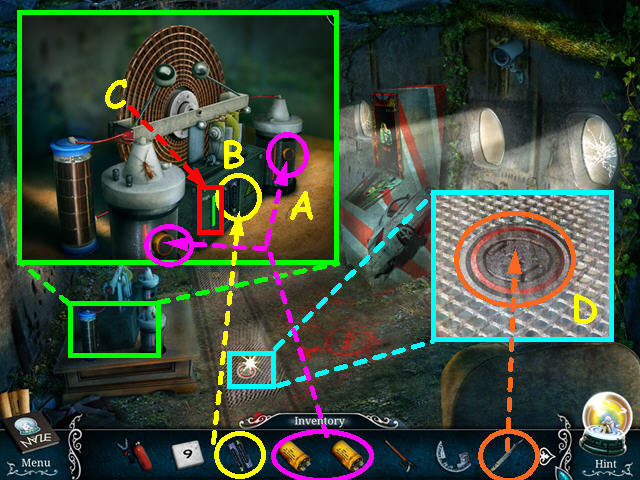
- Look at the device on the left and place the 2 CAPACITORS into the 2 holes (A).
- Place the BATTERIES into the center (B).
- Once the gauge fills with green, take the batteries (C).
- The batteries will combine with the EMPTY REMOTE to become the REMOTE.
- Look at the hatch in the floor and use the PROPELLER to open it (D).
- Select the open hatch for a HOS.

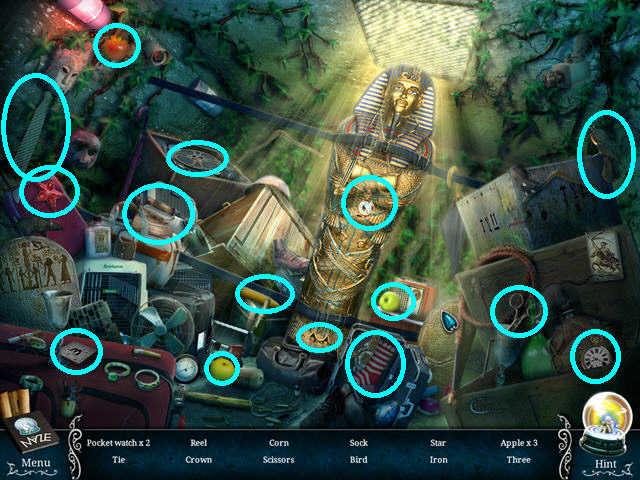
- Locate all the items on the list.
- You will earn the NUMBER 3.
- Travel to the plane graveyard.

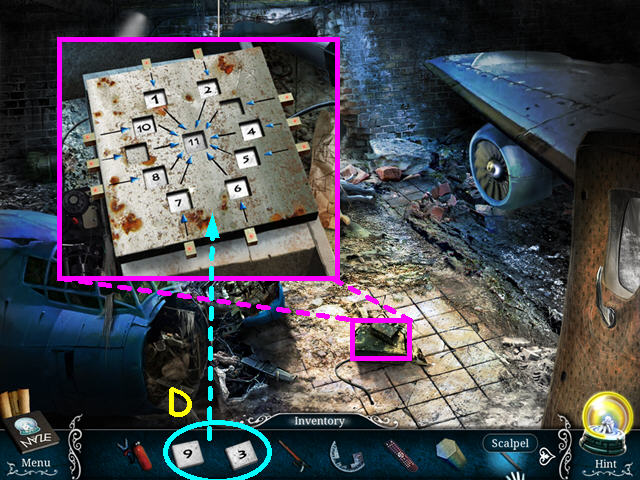
- Look at the box on the floor and place the NUMBER 3 and NUMBER 9 into the empty spots (D).
- This will trigger a mini-game.

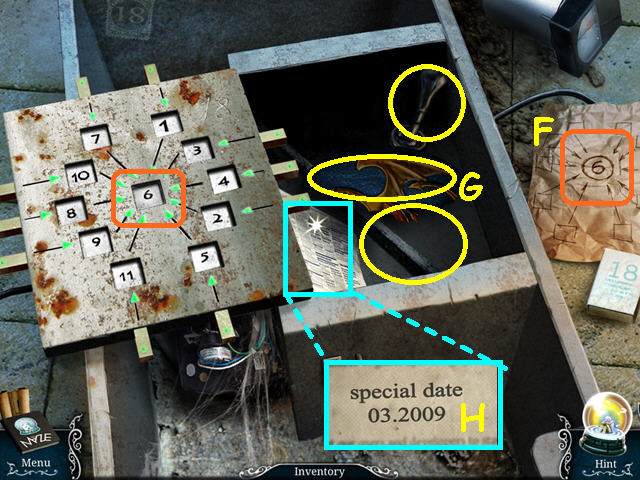
- Move the numbers so that all the sets add up to 18.
- Per the clue, the center number should be 6 (F).
- Click on an outer number to swap it with the center number.
- The arrows will turn green when a set is correct.
- Take the LEVER, SPHERE ROD, and 1/2 EGGSHELL (G).
- Make sure to read the newspaper for a clue (H).
- Travel to reception.

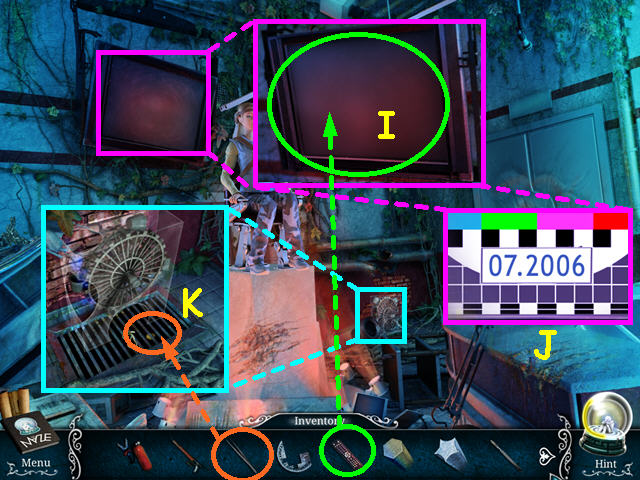
- Look at the TV and use the REMOTE to turn it on (I).
- Make sure to click on the picture to find the clue (J).
- Look at the water wheel and use the TWEEZERS to get the COIN (K).
- Travel to the plane and look at the video game.

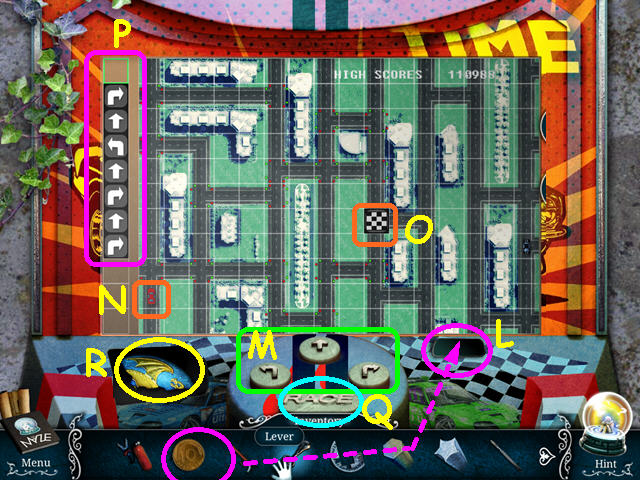
- Use the COIN on the slot to trigger the mini-game (L).
- Press the buttons (M) to create a path for the car (N) to follow to the flag (O).
- The path is shown on the left (P).
- Press the ‘Race’ button to begin the race (Q).
- Take the 2/2 EGGSHELL (R).
- Walk down to exit the plane.

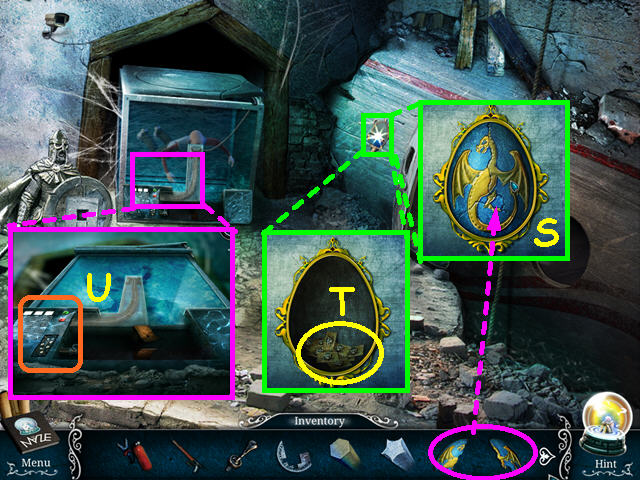
- Look at the egg and place the 2 EGGSHELLS into the form (S).
- Take the DRAGONS from inside the egg (T).
- Look at the aquarium and select the code lock on the left for a mini-game (U).

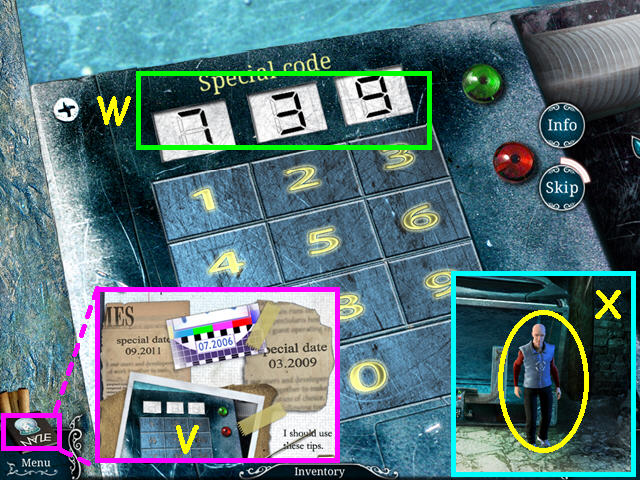
- Look in the diary for the 3 clues (V).
- Put the numbers in the order of the years 2006-2009-2011.
- Press the numbers 7-3-9 on the keypad (W).
- Talk to Josh (X).
- Travel to the plane graveyard.

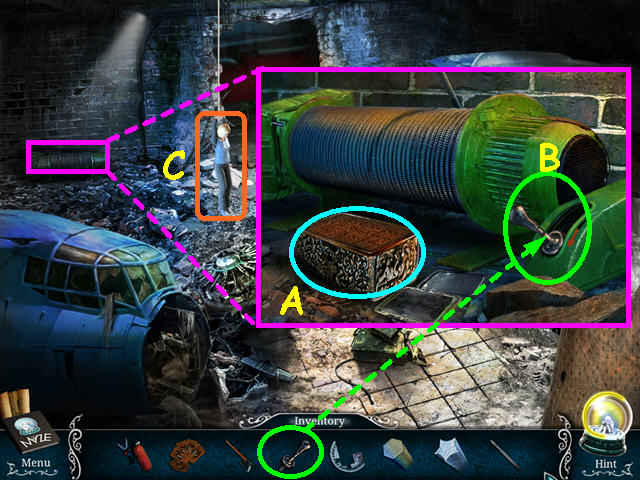
- Look at the winch and note the dragon box (A).
- Place the lever on the right of the winch (B).
- Talk to Lindsey (C).
- Look at the winch again and select the dragon box for a mini-game.

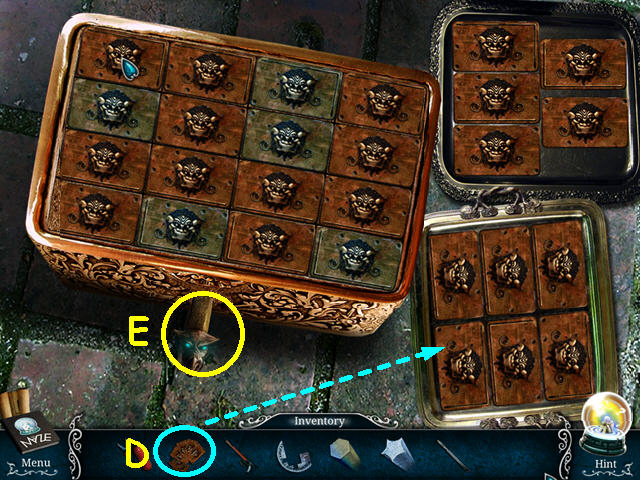
- Place the dragons on the box top trigger the mini-game (D).
- Place the tiles in the correct positions based on the number of dots and the lines.
- The top row has lines in the upper right corner, the 2nd row had no lines, the 3rd row has a line on the bottom, while the bottom row has lines in the lower left corner.
- The 1st column has 2 dots, the 2nd column has 4 dots, the 3rd column has 1 dot, and the 4th column has 3 dots.
- Take the DRAGON ROD (E).
- Walk down to enter the plane.

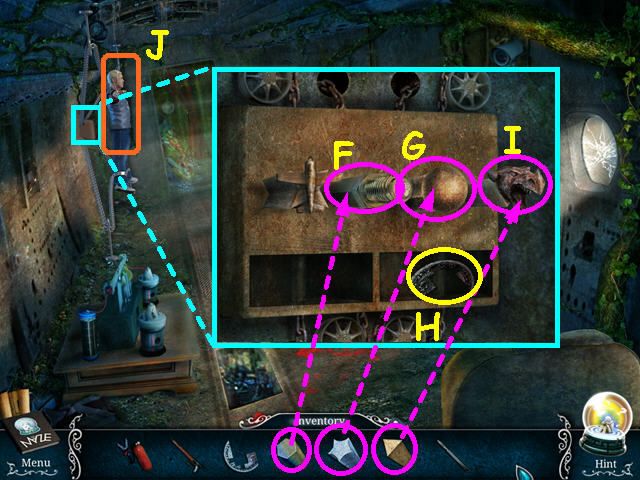
- Look at the chains mechanism.
- Use the BOLT ROD in the second position (F).
- Use the SPHERE ROD in the 3rd position (G).
- Take the 2/2 LOCK PART (H).
- Place the DRAGON ROD in the last position (I).
- Talk to Adrian (J).
- Travel to reception.

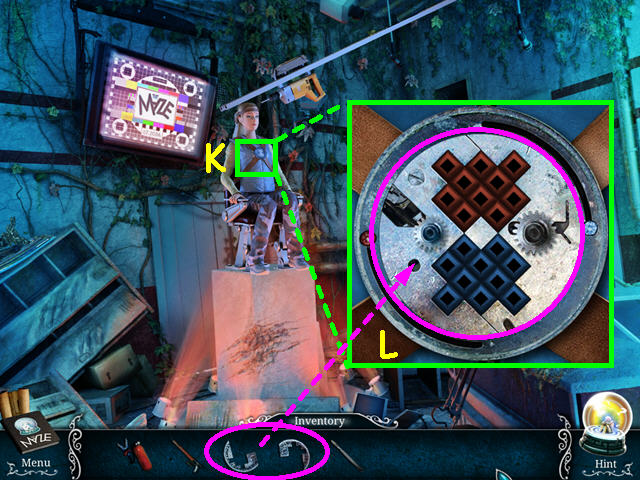
- Look at the lock on the girl (K).
- Place the 2 LOCK PARTS into the lock for a mini-game (L).

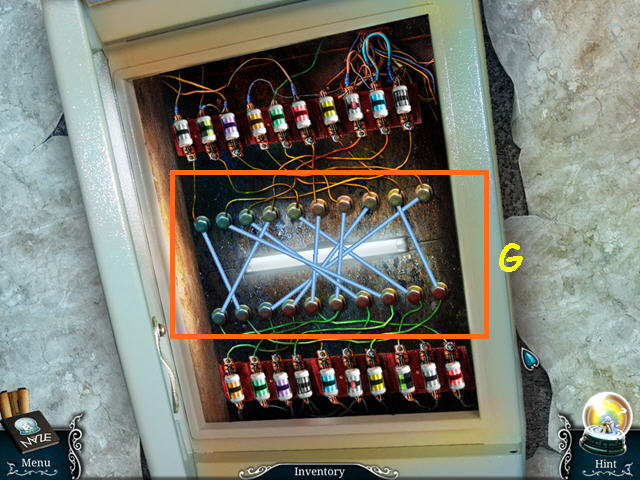
- Move the blue tiles to the top section and the red tiles to the bottom section.
- Move a tile to the empty space by sliding or jumping an adjacent tile.
- Please look at the screenshot for the solution.

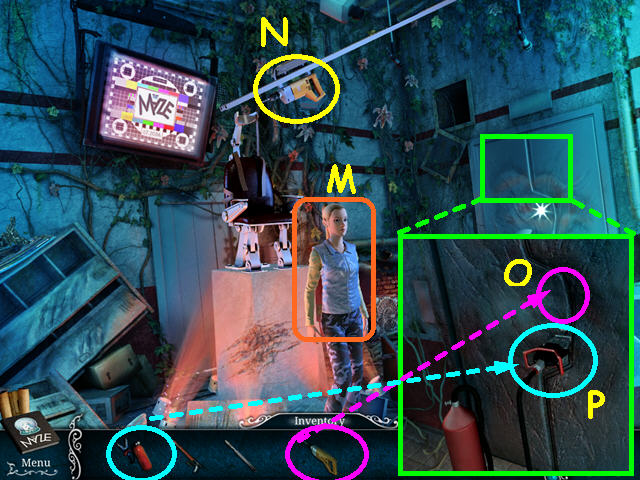
- Talk to Cindy (M).
- Take the DRILL (N).
- Look at the door and use the DRILL to make a small hole (O).
- Use the MECHANICAL JAW on the metal door (P).
Level 6: The Roof

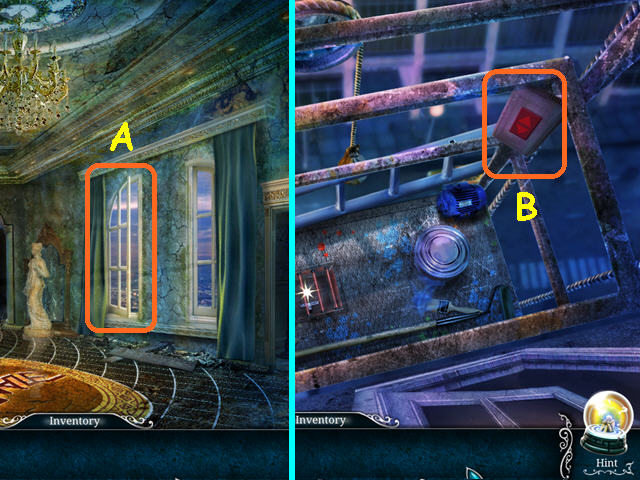
- Climb out the window (A).
- Press the up arrow on the scaffold control (B).

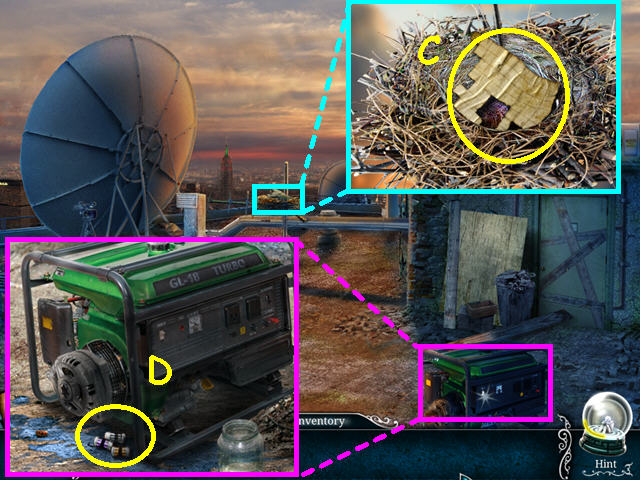
- Look at the bird’s nest and take the 1/2 PIECE of PAPER (C).
- Look at the generator and take the FUSES (D).
- Walk down to take the scaffold down.
- Walk down again to return to the hall.

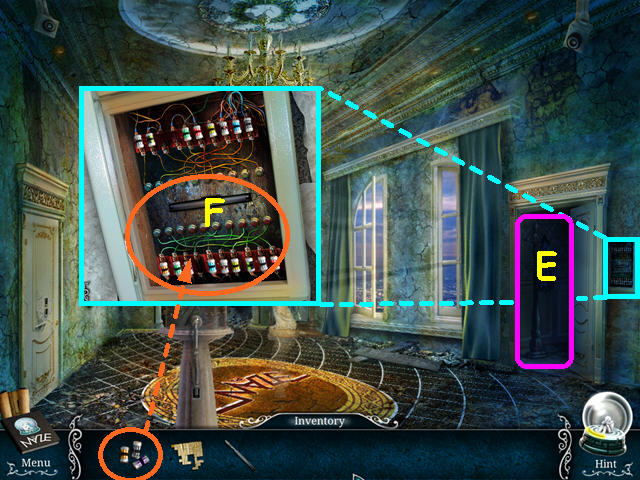
- Note the storage room (E).
- Look at the fuse box and place the FUSES inside for a mini-game (F).


- Connect the top fuses to the matching bottom fuses.
- Choose a fuse on the top and follow its wire to the bolt in the center section (G).
- Find the same color fuse in the bottom area and follow its wire up to the bolt in the center section.
- Click on the 2 bolts to connect the fuses.
- Look in the storage room.

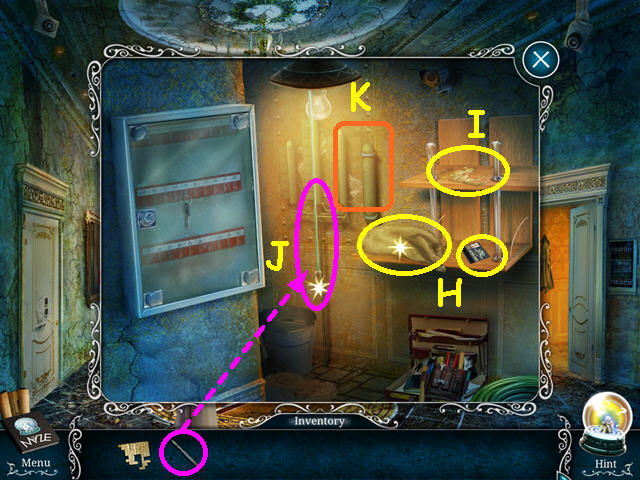
- Take the SACK and the ACCESS CARD (H).
- Take the 2/2 PIECE of PAPER (I).
- Use the SCALPEL on the light pull to get a ROPE (J).
- Select the pipe system for a mini-game (K).

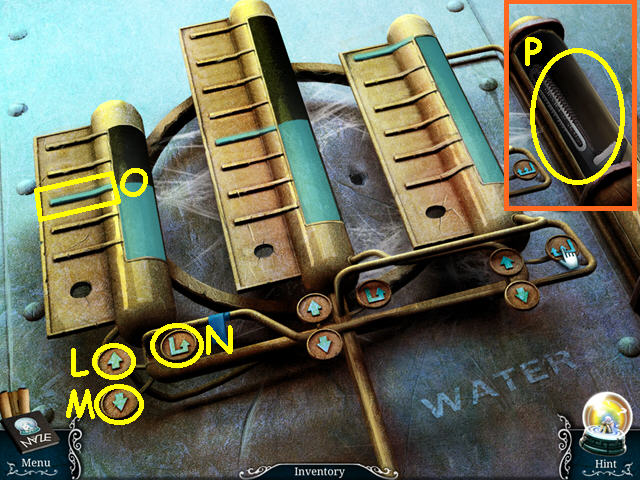
- Using the fill (L), empty (M), and transfer buttons (N), fill each of the 3 pipes to the green line (O).
- Our solution was: right fill button, right transfer button, left empty button, center transfer button, right transfer button, left empty button, right fill button, right transfer button, and right fill button.
- Take the 1/2 WRENCH PART (P).
- Exit to the scaffold.

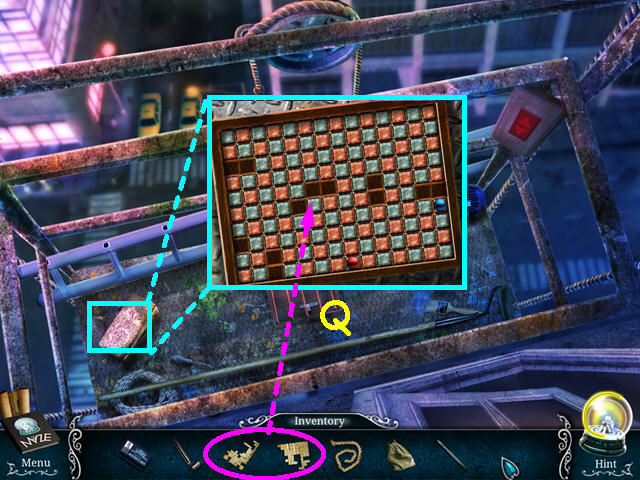
- Look at the small box and place the 2 PIECES of PAPER onto the grid (Q).
- This will trigger a mini-game.

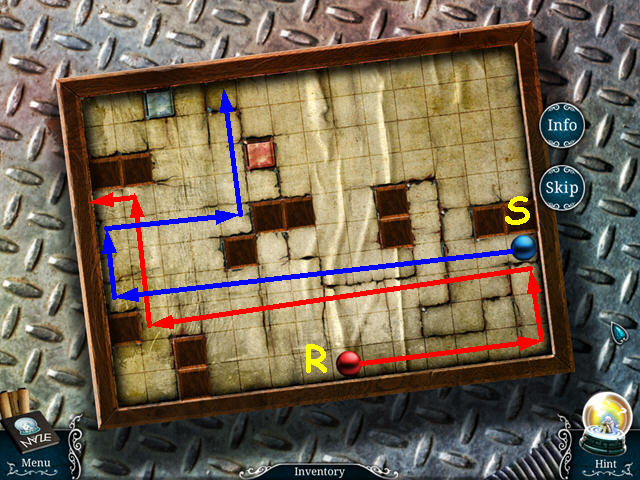
- Roll the red ball to the red square and roll the blue ball to the blue square.
- Click on a ball, then select the direction you wish to move.
- Move the red ball: right-up-left-up-left (R).
- Move the blue ball: left-up-right-up (S).

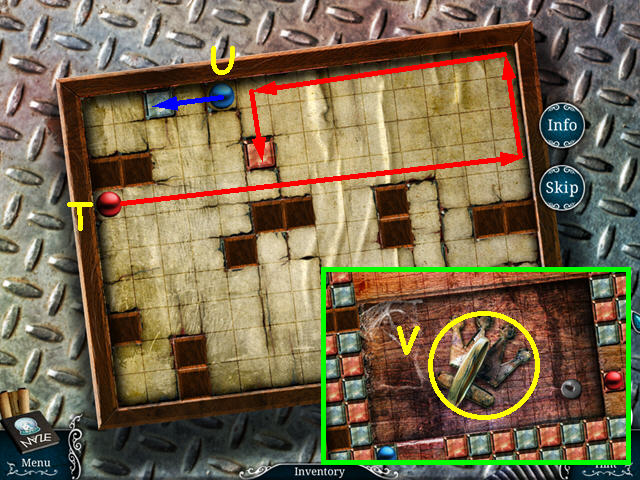
- Move the red ball: right-up-left- down (T).
- Move the blue ball to the left (U).
- Take the CROWN KEY (V).
- Enter the hall.

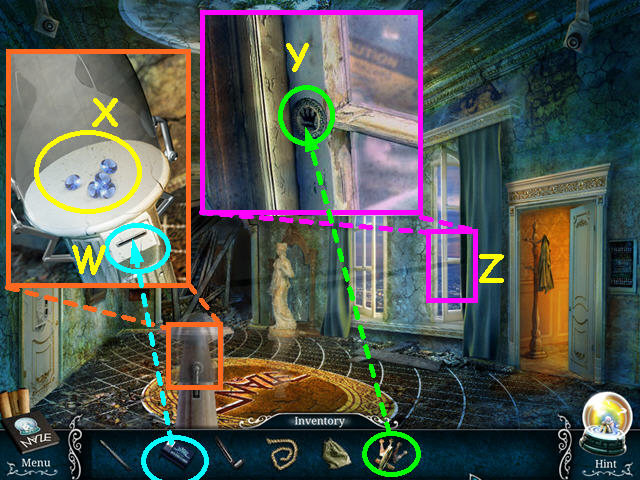
- Look at the glass dome and use the ACCESS CARD on the slot (W).
- Take the BLUE CRYSTALS (X).
- Look at the right window and use the CROWN KEY on the lock (Y).
- Select the right window for a HOS (Z).

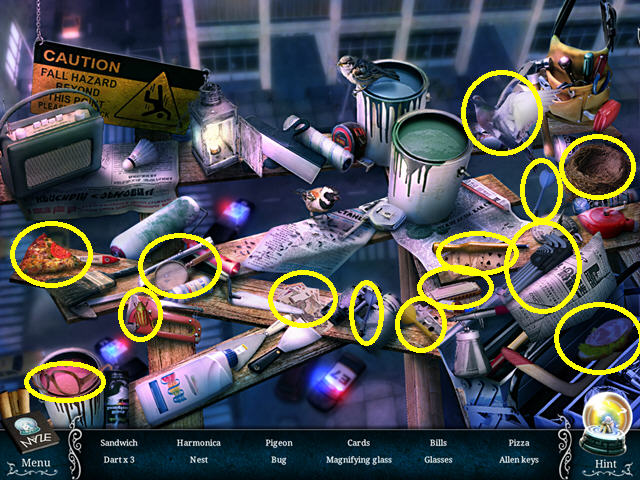
- Locate all the items on the list.
- You will earn the ALLEN KEY.
- Return to the roof.

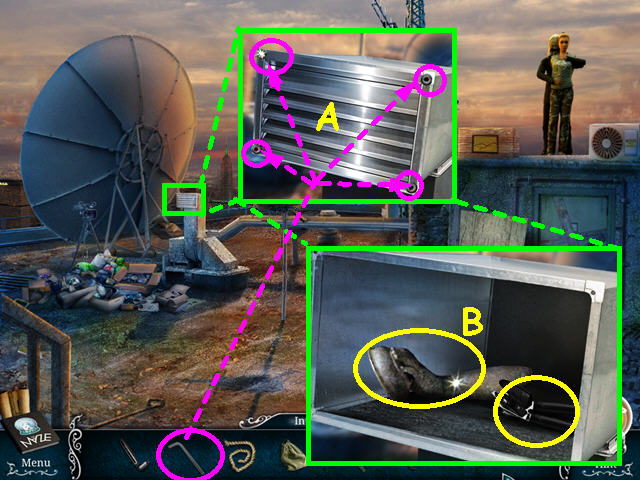
- Look at the vent and use the ALLEN KEY on the 4 bolts (A).
- Take the CAN OPENER and the STATUE ARM (B).
- Walk down to the scaffold.

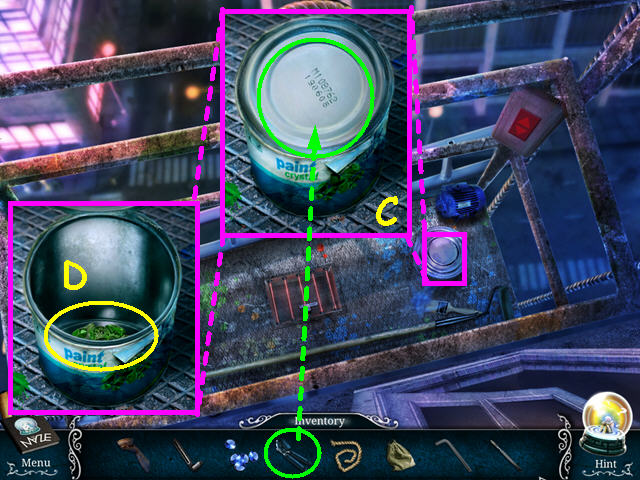
- Look at the paint can and use the CAN OPENER on the top (C).
- Take the GREEN CRYSTALS (D).
- Walk to the hall.

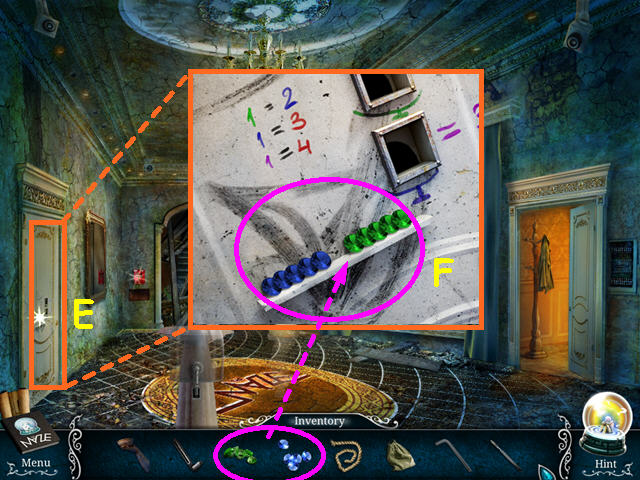
- Look at the door on the left (E).
- Place the BLUE CRYSTALS and the GREEN CRYSTALS on the shelf to trigger a mini-game (F).

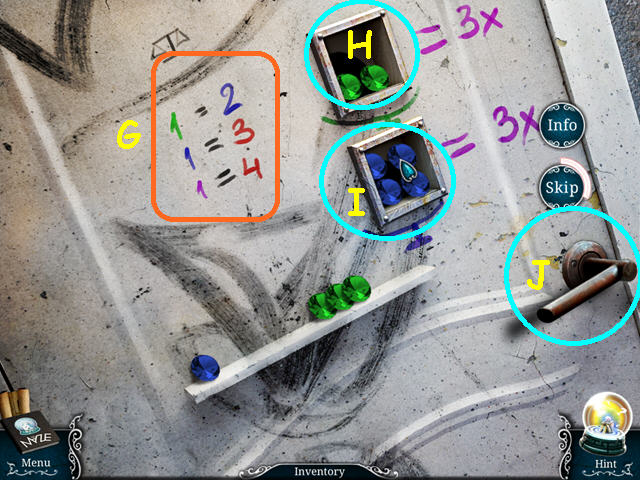
- Use the clues to determine how many crystals go in each box (G).
- Since 1 purple equals 4 red, then 3 purple equals 12 red.
- Since 1 blue equals 3 red, then 4 blue equals 12 red, which is equal to 3 purple.
- Since 1 green equals 2 blue, then 2 green equals 4 blue, which is equal to 3 purple.
- Place 2 green crystals in the upper box to equal 3 purple (H).
- Place 4 blue crystals in the lower box to equal 3 purple (I).
- Click on the door handle (J).
- Select the door for a HOS.

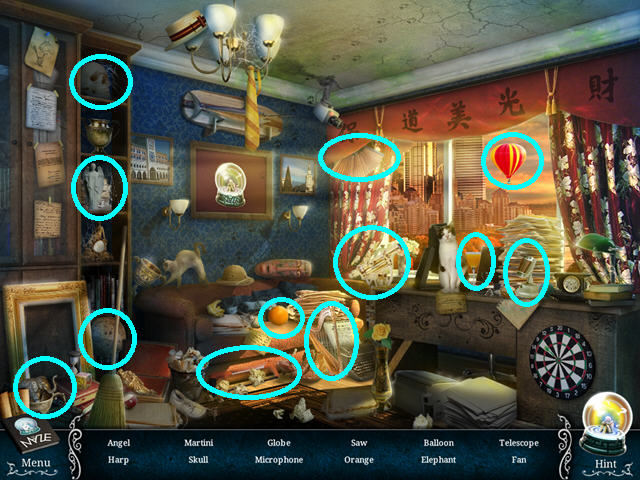
- Locate all the items on the list.
- You will earn the SAW.
- Return to the scaffold.

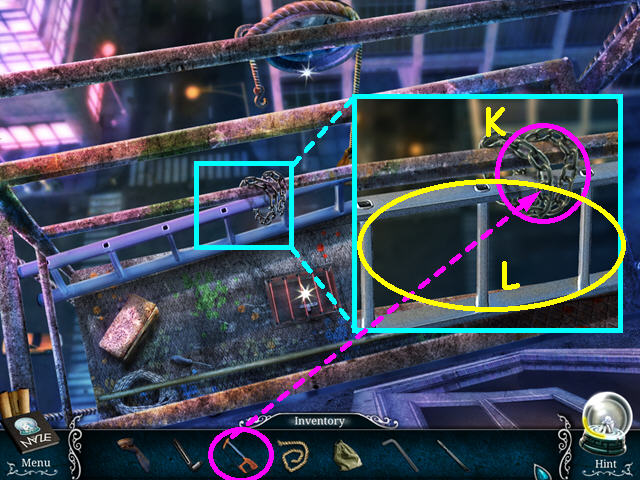
- Look at the ladder and use the SAW to cut the chains (K).
- Take the ladder (L).
- Return to the roof.

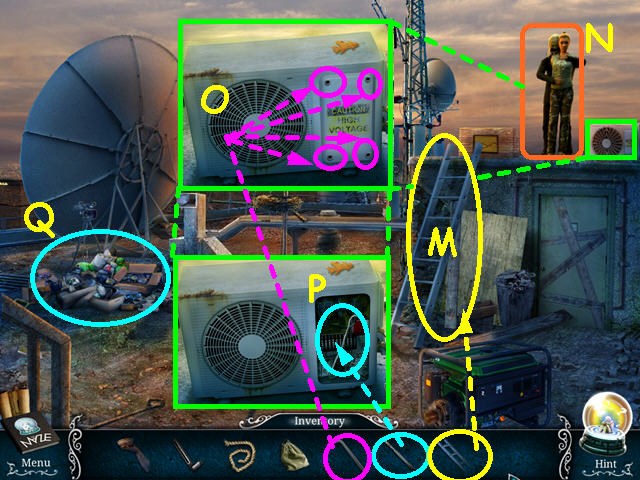
- Place the LADDER against the shed (M).
- Click on the villain and the hostage (N).
- Look at the air conditioner and use the ALLEN KEY on the 4 bolts (O).
- Use the SCALPEL to cut, then take the PLUG (P).
- Select the trash pile for a HOS (Q).

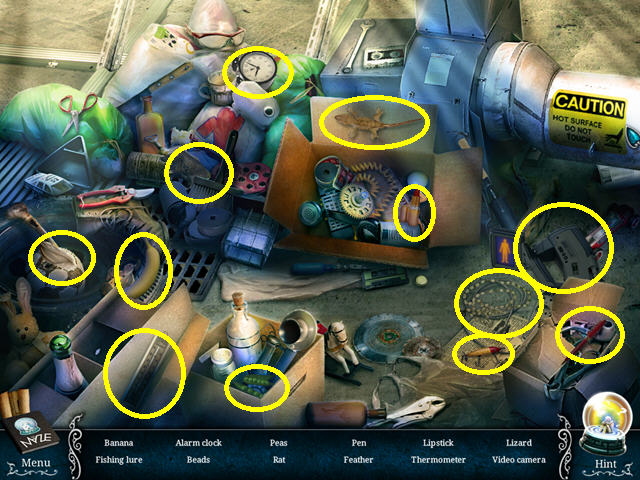
- Locate all the items on the list.
- You will earn the THERMAL CAMERA.

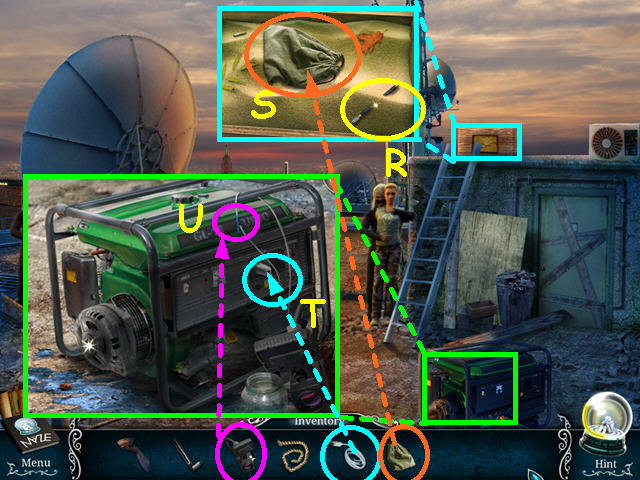
- Look at the box of sand and take the GLASS CUTTER (R).
- Place the SACK on the sand (S).
- Look at the generator and place the PLUG into the outlet (T).
- Attach the THERMAL CAMERA to the end of the wire (U).
- Return to the hall.

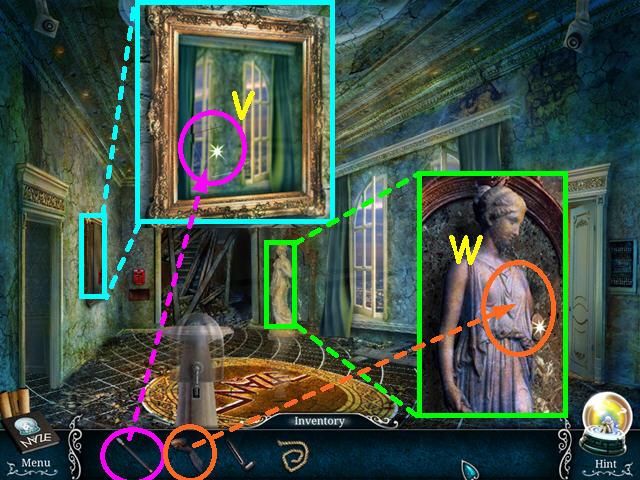
- Look at the mirror, use the GLASS CUTTER then take the piece of MIRROR (V).
- Look at the statue and place the STATUE ARM on it (W).
- Travel to the scaffold.

- Look at the lasers and use the MIRROR to block the rays (A).
- Take the FIRE ALARM HANDLE (B).
- Enter the hall and look at the fire alarm (C).
- Place the FIRE ALARM HANDLE in the alarm (D).
- Take the SHOVEL (E).
- Return to the roof.


- Look at the box of sand and use the SHOVEL on the sand (F).
- Take the SANDBAG (G).
- Return to the scaffold.
- Look at the pulley and hang the SANDBAG on the hook (H).
- Take the GENERATOR WINCH (I).
- Travel to the roof.

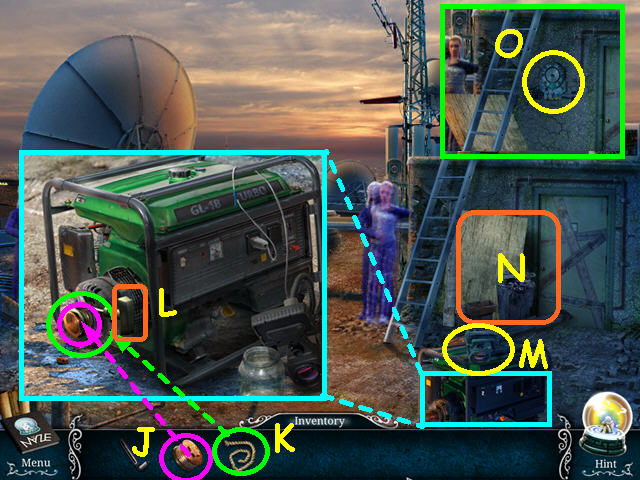
- Look at the generator and place the GENERATOR WINCH on the end (J).
- Place the ROPE on the winch (K).
- Pull the handle to start the generator (L).
- Take the thermal camera to see where the villain is hiding (M).
- Exit the thermal picture and click on the debris in front of the door (N).
- Click on the lock for a mini-game (O).


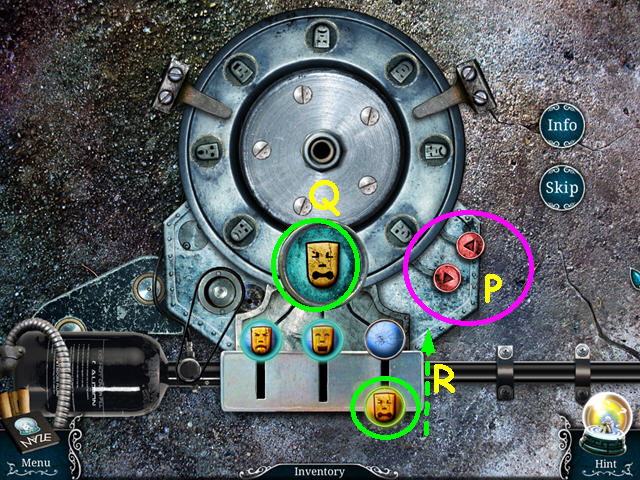
- Press the red buttons to spin the masks around (P).
- When a mask in the large circle (Q) matches one of the 3 yellow masks at the bottom, slide the matching mask up (R).
- The upper red button rotates the masks counterclockwise 5 places and the lower red button rotates the masks clockwise 3 places.

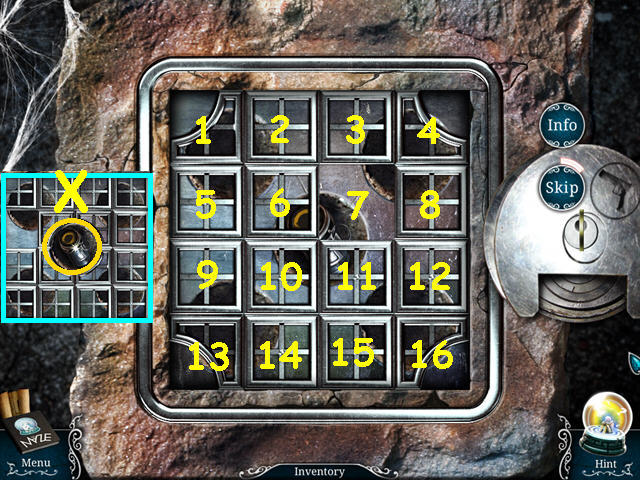
- Enter the door to the right of the lock (S).
- Take the 2/2 WRENCH PART which will combine with the 1/2 WRENCH PART and make the WRENCH (T).
- Return to the hall.

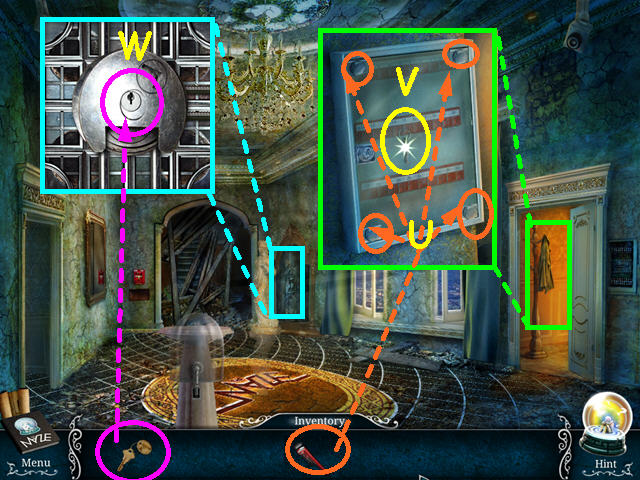
- Look in the storage room and use the WRENCH on the 4 bolts on the key case (U).
- Take the GUN KEY (V).
- Look at the statue and use the GUN KEY in the lock for a mini-game (W).


- Slide the tiles to create an opening in the center.
- Click on a tile adjacent to the empty spot to move it to that location.
- Click on the tiles in the numerical location in this order: 3-4-8-12-16-15-11-12-16-15-14-13-9-10-11-7-3-2-1-5-6-10.
- 14-15-11-7-3-2-1-5-6-10-11-7-3-4-8-12-11-7-6-5.
- Take the FLASH GRENADE from the center (X).
- Return to the room on the roof.

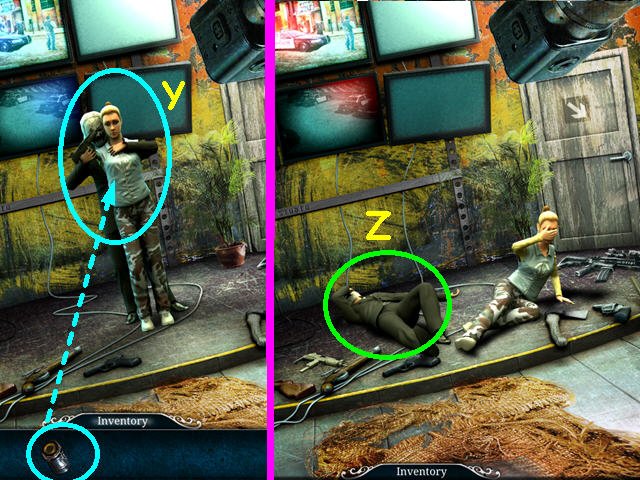
- Use the FLASH GRENADE on the villain (Y).
- Click on the villain to put him in handcuffs (Z).
- Congratulations! You have completed Urban Legends: The Maze!






 Haunted Hotel: Phoenix Walkthrough, Guide, & Tips
 Mystery Trackers: Winterpoint Tragedy Walkthrough, Guide, & Tips
 Echoes of the Past: The Castle of Shadows Walkthrough, Guide, & Tips
 Garden Rescue Video Walkthrough, Guide, & Tips
 Shrouded Tales: The Spellbound Land Walkthrough, Guide, & Tips