Dark Lore Mysteries: The Hunt for Truth Walkthrough, Guide, & Tips
Dark Lore Mysteries: The Hunt for Truth Walkthrough

Welcome to the Dark Lore Mysteries: The Hunt for Truth Walkthrough
Are a town’s superstitions justified? Follow the blood to find out!
Whether you use this document as a reference when things get difficult or as a road map to get you from beginning to end, we’re pretty sure you’ll find what you’re looking for here.
This document contains a complete Dark Lore Mysteries: The Hunt for Truth game walkthrough featuring annotated screenshots from actual gameplay!
We hope you find this information useful as you play your way through the game. Use the walkthrough menu below to quickly jump to whatever stage of the game you need help with.
Remember to visit the Big Fish Games Forums if you find you need more help. Have fun!
This walkthrough was created by Rebekah, and is protected under US Copyright laws. Any unauthorized use, including re-publication in whole or in part, without permission, is strictly prohibited.
General Tips

- This is the official guide for Dark Lore Mysteries: The Hunt for Truth.
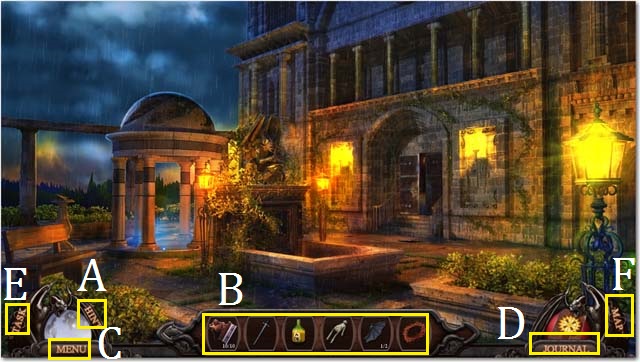
- Use the Hint Button (A) if you need additional help.
- Your Inventory Bar (B) will hold items until they are needed.
- Click on the Menu button (C) to exit, pause, or resume the game. You can also use this button to adjust your options (sound, music, and screen size).
- Use your Journal (D) for additional help.
- View current tasks here (E).
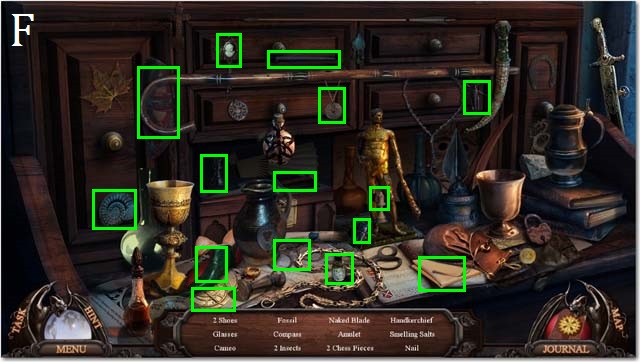
- You can use your Map (F) to see what locations have actionable tasks.
- Zoom into sparkling scenes to play Hidden Object Scenes. Hidden Object Scenes will be referred to as HOS in this guide.
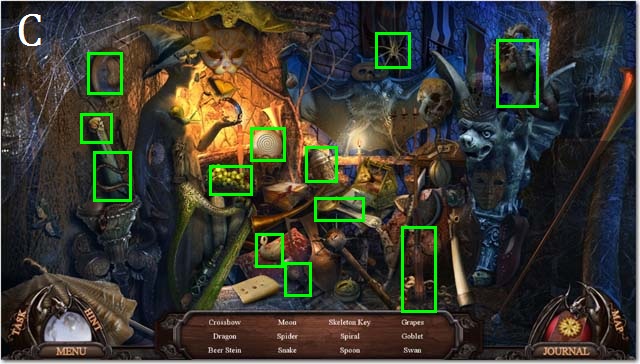
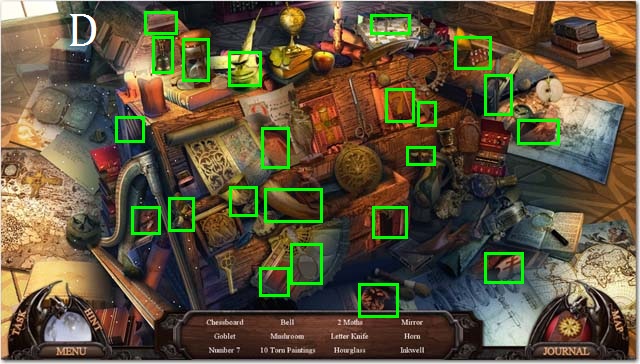
- All items in the HOS are marked in green unless otherwise noted.
Chapter 1: The Tavern

- Speak with Father Marius (G).
- Zoom into Magistrate’s body; examine the body. Collect the letter (H) and the GOLDEN CROSS KEY (I).
- Zoom into the cart; collect the TELESCOPE EYEPIECE (J).

- Zoom into the sparkles to play a HOS.
- Collect all of the items on the list to receive the HOOF PICK (K).
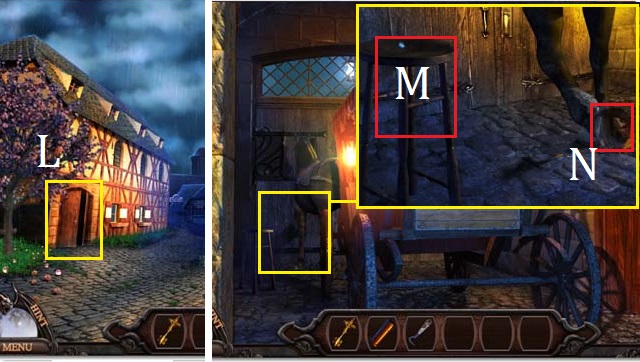
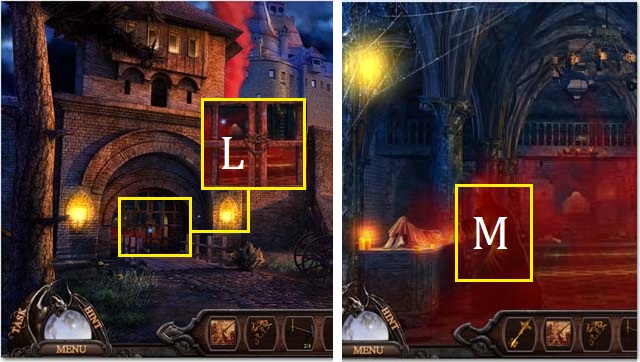
- Enter the Carriage House (L).
- Zoom into the horse; collect the STOOL (M) and then lift the horse’s leg. Use the HOOF PICK to remove and collect the MOSAIC TILE (N).
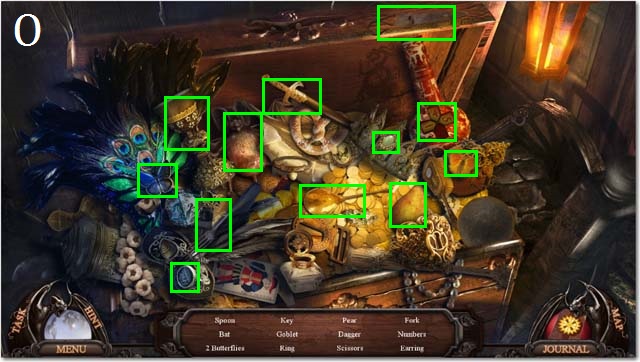
- Zoom into the sparkles to play a HOS.
- Collect all of the items to receive the STAINED GLASS CROSS (O).
- Exit the Carriage House.
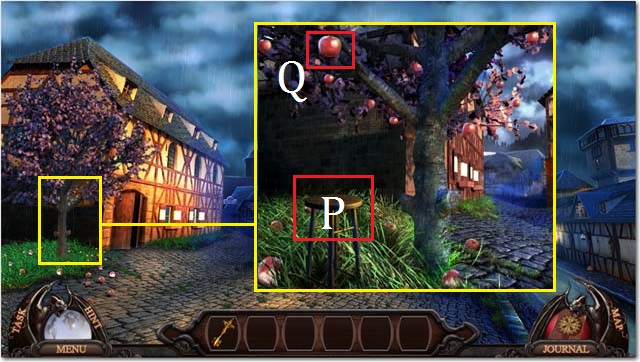
- Zoom into the tree; place the STOOL under the tree (P) and then collect the APPLE (Q).
- Move to the Tower Steps.
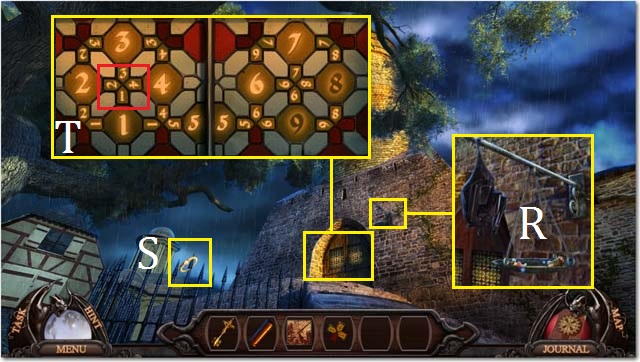
- Zoom into the feeder; place the APPLE into the feeder (R).
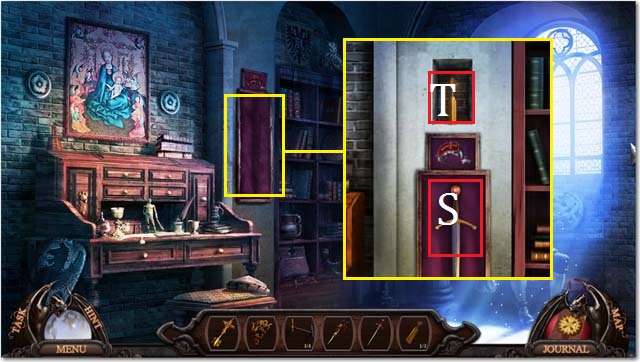
- Collect the DOOR KNOCKER (S).
- Zoom into the door; place the STAINED GLASS CROSS into the puzzle. Swap the center tiles (T) and then rotate them until you have the configuration shown in the screenshot.
- You may enter the Tower at this point; however there are no active scenes in this location yet.
- Return to the Outside of the Tavern.
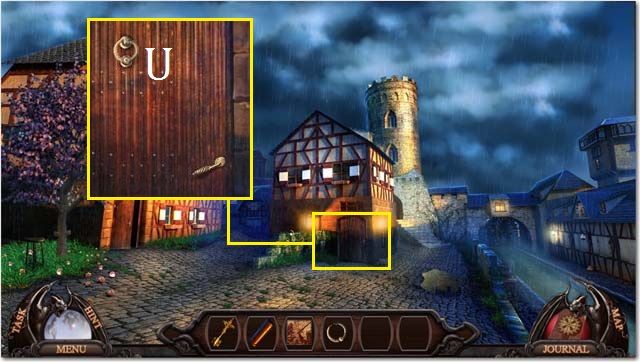
- Zoom into the Tavern Door; place the DOOR KNOCKER on the door (U).
- Enter the Tavern.
- Speak with the Barmaid.
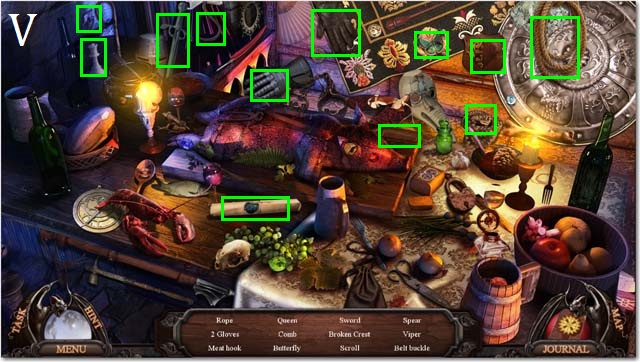
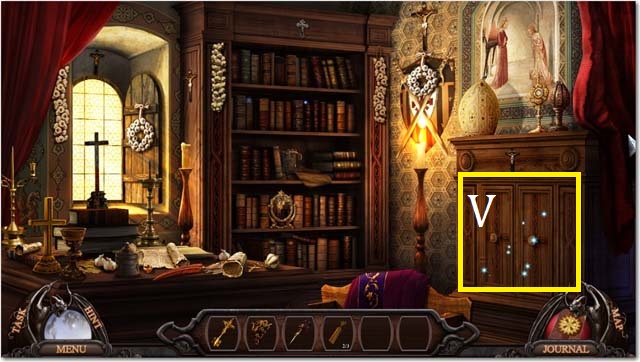
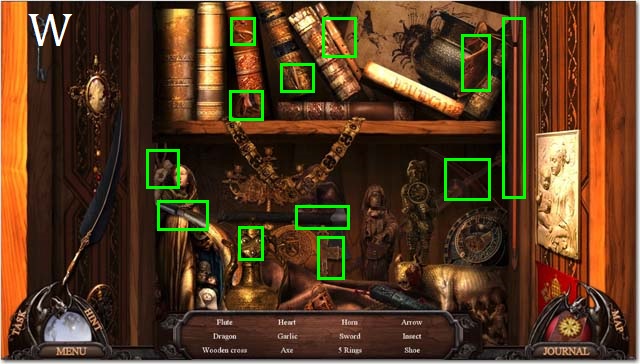
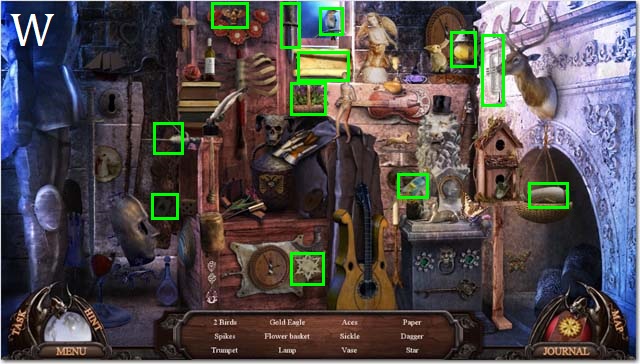
- Zoom into the sparkles to play a HOS.
- Collect all of the items to receive the first BROKEN CREST (V).
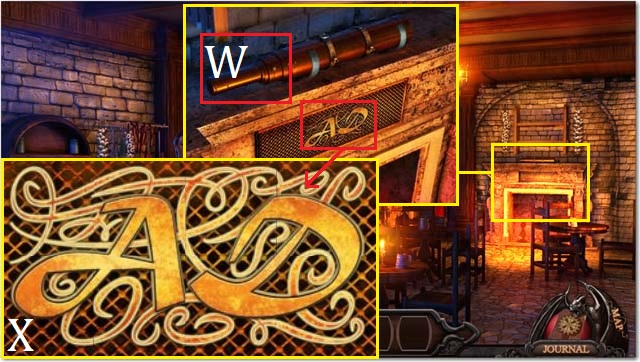
- Zoom into the fireplace mantel; place the TELESCOPE EYEPIECE on the TELESCOPE (W).
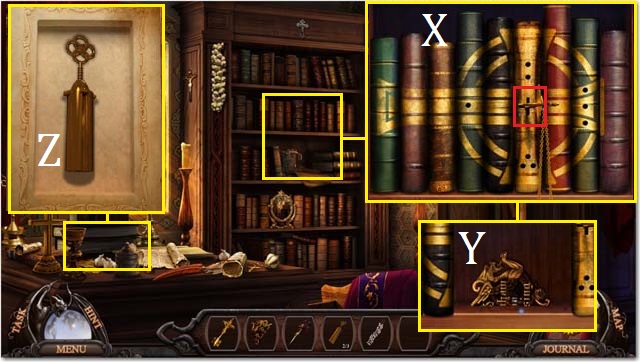
- Zoom into the panel; click on a square and then swap it with a neighboring square until you have the arrangement shown in the screenshot (X).
- Collect the TELESCOPE.
- Return to the Tower.
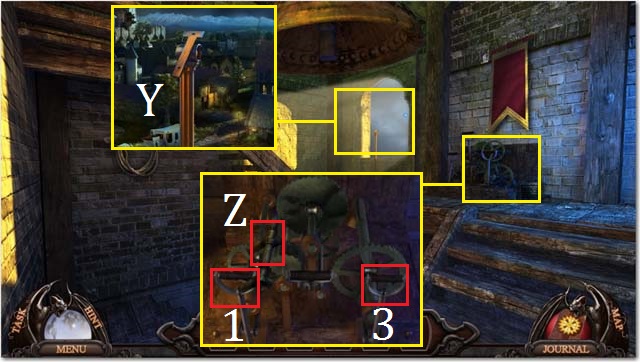
- Zoom into the window; place the TELESCOPE on the stand (Y). Move your cursor to the top left hand corner of the pop-up window until you view the red smoke.
- Zoom into the mechanism; remove the first LADDER RUNG (Z).
- Pull the levers in the following order: 3, 1.
- Return to the Outside Tavern. Take the carriage to the Town Center.
Chapter 2: The Town Center
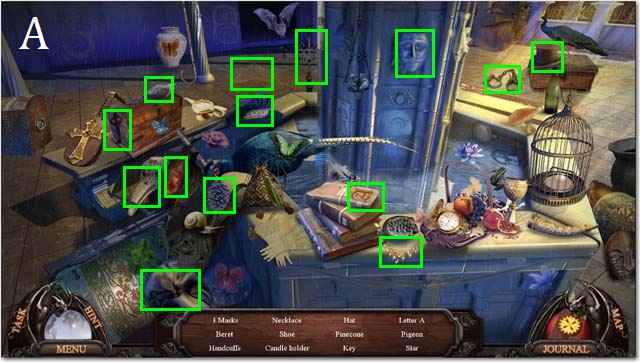
- Zoom into the sparkles to play a HOS.
- Collect all of the items to receive the LUGGAGE KEY (A).
- Enter the Morgue.
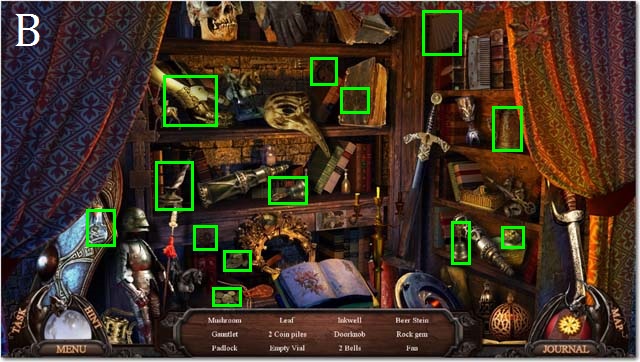
- Zoom into the sparkles to play a HOS.
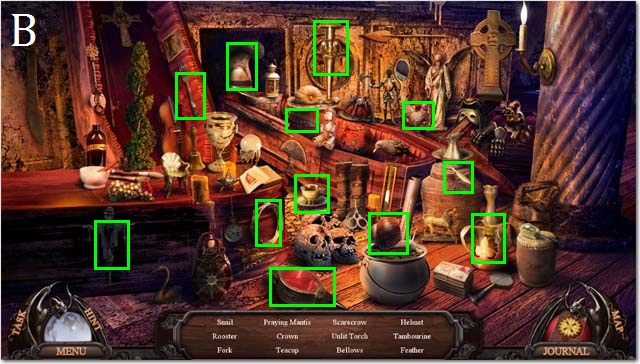
- Collect all of the items to receive the EMPTY VIAL (B).
- Enter the Doctor’s Office.
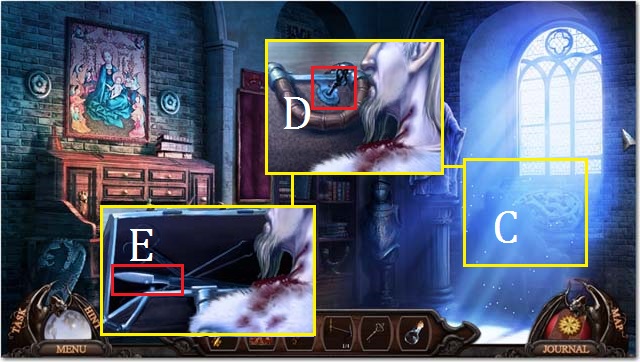
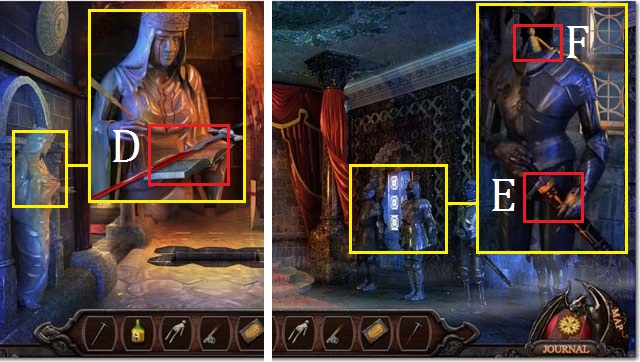
- Examine the Doctor’s body (C).
- Zoom back into the Doctor’s Body; use the LUGGAGE KEY in the bag lock (D). Collect the SCALPEL (E).
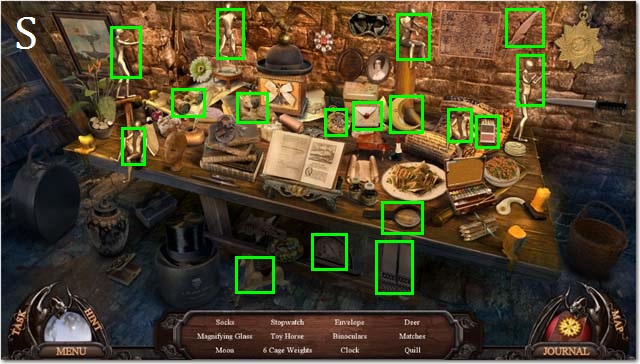
- Zoom into the sparkles to play a HOS.
- Collect all of the items to receive the SMELLING SALTS (F).
- Exit the Doctor’s Office.
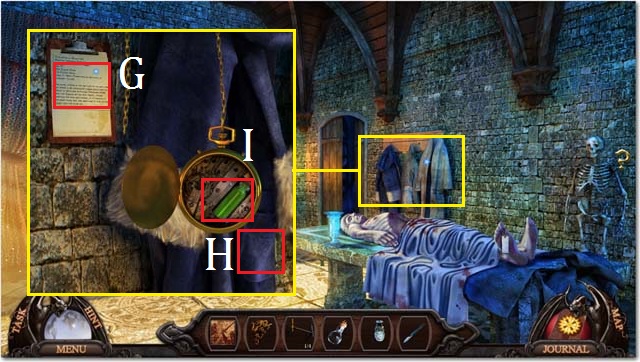
- Zoom into the coats; collect the paper (G).
- Pull the watch (H) from the pocket.
- Use the SCALPEL to pry open the watch’s back and then collect the ACID VIAL (I).
- Exit the Morgue.
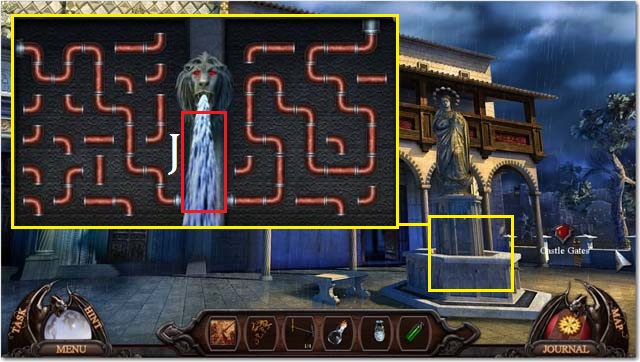
- Zoom into the fountain; arrange the pipe segments as they are shown in the screenshot.
- Fill the EMPTY VIAL from the fountain (J) to receive the VIAL OF HOLY WATER.
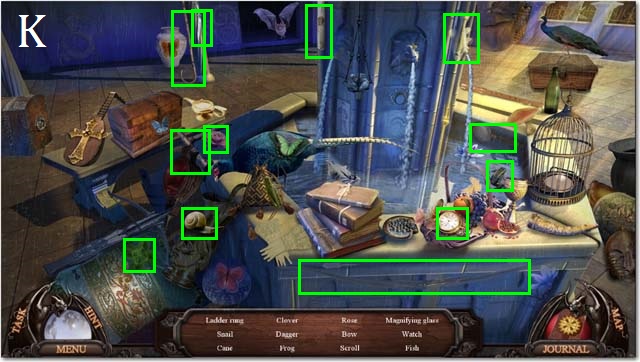
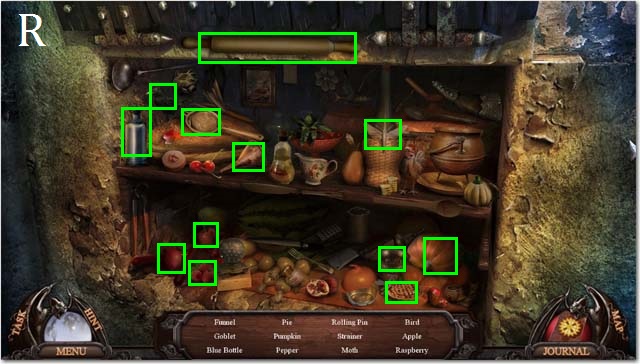
- Zoom into the sparkles to play a HOS.
- Collect all of the items to receive the second LADDER RUNG (K).
- Move to the Castle Gate.
- Zoom into the gate; pour the ACID VIAL onto the chain (L).
- Enter the Castle Halls.
- Pour the VIAL OF HOLY WATER over the Evil Spirit (M).
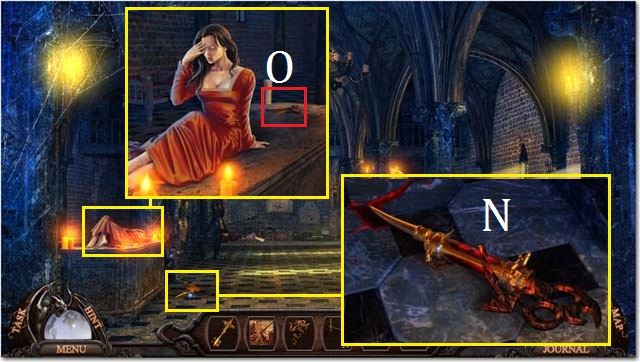
- Zoom into the floor; collect the SYRINGE (N).
- Zoom into Elizabeth; use the SMELLING SALTS to wake her up. Collect the SWORD (O).
- Enter the Crypt.
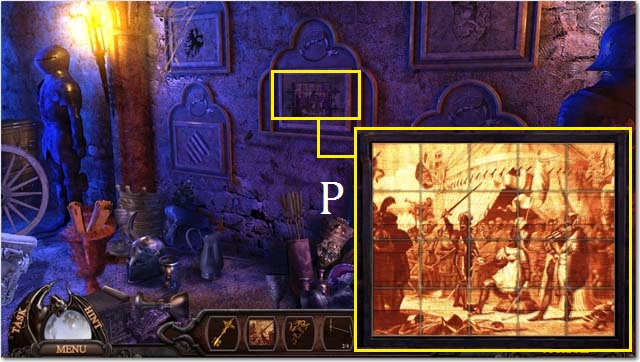
- Zoom into the wall panel; place the MOSAIC TILE into the puzzle.
- Swap the tiles to configure the picture shown in the screenshot (P).
- Collect all of the items on the list to receive the third LADDER RUNG (Q).
- Return to the Morgue.
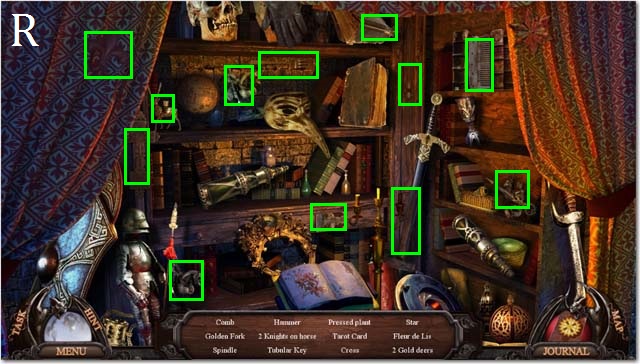
- Zoom into the sparkles to play a HOS.
- Collect all of the items to receive the first TUBULAR KEY (R).
- Enter the Doctor’s Office.
- Zoom into the frame; place the SWORD in the frame (S) and then collect the second TUBULAR KEY (T).
- Return to the Outside Tavern.
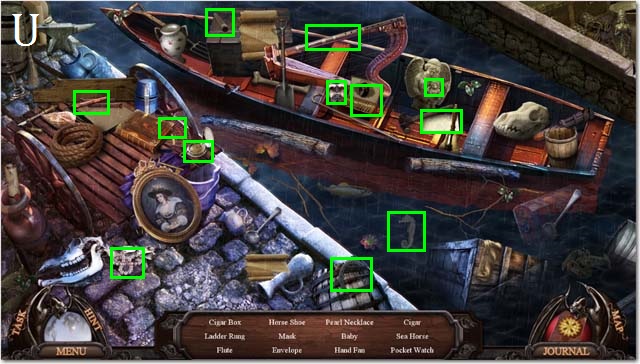
- Zoom into the sparkles to play a HOS.
- Collect all of the items to receive the fourth LADDER RUNG (U).
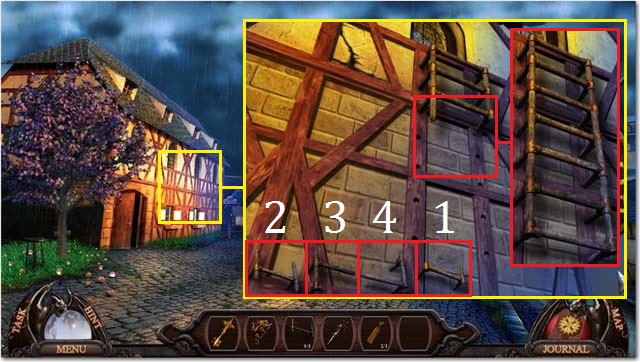
- Zoom into the side of the building; place the four LADDER RUNGS into the pop-up window. Reconstruct the broken ladder by placing the pieces in order of 1-4 from top to bottom.
- Once the ladder is constructed you will be automatically transported to the Magistrates Office.
- Zoom into the sparkles to play a HOS.
- Collect all of the items to receive the STRING OF GARLIC (W).
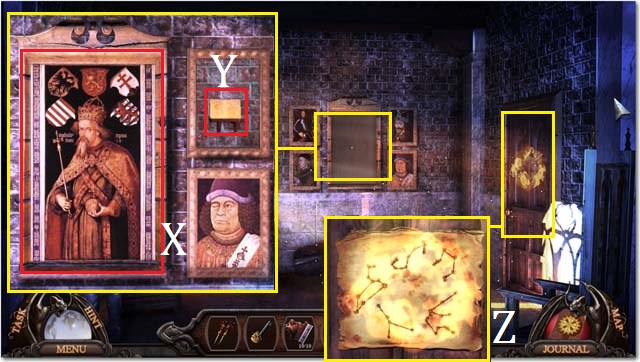
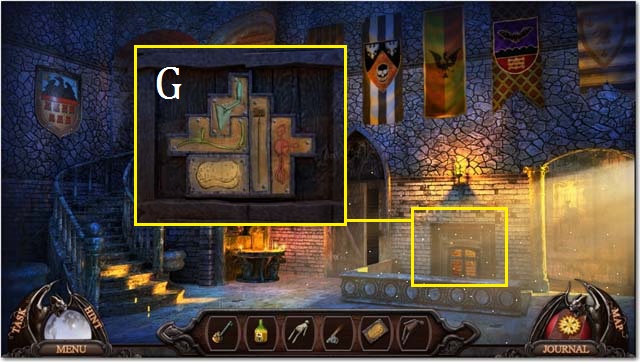
- Zoom into the bookshelf; rearrange the books to form the cross as shown in the screenshot (red).
- Insert the GOLDEN CROSS KEY into the keyhole (X) and then turn the key. Collect the second BROKEN CREST (Y).
- Zoom into the book on the desk; place both BROKEN CRESTS into the books cover and then collect the third TUBULAR KEY (Z).
- Return to the Town Center.
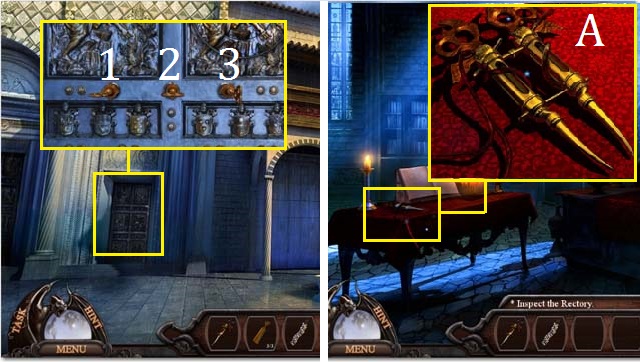
- Zoom into the Rectory door; place the three TUBULAR KEYS in the holes. Turn the keys in the following order to unlock the door: 3, 3, 2, 2, 2, 1, 1, 1.
- Enter the Rectory.
- Zoom into the table; place the SYRINGE next to the other syringe (A) and then collect it as the DUAL SYRINGE.
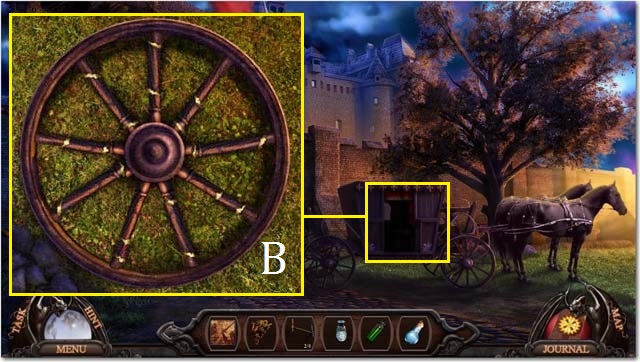
- Once you are back at the Castle gate, a window will pop-up with the broken wheel: assemble the spoke pieces as they are shown in the screenshot (B).
- Hint: the orientations of the spoke pieces do not change. If you are having trouble reconstructing the wheel, simply move the spoke piece around the wheel until you find its place.
- Enter the Castle Halls and then move to the Foyer.
Chapter 3: The Castle
- Zoom into the sparkles to play a HOS.
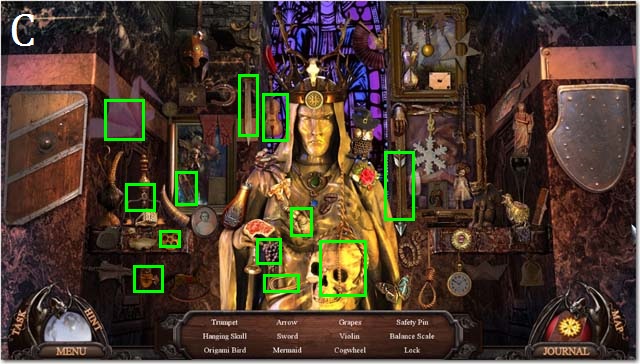
- Collect all of the items to receive the SKELETON KEY (C).
- Enter the Library 1st Floor.
- Zoom into the sparkles to play a HOS.
- Collect all of the items to receive the ten JIGSAW PIECES (D).
- Exit the Library and then enter the Gardens.
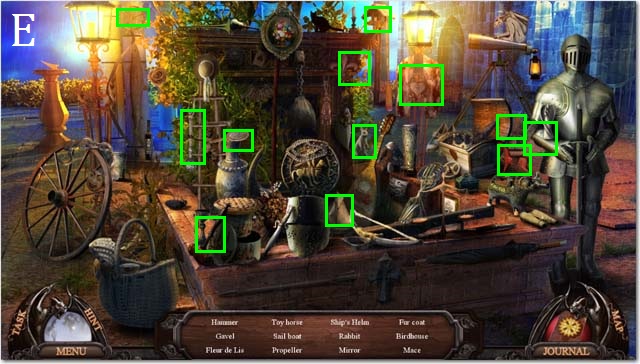
- Zoom into the sparkles to play a HOS.
- Collect all of the items to receive the HAMMER (E).
- Enter the Hallway.
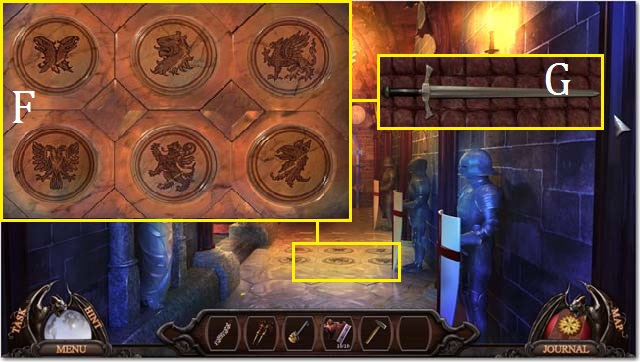
- Zoom into the ground; swap the tiles to arrange them as they are shown in the screenshot (F).
- Collect the CLEAN SWORD (G).
- Enter the Throne Room.
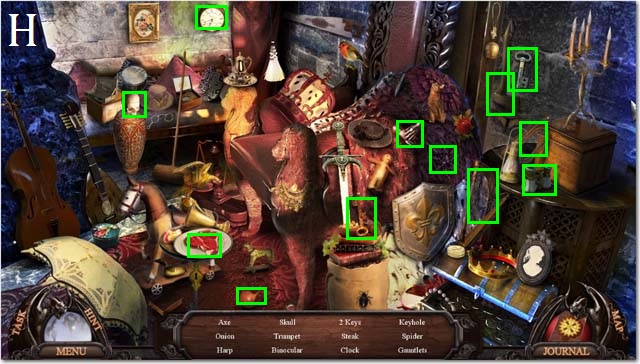
- Zoom into the sparkles to play a HOS.
- Collect all of the items to receive the STEAK (H).
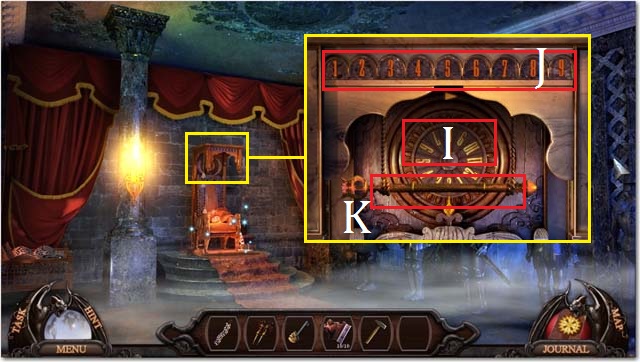
- Zoom into the top of the throne; spin the wheel (I) (you have unlimited spins).
- The goal is to remove all of the numbers across the top (J). If you spin a 5, you may remove the 5, or the 4 and 1, or the 2 and 3. If you are left with a 2 and spin a 7, you will need to keep spinning the wheel until you spin a 2. Continue to spin the wheel until you have removed all of the numbers above.
- Once you have removed all of the numbers, collect the SCEPTER (K).
- Return to the Library 1st Floor.
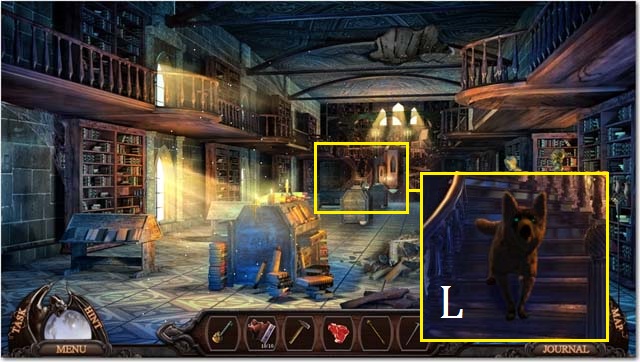
- Zoom into the staircase; feed the STEAK to the dog (L).
- Climb the staircase to the Library 2nd Floor.
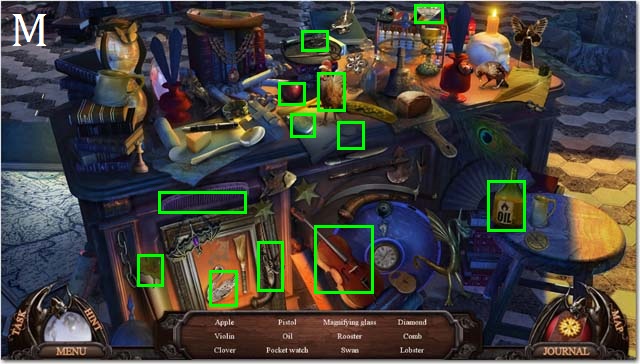
- Zoom into the sparkles to play a HOS.
- Collect all of the items to receive the OIL (M).
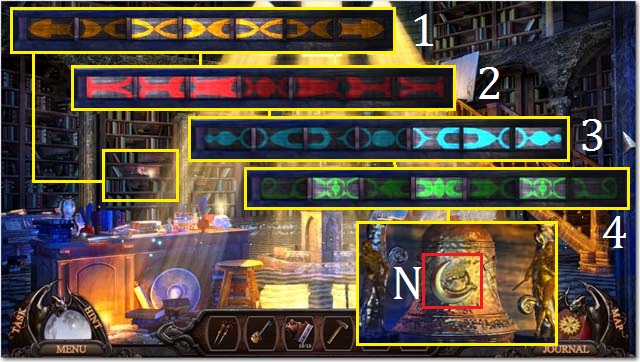
- Zoom into the bell on the shelf; arrange the yellow band as it is shown in the screenshot (1). Continue with the red (2), blue (3), and green (4) bands.
- Collect the CRESCENT MOON (N).
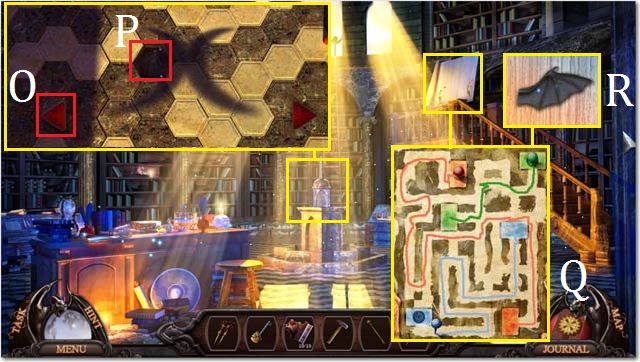
- Place the CRESCENT MOON on the fountain; Press the left red arrow (O) until the shadow forms the figure of the man shown in the screenshot.
- Use the HAMMER on the tile which the head of the shadow falls on and then collect the first VOODOO DOLL (P).
- Zoom into the map; you may use the screenshot (Q) as a guide for dragging the different pins to their matching bases.
- Collect the first BAT WING (R).
- Return to the Library 1st Floor.
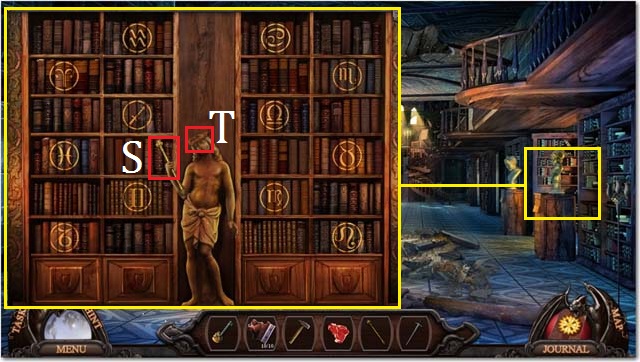
- Zoom into the bookshelf; place the SCEPTER in the statue’s hand (S). Swap the books to complete the symbols as they are shown in the screenshot.
- Collect the THORN CROWN (T).
- Return to the Garden.
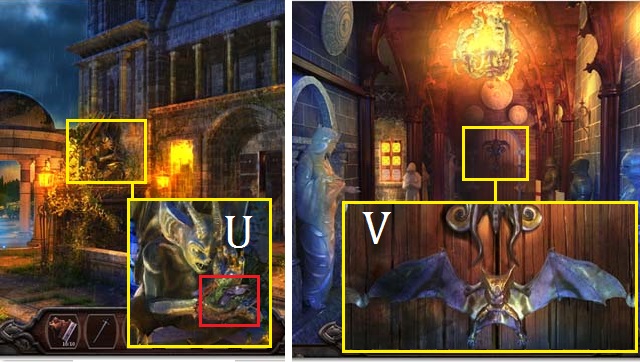
- Zoom into the statue; place the THORN CROWN around the statue’s hands and then collect the second BAT WING (U).
- Return to the Hallway.
- Zoom into the back door; place both BAT WINGS on the door (V).
- Enter the Drawing Room.
- Zoom into the sparkles to play a HOS.
- Collect all of the items to receive the SENSITIVE PAPER (W).
- Zoom into the back wall; place the JIGSAW PIECES in the frame and then arrange them as they are shown in the screenshot (X).
- Collect the BASIN TILE (Y).
- Zoom into the door; place the SENSITIVE PAPER on the door and then collect the ZODIAC MAP (Z).
- Enter the Bedroom.

- Zoom into the sparkles to play a HOS.
- Collect all of the items to receive the FISHING ROD (A).
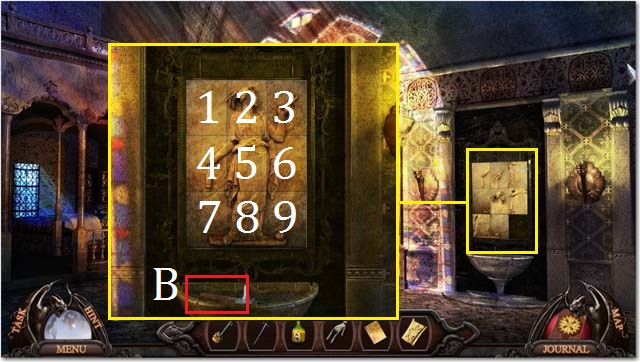
- Zoom into the wall panel; slide the tiles from one space to another in order to arrange the correct image. You may use the following order: 8, 5, 6, 3, 2, 1, 4, 5, 8, 7, 4, 1, 2, 5, 8, 7, 4, 1.
- Place the BASIN TILE in slot 1 and then collect the SPONGE (B).
- Return to the Garden.
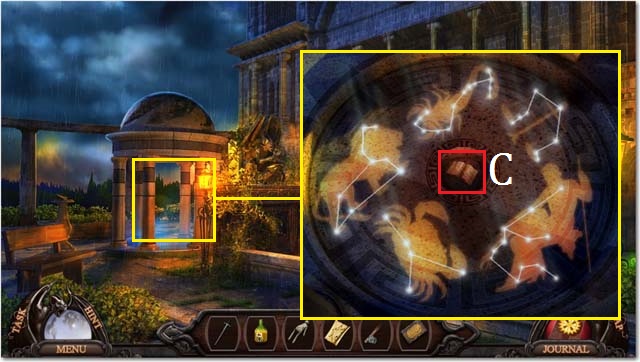
- Zoom into the gazebo; place the ZODIAC MAP into the pop-up window. Connect the dots to form each constellation (shown in the screenshot). You have to trace one star at a time to draw the line. Collect the MARBLE BOOK (C).
- Return to the Hallway.
- Zoom into the statue; place the MARBLE BOOK in the statue’s hand (D).
- Once the blood starts to run, place the CLEAN SWORD over the book and then collect the BLOODY SWORD.
- Enter the Throne Room.
- Zoom into the suit of armor; place the BLOODY SWORD in the sword sheath (E).
- Collect the third VOODOO DOLL (F).
- Return to the Foyer.
- Zoom into the door to the servant’s passage; place the SPONGE on the door and then arrange the different tools as they are shown in the screenshot (G).
- Enter the Servant’s Passage. Continue into the Servant’s Quarter.
Chapter 4: The Servant’s Passage
- Zoom into the sparkles to play a HOS.
- Collect all of the items to receive the CARD (H).
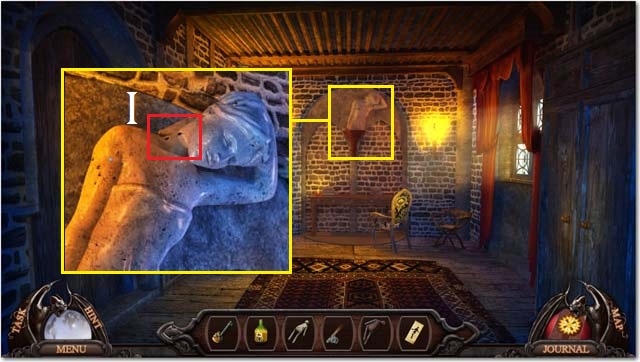
- Zoom into the statue; place the DUAL SYRINGE in the statue’s neck (I).
- Enter the Catacombs.
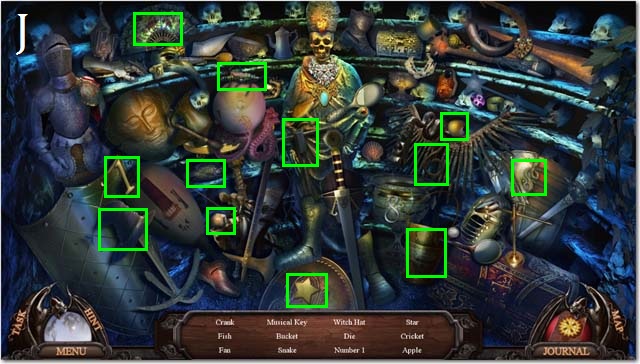
- Zoom into the sparkles to play a HOS.
- Collect all of the items to receive the CRANK (J).
- Return to the Servant’s Passage.
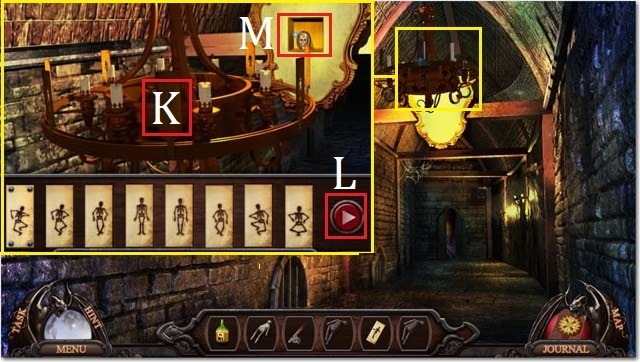
- Zoom into the chandelier; place the CARD on the chandelier (K). Arrange the cards as they are shown in the screenshot and then press the play button (L).
- Collect the SKULL COIN (M).

- Zoom into the back door; place the SKULL COIN in the center square (5). Move the coin to the following squares in the following order: from 5 to 4, 1, 2, 5, 8, 7, 4, 5, 2, 1, 4, 7, 8, 9, 6, 3, 2.
- Enter the Jail.
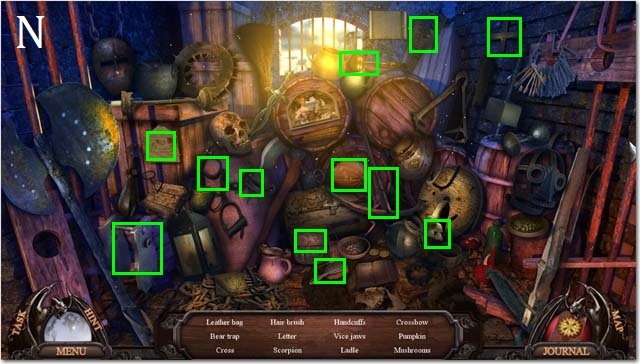
- Zoom into the sparkles to play a HOS.
- Collect all of the items to receive the VICE (N).
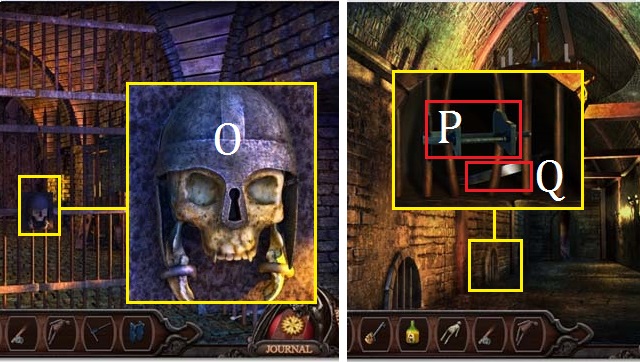
- Zoom into the lock; use the SKELETON KEY to open the lock (O).
- Return to the Servant’s Passage.
- Zoom into the grate; place the VICE between the bars (P). Use the CRANK on the vice and then collect the KNIFE (Q).
- Return to the Jail and then enter the Split Stairs.
- Zoom into the sparkles and then open the wooden door to play a HOS.
- Collect all of the items to receive the JAR (R).
- Enter the Torture Room.
- Zoom into the sparkles to play a HOS.
- Collect all of the items to receive the WEIGHT (S).
- Return to the Split Stairs.
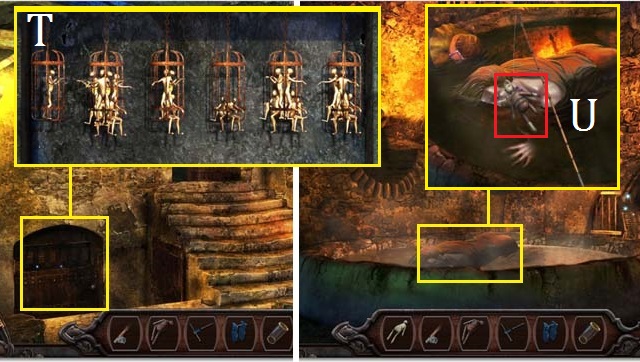
- Zoom into the Pit door; place the WEIGHT in the empty cage and then arrange the cages as they are shown in the screenshot (T).
- Enter the Pit.
- Zoom into the body; use the FISHING ROD to fish out the fourth VOODOO DOLL (U).
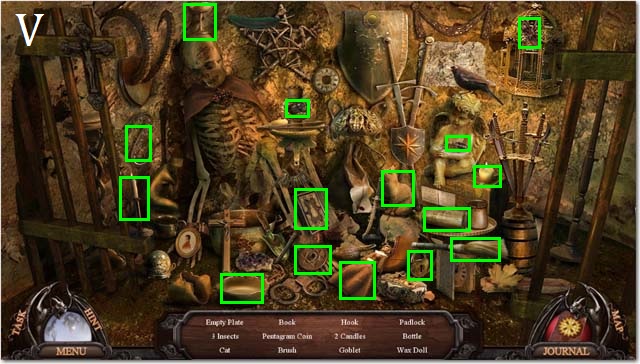
- Zoom into the sparkles to play a HOS.
- Collect all of the items to receive the WAX DOLL (V).
- Return to the Torture Room.
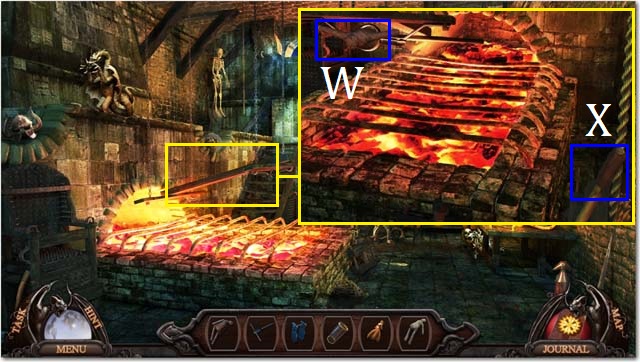
- Zoom into the heat rack; place the WAX DOLL on the spit (W) and then pull the handle (X).
- Once the wax melts collect the fifth VOODOO DOLL.
- Return to the Foyer.
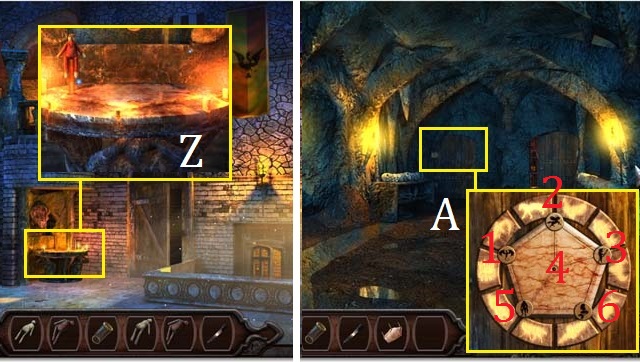
- Zoom into the table; place the 5 VOODOO DOLLS on the table (Z) to receive the PENTAGRAM.
- Return to the Catacombs.
- Zoom into the Coffin Room door; place the PENTAGRAM in the lock and then arrange the disks as they are shown in the screenshot (A) using the following sequence: 3, 2, 4, 3, 6, 5, 1, 2, 3, 4.
- Enter the Coffin Room.
- Zoom into the sparkles to play a HOS.
- Collect all of the items to receive the TORCH (B).
- Enter the Queen’s Hall.
- Zoom into the sparkles to play a HOS.
- Collect all of the items to receive the SKULL (C).
- Return to the Coffin Room.
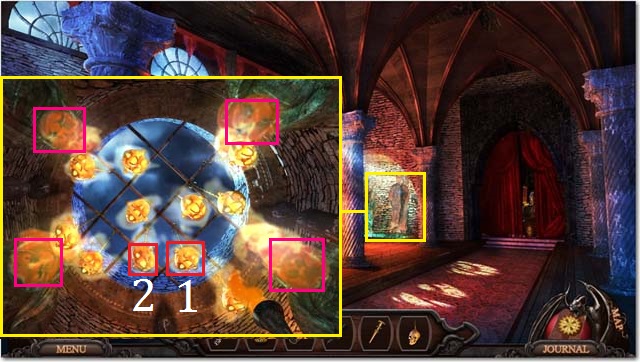
- Zoom into the alcove; hang the SKULL from the grate. Swing the lit skull (1) and the second skull (2) nearest to the lit skull to light the second skull. Continue this way until you have lit all the skulls. You may have to swing the skulls several times to get the timing right.
- Once all of the skulls are lit, collect all four HELMETS (pink).
- Light your TORCH on the lit skulls to receive the LIT TORCH.
- Return to the Queen’s Hall.
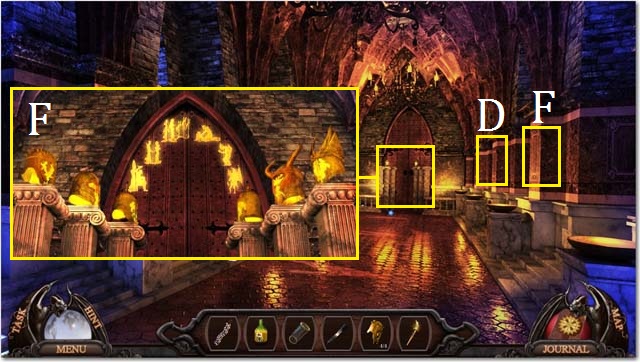
- Zoom into the alcoves (D) and (E) to examine the two paintings.
- Zoom into the back door; place the four HELMETS on the pillars and then arrange them as they are shown in the screenshot (F).
- Enter the Experiment Chamber.
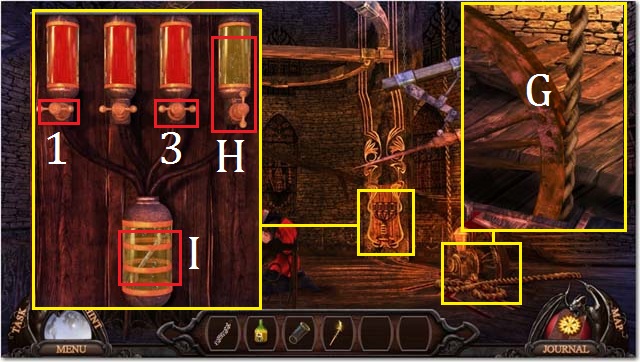
- Zoom into the wheel; cut the rope (G) with the KNIFE.
- Zoom into the blood panel; place the JAR in the empty slot (H).
- Pour the OIL into the empty JAR and then turn to knobs in the order of 3 and 1 to place only oil in the bottom jar.
- Collect the WRENCH (I).
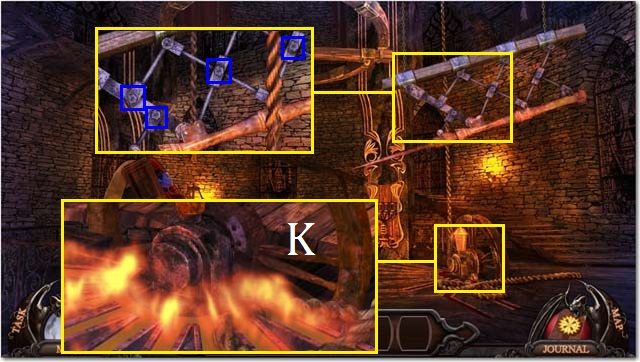
- Zoom back into the wheel; light the oil (K) with the LIT TORCH.
- Zoom into the large needle; use the WRENCH to remove the four bolts (blue) and send the needle crashing into Vlad.
- Congratulations! You have completed Dark Lore Mysteries: The Hunt for Truth.


 Mystery Age: Liberation of Souls Walkthrough, Guide, & Tips
 Echoes of the Past: The Revenge of the Witch Walkthrough, Guide, & Tips
 Mythic Wonders: Child of Prophecy Walkthrough, Guide, & Tips
 Mystery Valley Walkthrough, Guide, & Tips
 Legends of the East: The Cobra's Eye Walkthrough, Guide, & Tips