Grim Tales: The Stone Queen Walkthrough, Guide, & Tips
Grim Tales: The Stone Queen Walkthrough

Welcome to the Grim Tales: The Stone Queen Walkthrough
The family saga continues when your nephew Brandon encounters the mysterious Stone Queen in a lonely mountain town.
Whether you use this document as a reference when things get difficult or as a road map to get you from beginning to end, we’re pretty sure you’ll find what you’re looking for here.
This document contains a complete Grim Tales: The Stone Queen game walkthrough featuring annotated screenshots from actual gameplay!
We hope you find this information useful as you play your way through the game. Use the walkthrough menu below to quickly jump to whatever stage of the game you need help with.
Remember to visit the Big Fish Games Forums if you find you need more help. Have fun!
This walkthrough was created by prpldva, and is protected under US Copyright laws. Any unauthorized use, including re-publication in whole or in part, without permission, is strictly prohibited.
General Tips

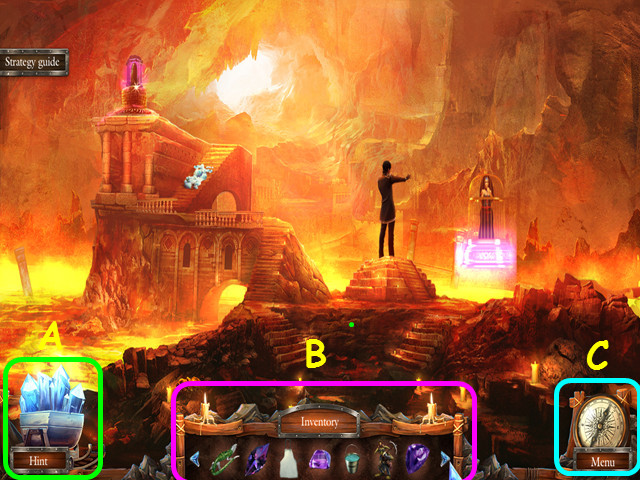
- Hidden-object scenes are referred to as HOS in this walkthrough.
- HOS and mini-games are often randomized – your solution may vary.
- HOS items listed in green are hidden or require additional steps.
- Hints are unlimited, but you must wait for the crystals to regrow (A).
- Your inventory (B) is located in the lower panel – select an item to use it.
- The inventory auto-hides, move your mouse down to reveal the panel.
- Select the compass icon to view the map (C).

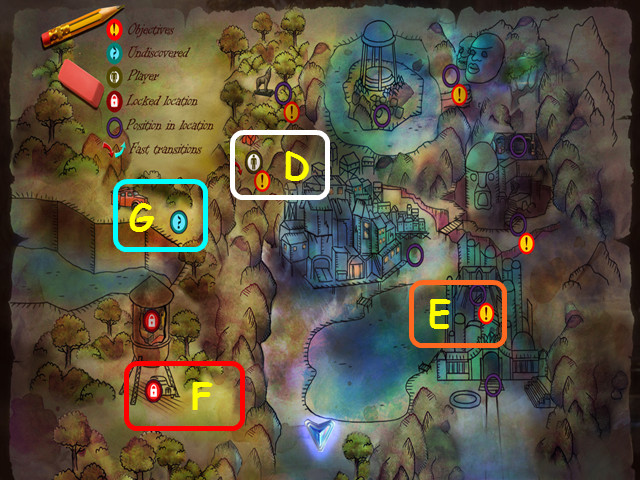
- You current location on the map is indicated by the figure in the white circle (D).
- Previously visited locations that have more tasks to complete will show an exclamation mark (E).
- Locks indicate you cannot currently visit a location (F).
- A question mark indicates a location you have not gained access to yet (G).
- Hover your mouse over a location on the map and you will see a picture from that location and the tasks you need to complete.
- Select a previously visited location to travel there.
Chapter 1: The Town

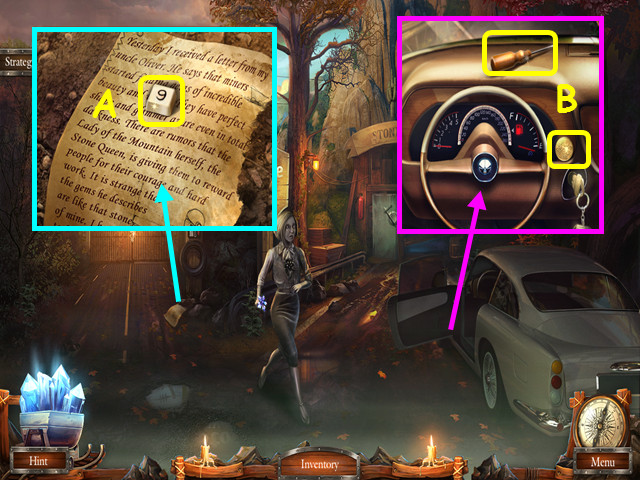
- You will have the option of some interactive help.
- Look at the note and take the 9 BRONZE BUTTON (A).
- Look inside the car; take the SCREWDRIVER and the 1st COIN (B).

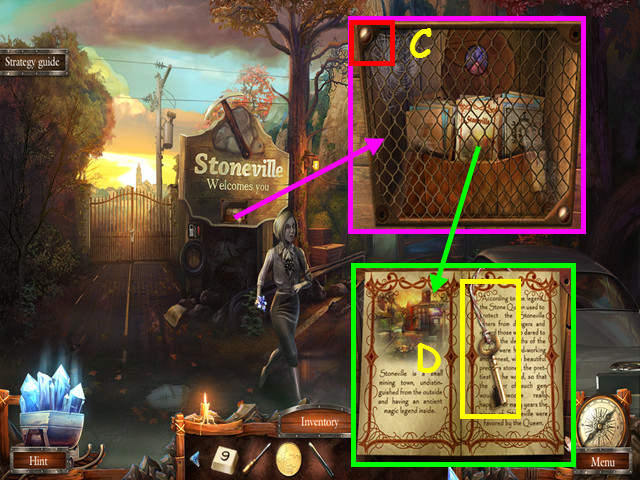
- Look at the sign and use the SCREWDRIVER to remove the screws (C).
- Look at the brochure and take the MINE KEY (D).

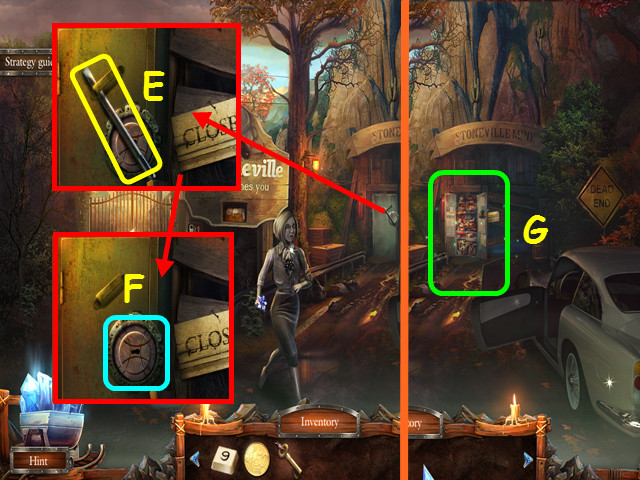
- Look at the cabinet and take the DRILL BIT (E).
- Use the MINE KEY in the lock (F).
- Select the open cabinet for a HOS (G).

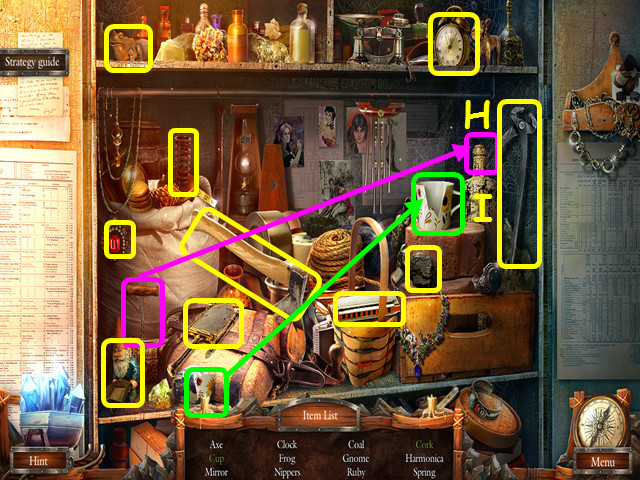
- Locate all the items on the list.
- Use the corkscrew on the bottle to find the cork (H).
- Place the shard in the crack to repair the cup (I).
- You will earn the PINCERS.

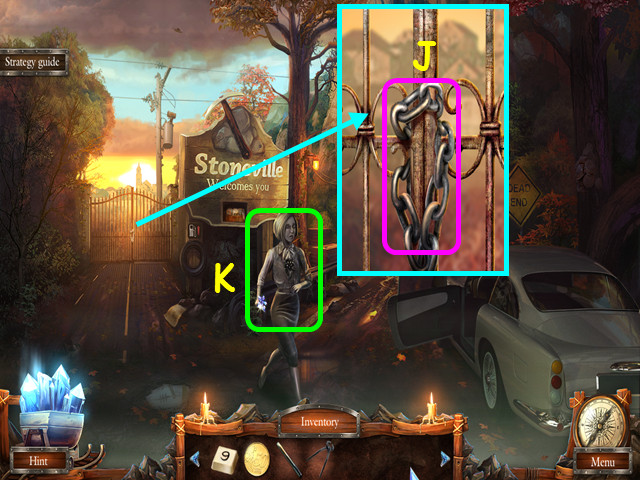
- Look at the gate and use the PINCERS on the chain (J).
- Make note of the stone girl (K).
- Walk forward through the gate to the square.

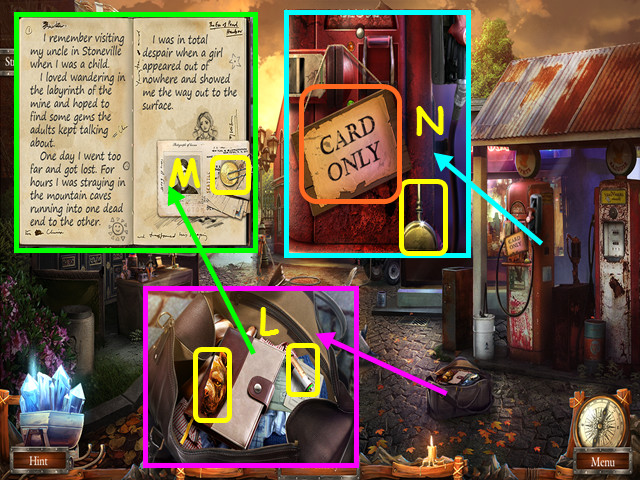
- Look in the bag; take the 1st STATUE HEAD PIECE and the 1st BATTERY (L).
- Open the journal and take the 2nd COIN (M).
- Look at the gas pump; remove the sign and take the OIL CAN (N).
- Walk down to return to the entrance.

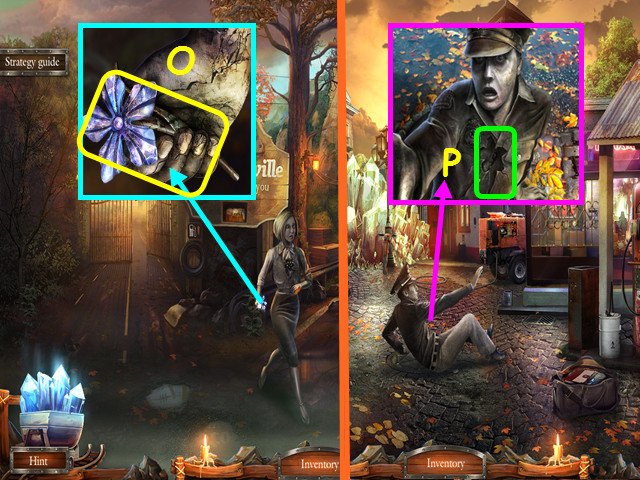
- Look at the girl’s hand; use the OIL CAN, then take the STONE FLOWER (O).
- Walk through the gate.
- Look at the guard and place the STONE FLOWER in his chest (P).

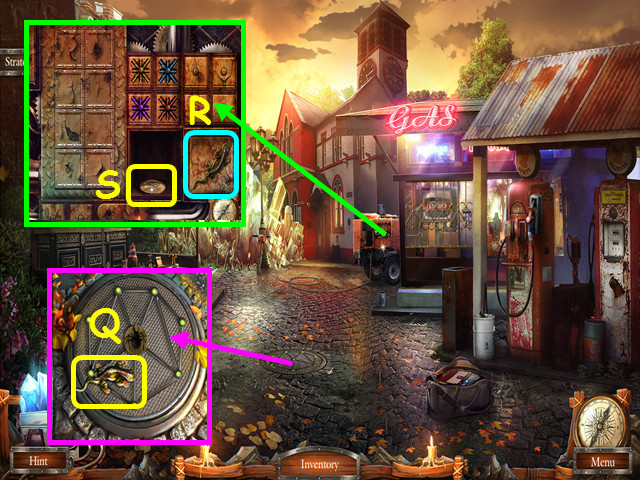
- Take the STONE LIZARD from the hatch (Q).
- Look at the drilling machine and place the STONE LIZARD in the indentation (R).
- Take the 3rd COIN (S).

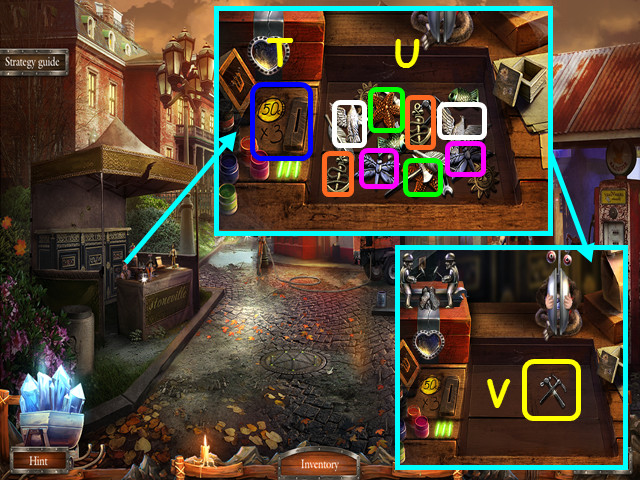
- Look at the stall and place the 3 COINS in the slot (T).
- Select pairs of trinkets to remove them from the pile (U).
- Take the COAT OF ARMS (V).
- Exit the stall and walk down.

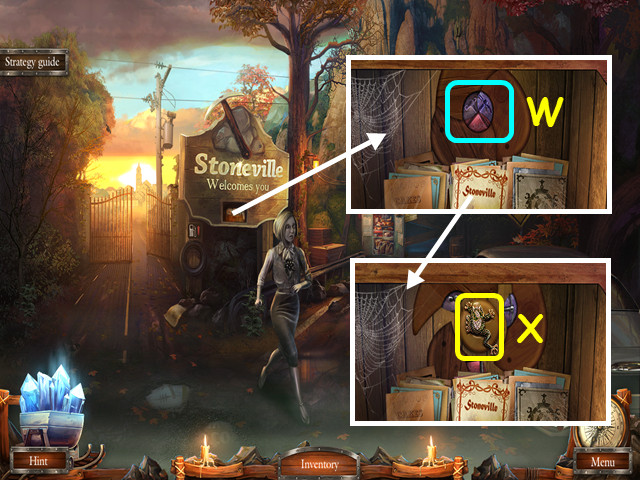
- Look at the sign and place the COAT OF ARMS on the emblem (W).
- Take the STONE FROG (X).
- Walk forward and look at the drilling machine.

- Place the STONE FROG into the indentation (A).
- Place the 4 stars (B) into the grid so the beams reach all the open squares (C).


- Try to walk forward.
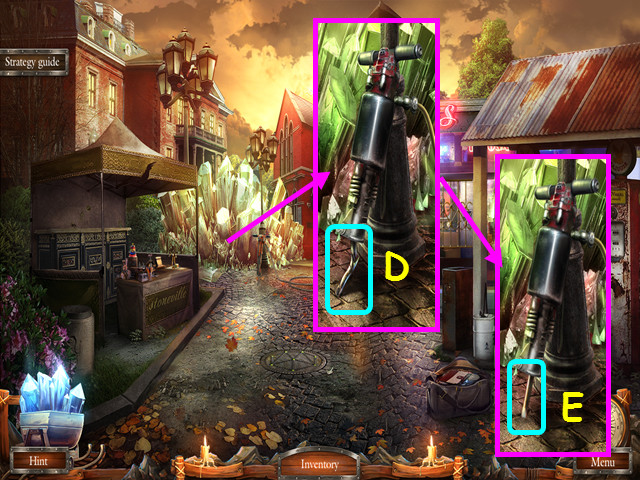
- Zoom into the crystals and remove the broken bit from the rock drill (D).
- Place the DRILL BIT in the rock drill (E).
- Take the drill and it will drill a path through the crystal.
- Walk forward to the front of the hospital.

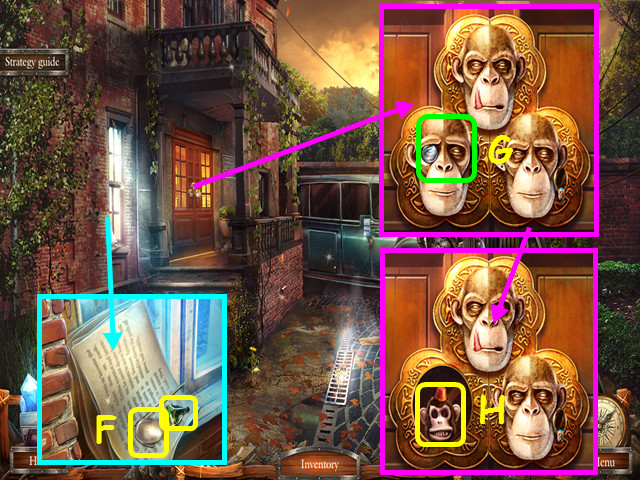
- Look at the window; take the MONOCLE and the 1/3 EMERALD (F).
- Look at the door, place the MONOCLE on the lower left monkey head (G), then take the TOY MONKEY HEAD (H).
- Walk down to the square.

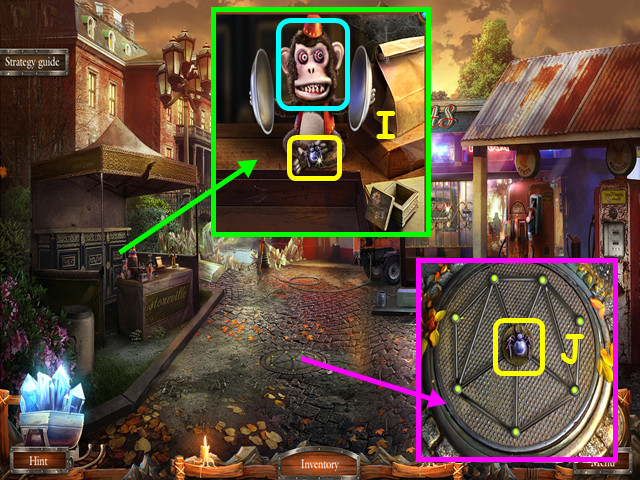
- Look at the stall and place the TOY MONKEY HEAD on the monkey body, then take the SPIDER (I).
- Look at the hatch and place the SPIDER in the indentation for a mini-game (J).

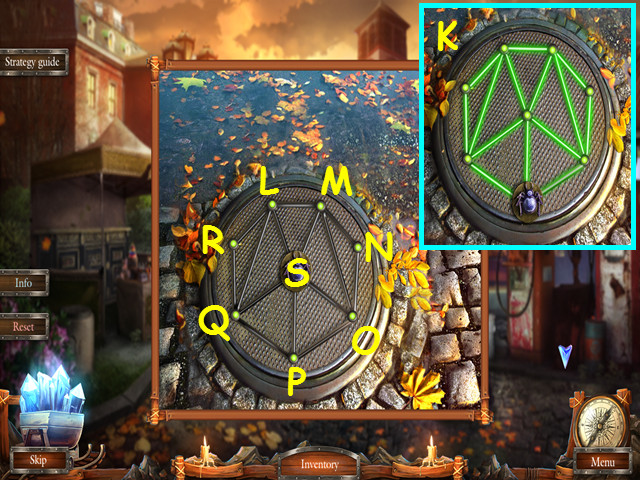
- Move the spider so it travels on all the strands of the web without repeating any (K).
- Select an adjacent point to move the spider there; previously visited strands will light up.
- Select the points in this order: L, R, Q, L, M, S, Q, P, S, O, M, N, O, P.
- Select the hatch for a HOS.

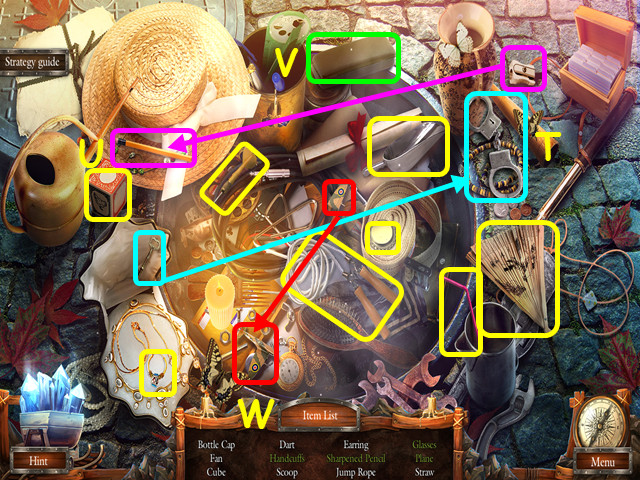
- Locate all the items on the list.
- Use the key to unlock the handcuffs (T).
- Use the sharpener on the pencil to make the sharpened pencil (U).
- Open the case to find the glasses (V).
- Place the wing on the body to complete the plane (W).
- You will earn the EARRING.
- Walk forward.

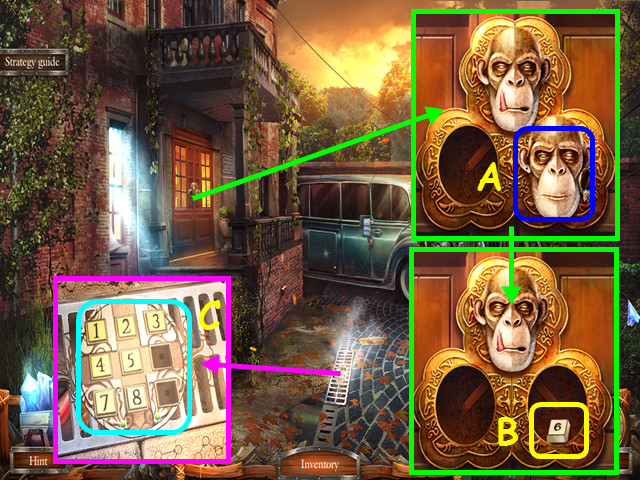
- Look at the door and place the EARRING on the lower right monkey head (A).
- Take the 6 BRONZE BUTTON (B).
- Look at the drain; place the 6 and 9 BRONZE BUTTONS on the keypad for a mini-game (C).

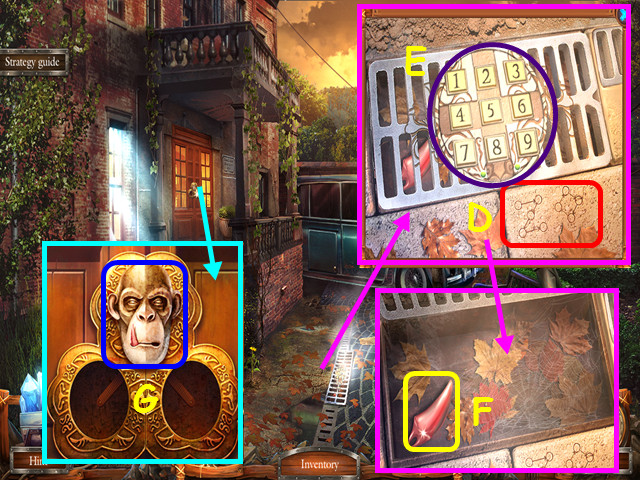
- Press the buttons in the correct order, based on the carvings (D).
- Press the buttons on the key pad (E) in this order: 1, 3, 5, 7, 9, 2, 6, 8, 4.
- If you press the wrong button, press the Reset and start over.
- Take the FANG (F).
- Look at the door and place the FANG on the upper monkey head (G).
- Walk left to enter the hospital hall.

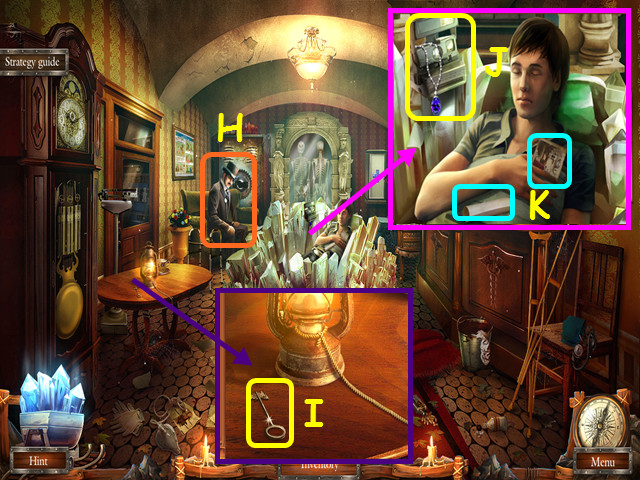
- Talk to Oliver to earn the CARD (H).
- Look at the table and take the CROSS-SHAPED KEY (I).
- Look at Brandon; take the BLUE CRYSTAL and the CAMERA (J).
- Look at the note and the photo (K).
- Walk down.

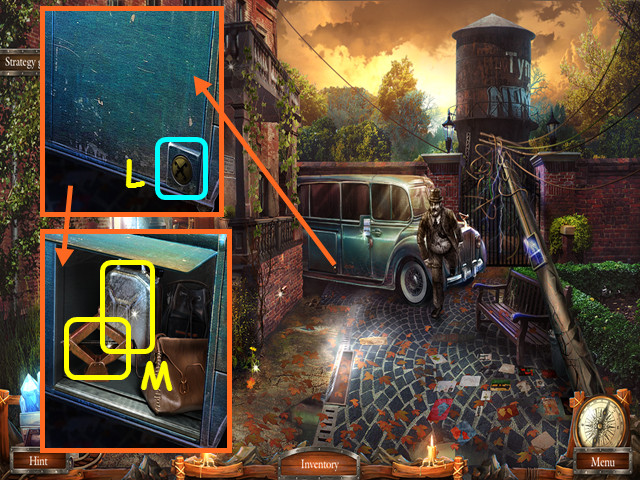
- Look at the luggage compartment on the car and use the CROSS-SHAPED KEY on the lock (L).
- Take the JACK and the GAS CAN (M).
- Enter the hospital.

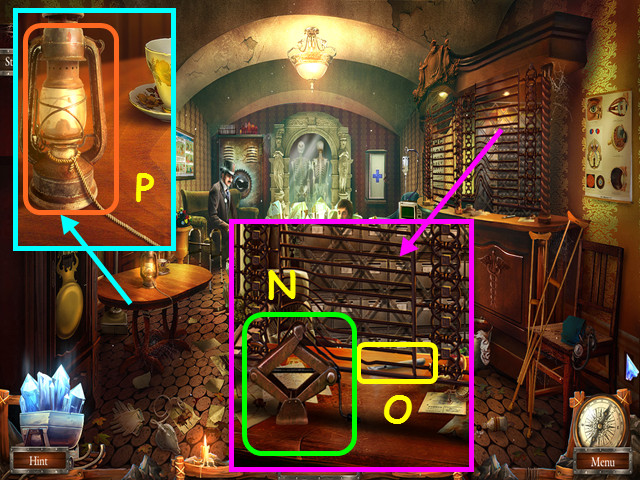
- Look at the card catalog and place the JACK under the grating, then turn the crank (N).
- Take the SCALPEL (O).
- Look at the table; use the SCALPEL on the rope, then take the OIL LAMP (P).
- Walk down.

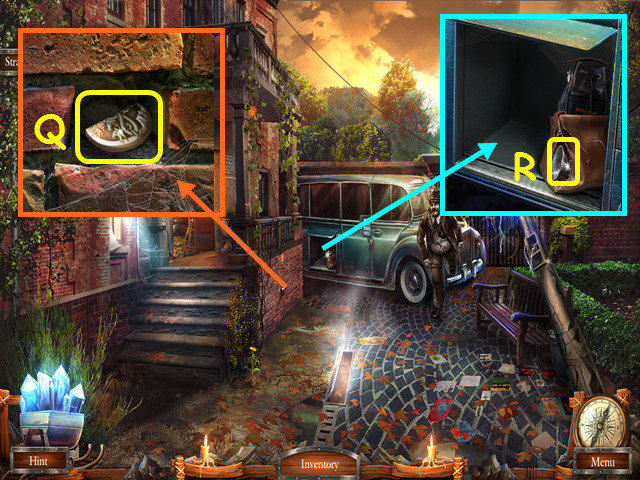
- Look at the wall, use the SCALPEL to take the BRICK, then take the PIECE OF AMULET (Q).
- Look in the luggage compartment and use the SCALPEL on the bag; open the bag and take the FUNNEL (R)..
- Walk down.

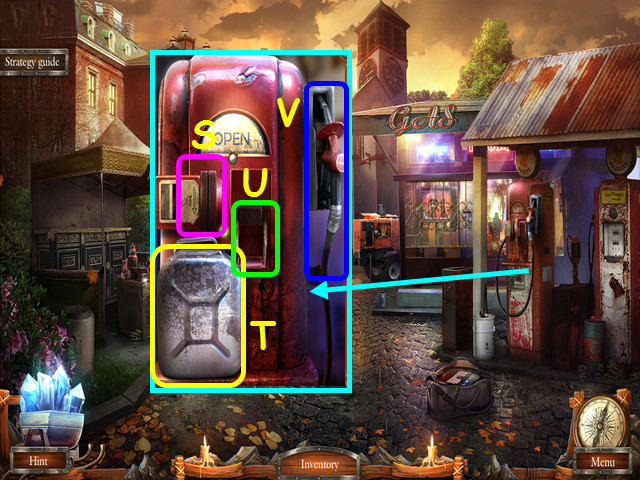
- Look at the gas pump, use the CARD on the reader (S), place the GAS CAN on the pump (T), pull the lever (U), and use the nozzle (V) on the gas can.
- Take the GASOLINE.
- Walk down.

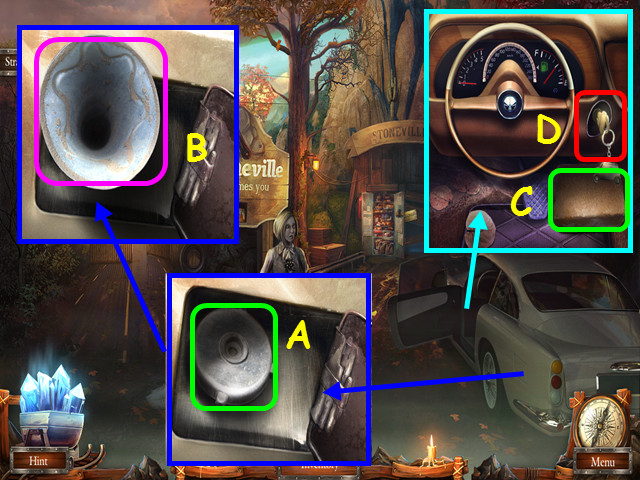
- Look at the gasoline tank, open the cover, and remove the lid (A).
- Place the FUNNEL in the tank, then pour in the GASOLINE (B).
- Look in the driver’s seat, place the BRICK on the pedal (C), then turn the key (D).
- Walk forward to the mine.

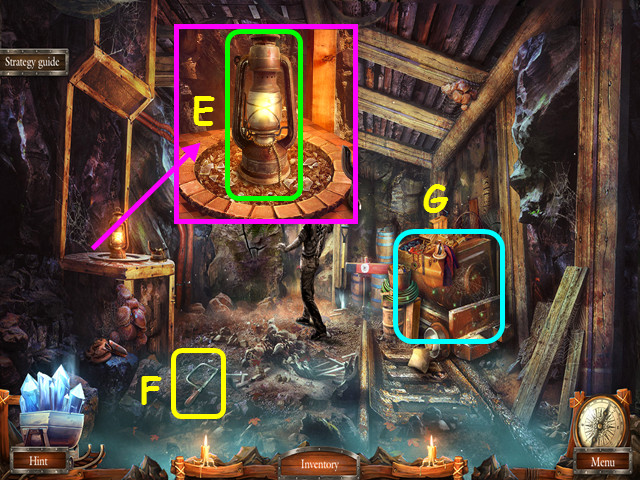
- Look at the niche, remove the old lamp fragment, then place the OIL LAMP on the table (E).
- Take the HANDSAW (F).
- Look at the trolley for a HOS (G).

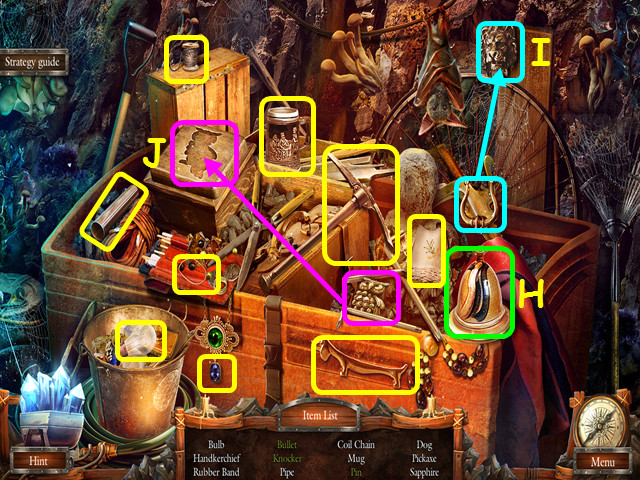
- Locate all the items on the list.
- Open the cover to find the pin (H).
- Place the knocker piece on the lion head to make the knocker (I).
- Place the owl on the box lid, then take the bullet (J).
- You will earn the COIL WITH A HOOK.
- Walk down, then go left to the square.

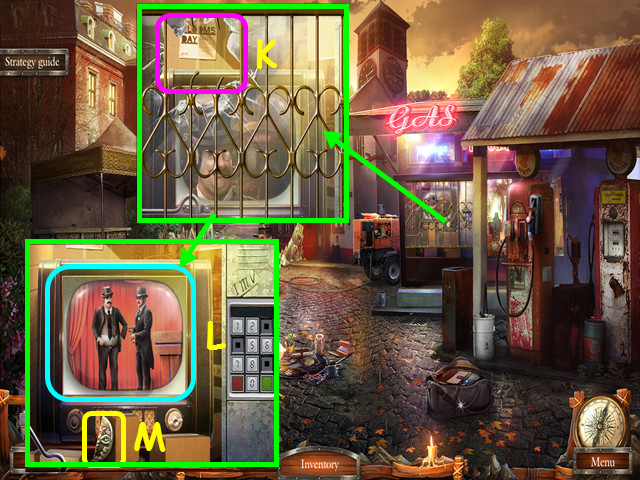
- Look at the showcase and use the COIL WITH A HOOK to open the window (K).
- Watch the television (L).
- Take the PART OF AMULET (M).
- Return to the hospital hall.

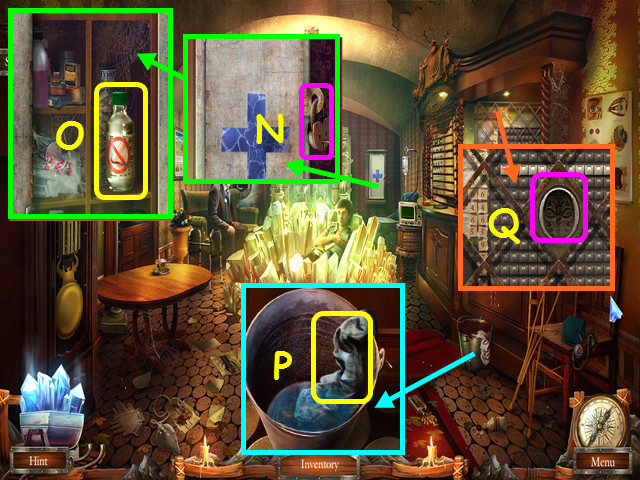
- Look at the medicine chest and use the HANDSAW on the lock (N).
- Take the SAL AMMONIAC (O).
- Look at the bucket, pour the SAL AMMONIAC on the rag, then take the AMMONIA RAG (P).
- Look at the card catalog; place the PIECE OF AMULET and the PART OF AMULET in the lock (Q).
- This will trigger a mini-game.

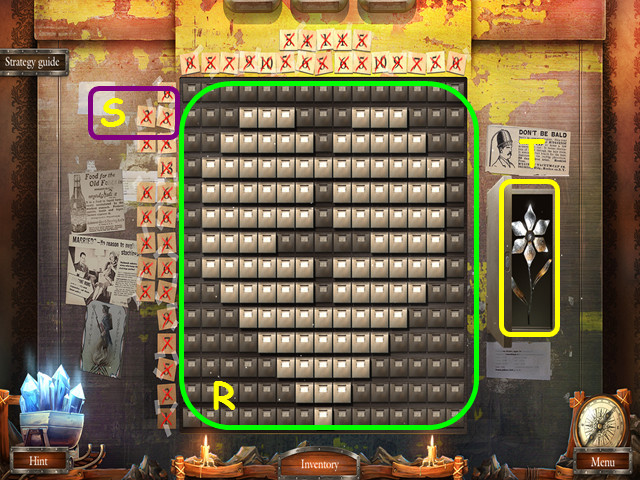
- Open the drawers based on the numbers at the top and left (R).
- Each number indicates a continuous block of drawers to open in a row or column.
- Two numbers will have at least one or more closed drawers between each block (S).
- Several rows and columns are complete, indicated by the red ‘X’ on the numbers.
- Take the STONE FLOWER from the compartment (T).
- Return to the mine.

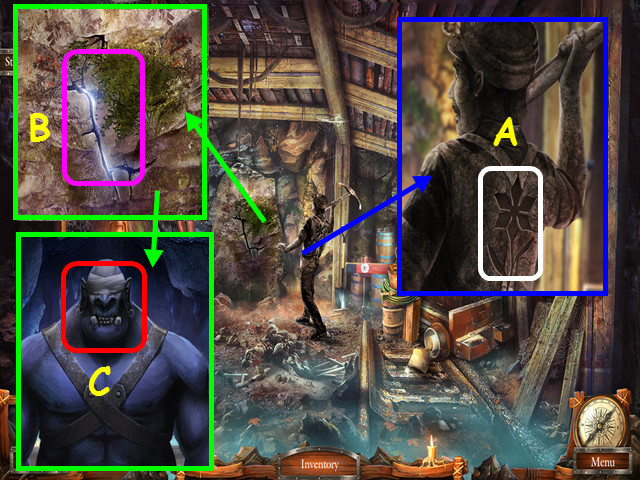
- Look at the miner and place the STONE FLOWER in his back (A).
- The miner will give you the PICKAX.
- Look at the wall and use the PICKAX on the crack (B).
- Look at the troll and use the AMMONIA RAG on his head (C).
- Walk forward.

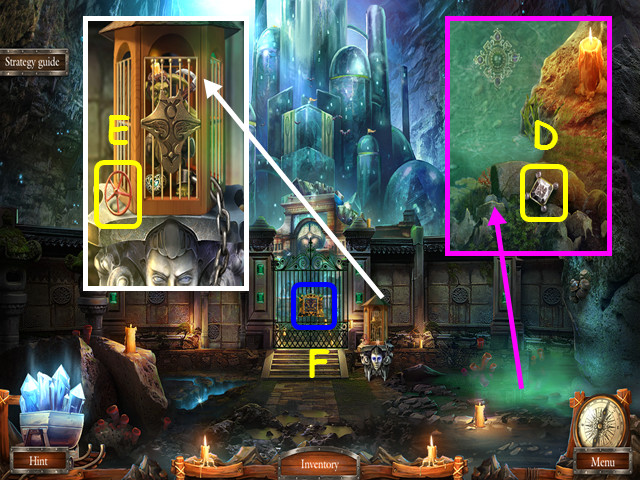
- Look at the water and take the 1/3 DIAMOND (D).
- Look at the cell and take the VALVE (E).
- Note the mini-game on the gate (F).
- Walk down.

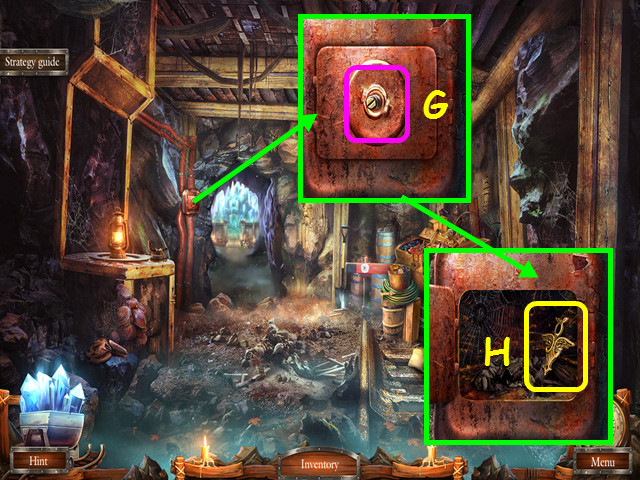
- Look at the sewage control and use the VALVE on the cover (G).
- Take the AMULET (H).
- Walk forward.

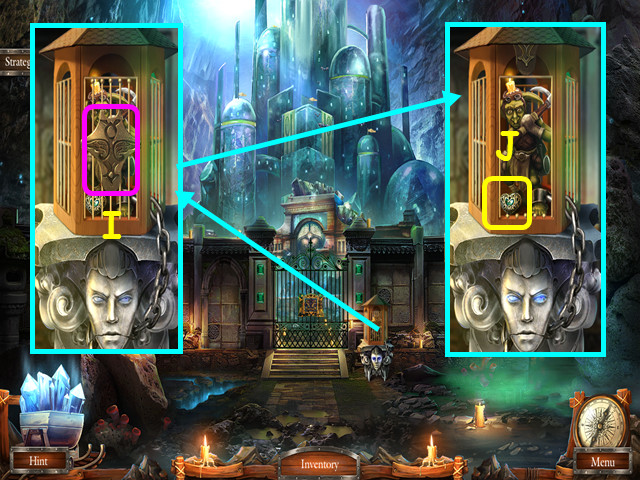
- Look at the cell and place the AMULET in the indentation (I).
- Take the HEART KEY (J).
- Return to the square.

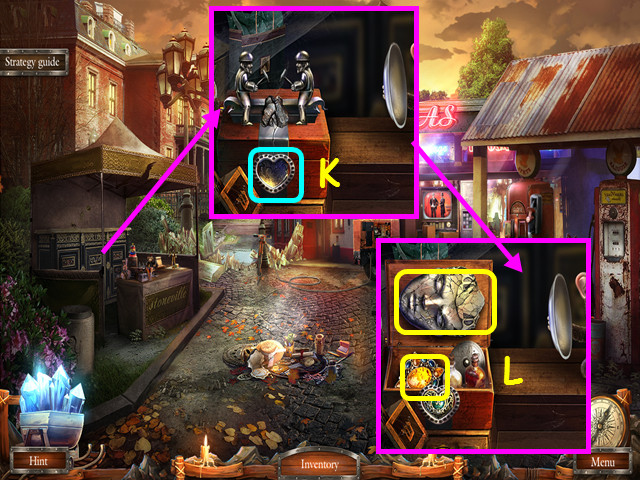
- Look at the stall and place the HEART KEY in the lock (K).
- Take the STONE QUEEN EMBLEM and the 1st BAS-RELIEF jewel (L).
- Walk down, enter the mine, then walk forward to the Castle gate.

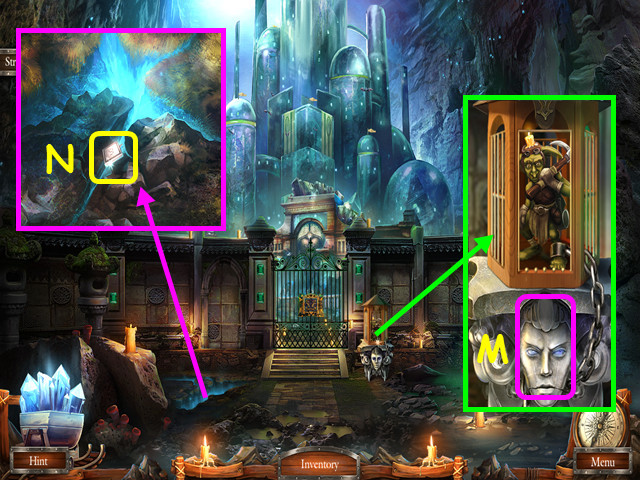
- Look at the cell and place the STONE QUEEN EMBLEM on the base (M).
- After talking to the goblin you will earn the 2nd BAS-RELIEF jewel and the GOBLIN.
- Look at the crack and use the GOBLIN to widen the gap, then take the 9 BUTTON (N).
- Look at the gate.

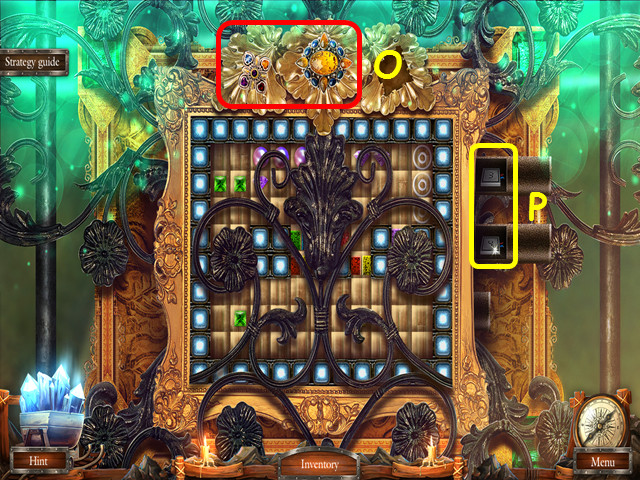
- Look at the gate place the 1st and 2nd BAS-RELIEF jewels into the indentations (O).
- Take the 3 BUTTON and the 4 BUTTON (P).
- Travel to the square.

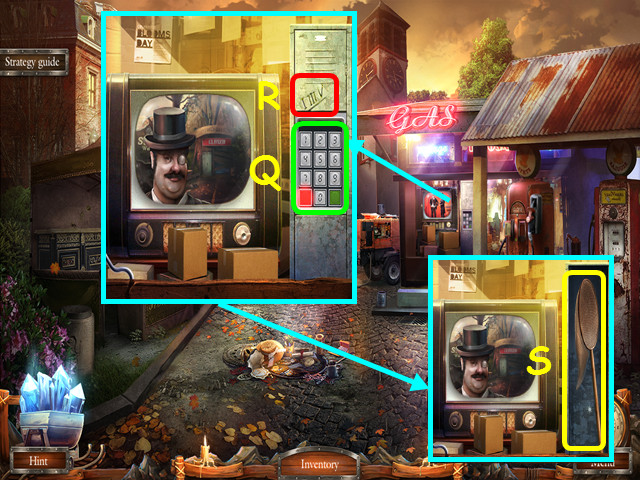
- Look at the showcase; place the 3, 4, and 9 BUTTONS on the keypad (Q).
- Note the code scratched on the locker (R).
- Press the 1, 3, and 5 buttons on the keypad.
- Take the NET (S).
- Return to the Castle gate.

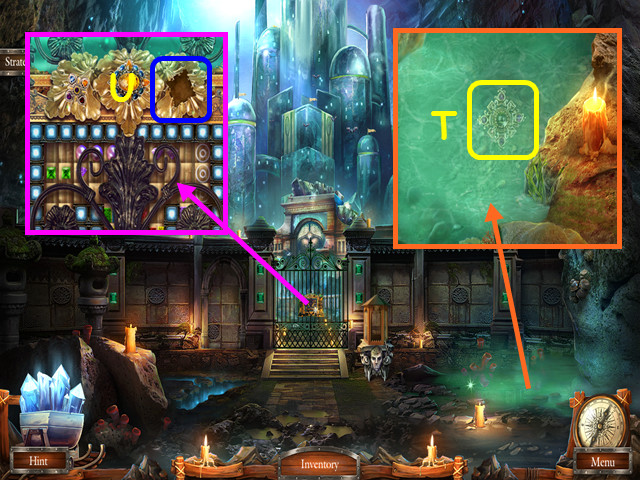
- Look at the water and use the NET to take the 3rd BAS-RELIEF jewel (T).
- Look at the gate and place the 3rd BAS-RELIEF jewel into the indentation for a mini-game (U).

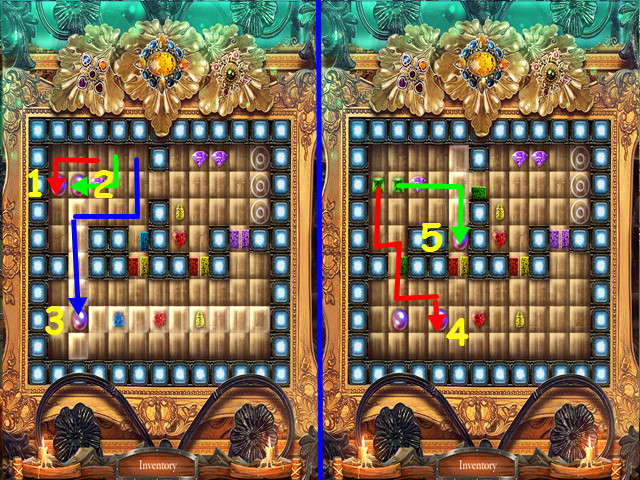

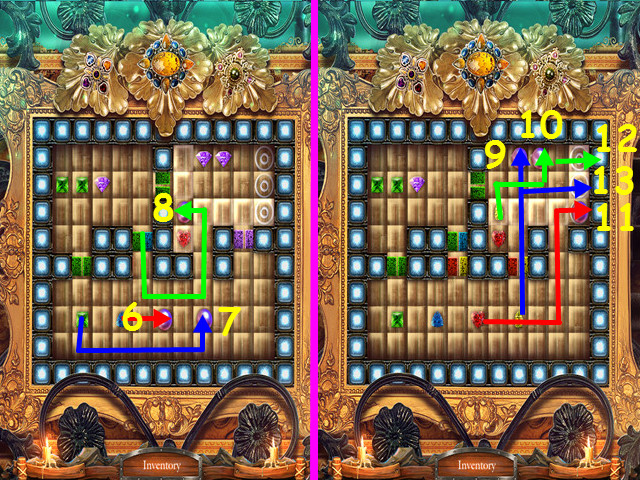
- Move the 3 pearls to the 3 circles.
- Move a pearl to a gem to open a gate of the same color.
- Move the pearls in the directions and sequence indicated (1- 13).
Chapter 2: The Underground

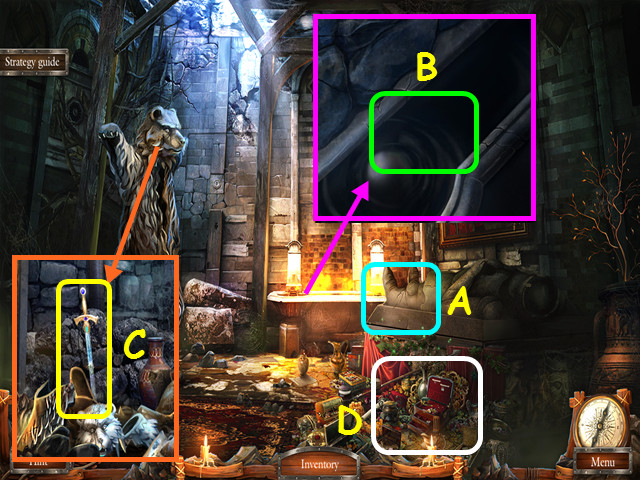
- Zoom into the coffin and take the MATCHES (A).
- Look at the oil trough and use the MATCHES to light the oil (B).
- Look at the bear, use the GOBLIN to destroy the bear, then take the SWORD (C).
- Select the King’s things for a HOS (D).

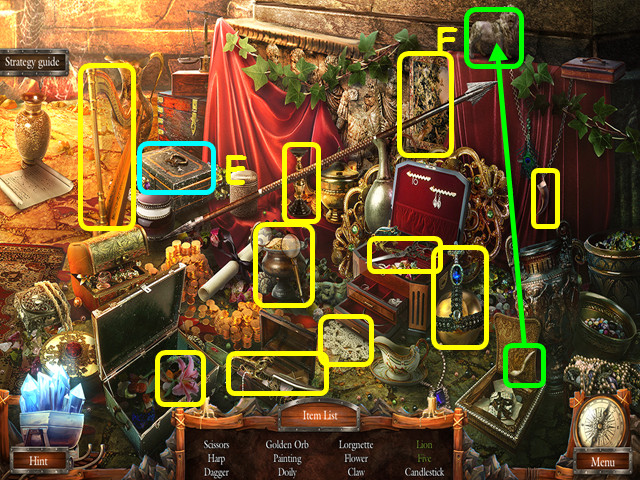
- Locate all the items on the list.
- Open the chest to find the five (E).
- Place the tail on the body to complete the lion (F).
- You will earn the GOLDEN ORB.

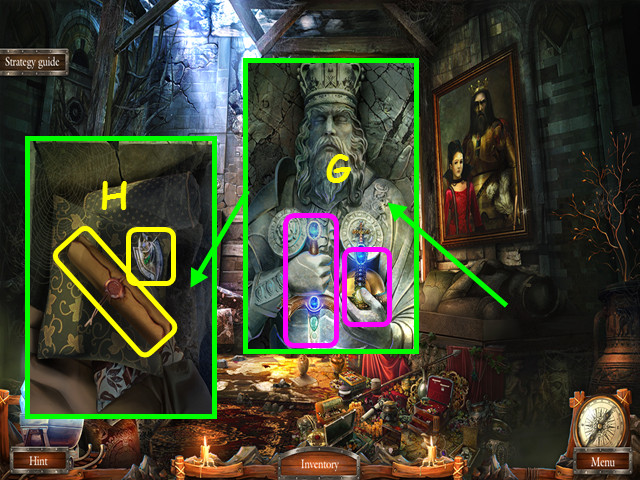
- Look at the sarcophagus; place the SWORD and the GOLDEN ORB in the King’s hands (G).
- Take the COAT OF ARMS and the LETTER (H).

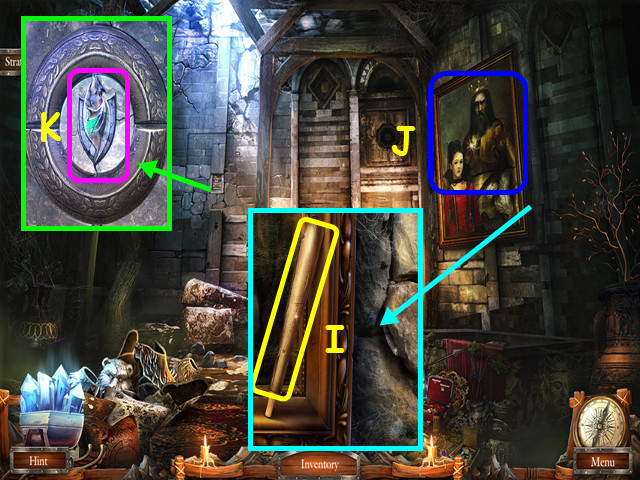
- Look at the picture and take the HANDLE (I).
- Use the CAMERA on the picture to get the PHOTO (J).
- Look at the hidden door and place the COAT OF ARMS into the indentation for a mini-game (K).

- Move the Warrior, Archer, and the Warlock up the board to the end.
- At least the Warlock (L) needs to make it to the end (M).
- Destroy the monsters (N) and take the gold (O).
- Select a figure and move it to a highlighted square, or use the arrows to move all three (P).
- You can also skip a turn by pressing the crossed circle (Q).
- Watch the life meters under each character (R).
- Walk up the stairs, then walk down to the mine.

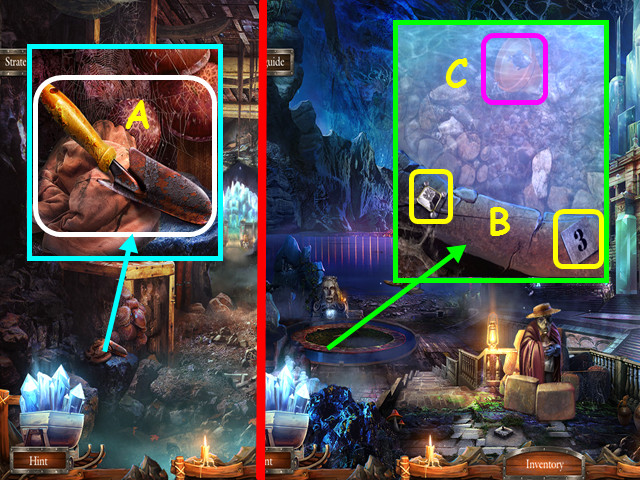
- Look at the incomplete trowel and attach the HANDLE to make the TROWEL (A).
- Walk forward twice to the Castle Square.
- Look at the fountain; take the 2/3 DIAMONDS and the THREE (B).
- Use the NET to get the POT (C).
- Use the map to return to the front of the hospital.

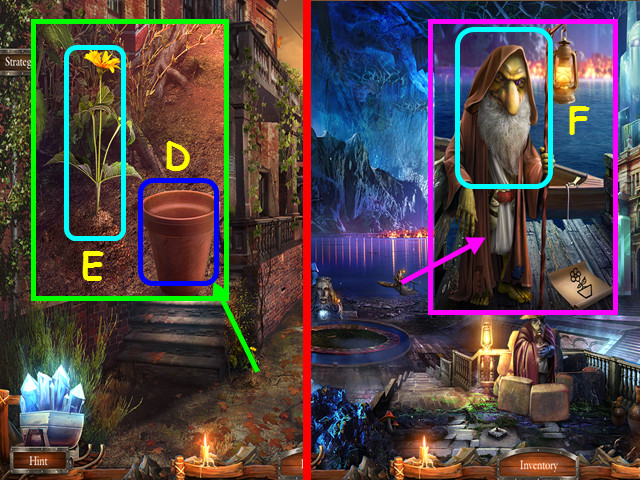
- Look at the flowerbed and place the POT on the ground (D).
- Use the TROWEL on the flower, then take the POTTED SPROUT (E).
- Return to the Castle Square.
- Look at the ferryman and give him the POTTED SPROUT (F).
- Go forward to Stone city.


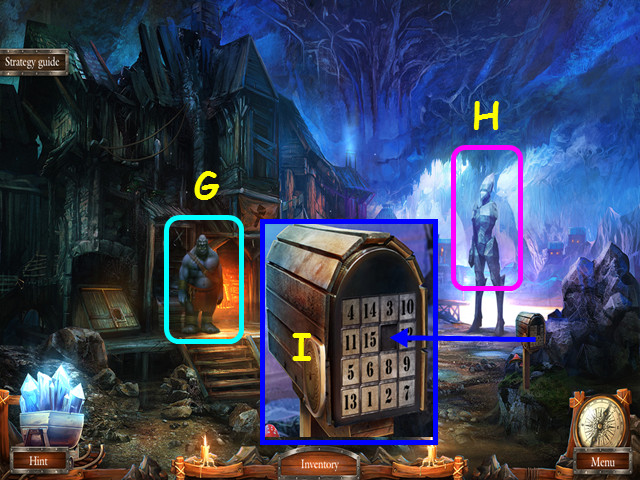
- Talk to the blacksmith (G).
- Talk to the golem (H).
- Look at the mailbox and place the THREE in the grid to trigger a mini-game (I).

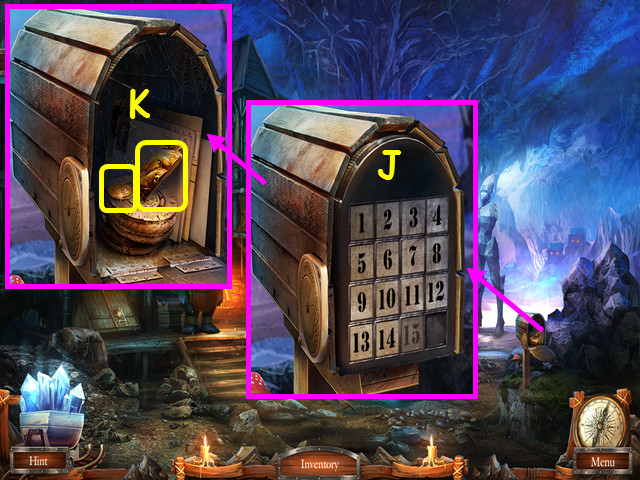
- Slide the tiles to put the numbers in order (J).
- Select the numbers in this order: 3, 14, 4, 11, 5, 6, 1, 2, 7, 9, 12, 10, 14, 4, 11, 5, 15, 1, 2, 7, 8, 3, 10, 14, 4, 11, 1, 2, 3, 8, 7, 13, 6, 15, 5, 1, 2, 3, 8, 10, 3, 8, 13, 7, 9, 12, 14, 4, 11, 3, 10, 14, 12, 9, 7, 6, 15, 5, 1, 2, 3, 10, 4, 11, 10, 4, 14, 7, 9, 12, 11, 10, 4, 3, 2, 1, 5, 13, 6, 9, 12, 11, 10, 14, 8, 6, 7, 10, 11, 12, 9, 15, 13, 5, 6, 7, 15, 9, 12, 11, 14, 8, 7, 6, 5, 15, 9, 13, 15, 9, 10, 14, 11, 12, 14, 11, 12, 14, 13, 15, 9, 10, 11, 12, 14, 13, 15, 9, 10, 11, 12, 15, 13, 14, 15, 12, 11, 10, 9, 13, 14, 15.
- Take the 1/2 BRONZE and the 2nd STATUE HEAD PIECE (K).

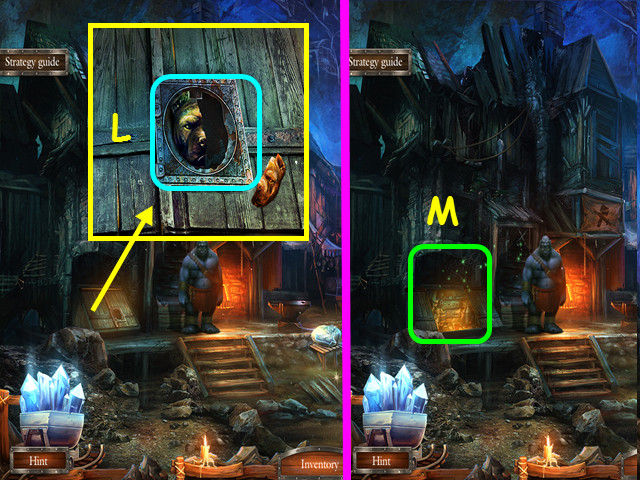
- Look at the basement door and place the 2 STATUE HEAD PIECES in the indentation (L).
- Select the basement for a HOS (M).

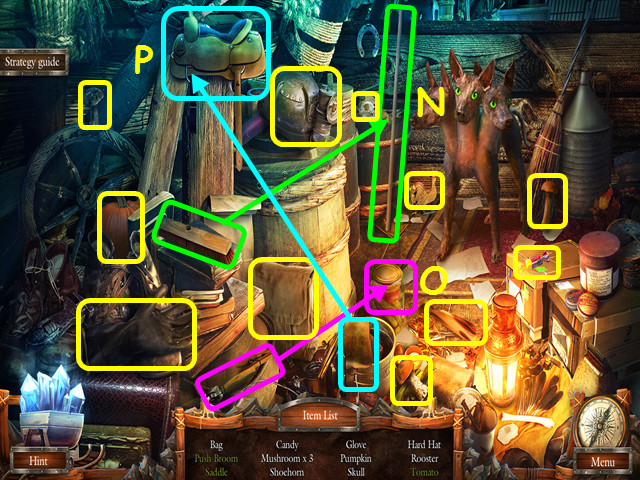
- Locate all the items on the list.
- Place the broom head on the stick to make the push broom (N).
- Use the can opener on the jar to find the tomato (O).
- Place the stirrup on the saddle to complete it (P).
- You will earn the RUBBER GLOVE.
- Travel to the front of the hospital.

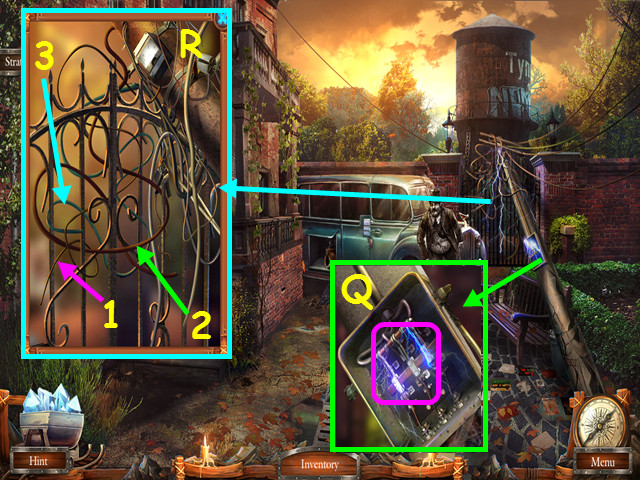
- Look at the transformer and use the RUBBER GLOVE to pull the lever (Q).
- Look at the gate for a mini-game (R).
- Remove the wires in numerical order (1-3).
- Walk forward through the gate to the water tower.

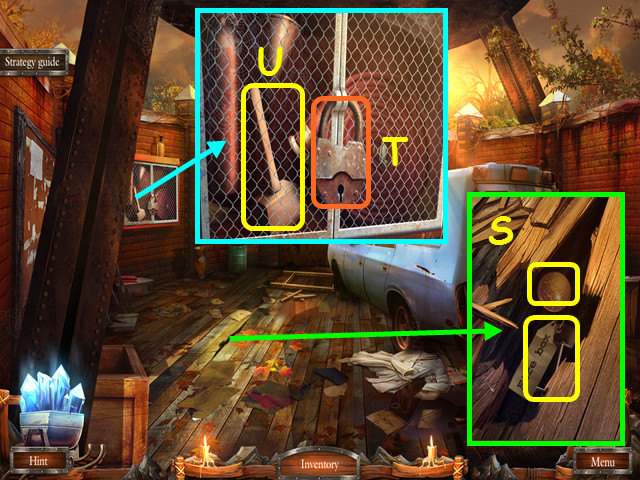
- Look at the floor and use the GOBLIN on the boards, then take the 2/2 BRONZE and the FIRE CABINET KEY (S).
- Look at the fire cabinet and use the FIRE CABINET KEY on the lock (T).
- Take the MALLET (U).
- Return to the Castle Square.

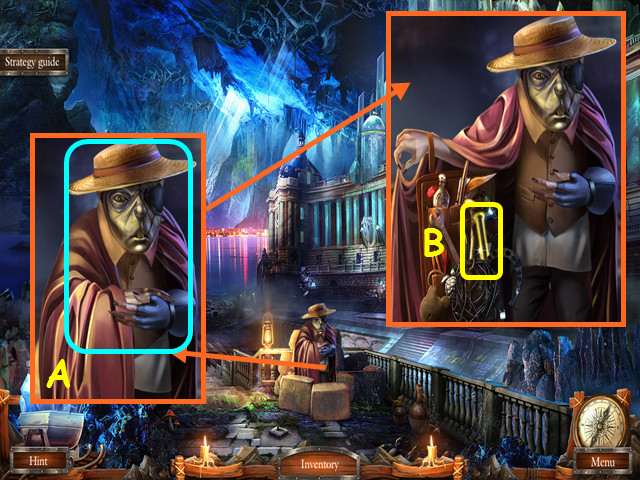
- Look at the Trader and give him the 2 BRONZE (A).
- Take the CHISEL (B).
- Walk forward to Stone city.

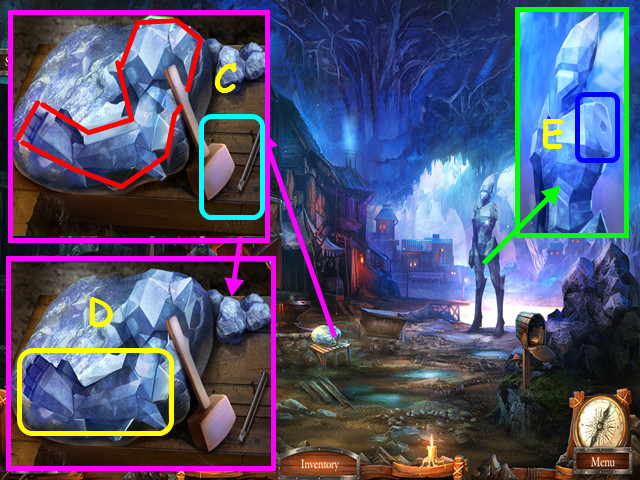
- Look at the bench; place the CHISEL and the MALLET on the bench (C).
- Select the lines as they light up; there are 9 that outline the arm.
- Take the GOLEM’S HAND (D).
- Look at the golem and place the GOLEM’S HAND on the body (E).
- Walk forward.

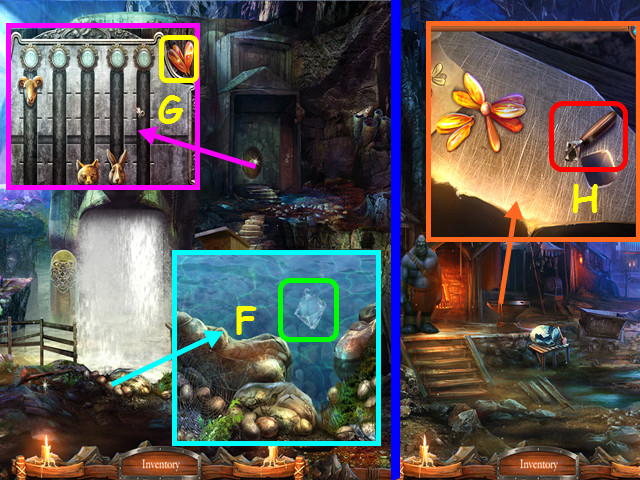
- Look at the water’s edge and use the NET to take the DIAMOND (F).
- Look at the door and take the 1st PETAL (G).
- Walk down.
- Look at the anvil and place the DIAMOND on the handle to make the GLASS CUTTER (H).
- Walk forward.

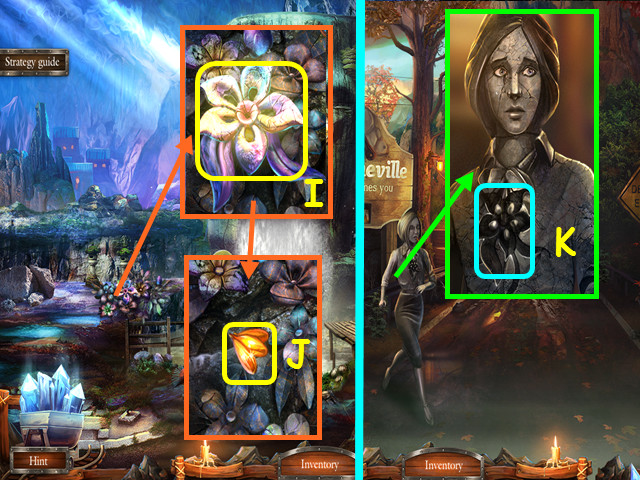
- Look at the flower field; use the GLASS CUTTER on the flower, then take the RUBY FLOWER (I) and the PETAL underneath (J).
- Use the map to travel to the entrance to the city.
- Look at the girl and place the RUBY FLOWER in her chest (K).
- You will earn the AMBULANCE KEYS.
- Return to the water tower.

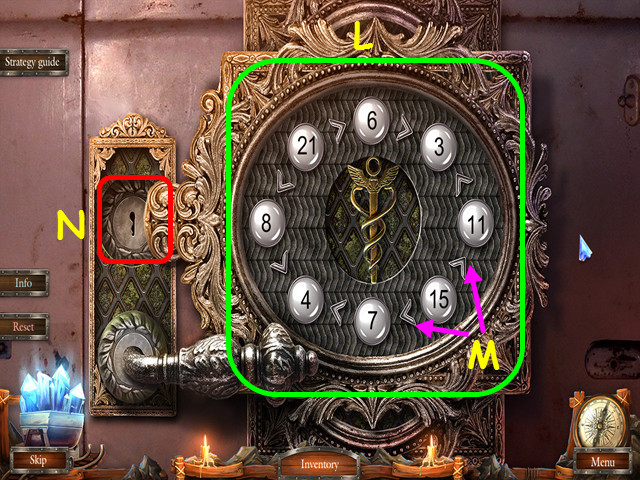
- Look at the back of the ambulance for a mini-game.
- Place the numbers in the correct place; select 2 numbers to swap positions (L).
- The numbers must be placed according to the ‘greater than’, and ‘less than’ symbols (M).
- Use the AMBULANCE KEYS in the keyhole (N).

- Look at the robe and take the $10 DOLLARS, then use the SCALPEL to cut open the pocket and take the KEY CARD (O).
- Look inside the ambulance; take the HAMMER and the PILLS (P).
- Use the GLASS CUTTER on the window to get the 1/2 SILVER (Q).
- Use the KEY CARD on the kit (R), then take the TWEEZERS and the OIL (S).
- Travel to the King’s tomb.

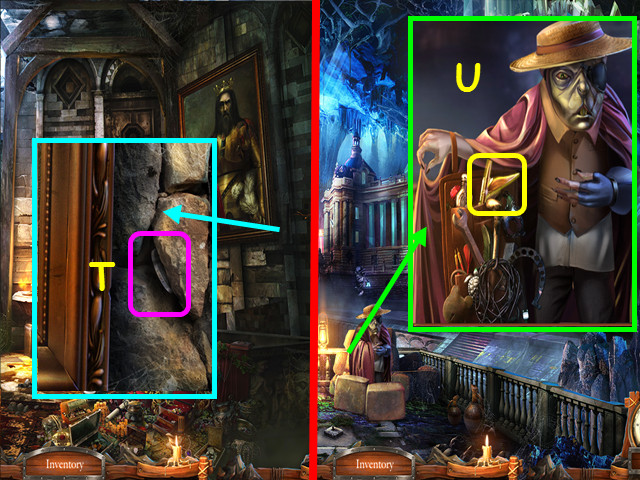
- Look at the picture and use the TWEEZERS to get the 2/2 SILVER (T).
- Walk to the Castle Square.
- Look at the Trader and give him the 2 SILVER, then take the STEM (U).
- Go forward to the Stone city.


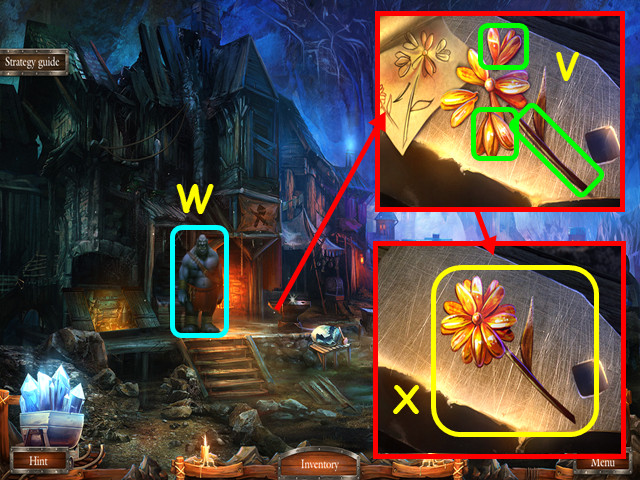
- Look at the anvil; place the 2 PETALS and the STEM on the anvil (V).
- Give the HAMMER to the blacksmith (W).
- Look at the anvil and take the STONE FLOWER (X).
- Return to the front of the hospital.

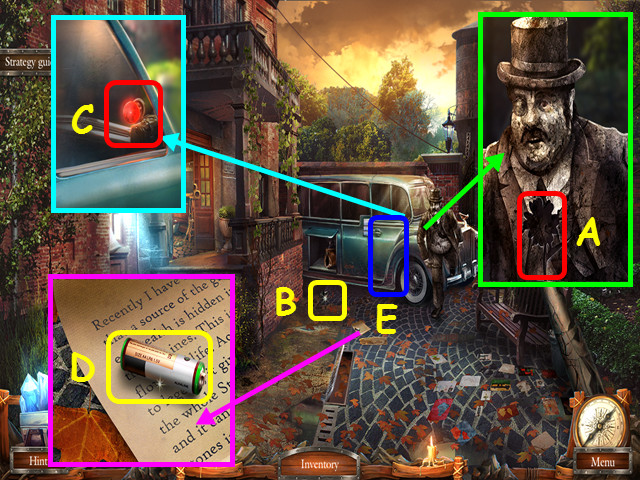
- Look at the stone mayor and place the STONE FLOWER on his chest (A).
- Take the CAR ALARM CONTROLS (B).
- Look at the front window of the van and use the CAR ALARM CONTROLS on the alarm (C).
- Look at the note and take the 2nd BATTERY (D).
- Look inside the van for a HOS (E).

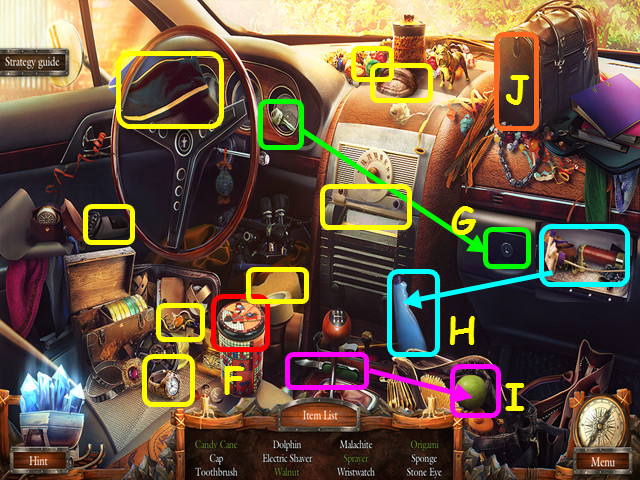
- Locate all the items on the list.
- Open the can to find the candy cane (F).
- Use the key on the glove box lock (G).
- Take the spray head and place it on the bottle to make the sprayer (H).
- Use the pocket knife on the fruit to find the walnut (I).
- Open the bag to find the origami (J).
- You will earn the EYE.
- Walk forward.

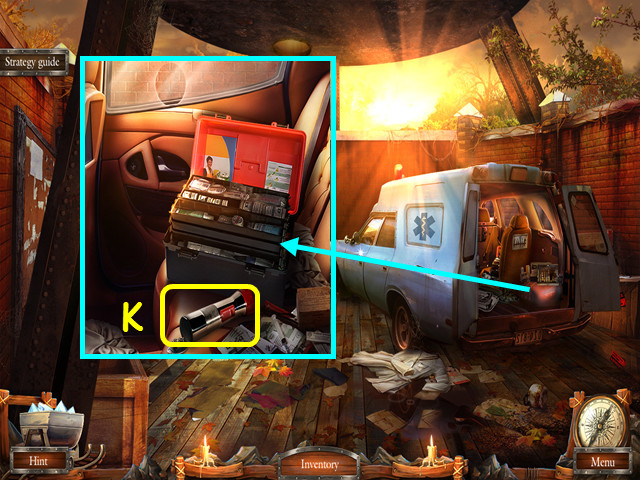
- Look in the ambulance, place the 2 BATTERIES into the flashlight, then take the FLASHLIGHT (K).
- Go to the waterfall.

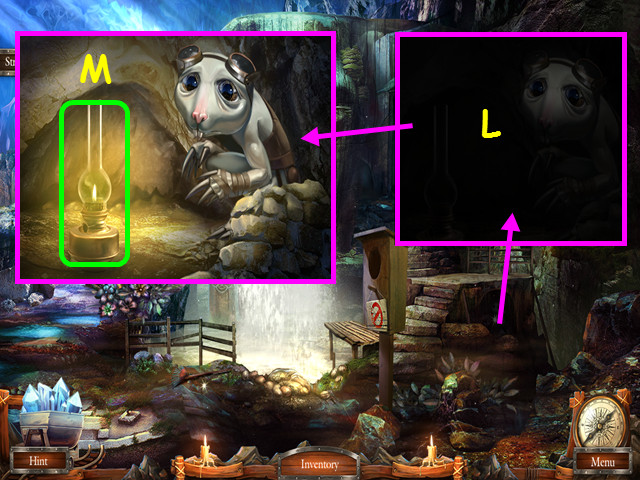
- Look at the mole and use the FLASHLIGHT on him (L).
- Put the OIL in the lamp, then use the MATCHES on the lamp (M).
- You will earn the NOSE.
- Go to the Castle Square.

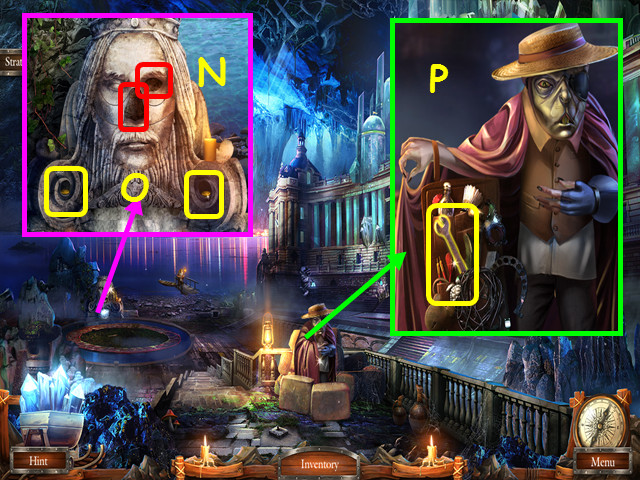
- Look at the King’s face and place the EYE and the NOSE on the face (N).
- Take the 2 GOLD (O).
- Look at the Trader and give him the 2 GOLD, then take the WRENCH (P).
- Travel to the water tower.

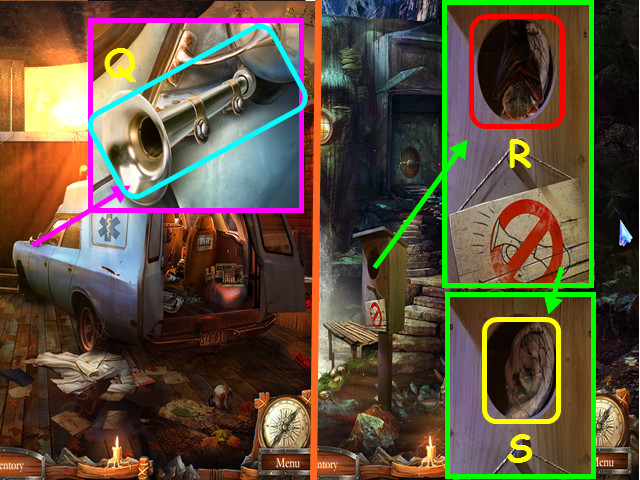
- Look at the front of the ambulance; use the WRENCH to remove the bolts, then take the HORN (Q).
- Return to the waterfall.
- Look at the starling-house and use the HORN to wake the bat (R), then take the EAR (S).
- Walk down twice.

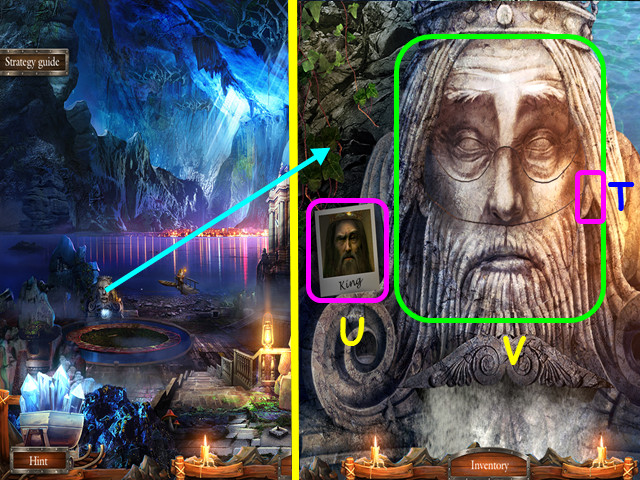
- Look at the King’s face and place the EAR on the face (T).
- Place the PHOTO on the left for a mini-game (U).
- Change the eyes, nose and mouth to match the photo (V).

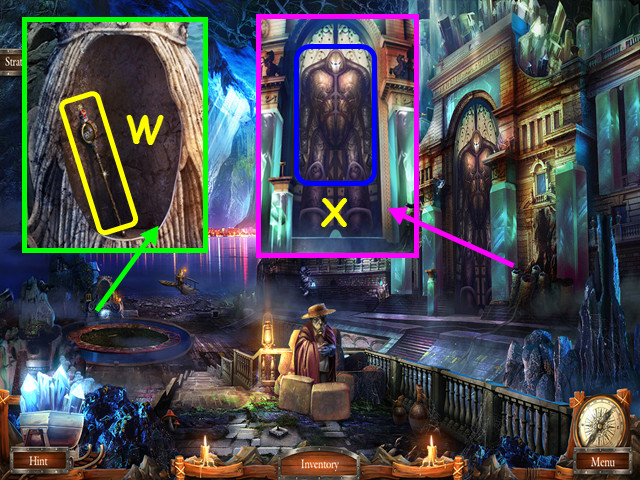
- Take the SCEPTER (W).
- Look at the Golem and give him the SCEPTER (X).
- Walk right to the Stone castle.
Chapter 3: The Queen

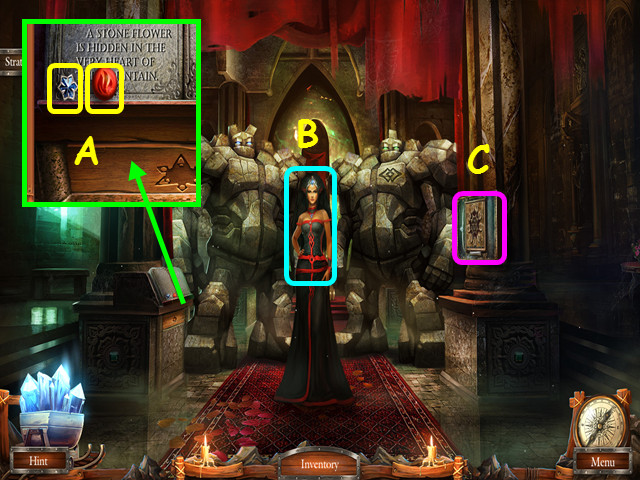
- Look at the chronicle; take the 1/3 TOPAZ and the MOLECULE (A).
- Give the LETTER to the Stone Queen (B).
- She will give you the LETTER OF POWERS.
- Note the mini-game in the glass showcase (C).
- Travel to the waterfall.

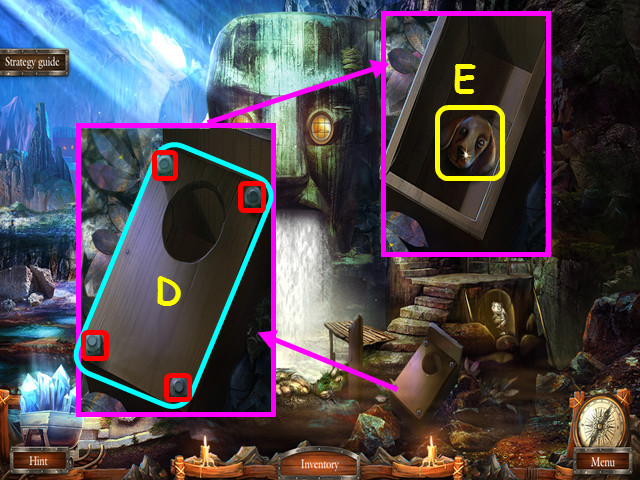
- Look at the starling-house and use the WRENCH on the fastenings, then take the NUTS (D).
- Remove the lid and take the 1st HEAD (E).
- Travel to the water tower.

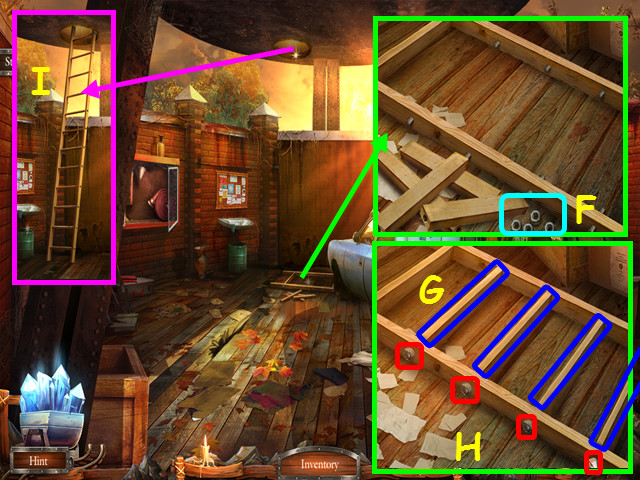
- Look at the ladder and place the NUTS on the floor to trigger a mini-game (F).
- Place the 4 boards into position (G).
- Place the nuts on the bolts (H).
- Use the WRENCH to tighten the screw nuts, then take the LADDER.
- Look at the water tower and use the LADDER in the hatch (I).
- Go up the ladder.

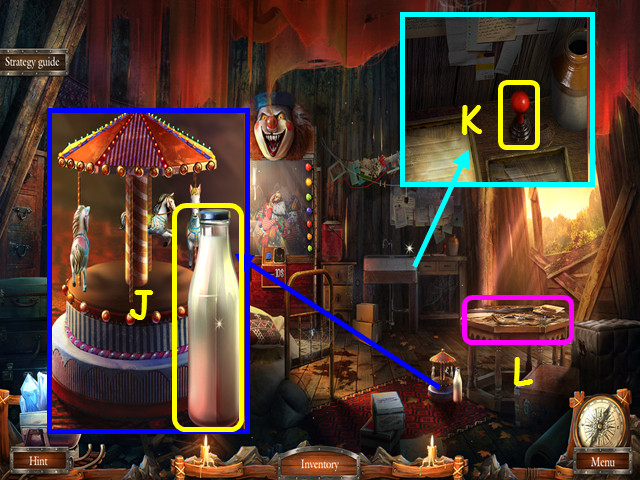
- Look at the carousel and take the MILK (J).
- Look at the photo development area and take the JOYSTICK (K).
- Note the rifle table (L).

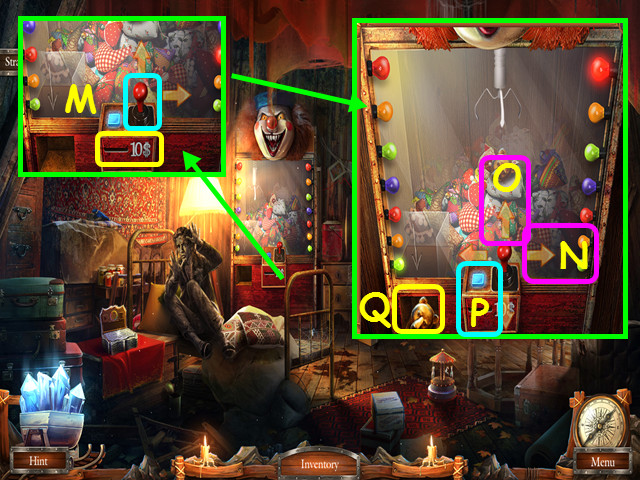
- Look at the crane machine; place the JOYSTICK on the control and insert the $10 DOLLARS in the slot (M).
- Select the right arrow twice (N), select the up arrow twice (O), then press the button (P).
- Take the 2nd HEAD (Q).
- Return to the waterfall and look at the door.

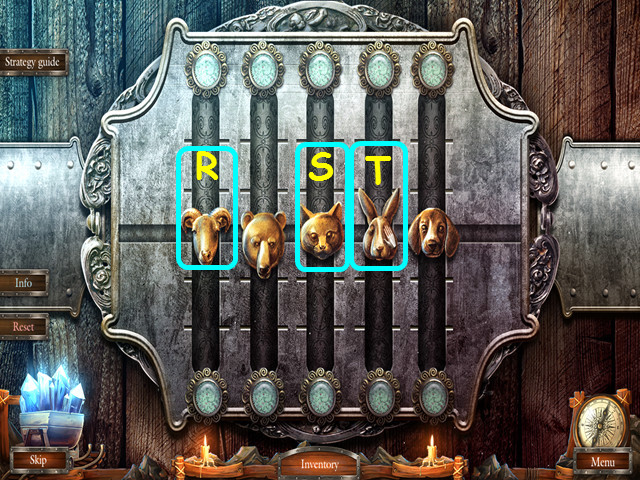
- Place the 2 HEADS on the device to trigger the mini-game.
- Drag the heads to place them all on the center line.
- Moving one head may cause another to move.
- Move the goat to the center (R), move the cat to the center (S), then move the rabbit to the center (T).
- Enter the door.

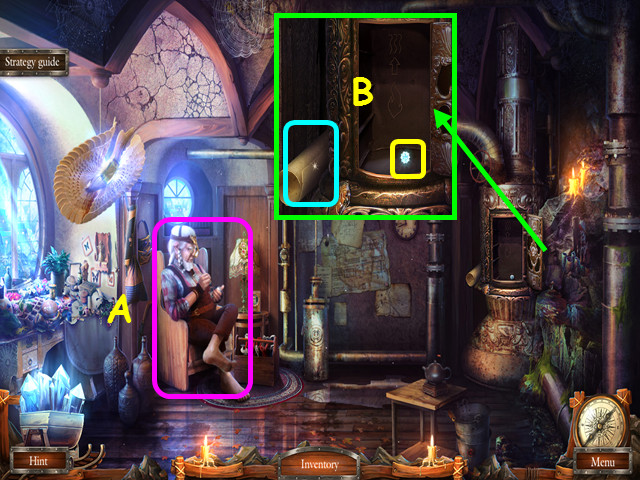
- Talk to the halfling and give him the LETTER OF POWERS (A).
- Look in the stove, read the instructions, then take the 1/4 STAR (B).
- Travel to Stone city.

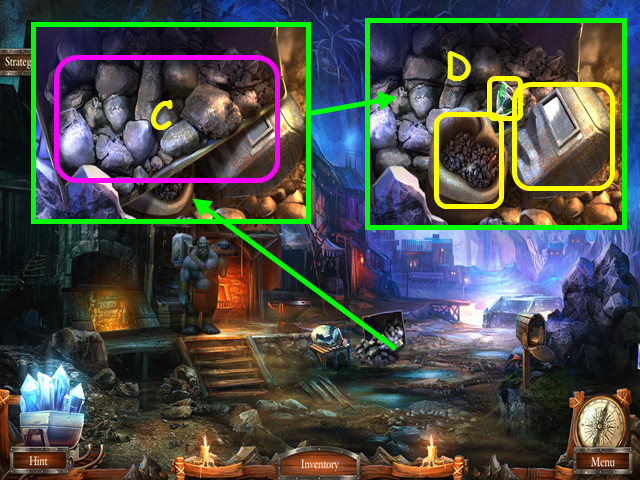
- Look at the trolley and use the GOBLIN on it (C).
- Take the COAL, CRUSHED WELDING MASK and the 2/3 EMERALD (D).

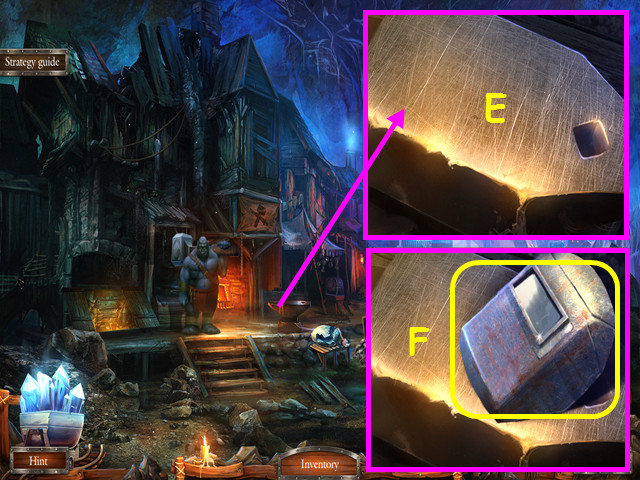
- Look at the anvil and place the CRUSHED WELDING MASK on it (E).
- Once the blacksmith is done, take the WELDING MASK (F).
- Travel to the halfling inside the head waterfall.

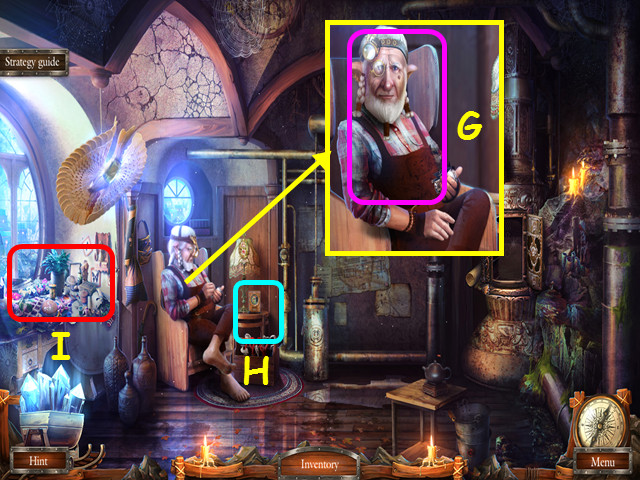
- Look at the halfling and give him the WELDING MASK (G).
- Note the calendar mini-game (H).
- Look at the halfling’s things for a HOS (I).

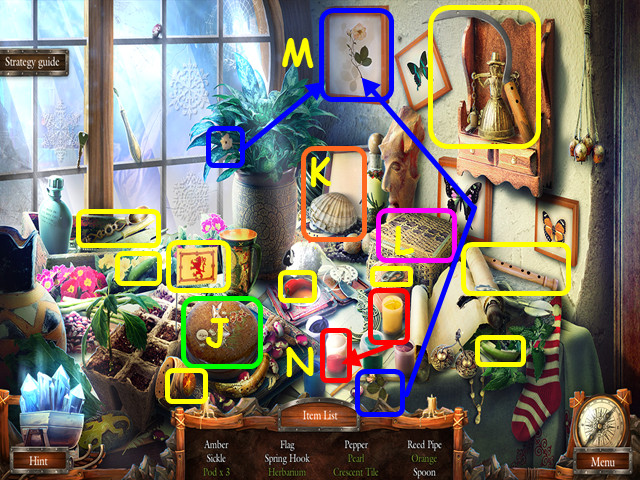
- Locate all the items on the list.
- Open the round box to find a pod (J).
- Open the clam shell to find a pearl (K).
- Open the sewing box to find the crescent tile (L).
- Move the petals and leaves to the frame to complete the herbarium (M).
- Pour the yellow paint into the red paint to make orange (N).
- You will earn the CRESCENT TILE.

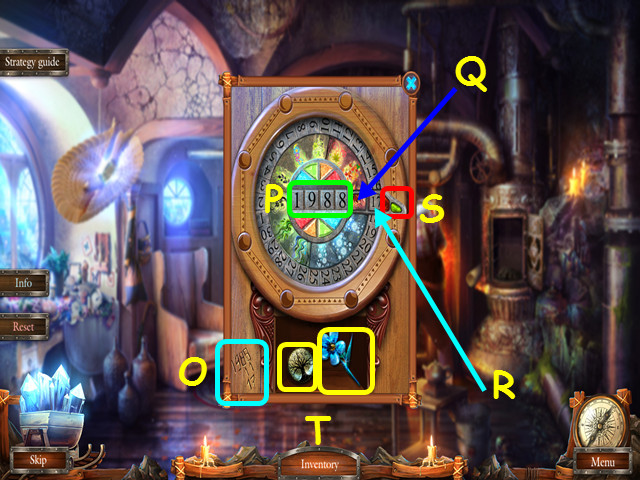
- Look at the calendar mini-game and place the CRESCENT TILE in the device.
- Note the date carved in the corner (O).
- Change the center numbers to 1988 (P).
- Move the colored ring so the last part of fall (orange) is to the right of the year (Q).
- Turn the outer dial so 17 is shown in the frame (R).
- Press the green button (S).
- Take the 1/3 RUNE and the SERVANT’S STONE (T).
- Travel to the inside of the water tower.

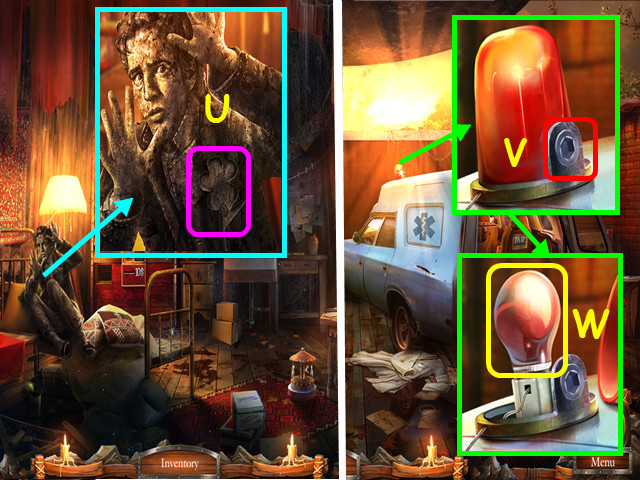
- Look at the servant and place the SERVANT’S STONE in his chest (U).
- You will earn the HEX KEY.
- Walk down.
- Look at the emergency light atop the ambulance and use the HEX KEY to remove the cover (V).
- Take the RED LIGHT BULB (W).
- Climb up the ladder.

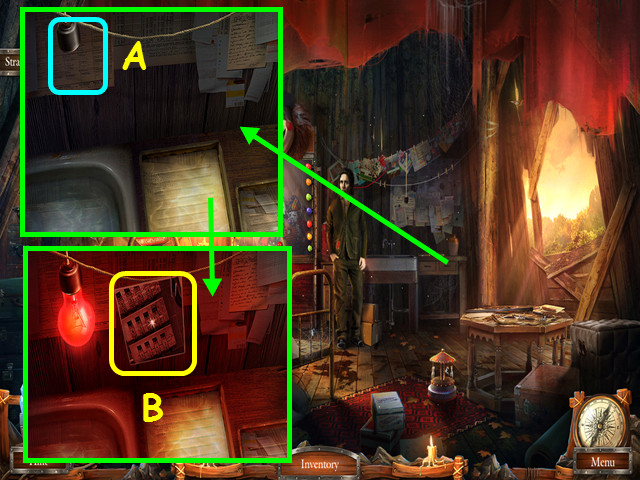
- Look at the photo development table and place the RED LIGHT BULB in the socket (A).
- Take the PHOTO (B).
- Walk down twice.

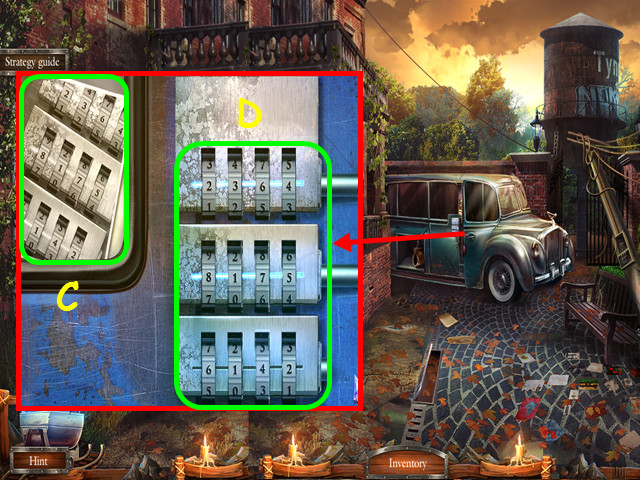
- Look at the lock on the van for a mini-game.
- Place the PHOTO on the left to activate the mini-game (C).
- Change the locks to match the photo (D).
- Enter the van laboratory.

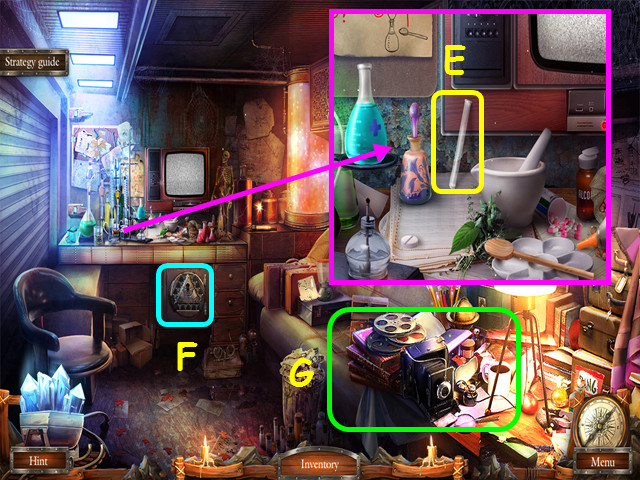
- Look at the chemistry table and take the TEST TUBE (E).
- Note the safe mini-game (F).
- Look at Sheldon’s things for a HOS (G).

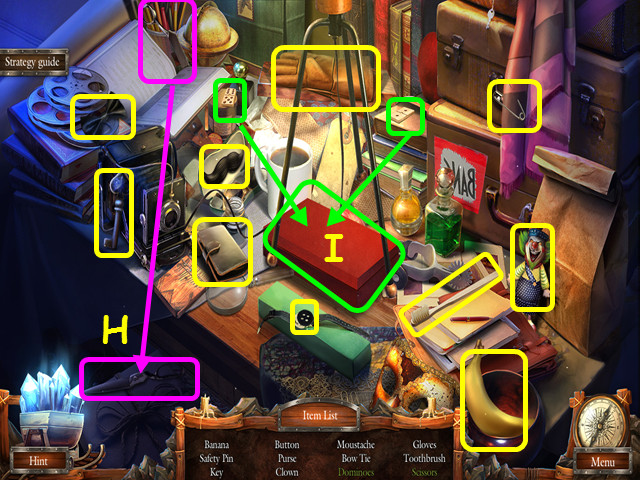
- Locate all the items on the list.
- Place the scissors half with the other half to make the scissors (H).
- Open the case and return the 2 tiles to the case to make the dominoes (I).
- You will earn the SPADE KEY.

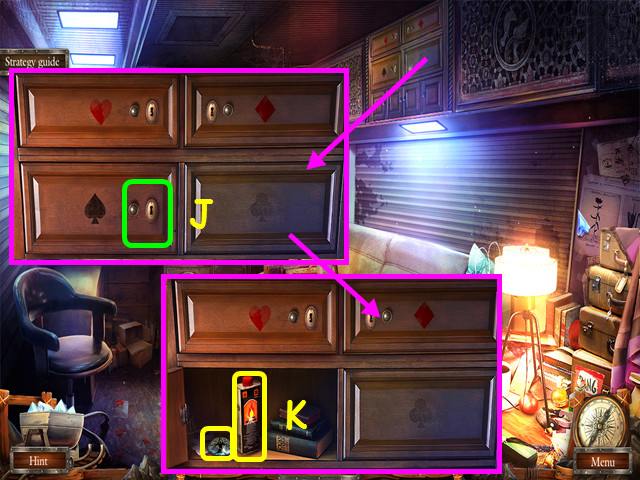
- Look at the compartments and use the SPADE KEY to open the spades compartment (J).
- Take the 2/3 RUNES and the FUEL (K).
- Travel to the head waterfall.

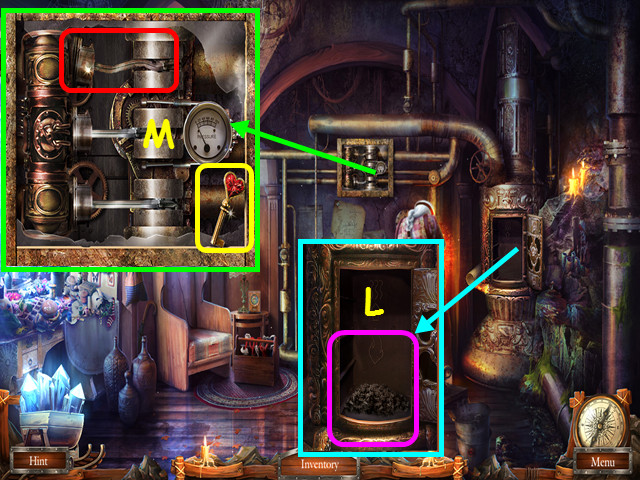
- Look at the fireplace, place the COAL inside, add the FUEL, then use the MATCHES (L).
- Look at the pump; take the HEART KEY and remove the bent piston (M).
- Return to the van laboratory.

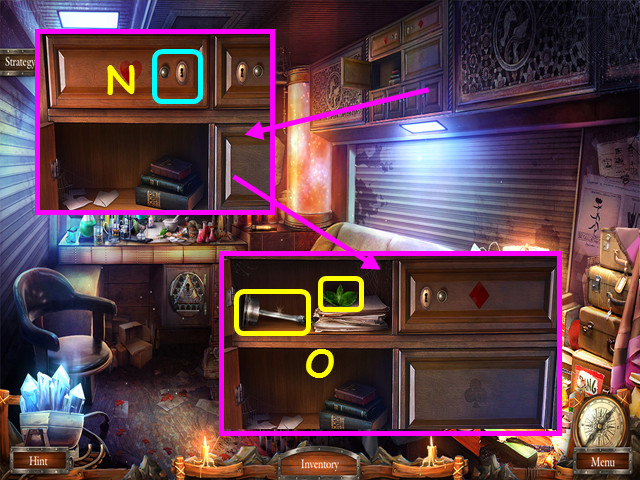
- Look at the compartments and use the HEART KEY on the heart compartment (N).
- Take the PISTON and the VALERIAN (O).

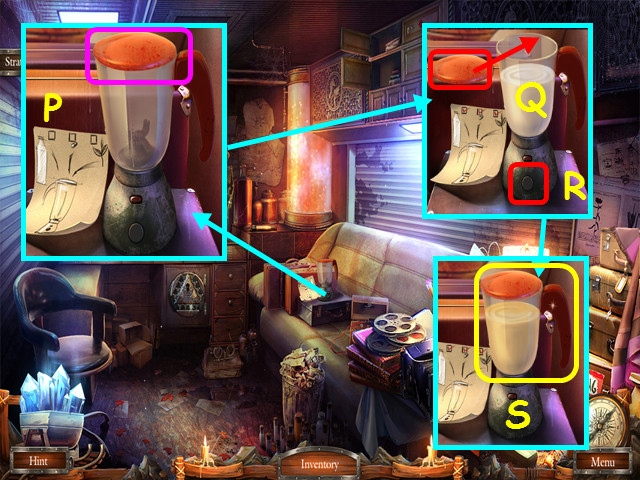
- Look at the mixer and remove the lid (P).
- Place the VALERIAN, MILK, and the PILLS in the mixer, then replace the lid (Q).
- Push the button (R).
- Take the SLEEPING POTION (S).
- Travel to the head waterfall.

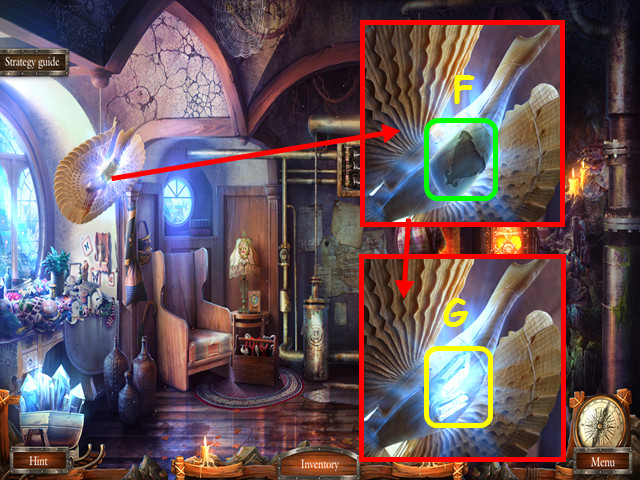
- Look at the pump and replace the PISTON (T).
- You will earn the KNOWLEDGE AMULET.
- Travel to the Stone castle.

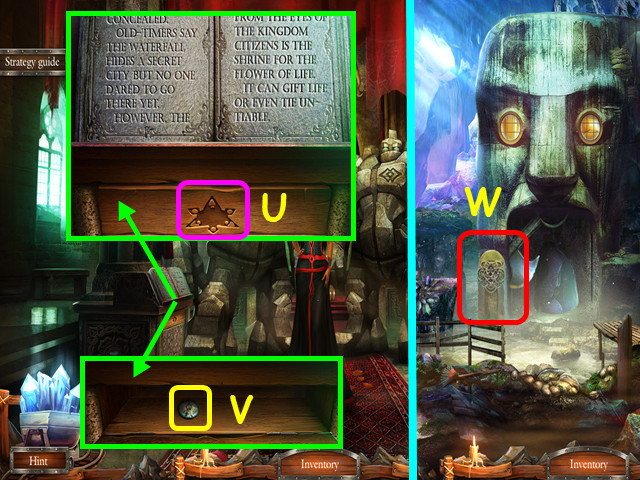
- Look at the chronicle and place the KNOWLEDGE AMULET into the indentation (U).
- Take the 3/3 RUNES (V).
- Walk to the waterfall.
- Look at the runes area (W).

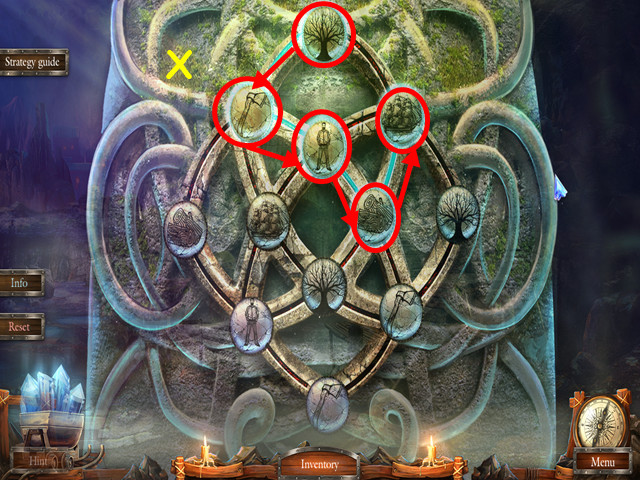
- Place the 3 RUNES into the device for a mini-game.
- Press the runes in 5 moves to get from tree to ship.
- Press tree, axe, man, logs, and ship (X).
- Walk forward to the old city.

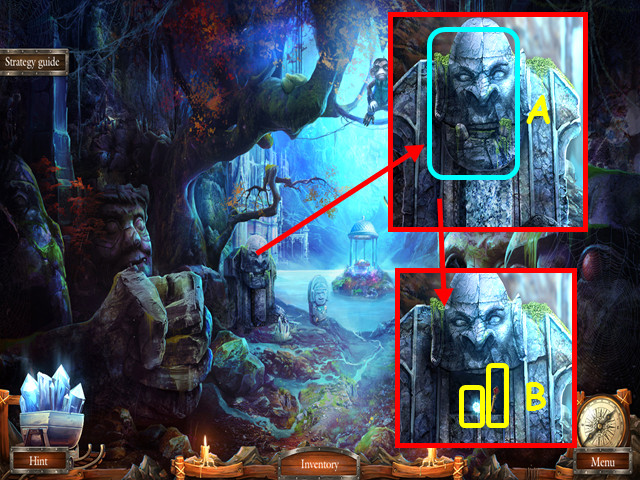
- Look at the head and use the GOBLIN to open it (A).
- Take the 2/4 STAR and the DIAMOND KEY (B).
- Return to the van laboratory.

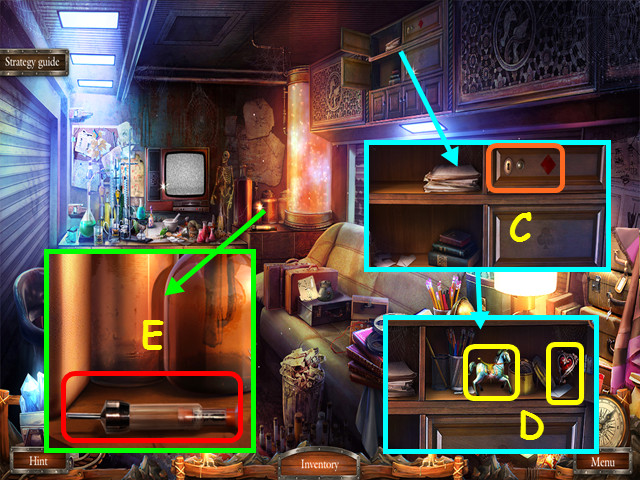
- Look at the compartments and use the DIAMOND KEY on the diamond compartment (C).
- Take the TOY HORSE and the RUBY HEART (D).
- Look at the test tube and use the SLEEPING POTION on the syringe to get the AMPOULE (E).
- Travel to Head waterfall.


- Look at the bird and place the RUBY HEART in the chest (F).
- Take the CRYSTAL (G).
- Travel to the inside of the water tower.

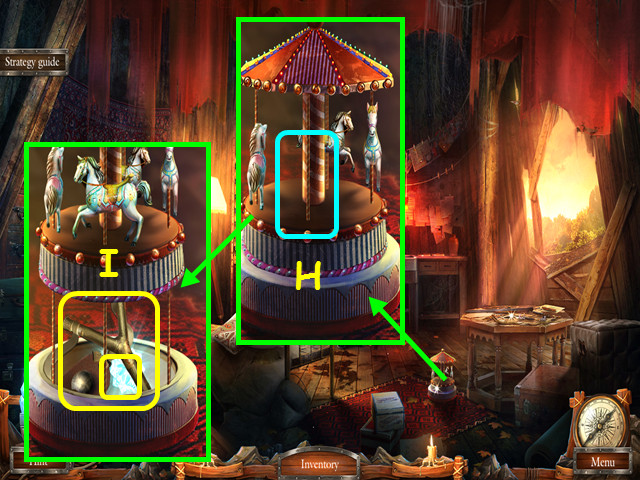
- Look at the carousel and place the TOY HORSE on the pole (H).
- Take the SLINGSHOT and the 3/4 STAR (I).
- Go to the old city.

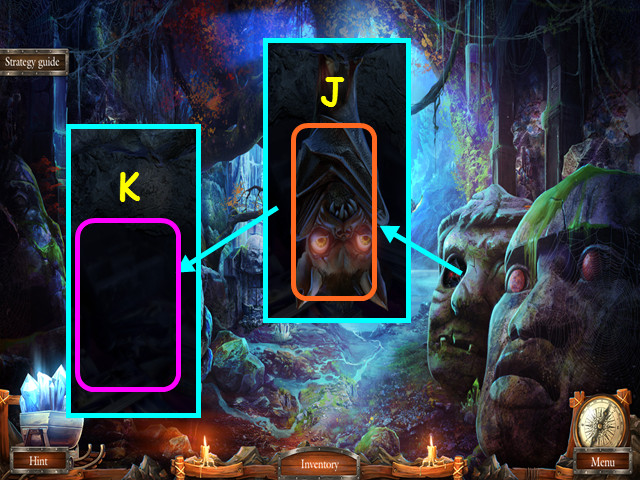
- Look in the eye and use the SLINGSHOT on the bat (J).
- Look inside the eye again and place the CRYSTAL inside (K).
- Select the eye for a HOS.

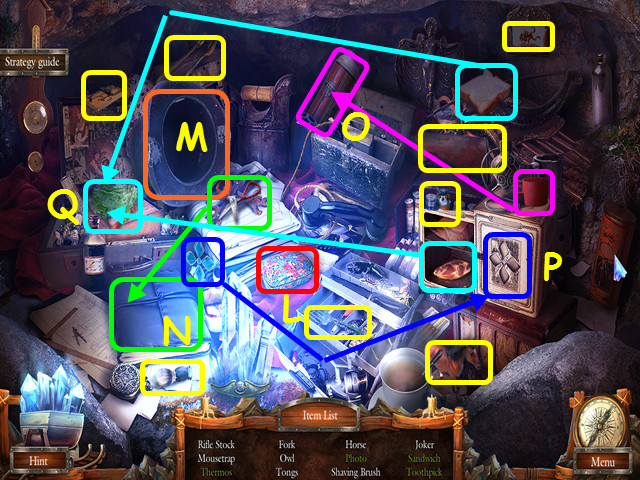
- Locate all the items on the list.
- Open the case to find the toothpick (L).
- Lift the hat to find the scissors (M).
- Use the scissors to open the album and find the photo (N).
- Place the cup on the cylinder co complete the thermos (O).
- Place the jewel on the door to open the safe (P).
- Place the meat from the safe, then the bread on top of the lettuce to make the sandwich (Q).
- You will earn the RIFLE STOCK.
- Return to the inside of the water tower.

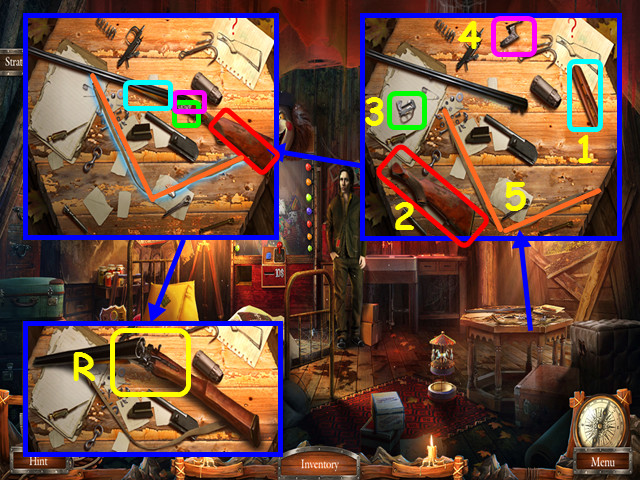
- Select the rifle table on the right and place the RIFLE STOCK on the table to trigger the mini-game.
- Build the rifle, using the flashing hints as your guide.
- Place the parts in numerical order (1-5).
- Use the AMPOULE on the open rifle to get the RIFLE (R).
- Travel to the old city.

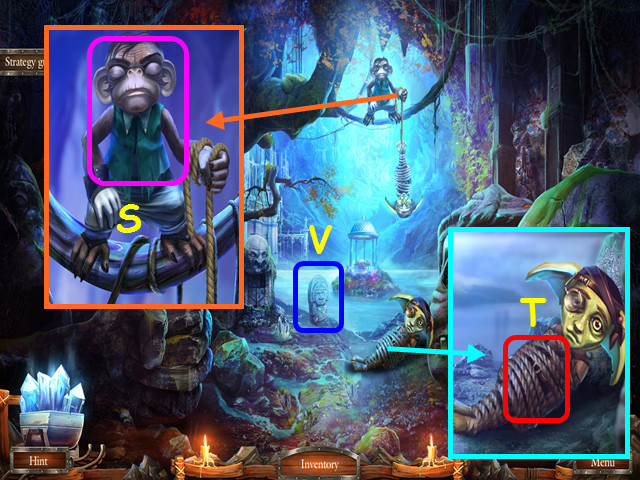
- Look at the monkey and use the RIFLE on him (S).
- Look at the goblin and use the SCALPEL on his ropes (T).
- You will earn the SPIDER AMULET.
- Note the octopus by the lake (U).
- Go to the van laboratory and look at the safe.

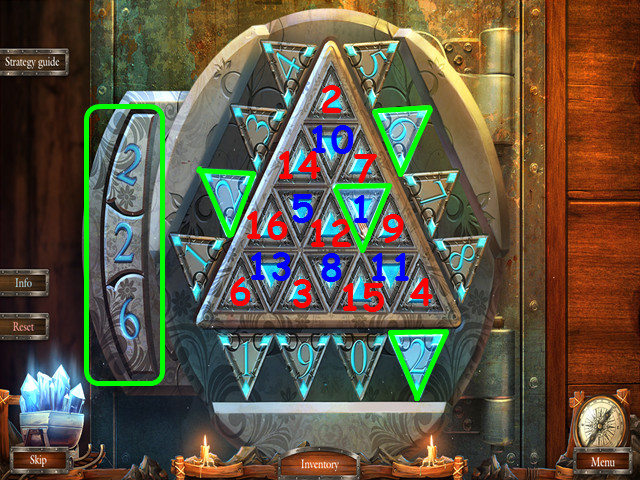
- Place the SPIDER AMULET into the indentation to trigger the mini-game.
- Look at the set of numbers on the left (V), then press the triangle that lights those 3 numbers.
- Press the triangles in numerical order (1-16).
- Take the 4/4 STAR, VIDEOTAPE, and the MUSIC SHEET from the open safe.
- Go to the inside of the water tower.

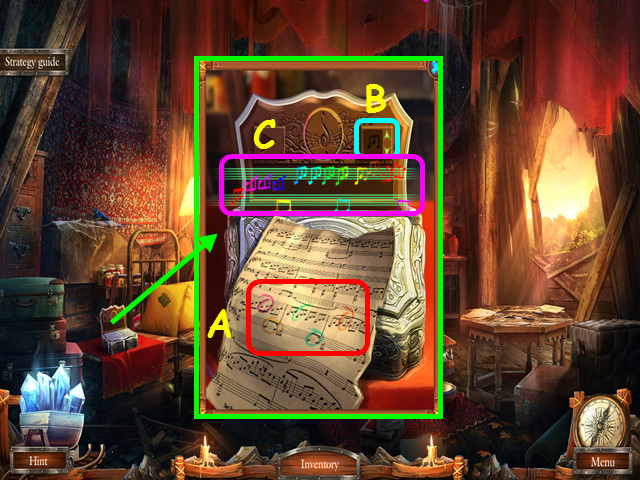
- Look at the music box and place the MUSIC SHEET on top to trigger a mini-game.
- Look at the 5 notes circled on the sheet music (A).
- Find the matching notes in the upper right box (B); select, then place them on the colored music staff (C).
- Take the MUSIC BOX.
- Travel to the old city.

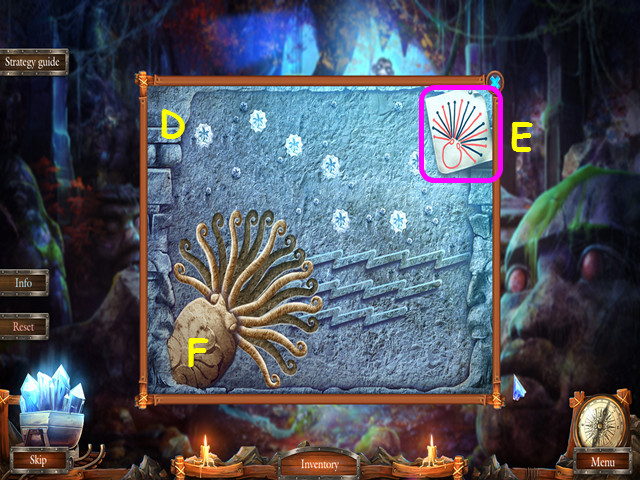
- Look at the octopus by the lake and place the 4 STARS in the indentations to trigger a mini-game (D).
- Look at the clue in the upper right corner (E), then move the tentacles to match the red lines (F).
- Select a tentacle, then select a highlighted spot to move it to.
- Walk forward to the rotunda.

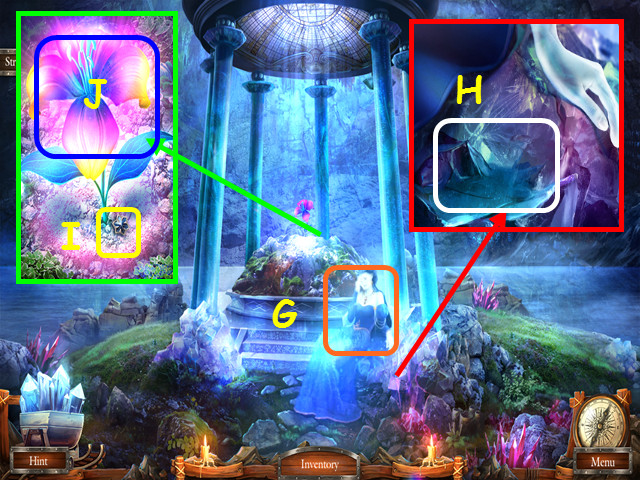
- Talk to the ghost (G).
- Look at the ghost and place the MUSIC BOX on the shelf (H).
- Look at the flower of life and take the 2/3 TOPAZ (I).
- Use the TEST TUBE on the flower to gather the POLLEN (J).
- Travel to the van laboratory and look at the chemistry table in the back.

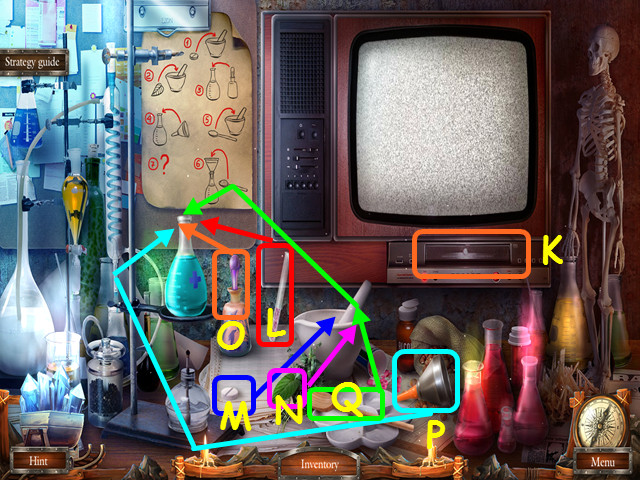
- Place the VIDEOTAPE into the VCR (K).
- Place the POLLEN on the table.
- Place the tablet (M), then the leaf (N) into the mortar and pestle.
- Use the dropper on the flask (O).
- Place the funnel in the flask (P).
- Use the spoon on the mortar and pestle, then use it on the flask (Q).
- Use the pollen on the flask (L).
- Take the flask of the HEALING POTION.
- Go to the hospital hall.

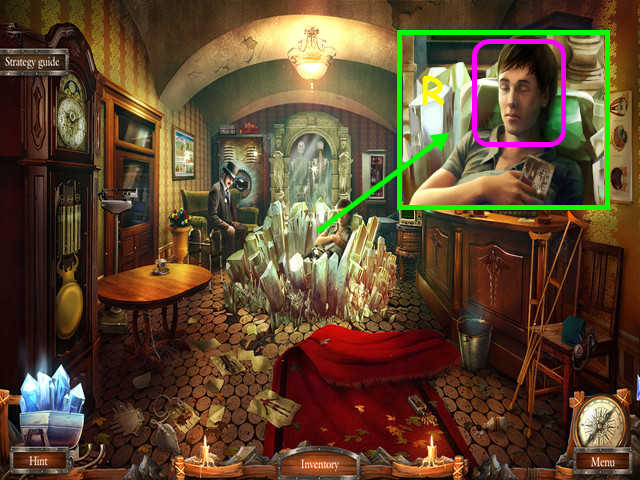
- Look at Brandon and give him the HEALING POTION (R).
- Travel to the rotunda.
Chapter 4: The Flower of Life

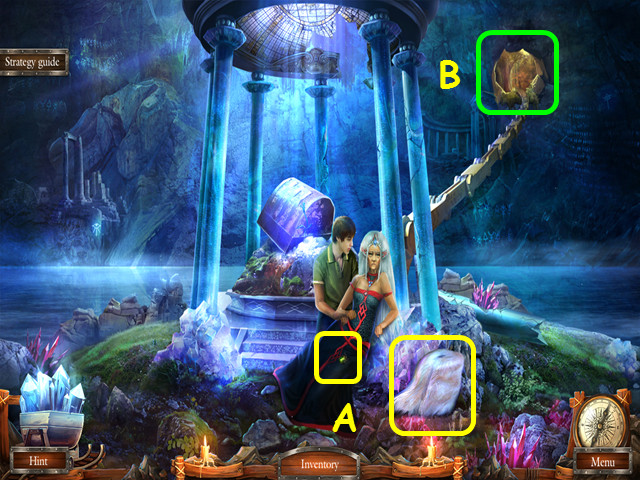
- Take the QUEEN AMULET and the FUR COAT (A).
- Walk forward to the forest (B).

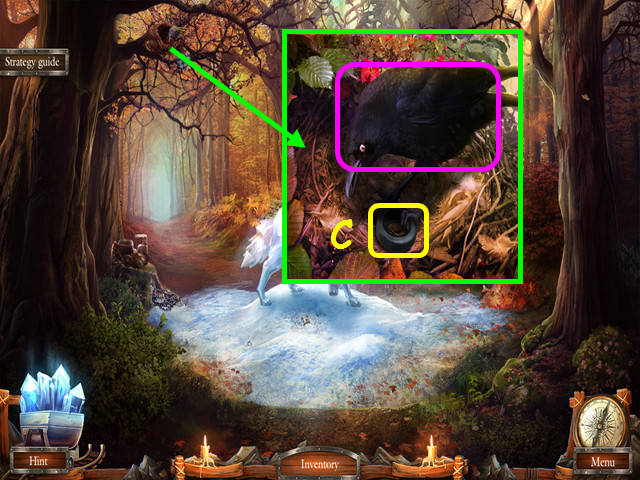
- Look at the nest and use the SLINGSHOT on the crow, then take the INSULATING TAPE (C).
- Travel to the waterfall.

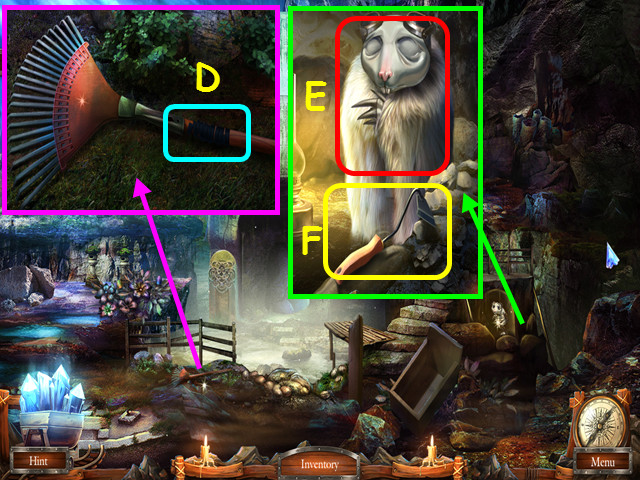
- Look at the rake; use the INSULATING TAPE to repair it, then take the RAKE (D).
- Look at the mole and give him the FUR COAT (E).
- Take the GARDEN HOE (F).
- Return to the forest.

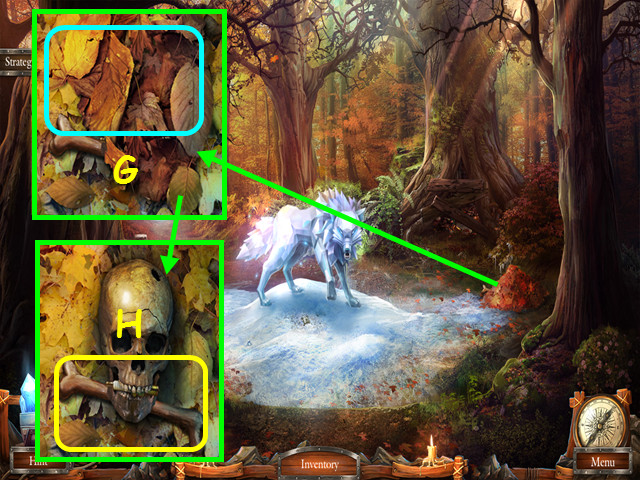
- Look at the skeleton and use the RAKE to take the FOLIAGE (G).
- Take the BONE (H).
- Travel to Stone city.

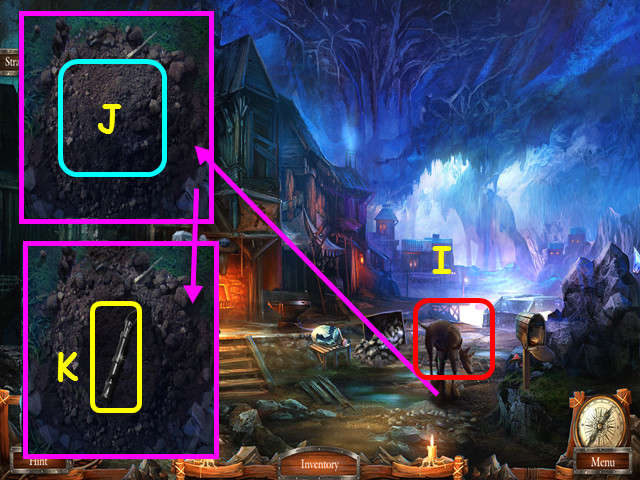
- Give the BONE to the dogs (I).
- Look at the dirt mound; use the GARDEN HOE to dig (J).
- Take the WHISTLE (K).
- Return to the forest.

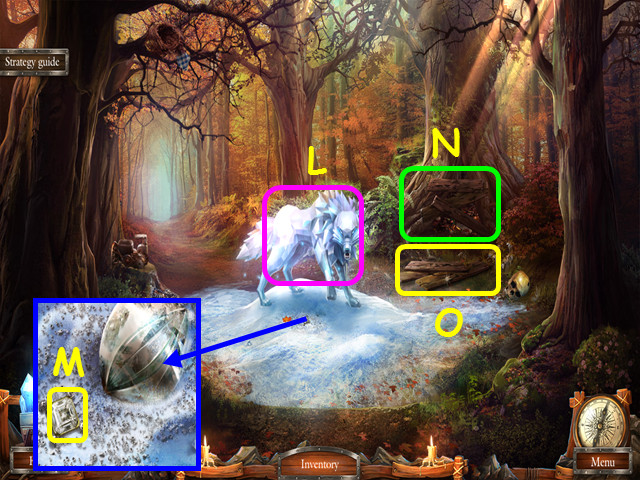
- Use the WHISTLE on the wolf (L).
- Look at the ice and take the 2/3 DIAMOND (M).
- Use the GOBLIN on the den (N).
- Take the LUMBER (O).
- Select the den for a HOS.

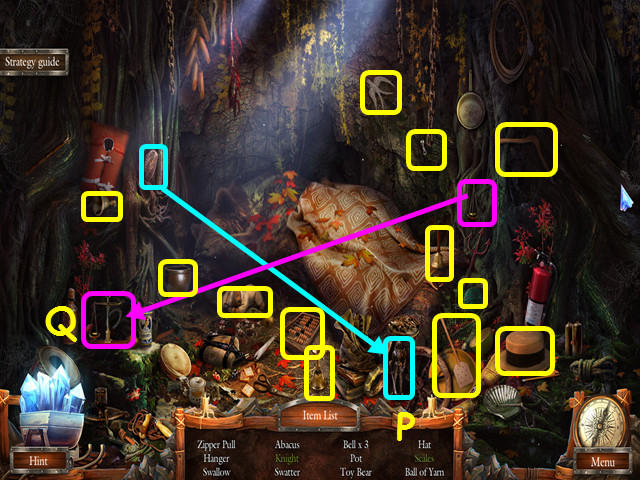
- Locate all the items on the list.
- Place the shield on the figure to make the knight (P).
- Place the bowl on the device to complete the scales (Q).
- You will earn the ZIPPER PULL.
- Walk forward.

- Look at the scarecrow; place the LUMBER and the FOLIAGE at the base, then use the MATCHES to start a fire (R).
- Take the HEX KEY (S).

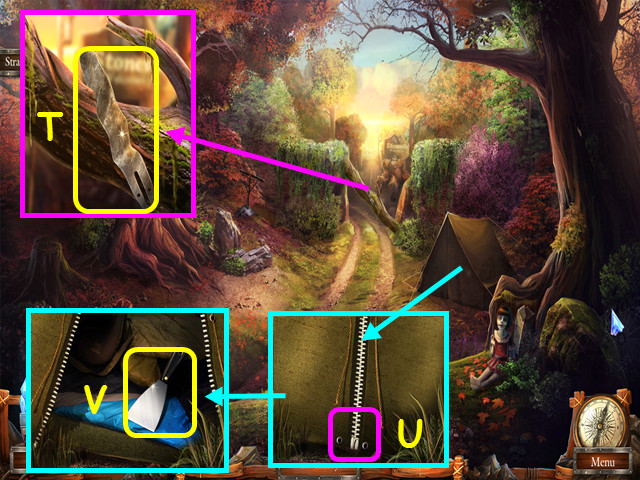
- Look at the barrier and take the BENT SAW BLADE (T).
- Look at the tent and use the ZIPPER PULL on the zipper (U).
- Take the PALETTE KNIFE (V).
- Travel to the Stone city.


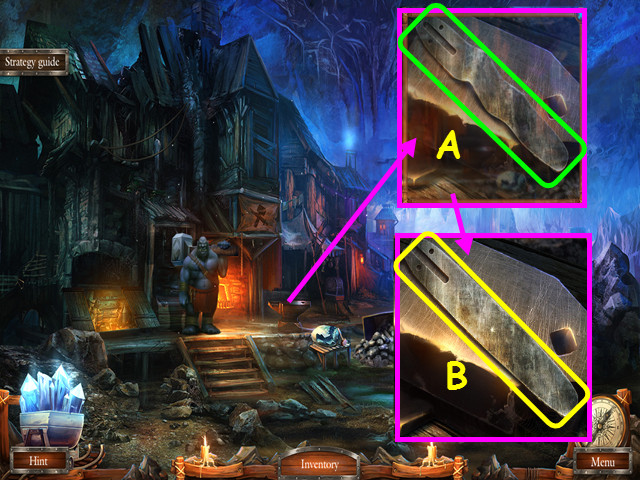
- Look at the anvil and place the BENT SAW BLADE on it (A).
- Take the CHAINSAW BLADE (B).
- Travel to the forest.

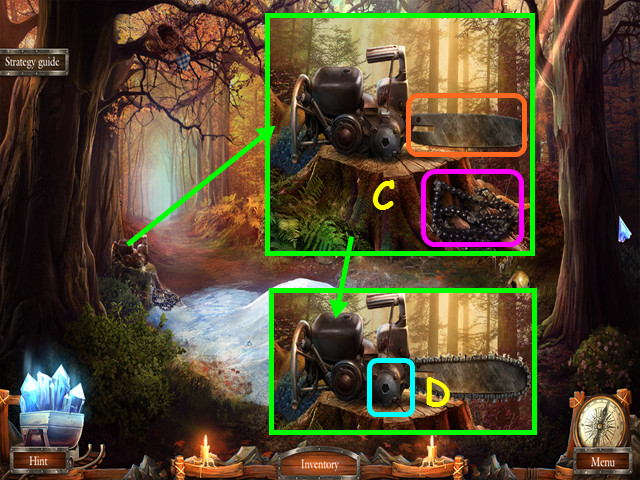
- Look at the chainsaw and place the CHAINSAW BLADE on it, then place the chain on the blade (C).
- Use the HEX KEY on the bolt (D.
- Take the CHAINSAW.
- Walk forward.

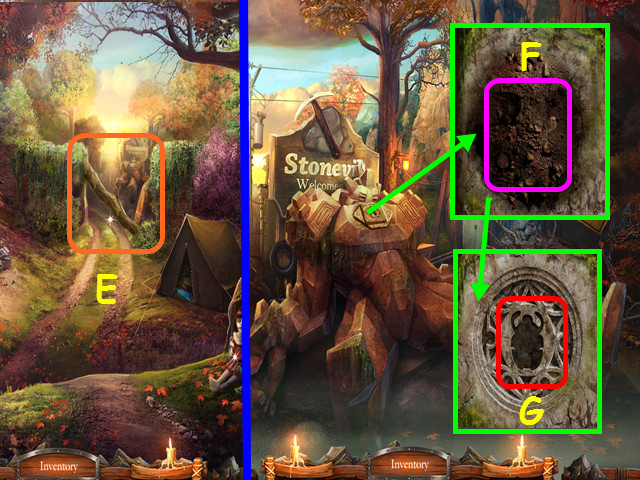
- Zoom into the barrier and use the CHAINSAW to cut the log (E).
- Walk forward.
- Look at the golem and use the PALETTE KNIFE on the moss (F).
- Place the QUEEN AMULET in the indentation for a mini-game (G).

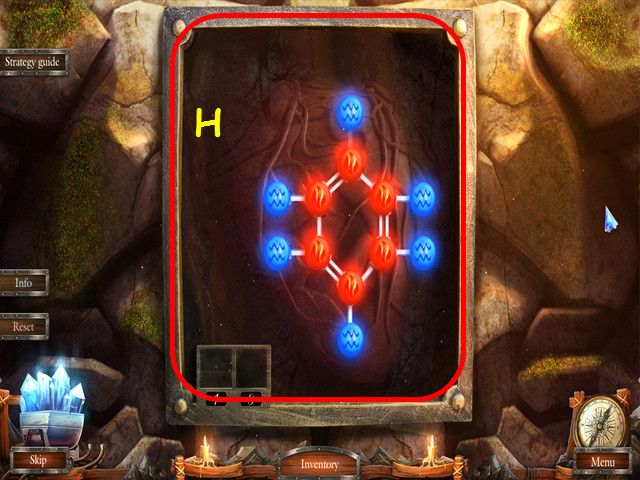
- Place the MOLECULE in the box to trigger the mini-game.
- Connect all the molecules so all the white connections are used (H).
- Select a molecule to see where you can place it, then select a location.

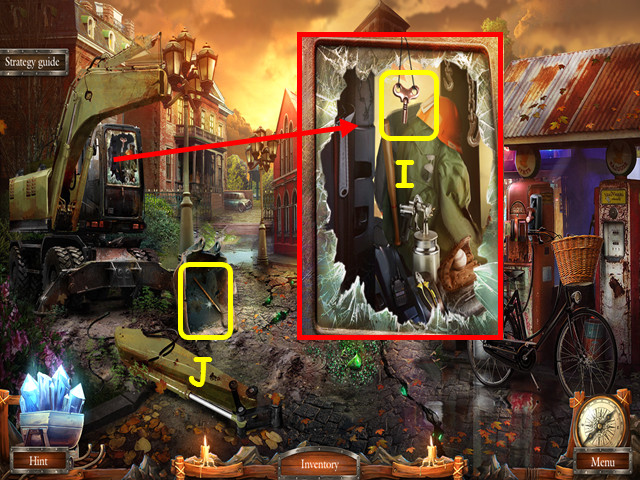
- Look in the bulldozer and take the WIND-UP KEY (I).
- Take the GAFF (J).
- Go to the old city.

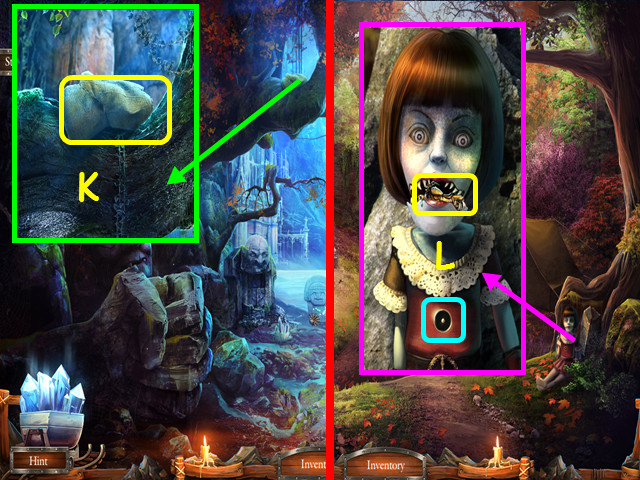
- Look at the tree branch and use the GAFF to retrieve the GLOVE (K).
- Go the Forest’s Edge.
- Look at the doll and use the WIND-UP KEY in her chest, then take the BIKER AMULET from her mouth (L).
- Walk down to the forest.

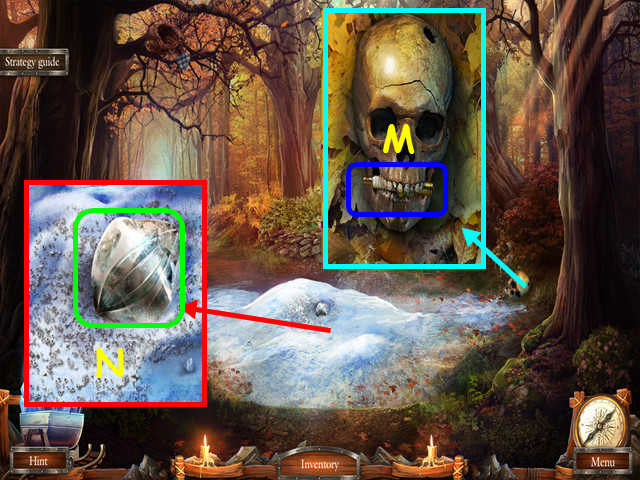
- Look at the skull and use the PALETTE KNIFE to take the SPARK PLUG (M).
- Look at the ice and use the GLOVE to take the 1st PETAL (N).
- Use the map to travel to the hospital hall.

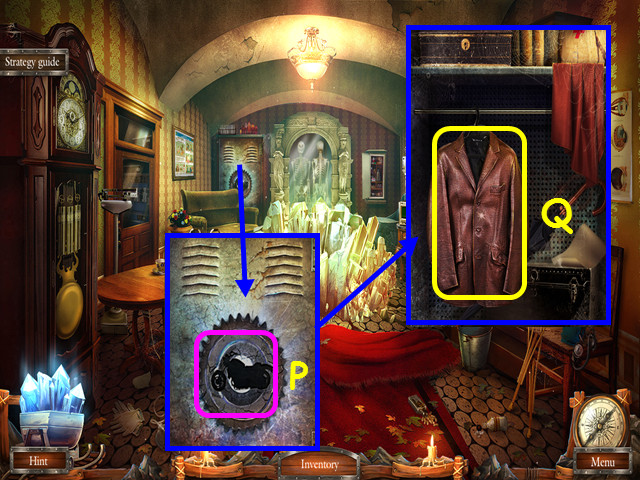
- Look at the locker and place the BIKER AMULET in the indentation (P).
- Take the JACKET (Q).
- Return to the square.

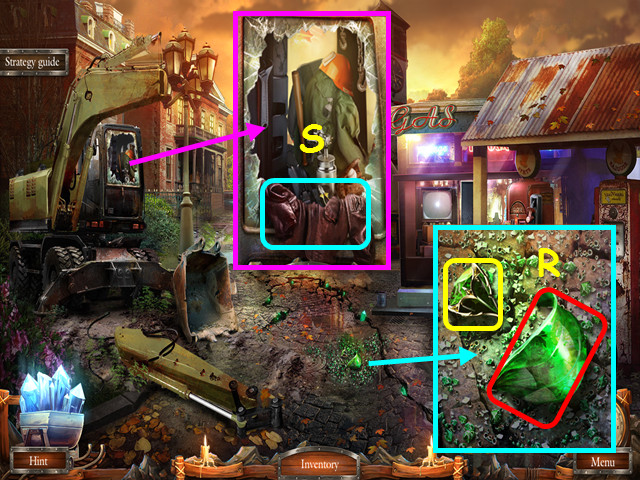
- Look at the ground; take the 3/3 emerald and use the GLOVE to take the 2nd PETAL (R).
- Look at the bulldozer and use the JACKET on the broken glass (S).
- Select the bulldozer cabin for a HOS.

- Locate all the items on the list.
- Place the digging arm on the toy to make the excavator (T).
- You will earn the NET GUN.
- Travel to below the water tower.

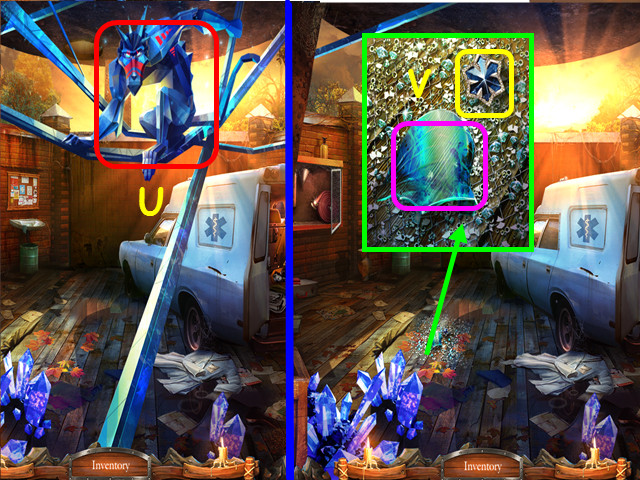
- Use the NET GUN on the blue monkey (U).
- Look at the ground; take the 3/3 TOPAZ and use the GLOVE to take the 3rd PETAL (V).
- Travel to the Stone castle.


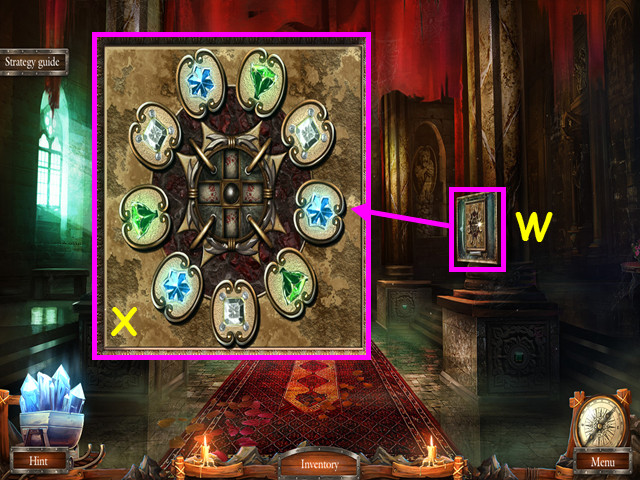
- Look at the glass showcase on the right (W).
- Place the 3 DIAMONDS, the 3 TOPAZ, and the 3 EMERALDS onto the board for a mini-game (X).

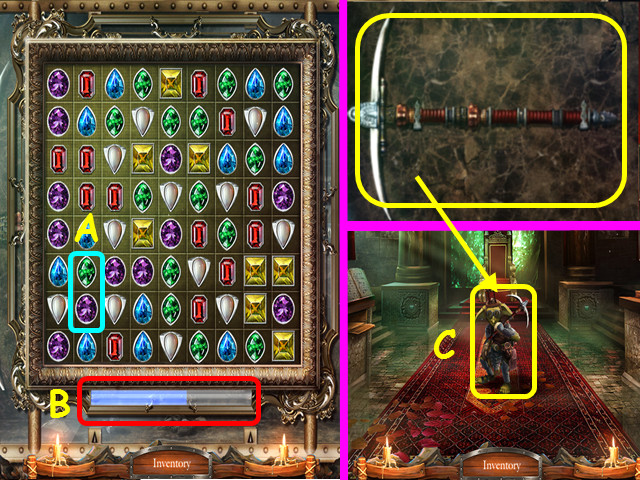
- Form chains of 3 or more gems; select 2 adjacent gems to swap positions if one will make a chain (A).
- Continue making chains until the meter fills (B).
- Take the pickaxe and the goblin will arm himself with it; then take the TITANIUM GOBLIN (C).
- Go to the water tower.

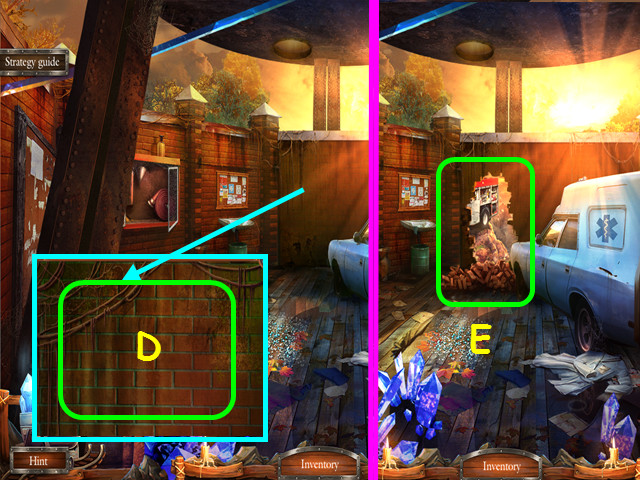
- Look at the tower wall and use the TITANIUM GOBLIN to break through (D).
- Walk forward to the precipice (E).

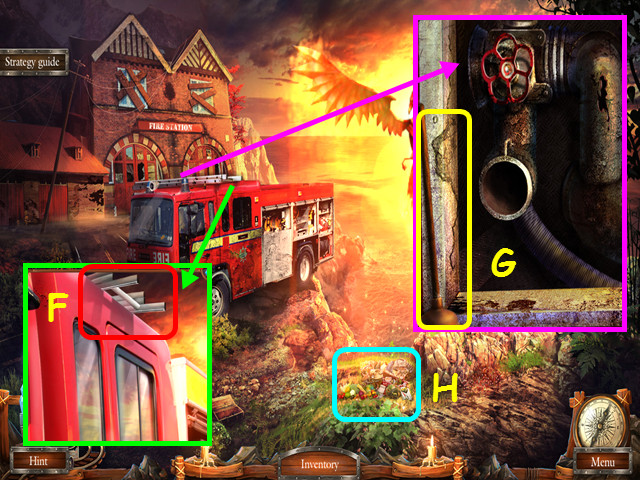
- Look at the ladder and use the GAFF to pull it off the truck (F).
- Look at the top of the truck and take the PLUNGER (G).
- Select the emergency kit for a HOS (H).

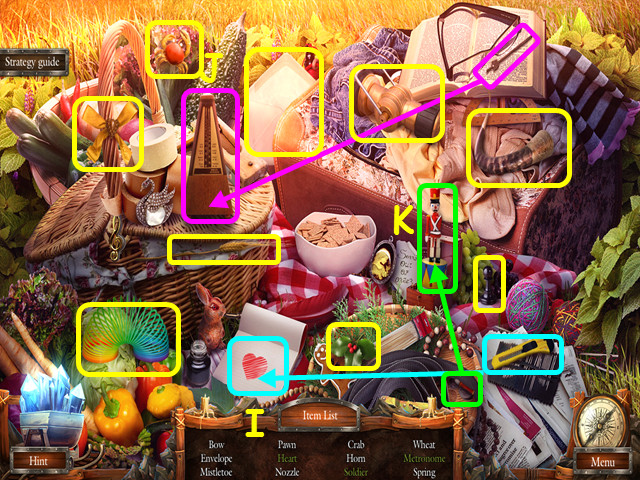
- Locate all the items on the list.
- Use the utility knife to cut out the heart (I).
- Move the arm to the face to restore the metronome (J).
- Place the arm on the figure to restore the soldier (K).
- You will earn the NOZZLE.
- Go to the water tower.

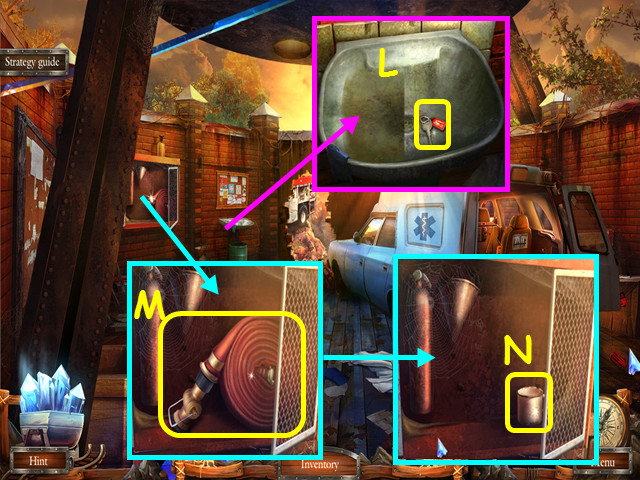
- Look at the sink; use the PLUNGER to clear the water, then take the CABIN KEY (L).
- Look at the fire cabinet, place the NOZZLE on the hose, then take the FIRE HOSE (M).
- Take the MUG (N).
- Travel to the Forest’s Edge.

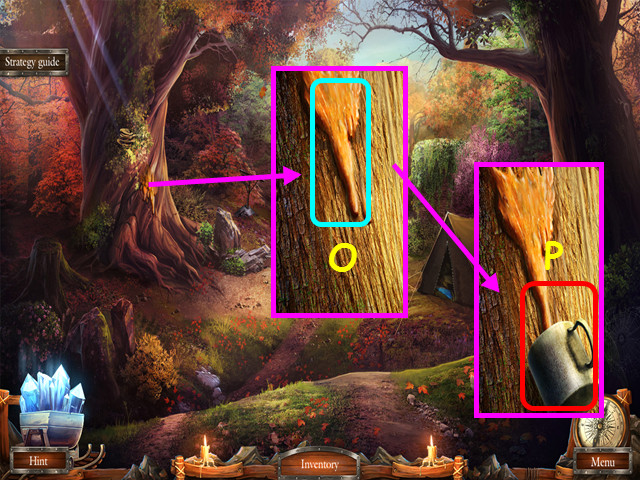
- Look at the tree and use the PALETTE KNIFE on the sap (O).
- Use the MUG to capture the PITCH (P).
- Return to the precipice.

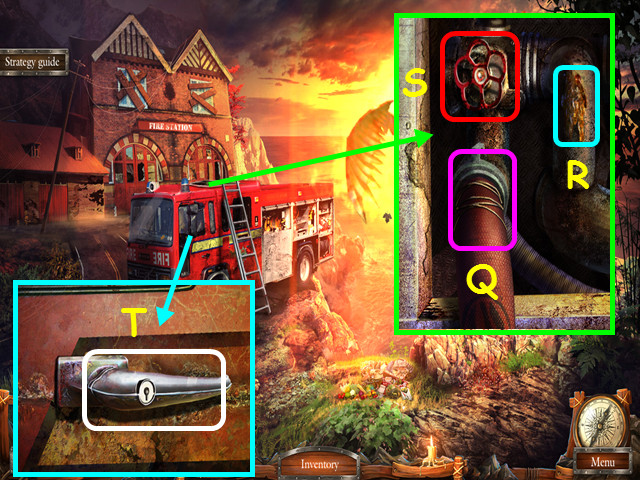
- Look at the roof of the firetruck and place the FIRE HOSE on the outlet (Q).
- Use the PITCH on the hole in the pipe (R).
- Turn the valve (S).
- Look at the cabin door and use the CABIN KEY in the lock, then look inside the cabin (T).

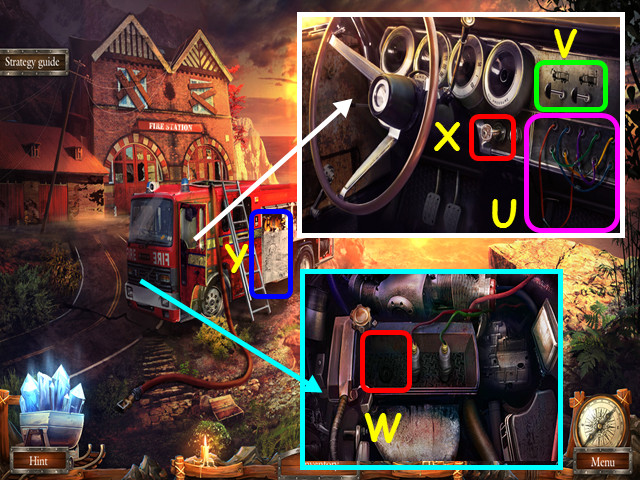
- Use the INSULATING TAPE on the wires to trigger the mini-game (U).
- Select the pairs of same-colored wires.
- Move the 2 sliders to the left (V).
- Look under the hood and place the SPARK PLUG in the engine (W).
- Turn the key (X).
- Select the side of the truck for a mini-game (Y).

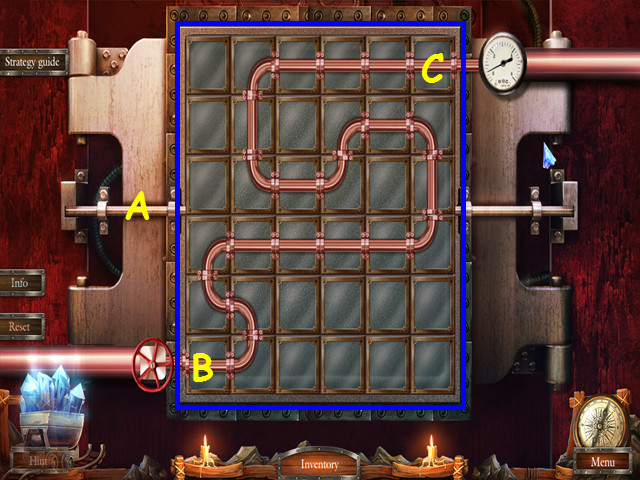
- Move the tiles so all the pipes are connected (A).
- Select a tile you want to move, then select a highlighted space to swap positions.
- The pipes must connect from the lower left (B) to the upper right (C).

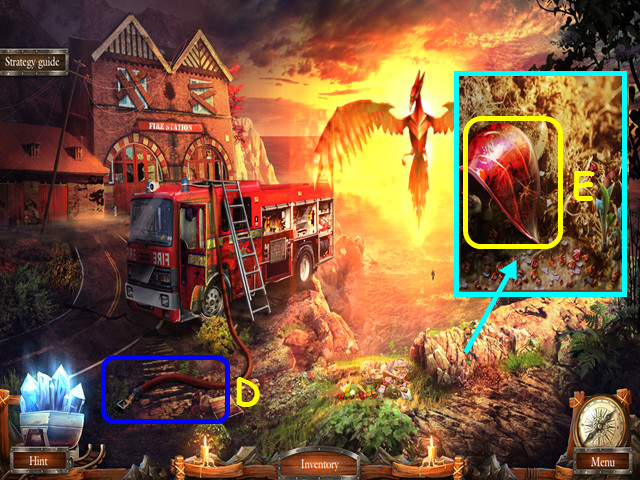
- Pick up the fire hose (D).
- Look at the precipice and use the GLOVE to take the 4th PETAL (E).
- Travel to the rotunda.

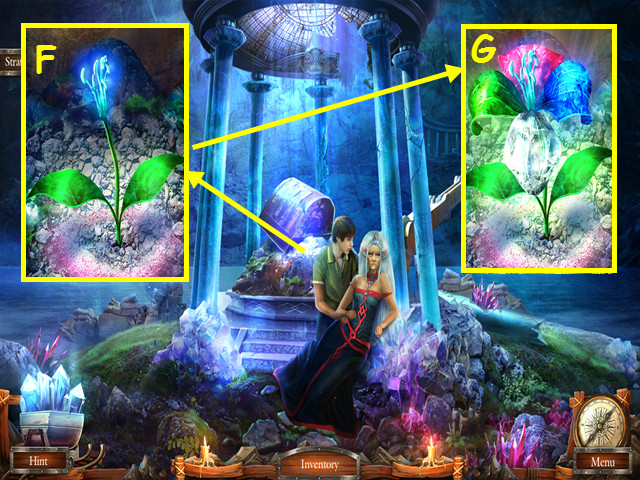
- Look at the flower of life and place the 4 PETALS on the stem (F).
- Use the BLUE CRYSTAL on the flower (G).
- Congratulations! You have completed Grim Tales: The Stone Queen!





 Cruel Games: Red Riding Hood Walkthrough, Guide, & Tips
 The Keepers: The Order's Last Secret Walkthrough, Guide, & Tips
 Danse Macabre: The Last Adagio Walkthrough, Guide, & Tips
 Tearstone Walkthrough, Guide, & Tips
 Nightmare Adventures: The Witch's Prison Walkthrough, Guide, & Tips