Danse Macabre: The Last Adagio Walkthrough, Guide, & Tips
Danse Macabre: The Last Adagio Walkthrough

Welcome to the Danse Macabre: The Last Adagio Walkthrough
Your sister disappears the night of her star debut – and there are ghosts in the theater! Will this dance ever end?
Whether you use this document as a reference when things get difficult or as a road map to get you from beginning to end, we’re pretty sure you’ll find what you’re looking for here.
This document contains a complete Danse Macabre: The Last Adagio game walkthrough featuring annotated screenshots from actual gameplay!
We hope you find this information useful as you play your way through the game. Use the walkthrough menu below to quickly jump to whatever stage of the game you need help with.
Remember to visit the Big Fish Games Forums if you find you need more help. Have fun!
This walkthrough was created by MargieB, and is protected under US Copyright laws. Any unauthorized use, including re-publication in whole or in part, without permission, is strictly prohibited.
General Tips
- This is the official guide for Danse Macabre: The Last Adagio!
- This guide will not mention each time you have to zoom into a location; the screenshots will show each zoom scene.
- Hidden-object puzzles are referred to as HOPs in this guide. Items listed in green or red, are hidden or require additional actions to locate. Interactive items in HOPs are color-coded.
- Mini-games and HOPs are sometimes randomized; your solution may vary.
- In HOPs, groups of items will be marked in the same color. Listed items will be marked in yellow and interactive items will be color-coded.
- This guide will give step-by-step solutions for all puzzles which are not random. Please read the instructions in the game for each puzzle.
Chapter 1: Theater

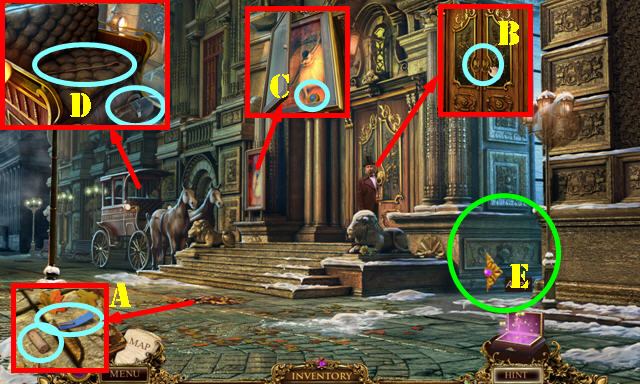
- Talk to the stage manager.
- Move the leaves; take the CORK and MATCHES (A).
- Take the DOOR HANDLE (B).
- Place the CORK in the hole and take the TOKEN 1/3 (C).
- Take the RIDING CROP and EMPTY BAG (D).
- Go to the Alley (E).

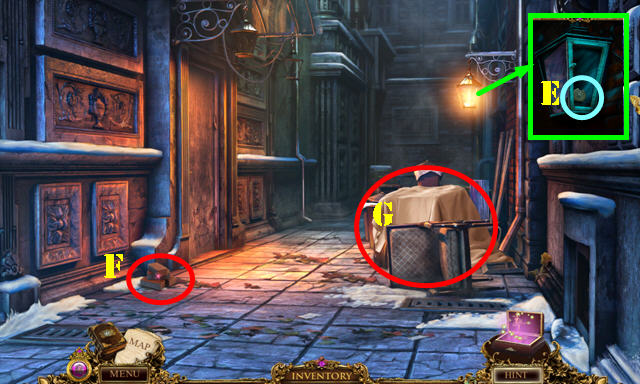
- Place the DOOR HANDLE and take the TOKEN 2/3 (E).
- Use the MATCHES on the candle. You receive the MATCHBOOK COVER.
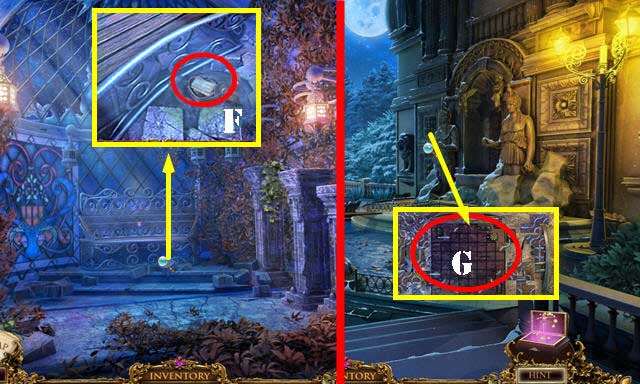
- Take the BRICKS (F).
- Remove the cloth to activate a HOP (G).

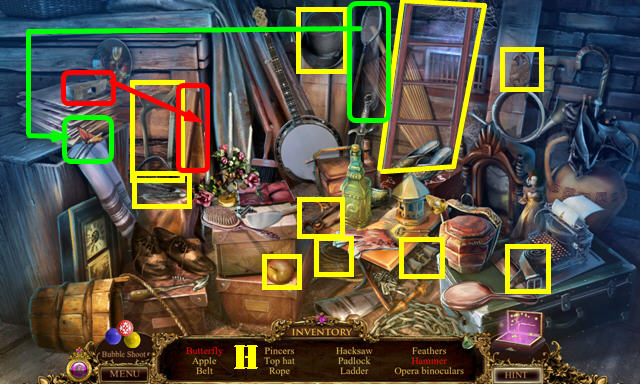
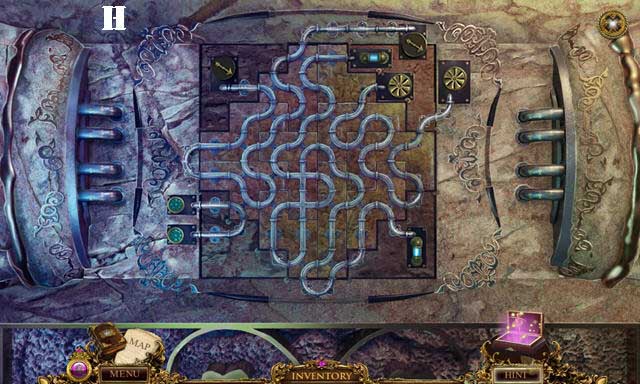
- Play the HOP (H).
- You receive the LADDER.
- Walk down.

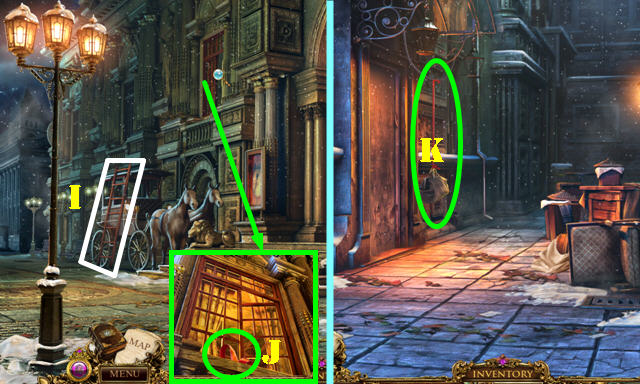
- Place the LADDER (I) on the carriage; use the RIDING CROP to get the RIBBON (J).
- Go to the Alley.
- Place the RIBBON on the rail and then hang the EMPTY BAG on it. Place the BRICKS in the empty bag (K).
- Swing the bag twice and go to the Side Entrance.

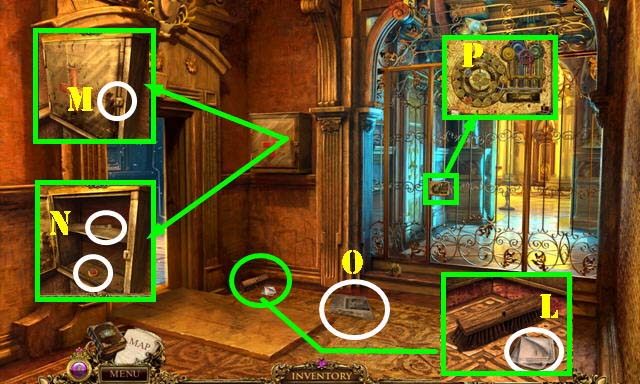
- Take the HANDKERCHIEF (L).
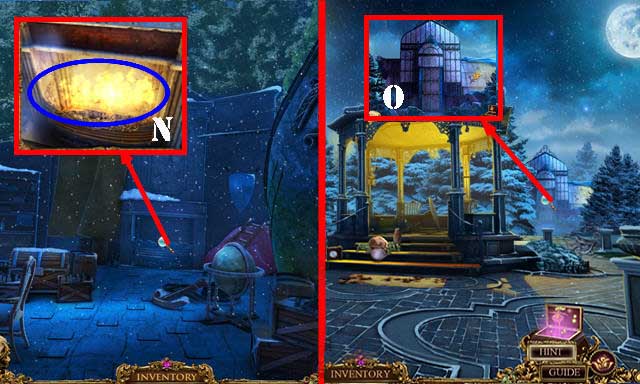
- Use the MATCHBOOK COVER on the latch (M); take the HAIR PIN and TOKEN 3/3 (N).
- Take the newspaper article (O).
- Place the 3 TOKENS on the lock to activate a puzzle (P).

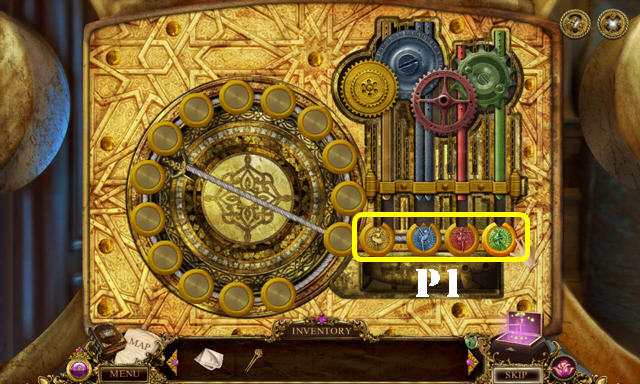
- Slide the tokens into the right slots. Start by placing the token on the right first, by placing them in this order: green, red, blue, and gold.
- The Solution (P1) is random.
- Go to the Lobby Entrance.

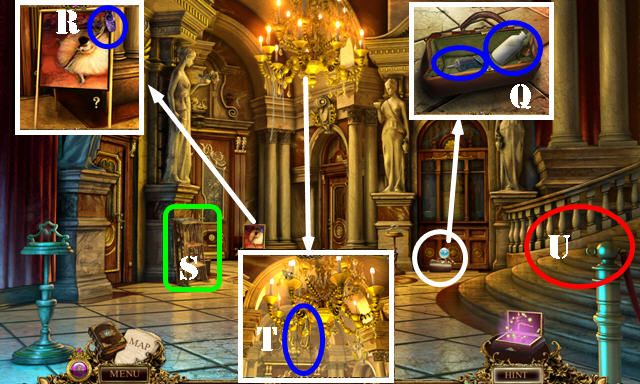
- Use the HAIR PIN in the lock; take the GLUE and MILK (Q).
- Take the BALLET SLIPPER 1/3 (R).
- Move the stepladder (S); take the PIANO WIRE (T).
- Go to the Lobby (U).

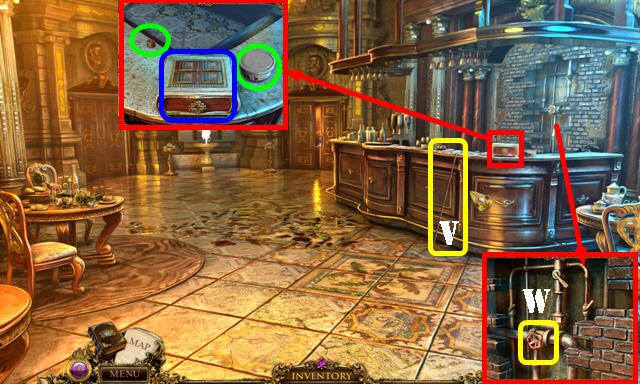
- Talk to Marie.
- Take the BROOM HANDLE (V) and the VALVE HANDLE (W).
- Take the TIN CAN and the CASH REGISTER BUTTON (green). Open the music box (blue).
- Return to the Side Entrance.

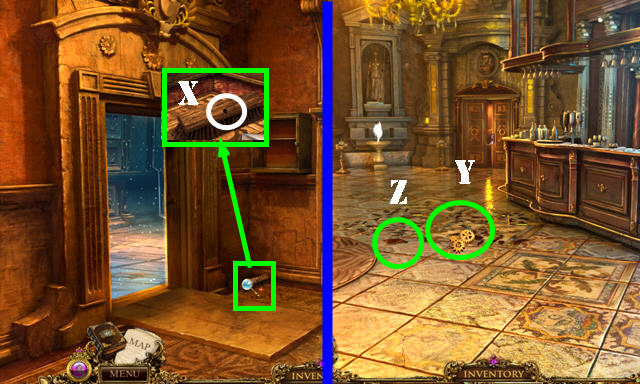
- Place the GLUE in the hole and then the BROOM HANDLE on the sweeper to get the BROOM (X). Take the TWEEZERS below it.
- Return to the Lobby.
- Use the BROOM on the debris to activate a HOP (Y).
- Use the HANDKERCHIEF to get the SHARP SHARD (Z).

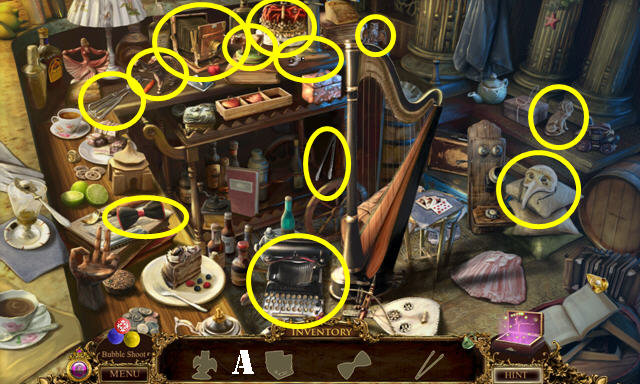
- Play the HOP (A).
- You receive the CAN OPENER.

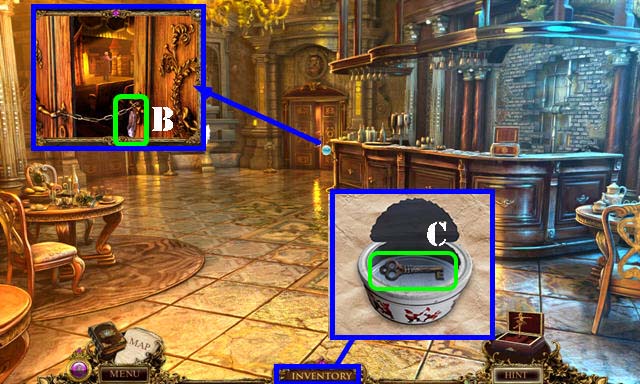
- Take the BALLET SLIPPER 2/3 (B).
- Open the TIN CAN with the CAN OPENER; take the WARDROBE KEY (C).
- Walk down.

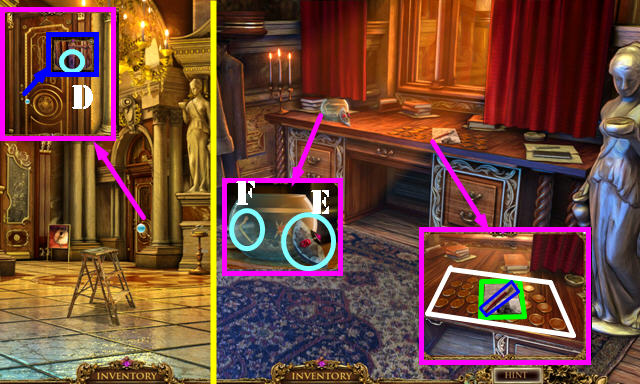
- Use the WARDROBE KEY in the lock (D); turn the key and enter the Coat Room.
- Take the MOSAIC PIECE 1/3 (E). Use the TWEEZERS to get the DRAWER HANDLE (F).
- Take the GLASS CUTTER (blue) and the newspaper article (green).
- Zoom into the tokens for a puzzle (white).

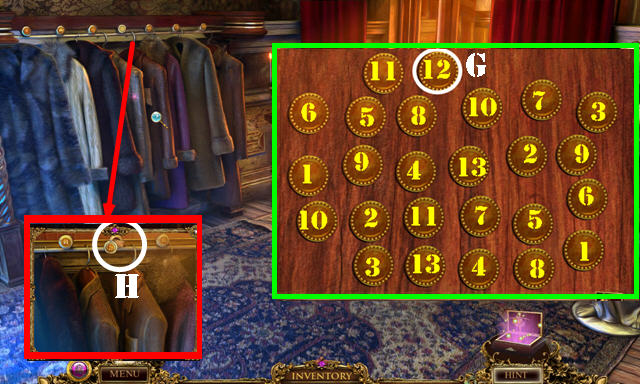

- Find the matching numbers. Take the NUMBER 12 TOKEN (G).
- Place the NUMBER 12 TOKEN in the slot; take the SAFE COMBINATION (H).
- Walk down.
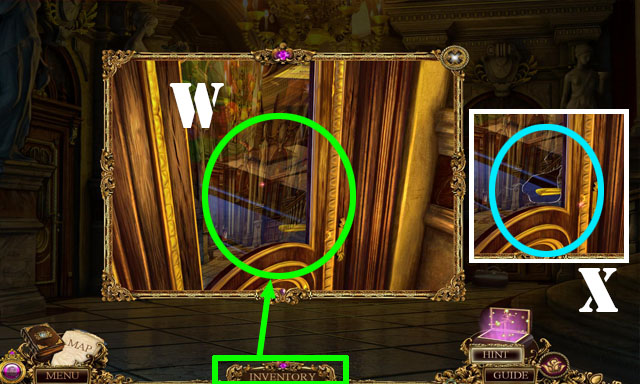
- Use the GLASS CUTTER on the glass of the door on the left (W); pull the handle (X) and enter the Box Office.

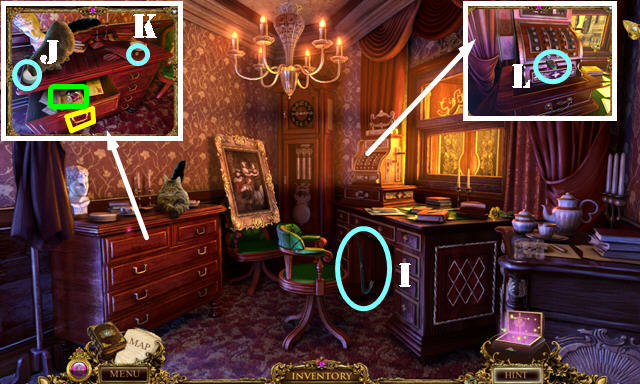
- Take the CROWBAR (I).
- Place the DRAWER HANDLE (yellow); take the THREAD and BALLERINA POSES (green).
- Place the MILK in the saucer (J); take the CASH REGISTER BUTTON 2/2 (K).
- Place the 2 CASH REGISTER BUTTONS on the register; take the MOSAIC PIECE 2/3 (L).

- Place the SAFE COMBINATION on the safe (M).
- Spin the dial (N) in the following order and stop after each number: counterclockwise to 15, clockwise to 55, counterclockwise to 10, counterclockwise to 35, and clockwise to 20.
- Take TROPHY 1/3 (O).
- Return to the Coat Room.


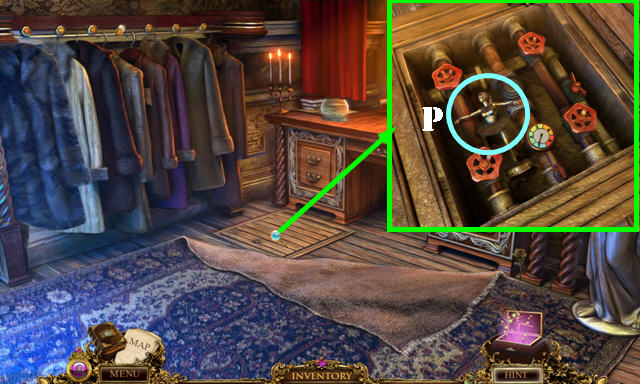
- Move the carpet; use the CROWBAR on the trapdoor.
- Take TROPHY 2/3 (P).

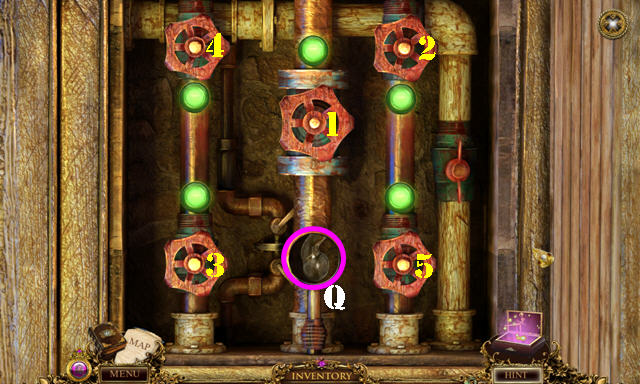
- Zoom into the pipes and place the VALVE HANDLE on the pipes for a puzzle.
- Select the pipes in order (1-5).
- Take the DOOR HANDLE (Q).
- Return to the Side Entrance.

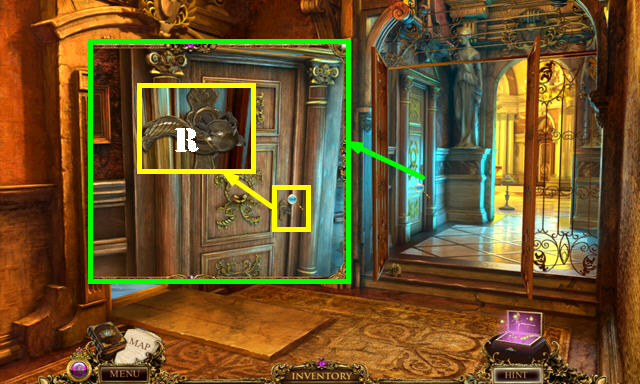
- Place the DOOR HANDLE on the door; enter the VIP Lounge (R).
- Talk to the ghost.

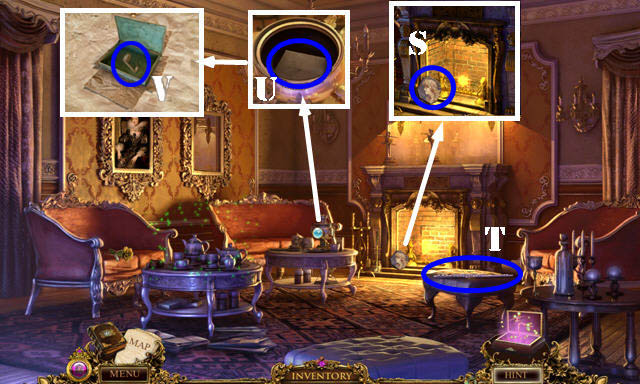
- Take the DECORATIVE TILE (S) and FLUTE (T).
- Remove the lid; take the PACKAGE (U).
- Use the SHARP SHARD on the PACKAGE; take the NOTE SYMBOL 1/2 (V).

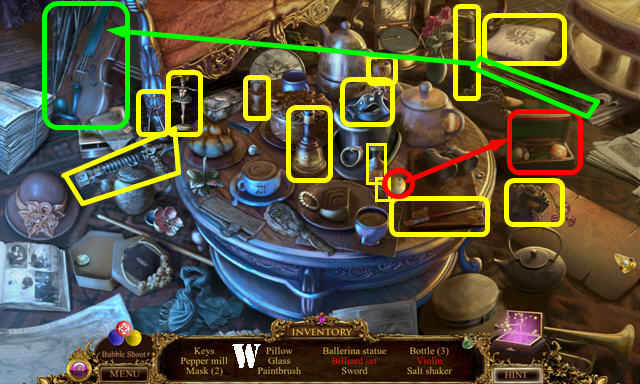
- Play the HOP (W).
- You receive the TROPHY 3/3.

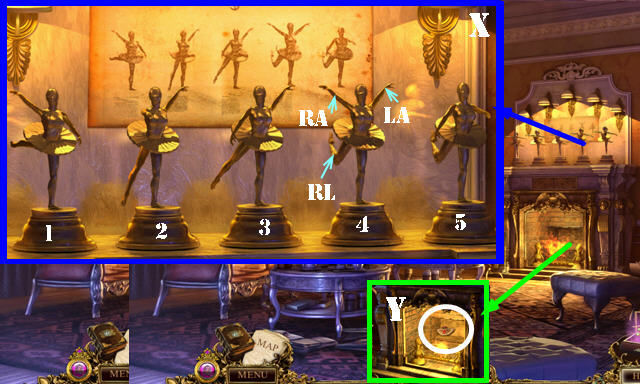
- Place the 3 TROPHIES and the BALLERINA POSES on the mantle for a puzzle.
- Arrange the ballerina poses as shown to complete the puzzle (X).
- Ballerina 1: RLx3 and LAx2.
- Ballerina 2: RAx1.
- Ballerina 3: RLx1 and RAx2.
- Ballerina 4: RLx2.
- Ballerina 5: RLx2, RAx2, and Lax1.
- Take the MOSAIC PIECES 3/3 (Y).
- Return to the Lobby.

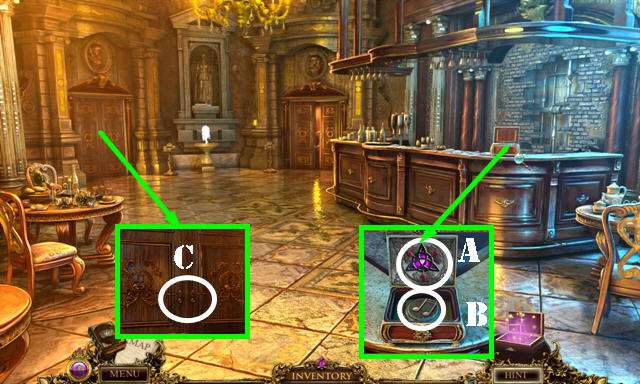
- Place the 3 MOSAIC PIECES on the box (A); take the NOTE SYMBOL 2/2 (B).
- Place the 2 NOTE SYMBOLS on the door (C) and enter the Hallway.

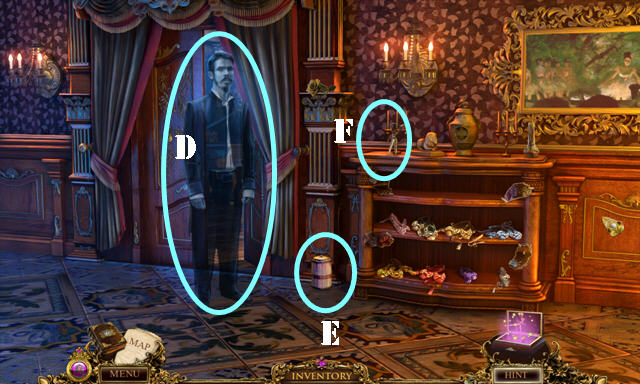
- Talk to Pierre and give him the FLUTE (D).
- Take the PAINT CANNISTERS 1/3 (E) and the SCISSORS (F).
- Enter the Practice Room.

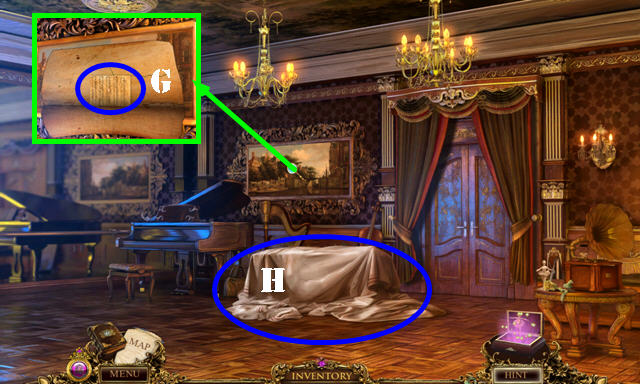
- Cut the painting with the SCISSORS; take the MUSIC SHEET 1/2 (G).
- Remove the cloth (H) to activate a HOP.

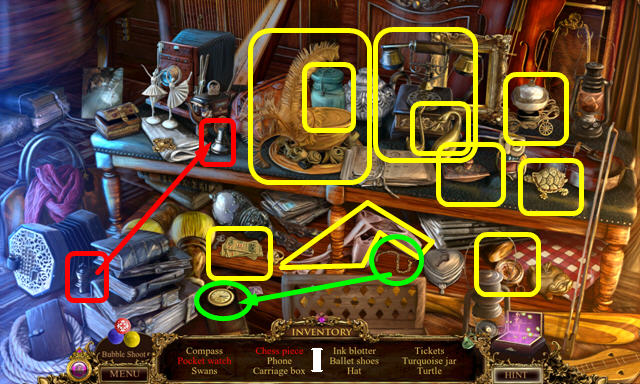
- Play the HOP (I).
- You receive the BALLET SLIPPERS 3/3.
- Walk down.

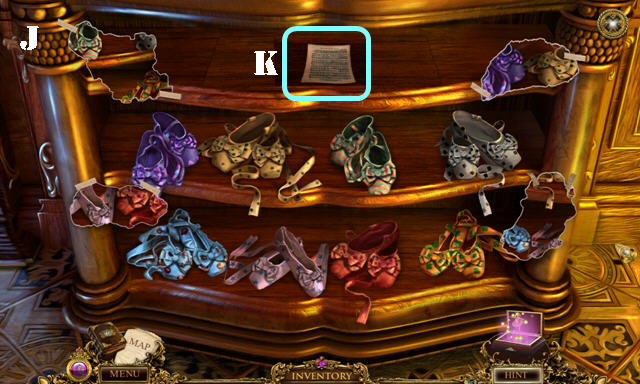
- Place the 3 BALLET SLIPPERS on the shelf for a puzzle.
- Select two slippers to swap their positions.
- Solution (J).
- Take the MUSIC SHEET 2/2 (K).
- Return to the Practice Room.
Chapter 2: Backstage

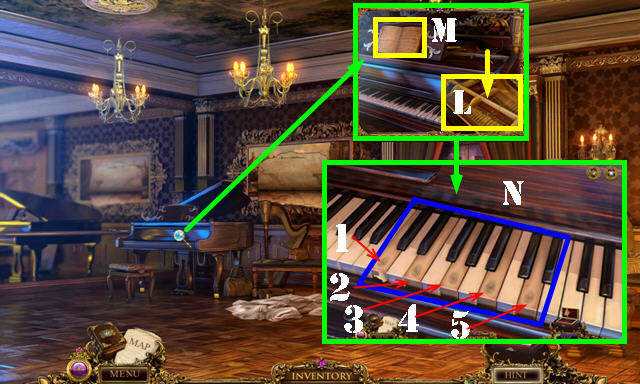

- Place the PIANO WIRE (L) and the 2 MUSIC SHEETS (M) on the piano and press the keys for a puzzle.
- Repeat the six sequences.
- Round one: 3.
- Round two: 3, 1.
- Round three: 3, 1, 4.
- Round four: 3, 1, 4, 2.
- Round five: 3, 1, 4, 2, 3.
- Round six: 3, 1, 4, 2, 3, 5.
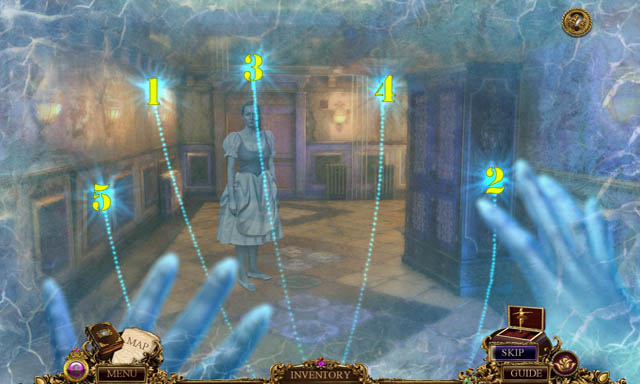
- Complete the puzzle for a cut scene and another puzzle.
- Touch the lights in order (1-5).

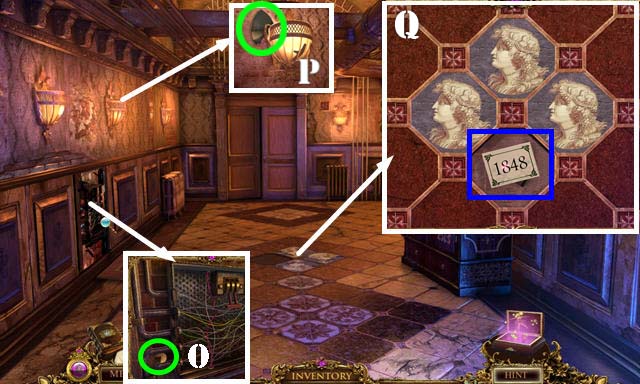
- Open the panel and take the WOODEN DISC (O).
- Take the RECORD FRAGMENT 1/5 (P).
- Place the DECORATIVE TILE on the floor for a puzzle. Swap the tiles in each section as shown (Q).
- Take the LABEL and the RECORD FRAGMENT 2/5 below it (blue).
- Head right to the Backstage Hallway.

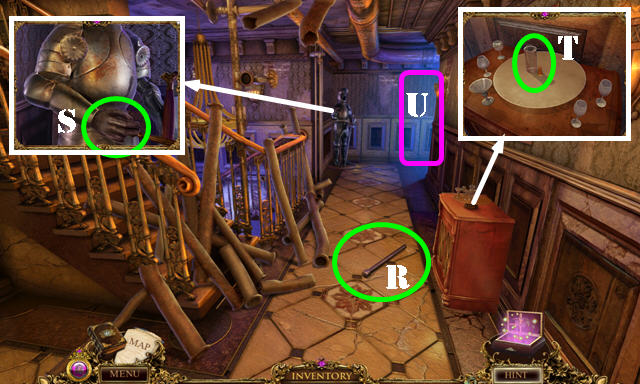
- Take the METAL ROD (R).
- Remove the sleeve and take the GLOVE (S).
- Move the glasses and take the MEASURING BEAKER (T).
- Go to the Passageway (U).

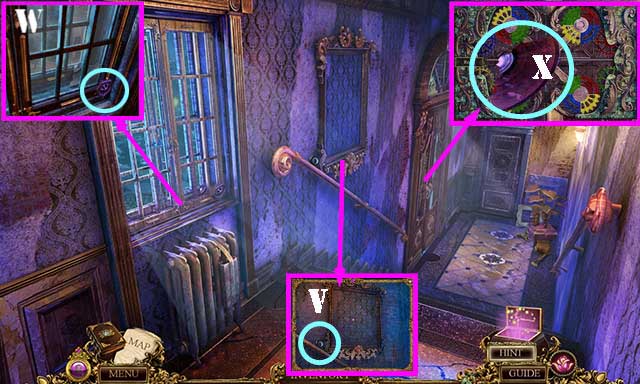
- Talk to the ghost.
- Take the ELECTRICAL TAPE (V), PHONOGRAPH NEEDLE (W), and RECORD FRAGMENT 3/5 (X).

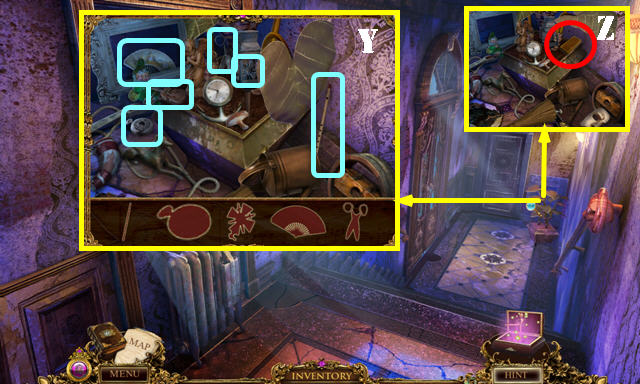
- Play the HOP (Y).
- Take the WOODEN BLOCK (Z).
- Return to the Corridor.

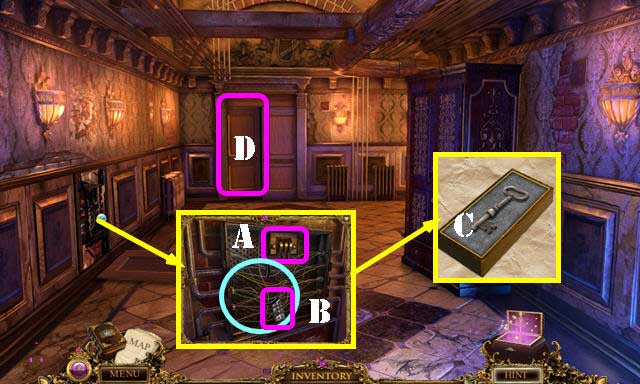
- Use the GLOVE on the handle (A) and the ELECTRICAL TAPE on the wires (blue).
- Pull the handle and take the KEY PICTURE (B).
- Use the KEY PICTURE on the WOODEN BLOCK; take the KEY BLOCK (C).
- Enter the Scene Shop (D).

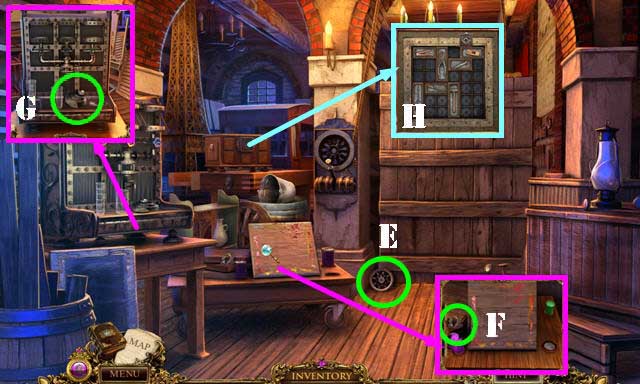
- Take the MACHINE WHEEL (E), GOLDEN EMBLEM (F), and RECORD FRAGMENT 4/5 (G).
- Place the KEY BOX in the slot to activate a puzzle (H).

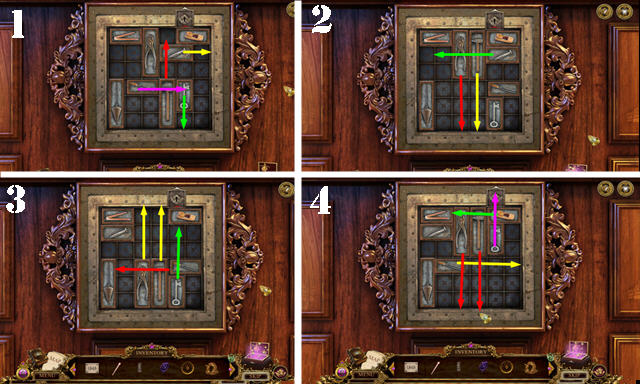
- Slide the key plate into the lock.
- To solve the puzzle, follow the arrows in this order: yellow, red, green, and purple (1-4).
- Take the PAINTBRUSH (5).
- Walk down.

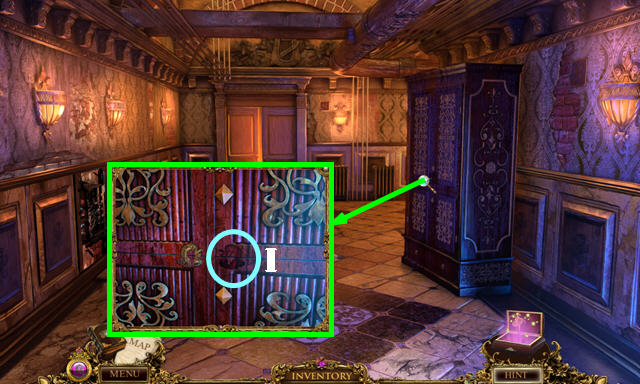

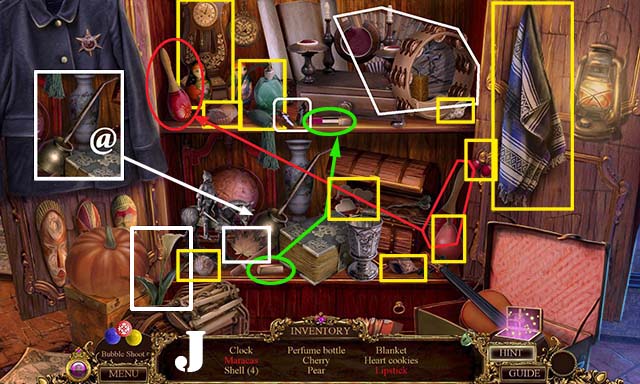
- Place the GOLDEN EMBLEM (I) and open the doors to activate a HOP.
- Play the HOP (J).
- Take the OIL CAN (@).
- Return to the Backstage Hallway.

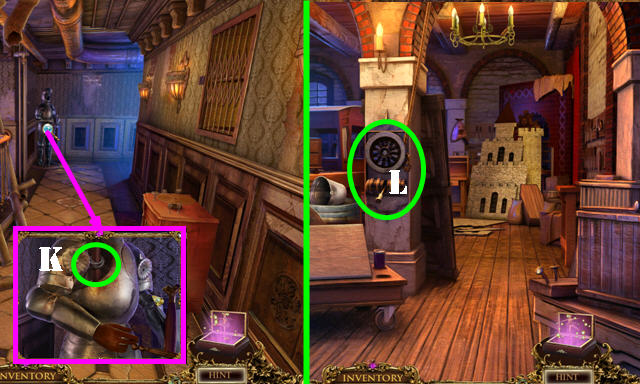
- Use the OIL CAN on the armor and take the PIECE OF ROPE (K).
- Return to the Scene Shop.
- Use the PIECE OF ROPE on the mechanism and pull the handle (L).
- Go forward to the Workshop.

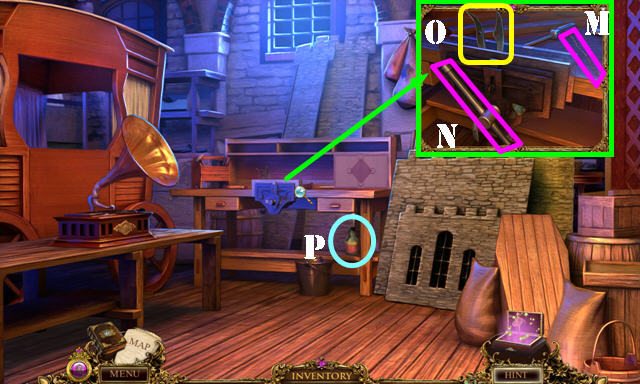

- Take the METAL WIRE (M).
- Place the METAL ROD on the vise (N) and turn it; take the BOLT CUTTER PARTS (O).
- Take the BOTTLE OF GLUE (P).
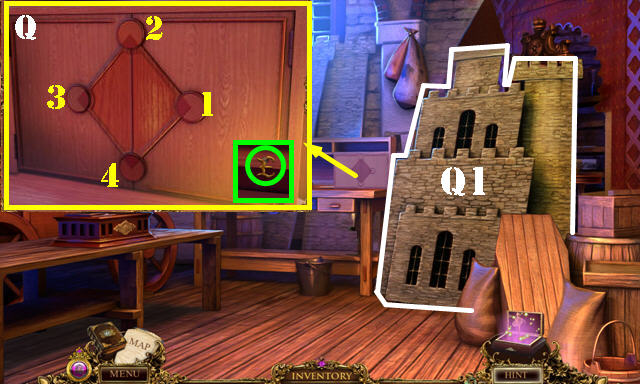
- Place the WOODEN DISC in the slot. Arrange the discs as shown (Q) by pressing the discs in this order: 1, 1, 1, 2, 2, and 2.
- Take the LETTER E (green).
- Remove the wall to activate a HOP (Q1).

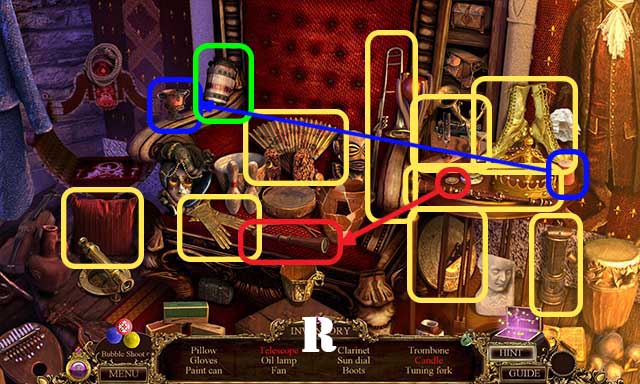
- Play the HOP (R).
- You receive the PAINT CANNISTER 2/3.
- Return to the Corridor.

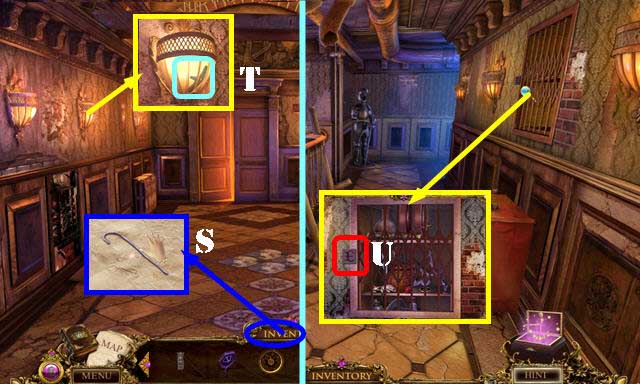
- Bend the METAL WIRE three times and take the BENT WIRE (S).
- Use the BENT WIRE to get the WINDOW HANDLE (T).
- Return to the Backstage Hallway.
- Place the LETTER E in the slot (U) to activate a HOP.

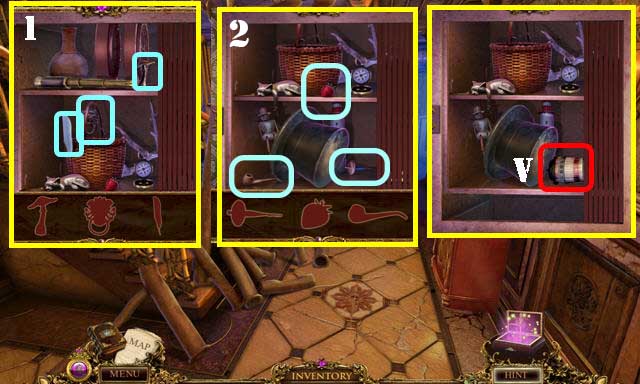
- Play the HOPs (1and 2).
- Take the PAINT CANNISTER 3/3 (V).
- Return to the Passageway.

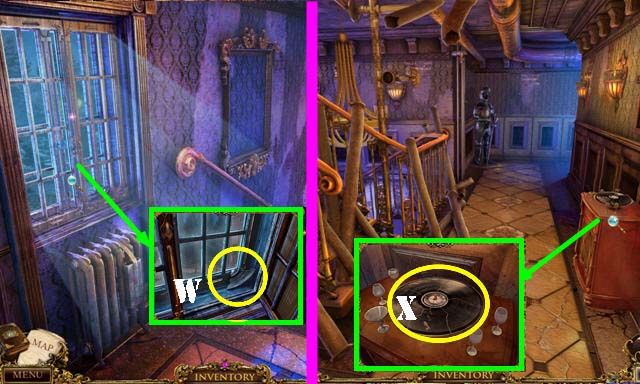
- Place the WINDOW HANDLE in the slot and turn it; take the RECORD FRAGMENT 5/5 (W).
- Walk down.
- Use the BOTTLE OF GLUE on the disc and then put down the 5 RECORD FRAGMENTS; take the GLUED RECORD (X).
- Return to the Workshop.

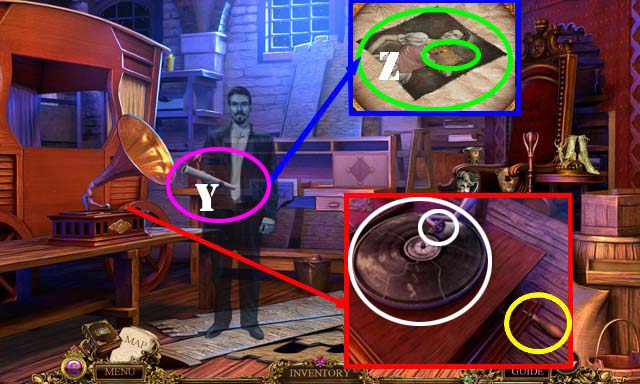
- Place the PHONOGRAPH NEEDLE on the arm and put down the GLUED RECORD (white).
- Turn the handle (yellow).
- Take the ROLLED PAINTING (Y) and unroll it completely; take the RECIPE and FADED PAINTING (Z).
- Walk down.

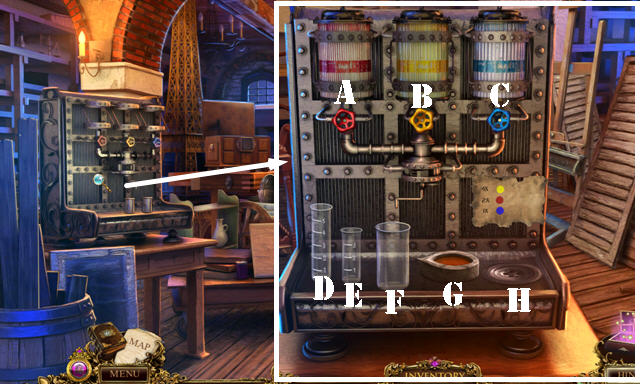
- Put down the MEASURING BEAKER. 3 CANNISTERS, and RECIPE for a puzzle.
- Solution: A, F-D, D-E, D-G.
- B, F-D, D-E, E-H, D-E, F-D, D-E, D-G.
- C, F-E, E-D, F-E, E-D, E-G.
- Take the MIXED COLOR (G).

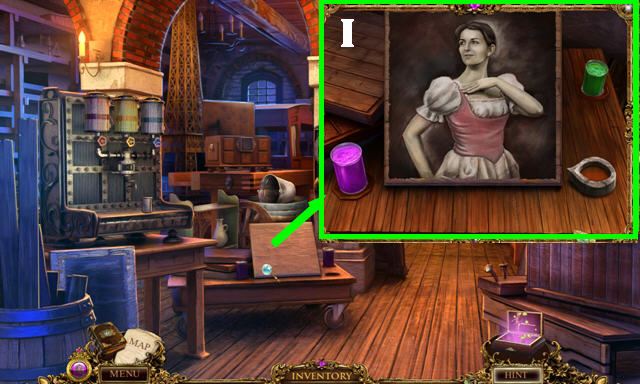
- Put down the FADED PAINTING, MIXED COLOR, and PAINTBRUSH for a puzzle.
- Puzzle not working at time guide was written.
- Take the PAINTING (I).
- Return to the Passageway.

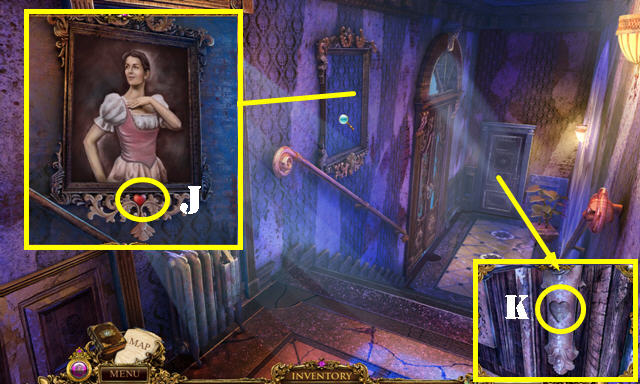
- Place the PAINTING in the frame; take the CRYSTAL HEART (J).
- Place the CRYSTAL HEART in the slot (K) and go into the Green Room.
Chapter 3: The Green Room

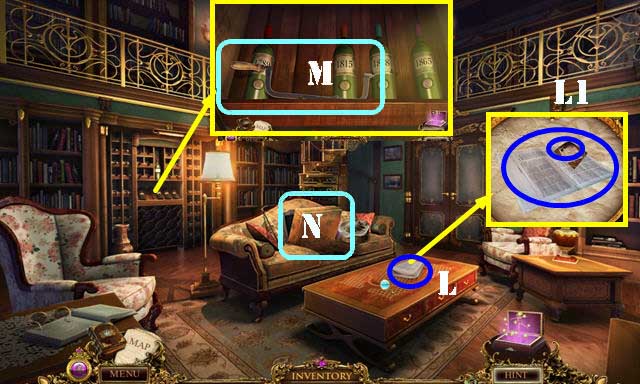
- Take the FOLDED NEWSPAPER (L); unfold it; take the clue and the NEWSPAPER (L1).
- Take the SAW HANDLE (M).
- Lower the cushion to activate a HOP (N).

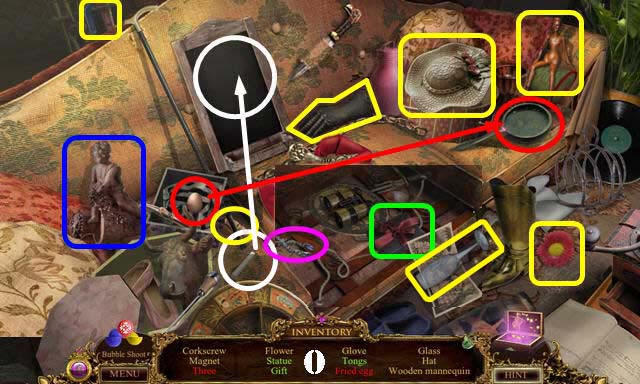
- Play the HOP (O).
- Lift and lower the center cushion and move the left pillow to find all the items.
- You receive the ICE PICK.
- Take the stairs up to the Gallery Hallway.

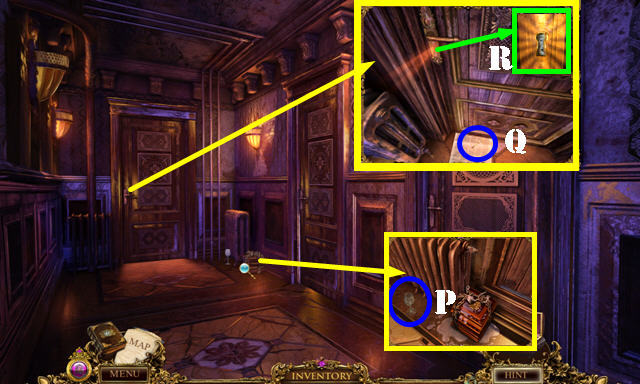
- Take the WINE GLASS 1/2 (P).
- Place the NEWSPAPER under the door (Q).
- Insert the ICE PICK through the keyhole (R) and take the BRASS KEY (Q).
- Use the BRASS KEY in the lock and enter the Makeup Room.

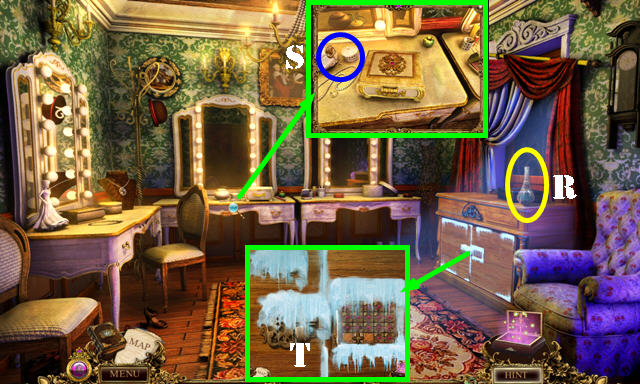
- Take the VASE WITH WATER (R) and the CROSS-SHAPED KEY (S).
- Use the ICE PICK on the ice for a puzzle (T).

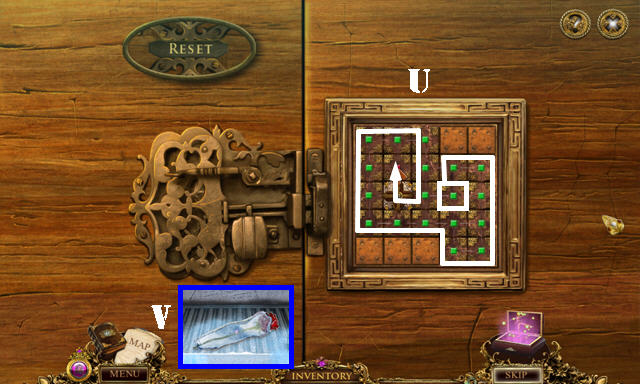


- The tile can initially be placed anywhere on the board. Place it on the area with the white square to begin.
- Solution (U). Take the FROZEN ROSE (V).
- Walk down.
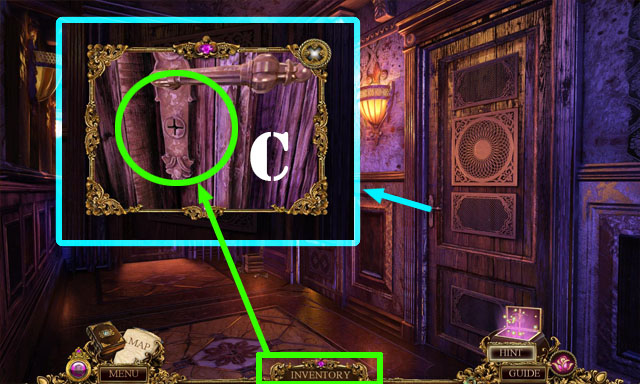
- Use the CROSS-SHAPED KEY in the keyhole (C). Turn the key and enter the Dressing Room.
- Take the BOLT (W). Use the BOLT on the BOLT CUTTER PARTS; take the BOLT CUTTERS (X).
- Remove the partition; take the OVAL PHOTO (Y).
- Use the SCISSORS on the curtains (Z) to get the FABRIC STRIP 1/2 and to activate a HOP.

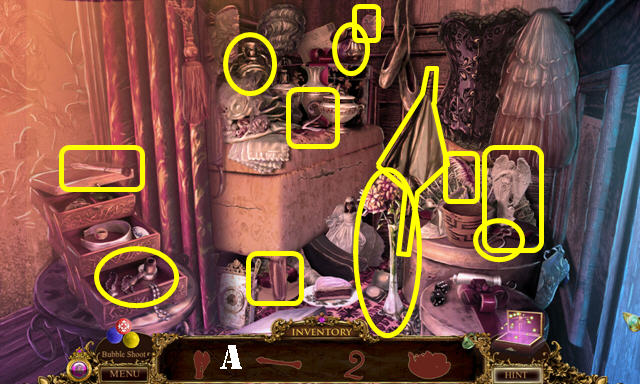
- Play the HOP (A).
- You receive the WINE GLASS 2/2.
- Walk down.

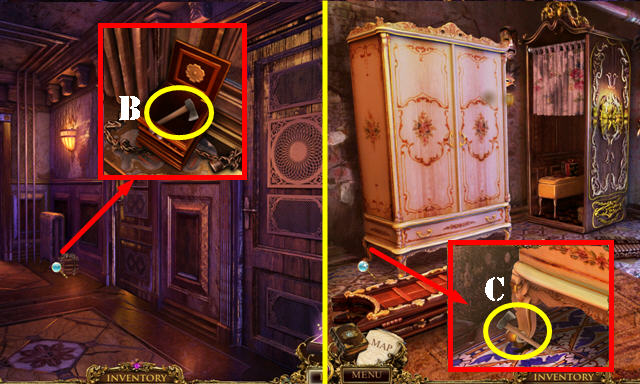
- Use the BOLT CUTTERS on the chain; open the box and take the SMALL HATCHET (B).
- Return to the Dressing Room.
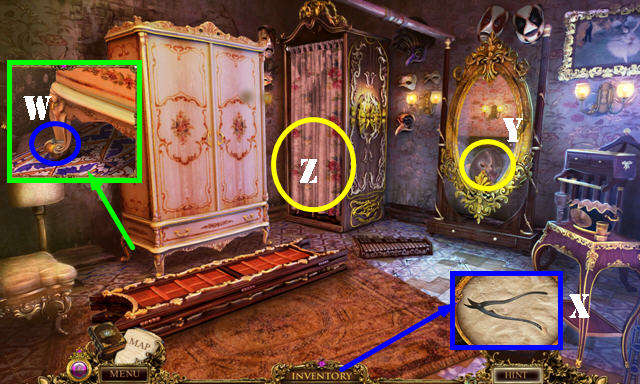
- Use the SMALL HATCHET on the leg (C).
- Go through the hole in the wall.

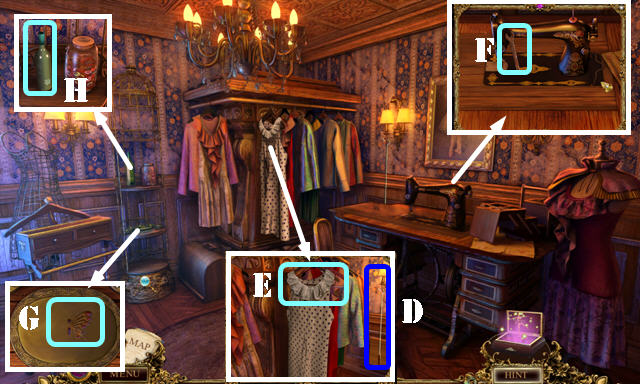

- Take the GARMENT HOOK (D).
- Cut the FABRIC STRIP 2/2 with the SCISSORS (E).
- Take the WRENCH (F), BUTTERFLY WINGS (G) and the UNMARKED WINE BOTTLE (H).
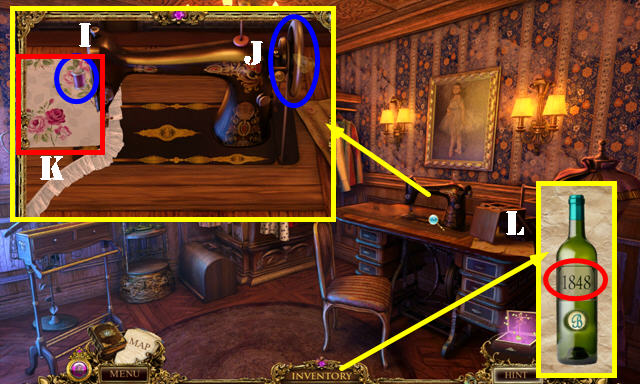
- Place the THREAD (I) and the MACHINE WHEEL (J) on the sewing machine.
- Put down the FABRIC (K) to get the TABLECLOTH.
- Place the LABEL on the UNMARKED WINE BOTTLE; take the WINE BOTTLE (L).
- Walk down twice.

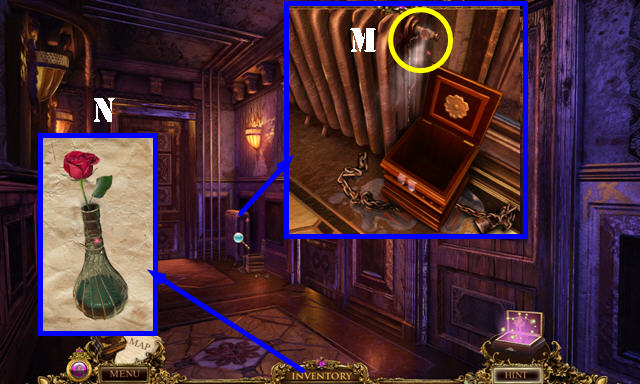
- Use the WRENCH on the valve; place the FROZEN ROSE on the steam to acquire the ROSE (M).
- Place the ROSE in the VASE WITH WATER; take the ARRANGED VASE (N).
- Walk down.

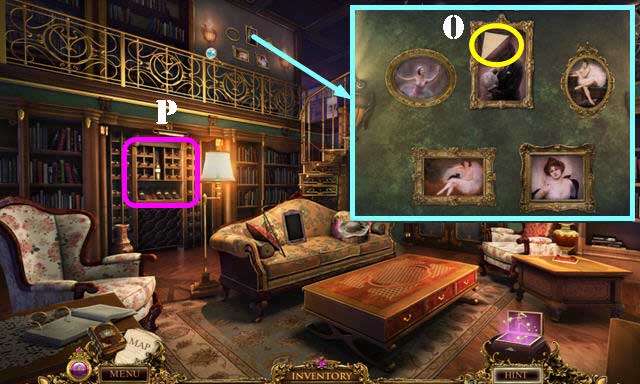
- Place the OVAL PHOTO in the frame for a puzzle.
- Swap the photos as shown. Take the note (O).
- Put down the WINE BOTTLE for a puzzle.

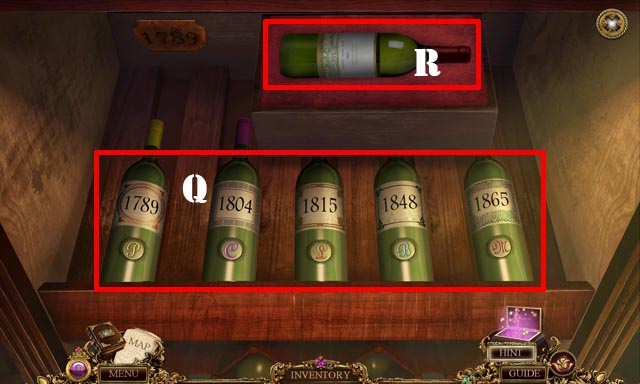
- Put the labels in place and then place the bottles in the right order. See the Journal for clues.
- Solution (Q).
- Take the AGED WINE (R).
- Return to the Makeup Room.

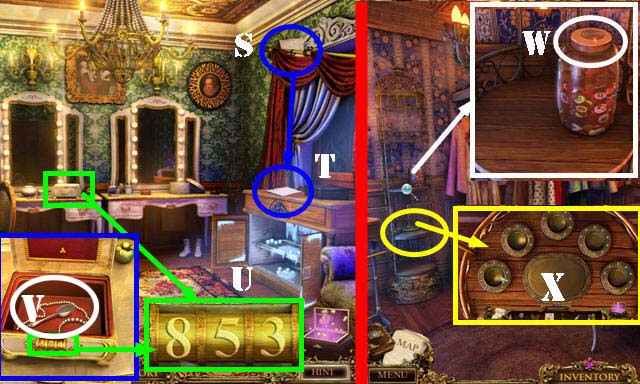
- Use the GARMENT HOOK on the note (S); take the note (T).
- Change the numbers to 853 (U); take the SILVER SPOON (V).
- Return to the Costume Shop.
- Use the SILVER SPOON on the lid; take the BUTTONS (W).
- Put down the BUTTONS on the tray for a puzzle (X).

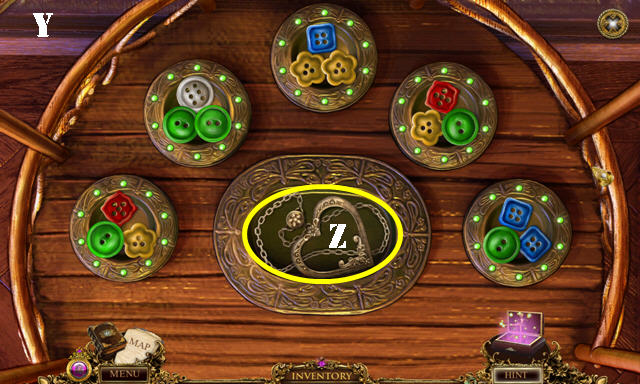
- Place the buttons on the right dishes so the holes on the buttons match up to ten.
- Solution (Y).
- Take the LOCKET FRAME (Z).

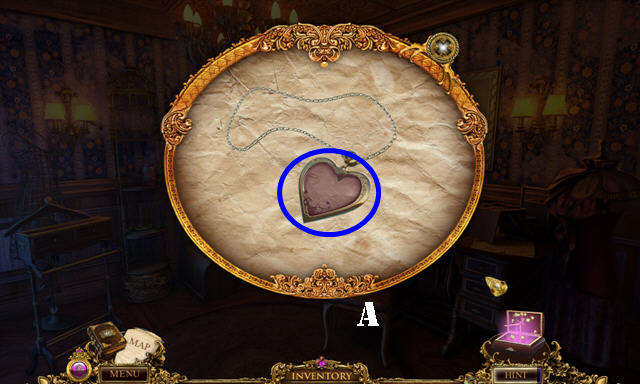
- Place the CRYSTAL HEART in the LOCKET FRAME; take MARIE’S LOCKET (A).
- Return to the Green Room.

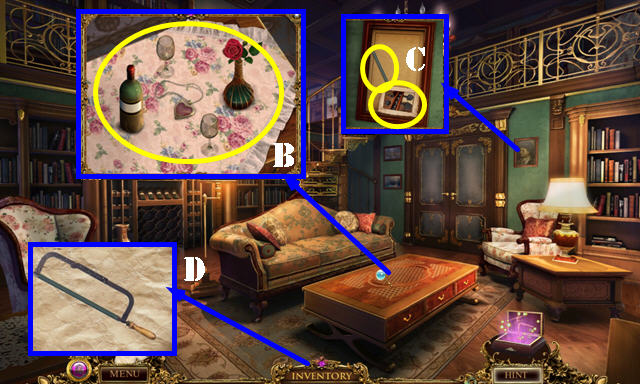

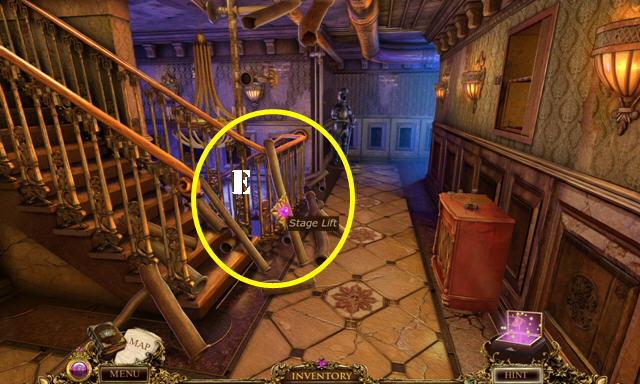
- Put down the TABLECLOTH, 2 WINE GLASSES, ARRANGED VASE, AGED WINE and MARIE’S LOCKET (B).
- Talk to Marie to get MARIE’S LOCKET back.
- Remove all the glass and the photo; take the clue and the METAL BLADE (C).
- Place the METAL BLADE on the SAW HANDLE; take the HACKSAW (D).
- Return to the Backstage Hallway.
- Cut through the pipes with the HACKSAW (E). Go to the Stage Lift.
Chapter 4: Stage Lift

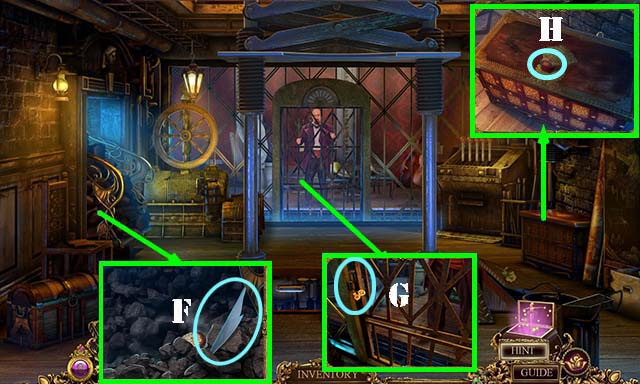
- Take the FEATHER 1/5 (F).
- Use the HACKSAW on the bars (G).
- Take the ROSIN (H).
- Go forward.

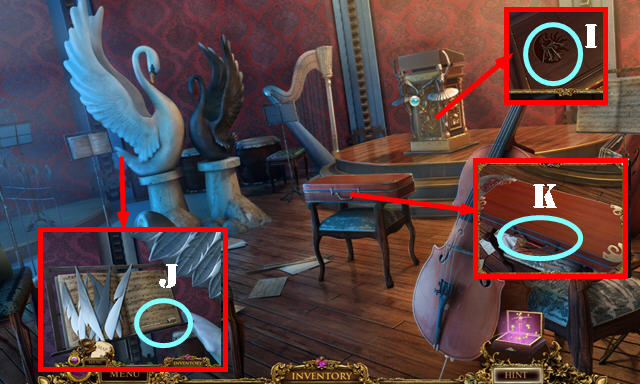
- Remove the music sheets and take the SET OF KEYS (I).
- Take the BOW SCREW (J).
- Open the latches for a HOP (K).

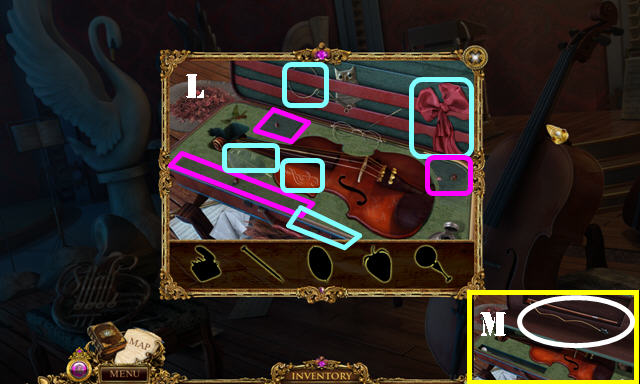
- Play the HOP (L). The sections marked in purple must be opened.
- Take the BROKEN BOW (M).

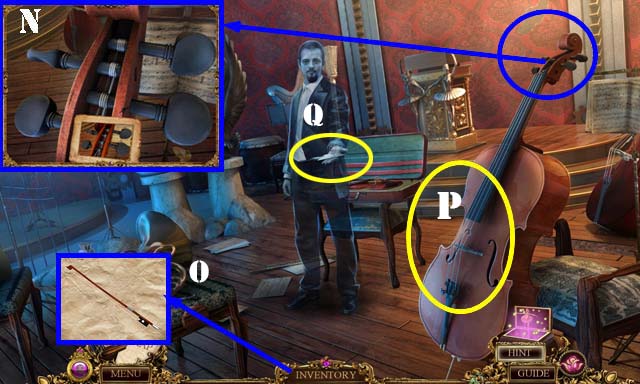
- Zoom into the top of the cello for a puzzle. Face the pegs correctly. Solution (N).
- Use the BOW SCREW on the BROKEN BOW. Use the ROSIN on the BOW and then take it (O). Place the BOW on the cello (P).
- Take the FEATHER 2/5 (Q).
- Return to the Backstage Hallway and go up to the Upper Hallway.

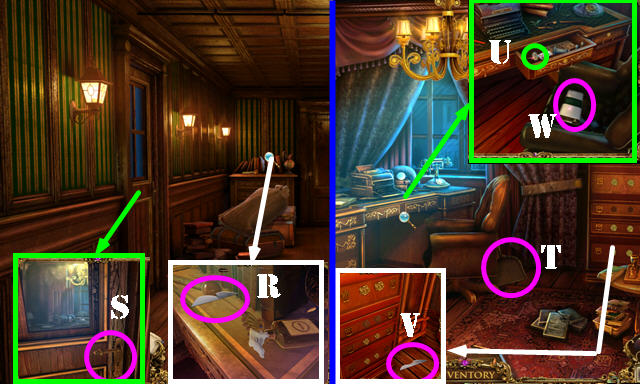
- Take the FEATHER 3/5 (R).
- Use the SET OF KEYS on the lock and go through the door (S).
- Take the DUST PAN (T), FUSES 1/2 (U), FEATHER 4/5 (V), and PAINT THINNER (W).
- Walk down.

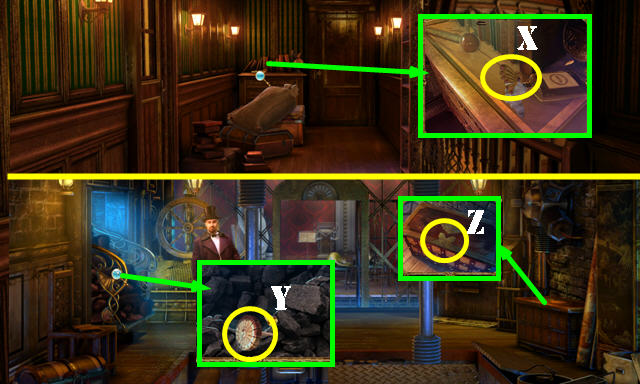
- Use the PAINT THINNER on the paint; take the BUTTERFLY WING 2/2 (X).
- Return to the Stage Lift.
- Use the DUST PAN on the stones; take the FUSE 2/2 (Y).
- Place the 2 BUTTERFLY WINGS on the trunk to activate a HOP (Z).

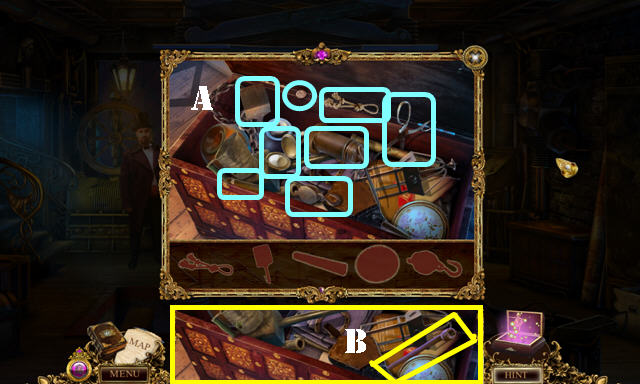
- Play the HOP (A).
- Take the HANDLE (B).
- Return to the Upper Hallway.

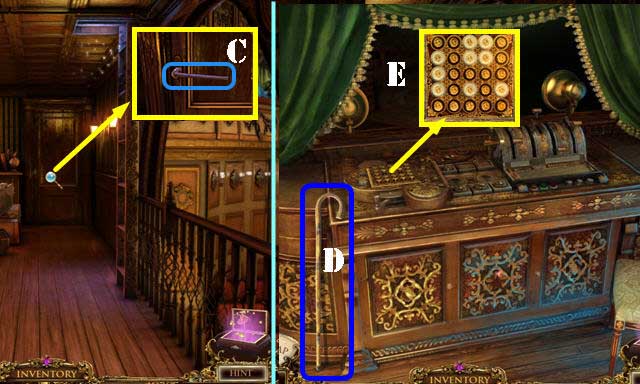
- Use the HANDLE on the door and then go through it (C).
- Take the WALKING CANE (D).
- Put down the 2 FUSES for a puzzle (E).

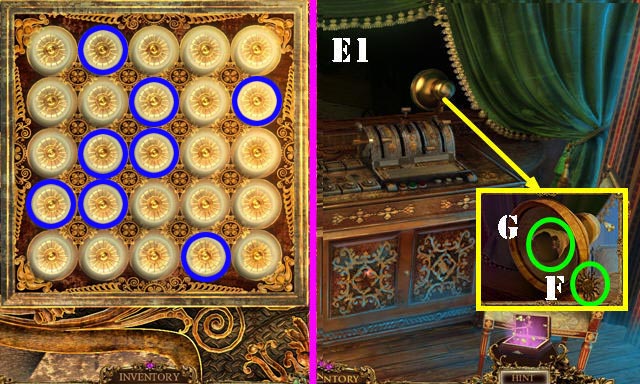
- Light up all the fuses.
- Press all the fuses marked in blue, in any order, and then select the one marked in red last to solve the puzzle (E1).
- Take the SUN (F) and remove the broken bulb (G).
- Walk down.

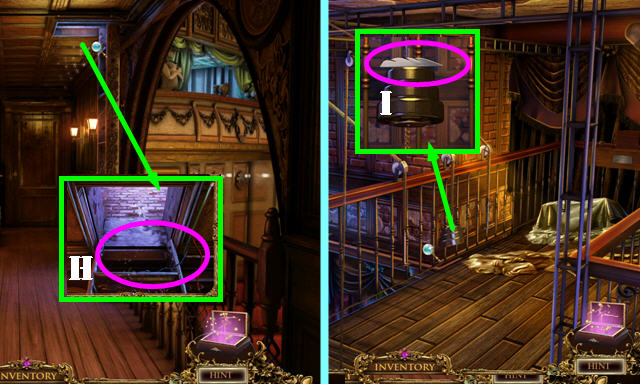
- Use the WALKING CANE on the wires; go up the ladder (H).
- Take the FEATHER 5/5 (I).

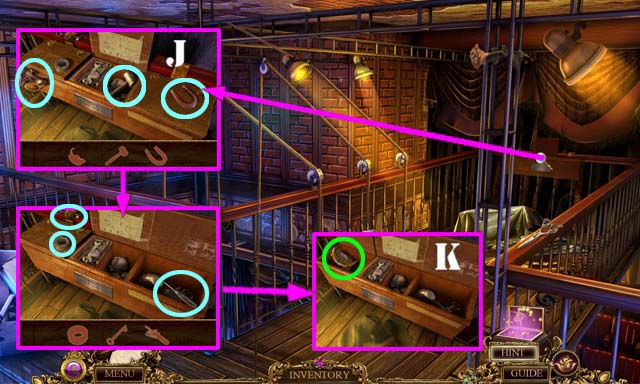
- Play the HOP (J).
- Take the MOON (K).
- Return to the Orchestra Pit.

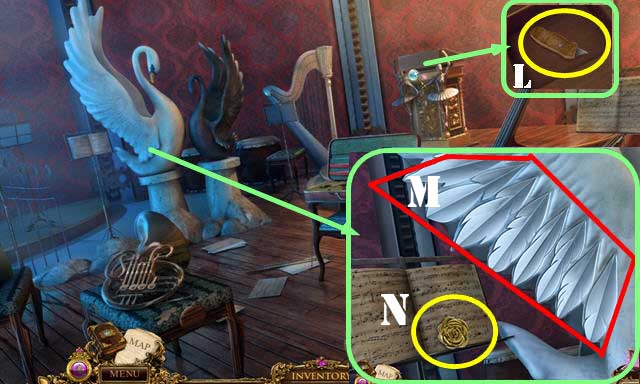

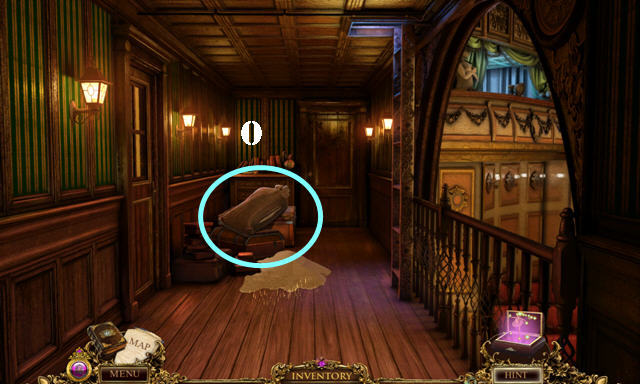
- Place the MOON and the SUN in the slots; take the BOX CUTTER (L).
- Put down the 5 FEATHERS for a puzzle. Place the feathers in the right slots. Solution (M).
- Take the WOODEN ROSE 1/2 (N).
- Return to the Upper Hallway.
- Use the BOX CUTTER on the sandbag and open the trunk for a HOP (O).

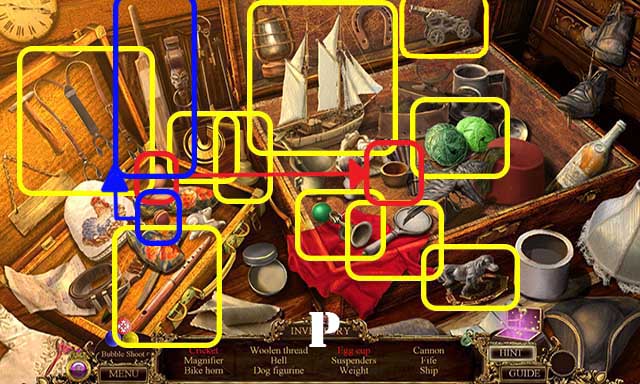
- Play the HOP (P).
- You receive the WEIGHT.
- Return to the Lighting Booth.

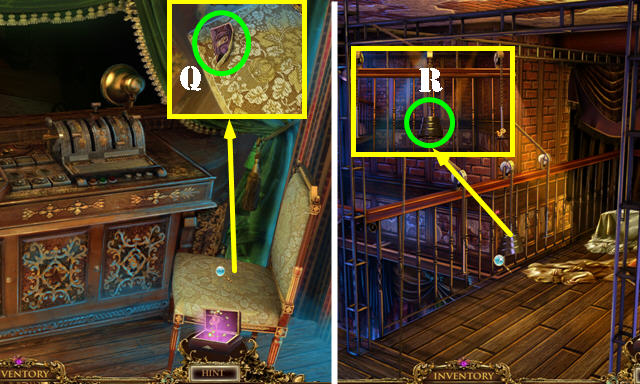
- Use the BOX CUTTER on the chair; take the MASK PIECE (Q).
- Return to the Fly Gallery.
- Place the WEIGHT on the others to activate a puzzle (R).

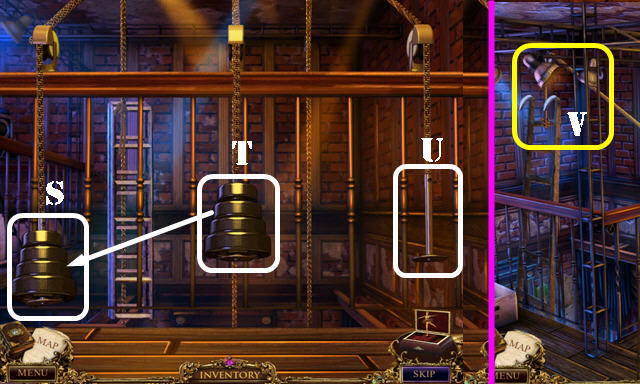
- Place all the weights on the left bar.
- Solution: T-U, T-S, U-S, T-U, S-T, T-S, T-U.
- T-S, U-S, U-T, S-T, U-S, T-U, T-S, U-S. Puzzle stopped working, couldn’t verify solution.
- Use the WALKING CANE on the ladder (V).
- Go Backstage.

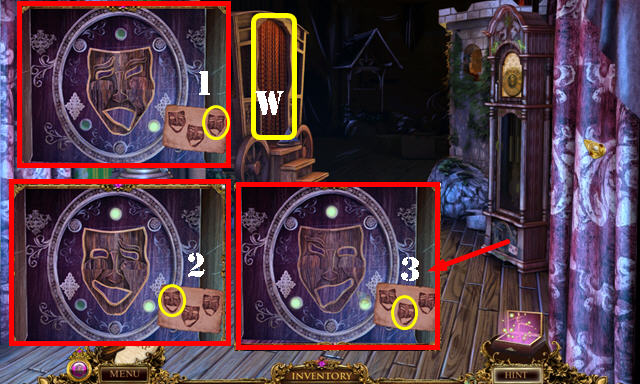
- Place the MASK PIECE to activate a puzzle.
- Recreate the 3 mask expressions (1-3).
- Take the STAR.
- Open the curtains to activate a HOP (W).

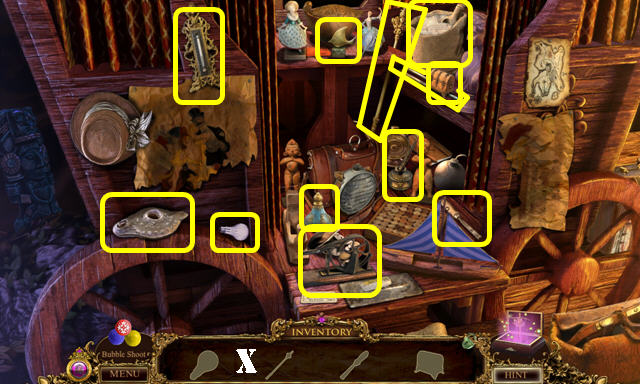
- Play the HOP (X).
- You receive the CLOCK HANDS 1/2.
- Return to the Lighting Booth.

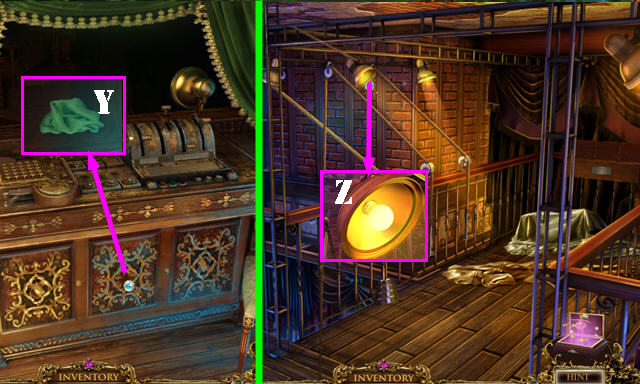
- Place the STAR in the slot and take the TOWEL (Y).
- Return to the Fly Gallery.
- Remove the LIGHT BULB with the TOWEL (Z).
- Return to the Lighting Booth.

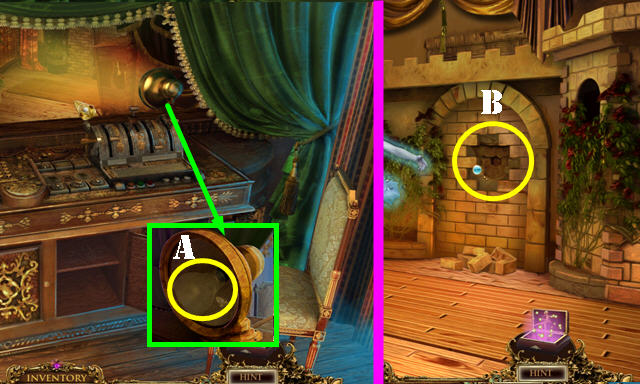
- Place the LIGHT BULB in the lamp (A).
- Return to Backstage and go forward to the Stage.
- Give MARIE’S LOCKET to Gaspar.
- Remove the bricks for a HOP (B).

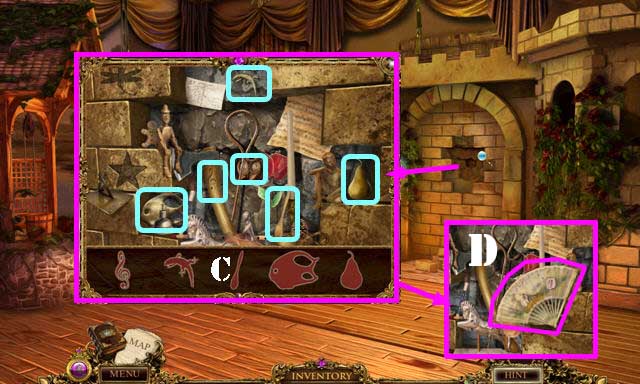
- Play the HOP (C).
- Take the HAND FAN (D).
- Walk down.

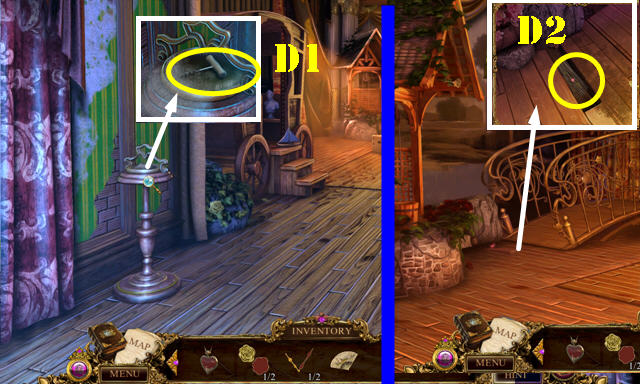
- Use the HAND FAN on the ashes; take the CORKSCREW (D1).
- Go forward.
- Use the CORKSCREW on the board; take the REEDS () and the CLOCK HAND 2/2 below it (D2).
- Walk down.

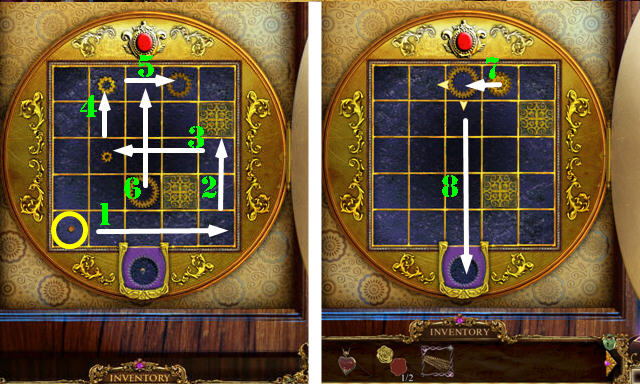
- Place the 2 CLOCK HANDS on the clock for a puzzle.
- Solution: 1-8.
- Take the WOODEN ROSE 2/2.
- Go forward.

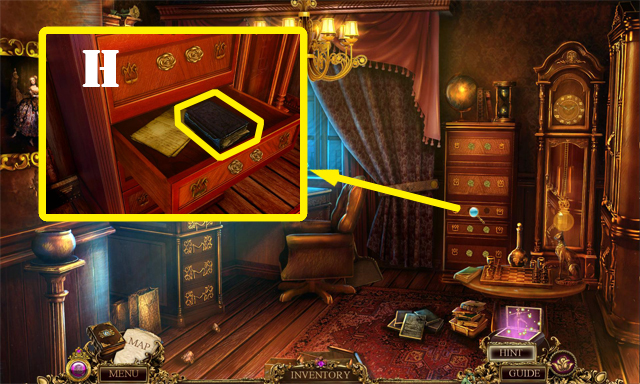
- Place the 2 WOODEN ROSES on the drawer; take the LEDGER (H).
- Return to the Stage Lift.

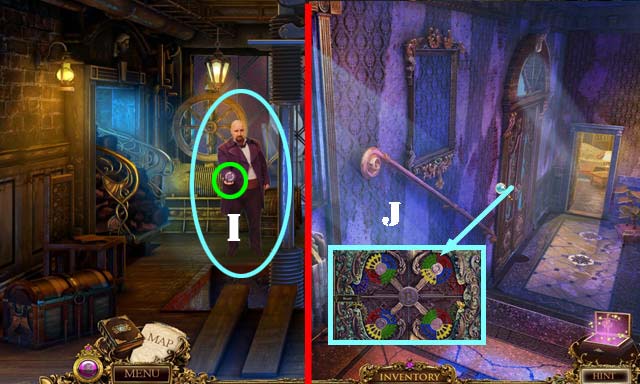
- Give the LEDGER to the manager (I).
- Take the GARDEN DOOR ACTIVATOR (green).
- Return to the Passageway.
- Place the GARDEN DOOR ACTIVATOR on the door for a puzzle (J).

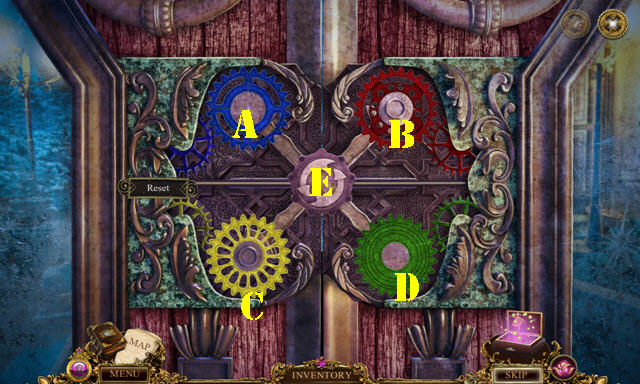
- Solution: Ax2, Bx3, C, D, E, Ax3, Bx2, Cx3, D, Ex3, Ax3, Bx3, Cx3, D, and Ex2.
- Go through the door.
Chapter 5: The Garden

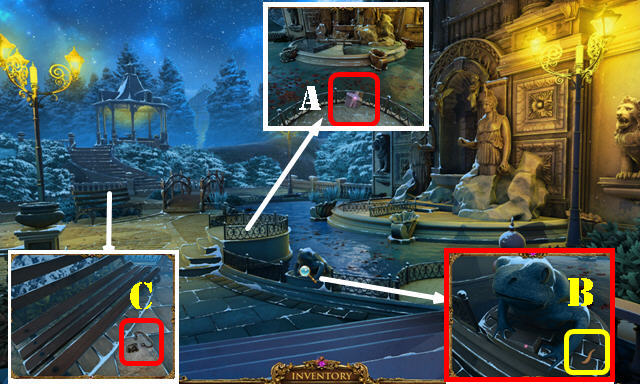
- Take the PICTURE TILE (A), STAINED GLASS 1/4 (B), and FLINT AND STEEL (C).
- Go forward.

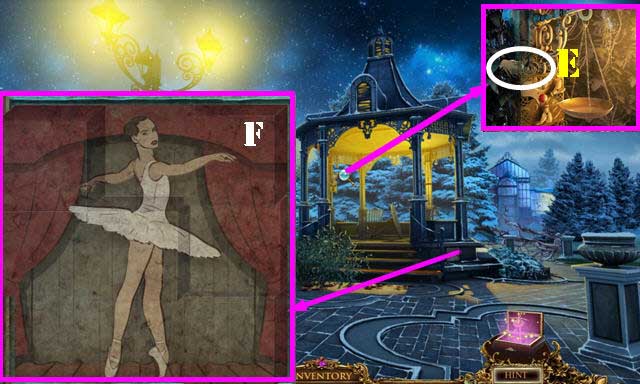

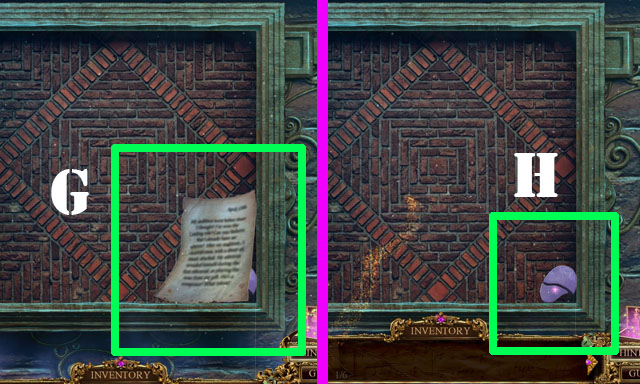
- Take the CONTINENT PIECE 1/3 (E).
- Place the PICTURE TILE on the wall for a puzzle. Solution (F).
- Take MARIE’S DIARY 1/6 (H) and the STAINED GLASS 2/4 below it.
- Head left to the Garden Theater.

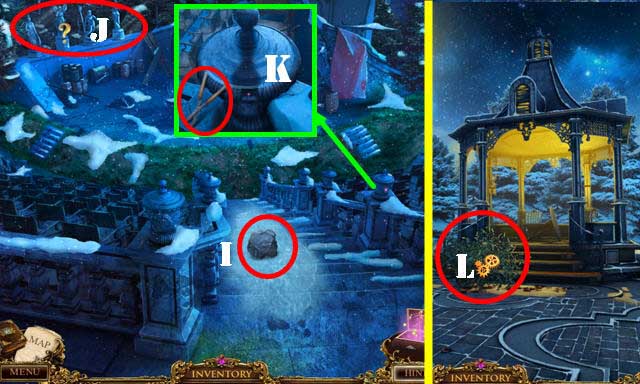
- Take the ROCK (I).
- Touch the statues for a clue (J).
- Take the SHEARS (K).
- Walk down.
- Use the SHEARS to get the VINES (L) and activate a HOP.

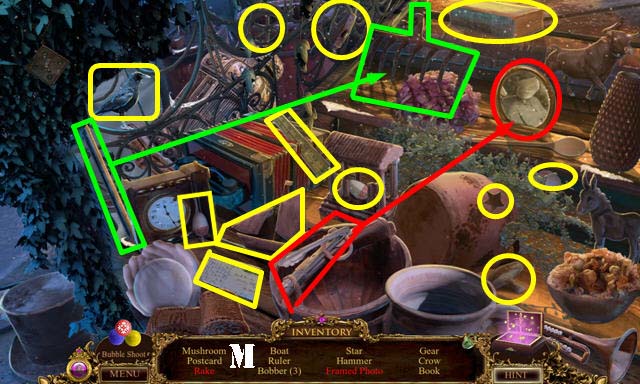
- Play the HOP (M).
- You receive the RAKE.

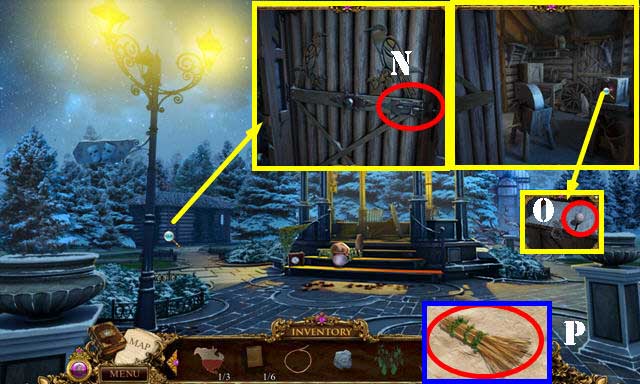
- Use the ROCK on the latch and then slide it (N).
- Take the MARBLE (O).
- Use the VINES on the REEDS; take the SMALL BROOM (P).
- Walk down.

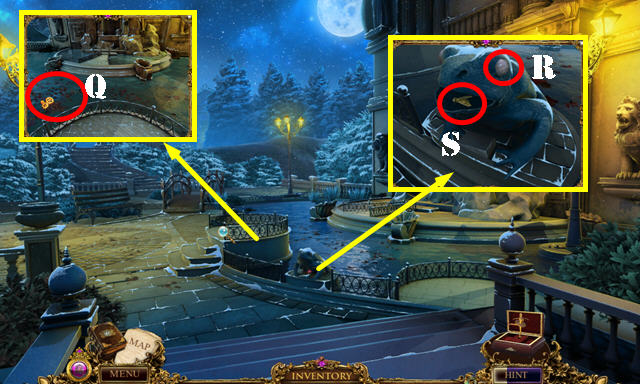
- Use the RAKE on the leaves to get the SNOWFLAKE TOKEN (Q).
- Place the MARBLE in the slot (R); take the FLY (S).
- Return to the Gazebo.

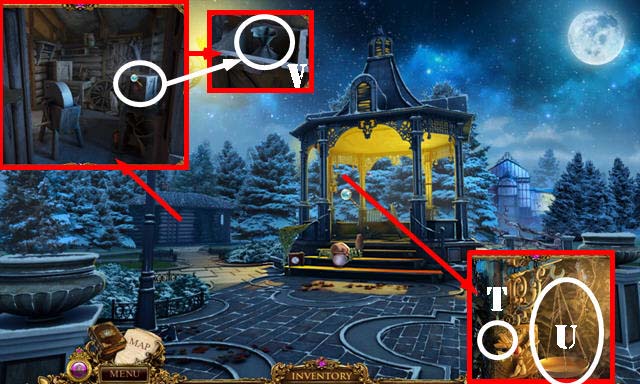
- Place the FLY next to the others (T); take the SMALL SCALE 1/2 (U).
- Place the SNOWFLAKE TOKEN on the lock; take the BAG OF SALT (V).
- Return to the Garden Theater.

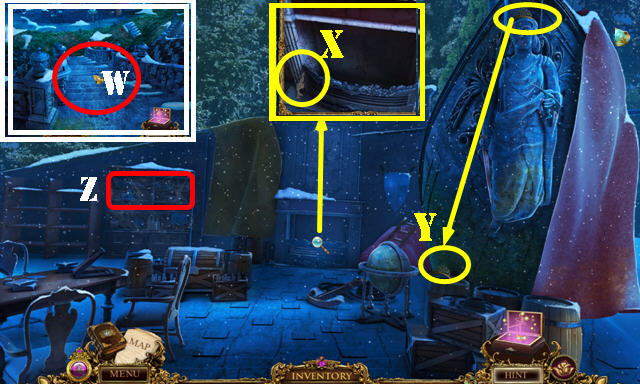
- Use the BAG OF SALT on the steps (W).
- Go forward.
- Take the CONTINENT PIECE 2/3 (X).
- Use the RAKE on the TIARA and then take it (Y).
- Use the SMALL BROOM on the bookcase to activate a HOP (Z).

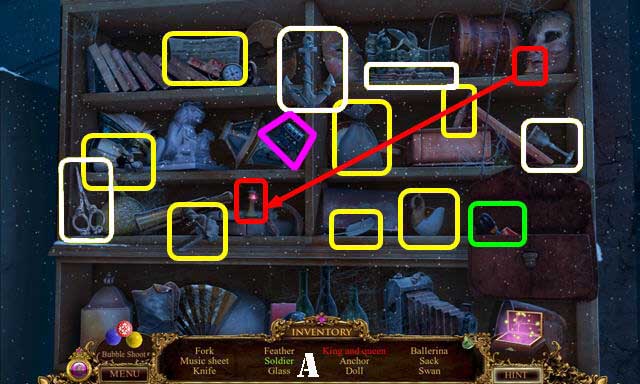
- Play the HOP (A).
- You receive the COUNTER.
- Walk down.

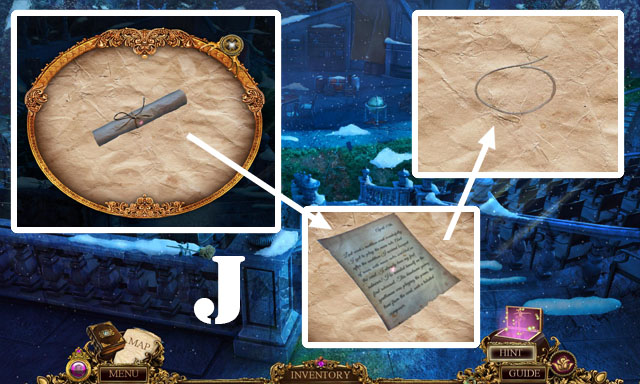

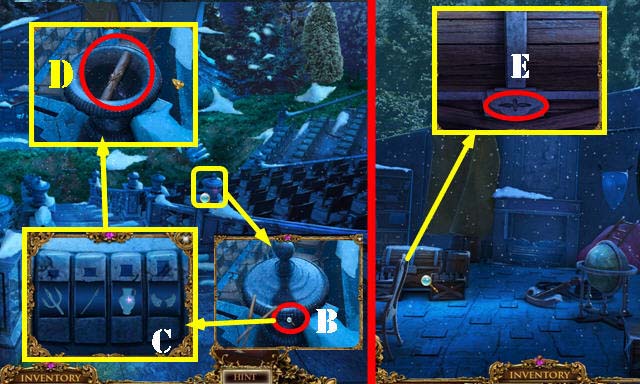
- Place the COUNTER on the mechanism (B).
- Change the symbols as shown: Trident, Spear, Vase, and Wings (C).
- Take the SCROLL (D) and the IRON TOKEN below it.
- Open the SCROLL; take it and the CORD below it (J).
- Go forward.
- Place the IRON TOKEN on the lock to activate a HOP (E).

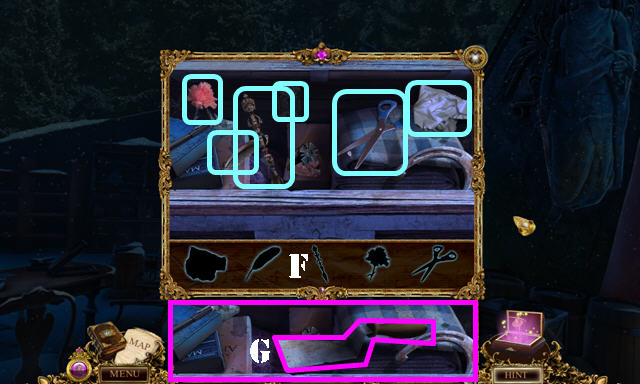
- Play the HOP (F).
- Take the TROWEL (G).
- Return to the Garden.

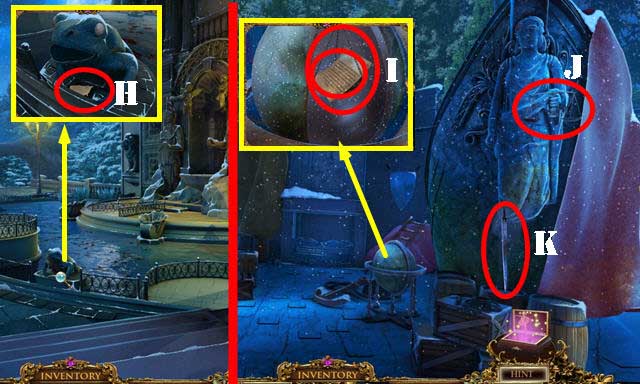
- Use the TROWEL on the brick; take the CONTINENT PIECE 3/3 (H).
- Return to the Outdoor Stage.
- Place the 3 CONTINENT PIECES on the globe. Press each of the three continents once; take MARIE’S DIARY 2/6 and the SMALL SCALES 2/2 (I).
- Place the 2 SMALL SCALES on the statue (J); take the DULL SWORD (K).
- Return to the Gazebo.

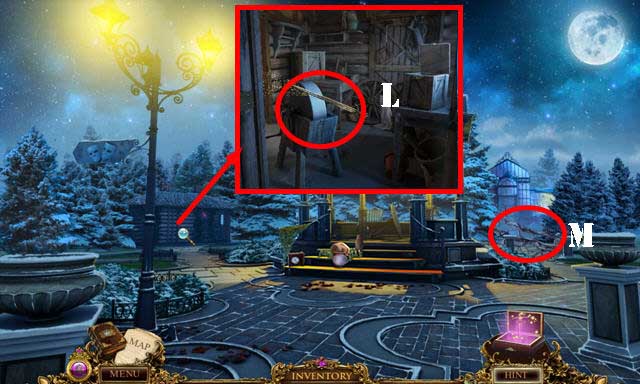
- Use the DULL SWORD on the grindstone to get the SHARP SWORD (L).
- Use the SHARP SWORD to get the TINDER (M).
- Return to the Outdoor Stage.

- Place the TINDER and then the FLINT AND STEEL in the fireplace to get a clue (N).
- Return to the Gazebo.
- Place MARIE’S LOCKET on the scene for a puzzle (O).

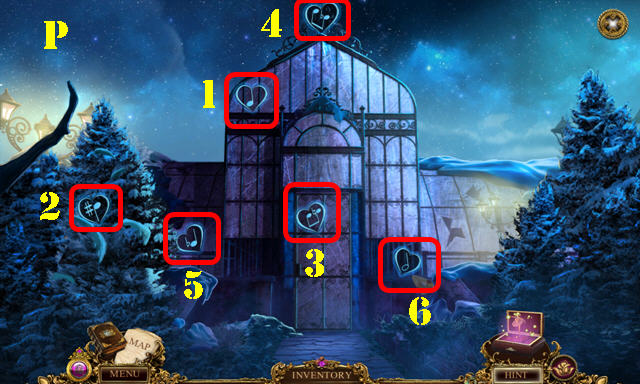
- Find all the hidden hearts in the scene and press on them (P).
- Select the hearts in the order shown (1-6).
- Enter the Greenhouse.

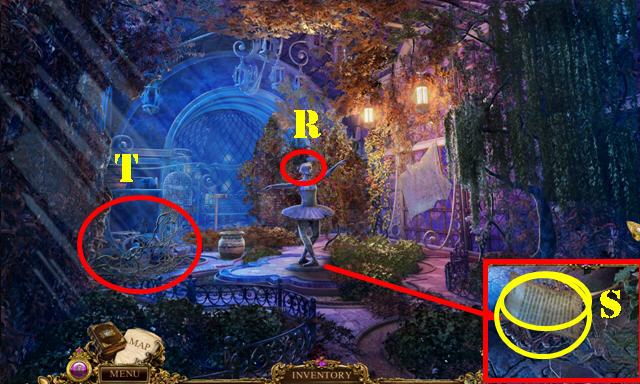
- Place the TIARA on the statue (R).
- Move the shards out of the way; take MARIE’S LOCKET 5/6 and the HAND MIRROR FRAME (S).
- Remove the vines to activate HOP (T).

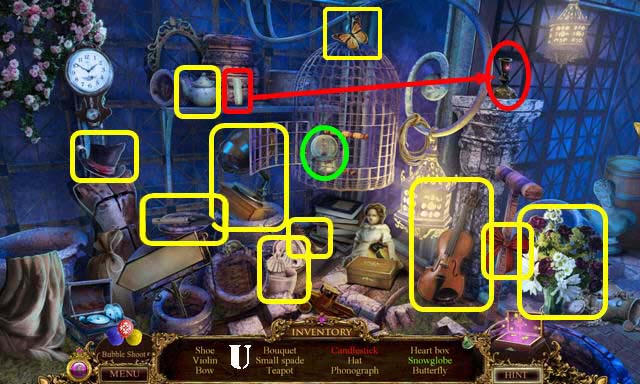
- Play the HOP (U).
- You receive the SMALL SPADE.
- Go forward to the Romantic Spot.

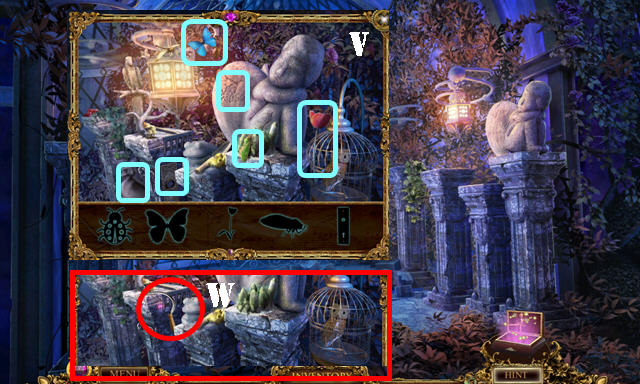
- Play the HOP (V).
- Take the SICKLE (W).

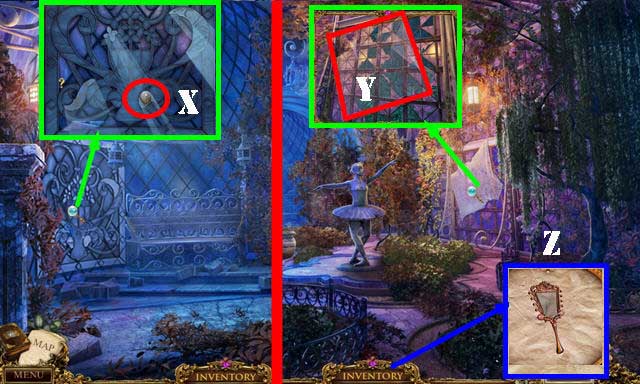
- Take the COIN (X).
- Walk down.
- Use the SICKLE to get the NETTING (Y).
- Place the NETTING in the HAND MIRROR FRAME; tie the CORD to it and take the SMALL NET (Z).
- Return to the Garden.

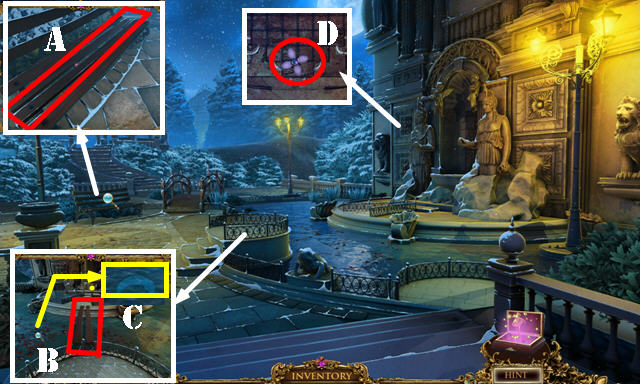
- Use the COIN to get the BOARDS (A).
- Put down the BOARDS (B). Use the SMALL NET to get the STAINED GLASS 3/4 (C).
- Take the STAINED GLASS 4/4 (D).
- Return to the Romantic Spot.

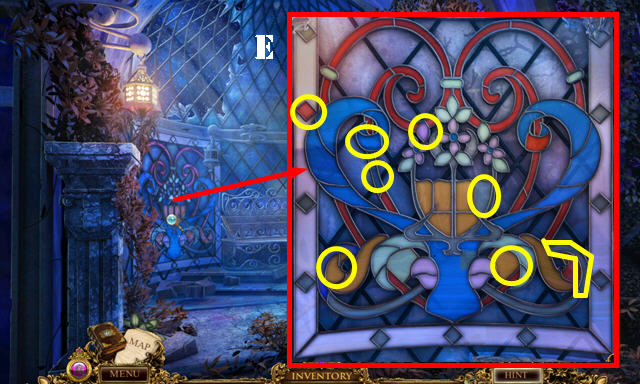
- Place the 4 STAINED GLASS pieces on the window for a puzzle.
- Find the differences (E).

- Use the SMALL SPADE on the ground; place MARIE’S LOCKET in the slot; take MARIE’S DIARY 5/6 and the FOUNTAIN PIECE (F).
- Return to the Garden.
- Place the FOUNTAIN PIECE to activate a puzzle (G).


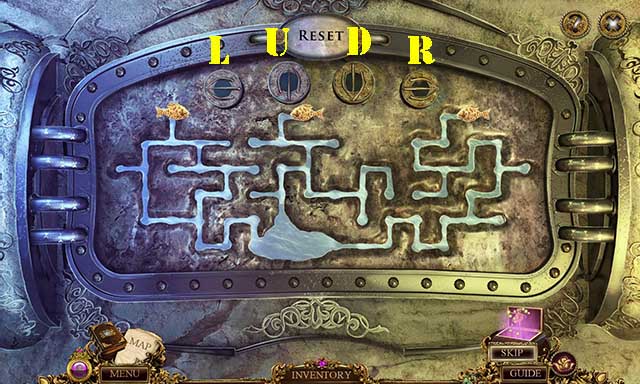

- Place all the tiles correctly.
- Solution, part 1 (H).
- Solution, part 2: L, D, R, D, L, Dx2, Rx2, U, R, Dx2, L, D, L, Dx2, L, U, L, D, R, D, Lx2, R, U, R, D, Lx2.
- Take MARIE’S DIARY 6/6.
- Return to the Stage.
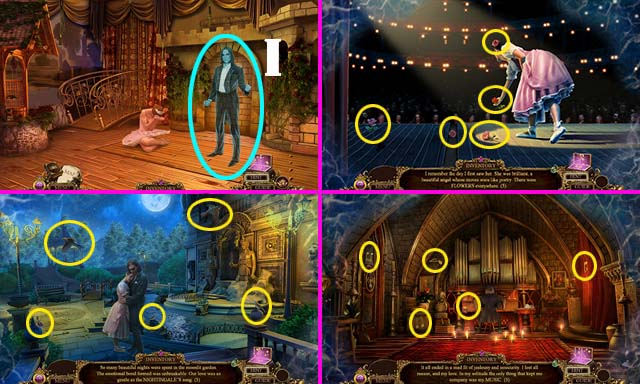
- Give the 6 MARIE’S DIARY pieces to Gaspar (I). Play the HOP.
- Congratulations, you have completed Danse Macabre: The Last Adagio!


 The Stroke of Midnight Walkthrough, Guide, & Tips
 The Mystery of the Crystal Portal: Beyond the Horizon Walkthrough, Guide, & Tips
 The Return of Monte Cristo Walkthrough, Guide, & Tips
 Danger Next Door: Miss Teri Tale's Adventure Walkthrough, Guide, & Tips
 Nightfall Mysteries: Black Heart Walkthrough, Guide, & Tips