Left in the Dark: No One on Board Walkthrough, Guide, & Tips
Left in the Dark: No One on Board Walkthrough

Welcome to the Left in the Dark: No One On Board Walkthrough
Discover what connects the ship’s disappearance with Devil’s Island and a family’s unsolved murder!
Whether you use this document as a reference when things get difficult or as a road map to get you from beginning to end, we’re pretty sure you’ll find what you’re looking for here.
This document contains a complete Left in the Dark: No One On Board game walkthrough featuring annotated screenshots from actual gameplay!
We hope you find this information useful as you play your way through the game. Use the walkthrough menu below to quickly jump to whatever stage of the game you need help with.
Remember to visit the Big Fish Games Forums if you find you need more help. Have fun!
This walkthrough was created by Prpldva, and is protected under US Copyright laws. Any unauthorized use, including re-publication in whole or in part, without permission, is strictly prohibited.
General Tips

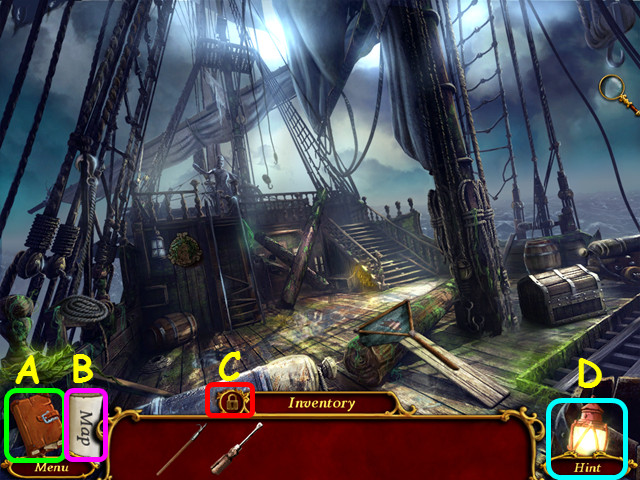
- This is the official guide for Left in the Dark: No One On Board.
- This guide will not mention each time you have to zoom into a location; the screenshots will identify each location.
- Hidden-object puzzles are referred to as HOPs in this guide. Items listed in blue are hidden or require additional actions to locate. Interactive items in HOPs are color-coded.
- Mini-games and HOPs are sometimes randomized; your solution may vary.
- Refer to your Journal for notes, objectives, and map (A).
- Use your map to see where actions are available and quickly travel (B).
- Prevent your inventory from auto-hiding by selecting the lock (C).
- Select the lantern for a hint (D).
Chapter 1: The Harbor

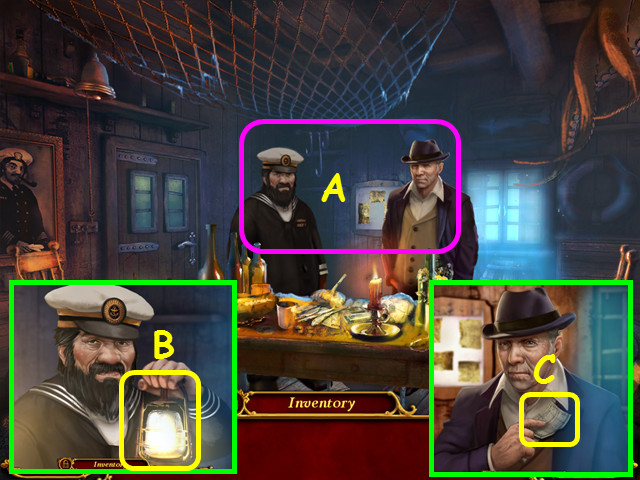
- You will have the option of some interactive help.
- Talk to the Mayor and the Harbormaster (A).
- Take the LANTERN from the Harbormaster (B).
- Take the PASS from the Mayor (C).
- Walk left.

- Note the entrance to the shack (D).
- Take the BOATHOOK (E).
- Walk forward.

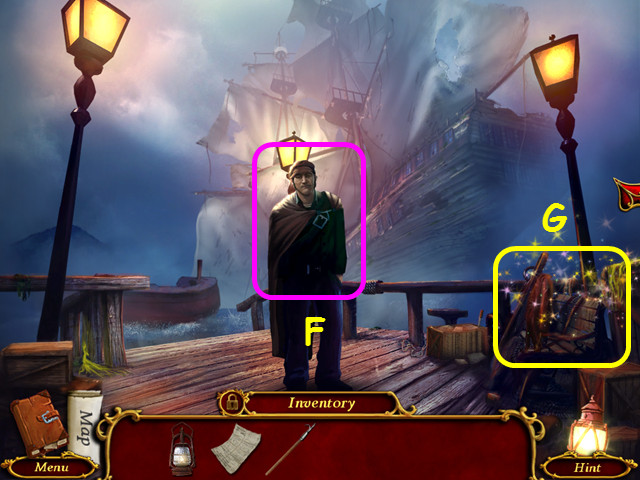
- Give the PASS to the sailor (F).
- Select the bench (G).

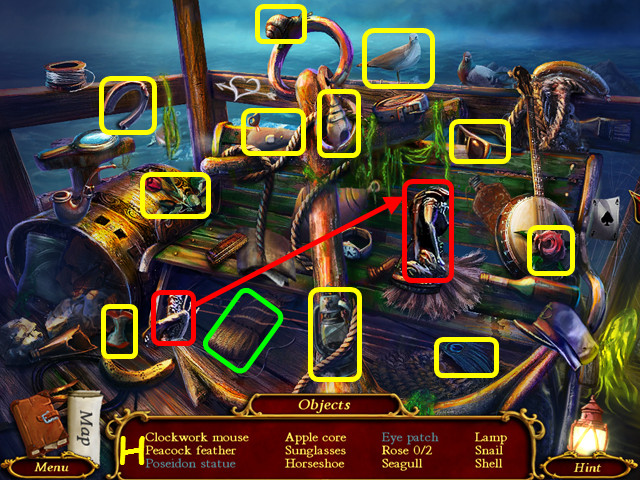
- Play the HOP to earn the CLOCKWORK MOUSE (H).
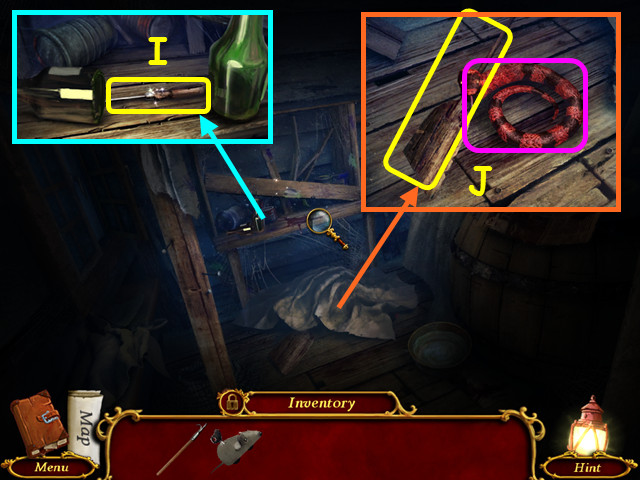
- Walk down and enter the Shack.


- Use the LAMP anywhere on the darkness.
- Move the bottles and take the SCREWDRIVER (I).
- Remove the cloth, use the CLOCKWORK MOUSE on the snake, and take the OAR (J).
- Walk down. After the cut-scene, go forward.

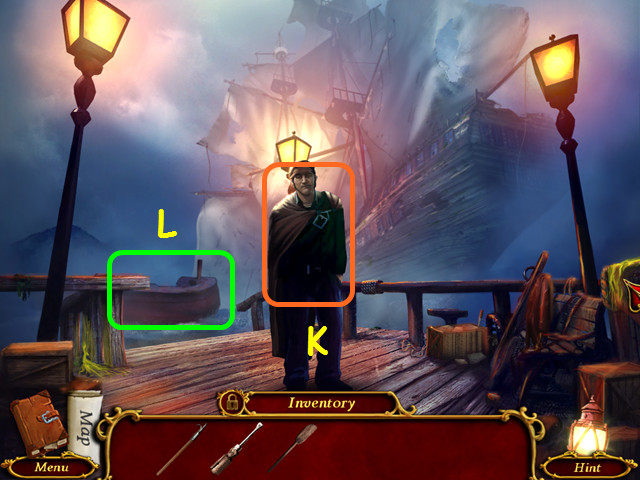
- Give the OAR to the sailor (K).
- Go forward to the boat (L).
Chapter 2: The Ship’s Deck

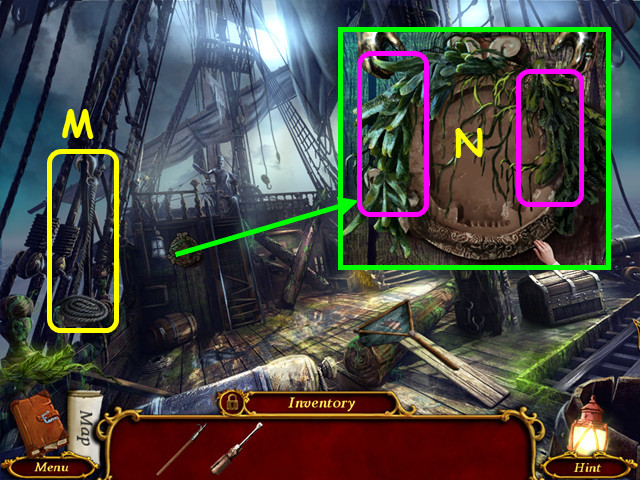
- Take the HOOK (M).
- Remove the seaweed (N).
- Walk forward.

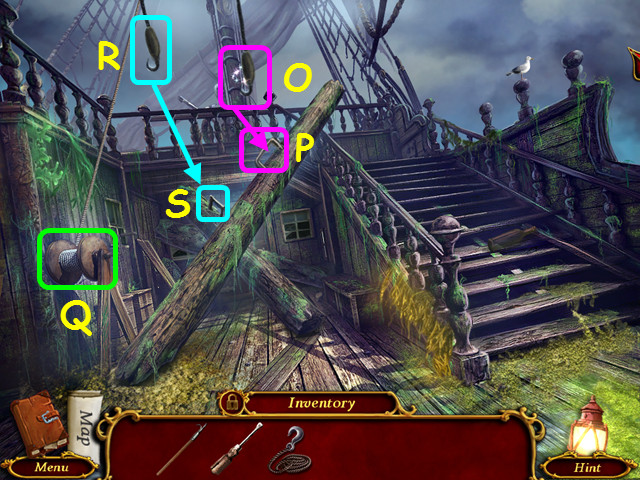
- Place the right hook (O) on the beam (P) and turn the winch (Q).
- Use the BOATHOOK to lower the left hook (R), attach it to the beam (S), and turn the winch.
- Walk up the stairs.

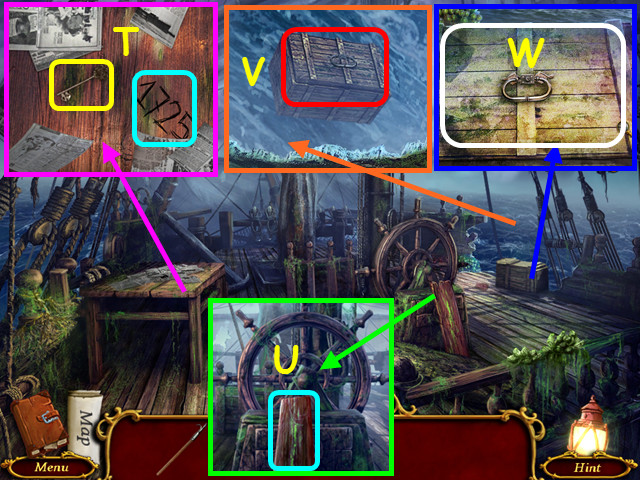
- Move the newspapers; take the KEY and note the 1725 code (T).
- Move the board (U).
- Use the HOOK to bring the chest aboard (V).
- Use the SCREWDRIVER on the lid and open the crate (W).

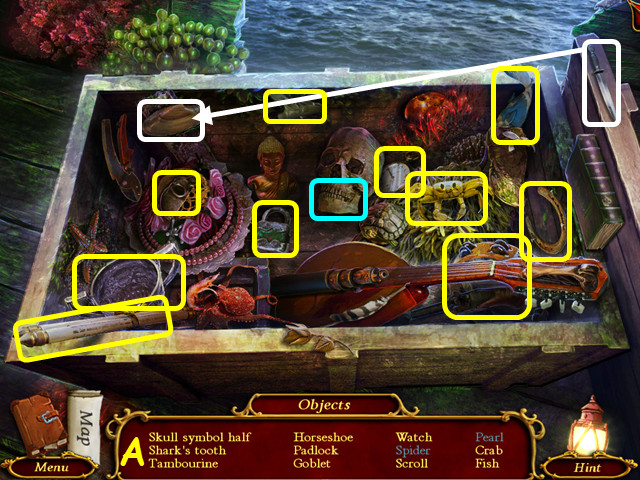
- Play the HOP to earn the 1/2 SKULL SYMBOL (A).
- Walk down twice.

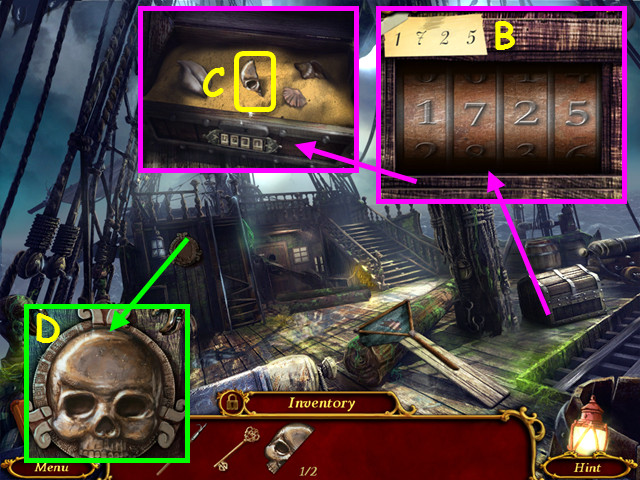
- Enter the code 1725 (B).
- Open the chest and take the 2/2 SKULL SYMBOL (C).
- Place the 2/2 SKULL SYMBOL in the indentation (D).

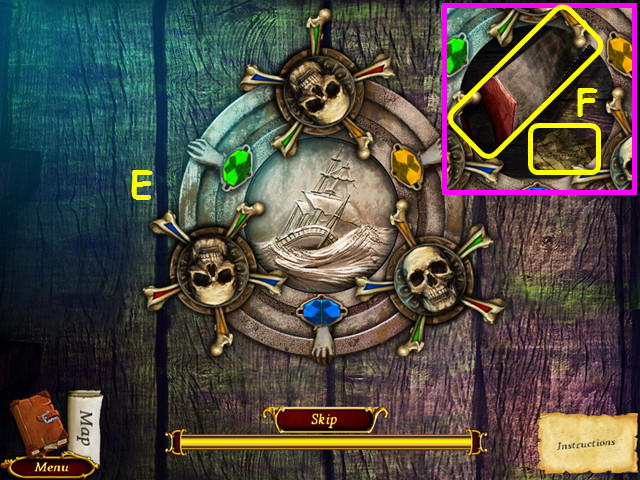
- Rotate the skulls to the 3 gems are a solid color (E).
- Take the SAW and 1/4 MAP PIECE (F).
- Walk forward.

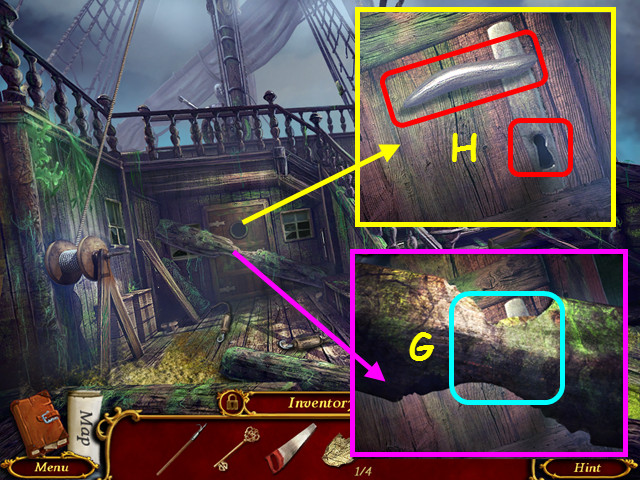
- Use the SAW to cut the beam (G).
- Turn the KEY in the lock and turn the handle (H).
- Walk forward.
Chapter 3: Below Deck

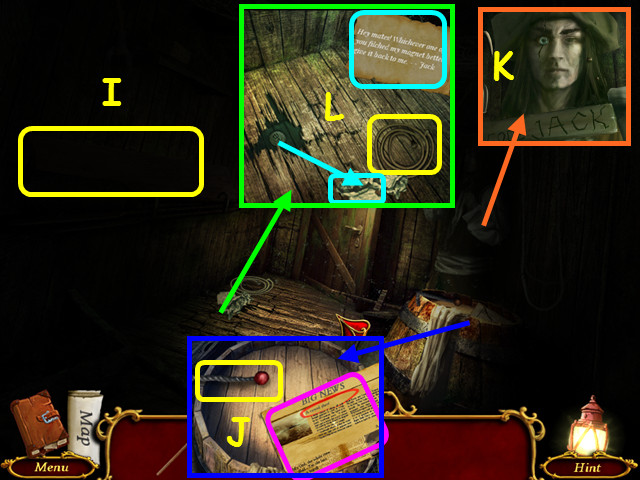
- Take the PLANK (I).
- Look at the newspaper and take the LEVER (J).
- Note the code JACK (K).
- Move the rag, take the STRING, and read the note (L).
- Walk forward.

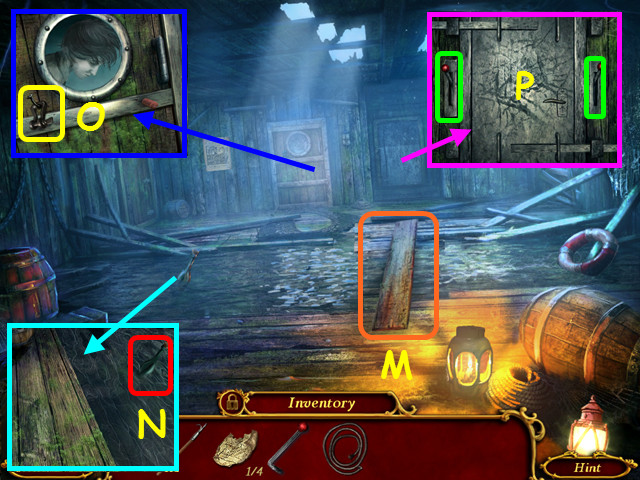
- Place the PLANK across the water (M).
- Use the BOATHOOK to retrieve the bottle (N).
- Take the 1/2 SHACKLE (O).
- Place the LEVER on the left, and then pull both levers down (P).
- Turn the handle and walk forward.

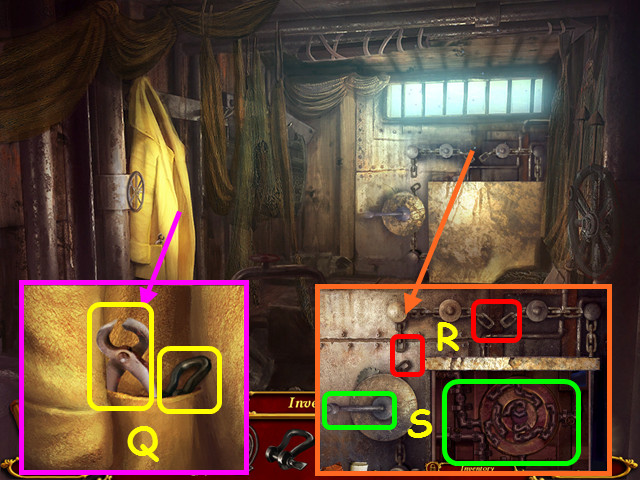
- Take the 2/2 SHACKLES and the PLIERS (Q).
- Use the 2 SHACKLES on the breaks in the chain (R).
- Turn the handle and look inside (S).

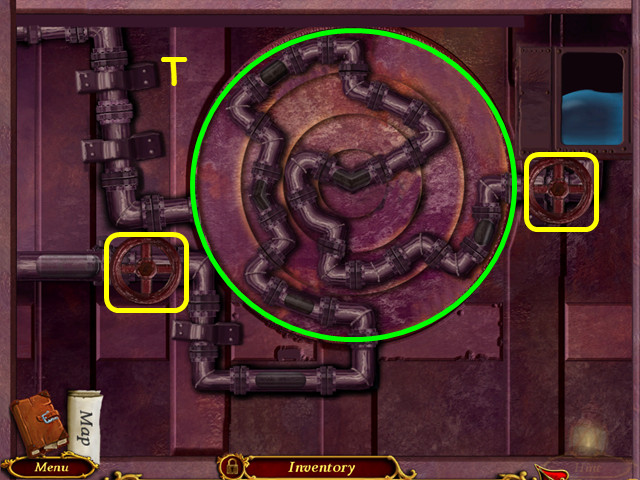
- Rotate the rings to connect the 2 valves (yellow).
- Drag the rings to rotate them into position (T).
- Turn both valves.
- Walk down.

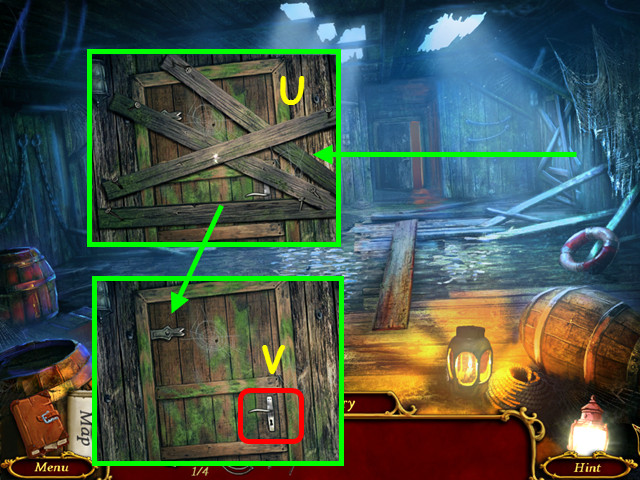
- Use the PLIERS to remove the boards (U).
- Turn the handle and walk to the right (V).

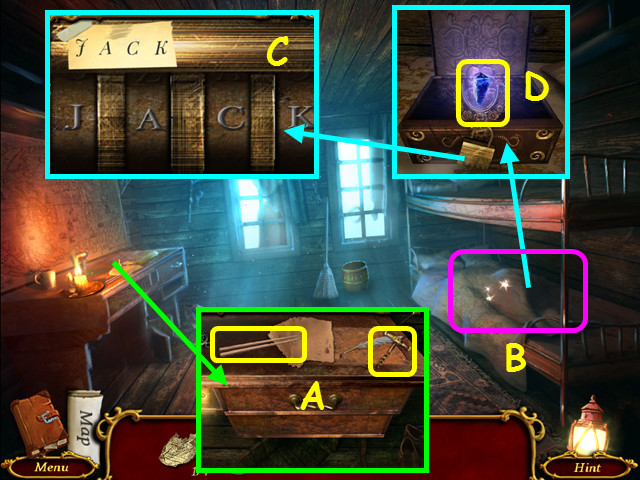
- Take the CHOPSTICKS and the CORKSCREW (A).
- Remove the blanket (B).
- Enter the code JACK (C).
- Take the CRYSTAL (D).
- Walk down.

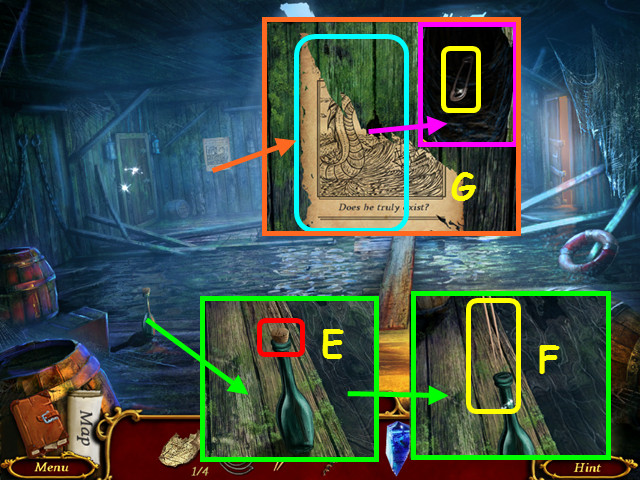
- Use the CORKSCREW to remove the cork (E).
- Use the CHOPSTICKS in the bottle to get the HOUR HAND (F).
- Remove the poster and use the CHOPSTICKS to take the SAFETY PIN (G).
- Walk to the right.

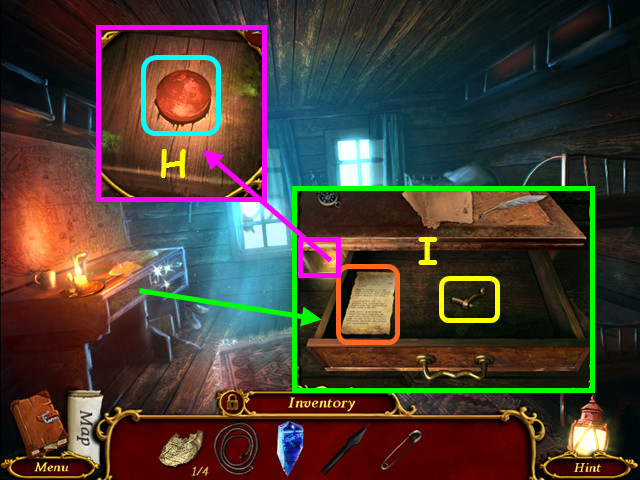
- Use the SAFETY PIN to raise the BUTTON, and then press it (H).
- Read the entry and take the DOOR HANDLE (I).
- Walk down.

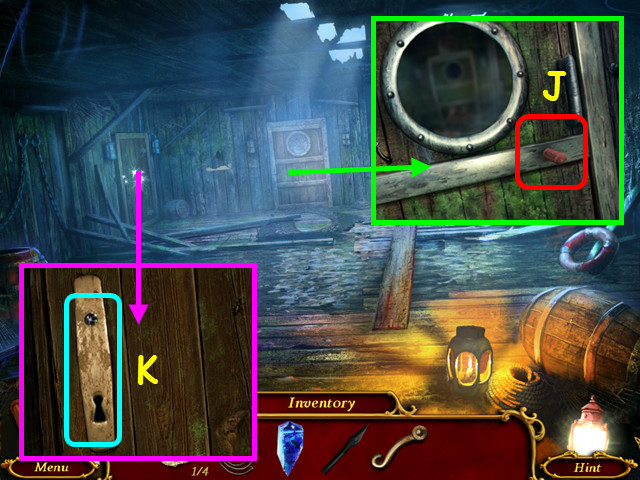
- Note the location for a handle wheel (J).
- Place the DOOR HANDLE on the door and pull it down (K).
- Select the room.

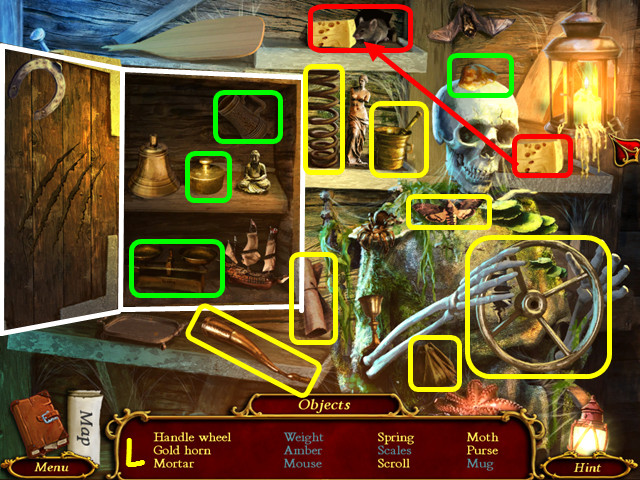
- Play the HOP to earn the HANDLE WHEEL (L).
- Place the HANDLE WHEEL on the door, turn it, and enter the Corridor.
Chapter 4: Deeper into the Ship

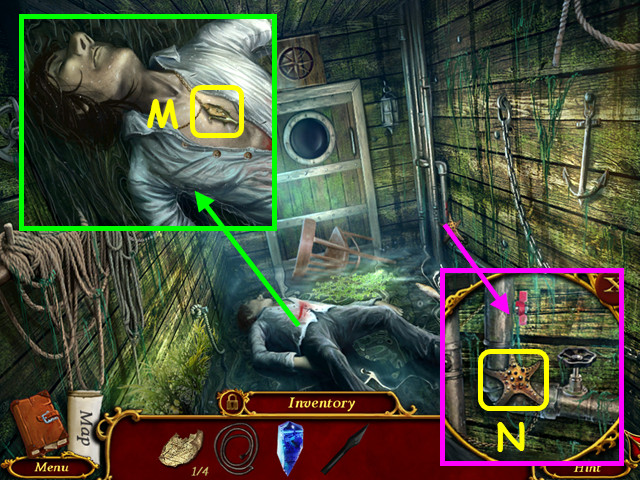
- Take the FISH FIGURE (M).
- Take the ORANGE STARFISH (N).
- Walk forward.

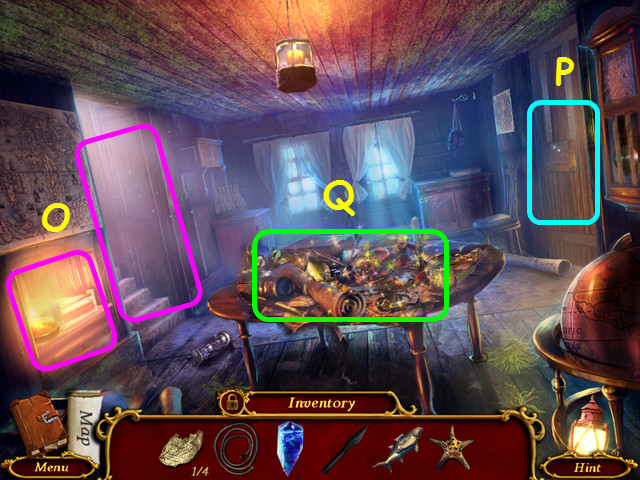
- Note the planets mini-game and the Hallway to the Captain’s Room (O).
- Note the mini-game on the right door (P).
- Select the table (Q).

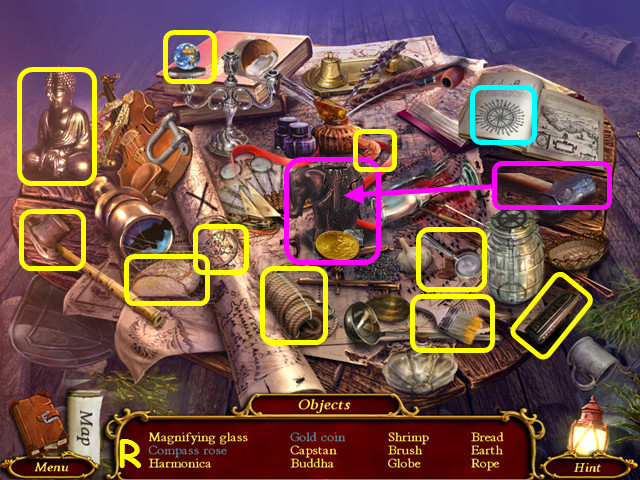
- Play the HOP to earn the 1/3 PLANET (R).
- Look at the right door.

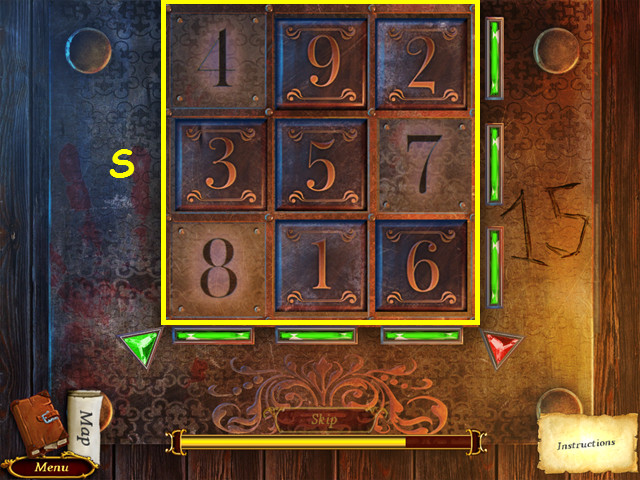
- Swap the tiles so they add to 15 vertically and horizontally (S).
- Note the 4, 7, and 8 tiles do not move.
- Pull the handle that appears, and then walk to the right.

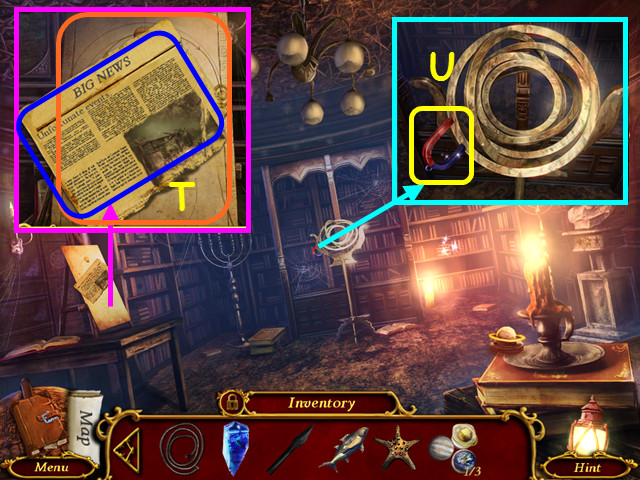
- Read the newspaper and note the positions of the planets (T).
- Use the STRING on the magnet to get the MAGNET AND ROPE (U).

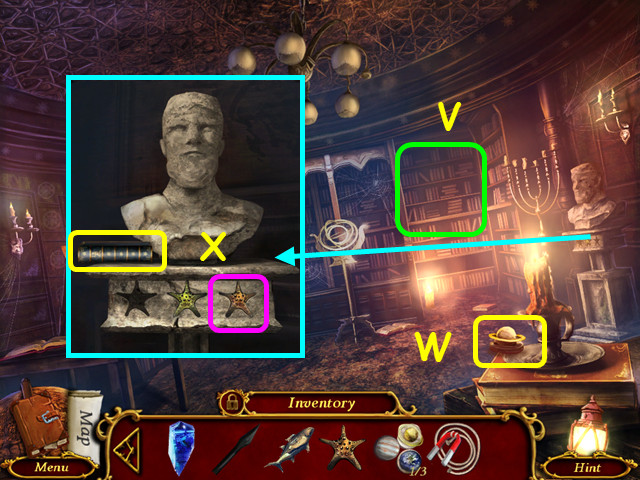
- Note the mini-game on the bookcase (V).
- Take the 2/3 PLANET (W).
- Take the 1/3 BOOKS and place the ORANGE STARFISH on the base of the bust (X).
- Walk down and left.

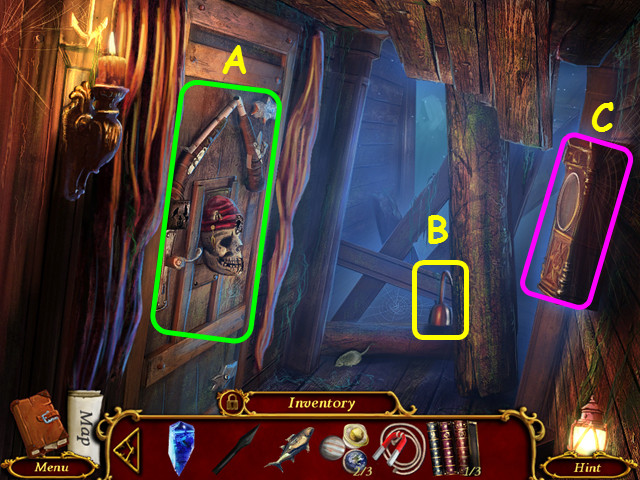
- Note the Captain’s door (A).
- Take the PIRATE’S HOOK (B).
- Note the clock on the right (C).
- Walk down 4 times.

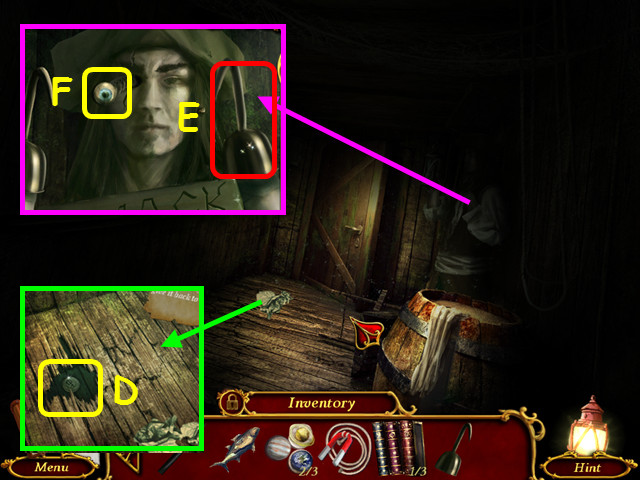
- Use the MAGNET AND ROPE to take the NEPTUNE SYMBOL (D).
- Place the PIRATE’S HOOK on the right (E).
- Take the 1/2 EYE (F).
- Walk down and go up the stairs.

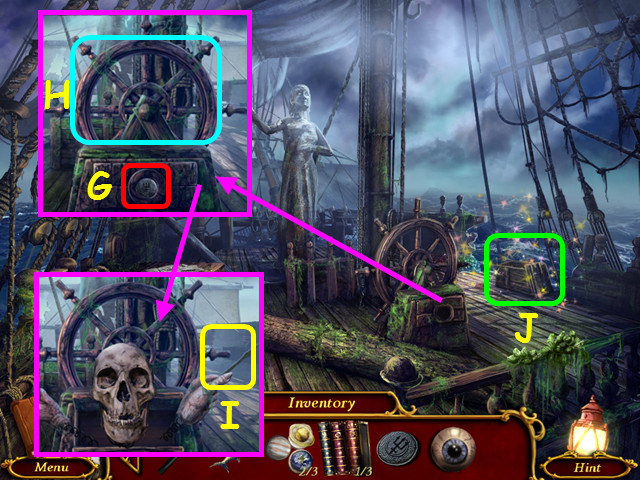
- Place the NEPTUNE SYMBOL in the circle (G).
- Spin the wheel (H).
- Take the MINUTE HAND (I).
- Select the chest (J).

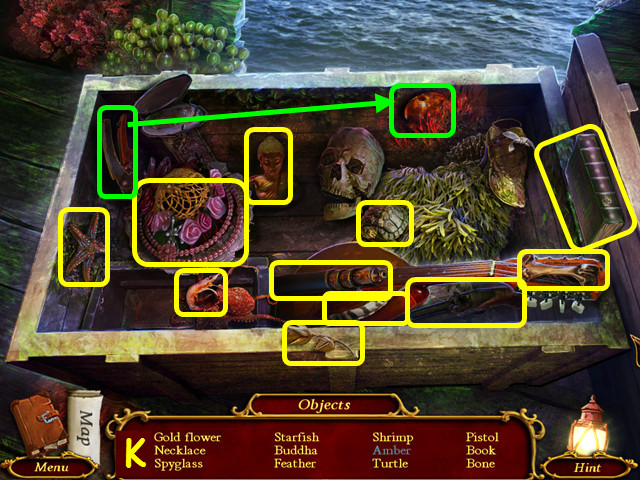
- Play the HOP to earn the 2/3 BOOK (K).
- Return to the Hallway to the Captain’s Room.
- Select the clock on the right.

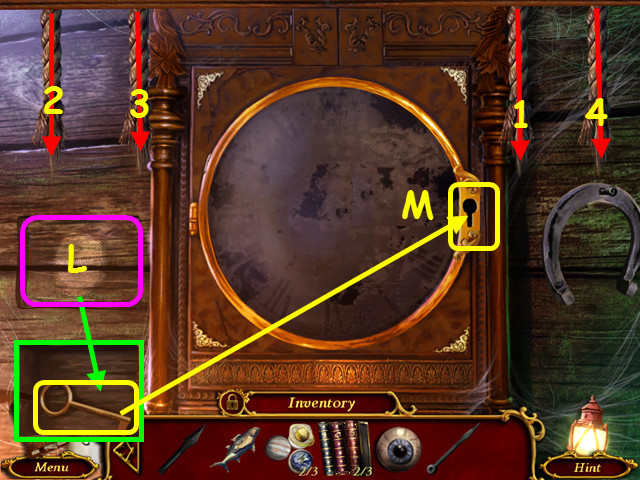

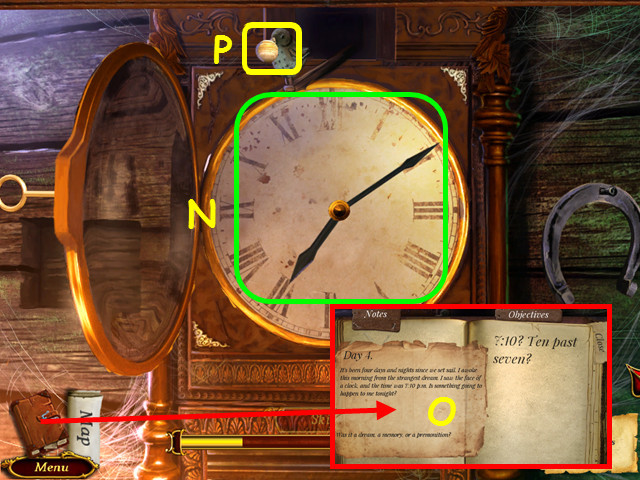
- Press the wooden button (L).
- Find the order to pull all the ropes down (1-4).
- Take the KEY and use it in the lock (M).
- Place the HOUR HAND and the MINUTE HAND on the face and set the clock to 7:10 (N).
- Refer to your journal for the time (O).
- Take the 3/3 PLANET (P).
- Walk down and select the planets mini-game on the left.

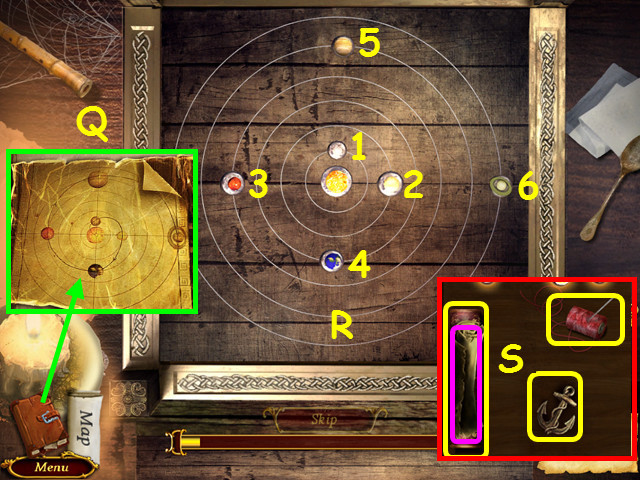
- Place the 3 PLANETS on the board.
- Refer to your journal for the planets diagram (Q).
- Move the planets to match the diagram (R).
- Moving some planets may move others.
- Move the planets into position in numerical order (1-6).
- Read the diary page, take the ANCHOR FIGURINE, NEEDLE AND THREAD, and the 3/3 BOOKS (S).
- Walk right and select the bookcase on the right.

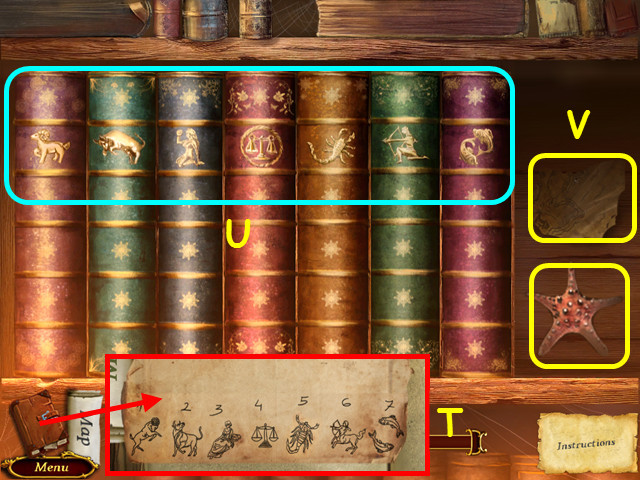
- Place the 3 BOOKS on the shelf.
- Refer to your journal for the order of the books (T).
- Select 2 books to swap positions and place them in the correct order (U).
- Take the 2/4 MAP PIECES and the RED STARFISH (V).

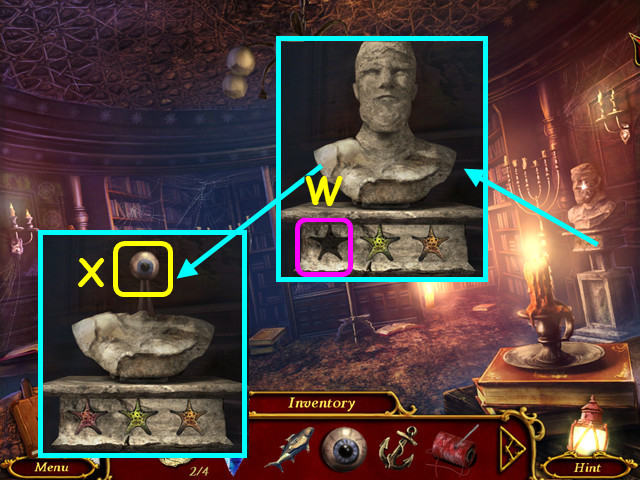
- Place the RED STARFISH in the base (W).
- Take the 2/2 EYE (X).
- Walk down 6 times.

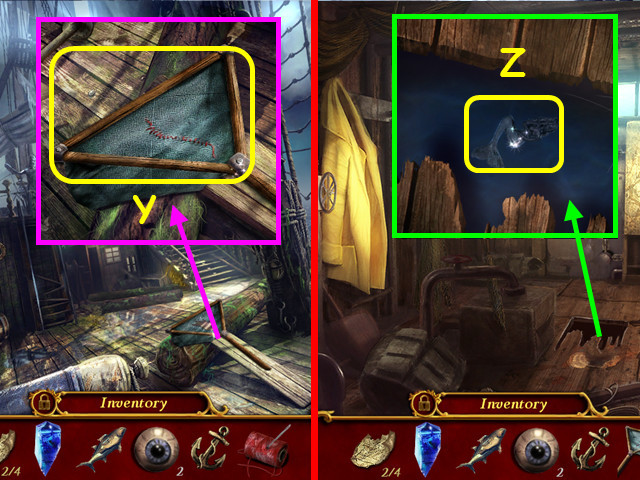
- Use the NEEDLE AND THREAD to repair and take the FISHING NET (Y).
- Go forward 3 times and enter the Utility room.
- Use the FISHING NET to take the MERMAID FIGURE (Z).
- Go to the Captain’s door.
Chapter 5: The Captain’s Cabin

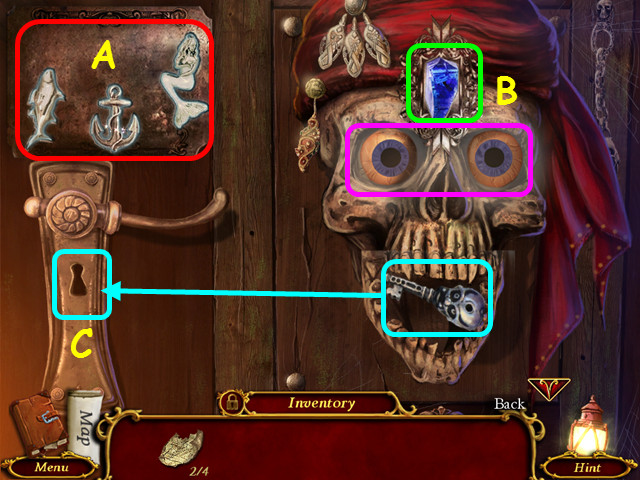
- Place the FISH FIGURE, ANCHOR FIGURE, and MERMAID FIGURE on the left (A).
- Place the CRYSTAL in the center of the skull and the 2 EYES in the sockets (B).
- Take the key and use it in the lock; pull down the handle (C).
- Enter the cabin.

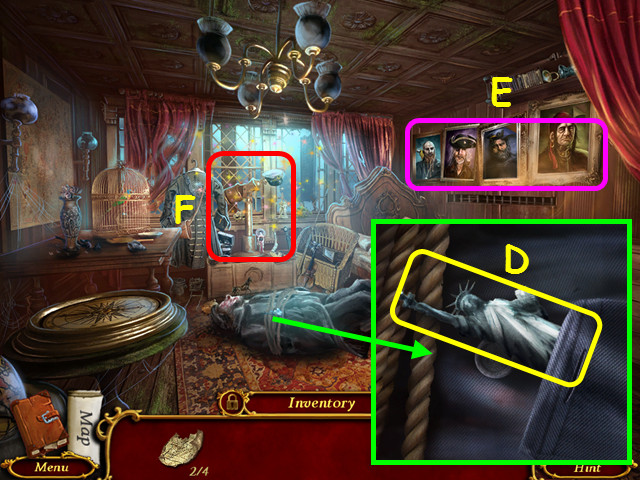
- Take the 1/2 STATUE (D).
- Note the portraits on the wall (E).
- Select the telescope (F).

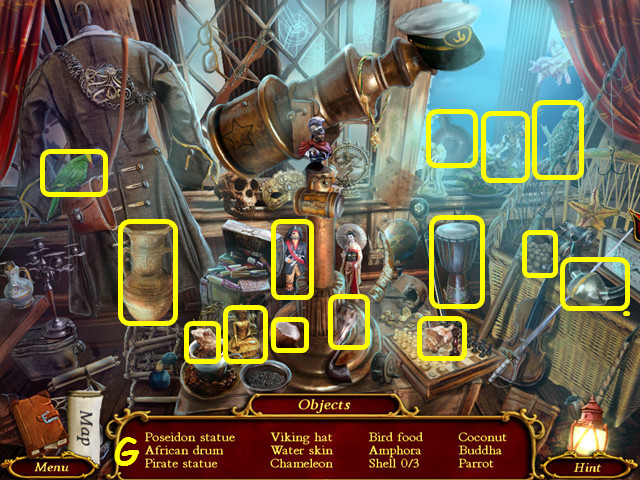
- Play the HOP (G).
- You will earn the BIRD FOOD.

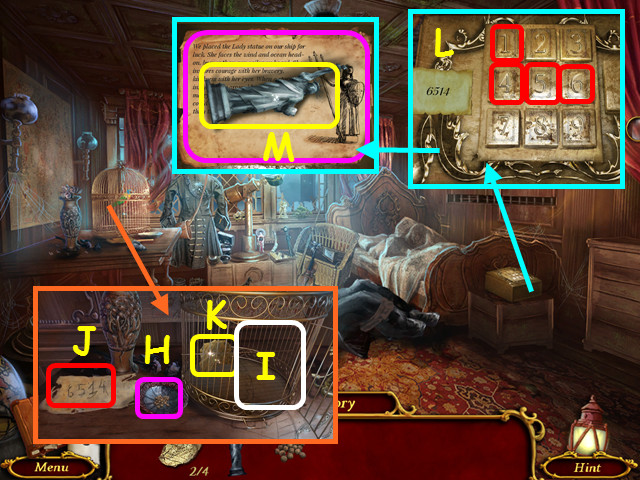
- Place the BIRD FOOD in the bowl (H).
- Open the cage (I).
- Note the code 6514 (J) and take the 3/4 MAP SCRAP (K).
- Enter the code (L).
- Take the 2/2 STATUE and read the page (M).
- Select the portraits.

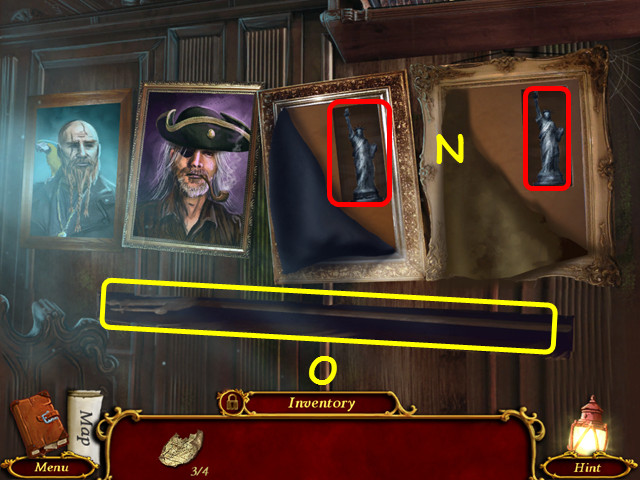
- Tear the 2 right canvases open and place the 2 STATUES in the openings (N).
- Take the TRIDENT (O).
- Walk down twice and select the table.

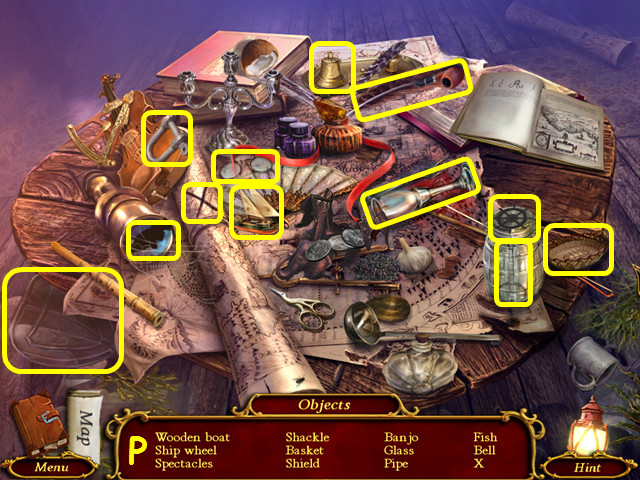
- Play the HOP to earn the SHIELD (P).
- Walk down 4 times and go up the stairs.

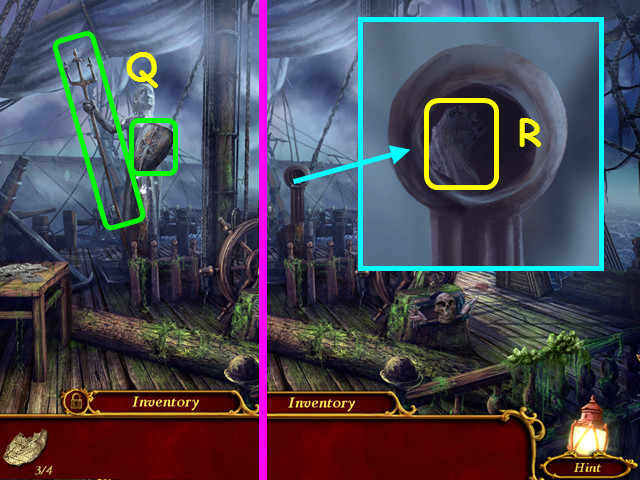
- Place the TRIDENT and the SHIELD on the statue (Q).
- Take the 4/4 MAP PIECE (R).
- Walk down 3 times and select the bench.

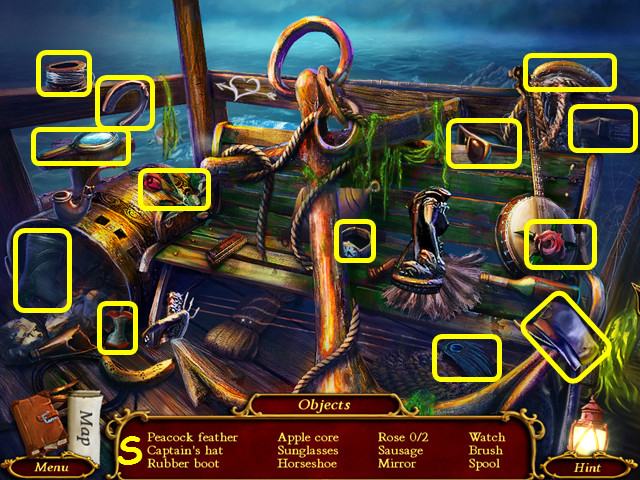
- Play the HOP to earn the SAUSAGE (S).
- Walk down twice and select the table.

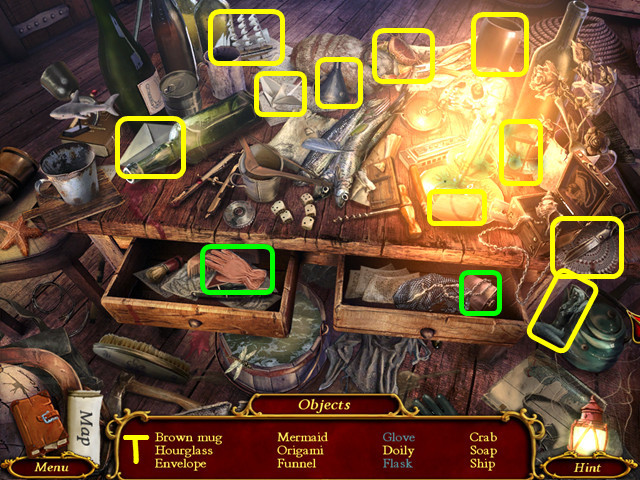
- Play the HOP to earn the GLOVE (T).
- Select the map board on the back wall.

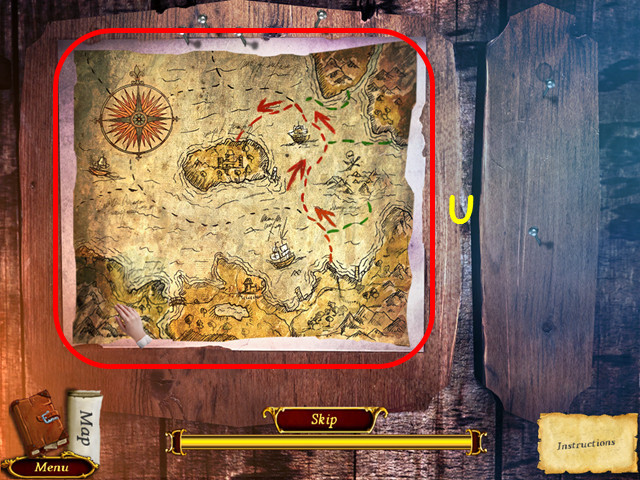
- Place the 4 MAP PIECES on the board.
- Restore the map by dragging the pieces into position (U).
- Select a piece to rotate it in place.
- Take the MAP and walk to the left.
Chapter 6: Finding a Ship

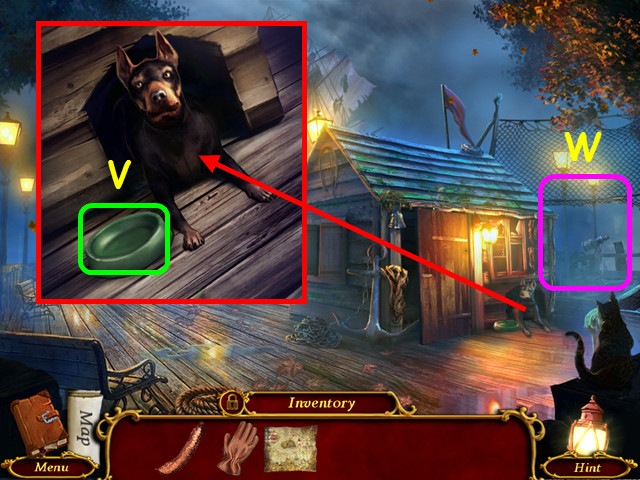
- Place the SAUSAGE in the bowl (V).
- Walk to the right (W).

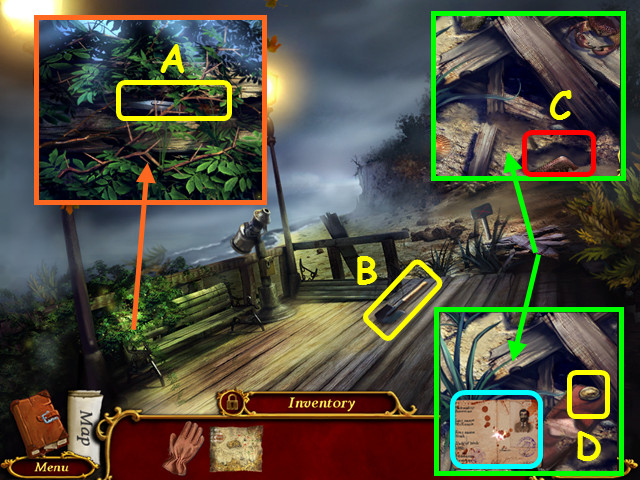
- Use the GLOVE to take the KNIFE (A).
- Take the SHOVEL (B).
- Use the SHOVEL on the X (C).
- Read the ID and take the COIN (D).
- Walk down.

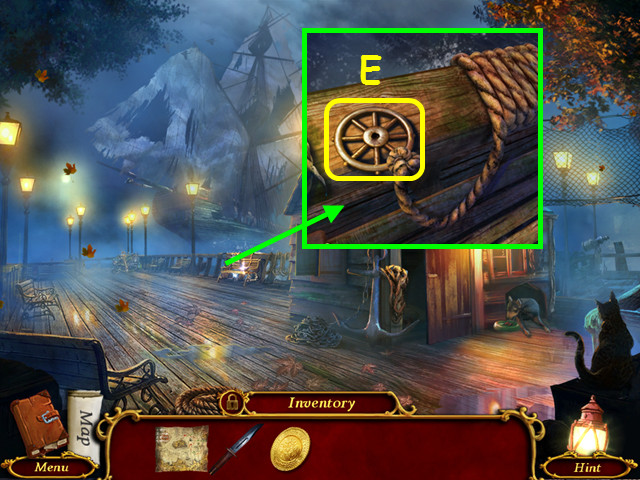
- Use the KNIFE to cut the rope, and then take the KNOB (E).
- Walk to the right.

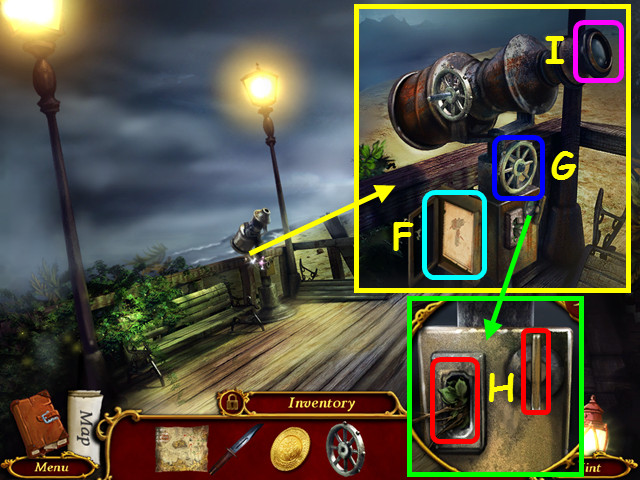
- Open the case and read the instructions (F).
- Place the KNOB on the post (G).
- Remove the debris from the slot, insert the COIN, and turn the knob (H).
- Look in the lens (I).

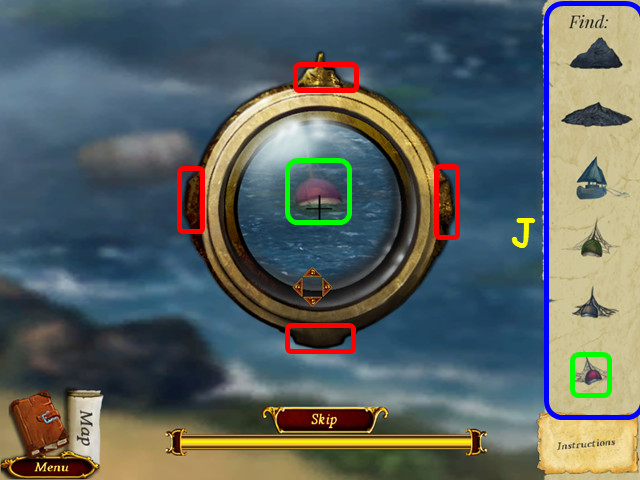
- Tap the top, bottom, left, and right edges of the lens to move it (red).
- Find the items in the lens to play the HOP (J).
- Walk forward.

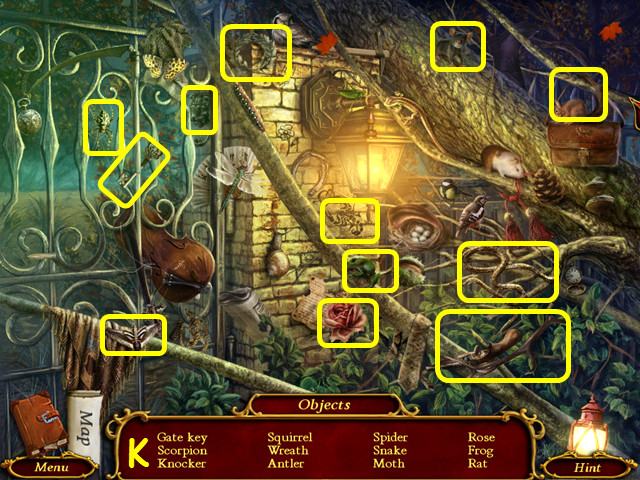
- Select the debris on the right.
- Play the HOP to earn the GATE KEY (K).
- Use the GATE KEY on the gate lock and turn the handle.
- Walk forward.

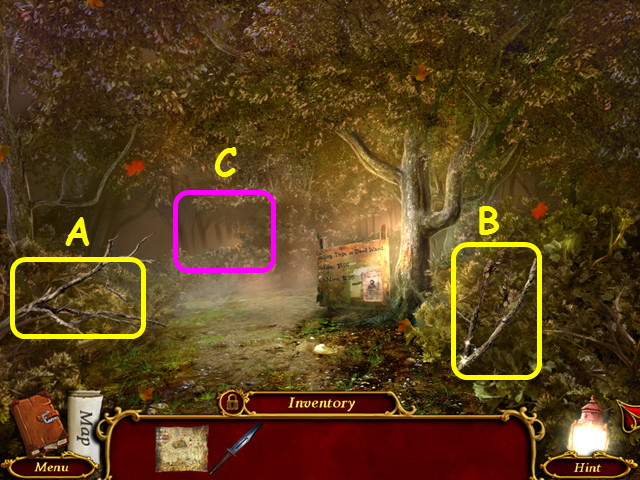
- Take the 1/3 (A) and 2/3 BRANCHES (B).
- Walk forward (C).

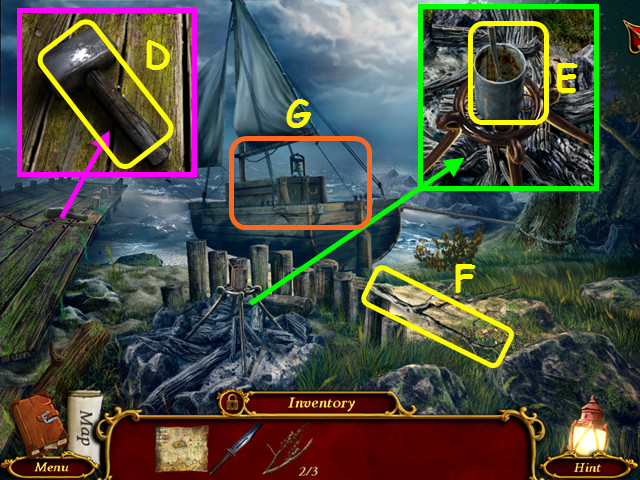
- Take the HAMMER (D).
- Take the CAN WITH SPOON (E).
- Take the 3/3 BRANCH (F).
- Note the ship (G).
- Walk down.

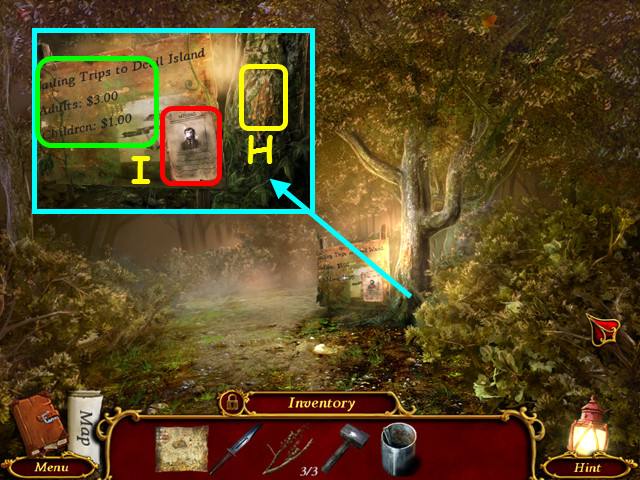
- Use the CAN WITH SPOON on the tree to get the CAN OF RESIN (H).
- Read the missing poster and sign (I).
- Walk forward and get on the ship.

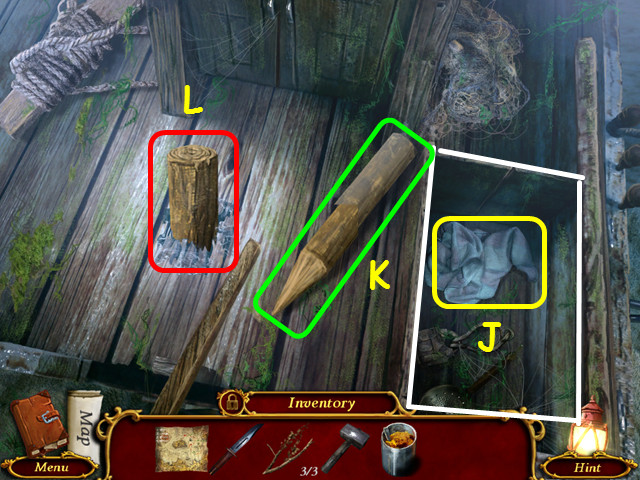
- Open the box and take the WET RAG (J).
- Use the KNIFE 4 times on the pole (K) and place it in the hole (L).
- Use the HAMMER on the pole.
- Exit the close-up and walk down twice.

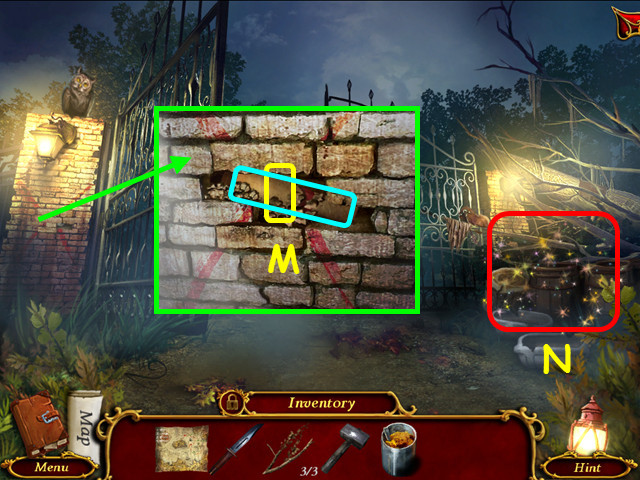
- Use the HAMMER on the bricks; read the newspaper and take the MATCHES (M).
- Select the debris on the right (N).

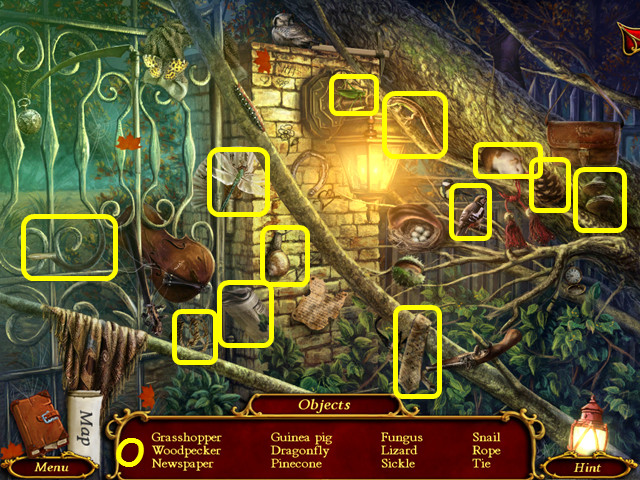
- Play the HOP to earn the NEWSPAPER (O).
- Walk forward twice.

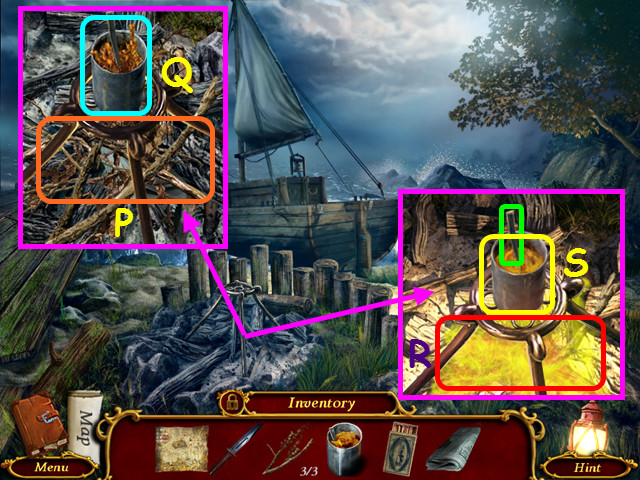
- Place the NEWSPAPER and the 3 BRANCHES in the campfire (P).
- Place the CAN OF RESIN on the stand (Q).
- Use the MATCHES to light the fire (R).
- Select the spoon to stir the resin, and then use the WET RAG to take the HOT RESIN (S).

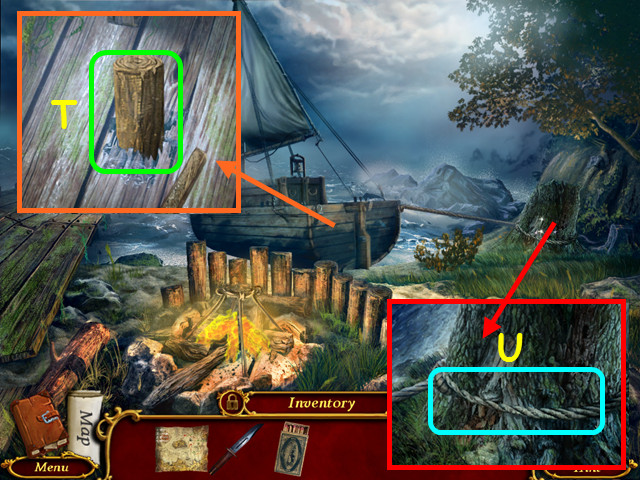
- Pour the HOT RESIN on the pole (T).
- Use the KNIFE to cut the rope (U).
- Go forward.
Chapter 7: Devil’s Island

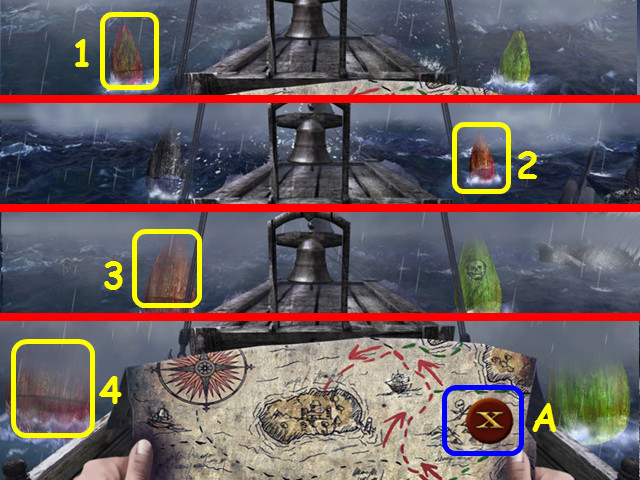
- Select all the red route buoys (1-4).
- You do not need to keep the map open (A).

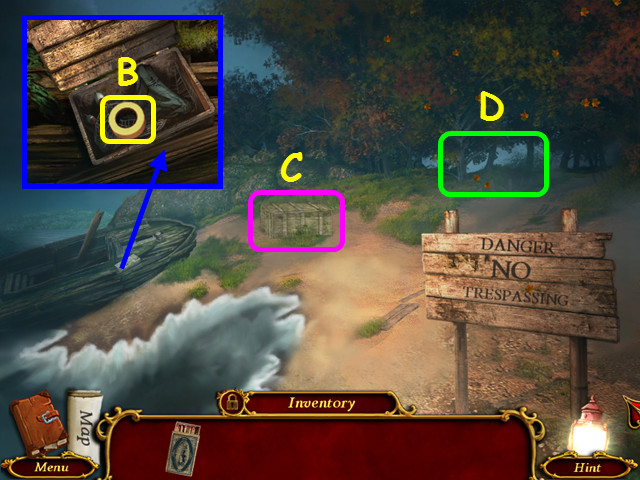
- Open the box and take the TAPE (B).
- Note the crate of coal (C).
- Walk to the bridge (D).

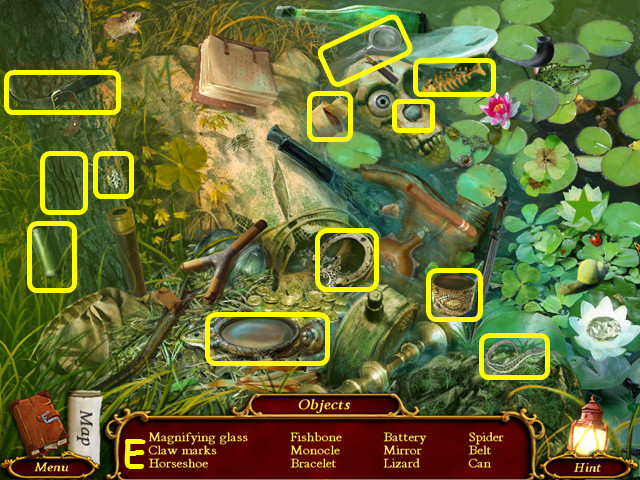
- Select the debris on the right.
- Play the HOP to earn the BATTERY (E).
- Walk forward.

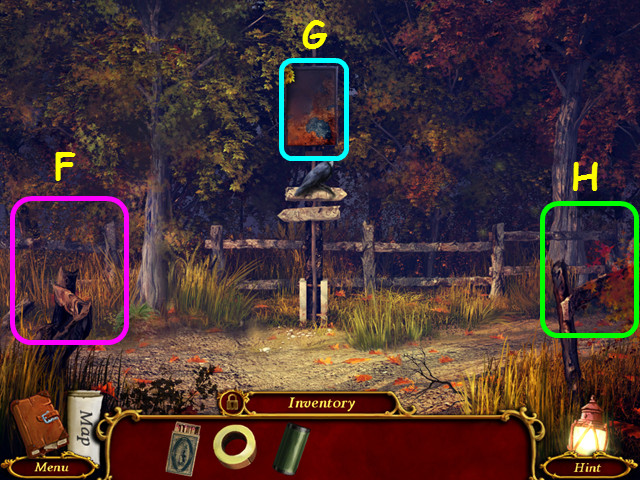
- Note the path to the Mansion (F).
- Note the circuit box mini-game (G).
- Walk right to the Stables (H).

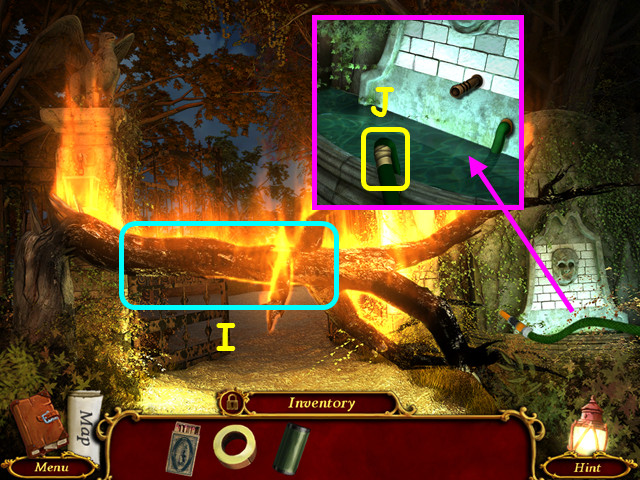
- Note the fire (I).
- Use the TAPE on the hose (J).
- Walk down and go left.

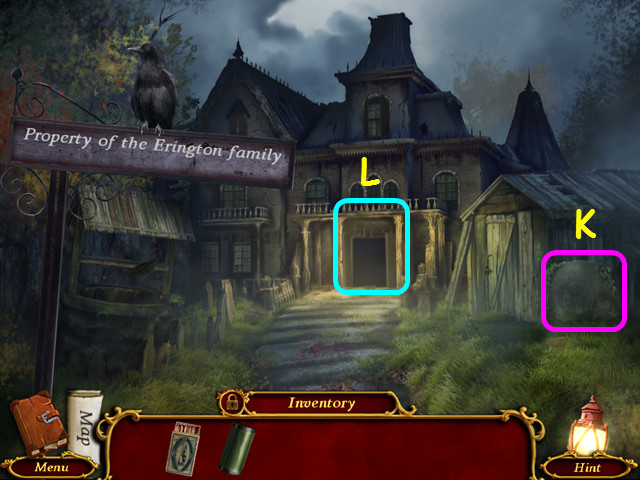
- Note the tombstone mini-game (K).
- Enter the Foyer (L).

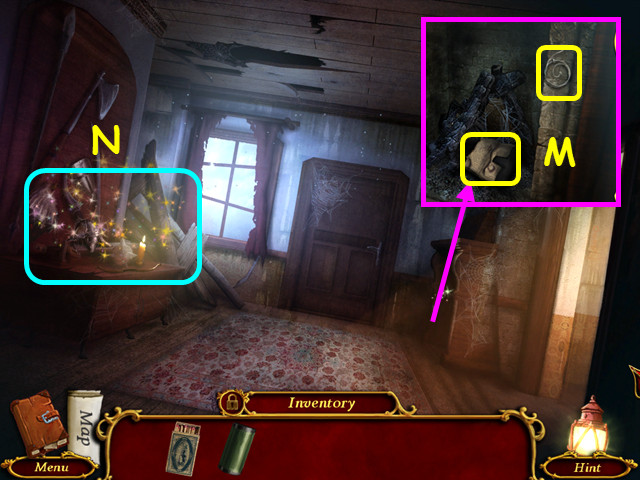
- Read the notebook and take the HARP STRING (M).
- Select the weaponry on the left (N).

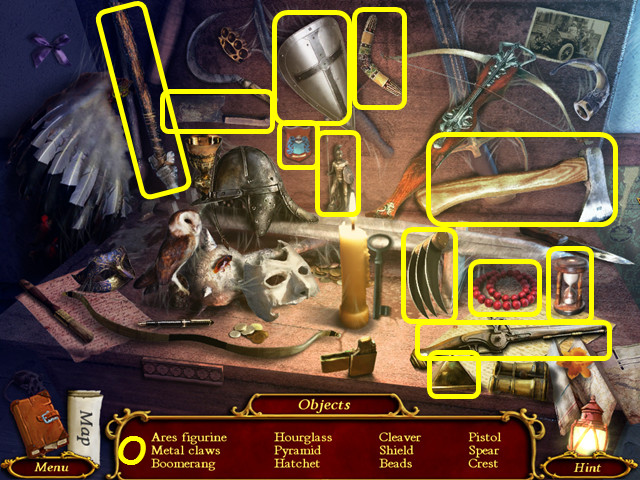
- Play the HOP to earn the HATCHET (O).
- Walk to the right.

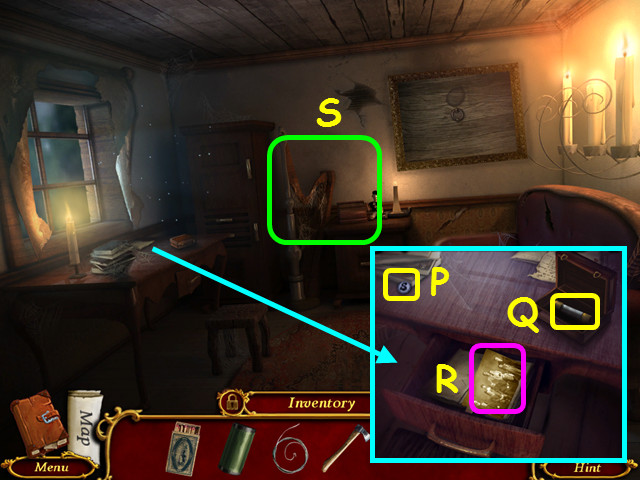
- Take the 1/2 KEY (P).
- Open the box and take the FUSE (Q).
- Open the drawer; open the book and look at the photograph (R).
- Note the harp (S).
- Walk down 3 times and select the circuit box mini-game.

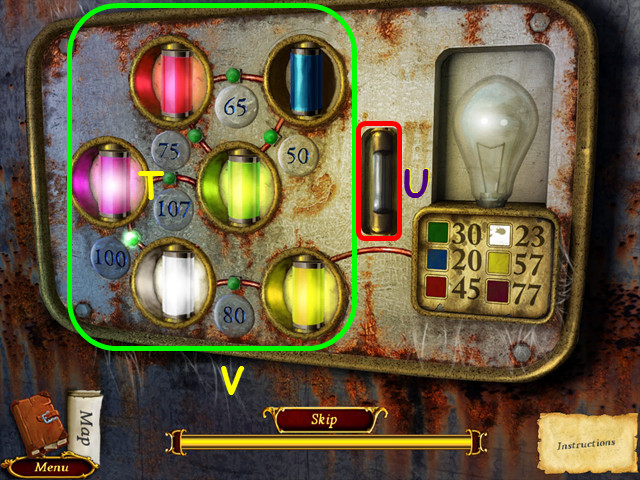
- Open the cover and look inside.
- Place the battery in the left opening (T) and the FUSE in the right opening (U).
- Swap the batteries so the power of two batteries equals the circuit (V).
- Walk to the left.

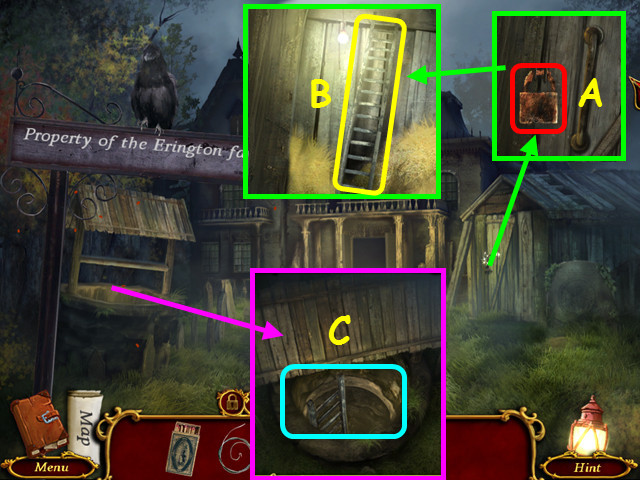
- Use the HATCHET on the lock (A).
- Open the door and take the LADDER (B).
- Place the LADDER in the well and climb down (C).
Chapter 8: Underground

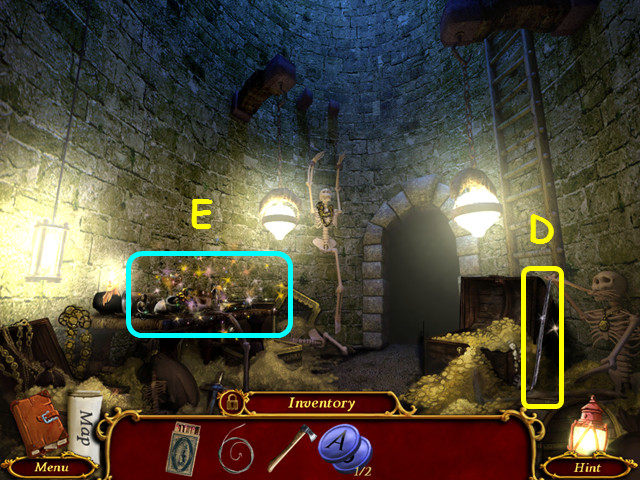
- Take the METAL ROD (D).
- Select the table (E).

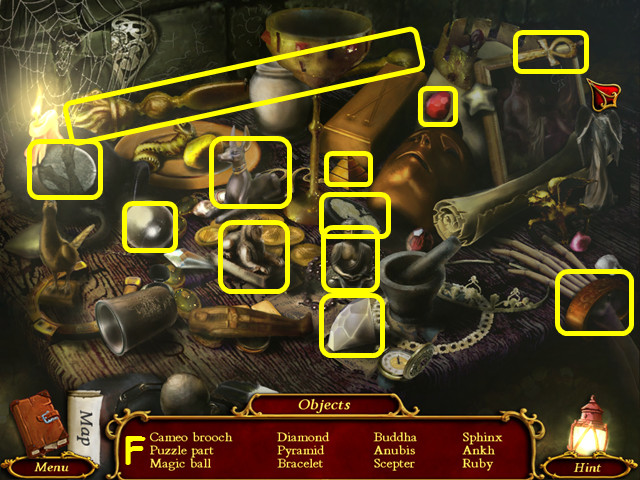
- Play the HOP to earn the 1/2 PUZZLE PART (F).
- Walk forward.

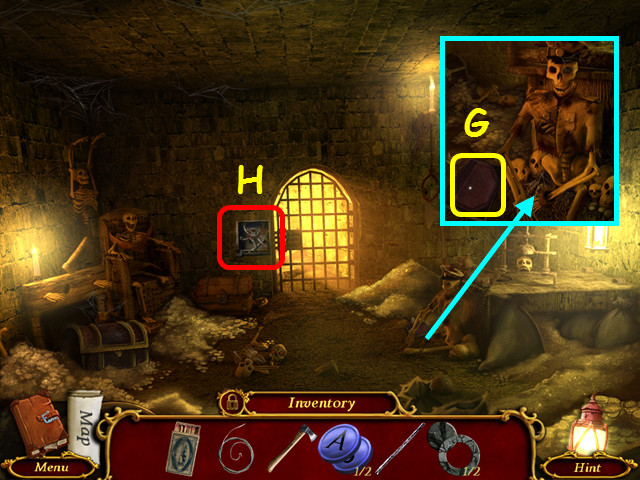
- Read the journal (G).
- Select the lock (H).

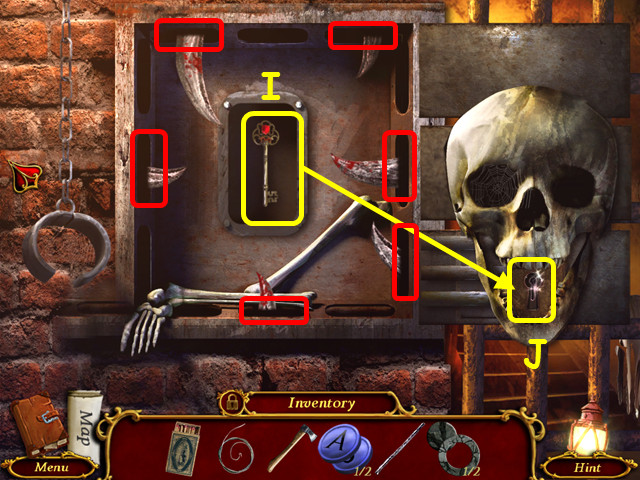
- Drag the blades back into the recesses (red).
- Take the KEY (I) and use it in the lock (J).
- Walk forward.

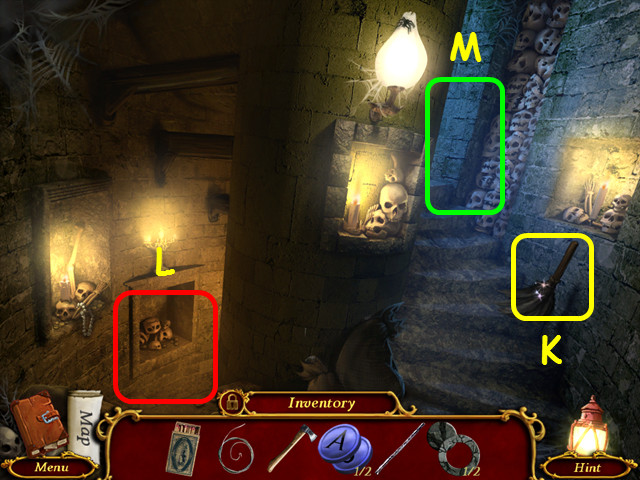
- Take the BRUSH (K).
- Note the path back to the dungeon (L).
- Walk up to the Girl’s Room (M).

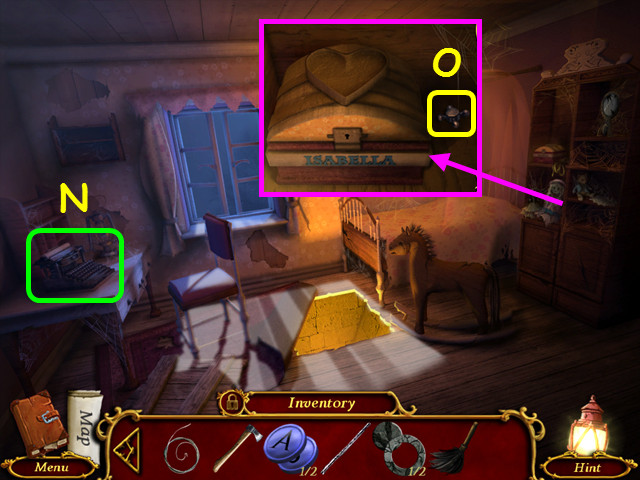
- Note the typewriter mini-game (N).
- Take the KNOB (O).
- Enter the hole in the floor and go forward on the left to the dungeon.
- Walk down, go up the ladder, walk down, and right.

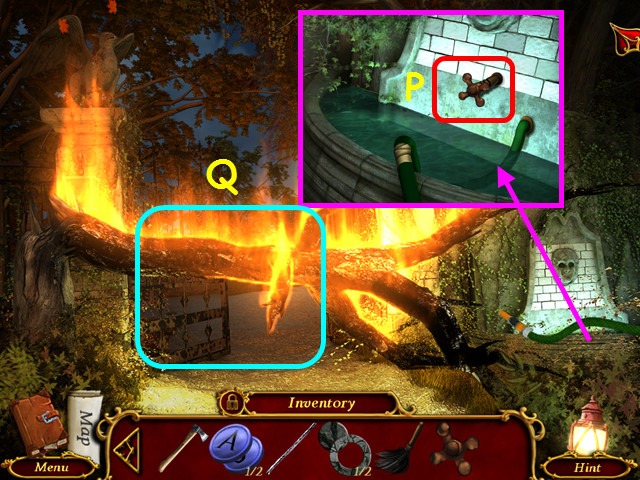
- Place the KNOB on the pipe and turn it on (P).
- Walk forward (Q).

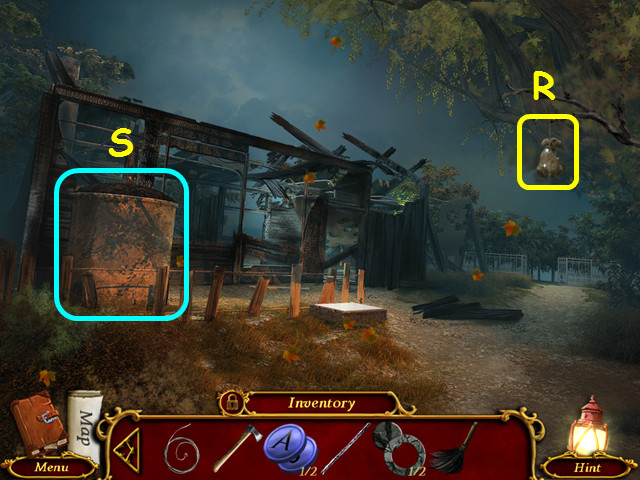
- Take the SACK (R).
- Note the furnace area (S).
- Walk down 3 times.

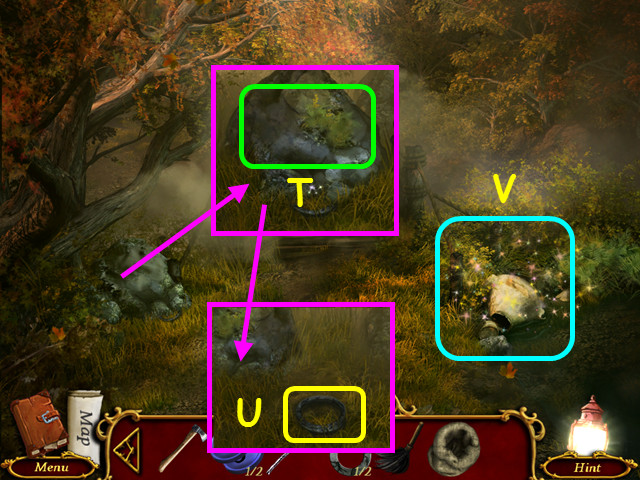
- Use the METAL ROD to lift the rock (T).
- Take the 2/2 PUZZLE PARTS (U).
- Select the debris on the right (V).

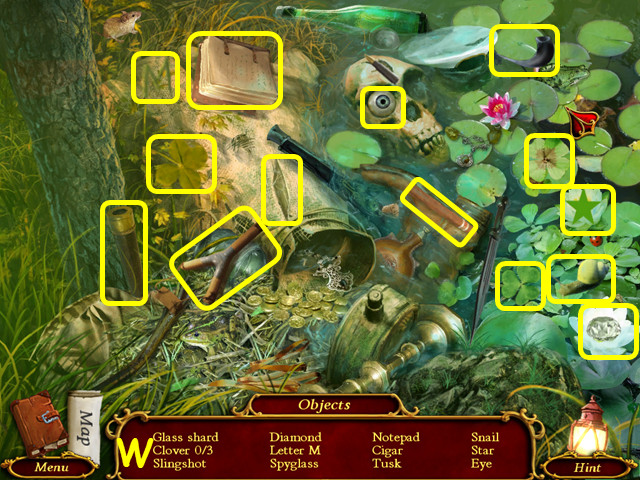
- Play the HOP to earn the TUSK (W).
- Walk down.

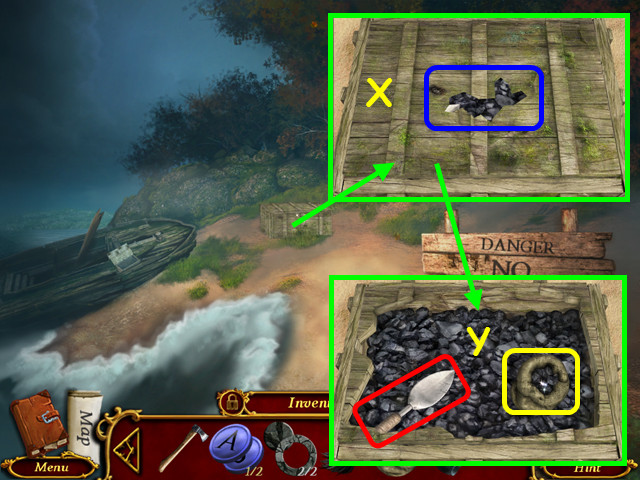
- Use the HATCHET on the crate (X).
- Place the SACK on the coal and use the scoop to fill it up (Y).
- Take the COAL.
- Walk forward twice, go left, and select the tombstone mini-game.

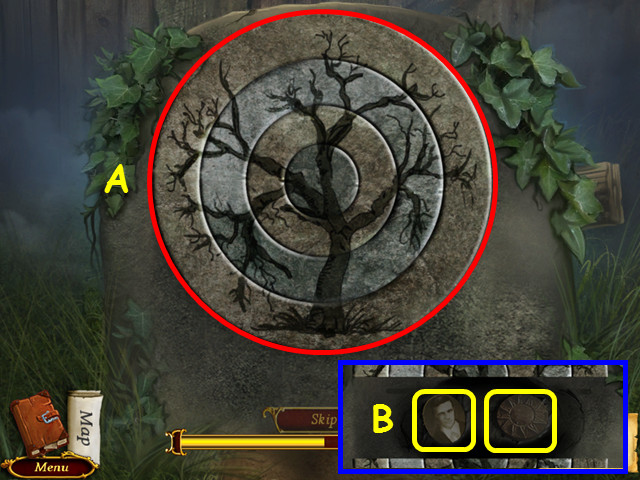
- Place the 2 PUZZLE PARTS in the rings.
- Restore the image of the tree by rotating the rings (A).
- Start with the outer ring and work towards the center.
- Take the 1/3 PHOTOGRAPH and the SUN RELIEF (B).
- Walk forward.

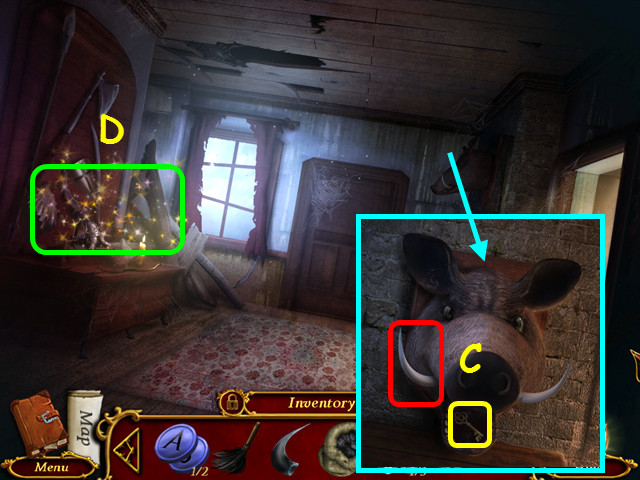
- Place the TUSK on the boar and take the SMALL KEY (C).
- Select the weaponry on the left (D).

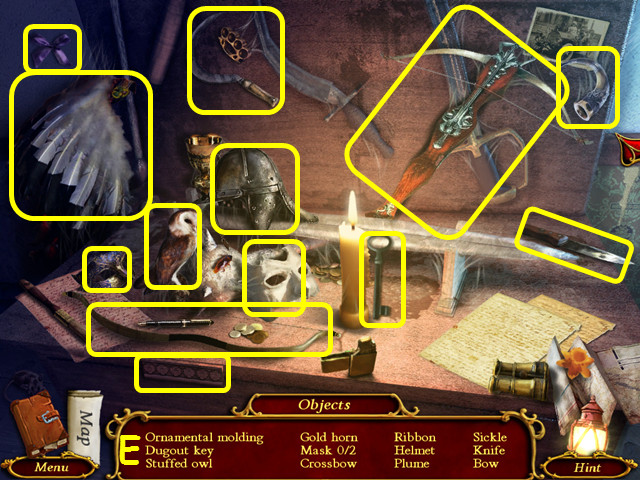
- Play the HOP to earn the DUGOUT KEY (E).
- Walk down and enter the well.
- Select the table on the left.

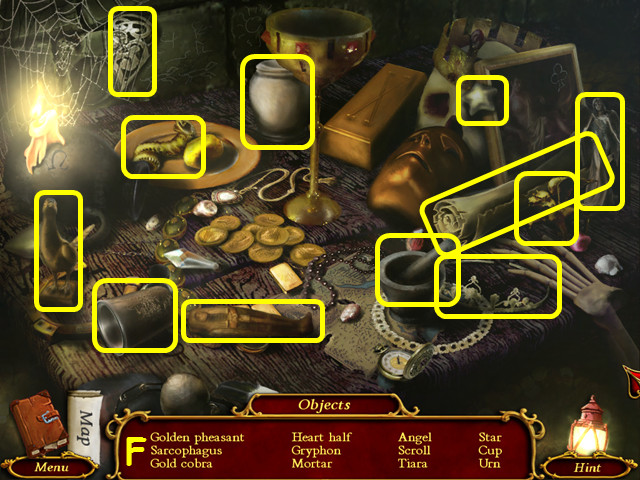
- Play the HOP to earn the 1/2 HEART HALF (F).
- Walk forward.

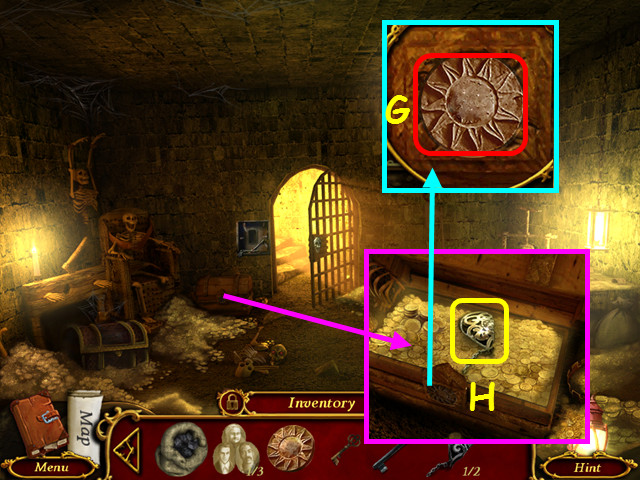
- Place the SUN RELIEF in the lock and push (G).
- Take the 2/2 HEART HALF (H).
- Walk forward and go up the stairs.

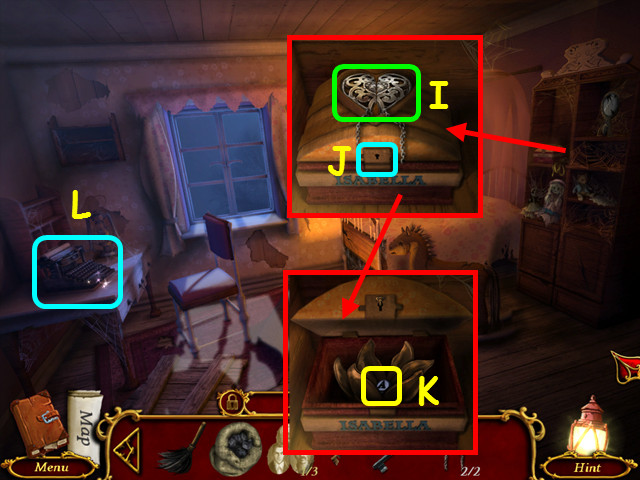
- Place the 2 HEART HALVES in the indentation (I).
- Use the SMALL KEY in the lock (J).
- Take the 2/2 KEYS (K).
- Select the typewriter (L).

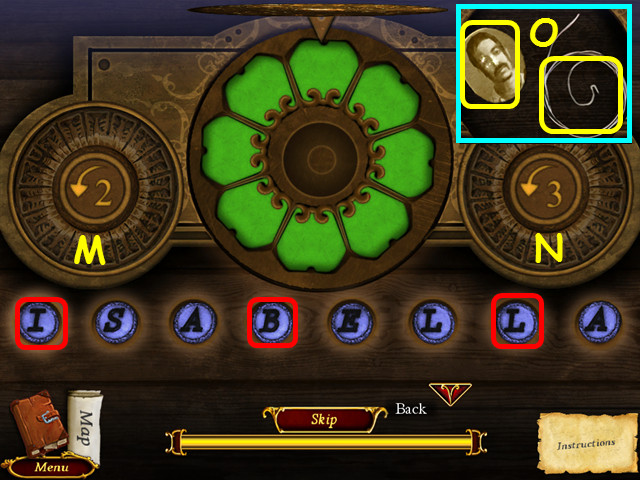
- Place the 2 KEYS on the board.
- Press all the blue keys down by selecting the 3 circled keys (red).
- Use the 2 buttons to change all the petals to green.
- Press the buttons in this order: Mx4, Nx3, Mx1, Nx3, M, and N.
- Take the 2/3 PHOTOGRAPHS and the 2/2 HARP WIRE (O).
- Go down 3 times, up the ladder, down, right, and forward.

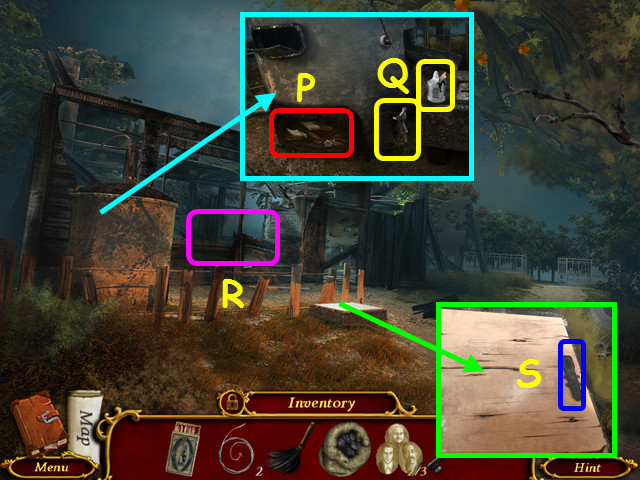
- Place the COAL in the furnace, and then use the MATCHES (P).
- Take the DANCER STATUE and the GREASE (Q).
- Note the leaves (R).
- Use the DUGOUT KEY on the lock (S).

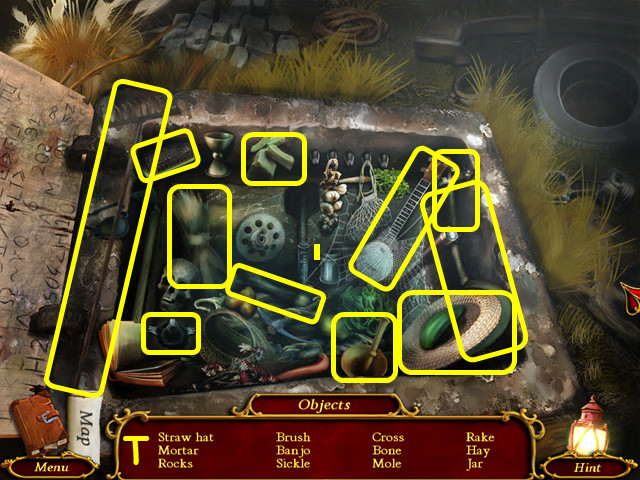
- Play the HOP to earn the RAKE (T).
- Look at the leaves.

- Use the RAKE on the leaves (U).
- Take the MEDALLION (V).
- Walk down twice, go left, forward, and right.

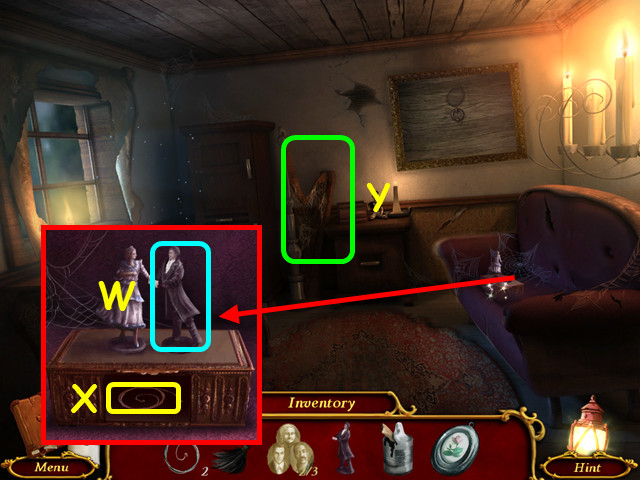
- Place the DANCER STATUE on the music box (W).
- Take the 3/3 HARP STRING (X).
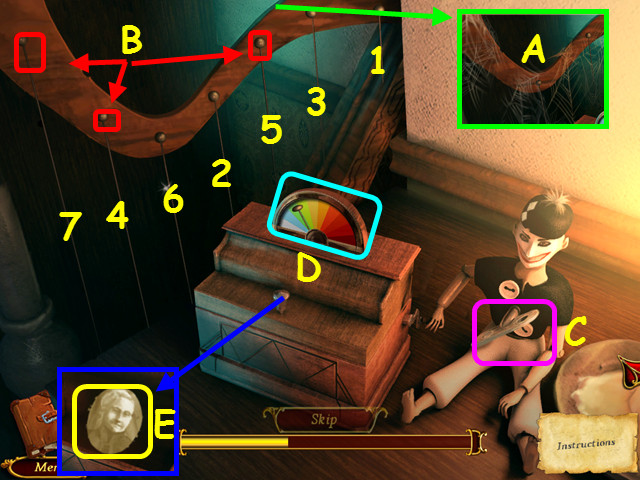
- Look at the harp (Y).


- Use the BRUSH on the cobwebs (A).
- Place the 3 HARP STRINGS on the harp (B).
- Turn the key in the doll (C).
- Watch the strings light up, and then repeat the tune by selecting the strings in the order they were played, before the timer (D) expires.
- Play the strings in numerical order (1-7).
- Take the 3/3 PHOTOGRAPHS (E).

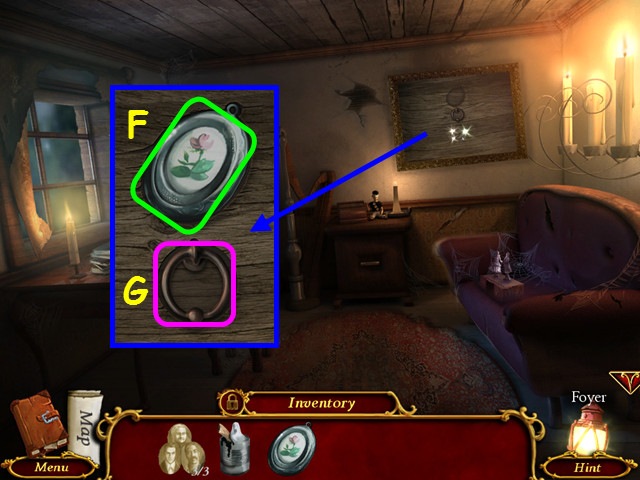
- Place the MEDALLION in the indentation (F).
- Pull the ring (G).

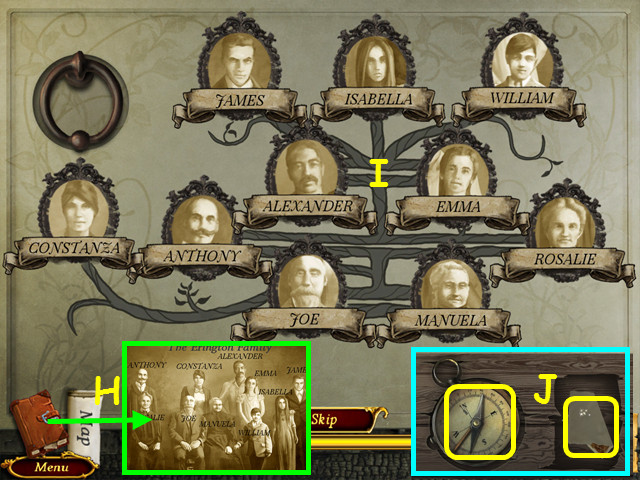
- Place the 3 PHOTOGRAPHS on the board.
- Refer to your journal for the family photograph (H).
- Place the photographs with the correct name (I).
- Take the COMPASS and look at the photo (J).
- Walk down 3 times, go right, and forward.
- After the cut-scene, walk forward.

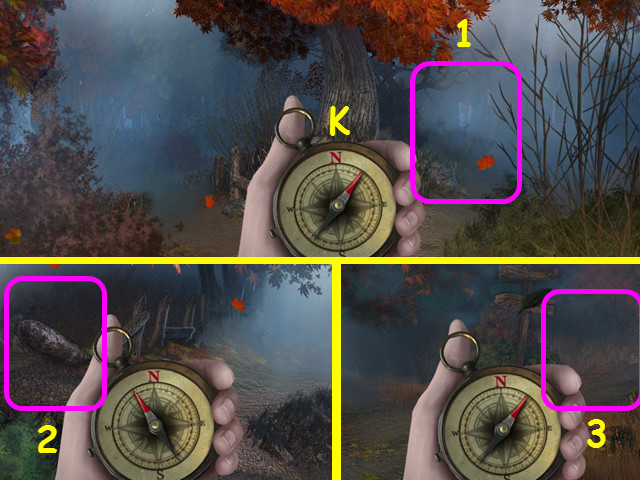
- Use the COMPASS to guide you to the North side of the island (K).
- Walk right, left, and right (1-3).
Chapter 9: Lighthouse

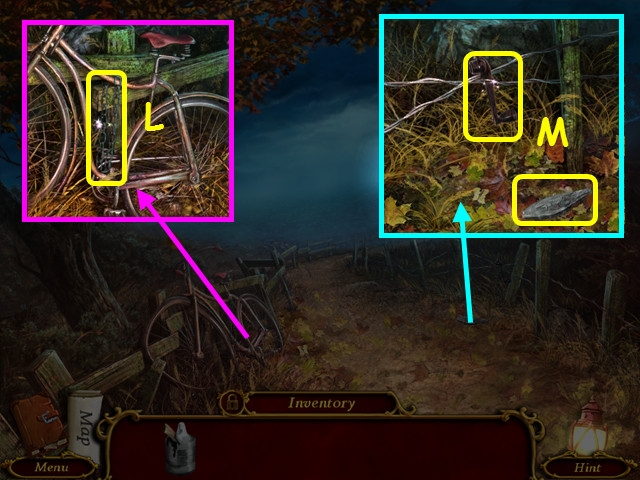
- Take the CHAIN (L).
- Take the 1/2 IRON and the CRANK (M).
- Walk forward twice.

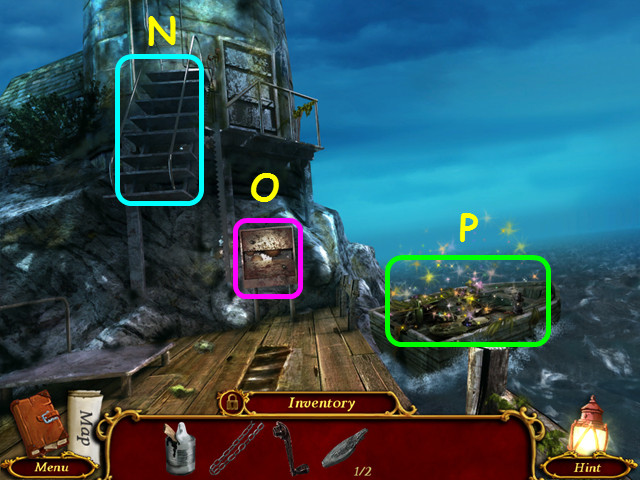
- Note the stairs to the lighthouse (N).
- Note the stair control (O).
- Select the boat (P).

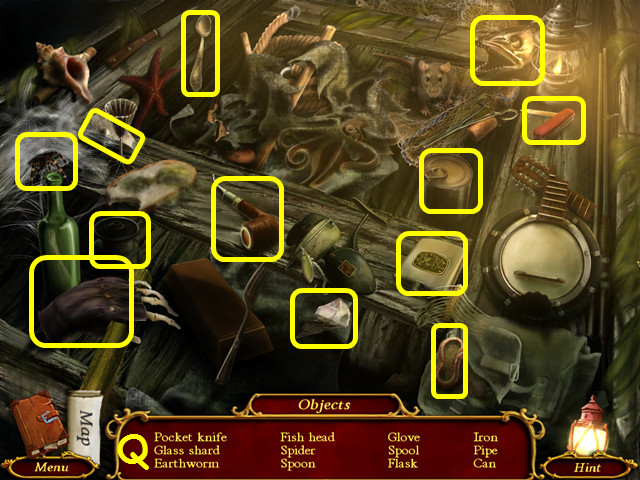
- Play the HOP to earn the 2/2 IRON (Q).
- Walk down 3 times and select the dugout.

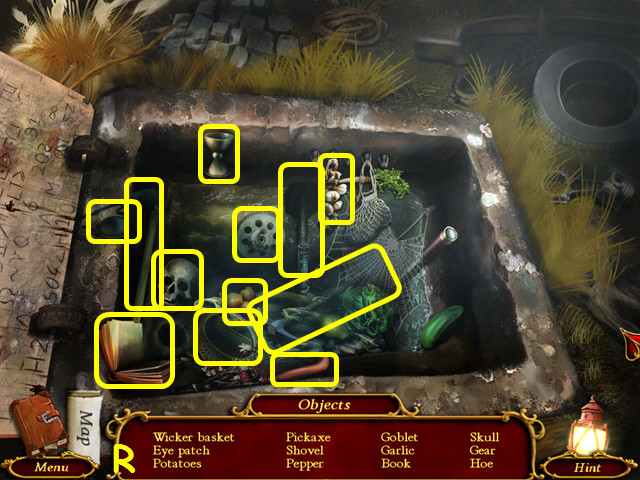
- Play the HOP to earn the 1/2 GEAR (R).
- Look at the furnace.

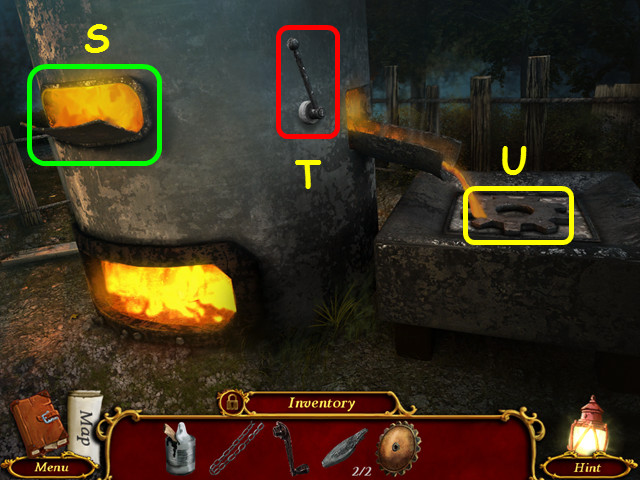
- Place the 2 IRONS in the opening (S).
- Pull the lever (T).
- Take the 2/2 GEAR (U).
- Walk forward 3 times.

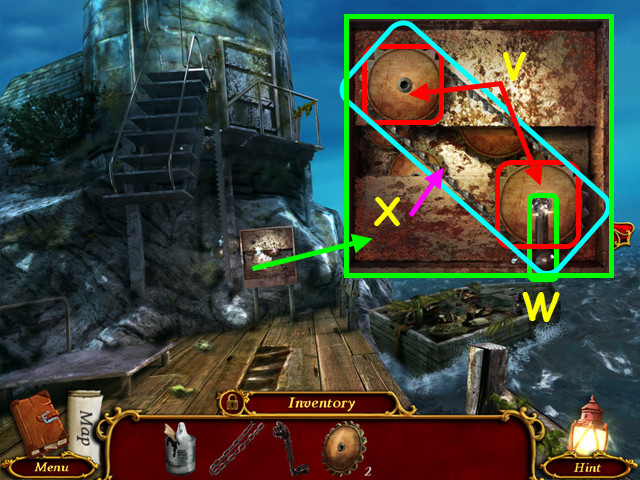
- Place the 2 GEARS on the spindles, and then attach the CHAIN (V).
- Place the CRANK on the lower gear (W).
- Use the GREASE on the chain (X).
- Turn the crank.
- Walk up the stairs.

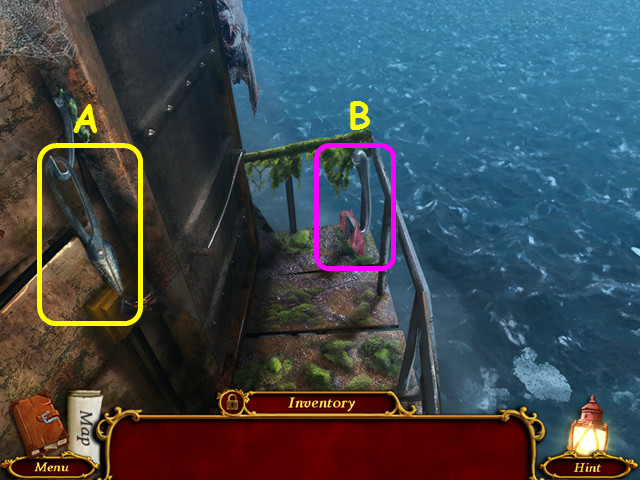
- Take the BOLT CUTTERS (A).
- Note the hook (B).
- Walk down and select the boat.

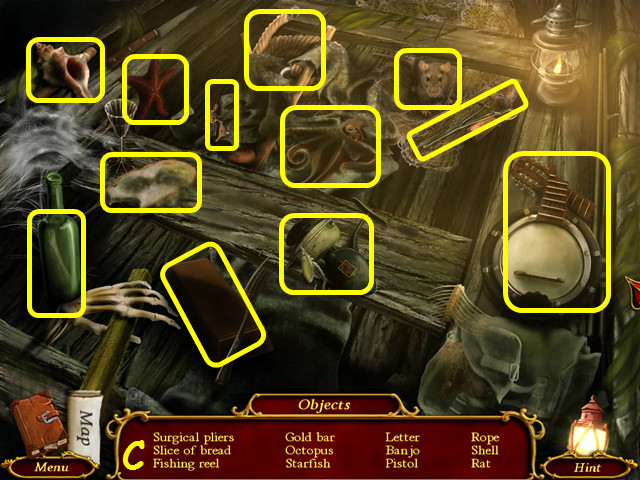
- Play the HOP to earn the ROPE (C).
- Walk down.

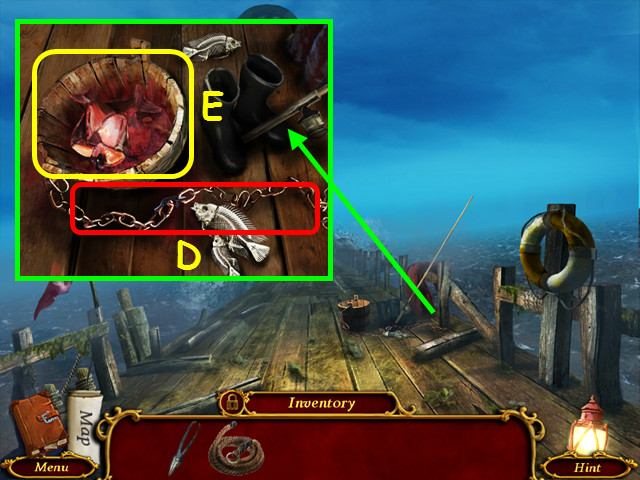
- Use the BOLT CUTTERS on the chain (D).
- Take the BUCKET OF CHUM (E).
- Walk forward and go up the stairs.

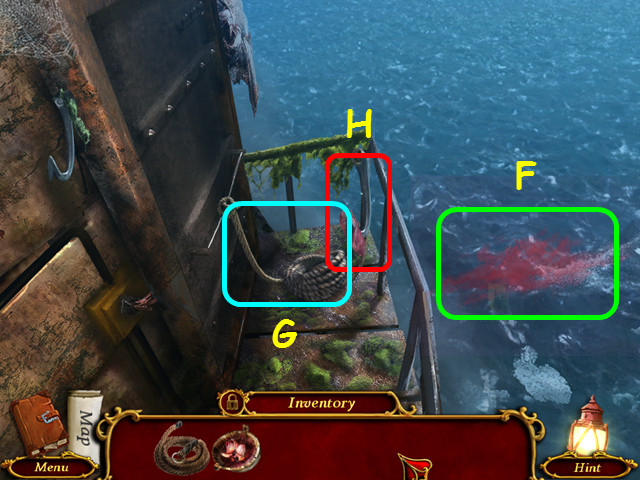
- Use the BUCKET OF CHUM on the water (F).
- Use the ROPE on the hook (G).
- Toss the hook in the water (H).
- Walk left.

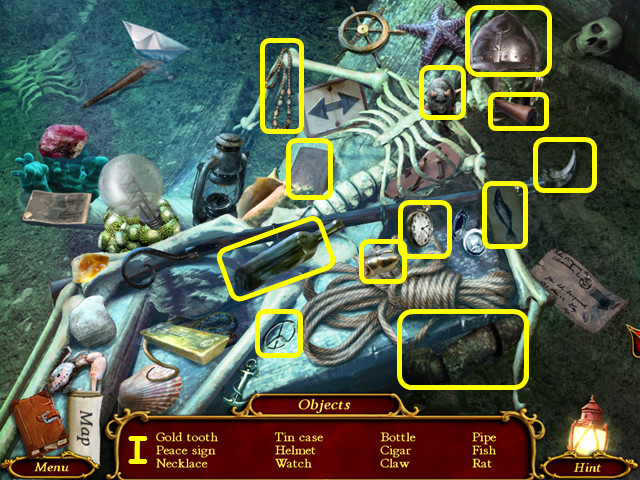
- Select the skeleton.
- Play the HOP to earn the PIPE (I).

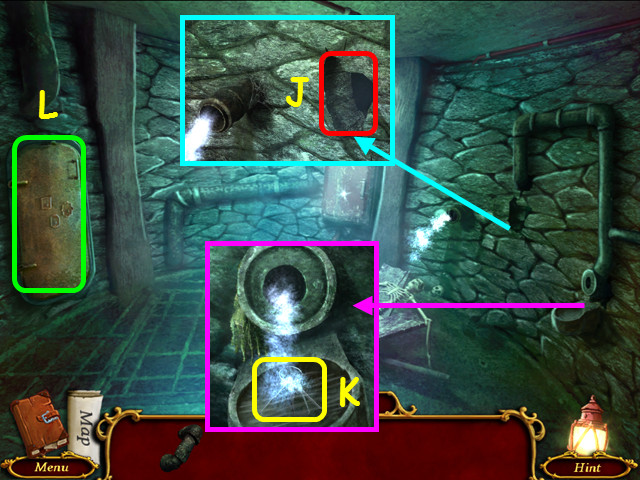
- Use the PIPE on the hole (J).
- Take the LOCK PICK (K).
- Select the door (L).

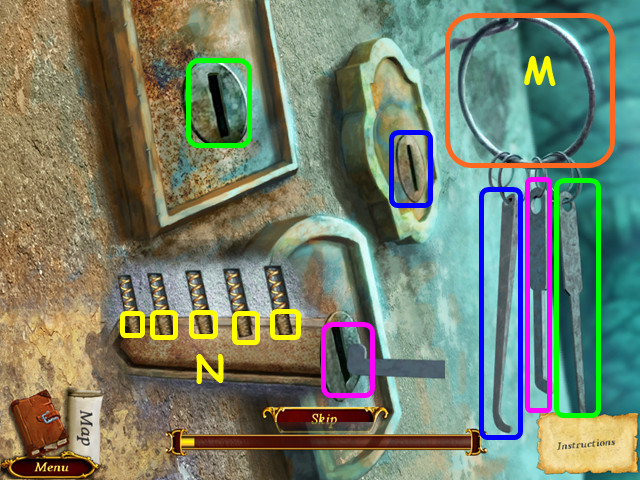
- Hand the LOCK PICK on the ring (M).
- Place the picks in the locks (color-coded).
- Click to push the tumbler up when the end of the pick is under it. You must lift all the tumblers in a lock in one pass (N).
- Walk to the left.

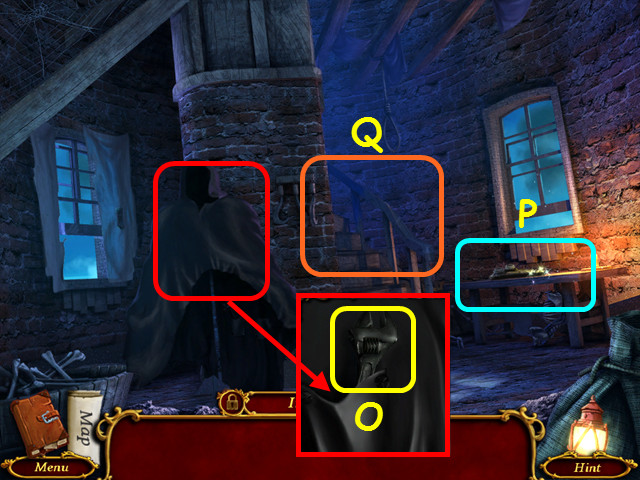
- Turn the cloak around; take the WRENCH (O).
- Note the mini-game on the table (P).
- Go up the stairs (Q).

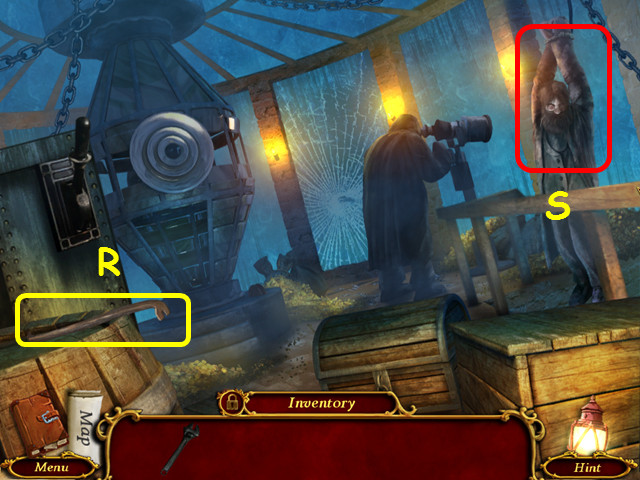
- Take the CROWBAR (R).
- Note the detective (S).
- Walk down twice and select the skeleton.

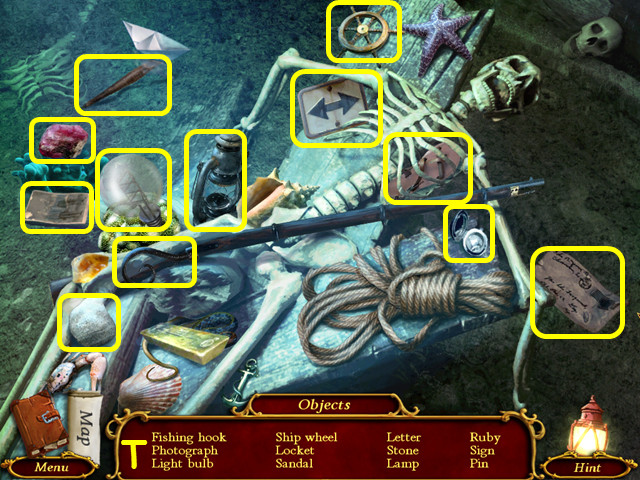
- Play the HOP (T).
- You will earn the 1/2 LIGHT BULB.

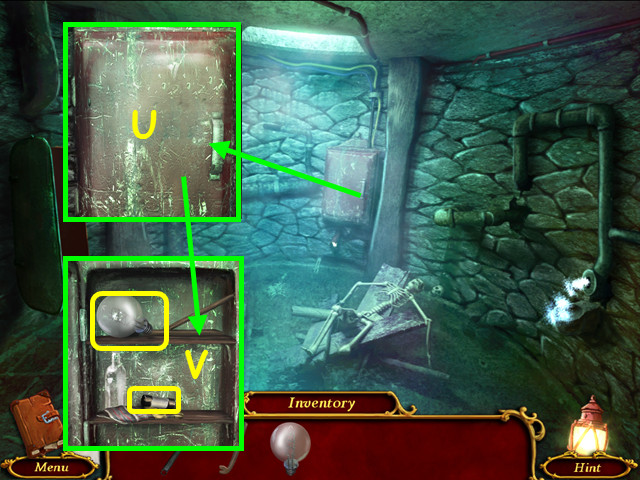
- Use the CROWBAR to open the cover (U).
- Take the 2/2 LIGHT BULB and the FUSE (V).
- Walk left and look at the table.

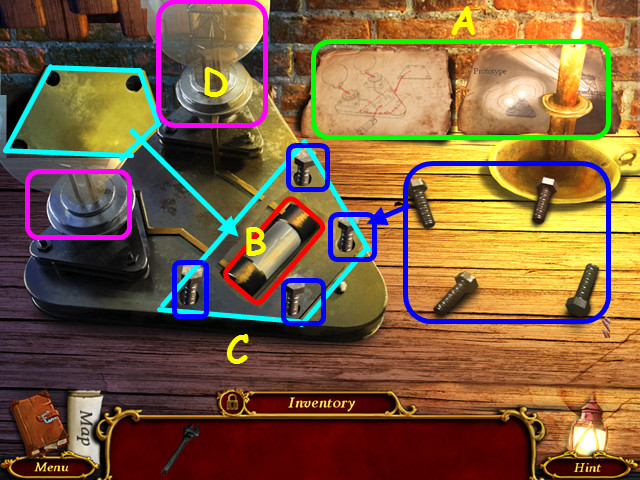
- Read the directions and diagram (A).
- Place the FUSE in the opening (B).
- Put the plate over the fuse and place the 4 bolts in the holes (C).
- Use the WRENCH on the 4 bolts.
- Place the 2 LIGHT BULBS in the large holes (D).
- Take the LIGHTHOUSE LAMP.
- Walk up the stairs.

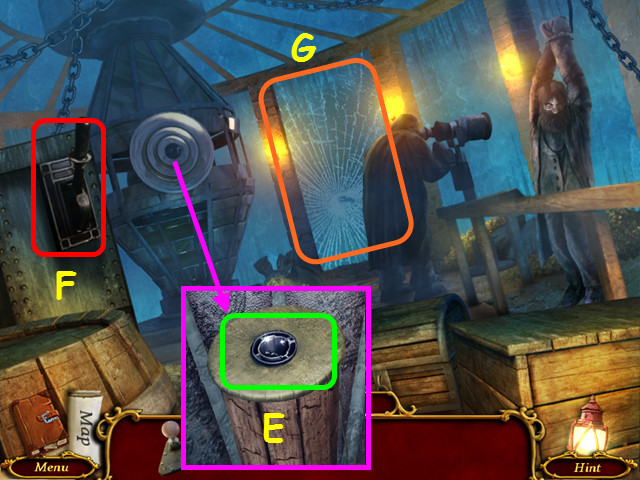
- Place the LIGHTHOUSE LAMP on the post (E).
- Pull the lever (F).
- Look out the window (G).

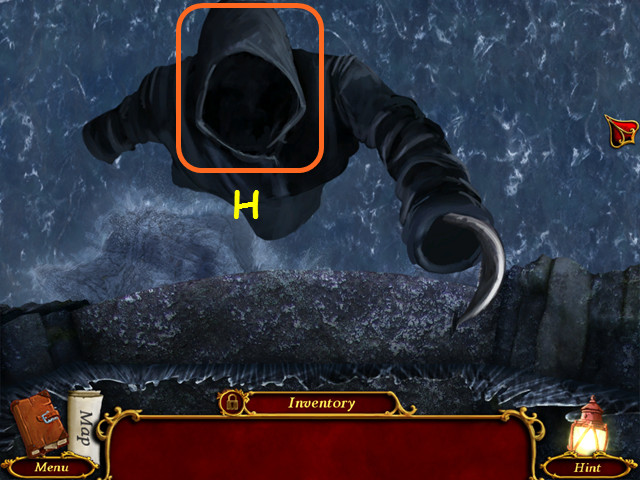
- Remove the hood (H).
- Congratulations! You have completed Left in the Dark: No One on Board!





 Big City Adventure: Vancouver Walkthrough, Guide, & Tips
 Epic Escapes: Dark Seas Walkthrough, Guide, & Tips
 Samantha Swift: Mystery from Atlantis Walkthrough, Guide, & Tips
 Guardians of Beyond: Witchville Walkthrough, Guide, & Tips
 Vampire Legends: The True Story of Kisilova Walkthrough, Guide, & Tips