Guardians of Beyond: Witchville Walkthrough, Guide, & Tips
Guardians of Beyond: Witchville Walkthrough

Welcome to the Guardians of Beyond: Witchville Walkthrough!
Save Witchville before it’s too late in Guardians of Beyond: Witchville, a thrilling Hidden Object Puzzle Adventure game!
Whether you use this document as a reference when things get difficult or as a road map to get you from beginning to end, we’re pretty sure you’ll find what you’re looking for here.
This document contains a complete Guardians of Beyond: Witchville game walkthrough featuring annotated screenshots from actual gameplay!
We hope you find this information useful as you play your way through the game. Use the walkthrough menu below to quickly jump to whatever stage of the game you need help with.
Remember to visit the Big Fish Games Forums if you find you need more help. Have fun!
This walkthrough was created by Rebekah, and is protected under US Copyright laws. Any unauthorized use, including re-publication in whole or in part, without permission, is strictly prohibited.
General Tips

- You will not need to follow the exact path of this guide; however, some actions will need to be performed before you can complete another scene.
- Zoom into the sparkling areas to trigger a Hidden Object Scene. Throughout the guide, we will use the acronym ‘HOS’ for Hidden Object Scenes.
- The HOS are random. The screenshots in this walkthrough should be used as an example.
Chapter 1: The Restaurant

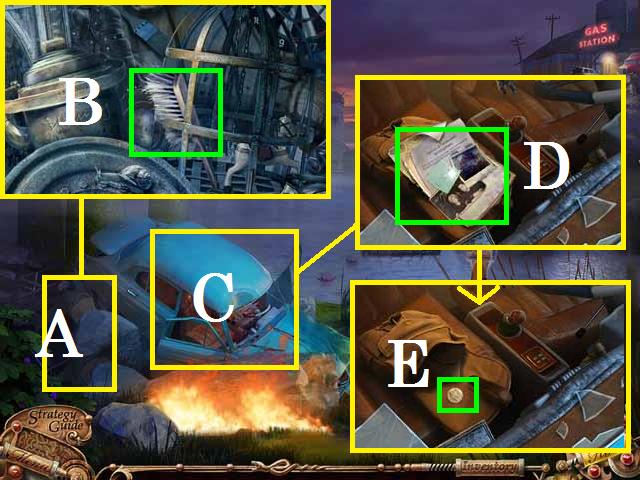
- Zoom into the rocks (A) and pick up the BRUSH (B).
- Zoom into the car (C) and then the papers (D).
- Once it is available pick up the photo.
- Pick up the now available COIN (E).

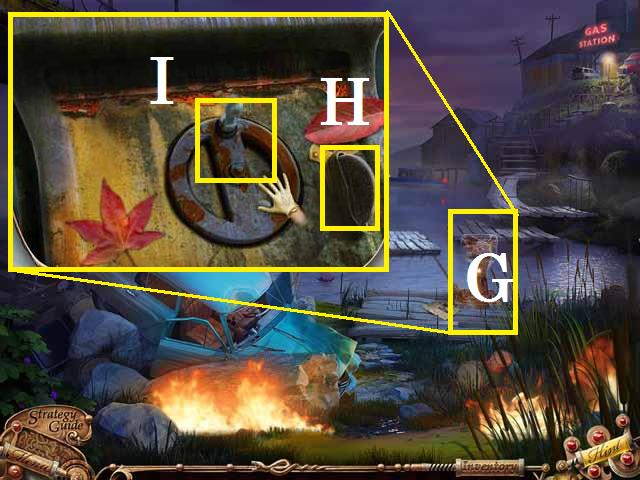
- Zoom into the control box (G).
- Remove the cobwebs with the BRUSH.
- Place the COIN in the slot (H) and spin the handle (I).
- Move towards the restaurant.

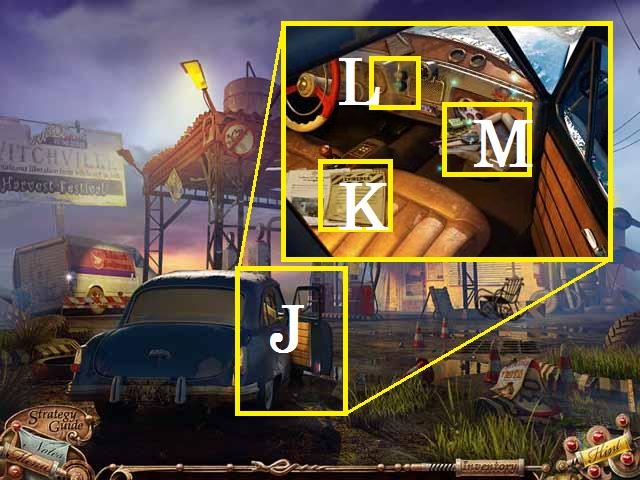
- Zoom into the car (J).
- Pick up the paper (K), and zoom into the radio (L).
- Zoom into the sparking glove box (M) to play a HOS.

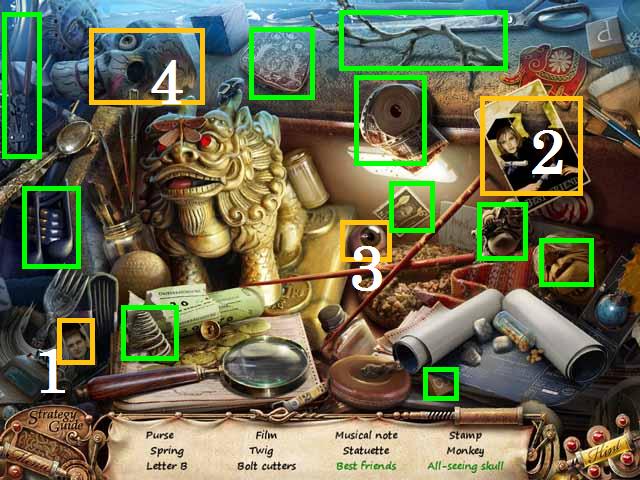
- Place the head (1) on the photo (2) and pick it up.
- Place the eye (3) in the skull (4) and pick it up.
- Complete the HOS to receive the BOLT CUTTERS.

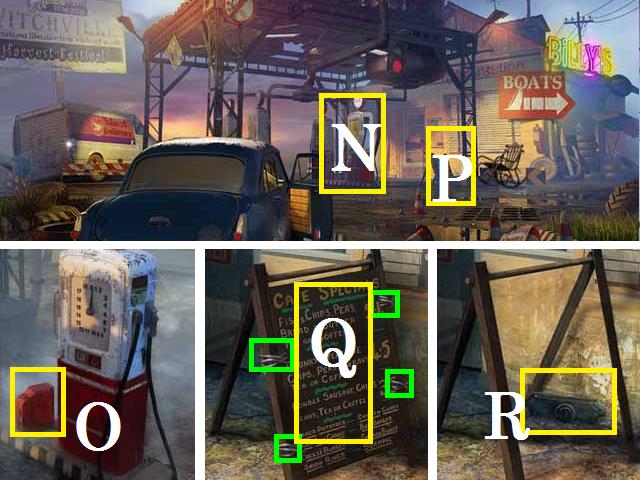
- Zoom into the gas tank (N); pick up the LEAKY GAS CAN (O).
- Zoom into the sign (P).
- Remove all four wires (green) with the BOLT CUTTERS and pick up the BOARD (Q).
- Pick up the DOOR HANDLE (R).

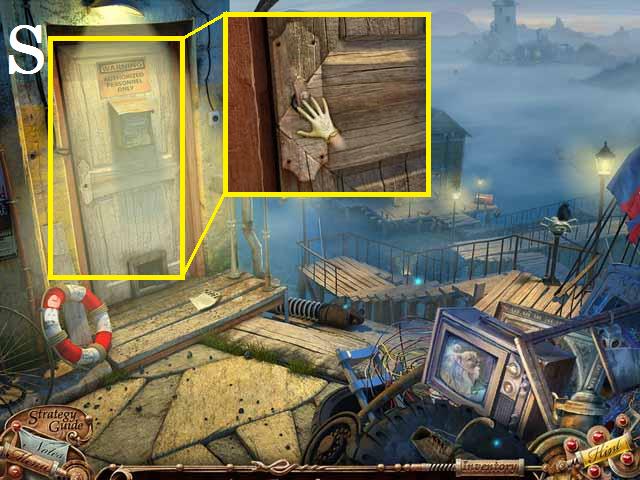
- Move to the right towards the restaurant’s back door.
- Zoom into the door (S) and place the DOOR HANDLE.

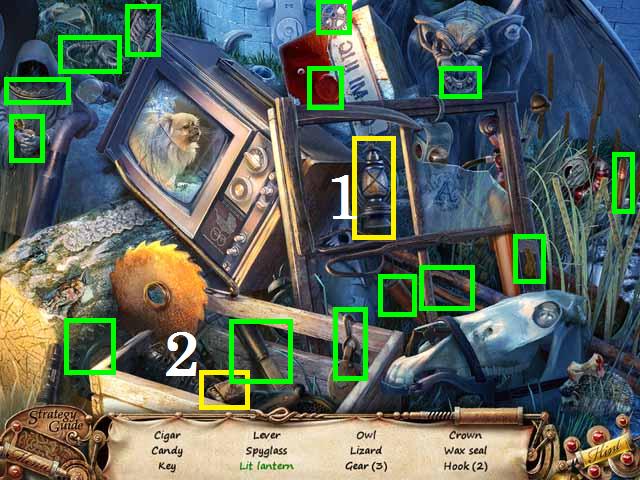
- Zoom into the sparkles to play a HOS.
- Light the LANTERN (1) with the matches (2).
- Receive the DIRTY TRUNK KEY.

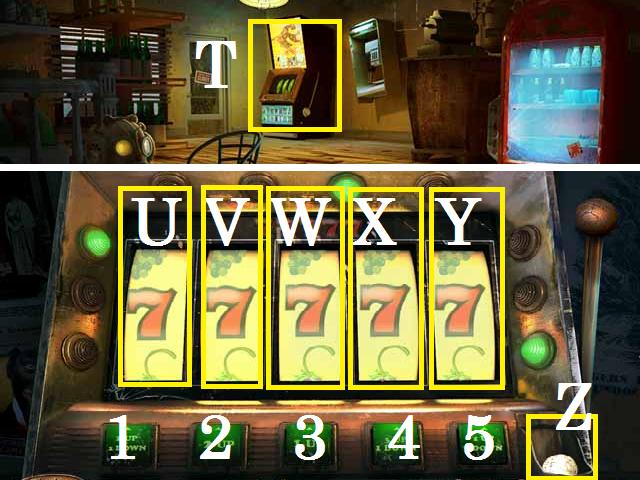
- Enter the restaurant.
- Zoom into the slot machine (T).
- Set the dials all to 7′s: first set the fourth (X) dial using button (4).
- Set the first (U) dial using the (1) button followed by the fifth (Y) dial using the (2) button.
- Finish with the second (V) dial using the (3) button.
- Pick up the COIN (Z).

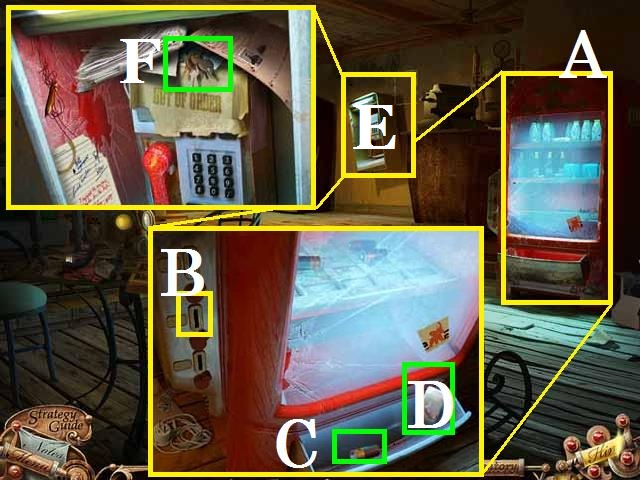
- Zoom into the vending machine (A).
- Place the COIN in the slot (B); pick up the BATTERY (C) and NAIL POLISH REMOVER (D).
- Zoom into the telephone (E); move the papers and pick up the MAIL TRUCK KEYS (F).

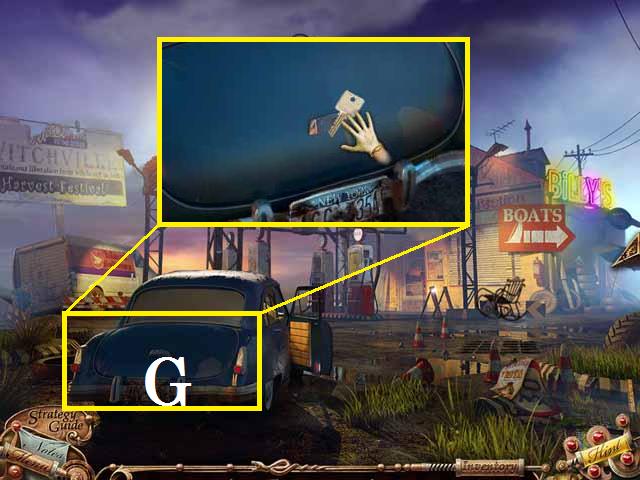
- Move back 2 scenes to the front of the restaurant.
- Combine the NAIL POLISH REMOVER and the DIRTY TRUNK KEY to create the TRUNK KEY.
- Zoom into the trunk of the car (G).
- Open the trunk using the TRUNK KEY to play a HOS.

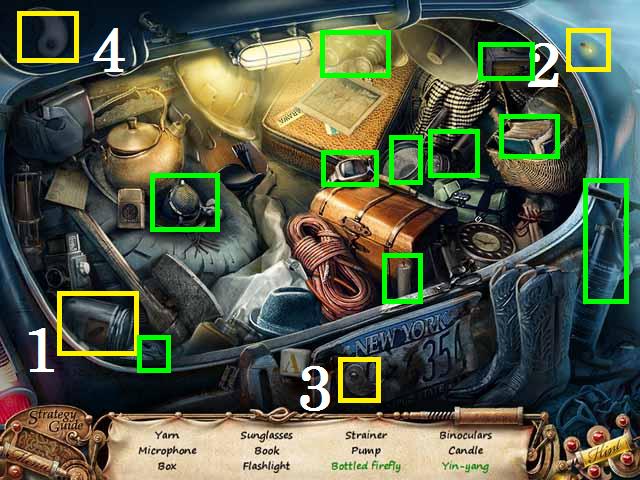
- Place the bottle (1) over the firefly (2).
- Place the yang piece (3) with the yin (4).
- Receive the EMPTY FLASHLIGHT.

- Combine the EMPTY FLASHLIGHT and the BATTERY to create the FLASHLIGHT.
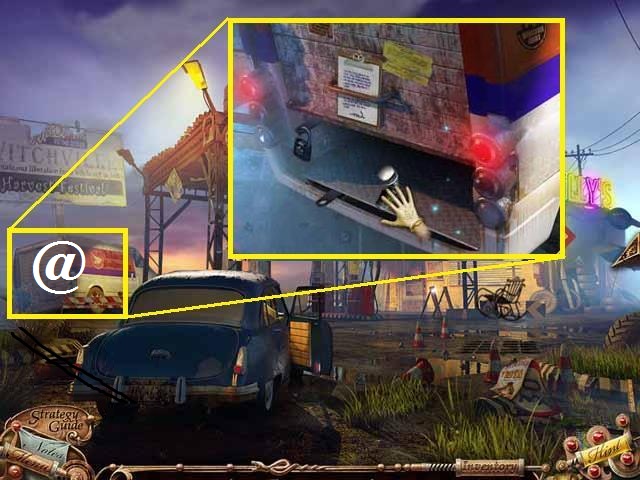
- Zoom into the truck (@) and open the lock with the MAIL TRUCK KEYS.

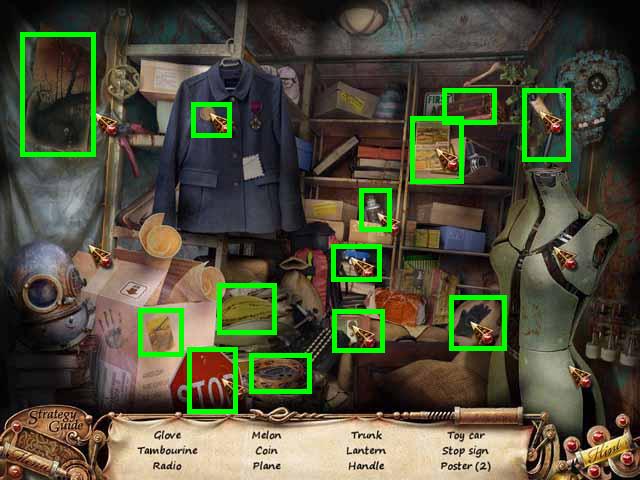
- You need to pick up the FLASHLIGHT before entering the truck to play a HOS.
- Receive the HANDLE.

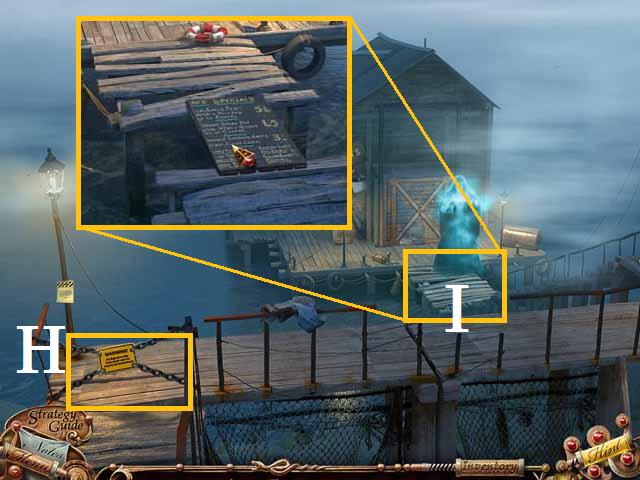
- Move towards the dock.
- Use the BOLT CUTTERS on the chain (H).
- Zoom into the broken dock (I) and place the BOARD.
- Cross the dock.

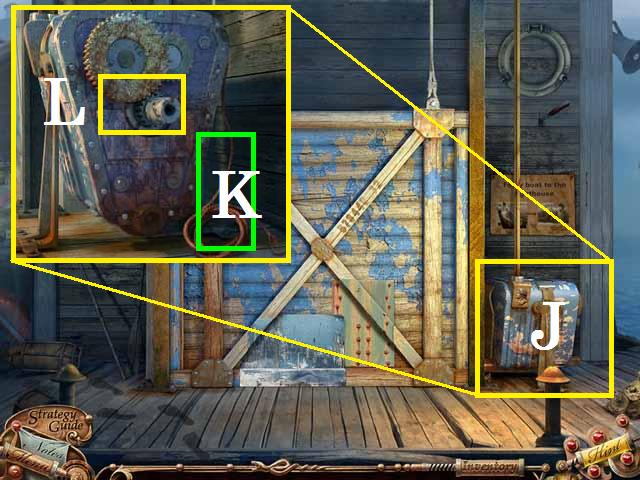
- Zoom into the mechanism (J); pick up the FISHING LINE (K) and place the HANDLE (L).
- Move to the left before entering the boat house.

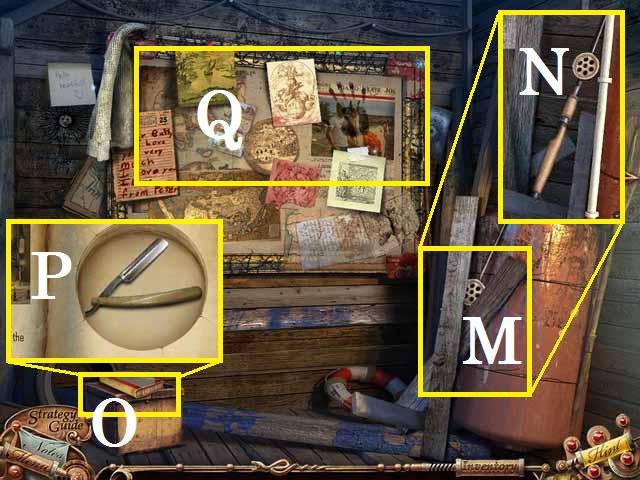
- Zoom into the wood (M); move the pieces and pick up the FISHING ROD (N).
- Zoom into the book (O); flip the page and pick up the RAZOR (P).
- Zoom into the wall (Q) to play a HOS.

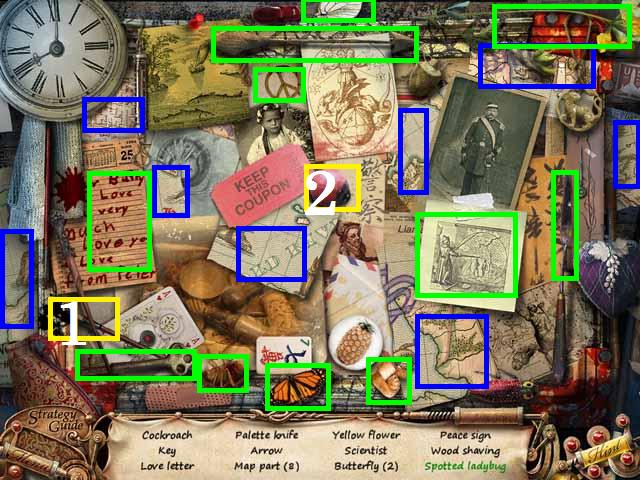
- Drag the paintbrush (1) over the ladybug (2) and pick it up.
- Receive the MAP PIECES.

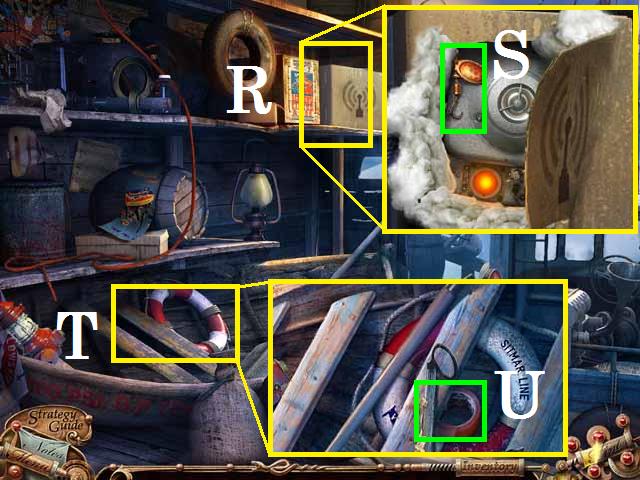
- Go back one scene and enter the boat house.
- Zoom into the box (R); cut it open with the RAZOR and pick up the FISHING HOOK (S).
- Zoom into the buoy (T) and pick up the STICKY TAPE (U).

- Combine the FISHING ROD, FISHING LINE, and FISHING HOOK.
- Move back two scenes and zoom back into the dock.
- Pick up the BOAT KEY (V) with the ROD.
- Combine the STICKY TAPE and LEAKY GAS CAN to obtain the PATCHED GAS CAN.
- Return to the front of the restaurant and zoom into the gas tank.
- Place the GAS CAN next to the pump and pick it back up (@).

- Return to the boat house.
- Zoom into the boat (W).
- Pour the FULL GAS CAN in the funnel (X) and place the BAOT KEY (Y).
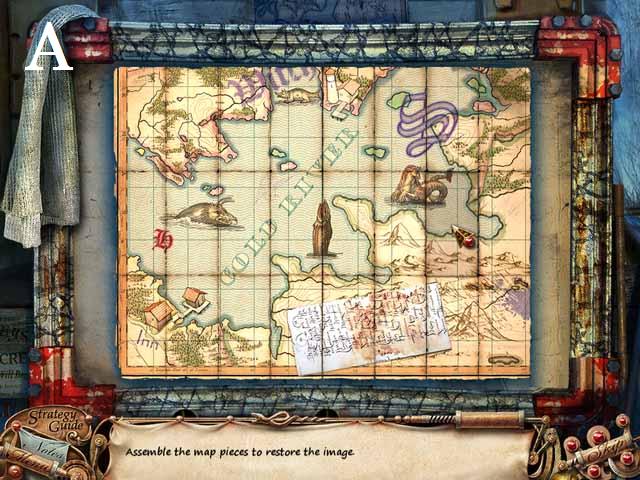
- Place the MAP PIECES (Z).


- Unscramble the map.
- See the screenshot for the final image (A).

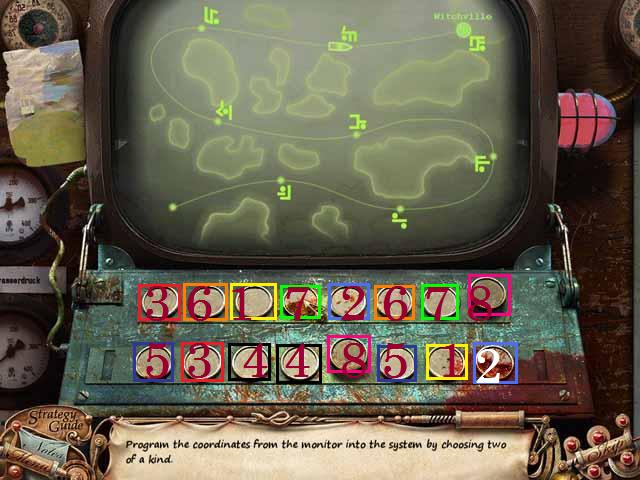
- Press the matching pairs of buttons in sequential order of (1-8).
Chapter 2: The Lighthouse

- Zoom into the lighthouse.
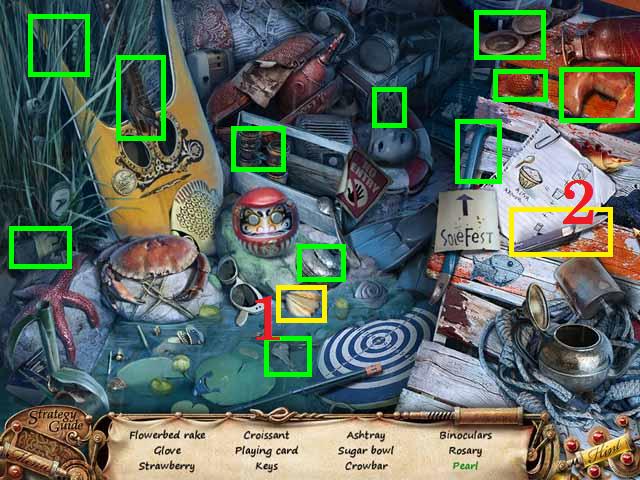
- Zoom into the sparkles to play a HOS.
- Open the shell (1) with the knife (2).
- Receive the CROWBAR.

- Move towards the ship.
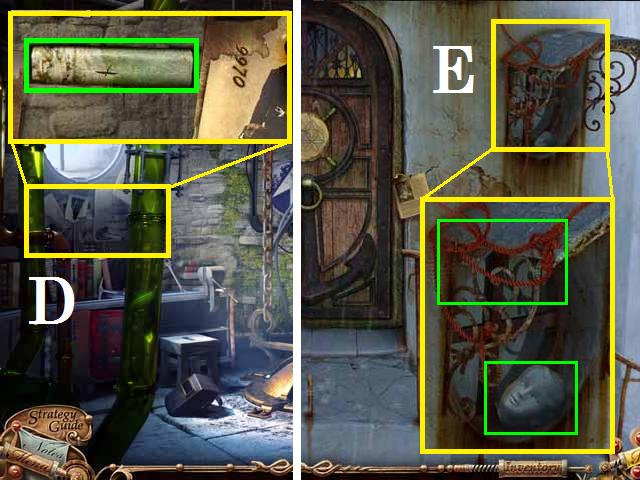
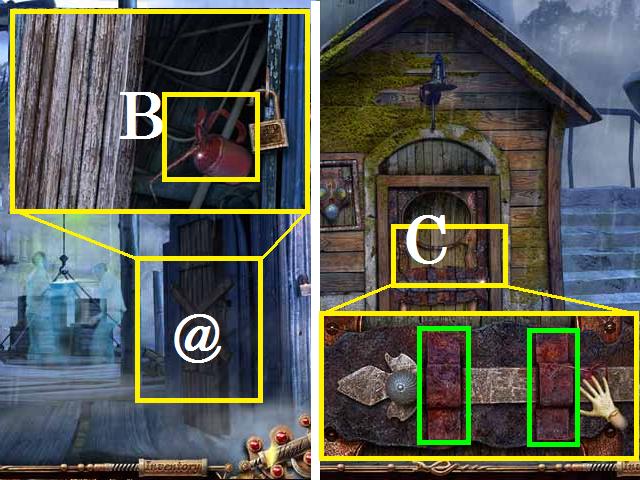
- Zoom into the tool shed (@); remove the boards and the lock with the CROWBAR.
- Pick up the OIL CAN (B).
- Return to the lighthouse steps and zoom into the lower door (C).
- OIL both hinges (green); slide the lock open and go inside.

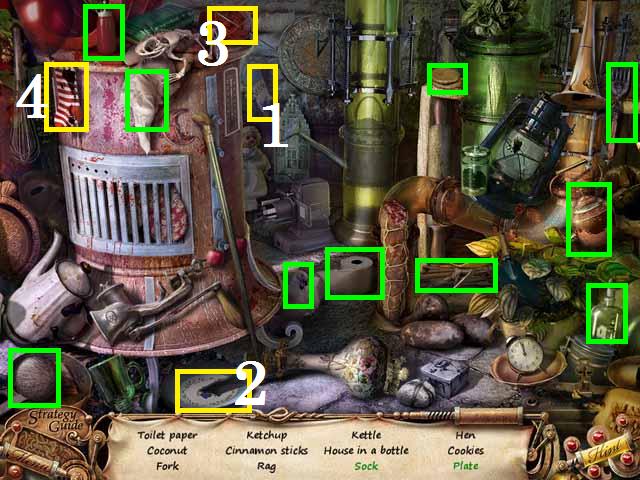
- Zoom into the sparkles to play a HOS.
- Put the plate piece (1) on the plate (2).
- Drop the yarn (3) over the sock (4).
- Receive the RAG.


- Zoom into the wall (D); move the paper and pick up the LIBRARY BOOK (green) (Note: you will need the code on the paper later).
- Move back one scene and take the stairs up.
- Zoom into the awning (E); pick up the ROPE (green) and the STATUE’S HEAD (green).
- Move back to the boat.

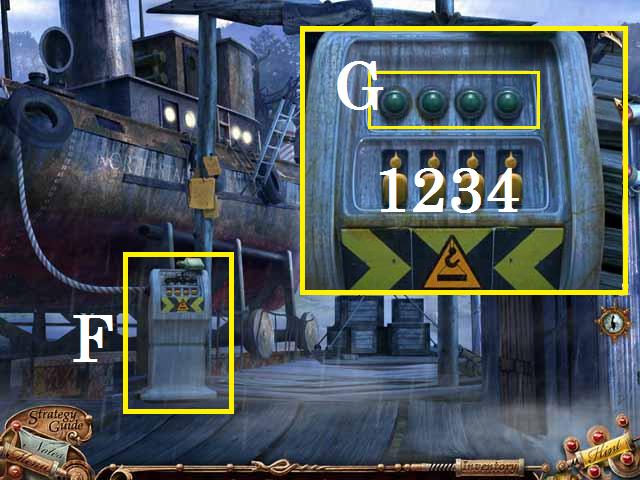
- Zoom into the control panel (F) and clean the lights (G) with the RAG.
- Pull the levers in the following order: 3, 4, 1, and then 2.

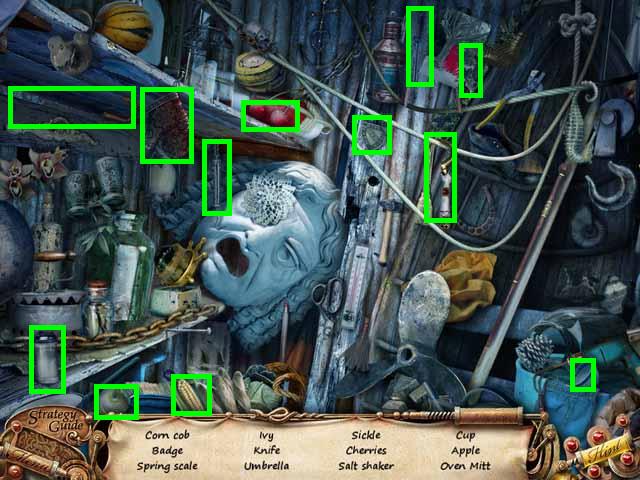
- Take the path to New City Gate, once the dialogue is over, return to the boat.
- Zoom into the tool shed to play a HOS.
- Receive the OVEN MITT.

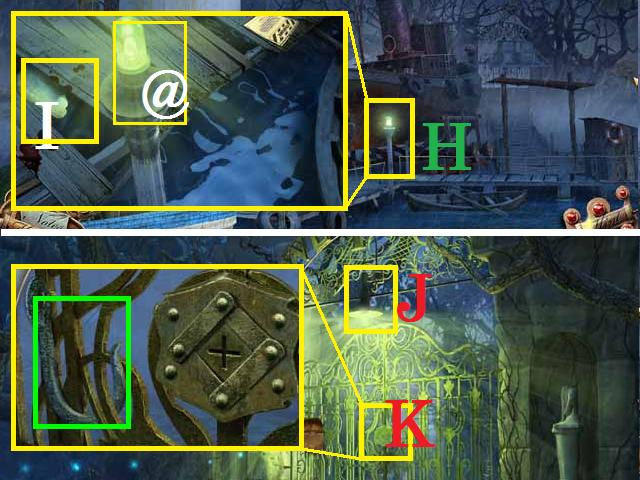
- Move back one scene and zoom into the light (H).
- Remove the LIGHT BULB (@) with the OVEN MITT.
- Move the two boards (I) and pick up the STATUE’S WING.
- Return to the New City Gate.
- Replace the LIGHT BULB (J).
- Zoom into the gate’s lock (K); pick up the HOOK (green).

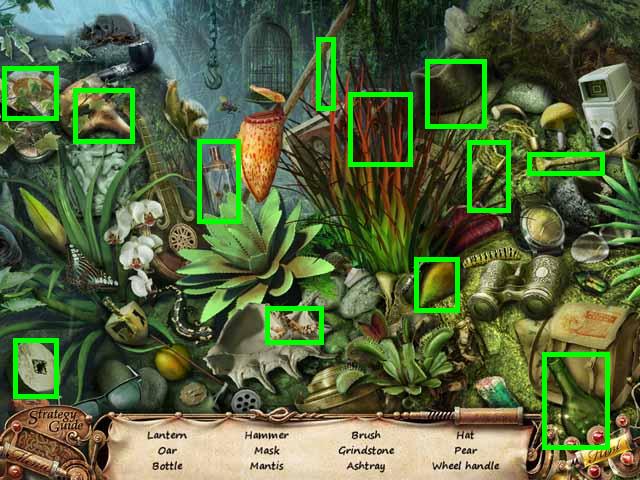
- Zoom into the sparkles to play a HOS.
- Receive the WHEEL HANDLE.

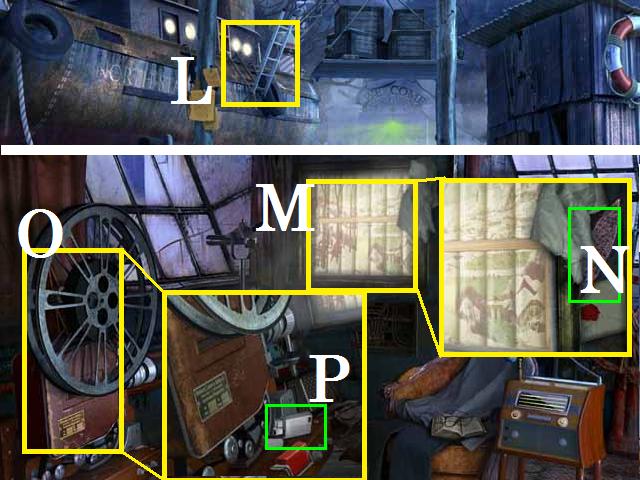
- Return to the boat.
- Combine the HOOK and ROPE to create the HOOK WITH ROPE.
- Drop the HOOK WITH ROPE over the ladder (L).
- Go up the ladder and enter the boat cabin.
- Zoom into the projection (M) on the wall and pick up the PUZZLE LOCK PART (N).
- Zoom into the projector (O) and pick up the LIGHTER (P).

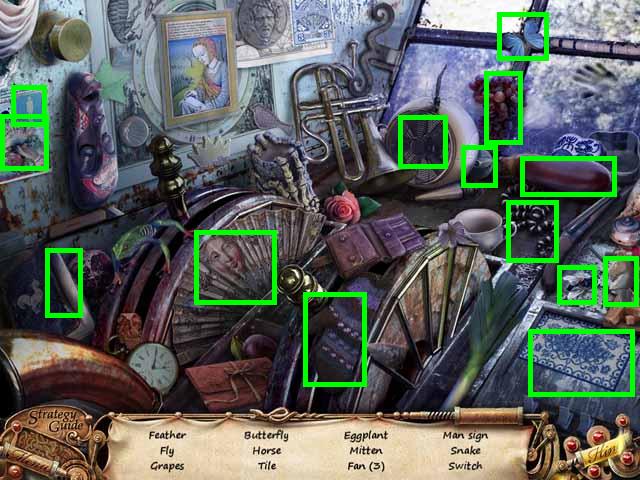
- Zoom into the sparkles to play a HOS.
- Receive the SWITCH.

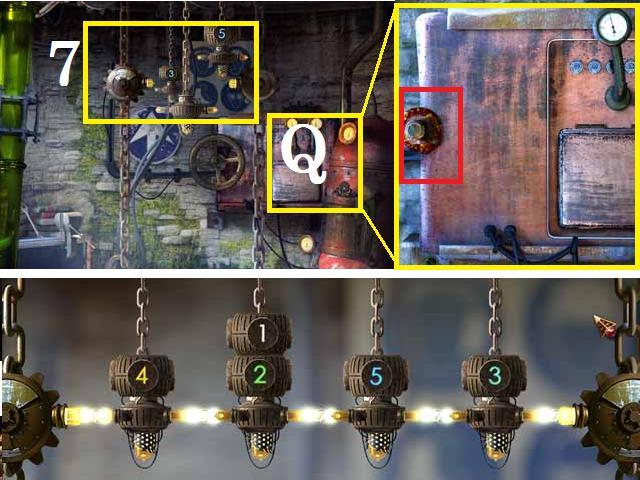
- Return to the lighthouse and enter the lower level.
- Zoom into the panel (Q) and place the WHEEL HANDLE (red).
- Zoom into the weights (7).
- Move the weights to the positions shown in the screenshot. (Hint: First place the 5 with the 4 on top. Next, place the 3, 2 and 1. Finish with the 4).

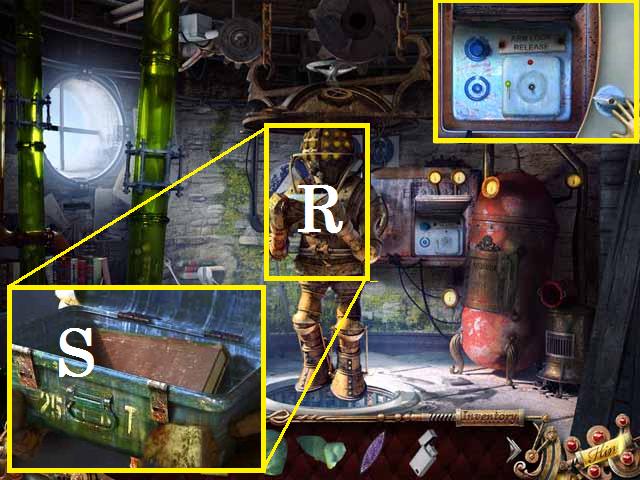
- Zoom back into the panel; place the SWITCH and turn it.
- Zoom into the dive suits hands (R) and pick up the LIBRARY BOOK (S).

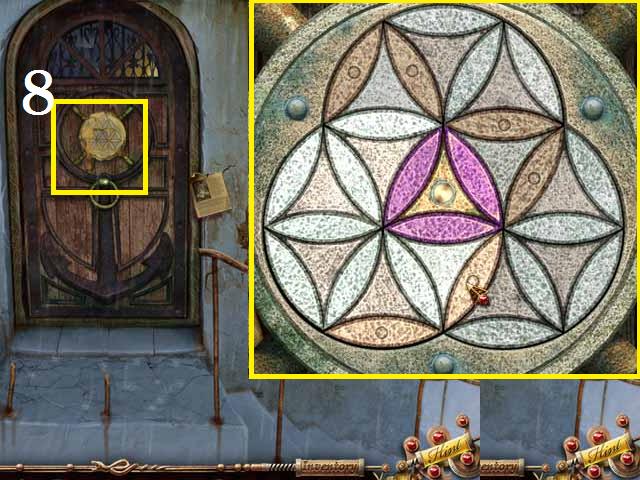
- Go upstairs; melt the wax over the door lock with the LIGHTER (8).
- Place the PUZZLE LOCK PART in the open slot.
- Spin the top dial so that the purple PUZZLE LOCK PARTS are in the middle as shown in the screenshot. (Note: the beginning positions are random; simply back out and zoom back in to change the pattern for an easier solution).
- Enter the lighthouse.

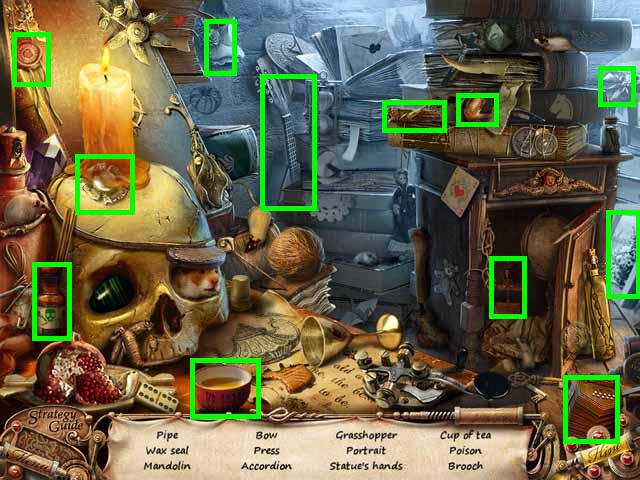
- Zoom into the sparkles to play a HOS.
- Receive the STATUE’S HANDS.

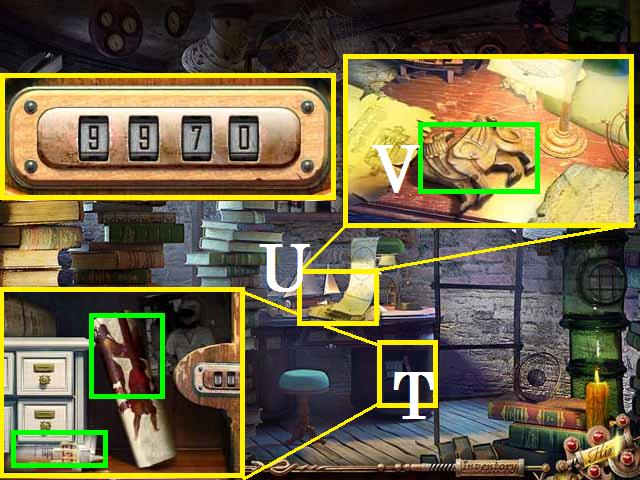
- Zoom into the desk door (T); (the code can be found in your notes) set it to 9970.
- Zoom into the cabinet; pick up the GLUE (green) and LIBRARY BOOK (green).
- Zoom into the desk top (U); move the papers and pick up the GRYPHON KEY (V).

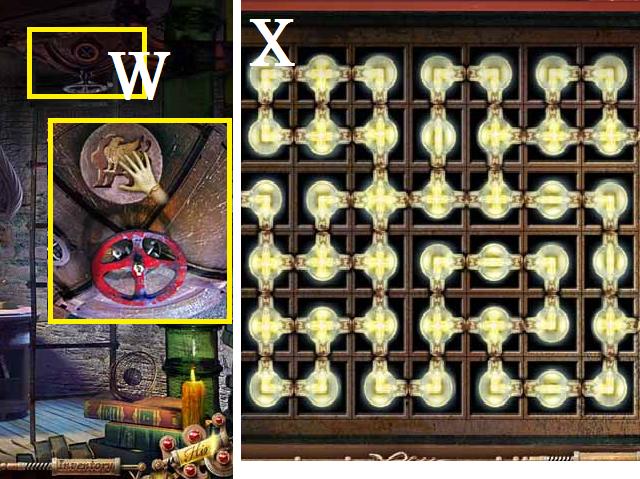
- Zoom into the hatch (W); place the GRYPHON KEY, turn the wheel and go upstairs.
- Zoom into the panel; rotate the elements as shown in the screenshot (X).
- Pick up the LIBRARY BOOK .

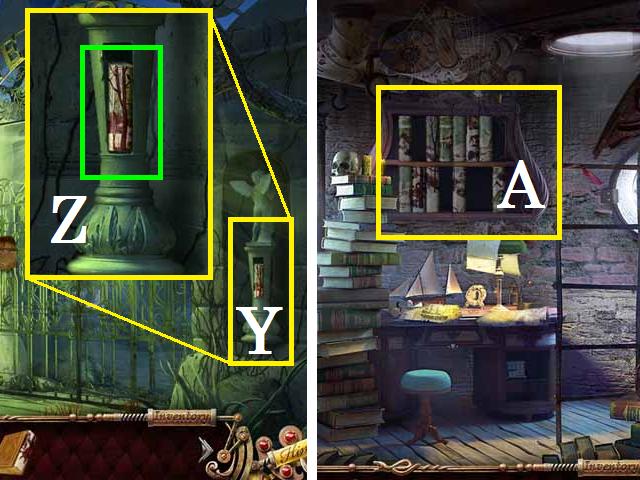
- Return to the gate to New City.
- Zoom into the broken statue (Y); place the GLUE followed by the STATUE’S HANDS, STATUE’S WINGS, and the STATUE’S HEAD.
- Zoom back in and pick up the last LIBRARY BOOK (Z).
- Return to the upstairs of the lighthouse.
- Zoom into the shelf (A) and place all of the LIBRARY BOOKS.

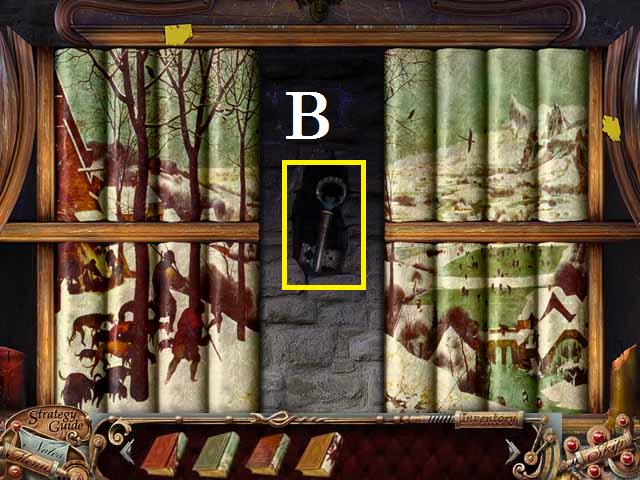
- Arrange the books to create the image as shown in the screenshot.
- Pick up the GATE KEY (B).
- Return to the Gate; unlock the gate and enter New City.
Chapter 3: New City

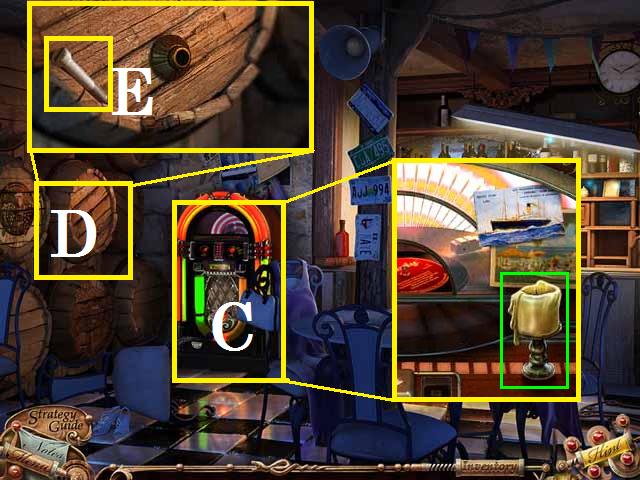
- Move to the restaurant.
- Zoom into the jukebox (C); pick up the CANDLE (green).
- Zoom into the barrel (D); pick up the SCREW (E).

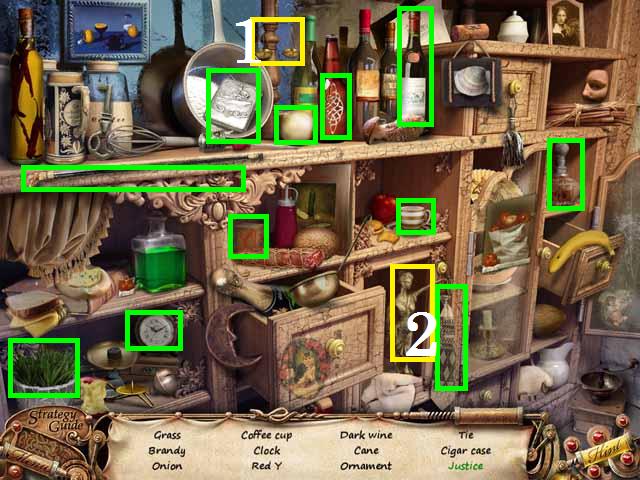
- Zoom into the sparkles to play a HOS.
- Place the scales (1) on the justice statue (2).
- Receive the ORNAMENT.

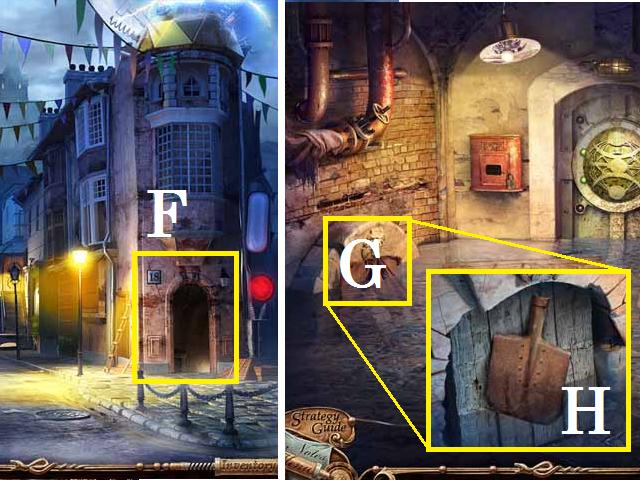
- Move back one scene and enter the building 18 (F).
- Zoom into the drain (G); move the debris and pick up the SPADE BLADE (H).

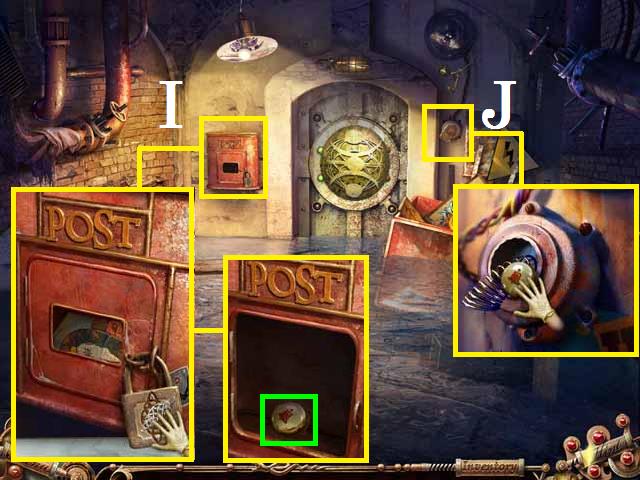
- Zoom into the mailbox (I).
- Place the ORNAMENT on the lock and open the door.
- Pick up the PICTURE and the DOORBELL (green).
- Place the DOORBELL (J) to drop the TOY SHOP KEY into the garbage can.

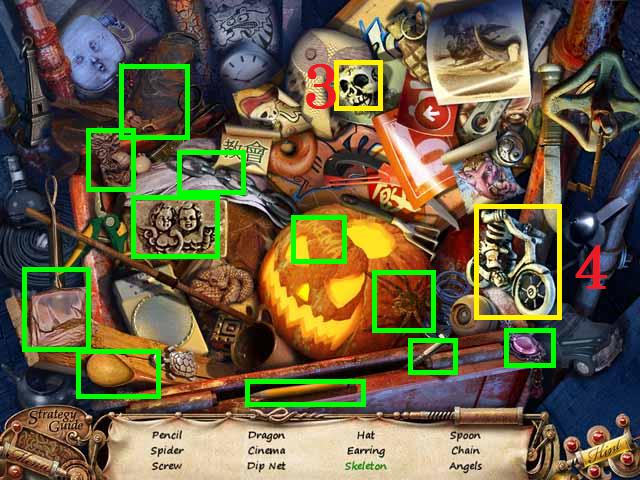
- Zoom into the sparkles to play a HOS.
- Place the skeleton head (3) on the trike (4).
- Receive the TOY SHOP KEY.

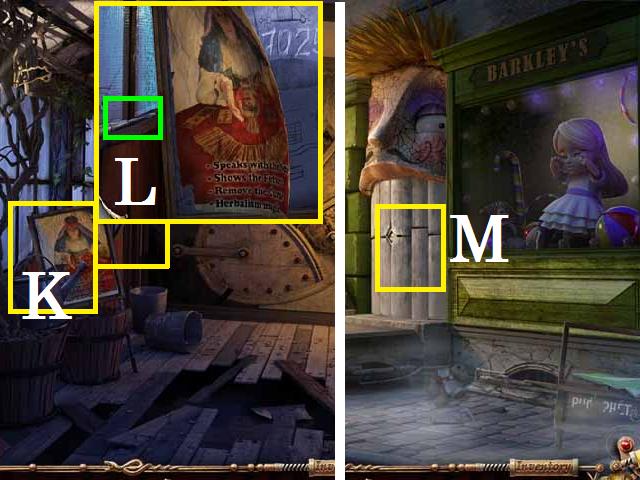
- Back out one scene and move forward towards the toyshop.
- Go up the stairs.
- Zoom into the poster (K) and click on it to reveal the code.
- Pick up the SCREWDRIVER (L).
- Go back downstairs.
- Zoom into the door (M); open it with the TOY SHOP KEY.
- Enter the Toy Shop.

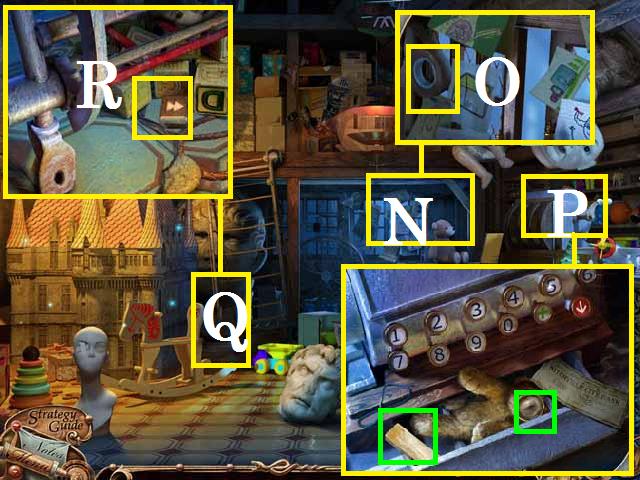
- Zoom into the back wall (N); pick up the DUCT TAPE (O).
- Zoom into the cash register (P); key in the code 7025 from the poster upstairs.
- Pick up the LENS (green) and WHETSTONE (green) from the open drawer.
- Zoom into the ladder (Q); pick up the SKIP BUTTON (R).

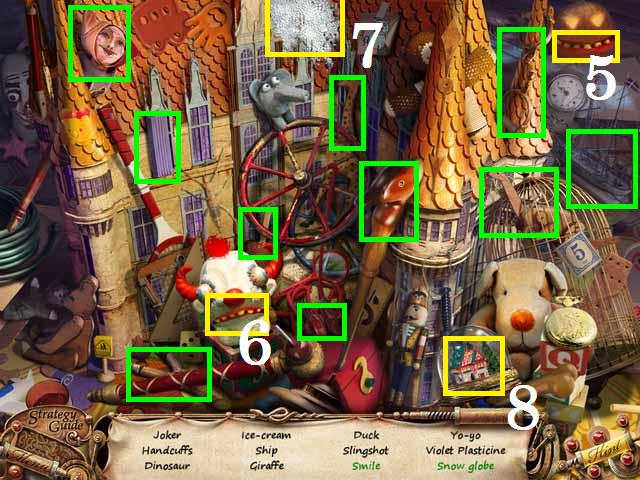
- Zoom into the sparkles to play a HOS.
- Place the smile (5) on the face (6).
- Place the snow (7) in the globe (8).
- Receive the WOODEN TOYS.

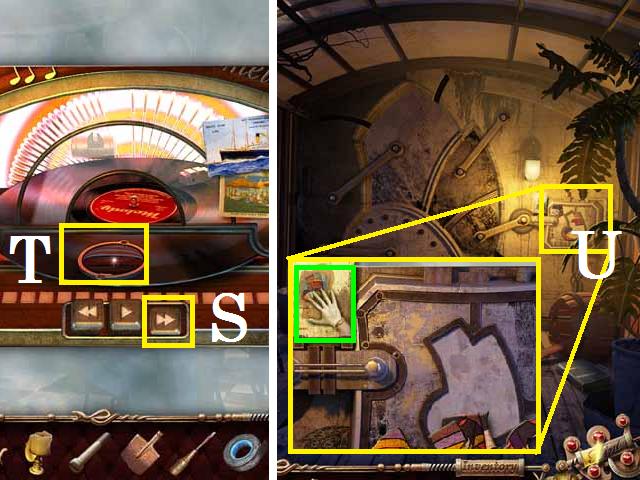
- Return to the restaurant.
- Zoom into the jukebox and place the SKIP BUTTON (S).
- Hit the BUTTON and pick up the LENS (T).
- Move back towards the toy shop and go back upstairs.
- Zoom into the door lock (U) and place the PICTURE (green).

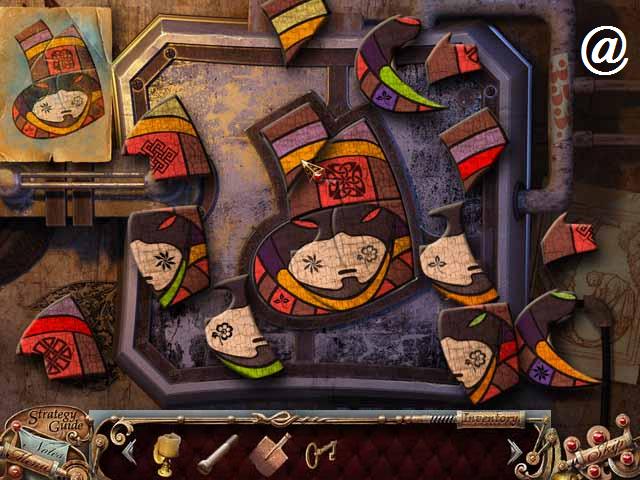
- Arrange the pieces to make the picture, as shown in the screenshot (@).
- Enter the graveyard.

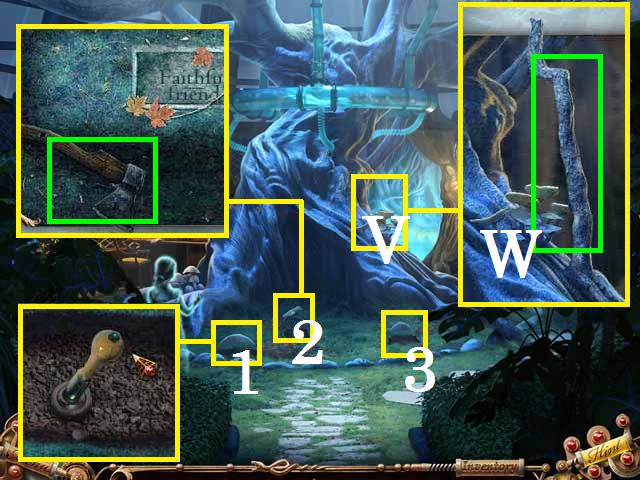
- Zoom into the faithful friend grave (2); pick up the BLUNT AXE (green).
- Combine the AXE and WHETSTONE to create the SHARPENED AXE.
- Zoom into the tree (V); cut the branch (W) with the SHARPENED AXE.
- Combine the SPADE BLADE and SPADE HANDLE to create the SPADE ().
- Dig up all three graves (1-3) with the SPADE and turn each handle.
- Go into the back room.
- Return to the graveyard.

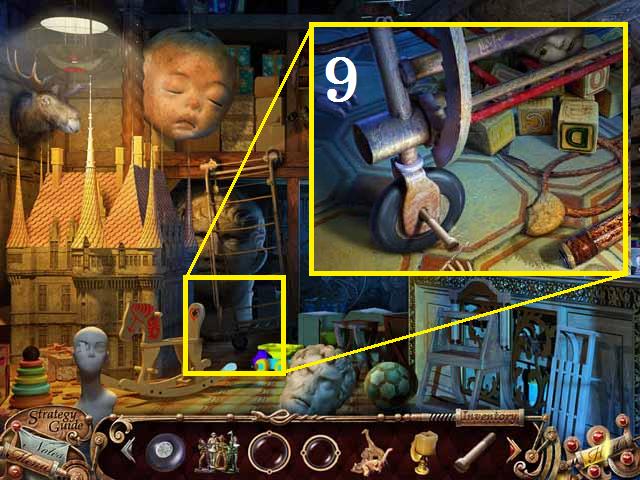
- Click on the sparkles to play a HOS.
- Place the ballerina (5) in the box (6). For ease of identification the FEATHERS have been marked in orange and the SHURIKEN have been marked in pink in the screenshot.
- Receive the DIP NET.

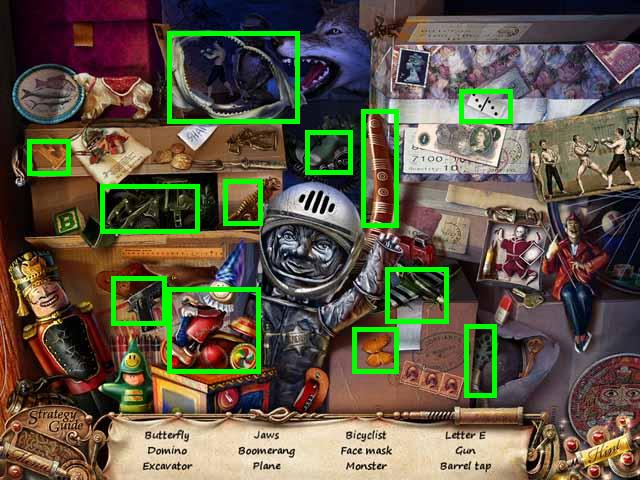
- Return to the back room; zoom into the magical well (X) and pick up the SPECIAL KEY with the DIP NET.
- Return to building 18.
- Zoom into the door; place the SPECIAL KEY (7).

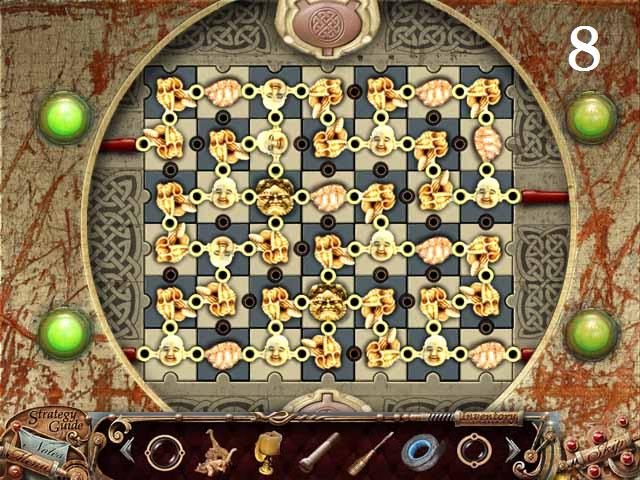
- Spin the elements as shown in the screenshot (8).

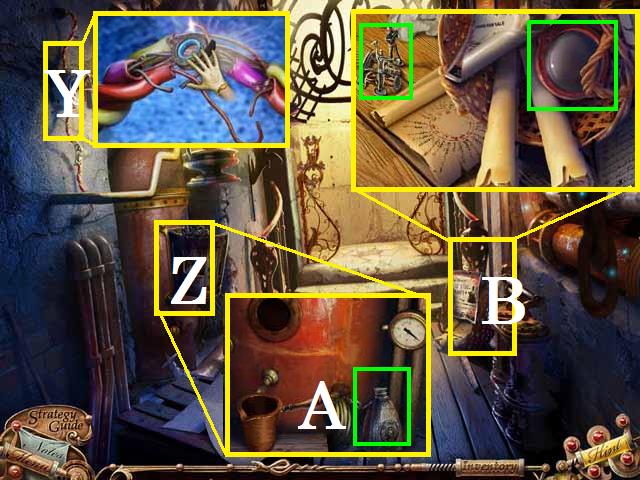
- Enter the hallway; zoom into the wires (Y) and fix with the DUCT TAPE.
- Zoom into the stove (Z) and pick up the EMPTY FLASK (A).
- Zoom into the corner (B); move the papers and pick up the LENS and TIN SOLDIERS (green).

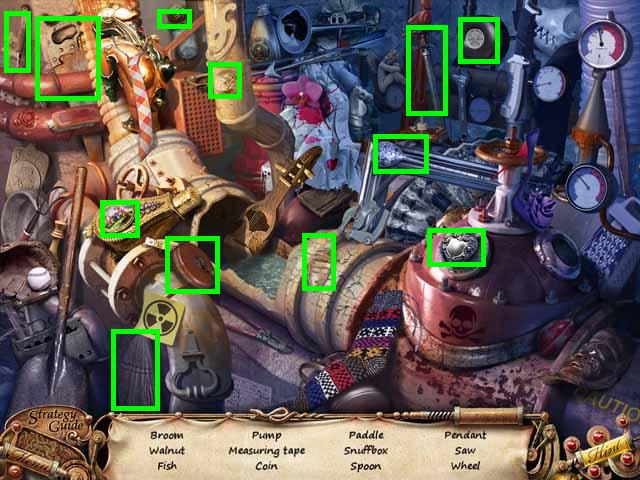
- Zoom into the sparkles to play a HOS.
- Receive the WHEEL.


- Return to the toy store.
- Zoom back into the ladder.
- Place the WHEEL (9) followed by the SCREW and the SCREWDRIVER.


- Zoom into the sparkles above to play a HOS.
- Receive the BARREL TAP.

- Move to the restaurant.
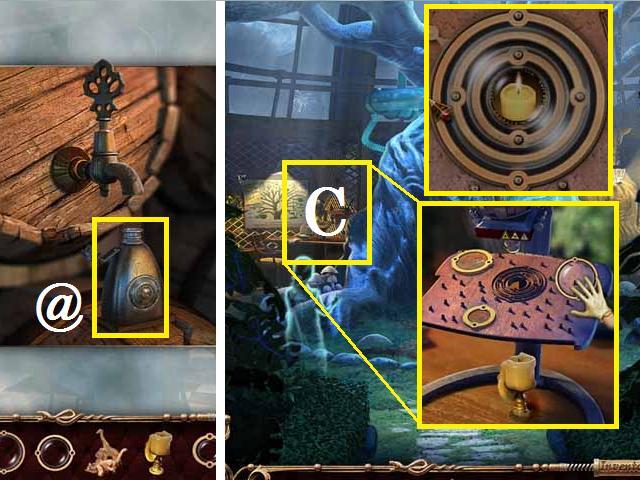
- Zoom back into the alcohol barrel; place the TAP and the FLASK.
- Pull the TAP, and then pick up the FULL FLASK (@).
- Return to the graveyard; zoom into the microscope (C).
- Place the three LENSES and the CANDLE.
- If you move one LENS at a time, alternating sides, you can get them all into the center, as shown in the screenshot. (Hint: click over the peg to move the LENS).
- Receive the LIT CANDLE.

- Move back to building 18 and enter the hallway.
- Zoom into the stove; place the WOODEN TOYS, the FULL FLASK, and the LIT CANDLE inside.
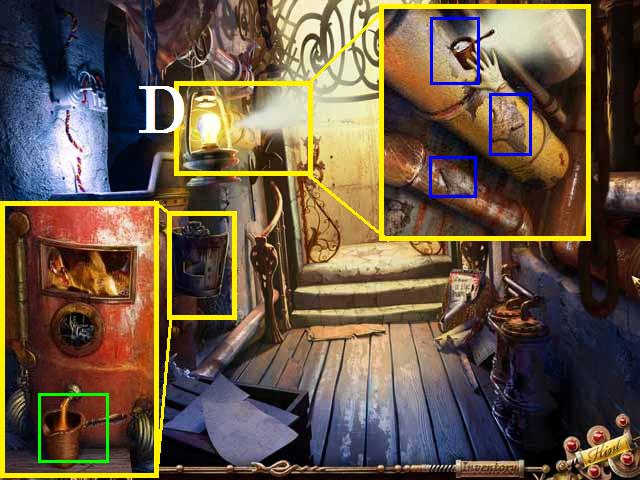
- Place the TIN SOLDIERS in the stove and pick up the MOLTEN TIN (green).
- Zoom into the pipes (D); fix all three holes (blue) with the MOLTEN TIN.

- Use the elevator to go upstairs.
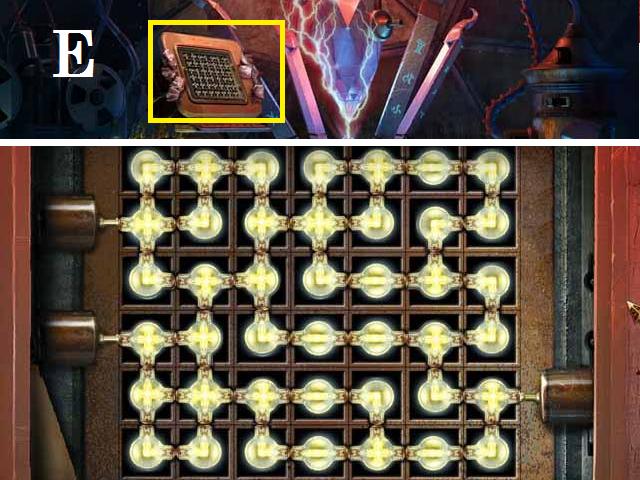
- Zoom into the panel (E).
- Rotate the elements as shown in the screenshot.
- Pick up the FUSE.

- Go back outside.
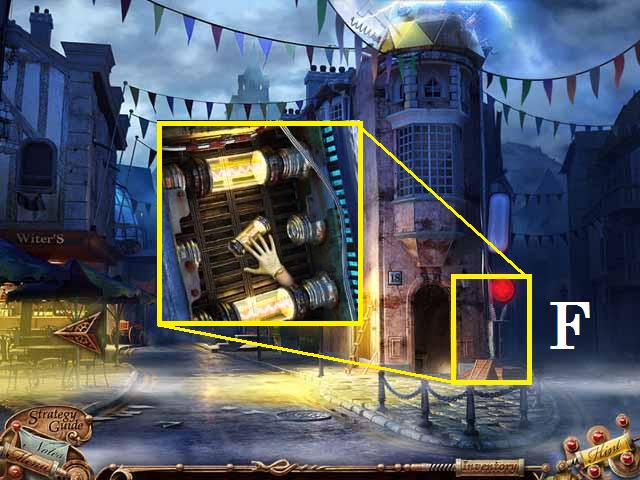
- Zoom into the side of building 18 (F) and place the FUSE.
- Take the now available path.
Chapter 4: The Fair

- Move left toward the fountain and garage.
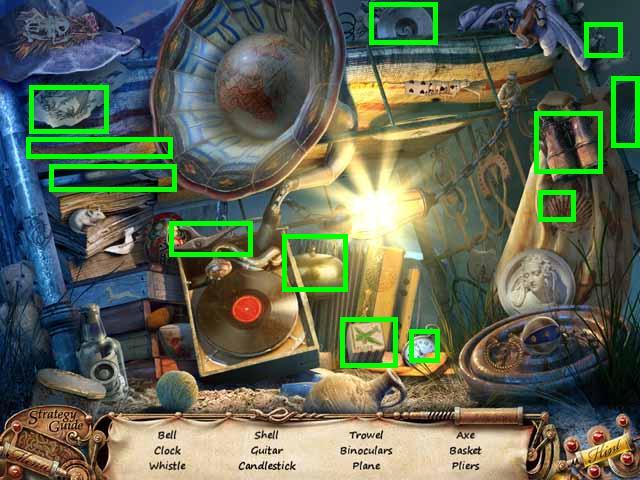
- Zoom into the sparkles to play a HOS.
- Receive the PLIERS.

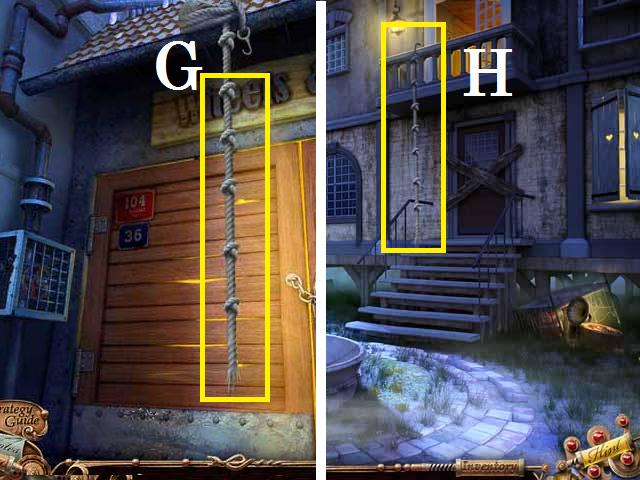
- Move toward the garage; pick up the ROPE with HOOK (G).
- Back up one scene.
- Drape the ROPE with HOOK over the balcony (H) and go upstairs.

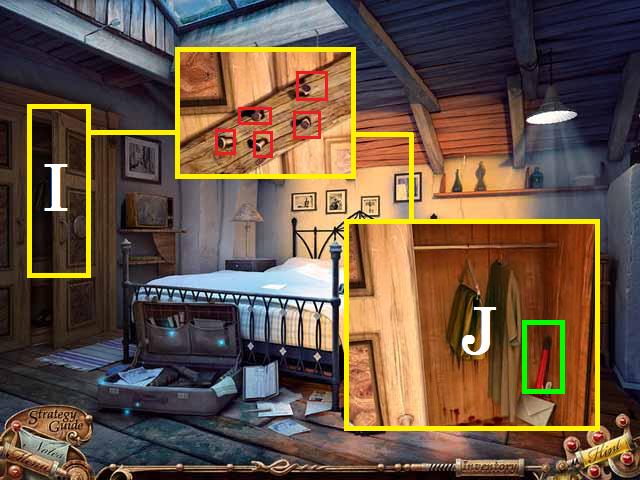
- Zoom into the closet door (I); remove the nails (red) with the PLIERS.
- Move the letter and pick up the WRENCH (J).

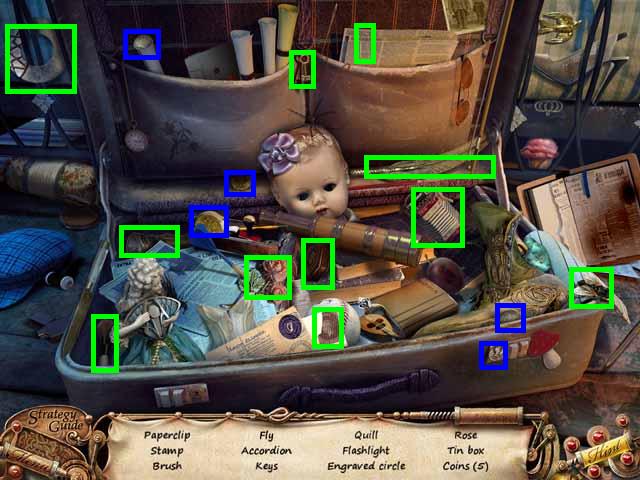
- Zoom into the sparkles to play a HOS.
- The 5 coins are marked in blue.
- Receive the ENGRAVED CIRCLE.

- Return to the garage door.
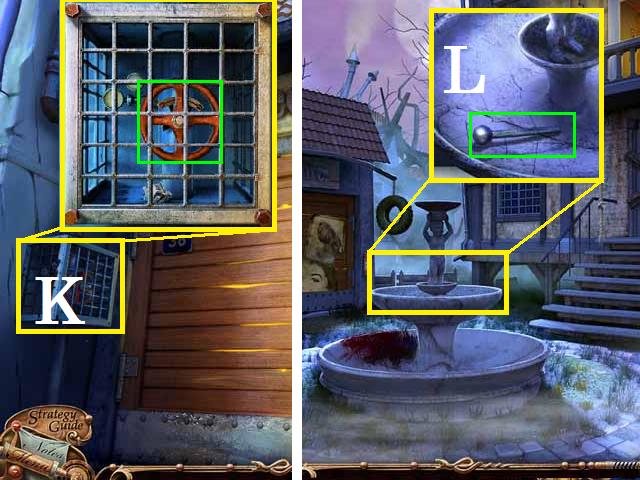
- Zoom into the cage (K); remove all four bolts with the WRENCH and spin the handle.
- Move back one scene and zoom into the top tier of the fountain.
- Pick up the HANDLE (L).
- Return to the garage door.

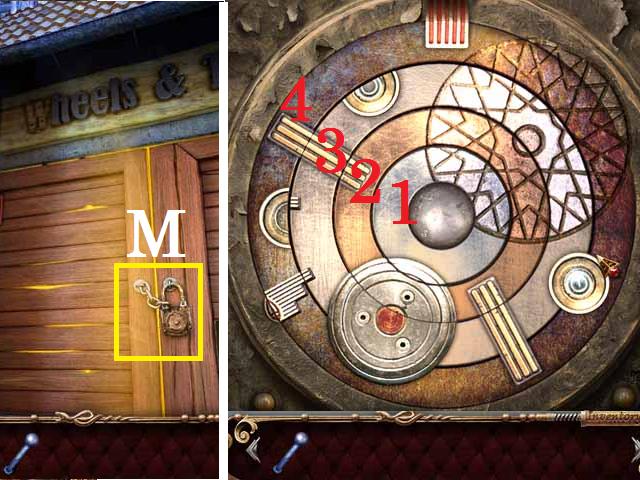
- Zoom into the lock (M); place the ENGRAVED CIRCLE.
- To set the circles, as shown in the screenshot, start with the inner most circle (1), followed by the third (3), second (2), and finish with the outer ring (4).
- Enter the garage.

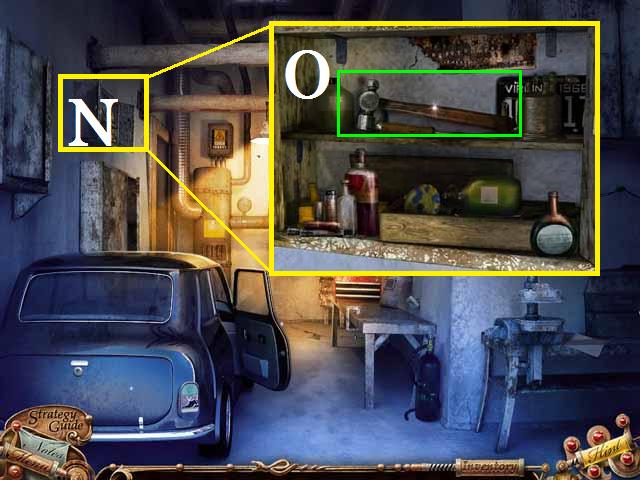
- Zoom into the shelf (N).
- Move the items on the shelf and pick up the HAMMER (O).

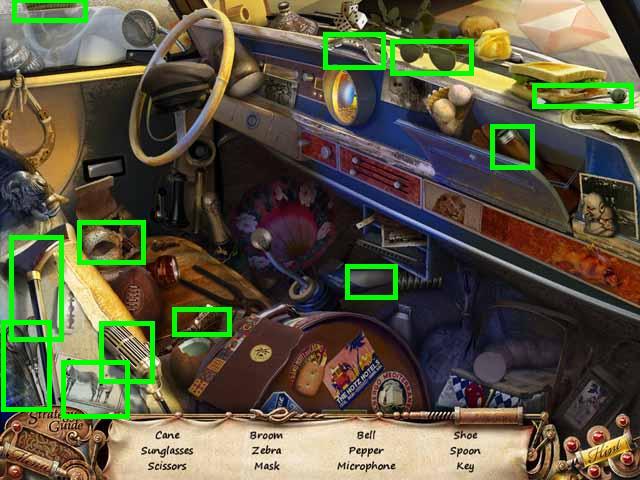
- Zoom into the sparkles to play a HOS.
- Receive the BENT CAR KEY.

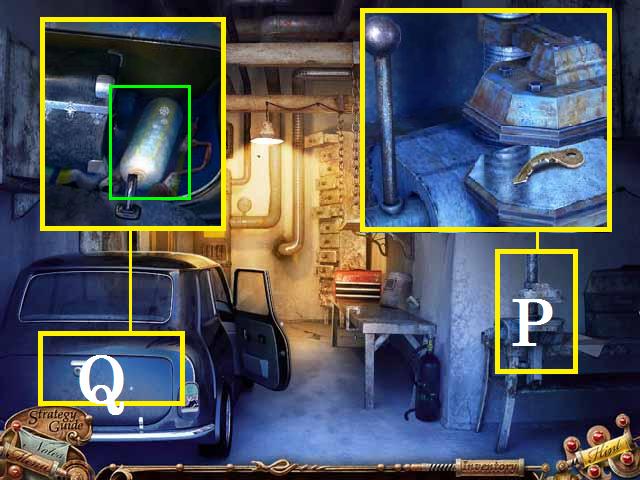
- Zoom into the vice (P); place the BENT CAR KEY and the HANDLE.
- Pull the HANDLE and pick the CAR KEY back up.
- Zoom into the trunk (Q) and open it with the CAR KEY.
- Pick up the LIQUID NITROGEN (green).

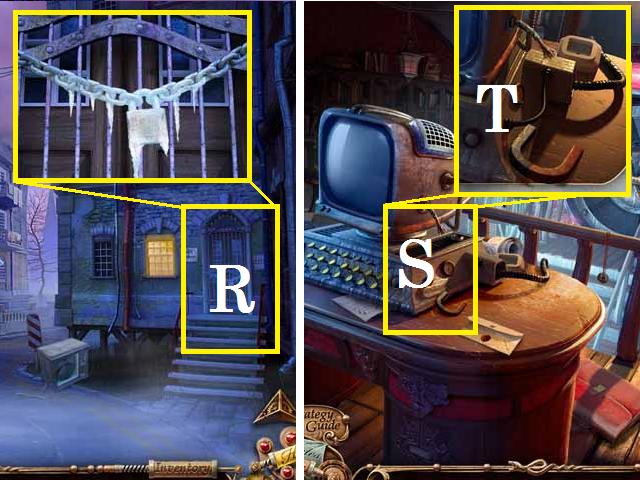
- Back up three scenes.
- Move toward the archive building.
- Zoom into the door lock (R); spray the LIQUID NITROGEN on the lock and break it with the HAMMER.
- Go inside and zoom into the computer (S).
- Pick up the MAGNET (T).

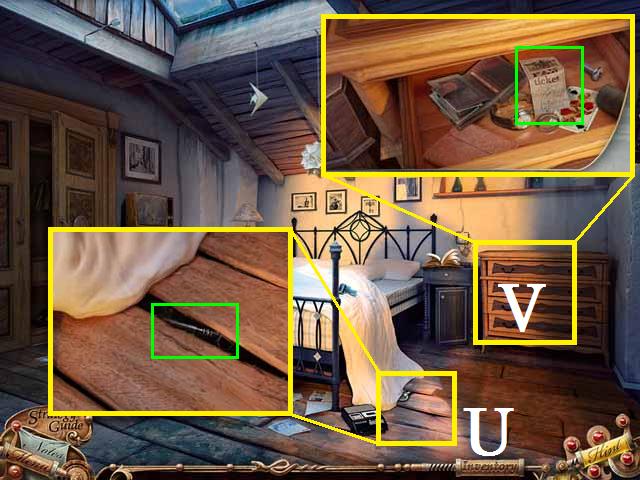
- Return to the hotel room.
- Zoom into the floor (U) and pick up the KEY (green) with the MAGNET.
- Zoom into the dresser (V) and open the door with the KEY.
- Pick up the FUNFAIR TICKET (green).

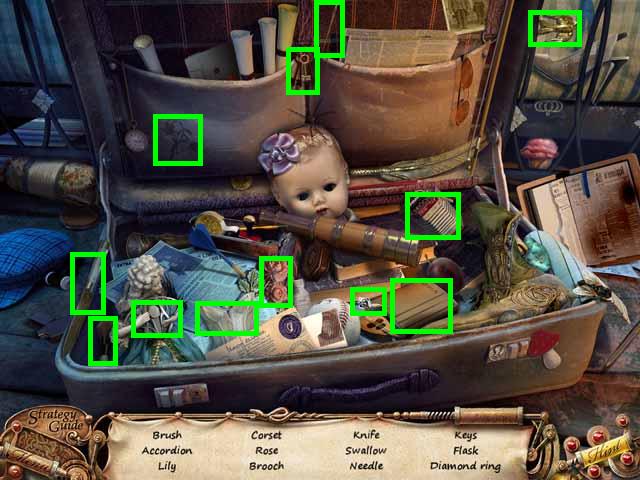
- Zoom into the sparkles to play a HOS.
- Receive the DIAMOND RING.

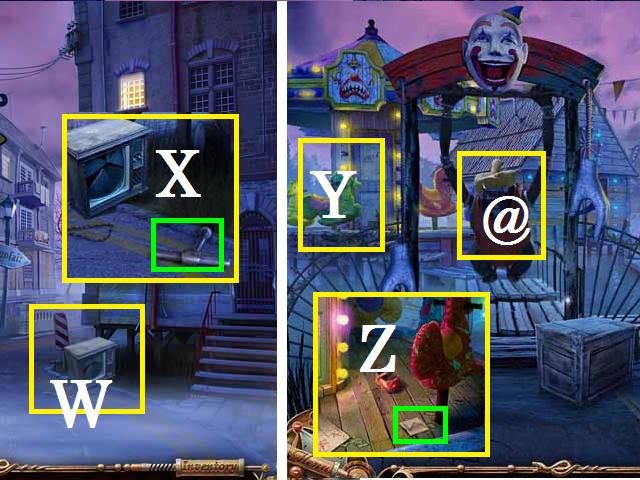
- Back out two scenes.
- Zoom into the TV (W) and pick up the SPECIAL KEY (X).
- Move towards the fair grounds.
- Give the FUNFAIR TICKET to the gatekeeper (@).
- Zoom into the carousel(Y); pick up the SIGN (Z).

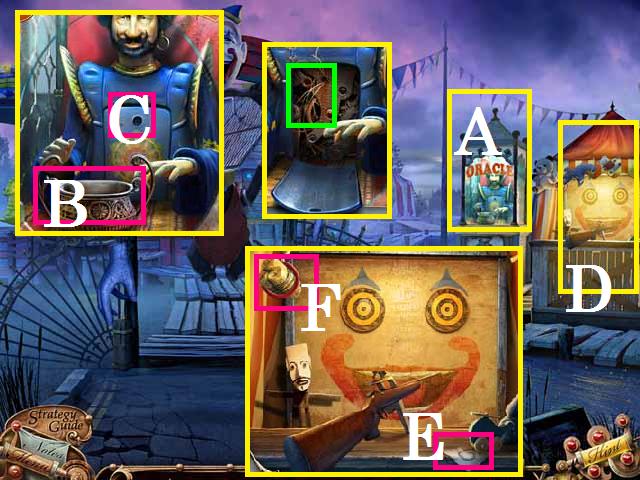
- Zoom into the fortune teller (A); cut the glass with the DIAMOND RING and pick up the EMPTY POT (B).
- Open the panel (C) with the SPECIAL KEY and pick up the WIRE (green).
- Zoom into the shooting gallery (D); pick up the SIGN (E) and the CANDLES (F).

- Enter the fair.
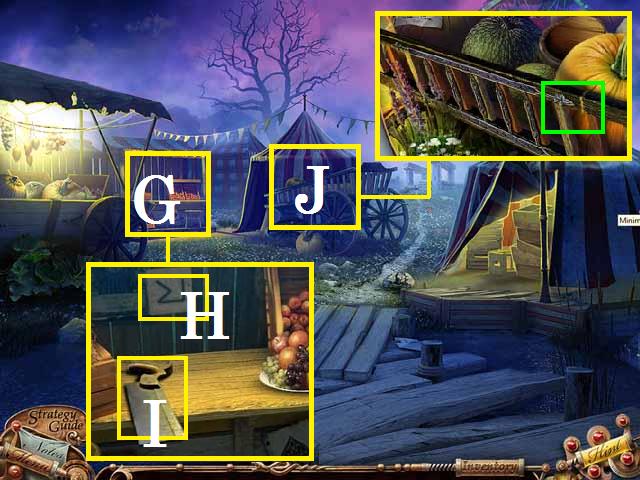
- Zoom into the stand (G); pick up the SIGN (H) and the SAW (I).
- Zoom into the cart (J); SAW the side (green) to get the LADDER PART.

- Move forward down the path.
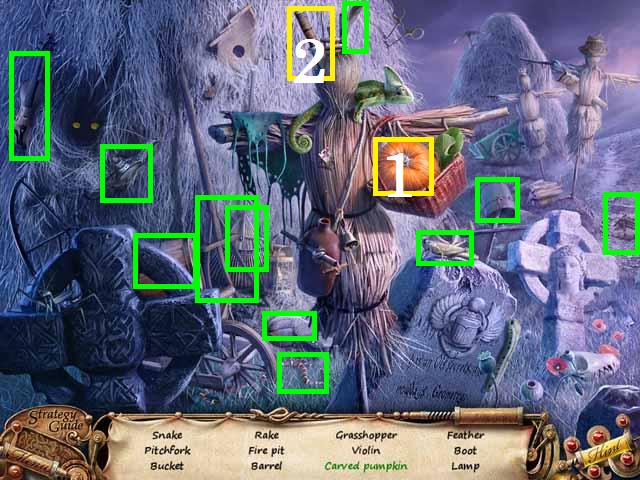
- Zoom into the sparkles to play a HOS.
- Carve the pumpkin (1) with the knife (2).
- Receive the LAMP.

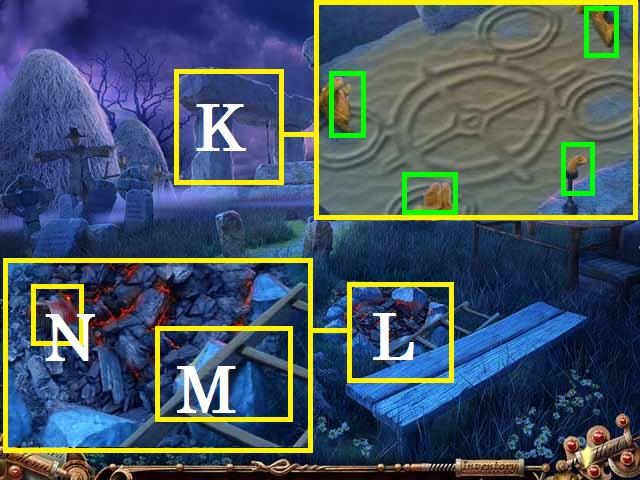
- Zoom into the altar (K); pick up the CANDLE PIECES (green).
- Zoom into the fire pit (L); pick up the LADDER PART (M) and click the can (N) two times.
- Place all of the CANDLE PIECES in the can; pick up the CANDLE.

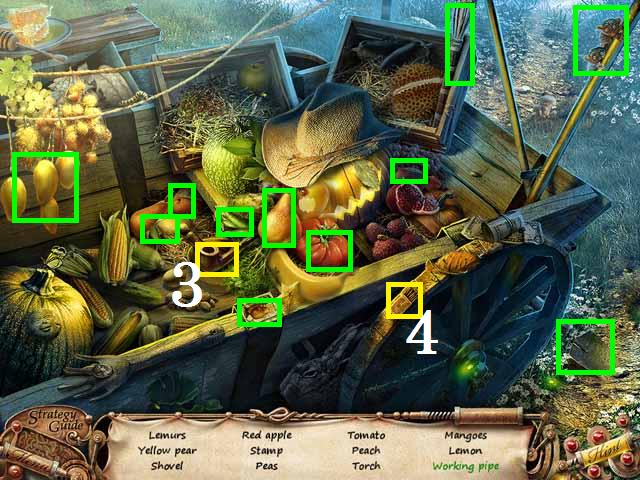
- Combine the two LADDER PARTS to create the NEW LADDER.
- Move back one scene.
- Zoom into the sparkles to play a HOS.
- Light the pipe (3) with the matches (4).
- Receive the UNLIT TORCH.

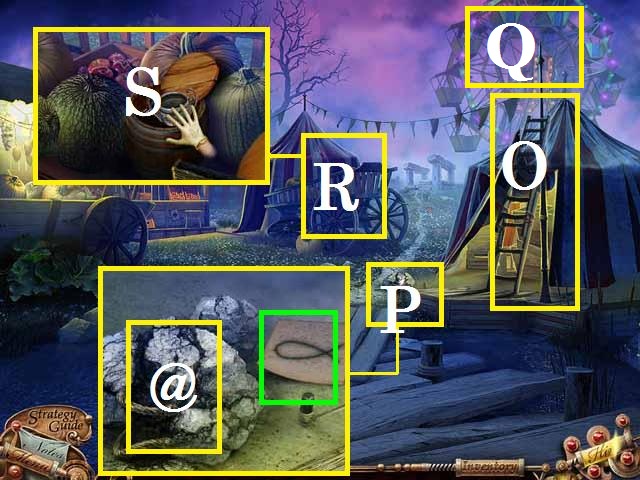
- Lean the NEW LADDER on the tent (O).
- Zoom into the stand (P); pick up the SIGN (green) and place the TORCH (@).
- Place the WIRE on the tent top (Q).
- Pick up the LIT TORCH.
- Zoom into the wagon (R); move the pumpkins and the lid (S).
- Fill the EMPTY POT from the barrel of water.

- Move forward down the path.
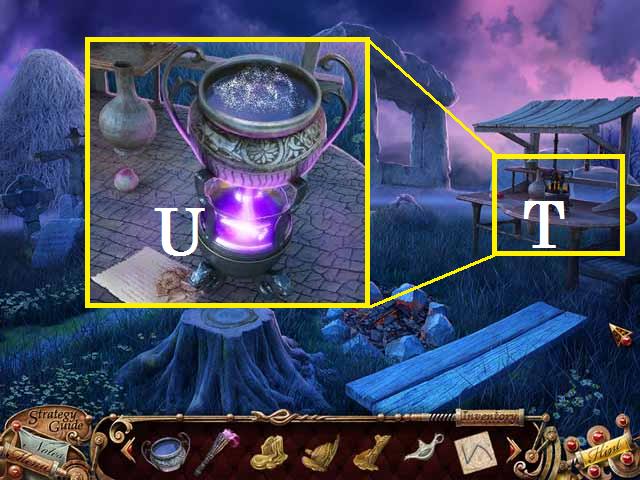
- Zoom into the table (T).
- Light the burner (U) with the LIT TORCH and set the FULL POT on top.

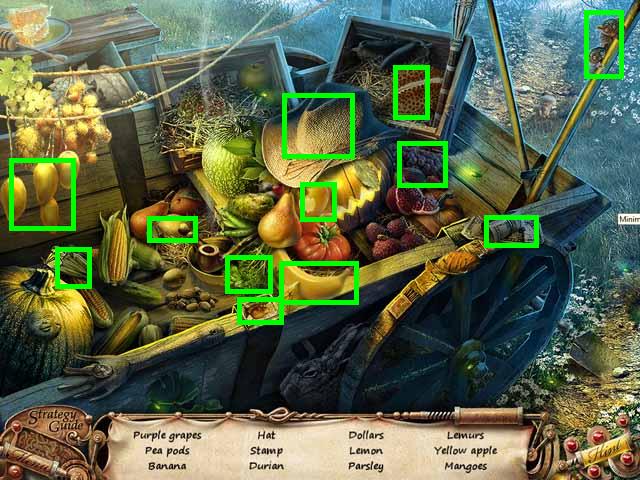
- Move back one scene; zoom into the sparkles to play a HOS.
- Receive the INGREDIENTS.

- Return to the ritual place.
- Zoom back into the table and place the INGREDIENTS in the POT.
- Fill the LAMP from the POT.
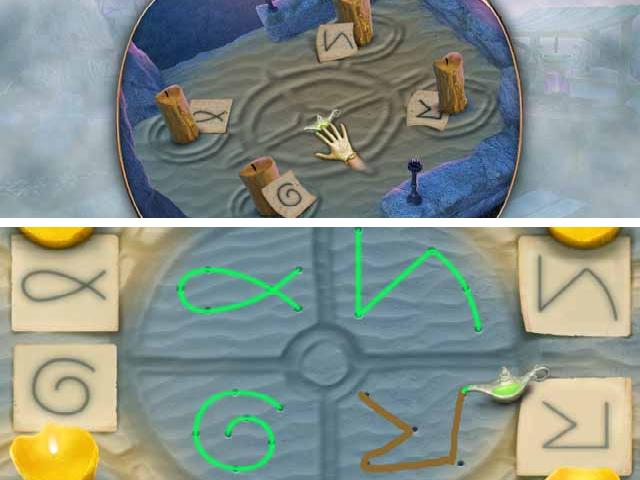
- Zoom back into the altar; place the four CANDLES, SIGNS, and the MAGIC POTION.
- Draw the symbols as shown in the screenshot.

- Back up to the fair’s entrance.
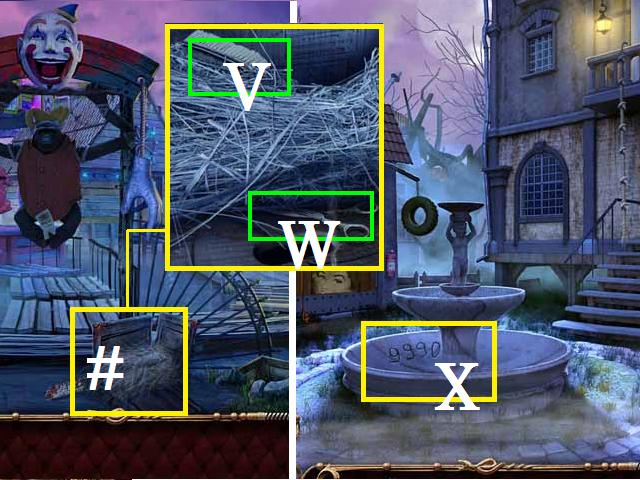
- Zoom into the crate (#); pick up the BRUSH (V) and SCISSORS (W).
- Return to the fountain; scrub the dirt (X) with the BRUSH to get the code.

- Move back one scene.
- Zoom back into the TV; cut the CORD (Y) with the SCISSORS.
- Go inside the archives; zoom back into the computer.
- Place the CORD to see the path (6) through the archives.

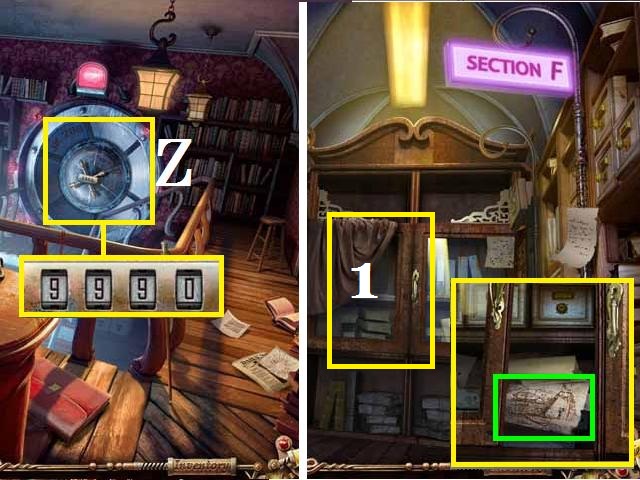
- Zoom into the door lock (Z); enter the code 9990.
- Move through the archives as follows: forward, right, forward, left, forward, left, forward, right.
- When you get to section F zoom into and open the cabinet (1).
- Pick up the paper (green).
Chapter 5: The Underwater Lab

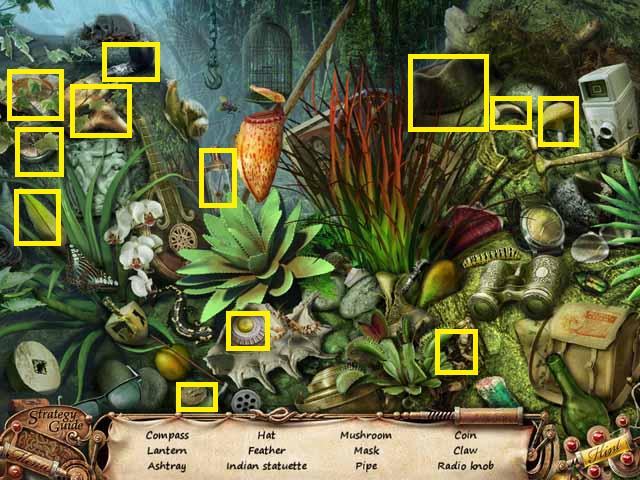
- Zoom into the sparkles to play a HOS.
- Receive the RADIO KNOB.

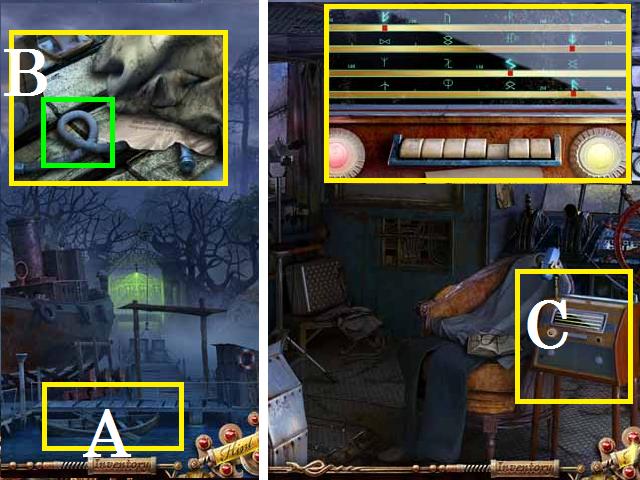
- Move back two scenes.
- Zoom into the row boat (A); move the cloth and pick up the HOSE (B).
- Move to the boat and enter the cabin.
- Zoom into the radio (C); place the RADIO KNOB.
- Click both knobs until the symbols light up as shown in the screenshot.

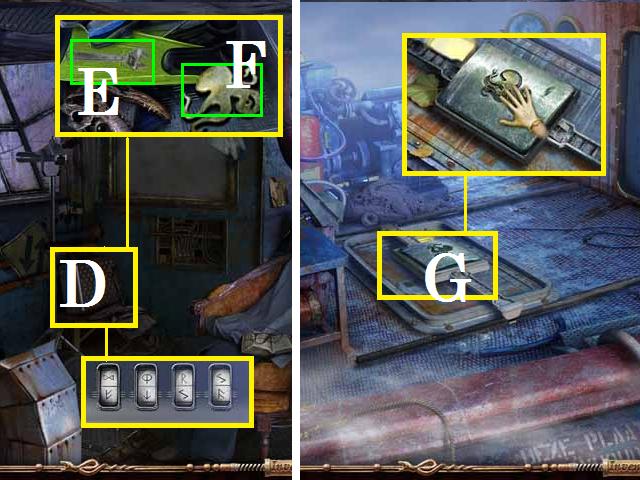
- Zoom into the suitcase (D); key in the code from the radio.
- Pick up the WRENCH (E) and OCTOPUS KEY (F).
- Stay on the boat but exit the cabin.
- Place the OCTOPUS KEY on the hatch (G) and enter the hold.

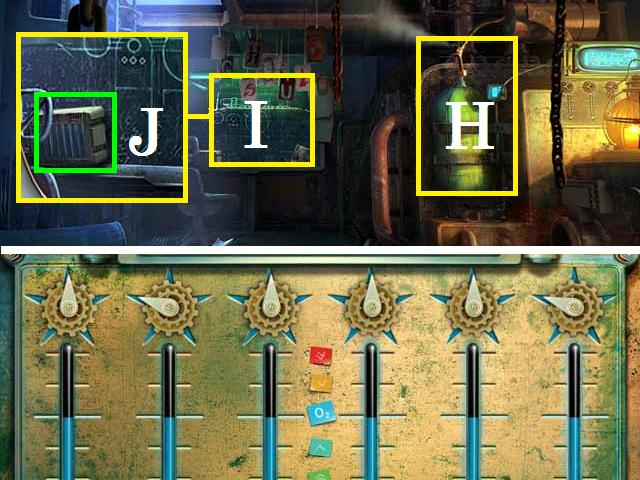
- Zoom into the busted hose (H).
- Remove the hose with the WRENCH and attach the new HOSE.
- Set the dials, as shown in the screenshot, and receive the OXYGEN TANK.
- Zoom into the desk (I) and pick up the EMPTY BATTERY (J).


- Go to the upstairs of the lighthouse and enter the attic.
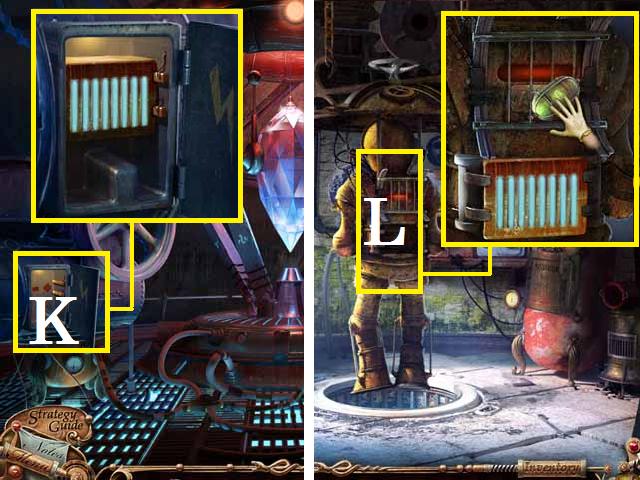
- Place the EMPTY BATTERY in the charger (K); pick it up after it is fully charged.
- Go downstairs and enter the lower level.
- Zoom into the dive suit (L); place the OXYGEN TANK and CHARGED BATTERY on it.

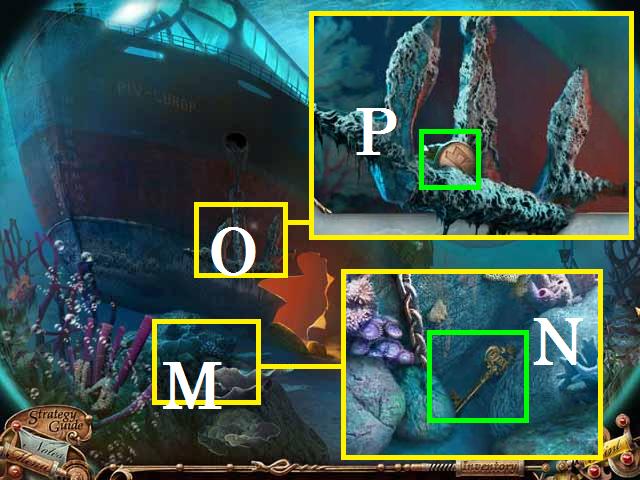
- Zoom into the rocks (M); move them and pick up the ANCIENT KEY (N).
- Zoom into the anchor (O) and pick up the GUARDIAN KEY (P).

- Enter the sunken ship.
- Zoom into the left GUARDIAN (Q); open the glass and place the GUARDIAN KEY.
- Zoom into the trunk (R); unlock it with the ANCIENT KEY and pick up the GUARDIAN KEY (S).
- Zoom into the right GUARDIAN (T); open the glass, place the KEY and pick up the ARROW (green).

- Move forward through the door.
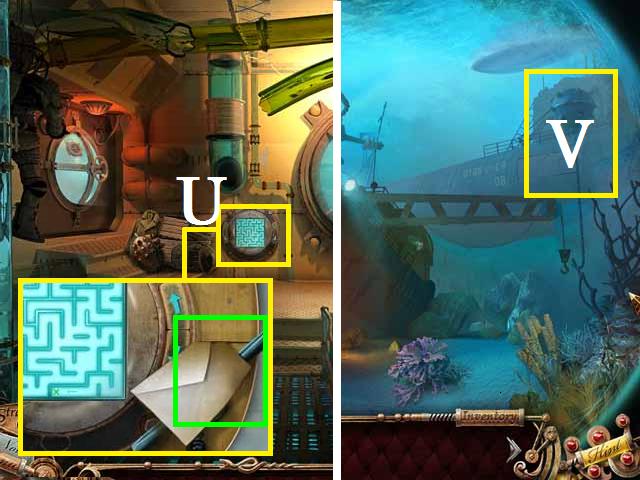
- Zoom into the puzzle lock (U) and pick up the EMPTY HARPOON GUN (green).
- Combine the EMPTY HARPOON GUN and ARROW to create the HARPOON.
- Exit the ship.
- Shoot the HARPOON at the mine (V).

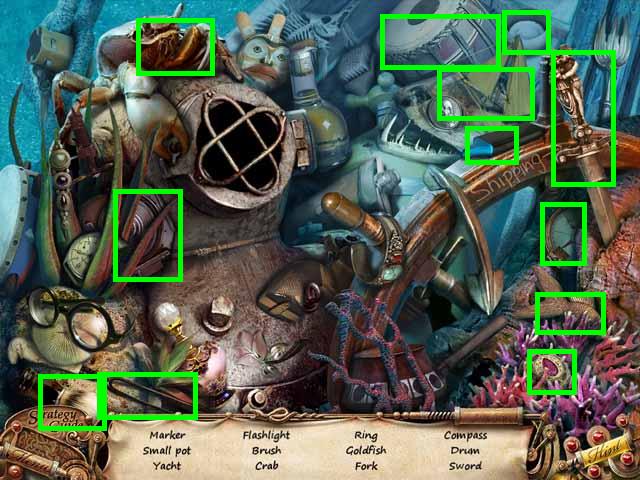
- Zoom into the sparkling wreck to play a HOS.
- Receive the KNIFE.


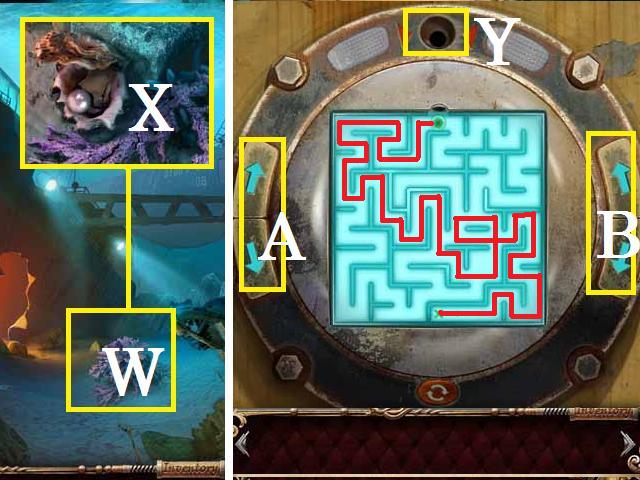
- Zoom into the seaweed (W); cut IT with the KNIFE and pick up the PEARL (X).
- Go back inside and zoom into the puzzle lock.
- Place the PEARL in the hole (Y).
- Use the arrows (A-B) to rotate the board and move the pearl along the labyrinth.
- Follow the path marked in red in the screenshot.

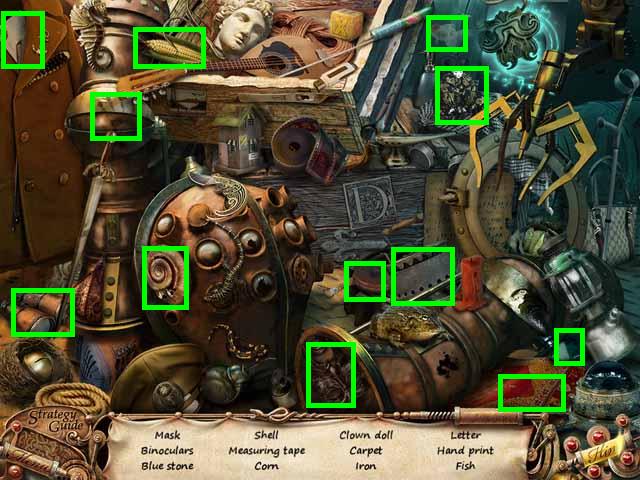
- Zoom into the sparkling pile of crates to play a HOS.
- Receive the OIL CAN.


- OIL the door’s track (D) and move forward.
- Zoom into the stand (E); move the book and pick up the HOOK (F).
- Zoom into the drain (G); move the paper and pick up the KEY (@) with the HOOK.
- Move the other paper and pick up the PUNCH CARD (I).

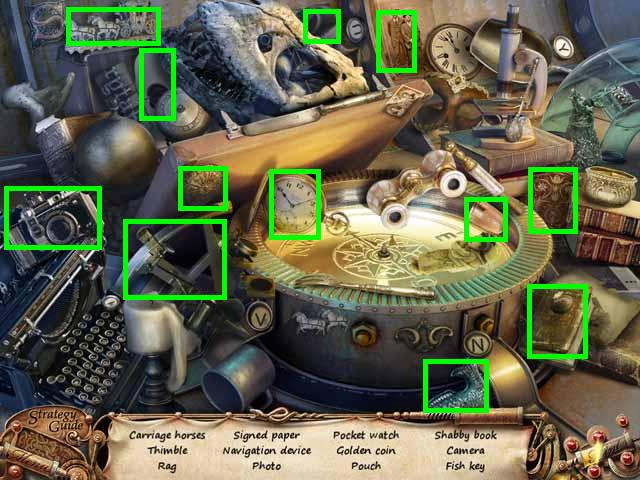
- Zoom into the sparkles to play a HOS.
- Receive the FISH KEY.

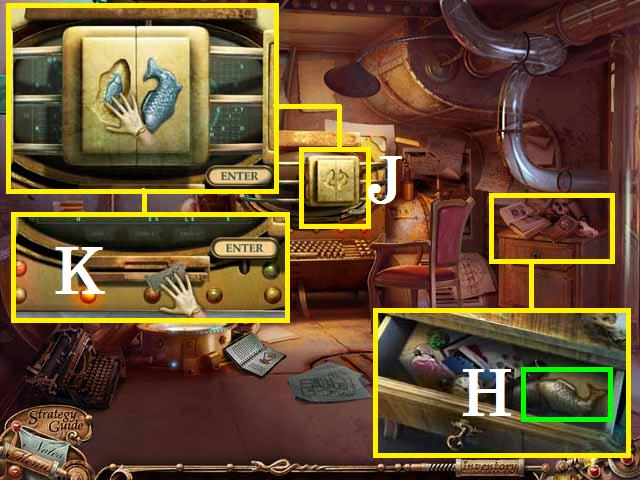
- Zoom back into the stand; unlock the drawer with the KEY and pick up the FISH KEY (H).
- Zoom into the lock (J) and place both FISH KEYS.
- Insert the PUNCH CARD into the slot (K).

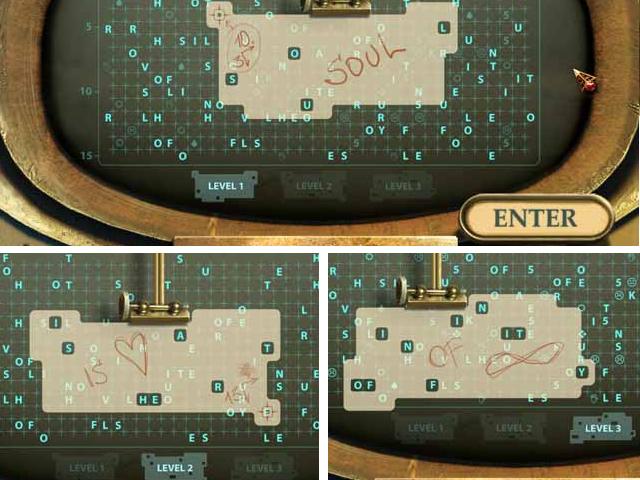
- Move the PUNCH CARD to spell out ‘soul’, ‘is heart’ and ‘of infinity’ as shown in the screenshot and hit enter.
- Exit one scene and zoom back into the sparkles to play a HOS.

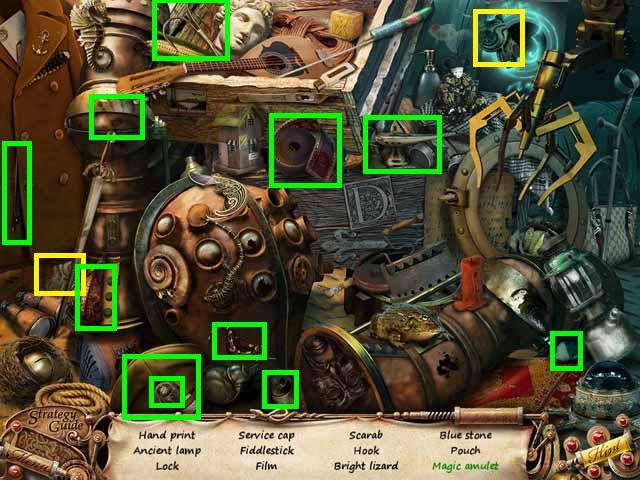
- Combine the two pieces (yellow) of the AMULET.
- Receive the MAGIC AMULET.

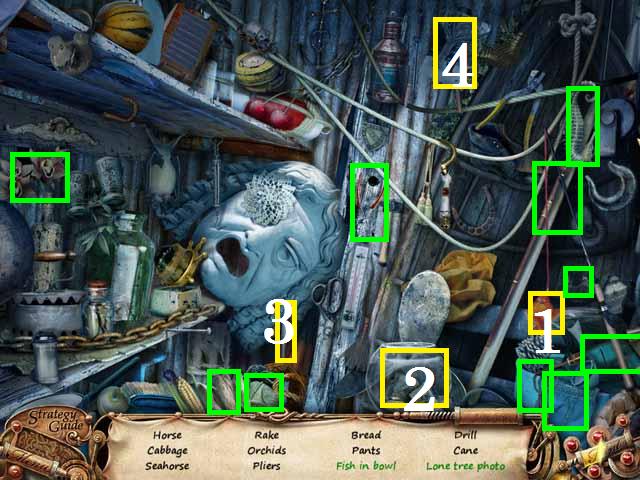
- Once back on top, zoom into the sparkling shed to play a HOS.
- Place the fish (1) in the bowl (2).
- Use the MARKER (3) to scribble out the man in the picture (4).
- Receive the PLIERS.

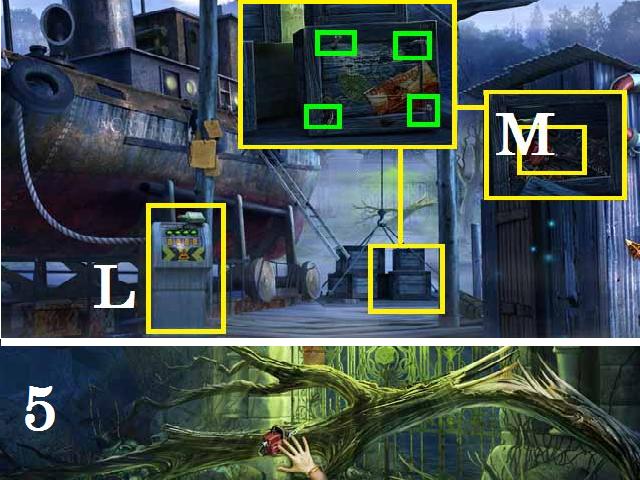
- Zoom into the crate; remove the nails (green) with the PLIERS and pick up the SAW (M).
- Raise the crates, using the control panel (L), and move forward to the gate.
- Cut the fallen tree (5) with the SAW three times until the gate opens.
- Go through the gate.

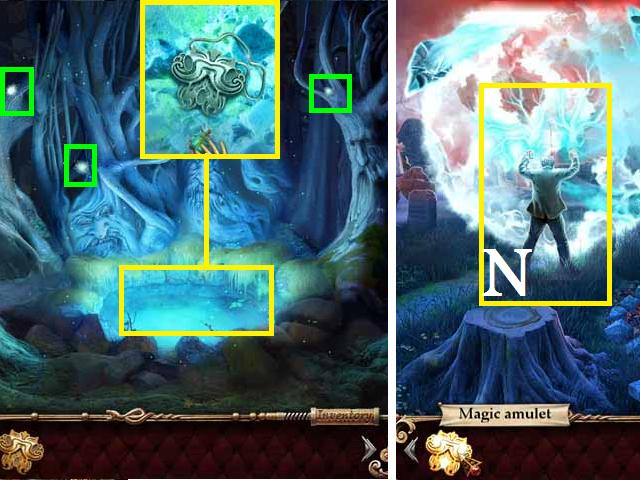
- Pick up the three MAGIC BEETLES (green).
- Zoom into the magic pool; place the MAGIC AMULET and the BEETLES.
- Pick up the MAGIC AMULET.
- Back out one scene.
- Drop the MAGIC AMULET over Daniel (N).
- Congratulations! You have completed Guardians of Beyond: Witchville!





 Journalistic Stories Walkthrough, Guide, & Tips
 Kellie Stanford: Turn of Fate Walkthrough, Guide, & Tips
 Eternal Journey: New Atlantis Walkthrough, Guide, & Tips
 Dark Parables: The Red Riding Hood Sisters Walkthrough, Guide, & Tips
 Mystery Murders: The Sleeping Palace Walkthrough, Guide, & Tips