Vampire Legends: The True Story of Kisilova Walkthrough, Guide, & Tips
Vampire Legends: The True Story of Kisilova Walkthrough

Welcome to the Vampire Legends: The True Story of Kisilova Walkthrough
Vampire Legends: The True Story of Kisilova is an incredible adventure based on the true story of the first documented case of vampirism ever!
Whether you use this document as a reference when things get difficult or as a road map to get you from beginning to end, we’re pretty sure you’ll find what you’re looking for here.
This document contains a complete Vampire Legends: The True Story of Kisilova game walkthrough featuring annotated screenshots from actual gameplay!
We hope you find this information useful as you play your way through the game. Use the walkthrough menu below to quickly jump to whatever stage of the game you need help with.
Remember to visit the Big Fish Games Forums if you find you need more help. Have fun!
This walkthrough was created by BrownEyedTigre, and is protected under US Copyright laws. Any unauthorized use, including re-publication in whole or in part, without permission, is strictly prohibited.
General Tips

- This is the official guide for Vampire Legends: The True Story of Kisilova.
- Select Options to adjust music and sound volume. You can also adjust custom cursor and voiceovers.
- You may choose between Regular Mode and Expert Mode.
- Some of the puzzles in Expert Mode are more challenging than the Regular Mode. Those puzzle solutions are also in the guide.
- The Profile button can be used to manage your profiles in the game.
- The Hidden-object puzzle scenes will be referred to as HOP throughout the guide. Items labeled in orange in the find list require an extra step to find.
- In order to trigger a HOP and other active areas you will need to perform tasks or actions prior. If you are unable to use an Inventory Item or access a HOP when the strategy guide states please check what you may have missed.
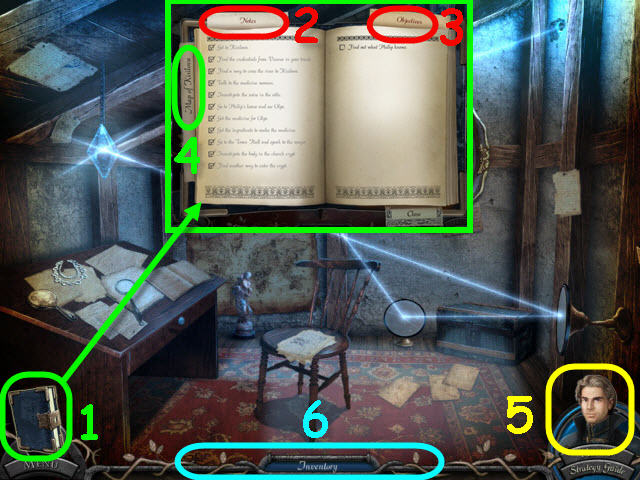
- Open your journal (1) to view your notes (2) and objectives (3).
- Select the Map of Kisilova tab (4) in the journal to access a map.
- The use of the Hint button (5) is unlimited, but you must wait for it to recharge between uses.
- Move your cursor to the bottom of the screen to pull up the Inventory Bar (6).
Chapter 1: Kisilova
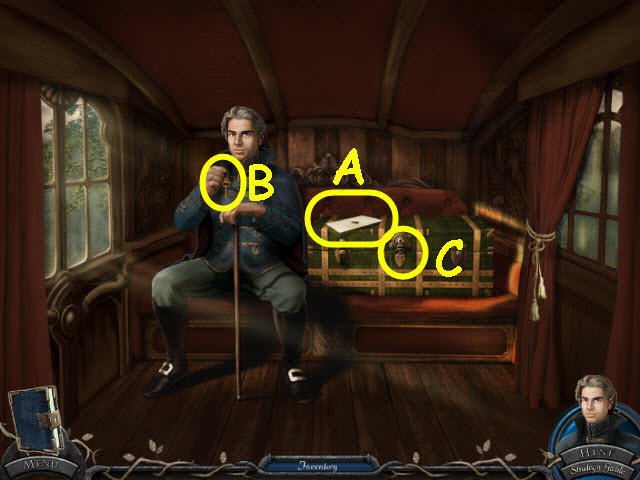
- Examine the letter; open it and read it (A).
- Take the KEY (B).
- Use the KEY on the trunk lock (C).
- Examine the opened trunk to access a HOP.
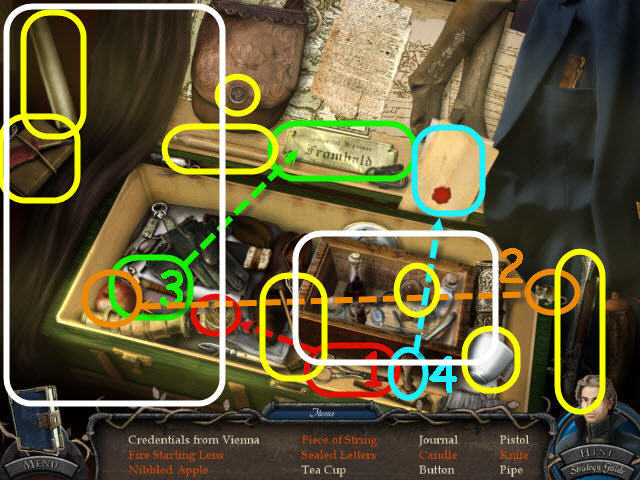
- Find the items listed.
- In the areas circled in white; move the draped cloth and open the wooden box to find hidden items.
- Use the scissors on the string to get a piece of string (1).
- Place the mouse on the apple to get a nibbled apple (2).
- Use the nail puller on the nail and remove the sign to get a knife (3).
- Use the stamp on the seal to get a sealed letters (4).
- You will earn CREDENTIALS FROM VIENNA.
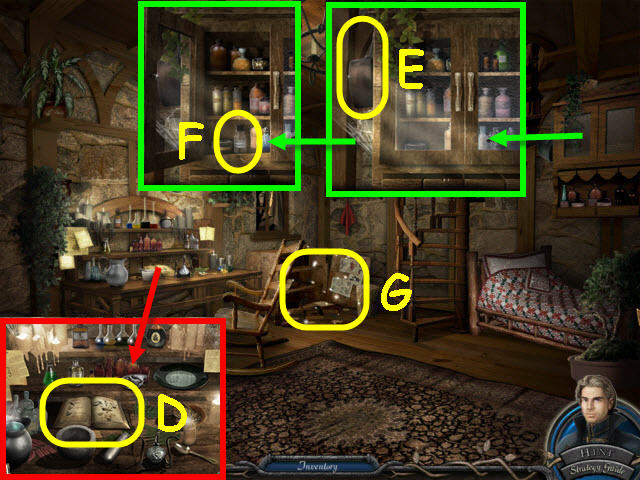
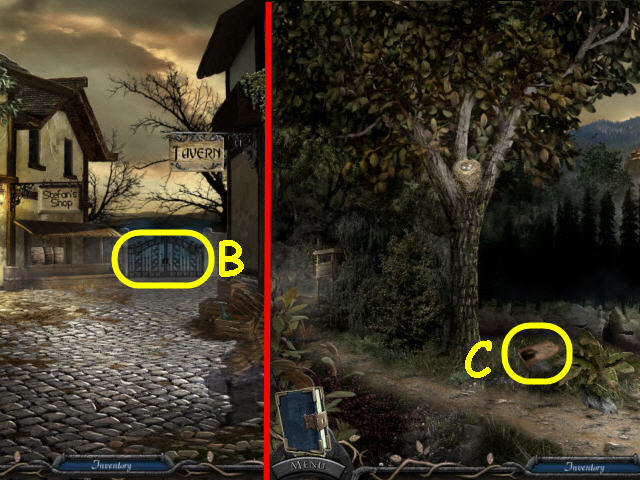
- Exit the train via the door on the left.
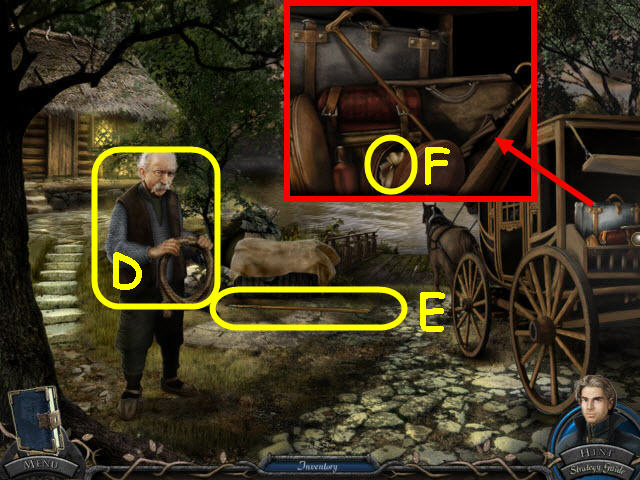
- Speak to the ferry operator (D).
- Take the GAFF (E).
- Examine the back of the coach; move the luggage lid and take the MONEY POUCH (F).
- Go forward to the ferry.
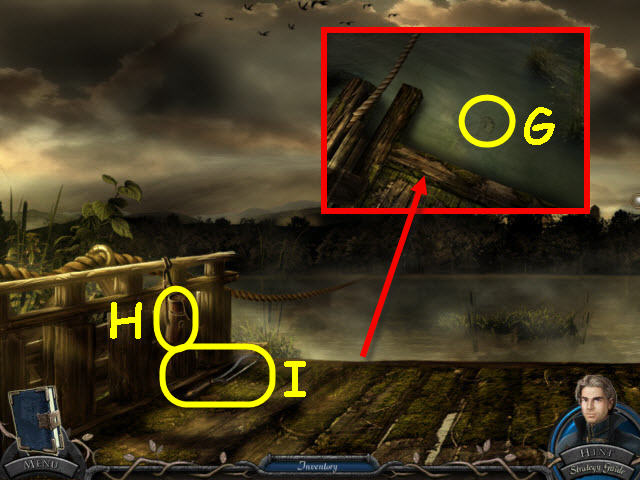
- Examine the water and use the GAFF to get the MISSING GEAR (G).
- Open the pouch; take the SPYGLASS (H).
- Take the HACKSAW (I).
- Back out and enter the ferry operator’s house on the left.
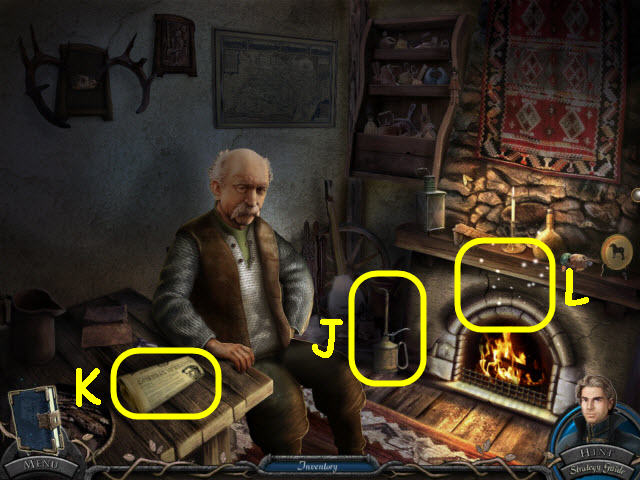
- Take the OILCAN (J).
- Read the newspaper (K) and then give the MONEY POUCH to the ferryman.
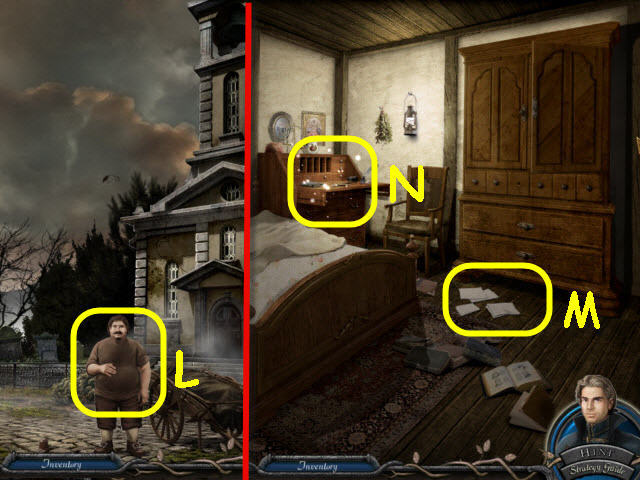
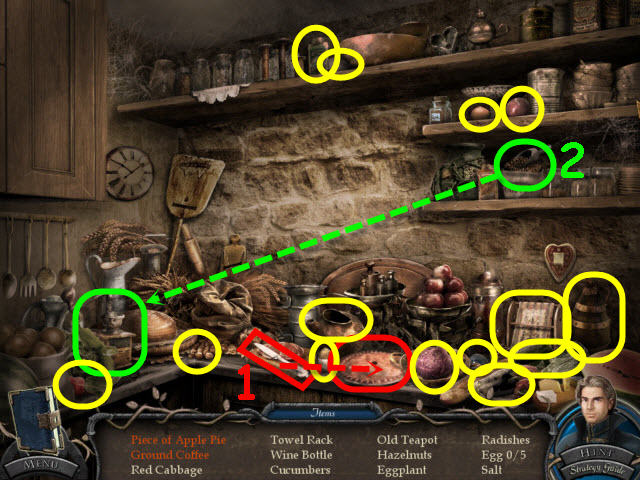
- Examine the fireplace to access a HOP (L).

- Find the items listed.
- Use the net to catch the fly and get the spider (1).
- Open the lid on the coffee can to get coffee beans (2).
- Use the key on the padlock and get an open padlock (3).
- You will earn a CRANK HANDLE.
- Back out.
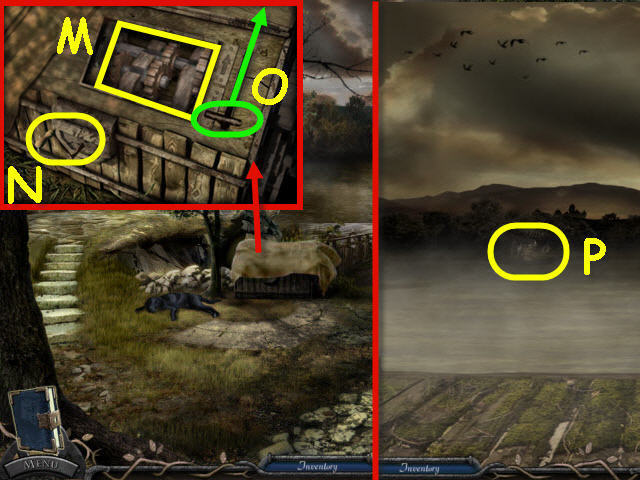
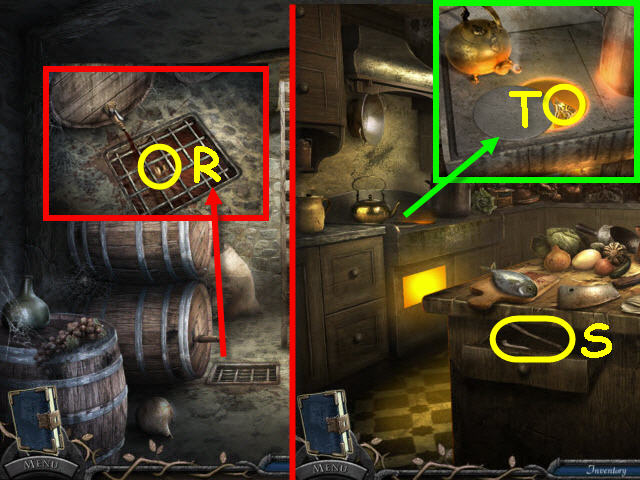
- Remove the cover and examine the mechanism. Use the handle to slide the panel left and place the MISSING GEAR inside (M).
- Use the OILCAN on the gears; place the CRANK HANDLE in the front (N).
- Turn the crank handle and pull up the lever (O).
- Go forward to board the ferry.
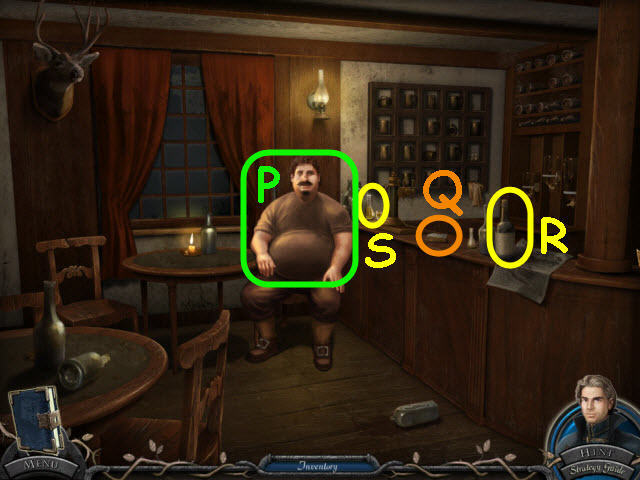
- Use the SPYGLASS on the horizon to trigger a puzzle (P).
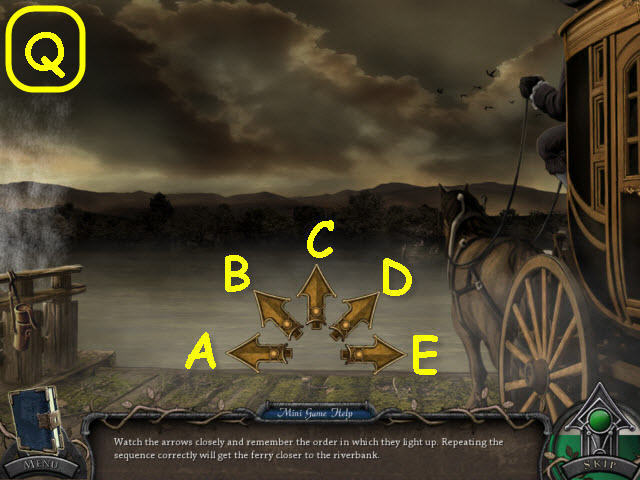
- Repeat the sequences.
- To solve the puzzle, select the following arrows: A-D-B, B-C-E-D, D-E-C-A and B (Q).
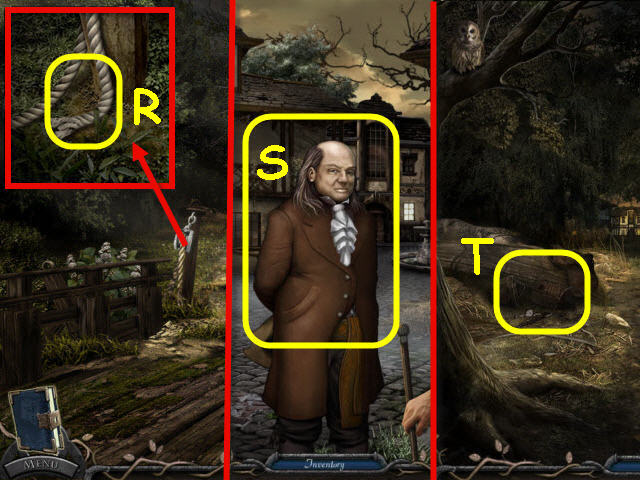
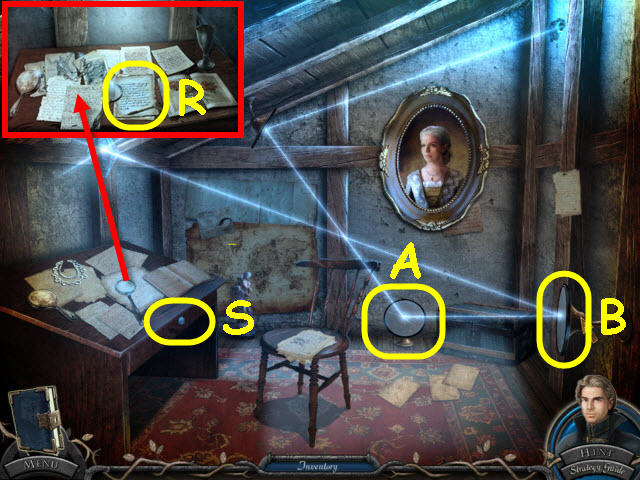
- Examine the winch; use the HACKSAW on the rope to get a PIECE OF ROPE (R).
- Go forward up the path twice.
- Give the CREDENTIALS FROM VIENNA to Philip (S).
- Back out.
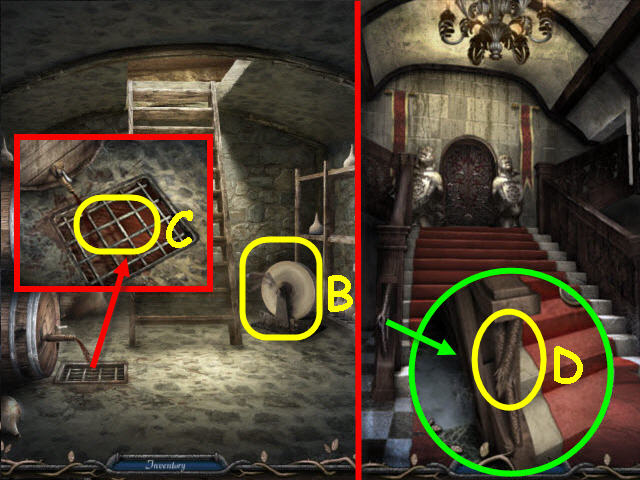
- Examine the debris to access a HOP (T).
- Find the items listed.
- Place the head on the body to get a doll (1).
- Use the pocket knife on the melon to get a melon piece (2).
- Use the chalk on the Tic-tac-toe board to get Tic-tac-toe (3).
- You will earn a DOORBELL.
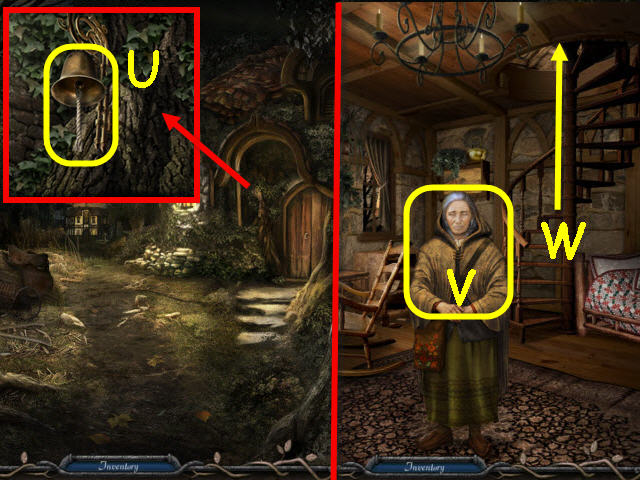
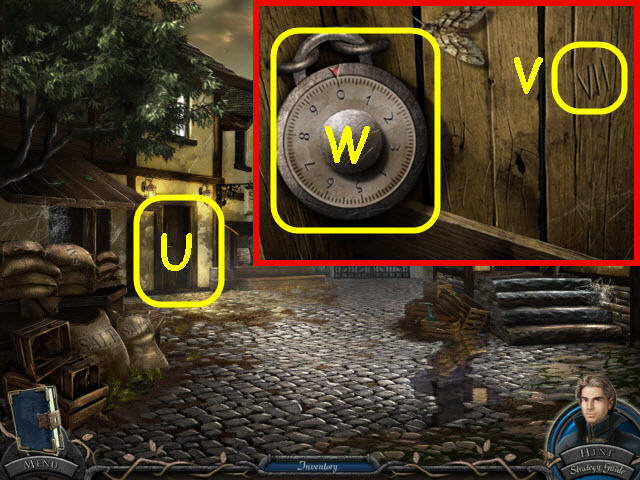
- Examine the area left of the door and hang the DOORBELL on the hook. Place the PIECE OF ROPE on the bell and ring it (U).
- Enter the medicine woman’s house.
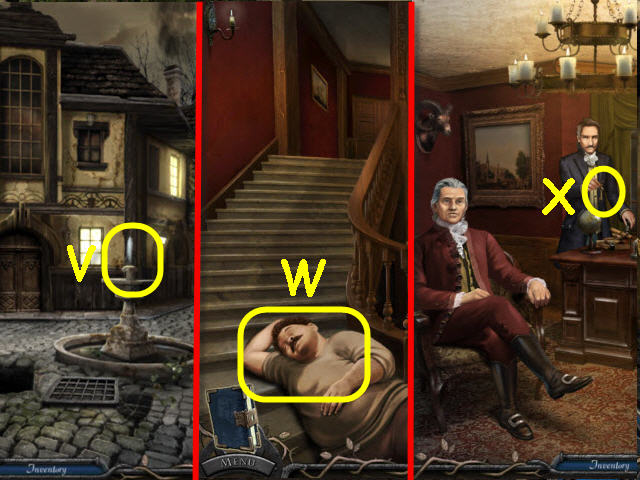
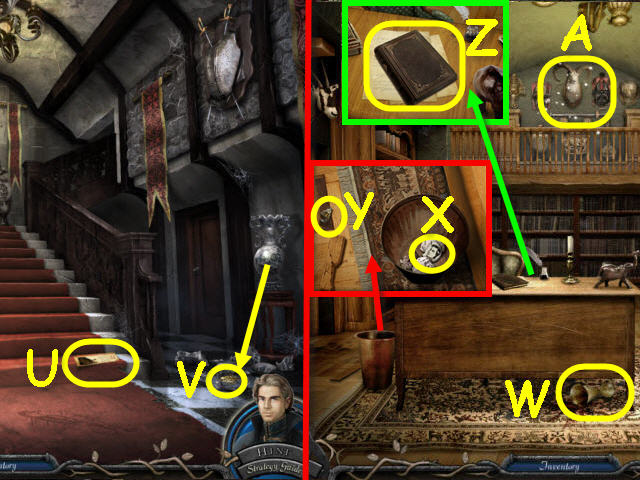
- Speak to the medicine woman (V).
- Go up to the attic (W).
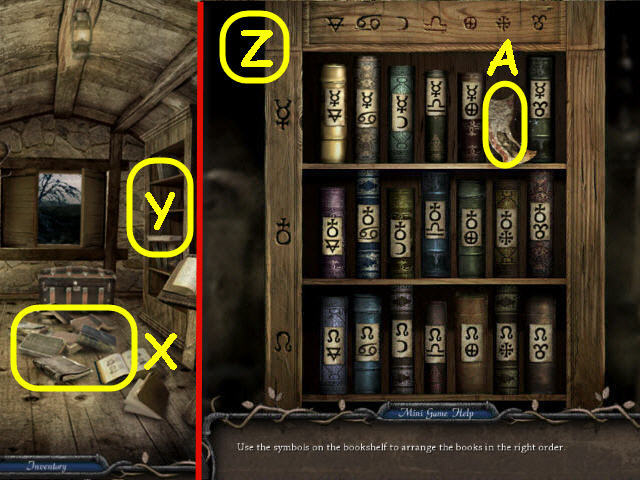
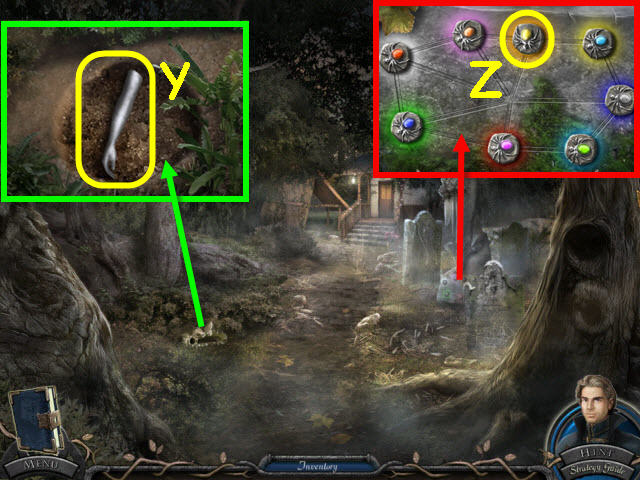
- Pick up the books on the ground (X) and then examine the bookshelves to trigger a puzzle (Y).
- Arrange the books in the correct order.
- See screenshot for solution (Z).
- Take the book page (A).
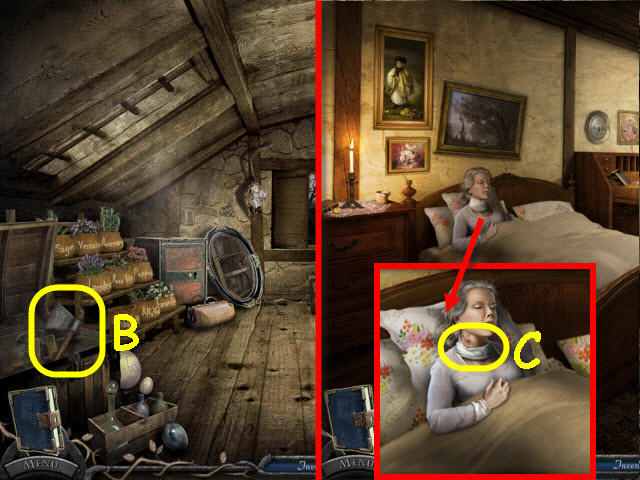
- Open the trunk; take the AXE (B).
- Back out twice; go forward and enter Philip’s house on the right.
- Examine Olga and move the neck bandage; select the bandage again to place it back (C).
- Back out twice and go right into the medicine woman’s house.
Chapter 2: Olga
- Examine the table; read the recipe book (D).
- Examine the cabinet; take the COOKING POT (E).
- Open the left cabinet door; take the EMPTY ELIXIR BOTTLE (F).
- Examine the corner to access a HOP (G).
- Find the items listed.
- Move the wooden panel to get the rope (1).
- Push in the board to get the golden coin (2).
- You will earn GARDEN SHEARS.
- Go up to the attic.
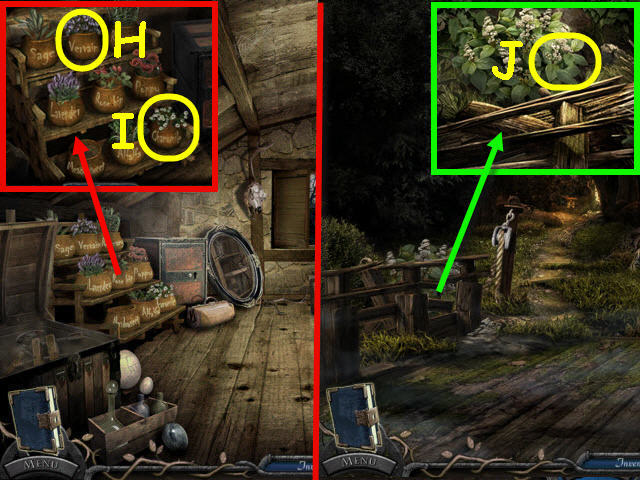
- Examine the herbs; use the GARDEN SHEARS to get the VERVAIN (H) and the CHAMOMILE (I).
- Back out three times.
- Knock down the fence and examine the plant; use the GARDEN SHEARS to get the MEADOWSWEET (J).
- Go forward.
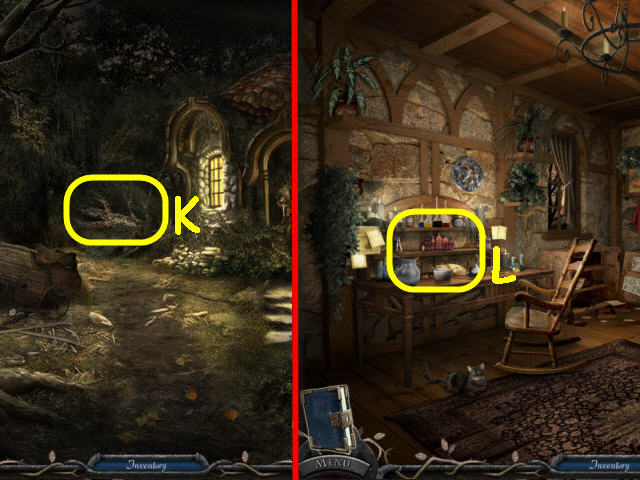
- Use the AXE on the fallen tree (K).
- Go right into the house.
- Examine the table and place the VERVAIN, CHAMOMILE, and MEADOWSWEET on the plate and the COOKING POT in the lower right to trigger a puzzle (L).
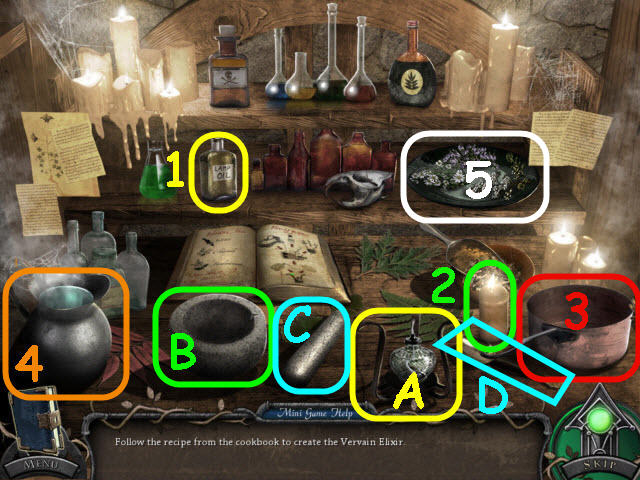
- Follow the directions in the book to create the elixir.
- Place the lamp oil (1) in the burner (A).
- Use the candle (2) to light the burner (A).
- Place the pot (3) on the lit burner.
- Use the water pitcher (4) on the pot.
- Place an herb (5) in the mortar (B) and use the pestle (C) on it.
- Place the crushed herbs in the pot.
- Repeat for the next two herbs (5).
- Use the spoon (D) to stir the pot.
- Use the EMPTY ELIXIR BOTTLE on the pot to get a VERVAIN ELIXIR.
- Back out; go forward and then right into Philip’s house.

- Give the VERVAIN ELIXIR to the medicine woman (M).
- Take the MEDALLION (N).
- Back out.
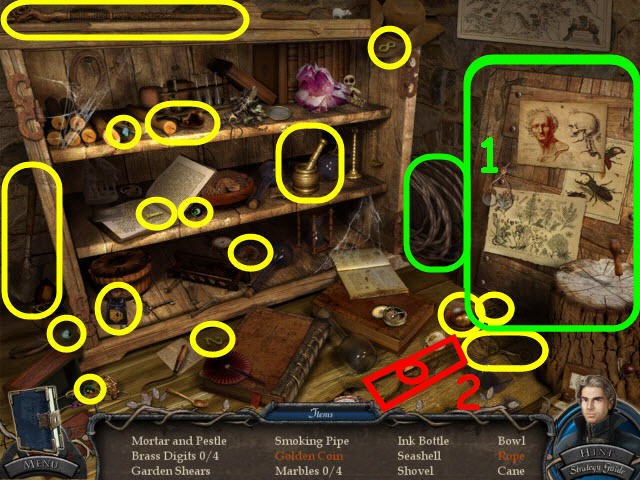
- Examine the cart to access a HOP (O).
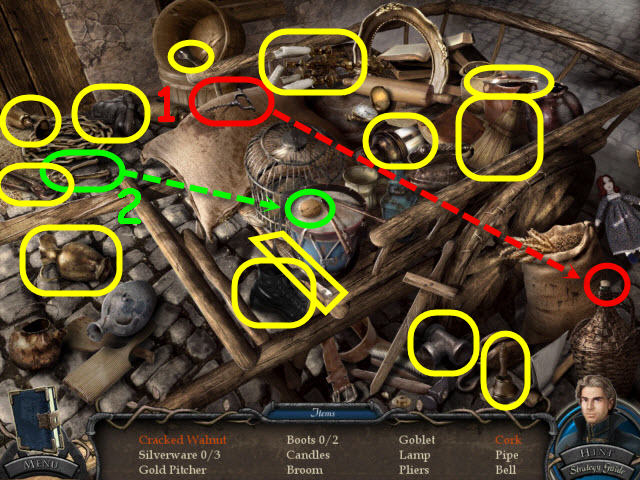
- Find the items listed.
- Use the corkscrew on the bottle to get a cork (1).
- Use the nutcracker on the nut to get a cracked walnut (2).
- You will earn a METAL PIPE.
- Go forward twice into the town hall lobby.
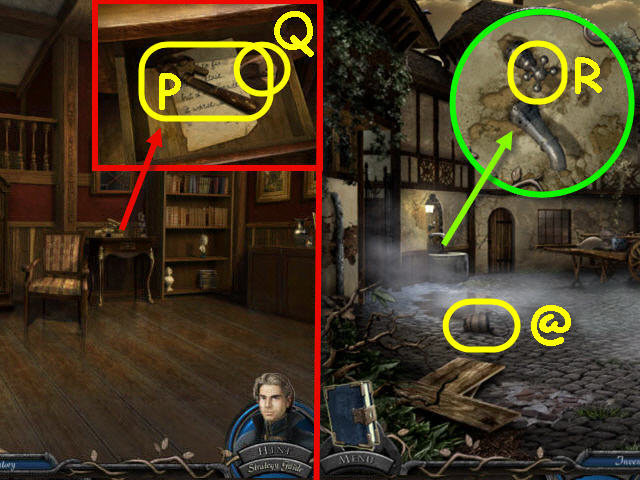
- Examine the hall table and open the drawer. Take the WRENCH (P), and the CLAY (Q).
- Back out twice.
- Examine the spigot and use the WRENCH to get the VALVE AND NUT (R).
- Examine the bucket and place the CLAY on it; automatically get a BUCKET (@).
- Go forward.
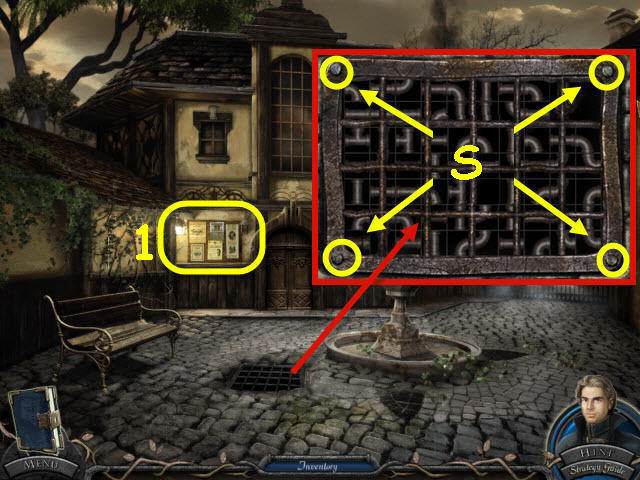
- Examine the bulletin board (1) and read the note.
- Examine the grate and use the WRENCH on each of the 4 bolts (S); remove the grate.
- Place the VALVE AND NUT on the upper right stem and the METAL PIPE in the empty slot to trigger a puzzle.
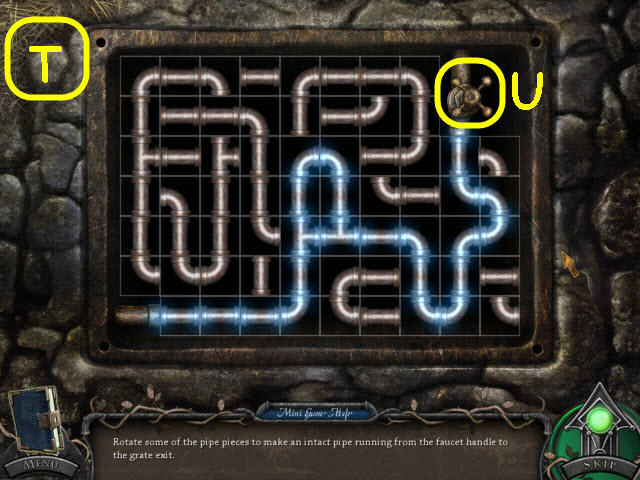
- Connect the pipes to create a continuous flow.
- See screenshot for solution (T).
- Turn the tap when complete (U).
- Use the BUCKET on the fountain (V) to get a BUCKET OF WATER.
- Go forward into the town hall lobby.
- Use the BUCKET OF WATER on Stefan (W).
- Go up the stairs.
- Select anywhere in the room to speak.
- Give the MEDALLION to the gentlemen. After exhausting all conversation; take the CABINET KEY (X).
- Back out.
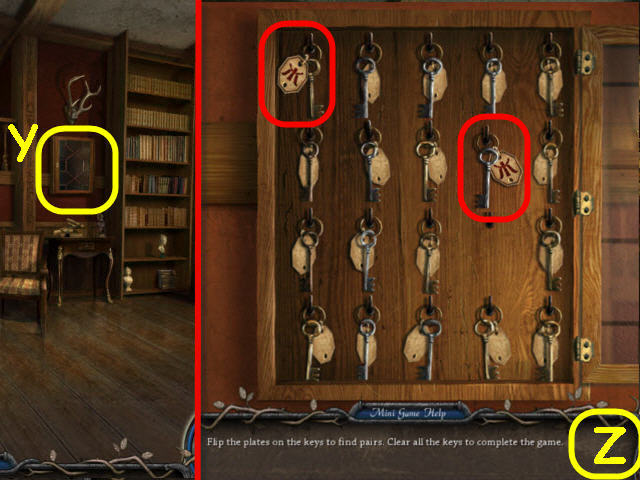
- Examine the cabinet and use the CABINET KEY on the lock to trigger a puzzle (Y).
- Find the matching sets of keys (Z).
- The layout of the keys is random.
- You will earn a CEMETERY GATE KEY.
- Back out.
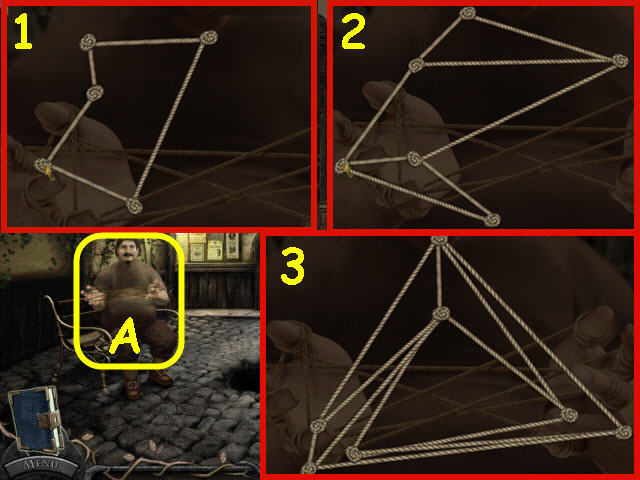
- Speak to Stefan on the bench (A).
- Select him again to trigger a puzzle.
- Separate the strings so that none of them cross.
- See screenshot for one solution for each of the three levels (1-3).
- Take the KNIFE (B).
- Back out.
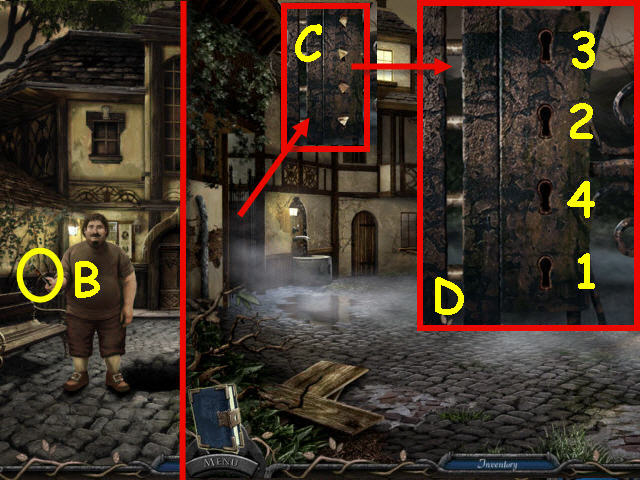
- Go to the cemetery gate; use the KNIFE to unplug the locks and then use the CEMETERY GATE KEY on the locks to trigger a puzzle (C).
- Select the keyholes in the correct order.
- See screenshot for order (D).
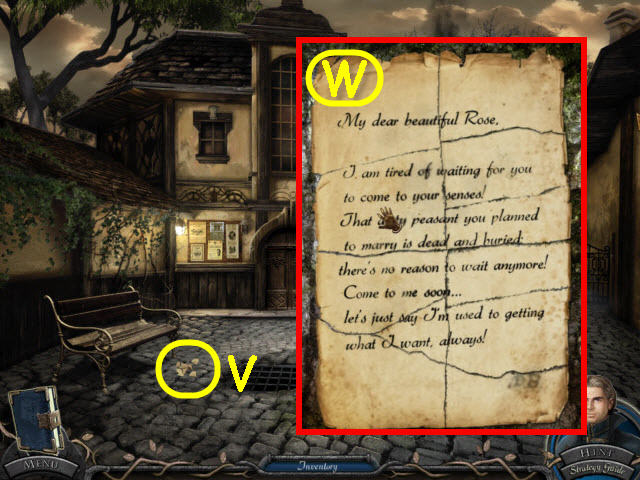
- Go forward via the left path twice to Rose’s garden.
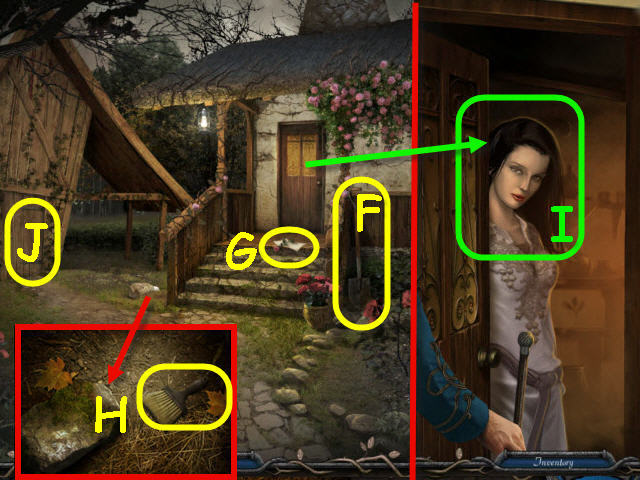
- Take the SHOVEL (F).
- Take the note (G).
- Examine the rock and move the hay; take the BRUSH (H).
- Go up on the porch and knock on the door; speak to Rose (I) and show her the MEDALLION.
- Examine the shed door to access a HOP (J).
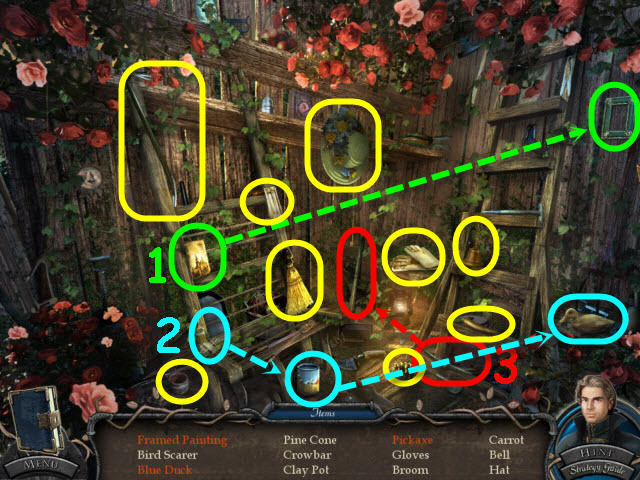
- Find the items listed.
- Place the painting in the frame to get a framed painting (1).
- Use the paintbrush on the blue paint; use the dipped paint brush on the duck to get a blue duck (2).
- Place the pickaxe head on the handle to get a pickaxe (3).
- You will earn a CROWBAR.
- Back out twice.
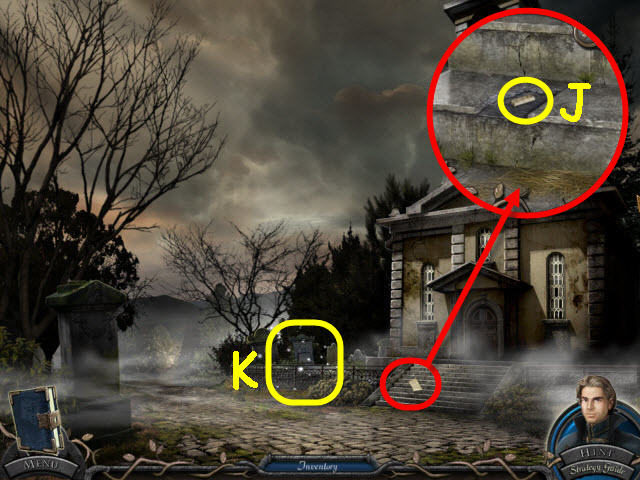
- Examine the paper and move it; take the PIANO KEY (J).
- Examine the gravestones to access a HOP (K).
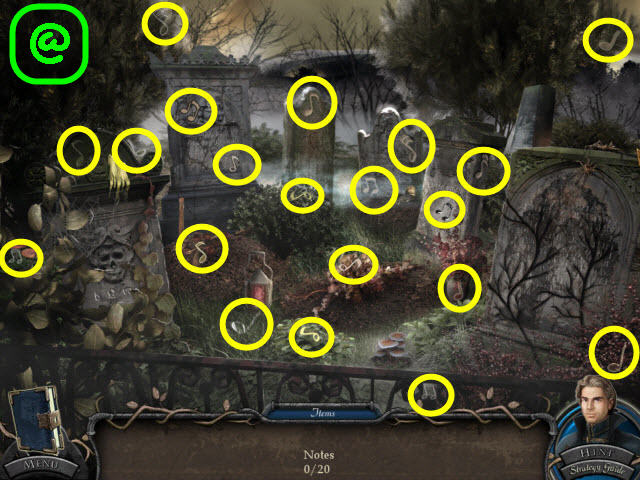
- Find the 20 notes (@).
- You will earn a MUSIC SHEET.
- Go into the church.
Chapter 3: The Church

- Read the note (L).
- Take the BROOM (M).
- Examine the gate and use the CROWBAR on the two hinges (N).
- Take the ANGEL STATUE WING (O).
- Go forward into the church main hall.
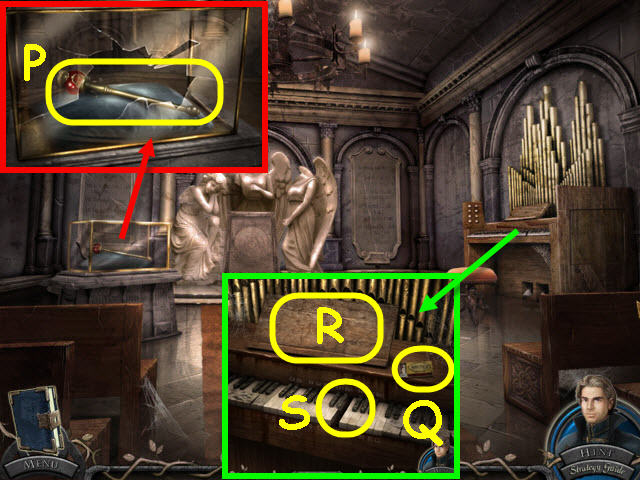
- Examine the display case and use the CROWBAR on it; take the ANGEL STATUE SCEPTER (P).
- Go towards the organ; take the MATCHES (Q).
- Place the MUSIC SHEET on the holder (R), and the PIANO KEY on the keyboard (S) to trigger a puzzle.
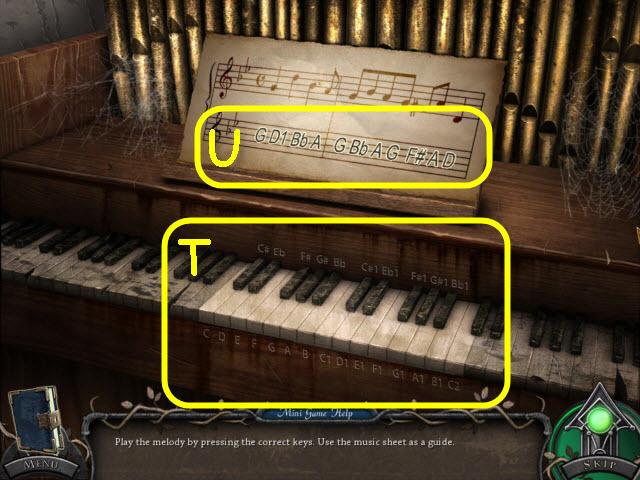
- Play the tune from the sheet music.
- To solve the puzzle, select the keys (T) with the same letters in the order matching the sheet music (U).
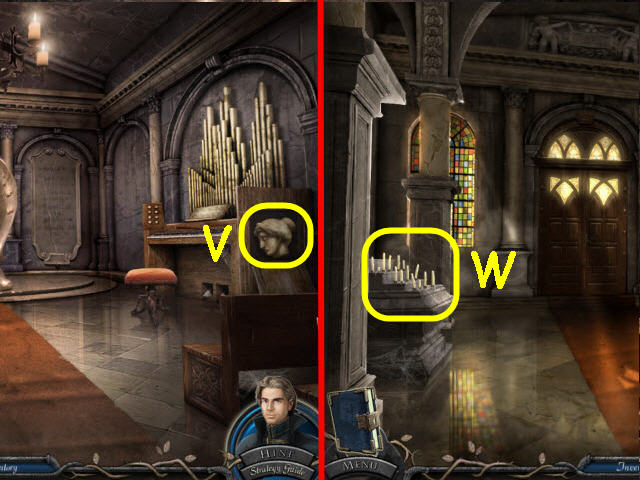
- Take the ANGEL STATUE HEAD (V).
- Back out.
- Use the MATCHES on the candles to trigger a puzzle (W).
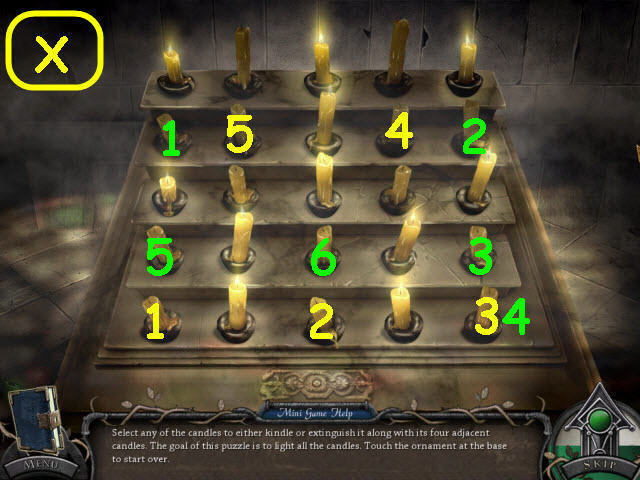
- Light all the candles.
- In regular mode: To solve the puzzle, select the candles in the order marked in yellow numbers (X).
- In expert mode: To solve the puzzle, select the candles in the order marked in green numbers.
- You will earn a SPIDER STONE PIECE.
- Back out and go left down the path.
- Examine the snake and use the BROOM on it. Use the SHOVEL on the loose soil; take the ANGEL STATUE ARM (Y).
- Examine the statue base and place the SPIDER STONE PIECE on the yellow gem to trigger a puzzle (Z).
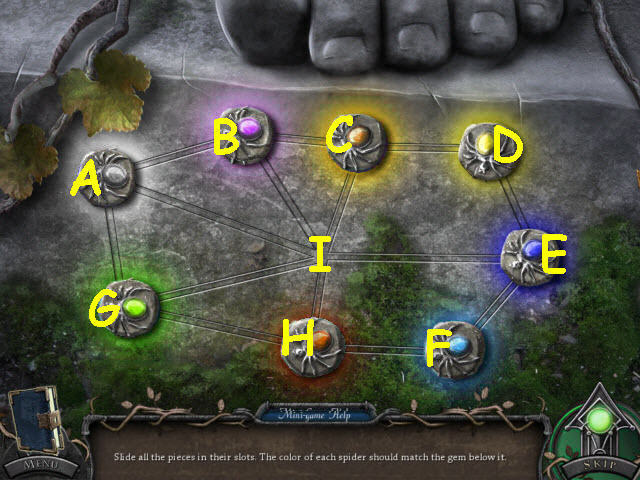
- Place the spiders in their matching colored slots.
- To solve the puzzle, select the following slots: E, D, C, B, I, H, G, A, B, I, H, F, E, I, H, G and I.
- You will earn a PUTTY KNIFE.
- Back out.
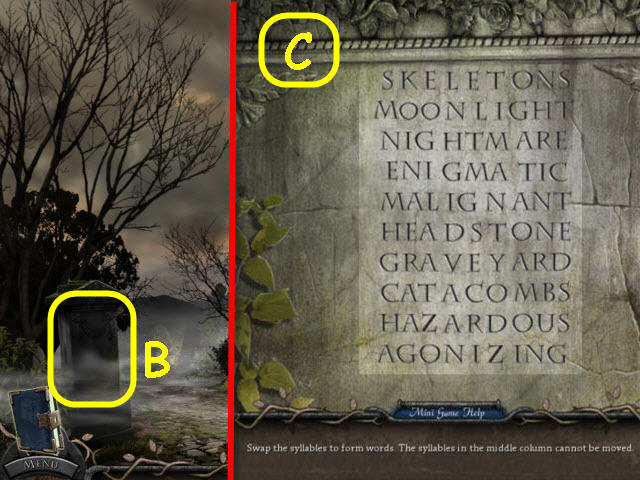
- Examine the gravestone and use the PUTTY KNIFE on the moss to trigger a puzzle (B).
- Arrange the syllables to form words.
- See screenshot for solution (C).
- Take the ANGEL STATUE BOOK.
- Enter the church and go forward twice.
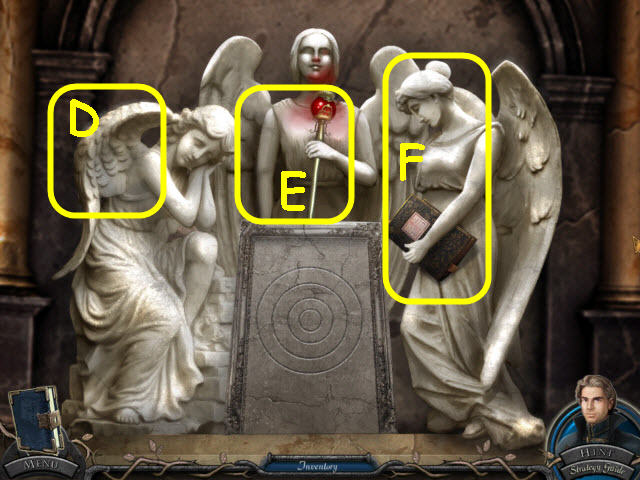
- Place the ANGEL STATUE WING on the left statue (D).
- Place the ANGEL STATUE SCEPTER and ANGEL STATUE ARM on the center statue (E).
- Place the ANGEL STATUE HEAD and ANGEL STATUE BOOK on the right statue (F).
- You will trigger a puzzle when complete.

- Rotate the rings to align the lines straight up.
- To solve the puzzle, select the following rings: Rotate the outer ring so that the line is where shown in the screenshot (1).
- Rotate the second largest ring until the outer line is on the top (2).
- Rotate the second smallest ring so that the 3 largest rings line up almost straight up (3).
- Rotate the smallest ring to complete the line (4).
- Go forward into the crypt.
Chapter 4: The Crypt
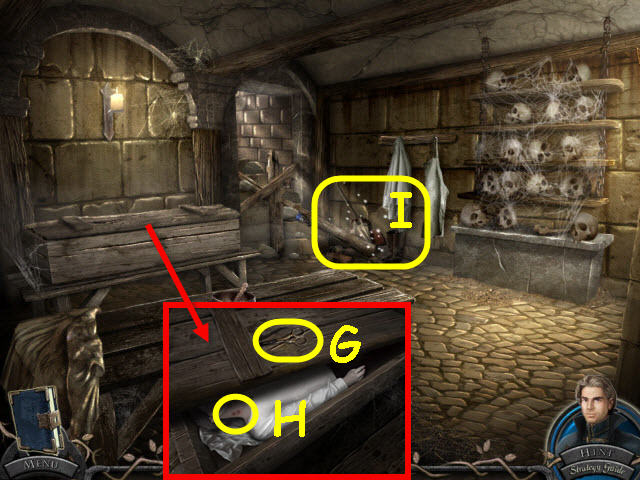
- Examine the coffin; take the SCISSORS (G).
- Use the CROWBAR on the coffin lid; examine the bite marks on the neck (H).
- Examine the debris to access a HOP (I).
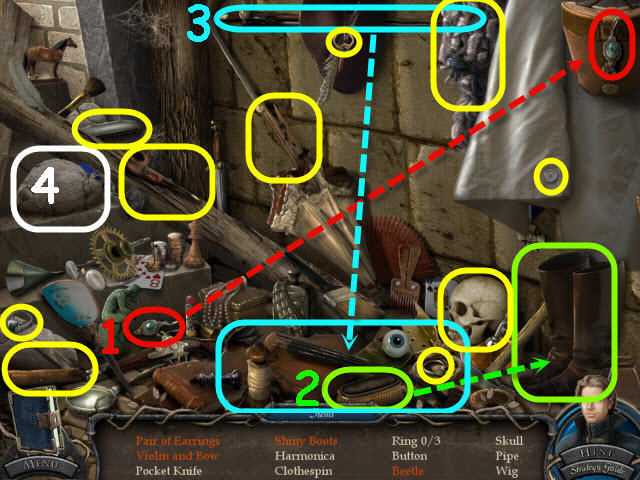
- Find the items listed.
- Place the earring by the earring to get a pair of earrings (1).
- Use the brush on the boots to get shiny boots (2).
- Place the bow by the violin to get a violin and bow (3).
- Move the rock to get a beetle (4).
- You will earn a SKULL.
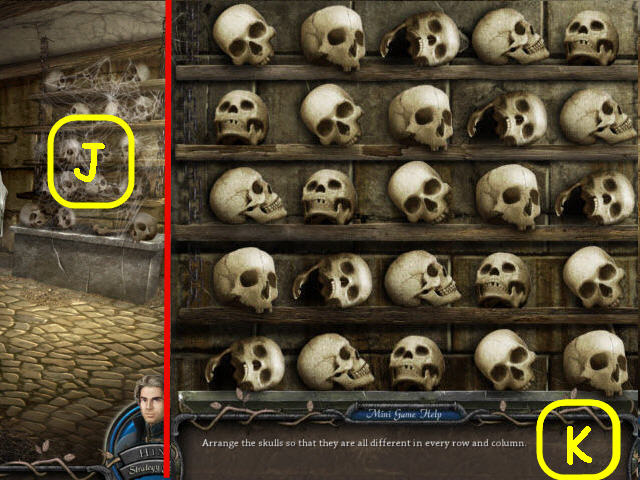
- Examine the skull rack; use the BRUSH on the cobwebs (J).
- Place the SKULL on the center shelf to trigger a puzzle.
- Arrange the skulls so that no two are alike in any row or column.
- See screenshot for solution (K).
- Select the crumpled paper twice and take the 25 in the corner to get a PAPER CLUE.
- Back out four times.
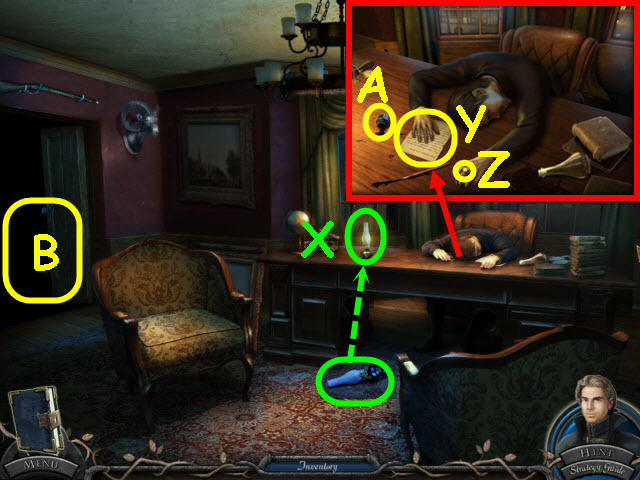
- Speak to Stefan (L).
- Back out and go right into Philip’s house.
- Speak to the man.
- Pick up the papers on the floor (M).
- Examine the desk to access a HOP (N).
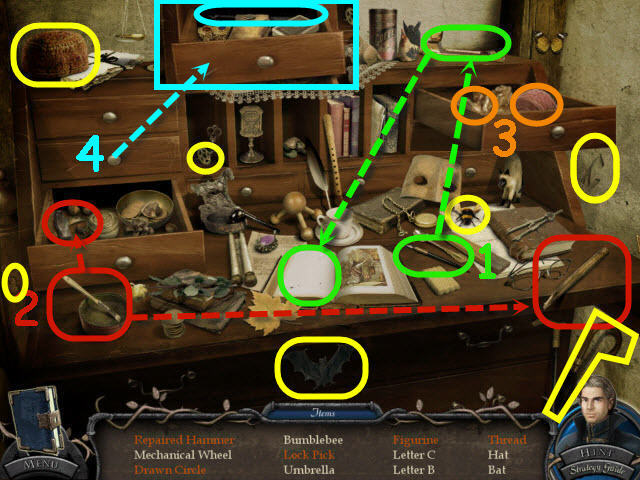
- Find the items listed.
- Place the pen in the inkwell. Use the dipped pen on the blank page to get a drawn circle (1).
- Use the brush with glue on the two parts of the hammer to get a repaired hammer (2).
- Open the drawer to get the figurine and thread (3).
- Open the drawer to get a lock pick (4).
- You will earn a LOCK PICK TOOL.
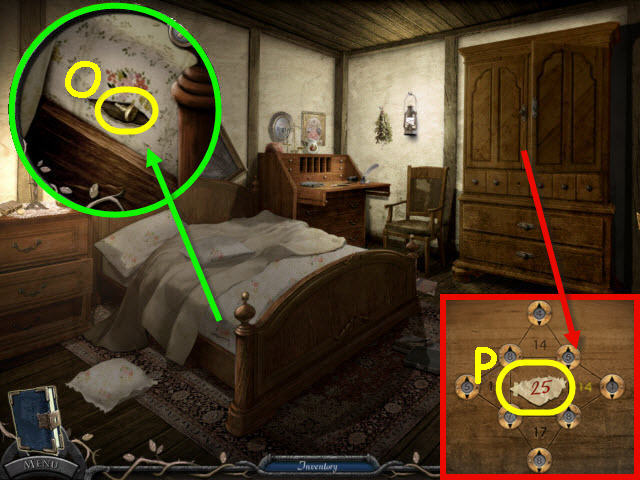
- Examine the mattress and use the SCISSORS on the stitches; take the KNOB (O).
- Examine the cupboard and place the KNOB on it; select the knob to open it. Place the PAPER CLUE on the board to trigger a puzzle (P).
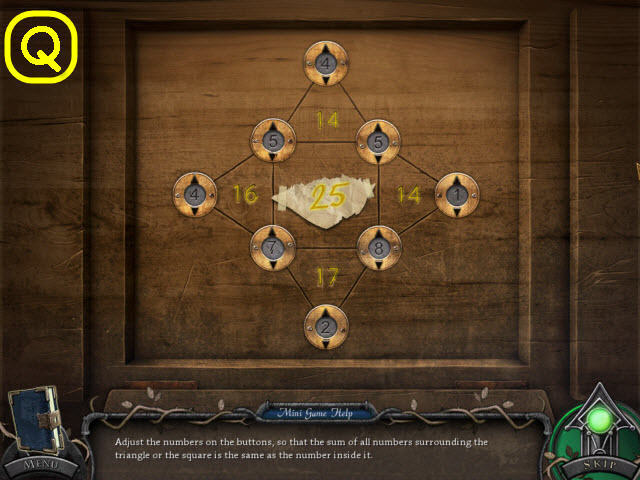
- Adjust the numbers using the arrows so that they add up to the center number of each.
- See screenshot for solution (Q).
- Go through the newly-opened passage to trigger a puzzle.
- Adjust the mirrors to shine the beam on the crystal.
- To solve the puzzle, select the following mirrors: A x 2 and B x 2.
- Examine the desk and take the note (R).
- Use the LOCK PICK TOOL on the desk drawer to trigger a puzzle (S).
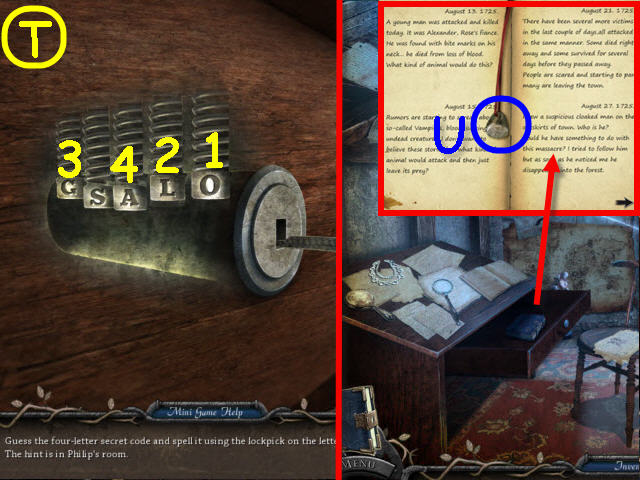
- Tap the correct 4 letters in order to unlock the lock.
- Solution: O-L-G-A (T).
- Pick up the book; take PHILIP’S RING (U).
- Flip the pages of the book to read the entries.
- Back out twice and go forward.
- Pick up the letter pieces to trigger a puzzle (V).
- Assemble the pieces.
- Tap the pieces to rotate them.
- See screenshot for solution (W).
- Take the assembled letter.
- Go forward into the town hall and up the stairs.
- Place the fallen lamp on the desk and use the MATCHES to light it (X).
- Examine the mayor; read the note (Y), take the MAYOR’S RING (Z) and the DIRTY EMPTY INK BOTTLE (A).
- Examine the doorway to access a HOP (B).
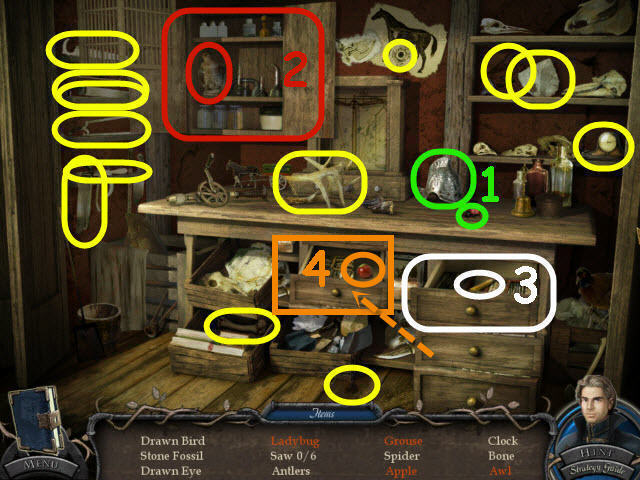
- Find the items listed.
- Move the helmet to get the ladybug (1).
- Open the cabinet to get a grouse (2).
- Open the top drawer to get the awl (3).
- Open the middle drawer and remove the cloth to get the apple (4). You can do this before or after you get the awl from the top drawer.
- You will earn an AWL.
- Back out.
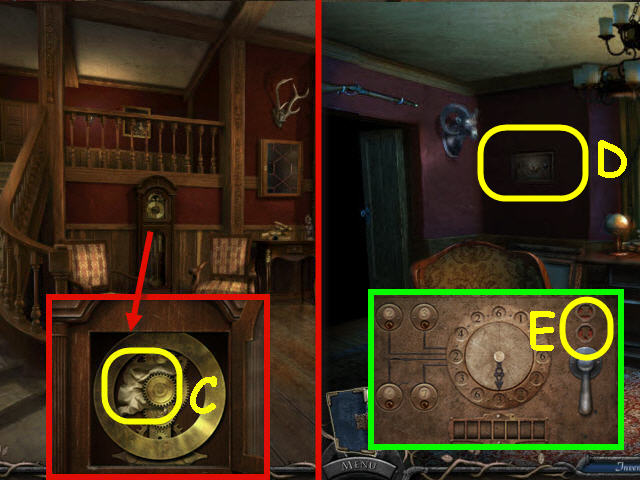
- Examine the clock and open the panel. Use the AWL on the face; take the SEVEN DIGIT NUMBER (C).
- Go upstairs.
- Move the painting to expose a safe (D).
- Place PHILIP’S RING and the MAYOR’S RING in the upper right slots (E). Place the SEVEN DIGIT NUMBER on the safe to trigger a puzzle.
- Set the correct code to open the safe.
- Legend for the following solution: The first number is the number on the button, CC indicates the arrow underneath needs to point counterclockwise, and C indicates the arrow underneath needs to point clockwise.
- To solve the puzzle, select the following numbers: 4CC, 3CC, 4C, 2CC, 7CC, 4CC and 3C (F).
- Select the handle to open the safe; take the GUNPOWDER POUCH (G), read the scroll (H) and the book (I).
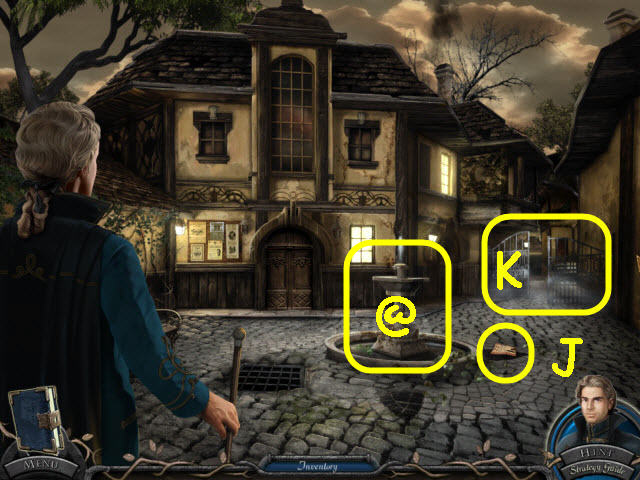
- Exit the town hall.
- Pick up the note (J).
- Use the DIRTY EMPTY INK BOTTLE on the fountain to get a CLEAN INK BOTTLE (@).
- Go forward through the newly-opened gate (K).
Chapter 5: The Market
- Check the gate (L).
- Examine the salt bags and use the AWL on it (M).
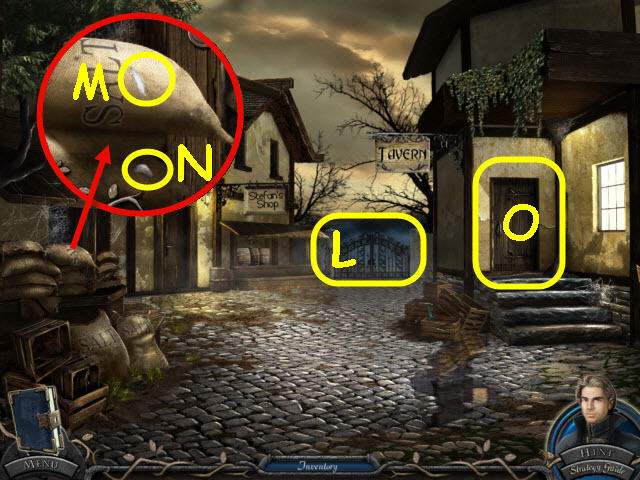
- Use the CLEAN INK BOTTLE on the spilled salt to get a BOTTLE OF SALT (N).
- Go into the tavern (O).
- Speak to Stefan (P).
- Take the CARDS (Q), VINEGAR (R) and the RAKIA (S).
- Give the CARDS to Stefan to trigger a puzzle.

- Watch the cards being shuffled and guess where the ace is.
- Select the cards to start.
- The location of the ace card is random (T).
- You will get a journal update with a code.
- Back out.
- Examine the shop door to trigger a puzzle (U).
- Move the note to expose a number (V).
- Enter the code from winning the card game and the number etched in the door to get the combination. Select the numbers: 1-6-3-7 (W).
- Enter the shop to access a HOP.
- Find the items listed.
- Place the fruit in the bowl to get a bowl of fruit (1).
- Use the cleaver on the meat to get sliced meat (2).
- Use the can opener on the can of beans to get beans (3).
- You will earn a KEY.
- Examine the gate and use the KEY on the lock (X).
- Speak to the medicine woman; take the recipe (Y).
- Go into the tavern.
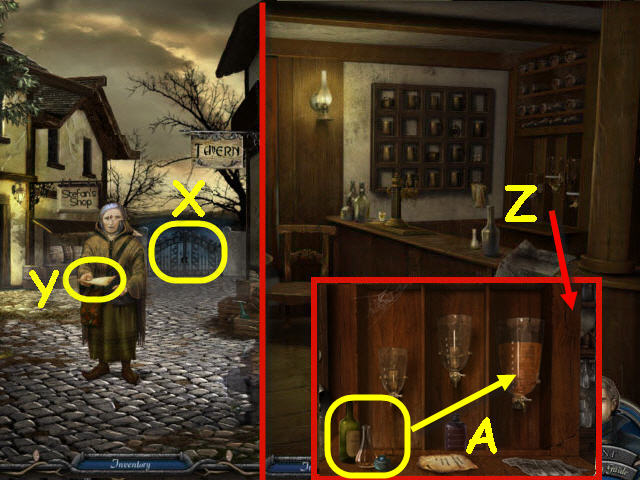
- Examine the mixers (Z) and the recipe will be added automatically. Place the RAKIA, VINEGAR, and BOTTLE OF SALT on the shelf to the left under the mixers.
- Pour the VINEGAR, RAKIA, and the BOTTLE OF SALT in the far right container to trigger a puzzle (A).
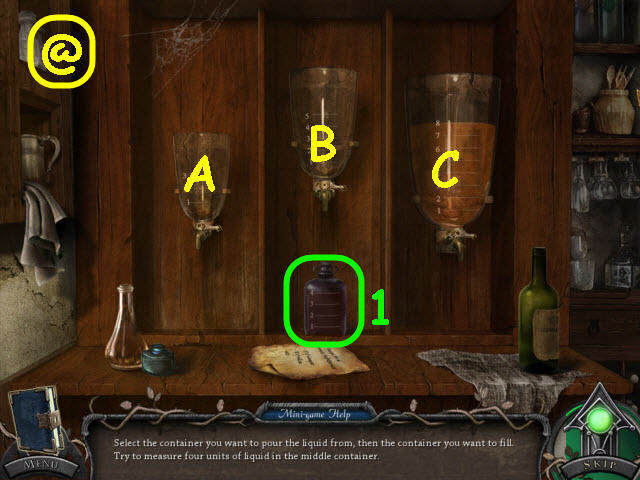
- Measure 4 units in the center container.
- To solve the puzzle, select the following containers: C- B, B-A, A-C, B-A, C-B and B-A (@).
- Take the CORROSIVE SUBSTANCE (1).
- Back out.
- Examine the gate and use the CORROSIVE SUBSTANCE on the lock (B).
- Go forward.
- Pick up the note (C).
- Follow the path on the left twice.
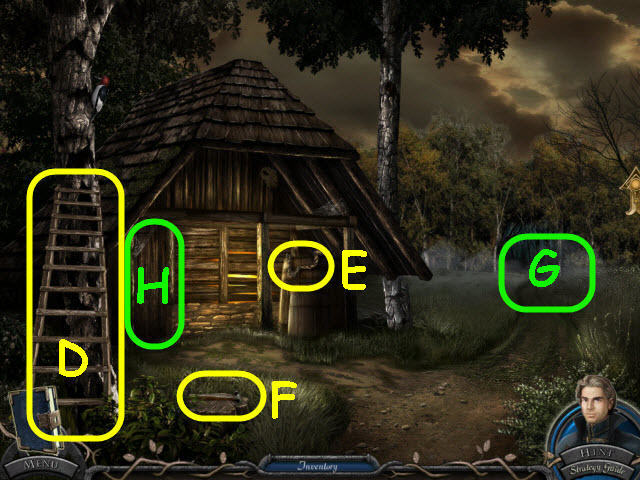
- Take the LADDER (D), ROPE (E), and HAMMER (F).
- Attempt to go up the path on the right (G).
- Enter the barn (H).
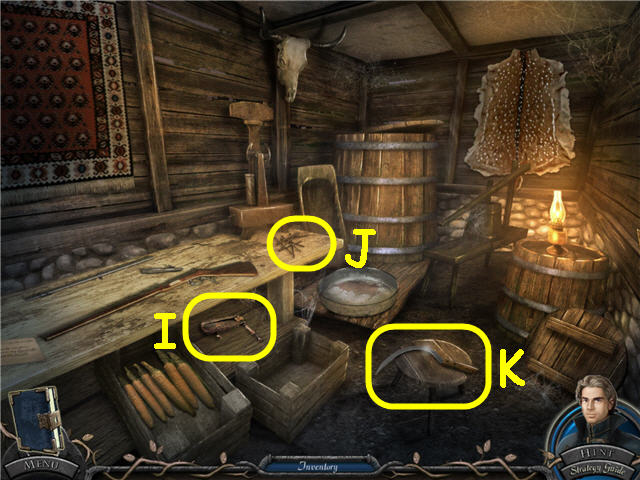
- Take the BIRD SCARER (I), NAILS (J), and SICKLE (K).
- Back out twice.
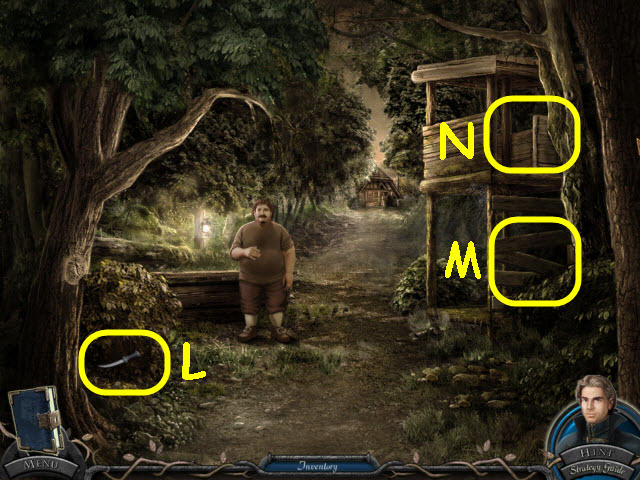
- Speak to Stefan.
- Use the SICKLE on the bushes; take the SHORT SWORD (L).
- Examine the steps and use the NAILS and then the HAMMER on it (M).
- Examine the elevated stand to access a HOP (N).
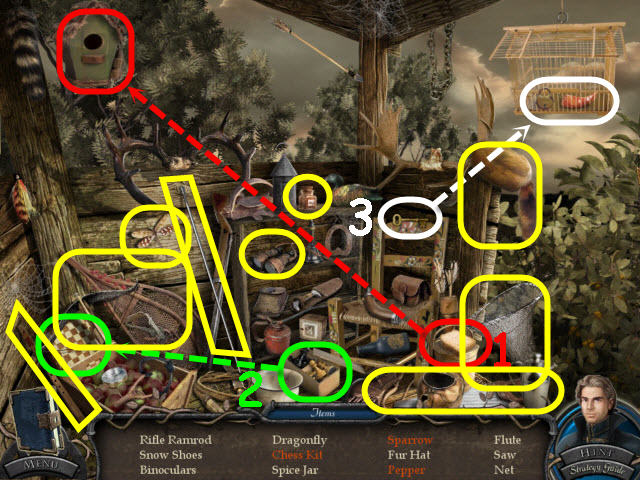
- Find the items listed.
- Place the bread on the bird house to get a sparrow (1).
- Place the chess pieces by the chess board to get a chess kit (2).
- Use the key on the lock to get a pepper (3).
- You will earn a RIFLE RAMROD.
- Back out.
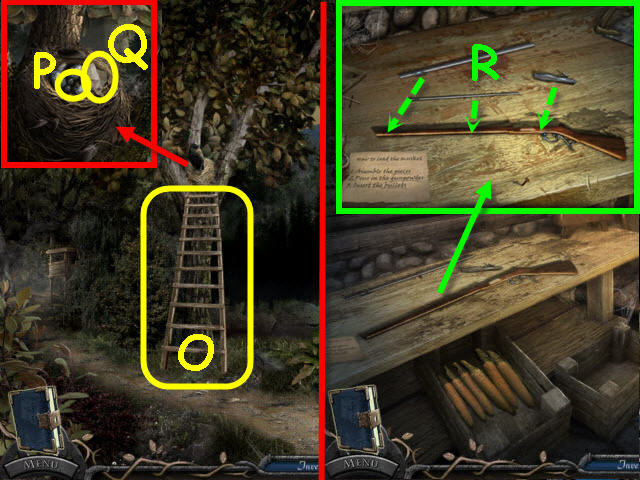
- Place the LADDER against the tree (O).
- Examine the nest and use the BIRD SCARER on the bird; take the LEAD BULLETS (P).
- Examine the crumpled note and unfold it to read it (Q).
- Go up the path on the left twice and enter the barn.
- Examine the workbench and place the RIFLE RAMROD on it; assemble the pieces (R).
- Use the GUNPOWDER POUCH and then the LEAD BULLETS on the assembled rifle; take the LOADED MUSKET.
- Back out twice.
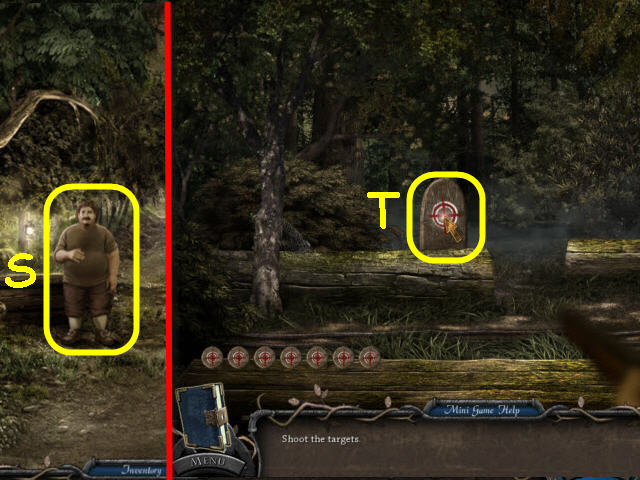
- Give the LOADED MUSKET to Stefan to trigger a puzzle (S).
- Shoot the targets as they appear in the screen (T).
- You will earn a LANTERN.
- Go forward.
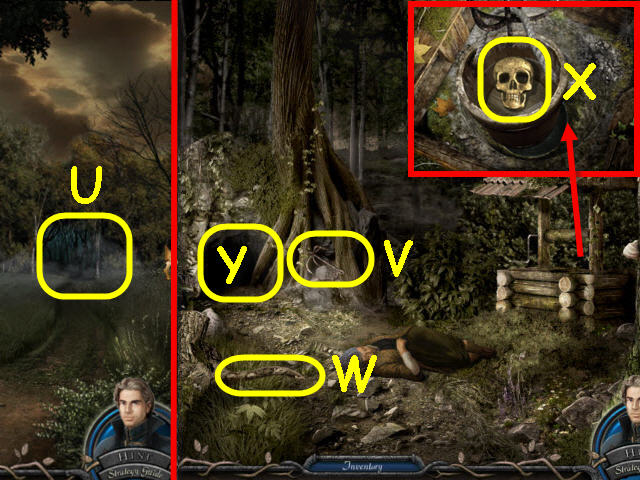
- Use the LANTERN on the path on the right (U).
- Use the ROPE on the hook to get a ROPE WITH HOOK (V).
- Take the STICK (W).
- Examine the well; use the ROPE WITH HOOK on the bucket. Pull up the bucket; take the SKULL (X).
- Examine the vines and use the SHORT SWORD on them twice to clear a passage (Y).
- Go into the newly-opened passage.
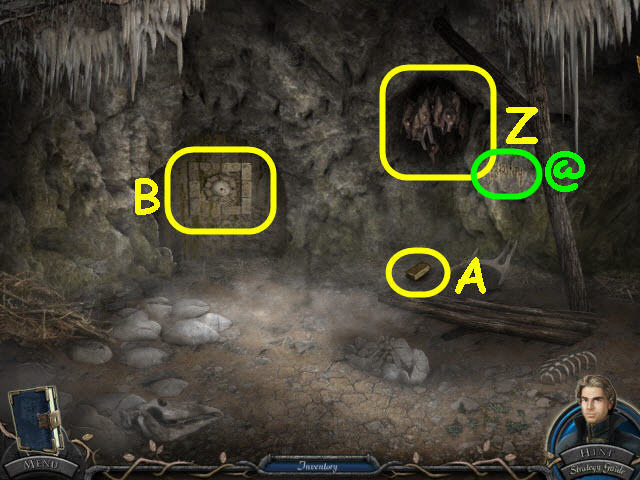
- Examine the labyrinth etching (@).
- Examine the bats and use the STICK on them (Z).
- Take the BRICK (A).
- Examine the door; place the BRICK in the empty border space and the SKULL in the center to trigger a puzzle (B).
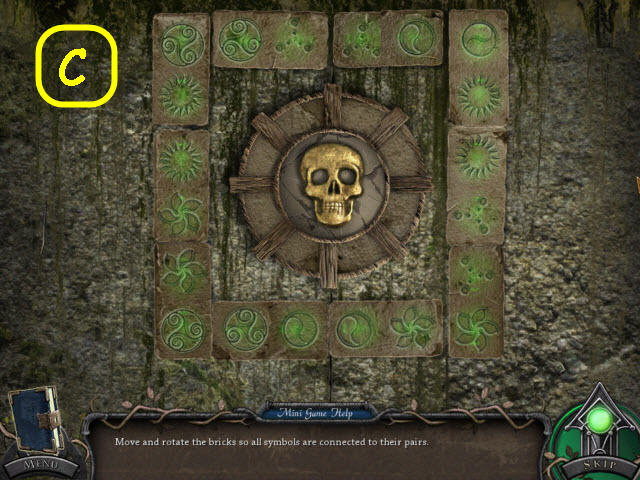
- Connect the bricks so that all matching symbols are connected.
- Select a brick twice to rotate it.
- See screenshot for solution (C).
- Go forward through the newly-opened passage.
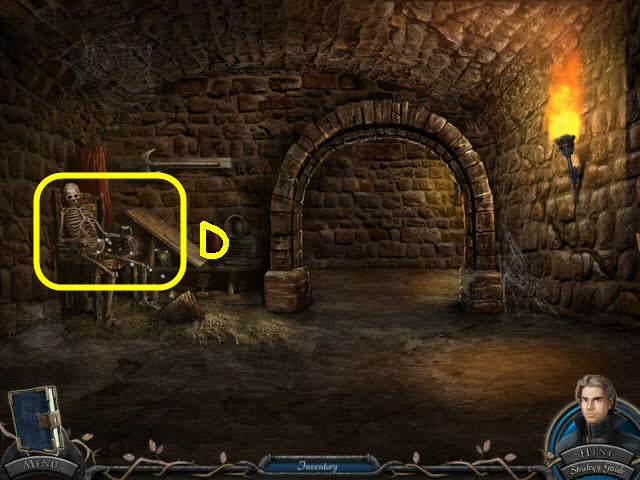
- Examine the skeleton (D).
- You will access a HOP.
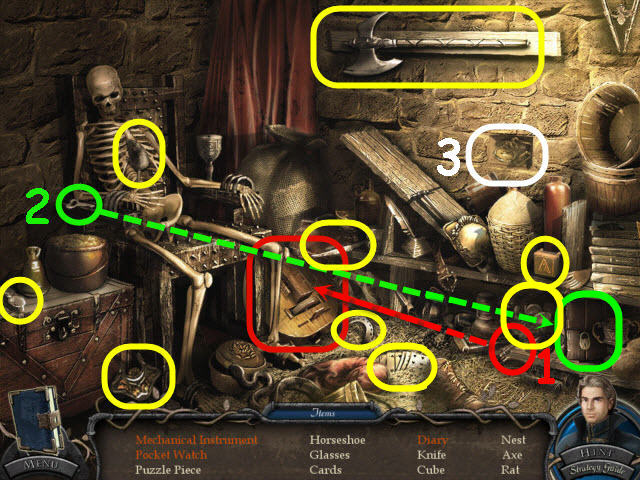
- Find the items listed.
- Use the wind-up key on the instrument to get the mechanical instrument (1).
- Use the key on the lock to get the diary (2).
- Remove the brick to get the pocket watch (3).
- You will earn a GRAND HALL PUZZLE PIECE.
- Go forward to start the labyrinth puzzle.
- Find your way through the labyrinth.
- Tip: The letters on the floor will spell LABYRINTH if you are going in the correct direction (E).
- To get through the catacombs go in the following directions: Right, forward, right, forward, left, forward, right, right (there is no letter on the floor here) and forward.
Chapter 6: The Castle
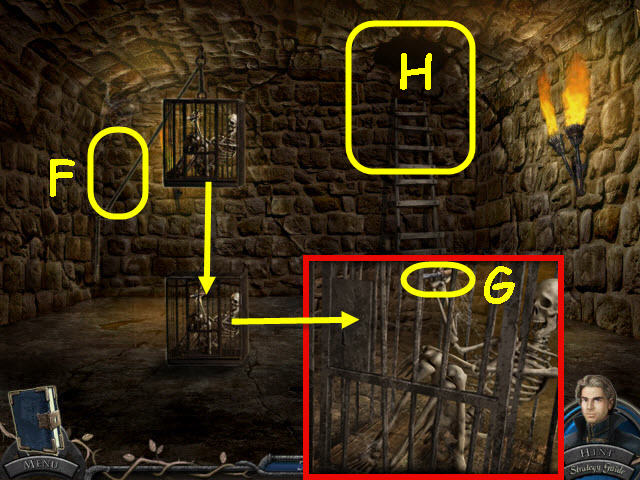
- Use the SHORT SWORD on the rope (F) to lower the cage.
- Examine the cage; take the CHISEL (G).
- Go up the ladder (H).
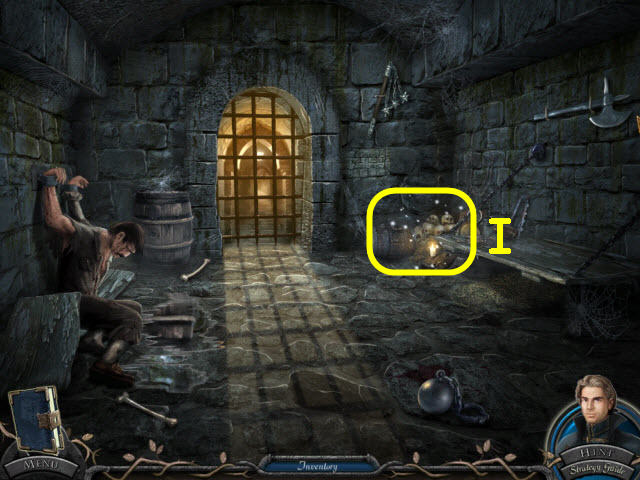
- Select the corner on the right rear of the cell (I).
- You will access a HOP.
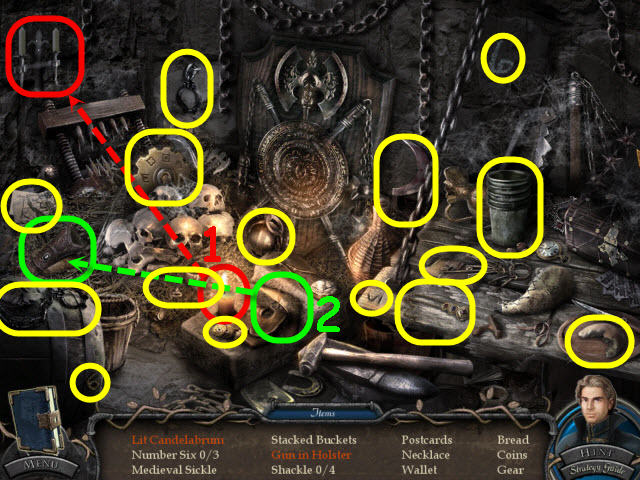
- Find the items listed.
- Use the lit candle and the candelabrum to get a lit candelabrum (1).
- Place the gun in the holster to get a gun in holster (2).
- You will earn a GEAR.
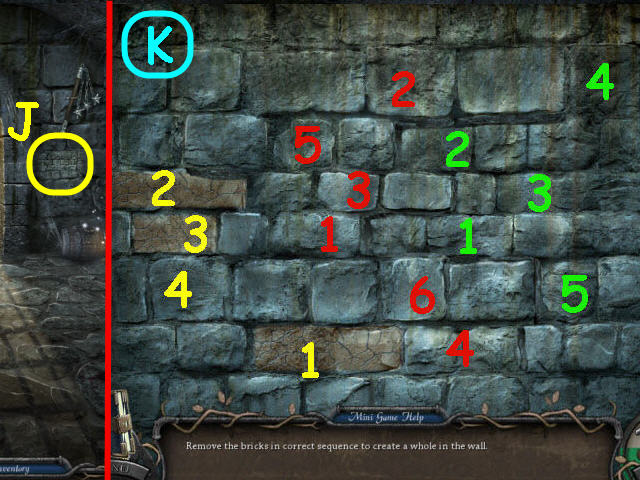
- Use the CHISEL on the bricks to trigger a puzzle (J).
- Duplicate the sequence of flashing bricks.
- To solve the puzzle, select the bricks in the order marked on the screenshot: Yellow, green and red (K).
- Place the GEAR on the left empty stem to trigger a puzzle.
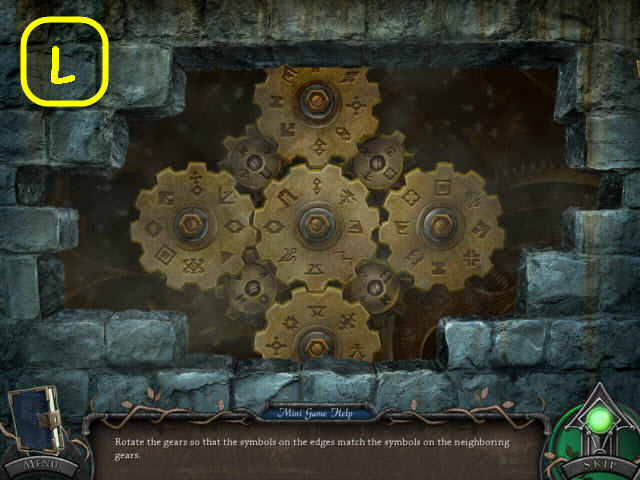
- Rotate the gears so that all touching symbols match.
- See screenshot for solution (L).
- Go forward through the newly-opened doorway.
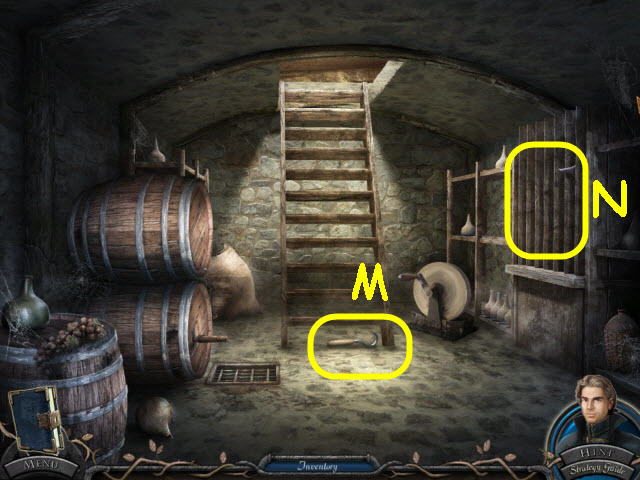
- Take the IRON HOOK (M).
- Examine the wine rack to trigger a puzzle (N).
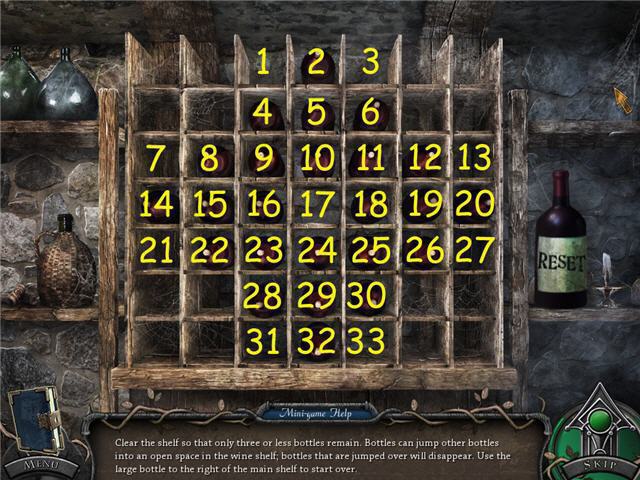
- Jump the bottles so that 3 remain in the regular mode and 1 remains in the expert mode.
- To solve the puzzle in the regular mode, select the following: 15-17, 18-16, 20-18, 29-17, 22-24, 17-29, 5-17, 17-15, 25-33, 14-16, 33-31, 9-1, 1-3, 11-25, 3-11, 12-10, 31-23, 26-24, 29-17, 17-5, and 23-9.
- Expert mode: 15-17, 18-16, 20-18, 29-17, 22-24, 17-29, 5-17, 17-15, 25-33, 14-16, 33-31, 9-1, 1-3, 11-25, 3-11, 12-10, 31-23, 26-24, 29-17, 17-5, 23-9, 8-10 and 10-2.
- You will earn a 2nd GRAND HALL PUZZLE PIECE.
- Go forward up the ladder.
- Read the newspaper (P).
- Examine the counter to access a HOP (Q).
- Find the items listed.
- Use the knife on the apple pie to get a piece of apple pie (1).
- Place the coffee beans in the grinder to get ground coffee (2).
- You will earn a TAP HANDLE.
- Back out.
- Examine the bottom barrel and place the TAP HANDLE on the tap; turn the tap handle and take the KNOB (R).
- Go up the ladder.
- Place the KNOB on the drawer; take the TONGS (S).
- Examine the stove and use the IRON HOOK on the burner plate. Use the TONGS to get the 3rd GRAND HALL PUZZLE PIECE (T).
- Go forward through the double doors.
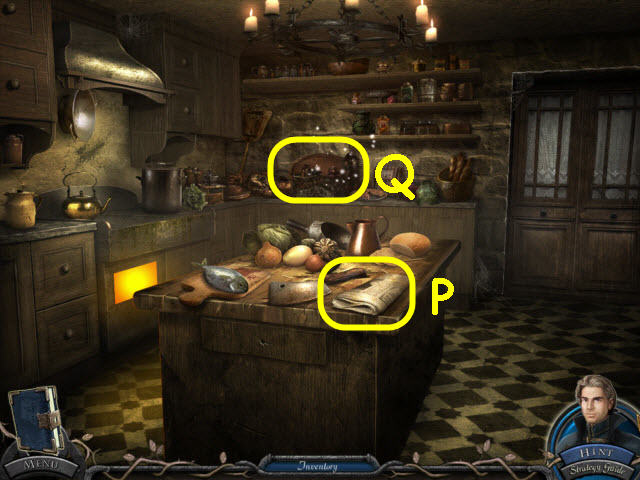
- Take the note (U).
- Knock over the vase; take the 4th GRAND HALL PUZZLE PIECE (V).
- Go right through the door.
- Take the CHALICE (W).
- Examine the waste basket; remove the paper and note the medallion piece (X).
- Remove the loose floorboard; take the 5th GRAND HALL PUZZLE PIECE (Y).
- Examine the desk; read the book and turn the pages (Z).
- Examine the balcony to access a HOP (A).

- Find the items listed.
- Place the 2 drumsticks on the drum to get a drum (1).
- Use the hammer on the ship in a bottle to get a ship (2).
- You will earn a DULL HUNTING KNIFE.
- Go left and back out twice.
- Use the DULL HUNTING KNIFE on the grinding wheel; get a SHARP HUNTING KNIFE (B).
- Examine the grate; use the CHALICE on the wine it to get a CHALICE OF WINE (C).
- Go forward twice.
- Examine the baluster; use the SHARP HUNTING KNIFE on the broken baluster to get a STAKE (D).
- Go up the stairs.
- Place the 5 GRAND HALL PUZZLE PIECES in the center (E).
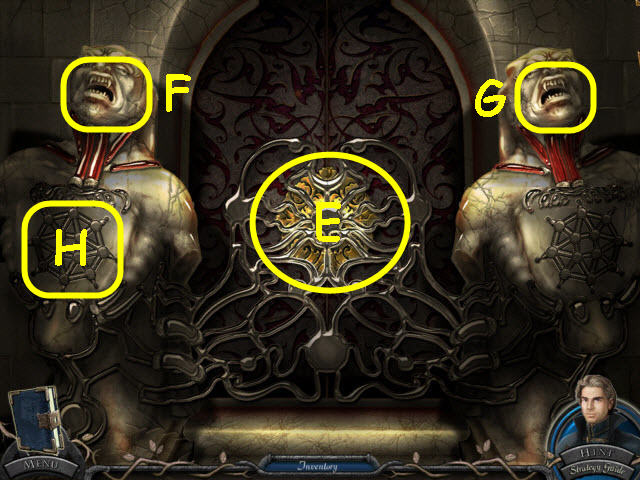
- Use the CHALICE OF WINE in both of the demons mouths (F-G).
- Select the chest of the left demon to trigger a puzzle (H).
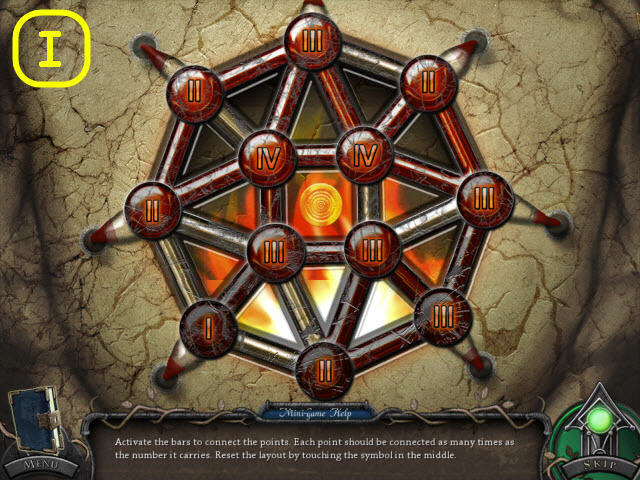
- Select the number of bars connecting each circle as dictated by the circles number.
- See screenshot for solution (I).
- Select the chest of the right demon to trigger a puzzle.
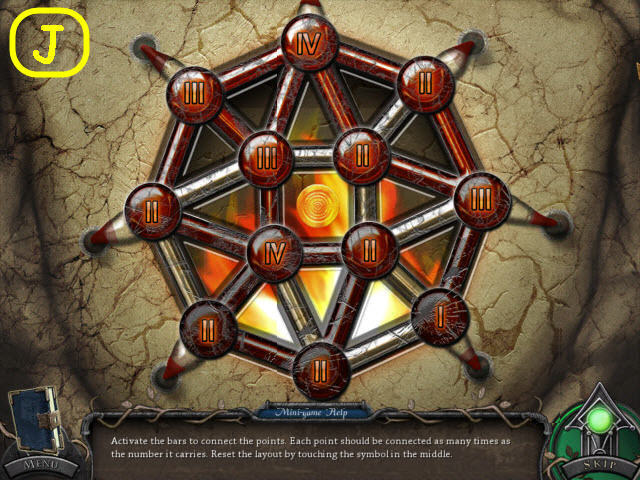
- Select the number of bars connecting each circle as dictated by the circles number.
- See screenshot for solution (J).
- Go forward through the doors.
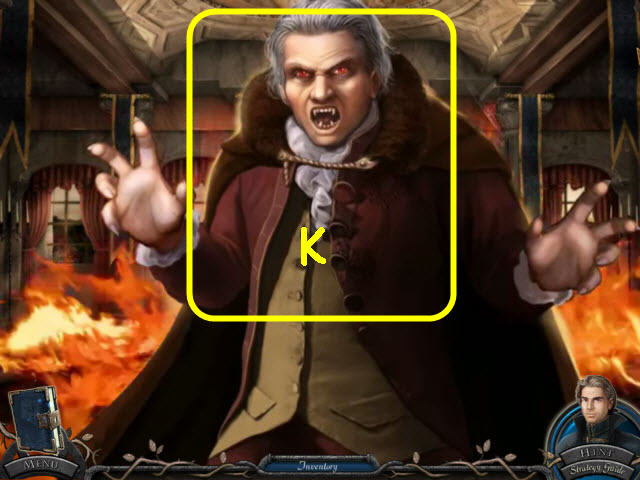
- Use the STAKE on the vampire (K).
- Congratulations! You have successfully completed Vampire Legends: The True Story of Kisilova.


 The Keepers: The Order's Last Secret Walkthrough, Guide, & Tips
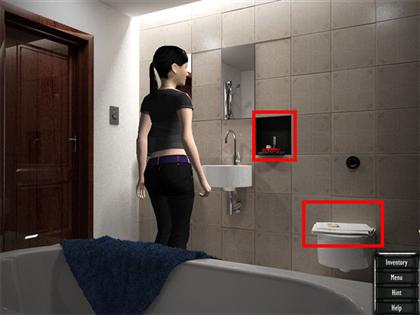 Iron Roses Walkthrough, Guide, & Tips
 Awakening: The Redleaf Forest Walkthrough, Guide, & Tips
 Dominic Crane 2: Dark Mystery Revealed Walkthrough, Guide, & Tips
 Hidden in Time: Looking-glass Lane Walkthrough, Guide, & Tips