Shiver: Moonlit Grove Walkthrough, Guide, & Tips
Shiver: Moonlit Grove Walkthrough

Welcome to the Shiver: Moonlit Grove Walkthrough
With your carriage broken, and a wolf nearby, you must find shelter. What awaits you in the village just ahead?
Whether you use this document as a reference when things get difficult or as a road map to get you from beginning to end, we’re pretty sure you’ll find what you’re looking for here.
This document contains a complete Shiver: Moonlit Grove game walkthrough featuring annotated screenshots from actual gameplay!
We hope you find this information useful as you play your way through the game. Use the walkthrough menu below to quickly jump to whatever stage of the game you need help with.
Remember to visit the Big Fish Games Forums if you find you need more help. Have fun!
This walkthrough was created by prpldva, and is protected under US Copyright laws. Any unauthorized use, including re-publication in whole or in part, without permission, is strictly prohibited.
General Tips

- This is the official guide for Shiver: Moonlit Grove.
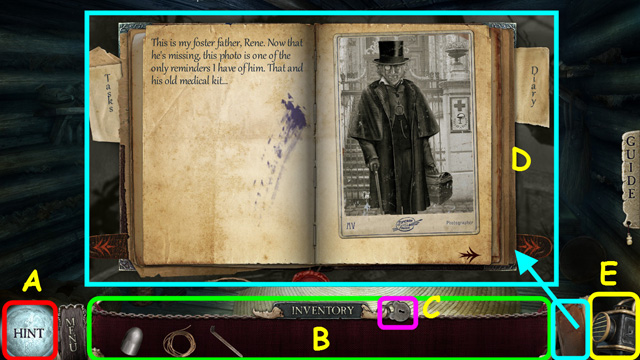
- Hints are unlimited, but you must wait for the meter to refill (A).
- Your inventory (B) is located in the lower panel; select an item to use it.
- The panel auto-hides; move your mouse down to bring it up.
- You can lock the panel in place with this lock (C).
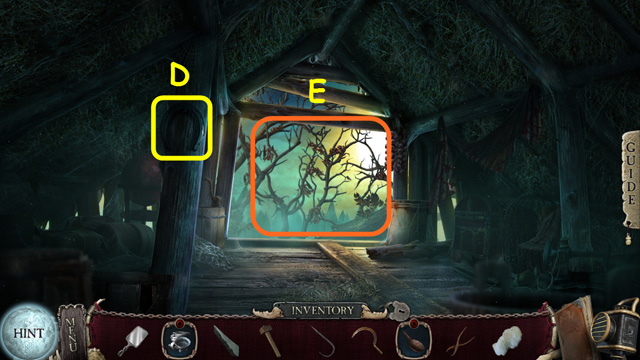
- Look in your diary to read the adventure’s events and clues (D).
- Once you find and repair the lamp, it can be used to light dark areas (E).
- Hidden-object puzzles are referred to as HOPs in this walkthrough.
- Mini-games and HOPs are sometimes randomized; your solution may vary.
- Items listed in red are hidden, or they require addition actions to locate.
Chapter 1: The Wreck
- You will have the option of some interactive help.
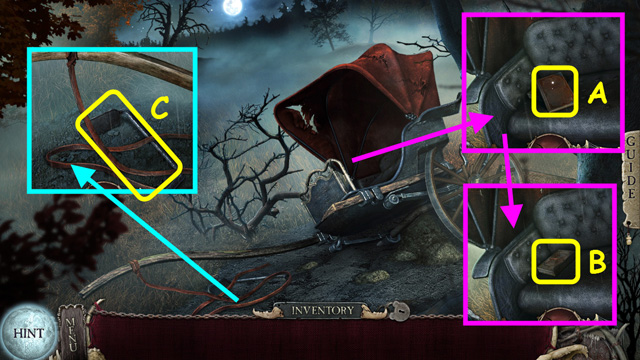
- Look inside the carriage and take the diary (A).
- Look inside the carriage again and take the METAL BOX (B).
- Look at the reins and take the FOOTBOARD (C).
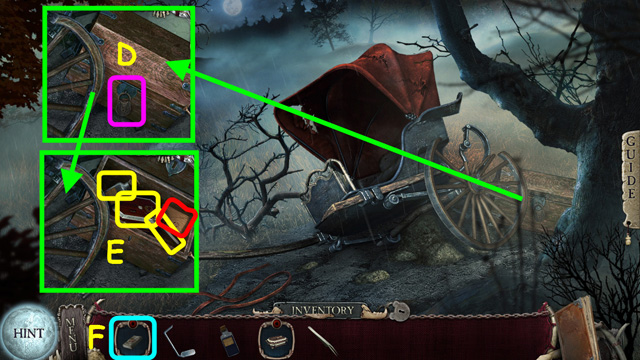
- Look at the chest and use the FOOTBOARD on the lock (D).
- Take the ALCOHOL, TWEEZERS, CASKET, and notes (E).
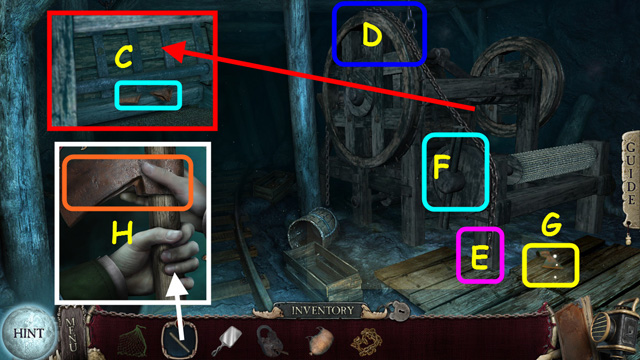
- Look at the METAL BOX in your inventory (F).
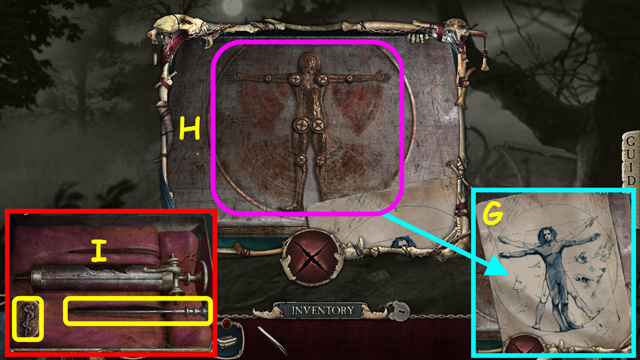
- Look at the diagram to see the placement of the arms and legs (G).
- Move the metal arms and legs to match the diagram (H).
- Take the CADUCEUS CHIP and the SYRINGE NEEDLE (I).
- Walk forward.
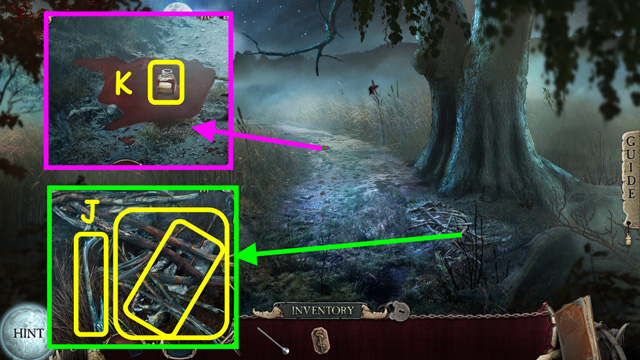
- Look at the debris; take the BRUSHWOOD, SKULL, and BONE (J).
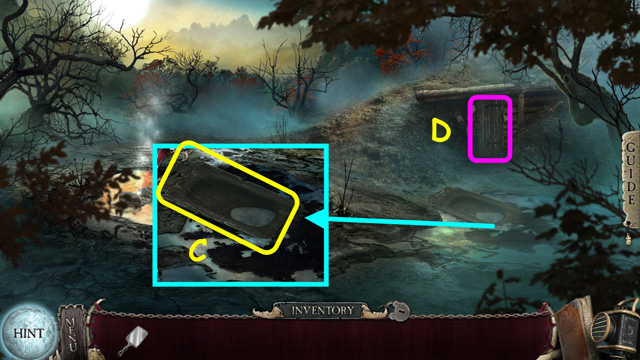
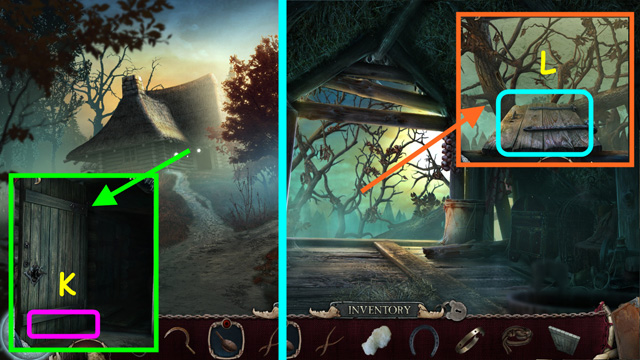
- Look at the puddle and take the PERFUMED OIL (K).
- Walk forward.
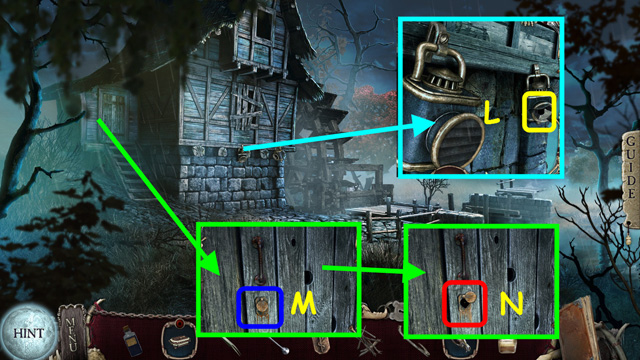
- Look at the wall and take the GLASS SHARD from the broken lantern (L).
- Look at the door and use the PERFUMED OIL on the lock cover (M).
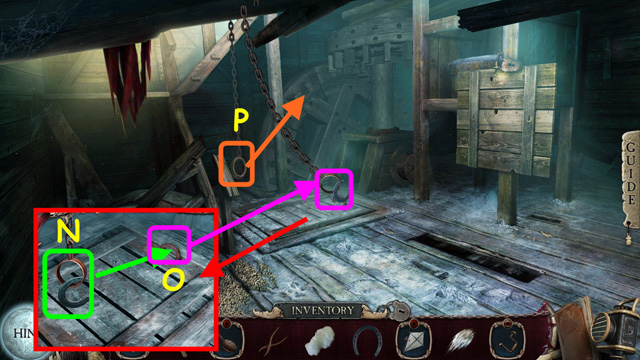
- Use the SYRINGE NEEDLE on the lock for a mini-game (N).
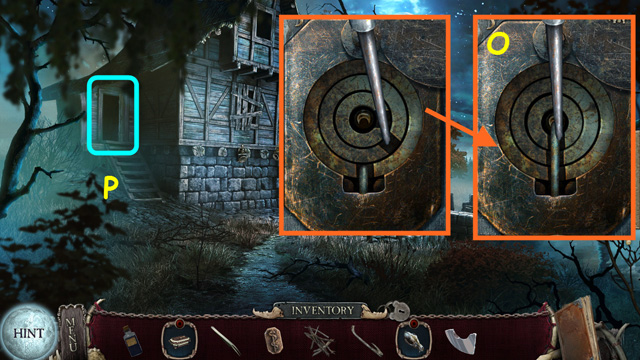
- Drag the needle tip and push the slots to the down position (O).
- Enter the door to the mill (P).
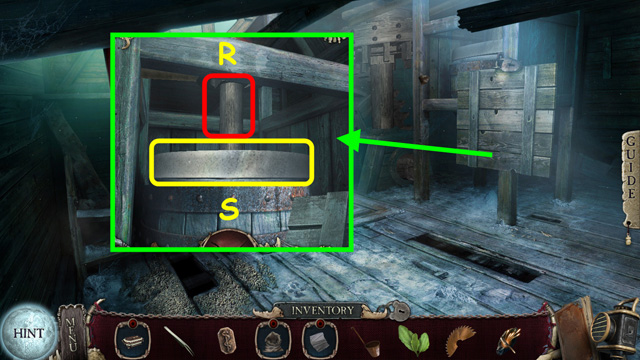
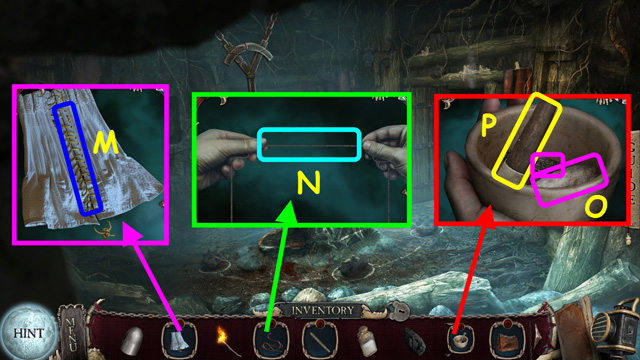
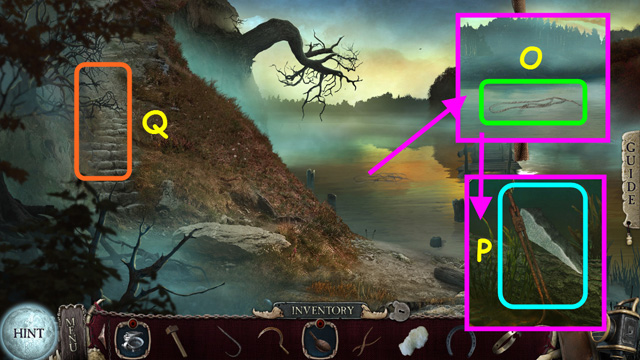
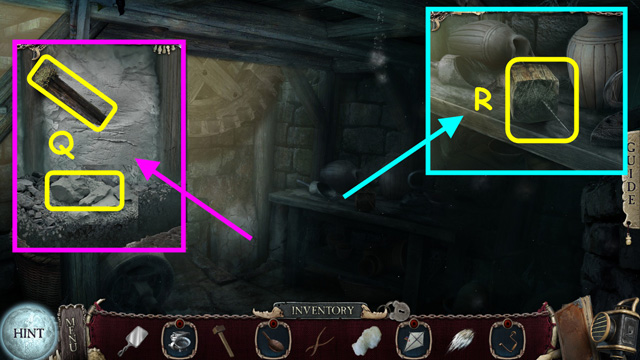
- Look at the bag and use the GLASS SHARD to cut a hole (Q).
- Take the EMPTY BAG and the TONGS (R).
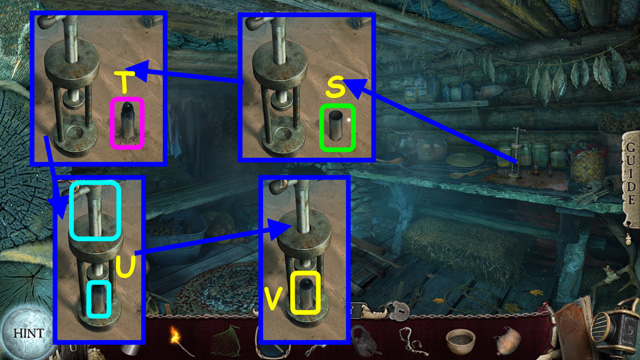
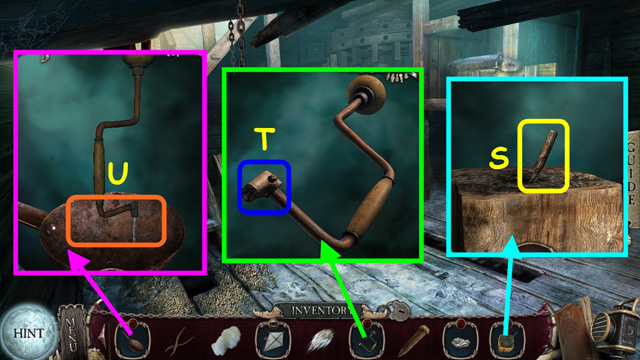
- Look at the bin and use the tongs to remove the 3 nails and earn the HINGE (S).
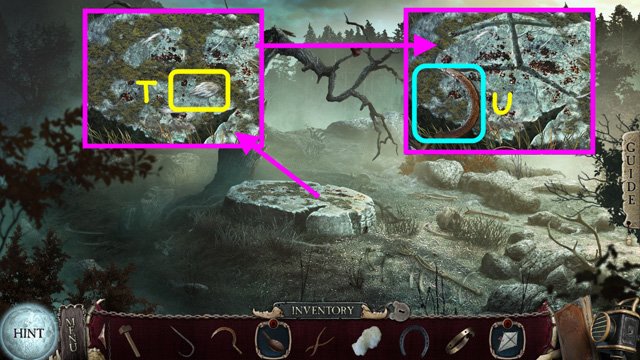
- Take the STONE (T).

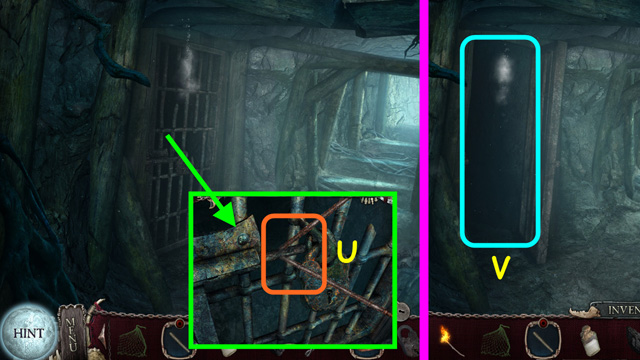
- Look at the SKULL in your inventory and use the STONE on the skull 3 times to break it open (U).
- Take the ARROWHEAD (V).
- Zoom into the trapdoor and read the note (W).
- Walk down twice.
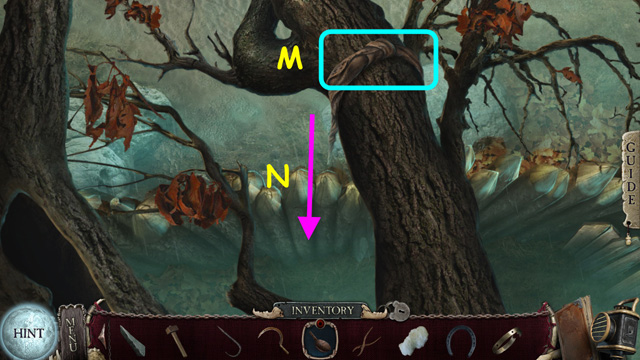
- Read the newspaper clipping on the tree (X).
- Walk down.

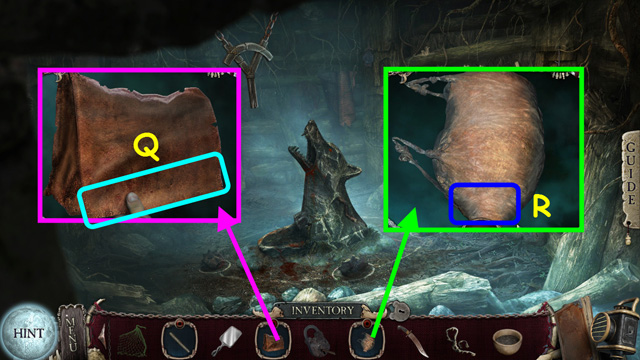
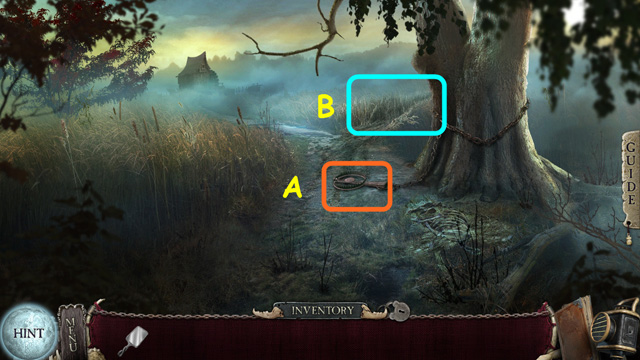
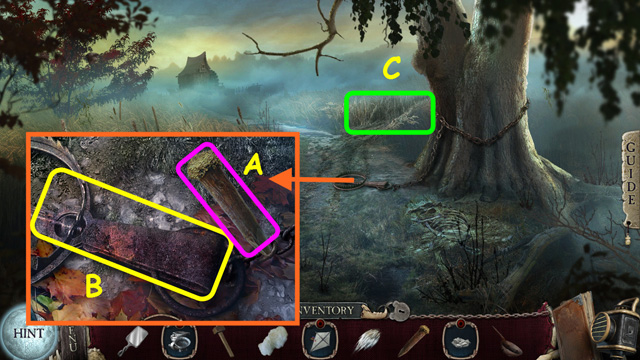
- Look at the reins and use the GLASS SHARD to cut the leather (A).
- Take the REINS (B).
- Look at the wheel and use the TONGS to take the LINCHPIN (C).
- Take the BROKEN WHEEL (D).
- Walk forward 3 times.
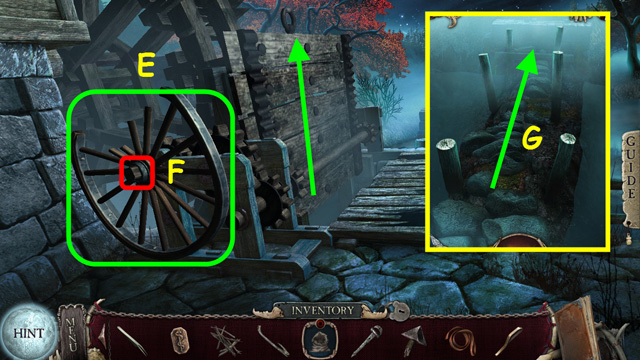
- Place the BROKEN WHEEL on the winch (E).
- Use the ARROWHEAD in the center of the wheel to lock it in place (F).
- Drag the wheel in a clockwise circle to raise the dam.
- Wait for the water to recede, and then walk forward on the path (G).
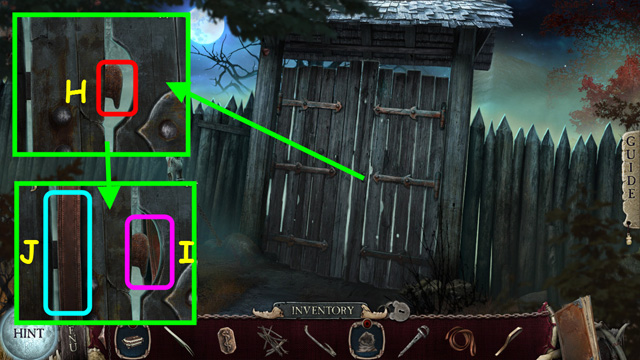
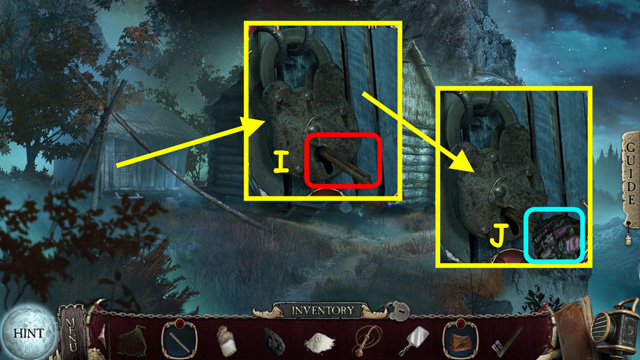
- Look at the door and use the REINS on the lock (H).
- Use the BONE on the rein loop (I).
- Pull the end of the rein (J).
- Open the door and walk forward.
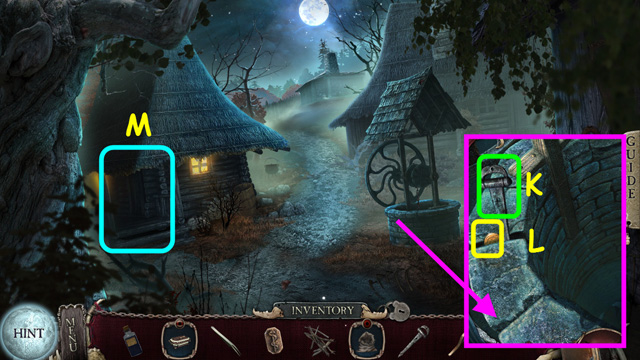
- Look at the well and place the HINGE in the crack with the coin (K).
- Push the hinge to widen the crack and take the COIN (L).
- Zoom into the hut and knock on the door (M).
- Talk to the man by choosing any response.
- Enter the hut.
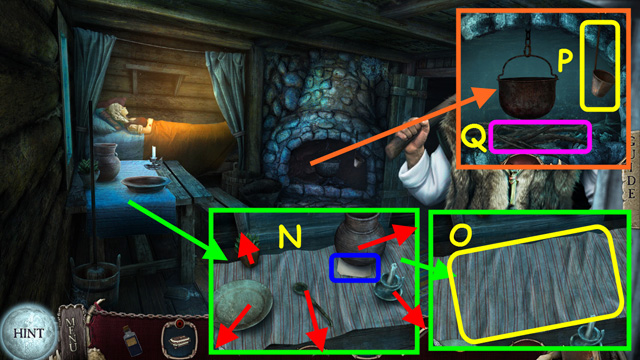
- Look at the table, move all the items aside, and read the note (N).
- Take the TABLECLOTH (O).
- Look at the fireplace and take the SCOOP (P).
- Place the BRUSHWOOD under the cauldron (Q).
- Walk down, then forward.
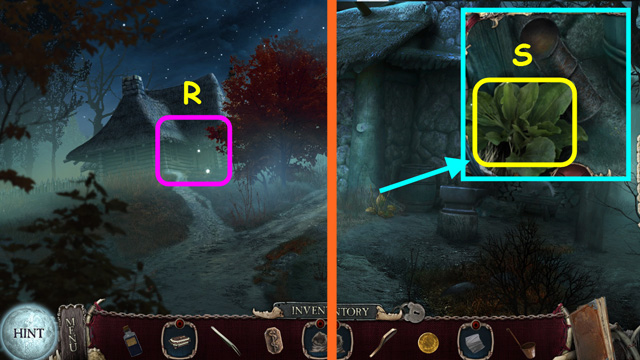
- Note the hut on the left (R).
- Walk forward.
- Look by the barrel and take the HEALING HERBS (S).
- Walk to the left.
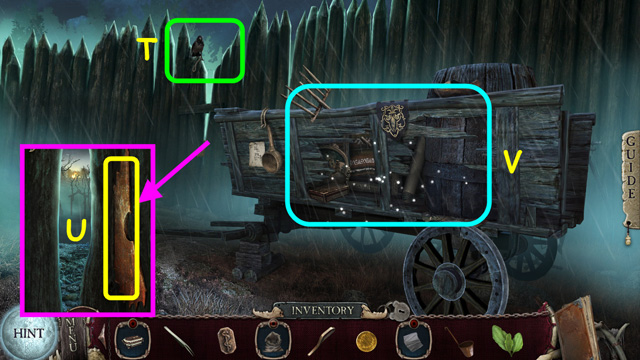
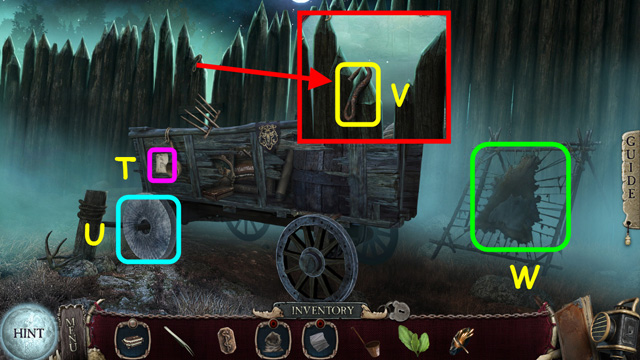
- Note the top of fence (T).
- Look at the crack and take the SAW BLADE (U).
- Look inside the wagon for a HOP (V).
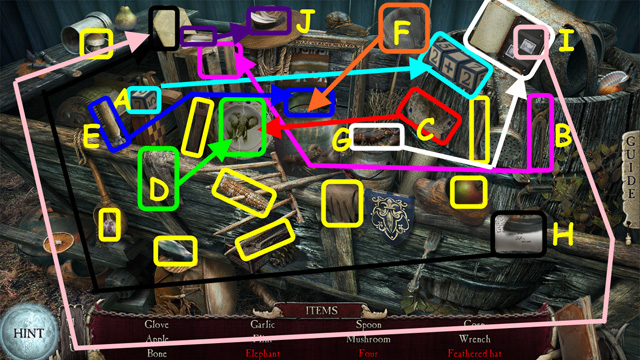
- Locate all the items on the list.
- Place the block with the other 2 and turn the numbers to read ’2+2′ to make four (A).
- Use the tongs to open the crate (B).
- Place the 2 plate pieces together (C).
- Use the rag on the plate to find the elephant (D).
- Use the opener to remove the lid (E).
- Use the net to remove the lobster (F).
- Use the lobster to cut the ties on the book (G).
- Place the note in the envelope (H).
- Open the book, take a stamp, and place it on the envelope (I).
- Place the feather in the hat to make the feathered hat (J).
- You will earn the FLINT.
- Walk down 6 times.
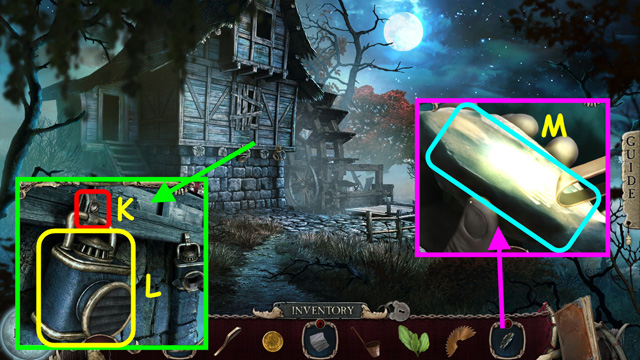
- Look at the wall and use the COIN on the screw (K).
- Take the LAMP (L).
- Look at the FLINT in your inventory and use the LINCHPIN on the flint to make the FLINT AND STEEL (M).
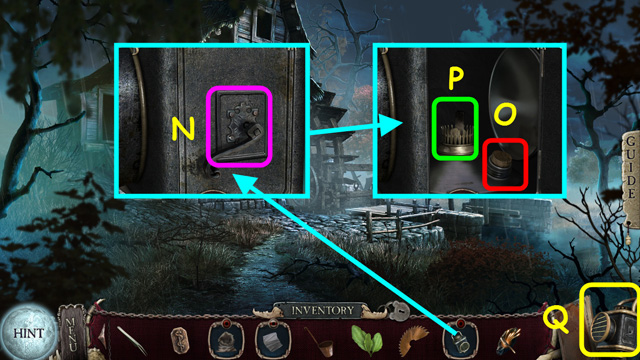
- Look at the LAMP in your inventory and open the cover (N).
- Remove the cork and pour in the ALCOHOL (O).
- Use the FLINT AND STEEL on the wick (P).
- The LAMP will now sit on the lower right of your menu bar (Q).
- Enter the mill.
- Look at the cabinet and use the SAW BLADE on the axle (R).
- Take the MILLSTONE (S).
- Walk down, go forward 5 times, and then walk to the left.
- Read the note (T).
- Place the MILLSTONE on the wagon (U).
- Push the wagon to the left.
- Look at the fence and take the HOOK (V).
- Look at the hide for a mini-game (W).
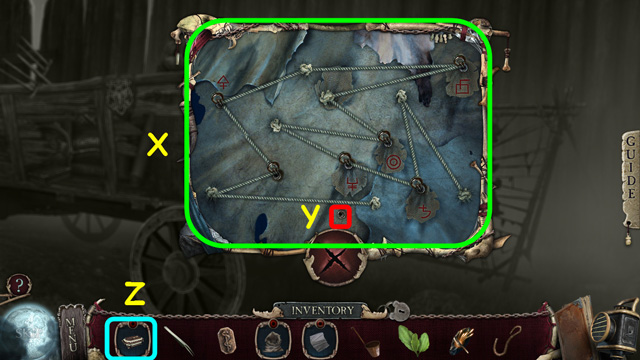
- Untangle the rope by moving the metal rings to different holes (X).
- The hole that is empty when you begin needs to be empty when you solve the mini-game (Y).
- The code will go into your diary.
- Look at the CASKET in your inventory for a mini-game (Z).
Chapter 2: Saving the Girl
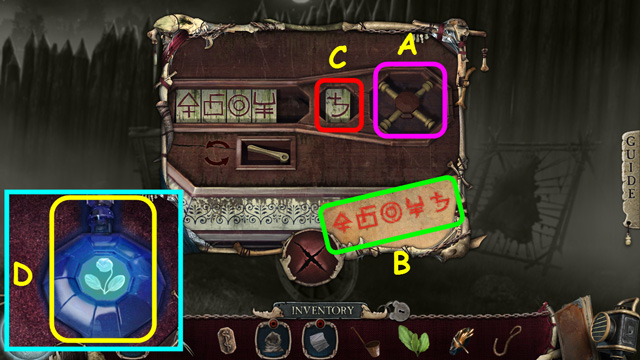
- Spin the wheel (A) until you see the 1st symbol in the code (B) in the opening (C).
- When you release the wheel, the token will move to the left.
- Continue this process for the next 4 symbols.
- The sequence of symbols is randomly generated; your solution may vary.
- Take the POTION (D).
- Walk down 3 times.

- Look at the well and place the HOOK on the chain (E).
- Take the BUCKET OF WATER (F).
- Enter the cabin on the left.
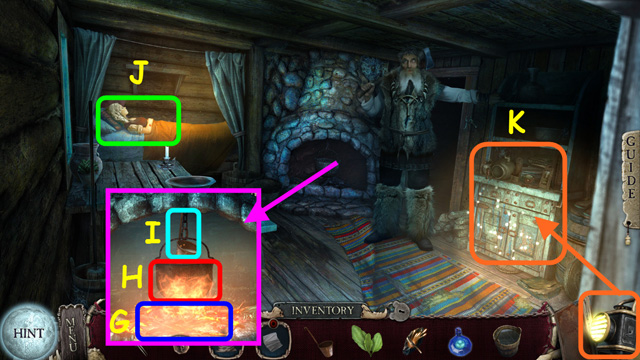
- Look at the fireplace and use the FLINT AND STEEL on the brushwood (G).
- Pour the BUCKET OF WATER into the cauldron (H).
- Use the SCOOP on the cauldron to get WARM WATER (I).
- Note the girl (J).
- Select the LAMP, then select the cabinet for a HOP (K).
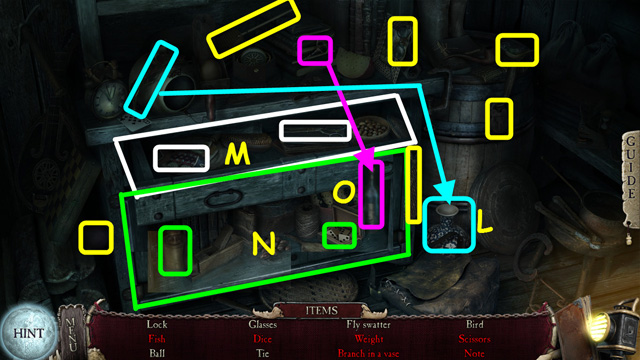
- Locate all the items on the list.
- Place the branch in the vase to make the branch in vase (L).
- Open the drawer to find the fish and the scissors (M).
- Open the cupboard doors to find the dice and the weight (N).
- Use the corkscrew on the bottle to find the note (O).
- You will earn the SCISSORS.
- Look at the girl.

- Use the WARM WATER on the wound (P).
- Use the TWEEZERS to remove the BULLET (Q).
- Place the HEALING HERBS on the wound (R).
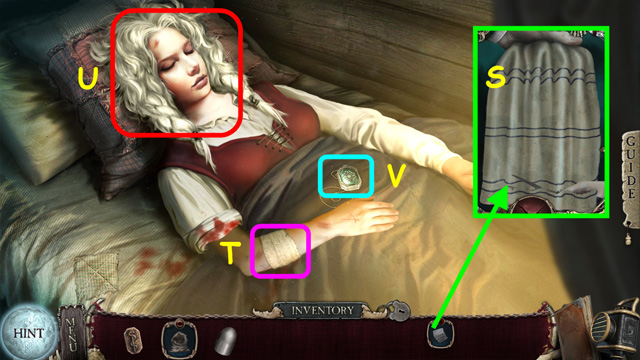
- Look at the TABLE CLOTH in your inventory and use the SCISSORS on it to make BANDAGES (S).
- Use the BANDAGES over the healing herbs (T).
- Give the girl the POTION (U).
- Look at the locket (V).
- Walk down and enter the room on the right.
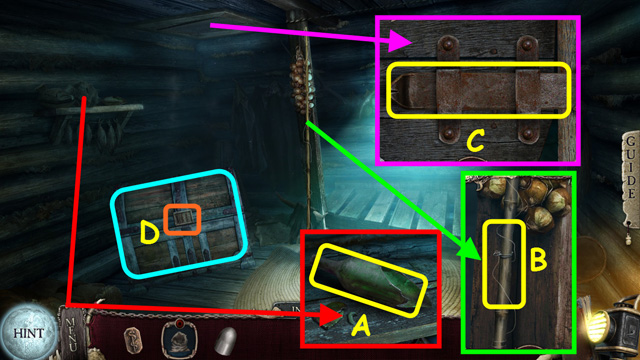
- Use the LAMP, look at the shelf, and take the BROKEN BOTTLE (A).
- Look at the pole and use the BROKEN BOTTLE to take the FISHING LINE (B).
- Look at the trapdoor and take the BAR (C).
- Look at the chest and zoom into the lock for a mini-game (D).

- Place the CADUCEUS CHIP on the left slider to trigger the mini-game (E).
- You need to move the sliders to open the holes on the right.
- Move the center slider to the top (F).
- Move the left slider to the top.
- Move the center slider to the bottom.
- Move the right slider to the middle (G).
- Move the center slider to the middle.
- Move the right slider to the bottom.
- Use the BAR to open the chest (H).
- Read the letter (I).
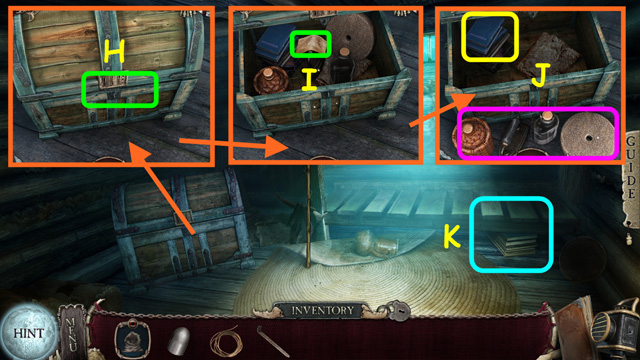
- Look at the chest again; take the BOOKS and move all the heavy items outside the chest (J).
- Use the BOOKS on the bed pallet (K).
- Walk down.

- Look at the padlock (L).
- Use the LAMP and take some HAY (M).
- Look at the EMPTY BAG in your inventory and place the HAY inside to make the PILLOW (N).
- Walk down.
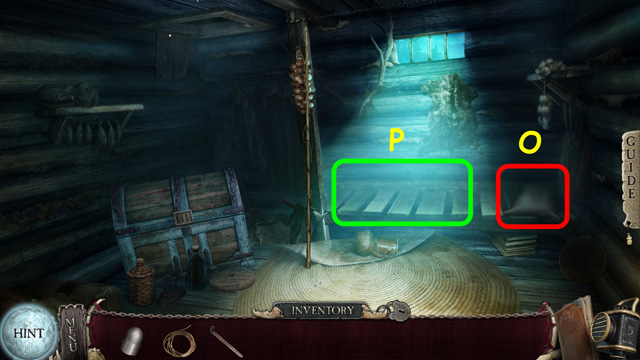
- Place the PILLOW on the bed pallet (O).
- Look at the bed to sleep (P).
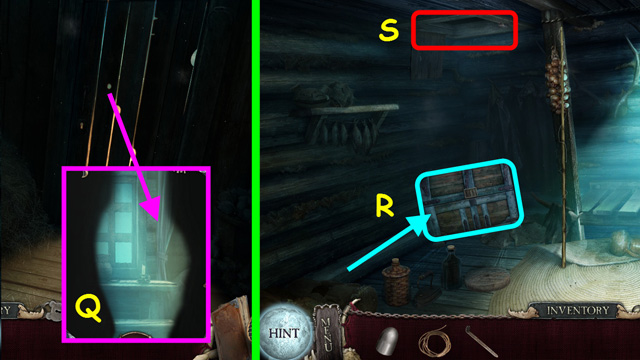
- Walk down and look at the hole in the door (Q).
- Walk down.
- Push the chest (R).
- Use the LAMP and climb up through the trapdoor (S).
- Read the note (T).
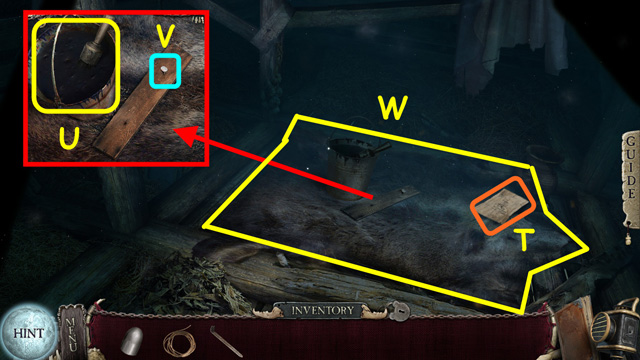
- Look at the floor and take the TAR (U).
- Use the BAR on the board to get the NAIL (V).
- Take the PELT (W).

- Look at the NAIL in your inventory and attach the FISHING LINE to make the HOOK AND LINE (A).
- Look through the hole in the floor and use the HOOK AND LINE on the key (B).
- Drag the hook down over the key and release to get the KEY (C).
- Walk down twice.
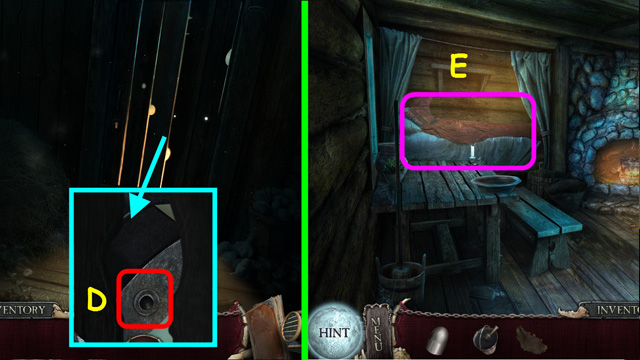
- Look at the hole in the door and use the KEY on the lock (D).
- Open the door and walk forward.
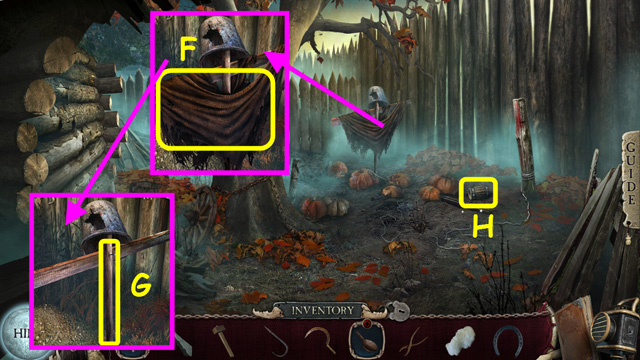
- Look at the bed (E).
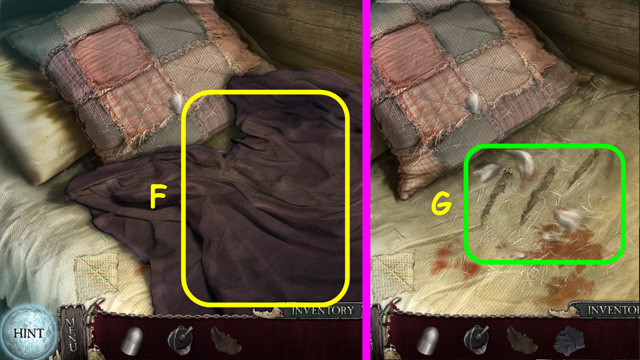
- Take the BLANKET (F).
- Note the bedding (G).
- Walk down twice to exit the hut, walk forward twice, and walk to the left.
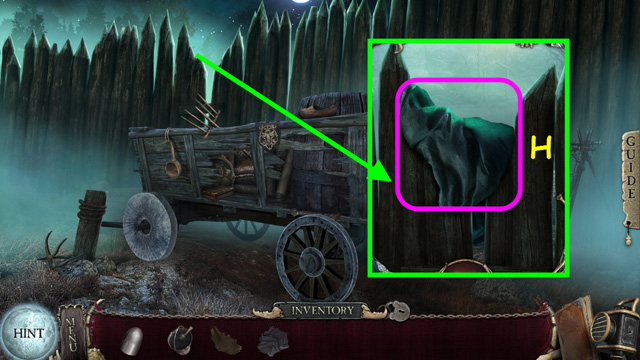
- Look at the fence and use the BLANKET on the points (H).
- Go forward.
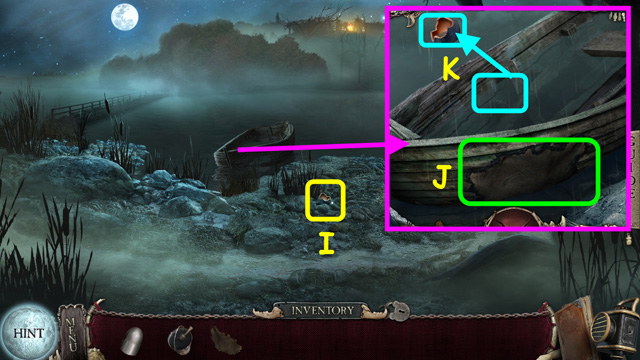
- Zoom into the ground and take the SCOOP (I).
- Look at the boat; place the PELT over the hole, then use the TAR on the pelt (J).
- Use the SCOOP on the water, and then pour it outside the boat 4 times (K).
- Enter the boat to cross the water and walk forward.
Chapter 3: Captured
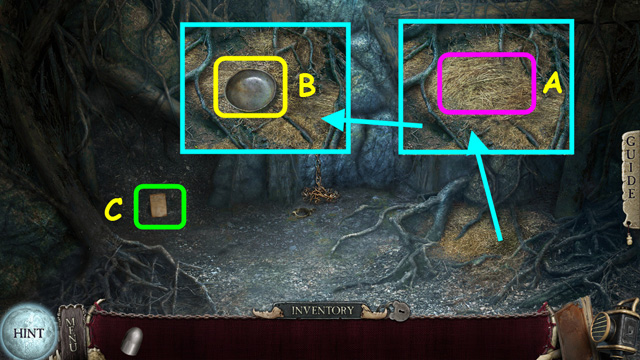
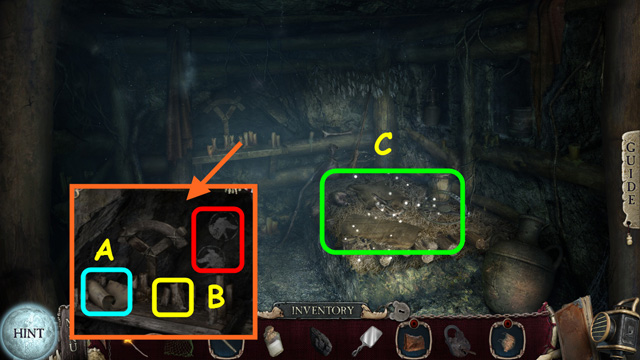
- Look at the ground and brush away the hay 3 times (A).
- Take the BOWL (B).
- Zoom in and read the note (C).
- You will earn the PHOTO.
- Look in the alcove and use the BOWL on the casket (D).
- Take the CASKET (E).
- Use the BOWL on the dirt to dig an escape route (F).
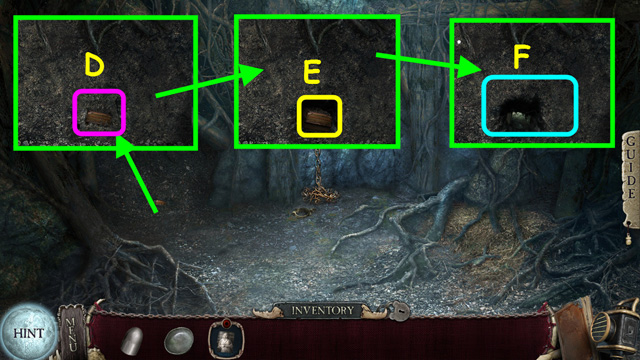
- Go forward.
- Look at the alcove and take the TORCH (G).
- Look at the wolf head and take the PEBBLES (H).
- Open the mouth and place the TORCH inside (I).
- Turn the crank (J) to sharpen the torch; take the STAKE.
- Walk down and look up.
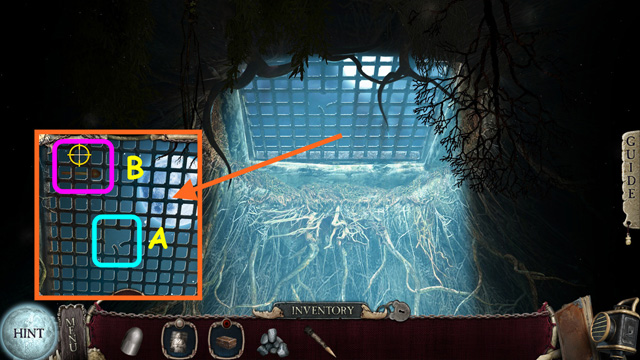
- Look at the grate and use the PEBBLES on the grate for a mini-game.
- Throw the pebbles to knock the spoon to the hole in the grate (A).
- Watch the aiming circle and click when you want to throw (B).
- You will earn the SPOON.
- Look down and go forward.
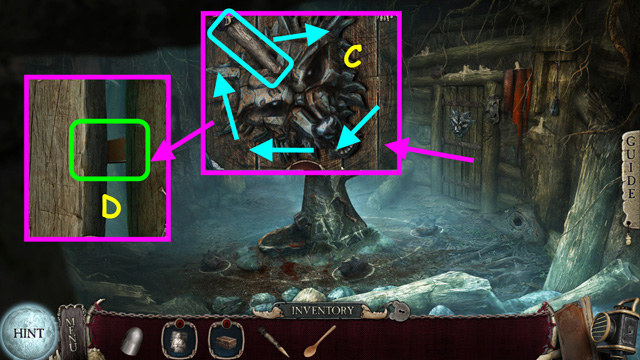
- Look at the door and use the STAKE on the head (C).
- Drag the head in a clockwise circle.
- Use the SPOON to lift the latch (D).
- Walk forward.
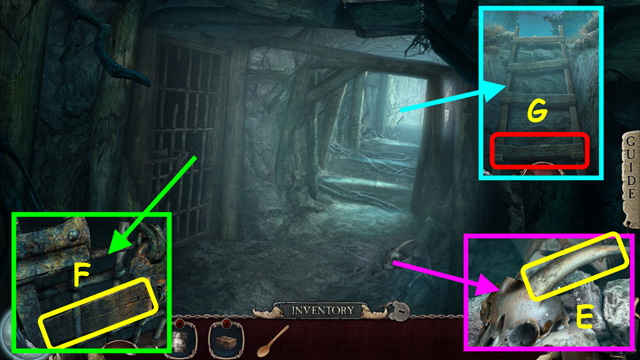
- Look at the ground and take the HORN from the skull (E).
- Look at the cell door and take the LADDER RUNG (F).
- Look at the ladder and place the LADDER RUNG on the ladder (G).
- Climb up the ladder and walk forward.
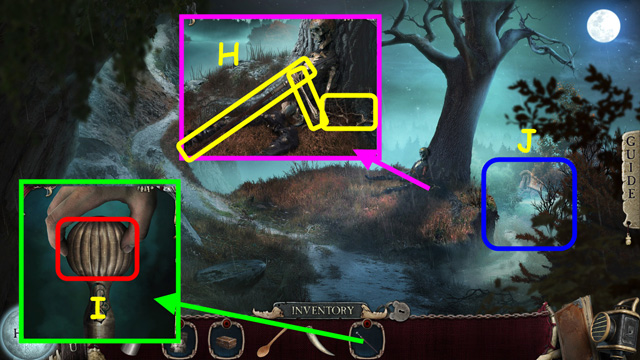
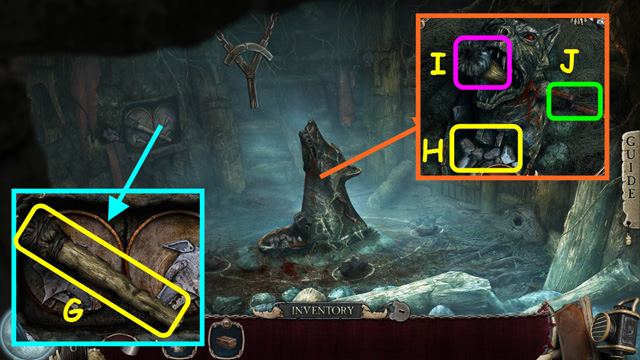
- Look at the skeleton; take the BRUSHWOOD, CANE, and BONE (H).
- Look at the CANE in your inventory and remove the cap to find the AWL (I).
- Walk to the right (J).
- Take the HEADSCARF (K).
- Look at the campfire and place the BRUSHWOOD under the cauldron (L).
- Note the path to the right (M).
- Enter the gypsy wagon (N).
- Look at the table; take the CARDS and touch the crystal ball (O).
- Look at the window seat and take the CORSET (P).
- Use the HORN on the bowl to get the HORN WITH OIL (Q).
- Select the table on the left for a HOP (R).
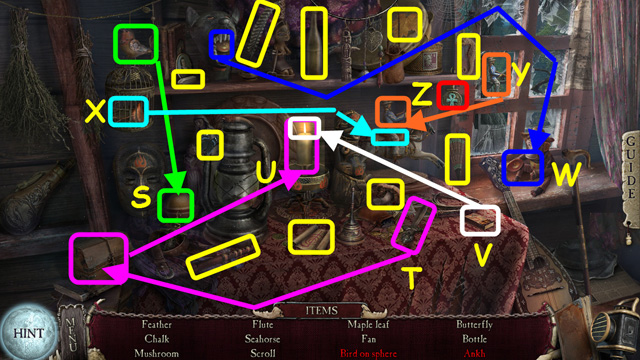
- Locate all the items on the list.
- Place the bird on the sphere to make the bird on a sphere (S).
- Use the knife to cut the rope on the box (T).
- Open the box, take the candle, and place it on the stand (U).
- Use the matches on the candle (V).
- Open the curtain and place the cymbal on the monkey (W).
- Open the birdcage, take the saddle, and place it on the horse (X).
- Place the rider on the horse (Y).
- Find the ankh (Z).
- You will earn the FAN.
- Walk down.
- Look at the campfire and use the FAN on the brushwood (A).
- You will earn the BURNING BRANCH.
- Walk down.
- Walk up the left path (B).

- Look at the net; remove it from the 3 nails to take the NET (C).
- Note the path on the right (D).
- Open the door and enter the shack (E).
- Look at the stool; pull on it twice to take the WOODEN LEG (F).
- Look at the table and take the SALTPETER (G).
- Walk down, then go forward on the right.
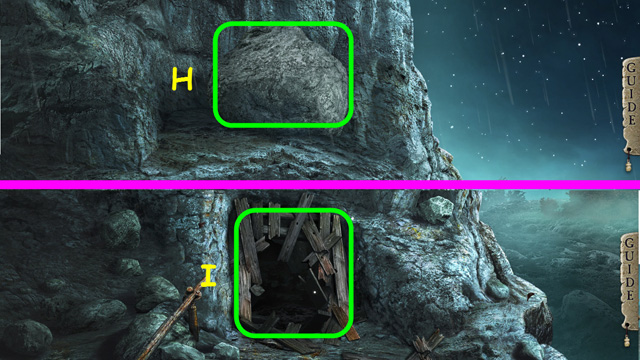
- Look up and use the HORN WITH OIL on the rock above the opening (H).
- Walk forward into the mine (I).
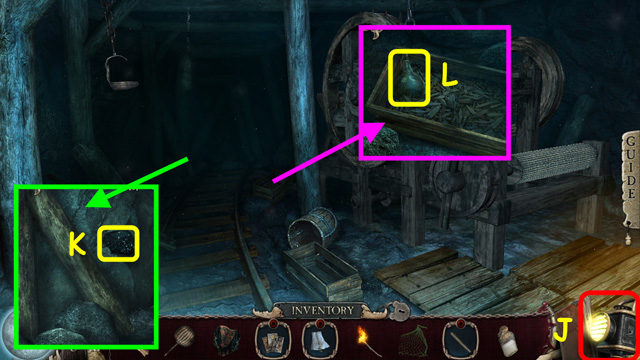
- Use your LAMP (J).
- Look in the corner and pull 3 times to get the COAL (K).
- Look in the crate and take the FLASK (L).
- Walk down 6 times.
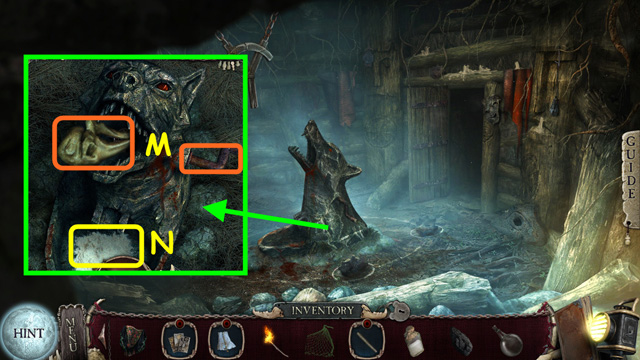
- Look at the wolf head; place the BONE in the grinder and turn the crank 6 times (M).
- Take the BONE MEAL (N).
- Walk forward 3 times, walk to the right twice, and then go forward.

- Look at the shore; take the TAROT CARDS and the BOAT HOOK (O).
- Use the FLASK on the water to make the MAGNIFYING FLASK (P).
- Look at the CARDS in your inventory for a mini-game (Q).
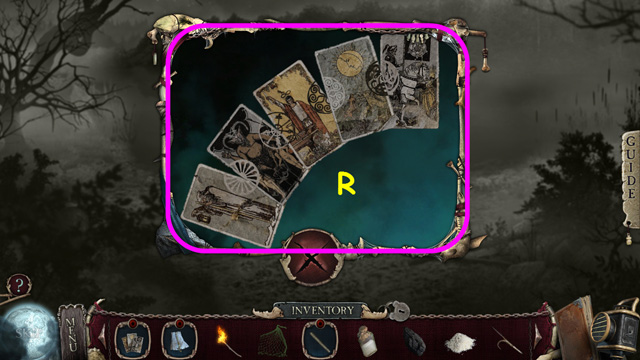
- Add the TAROT CARDS to trigger the mini-game.
- Swap the cards so the symbols are complete (R).
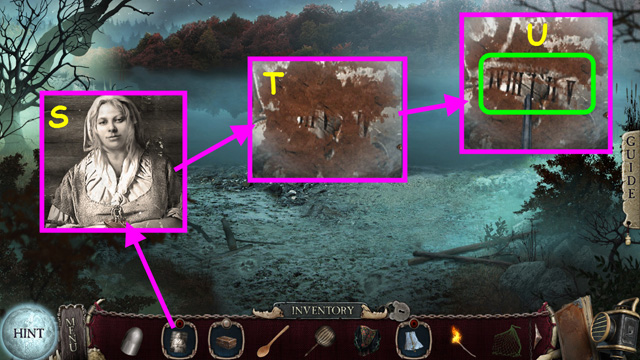
- Look at the PHOTO in your inventory and use the MAGNIFYING FLASK on the photo (S).
- Drag the photo to view the dirty area (T).
- Use the AWL to scratch off the dirt and see the code (U).
- Drag the awl back and forth to reveal the code.
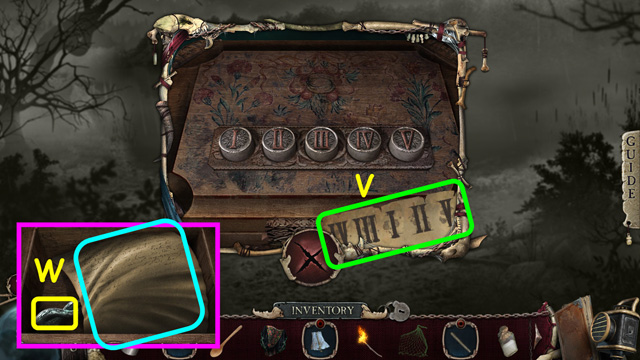
- Look at the CASKET in your inventory and press the buttons in in the order from the code (V).
- This sequence is randomly generated; your solution may vary.
- Read the note and take the MIRROR (W).
- Walk down 3 times.
Chapter 4: Escaping the Island
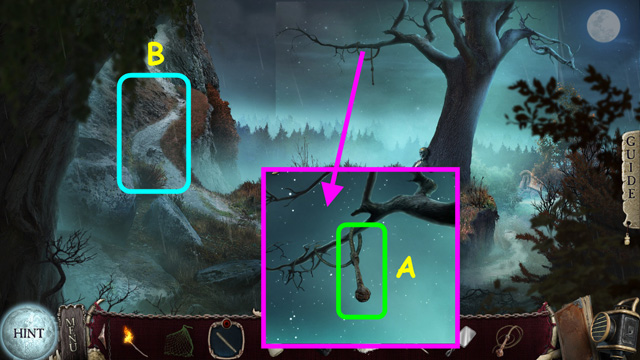
- Look at the tree and use the BOAT HOOK to take the WHIP (A).
- Walk to the left (B).
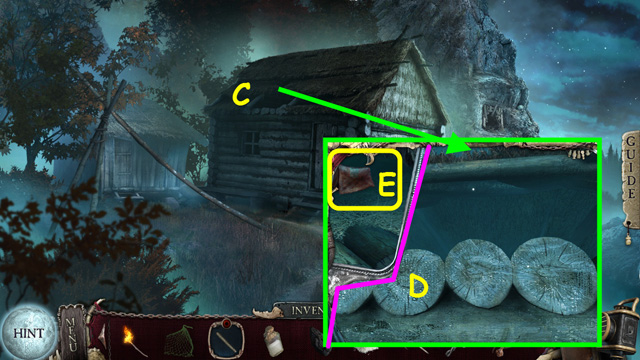
- Look at the hole in the roof (C).
- Use the MIRROR on the logs (D).
- Use the BOAT HOOK on the reflection to get the LEATHER BAG (E).
- Walk down, go right, and enter the gypsy wagon.
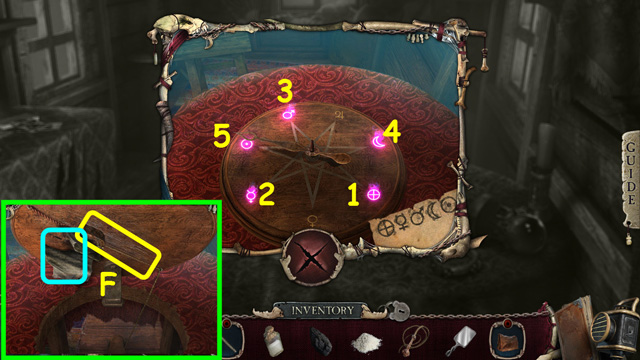
- Look at the table for a mini-game.
- Drag the pointer to light all the symbols in order without letting go of the pointer (1-5).
- The sequence is randomly generated; your solution may vary.
- Read the note and take the ROPE WITH MAGNET (F).
- Walk down 3 times.
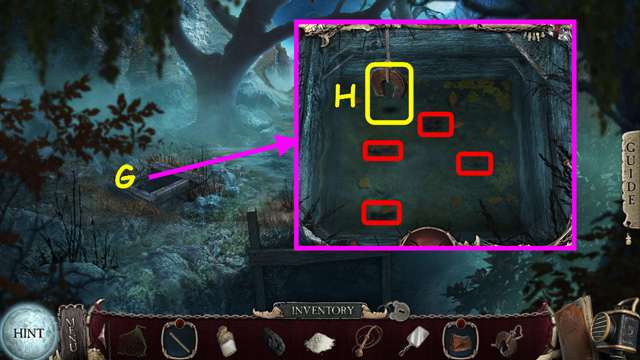
- Look at the well (G) and use the ROPE WITH MAGNET on the water.
- Drag the magnet over the dark areas (red); release the magnet when the shadow (H) is over a dark area.
- You will earn the KEY.
- Walk forward and left.
- Look at the shed and place the KEY in the lock (I).
- Use the HEADSCARF on the key to unlock the lock (J).
- You will keep the LOCK WITH KEY.
- Look in the shed for a HOP.
- Locate all the items on the list.
- Place the pumpkin on the scarecrow (K).
- Use the sword on the pumpkin (L).
- Take the key and use it on the chest (M).
- Place the giraffe head on the body to make the giraffe (N).
- You will earn the FULL WATERSKIN.
- Walk down and right.
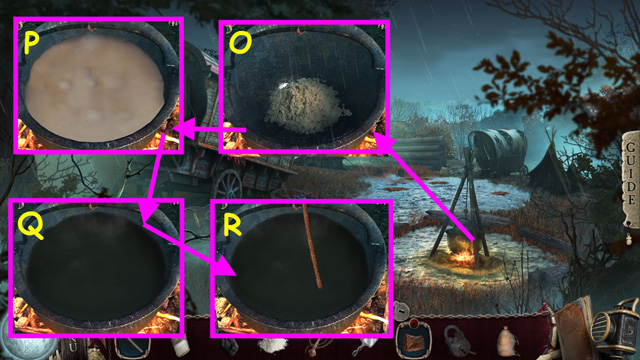
- Look at the campfire and add the BONE MEAL to the cauldron (O).
- Empty the FULL WATERSKIN into the cauldron (P).
- The WATERSKIN will return to the inventory.
- Use the SPOON to stir the mixture until the spoon is taken away (Q).
- Drag the spoon in a circular motion to stir.
- Use the WHIP on the cauldron to get the WHIP WITH GLUE (R).
- Walk to the right and go forward.
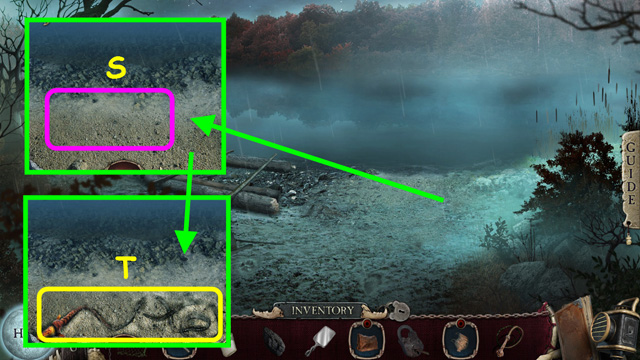
- Look at the shore and place the WHIP WITH GLUE on the sand (S).
- Take the ABRASIVE WHIP (T).
- Walk down 5 times.
- Look at the cell door and use the ABRASIVE WHIP on the bars (U).
- Enter the cell (V).
- Look in the corner and read the note (A).
- Take the SNUFFED CANDLE and note the wolf heads (B).
- Look at the pallet for a HOP (C).
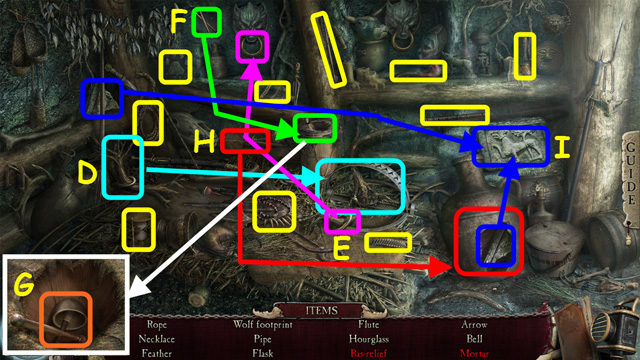
- Locate all the items on the list.
- Use the twig on the trap (D).
- Use the ring on the wolf head and pull it down (E).
- Use the drumsticks on the drum (F).
- Look in the drum to find the mortar (G).
- Use the hammer 3 times on the vessel (H).
- Place the 2 pieces with the third to make the bas-relief (I).
- You will earn the MORTAR AND PESTLE.
- Walk down twice.
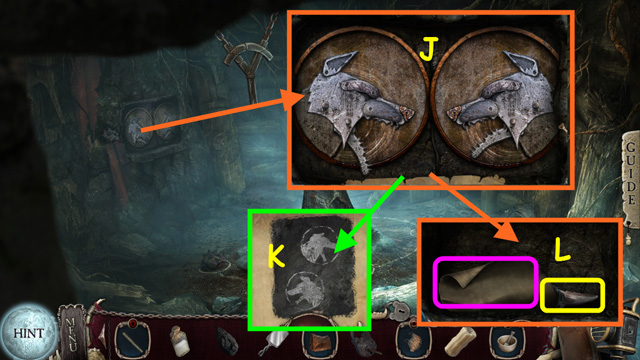
- Look at the alcove and move the wolf heads (J) to match the diagram (K).
- The diagrams are randomly generated; your solution may vary.
- Read the note and take the KNIFE (L).
- Look at the CORSET in your inventory and use the KNIFE on the laces to get the CORD (M).
- Look at the CORD in your inventory and use the SNUFFED CANDLE on it to make the WICK (N).
- Look at the MORTAR AND PESTLE in your inventory; place the COAL and the SALT PETER inside (O).
- Select the pestle to grind the mixture and make the GUNPOWDER (P).
- Look at the LEATHER BAG in your inventory and use the KNIFE to cut a BAND (Q).
- Look at the WATERSKIN in your inventory; push the bag 3 times to inflate it, and then use the BAND to tie it closed to make the AIR BAG (R).
- Walk forward 3 times, walk to the left, and enter the cabin.
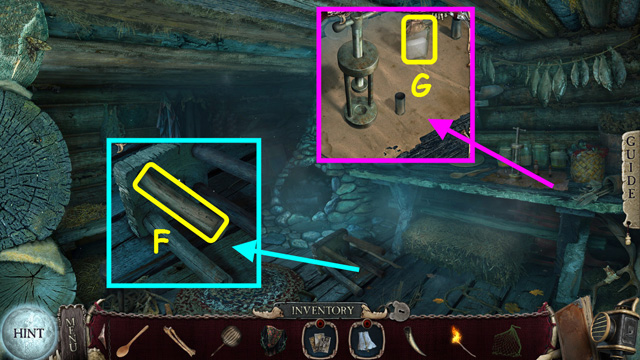
- Look at the table and use the GUNPOWDER on the casing (S).
- Place the BULLET on the casing (T).
- Move the bullet/casing to the press and turn the crank (U).
- Take the ROUND from the press (V).
- Walk down 6 times.
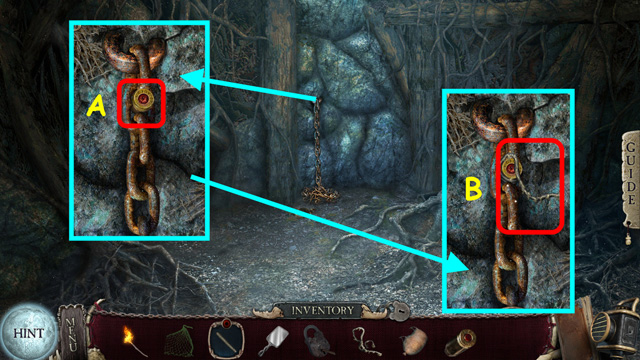
- Look at the chains and place the ROUND in the link (A).
- Place the WICK on the round, and then use the BURNING BRANCH on the wick to earn the CHAIN (B).
- Walk forward 4 times, walk left, and go forward twice.
- Look at the press to see the trapped axe head (C).
- Place the CHAIN on the press (D).
- Use the LOCK WITH KEY on the chain (E).
- Turn the wheel several times (F).
- Take the AXE HEAD (G).
- Look at the WOODEN LEG in your inventory and add the AXE HEAD to make the AXE (H).
- Walk down 3 times and walk to the right twice.

- Look at the logs and use the AXE twice on each stake (I).
- Walk forward.

- Move the 4 logs to the raft (J).
- Use the NET on the raft, and then push it out in the water (K).
- Use the AIR BAG on the raft (L).
- Get on the raft.
Chapter 5: Return to the Village
- Walk down from the mill.
- Note the trap (A).
- Walk to the right (B).
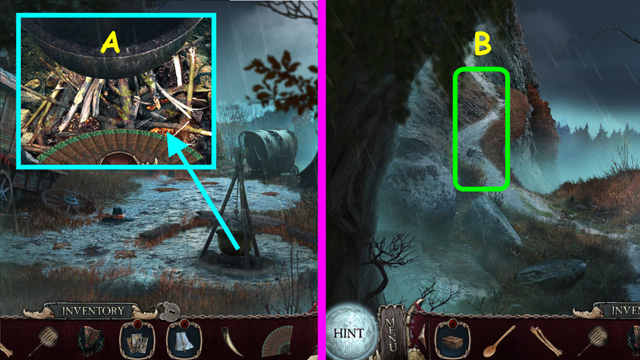
- Look at the puddle and take the TROUGH (C).
- Open the door and enter the borough (D).
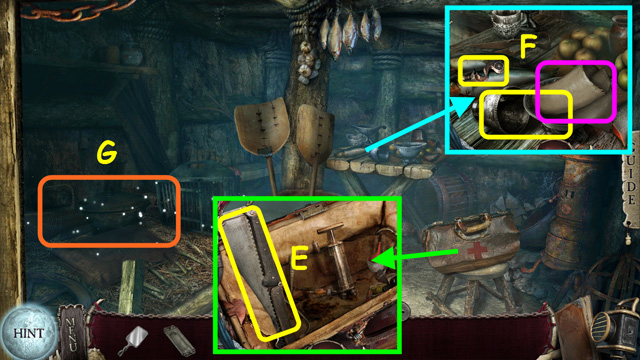
- Look at the bag, open it, and take the SURGICAL SAW (E).
- Look at the table, read the note, take the KITCHEN UTENSILS, and take the GUN LOCK (F).
- Select the area on the left for a HOP (G).
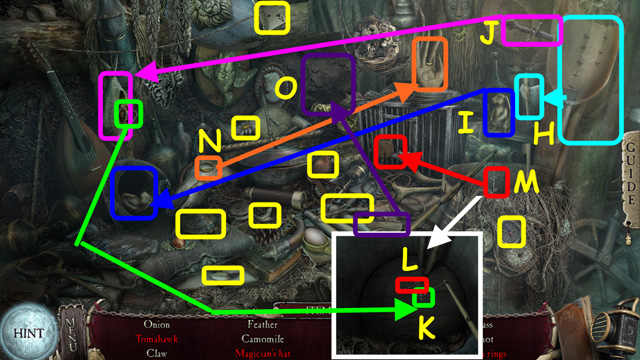
- Locate all the items on the list.
- Move the scoop to find the tomahawk (H).
- Place the rabbit it the hat to make the wizard’s hat (I).
- Use the knife on the fish to find the hook (J).
- Look in the barrel and place the hook on the line (K).
- Drag the hook over the key and release (L).
- Take the key and use it on the lock (M).
- Place the ring on the hand to make the hand with rings (N).
- Open the curtain and use the shovel to dig up the golden idol (O).
- You will earn the KEY.
- Walk down twice and go forward 6 times.
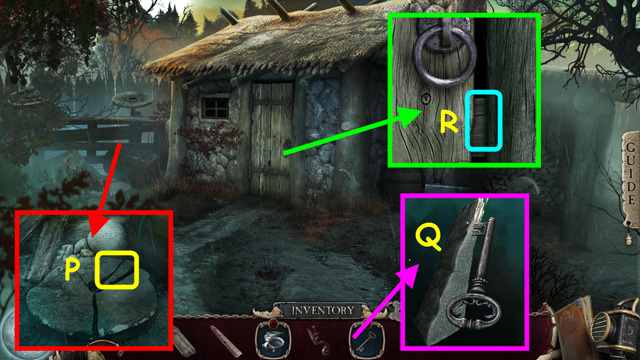
- Look at the wagon and take the WHETSTONE (P).
- Look at the KEY in your inventory and use the WHETSTONE to make the KEY SHAFT (Q).
- Zoom into the door, look at the lock, and use the SURGICAL SAW on the latch (R).
- Open the door and enter the blacksmith’s shop.
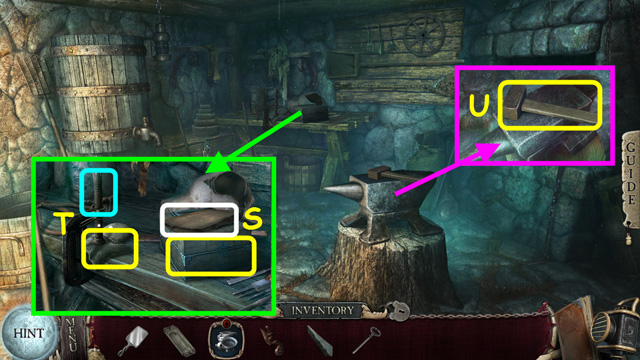
- Look at the bench, read the letter, and take the BOX (S).
- Use the KEY SHAFT to open and take the CLAMP; take the MITT (T).
- Look at the anvil and take the SLEDGEHAMMER (U).
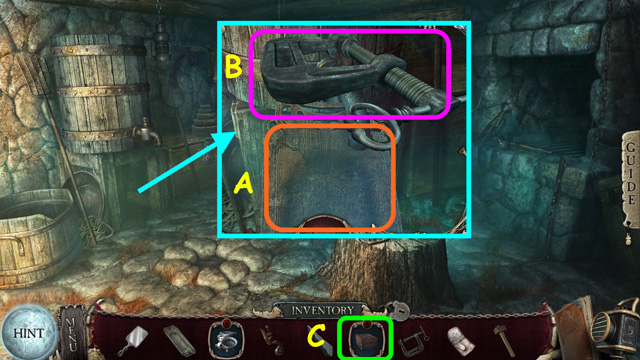
- Look at the barrel and place the TROUGH under the spigot (A).
- Place the CLAMP on the spigot and turn it (B).
- Look at the BOX in your inventory for a mini-game (C).
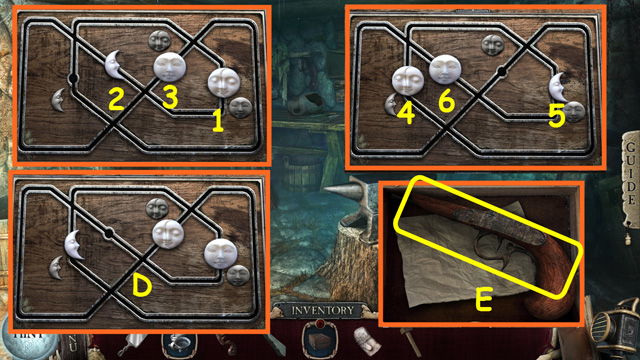
- Move the moon phases along the tracks so they are next to their matching moons (D).
- Select the moons in numerical order (1-6).
- Take the GUN HANDLE (E).
- Walk down.

- Look at the drain and take the GUN BARREL (F).
- Look at the GUN HANDLE in your inventory; add the GUN BARREL and the GUN LOCK to make the GUN (G).
- Walk down.
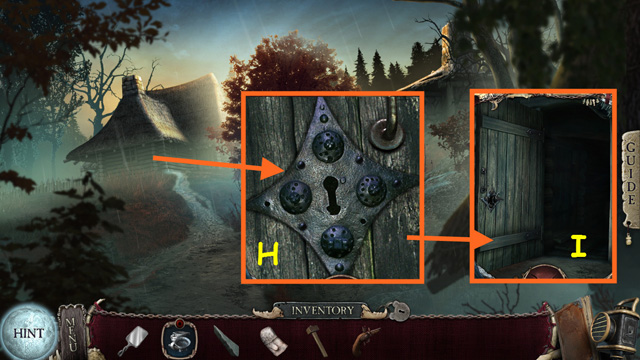
- Zoom into the cabin door, look at the lock and use the GUN on the lock (H).
- Open the door and enter the cabin (I).
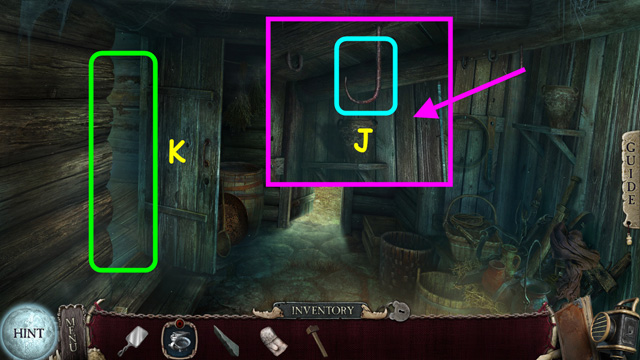
- Look at the ceiling and use the SLEDGEHAMMER to take the HOOK (J).
- Enter the door on the left (K).
- Note the chest (L).
- Look at the KITCHEN UTENSILS in your inventory and use the MITT to clean them (M).
- Drag the mitt over all the surfaces until the mitt disappears.
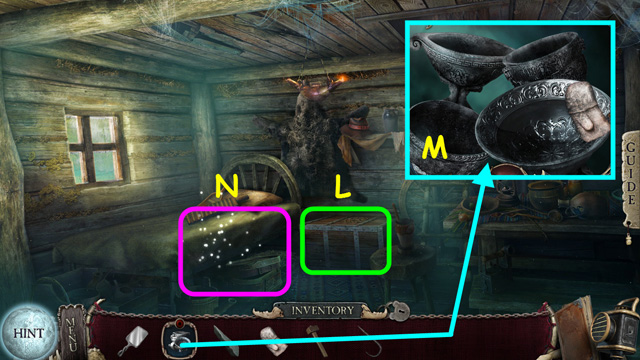
- Look under the bed for a HOP (N).
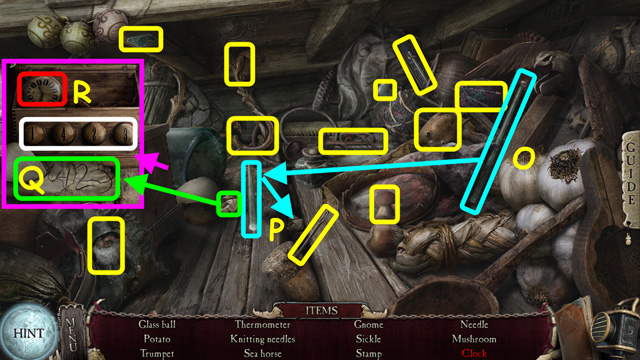
- Locate all the items on the list.
- Take the rod and rub it on the rug (O).
- Use the rod on the crack in the wood to get the scraps (P).
- Look at the chest and place the scraps in front; arrange the scraps to form the code (Q).
- Turn the balls to 1-4-2-3 to open the chest and take the clock (R).
- You will earn the SICKLE.
- Look at the chest for a mini-game.
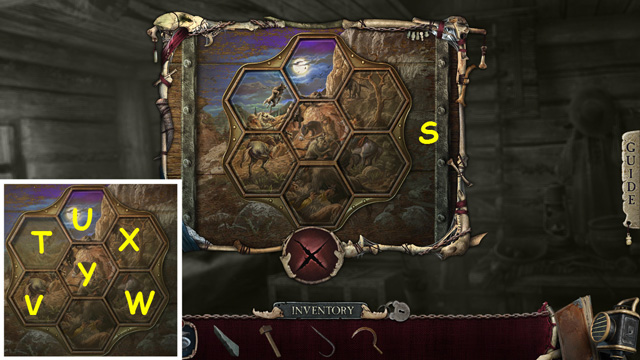
- Rotate the hexagons to restore the picture (S).
- Moving one hexagon may cause one or more to move.
- Move the hexagons in this order: T, Ux2, Vx3, W, X, and Yx2.
- Read the letter; take the PLIERS and the SCOOP from inside the chest.
- Look at the bear pelt and use the SICKLE on the stitches (A).
- Take the WADDING (B).
- Climb up the ladder (C).
- Take the HORSESHOE (D).
- Note the tree (E).
- Walk down twice and go forward.
- Look at the scarecrow and take the RAGS (F).
- Pull the arm and bucket off, then pull several times to get the LEVER (G).
- Zoom into the ground and take the OLD MUG (H).

- Look at the RAGS in your inventory and use the SICKLE to cut strips and make a ROPE (I).
- Look at the OLD MUG in your inventory and take the METALLIC BAND (J).
- Walk down twice.
- Look at the cabin on the left and use the LEVER under the door to take the DOOR (K).
- Enter the cabin, walk left, and go up the ladder.
- Look at the tree and use the DOOR to make a bridge (L).
- Walk forward.
- Hang the ROPE from the branch (M).
- Climb down the rope (N).
- Move forward to the water, and then look at the floating debris (O).
- Look at the log and use the WHETSTONE to take the BROKEN ANCHOR (P).
- Drag the whetstone back and forth to release the anchor.
- As the scene darkens, go up to the surface for air as needed.
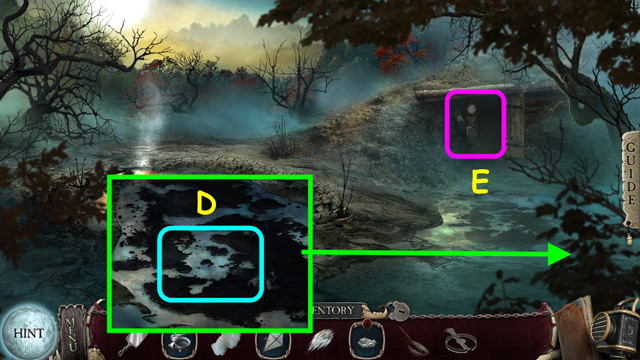
- Walk down, then up the hill on the left (Q).

- Take the KITE (R).
- Note the tree (S).
- Walk forward.
- Look at the stone altar and take the WHITE FUR (T).
- Use the SICKLE to scrape away the moss (U).
- Drag the sickle back and forth until it disappears.
- Walk down twice, go up the rope, walk down 4 times, and go forward twice.
Chapter 6: The Ritual
- Look at the anvil and place the HOOK on top (A).
- Add the BROKEN ANCHOR, then the METALLIC BAND to the hook (B).
- Use the SLEDGEHAMMER on the bands to make the GRAPPLING HOOK (C).
- Walk down 6 times.
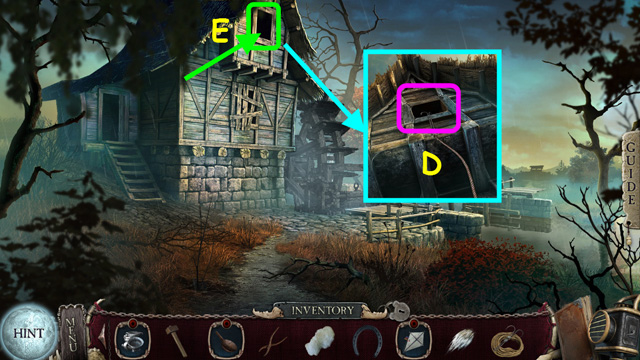
- Look at the mill and use the GRAPPLING HOOK on the window (D).
- Enter the window (E).
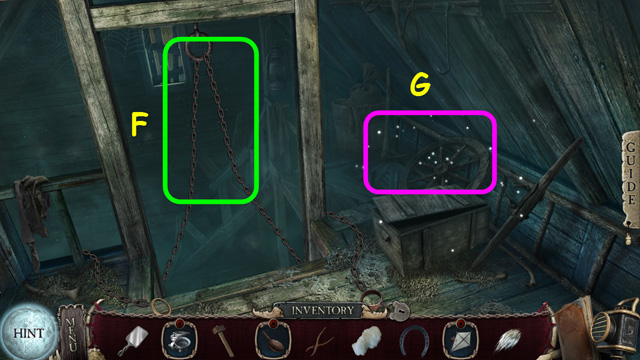
- Pull on the chains (F).
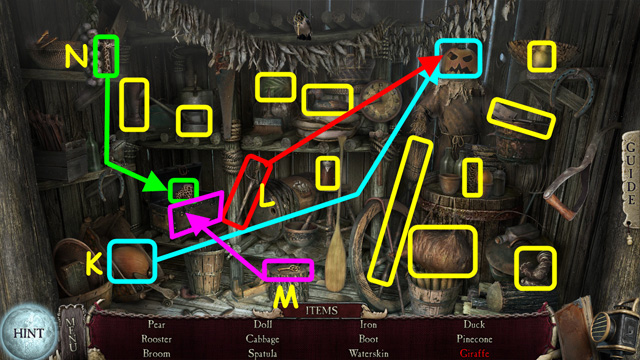
- Select the crate area for a HOP (G).
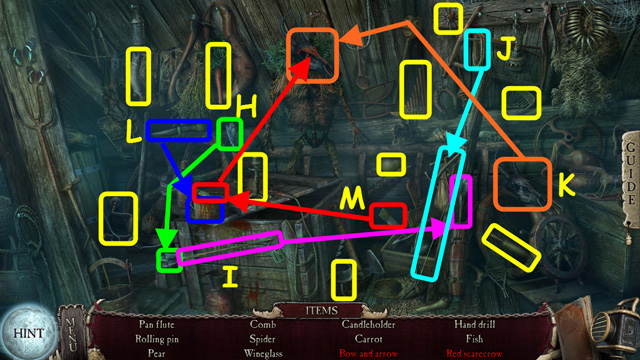
- Locate all the items on the list.
- Place the feathers on the arrow (H).
- Place the arrow in the quiver (I).
- Place the string on the bow to make the bow and arrow (J).
- Place the skull on the scarecrow (K).
- Use the knife to open the can (L).
- Use the brush on the can, then on the skull to make the red scarecrow (M).
- You will earn the BROKEN DRILL.
- Walk down, and then enter the mill.
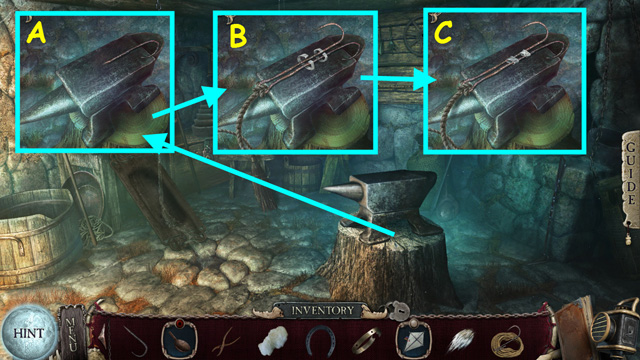
- Look at the trapdoor and use the HORSESHOE on the ring (N).
- Drag the ring to the trapdoor handle so the horseshoe hooks the handle (O).
- Drag the other ring to the wheel (P).
- Enter the trapdoor.
- Look in the corner; take the STAKE and the DRY CLAY (Q).
- Look at the table and take the WOOD WITH DRILL BIT (R).
- Walk up the stairs.
- Look at the WOOD WITH DRILL BIT in your inventory and use the PLIERS to pull out the DRILL BIT (S).
- Look at the BROKEN DRILL in your inventory and add the DRILL BIT to make the HAND DRILL (T).
- Look at the SCOOP in your inventory and use the HAND DRILL to make the COLANDER (U).
- Spin the drill to make 3 holes.
- Walk down twice.
- Look at the trap and use the STAKE on the chain, and then hit the stake with the SLEDGEHAMMER (A).
- Take the TRAP (B).
- Walk to the right (C).
- Look at the puddle and use the COLANDER to collect the PETROLEUM (D).
- Enter the borough (E).
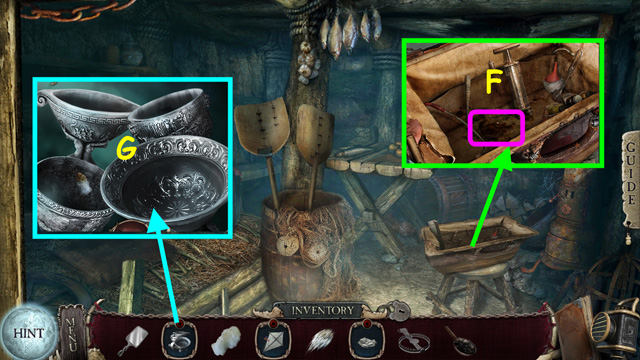
- Look in the bag and use the WADDING to collect the IODINE (F).
- Look at the KITCHEN UTENSILS and use the IODINE on each of the pieces to find the GOBLET (G).
- Walk down.
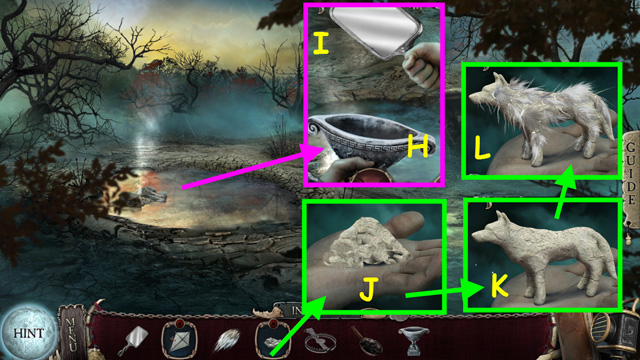
- Look at the thermal spring and place the GOBLET near the edge (H).
- Hold the MIRROR over the goblet to collect the TRUE WATER (I).
- Look at the DRY CLAY in your inventory and add the TRUE WATER (J).
- Manipulate the clay 6 times to make a figurine, and then add the WHITE FUR (K).
- Take the WOLF FIGURINE (L).
- Walk down, go forward 5 times, enter the cabin on the left, and walk forward.
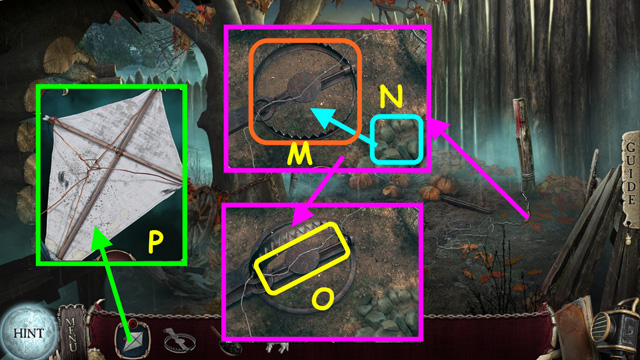
- Look at the pumpkin patch and place the TRAP under the wire (M).
- Take a rock and use it in the center of the trap (N).
- Take the WIRE (O).
- Look at the KITE in your inventory and use the WIRE on the frame to make the KITE (P).
- Walk down, left, go up the ladder, and go forward 4 times.

- Look at the tree and use the KITE on the branch (Q).
- Look at the altar and use the PETROLEUM on the symbol (R).
- Place the WOLF FIGURINE on the symbol (S).
- Place the end of the kite string on the figurine (T).
- Congratulations! You have completed Shiver: Moonlit Grove!


 Time Relics: Gears of Light Walkthrough, Guide, & Tips
 Amaranthine Voyage: The Shadow of Torment Walkthrough, Guide, & Tips
 Mystery of the Ancients: Lockwood Manor Walkthrough, Guide, & Tips
 Mystery of the Ancients: Deadly Cold Walkthrough, Guide, & Tips
 Chronicles of Mystery: The Scorpio Ritual Walkthrough, Guide, & Tips