Mystery of the Ancients: Lockwood Manor Walkthrough, Guide, & Tips
Mystery of the Ancients: Lockwood Manor Walkthrough
Welcome to the Mystery of the Ancients: Lockwood Manor Walkthrough!
There’s a terrible secret hidden deep within Lockwood Manor. Uncover the truth in order to save your best friend, and yourself, in this thrilling hidden object adventure game!
Whether you use this document as a reference when things get difficult or as a road map to get you from beginning to end, we’re pretty sure you’ll find what you’re looking for here.
This document contains a complete Mystery of the Ancients: Lockwood Manor game walkthrough featuring annotated screenshots from actual gameplay!
We hope you find this information useful as you play your way through the game. Use the walkthrough menu below to quickly jump to whatever stage of the game you need help with.
Remember to visit the Big Fish Games Forums if you find you need more help. Have fun!
This walkthrough was created by prpldva, and is protected under US Copyright laws. Any unauthorized use, including re-publication in whole or in part, without permission, is strictly prohibited.
General Tips

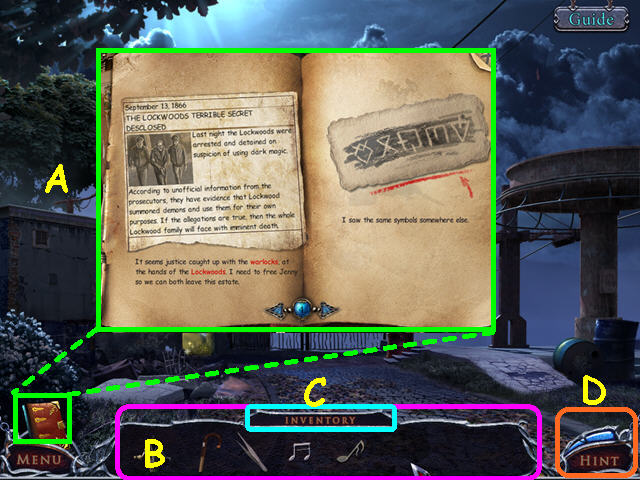
- Hidden Object Scenes and mini-games are often randomized – your solution may vary.
- Hidden Object Scenes will be referred to as HOS in this walkthrough.
- Inside the journal you will find the clues and diary pages you have found (A).
- Your inventory is in the bottom panel- click on an item to select it for use (B).
- Move your mouse to the left or right over the inventory panel to scroll.
- The inventory will auto-hide when not in use; move your mouse over the ‘Inventory’ sign to reveal the panel (C).
- Hints are unlimited, but you must wait for the hint meter to recharge (D).
Chapter 1: The Manor Grounds

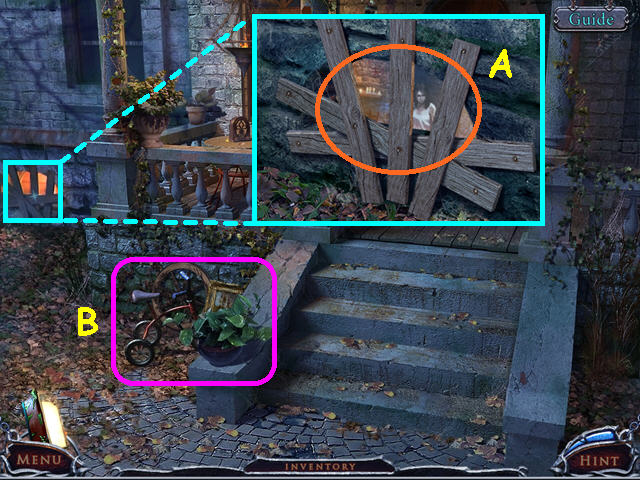
- You will have the option of some interactive help.
- Look at the basement window, then click on the window (A).
- Select the area for a HOS (B).

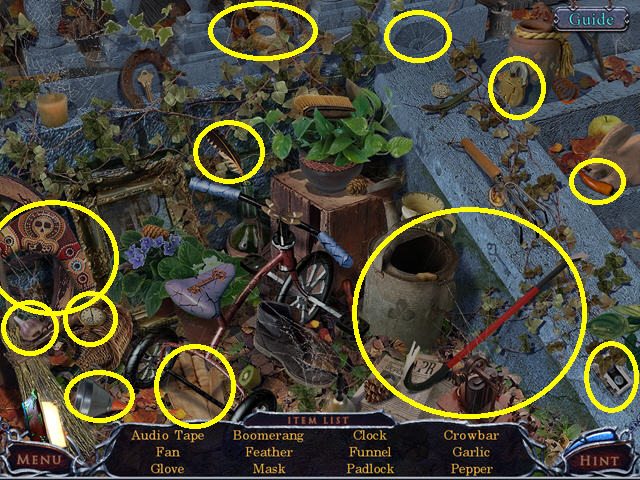
- Locate all the items on the list.
- You will earn the CROWBAR.

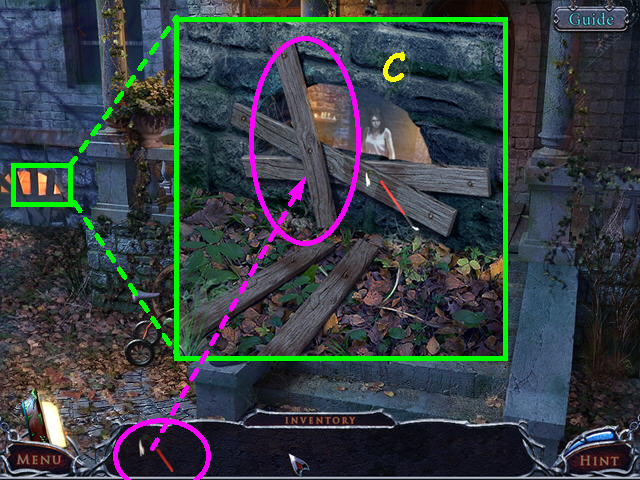
- Look at the basement window and use the CROWBAR 3 times on the boards (C).
- Enter the window, then click anywhere for a cut-scene.

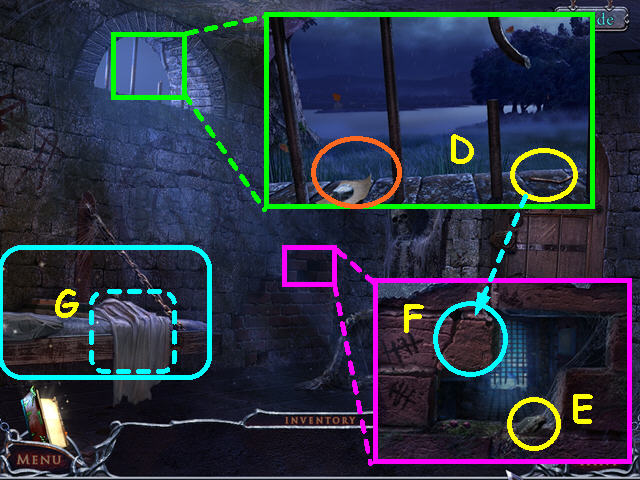
- Look at the window; take the diary page and the NAIL (D).
- Look at the hole in the bricks and take the COAL (E).
- Use the NAIL 3 times on the mortar at the top of the broken brick to make it fall, then take the BRICK (F).
- Pull the blanket on the cot, then select the cot for a HOS (G).

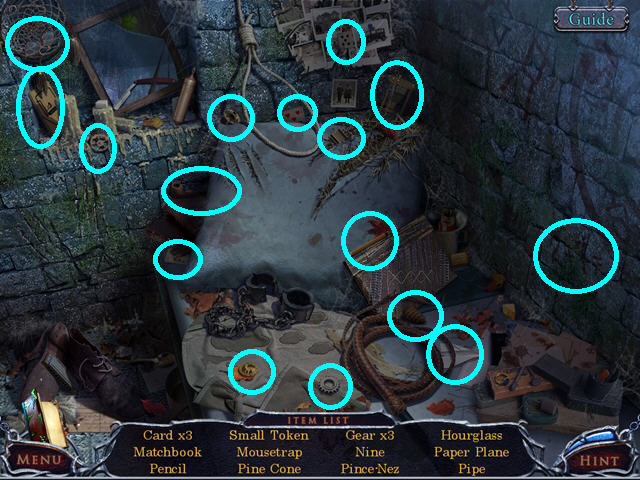
- Locate all the items on the list.
- You will earn the SMALL TOKEN.

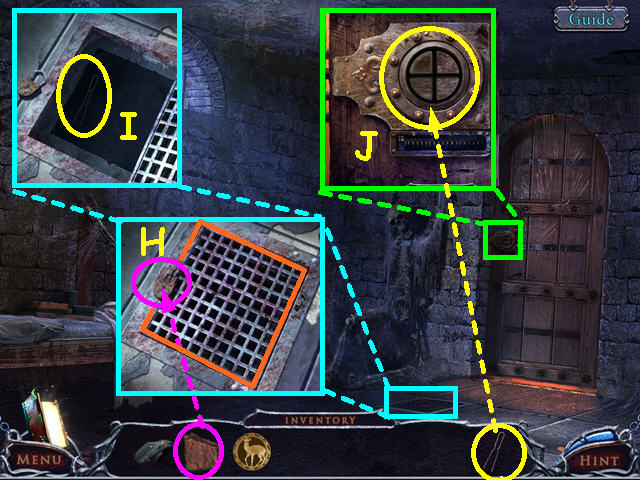
- Look at the grate in the floor and use the BRICK to break the lock (H).
- Click on the grate to open it and take the HAIR PIN (I).
- Look at the lock on the door and use the HAIR PIN for a mini-game (J).

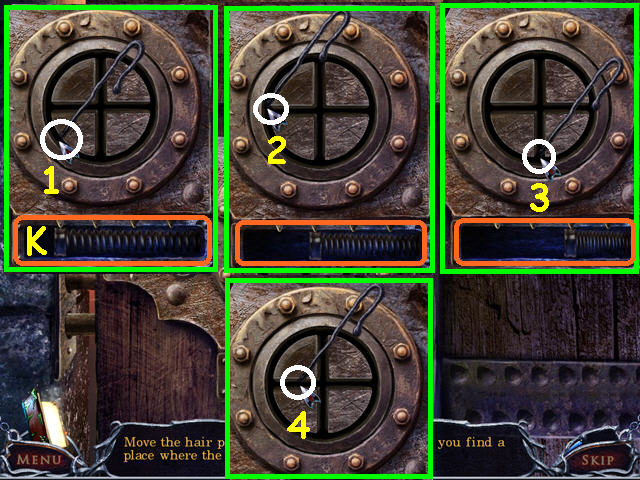
- Move the hair pin around the grooves in the lock until you find a spot where it shakes, then click the mouse.
- You will need to do this 4 times – the bolt will move to the right each time you are correct (K).
- Our solution is shown (1-4).
- This and many of the mini-games are randomly generated – your solution may vary.
- Walk forward.

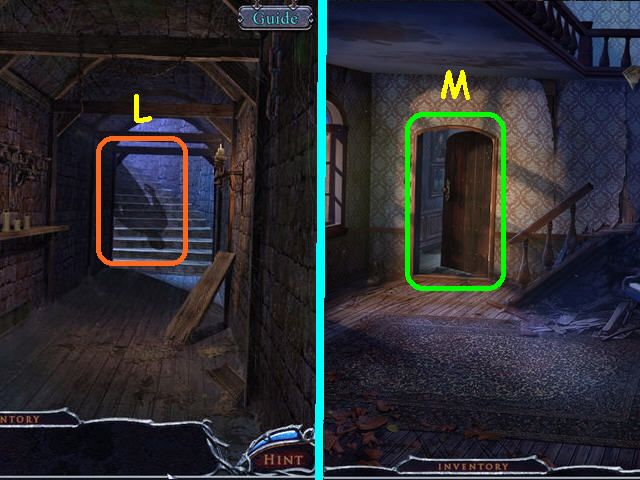
- Click on the shadow for a cut-scene (L).
- Walk up the stairs.
- Walk forward, into the office (M).

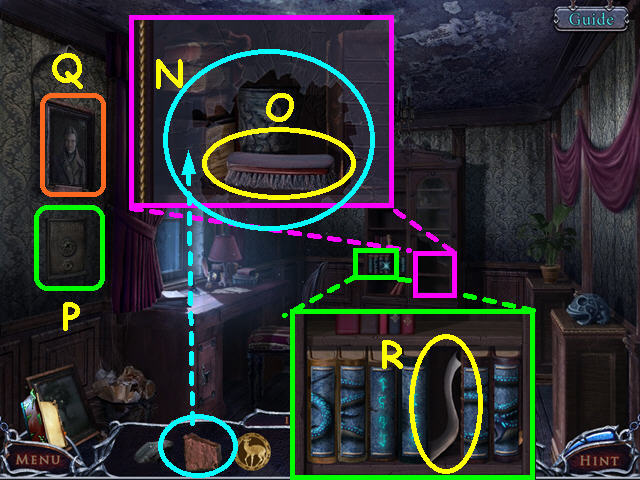
- Look at the cabinet and use the BRICK 3 times on the glass (N).
- Take the SCRUB BRUSH (O).
- Click on the lower painting to remove it from the wall (P).
- Look at the Lockwood ancestor portrait (Q).
- Look at the bookshelf and take the PIECE of PAPER (R).
- Walk down twice to return to the basement hall.

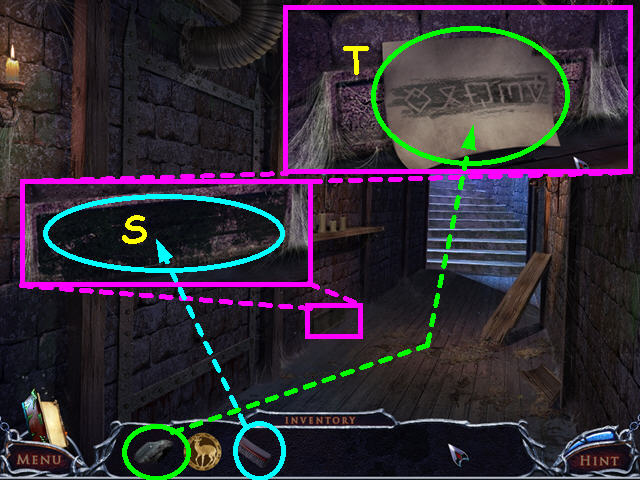
- Look at the stone plate and use the SCRUB BRUSH 3 times to clean away the grime (S).
- Place the PIECE of PAPER on the stone, then use the COAL 3 times to make a rubbing (T).
- Take the PAPER with SYMBOLS, then walk forward.
- Look at the piano.

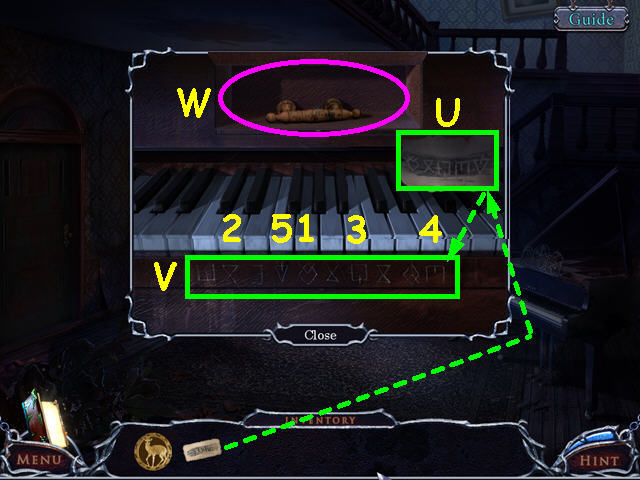
- Place the PAPER with SYMBOLS on the piano (U).
- Play the keys that have the same symbols as the paper (V).
- Press the keys in numerical order (1-5).
- Take the DRAWER HANDLE (W).
- Walk forward to the office.

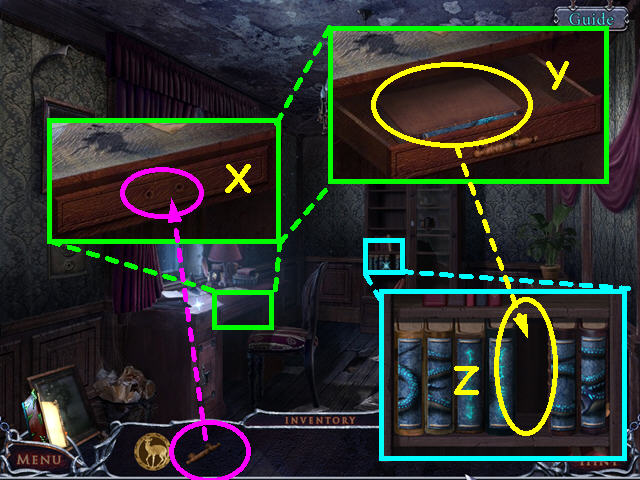
- Look at the desk and place the DRAWER HANDLE on the drawer (X).
- Click on the handle to open the drawer and take the OLD BOOK (Y).
- Look at the bookcase and place the OLD BOOK on the shelf for a mini-game (Z).

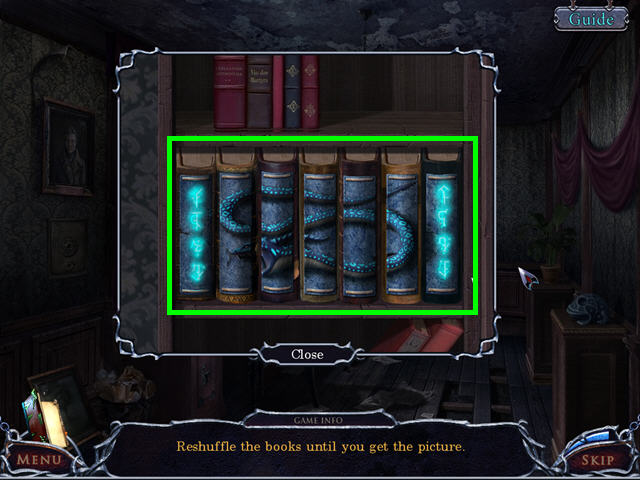
- Restore the picture on the book spines.
- Click on 2 books to swap positions.

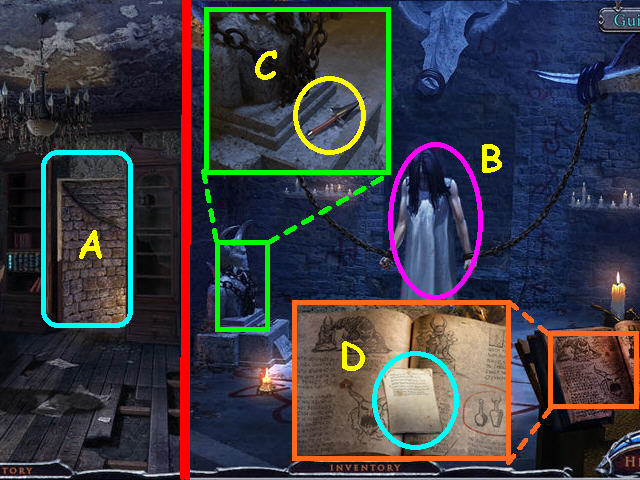
- Walk forward into the secret chamber (A).
- Talk to Jenny to learn the magic vessel is in the green house (B).
- Look at the statue and take the RITUAL KNIFE (C).
- Look at the ritual book and take the diary page (D).
- Walk down to exit the chamber.

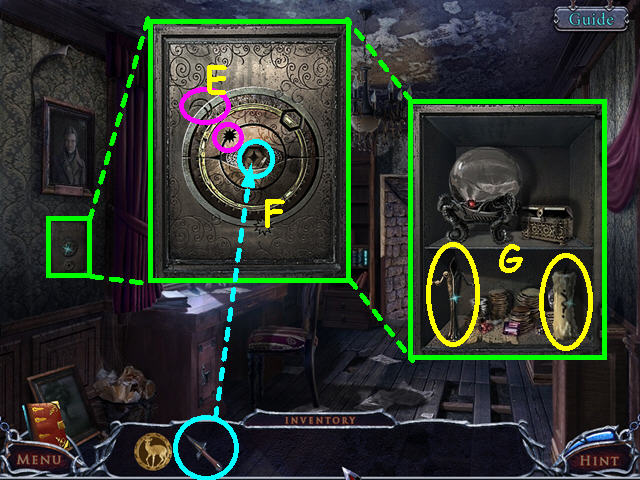
- Look at the safe and turn the dials to align the symbols (E).
- Place the RITUAL KNIFE in the center of the safe (F).
- Take the 1/2 STATUETTE and the CANDLE (G).
- Walk down twice then look at the candles on the left for a mini-game.

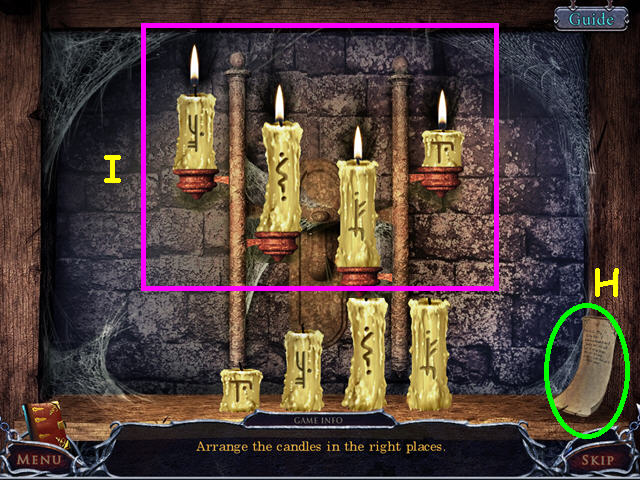
- Place the candle on the shelf to trigger the mini-game.
- Take the diary page (H).
- Place the candles in the holders so that the flames match the soot marks on the wall (I).

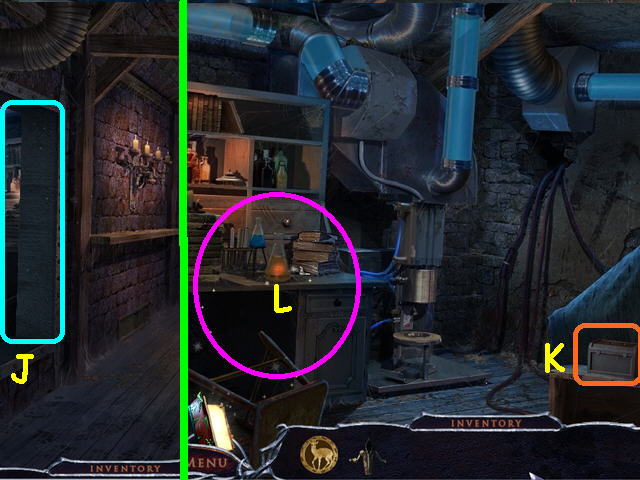
- Walk left into the secret lab (J).
- Note the box (K).
- Select the desk for a HOS (L).

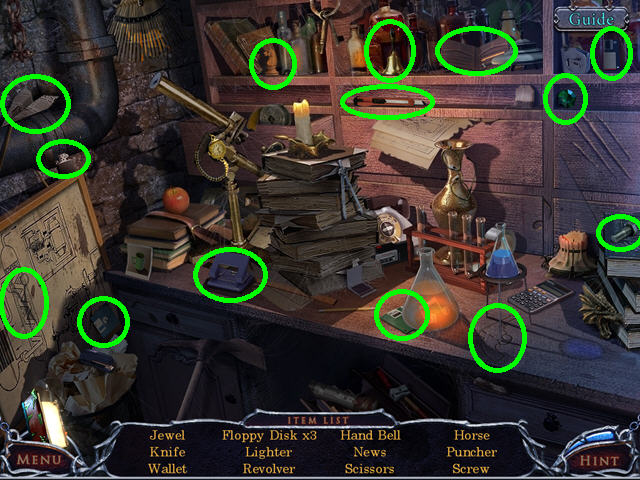
- Locate all the items on the list.
- You will earn the JEWEL.
- Exit and return to the office.

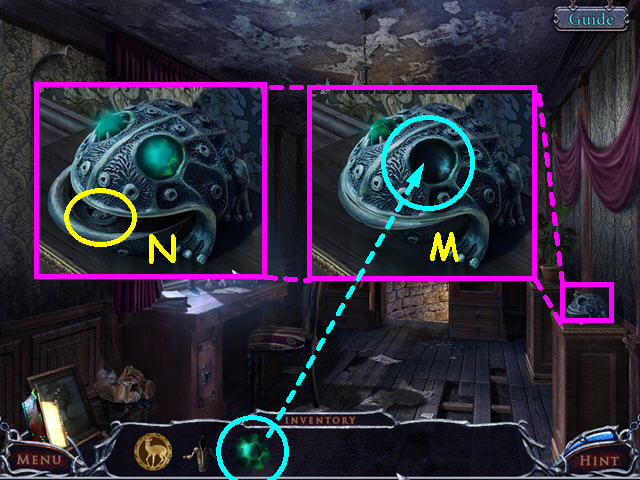
- Look at the frog and place the JEWEL into the eye (M).
- Take the LARGE TOKEN (N).
- Exit and return to the lab.

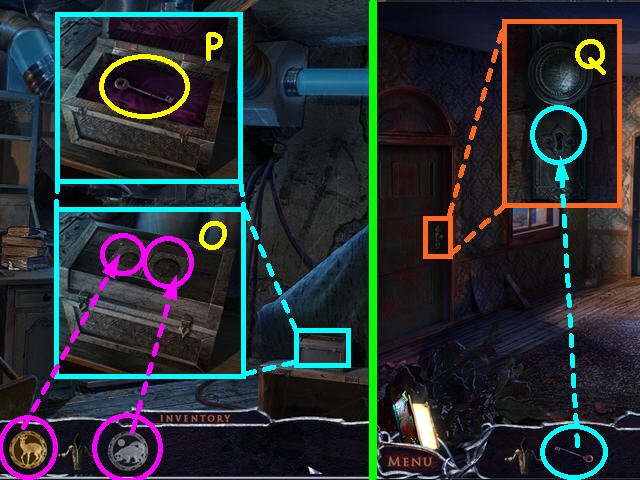
- Look at the box, use the SMALL TOKEN on the left circle, and the LARGE TOKEN on the right circle (O).
- Take the MAIN ENTRANCE KEY (P).
- Exit the lab and walk forward.
- Look at the front door and use the MAIN ENTRANCE KEY on the lock (Q).
- Exit through the front door.

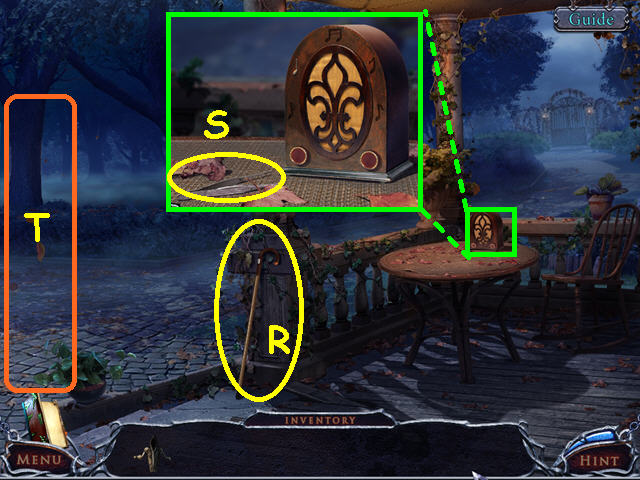
- Take the CANE (R).
- Look at the table and take the TWEEZERS (S).
- Walk to the left (T).

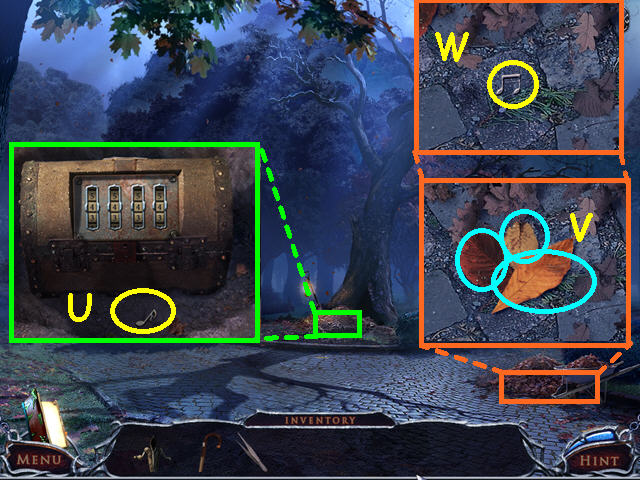
- Look in the hole and take 1/4 MUSICAL NOTE (U).
- Look at the leaves and move the 3 leaves out of the way (V).
- Take the 2/4 MUSICAL NOTE (W).
- Walk on the right path.

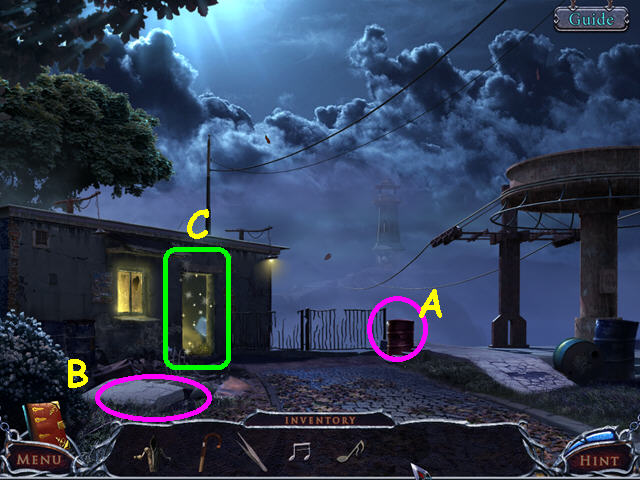
- Note the steel drum (A).
- Note the iron rods in the concrete (B).
- Click on the door to the building, then select it again for a HOS (C).

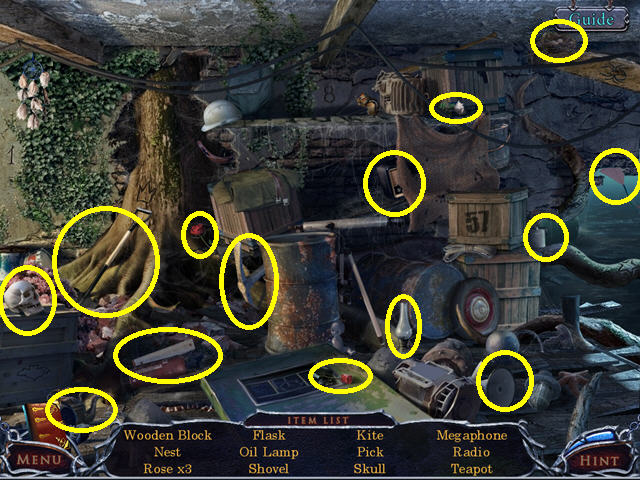
- Locate all the items on the list.
- You will earn the 1/2 LADDER STEP.
- Walk down to exit the scene, then go to the left.

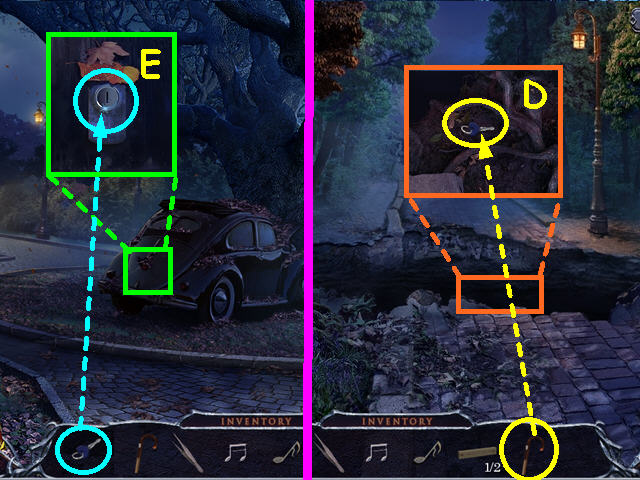
- Walk to the left of the car.
- Look in the ravine and use the CANE to get the CAR KEY (D).
- Return to the car, look at the trunk and use the key on the lock (E).
- Select the trunk of the car for a HOS.

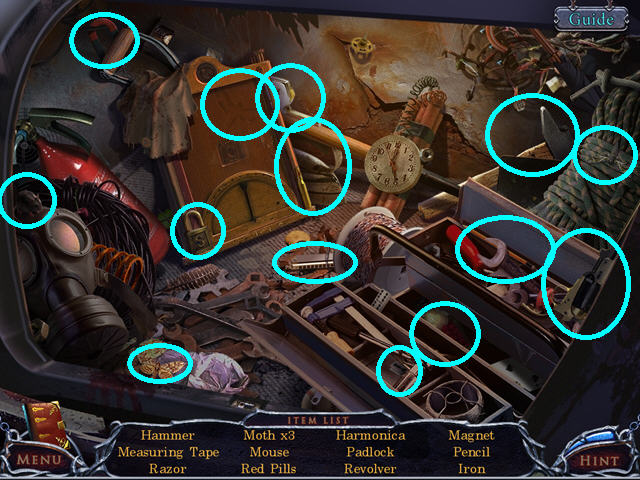
- Locate all the items on the list.
- You will earn the HAMMER.
- Enter the gate to the right of the car.

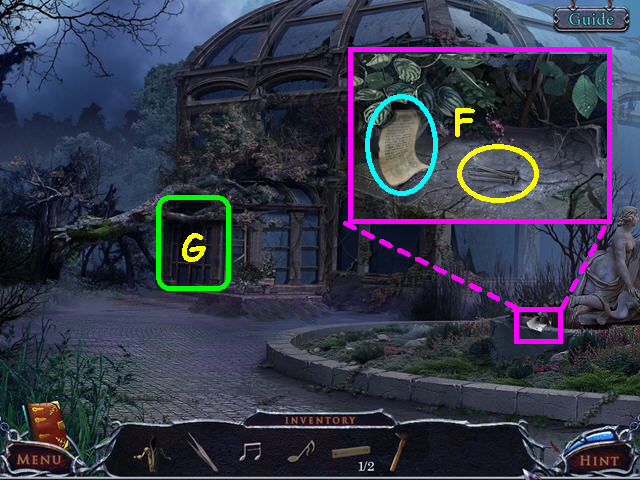
- Look near the statue; take the diary page and the NAILS (F).
- Walk forward to the entrance (G).

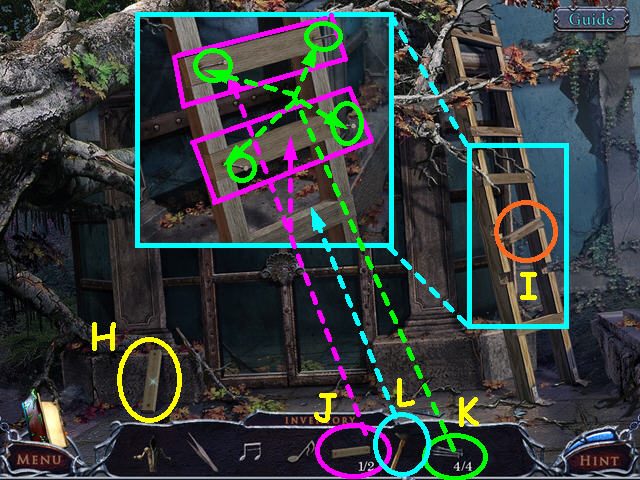
- Take the 2/2 LADDER STEP (H).
- Try to go up the ladder to remove the broken step (I).
- Look at the ladder and place the 2 LADDER STEPS into the grooves (J).
- Place 1 of the 4 NAILS on each end of the 2 steps (K).
- Use the HAMMER 3 times on each nail (L).
- Climb up the ladder.

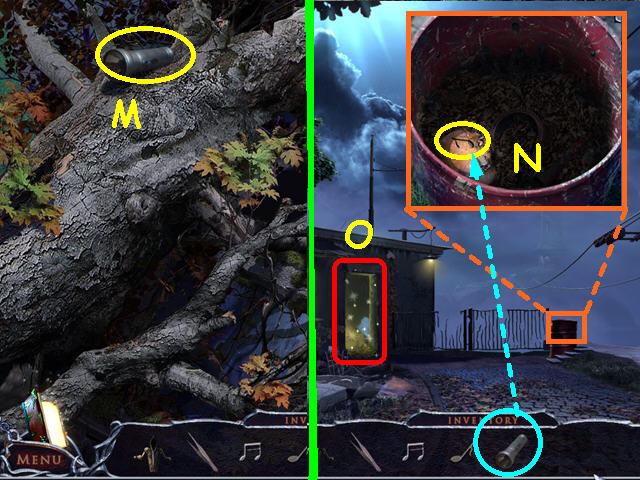
- Take the FLASHLIGHT (M).
- Walk down 4 times, then walk to the right.
- Look at the steel drum then use the FLASHLIGHT to find the 3/4 MUSICAL NOTE (N).
- Select the door of the building for a HOS (O).

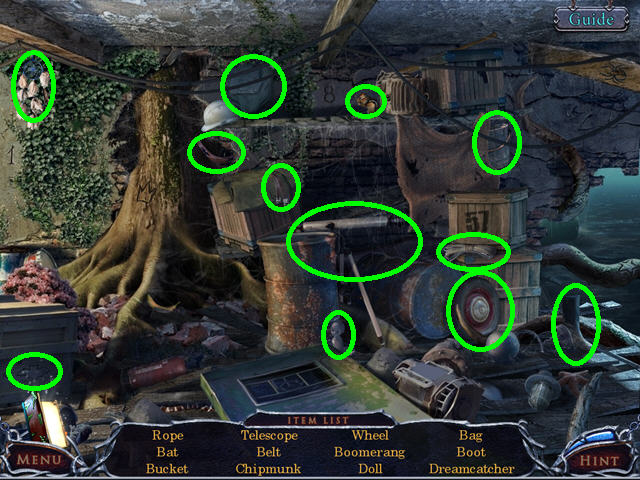
- Locate all the items on the list.
- You will earn the ROPE.
- Return to the greenhouse and climb up the ladder.

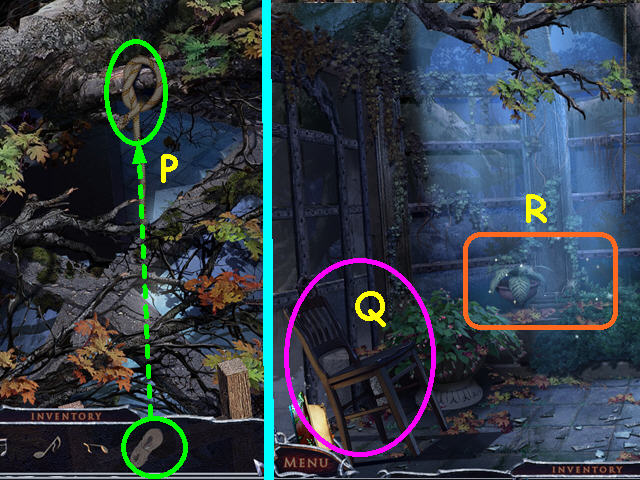
- Tie the ROPE on the branch (P).
- Climb down the rope.
- Remove the chair and open the door (Q).
- Select the planter area for a HOS (R).

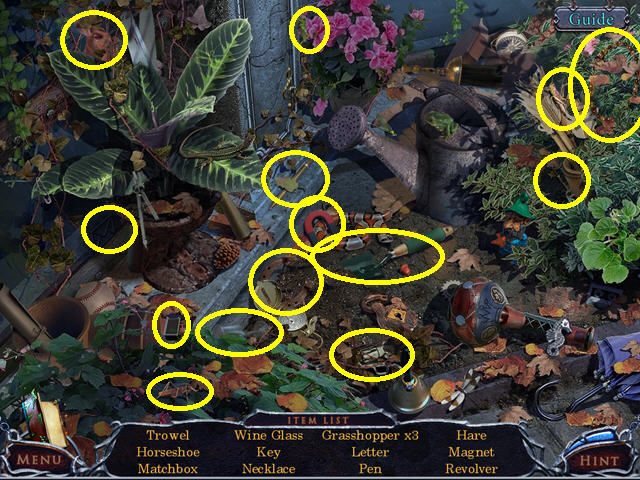
- Locate all the items on the list.
- You will earn the TROWEL.
- Walk to the right.

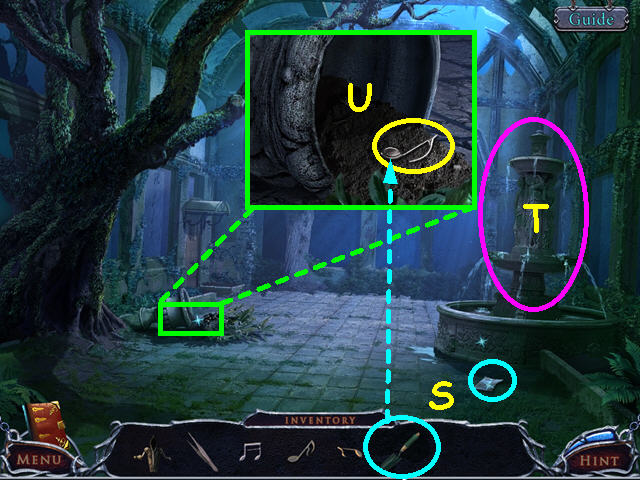
- Take the diary page (S).
- Look at the fountain and a panel will open at the base (T).
- Look at the overturned urn then use the TROWEL 4 times to find 4/4 MUSICAL NOTE (U).
- Return to the front porch of the house.

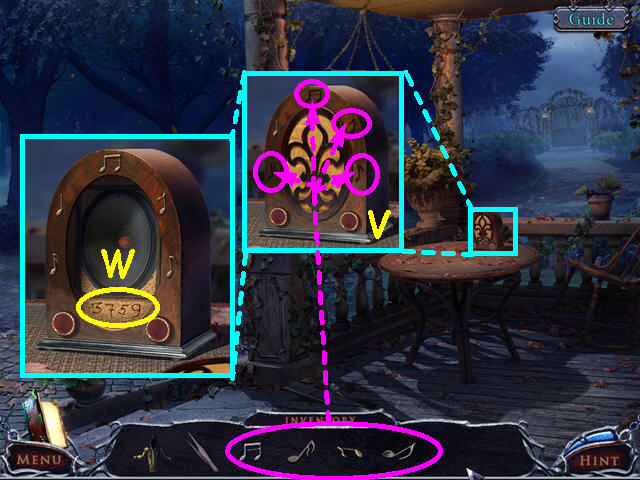
- Look at the radio and place the 4 MUSICAL NOTES into the matching niches (V).
- Note the code that is uncovered (W).
- Walk to the right.

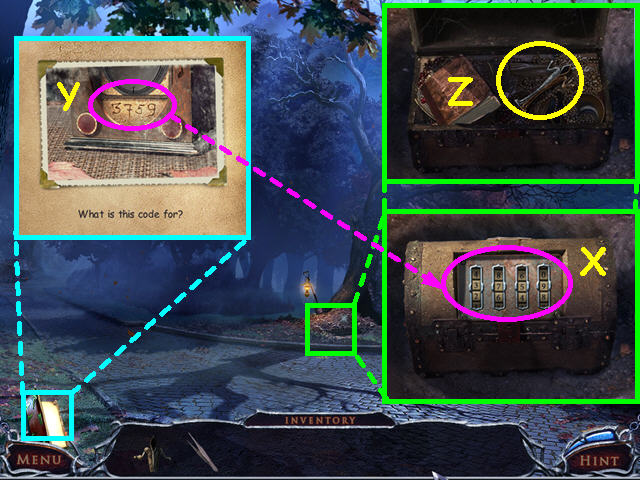
- Look in the hole and enter the code from the radio (X).
- You can refer to your diary (Y).
- Take the 2/2 STATUETTE (Z).
- Return to the greenhouse, go inside, then walk to the right.

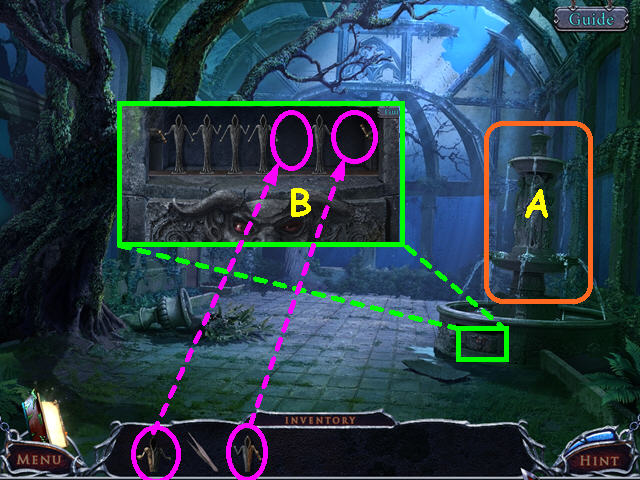
- Click on the fountain to reveal a hidden compartment if you did not do this earlier (A).
- Look in the compartment and place the 2 STATUETTES on the shelf for a mini-game (B).

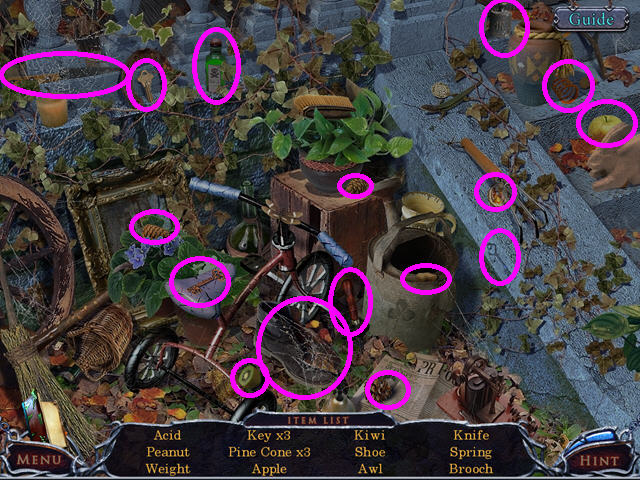
- Move the statuettes so that they are all connected by the hands (C).
- Click on 2 statuettes to swap positions.
- The hands will light when connected.
- Note that 2 statuettes are two-toned and have hinged arms- they belong on the ends (D).
- Take the MYSTERY VESSEL from the opening (E).
- Return to Jenny in the secret chamber in the manor.

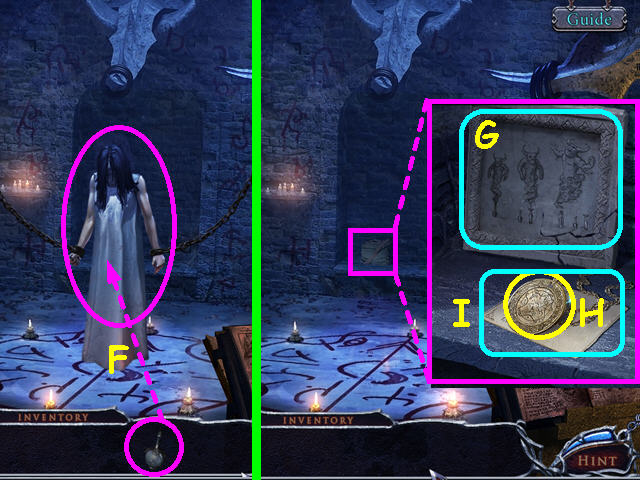
- Give the MYSTERY VESSEL to Jenny (F).
- Once the demon disappears, look at the bench, then look at the small mural (G).
- Take the MEDALLION and the PEARL that is under the medallion (H).
- Read the diary page (I).
- Exit the manor and select the porch steps for a HOS.


- Locate all the items on the list.
- You will earn the ACID.
- Walk left, then right to the cable-way area.

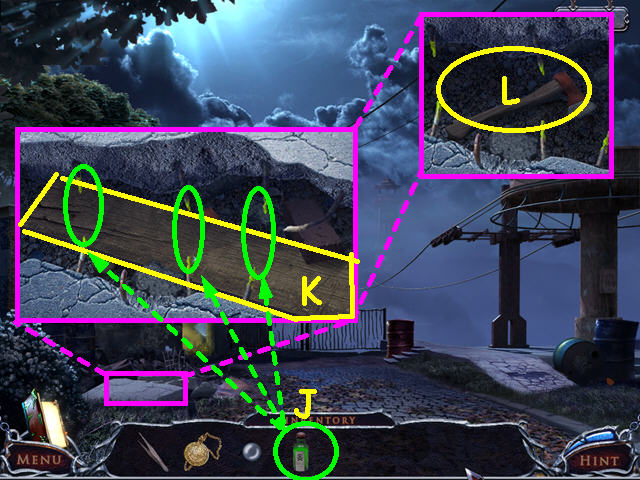
- Look at the broken concrete and use the ACID 3 times on the iron rods (J).
- Take the WOODEN PLANK (K) and the AXE that is underneath (L).
- Walk down, then left and select the trunk of the car for a HOS.

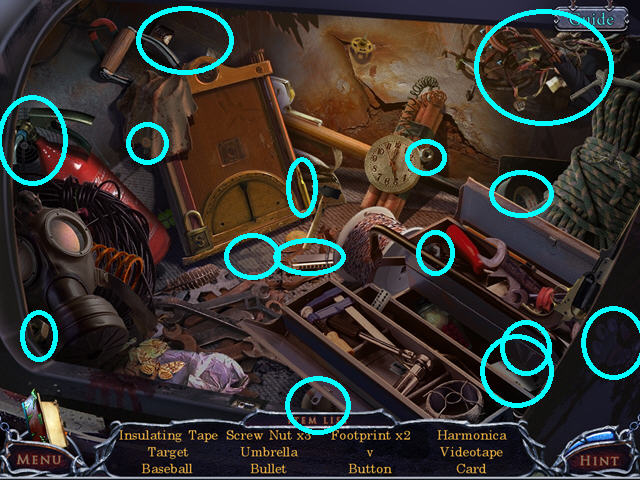
- Locate all the items on the list.
- You will earn the INSULATING TAPE.
- Walk to the left.

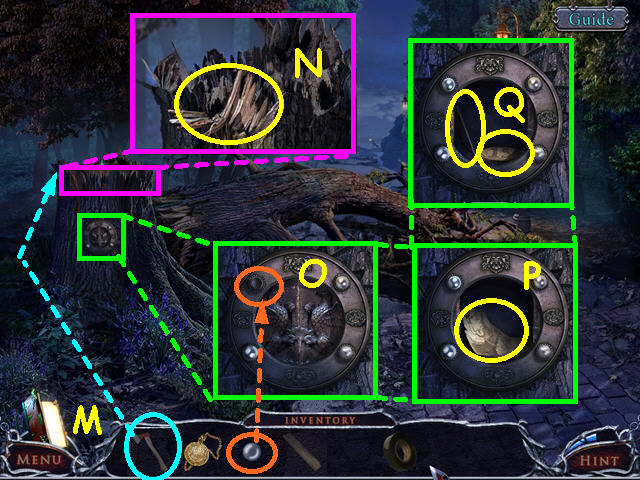
- Use the AXE to cut down the tree (M).
- Look at the stump and take the WOOD CHIPS (N).
- Look at the safe and replace the missing PEARL (O).
- Take the MAP (P).
- Take the 15 CENT coin and the NEEDLE (Q).
- Walk forward.
Chapter 2: Lighthouse Island

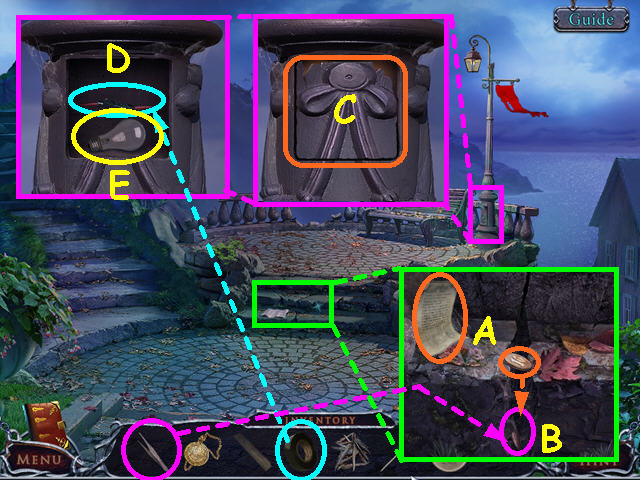
- Look at the steps and take the smoker instructions and try to take the 10 cent coin (A).
- Use the TWEEZERS to retrieve the 10 CENT coin (B).
- Look at the base of the light pole and open the cover (C).
- Use the INSULATING TAPE on the wires (D).
- Take the LIGHT BULB (E).
- Walk to the right.

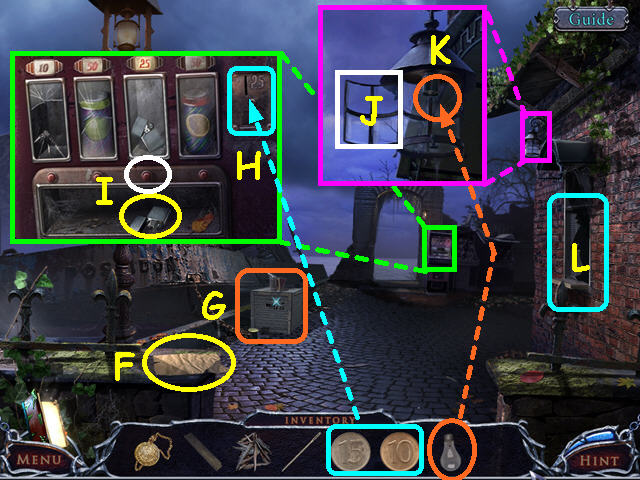
- Take the PAPER (F).
- Note the crate (G).
- Look at the vending machine and use the 10 CENT and 15 CENT coins on the slot (H).
- Press the button, then take the LIGHTER (I).
- Look at the lamp and open the door (J).
- Use the LIGHT BULB on the lamp (K).
- Select the broken window for a HOS (L).

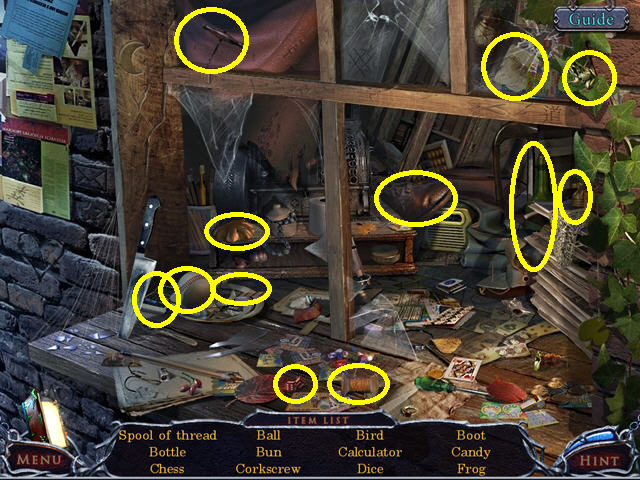
- Locate all the items on the list.
- You will earn the SPOOL of THREAD which will combine with the NEEDLE to become NEEDLE with THREAD.
- Look at the crate.

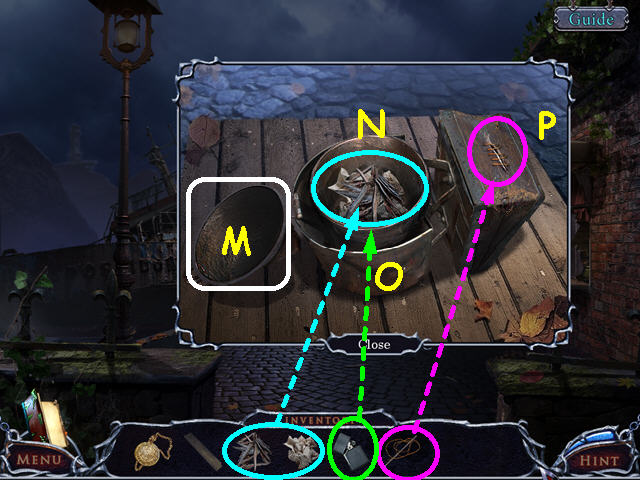
- Open the lid on the smoker (M).
- Place the PAPER, then the WOOD CHIPS inside (N).
- Use the LIGHTER to light the chips (O).
- Use the NEEDLE and THREAD to repair the hole (P).
- Close the lid and pump the smoker twice.
- Take the BEE SMOKER then walk down once.

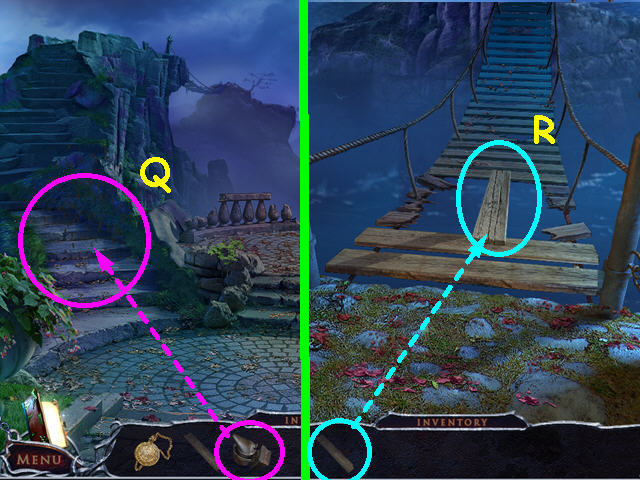
- Use the BEE SMOKER on the swarm of bees 3 times, then walk up the steps (Q).
- Place the WOOD PLANK over the hole in the bridge and walk forward (R).

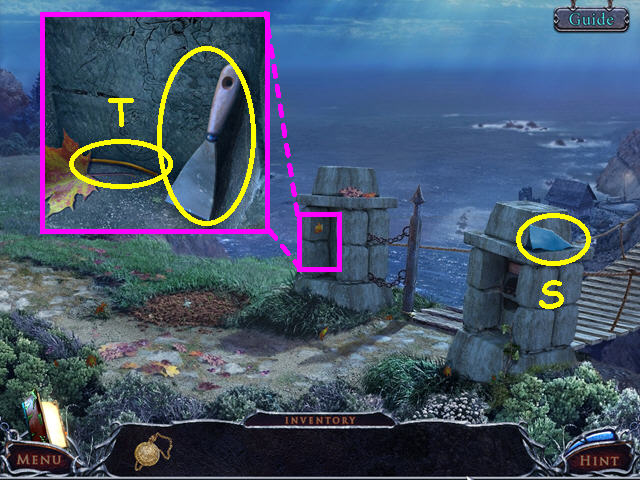
- Take the 1/6 MIRROR SHARD (S).
- Look in the left column and take the SCRAPER and the 1/3 ELECTRICAL WIRE (T).
- Walk to the left.

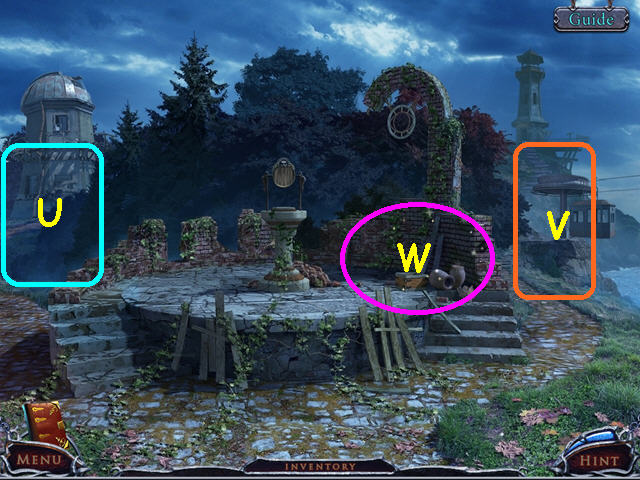
- Note the path to the observatory (U).
- Note the path to the lighthouse (V).
- Select the area by the partial arch for a HOS (W).

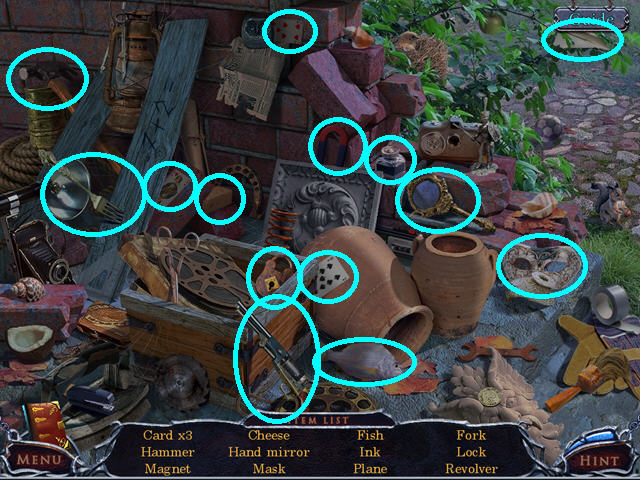
- Locate all the items on the list.
- You will earn the CHEESE.
- Take the right path towards the light house.

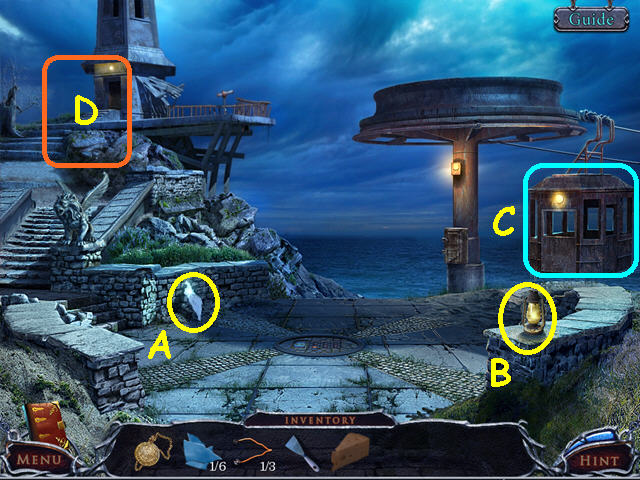
- Take the 2/6 MIRROR SHARD (A).
- Take the LAMP (B).
- Note the cable car (C).
- Walk up towards the lighthouse (D).

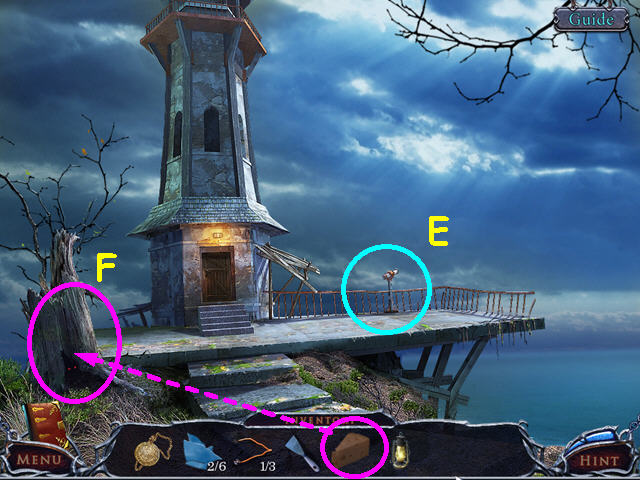
- Note the telescope (E).
- Use the CHEESE on the stump (F).
- Select the stump for a HOS.

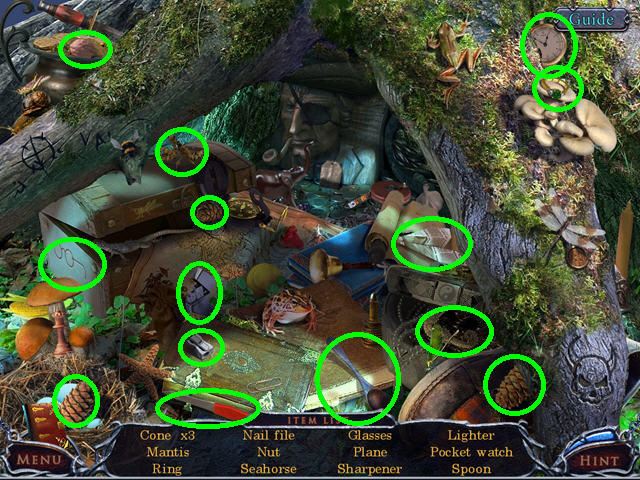
- Locate all the items on the list.
- You will earn the NAIL FILE.
- Walk down twice, then go left to the observatory.

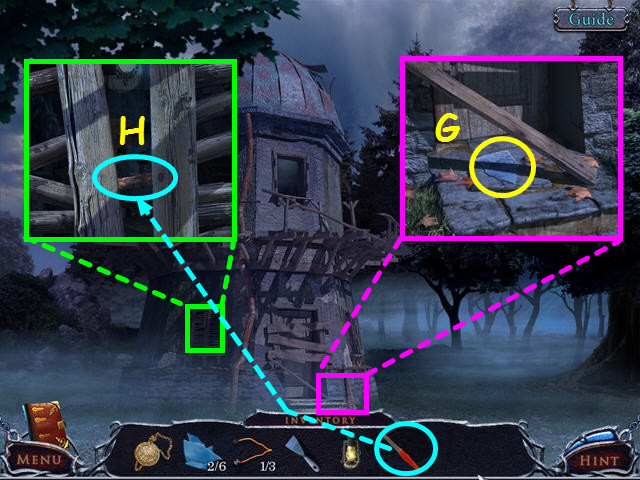
- Look near the front steps and take the 3/6 MIRROR SHARD (G).
- Look at the shutters and use the NAIL FILE to open the latch (H).
- Enter the observatory through the window.

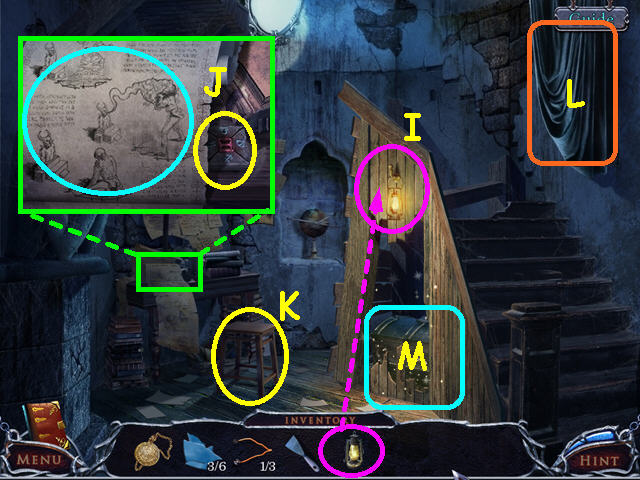
- Hang the LAMP on the hook (I).
- Look at the desk and read the parchment and take the ZODIAC TILE (J).
- Take the STOOL (K).
- Pull the drape off the mirror (L).
- Select the chest under the lamp for a HOS (M).

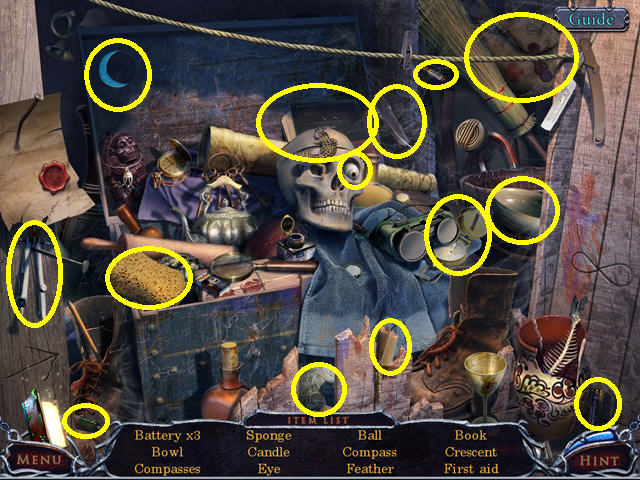
- Locate all the items on the list.
- You will earn the SPONGE.
- Walk down twice, go to the right, then enter the cable car.

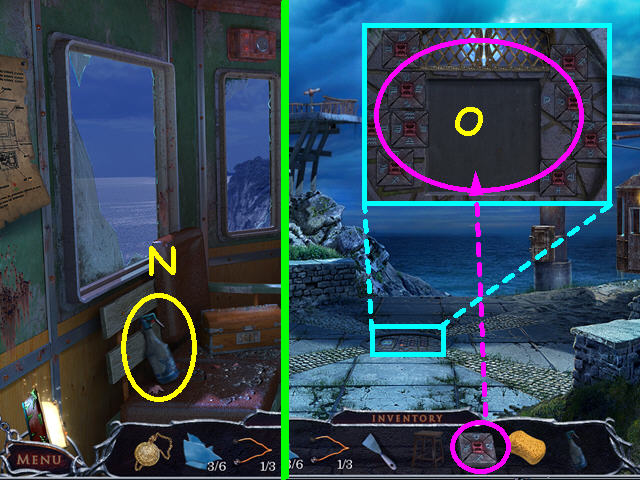
- Take the WINDOW CLEANER (N).
- Exit the cable car.
- Select the circle in the center of the walkway and use the ZODIAC TILE on the circle for a min-game (O).

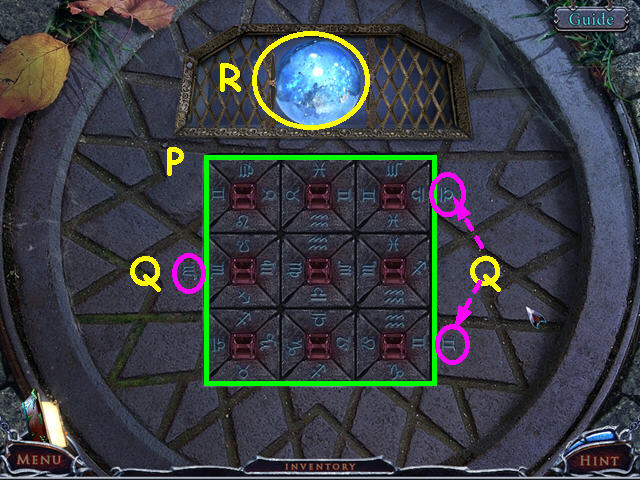
- Place the squares into the center so that all the symbols touch a matching symbol (P).
- Note the 3 symbols on the outside to get you started (Q).
- Take the BLUE SPHERE from the opening (R).
- Walk up to the lighthouse and look at the telescope.

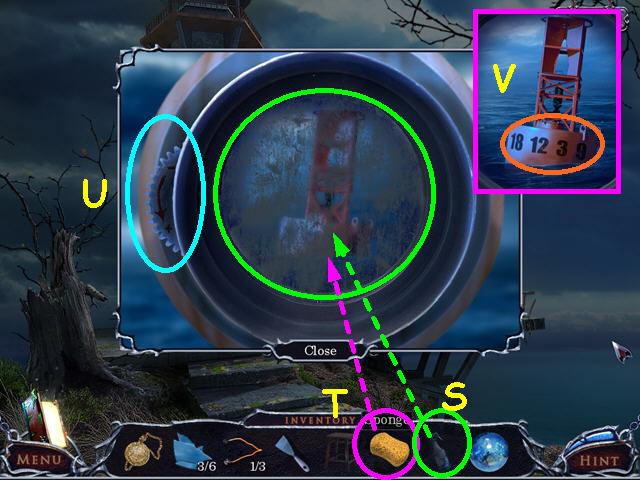
- Use the WINDOW CLEANER 3 times on the lens (S).
- Use the SPONGE 3 times to clean the lens (T).
- Click on the focus dial to make the image clear (U).
- Note the code on the buoy (V).
- Return to the cable car.

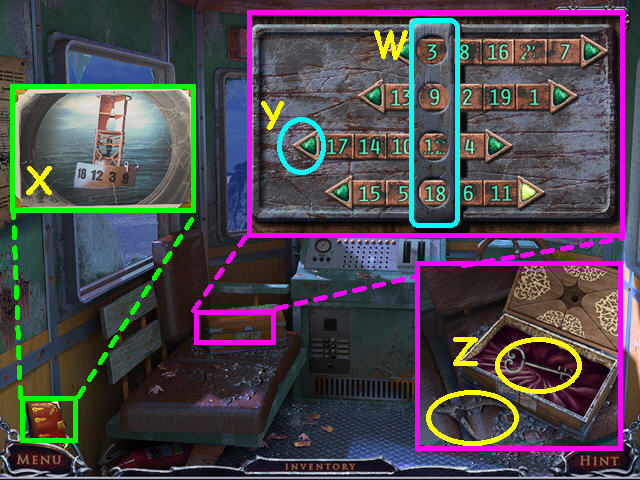
- Look at the box on the bench for a mini-game.
- Using the code from the buoy, slide the bars so the correct numbers are in the circles (W).
- You can refer to the code in your journal (X).
- Note that the numbers are not in any order.
- Click on the arrows to move the bars (Y).
- Take the PLIERS and the LIGHTHOUSE KEY (Z).
- Walk to the lighthouse, look at the door and use the LIGHTHOUSE KEY in the lock.
- Enter the lighthouse.

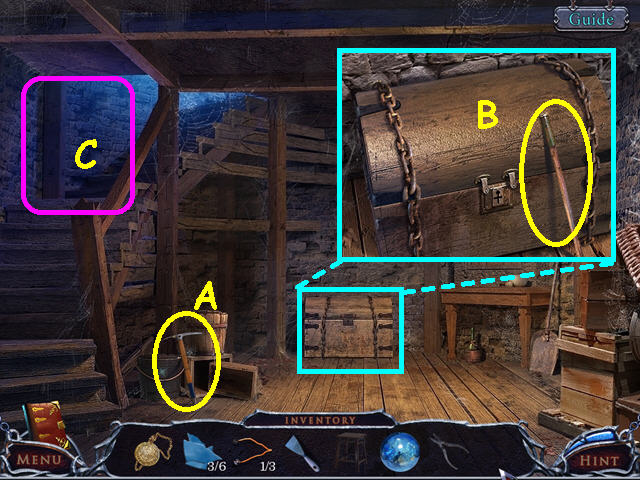
- Take the PICKAXE (A).
- Look at the chest and take the WOODEN STICK (B).
- Walk up the stairs (C).

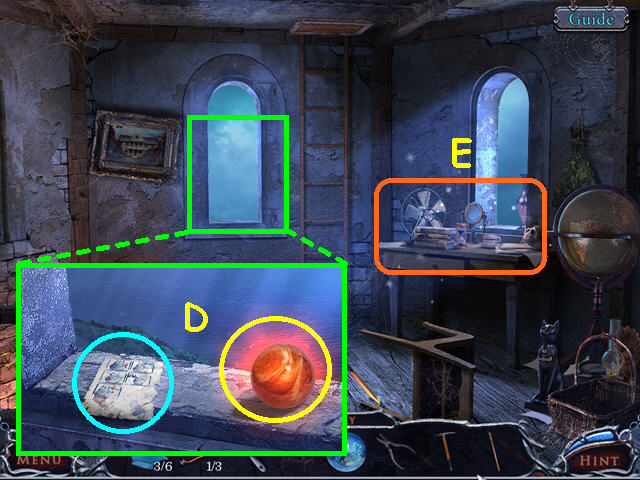
- Look out the window; take the lamp instructions and the YELLOW SPHERE (D).
- Select the desk for a HOS (E).

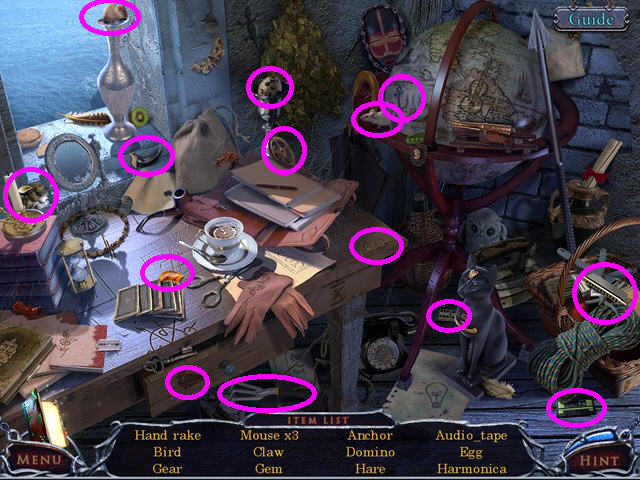
- Locate all the items on the list.
- You will earn the HAND RAKE.
- Exit the lighthouse and select the stump for a HOS.

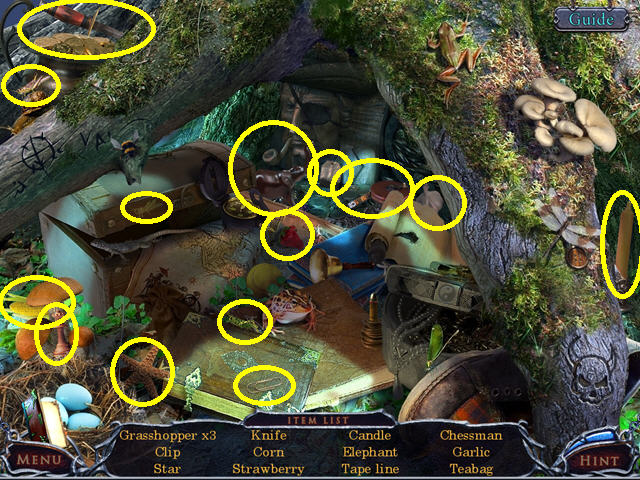
- Locate all the items on the list.
- You will earn the KNIFE.
- Walk down twice.

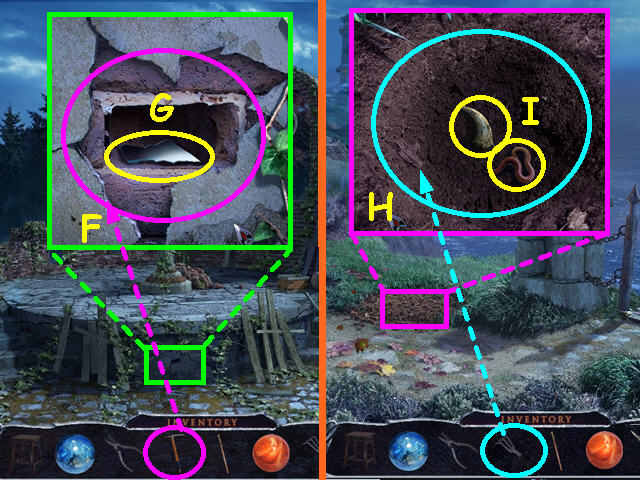
- Look at the base of the platform and use the PICKAXE 3 times to remove the plaster (F).
- Take the 4/6 MIRROR SHARD (G).
- Walk down to the bridge area.
- Look at the mound of dirt and use the HAND RAKE 3 times (H).
- Take the WORM and the CLAW (I).
- Return to the front of the observatory.

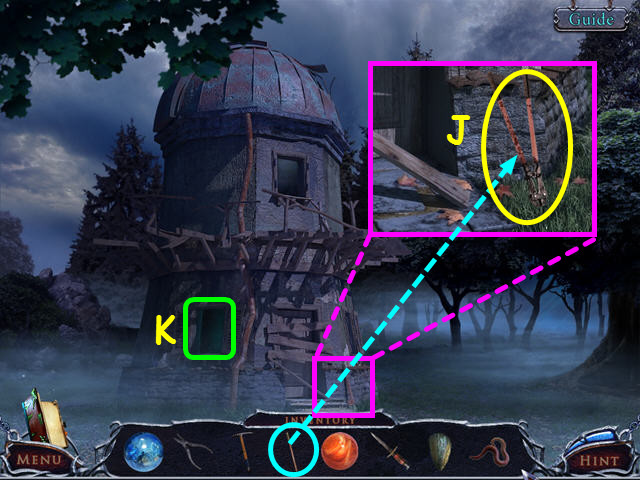
- Look near the front steps and use the WOODEN STICK on the broken wire cutters (J).
- Take the WIRE CUTTERS.
- Enter the observatory through the window (K).

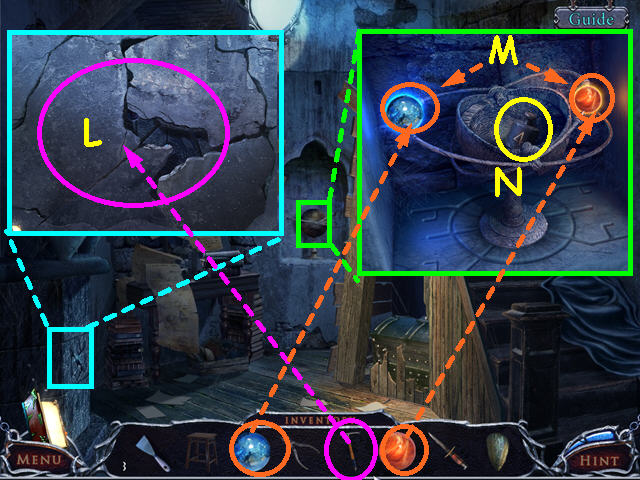
- Look at the area beneath the gargoyle and use the PICKAXE 4 times to clear away the plaster (L).
- Exit the close-up – you cannot complete this mini-game now.
- Look at the globe and place the BLUE SPHERE and the YELLOW SPHERE into the outer rings (M).
- Take the 4 Kg WEIGHT from inside the globe (N).
- Walk down twice, then walk to the right.

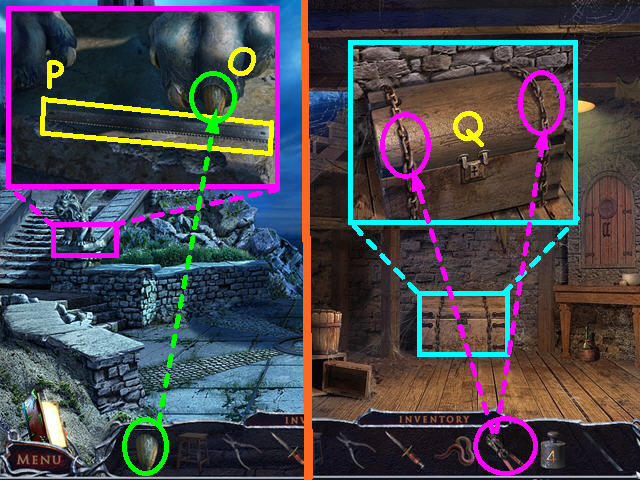
- Look at the gargoyle and replace the CLAW (O).
- Take the HACKSAW BLADE (P).
- Return to the lighthouse and go inside.
- Look at the chest and use the WIRE CUTTERS on the 2 chains (Q).
- Walk up the stairs.

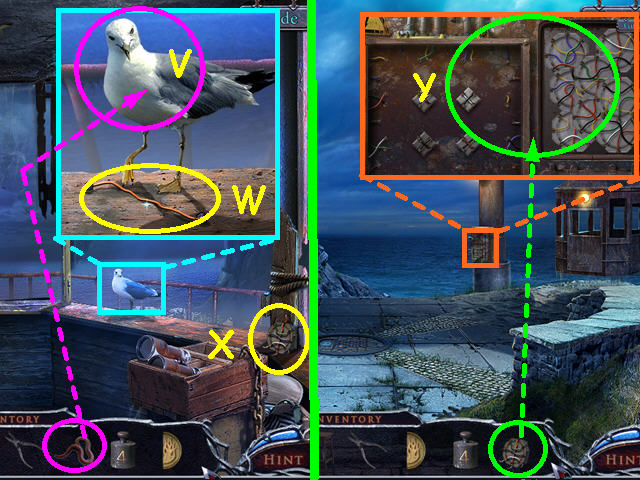
- Look at the painting and use the KNIFE on it twice (R).
- Click on the cuts to open it up and take the 1/2 FIRE EMBLEM FRAGMENT (S).
- Look at the overhead hatch and use the HACKSAW BLADE on the latch 3 times (T).
- Climb up the ladder (U).


- Look at the seagull and give him the WORM (V).
- Take the 2/3 ELECTRICAL WIRE (W).
- Take the CIRCUIT CHIP (X).
- Exit the lighthouse and walk down once.
- Look at the control box and use the CIRCUIT CHIP to trigger a mini-game (Y).

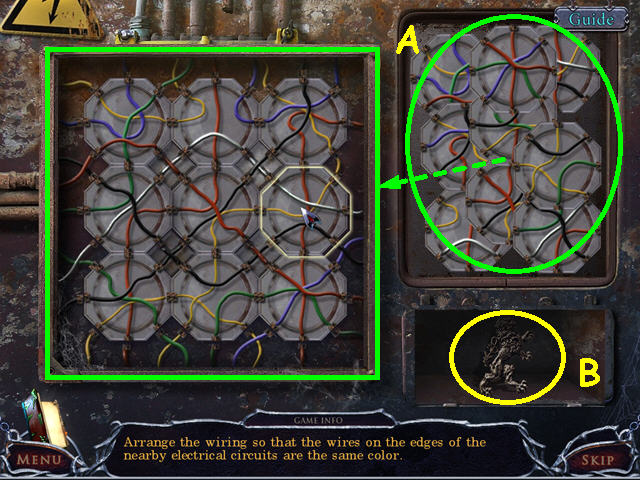
- Place the chips into the grid so all the colored wires match (A).
- Take the LION INSIGNIA (B).
- Enter the cable car.

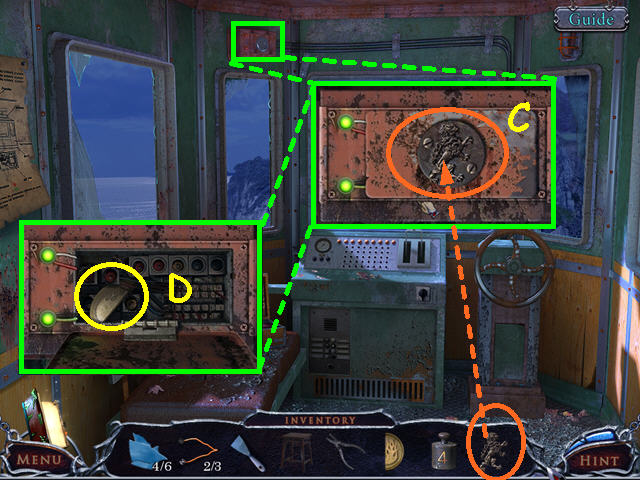
- Look at the overhead control box and place the LION INSIGNIA into the outline (C).
- Click on the box to open it, then take the 2/2 FIRE EMBLEM FRAGMENT (D).
- Walk down twice and select the area by the arch for a HOS.

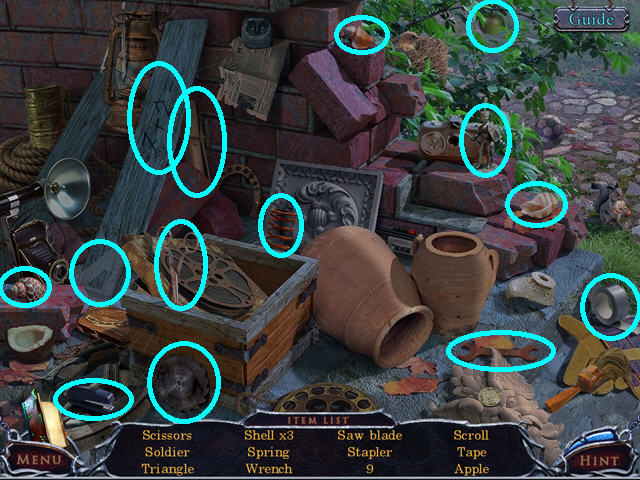
- Locate all the items on the list.
- You will earn the SCISSORS.
- Return to the lighthouse and go inside.

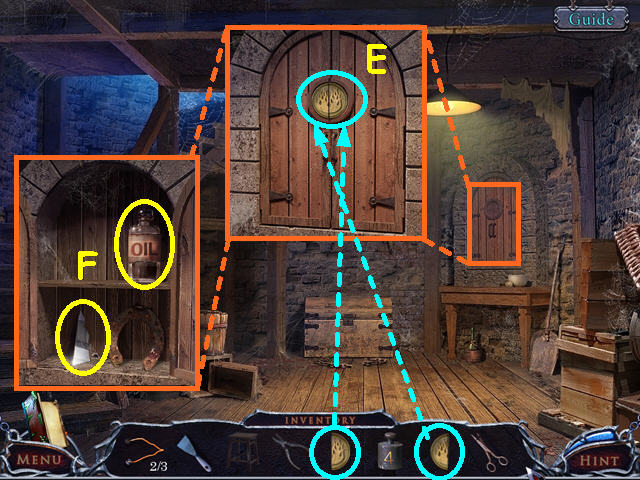
- Look at the cabinet and place the 2 FIRE EMBLEM FRAGMENTS into the circle (E).
- Open the cabinet and take the 5/6 MIRROR SHARD and the OIL (F).
- Walk upstairs and select the desk for a HOS.

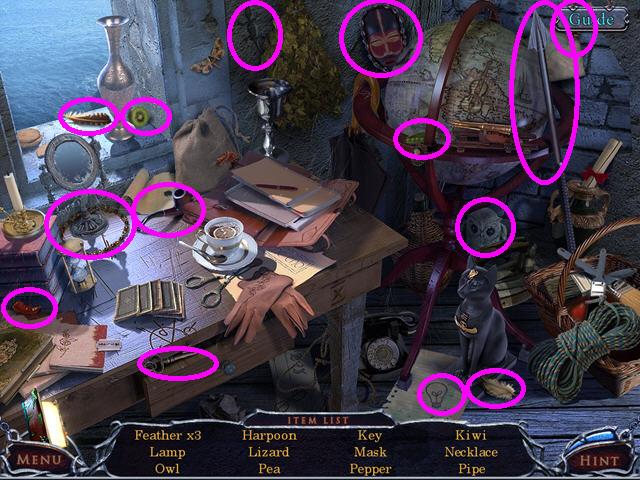
- Locate all the items on the list.
- You will earn the HARPOON.
- Climb up the ladder.

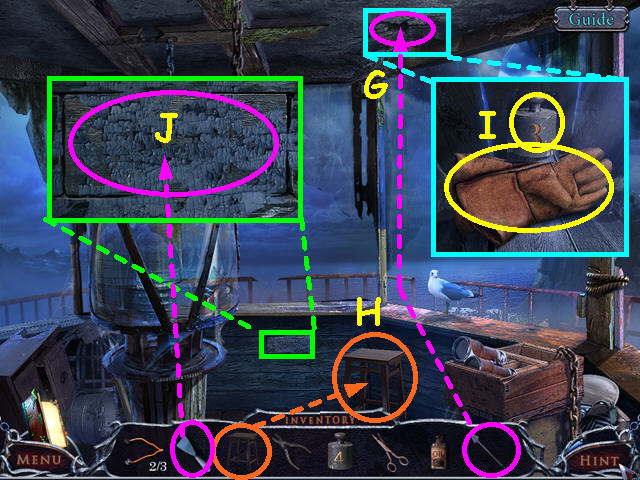
- Use the HARPOON on the hole in the ceiling 2 times (G).
- Place the STOOL on the floor (H).
- Look inside the hole and take the GLOVES and the 3 Kg WEIGHT (I).
- Look at the block of wood and use the SCRAPER 3 times to remove the paint (J).
- Exit the lighthouse and return to the bridge area.

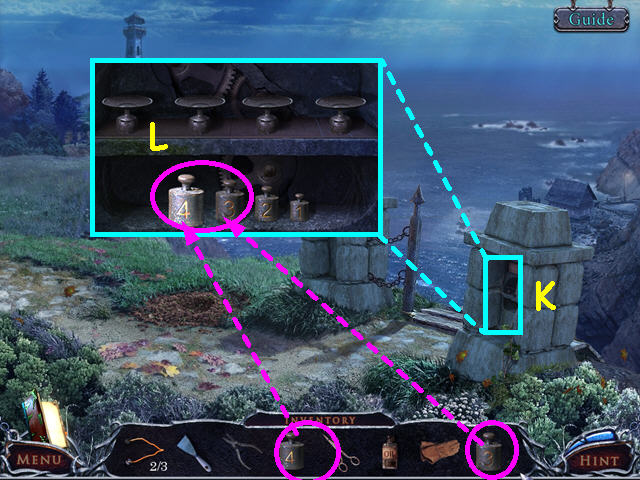
- Look at the right pillar (K).
- Place the 4 Kg WEIGHT and the 3 Kg WEIGHT on the shelf to trigger a mini-game (L).

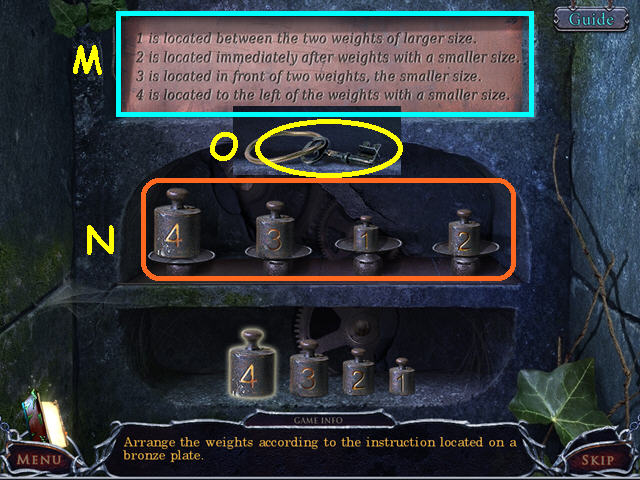
- Using the clues (M) place the weights in the correct position (N).
- Take the CHEST KEY that was hidden under the clues (O).
- Return to the observatory and enter through the window.
- Select the chest under the lamp for a HOS.

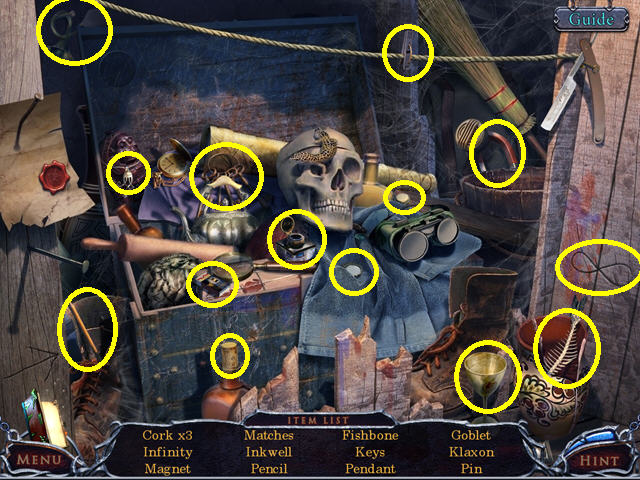
- Locate all the items on the list.
- You will earn the MATCHES.
- Walk to the lighthouse and go inside.

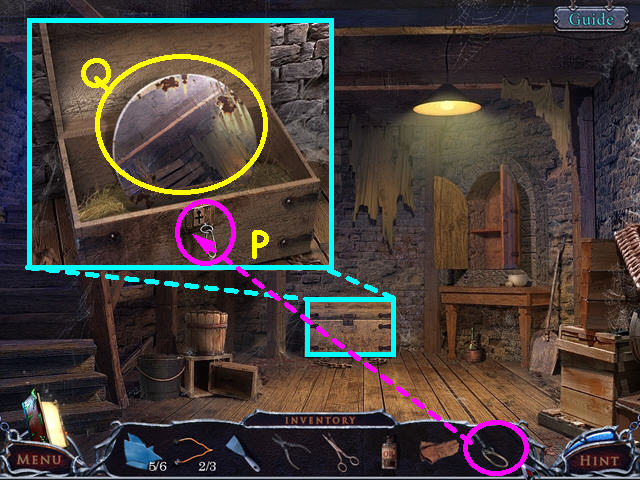
- Look at the chest and use the CHEST KEY on the lock (P).
- Click to open the lid and take the MIRROR (Q).
- Walk upstairs, then take the ladder to the lamp area.

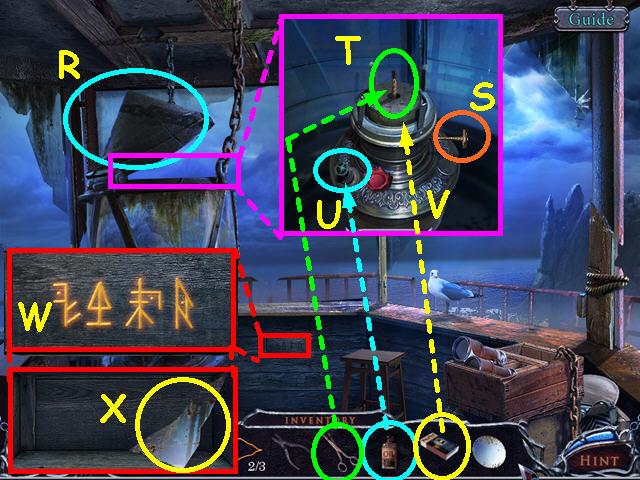
- Open the top of the lamp (R).
- Look inside the lamp and click the knob to raise the wick (S).
- Use the SCISSORS to trim the wick (T).
- Click on the red cap, then pour the OIL into the lamp (U).
- Use the MATCHES on the wick to light the lamp (V).
- Look at the block of wood to see the illuminated runes (W).
- Click on the panel and take the 6/6 MIRROR SHARD (X).
- Exit the lighthouse, then walk down twice.

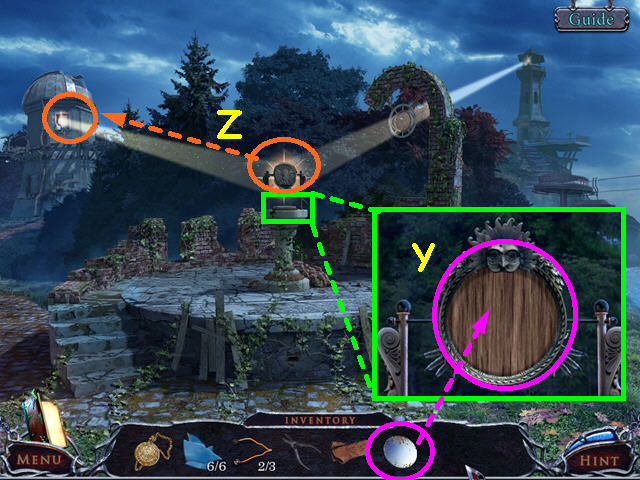
- Look at the pedestal on the platform and place the MIRROR into the holder (Y).
- Click on the mirror so the beam points to the observatory (Z).
- Walk to the observatory and go inside.

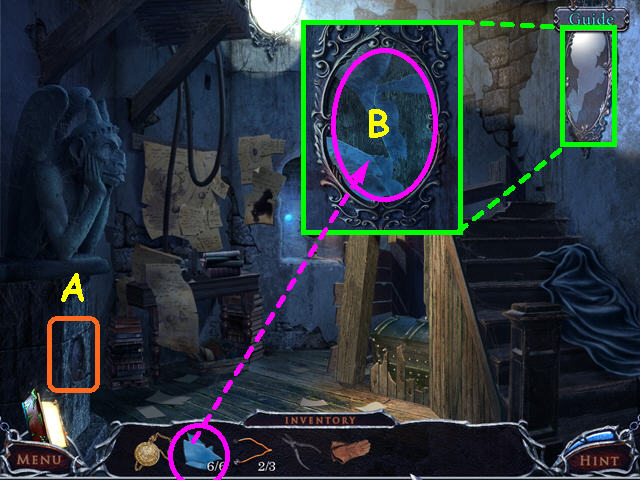
- Note the area under the gargoyle (A).
- Look at the mirror and use the 6 MIRROR SHARDS on the mirror for a mini-game (B).

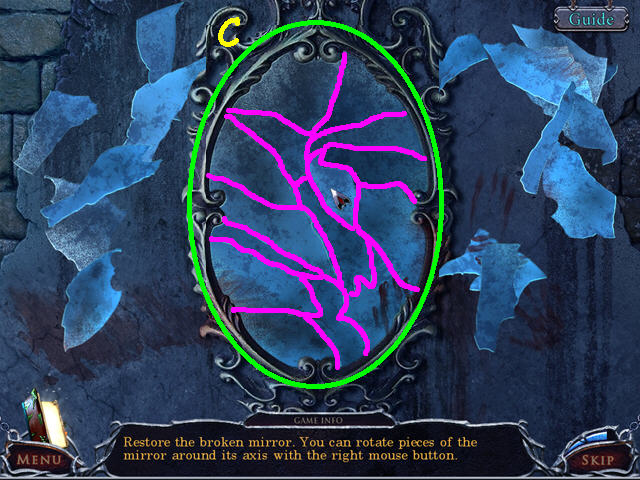
- Restore the broken mirror by placing all the pieces inside the frame (C).
- Left-click to pick up a piece, right-click to rotate, then left-click again to place.
- Pieces will darken slightly and lock in place when correct.
- Look at the area beneath the gargoyle for a mini-game.

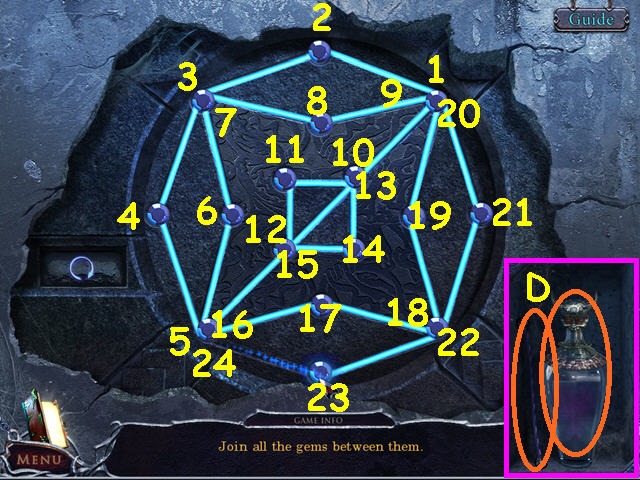
- Connect all the gems and pathways in one continuous line.
- Click on a gem, then click on the next one to start the path.
- Continue until all the paths have been traveled without duplication.
- Press the gems in numerical order (1-24).
- Take the 3/3 ELECTRICAL WIRE and the SECOND VESSEL (D).
- Travel to the cable car.

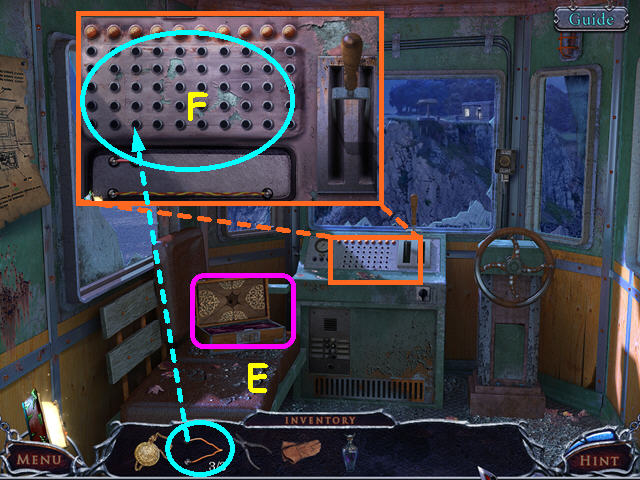
- Note the open box on the seat (E).
- Look at the console and use the 3 ELECTRICAL WIRES for a mini-game (F).

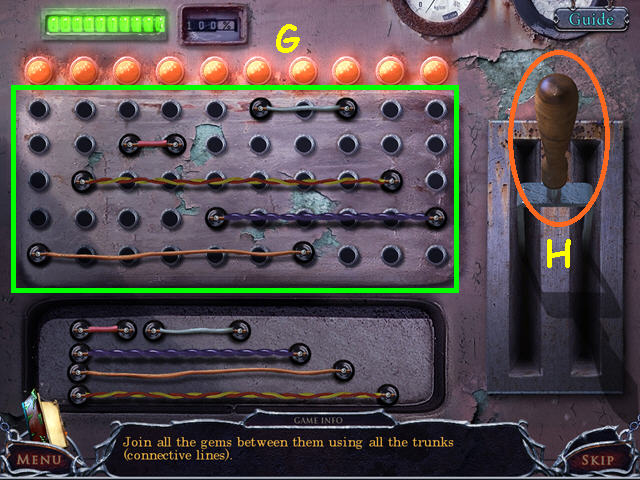
- Place the cables so that there is one connector under each light (G).
- Pull the lever (H).

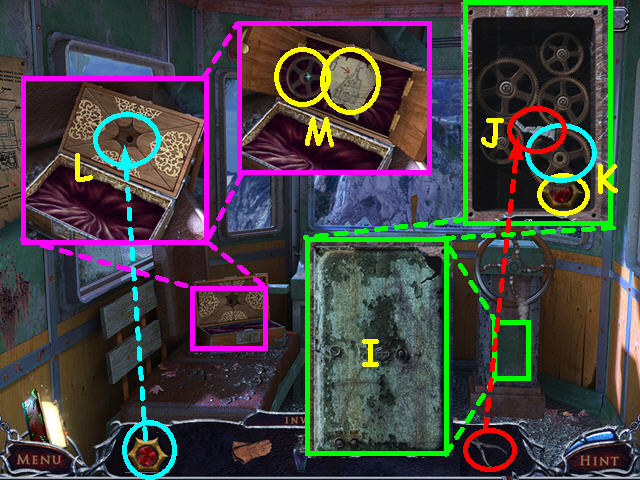
- Look at the panel under the wheel and click to it to open (I).
- Use the PLIERS to remove the piece jamming the gears (J).
- Remove the broken gear and take the STAR INSIGNIA (K).
- Look at the box on the bench and place the STAR INSIGNIA into the niche (L).
- Take the map piece and the GEAR (M).

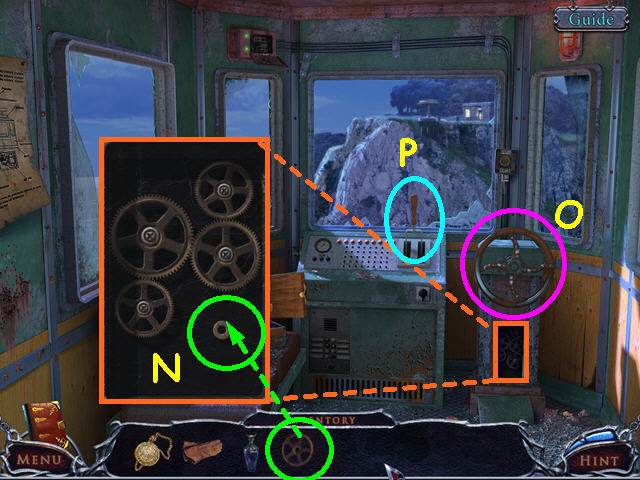
- Look at the gearbox under the wheel and place the GEAR inside (N).
- Click on the wheel (O).
- Pull the lever (P).
- Walk down twice, then go forward to the cemetery gate.
Chapter 3: The Cemetery

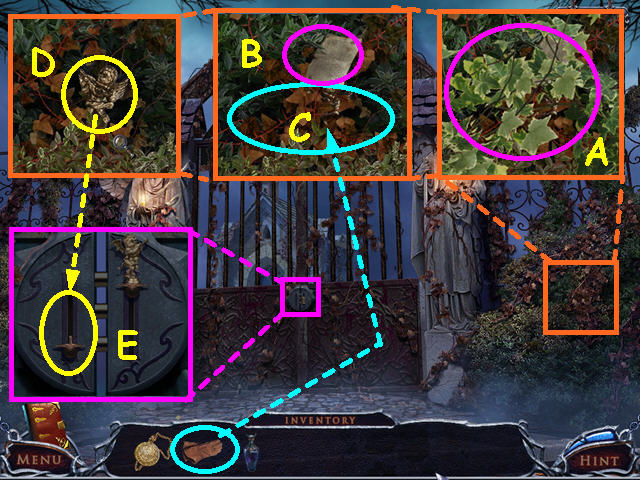
- Look at the bushes on the right and click 3 times to remove the green growth (A).
- Take the diary page (B).
- Use the GLOVES on the sharp growth 3 times (C).
- Take the ANGEL (D).
- Look at the gate lock and place the ANGEL on the left (E).
- Enter the cemetery.

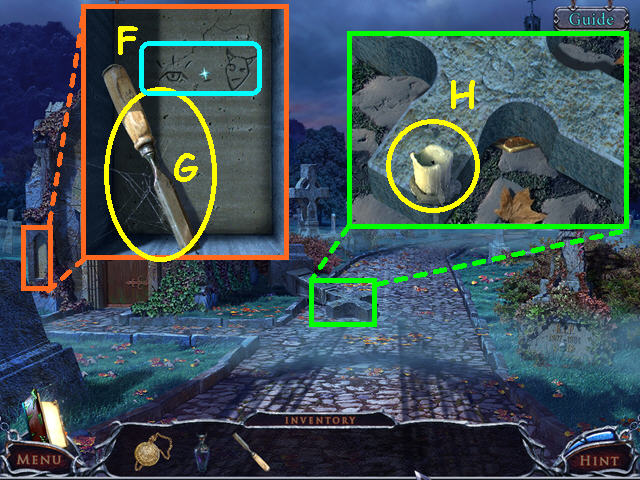
- Look at the alcove on the crypt and note the symbols (F).
- Take the CHISEL (G).
- Look at the fallen cross and take the 1/5 CANDLE (H).
- Walk forward.

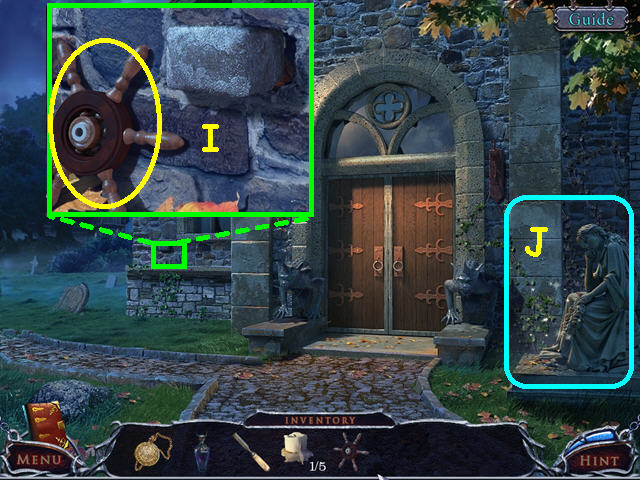
- Look by the window and take the LEVER (I).
- Select the statue for a HOS (J).

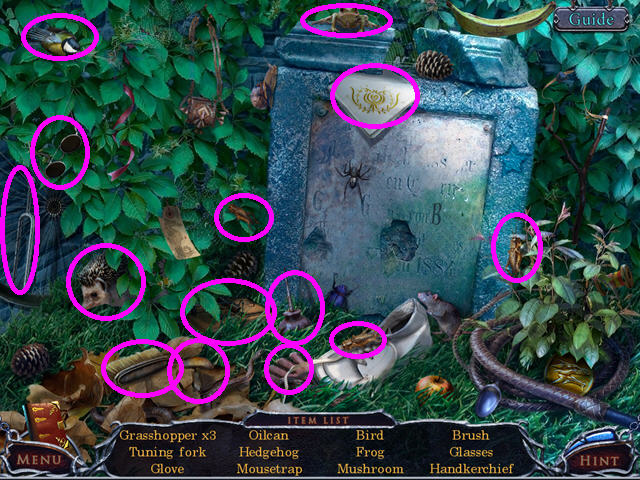
- Locate all the items on the list.
- You will earn the OIL CAN.
- Walk to the left.

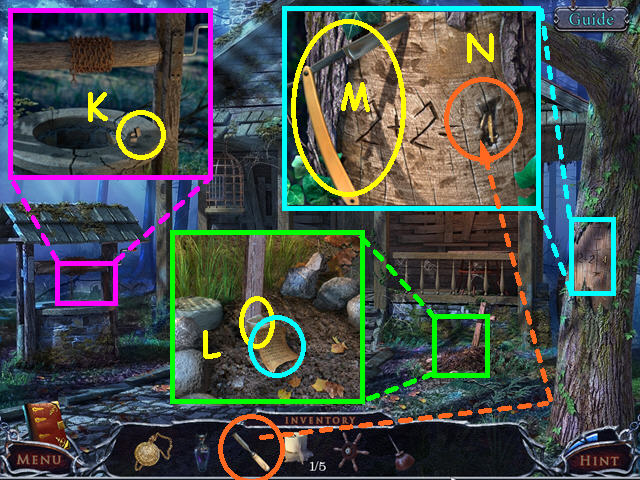
- Look at the well and take the LIGHTER (K).
- Look at the grave, take the diary page and the 2/5 CANDLE (L).
- Look at the tree and take the RAZOR (M).
- Use the CHISEL 3 times to get the 1/2 GRAVESTONE DIGIT (N).
- Return to the front of the church.

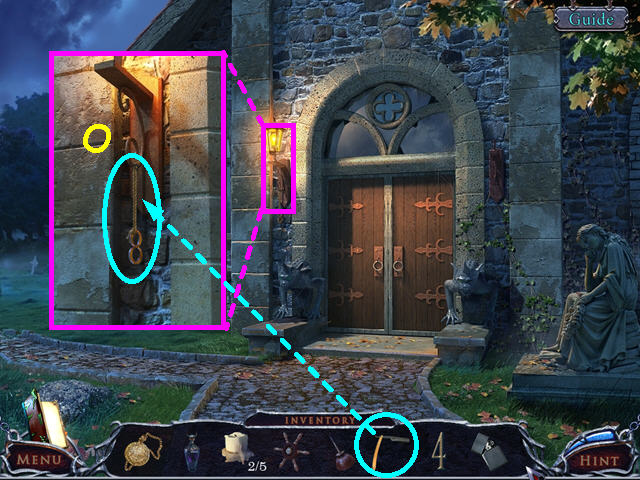
- Look at the lamp sconce and use the RAZOR on the string 3 times to get the 2/2 GRAVESTONE DIGIT (O).
- Walk down.

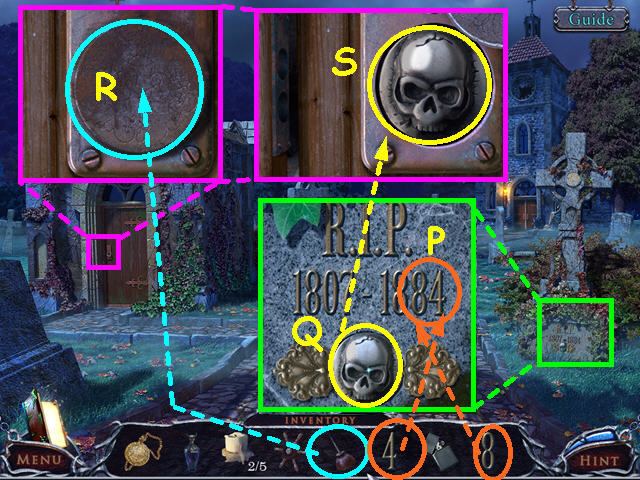
- Look at the headstone and replace the 2 GRAVESTONE DIGITS (P).
- Take the SKULL COIN (Q).
- Look at the crypt door and use the OIL CAN 3 times on the circle (R).
- Click on the circle to move it open and place the SKULL COIN inside (S).
- Enter the crypt.

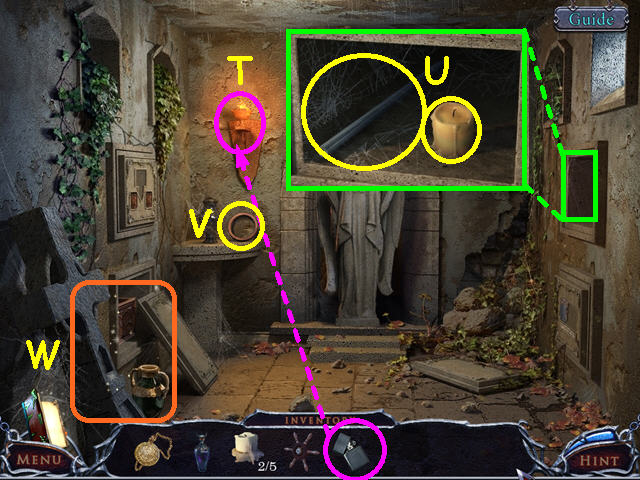
- Use the LIGHTER to light the lamp (T).
- Look in the alcove and take the 3/5 CANDLE and the METAL POLE (U).
- Take the WOODEN CIRCLE (V).
- Select the lower left area for a HOS (W).

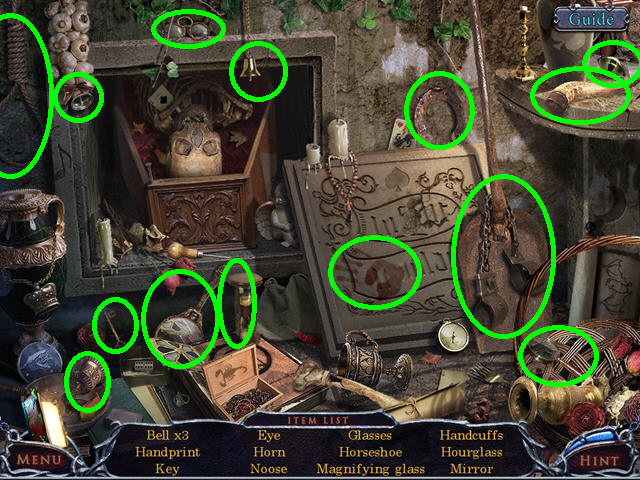
- Locate all the items on the list.
- You will earn the EYE.
- Exit the crypt.

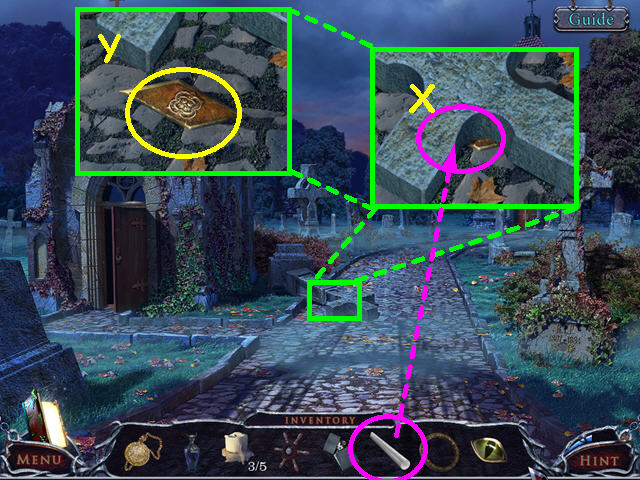
- Look at the fallen cross and use the METAL POLE to move the cross (X).
- Take the 1/3 BRONZE PLATE (Y).
- Walk forward.

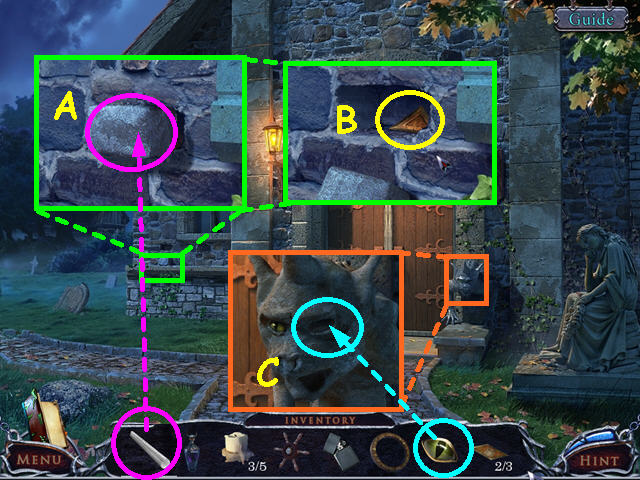
- Look under the window and use the METAL POLE to loosen the brick (A).
- Pull the brick out and take the 2/3 BRONZE PLATE (B).
- Look at the right gargoyle and replace the EYE (C).
- Enter the church.

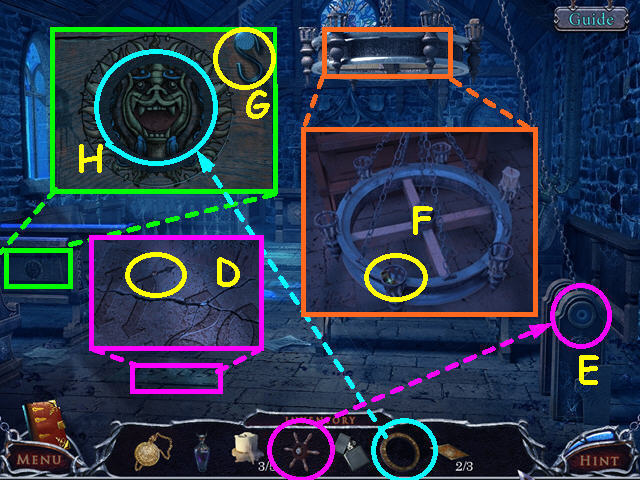
- Look at the stone plate and take the 1/2 HOUR HAND (D).
- Place the LEVER on the winch then click the lever to lower the chandelier (E).
- After it lowers, look at the chandelier and take the CHESS PIECE (F).
- Look at the back of the pew and take the HOOK (G).
- Place the WOODEN RING into the picture for a mini-game (H).

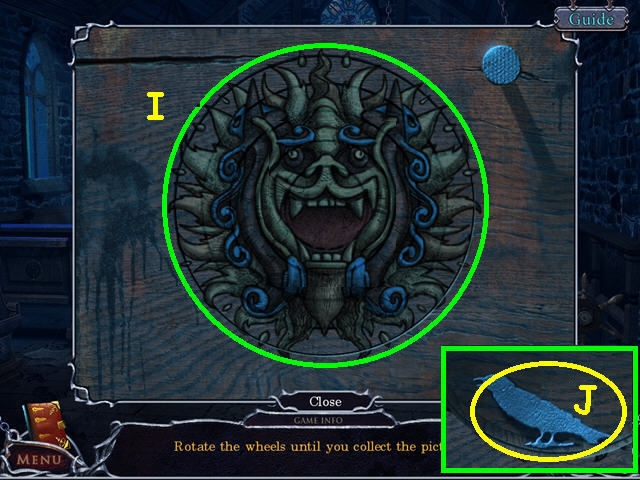
- Restore the picture by rotating the rings (I).
- Click on each ring to move it to the desired point.
- Take the BIRD KEY that is hidden behind the picture (J).
- Return to the front of the cabin.

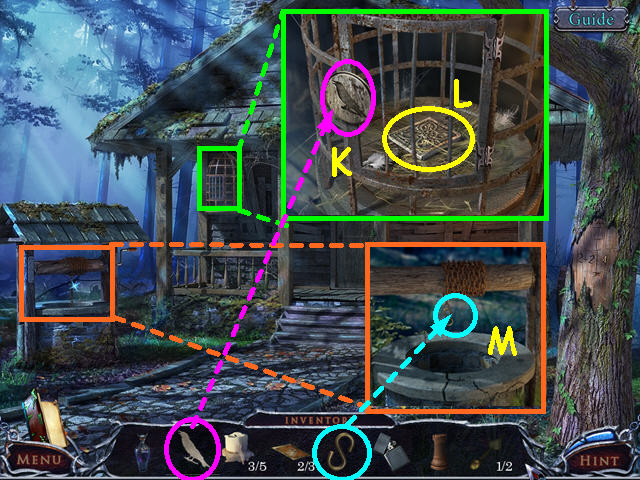
- Look at the birdcage and use the BIRD KEY on the lock (K).
- Take the 3/3 BRONZE PLATE (L).
- Look at the well and place the HOOK on the chain (M).
- Return to the crypt and go inside.

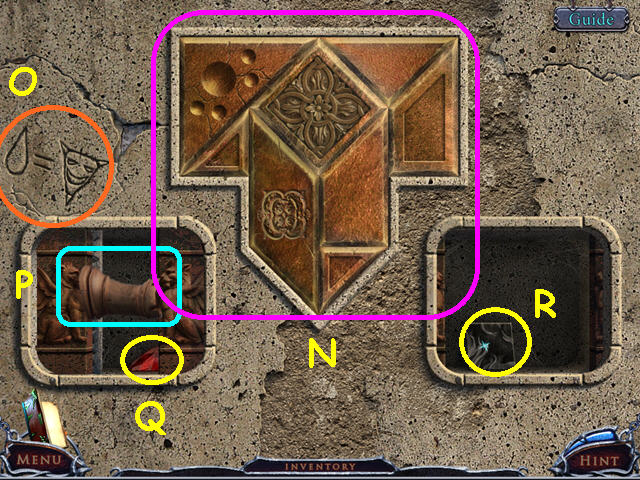
- Look at the center panel on the left for a mini-game.
- Place the 3 BRONZE PLATES onto the wall to trigger a mini-game.
- Place all the bronze plates into the outline (N).
- Note the symbols (O).
- Place the CHESS PIECE into the left niche to hold open the doors (P).
- Take the AMULET (Q).
- Take the 1/4 STONE TABLET (R).

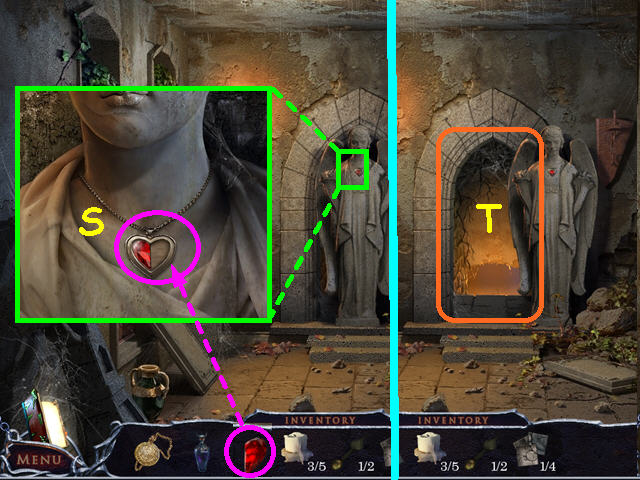
- Look at the statue and place the AMULET into the heart (S).
- Walk forward into the passageway (T).

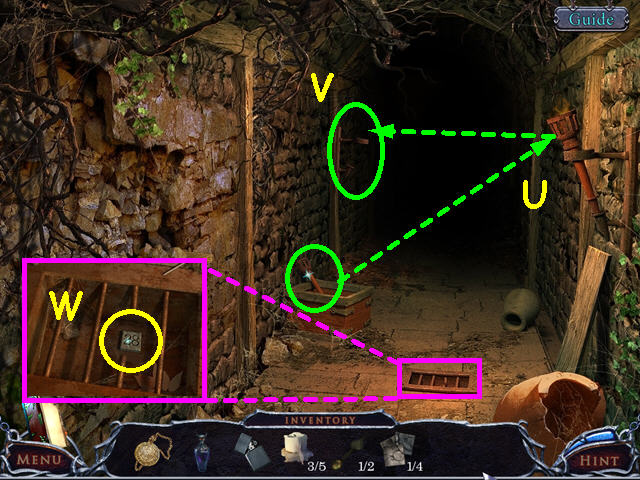
- Take the TORCH from the crate and use it on the wall torch to get the LIT TORCH (U).
- Place the LIT TORCH into the left holder (V).
- Look in the grate and take the 1/3 NUMERICAL STONE (W).
- Walk forward.

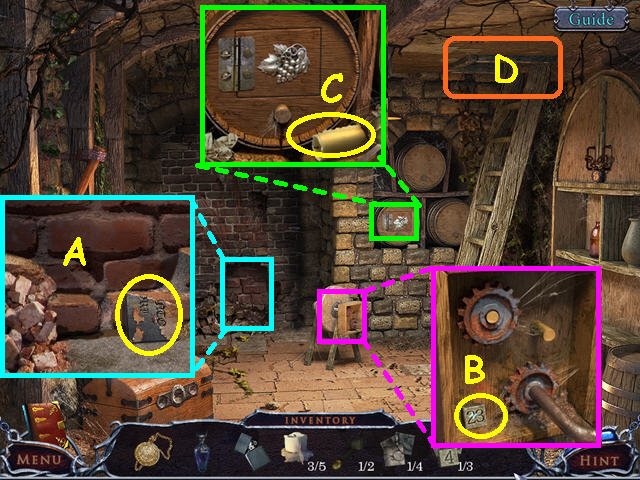
- Look at the bricks and take the PLATE FRAGMENT (A).
- Look at the sharpener and take the 2/3 NUMERICAL STONE (B).
- Look at the wine cask and take the 4/5 CANDLE (C).
- Note the hatch (D).
- Walk down twice.

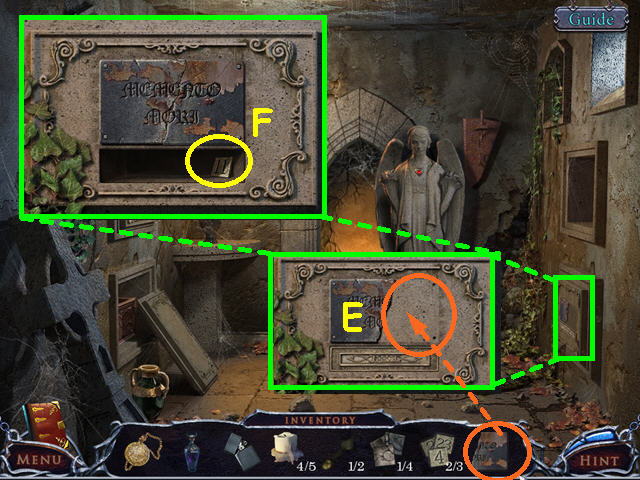
- Look at the lower wall crypt on the right and place the PLATE FRAGMENT onto the face (E).
- Take the 3/3 NUMERICAL STONE (F).
- Walk forward twice and look at the hatch for a mini-game.

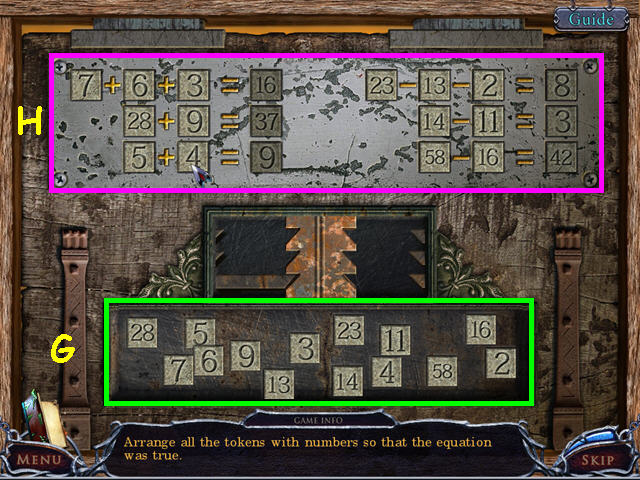
- Place the 3 NUMERICAL STONES into the bottom section to trigger the mini-game (G).
- Place the digits in the top section so that all equations are true (H).
- Climb up the ladder through the hatch.

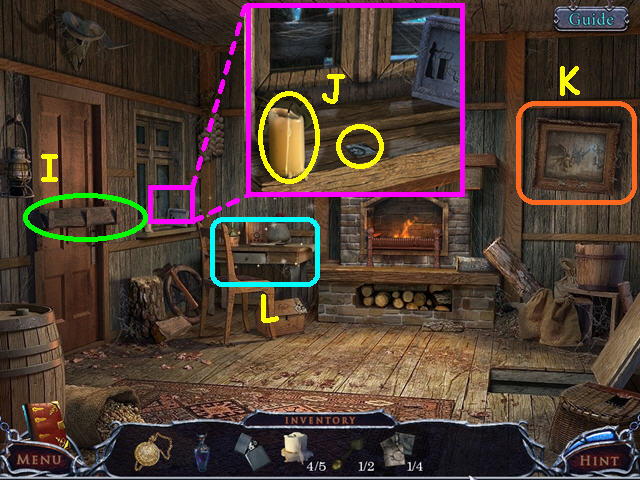
- Remove the lock bar and open the door (I).
- Look at the windowsill, take the 5/5 CANDLE and the 2/4 STONE TABLETS (J).
- Note the painting on the right (K).
- Select the table for a HOS (L).

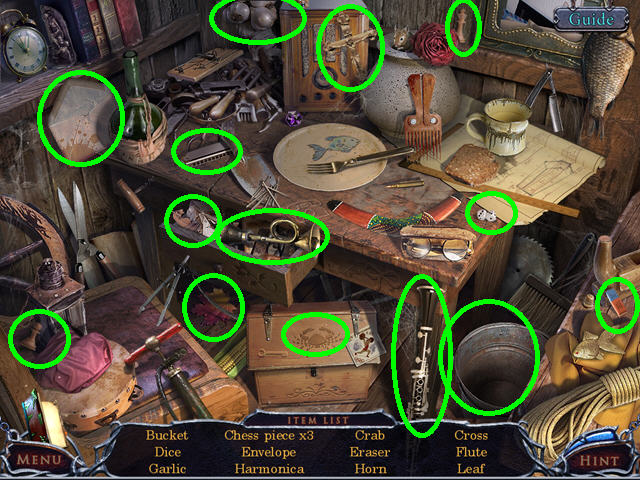
- Locate all the items on the list.
- You will earn the BUCKET.
- Select the painting for a mini-game.

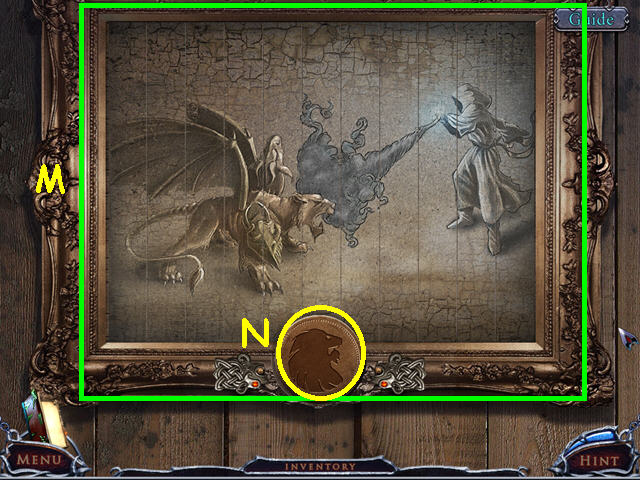
- Restore the painting by swapping strips (M).
- Click on two strips to swap position.
- Take the LION COIN (N).
- Walk left to exit the cabin.

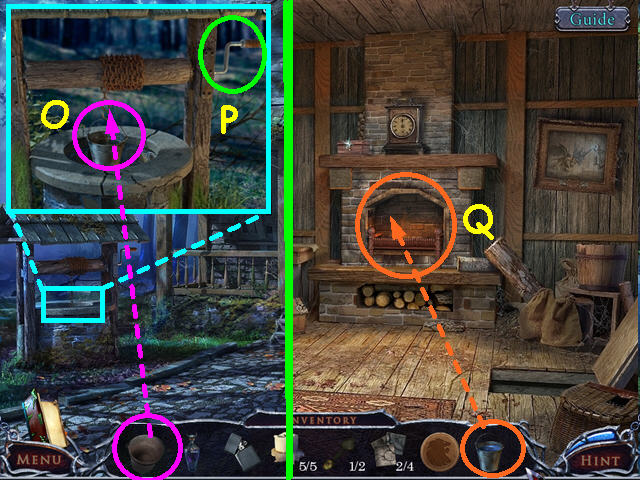
- Look at the well and hang the BUCKET on the hook (O).
- Click on the handle to lower the bucket (P).
- Once you hear it reach the bottom, click the handle again.
- Take the BUCKET with WATER.
- Enter the cabin.
- Use the BUCKET with WATER on the fireplace (Q).
- Walk to the front of the church and select the statue for a HOS.

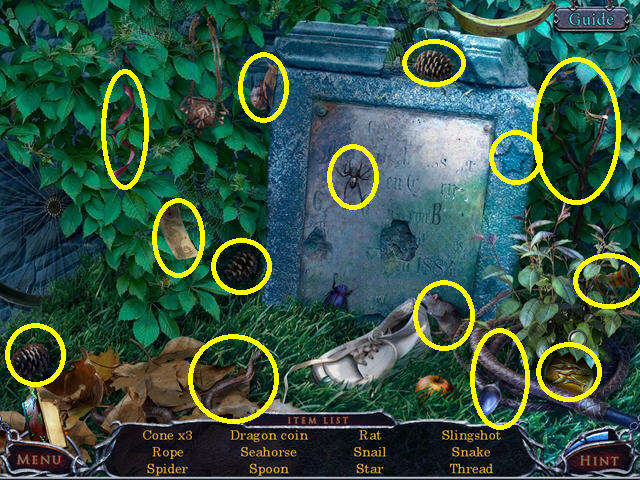
- Locate all the items on the list.
- You will earn the DRAGON COIN.
- Enter the church.

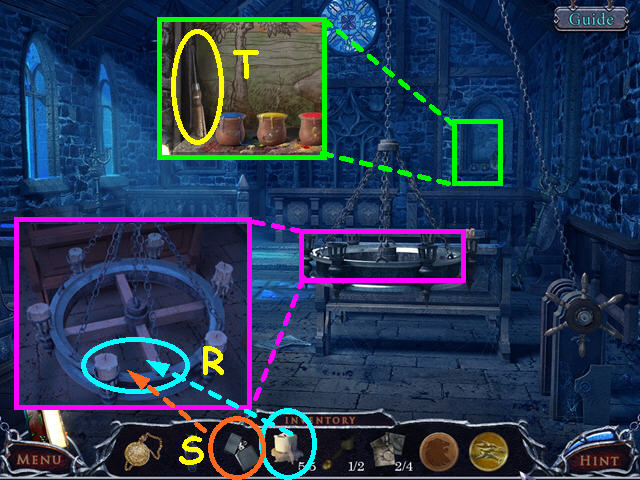
- Look at the chandelier and place the 5 CANDLES into the holders (R).
- Use the LIGHTER to light the candles (S).
- Look at the right alcove and take the SCREWDRIVER (T).
- Return to the crypt, go inside and select the lower left area for a HOS.

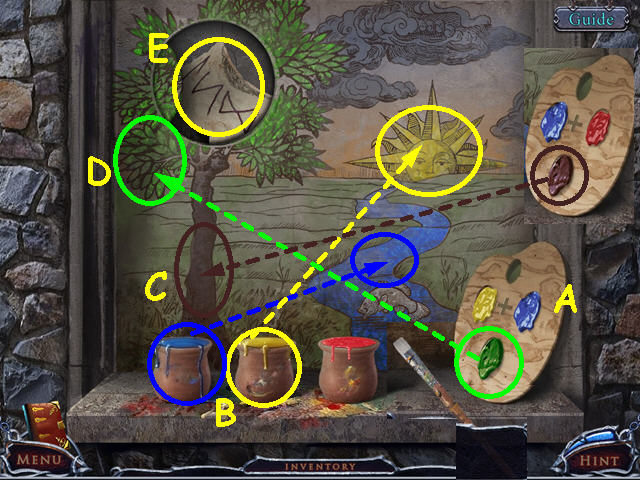
- Locate all the items on the list.
- You will earn the SNAKE COIN.
- Walk forward twice.

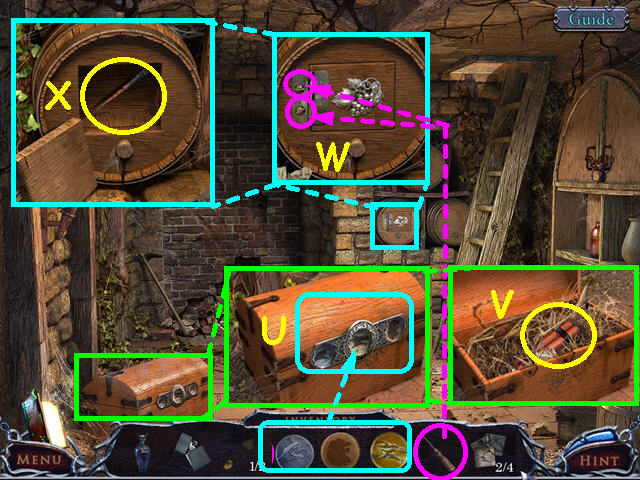
- Look at the chest and place the SNAKE, LION, and DRAGON COINS into the lock (U).
- Take the TNT (V).
- Look at the wine cask and use the SCREWDRIVER on the 2 screws (W).
- Take the BRUSH (X).
- Return to the church and go inside.
- Select the back right alcove for a mini-game.


- Use the BRUSH to grab paint from the jars.
- Mix paints on the palette by putting 2 paints at the top (A).
- Paint the sun yellow and the river blue (B).
- Mix blue and red to make brown and paint the tree trunk (C).
- Mix yellow and blue to make green and paint the leaves on the tree (D).
- Take the runes code from the hole in the tree (E).
- Return to the crypt, go inside and walk forward once.

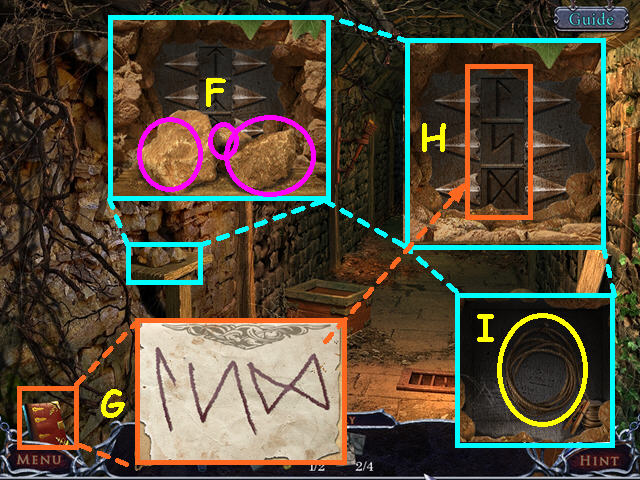
- Look at the shelf on the left and remove the 3 rocks (F).
- Refer to the code in the journal (G).
- Use the arrows to enter the code (H).
- Take the FUSE (I).
- Walk forward.

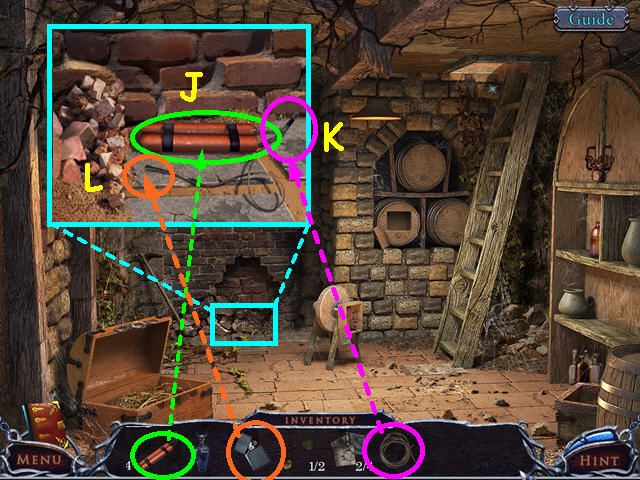
- Look at the base of the bricks and place the TNT on the ground (J).
- Use the FUSE on the TNT (K).
- Use the lighter to light the fuse (L).
- Walk forward twice.

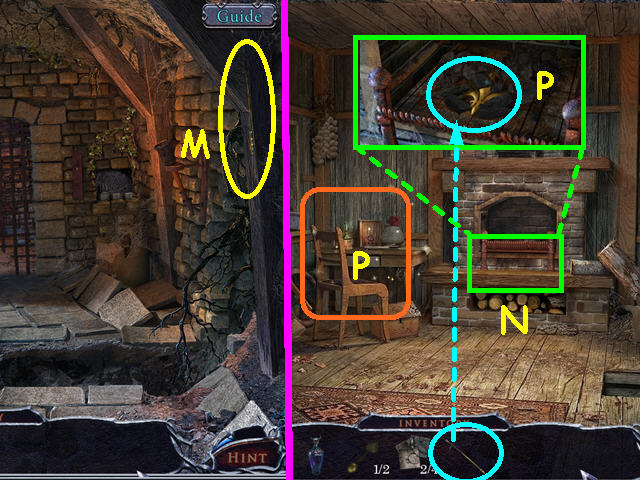
- After the floor caves in, take the POKER (M).
- Return to the cabin and look at the fireplace (N).
- Use the poker to move the embers 3 times (O).
- Take the FLEUR-DE-LIS (P).
- Select the desk for a HOS (Q).

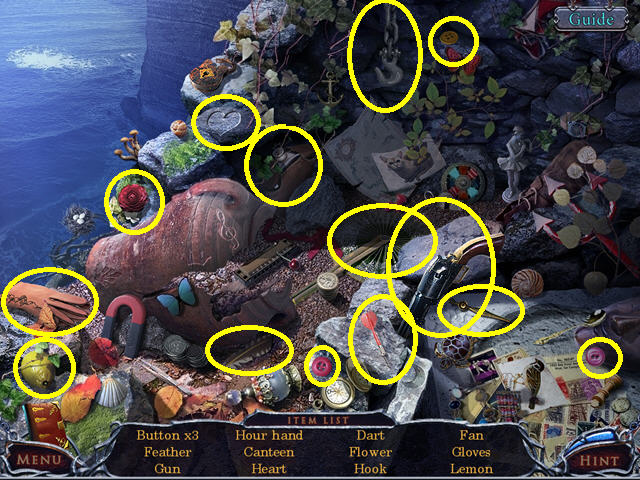
- Locate all the items on the list.
- You will earn the ROPE.
- Walk to the church and go inside.

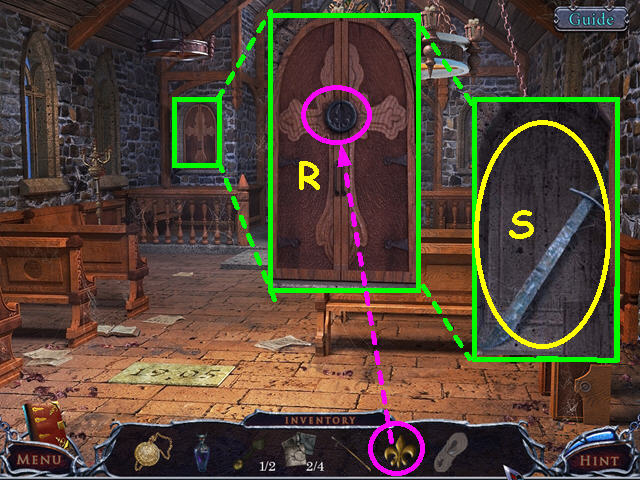
- Look at the left alcove and use the FLEUR-DE-LIS on the lock (R).
- Take the BLUNT SWORD (S).
- Return to the crypt, enter then walk forward 3 times.

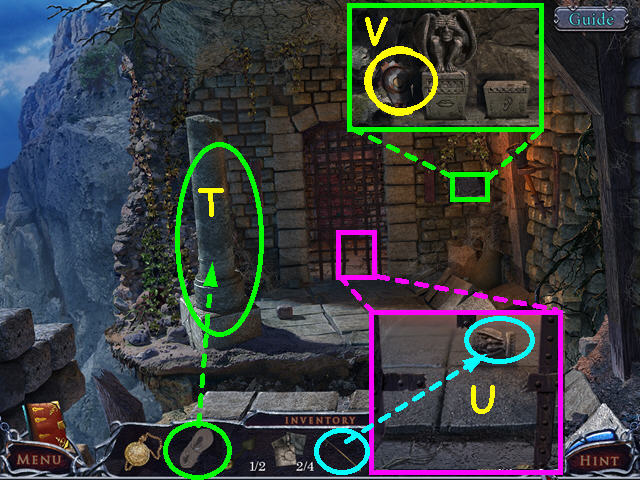
- Use the ROPE to pull down the pillar (T).
- Look at the base of the gate and use the POKER to get 1/2 GARGOYLES (U).
- Look at the controls and take the GEAR (V).
- Walk down to exit the scene.

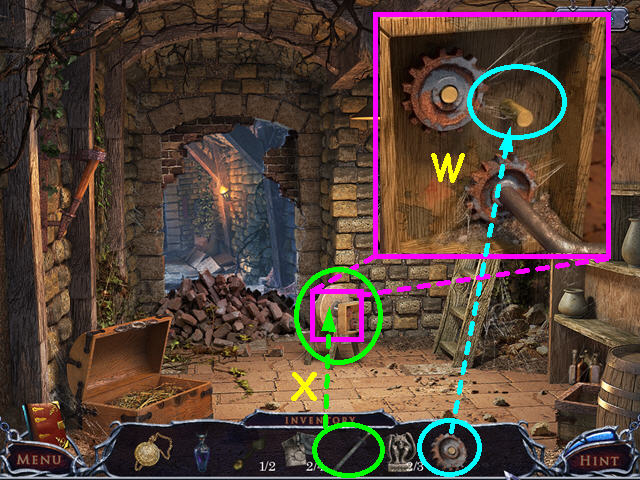
- Look at the grinder and place the GEAR inside (W).
- Use the BLUNT SWORD on the grinder to become the SHARP SWORD (X).
- Walk forward.

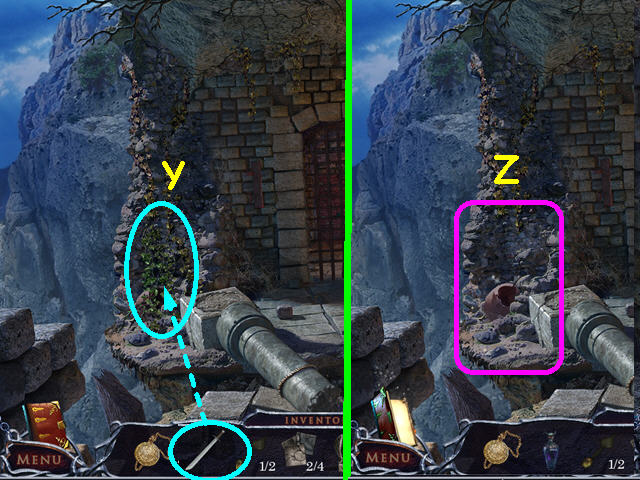
- Use the SHARP SWORD on the growth 3 times (Y).
- Select the area for a HOS (Z).


- Locate all the items on the list.
- You will earn the 2/2 HOUR HAND.
- Walk to the cabin.

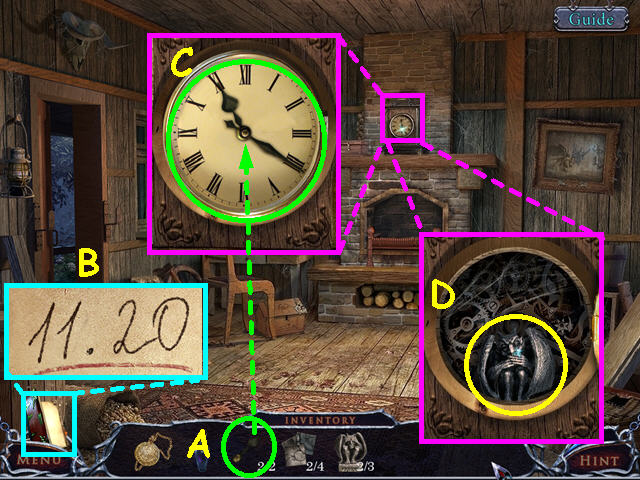
- Look at the clock and place the 2 HOUR HANDS on the face (A).
- Refer to your journal for the clue (B).
- Set the clock to 11:20 (C).
- Take the 2/2 GARGOYLE from inside the clock (D).
- Climb down the hatch, then walk forward.

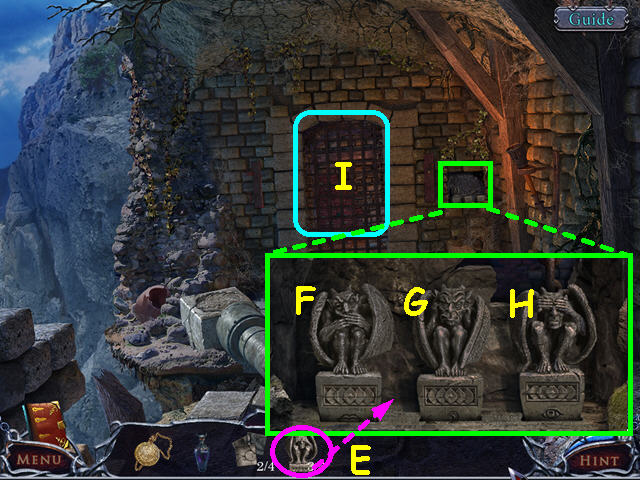
- Look at the control and place the 2 GARGOYLES on the pedestals (E).
- Move the gargoyle hiding his mouth to the left pedestal (F).
- The gargoyle covering his ears needs to be in the center (G).
- Place the gargoyle hiding his eyes on the right pedestal (H).
- Walk forward through the gate (I).

- Look at the mini-game on the right and take the KEY (J).
- Return to the cabin.
- Look at the box and use the KEY on the lock (K).
- Click on the key to open the box.
- Note the symbols (L).
- Take the FACE BUTTON (M).
- Climb down the hatch, walk forward then select the area at the base of the fallen pillar for a HOS.

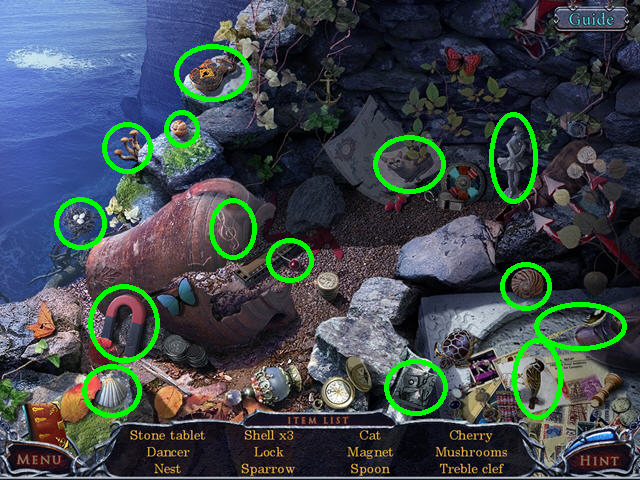
- Locate all the items on the list.
- You will earn the 3/4 STONE TABLET.
- Walk forward and select the right wall for a mini-game.


- Place the FACE BUTTON into the empty spot to trigger the mini-game.
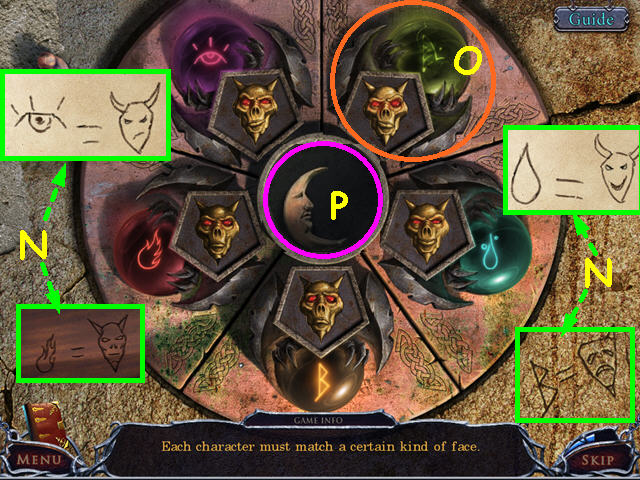
- Refer to the clues in your journal and on the mini-game (N).
- Click on each face to make it match the clues.
- The outer symbols will stop blinking when correct.
- For the face that does not have a clue, select the face that is not on any other (O).
- Take the MOON from the center (P).
- Walk down twice.

- Look at the cabinet and use the MOON on the lock (Q).
- Click on the cabinet doors to open them and take the 4/4 STONE TABLET (R).
- Walk forward twice and select the left wall for a mini-game.

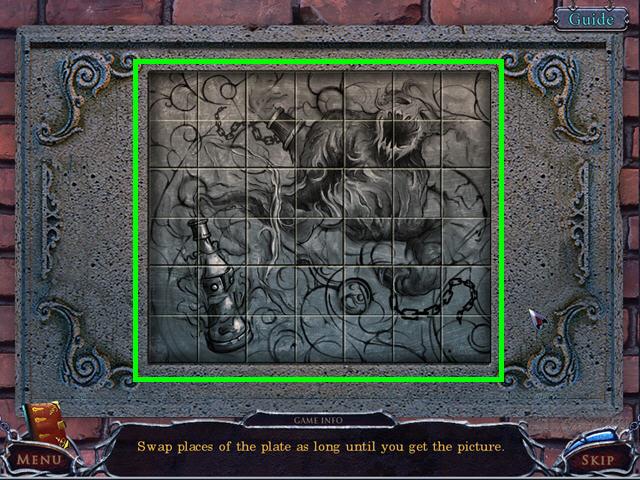
- Place the 4 STONE TABLETS into the grid to activate the mini-game.
- Restore the picture by swapping tiles.
- Click on 2 tiles to swap position.


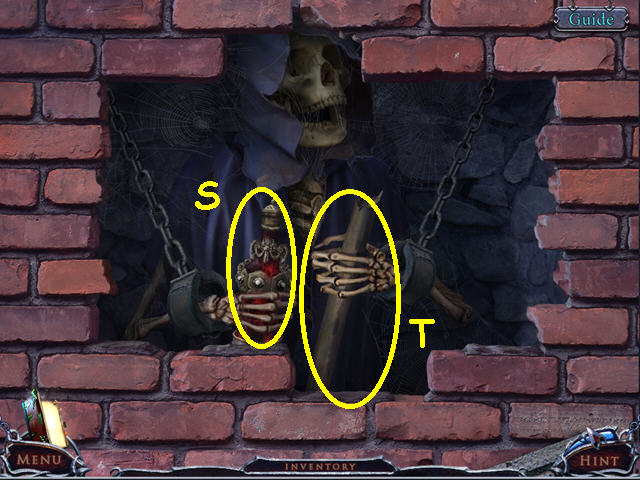
- Take the THIRD VESSEL from the skeleton (S).
- Take the STICK (T).

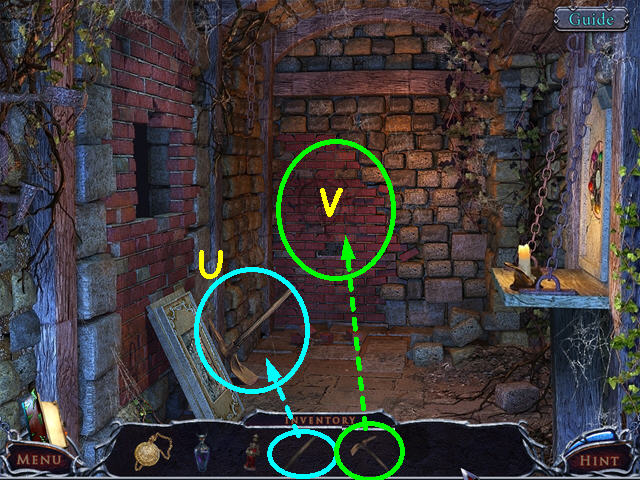
- Use the STICK on the pick head, then take the PICKAXE (U).
- Use the PICKAXE on the brick wall several times (V).
- Walk forward to find yourself back in the dungeon cell.
- Walk forward 4 times to return to the secret ritual chamber.

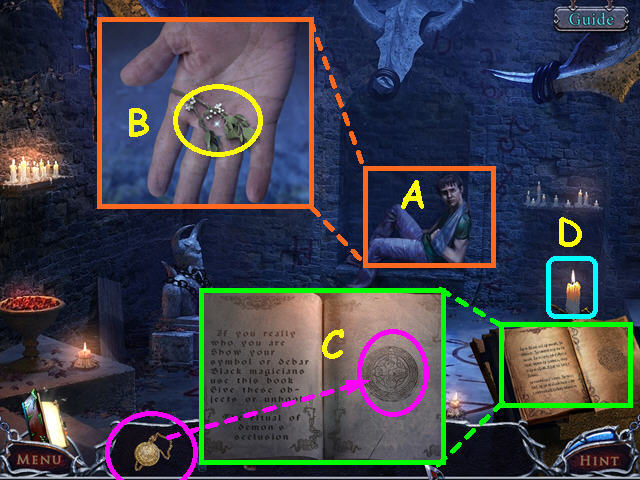
- Talk to John (A).
- After he passes out, look at John, click on his hand to open it and take the MISTLETOE (B).
- Look at the ritual book and place the MEDALLION on the symbol (C).
- Click on the candle to put the book in darkness (D).
- Exit the book close-up.

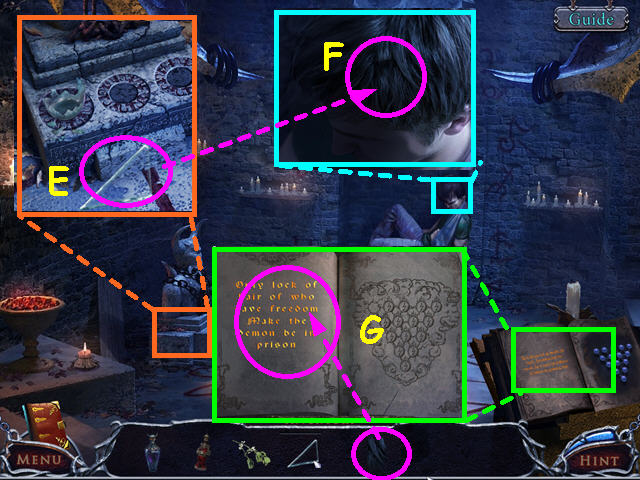
- Look at the base of the statue and take the GLASS SHARD (E).
- Look at John’s head and use the GLASS SHARD to take HAIR (F).
- Look at the ritual book and place HAIR on the page for a mini-game (G).

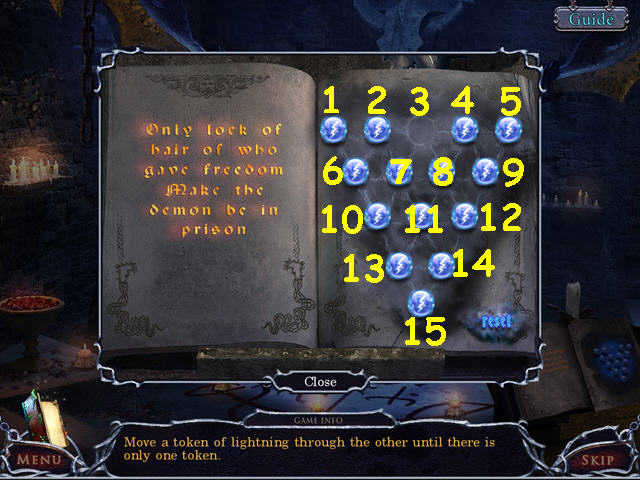
- Remove the balls by jumping until there is only one.
- Number the locations 1-15 going across and down.
- Make the following moves: 10-3, 1-10, 3-1, 13-6, 1-10, 12-3, 15-12, 9-14, 14-7, 4-2, 10-3, 2-4, 5-3.
- Exit the close-up of the book.

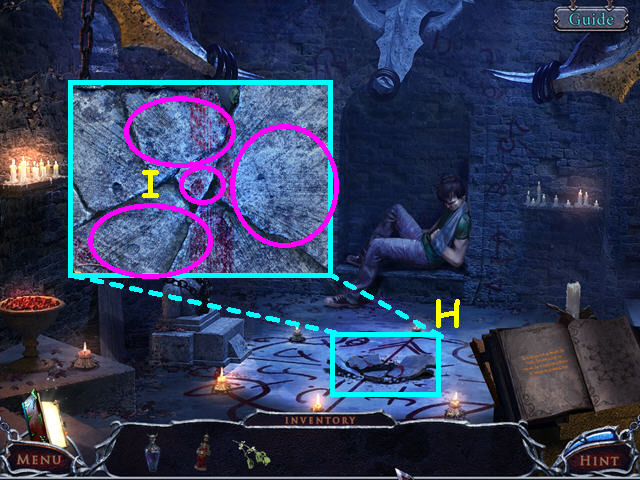
- Look in the hole in the floor (H).
- Remove the concrete pieces for a mini-game (I).

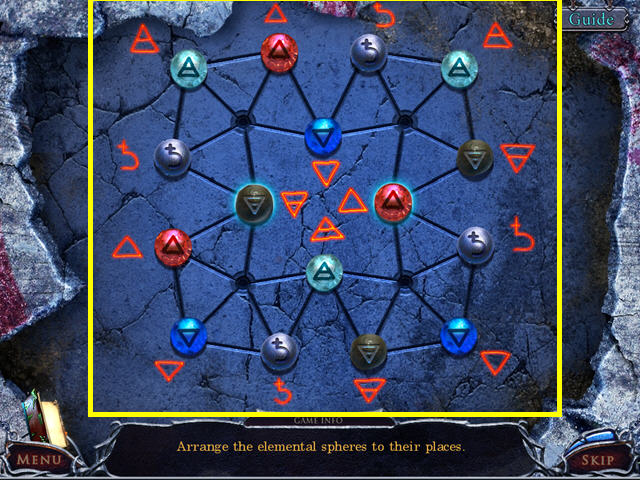
- Move the marbles so that the symbols on the marbles match the symbols they are near.
- Click on a marble, then click on an adjacent spot to move.
- The symbols on the concrete will light when a marble is correct.
- Exit the ritual book close-up.

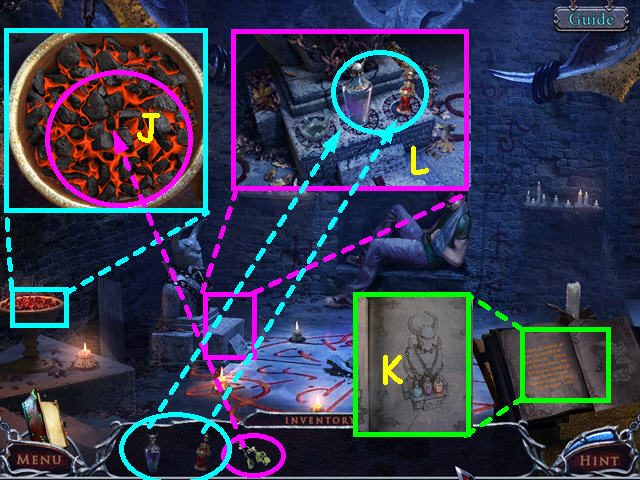
- Look at the brazier and add the MISTLETOE (J).
- Look at the ritual book to learn you must place the vessels (K).
- Look at the base of the statue and place the SECOND and THIRD VESSELS in the circles (L).
- Congratulations! You have completed Mystery of the Ancients: Lockwood Manor Standard Edition!



 Love & Death™: Bitten ™ Walkthrough, Guide, & Tips
 Chimeras: The Signs of Prophecy Walkthrough, Guide, & Tips
 The Mirror Mysteries 2: Forgotten Kingdoms Walkthrough, Guide, & Tips
 Final Cut: The True Escapade Walkthrough, Guide, & Tips
 Save Our Spirit Walkthrough, Guide, & Tips