Love & Death™: Bitten ™ Walkthrough, Guide, & Tips
Love & Death™: Bitten ™ Walkthrough

Welcome to the Love & Death: Bitten Walkthrough!
Play as Victoria by day and Damon by night, solving unique puzzles, collecting and combining hidden items and unlocking secret passages!
Whether you use this document as a reference when things get difficult or as a road map to get you from beginning to end, we’re pretty sure you’ll find what you’re looking for here.
This document contains a complete Love & Death: Bitten game walkthrough featuring annotated screenshots from actual gameplay!
We hope you find this information useful as you play your way through the game. Use the walkthrough menu below to quickly jump to whatever stage of the game you need help with.
Remember to visit the Big Fish Games Forums if you find you need more help. Have fun!
This walkthrough was created by Margie B.
General Tips

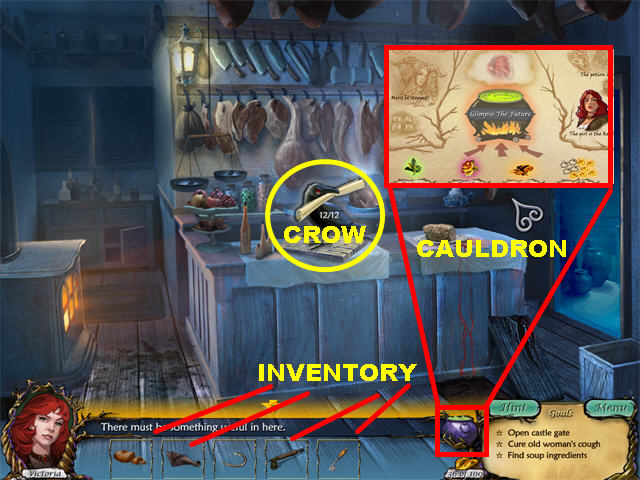
- The game has 7 chapters. You will play as two different characters: Victoria and Damon.
- Your goals are located in the lower right corner. Make sure you use the scrolling arrows to view all of them.
- Hints are unlimited and recharge pretty quickly.
- Click on the CROWS that appear on the screen to trigger Hidden Object Scenes.
- You can use a hint in both Hidden Object Scenes and regular scenes.
- Items written in yellow in the Hidden Object Scenes require you to perform certain actions before being taken off the list. A clue might say “4 feathers in a nest;” find 4 feathers and drag them to a nest.
- Items written in light blue are hidden behind something else.
- The hint will show you where an inventory item needs to be used.
- Click on the hint button to read the instructions for any mini-game.
- Mini-games can be skipped by clicking on the Skip Button once it has been charged.
- Inventory items will be located at the bottom of the scene. Pick up inventory items and place them into scene locations.
- Use the arrows on each side of your inventory tray to scroll through all items.

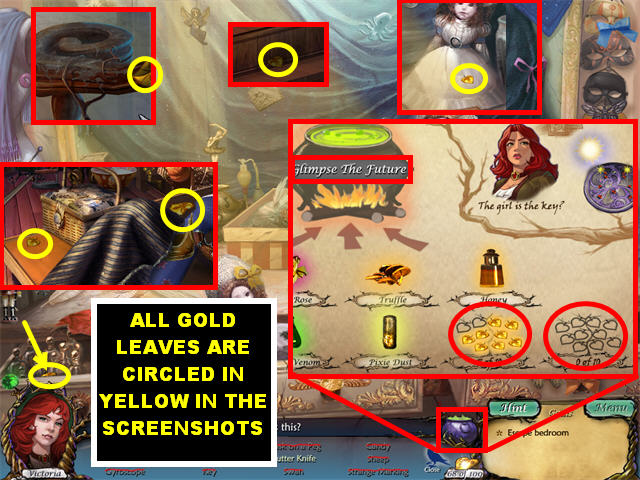
- You must collect 100 leaves throughout the game. The GOLDEN LEAVES will always be circled in yellow in the screenshots. Collecting the leaves will give you a “Glimpse of the Future” at the end of the game.
- Click on the cauldron icon in the lower right to view your progress. This screen shows you how many leaves you’ve collected and how far you’ve gotten in the game.
- The leaf counter in the lower right will glow whenever there are GOLDEN LEAVES in a scene.
- GOLDEN LEAVES can be found in any scene. Make sure that you look for them in the Hidden Object Scenes after some of the items have been moved out of the way.
- You may have to return to a room several times before some of the GOLDEN LEAVES become available.
- Some GOLDEN LEAVES can be hard to spot. They can also be very large!
- There are more than 100 leaves in the game. Once you find the first 100, the rest of the leaves will no longer appear in your game.
- The game will give you plenty of chances to collect all the leaves. If you fail to collect them before the game is over, you will have to replay the game in order to “Glimpse into the Future.”
Chapter 1: The Search

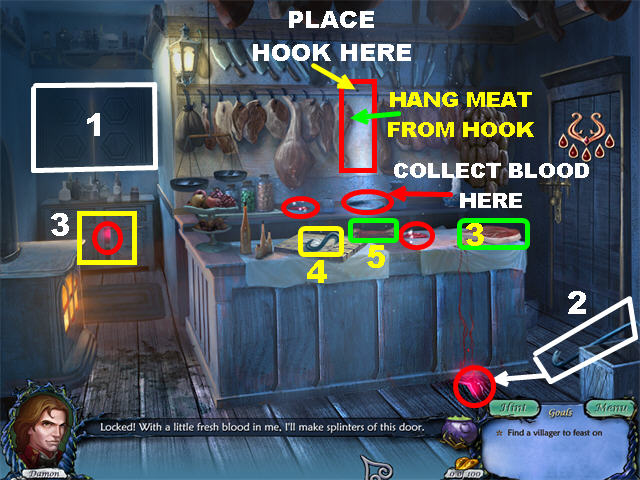
- Close the SHUTTERS (1) in the back of the scene.
- Click on the door.
- Pick up the CROWBAR (2) by the door and place it on the loose floorboard in the lower right.
- Collect the BLOOD stains marked in red in the scene.
- Click on the cabinet in the back and pick up the BLOOD stain inside the cabinet.
- Pick up the BLOODY MEAT (3) on the table.
- Pick up the MEAT HOOK (4) on the table and hang it in the center of the back wall.
- Place the BLOODY MEAT (3) on the hook; click on the BLOOD that falls into the tray below.
- Click on the right door.
- Pick up the BONE (5) on the table and give it to the wolf by the door.
- Go to the Storage Room by clicking on the door on the right.

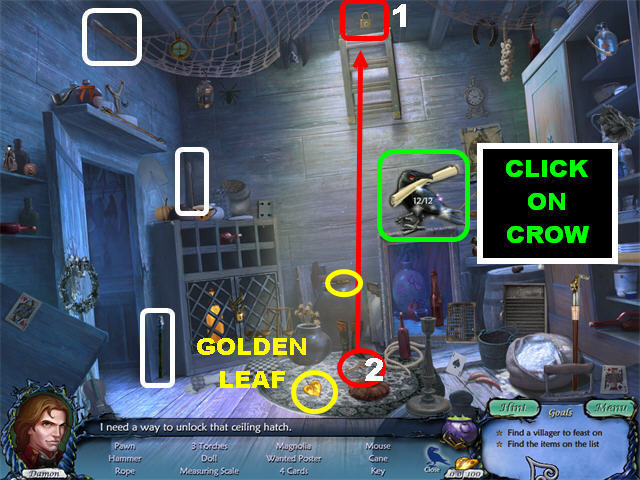
- Pick up the 2 GOLDEN LEAVES on the ground. You must collect 100 leaves throughout the game.
- Click on the LOCK (1); then click on the CROW that appears on the screen to trigger a Hidden Object Scene.
- The 3 TORCHES are marked in white.
- The KEY (2) will go into inventory.
- Place the KEY (2) on the LOCK (1) and go to the Rooftop.

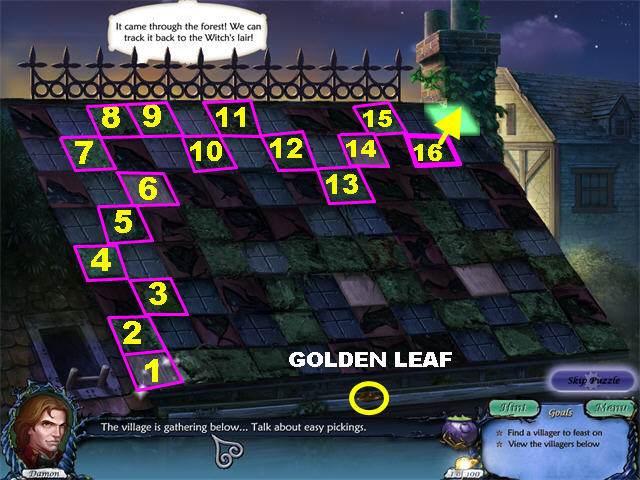
- Click on the tiles that will lead you to the exit in the upper right.
- You cannot step on cracked tiles or crossed tiles.
- Pick up the GOLDEN LEAF in the lower center.
- Please look at the screenshot for the solution.

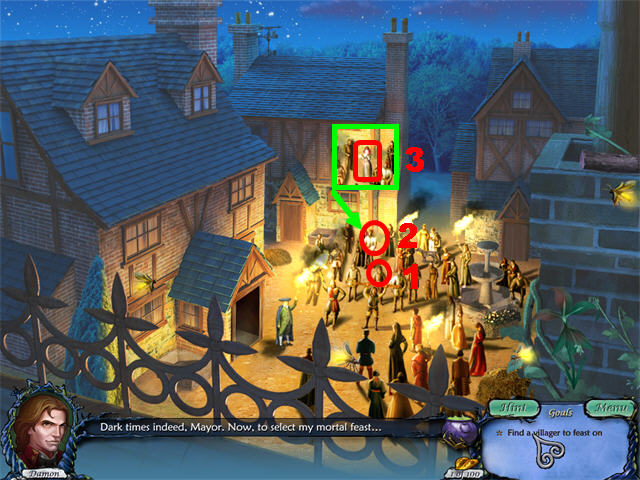
- Click on the villagers in the order shown on the screenshot.
- After you click on the 2 villagers, click on the female (3) that appears in the crowd.
Chapter 2: The Choice

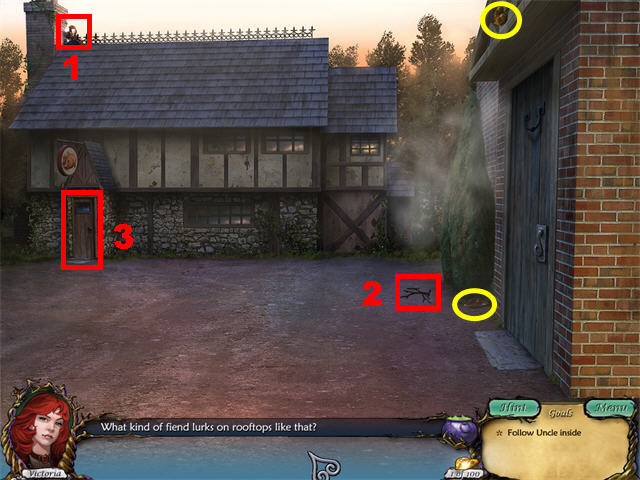
- Click on the STRANGER (1) in the upper left to unlock the door.
- Pick up the TWIGS (2) on the lower right.
- Pick up the 2 GOLDEN LEAVES.
- Go through the LEFT (3) door to enter the Butcher Shop.

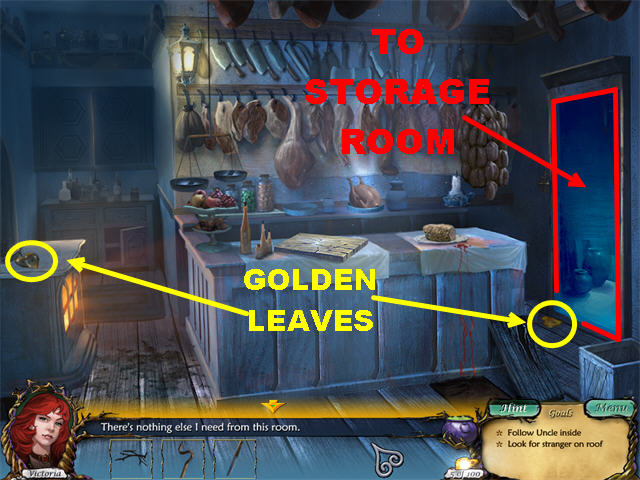

- Go to the right to access the Storage Room.
- Go back to the Butcher Shop.
- Pick up the 2 GOLDEN LEAVES.
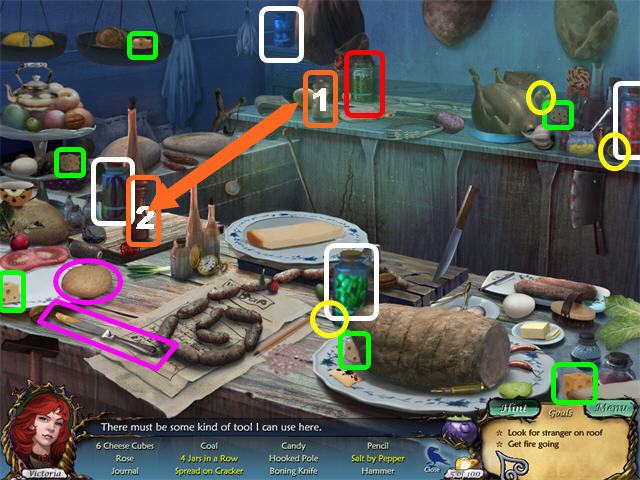
- Click on the CROW to trigger a Hidden Object Scene.
- 4 Jars in a Row: Pick up the JARS marked in white and place them next to the jar marked in red.
- Spread on Cracker: Grab the KNIFE marked in purple and spread its contents on the cracker marked in purple.
- Salt by Pepper: Pick up the SALT (1) on the counter and place it by the PEPPER (2) on the table.
- The 6 Cheese Cubes are marked in green.
- Pick up the 3 GOLDEN LEAVES. Some leaves may not appear until after you’ve picked up other items.
- The HOOKED POLE and the KNIFE will go into inventory.
- Go to the Storage Room on the right.
- Place the HOOKED POLE on the ladder in the upper center; click on the ladder to access the rooftop.

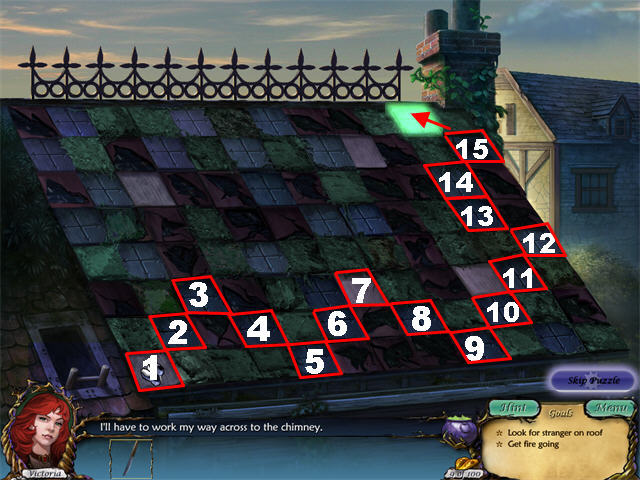
- Find your way to the chimney. In this section, you can step on the tiles with crosses.
- Please look at the screenshot for the solution.

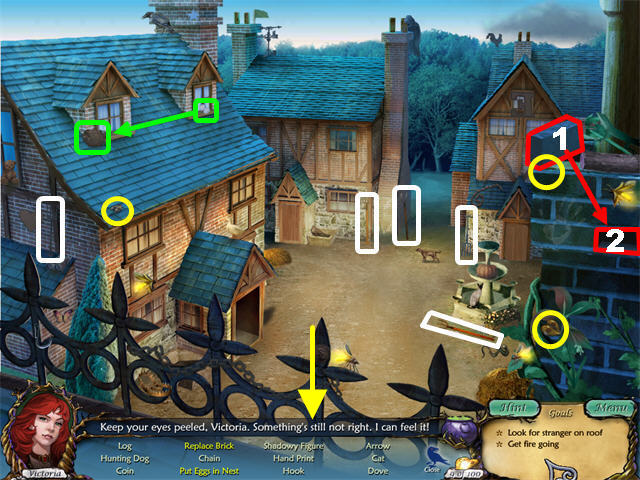
- Click on the CROW on the left side of the screen to trigger a Hidden Object Scene.
- Pick up the GOLDEN LEAVES.
- Replace Brick: Pick up the BRICK (1) in the upper right and place it in the space marked in red (2).
- Pick up the GOLDEN LEAF below the brick (1).
- Put Eggs in Nest: Pick up the EGGS marked in green; place them in the nest marked in green.
- The 5 PITCHFORKS are marked in white.
- The BRANCH will go into inventory after your search.
- Click at the bottom of the scene to access the rooftop. Click on the ladder in the lower left corner, go through the left door, click at the bottom of the scene and enter the Home through the door on the right.

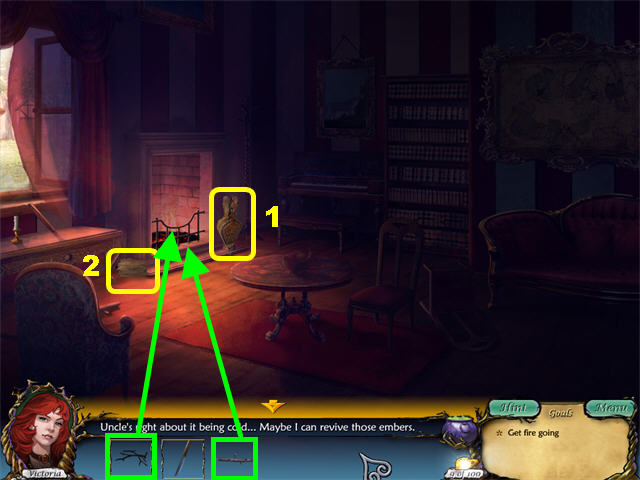
- Pick up the BELLOWS (1) right of the fireplace.
- Pick up the CRUMPLED PAPER (2) by the fireplace.
- In this order, place the BELLOWS, CRUMPLED PAPER, TWIGS, and BRANCH into the fireplace.

- Click on the CROW on the left after the vampire disappears.
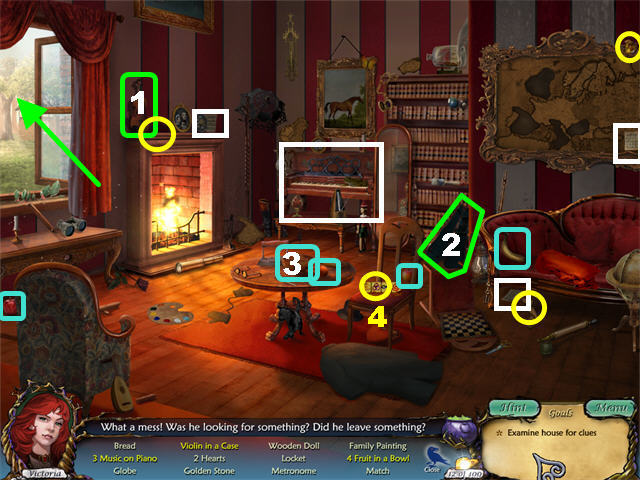
- Pick up the 4 GOLDEN LEAVES. Some leaves can only be obtained after other items have been picked up.
- 3 Music on Piano: Pick up the MUSIC SHEETS marked in white and place them on the piano.
- Violin in a Case: Pick up the VIOLIN (1) over the fireplace and place it in the VIOLIN CASE (2) in the lower right.
- 4 Fruit in a Bowl: Pick up the 4 FRUITS marked in blue and place them in the BOWL (3) on the table.
- Pick up the GOLDEN STONE (4), and the GOLDEN LEAF that appears afterwards, on the chair.
- The BREAD, MATCH, and GOLDEN STONE will go into inventory after your search.
- Go out the window to reach the Bridge.

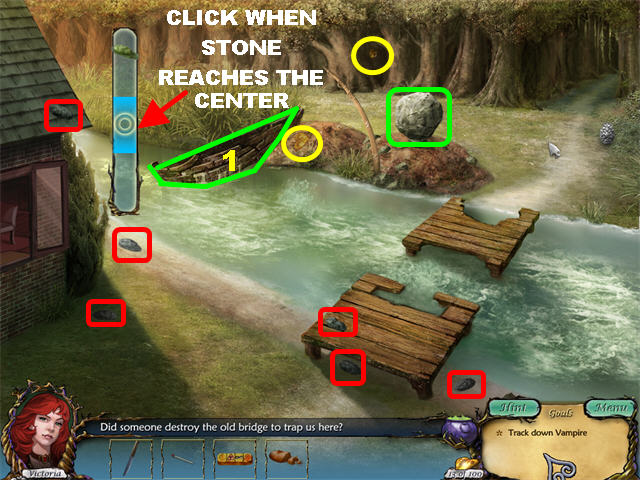
- Pick up the 6 THROWING STONES marked in red.
- Pick up the 2 GOLDEN LEAVES.
- Place one of the stones at the OLD BOAT (1); click your mouse when the stone hits the middle of the target. Follow the same steps with 2 more stones.
- The third stone will break the boat in pieces.

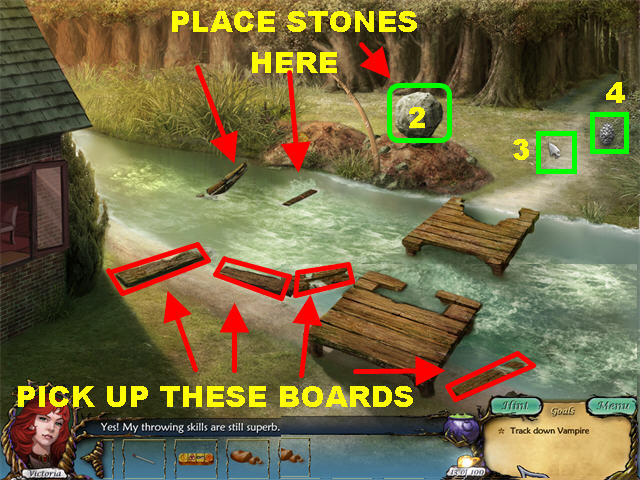
- Place the other 2 stones on the 2 parts of the broken boat in the water; pick up the 4 BOARDS on the ground.
- Place the last STONE at the BOULDER (2) on the other side; the boulder will land at the end of the bridge.
- Place the 4 BOARDS on the broken bridge.
- Pick up the WHITE ARROWHEAD (3) and the WHITE PINECONE (4) at the end of the bridge.
- Go to the Forest in the back of the scene.

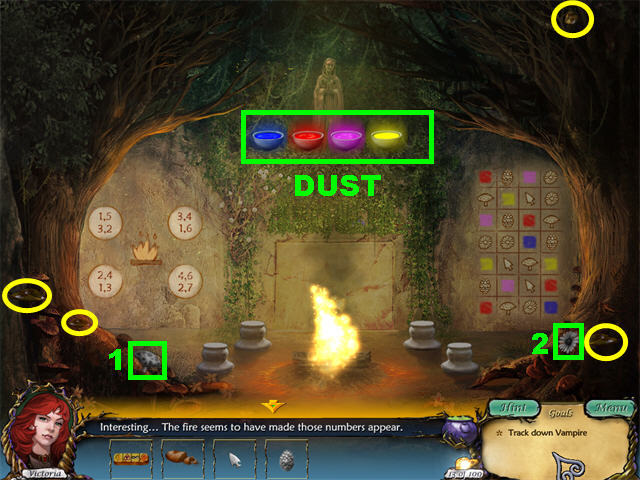
- Place the KNIFE on the vines in the back of the scene.
- Pick up the 4 GOLDEN LEAVES.
- Pick up the WHITE MUSHROOM (1) in the lower left.
- Pick up the WHITE FLOWER (2) in the lower right.
- Place the MATCH on the firewood in the lower center.
- Place the WHITE MUSHROOM on the red dust in the upper center to obtain the RED MUSHROOM.
- Place the WHITE FLOWER in the pink dust to obtain the PINK FLOWER.
- The WHITE ARROWHEAD goes on the yellow dust to obtain the YELLOW ARROWHEAD.
- The WHITE PINECONE goes on the blue dust to obtain the BLUE PINECONE.

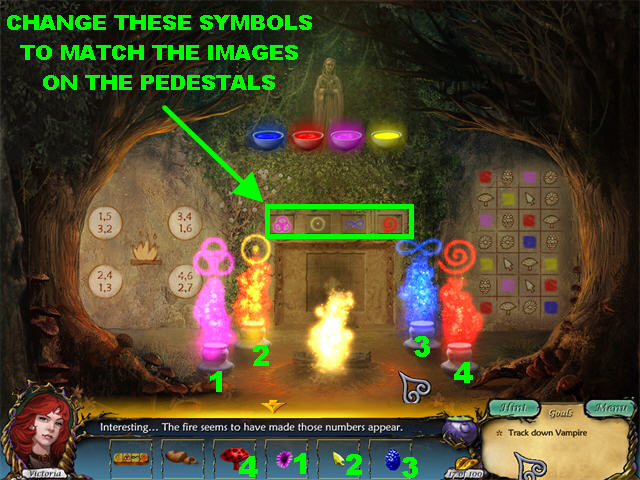
- Place the PINK FLOWER on pedestal #1.
- The YELLOW ARROWHEAD goes on pedestal #2.
- Put the BLUE PINECONE on pedestal #3.
- Place the RED MUSHROOM on the pedestal #4.
- Change the symbols in the back wall to match the symbols above each pedestal.
- Please look at the screenshot for the solution.
- Click on the grid that appears on the back wall to trigger a puzzle.

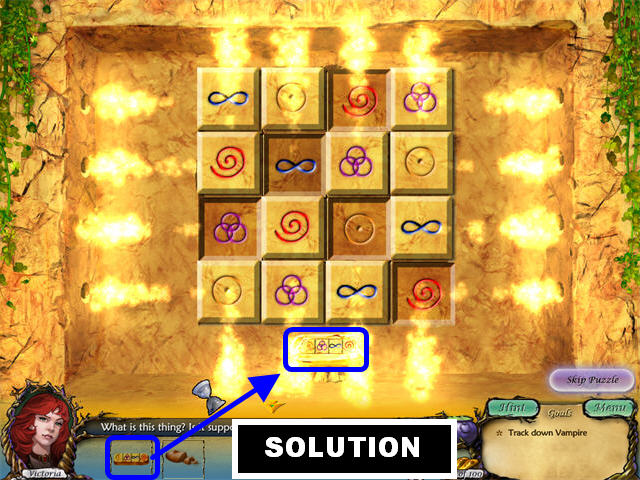
- Place the GOLDEN STONE in the holder at the lower center to create symbols on the back wall.
- Click on the tiles to change the symbols on the board. Arrange the symbols so that each row and column has only 1 of each symbol.
- When a row or column is correct, flames will appear on each side of it.
- Please look at the screenshot for the solution.
- Two paths will appear after the puzzle is solved.
- Take the left path to Castle Gate.

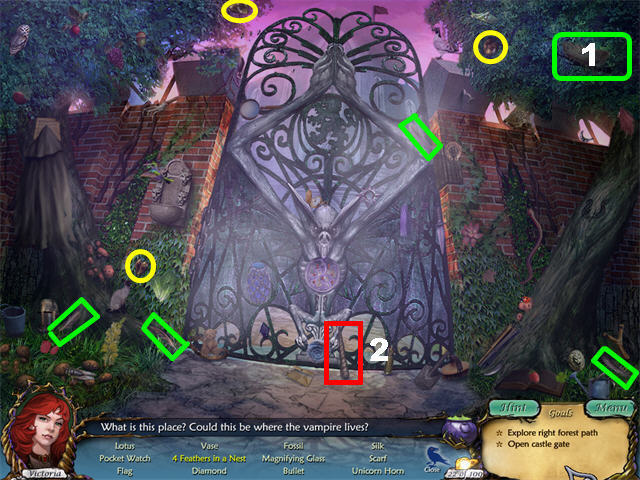
- Click on the CROW to trigger a Hidden Object Scene.
- Pick up the 3 GOLDEN LEAVES.
- 4 Feathers in a Nest: Pick up the 4 FEATHERS marked in green; place them in the NEST (1) in the upper right.
- The UNICORN HORN (2) is added to your inventory after your search.
- Go to the Forest House by going down and then right.

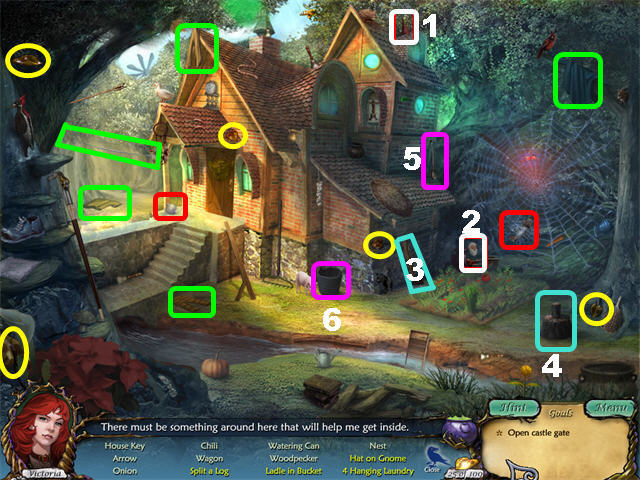
- Click on the door; then click on the CROW to trigger a Hidden Object Scene.
- Pick up the 5 GOLDEN LEAVES.
- Hat on Gnome: Pick up the HAT (1) on the roof and place it on the GNOME (2).
- Split a Log: Pick up the AXE (3) and place it on the LOG (4) in the lower right.
- Ladle in Bucket: Pick up the LADLE (5) and place it on the BUCKET (6).
- 4 Hanging Laundry: Pick up the 4 LAUNDRY pieces marked in green and place them on the left line.
- The ONION and the HOUSE KEY will go into inventory.
- Place the HOUSE KEY on the door; enter Odette’s Parlor.

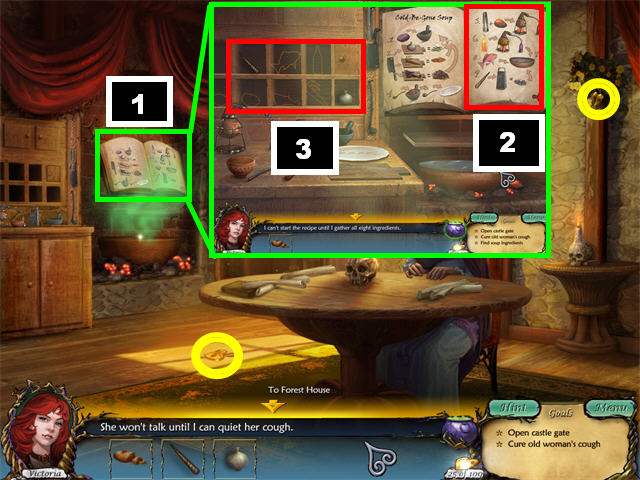
- Click on the BOOK (1) in the back for a closer look.
- Click on the OPEN BOOK (2) on the right.
- Click on the cubbyholes (3) on the left; the ONION and UNICORN HORN will go into the cubbyholes.
- Go back to the parlor.
- Pick up the 2 GOLDEN LEAVES.
- Click on the CROW to trigger a Hidden Object Scene.

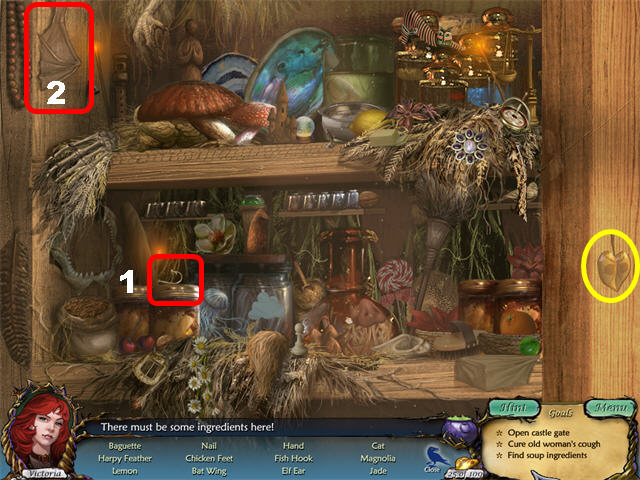
- The FISHING HOOK (1) and the BAT’S WING (2) will enter inventory after your search.
- Pick up the GOLDEN LEAF.
- Go back to the bridge; click on the window on the left to enter the Home.

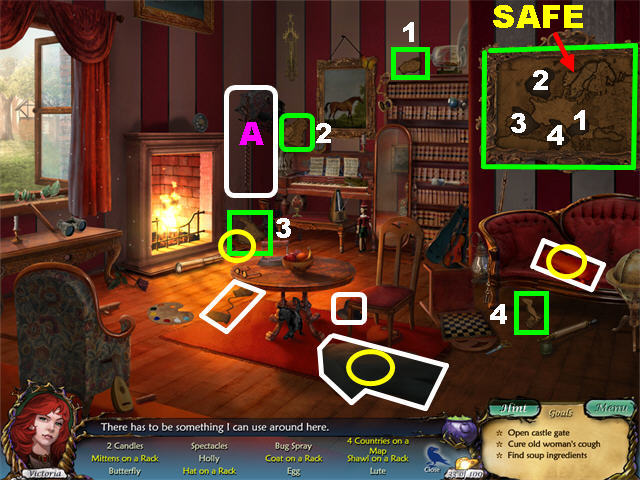
- Click on the crow to trigger a Hidden Object Scene.
- 4 Countries and a Map: Pick up the 4 COUNTRIES marked in green and match them up with the numbers shown on the map.
- Coat, Shawl, Hat, and Mittens on a Rack: Pick up all the items marked in white and place them on the RACK (A) next to the fireplace.
- Pick up the 3 GOLDEN LEAVES.
- The BUG SPRAY will go into inventory at the end of your search.
- Click on the safe that just opened behind the map in the upper right.
- Pick up the WINE CABINET KEY inside the safe.
- Go down and enter the Butcher’s Shop through the door on the left.

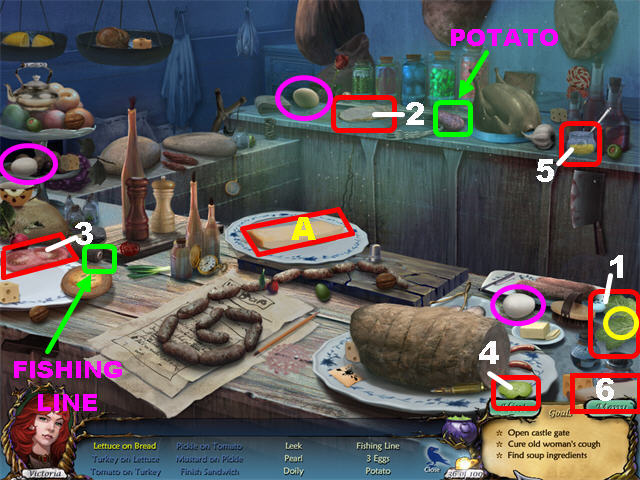
- Click on the CROW to start the Hidden Object Scene.
- The EGGS are circled in purple.
- Lettuce on Bread: Pick up the LETTUCE (1) and place it on the PLATE (A) on the table.
- Pick up the GOLDEN LEAF below the lettuce.
- Turkey on Lettuce: Pick up the TURKEY (2) and place it on the PLATE (A) on the table.
- Tomato on Turkey: Pick up the TOMATO (3) and place it on the PLATE (A) on the table.
- Pickle on Tomato: Pick up the PICKLE (4) and place it on the PLATE (A) on the table.
- Mustard on Pickle: Pick up the MUSTARD (5) and place it on the PLATE (A) on the table.
- Finish Sandwich: Pick up the BREAD (6) and place it on the PLATE (A) on the table.
- The EGG, POTATO, and FISHING LINE will go into inventory.
- Go to the Storage Room on the right.

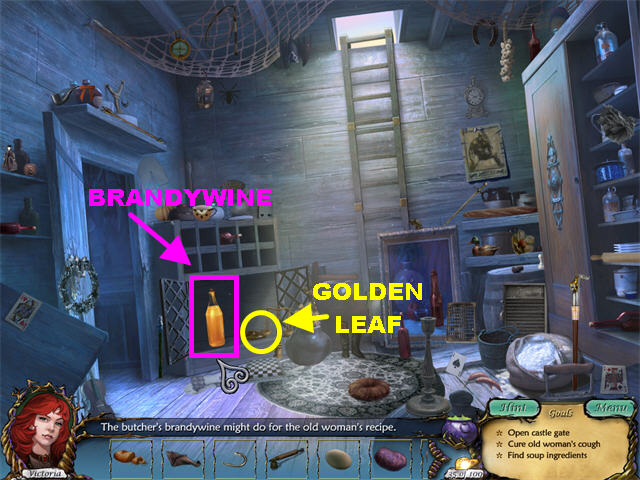
- Place the WINE CABINET KEY in the cabinet on the left.
- Pick up the GOLDEN LEAF and the BRANDYWINE inside the cabinet.
- Go to the bridge.

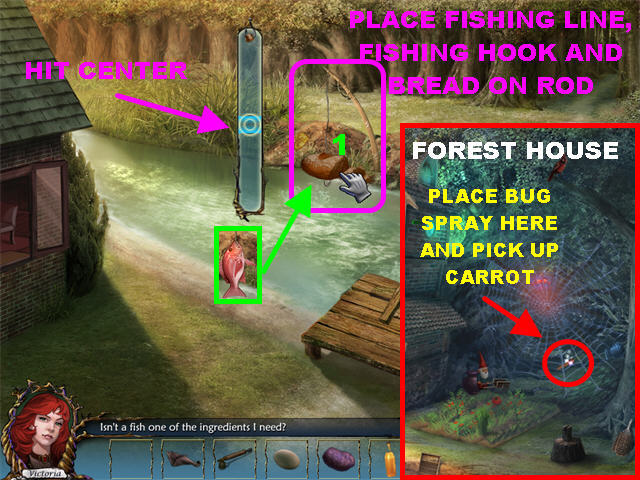
- Place the FISHING LINE and the FISHING HOOK on the Fishing Rod (1) on the other side of the bridge.
- Place the BREAD on the fishing rod.
- Stop the meter in the middle and the FISH will appear on your rod; click it to enter it into inventory.
- Go back to the Forest House.
- Place the BUG SPRAY on the carrot on the spider web.
- Grab the CARROT on the web and head back inside to Odette’s Parlor.

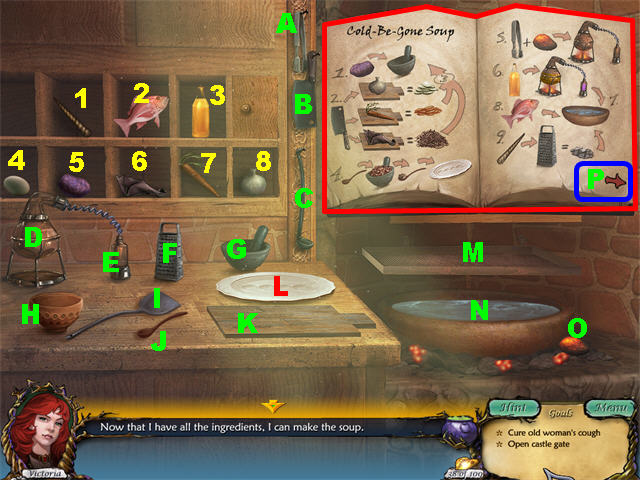
- Click on the book on the left.
- All the ingredients will fall into the cubbyholes.
- Place the POTATO (5) in the MORTAR AND PESTLE (G).
- Place the ONION (8), CARROT (7), and BAT’S WING (6) on the CUTTING BOARD (K); use the CLEAVER (B) to chop them.
- Place the CHOPPED ONIONS, CARROTS & BAT’S WING in the MORTAR and PESTLE (G).
- Grab 4 SPOONFULS (J) of the mix in the MORTAR and PESTLE (G) and add them to the PLATE (L) on the counter.
- Use the TONGS (A) to pick up the large EMBER (O) in the lower right and place it below the BURNER (D) on the left.
- Place the BRANDYWINE (3) On the BURNER (D).
- Place the VIAL (E) attached to the burner in the CAULDRON (N).
- Put the FISH (2) in the CAULDRON (N).
- Shred the UNICORN HORN (1) with the GRATER (F). Place the UNICORN HORN SHREDS in the CAULDRON (N).
- Click on the RED ARROW (P) on the lower right side of the book to turn the page.

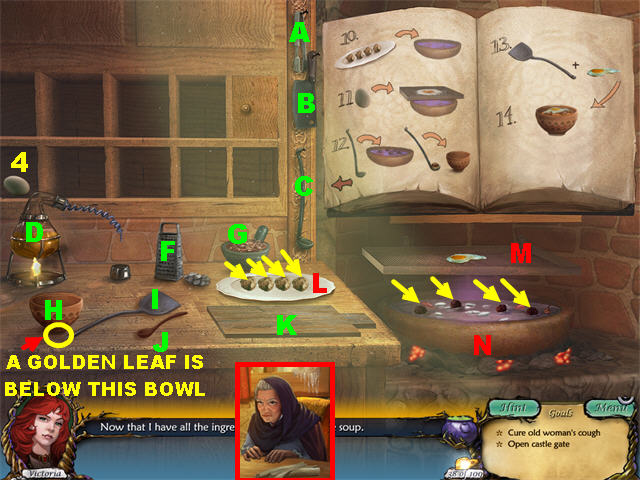
- Drag the 4 BALLS (L) on the white plate into the CAULDRON (N).
- Drag the EGG (4) to the TRAY (M) above the cauldron.
- Use the LADLE (C) in the CAULDRON (N); then place it in the BOWL (H) on the left to remove the 4 BALLS one by one.
- Use the SPATULA (I) to remove the EGG (M) above the cauldron; place it in the BOWL (H) on the left.
- Click on the BOWL (H) to enter the COLD BE-GONE SOUP into inventory.
- Pick up the GOLDEN LEAF below the bowl and exit that window.
- Give the COLD-BE-GONE SOUP to Odette and she will give you 2 REFLECTING MIRRORS at the end of the conversation.
- Go to the Castle Gate.

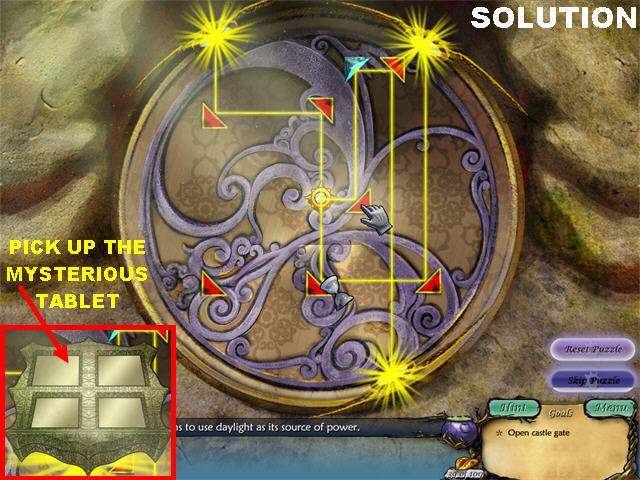
- Click on the circle at the bottom of the gate.
- Place the 2 REFLECTING MIRRORS on the empty slots.
- Turn the red arrows so the beams of light reflect on all 3 mirrors.
- Please look at the screenshot for the solution.
- Pick up the MYSTERIOUS TABLET in the center of the puzzle.
- Go through the gate to end this chapter.
Chapter 3: The Vampire’s Surprise

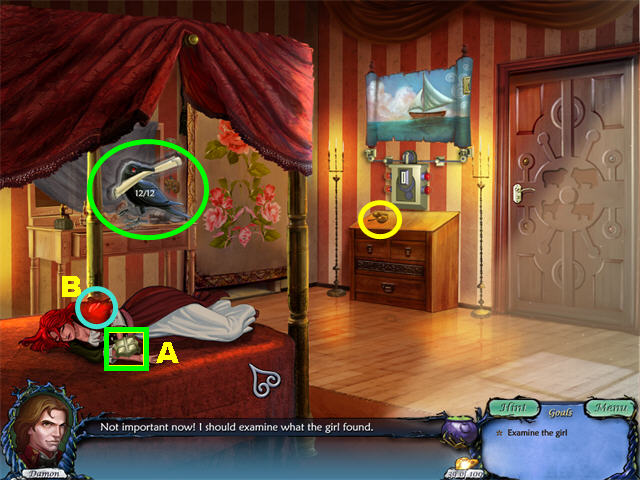

- Click on Victoria.
- Pick up the MYSTERIOUS TABLET (A).
- Pick up the GOLDEN LEAF.
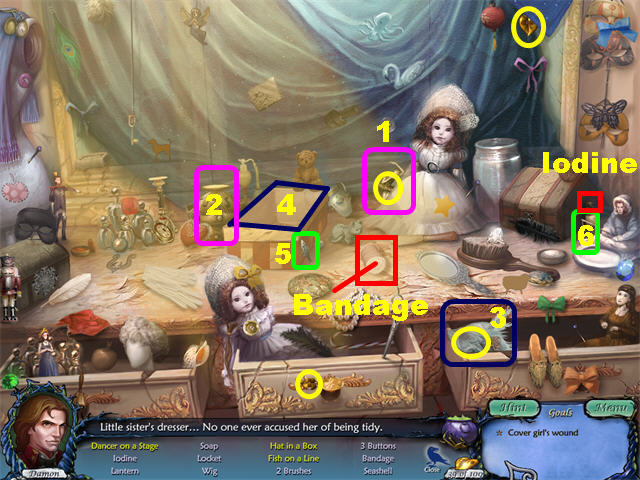
- Click on the crow.
- Pick up the 4 GOLDEN LEAVES in the scene. Some may not be visible until other items have been picked up.
- Dancer on Stage: Pick up the BALLERINA (1) and place her on the STAGE (2).
- Hat in Box: Pick up the HAT (3) and place it in the BOX (4).
- Fish on a Line: Pick up the FISH (5) and place it on the LINE (6) in the lower right.
- The IODINE, BANDAGE, and BRUSH will go into inventory.
- Go back to the Bedroom.
- Place the IODINE and the BANDAGE on Victoria’s arm WOUND (B).
- Go down to the Courtyard and make a right into the Aviary.

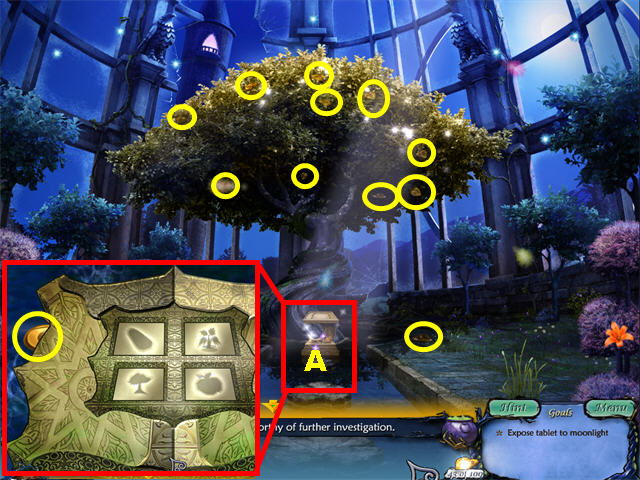
- Pick up the 11 GOLDEN LEAVES in the scene.
- Click on the MOON PEDESTAL (A) for a closer look.
- Place the MYSTERIOUS TABLET on the pedestal. You have to go and find the runes that appear on the book.
- Click on the large GOLDEN LEAF in the upper left.
- Exit that view; go down and then left to reach the Garden.

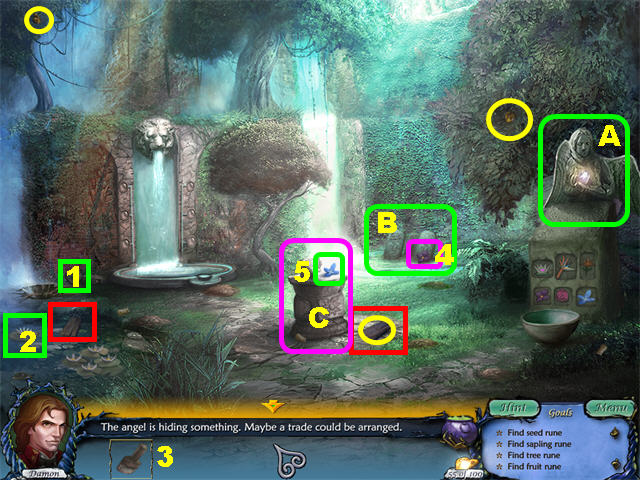

- Pick up the 3 GOLDEN LEAVES.
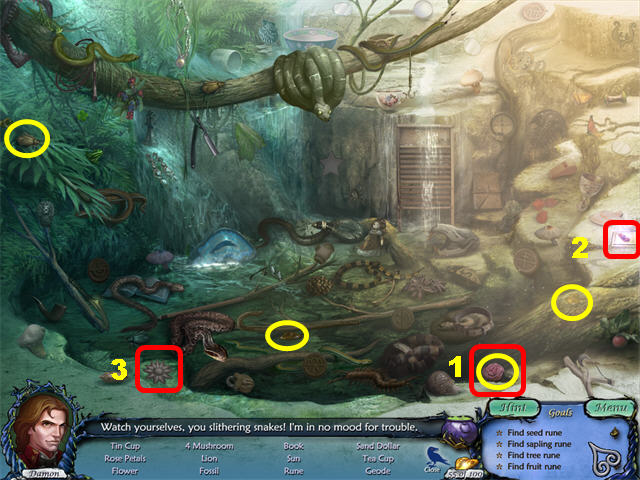
- Click on the ANGEL (A) on the right; then click on the CROW.
- Pick up the 4 GOLDEN LEAVES. The last one will appear below the flower marked in red.
- The FLOWER (1), the SEED RUNE (2), and the SUN ENGRAVING (1) will go into inventory.
- Back at the Garden.
- Pick up the WOOD PLANKS marked in red.
- Pick up the MOON ENGRAVING (1) and the FLOWER (2) on the lower left.
- Place the BRUSH (3) on the TOMBSTONES (B) on the far right 3 times to clean it up.
- Pick up the FLOWER (4) on the third tombstone.
- Place the MOON ENGRAVING and the SUN ENGRAVING on the PEDESTAL (C) in the middle; pick up the FLOWER (5).
- Go down to the Courtyard.

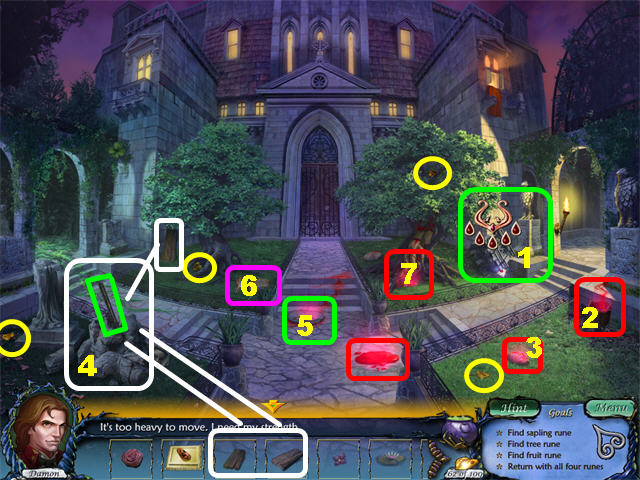
- Pick up the 4 GOLDEN LEAVES in the scene.
- Click on the sparkling fallen BALCONY STONE (1) on the right; look for the 5 BLOOD stains in the scene.
- Click on the BUCKET (2) on the right to tip it over and collect the BLOOD sample.
- Click on the ROCK (3) on the right to move it and collect the BLOOD sample.
- Pick up the WOOD PLANK marked in white.
- Place the 3 WOODEN PLANKS on the ROCKS (4) in the lower left; pick up the IRON PIPE.
- Place the IRON PIPE on the bloody area by the CENTER STEPS (5) and pick up the 3 SHARP STONE PAVERS.
- Pick up the BLOOD by the STEPS (5) after the pavers have been picked up.
- Click on the ROCK (6) next to the center steps and pick up the FLOWER.
- Place the 3 SHARP STONE PAVERS on the TREE BARK (7) on the right and click on the BLOOD on the bark.
- Click on the fallen balcony stone and pick up the FRUIT RUNE (1) underneath.
- Go to the Castle Gate.

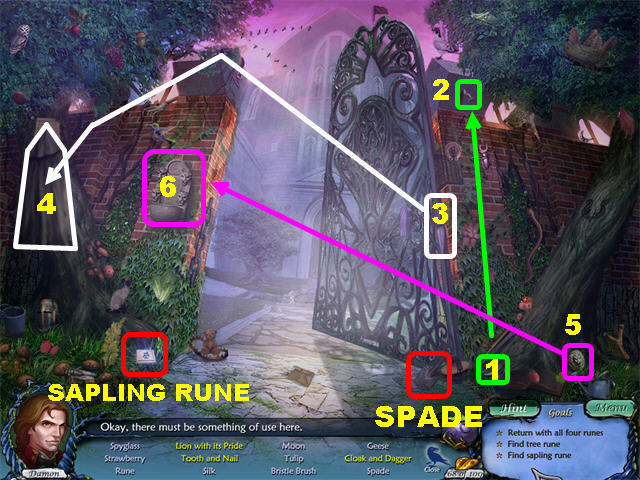
- Click on the CROW.
- Tooth and Nail: Pick up the TOOTH (1) and place it on the NAIL (2) in the upper right.
- Cloak and Dagger: Pick up the DAGGER (3) and place it on the CLOAK (4) on the left.
- Pick up the LION (5) and place it with its PRIDE (6) on the left.
- The SAPLING RUNE and the SPADE will enter inventory.
- Go back to the Garden.

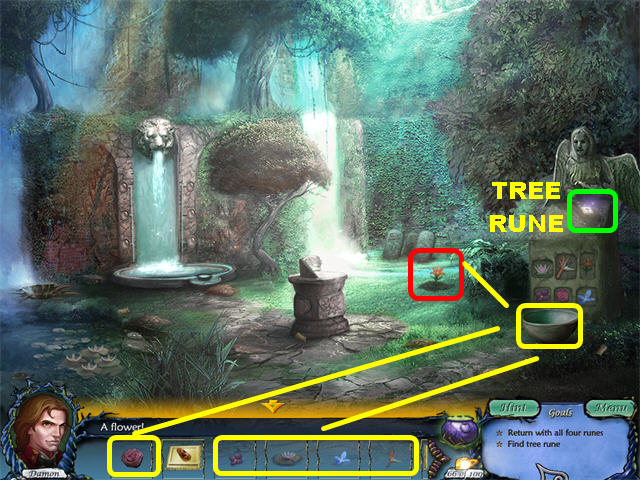
- Place the SPADE on the area marked in red to obtain the last FLOWER.
- Place the 6 FLOWERS in the offering bowl on the right.
- Grab the TREE RUNE from the angel’s hand.
- Go back to the Aviary.

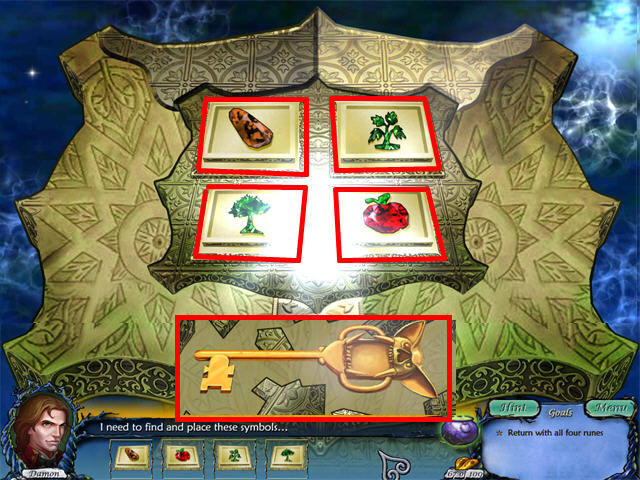
- Click on the moon pedestal.
- Place the SEED RUNE, FRUIT RUNE, SAPLING RUNE, and the FRUIT RUNE in the appropriate slots.
- Pick up the KEY in the middle of the tablet.
- Exit the view and go to the Tower Room in the upper left.

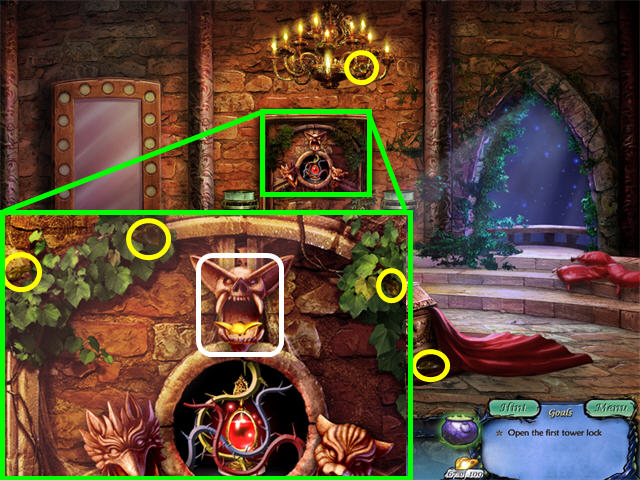
- Pick up the 2 GOLDEN LEAVES.
- Click on the TOWER LOCK in the back of the scene.
- Pick up the 3 GOLDEN LEAVES.
- Place the TOWER KEY in the top lock to end this chapter.
Chapter 4: Change of Heart

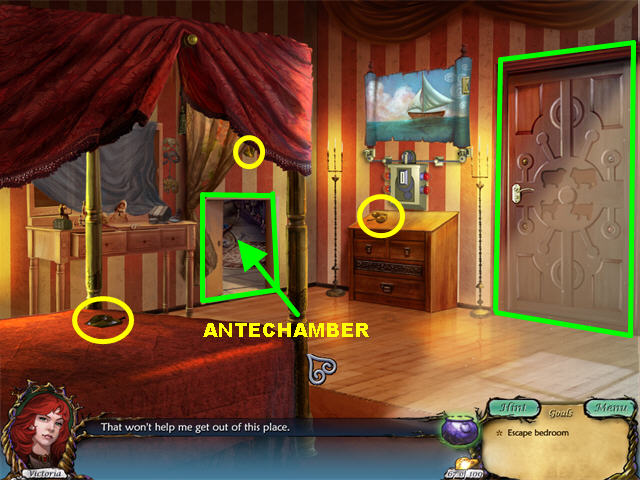

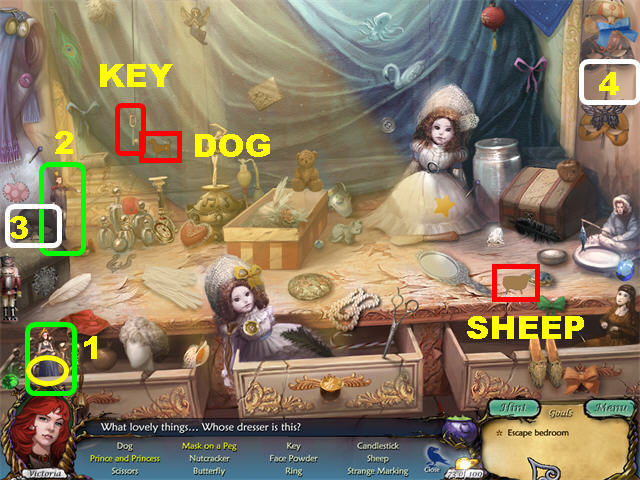
- Click on the door; then on the CROW.
- Prince and Princess: Pick up the PRINCESS (1) and put her next to the PRINCE (2).
- Mask on a Peg: Pick up the MASK (3) and place it on the PEG (4) in the upper right.
- Pick up the GOLDEN LEAF below the Princess, on the edge of the drawer.
- The WOODEN DOG, KEY, and WOODEN SHEEP will enter inventory.
- Go to the Bedroom.
- Open the curtains in the back of the scene.
- Pick up the 3 GOLDEN LEAVES.
- Go to the Antechamber behind the curtains.

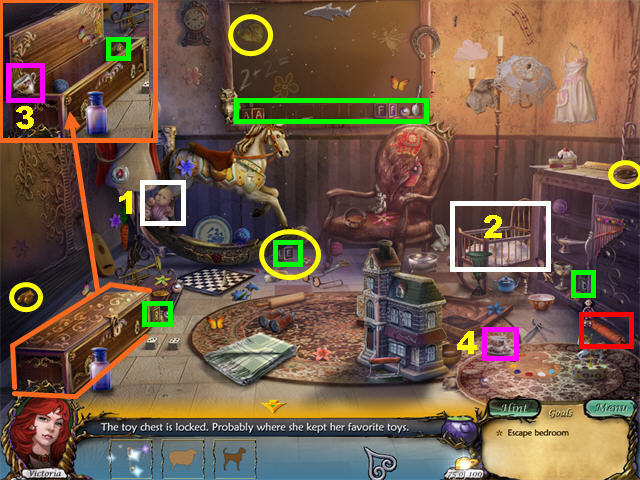
- Click on the horse.
- Place the KEY on the locked chest to open it.
- Click on the CROW.
- Baby in Bed: Pick up the BABY (1) on the left and place it in the BED (2) on the right.
- Alphabet: Pick up the BLOCKS marked in green and place them on the blackboard in alphabetical order.
- Cup in Saucer: Pick up the CUP (3) inside the chest and place it on the SAUCER (4) on the lower right.
- The WOODEN COW is inside the chest.
- Pick up the 4 GOLDEN LEAVES; some of them are below other items.
- The REFLECTING MIRROR, CARROT, WOODEN COW, and DYNAMITE will go into inventory.
- Place the CARROT on the horse on the left; pick up the WOODEN PIG inside the horse.
- Go back to the Bedroom.

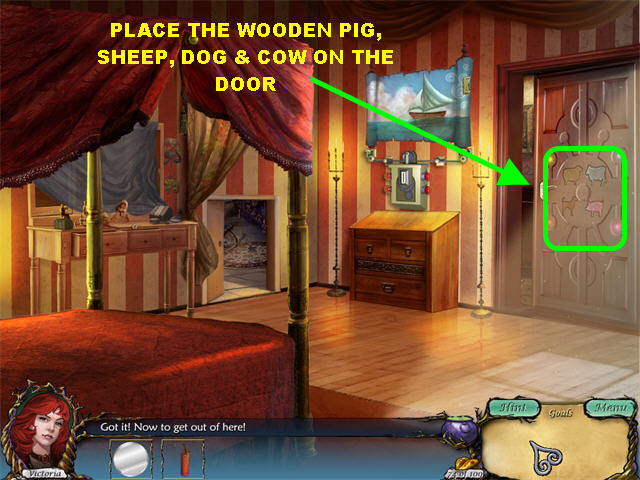
- Place the WOODEN PIG, WOODEN COW, WOODEN SHEEP, and WOODEN DOG in the matching slots on the door.
- Go to the Hallway and enter the Weapon Room on the right.

- Click on the CROW.
- Pick up the 5 GOLDEN LEAVES in the scene.
- Knight and 3 Armor: Pick up the ARMOR pieces marked in purple and place them on the Knight on the left.
- 3 Spears on the Rack: Pick up the SPEARS marked in green and place them on the rack on the right side of the wall.
- The DYNAMITE and the SCYTHE enter inventory.
- Return to the Hallway.
- Place the SCYTHE on the door on the far right to cut the foliage.
- Go to the Balcony.

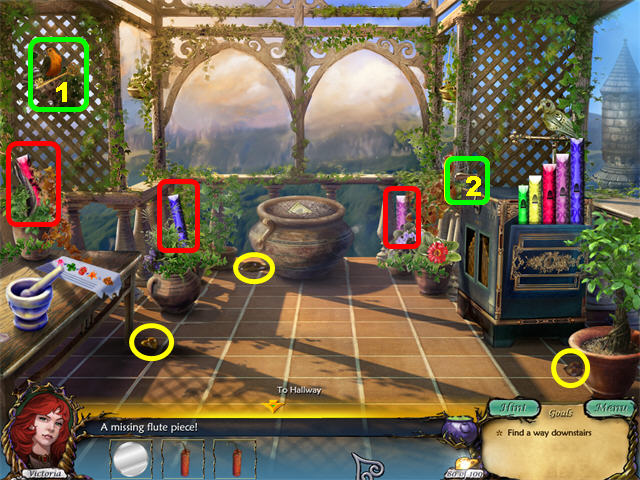
- Pick up the 3 GOLDEN LEAVES.
- Click on the BIRD (1) in the upper left.
- Click on the HANDLE (2) on the right to trigger a mini-game.
- Place the SCYTHE on the areas marked in red to uncover the colored flutes.
- Pick up the RED, BLUE, and PURPLE FLUTES and place them next to the green and yellow flutes on the right.
- Duplicate the musical sequences by clicking on the matching colored flutes in the scene.
- You must complete 4 sequences to win the game. Click on the flutes in the following order to solve the puzzle.Green – Yellow
Yellow – Red – Green
Green – Red – Purple – Yellow
Red – Purple – Yellow – Green – Blue
- Grab the KEY in the upper left after the bird flies away.
- Go back to the Hallway.
- Place the KEY on the door in the back to enter the Study.

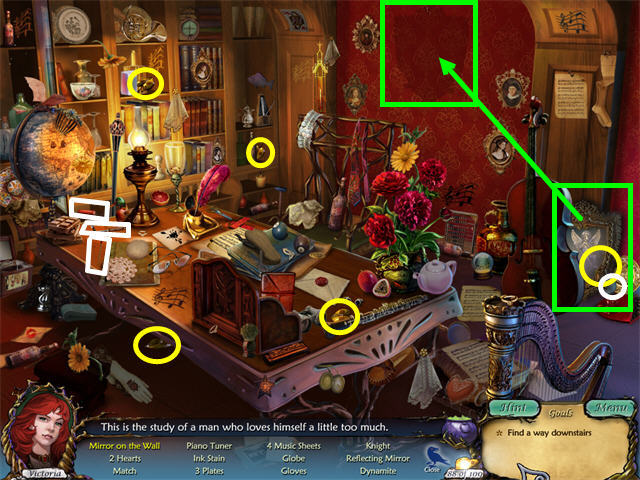
- Click on the CROW.
- Pick up the MIRROR on the lower right and place it on the wall.
- Pick up the 5 GOLDEN LEAVES circled in yellow.
- The MATCH, REFLECTING MIRROR, DYNAMITE, and PIANO TUNER enter inventory.
- Go back to the Hallway.


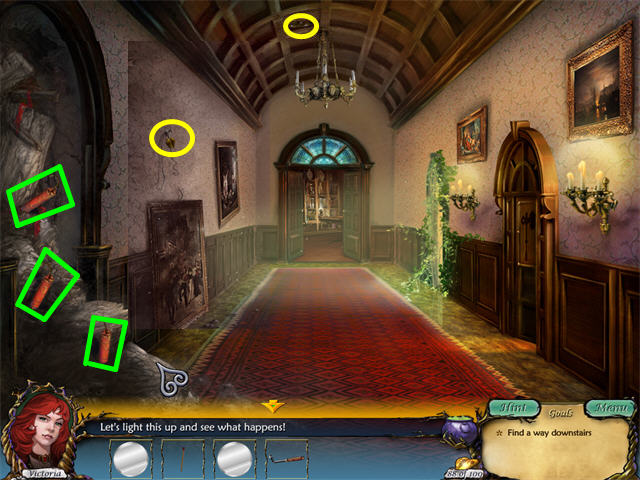
- Place the 3 DYNAMITE STICKS on the rubble on the left.
- Place the MATCH on each of the 3 DYNAMITE STICKS to blow up the rubble.
- Pick up the 2 GOLDEN LEAVES.
- Go to the Grand Foyer on the left and go to the Ballroom on the right.

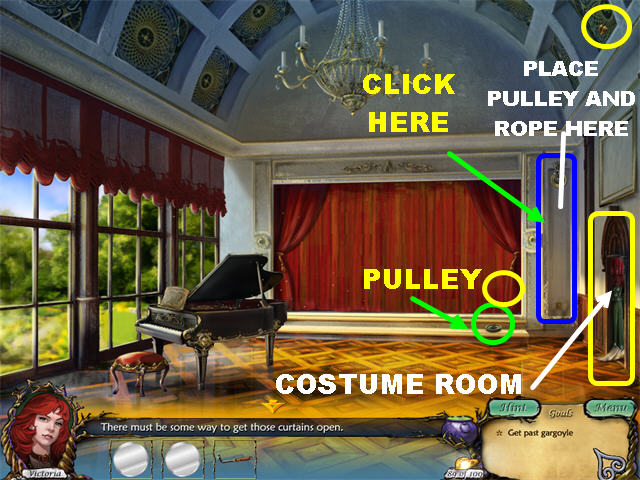

- Click on the spot marked in blue on the right.
- Pick up the GOLDEN LEAF.
- Pick up the PULLEY in the lower right.
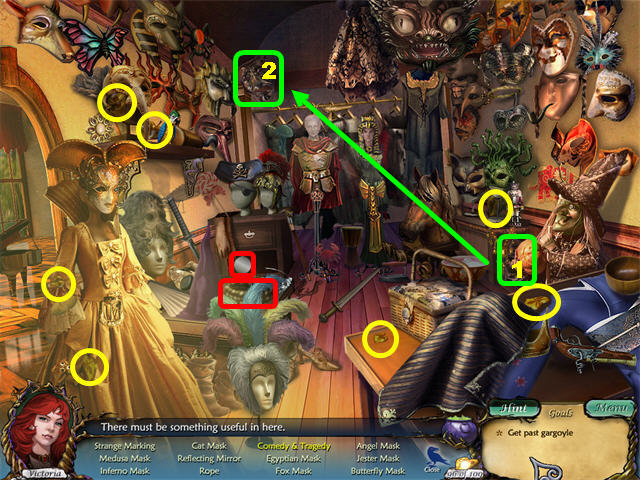
- Go to the Costume Room on the right.
- Click on the CROW.
- Pick up the 7 GOLDEN LEAVES.
- Comedy & Tragedy: Pick up the COMEDY MASK (1) in the lower right and place it on the TRAGEDY MASK (2) in the upper left.
- The ROPE and REFLECTING MIRROR enter inventory.
- Go back to the Ballroom.
- Place the PULLEY and the ROPE to the right of the curtain; click on the pulley to open the curtains.
- Pick up the GOLDEN LEAF in the lower right side of the open stage.

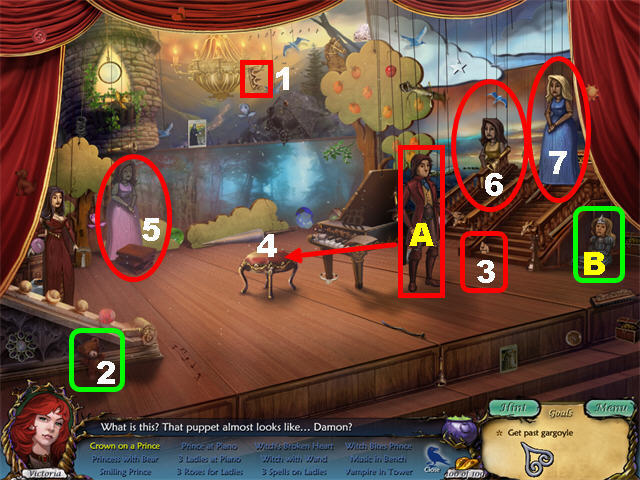
- Click on the CROW on stage.
- The following events have to be performed in the order shown.
- Crown on a Prince: Pick up the CROWN (1) and place it on the PRINCE (A) on the right.
- Princess with Bear: Grab the BEAR (2) and place it on the PRINCESS (B) on the lower right.
- Smiling Prince: Pick up the SMILE (3) on the steps and give it to the PRINCE (A) on the right.
- Prince at Piano: Drag the PRINCE (A) to the PIANO BENCH (4) onto the stage.
- 3 Ladies at Piano: Drag the 3 LADIES marked 5, 6, and 7 to the piano on stage.

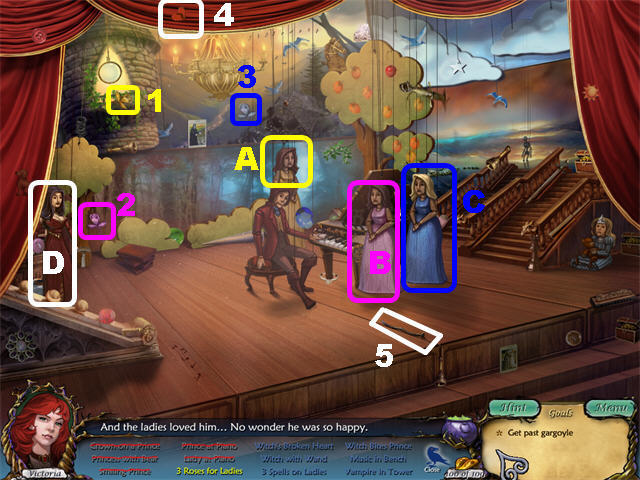
- The 3 Roses for Ladies: Give ROSE (1) to LADY (A), ROSE (2) to LADY (B), and ROSE (3) to LADY (C).
- Witch’s Broken Heart: Give the BROKEN HEART (4) to the WITCH (D) on the left.
- Witch with Wand: Pick up the WAND (5) and give it to the WITCH (D) on the left.

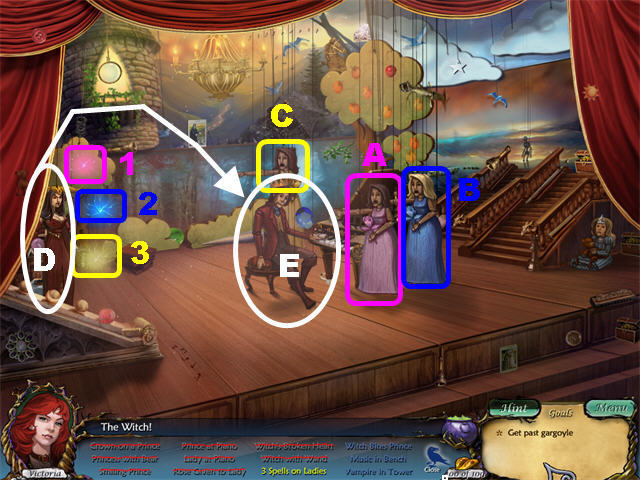
- The 3 Spells on Ladies: Give SPELL (1) to LADY (A), SPELL (2) to LADY (B), and SPELL (3) to LADY (C).
- Witch Bites Prince: Drag the WITCH (D) over to the PRINCE (E) on the right.

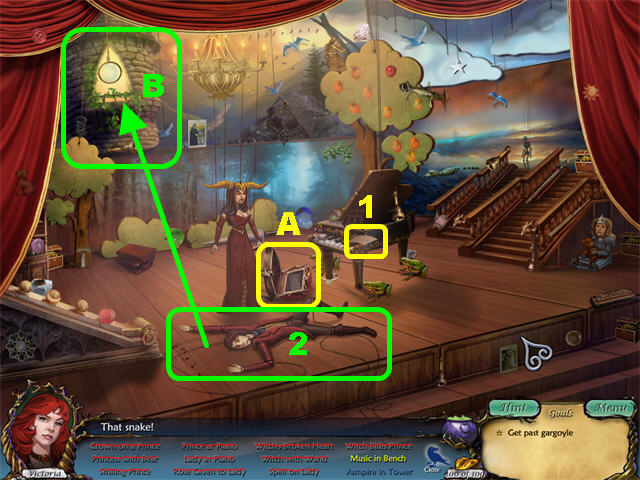
- Music on Bench: Place the SHEET MUSIC (1) on the MUSIC BENCH (A).
- Vampire in Tower: Drag the VAMPIRE (2) to the TOWER (B) in the upper left.
- The KEY enters inventory after the search has been completed. You will be taken back to the Ballroom.

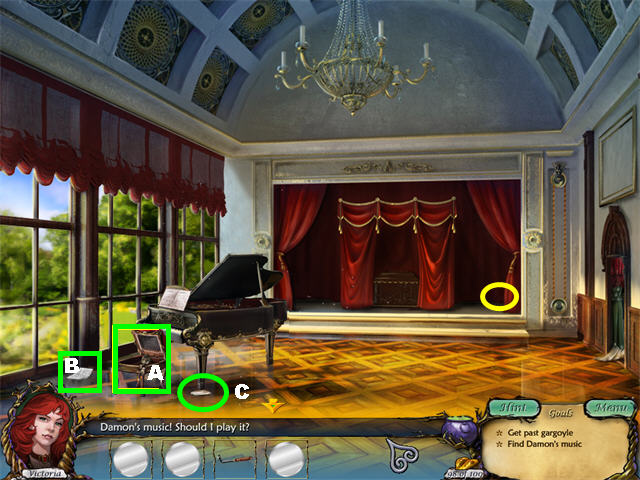
- Place the KEY in the BENCH (A) and pick up DAMON’S MUSIC (B) when it falls by the window.
- Place DAMON’S MUSIC above the keyboard. It goes back into inventory.
- Place the PIANO TUNER inside the piano.
- Place DAMON’S MUSIC above the keyboard again; this time it will stick.
- Pick up the REFLECTING MIRROR (C) at the foot of the piano.
- Go to the Grand Foyer.

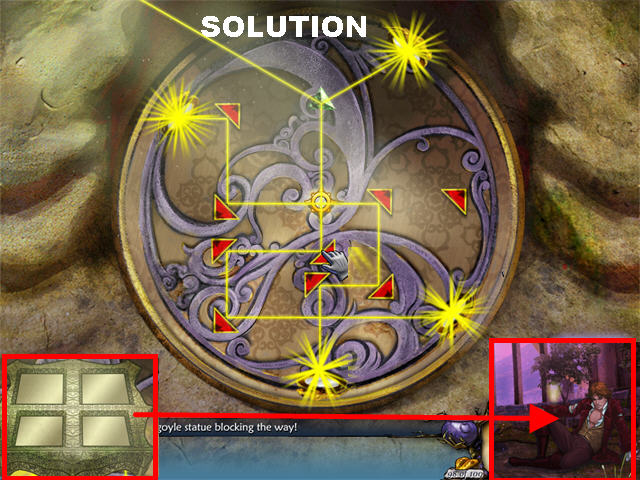
- Click on the Gargoyle on the left.
- Place the 4 REFLECTING MIRRORS in the empty slot.
- Turn the arrows around so the beams reflect on each of the mirrors.
- Please look at the screenshot for the solution.
- Pick up the MYSTERIOUS TABLET in the middle of the puzzle.
- Go to the Courtyard; then through the door next to the gargoyle then right to reach the Aviary.
- Give the MYSTERIOUS TABLET to the vampire on the right.
Chapter 5: Lover’s Part

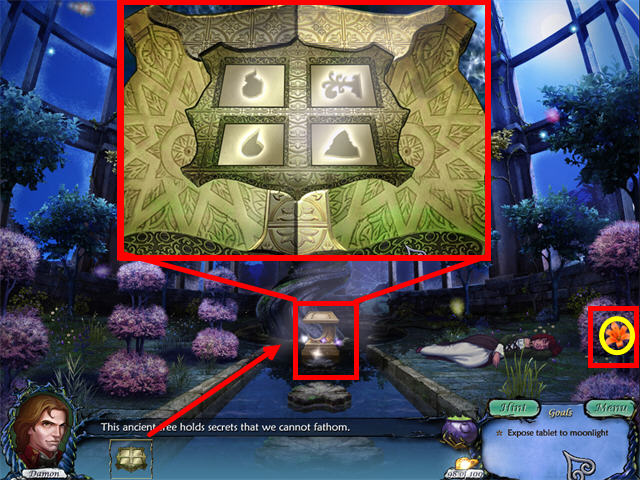
- Pick up the INGREDIENT in the lower right.
- Pick up the GOLDEN LEAF below the ingredient.
- Click on the moon pedestal.
- Place the MYSTERIOUS TABLET on the pedestal.
- Return to the Courtyard.

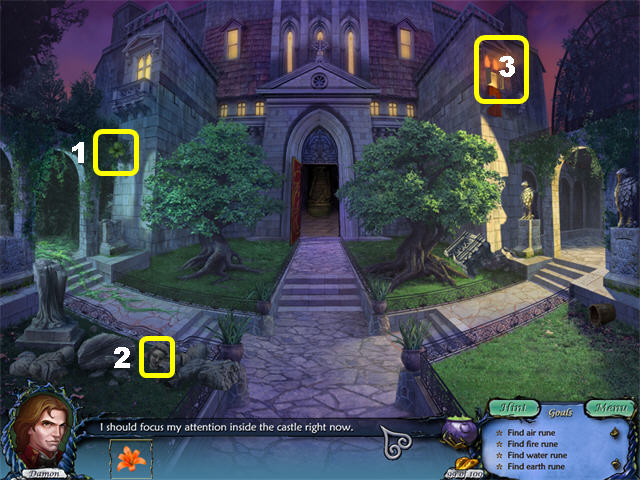
- Pick up the INGREDIENT (1) in the upper left.
- Pick up the MERMAID HEAD (2) in the lower left.
- Go to the BEDROOM (3) in the upper right.

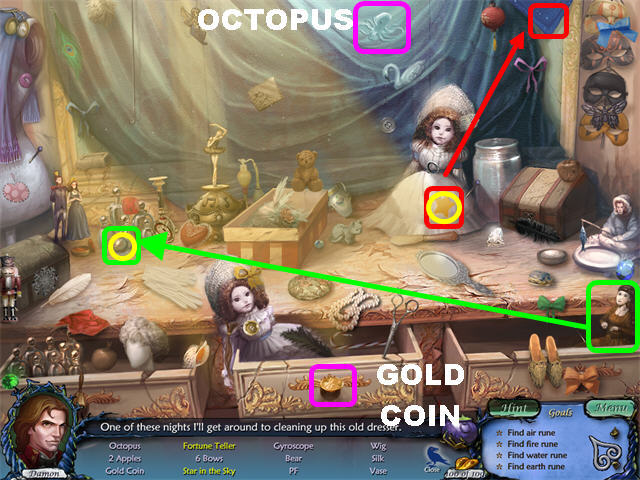
- Click on the CROW.
- Fortune Teller: Give the CRYSTAL BALL marked in green to the LADY on the lower right.
- Pick up the GOLDEN LEAF below the crystal ball.
- Star in the Sky: Pick up the STAR marked in red and place it on the SKY in the upper right.
- The STONE OCTOPUS and the GOLD COIN enter inventory.
- Go to the Antechamber in the bedroom.

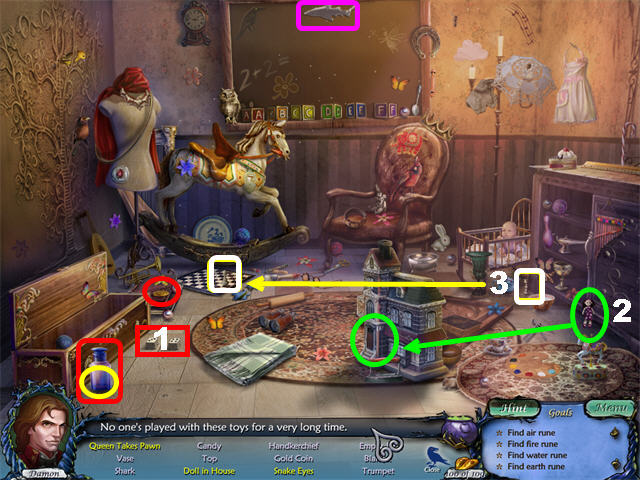
- Click on the CROW.
- Snake Eyes: Click on the DICE (1) on the floor.
- Doll in House: Pick up the DOLL (2) and place it in the HOUSE on the rug.
- Queen Takes Pawn: Pick up the QUEEN (3) and place it on the chessboard.
- Pick up the EMPTY JAR in the lower left and pick up the GOLDEN LEAF below it.
- The GOLD COIN, STONE SHARK, and EMPTY JAR go into inventory.
- Go to the Hallway and then the Study.

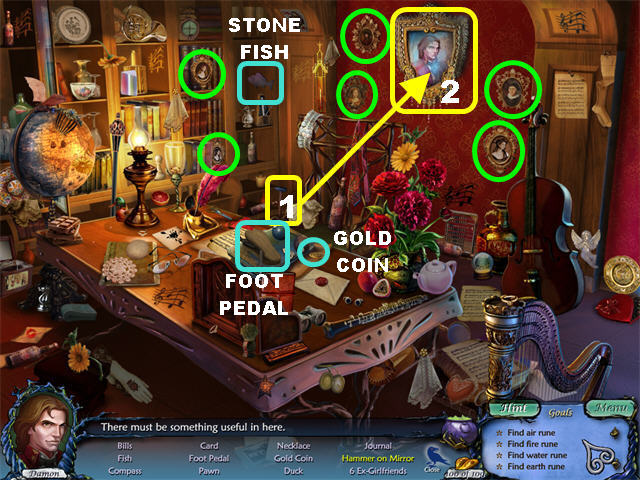
- Click on the CROW.
- 6 Ex-Girlfriends: The 6 Ex-girlfriends are circled in green.
- Hammer on Mirror: Pick up the HAMMER (1) and place it on the MIRROR (2) in the upper right.
- The GOLD COIN, STONE FISH, and FOOT PETAL will be added to inventory.
- Go to the Bedroom, down from the Hallway.

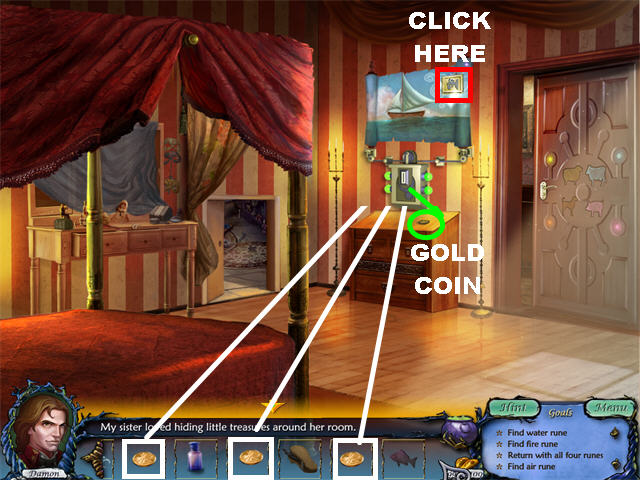
- Pick up the GOLD COIN on dresser in the Bedroom.
- Place the 4 GOLD COINS on the coin slot below the picture.
- Click on the upper right side of the picture.
- Go to the Hallway and enter the Weapon Room on the right.

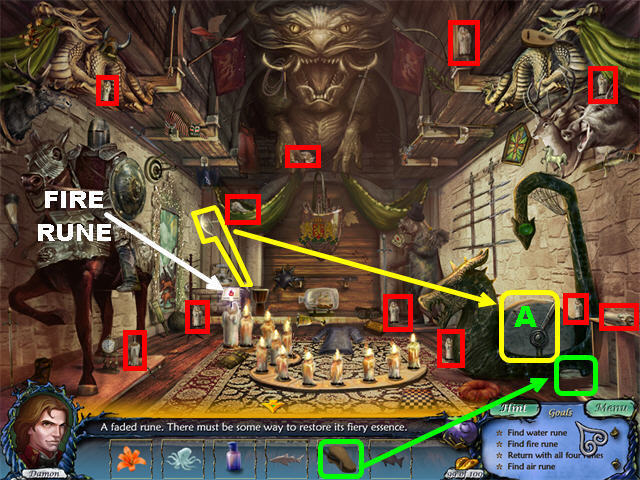
- Click on the pedestal marked in green.
- Pick up the AXE marked in yellow.
- Pick up the 11 UNLIT CANDLES marked in red.
- Place the UNLIT CANDLES on the holder on the carpet.
- Place the FOOT PEDAL on the area marked in green.
- Place the AXE on the GRINDING STONE (A); the dragon’s breath will light up all the candles.
- Pick up the FIRE RUNE on the left.
- Go to the Ballroom; then enter the Costume Room on the right.

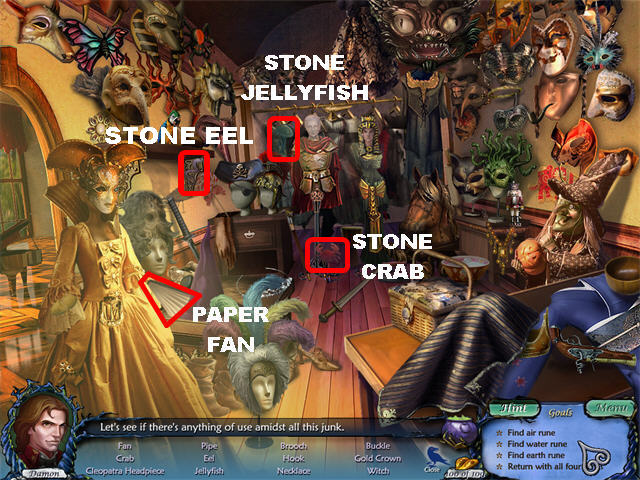
- Click on the crow.
- The STONE JELLYFISH, STONE EEL, STONE CRAB and PAPER FAN enter inventory.
- Go to the Grand Foyer.

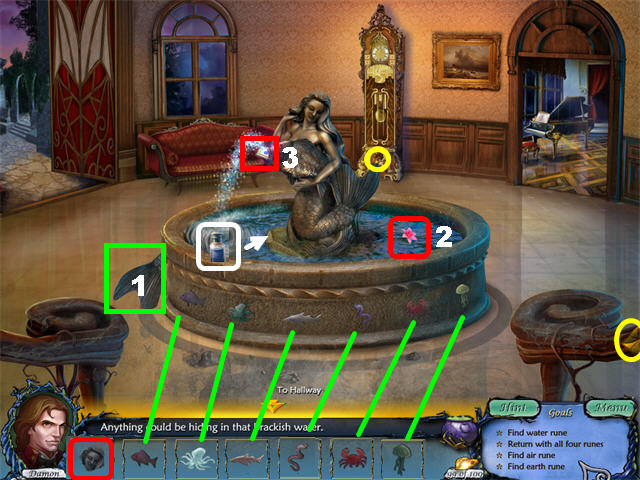
- Pick up the 2 GOLDEN LEAVES.
- Pick up the MERMAID TAIL (1) on the left side of the fountain.
- Place the MERMAID HEAD and the MERMAID TAIL on the statue.
- From left to right, place the STONE FISH, STONE OCTOPUS, STONE SHARK, STONE EEL, STONE CRAB, and STONE JELLYFISH at the bottom of the fountain.
- Pick up the INGREDIENT (2) in the fountain.
- Place the JAR in the fountain to obtain the JAR OF WATER.
- Pick up the WATER RUNE (3) next to the mermaid.
- Go to the Hallway; then to the Balcony.

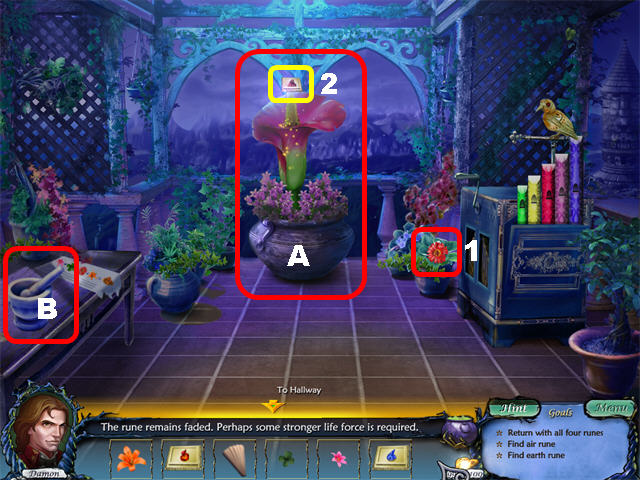
- Pick up the INGREDIENT (1) on the right.
- Place the JAR OF WATER on the large VASE (A).
- Place the 4 INGREDIENTS (FLOWERS) in the MORTAR & PESTLE (B) on the left.
- Click on the mortar and pestle to obtain the FAST GROWTH POWDER and place it in the large VASE (A).
- Pick up the EARTH RUNE (2) once the flower grows.
- Go back to the Bedroom.

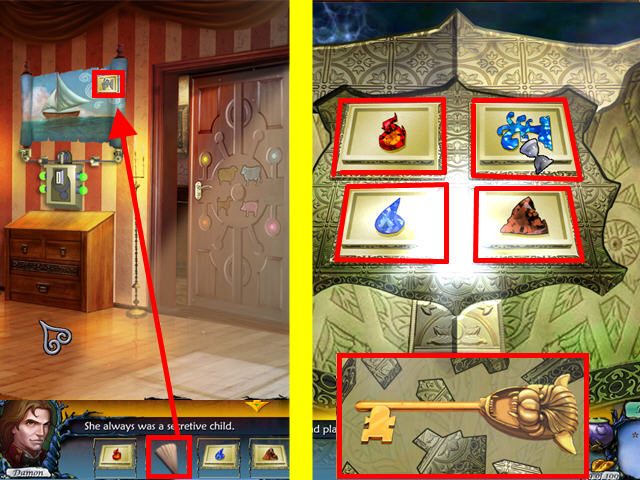
- Place the PAPER FAN on the RUNE on the upper right side of the painting.
- Pick up the AIR RUNE on the painting.
- Go to the Aviary and click on the moon pedestal.
- Place the FIRE RUNE, AIR RUNE, WATER RUNE, and EARTH RUNE in their matching spots.
- Pick up the KEY in the center and exit that view.
- Go to the Tower Room in the upper left side of the Aviary.
- Click on the Tower Lock in the back of the scene for a closer look.
- Place the KEY in the keyhole in the lower right.
Chapter 6: The Witch’s Return

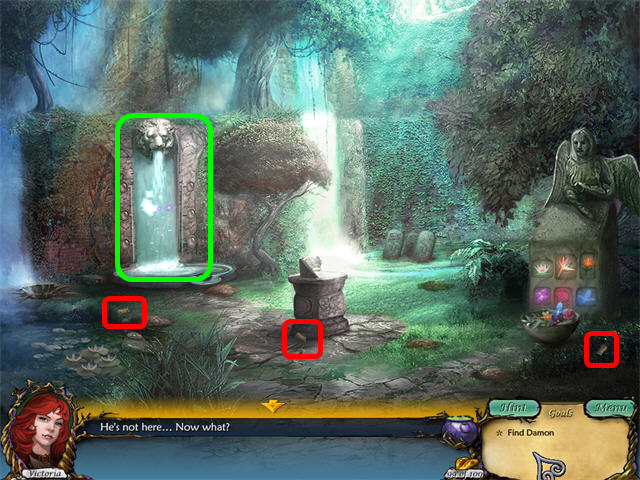
- Go to the Garden.
- Pick up the 3 VALVES marked in red.
- Click on the waterfall for a closer look.

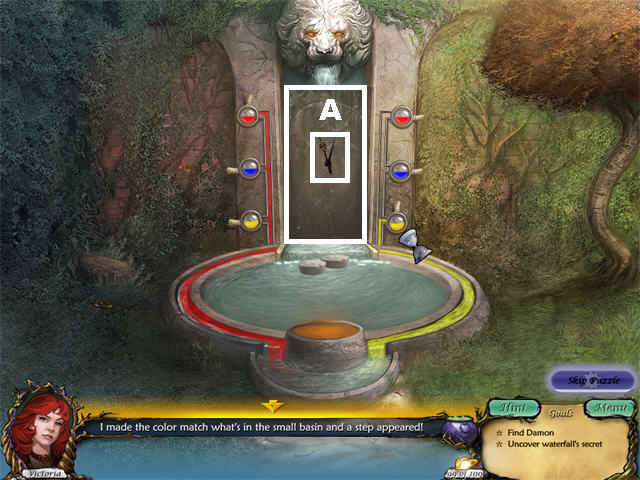
- Place the 3 VALVES on the left side of the waterfall to trigger a puzzle.
- Turn the valves so you can form the colors shown in the basin.
- Click on the valves to mix the colors you need. You can mix several colors at once.
- As each color has been added a new stepping stone will appear in the fountain.
- You have to successfully complete 10 rounds of this puzzle. The solutions below are given in order of appearance, please click on the appropriate valves.Blue
Yellow
Orange = Red and Yellow
Purple = Red and Blue
Green = Blue and Yellow
Violet = Red, Blue, and Blue
Mustard = Yellow, Yellow, and Red
Light Green = Blue, Yellow, and Yellow
Light Purple = Red, Red, and Blue
Black = Red, Blue, and Yellow
- Grab the CLOCK HANDS (A) in the back of the waterfall.
- Enter the back of the waterfall to go to Celeste’s Corner.

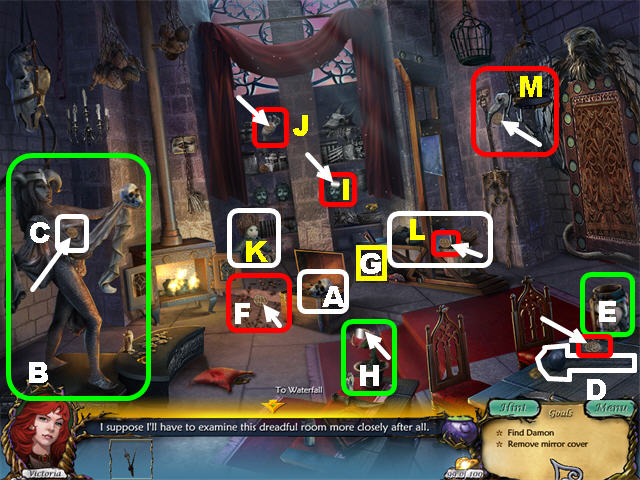
- Click on the mirror on the right for a closer look.
- Go back to Celeste’s Chamber.
- Pick up the SKULL (A) in the chest.
- Place the SKULL on CELESTE’S STATUE (B) on the left; take the WOODEN DISC (C) from her chest.
- Pick up the LADLE (D) in the lower right.
- Place the LADLE in the JAR (E) on the right; pick up the WOODEN DISC on the counter.
- Click on the LEAVES (F) on the floor and pick up the WOODEN DISC.
- Pick up the GLASS OF BLOOD (G) under the guillotine.
- Place the GLASS OF BLOOD on the PLANT (H) on the lower right; pick up the REFLECTING MIRROR on the plant.
- Click on the HEAD (I) in the back and pick up the REFLECTING MIRROR.
- Click on the HAND (J) in the back and pick up the WOODEN DISC.
- Pick up the DOLL (K) on the far left, place it on the GUILLOTINE (L); click on the lever and pick up the WOODEN DISC.
- Click on the BIRD (M) in the upper right and pick up the WOODEN DISC from its mouth.
- Go back to the Garden.

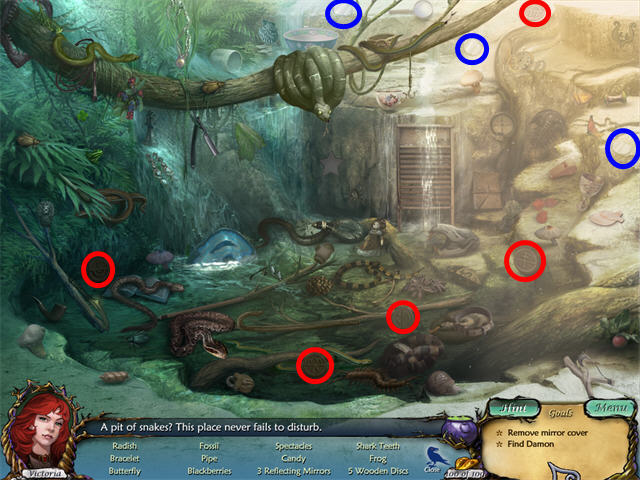
- Click on the CROW.
- Pick up the WOODEN DISCS marked in red which will be added to inventory at the end of your search.
- Pick up the REFLECTING MIRRORS marked in blue which will be added to inventory at the end of your search.
- Go back to Celeste’s Chamber.

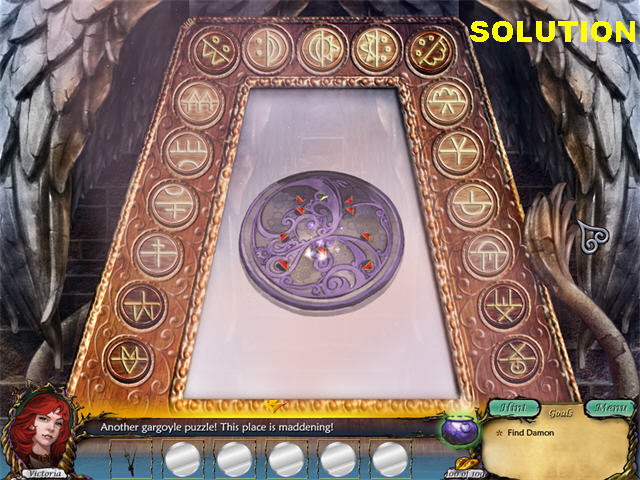
- Click on the mirror on the right for a closer look.
- Place the 12 WOODEN DISCS in the empty slots having something in common with the adjacent disc.
- Please look at the screenshot for the solution.
- Click on the DISC in the center to trigger another puzzle.

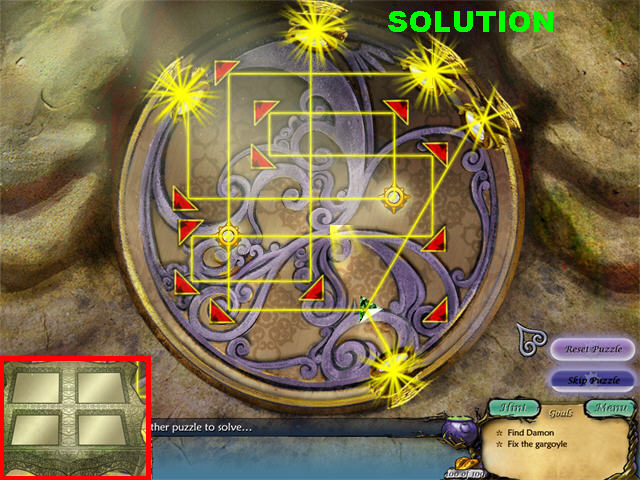
- Place the 5 REFLECTING MIRRORS in the empty slots.
- Turn the arrows so the beam of light reflects on each of the 5 mirrors.
- Please look at the screenshot for the solution.
- Pick up the MYESTRIOUS TABLET in the middle of the puzzle.
Chapter 7: Love and Death

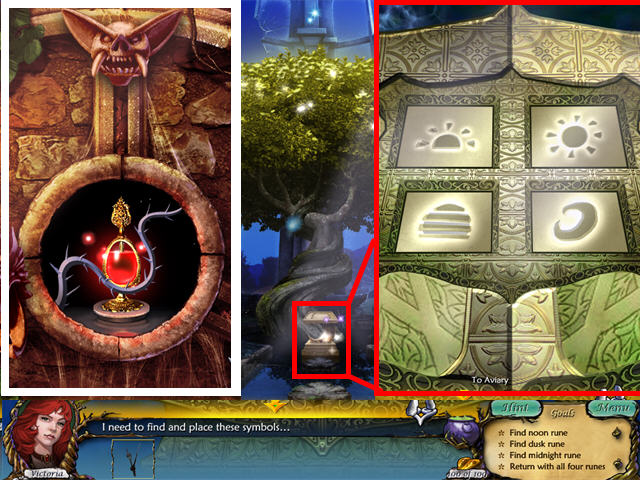
- Go through the broken mirror on the right to enter the Tower Room.
- Take a closer look at the Tower Lock in the back of the scene. Exit out of that view.
- Go to the Aviary.
- Click on the moon pedestal for a closer look; place the MYSTERIOUS TABLET on it.
- Exit that scene; go back to the Grand Foyer and right to the Ballroom.

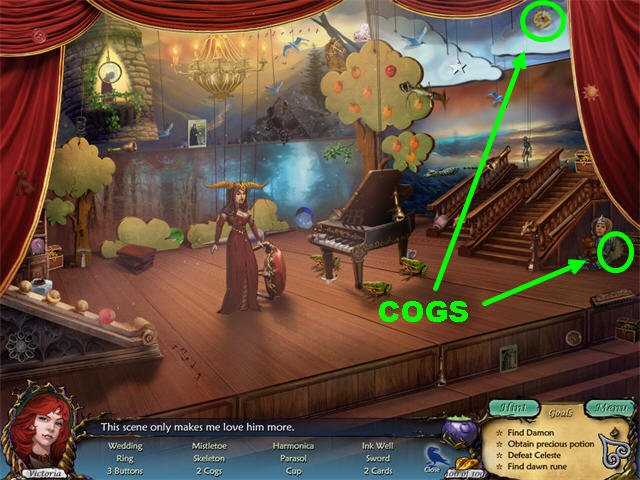
- Click on the CROW.
- The COGS circled in green will enter inventory after your search.
- Go to the Costume Room on the right.

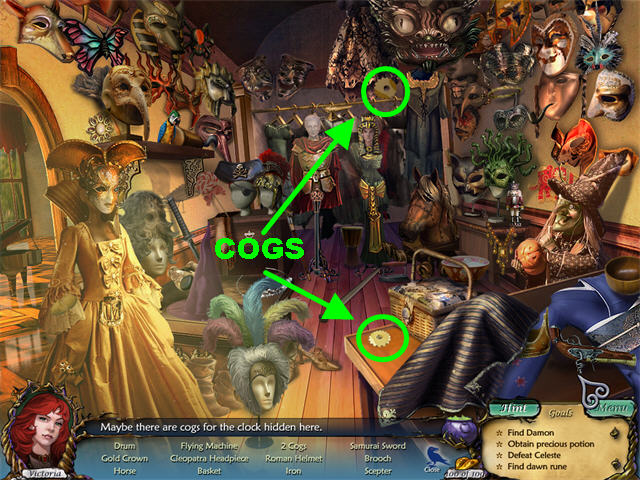
- Click on the CROW.
- The COGS circled in green will enter inventory after your search.
- Go to the Weapon Room through the Hallway.

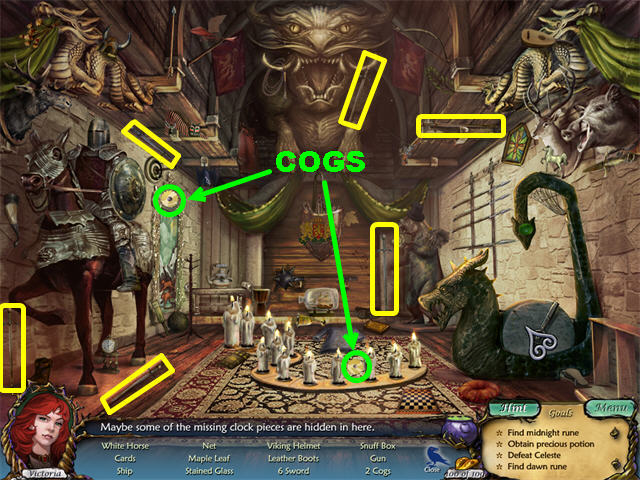
- Click on the CROW.
- The 6 SWORDS are marked in yellow.
- The COGS circled in green will enter inventory after your search.
- Go to the Study through the back door in the Hallway.

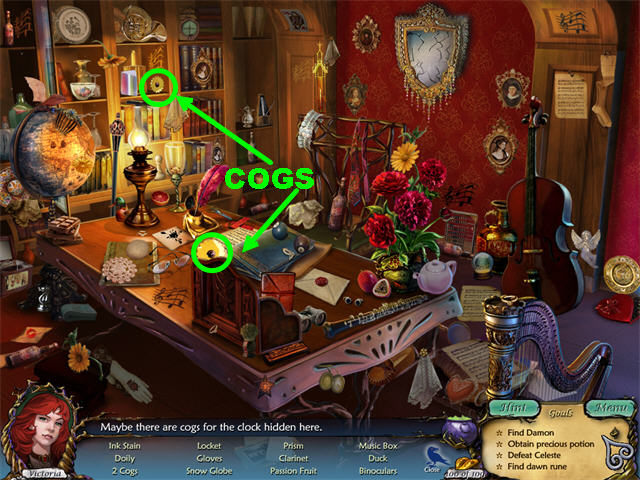
- Click on the CROW.
- The COGS circled in green will enter inventory after your search.
- Click the bottom of the screen in the Hallway to access the Bedroom.

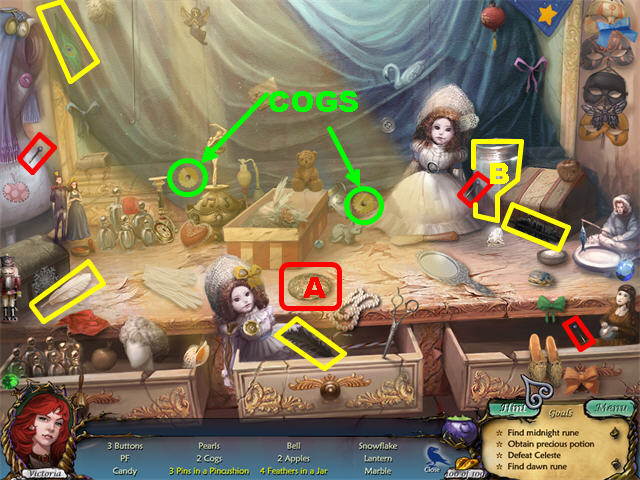
- Click on the CROW.
- 3 Pins in a Pincushion: Pick up the 3 PINS marked in red and place them on the PINCUSHION (A) in the lower center.
- 4 Feathers in a Jar: Pick up the 4 FEATHERS marked in yellow and place them in the JAR (B) on the right.
- The COGS circled in green will enter inventory after your search.
- Go into the Antechamber in the Bedroom.

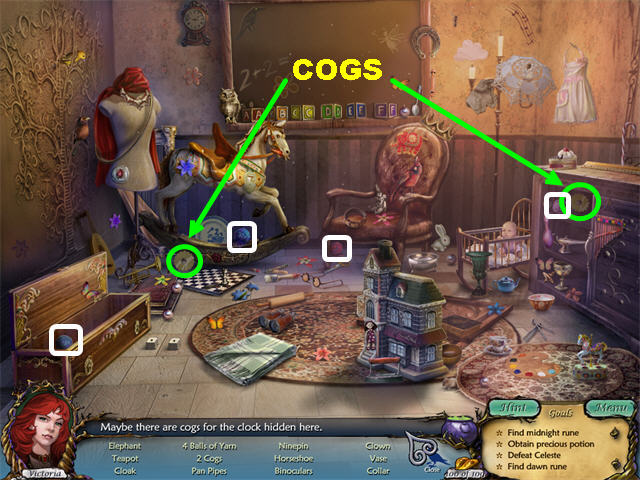
- Click on the CROW.
- The 4 BALLS OF YARN are marked in white.
- The COGS circled in green will enter inventory after your search.
- Go back to the Grand Foyer.

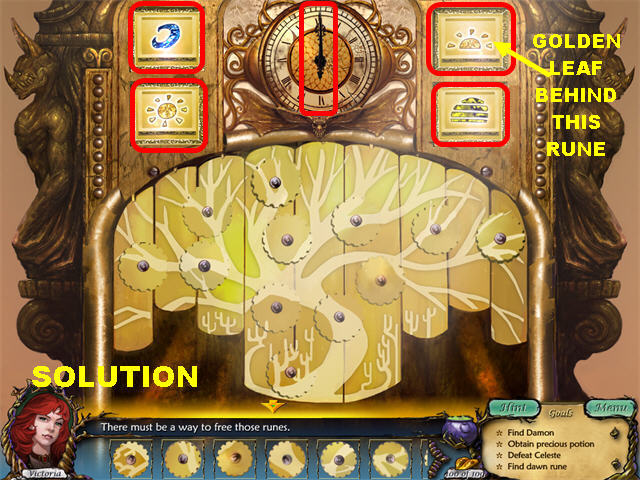
- Take a closer look at the grandfather clock.
- Place the CLOCK HANDS on the clock.
- Place the COGS in the empty slots in the clock in the correct order.
- Rotate the Cogs in order to complete the picture.
- To move a Cog to a different spot, click it when the Hand Icon appears in the center. You can click on the Reset Button to start over.
- When a Cog is in the correct spot, it will lock.
- Please look at the screenshot for the solution.
- Pick up the NOON RUNE, MIDNIGHT RUNE, DAWN RUNE, and DUSK RUNE.
- Go through the left door and make a right to reach the Aviary.

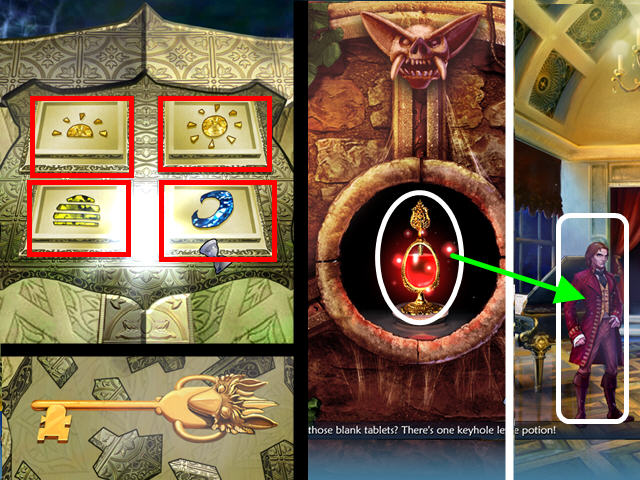
- Click on the moon pedestal for a closer look.
- Place the NOON RUNE, MIDNIGHT RUNE, DUSK RUNE, and DAWN RUNE in their appropriate slots on the Mysterious Tablet.
- Pick up the KEY in the middle of the tablet.
- Go to the Garden, through the waterfall; go to Celeste’s Chambers and go through the mirror to reach the Tower Room.
- Click on the Tower Lock for a closer look and place the KEY on the lock in the lower left.
- Grab the POTION in the center of the wall.
- Go back to the Ballroom inside the castle.
- Give Damon the POTION.
- Click on the MUSIC SHEET on the piano to trigger a puzzle.

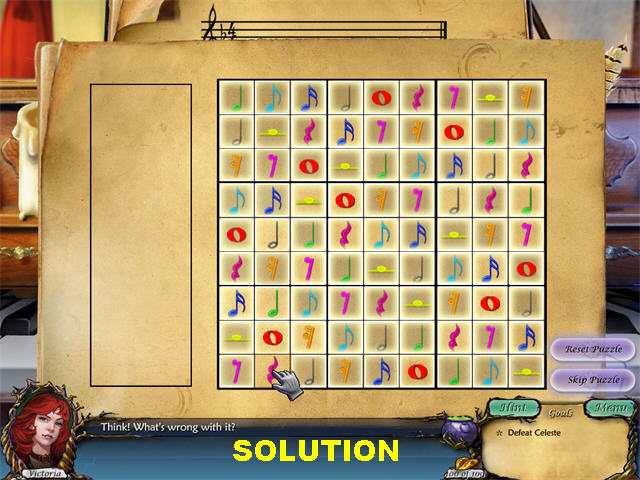
- Fill in the missing notes to complete the song.
- Every row, column, and 3×3 grid must contain all 9 musical symbols and cannot be repeated in a grid.
- Correct rows or columns will light up and lock in place.
- Please look at the screenshot for the solution.

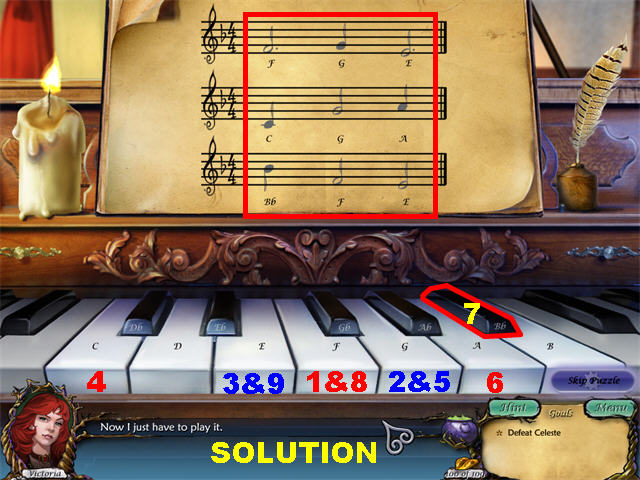
- Play the correct tune on the piano.
- Each piano key is labeled with a note; press on the keys in the order shown on the sheet.
- For sequence number 7 (Bb) you have to click on the black key highlighted in red in the screenshot.
- If you make a mistake you will have to start over.
- Please look at the screenshot for the solution.

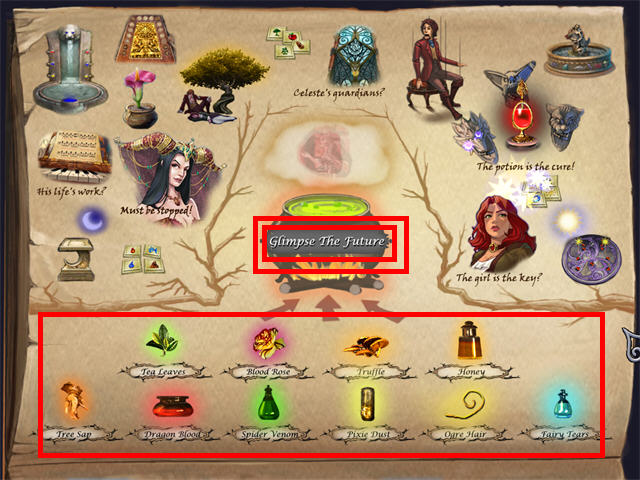
- Go to the map and click “Glimpse the Future” to trigger a mini-game.
- You can only glimpse the future if you’ve collected all 100 GOLDEN LEAVES in the game. The bottom of your map has to look like the image shown, or you will not be able to move on to the next step.
- You can replay the game to obtain the 100 GOLDEN LEAVES.
- Please follow these steps to complete the puzzle if you have the necessary leaves.

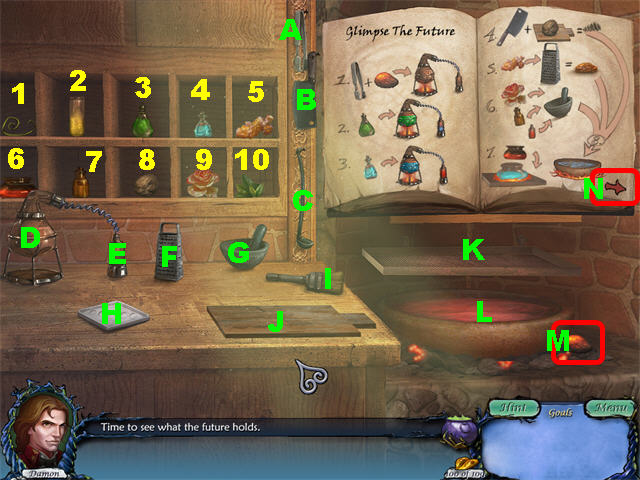
- Use the TONGS (A) to pick up the EMBER (M) in the lower right and place the EMBER on the BURNER (D).
- Place the GREEN VIAL (3) on the burner.
- Place the BLUE VIAL (4) on the burner.
- Use the CLEAVER (B) to chop the WALNUT (8) on the CUTTING BOARD (J).
- Use the GRATER (F) to shred the GINGER (5).
- Place the ROSE (9), the SMALL BROWN VIAL (7), and the VIAL (E) attached to the burner into the MORTAR & PESTLE (G).
- Place the RED VIAL (6) on the PLATE (K) above the cauldron; it will turn light blue.
- Place the GRATED GINGER, CHOPPED WALNUTS, and the MORTAR & PESTLE MIX (G) into the CAULDRON (L).
- Click on the RED ARROW (N) on the lower right side of the book to turn the page.

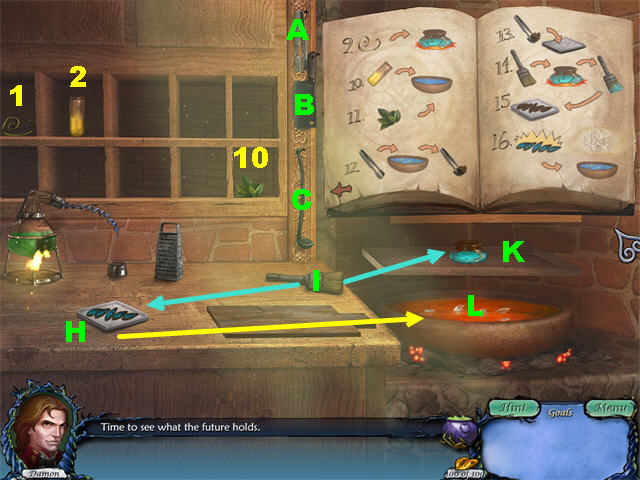
- Place the METAL WIRE (1) on the LIGHT BLUE VIAL (K) above the cauldron.
- Place the tall YELLOW VIAL (2) into the CAULDRON (L).
- Place the LEAVES (10) into the CAULDRON (L).
- Use the TONGS (A) to remove the 5 LEAVES inside the CAULDRON (L).
- Place the TONGS on the gray HOTPLATE (H) on the table. You have to remove all 5 leaves and place each one on the hotplate.
- Dip the BRUSH into the BLUE VIAL above the cauldron.
- Smear the BRUSH on the hotplate to paint each of the LEAVES blue. You will have to dip the brush for each leaf.
- Place the BLUE LEAVES from the hotplate in the cauldron.
- Congratulations! You’ve Completed Love and Death: Bitten!






 Angelica Weaver: Catch Me When You Can Walkthrough, Guide, & Tips
 Black Circle: A Carol Reed Mystery Walkthrough, Guide, & Tips
 PuppetShow Destiny Undone Walkthrough, Guide, & Tips
 Allora and the Broken Portal Walkthrough, Guide, & Tips
 Empress of the Deep: Legacy of the Phoenix Walkthrough, Guide, & Tips