Dungeon Boss Tips and Tricks, Guide, & Tips
Dungeon Boss Tips and Tricks


Lead your team of powerful heroes through heavily-armed dungeons, defeating legendary enemy bosses and grabbing loot along the way in this strategy RPG. Collect and improve your team of heroes to outmatch enemies in combat, and guard your own dungeon against any invader.
Whether you use this document as a reference when things get difficult or as a road map to get you from beginning to end, we’re pretty sure you’ll find what you’re looking for here.
- For more game help, be sure to visit the Dungeon Boss Forum to ask questions, share tips or connect with other Dungeon Boss players.
- For Dungeon Boss technical questions, please contact Customer Service.
- To see more from Dungeon Boss, visit our website (www.dungeonboss.com).


Chapter 1: Getting Started

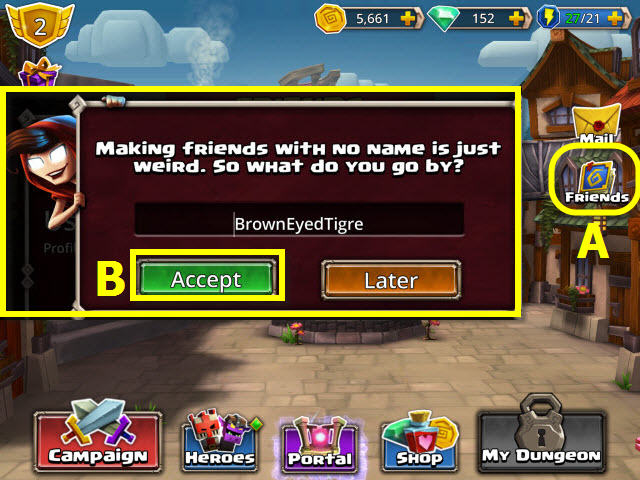
- After the tutorial, select the friends tab (A).
- Choose a profile name; select accept (B).

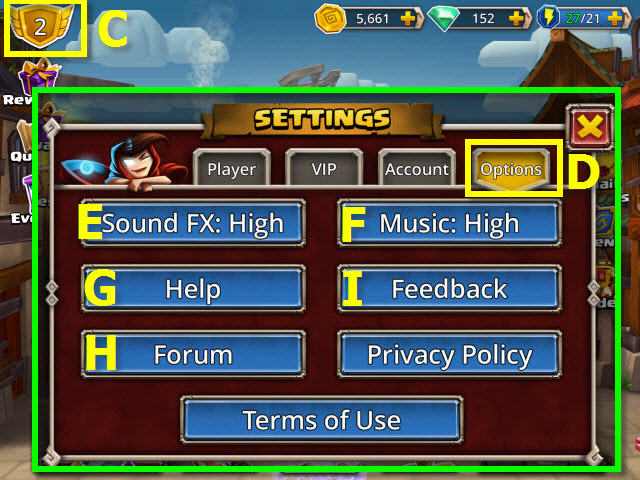
- Select your profile name or rank number (C) and choose the options tab (D).
- You can change the volume of the sound FX (E) and music (F).
- You can also access help (G), the forum (H), and send feedback (I).

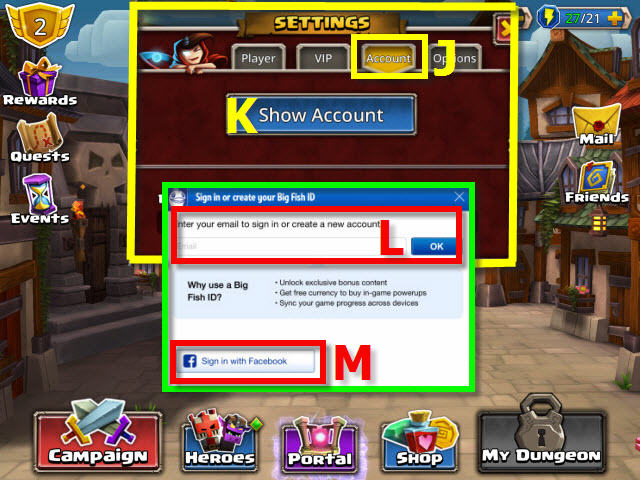
- Select the account tab (J) and show account button (K) to connect through your Big Fish account (L) or Facebook (M).
- Connecting your account will allow you to sync your game across other devices as well as other perks.


- If you have a game already on a device and wish to play that game on another device, follow this order after logging in: Select yes (M1), synced (M2) and then OK (M3).
- You will now be able to play the same game across multiple devices.
Chapter 2: Rewards and Mail

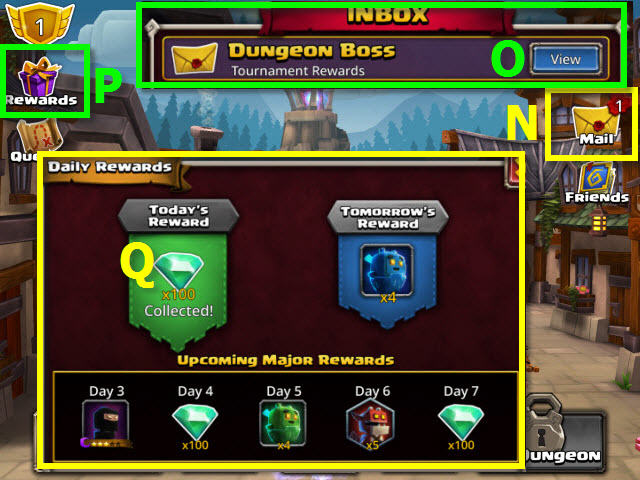
- You will be notified of new mail by the number next to the mail tab (N). The number signifies how many messages you have.
- Select view (O) to open the mail.
- Select the rewards button to collect your daily reward (P). You will receive a daily reward for playing every day; select today’s reward icon to receive your reward (Q).
Chapter 3: Rank and VIP

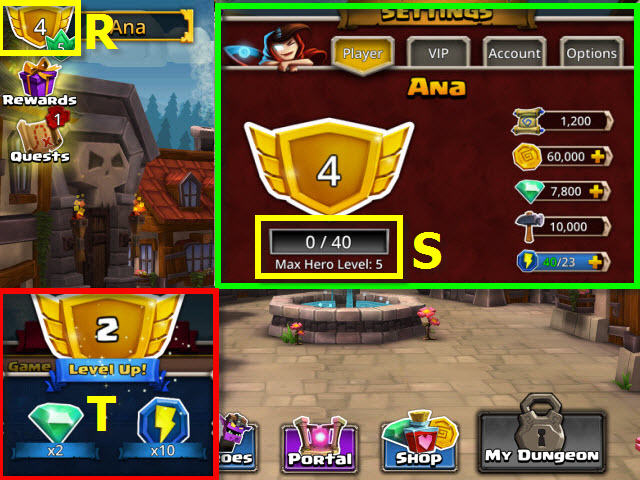
- Your rank is located here (R).
- Selecting your rank will pull up your player info. You can see how many more points are needed to the next rank here (S).
- You will receive a special reward when you rank up (T).

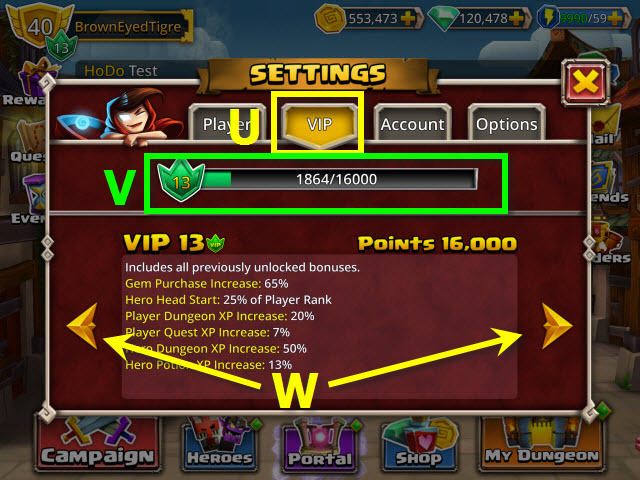
- Select the VIP tab to pull up your VIP stats (U).
- Purchasing gems and bundles will increase your VIP rank. You can see how many more points are needed to the next rank here (V). Every purchase of gems and bundles in the shop will give you additional points leading to the next level up
- Use the arrows (W) to check out the bonuses for each level (W1).
Chapter 4: Stamina

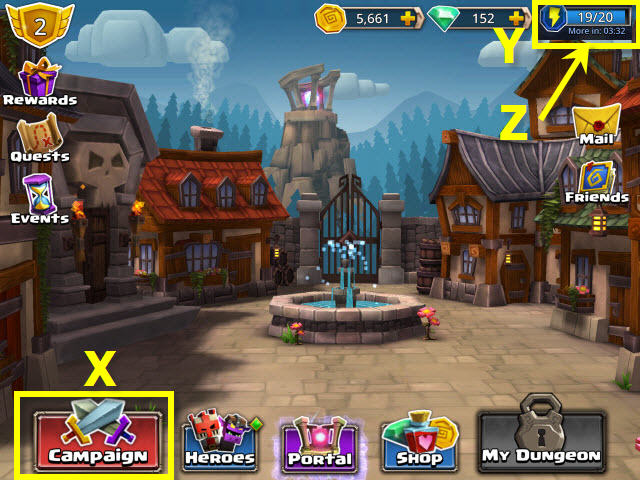
- Select the campaign button to access the dungeons (X).
- Stamina is needed to open the dungeons. Your stamina meter is located here (Y).
- Stamina will automatically replenish or you can purchase more. The timer for a single stamina point regeneration is located here (Z).

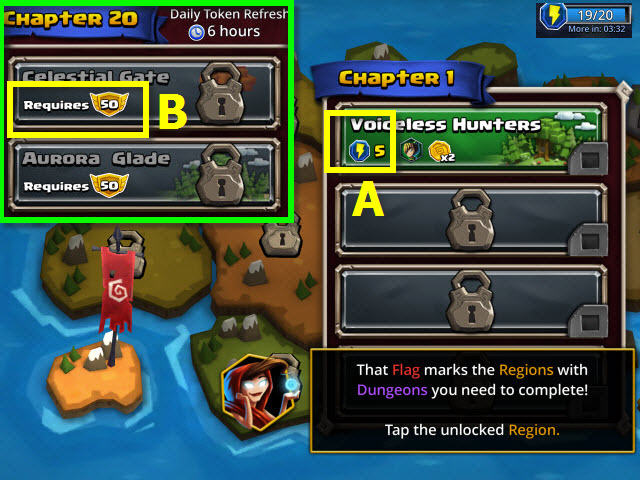
- The amount of stamina required to enter a dungeon is located here (A).
- The level required to play a dungeon if you are not able to yet is located here (B).
Chapter 5: Shopping, Gold, Gems, and Treasure Rooms

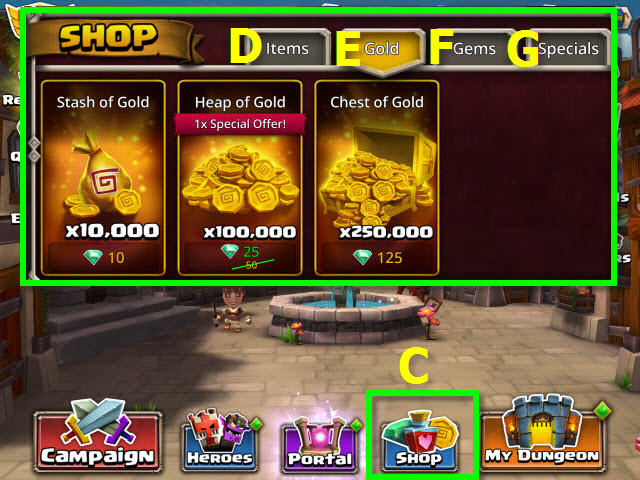
- Select the shop button to make any purchases (C).
- There are two kinds of currency; gems and gold.
- You can use gold and gems to purchase items (D) you will need for your campaigns and heroes.
- You can use gems to purchase gold here (E).
- You can purchase gems here (F).
- Specials are a great value to get bundles of items, gold, gems, and heroes (G).

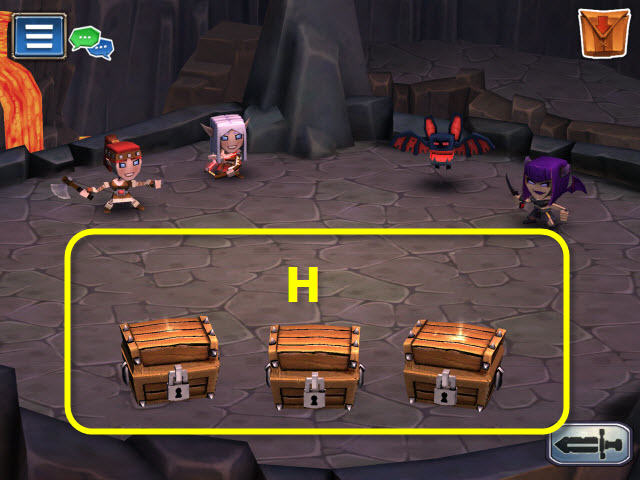
- Treasure levels will randomly appear in dungeons and you can earn extra gold or items when you choose a chest (H).
- Some levels will also randomly drop a chest after you beat it and you will gain more gold or items.
- You will receive a large chest of gold or items after completing each dungeon boss fight.

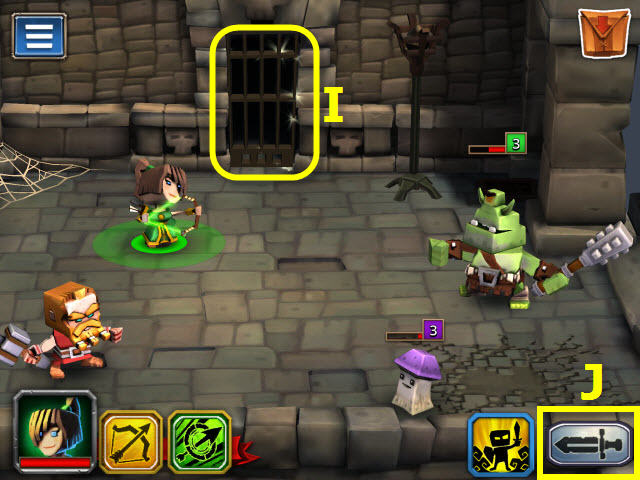
- Check out each level thoroughly for sparkling areas signaling hidden stamina, gold, gems, and items. If you see a sparkling item, select it to collect your loot (I).
- Be aware that when you are using the auto-battle mode (J), you may battle through the level and jump to the next one and miss a sparkling area.
Chapter 6: Hero Levels, Stars, and Hero Tokens

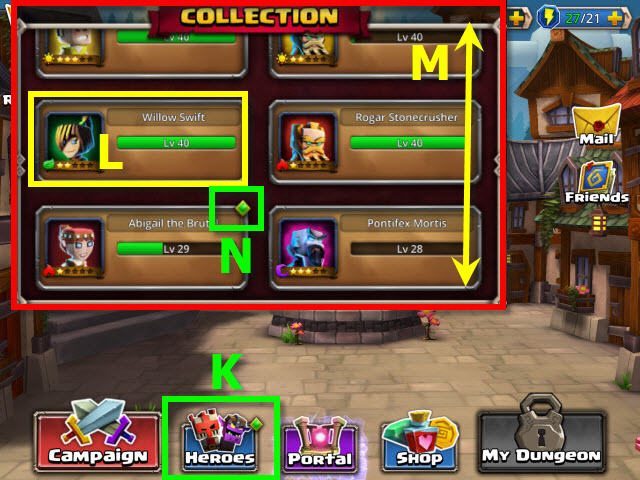
- Select the heroes button (K) to access your collection.
- Select the button of the hero you wish to examine (L).
- You can scroll through the heroes by swiping inside the frame (M).
- A hero with a green diamond in the corner signifies you have upgrades available (N).

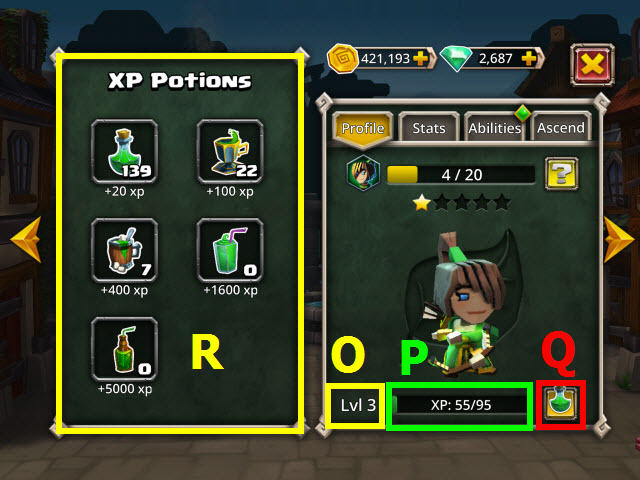
- Your level info is located here (O).
- There are two ways to level up your hero. You can use your hero on your team to gain XP points (P) or use an XP potion.
- If you have XP potions available you can use those to quickly increase their XP. Select the potion icon (Q) and then choose the amount of XP you wish to apply (R).
- If you try and use a bottle that is more than you need, a warning will be given so you do not waste any.

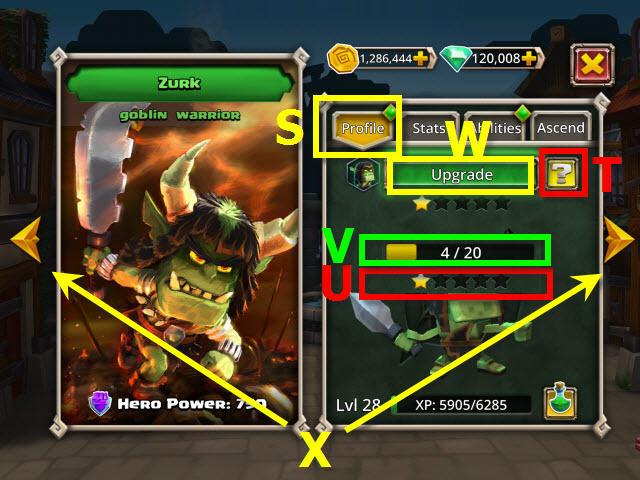
- Select the profile tab to bring up the level info (S).
- Select the question mark (T) to find where to find the location of the hero tokens that are required to upgrade the star ratings (U).
- The number of hero tokens required to achieve the next star is located here (V).
- Increasing your heroes’ stars will greatly increase their attack, defense, health and skill.
- When you have enough hero tokens, select the upgrade button (W).
- You can scroll through the heroes by selecting the arrows (X).

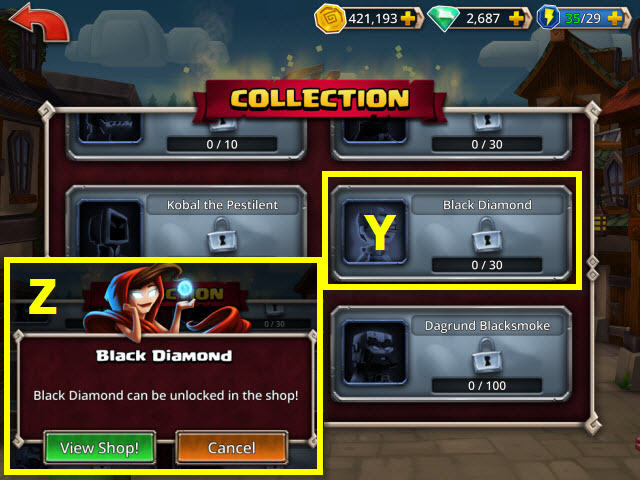
- Hero tokens are required to unlock heroes (Y) and to add stars.
- Press the button of the unlocked hero to see where to find the hero token for that particular hero (Z).
- Some hero tokens will be dropped in specific dungeons through completing quests, in portal chests, and others will drop randomly throughout your adventuring.
Chapter 7: Stats and Abilities

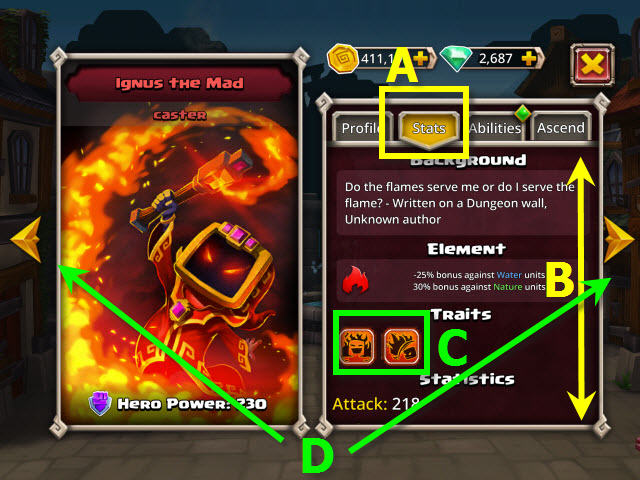
- Select a hero and then select the stats tab to bring up your heroes’ stats (A).
- Slide you finger up and down on the stats to view them all (B).
- Hold down the trait buttons to see your heroes’ traits (C).
- Select the arrows (D) to scroll through the hero collection stats and see how they compare.

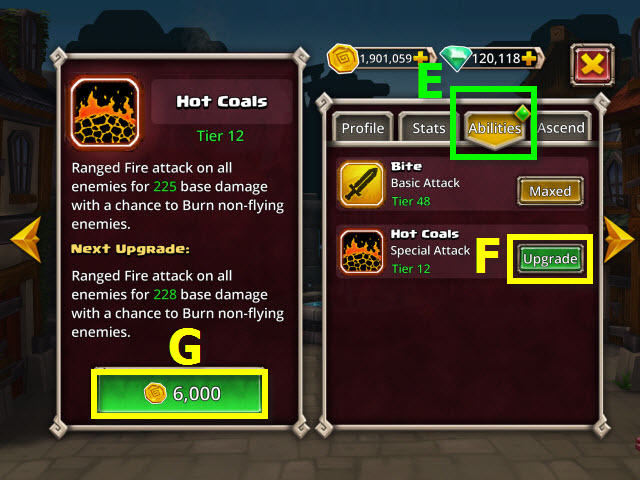
- Select the ability tab to view your heroes’ special abilities (E).
- Press the upgrade button (F) to increase your ability.
- The cost and benefits to upgrade is located here (G).

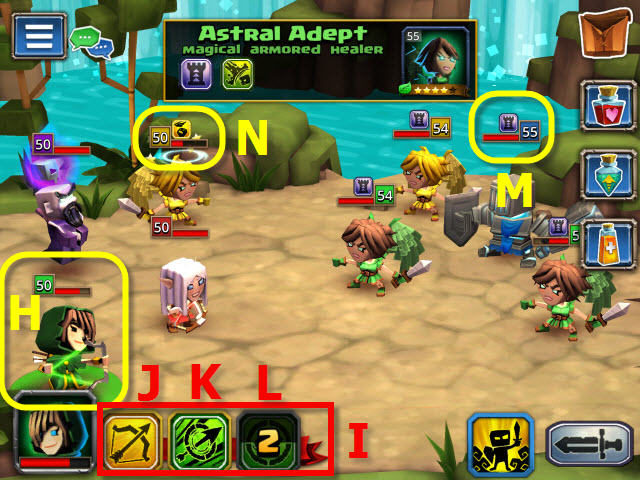
- During a campaign, your current battling hero will be highlighted (H); its abilities are located here (I).
- You will by default use the ability that is closest to your hero’s avatar. This ability requires no recharge (J).
- You can choose another ability by selecting it (K). A description of the ability will pop-up and you can select it again to not use it.
- Depending on the ability, some will take longer to recharge than others. The number of turns left to recharge are located on the ability button (L).
- Your opponent may be using an ability to protect itself from you; these activated abilities can be seen on the opponents health bar (M).
- If your hero has been inflicted by one of your opponents, you will see the infliction on your health bar (N). You can see what the infliction is by pressing and holding down on the inflicted hero and then selecting the icon.
Chapter 8: Ascending Your Heroes and Evos

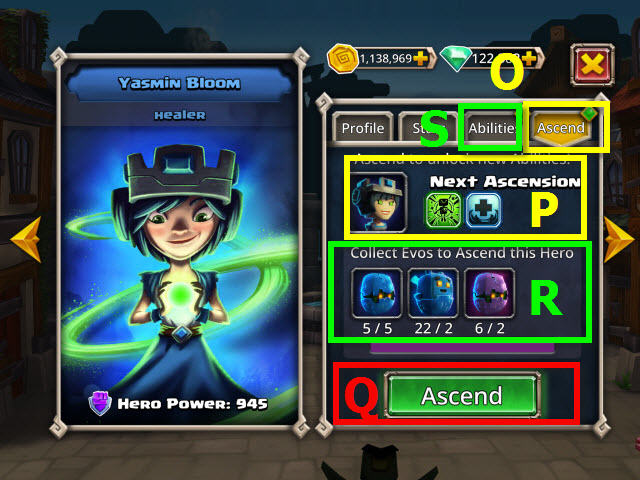
- Select the ascend tab to bring up the ascend info for your hero (O).
- Ascending your hero unlocks new abilities (P).
- Press the ascend button (Q) when you have all the evos required (R).
- After you ascend your hero, check the abilities tab (S) for available upgrades on your new ability.

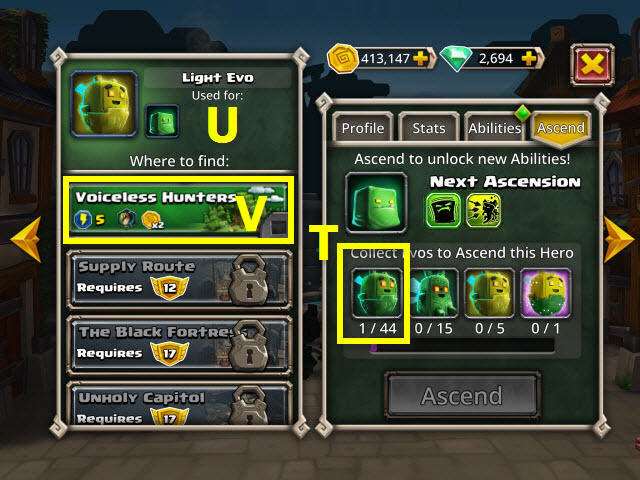
- Some evos are exclusive to ascending a single hero and others are needed for multiple heroes. Prior to ascending your hero, be sure and check you are not using up evos you need for a more favored hero.
- Select an evo (T) to bring up the location of where you can acquire them (U).
- Select a dungeon to quick travel there for a chance to get the evo needed (V).

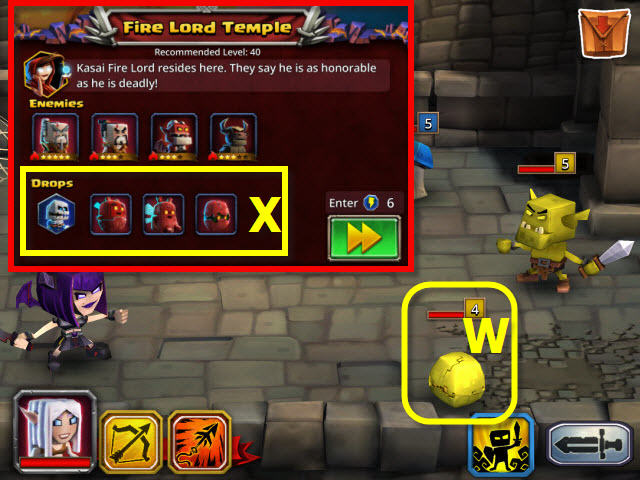
- When you come across an evo during a campaign, be sure and attack it first (W). They are sneaky and run off if you attack another enemy first.
- You can see what some of the evos look like in that specific dungeon prior to entering so you know what to look for (X).
- Even though your desired evo may not have appeared during a campaign, it can still drop after your boss fight.
Chapter 9: Campaigns and Creating Your Team

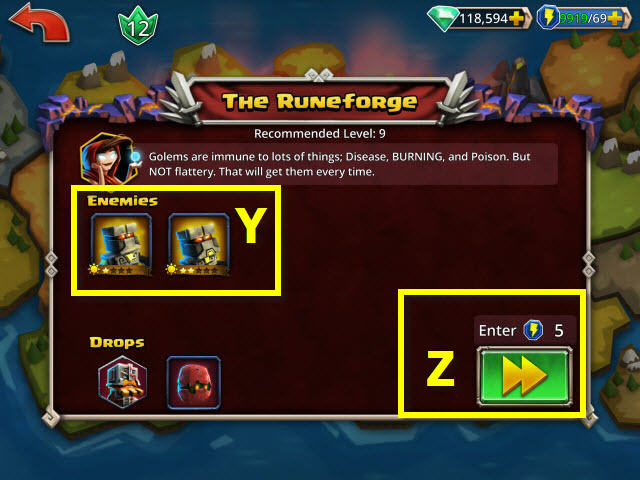
- After choosing your desired dungeon there will be a screen detailing the enemies you will encounter (Y). Knowing your enemies will allow you to make an educated decision on the best hero choices for your team.
- You will not use stamina until after you create your team; you can safely enter (Z) without spending stamina.

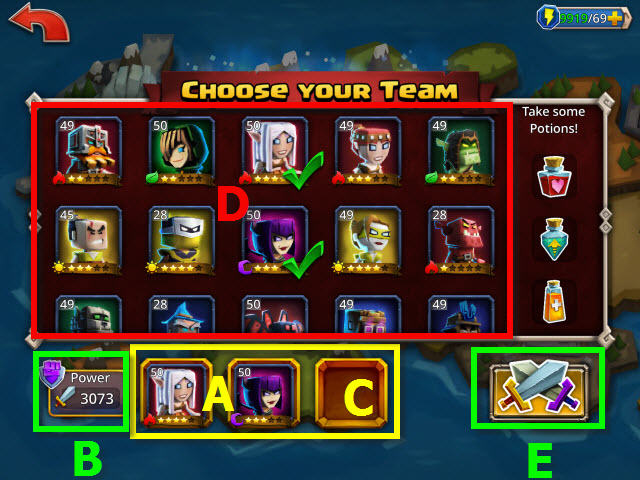
- Red fire heroes do well against nature and water. Blue water heroes do well against fire and nature. Green nature heroes do well against water and fire. Yellow light heroes do well against dark. Purple dark heroes do well against light.
- Chapter 1 allows for a team of 2 heroes. Chapter 2 increases to 3 heroes; chapter 6 and above are 4 hero teams.
- Your team is located here (A). The combined power of your team is shown here (B); the higher the number, the better.
- You can swap heroes by selecting one in your team to empty the space (C) and then selecting one from your available heroes (D).
- Select the crossed-sword button after you have selected your team and are ready to battle (E).

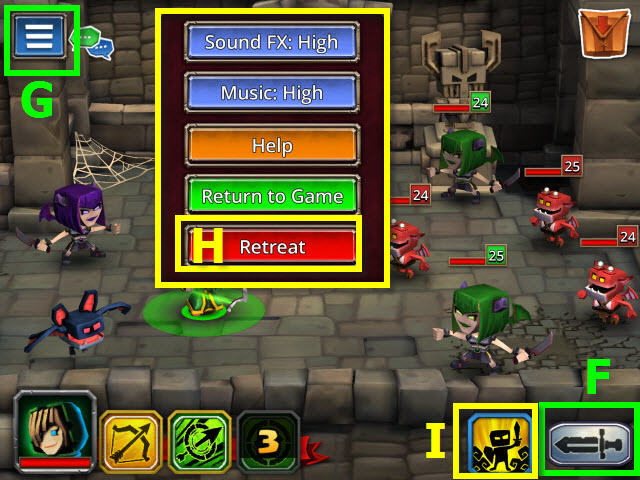
- Choose the auto-battle button if you wish to have the moves automatically performed for you (F).
- When collecting evos in a dungeon way below your level, auto-battle is a very handy tool to get through quickly. It will stop if one of your heroes dies or you come across a treasure room.
- Pay attention to sparkling areas in the room and select them quickly while the battle is going on to collect extras; the screen will advance and you will not be able go back.
- You can retreat from the campaign by selecting the pause button (G) and then the retreat button (H).
- Select the summon friend button to get assistance from your friends shared champion (I). This feature is disabled in epic dungeons.
Chapter 10: Potions

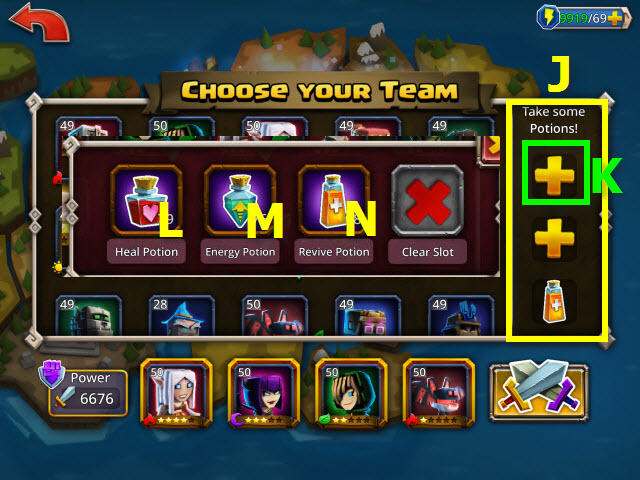
- Choose your potions for your campaign here (J).
- Make sure that you are fully stocked before going into battle by purchasing items in the shop; you’ll be unable to purchase items during a battle.
- You may take a max of three of any combination of potions with you.
- Select a slot to change or eliminate the contents (K).
- Heal potion fully heals your hero and will cure poison and burn (L).
- Energy potion fully restores your hero’s ability (M).
- Revive potion brings a dead hero back to life (N).

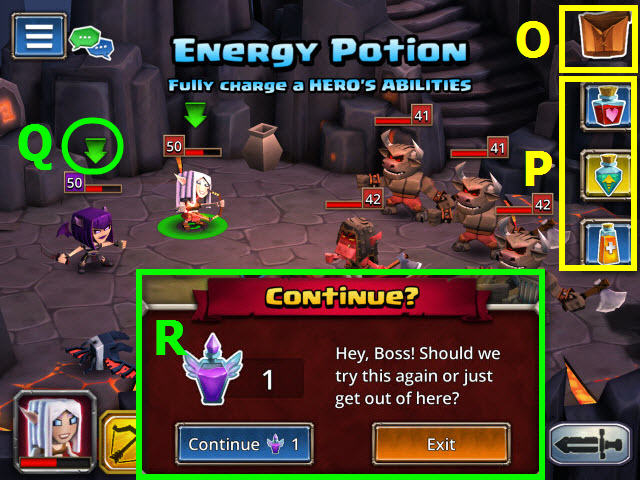
- Select the backpack to open it (O) and see your available potions (P); select it again to close.
- Select the potion you wish to use and then select the hero that you wish to apply it to. Heroes that are eligible to use the potion will have an arrow above them (Q).
- If you lose all your lives and are defeated, you will have a chance to use an elixir of life to continue (R).
- You may not use an elixir of life in an epic dungeon.

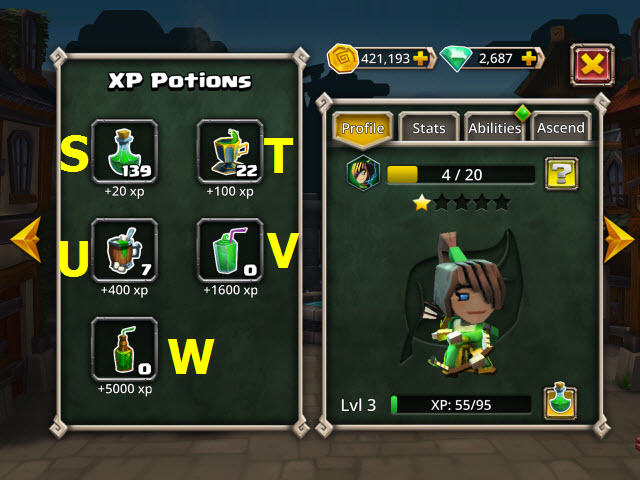
- XP Potions are used to level up your hero. There is a 20 XP size (S) that is available as drops only.
- There are also a 100 XP (T) and 400 XP size (U) available in the shop under items, and a 1600 XP (V) and 5000 XP (W) available in bundles in the shop under specials or in portal drops.
Chapter 11: Portal

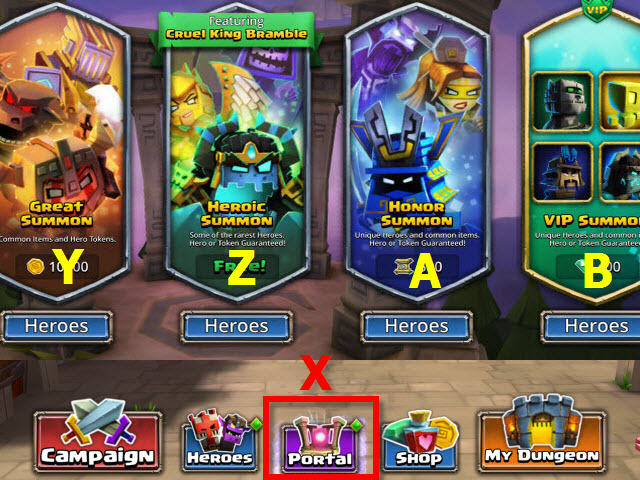
- Select the portal button on the main screen to access it (X).
- You can summon heroes, hero tokens, and gain items in the portals.
- Select the great summon to receive common items and hero tokens (Y).
- Select the heroic summon to receive some of the rarest heroes or hero tokens. Heroes or tokens are guaranteed (Z).
- Select the honor summon to receive unique heroes and common items. A hero or tokens are guaranteed to drop (A).
- Select the VIP summon to receive powerful heroes and common items. A hero or honorable summon to summon a 2 or 3 star rare hero are guaranteed to drop (B).
- If the portal button is sparkling you could have a free summon available.

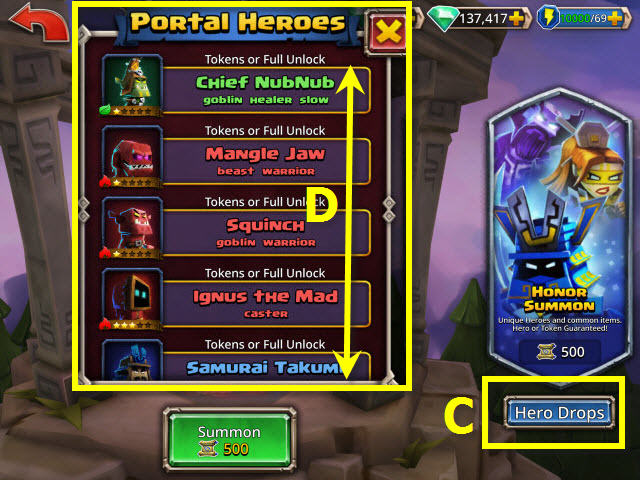
- Select the hero drops button to see what heroes or tokens can drop (C).
- Slide you finger up and down to view them all. (D).
Chapter 12: Quests and Special Events

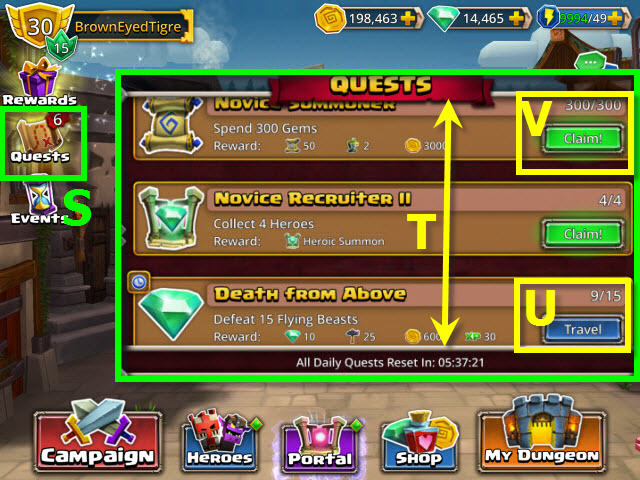
- Select the quests button to check for current quests (S).
- A number next to the quest button signifies how many reward you have to collect.
- Slide your finger up and down to view all the available quests (T).
- Select the travel button (U) to bring up areas to complete the quest.
- Collect your rewards for completion here (V).

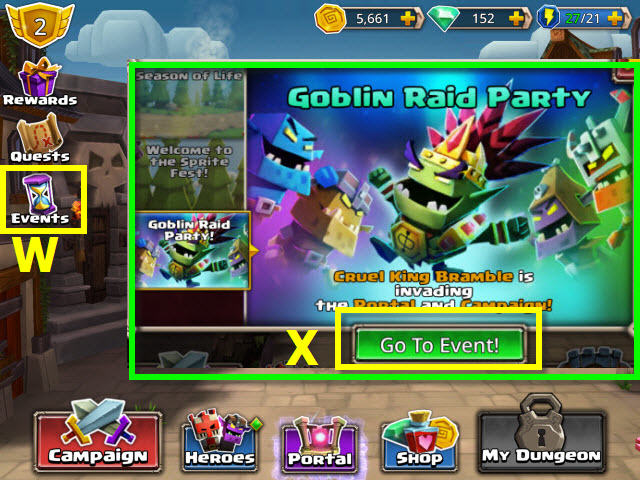
- The events button will appear when there are current events (W).
- Select the go to event button (X) to go to the event.
Chapter 13: Epic Dungeons

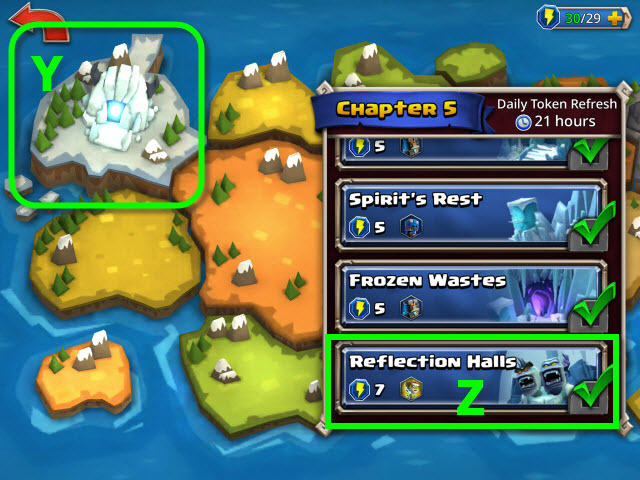
- Epic dungeon locations will be noted with a portal on the region (Y) and they are the final dungeon (Z).
- You will be warned prior to entering an epic dungeon; be prepared before you go in.
- You will not be able to summon a friend’s hero to help you and you will be unable to use a ‘continue’ if you fail.
Chapter 14: My Dungeon and Raids

- After you reach level 10 (A), you will unlock the dungeon.
- Select the my dungeon button (B).

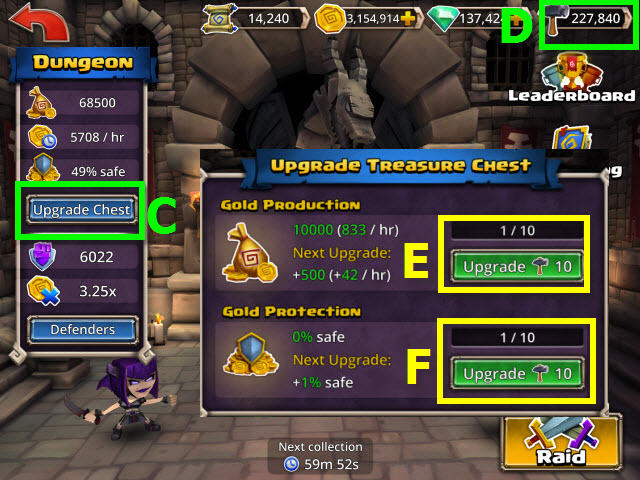
- Upgrade your treasure chest by selecting the upgrade chest button (C) by using hammers (D).
- Hammers are dropped and earned by playing campaigns, completing quests, and portal activity.
- You can upgrade your chest to increase gold production (E) and gold protection (F).

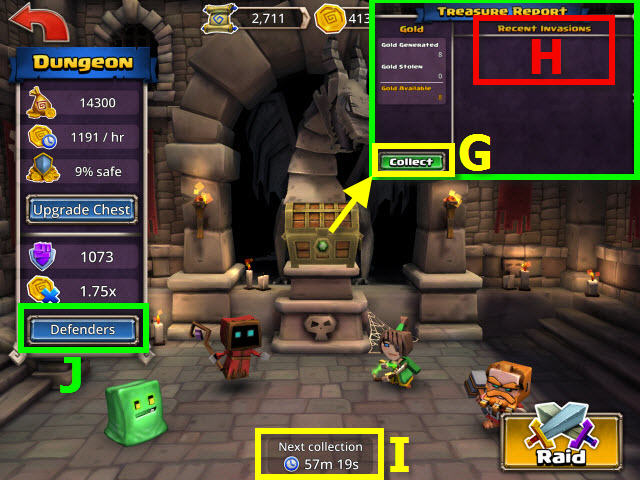
- You can collect gold every hour by selecting the chest when it’s sparkling; select the collect button (G).
- Selecting the chest will bring up a treasure report stating invasions by others (H).
- The countdown timer to the next gold collection is located here (I).
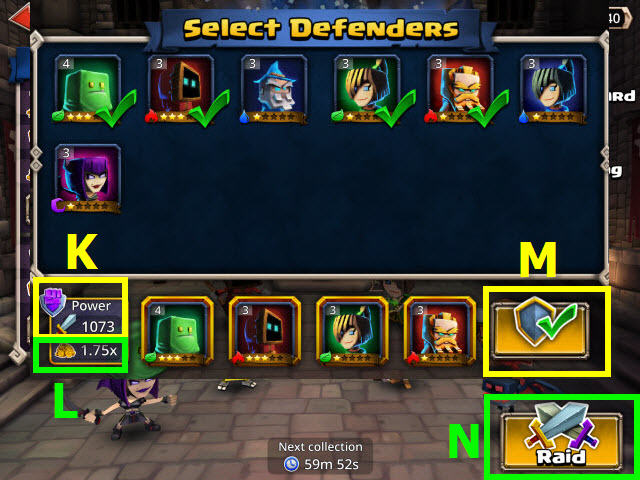
- Select the defenders button (J) to choose your team of defenders.


- Choose a team that will have the most power (K).
- The gold multiplier is an increase of gold production based upon your defending teams power (L).
- Select the shield button when you have assembled your team (M).
- Select the raid button to raid other dungeons and steal their gold (N).

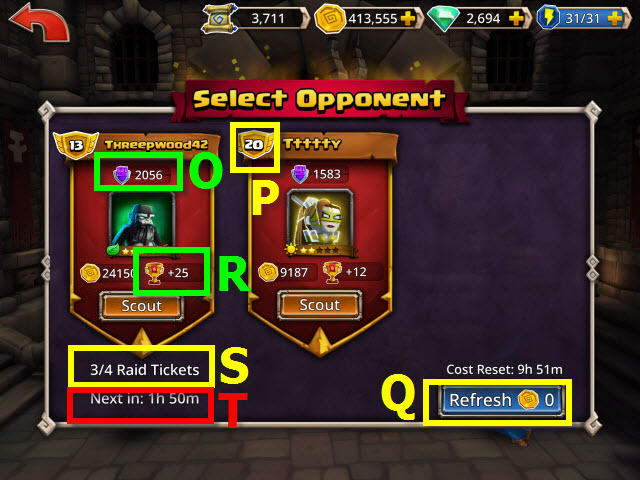
- Examine the power level (O) and player level (P) of the available raids to find one most suited to your level. To refresh the list to attempt to get lower levels, select here (Q).
- The higher the power level, the more trophies (R) you collect if you win.
- You can store up to 4 raid tickets (S); each ticket is good for one raid.
- The timer for a new raid ticket generation is located here (T).
- There is no assistance or potions permitted in a raid battle.

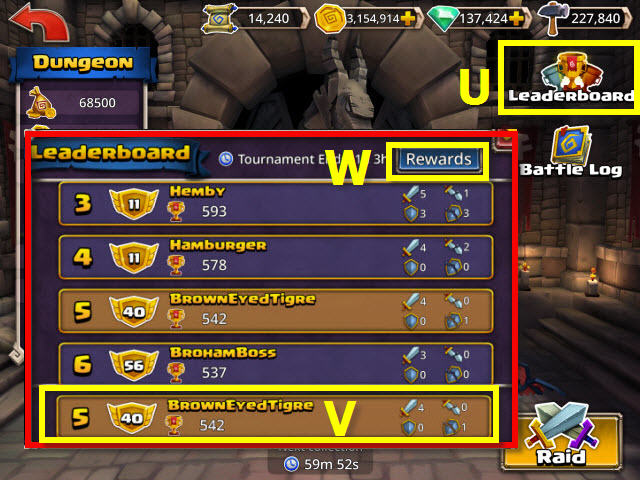
- Check the leaderboard (U) for your rankings in raids (V).
- Check out the rewards here (W).
- When the tournament ends, you will receive a mail notification of your reward if earned.

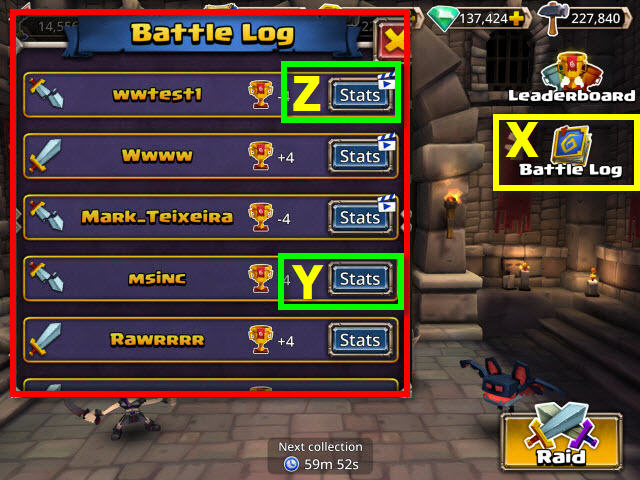
- Check the battle log for a list of your battles (X).
- Select stats (Y) to bring up the details of the battle; if there is a clapboard (Z) on the stats, you can watch a replay of your battle.
Chapter 15: Tips, Tricks, and Game Review

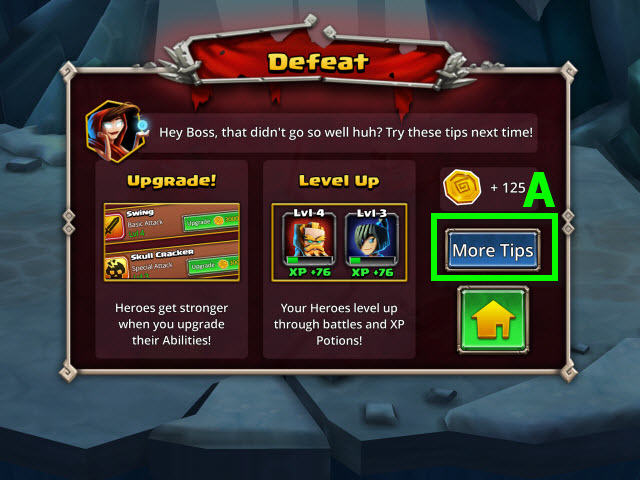
- Select the more tips button after a defeat to get some great strategy tips (A).
- Pay attention to notations before entering a dungeon; it may offer you a valuable tip.
- Don’t waste high attack ability on a nearly dead villain.
- Kill opponents that are healers first, otherwise they will heal their army when it’s their turn.
- If you go after the easier to kill opponents early on and decrease the size of their army, they will have fewer chances to attack you when it’s their turn.
- The greater the difference in levels between you and your opponent, the greater the chance of a miss.
- You will automatically start fresh with renewed health in a dungeon. In order to save on healing potions do not use them at the end of a dungeon run if it’s not absolutely necessary.
- Look at the drops before entering a dungeon so you can adjust your team for what’s inside the dungeon.
- You can interact with your surroundings just for fun by selecting unlit lamps, torches, statues and other scenery; check out what happens to them.

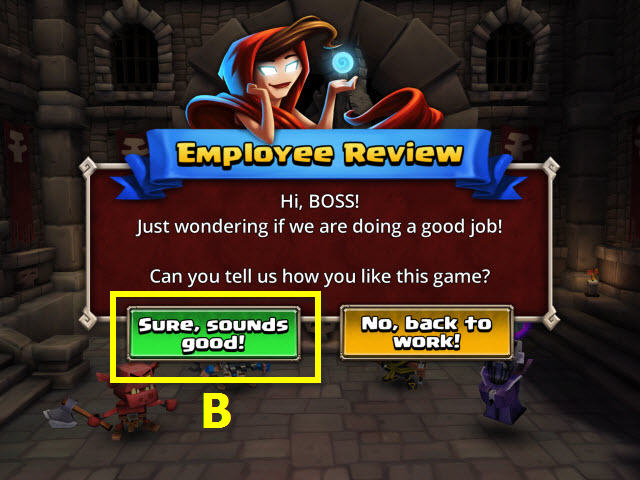
- Having fun? Be sure and let us know if the review pops up (B)!


![]()
![]()
![]()
![]()






 Gothic Fiction: Dark Saga Walkthrough, Guide, & Tips
 The Dracula Files Walkthrough, Guide, & Tips
 Mythic Wonders: The Philosopher's Stone Walkthrough, Guide, & Tips
 1001 Nights: The Adventures of Sindbad Walkthrough, Guide, & Tips
 Zodiac Prophecies: The Serpent Bearer Walkthrough, Guide, & Tips