Azada: Elementa Walkthrough, Guide, & Tips
Azada: Elementa Walkthrough

Welcome to the Azada: Elementa Walkthrough
Azada’s saga continues when its precious elements are stolen!
Whether you use this document as a reference when things get difficult or as a road map to get you from beginning to end, we’re pretty sure you’ll find what you’re looking for here.
This document contains a complete Azada: Elementa game walkthrough featuring annotated screenshots from actual gameplay!
We hope you find this information useful as you play your way through the game. Use the walkthrough menu below to quickly jump to whatever stage of the game you need help with.
Remember to visit the Big Fish Games Forums if you find you need more help. Have fun!
This walkthrough was created by Margie B, and is protected under US Copyright laws. Any unauthorized use, including re-publication in whole or in part, without permission, is strictly prohibited.
General Tips

- This is the official guide for Azada: Elementa.
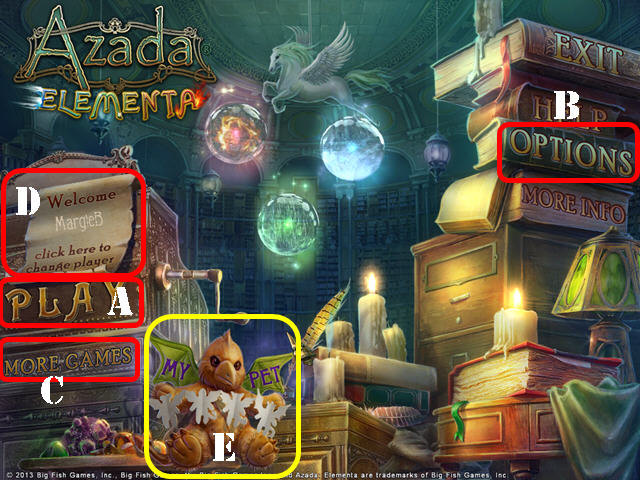
- Select ‘Play’ (A) to begin your adventure.
- Select Options (B) to adjust sound and screen size.
- The ‘More Games’ (C) Button shows you other titles available from this developer.
- The ‘Click here to change player’ button (D) can be used to manage your profiles in the game.
- Select ‘My Pet’ (E) to buy outfits for your pet with the critter coins you collect throughout the game.
- The Hidden-object puzzle scenes will be referred to as HOPS throughout the guide. The lists in the HOPS are random; our lists may vary from yours.
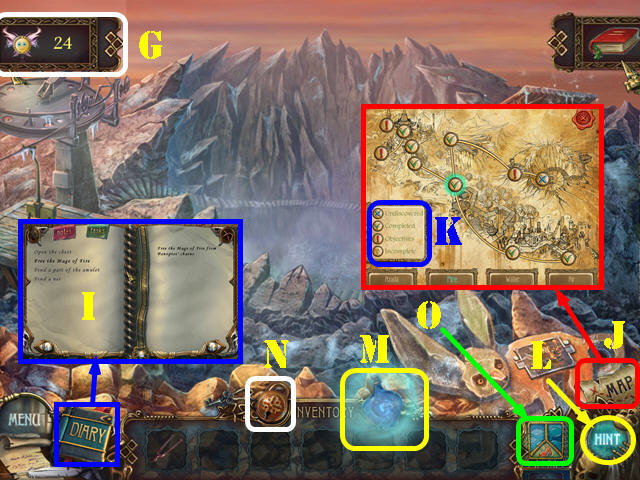
- Hover your mouse over the critter tab (G) to view the coins you’ve collected thus far. There is a complete list of critter coins at the end of the guide.
- Open your Diary (I) to view your notes and your tasks. Select a task to read more about it.
- Use the Map (J) to travel directly to a location. Look at the legend (K) to see what each marking means.
- The use of the Hint button (L) is unlimited, but you must wait for it to recharge between uses.
- Pick up the Magic Bottle (M) when it glows and move it around the scene to find the hidden magic areas.
- Close and open the lock (N) on the inventory bar.
- Your Amulet pieces are stored here (O).
Chapter 1: Azada
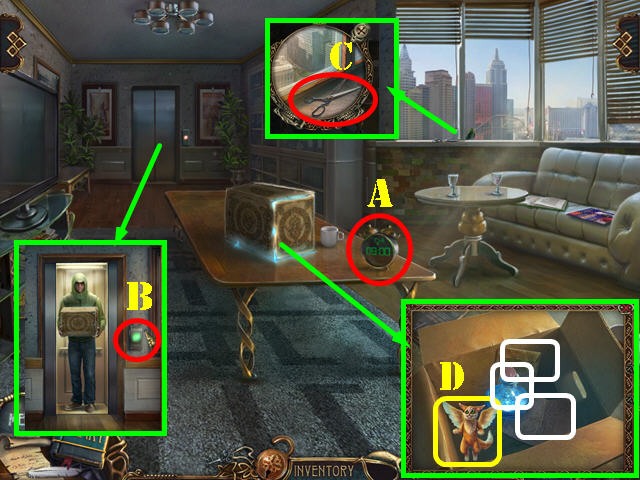
- Touch the alarm clock (A).
- Zoom into the elevator and press the button (B).
- Talk to the cab driver.
- Zoom into the window and take the SCISSORS (C).
- Zoom into the package and cut it with the SCISSORS; take the PET (D) and follow the tutorial instructions to name your pet.
- Take the MAGIC BOTTLE, the ADDRESSED ENVELOPE, and the letter (white).
- Enter the elevator and then exit it once you reach outside.
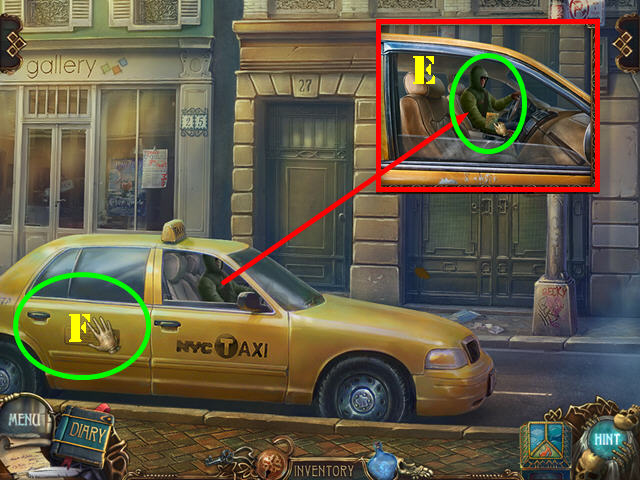
- Zoom into the cab’s front window; give the ADDRESSED ENVELOPE to the driver (E).
- Open the back door and enter the cab (F).
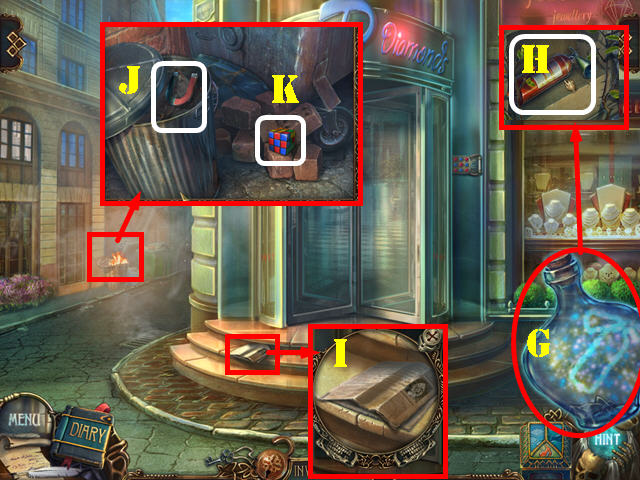
- Pick up the MAGIC BOTTLE and press it on the grid (G); pick up the MAGIC BOTTLE again and use it on the vent.
- Remove the grid vent take the EXTINGUISHER (H).
- Examine the steps; take the newspaper (I) and the BUTTON below it.
- Examine the fire. Zoom into the fire again and use the EXTINGUISHER on the fire. Take the MAGNET (J).
- Look at the pattern on the cube (K).
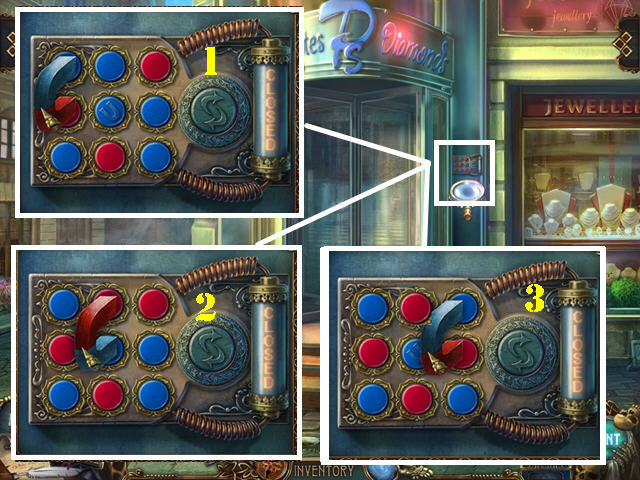
- Examine the lock; add the MAGNET and the BUTTON to it to activate a mini-game.
- Use the magnet to enter the combination for the alarm system. You can right-click on the magnet to rotate it. Once the magnet is in the right spot, left-click on it to change the color of the buttons.
- To solve the puzzle, follow these steps: 1, 2, 3.
- Talk to Panoptes.
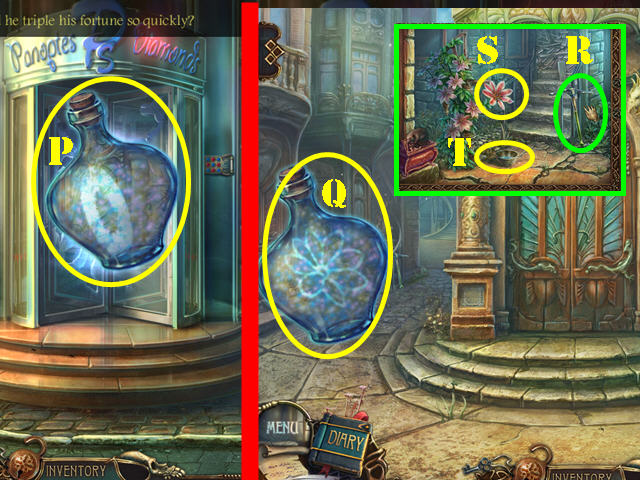
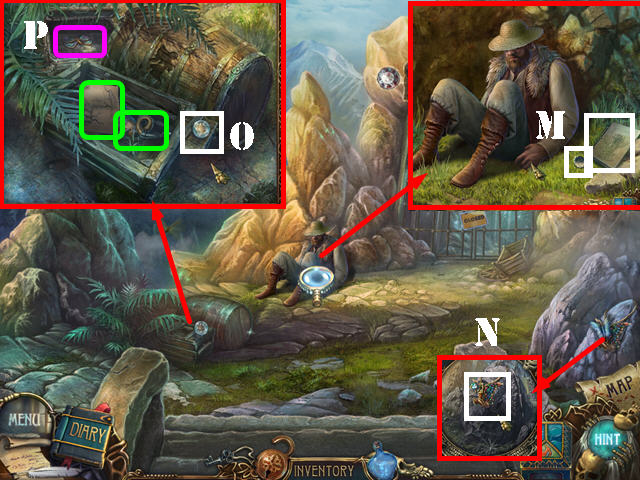
- Take the MAGIC BOTTLE and press it against the door (P). Remove the note from the screen.
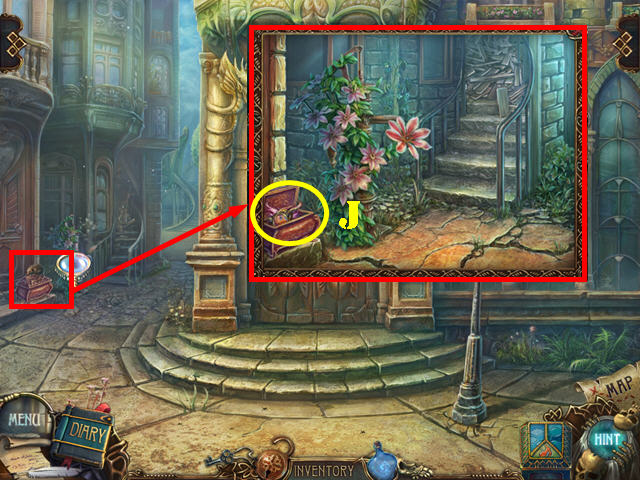
- Use the MAGIC BOTTLE on the plant (Q).
- Take the PICK (R).
- Use the MAGIC BOTTLE on the flower bud (S). Touch the flower and take the BOWL WITH WATER (T).
- Go through the door.
- Zoom into Titus and then take the scroll from his hand.
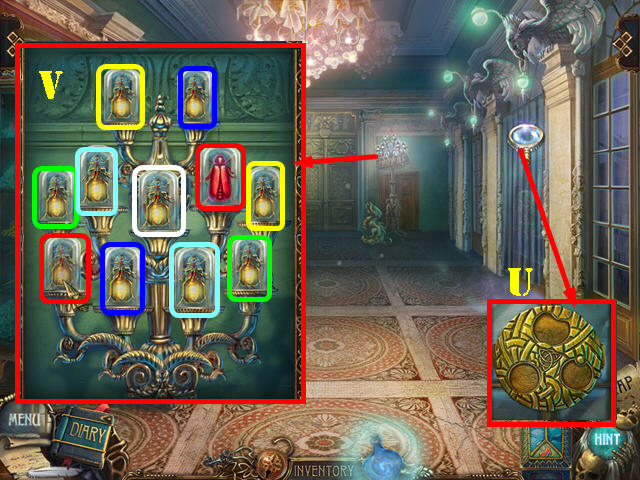
- Zoom into the curtain and open it (U).
- Examine the lamps to activate a puzzle. Touch the lamps to reveal the matching fireflies.
- Please look at the screenshot for the solution (V).
- Take the last FIREFLY (white).
- Walk down and go right.

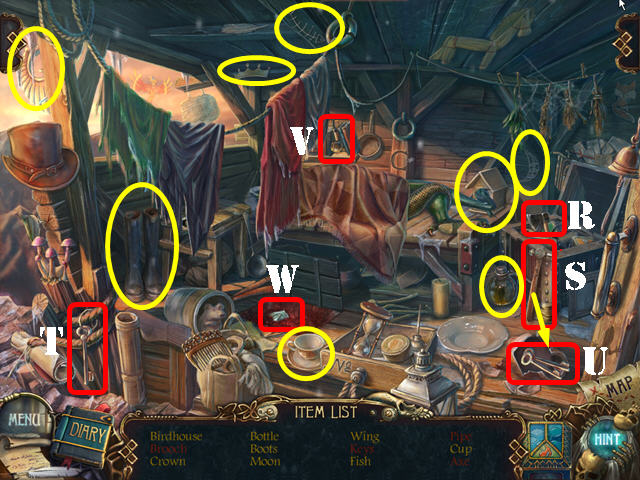
- Play the HOPS.
- Use the nail (1) on the balloon (2) and take the broken balloon (3).
- Place the hat (4) on the puppet (5) and take the jester.
- Put the seat (6) on the wheel (7) and take the unicycle.
- Use the brush (8) on the mask (9) and take the red mask.
- You will receive the PUTTY KNIFE.
- Walk down.
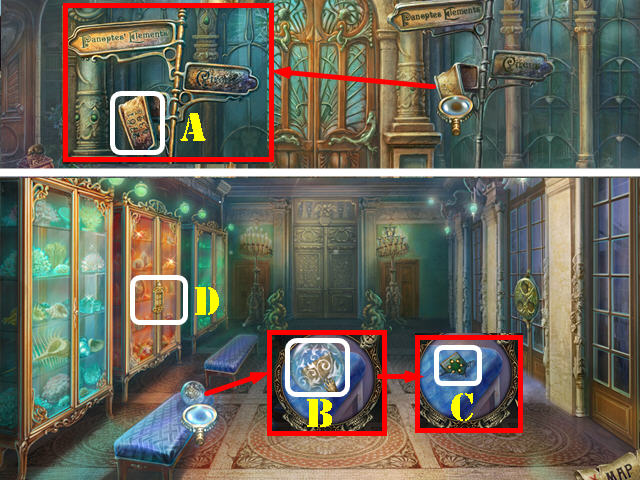
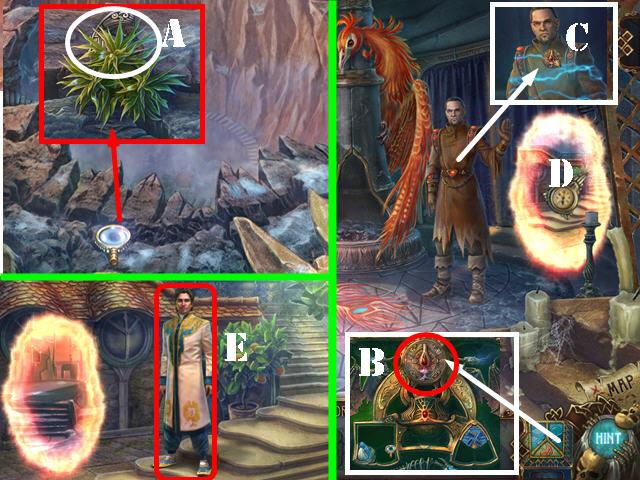
- Zoom into the sign; remove the rust with the PUTTY KNIFE and look at the code (A).
- Go through the door.
- Zoom into the ball on the bench; touch it and take the note (B). Cut the cloth with the scissors and take the TILE (C).
- Zoom into the glass doors and put the TILE on the puzzle to activate it (D).
- Enter the code found outside on the sign (2761 on top and 4325 at the bottom) (E).
- Take the EARRING (F).
- Walk down and go right.
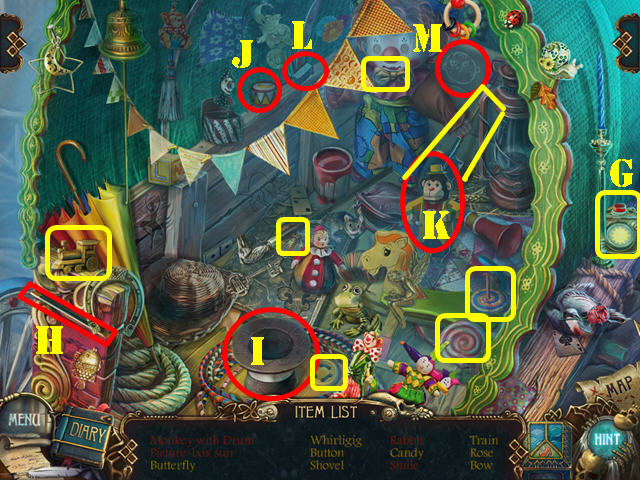
- Play the HOPS.
- Touch the button 3 times (G) and take the picture-box sun.
- Use the wand (H) on the hat (I) and take the rabbit.
- Give the drum (J) to the monkey (K) and take the monkey with drum.
- Use the chalk (L) on the face (M) and take the smile.
- You will receive the SHOVEL.
- Take the note (N).
- Use the MAGIC BOTTLE on the ground (where the note was located) and then use the PICK on the loose stone.
- Use the MAGIC BOTTLE on the carrot (O). Use the SHOVEL to get the CARROT.
- Take a closer look at the bunny and give it the CARROT (P). Take the EARRING (Q).
- Tip the oatmeal bag and take the BOX LOCK PART (R). Place the BOWL WITH WATER in the oatmeal to receive the UNCOOKED OATMEAL.
- Zoom into the elephant and place the 2 EARRINGS on it to activate a puzzle (S).
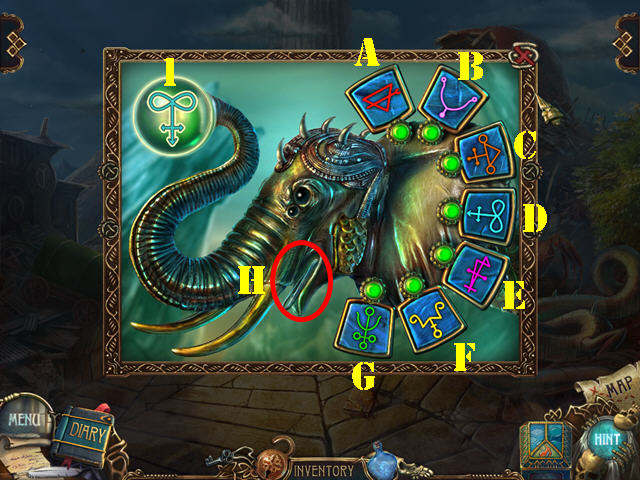
- Remember the sequence of symbols in the crystal ball (1) and duplicate them on the earrings.
- First sequence: D, E, G.
- Second sequence: A, C, F, B.
- Take the TWEEZERS (H).
- Walk down.
- Zoom into the plant; remove the rat and place the BOX LOCK PART on the lock. Take the CRAB’S GLASSES (J).
- Go right.
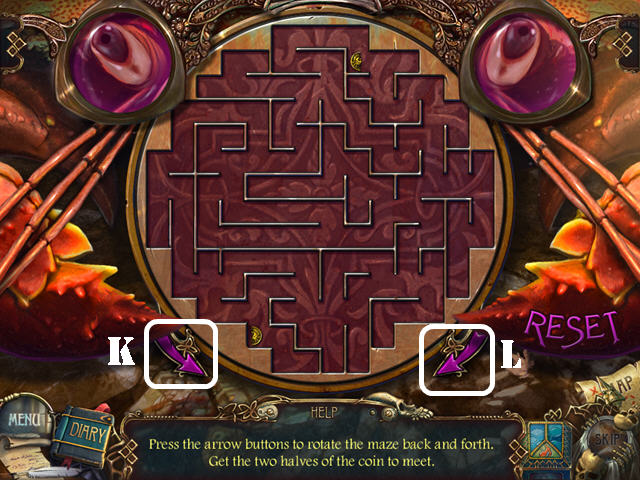
- Zoom into the crab and place the CRAB’S GLASSES on it to activate a puzzle.
- Use the arrow buttons to rotate the maze until both coin parts meet.
- To solve the puzzle, select the arrows in this order: K x 2, L x 3, K, L, K, L, K, L x 2, K x 3, L x 2, K x 2, L, K x 2, L, K x 3,L x 2, K x 2, L, and K.
- Take the MAGIC STAFF.
- Return to Panoptes’ residence.
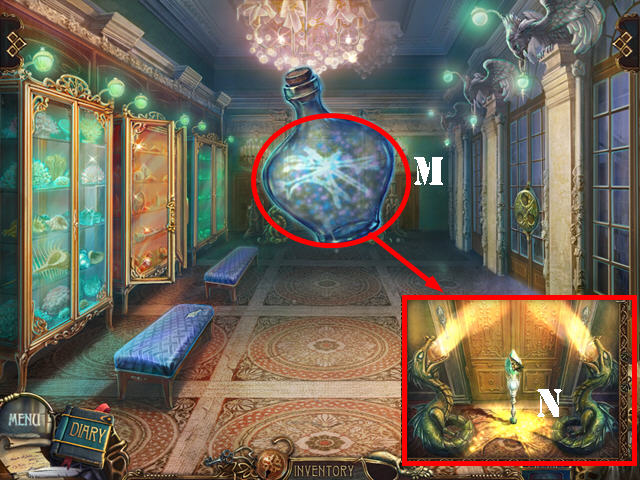
- Use the MAGIC BOTTLE on the door; touch the dragons and then use the MAGIC BOTTLE on the close-up (M).
- Place the MAGIC STAFF on the door (N).
- Go through the door.
Chapter 2: The Square
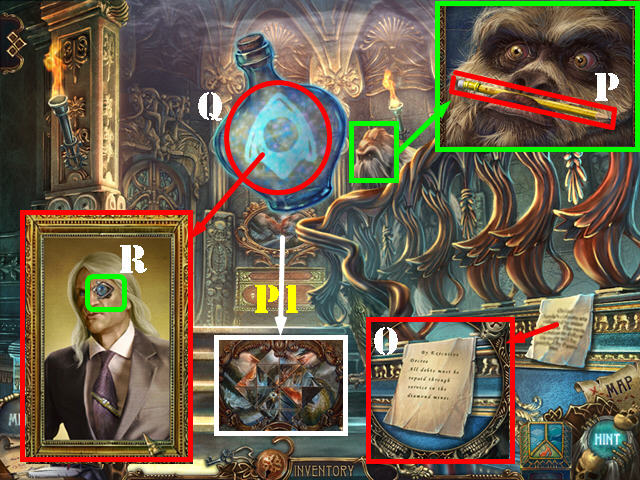
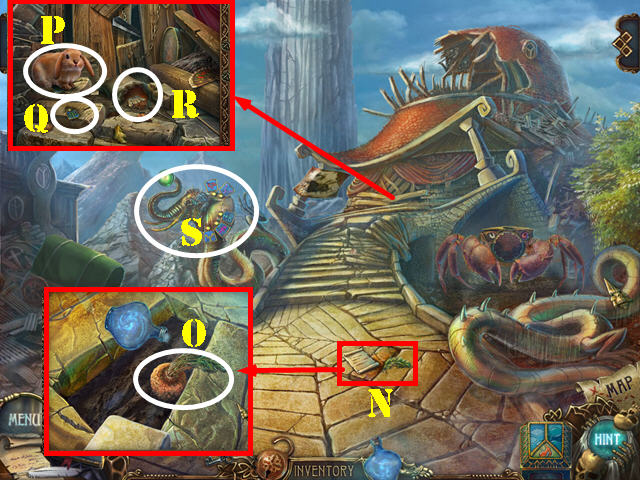
- Zoom into the note and take it (O).
- Zoom into the yeti; use the SCISSORS to cut his hair. Take the PENCIL (P).
- Look at the frame (P1).
- Use the MAGIC BOTTLE on the portrait and again on the close-up (Q).
- Take the LENS (R).
- Go through the door.
- Open the window.
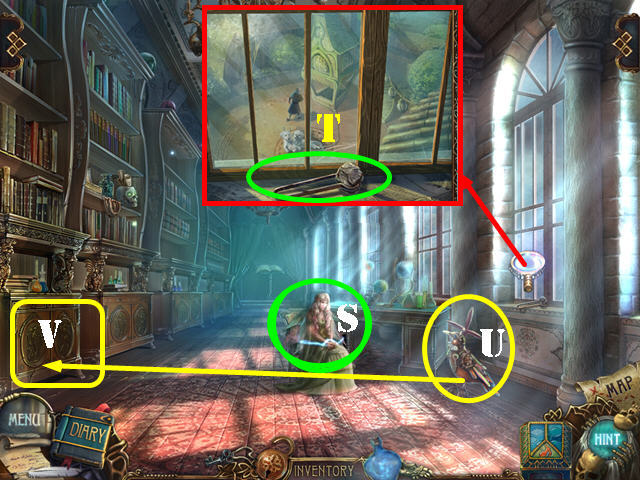
- Talk to the Flower Fairy (S).
- Zoom into the window and take the COAL (T).
- Touch the mechanical bird (U) and it will knock down the cabinet door.
- Zoom into the cabinet door (V) and use the FIREFLY in it to activate a HOPS.
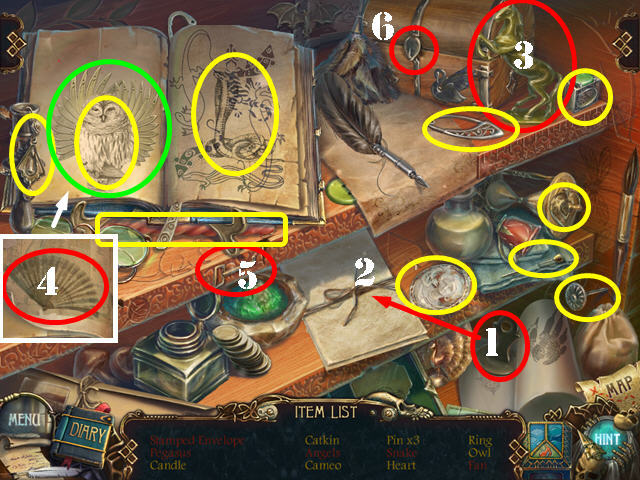
- Play the HOPS.
- Place the stamp (1) on the envelope (2) and take the stamped envelope.
- Place the wings (green) on the horse (3) and take Pegasus.
- Flip the page and take the fan (4).
- Place the key (5) in the lock (6) and take the angels.
- You will receive the CANDLE.
- Walk down.
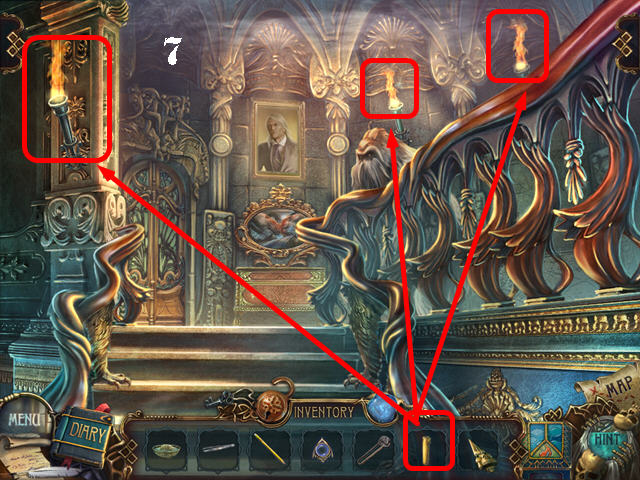
- Place the CANDLE on any of the torches to receive the BURNING CANDLE (7).
- Go through the door.
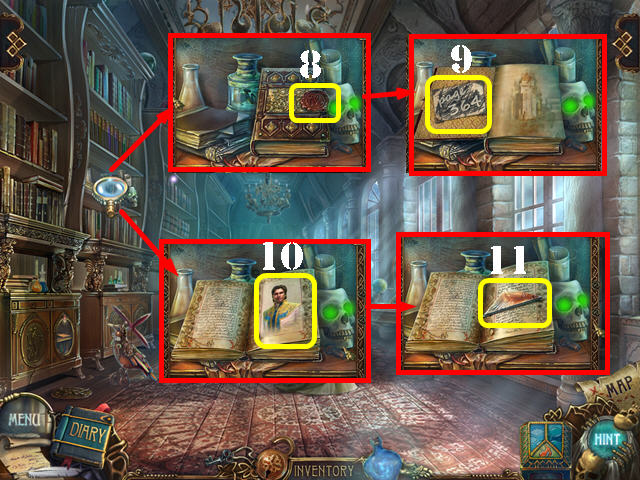
- Zoom into the shelf and melt the seal with the BURNING CANDLE (8).
- Use the PENCIL on the left page to receive a code (9).
- Flip the right page to view a message from Titus (10).
- Flip the right page once more and take the PICTURE PART (11).

- Zoom into the table.
- Place the COAL on the burner and light it with the BURNING CANDLE (12).
- Place the UNCOOKED OATMEAL (13) on the stand and take the COOKED OATMEAL.
- Walk down.

- Zoom into the puzzle and place the PUZZLE PART on it.
- Recreate the image by turning the fragments in the right order.
- To solve the puzzle, select the fragments in this order: E, G, H, F, D, C, B, and A.
- Take the LENS.
- Go through the door.
- Play the HOPS.
- Touch the quill (I) and take the signature.
- Flip the book pages to get the eye (J), the bookmark (J1), the snake (J2) and the map (K).
- Place the powder (L) in the bottle (M) and take the potion bottle.
- You will receive the DUSTER.
- Use the MAGIC BOTTLE on the podium in the back of the room and then flip the pages 3 times. Use the MAGIC BOTTLE on the book once more. Place the 2 LENSES on the book to activate a puzzle.
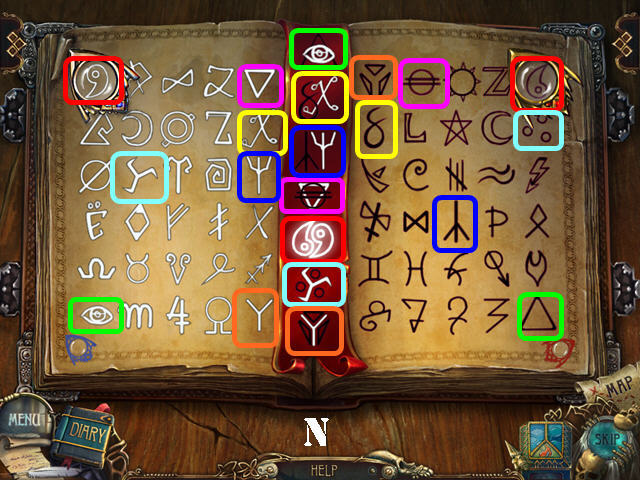
- Place the 2 lenses on the two symbols that constitute one of the symbols on the bookmark.
- Please look at the screenshot for the first part of the solution (N).
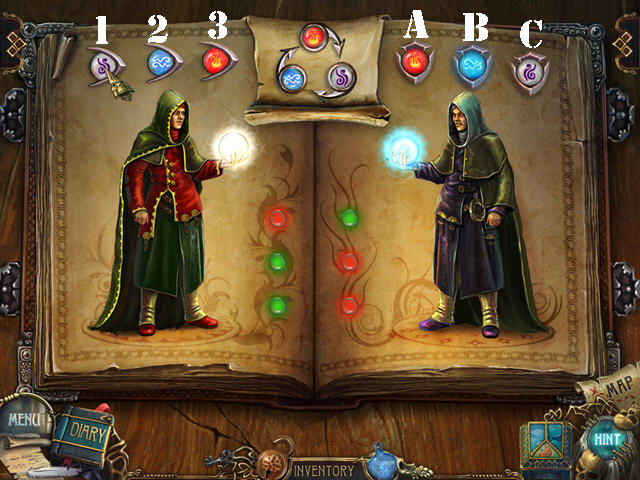
- Choose the correct sphere on the left so it can defeat the wizard on the right. If you make the right choice, the green light on the left side will light up.
- Sphere 1 will defeat sphere B, sphere 2 will defeat sphere A, and sphere 3 will defeat sphere C.
- The solution is random.
- Take the LOCKET.
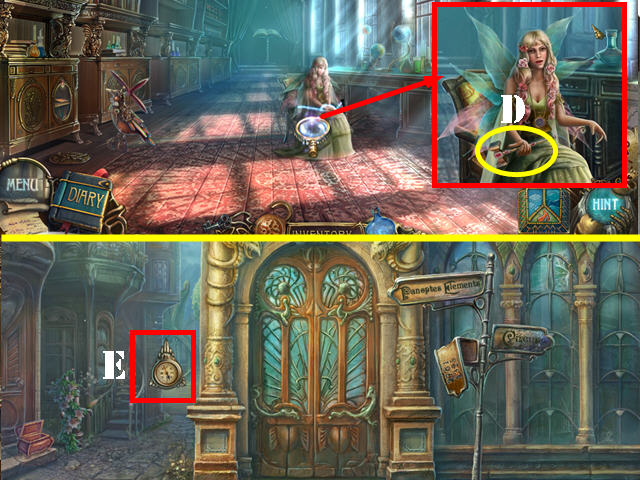
- Zoom into the fairy and give her the LOCKET; take the HAMMER (D).
- Walk down 3 times and go forward through the left side of the screen (E).
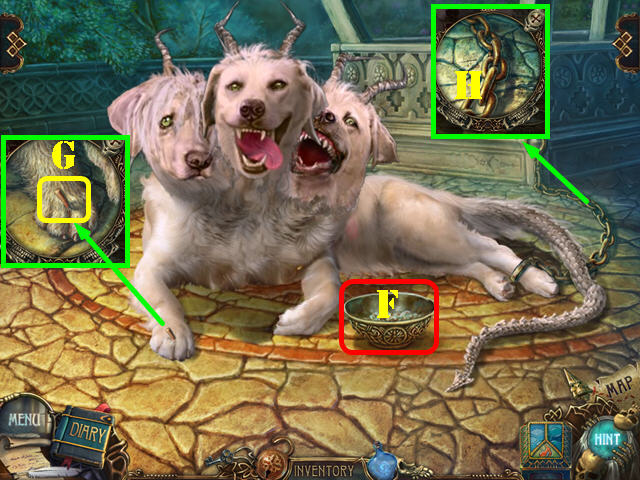

- Zoom into the dogs and place the COOKED OATMEAL on the ground (F).
- Zoom into the paw; use the TWEEZERS to retrieve the splinter (G).
- Zoom into the chain and break it with the HAMMER (H).
- Zoom into the ground; take the note and the SNAKE below it (I).
- Zoom into the clock (J).
- Zoom into the window and open it; move the handkerchief and take the GEM (K).
- Go up the middle steps to access the mine (L).
- Zoom into the miner; take the note and the SPOON (M).
- Zoom into the butterfly; touch it and take the AMULET (N).
- Examine the crates; touch the sphere; open the note and take it (O).
- Place the SNAKE in the slot and remove the cover. Take the HORN and the note (green).
- Place the GEM in the slot and take the BUTTERFLY (P).
- Walk down.

- Zoom into the lantern; place the BUTTERFLY in the slot (Q) and take the PUZZLE PART (R).
- Go into Penoptes’ shop (S).

- Use the HORN on the scene to drive away the ravens.
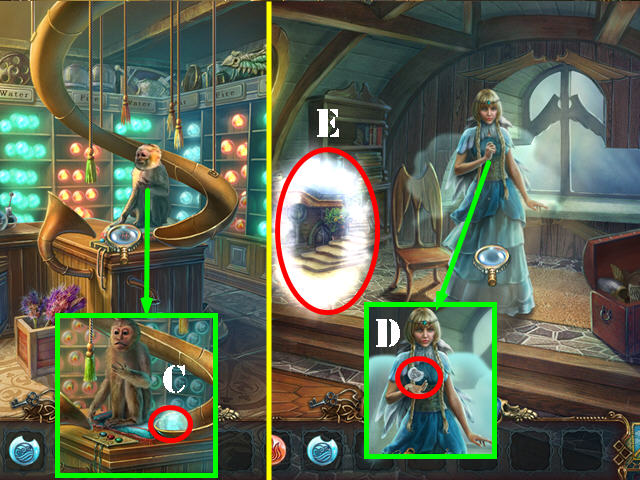
- Zoom into the monkey (T).
- Open the cabinet and zoom into it; take the GOLDFISH (U).
- Zoom into the cash register and shut the drawer (V).
- Return to the mine.
- Zoom into the crates.
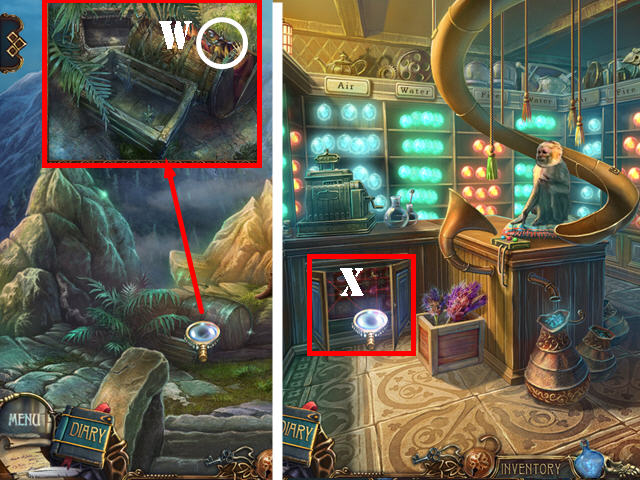
- Place the GOLDFISH in the slot; take the STONES (W).
- Return to Panoptes’ shop.
- Zoom into the cabinet (X) and place the STONES on it to activate a puzzle.
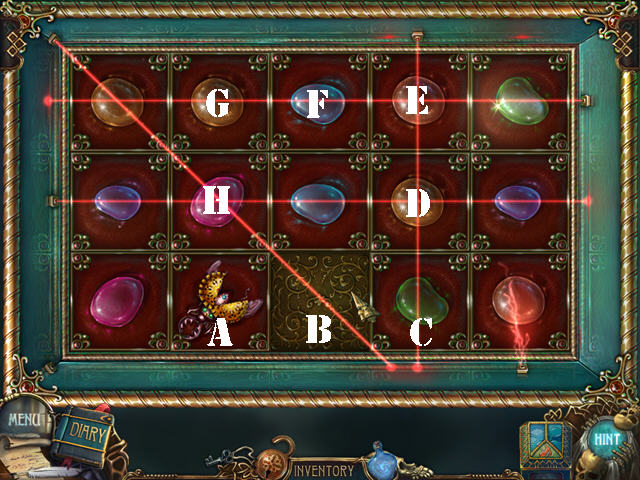
- Select a stone to move it to an adjacent empty spot. Keep moving the stones out of the way until the insect reaches the spot without lasers.
- To solve the puzzle, select the stones in this order: B, C, D, E, F, G, H, A, B, C, D, E, F, G, H, A, B, C, D, E, F, G, H, A, and B.
- Take the METAL EATERS.
- Walk down for a cut scene.
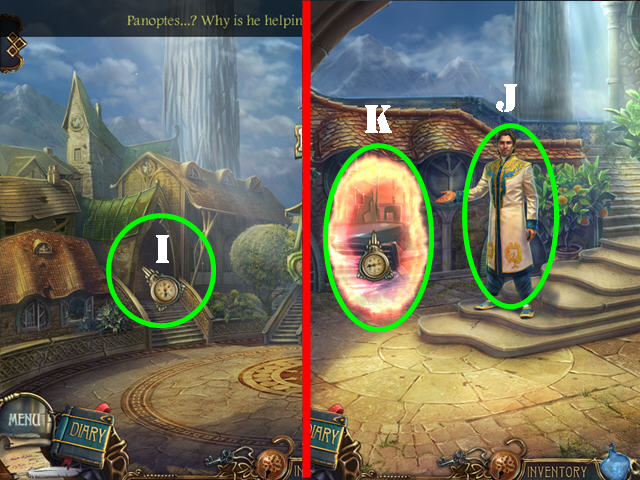
- Go through the newly-opened door (I).
- Talk to Titus (J).
- Go through the portal (K).
Chapter 3: The World of Fire
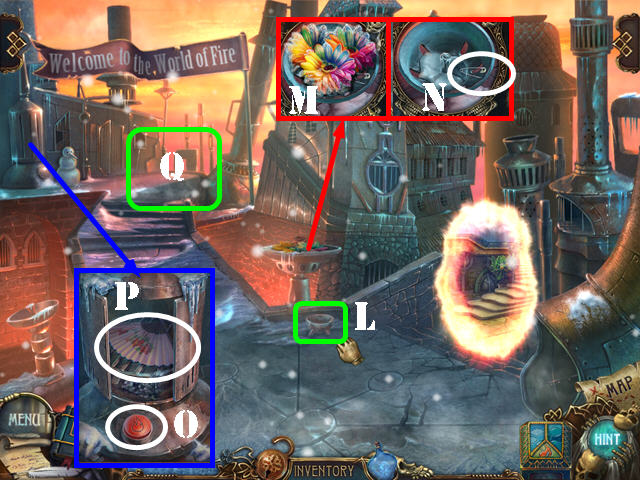
- Take the BOWL (L).
- Examine the FLOWERS and remove them with the SPOON (M). Take the PIN (N).
- Examine the device; press the button (O) and touch the spider. Use the DUSTER on the dirt and take the FAN (P).
- Go forward (Q).
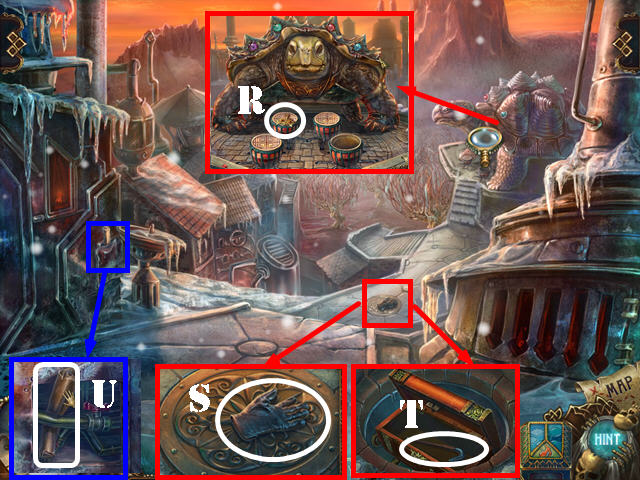
- Zoom into the turtle and take the KEY (R).
- Examine the manhole cover and take the GLOVE (S).
- Use the METAL EATERS on the manhole cover. Use the PIN in the lock and take the CROWBAR (T).
- Zoom into the metal sheet and use the CROWBAR on it; take the DRUM SKIN (U).
- Walk down.
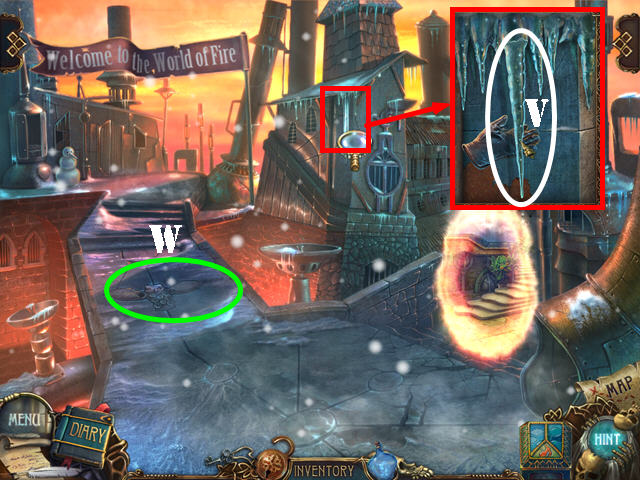
- Zoom into the ICICLE and take it with the GLOVE (V).
- Zoom into the owl on the ground (W) and place the PUZZLE PART on it to activate a puzzle.
- Rotate the puzzle pieces here (A). Select two pieces to swap their positions.
- Swap the pieces in this order: F-B, K-G, I-J, D-B, C-E, I-K, and H-D.
- Rotate the pieces by placing them on the arrows (A) in this order: Cx4, Hx5, Kx4, Ix5, Jx5, Gx5, Fx4, Dx4, Bx5, and Ex5.
- Use the KEY in the keyhole and take the TURTLE EYES.
- Go forward.
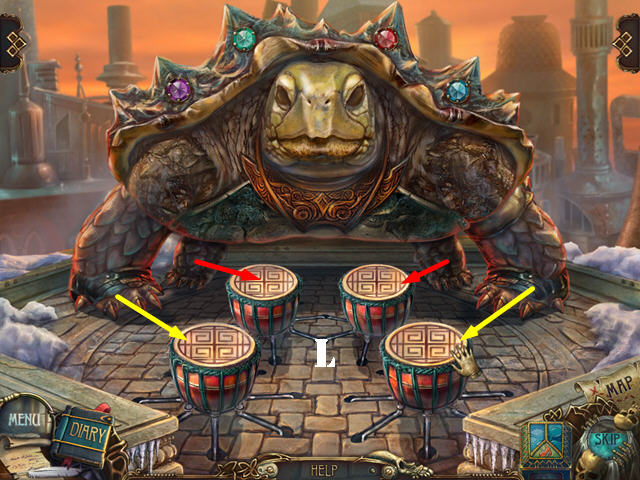
- Zoom into the turtle and place the TURTLE EYES on it. Put the DRUM SKIN on the drum to activate a puzzle.
- Reproduce the turtle’s stomping by picking the drums in the right order.
- The solution to this puzzle is random. Please look at the screenshot to see what drum corresponds to each foot (L).
- Solving this puzzle allows you to go forward; go forward.
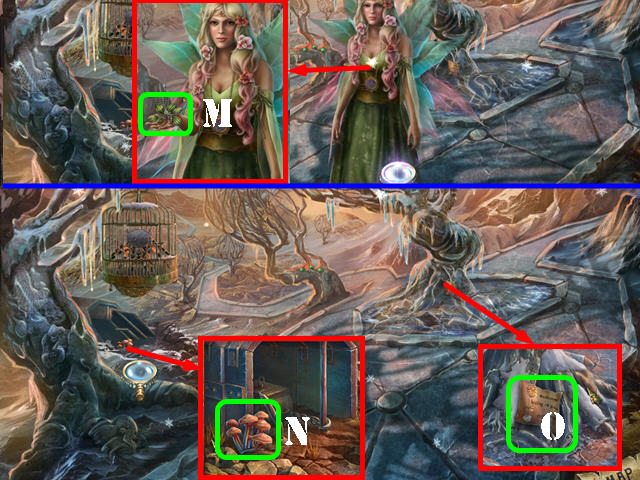
- Talk to the fairy; give her the AMULET and take the HEALING RIB GRASS (M).
- Examine the ground and take the MUSHROOMS (N).
- Examine the base of the tree and take the RECIPE HALF (O).
- Go right.
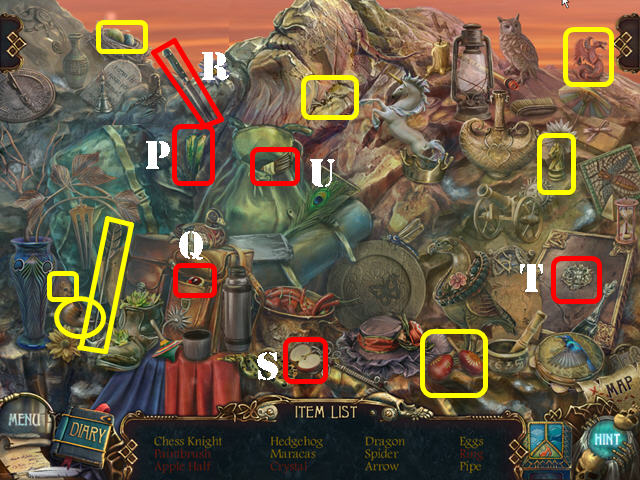
- Play the HOPS.
- Move the backpack and take the crystal (P).
- Open the pocket and take the ring (Q).
- Cut the apple with the knife (R) and take the apple half (S).
- Place the symbol (T) on the bag and take the paintbrush (U).
- You will receive the CRYSTAL.
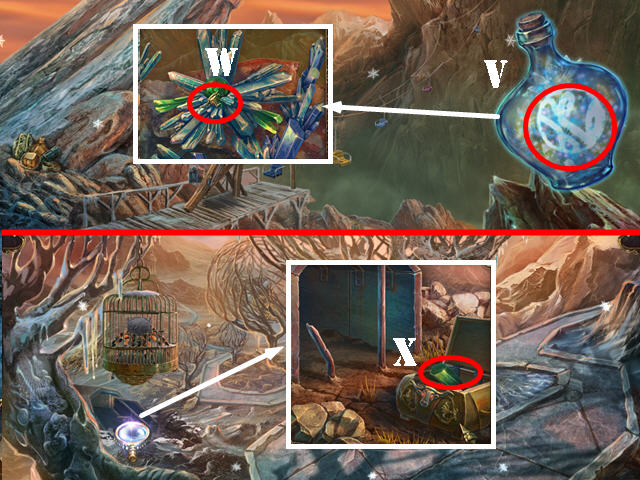
- Use the MAGIC BOTTLE on the crystal flowers (V); take the note and then take the BULL’S HEAD (W).
- Walk down.
- Zoom into the gold chest. Touch the chain and place the BULL’S HEAD in the slot and take the CRYSTAL (X).
- Go right.
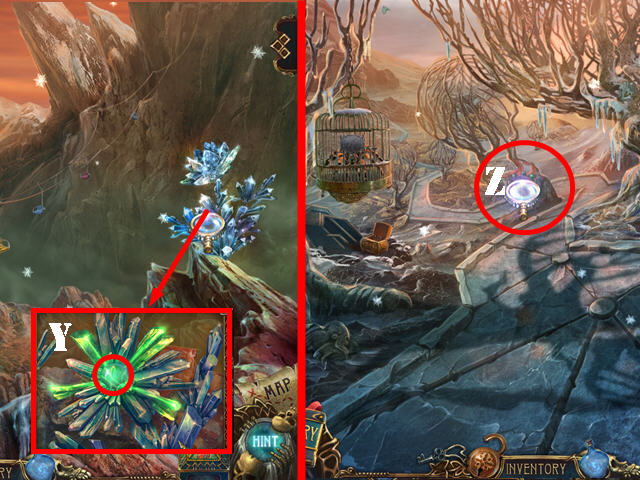
- Zoom into the crystals; place the 2 CRYSTALS on them.
- Use the MAGIC BOTTLE on the crystals and take the GREEN BALL (Y).
- Walk down.
- Zoom into the volcano (Z); remove the branches and use the GREEN BALL on it to activate a puzzle.
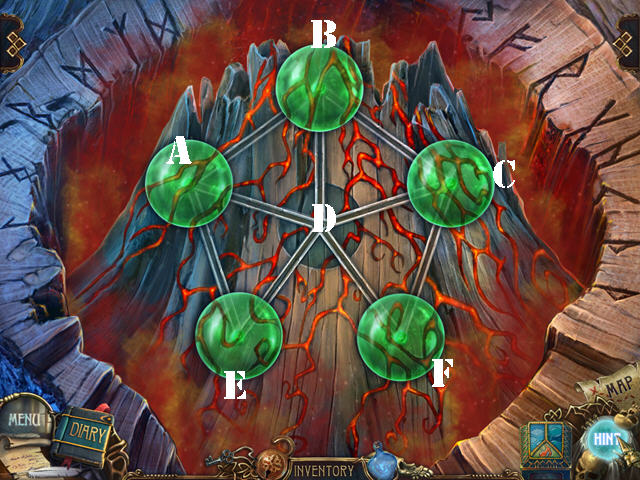
- Move the green balls through the rails until they are all in the right positions.
- To solve the puzzle, touch the balls in this order: A, E, D, B, A, E, D, C, B, A, E, D, B, C, F, D, B, C, F, and D.
- Take the AMULET PIECE and the SPOOL.
- Walk down.
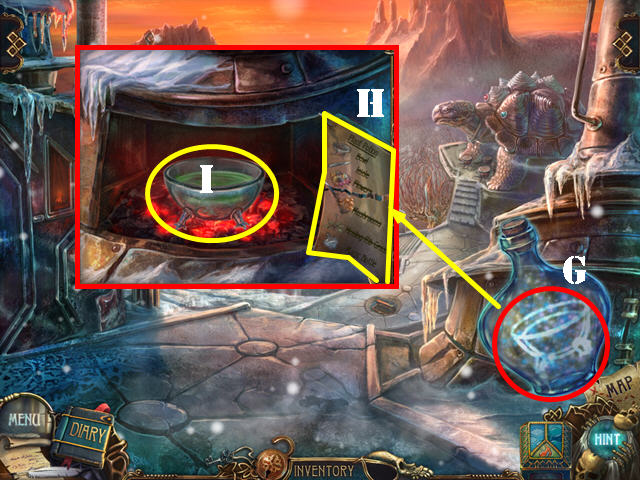
- Use the MAGIC BOTTLE on the furnace door (G) and then open it.
- Place the RECIPE HALF on the other one (H).
- Use the FAN on the coals and then place the BOWL into the furnace.
- Place the items into the bowl in the following order: ICICLE, FLOWERS, MUSHROOMS, and the HEALING RIB GRASS (I).
- Use the MAGIC BOTTLE on the bowl and take the PLANT-REVIVAL POTION.
- Go forward and then go right.
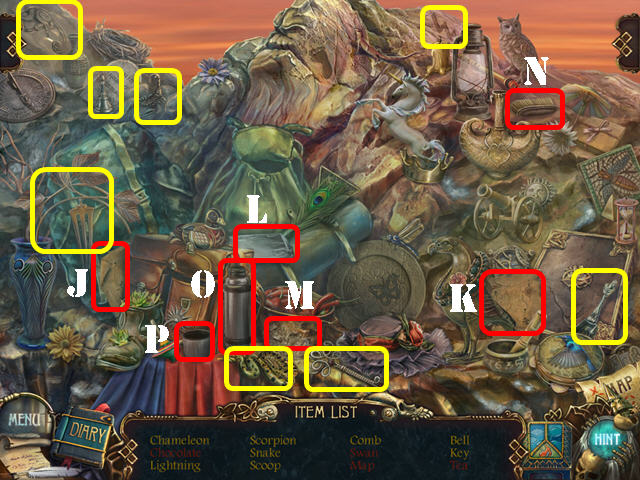
- Play the HOPS.
- Place the map piece (J) next to the other (K) and take the map.
- Open the wrapper and take the chocolate (L).
- Scrub the pot (M) with the brush (N) and take the swan.
- Touch the thermos (O) and take the tea (P).
- You will receive the SCOOP.
- Walk down twice.
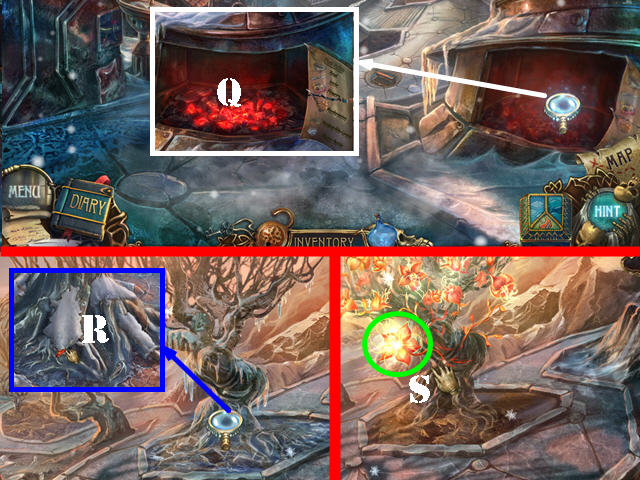
- Zoom into the furnace and use the SCOOP on the coal to get the SCOOP WITH COAL (Q).
- Go forward.
- Zoom into the base of the tree; use the SCOOP WITH COAL on it and you will automatically receive the SHOVEL (R). Use the PLANT-REVIVAL POTION on the roots.
- Take the FIRE FLOWER (S).
- Walk down.
- Zoom into the furnace and use the SCOOP in it to get the SCOOP WITH COAL (Q).
- Go forward twice.
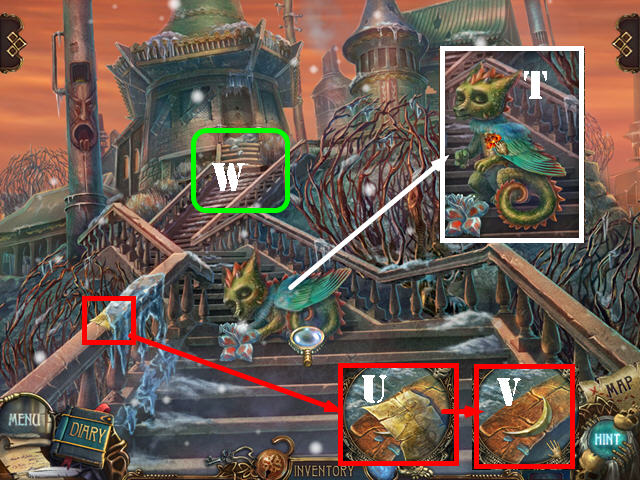
- Zoom into the dragon and touch it; give it the FIRE FLOWER (T).
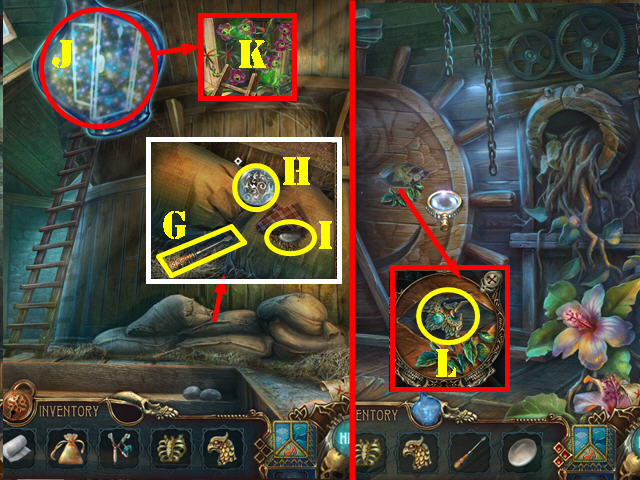
- Zoom into the railing; take the clue (U) and the SHUTTERS MOON (V).
- Go forward (W).
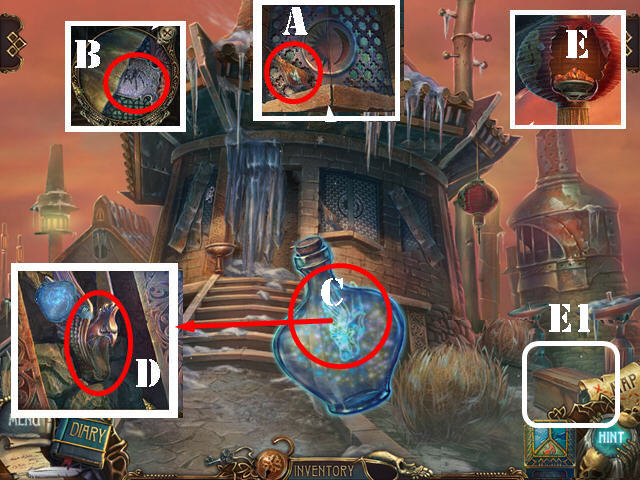
- Zoom into the shutters and take the BELLOWS (A).
- Zoom into the left window and take the NAMEPLATE (B).
- Use the MAGIC BOTTLE on the peacock (C) and again on the close-up. Take the PEACOCK (D).
- Move the crate in the lower right (E1); zoom into the lantern and touch it. Use the SCOOP WITH COAL in it and take the LAMP (E).
- Walk down twice.
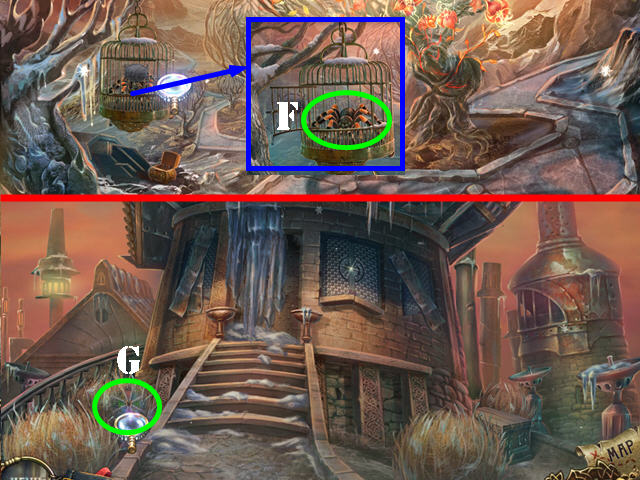
- Zoom into the cage and place the NAMEPLATE on it. Take the SPIDER (F).
- Go forward twice.
- Zoom into the spiders (G) and put down the SPIDER to activate a puzzle.
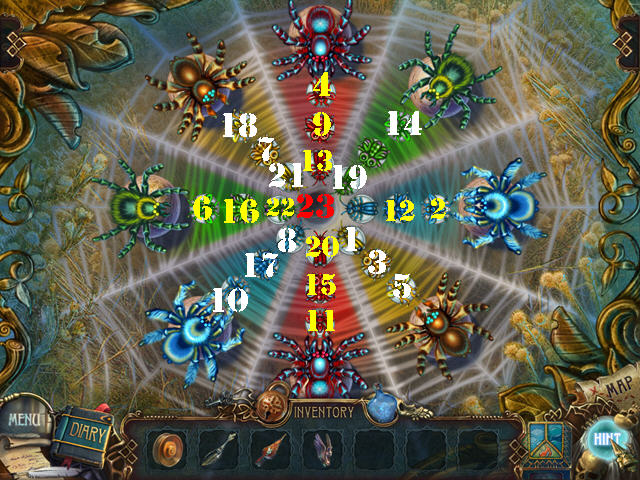
- Move the flies to the cobwebs of the same color.
- Please look at the screenshot for the solution, and touch the spiders in the order shown (H).
- Take the SPIDER WEB.
- Walk down.
- Zoom into the pole; place the SPIDER WEB in its mouth (I) and the BELLOWS in the hole above (J).
- Take the SHUTTERS SUN (I).
- Go forward.
- Zoom into the right window; place the SHUTTERS MOON and the SHUTTERS SUN into the slots (L). Go through the window.
- Go through the lower door once inside.
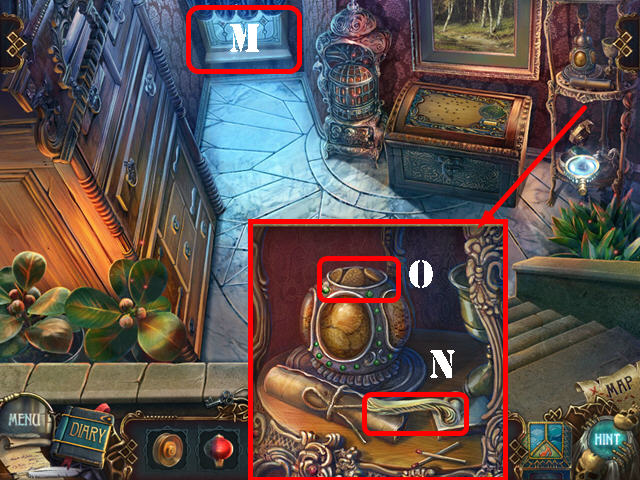
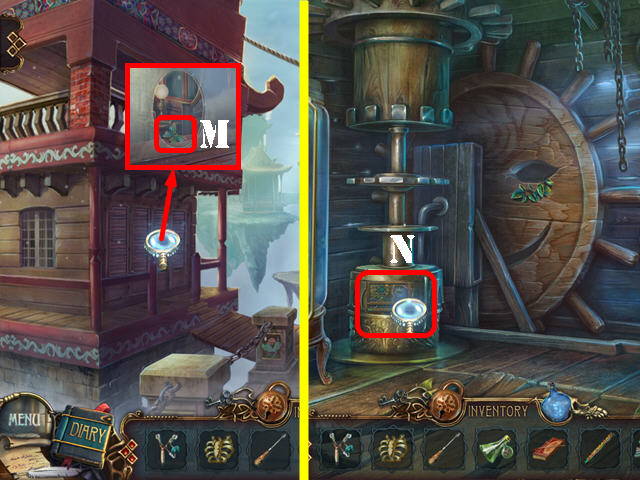
- Open the window (M).
- Examine the stand; take the HANDLE (N).
- Remove the top and take the COOKIE (O). Touch the jar 3 times to finish eating the rest of the cookies.
- Walk down.
Chapter 4: The Mage of Fire
- Zoom into the table; feed the COOKIE to the plant (P). Touch the kettle (magenta) twice and take the KEY (Q).
- Zoom into the stove; place the HANDLE on it. Pull the handle and take the GEAR (R).
- Go through the bottom door.
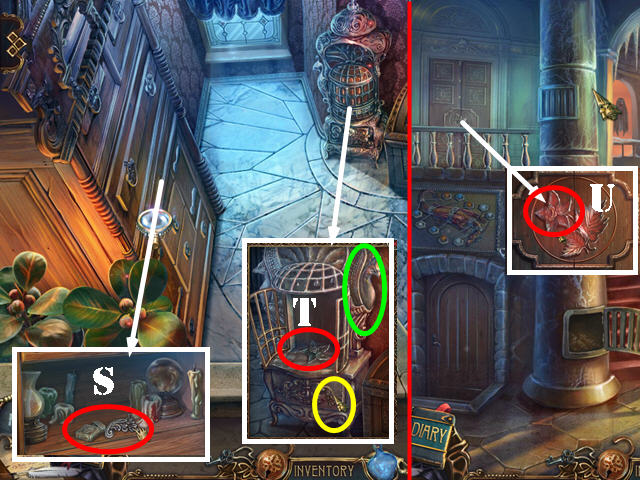
- Zoom into the armoire and use the KEY in the lock. Take the CAGE PART (S).
- Zoom into the cage and place the PEACOCK on the right (green) and the CAGE PART in the slot (yellow).
- Take the FLOWER (T).
- Walk down.
- Zoom into the top door and place the FLOWER in the slot (U). Go through the door.

- Use the LAMP on the scene to light up the room.
- Talk to the Mage of Fire; you have to find a way to get rid of the magical chains (V).
- Examine the tail; move it; take the TONGS and the GEAR (W).
- Examine the curtain and take the ROPE (X).
- Zoom into the KEYS and take them (Y).
- Walk down.
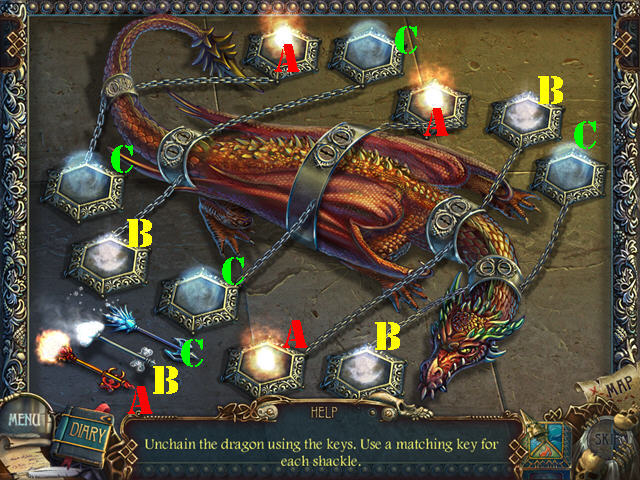
- Zoom into the frame in between the two doors and add the KEYS to activate a puzzle.
- Place a matching key into each shackle.
- Please look at the screenshot for the solution (A, B, C,). You may have to place the key in a shackle more than once.
- Take the ENGINE in the niche.
- Walk down 3 times and go right.
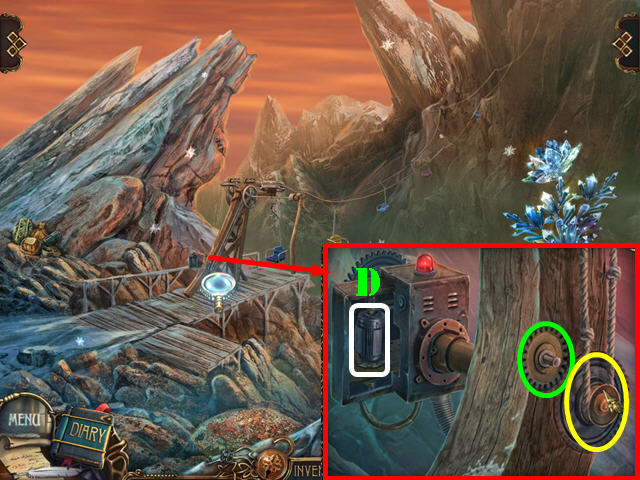
- Zoom into the chair lift mechanism.
- Place the ENGINE in the mechanism (D).
- Place the 2 GEARS into position (yellow and green). Place the SPOOL on the largest gear (yellow) and then attach the ROPE to it.
- Go up the lift.
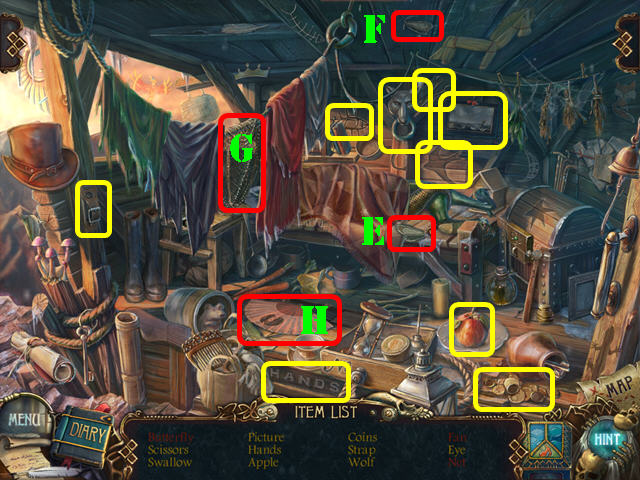
- Play the HOPS.
- Move the cloth and take the wings (E); place them on the moth (F) and take the butterfly.
- Move the clothes and take the net (G).
- Move the rug and take the fan (H).
- You will receive the NET.
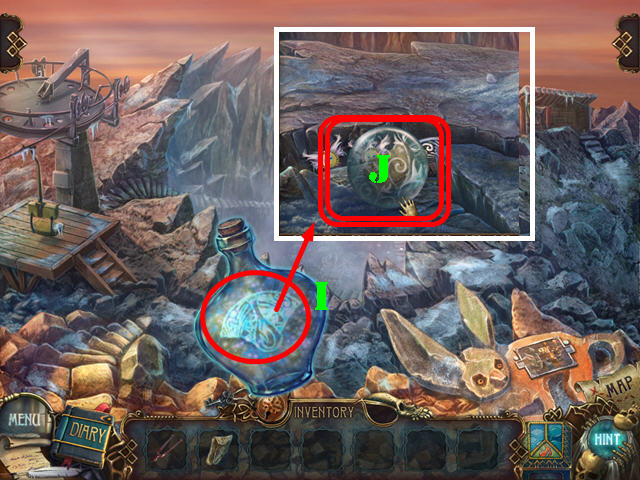
- Use the MAGIC BOTTLE on the rocks (I); touch the sphere and take the note (J).
- Go forward.
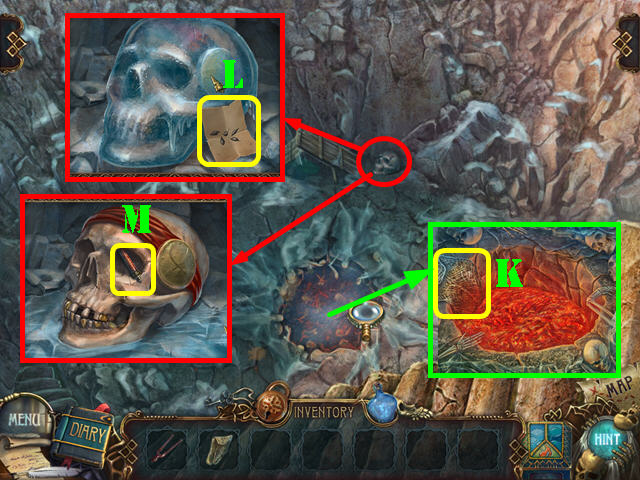
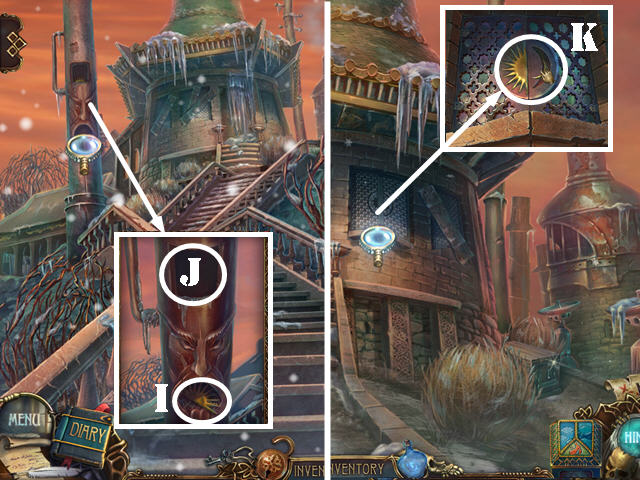
- Zoom into the crater and use the NET in it. Take the HOT NET with the TONGS (K).
- Zoom into the skull and take the note (L).
- Use the HOT NET on the frozen skull and take the SOLDERING IRON (M).
- Return to the basement.
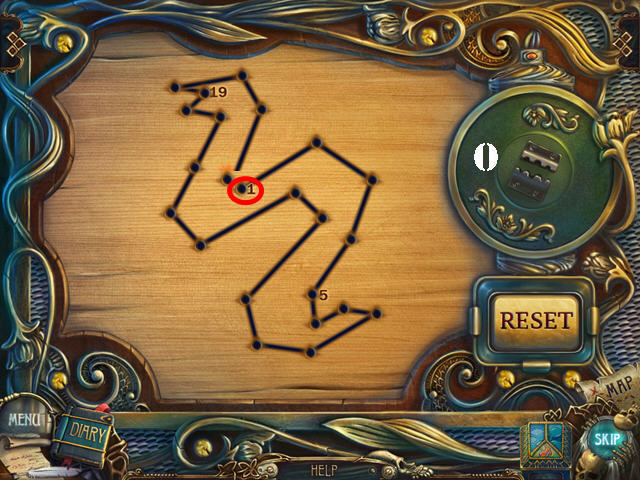
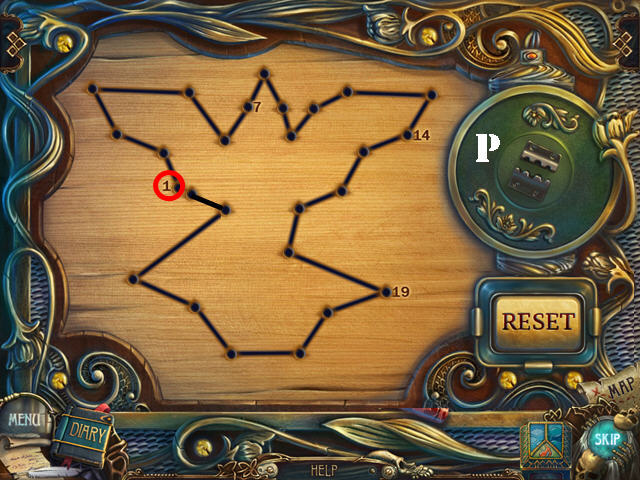
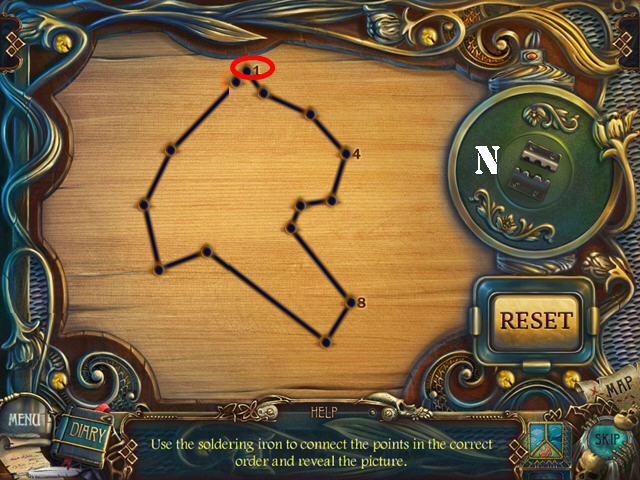
- Zoom into the chest and put down the SOLDERING IRON to activate a puzzle.
- Connect the dots with the soldering iron. Move the soldering iron over the dots and press down on the iron when you see a red glow.
- Use the numbers on the board as a clue.
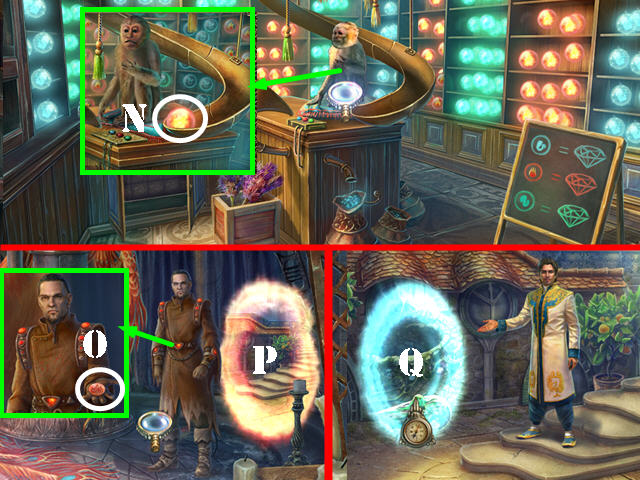
- Please look at the screenshots for the 3 solutions (N, O, and P).
- Zoom into the chest and take the PICTURE PART.
- Return to the chair lift and take it to the other side.
- Zoom into the picture in the lower right and place the PICTURE PART on it to activate a puzzle.
- Select a piece and then touch an adjacent empty spot to move it there. Place a piece in the holding area (red) and select the arrows on each side (green) to rotate it.
- Please look at the screenshot for the solution (Q).
- Take the GOLD TOOTH and the PICTURE PART.
- Play the HOPS.
- Open the chest and take the axe (R).
- Break the vase with the hammer (S); place the key (T) next to the others (U) and take the keys.
- Move the books and take the pipe (V).
- Open the hatch and take the brooch (W).
- You will receive the AXE.
- Go forward.
- Zoom into the barrel and break it with the AXE (X).
- Move the apple and take the GOLD TOOTH (Y).
- Zoom into the skull and place the 2 GOLD TEETH in the mouth and take the GRAIN (Z).
- Walk down.
- Zoom into the stones and place the GRAIN in the crack. Use the MAGIC BOTTLE on it and take the AMULET PIECE (A).
- Return to the Mage of Fire. Open the amulet; take it (B) and zoom into the mage. Use the amulet on him (C).
- Talk to the Mage.
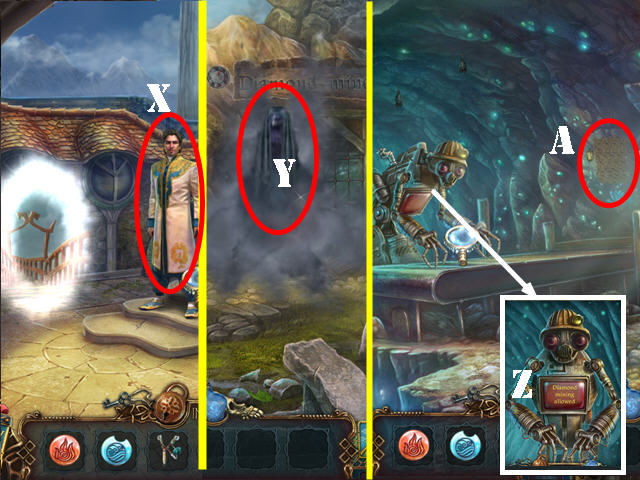
- Go through the portal (D).
- Talk to Titus (E).
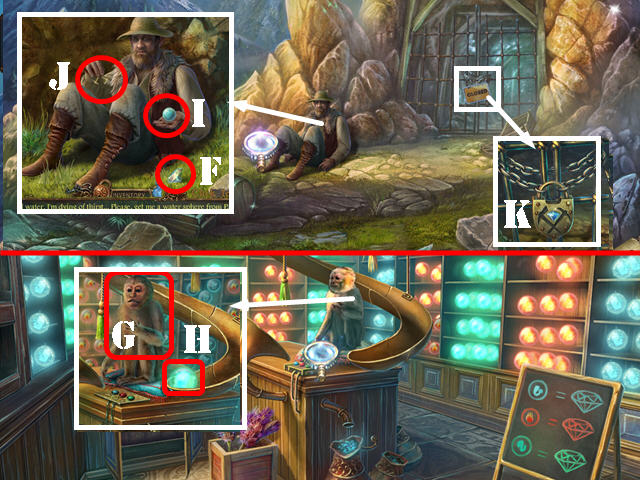
- Return to the mine and talk to the miner; take the DIAMOND (F).
- Return to Panoptes’ shop.
- Zoom into the monkey and give it the DIAMOND (G); take the SPHERE OF WATER (H).
- Return to the mine entrance; give the SPHERE OF WATER (I) to the miner and take the KEY (J).
- Zoom into the gate and remove the sign; use the KEY in the lock (K); remove the lock and go through the door.
- Zoom into the robot to get permission to mine.
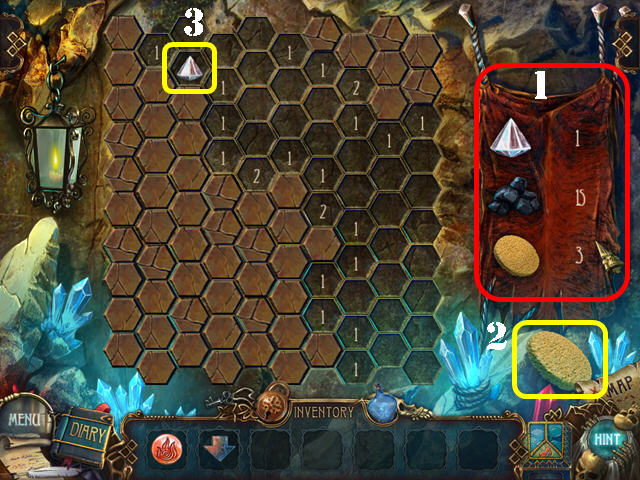
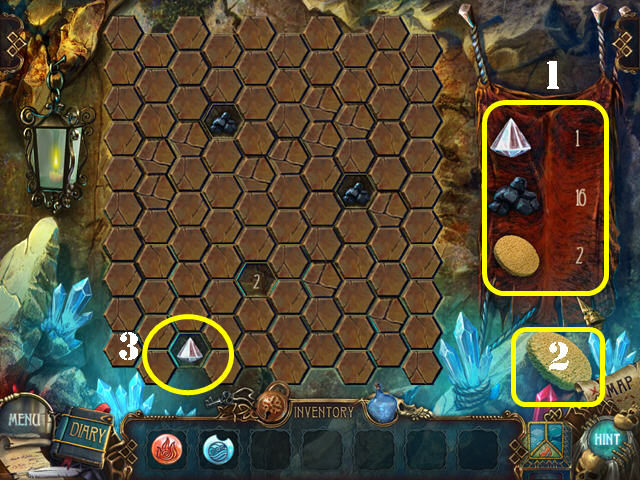
- Zoom into the puzzle on the wall.
- Break the stone hexagons to reveal what is behind them without uncovering a coal. Select any hexagon to begin.
- Selecting a hexagon that doesn’t have a coal reveals the number of neighboring squares containing coals.
- Take the sponge and drag it to the puzzle to start over if the coal explodes (L).
- The solution to this puzzle is random. Take the DIAMOND (M).
- Return to Panoptes’ shop.
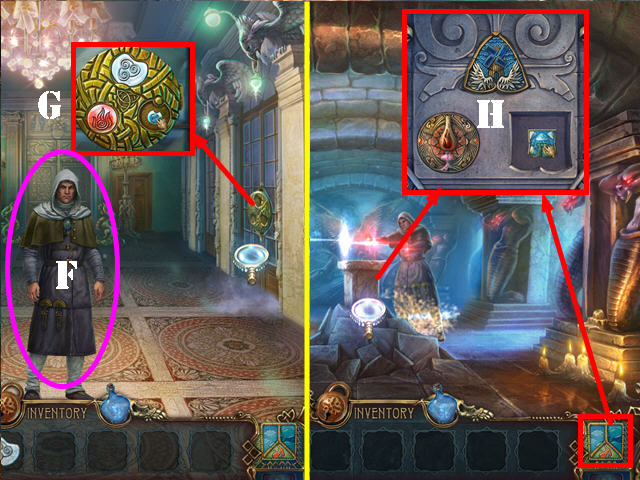
- Zoom into the monkey and give it the DIAMOND. Take the SPHERE OF FIRE (N).
- Return to the portal and go through it.
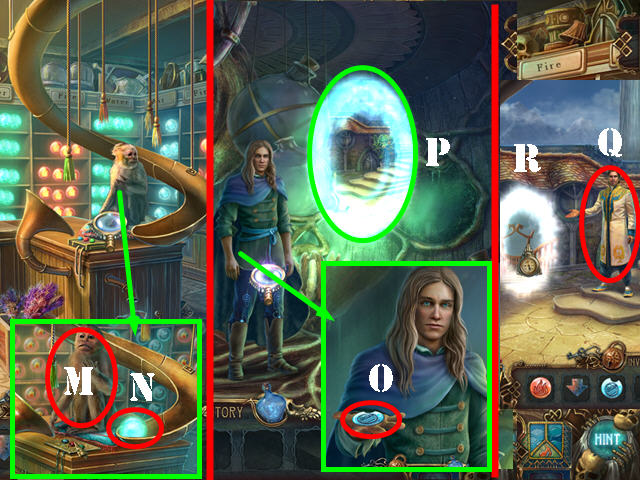
- Zoom into the mage and give him the SPHERE OF FIRE. Zoom into the Mage again and take the FIRE RUNE (O).
- Go through the portal (P) and talk to Titus.
- Go through the portal (Q).
Chapter 5: The World of Water
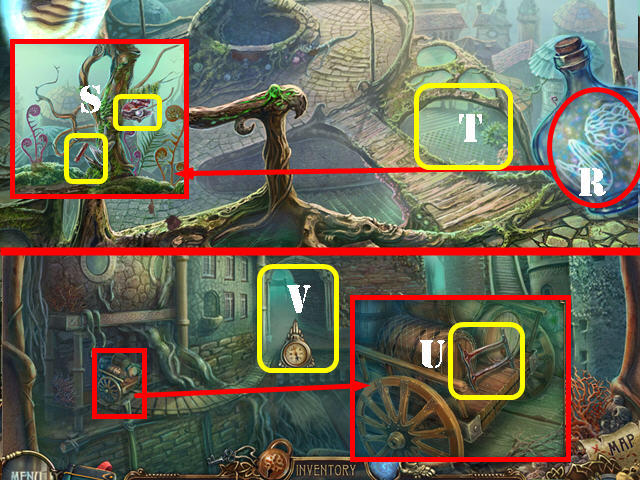
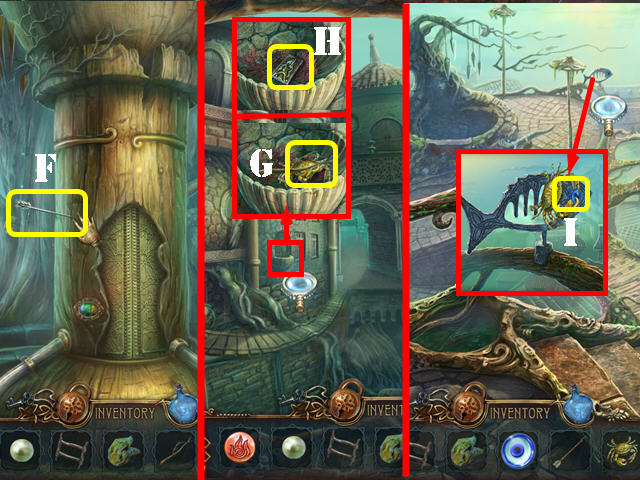
- Use the MAGIC BOTTLE on the tree and then again on the close-up (R).
- Take the PEARL and the CORKSCREW (S).
- Go forward (T).
- Zoom into the cart; take the LADDER PART (U).
- Go through the doorway (V).
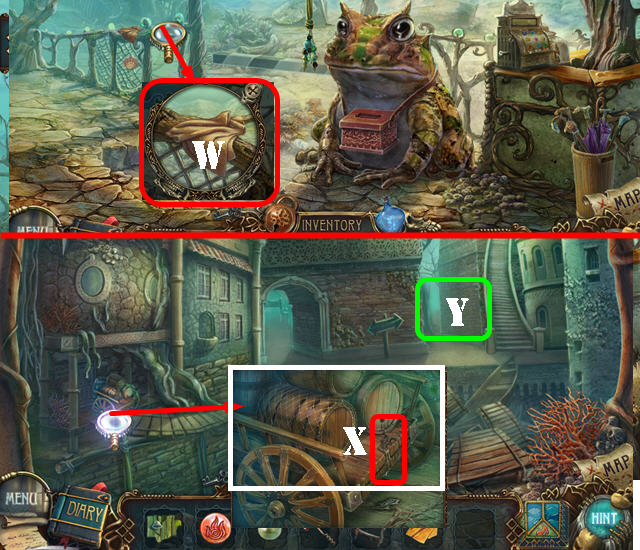
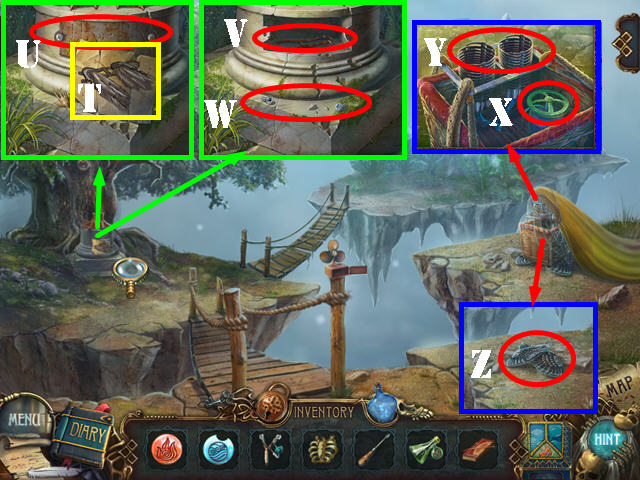
- Zoom into the railing; take the RAG (W).
- Walk down.
- Zoom into the cart. Use the CORKSCREW on the cork; place the RAG on the water to get the WET RAG (X).
- Go right (Y).
- Zoom into the roots and take the BRANCH (A).
- Touch the shell and take the EYE (B).
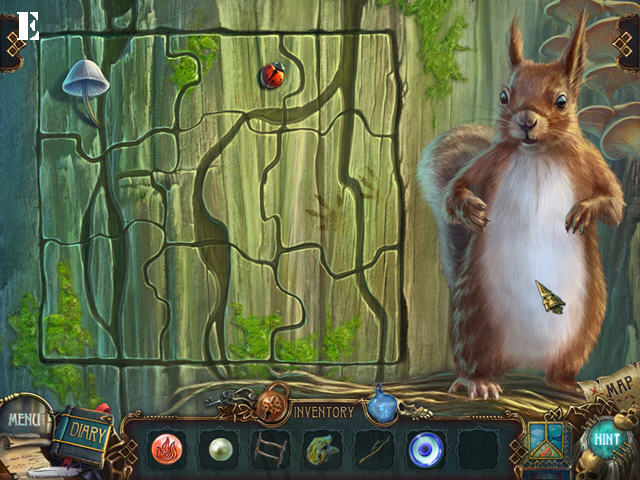
- Examine the tree and place the PICTURE PART on the tree to activate a puzzle (C).
- Touch the squirrel to rotate the puzzle piece it’s holding. Drag the pieces into a spot; pieces placed correctly will lock in place.
- Please look at the screenshot for the solution (E).
- Go into the tree house.
- Take the ARROW (F).
- Walk down twice.
- Zoom into the fountain; use the BRANCH to get the CRAB (G).
- Take the WELL PART (H).
- Walk down.
- Zoom into the fish; use the CRAB on the fish and take the EYE (I).
- Go forward.
- Zoom into the top door (J); place the 2 EYES on the lock to activate a puzzle.
- Turn the eyes until the lasers point to the correct stones.
- To solve the puzzle, touch the eyes in this order: L and Mx4.
- Go through the door.
- Examine the shell and place the PEARL on the stand. Pull back the sheet and take the PATTERNED STONE (N). Move the pillow and take the RIBBON (O).
- Examine the shelf; touch the sphere, open the letter, and take it (P).
- Take the TAP KNOB (Q).
- Zoom into the corals; place the CRAB on the corals and then take the BEAM (R).
- Return to the inside of the tree house.
- Examine the pipe and remove the flowers; place the RIBBON on the crack (S) and then turn the handle (T).
- Look at the panel and change the colors to the image on the screenshot (green, yellow, blue) (U).
- Go into the elevator (V).
- Take the LADDER PART (W).
- Examine the jaws and place the BEAM on it to activate a HOPS (X).
- Play the HOPS.
- Touch the panel to reveal the key; use the key (A) on the chest lock; take the sail (B) and place it on the ship; take the sailing ship (C).
- Move the coral and take the tooth (D).
- You will receive the SHELL.
- Walk down.

- Zoom into the shell and place the SHELL on it to activate a puzzle.
- Look at the shell in the center and aim it so that it lands next to, or in between a matching shell (E).
- Match 3 shells of the same color to eliminate them from the board.
- The solution to this puzzle is random.
- Take the EMPTY LANTERN.
- Go into the elevator.
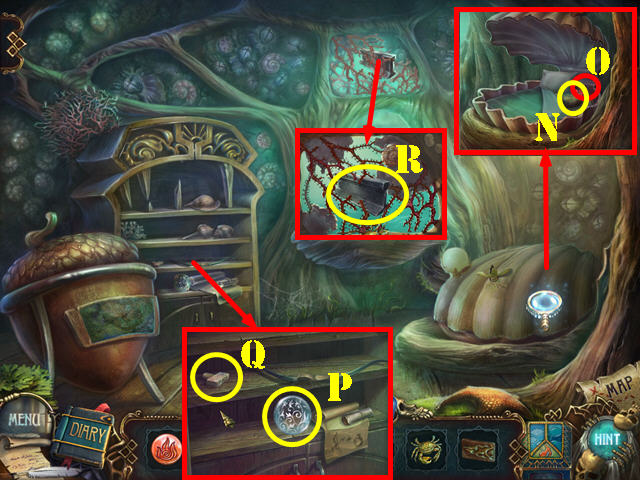
- Zoom into the teapot.
- Place the TAP KNOB on the spout (1) and then place the EMPTY LANTERN on the stump.
- Turn the knob and take the LIGHTING LANTERN (2).
- Zoom into the wall; place the LIGHTING LANTERN on the wall and take the SCOOP NET (3).
- Walk down.
- Examine the crack; touch the sphere, open the note and take it (4).
- Use the SCOOP NET to get the TADPOLES and then take the MAGIC DISK (5).
- Go into the elevator.

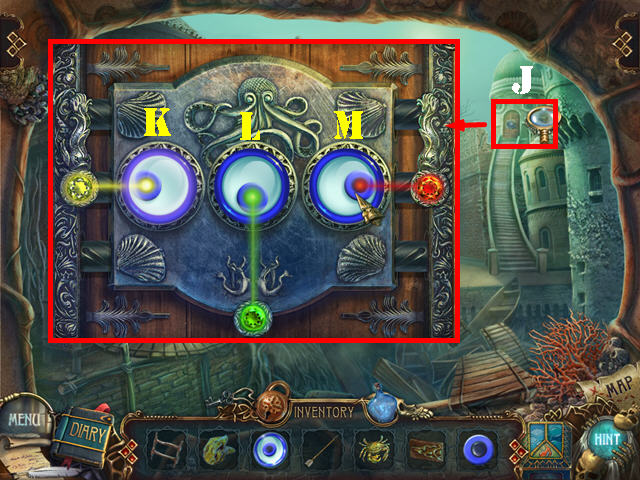
- Zoom into the door and place the MAGIC DISK in the slot to activate a puzzle.
- Touch an outer arrow to move the pieces to the center location.
- Use the arrows in the center of each disk to rotate it.
- To solve the puzzle, touch the arrows in this order: D, A, Fx3, E, A, D, A, E, Fx3, E, C, Ax2, E, A, Ix2, D, A, C, Hx3, C, Ax3, D, Ax2, B, Ax2, B, A, Fx3, E, Ax2, E, Fx3, E, Ax2, C, Hx3, C, Ax2, E, Ax3, Gx3, B, Ax2, B, Ax2, Ix3, D, Ax2, D, Ax2, Gx2, B, Ax2, B, Ax3, Hx3, C, Ax2, C, H, Ax2, C, A, B, Ax2, G, B, Ax2, B, Gx3, Ax2, and B.
- Go through the door.
Chapter 6: The Mage of Water
- Talk to the Mage of Water (J).
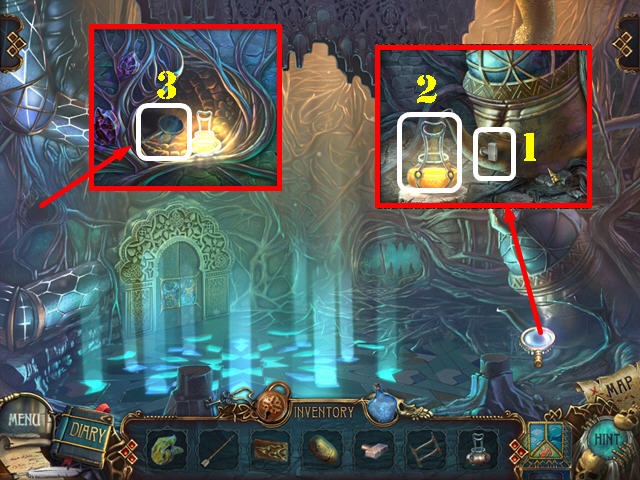
- Use the MAGIC BOTTLE in the lower left corner (K); take the WELL PART (L).
- Use the MAGIC BOTTLE on the flask (M) and take the FOSSILIZATION POTION.
- Return to the well.
- Zoom into the well and put the 2 WELL PARTS in the slots (N), touch the sphere (O) and take the COIN (P).
- Return to the tower.
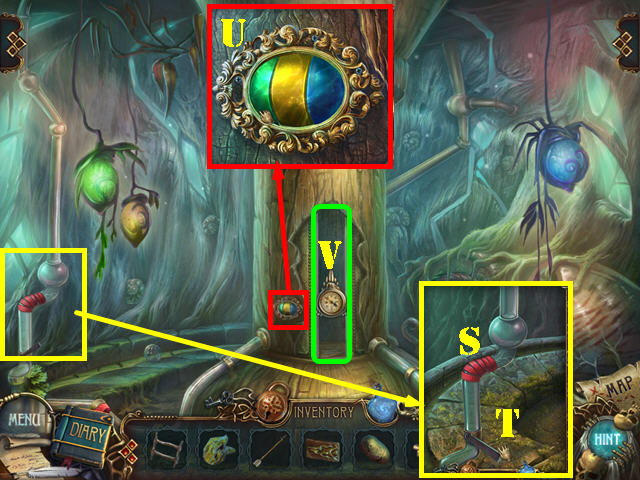
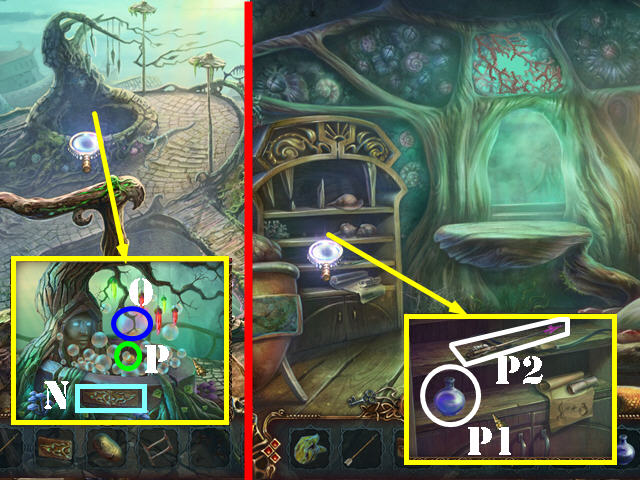
- Zoom into the shelf and place the ARROW and the FOSSILIZATION POTION on the shelf. Place the arrow in the potion (P1) and take the BOW OF PETRIFICATION (P2).
- Return to the outside of the tree house.
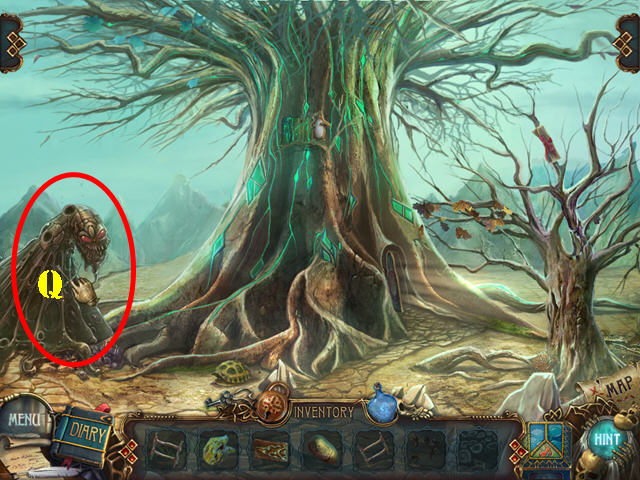
- Use the BOW OF PETRIFICATION on the monster (Q).
- Go forward.
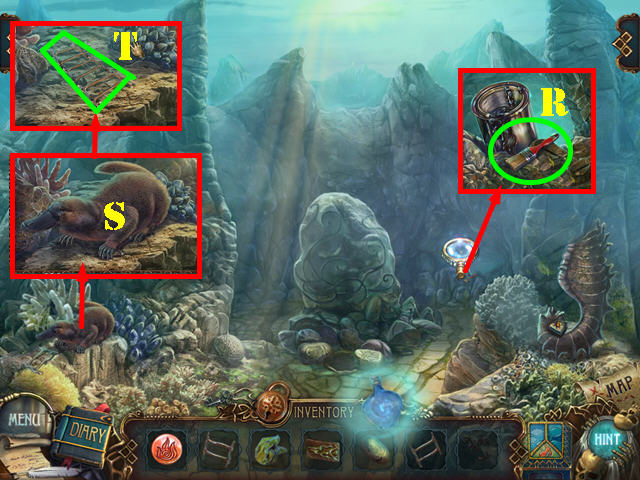
- Examine the stones; touch the brush to get the BRUSH WITH RESIN (R).
- Examine the platypus and give him the TADPOLES (S).
- Use the BRUSH WITH RESIN on the ladder piece. Put the LADDER PART on top of the other one and use the BRUSH WITH RESIN on it.
- Put down the second LADDER PART and take the LADDER (T).
- Walk down.
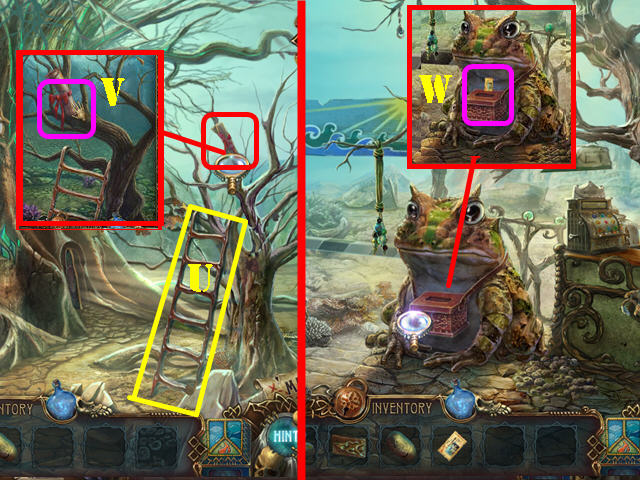
- Place the LADDER on the tree (U); zoom into the top of the tree; remove the bow and take the TICKET TO BEACH (V).
- Walk down and go through the left doorway.
- Zoom into the frog and place the TICKET TO BEACH in the box (W).
- Go forward.
- Zoom into the ship and take the PATTERNED STONE (1).
- Turn the wheel for a box to appear (2).
- Use the MAGIC BOTTLE on the corals (3) and then use it on the rod; take the FISHING ROD (4).
- Zoom into the maze to activate a puzzle (5).
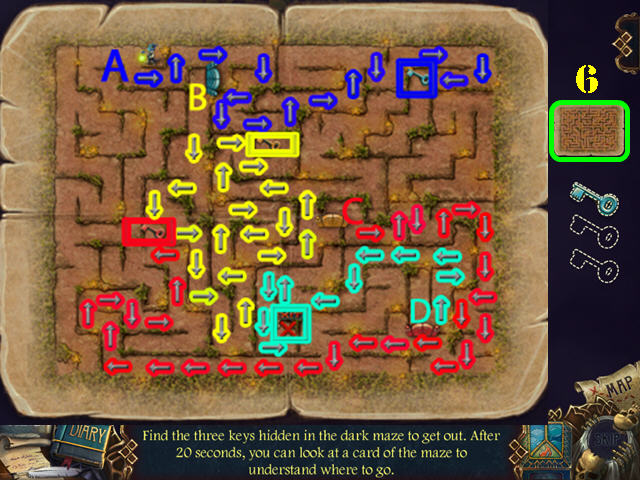
- Find the 3 keys in the maze. You can open the card maze after 20 seconds for a clearer view of the complete puzzle (6).
- To solve the puzzle, follow the paths in the screenshot (A, B, and C).
- Enter the cave.
- Play the HOPS.
- Place the flower (7) in the vase (8) and take the rose.
- Place the dolphin (9) next to the other one (10) and take the dolphins.
- Put the shell (11) on the shield (12) and take the shield.
- Open the egg and take the ring (13).
- You will receive the REGISTER HANDLE.
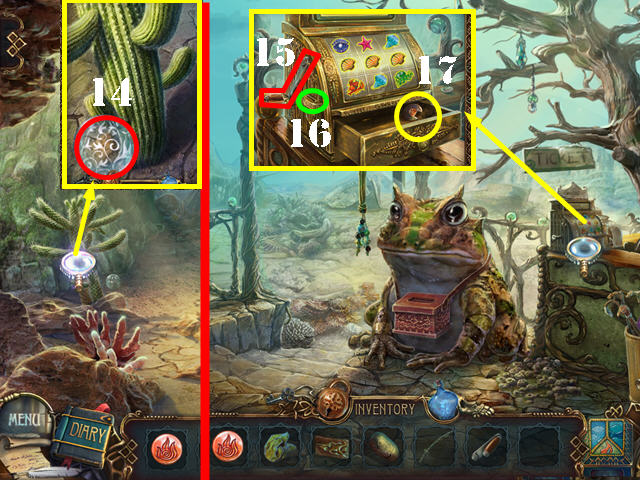
- Zoom into the cactus; touch the sphere and take the note (14).
- Walk down twice.
- Zoom into the cash register and place the REGISTER HANDLE on it (15). Insert the COIN into the slot (16).
- Pull the handle 3 times and take the CONCH (17).
- Walk down and go into the tower.

- Zoom into the puzzle and use the WET RAG on it (18).
- Place the CONCH to activate a puzzle.
- Touch the shells (green) to rotate the ring. Touch a puzzle piece to add it to the holder (red). Use the holders to transfer pieces into the right slots (yellow).
- Please look at the screenshot for the image of the final solution (19).
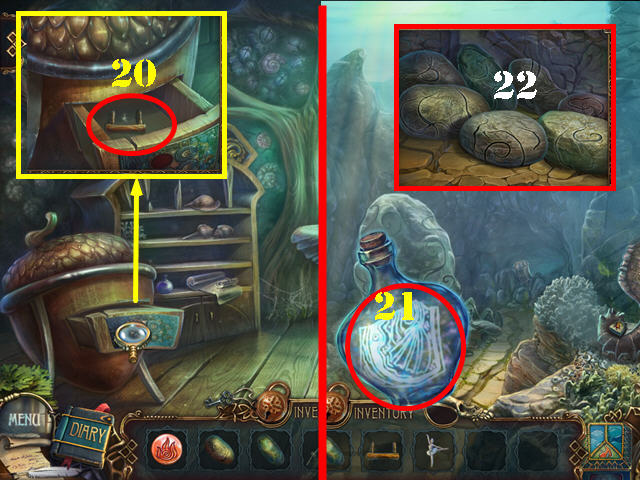
- Look in the drawer and take the LEVER (20).
- Walk down; go to the right and then forward on the left.
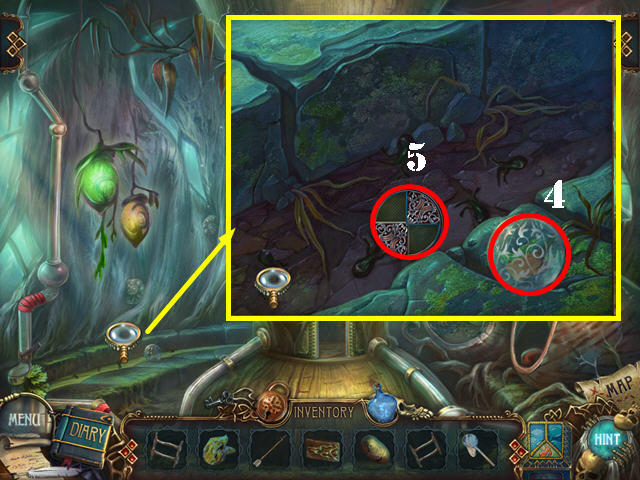
- Use the MAGIC BOTTLE on the stone (21); place the 2 PATTERNED STONES on the ground (22).
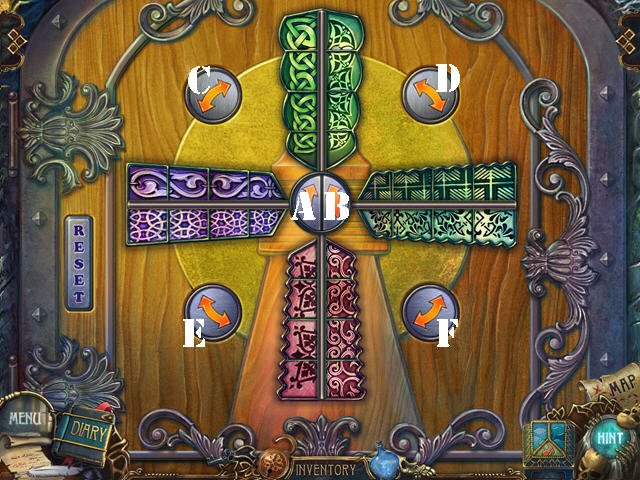
- Use the MAGIC BOTTLES on the stones and then zoom into the glowing stone to activate a puzzle.
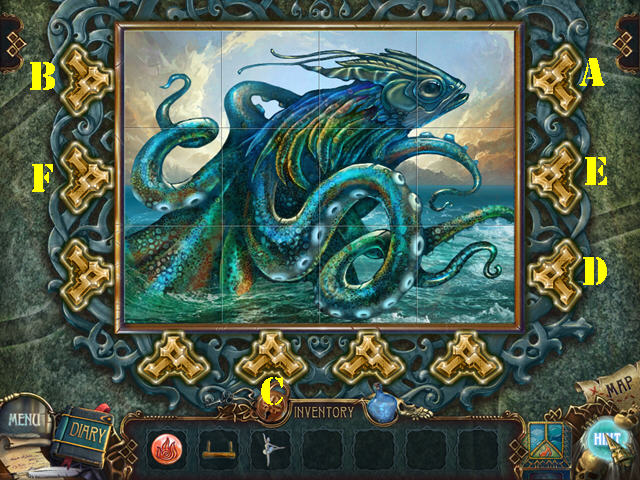
- Use the gold buttons to turn the puzzle pieces until the picture has been recreated.
- To solve the puzzle, please select the buttons in this order: A, B, A, Cx2, Dx2, E, and F.
- Take the AMULET PIECE.
- Return to the Mage of Water.
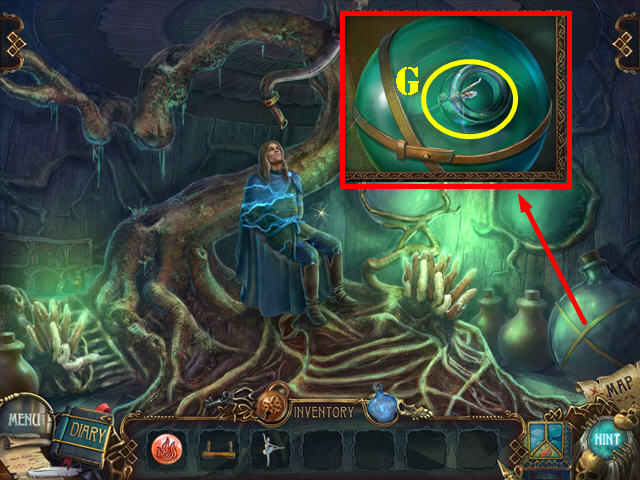
- Zoom into the bottle and remove the cork. Use the FISHING ROD to get the BALLERINA (G).
- Walk down.
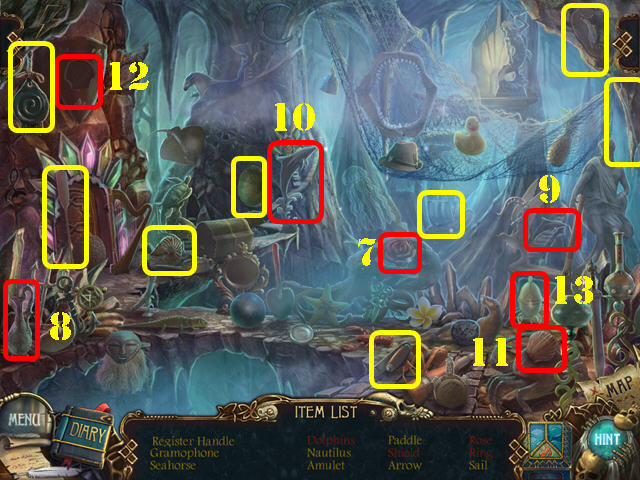
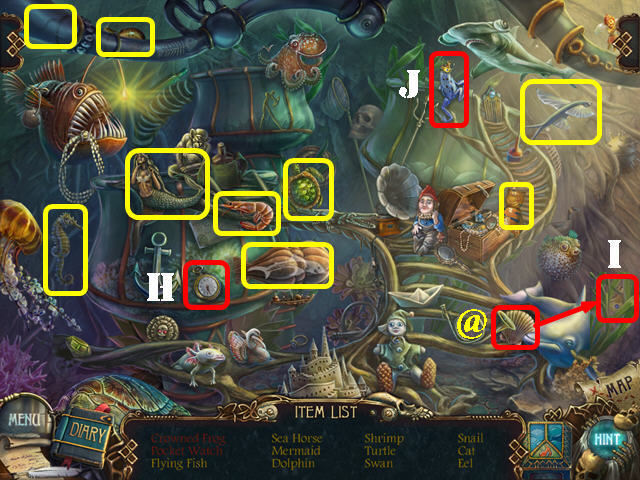
- Play the HOPS.
- Touch the leaves and take the pocket watch (H).
- Cut the seaweed with the shell (@) and take the crown (I); place the crown on the frog (J) and take the crowned frog.
- You will receive the TURTLE.
- Return to the beach.
- Zoom into the ship; place the BALLERINA on the box and take the THREAD (K).
- Go into the cave.
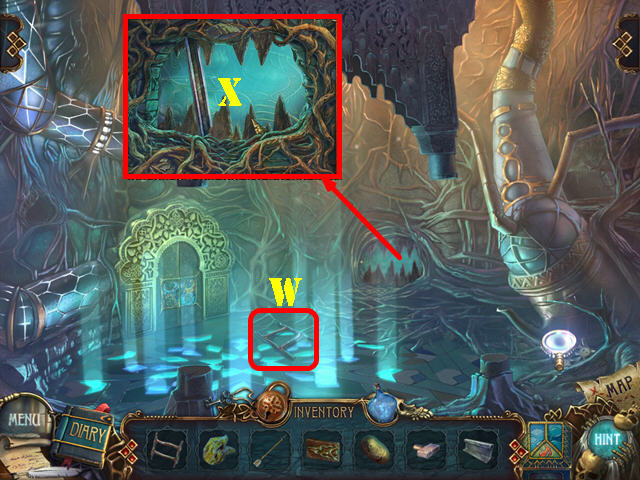
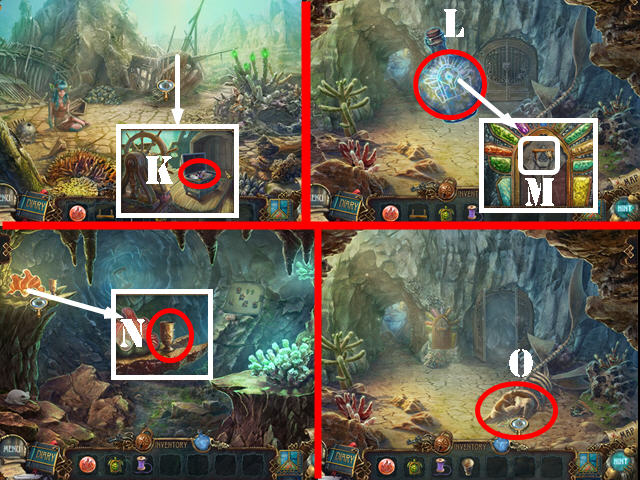
- Use the MAGIC BOTTLE on the painted stones and then again on the close-up (L); place the LEVER and then pull on it (M).
- Go forward.
- Zoom into the cliff and take the CUP (N).
- Walk down.
- Zoom into the puzzle and place the TURTLE on it to activate it (O).
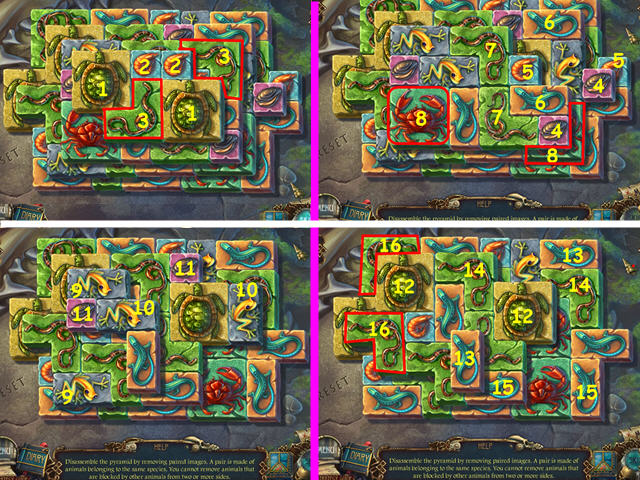
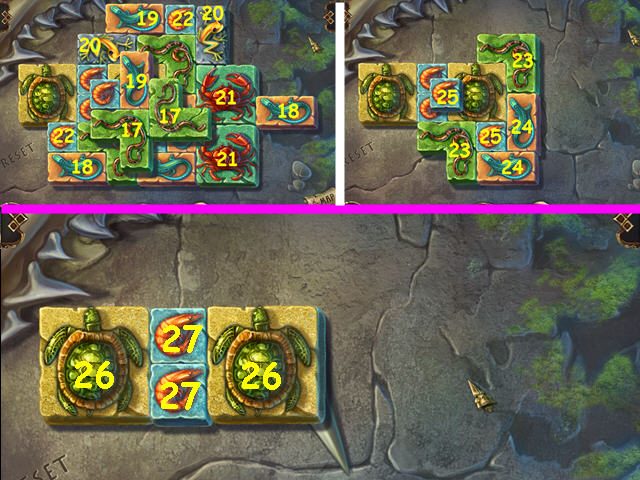
- Select matching unobstructed animals to remove them from the board.
- The puzzle will be complete after all the matches have been made..
- Please look at the screenshots for the solution (1-27).
- Take the SHARK TOOTH.
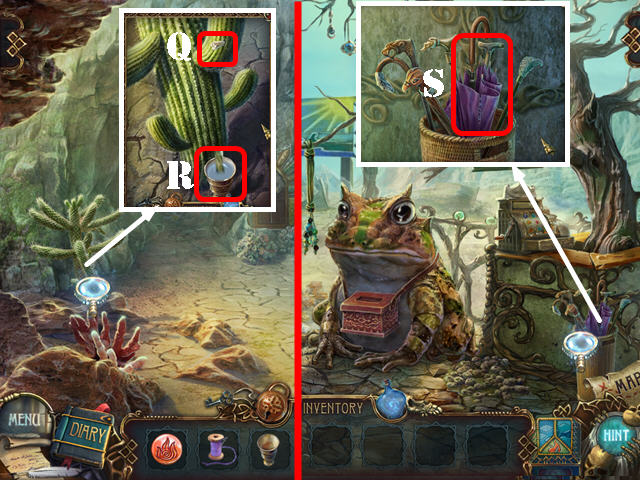
- Zoom into the cactus and put down the CUP.
- Use the SHARK TOOTH to cut the top of the cactus (Q) and then take the CACTUS JUICE (R).
- Walk down twice.
- Zoom into the umbrella stand; use the THREAD on the UMBRELLA and take it (S).
- Go forward.
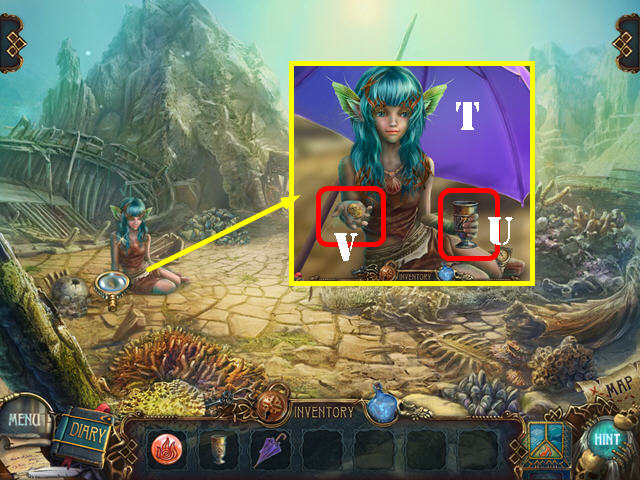
- Zoom into the mermaid and give her the UMBRELLA (T). Zoom back into the mermaid and then give her the CACTUS JUICE (U).
- Take the HOURGLASS PIECE (V).
- Go into the cave.
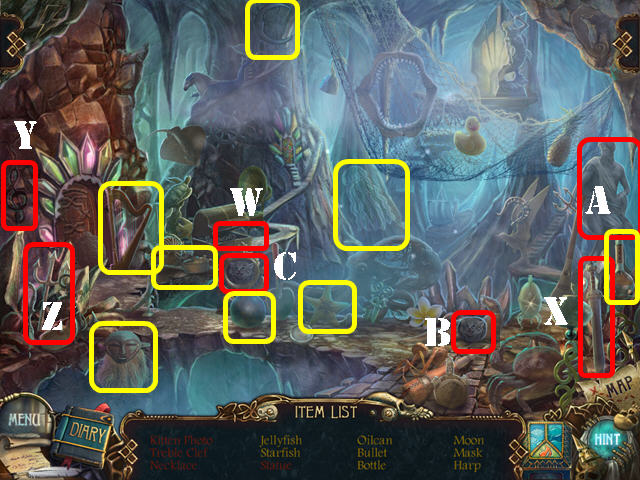
- Play the HOPS.
- Open the chest and take the necklace (W).
- Use the sword (X) on the stone and take the treble clef (Y).
- Give the trident (Z) to the statue (A) and take the Neptune statue.
- Put the kitten picture (B) in the frame (C) and take the kitten photo.
- You will receive the OILCAN.
- Go forward.
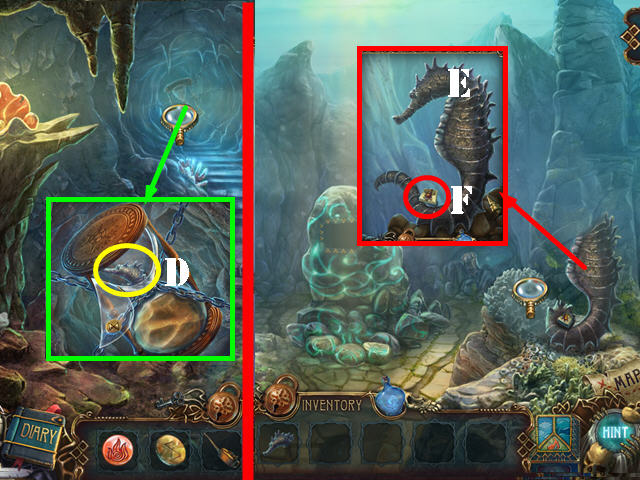
- Zoom into the hourglass and insert the HOURGLASS PIECE on it; take the SEA HORSE HEAD (D).
- Return to the outside of the tree house and go forward on the left side.
- Zoom into the monument; place the SEA HORSE HEAD on it (E) and take the PLATYPUS BUTTON (F).
- Return to the inside of the cave.
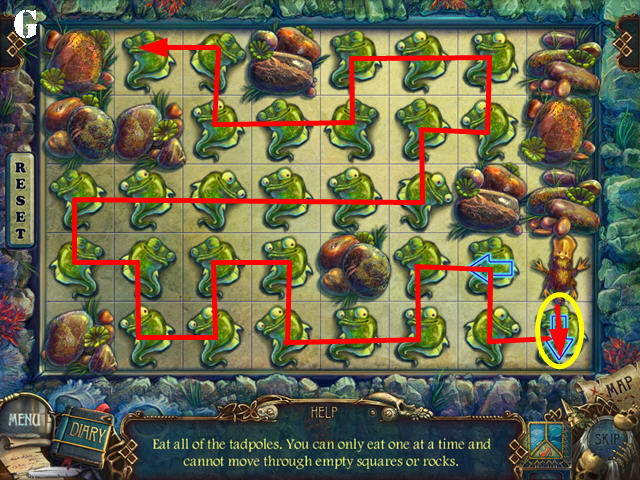
- Zoom into the puzzle and put down the PLATYPUS BUTTON to activate the puzzle.
- Use the arrows to move the platypus through the puzzle so it can eat the tadpoles. The platypus cannot go through empty spots.
- Please look at the screenshot for the solution (G).
- Take the AMULET PIECE.
- Return to the Mage of Water.
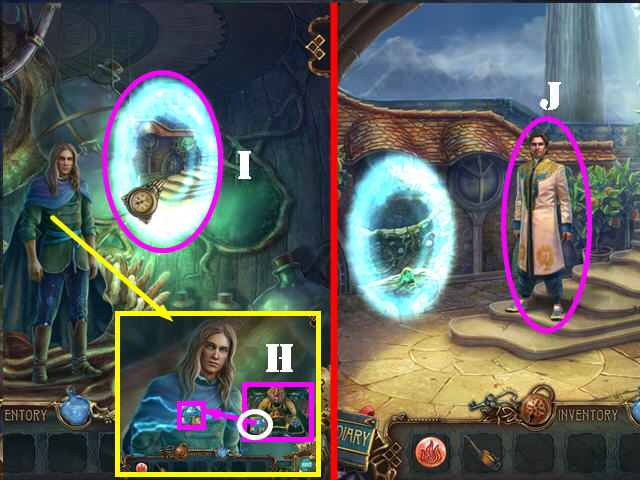
- Zoom into the Mage of Water; open the amulet and give it to him (H).
- Talk to the Mage; he needs the water sphere.
- Go through the portal (I).
- Talk to Titus (J).
- Return to the inside of the mine.
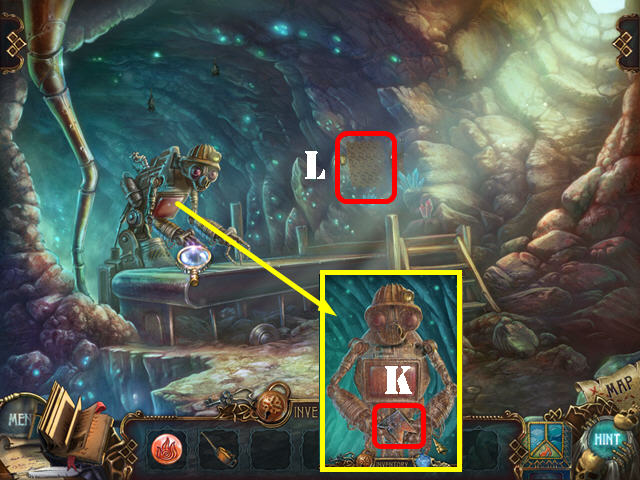
- Zoom into the robot and take the ARROW (K).
- Use the OILCAN on the robot.
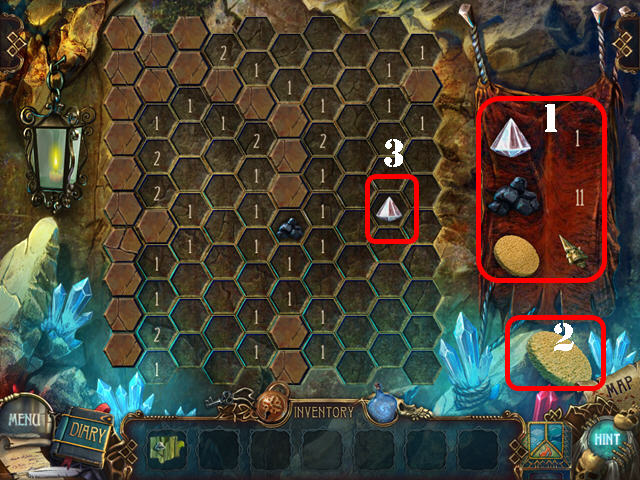
- Zoom into the puzzle (L).
- Break the stone hexagons to reveal what is behind them without uncovering a coal. Select any hexagon to begin.
- Selecting a hexagon that doesn’t have a coal reveals the number of neighboring squares containing coals.
- The clue on the side lets you know how many of each element is present (1).
- Drag and drop the sponge (2) to the puzzle if the coal explodes.
- The solution to this puzzle is random.
- Take the DIAMOND (3).
- Return to Panoptes’ shop.
- Zoom into the monkey; give him the DIAMOND (M) and take the SPHERE OF WATER (N).
- Return to the portal and go through it.
- Zoom into the Mage of Water; give him the SPHERE OF WATER and take the WATER RUNE (O).
- Go through the portal (P).
- Talk to Titus (Q) and then go through the portal (R).
Chapter 7: The World of Air
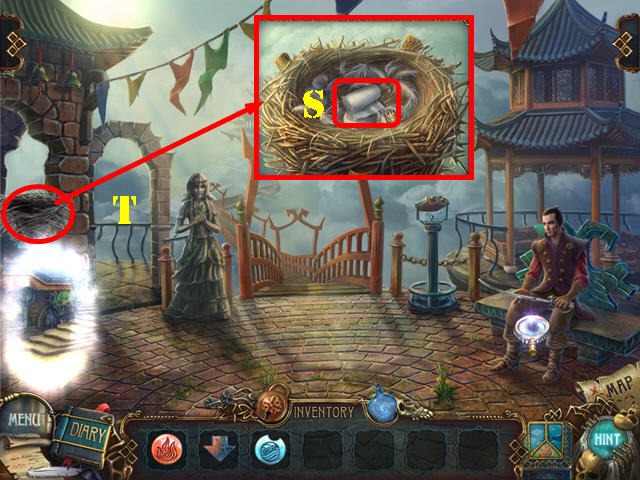
- Examine the nest; move the feathers and take the BANDAGE (S).
- Go through the left doorway (T).
- Examine the bench; take the MASK and the newspaper (U).
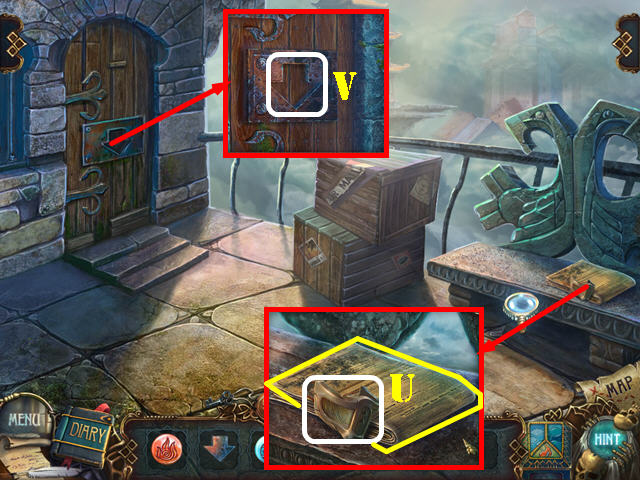
- Zoom into the door; place the ARROW on it; touch the arrow and go through the door (V).
- Play the HOPS.
- Place the ladder (W) on the shelf (X) and take the umbrella (Y).
- Cut the fence with the clippers (Z) and take the peacock (A).
- Place the pagoda piece (B) next to the other one (C) and take the pagoda.
- You will receive the POLLEN BAG.
- Go forward.
- Zoom into the pedestal and take the SLINGSHOT (D).
- Examine the mailbox and open it; take the PTERODACTYL BONE (E).
- Walk down 3 times.
- Zoom into the guard; give him the MASK and take the SWORD (F).
- Go left.
- Examine the crate; touch the top one and use the SWORD on the bottom one.
- Take the TIARA (G).
- Walk down.
- Zoom into the statue; place the TIARA on her head (H) and take the WINDMILL PART (I).
- Go forward.

- Zoom into the lion and take the KEY (J).
- Use the MAGIC BOTTLE on the cotton plant and again on the close-up (K).
- Take the EAGLE HEAD (L).
- Zoom into the windmill (M) and place the WINDMILL PART on it to activate a puzzle.
- Use the arrows to swap 2 adjacent pieces until you recreate the image.
- To solve the puzzle, select the arrows in this order: F, D, C, E, Ax3, D, C, E, F, Bx2, C, Ax2, C, Ax3, Bx3, D, and B.
- Go to the windmill.
- Use the slingshot on the scene.
- Zoom into the sack; take the SCREWDRIVER (G).
- Remove the sack; touch the sphere; open the letter and take it (H).
- Remove the patch and take the LENS (I).
- Use the MAGIC BOTTLE on the door (J) and again on the flowers (K); use the KEY in the lock.
- Go forward.
- Zoom into the crack; take the BIRD (L).
- Walk down.
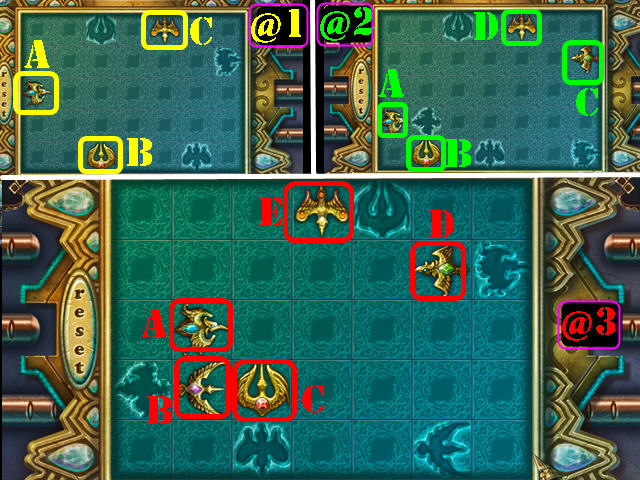
- Zoom into the door and place the BIRD in the slot to activate a puzzle.
- Place the birds in their matching silhouettes.
- For the round 1 solution (@1), please follow these steps: Ax2, Bx2, C, Ax2, Cx3, Ax2, and Bx2.
- For the round 2 solution (@2), please follow these steps: Cx2, Dx2, B, A, B, Ax3, D, C, D, Cx3, Bx2, and Ax2.
- For the round 3 solution (@3), please follow these steps: E, Dx2, A, C, D, E, B, E, Cx2, Ax2, C, Ax3, Bx3, Dx2, and Ex2.
- Go through the door.
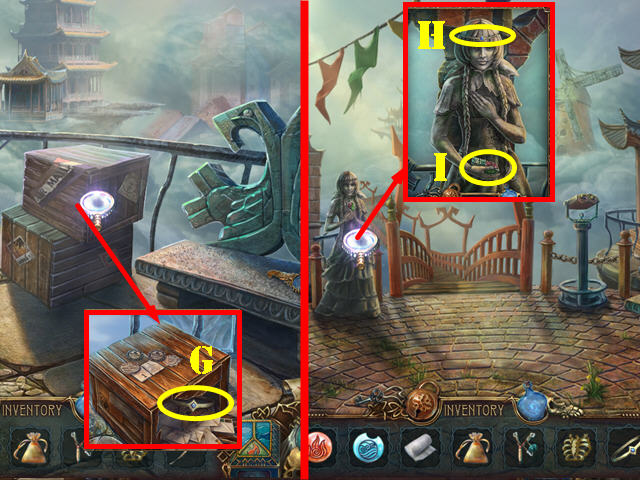
- Zoom into the chest and open it; take the CLOUD COLLECTOR and the PENDANT (F).
- Examine the niche; turn on the light (G) and take the matches (H).
- Walk down.
- Zoom into the swan; place the PENDANT into the slot (I) and take the MECHANISM PART (J).
- Walk down twice and go through the left doorway.
- Zoom into the bench and place the EAGLE HEAD on the handle (K); take the LENS (L).
- Walk down.
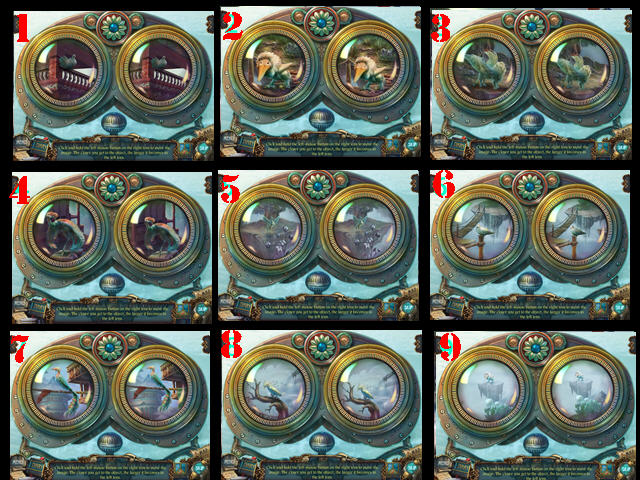
- Zoom into the binoculars and place the 2 LENSES on it to activate a puzzle.
- Hold and drag the image on the right lens until it matches the one on the left.
- Both images will automatically change once both images have been matched.
- Please look at the screenshot for the solution (1-9).
- Take the RING.
- Go left; through the door and forward.
- Zoom into the window and open the shutters; cut the glass with the RING and take the BUTTERFLY (M).
- Return to the attic in the windmill.
- Zoom into the mechanism; place the MECHANISM PART and the BUTTERFLY on it to activate a puzzle (N).
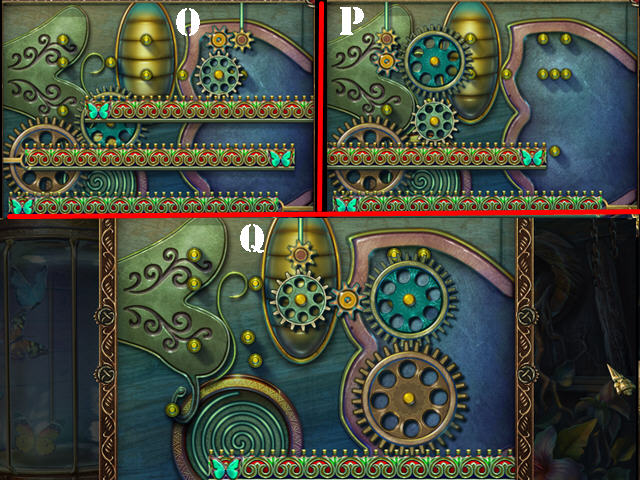
- Set the gears in the right spots 3 separate times.
- Please look at the screenshot for the solutions (O, P, and Q).
- Zoom into the flowers and use the POLLEN BAG on it to receive the HEALING POLLEN (R).
- Walk down twice.
- Zoom into the lion. Place the HEALING POLLEN on the wound and then place the BANDAGE over it (S).
- Touch the flying lion.
- Examine the pedestal; take the note (T).
- Use the SCREWDRIVER on the screws (U) and take the BELT (V). Then take the SCREWS (W).
- Zoom into the basket. Turn the valve (X) and then use the MATCHES on the burners (Y).
- Take the PEGASUS WINGS (Z).
- Go forward.
Chapter 8: The Finale
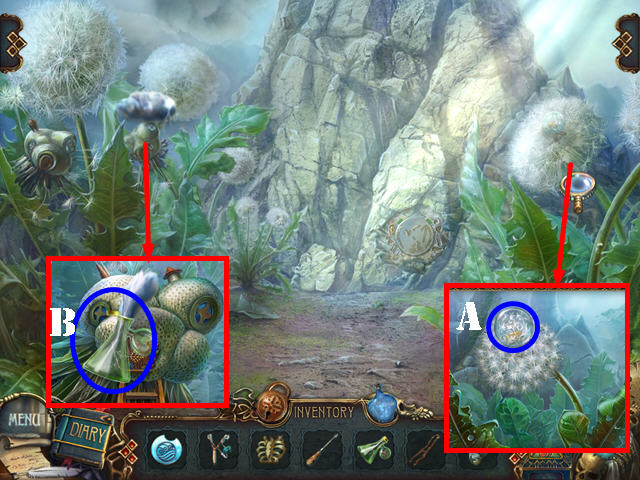
- Examine the dandelion; touch the sphere; open the letter and then take it (A).
- Zoom into the cloud and use the CLOUD COLLECTOR on it to get the CLOUD (B).
- Walk down.
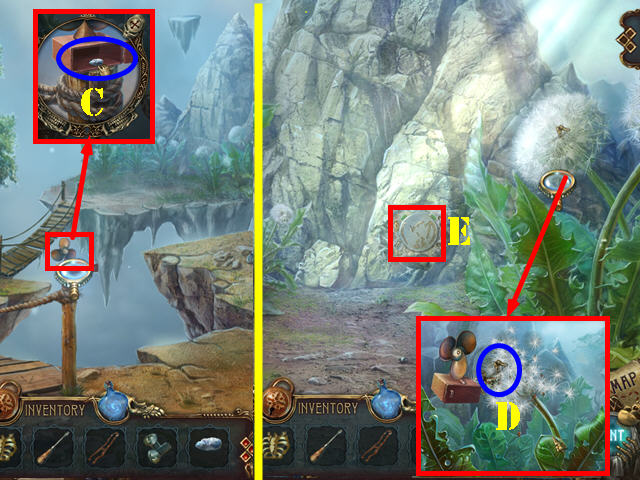
- Zoom into the broken fan and put the CLOUD in the box (C); take the FAN.
- Go forward.
- Zoom into the dandelion; use the FAN on it and take the PTERODACTYL BONE (D).
- Zoom into the bones place the 2 PTERODACTYL BONES on it to activate a puzzle (E).
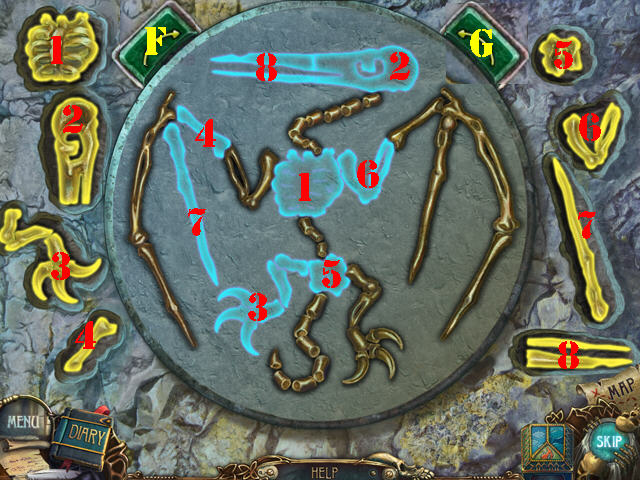
- Use the arrows to rotate the board (F and G) and then select a piece, hold it, and put in place.
- Please look at the screenshot for the solution (1-8).
- Take the DRAGON.
- Return to the Air Mage.
- Zoom into the niche and place the DRAGON on the scale (H); take the BELL (I).
- Zoom into the window; put down the BELT and then touch the wings. Place the SCREWS to the wings and fasten them with the SCREWDRIVER.
- Take the ARTIFICIAL WINGS (J).
- Return to the bell area.
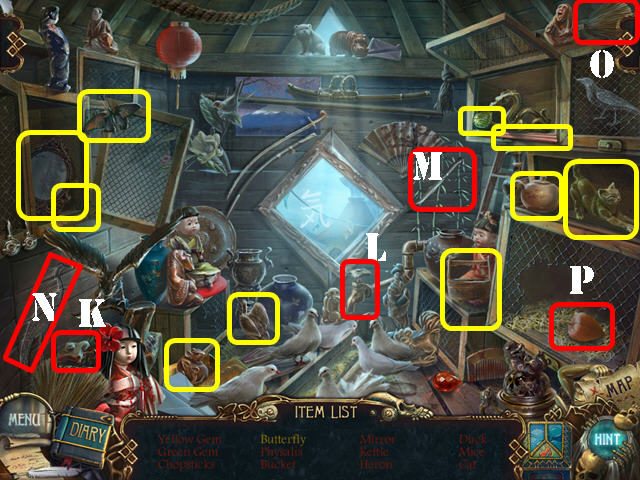
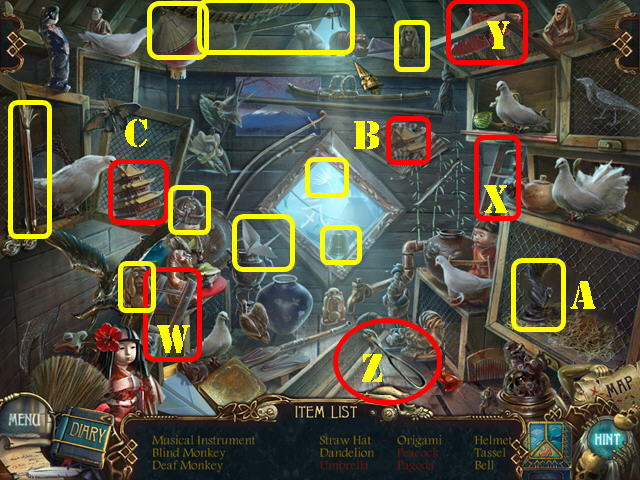
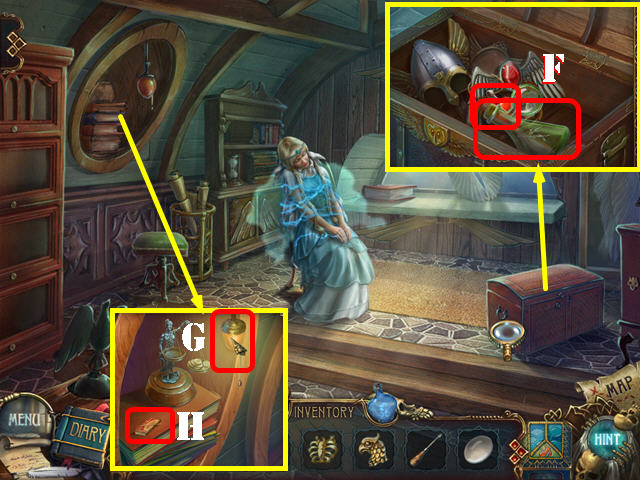
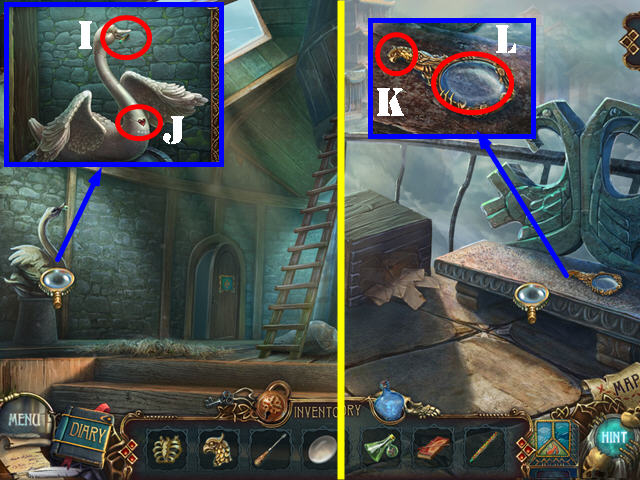
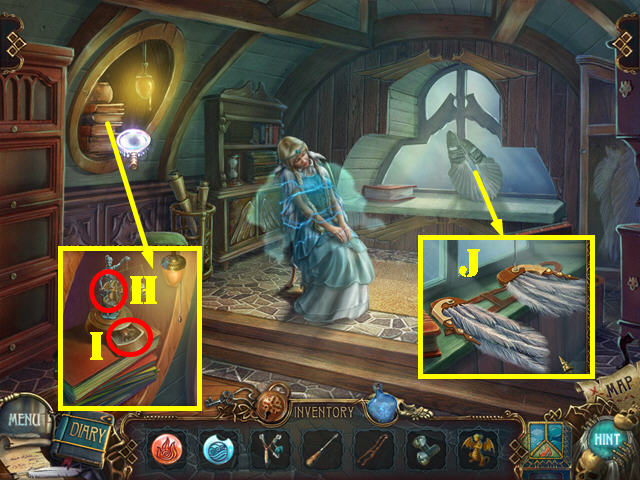
- Play the HOPS.
- Place the spigot (K) on the faucet (L) to find the items on the list once the doves move to drink water.
- Use the knife (M) on the wood and take the heron (N).
- Use the duster (O) on the hay and take the physalis (P).
- You will receive the BELL.
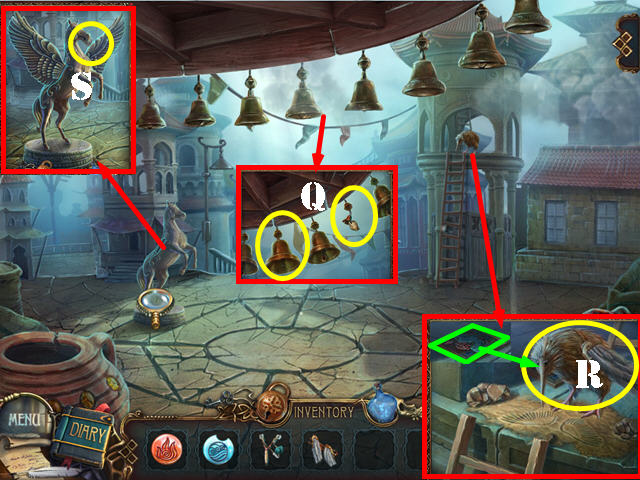
- Zoom into the bells and hang the 2 BELLS (Q).
- Zoom into the wingless bird and apply the ARTIFICIAL WINGS to it (R); take the PILLAR PART (green).
- Zoom into the horse; place the PEGASUS WINGS on it and take the AMULET PIECE (S).
- Go forward.

- Zoom into the pillar and place the PILLAR PART on it (T).
- Take the AMULET PIECE (U).
- Return to the Air Mage.
- Zoom into the Mage of Air; open the AMULET and use it on her (V).
- Talk to the mage and then go through the portal (W).
- Talk to Titus (X).
- Return to the outside of the mine; use the SLINGSHOT on the raven and enter the mine (Y).
- Zoom into the robot (Z).
- Zoom into the puzzle (A).
- Break the stone hexagons to reveal what is behind them without uncovering a coal. Select any hexagon to begin.
- Selecting a hexagon that doesn’t have a coal reveals the number of neighboring hexagons containing coals.
- The clue on the side lets you know how many of each element is present (1).
- Drag and drop the sponge (2) to the puzzle if the coal explodes.
- The solution to this puzzle is random.
- Take the DIAMOND (3).
- Return to Panoptes’ shop.
- Zoom into the monkey and give him the DIAMOND (B); take the SPHERE OF AIR (C).
- Return to the portal and go through it.
- Give the SPHERE OF AIR to the Mage. Zoom into the Mage again and take the AIR RUNE (D).
- Go through the portal (E).
- Talk to Argus (F).
- Place the AIR RUNE, FIRE RUNE, and WATER RUNE in the slots (G).
- Go through the door.
- Zoom into the pedestal; open the amulet and place the 3 AMULETS in the slots to activate a puzzle (H).
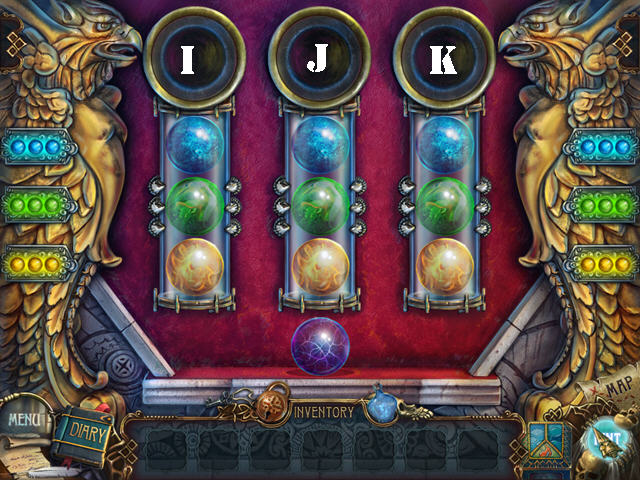
- Arrange the spheres in the order given by the solution shown on the each side of the puzzle.
- Drop a sphere into the top of the tube to cause the bottom sphere in that tube to drop out. One of the spheres is purple; make sure that is the last one remaining.
- To solve the puzzle, drop the spheres in this order: Kx2, Jx2, Ix2, Kx3, and Jx1.
- Congratulations, you have completed Azada: Elementa.
Critter Coins

- There are a total of 105 coins in the game (83 in the SE and 22 in the CE).
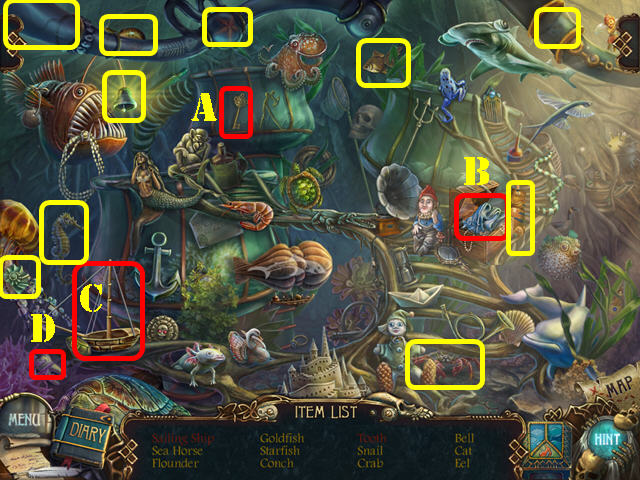
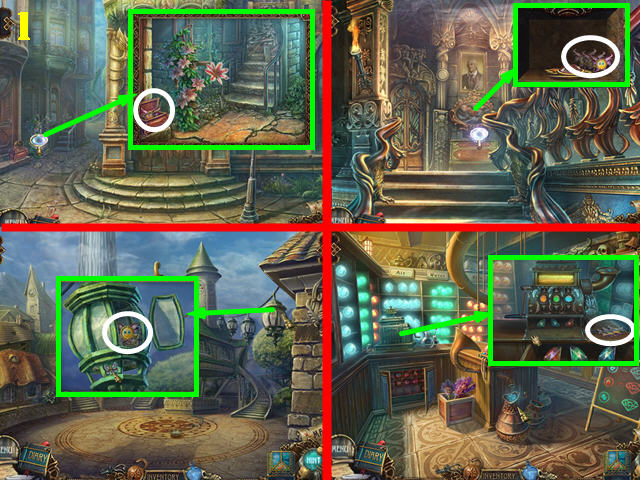
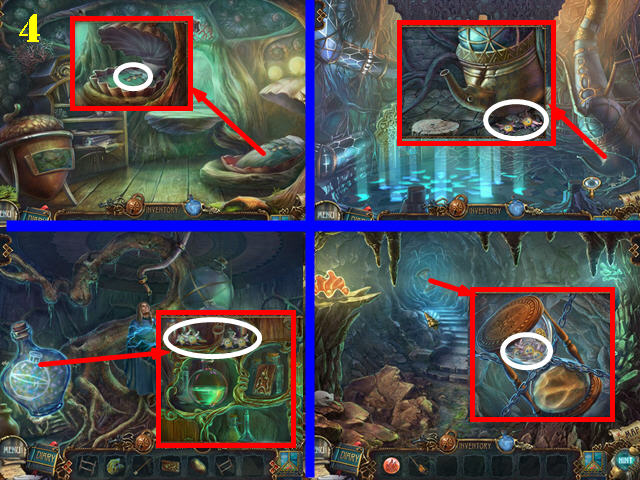
- Scenes 1-4 for the coin locations are shown here (1).
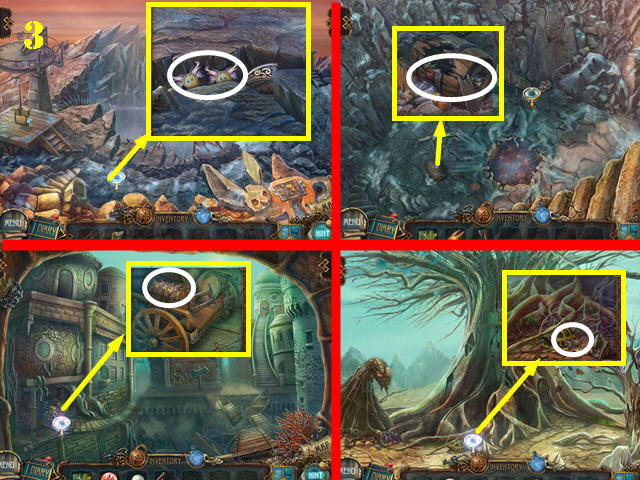
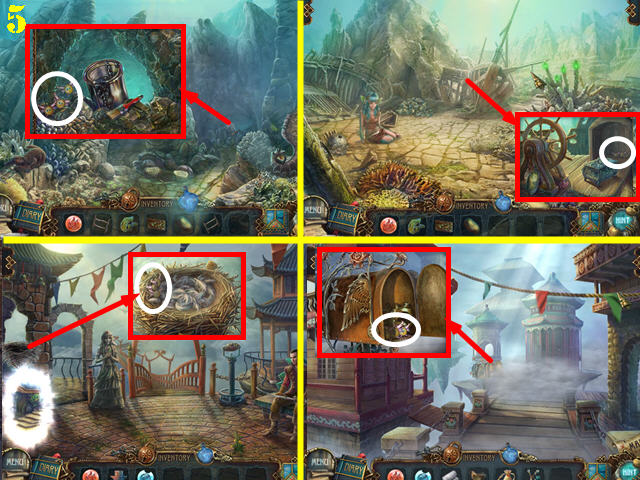
- Scenes 5-9 for the coin locations are shown here (2).
- Scenes 10-13 for the coin locations are shown here (3).
- Scenes 14-17 for the coin locations are shown here (4).
- Scenes 18-21 for the coin locations are shown here (5).
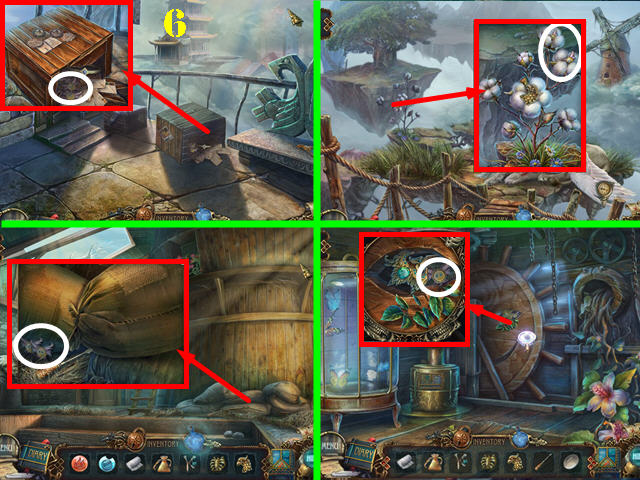
- Scenes 22-25 for the coin locations are shown here (6).
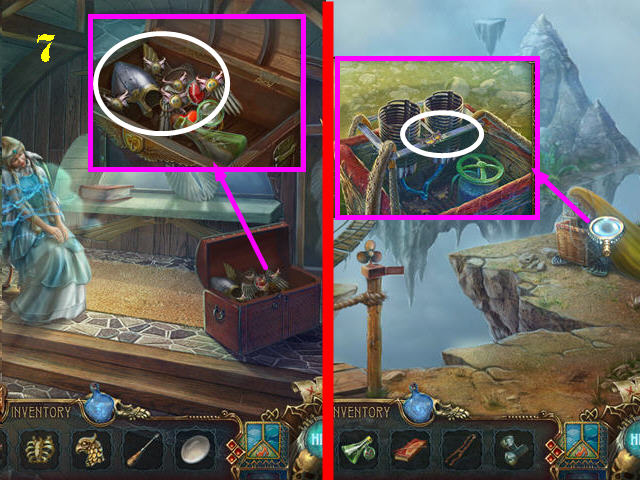
- Scenes 26-27 for the coin locations are shown here (7).


 Nancy Drew Dossier: Resorting to Danger Walkthrough, Guide, & Tips
 Millennium 2: Take Me Higher Walkthrough, Guide, & Tips
 Nevertales: The Beauty Within Walkthrough, Guide, & Tips
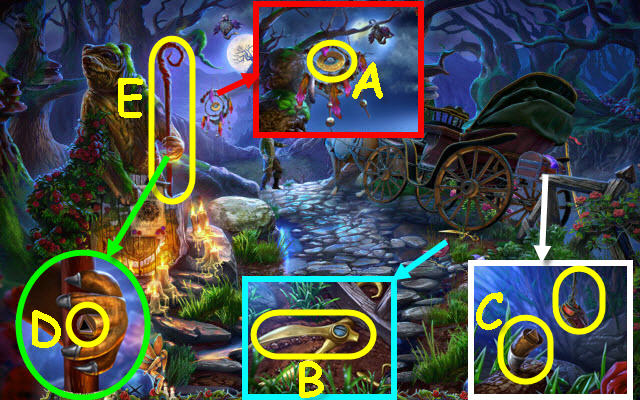 Grim Legends: The Forsaken Bride Walkthrough, Guide, & Tips
 Small Town Terrors: Pilgrim's Hook Walkthrough, Guide, & Tips