Lost Tales: Forgotten Souls Walkthrough, Guide, & Tips
Lost Tales: Forgotten Souls Walkthrough

Welcome to the Lost Tales: Forgotten Souls Walkthrough
Rescue your daughter from the clutches of the evil witch in the cabin!
Whether you use this document as a reference when things get difficult or as a road map to get you from beginning to end, we’re pretty sure you’ll find what you’re looking for here.
This document contains a complete Lost Tales: Forgotten Souls game walkthrough featuring annotated screenshots from actual gameplay!
We hope you find this information useful as you play your way through the game. Use the walkthrough menu below to quickly jump to whatever stage of the game you need help with.
Remember to visit the Big Fish Games Forums if you find you need more help. Have fun!
This walkthrough was created by Rebekah, and is protected under US Copyright laws. Any unauthorized use, including re-publication in whole or in part, without permission, is strictly prohibited.
General Tips

- This is the official guide to Lost Tales: Forgotten Souls.
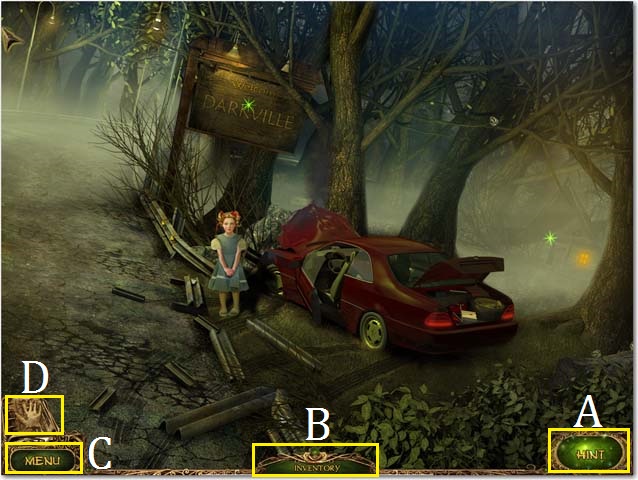
- Use the Hint Button (A) if you need additional help.
- Your Inventory Bar (B) will hold items until they are needed.
- Select the Menu button (C) to exit, pause, or resume the game. You can also use this button to adjust your options (sound, music, and screen size).
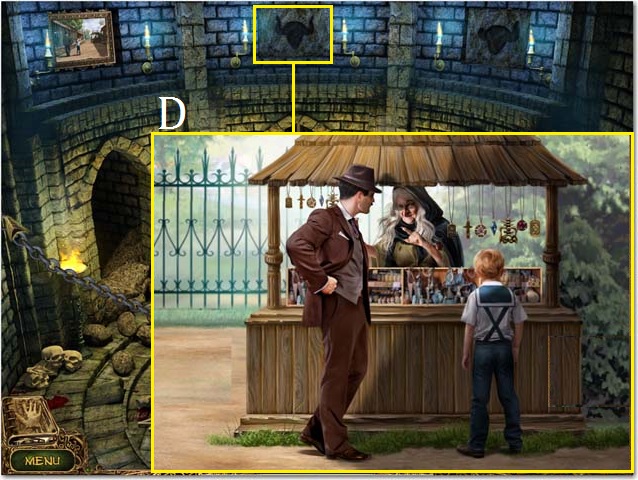
- Use your Journal (D) for additional help.
- Zoom into sparkling scenes to play the Hidden-object puzzle scenes; they will be referred to as ‘HOPS’ in the remainder of this guide.
- All items in the HOPS are marked in green unless otherwise noted.
Chapter 1: The Magic Book
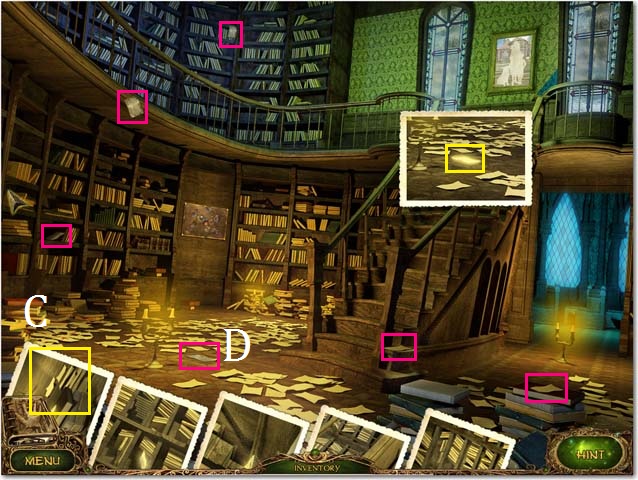
- Interact with the little girl.
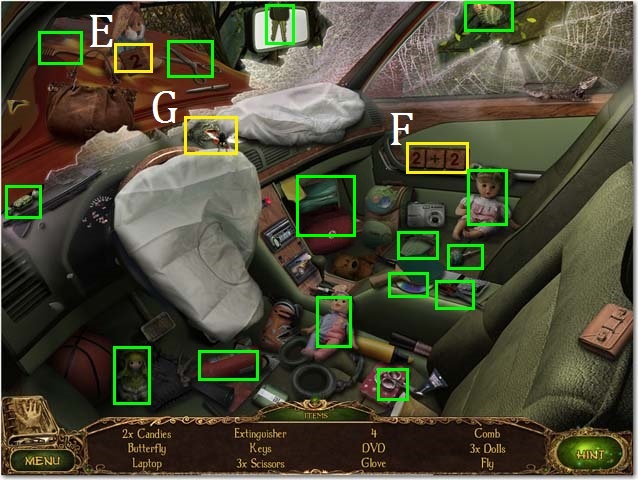
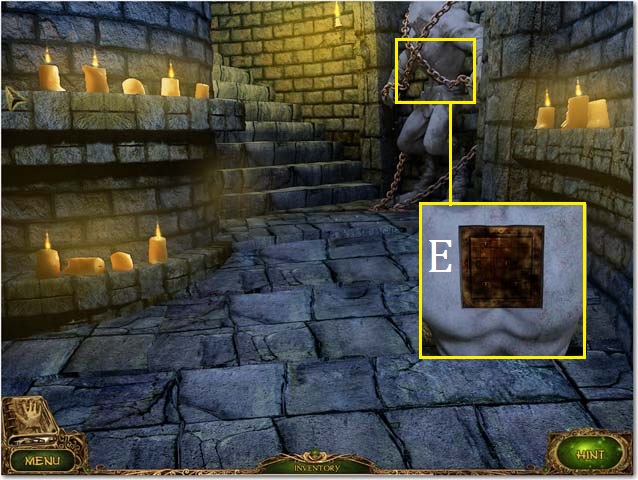
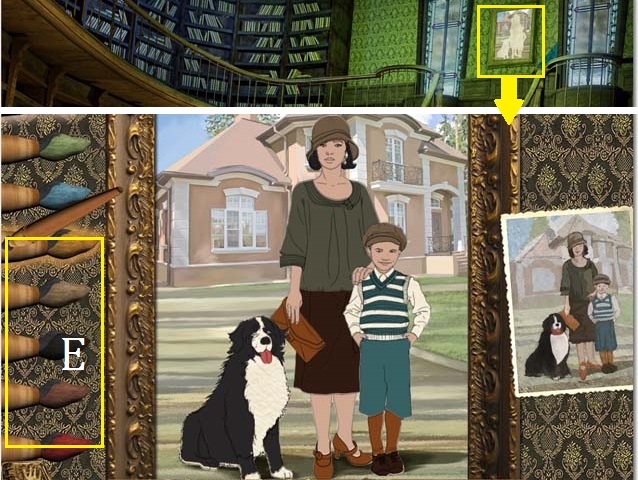
- Zoom into the sparkles to play the HOPS.
- Place the 2 block (E) with the other blocks (F) to get the 4.
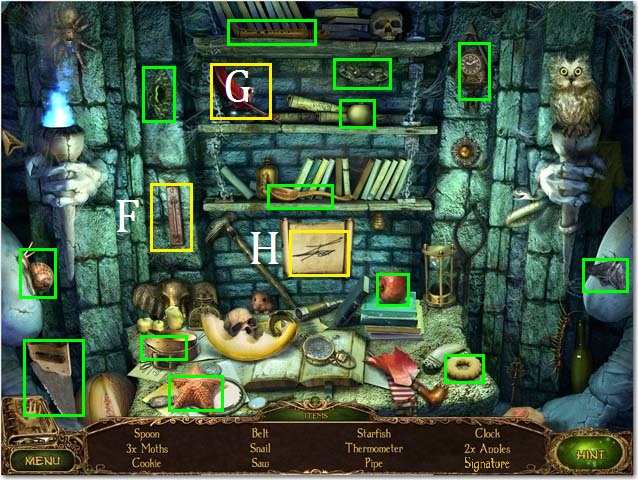
- Tap the frog so that it catches the Fly (G).
- Collect all of the items, marked in green in the screenshot, to receive the CAR KEYS.
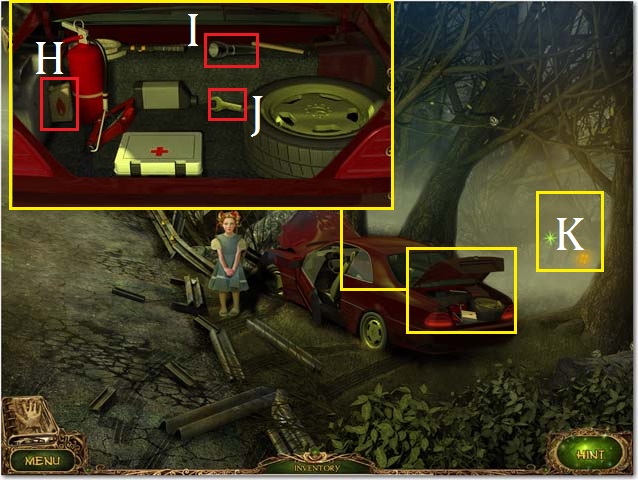
- Zoom into the car trunk; unlock the trunk with the CAR KEYS.
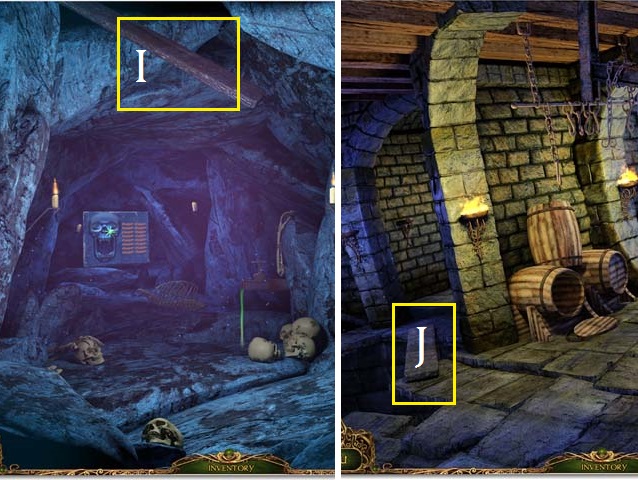
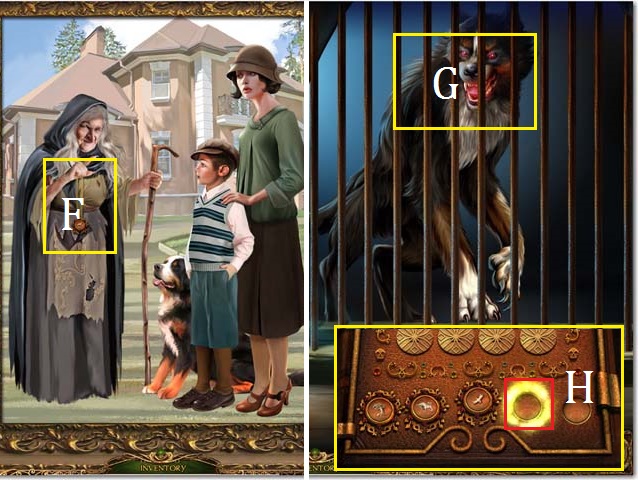
- Open the car trunk; move the items around and then collect the LAMP OIL (H), FLASHLIGHT (I), and the WRENCH (J).
- Hold the FLASHLIGHT out in front of you and then move forward (K) to the cabin exterior.
- After speaking with the old woman, enter the cabin.
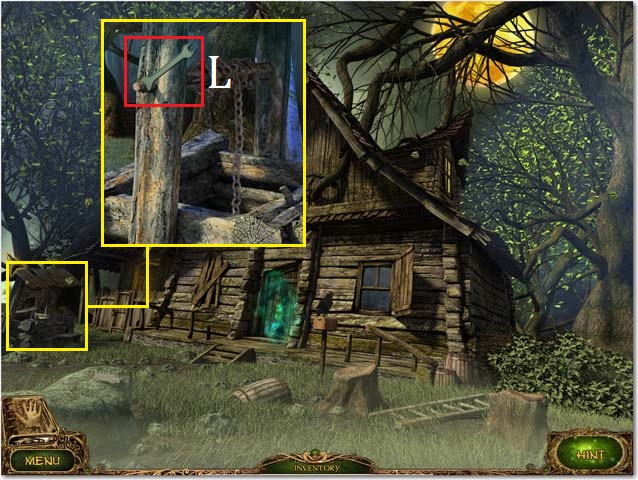
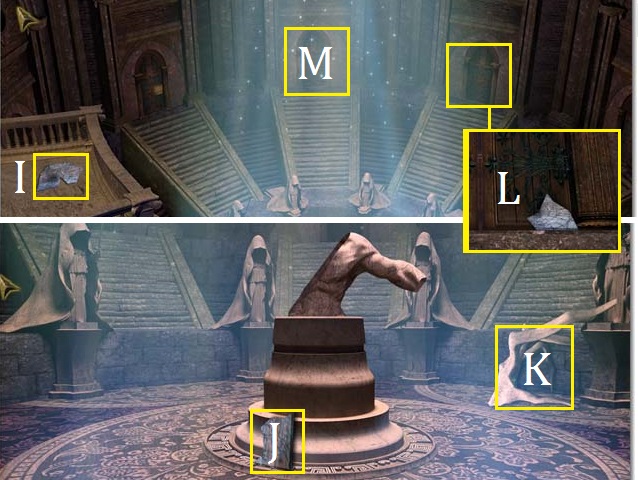
- Once you are back outside, zoom into the well. Place the WRENCH on the handle (L) and turn it to raise the bucket.

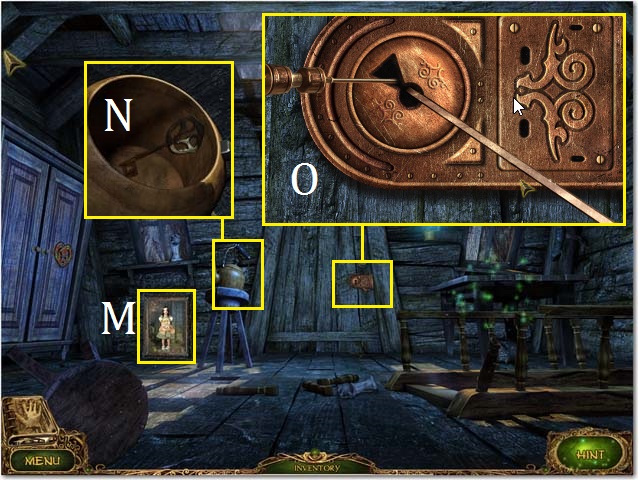
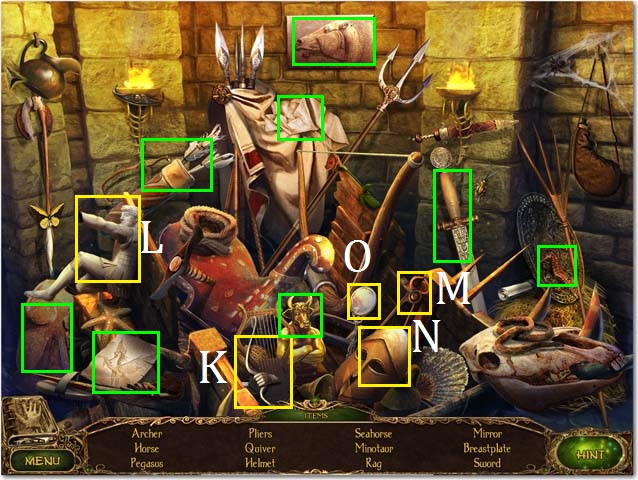
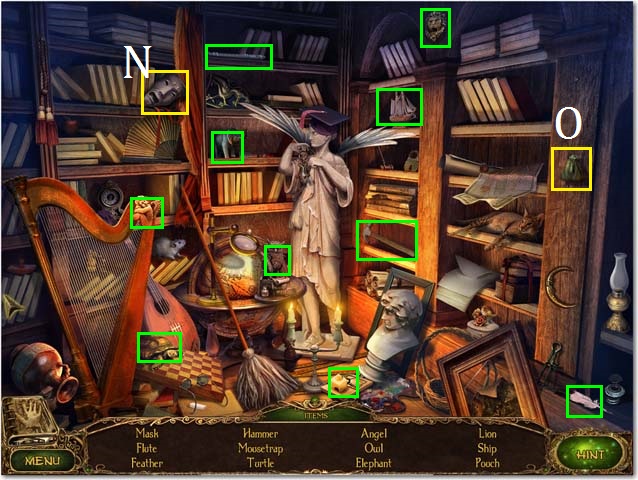
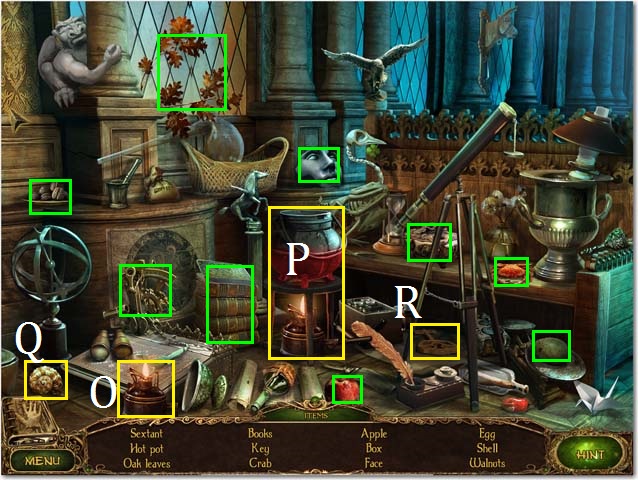
- Zoom into the sparkles to play the HOPS.
- Smash the egg (M) with the hammer (N) to find the Chick.
- Place the record (O) on the player (P) to get the Music note (Q).
- Collect the remaining items to receive the BUNCH OF KEYS.

- Zoom into the gate; use the BUNCH OF KEYS to open the lock (R).
- Enter the shed.
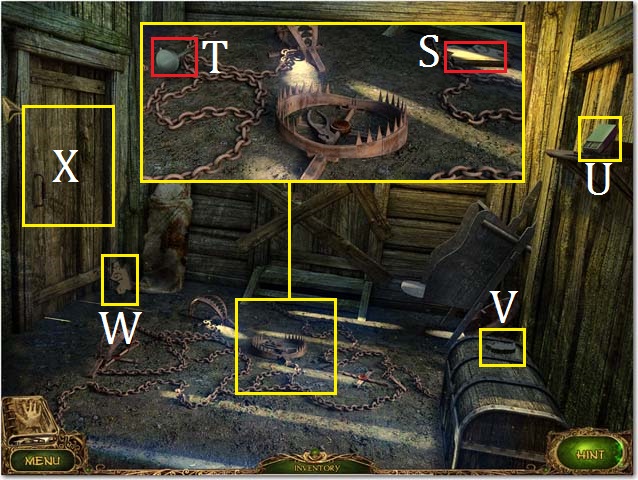
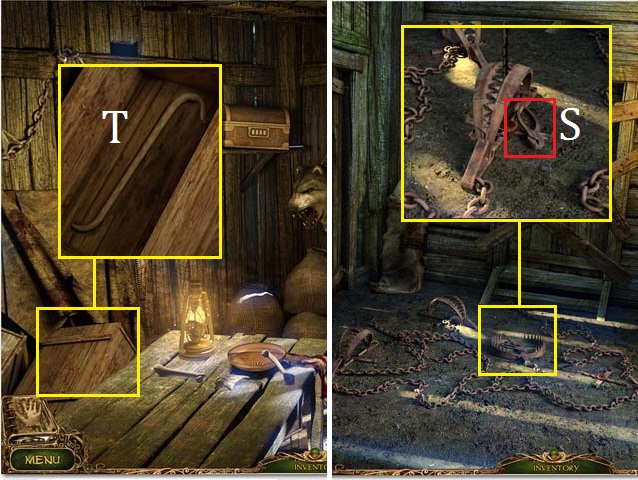
- Zoom into the animal trap; collect the first PLAQUE piece (S) and the FUNNEL (T) and then close the window.
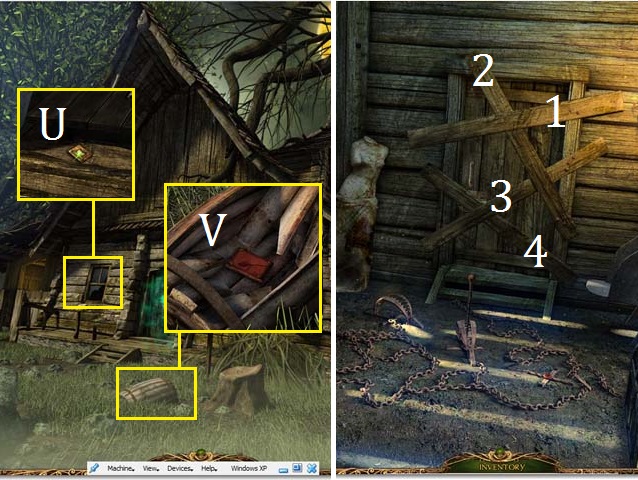
- Collect the MATCHES (U), and the second and third PLAQUE pieces (V, W).
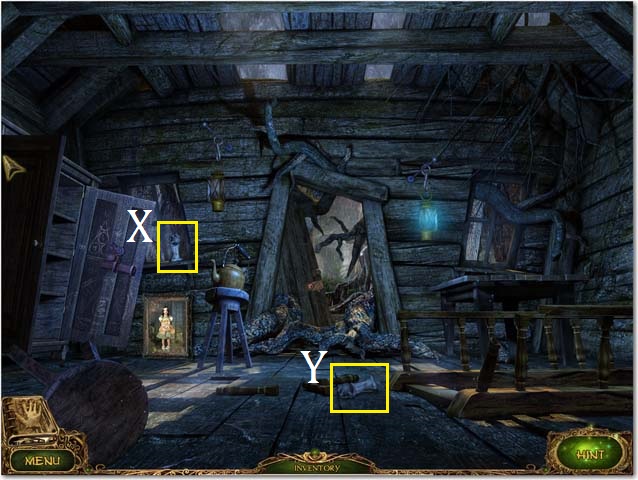
- Enter the back room (X).
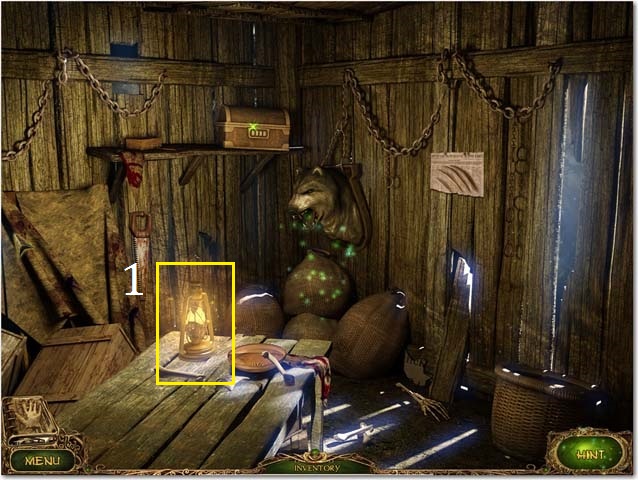
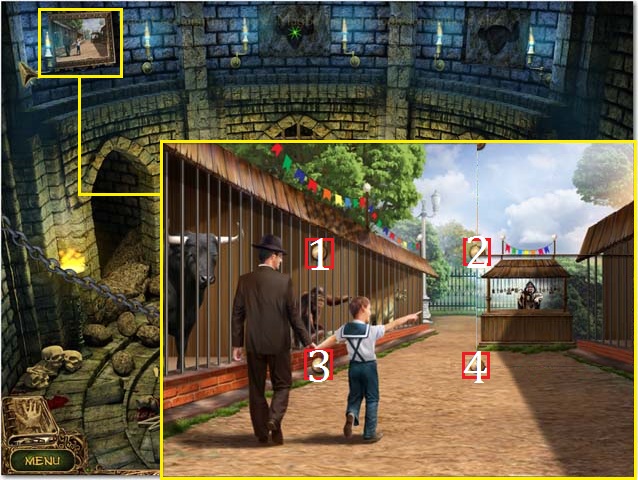
- Place the FUNNEL in the lamp (1). Pour the LAMP OIL into the funnel and then light the lamp with the MATCHES.
- Zoom into the sparkles to play the HOPS.
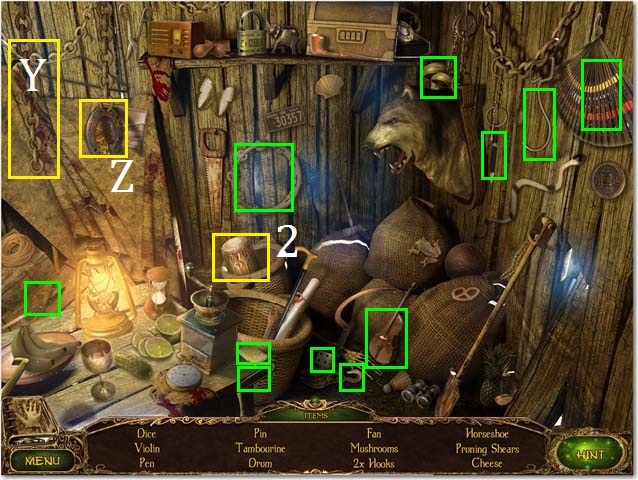
- Open the basket to reveal the Drum (2).
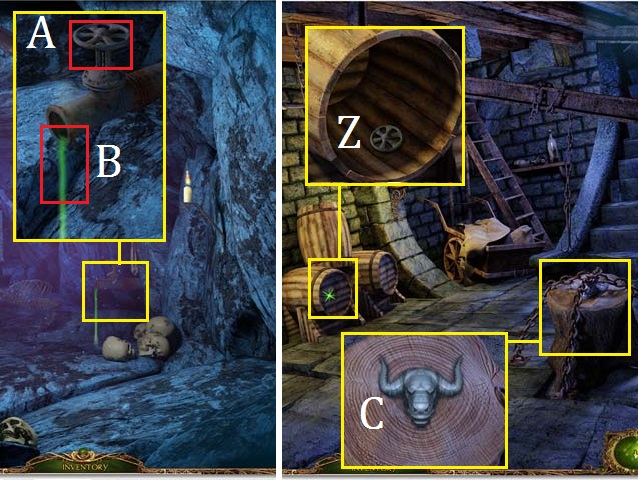
- Pull the chain (Y) to lower the Horseshoe (Z).
- Collect the remaining items to receive the PRUNING SHEARS.
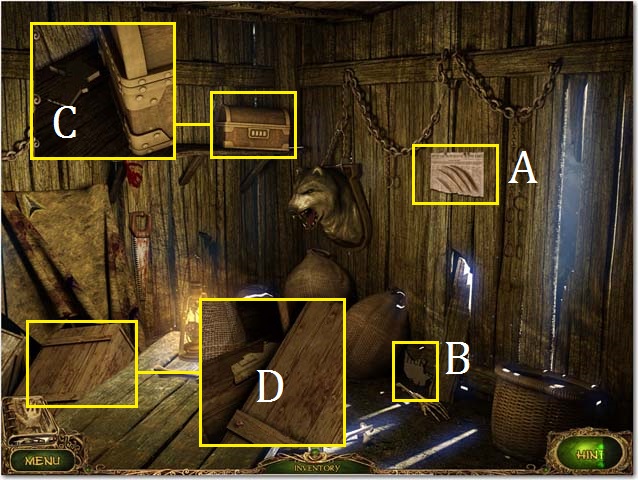
- Examine the paper clipping (A).
- Collect the fourth PLAQUE piece (B).
- Zoom into the chest; collect the fifth PLAQUE piece (C).
- Zoom into the crate; collect the sixth PLAQUE piece (D).
- Go back outside.
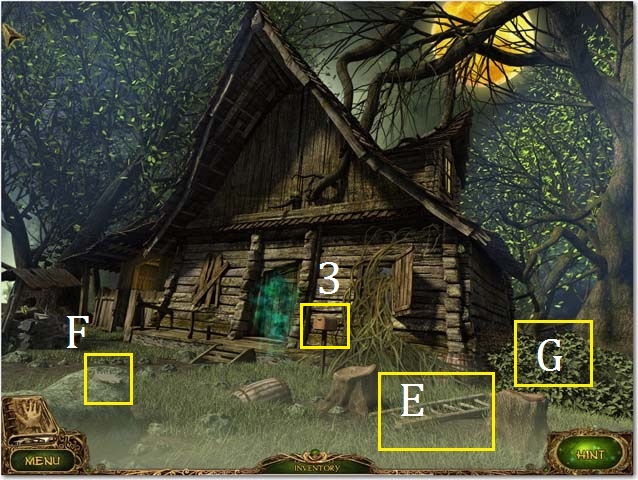
- Collect the LADDER (E) and the seventh PLAQUE piece (F).
- Use the PRUNNING SHEARS on the weeds (G).
- Scare the crow off the mailbox (3).
- Enter the side yard.
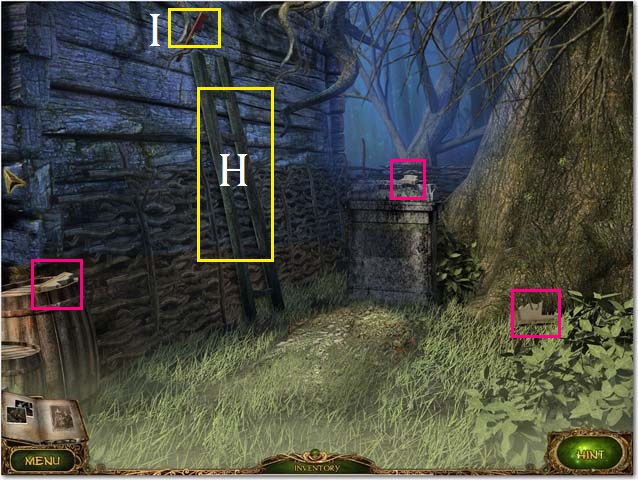
- Collect the eighth, ninth and tenth PLAQUE pieces (pink).
- Lean the LADDER on the side of the house (H) and then collect the MAILBOX FLAG (I).
- Return to the front yard.
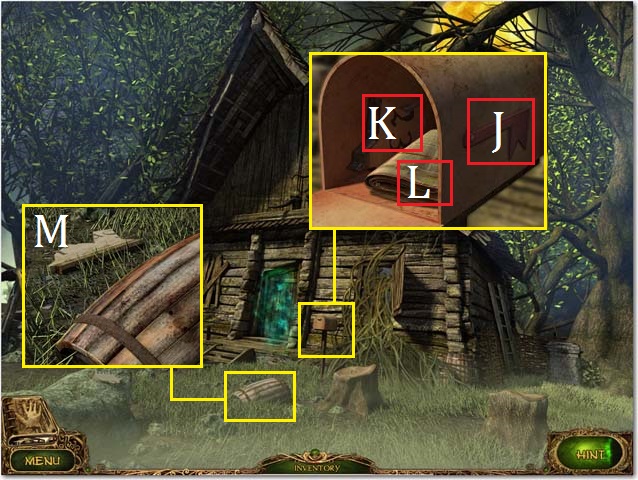
- Zoom into the mailbox; place the MAILBOX FLAG on the box (J) and pull it down.
- Collect the eleventh PLAQUE piece (K) and read the newspaper (L).
- Zoom into the barrel; collect the twelfth PLAQUE piece (M).
- Return to the side yard.
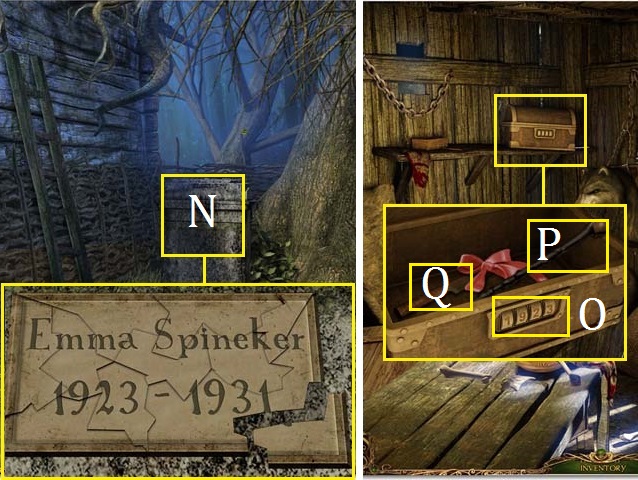
- Place the twelve PLAQUE pieces on the gravestone (N); arrange the pieces as they are shown in the screenshot.
- Return to the back room through the gate in the front yard.
- Zoom into the chest; set the dials (O) to 1923.
- Open the chest; collect the CANE (P) and KNIFE (Q).
- Back up one scene.
- Zoom into the animal trap; trigger the trap with the cane and then collect the PLIERS (S).
- Enter the back room.
- Zoom into the crate; remove the nails with the PLIERS, remove the lid and then collect the CROWBAR (T).
- Return to the front yard.
- Remove the boards from the window with the CROWBAR. Zoom into the broken window; collect the MOON TILE (U).
- Zoom into the barrel; smash the barrel with the CROWBAR and then collect the BOOKCASE TILE (V).
- Return to the shed.
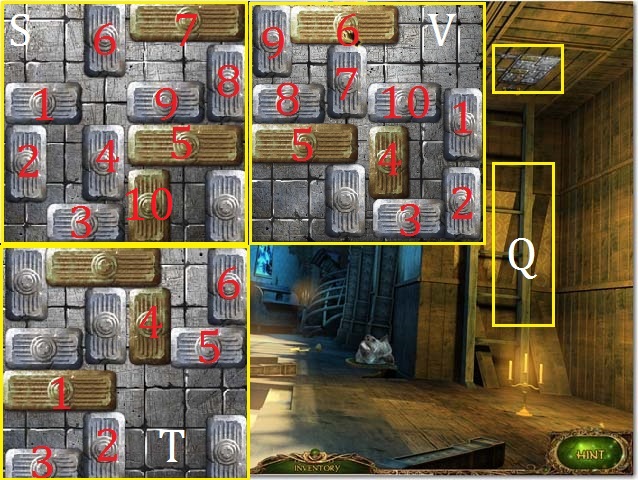
- Use the CROWBAR to remove the boards from the door. You will need to remove them in the order of 1-4.
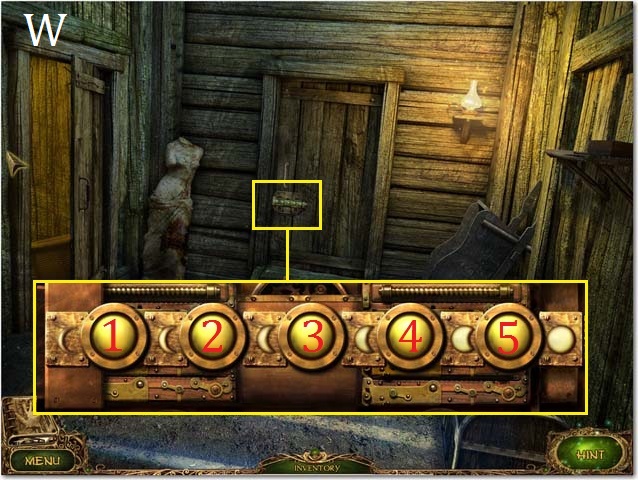
- Zoom into the door lock; place the MOON TILE in the lock.
- Using the buttons, swap the moon tiles so that they are arranged in the order shown in the screenshot. You may use the following sequence: 2, 1, 4, 5, 3, 2, and 4. (W).
- Enter the Study.
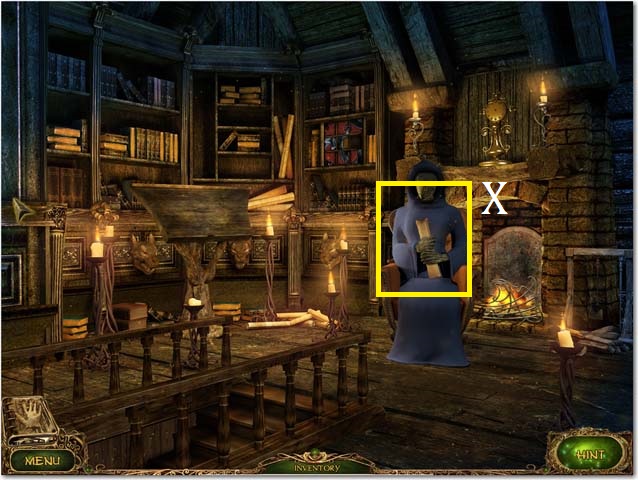
- Spin the chair around and then collect the paper clipping (X).
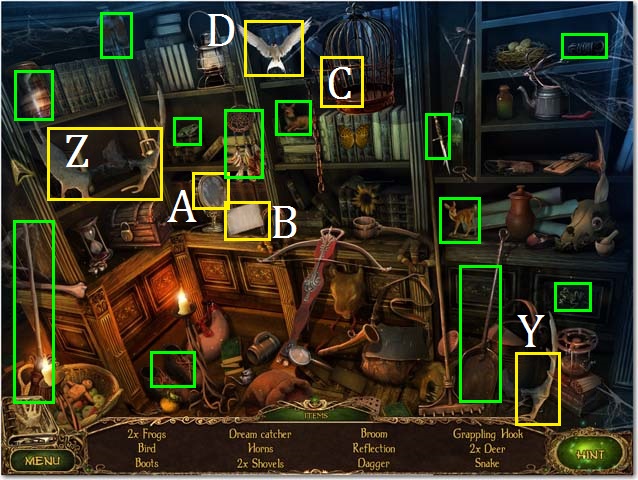
- Zoom into the sparkles to play the HOPS.
- Place the horn (Y) with the other horn (Z) for the Horns.
- Clean the mirror (A) with the cloth (B) to see the Reflection.
- Open the cage (C) to release the Bird (D).
- Collect the remaining items to receive the SHOVEL.

- Zoom into the bookcase; place the BOOKCASE TILE in the puzzle. Swap and rotate the pieces until you have the image shown in the screenshot. Collect the MAGIC BOOK (E).
- Place the MAGIC BOOK on the pedestal (F).
- Return to the side yard.
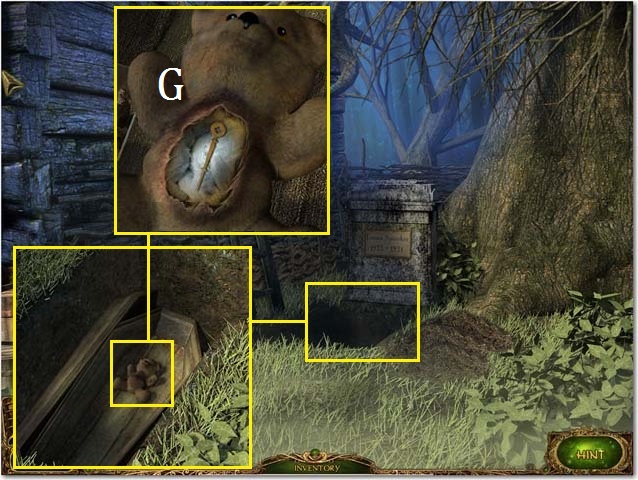
- Use the SHOVEL to dig up the grave.
- Zoom into the open grave and then open the casket; slice open the bear with the KNIFE and then collect the CLOCK HAND (G).
- Return to the Study.
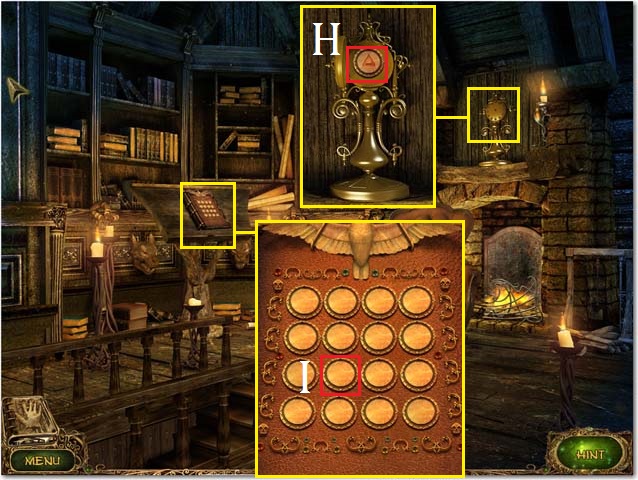
- Zoom into the mantel; place the CLOCK HAND on the clock and then collect the BOOK SYMBOL (H).
- Zoom into the Magic book; place the BOOK SYMBOL on the book’s cover (I). Match all of the symbols in the memory game.
Chapter 2: The Tree’s Soul
- Once you have been transported to the old cabin, zoom into the sparkles to play the HOPS.
- Use the knife (J) to cut out a Pumpkin Slice (K).
- Move the basket to reveal the Metal stick (L).
- Collect the remaining items to receive the LOCK PICK PART.
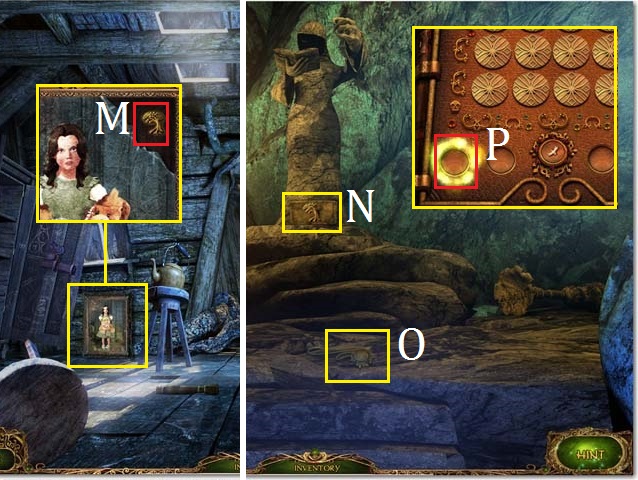
- Examine the painting (M).
- Zoom into the kettle; open the lid and then collect the KEY (N).
- Zoom into the door’s lock; place the LOCK PICK PART in the lock. Set it to approximately the four o’clock position (O).
- Exit the old cabin.
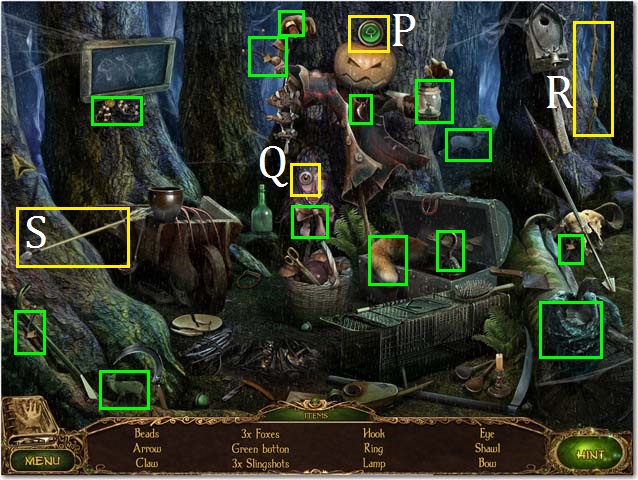
- After speaking with the old woman, zoom into the sparkles to play the HOPS.
- Remove the hat to reveal the Green Button (P).
- Open the mask’s Eye (Q).
- Pull the rope (R) to the shoot the Arrow (S).
- Collect the remaining items to receive the GREEN BUTTON.
- Collect the first WEIGHT (T).
- Return to the old cabin.
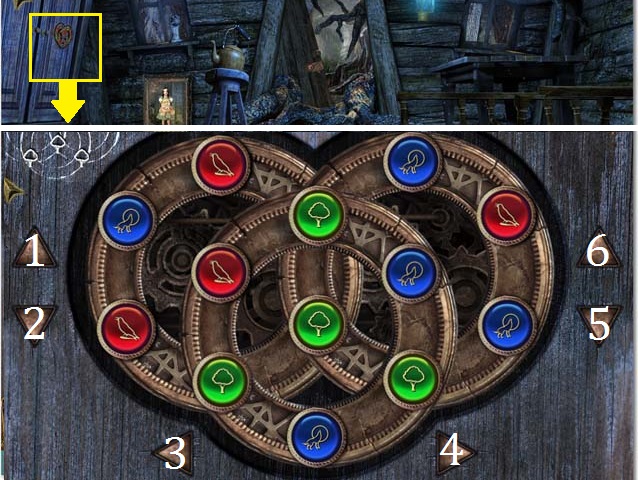
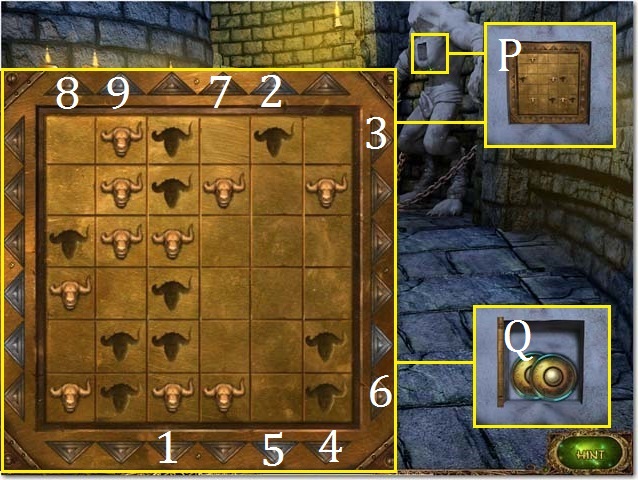
- Zoom into the wardrobe; place the green button in the lock.
- You may use the following sequence to spin the green buttons into the correct positions: 3, 5, 4, 4, 6, 1, 1, 6, 6, 6, 2, 2 and 2.
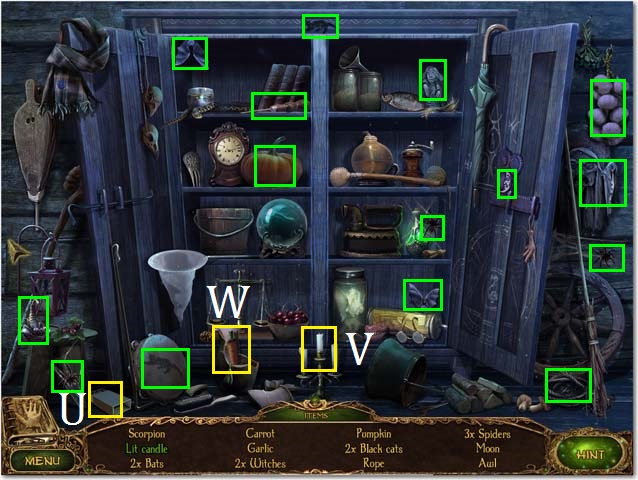
- Zoom into the sparkles to play the HOPS.
- Use the matches (U) to get the Lit Candle (V).
- Break the vase with your hand to find the Carrot (W).
- Collect the remaining items to receive the ROPE.
- Collect the second and third WEIGHT (X) (Y).
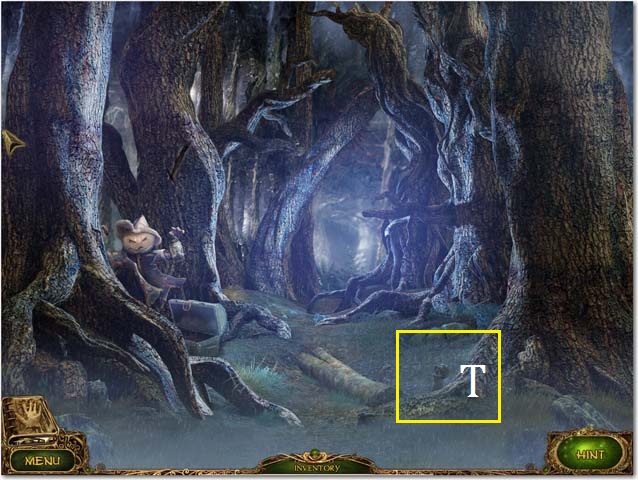
- Exit the old cabin and then move forward down the path to the temple entrance.
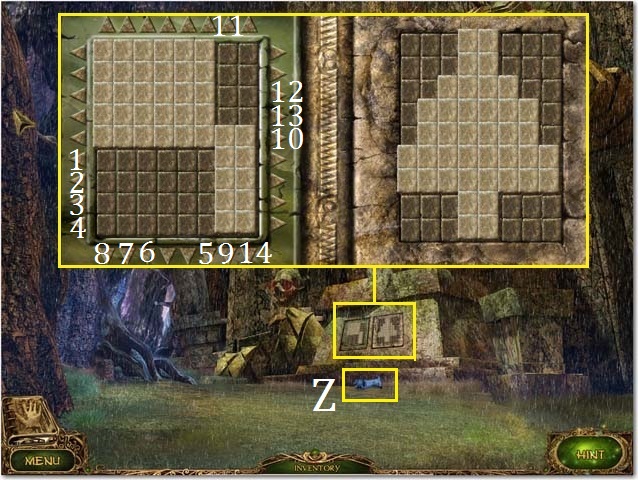
- Zoom into the panels; using the arrows move the blocks on the left to resemble the blocks on the right.
- You may use the following sequence: 1, 1, 1, 2, 2, 2, 3, 3, 3, 4, 4, 4, 5, 5, 6, 6, 7, 7, 8, 8, 9, 10, 10, 11, 12, 9, 13, 14, 12, 9, and 14.
- Collect the fourth WEIGHT (Z).
- Back up one scene.

- Zoom into the hole (A); place the ROPE down the hole and climb down into the tomb.
- Speak with the man attached to the tree (B) to receive the EMPTY BOTTLE.
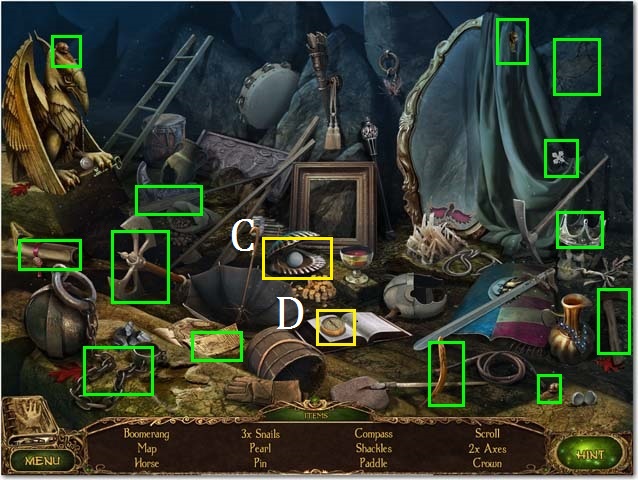
- Zoom into the sparkles to play the HOPS.
- Open the shell to find the Pearl (C).
- Open the book to find the Compass (D).
- Collect the remaining items to receive the AXE.
- Exit the tomb.
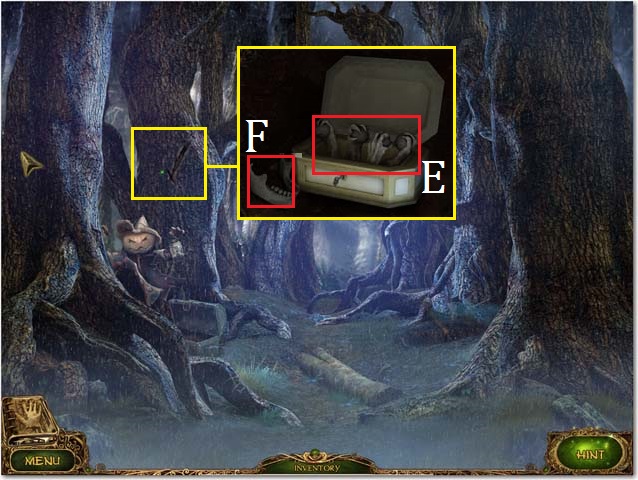
- Use the AXE to open the hole in the tree; zoom into the hole.
- Use the KEY to open the box. Collect the last four of the eight WEIGHTS (E), and the STONE JAW (F).
- Return to the tomb.
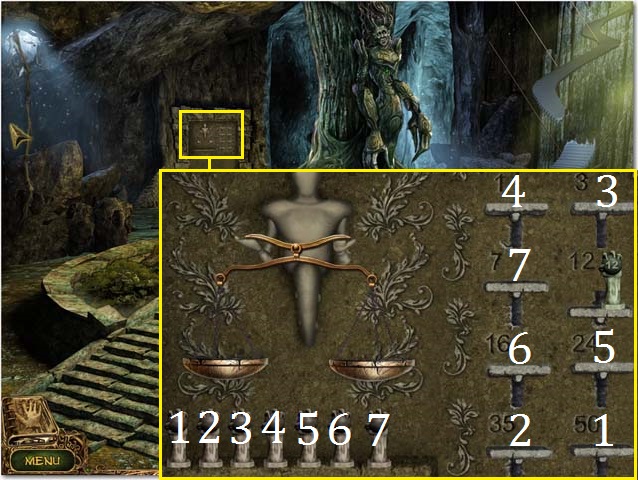
- Zoom into the panel; place the eight WEIGHTS on the ledge.
- Use the scale to find the heaviest weight (1) and place it in the 50 spot. Continue in this manner until you have placed all the weights. See the screenshot for the solution (1-7).
- Exit the tomb and take the path to the temple entrance. Enter the temple.
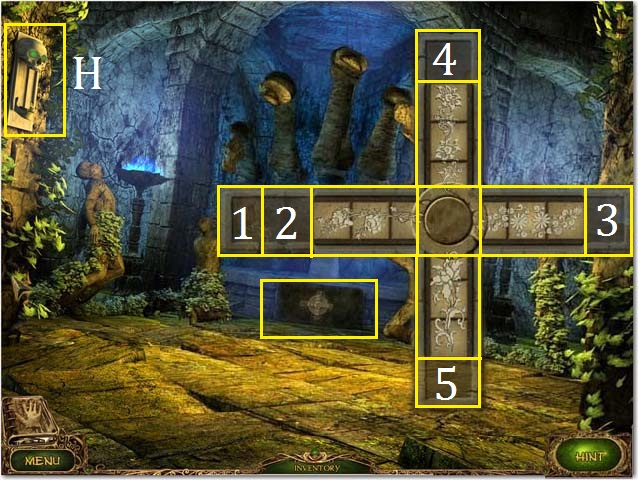
- Place the STONE JAW on the lever (H).
- Zoom into the fountain’s base; swap the tiles to arrange them as they are shown in the screenshot.
- You may use the following sequence: (S= spin, 1 out = move a tile out of slot 1 into the shaft, 1 in= move a piece into slot 1). 4 in, 3 in, S, 5 in, S, 1 in, S, 4 out, (you should have the first piece in the correct position) 2 in, S, S, S, 2 out, 4 in, S, 4 out, 2 in, S, S, S, 4 in, S, S, 4 out, S, 3 out, S, S, 2 out, 3 in, S, 5 out, 2 in, S, 4 in, S, S, 5 in, S, 5 out, S, S, 3 out, S, S, 2 out, S, 1 out, and 4 out.
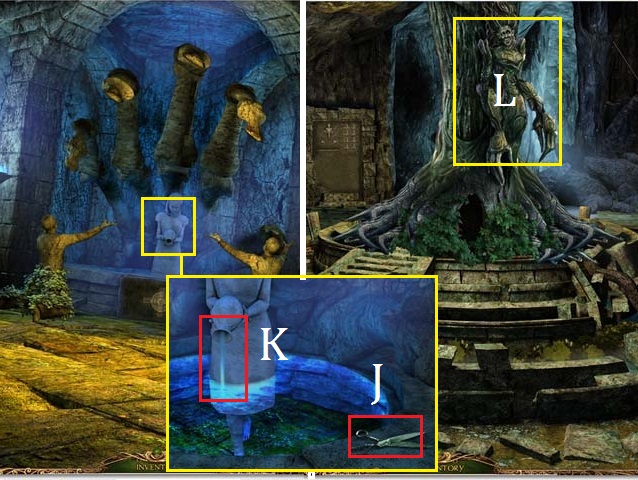
- Zoom into the fountain; collect the SCISSORS (J).
- Fill the EMPTY BOTTLE with water from the fountain (K) to receive the BOTTLE WITH WATER.
- Return to the tomb.
- Pour the BOTTLE WITH WATER on the tree (L).
- Return to the old cabin.
- Zoom into the painting; use the SCISSORS to cut the painting and then collect the TREE MEDALLION (M).
- Return to the tomb and then climb the stairs.
- Place the TREE MEDALLION in the slot (N).
- Collect the AMULET (O).
- Go back downstairs.
- Place the AMULET over the tree to free the little boy’s spirit.
- Once the book appears place the AMULET in the first slot (P).
Chapter 3: The Minotaur’s Soul
- Interact with the Minotaur.
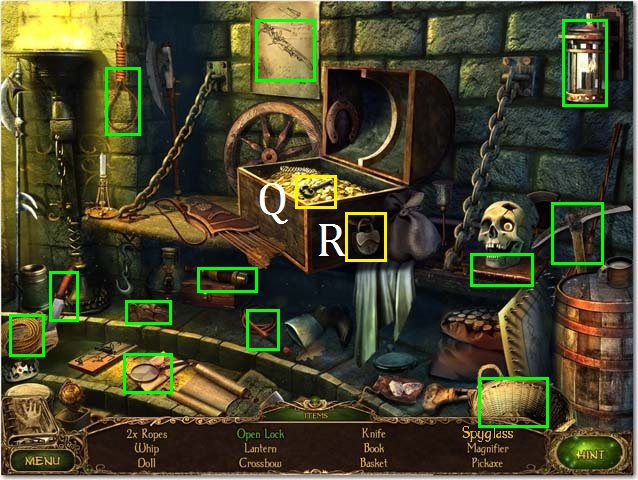
- Zoom into the sparkles to play the HOPS.
- Use the key (Q) to Open the Lock (R).
- Collect the remaining items to receive the PICKAXE.
- Use the PICKAXE to remove the rubble (U).
- Enter the side cave.
- Collect the HAMMER (V).
- Exit the side cave.
- Zoom into the first panel; swap the tiles so that they form the picture shown in the screenshot. The starting positions are random. One solution was: 3, 4, 2, 1, 1, 1, 4, 2, 3, 2, 2, 3, 3 and 3.
- Enter the middle cave.
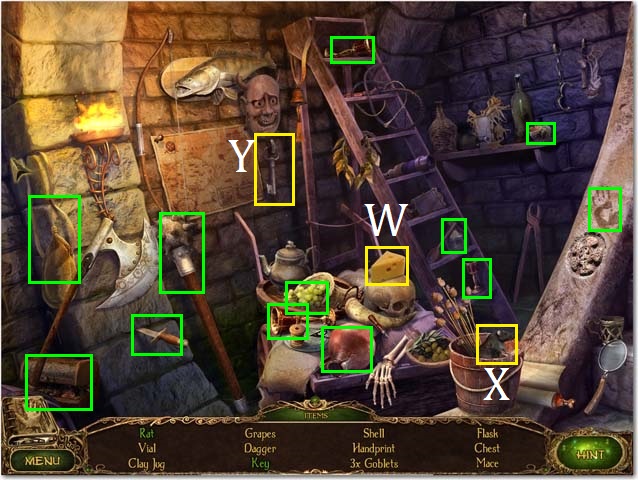
- Zoom into the sparkles to play the HOPS.
- Give the cheese (W) to the Rat (X).
- Raise the mask to locate the Key (Y).
- Collect the remaining items to receive the VIAL.
- Zoom into the barrel; use the HAMMER to remove the lid and then collect the VALVE (Z).
- Return to the side cave.
- Zoom into the pipe; place the VALVE on the pipe (A).
- Turn the VALVE and then collect the acid (B) with the VIAL to receive the VIAL WITH ACID.
- Exit the side cave and enter the middle cave.
- Zoom into the tree stump; pour the VIAL WITH ACID over the chains and then collect the STONE MINOTAUR (C).
- Return to the main cave.
- Place the STONE MINOTAUR in the slot of the second panel and zoom in; swap and rotate the tiles to arrange them as they are shown in the screenshot (D).
- Enter the third cave.
- Zoom into the statue; pour the VIAL WITH ACID on the statue’s chains and then use the HAMMER to break open the chest (E).
- Climb the stairs.
- Zoom into the sparkles to play the HOPS.
- Move the elephant head to reveal the Thermometer (F).
- Use the pen (G) on the scroll to write the Signature (H).
- Collect the remaining items to receive the S AW.
- Return to the main cave and then enter the side cave.
- Use the SAW on the rafter (I) to receive the BOARD.
- Return to the middle cave.
- Lay the BOARD over the hole (J).
- Move to the back room of the middle cave.
- Zoom into the sparkles to play the HOPS.
- Place the bow (K) on the Archer (L).
- Move the shield to reveal the Pliers (M), Helmet (N), and Mirror (O).
- Collect the remaining items to receive the RAG.
- Return to the third cave.
- Zoom into the statue; use the RAG to clean the panel (P).
- Zoom into the panel; using the arrows, place the Minotaur heads into the empty slots. The starting positions are random. From the starting position shown in the screenshot, you may use the following sequence: 1, 2, 2, 3, 4, 5, 6, 6, 7, 8, 9 and 6.
- Collect the SKULL EYES (Q).
- Return to the main cave and then enter the side cave.
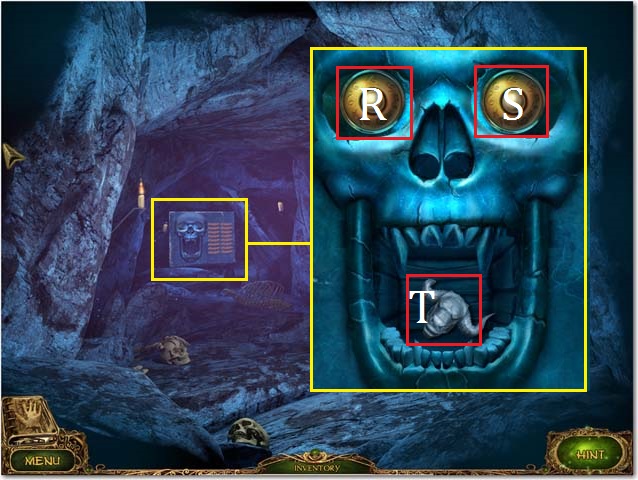
- Zoom into the skull panel; place the SKULL EYES in the skulls sockets (R), (S). Move the elevator up and down until you land on the correct space. You may use the following sequence: R, R, S, S, R, R, S, R, R, and S.
- Collect the second STONE MINOTAUR (T).
- Return to the main cave.
- Place the second STONE MINOTAUR in the third panel and then zoom in: rotate the tiles to arrange them as they are shown in the screenshot (U).
- Receive the second AMULET.
- Place the second AMULET in the second slot (V) in the magic book.
Chapter 4: The Wolf’s Soul
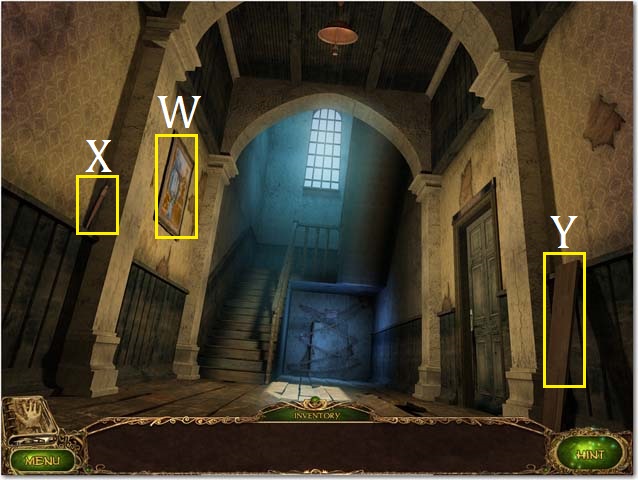
- Knock the picture (W) down.
- Collect the first BRUSH (X).
- Collect the first BOARD (Y).
- Climb the stairs to the landing.
- Collect the PLIERS (Z).
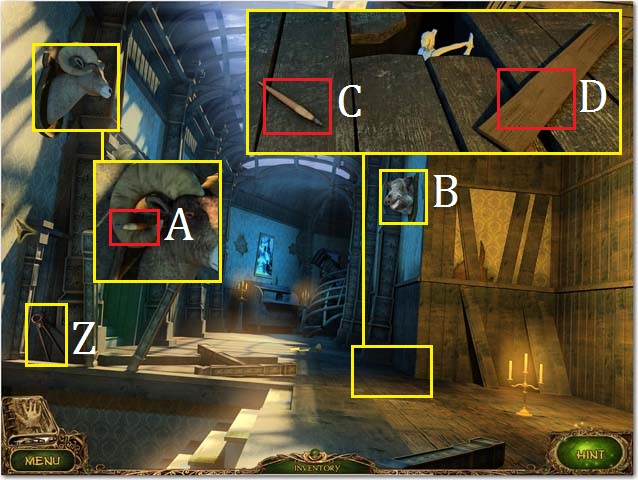
- Zoom into the ram’s head; collect the second BRUSH (A).
- Knock the other animal head (B) down.
- Zoom into the hole; collect the third BRUSH (C) and the second BOARD (D).
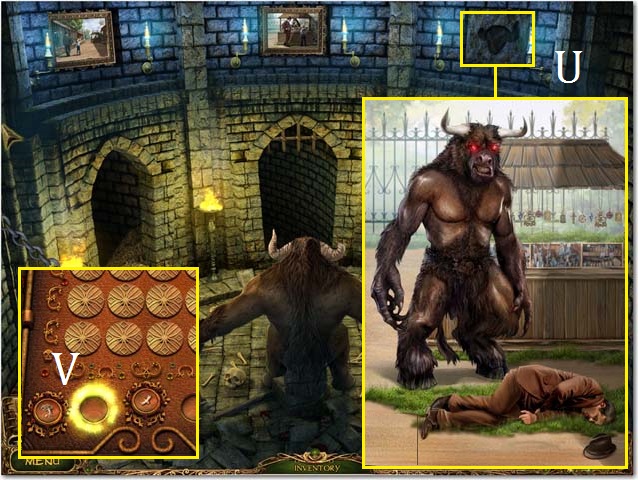
- Zoom into the sparkles to play the HOPS.
- Move the hat to find the Opera Glasses (E).
- Move the painting to find the Envelope (F).
- Move the books to find the Sphere (G).
- Collect the remaining items to receive the SPEAR.
- Enter the piano room to the left.
- Collect the third BOARD (H).
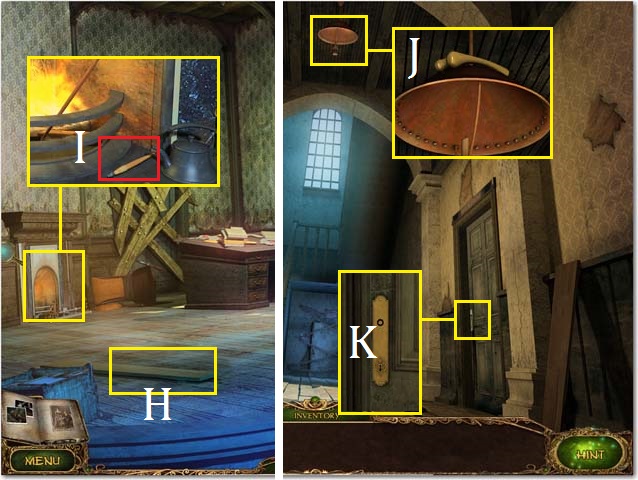
- Zoom into the fireplace; collect the fourth BRUSH (I).
- Return back downstairs.
- Zoom into the light; use the SPEAR to retrieve the DOOR HANDLE (J).
- Zoom into the library door; place the DOOR HANDLE on the door (K).
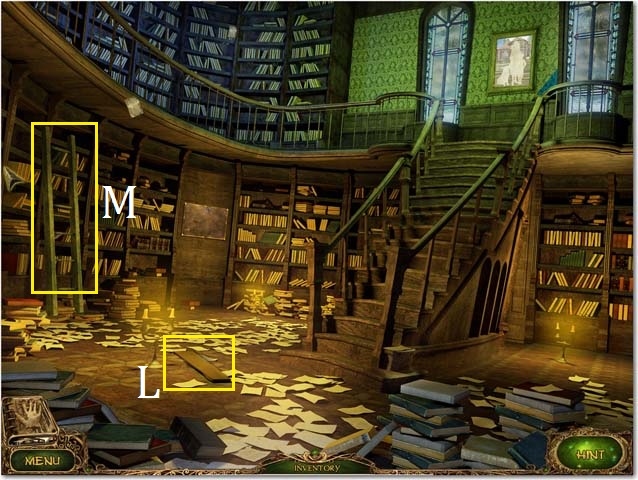
- Enter the library.
- Collect the fourth BOARD (L) and the LADDER (M).
- Zoom into the sparkles to play the HOPS.
- Move the curtain to find the Mask (N).
- Move the painting to find the Pouch (O).
- Collect the remaining items to receive the HAMMER.
- Return to the upstairs landing.
- Lean the LADDER on the wall (Q).
- Zoom into the hatch latch; for this puzzle the movement is represented by R=right, L=left, U=up, and D=down.
- Move each piece as far in the direction indicated that it can move. Start with figure (S) move 1R, 2U, 3L, 4D, 5L, 1L, 6D, 7L, 8U, 9R and 10U. Your board should now look like figure (T).
- From figure (T) move 1R, 2U, 3R, 2D, 3L, 4D, 5L, and 6D. Your board should now look like figure (V).
- From figure (V) move 1U one space, 2U, 3R, 4D, 5R, 6R, 7U, 8R, 9D, 5L, 8L, 7D, 6L, 1U, 10R, and 4U.
- Enter the attic.
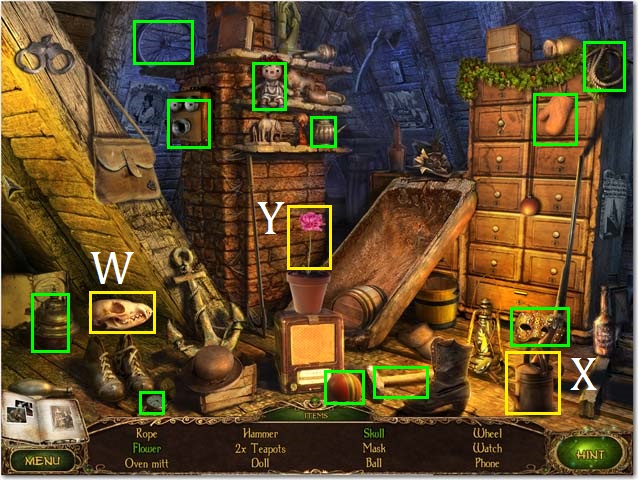
- Zoom into the sparkles to play the HOPS. Note: if the sparkles are not present zoom into the back right corner of the room.
- Move the book to reveal the Skull (W).
- Pour the watering can (X) over the flowerpot to grow the Flower (Y).
- Collect the remaining items to receive the OVEN MITT.
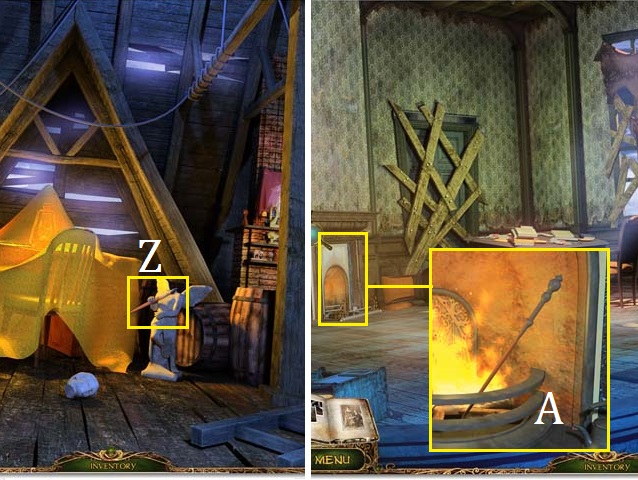
- Collect the fifth BRUSH (Z).
- Return to the piano room.
- Zoom into the fireplace; use the OVEN MITT to retrieve the POKER (A) from the fire.
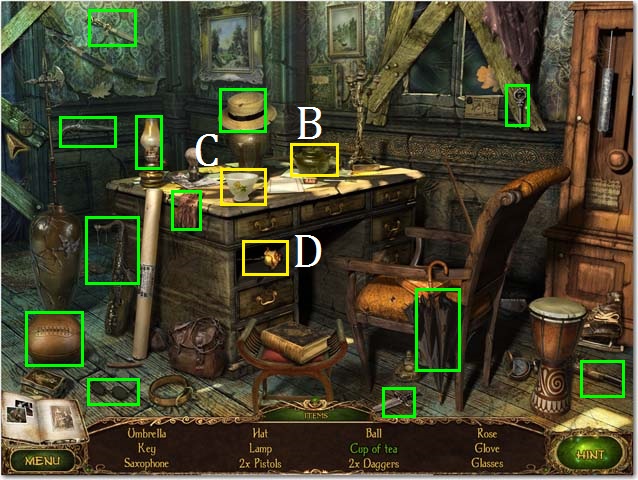
- Zoom into the sparkles to play the HOPS.
- Pour the teapot (B) into the Cup of Tea (C).
- Open the drawer to locate the Rose (D).
- Collect the remaining items to receive the KEY.
- Return to the downstairs hallway.
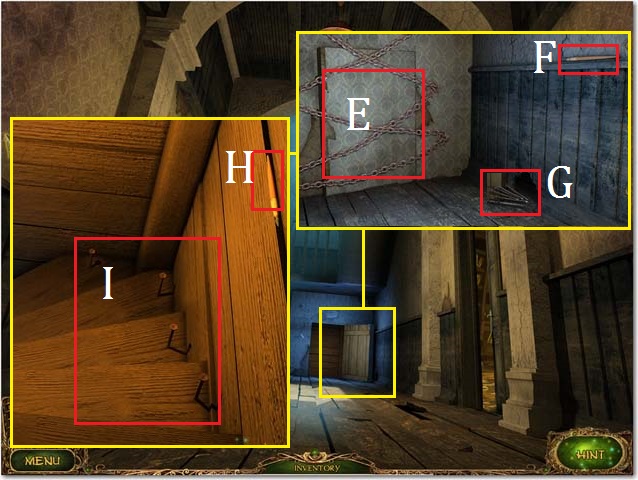
- Zoom into the chained door; use the PLIERS to remove the chains (E).
- Collect the sixth BRUSH (F).
- Dig out the NAILS (G) from the hole using the POKER.
- Enter the basement landing.
- Collect the seventh BRUSH (H).
- Place the four BOARDS on the landing (I).
- Secure the NAILS on the boards using the HAMMER.
- Go down to the basement.
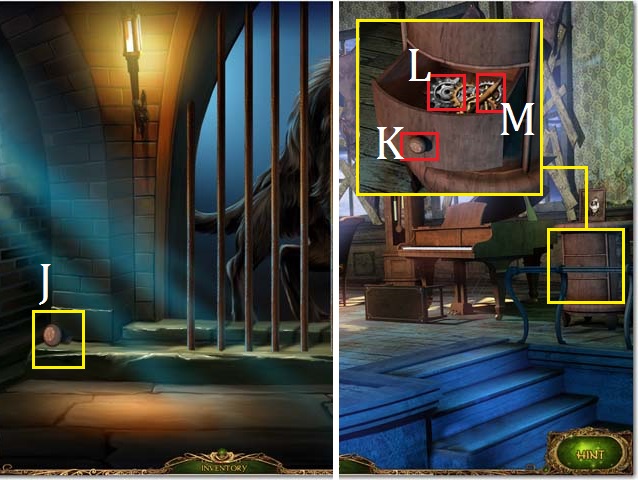
- Collect the HANDLE (J).
- Return to the piano room.
- Zoom into the side table; place the HANDLE on the drawer (K) and then collect the GEARS (L) and the eighth BRUSH (M).
- Return to the library.
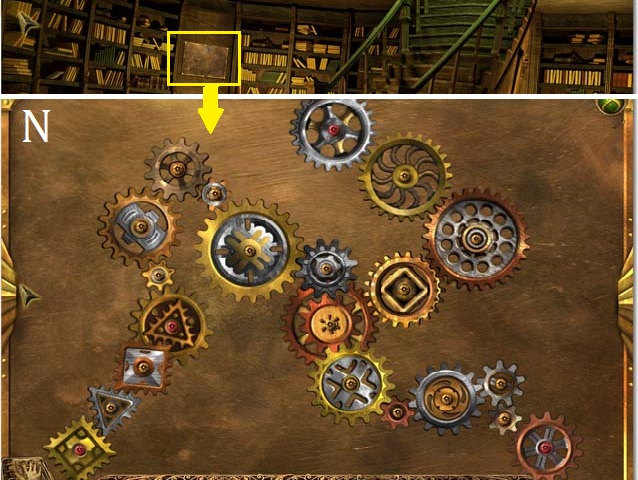
- Zoom into the frame; place the GEARS on the puzzle. Arrange the gears so that all the gears are spinning. You may use the screenshot (N) for a solution.
- Zoom into the sparkles to play the HOPS.
- Place the Bunsen burner (O) under the Hot Pot (P).
- Move the pot to reveal the Shell (Q).
- Move the weights to reveal the KEY (R).
- Collect the remaining items to receive the SAFE KEY.
- Exit the library.
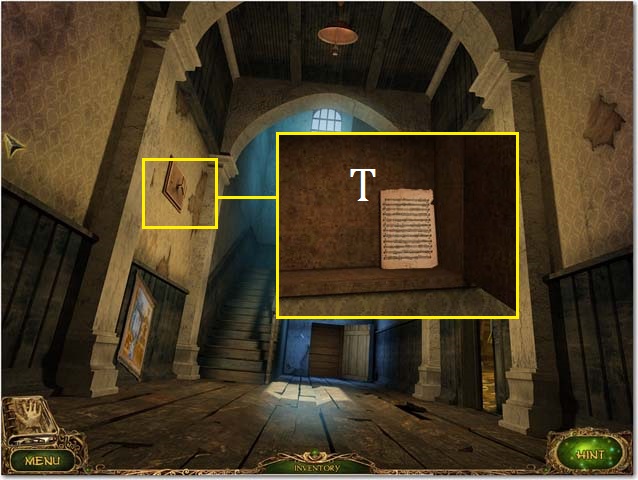
- Zoom into the safe; open the safe with the SAFE KEY and then collect the SHEET MUSIC (T).
- Return to the piano room.
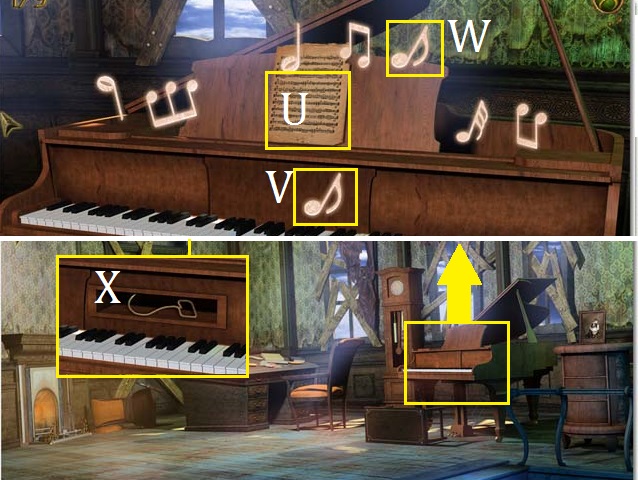
- Zoom into the piano; place the SHEET MUSIC on the piano (U).
- Match the notes on the piano (V) to those floating in the air (W) before they drift away. Continue until you have completed all of the sequences and the panel opens.
- Collect the HOOK (X).
- Exit the piano room.
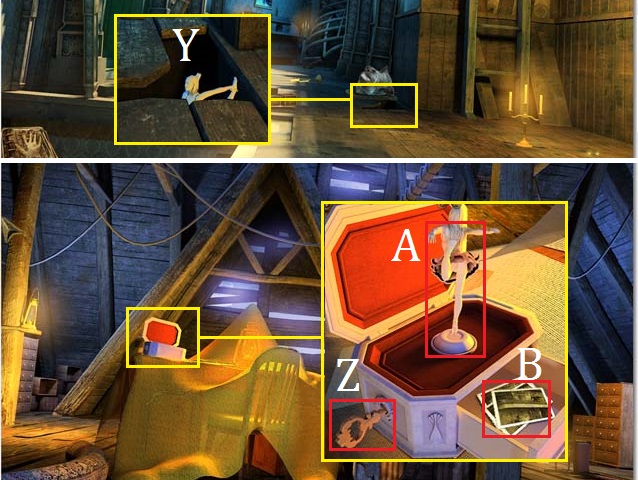
- Zoom into the hole; using the HOOK, retrieve the BALLERINA (Y) from the hole.
- Return to the Attic.
- Zoom into the table; open the box (Z) with the KEY. Place the BALLERINA in the box (A) and then collect the PHOTOS (B).
- Return to the library.
- You can zoom into a photo (C) to receive a hint as to where one of the portrait pieces is hidden (D).
- Collect all six PICTURE PIECES (pink).
- Zoom into the painting; place the PICTURE PIECES and the 8 BRUSHES on the puzzle. Paint the photo as it is shown in the screenshot using the brushes (E).
- Collect the AMULET (F) once you have finished the painting.
- Return to the basement.
- Place the AMULET over the wolf (G).
- Place the amulet into the fourth slot (H) in the Magic Book.
Chapter 5: the Statue’s Soul
- Collect the first MIRROR FRAGMENT (I).
- Zoom into the center of the room to enter the statue scene.
- Collect the second MIRROR FRAGMENT (J) and the first STATUE PART (K).
- Exit the statue scene.
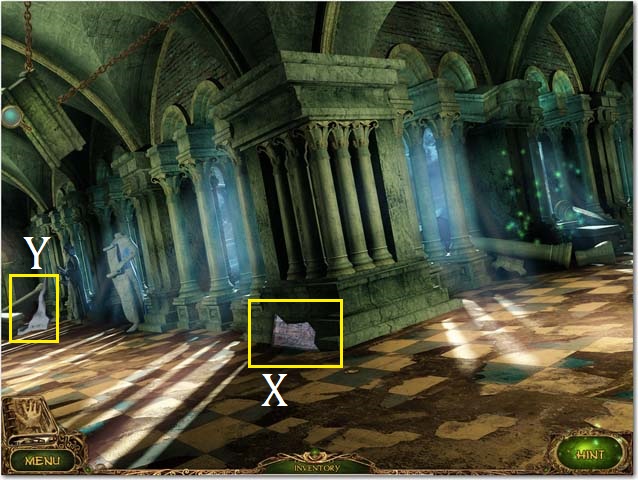
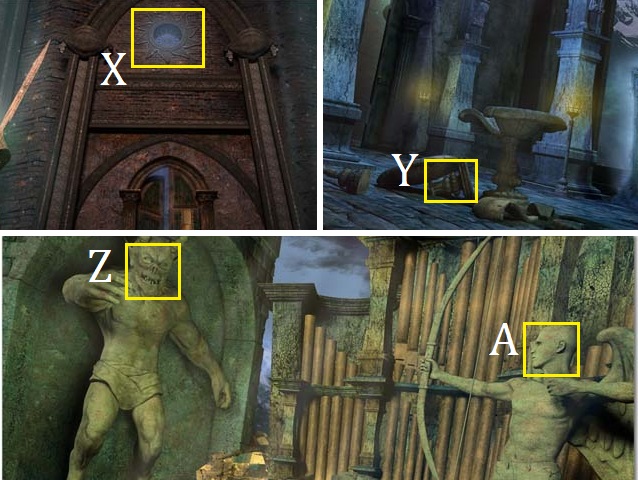
- Zoom into the far right doorway; collect the third MIRROR FRAGMENT (L).
- Zoom into the middle doorway (M).
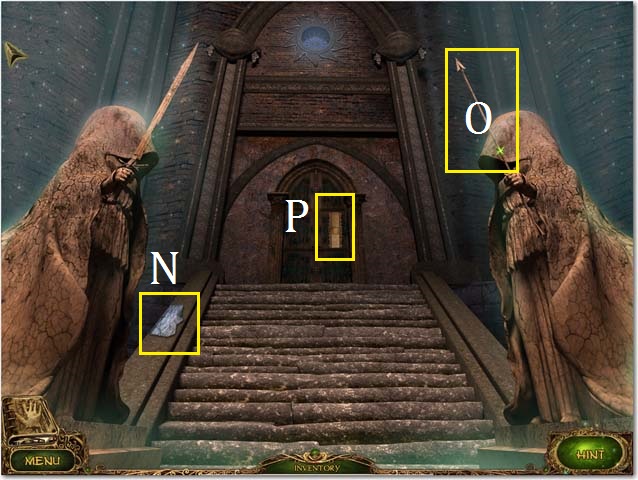
- Collect the fourth MIRROR FRAGMENT (N) and the first BOW (O).
- Zoom into the doorway (P).
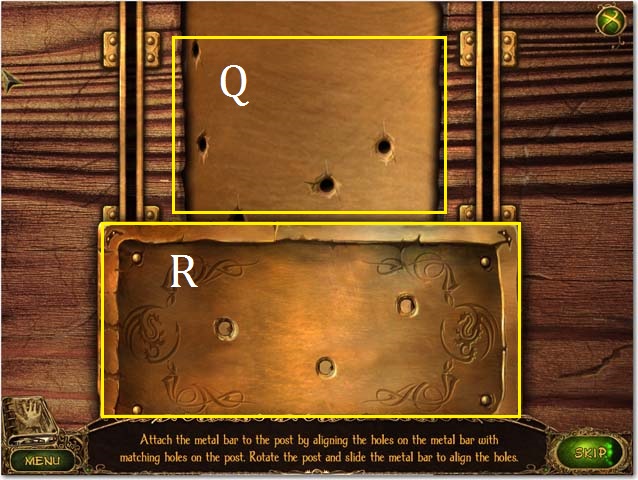
- Rotate the middle barrel (Q) to the left and lower the bar (R) to match up the holes and open the lock.
- Enter the mirror room.
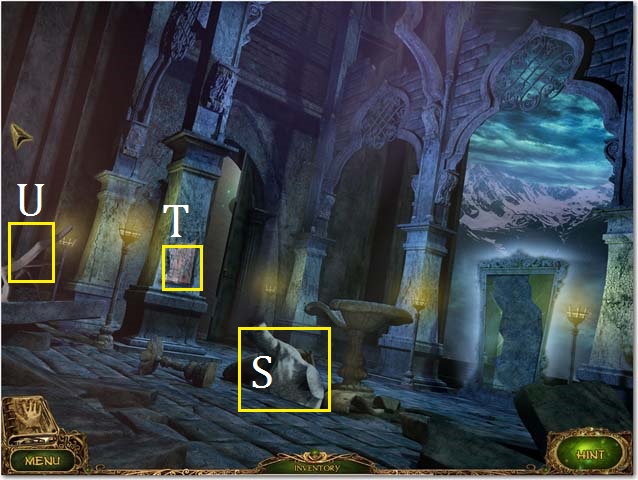
- Collect the second STATUE PIECE (S), the fifth MIRROR FRAGMENT (T), and the third STATUE PIECE (U).
- Return to the first scene.
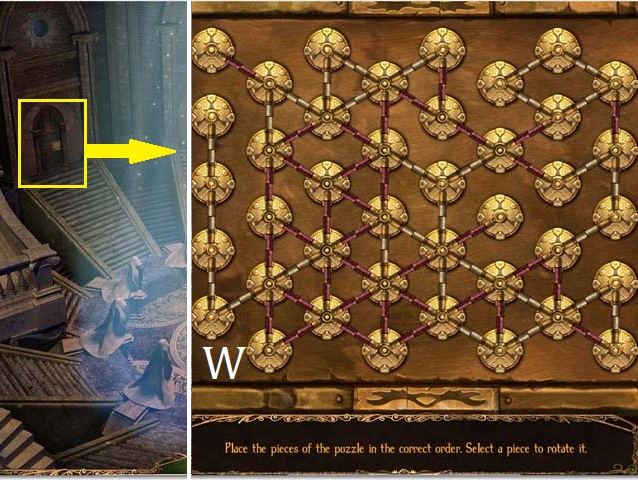
- Zoom into the far left; rotate the pieces so that all the white connections are paired as well as the pink. Once a piece is in the correct position, you will not be able to spin it anymore. You may use the screenshot (W) as a key.
- Enter the column room.
- Collect the sixth MIRROR FRAGMENT (X) and the third STATUE PIECE (Y).
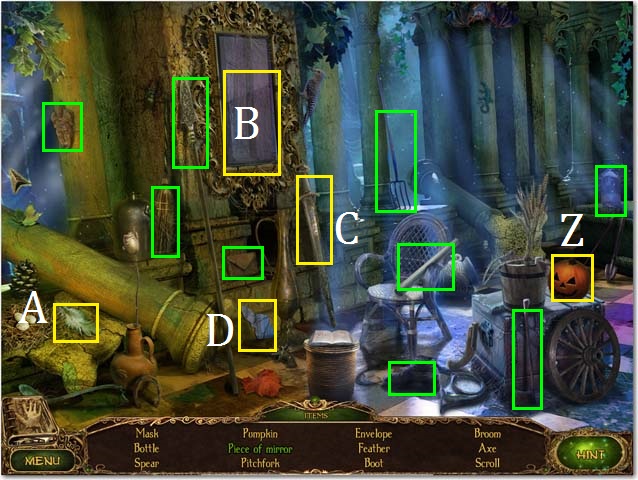
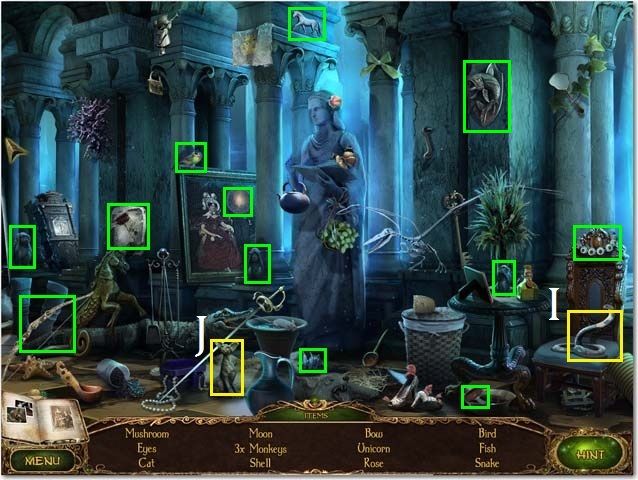
- Zoom into the sparkles to play the HOPS.
- Move the pot to reveal the Pumpkin (Z).
- Move the nest to find the Feather (A).
- Break the mirror (B) with the sword (C) to get the Piece of Mirror (D).
- Collect the remaining items to receive the seventh MIRROR FRAGMENT.
- Return to the mirror room.
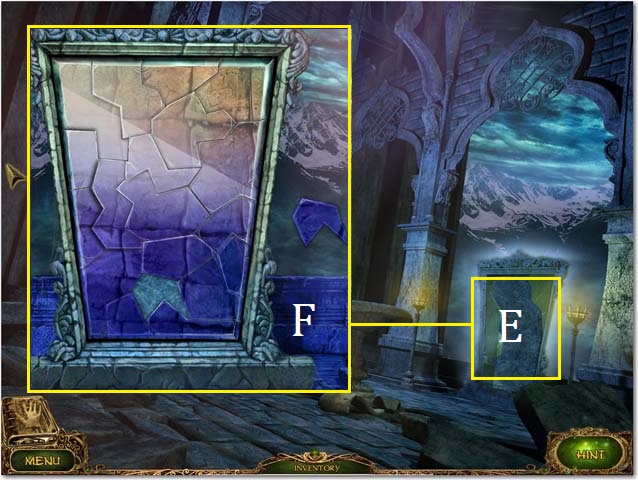
- Drop the 7 MIRROR FRAGMENTS over the mirror (E).
- Arrange the fragments as they are shown in the screenshot (F) to complete the mirror.
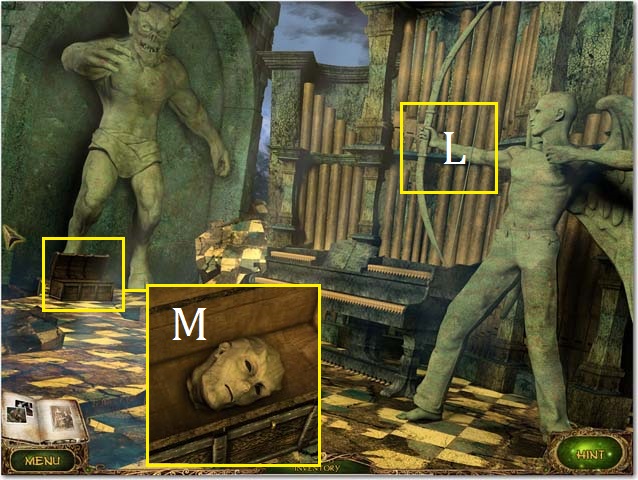
- Travel through the mirror to the angel room.
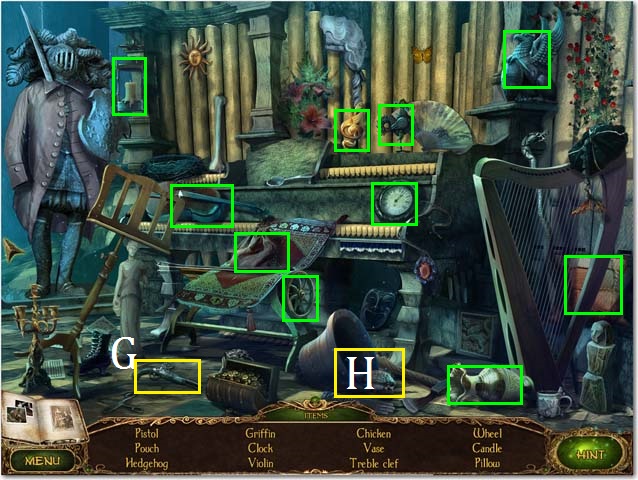
- Zoom into the sparkles to play the HOPS.
- Move the chest to find the Pistol (G).
- Ring the bell to scare out the Hedgehog (H).
- Collect the remaining items to receive the PISTOL.
- Return to the column room, through the far left door of the first scene.
- Zoom into the sparkles to play the HOPS.
- Move the pillow to reveal the Snake (I).
- Move the pitcher to reveal the Cat (J).
- Collect the remaining items to receive the second BOW.
- Shoot the chain (K) with the PISTOL.
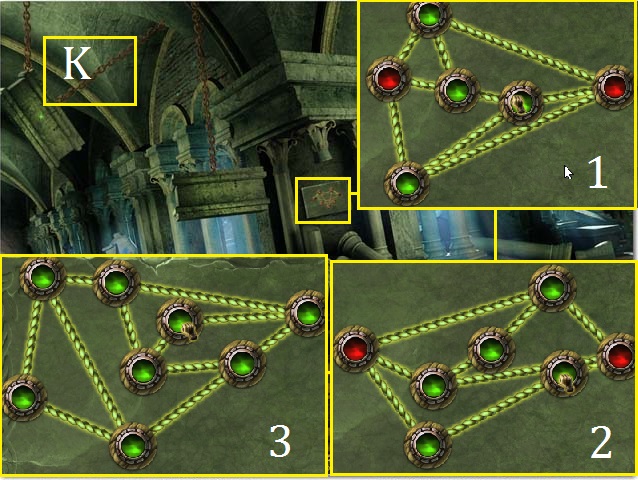
- Zoom into the smashed columns; untangle the ropes so that none cross each other. The ropes will turn green when they are untangled. You may use the screenshots (1-3) as a guide.
- Once you have unscrambled all of the ropes you will receive the third BOW.
- Return to the angel room.
- Place the BOW in the angel’s hands (L).
- Zoom into the fallen box; collect the fifth STATUE PIECE (M).
- Return to the statue scene.
- Lay out the STATUE PIECES and the statue will automatically assemble itself. You will receive a KEY.
- Return to the mirror room.
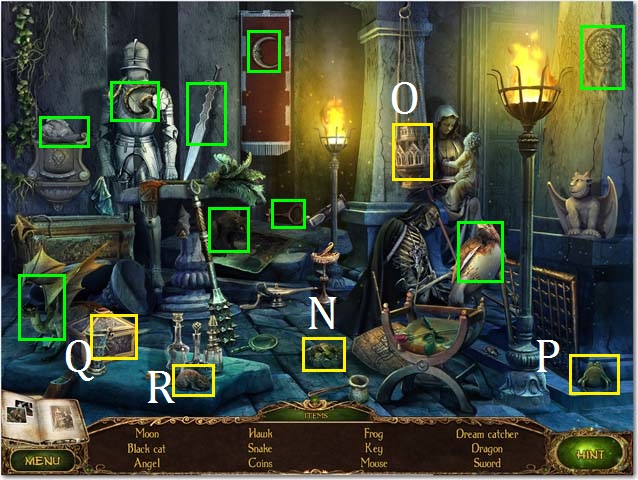
- Zoom into the sparkles to play the HOPS.
- Move the shield to locate the Coins (N).
- Shake the incense burner (O) to get the Frog (P).
- Move the box (Q) to get the Mouse (R).
- Collect the remaining items to receive the second KEY.
- Return to the first scene.
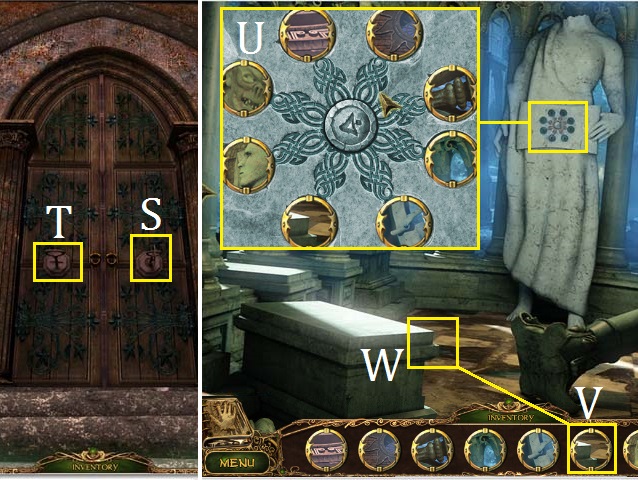
- Zoom into the far right door; place the first KEY in the right side (S) of the lock and the second KEY in the left side (T) of the lock.
- Enter the token room.
- Zoom into the statue; collect the middle token (U) to receive all of the TOKENS.
- Grab the token with the ledge corner (V) and place it over the corner (W) so that it transforms into a token with a symbol.
- Exit the token room. Move into the middle doorway.
- Take the token that matches the sun crest (X) and tap it over the sun.
- Enter the mirror room.
- Tap the token that matches the fallen pillar and tap it over the fallen pillar (Y).
- Travel through the mirror to the angel room.
- Use the tokens that match the two faces (Z), (A).
- Move to the column room.
- Use the token that matches the arch (B) in the column.
- Use the token that matches the scroll on the statue (C).
- Return to the statue scene.
- Use the token that matches the detail in the ring (D) around the statue.
- Return to the token room.
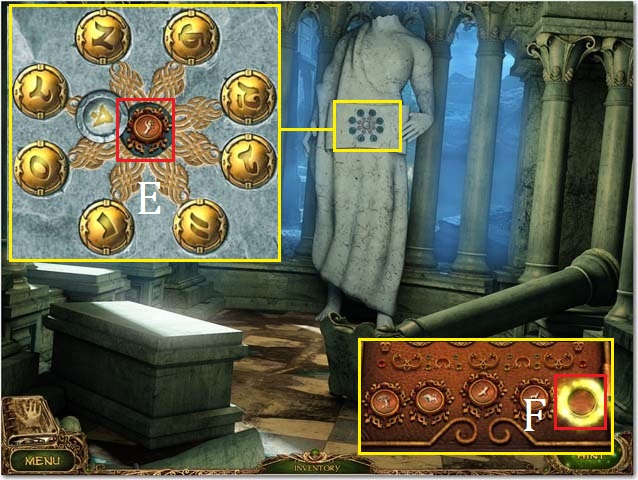
- Zoom into the statue; place all of the transformed tokens in their matching slots.
- Collect the EMBLEM (E).
- Return to the statue scene.
- Drop the EMBLEM over the statue.
- Place the EMBLEM in the last slot (F) on the Magic Book.
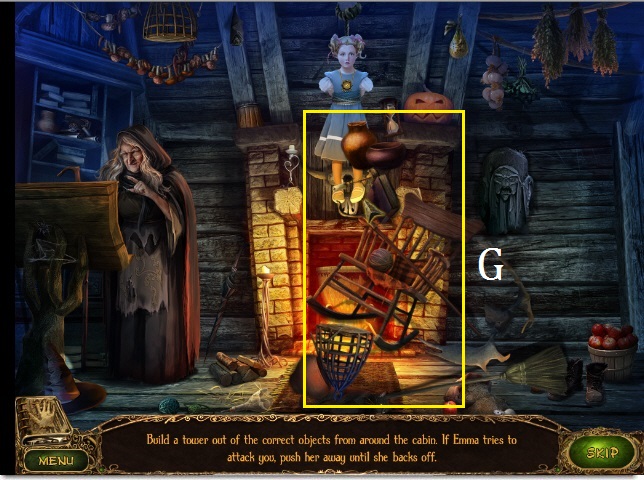
- Stack the random items, from around the room, up under your daughter. If Emma blocks your way just repeatedly push her out of the way until she moves. You may use the screenshot (G) as an example of how you can build your tower.
- Congratulations! You have completed Lost Tales: Forgotten Souls!


 Love Chronicles: A Winter's Spell Walkthrough, Guide, & Tips
 Labyrinths of the World: Shattered Soul Walkthrough, Guide, & Tips
 Sable Maze: Forbidden Garden Walkthrough, Guide, & Tips
 Fabled Legends: The Dark Piper Walkthrough, Guide, & Tips
 Mystery Case Files: Dire Grove, Sacred Grove Walkthrough, Guide, & Tips