Mystery Case Files: Dire Grove, Sacred Grove Walkthrough, Guide, & Tips
Mystery Case Files: Dire Grove, Sacred Grove Walkthrough
Welcome to the Mystery Case Files: Dire Grove, Sacred Grove Walkthrough
A deadly secret lurks in the woods of Dire Grove!
Whether you use this document as a reference when things get difficult or as a road map to get you from beginning to end, we’re pretty sure you’ll find what you’re looking for here.
This document contains a complete Mystery Case Files: Dire Grove, Sacred Grove game walkthrough featuring annotated screenshots from actual gameplay!
We hope you find this information useful as you play your way through the game. Use the walkthrough menu below to quickly jump to whatever stage of the game you need help with.
Remember to visit the Big Fish Games Forums if you find you need more help. Have fun!
This walkthrough was created by prpldva, and is protected under US Copyright laws. Any unauthorized use, including re-publication in whole or in part, without permission, is strictly prohibited.
General Tips
- This is the official guide for Mystery Case Files: Dire Grove, Sacred Grove.
- This guide will not mention each time you have to zoom into a location; the screenshots will show each zoom scene.
- Hidden-object puzzles are referred to as HOPs. This guide will not show HOP solutions. It will identify the location of the HOP and the inventory item acquired.
- This guide will show solutions for non-random puzzles. Please read the in-game instructions for each puzzle.
- Some of the longer puzzle solutions may be posted on different pages.
Chapter 1: What Happened?

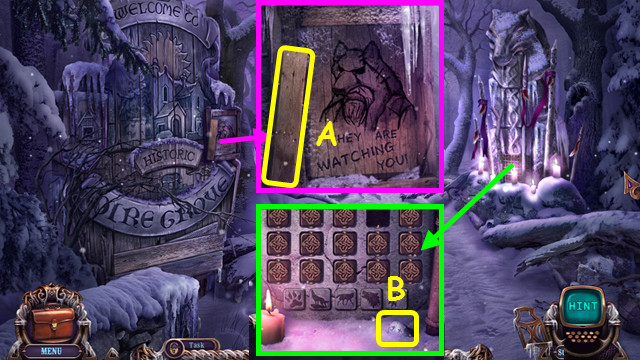
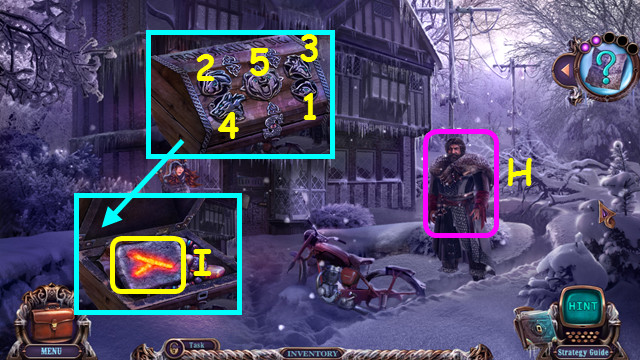
- Enter 3-7-5-8 on the SUITCASE and open the case; play the HOP to earn the BADGE (inventory).
- Take the PLANK (A); brush the snow twice and take the first BATTERY (B).
- Walk forward.

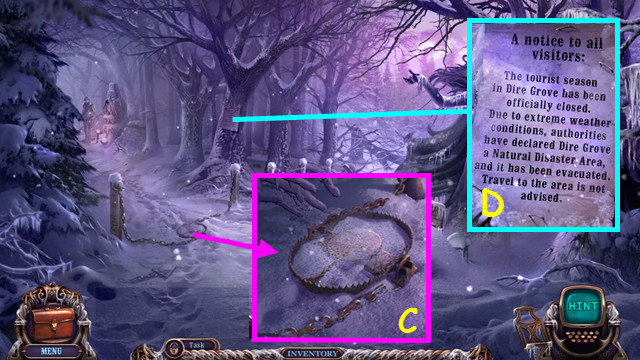
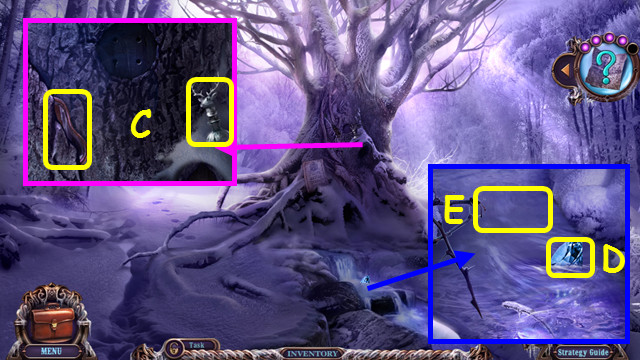
- Place the PLANK (C).
- Read the notice (D).
- Walk left.

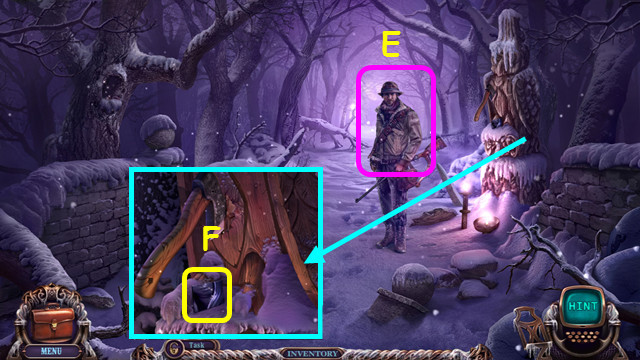
- Talk to the Hunter; give him the BADGE (E).
- Take the first BANSHEE-STATUE PART (F).
- Walk forward.

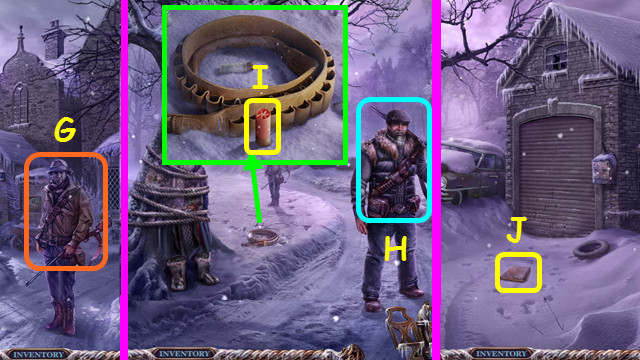
- Select the Hunter (G).
- Walk right.
- Talk to the Samuel thoroughly to receive the RIFLE (H). Take the RIFLE CARTRIDGE (I). Combine the RIFLE and RIFLE CARTRIDGE to make the LOADED GUN (inventory).
- Walk forward.
- Take and read SAMUEL’S DIARY (J).
- Walk left.

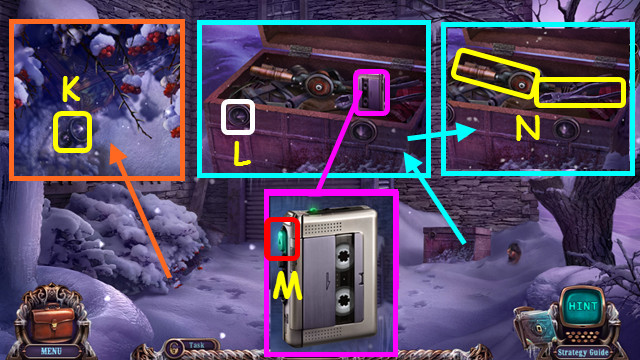
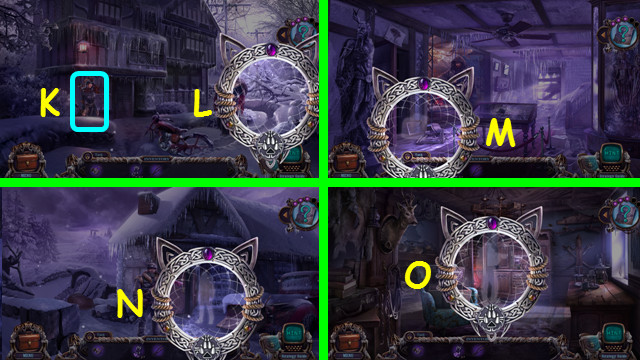
- Take the BUTTON (K).
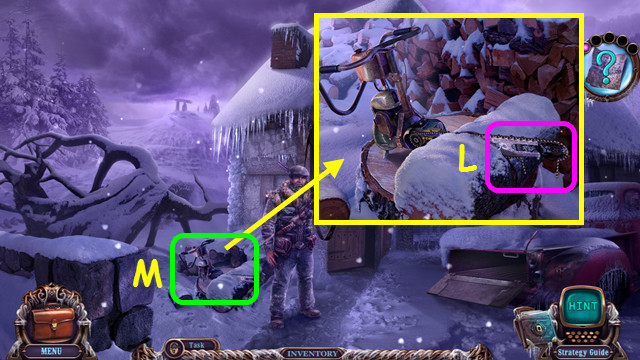
- Remove the ice and place the BUTTON (L).
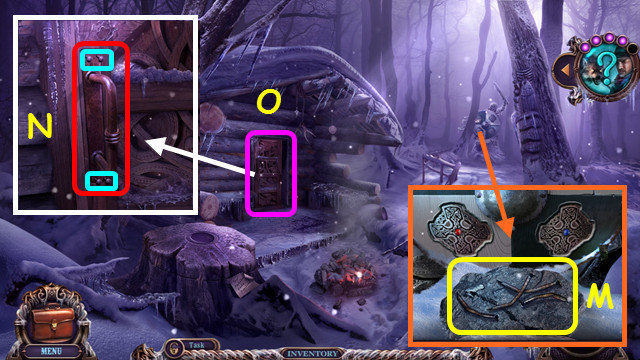
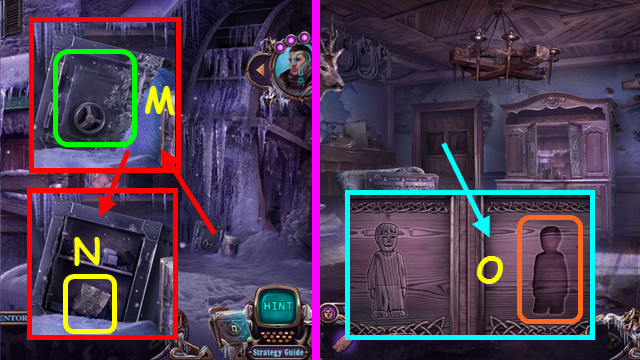
- Press both buttons, open the chest, select the DICTAPHONE MESSAGE, and push the play button (M).
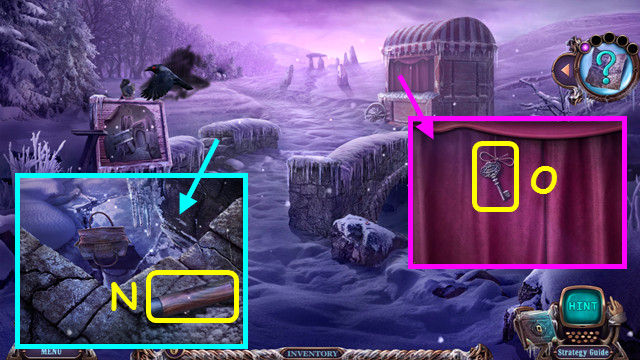
- Take the BROKEN DRILL and WIRE CUTTERS (N).
- Walk down.

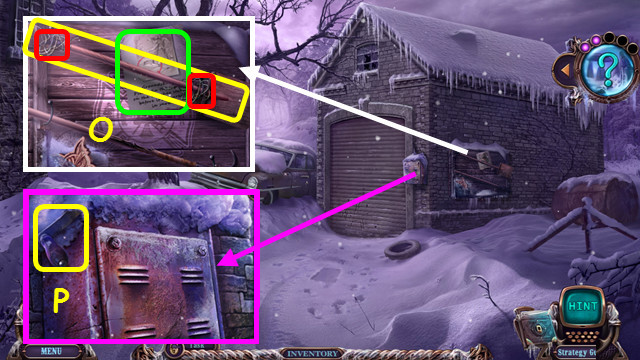
- Use the WIRE CUTTERS twice; take the SPADE and read the note (O).
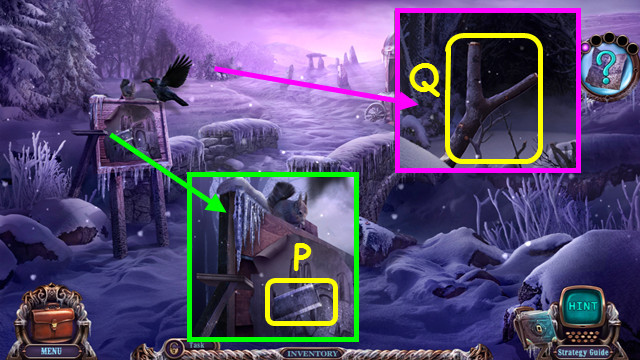
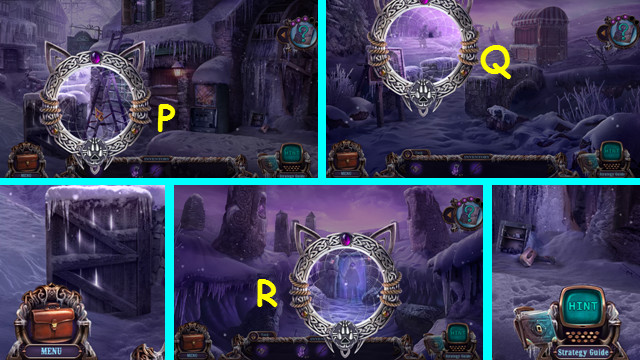
- Take the DRILL PART (P).
- Walk down 4 times.

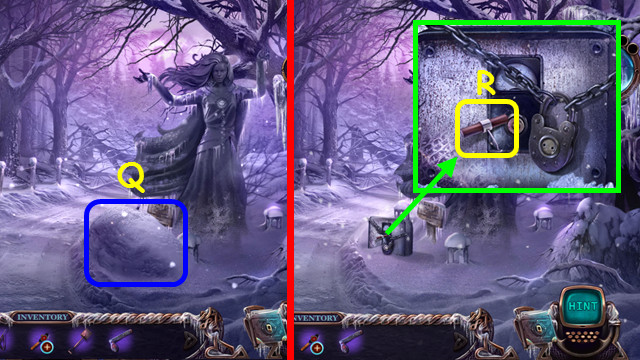
- Use the SPADE on the snow 3X (Q).
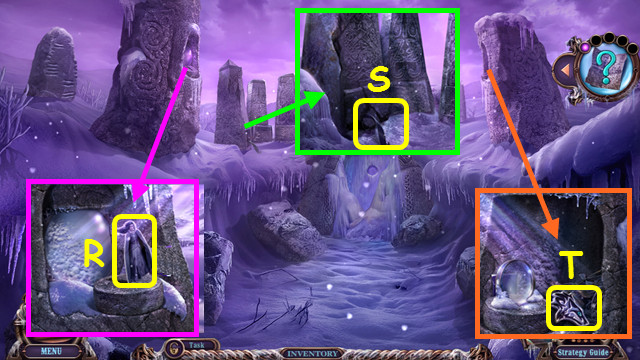
- Take the CORKSCREW (R).
- Walk left and forward.

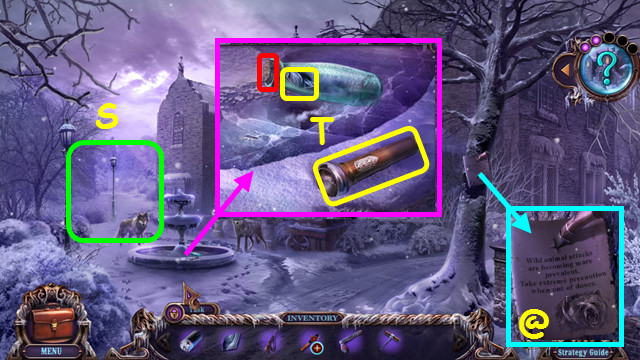
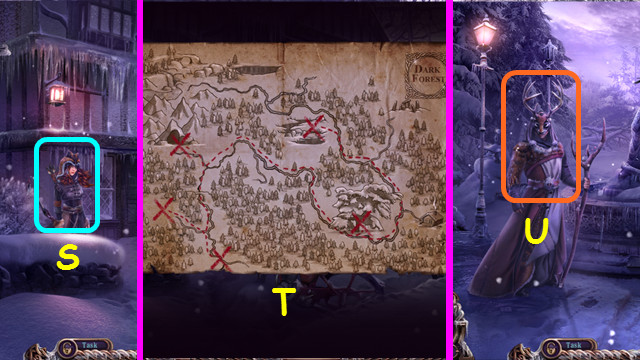
- Use the LOADED GUN (S).
- Use the CORKSCREW on the cork; take the second BANSHEE-STATUE PART and BROKEN FLASHLIGHT (T). Read the notice (@).
- Walk left.

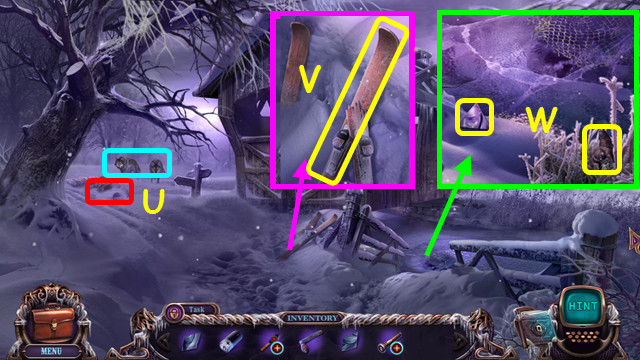
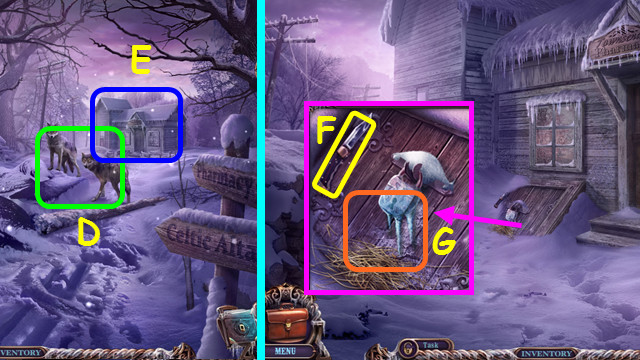
- Look at the wolves, and then the man in the snow (U).
- Take the 1/2 SKI (V).
- Take the third BANSHEE-STATUE PART and WOLF FIGURINE (W).
- Walk down.

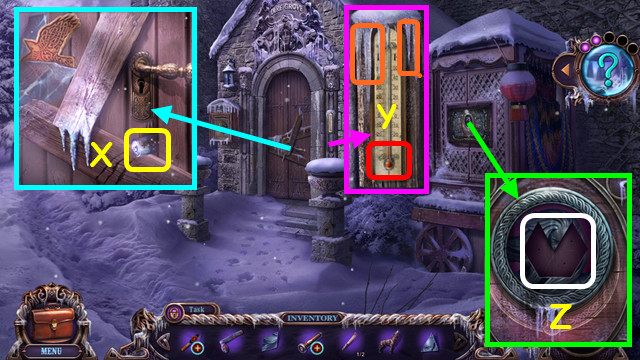
- Wiggle twice and take the second BATTERY (X).
- Remove the ice and touch the thermometer (Y).
- Place the 3 BANSHEE-STATUE PARTS (Z).

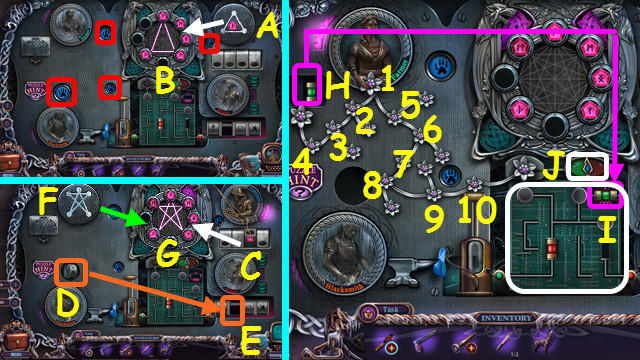
- Flip the fisherman (A), place the rune in the holder, and duplicate the symbol (B). Turn all the prints to bear (red).
- Use the fisherman’s hook on the third compartment; take the rune and place it in the holder (C). Place the wheel (D) in the device (E).
- Flip the farmer (F) and duplicate the symbol (G). Select the flowers (1-10).
- Place the green fuse (H) in the holder (I).
- Move the connections as shown and press the green power, and then the red power (J).

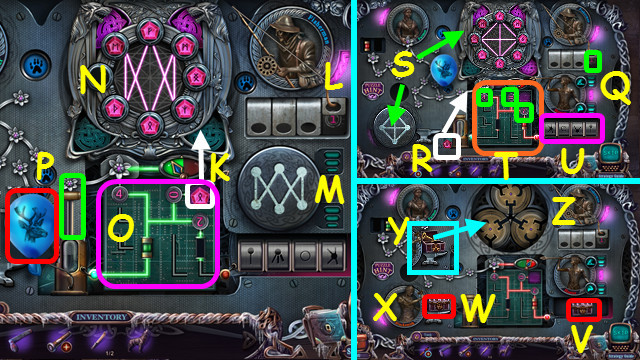
- Move the rune to the holder (K). Move the hook to the fourth compartment (L). Flip the hunter (M) and duplicate the symbol (N).
- Place the green fuse, move the connections as shown, and press the green power (O). Press the pump handle, select the balloon once (P).
- Press the angle and strength each once; select the hunter (Q). Place the rune in the holder (R).
- Flip the blacksmith and duplicate the symbol (S). Place the red fuse and press the red power twice (T).
- Turn the wheels (U) so the number of spokes matches the numbers 4-0-2-1 (green).
- Place the chest (V) on the anvil (W) and select the blacksmith (X).
- Turn the wheels as shown (Z) and use the key (Y) in the wheels.

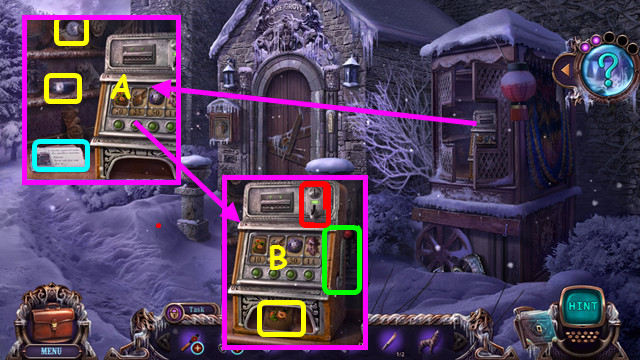
- Open the door; take the TEN PENCE, third BATTERY, and read the note (A).
- Place the TEN PENCE in the slot, pull the lever, and take the NUTS (B).
- Combine the BROKEN FLASHLIGHT and 3 BATTERIES to make the FLASHLIGHT (inventory).
- Walk down twice.

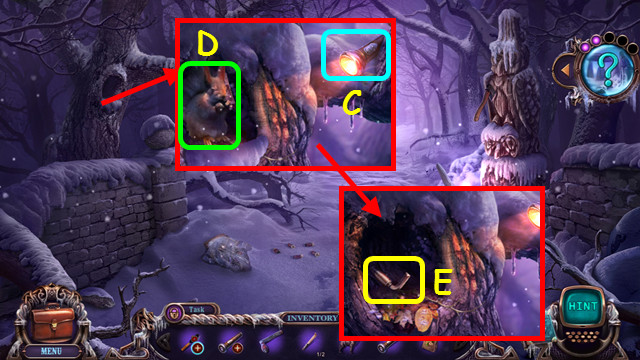
- Place the FLASHLIGHT and turn it on (C).
- Give the NUTS (D).
- Take the MAIL HANDLE (E).
- Walk forward twice.

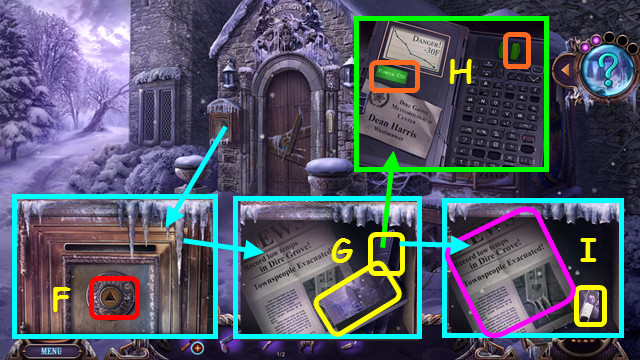
- Use the MAIL HANDLE (F); take the KEY CARD and CLIMATE RESEARCH (G).
- Press the power; play all the recordings (H).
- Read the paper; take the ZIPPER SLIDER (I).
- Walk down twice.

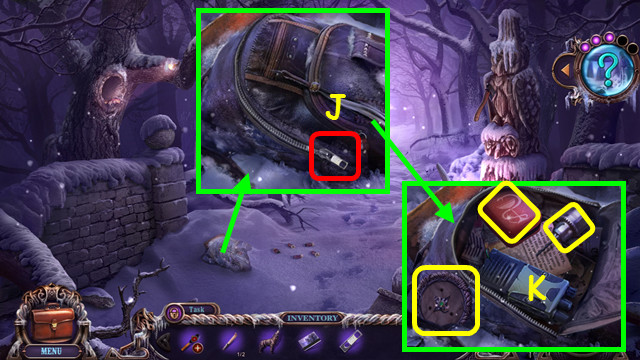
- Brush off the snow twice; place the ZIPPER SLIDER (J).
- Take the MEDICAL KIT, DRILL BIT, and DRUID AMULET (K).
- Combine the BROKEN DRILL, DRILL PART, and DRILL BIT to make the DRILL (inventory).
- Walk to the Yard.

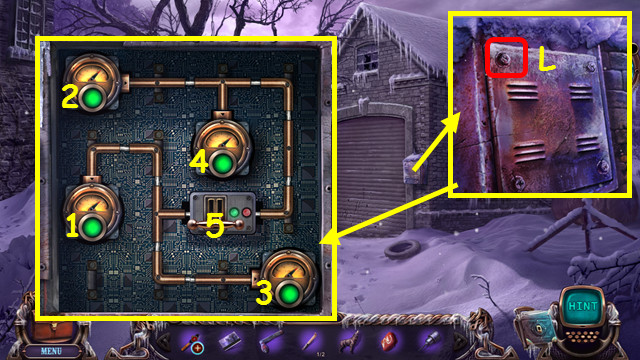
- Use the DRILL on the screws (L).
- Rotate the pipes as shown and press the buttons (1-5).
- Walk forward.

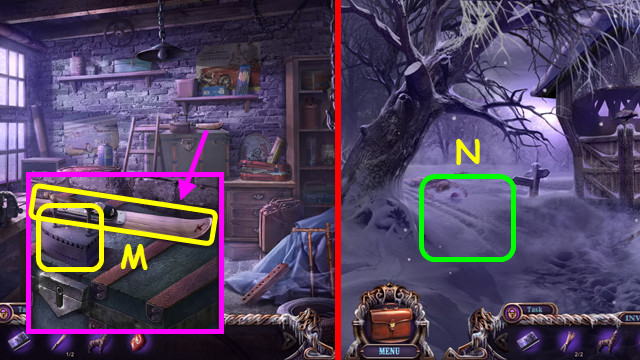
- Take the COLD IRON and 2/2 SKI (M).
- Walk to the Old Bridge.
- Use the 2 SKIS (N).

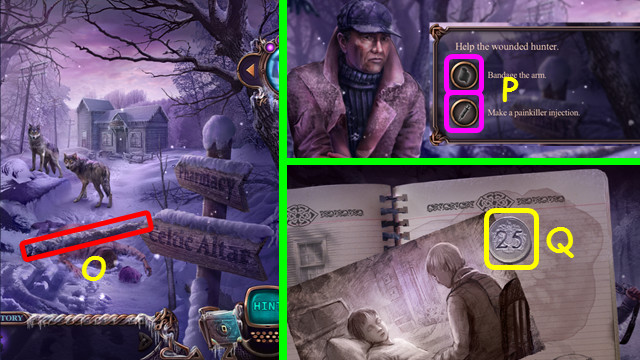
- Remove the log (O).
- Bandage the arm; give the man a painkiller (P).
- Read the TORN PAGES; take the COIN (Q).
- Walk down and forward.

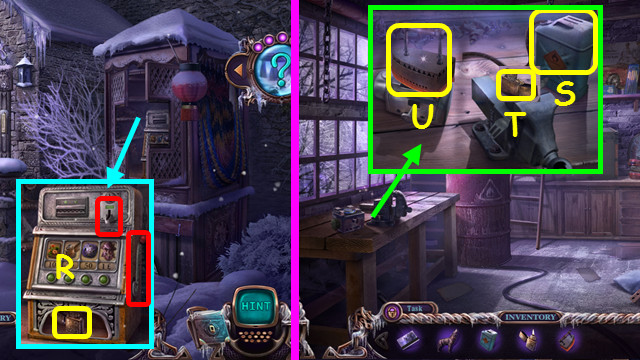
- Place the COIN and pull the lever; take the LIGHTER (R).
- Go to the Garage.
- Use the LIGHTER to earn the GASOLINE (S).
- Touch and take the FUELED LIGHTER (T).
- Place the COLD IRON; take the HOT IRON (U).
- Walk down.

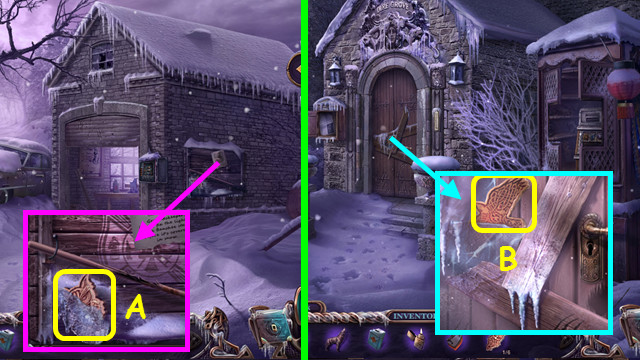
- Use the HOT IRON; take the 1/6 FIGURINE (A).
- Walk to the Hotel Entrance.
- Use the HOT IRON; take the 2/6 FIGURINE (B).
- Walk left twice.

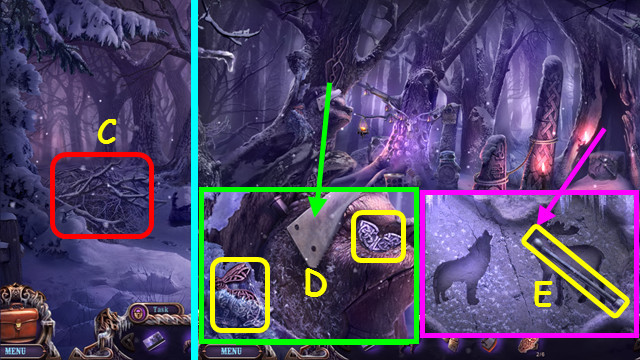
- Use the GASOLINE and FUELED LIGHTER (C).
- Walk left.
- Use the HOT IRON; take the 3/6 FIGURINE and first DRUID AMULET PIECE (D).
- Take the LATCH VALVE (E).
- Go to the Garage.

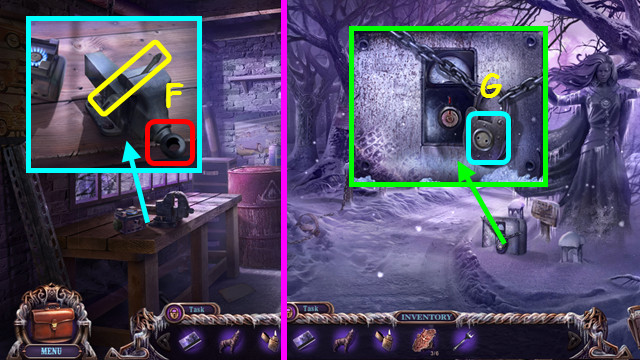
- Use the LATCH VALVE; take the FORK (F).
- Remove the middle tine on the FORK to make the BROKEN FORK (inventory).
- Go to the Crossroads.
- Use the BROKEN FORK (G).

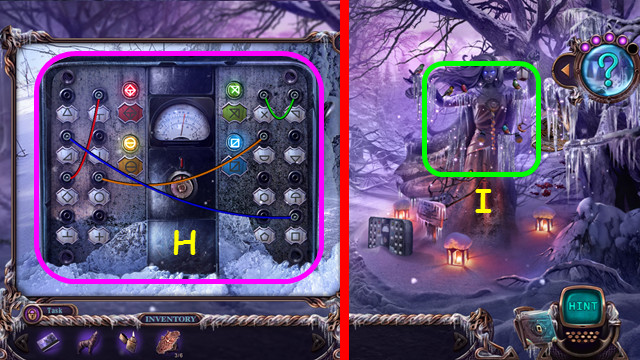
- Connect the wires (H).
- Play the HOP (I); use the pin on the lock and restore the page to earn A HISTORY OF THE MISTWALKERS.

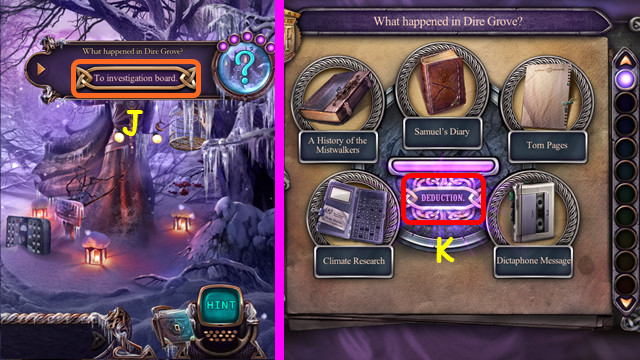
- Select the button (J).
- Press deduction (K).
- Walk to the Old Tree.
Chapter 2: Mistwalkers Attack

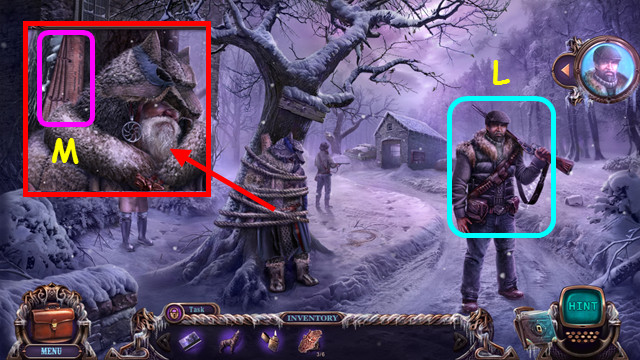
- Talk to Samuel; earn the WOLF SYMBOL (L).
- Select the slats (M).

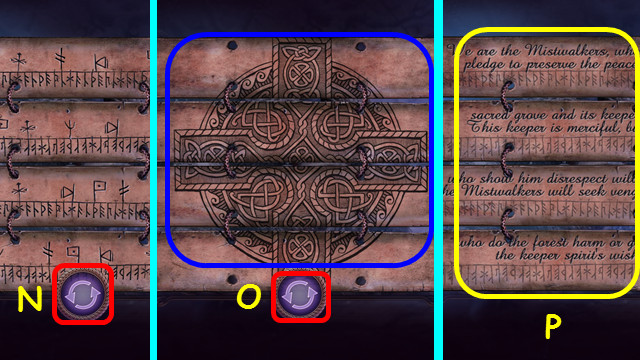
- Press the button (N).
- Restore the picture and push the button (O).
- Take the MISTWALKER’S OATH (P).

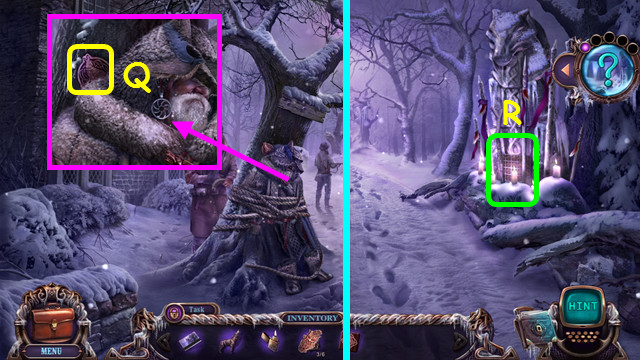
- Take the 4/6 FIGURINE (Q).
- Walk down 4 times.
- Select the mini-game (R).

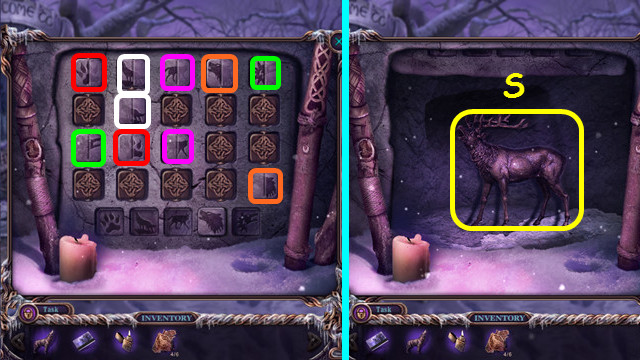
- Place the WOLF SYMBOL.
- Select the pairs (color-coded).
- Take the DEER FIGURINE (S).
- Return to the Druid Shrine.

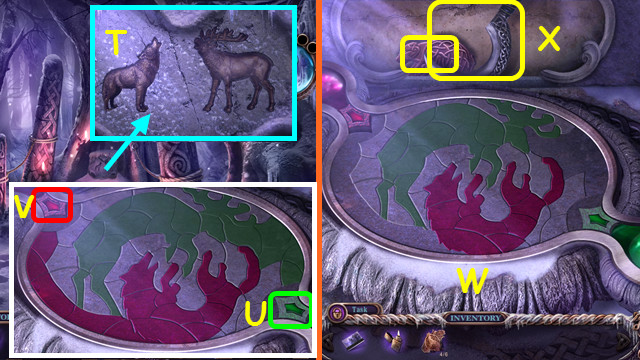
- Place the WOLF FIGURINE and DEER FIGURINE (T).
- Select the green pieces shown; press the green arrow (U).
- Select the red pieces shown; press the red arrow (V).
- Select the excess pieces (W).
- Take the 5/6 FIGURINE and SICKLE (X).
- Walk to the Hotel Side Yard.

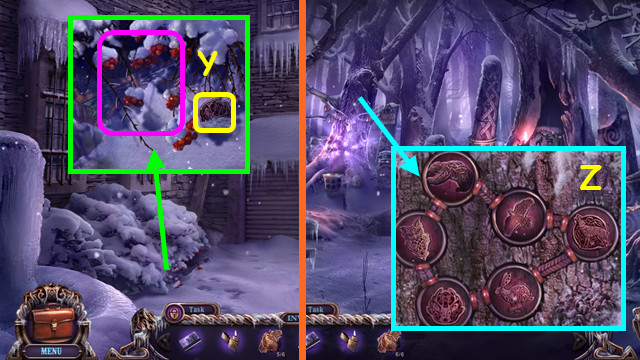
- Use the SICKLE; take the 6/6 FIGURINE (Y).
- Return to the Druid Shrine.
- Select the tree; place the 6 FIGURINES (Z).
- Select the tree again.

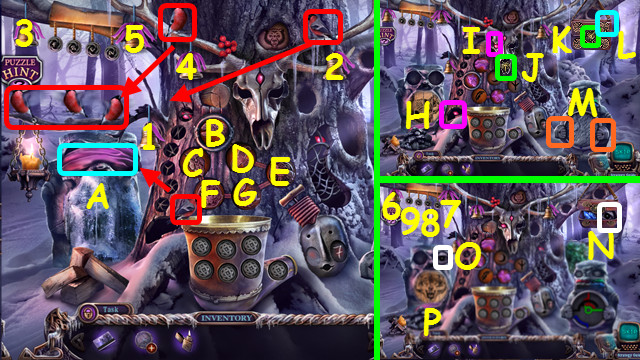
- Play the bells (1-5).
- Move the birds to the branch (red). Remove the blindfold (A).
- Select C-G-C-G-B-F-E-F-E-D-C-D-G-C-D-G-E-B-C-B-C-G-B-B-F-D-F-E.
- Move the stone (H) to the eye (I). Move the head (J) to the bag (K); turn the upper right disc once (L).
- Select each hand 4 times (M). Place the eye (N) in the right socket (O). Press each half twice, press the eye twice to make the wolf (P).
- Pull the cords (6-9).

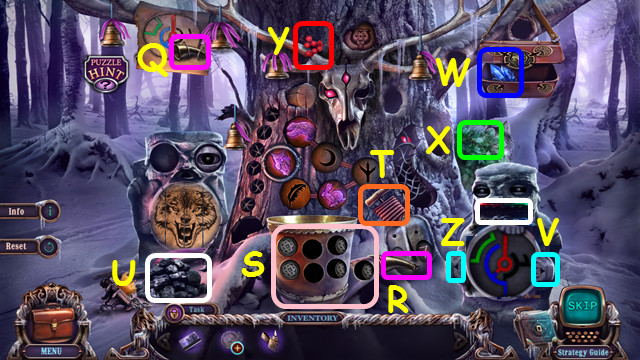
- Place the horn (Q) on the face (R).
- Configure the runes as shown (S).
- Press the bellows (T). Place the coal (U) in the mouth and press the right hand (V).
- Place the crystal (W) in the mouth and press the right hand.
- Place the leaf (X) in the mouth and press the right hand.
- Place the berries (Y) in the mouth.
- Press V-Z-V-Z-Vx3-Z-Vx3.

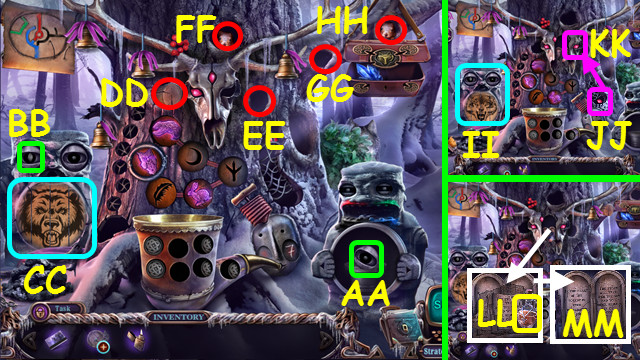
- Place the eye (AA) in the socket (BB); press each half twice, press the left eye to make the bear (CC).
- Move the cork (DD) to (EE), select the squirrel at (FF). Move the cork from (EE) to (FF); select the squirrel at (DD) and then at (EE).
- Move the cork to (EE) and select the squirrel at (GG). Move the cork to (GG) and select the squirrel at (HH).
- Change the picture back to the wolf; select each half once, and then the left eye twice (II). Place the stone (JJ) in the skull (KK).
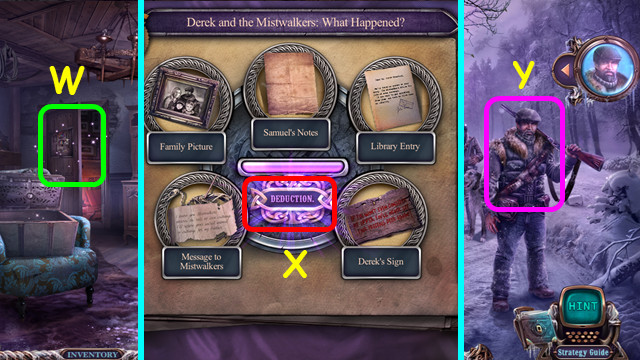
- Take the REVIVING POTION (LL). Restore and take the MISTWALKER’S PROPHECY (MM).
- Return to the Old Tree.

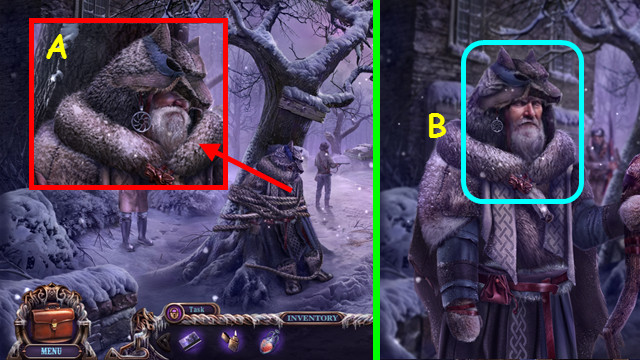
- Use the REVIVING POTION (A).
- Talk to Ulf; receive the MAP and RUNE SKULL (B).

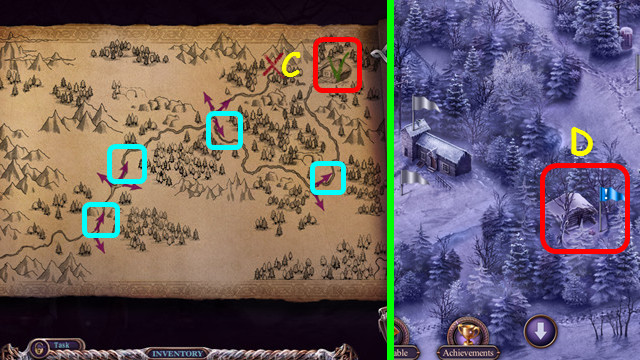
- Select and open the MAP (inventory).
- Select the arrows (C).
- Open the briefcase; select the Mistwalker Camp (D).

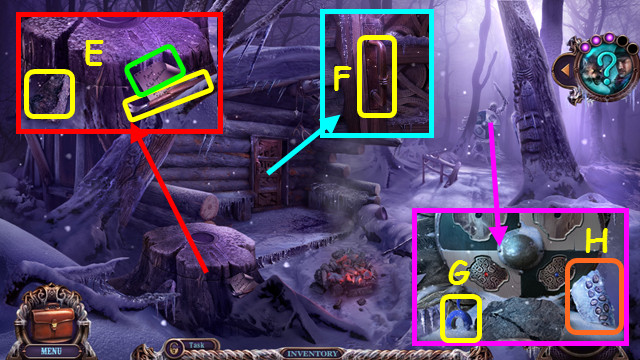
- Take the STONE, BROKEN CROWBAR, and note (E).
- Take the HANDLE (F).
- Brush the snow; take the INSULATING TAPE (G).
- Combine the BROKEN CROWBAR and INSULATING TAPE to make the CROWBAR (inventory).
- Select the ice (H).

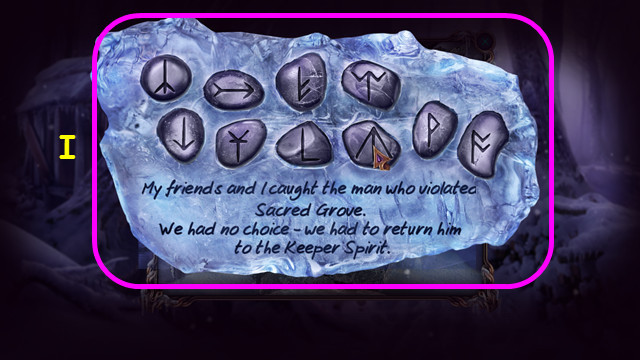
- Restore the runes to find the ICE MESSAGE (I).
- Travel to Outside Dire Grove.

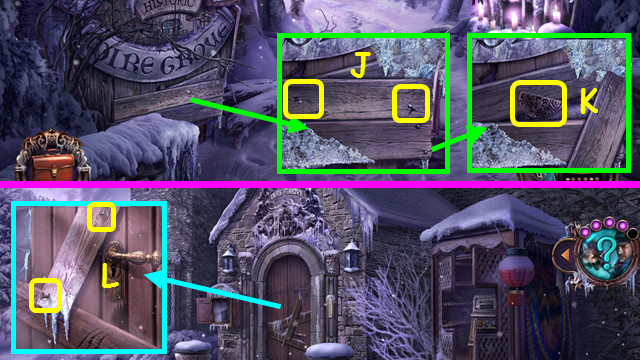
- Use the CROWBAR to take the 1/4 and 2/4 NAILS (J).
- Take the first SUN HALF (K).
- Go to the Hotel Entrance.
- Use the CROWBAR to take the 3/4 and 4/4 NAILS (L).
- Return to the Mistwalker Camp.

- Place the 4 BENT NAILS; use the STONE to make the 4 NAILS (M).
- Place the HANDLE and NAILS; use the STONE (N).
- Open and select the door; play the HOP to earn the SACRIFICE WHISTLE SCROLL (O).

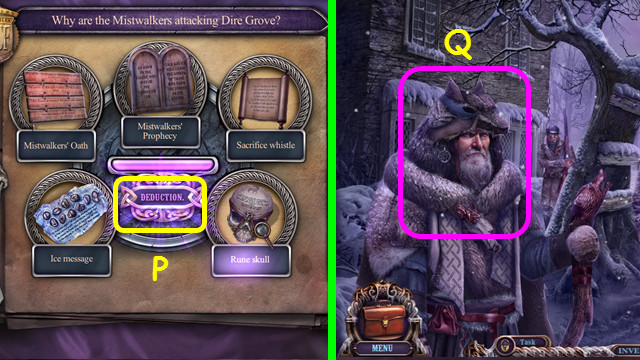
- Go to the investigation board and select deduction (P).
- Travel to the Old Tree.
- Talk to the Mistwalker (Q).
Chapter 3: Samuel Crawford

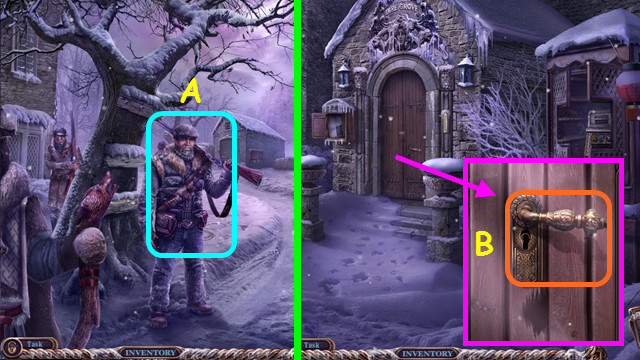
- Talk to Samuel; earn the HOTEL KEY (A).
- Go to the Hotel Entrance.
- Use the HOTEL KEY, turn the handle, and enter the Hotel Hall (B).

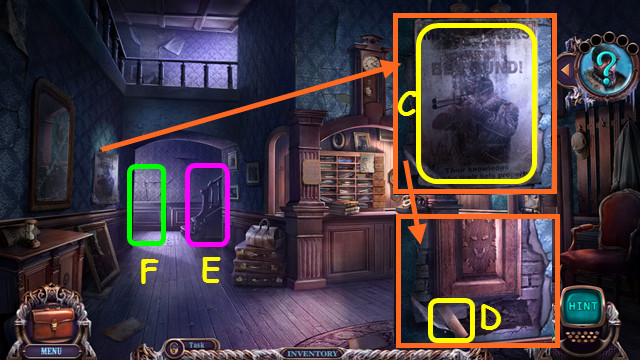
- Clean off and take the POSTER (C).
- Brush the cobwebs and take the GRINDSTONE (D).
- Note the Staircase (E).
- Go to the Sitting Room (F).

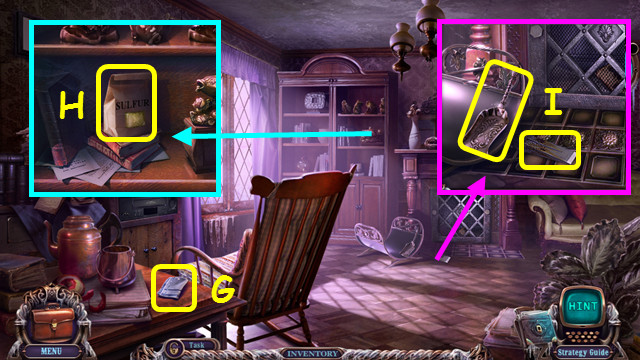
- Take the HANKY (G).
- Take the SULFUR (H).
- Take the BLUNT WEDGE and SCOOP (I).
- Use the GRINDSTONE 3X on the BLUNT WEDGE to make the WEDGE (inventory).
- Go to the Path.

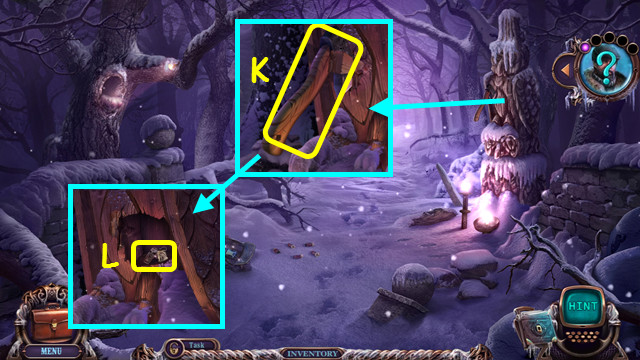
- Use the WEDGE and STONE to take the AXE (K).
- Take the WHISTLE (L).
- Walk to the Snowdrifted Street.

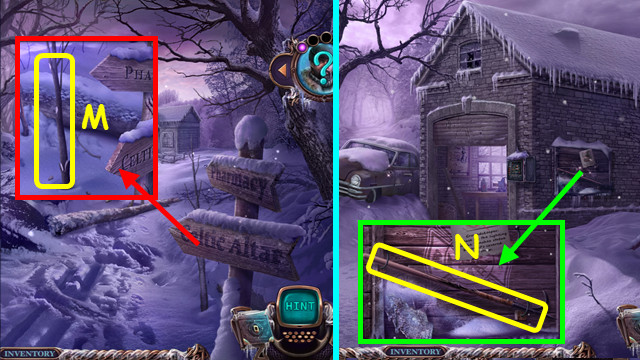
- Use the AXE 3 times to take the STICK (M).
- Go to the Yard.
- Remove the broken handle and add the STICK; take the HUFF (N).
- Go to the Old Bridge.

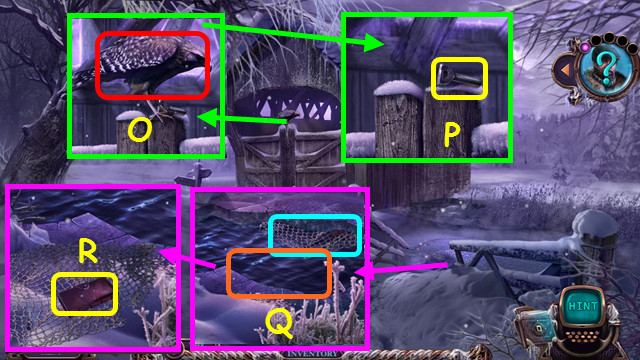
- Use the WHISTLE (O).
- Take the LATCH (P).
- Use the AXE on the ice, and then the HUFF on the net (Q).
- Take the WALLET (R).
- Open the WALLET; take the MAGNET KEY and COIN (inventory).
- Walk down.

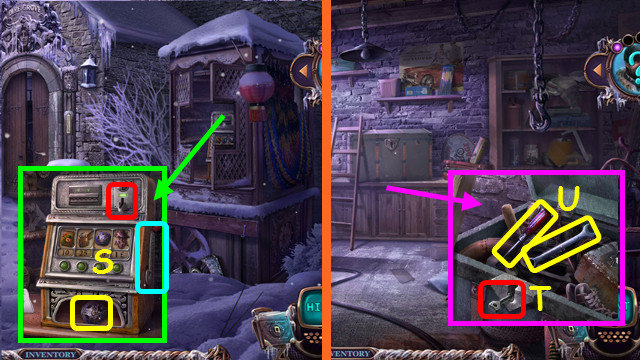
- Place the COIN, pull the lever, and take the first CELTIC CROSS (S).
- Go to the Garage.
- Place the LATCH; open the chest (T).
- Take the SCREWDRIVER and WRENCH (U).
- Go to the Sitting Room.

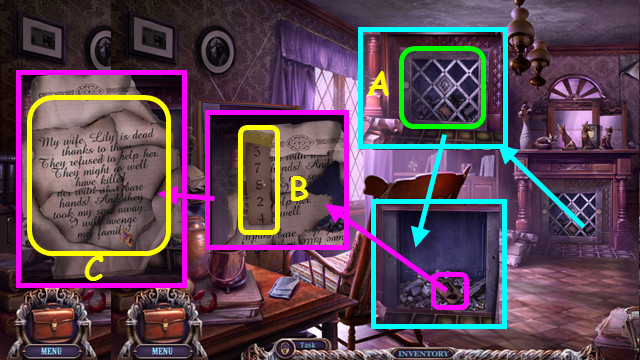
- Use the WRENCH (A).
- Take the CODE (B).
- Restore the BURNED NOTE (C).
- Walk down.

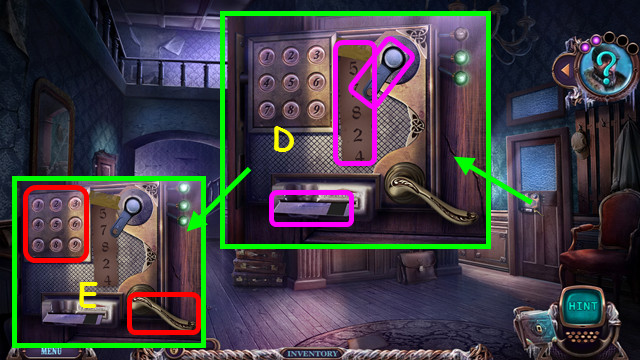
- Place the KEY CARD, CODE, and MAGNET KEY (D).
- Enter the code 5-7-8-2-4 and pull the handle (E).
- Walk right.

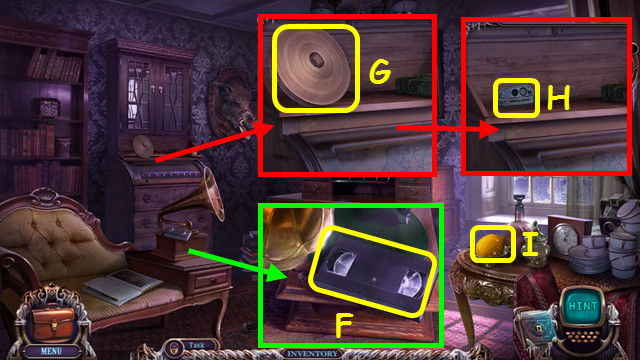
- Take the VIDEO TAPE (F).
- Take and read the TELEGRAPH TAPE (G).
- Take the GENERATOR-DOOR REMOTE (H) and LEMON (I).
- Go to the Path.

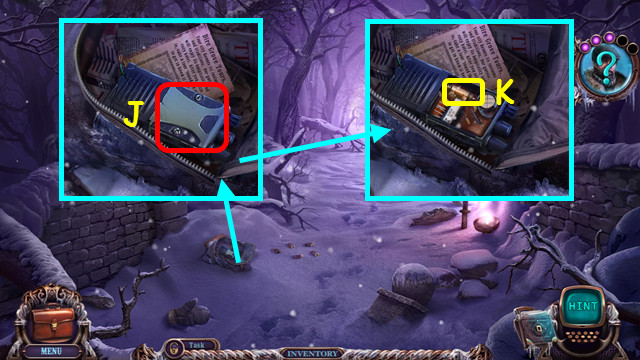
- Use the SCREWDRIVER (J).
- Remove the cover; take the first SAFETY LOCK (K).
- Go to the Staircase.

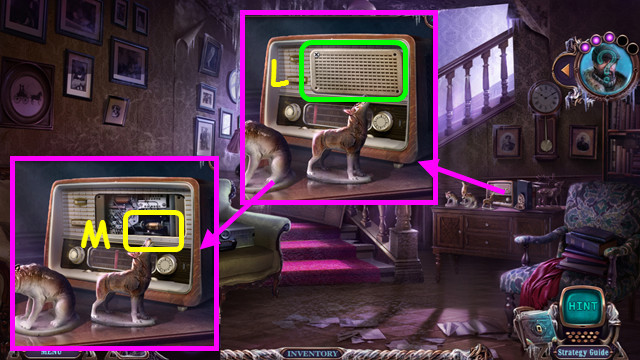
- Use the SCREWDRIVER (L).
- Take the second SAFETY LOCK (M).
- Go to the Hotel Side Yard.

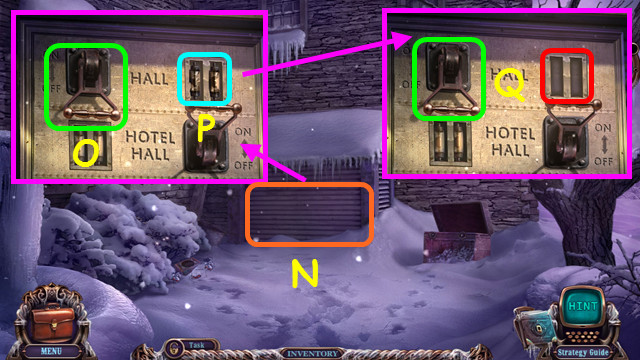
- Use the GENERATOR-DOOR REMOTE (N).
- Flip the switch (O); remove the burnt fuses (P).
- Place the 2 SAFETY LOCKS; flip the switch (Q).
- Go to the Sitting Room.

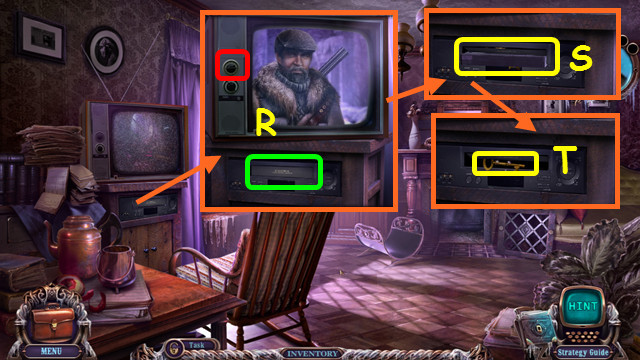
- Place the VIDEOTAPE; turn the knob 3X (R).
- Take the CAMERA RECORDING (S) and OWNER’S DRAWER KEY (T).
- Walk down.

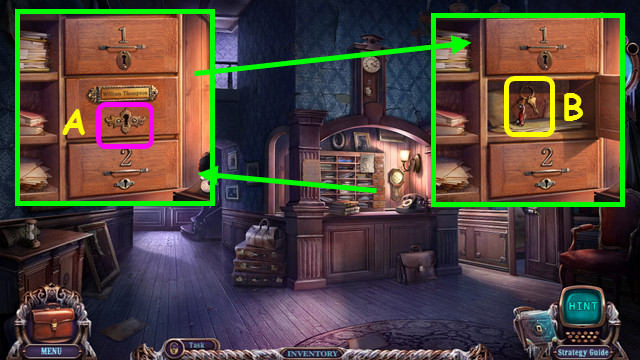
- Use the OWNER’S DRAWER KEY (A).
- Move the papers; take the CAR KEY (B).
- Travel to the Yard.

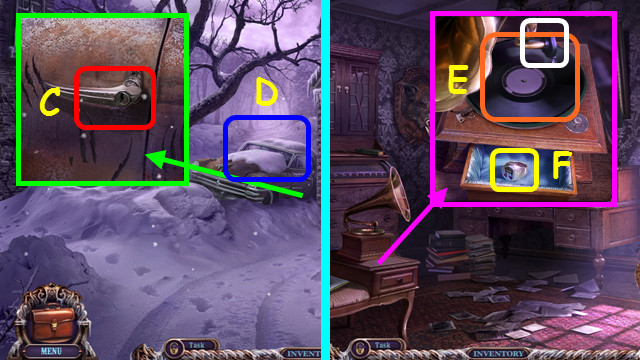
- Use the CAR KEY; open the door (C).
- Play the HOP to earn the RECORD (D).
- Go to the Office.
- Place the RECORD; select the spindle twice (E).
- Take the SIGNET (F).
- Go to the Staircase.

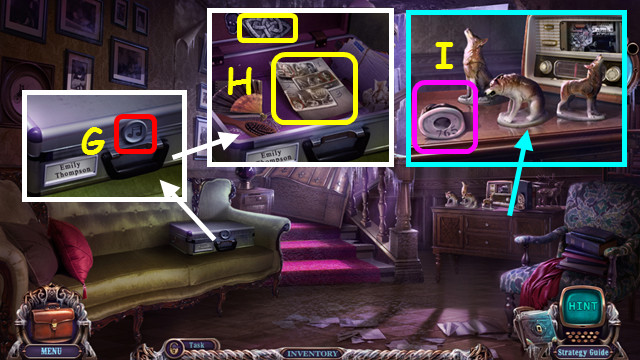
- Use the SIGNET (G).
- Move the items; take the HINT and second DRUID AMULET PIECE (H).
- Tip the wolf figurine (I).
- Walk down and left.

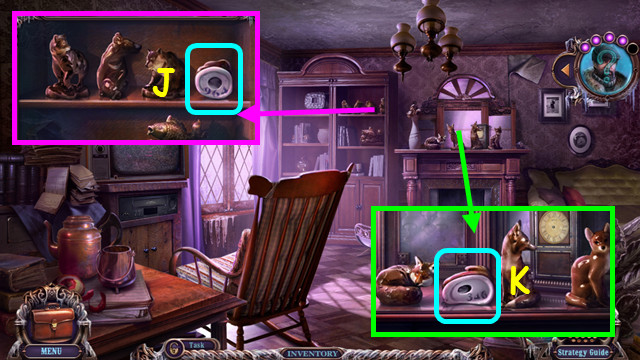
- Tip the bear figurine (J).
- Tip the fox figurine (K).
- Walk to the Office.

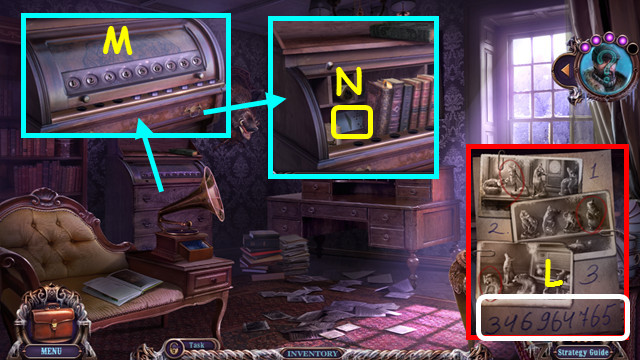
- Refer to the HINT (L).
- Press 3-4-6-9-6-4-7-6-5 (M).
- Move the letters; take the PUNCHCARD (N).

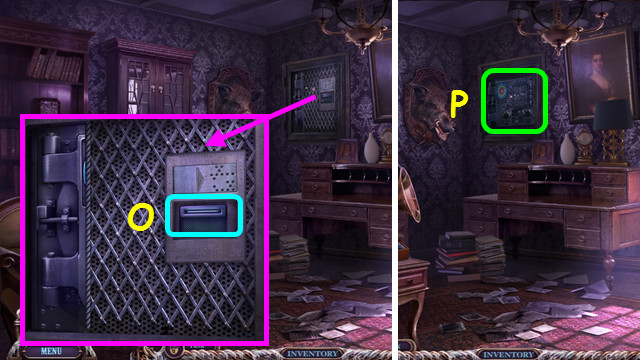
- Place the PUNCHCARD (O).
- Select the safe (P).

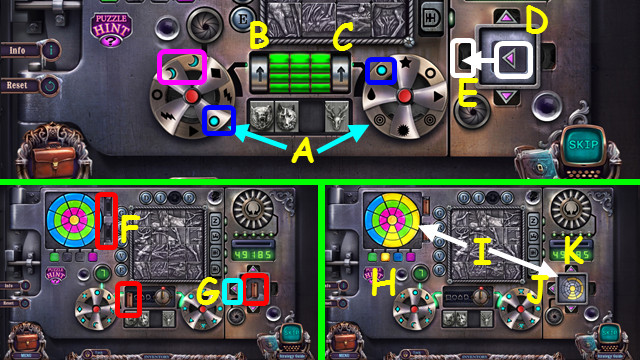
- Select matching pairs between the two wheels; use the red buttons to turn the blades (A).
- Match all the pairs; locations are random. Press Bx4-Cx2. Press Dx2, place the left arrow (E), press Dx2-E.
- Place the 2 batteries (red) into the holders (F). Press G.
- Press yellow (H). Duplicate the yellow pattern (I). Press J-Kx2.

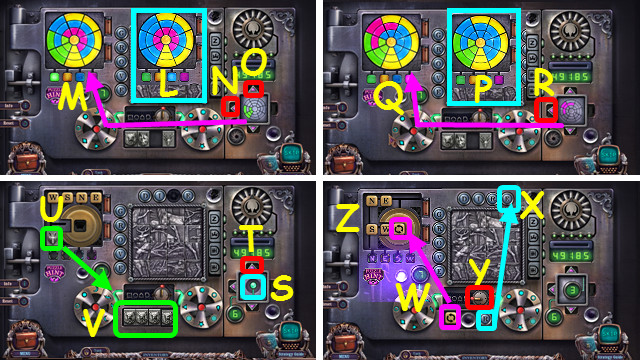
- First, change all the green to blue (L), and then duplicate the green pattern (M). Press N-O.
- Change all the pink to blue (P). Add the pink pattern (Q). Press R.
- Press the button (S). Press Tx2. Move the fox head (U); Change so all heads are the same (V).
- Move the button (W) and the ‘R’ (X). Move the toggle to the left (Y).
- Slide the letters as shown (Z). Press the button; slide the ‘W’ up and right.
- Press the button, slide the ‘S’ right; press the button and slide the ‘S’ up.

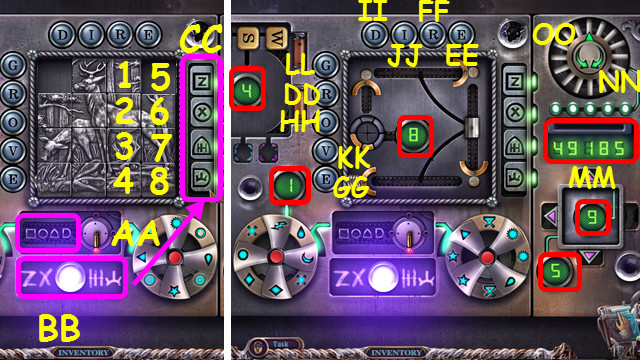
- Point the toggle down (AA).
- Combine the shapes and symbols (BB); change the tiles to match (CC).
- Select the locations 6-7-8-4-3-7-6-2-1-5. Select DDx6-EEx2-FF-GG-HH-II-EE-JJ-EE-KK-JJ-LL.
- Change the numbers (red) to match the display (MM).
- Select the green arrows NNx4-OOx4-NNx6-OO-NNx3.

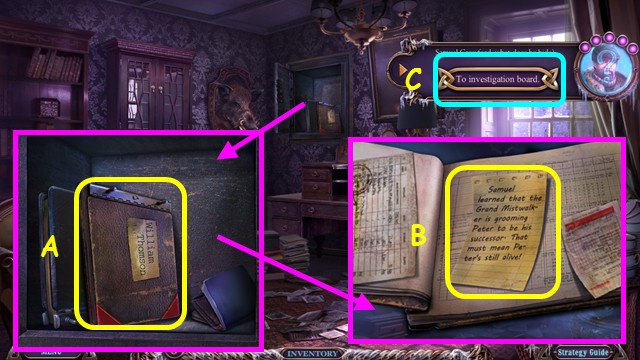
- Take and open the ledger (A).
- Locate the HOTEL OWNER’S NOTE (B).
- Go to the investigation board (C).

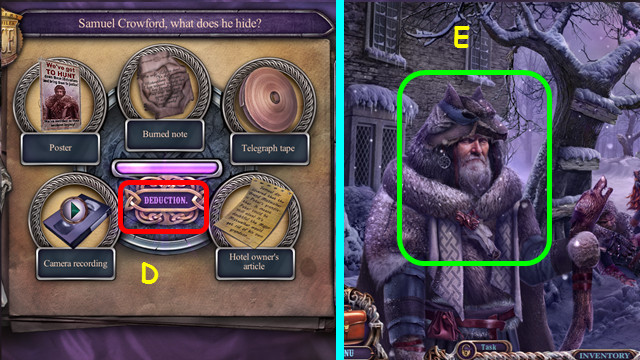
- Select deduction (D).
- Go to the Old Tree.
- Talk to the Ulf; earn the third DRUID AMULET PIECE (E).
- Restore the DRUID AMULET (inventory).
- Go to the Mistwalker Camp.
Chapter 4: An Old Grudge

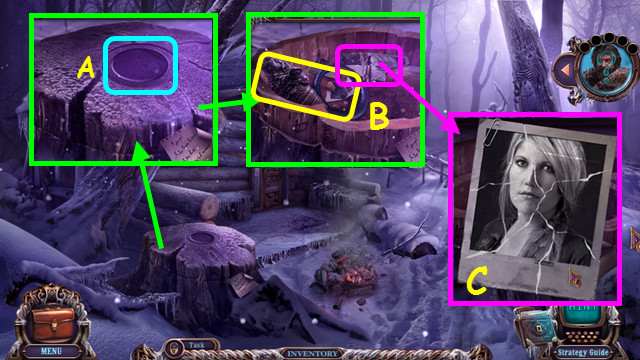
- Place the DRUID AMULET (A).
- Take the WOLF HORN and select the scraps (B).
- Restore and take the TORN PICTURE (C).
- Go to the Snowdrifted Street.

- Use the WOLF HORN (D).
- Walk forward (E).
- Take the KNIFE (F); use the FUELED LIGHTER (G).
- Cut the LEMON with the KNIFE; squeeze the LEMON onto the HANKY to make the HANKY WITH JUICE (inventory).
- Go to the Garage.

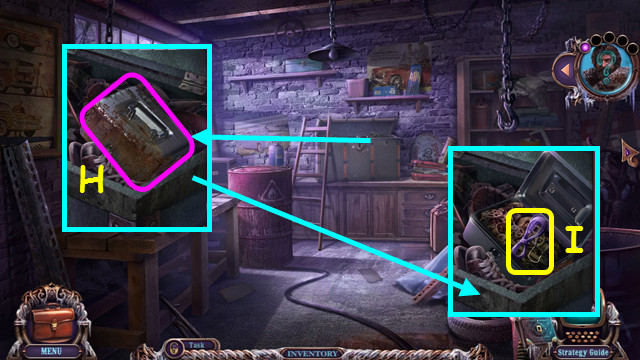
- Use the HANKY WITH JUICE (H); open the case and take the LINE WITH HOOK (I).
- Go to the Staircase.

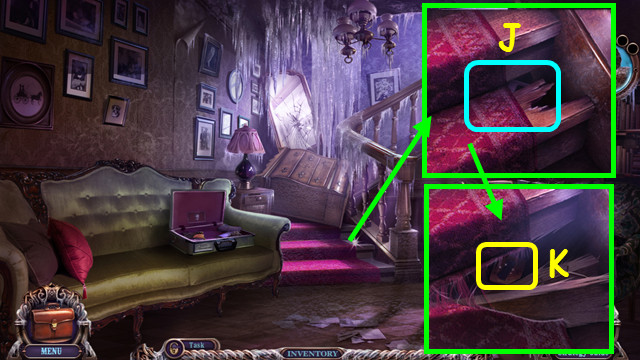
- Use the CROWBAR (J); use the LINE WITH HOOK to take the SAW HANDLE (K).
- Go to the Druid Shrine.

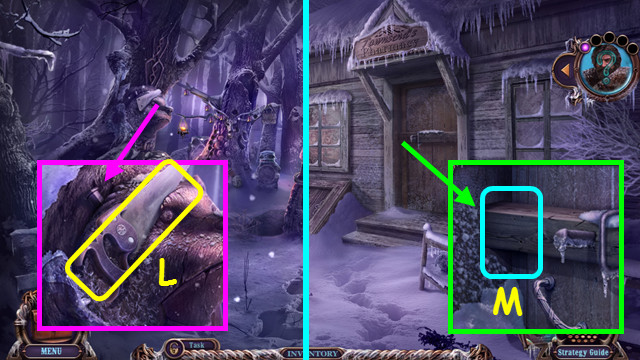
- Use the SAW HANDLE; take the SAW (L).
- Go to Outside Pharmacy.
- Use the SAW (M), open the door, and walk forward.

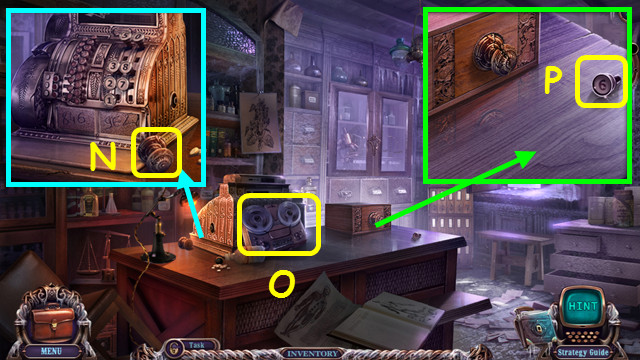
- Take the BOX KNOB (N).
- Take the CHEMIST’S RECORDER (O).
- Take the first REGISTER BUTTON (P).

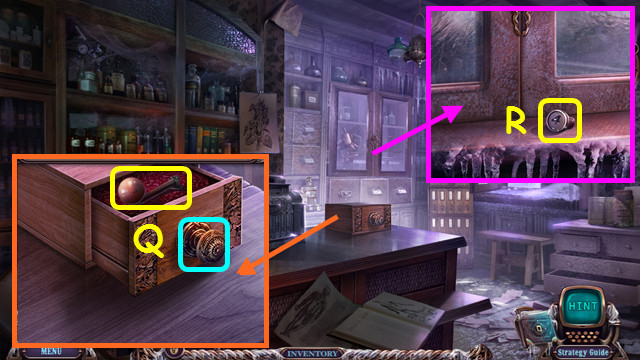
- Remove the old handle and place the BOX KNOB; open the drawer and take the REGISTER LEVER (Q).
- Take the second REGISTER BUTTON (R).

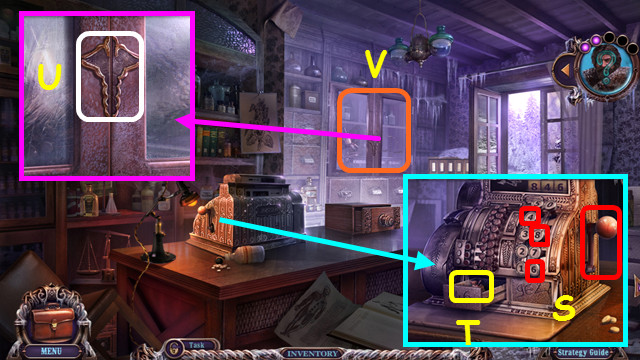
- Place the 2 REGISTER BUTTONS and REGISTER LEVER (S).
- Press 8-4-6, pull the lever, and take the CADUCEUS (T).
- Place the CADUCEUS (U); open the doors.
- Play the HOP to earn the MEDICINE BOX (V).
- Go to the Old Tree.

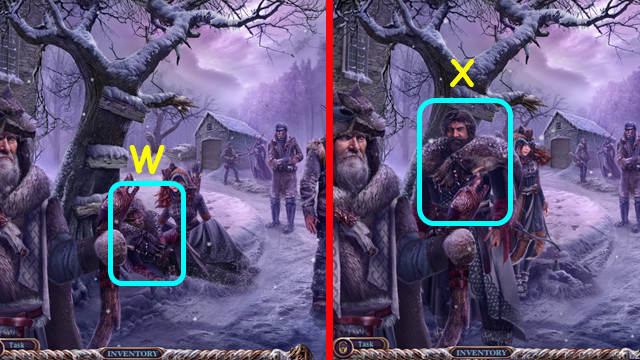
- Use the MEDICINE BOX (W).
- Talk to Bjorn to earn the BEAR EAR (X).
- Go to the Druid Shrine.

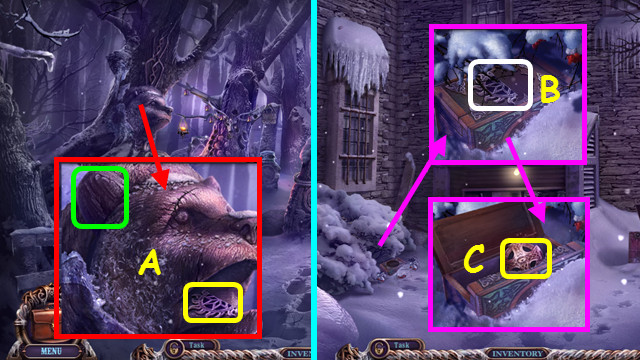
- Place the BEAR EAR; take the second SUN HALF (A).
- Go to the Hotel Side Yard.
- Place the 2 SUN HALVES (B); take the second CELTIC CROSS (C).
- Go to the Mistwalker Camp.

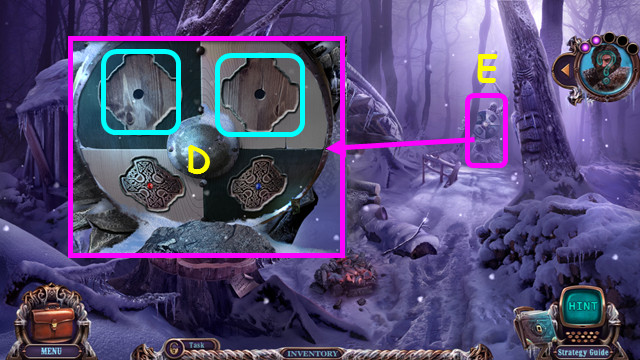
- Place the 2 CELTIC CROSSES (D).
- Select the shield (E).

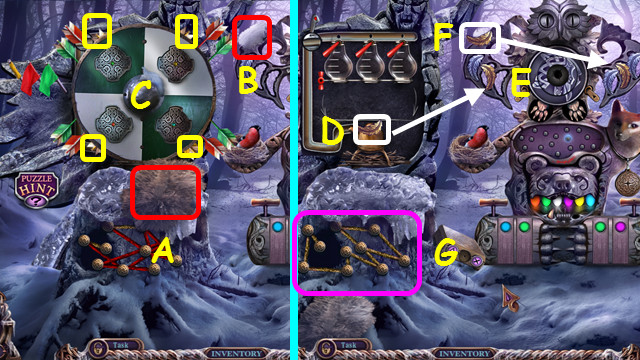
- Remove the fur (A) and snow (B). Select the 4 yellow arrows; select the 4 yellow arrows again (C).
- Do the same for the 4 red arrows, and then the 4 green arrows. Place the FEATHER (D) on the owl (E).
- Place the FEATHER (F) on the owl. Untangle the ropes (G). Place the FEATHER (H) on the owl.
- Remove the snow twice (I).
- Select the positions 3-5-7-6-4-2-3-5-4.
- Push both wings down 3x (J).
- Move the button (K) to the box (L). Press the buttons center-left-right.

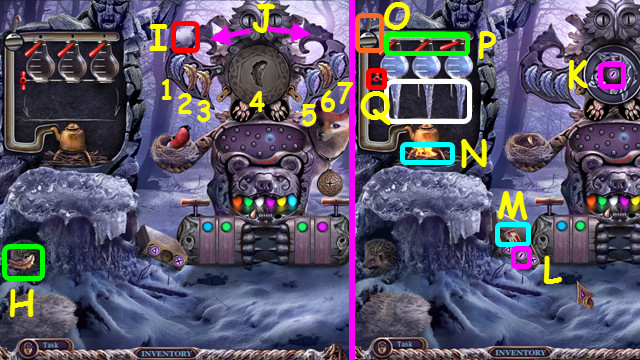
- Use the matches (M) on the wood (N).
- Select the valve (O).
- Select the 3 levers until each flask is full (P).
- Turn the knob; select the icicles (Q).

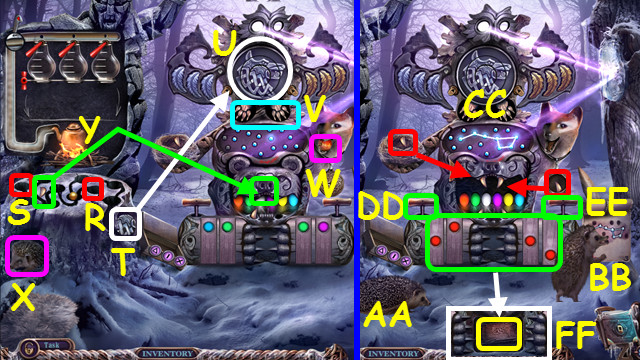
- Select R-S; place the shield piece (T).
- Restore the shield (U). Select the owl claws until you see the light beam (V).
- Give the apple (W) to the hedgehog (X). Move the tooth to the bear (Y).
- Select the hedgehog (AA). Turn to page 3 (BB); recreate the dipper (CC).
- Place the 2 teeth (red) in the bear. Select DDx3; turn the reels to red. Select EEx3; turn the reels to green.
- Select DDx3; turn the reels to white. Select EEx3; turn the reels to pink. Select DDx3; turn the reels to yellow. Select EEx3; turn the reels to blue.
- Take BJORN’S DIARY (FF); open it and take the HUNTER’S BADGE.
- Go to the Old Tree.

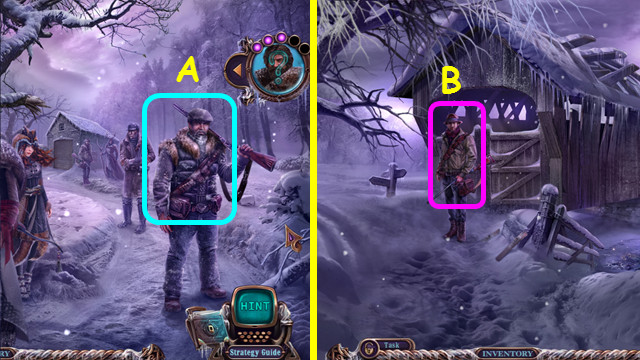
- Use the HUNTER’S BADGE (A); talk to Samuel and earn SAMUEL’S AMULET.
- Go to the Old Bridge.
- Talk to the hunter (B).
- Walk forward.

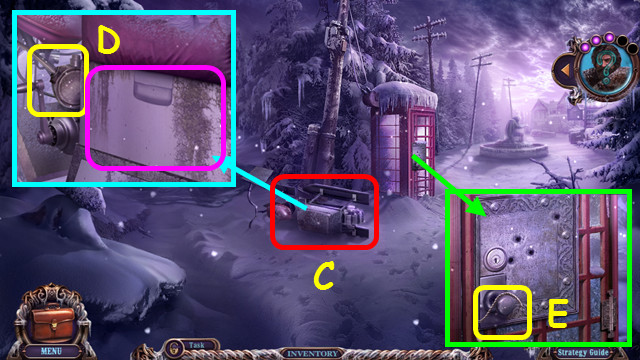
- Stand up the snow bike (C).
- Take the EMPTY OILCAN; open the compartment (D).
- Take the WICK (E).
- Walk right.

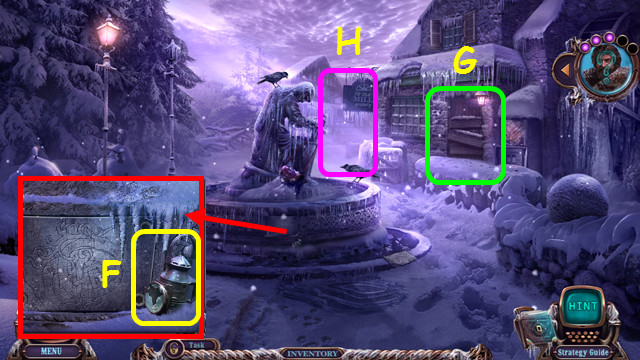
- Take the BROKEN LANTERN (F).
- Note the path to the Shop (G).
- Go to Outside Museum (H).

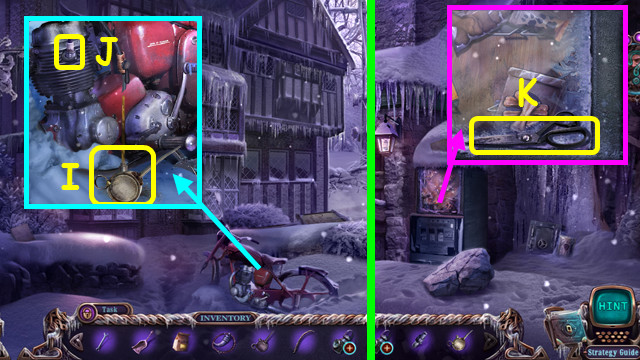
- Place the EMPTY OILCAN; take the OILCAN (I).
- Use the WRENCH to take the SPARK PLUG (J).
- Go to the Shop.
- Take the SCISSORS (K).
- Walk down.

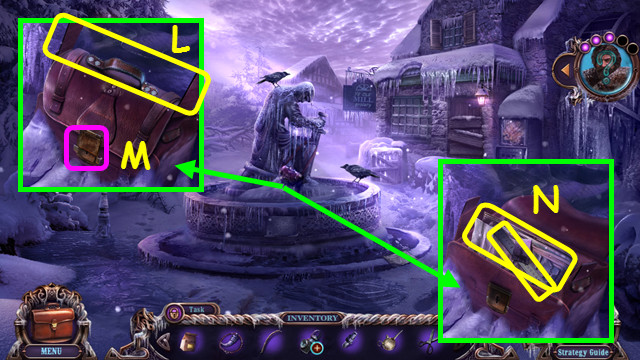
- Use the SCISSORS to take the BELT (L).
- Use the OILCAN (M).
- Open the bag; take the PAPER and RULER (N).
- Walk down.

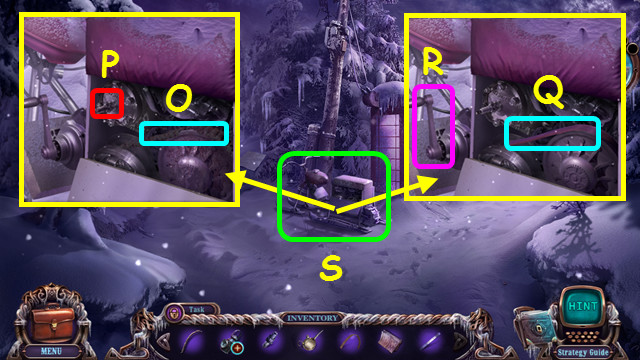
- Remove the old belt and use the OILCAN (O).
- Remove the old sparkplug and place the SPARKPLUG (P).
- Place the BELT (Q); turn the crank (R).
- Select the snow bike (S).

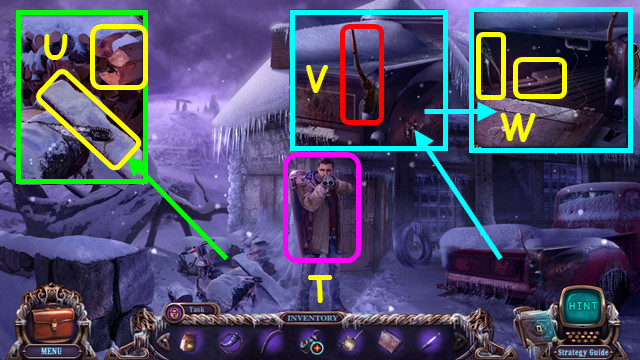
- Show SAMUEL’S AMULET (T).
- Talk to Derek to earn the envelope; open it to find TED’S LETTER and FISH AMULET.
- Take the WOOD; remove the snow and take the BOARD (U).
- Use the OILCAN; pull the lever (V).
- Take the BRUSH and NIPPERS (W).
- Go to the Sitting Room.

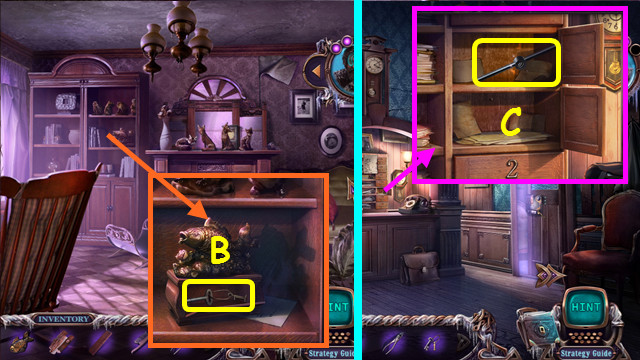
- Place the FISH AMULET; take the HOTEL-DRAWER KEY (B).
- Walk down.
- Use the HOTEL-DRAWER KEY; take the JACK PART (C).
- Travel to Outside Museum.

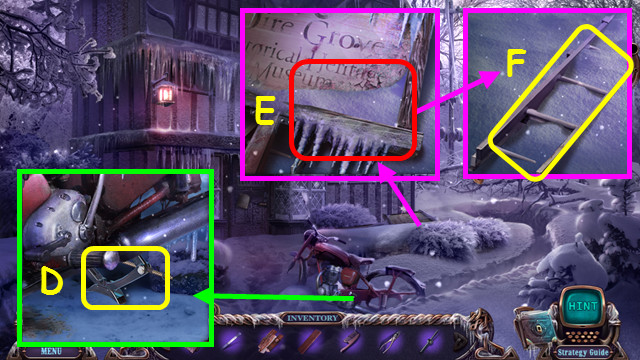
- Place the JACK PART to earn the JACK (D).
- Use the JACK (E).
- Take the LADDER (F).
- Go to the Shop.

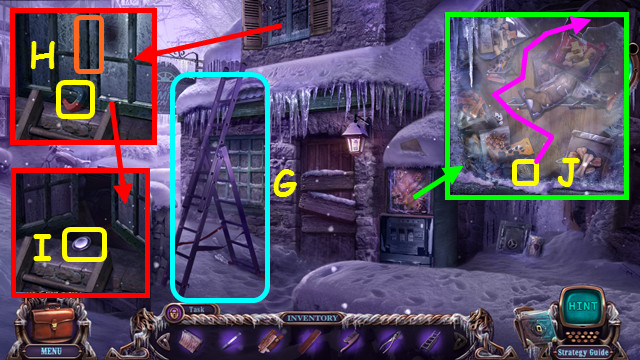
- Place the LADDER, use the OILCAN, and select the ladder (G).
- Take the MAGNET; use the RULER (H).
- Take the LENS (I).
- Use the MAGNET to drag the POUND COIN up (J).
- Travel to the Hotel Entrance.

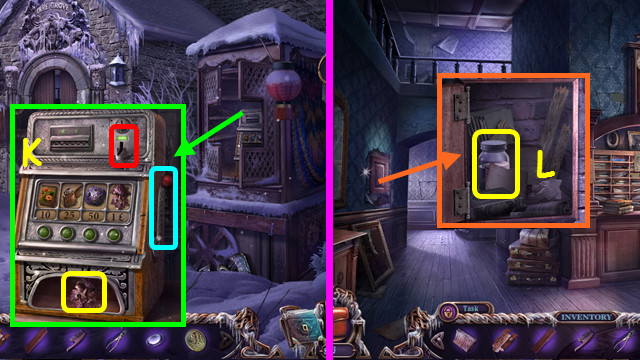
- Place the POUND COIN, pull the lever, and take the MASK (K).
- Walk forward.
- Place the MASK; take the ALCOHOL (L).
- Combine the BROKEN LANTERN, LENS, ALCOHOL, WICK, and FUELED LIGHTER to make the LANTERN (inventory).
- Walk left.

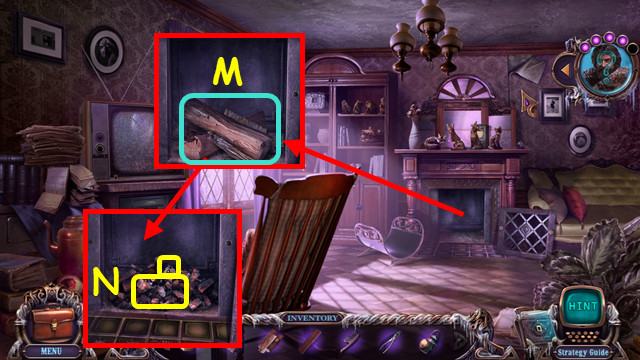
- Use the WOOD, PAPER, and FUELED LIGHTER (M).
- Use the SCOOP to take the COAL; take the REGISTER BUTTON (N).
- Return to the Shop.

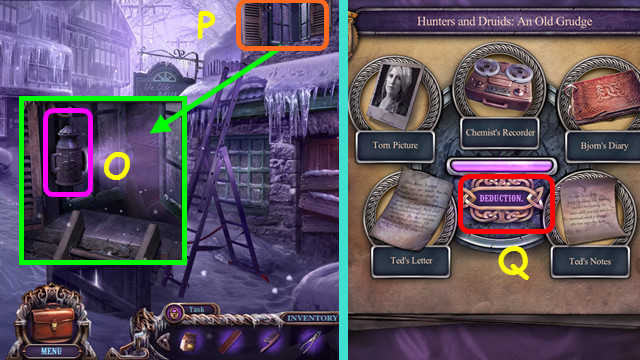
- Use the LANTERN (O); play the HOP to earn TED’S NOTES (P).
- Go to the investigation board and select deduction (Q).
- Return to the Old Tree.

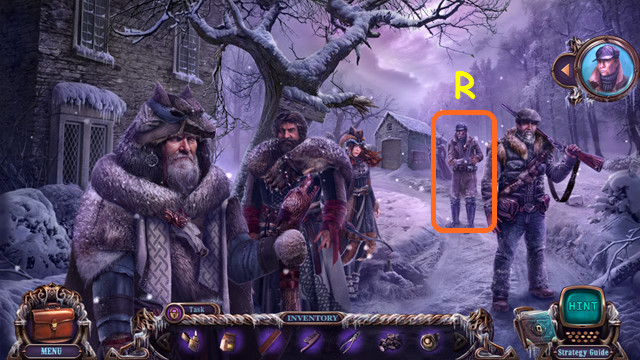
- Talk to Ted to earn the FURNITURE WRENCH (R).
- Return to the Square.
Chapter 5: Derek and the Mistwalkers

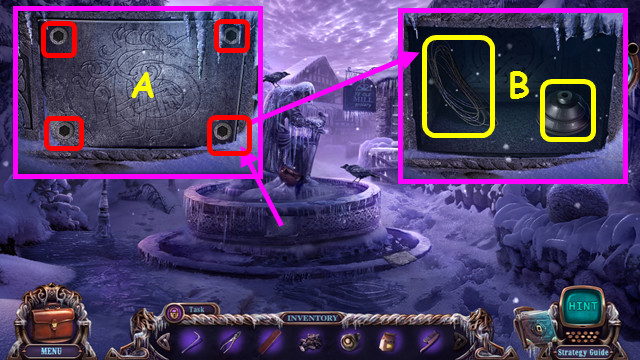
- Use the FURNITURE WRENCH; remove the cover (A).
- Take the WIRE and the first GLASS-CUTTER PART (B).
- Combine the WIRE and NIPPERS; bend the wire several times to make the LOCKPICK (inventory).
- Go to the Pharmacy.

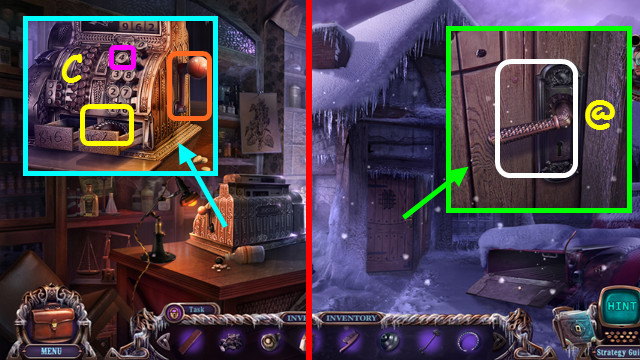
- Place the REGISTER BUTTON, press 9-6-2, pull the handle, and take the RING (C).
- Go to Derek’s House.
- Use the LOCKPICK; turn the handle (@).

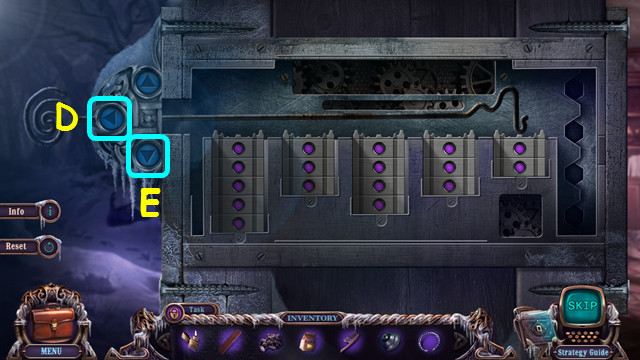
- Select E-D-Ex2-D-Ex3-D-Ex3-D-Ex4-D.
- Walk forward.

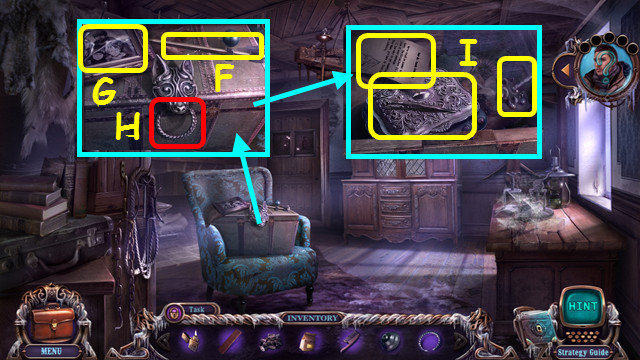
- Take the GLASS-CUTTER BASE (F).
- Remove the glass; take the FAMILY PICTURE (G).
- Place the RING and pull (H).
- Take the LIBRARY ENTRY, BOX and VALVE (I).
- Look at the box; take the TWEEZERS (inventory).

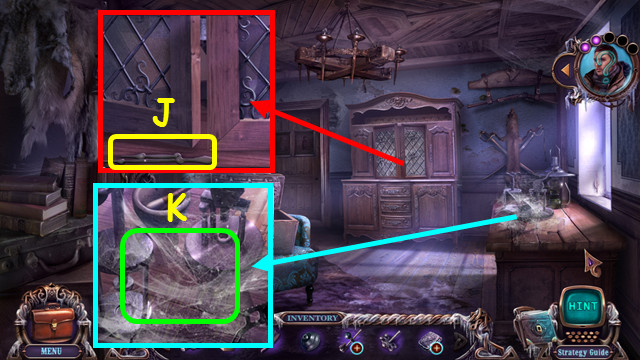
- Take the CLOCK HANDS (J).
- Use the BRUSH (K).
- Return to the Sitting Room.

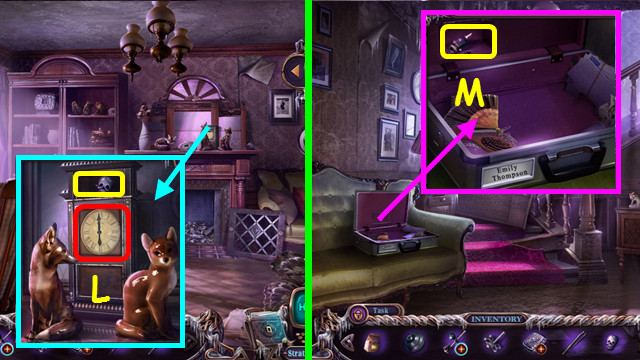
- Place the CLOCK HANDS and select the face; take the SKULL (L).
- Go to the Staircase.
- Place the SKULL; take the second GLASS-CUTTER PART (M).
- Combine the GLASS-CUTTER BASE and the 2 GLASS-CUTTER PARTS to make the GLASS CUTTER (inventory).
- Go to the Shop.

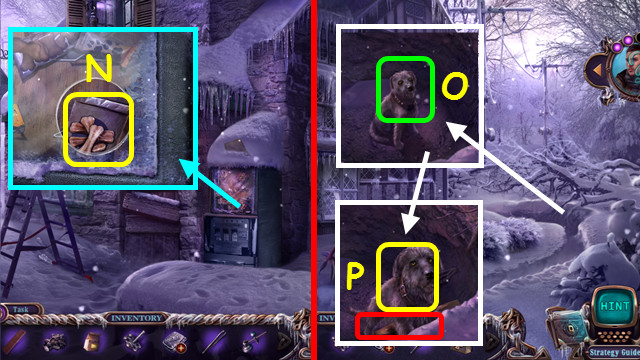
- Use the GLASS CUTTER; take the DOG FOOD (N).
- Walk down and forward.
- Give the DOG FOOD (O).
- Place the BOARD; take THUNDER (P).
- Go to the Old Tree.

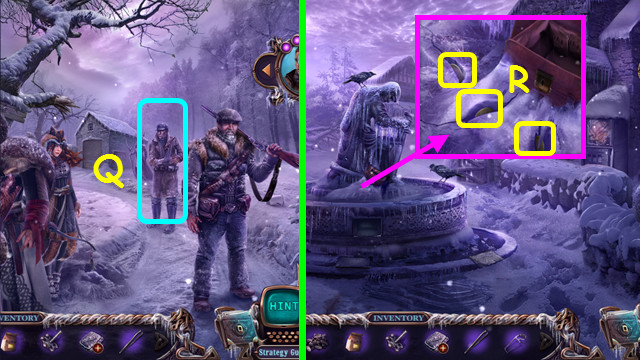
- Give THUNDER to Ted; you receive the HANDSAW (Q).
- Travel to the Square.
- Use the TWEEZERS to take the 3 BRASS CIRCLES (R).
- Return to Derek’s House.

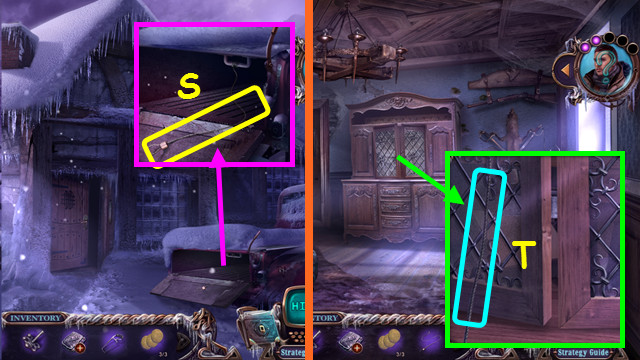
- Use the HANDSAW; take the CABLE (S).
- Walk forward.
- Use the CABLE, pull the cable, and open the doors (T).

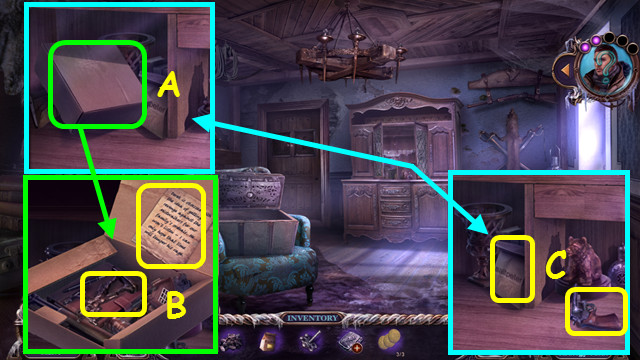
- Open the box (A); take the LEAD TOY and SAMUEL’S NOTES (B).
- Take the SALTPETER and UNLOADED GUN (C).

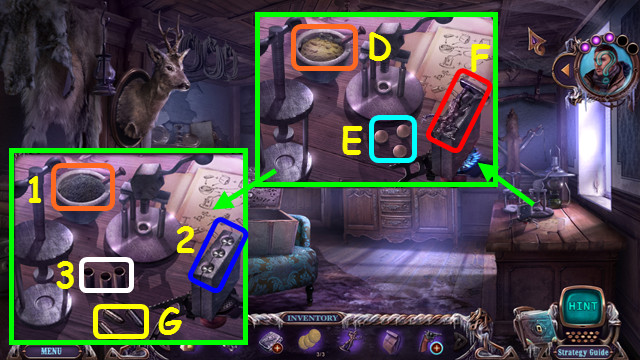
- Place the COAL, SULFUR, and SALTPETER; select the mortar (D).
- Place the BRASS CIRCLES; select each, one at a time (E). Place the LEAD TOY (F).
- Select the mortar, lead cap, and case to make a bullet (1-3). Do this 3x.
- Take the AMMO (G). Combine the UNLOADED GUN and AMMO to make the LOADED GUN (inventory).
- Travel to the Street.

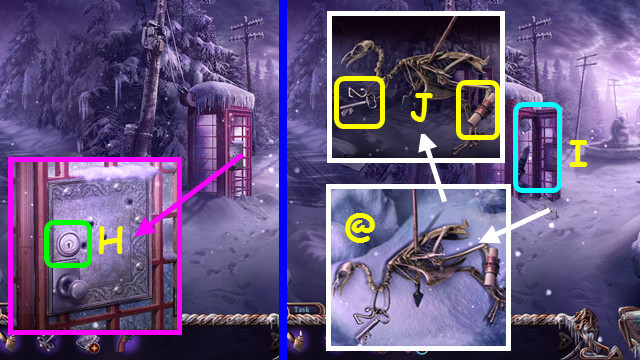
- Use the LOADED GUN (H).
- Play the HOP to earn the TORCH BASE (I).
- Brush the snow and select the skeleton (@); take the MESSAGE TO MISTWALKERS and HOTEL-DRAWER KEY (J).
- Go to the Hotel Hall.

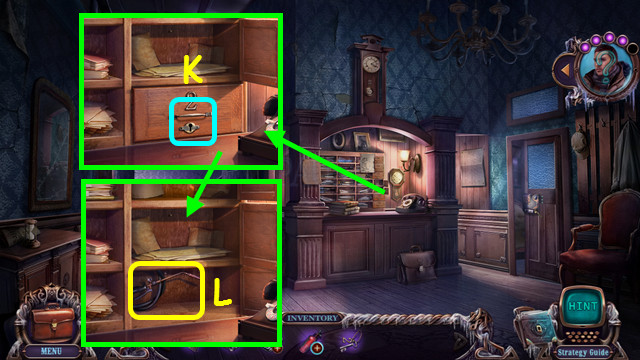
- Use the HOTEL-DRAWER KEY (K).
- Take the TORCH HOSE (L).
- Combine the TORCH BASE, TORCH HOSE, VALVE, and FUELED LIGHTER to make the TORCH (inventory).
- Travel to the Shop.

- Use the TORCH; remove the door (M).
- Take the HINT (N).
- Combine the BOX and HINT; select the runes per the hint and take the DEREK FIGURE (inventory).
- Go to Inside House.
- Place the DEREK FIGURE (O).

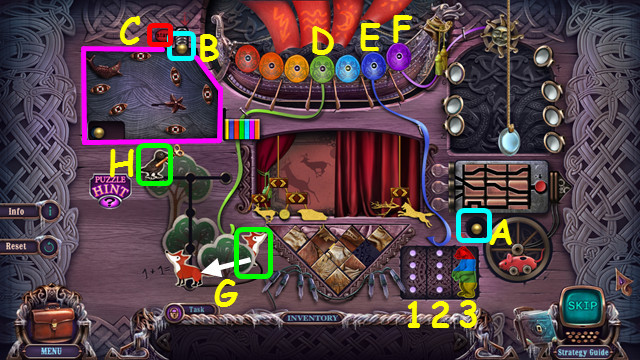
- Place the gold ball (A) in the holder (B).
- Move the starfish, fish, and bumpers as shown; press start (C).
- Press the green shield 5x (D), press the blue shield twice (E), and press the purple shield 3x (F).
- Move the fox and press him twice (G); press the crow (H).
- Move the colored pieces of the bear to the columns indicated: red-1, blue-2, red-3, blue-1, red-1, green-2, red-3, blue-2, red-1, blue-3, red-3, green-1, red-1, blue-2, red-3, blue-1, red-1, yellow-2, red-3, blue-2, red-1, blue-3, red-3, green-2, red-1, blue-2, red-3, blue-1, red-1, green-3, red-3, blue-2, red-1, blue-3, red-3, yellow-1, red-1, blue-2, red-3, blue-1, red-1, green-2, red-3, blue-2, red-1, blue-3, red-3, green-1, red-1, blue-2, red-3, blue-1, and red-1.

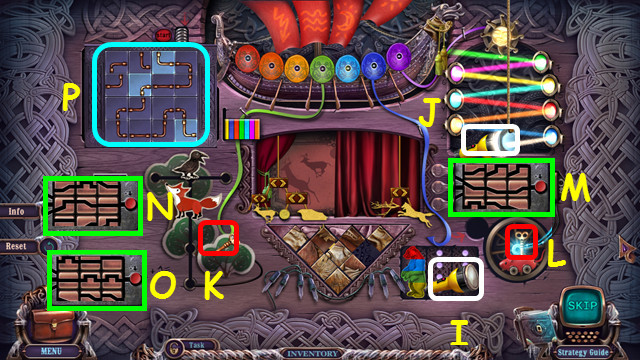
- Place the flashlight (I) by the reflectors; adjust the reflectors as shown ( J).
- Take the key (K) and use it on the mouse (L).
- Move the paths as shown; press the button (M).
- Move the paths as shown; press the button (N).
- Move the paths as shown; press the button (O).
- Swap the tiles as shown (P).

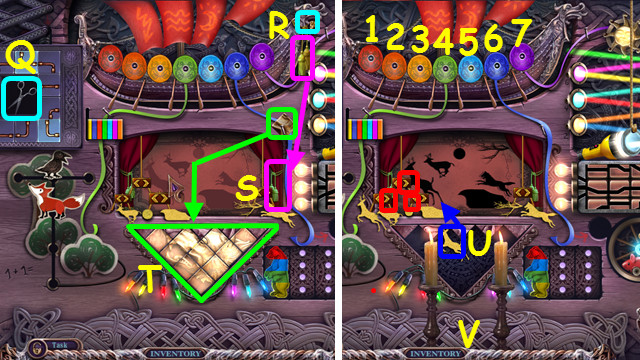
- Use the scissors (Q) on the ship (R); Use the ropes on the curtain (S).
- Place the tile; swap the tiles to restore the carving (T).
- Move the stag to the stage (U).
- Press the circled arrows once (red).
- Move the candles to the positions shown (V).
- Select the shields: 3-6-1-4-5-7-2, 7-5-1-3-2-4-6, 2-3-1-4-7-5-6, and 6-2-1-5-3-7-4.

- Play the HOP to earn DEREK’S SIGN (W).
- Go to the investigation board and select deduction (X).
- Go to the Old Tree.
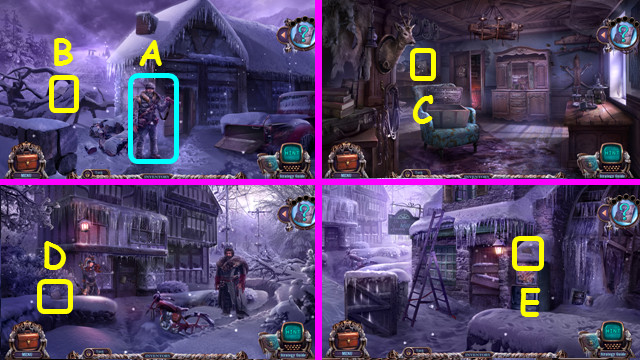
- Talk to Samuel (Y).
- Go to Derek’s House.
Chapter 6: Where Is Derek?

- Talk to Samuel; you earn the 0/6 FOLDER (A). Take the 1/6 FOLDER (B).
- Walk forward.
- Take the 2/6 FOLDER (C).
- Travel to Outside Museum.
- Take the 3/6 FOLDER (D).
- Go to the Shop.
- Take the 4/6 FOLDER (E).
- Walk down.

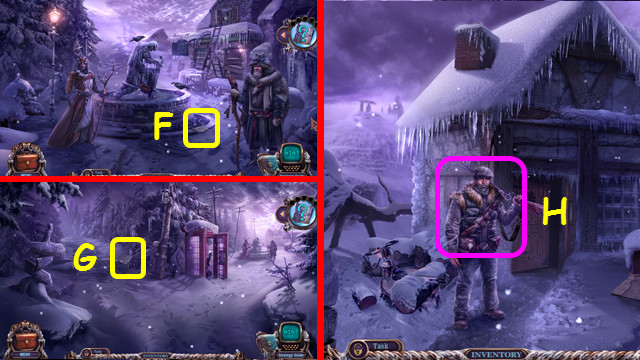
- Take the 5/6 FOLDER (F).
- Walk down.
- Take the 6/6 FOLDER (G).
- Walk left.
- Talk to Samuel to earn the MAP (H).
- Go to the Square.

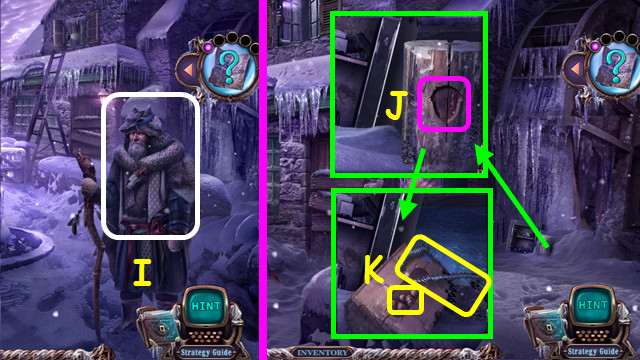
- Talk to Ulf; you earn the ACORN (I).
- Go to the Shop.
- Place the ACORN (J).
- Take the ACORNS and CHAIN (K).
- Travel to Derek’s House.

- Place the SAW’S CHAIN (L).
- Select the saw (M).
- Walk left.

- Take the HATCHET HANDLE (N).
- Take the CELLAR KEY; open the curtains (O).

- Use the HATCHET HANDLE; take the HATCHET (P).
- Use the HATCHET twice; take the SLINGSHOT BASE (Q).
- Walk forward.

- Take the first FIGURINE (R).
- Use the HATCHET to take the LEATHER BAND (S).
- Take the HEAD (T).
- Return to Outside Pharmacy.

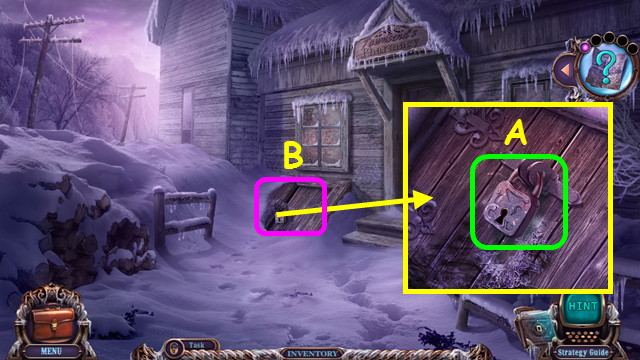
- Use the CELLAR KEY to take the KEY LOCK (A).
- Play the HOP to earn the PICK AXE (B).
- Return to Banshee Hall.

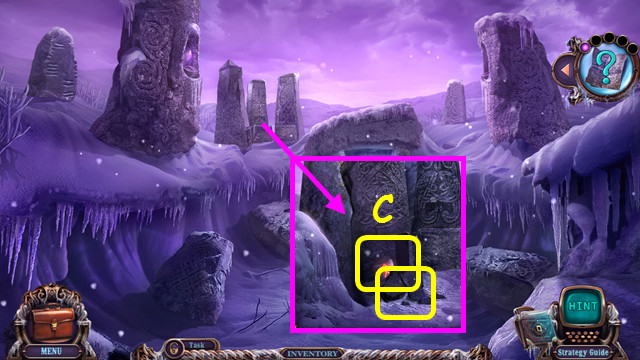
- Use the PICK AXE; take the first FIRE RUNE and STONES (C).
- Combine the SLINGSHOT BASE, LEATHER BAND, and STONES to make the SLINGSHOT (inventory).
- Walk down.

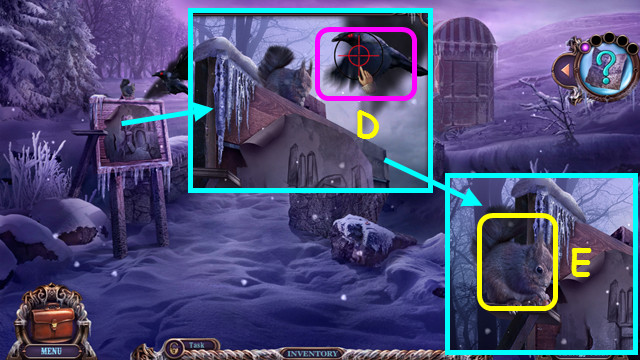
- Use the SLINGSHOT on the crow 3x (D).
- Place the ACORNS; take the SQUIRREL (E).
- Return to the Square.

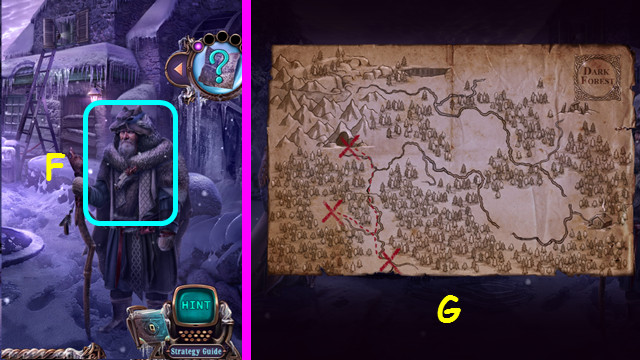
- Talk to Ulf (F).
- Select the map to take ULF’S INFORMATION (G).
- Walk forward.

- Talk to Bjorn to earn BJORN’S BOX (H).
- Combine BJORN’S BOX and the HEAD; Select the heads 1-5.
- Take the second FIRE RUNE (I).
- Return to Banshee Hall.

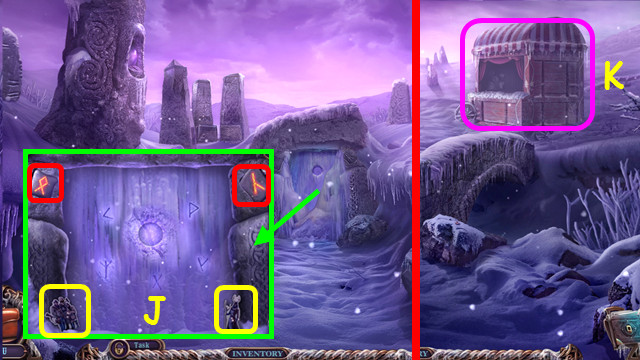
- Place the 2 FIRE RUNES (red); take the second and third FIGURINES (J).
- Walk down; select the puppet stage (K).

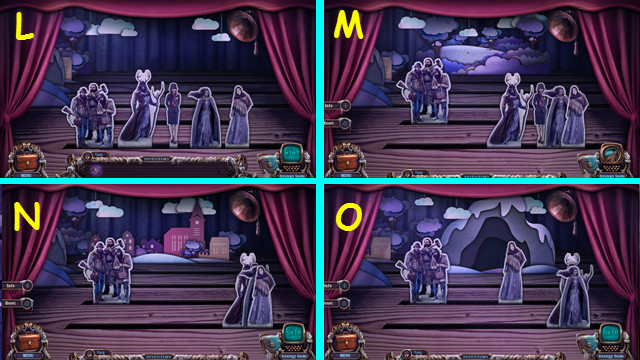
- Place the 3 FIGURINES (L).
- Select the trees and citizens (M).
- Select the town and citizens (N).
- Select the cave, citizens, and young woman (O).

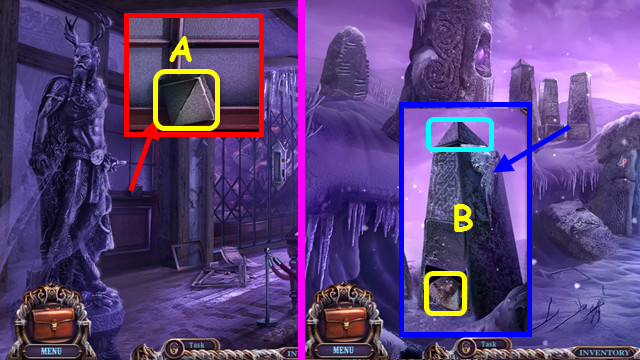
- Select the cave, banshee, and detective (P).
- Select the Sacred Grove, citizens, and Mistwalker (Q).
- Select the cave, Mistwalker, and Banshee (R).
- Take the DATE OF FOUNDING (S).
- Travel to Outside Museum.

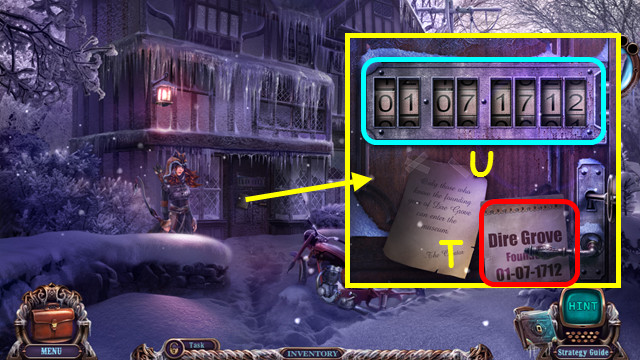
- Place the DATE OF FOUNDING (T).
- Enter the date (U).
- Walk forward.


- Take the OBELISK TOP (A).
- Go to Banshee Hall.
- Place the OBELISK TOP; take the GLOVE (B).
- Return to Inside Museum.

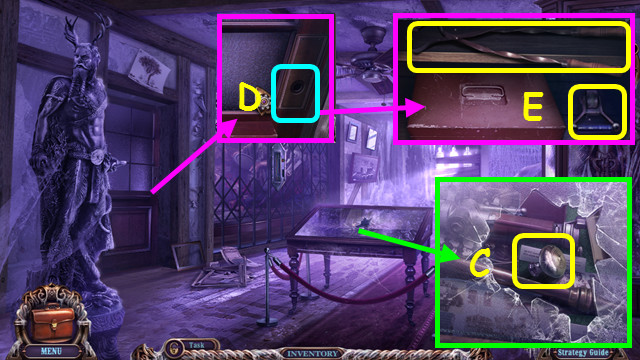
- Use the GLOVE on the glass; take the DOOR KNOB (C).
- Use the DOOR KNOB (D).
- Take the TONGS and SWITCH (E).

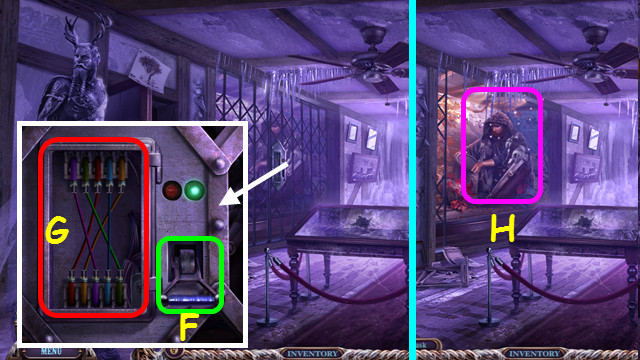
- Place the SWITCH (F).
- Swap the wires as shown; lift the switch (G).
- Play the HOP to earn the BEAR TOTEM (H).

- Walk down.
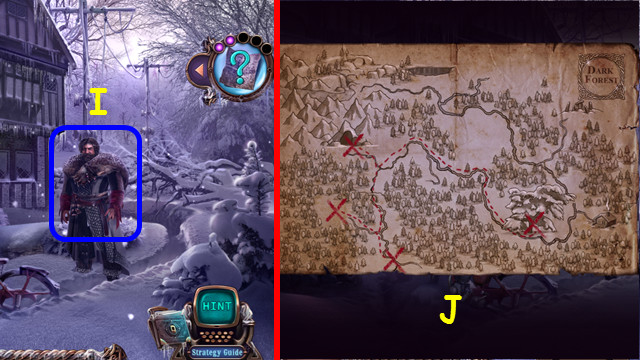
- Talk to Bjorn (I).
- Select the map to take BJORN’S INFORMATION (J).

- Talk to Camryn; earn the 0/7 MEMORY HOLDER and MEMORY LENS (K). Use the MEMORY LENS to collect the 1/7 MEMORY HOLDER (L).
- Walk forward.
- Use the MEMORY LENS to collect the 2/7 MEMORY HOLDER (M).
- Return to Derek’s House.
- Use the MEMORY LENS to collect the 3/7 MEMORY HOLDER (N).
- Walk forward.
- Use the MEMORY LENS to collect the 4/7 MEMORY HOLDER (O).
- Go to The Shop.

- Use the MEMORY LENS to collect the 5/7 MEMORY HOLDER (P).
- Walk to Banshee Road.
- Use the MEMORY LENS to collect the 6/7 MEMORY HOLDER (Q).
- Walk forward.
- Use the MEMORY LENS to collect the 7/7 MEMORY HOLDER (R).
- Return to Outside Museum.

- Talk to Camryn (S).
- Select the map to take CAMRYN’S INFORMATION (T).
- Walk down.
- Talk to the Masked Druid; earn the THICKET AMULET (U).
- Go to Banshee Road.

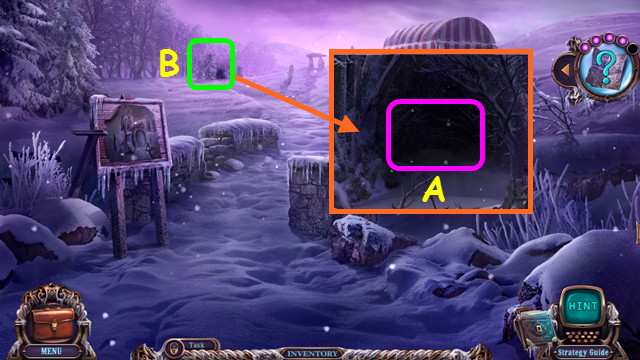
- Use the THICKET AMULET (A).
- Walk to the Grove (B).

- Take the BROKEN WINDOW and EMPTY VIAL (C).
- Restore the BROKEN WINDOW to make the MIRROR (inventory).
- Use the TONGS to take the DIAMOND (D).
- Use the EMPTY VIAL to make the ICE VIAL (E).
- Return to Inside Museum.

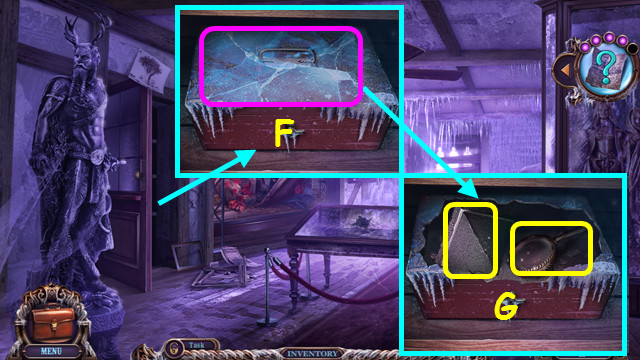
- Use the ICE VIAL; crack the ice several times (F).
- The EMPTY VIAL returns to inventory.
- Take the MAGNIFIER and OBELISK TOP (G).
- Return to Banshee Hall.

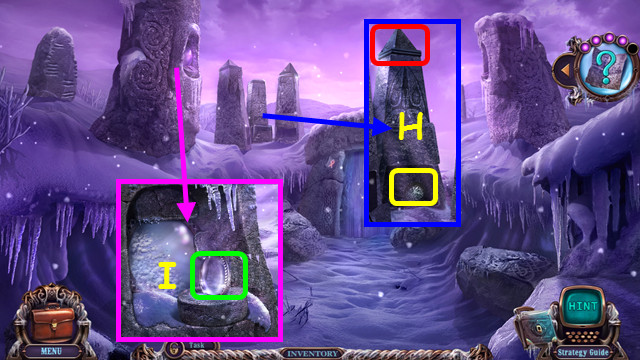
- Place the OBELISK TOP; take the SUMMONING DISK (H).
- Place the MAGNIFIER; touch the magnifier (I).

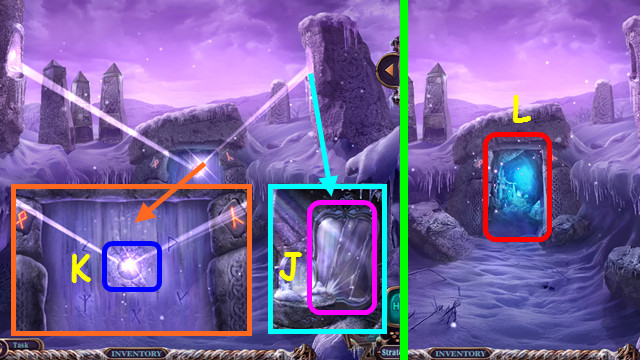
- Place the MIRROR; touch the mirror (J).
- Place the DIAMOND (K).
- Play the HOP to earn the BANSHEE’S FLOWER (L).
- Return to the Grove.

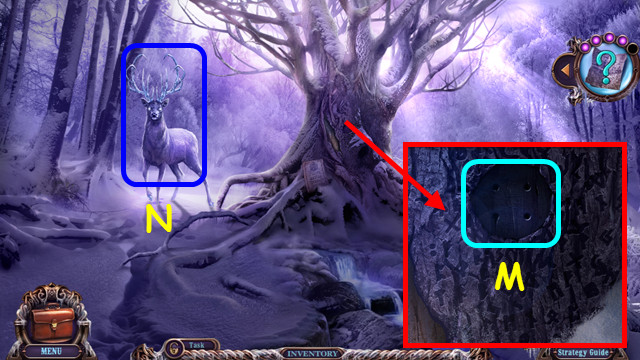
- Place the SUMMONING DISK (M).
- Talk to the Ancient Spirit; you earn the TEAR VIAL (N).
- Go to the Square.

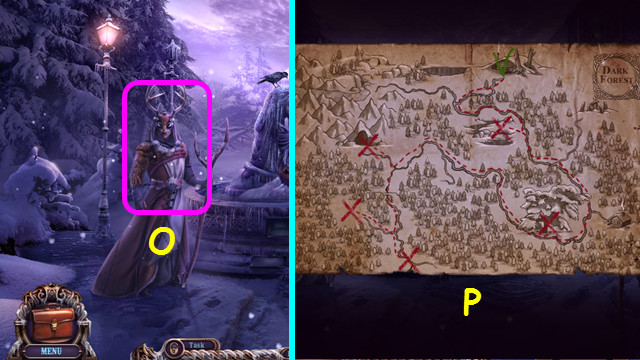
- Talk to the Masked Druid (O).
- Select the map to receive the MASKED DRUID’S INFORMATION (P).

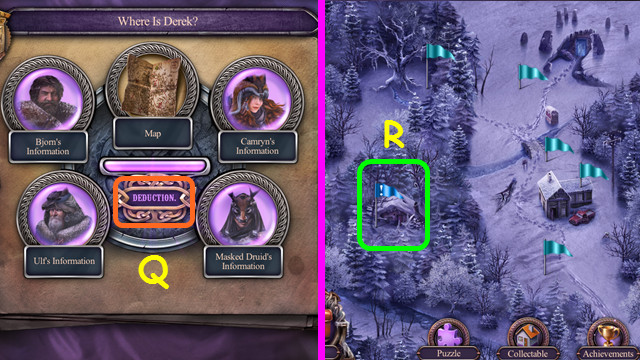
- Go to the investigation board and select deduction (Q).
- Go to the Hideout (R).

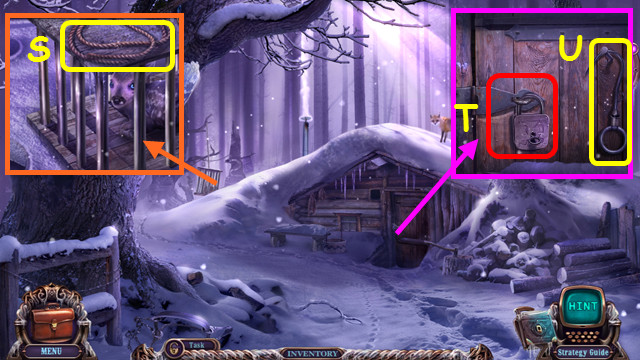
- Take the ROPE (S).
- Close the door and use the KEY LOCK (T).
- Take the HOOK (U).
- Combine the HOOK and ROPE to make the ROPE KEY (inventory).
- Go to Banshee Road.

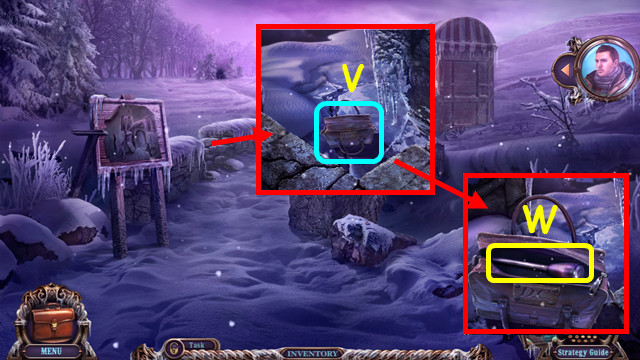
- Use the ROPE KEY (V).
- Open the bag; take the CARVED LEVER (W).
- Return to the Hideout.

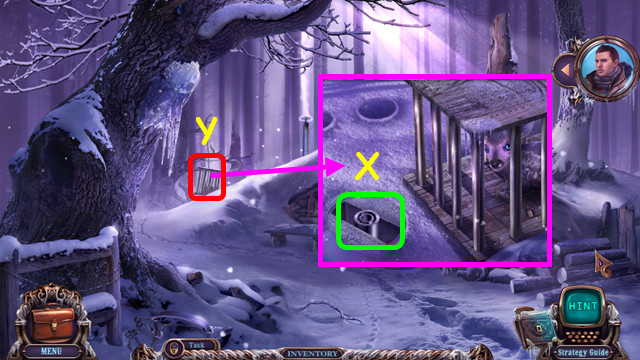
- Place the CARVED LEVER (X).
- Select the cage (Y).

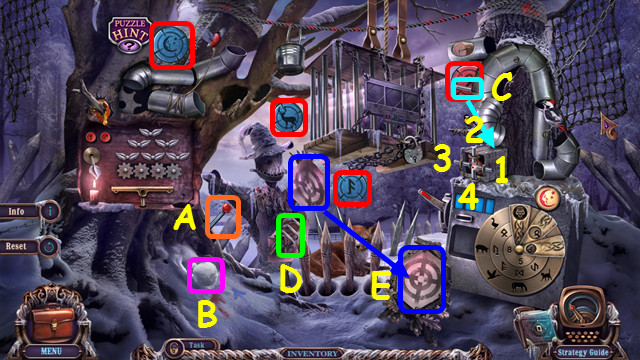
- Pull the lever (A).
- Make a snowball (B); throw one at each target (red).
- Move the rod to the squirrel cage (C); press the rods 1-4.
- Remove the 3 clamps (D); move the target to the frame (E).
- Throw a snowball at the target.

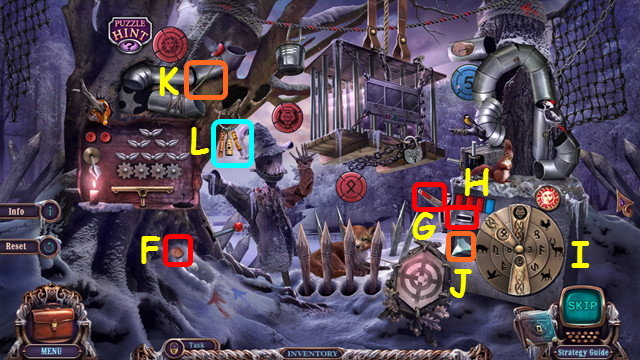
- Place the coin (F) in the slot; pull the lever (G). Use snowballs to change the colored targets to match the bars (H).
- Move the arms as shown; press the button (I). Use the shard (J) on the rope (K).
- Select each of the 3 whistles (L). Place the coin (M) in the slot and pull the lever.
- Use snowballs to change the colored target to match the bars (N).
- Move the arms as shown; press the button (O).
- Turn the pipes (P).
- Give an acorn (Q) to the squirrel (R).

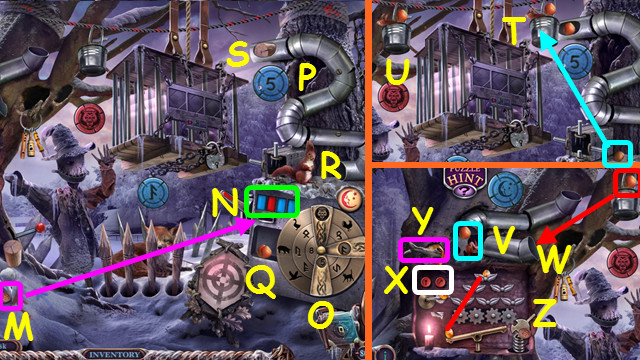
- Place an acorn (S). Slide the bucket all the way right; place the acorn in it (T). Slide the bucket all the way left (U). Place the acorn from the right pipe and turn the cog twice (V).
- Place the acorn (W). Press the left arrow 3x (X). Press the branch 4x (Y).
- Press the left arrow twice, the right once, and the left twice more (X).
- Select the left leaves to move the drop to the bar; Select the left and right sides of the bar until the drop disappears (Z).

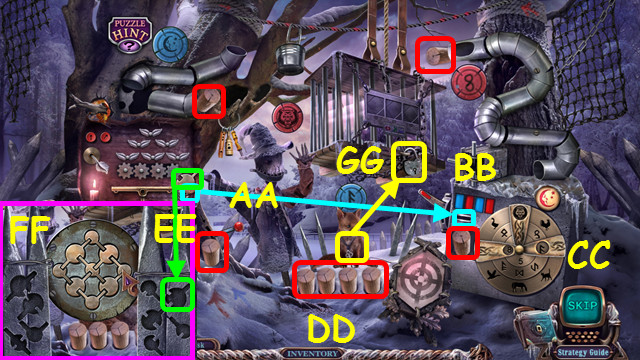
- Place the COIN in the machine; pull the lever (AA).
- Use snowballs to change the colored targets to match the bars (BB).
- Move the arms as shown (CC).
- Place the 4 corks (red) on the spikes (DD).
- Move the button to the machine (EE).
- Place the buttons in the panel (FF).
- Use the key on the lock (GG).

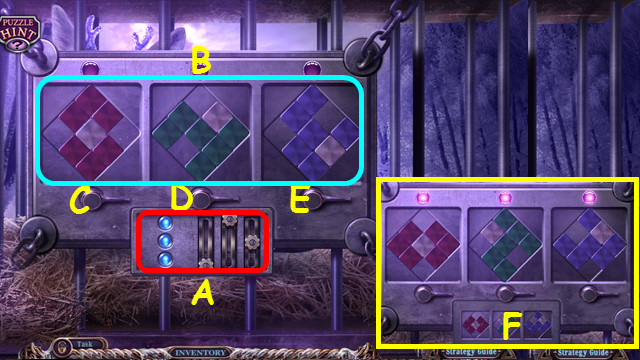
- Slide the knobs as shown (A).
- Change the tiles as shown (B).
- Select C-Dx3-Ex3.
- The final solution (F).
- Congratulations! You have completed Mystery Case Files: Dire Grove, Sacred Grove!






 Punished Talents: Seven Muses Walkthrough, Guide, & Tips
 Gemini Lost Walkthrough, Guide, & Tips
 Phenomenon Meteorite Walkthrough, Guide, & Tips
 Millennium 2: Take Me Higher Walkthrough, Guide, & Tips
 Agatha Christie: 4:50 from Paddington Walkthrough, Guide, & Tips