Sable Maze: Forbidden Garden Walkthrough, Guide, & Tips
Sable Maze: Forbidden Garden Walkthrough

Welcome to the Sable Maze: Forbidden Garden Walkthrough
Your parents always told you to stay away from the mysterious maze behind their house…. and you’re about to find out why.
Whether you use this document as a reference when things get difficult or as a road map to get you from beginning to end, we’re pretty sure you’ll find what you’re looking for here.
This document contains a complete Sable Maze: Forbidden Garden game walkthrough featuring annotated screenshots from actual gameplay!
We hope you find this information useful as you play your way through the game. Use the walkthrough menu below to quickly jump to whatever stage of the game you need help with.
Remember to visit the Big Fish Games Forums if you find you need more help. Have fun!
General Tips
- This is the official guide for Sable Maze: Forbidden Garden.
- This guide will not mention each time you have to zoom into a location; the screenshots will show each zoom scene.
- Hidden-object puzzles are referred to as HOPs. This guide will not show HOP solutions. It will identify the location of the HOP and the inventory item acquired. You have the option of playing a match-3 game instead of the HOP.
- This guide will show solutions for non-random puzzles. Please read the in-game instructions for each puzzle.
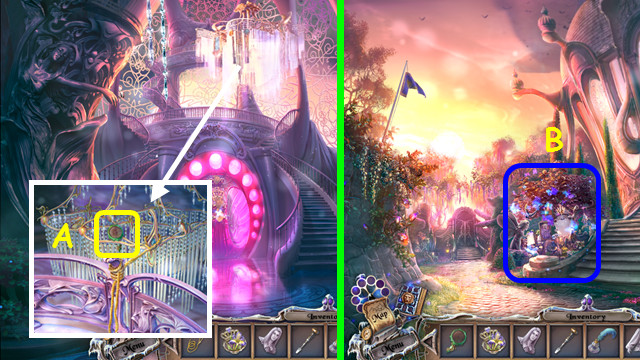
Chapter 1: The Arrival

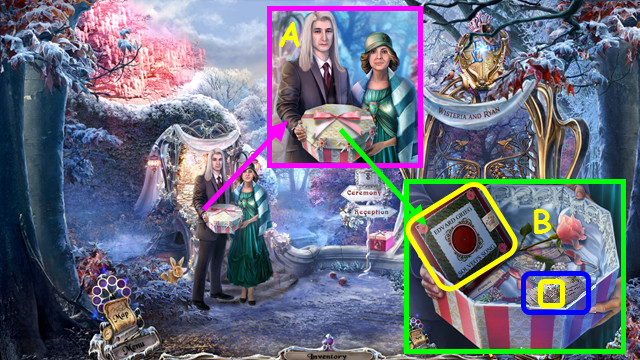
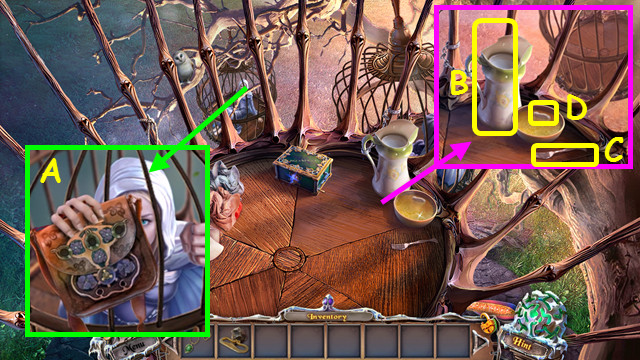
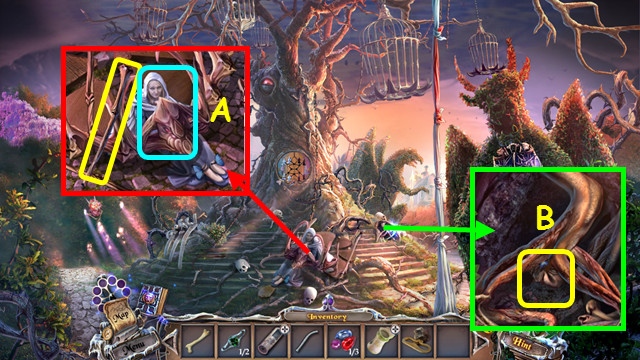
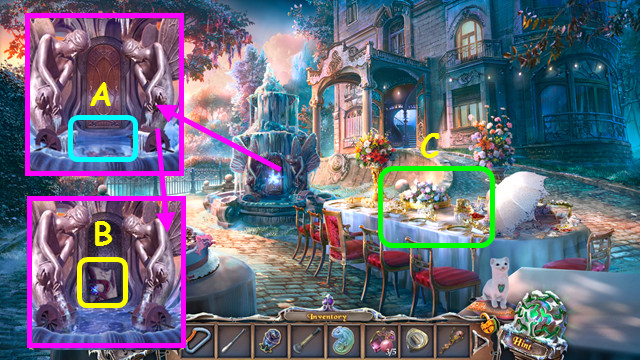
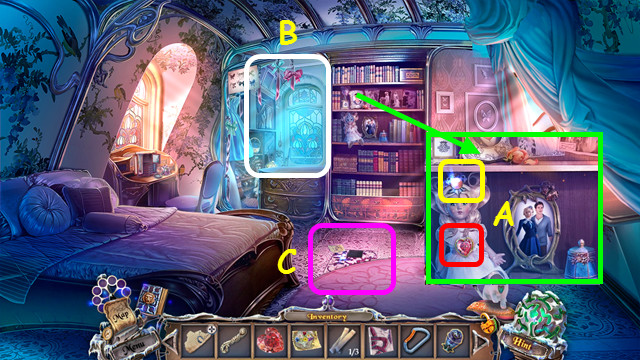
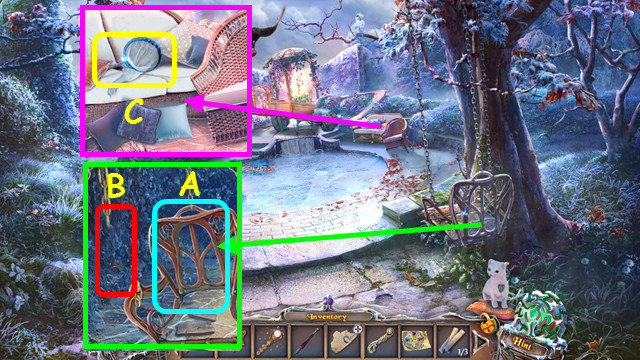
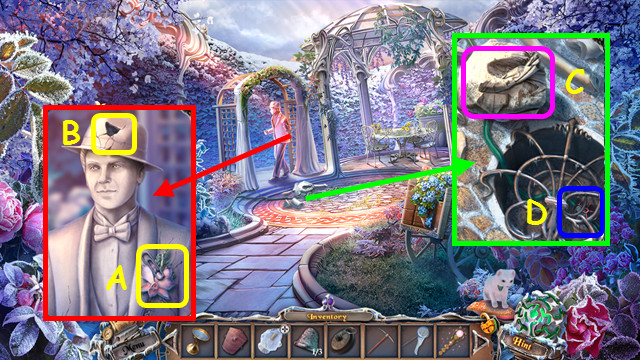
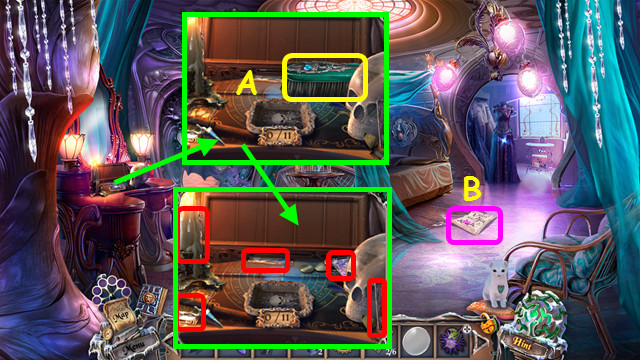
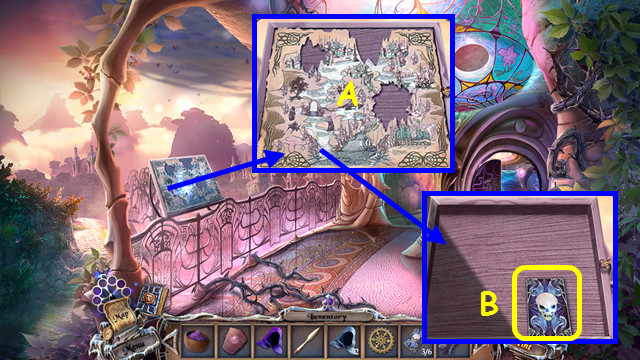
- Talk to your parents; open the gift (A).
- Take the RECORD SLEEVE; take the invitation and the CROWN KEY (B).
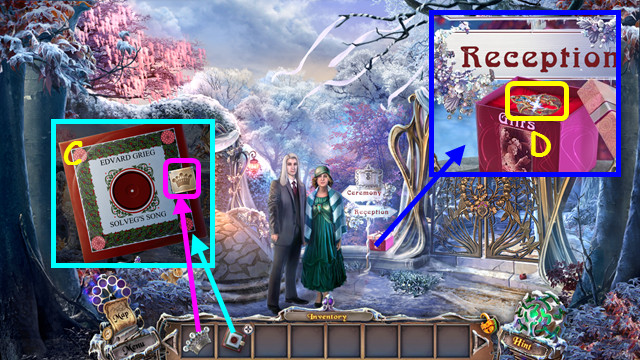
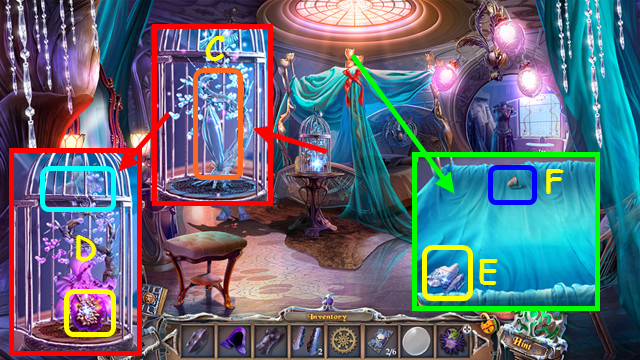
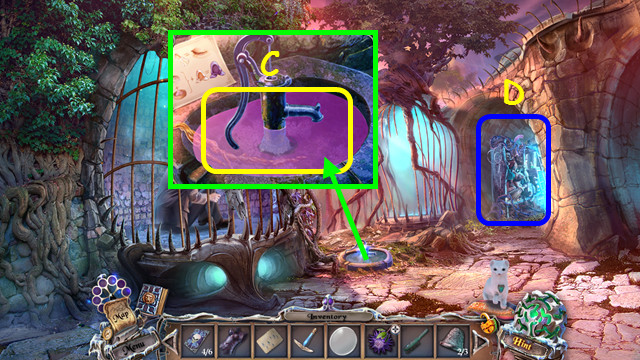
- Look at the RECORD SLEEVE in inventory; use the CROWN KEY on the lock to earn the RECORD (C).
- Inventory item combinations will not be pictured in the rest of the guide unless further explanation is required.
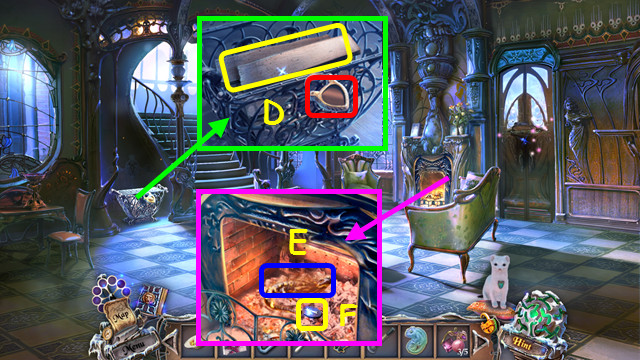
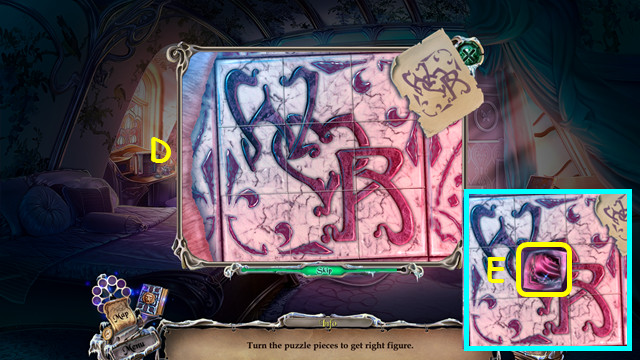
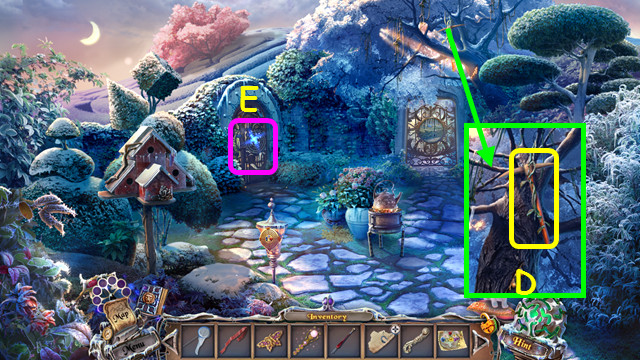
- Open the box; take the KEY (D).
- Walk left.
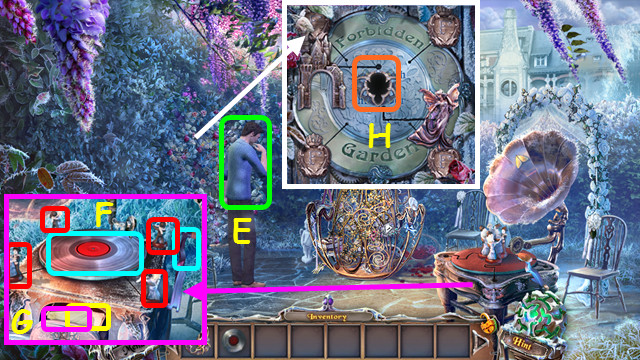
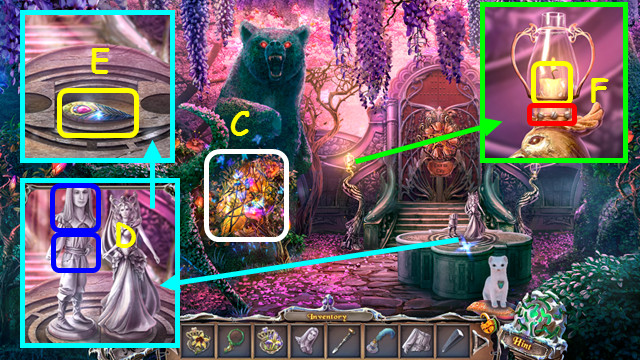
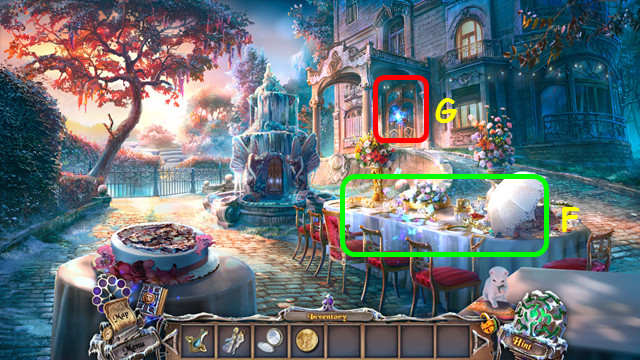
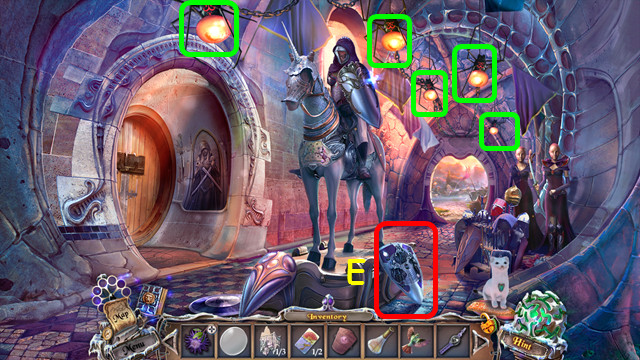
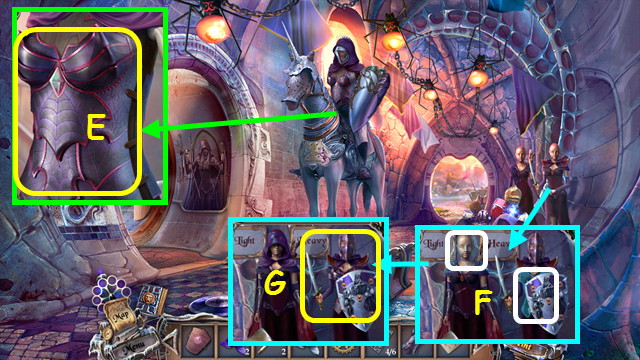
- Talk to Ryan (E).
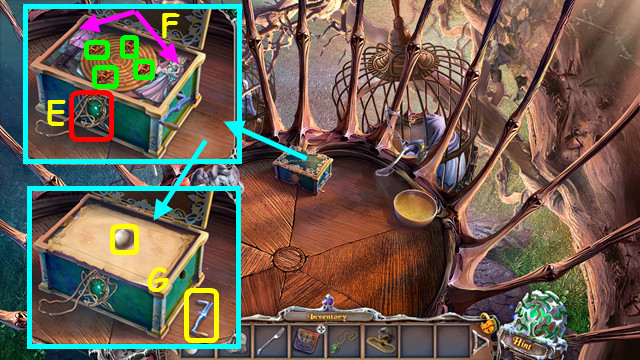
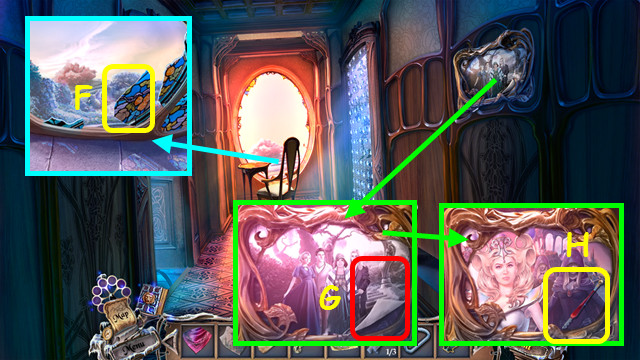
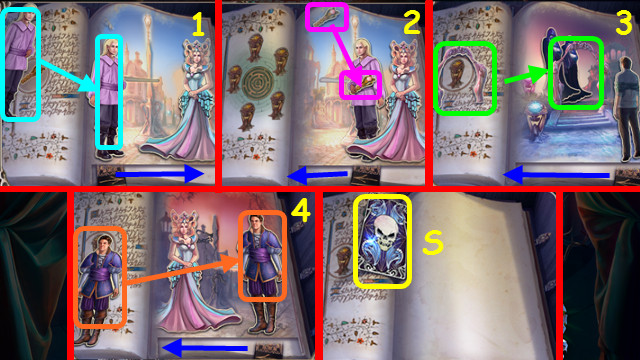
- Move the 4 couples, place the RECORD, and turn the crank (F).
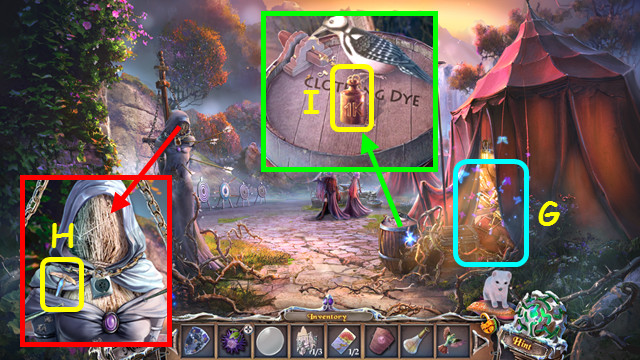
- Take the letter and PAPER (G).
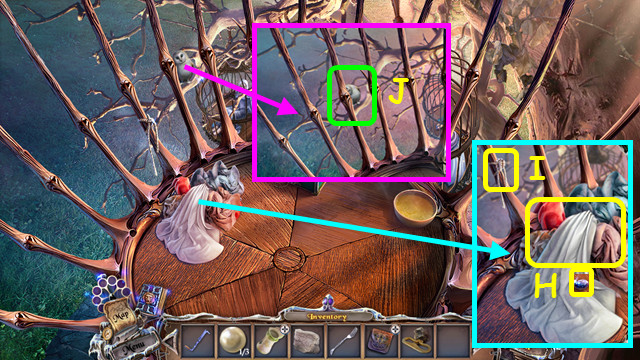
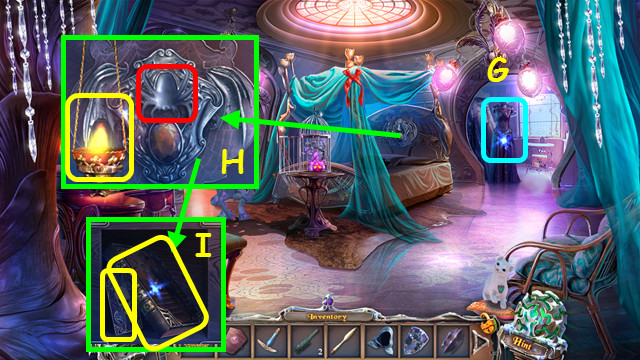
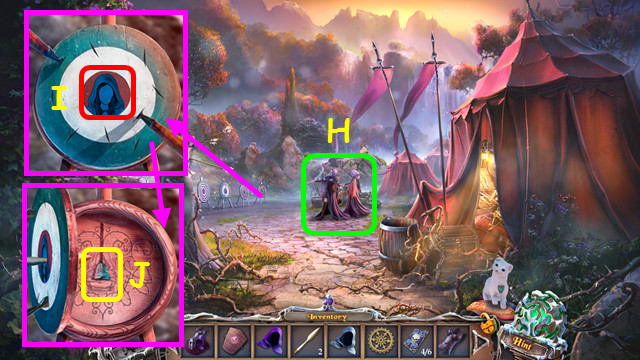
- Place the KEY; you earn the MAILBOX HANDLE (H).
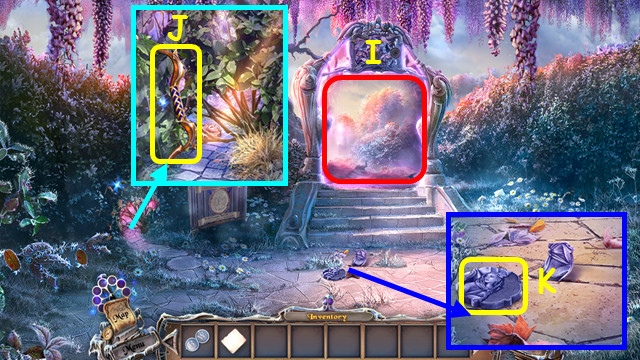
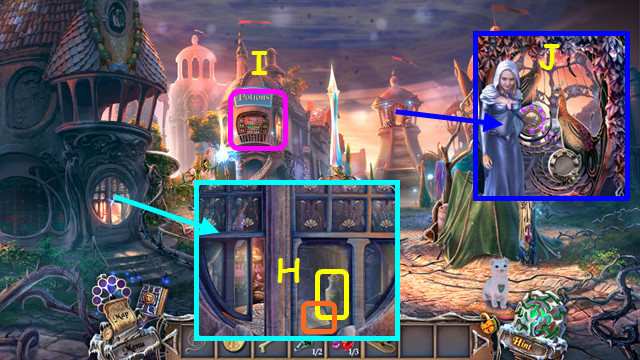
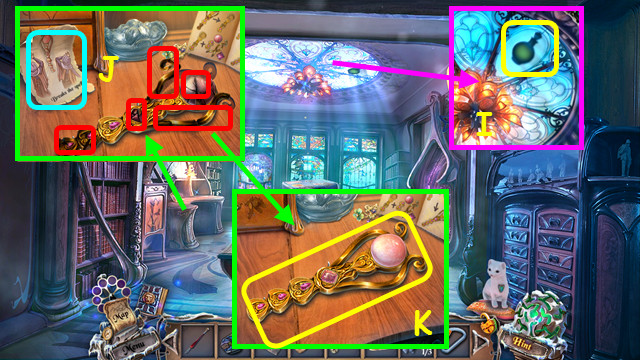
- Try the gate (I).
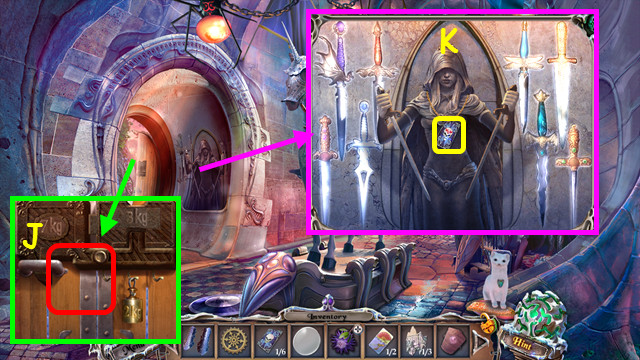
- Move the branches and take the BOW (J).
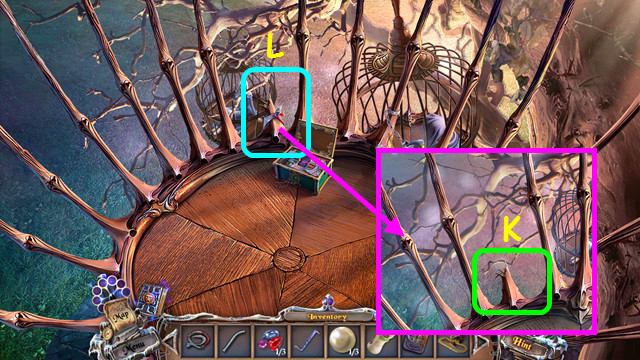
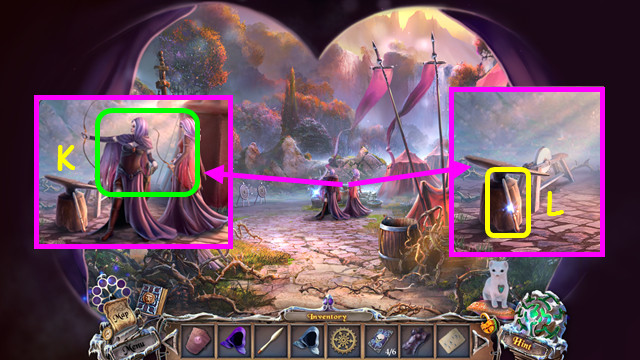
- Take the first ARCH-TILE PART (K).
- Walk down twice.
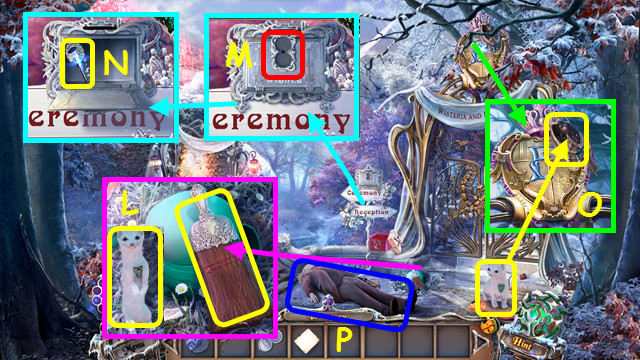
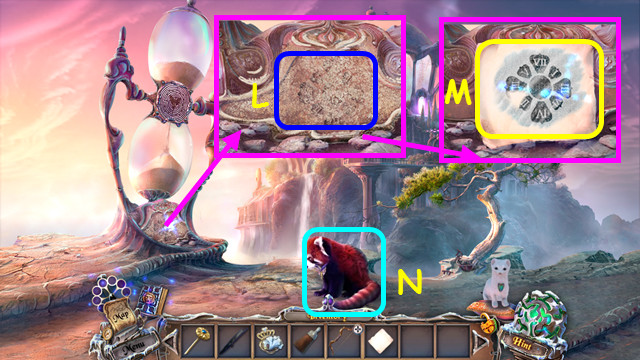
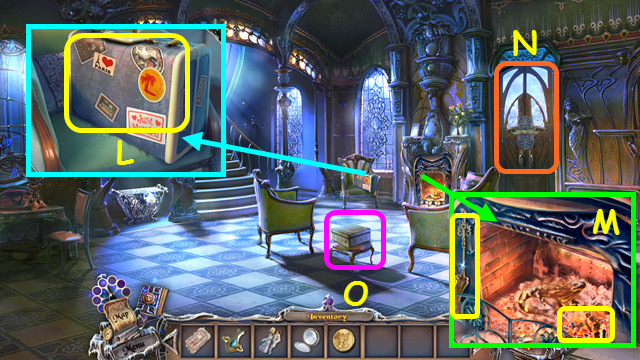
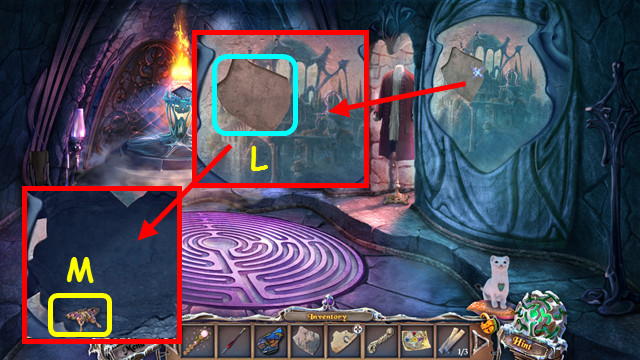
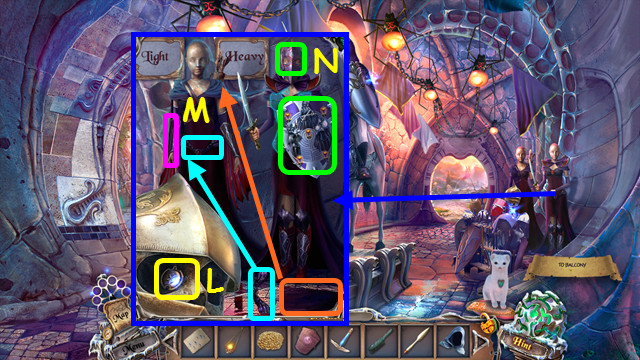
- Take the BROOM, select the hat, and take the ERMINE (L).
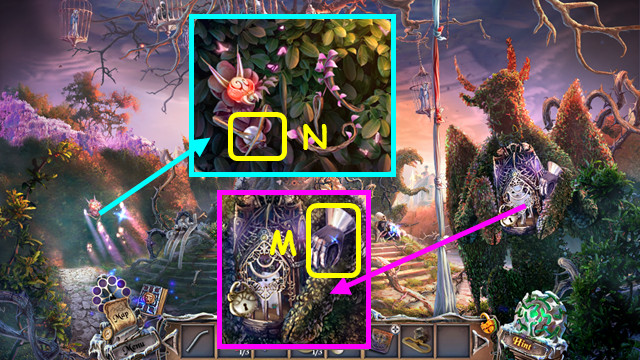
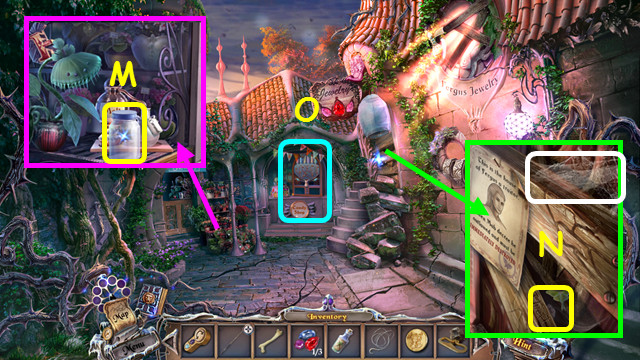
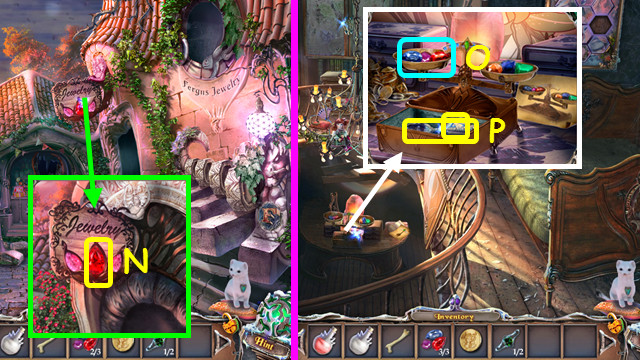
- Place the MAILBOX HANDLE (M).
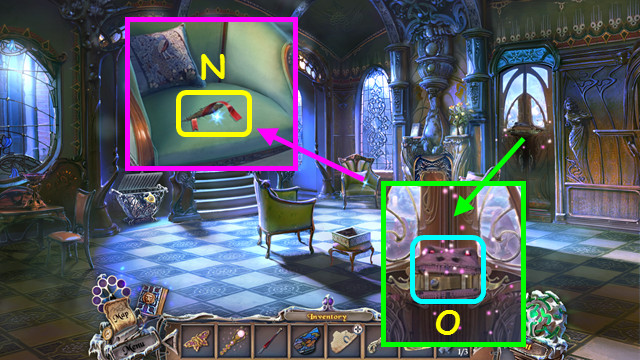
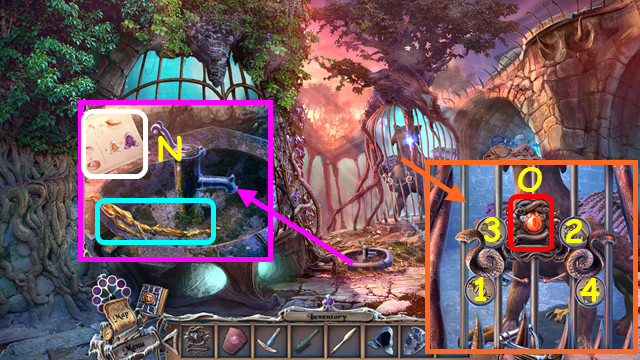
- Take the KEY (N).
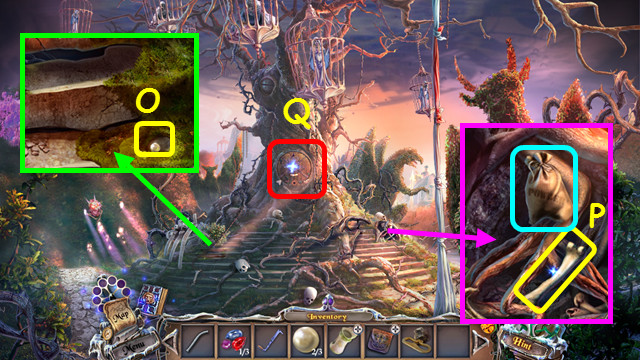
- Use the ERMINE to take the BAG (O).
- Open the BAG; take the note and SMELLING SALTS.
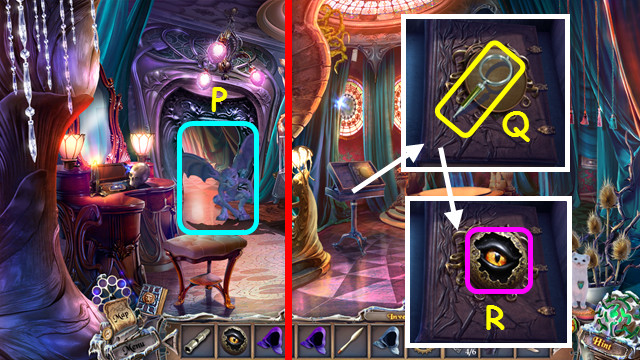
- Select Father (P).
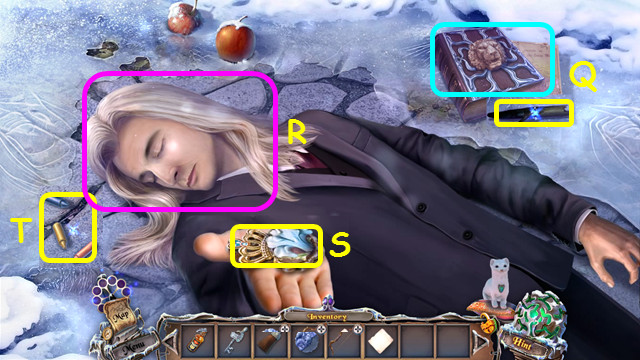
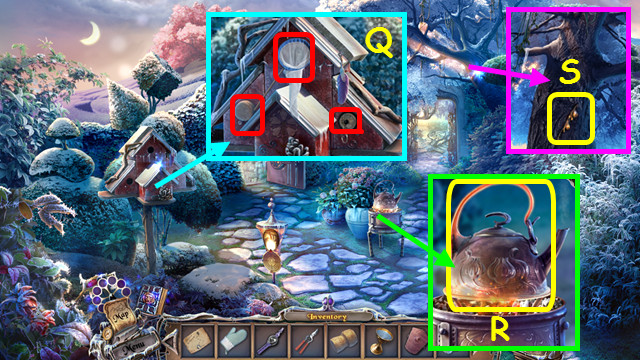
- Take the book and COAL (Q).
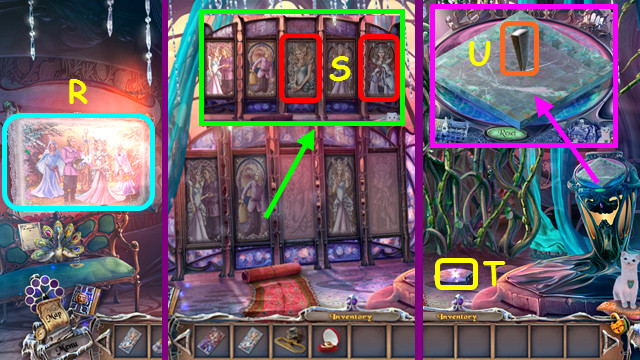
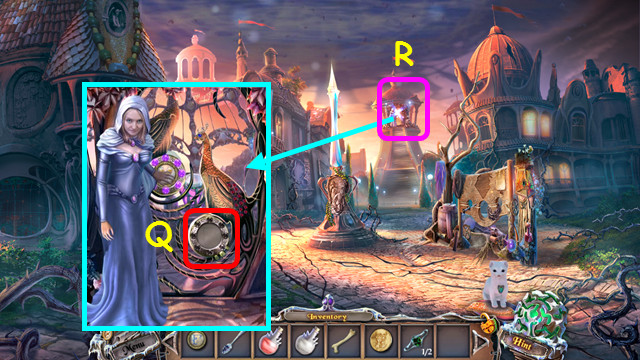
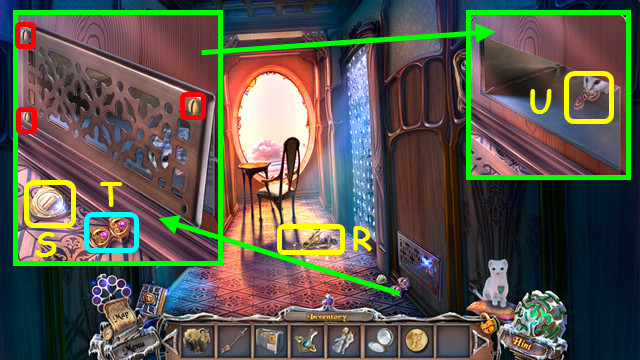
- Use the SMELLING SALTS (R).
- Take the THRONE-ROOM KEY (S).
- Take the CHALK (T).
- Talk to Father (A).
- Walk left.
- Use the KEY (B).
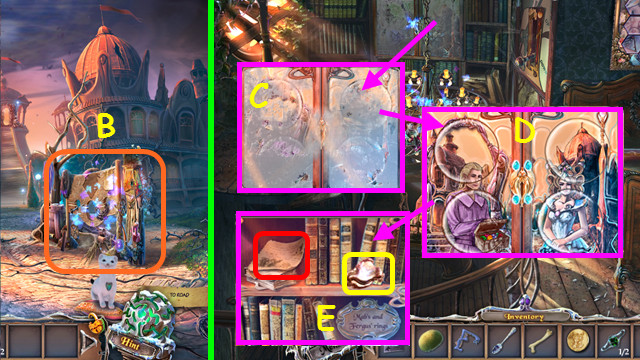
- Play the HOP; earn the CAKE KNIFE (C).
- Walk left.
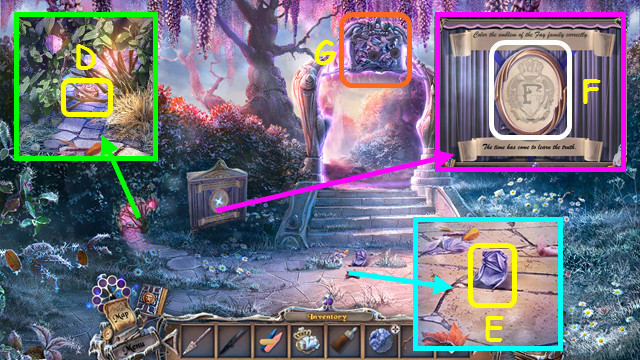
- Use the ERMINE to take the first ARCH TILE (D).
- Use the CAKE KNIFE to take the second ARCH-TILE PART (E).
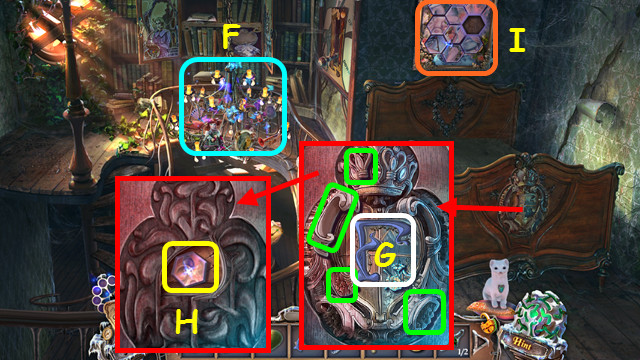
- Use the CHALK to play the HOP; you earn the GLUE and NAIL (F).
- Combine the first ARCH-TILE PART, the GLUE, and the second ARCH-TILE PART to make the second ARCH TILE.
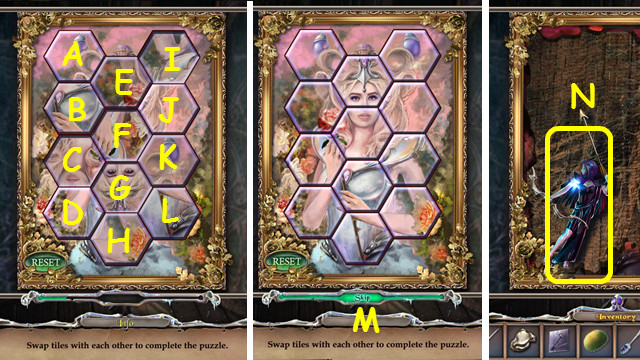
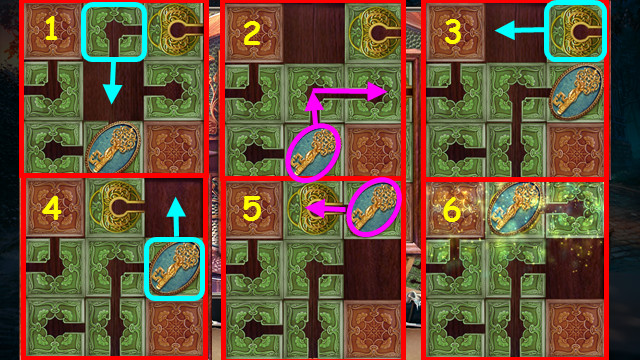
- Select the mini-game (G).
- Place the 2 ARCH TILES on the board.
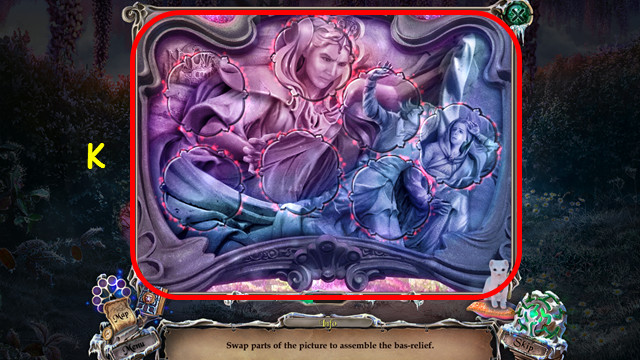
- Restore the picture (K).
- Walk forward.
Chapter 2: The Grounds
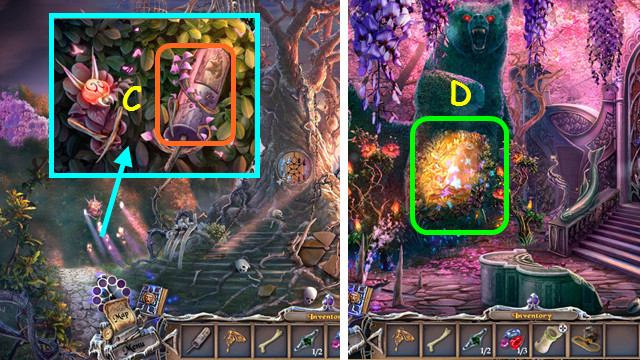
- Use the BROOM (L).
- Use the PAPER and then the COAL; take the INSTRUCTIONS (M).
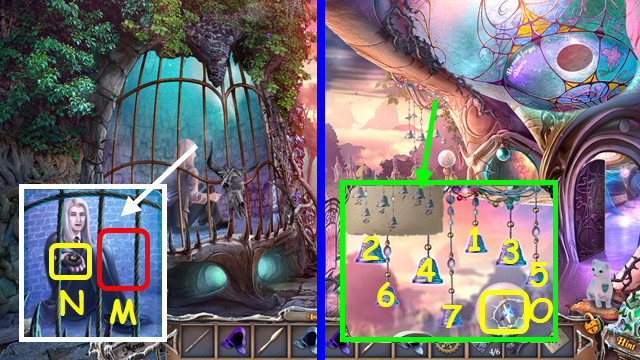
- Pet the Red Panda (N).
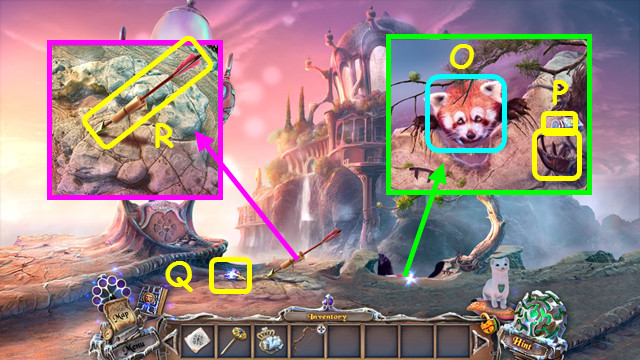
- Save the Red Panda (O).
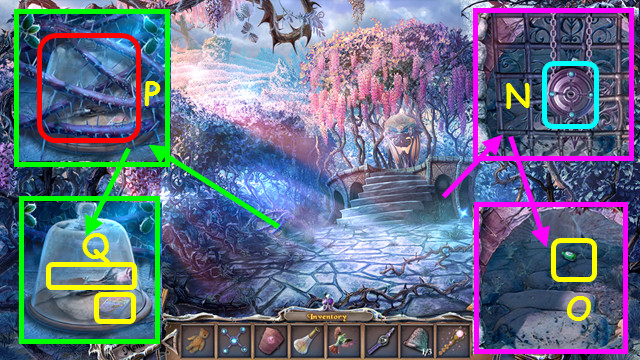
- Take the BROKEN HAMSTER-BALL PART and SLEEPING POTION (P).
- Assemble the BROKEN HAMSTER-BALL PART to make the first HAMSTER-BALL PART.
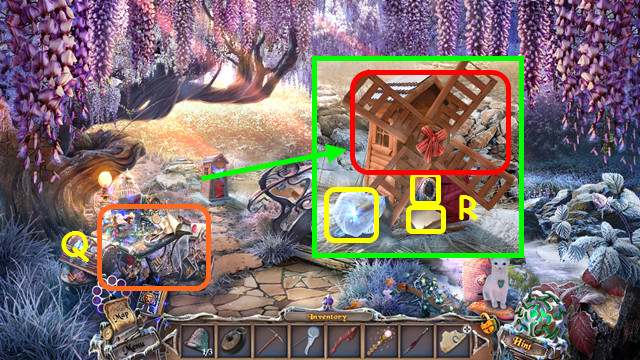
- Take the FAIRY KEY (Q).
- Take the note and the ARROW (R).
- Combine the BOW, ARROW, and SLEEPING POTION to make the BOW AND ARROW.
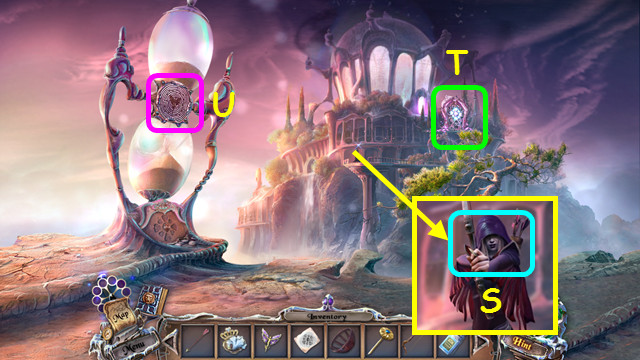
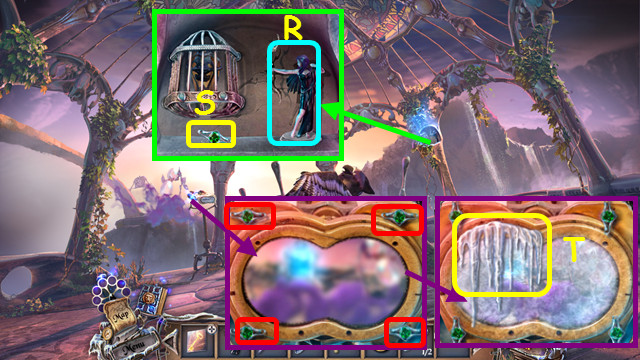
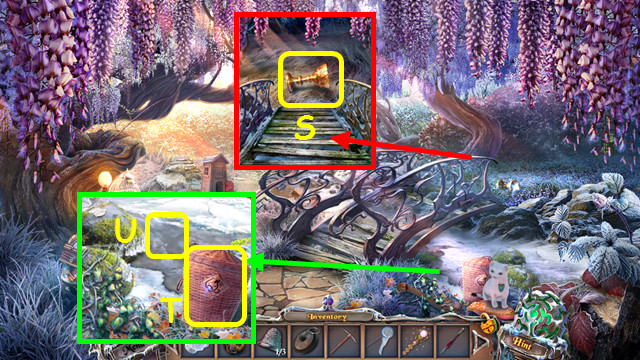
- Use the BOW AND ARROW (S).
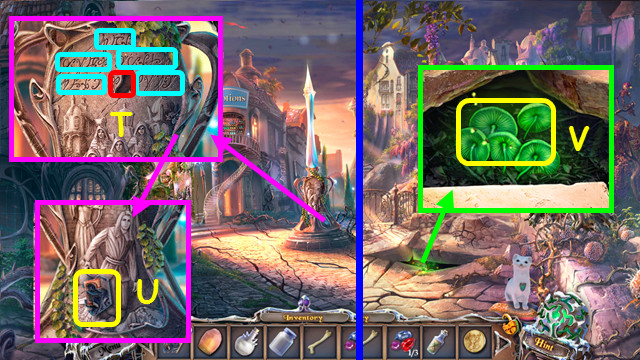
- Note the gate mini-game (T).
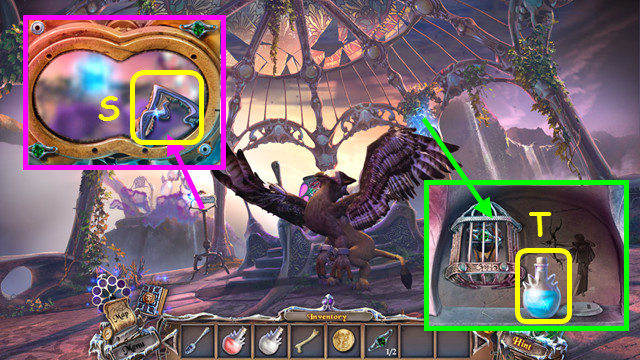
- Select the hourglass (U).
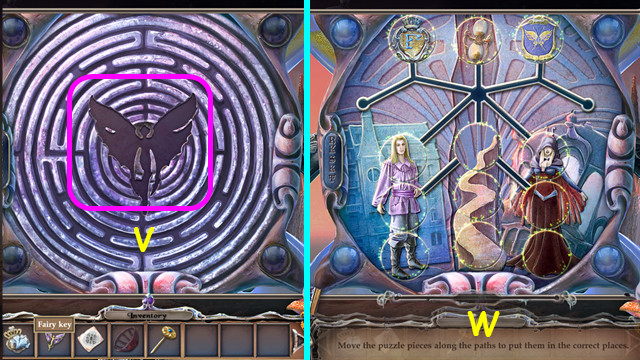
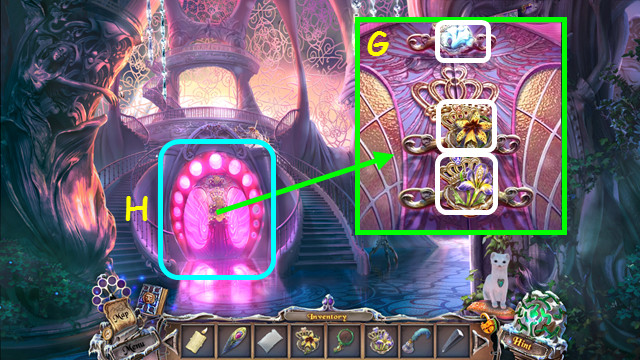
- Place the FAIRY KEY (V).
- Restore the picture (W).
- Select the gate mini-game.
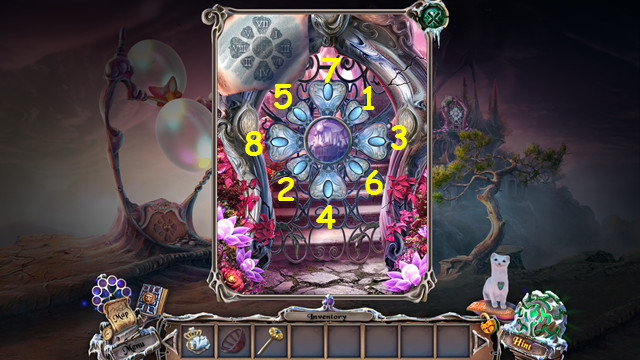
- Select the pieces (1-8).
- Walk forward.
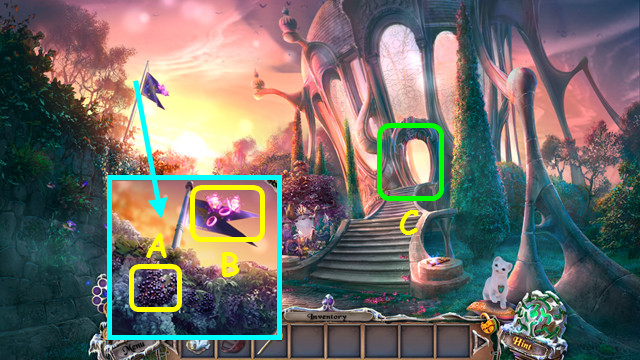
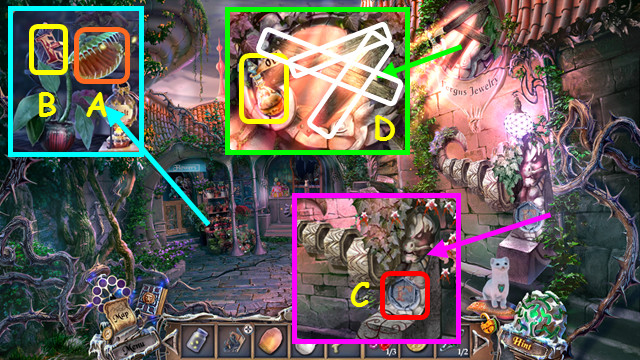
- Take the BLACKBERRIES (A).
- Use the ERMINE to take the RINGS and FLAG PIECE (B).
- Look at the Castle Hall (C).
- Walk left.
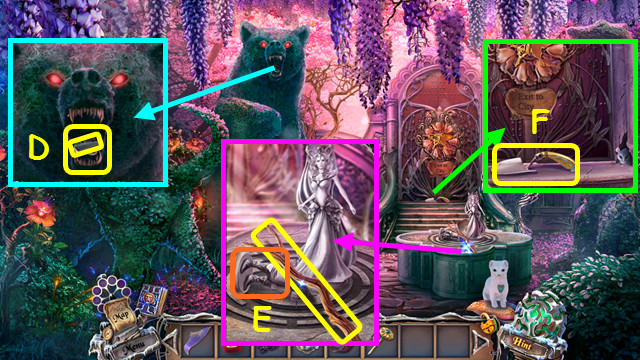
- Use the ERMINE to take the WEDGE and the FLINT (D).
- Take the BRANCH and stand up the statuette piece (E).
- Take the BROKEN SHOVEL (F).
- Combine the BROKEN SHOVEL and NAIL to make the SHOVEL.
- Walk down.
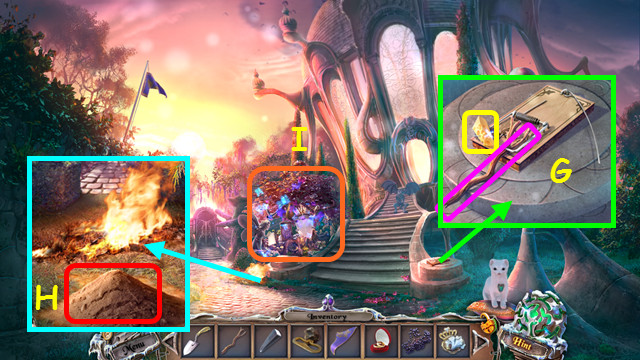
- Use the BRANCH on the trap; take the CHEESE (G).
- Use the SHOVEL (H).
- Play the HOP to earn the HAMSTER BALL (I).
- Combine the HAMSTER BALL with the HAMSTER-BALL PART to make the HAMSTER BALL.
- Walk left.
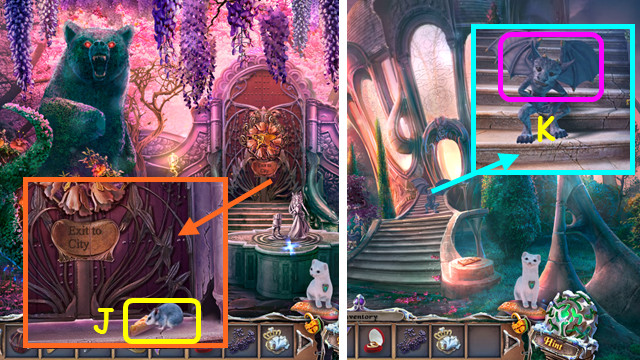
- Place the CHEESE to capture the MOUSE (J).
- Combine the MOUSE and HAMSTER BALL to make the MOUSE IN BALL.
- Walk down.
- Use the MOUSE IN BALL (K).
- Walk right.
Chapter 3: The Castle
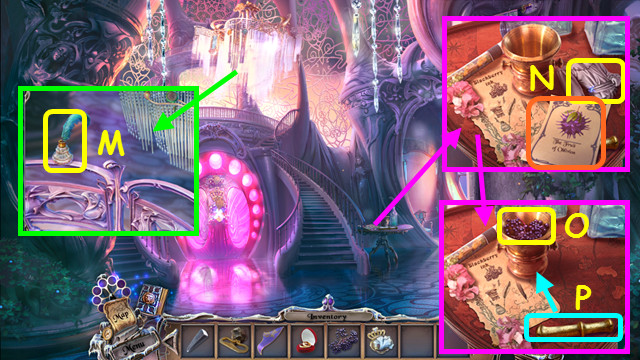
- Take the EMPTY INKWELL (M).
- Take the note and STATUETTE PART (N).
- Place the BLACKBERRIES (O) and use the pestle in the mortar (P).
- Use the EMPTY INKWELL on the mortar to take the INK.
- Walk right.
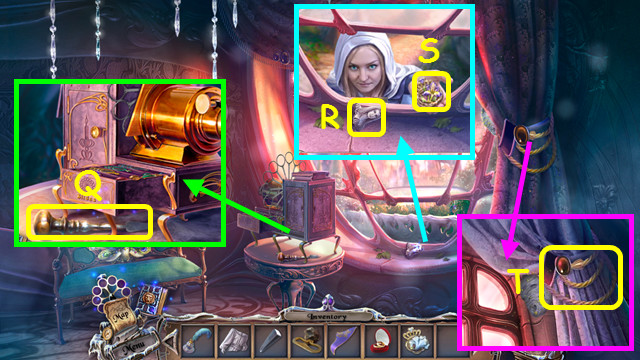
- Take the SCREWDRIVER (Q).
- Take the PART OF STATUETTE (R).
- Take the second THRONE-ROOM KEY (S).
- Use the ERMINE to take the ROPE (T).
- Walk down.
- Use the ROPE on the chandelier; take the DIRTY SLIDE (A).
- Combine the DIRTY SLIDE and FLAG PIECE to make the first SLIDE.
- Walk down.
- Play the HOP to earn the 3rd THRONE-ROOM KEY (B).
- Walk left.
- Play the HOP to earn the WHITE FABRIC (C).
- Place the STATUETTE PART and the PART OF STATUETTE (D).
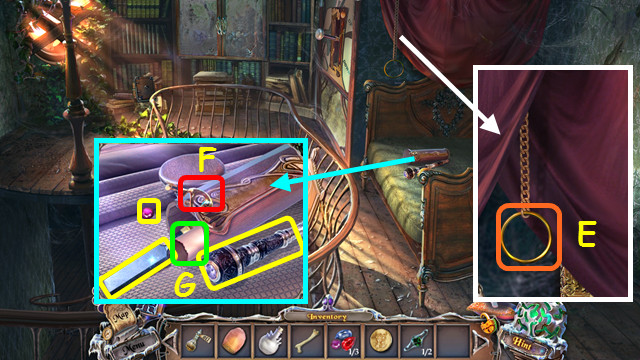
- Take the FEATHER (E).
- Use the SCREWDRIVER on the screws; take the CANDLE (F).
- Return to Castle Hall.
- Place the 3 THRONE-ROOM KEYS (G).
- Enter Mab’s Throne Room (H).
- Use the ERMINE on the rope (I).
- Take the STICK (J).
- Use the WEDGE on the seal mini-game (K).
- Walk down.

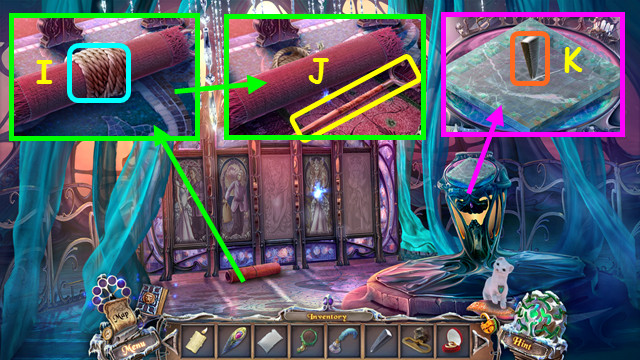
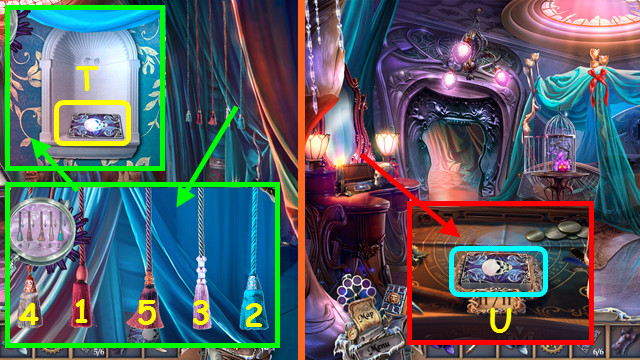
- Use the STICK to take the first TAPESTRY (L).
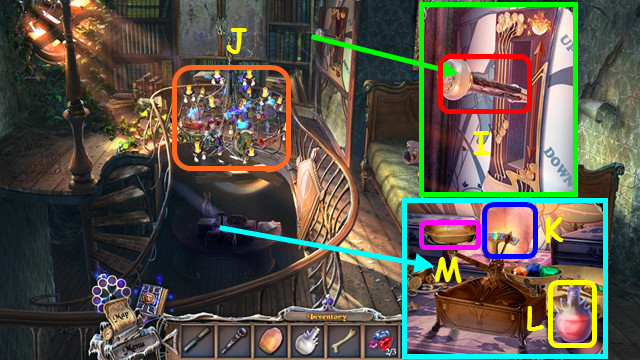
- Walk right.
- Place the FEATHER (M).
- Select the feathers (1-7).
- Take the second SLIDE (N).
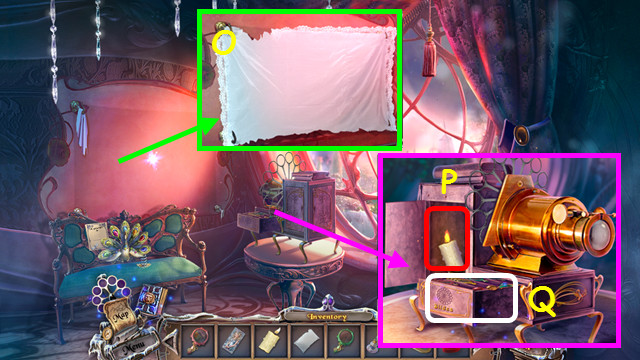
- Place the WHITE FABRIC (O).
- Open the door and place the CANDLE inside (P).
- Select the mini-game (Q).
- Place the 2 SLIDES on the board.
- Move the slides indicated (1-6).
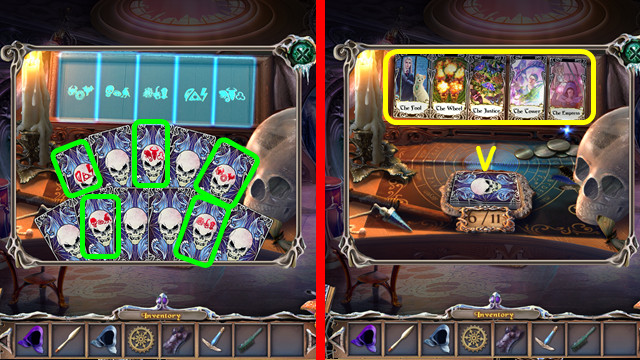
- Play the HOP to earn the second TAPESTRY (R).
- Combine the second TAPESTRY and the INK to make the second TAPESTRY.
- Walk to Mab’s Throne Room.
- Place the 2 TAPESTRIES (S).
- Take the STONE (T).
- Use the STONE on the wedge (U).

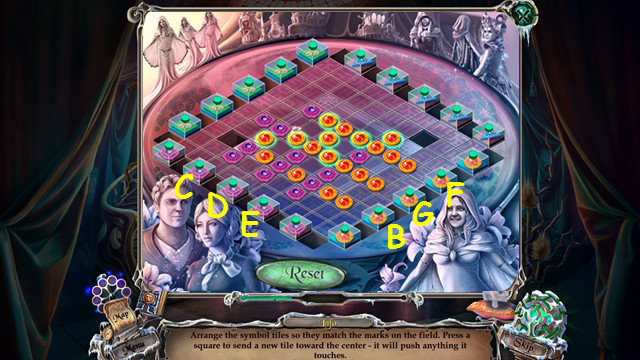
- Solution: Ax3-Bx2-A-B-A-B-Cx4-D-C-D-C-Dx3-Ex3-Fx4-Gx4.
- Take the MEDALLION (H).
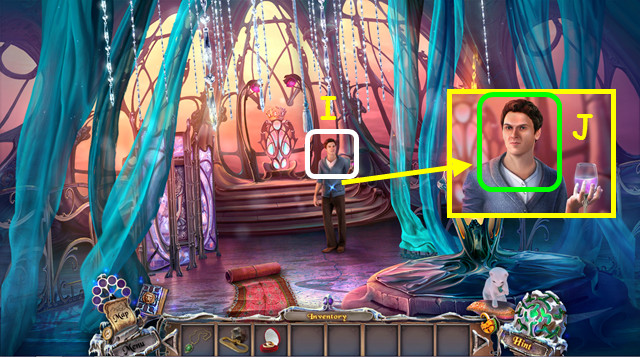
- Talk to Ryan (I).
- Use the RINGS on Ryan (J).
Chapter 4: The Prison
- Talk to the Fairy for the BAG (A).
- Take the BROKEN PITCHER (B).
- Take the FORK (C); use it to take the MEAT (D).
- Place the MEDALLION (E).
- Pull the figures left and right (F).
- Press the buttons (green).
- Take the 1/3 PEARL and the LEVER (G).
- Take the FABRIC and the 1/3 GEMS (H).
- Use the FORK to take the WICK (I).
- Combine the FABRIC; tie it together to make the ROPE.
- Use the MEAT (J).
- Place the ROPE (K).
- Go forward (L).
- Take the GLOVE (M).
- Use the GLOVE to take the 2/3 PEARL (N).
- Take the 3/3 PEARL (O).
- Combine the BAG and the 3 PEARLS. Take the instructions, the 1/2 VALVE, and UNARMED BOMB.
- Take the BONE and touch the powder (P).
- Select the mini-game (Q).
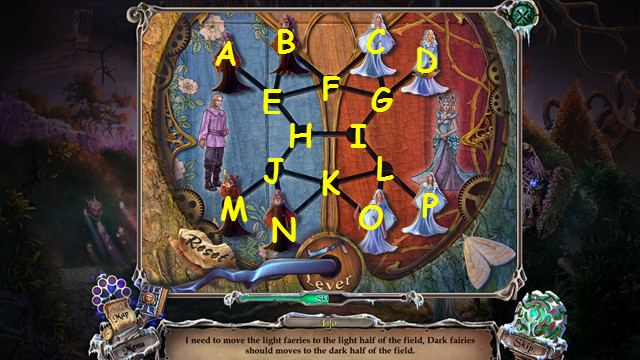
- Place the LEVER under the cage.
- Solution: P-G, O-H, N-P, H-I, M-O, I-N, G-M, D-J, C-H, B-D, H-I, A-C, I-B, J-A.
- Take the ROD and use it to free the Fairy (A).
- You earn the CITY KEY.
- Use the ROD to take the GUNPOWDER (B).
- Combine the UNARMED BOMB, WICK, and GUNPOWDER to make the BOMB.
- Use the BOMB and the FLINT (C).
- Walk left twice.
- Play the HOP to earn the LOCKPICKS (D).
- Walk down.
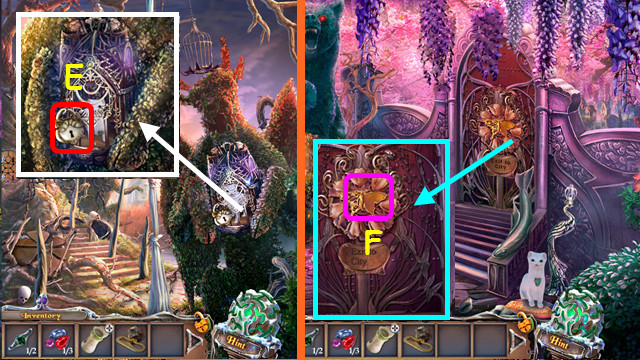
- Use the LOCKPICKS (E).
- Walk left.
- Place the CITY KEY and enter the door (F).
Chapter 5: The City
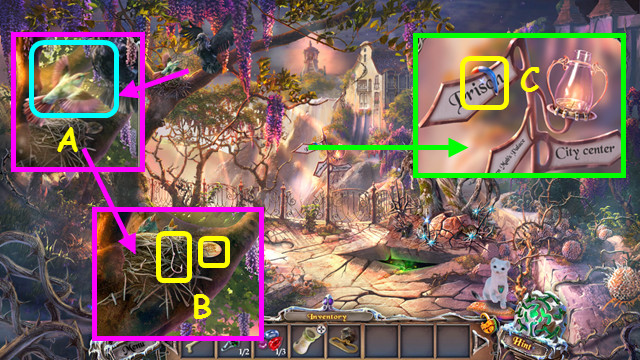
- Use the ERMINE (A).
- Take the COIN and FISHING LINE (B).
- Take the MAGNET (C).
- Walk down twice.
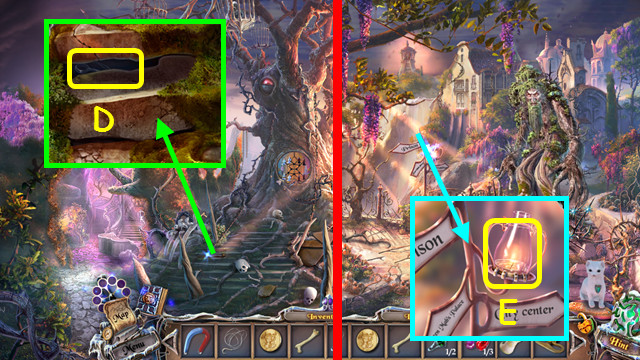
- Use the MAGNET to take the PLIERS (D).
- Walk left and forward.
- Use the PLIERS here; lift the glass and take the WAX (E).
- Combine the BROKEN PITCHER and WAX to make the PITCHER.
- Walk down.
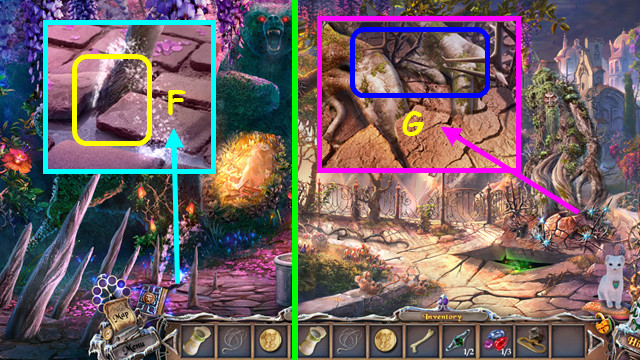
- Use the PITCHER to get the PITCHER WITH WATER (F).
- Walk forward.
- Use the PITCHER WITH WATER (G).
- Walk forward.
- Use the ERMINE to take the note and WEED POWDER (H).
- Note the potions mini-game (I).
- Select the gate (J).

- Take the BROKEN FISHING ROD and use the ERMINE on the ropes (K).
- Combine the BROKEN FISHING ROD and the FISHING LINE to make the FISHING ROD.
- Play the HOP to earn the CANDY MACHINE DETAIL (L).
- Walk left.
- Take the EMPTY JAR (M).
- Remove the cobweb; use the FISHING ROD to take the RUNE (N).
- Select the mini-game (O).
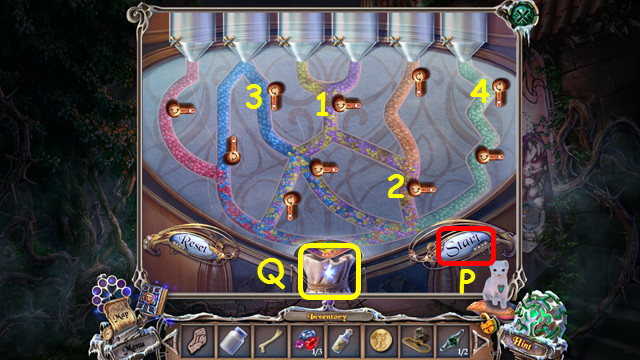
- Place the CANDY MACHINE DETAIL on the device.
- Press the levers (1-4).
- Press the button (P).
- Take the CANDY (Q).
- Place the CANDY; take the WHITE BOTTLE (R).
- Take the SKY LANTERNS (S).
- Combine the SKY LANTERNS and the FLINT to make the LIT SKY LANTERN.
- Walk down.
- Place the RUNE and select the 5 words (T).
- Take the first BUTTON PART (U).
- Walk down.
- Use the WEED POWDER and EMPTY JAR to make the JAR WITH BUGS (V).
- Return to the Alleyway.
- Use the JAR WITH BUGS (A).
- Take the second BUTTON PART (B).
- Combine the 2 BUTTON PARTS to make the STEPS BUTTON.
- Place the STEPS BUTTON (C).
- Take the OIL and remove the boards (D).
- Walk right.
Chapter 6: Fergus’s Home
- Pull the chain (E).
- Use the OIL on the latch and open the case (F).
- Take the WALKING STICK, note, CHISEL, and the 2/3 GEMS (G).
- Remove the handle, place the WALKING STICK, and pull it down (I).
- Play the HOP to earn the BOWL (J).
- Place the LIT SKY LANTERN (K).
- Take the RED BOTTLE (L).
- Place the BOWL (M).
- Walk down.
- Use the CHISEL to take the 3/3 GEM (N).
- Walk right.
- Place the 3 GEMS (O).
- Take the KEY and SPOON (P).
- Walk down twice.
- Place the KEY (Q).
- Walk forward (R).
- Take the LETTER (S).
- Take the BLUE BOTTLE (T).
- Walk down; select the potions mini-game.
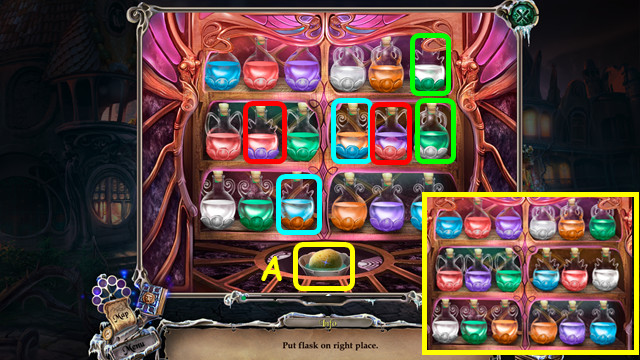
- Place the WHITE BOTTLE, RED BOTTLE, and BLUE BOTTLE on the shelves.
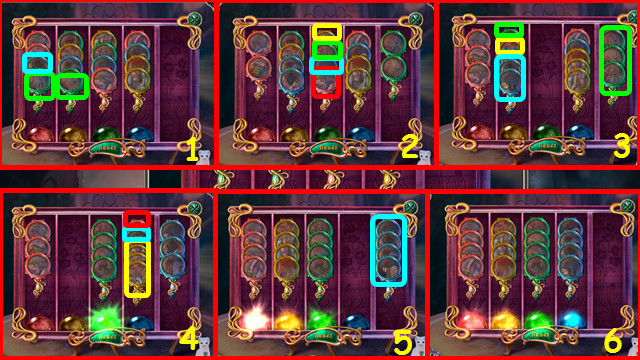
- Swap the 3 pairs of bottles (color-coded).
- Take the SPONGE (A).
- Play the HOP to earn the FORM (B).
- Return to Fergus’s House.
- Use the SPONGE (C).
- Restore the picture (D).
- Take the notes and TIN (E).
- Play the HOP to earn the NAIL FILE (F).
- Restore the pieces (green).
- Place the LETTER (G).
- Take the TILE (H).
- Select the tile mini-game (I).
- Place the TILE on the board.
- Solution: K-J, J-I, G-F, F-B, B-E, B-F, F-C, C-B, K-J, G-D, D-C, K-L, L-G, G-K, L-H, H-D, G-L, L-H, L-K, K-G, and K-L.
- The final solution is shown here (M).
- Take the ARCHER STATUETTE (N).
- Walk down.

- Place the FORM (O).
- Use the SPONGE, and then add the TIN (P).
- Take the FORM WITH KEY (Q).
- Return to the Arbor.
- Place the ARCHER STATUETTE; touch it to fire the arrow (R).
- Take the 2/2 VALVE (S).
- Place the 2 VALVES; turn each valve once (red).
- Take the ICE (T).
- Combine the FORM WITH KEY and the ICE to get the KEY.
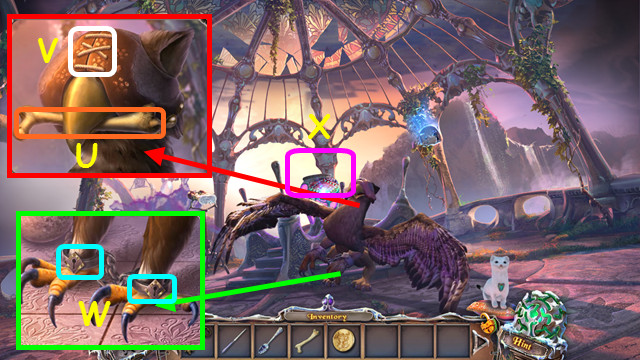
- Give the BONE to the Griffin (U).
- Use the NAIL FILE (V).
- Use the KEY on both manacles (W).
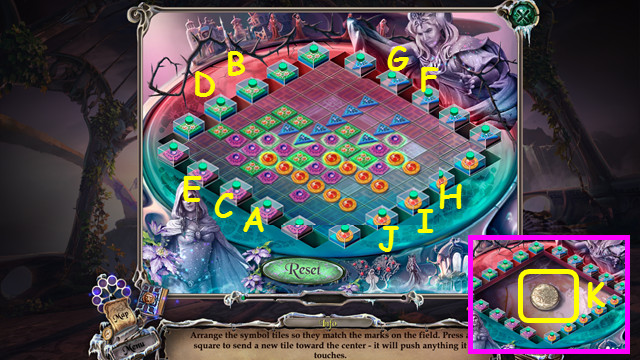
- Select the mini-game (X).
- Solution: Ax7-Bx6-Cx5-Dx4-Ex3-Fx3-Gx5-Hx2-Ix4-G-Jx6.
- Take the WATCH WITH MIRROR (K).
Chapter 7: Home Again
- Open the WATCH WITH MIRROR to make the OPEN MIRROR.
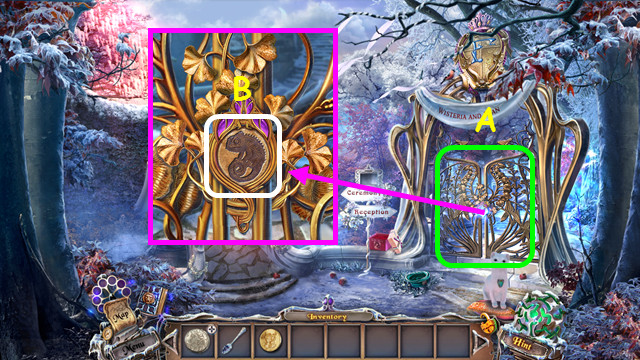
- Look at the gate to earn the ESTATE GATE KEY (A).
- Use the ESTATE GATE KEY on the lock (B).
- Walk right.
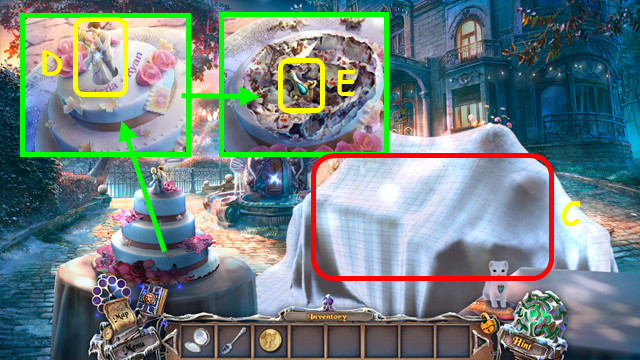
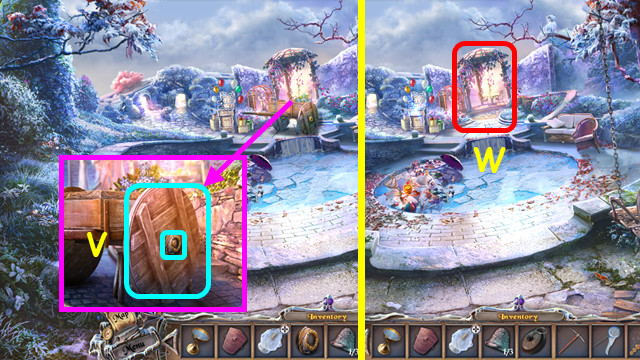
- Remove the covering (C).
- Take the COUPLE (D).
- Use the SPOON to take the DRAWER KNOB (E).
- Play the HOP to earn the SEATING ARRANGEMENT (F).
- Select the mini-game (G).
- Move the tiles and key to solve (1-6).
- Enter Fergus’s House.
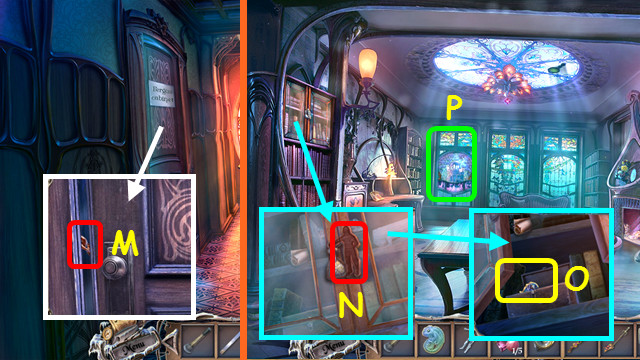
- Take the SUITCASE (L).
- Take the SCOOP; use it to take the HOT COALS (M).
- Look at the door (N).
- Select the mini-game (O).
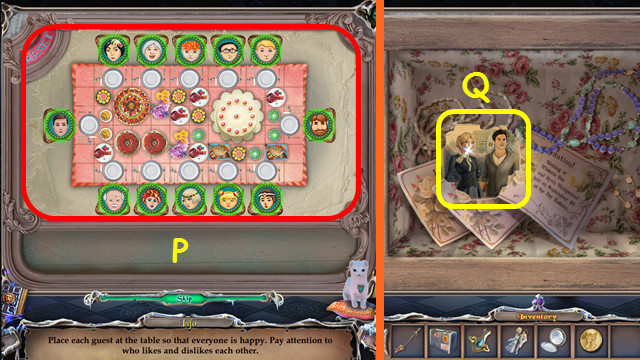
- Place the SEATING ARRANGEMENT on the box.
- Place the people as shown (P).
- Take the PHOTO (Q).
- Walk up the stairs.
- Take the BROKEN SCEPTER (R).
- Take the TILE (S).
- Try to take the other item (T).
- Use the COIN on the screws (red).
- Use the ERMINE to take the 1/5 SCEPTER PART (U).
- Walk right.
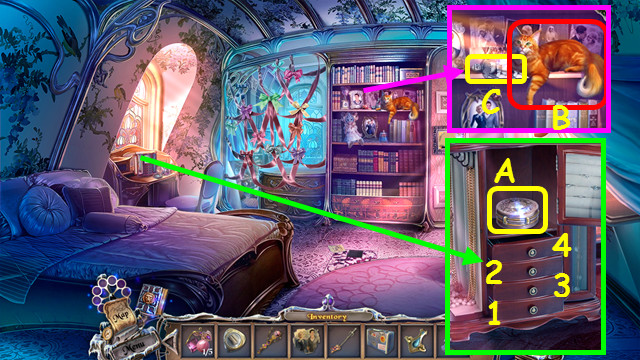
- Open the drawers (1-4).
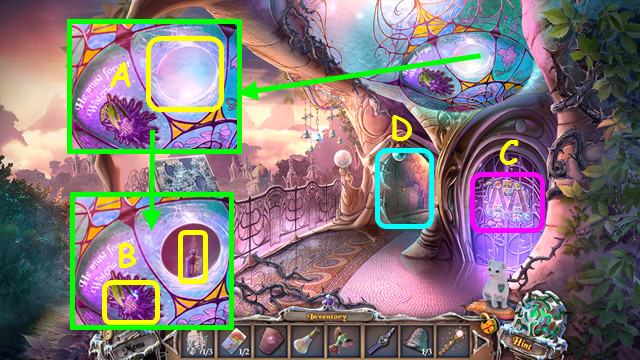
- Take the CREAM (A).
- Use the OPEN MIRROR (B).
- Take the KNIGHT (C).
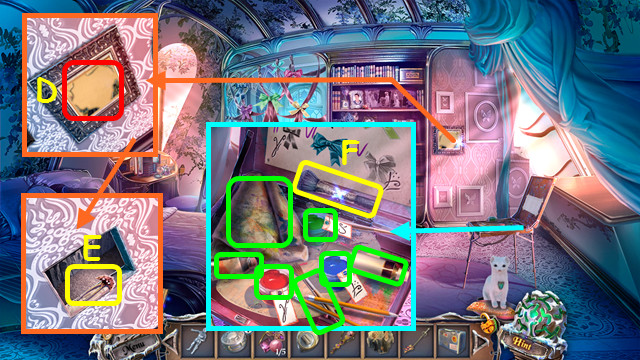
- Place the PHOTO (D).
- Touch the pin, and then use the ERMINE to take the PIN (E).
- Combine the CREAM and PIN to find the CHAMELEON TILE.
- Take the MAKEUP BRUSH (F).
- Select all the pieces to put them in place (green).
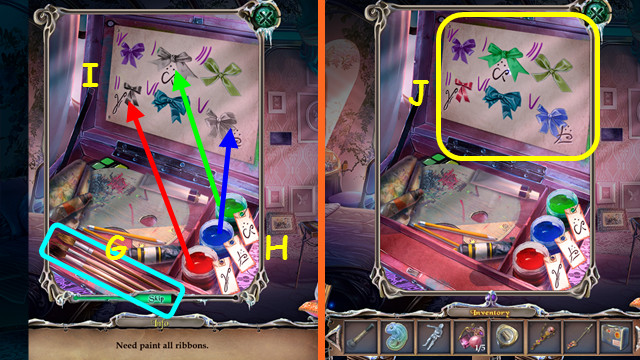
- Take a brush (G), use it on the paint (H), and then paint the correct bow (I).
- Take the INSTRUCTIONS (J).
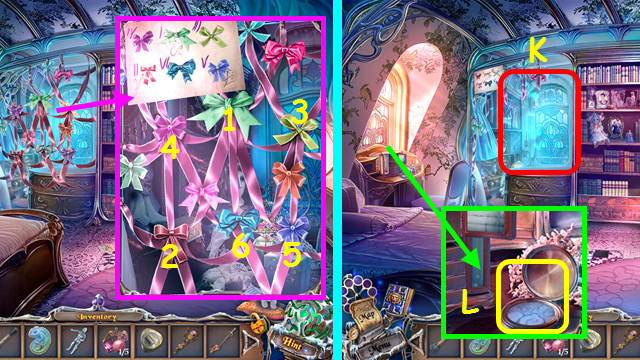
- Select the bows (1-6).
- Play the HOP to earn the RULER (K).
- Open the compact; use the MAKEUP BRUSH on it to make the BRUSH WITH POWDER (L).
- Walk down.
- Use the RULER (M).
- Walk left.
- Place the KNIGHT (N).
- Open the box and take the SEAL TILE (O).
- Play the HOP to earn the 2/5 SCEPTER PART (P).
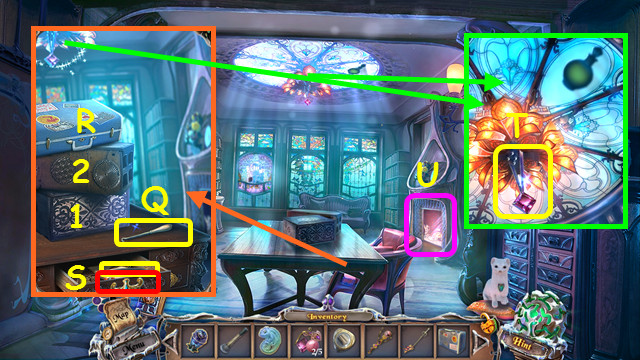
- Take the CROCHET HOOK (Q).
- Move the 2 boxes (1-2) and the SUITCASE will appear on top (R).
- Use the DRAWER KNOB; take the CARABINER (S).
- Take the 3/5 SCEPTER PART (T).
- Note the fireplace mini-game (U).
- Walk down 3 times.
- Place the HOT COALS (A).
- Take the TILE (B).
- Play the HOP to earn the FRUIT SALAD (C).
- Walk right.
- Place the TILE on the lock; take the 1/3 BOARDS (D).
- Give the FRUIT SALAD to the salamander (E).
- Take the BUTTON (F).
- Walk upstairs and left. Select the fireplace mini-game.
- Place the BUTTON on the mini-game.
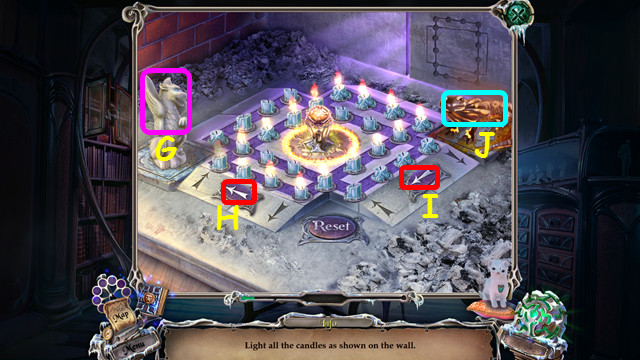
- Solution: J-Ix4-J-Ix4-J-Ix4-J-H-I-H-I-H-Ix3-H-J-Ix8-J-I-Hx4-Ix6-G-Ix8-G.
- Walk right.
- Use the ERMINE to take the HEART (K).
- Use the BRUSH WITH POWDER (L).
- Press the buttons (red).
- Take the 4/5 SCEPTER PART and the DIAGRAM (M).
- Use the CROCHET HOOK to take the HANDLE (N).
- Select the mini-game (O).
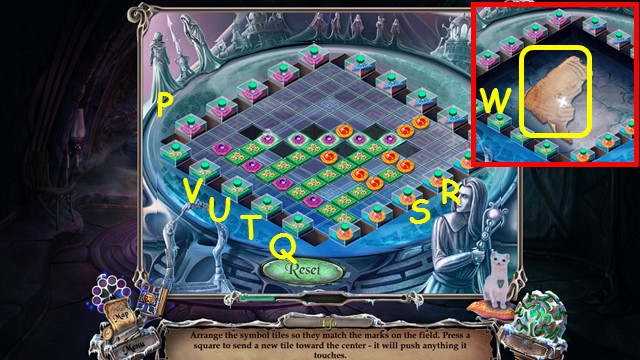
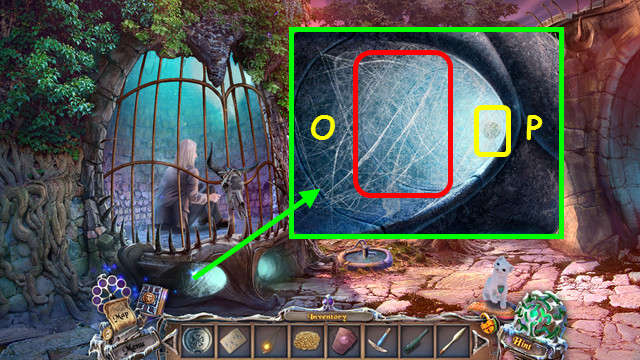
- Solution: Px8-Qx2-P-Qx3-Rx3-Sx5-Tx6-Ux4-Vx2.
- Take the first LABYRINTH MAP PART (W).
- Walk down twice, and then go right.
- Place the HEART and take the 5/5 SCEPTER PART (A).
- Play the HOP to earn the FRESCO PART (B).
- Select the tile mini-game (C).
- Move the rug and place the TILE in the mini-game.
- Rotate the tiles to match the diagram (D).
- Take the SCARF (E).
- Walk down.
- Use the SCARF to take the SHARD (F).
- Use the SHARD on the photo (G).
- Take the GLASS CUTTER (H).
- Walk left.
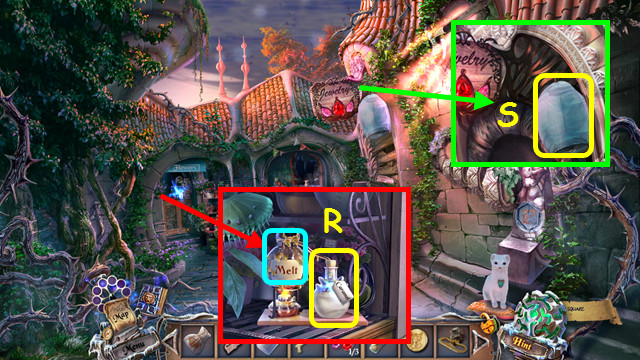
- Use the GLASS CUTTER to take the MELTING POTION (I).
- Read the instructions (J), place the BROKEN SCEPTER on the table, and remove the dark pieces (red).
- Place the 5 SCEPTER PARTS on the scepter, use the MELTING POTION on it, and then take the SCEPTER (K).
- Walk right.
- Place the FRESCO PART (L).
- Take the BUTTERFLY TILE (M).
- Walk down 3 times.
- Use the SHARD on the chair; take the RIBBON (N).
- Use the SCEPTER (O).
- Open the latch and walk right.
Chapter 8: The Gardens
- Push the swing (A).
- Use the CARABINER (B).
- Move the pillows; take the NET (C).
- Walk left.
- Use the ERMINE to take the PICK (D).
- Select the mini-game (E).
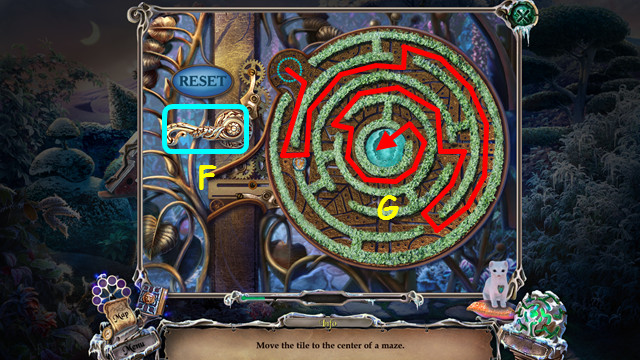
- Place the HANDLE (F).
- Drag the tile to the center (G).
- Walk left.
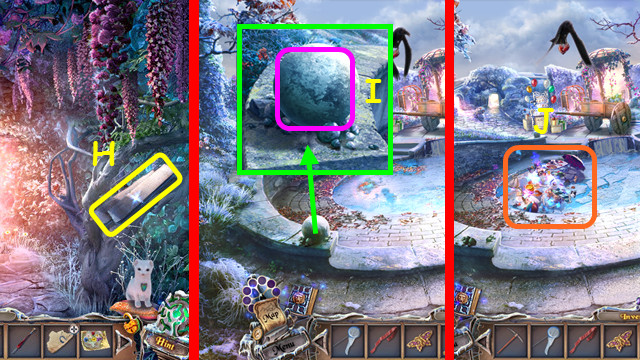
- Take the 2/3 and 3/3 BOARDS (H).
- Walk down twice.
- Use the PICK on the ball (I).
- Play the HOP to earn the STOPPER (J).
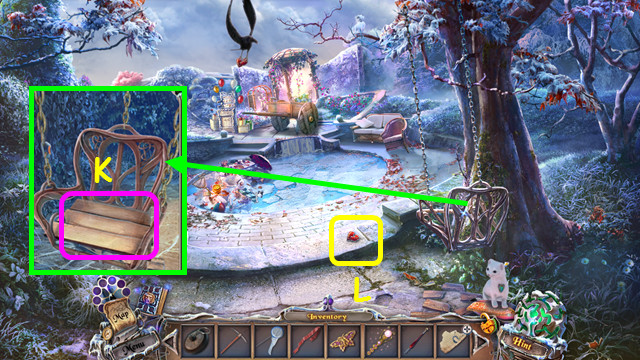
- Place the 3 BOARDS in the swing (K).
- Push the swing; take the BROKEN HEART TILE (L).
- Walk left.
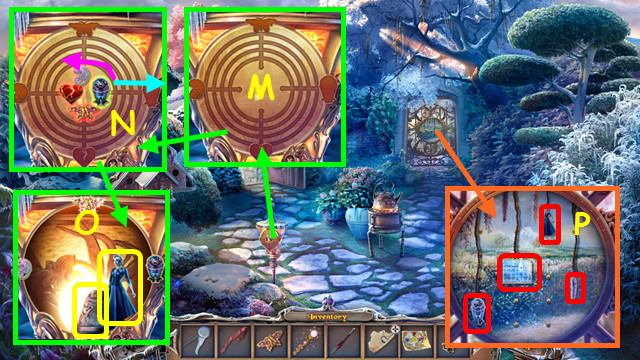
- Place the BUTTERFLY TILE, the SEAL TILE, the CHAMELEON TILE, and the BROKEN HEART TILE (M).
- Rotate the center and move the tiles to the matching positions (N).
- Take the DOOR TILE and the 1/3 BELL (O).
- Place the DOOR TILE (P); select each tile once (red).
- Walk right.
- Play the HOP to earn the BROKEN VANE (Q).
- Align the BROKEN VANE and use the RIBBON on it to make the VANE.
- Place the VANE; take the note, WHEEL CAP, and the ICE WITH SOMETHING (R).
- Use the ERMINE to take the CUP (S).
- Take the BASKET (T).
- Use the CUP on the stream to make the CUP WITH WATER (U).
- Walk down twice.
- Place the wheel on the cart; add the WHEEL CAP (V).
- Walk forward (W).
- Take the FLOWER TILE and the CLIP (A).
- Bend the CLIP 4 times to make the KEY.
- Use the ERMINE to take the CORK (B).
- Use the PICK (C).
- Use the ERMINE (D).
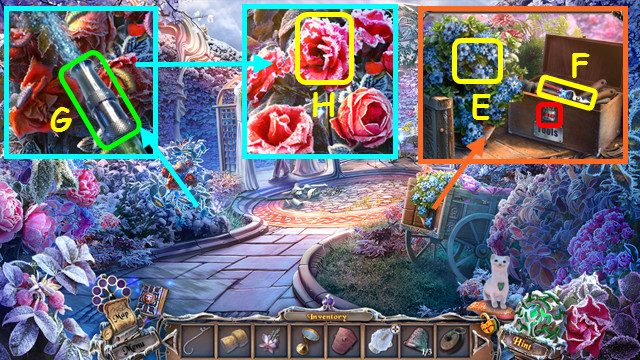
- Take the FLOWERS (E).
- Use the KEY on the lock; take the CLIPPERS (F).
- Use the hose (G).
- Use the CLIPPERS to take the ROSES (H).
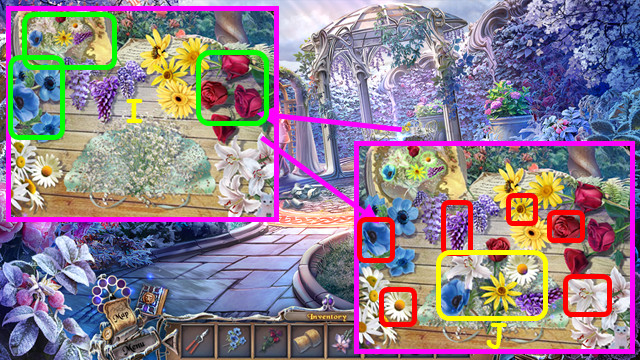
- Place the DIAGRAM, the ROSES, and the FLOWERS on the table (I).
- Select the flowers (red).
- Take the BOUQUET (J).
- Walk down.
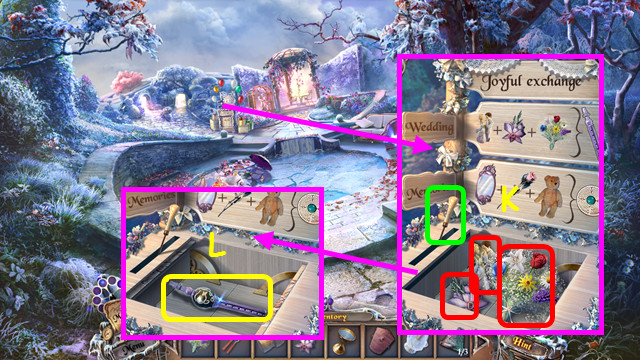
- Place the COUPLE, the BOUQUET, and the FLOWER TILE; pull the lever (K).
- Take the SNAKE FLUTE (L).
- Go to the Garden Creek.
Chapter 9: The Labyrinth
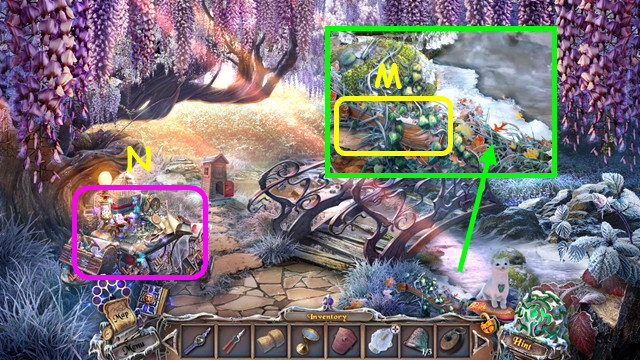
- Use the CLIPPERS; take the LEG (M).
- Play the HOP to earn the second LABYRINTH MAP PART (N).
- Walk down twice.

- Place the LEG (O).
- Take the POTHOLDER and the 3rd LABYRINTH MAP PART (P).
- Combine the 3 LABYRINTH MAP PARTS to make the LABYRINTH INSTRUCTIONS.
- Walk left.
- Place the NET, the STOPPER, and the CORK on the birdhouse to take the BIRD (Q).
- Use the CUP WITH WATER on the teapot, and then use the POTHOLDER to take the TEAPOT WITH HOT WATER (R).
- Combine the ICE WITH SOMETHING and the TEAPOT WITH HOT WATER to find the EMPTY BOTTLE.
- Use the EMPTY BOTTLE on the tree to take the BOTTLE WITH RESIN (S).
- Walk left.
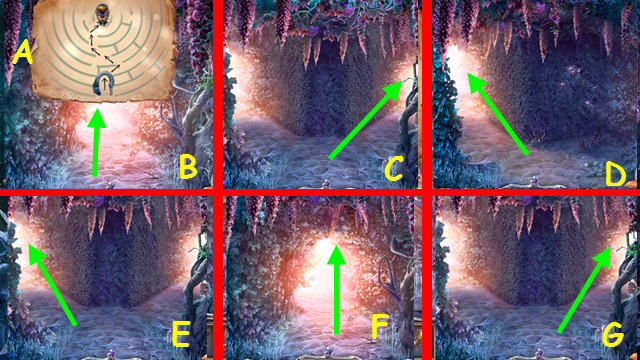
- Refer to the map (A).
- Walk forward, right, left, left, forward, and right (B-G).
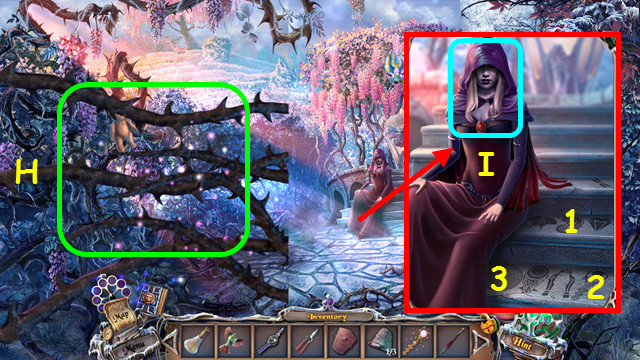
- Use the SCEPTER on the vines (H).
- Talk to the Fairy (I).
- As she asks the riddles, select the symbols chameleon (1), scepter (2), and maze (3).
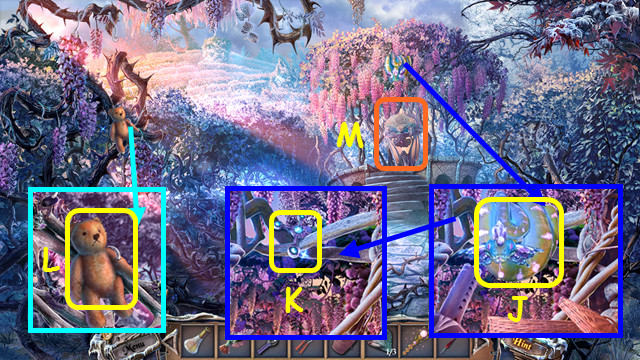
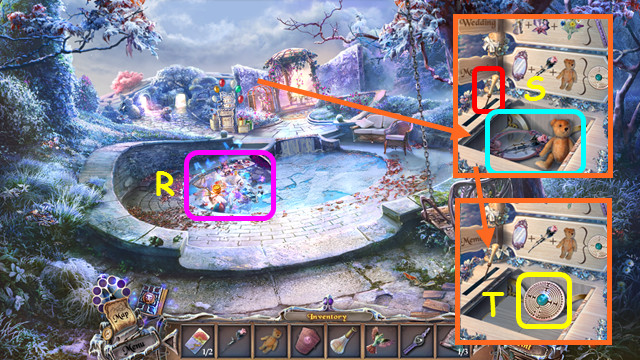
- Use the BASKET and the SNAKE FLUTE on the snake to get the BASKET WITH SNAKE (J).
- Take the GATE HANDLE (K).
- Use the CLIPPERS to take the TEDDY BEAR (L).
- Note the mini-game (M).
- Use the GATE HANDLE (N).
- Use the ERMINE to take the LIMESTONE (O).
- Use the LIMESTONE on the vines (P).
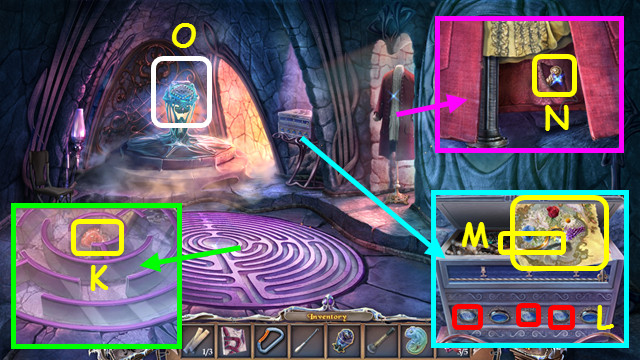
- Remove the dome; take the ROSE and the 1/2 TILE (Q).
- Walk down twice.
- Play the HOP to earn the MIRROR (R).
- Place the MIRROR, ROSE, and the TEDDY BEAR in the compartment and pull the lever (S).
- Take the TILE (T).
- Return to the Field with Thorns and select the mini-game.
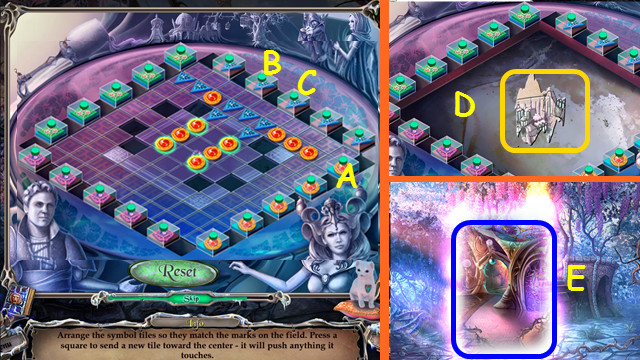
- Place the TILE on the board.
- Solution: Ax6-B-A-B-A-Bx2-C-A-C-A-Cx2.
- Take the 1/3 MAP OF MAB’S PALACE (D).
- Enter the portal (E).
Chapter 10: The Armory
- Use the GLASS CUTTER to take the GLASS (A).
- Take the PICTURE OF FRUIT and the 1/2 WEIGHT (B).
- Note the domino mini-game (C).
- Walk to the Armory (D).
- Select the 5 lights (green).
- Play the HOP to earn the SHIELD (E).
- Walk forward.
- Play the HOP to earn the HELMET (G).
- Take the HANDLE (H).
- Take the 2/2 WEIGHT (I).
- Walk down.
- Place the 2 WEIGHTS (J).
- Place the HANDLE on the wall.
- Restore the handles as shown and take the 1/6 TAROT CARD (K).
- Walk left.

- Take the TILE (L).
- Place the BASKET WITH SNAKE and use the SNAKE FLUTE on the snakes; you earn the BASKET WITH SNAKES (M).
- Read the instructions; use the BOTTLE WITH RESIN on the crack (N).
- Place the TILE (O).
- Select the outer tiles (1-4).
- Take the 2/6 TAROT CARD and the LEVER (P).
- Play the HOP to earn the GAUNTLETS (Q).
- Use the LEVER on the pump; take the 2/2 TILE (R).
- Walk down twice and select the domino mini-game.

- Place the 2 TILES on the board.
- Place the tiles as shown (S).
- Walk right.
- Take the BRUSH (A).
- Select the 5 tarot cards (red).
- Read the note (B).
- Open the cage and use the SCEPTER (C).
- Place the BIRD in the cage; take the GRAIN (D).
- Take the 2/3 MAP OF MAB’S PALACE (E).
- Use the ERMINE to take the 2/3 BELL (F).
- Play the HOP to earn the SPIDER TILE (G).
- Take the TORCH and place the SPIDER TILE (H).
- Take the 3/6 TAROT CARD and the DIARY (I).
- Play the HOP on the DIARY cover; open it and take the INSTRUCTIONS.
- Return to the Armory.
- Use the BRUSH; take the MEDALLION (L).
- Move the cape and the belt to the left soldier and place the GAUNTLETS on her (M).
- Place the SHIELD and HELMET on the right soldier (N).
- Walk left.
- Use the TORCH (O).
- Use the ERMINE to take the GEAR (P).
- Walk down.
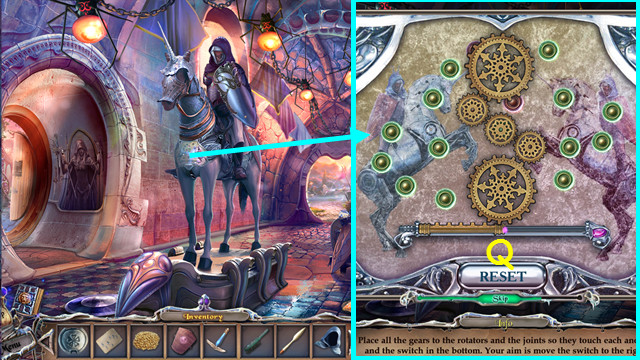
- Place the GEAR in the device.
- Arrange the gears (Q).
- Walk forward.
- Place the MEDALLION to take the LIGHT HOOD (R).
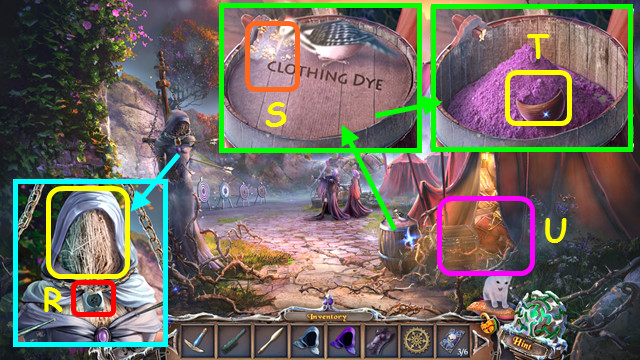
- Place the GRAIN (S).
- Take the DYE (T).
- Play the HOP to earn the 3/3 MAP OF MAB’S PALACE (U).
- Walk down twice.
- Place the 3 MAP OF MAB’S PALACE (A).
- Take the 4/6 TAROT CARD (B).
- Return to the Menagerie.
- Place the DYE and the LIGHT HOOD in the water to make the DARK HOOD (C).
- Play the HOP to earn the SPEAR (D).
- Walk down.
- Use the SPEAR to take the ARMOR (E).
- Place the DARK HOOD and the ARMOR (F).
- Take the ARMOR (G).
- Walk forward.
- Use the ARMOR (H).
- Use the SPEAR (I).
- Take the 3/3 BELL (J).
- Use the BASKET WITH SNAKES (K).
- Take the RASP (L).
- Walk down and left.
- Use the RASP (M).
- Take the EYE TILE (N).
- Walk down twice.
- Hang the 3 BELLS; select the bells (1-7).
- Take the WHISTLE (O).
- Walk right.
- Use the WHISTLE (P).
- Walk left.
- Take the MAGNIFIER FRAME (Q).
- Combine the MAGNIFIER FRAME and the GLASS to make the MAGNIFIER.
- Use the MAGNIFIER on the PICTURE OF FRUIT to get the INSTRUCTIONS.
- Place the EYE TILE on the book and press it (R).
- Restore each item and move the lever on each page (1-4).
- Take the 5/6 TAROT CARD (S).
- Pull the cords (1-5).
- Take the 6/6 TAROT CARD (T).
- Walk down.
- Place the 6 TAROT CARDS and select the stack (U).
- Select the 5 cards (green).
- Take the 5 TAROT CARDS (V).
- Walk left.
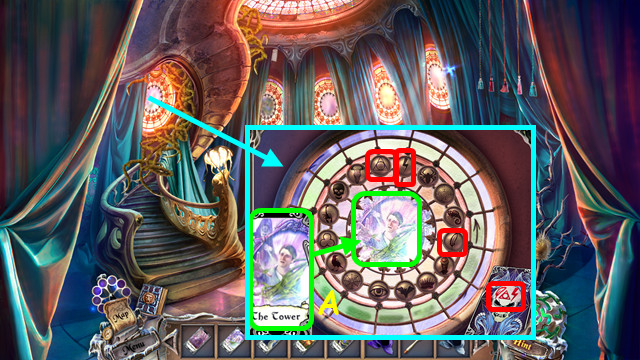
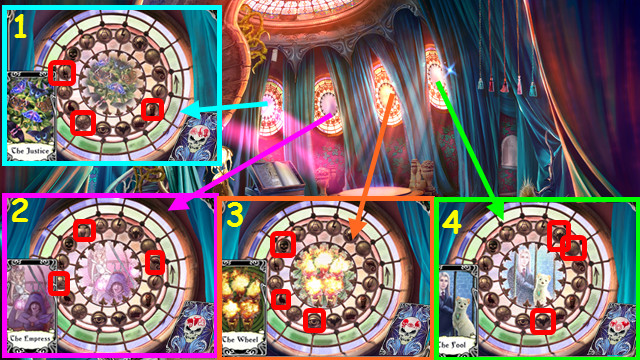
- Press the center twice and place the matching TAROT CARD (A).
- Select the 3 matching symbols (red).
- Do the same for the other 4 panels (1-4).
- Select the seal mini-game on the dais.
- Solution: Bx7-Cx2-Dx4-Ex6-Fx6-Gx6.
- Walk up the stairs.
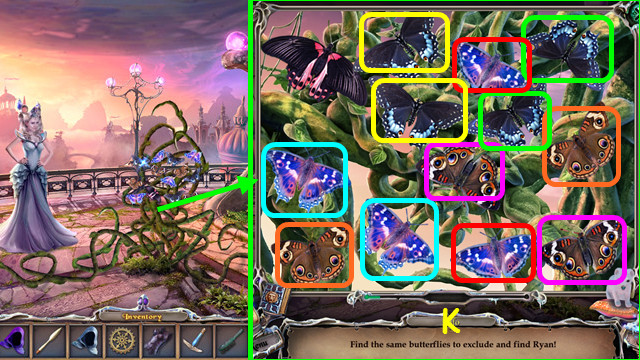
- Select the pairs (K).
- The butterflies move after each pair.
- Congratulations! You have completed Sable Maze: Forbidden Garden!


 Artifacts of the Past: Ancient Mysteries Walkthrough, Guide, & Tips
 Love Chronicles: Salvation Walkthrough, Guide, & Tips
 Christmas Stories: Hans Christian Andersen's Toy Soldier Walkthrough, Guide, & Tips
 Royal Envoy 3 Walkthrough, Guide, & Tips
 Syberia, Part 2 Walkthrough, Guide, & Tips