Love Chronicles: Salvation Walkthrough, Guide, & Tips
Love Chronicles: Salvation Walkthrough

Welcome to the Love Chronicles: Salvation Walkthrough
The evil Alura is back, and this time she’s attacking your homeland!
Whether you use this document as a reference when things get difficult or as a road map to get you from beginning to end, we’re pretty sure you’ll find what you’re looking for here.
This document contains a complete Love Chronicles: Salvation game walkthrough featuring annotated screenshots from actual gameplay!
We hope you find this information useful as you play your way through the game. Use the walkthrough menu below to quickly jump to whatever stage of the game you need help with.
Remember to visit the Big Fish Games Forums if you find you need more help. Have fun!
This walkthrough was created by MargieB, and is protected under US Copyright laws. Any unauthorized use, including re-publication in whole or in part, without permission, is strictly prohibited.
General Tips
- This is the official guide for Love Chronicles: Salvation.
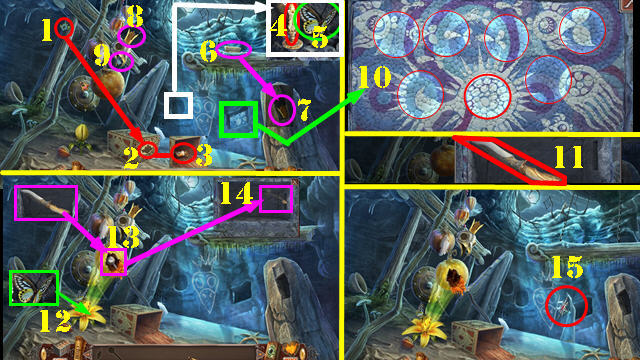
- Select ‘Play’ in the main menuto begin your adventure.
- Select’ Options’ in the main menu to adjust sound, custom cursor, difficulty level, and screen size.
- The ‘Change Player’ button on the main menu can be used to manage your profiles in the game.
- Use the map to jump quickly from one location to another.
- Hidden-object puzzles will be referred to as HOPs throughout the guide. Mini-games and HOPs are sometimes randomized; your solution may vary. Items in HOPs are highlighted in red and interactive items are color-coded.
- Hints are unlimited, but you must wait for the meter to refill. You can refill the hint meter faster by catching fireflies in the scene and dragging them to the hint button.
Introduction

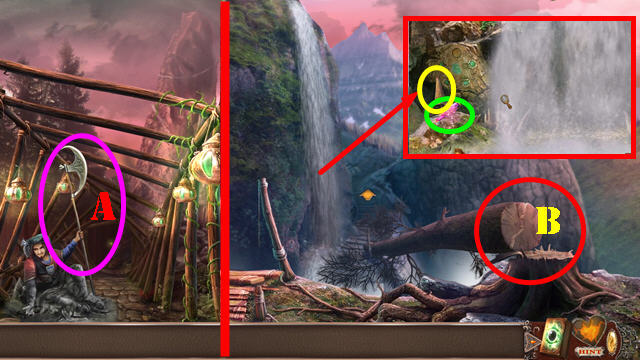
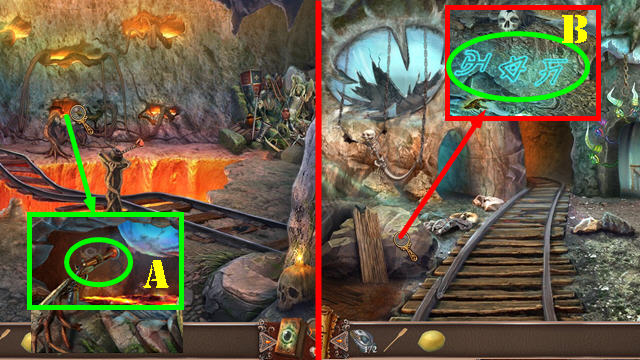
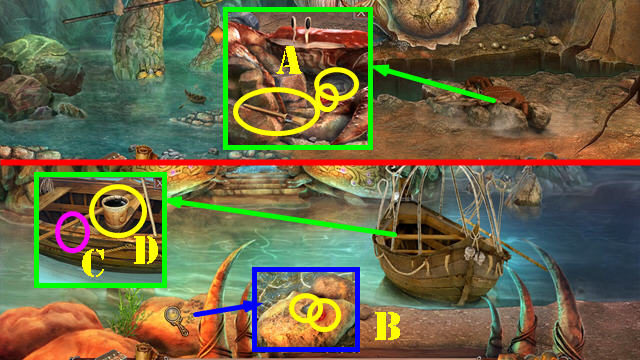
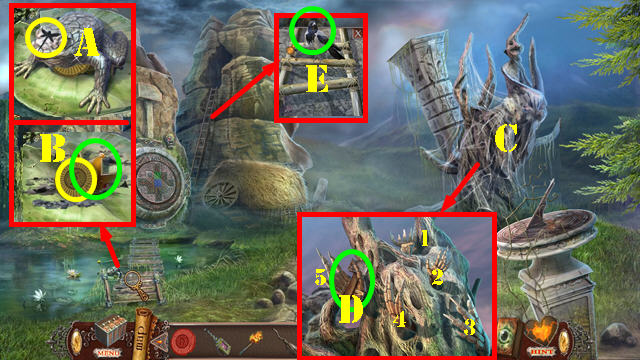
- Take the HALBERD (A).
- Go forward to reach the Waterfall Cliff.
- Use the HALBERD to cut the tree (B).
- Zoom into the waterfall; touch the bird (green) and then take the PARASOL (yellow).
- Walk down and go forward to reach Lucio’s House.
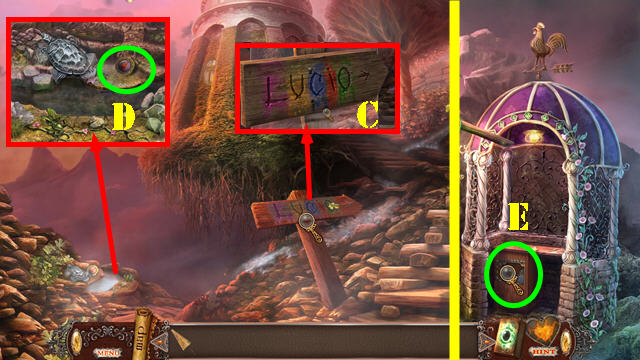
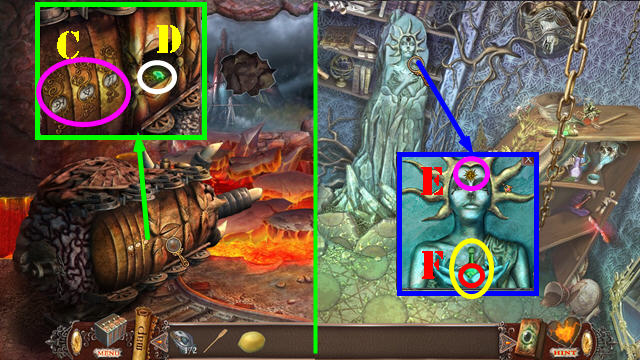
- Look at the sign (C).
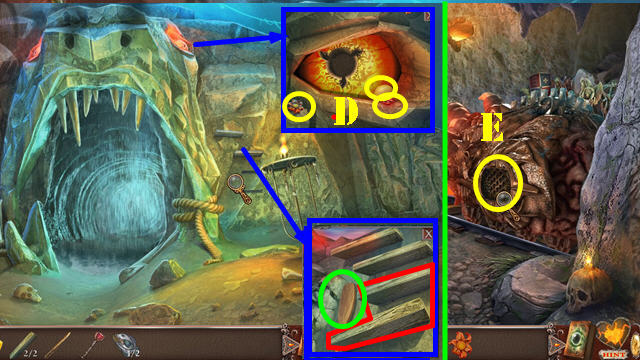
- Zoom into the stream and take the BUTTON (D).
- Walk down twice to reach the Log Tunnel.
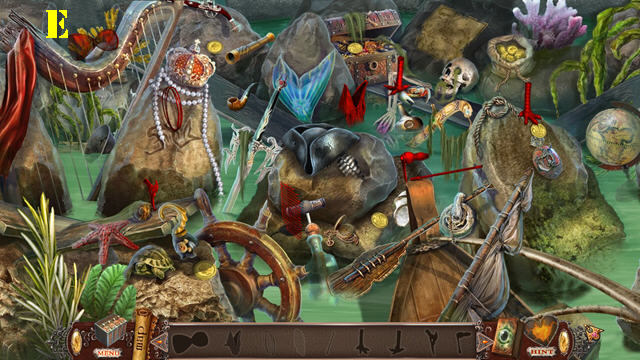
- Zoom into the puzzle (E) and place the BUTTON on it to activate the puzzle.
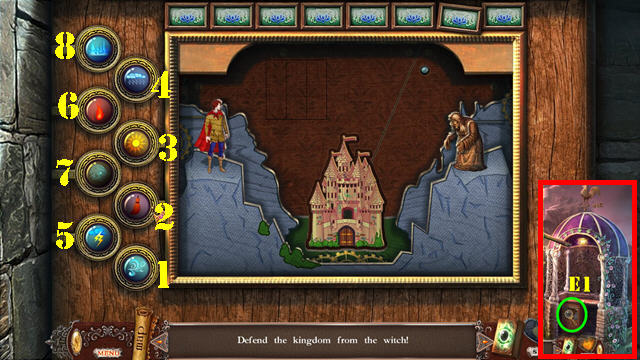
- Touch the buttons in the right order to defeat the element in the center of the stage. The solution is random but the descriptions below will help you solve the puzzle.
- Use the wind (1) button to defeat thunder.
- Use the broom (2) button to get rid of the cobweb.
- Use the sun (3) button on the ice waves.
- Use the rain (4) button on the flames.
- Use the lightning (5) button on the boulders.
- Use the fire (6) button on the wolf.
- Use the cobweb (7) button on the flies.
- Use the ice (8) button on the snakes.
- Take the BUTTERFLY NET (E1).
- Return to Lucio’s House.
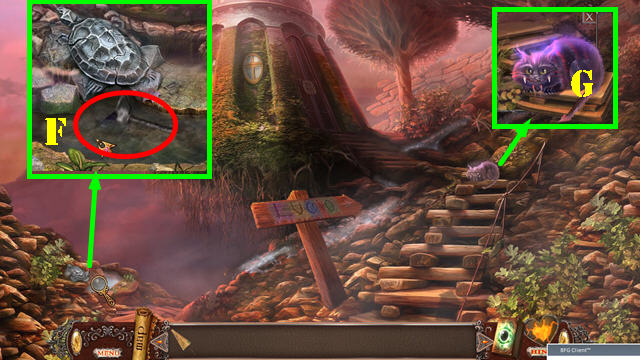
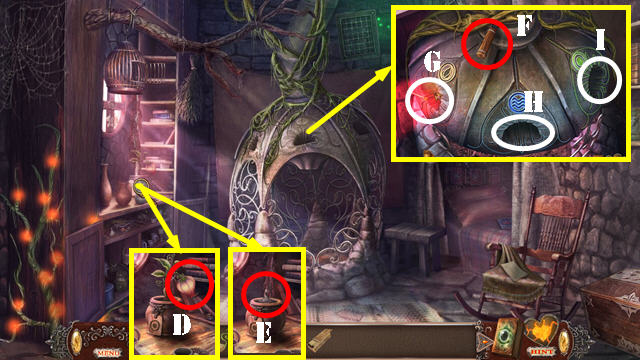
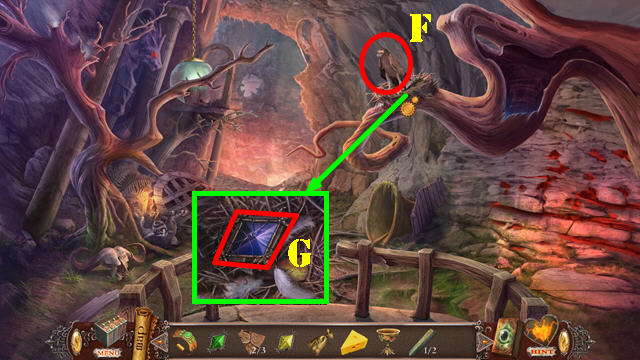
- Zoom into the stream; use the BUTTERFLY NET to catch the FISH (F).
- Zoom into the cat and give it to FISH (G).
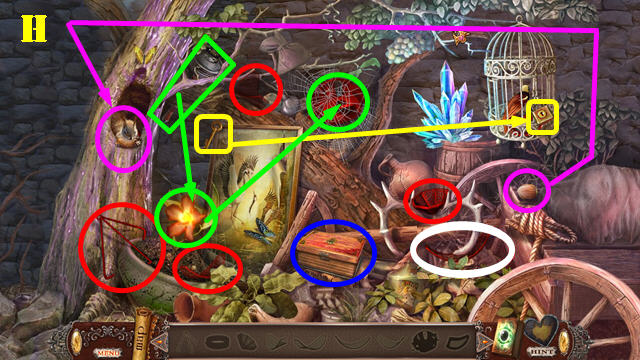
- Play the HOP.
- Interactive items are color-coded (H).
- You will receive the LANTERN.
- Go forward to the Entrance to Lucio’s House.
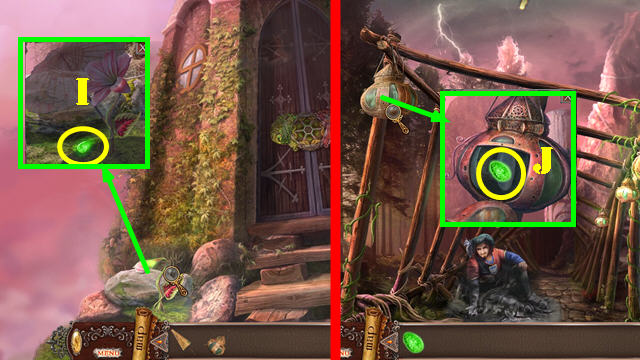
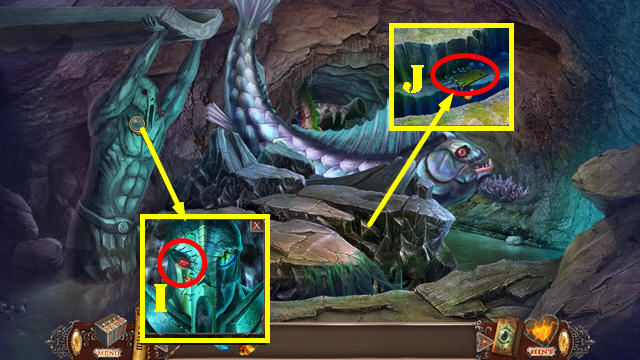
- Zoom into the flower; put the PARASOL on it and pick up the SHINING STONE (I).
- Return to the Log Tunnel.
- Hang the LANTERN. Zoom into the lantern, open it and insert the SHINING STONE in it (J) to receive the PUZZLE PIECE.
- Return to the Entrance to Lucio’s House.

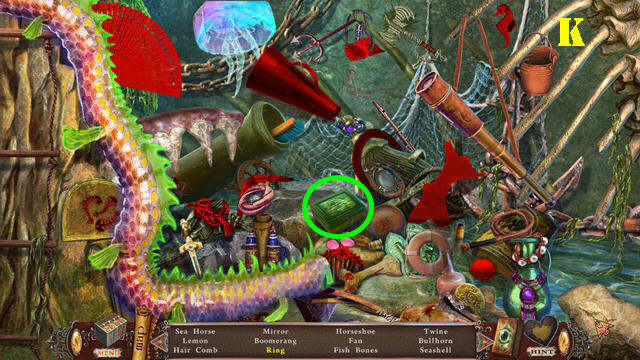
- Zoom into the door and place the PUZZLE PIECE on it to activate it.
- Rotate the medallions until they are all connected and they all glow green.
- Please look at the screenshot for the solution (K).
- Go through the door to reach Inside Lucio’s House.
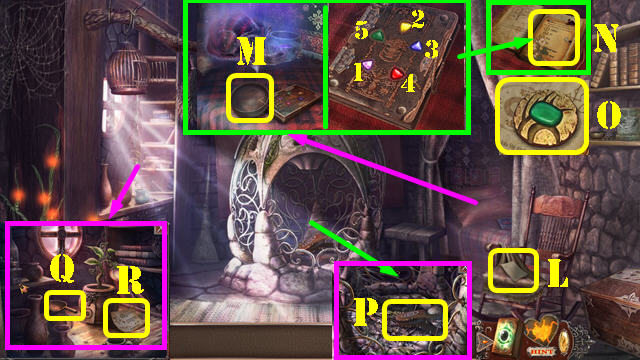
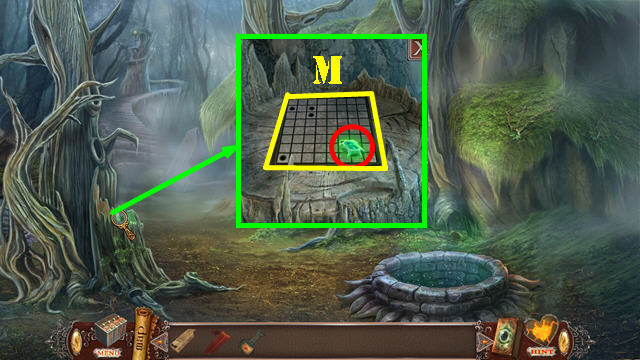
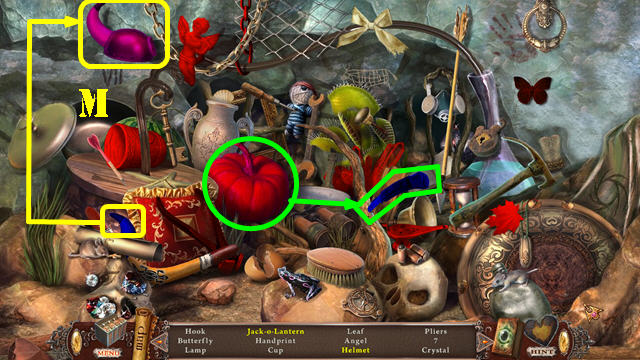
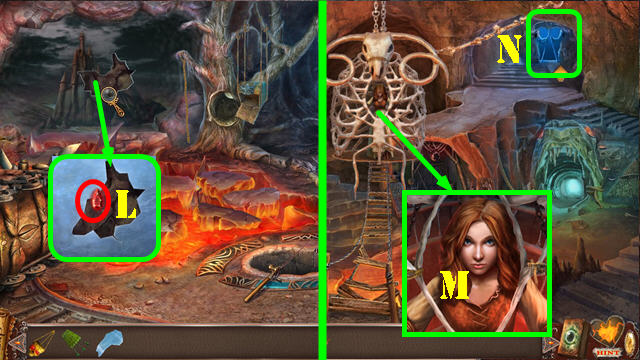
- Take the note (L).
- Take a closer look at the bed and take the SIEVE (M).
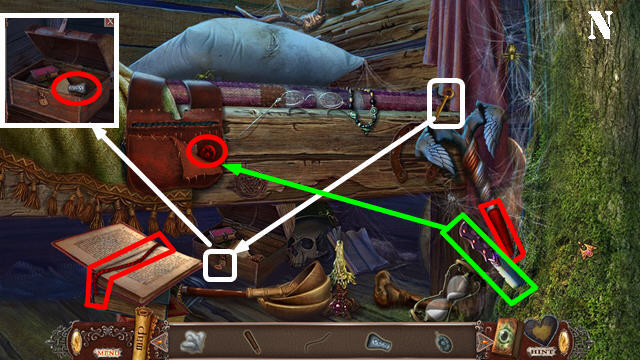
- Take a closer look at the book. Touch the gems in this order: purple (1), yellow (2), blue (3), red (4), and green (5).
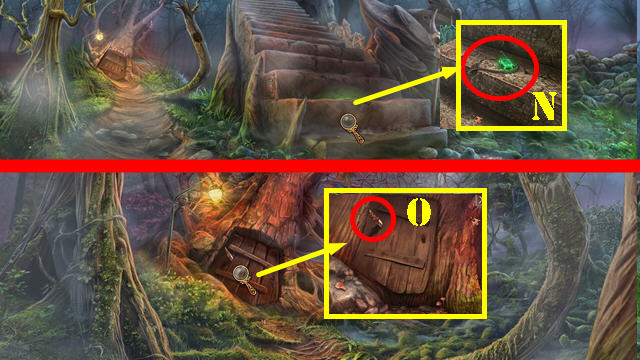
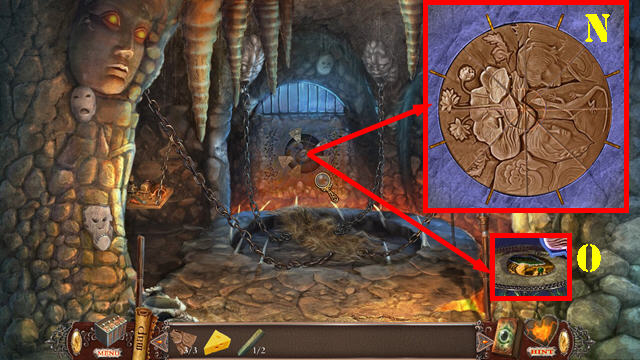
- Open the book. Take the note (N) and then take the STONE KEY (O).
- Take a closer look at the fireplace and take the BELLOWS (P).
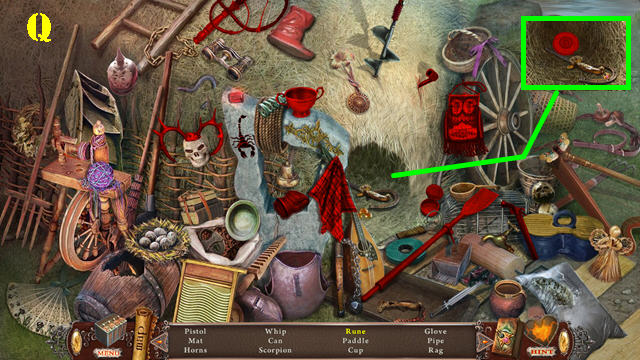
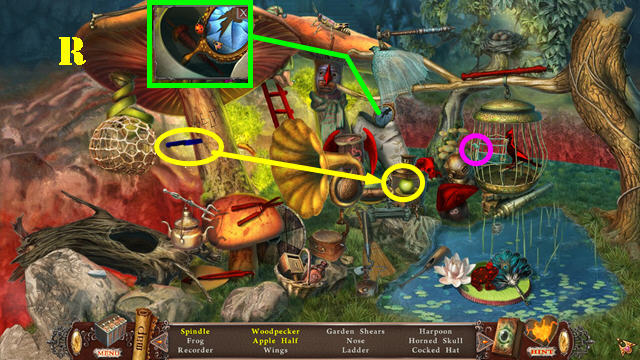
- Zoom into the table; take the LADLE (Q), the note (R) and the LIFE FLOWER SEED below it.
- Return to the Waterfall Cliff.
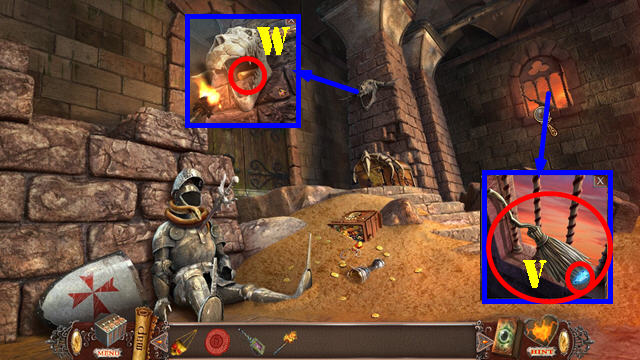
- Zoom into the waterfall.
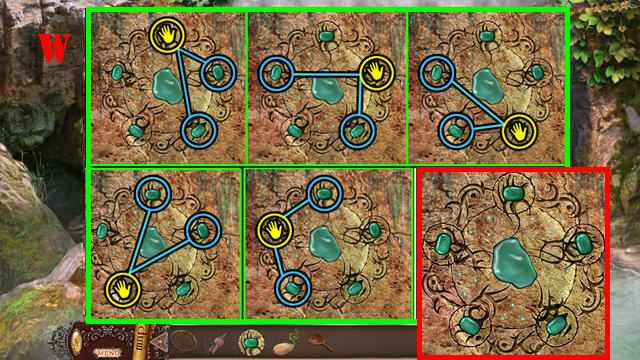
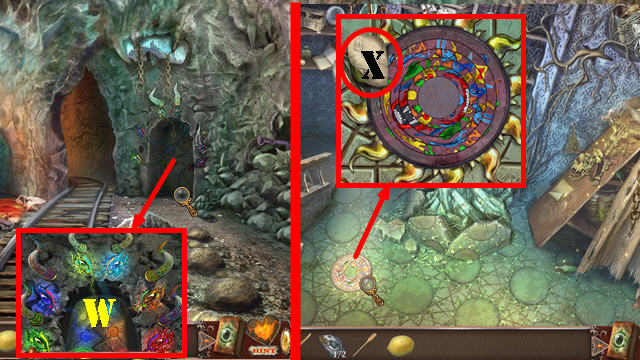
- Zoom into the stone and place the STONE KEY in it to activate a puzzle.
- Rotate the stones to set them in the right position.
- The first five sections of the screenshot shows you how each set of stones is affected when touched. The last part of the screenshot (red) shows the final solution (W).
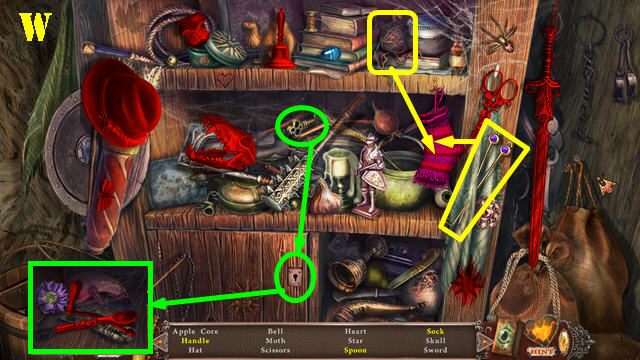
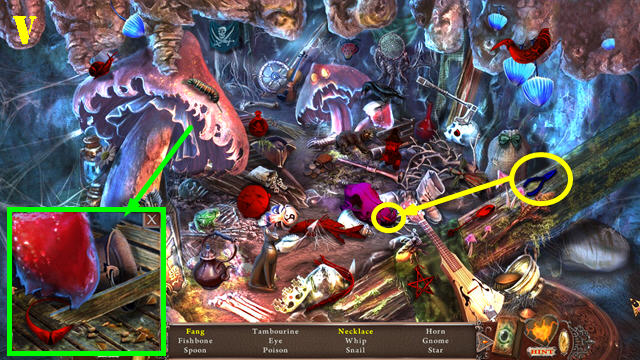
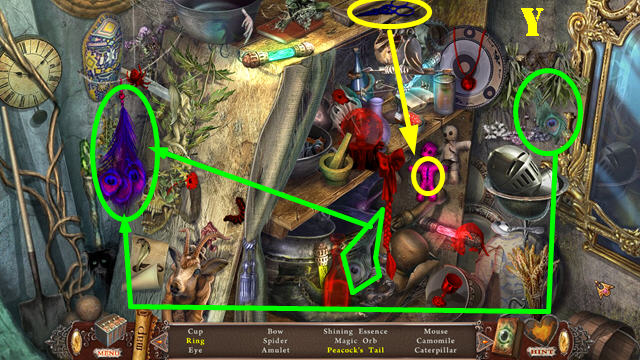
- Play the HOP.
- Interactive items are color-coded (X).
- You will receive the SCREWDRIVER.
- Return to Lucio’s House.
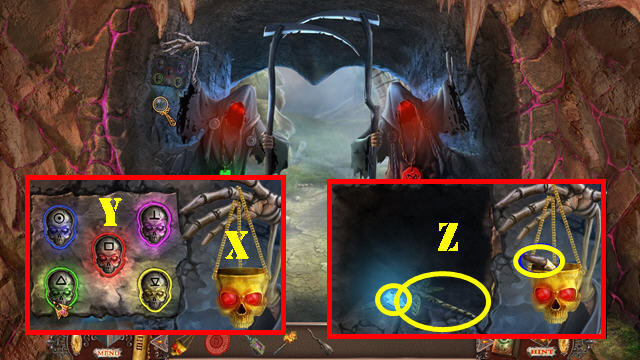
- Zoom into the stream; place the LADLE in the water to receive the LADLE OF WATER (Y).
- Go to the Entrance to Lucio’s House.
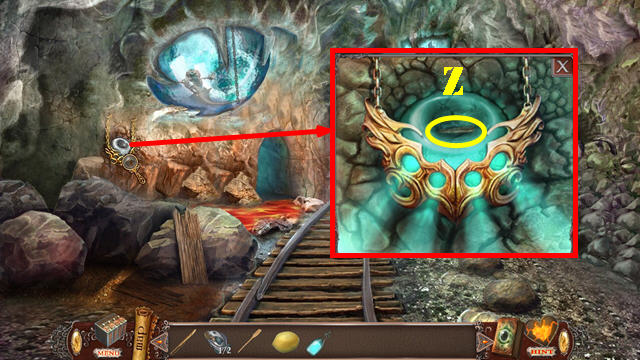
- Zoom into the ground; use the SIEVE on it to receive the CLEAN EARTH (Z).
- Go Inside Lucio’s House.
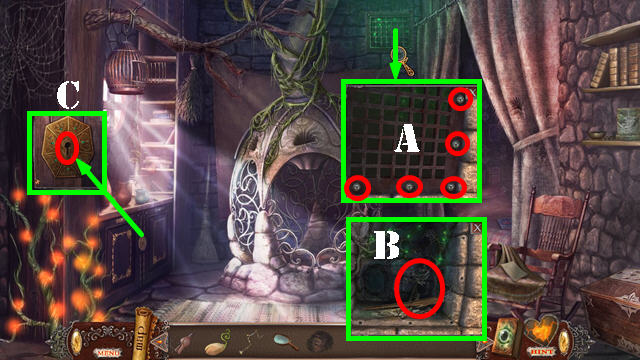
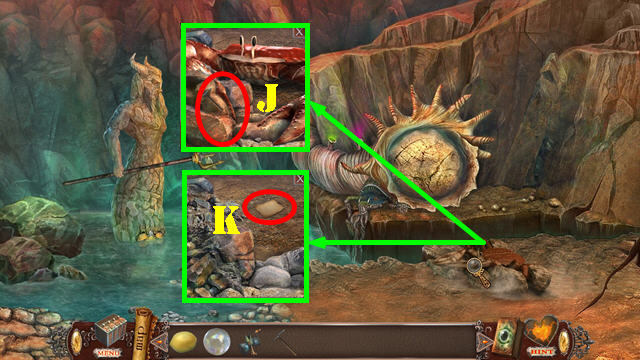
- Zoom into the grate and use the SCREWDRIVER to remove the bolts (A). Remove the grate and take the CABINET KEY (B).
- Zoom into the cabinet and use the CABINET KEY in the lock. Turn the key to activate a HOP (C).
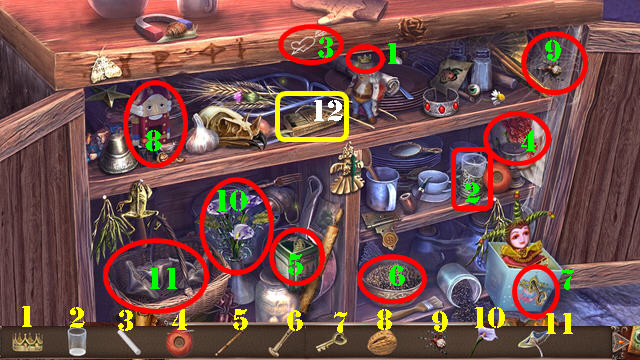
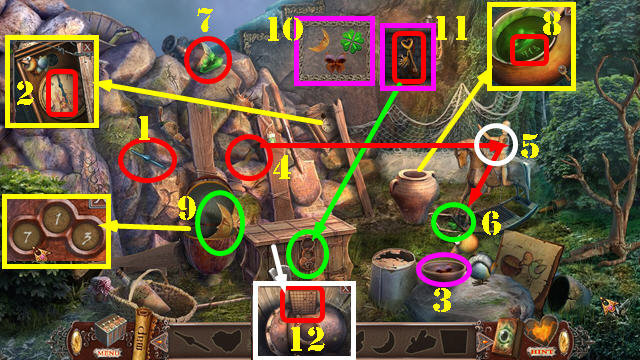
- Play the HOP.
- Put the items back in their place (1-11).
- Take the MATCHES (12).
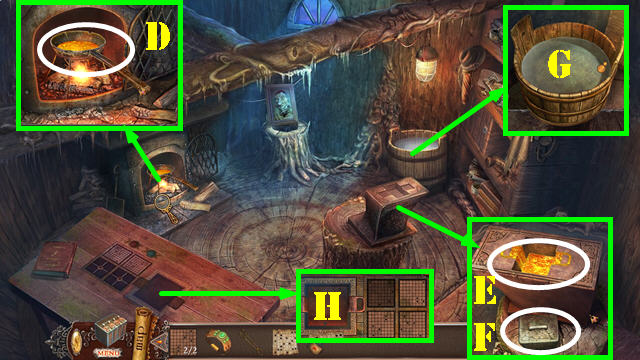
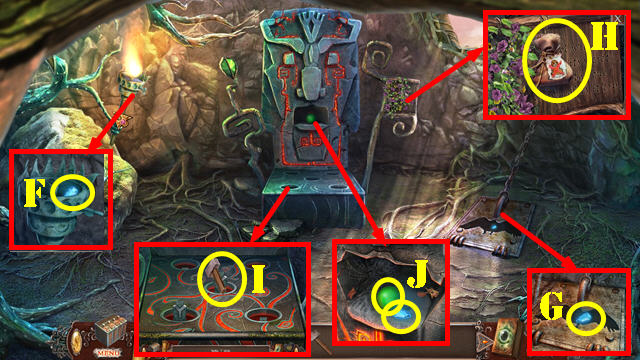
- Take a closer look at the table; use the MATCHES on the flower (D) and take the LIFE FLOWER DUST (E).
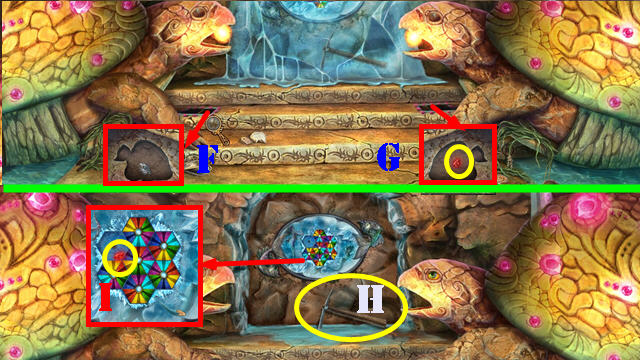
- Examine the top of the fireplace; place the LIFE FLOWER SEED into the right niche (I). Turn the handle (F) and place the BELLOWS into the center niche (H).
- Place the CLEAN EARTH in the right niche (I) and then place the LIFE FLOWER DUST in the left niche (G).
- Turn the handle (F) and use the LADLE OF WATER in the center niche (H).
- Use the MATCHES in the left niche (G).
Chapter 1
- You arrive at the Village of the Light Wizards.
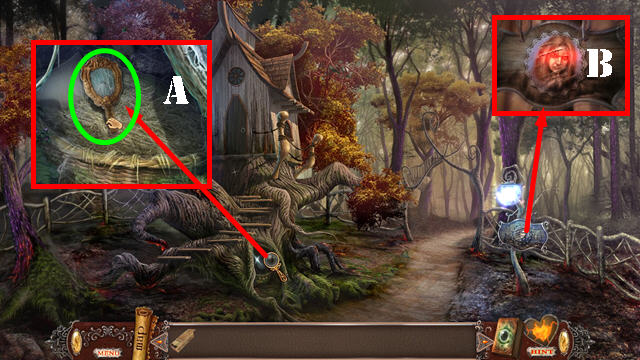
- Examines the tree hollow and touch the mirror for a cut scene. Take the MIRROR (A).
- Look at the sign (B).
- Go forward to reach the Well to the World of Evil.
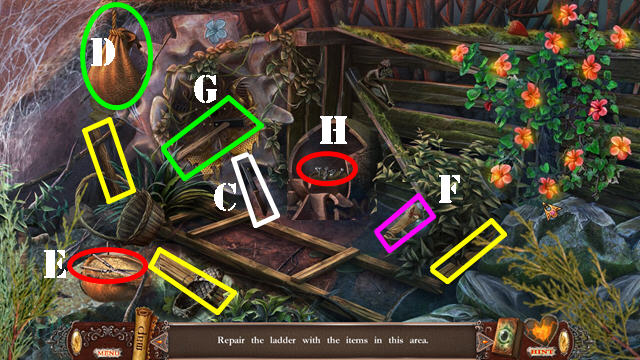
- Zoom into the sparkles to activate the mini-puzzle.
- Place the three wooden planks (yellow) on the Ladder.
- Use the knife (C) to cut the rope (D) and then take the shears (E).
- Use the shears on the bush and take a bottle (F).
- Spray the bottle on the bees and take the hammer (G). Use the hammer to crack the vase and take the nails (H).
- Put the nails on the Ladder and then use the hammer on the nails to receive the LADDER.
- Go forward to Alura’s Flower.
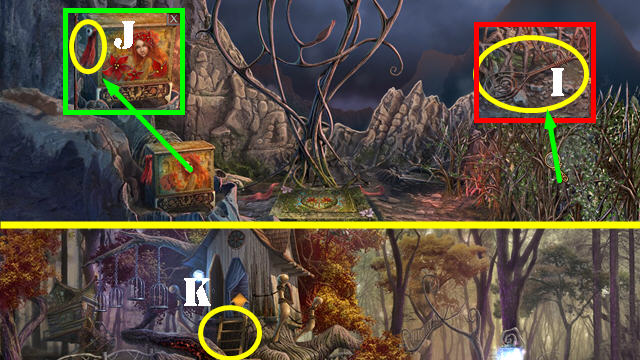
- Zoom into the bushes and take the CARPET BEATER (I).
- Zoom into the box and take the RED SCARF (J).
- Return to the Village of the Light Wizards.
- Place the LADDER on the door and enter the Wizard’s House (K).
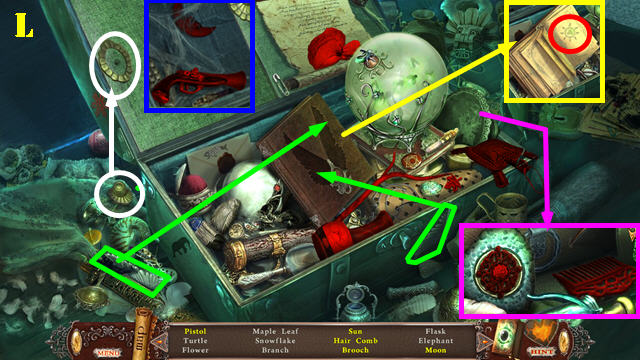
- Zoom into the fireflies; take six of the fireflies and place them inside the globe to light up the scene and activate a HOP.
- Interactive items are color-coded (L).
- You’ll receive the FLASK.
- Use the CARPET BEATER on the pillow.
- Zoom into the pillow for a HOP.
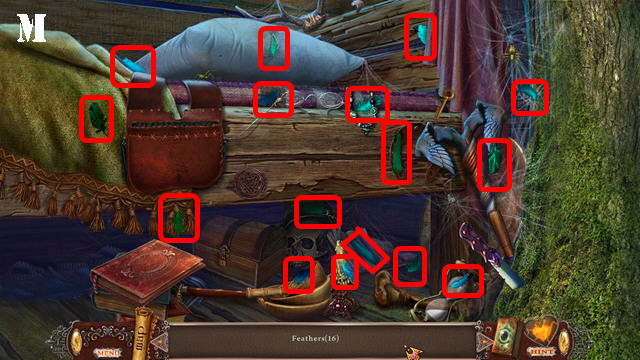
- Find that the 16 feathers (M).
- Find the items in silhouettes. The interactive items are color-coded (N).
- You will receive the FEATHER DUSTER.
- Walk down.
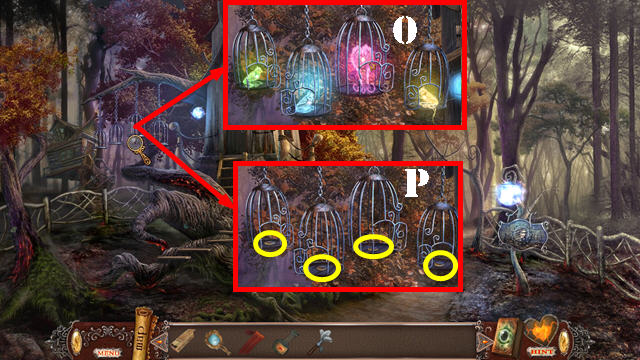
- Zoom into the cages.
- Use the FEATHER DUSTER on the cages (O).
- Watch the birds at they chirp and flap. Touch the birds in the same sequence that they become animated. You have to repeat 3 sequences to beat the game.
- The solution is random.
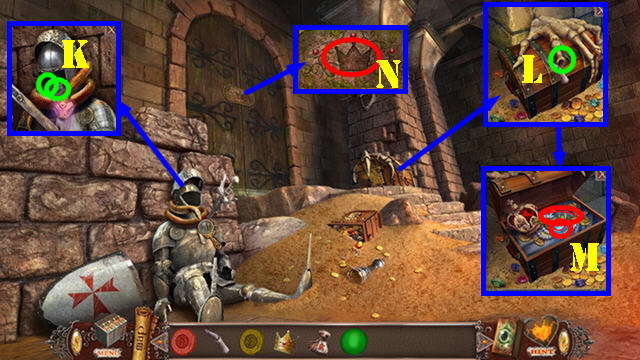
- Take the four COINS (P).
- Return to the Wizard’s House.
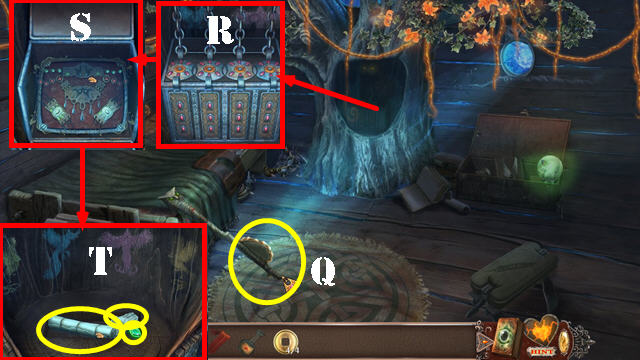
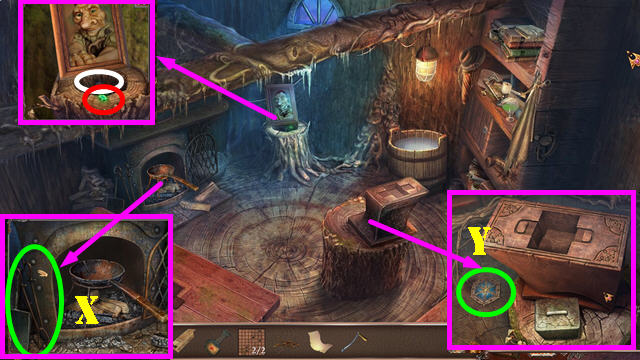
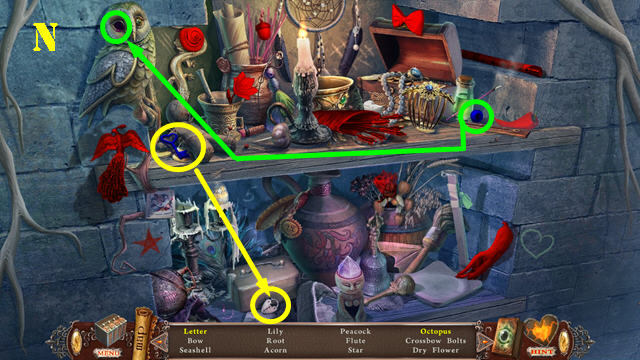
- Place the MIRROR on the ground (Q); touch the owl in the tree hollow and then zoom into the hollow.
- Put the four COINS on the chest and then open it (R); take the amulet holder (S).
- Take the Gem, the note, and the CANDLE (T).
- Return to the Well to the World of Evil.
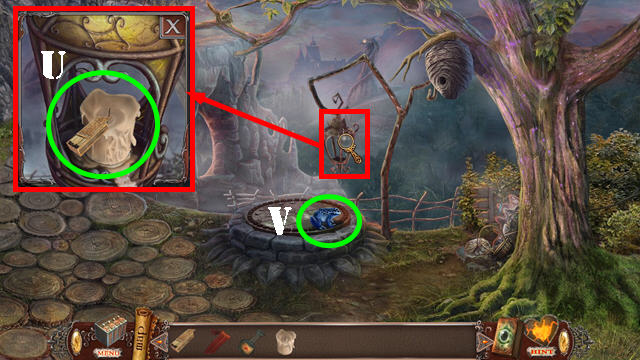
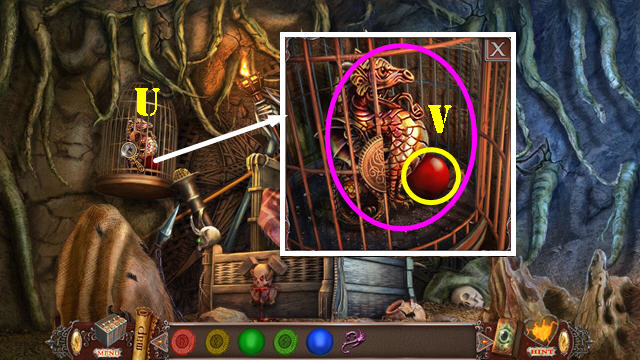
- Zoom into the lantern; place the CANDLE in it and light the candle with the MATCHES (U).
- Move the frog (V) and then take a closer look at the well cover to activate a puzzle.
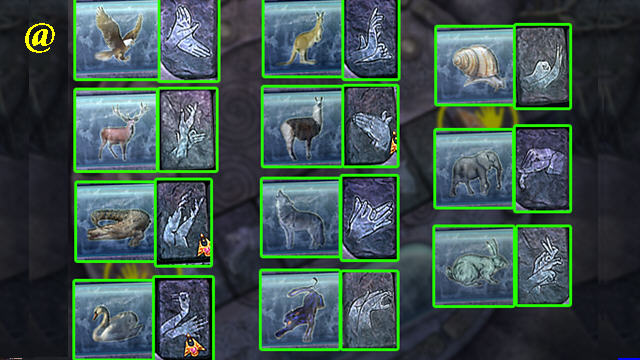
- Look at the shadow and then match the animal it’s representing by scrolling through all the choices and selecting the right one.
- You must identify 11 animals correctly to solve the puzzle.
- Please look at the screenshot for the solution (@).
- Go into the well to access the Well to the World of Evil.
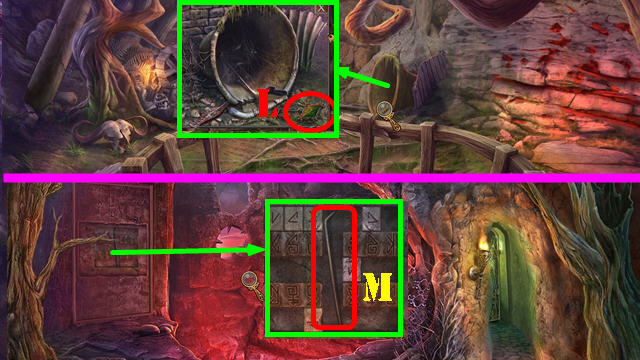
- Examine the tree stump; take the Gem and the PLATE 1/2 (M).
- Go forward to On Zander’s Mountain.
- Play the HOP.
- Move the board and take the clock hand (1). Zoom into the clock and place the clock hand on it. Change the time to 12:00 to get the bird (2).
- Place the bird on the seeds and take the butterfly (3).
- Place the arm (4) on the dummy (5). Touch the dummy and take the clover (6).
- Take the glowing crystal (7).
- Zoom into the vase and place the glowing crystals in it to see the number 713 (8).
- Zoom into the pod; change the numbers to 713 and take the moon (9).
- Place the moon, butterfly, and the clover in the slots (10).
- Take the key (11) and use it in the lock; open the chest and take the PLATE 2/2 (12).
- Take a closer look at the steps; take the ROPE and the Gem (N).
- Go forward on the left.
- Take a closer look at the door and put the RED SCARF on the blade. Attach the rope to the blade and take the HUNTING KNIFE (O).
- Return to Alura’s Flower.

- Examine the bushes and use a HUNTING KNIFE on them to get the BRUSHWOOD. Take the WIZARD FIGURINE (P).
- Go to On Zander’s Mountain.
- Examine the side of the steps and place the WIZARD FIGURINE on it to activate a puzzle (Q).
- Move the wizards in the right spots to drive the Dragon into a blue zone.
- Select a wizard and then select an empty spot for the wizard to move to. Keep moving the wizards to block the dragon into one of the blue corners (R). If the dragon makes to the edge, the puzzle will restart.
- The solution is random.
- Go up the steps to reach At the Mountain Top.
- Take the PAPER SHEET (S).
- Examine the niche; take the note and the DOOR HANDLE (T).
- Return to the Shack on the Marsh.
- Zoom into the door and place the DOOR HANDLE on it. Pull the door handle and go into the Forge (U).
- Play the HOP.
- Interactive items are color-coded (W).
- You will receive the HANDLE.
- Examine the tree stump; take the Gem (red) to receive the BRACELET.
- Take the COAL (white).
- Examine the fireplace and take the TONGS (X).
- Take a closer look at the molding and take the AMULET (Y).
- Return to At the Mountain Top.
- Zoom into the niche; place the PAPER SHEET on it and then use the COAL on it to view a clue. Take the LOCK IMPRESSION (Z).
- Return to Alura’s Flower.
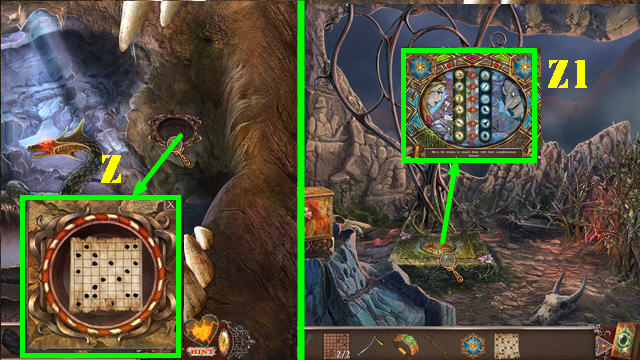
- Zoom into the mosaic and place The AMULET on to activate a puzzle (Z1).
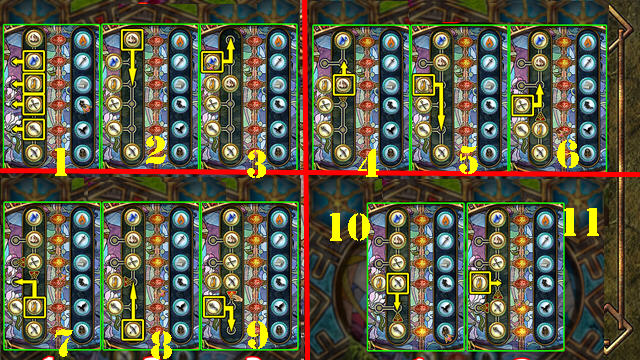
- Move the tokens to match with a complementary element.
- Hover over an item and press the arrow to move the token in that direction.
- Please look at the screenshot for the solution (1-11).

- Use the FLASK on the flower to get the FLASK WITH NECTAR (B).
- Examine the box and place the HANDLE on the side of it. Pull the HANDLE (C) and take the PRECIOUS METAL (C1).
- Return to the Forge.
- Examine the fireplace; place the BRUSHWOOD in it and then light it with the MATCHES. Put the PRECIOUS METAL in the pan; take the MOLTEN METAL (D).
- Zoom into the mold and place the MOLTEN METAL in it (E), then touch the brick and use the TONGS to get the MOLTEN FLAT KEY (F).
- Zoom into the Bucket and put the MOLTEN FLAT KEY in to receive the FLAT KEY (G).
- Zone into the table (H) put the 2 PLATES, the LOCK IMPRESSION, and the FLAT KEY on it to activate the puzzle.
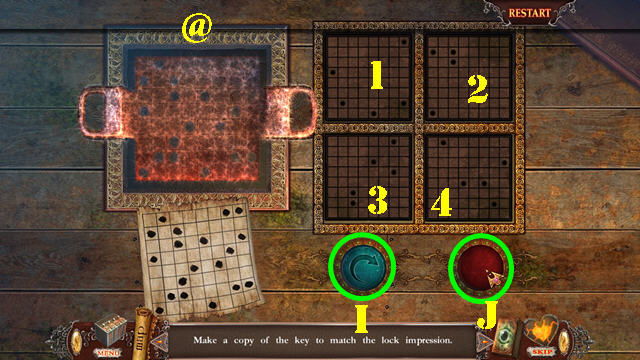
- Make a copy of the key to match the lock impression.
- Select a plate and then select the blue arrow (I) to rotate the plate. Use the red button (J) to place your impression on the large plate (@).
- Please look at the screenshots for the solution (1-4).
- You will receive the SPECIAL KEY.
- Return to At the Mountain Top.

- Examine the niche and place the SPECIAL KEY on it (K).
- Go down the elevator.
Chapter 2
- Examine the bell and take the GREEN GEM (L).
- Go forward to the Lava Pit.
- Zone into the wall and take the CROWBAR (M).
- Go through the right door to reach the Guard’s Room.
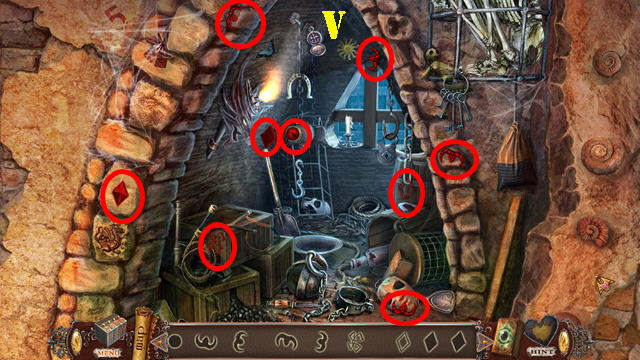
- Play the HOP.
- Interactive items are color-coded (N).
- You will receive the CROSSBOW BOLTS.

- Examine the pot and take the PUZZLE PART 1/3 (O).
- Touch the center head (P) and then zoom into the basket (Q).
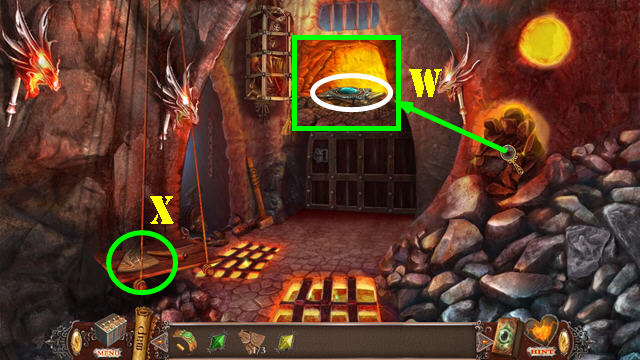
- Walk down twice to reach the Lair.
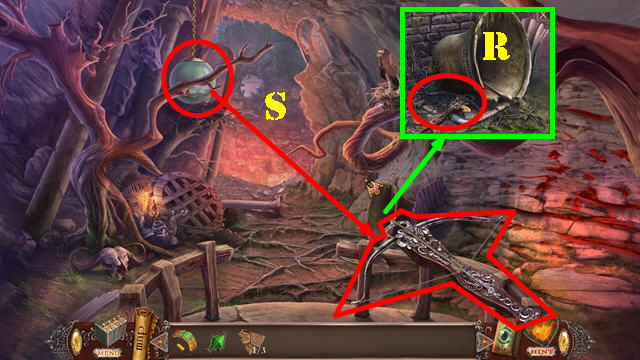
- Examine the bell and use the CROWBAR on it; take the CROSSBOW (R).
- Place the CROSSBOW on the orb and it will automatically merge with the CROSSBOW BOLTS (S). This action activates a HOP.
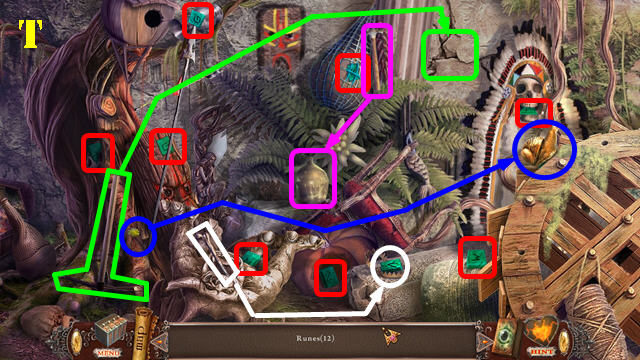
- Play the HOP.
- Find the 12 runes. Interactive items are color-coded (T).
- You will receive the RUNES.
- Go forward.
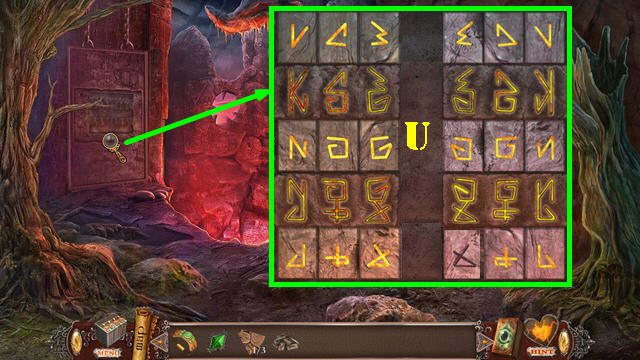
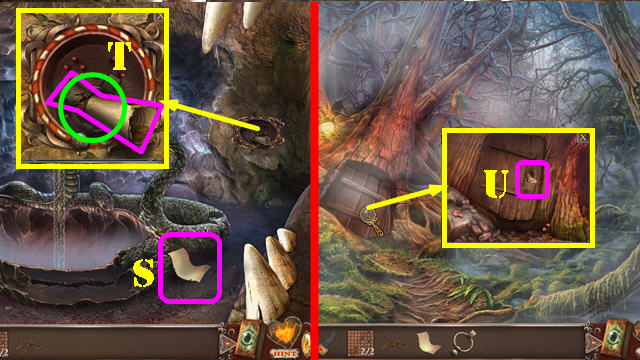
- Zoom Into the wall and place the RUNES on it to activate a puzzle.
- Arrange the tokens so that every token in a vertical pair makes up the rune standing between them.
- Drag the runes on the board to the right spots. Runes placed correctly will light up.
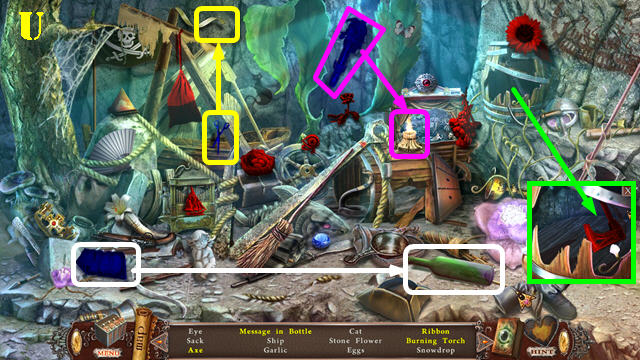
- Please look at the screenshot for the solution (U).
- Go through the door to reach Outside Hanga’s Cell.
- Play the HOP.
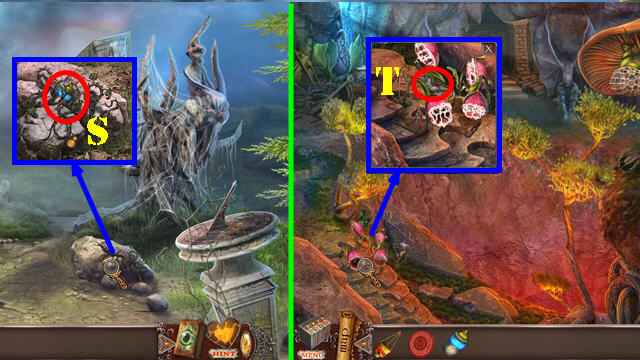
- Find the silhouette items to receive the YELLOW GEM (V).
- Examine the stones and remove them; take the INSIGNIA and the EMPTY SACK (W).
- Grab the PUZZLE PART 2/3 (X).
- Return to the Guard’s Room.
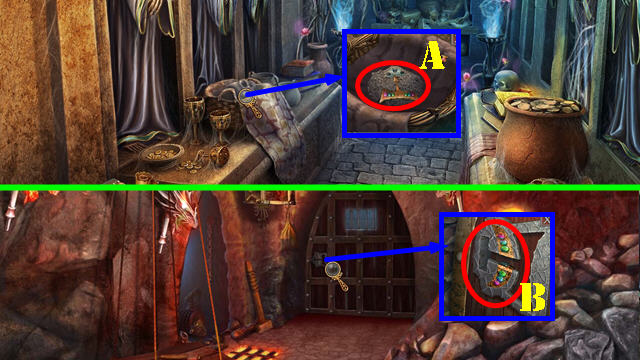
- Examine the basket; place the INSIGNIA on the skull’s forehead and take the CELL KEY (A).
- Return to Outside Hanga’s Cell.
- Examine the cell door and use the CELL KEY on it (B).
- Go through the door to reach Hanga’s Cell.
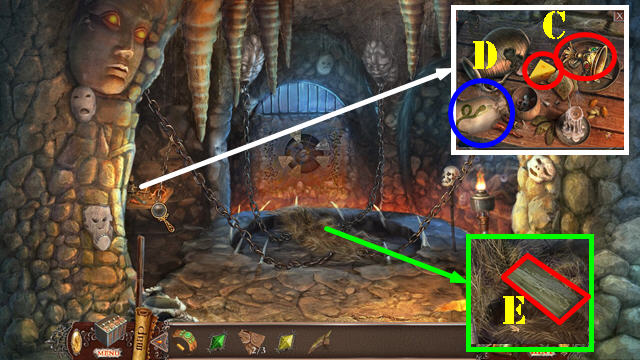
- Zoom into the table; take the CHEESE and the BOWL (C).
- Place the EMPTY SACK on the table to get the VIPER IN A SACK (D).
- Take a closer look at the hay; remove some of it and take the RUNG 1/2 (E).
- Return to the Lair.
- Give the VIPER IN A SACK to the bird (F).
- Zoom into the nest and take the BLUE GEM (G).
- Go forward.

- Zoom into the wall; place the GREEN GEM, YELLOW GEM, and the BLUE GEM in the slots (H) for a bridge to appear.
- Take the bridge to reach Alura’s Cage (I).
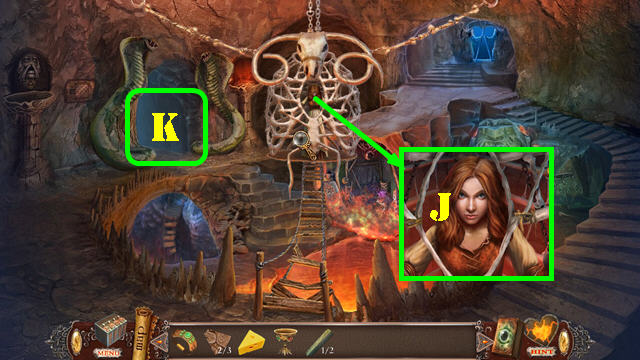
- Examine the cage to talk to the girl. Give her the BRACELET to receive the LOW RELIEF (J).
- Go through the snake entrance to reach the Snakes (K).

- Zoom into the fountain and put the LOW RELIEF in the slot (L).
- Use the BOWL in the water stream to get the CUP OF HOT WATER.
- Return to the Lair.
- Zoom into the niche; use the CUP OF HOT WATER on the ice and take the PUZZLE PART 3/3 (M).
- Return to Hanga’s Cell.
- Zoom into the back wall and place the 3 PUZZLE PARTS on it to activate a puzzle.
- Touch a puzzle piece to add it to the ring in the center. Rotate the inner ring as needed.
- Please look at the screenshot for the solution (N).
- Take the SNAKE’S HEAD (O).
- Return to the Snakes.
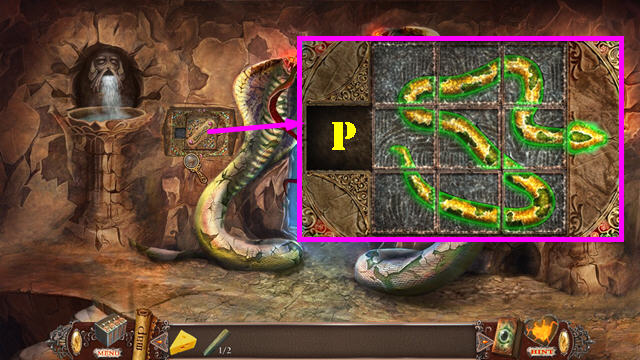
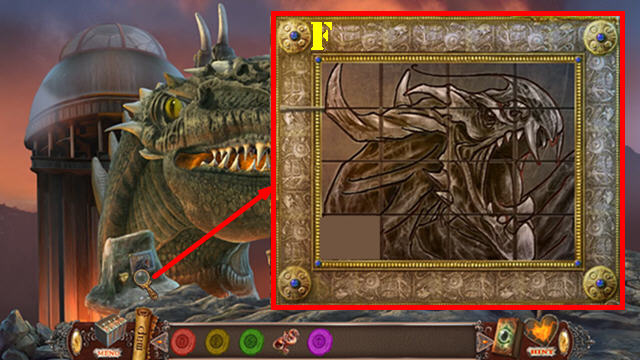
- Zoom into the wall and place the SNAKE’S HEAD on the board to activate a puzzle.
- Move the tiles to assemble the snake picture.
- Pieces that have been placed correctly, will glow green.
- Please look at the screenshot for the solution (P).
- Go through the door to access the Rock-eating machine and then follow the tracks to reach the Tunnel Landslide.
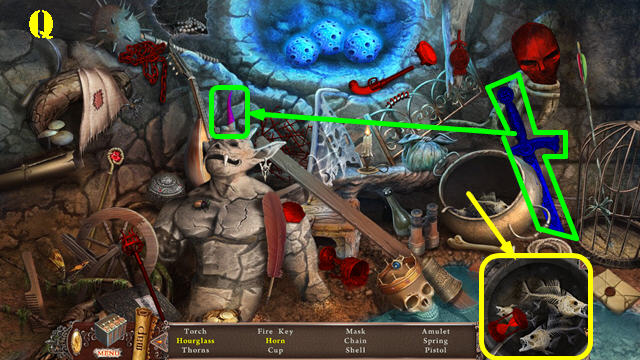
- Play the HOP.
- Interactive items are color-coded (Q).
- You will receive the FIRE KEY.
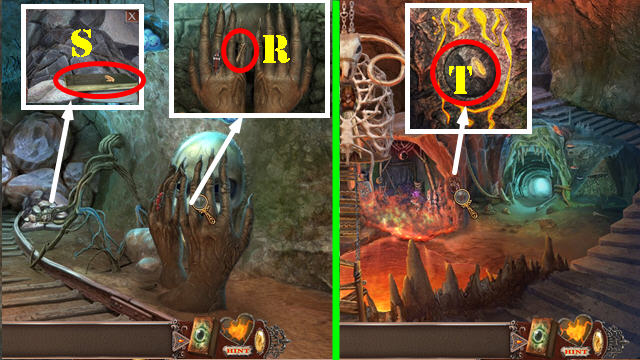
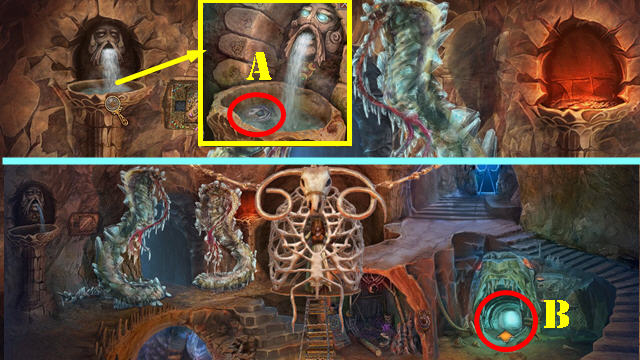
- Zoom into the hands and take the TONGS (R).
- Zoom into the stones; remove them and take the RUNG 2/2 (S).
- Return to Alura’s Cage.
- Examine the socket and place the FIRE KEY in the slot to activate a HOP (T).
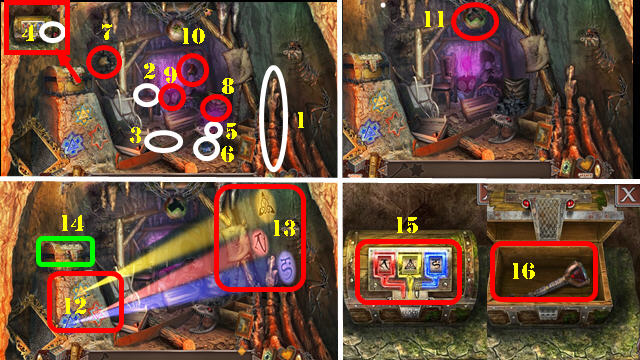
- Play the HOP.
- Take the handle (1) and the knife (2).
- Place the handle on the pickaxe head (3) and take the pickaxe.
- Zoom into the chest and take the eye (4). Place the eye on the skull (5) and take the symbol (6).
- Use the pickaxe on the wall and take the symbol (7).
- Use the knife on the sack and take the spiral (8). Place the spiral on the box (9) and take the acid (10).
- Use the acid on the orb and take the symbol (11).
- Place the 3 symbols in the slots (12) and look at the code on the wall (13).
- Zoom into the chest (14) and input the code from the wall (15).
- Take the LEVER (16).
- Return to the Snakes.
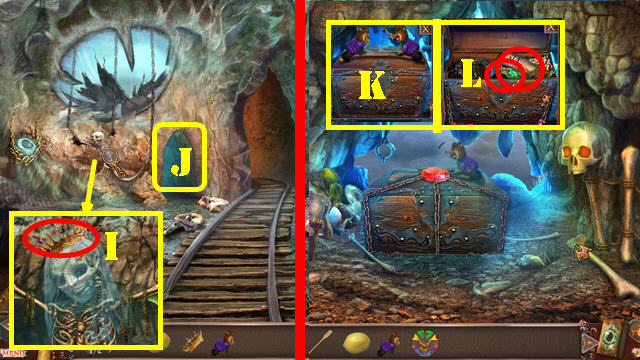
- Zoom into the fountain; use the TONGS to get the FISH 1/2 (A).
- Return to Alura’s cage. Go into the lower right entryway to reach the Water Dragon (B).
- Zoom into the wall and take the PADDLE (green).
- Place the 2 RUNGS on the wall (red).
- Zoom into the right eye; take the FLOWER TOKEN, the LEMON, and the Gem (D).
- Return to the Rock-eating machine.
- Examine the machine and place the FLOWER TOKEN on it to activate the puzzle (E).
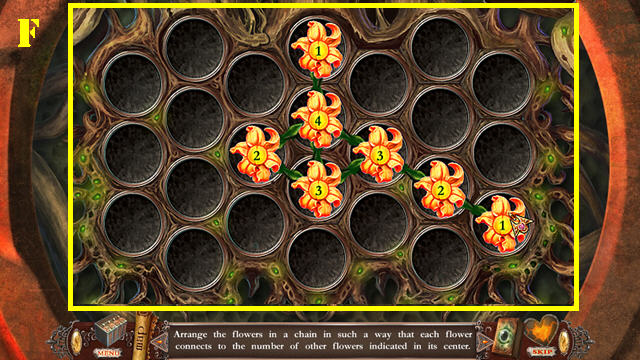
- Press down on a flower and drag it to another spot. Connect the flowers so they are connected to the same amount of flowers as shown in the center.
- The petals will light up when they are placed correctly.
- Please look at the screenshot for the solution (F).
Chapter 3
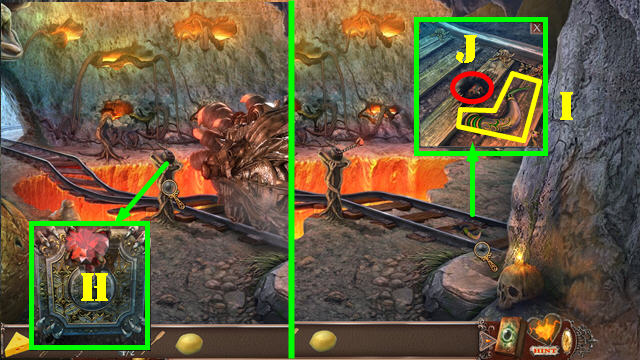
- Examine the panel and place the LEVER on it. Pull the lever (H).
- Zoom into the tracks and take the HORN 1/3 (I).
- Use the TONGS to get the RING (J).
- Play the HOP.
- Interactive items are color-coded (K).
- You will receive the CAGE WITH TRAPDOOR.
- Return to the Snakes.
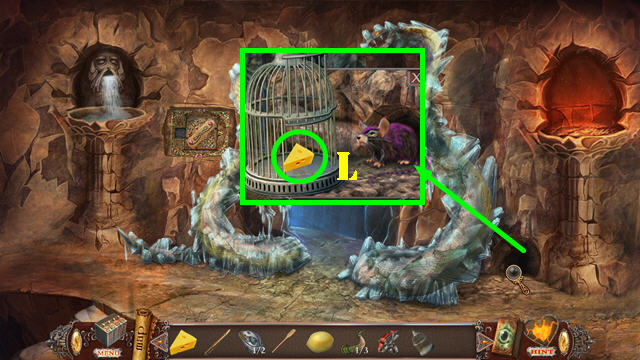
- Examine the mouse hole; put down the CAGE WITH TRAPDOOR and place the CHEESE in it (L).
- Take the MOUSE IN CAGE.
- Return to the Tunnel Landslide.
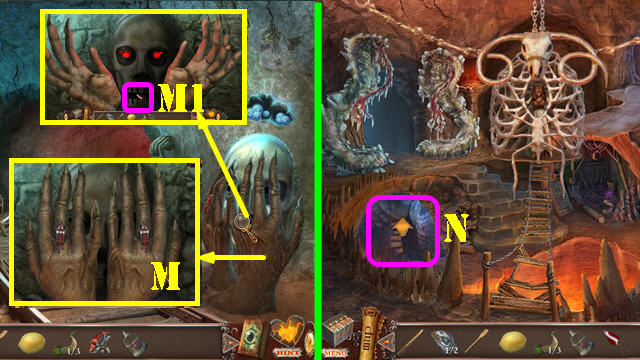
- Examine the hands and place the RING on it to activate a puzzle (M).
- Repeat the sequence of finger movements for both hands. The solution is random (M).
- Take the HOOK (M1).
- Go forward to reach the Tunnel near Aquarium and then go forward to reach the Mirror of Desires.
- Return to Alura’s cage and go into the lower left cave to access the Chasm (N).
- Look inside the tram and take the scroll (O).
- Return to the Mirror of Desires.
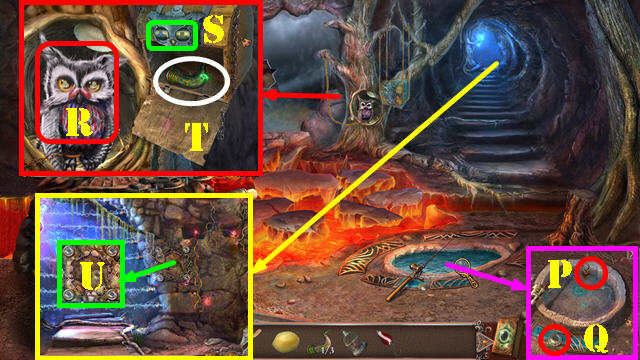
- Zoom into the pool of water and place the HOOK on the fishing rod (P).
- Take the MUSHROOM CAVE KEY (Q).
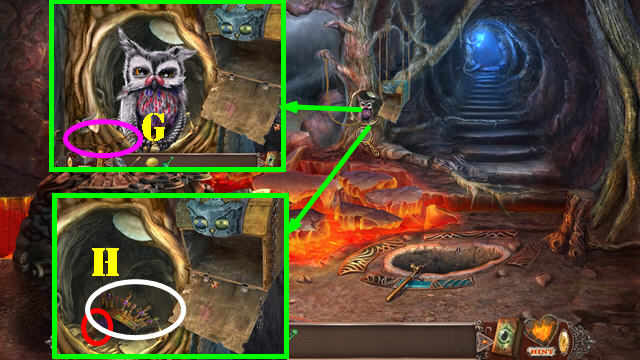
- Zoom into the owl and give it the MOUSE IN CAGE to view a code (R).
- Change the eyes on the mechanical owl (S) to reflect the code in the owl’s eyes (R) by pressing the left eye 3 times and the right one twice.
- Press the beak to open the box; take the Gem and the HORN 2/3 (T).
- Zoom into the top of the steps.
- Take a closer look at the niche and place the MUSHROOM CAVE KEY in it (U).
- Play the HOP.
- Interactive items are color-coded (V).
- You will receive the HORN 3/3.
- Return to the Tunnel near Aquarium.
- Examine the doorway and place the 3 HORNS on it (W).
- Go through the door.
- Examine the mosaic and take the note (X).
- Play the HOP.
- Open the curtain.
- Interactive items are color-coded (Y).
- You will receive the SHINING ESSENCE.
- Return to the Tunnel near Aquarium.
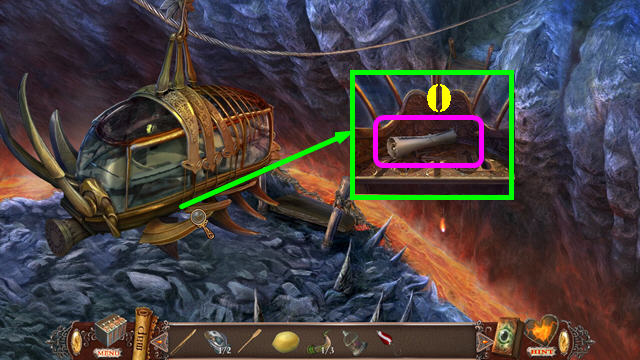
- Zoom into the lantern and place the SHINING ESSENCE in it.
- Use the TONGS to get the BULLET (Z).
- Return to the Rock-eating Machine.
- Zoom into the gun and place the BULLET in it (A).
- Return to the Tunnel near Aquarium.
- Examine the stone and look at the code (B).
- Return to the Mirror of Desires.
- Examine the machine and change the symbols according to this (C).
- Take the Gem and the SUN (D).
- Return to the Wizard’s Workshop.
- Examine the statue and place the SUN on her forehead (E).
- Take the Gem and the ACID (F).
- Return to the Mirror of Desires.
- Zoom into the owl and place the ACID on the chain (G).
- Take the DIADEM and the TOY BEAR (H).
- Return to the Tunnel near Aquarium.
- Examine the skeleton and place the DIADEM on the skull to receive the DISC (I).
- Go through the left tunnel to access the Cave with Chest (J).
- Zoom into the chest; place the TOY BEAR on it (K); take the Gem and the STENCIL (L).
- Play the HOP.
- Interactive items are color-coded (M).
- You will receive the CUP.
- Return to the Wizard’s Workshop.
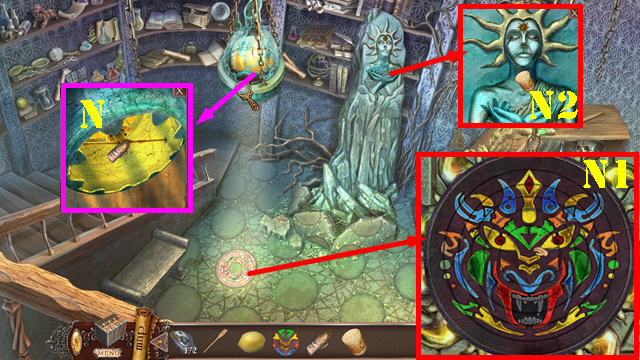
- Examine the lamp and place the STENCIL on it (N).
- Examine the mosaic and place the DISC on it to activate a puzzle.
- Rotate the discs to assemble the right image.
- Please look at the screenshot for the solution (N1).
- Take the note and the MIRROR SHARD.
- Zoom into the statue; place the CUP on its face to get the CUP OF TAR (N2).
- Return to the Mirror of Desires.
- Examine the mirror; place the MIRROR SHARD on it and take the Gem to receive the BRACELET (1).
- Return to Alura’s Cage.
- Zoom into the cage; give her the BRACELET to receive the DRAGON’S PUPIL (2).
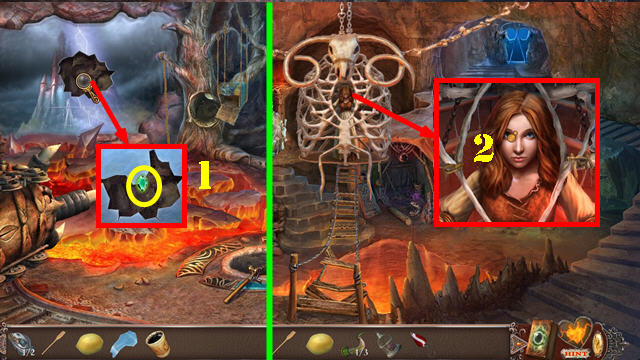
- Return to the Water Dragon.
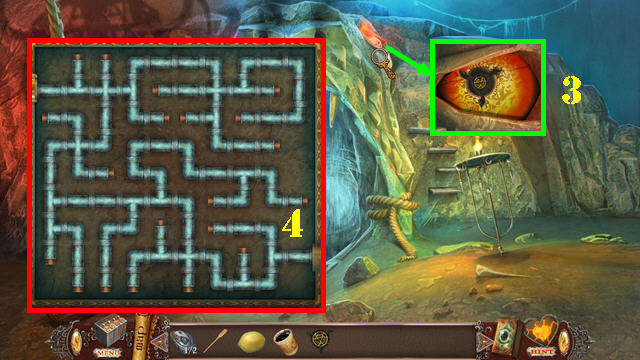
- Examine the right eye; place the DRAGON’S PUPIL in it and then zoom into the puzzle (3).
- Touch a pipe to rotate it. Keep rotating pipes until they are all connected without any leaks.
- Please look at the screenshot for the solution (4).
- Go forward to the Statue of Neptune.
Chapter 4
- Zoom into the crab; take the Gem, the FISH 2/2 and the BRUSH (A).
- Go forward to the River.
- Examine the rock; take the Gem and the PEARL (B).
- Zoom into the boat and place the PADDLE on it (C).
- Place the CUP OF TAR on the boat and dip the BRUSH in it (D).
- Play the HOP.
- Find all the silhouette items to receive the POTION MIXER (E).
- Go forward to the Tortoises.
- Examine the left side of the steps; place the FISH in the slot (F).
- Examine the right side of the steps; take the Gem (G) and then place the FISH in the slot.
- Take the PICKAXE (H).
- Examine the wall and take the Gem (I).
- Return to the Statue of Neptune.
- Zoom into the crab and use the PICKAXE 3 times on the stones to free the crab (J).
- Take the PARCHMENT (K).
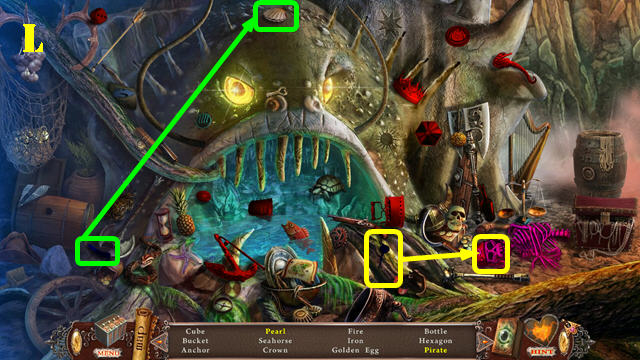
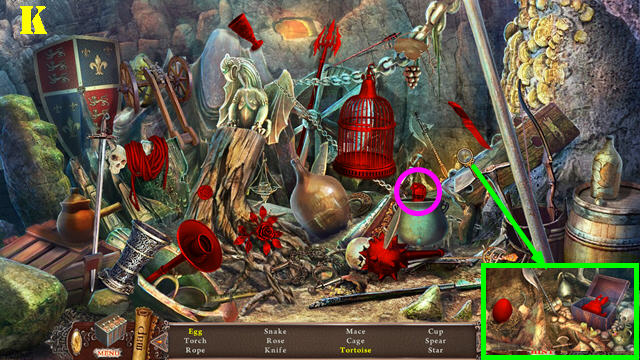
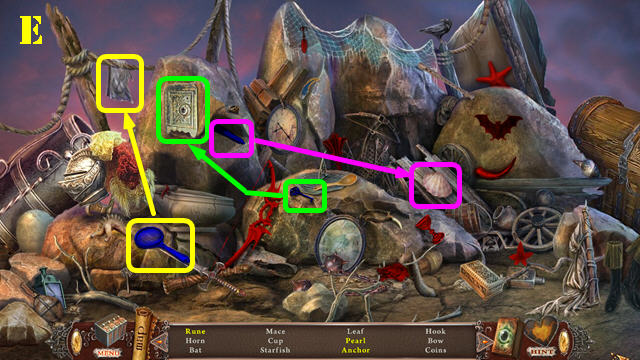
- Play the HOP.
- Interactive items have been color-coded (L).
- You will receive the HEXAGON.
- Return to the Tortoises.
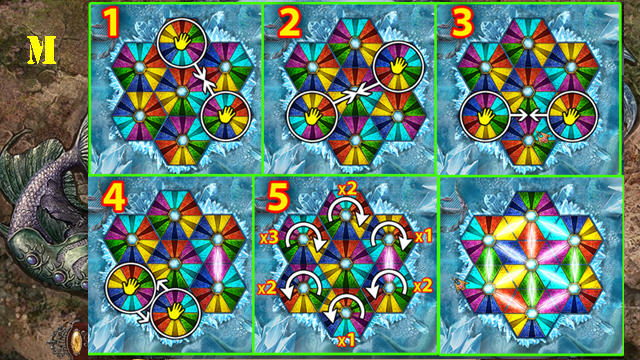
- Zoom into the back wall and place the TORTOISES on the puzzle to activate it.
- Touch a hexagon to rotate it. Place the hexagons so adjacent sides match. Touch 2 hexagons to swap their positions.
- Please look at the screenshot for the solution (M).
- Go forward to the Hall of Neptune.
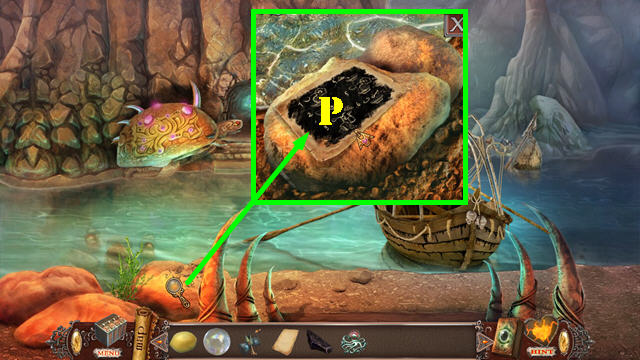
- Examine the statue and then touch the amulet (N).
- Examine the table; take the Gem, the note, the PIECE OF COAL, and the OCTOPUS PIECE (O).
- Return to the River.
- Zoom into the stones; place the PARCHMENT on it and then rub the PIECE OF COAL on it.
- Take the POTION RECIPE (P).
- Return to the Hall of Neptune.
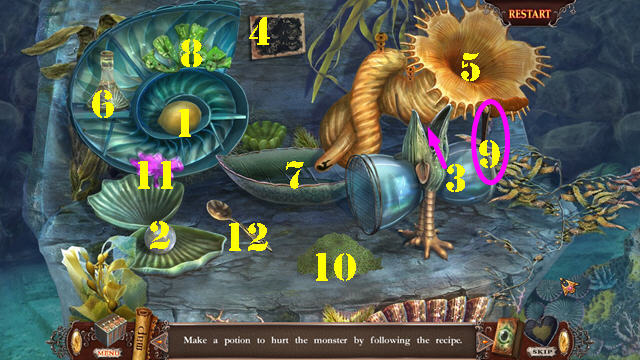
- Zoom into the table; put down the LEMON (1), PEARL (2), POTION MIXER (3), and the POTION RECIPE (4).
- Take a closer look at the recipe (4) and follow the steps.
- Place the lemon (1) in the plant (5).
- Use the flask (6) in the bowl (7).
- Put the mushrooms (8) and the pearl (2) in the potion mixer (3) and flip the handle (9).
- Place the ground items (10) in the bowl (7).
- Place the goo (11) in the plant (5).
- Use the spoon (12) to mix the ingredients in the bowl and to receive the POTION FOR SEA MONSTER.
- Give the POTION FOR SEA MONSTER to the sea monster.

- Play the HOP.
- Zoom into the niche (1) and take the hammer (not shown).
- Use the bottle (2) on the tentacles and take the fin (3).
- Place the fin on the fish and pull on it (4). Take the hilt (5).
- Use the hammer on the gong (6) and take the hook (7).
- Place the hilt on the blade and take the sword (8).
- Put the hook on the rod (9) and take the fishing rod. Use the fishing rod in the water and take the T symbol (10).
- Cut the rope with the sword (11) to take the board. Put the board on the gap (12) and zoom into the wall. Place the T symbol on the wall (13) and take the key (14).
- Zoom into the shell and place the key in the keyhole (15).
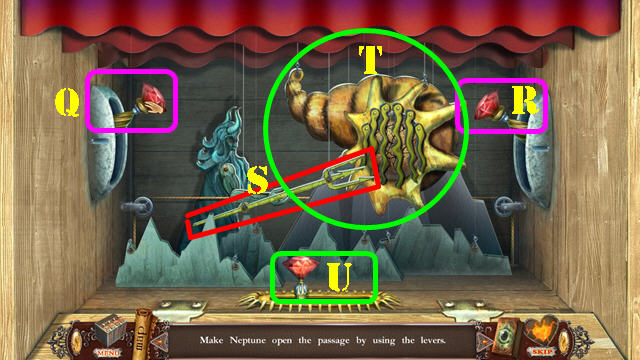
- Zoom into the stage to activate a puzzle.
- Pull the side levers (Q and R) until the Trident (S) and the shell appear (T). Then pull on the lower lever (U).
- Return to the Statue of Neptune and go to the Inside the Shell.
- Examine the ground; take the Gem and the PIKE POLE (A).
- Look at the right side of the wall; move the bone aside; take the Gem (B) and the GLASS EYE below it.
- Take the LANTERN (C).
- Examine the fish; take the Gem (D).
- Place the OCTOPUS PIECE in the niche. Take the SAILOR’S KNIFE (E).
- Return to the Hall of Neptune.
- Examine the statue; cut the seaweed with the SAILOR’S KNIFE and take the VILLAIN’S TOKEN (F).
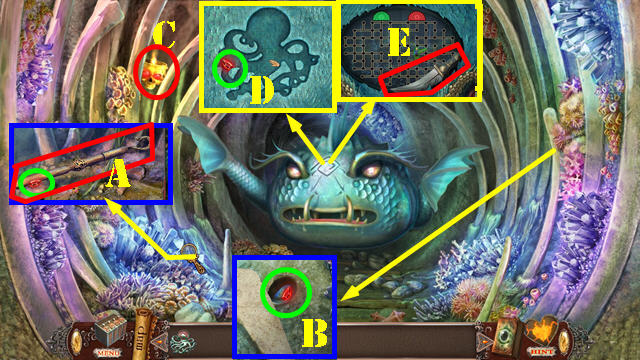
- Return to Inside the Shell.
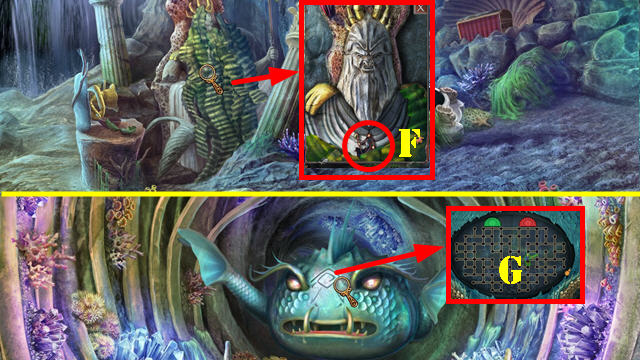
- Zoom into the fish and place the VILLAIN’S TOKEN on the puzzle to activate it (G).
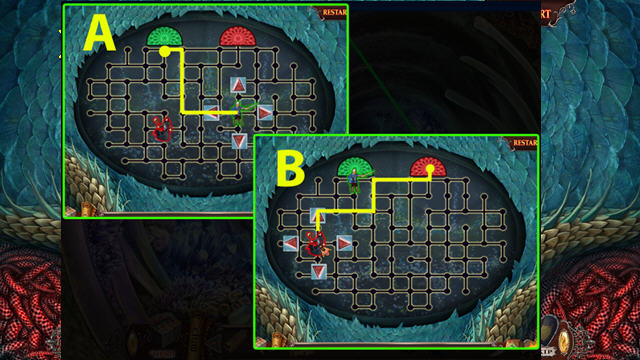
- Move the tokens to the area of the same color. Moving one token, moves the other in the same direction.
- To solve the puzzle (H), please move the tokens in the order shown on the screenshot (A and B).
- Go forward to Inside the Fish.
- Examine the statue; take the Gem (I). Place the GLASS EYE in the socket.
- Zoom into the stone; use the PIKE POLE on the amulet (J); take the GREEN AMULET.
- Play the HOP.
- Interactive items are color-coded (K).
- You will receive the MIRROR SHARD.
- Return to the Mirror of Desires.
- Zoom into the mirror and place the MIRROR SHARD on it. Take the Gem (L) to receive the NECKLACE.
- Return to Alura’s Cage.
- Zoom into the cage and give her the NECKLACE to receive the RED AMULET (M).
- Go to the cave in the upper right to reach the Guardians of Silence (N).
- Zoom into the left statue; place the GREEN AMULET on it (O).
- Zoom into the right statue; place the RED AMULET on it (P).
- Go forward to the Glen.
Chapter 5
- Play the HOP.
- Interactive items are color-coded (Q).
- You will receive the RUNE OF ENERGY.
- Go forward to the Mushrooms.
- Play the HOP.
- Interactive items are color-coded (R).
- You will receive the GARDEN SHEARS.
- Walk down to the Glen.
- Zoom into the stone; use the GARDEN SHEARS on the vines and take the GLUE (S).
- Go forward.
- Zoom into the carnivorous plants; give them the GLUE and take the OILCAN (T).
- Play the HOP.
- Interactive items are color-coded (U).
- You will receive the TORCH.
- Go forward to the Throne Hall Entrance.
- Examine the window; take the Gem and the BROOM (V).
- Zoom into the left wall; use the TORCH on it and take the note (W).
- Return to the Guardians of Silence.
- Zoom into the skull and hang the LANTERN to activate a puzzle (X).
- Place the skull symbols according to the clue. Select any two skulls to swap their symbols. When a symbol is in the right spot, its eyes will light up.
- Please look at the screenshot for the solution (Y).
- Take the FINGER, the Gem, and the STONE DRAGONFLY (Z).
- Go forward.
- Zoom into the stone frog. Place the STONE DRAGONFLY on its head (A); take the RUNE OF RENEWAL, the Gem, and the CROWN (B).
- Use the BROOM on the cobwebs on the tree (C).
- Zoom into the tree to activate a puzzle.
- Open the hands in this order: (1-5).
- Take the HAMMER (D).
- Examine the ladder; use the TORCH to shoo the bird away (E).
- Take the ladder up to the Idol Room.
- Zoom into the torch; take the Gem (F). Use the OILCAN and then the TORCH on the torch.
- Zoom into the plate and take the Gem (G).
- Examine the sign; move the flowers and take the SOPORIFIC POWDER (H).
- Zoom into the idol base and use the HAMMER on it to activate a puzzle.
- Hit the idols with the hammer 10 times. This puzzle is random (I).
- Zoom into the niche; take the Gem and the GREEN MARBLE (J).
- Return to the Throne Hall Entrance.
- Examine the armor and use the SOPORIFIC POWDER on the snake; take the THRONE GEM and the RUNE OF INSPIRATION (K).
- Zoom into the chest and place the FINGER on the hand (L).
- Take the Gem and the EAGLE TOKEN (M).
- Zoom into the door and place the CROWN in the slot to activate a puzzle (N).
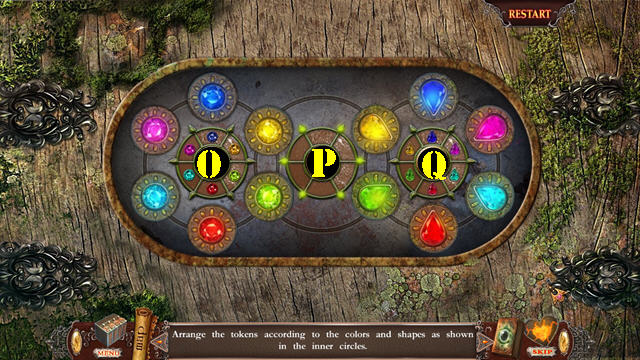
- Place the tokens in the spots of the same color and shape.
- Use the arrows in the center to rotate the gems. The gems in intersecting sections can be moved from ring to ring.
- To solve the puzzle, please follow these steps: Qx4, Px5, and Ox5.
- Go through the door to access the Throne Hall.
- Examine the stone and place the THRONE GEM in the slot; take the Gem and the BLUE MARBLE (R).
- Return to the Idol Room.
- Examine the plate and put the EAGLE TOKEN in the slot to activate a HOP (S).
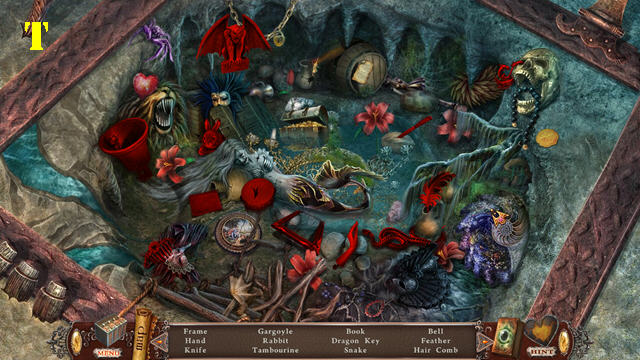
- Play the HOP.
- Find all the items on the list to receive the DRAGON KEY (T).
- Return to the Throne Hall.
- Remove the cloth and zoom into the cage (U).
- Place the DRAGON KEY in the lock; take the RED MARBLE and the FIRE DRAGON (V).
- Return to the Glen.

- Zoom into the wall; place the GREEN MARBLE, BLUE MARBLE, and RED MARBLE in the slots to activate a puzzle.
- Use the arrows to rotate the board until all the marbles fall into the holes of the same color.
- To solve the puzzle, select the arrows in this order: A, B, Ax3, Bx4, Ax4, and B.
- Play the HOP.
- Place the emblem (1) in the slot (2) and take the matches (3).
- Zoom into the niche; use the matches on the candle (4) and take the butterfly (5).
- Use the brush (6) on the moss and take the crown (7).
- Place the crown on the bird’s head (8) and take the disc (9).
- Zoom into the niche and put the disc on the puzzle to activate it. Rotate all seven pieces in place as shown in the screenshot (10).
- Take the knife (11).
- Place the butterfly on the flower (12) and cut the pod with the knife; take the lever (13).
- Zoom into the niche and place the lever in the slot (14). Pull the lever.
- Take the STAR (15).
- Return to the Chasm.
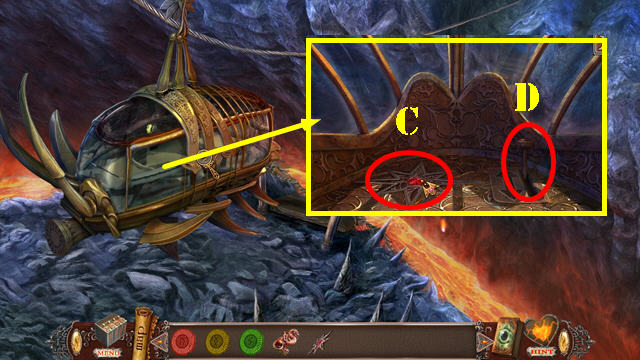
- Zoom into the tram; place the STAR in the slot (C) and pull the lever (D).
- Play the HOP.
- Interactive items are color-coded.
- You will receive the RUNE OF JUSTICE (E).
- Examine the stone and place the FIRE DRAGON on the pedestal to activate a puzzle.
- Touch a tile to move it to an empty spot until the picture has been reassembled.
- Please look at the screenshot for the solution (F).
- Go into the dragon’s mouth to access the Cup of Evil.

- Zoom into the plate; place the RUNE OF JUSTICE, RUNE OF INSPIRATION, RUNE OF RENEWAL, and RUNE OF ENERGY into the slots to activate a puzzle.
- Touch a rune to move it to an empty spot until all tokens are on their matching color.
- To solve the puzzle, select the runes in the order shown (1-5).
- Take the MAGIC BOW AND ARROW.
- Use the MAGIC BOW AND ARROW on the dome (G).
- You will receive the MIRROR SHARD.
- Go through the portal.
- Zoom into the mirror and place the MIRROR SHARD on it; take the Gem (H) to receive the DIADEM.
- Return to Alura’s Cage.
- Zoom into the cage and give her the DIADEM (I).
- Congratulations, you have completed Love Chronicles: Salvation Collector’s Edition!


 Emberwing: Lost Legacy Walkthrough, Guide, & Tips
 Sherlock Holmes and the Hound of the Baskervilles Walkthrough, Guide, & Tips
 The Clockwork Man: The Hidden World Walkthrough, Guide, & Tips
 Sacra Terra: Angelic Night Walkthrough, Guide, & Tips
 Dreamland Walkthrough, Guide, & Tips