Love Story: The Way Home Walkthrough, Guide, & Tips
Love Story: The Way Home Walkthrough
Welcome to the Love Story: The Way Home Walkthrough
After being passed from one orphanage to another, all Katherine wants is a family to call her own.
Whether you use this document as a reference when things get difficult or as a road map to get you from beginning to end, we’re pretty sure you’ll find what you’re looking for here.
This document contains a complete Love Story: The Way Home game walkthrough featuring annotated screenshots from actual gameplay!
We hope you find this information useful as you play your way through the game. Use the walkthrough menu below to quickly jump to whatever stage of the game you need help with.
Remember to visit the Big Fish Games Forums if you find you need more help. Have fun!
This walkthrough was created by SeverineSnape, and is protected under US Copyright laws. Any unauthorized use, including re-publication in whole or in part, without permission, is strictly prohibited.
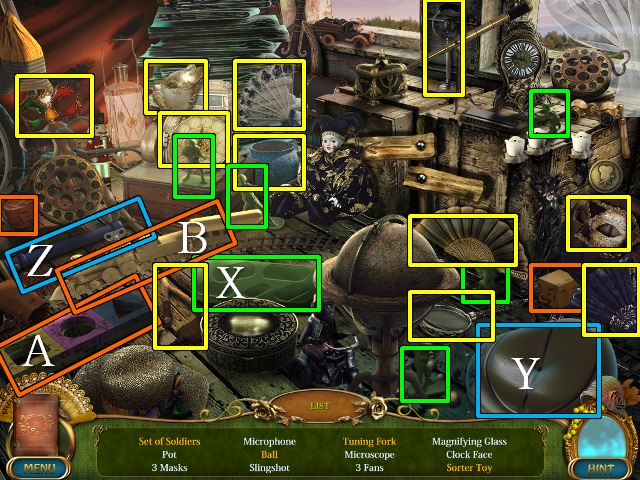
General Tips

- This is the official guide for Love Story: The Way Home.
- There are three difficulty modes: Casual, Normal and Advanced.
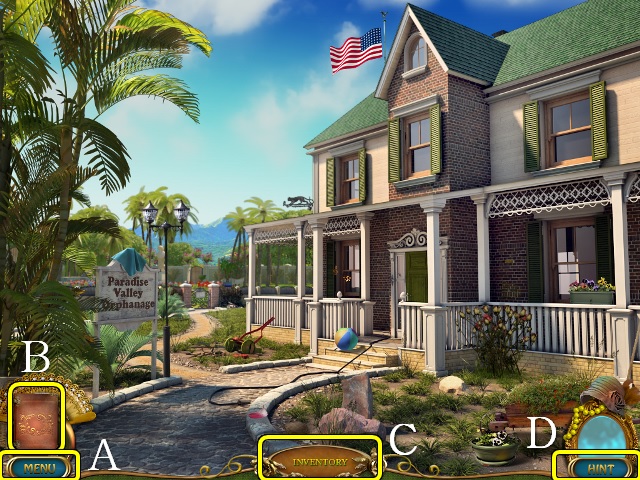
- Select Menu (A) to go back to the Main Menu and exit the game, and to change display and sound options.
- The Journal (B) keeps track of the two storylines.
- Move your cursor to the bottom of the screen to pull up the Inventory Bar (C).
- The Hint (D) button gives you clues on where to go next or objects to pick up.
- The Hint button changes to a Skip button in mini-games.
- Throughout the guide, we will use the acronym ‘HOP’ for Hidden-object puzzles.
- HOP items listed in orange require an extra action; for example, drawers need to be opened or several items need to be combined.
Chapter 1: Paradise Valley Orphanage
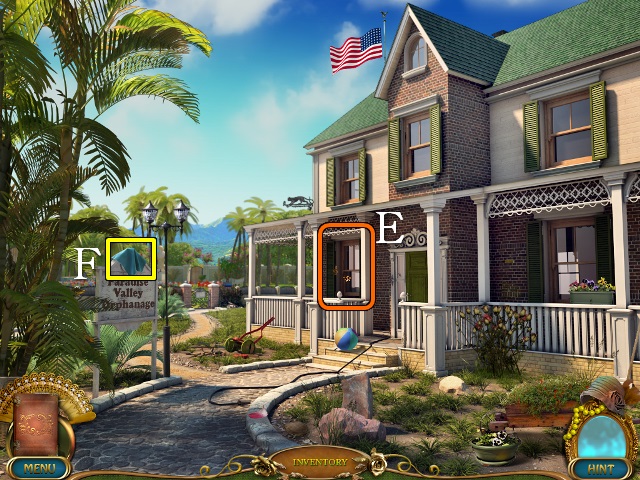
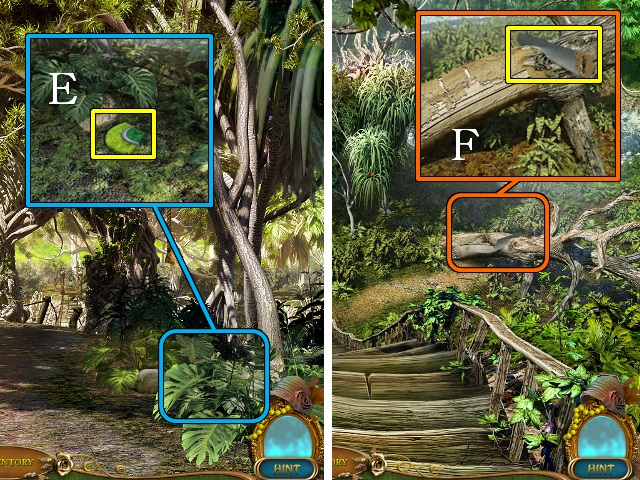
- Look through the window (E).
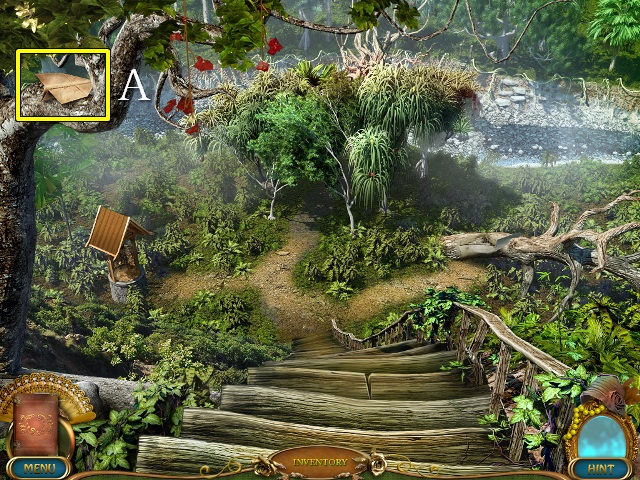
- Take the RAG (F).
- Go left to the Garden Gate.
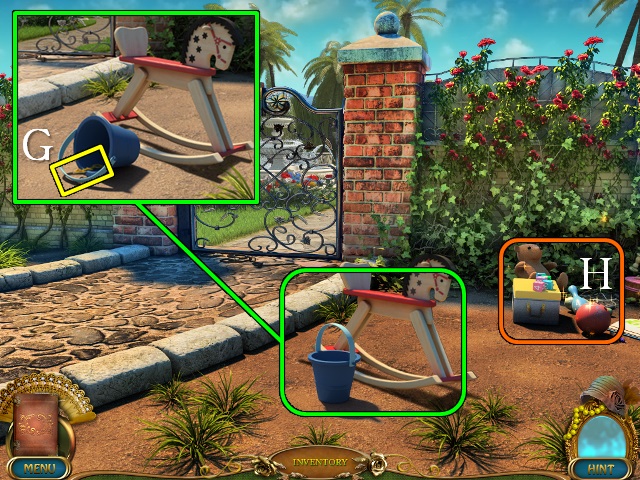
- Zoom into the rocking horse; knock over the bucket and take the HOUR HAND (G).
- Zoom into the toys for a HOP (G).
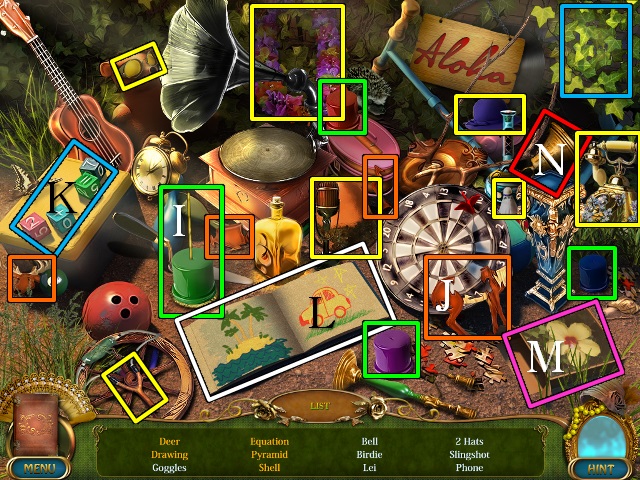
- Put the three blocks (green) on the spike (I) to get the pyramid.
- Assemble the deer (orange; J).
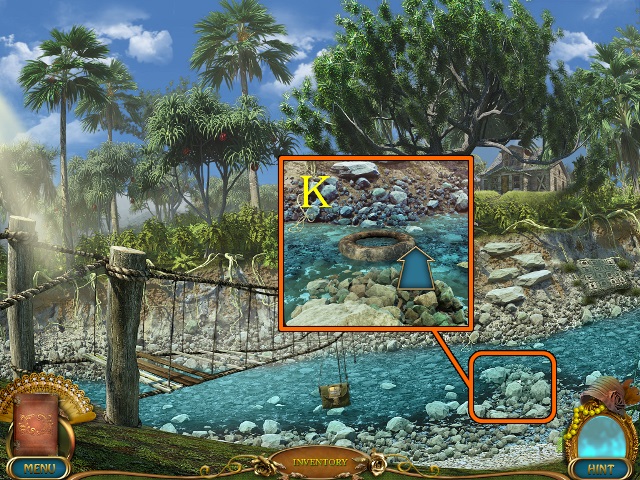
- Move the ivy to find the missing block for the equation (blue; K).
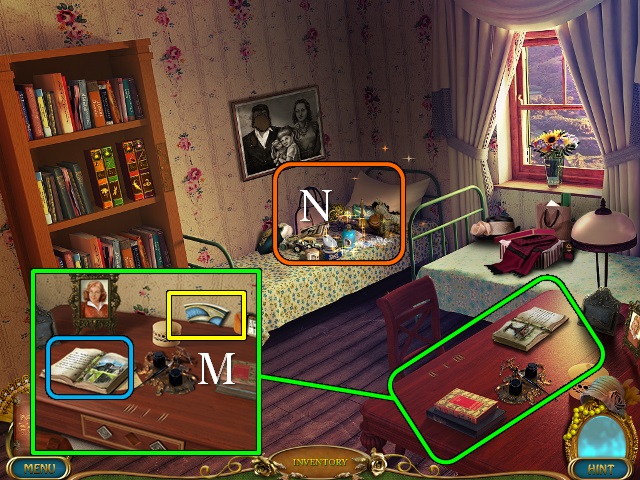
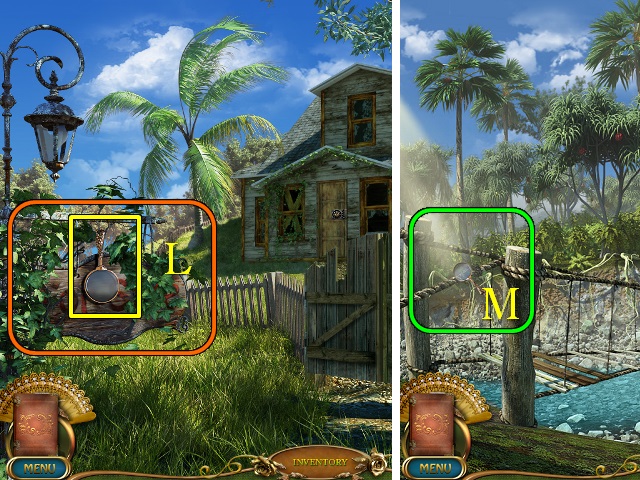
- Turn the page in the book for the drawing (L).
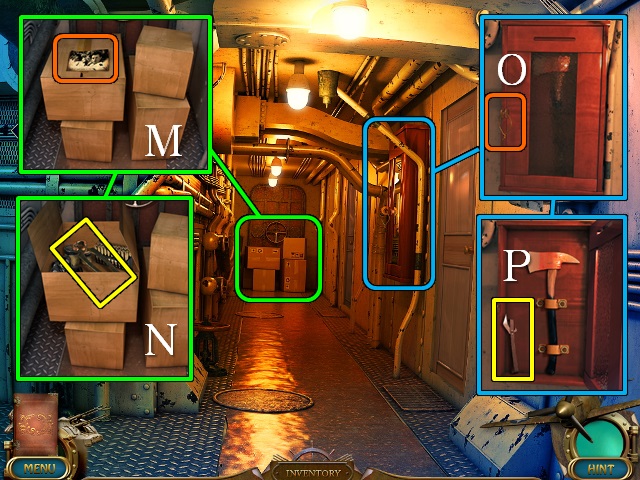
- Shake the box to find the shell (M).
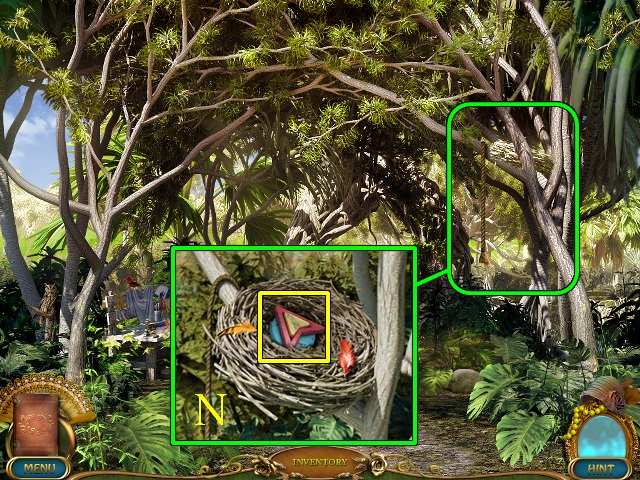
- You will receive a BELL (N).
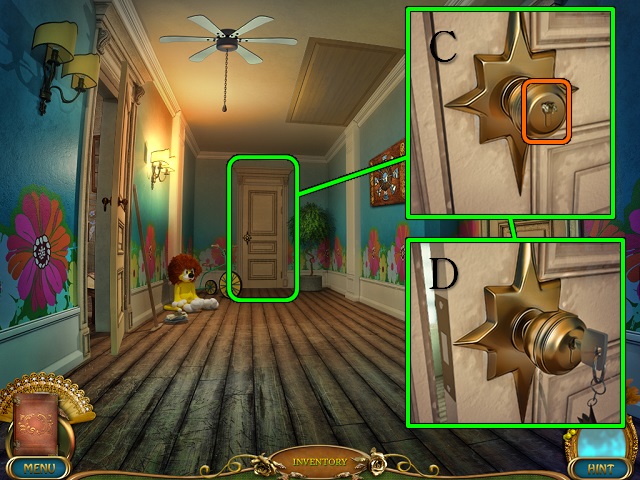
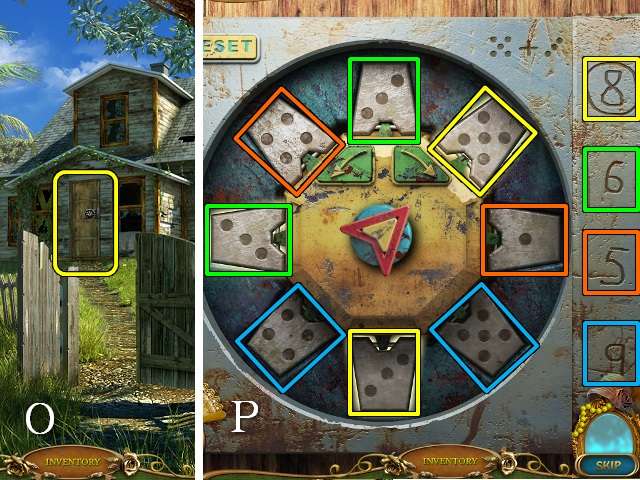
- Walk down and go to the Front Door.
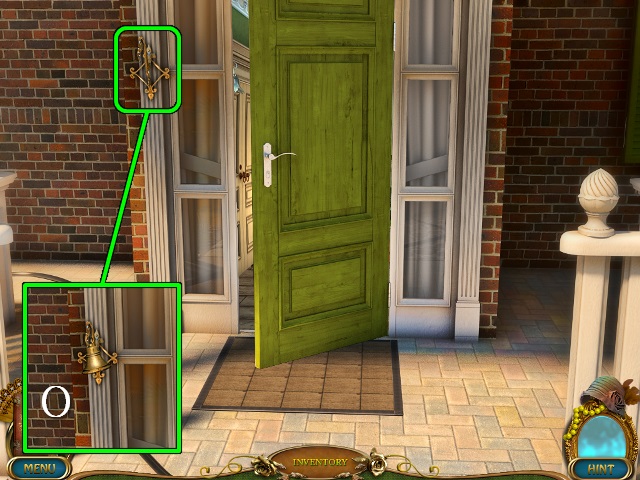
- Try to open the door.
- Hang the BELL from the hook (O).
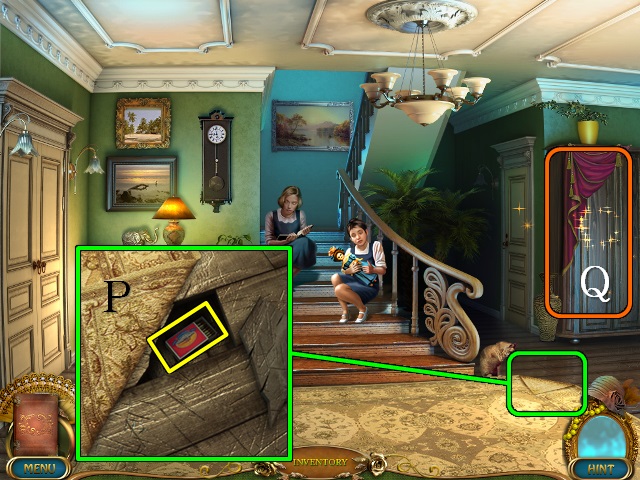
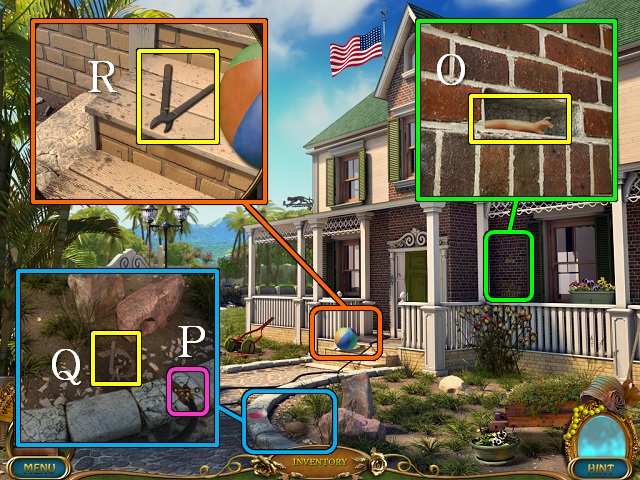
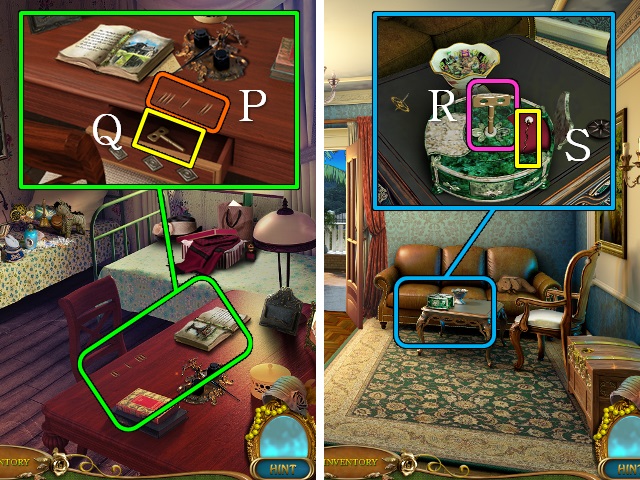
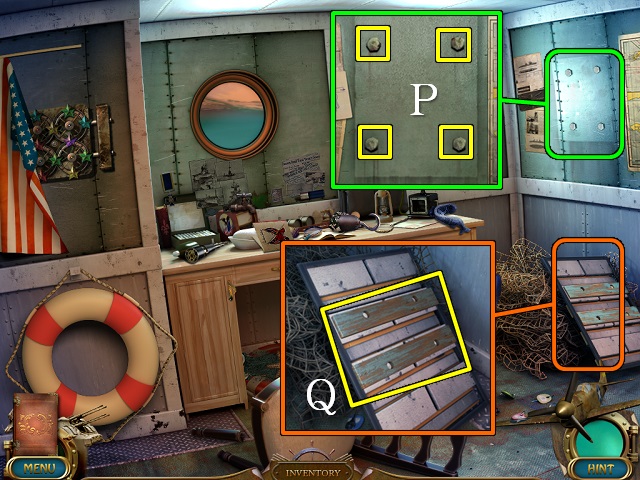
- Zoom into the rug; move the rug and the floorboard and take the MATCHES (P).
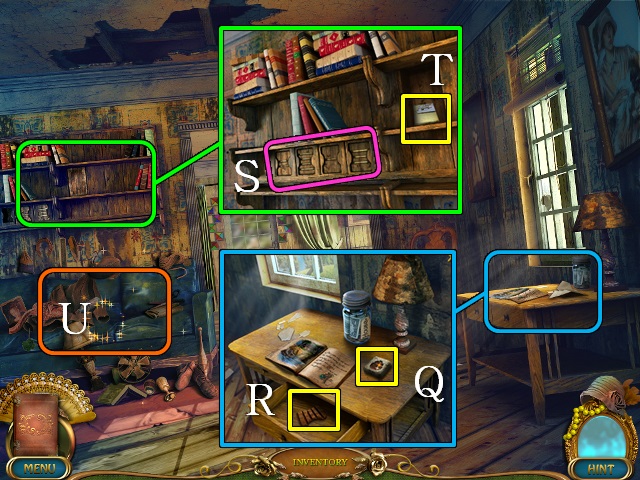
- Open the cupboard and look inside for a HOP (Q).
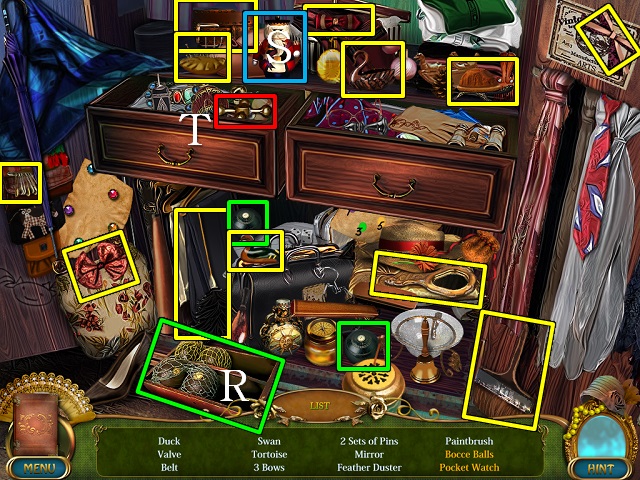
- Open the two drawers.
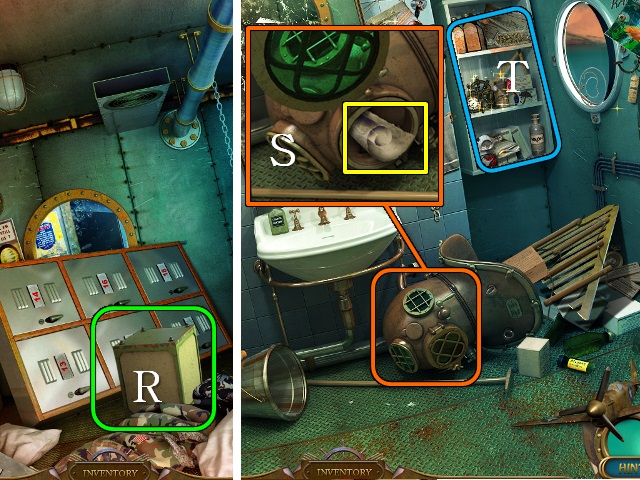
- Put the two bocce balls (green) in the box (R).
- Open the Russian doll for the pocket watch (S).
- You will receive a VALVE (T).
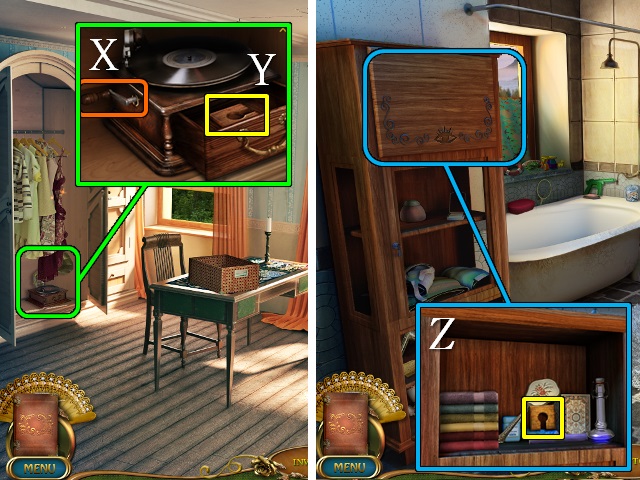
- Open the doors on the left.
- Go left into the Piano Room.
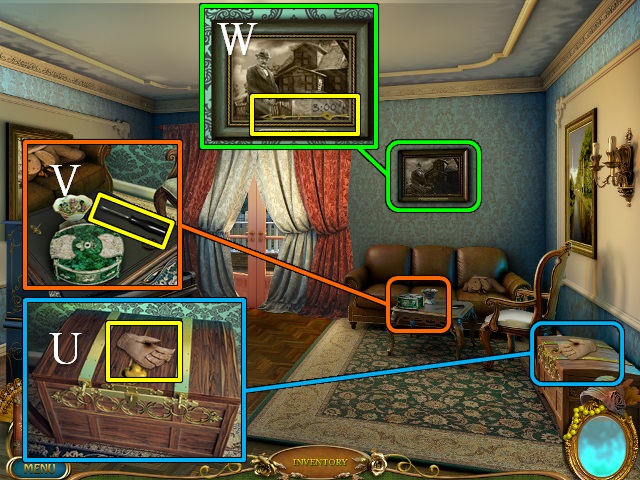
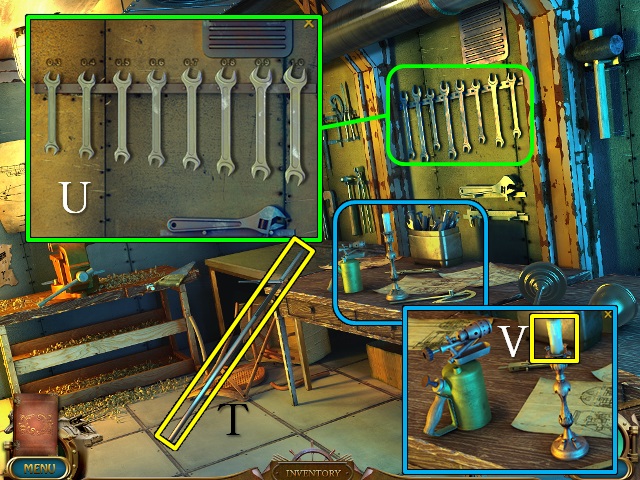
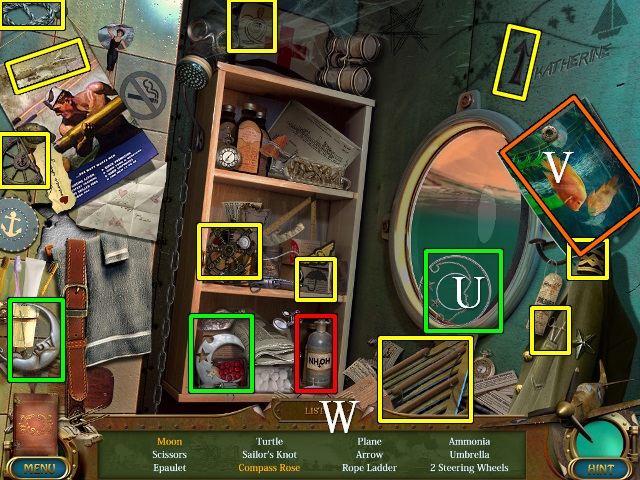
- Zoom into the trunk and take the GLOVE (U).
- Zoom into the coffee table and take the SCREWDRIVER (V).
- Zoom into the painting and clean it with the RAG; take the MINUTE HAND and note the numbers (W).
- Open the doors.
- Walk forward.
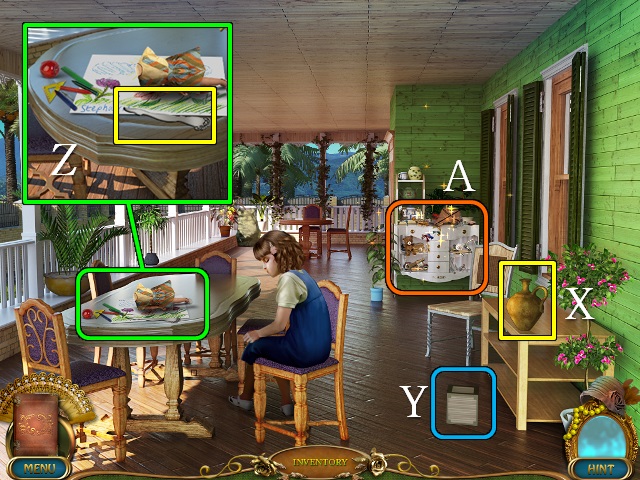
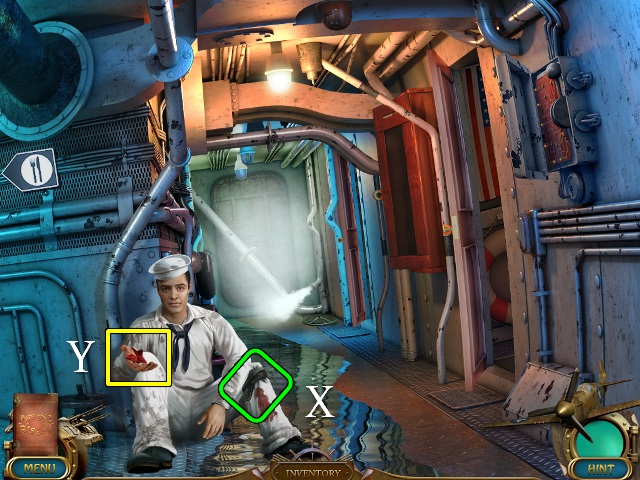
- Take the JUG OF WATER (X).
- Open the Jack-in-the-Box (Y).
- Zoom into the table and take the LETTER OPENER (Z).
- Zoom into the dresser for a HOP (A).
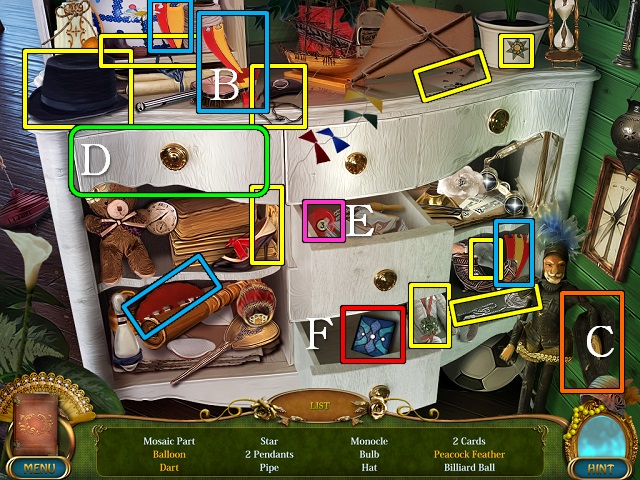
- Assemble the balloon (blue, B).
- Move the knight’s shield for the dart (C).
- The peacock feather is in the left drawer (D).
- The billiard ball is in the second drawer from the top (E).
- The MOSAIC PIECE is in the bottom drawer (F).
- Walk down twice to the Hallway.

- Zoom into the cabinet and put the MOSAIC PIECE on it to trigger a mini-game.
- Find pairs of similar (but not identical) images; if the images don’t match, the two tiles you selected will swap around.
- Once you’ve found all the pairs, move the tiles around to make a cohesive image (G).
- Take the note and the KEY.
- Zoom into the door and open it with the KEY (H).
- Go through the door to the Kitchen.
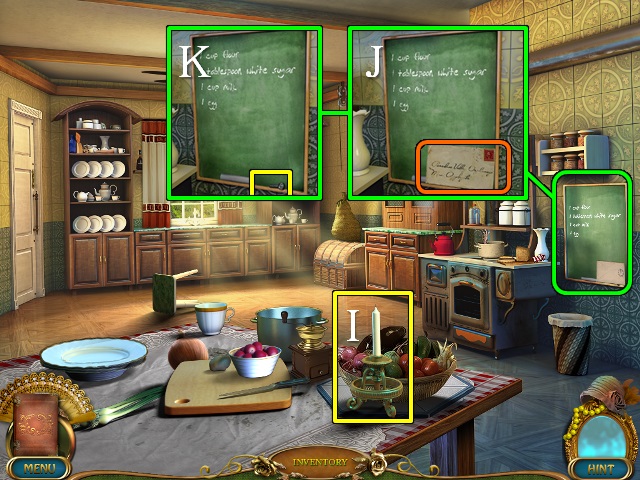
- Light the candle with the MATCHES and take the LIT CANDLE (I).
- Zoom into the blackboard and open the letter with the LETTER OPENER (J); take the photo, the note and the SCREW (K).
- Walk down.

- Zoom into the plant under the stairs; light the scene with the LIT CANDLE and take the STOOL LEG (L).
- Go back to the kitchen.
- Zoom into the broken stool (M); attach the STOOL LEG to the stool and pick up the STOOL.
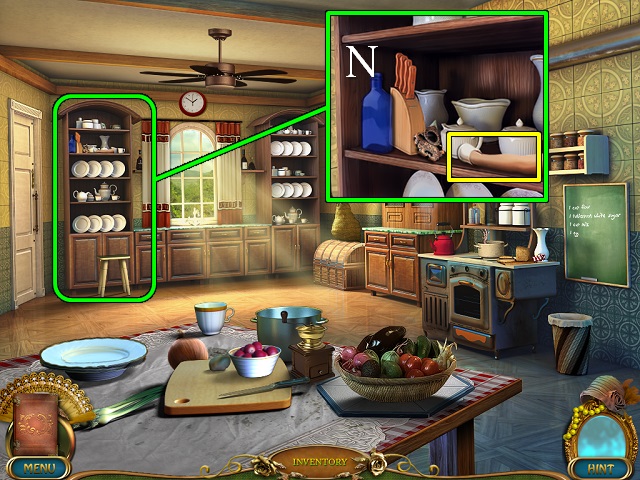
- Put the STOOL down under the left cupboard and take the DOLL’S LEG (N).
- Walk down three times to the Front Yard.
- Zoom into the wall, remove the brick with the SCREWDRIVER and take the DOLL’S ARM (O).
- Zoom into the flower bed, put the VALVE on the hose (P) and turn the valve; take the CLIPPER HALF (Q).
- Zoom into the steps and move the beach ball; put the CLIPPER HALF on the clippers, join them with the SCREW, tighten the screw with the SCREWDRIVER and pick up the GARDEN CLIPPERS (R).
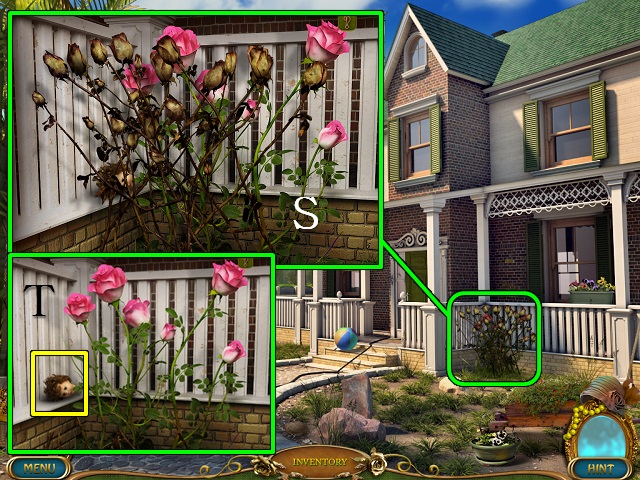
- Zoom into the rose bushes for a mini-game.
- Remove all the dead branches with the GARDEN CLIPPERS (S) until you can pick up the DOLL’S HEAD (T).
- Go to the Porch behind the Piano Room.
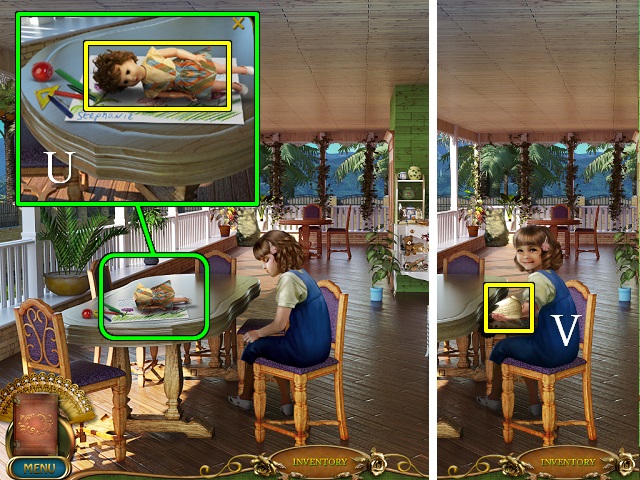
- Zoom into the table and attach the DOLL’S HEAD, DOLL’S LEG and DOLL’S ARM to the doll; pick up the DOLL (U).
- Give the DOLL to Stephanie.
- Take the SHEET MUSIC PIECE (V).
- Walk down.
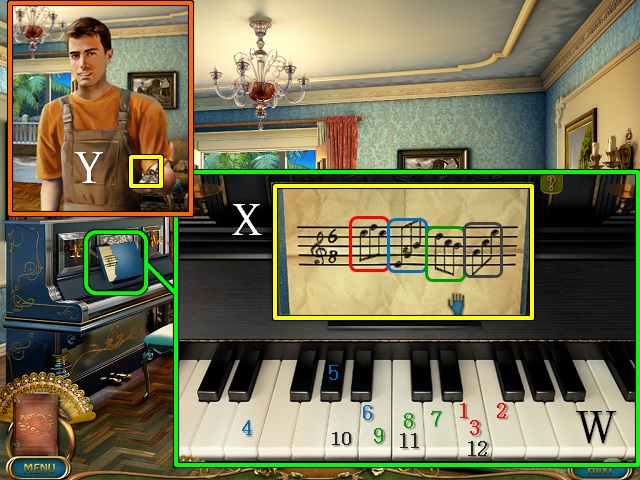
- Zoom into the piano and put the SHEET MUSIC PIECE on the reader for a mini-game.
- Repeat the notes the piano plays (W).
- Take the SHEET MUSIC (X).
- Give the SHEET MUSIC to Steven.
- Take the GARDEN GATE KEY (Y).
- Walk down.
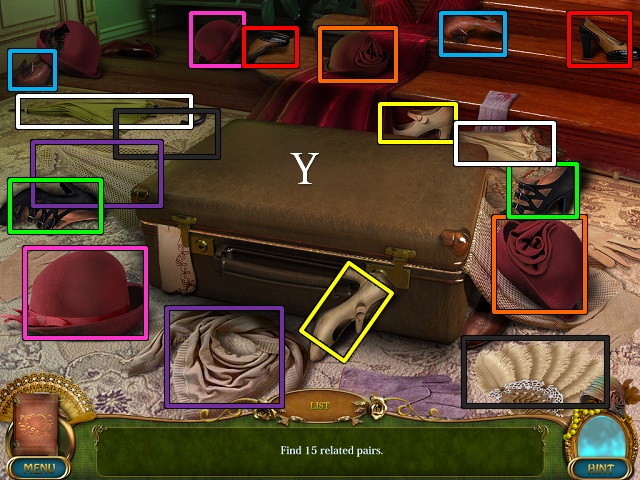
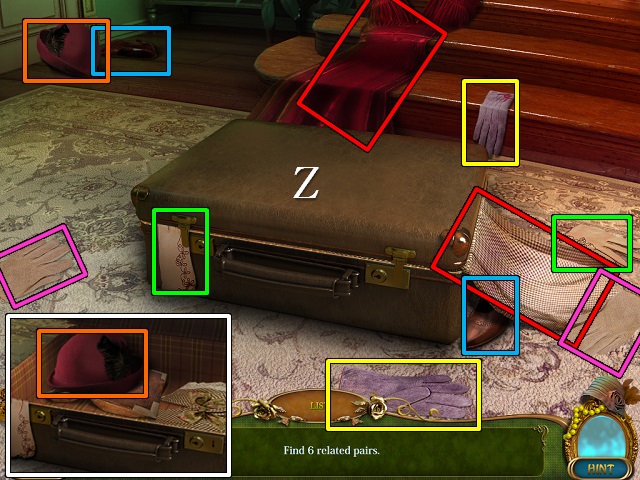
- Find 15 matching pairs of items (Y and Z); some pairs are identical, some are just similar.
- You will receive a SUITCASE and a VASE.
- Go to the Garden Gate.
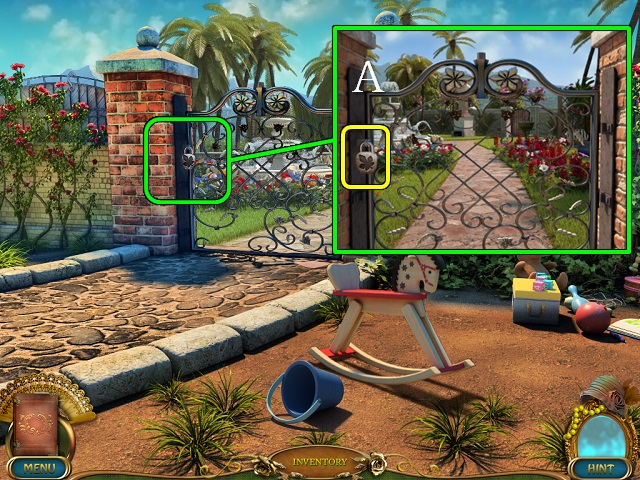
- Zoom into the gate and open it with the GARDEN GATE KEY (A).
- Walk forward to the Garden.
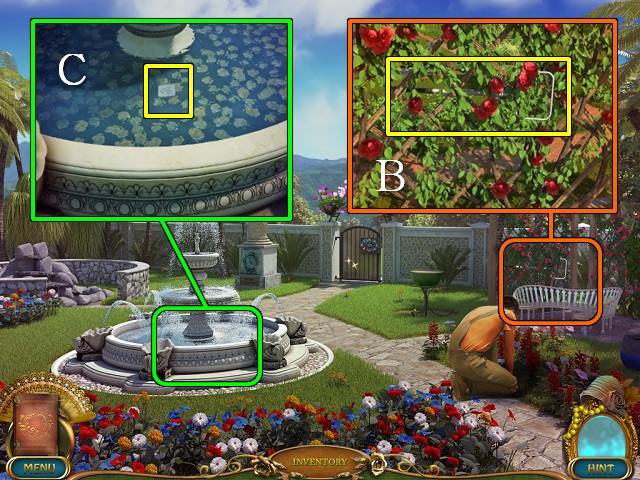
- Zoom into the bench; use the GLOVE to take the SCOOP NET (B).
- Zoom into the fountain; use the SCOOP NET to get the STATUE BUTTON (C).
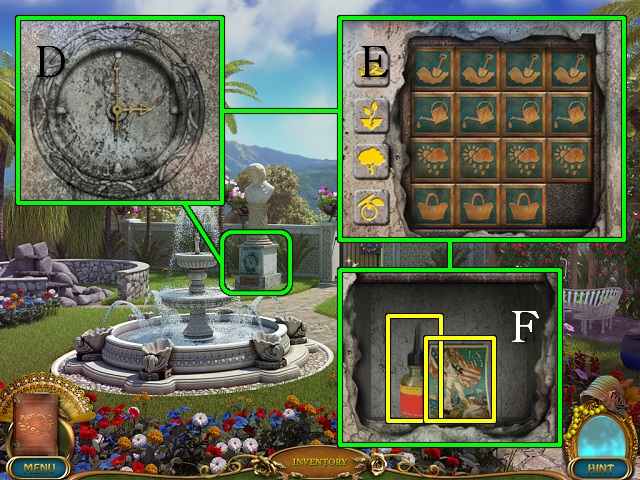
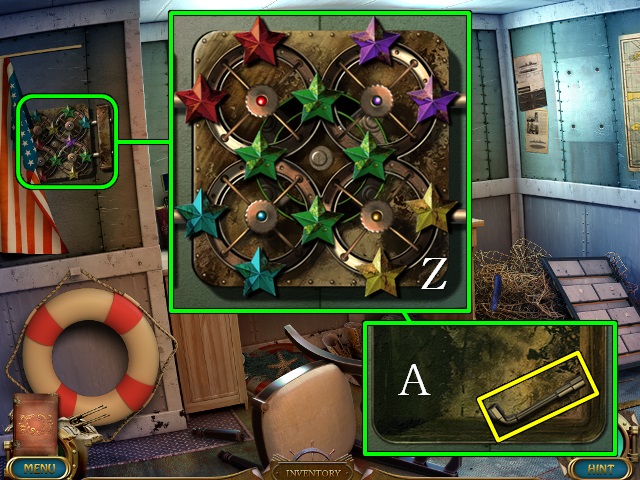
- Zoom into the statue base and put the HOUR HAND and MINUTE HAND on it; set the time to 3:00 (D).
- Put the STATUE TILE on the statue to trigger a mini-game.
- Slide the tiles into the correct rows as in the screenshot (E); the starting position is random so a step-by-step solution can’t be given.
- Take the PAMPHLET and the GLUE (F).
- Give the PAMPHLET to Steven.
Chapter 2: The Engagement Ring
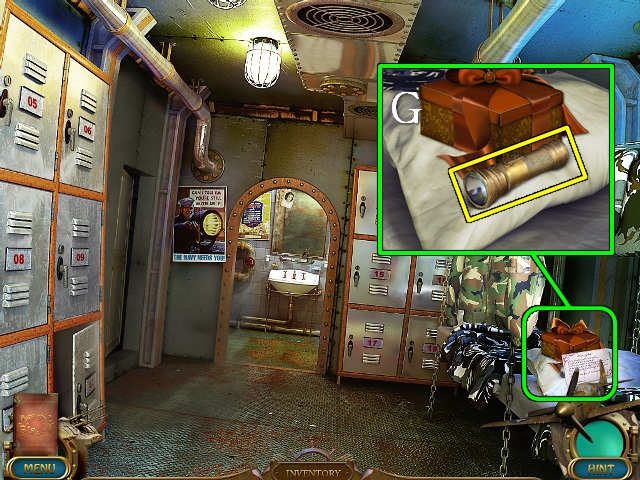
- Zoom into the bunk and take the note and the FLASHLIGHT (G).
- Walk forward into the Head.

- Zoom into the bucket and take the LEVER (H).
- Go to the medicine cabinet for a mini-game.
- Use the clues on the wall to figure out in which order to push the buttons (I).
- Zoom into the cabinet for a HOP.
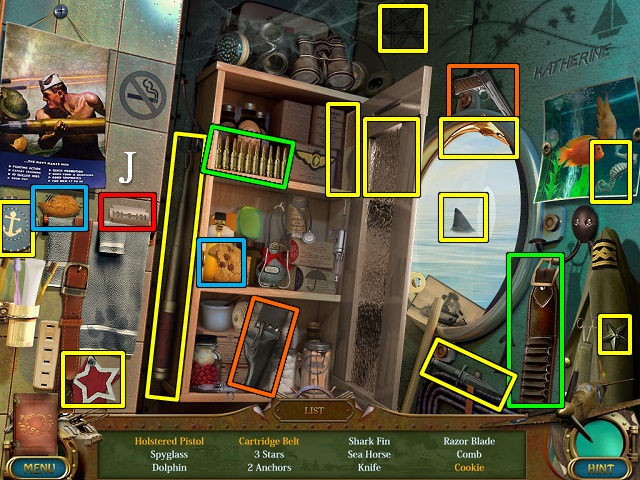
- Open the cabinet; one of the anchors will be behind the cabinet door.
- Put the pistol in the holster (orange).
- Put the bullets in the cartridge belt (green).
- Combine the two parts of the cookie (blue).
- You will receive a RAZOR BLADE (J).
- Walk down and go left into the Passageway.
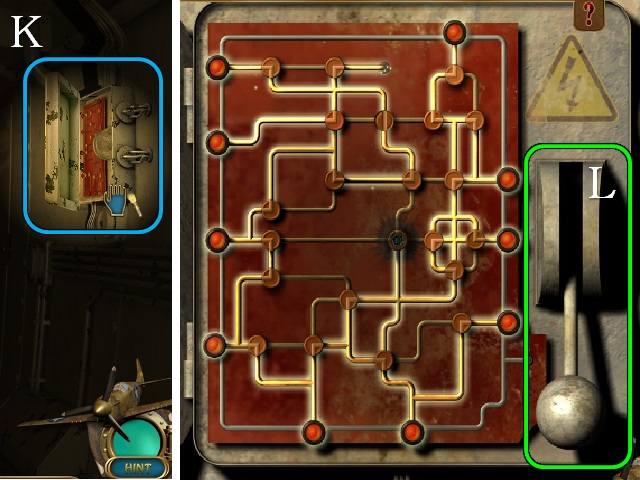
- Use the FLASHLIGHT on the scene to find the power box (K).
- Open the power box and zoom into it for a mini-game.
- Put the LEVER in the slot (L).
- Rotate the connectors until all lights are powered, then pull the lever to switch on the light.
- Zoom into the back door and take the photo (M); cut through the tape with the RAZOR BLADE, open the box and take the WIRE CUTTER (N).
- Zoom into the emergency box and remove the PIECE OF WIRE with the WIRE CUTTER (O); open the box and take the CAN OPENER (P).
- Go left into the Portside Passageway.

- Zoom into the panel and remove it with the CAN OPENER; take KEY 1/2.
- Walk down.
- Zoom into the door to the Petty Officer’s Office and pick the lock with the PIECE OF WIRE (R).
- Go through the door.
- Zoom into the net and cut it with the RAZOR BLADE; take KEY 2/2.
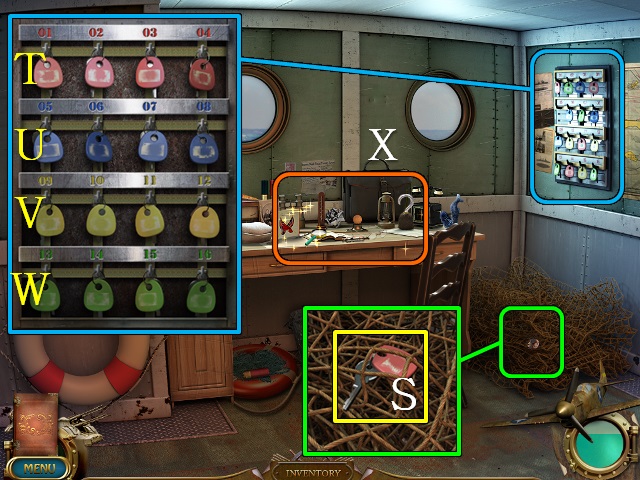
- Zoom into the key panel and put the KEYS on it to trigger a mini-game.
- Move the rows and columns of keys to organize them by color.
- From the default position, one solution is:
- Row W: 1 left, Column 01: 1 up, Column 02: 2 up, Column 03: 1 down.
- Row V: 1 left, Column 04: 1 up, Column 02: 1 down, Row W: 1 left, and Column 02: 1 up.
- You will receive a KEY.
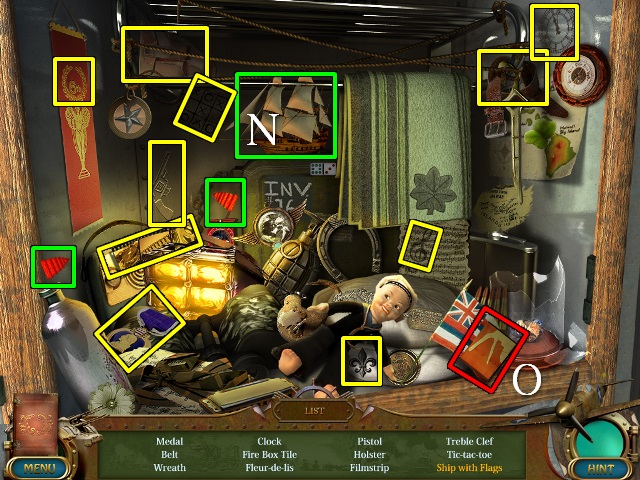
- Zoom into the desk for a HOP (X).
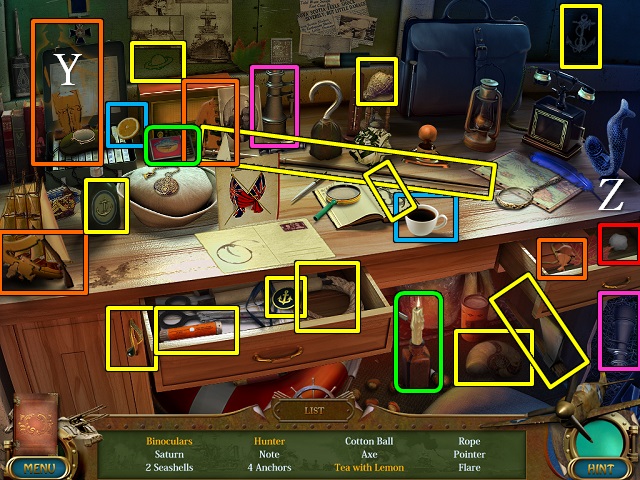
- Light the candle with the matches (green) to look under the desk.
- Assemble the hunter (orange; Y).
- Put the lemon in the tea (blue).
- Put the two halves of the binoculars together (pink).
- You will receive a COTTON BALL (Z).
- Go back to the Bunk Room.
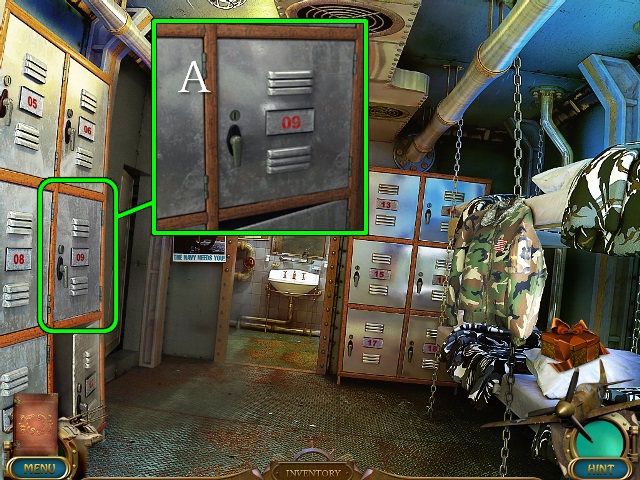
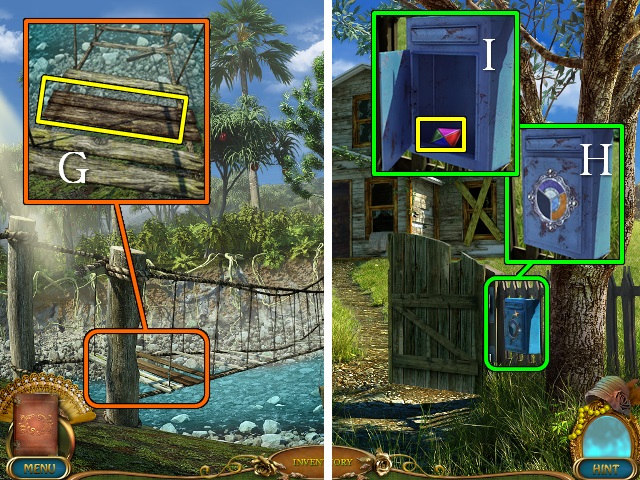
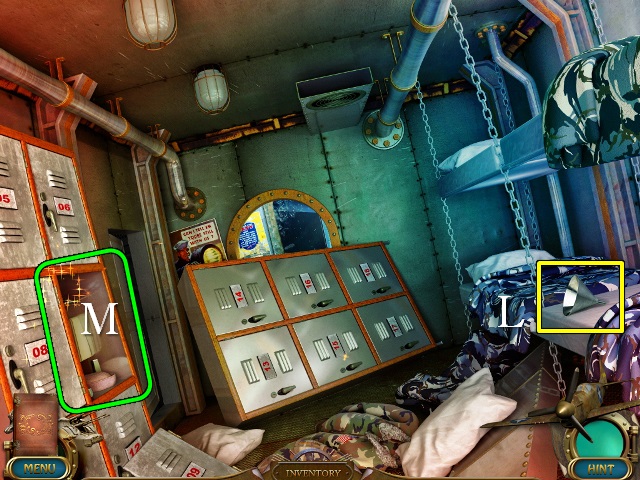
- Zoom into locker 09 (A) and open it with the KEY.
- Zoom into the locker again for a HOP.
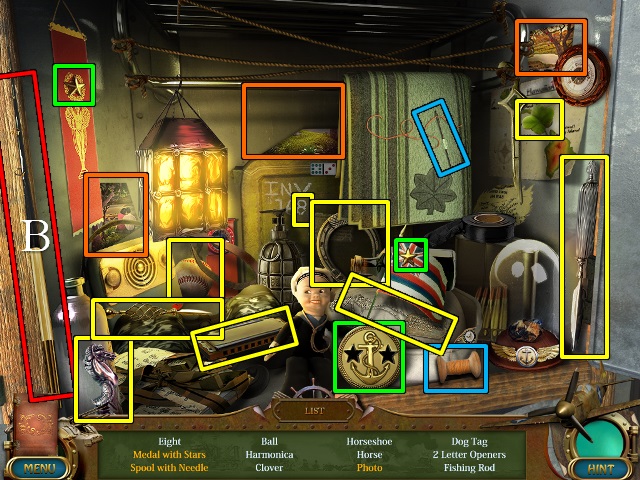
- Put the two stars on the medal (green).
- Combine the needle with the spool (blue).
- Assemble the photo (orange).
- You will receive a FISHING ROD (B).
- Go into the Head.
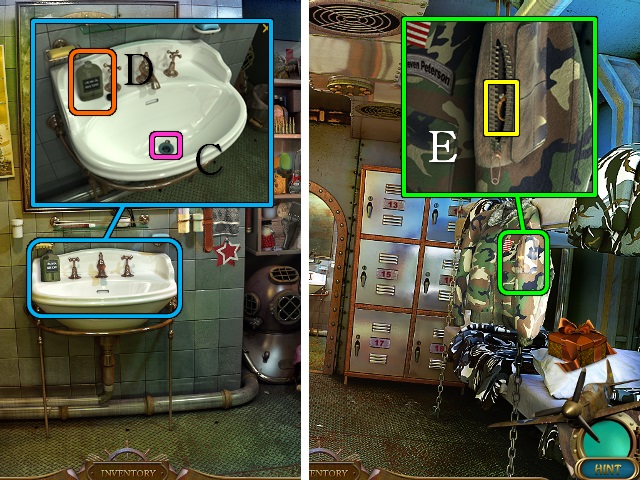
- Zoom into the sink and take the PIN with the FISHING ROD (C); use the COTTON BALL on the bottle of tonic (D) to get a WET COTTON BALL.
- Walk down.
- Zoom into the jacket, put the PIN on the zipper and wet it with the WET COTTON BALL; take the ring (E).
Chapter 3: Upstairs
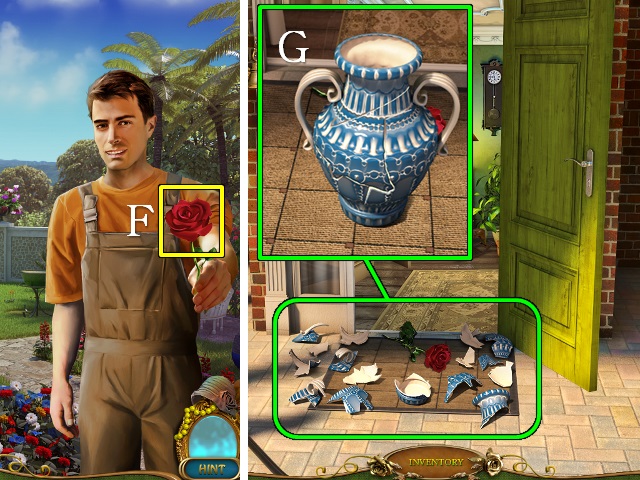
- Take the rose (F) to get a VASE WITH ROSE.
- Go to the Front Door.
- Zoom into the vase for a mini-game.
- Reassemble the vase; note that you need to place the pieces in the back before you can place the front ones (G).
- Once you’ve put all pieces in place, use the GLUE to trace the cracks in the vase.
- You get the VASE WITH ROSE back.
- Go into the Hallway.
- Play the HOP in the cupboard.
- Polish the shoe (H) with the brush (I).
- Select the colored gems in the order shown on the example (J) to get the star.
- You will receive an UMBRELLA (K).
- Go up the stairs.
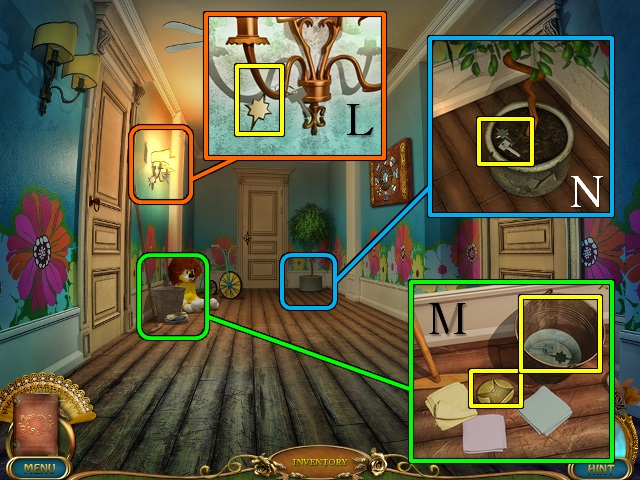
- Zoom into the lamp and attempt to take the key (L).
- Zoom into the bucket and take the PAIL; move the cloths until you find a DISC (M).
- Zoom into the plant, water it from the PAIL and take the ROOM KEY (N).
- Open the door on the left and go through it.
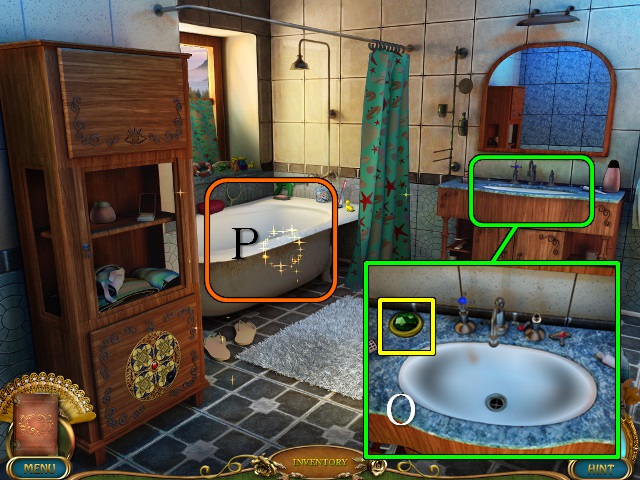
- Zoom into the sink and take OWL’S EYE ½ (O).
- Move the shower curtain.
- Zoom into the bath for a HOP (P).
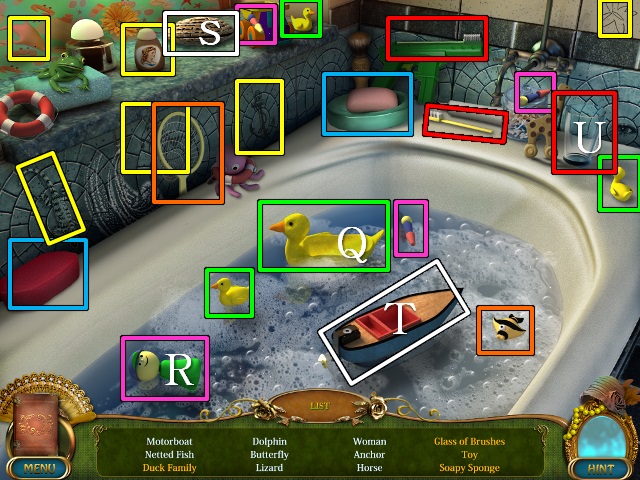
- Put the baby ducks (green) on the mother duck (Q) to find the duck family.
- Put the sponge on the soap for the soapy sponge (blue).
- Take the fish with the net (orange).
- Put the arms and legs (pink) on the toy (R); the fourth limb is behind the sponge.
- Open the shell (S) to find the key to wind up the motorboat (T).
- Put the three brushes (red) in the glass (U); the third brush is under the motorboat.
- After completing the HOP, take the PLUG from the bath.
- Go to the Garden Gates.
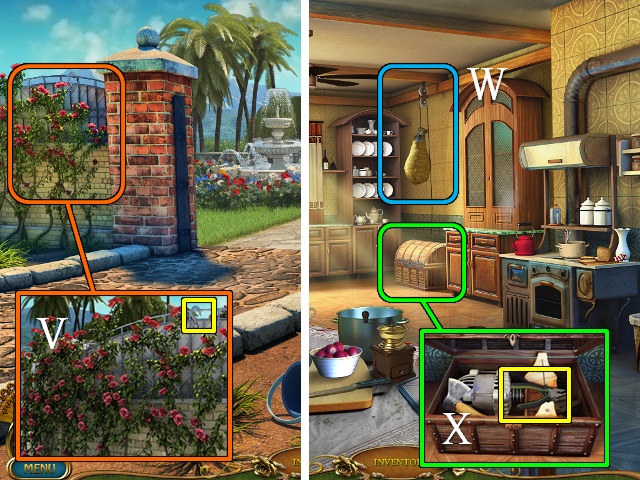
- Zoom into the roses; take the HOOK with the UMBRELLA (V).
- Go to the Kitchen.
- Put the HOOK on the pulley and pull the rope (W).
- Zoom into the chest and open it; take the PLIERS (X).
- Go to the Bathroom.
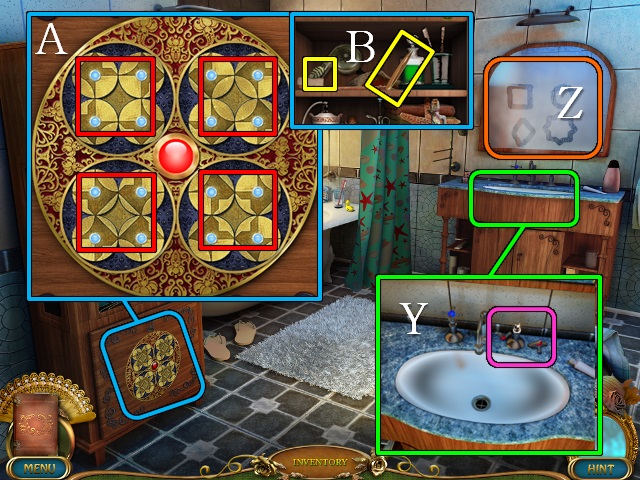
- Zoom into the sink and turn on the hot tap with the PLIERS (Y).
- Note the code on the mirror (Z).
- Zoom into the bottom of the cabinet and put the DISC on it to trigger a mini-game.
- Rotate the discs to make the shapes you saw on the mirror (A).
- Take the TWEEZERS and LEAF 1/2 (B).
- Walk down.
- Zoom into the door in the back and unblock the lock with the TWEEZERS (C); unlock the door with the ROOM KEY (D).
- Go through the door into Katherine’s Bedroom.
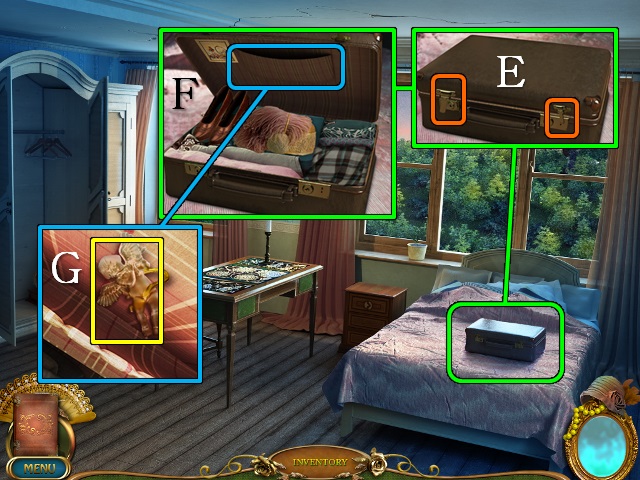
- Put the SUITCASE on the bed.
- Zoom into the suitcase, open the two clasps (E) and zoom into the pocket (F); take the ANGEL (G).
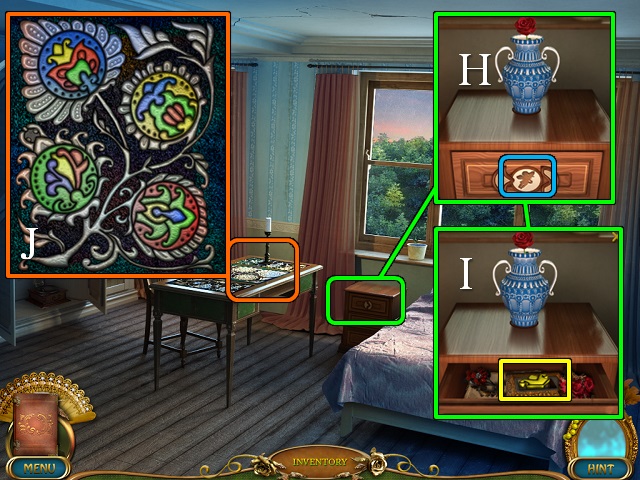
- Zoom into the bedside table and put the VASE WITH ROSE on it; put the ANGEL on the lock (H) and take the DESK ELEMENT from the drawer (I).
- Zoom into the desk and put the DESK ELEMENT on it to trigger a mini-game.
- First move the colored elements around the sides into the shapes in the center.
- Then swap the completed shapes around to complete the figure (J).
- Take the note and BOOK 1/2.
- Zoom into the box; take the paper plane note and the KNIFE (K).
- Attempt to walk down and pick the lock with the KNIFE (L).
- Walk down and go right into Patricia’s room.
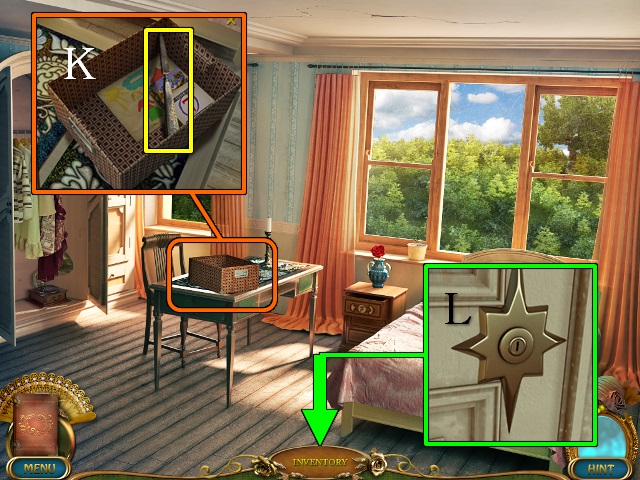
- Zoom into the desk, read the journal and take the LOCK PIECE (M).
- Zoom into the bed for a HOP (N).
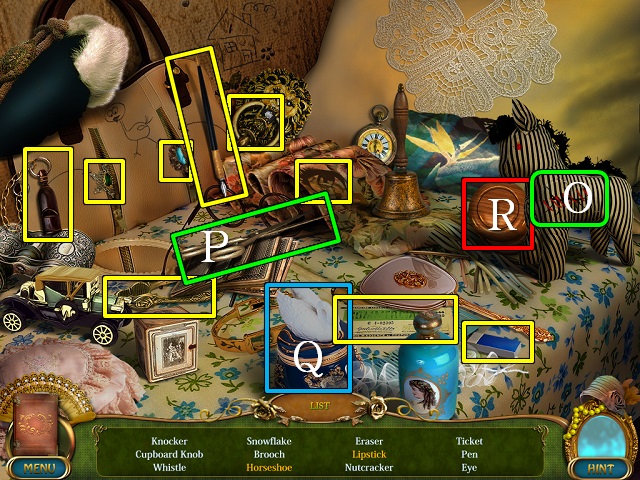
- Open the zippers to find the brooch and the snowflake.
- Cut the side of the toy zebra (O) with the scissors (P) to find the lipstick.
- The horseshoe is in the swan box (Q).
- You get a CUPBOARD KNOB (R).
- Walk down.
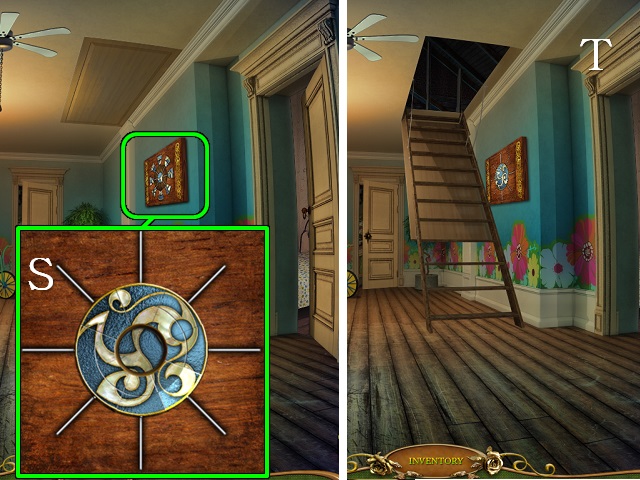
- Zoom into the attic lock and put the LOCK PIECE on it to trigger a mini-game.
- Rotate the center wheel and move the lock pieces to the center to reassemble the lock (S).
- Go up the ladder (T) to the Attic.
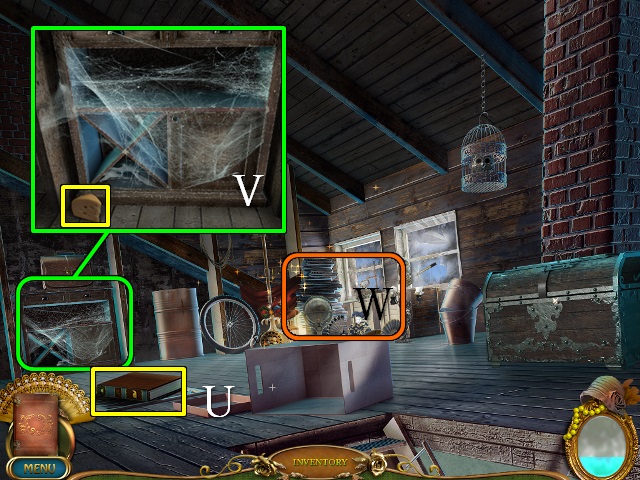
- Take BOOK 2/2 (U).
- Zoom into the cupboard and take the CHEESE (V).
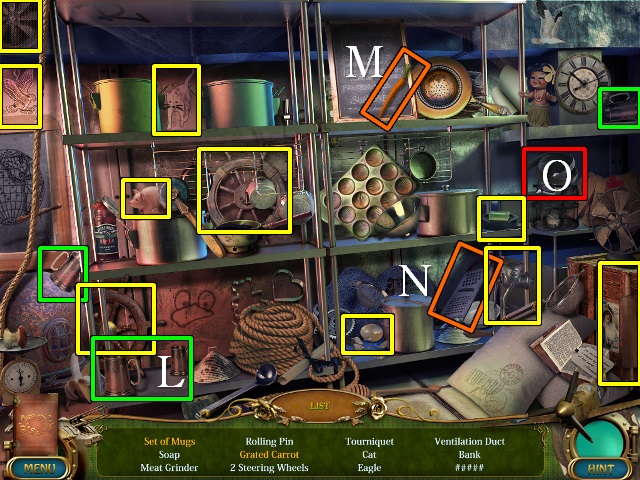
- Play the HOP in the center of the room (W).
- Put the five soldiers (green) on the green board (X).
- Inflate the ball (Y) with the bike pump (Z); the microscope and tuning fork are under the ball.
- Put the colored blocks (orange) on the sorter toy (A); you need to move the train (B) to find the triangle.
- You will receive SEEDS.
- Go to Patricia’s room.
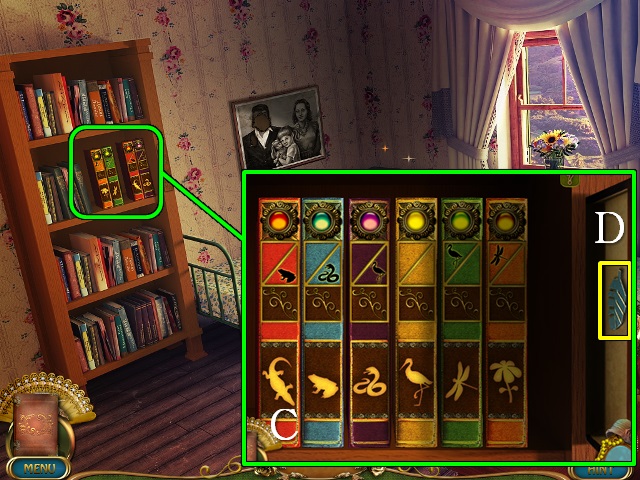
- Zoom into the shelf and put the BOOKS on it to trigger a mini-game.
- Using the images on the spines as clues, swap the books around until they’re in the right order (C).
- Take LEAF 2/2 (D).
- Go to the kitchen.
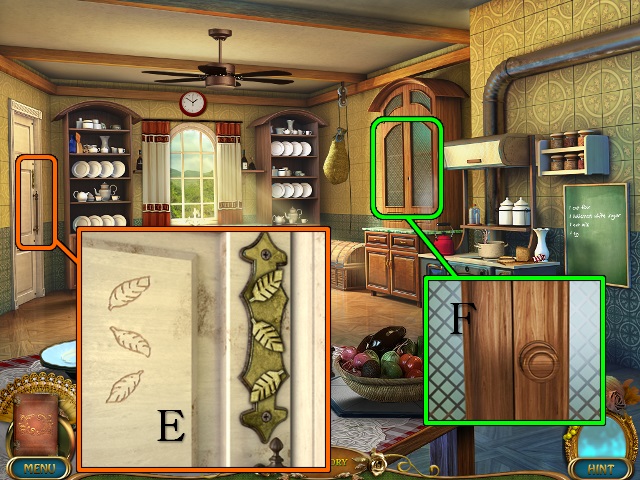
- Zoom into the basement door and put the LEAF on the handle; turn the leaves to the configuration carved into the door (E).
- Zoom into the cupboard; put the CUPBOARD KNOB on the door and turn it (F).
- Zoom into the cupboard for a HOP.
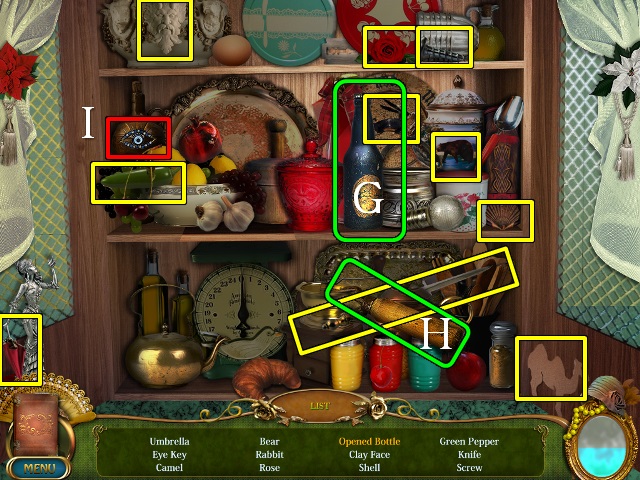
- Open the bottle (G) with the bottle opener (H).
- You will receive an EYE KEY (I).
- Go through the basement door.
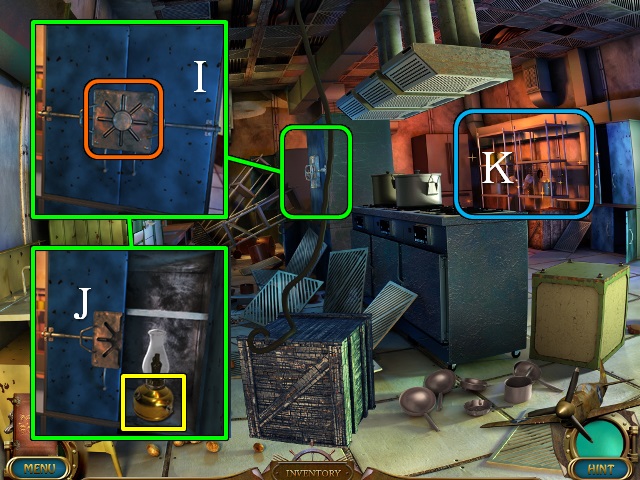
- Turn on the light (J).
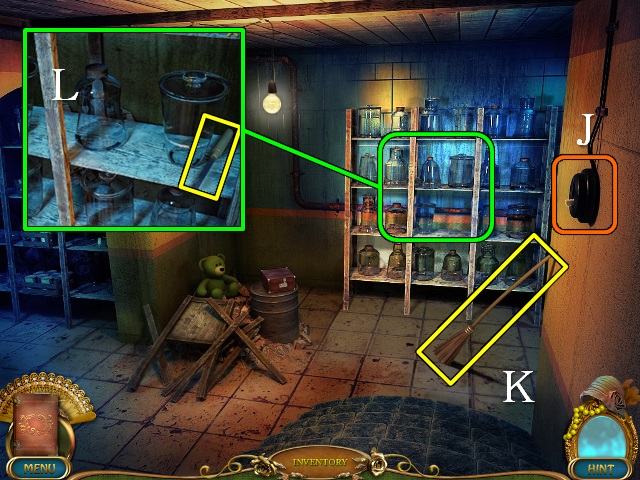
- Take the BROOM (K).
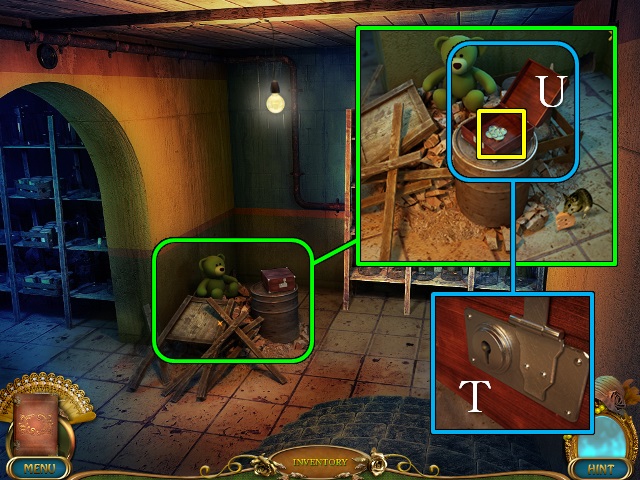
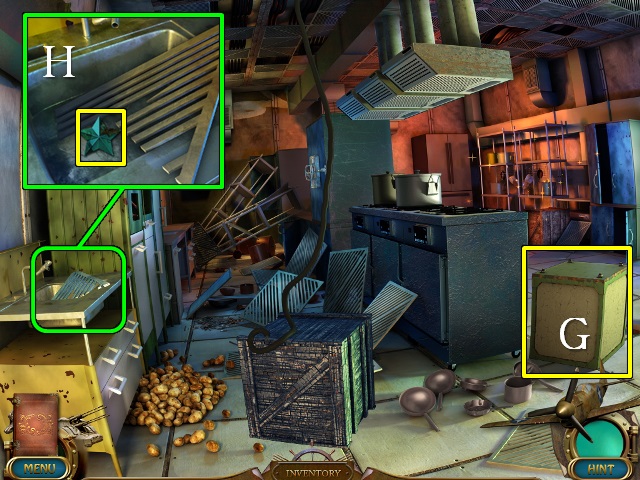
- Zoom into the shelves and take the CHISEL (L).
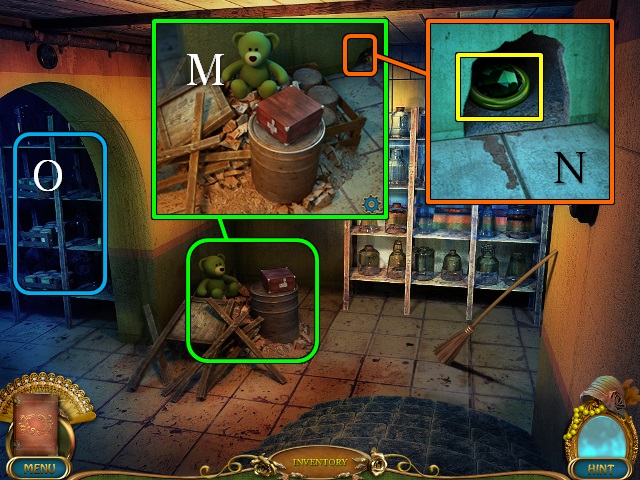
- Zoom into the junk pile and give the CHEESE to the mouse (M); zoom into the mouse hole and take OWL’S EYE 2/2 (N).
- Attempt to walk down.
- Play the HOP (O).
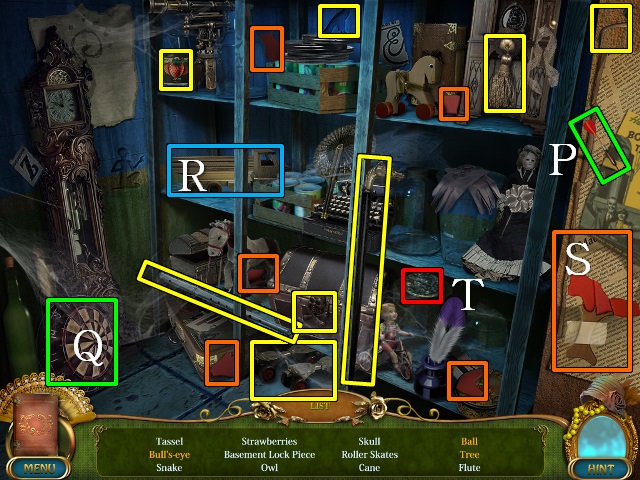
- Put the dart (P) on the dartboard (Q) for the bull’s eye.
- Tip the truck (R) to find the ball.
- Assemble the tree (orange; S).
- You will receive a BASEMENT LOCK PIECE (T).

- Walk down to zoom into the basement door; remove the cover with the CHISEL, put the BASEMENT LOCK PIECE on the lock and turn the three discs to make one connected line (U).
- Go to the Attic.
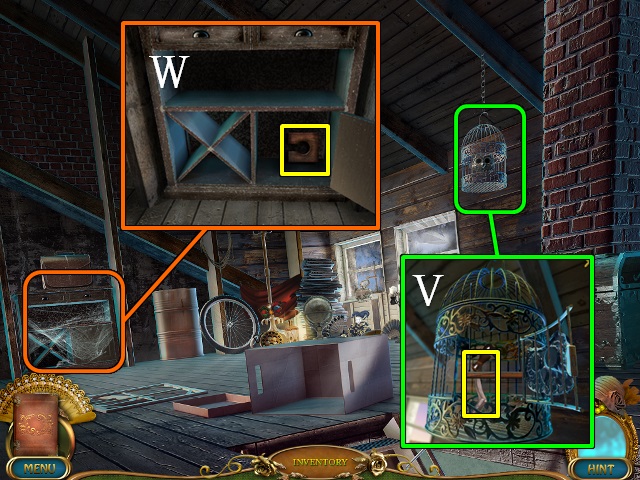
- Zoom into the birdcage and open it with the OWL’S EYEs 2/2; take the GRAMOPHONE HANDLE (V).
- Zoom into the cupboard and clean it with the BROOM; open the door and take TRUNK PART 1/3 (W).
- Go to Katherine’s Bedroom.
- Zoom into the wardrobe and put the GRAMOPHONE HANDLE on the gramophone (X); take TRUNK PART 2/3 (Y).
- Go to the Bathroom.
- Zoom into the top cabinet and open it with the EYE KEY; take TRUNK PART 3/3 (Z).
- Go back to the Attic.
- Zoom into the trunk and put the TRUNK PARTS on it to trigger a mini-game.

- Move the button to the hole on the right by moving it onto the tiles and sliding the tiles around to make a path.
- Slide the blue tile 1 up (A). Slide the tiles on the middle row 1 right (B).
- Slide the coin down, right, up (C). Move the tiles in the green block 5 moves counter-clockwise (D).
- Slide the yellow tile 1 left (E). Move the tiles in the orange block 5 moves counter-clockwise (F).
- Move the coin down and as far right as it will go (G). Move the tiles in the orange block 5 moves clockwise (H).
- Slide the coin to the left (I). Move the tiles in the orange block 3 moves counter-clockwise (J).
- Slide the white tile 1 left (K). Slide the coin 1 left (L).
- Slide the tile with the coin 1 right and move the coin 1 down (M). Read the paper and take the DRAWER LOCK PIECE (N) and GATE LOCK PIECE 1/2 (O).
- Go to Patricia’s Room.
- Zoom into the desk, put the DRAWER PIECE on the drawer and press the three pieces in the order shown on the desk (P); take the CHEST KEY (Q).
- Go to the Piano Room.
- Zoom into the coffee table; unlock the jeweled chest with the CHEST KEY (R) and take the PIN (S).
- Go to the Basement.
- Zoom into the junk and then into the box; pick the lock with the PIN (T) and take the TRUNK BUTTON (U).
- Go back to the Piano Room.

- Zoom into the trunk and open it with the TRUNK BUTTON (V); take the SCISSORS (W).
- Go forward to the Porch.
- Zoom into the far corner; open the sack with the SCISSORS and take the SACK (X).
- Go to the Garden.
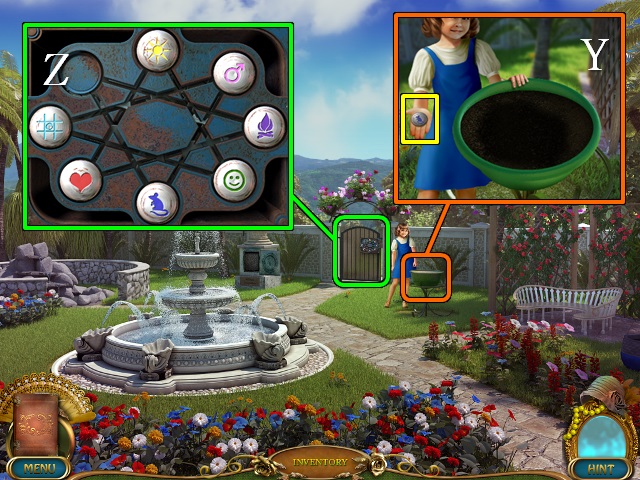
- Zoom into the flower pot and plug the hole with the PLUG; put the soil from the SACK in the pot, sow the SEEDS, water them with the JUG OF WATER and take the GATE LOCK PIECE from Stephanie (Y).
- Zoom into the gate and put the GATE LOCK PIECES on it for a mini-game.
- Slide the discs around to their correct spots (Z).
- Slide a button to the empty spot, then follow the line back to the button you can slide into the spot that just opened up etc.; it takes many moves but if you keep following the line you’ll get there in the end.
- Go through the gate.
Chapter 4: The Old House
- Read the note in the paper plane (A).
- Walk forward to the Grove.
- Zoom into the bench for a HOP.
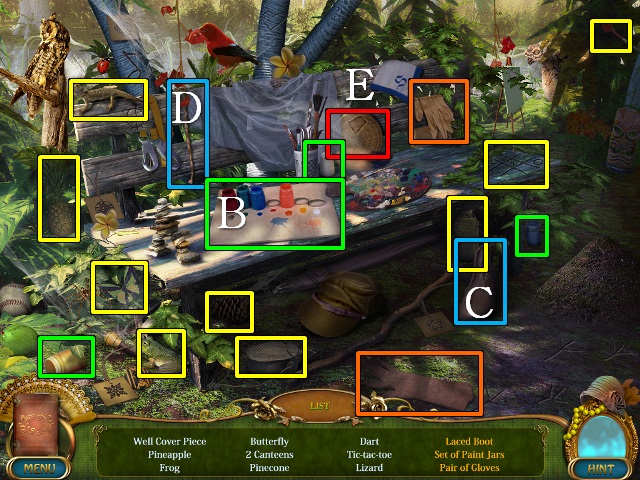
- Put the three jars of paint (green) on the board (B).
- Lace the boot (C) with the shoelace (D).
- Combine the two gloves (orange).
- You will receive the WELL COVER PIECE 1/2 (E).
- Walk forward to the Bridge.
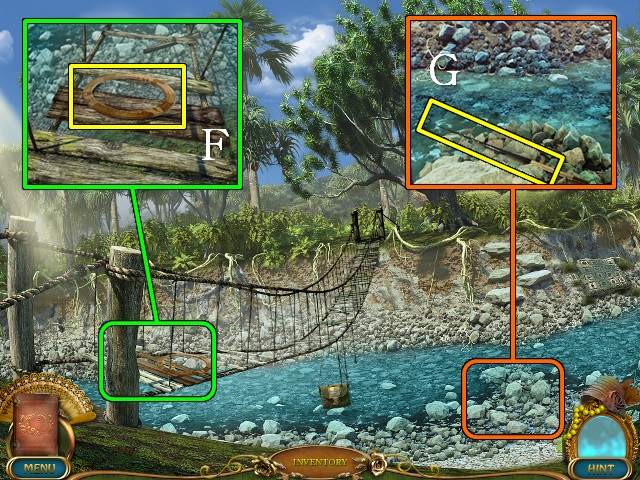
- Zoom into the bridge and take WELL COVER PIECE 2/2 (F).
- Zoom into the rocks and take the FISHING ROD (G).
- Walk down twice to the Stairs.
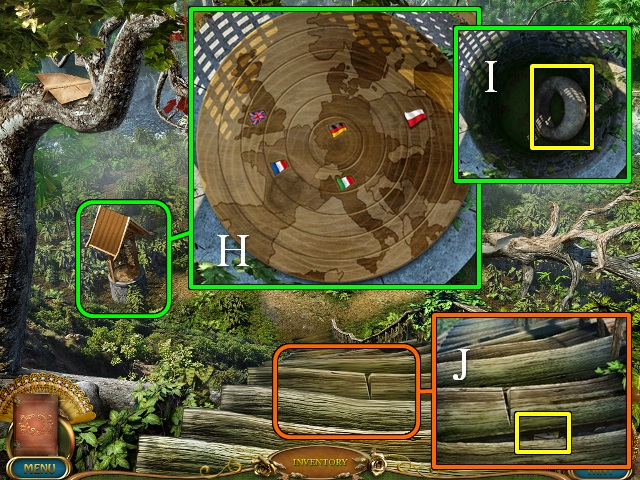
- Zoom into the well and trigger the mini-game with the WELL COVER PIECES.
- Grab and rotate the rings to create a map of Europe.
- When the map is complete, put the flags on the correct countries (H).
- Scrape the moss of the tire with the CHISEL and take the TIRE (I).
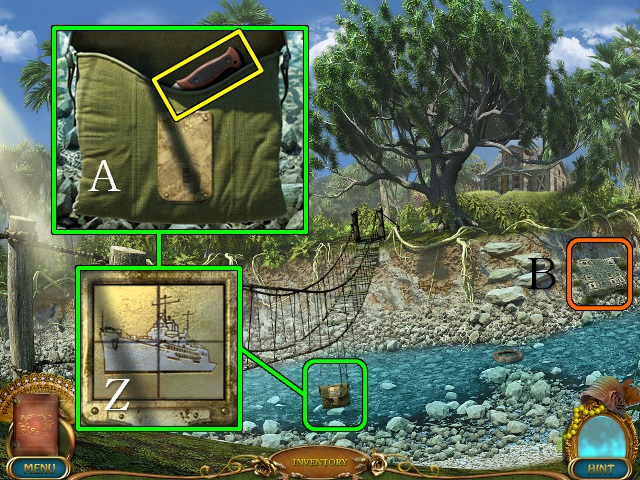
- Zoom into the steps and take BAG LOCK PIECE 1/2 with the FISHING ROD (J).
- Go to the Bridge.
- Zoom into the stream and put the TIRE in it (K).
- Walk forward to the Gate.
- Move the ivy and take the MAGNIFYING GLASS (L).
- Walk down.
- Burn through the ropes with the MAGNIFYING GLASS (M); you get a ROPE.
- Walk down.
- Use the ROPE on the tree.
- Climb to the nest and take the INDICATOR (N).
- Go to the Gate.
- Open the gate.
- Zoom into the front door (O) and use the INDICATOR to trigger the mini-game (P).
- Remove the bolts by selecting two tabs that add up to the correct number of dots.
- You can only select tabs that the three points of the indicator point to.
- Rotate the indicator using the arrow buttons.
- Go into the Old House.
- Zoom into the table and take the paper plane and the STONE (Q); open the drawer and take the WOOD BUTTON (R).
- Zoom into the shelves and put the WOOD BUTTON on the shelf; push the buttons in numerical order (S) and take BAG LOCK PIECE 2/2 (T).
- Zoom into the couch for a HOP (U).
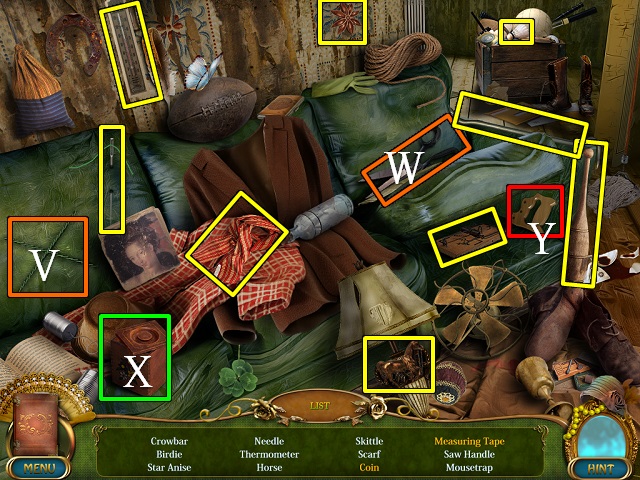
- Lift the cushion to find the saw handle and mousetrap.
- Cut the stitched cushion (V) with the scissors (W) to find the coin.
- The measuring tape is in the box (X).
- You will receive a SAW HANDLE (Y).
- Go to the Bridge.
- Zoom into the bag and put the BAG LOCK PIECE on the lock; swap the tiles around to restore the picture (Z), read the newspaper and take the KNIFE (A).
- Zoom into the puzzle on the shore (B) and activate it with the STONE.
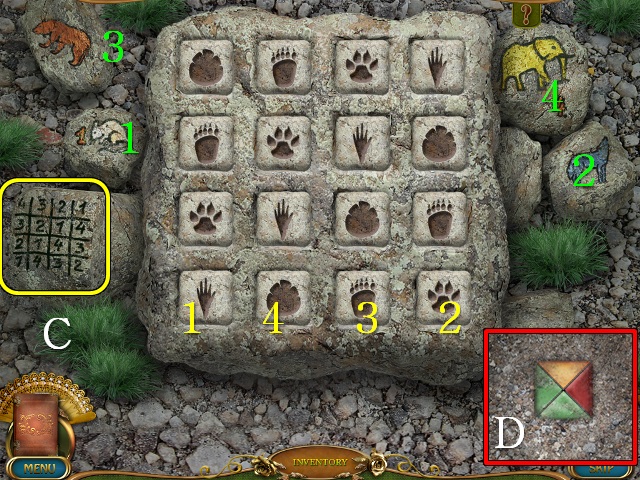
- Figure out which paw prints belong to which animal.
- Organize the animals according to size: mouse (1), wolf (2), bear (3), and the elephant (4).
- Rearrange the tiles according to the numbers on the grid (C).
- Take the STAINED GLASS 1/2 (D).
- Walk down.
- Zoom into the shrubs and cut them back with the KNIFE; take the MAILBOX LOCK PART (E).
- Walk down.
- Zoom into the tree and put the SAW HANDLE on the saw blade; take the SAW (F).
- Go to the Bridge.
- Zoom into the bridge and remove the PLANKS with the SAW (G).
- Go to the Gate.
- Zoom into the mailbox and put the MAILBOX LOCK PART on it (H); push the three buttons until they’re all green, read the newspaper and take the STAINED GLASS (I).
- Go into the Old House.

- Put the PLANKS over the gap in the floor (J).
- Zoom into the back door and put the STAINED GLASS on it to trigger a mini-game.
- Arrange the pieces of glass on the door so the colors of adjoining pieces match (K).
Chapter 5: Escaping the Ship
- Take the FUNNEL (L).
- Zoom into the locker for a HOP (M).
- Put the two flags (green) on the ship (N).
- You will receive a FIRE BOX TILE (O).
- Go left and then right into the Petty Officer’s Cabin.
- Play the HOP on the desk.

- Put the dial (P) on the compass (Q).
- The snorkel and one of the eagles are in the left drawer (R).
- You will receive the GALLEY KEY (S).
- Walk down to the Passageway and go right through the second door into the Tool Room.
- Take the HARPOON (T).
- Zoom into the wall and rearrange the wrenches according to size (U).
- You will receive a WRENCH.
- Zoom into the bench and take the CANDLE (V).
- Walk down.
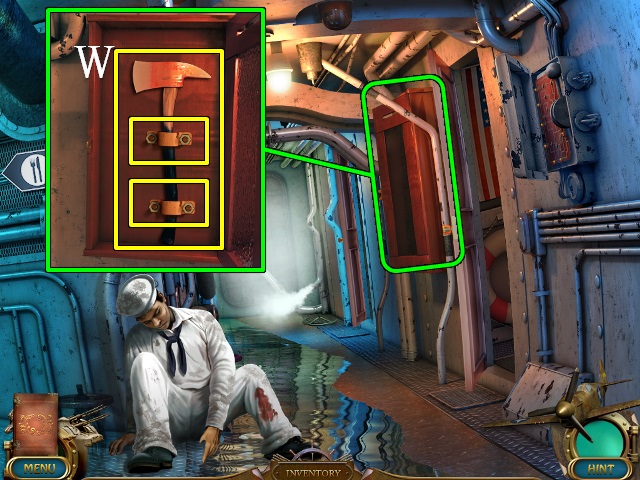
- Zoom into the emergency box and use the WRENCH to take two sets of NUTS and CLAMPS; You will receive the AXE (W).
- Go left to the Portside Passageway.
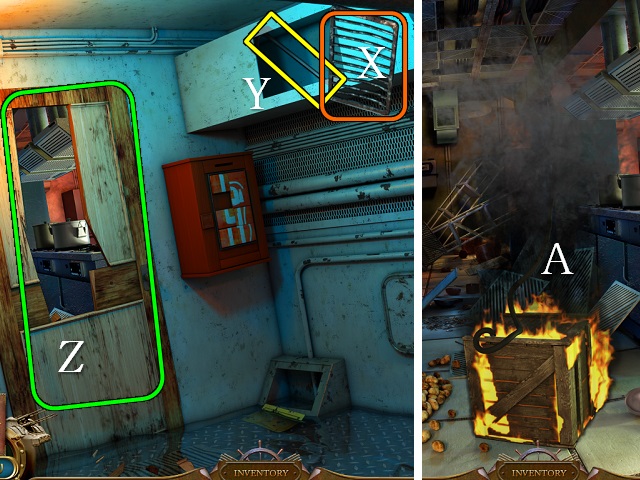
- Use the HARPOON to remove the grate (X) and take the CROWBAR (Y).
- Break through the door with the AXE (Z).
- Go through the door into the Galley.
- Light the CANDLE in the fire to get a LIT CANDLE (A).
- Go to the Tool Room.
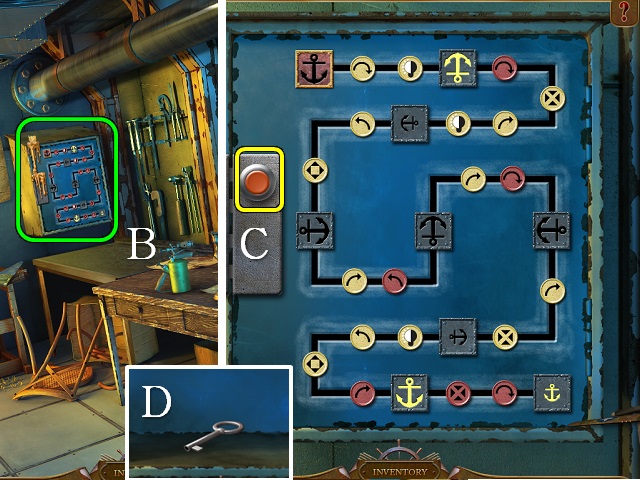
- Zoom into the safe (B) and melt the wax with the LIT CANDLE to trigger a mini-game.
- Push the red button (C) to make the anchor move.
- Activate the correct buttons so that the anchor will change shape and color according to the guide blocks along the way.
- The correct setting is shown in the screenshot.
- Read the fire escape plan and take the EXTINGUISHER BOX KEY (D).
- Go to the Portside Passageway.
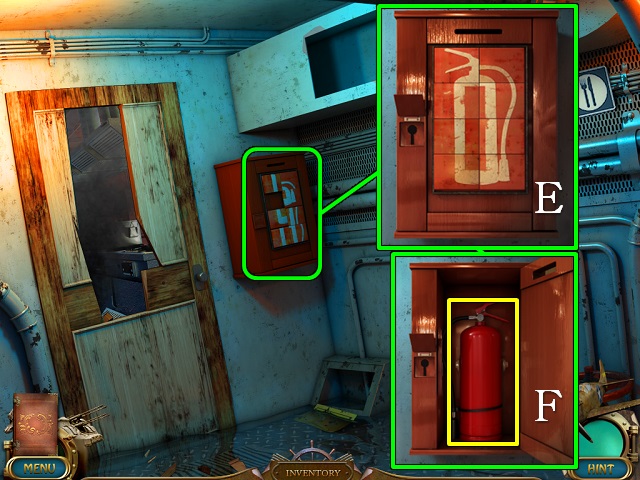
- Zoom into the fire extinguisher box and put the BOX TILE on it, then move the tiles around to recreate the picture of a fire extinguisher (E); open the box with the EXTINGUISHER BOX KEY and take the EXTINGUISHER (F).
- Go into the Galley.
- Extinguish the fire with the EXTINGUISHER.
- Pick up the BOX (G).
- Zoom into the sink and take SAFE LOCK PART 1/2 (H).
- Zoom into the locked cabinet, put the GALLEY KEY on it and turn it to open (I); take the glass from the lamp and pick up the KEROSENE CANISTER (J).
- Zoom into the right wall for a HOP (K).
- Put the two mugs (green) with the two other ones on the shelf (L).
- Grate the carrot (M) on the grater (N).
- You will receive a TOURNIQUET (O).
- Go to the Petty Officer’s Cabin.
- Zoom into the wall and use the WRENCH to take the four BOLTS (P).
- Zoom into the fallen cabinet and take off the PLANKS with the CROWBAR (Q).
- Go to the Bunk Room.
- Put the BOX down and climb over the lockers into the Head (R).
- Zoom into the diving helmet, open the visor and take the INSTRUCTIONS PIECE (S).
- Zoom into the wall cabinet for a new HOP (T).
- Put the two pieces of the moon (green) with the one in the window (U).
- Move the poster (V) to find the compass rose.
- You will receive AMMONIA (W).
- Go to the sailor in the Passageway.
- Revive the sailor with the AMMONIA and put the TOURNIQUET around his leg (X).
- Take SAFE LOCK PART 2/2 (Y).
- Go into the Petty Officer’s Cabin.
- Zoom into the safe and activate the mini-game with the SAFE LOCK PARTS.
- Rotate the circles until the stars are all on the wheels with matching color and the green stars are in the center (Z).
- The starting position is random, so no step-by-step solution can be given.
- Take the SOCKET WRENCH (A).
- Go to the Tool Room.
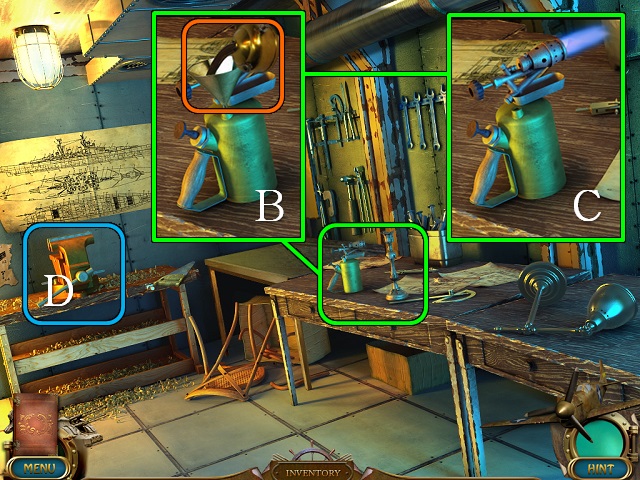
- Zoom into the bench, put the FUNNEL on the blowtorch, pour kerosene from the KEROSENE CANISTER down the funnel and light the blowtorch with the LIT CANDLE (B); take the BLOWTORCH (C).
- Go towards the vice (D).
- Put the INSTRUCTIONS PIECE on the wall (E).
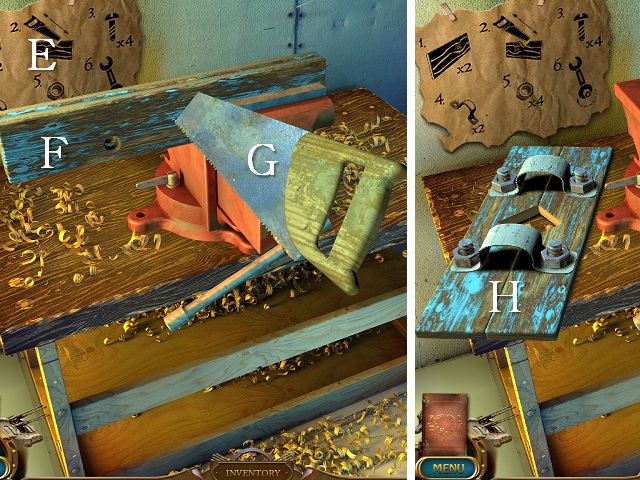
- Put the PLANKS in the vice (F) and cut them with the SAW (G).
- Put the BOLTS, CLAMPS and NUTS on the boards and tighten with the WRENCH.
- Take the EXIT DOOR OPENER (H).
- Go to the Portside Passageway.
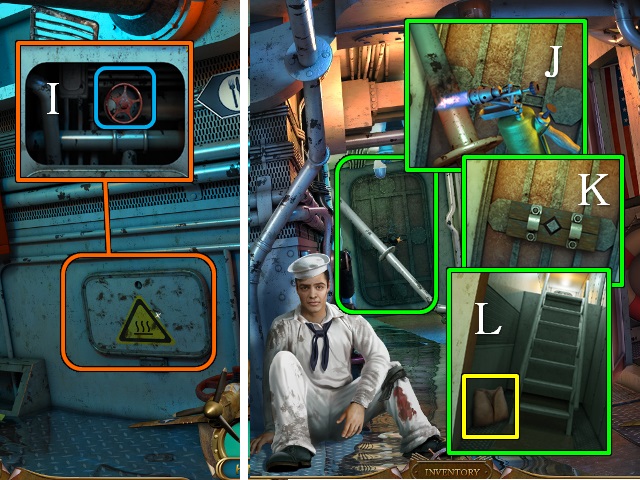
- Zoom into the metal panel and remove it with the SOCKET WRENCH; turn the valve (I).
- Walk down.
- Zoom into the back door and remove the pipe with the BLOW TORCH (J); open the door with the EXIT DOOR OPENER and take the LIFE JACKET (L).
- Give the LIFE JACKET to the sailor.

- Zoom into the wall calendar, take off the top page and take the calendar (M).
- Zoom into the bedside cabinet; read the note and take the SCISSORS (N).

- Zoom into the bed, then into the suitcase (O); zoom into the suitcase pocket, cut the lining with the SCISSORS and take KNITTING NEEDLE 1/2 (P).
- Open the cupboard, zoom into it and take KNITTING NEEDLE 2/2 (Q).

- Zoom into the desk and cut the ribbon with the SCISSORS (R).
- Zoom into the floorboards and take the envelope with the KNITTING NEEDLES (S); open the envelope and take the NOTE WITH CODE (T).
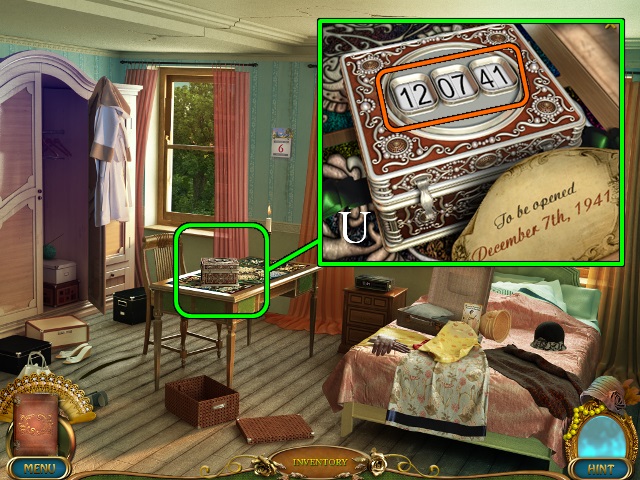
- Zoom into the desk again and put the NOTE WITH CODE on the desk; enter 12-07-41 into the lock (U) and take the postcard.
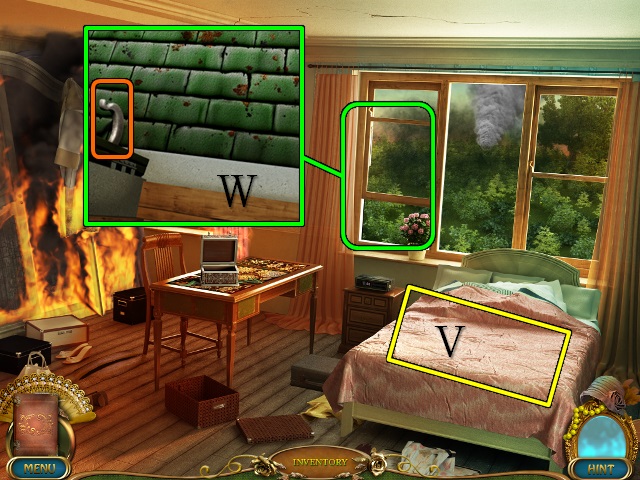
- Move everything off the bed and take the BLANKET (V).
- Zoom into the window and hang the BLANKET from the hook (W).
- Open the window for Patricia.
- Congratulations, you have completed Love Story: The Way Home!


 Chronicles of Mystery: The Legend of the Sacred Treasure Walkthrough , Guide, & Tips
 Nevertales: Legends Walkthrough, Guide, & Tips
 Fairway Solitaire HD Tips and Tricks, Guide, & Tips
 Reflections of Life: Equilibrium Walkthrough, Guide, & Tips
 Secrets of the Dark: Eclipse Mountain Walkthrough, Guide, & Tips