Nevertales: Legends Walkthrough, Guide, & Tips
Nevertales: Legends Walkthrough

Welcome to the Nevertales: Legends Walkthrough.
The love between you and your husband was strong enough to end a war… but is it strong enough to save the world?
Whether you use this document as a reference when things get difficult or as a road map to get you from beginning to end, we’re pretty sure you’ll find what you’re looking for here.
This document contains a complete Nevertales: Legends game walkthrough featuring annotated screenshots from actual gameplay!
We hope you find this information useful as you play your way through the game. Use the walkthrough menu below to quickly jump to whatever stage of the game you need help with.
Remember to visit the Big Fish Games Forums if you find you need more help. Have fun!
This walkthrough was created by prpldva, and is protected under US Copyright laws. Any unauthorized use, including re-publication in whole or in part, without permission, is strictly prohibited.
General Tips
- This is the official guide for Nevertales: Legends.
- This guide will not mention each time you have to zoom into a location; the screenshots will show each zoom scene.
- Hidden-object puzzles are referred to as HOPs. This guide will not show HOP solutions. It will identify the location of the HOP and the inventory item acquired.
- This guide will show solutions for non-random puzzles. Please read the in-game instructions for each puzzle.
Chapter 1: Save the King

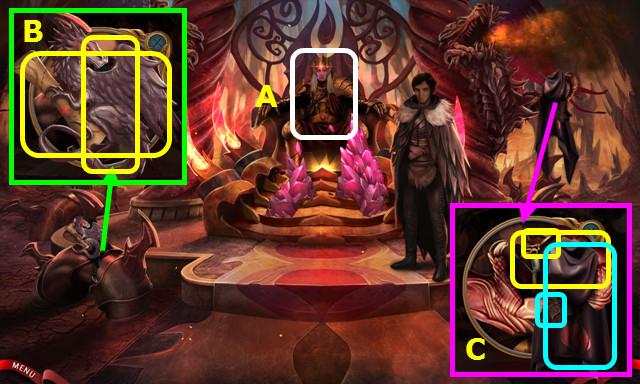
- Talk to Ashbringer (A).
- Take the MAP and INVENTORY BAG (B). Both now appear in the menu bar.
- Take the cloak, gloves, ROYAL KEY, and ROYAL CHEST (C).
- Combine the ROYAL CHEST and ROYAL KEY; take the LETTER OPENER (inventory).

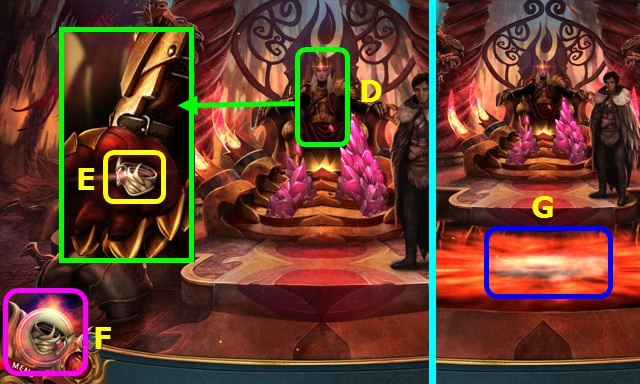
- Talk to Ashbringer (D); take the RING OF FIRE (E).
- The RING OF FIRE in now in the menu bar (F).
- Use the RING OF FIRE; enter the portal (G).

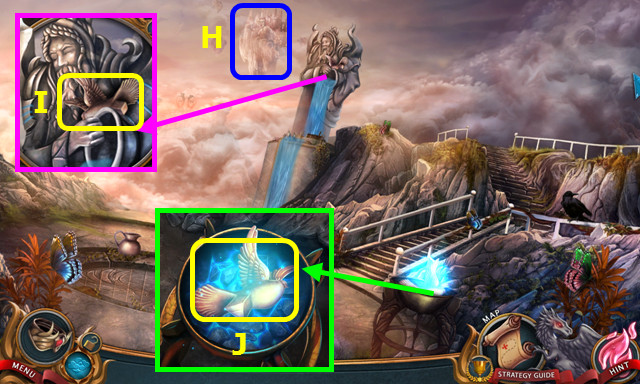
- Look at the Wind Palace (H).
- Take the SQUARE-SHAPED DOVE (I).
- Select the cauldron and talk to Hark; use the RING OF FIRE and take the TRIANGLE-SHAPED DOVE (J).

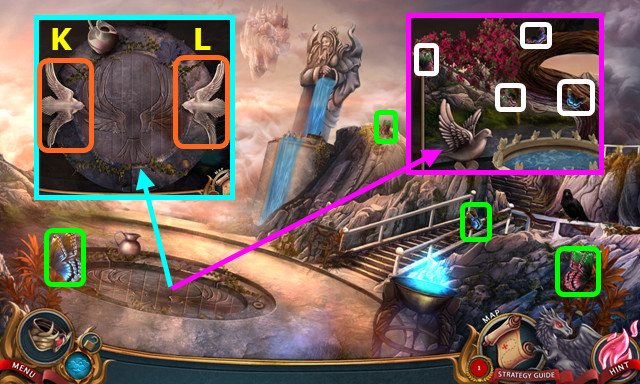
- Place the TRIANGLE-SHAPED DOVE (K) and the SQUARE-SHAPED DOVE (L); turn both doves.
- Select the 4 butterflies (white).
- Select the 4 butterflies (green).
- Walk right.

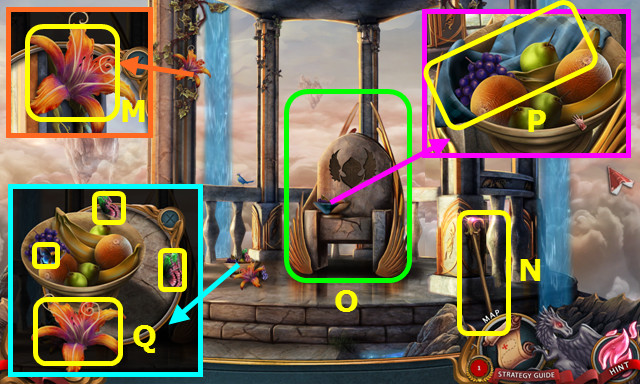
- Take the NECTAR FLOWER (M) and CANE (N).
- Turn the throne (O); move the fruit and take the CLOTH (P).
- Place the NECTAR FLOWER and select the 3 butterflies; take the NECTAR FLOWER (Q).
- Walk down.

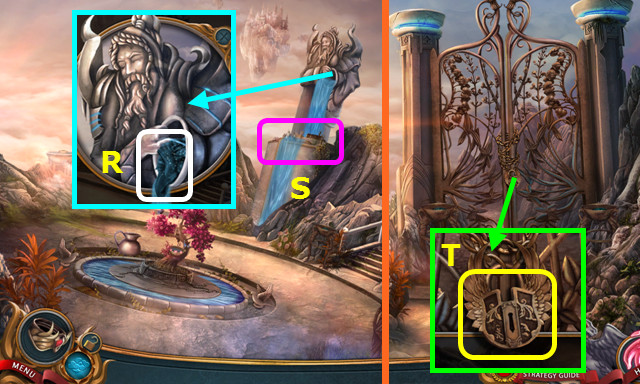
- Place and push the CLOTH (R).
- Play the HOP; earn the WINGED KEY (S).
- Walk left.
- Use the WINGED KEY (T); earn the WING PADLOCK.
- Disassemble the WING PADLOCK to find the 2 WINGS and PADLOCK (inventory).
- Open the gate; go forward.

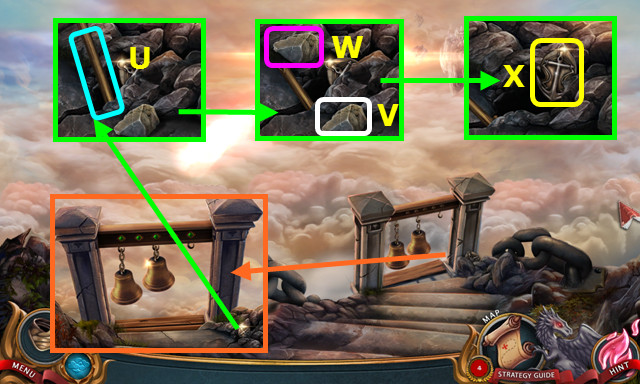
- Place, then use the CANE 3x (U).
- Pick up the rock (V); select the rock 2x (W).
- Take the HARBOR EMBLEM (X).
- Go to the Cliff Gazebo.

- Place the HARBOR EMBLEM and 2 WINGS (A).
- Talk to the Harbor Master (B).
- Take the BELL (C).
- Return to the Skyport.


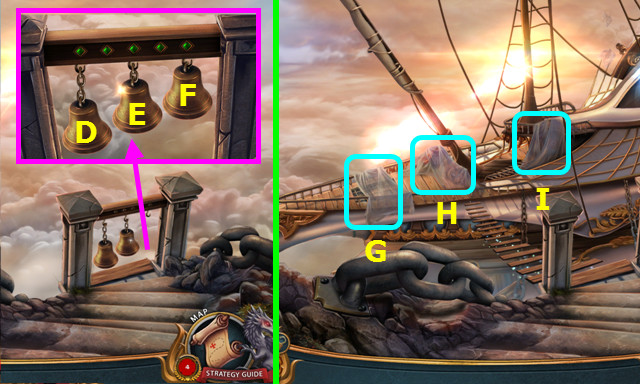
- Place the BELL; select D-F-E-F-D.
- Select G-H-I.

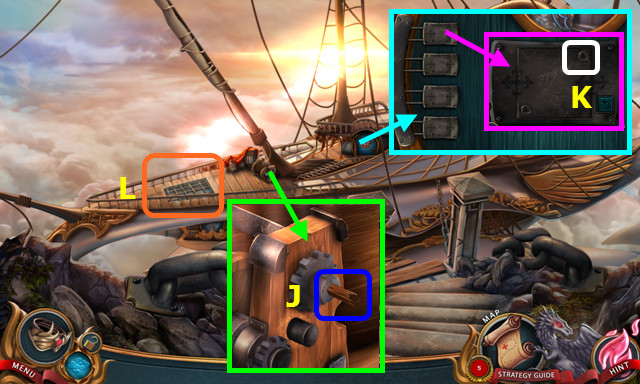
- Pull the wood shard (J).
- Note the screw-hole shape (K).
- Enter (L).

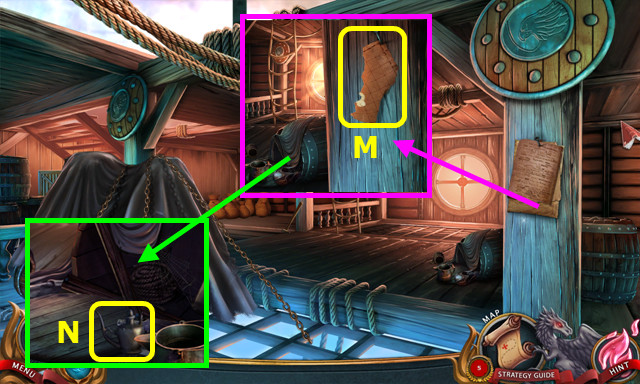
- Remove the 3 papers; take the 1/3 SKYMAP PIECE (M).
- Remove the items; take the OIL (N). The OIL will be behind the third item.
- Walk down 3x.

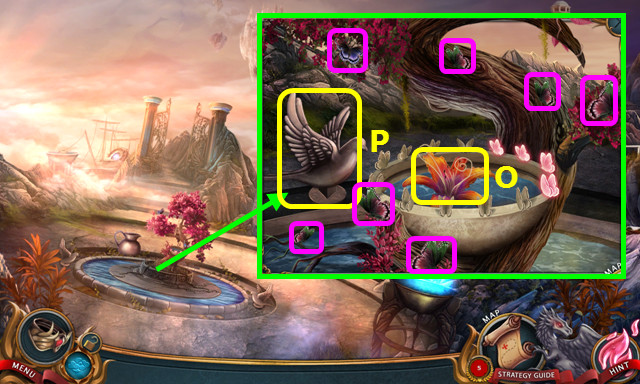
- Place the NECTAR FLOWER; select the 7 butterflies (pink); take the NECTAR FLOWER (O).
- Use the OIL; take the TRIANGLE-SHAPED DOVE (P).
- Return to the Skyport.

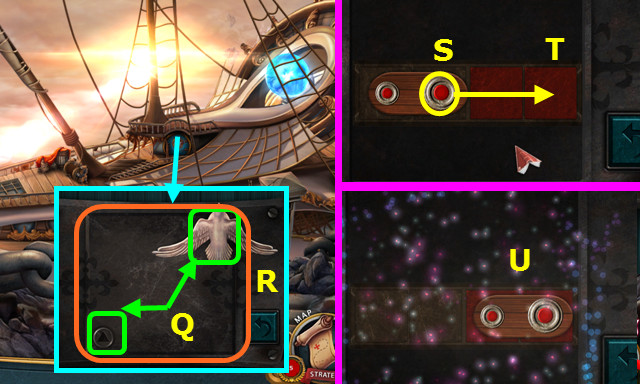

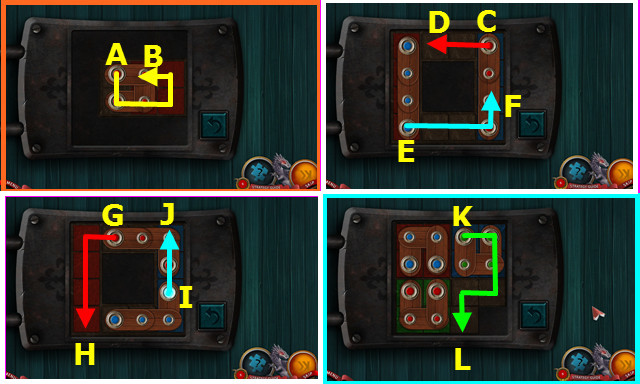
- Place and turn the TRIANGLE-SHAPED DOVE 2x (Q).
- Remove the panel (R).
- Drag the piece S-T.
- Solution (U).
- Drag the piece A-B.
- Drag C-D, E-F, and G-H. I-J.
- Drag K-L.

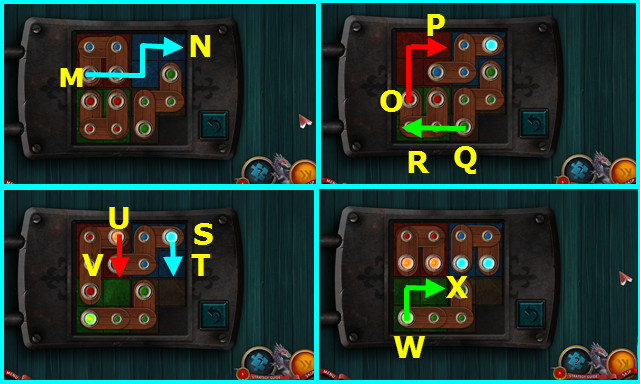
- Drag M-N, O-P, Q-R, S-T, U-V, W-X.
- Go forward.

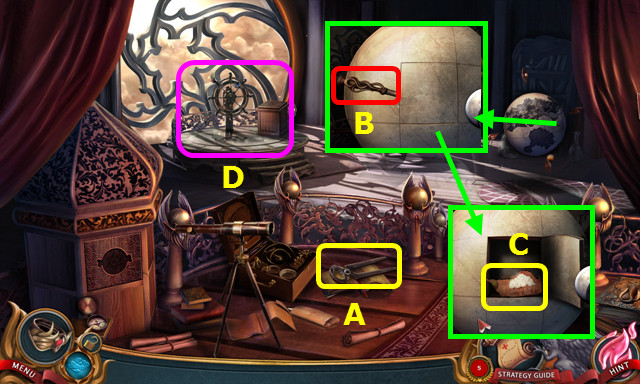
- Take the METAL CUTTERS (A).
- Turn the globe; use the LETTER OPENER 3x (B).
- Take the 2/3 SKYMAP PIECE (C).
- Select (D).

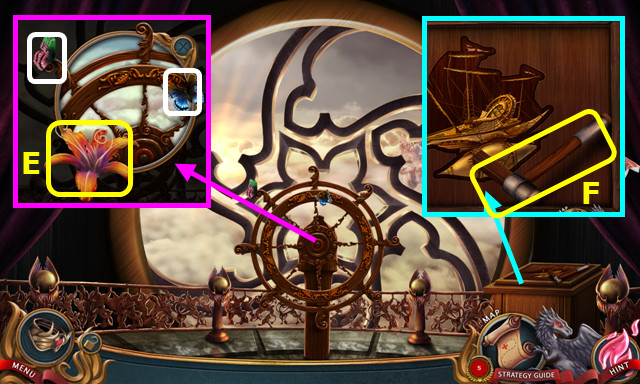
- Place the NECTAR FLOWER and select the 2 butterflies; take the NECTAR FLOWER (E).
- Take the CRANK HANDLE (F).
- Walk down 4x.

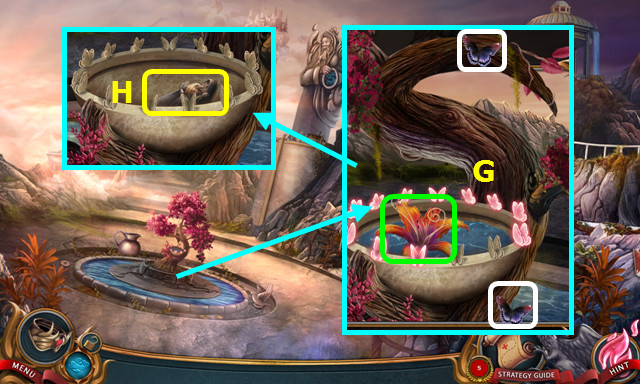
- Place the NECTAR FLOWER; select the 2 butterflies (G).
- Take the STATUETTE (H).
- Walk left.

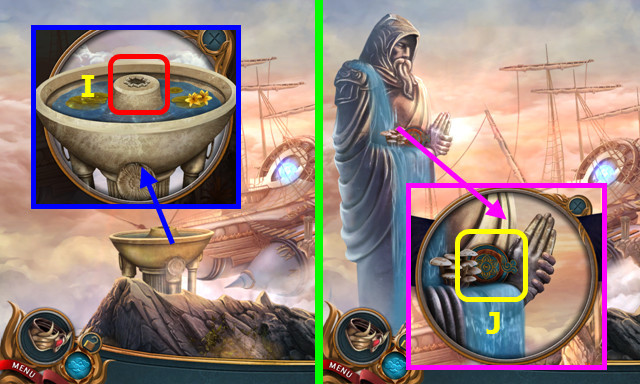
- Place the STATUETTE (I).
- Take the CABINET ORNAMENT (J).
- Go to the Falcon’s Bridge.

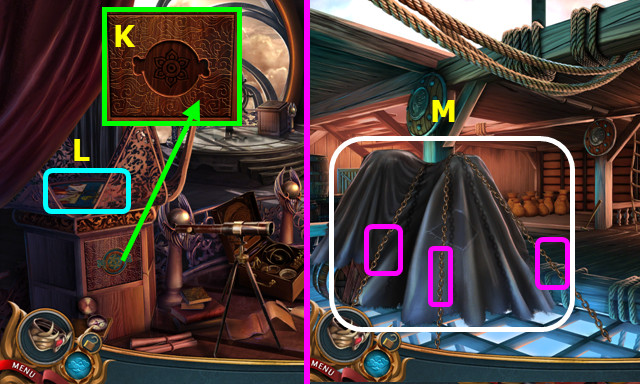
- Place the CABINET ORNAMENT (K).
- Play the HOP; take the 3/3 SKYMAP PIECE (L).
- Go to the Falcon’s Cargo Hold.
- Use the METAL CUTTERS 3x; remove the cover (M).

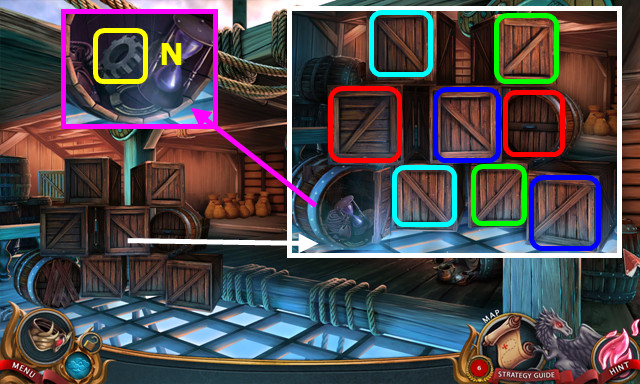
- Select pairs (color-coded).
- Move the items; take the IRON GEAR (N).
- Walk down.

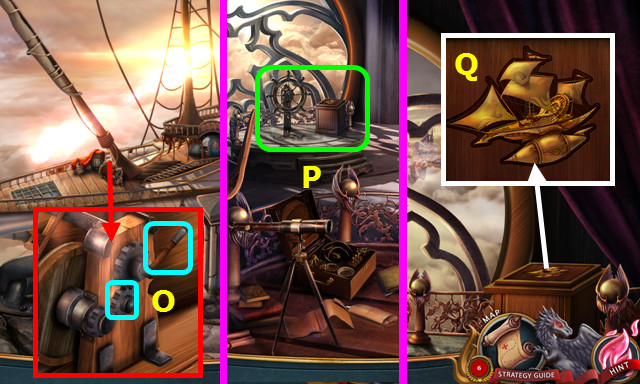
- Place the IRON GEAR and CRANK HANDLE; select the handle (O).
- Go forward.
- Select (P).
- Select (Q).

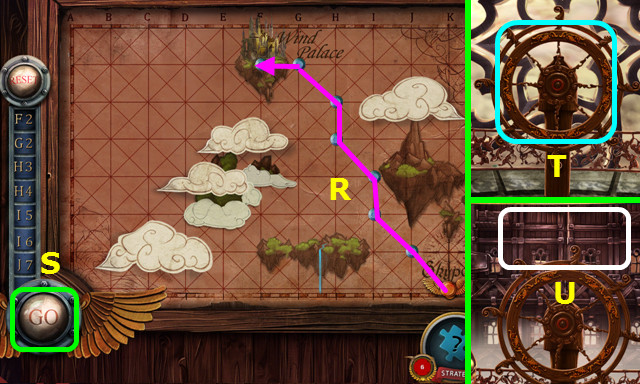
- Place and restore the 3 SKYMAP PIECES.
- Select the route (R).
- Press (S).
- Select (T).
- Go forward (U).
Chapter 2: The Wind Palace

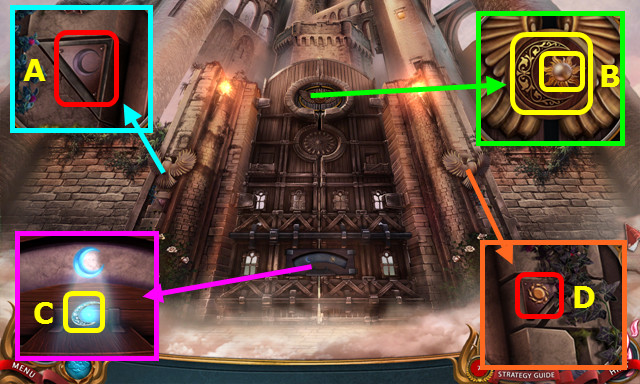
- Press (A).
- Take the DRAINED SUN and DRAINED MOON (B).
- Place the DRAINED MOON; earn the CHARGED MOON (C).
- Move the ivy 2x; press (D).

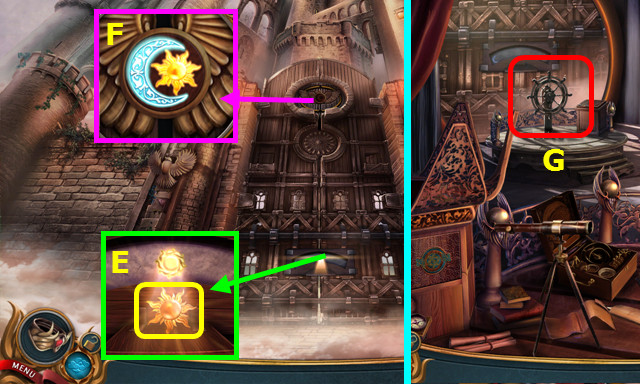
- Place the DRAINED SUN; earn the CHARGED SUN (E).
- Place and press the CHARGED MOON and CHARGED SUN (F).
- Walk down.
- Select (G).
- Go forward.

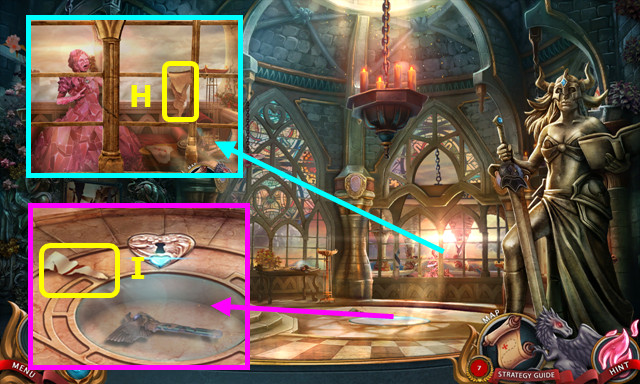
- Take the 1/2 PORTRAIT PIECE (H).
- Take the 2/2 PORTRAIT PIECE (I).

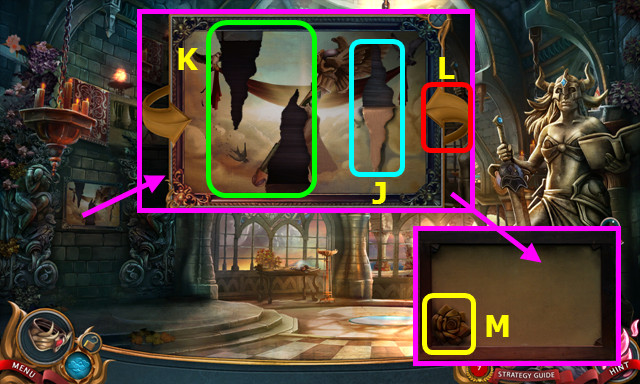
- Place the 2 PORTRAIT PIECES (K); lift the torn piece (J).
- Select (L).
- Take the ROSE (M).

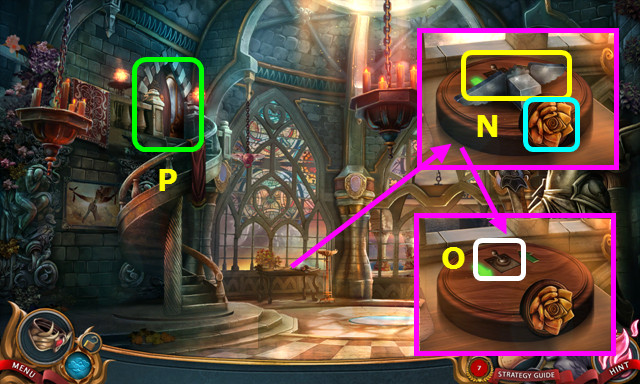
- Place the ROSE; take the 1/2 WINGED KNOB (N).
- Select (O).
- Enter (P).

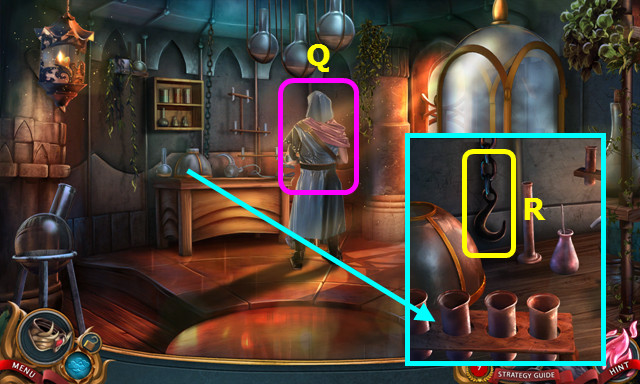
- Talk to Gaston (Q).
- Take the CHAIN (R).
- Walk down.

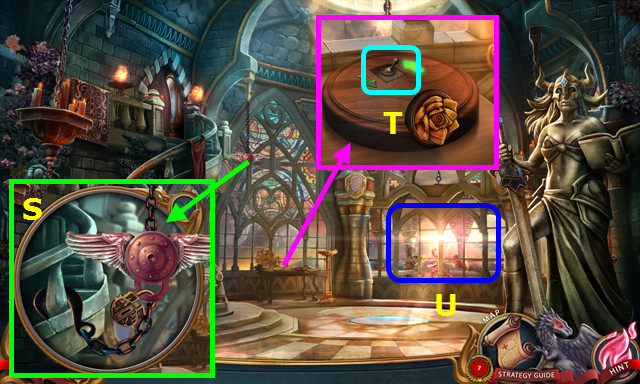
- Pull the winged fitting. Place the CHAIN on the banister and fitting; add the PADLOCK (S).
- Select (T).
- Select (U).

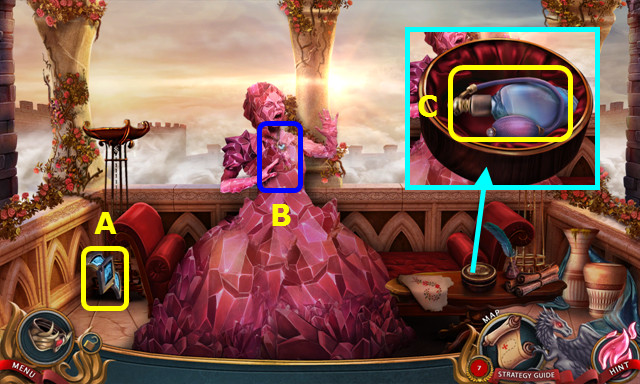
- Take the SWORD INSERT (A).
- Note the key (B).
- Open the box; take the PERFUME BOTTLE (C).
- Walk down.

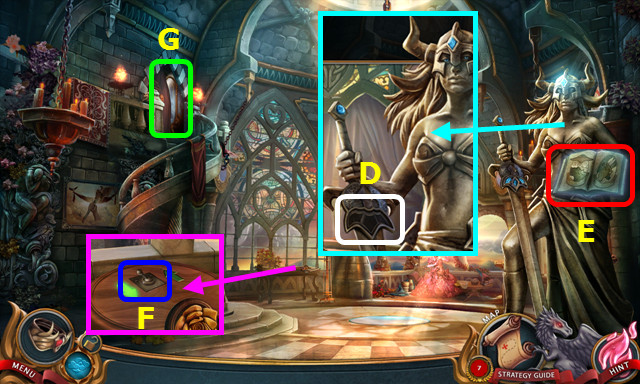
- Place the SWORD INSERT (D).
- Play the HOP; take the 2/2 WINGED KNOB (E).
- Select (F).
- Enter (G).

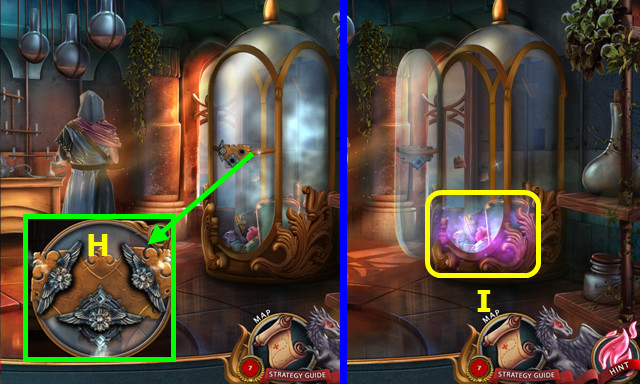
- Place the 2 WINGED KNOBS; turn all 3 knobs (H).
- Play the HOP; earn the ACID (I).
- Empty the PERFUME BOTTLE and combine with the ACID to make the ACID (inventory).
- Walk down.

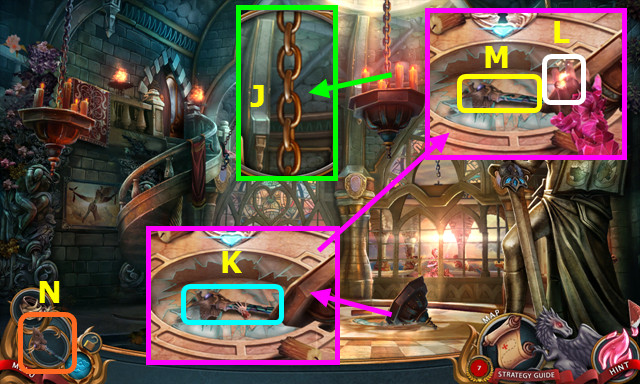
- Use the ACID 3x (J).
- Move the glass; reach for the scepter (K).
- Select (L).
- Select the HEALING SCEPTER 3x (M).
- The HEALING SCEPTER is now in the menu bar (N).

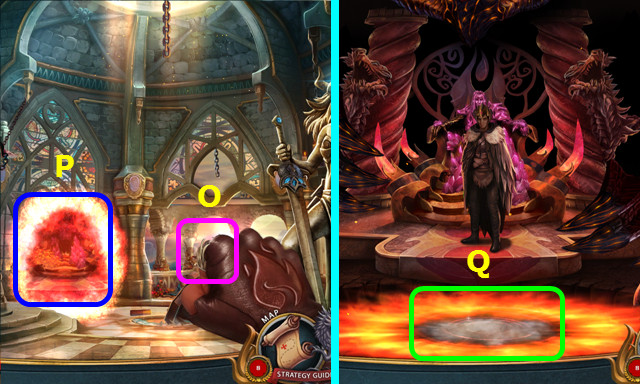
- Select (O).
- Enter the portal (P).
- Enter the portal (Q); walk right.

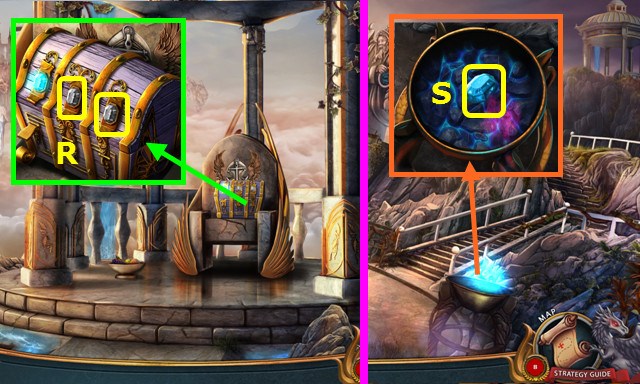
- Take the 2 DEPLETED GEMS (R).
- Walk down.
- Place a DEPLETED GEM; take the 1/2 GLOWING GEM (S).
- Walk left.

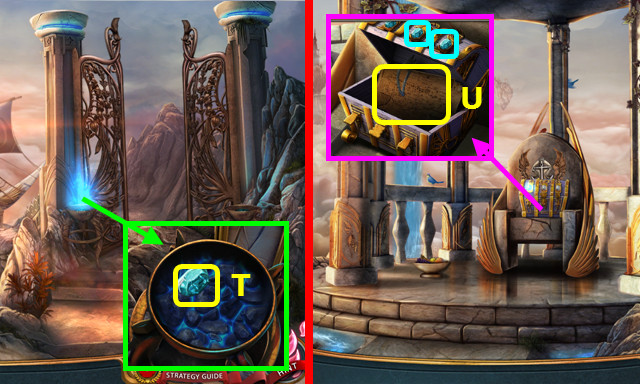
- Place a DEPLETED GEM; take the 2/2 GLOWING GEM (T).
- Walk down and right.
- Place the 2 GLOWING GEMS; take the REALM MAPS (U).
- Sort the REALM MAPS; take the GELLUM MAP (inventory).
- Go to the Falcon’s Bridge; select the ship’s wheel.

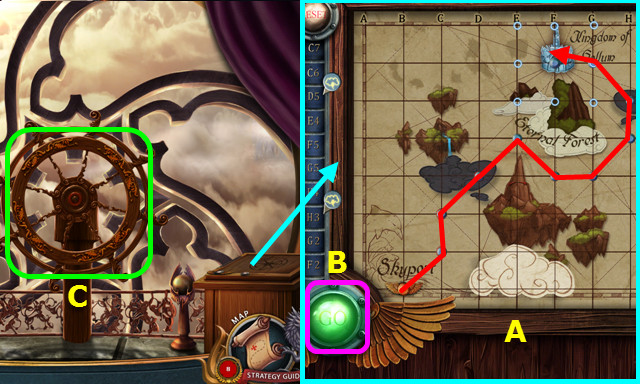
- Place the GELLUM MAP; select the path (A).
- Select (B).
- Select the helm (C).

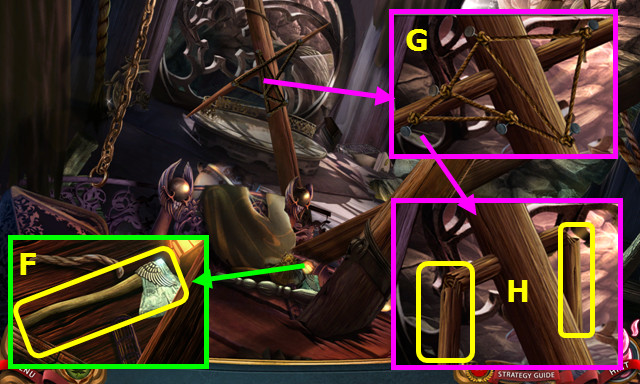
- Move the items; take the AXE (F).
- Arrange the ropes; take the ROPE (G).
- Use the AXE 2x; take the 2 MAST POLES (H).
- Combine the 2 MAST POLES and ROPE to make the ROPE LADDER (inventory).

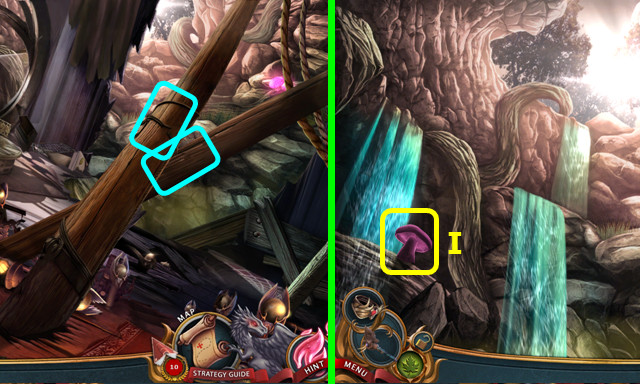
- Use the AXE 3x on each mast (blue).
- Go forward.
- Take the 1/3 GLOWING MUSHROOM (I).

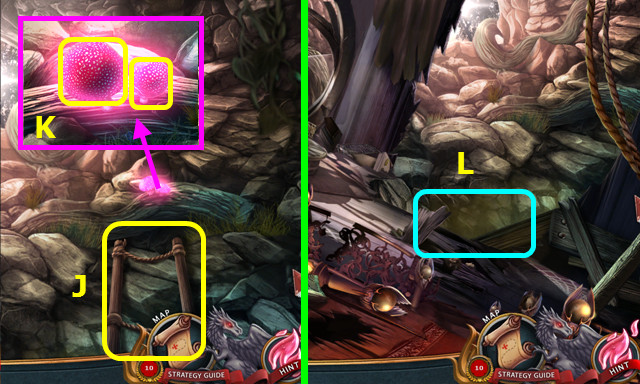
- Place the ROPE LADDER (J).
- Take the 2/3 and 3/3 GLOWING MUSHROOMS (K).
- Take the ROPE LADDER.
- Remove the ROPE from the ROPE LADDER (inventory).
- Walk down.
- Select (L); use the GLOWING MUSHROOMS 3x.
- Play the HOP; earn the ANCHOR EMBLEM.
- Remove the anchor from the ANCHOR EMBLEM; add the ROPE to make the GRAPPLING HOOK (inventory).
- Go forward.

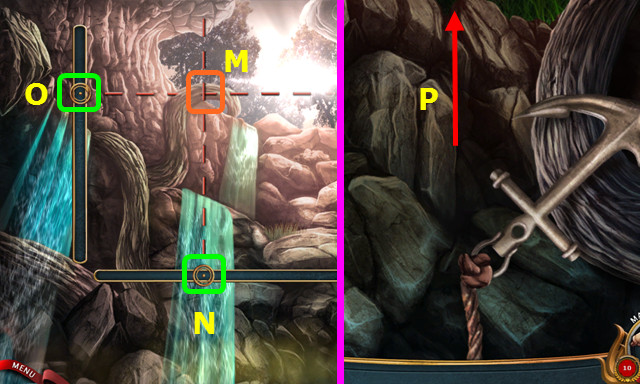
- Use the GRAPPLING HOOK (M).
- Select the root when the indicator (N) is directly below.
- Select the root when the indicator (O) is directly next to it.
- Go forward.
- Go forward (P).
Chapter 3: The Eternal Forest

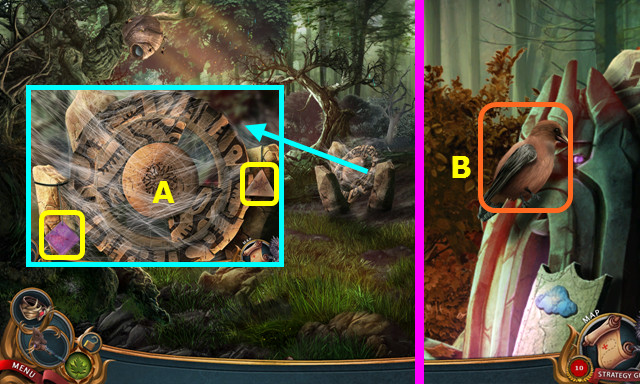
- Take the 1/3 and 2/3 GLASS PIECES (A).
- Walk left.
- Select (B).

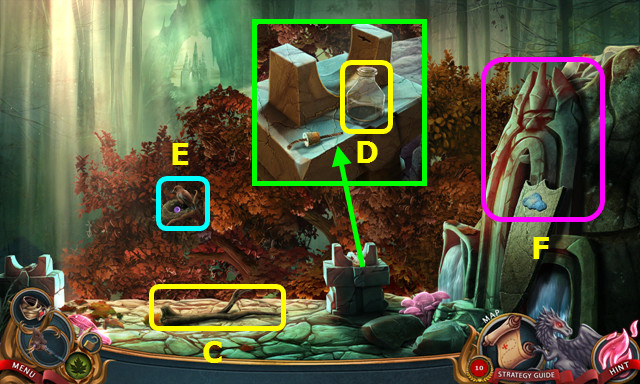
- Take the BRANCH (C).
- Remove the cork; take the EMPTY OIL LAMP (D).
- Select (E).
- Talk to the Statue (F).
- Walk down 3x.

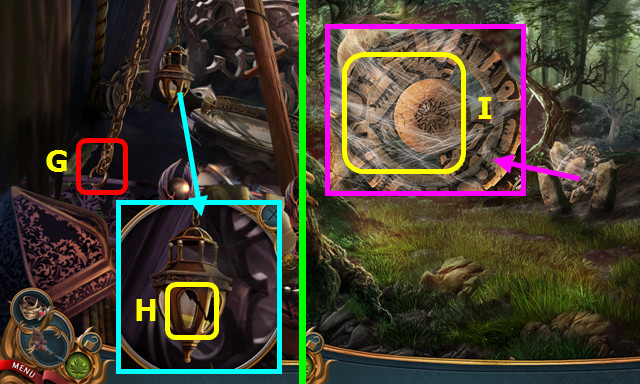
- Select (G).
- Use the EMPTY OIL LAMP; take the FULL OIL LAMP (H).
- Go forward 2x.
- Use the BRANCH to make the STICKY BRANCH (I).
- Walk left.

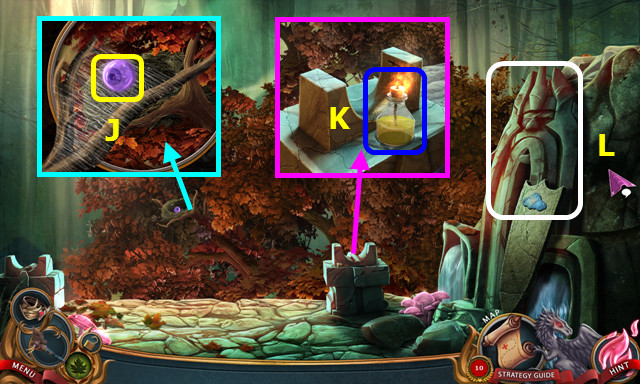
- Use the STICKY BRANCH; take the STATUE EYE (J).
- Place the FULL OIL LAMP, select the wick, and use the RING OF FIRE (K).
- Select (L).

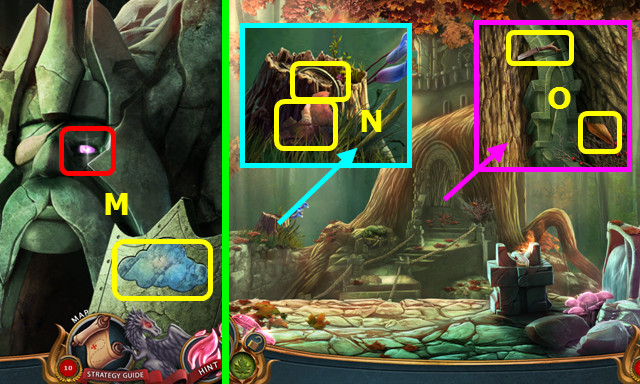
- Place the STATUE EYE and take the MARBLE CLOUD (M).
- Pull and take the LENS FRAME and 1/3 MURAL PIECE (N).
- Take the DRUID KNIFE and LEAF (O).
- Walk down.

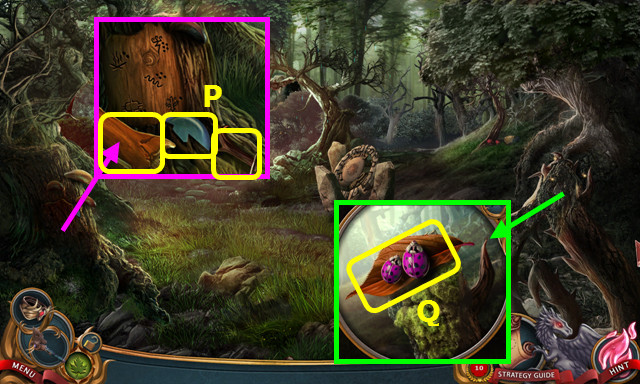
- Use the DRUID KNIFE 2x; take the 1/3 LENS PIECE, TREE BARK, and KNIFE HANDLE (P).
- Remove the wood; use the LEAF 3x to take the LEAF WITH BUGS (Q).
- Walk left.

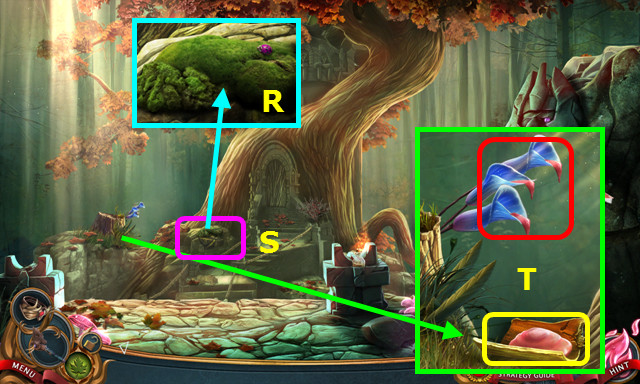
- Place the LEAF WITH BUGS (R).
- Play the HOP; earn the 2/3 LENS PIECE (S).
- Place the TREE BARK, select the flowers 10x, and take the NECTAR (T).
- Walk down.

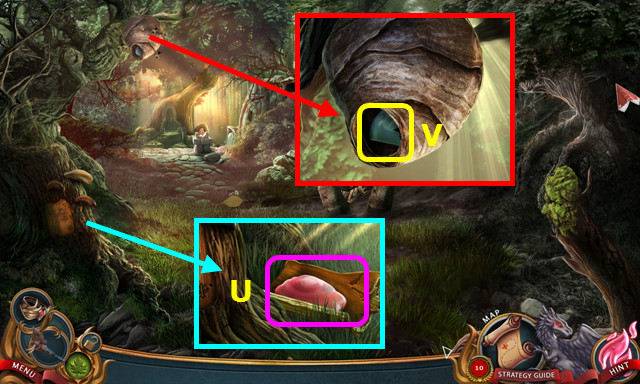
- Place the NECTAR (U).
- Take the 3/3 LENS PIECE (V).
- Combine the LENS FRAME and 3 LENS PIECES to make the DOOR LENS (inventory).
- Walk left.

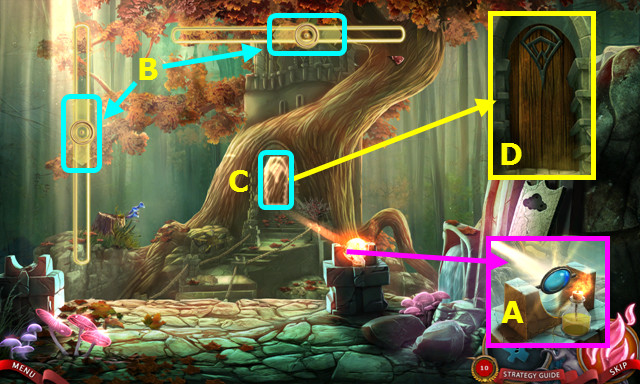
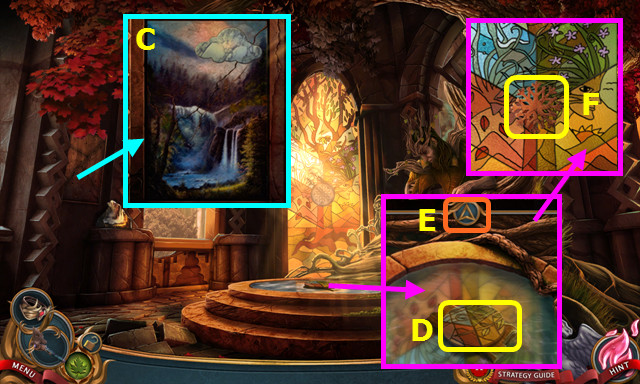
- Place the DOOR LENS (A).
- Move the sliders (B) to move the door image over the door (C).
- Open the door (D); go forward.

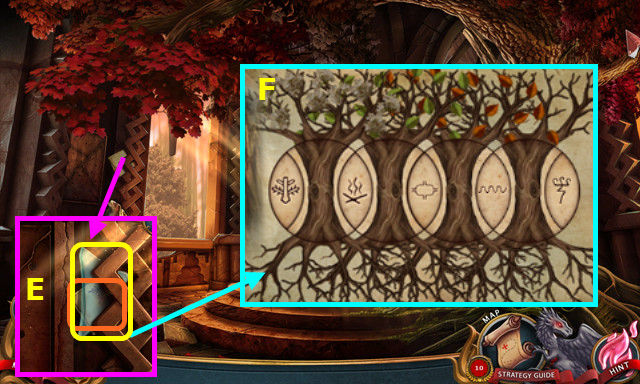
- Take the 3/3 GLASS PIECE and read the paper (E).
- Solution (F).
- Take the FOREST MAP.

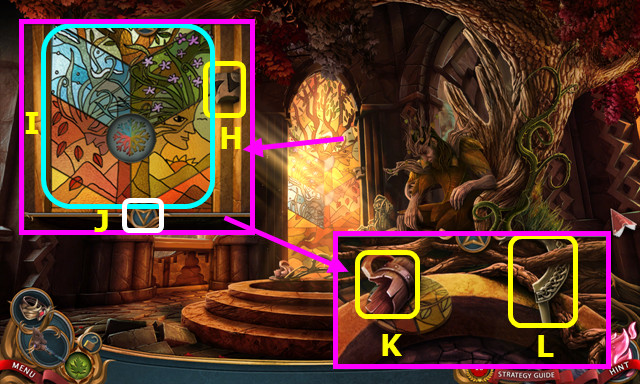
- Take the 1/2 CALENDAR ELEMENT (H).
- Arrange the panes (I).
- Pan down (J).
- Take the BROKEN CUP (K).
- Use the KNIFE HANDLE to take the BLUNT SICKLE (L).

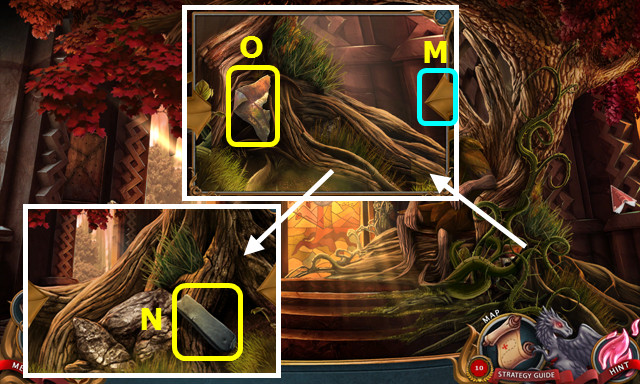
- Rotate the view (M); take the SANDSTONE (N).
- Combine the BLUNT SICKLE and SANDSTONE; take the SICKLE (inventory).
- Use the SICKLE 3x; take the 2/3 MURAL PIECE (O).

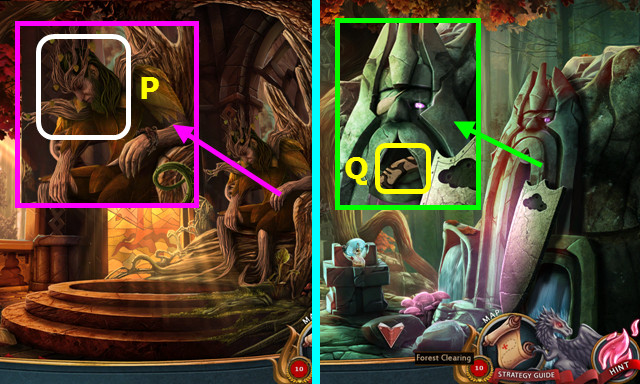
- Try to wake the King (P).
- Walk down.
- Talk to the Statue; take the 2/2 CALENDAR ELEMENT (Q).
- Walk down.

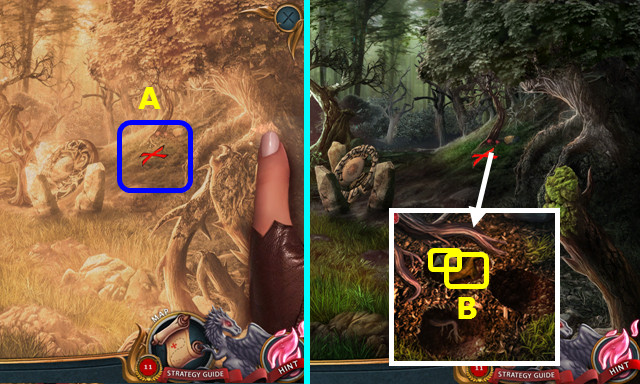
- Select the FOREST MAP (inventory); select the X (A).
- Use the BROKEN CUP 3x; take the HORSE and 3/3 MURAL PIECE (B).
- Walk left; go forward.

- Place the 3 MURAL PIECES; restore the 4th piece and add the MARBLE CLOUD (C).
- Take the SHARD (D); pan up (E).
- Place the SHARD; take the SNOWFLAKE (F).
- Walk down 2x.

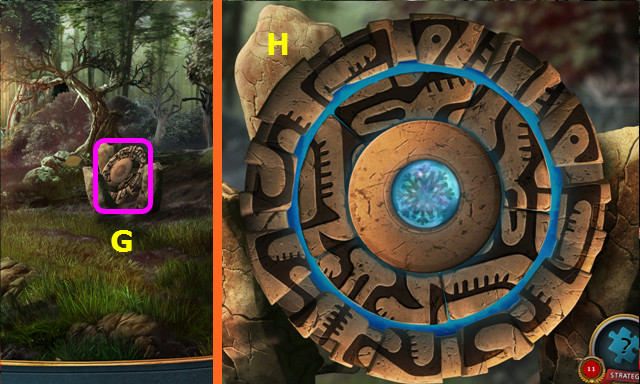
- Select (G).
- Place the 2 CALENDAR ELEMENTS and SNOWFLAKE; restore the ring (H).
- Walk left; go forward.

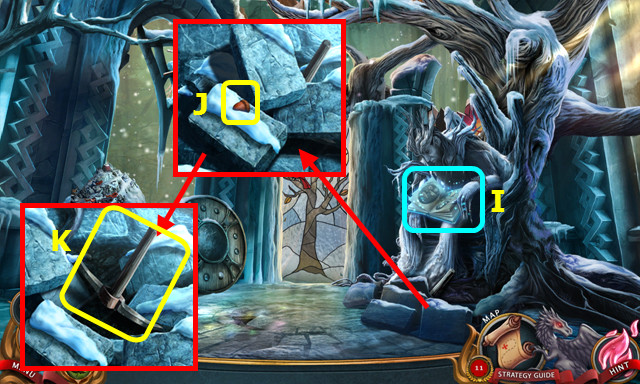
- Play the HOP; take the HAYSTACK (I).
- Take the ACORN (J); move the 3 bricks and take the PICKAXE (K).

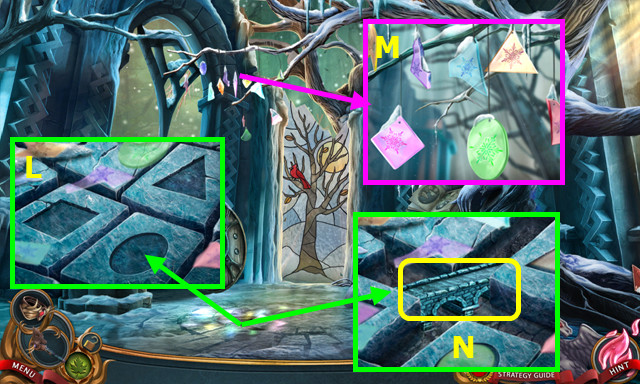
- Look at the floor (L).
- Place the 3 GLASS PIECES; arrange as shown (M).
- Take the STONE BRIDGE (N).

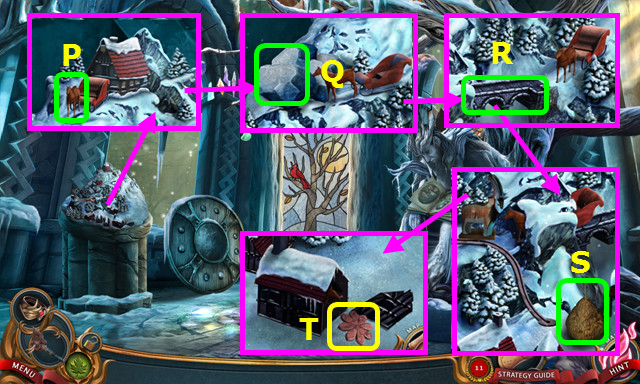
- Place the HORSE (P).
- Use the PICKAXE (Q).
- Place the STONE BRIDGE (R).
- Place the HAYSTACK (S).
- Take the STONE FLOWER (T).
- Walk down 2x.

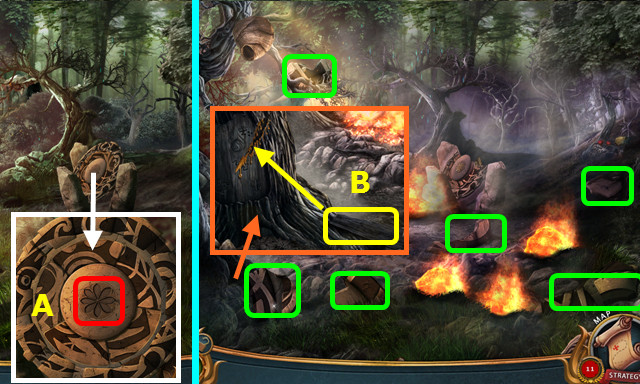
- Try to place the STONE FLOWER (A).
- Use the wood on the resin; earn the WOOD WITH RESIN (B).
- Take the 6 CALENDAR PIECES (green).
- Walk down.

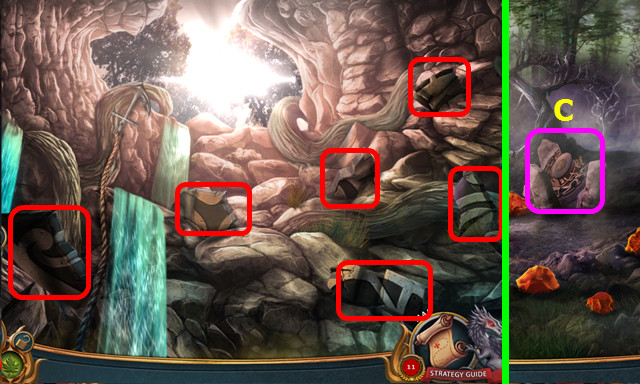
- Take the 6 CALENDAR PIECES (red).
- Combine the 12 CALENDAR PIECES and WOOD WITH RESIN to make the GLUED CALENDAR PIECES (inventory).
- Go forward.
- Select (C).

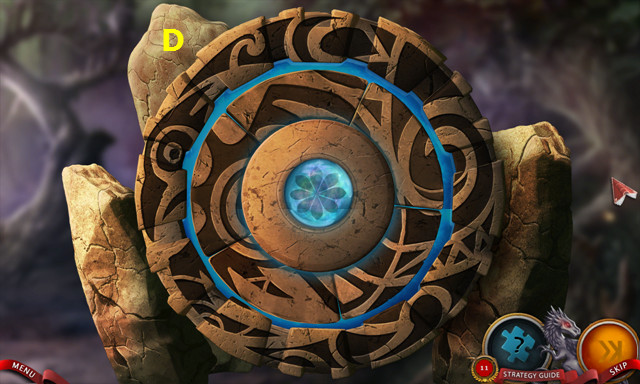
- Place the GLUED CALENDAR PIECES and STONE FLOWER; restore the ring (D).
- Walk left and forward.

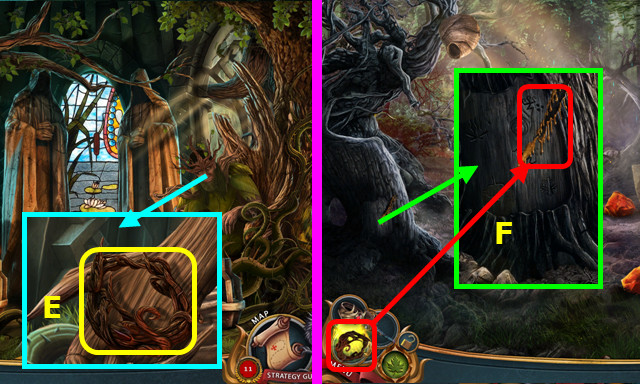
- Talk to the King; take the BRACELET OF GROWTH (E).
- Walk down 2x.
- Use the BRACELET OF GROWTH from the menu bar (F).

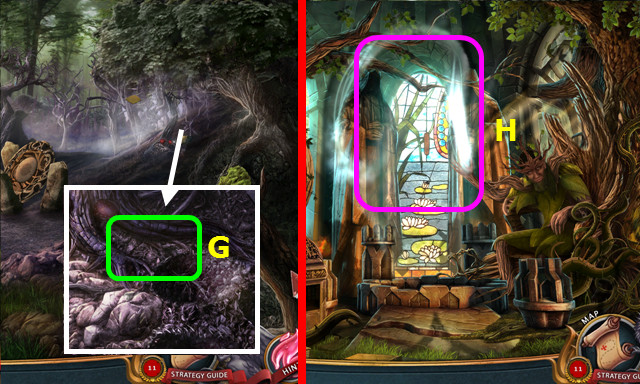
- Use the BRACELET OF GROWTH (G).
- Walk left and forward.
- Enter the Portal (H).
Chapter 4: The Underwater City

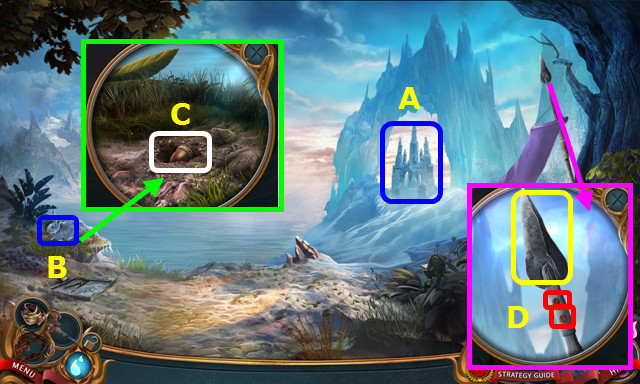
- Look at the castle (A).
- Select (B).
- Move the dirt 3x and place the ACORN; cover with dirt and use the BRACELET OF GROWTH (C).
- Remove the 2 screws; take the SPEARHEAD (D).

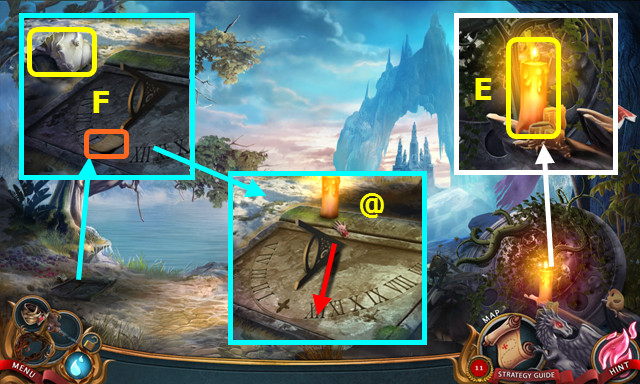
- Take the BURNING CANDLE (E).
- Take the HEAVY STATUE PART and read the note (F).
- Place the BURNING CANDLE; drag the candle to move the shadow to 12 (@).

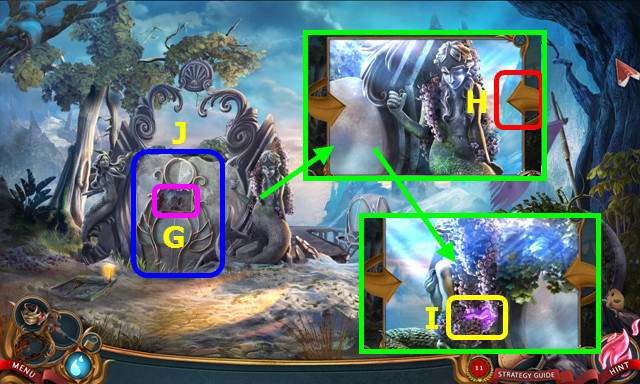
- Read the legend (G).
- Flip the image (H).
- Take the 1/4 AMETHYST SHARD (I).
- Enter (J). Go forward.

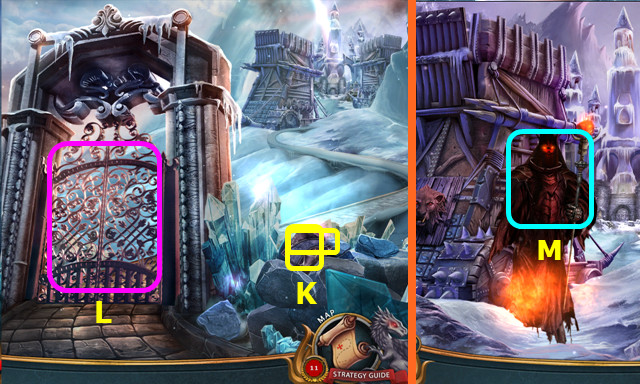
- Use the SPEARHEAD and HEAVY STATUE PART; take the TILE and 2/4 AMETHYST SHARD (K).
- Open the gate; go forward (L).
- Select (M).
- Walk down.

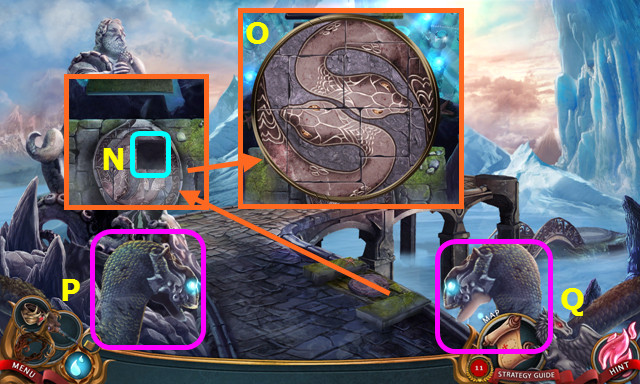
- Place the TILE (N).
- Solution (O).
- Select P-Q-Q-P.

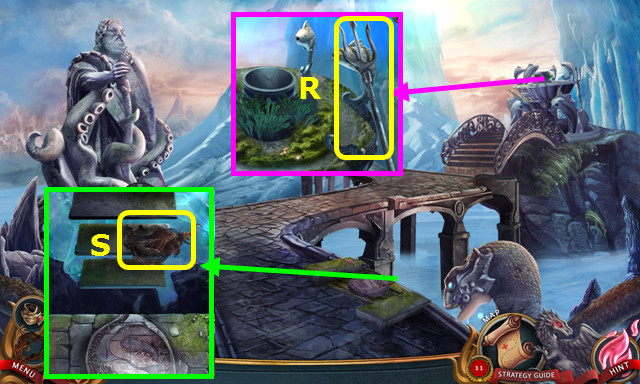
- Take the TRIDENT (R).
- Use the TRIDENT to take the JUNK PILE (S).
- Move the items in the JUNK PILE; take the 1/2 FISH FIGURINE. Continue sorting to find the bottle and use the HEAVY STATUE PART; take the 3/4 AMETHYST SHARD and SHARP GLASS (inventory).
- Walk down.

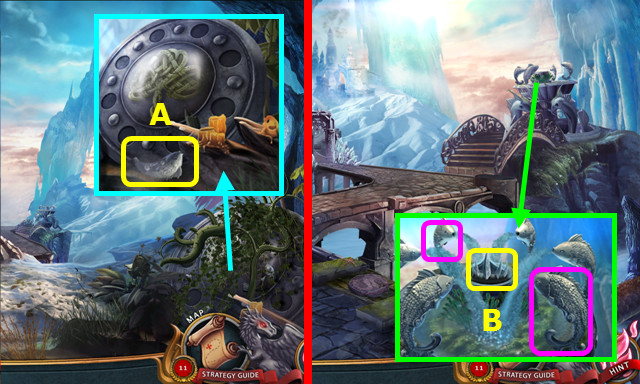
- Use the SHARP GLASS 3x; take the 2/2 FISH FIGURINE (A).
- Go forward.
- Place the 2 FISH FIGURINES; take the STONE CROWN (B).
- Walk down.

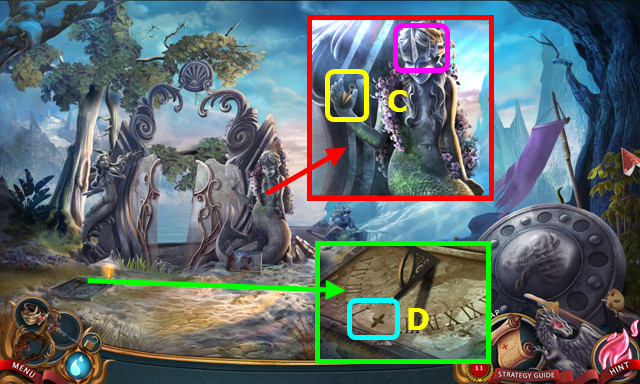
- Place the STONE CROWN; take the STRANGE KEY (C).
- Use the STRANGE KEY (D).

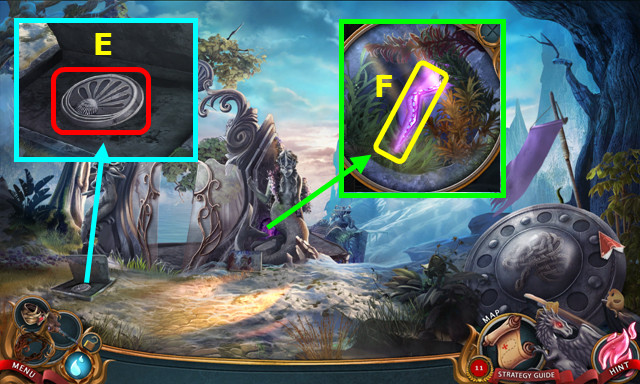
- Restore and press the disc (E).
- Move the 3 plants; take the 4/4 AMETHYST SHARD (F).
- Walk forward.

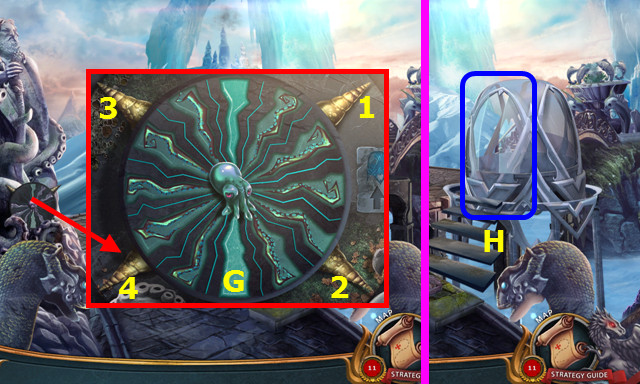
- Place the 4 AMETHYST SHARDS; arrange as shown (G).
- Select 1-4. This sequence is random; your solution may vary.
- Enter (H).

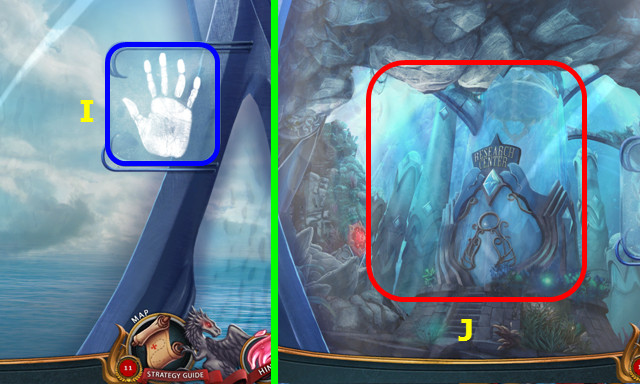
- Select (I).
- Open the glass (J).
- Go forward.

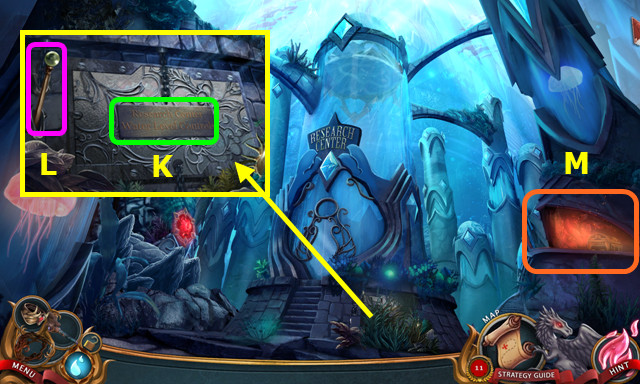
- Move the bushes; read the sign (K).
- Select (L).
- Walk right (M).

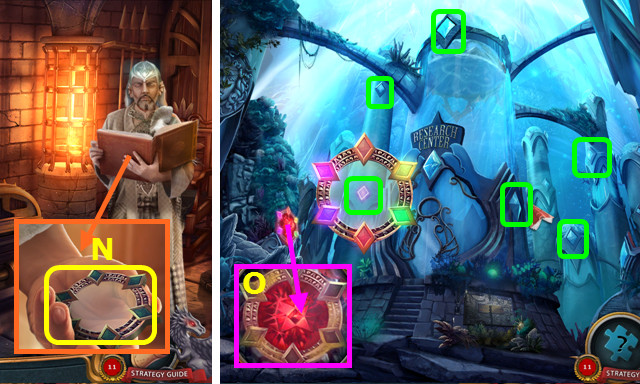
- Talk to the City Historian; take the SUBMARINE KEY (N).
- Walk down.
- Use the SUBMARINE KEY (O).
- Select the finder; locate the diamonds (green).
- Walk left.

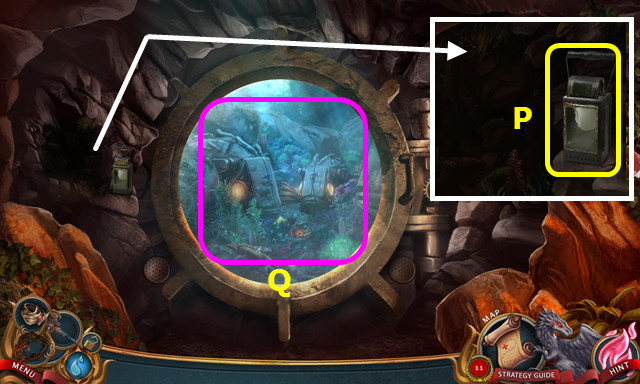
- Take the EMPTY LANTERN (P).
- Note the flooded chamber (Q).
- Walk down and right.

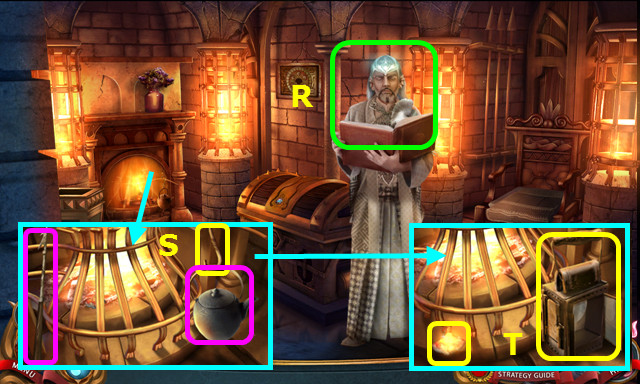
- Talk to the City Historian (R).
- Select the poker; remove the teapot and take the S-HOOK (S).
- Place the EMPTY LANTERN; use the RING OF FIRE and take the GLOWING LANTERN (T).
- Walk down and left.

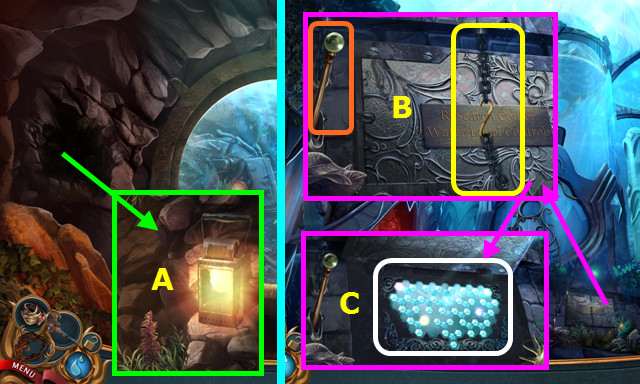
- Place the GLOWING LANTERN; play the HOP and take the LOBSTER FIGURINE (A).
- Walk down.
- Place the S-HOOK, select the lower chain, and pull the lever (B).
- Select (C).

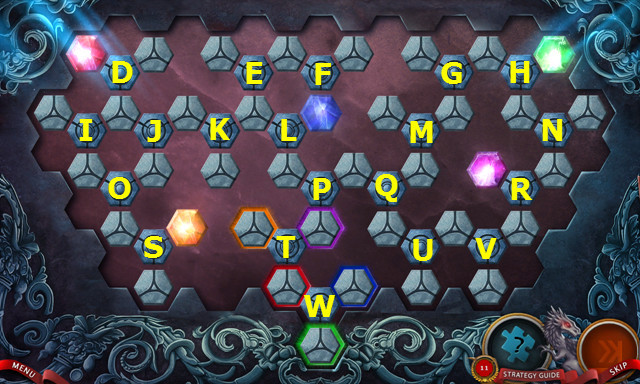
- Solution Hx2-G-M-Qx2-L-P-T-P-W-T-W-Sx2-Ox2-Dx2-J-K-J.
- L-K-L-P-L-Px2-T-Px2-T-Rx2-Vx2-Ux2-Q-P.
- Walk forward.

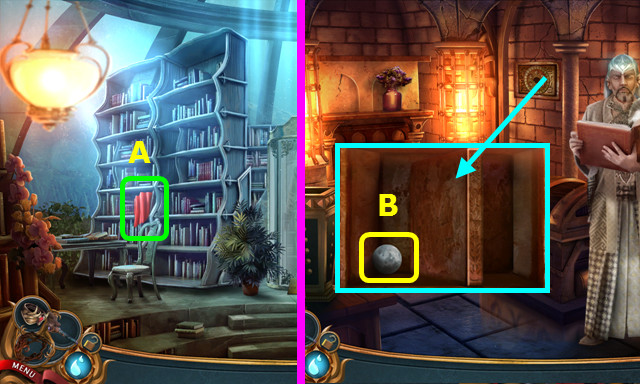
- Move the cloth, select and play the HOP; take the SHELL (A).
- Walk down and right.
- Place and select the SHELL; take the SILVER GLOBE (B).

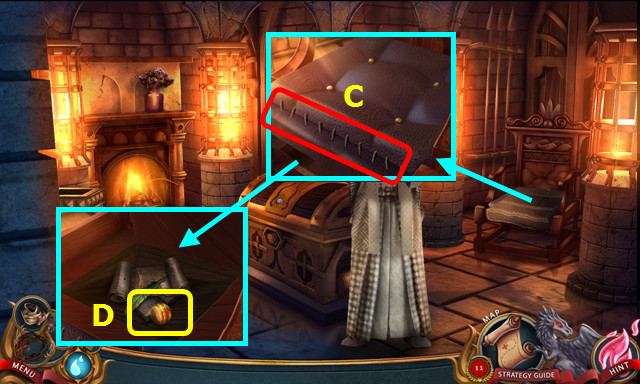
- Remove the cloth; use the SHARP GLASS and remove the cushion (C).
- Place the LOBSTER FIGURINE, open the panel, and take the GOLDEN GLOBE (D).
- Walk down and forward.

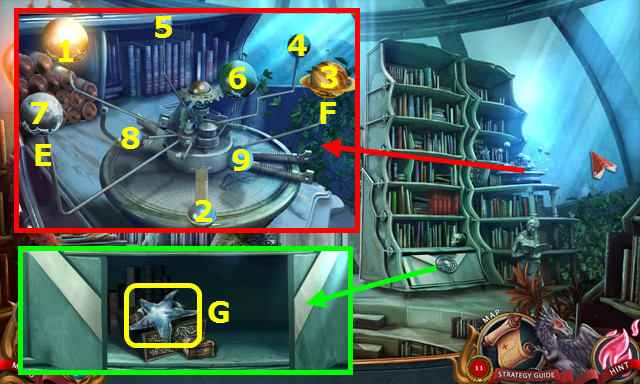
- Place the SILVER GLOBE (E) and GOLDEN GLOBE (F).
- Select the silver globe, watch the sequence, and select 1-4.
- Watch the sequence and select 5-9.
- Remove the lock, open the door, and take the GLASS STARFISH (G).

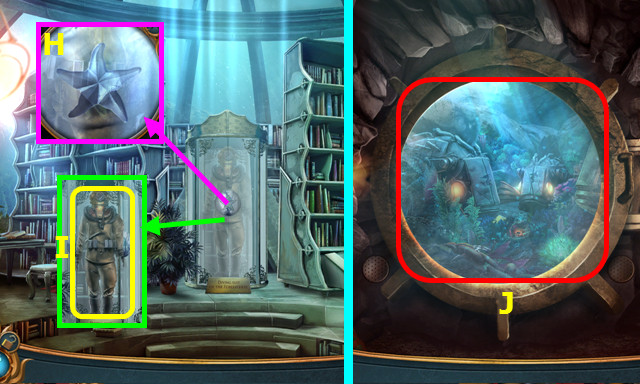
- Place the GLASS STARFISH (H).
- Take the DIVING SUIT (I).
- Walk down and left.
- Use the DIVING SUIT (J).

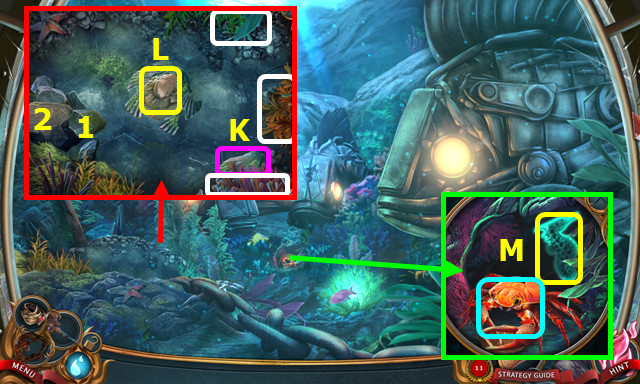
- Move the plants (white); select the clam (K).
- Select 1-2.
- Take the SCALLOP MEAT (L).
- Use the SCALLOP MEAT; take the SEAHORSE INLAY (M).

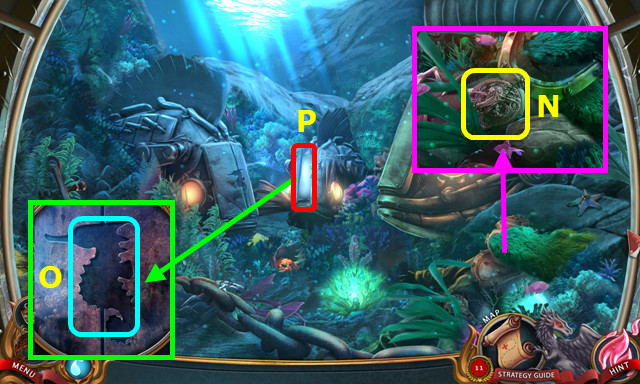
- Take the DIVER’S WEIGHT (N).
- Place the SEAHORSE INLAY (O).
- Enter (P).

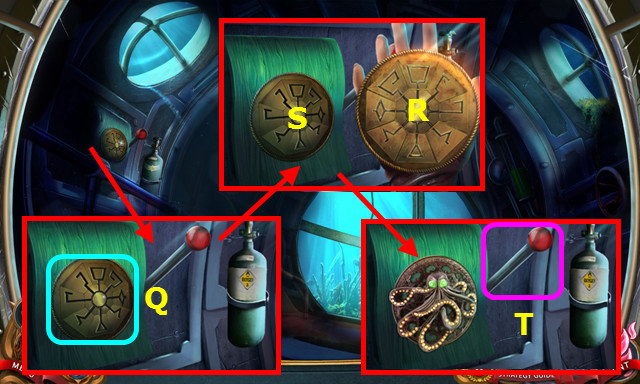
- Use the DIVER’S WEIGHT (Q).
- Arrange the pieces (R); select (S).
- Pull (T).

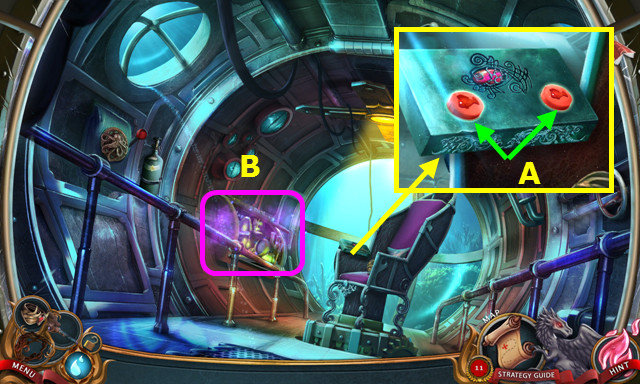
- Press the 2 buttons (A).
- Play the HOP (B).
- Walk forward.

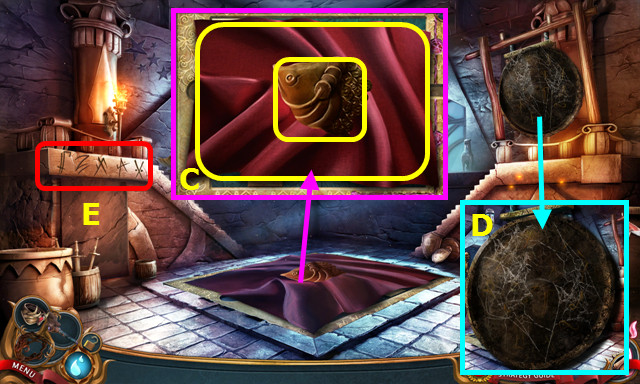
- Take the STONE FISH HEAD and CLOTH (C).
- Use the CLOTH (D).
- Note the symbols (E).
- Walk left.

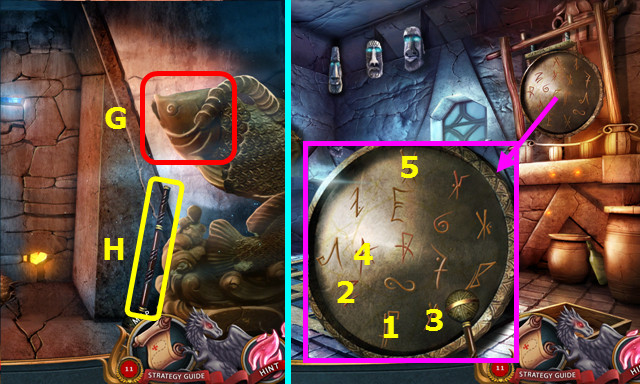
- Place the STONE FISH HEAD (G).
- Take the GONG MALLET (H).
- Walk down.
- Use the GONG MALLET; select 1-5.

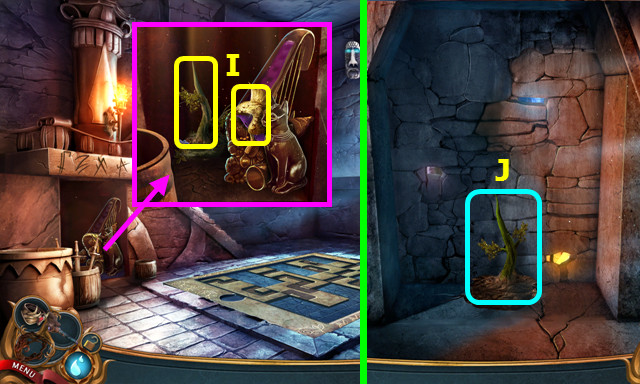
- Take the SMALL TREE and MINIATURE HELMET (I).
- Go left.
- Place the SMALL TREE and use the BRACELET OF GROWTH (J).
- Walk forward.

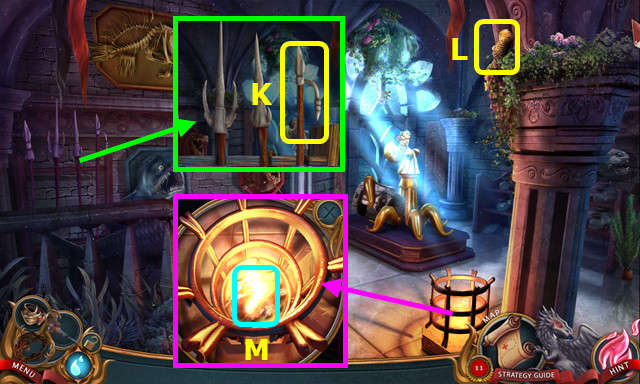
- Take the HOOKED SPEAR (K).
- Use the HOOKED SPEAR (L).
- Use the RING OF FIRE to earn the MINIATURE GAUNTLET (M).

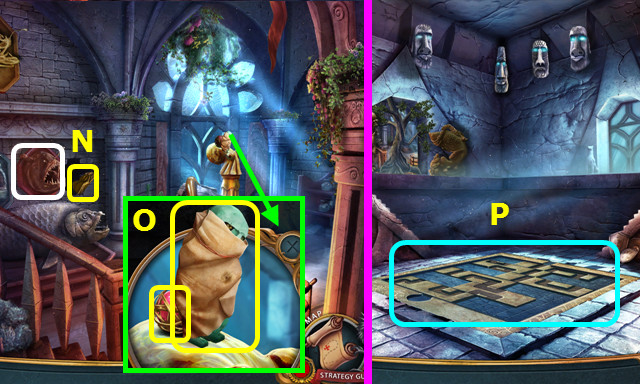
- Select the fish head; take the MINIATURE CAPE (N).
- Take the JADE STATUE and PUZZLE PART (O).
- Walk down.
- Select (P).

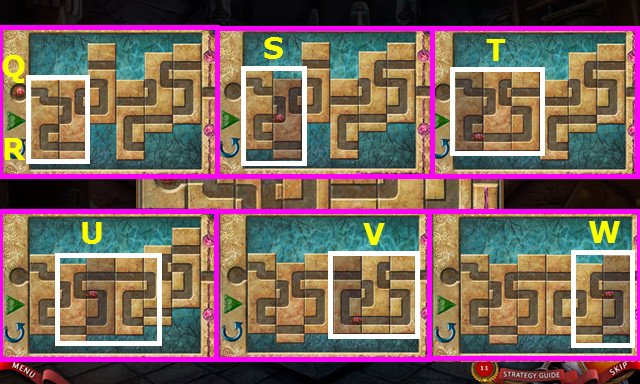
- Place the PUZZLE PART (Q).
- Slide the pieces to create the 1st section of path and press the green button (R).
- Continue the path and press the button (S-W).
- Walk down.

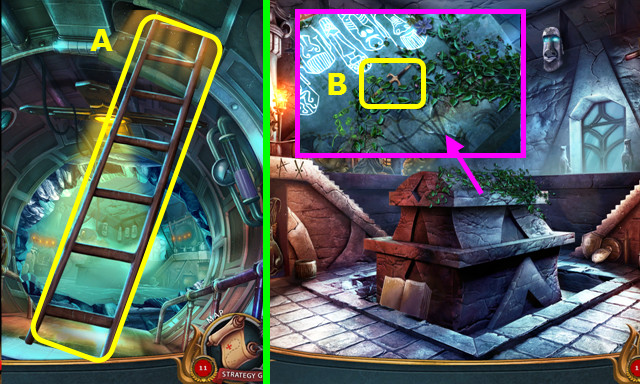
- Use the HOOKED SPEAR; take the LADDER (A).
- Go forward.
- Take the MINIATURE SWORD (B).
- Walk left.

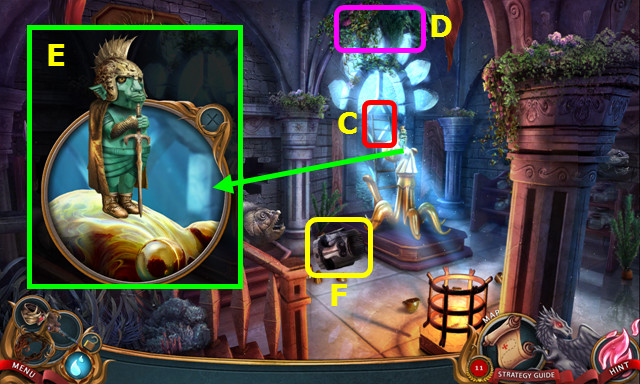
- Place the LADDER (C).
- Move the plants and play the HOP; earn the MINIATURE BOOTS (D).
- Unwrap the JADE STATUE; add the MINIATURE HELMET, MINIATURE CAPE, MINIATURE SWORD, MINIATURE GAUNTLET, and MINIATURE BOOTS to make the ASSEMBLED STATUE (inventory).
- Place the ASSEMBLED STATUE (E).
- Take the WATCHER HEAD (F).
- Walk down.

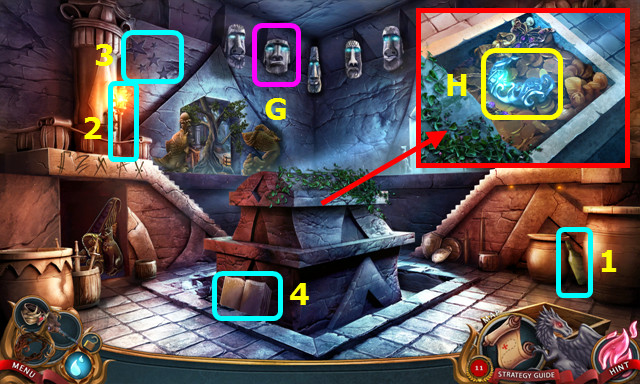
- Place the WATCHER HEAD (G).
- In response to the head’s questions, select 1-4.
- Slide the lid; take the NECKLACE OF CUNNING (H). It is now in the menu bar.
- Walk down.

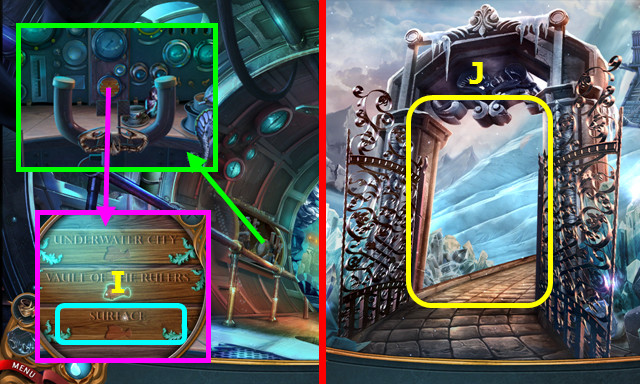
- Select (I).
- Go forward.
- Use the NECKLACE OF CUNNING (J).
- Go forward 2x.
Chapter 5: The Crystal Castle

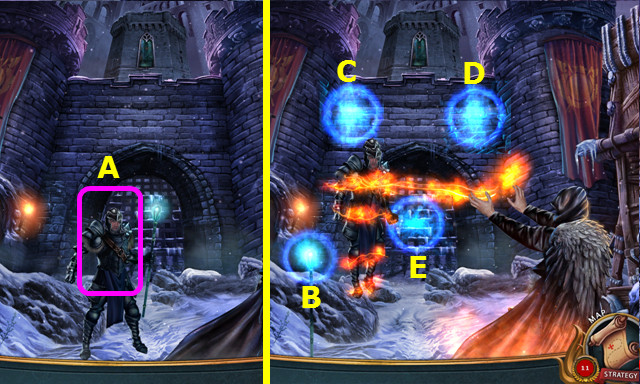
- Select the King (A).
- Select B-C-D-E.
- Talk to the King again.

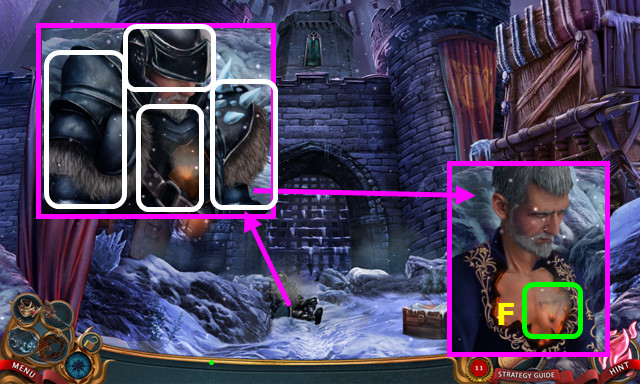
- Shake the King; remove the 4 pieces of armor (white).
- Use the HEALING SCEPTER (F); shake the King again.
- Walk down.

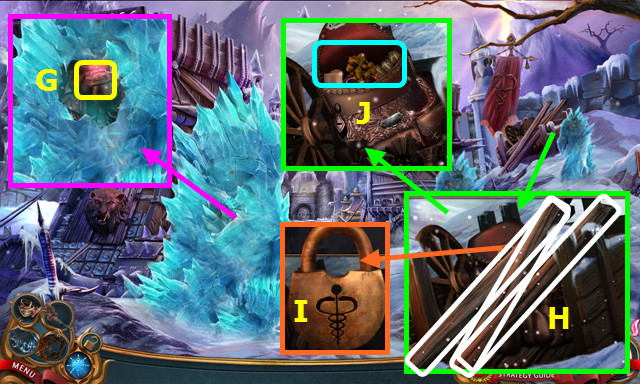
- Use the RING OF FIRE; take the CADUCEUS (G).
- Remove the 3 logs (H).
- Place the CADUCEUS (I).
- Open the bag; select and play the HOP. Earn the SMELLING SALTS (J).
- Walk forward.

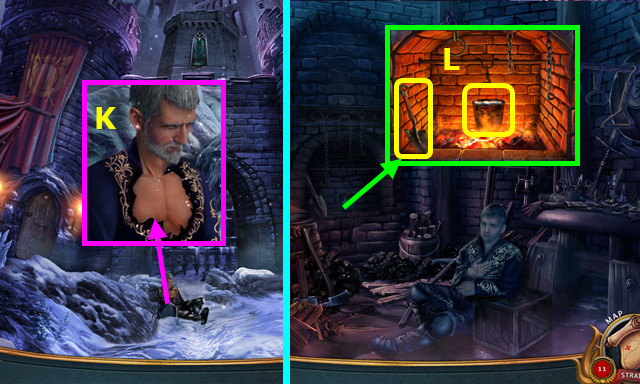
- Use the SMELLING SALTS; select the King (K).
- Walk left.
- Use the RING OF FIRE; take the SHOVEL and HOT WATER (L).

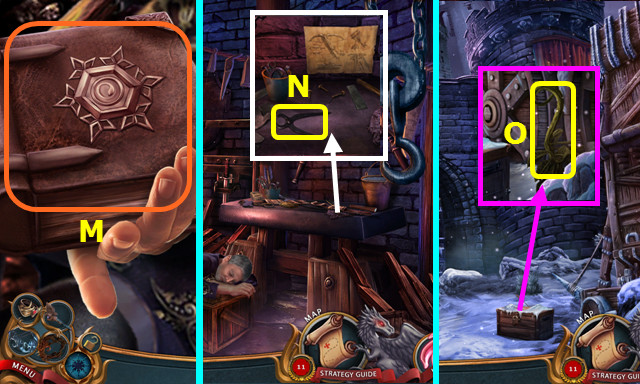
- Select (M); turn the page, play the HOP, and take the OWL EMBLEM.
- Read the instructions, move the items, and take the TONGS (N).
- Walk down.
- Use the HOT WATER; take the PLANT (O).
- Walk down.

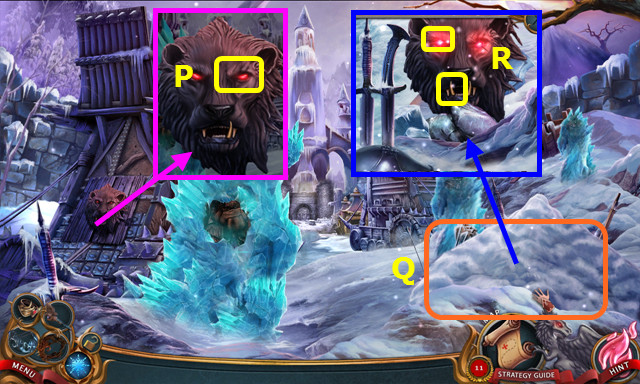
- Take the LION’S EYE (P).
- Select 3x (Q).
- Use the SHOVEL and place the LION’S EYE; use the TONGS to take the LION’S TOOTH and retrieve the LION’S EYE (R).

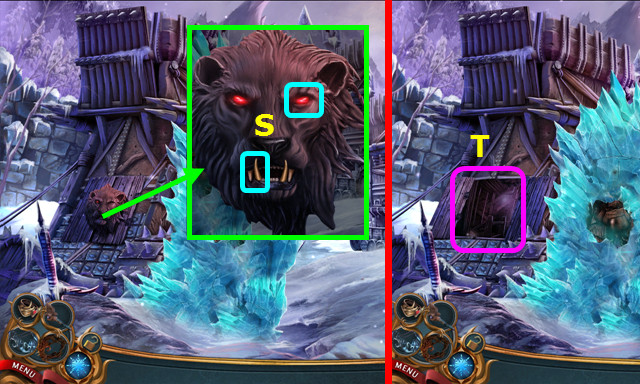
- Place the LION’S EYE and LION’S TOOTH (S).
- Enter (T).

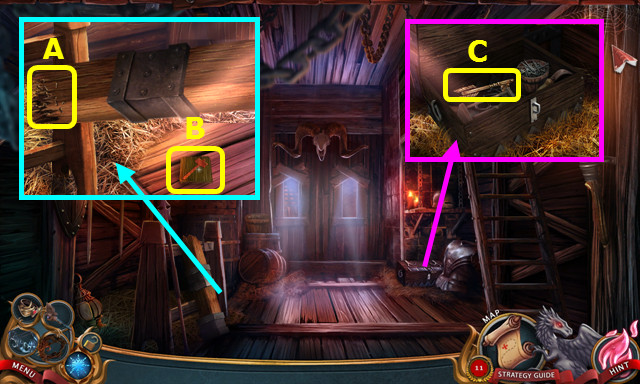
- Select the beam; take the TERMITES (A).
- Move the hay 3x; take the 1/2 WOODEN TILE (B).
- Open the box, move the items, and take the CHEST KEY (C).
- Walk down and forward.

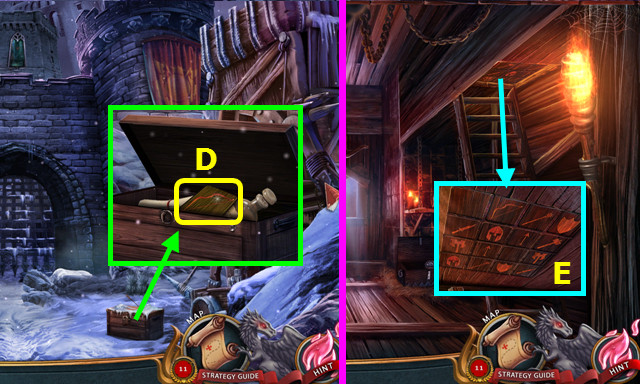
- Use the CHEST KEY; take the 2/2 WOODEN TILES (D).
- Walk down and left.
- Place the 2 WOODEN PLATES (E).

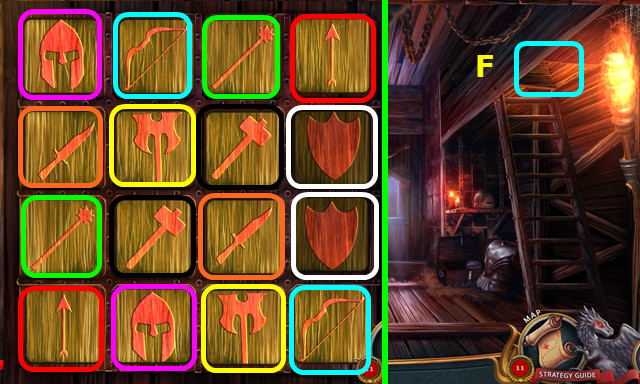
- Select the pairs (color-coded).
- Enter (F).

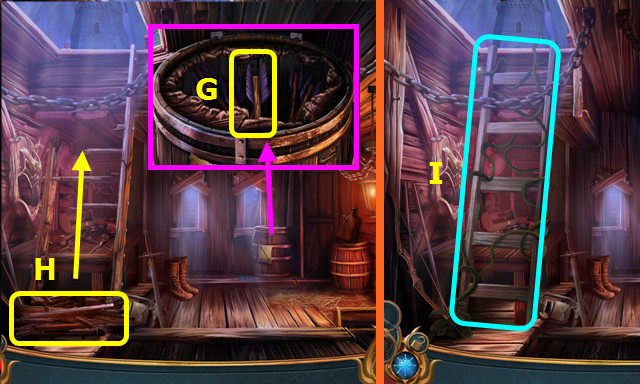
- Place the TERMITES; take the ARROW (G).
- Try the ladder; take the BROKEN LADDER (H).
- Restore the BROKEN LADDER; add the plant and use the BRACELET OF GROWTH to make the REPAIRED LADDER (inventory).
- Place the REPAIRED LADDER and go up (I).

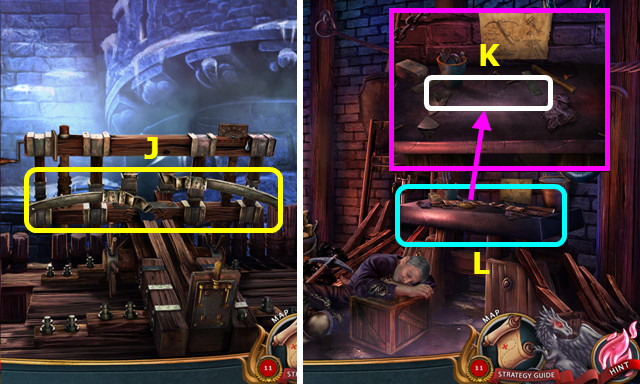
- Take the BROKEN BOW (J).
- Return to the Guard House.
- Place the BROKEN BOW (K).
- Play the HOP; earn the REPAIRED CROSSBOW (L).
- Return to the top of Siege Tower.

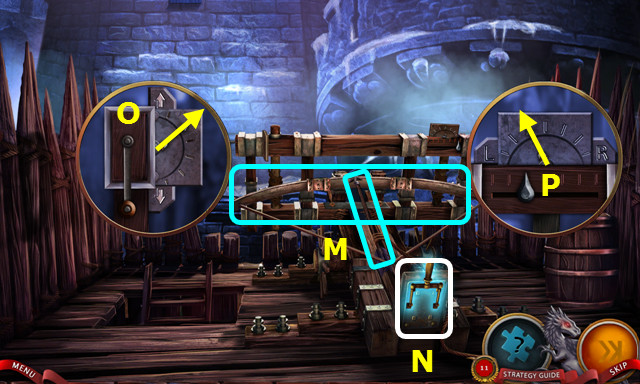
- Place the REPAIRED CROSSBOW and ARROW (M).
- Select the switch (N).
- Turn the crank 4x (O); move the slider left 1x (P).
- Select the switch again (N).
- Go forward.

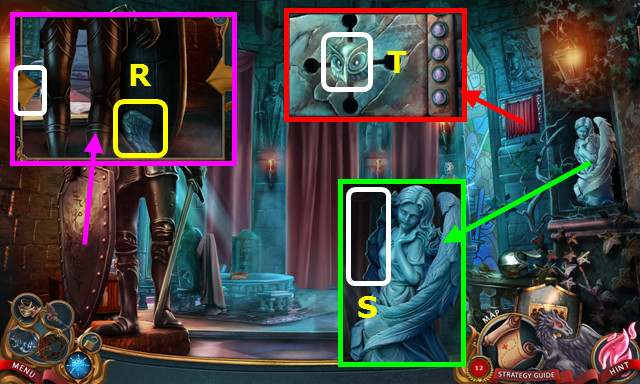
- Rotate the view; take the ANGEL WING (R).
- Place the ANGEL WING (S).
- Open the curtain; place the OWL EMBLEM (T).

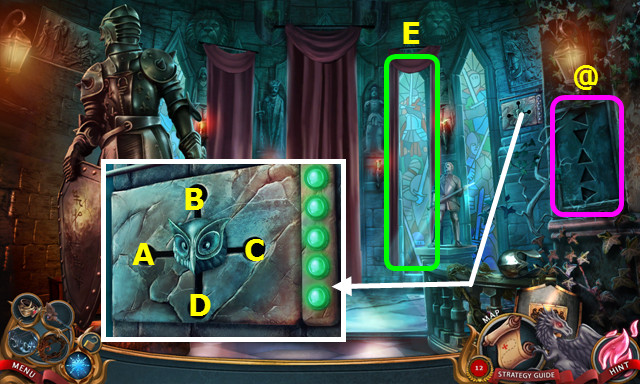
- Note the code (@).
- Select A-D-B-B-C.
- Play the HOP; take the KNIGHT’S INSIGNIA (E).

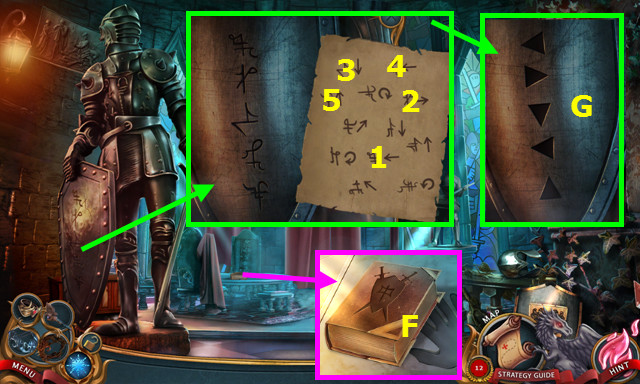
- Place the KNIGHT’S INSIGNIA; read the book; take the RUNE PAGE (F).
- Use the RUNE PAGE; select (1-5).
- Note the code (G).

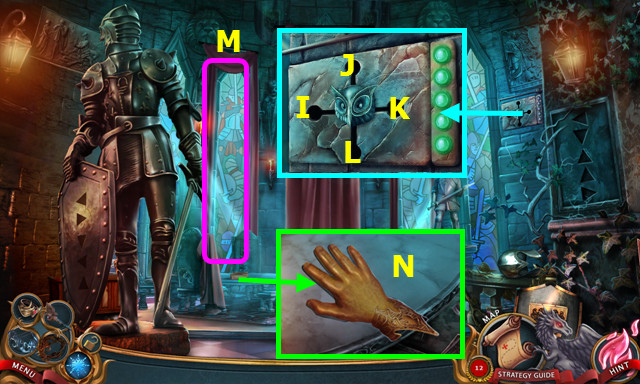
- Select I-K-L-I-J.
- Play the HOP; take the GOLDEN HAND (M).
- Place and press the GOLDEN HAND (N).

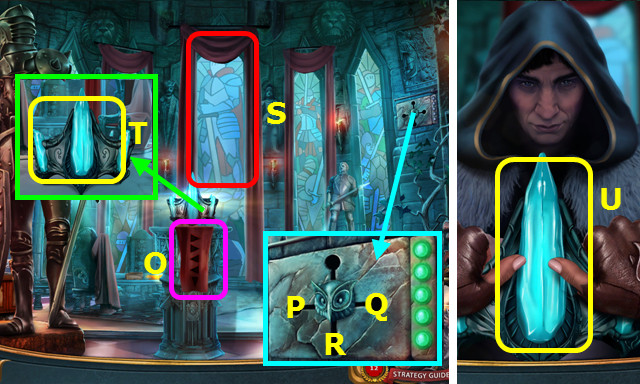
- Note the code (O).
- Select Q-Q-P-P-R.
- Play the HOP; pull the lever (S).
- Select (T).
- Select the crown 3x (U).
Chapter 6: The Afterlife

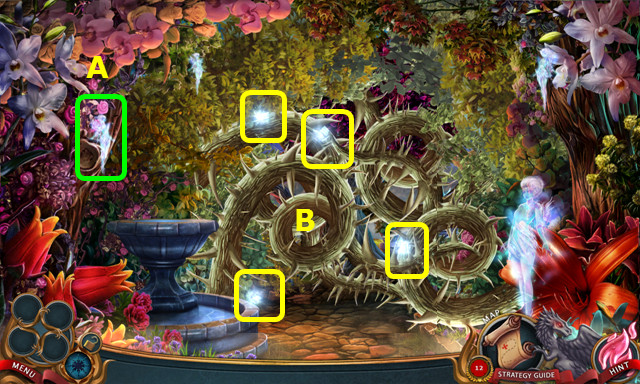
- Try to walk forward.
- Select (A).
- Select each of the 4 moving Fairies (B).
- Walk forward.

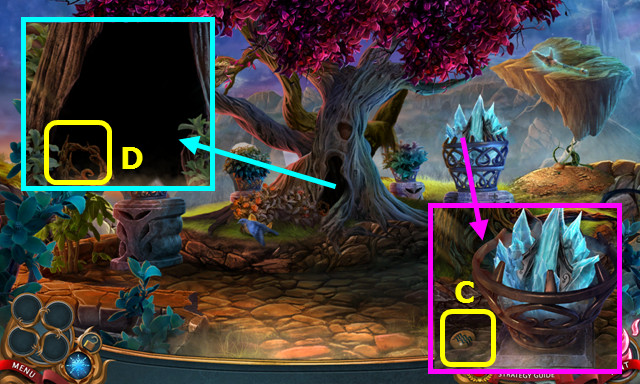
- Take the WATER SYMBOL (C).
- Select (D).
- Walk down.

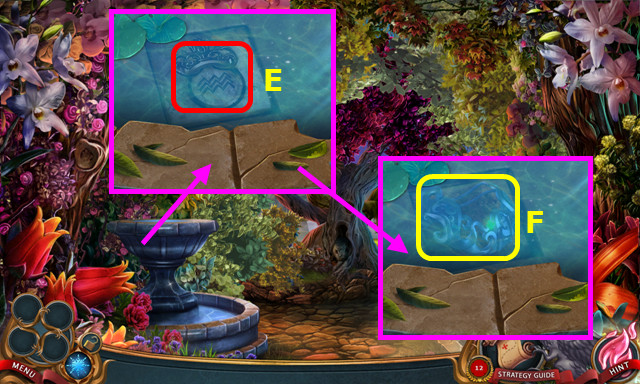
- Use the WATER SYMBOL (E).
- Take the NECKLACE OF CUNNING (F).
- Go forward.

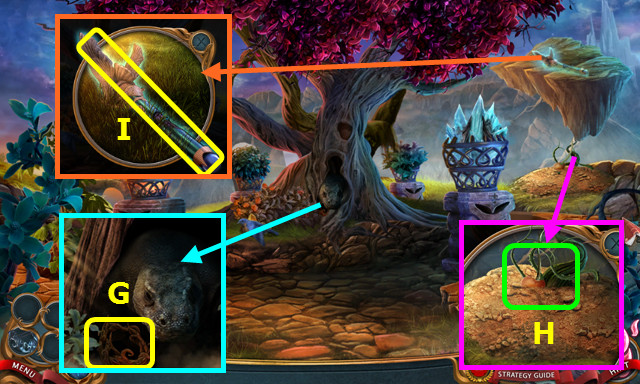
- Use the NECKLACE OF CUNNING; take the BRACELET OF GROWTH (G).
- Use the BRACELET OF GROWTH (H).
- Take the HEALING SCEPTER (I).

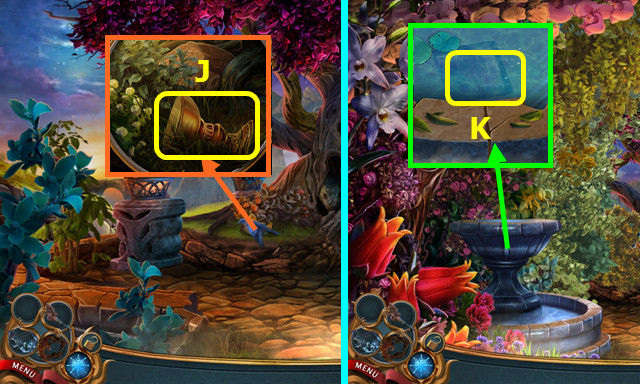
- Use the HEALING SCEPTER; take the EMPTY GOBLET (J).
- Walk down.
- Use the EMPTY GOBLET to take the GOBLET OF WATER (K).
- Go forward.

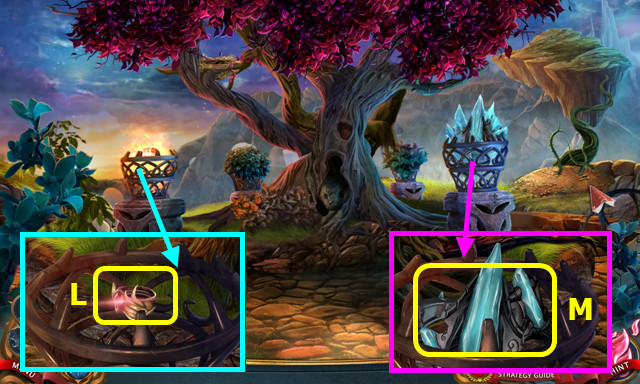
- Use the GOBLET OF WATER; take the RING OF FIRE (L).
- Use the RING OF FIRE; take the BROKEN CROWN (M).

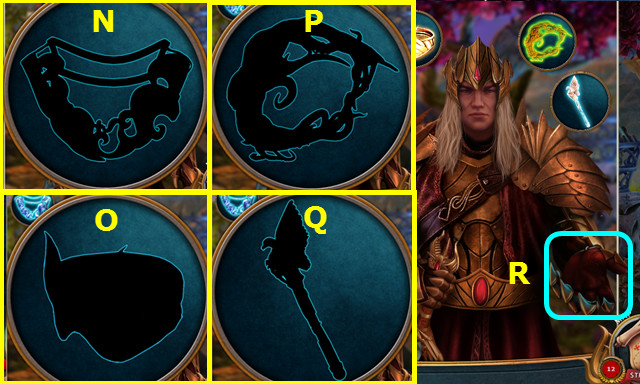
- Place the NECKLACE OF CUNNING (N), the RING OF FIRE (O), the BRACELET OF GROWTH (P), and HEALING SCEPTER (Q).
- Place the BROKEN CROWN (R).

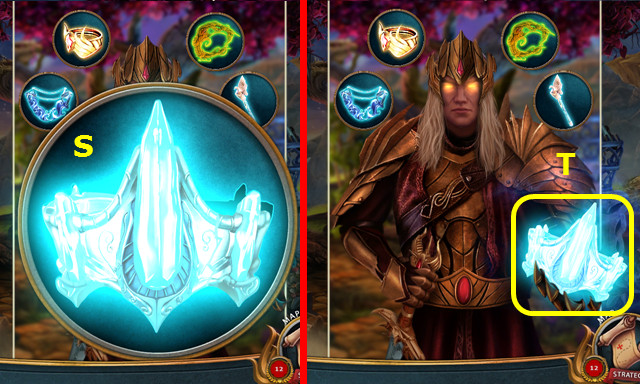
- Restore the crown (S).
- Take the CROWN OF COURAGE (T).

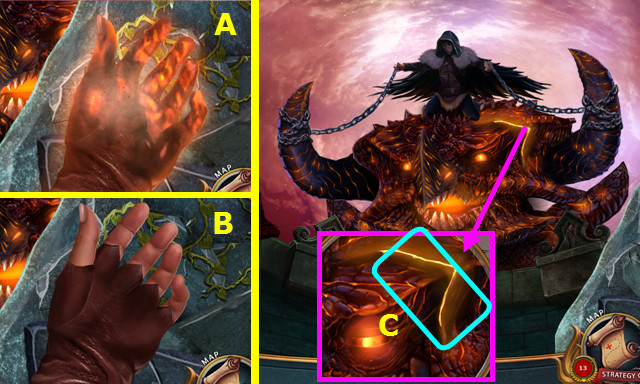
- Move left.
- Use the HEALING SCEPTER (A).
- Use the RING OF FIRE (B).
- Move left.
- Use the RING OF FIRE (C).

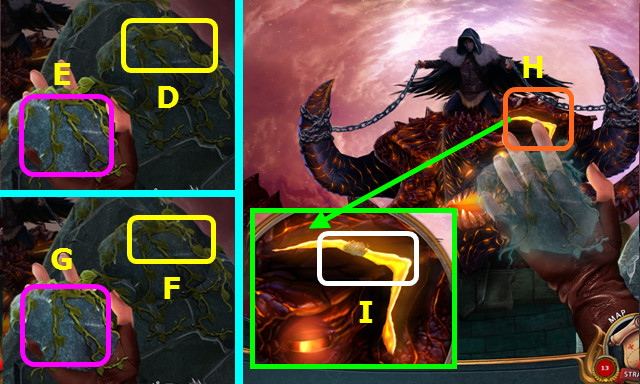
- Take (D); select (E).
- Take (F); use the NECKLACE OF CUNNING (G).
- Move left.
- Select (H).
- Use the HEALING SCEPTER and the BRACELET OF GROWTH (I).

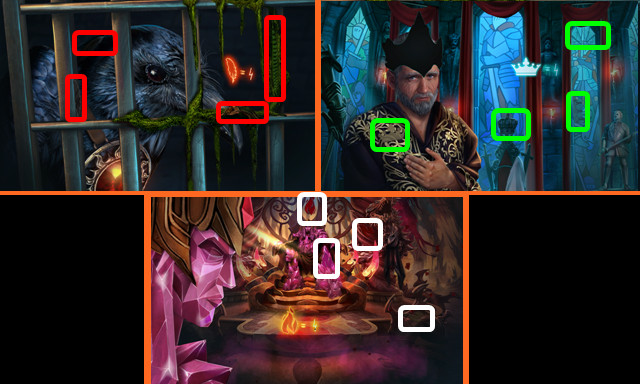
- Select the 4 feathers (red).
- Select the 4 crowns (green).
- Select the 4 flames (white).
- Congratulations! You have completed Nevertales: Legends!



 The Great Unknown: Houdini's Castle Walkthrough, Guide, & Tips
 Time Builders: Pyramid Rising 2 Walkthrough, Guide, & Tips
 Azada: In Libro Walkthrough, Guide, & Tips
 Farm Frenzy 3: American Pie Walkthrough, Guide, & Tips
 Hallowed Legends: Templar Walkthrough, Guide, & Tips