Reveries: Sisterly Love Walkthrough, Guide, & Tips
Reveries: Sisterly Love Walkthrough

Welcome to the Reveries: Sisterly Love Walkthrough
In order to save your life, your twin sister traded her soul to a witch. Now you must race through the looking glass to rescue her!
Whether you use this document as a reference when things get difficult or as a road map to get you from beginning to end, we’re pretty sure you’ll find what you’re looking for here.
This document contains a complete Reveries: Sisterly Love game walkthrough featuring annotated screenshots from actual gameplay!
We hope you find this information useful as you play your way through the game. Use the walkthrough menu below to quickly jump to whatever stage of the game you need help with.
Remember to visit the Big Fish Games Forums if you find you need more help. Have fun!
This walkthrough was created by prpldva, and is protected under US Copyright laws. Any unauthorized use, including re-publication in whole or in part, without permission, is strictly prohibited.
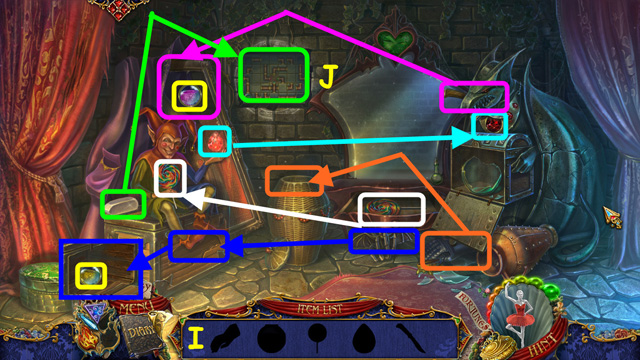
General Tips

- This is the official guide for Reveries: Sisterly Love.
- The Fortune Nuts are only available in the Collector’s Edition.
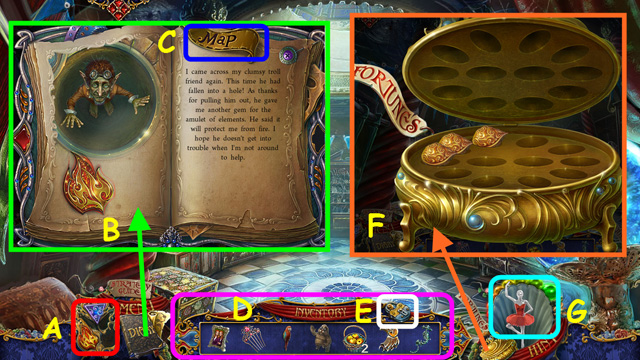
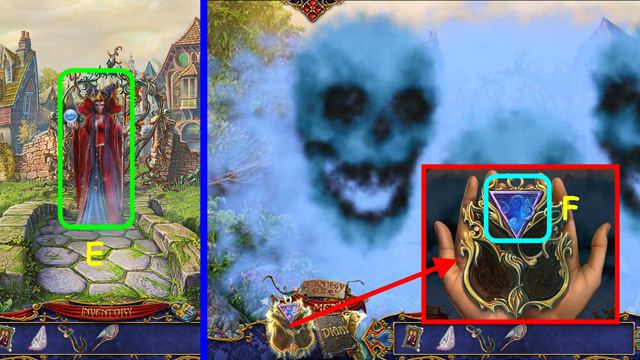
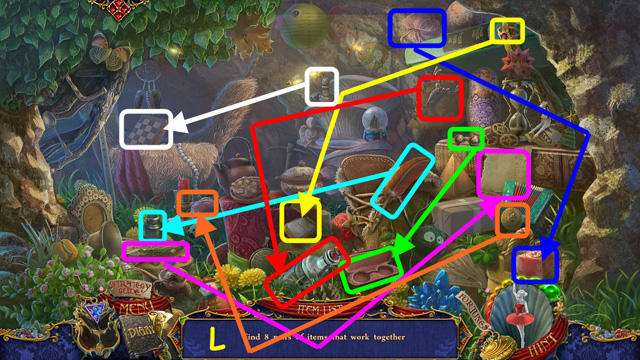
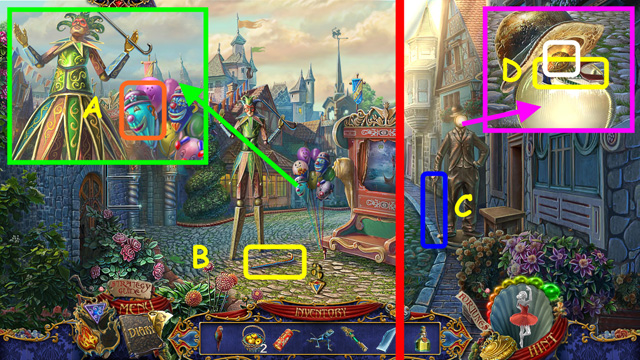
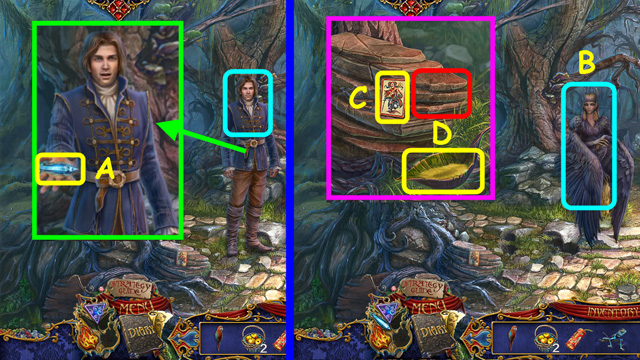
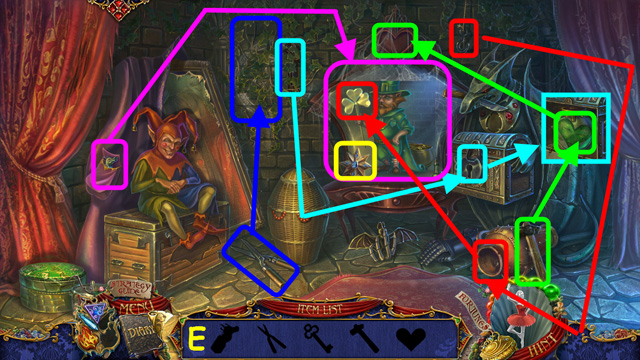
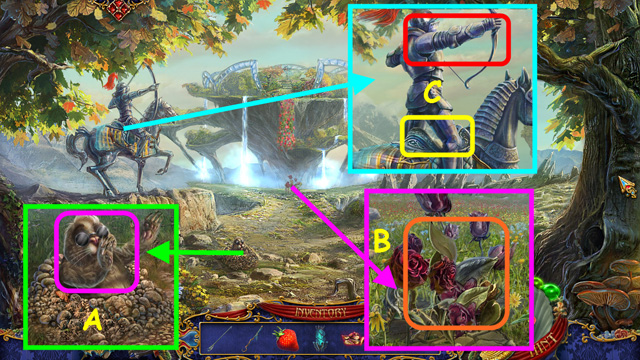
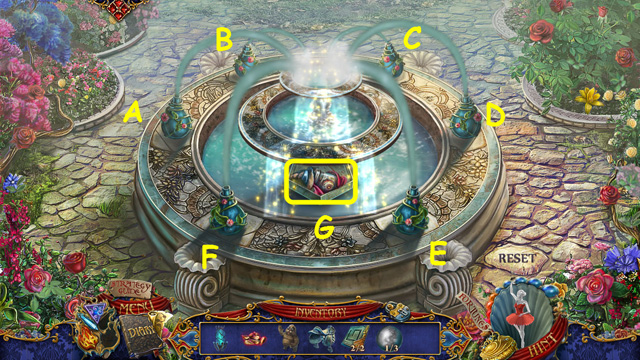
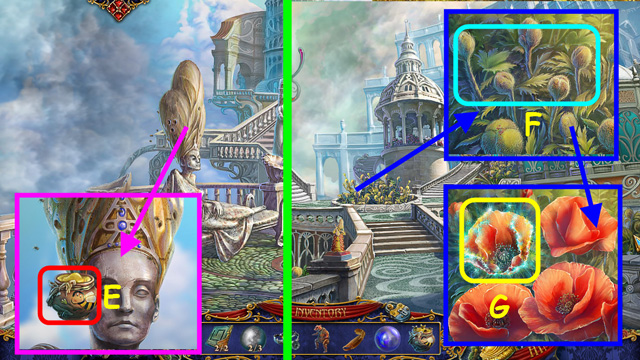
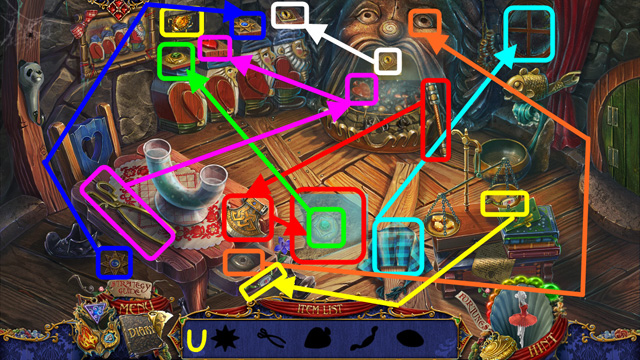
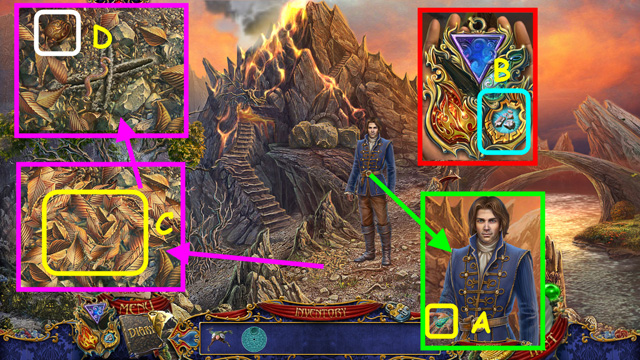
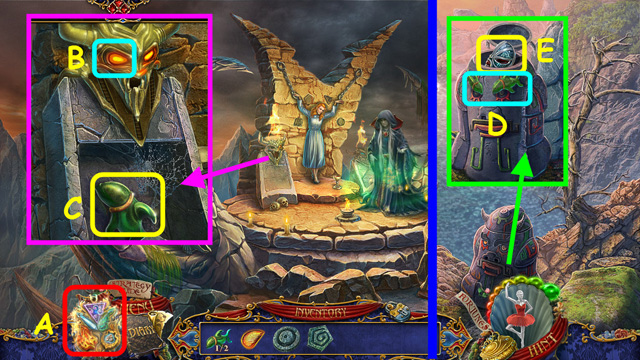
- Select the AMULET and choose a crystal to use it against the elements (A).
- Look in your diary to read the adventure’s events and clues (B).
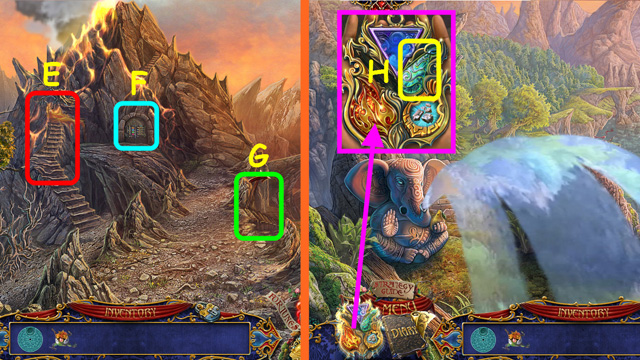
- Select the ‘Map’ tab to access the map (C).
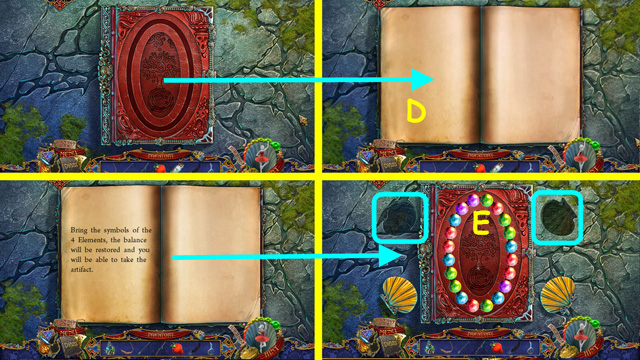
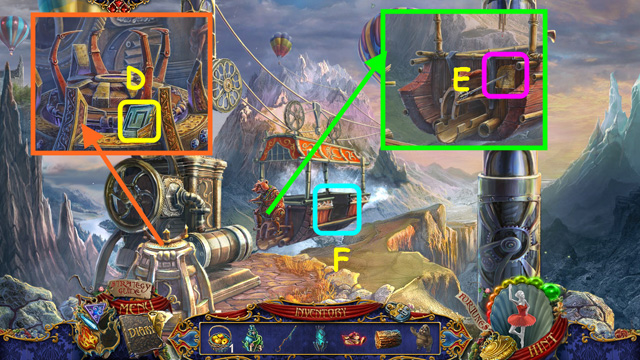
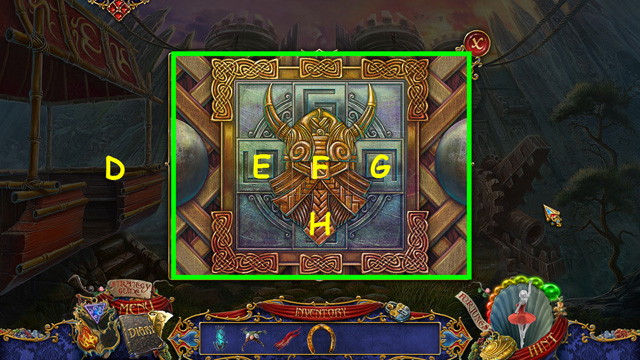
- Your inventory (D) is located in the lower panel; select an item to use it.
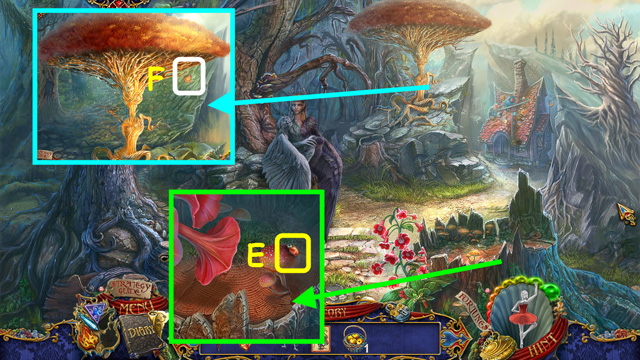
- The panel auto-hides; move your mouse down to bring it up.
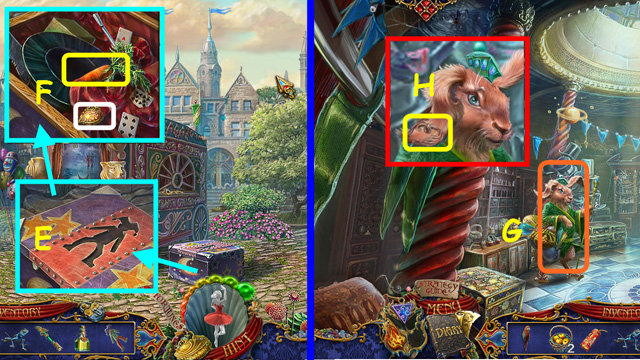
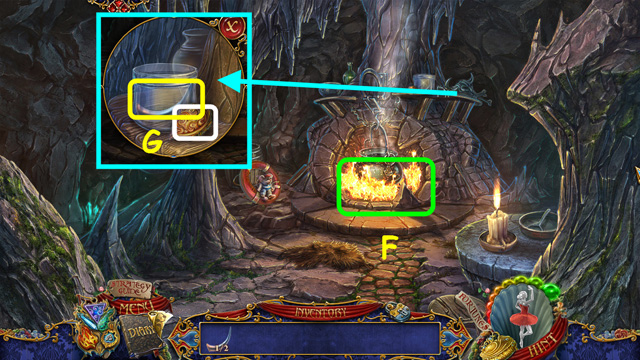
- You can lock the inventory panel in place with this lock (E).
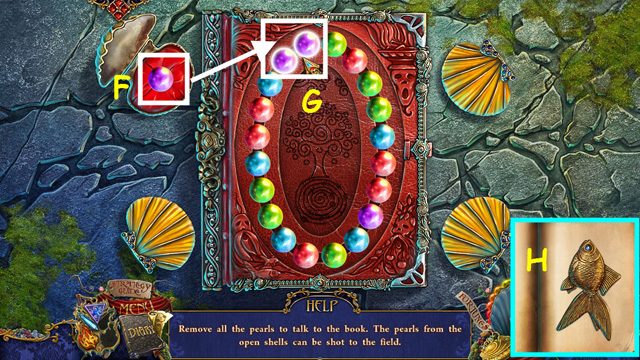
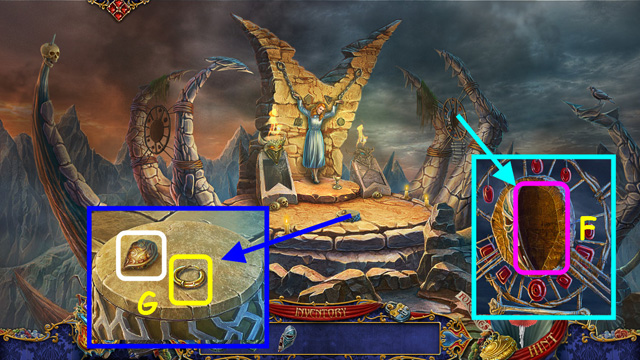
- Select and open the jewelry box to view the Fortune Nuts you have collected (F).
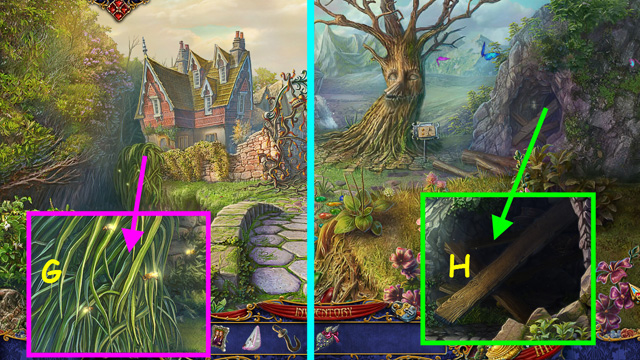
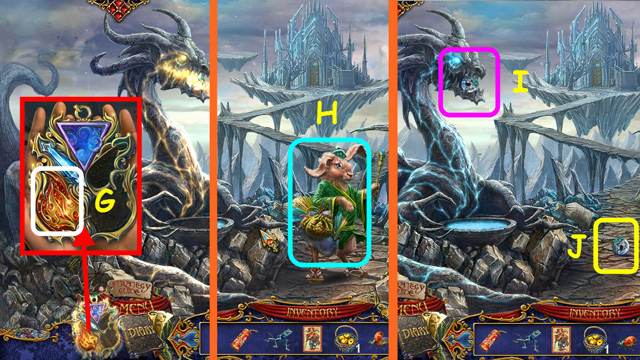
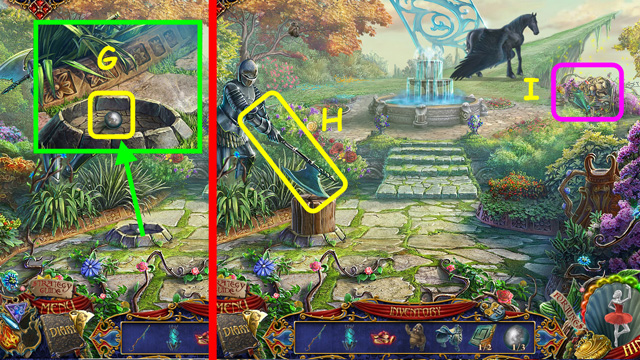
- Hints are unlimited, but you must wait for the meter to refill (G).
- Hidden-object puzzles are referred to as HOPs in this walkthrough.
- Mini-games and HOPs are sometimes randomized; your solution may vary.
- Items listed in red are hidden, or they require additiona actions to locate.
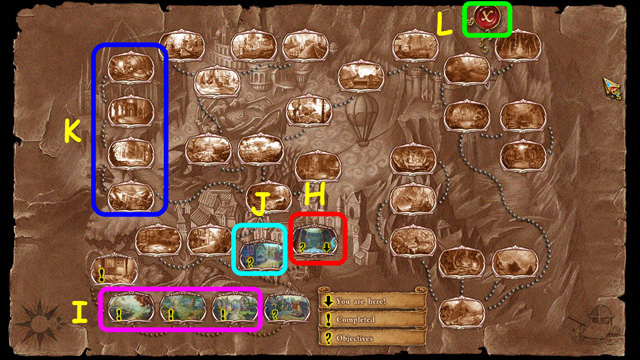
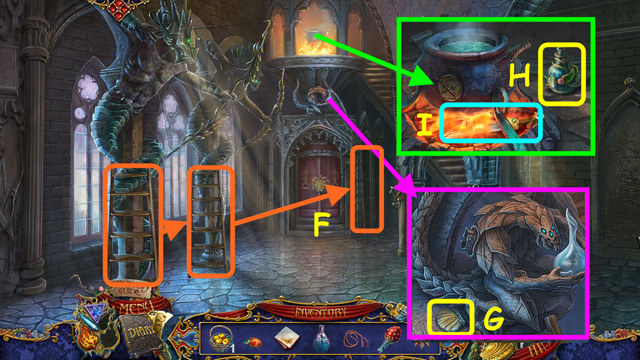
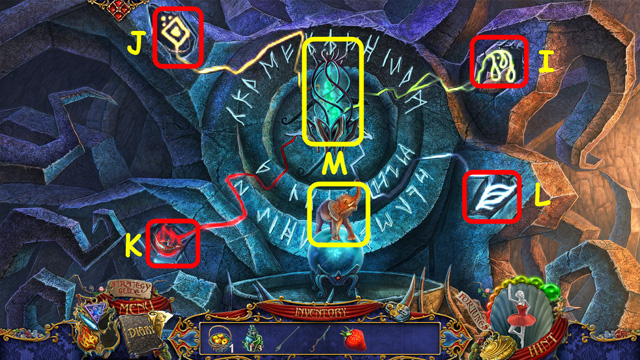
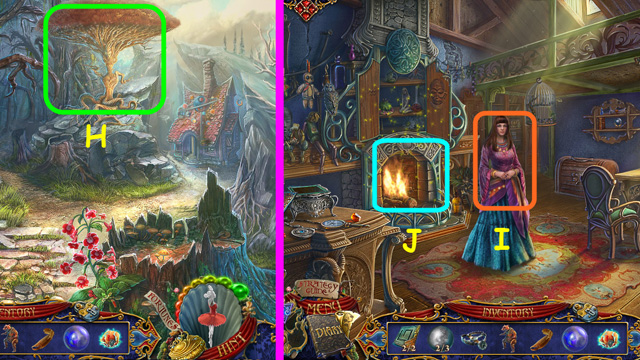
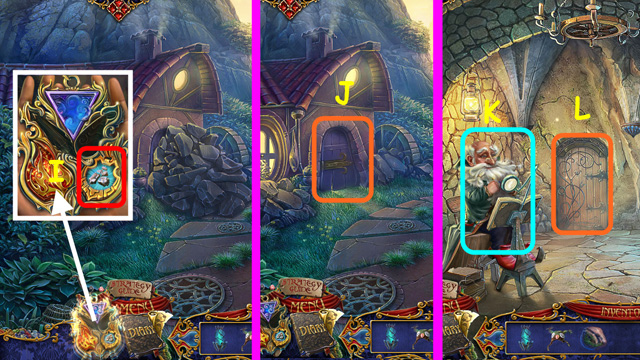
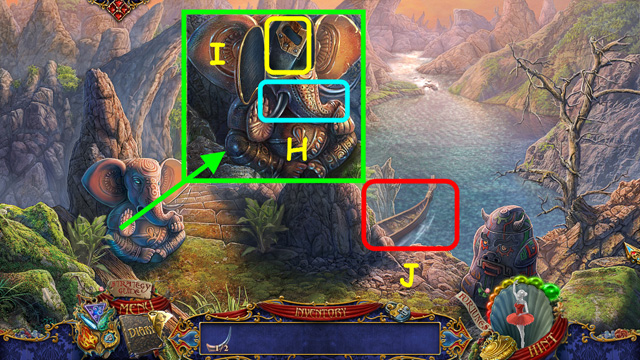
- Your current location is indicated by a down arrow (H).
- An exclamation point indicates the location is complete (I).
- Questions marks indicate that there are still objectives at that location (J).
- Locations with no symbols are not open to you yet (K).
- Select the ‘X’ to return to the diary (L).
Chapter 1: A Sister’s Sacrifice
- You will have the option of an interactive tutorial.
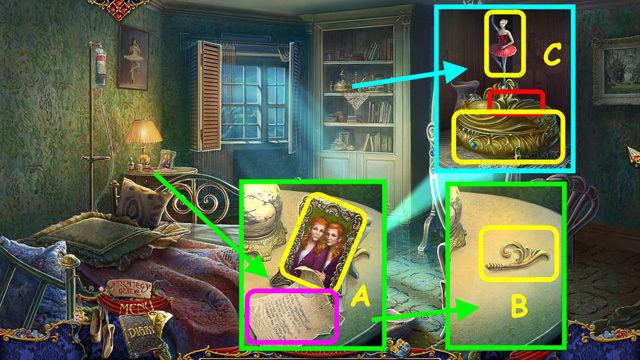
- Look at the table, read the records, and take the FAMILY PHOTO (A).
- Take the HANDLE (B).
- Look at the bookcase; place the HANDLE on the music box, take the ballerina, and the music box (C).
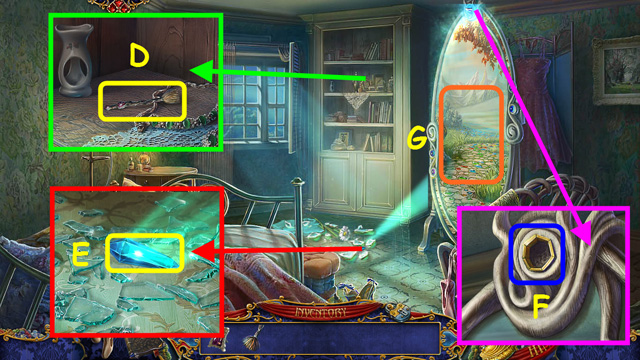
- Take the BRUSH (D).
- Look at the floor; use the BRUSH on the broken glass and take the CRYSTAL (E).
- Look at the top of the mirror and place the CRYSTAL in the opening (F).
- Enter the mirror (G).
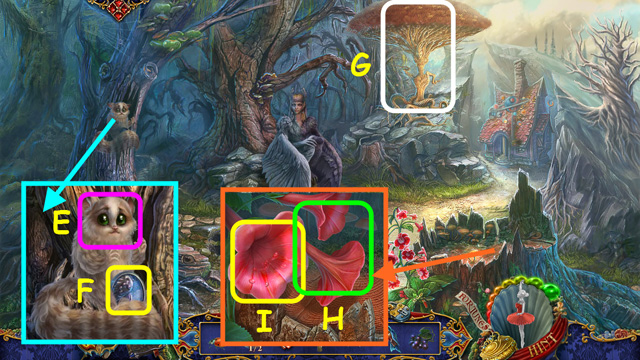
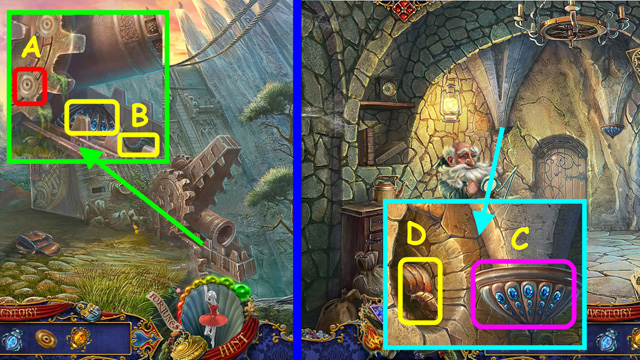
- Look at the ground, take the BRANCH, and read the note (H).
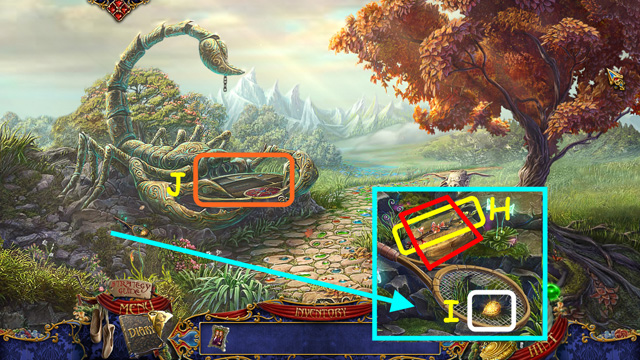
- Take the 1/24 Fortune Nut (I).
- Note the scorpion mini-game (J).
- Walk forward.

- Talk to the Prince (K).
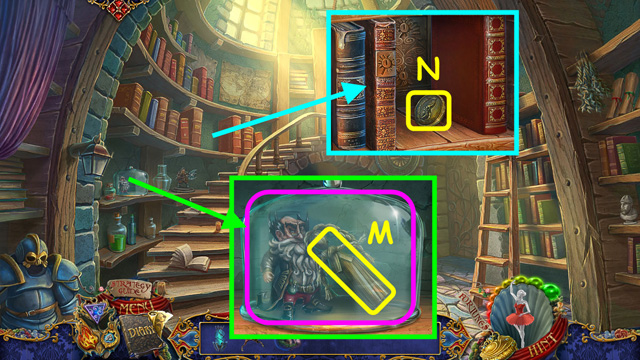
- Take the AMULET (L).
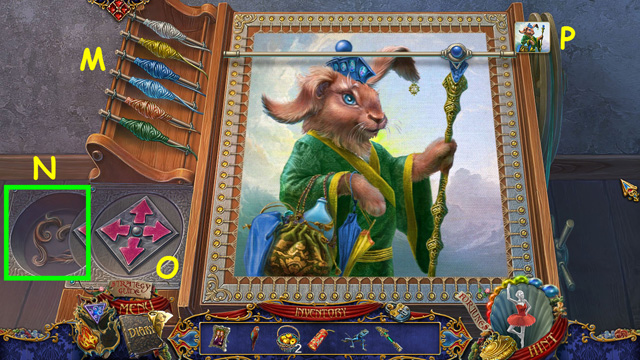
- The AMULET will sit on the left side of the menu bar (M).
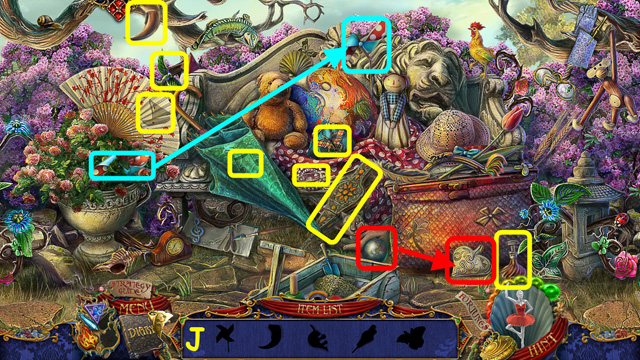
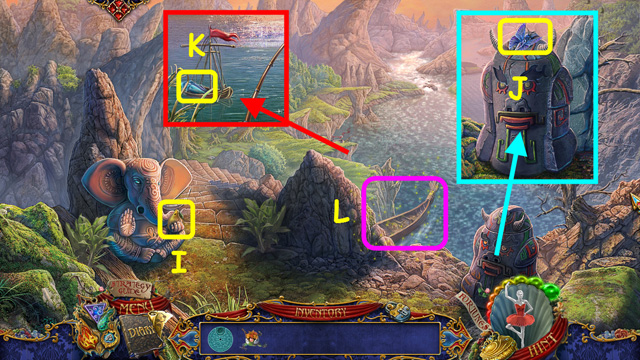
- Pull some of the boards and look in the cave to discover you need some light (N).
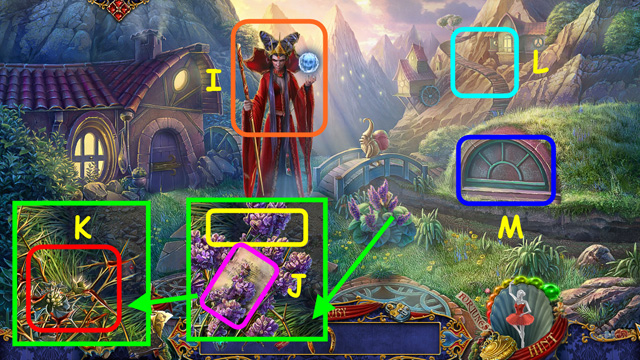
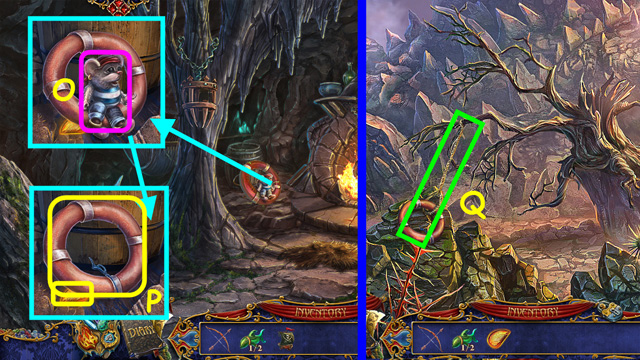
- Look at the tree (O).
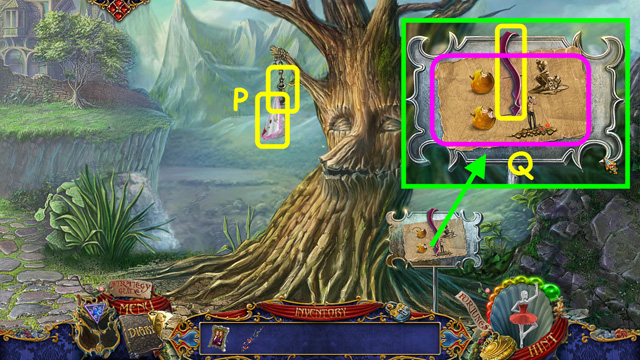
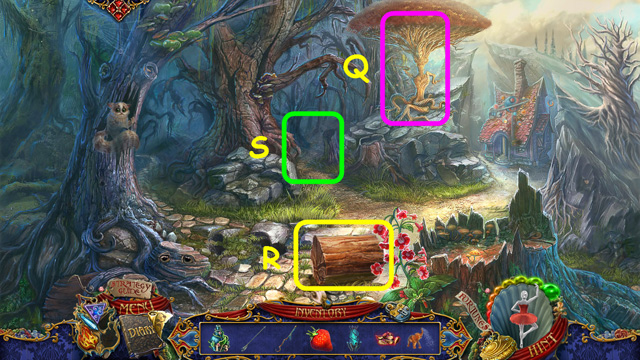
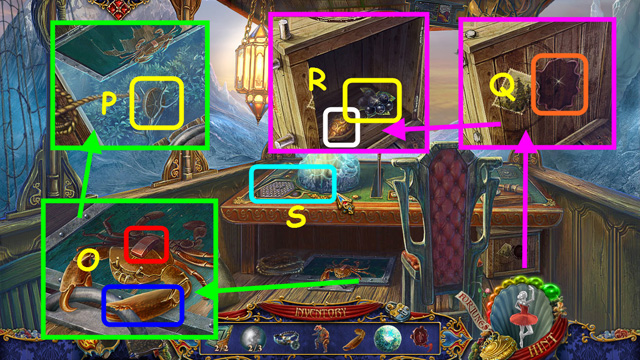
- Take MONICA’S HANDKERCHIEF and the HOOK (P).
- Take the RIBBON and read about the apple (Q).
- Back away from the tree and walk forward.
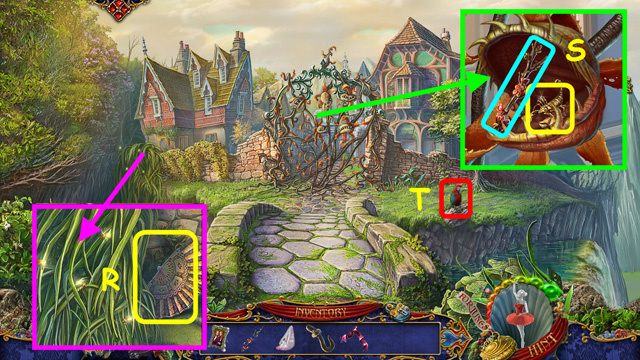
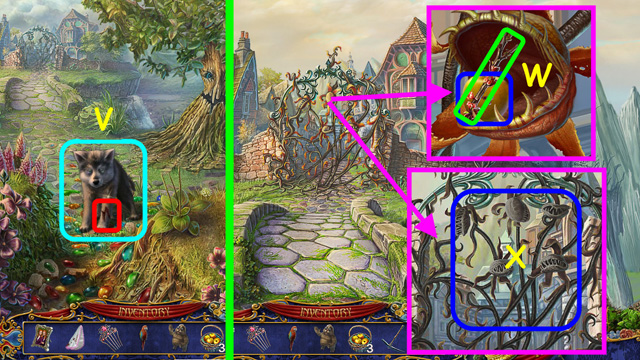
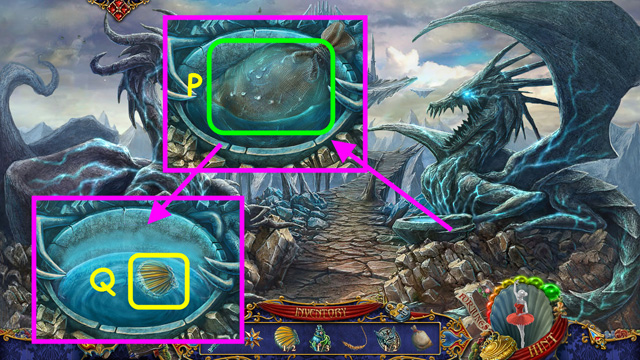
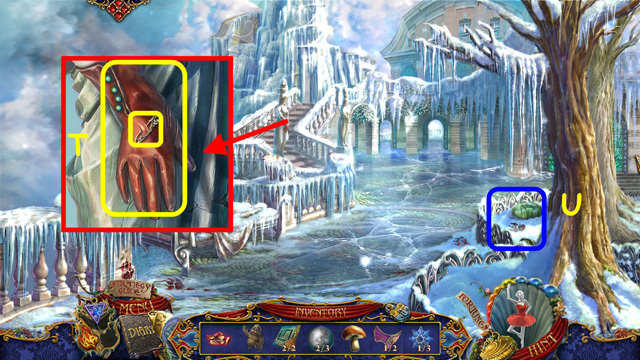
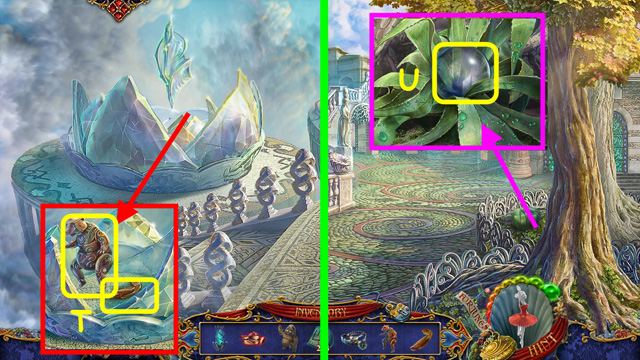
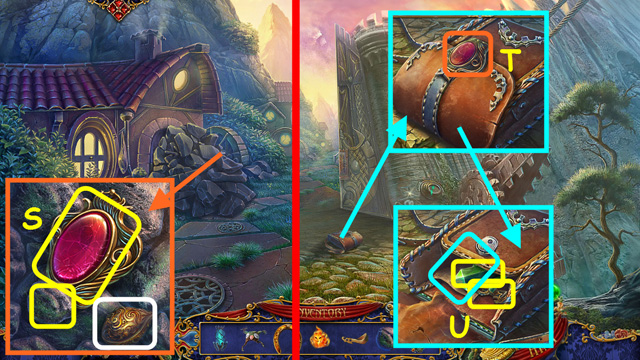
- Look at the grass and take the FAN (R).
- Zoom into the fence twice, place the BRANCH in the plant’s mouth, and take the SCORPION (S).
- Try to take the bird (T).
- Walk down.
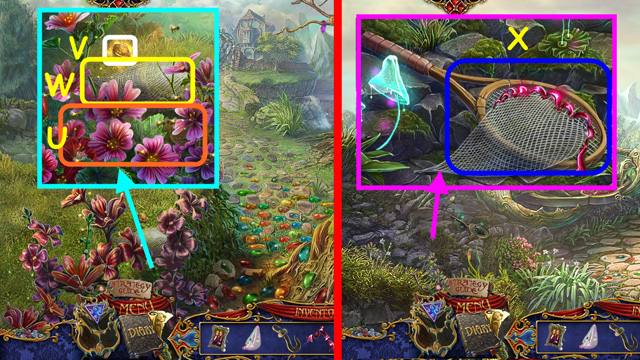
- Look at the ground and use the FAN to get rid of the bees (U).
- Take the 2/24 Fortune Nut (V).
- Take the NET (W).
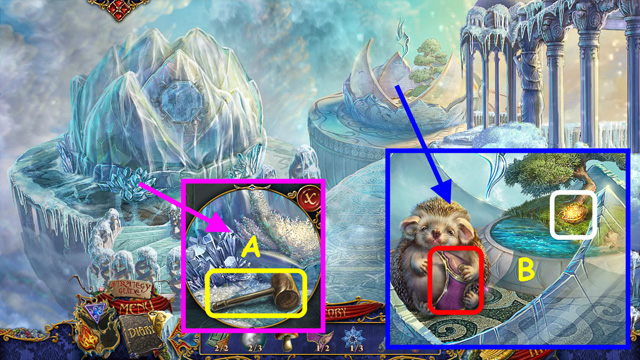
- Walk down.
- Look at the ground; use the NET and the RIBBON on the racquet to make the LANDING NET (X).
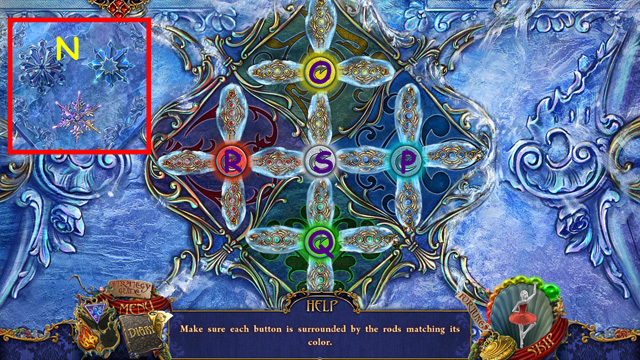
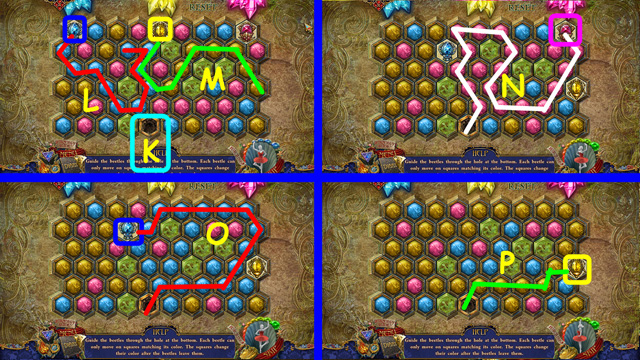
- Look at the scorpion for a mini-game.

- Place the SCORPION in the right compartment to trigger the mini-game.
- Use the buttons to move the scorpion to the exit.
- Doors can only move along the red arrows; some will open/close automatically.
- Press the buttons in this order: AX3, B, Cx2, D, A, C, B, Ax2, D, C, B, C, D, Ax2, B, C, and B.
- Walk forward twice.
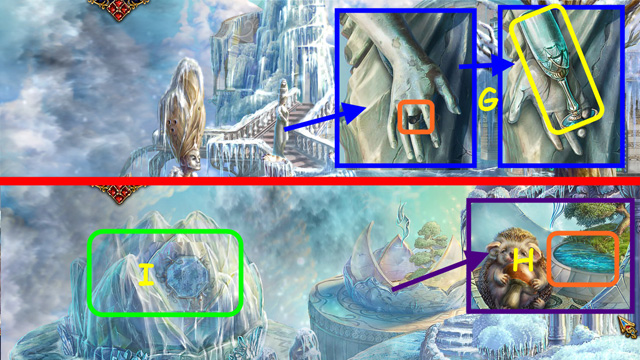
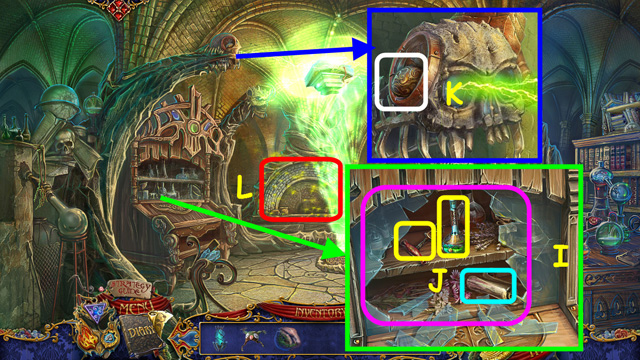
- Talk to the Witch (E).
- Look at the AMULET and select the smoke gem to dispel the skulls (F).
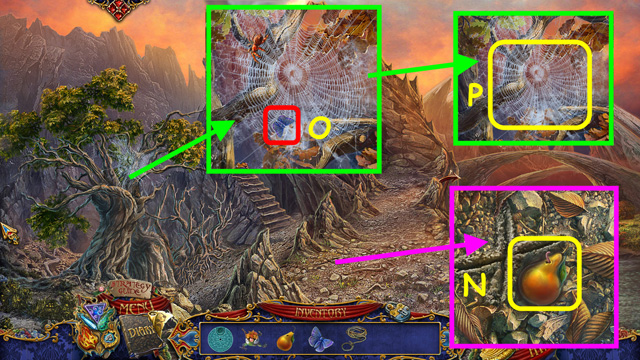
- Look at the grass and use the LANDING NET to capture the FIREFLIES (G).
- Walk down.
- Look at the cave and use the FIREFLIES on the darkness (H).
- Select the cave for a HOP.
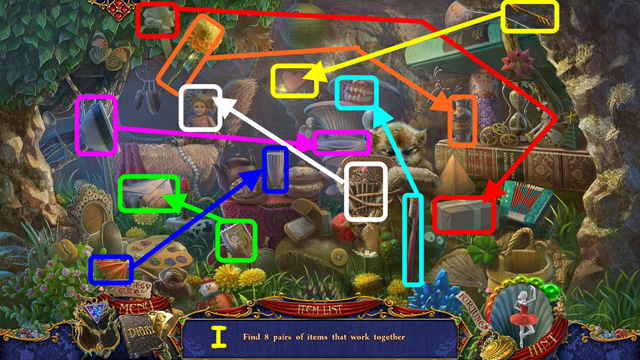
- Locate 8 pairs of related items (I).
- You will earn the COMB.
- Walk forward.
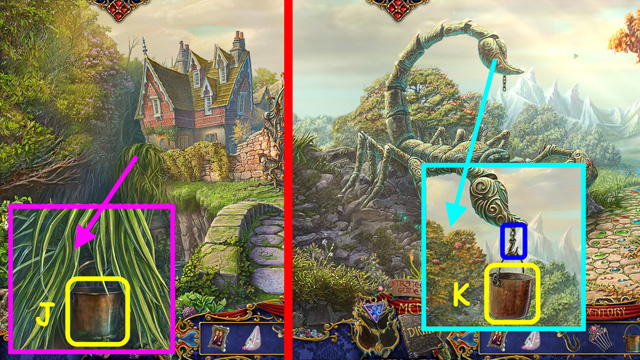
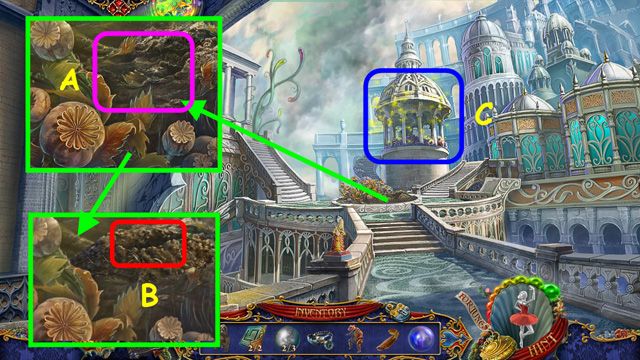
- Look at the grass and use the COMB on the blades to find the BUCKET (J).
- Walk down twice.
- Look at the scorpion tail; place the HOOK on the chain, and the BUCKET on the hook (K).
- After the tail goes in the well, take the BUCKET OF WATER.
- Walk forward and look in the cave for a HOP.
- Locate 8 pairs of related items (L).
- You will earn the SUNGLASSES.
- Walk forward.
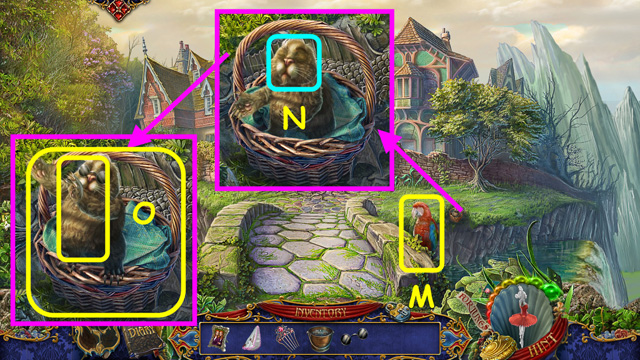
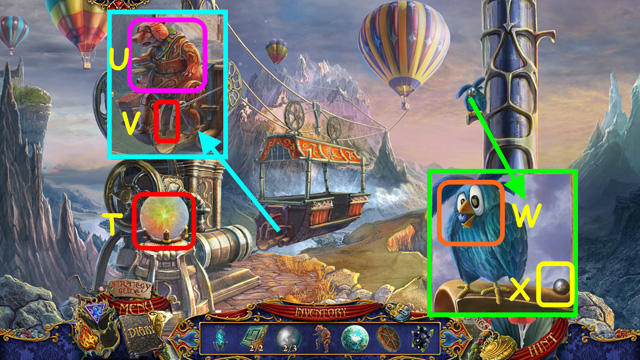
- Take the PARROT (M).
- Look at the basket and give the SUNGLASSES to the mole (N).
- Take the MOLE and the BASKET (O).
- Walk down and look at the tree.
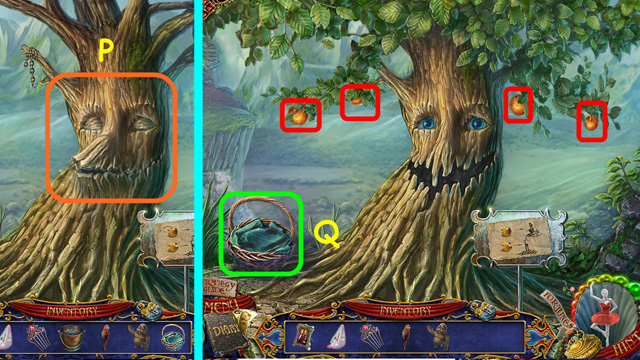
- Use the BUCKET OF WATER on the tree (P).
- Look at the tree again; place the BASKET on the left (Q) and take the 4 apples (red).
- Take the BASKET OF APPLES.
- Walk forward.
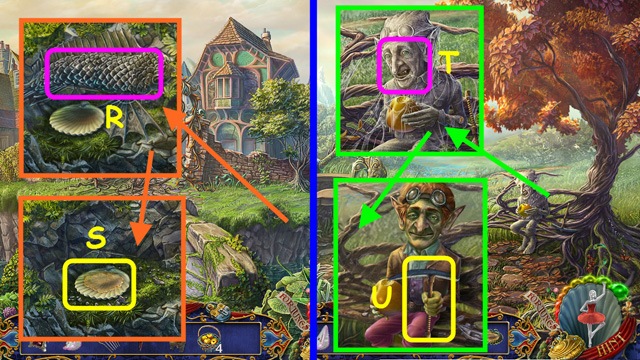
- Look at the fish statue and use the BASKET OF APPLES on his side (R).
- Take the APPLE JUICE (S).
- Walk down twice.
- Look at the Troll and use the APPLE JUICE on his mouth (T).
- Talk to the Troll and take the PICKAXE (U).
- Walk forward.
- Use MONICA’S HANDKERCHIEF on the cub’s injury, and then take the WOLF CUB (V).
- Walk forward.
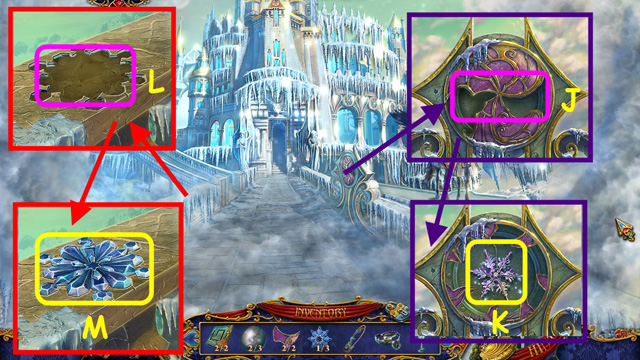
- Zoom into the plant on the gate, use the BASKET OF APPLES on the mouth, and take the branch (W).
- Use the PICKAXE on the gate (X), walk forward, and left.
Chapter 2: The Village
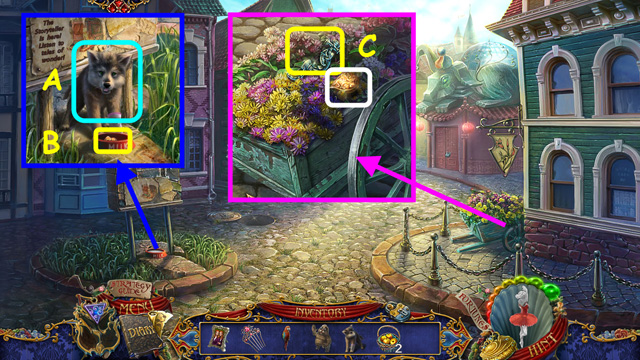
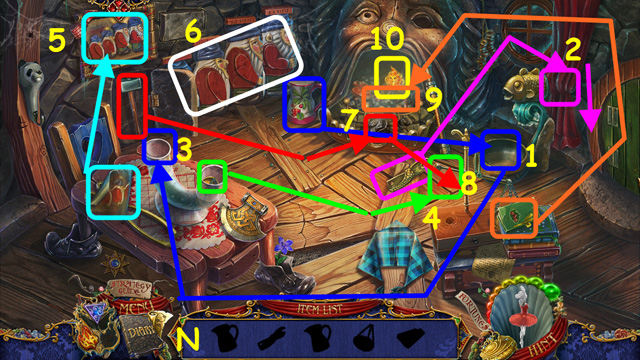
- Look at the bulletin board and place the WOLF CUB at the bowl of milk (A).
- Take the EAGLE HEAD from the bowl (B).
- Look at the flower cart; move some flowers, take the HANDLE and the 3/24 FORTUNE NUT (C).
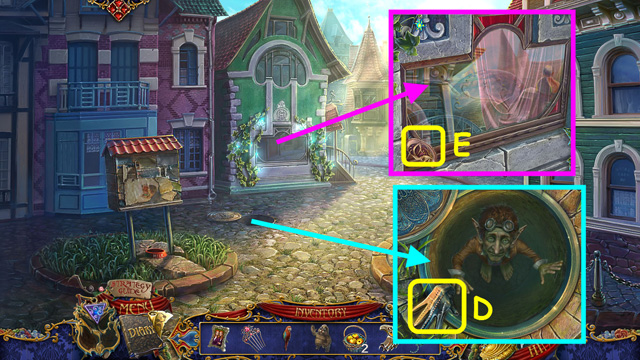
- Look at the manhole and take the GLOVE (D).
- Look at the window and take the MASK HALF (E).
- Walk down.
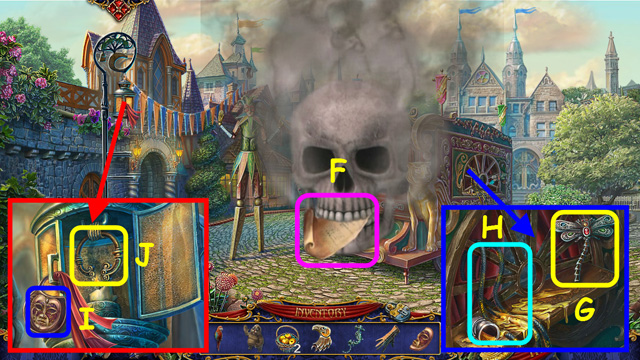
- Take the note from the skull (F).
- Look at the side of the wagon and take the 1/2 DRAGONFLY (G).
- Use the GLOVE to take the ROPE (H).
- Look at the lamp and place the MASK HALF in the lock (I).
- Open the door and use the GLOVE to take the RING (J).
- Walk to the left.
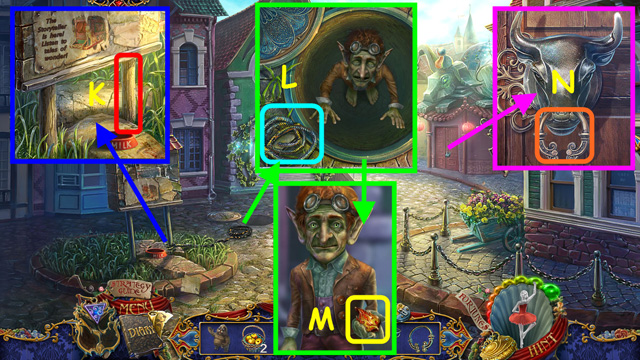
- Look at the bulletin board and use the ROPE on the post (K).
- Look in the manhole and give the rope to the troll (L).
- Take the FIRE GEM for your AMULET (M).
- Look at the door; place the RING in the bull’s nose, and then knock (N).
- Enter the magic shop.
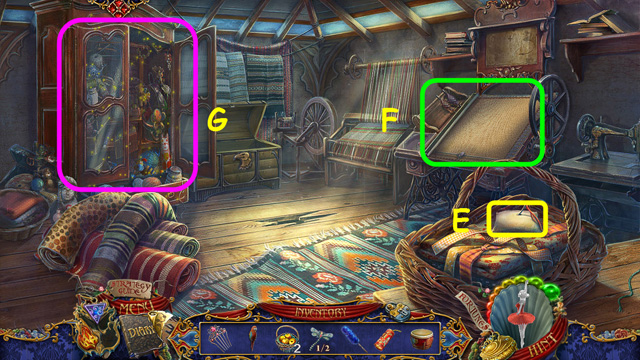
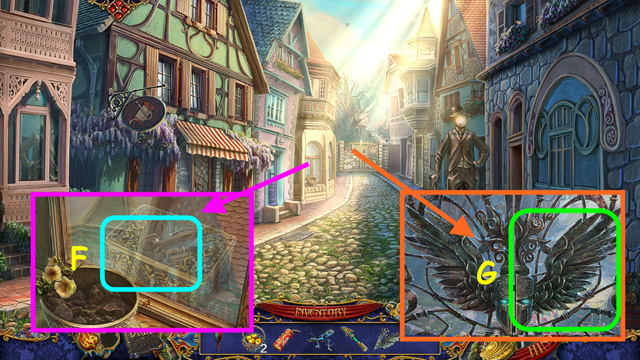
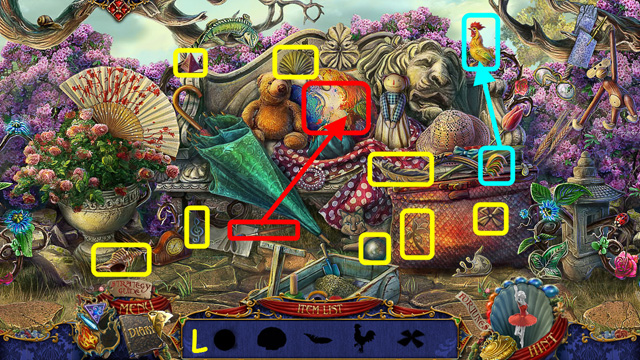
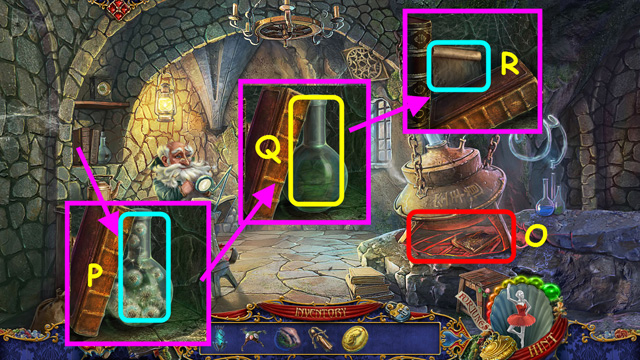
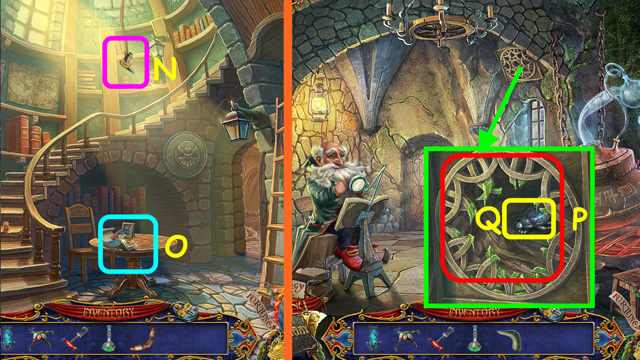
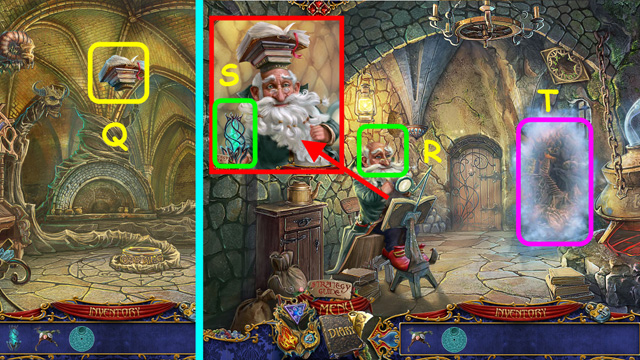
- Look at the right counter, read the note, and take the KNITTING NEEDLES (O).
- Look at the cabinet, use the HANDLE on the lock, and open the door (P).
- Take the 4/24 Fortune Nut (Q).
- Note the mini-game on the box (R).
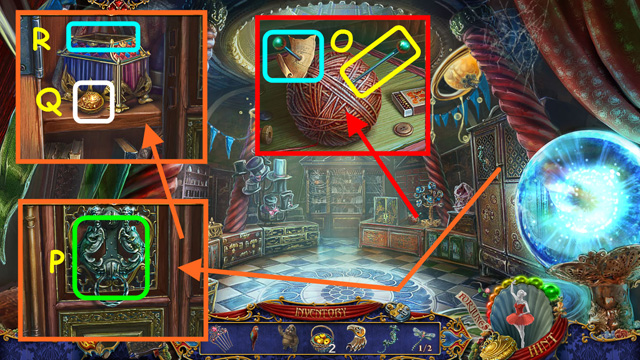
- Exit the shop and walk forward.
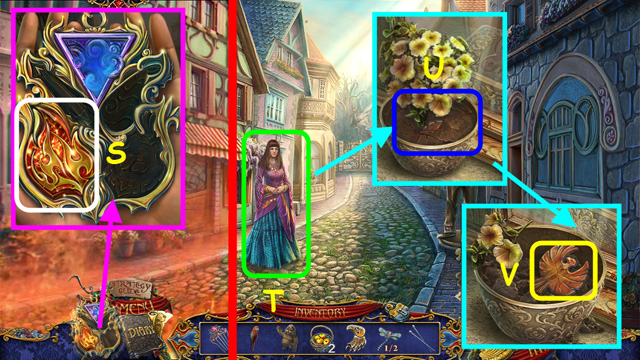
- Look at your AMULET and select the FIRE GEM to dissipate the flames (S).
- Talk to the Gypsy (T).
- Look at the window and use the MOLE in the planter (U).
- Take the BIRD FIGURE (V).
- Look at the door and take the DUSTER (W).
- Place the KNITTING NEEDLES in the lock (X).
- Push the yarn ball in to open the door; enter the weavers.
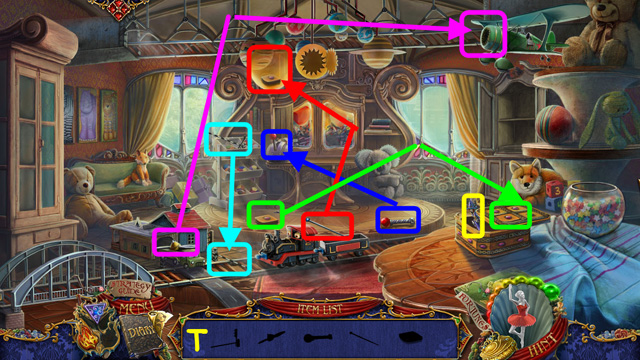
- Look at the chest; place the EAGLE in the bottom part of the lock and the BIRD FIGURE in the top of the lock (A).
- Take the CRACKER (B); try to take the 2nd cracker (C).
- Take the DRUM (D).
- Take the NEEDLE WITH THREAD (E).
- Note the mini-game on the embroidery machine (F).
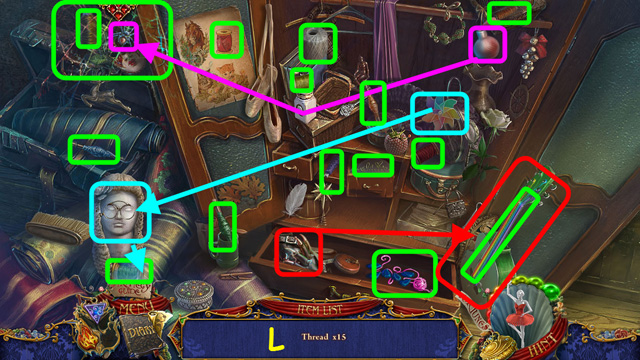
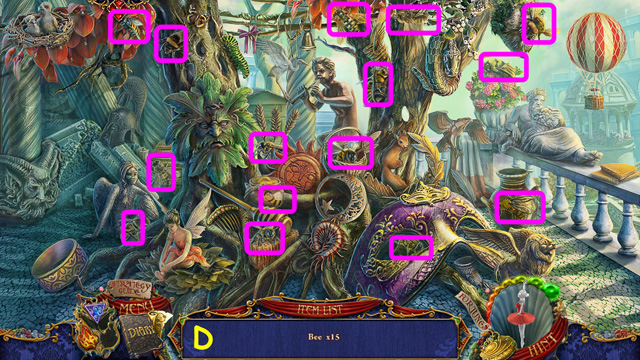
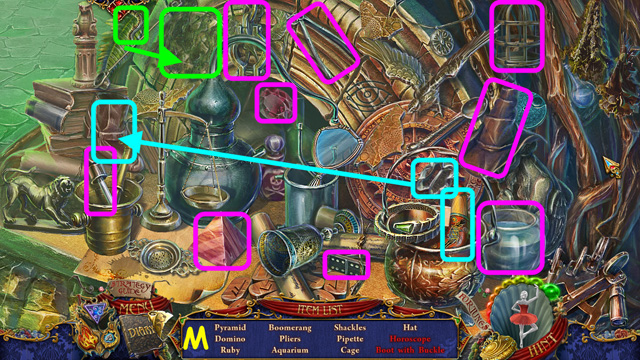
- Select the wardrobe for a HOP (G).
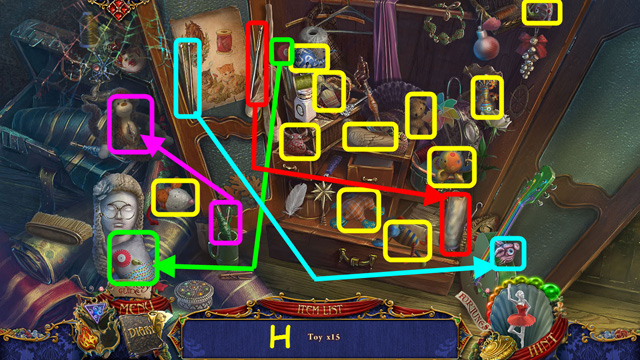
- Locate the 15 toys (H).
- You will earn the LIZARD.
- Walk down twice and enter the magic shop on the right.
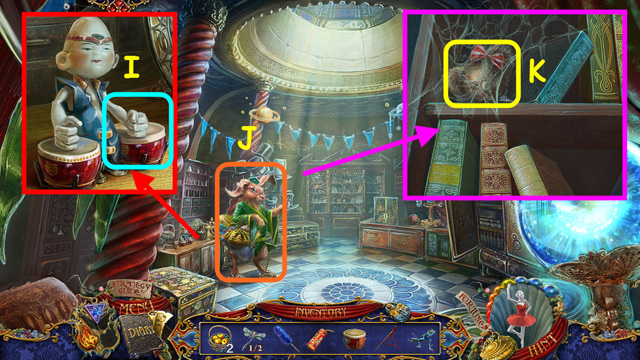
- Look at the left counter and use the DRUM on the figurine (I).
- Talk to the Rabbit (J).
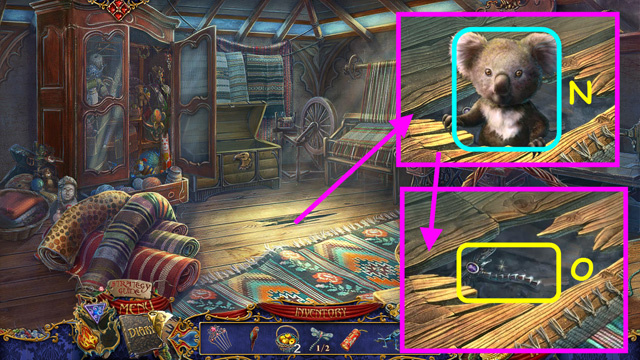
- Look at the bookcase, use the DUSTER on the webs, and take the KOALA HEAD (K).
- Walk down twice.
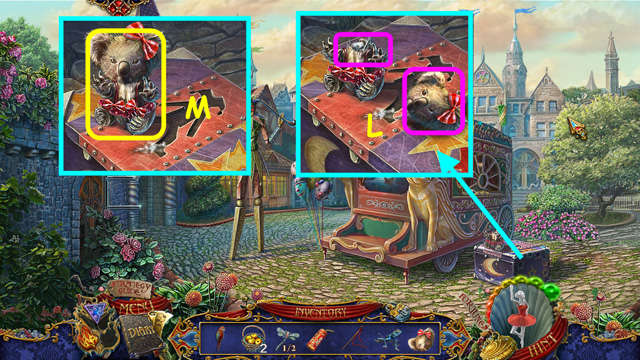
- Look at the chest; place the KOALA HEAD on the lid and use the NEEDLE WITH THREAD on the body (L).
- Take the KOALA BEAR (M).
- Walk left, forward, and left again to enter the weaver’s shop.
- Look at the hole in the floor and give the KOALA BEAR to the koala (N).
- Take the 2/2 DRAGONFLY (O).
- Walk down twice and enter the magic shop.
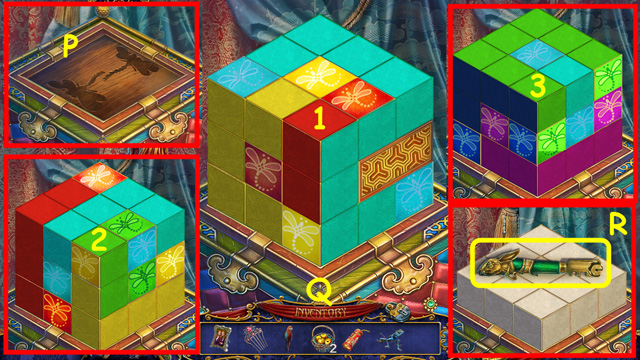
- Look in the cabinet on the right, and then look at the top of the box for a mini-game.
- Place the 2 DRAGONFLY figures in the lid to activate the mini-game (P).
- Color the blocks to connect dragonflies of the same color (Q).
- Select a dragonfly to select a color then color the blank squares.
- There are three levels to solve (1-3).
- Take the GLASS CUTTER (R).
- Walk down.
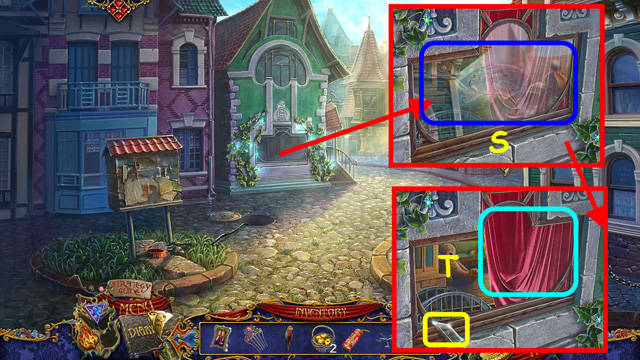
- Look at the window and use the GLASS CUTTER on the glass (S).
- Take the GLASS SHARD and open the drape (T).
- Look in the window for a HOP.
- Locate all the items by their silhouette (U).
- Return the items to where they belong in the scene.
- You will earn the REVEALING INK.
- Walk down.
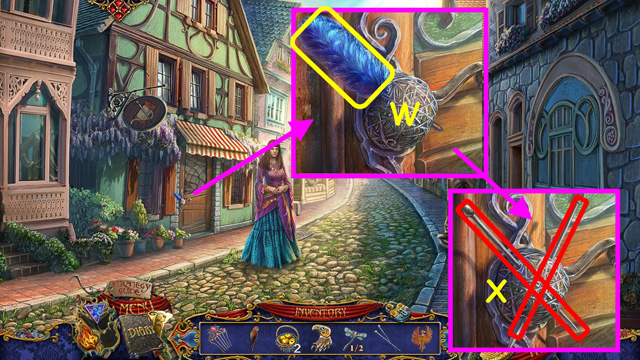
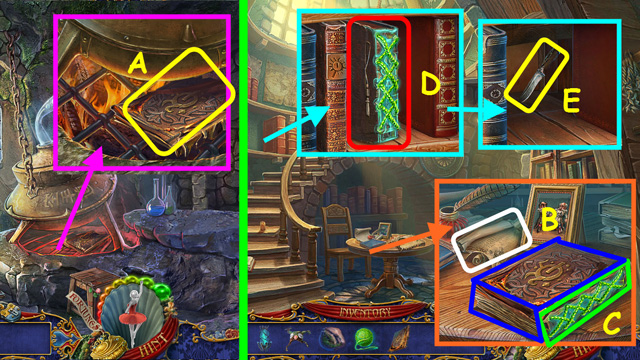
- Look at the harlequin and use the GLASS SHARD on the balloons (A).
- Take the CANE (B).
- Walk left and forward.
- Use the CANE on the statue (C).
- Look at the hat; take the CLOWN FIGURE and the 5/24 Fortune Nut (D).
- Walk down twice.
- Look at the chest and place the CLOWN FIGURE on the lid (E).
- Take the CARROT and the 6/24 Fortune Nut (F).
- Walk left and enter the magic shop.
- Give the CARROT to the rabbit (G).
- Use the COMB on his ear and take the MAGIC FUR (H).
- Walk down, go forward and enter the weaver’s shop.
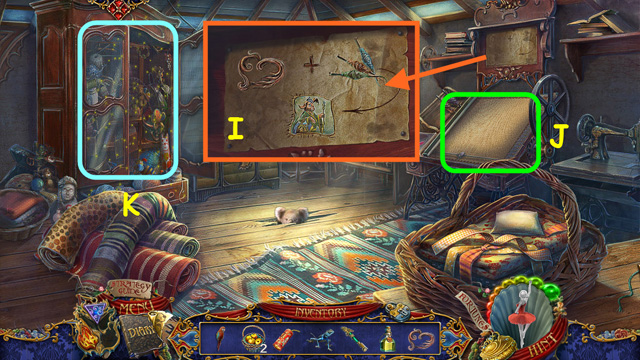
- Look at the paper and use the REVEALING INK on it (I).
- Note the weaving machine (J).
- Select the wardrobe for a HOP (K).
- Locate all the thread (L).
- You will earn THREAD.
- Look at the weaving machine for a mini-game.
- Place the THREAD with the other thread (M).
- Place the MAGIC FUR in the receptacle (N).
- Use the arrows (O) to move the needle over an area, and then select the color of thread.
- Use the photo as reference (P).
- Take the MAGIC SHAWL.
- Walk down.

- Give the MAGIC SHAWL to the gypsy (Q).
- Place the FAMILY PHOTO in her hand (R).
- Take the HUNTER PUPPET (S).
- Walk down and select the window for a HOP.
- Locate all the items based on their silhouettes (T).
- Place the items back in the scene as needed.
- You will earn the WITCH PUPPET.
- Walk down and look at the front of the wagon for a mini-game.
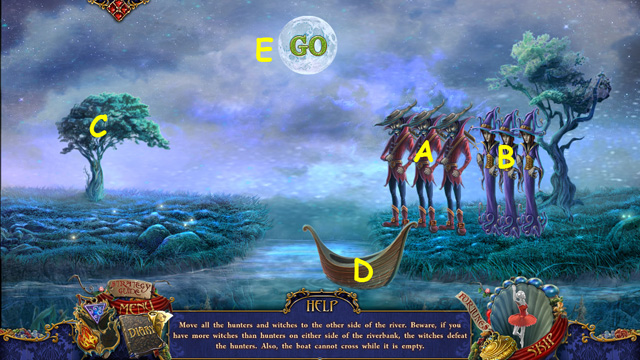
- Place the WITCH PUPPET and the HUNTER PUPPET on the shore to activate the mini-game.
- Move all the hunters (A) and witches (B) to the opposite shore (C).
- There cannot be more witches than hunters on any side.
- Select 2 witches to move them to the boat (D) and press go (E). Select a witch in the boat and press go.
- Select a witch on the right shore and press go.
- Remove one witch from the boat and press go.
- Remove the witch in the boat and add 2 hunters and press go.
- Remove a hunter, add a witch and press go.
- Remove a witch, add a hunter and press go.
- Remove both hunters from the boat, add a witch, and press go.
- Place a witch in the boat and press go.
- Remove a witch from the boat and press go.
- Add a witch to the boat, press go, and then remove both witches.
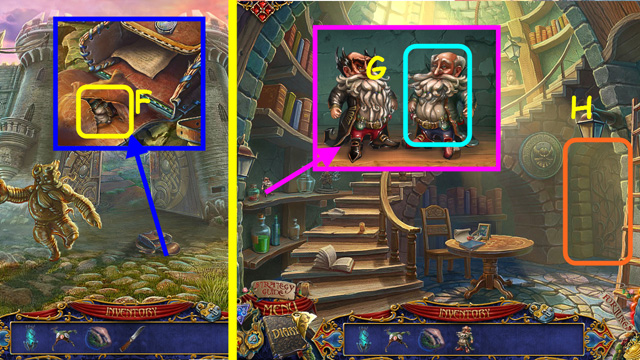
- Take the GATE PART when it appears.
- Walk left and forward.
- Look at the window and use the GLASS CUTTER on the glass (F).
- Look at the gate and place the GATE PART in the lock (G).
- Walk forward.
Chapter 3: The Witch’s Castle
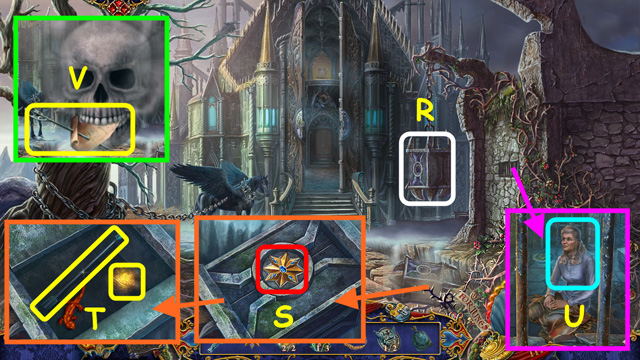
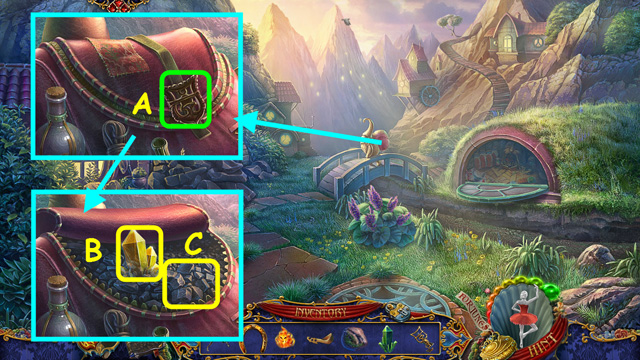
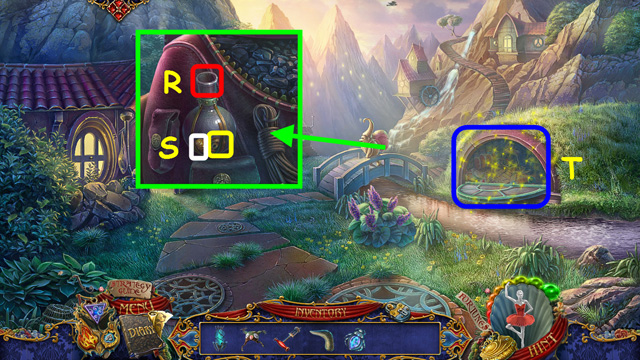
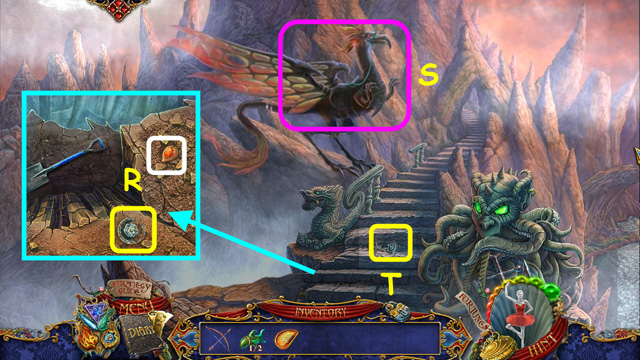
- Talk to the Prince and take the FROST GEM (A).
- Talk to the Harpy (B).
- Look at the rocks and take the PLAYING CARD (C).
- Use the BASKET OF APPLES on the rocks and take the APPLE JUICE (D).
- Use the APPLE JUICE on the Harpy.
- Look at the stump and take the LADYBUG (E).
- Look at the Fortune Nut Tree and take the 7/24 Fortune Nuts (F).
- Exit the tree and walk to the left.
- Look at the AMULET and use the FIRE GEM to dissipate the flames (G).
- Talk to the Rabbit (H).
- Use the PARROT on the left dragon head (I).
- Take the LITTLE PLANET (J).
- Walk down and look at the house on the right for a mini-game.
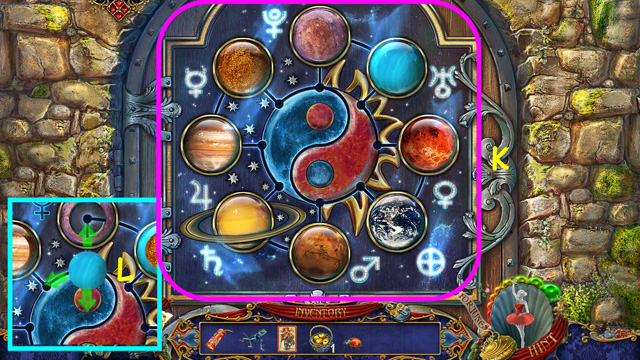
- Place the LITTLE PLANET on the rings to trigger the mini-game.
- Move the center planet pieces along the tracks to the matching outer rings (K).
- Select a planet and choose a green arrow to move it in that direction (L).
- Walk to the right.
- Talk to the Gypsy (M).
- Look at the shelf and take the 1/2 RAVEN EMBLEM (N).
- Look at the table and take the HANDKERCHIEF (O).
- Note the fireplace (P).
- Look at the box on the desk for a mini-game (Q).
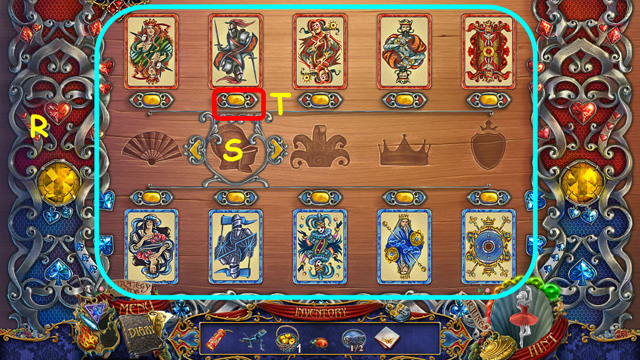
- Place the PLAYING CARD on the board to activate the mini-game.
- Restore the cards and put them in the correct place based on color and designation (R).
- Select a card to rotate it in place.
- Move the center mechanism left and right using the arrows (S).
- Once the mechanism is by the card, press the yellow button to move the closest half of the card to the mechanism (T).
- Use this to move the cards halves to the correct locations.
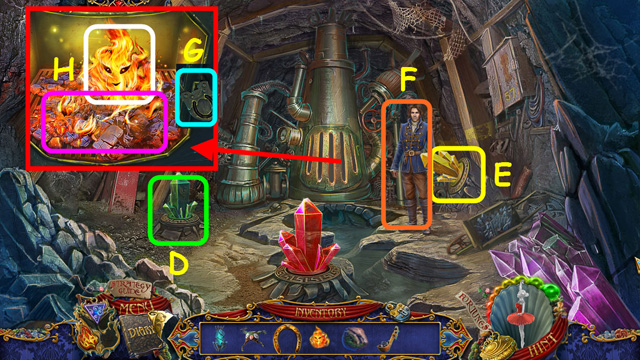
- Take the BUTTERFLY.
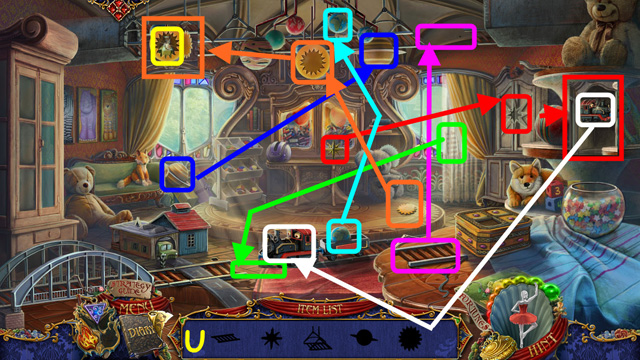
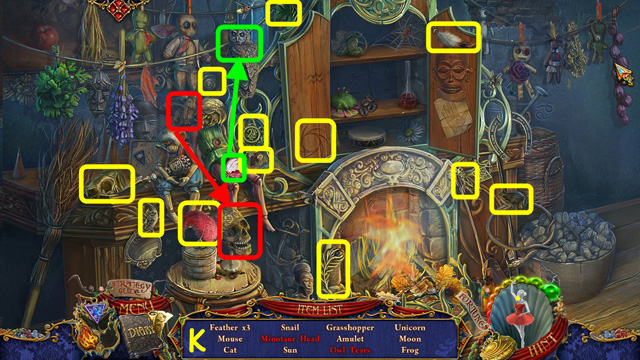
- Select the fireplace for a HOP.
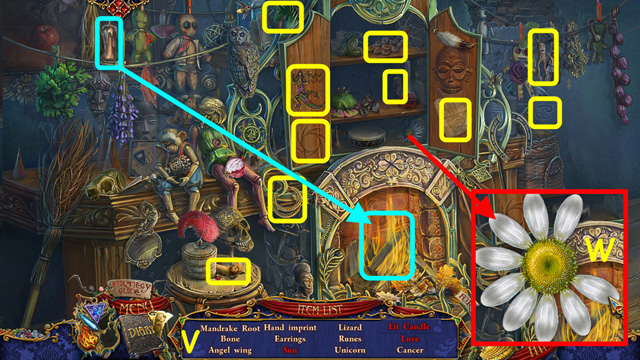
- Locate all the items on the list (V).
- Pull the petals off the daisy to find love (W).
- You will earn the LIT CANDLE.
- Walk down twice.

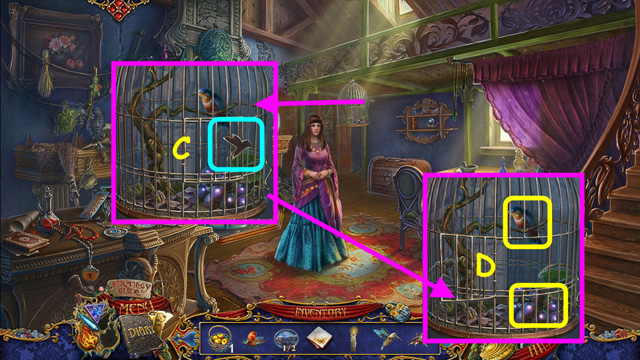
- Look in the window and place the BUTTERFLY on the lid of the box (A).
- Take the HUMMINGBIRD FIGURE and the BAT WINGS (B).
- Walk forward and right.
- Look at the cage and place the HUMMINGBIRD FIGURE into the lock (C).
- Take the GRAPES and the HUMMINGBIRD (D).
- Walk down.
- Look at the tree hollow and give Josie the GRAPES (E).
- Take the 2/2 RAVEN EMBLEM (F).
- Zoom into the tree and take the 8/24 Fortune Nut (G).
- Look at the stump and use the HUMMINGBIRD on the flowers (H).
- Take the FLOWER WITH NECTAR (I).
- Walk to the right.
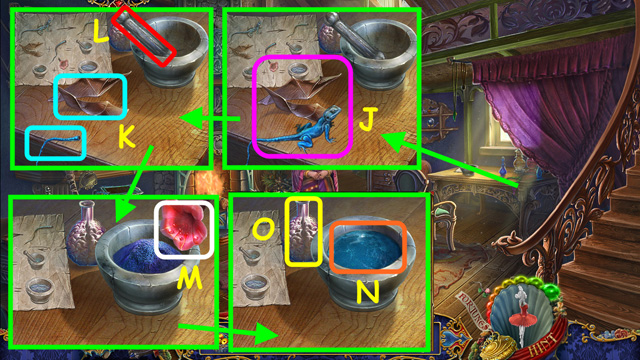
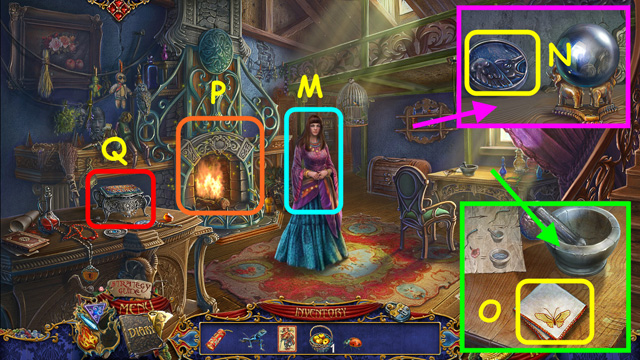
- Look at the table; place the LIZARD and the BAT WINGS on the table (J).
- Use the CRACKER on the lizard to scare him into leaving the tail.
- Place the tail and bat wings into the mortar (K).
- Select the pestle to mix the ingredients (L).
- Place the FLOWER WITH NECTAR on the mortar and rotate it (M).
- Select the liquid to move it to the bottle (N).
- Take the MEMORY ELIXIR (O).
- Walk down, left, and forward.
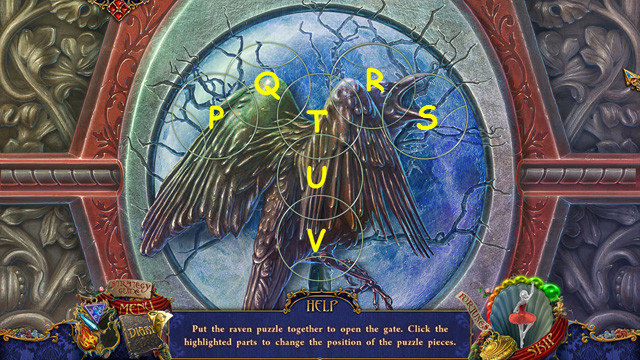
- Look at the castle door for a mini-game.
- Place the 2 RAVEN EMBLEMS in the openings.
- Rotate the discs to restore the picture.
- Select the discs in this order: P, Q, Q, S, R, R, V, U, T, and T.
- Walk forward to enter the castle.
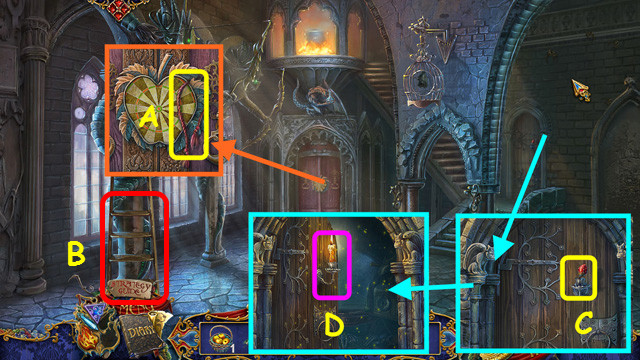
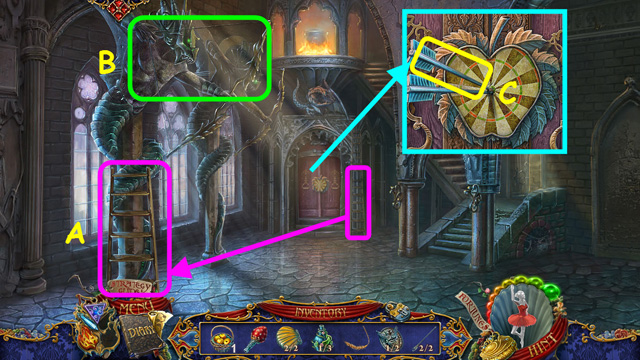
- Look at the door and take the ROPE (A).
- Note the movable ladder (B).
- Look at the door and take the HANDLE (C).
- Open the door and place the LIT CANDLE in the holder (D).
- Select the room for a HOP.
- Locate the items by silhouette and use them in the scene (E).
- You will earn the STAR.
- Move the ladder twice to the door (F).
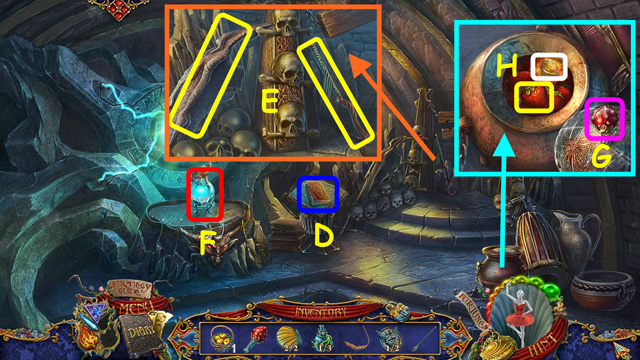
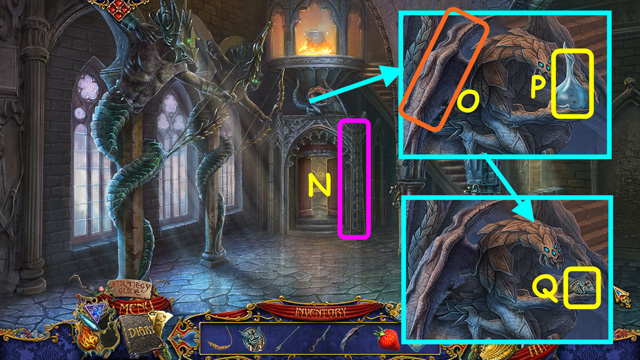
- Look at the wyvern and take the 1/2 SHELL (G).
- Look at the cauldron and take the 1/3 VASE (H).
- Use the HANDKERCHIEF to take the DAGGER (I).
- Walk down.
- Use the DAGGER to remove the biting flowers (J).
- Look at the box and take the WHEAT (K).
- Walk down.
- Look at the bag and use the DAGGER on the tie (L).
- Use the LADYBUG on the dragon (M).
- Dig in the sand and take the 1/2 COLLAR PART (N).
- Use the ROPE to close the bag and take the BAG OF SAND (O).
- Look in the right basin and add the BAG OF SAND to soak up the water; remove the BAG OF WET SAND (P).
- Take the 2/2 SHELL (Q).
- Walk forward.
- Zoom into the box and place the BAG OF WET SAND on top (R).
- Look at the box and place the STAR in the lock (S).
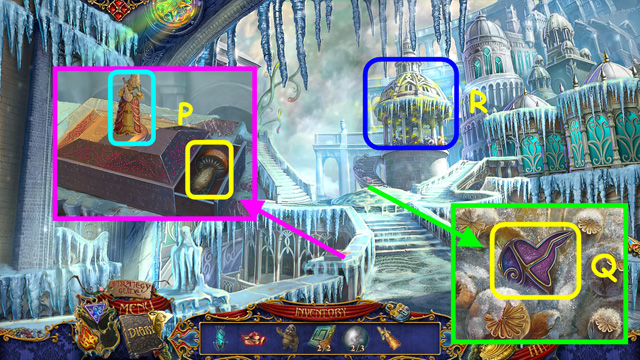
- Take the 1/2 ARROW and the 9/24 Fortune Nut (T).
- Look in the cell and give Monica the MEMORY ELIXIR (U).
- Take the message from the skull to get the 2/2 ARROW (V).
- Walk forward.
- Move the ladder to the left column (A).
- Look at the archers and load the 2 ARROWS (B).
- Look at the door and take an ARROW (C).
- Walk forward.
- Note the book (D).
- Look at the rack; take the WYVERN WING and the SHEPHERD’S HOOK (E).
- Note the crystal ball (F).
- Look at the jar and attach the HANDLE (G).
- Remove the lid; take the STRAWBERRY and the 10/24 Fortune Nut (H).
- Walk down and select the door on the right for a HOP.
- Locate all the items by their silhouette, and use them in the scene (I).
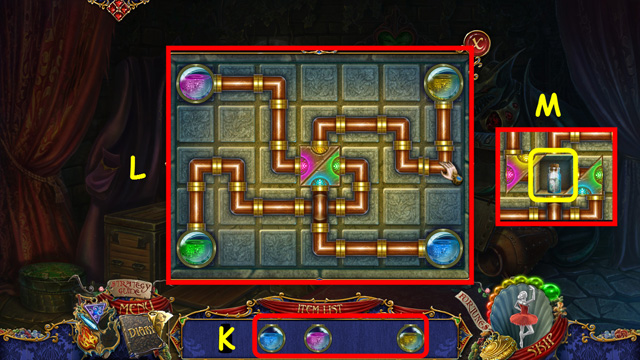
- Look at the wall for a mini-game (J).
- Place the 3 FLASKS in the openings (K).
- Arrange the pipes to flow the colors from the center (L) to the correct flasks.
- Take the POWDER OF TRUTH (M).
- Move the ladder to the door (N).
- Look at the wyvern and attach the WYVERN WING (O).
- Take the VASE WITH SPIDERS (P) and the 2/2 COLLAR PART (Q).
- Walk down.
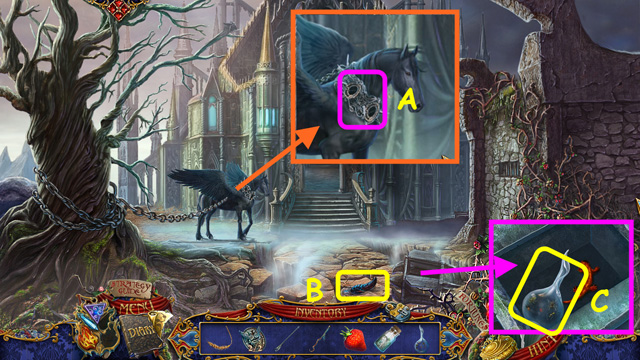
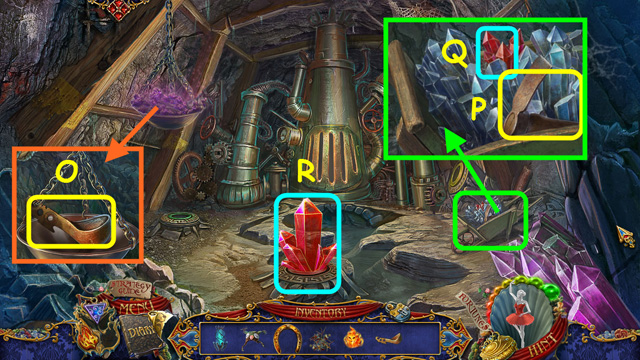
- Look at Pegasus and place the 2 COLLAR PARTS in the openings (A).
- Take the FEATHER (B).
- Look in the box and use the VASE WITH SPIDERS on the salamander to get the VASE WITH SALAMANDER (C).
- Walk forward twice and look at the book.
- Open the book and use the POWDER OF TRUTH on the pages (D).
- Close the book and place the 2 SHELLS in the indentations for a mini-game (E).
- Shoot the pearls from the open shell to make sets of 3 or more matching color pearls (F).
- Move the cursor between 2 pearls that you want to shoot, and then select to shoot the pearl from the shell (G).
- Clear all the pearls in this manner to open the book.
- Take the GOLD FISH (H).
- Look at the crystal ball.
- Place the GOLD FISH in the upper right niche (I).
- Place the WHEAT in the upper left niche (J).
- Place the VASE WITH SALAMANDER in the lower left niche (K).
- Place the FEATHER in the lower right niche (L).
- Take the ARTIFACT and the ELEPHANT FIGURE (M).
- Walk down 4 times, and go to the right.
- Take the MAGIC SEEDS from the gypsy (N).
- Look at the shelf and place the ELEPHANT FIGURE on the crystal ball (O).
- Take the WATER ELEPHANT (P).
- Walk down.
- Zoom into the tree and take the 11/24 Fortune Nut (Q).
- Take the LOG (R).
- Walk forward (S).
Chapter 4: City in the Clouds
- Look at the mole, give him the STRAWBERRY, and take the MOLE (A).
- Look at the flowers and use the WATER ELEPHANT on them (B).
- Look at the knight, load the ARROW, and take the SADDLE (C).
- Walk to the right.
- Look at the machine and take the 1/2 GATE PART (D).
- Look at the back of the gondola and read the notice (E).
- Note the gondola entrance (F).
- Walk down and go forward.
- Look at the circle; take the 1/3 BALL and place the LOG in the circle (G).
- Take the BATTLE AXE (H).
- Select the bench for a HOP (I).
- Locate the items based on their silhouettes (J).
- You will earn the CLAW.
- Walk down.
- Look at the crate and use the BATTLE AXE to open it (K).
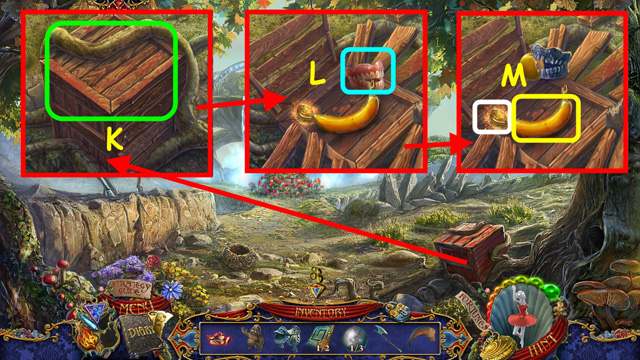
- Use the BASKET OF APPLES on the choppers (L).
- Take the BANANA and the 12/24 Fortune Nut (M).
- Walk forward.
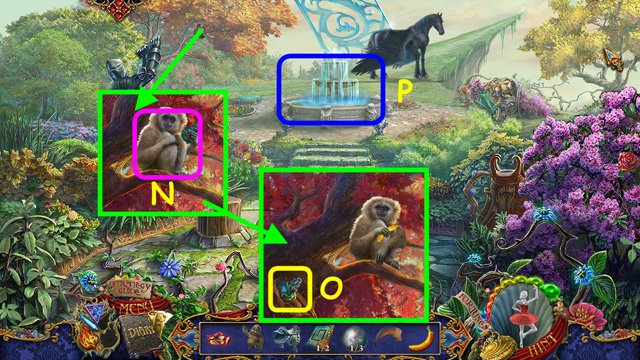
- Look at the tree and give the BANANA to the monkey (N).
- Use the SHEPHERD’S HOOK to take the 2/3 VASE (O).
- Note the fountain mini-game (P).
- Walk down, right, and enter the gondola.
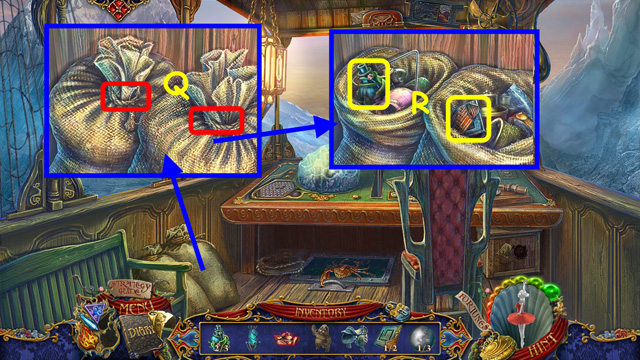
- Look at the bags and use the CLAW on the 2 ties (Q).
- Take the 3/3 VASE and the 2/2 GATE PART (R).
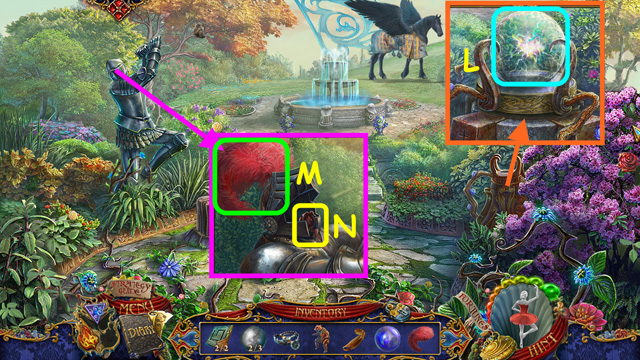
- Walk down twice, go forward, and select the fountain for a mini-game.
- Place the 3 VASES on the fountain to trigger the mini-game.
- Select the vases to move all the streams to the top tier.
- Select the vases in order: A, C, E, B, D, and F.
- Take the VANISHING ELIXIR (G).
- Walk down.

- Look at the knight and use the VANISHING ELIXIR on him (H).
- Take the SADDLECLOTH (I).
- Walk forward.

- Look at Pegasus; place the SADDLECLOTH and the SADDLE on his back (J).
- Select the bench for a HOP (K).
- Locate all the items by their silhouette (L).
- You will earn the 2/3 BALL.
- Get on Pegasus.

- Look at the AMULET and select the FROST GEM to get rid of the ice (M).
- Look at the railing; take the DOLL and read the notice (N).
- Walk to the left (O).
- Look at the box; place the DOLL on the lock and take the MUSHROOM (P).
- Look at the ice and take the 1/2 MOSAIC PIECE (Q).
- Select the rotunda for a HOP (R).
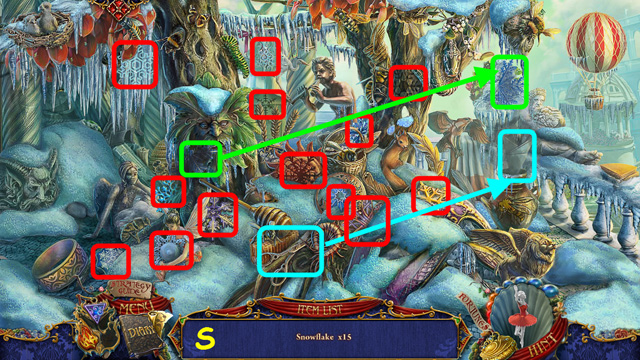
- Locate all the snowflakes (S).
- You will earn the 1/3 SNOWFLAKE.
- Walk down and forward.
- Look at the statue; take the PIN and the GLOVE (T).
- Note the wolf trap (U).
- Walk forward.
- Look at the ice, use the GLOVE to move the snow, and take the HAMMER (A).
- Look at the dome; give the MUSHROOM to the hedgehog and take the 13/24 Fortune (B).
- You will earn the 2/2 GLASS.
- Walk down.
- Look at the vase and use the HAMMER to break it open (C).
- Read the scroll; take the TRAP KEY and the 14/24 Fortune Nut (D).
- Look at the trap and use the TRAP KEY in the lock (E).
- Take the TRAP and the RING (F).
- Look at the statue, place the RING on her hand, and take the WINEGLASS (G).
- Walk forward.
- Look at the dome; use the WINEGLASS on the water to get the GLASS WITH WATER (H).
- Note the large ice dome on the left (I).
- Walk down twice.
- Look at the left railing and place the 2 GLASS pieces in the lock (J).
- Take the 2/3 SNOWFLAKE (K).
- Look at the left railing and use the GLASS OF WATER on the indentation (L).
- Use the PIN to take the 3/3 SNOWFLAKE (M).
- Walk forward twice and look at the large ice dome on the left.
- Place the 3 SNOWFLAKES on the cover to open it (N).
- Rotate the fins to move the colored blades to the correct colored button.
- Our solution is: O, P, S, O, O, S, S, R, R, S, S, S, O, O, P, P, Q, Q, R, R, S, and S.
- Look at the dome; take the BEAR and the CLAW (T).
- Walk down.
- Look at the plant, open the leaves, and take the UNCHARGED SPHERE (U).
- Walk down and go left.
- Look at the ground and use the MOLE to dig (A).
- Plant the MAGIC SEEDS in the hole (B).
- Select the rotunda for a HOP (C).
- Locate all the bees (D).
- You will earn the HONEY.
- Walk down and forward.
- Look at the statue and use the HONEY to collect the BEES (E).
- Walk down and left.
- Look at the plants and use the BEES to pollinate them (F).
- Take the MAGIC HERB (G).
- Walk down and get on Pegasus. Walk down twice.
- Zoom into the tree; take the 15/24 and 16/24 Fortune Nuts (H).
- Enter the gypsy cottage.
- Give the MAGIC HERB to the Gypsy (I).
- Select the fireplace for a HOP (J).
- Locate all the items on the list (K).
- You will earn the FEATHER.
- Walk down and go forward twice.
- Look at the stand and place the UNCHARGED SPHERE in the brackets, and then take the CHARGED SPHERE (L).
- Look at the knight and place the FEATHER in his helmet (M).
- Take the STAMP (N).
- Walk down, right, and enter the gondola.
- Look at the trap door, place the CLAW on the crab, and press the red button (O).
- Look at the trap door and use the TRAP on the rope to get the WHEEL (P).
- Look at the crate and place the STAMP in the indentation (Q).
- Take the BLUEBERRIES and the 17/24 Fortune Nut (R).
- Note the mini-game on the console (S).
- Walk down.
- Zoom into the machine and place the CHARGED SPHERE in the holder (T).
- Look at the back of the gondola and place the BEAR in the chair (U).
- Place the WHEEL in the opening (V).
- Look at the bird and give him the BLUEBERRIES (W).
- Take the 3/3 BALL (X).
- Enter the gondola and look at the mini-game on the console.
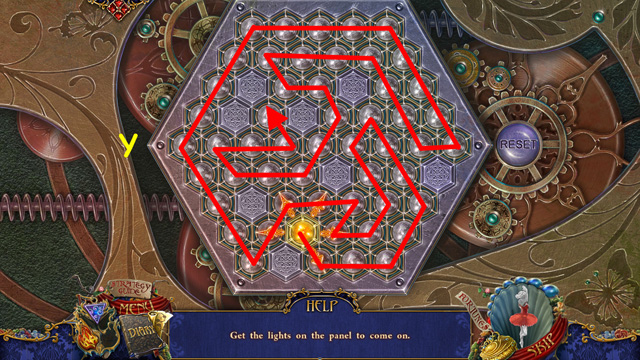
- Place the 3 BALLS on the grid to activate the mini-game.
- Move the orange ball through the grid to turn on all the lights (Y).
- Select any one of the arrows to move in that direction; you will move in a straight line until you meet an obstacle.
- Go forward in the gondola.
Chapter 5: The Dwarf Kingdom
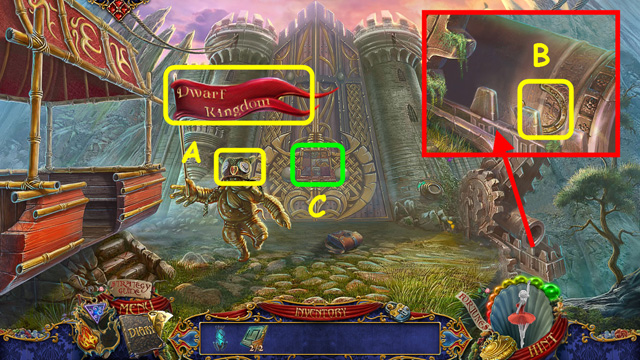
- Take the WOOL HAT and FLAG (A).
- Look at the cannon and take the HORSESHOE (B).
- Look at the gate for a mini-game (C).
- Place the 2 GATE PARTS in the grid to activate the mini-game.
- Select the tiles to rotate the pieces around it and restore the emblem (D).
- Select the tiles in these positions: E, F, G, G, E, H, F, and F.
- Walk forward.
- Talk to the witch (I).
- Look at the flowers; read the note and take the LAVENDER (J).
- Try to take the thorns; use the FLAG to take the BLOODY THORNS (K).
- Note the path up the mountain (L).
- Open the window for a HOP (M).
- Locate the items by their silhouettes and use them in the scene (N).
- Place the pitcher under the pump (1).
- Place the tail on the fish, then pump the tail (2).
- Pour the pitcher of water into the pipe (3).
- Place the tray on the scale (4).
- Place the parchment in the frame (5).
- Arrange the figures by height; select 2 figures to swap positions (6).
- Use the hammer on the coal (7).
- Place the gold in the scale (8).
- Place the ball of fire in the oven (9).
- Take the live fire (10).
- You will earn LIVE FIRE.
- Go forward, up the mountain.
- Look at the hanging bowl; take the SPOON and place the LAVENDER inside (O).
- Tip over the cart; look inside and take the PICKAXE (P).
- Use the BLOODY THORNS on the crystals and take the RED CRYSTAL (Q).
- Place the RED CRYSTAL in the red holder (R).
- Walk down.
- Look at the rocks and use the PICKAXE; take the STONE, LOCK PART, and 18/24 Fortune Nut (S).
- Walk down.
- Look at the knapsack and use the LOCK PART on the lock (T).
- Open the flap, take the GREEN CRYSTAL, ZIPPER, and read the note (U).
- Walk forward.
- Look at the dwarf and use the ZIPPER on the knapsack (A).
- Take the YELLOW CRYSTAL (B).
- Use the SPOON to take some COAL (C).
- Walk forward.
- Place the GREEN CRYSTAL in the green holder (D), and the YELLOW CRYSTAL in the yellow holder (E).
- Talk to the Prince and he will give you the ROCK GEM for your AMULET (F).
- Look at the furnace and use the HORSESHOE to open the lock (G).
- Place the COAL in the furnace and add the LIVE FIRE (H).
- Close the door and walk down.
- Look at the AMULET and select the ROCK GEM (I).
- Enter the Alchemist’s (J).
- After talking to the witch, talk to the Alchemist (K).
- Walk forward (L).
- Look at the shelf, remove the dome, and take the STRAW DOLL (M).
- Look at the books and take the COIN (N).
- Walk down.
- Zoom into the grate; use the STRAW DOLL on the flames to get the BURNING STRAW DOLL (O).
- Look at the shelf and use the BURNING STRAW DOLL on the bottle (P).
- Take the bottle (Q) and read the note (R).
- Walk down.

- Zoom into the flowers and use the BOTTLE on the river to get the BOTTLE OF WATER (S).
- Walk down.
- Look at the wall and place the COIN in the slot (T).
- Take the YARN BALL (U).
- Walk forward and enter the Alchemist’s.
- Look at the grate and use the BOTTLE OF WATER to take the BOOK COVER (A).
- Walk forward.
- Look at the table, read the scroll, and place the BOOK COVER on the other half (B).
- Use the YARN BALL to repair it and take the BOOK (C).
- Look at the books and place the BOOK on the shelf (D).
- Take the KNIFE (E).
- Walk down 3 times.
- Look at the knapsack; use the KNIFE on the flap and take the ALCHEMIST STATUE (F).
- Walk forward, enter the Alchemist’s, and go forward.
- Look at the shelf and place the ALCHEMIST STATUE next to the other statue (G).
- Walk to the left (H).
- Look at the cabinet and use the STONE to break the glass (I).
- Read the scroll; take the CORKSCREW and ACID (J).
- Look at the left demon skull and take the 19/24 Fortune Nut (K).
- Select the center back for a HOP (L).
- Locate all the items on the list (M).
- You will earn the BOOMERANG.
- Walk down.
- Use the BOOMERANG on the rope (N).
- Zoom into the table and take the 1st DEMON HORN (O).
- Walk down.
- Look at the vent and use the ACID to make a hole (P).
- Take the 1st BEETLE (Q).
- Walk down.
- Look at the dwarf and use the CORKSCREW to open the bottle (R).
- Take the GEAR and the 20/24 Fortune Nut (S).
- Select the window for a HOP (T).
- Locate the items by their silhouettes and use them in the scene (U).
- You will earn the 2nd BEETLE.
- Walk down.
- Look at the cannon and place the GEAR on the device (A).
- Take the DOME PART and the HORN (B).
- Walk forward and enter the Alchemist’s.
- Look at the wall and attach the DOME PART (C).
- Take the 2nd DEMON HORN (D).
- Walk forward and right.
- Zoom into the left demon and attach the 2nd DEMON HORN (E).
- Zoom into the center demon and attach the HORN (F).
- Zoom into the right demon and place the 1st DEMON HORN in his head (G).
- Note the mini-game by the right demon (H).
- Select the back area for a HOP (I).
- Locate all the items on the list (J).
- You will earn the blue DISK.
- Look at the mini-game by the right demon.
- Place the 2 BEETLES in the openings to activate the mini-game.
- Move the 3 beetles to the opening at the bottom (K).
- Beetles can only move on tiles of the same color; the tile change color once the beetle moves on.
- Move the blue beetle along the red path (L), and the yellow beetle along the green path (M).
- Move the pink beetle along the white path (N).
- Continue moving the blue beetle on the red path (O).
- Move the yellow beetle on the green path to the end (P).
- Take the CAP (Q).
- Walk down twice.
- Place the CAP on the Alchemist (R).
- Give him the ARTIFACT (S).
- Enter the portal (T).
Chapter 6: The Mountain
- Talk to the Prince and take the WATER GEM (A).
- Look at the AMULET and select the ROCK GEM (B).
- Look at the leaves and use the WOOL HAT to take the LEAVES (C).
- Take the 21/24 Fortune Nut (D).
- Note the path up the mountain (E).
- Note the mini-game on the side of the mountain (F).
- Walk right to the river (G).
- Look at the AMULET and select the WATER GEM (H).
- Zoom into the elephant and take the PEAR (I).
- Look at the statue and take the BUTTERFLY (J).
- Look at the fishing spot and take the FROST GEM (K).
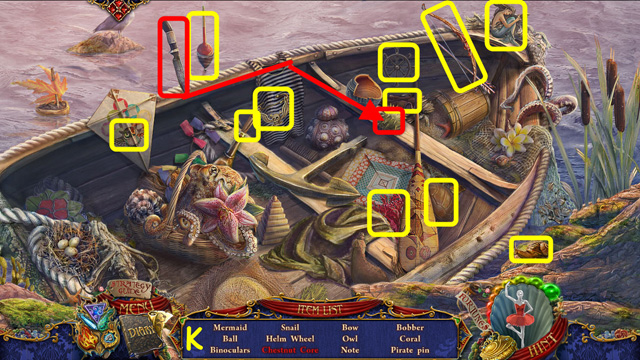
- Select the boat for a HOP (L).

- Locate all the items on the list (M).
- You will earn the LASSO.
- Walk down.
- Look at the ground and use the PEAR to take the worm (N).
- Look at the tree and place the BUTTERFLY on the web (O).
- Select the butterfly several times to lead the spider off the web.
- Pull on the web 3 times to get the FISHING LINE (P).
- Walk to the right.
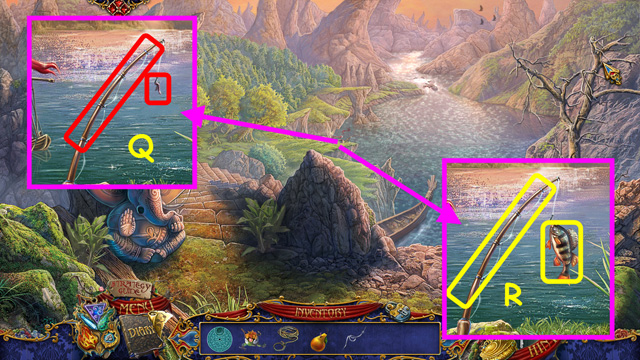
- Look at the fishing spot; place the FISHING LINE and WORM on the pole (Q).
- Take the FISH and the ROD (R).
- Walk down and go up the mountain.
- Look at the amulet and select the FIRE GEM (S).
- Look at the eagle and give him the FISH (T).
- Take the 1/2 TUSK (U).
- Use the ROD to take the green DISK (V).
- Use the LASSO on the branch (W).
- Walk down and look at the mini-game in the side of the mountain.

- Place the blue and green DISKS into the mechanism to activate the mini-game.
- Use the buttons (A) to adjust the speed of the disks (B) so the ball (C) will move from disk to disk and fall in the basket (D).
- Press the ‘START’ button to run the mechanism (E).
- Enter the side of the mountain.
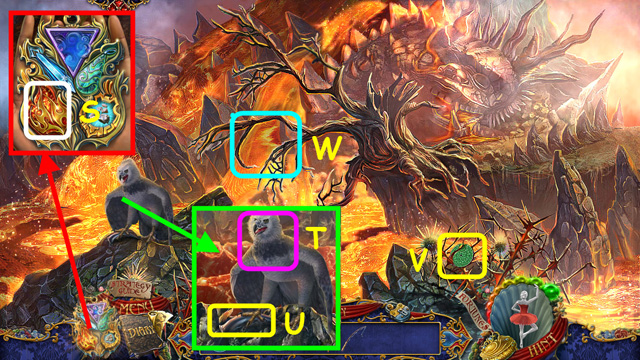
- Zoom into the cauldron and place the LEAVES on the coals (F).
- Look at the mantle; take the 2/2 TUSK and the 22/24 Fortune Nut (G).
- Walk down and right.
- Look at the elephant and place the 2 TUSKS in the holes (H).
- Take the SAW (I).
- Select the boat for a HOP (J).
- Locate all the items on the list (K).
- You will earn the BOW AND ARROW.
- Walk down and enter the side of the mountain.
- Look at the cage and use the SAW to cut it open (L).
- Take the 1/2 FISH FIGURE and the SAIL (M).
- Walk down and right.
- Look at the fishing spot; place the SAIL on and take the SHIP (N).
- Walk down and enter the side of the mountain.
- Look at the mouse and give him the ship (O).
- Take the RED EYE and the LIFE RING (P).
- Walk down and go left up the mountain.
- Use the LIFE RING on the rope (Q).
- Go forward.
- Look at the crevasse and take the 1st STONE and the 23/24 Fortune (R).
- Use the BOW AND ARROW on the bird (S).
- Take the 2nd STONE (T).
- Walk forward.
- Select the AMULET (A).
- Look at the idol and restore the RED EYE (B).
- Take the 2/2 FISH FIGURE (C).
- Walk down 3 times and go right.
- Look at the statue and place the 2 FISH FIGURES on the eyebrows (D).
- Take the MASK (E).
- Walk down, go left up the mountain, and go forward twice.
- Look at the hanging and replace the MASK (F).
- Look at the small platform; take the EARRING and the 24/24 Fortune Nuts (G).
- Walk down.

- Look at the octopus and replace the EARRING (H).
- Take the ANCHOR (I).
- Look in the crevasse and use the ANCHOR to retrieve the SPADE (J).
- Walk down twice.
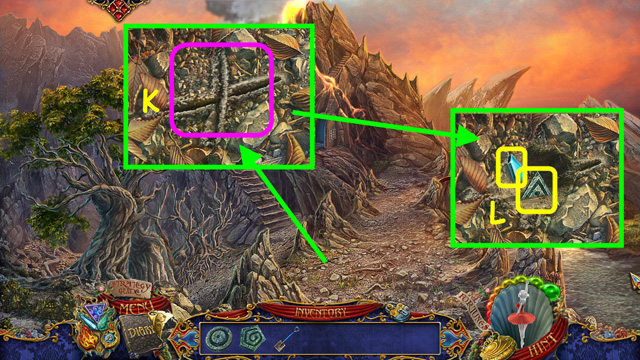
- Look at the ground and use the SPADE on the ‘X’ (K).
- Take the 3rd STONE and the EYE (L).
- Walk left up the mountain and go forward.
- After talking with the Prince, walk forward.
- Look at the right idol and restore the EYE (M).
- Take the 4th STONE (N).
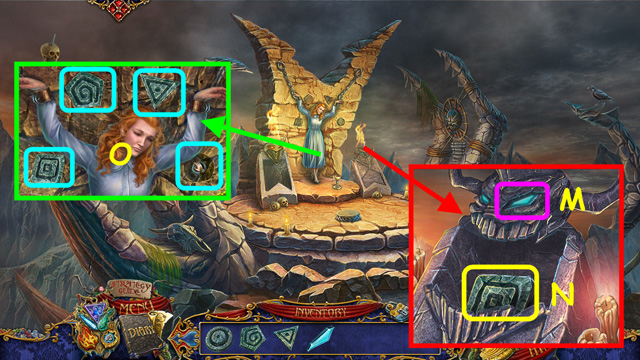
- Look at Monica and place the 4 STONES in the indentations (O).
- Talk to Monica (P).
- Talk to the troll (Q).
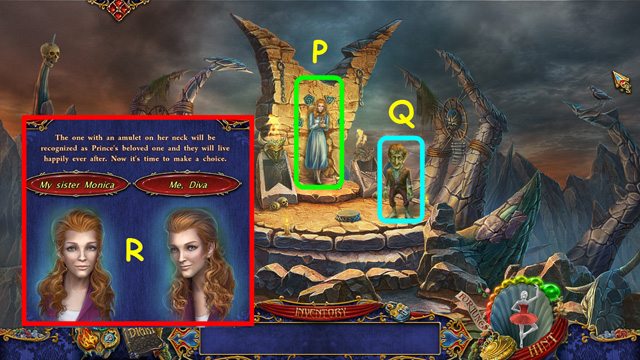
- You will need to choose who wins the Prince (R).
- Do you keep him for yourself, or let your sister have him?
- If you collected all the Fortune Nuts, you can make a wish while the orb spins (S).
- If you did not find them all, you can return to the other locations to look for them.
- Enter the portal (T).
- Congratulations! You have completed Reveries: Sisterly Love!


 Sea Legends: Phantasmal Light Walkthrough, Guide, & Tips
 Victorian Mysteries: The Yellow Room Walkthrough, Guide, & Tips
 Twisted Lands: Origin Walkthrough, Guide, & Tips
 Wanderland Tips and Tricks, Guide, & Tips
 Art of Murder: Cards of Destiny Walkthrough, Guide, & Tips