


Welcome to the Victorian Mysteries: The Yellow Room Walkthrough
A young woman is attacked in the middle of the night inside a locked room. How did the murderer escape?
Whether you use this document as a reference when things get difficult or as a road map to get you from beginning to end, we’re pretty sure you’ll find what you’re looking for here.
This document contains a complete Victorian Mysteries: The Yellow Room game walkthrough featuring annotated screenshots from actual gameplay!
We hope you find this information useful as you play your way through the game. Use the walkthrough menu below to quickly jump to whatever stage of the game you need help with.
Remember to visit the Big Fish Games Forums if you find you need more help. Have fun!
This walkthrough was created by prpldva, and is protected under US Copyright laws. Any unauthorized use, including re-publication in whole or in part, without permission, is strictly prohibited.

• Hidden Object Scenes and mini-games are often randomized – your solution may vary.
• Hidden Object Scenes will be referred to as HOS in this walkthrough.
• Hints are unlimited, but you must wait for the meter to refill. They are only available in HOS.
• Items in yellow require additional steps.
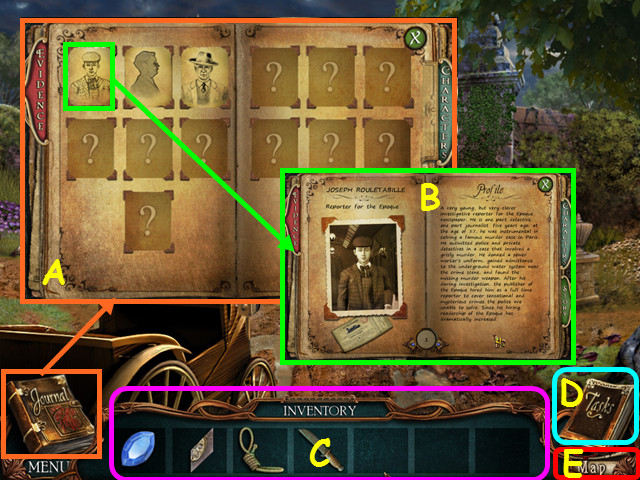
• Read your journal to review evidence and characters (A).
• Select a piece of evidence or character to get more information (B).
• Your inventory is in the bottom panel – select an item to choose it for use (C).
• The inventory panel auto-hides, move your mouse down to reveal the panel.
• Select the Tasks for details on what to investigate (D)
• Select the Map button for your current location (E).

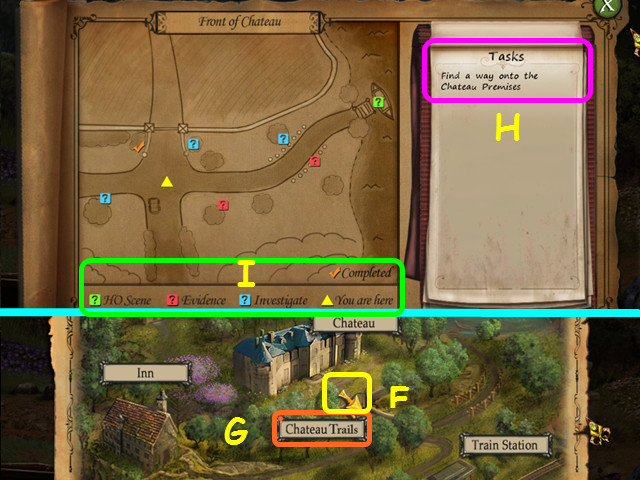
• Use the map to determine your current location; you are the yellow arrow (F).
• Selecting the name of a location will also bring up the task list (G).
• The task list will give a more detailed map of the area to include the locations of interest (H).
• Refer to the legend to see where HOS and other areas are located (I).
• Note that some HOS may need to be triggered and will not be immediately available.

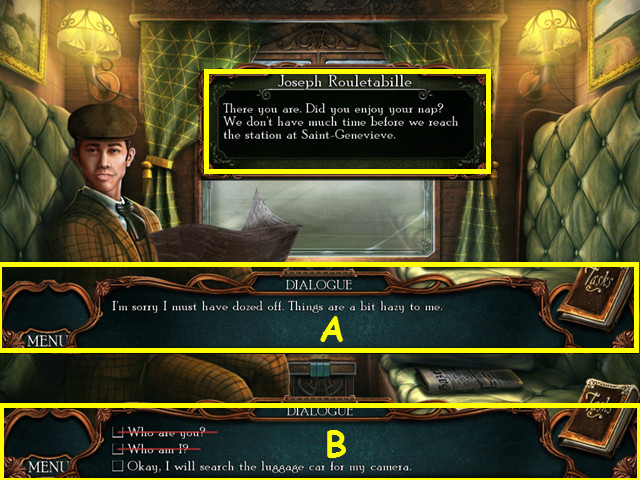
• You will have the option of some interactive help.
• During conversations, select the question or statement you wish to speak (A).
• Previously asked questions will have a red line through them (B).
• This guide will assume you have completed all future dialog.

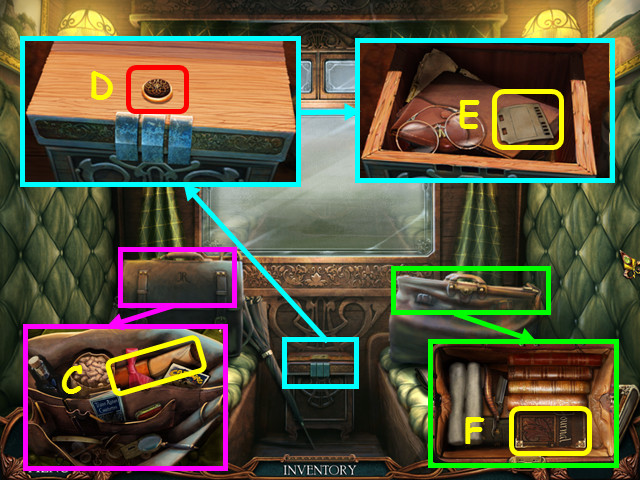
• Look at and open the briefcase on the left; take the map (C).
• Look at the box in the center and press the button (D).
• Take the 1/2 PAPER CARD (E).
• Look inside the bag on the right and take the journal (F).
• Walk down to exit the compartment.

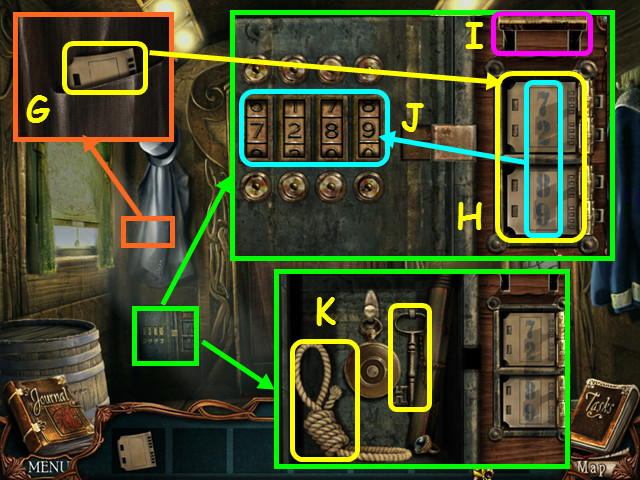
• After you are shot at, walk forward to the back door.
• Look at the coat and take the 2/2 PAPER CARD (G).
• Look at the device below the coat and place the 2 PAPER CARDS on the right (H).
• Pull down the lever to reveal the safe code on the paper cards (I).
• Enter the code on the left; 7-2-8-9 (J).
• Take the ROPE and the KEY from the safe (K).
• Walk down once to the hallway.
• Select the area under the right window for a HOS.

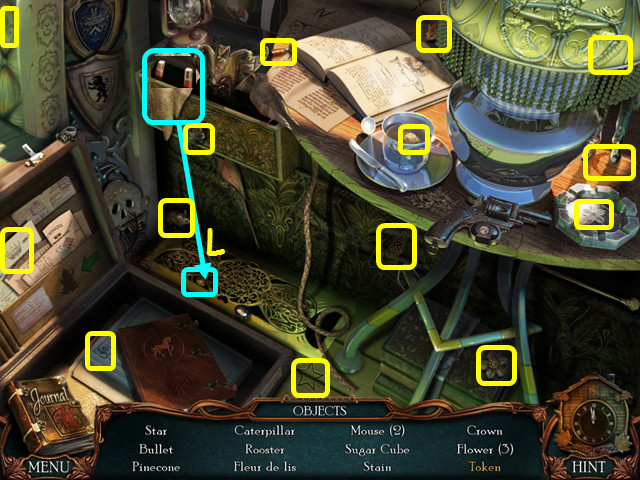
• Locate all the items on the list.
• Remove the cloth, take the magnet and use it on the grate to get the token (L).
• You will earn the TOKEN.
• Walk forward to the back door.

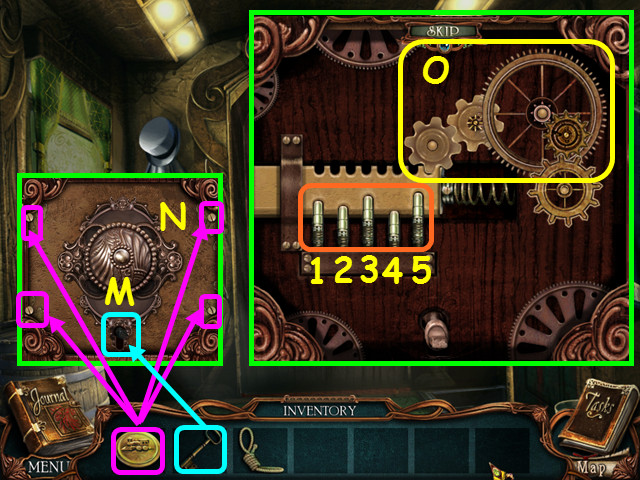
• Look at the baggage door; use the KEY in the lock, then turn the key (M).
• Use the TOKEN to remove the 4 screws (N).
• Drag the 4 gears to the pegs to connect to the locks spring (O).
• Find the correct sequence to push the tumblers down so they all stay down.
• Press 4-2-1-3-5.
• Walk forward twice to the luggage car.

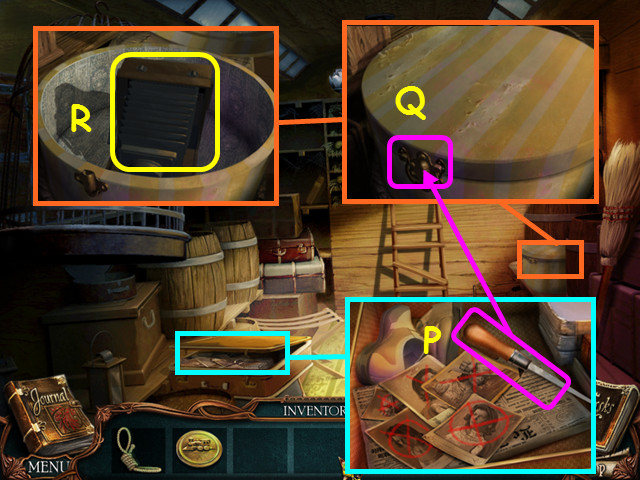
• Look in the suitcase on the left and take the FILE (P).
• Look at the hat box and use the FILE on the hasp (Q); take the camera (R).
• Your cursor will now change to a camera when you need to take a photo.
• Walk down 4 times.

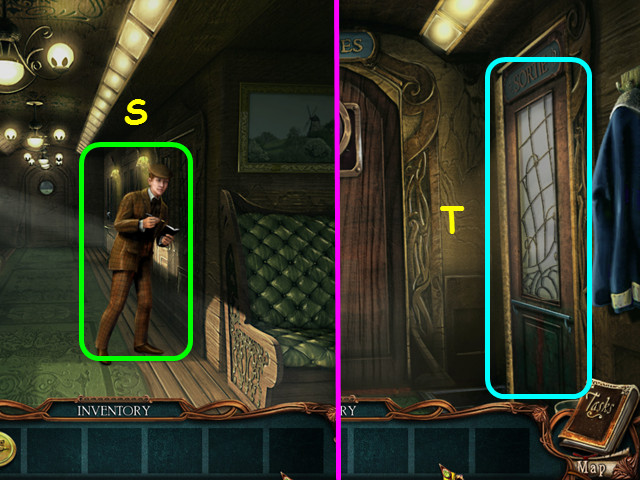
• Take a picture of Rouletabille (S).
• Make sure to take photos of evidence and characters to fill in your journal.
• Select Joseph to eavesdrop on the compartment.
• Walk down, forward, then go right to the train station (T).

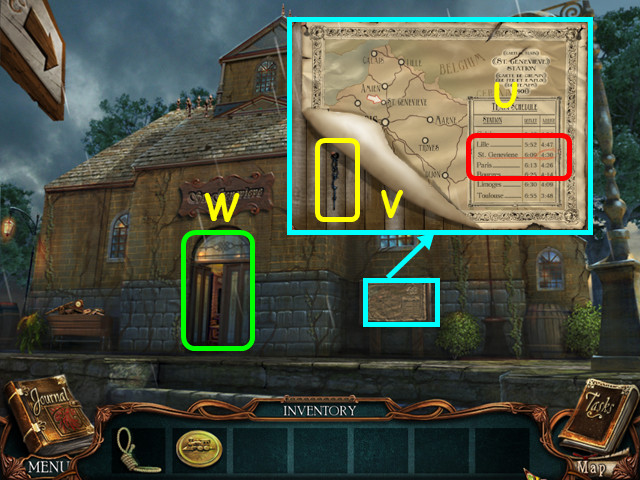
• Look at the schedule and note the time (U).
• Pull up the bottom left corner and take the CLOCK HAND (V).
• Enter the station (W).

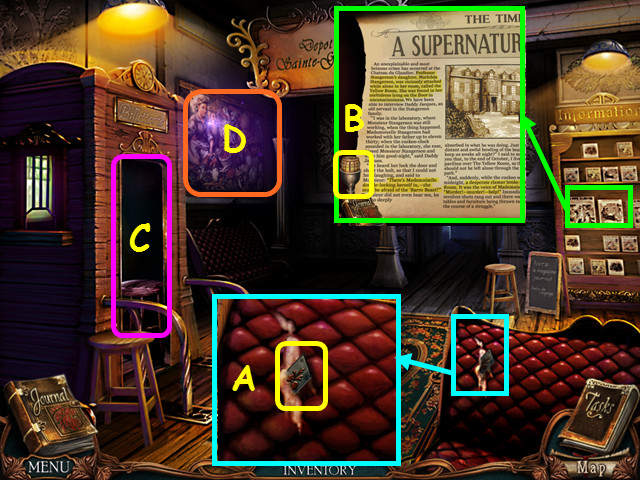
• Look at the rip in the seat and take the 1/3 BOX PIECE (A).
• Look at the newspaper, take a photo, then take the 1/2 SPARKPLUG (B).
• Note the entrance to the ticket booth (C).
• Select the painting for a HOS (D).

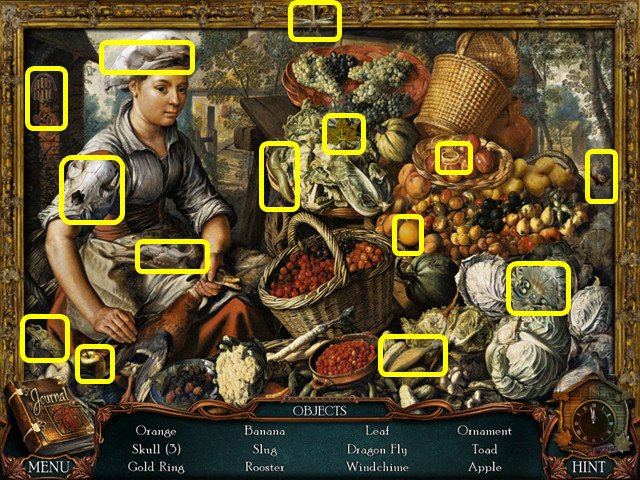
• Locate all the items on the list.
• You will earn the 1/3 APPLE.
• Enter the ticket booth.

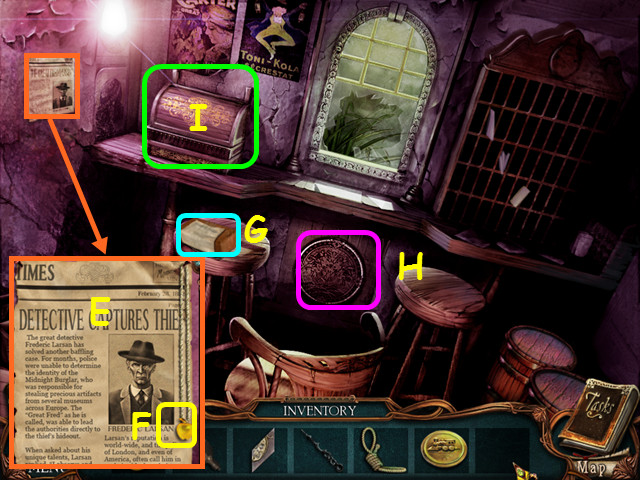
• Look at the newspaper and take a picture of the article (E).
• Take the 2/3 APPLE (F).
• Look at the brick and photograph the note (G).
• Note the mini-game under the counter (H).
• Look at the register for a mini-game (I).

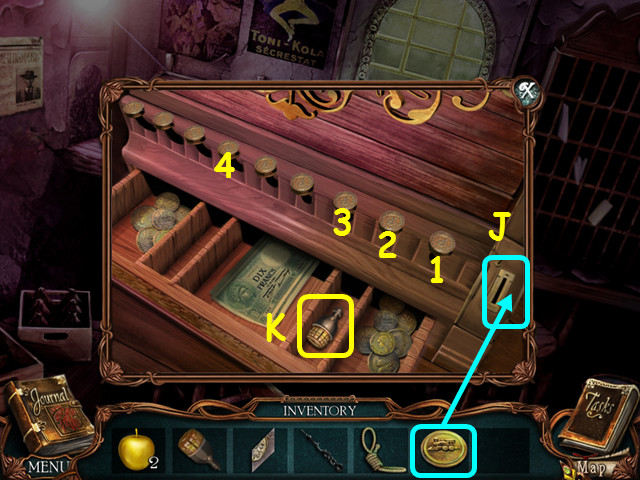
• Place the token in the slot on the right to activate the mini-game (J).
• Push all the buttons down; some buttons affect others.
• Push 1-2-3-4 to open the drawer.
• Take the 2/2 SPARKPLUG (K).
• Exit the ticket booth and go forward to the back of the station.

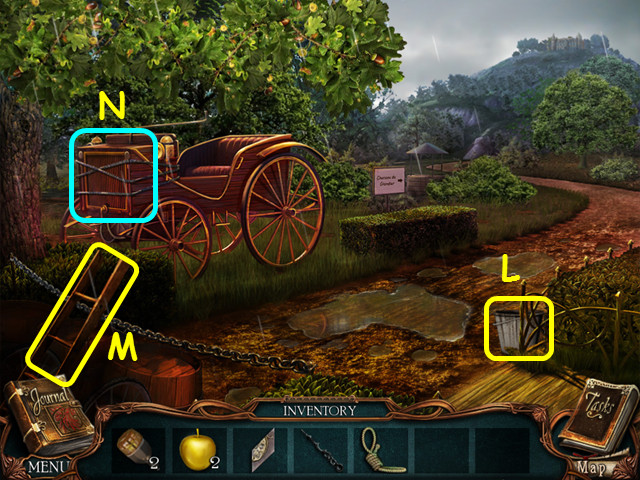
• Take the BUCKET of RAINWATER (L).
• Take the LADDER (M).
• Note the front end of the car (N).
• Walk down twice to the front of the station.

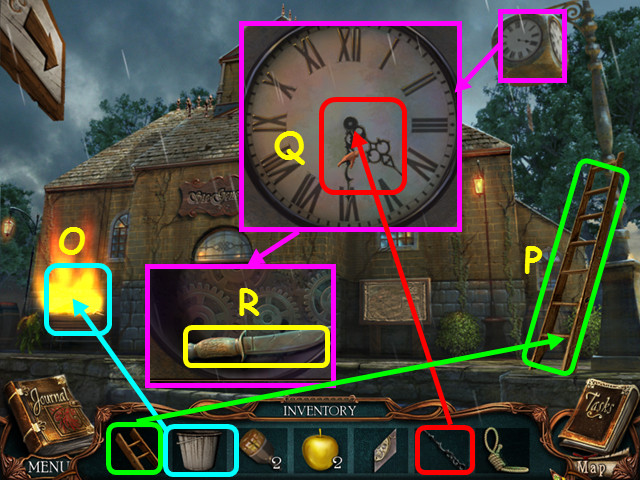
• Use the BUCKET OF RAINWATER to put out the fire in the bin (O).
• Use the LADDER on the clock’s pole (P).
• Look at the clock and place the CLOCK HAND in the center (Q).
• Set the clock to 4:30.
• Take the KNIFE from inside the clock (R).
• Select the bin for a HOS.

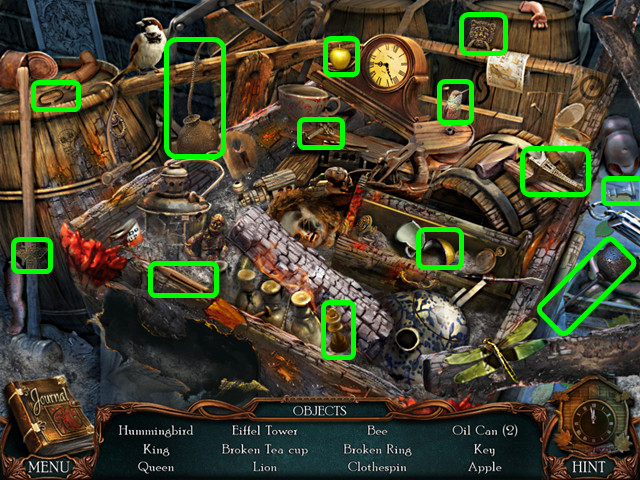
• Locate all the items on the list.
• You will earn the 3/3 APPLE.
• Enter the station, then the ticket booth.
• Select the mini-game under the counter.

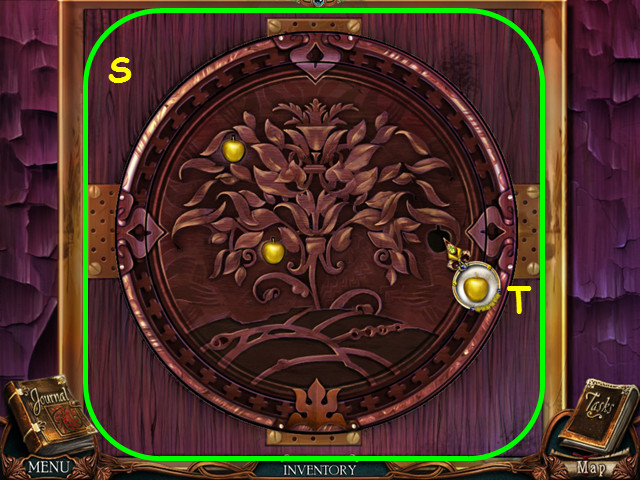
• Rotate the rings to restore the carving (S).
• Place the 3 APPLES in the indentations (T).

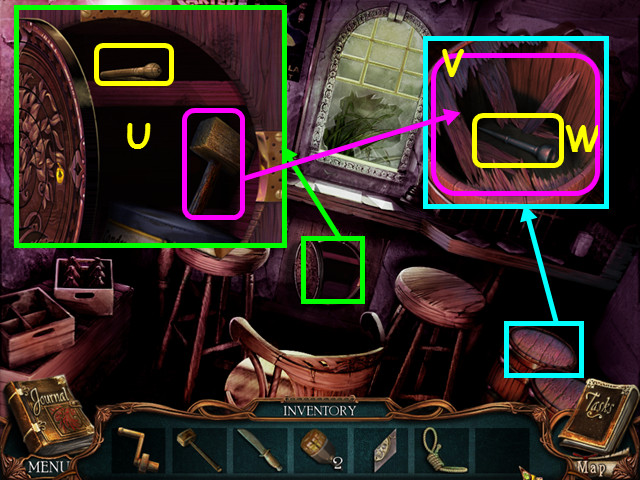
• Take the MALLET and the CRANK (U).
• Look at the barrel on the right and use the MALLET 4 times on the lid (V).
• Take the PISTON (W).
• Return to the back of the station and look at the front of the car.

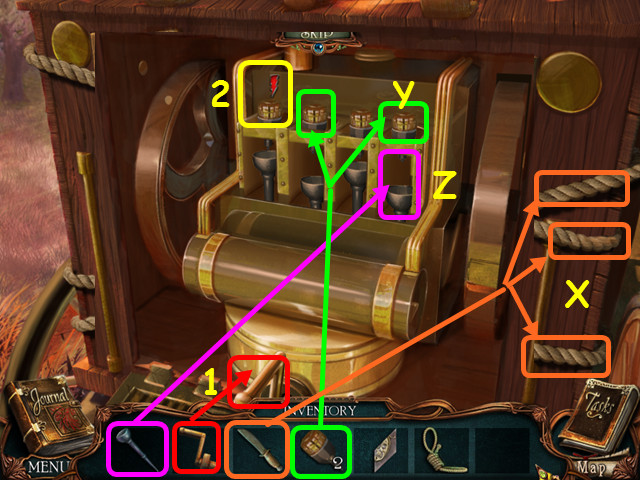
• Use the KNIFE to cut the 3 ropes (X).
• Place the 2 SPARKPLUGS into the holes near the top (Y).
• Place the PISTON in the empty space beneath the sparkplugs (Z).
• Use the CRANK on the hole at the bottom (1).
• Turn the crank to start the engine then select each sparkplug when the meter above it is full (2).
• You will have to restart the engine should you click in error.

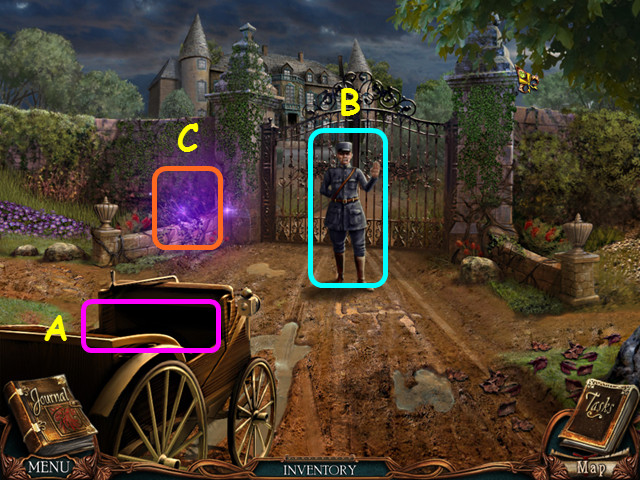
• Note there is a place to assemble something in the car (A).
• Talk to the guard to learn you are not permitted entry (B).
• Select the garden area next to the gate for a HOS (C).

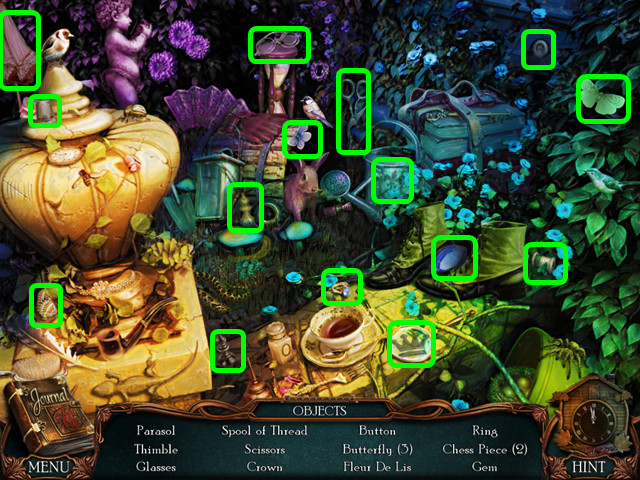
• Locate all the items on the list.
• You will earn the GEM.
• Walk to the left.

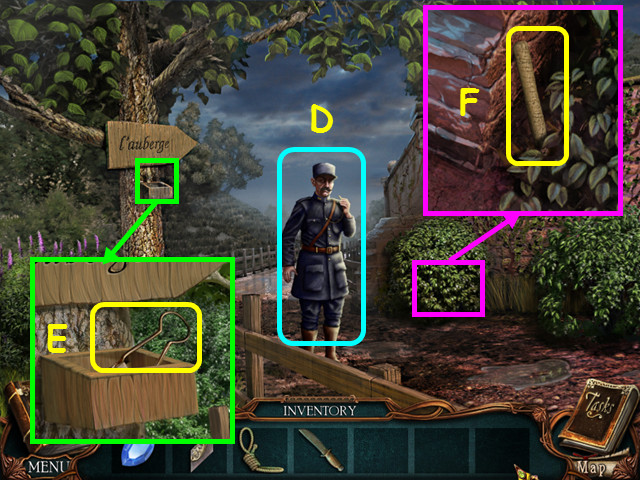
• Try to talk to the guard (D).
• Look at the container and take the CLIPPERS (E).
• Look in the bushes and take the RAKE (F).
• Walk to the right.

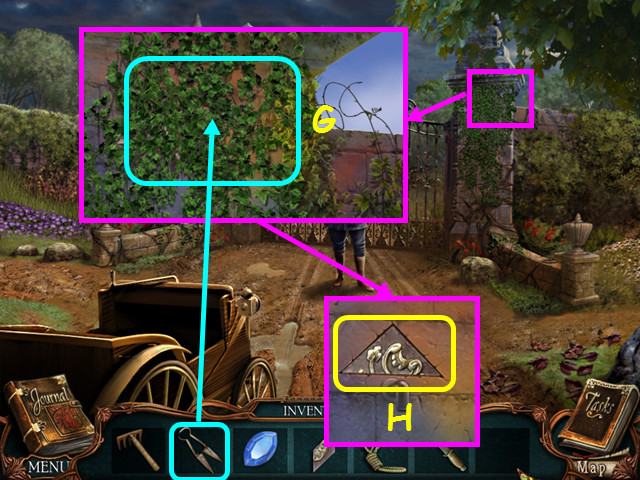
• Look at the right column and use the CLIPPERS 5 times on the vines (G).
• Take the 2/3 BOX PIECE (H).
• Walk to the right.

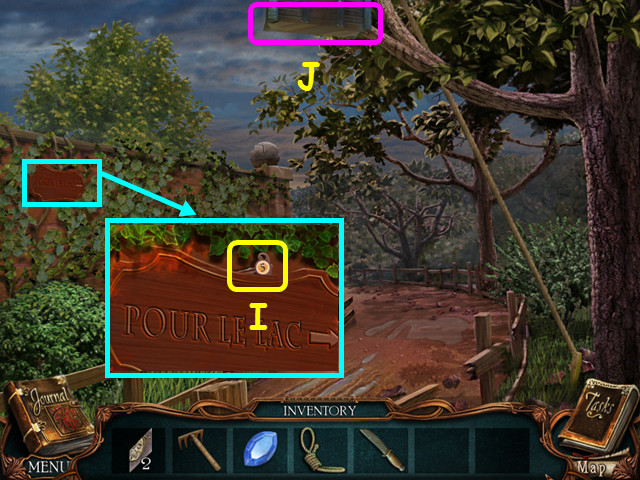
• Look at the sign and take the LATCH PIN (I).
• Note the box hanging overhead (J).

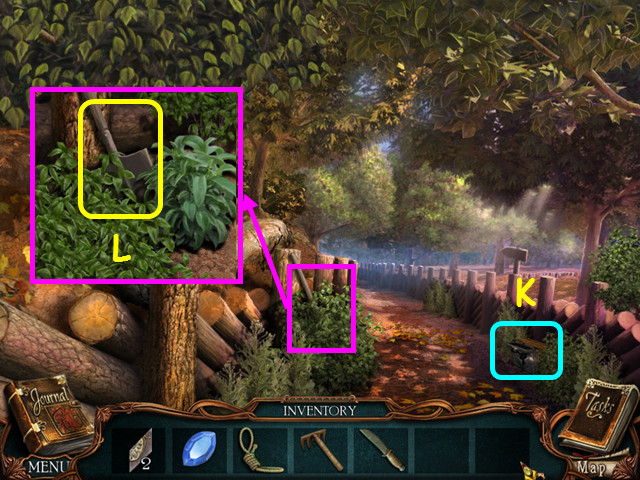
• Note the mini-game on the right (K).
• Look at the bushes and take the SHOVEL (L).
• Walk forward to the lake.

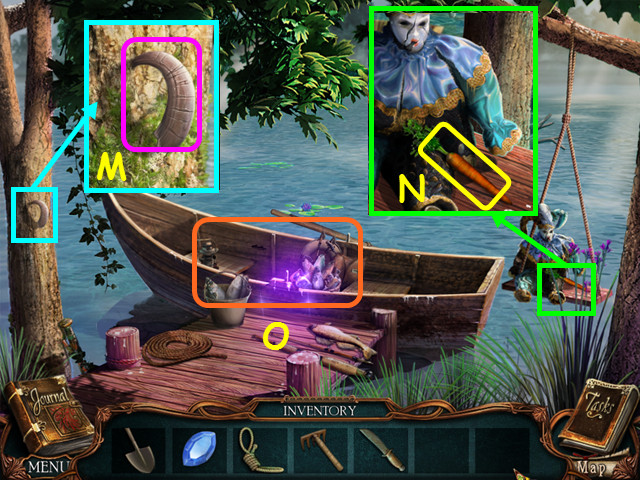
• Look at the claw in the tree and take a photo (M).
• Look at the clown and take the CARROT (N).
• Select the boat for a HOS (O).

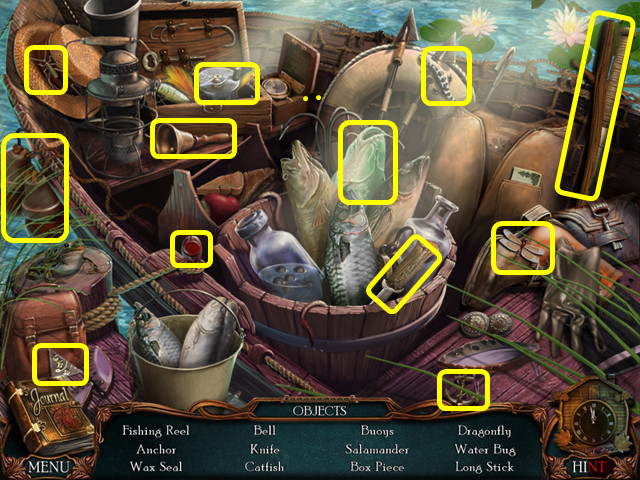
• Locate all the items on the list.
• You will earn the LONG STICK and the 3/3 BOX PIECE.
• Walk down once and look at the mini-game on the right.

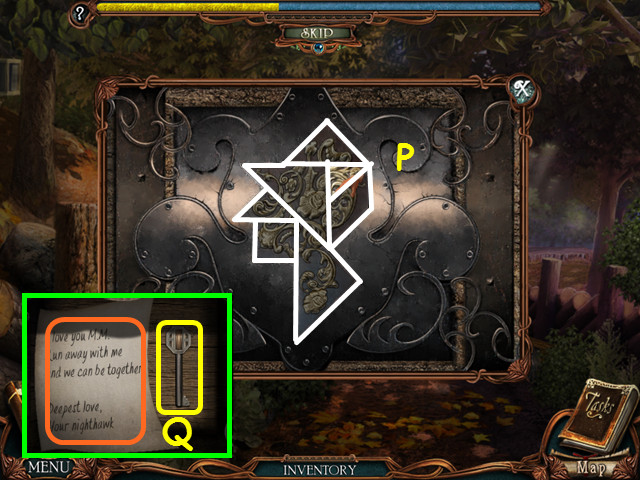
• Place the 3 BOX PIECES on the lid to trigger the mini-game.
• Drag pieces into position to complete the lid of the box; select pieces to rotate in place (P).
• Take a photo of the note and take the MAIL KEY (Q).
• Walk down twice and look in the car.

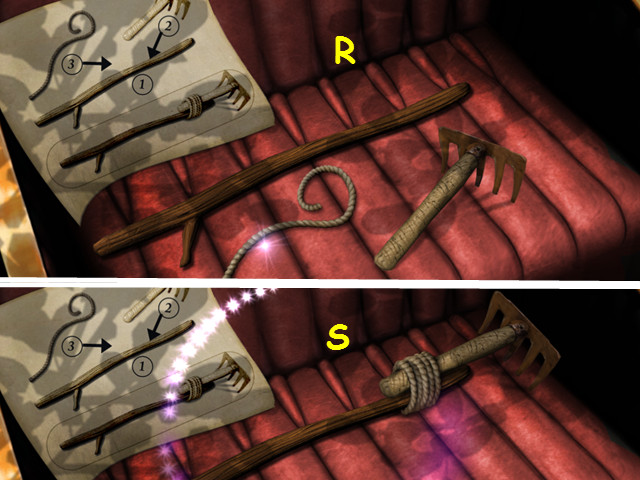
• Place the LONG STICK, RAKE, and ROPE on the seat (R).
• Move the rake to the top of the stick, then tie the pieces together with the rope (S).
• Take the LONG RAKE.
• Walk to the left.

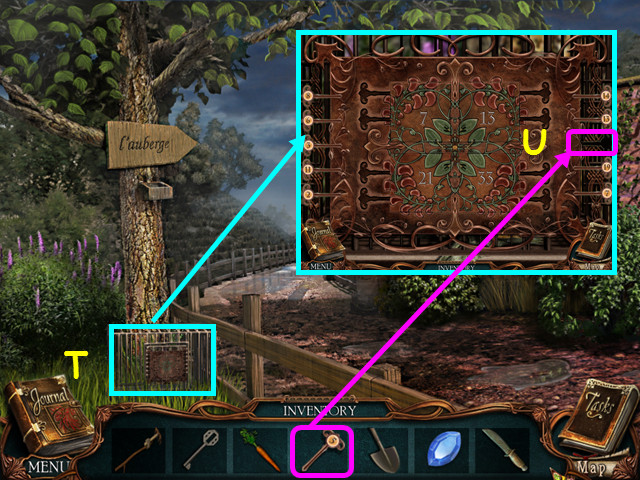
• Take a photo of the cage (T).
• Look at the cage and place the LATCH PIN on the right to trigger a mini-game (U).

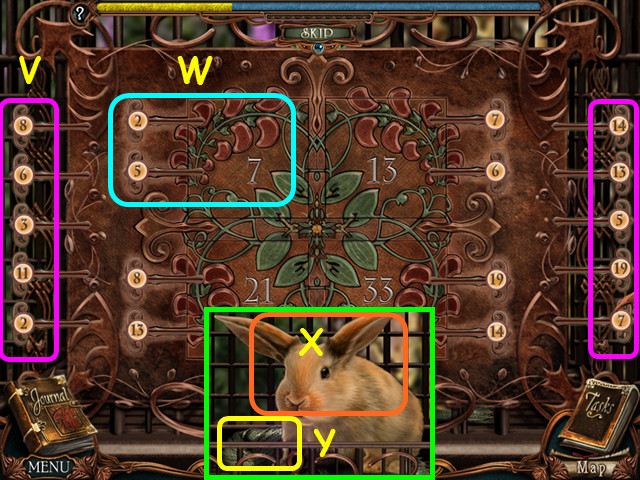
• Take latch pins from the sides (V) and place them in the grooves so the numbers on the pins equal the number in the square (W).
• Give the CARROT to the bunny (X) and take the SCARF (Y).
• Walk right twice, then go forward.

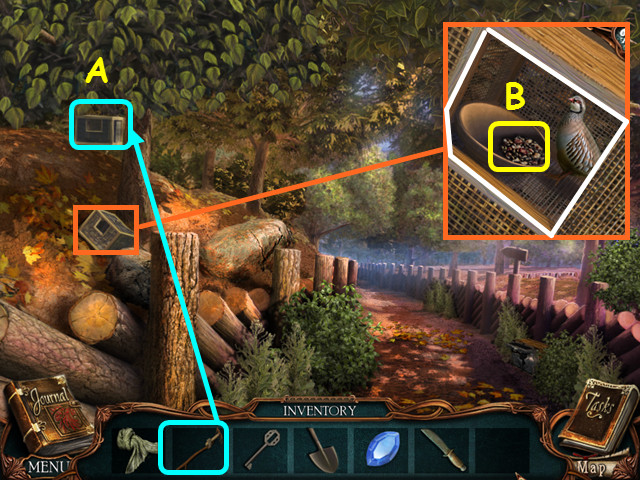
• Use the LONG RAKE to knock the box closer (A).
• Look at the box, remove the door and take the BIRD SEED (B).
• Walk down twice; go left, then forward to the Inn.

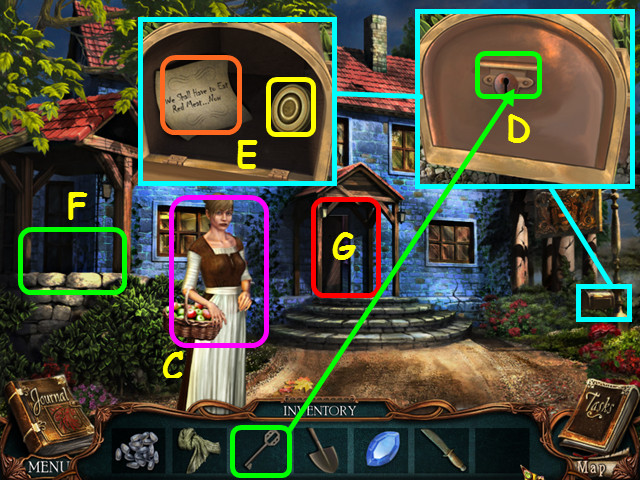
• Take a photo of the innkeeper’s wife (C).
• Look at the mailbox and use the MAIL KEY on the lock (D).
• Photograph the note and take the SAFE DIAL (E).
• Note the well (F).
• Walk forward to enter the inn (G).

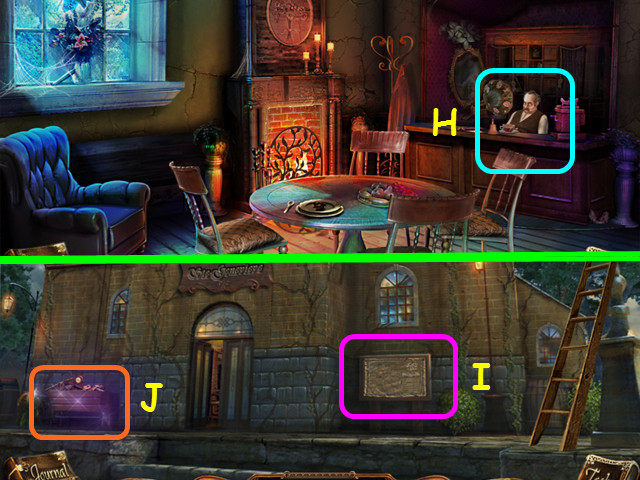
• Take a photo of the innkeeper (H).
• Walk down 6 times to return to the front of the train station.
• Look at the schedule to see that the train from Calais should arrive at 4:54 (I).
• Select the bin for a HOS (J).

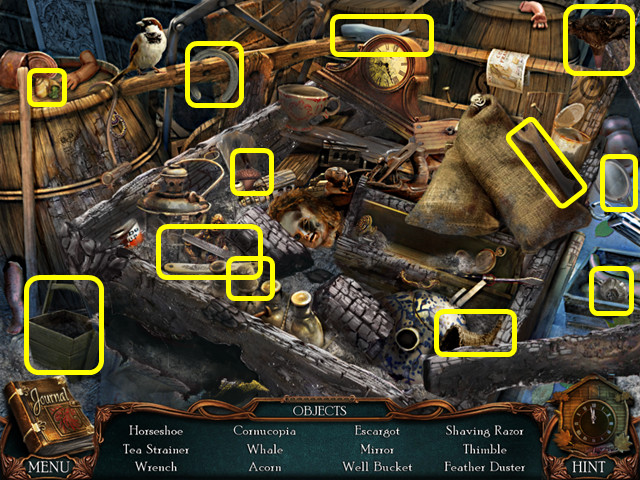
• Locate all the items on the list.
• You will earn the WELL BUCKET and the FEATHER DUSTER.
• Walk forward 3 times, go left, forward and enter the inn.
• Talk to the innkeeper again to learn he wants honey.
• Walk down once to exit the inn.

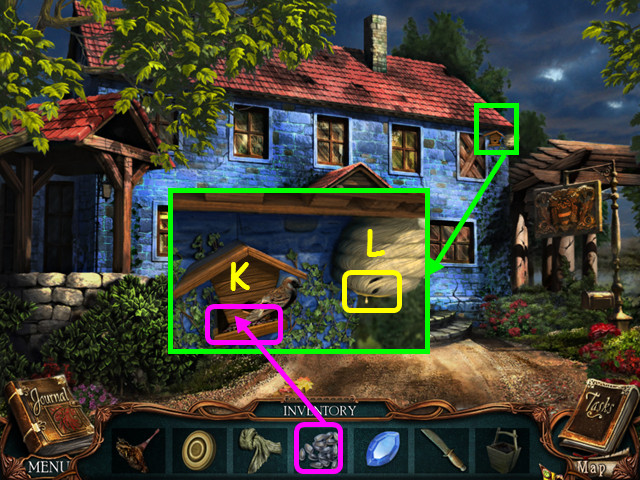
• Look at the eave and place the BIRDSEED on the feeder (K).
• Take the HONEY from the hive (L).

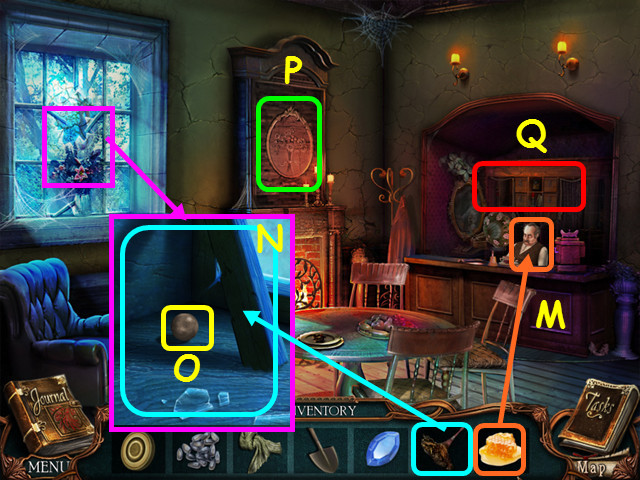
• Enter the inn and give the HONEY to the innkeeper (M).
• Look at the window and use the DUSTER 4 times to remove the dust (N).
• Take the 1/3 LEAD BALL (O).
• Note the safe (P).
• Select the area behind the counter for a HOS (Q).

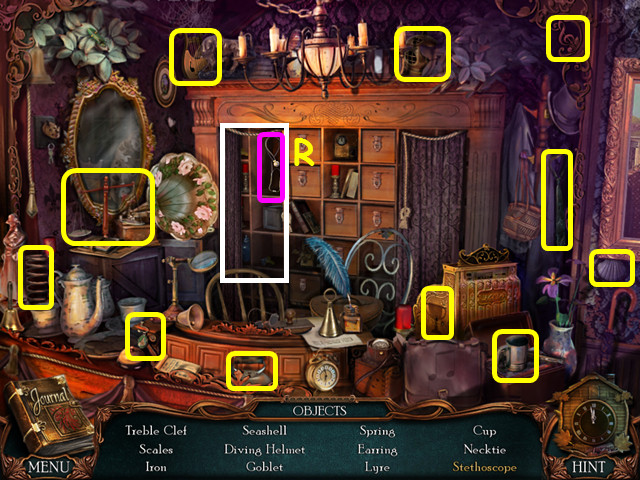
• Locate all the items on the list.
• Open the curtain to find the stethoscope (R).
• You will earn the STETHOSCOPE.
• Open the cover and zoom into the safe for a mini-game.

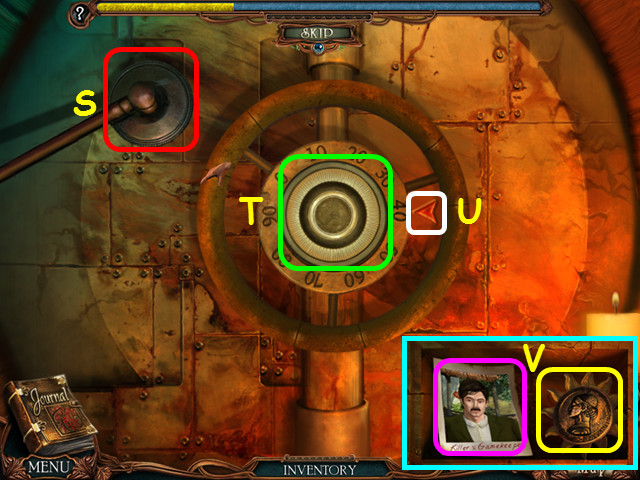
• Place the STETHOSCOPE (S) and the SAFE DIAL (T) on the safe to trigger the mini-game.
• Turn the dial until the arrow turns green (U), then release the dial.
• Do this 2 more times to open the safe.
• Photograph the gamekeeper’s picture and take the MEDALLION (V).
• Exit the inn and look at the well.

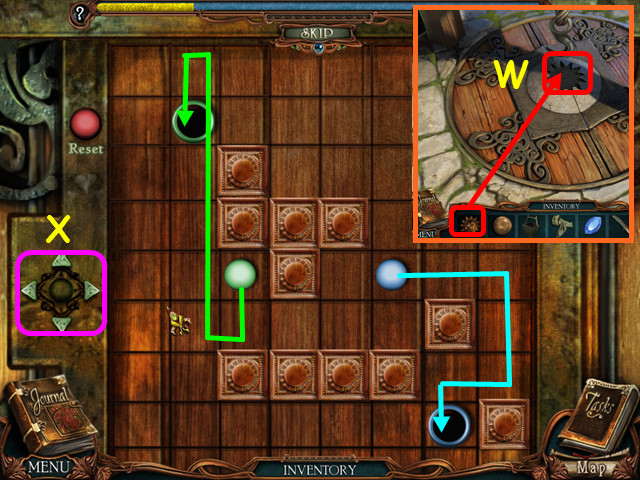
• Place the MEDALLION in the center of the well cover (W).
• Use the arrows (X) to move the balls into the matching colored holes at the same time.
• Press the arrows: right x 2, down x 2, left, up x 5, down.

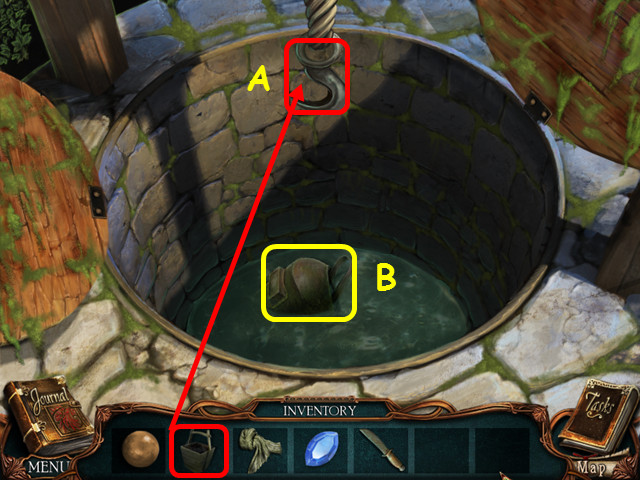
• Place the WELL BUCKET (A) on the hook to retrieve the WELDING MASK (B).
• Walk down, then go to the right twice.

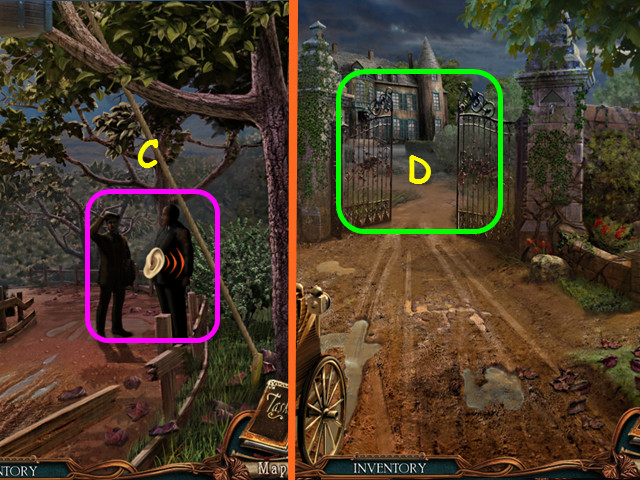
• Select the men to eavesdrop on their conversation (C).
• Walk down once then go forward through the gate (D).

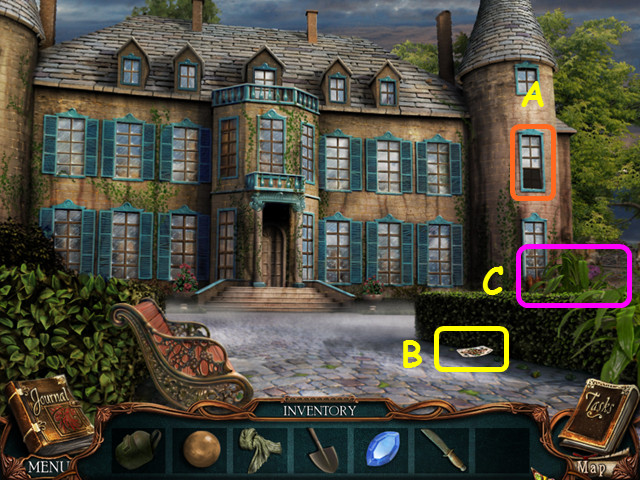
• Note the open window (A).
• Take the 1/4 CARD (B).
• Walk right to the garden (C).

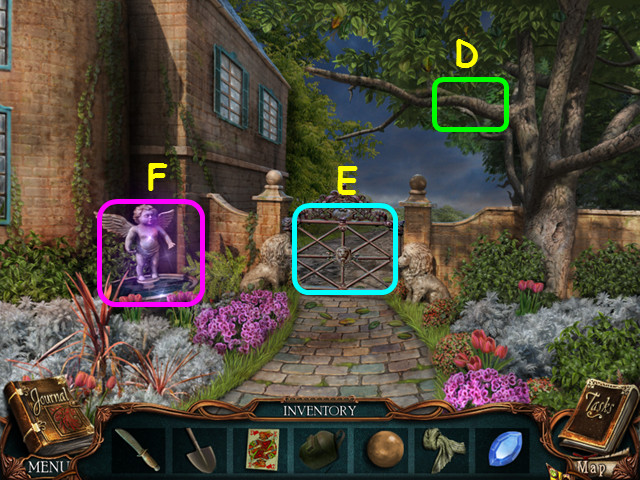
• Note there is something in the tree (D).
• Note the locked gate (E).
• Select the fountain for a HOS (F).

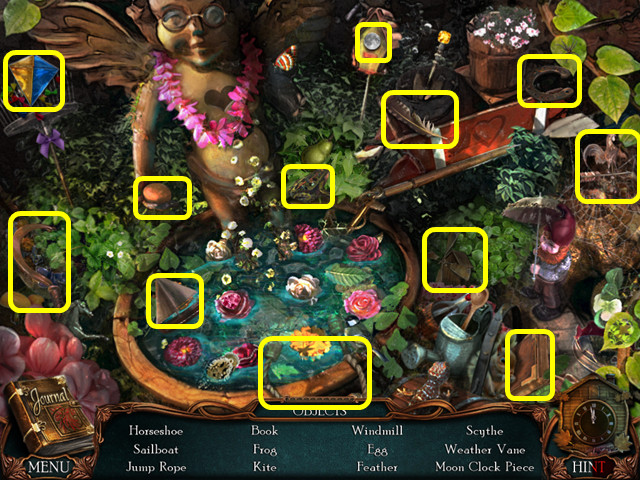
• Locate all the items on the list.
• You will earn the MOON CLOCK PIECE.
• Walk down, then enter the chateau.

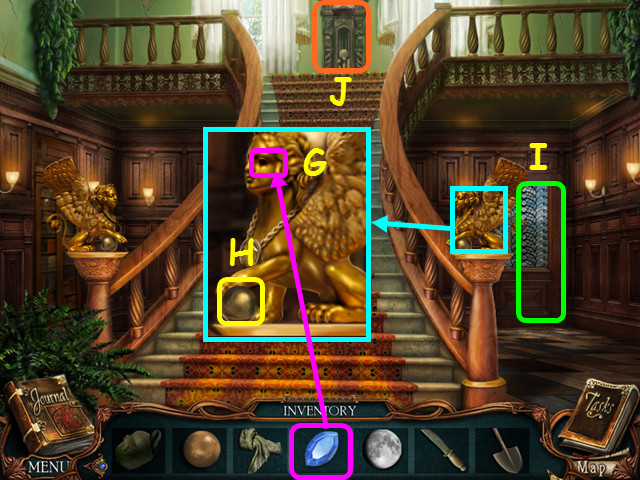
• Look at the right griffin and place the gem in the eye socket (G).
• Take the 2/3 LEAD BALL (H).
• Note the locked door on the first floor (I).
• Select the clock for a mini-game (J).

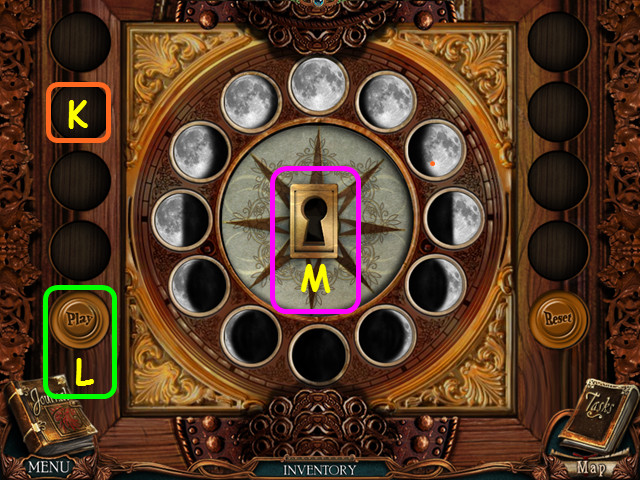
• Place the MOON CLOCK PIECE in the empty spot on the left to trigger the mini-game (K).
• Place the moons in chronological order, then press the ‘Play’ button to see if you are correct (L).
• Note the secret keyhole that appears (M).
• Walk to the upper left hall.

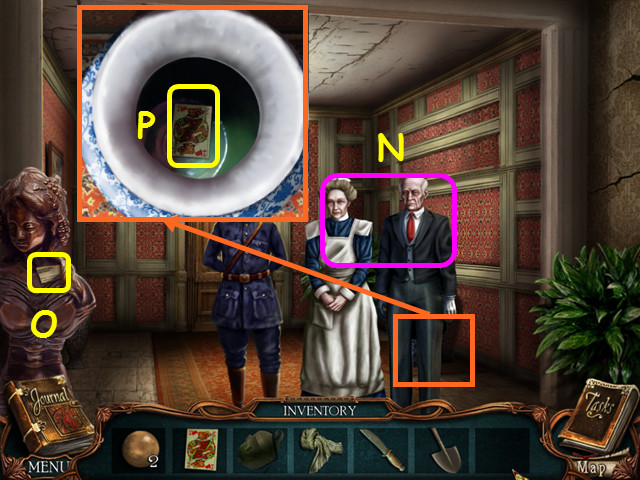
• Take a photo of the officer and caretakers (N).
• Take the 1/8 LETTER PIECE (O).
• Look in the blue vase behind the caretakers and take the 2/4 CARD (P).
• Walk down, speak to Rouletabille, then go to the upper right hall.

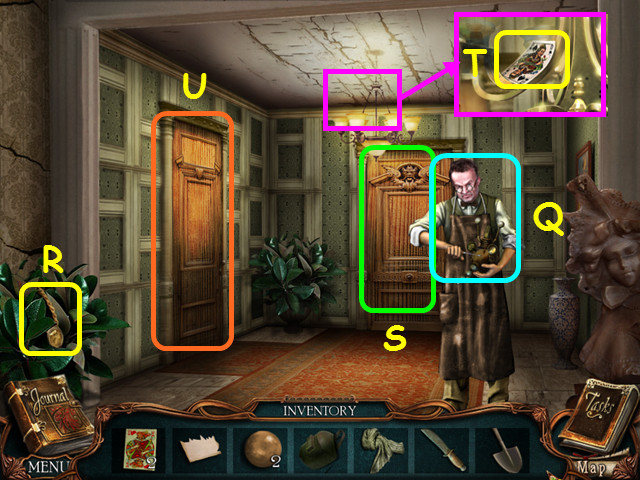
• Take a photo of Daddy Jacques (Q).
• Take the NECKLACE (R).
• Note Mathilde’s room (S).
• Look at the chandelier and take the 3/4 CARD (T).
• Enter Rouletabille’s room on the left (U).

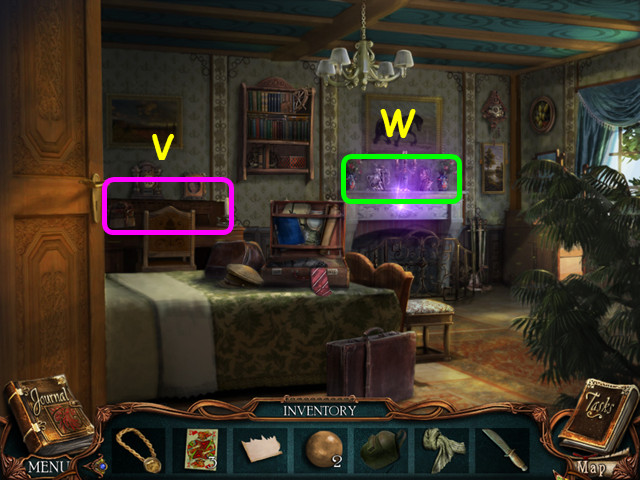
• Note the mini-game on the left (V).
• Select the mantle for a HOS (W).

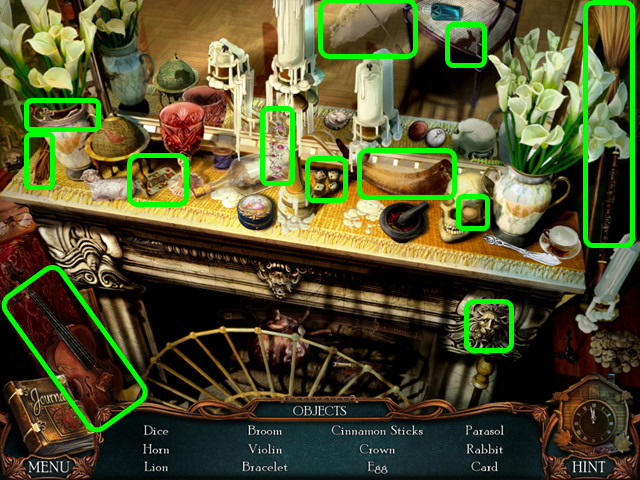
• Locate all the items on the list.
• You will earn the 4/4 CARD.
• Look at the mini-game on the left.

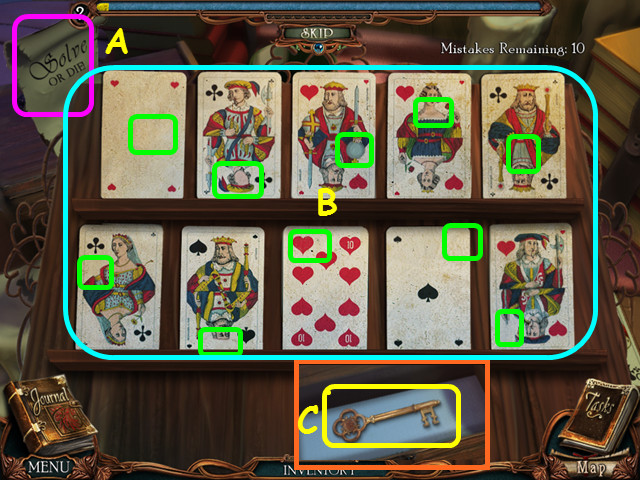
• Take a photo of the note (A).
• Place the 4 CARDS on the board to activate the mini-game.
• There is an error on each card; select the spot that is missing something (B).
• Take the CLOCK KEY (C).
• Walk down twice.

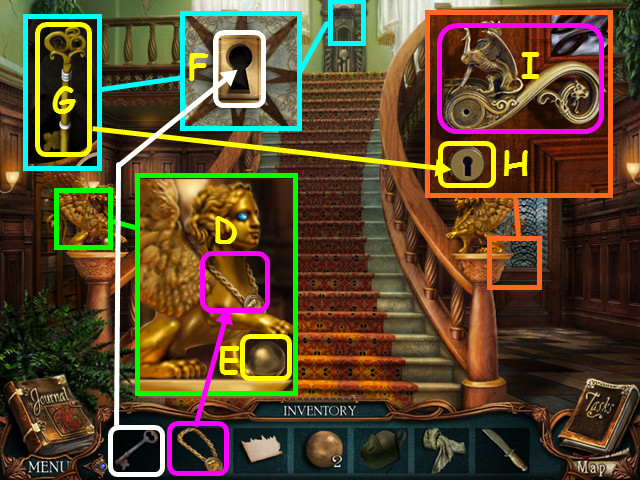
• Look at the griffin on the left and place the NECKLACE on its neck (D).
• Take the 3/3 LEAD BALL (E).
• Look at the clock and use the CLOCK KEY in the lock (F).
• Take the BACK DOOR KEY from the compartment (G).
• Look at the door and use the BACKDOOR KEY on the lock (H).
• Turn the key, then use the door handle (I).
• Walk out to the laboratory area.

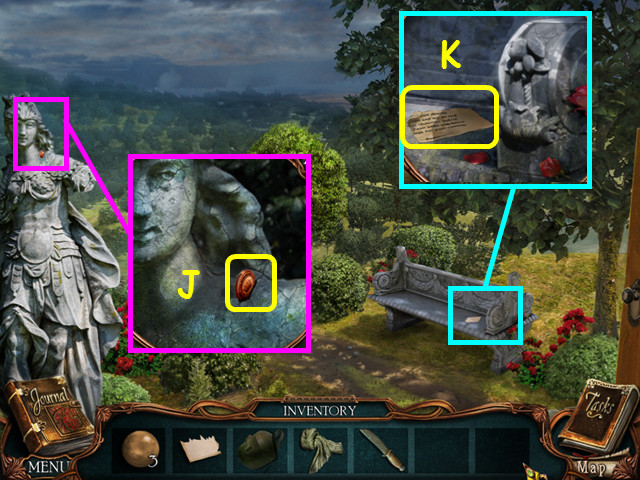
• Look at the statue and take the CHECKER (J).
• Look at the bench and take the 2/8 LETTER PIECE (K).
• Walk forward.

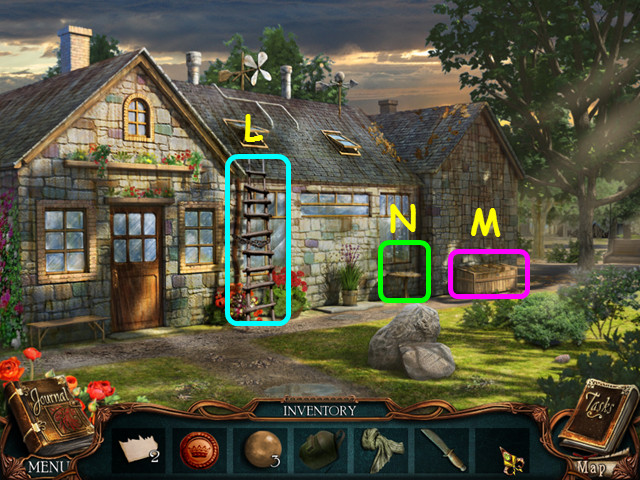
• Note the ladder (L).
• Note the locked storage bin with the rusty lock (M).
• Look at the table for a mini-game (N).

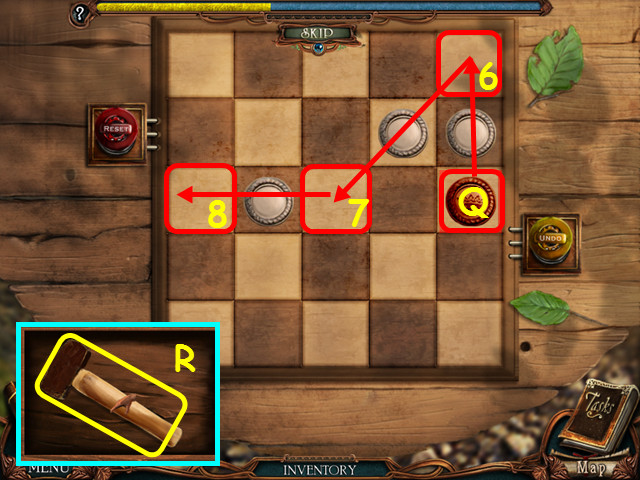
• Place the CHECKER on the board to trigger the mini-game.
• You must remove all the white checkers from the board by jumping over them.
• White can jump white checkers, but not the red checker.
• Select the red checker (O) in the center and move it in numerical order (1-4)
• Select the bottom center white checker (P) and have it jump the right center white checker (5).


• Select the red checker again (Q) and make moves 6-8.
• Take the HAMMER from the compartment (R).
• Look at the storage bin and use the HAMMER on the rusty lock.
• Select the storage bin for a HOS.

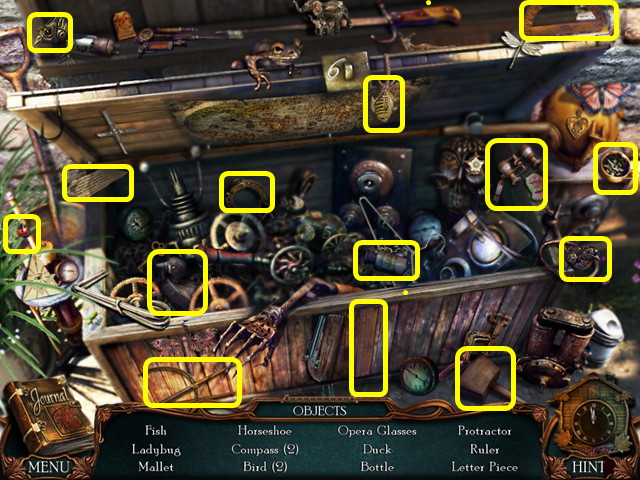
• Locate all the items on the list.
• You will earn the 3/8 LETTER PIECE.
• Enter the building.

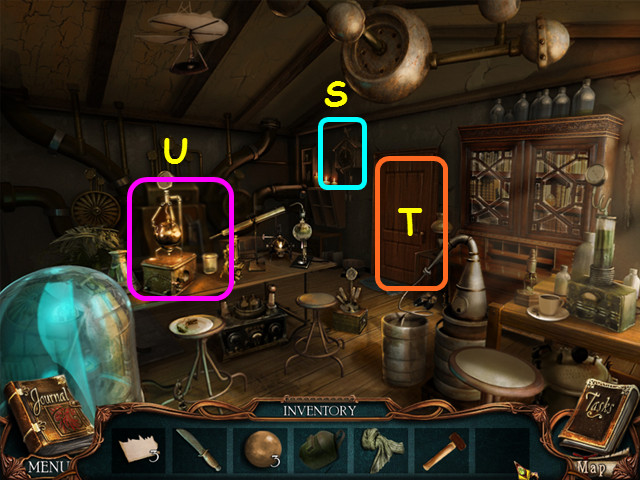
• Note the clock mini-game (S).
• Note the door to the yellow room (T).
• Select the device for a mini-game (U).

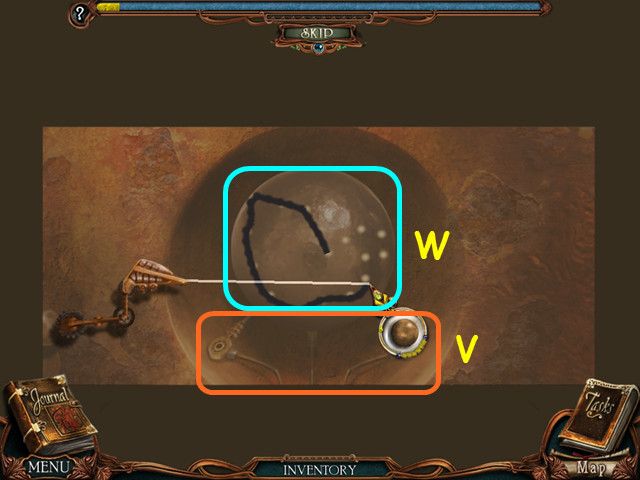
• Use the WELDING MASK on the device to trigger the mini-game.
• Place a LEAD BALL on the prongs in the center (V).
• Drag your cursor along the white dots to cut out a shape (W).
• Repeat the process for the other 2 LEAD BALLS.
• You will earn the HORSE, ROOSTER, and PIG.
• Select the clock mini-game.

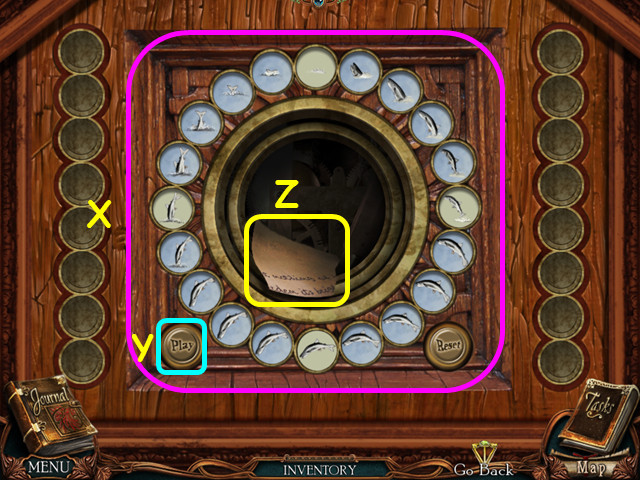
• Place the tiles in sequential order to show the fish jumping out of the water (X).
• Press the ‘Play’ button to see the movie and learn if you are correct (Y).
• Take the 4/8 LETTER PIECE from the compartment (Z).
• Enter the yellow room.

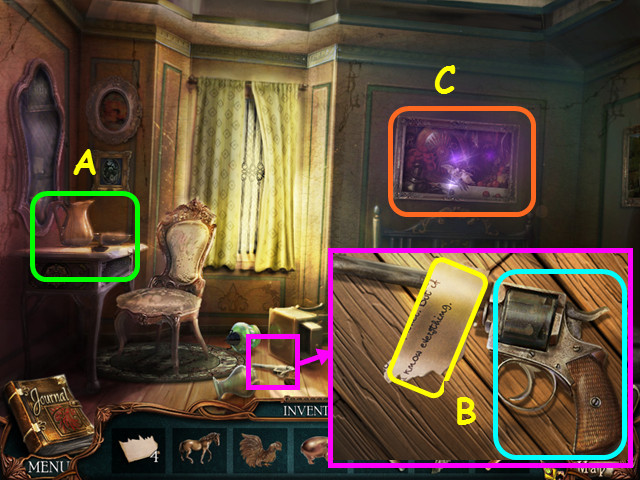
• Note the vanity has a place to reassemble the letter pieces (A).
• Look at the nightstand; take the 5/8 LETTER PIECE and take a photo of the handgun (B).
• Select the painting for a HOS (C).

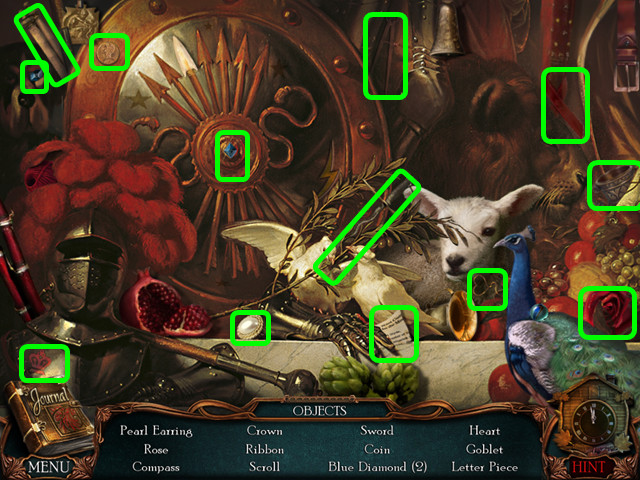
• Locate all the items on the list.
• You will earn the 6/8 LETTER PIECE.
• Walk down 6 times, then go to the right.

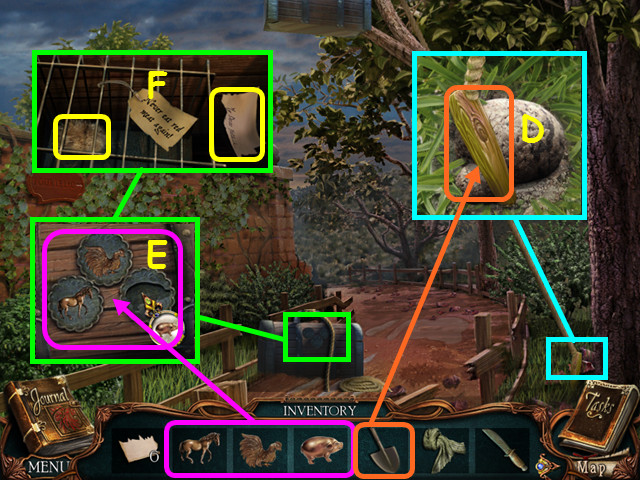
• Look at the stake holding the rope and use the SHOVEL to dig it up (D).
• Look at the fallen chest and place the PIG, ROOSTER, and HORSE on the lid (E).
• Take the FUR and the 7/8 LETTER PIECE (F).
• Walk down, go forward twice, walk out the back door and go forward 3 times to the yellow room.

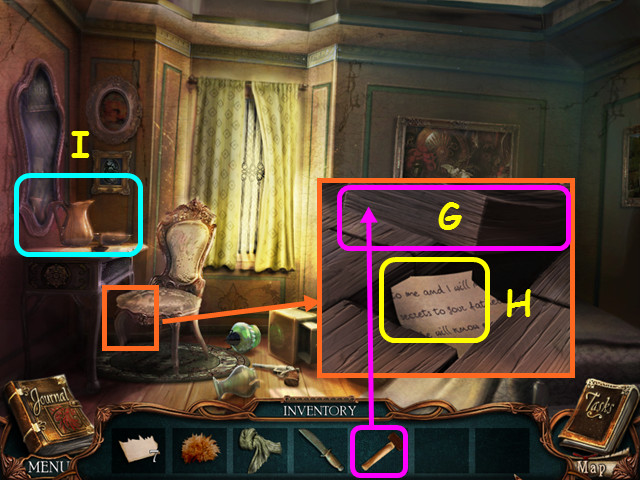
• Look under the desk and use the HAMMER on the loose floorboard (G).
• Take the 8/8 LETTER PIECE (H).
• Look at the vanity for a mini-game (I).

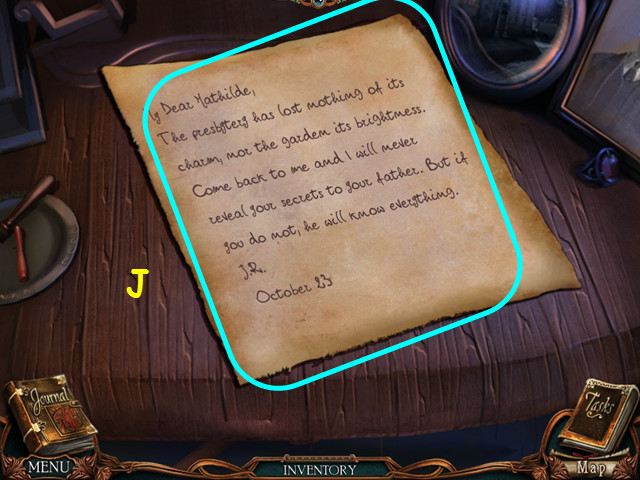
• Place the 8 LETTER PIECES on the table to start the mini-game.
• Restore the letter jigsaw-style by dragging the pieces into position (J).
• Take a photo of the letter.

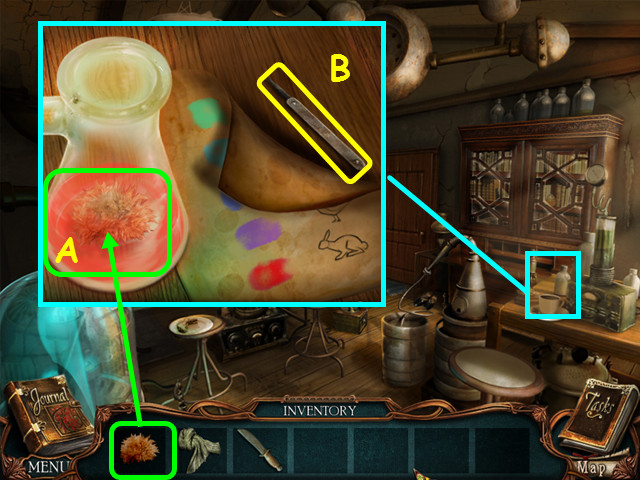
• Walk forward to enter the lab.
• Look at the testing apparatus on the right and place the FUR in the flask (A).
• Take the LOCK PICK (B).
• Walk down twice.

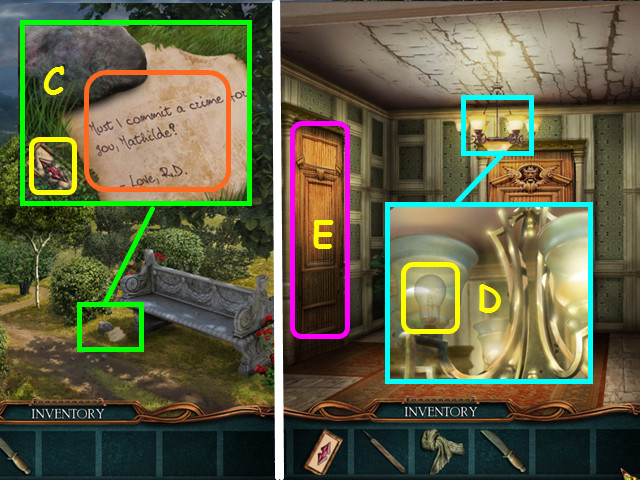
• Look at the rock by the bench; photograph the note and take the 1/4 SLIDER (C).
• Walk down to enter the chateau, the walk to the right hall.
• Look at the chandelier and take the LIGHT BULB (D).
• Enter Rouletabille’s room on the left (E).

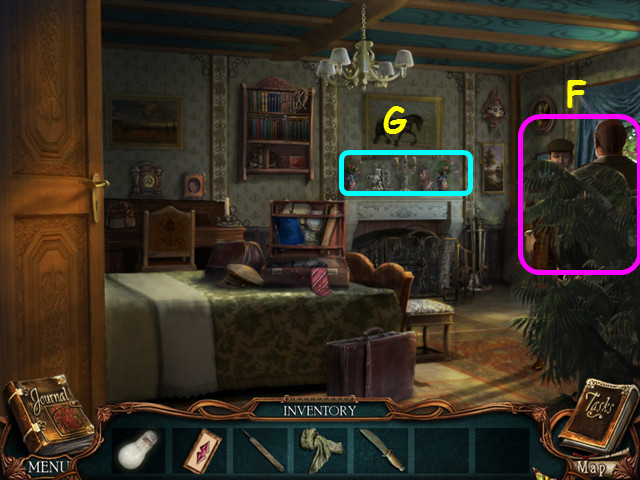
• Eavesdrop on the 2 men (F).
• Select the mantle for a HOS (G).

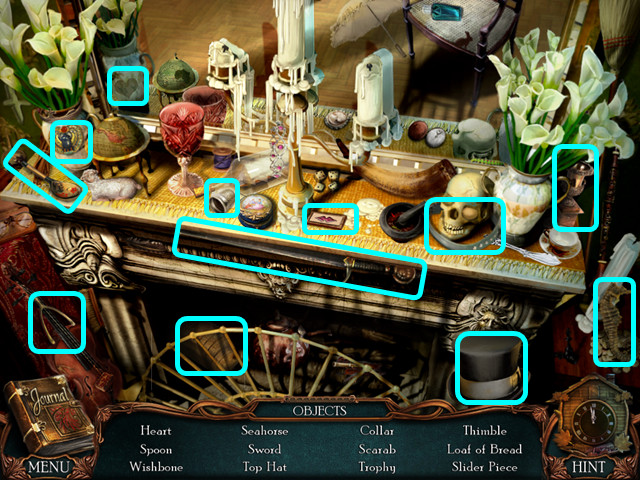
• Locate all the items on the list.
• You will earn the 2/4 SLIDER.
• Walk down, then enter Mathilde’s room.

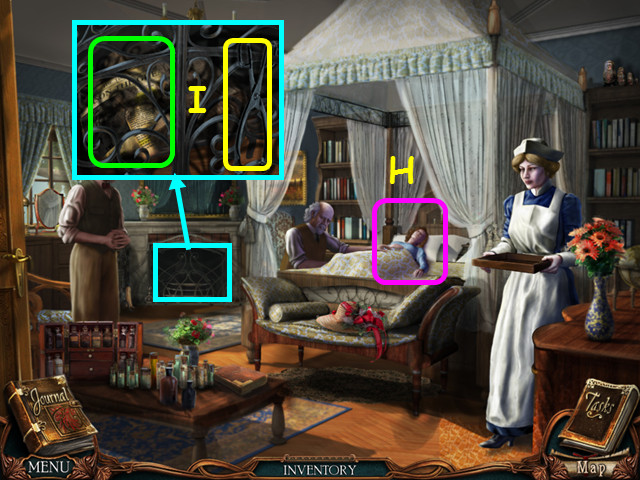
• Photograph Mathilde (H).
• Look in the fireplace; take the TONGS and take a photo of the newspaper (I).
• Walk down 3 times and go right to the garden.

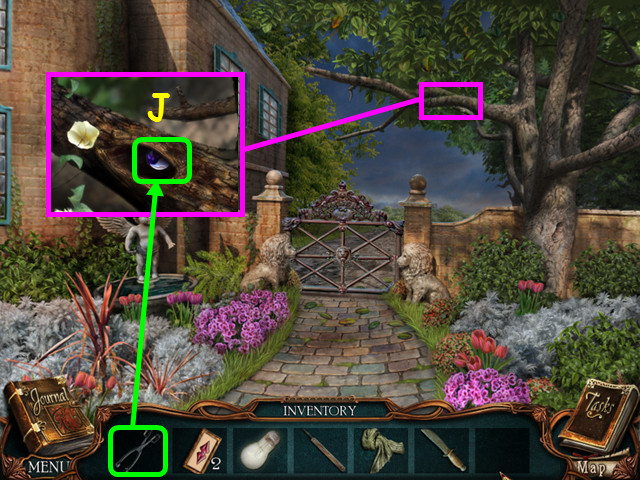
• Look at the branch and use the TONGS to take the MARBLE (J).
• Walk down, enter the chateau, then go out the back door. Walk forward to the laboratory and go inside.

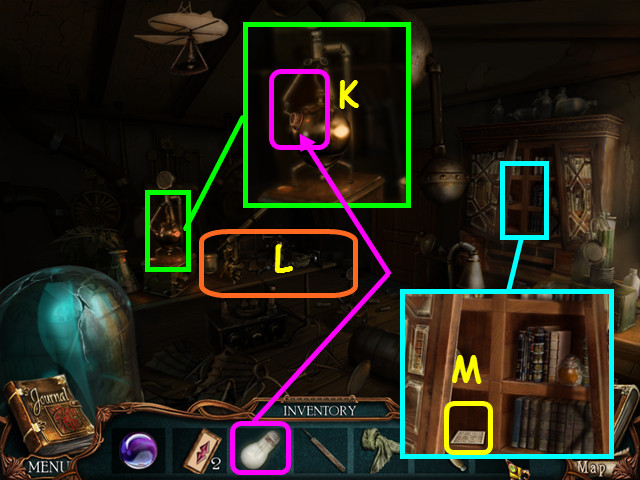
• Look at the table on the left and use the LIGHT BULB on the device (K).
• Take a photo of the ransacked table (L).
• Look at the bookcase and take the TAROT CARD (M).
• Walk forward to the yellow room and select the painting for a HOS.

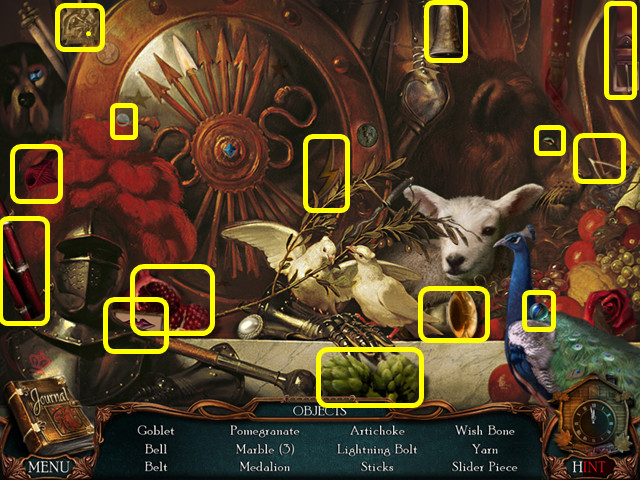
• Locate all the items on the list.
• You will earn the 3/4 SLIDER.
• Walk down 4 times to enter the chateau, the go to the left hall.

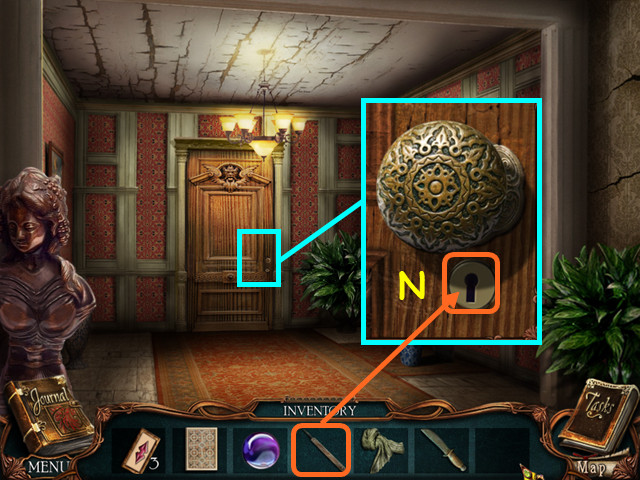
• Look at the door and use the LOCK PICK in the lock (N).
• Enter Larsan’s room.

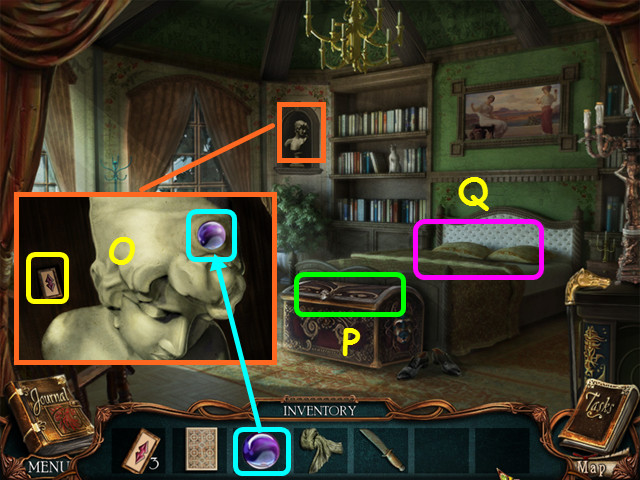
• Look at the bust, place the MARBLE in the hole, and take the 4/4 SLIDER (O).
• Note the chest mini-game (P),
• Select the bed for a mini-game (Q).

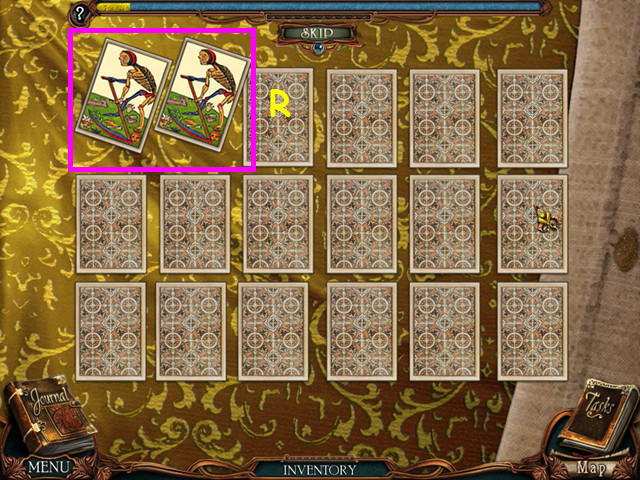
• Place the TAROT card in the empty space to trigger the mini-game.
• Remove the cards by turning over matching pairs (R).
• This mini-game is randomly generated.
• Take the SLIDER KEY.
• Look at the chest for a mini-game.

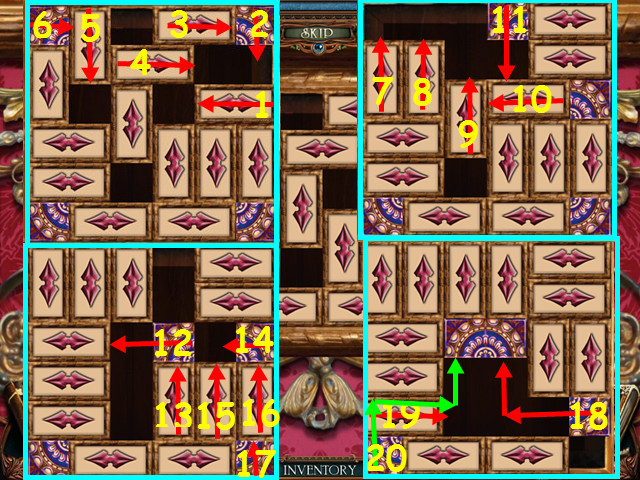
• Place the 4 SLIDERS on the board to trigger the mini-game.
• Move the sliders so you can move the 4 corner pieces to the center.
• Move the sliders in numerical order in the direction indicated (1-20).
• Note that moves 18 and 20 move more than one direction.
• Use the SLIDER KEY on the lock, then take a photo of the knife and code.
• Walk down twice and speak with Rouletabille.
• Go out the back door and walk forward.

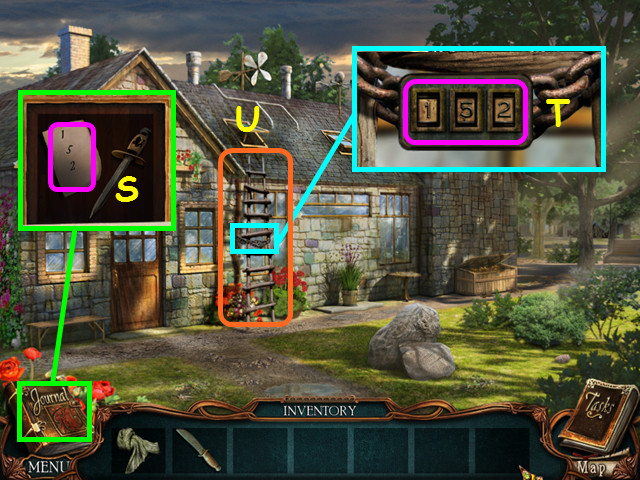
• Look at the chain on the ladder and enter the code from the slider box (S) on the lock (T).
• Take the LADDER (U).
• Walk down 3 times to the front of the chateau.

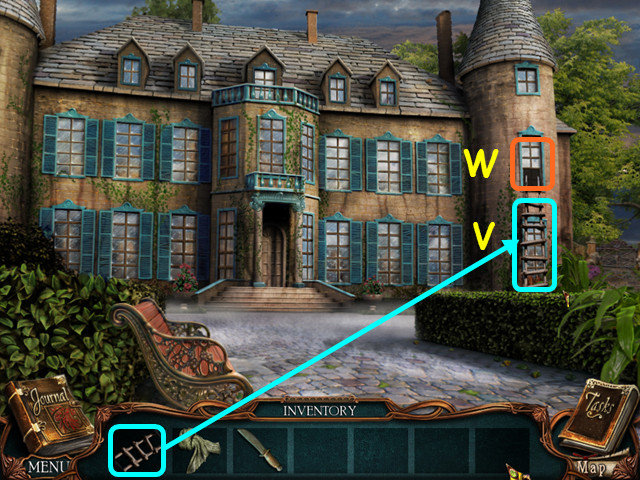
• Use the LADDER under Mathilde’s window (V).
• Look in the window (W).
• After the cut-scene, walk to the right.

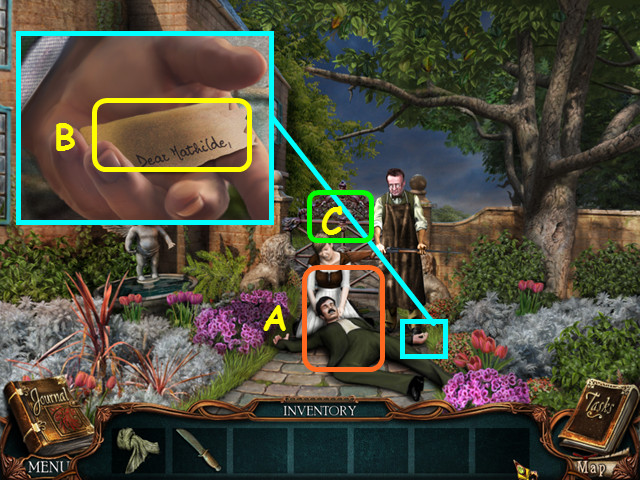
• Take a photo of Mr. Green (A).
• Look at his hand and take the 1/8 NOTE PIECE (B).
• Note the locked gate (C).
• Walk down, enter the chateau, walk to the right hall, and enter Rouletabille’s room.

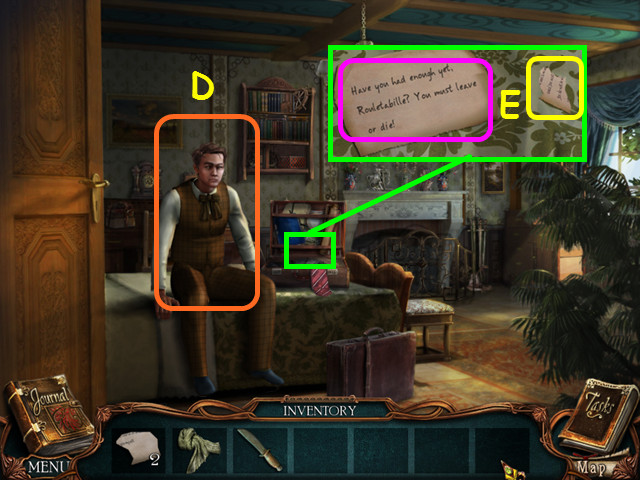
• Take a photo of Rouletabille (D).
• Look in the briefcase; photograph the threat and take the 2/8 NOTE PIECE (E).
• Walk down 2 times, then go right to the garden.
• After talking to Rouletabille, walk down 5 times to the front of the station.
• Rouletabille will talk to you again.

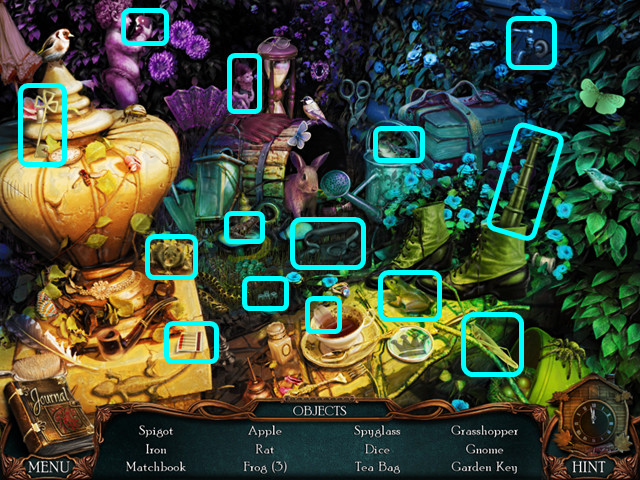
• Walk forward 3 times and select the bushes on the left side of the gate for a HOS.
• Locate all the items on the list.
• You will earn the GARDEN KEY.
• Walk forward, then right to the garden.
• Look at the gate and use the GARDEN KEY on the lock.
• Turn the key then walk forward.

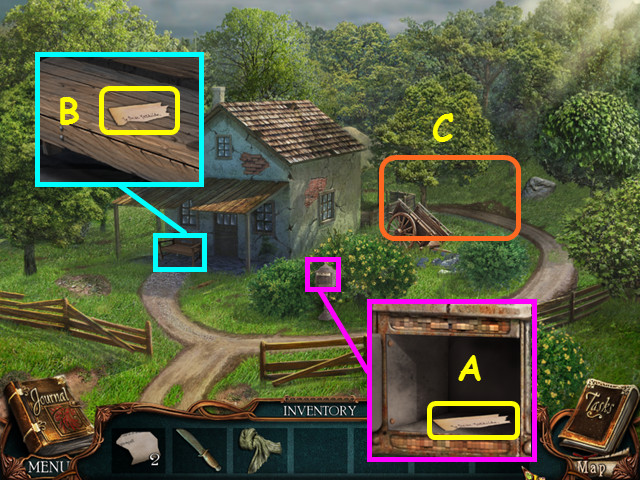
• Look at the mailbox; open the door and take the 3/8 NOTE PIECE (A).
• Look at the bench and take the 4/8 NOTE PIECE (B).
• Walk forward to the back porch (C).

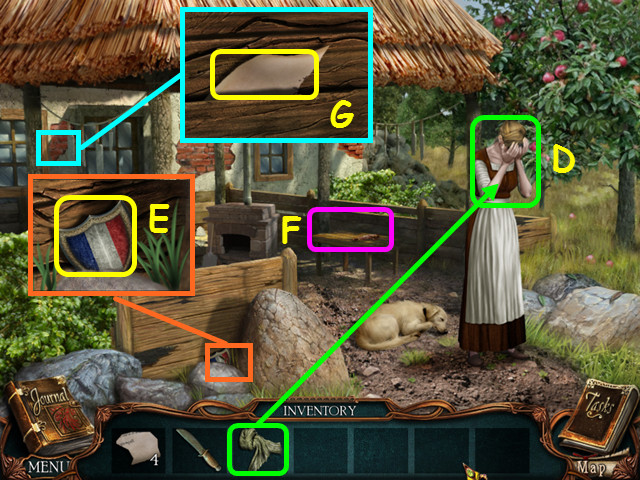
• Give the SCARF to the crying woman and she will give you the 5/8 NOTE PIECE (D).
• Look at the rocks and take the CREST (E).
• Note the table where you can reassemble the note (F).
• Look at the wall and take the 6/8 NOTE PIECE (G).
• Walk down 3 times, enter the chateau, then go left and enter Larsan’s room.

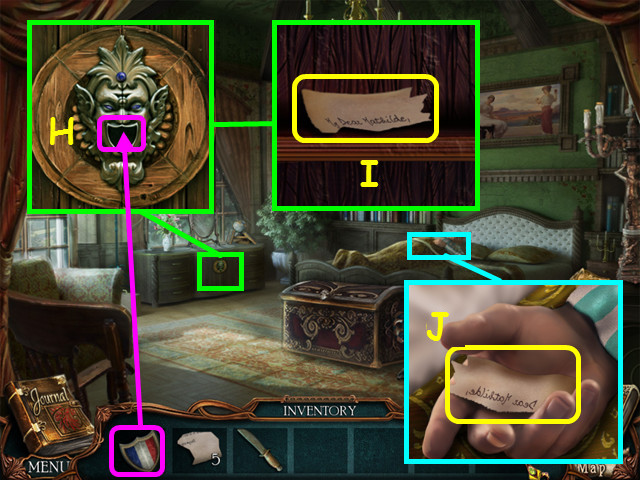
• Look at the dresser and use the CREST in the joker’s mouth (H).
• Take the 7/8 NOTE PIECE (I).
• Look at Larsan and take the 8/8 NOTE PIECE from his hand (J).
• Walk down 3 times, go right to the garden, then forward twice to the back porch.
• Look at the table to reassemble the note.

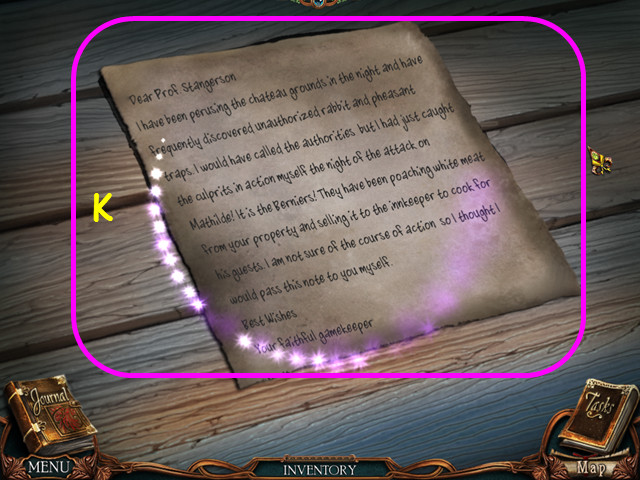
• Place the 8 NOTE PIECES on the table to activate the mini-game.
• Restore the note by assembling the pieces jigsaw-style (K).
• Photograph the note.
• Walk down twice to return to the garden.
• Select the fountain on the left for a HOS.

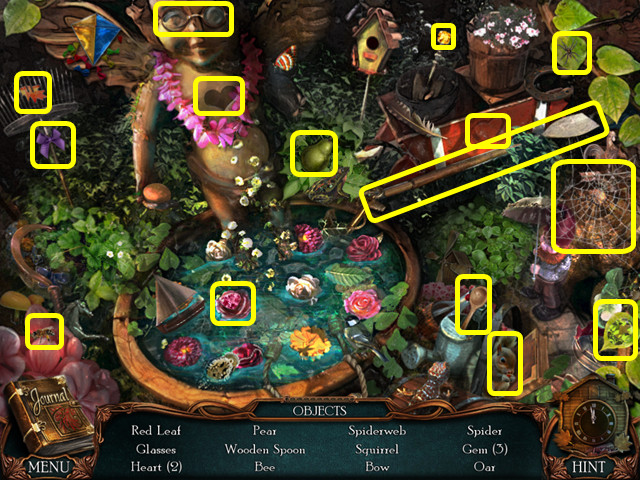
• Locate all the items on the list.
• You will earn the OAR.
• Walk down once and Daddy Jacques will speak to you.
• Walk down, go right, then forward and Larsan will speak to you.
• Walk forward once more to the dock.

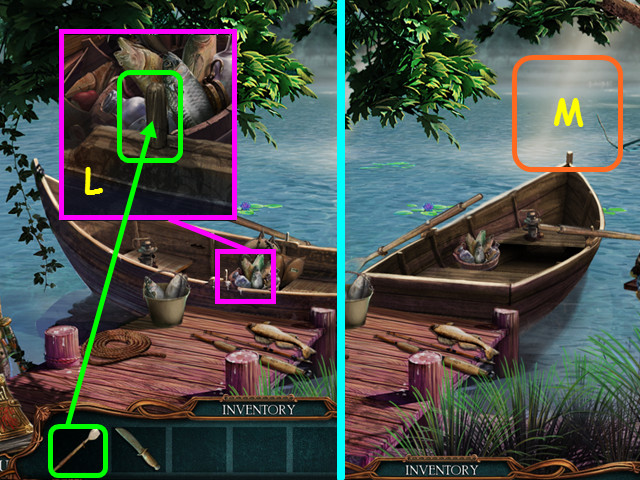
• Look at the boat and place the OAR on the oarlock (L).
• Go forward across the lake (M).

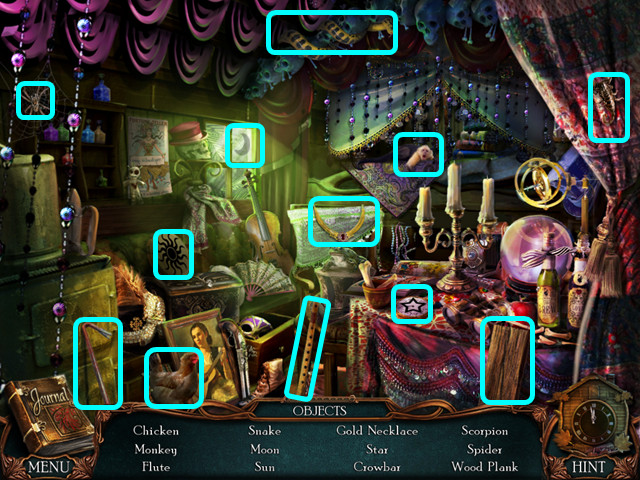
• Note the Gypsy shack (N).
• Walk forward to the cave path (O).

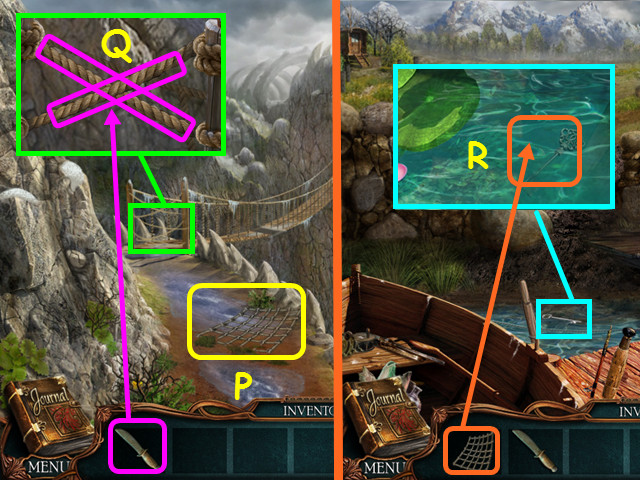
• Take the FISHING NET (P).
• Look at the end of the bridge and use the KNIFE to cut each of the 2 ropes (Q).
• Walk down once.
• Look in the water and use the FISHING NET to get the GYPSY KEY (R).
• Walk left to the gypsy hut.

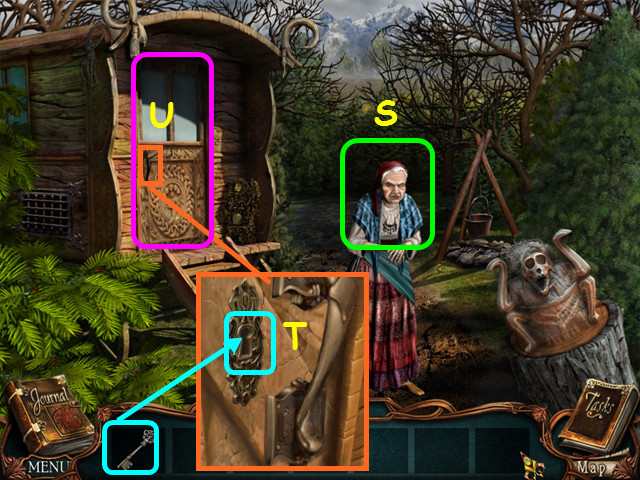
• Take a photo of the gypsy woman (S).
• Look at the door and use the key in the lock (T).
• Turn the key, then select the doorway for a HOS (U).


• Locate all the items on the list.
• You will earn the CROWBAR and the 1/2 WOOD PLANK.
• Walk down once.

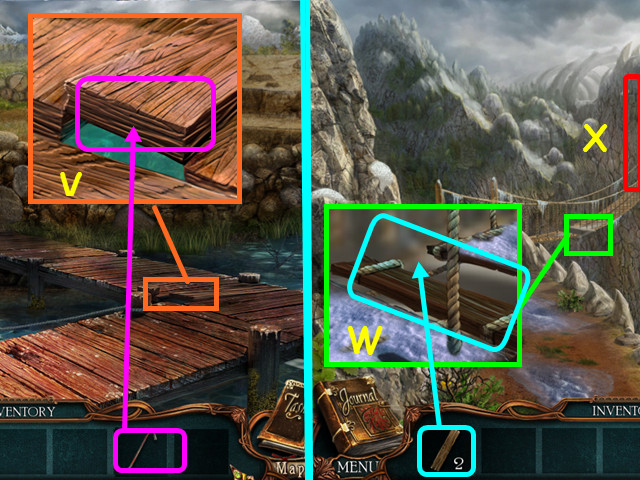
• Look at the dock and use the CROWBAR to take the loose 2/2 WOOD PLANK (V).
• Walk forward to the cave path.
• Look at the bridge and use the 2 WOOD PLANKS to fill in the holes (W).
• Walk across the bridge to the beastie cave (X).

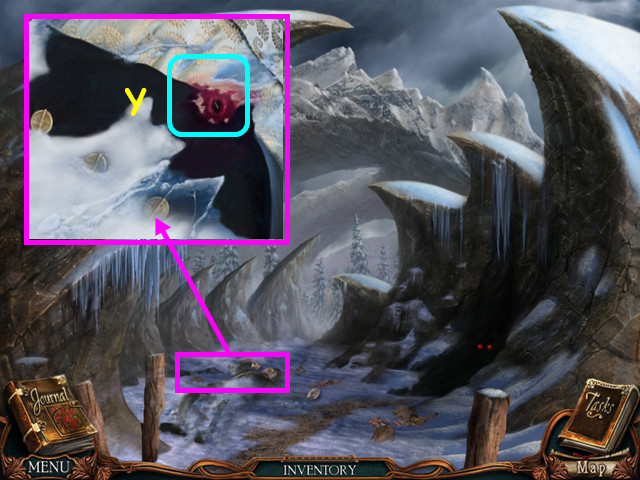
• Look at the body frozen in the ground and take a photograph of the bullet wound (Y).
• Walk down 6 times and walk forward to the chateau.
• After talking to Daddy Jacques, enter the house, walk to the right, and go inside Rouletbille’s room.

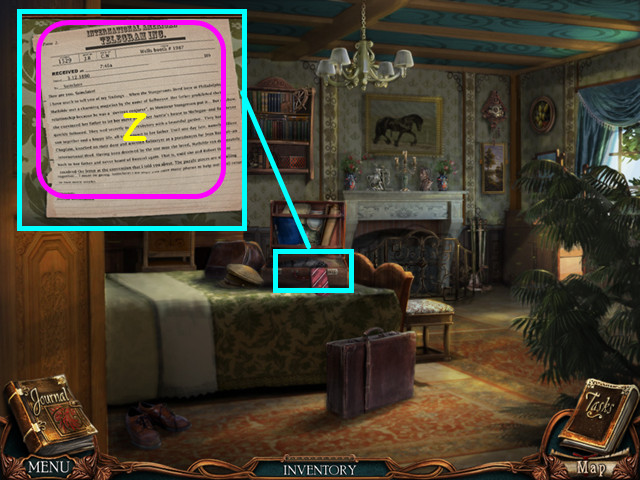
• Look on the bed and photograph the telegram (Z).
• After the cut scene, walk down 7 times to the front of the station.
• After speaking to Rouletbille, walk forward 7 times back to the laboratory.
• Congratulations! You have completed Victorian Mysteries: The Yellow Room!



 Web of Deceit: Black Widow Walkthrough, Guide, & Tips
 Dark Parables: Goldilocks and the Fallen Star Walkthrough, Guide, & Tips
 Crime Solitaire Walkthrough, Guide, & Tips
 Grim Tales: The Legacy Walkthrough, Guide, & Tips
 Portal of Evil: Stolen Runes Walkthrough, Guide, & Tips