Haunted Train: Spirits of Charon Walkthrough, Guide, & Tips
Haunted Train: Spirits of Charon Walkthrough
Welcome to the Haunted Train: Spirits of Charon Walkthrough
Charon’s train has left the station, and you’ll never believe who’s on board!
Whether you use this document as a reference when things get difficult or as a road map to get you from beginning to end, we’re pretty sure you’ll find what you’re looking for here.
This document contains a complete Haunted Train: Spirits of Charon game walkthrough featuring annotated screenshots from actual gameplay!
We hope you find this information useful as you play your way through the game. Use the walkthrough menu below to quickly jump to whatever stage of the game you need help with.
Remember to visit the Big Fish Games Forums if you find you need more help. Have fun!
This walkthrough was created by BrownEyedTigre, and is protected under US Copyright laws. Any unauthorized use, including re-publication in whole or in part, without permission, is strictly prohibited.
General Tips

- This is the official guide for Haunted Train: Spirits of Charon.
- This guide will not mention each time you have to zoom into a location; the screenshots will show each zoom scene.
- We will use the acronym HOP for Hidden-object puzzles. Interactive items will be color-coded and some will be numbered; please follow the numbers in sequence.
- The HOP lists may be random; our lists may vary from yours.
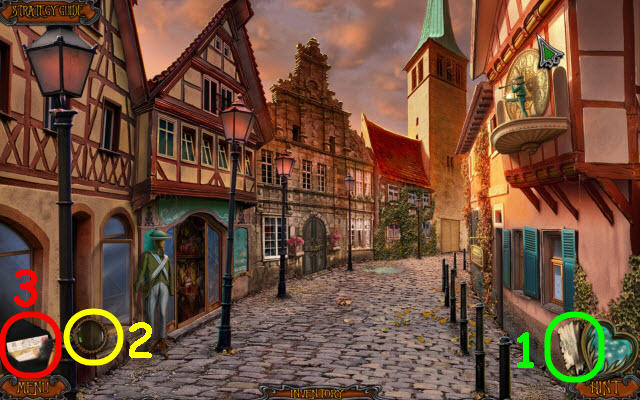
- Use the map (1) to check objective locations and fast travel to previously unlocked locations.
- Use the monocle (2) on green glowing mystical areas.
- Select the journal (3) for story updates and clues.
Chapter 1: The Spirit Train

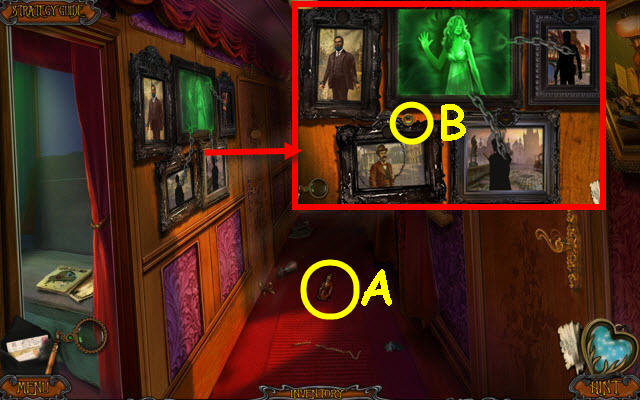
- Use the monocle on the dog (A).
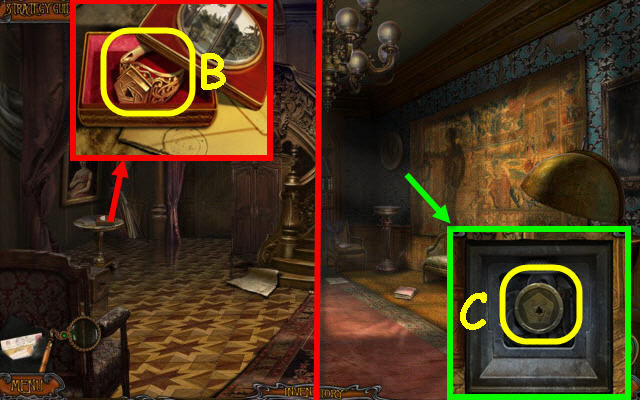
- Read the newspaper; take the COMPARTMENT KEY (B) and select the note.
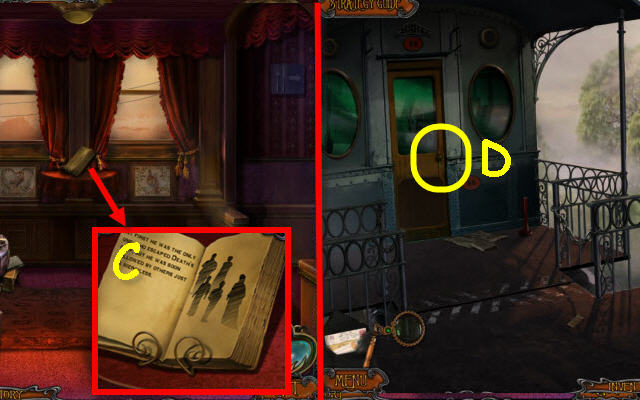
- Open the paper; take the WINDOW KNOB (C).
- Use the COMPARTMENT KEY on the door (D) and exit.
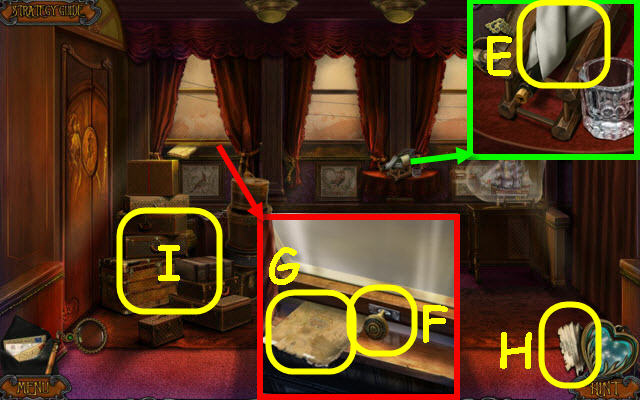
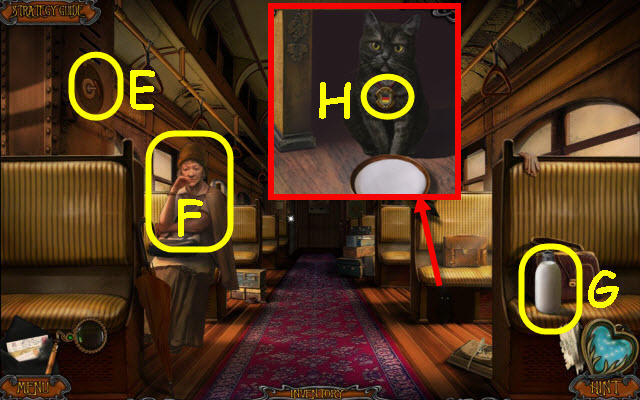
- Take the TOWEL (E).
- Place the WINDOW KNOB in the slot; lift up (F).
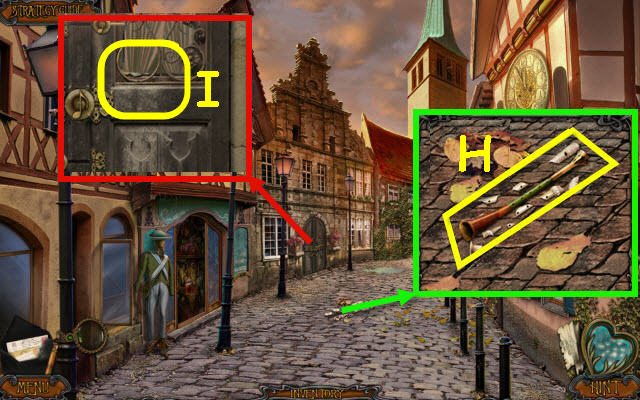
- Take the map (G) which will be added to your toolbar (H).
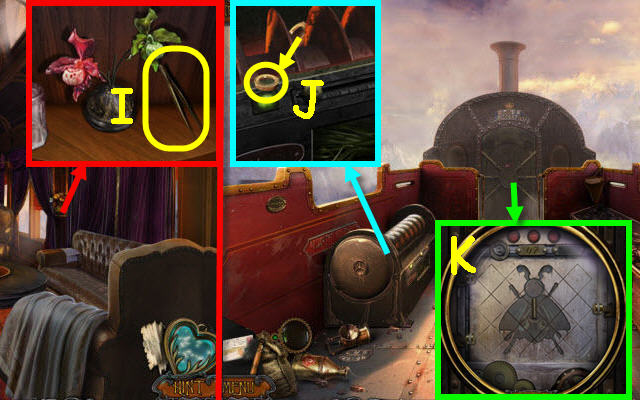
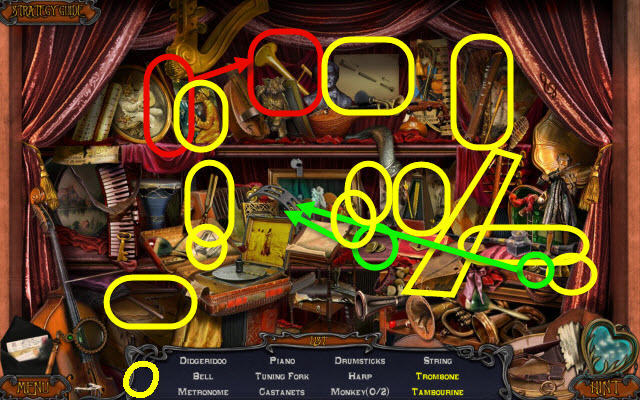
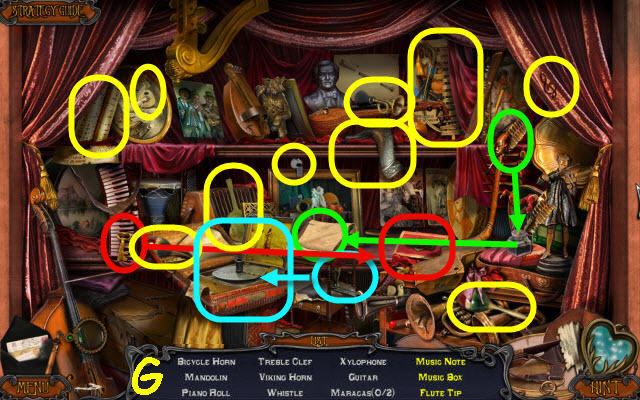
- Examine the luggage to access a HOP (I).
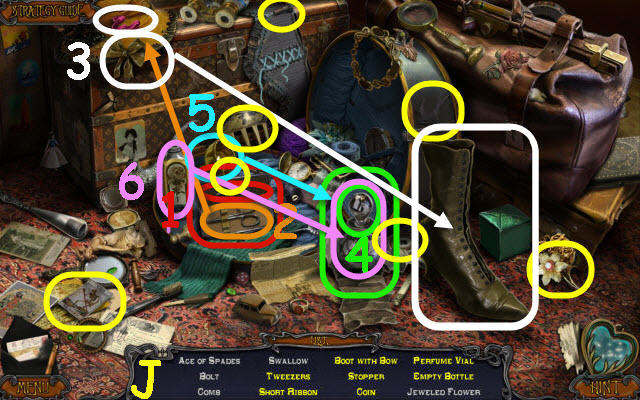
- Play the HOP.
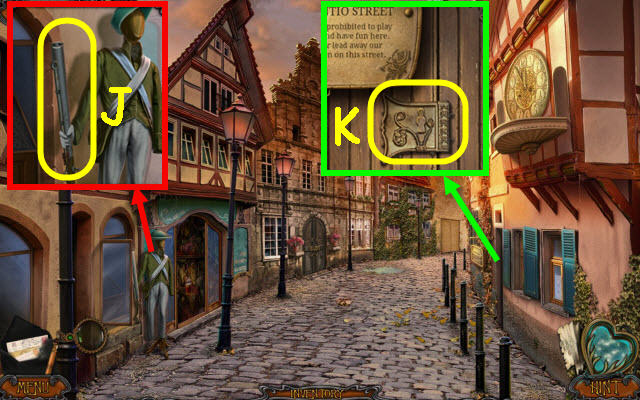
- You receive a JEWELED FLOWER (J).
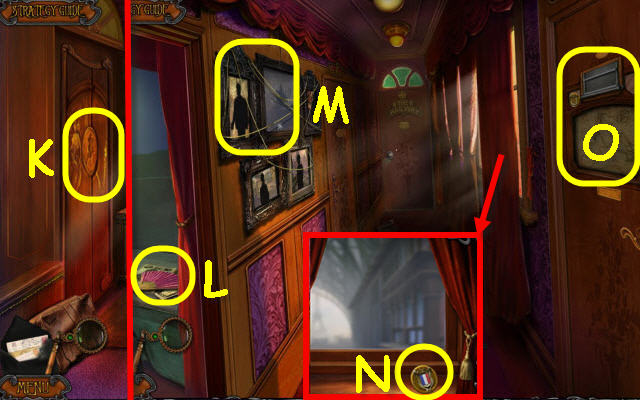
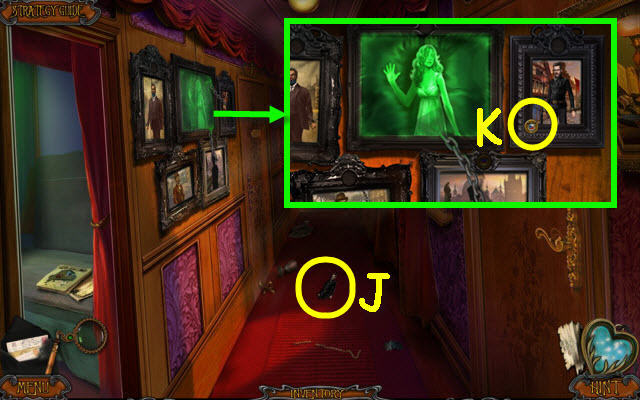
- Use the JEWELED FLOWER on the lock; go left (K).
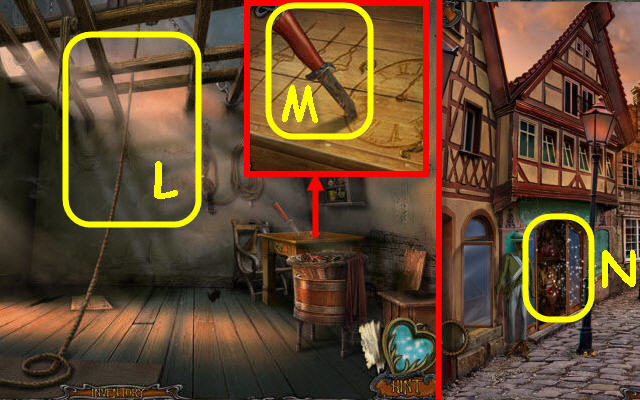
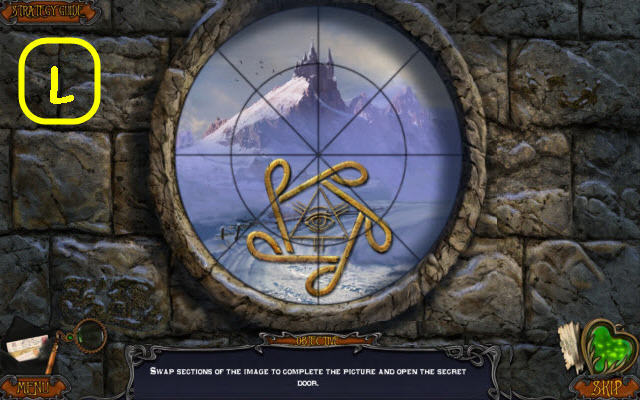
- Take the FAN (L) and select the magazines.
- Take the LACE (M).
- You receive MARY’S LOCKET.
- Use the LACE on the curtain; take the FRENCH FLAG BUTTON (N).
- Place the FRENCH FLAG BUTTON on the door to trigger a puzzle (O).
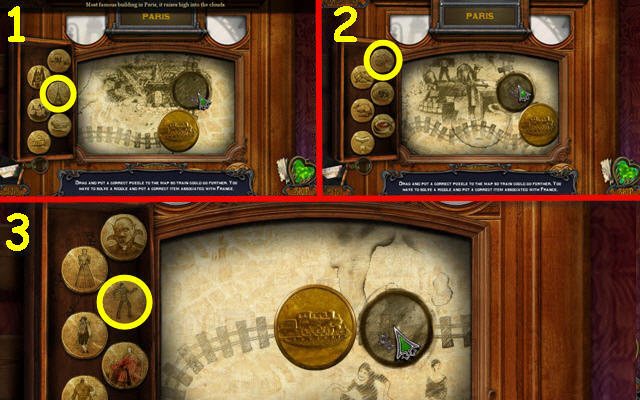
- Drag the correct token to solve the riddles.
- Solution: Eiffel Tower, croissant and mime (1-3).
- Go right.
Chapter 2: Paris
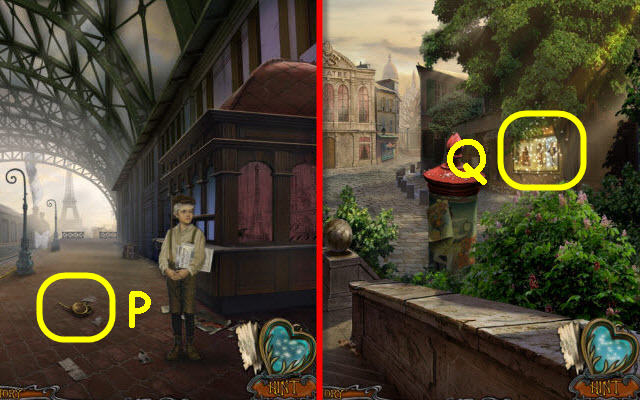
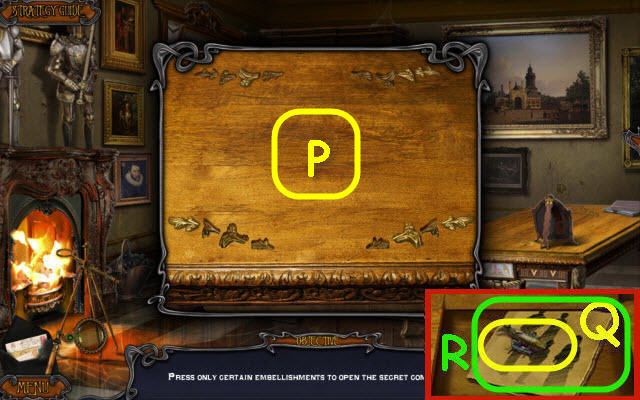
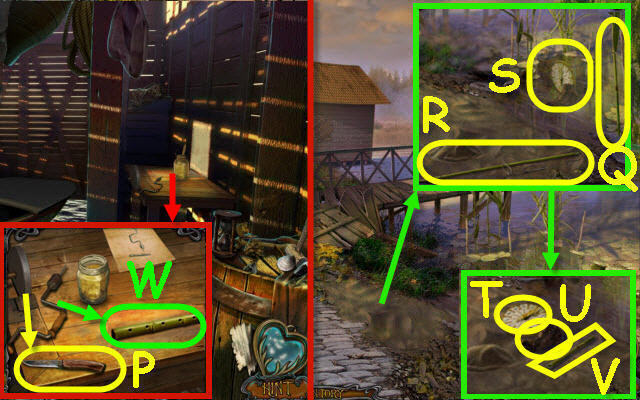
- Take the OILCAN (P).
- Go forward.
- Examine the storefront to access a puzzle (Q).
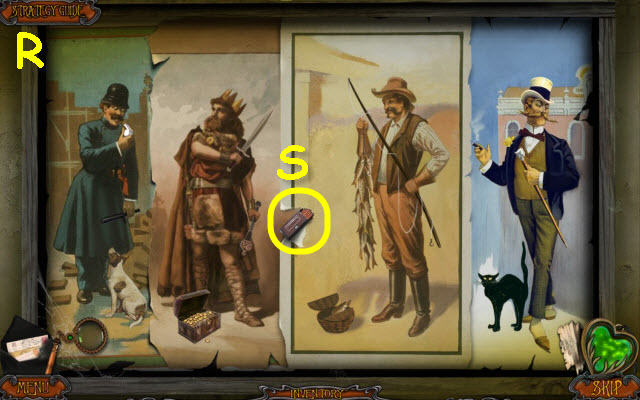
- Place the matching accessories to each character.
- See screenshot for solution (R).
- Take the MATCHES (S).
- Go forward up the path.

- Take the LADDER (T).
- Go to Luxury coupe.
- Use the OILCAN on the hinge; open the door. Take the WALLET (U).
- Go to Railroad terminal.
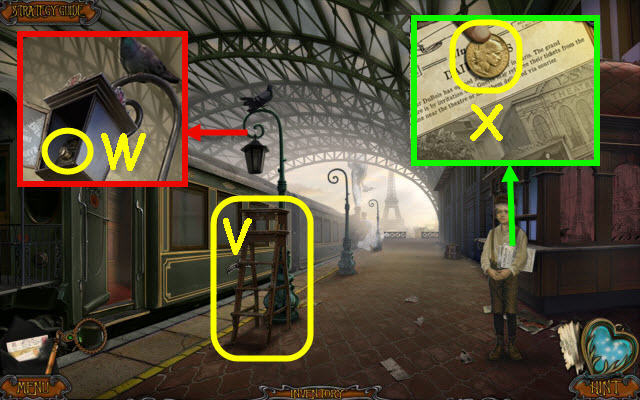
- Place the LADDER by the post (V).
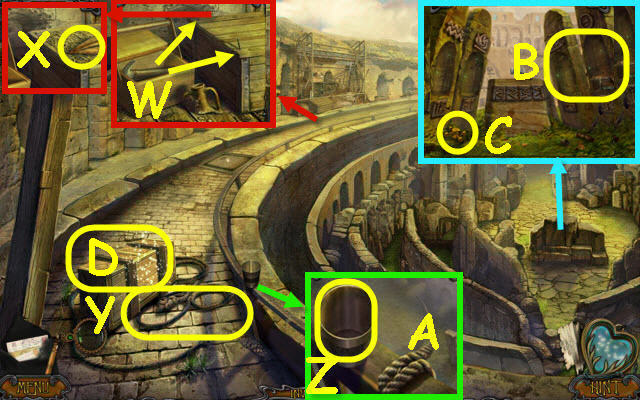
- Open the lantern; turn the gas valve and use the MATCHES on it (W). Take the LANTERN.
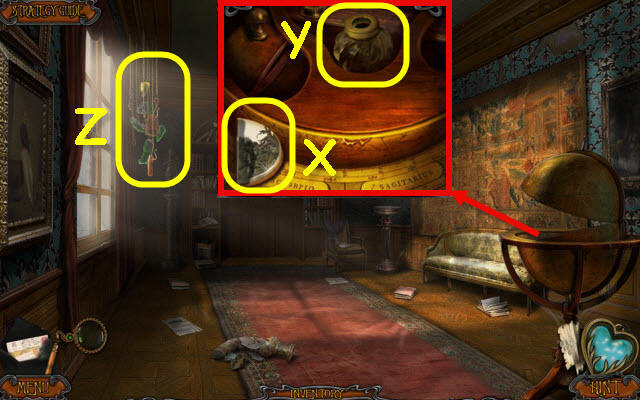
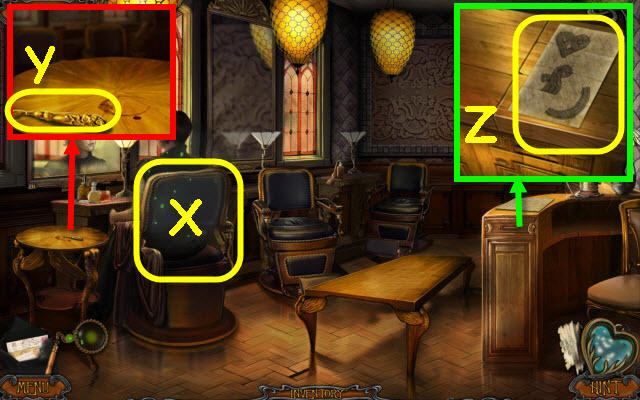
- Use the WALLET on the boy; take the COIN (X) and select the newspaper.
- Go forward.

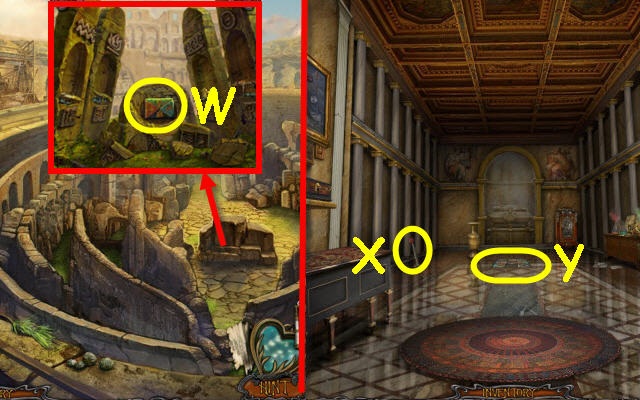
- Use the COIN in the viewer slot; scroll to the left (Y).
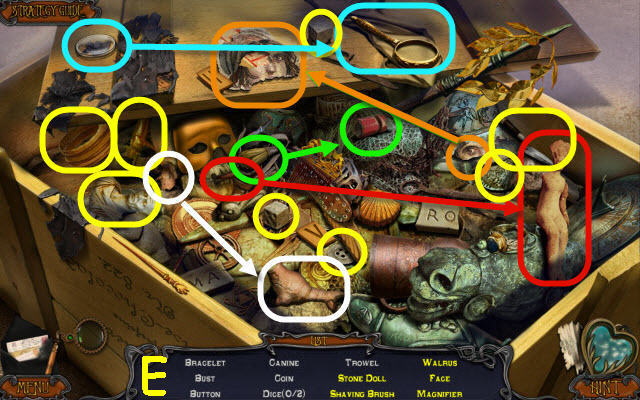
- Select the pillar on the right to access a HOP (Z).
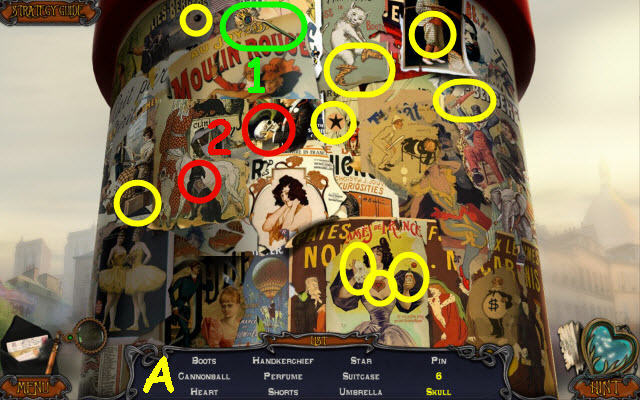
- Play the HOP.
- You receive a PIN (A).
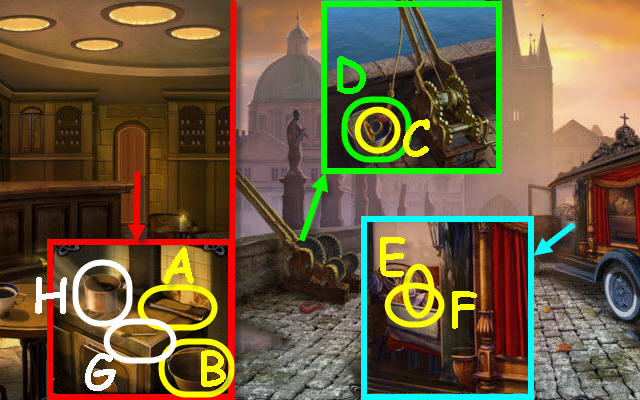
- Go to Mansion yard.

- Use the PIN on the latch; take the GLASS PANE (B).
- Assemble the correct hat; correct items circled in orange and take the BONNET (C).
- Back out.
- Give the FAN to the left mannequin (D) and the BONNET to the right one (E) to trigger a puzzle.
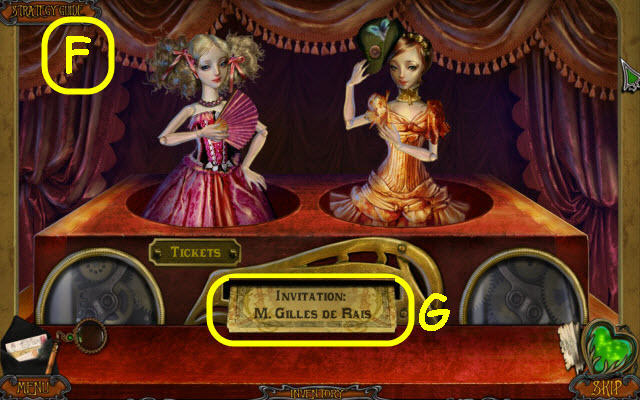
- Arrange the limbs to match the advertisement.
- See screenshot for solution (F).
- Take the TICKET (G).
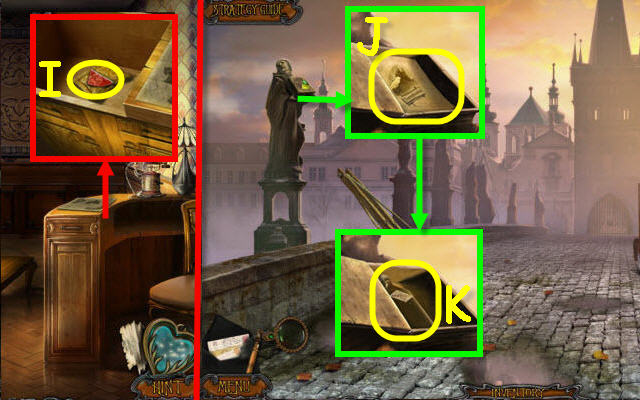
- Go to Mansion yard.
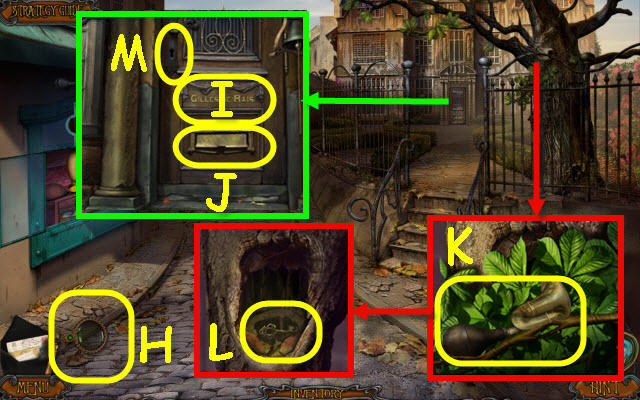
- Use the monocle (H) on the nameplate (I).
- Place the TICKET in the slot (J).
- Take the BICYCLE HORN (K).
- Move the branch; place the LANTERN in the hole. Move the leaves 4x; take the MANSION KEY (L).
- Use the MANSION KEY in the lock (M) and enter.
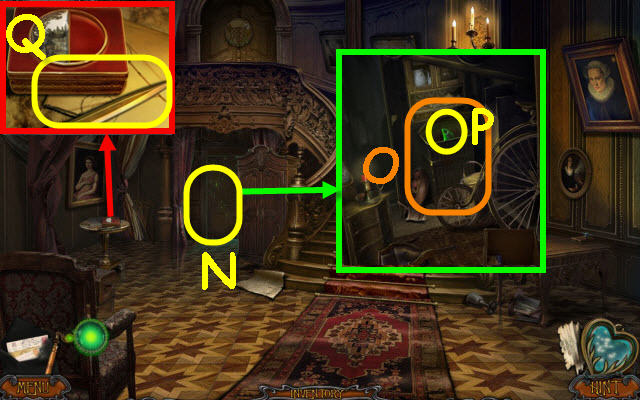
- Use the monocle on the door (N) and then again on the cabinet (O).
- Remove the items from the top of the cabinet and open it; take the COLORED GLASS SHARD (P).
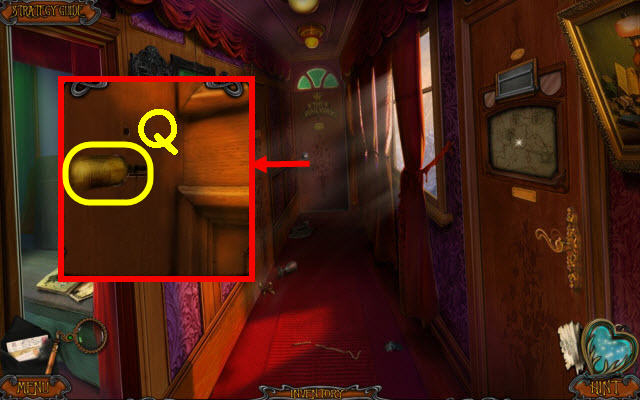
- Take the KNIFE (Q).
- Go to Theater square.

- Use the KNIFE on the twine; select the papers and take the LETTER SHEET (R).
- Go to Railroad terminal.
- Use the BICYCLE HORN on the pigeon; take the FEATHER (S).
- Go to Bluebeard’s hall.
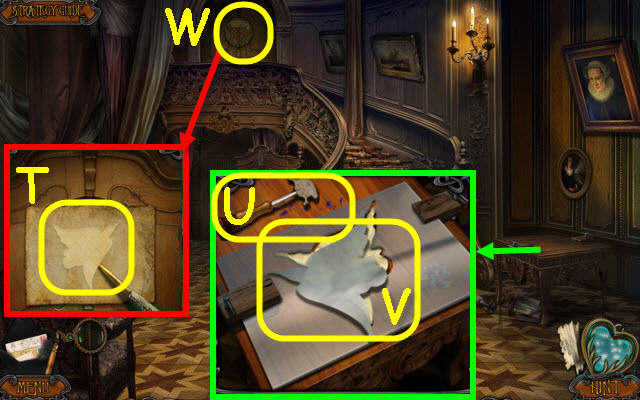
- Use the LETTER SHEET and KNIFE on the mosaic; receive a BIRD TEMPLATE (T).
- Place the GLASS PANE and BIRD TEMPLATE on the table. Use the glass cutter (U) on the glass; take the BIRD (V).
- Place the BIRD on the mosaic (W); turn it and enter.
- Take the IMAGE PIECE (X).
- Use the KNIFE on the slit; take the INK POT (Y).
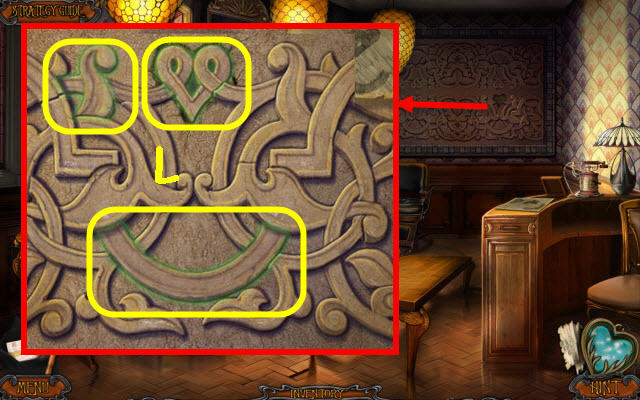
- Move the curtain; hang the COLORED GLASS SHARD on the hook to trigger a puzzle (Z).
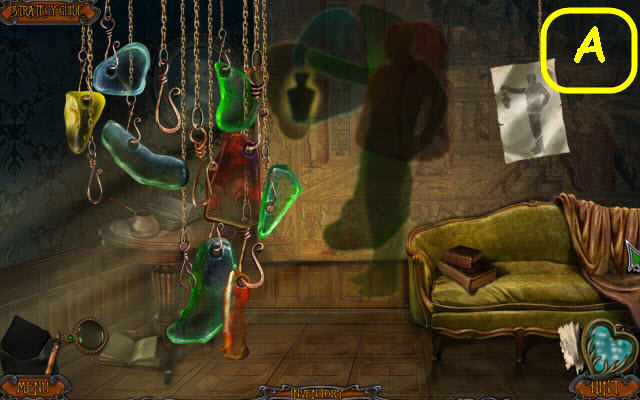
- Arrange the shards to complete the image.
- See screenshot for solution (A).
- Back out.
- Place the IMAGE PIECE on the box and open it; take the SEAL RING (B).
- Go upstairs.
- Remove the pin; place the SEAL RING in the recess (C).
- Go forward.
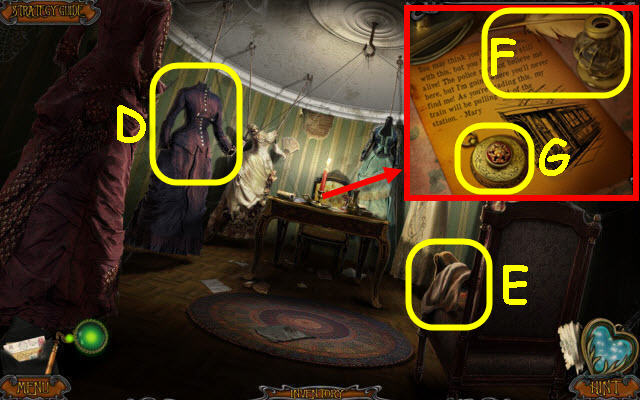
- Use the monocle on the dress (D).
- Examine the dress (E).
- Move the papers; place the INK POT and FEATHER on the table (F).
- Dip the feather in the ink pot; place MARY’S LOCKET on the imprint (G).
- Back out three times; then follow Bluebeard to the Passenger car.
Chapter 3: Long Journey
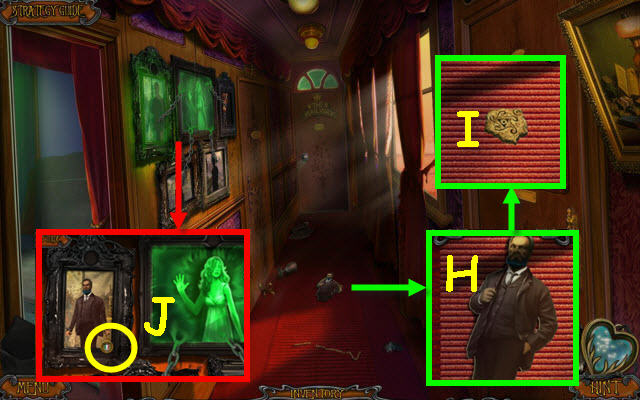
- Take the BLUEBEARD PORTRAIT (H) and INTRICATE KEY (I).
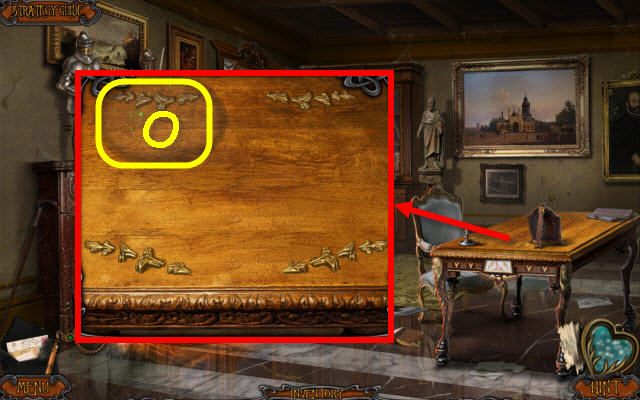
- Place BLUEBEARD PORTRAIT in the frame; take the ITALIAN FLAG BUTTON (J).
- Back out.
- Examine the suitcases to access a HOP.

- Play the HOP.
- You receive a CORKSCREW (K).
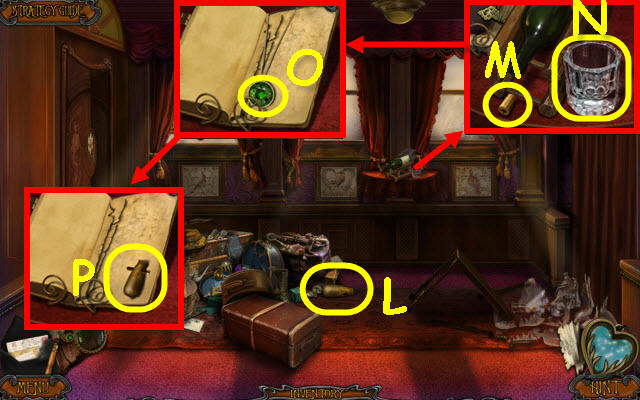
- Take the USELESS HANDLE (L).
- Use the CORKSCREW on the cork; take the CORK (M) and GLASS (N).
- Use the monocle and INTRICATE KEY on the book cover. Turn the pages 3x; take the EMERALD (O).
- Place the USELESS HANDLE on the dowel; take the DOOR HANDLE (P).
- Go left.
- Remove the doorknob; place the DOOR HANDLE in its’ place and turn it (Q).
- Go forward.
Chapter 4: Unexpected Stop
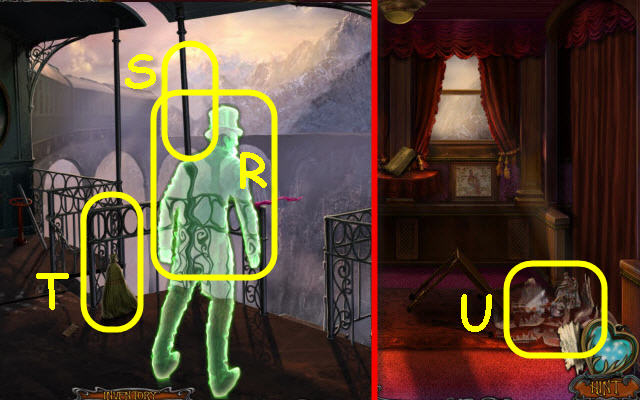
- Use the monocle on the gentleman (R).
- Take the BROOM HANDLE (S).
- Connect the BROOM HANDLE to the broom; take the BROOM (T).
- Back out twice.
- Use the BROOM on the glass (U).
- Go right.
- Receive an INDICATOR BULB.
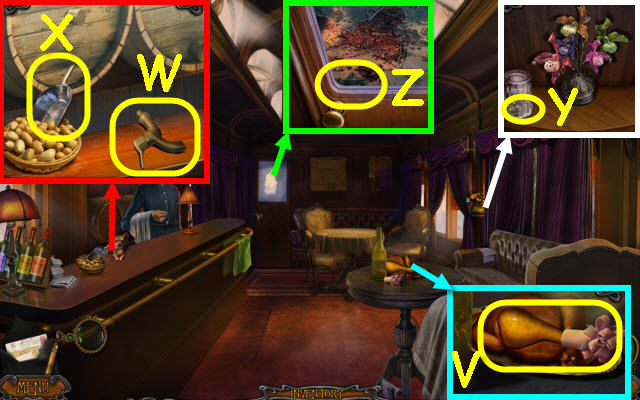
- Place the frill on the leg; take the CHICKEN LEG (V).
- Give the CHICKEN LEG to the dog and place the CORK on the tap; take the TAP (W).
- Take the SCOOP (X).
- Place the GLASS over the bug; take the MECHANICAL BUG (Y).
- Use the TOWEL on the glass; move the latch (Z).
- Go forward.
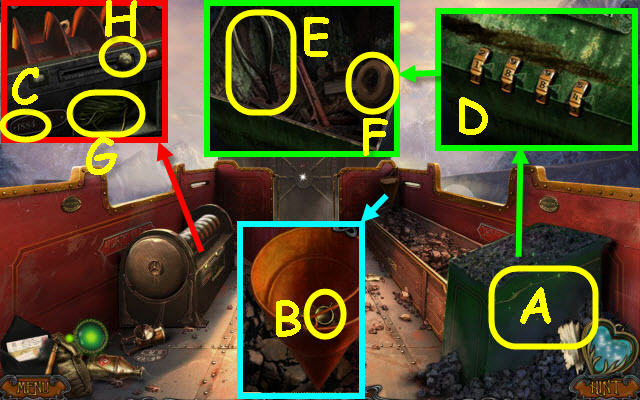
- Use the monocle on the coal bin (A).
- Use the SCOOP on the sand 4x; take the EMPTY OILER (B).
- Select the date (C).
- Move the coal and enter 1884 on the tumbler (D).
- Move the tools and rag; take the NIPPERS (E) and ELECTRICAL TAPE (F).
- Open the compartment; use the ELECTRICAL TAPE on the wires (G) and slide the knob (H).
- Back out.
- Use the NIPPERS on the flowers; take the TWEEZERS (I).
- Go forward.
- Use the TWEEZERS on the lens; take the LENS (J).
- Remove the center panel; use the LENS and MECHANICAL BUG on it to trigger a puzzle (K).
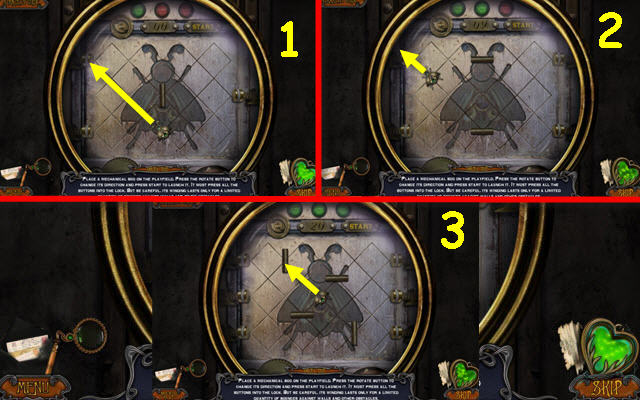
- Rotate the bug to hit all the buttons.
- Solution: Rotate to face the upper left each time (1-3).
- Go forward.
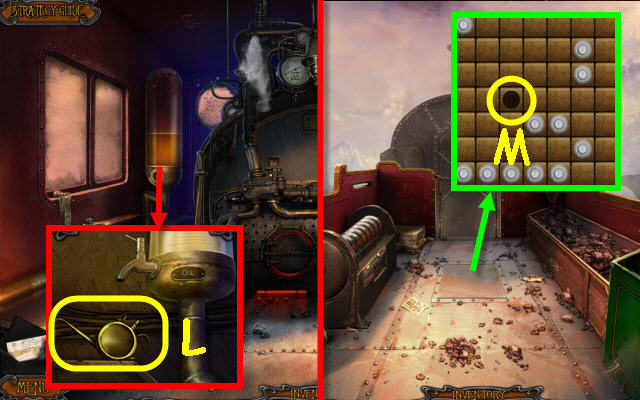
- Place the OILCAN on the container; place the EMPTY OILER by it. Turn the valve; take the OILER (L).
- Back out.
- Use the OILCAN on the panel; place the INDICATOR BULB in the slot to trigger a puzzle (M).
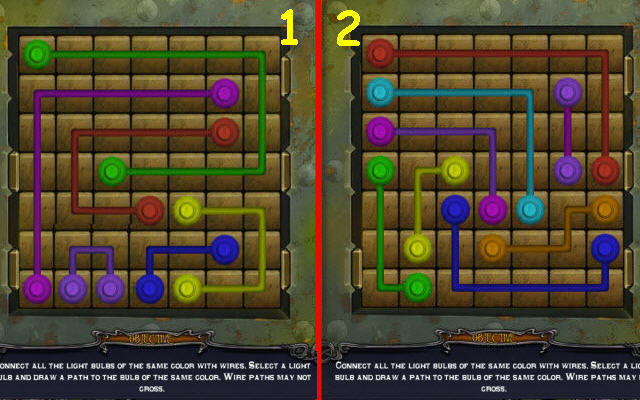
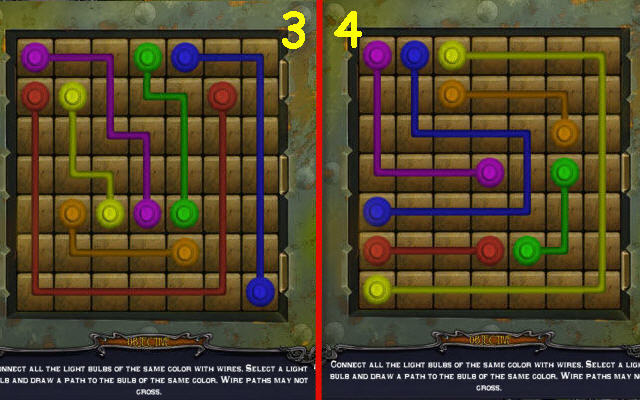
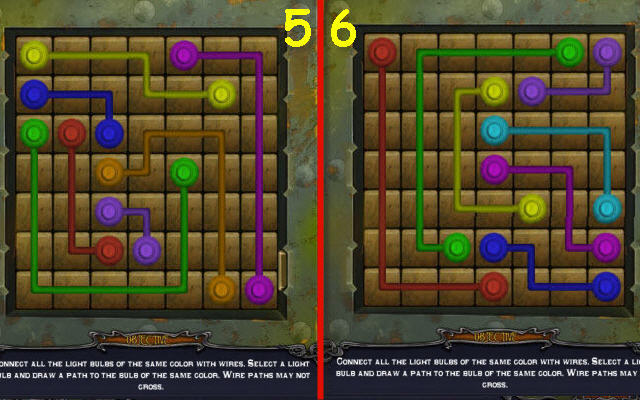
- Connect the same colored bulbs.
- See screenshots for solutions (1-6).
- Go down the hatch.
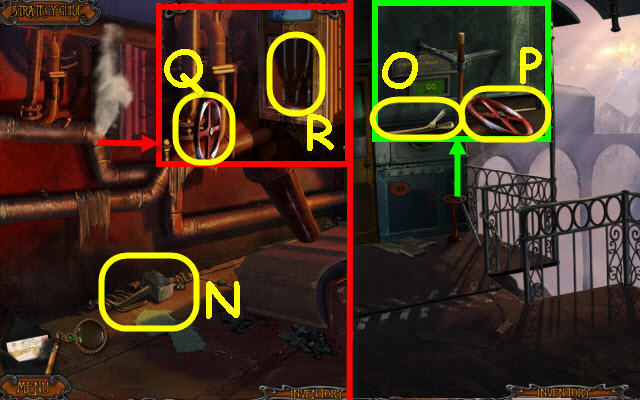
- Take the HAMMER (N).
- Go to Vestibule.
- Use the HAMMER on the handle; take the LEVER HANDLE (O).
- Turn the valve; take the VALVE (P).
- Go to Engine room.
- Place the VALVE on the stem; turn it (Q).
- Use the ELECTRICAL TAPE on each of the 3 wires (R).
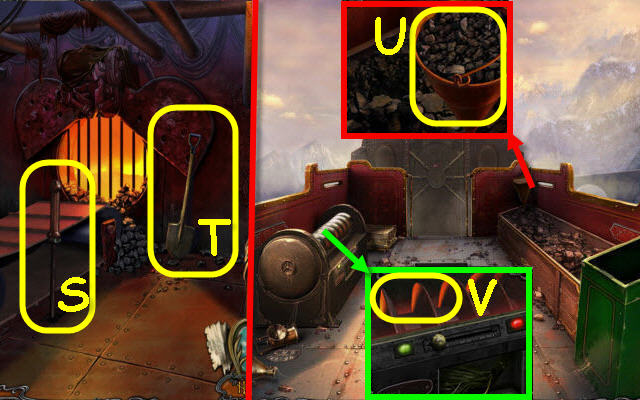
- Place the LEVER HANDLE by the conveyor; pull it (S).
- Take the SHOVEL (T).
- Back out.
- Use the SHOVEL on the coal 3x; take the COAL (U).
- Place the COAL in the grinder (V).
- Go down the hatch.
Chapter 5: Way to Rome
- Go to Vestibule; receive the 2nd ITALIAN FLAG BUTTON.
- Back out.
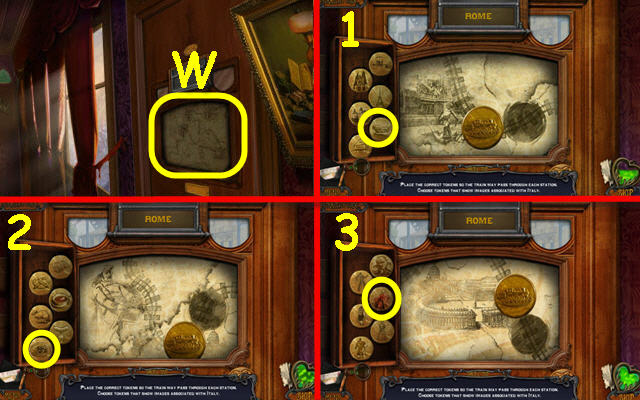
- Place the 2 ITALIAN FLAG BUTTONS in the slots to trigger a puzzle (W).
- Place the correct medallions to answer the riddles.
- Solution: Coliseum, spaghetti and cardinal (1-3).
- Go right.
Chapter 6: Rome
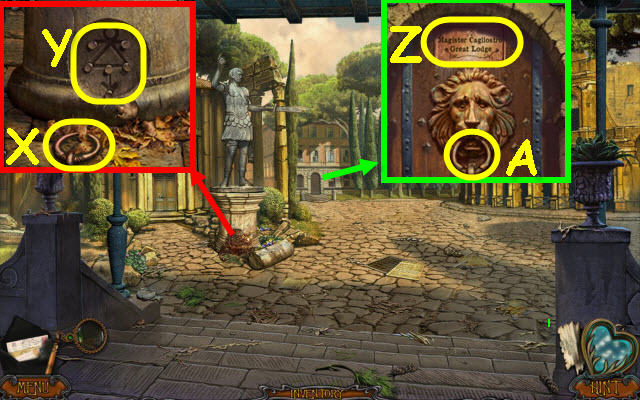
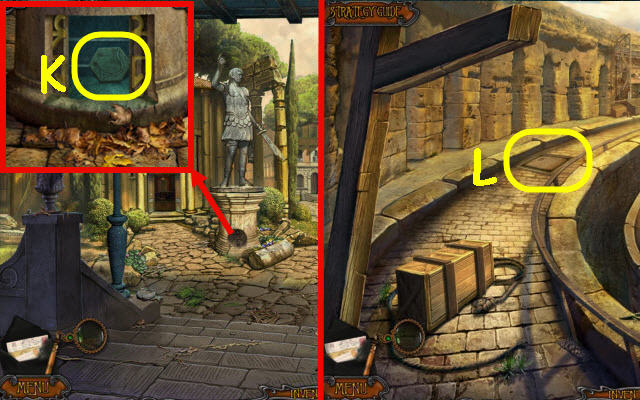
- Remove the leaves 3x; take the IRON RING (X) and push a button (Y).
- Use the monocle on the plaque (Z).
- Drag the pieces to complete the lion head. Place the IRON RING in its mouth; pull it (A).
- Enter the Great Lodge; go up the stairs.
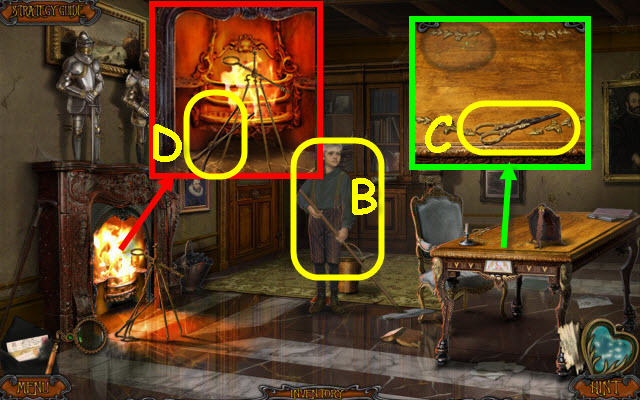
- Speak to the boy (B).
- Take the SCISSORS (C).
- Take the TONGS (D).
- Go to Rome square.
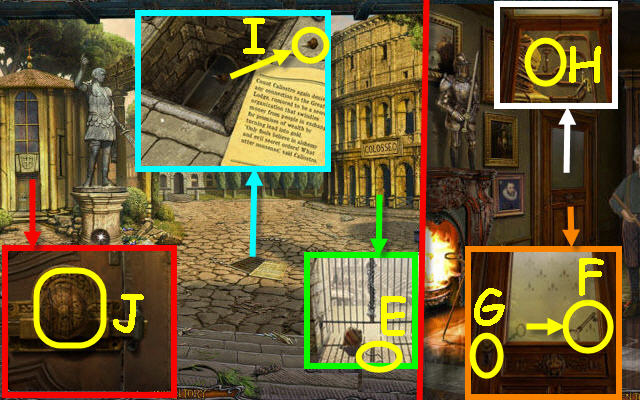
- Use the SCISSORS on the string; take the STRING NOOSE (E).
- Go to Upper lodge.
- Use the STRING NOOSE on the key. Select the key; take the SIDE ROOM KEY (F).
- Use the SIDE ROOM KEY in the lock (G); turn it.
- Take the HOOK (H).
- Go to Rome square.
- Select the knob and use the HOOK on the grate. Use the STRING NOOSE on the WOODEN HANDLE; take it (I).
- Place the WOODEN HANDLE in the hole; turn it and enter (J).
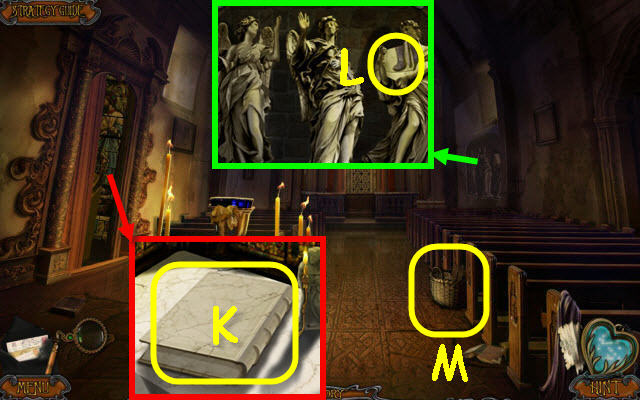
- Open the curtain; take the STONE BOOK (K).
- Take the COLUMN PIECE (L).
- Take the BASKET OF FOOD (M).
- Go to Upper lodge.
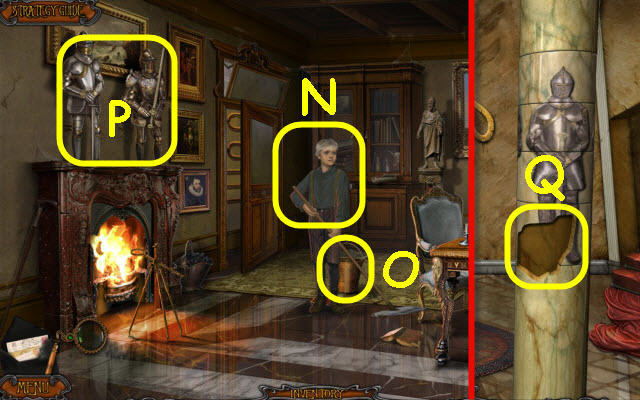
- Give the BASKET OF FOOD to the boy; receive a MONK CANDLESTICK (N).
- Use the MONOCLE on the boy.
- Take the BUCKET (O).
- Select the knights to get a clue (P).
- Back out.
- Place the COLUMN PIECE on the column to trigger a puzzle (Q).
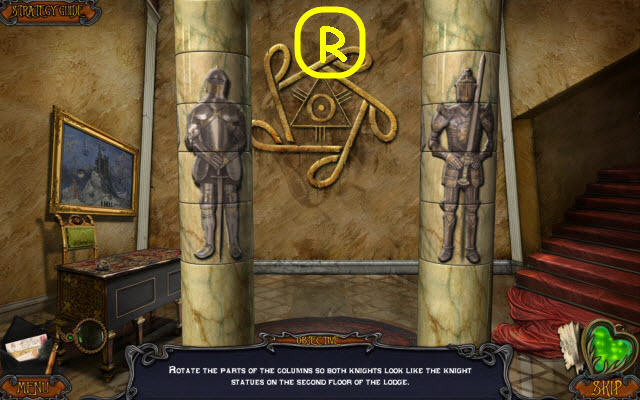
- Complete the knights.
- See screenshot for solution (R).
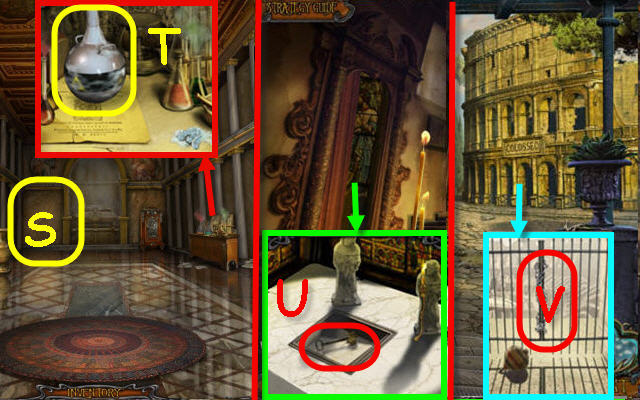
- Use the monocle in the corner (S).
- Tip the beaker; use the TONGS to get the LIQUID NITROGEN (T).
- Go to Church.
- Place the MONK CANDLESTICK on the table; take the X KEY (U).
- Back out.
- Use the LIQUID NITROGEN on the chain; open the gate (V).
- Enter the Coliseum.
- Remove the cloth and open the toolbox; use the hammer on the 2 nails (W).
- Open the crate; take the SPEAR (X).
- Use the SCISSORS on the rope; take the ROPE (Y).
- Take the CRUCIBLE (Z) and place the ROPE in the groove (A).
- Use the monocle on a pillar (B).
- Take the VALVE (C).
- Examine the crate to access a HOP (D).
- Play the HOP.
- You receive a TROWEL (E).
- Go to Church.
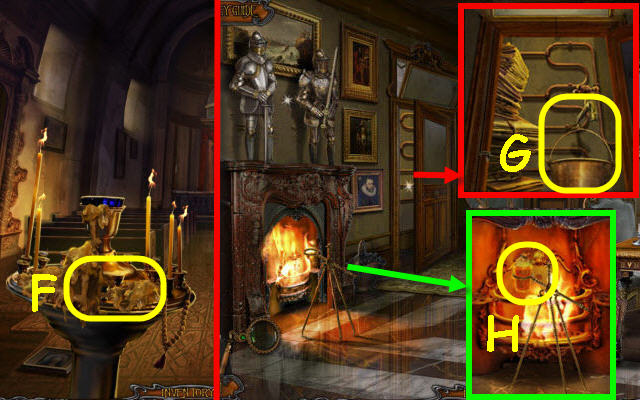
- Use the TROWEL to get WAX (F).
- Go to Upper lodge.
- Attach the VALVE on the stem; place the BUCKET underneath. Turn the valve; take the BUCKET OF WATER (G).
- Place the CRUCIBLE on the holder and the WAX in the crucible. Use the TONGS to get the MOLTEN WAX (H).
- Back out.
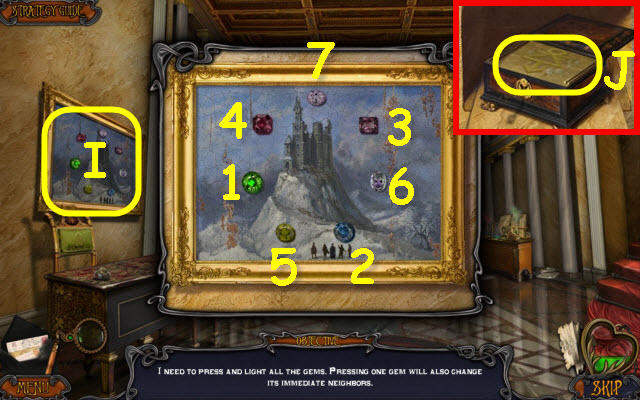
- Use the monocle on the painting; place the EMERALD on it to trigger a puzzle (I).
- Highlight all the jewels.
- Select in the order shown (1-7).
- Use the X KEY on the lock; turn it. Use the MOLTEN WAX and BUCKET OF WATER on the mold; take the RUNE MOLD (J).
- Back out.
- Place the RUNE MOLD on the pedestal; take the PATTERN CHAINS (K).
- Go to the Coliseum.
- Place the PATTERN CHAINS in the recess to trigger a puzzle (L).
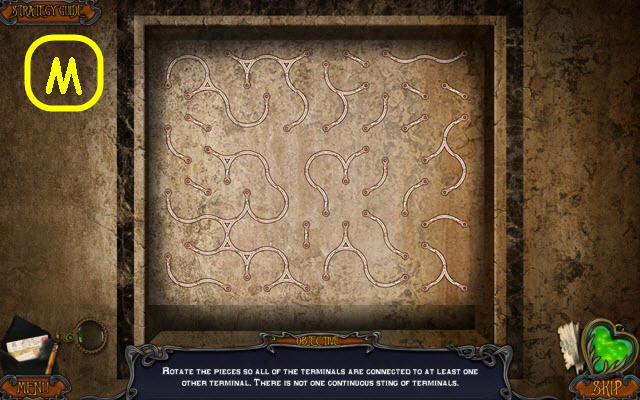
- Connect all the dots.
- See screenshot for solution (M).
- Take the BIRD STATUETTE.
- Examine the crate to access a HOP.
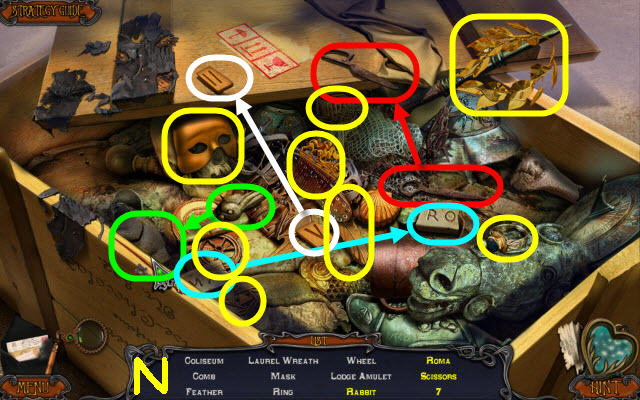
- Play the HOP.
- You receive a LODGE AMULET (N).
- Go to Upper lodge.
- Use the monocle on the spot (O).
- You will trigger a puzzle.
- Press the correct buttons as shown in your notes.
- See screenshot for solution (P).
- Place the LODGE AMULET in the slot; use the SCISSORS on the string. Take the FISH STATUETTE (Q) and BOOK PAGES (R).
- Select the runes paper to get a code.
- Go to the Coliseum.
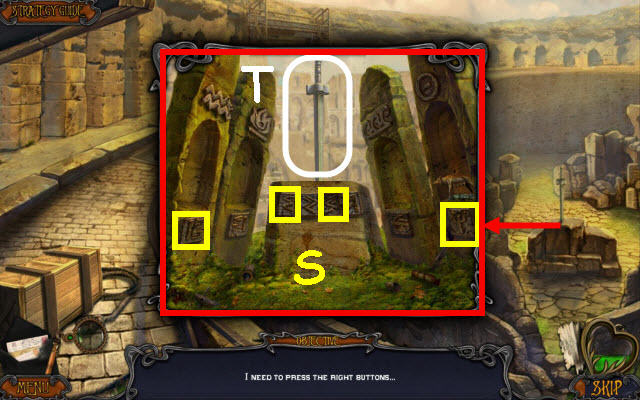
- Press the correct runes as shown in your notes.
- See screenshot for solution (S).
- Take the SWORD (T).
- Go to the Church.
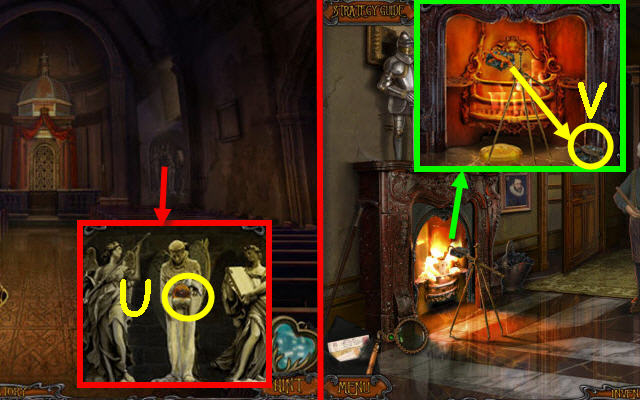
- Starting at the left, place the SPEAR, SWORD and STONE BOOK on the angels. Take the AMBER SPHERE (U).
- Go to Upper lodge.
- Place the AMBER SPHERE in the holder; use the TONGS to get the SALAMANDER STATUETTE (V).
- Go to the Coliseum.
- Starting at the left, place the FISH STATUETTE, SALAMANDER STATUETTE and BIRD STATUETTE in the pillars. Take the MOSAICS (W).
- Go to Great lodge.
- Move the vase; pull the lever (X).
- Place the MOSAICS on the mosaic to trigger a puzzle (Y).
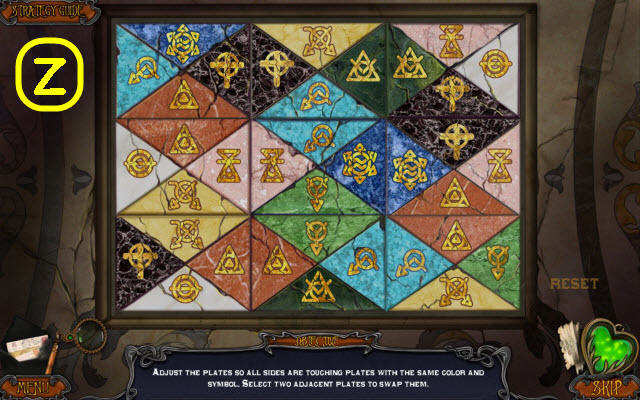
- Match the sides on the plates.
- See screenshot for solution (Z).
- Take the stone.
Chapter 7: Way to Germany
- Take the CAGLIOSTRO PORTRAIT (A).
- Place the CAGLIOSTRO PORTRAIT in the frame; take the GERMAN FLAG BUTTON (B).
- Back out.
- Receive a VESTIBULE KEY.
- Place the BOOK PAGES in the book and flip the pages 4x (C).
- Go to Vestibule.
- Use the VESTIBULE KEY on the lock; turn it and enter (D).
- Use the monocle on the cover; take it to receive a DISH and pull the knob (E).
- Speak to grandma (F).
- Take the MILK (G).
- Place the PLATE and MILK on the floor; take the 2nd GERMAN FLAG BUTTON (H).
- Go to Passenger car.
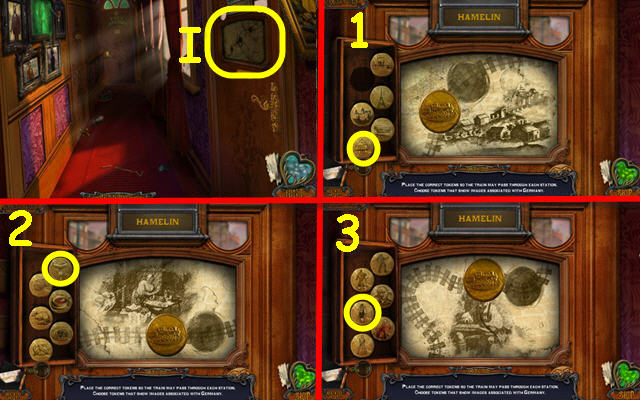
- Place the 2 GERMAN FLAG BUTTONS in the slots to trigger a puzzle (I).
- Place the correct medallions to answer the riddles.
- Solution: Burgermeister’s house, sausage and Burgermeister (1-3).
- Go right.
Chapter 8: Hamelin
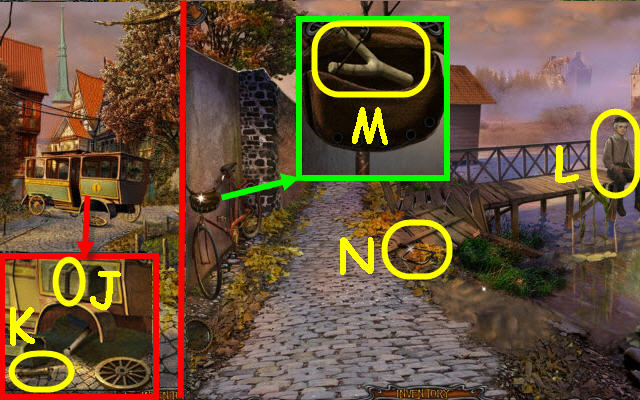
- Take the RUBBER BAND (J) and HAMMER (K).
- Go forward on the right.
- Speak to the boy (L).
- Open the pouch and pull up the slingshot. Place the RUBBER BAND on it; take the SLINGSHOT (M).
- Take the HACKSAW (N).
- Back out.
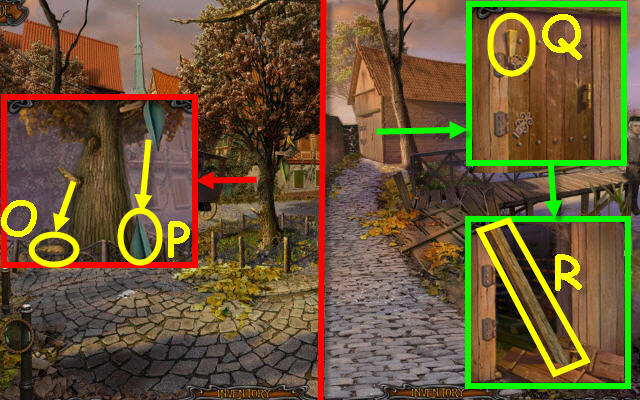
- Use the HACKSAW on the branch; take the WEDGE (O).
- Use the SLINGSHOT on the HAT; take the HAT (P) and read the note.
- Go to Embankment.
- Place the WEDGE on the hinge; use the HAMMER on it (Q).
- Take the BEAM (R); go forward.
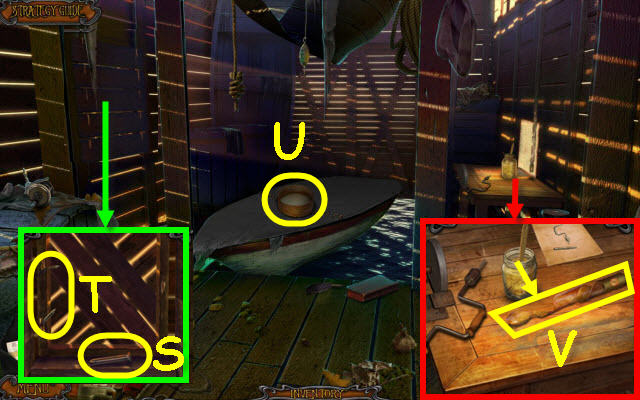
- Use the HACK SAW on the boards; take the METAL PIN (S) and use the HAMMER on the nails (T).
- Take the SIEVE (U).
- Pull down the flypaper and use the glue on it; take the INSECT TAPE (V).
- Go to Hamelin square.

- Use the BEAM, wheel (W), METAL PIN and HAMMER on the axle (X).
- Take the NIPPERS (Y).
- Remove the panel; pull the lever down (Z) and use the NIPPERS on the wires twice (A) to trigger a puzzle.
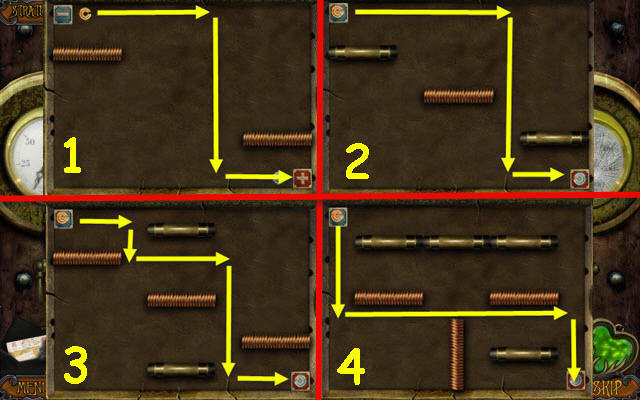
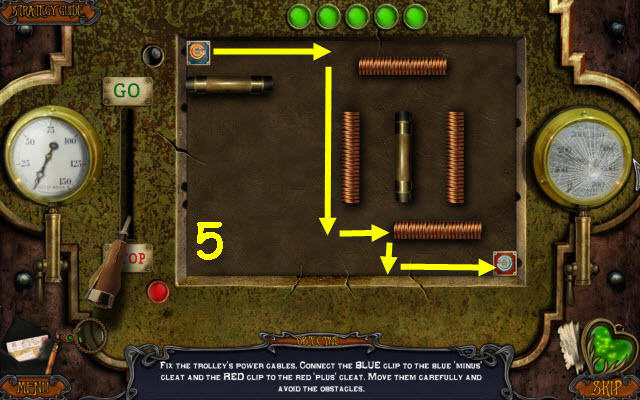
- Switch the red and blue chips.
- See screenshots for solution (1-5).
- Go forward on the left.
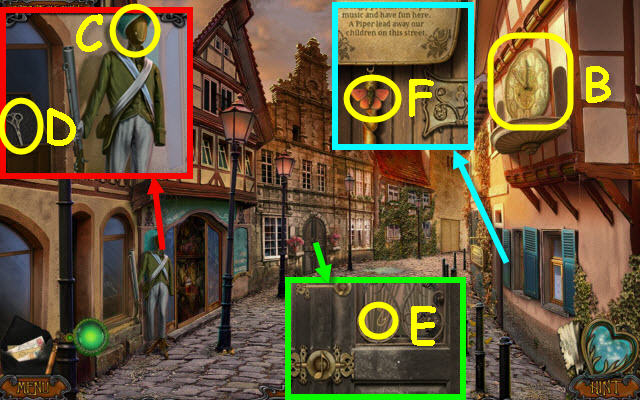
- Use the monocle on the clock (B).
- Use the monocle on the head and place the HAT on it (C).
- Open the door; take the SCISSORS (D).
- Use the NIPPERS to get the FISHING HOOK (E).
- Use the INSECT TAPE on the butterfly; take the FISHING BAIT (F).
- Go to Embankment.
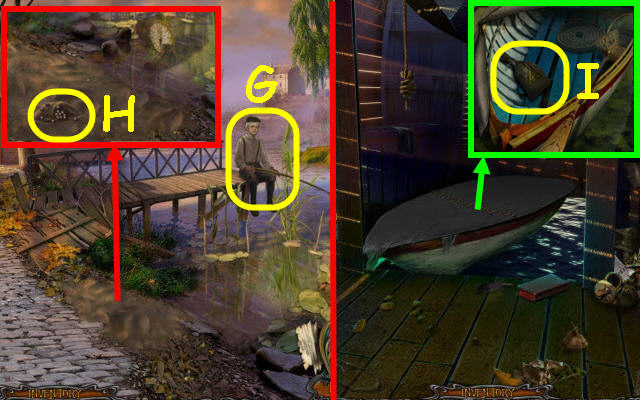
- Give the FISHING BAIT to the boy (G).
- Use the SIEVE on the sand; take the MUSKET BALLS (H).
- Go forward.
- Use the SCISSORS on the tarp and remove it. Drag the items; take the GUNPOWDER (I).
- Go to Hamelin street.
- Load the GUNPOWDER and MUSKET BALLS in the end of the musket; take the LOADED MUSKET (J).
- Use the LOADED MUSKET on the lock; remove it (K).
- Go right.
- Pull the rope (L).
- Take the DULL KNIFE (M).
- Go left.
- Examine the storefront to access a HOP (N).
- Play the HOP.
- You receive a FISHING LINE (O).
- Go to Boat shed.
- Sharpen the DULL KNIFE on the grinder; take the SHARP KNIFE (P).
- Back out.
- Use the SHARP KNIFE on the reed (Q).
- Tie the FISHING LINE and FISHING HOOK on the reed; take the FISHING ROD (R).
- Use the FISHING ROD in the water twice; take the CLOCK FACE (T), OLD BOOT (U) and REED PIPE (V).
- Go forward.
- Place the REED PIPE on the table and use the drill on it; take the FLUTE BARREL (W).
- Go to Clock tower.
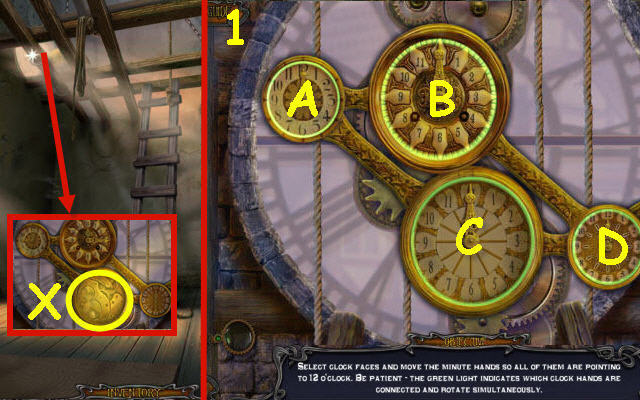
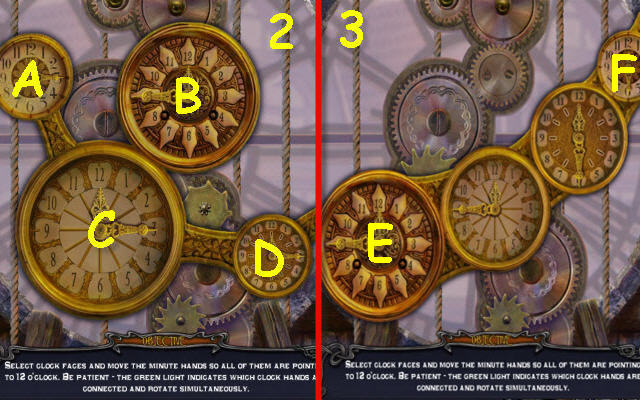
- Place the CLOCK FACE on the clock to trigger a puzzle (X).
- Solution 1st set: A clockwise to 12 and D counter clockwise to 12 (1).
- Second set: A clockwise to 12:30, D clockwise to 12:30, B counter clockwise to 12:30 and C clockwise to 12 (2).
- Third set: E counter clockwise to 12 and F counter clockwise to 12 (3).
- Use the monocle on the rope (Y).
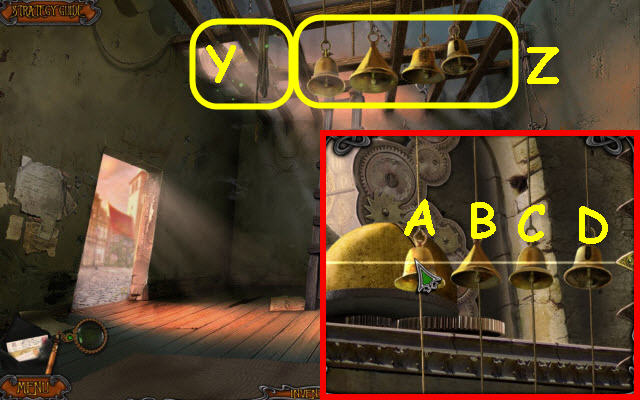
- Examine the bells to trigger a puzzle (Z).
- Solution: Pull A all the way down, pull B all the way down, pull C all the way down, and D all the way down.
- Pull A to the center. Pull C to the center. Pull D all the way up and Pull D to the center.
- Go left.
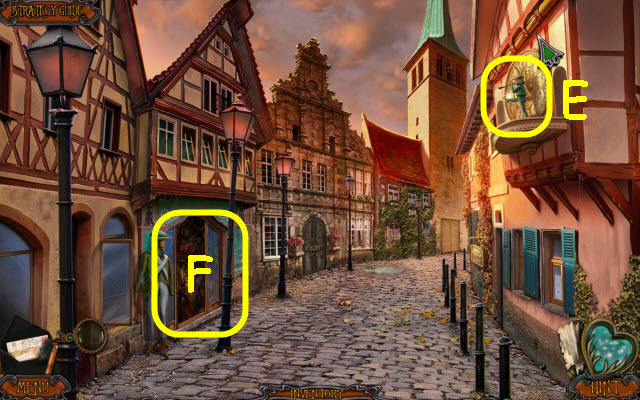
- Use the OLD BOOT on the statue (E).
- Examine the storefront to access a HOP (F).
- Play the HOP.
- You receive a FLUTE TIP (G).
- Use the monocle on the pipe; place the FLUTE BARREL and FLUTE TIP on it. Take the LURING PIPE (H).
- Use the LURING PIPE on the door (I).
Chapter 9: Way to Eastern Europe
- Take the PIPER PORTRAIT (J).
- Place the PIPER PORTRAIT in the frame; take the CZECH FLAG BUTTON (K).
- Go to First-class car; go to Vestibule.
- Use the monocle on the window (L).
- Go forward.
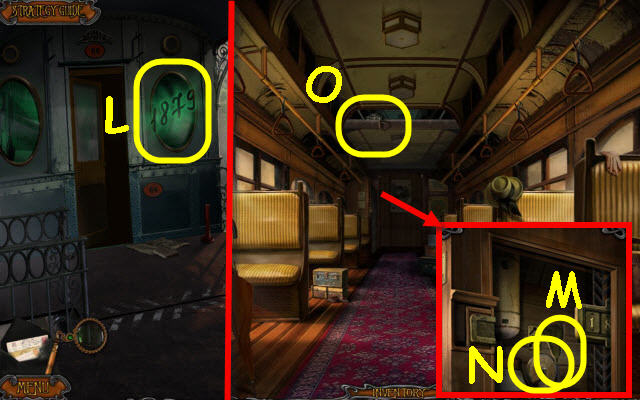
- Enter the code 1879; take the BROOM (M) and turn the lever (N).
- Use the BROOM on the chain and pull (O).
- Go forward.

- Move the curtains, pillows, lids and doors blocking the items in yellow; drag them to the matching recesses in the door (P).
- Place the wheel (Q) on the compartment; move the last piece (R) to the door and open the door.
- Speak to Master Charon; receive the 2nd CZECH FLAG BUTTON (S).
- Go to Passenger car.
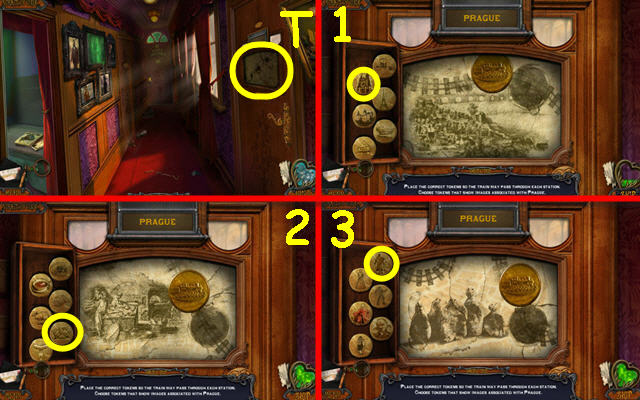
- Place the 2 CZECH FLAG BUTTONS in the slots to trigger a puzzle (T).
- Place the correct medallions to answer the riddles.
- Solution: Clock tower, pretzel and golem (1-3).
- Go right.
Chapter 10: Prague
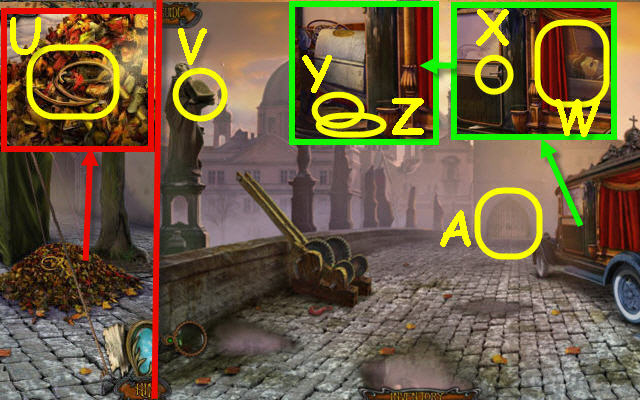
- Take the WIRE (U); move the leaves 3x to uncover a note.
- Go forward.
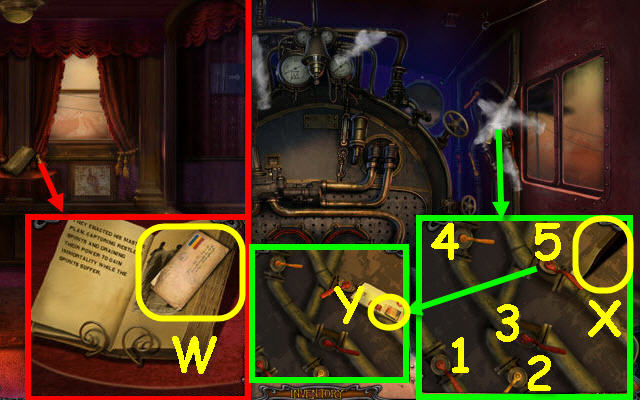
- Use the monocle on the book (V).
- Open the curtain (W); use the WIRE on the lock (X).
- Take the ROPE (Y) and WEDGE (Z).
- Use the WEDGE on the gate to trigger a puzzle (A).
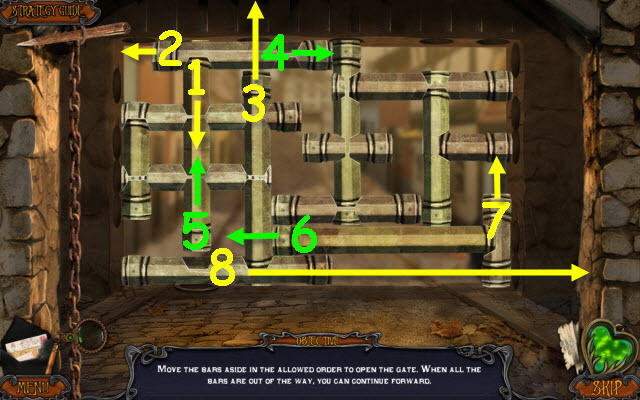
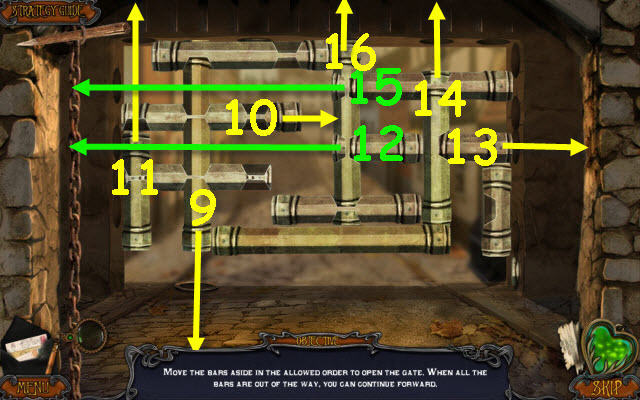
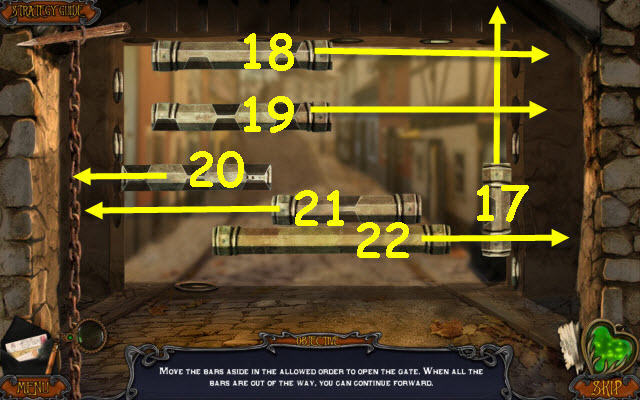
- Remove the pipes.
- See screenshots for solution (1-22).
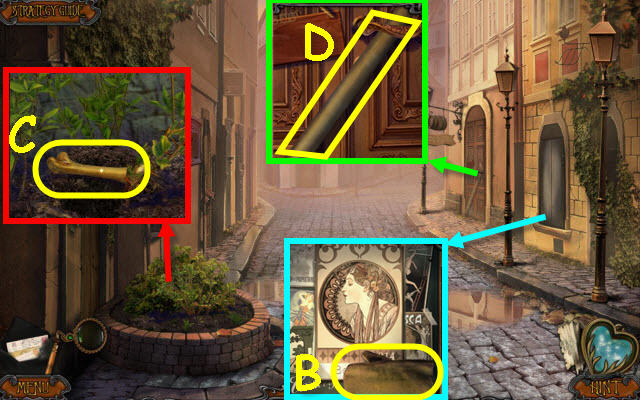
- Use the WIRE on the latch; take the OVEN MITT (B) and scroll through the posters.
- Use the OVEN MITT on the weeds; take the BONE (C).
- Take the STICK (D).
- Go to Station square.
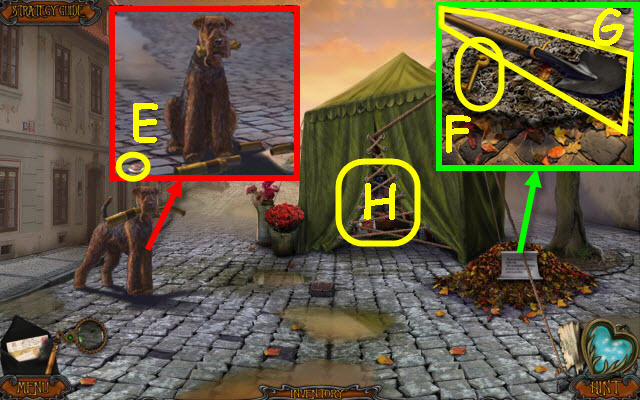
- Give the BONE to the dog; take the LENS (E).
- Use the LENS on the paper; take the BAR KEY (F).
- Place the STICK and WIRE on the shovel head; take the SHOVEL (G).
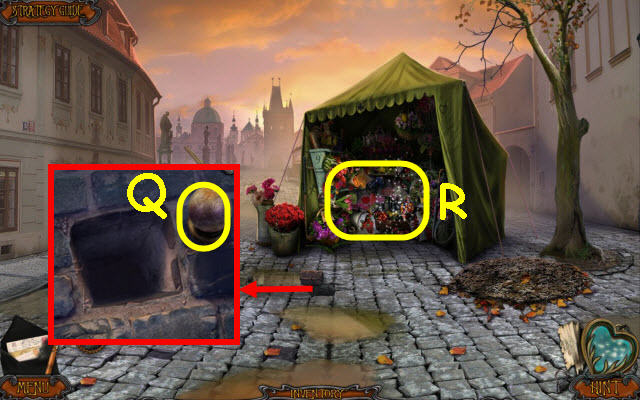
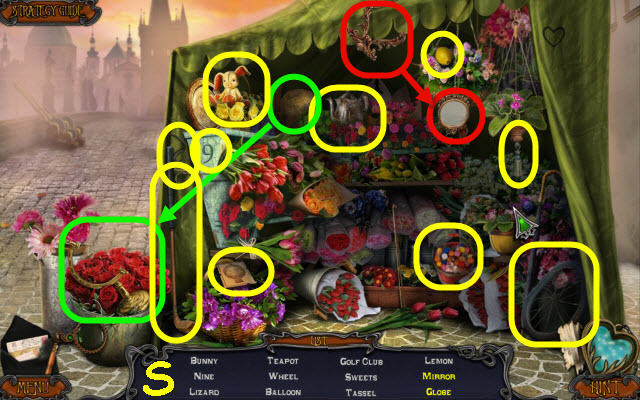
- Examine the tent to access a HOP (H).
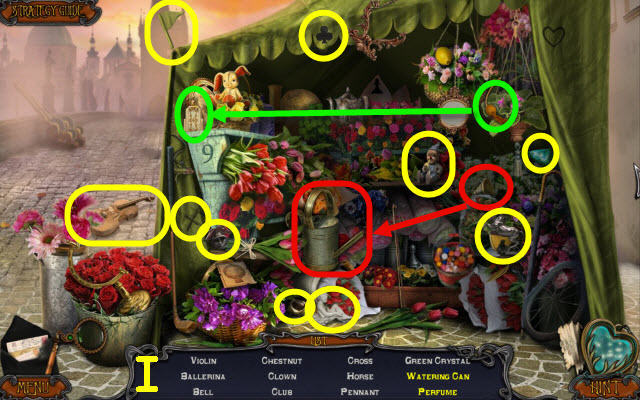
- Play the HOP.
- You receive a CRYSTAL (I).
- Go to Prague street.
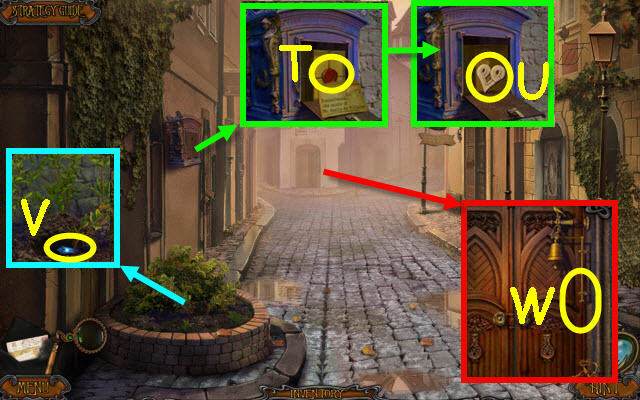
- Use the BAR KEY on the lock; turn it and enter (J).
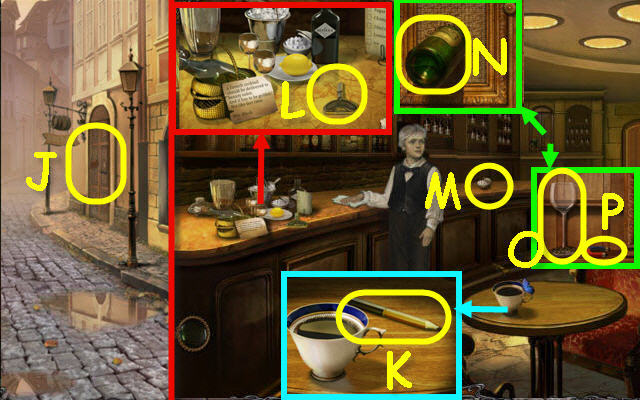
- Take the PENCIL (K).
- Attempt to take the key; take the POSTBOX KEY (L).
- Take the SUGAR (M).
- Take the CHAMPAGNE (N).
- Open the cabinet; take the WINE GLASS (O) and MAGNET (P).
- Go to Station square.
- Remove the brick; use the MAGNET in the hole and take the KITCHEN DOOR HANDLE (Q).
- Examine the tent to access a HOP (R).
- Play the HOP.
- You receive a LEMON (S).
- Go to Prague street.
- Use the POSTBOX KEY on the mailbox; turn it. Read the letter, take the STRING (T) and BAS-RELIEF PART (U).
- Use the SHOVEL on the dirt; take the 2nd CRYSTAL (V).
- Ring the bell; use the STRING on it and pull (W).
- Go forward.
- Use the monocle on the chair (X).
- Take the MANICURE KNIFE (Y).
- Use the PENCIL on the note (Z).
- Go to Bar.
- Place the KITCHEN DOOR HANDLE on the door; take the CHISEL (A) and BUCKET (B).
- Go to Charles Bridge.
- Place the BUCKET and ROPE by the hook; select the winch. Take the RING HANDLE (C) and BUCKET OF WATER (D).
- Use the RING HANDLE in the indent; take the BALLERINA (E) and ONIONS (F).
- Go to Bar.
- Use the LENS on the match (G) and select it. Use the BUCKET OF WATER and ONIONS in the pot; use the OVEN MITT to take the GOLDEN DYE (H).
- Go to Beauty salon.
- Use the CHISEL on the counter; take the 3rd CRYSTAL (I).
- Go to Charles Bridge.
- Place the 3 CRYSTALS on the book; take the PAGES (J) and GIN BOTTLE (K).
- Go to the Beauty salon.
- Use the monocle and BAS-RELIEF PART on the relief; press in the 3 matching shapes from the code (L).
- You will trigger a puzzle.
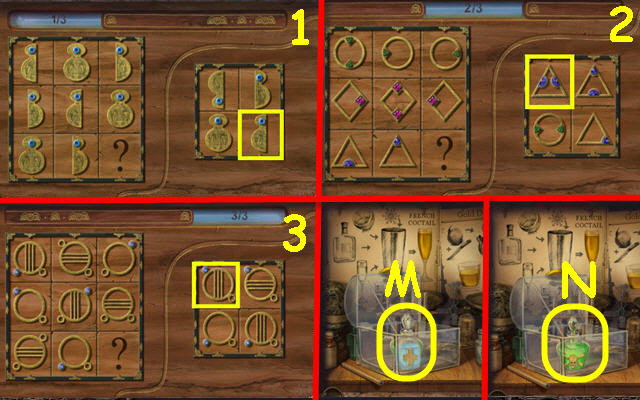
- Select the logical image to complete the sequences.
- See screenshot for solution (1-3).
- Open the container; take the ANTIDOTE (M) and POISON (N).
- Go to Bar.
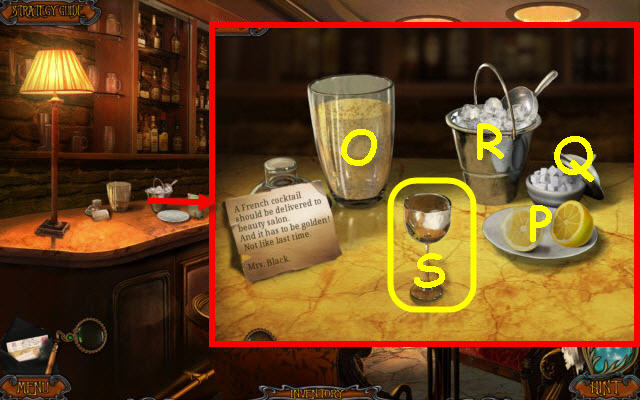
- Place the LEMON on the dish, the WINE GLASS, SUGAR on the counter and the GIN BOTTLE and CHAMPAGNE in the glass (O).
- Use the MANICURE KNIFE on the lemon (P); use the lemon on the glass (O).
- Place the sugar (Q) and ice (R) in the glass and select it.
- Add the POISON and GOLDEN DYE to the cocktail glass; take the POISONED COCKTAIL (S).
- Go to Beauty salon.
Chapter 11: Way to the Villain’s Lair

- Place the POISONED COCKTAIL on the table (T).
- Take the BLACK WIDOW PORTRAIT (U).
- Place the BLACK WIDOW PORTRAIT in the frame; take the TRANSYLVANIA FLAG BUTTON (V).
- Back out.
- Place the PAGES in the book; turn the page and take the LETTER (W).
- Go to Control room.
- Pull the levers in order (1-5); take the CHISEL (X).
- Use the LETTER on the 5th lever; move the lever and take the TRANSYLVANIA STAMP (Y).
- Go to Catering car.

- Take the WINDING HANDLE (Z).
- Place the WINDING HANDLE in the slot; turn it (A).
- Place the BALLERINA in the slot (B); use the CHISEL on the crack (C).
- Take the TOOTHPICK (D).
- Receive a HORSESHOE.
- Go to Passenger car.

- Place the TRANSYLVANIA FLAG BUTTON in one slot; place the TOOTHPICK and TRANSYLVANIA STAMP on the other slot to trigger a puzzle (E).
- Place the correct medallions to answer the riddles.
- Solution: Vampire castle, borsch and vampire (1-3).
- Go right.
Chapter 12: Final Chapter
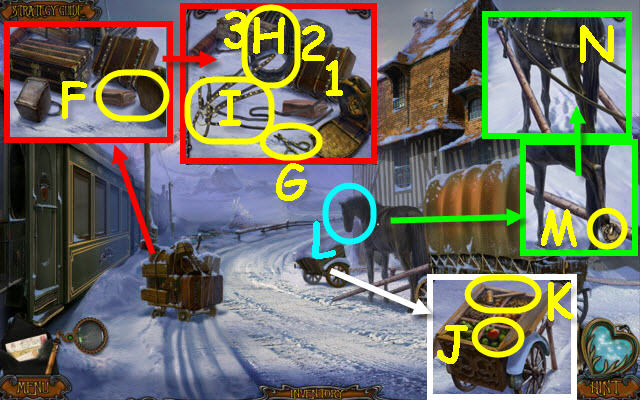
- Select the suitcases and zoom in and select the suitcases again (F).
- Use the scissors (G) on each of the straps (1-3); take the YOLK (H) and HARNESS (I).
- Remove the snow and open the cart; take the APPLE (J) and MALLET (K).
- Give the APPLE to the horse (L).
- Select the horse’s leg and remove the horseshoe; receive NAILS (M).
- Use the HORSESHOE, NAILS and MALLET on the hoof. Place the YOKE and HARNESS on the horse (N).
- Select the horse.
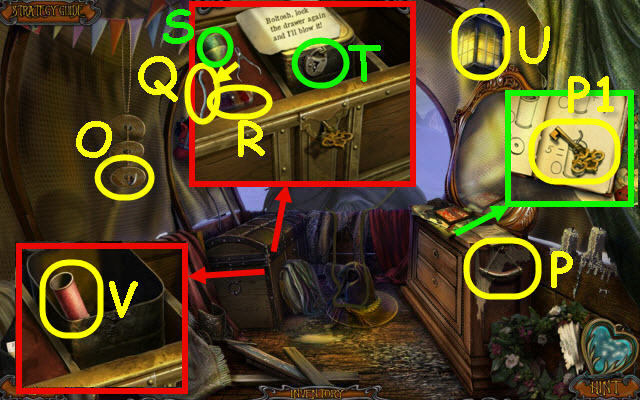
- Take the ROUND PLATE (O) and GUNPOWDER (P).
- Open the book; take the CHEST KEY (P1).
- Use the CHEST KEY on the chest. Use the clippers on the string; take the LONG FUSE (Q) and OIL BOTTLE (R).
- Use the funnel (S) and GUNPOWDER on the lock (T).
- Open the lantern; use the LONG FUSE on the flame and receive a BURNING FUSE (U).
- Use the BURNING FUSE on the lock (T).
- Take the FIRECRACKER CYLINDER (V).
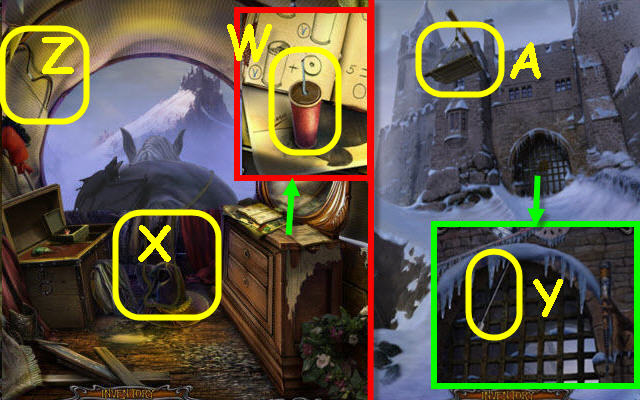
- Place the FIRECRACKER CYLINDER on the dresser. Place the GUNPOWDER, ROUND PLATE and BURNING FUSE in it; take the FIRECRACKER (W).
- Use the FIRECRACKER on the floor (X).
- Go forward.
- Take the ARROW (Y).
- Back out.
- Place the ARROW on the bow; take the BOW (Z).
- Go forward.
- Use the BOW on the platform (A).
- Move the boulder (B).
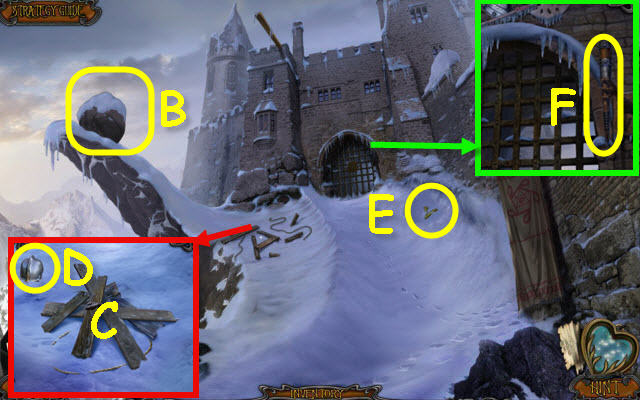
- Examine the debris; gather all the boards (C) and take the HELMET (D).
- Use the HELMET on the snow to get a HELMET WITH SNOW; take the V SYMBOL (E).
- Place the V SYMBOL in the slot; take the TORCH (F).
- Back out.
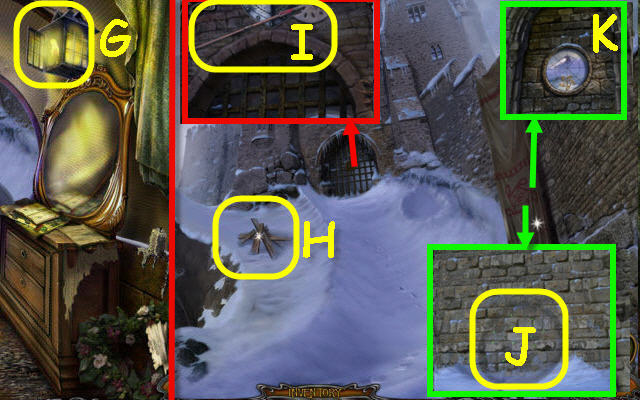
- Use the TORCH on the lantern; receive a BURNING TORCH (G).
- Go forward.
- Use the OIL BOTTLE, BURNING TORCH and HELMET WITH SNOW on the wood pile; receive BOILING WATER (H).
- Use the BOILING WATER on the arch; take the HALBERD (I).
- Remove the banner; use the monocle on the wall (J).
- Select the canvas and use the HALBERD on it; examine the image to trigger a puzzle (K).
- Complete the image.
- See screenshot for solution (L).
- Use the BURNING TORCH on the passage.
- Examine the grate to access a HOP.
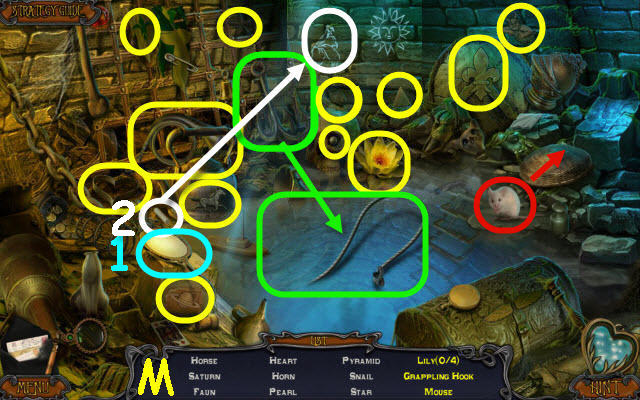
- Play the HOP.
- You receive a GRAPPLING HOOK (M).
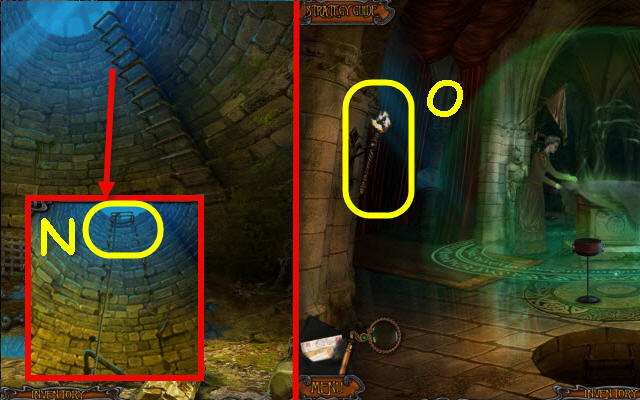
- Select the rungs twice; use the GRAPPLING HOOK on the top rung (N).
- Go up.
- Take the TORCHLIGHT (O).
- Back out.
- Select the grate to access a HOP.

- Play the HOP.
- You receive a CROWBAR (P).
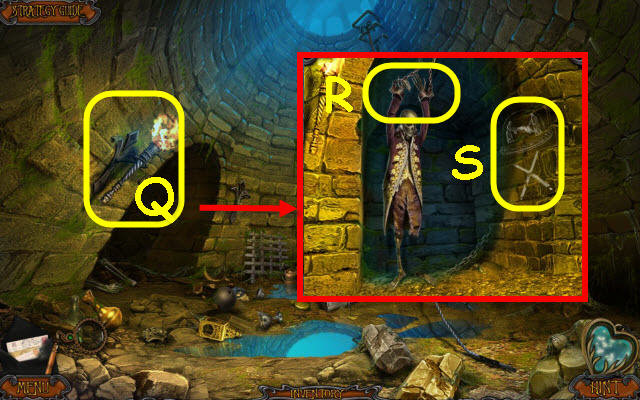
- Place the TORCHLIGHT in the holder (Q).
- Use the CROWBAR on the chains (R).
- Use the monocle on the wall; note the symbol (S).
- Go up.
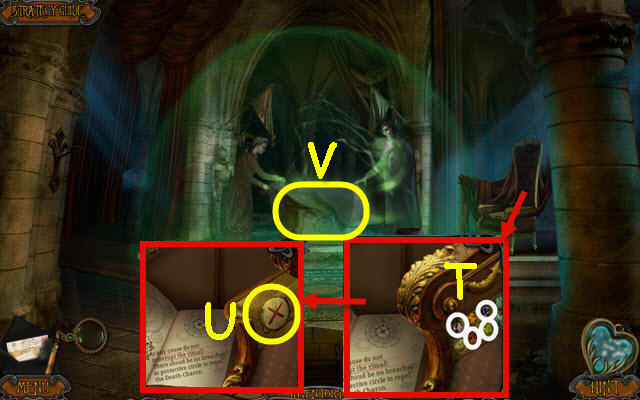
- Use the monocle on the gems; press the gems that lit up (T).
- Complete the X symbols (U).
- Select the altar to trigger a puzzle (V).
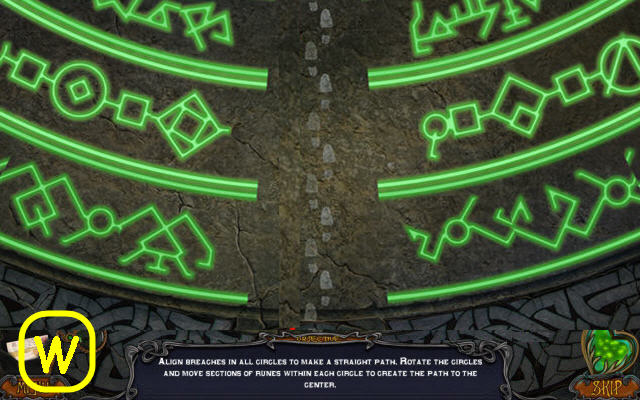
- Make a path.
- See screenshot for solution (W).
- Congratulations! You have successfully completed Haunted Train: Spirits of Charon.


 Botanica: Earthbound Walkthrough, Guide, & Tips
 Green Moon Walkthrough, Guide, & Tips
 House of 1000 Doors: Family Secrets Walkthrough, Guide, & Tips
 Haunted Manor: Lord of Mirrors Walkthrough, Guide, & Tips
 My Beautiful Vacation Walkthrough, Guide, & Tips