Witches' Legacy: Hunter and the Hunted Walkthrough, Guide, & Tips
Witches’ Legacy: Hunter and the Hunted Walkthrough
Welcome to the Witches’ Legacy: Hunter and the Hunted Walkthrough
Witch hunters have kidnapped Lynn! To save her, you’ll have to team up with an old foe and storm their castle.
Whether you use this document as a reference when things get difficult or as a road map to get you from beginning to end, we’re pretty sure you’ll find what you’re looking for here.
This document contains a complete Witches’ Legacy: Hunter and the Hunted game walkthrough featuring annotated screenshots from actual gameplay!
We hope you find this information useful as you play your way through the game. Use the walkthrough menu below to quickly jump to whatever stage of the game you need help with.
Remember to visit the Big Fish Games Forums if you find you need more help. Have fun!
This walkthrough was created by David Becker, and is protected under US Copyright laws. Any unauthorized use, including re-publication in whole or in part, without permission, is strictly prohibited.
General Tips
- This is the official guide for Witches’ Legacy: Hunter and the Hunted.
- This guide will not mention each time you have to zoom into a location; the screenshots will show each zoom scene.
- We will use the acronym HOP for Hidden-object puzzles. Interactive items will be color-coded and some will be numbered; please follow the numbers in sequence.
- Use the map to travel to a location.
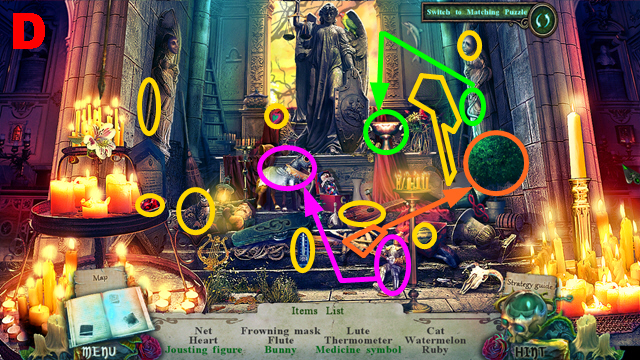
Chapter 1: The Driveway

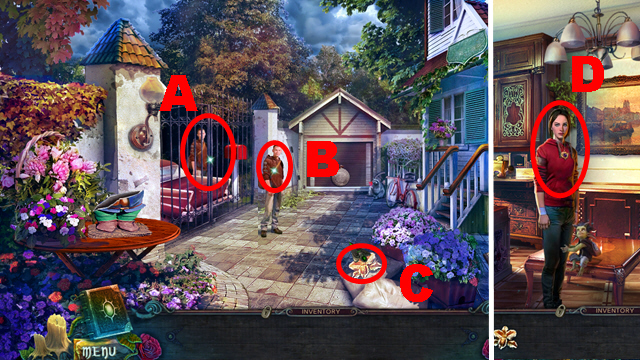
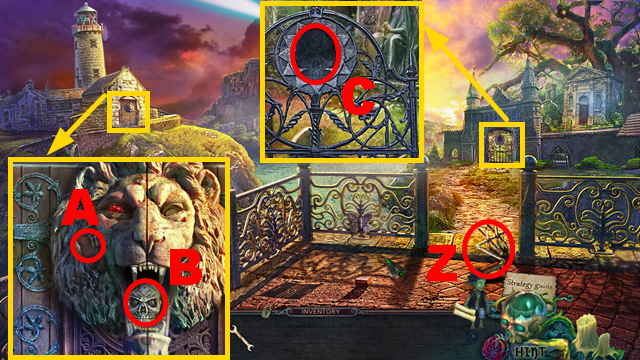
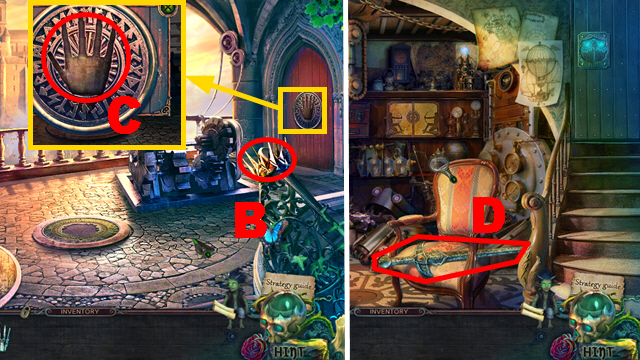
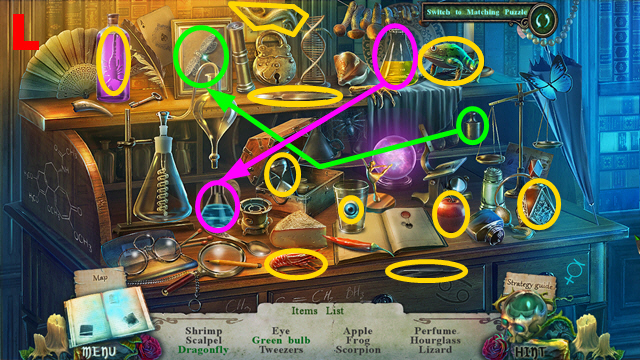
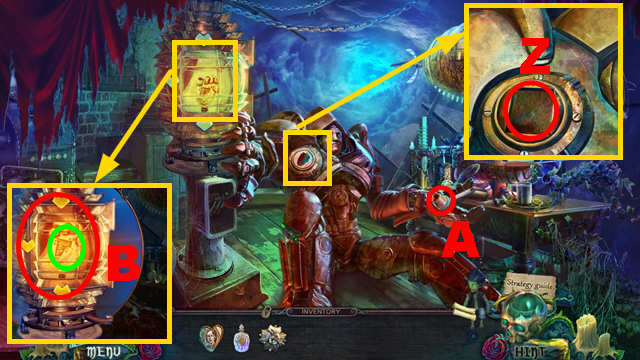
- Open the gate (A).
- Talk to the guy (B).
- Take the ORCHID SYMBOL (C).
- Turn right.
- Talk to the woman (D).
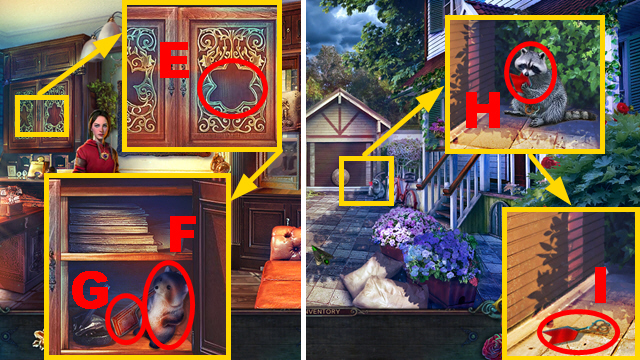
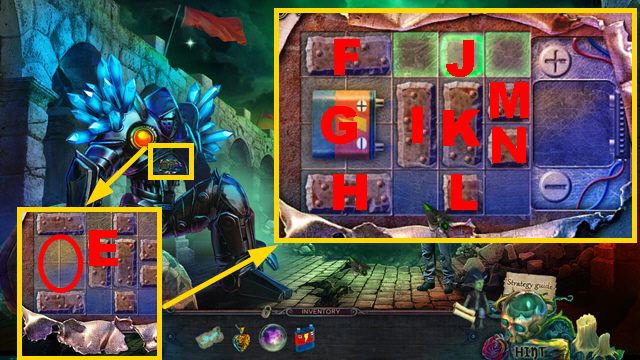
- Put the ORCHID SYMBOL into the niche (E); take the SQUEAKY TOY (F) and FLAG (G).
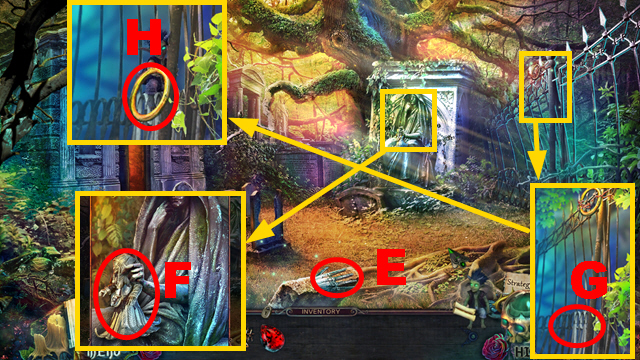
- Walk down.
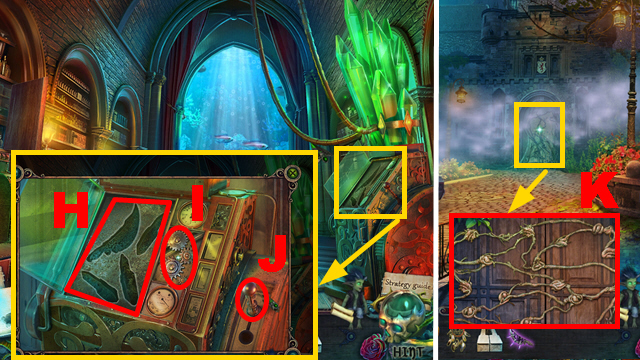
- Give the SQUEAKY TOY to the animal (H); take the RED KEY (I).
- Turn right.
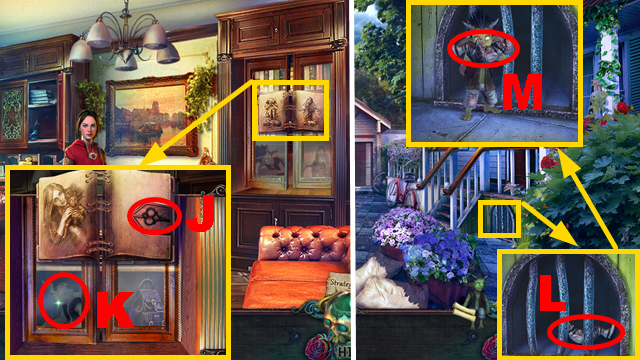
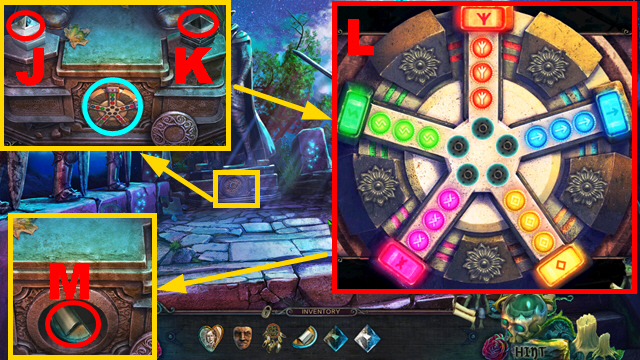
- Turn the page; put the RED KEY into the lock (J).
- Take IMP (K).
- Walk down.
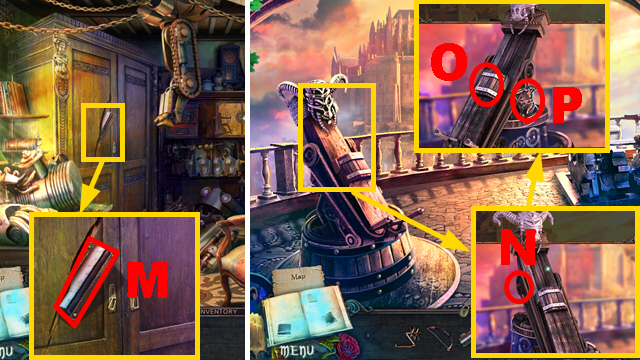
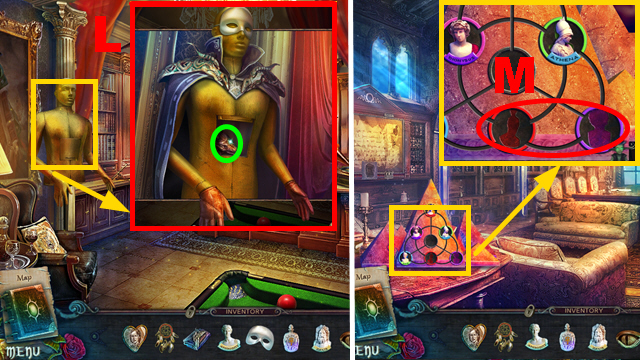
- Pull out the figurine with IMP (L); take the CARPENTER FIGURINE (M).
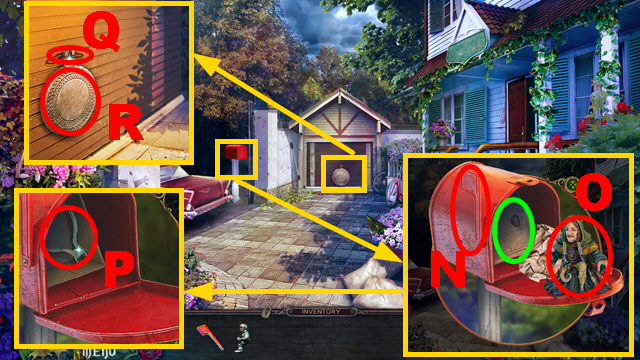
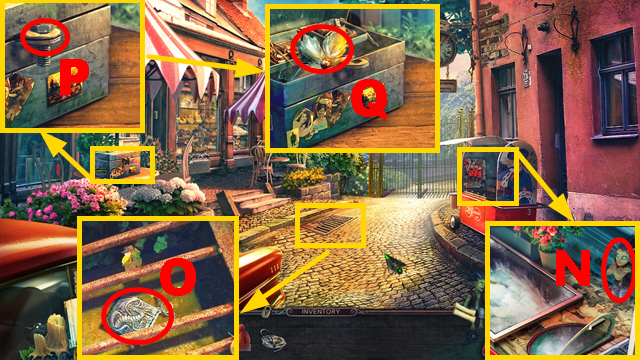
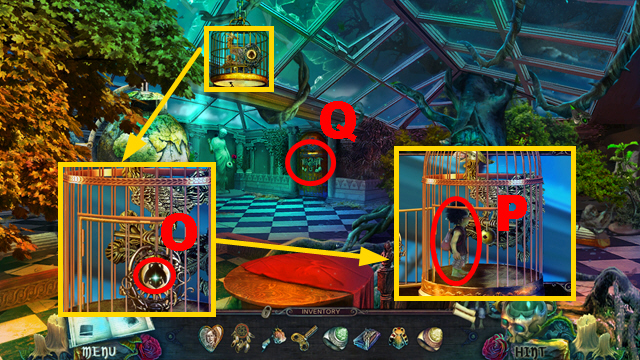
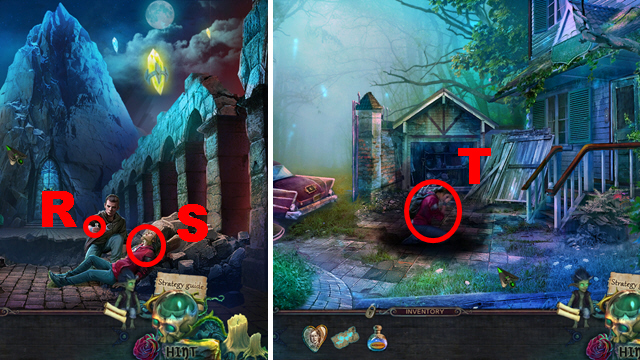
- Place the FLAG on the mailbox (N); pull the flag.
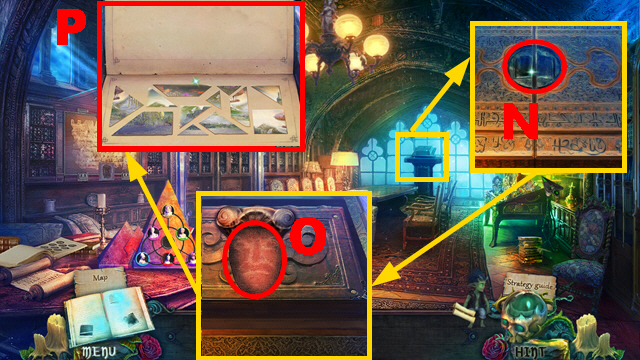
- Open the bag; take the ELIZABETH DOLL (O) and note (green).
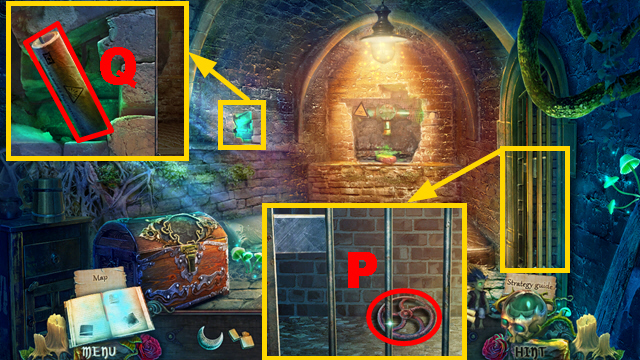
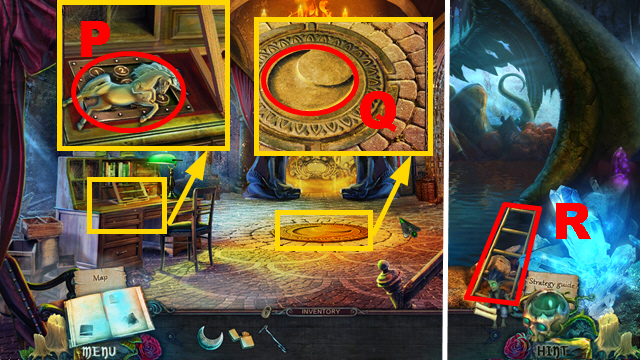
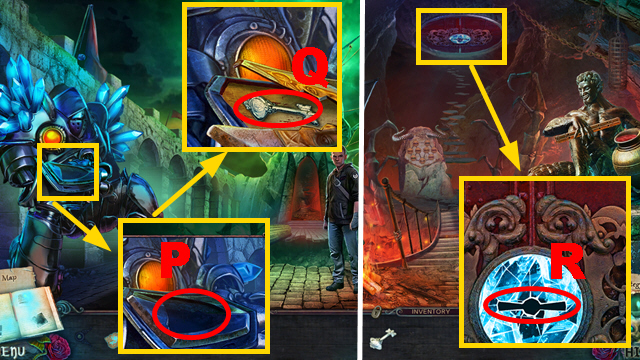
- Take the WIRE CUTTERS (P).
- Cut the wire with the WIRE CUTTERS (Q).
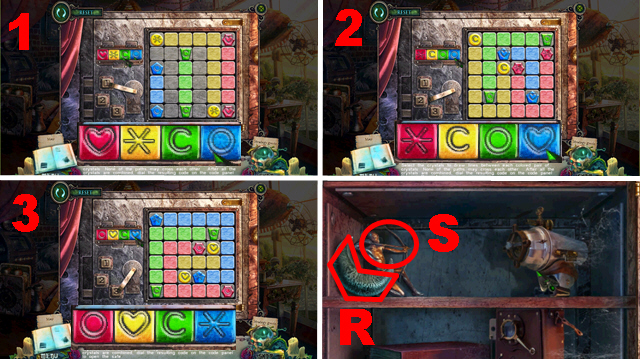
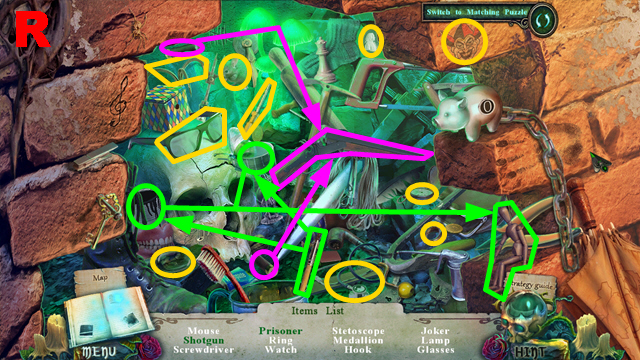
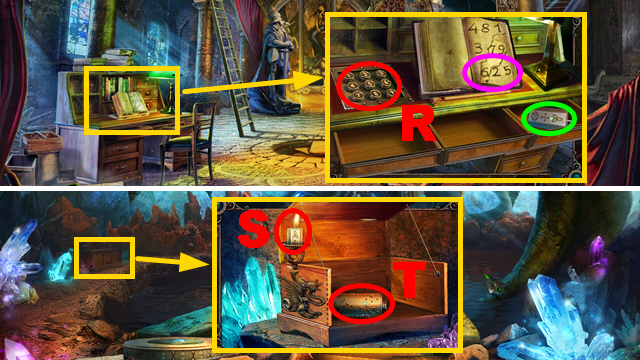
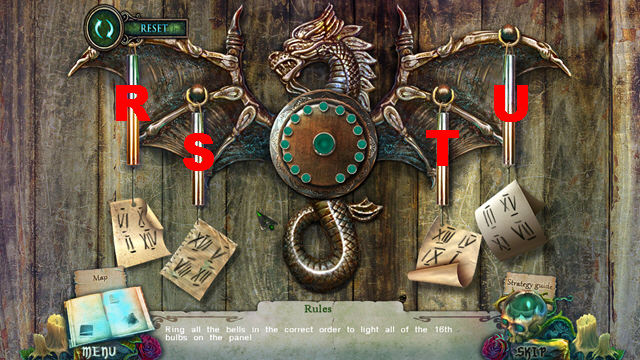
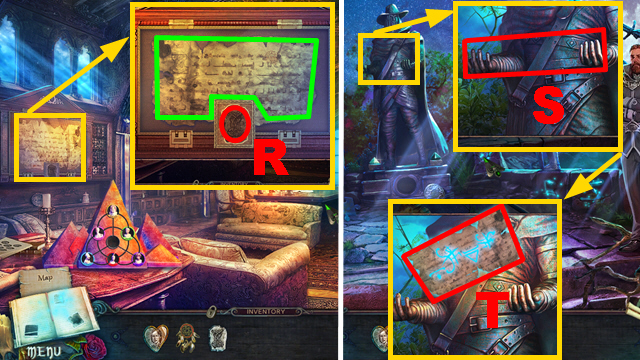
- Play the mini-game (R).
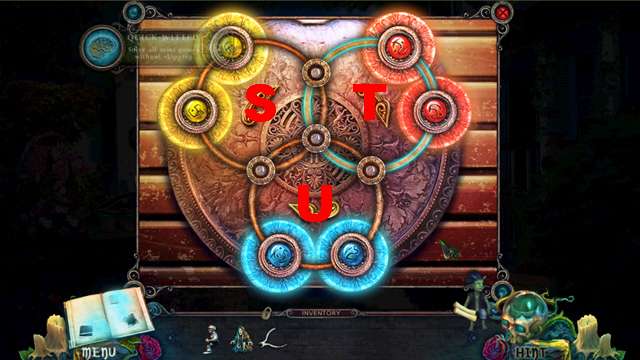
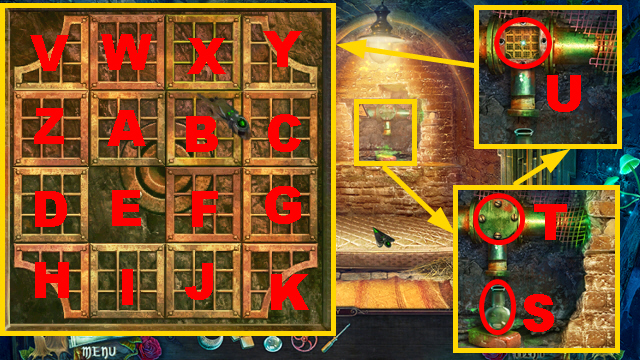
- Solution: S, U x4, T x3, U x3, T x3.
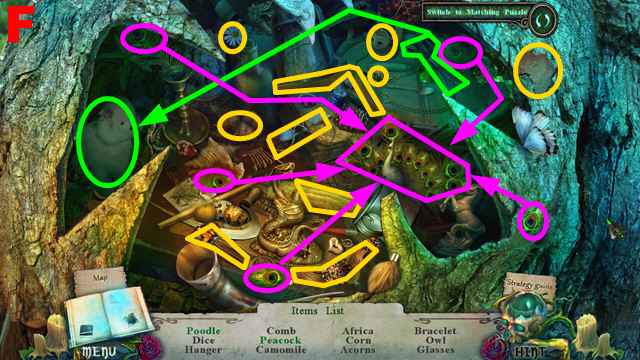
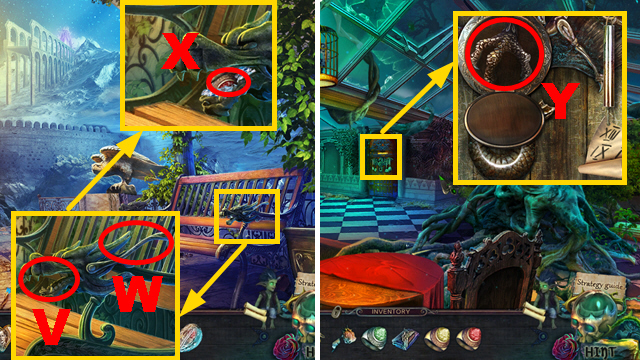
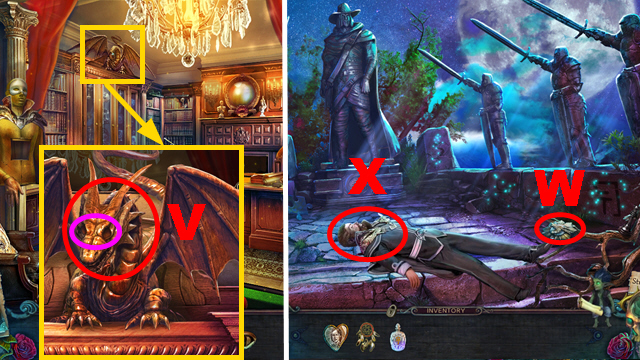
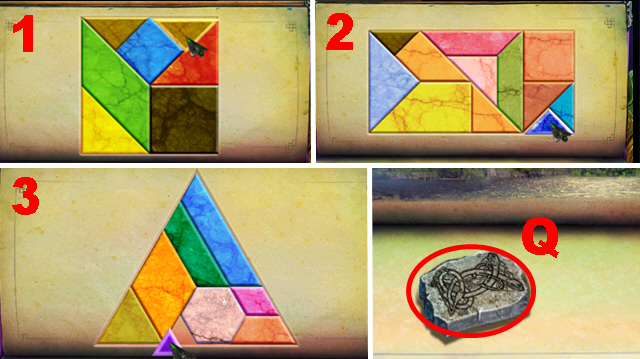
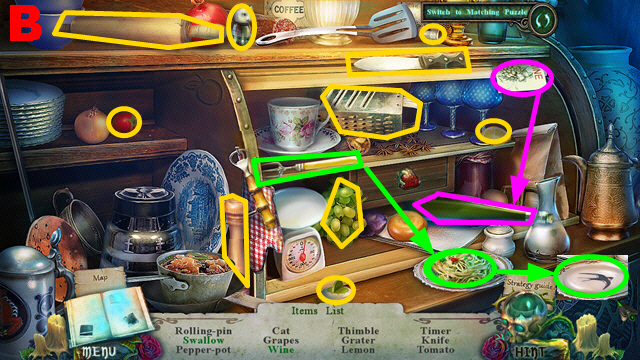
- Play the HOP.
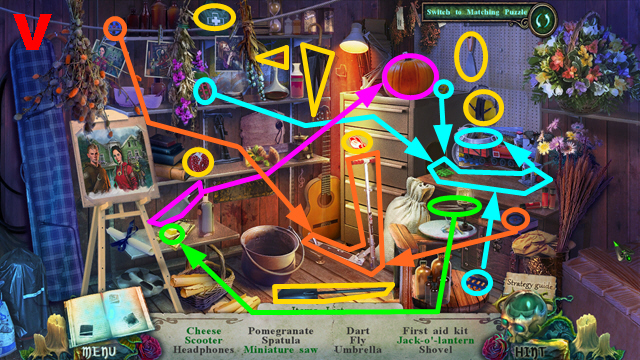
- You receive the MINIATURE SAW (V).
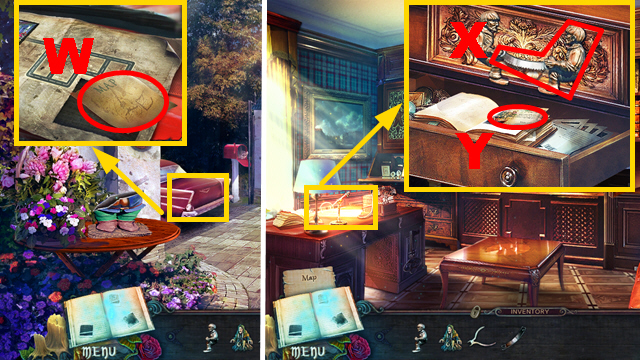
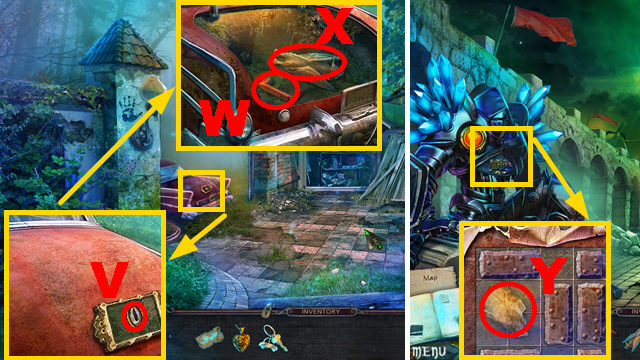
- Take the map (W).
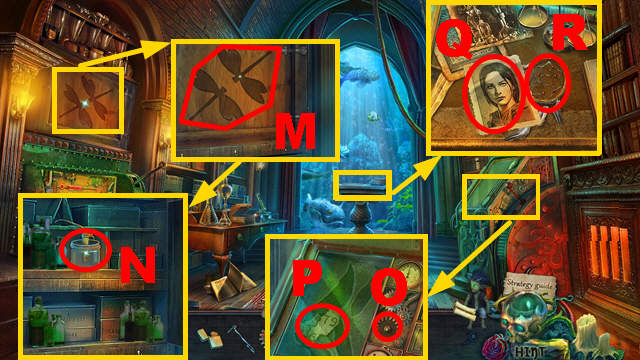
- Turn right.
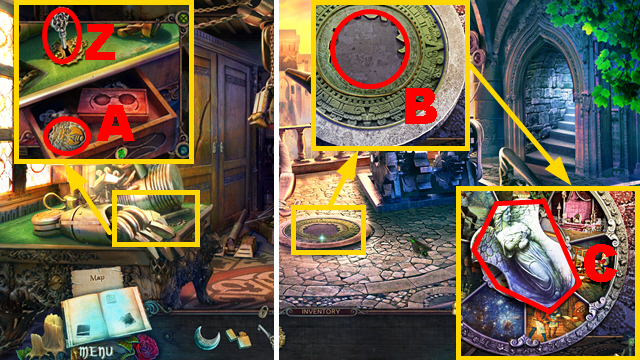
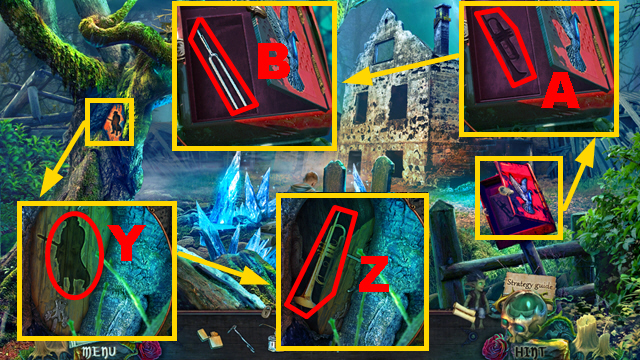
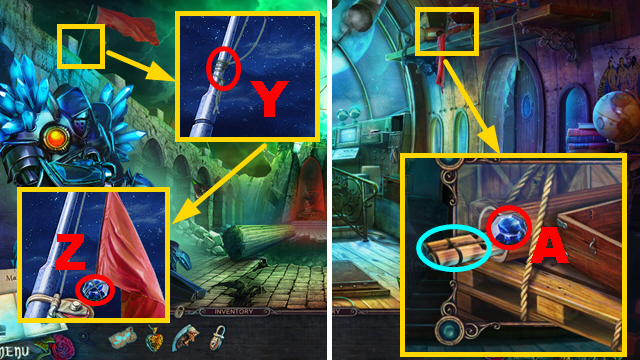
- Connect the CARPENTER FIGURINE and MINIATURE SAW to the drawer (X); open the book.
- Take EDWARD’S NOTE (Y).
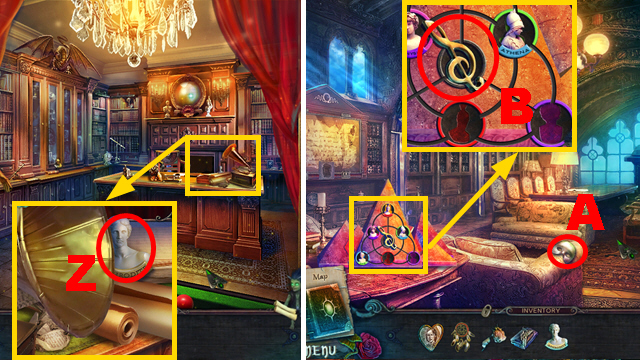
- Walk down.
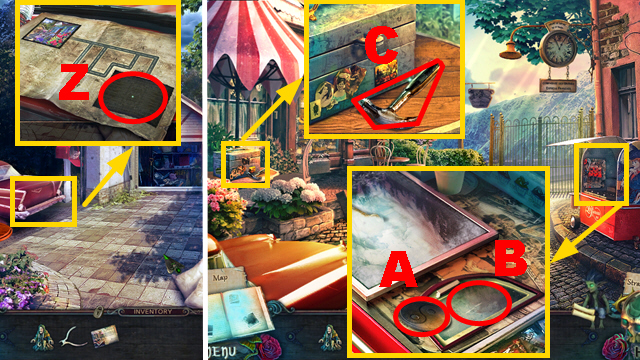
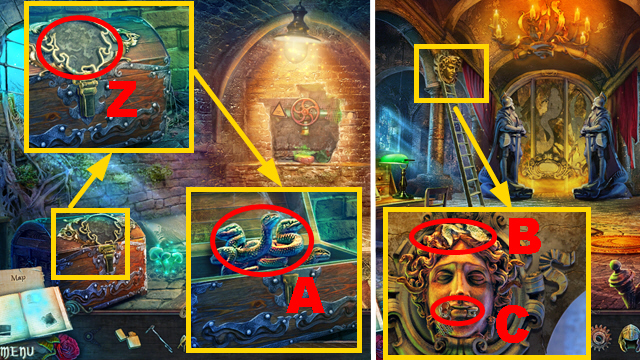
- Put EDWARD’S NOTE on the map (Z).
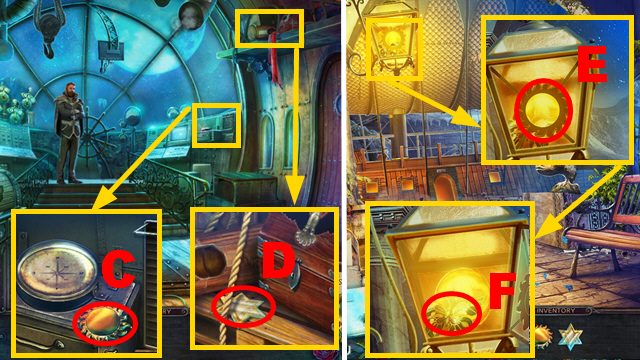
- Take the YIN AND YANG (A).
- Open the cover; put down IMP (B).
- Take the HAMMER (C).
- Walk down, turn right.
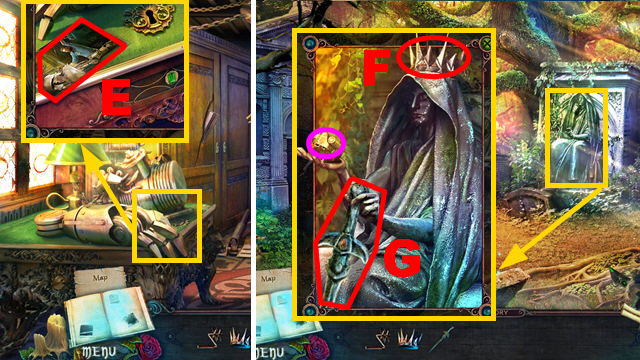
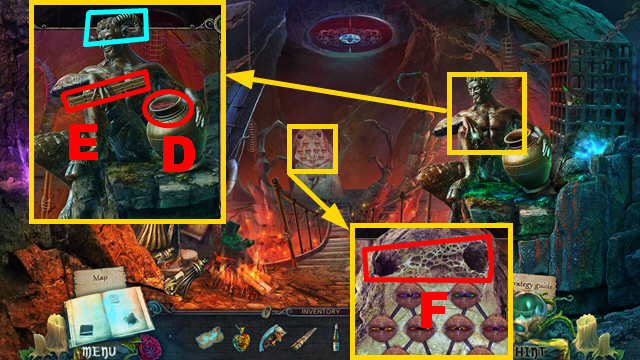
- Insert the YIN AND YANG into the slot (D); take the GLUE (E).
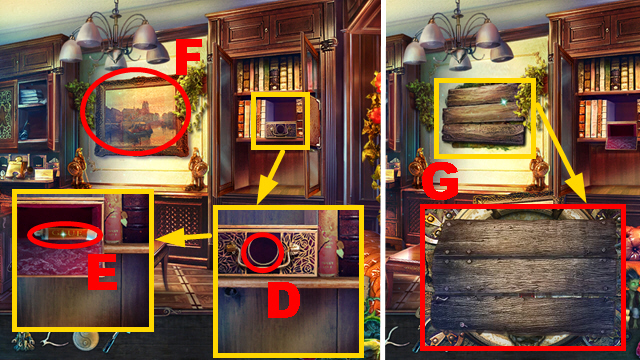
- Remove the painting (F).
- Remove the boards with the HAMMER (G).
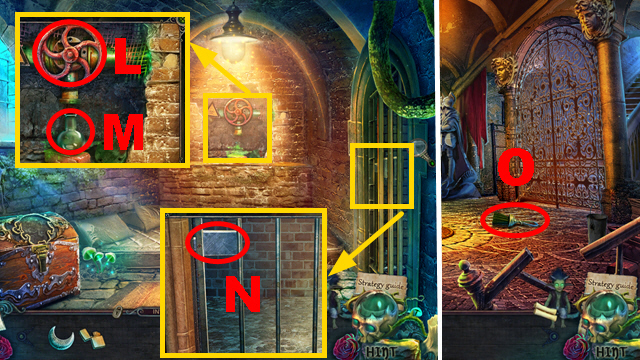
- Play the mini-game.
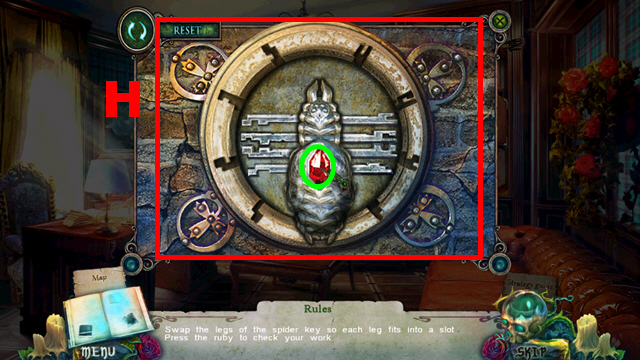
- Solution: (H).
- Press the ruby (green).
- Go downstairs.
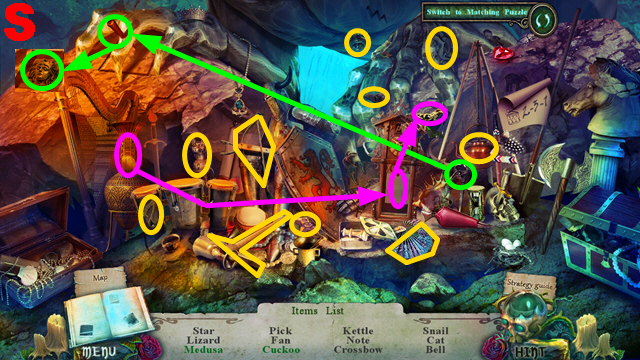
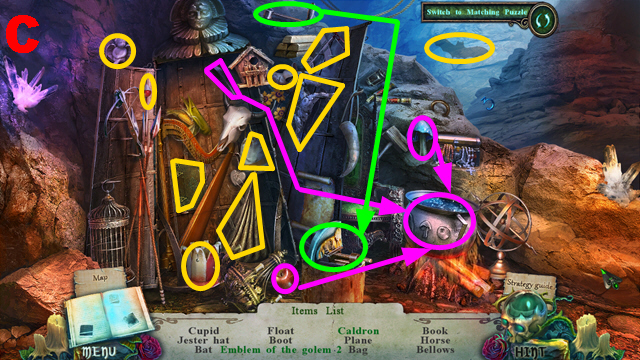
- Play the HOP.
- You receive the BROKEN GNOME (I).
- Take the KNITTED CAP (J).
- Put down the ELIZABETH DOLL (K).
- Walk down twice.
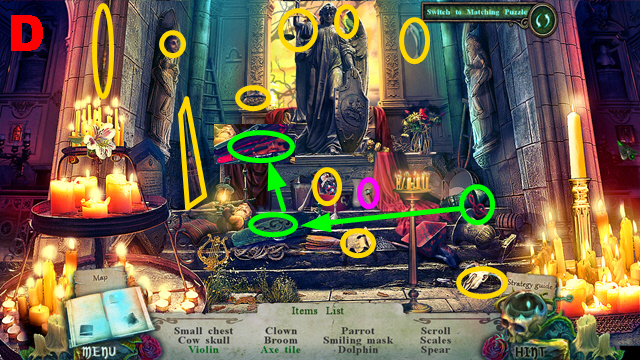
- Apply the GLUE to the broken statue (L); put the BROKEN GNOME on it.
- Take the FISHING LINE AND HOOK (M).
- Turn left.
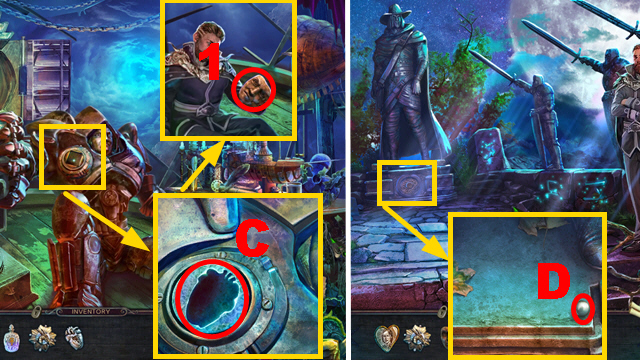
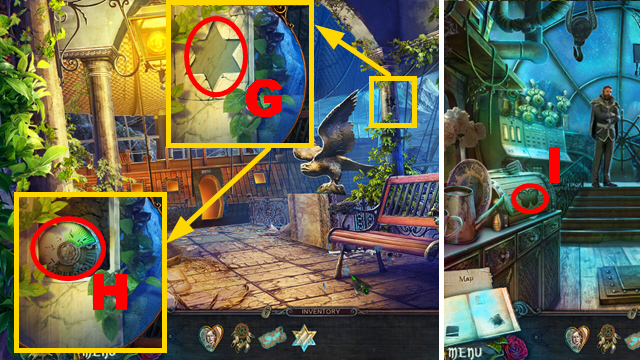
- Give the KNITTED CAP to imp (N) to receive the WRENCH.
- Collect the WITCH HUNTERS INSIGNIA with the FISHING LINE AND HOOK (O).
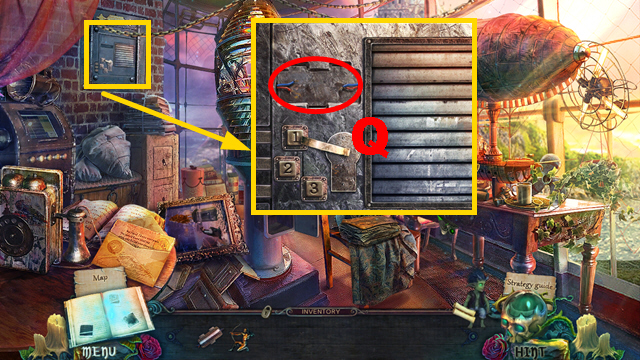
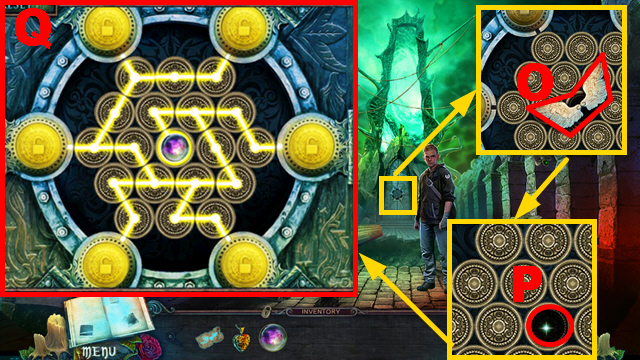
- Remove the screw with the WRENCH (P); open the box.
- Take the LILY SYMBOL (Q).
- Walk down, turn right.
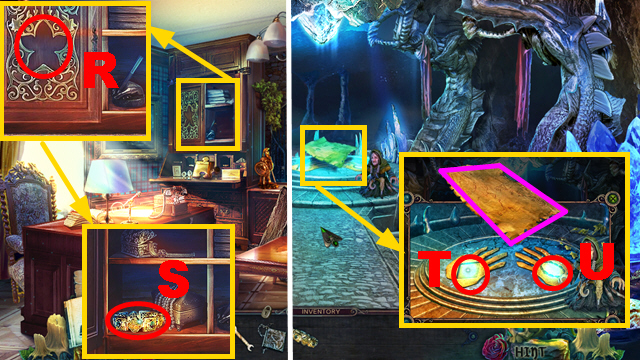
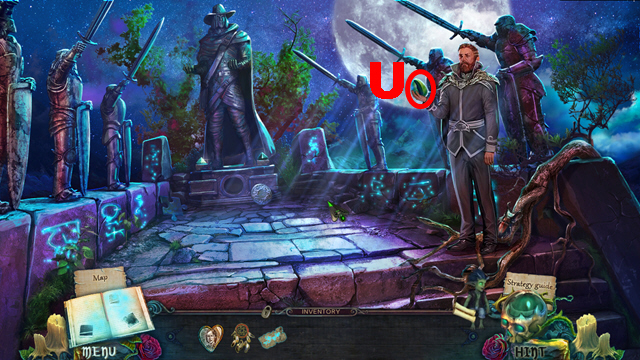
- Place the LILY SYMBOL on the niche (R); take LYNN’S BRACELET (S).
- Go downstairs.
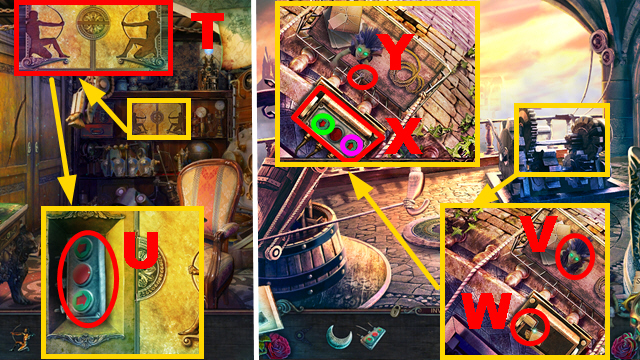
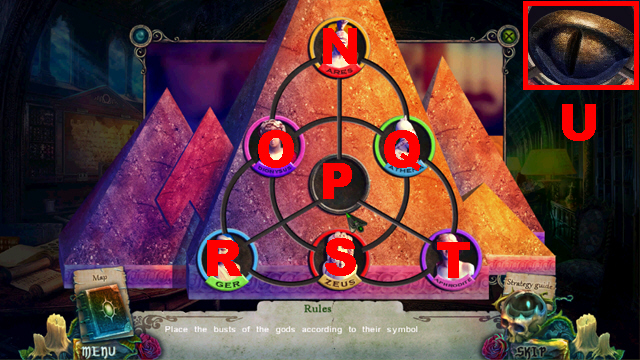
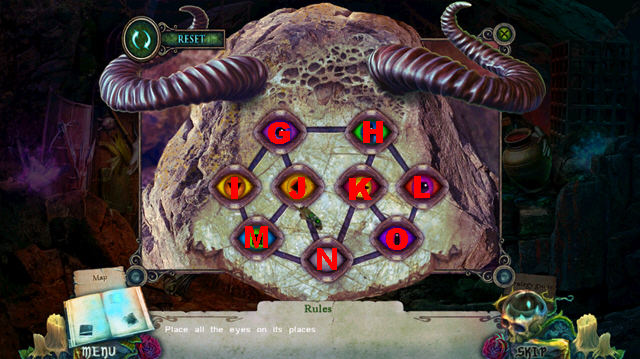
- Place the WITCH HUNTERS INSIGNIA (T) and LYNN’S BRACELET (U) on the niches.
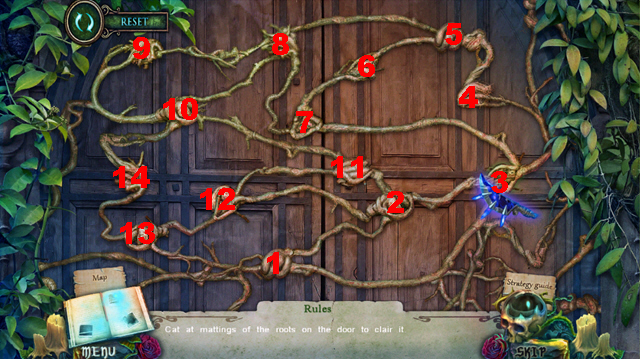
- Play the mini-game (purple).
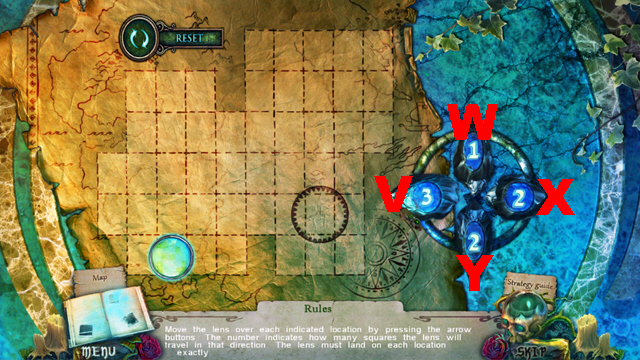
- Solution: W, X x3, V, X.
- X, V x3, W, Y x2, W.
- X, W, X, Y, V.
- Move forward.
Chapter 2: The Lake View
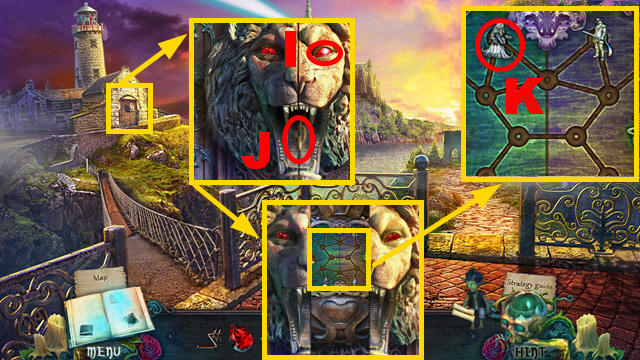
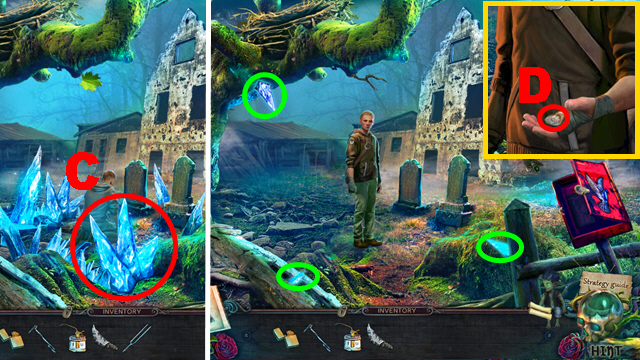
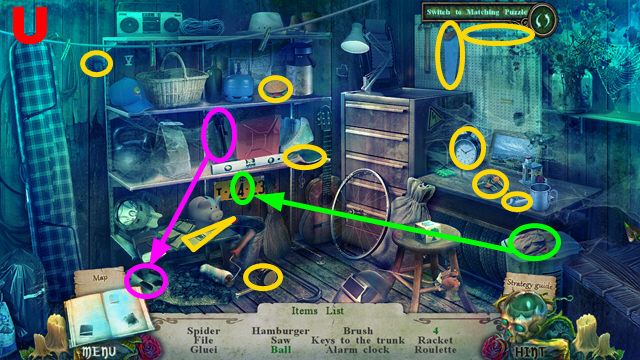
- Take the CRANK (Z).
- Remove the screw with the WRENCH (A); take the SKULL (B).
- Connect the SKULL to the gate (C).
- Turn right.
- Play the HOP.
- You receive the RUBY (D).
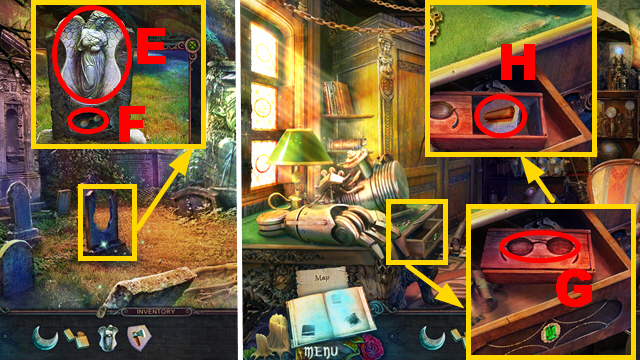
- Take the HAND KEY (E).
- Take the WITCH FIGURINE (F).
- Put down IMP (G).
- Give the WIRE CUTTERS to imp; take the RING (H).
- Walk down.
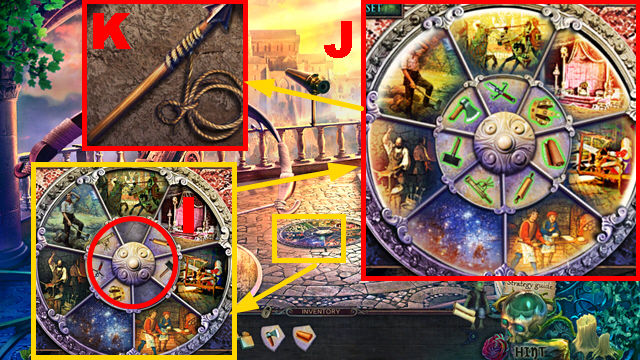
- Insert the RUBY into the slot (I); connect the RING to the chain (J).
- Pull the ring; put down the WITCH FIGURINE (K).
- Play the mini-game.
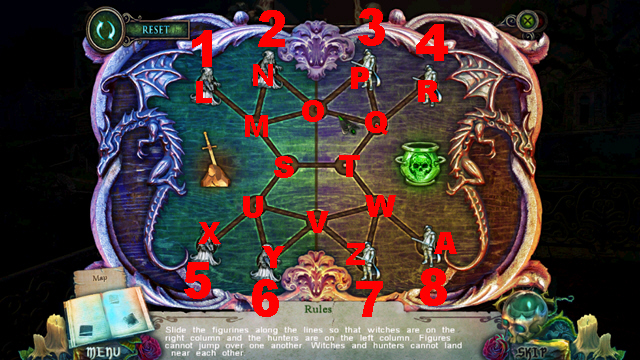
- Solution: 4-S, 3-W, 2-R, 4-T, 1-P, 4-N, 3-L, 5-Q, 6-S, 7-Y, 8-V, 6-T, 8-X, 6-A, 5-Z.
- Turn left.
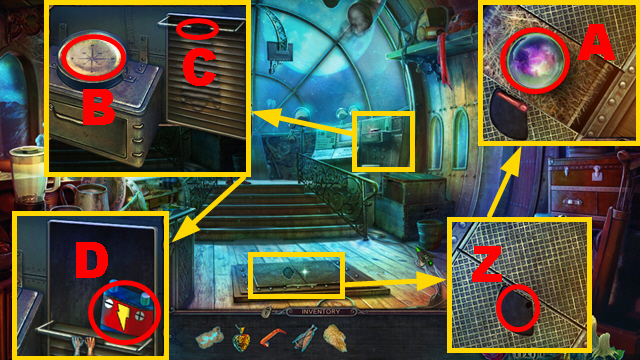
- Take the CROWN (B).
- Put the HAND KEY into the niche (C).
- Turn right.
- Take the STONE SWORD (D).
- Inspect the photo (E).
- Walk down twice, turn right.
- Connect the CROWN (F) and STONE SWORD (G) to the statue; take the GOLEM HEAD (purple).
- Go to the Workshop.
- Connect the GOLEM HEAD to the door (H); push the button (green).
- Go upstairs.
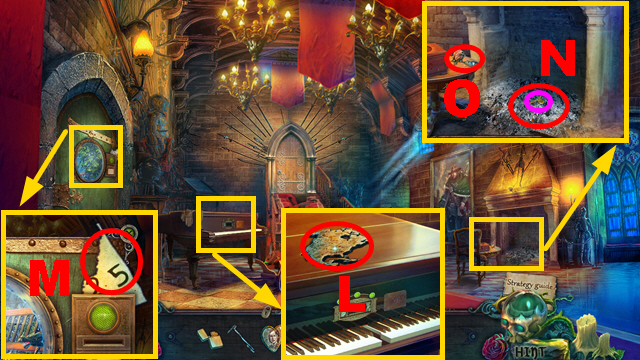
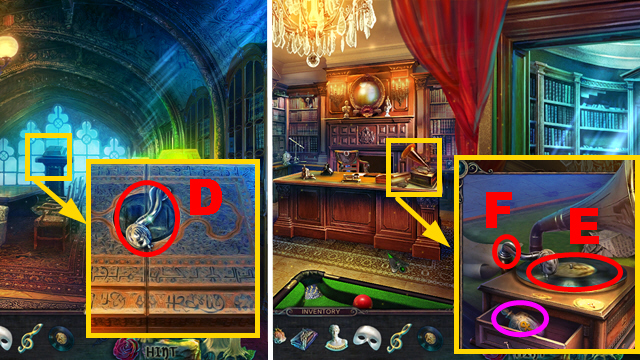
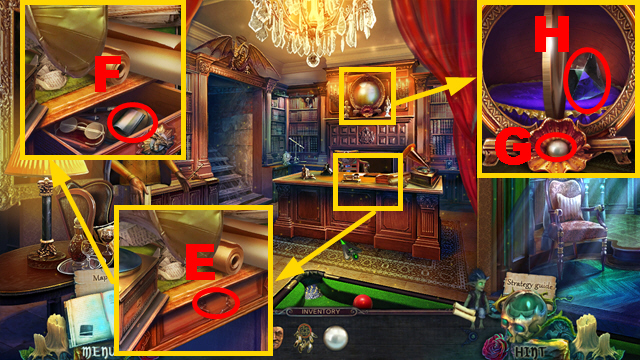
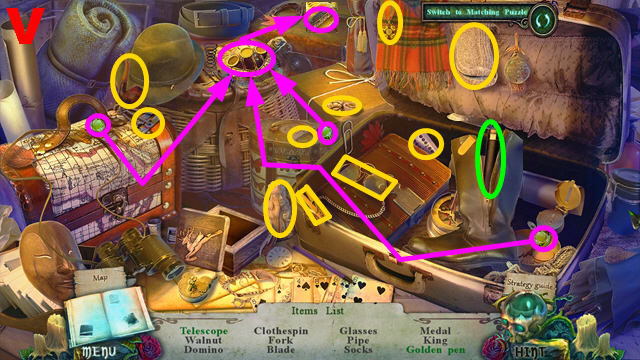
- Read the letter (I).
- Remove the painting (J).
- Open the compartment (K); take the SILVER FORK (blue).
- Play the HOP.
- You receive the CROSSBOW PART (L).
- Walk down.
- Collect the SAFE PANEL with the SILVER FORK (M).
- Walk down.
- Connect the CRANK to the crossbow (N); take the ARCHER FIGURINE (P).
- Put down the CROSSBOW PART (O).
- Turn right, then go up the stairs.
- Place the SAFE PANEL on the safe (Q).
- Play the mini-game.
- Solution: 1-3.
- Take the SILVER MOON (R) and ARCHER FIGURINE (S).
- Walk down.
- Place 2 ARCHER FIGURINES on the niches (T); take the REMOTE CONTROL (U).
- Walk down.
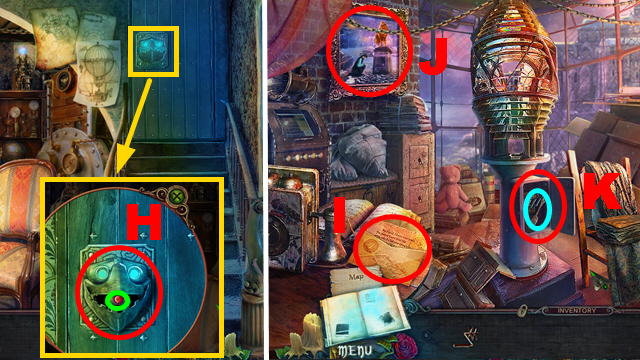
- Put down IMP (V); take the LIGHTER (W).
- Place the REMOTE CONTROL on the elevator (X); push button (purple) and button (green).
- Take the SILVER KEY (Y).
- Turn right.
- Insert the SILVER KEY into the lock (Z); turn it.
- Take the WITCH’S FACE (A).
- Walk down.
- Place the WITCH’S FACE on the slot (B); take the ANGEL (C).
- Walk down, turn right.
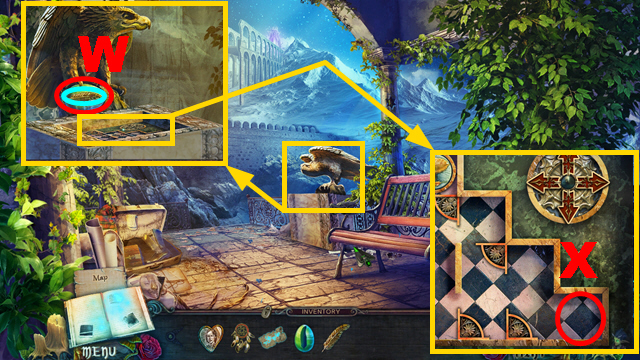
- Play the HOP.
- You receive the AXE TILE (D).
- Put down the ANGEL (E); take the GLASSES (F).
- Go to the Workshop.
- Place the GLASSES on the case (G); take the FABRIC TILE (H).
- Walk down.
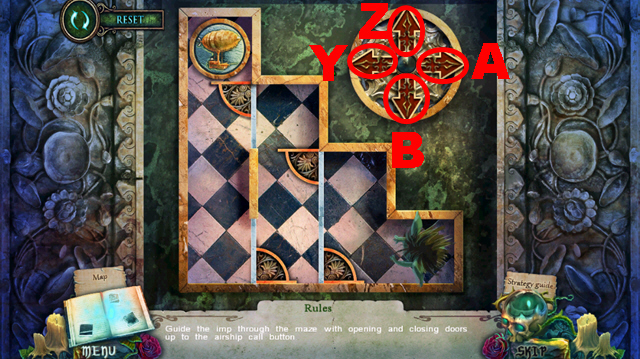
- Place the AXE TILE and FABRIC TILE on the board (I).
- Play the mini-game.
- Solution: (J).
- Take the JAVELIN WITH ROPE (K).
Chapter 3: The Dungeon

- Connect the JAVELIN WITH ROPE to the crossbow (L).
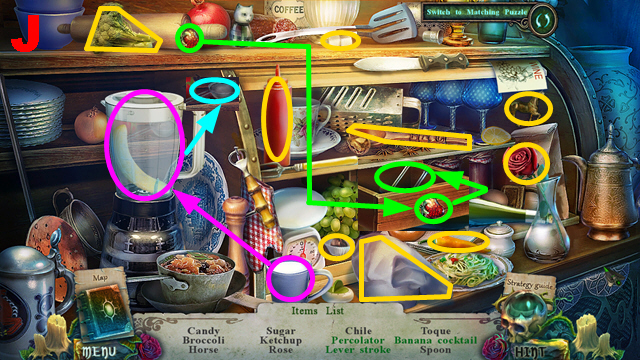
- Take the EMPTY FLASK (M) and IMP (N).
- Take the DYNAMITE (O).
- Use IMP to collect the VALVE (P).
- Put down the DYNAMITE (Q); light it with the LIGHTER.
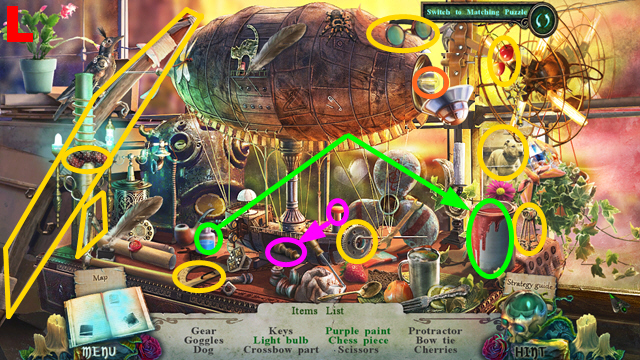
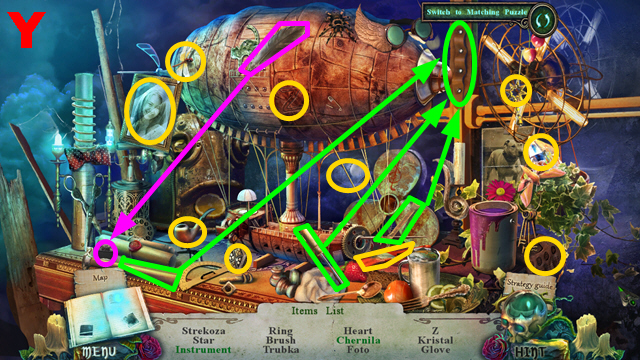
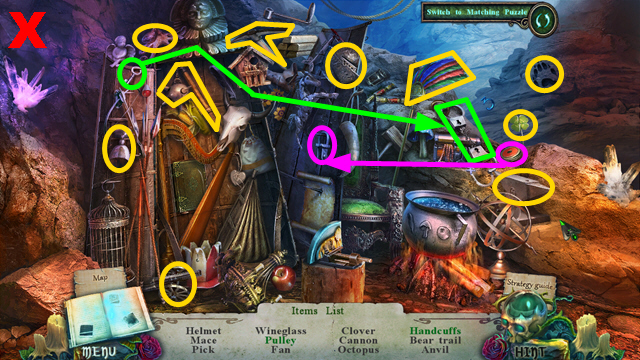
- Play the HOP.
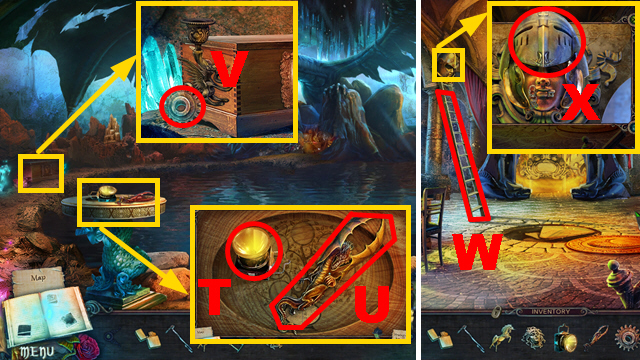
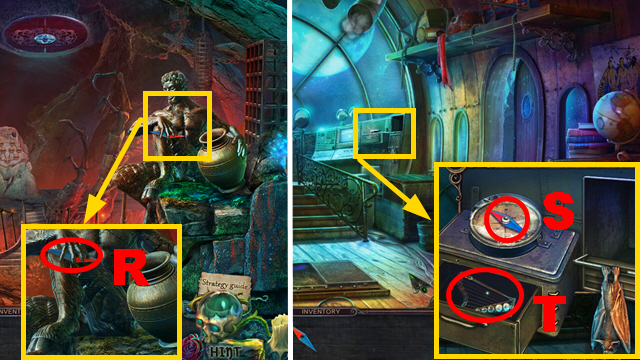
- You receive the SCREWDRIVER (R).
- Put down the EMPTY FLASK (S); remove the screws with the SCREWDRIVER (T).
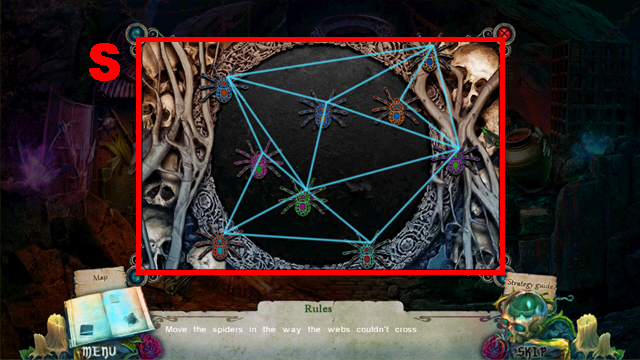
- Play the mini-game (U).
- Solution: A, W, V, Z, A, W, X, Y, C, B, A, W, X, Y, C, G, K, J, F, B, A, E, D, H, I, E, A, W, V, Z, D, H, I, E, A, B, C, G, K, J, I, H, D, Z, V, W, X, Y, C, B, A, W, X.
- Y, C, B, A, W, X, B, A, W, V, Z, D, H, I, J, K, G, C, B, X, W, V, Z, D, H, I, J, K, G, C, Y, X, W, V, Z, D, H, I, J, K, G, C, B, X, W, V, Z, D, H, I, J, K, G, C, B, X.
- Connect the VALVE to the pipe (L); turn it.
- Take the ACID (M).
- Pour the ACID over the lock (N).
- Turn right.
- Take the FIREPLACE BRUSH (O).
- Take the UNICORN EMBLEM (P).
- Put the SILVER MOON into the slot (Q).
- Go downstairs.
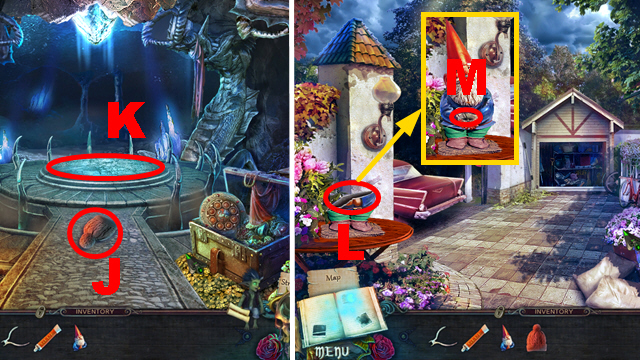
- Take the LADDER (R).
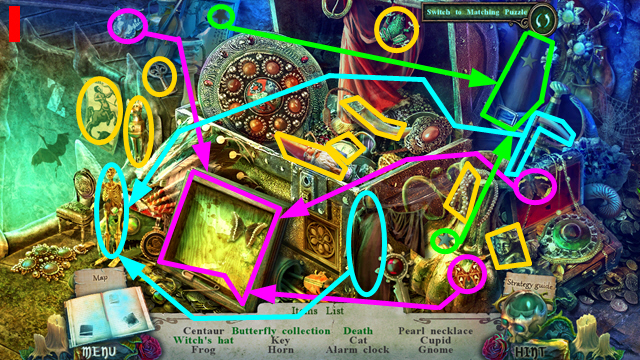
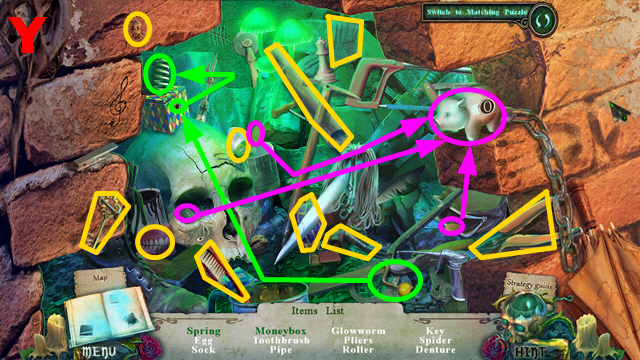
- Play the HOP.
- You receive the MEDUSA FACE (S).
- Take the LANTERN (T) and DRAGON EMBLEM (U).
- Take the COGWHEEL (V).
- Walk down.
- Put down the LADDER (W).
- Take the HELMET (X).
- Walk down.
- Play the HOP.
- You receive the SPRING (Y).
- Place the MEDUSA FACE on the chest (Z); press it.
- Take the SNAKES (A).
- Turn right.
- Connect the SNAKES to the head (B); take the CATACOMBS KEY (C).

- Insert the CATACOMBS KEY into the lock (D); turn it.
- Turn right.
- Connect the SPRING to the jack (E); take the DRAGONFLY (F).
- Put down the LANTERN (G); send out IMP (H).
- Put the HELMET on imp to acquire the MERMAID EMBLEM; take the ACORN (I).
- Walk down.
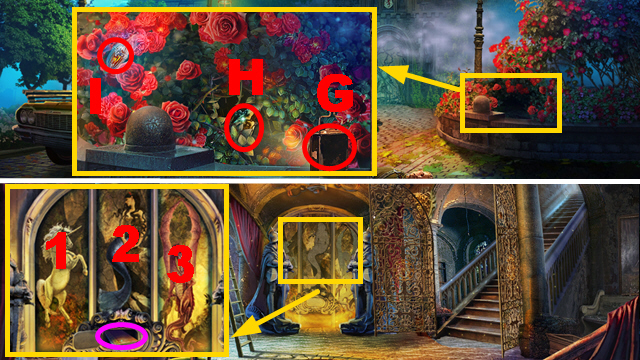
- Place the UNICORN EMBLEM (1), MERMAID EMBLEM (2), and DRAGON EMBLEM (3) on the wall; take the CODEBOOK (purple).
- Put down the CODEBOOK (J); enter the code ’481′ (blue).
- Take the TREE SYMBOL (green).
- Go downstairs.
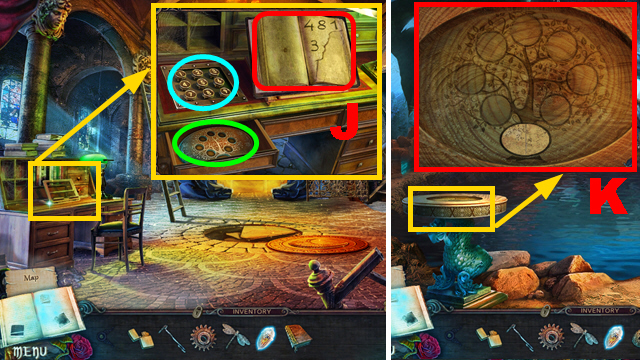
- Place the TREE SYMBOL on the table (K).
- Play the mini-game.
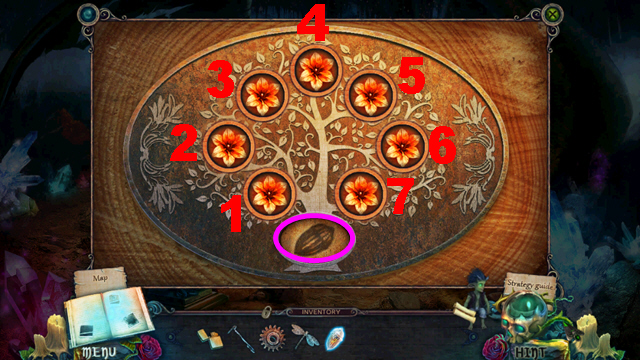
- Solution: 1, 2, 5, 6, 7, 3.
- Place the ACORN on the slot (purple).
- Move forward.
- Play the HOP.
- You receive the DRAGONFLY (L).
- Put 2 DRAGONFLIES into the niches (M); take the EMPTY OILER (N).
- Connect the COGWHEEL to the device (O); open the cover.
- Take the LEAF WITH CODE (P).
- Remove 3 pages; take LYNN’S PHOTO (Q) and the DREAM CATCHER (R).
- Walk down twice.
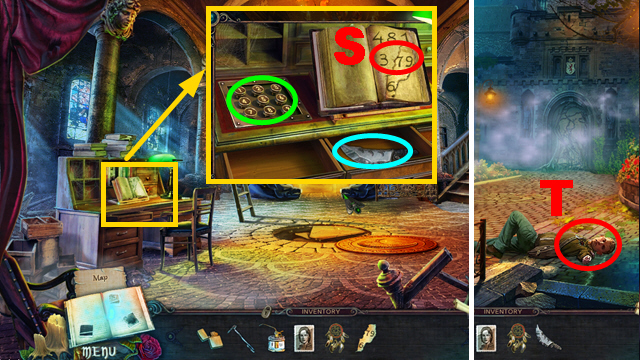
- Place the LEAF WITH CODE on the page (S); enter the code ’379′ (green).
- Take the DAGGER (blue).
- Turn right.
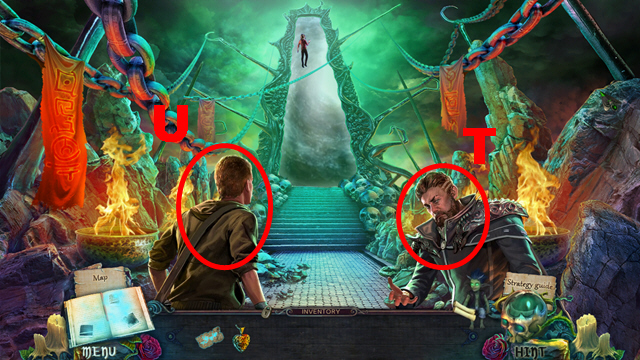
- Hold the DREAM CATCHER next to the guy (T).
- Go through the portal.
Chapter 4: The Cemetery at Home
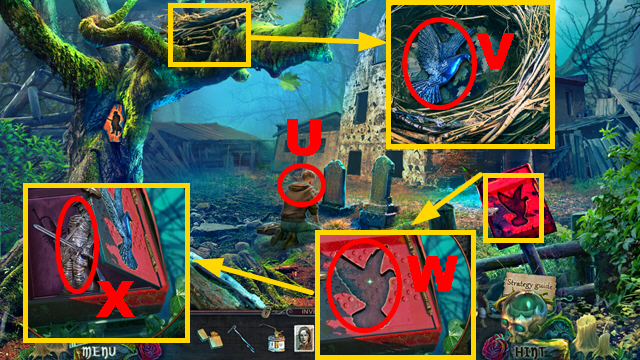
- Give LYNN’S PHOTO to the guy (U).
- Remove the leaves three times; take the DOVE (V).
- Place the DOVE on the slot (W); take the HUNTER FIGURE (X).
- Insert the HUNTER SYMBOL into the slot (Y); take the TRUMPET FIGURE (Z).
- Place the TRUMPET SYMBOL on the niche (A); take the TUNING FORK (B).
- Break the crystals with the TUNING FORK (C).
- Collect 3 CRYSTAL SHARDS (green).
- Take the MEDALLION PART (D).
- Put down the EMPTY OILER (E); take the FULL OILER.
- Go to the Laboratory.
- The guy (F) will talk to you.
- Walk down.
- Play the HOP.
- You receive the PIANO KEYS (G).
- Move forward.
- Put 3 CRYSTAL SHARDS and the DAGGER into the niches (H).
- Pour the FULL OILER over the gears (I).
- Pull the lever (J); take the ENCHANTED DAGGER.
- Walk down twice, turn right.
- Put down the ENCHANTED DAGGER (K).
- Play the mini-game.
- Solution: 1-14.
- Move forward.
- Try to go upstairs.
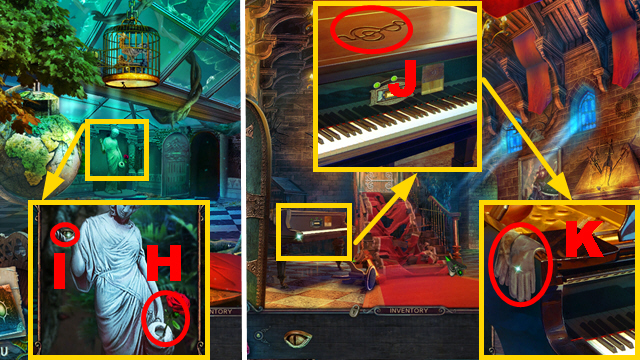
- Take NORTH AMERICA (L).
- Take the LEAF WITH CODE (M).
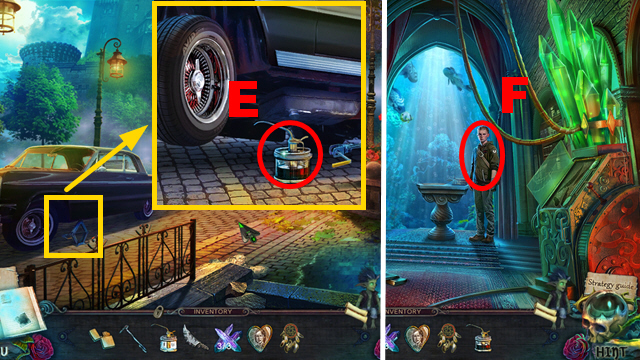
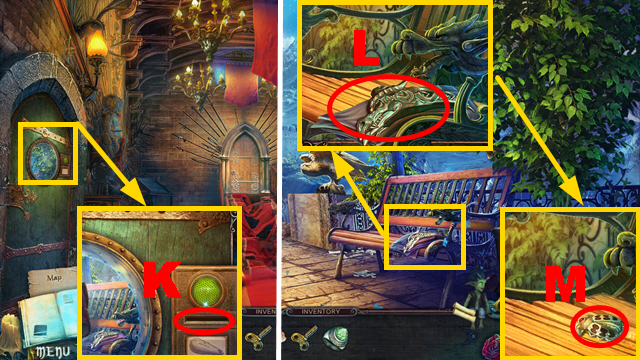
- Use the FIREPLACE BRUSH (N); take the DRIED ROSE (O) and CLOCKWORK KEY (purple).
- Turn right.
- Take AUSTRALIA (P).
- Walk down.
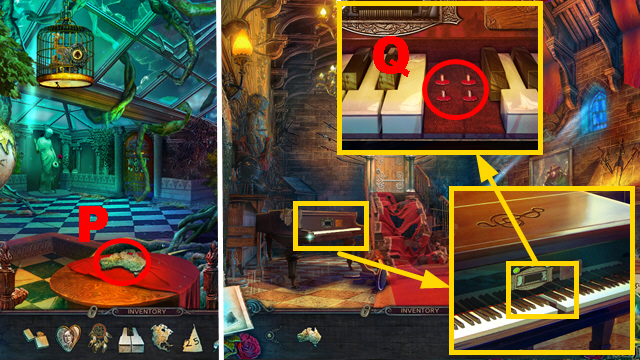
- Place the PIANO KEYS on the piano (Q).
- Walk down twice.
- Place the LEAF WITH CODE on the book (purple); enter the code ’625′ (R).
- Take the MAGIC CANDLE (green).
- Go downstairs.
- Put the MAGIC CANDLE into the holder (S); light it with the LIGHTER.
- Take the PIN DRUM (T).
- Go to the Castle Hall.
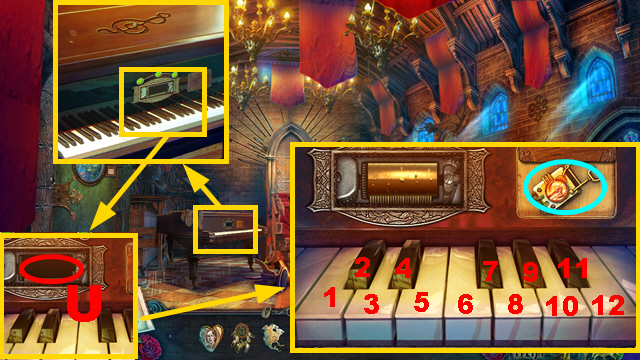
- Connect the PIN DRUM to the piano (U).
- Play the mini-game.
- Solution: 5, 10, 7, 12, 8.
- 7, 5, 2, 3, 11, 12.
- 7, 11, 8, 10, 2, 5, 3.
- Take the GRABBER MECHANISM (blue).
- Go to the Laboratory.

- Play the HOP.
- You receive the BALLERINA FIGURINE (V).
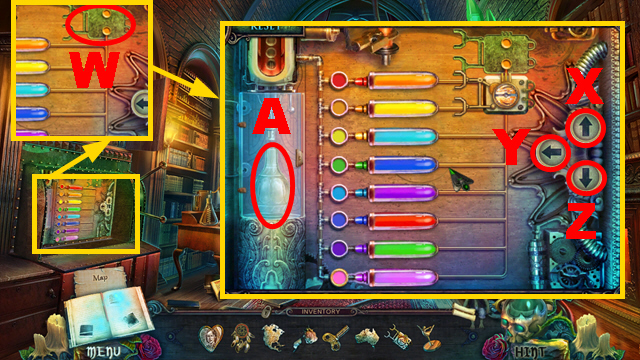
- Place the GRABBER MECHANISM on the device (W).
- Play the mini-game.
- Solution: Z x3, Y, Z x2, Y, X x5, Y, Z, Y, Z x2, Y.
- Take the ANTI-MAGIC ELIXIR (A).
- Go to the Castle Hall.
- Talk to the guy (B).
- Place the BALLERINA FIGURINE on the box (C); take the JEWELED RING (D).
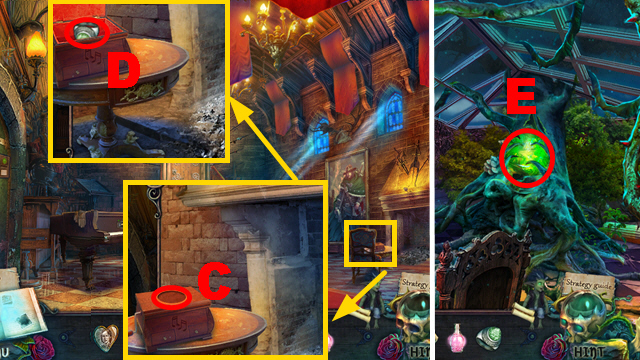
- Turn right.
- Pour the ANTI-MAGIC ELIXIR over the tree (E).
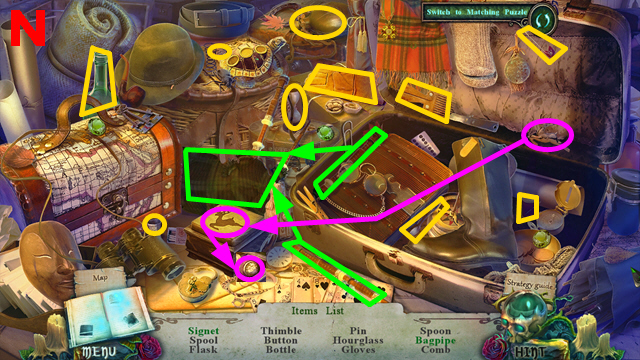
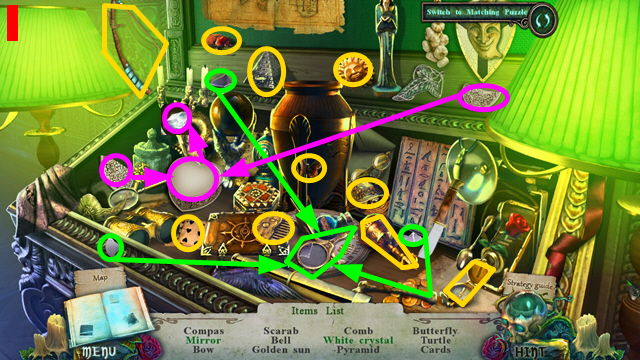
- Play the HOP.
- You receive AFRICA (F).
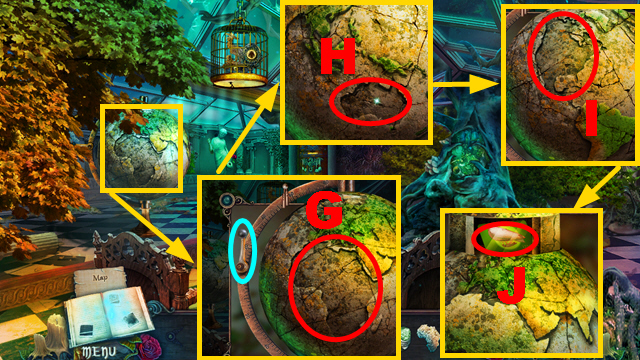
- Place AFRICA on the globe (G); turn the handle (blue).
- Place AUSTRALIA on the globe (H); turn the handle.
- Place NORTH AMERICA on the globe (I); take the KEY CARD (J).
- Walk down.
- Insert the KEY CARD into the slot (K).
- Turn left.
- Take the HUNTER’S CAPE (L) and SCARAB (M).
- Play the HOP.
- You receive the JEWELED RING (N).
- Walk down, turn right.
- Put the SCARAB into the slot (O); put IMP into the cage (P).
- Give the CLOCKWORK KEY to imp to acquire the CRYSTAL NUT.
- Play the mini-game (Q).
- Solution: T, R, U, T, S, R, U, S, T, R, U, S, T, R, U, S.
- Walk down, turn left.
- Put the CRYSTAL NUT into the nutcracker (V); push the handle (W).
- Take the JEWELED RING (X).
- Walk down, turn right.
- Place 3 JEWELED RINGS on the claw (Y).
- Move forward.
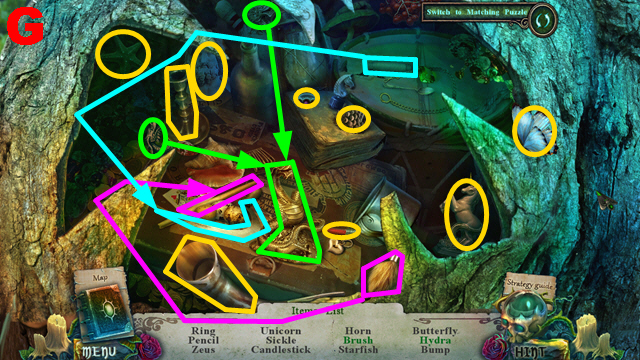
Chapter 5: The Headquarters
- Take APHRODITE (Z).
- Turn right.
- Take the MASK (A).
- Take the TREBLE CLEF (B).
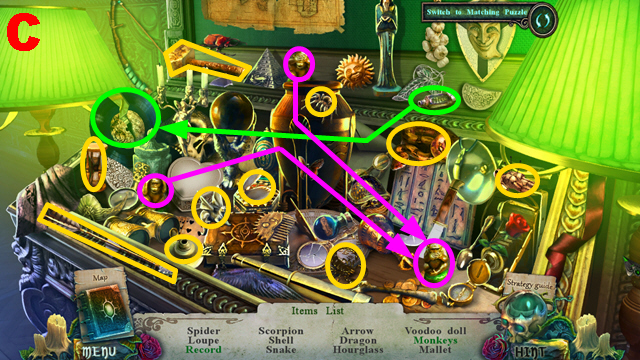
- Play the HOP.
- You receive the RECORD (C).
- Take the PHONOGRAPH NEEDLE (D).
- Walk down.
- Put down the RECORD (E) and PHONOGRAPH NEEDLE (F); take the LIVING WATER (purple).
- Walk down.
- Play the HOP.
- You receive ZEUS (G).
- Place the DRIED ROSE in the vase (H); pour the LIVING WATER over it.
- Take the LEFT EYE (I).
- Walk down.
- Insert the TREBLE CLEF into the slot (J); take the GLOVES (K).
- Turn right, move forward.
- Place the MASK, GLOVES, and HUNTER’S CAPE on the puppet (L); take the DRAGON HEAD (green).
- Turn right.
- Put ZEUS and APHRODITE into the slots (M).
- Play the mini-game.
- Solution: R, S, T, P, N, O, R, S, Q, N, O, R, S, Q, T, P, N, O, S, T, P, N, O, Q, N, P, T, Q, O, N, P.
- Take the RIGHT EYE (U).
- Walk down.
- Connect the DRAGON HEAD to the statue (V); place the RIGHT EYE and LEFT EYE on the head (purple).
- Turn left.
- Take the HEAD OF THE ORDER SYMBOL (W).
- Hold the DREAM CATCHER next to the guy (X).
- Go through the portal.
- Talk to the golem.
- Play the HOP.
- You receive the FRAMED PHOTO (Y).
- Place the FRAMED PHOTO on the niche (Z).
- Take the HEART KEY (A).
- Open the compartment with the HEART KEY (B); take the MECHANICAL HEART (green).
- Place the MECHANICAL HEART on the slot (C); pour the LIVING WATER over it.
- Take the FACE (1).
- Take the PEARL (D).
- Walk down.
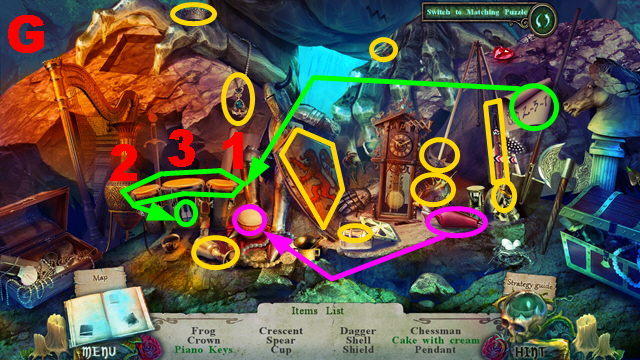
- Place the HEAD OF THE ORDER SYMBOL on the drawer (E); take the BOOK EMBLEM HALF (F).
- Put the PEARL into the shell (G); take the CRYSTAL BLACK (H).
- Turn right.
- Play the HOP.
- You receive the WHITE CRYSTAL (I).
- Walk down, turn left.
- Put down the WHITE CRYSTAL (J) and CRYSTAL BLACK (K).
- Play the mini-game (blue).
- Solution: (L).
- Take the BOOK EMBLEM HALF (M).
- Walk down, turn right.
- Put 2 BOOK EMBLEM HALVES into the niche (N); place the FACE on the slot (O).
- Play the mini-game (P).
- Solution: 1-3.
- Take the ANCIENT RUNE (Q).
- Place the ANCIENT RUNE on the slot (R); take the SCROLL (green).
- Walk down, turn left.
- Connect the SCROLL to the statue (S); take the ENCHANTED SCROLL (T).
- Take the STONE EGG (U).
- Walk down three times, turn left.
- Play the HOP.
- You receive the GOLDEN FEATHER (V).
- Connect the STONE EGG to the statue (W); put the GOLDEN FEATHER into the niche (blue).
- Put down IMP (X).
- Play the mini-game.
- Solution: Y, Z, Y, B, A, Z, Y, A, B, Y, Zx2, Y, Bx2, Ax2, Z, Y, A, B, Y, Zx2, A, Bx2, Y, Zx3.
- Move forward.
Chapter 6: The Airship
- Take the SUN MEDALLION (C).
- Take the STAR (D).
- Walk down.
- Place the SUN MEDALLION on the lantern (E); take the BUTTERFLY (F).
- Put the STAR into the niche (G); press it.
- Take the MANOMETER (H).
- Move forward.
- Place the BUTTERFLY on the box (I).
- Play the HOP.
- You receive the LEVER (J).
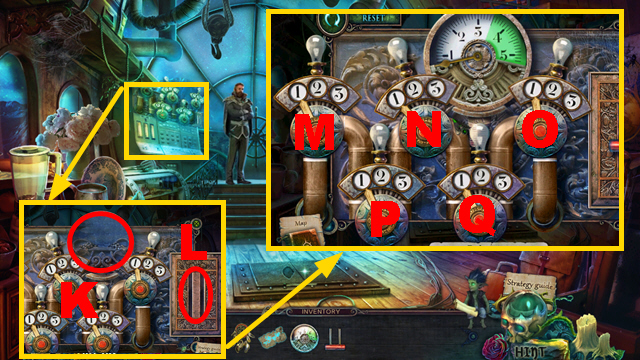
- Connect the MANOMETER (K) and LEVER (L) to the control panel on the left.
- Play the mini-game.
- Solution: N x2, M x2, O x2, N x2, Q, P, Q, P.
- Turn right.
- Inspect Lynn (S); take the ANTIDOTE (R).
- Hold the DREAM CATCHER next to Lynn.
- Go through the portal.
- Talk to Lynn; throw the ANTIDOTE and MEDALLION PART at Lynn (T).
- You receive the MEDALLION.
- Play the HOP.
- You receive the KEYS (U).
- Insert the KEYS into the lock (V); take the DOOR HANDLE (W) and BAT FIGURE (X).
- Take the SHARP STONE (Y).
- Walk down.
- Place the DOOR HANDLE on the niche (Z); turn the handle.
- Take the MAGICAL SPHERE (A).
- Break the glass cover with the SHARP STONE (B); put down the BAT FIGURE (C).
- Take the BATTERY (D).
- Turn right.
- Put down the BATTERY (E).
- Play the mini-game.
- Solution: J left, M up, M left, N up x2, K right, I right, G right, L left, I down, K down, N down, N left, K up x2, I right, N down x2, G right, H up x2, L left x2, N left x2, G down, H right x2, N up x2, L up x2, G left x2, I left x2, K down x2, K left, M right, M down x3.
- J right x2, J down x2, F right x3, H right, N up, N right, L right x2, G up x2, I left x2, K left x2, J left x2, M left x2, H down x2, F down x2, N right x2, L right x2, G right x2, I up x2, K up x2, J left x2, M left x2, F left x2, H left x2, L down x2, L left, N down x3, G right, G down, G right.
- Take the WINGS (O); put down the MAGICAL SPHERE (P).
- Play the mini-game.
- Solution: (Q).
- Move forward.
- Take the COMPASS NEEDLE (R).
- Walk down twice.
- Connect the COMPASS NEEDLE to the compass (S); take the LITTLE HARP (T).

- Place the WINGS on the box (U); take the GOLEM EMBLEM (V).
- Turn right, move forward.
- Put the LITTLE HARP into the niche (W).
- Play the HOP.
- You receive the PULLEY (X).
- Walk down.
- Connect the PULLEY to the rope (Y); pull it.
- Take the SAPPHIRE (Z).
- Walk down.
- Place the SAPPHIRE on the niche (A); take the SATYR’S FLUTE (blue).
- Play the HOP.
- You receive the WINE (B).
- Turn right, move forward.
- Play the HOP.
- You receive the GOLEM EMBLEM (C).
- Pour the WINE into the jug (D); place the SATYR’S FLUTE on the hand (E).
- Take the SATYR HORNS (blue).
- Put the SATYR HORNS into the niches (F).
- Play the mini-game.
- Solution: J, G, I, M, J, N, K, O, L, H, G, J, N, O, L, H, G, I, M, N, J, G, I, M, N, O, L, H, G, J, N, O, L, H, G, J, N, O, L, H, K, N, J, G, I, M, J, N, K, O, N, K, H, L, O, N.
- Walk down.
- Place 2 GOLEM EMBLEMS on the shield (P); take the CRYSTAL KEY (Q).
- Move forward.
- Insert the CRYSTAL KEY into the lock (R).
- Play the mini-game.
- Solution: (S).
- Move forward.
- Give the ENCHANTED SCROLL to the guy (T).
- Give the MEDALLION to the guy (U).
- Congratulations, you have have completed Witches’ Legacy: The Hunter and the Hunted.


 Time Dreamer Walkthrough, Guide, & Tips
 Haunted Hotel: Lonely Dream Walkthrough, Guide, & Tips
 Dark Sisterhood: The Initiation Walkthrough, Guide, & Tips
 Phenomenon Meteorite Walkthrough, Guide, & Tips
 New York Mysteries: Secrets of the Mafia Walkthrough, Guide, & Tips