Found: A Hidden Object Adventure Tips and Tricks, Guide, & Tips
Found: A Hidden Object Adventure Tips and Tricks
After a crash landing, you find yourself stranded on a secret island. As you explore you will meet pirates, discover ruins and so much more in this thrilling Hidden Object Puzzle Adventure!
Whether you use this document as a reference when things get difficult or as a road map to get you from beginning to end, we’re pretty sure you’ll find what you’re looking for here.
We hope you find this information useful as you play your way through the game. Use the walkthrough menu below to quickly jump to whatever stage of the game you need help with.
Remember to visit the Big Fish Games Forums if you find you need more help, or for technical trouble shooting on your iOS device, please see our FAQ.
This Tips and tricks article was created by Nathaniel Apgar, and is protected under US Copyright laws. Any unauthorized use, including re-publication in whole or in part, without permission, is strictly prohibited.
Walkthrough Menu
- Getting Started
- User Interface
- Quests
- Hidden-Object Puzzles
- Mobs and Bosses
- Collections
- Inventory
- The Shop
- Avatars
- Achievements
- Unlocks
- Well of Wishes
- Bonus Boxes
- Daily Quests
- The Second Island
Getting Started

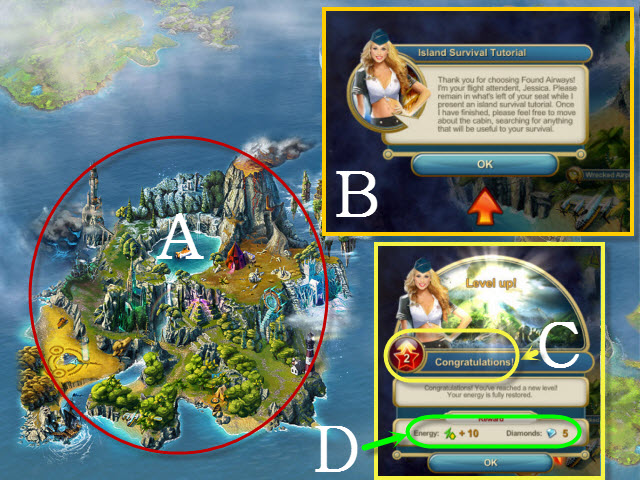
- To begin playing, select the first island (A).
- Jessica, the flight attendant greets you; she will guide you through the tutorial (B).
- Complete the quests to proceed through the tutorial.
- You gain levels by completing quests (C).
- Gaining levels allows you to unlock new HOP rooms, new mobs, bonus areas, daily quests, and a second island to explore.
- Each time you gain a level, your maximum energy increases and you will be awarded diamonds (D).
- There is a daily reward every day; be sure to play the game often and collect yours (E).
User Interface
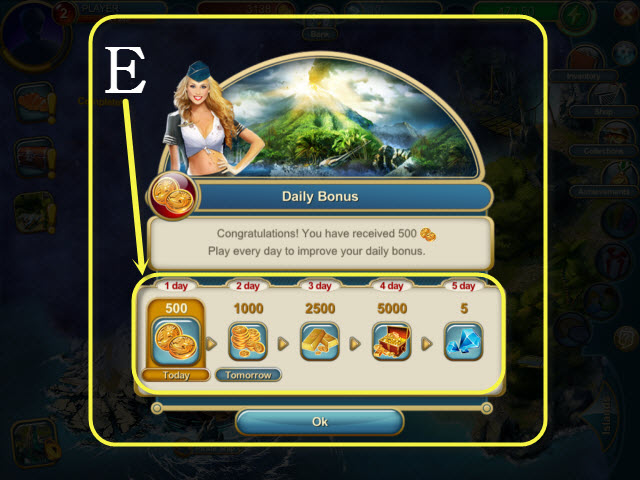
- This is your avatar tab; change your name and swap between various avatars here (F).
- Your total experience and current level are shown here (G).
- This is your total number of coins (H).
- This is your total number of diamonds (I).
- Coins and diamonds are the main currency in the game; use them to buy items at the shop, to unlock new areas, avatars, bonus games, or to craft collections.
- Select the plus button to access the bank; coins and diamonds can be purchased here at any time (J).
- Your energy bar is displayed here (K); energy is consumed each time you explore a HOP room.
- Your active quests are shown here; select them to see additional information for each quest (L).
- Exit the game here (M).
- The gear icon lets you change the options; adjust the mouse cursor, screen mode, gamma, and volume settings here (N).
- You can also restart the game in the options menu, but you will lose all of your progress so far; be careful!
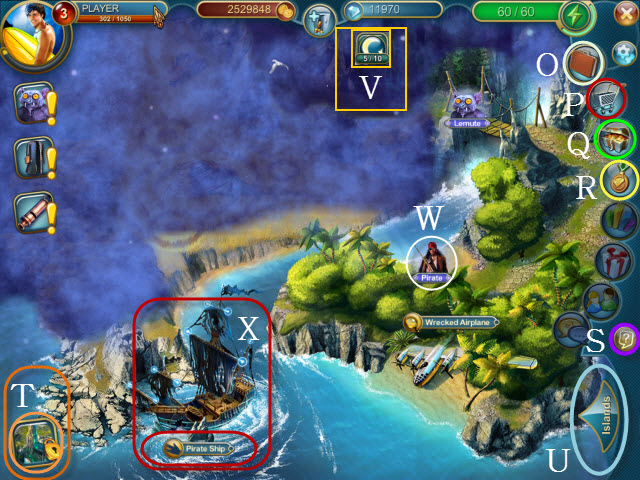
- Your inventory can be accessed here (O).
- Buy items at the shop with coins and diamonds here (P).
- View all of the possible collections here (Q).
- Browse through your achievements here (R).
- This button will toggle the menu captions on or off (S).
- Daily quests will be accessible here (T); available at level thirty.
- The islands tab (U) allows you to swap between islands; the second island is not available until you reach level fifty.
- Moons and stars are shown here; these are rare items that will grant you with bonus rewards for every ten you find (V).
- Mobs (W) roam the islands; banish or barter with them to gain additional rewards.
- Select a HOP room (X) to view more information or explore it.
Quests
- Completing quests is the main way you advance through the game.
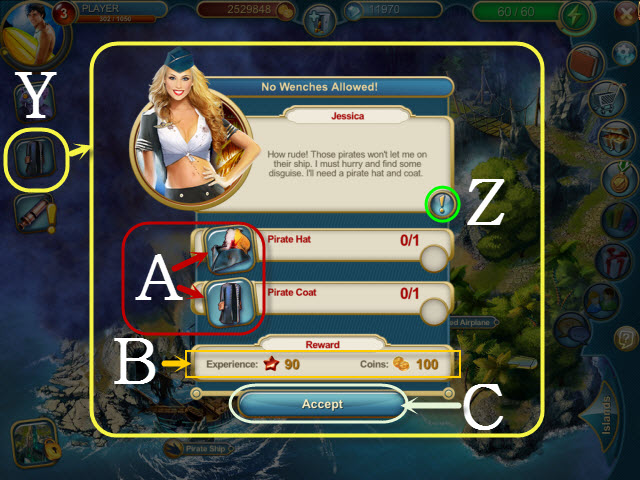
- Selecting a quest will bring up your quest information window (Y).
- Choose the info button (Z) for additional information on the selected quest.
- Select these icons (A) to view additional information for each quest objective; this will show you a list of all the places an item can be found.
- Some items can only be found in chests, from banishing or bartering with a mob, while others must be crafted.
- Certain quests require HOP completion or mob progress as part of the quest objective.
- The rewards you’ll receive for quest completion are shown here (B).
- Press the accept button to start a quest (C).
Hidden-Object Puzzles
- Exploring rooms and completing HOPs rewards you with the items you need to complete quests.
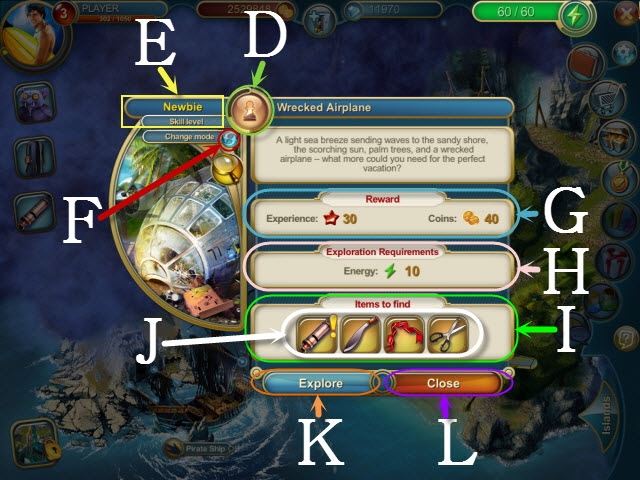
- This is your HOP experience meter (D); each time you complete a HOP, it gains experience.
- This is your current HOP skill level (E); HOPs rank up when your experience bar reaches a new skill level.
- As HOPs gain skill levels, additional items may be found in each room; some items can’t be found until the HOP reaches a higher rank.
- You will also receive more coins and experience for completing higher ranks.
- Some items require specific game modes to meet the quest requirement; modes can be changed here (F) for a diamond cost.
- This is the coin and experience reward received for completing the current HOP (G).
- This is the exploration requirement (H) to play the HOP; the energy, item, or coin requirement will be consumed by exploring it.
- Here are all the possible items you can find by completing the HOP (I); as you gain HOP ranks, more items will become available to find.
- Select an item to see a list of all the locations it can be found (J).
- The explore button activates the HOP (K).
- The close button returns you to the map (L).
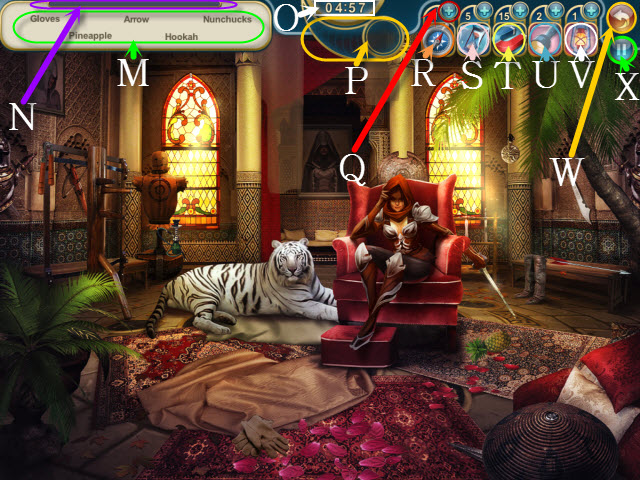
- This is your hidden-object list; find them to complete the HOP (M).
- Your HOP completion meter is displayed here (N).
- This is the HOP timer (O); if it reaches zero, you’ll fail the HOP and won’t receive anything.
- This is the bonus multiplier (P); find items in rapid succession to receive bonus items.
- There are five HOP power-ups to choose from; the plus button (Q) allows you to buy them for a diamond or coin cost.
- The compass (R) works like a hint button; use it to reveal a hidden item.
- The hourglass (S) freezes the HOP timer for thirty seconds; use this when you’re running out of time.
- The magnet (T) will instantly locate the current listed items.
- The flashlight (U) broadens your vision; useful for finding items in night-time HOPs.
- The lantern (V) will light up the whole screen temporarily; use these to get through night-time HOPs.
- Select the back button (W) to exit the HOP, but you will fail the room and won’t get the exploration requirement back.
- Press this button (X) to pause the game.
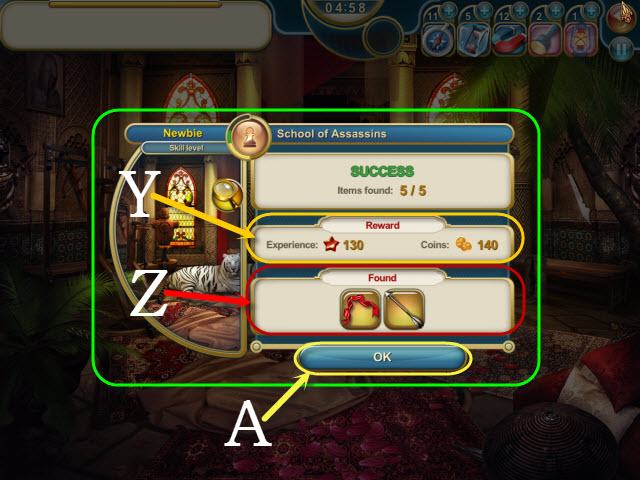
- When you successfully complete a HOP, the statistics window appears.
- Your total number of coins and experience gained is shown here (Y).
- The items you find are shown here (Z).
- Select the ok button to continue (A).
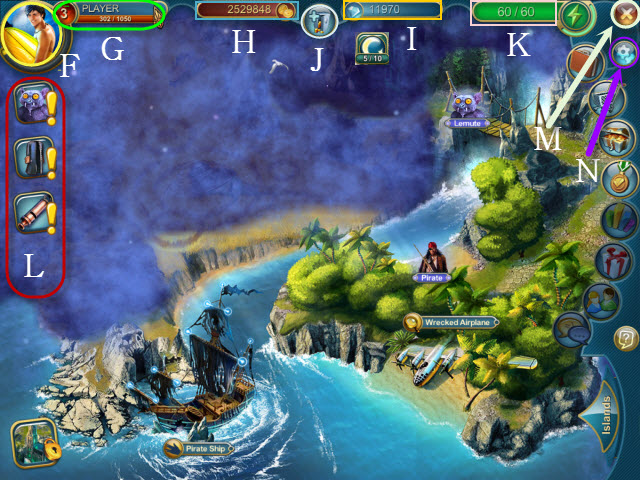
Mobs and Bosses
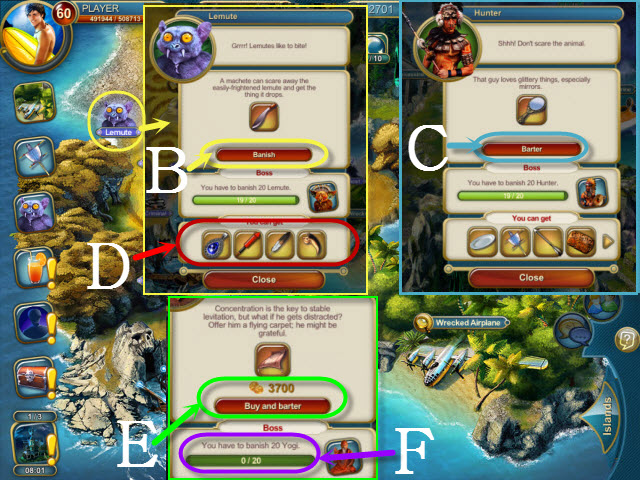
- In addition to completing HOPs to find items, you should also banish (B) and barter with mobs (C).
- Certain items can only be found on mobs; see what items they can yield here (D).
- More mobs will appear on the map as you advance in levels.
- Select a mob to see its individual item requirements; if you lack the required items, you can also purchase them with coins (E).
- Banish or barter with mobs repeatedly until their bar (F) is filled; in order to get progress you must be the appropriate level.
- Once the progress bar is filled, a boss will appear on the map.

- Select a boss to banish or barter with it (G); you must meet the requirements before the timer runs out (H) or the boss will vanish.
- Bosses require additional items to defeat (I); if you do not have the items needed to defeat one, you can also purchase them with diamonds (J).
- Bosses can yield some of the rarest items; check out their respective rewards here (K).
- After defeating a boss, the original mob that triggered it will re-spawn on your map.
- Bosses and mobs can be repeated as many times as you like.
Collections
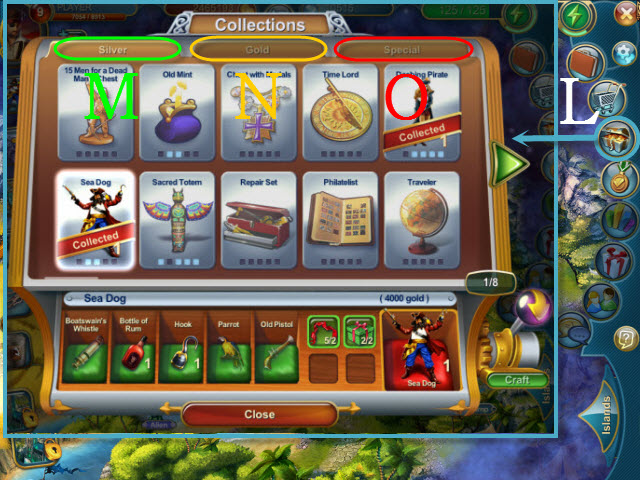
- This is your collections window (L).
- The silver tab (M) displays all of the novice collections.
- Select the gold tab (N) to view the advanced collections; most of these can’t be completed until you reach a higher level and have access to more items.
- The special tab (O) lists collections that can only be created at certain times of year, such as Halloween and Christmas; play during the holidays to craft them all.
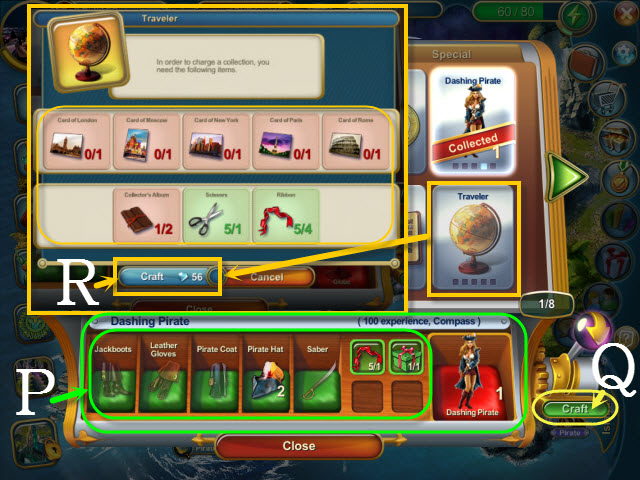
- There are also many quests that require crafted items in order to complete them.
- The list of items needed to craft each collectible is displayed here (P).
- Once you have all of the required items, select the craft button (Q) to create the collectible.
- If you can’t find all of the items required to craft a collectible, you may also spend diamonds (R) to obtain it.
Inventory
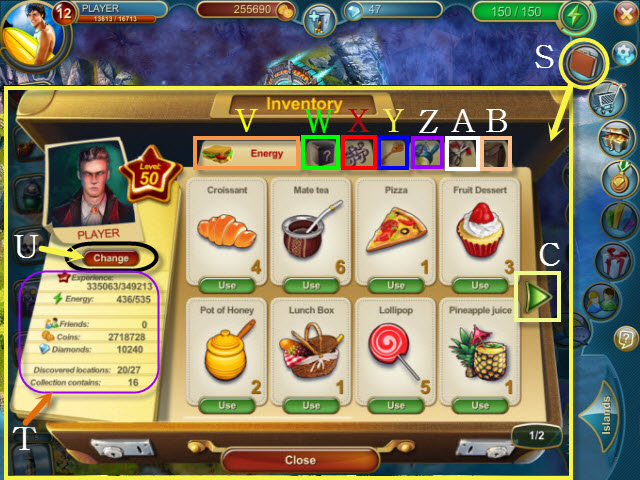
- Access your inventory here (S).
- Your gameplay statistics are shown here (T).
- Open the avatar window or change your name here (U).
- The energy tab (V) holds all of your energy-replenishing items; you will need to use these often.
- The chests tab (W) is where chests are stored; some items can only be found inside chests.
- The amulets tab (X) holds items that grant you special temporary bonuses.
- The access tab (Y) holds items related to exploring rooms, such as the tent, which requires fortune-teller cards.
- The tools tab (Z) is where you can view all your HOP power-ups.
- The collectibles tab (A) shows you all of your current items used to craft collections.
- The miscellaneous tab (B) holds all other general items; these are more common items required for quests and mobs.
- Select the green arrow (C) to view additional inventory pages on each tab.
The Shop
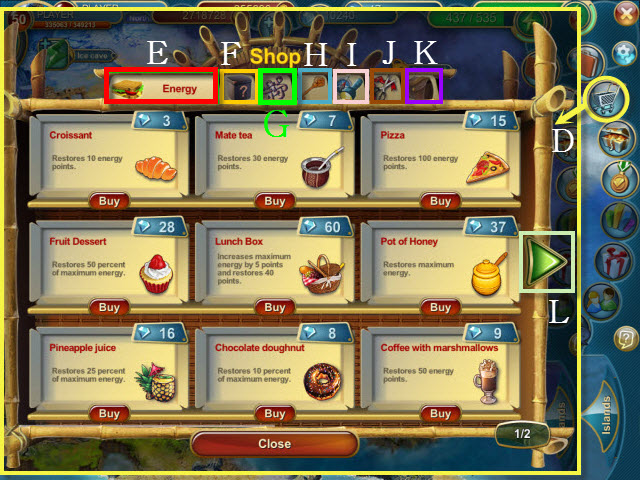
- The item shop can be accessed here (D); many items may be purchased here with diamonds or coins.
- The energy tab (E) holds all available energy-replenishing items.
- The chests tab (F) shows all available chests to purchase.
- The amulets tab (G) holds all of the special amulets you can buy; these items will grant you a variety of temporary bonus effects.
- The access tab (H) has items for sale that allow you to explore certain rooms.
- The tools tab (I) lists HOP power-ups for sale.
- The for collectibles tab (J) lets you purchase items used for crafting collections.
- The miscellaneous tab (K) holds all other general items for sale; use these to complete quests and mobs.
- Select the green arrow (L) to view additional shop pages within each tab.
Avatars
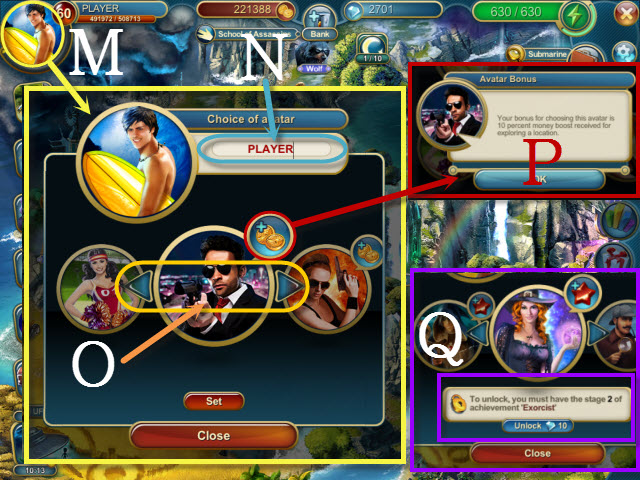
- This is your avatar window (M); it can also be accessed from the inventory screen.
- Change your name (N) or select a new avatar here (O).
- Certain avatars also have additional bonuses; view them here (P).
- There are many unique avatars to unlock by gaining achievement and levels, or by spending diamonds (Q).
- Try experimenting with different avatars until you find one that suits your needs.
Achievements
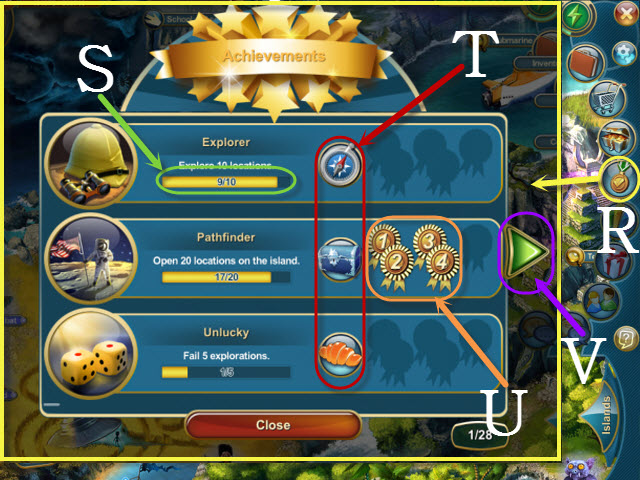
- View your achievements here (R); there are many achievements to unlock for a variety of rewards.
- Some achievements are also needed to unlock special avatars.
- Your progress bar (S) is displayed here; use it to track your achievement progress.
- View each achievement reward here (T).
- The current achievement stage is displayed here (U); as you meet achievement requirements, new stages will become available.
- Select the green arrow to browse through all of the possible achievements (V).
Unlocks
- There are a variety of new rooms, side games, daily quests, and an entire second island to unlock.
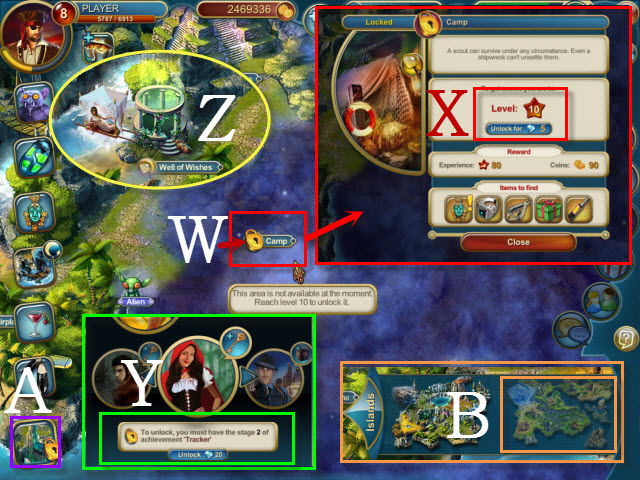
- Select a locked room to view the unlock requirements (W).
- You must meet a level and item requirement to unlock new rooms; they can also be unlocked by spending diamonds (X).
- Certain avatars require levels to unlock, but most can be obtained by completing achievements.
- Avatars can also be unlocked at any time by spending diamonds (Y).
- The Well of Wishes (Z) can be unlocked at level ten with items or diamonds.
- Daily quests are unlocked by reaching level thirty; access them here (A).
- The second island is unlocked by reaching level fifty; access it from the islands tab (B).
Well of Wishes
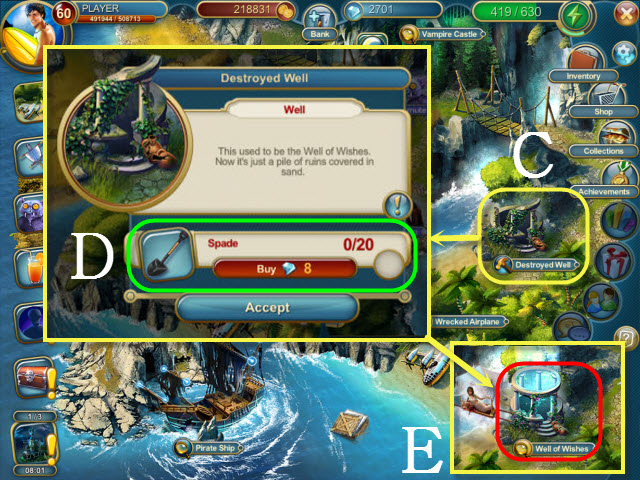
- The destroyed well (C) will appear on the map at level ten.
- Select the destroyed well; to unlock it, meet the special item requirement, or buy it with diamonds (D).
- Select the well of wishes to play a mini-game (E).
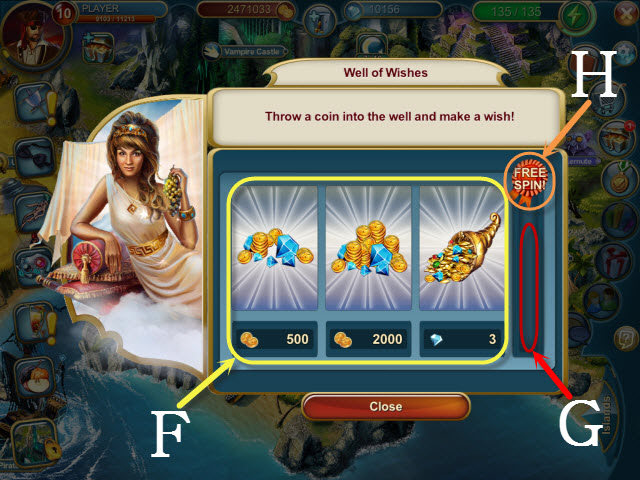
- Choose your desired wager to play (F).
- Each time you play, the meter (G) will fill up a little.
- You will receive a free spin (H) when the meter fills up completely.
- Rare items and prizes can be found by winning the game; play as often as you like.
Bonus Boxes
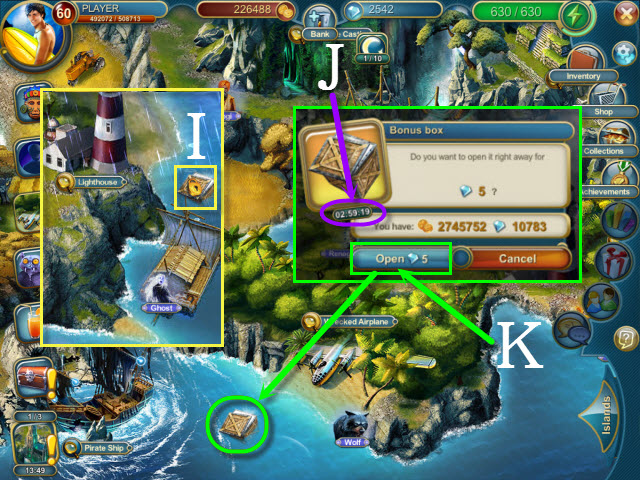
- Bonus boxes will appear in the ocean randomly.
- Each box will be locked (I) until the timer runs out (J).
- If you don’t want to wait for the timer, you can also spend diamonds (K) to open them early.
- Keep an eye out for bonus boxes; open them as often as possible to get additional rewards.
Daily Quests
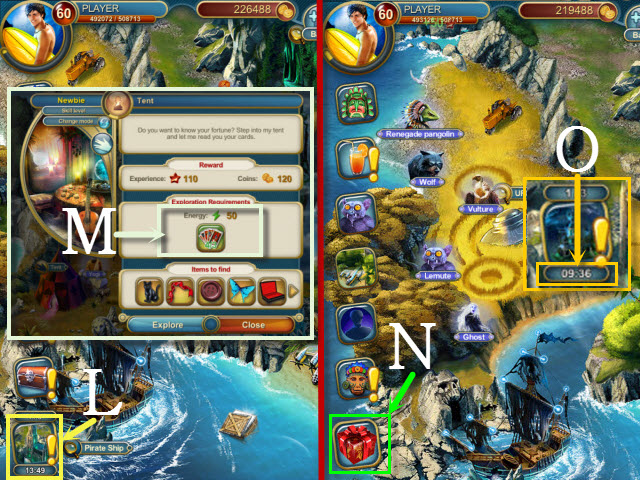
- Daily quests become available at level thirty; start one here (L).
- Daily quests are randomized quests that work just like normal quests.
- When you complete a round of three quests, you’ll receive a gift (N).
- This timer (O) tracks the amount of time remaining until the quests reset each day; finish any daily quests in progress before it reaches zero or you’ll have to start over.
- Five rounds of quests can be completed each day; finish the first round each day to get a fast reward.
The Second Island

- At level fifty, you will gain access to a whole new island to explore.
- Travel between islands from the main map (P) or the islands tab (Q).
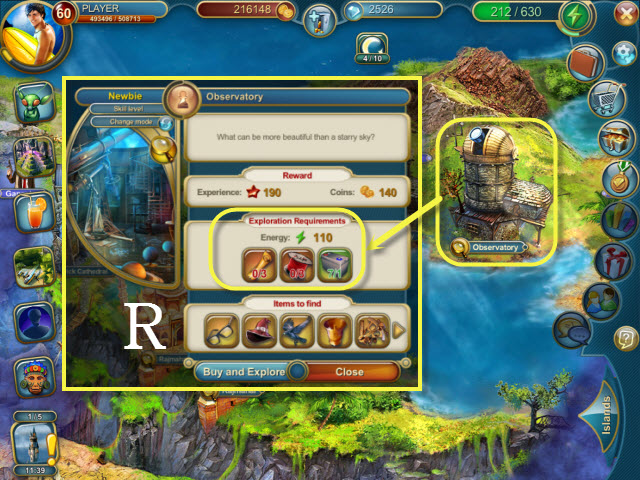
- The second island works much like the first island; however, all of the rooms require items for exploration now (R), in addition to the energy cost.
- Gold collections and some of the rarest items can be found here.
- Explore the second island until no items are left unfound.


 Puzzle Bots Walkthrough, Guide, & Tips
 Amulet of Time: Shadow of la Rochelle Walkthrough, Guide, & Tips
 Gothic Fiction: Dark Saga Walkthrough, Guide, & Tips
 Criminal Minds Walkthrough, Guide, & Tips
 Haunted Halls: Fears from Childhood Walkthrough, Guide, & Tips