Haunted Hotel: Lonely Dream Walkthrough, Guide, & Tips
Haunted Hotel: Lonely Dream Walkthrough

Welcome to the Haunted Hotel: Lonely Dream Walkthrough!
Explore the Haunted Hotel and experience supernatural phenomenon for yourself in Haunted Hotel: Lonely Dream!
Whether you use this document as a reference when things get difficult or as a road map to get you from beginning to end, we’re pretty sure you’ll find what you’re looking for here.
This document contains a complete Haunted Hotel: Lonely Dream game walkthrough featuring annotated screenshots from actual gameplay!
We hope you find this information useful as you play your way through the game. Use the walkthrough menu below to quickly jump to whatever stage of the game you need help with.
Remember to visit the Big Fish Games Forums if you find you need more help. Have fun!
This walkthrough was created by Chie, and is protected under US Copyright laws. Any unauthorized use, including re-publication in whole or in part, without permission, is strictly prohibited.
General Tips

- You can change players by clicking on your username in the bottom corner of the screen.
- From the Players Screen you can delete, rename, or create profiles.
- From the Main Menu you can adjust sound volume, screen mode, and watch the credits.
- When you start the game you must choose between Casual and Advanced Mode. Casual Mode has more, and faster recharging, hints; Advanced Mode gives you less help.
- There is also a short tutorial at the beginning of the game that you may skip. This walkthrough covers the tutorial section as well.
- In the game, there is a journal highlighted in red in the bottom left corner of the screen. This keeps all of the storyline information collected for you.
- There are three types of cursors used in the game.
- The Eye Cursor, in green, shows you that there is something of interest in an area.
- The Hand Cursor, in blue, shows you that an item can be picked up.
- And the Gears Cursor, in yellow, shows you that you can use an item at that spot.
- If you are stuck, you can click on the Tasks Button to see what you are supposed to do next.
- If you are still stuck, you can click the Hint Button to get more specific information.
- The Hint Button also lets you skip puzzles and helps you find hidden objects, one at a time.
Level 1
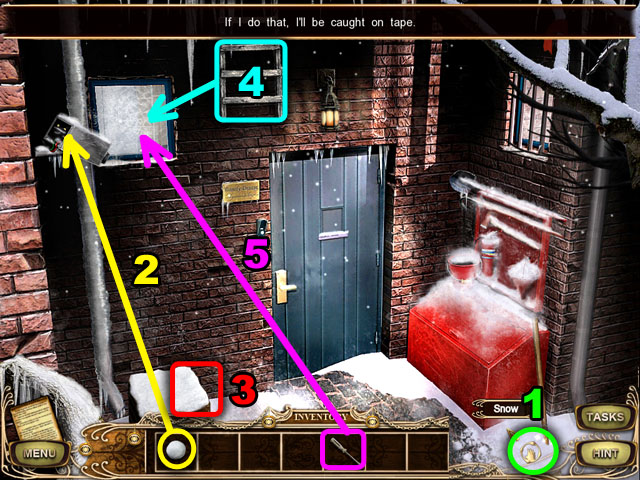
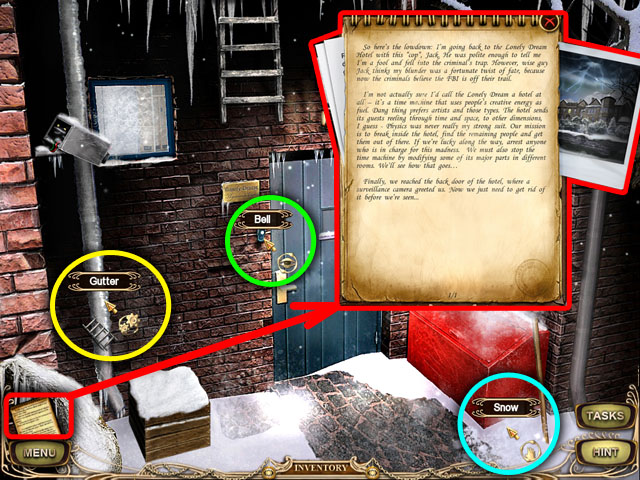
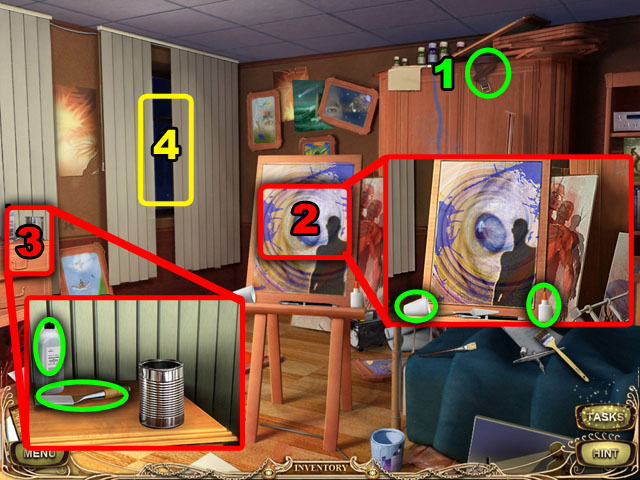
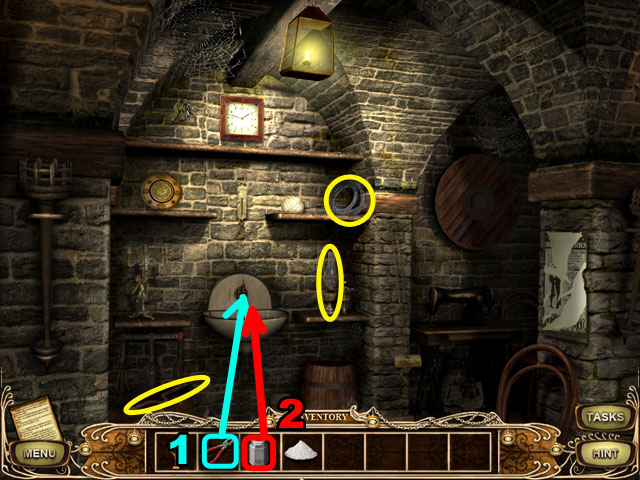
- Collect the SNOW in the bottom right corner (1).
- Click the SNOWBALL in the inventory and drag it to the camera in the upper left corner (2).
- Click on the wooden box and it will be moved to the right.
- Collect the SCREWDRIVER (3).
- Collect the LADDER and click it on the window (4).
- Use the SCREWDRIVER from the inventory to open the window (5).
- Click the window to go to the next scene.
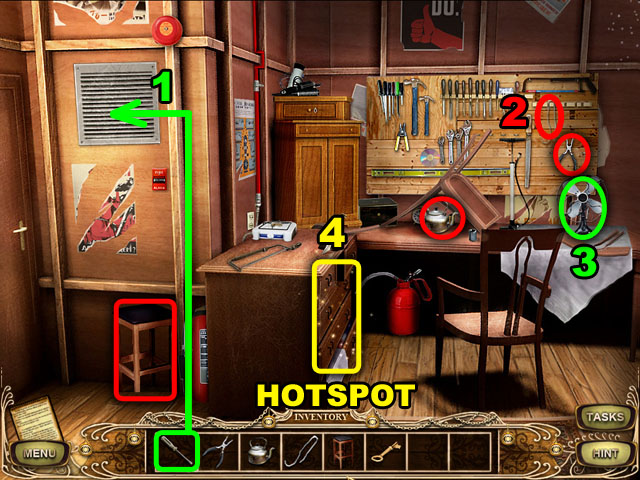
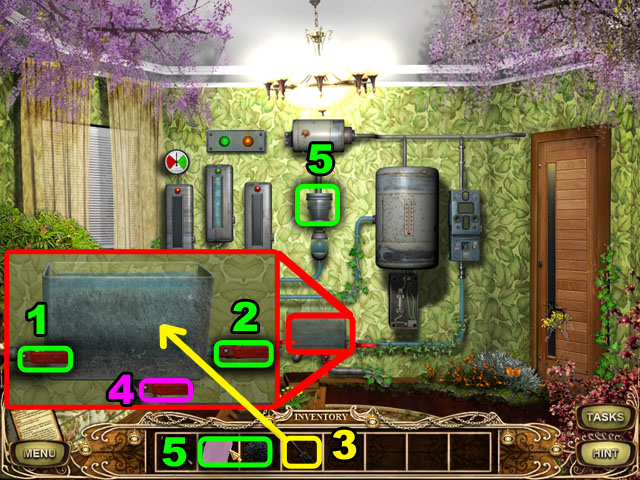
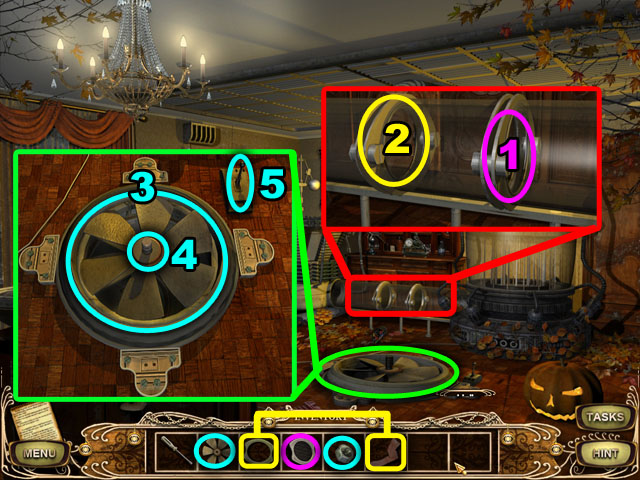
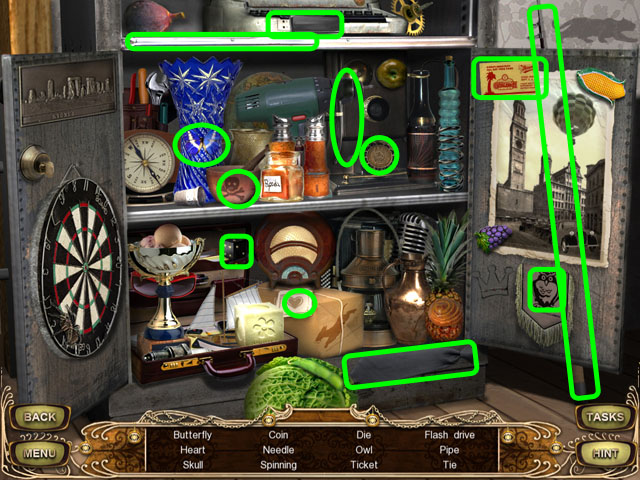
- Use the SCREWDRIVER to open the ventilation cover (1).
- Collect the STOOL, KETTLE, WIRE and PLIERS circled in red (2).
- Turn on the fan circled in green (3).
- Click on the hotspot highlighted in yellow in the left of the screen (4).
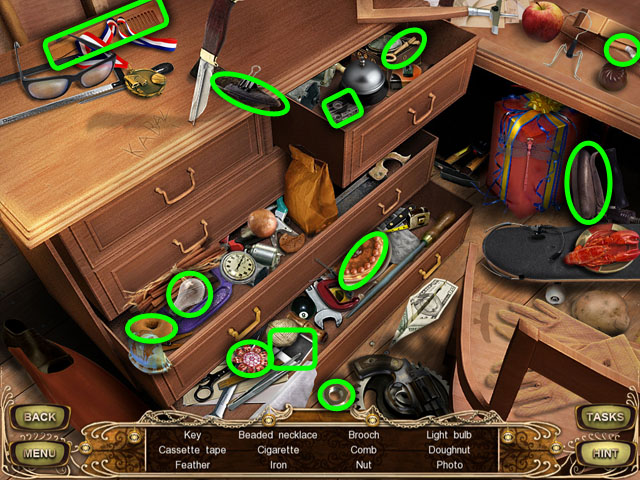
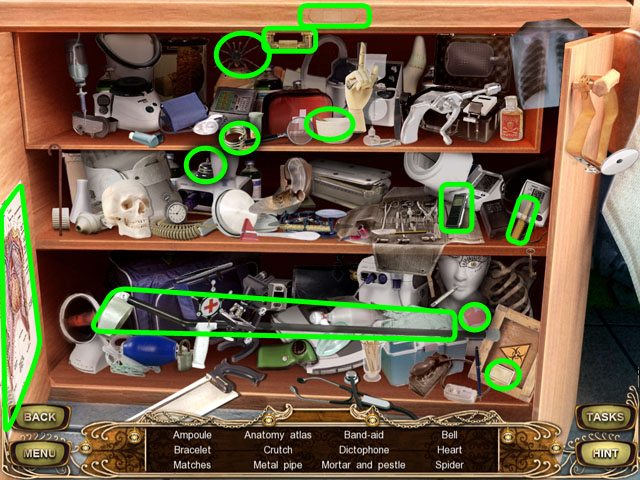
- Find 12 hidden objects listed at the bottom of the screen, in any order, circled in green in the image.
- The hidden objects are randomized and may be different in your playthrough.
- You will receive the KEY after finishing the scene.
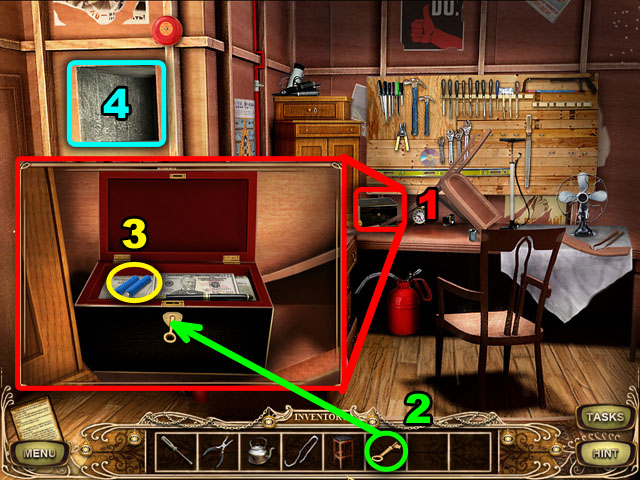
- Click on the small box in the middle (1).
- Use the KEY from the inventory to open the small box (2).
- Collect the BATTERIES in the box (3).
- Go inside the ventilation shaft (4).
Level 2
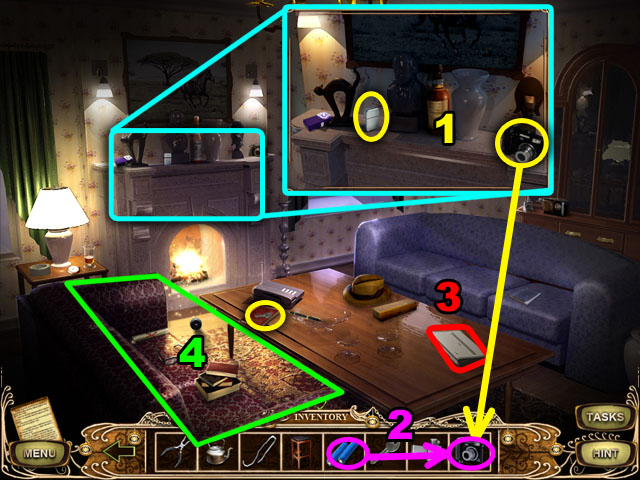
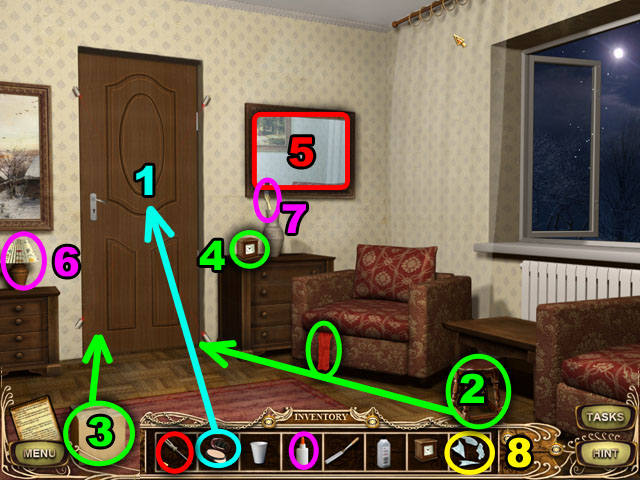
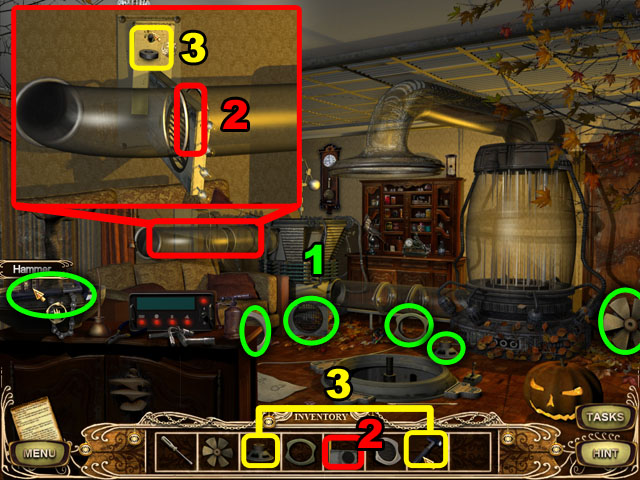
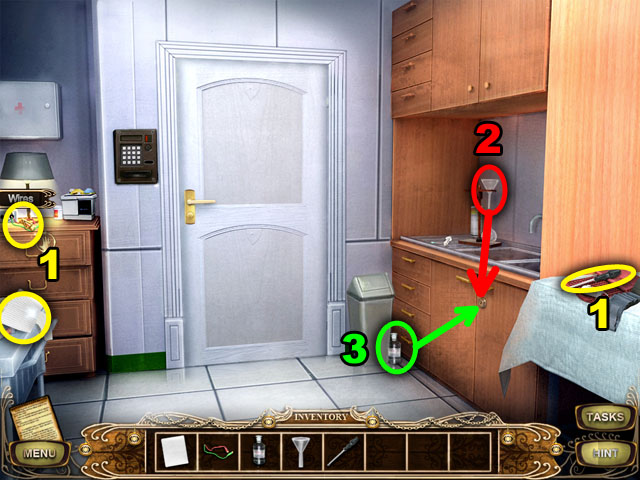
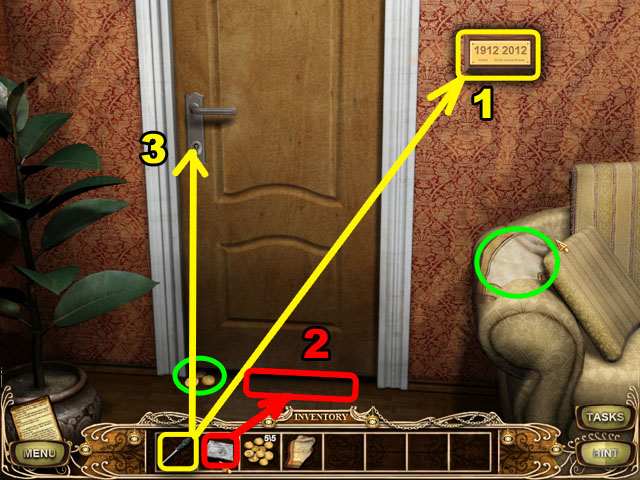
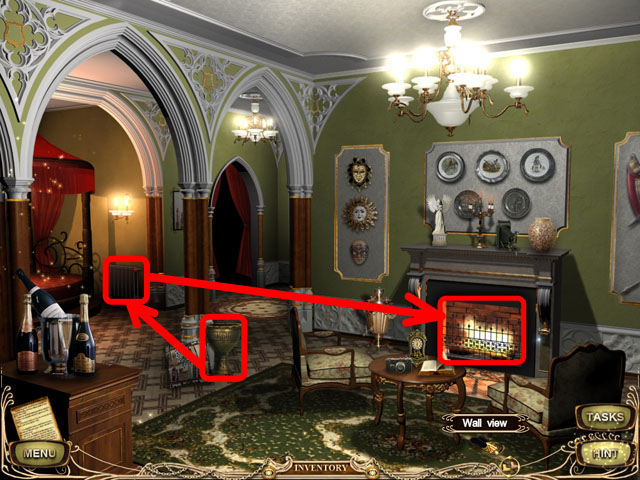
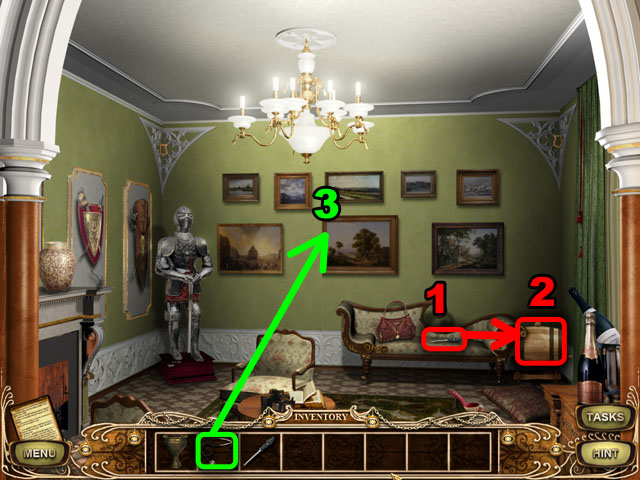
- Collect the KEY circled in yellow in the table.
- Click on the fireplace to zoom in and collect the LIGHTER and CAMERA circled in yellow (1).
- Open the inventory. Click the BATTERIES and combine them with the CAMERA (2).
- Check the printer on the table. You will need to use it later (3).
- Click on the couch hotspot to enter another hidden object scene (4).
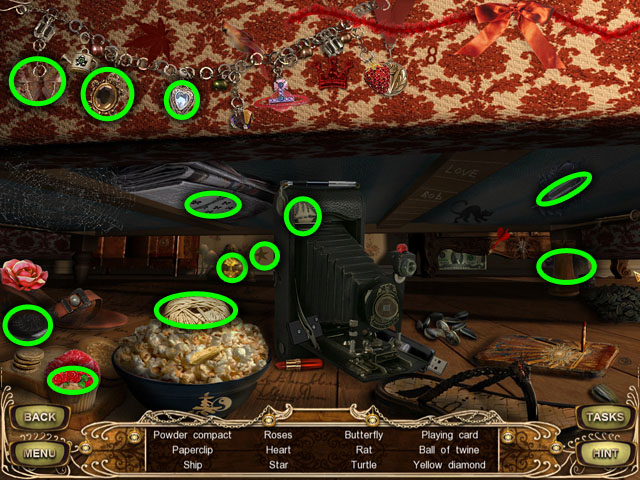
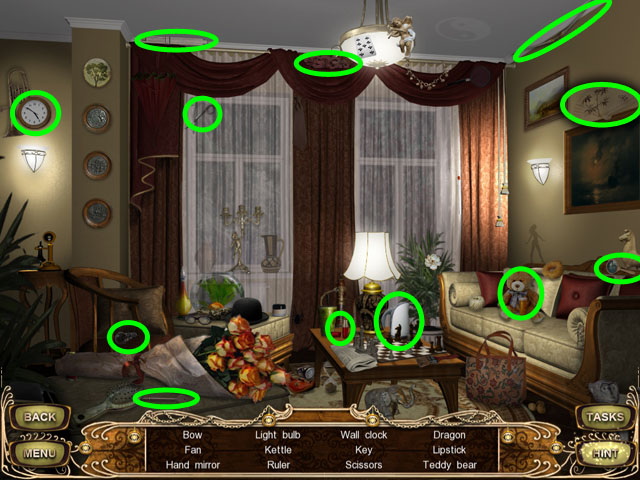
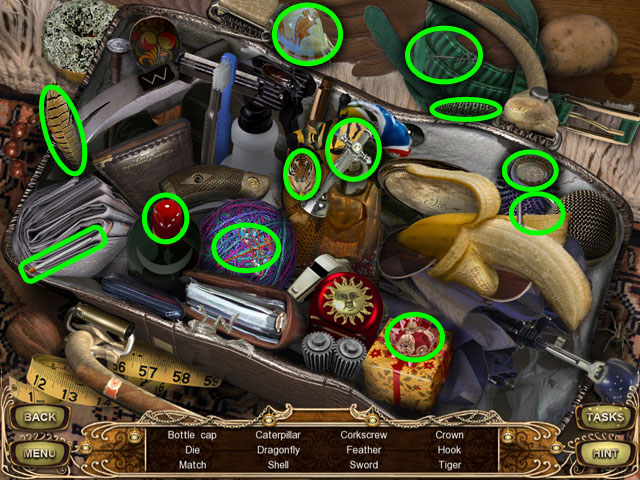
- Find 12 hidden objects listed at the bottom of the screen, in any order, circled in green in the image.
- The hidden objects are randomized and may be different in your playthrough.
- You will receive the POWDER COMPACT.
- Click on the bottom of the screen to move back to the storeroom.

- Use the KEY in the inventory to open the door.
- Move through the door to the hallway.
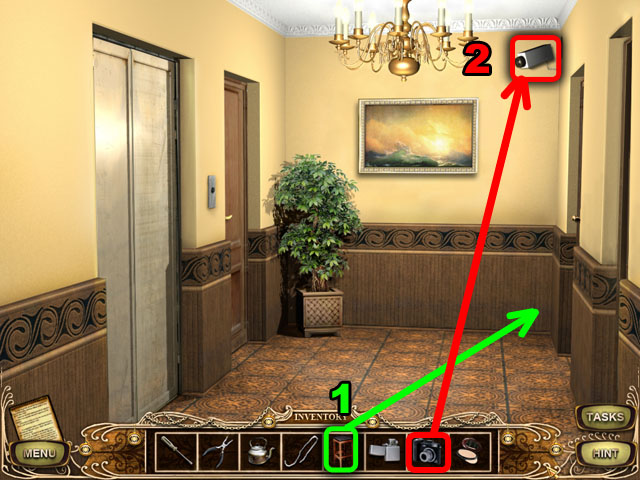
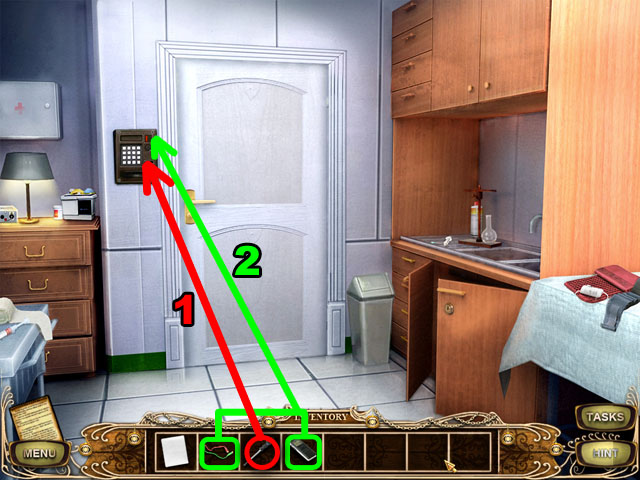
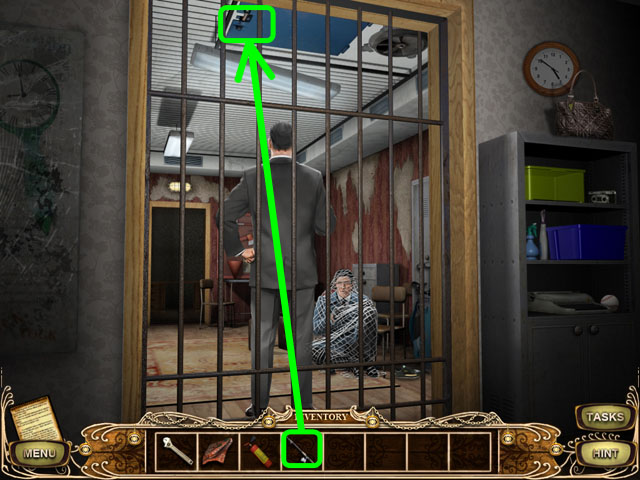
- Place the STOOL under the surveillance camera in the upper right corner (1).
- Take the picture with the CAMERA in the inventory from the surveillance camera angle (2).
- Enter the den from the door on the right. You won’t need to use the ventilation shaft anymore.
- Place the CAMERA WITH PHOTO from the inventory to the printer on the table to print.
- Take the PHOTO.
- Return to the hallway by clicking the bottom of the screen.
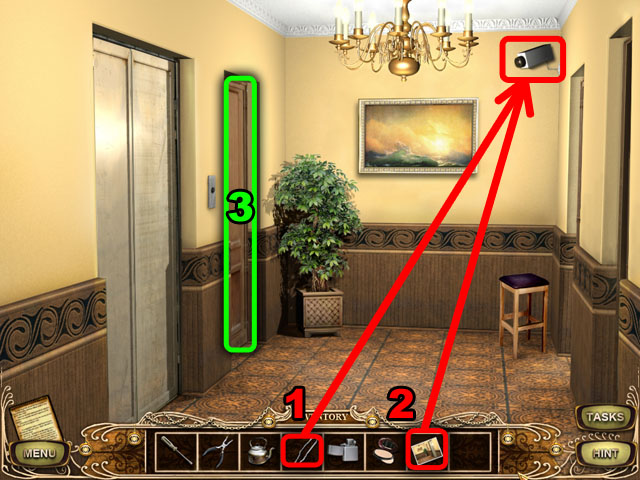
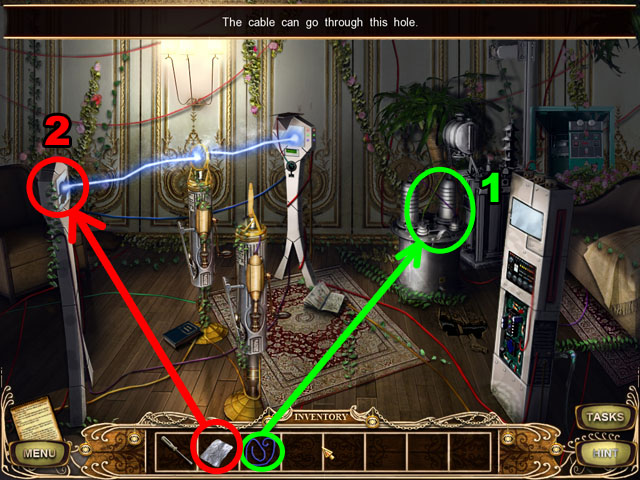
- Set the WIRE from the inventory onto the surveillance camera (1).
- Place the PHOTO from the inventory on to the WIRE (2).
- Enter the winter room (3).
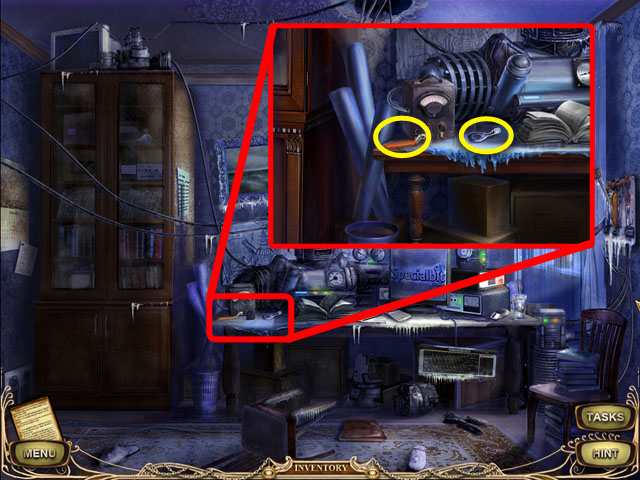
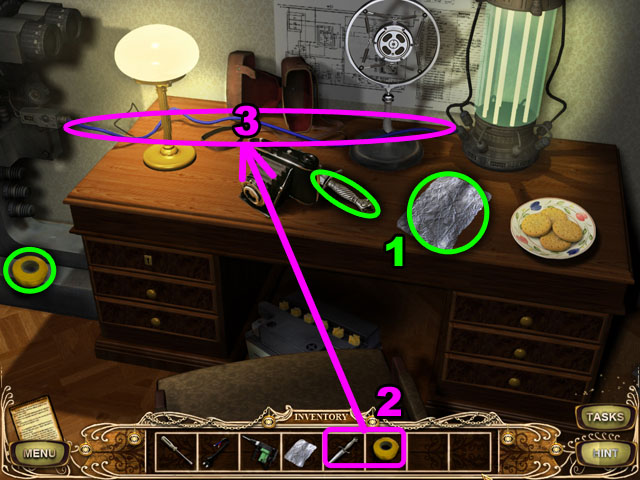
- Click on the table and collect the GAS HANDLE and the CLAMP circled in yellow.
- Return to the back yard through the right side of the storeroom.
- Click the KETTLE in the inventory and drag it to the SNOW on the right side of the screen, on top of the red box.
- Go back to the storeroom through the window.
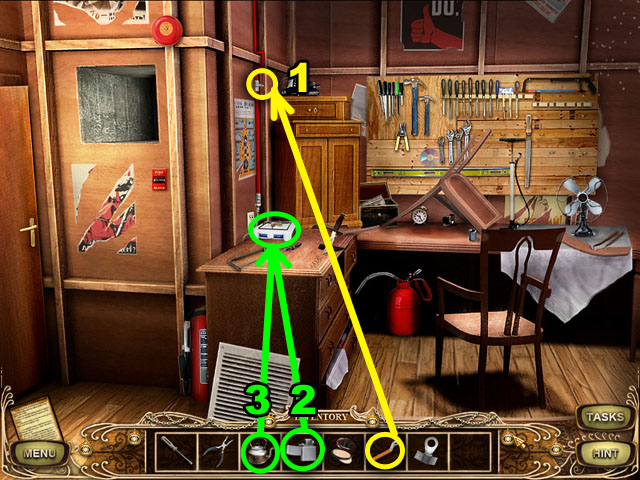
- Place the GAS HANDLE from the inventory onto the gas pipe (1).
- Open the gas by clicking the GAS HANDLE.
- Use the LIGHTER to light the hotplate (2).
- Set the KETTLE WITH SNOW onto the hotplate (3).
- After the water begins boiling, collect the KETTLE WITH HOT WATER.
- Return to the winter room through the hall.
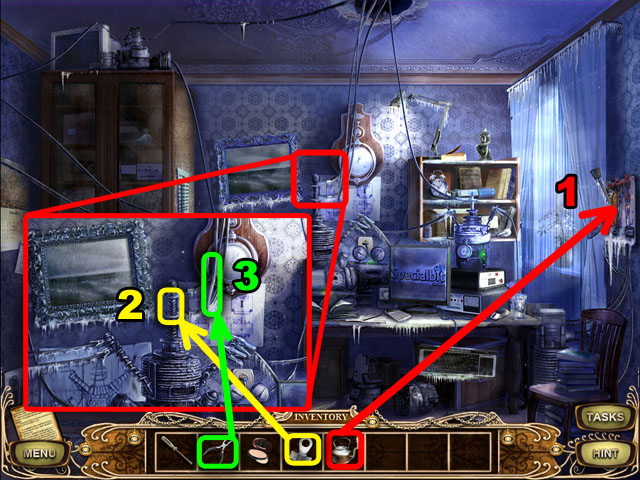
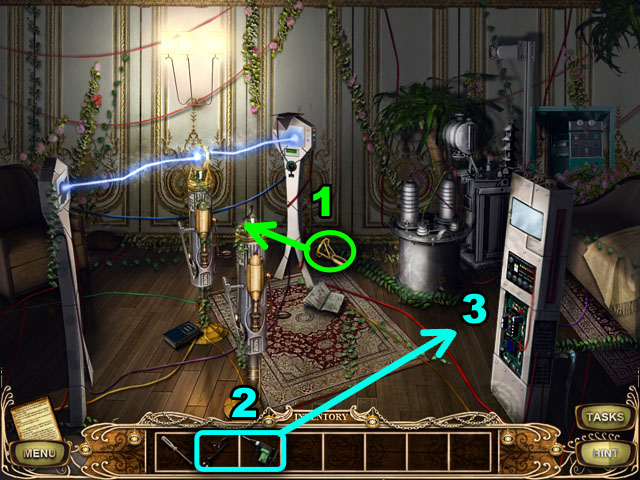
- Use the KETTLE WITH HOT WATER to melt the ice on the lever on the right (1).
- Click on the cable in the middle to zoom in.
- Put the CLAMP to the cable (2).
- Use the PLIERS to connect the cable (3).
- Click on the lever on the right to turn on the machine.
- Return to the hall and click on the elevator button in the left.
- Click on the elevator button again to open the doors and then enter the elevator.
- Enter the artist’s room on the right side of the hall, the door farthest from you.
Level 3
- Collect the belt circled in green (1).
- Click on the picture in the middle to zoom in. Collect the DISPOSABLE CUP and the GLUE (2).
- Click on the dresser in the left to zoom in. Collect the SOLVENT and the CHISEL (3).
- Click on the window in the left to go to the next room (4).
- Place the BELT from the inventory onto the statue in the upper middle to have something to grab on your way across.
- Enter the next room, through the window on the right.
- Collect the RAG, CLOCK, BOX, and STOOL circled in green in the screenshot.
- Use the POWDER COMPACT to show the security beam on the door (1).
- Place the STOOL on the right side of the door (2).
- Place the BOX on the left side of the door (3).
- Place the CLOCK on the box (4).
- Break the mirror with the SCREWDRIVER (5) and pick up the pieces on the chair.
- Put the GLUE on the lamp (6).
- Put the GLUE on the brush (7).
- Attach the BROKEN MIRROR to the lamp and brush (8).
- Use the BROKEN MIRROR on the STOOL to start the next puzzle.
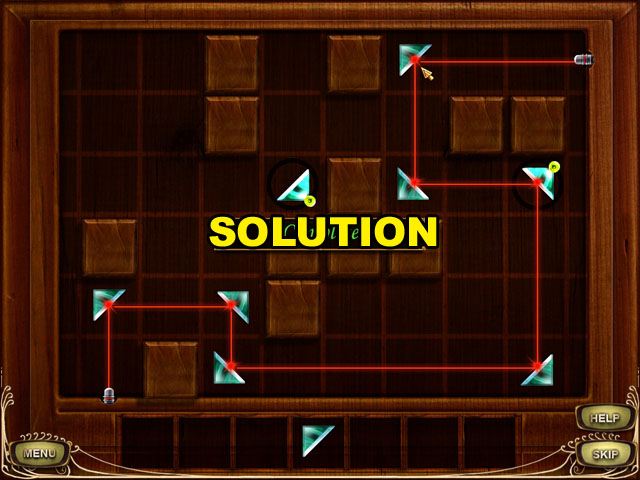
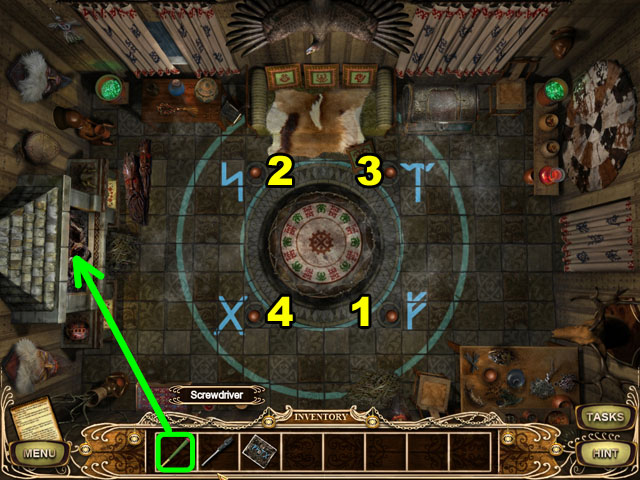
- Finish the puzzle by making the laser travel from the bottom left corner of the screen to the top right corner of the screen.
- Use the pieces of glass from your inventory on the different squares on the puzzle board.
- If the laser hits an angled mirror piece, it will reflect at a 90 degree angle. Refer to the image for the solution.
- Pieces inside circles can be rotated by clicking on them.
- You do not need to use all of the pieces to finish the puzzle.
- See the screenshot for one possible solution.
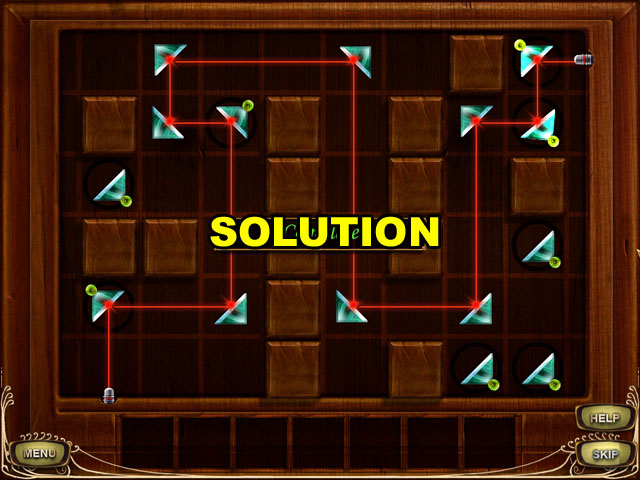
- Use the BROKEN MIRROR on the clock on the left to start another laser puzzle.
- Refer to the image for the solution to that puzzle.
- Return to the hall through the artist’s room from the window.
- Place the DISPOSABLE CUP in the water machine to take the WATER.
- Return to the artist’s room.
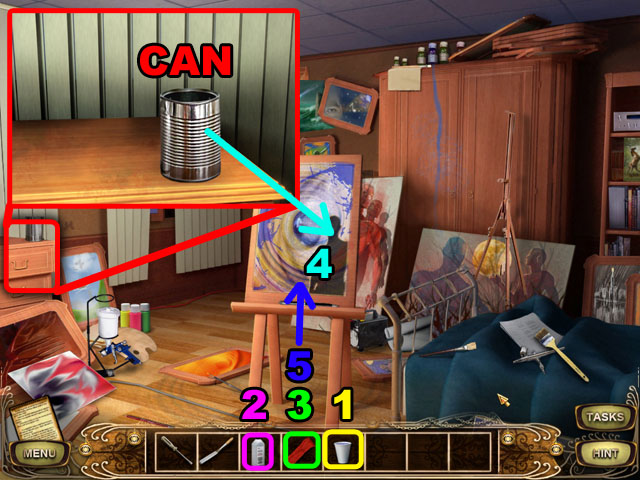
- Click on the dresser to zoom in.
- Pour the WATER into the can (1).
- Add the SOLVENT to the can (2).
- Soak the RAG in the can (3).
- Drag the mixture in the can to the picture (4) and then scrape off the painting with the RAG (5).
- You will see a secret picture of the key’s location under the old painting.
- Return to the next room through the window.
- Take off the piece of wood on the floor highlighted in green with the CHISEL.
- Collect the KEY.
- Open the door with the KEY on the left.
- Enter the bathroom.
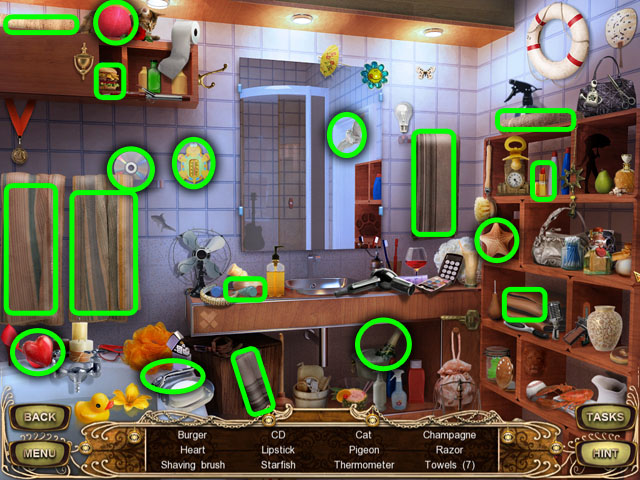
- Find 12 hidden objects listed at the bottom of the screen, in any order, circled in green in the image.
- The hidden objects are randomized and may be different in your playthrough.
- You will receive the STACK OF TOWELS.
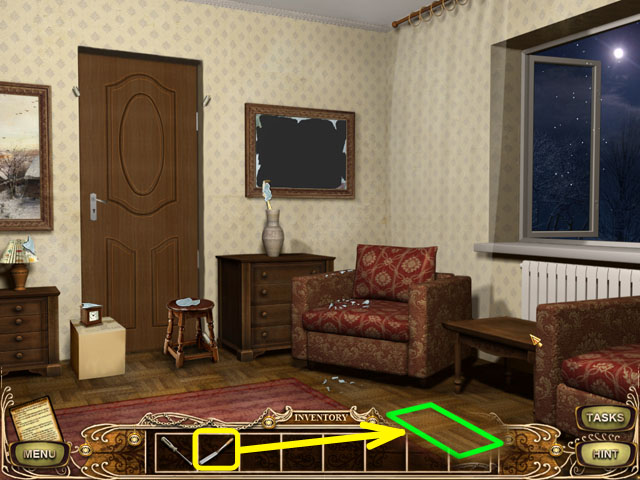
- Return to the previous room.
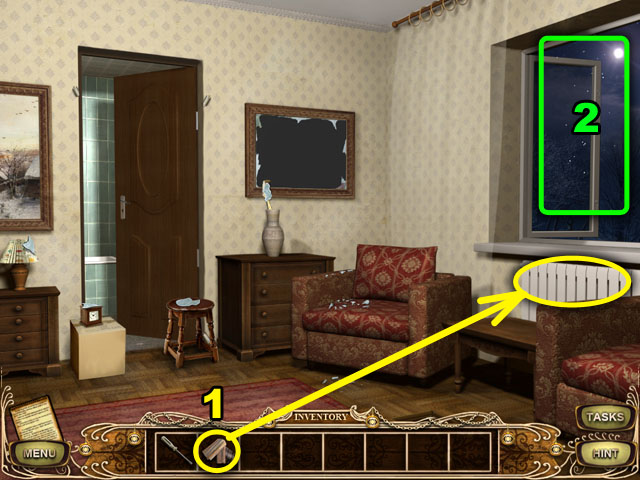
- Tie the STACK OF TOWELS to the radiator in the right (1).
- Move to the outside from the window (2) and then click on the rags coming out of the window to the right.
Level 4
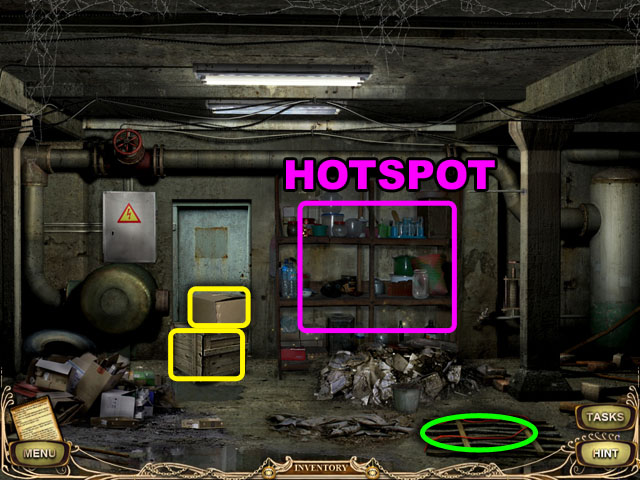
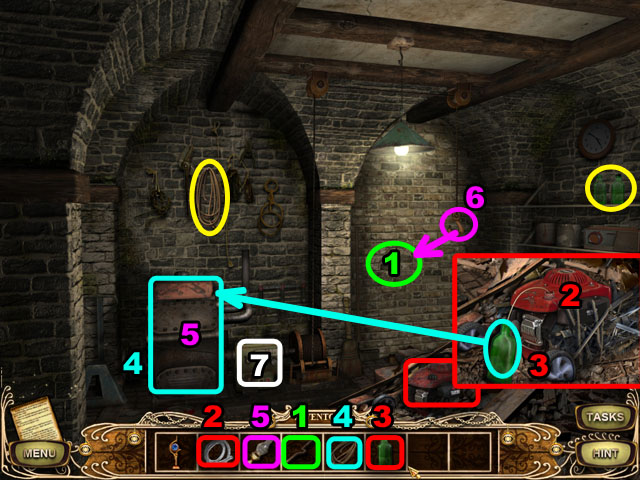
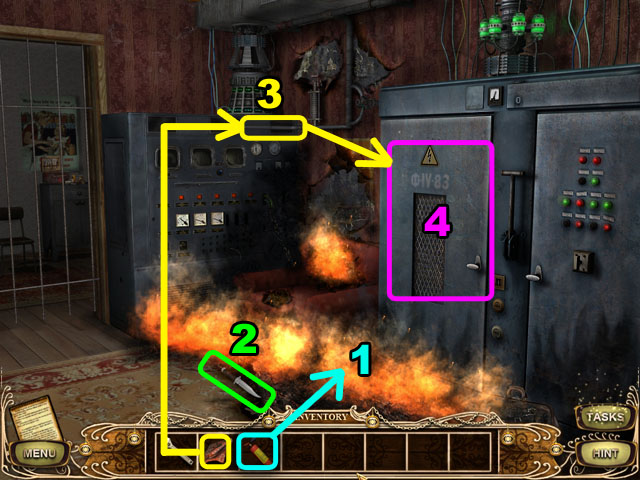
- Collect the WIRE, circled in green, in the bottom right corner.
- Move the cardboard box and the wooden box, both highlighted in yellow.
- Click on the shelf highlighted in purple.
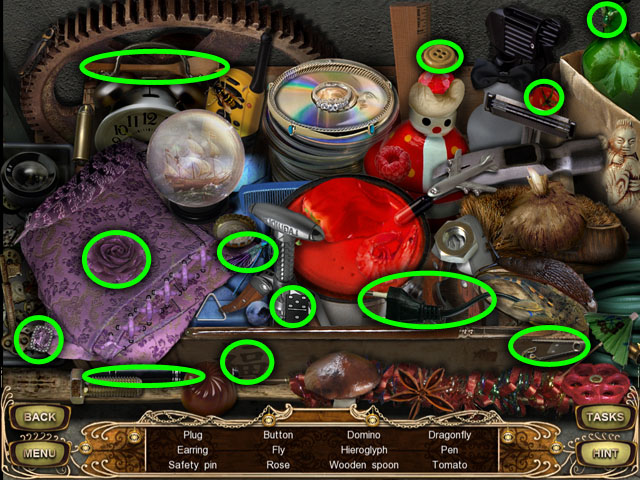
- Find 12 hidden objects listed at the bottom of the screen, in any order, circled in green in the image.
- The hidden objects are randomized and may be different in your playthrough.
- You will receive the PLUG and return to the previous room.
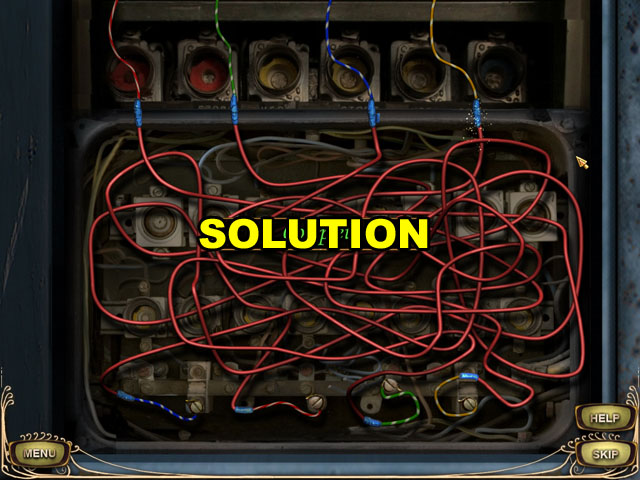
- Click the electricity box to open it and then place the WIRE in it to start the next puzzle.
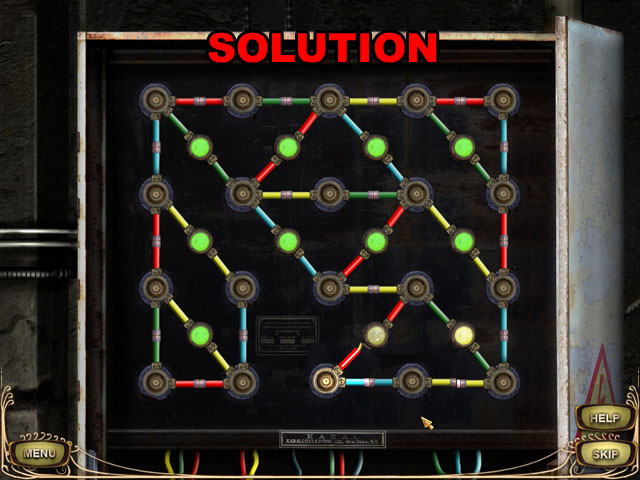
- Finish this puzzle by turning all of the lights green on the board.
- Every piece has different colored wires coming off of it.
- Click on any two pieces to switch their places.
- Connect the pieces to each other so that all of the pieces are connected with no dead ends, and the wires touching each other are all the same color.
- If all the pieces connected to a light are in the correct place, and they are connected to the right pieces, the light will turn green.
- See the screenshot for the correct solution.
- Click the door to the right of the electricity box and then click again to go up the stairs.
- Once you are in the hall, go forward one more time.
- Enter the store through the middle of the right side doors.
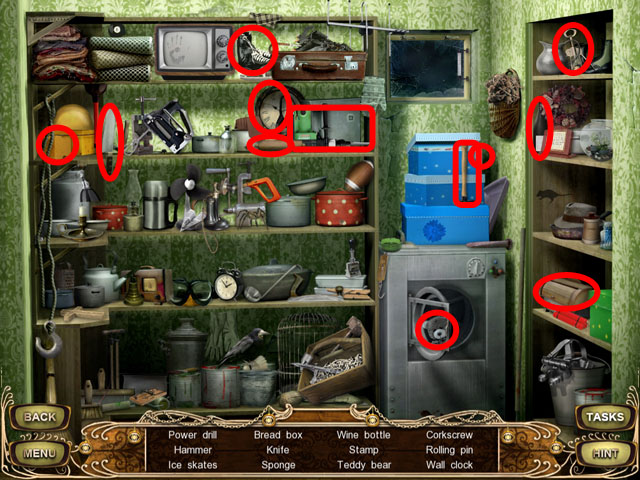
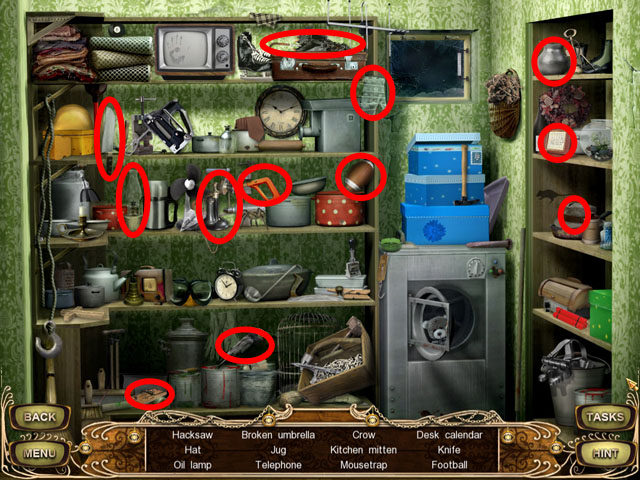
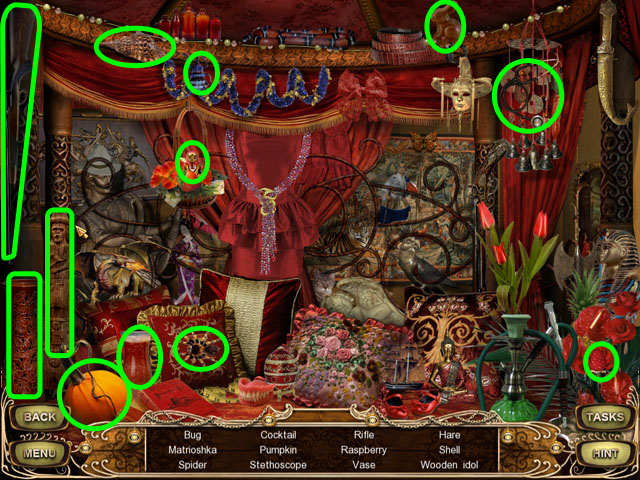
- Find 12 hidden objects listed at the bottom of the screen, in any order, circled in red in the image.
- The hidden objects are randomized and may be different in your playthrough.
- You will receive the POWER DRILL.
- Return to the hall.
- Enter the summer room, the first door on the left.
- Find the LENS FRAME in the middle. Place the LENS FRAME onto the lens frame holder (1).
- Combine the POWER DRILL and PLUG in the inventory (2).
- Make a hole in the floor with the POWER DRILL (3) on the right side of the room.
- Exit the room and enter the workshop that is to the right of the summer room.
- Collect the FOIL, KNIFE, and INSULATING TAPE circled in green (1).
- Combine the KNIFE and INSULATING TAPE in the inventory (2).
- Cut the LONG WIRE on the table with the KNIFE (3).
- Return to the summer room.
- Connect the long wire to the transformer (1), directly above the hole in the floor.
- Use the foil on the broken reflector to the left of the scene (2).
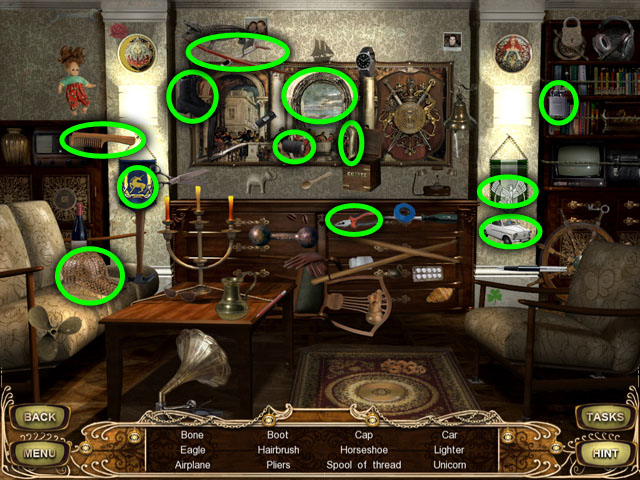
- Exit the room and enter the store again from the middle door on the right.
- Find 12 hidden objects listed at the bottom of the screen, in any order, circled in red in the image.
- The hidden objects are randomized and may be different in your playthrough.
- You will receive the HACKSAW.
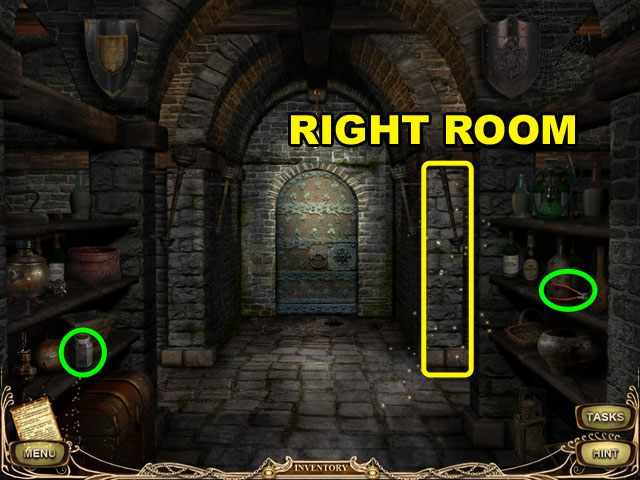
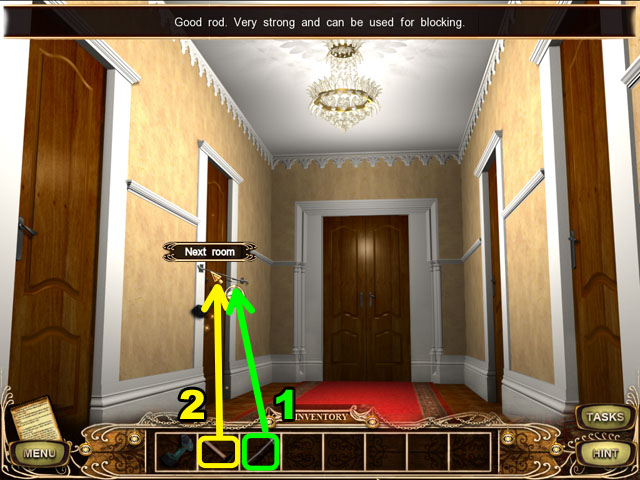
- Return to the hall. Click the bottom side of the screen twice to go to the basement.
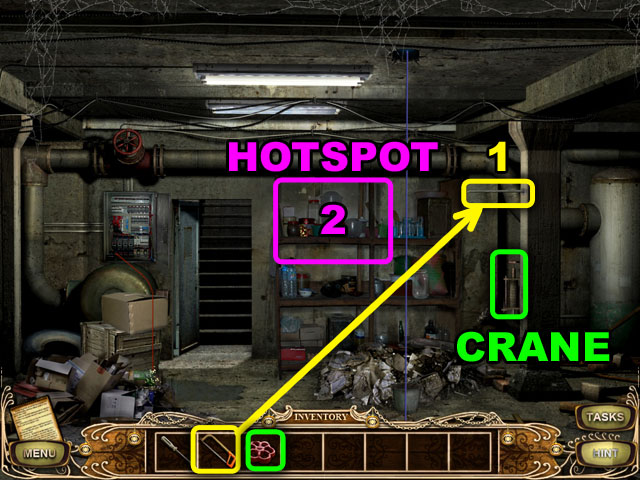
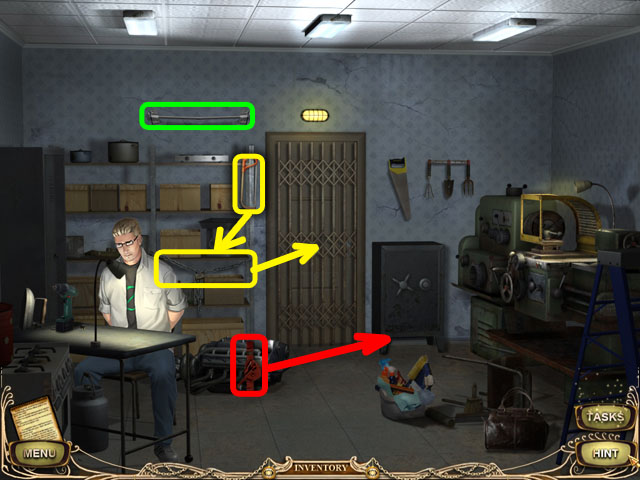
- Cut the ROD with the HACKSAW (1).
- Click on the shelf hotspot again (2).
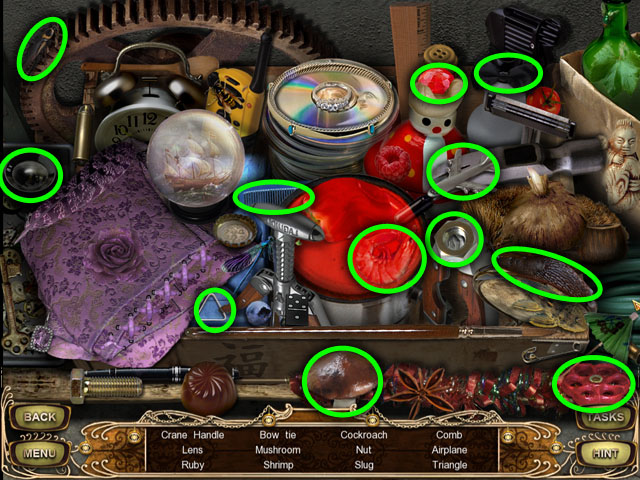
- Find 12 hidden objects listed at the bottom of the screen, in any order, circled in green in the image.
- The hidden objects are randomized and may be different in your playthrough.
- You will receive the CRANE HANDLE.
- Place the crane handle on to the crane, highlighted in green in the previous image.
- Return to the workshop.
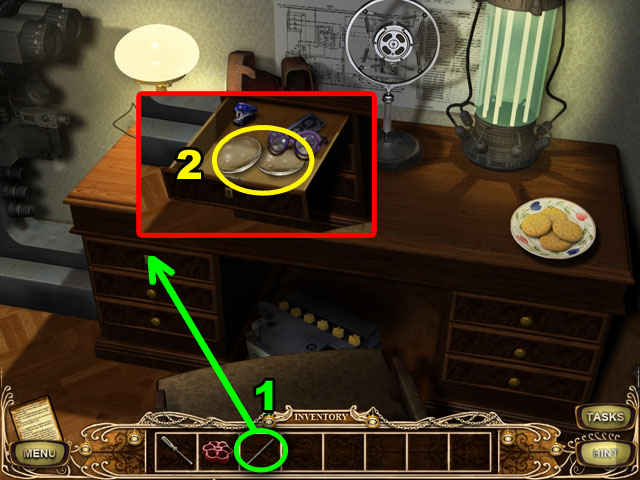
- Open the drawer with the ROD (1).
- Collect the LENSES in the drawer (2).
- Return to the summer room and place the LENSES onto the lens frame.
- Return to the basement.
- Turn on the crane by clicking the CRANE HANDLE.
- Return to the hall to see a cut scene.
- Push the elevator button and then enter the elevator.
- Enter the door labeled Antigravity, the leftmost door on the left side of the hallway.
Level 5
- Find 12 hidden objects listed at the bottom of the screen, in any order, circled in green in the image.
- The hidden objects are randomized and may be different in your playthrough.
- You will receive the SPOOL OF THREAD.
- Exit the room and enter the writer’s room, the left door on the right side of the hallway.
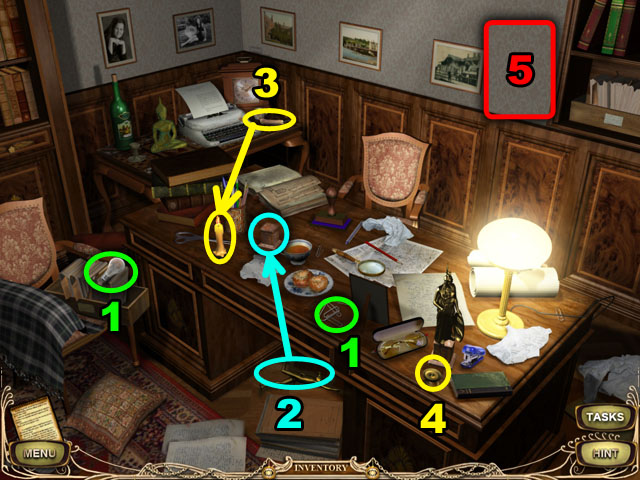
- Find the BULB and PAPERCLIP, both highlighted in green (1).
- Find the STATUETTE and place it on the stand highlighted in light blue (2).
- Collect the CANDLE circled in yellow and light it with the candle on the desk (3).
- Place the BURNING CANDLE on the candle holder (4).
- Click on the wall panel in the right and the safe will appear (5).
- Move to the second part of the room by clicking the left side of the screen.
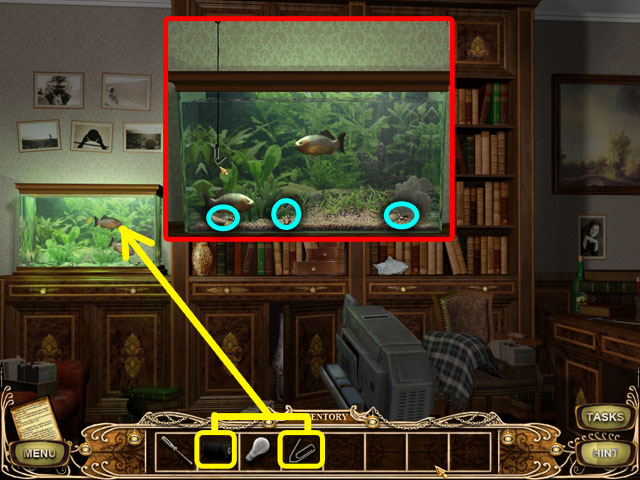
- Open the inventory and combine the PAPERCLIP and the THREAD.
- Drag the HOOK ON A THREAD to the aquarium on the left.
- Catch the three parts of the key in the aquarium with the HOOK ON A THREAD.
- The fish will follow your hook and if they touch the key pieces, those pieces will fall back down to the bottom.
- If you pull the pieces too fast, they will fall as well.
- After getting all the pieces of the key, return to the previous screen.
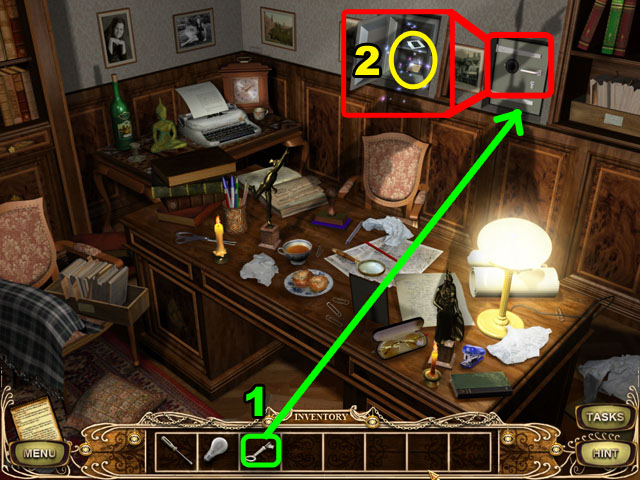
- Open the safe with the key in the inventory (1).
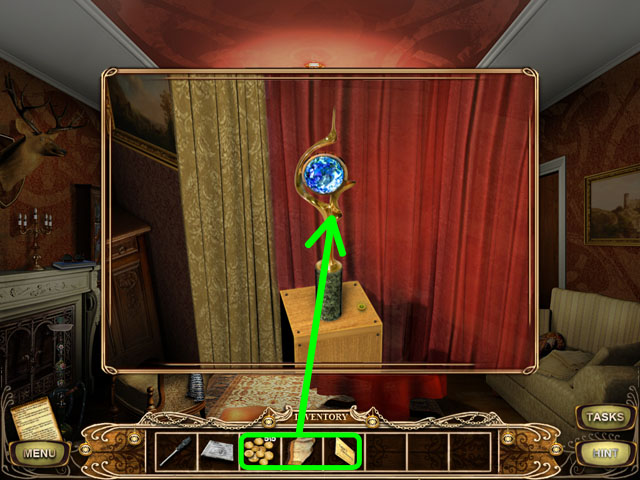
- Collect the SLIDE in the safe and click on the note to zoom in (2).
- Return to the second part of the room.
- Set the BULB into the projector in the middle of the bottom half of the screen.
- Insert the SLIDE into the projector.
- Click each symbol in correct order.
- When you make a wrong click there will be a red “X” visible above the symbol. When the click is correct it will show a green mark.
- There is a note in the bottom left corner that will give you a clue to the answer.
- See the image for the solution.
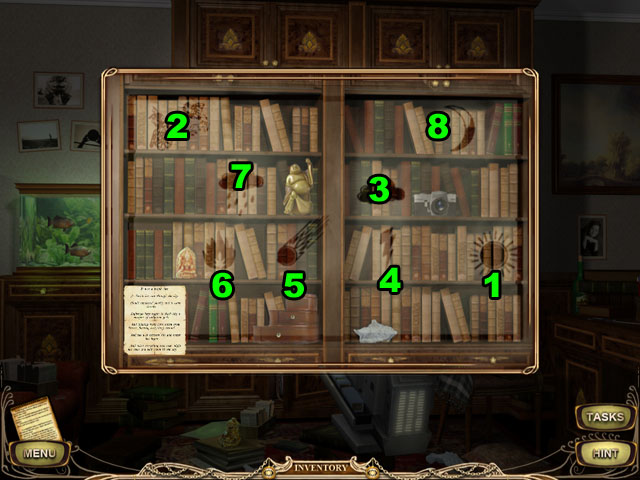
- Collect the BOTTLE and click the manuscript in the bookshelf.
- Exit the room and return to the hall.
- Enter the store room in the rightmost door on the right side of the hall.
Level 6
- Find 12 hidden objects listed at the bottom of the screen, in any order, circled in green in the image.
- The hidden objects are randomized and may be different in your playthrough.
- You will receive the CORKSCREW.
- Enter the spring room, the leftmost door on the left side.
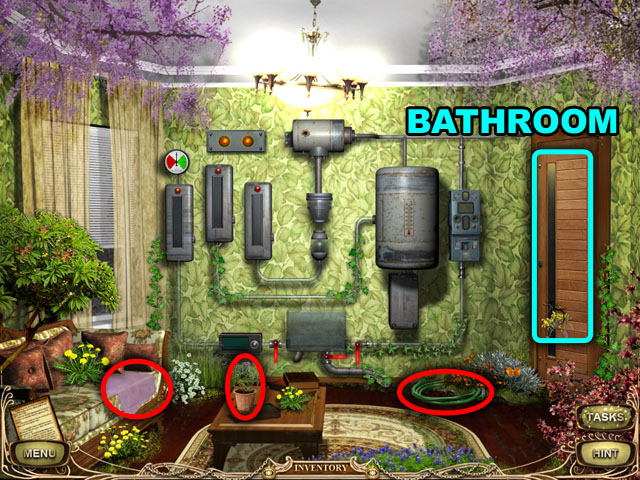
- Collect the TOWEL, POT WITH CARBON, and HOSE, all highlighted in red.
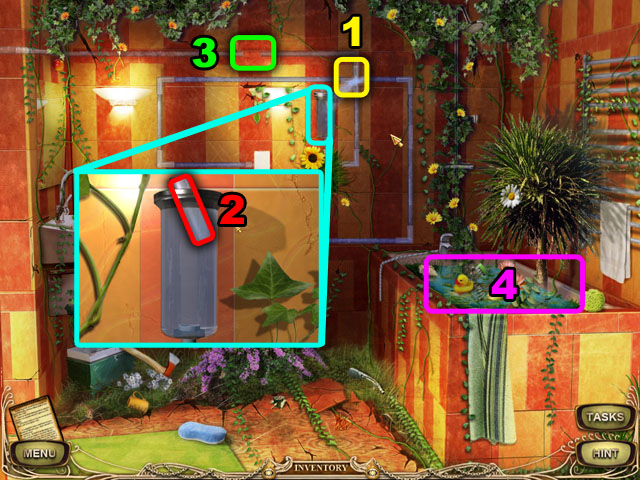
- Enter the bathroom on the right through the wooden door.
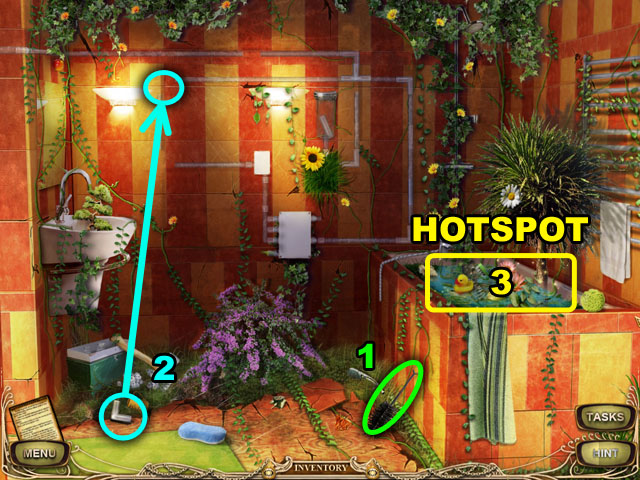
- Collect the SCRAPER highlighted in green (1).
- Collect the PIPE PIECE and connect the PIECE PIPE to the missing spot (2).
- Click on the bathtub hotspot on the right (3).
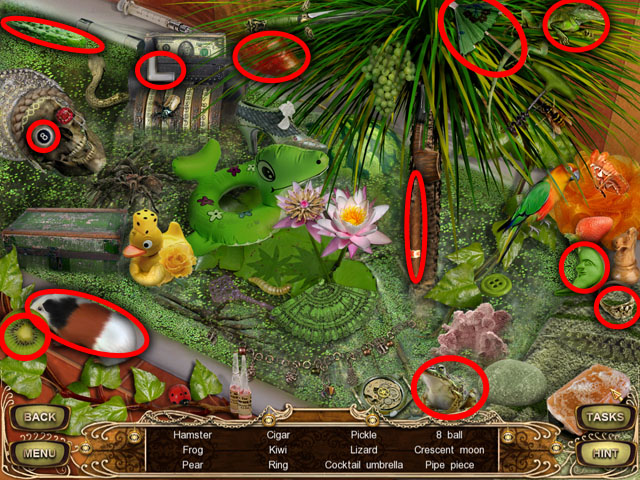
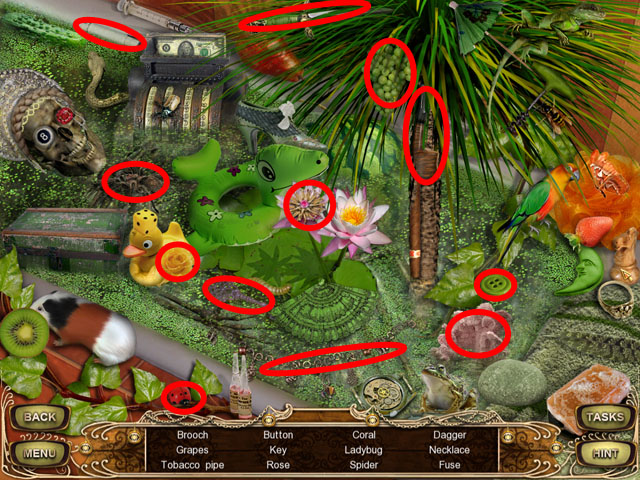
- Find 12 hidden objects listed at the bottom of the screen, in any order, circled in red in the image.
- The hidden objects are randomized and may be different in your playthrough.
- You will receive the PIPE PIECE.
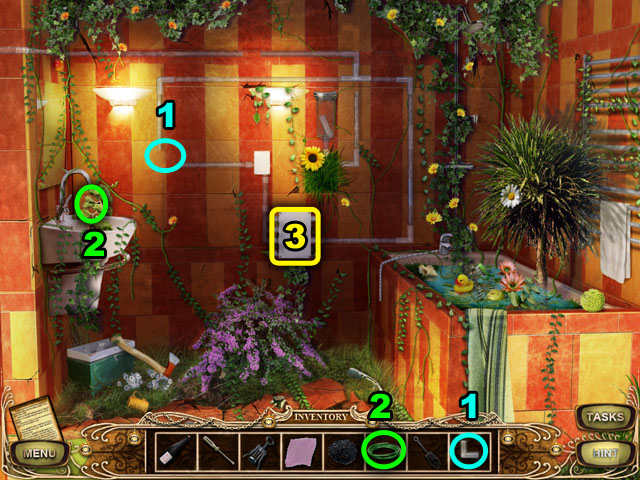
- Connect the PIPE PIECE in the missing spot (1).
- Set the HOSE onto the faucet on the right (2) and then click it again to turn the water on.
- Click on the water box (3) in the middle.
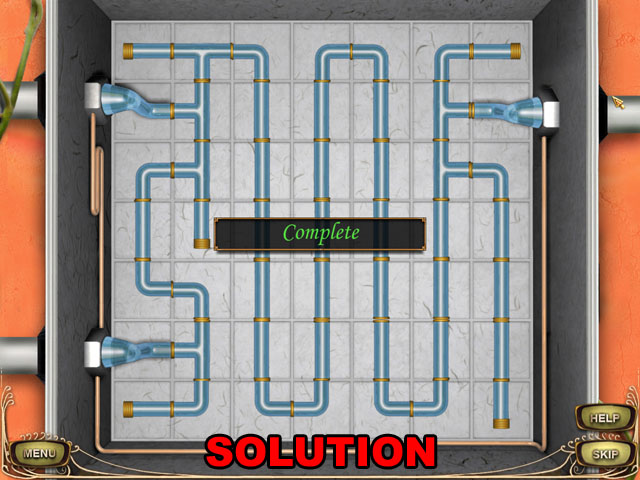
- Connect all of the pipes together without any of them leaking.
- Click any pipe to rotate it once.
- Pipes that are connected to the water source will turn blue.
- The ends of pipes that aren’t connected will leak water.
- Turn all of the pipes blue to finish the puzzle.
- See the image for the solution.
- Click on the connector highlighted in yellow to fill the can with water (1).
- Click on the can and collect the PIPE PIECE (2).
- Connect the PIPE PIECE to the missing spot (3) at the top of the screen.
- Click on the connector again until the upper pipe fills with water.
- Click on the bathtub hotspot (4).
- Find 12 hidden objects listed at the bottom of the screen, in any order, circled in red in the image.
- The hidden objects are randomized and may be different in your playthrough.
- You will receive the FUSE.
- Return to the first room of the spring room.
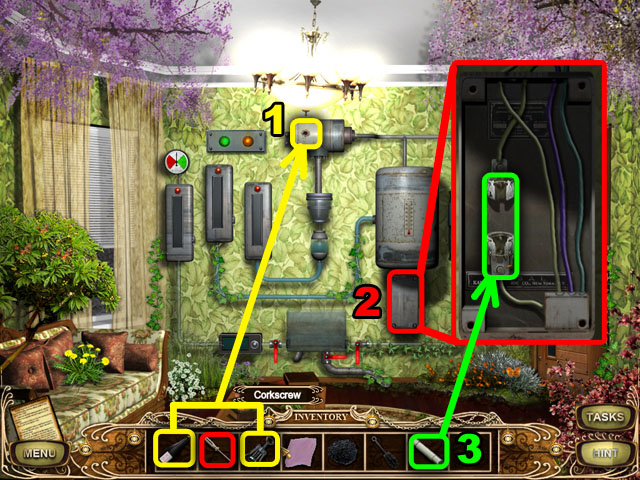
- Combine the WINE BOTTLE and the CORKSCREW in the inventory. Put the CORK into the leaking hole (1).
- There are four bolts in the fuse box cover under the boiler. Open the fuse box cover with the SCREWDRIVER (2).
- Put the FUSE in the fuse box (3).
- Click on the dirty tank in the middle to zoom in.
- Open the left (1) and then the right handles to fill the tank with water (2).
- Clean up the tank with the SCRAPER in the inventory (3).
- Open the bottom handle to empty the dirty water from the tank (4).
- Click the same handle again to fill the tank with clean water.
- Combine the TOWEL and POT CARBON in the inventory. Place the result in the filter, in the middle (5).
- After a short cut scene you will be in the hallway again. Enter the autumn room at the end of the hall.
Level 7
- Collect the HAMMER, FILTER, SENSOR PLATE, FILTER RING, and SPEAKER WITH MAGNET, all highlighted in green (1).
- Click the sensor on the left to zoom in.
- Place the SENSOR PLATE between the tubes (2).
- Combine the HAMMER and the SPEAKER WITH MAGNET to take out the MAGNET. Attach the plate to the MAGNET (3).
- Exit the room and enter the left room on the right side.
- Find 12 hidden objects listed at the bottom of the screen, in any order, circled in green in the image.
- The hidden objects are randomized and may be different in your playthrough.
- You will receive the KETTLE.
- Enter the sweethearts room on the left side, the leftmost door.
- Collect the STOCKINGS highlighted in green (1).
- Plug the KETTLE into the outlet to boil the water (2).
- After the water begins boiling, collect the KETTLE.
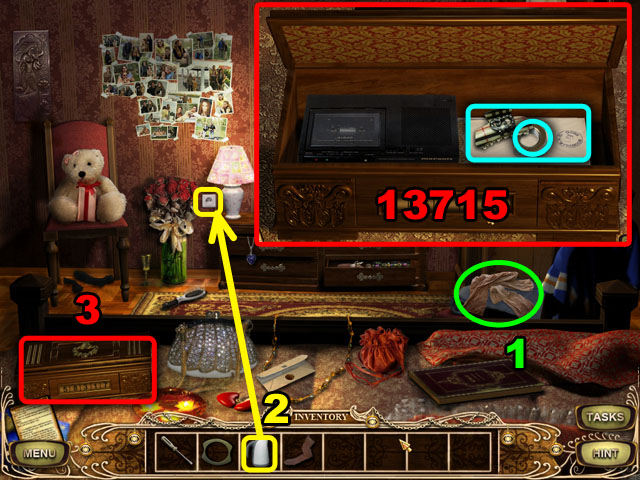
- Place the KETTLE WITH STEAMING WATER in front of the mirror. The number, 137×5, will appear on the mirror.
- Click on the box in the bottom left corner to zoom in. Arrange the numbers as “13715” to open the box.
- The fourth number is random, so set all of the other numbers and then click through the fourth number’s possibilities.
- Collect the NUT and click on the envelope to read the paper.
- Exit the room and enter the room of autumn.
- Place the FILTER highlighted in purple (1) in the tube under the machine.
- Combine the FILTER RING and the STOCKING in your inventory. Place the result in the tube (2) as well.
- Click on the FAN highlighted in green on the floor. Set the FAN from your inventory in the hole (3).
- Put the NUT in the middle (4).
- Turn on the FAN by pulling the lever (5).
- Exit the room. You can go to the stairs from the right door on the right side.
Level 8
- Collect the SCREWDRIVER, WIRE, and the PAPER (1).
- Collect the FUNNEL and place it on the key hole (2) of the cabinet below it.
- Collect the ACID and pour it into the FUNNEL (3).
- Click on the shelf hotspot.
- Find 12 hidden objects listed at the bottom of the screen, in any order, circled in green in the image.
- The hidden objects are randomized and may be different in your playthrough.
- You will receive the DICTAPHONE.
- Click on the key pad first.
- Open the keypad with the SCREWDRIVER (1).
- Combine the WIRE and the DICTAPHONE and place the result on the keypad (2).
- Click the keypad again and then click the door to open it and go through.
- Enter the security room on the left side.
Level 9
- Collect the PENCIL, MATCHES, and the WIRE (1).
- Click on the fuse panel and take out the DEAD FUSE (2).
- Combine the DEAD FUSE and the WIRE in the inventory (3).
- Place the FUSE WITH WIRE in the fuse panel.
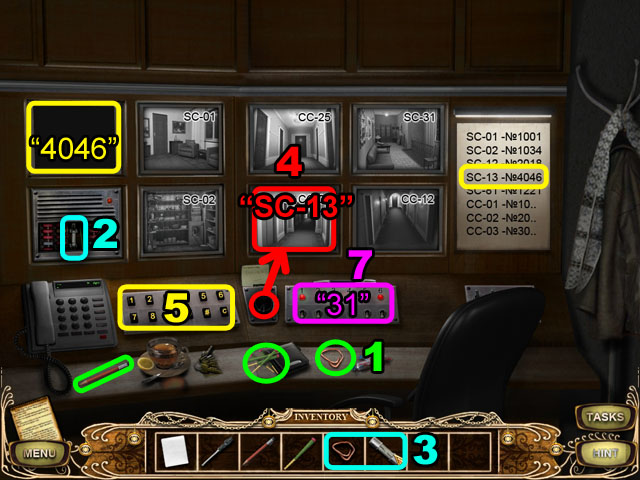
- Click on the selector in the middle until the monitor in the middle of the bottom changes to SC-13.
- Using the card to the right of the monitors, enter “4046” using the keyboard (5).
- If you mess up, hit the “C” Button to clear the numbers and try again.
- Return to the security corridor.
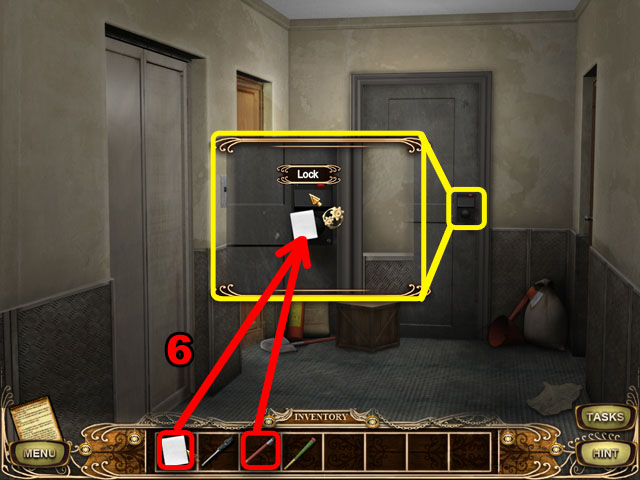
- Click on the lock to zoom in.
- Place the PAPER on the lock and scratch the paper with the PENCIL (6). The PAPER will show the number “31.”
- Return to the security room.
- Turn on switches 1 and 3, highlighted in purple in the previous image (7).
- Enter the previously locked room.
Level 10
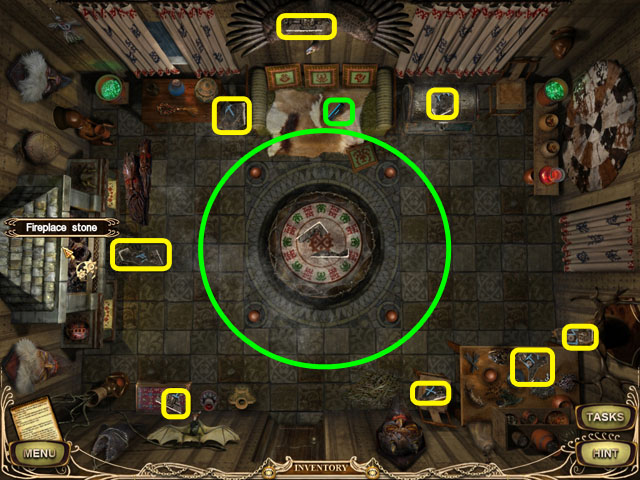
- Collect 8 PUZZLE PIECES highlighted in yellow.
- Use the UV LAMP highlighted in green to show the symbols in the middle.
- Right-click to remove the UV LAMP when you are finished.
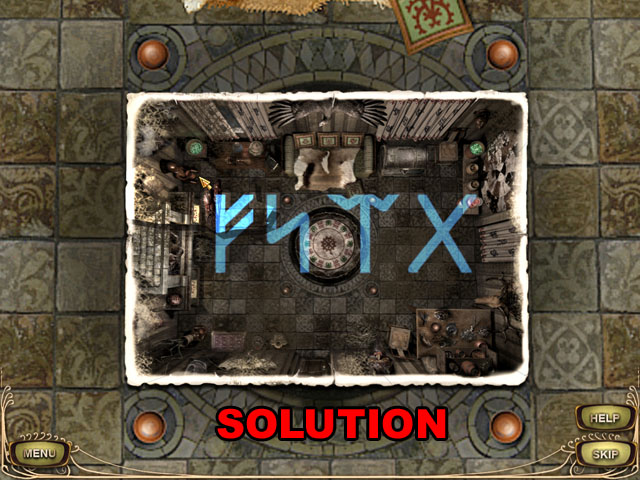
- Arrange the puzzle pieces like a jigsaw puzzle.
- Left-click the pieces to pickup and drop them.
- Right-click the pieces to rotate them.
- Use the white border to help you line up the edges.
- See the screenshot for the final image.
- Burn the MATCH highlighted in green by using the fireplace.
- Light the candles in the correct order. See the image for the solution.
Level 11

- Enter the clairvoyant room through the leftmost door.
- Collect the COINS and the NEWSPAPER, both highlighted in green.
- Enter the next room through the door to the right.
- Collect the COINS and the FABRIC highlighted in green.
- Remove the DOOR PLATE with the SCREWDRIVER (1).
- Place the NEWSPAPER under the door. Click on the NEWSPAPER to put it further under the door (3).
- Push out the KEY in the key hole with the SCREWDRIVER (2).
- Click on the NEWSPAPER again to pull it out from the door.
- Collect the KEY and open the door with it. You won’t be able to go through it without getting the talisman first.
- Return to the previous room.
- Combine the DOOR PLATE and the FABRIC in the inventory.
- Combine the FABRIC WITH THE PLATE and the COINS.
- Place the SACK on the stand of the TALISMAN to collect the TALISMAN.
Level 12
- Follow the door to the right and go through the door that you just unlocked.
- Click on the 6 pictures on the wall from the right to the left in order.
- The green lights underneath all of the images will light up.
- Click the two clocks in the middle to zoom in.
- Set the right clock to 7:15 as it said in the right painting.
- Set the left clock to 5:45 as it said in the left painting.
- Go down the stairs in the middle.
Level 13
- Collect the PLIERS and the EMPTY JAR, both highlighted in green.
- Move to the room to the right.

- Find 12 hidden objects listed at the bottom of the screen, in any order, circled in green in the image.
- The hidden objects are randomized and may be different in your playthrough.
- You will receive PLASTER.
- Go back to the previous scene and continue to the left room.
- Collect the ROD, OIL LAMP, and HOSE, all circled in yellow.
- Open the faucet with the PLIERS (1).
- Set the EMPTY JAR in the sink and fill the water into the JAR (2).
- Return to the main corridor.
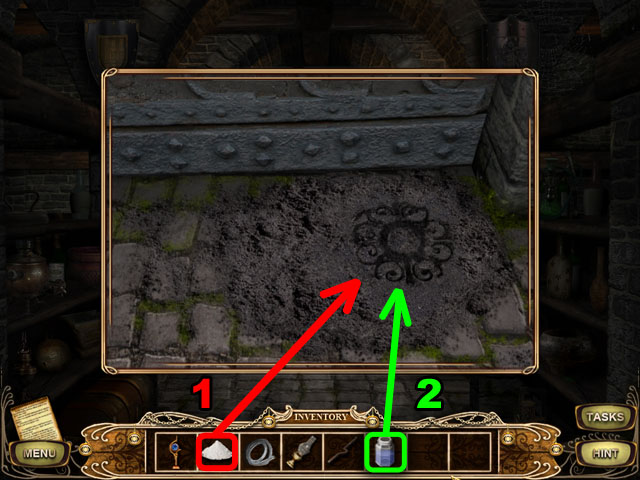
- Spread the PLASTER on to the dirt in front of the door (1).
- Pour the WATER on the FLOUR (2).
- Take the solidified FLOUR that turned the key.
- Open the door with the FLOOR AMULET GYPSUM and click it again to go through.
Level 14
- Collect the BOTTLE and ROPE, both circled in yellow in the screenshot.
- Use the ROD to remove one of the loose bricks on the wall to the right (1).
- Click on the lawnmower to zoom in. Click the cap to unscrew it. Place the HOSE into the gas tank of the lawnmower (2).
- Set the BOTTLE to get some fuel from the HOSE. Fill the engine with fuel from the bottle (3).
- Attach the COIL OF ROPE to the engine (4).
- Add the oil from the OIL LAMP to the engine as well. (5).
- Connect the HOOK to the ROD from step 1 (6).
- Turn on the engine by clicking it.
- Turn on the switch on the winch, to the right of the engine, to break the wall (7).
- Enter the main corridor and enter the pool.
Level 15
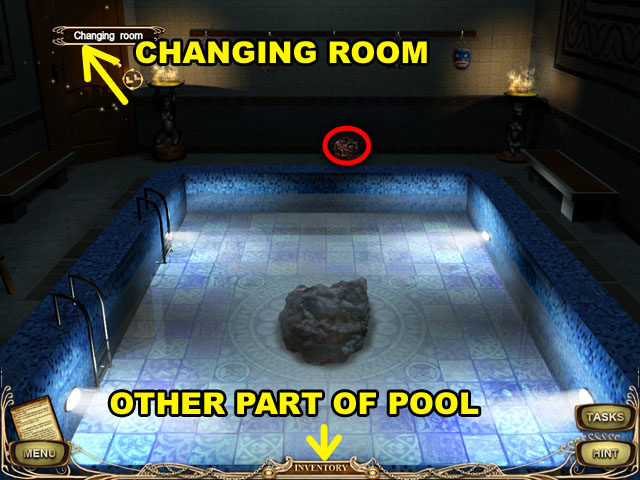
- Collect the MASK circled in red in the middle.
- Move to the other part of the pool by clicking towards the bottom of the screen.
- Click on the white NOTEPAD at the bottom.
- Return to the main pool screen.
- Move to the changing room by clicking the door in the upper left corner of the screen.
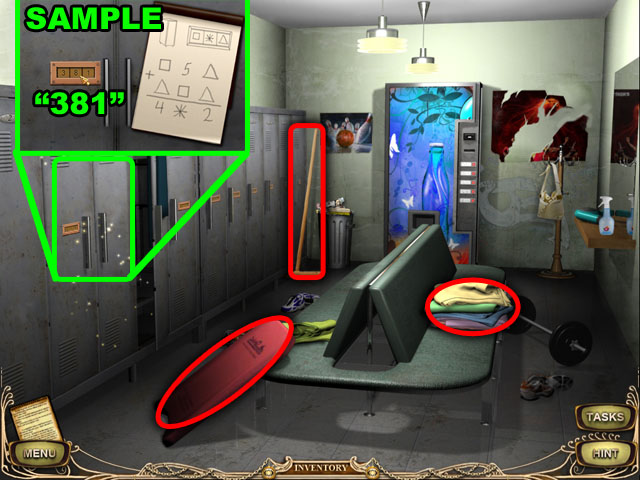
- Collect the BOARD, MOP, and TOWELS, highlighted in red.
- Click on the locker to zoom in. Click on the NOTEPAD in your inventory to bring up the password hint.
- Click on the locker combination to zoom in again, the NOTEPAD will be shown beside the lock.
- The password is a math problem. Each shape corresponds to a different number.
- Start with the left side by dividing it by 2, since both symbols are the same.
- Then minus the triangle number from the number on the left side to give you the square number.
- Then add the two numbers together to get the combination and the star number.
- Enter the correct numbers (381 in our example) to open the lock. The solution is randomized.
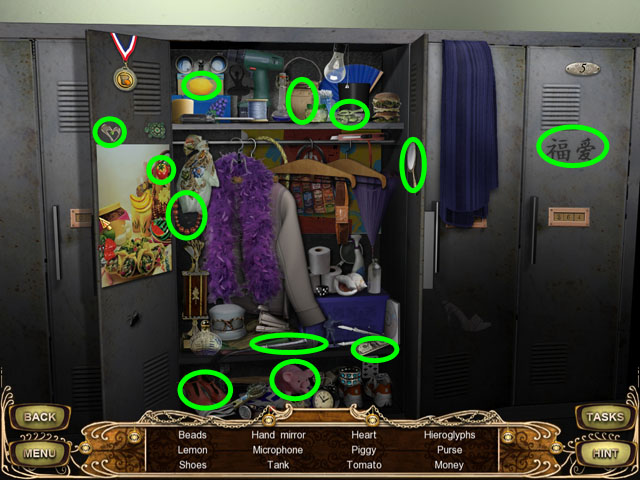
- Find 12 hidden objects listed at the bottom of the screen, in any order, circled in green in the image.
- The hidden objects are randomized and may be different in your playthrough.
- You will receive the ROPE.
- Return to the pool.
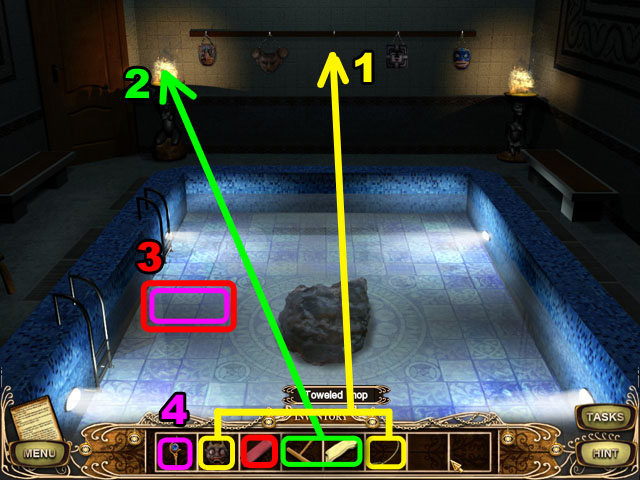
- Combine the MASK and the ROPE in the inventory. Place the MASK WITH ROPE on the missing spot in the upper middle (1).
- Combine the MOP and the TOWELS. Light the TOWELED MOP on fire with the torch on the left (2).
- Move to the other part of the pool by clicking the bottom.
- Light the two torches with the BURNING MOP.
- Return to the pool.
- Put the BOARD on the water (3).
- Place the TALISMAN from the inventory on the BOARD, placing it above the black meteor in the pool (4).
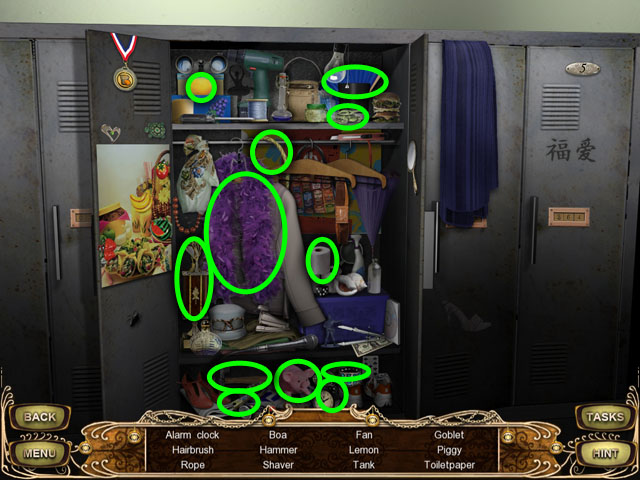
- Return to the changing room locker.
- Find 12 hidden objects listed at the bottom of the screen, in any order, circled in green in the image.
- You will receive some MONEY.
- Click on the vending machine in the middle.
- Insert the MONEY into the vending machine.
- Click on the red button in the bottom right corner to get four COINS.
- Return to the pool.
- Place the four COINS around the TALISMAN and watch the next cut scene.
- Collect the LADDER in the corridor.
- Enter the Hacker room on the left.
Level 16
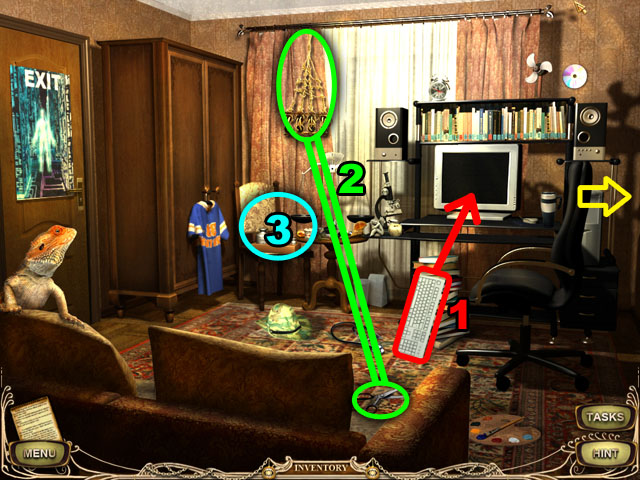
- Collect the KEYBOARD highlighted in red. Drag it to the monitor to turn on the computer (1).
- Collect the MACRAMÉ and the SCISSORS. Combine them to create the ROPES (2).
- Move to the room to the right and place the ropes on the hooks.
- Pick up the SACKS below the ropes.
- Return to the first room and click the scale in the middle of the screen (3).
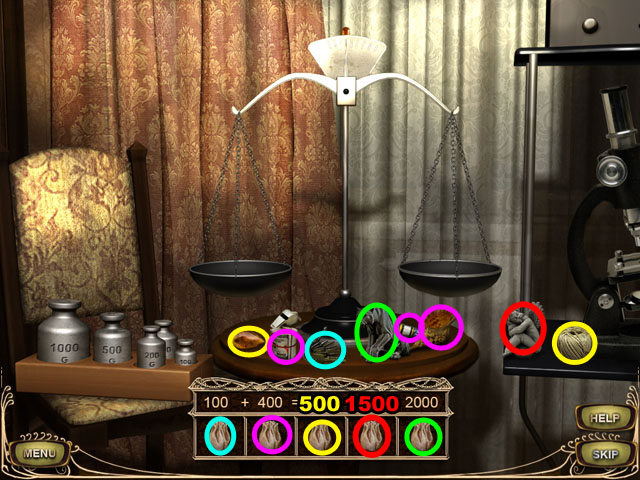
- Place the 100G weight on the left and then place the keys circled in light blue on the right. Click on the sack circled in light blue at the bottom.
- Place the two 200G weights on the left and the money, tube of paint, and the shell (all circled in purple) on the right. Click on the sack circled in purple in the bottom.
- Place the 500G weight on the left and the rock and yarn (both circled in yellow) on the right. Click on the sack circled in yellow at the bottom.
- Place the 1000G and 500G weights on the left and the angel statuette circled in red on the right. Click on the sack circled in red at the bottom.
- Place all of the weights on the left and the demon statuette circled in green on the right. Click on the sack circled in green at the bottom.
- Move to the next room by clicking the right side of the screen.
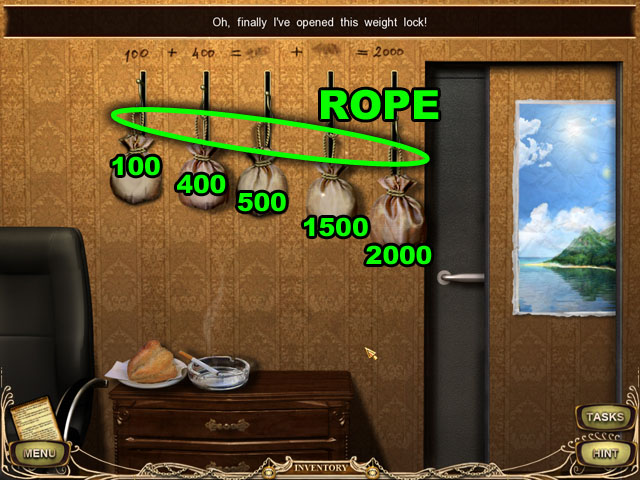
- Place the ROPE from the inventory onto the hooks.
- Place all the SACKS on the hooks, following the numbers. The third number is 500 and the fourth number is 1500.
- Then the door will be opened on the right. Enter the through the door.
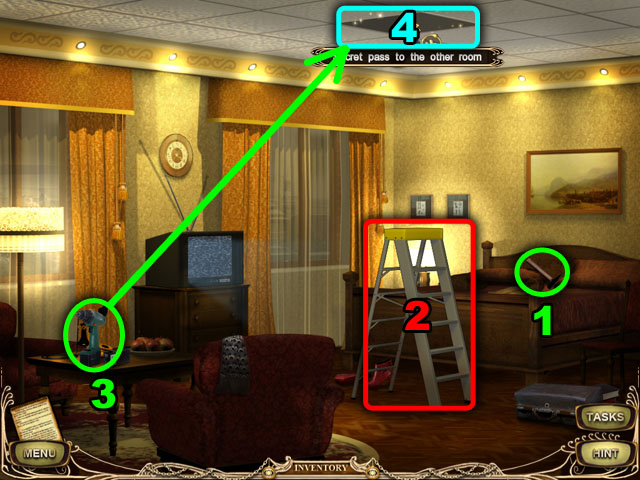
- Collect the HAMMER (1).
- Set the LADDER beside the bed (2).
- Collect the ELECTRIC SCREWDRIVER (3).
- Use it on the ceiling to find a secret passage to the other room (4).
- Collect the HACKSAW highlighted in yellow and cut the CHAIN below with it.
- Collect the JACK highlighted in red. Lift the safe with the JACK.
- Use the CHAIN from your inventory on the door, blocking it with the safe.
- Remove the ROD with the ELECTRIC SCREWDRIVER.
- Return to the hallway and go to the Hacker room.
- Smash the legs of the cabinet on the left with the HAMMER in the inventory.
- Move to the next room by going through the secret door and continue on to the hall.
- Place the ROD on the door to the room next to the hacker room.
- Use the SCREWDRIVER to screw it in.
Level 17
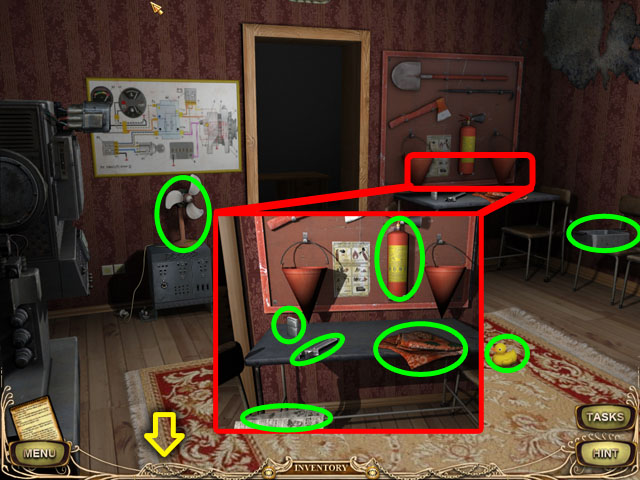
- Collect the FAN, RUBBER DUCK, and METAL BOX circled in green.
- Click on the table in the right highlighted in red. Collect the LIGHTER, WRENCH, CLOTH, NEWSPAPER, and EXTINGUISHER.
- Move to the other part of the room by clicking the bottom of the screen.
- Collect the PLASTIC BOTTLE on the red couch.
- Return to the previous room.
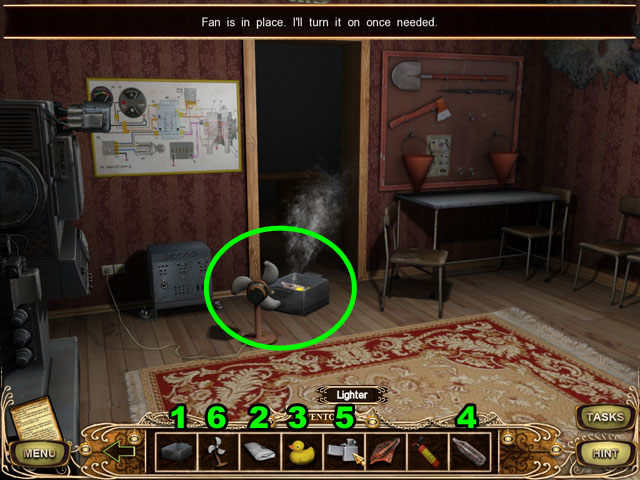
- Place the METAL BOX in front of the door (1).
- Put the NEWSPAPER into the METAL BOX (2).
- Put the RUBBER DUCK into the METAL BOX (3).
- Put the PLASTIC BOTTLE into the METAL BOX (4).
- Light the items inside the METAL BOX on fire with the LIGHTER (5).
- Set the FAN by clicking it on the doorway (6) and then click it again to send the smoke into the room.
- After watching the next cut scene, click on the shelves on the right.
- Find 12 hidden objects listed at the bottom of the screen, in any order, circled in green in the image.
- The hidden objects are randomized and may be different in your playthrough.
- You will receive the FISHING REEL.
- Open the hatch in the upper half of the screen with the FISHING REEL.

- Collect the SCOTCH TAPE and the PEN, highlighted in green.
- Collect the ANTENNA with the PEN.
- Click on the bag with the ANTENNA.
- Find 12 hidden objects listed at the bottom of the screen, in any order, circled in green in the image.
- The hidden objects are randomized and may be different in your playthrough.
- You will receive the HOOK.
- Combine the HOOK and the ANTENNA in the inventory.
- Combine the ANTENNA with the HOOK and the SCOTCH TAPE in the inventory.
- Collect the LAMP with the ANTENNA that you combined.
- Cut the net with the LAMP.
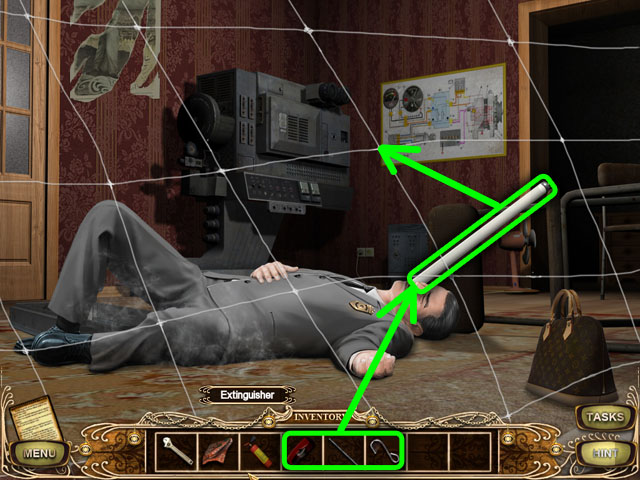
- Put out the fire with the EXTINGUISHER (1).
- Collect the KNIFE (2).
- Collect the PIPE highlighted in yellow with the CLOTH (3).
- Open the jammed door with the KNIFE.
- Connect the similarly colored wires from the bottom to the top to finish this puzzle.
- Click a wire and then a loose connection at the top to place them together.
- Click the wire again to remove it.
- Once all four wires are in the correct places, the puzzle will be completed.
- See the screenshot for the correct solution.
- Return to the other part of the room by clicking the bottom of the screen.
- Try to remove the nuts from the STRONG DEVICE on the left side with the WRENCH (1).
- Put the PIPE onto the WRENCH to make it strong and then remove the nuts (2).
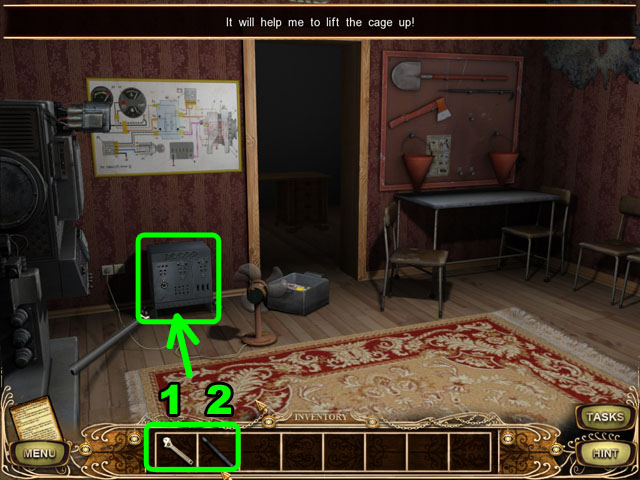
- Collect the STRONG DEVICE.
- Place the STRONG DEVICE under the cage.
- Use the PIPE on to the STRONG DEVICE to lift up the cage.
- After the cut scene is finished, click on the red bed on the left side of the screen.
Level 18
- Find 12 hidden objects listed at the bottom of the screen, in any order, circled in green in the image.
- The hidden objects are randomized and may be different in your playthrough.
- You will receive the STETHOSCOPE.
- Collect the BOWL from the middle of the screen, highlighted in red.
- Drag the BOWL to the radiator on the left side to drain some water from it.
- Use the BOWL WITH WATER to extinguish the fire in the fire place.
- Collect the KEY from inside the fireplace.
- Move to the other side of the room by clicking the bottom of the scene.
- Collect the SCREWDRIVER highlighted in red (1).
- Take the RING from the barrel with the SCREWDRIVER (2).
- Use the STETHOSCOPE to find the lock with numbers in the wall (3).
- Click on the lock with numbers to zoom in.
- Push the “ON” button in the bottom left corner.
- Repeat the number pattern three times to complete the puzzle.
- You can see the numbers again by clicking the “ON” button anytime.
- The solution is randomized, but if you make a mistake the computer will play the sequence again.
- Return to the main room by clicking the bottom of the screen.
- Move to the next room by clicking the door to the right of the bed.

- Collect the PLATE and the ROPE, highlighted in red, and place them on the spinning wheel in the middle.
- Place the RING on the spinning wheel.
- Polish the KEY highlighted in green with the spinning wheel.
- Return to the wall with the keypad.
- Open the wall with the POLISHED KEY from the inventory.
- Congratulations! You’ve completed Haunted Hotel: Lonely Dream!


 Legacy Tales: Mercy of the Gallows Walkthrough, Guide, & Tips
 European Mystery: The Face of Envy Walkthrough, Guide, & Tips
 Fierce Tales: The Dog's Heart Walkthrough, Guide, & Tips
 Whispered Secrets: Golden Silence Walkthrough, Guide, & Tips
 The Tudors Walkthrough, Guide, & Tips