Legacy Tales: Mercy of the Gallows Walkthrough, Guide, & Tips
Legacy Tales: Mercy of the Gallows Walkthrough

Welcome to the Legacy Tales: Mercy of the Gallows Walkthrough
Strange things happen in and around the dark castle at the Dutch coast. Find out how William van der Decken, famous for his battles against pirates, and his lovely wife Isabelle vanished. What happened to her and why was the captain found dead, dressed as a pirate?
Whether you use this document as a reference when things get difficult or as a road map to get you from beginning to end, we’re pretty sure you’ll find what you’re looking for here.
This document contains a complete Legacy Tales: Mercy of the Gallows game walkthrough featuring annotated screenshots from actual gameplay!
We hope you find this information useful as you play your way through the game. Use the walkthrough menu below to quickly jump to whatever stage of the game you need help with.
Remember to visit the Big Fish Games Forums if you find you need more help. Have fun!
This walkthrough was created by LuckySmile, and is protected under US Copyright laws. Any unauthorized use, including re-publication in whole or in part, without permission, is strictly prohibited.
General Tips

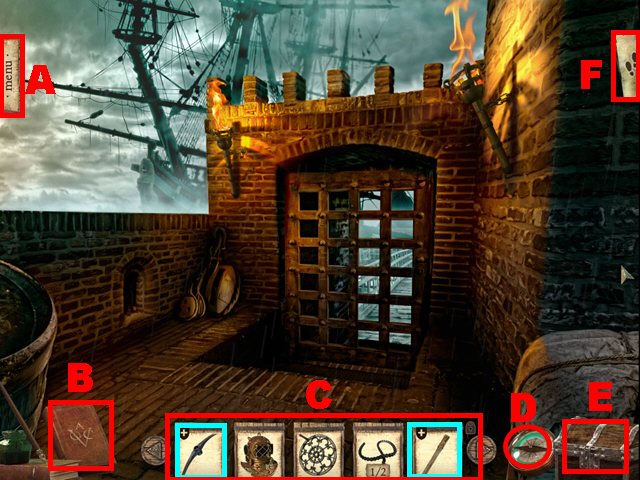
- This is the official guide for Legacy Tales: Mercy of the Gallows.
- Access the menu (A) to leave the game and to change the sound and display settings.
- Select the journal (B) to review the information you have already gathered.
- Collected items will be stored in your inventory (C).
- Inventory items that can be combined (light blue) will have a ‘plus’ sign attached to them; combine them to create a complete item.
- Press the hint button (D) whenever you get stuck.
- Golden coins will be stored in your coin chest (E); coins can be used to open chests that contain important items.
- Access the map (F) to jump quickly from one location to another; the map will also display whether or not there are still golden coins left in any area.
- Hidden-object puzzles will be referred to as HOPs throughout this guide. HOPS are randomized, your lists may differ from ours.
- There are two grades of difficulty you can choose from: casual and advanced mode.
Chapter 1: The Castle Ground

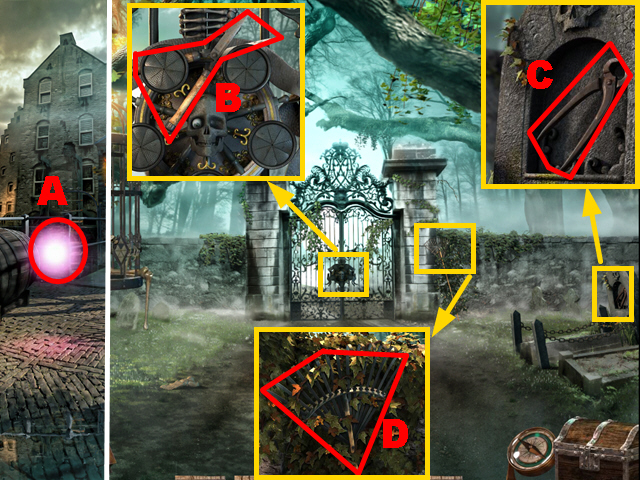
- You will receive the BROKEN HEART.
- Take a look at the radiating orb (A).
- Turn left.
- The ghost will talk to you.
- Zoom into the gate; take the HEDGE TRIMMER (B).
- Zoom into the grave; take the PINCERS (C).
- Zoom into the hedge and remove the leaves with the HEDGE TRIMMER three times; take the RAKE (D).
- Walk down and move to the right side.

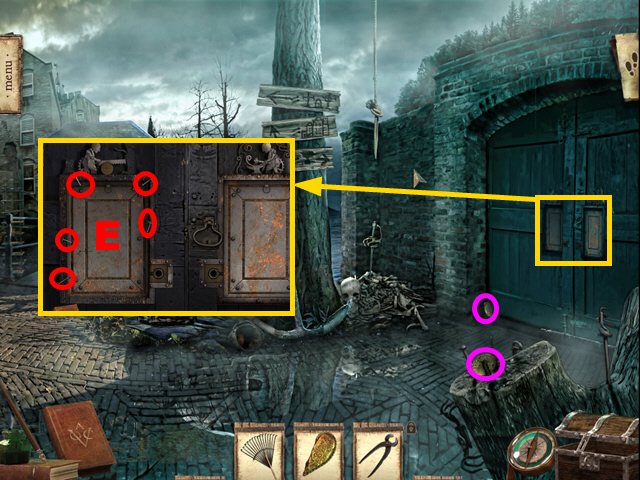
- Collect the 2 coins (purple).
- Zoom into the door; remove the five nails with the PINCERS (E).
- Play the mini-game.

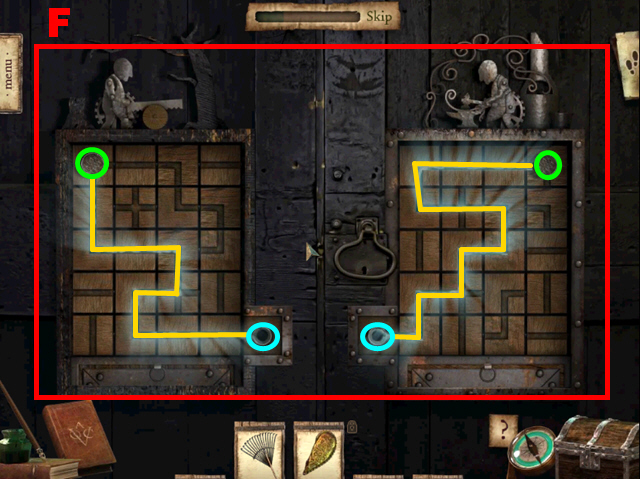
- To solve this puzzle (F), turn the maze parts to create the correct paths (yellow) so that the 2 pins (green) can reach the door (light blue).
- Turn right.

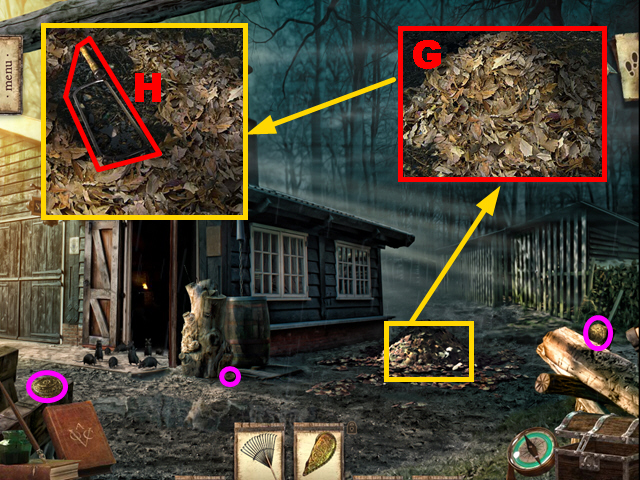
- Collect the three coins (purple).
- Zoom into the leaves and remove them with the RAKE (G); take the IRON SAW (H).
- Turn right.

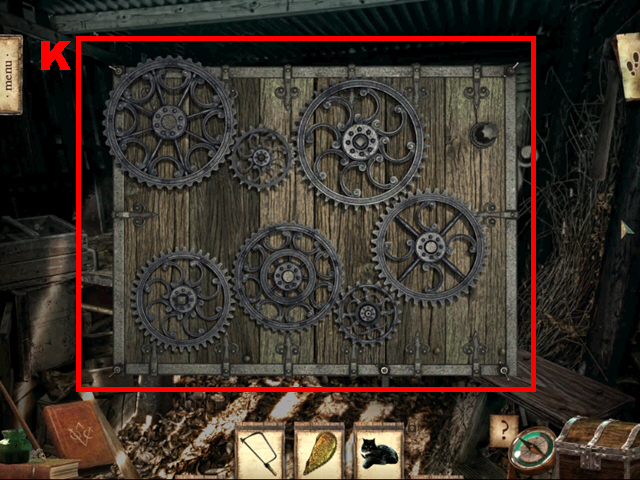
- Take the CAT (I).
- Collect the 7 GEARS (green).
- Zoom into the machine (J).


- Put the 7 GEARS back into their correct position (K).
- You will receive a note.
- Walk down.

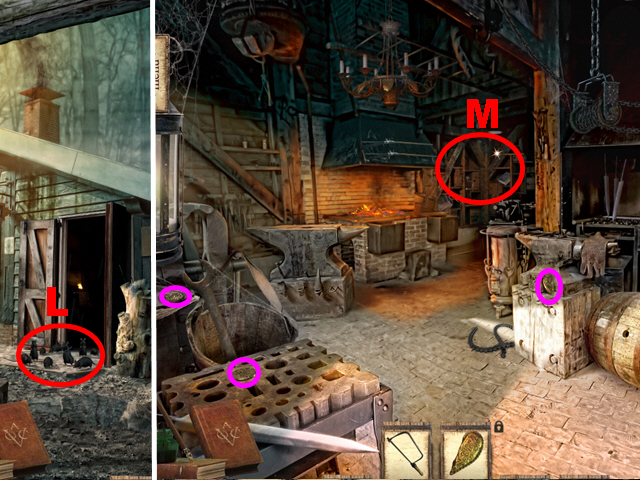
- Chase away the rats with the CAT (L).
- Enter the Smithy.
- Collect the 3 coins (purple).
- Zoom into the shelf (M).
- Play the HOP.

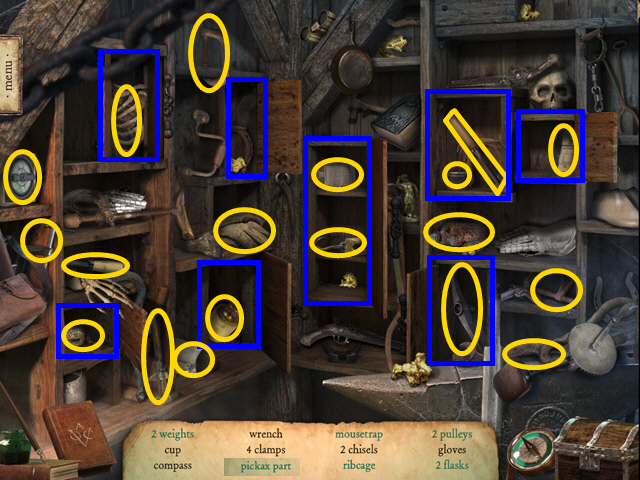
- Open the 8 doors (dark blue) one after another.
- You will receive the PICKAX PART.

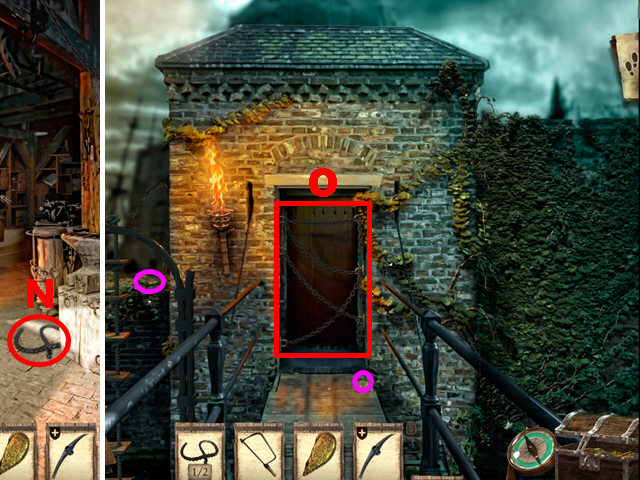
- Take the 1/2 BROKEN CHAIN (N).
- Walk down twice and go forward.
- Collect the 2 coins (purple).
- Cut the chains with the IRON SAW four times (O).
- Go down the ladder.

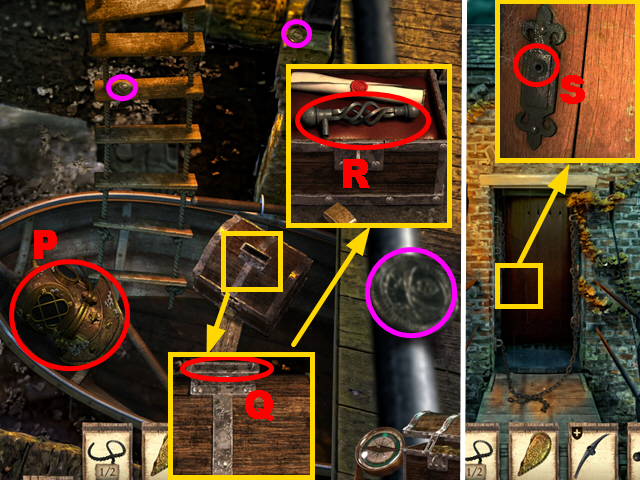
- Collect the 3 coins (purple).
- Take the DIVING HELMET (P).
- Zoom into the chest and insert ten golden coins into it (Q); take the DOOR HANDLE (R); you will receive the letter.
- Go to the Drawbridge.
- Zoom into the door; connect the DOOR HANDLE to it (S) and press the handle.
- Move forward.
Chapter 2: The Courtyard

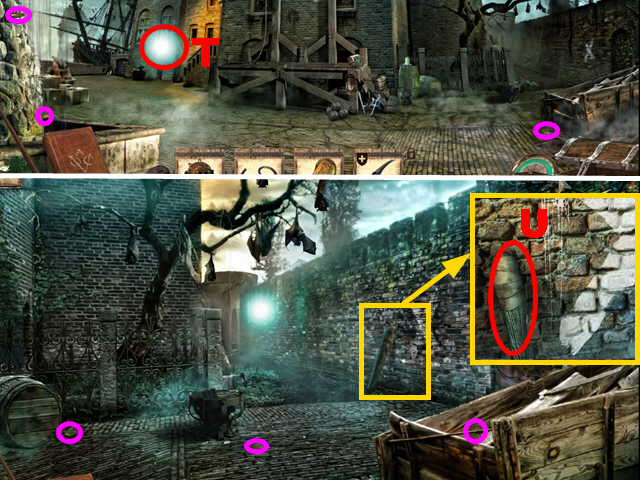
- Collect the 3 coins (purple).
- Take a look at the radiating orb (T).
- Go right towards the orb’s new location.
- Collect the 3 coins (purple).
- Zoom into the wall; take the DAMP TORCH (U).
- Walk down and turn left.

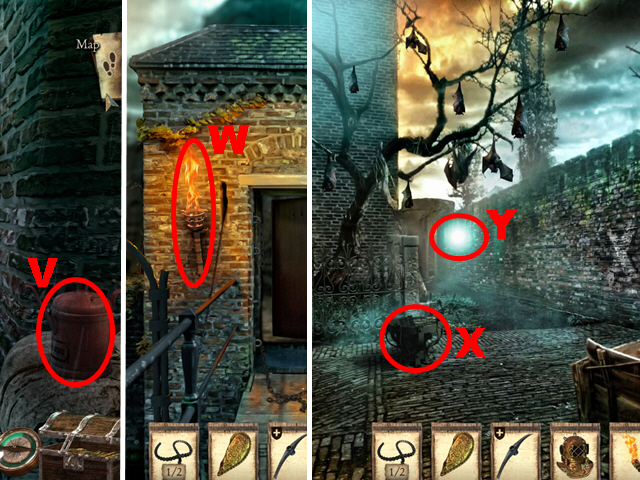
- Take the OILCAN (V).
- Combine the DAMP TORCH and the OILCAN from your inventory to receive the OILED TORCH.
- Go to the Drawbridge.
- Hold the OILED TORCH next to the torch (W) to receive the LIT TORCH.
- Go to the Dark Alley.
- Light the fire basket with the LIT TORCH (X).
- Take a look at the radiating orb (Y).
- Move forward.

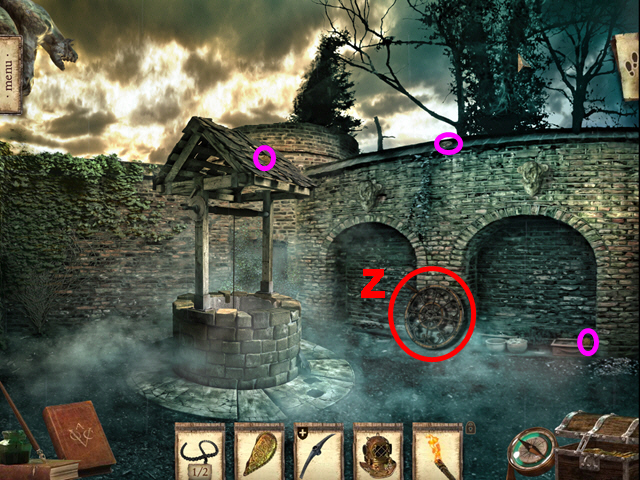
- Collect the 3 coins (purple).
- Take the MACHINE WHEEL (Z).
- Go to the Gate to the Batavia.

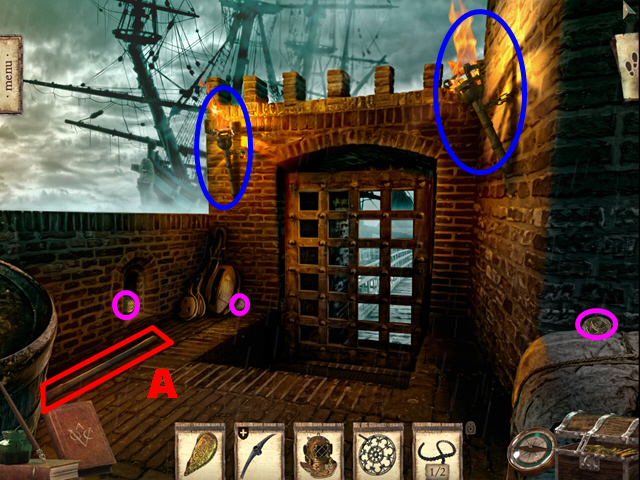
- Light the 2 torches with the LIT TORCH (dark blue).
- Collect the 3 coins (purple).
- Take the WOODEN HANDLE (A).
- Combine the PICKAX PART and the WOODEN HANDLE from your inventory to create the PICKAX.
- Go to the Dark Alley.

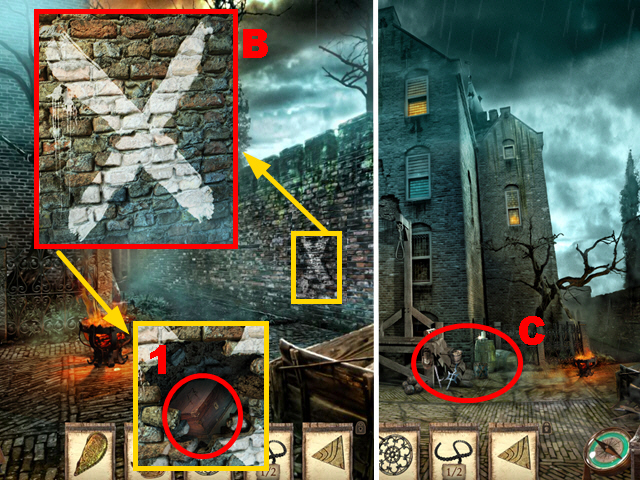
- Zoom into the wall and break it with the PICKAX (B) and take the box (1); you will receive a note and the BONE TRIANGLE.
- Walk down.
- Zoom into the barrels (C).
- Play the HOP.

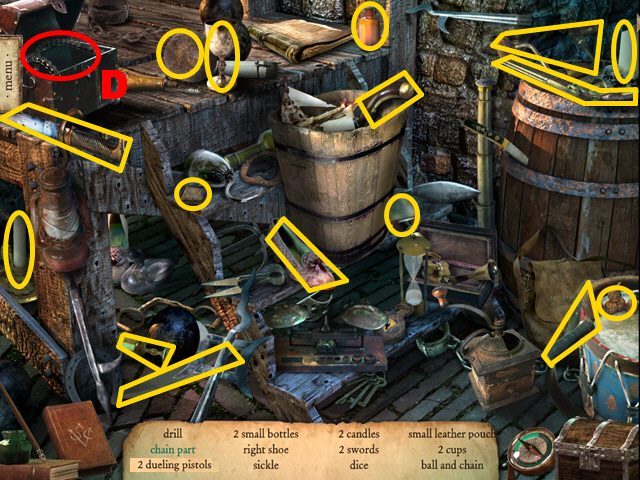
- Open the chest and take the chain part (D).
- You will receive the 2/2 BROKEN CHAIN.
- Go to the Woodshed.

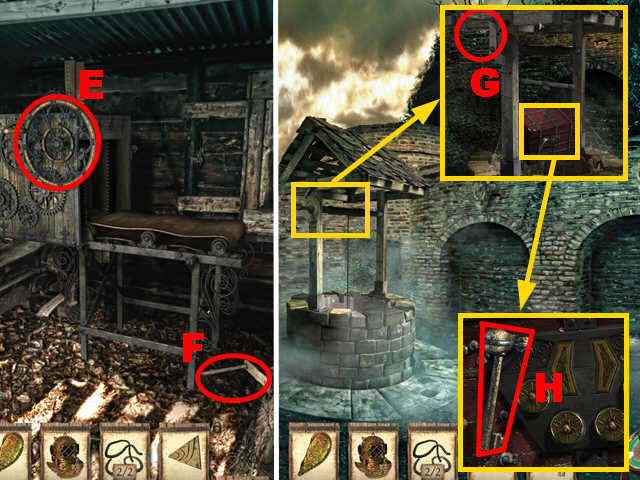
- Connect the MACHINE WHEEL to the machine (E).
- Turn the wheel and take the HANDLE (F).
- Go to the Old Well.
- Zoom into the well and connect the HANDLE to the well (G); turn the handle.
- Zoom into the chest; take the 1/3 KEY (H).
- Go to the Smithy.

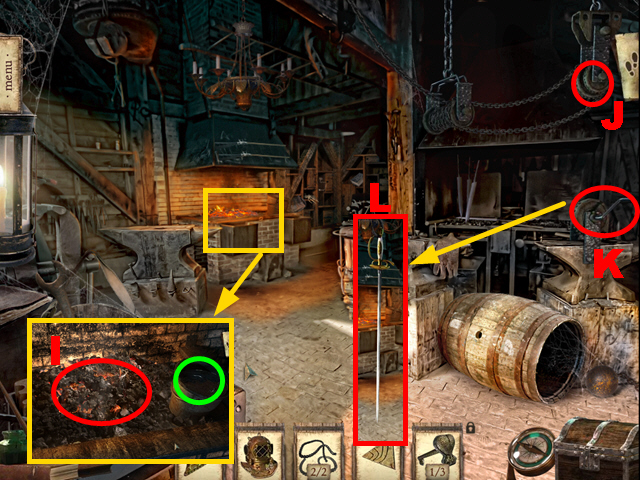
- Zoom into the oven and put down the 2 BROKEN CHAINS (I); put the chain into the bucket (green) and take the FIXED CHAIN.
- Connect the FIXED CHAIN to the mechanism (J) and turn the handle (K).
- Take the 1/3 SABRE (L).
- Go to the Castle Stairs.

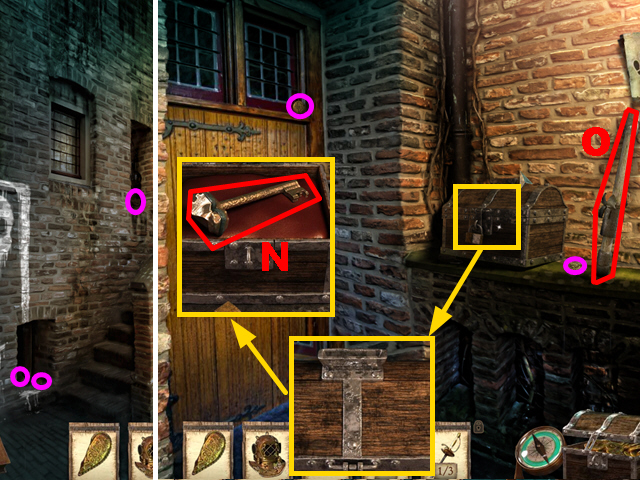
- Collect the 3 coins (purple).
- Go to the Castle Door.
- Collect the 2 coins (purple).
- Zoom into the chest and insert 20 coins into it (M); take the 2/3 KEY (N).
- Take the 1/2 LEVER (O).
- Go to the Dungeon Gate.

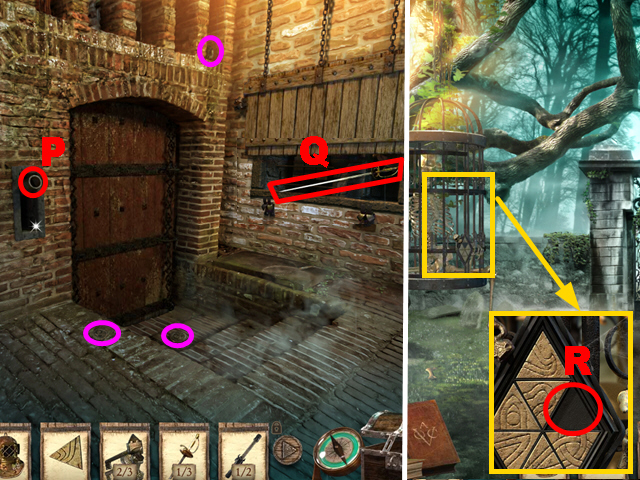
- Collect the 3 coins (purple).
- Insert the 1/2 LEVER into the slot (P), push it, and take the 2/3 SABRE (Q).
- Go to the Cemetery Road.
- Zoom into the cage; insert the BONE TRIANGLE into the niche (R).
- Play the mini-game.

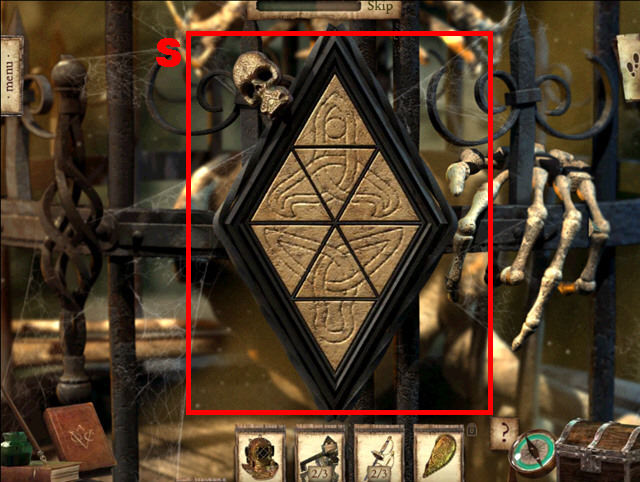
- To solve this puzzle (S), swap and rotate the triangular pieces to create the correct pattern.
- You will receive the 3/3 KEY.
- Go to the Castle Door.

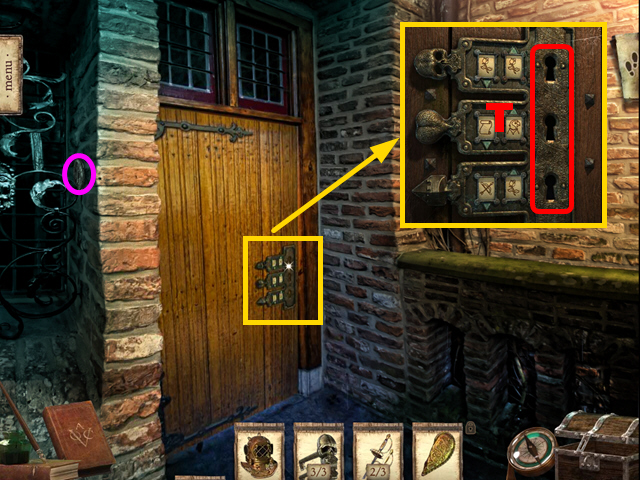
- Collect the coin (purple).
- Zoom into the door; insert the 3 KEYS into the locks (T).
- Play the mini-game.

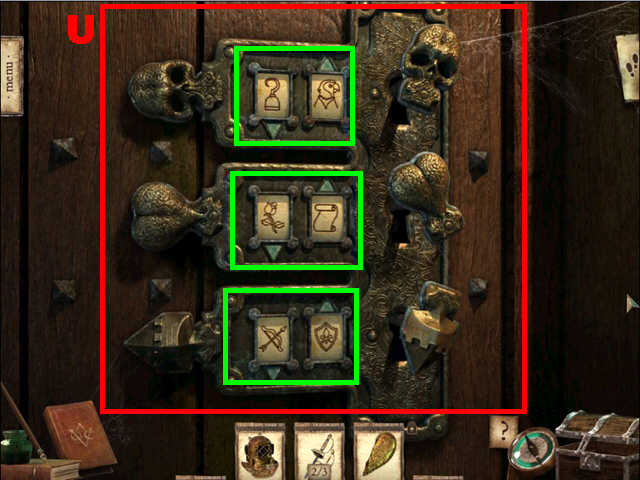
- To solve this puzzle (U), choose the correct images for all the 3 locks (green).
- Enter the Castle.
Chapter 3: The Castle

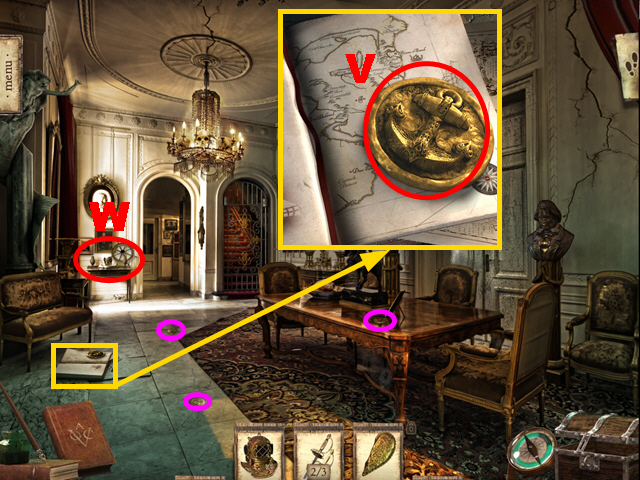
- Collect the 3 coins (purple).
- Zoom into the book; take the 1/5 PIRATE AMULET (V).
- Zoom into the desk (W).
- Play the HOP.

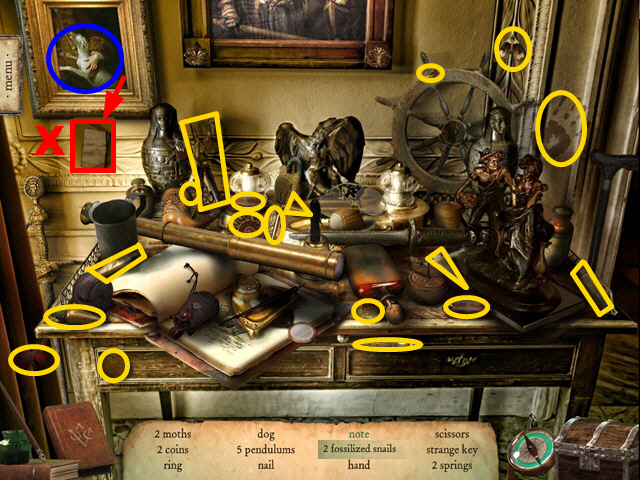
- Take the dog (dark blue) and the note behind the painting (X).
- You will receive the 1/2 STRANGE KEY.
- Move forward.

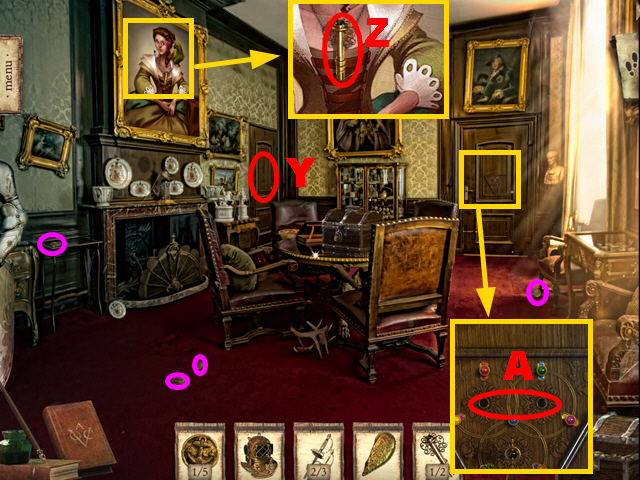
- Collect the 4 coins (purple).
- Open the left door (Y).
- Zoom into the painting; take the 2/2 STRANGE KEY (Z).
- Zoom into the right door; insert the 2 STRANGE KEYS into the slots (A).
- Play the mini-game.

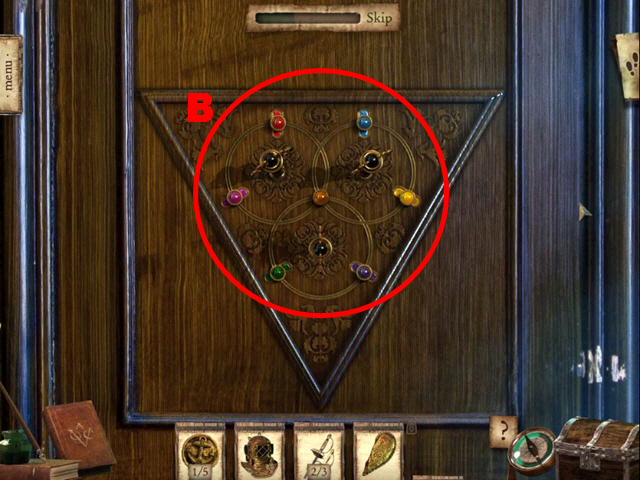
- To solve solve this puzzle (B), each key has to be moved into the slot of the same color. The solution is random.
- Turn left.

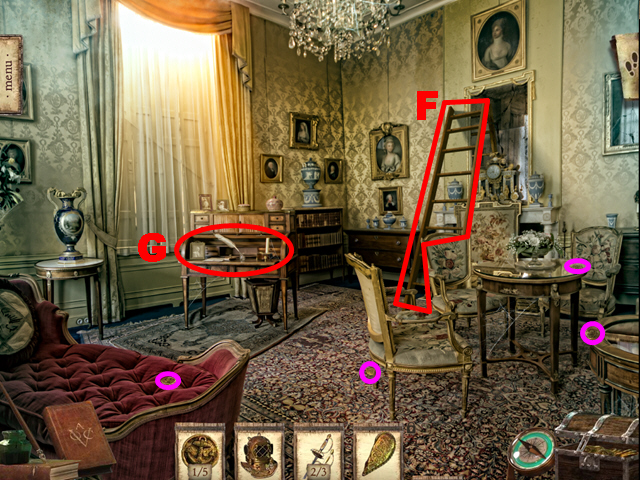
- Collect the 4 coins (purple).
- Take the LADDER (F).
- Zoom into the desk (G).
- Play the HOP.

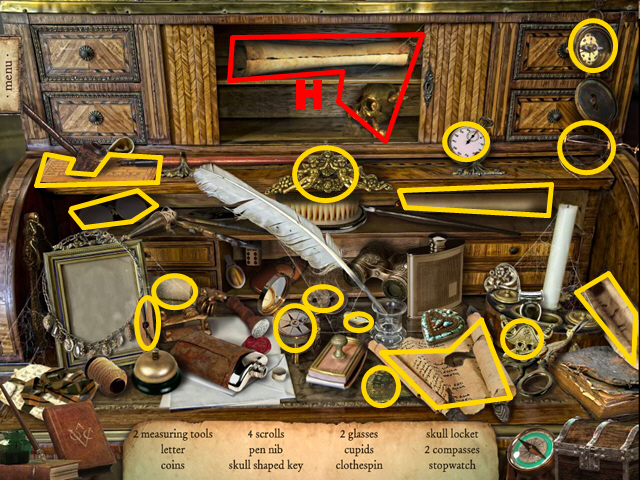
- Open the shelf; take the scroll and the skull shaped key (H).
- You will receive the SKULL-SHAPED KEY.
- Walk down and turn right.

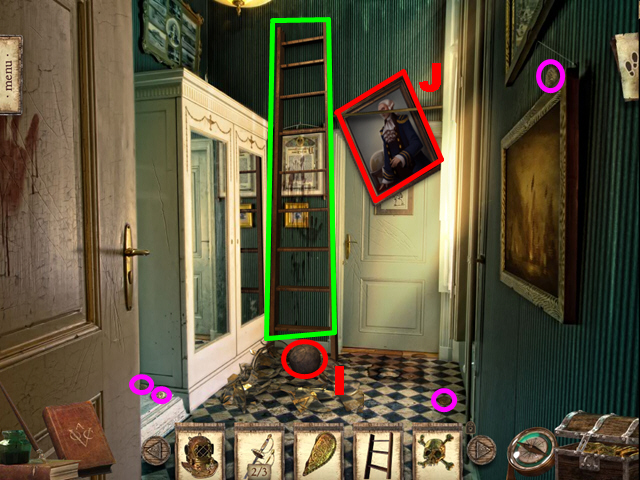
- Collect the 4 coins (purple).
- Put down the LADDER (green) and take the 1/3 CANNONBALL (I).
- Move up the painting up over the door (J).
- Open the door and move forward.

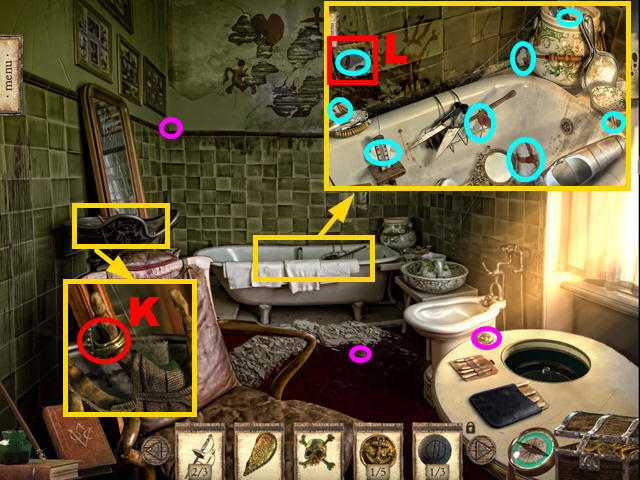
- Collect the 3 coins (purple).
- Zoom into the bowl; take the 1/3 SEAL RING (K).
- Zoom into the bathtub and remove the tile (L); collect the 8 PLASTER PIECES (light blue).

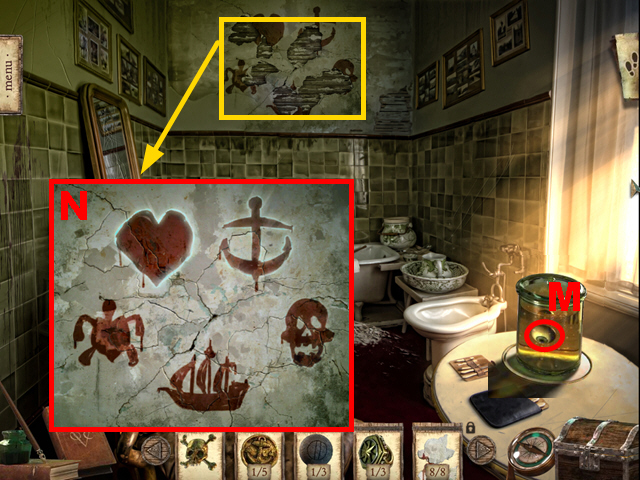
- Zoom into the wall; put the 8 PLASTER PIECES into the correct positions (M).
- Open the jar and take the EYE (N).
- The ghost will talk to you.
- Go to the Cemetery Road.
Chapter 4: The Cemetery Road

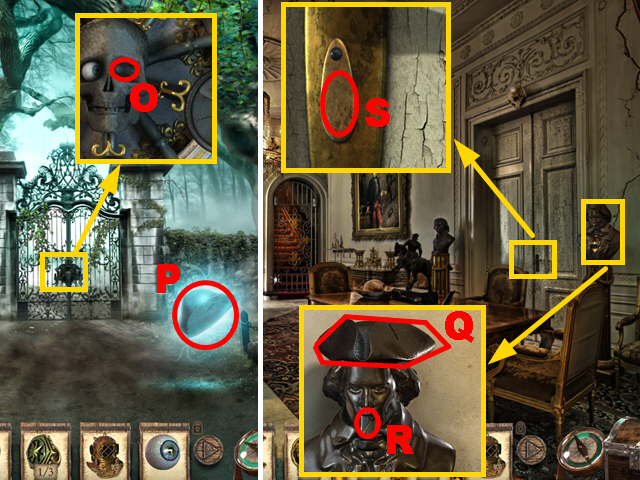
- Zoom into the gate; insert the EYE into the skull (O), back out of the vignette.
- Take the STONE HAT (P).
- Go to the Entrance Hall.
- Zoom into the bust and put the STONE HAT on it (Q); take the DINING ROOM KEY (R).
- Zoom into the door; insert the DINING ROOM KEY into the lock (S) and turn the key.
- Enter the Dining Room.

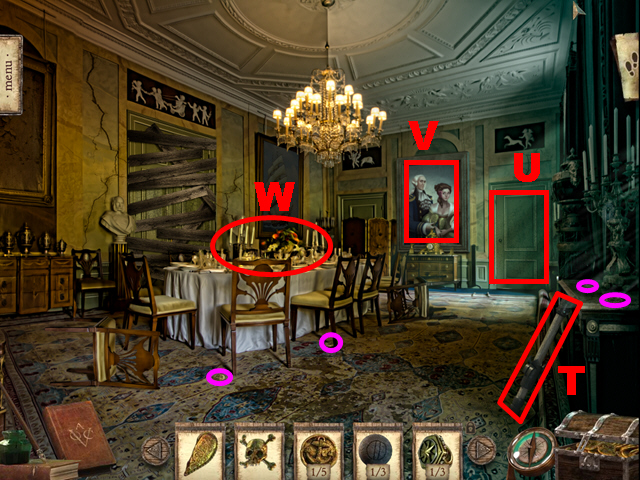
- Collect the 4 coins (purple).
- Take the 2/2 LEVER (T).
- Open the door (U).
- Take a look at the painting (V).
- Zoom into the table (W).
- Play the HOP.

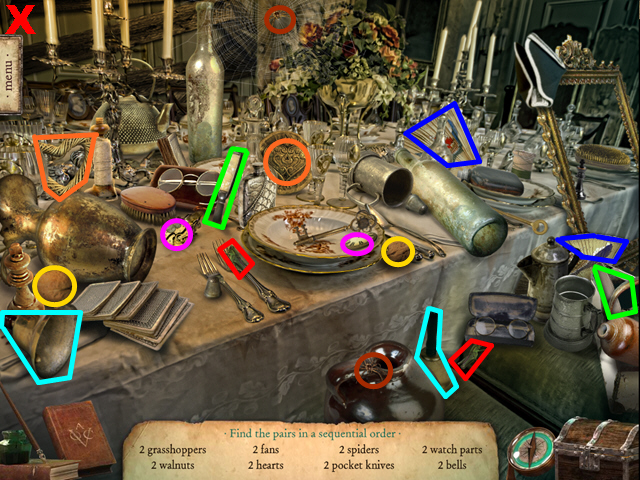
- Collect eight pairs of items. They are color-coded in the screenshot (X).
- You will receive the 2/5 PIRATE AMULET.
- Move forward.

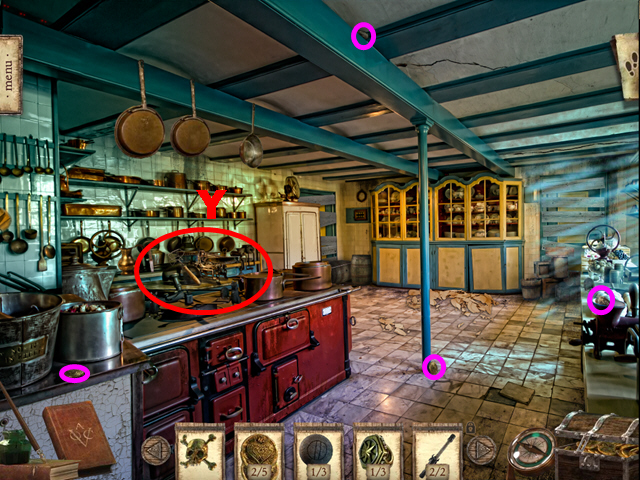
- Collect the 4 coins (purple).
- Zoom into the kitchen utensils (Y).
- Play the HOP.

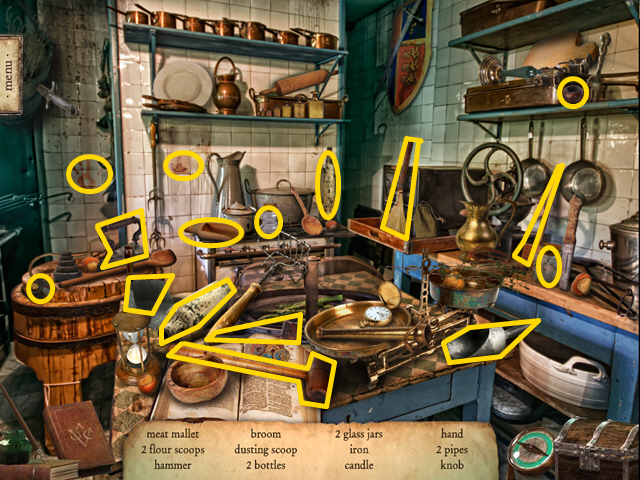
- Collect the 16 items (yellow).
- You will receive the 1/2 KNOB.
- Move forward.

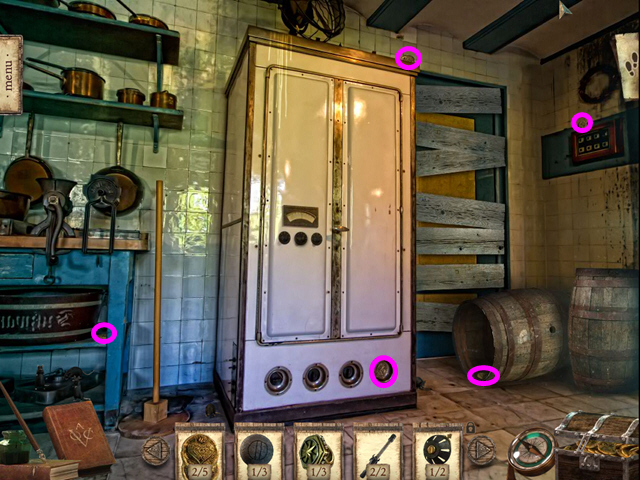
- Collect the 5 coins (purple).
- Go to the Smoking Lounge.

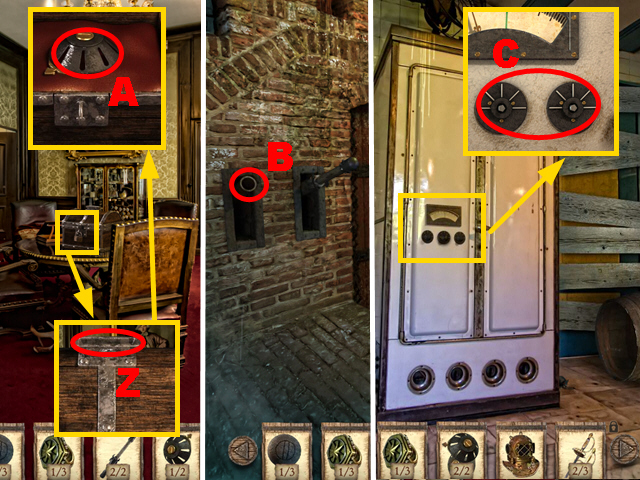
- Zoom into the chest and insert 31 coins into the slot (Z); take the 2/2 KNOB (A).
- Go to the Dungeon Gate.
- Insert the 2/2 LEVER into the empty slot (B) and press both levers.
- Go to the Pantry.
- Zoom into the fridge; connect the 2 KNOBS to the fridge (C).
- Play the mini-game.

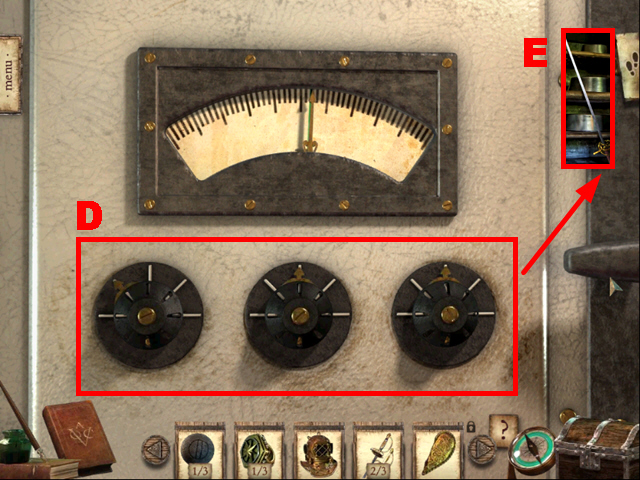
- To solve this puzzle (D), dial the knobs into the correct positions to reach the appropriate temperature.
- Take the 3/3 SABRE (E).
- Go to the Entrance Hall.
Chapter 5: The First Floor

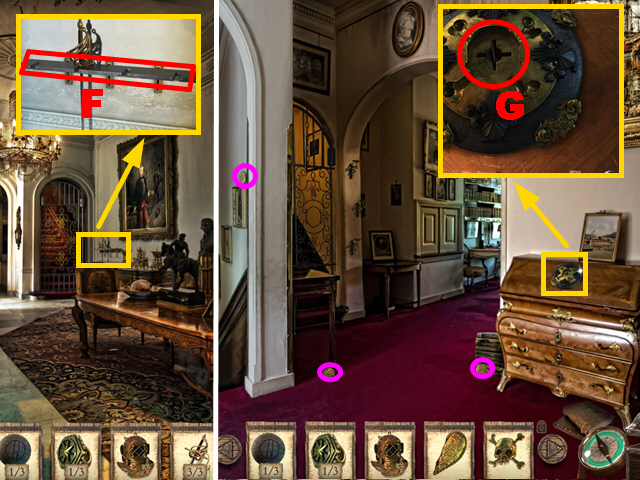
- Zoom into the gate; connect the 3 SABRES to the device (F).
- Go upstairs.
- Collect the 3 coins (purple).
- Zoom into the dresser; insert the SKULL-SHAPED KEY into the niche (G).
- Play the mini-game.

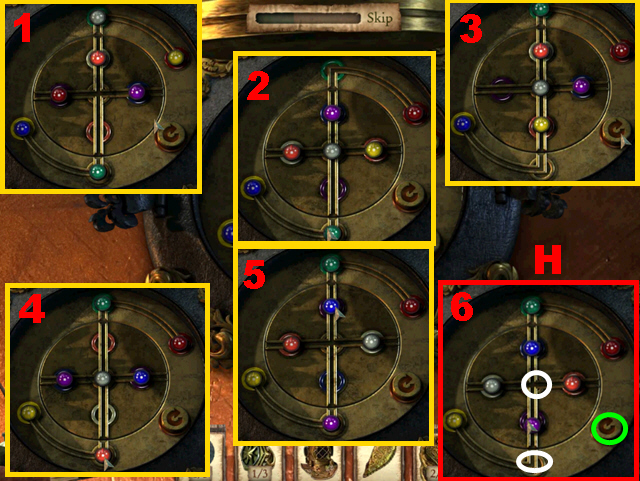
- To solve this puzzle (H), direct each ball into the slot of the same color. The solution is random.
- The button (green) rotates the central disc; the neutral spots (white) can be used to store colored balls.
- Turn right.

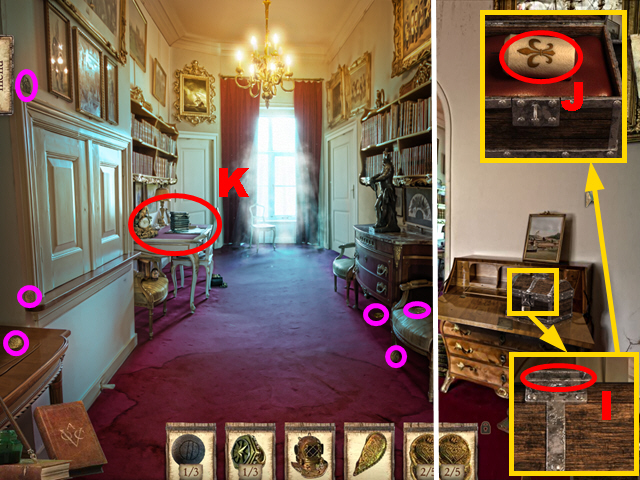
- Collect the 6 coins (purple).
- Walk down.
- Zoom into the chest and insert 12 coins into the slot (I); take the 1/3 CANDLE (J).
- Turn right.
- Zoom into the desk (K).
- Play the HOP.

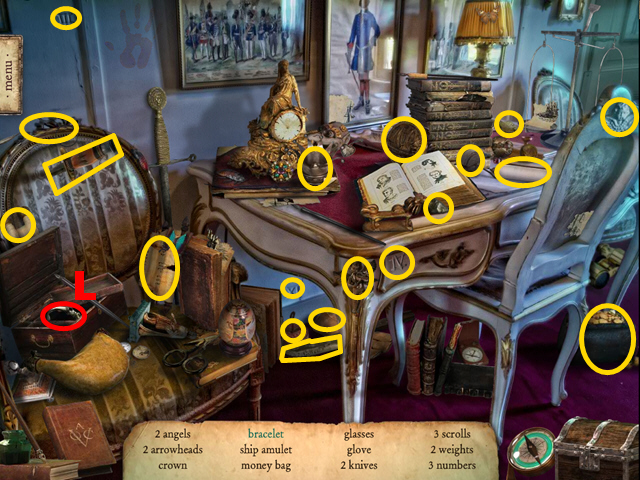
- Open the secret compartment of the box and take the bracelet (L).
- You will receive the 3/5 PIRATE AMULET.
- Open the door and turn right.

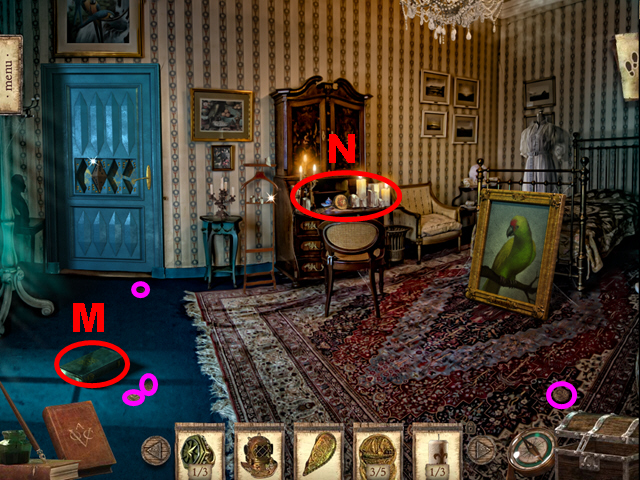
- Collect the 4 coins (purple).
- Take the BOOK (M).
- Zoom into the cupboard (N).
- Play the HOP.

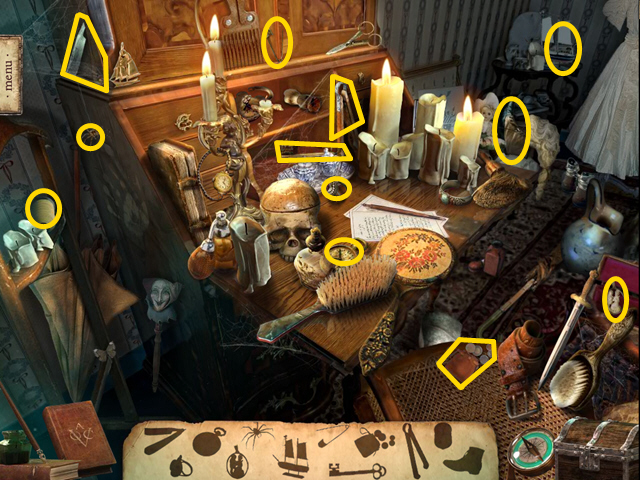
- Collect the 12 silhouette items (yellow).
- You will receive the RAZOR.

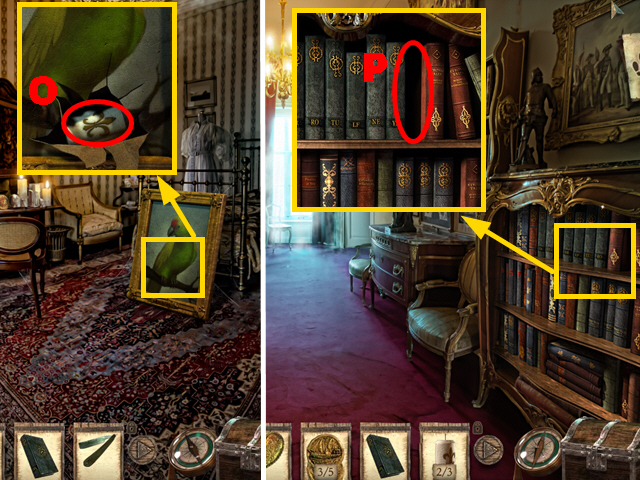
- Zoom into the painting and cut it open with the RAZOR; take the 2/3 CANDLE (O).
- Walk down.
- Zoom into the bookshelf; put the BOOK into the gap (P).
- Play the mini-game.

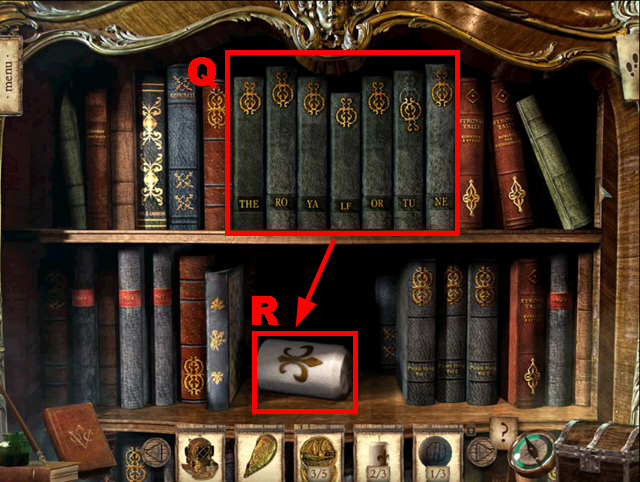
- To solve this puzzle (Q), swap the books to create the term ‘The Royal Fortune’.
- Take the 3/3 CANDLE (R).
- Walk down and move towards the stairs.

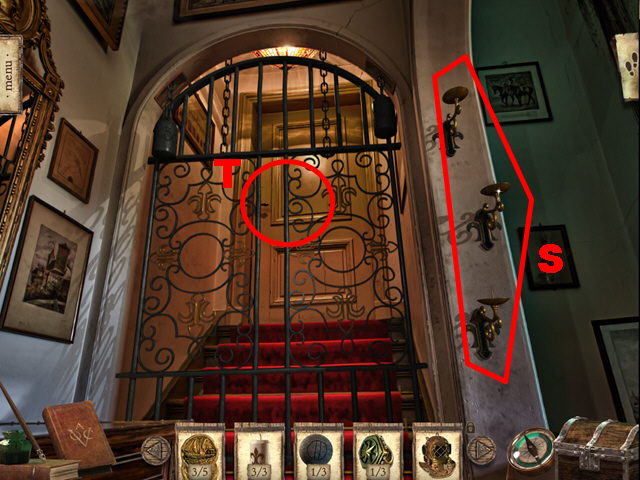
- Put the 3 CANDLES into the holders (S).
- Open the door (T).
- Move forward.
Chapter 6: The Attic

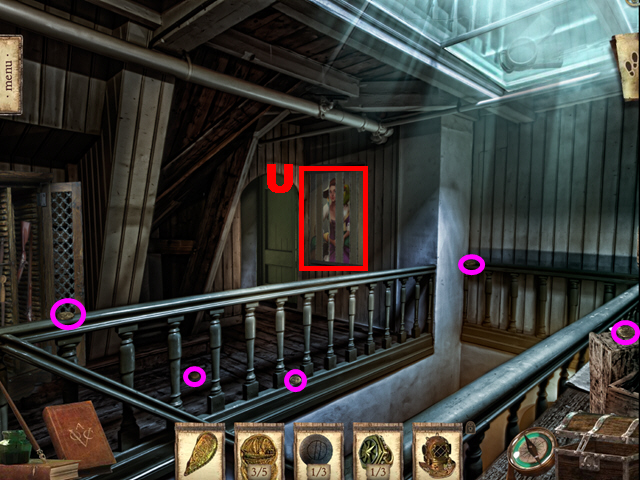
- Collect the 5 coins (purple).
- Zoom into the wall (U).
- Play the mini-game.

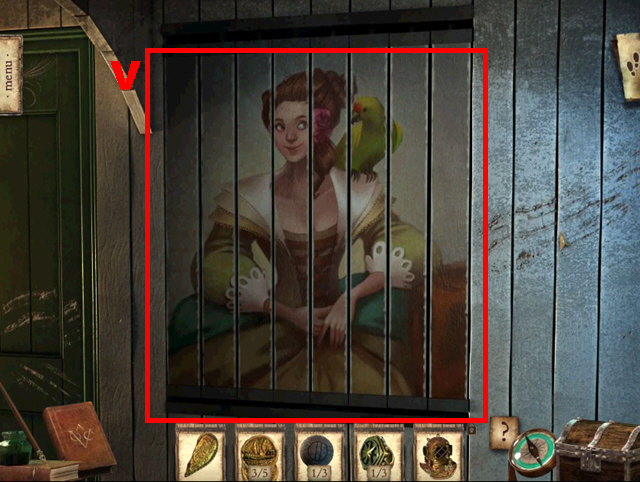
- To solve this puzzle (V), turn the painted boards until the correct picture is revealed.
- Move forward.

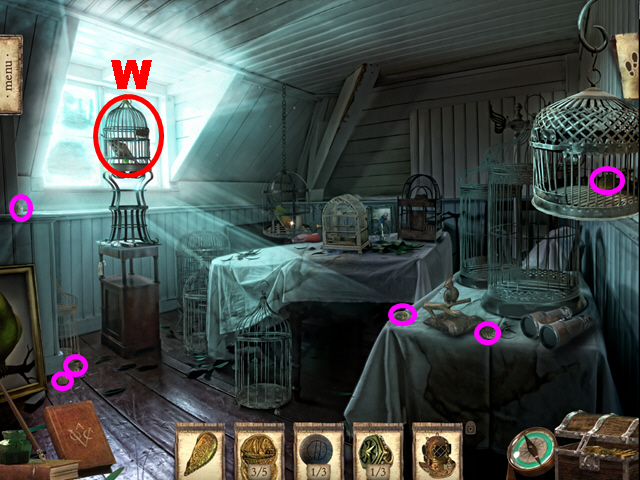
- Collect the 6 coins (purple).
- Zoom into the birdcage (W).
- Play the mini-game.

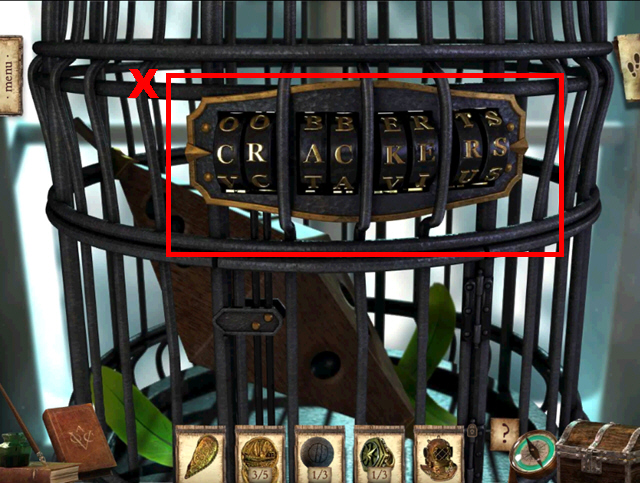
- To solve this puzzle (X), turn the letter dials and create the word ‘Crackers’.

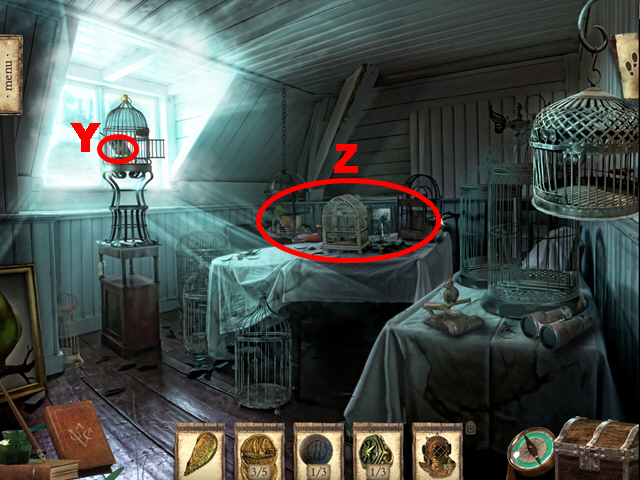
- Take the 1/3 WOODEN DIAMOND (Y).
- Zoom into the table (Z).
- Play the HOP.

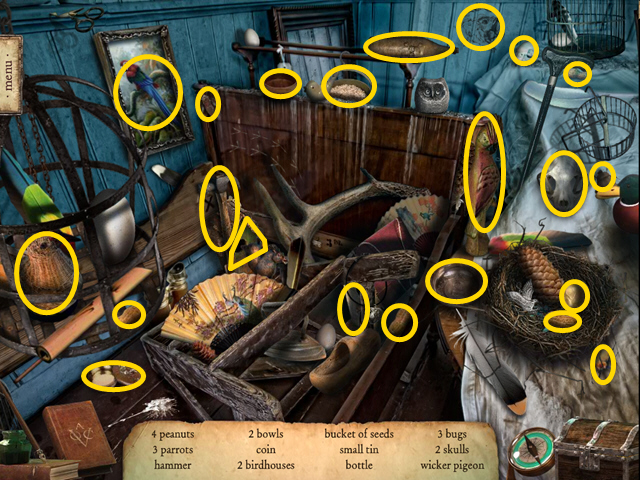
- Collect the 22 items (yellow).
- You will receive the RUM BOTTLE and the HAMMER.
- Walk down.

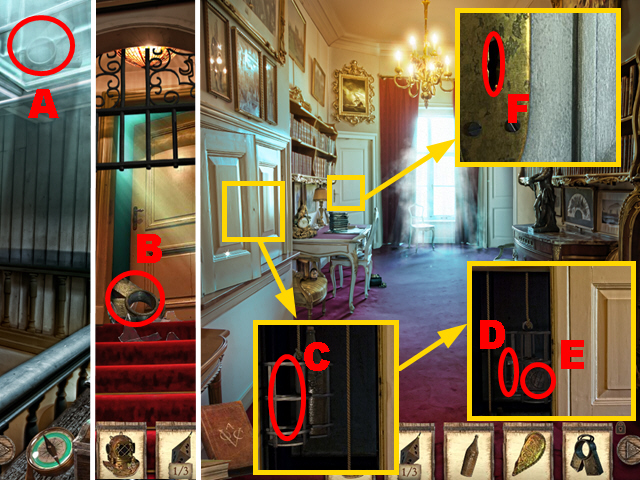
- Hit the glass with the HAMMER (A).
- Walk down.
- Take the MACHINE PART (B).
- Go to the Hallway.
- Zoom into the cupboard and open the left door; put down the RUM BOTTLE (C).
- Take the LIBRARY KEY (D) and the 2/3 CANNONBALL (E).
- Zoom into the left door; insert the LIBRARY KEY into the lock (F) and turn it once.
- Enter the Library.

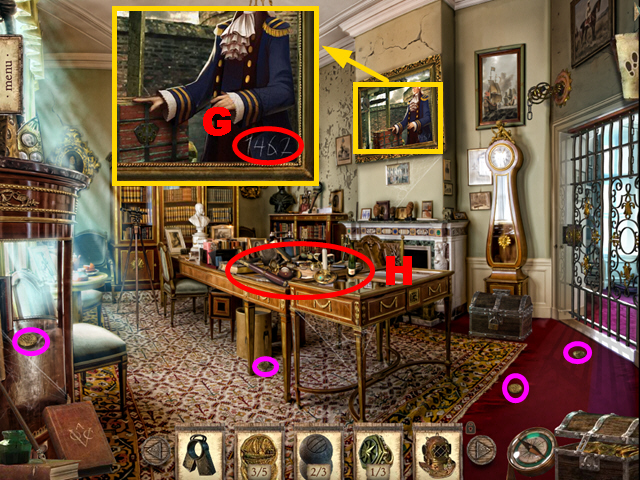
- Collect the 4 coins (purple).
- Zoom into the painting; make note of the code (G).
- Zoom into the table (H).
- Play the HOP.

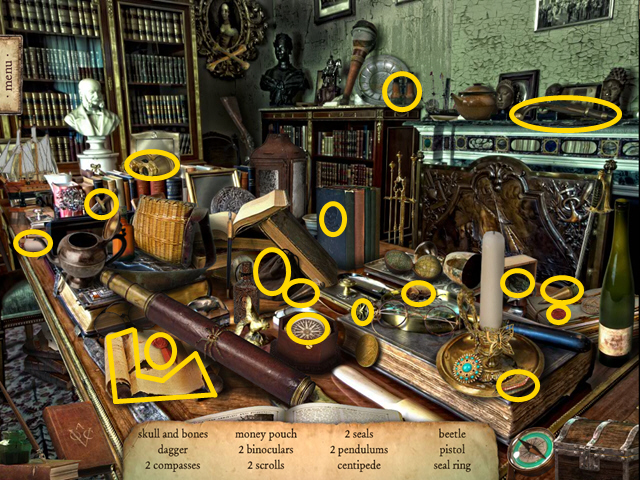
- Collect the 17 items (yellow).
- You will receive the 2/3 SEAL RING.
- Go to the Old Well.

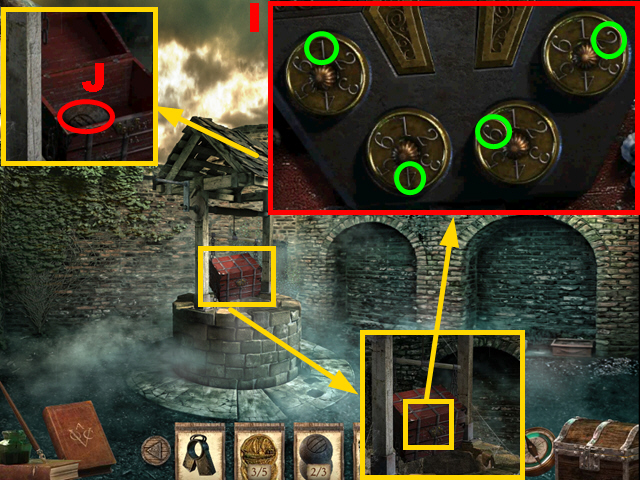
- Zoom into the well and then zoom into the chest; play the mini-game.
- To solve this puzzle (I), enter code ’1462′ into the dials (green).
- Take the 3/3 CANNONBALL (J).
- Go to the Dungeon Gate.

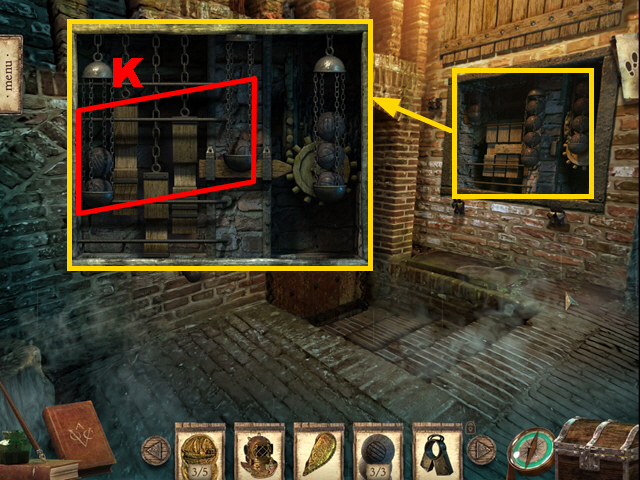
- Zoom into the device; put the 3 CANNONBALLS into it (K).
- Play the mini-game.

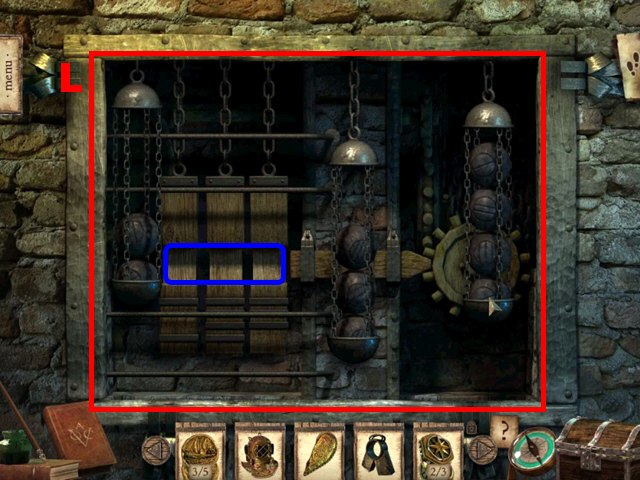
- To solve the puzzle (L), swap the cannon balls into their correct positions so that the wooden slider can move through the bar (dark blue).
- Enter the Dungeon.
Chapter 7: The Dungeon

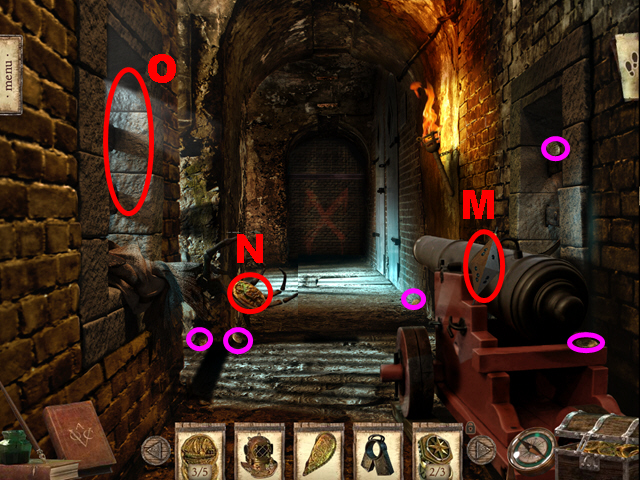
- Collect the 5 coins (purple).
- Take the 2/3 WOODEN DIAMOND (M).
- Open the skeleton hand and take the 4/5 PIRATE AMULET (N).
- Zoom into the window (O).
- Play the HOP.

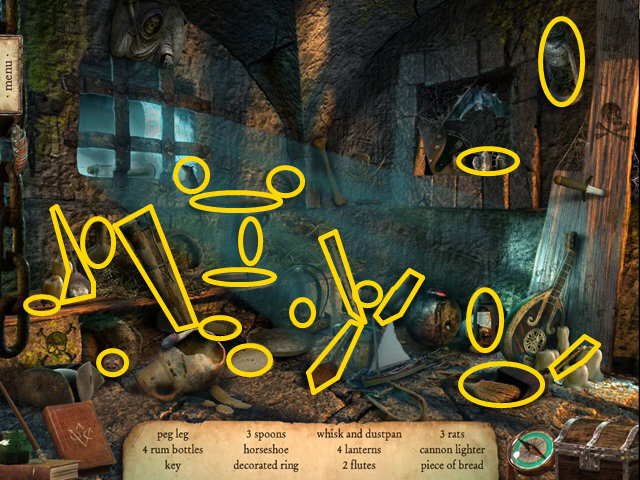
- Collect the 22 items (yellow).
- You will receive the LIGHTER and the 1/3 DECORATED RING.

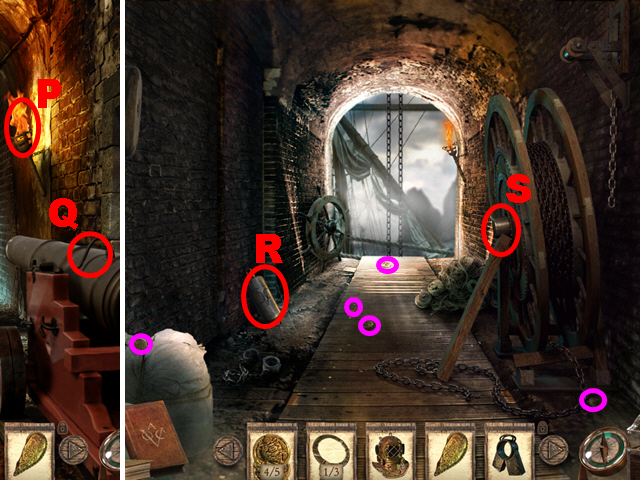
- Light the LIGHTER with the torch (P) to acquire the LIT LIGHTER.
- Light the fuse with the LIT LIGHTER (Q).
- Move forward.
- Collect the 5 coins (purple).
- Take the WEIGHT (R).
- Connect the MACHINE PART to the machine (S).
- Go to the Library.

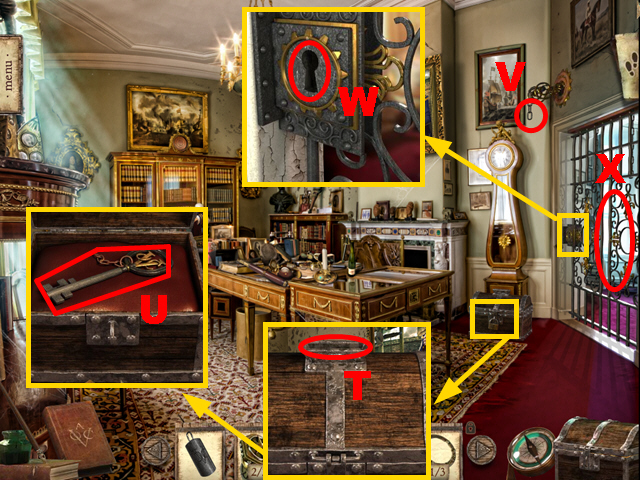
- Zoom into the chest and insert 26 coins into it (T); take the GATE KEY (U).
- Connect the WEIGHT to the chain (V).
- Zoom into the gate; insert the GATE KEY into the lock (W) and turn the key once.
- Zoom into the gate (X).
- Play the HOP.

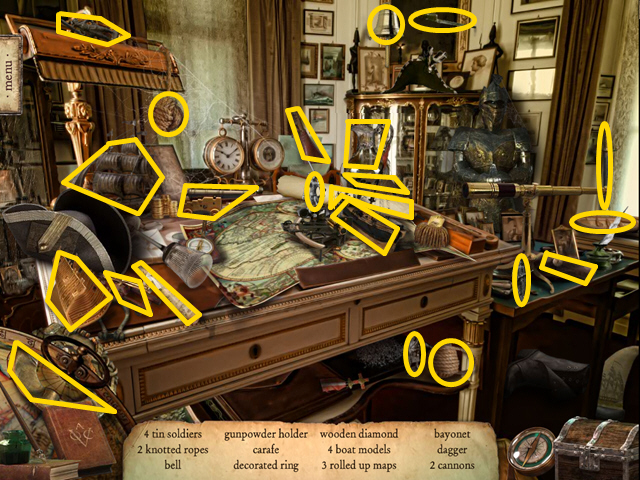
- Collect the 22 items (yellow).
- You will receive the 3/3 WOODEN DIAMOND and the 2/3 DECORATED RING.
- Go to the Bedroom.

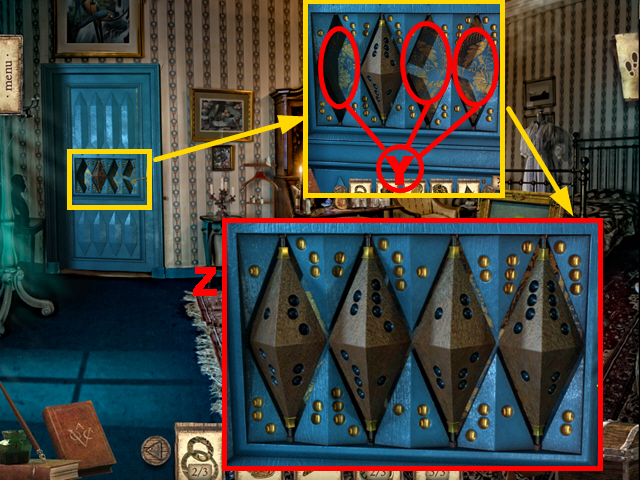
- Zoom into the door; insert the 3 WOODEN DIAMONDS into the niches (Y).
- Play the mini-game.
- To solve this puzzle (Z), turn each wooden diamond until the dots on the sides of each diamond correspond with the dots next to it.
- Move forward.

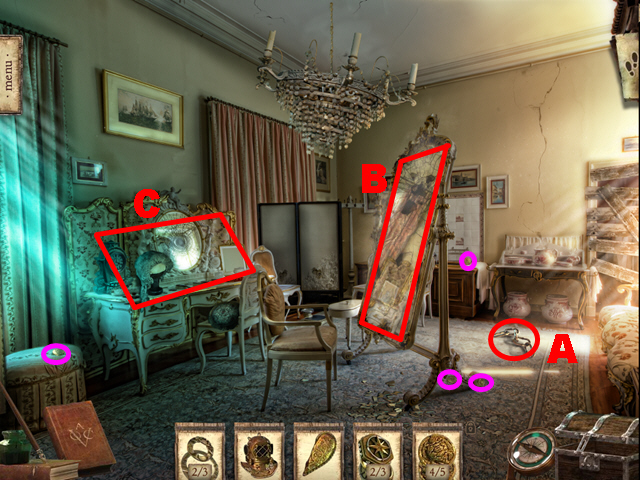
- Collect the 4 coins (purple).
- Take the CHAIN (A).
- Take a look at the mirror (B).
- Zoom into the dresser (C).
- Play the HOP.

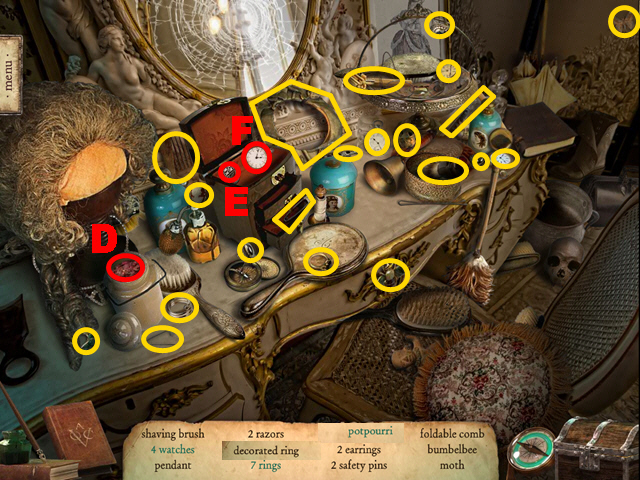
- Open the jar; take the potpourri (D).
- Open the small cabinet; take the ring (E) and the watch (F).
- You will receive the 3/3 DECORATED RING.
- Go to the Secret Corridor.

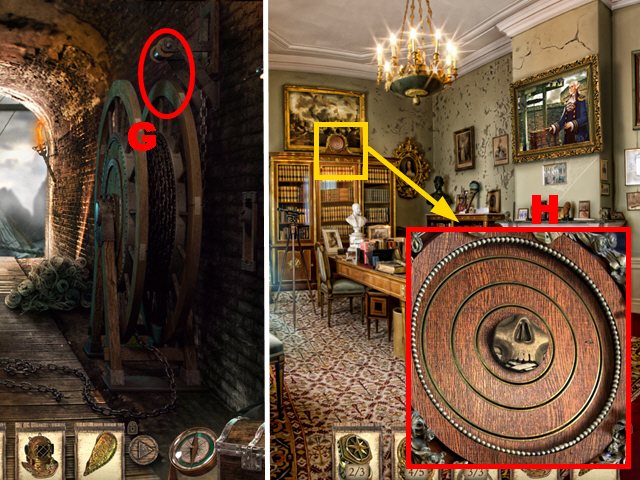
- Connect the CHAIN to the mechanism (G).
- Go to the Library.
- Zoom into bookshelf top; insert the 3 DECORATED RINGS into the ornament (H).
- Play the mini-game.

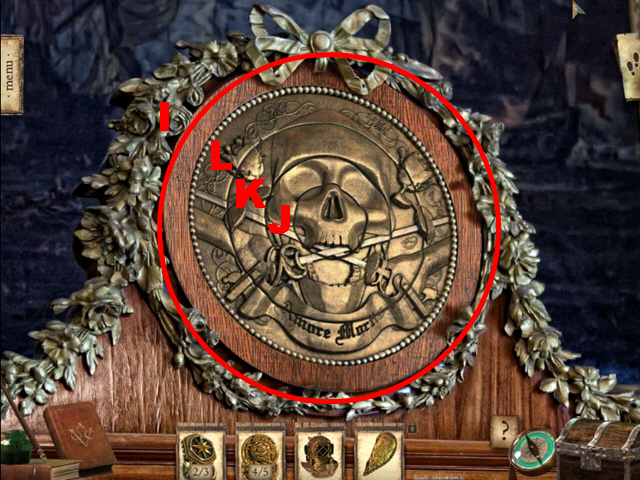
- To solve this puzzle (I), turn the 3 rings (J, K, and L) untl the correct image is created. This solution is random.
- Move forward.
Chapter 8: Isabelle’s Retreat

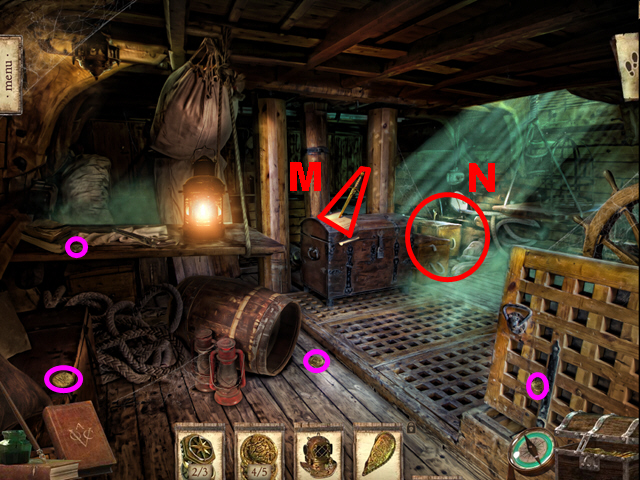
- Collect the 4 coins (purple).
- Take the GOLDEN DAGGER (M).
- Zoom into the chests (N).
- Play the HOP.

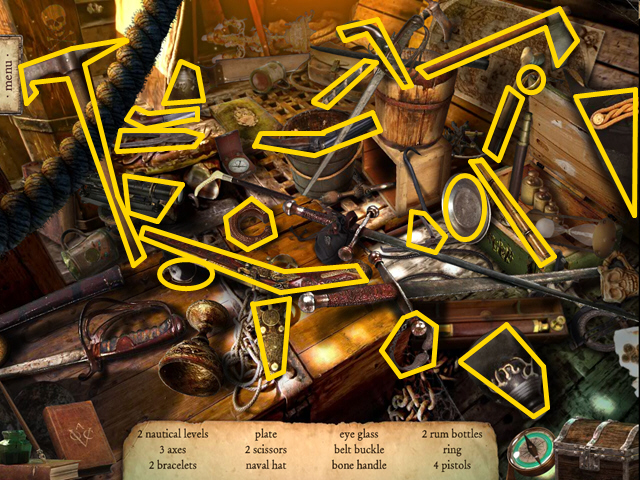
- Collect the 21 items (yellow).
- You will receive the BONE HANDLE.
- Go to the Secret Corridor.

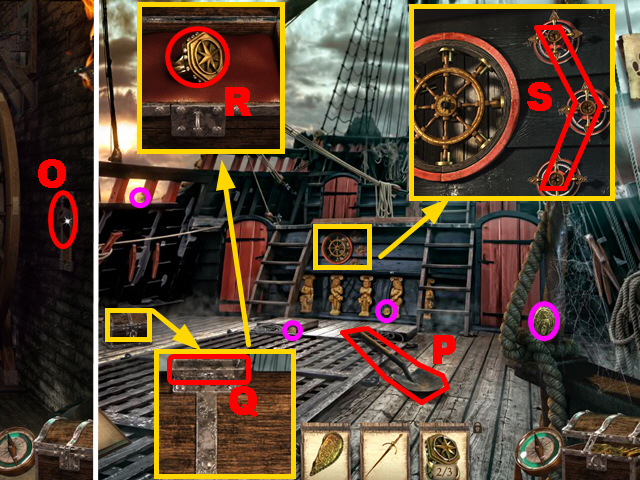
- Insert the BONE HANDLE into the slot (O) and press the handle.
- Move forward.
- Collect the 4 coins (purple).
- Take the SHOVEL (P).
- Zoom into the chest and insert 13 coins into the slot (Q); take the 3/3 SEAL RING (R).
- Zoom into the steering wheel; insert the 3 SEAL RINGS into the slots (S).
- Play the mini-game.

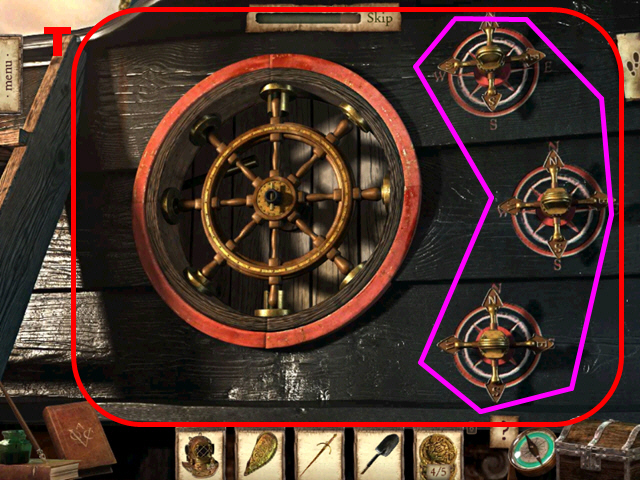
- To solve this puzzle (T), rotate the 3 sealed rings (purple) into the correct positions. The solution is random.
- Move forward.

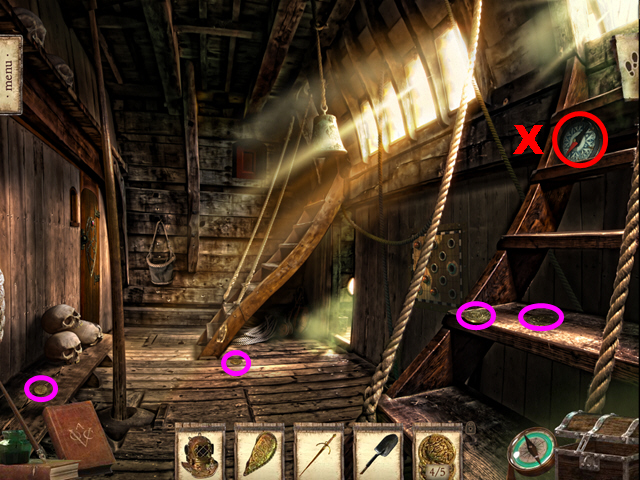
- Collect the 4 coins (purple).
- Take the COMPASS (X).
- Turn right.

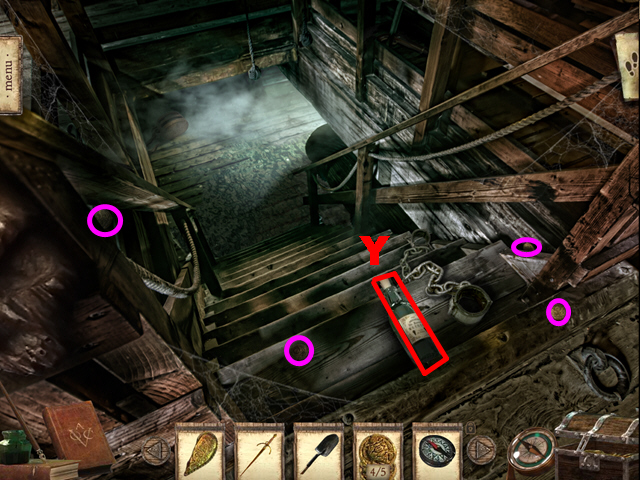
- Collect the 4 coins (purple).
- Take the note from the bottle (Y).
- Move forward.

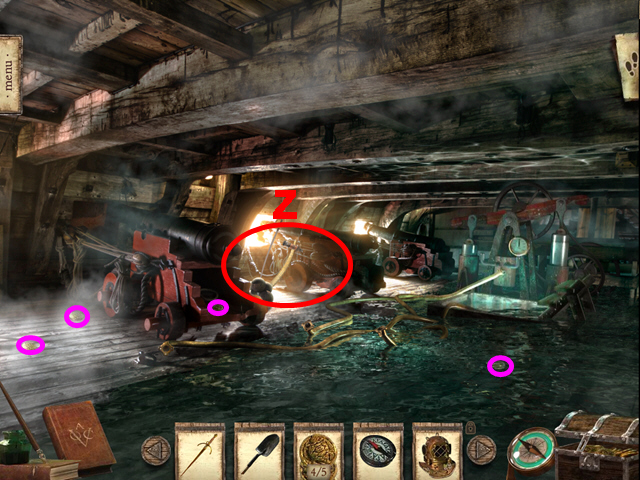
- Collect the 4 coins (purple).
- Zoom into the cannons (Z).
- Play the HOP.

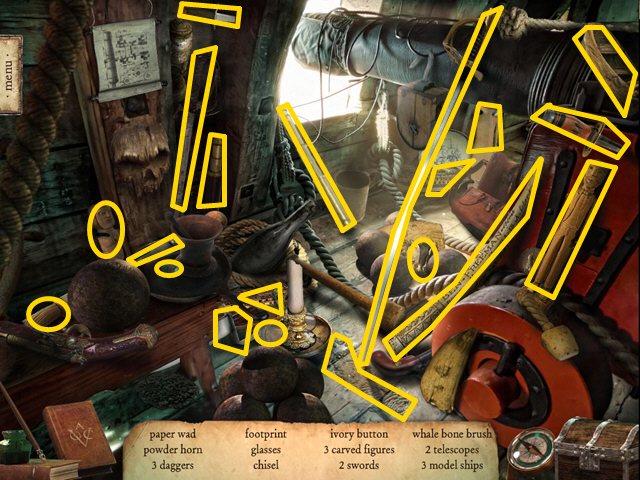
- Collect the 20 items (yellow).
- You will receive the IVORY PEG and the NUMBERED BUTTON.
- Go to the Wheelhouse.

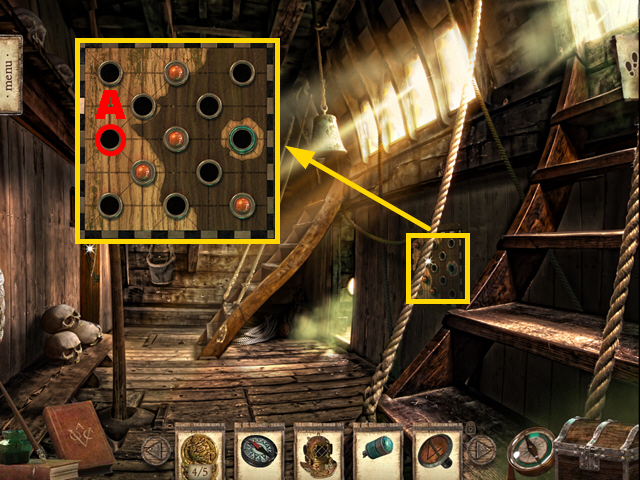
- Zoom into the panel; insert the IVORY PEG into the slot (A).
- Play the mini-game.

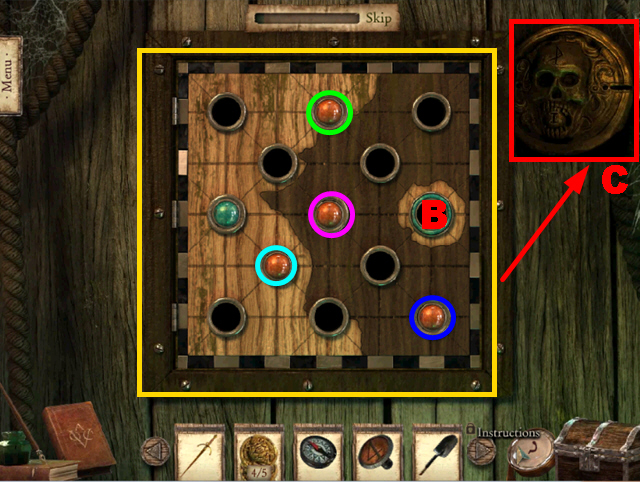
- To solve this puzzle, move the pegs into the following slots: move the red peg (green) across the red peg (purple), move the red peg (dark blue) across the red peg (green), move the red peg (dark blue) across the red peg (light blue), and move the green peg into the slot (B).
- Take the 5/5 PIRATE AMULET (C).
- Go to the Gun Deck.

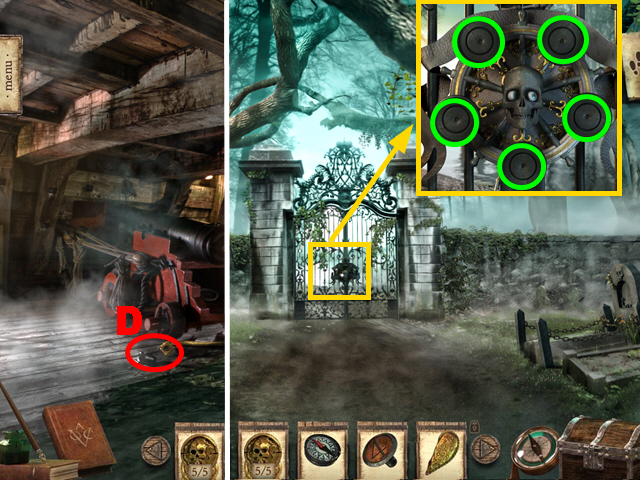
- Connect the DIVING HELMET to the hose (D).
- Go to the Cemetery Road.
- Zoom into the gate; insert the 5 PIRATE COINS into the slots (green).
- Play the mini-game.

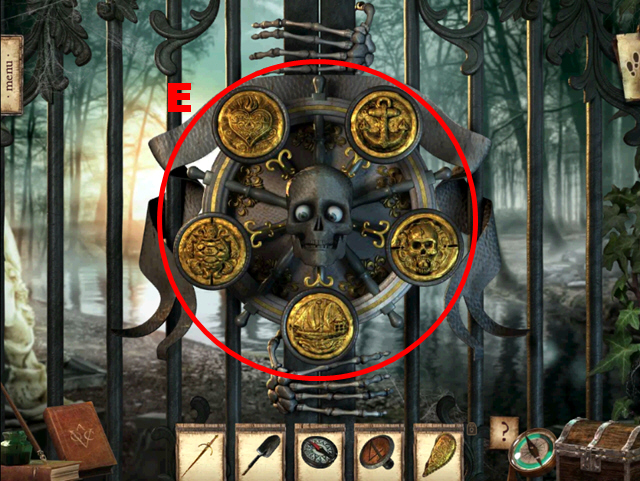
- To solve this puzzle (E), swap the coins until each coin is in the correct position.
- Move forward.
Chapter 9: The Cemetery

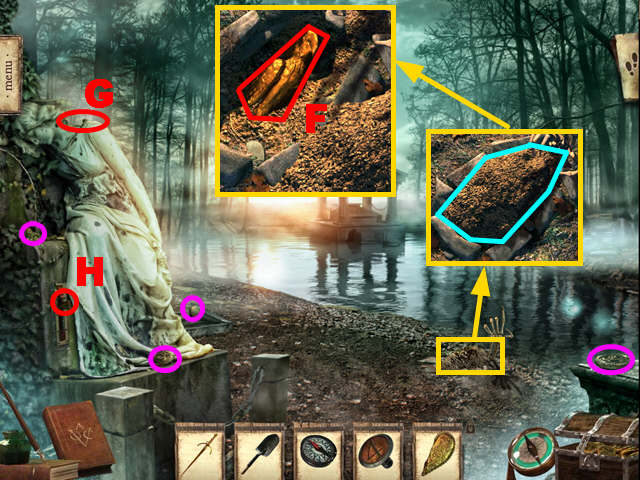
- Collect the 4 coins (purple).
- Zoom into the skeleton hand and remove the soil with the SHOVEL (light blue); take the GOLDEN PARROT (F).
- Put the GOLDEN PARROT on the statue’s shoulder (G).
- Insert the GOLDEN DAGGER into the slot (H) and push it.
- Move forward.

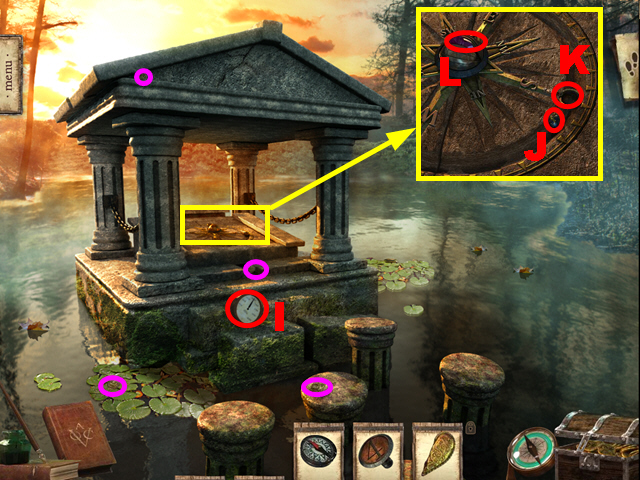
- Collect the 4 coins (purple).
- Take the AIR PUMP GAUGE (I).
- Zoom into the crypt and take the 1/4 BLACK PEARL (J); insert the 1/4 BLACK PEARL into the slot (K) and take the RUBY HEART (L).
- Go to the Gun Deck.

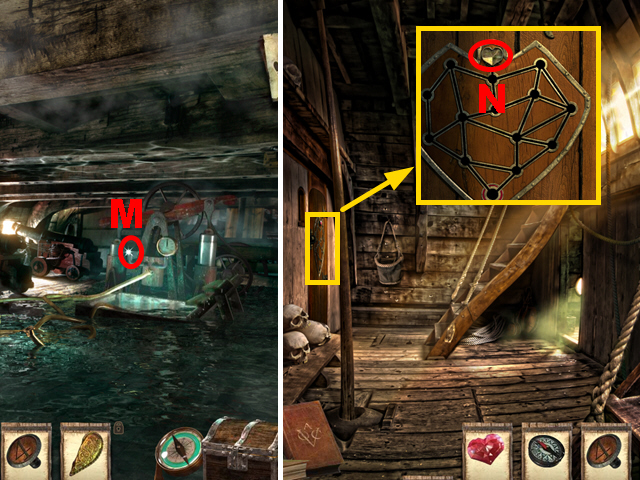
- Connect the AIR PUMP GAUGE to the pump (M).
- Go to the Wheelhouse.
- Zoom into the left door; insert the RUBY HEART into the niche (N).
- Play the mini-game.

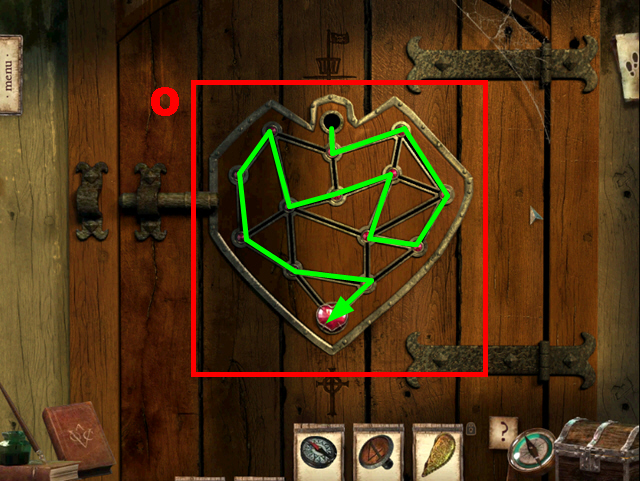
- To solve this puzzle (O), move the ruby heart along the line (green).
- Turn left.

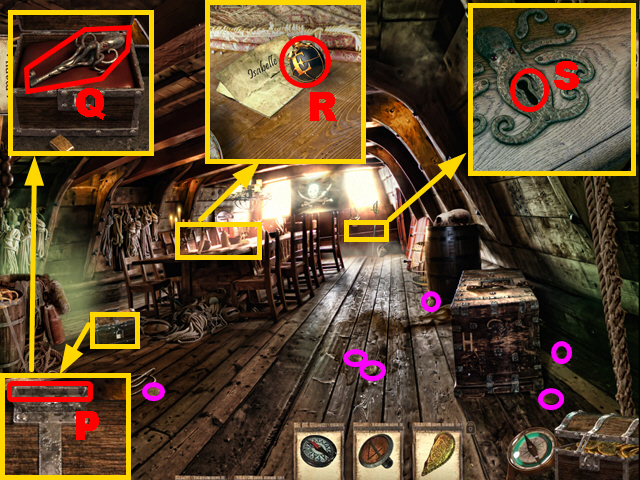
- Collect the 6 coins (purple).
- Zoom into the chest and insert 25 coins into the slot (P); take the OCTOPUS KEY (Q).
- Zoom into the table and remove the blanket; take the 2/4 BLACK PEARL (R) to acquire the note.
- Zoom into the bench; insert the OCTOPUS KEY into the lock (S) and turn it.
- Play the HOP.

- Collect the 19 items (yellow).
- You will receive the AIR PUMP HOSE.


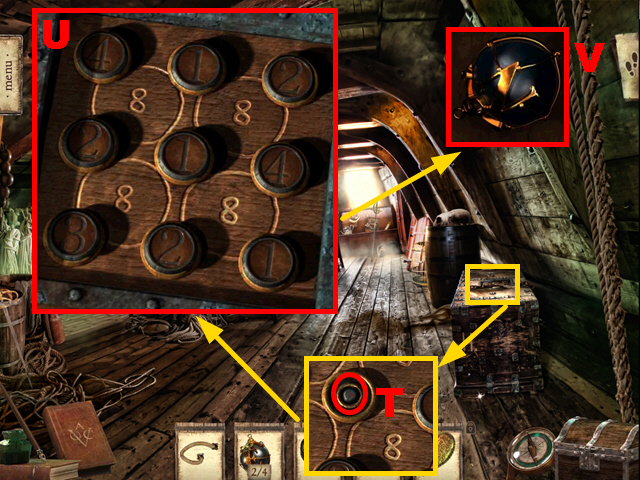
- Zoom into the chest; insert the NUMBERED BUTTON into the central spot (T).
- Play the mini-game.
- To solve this puzzle (U), swap the numbered buttons so that the sums of each circle equals ’8′.
- Take the 3/4 BLACK PEARL (V).
- Go to the Gun Deck.

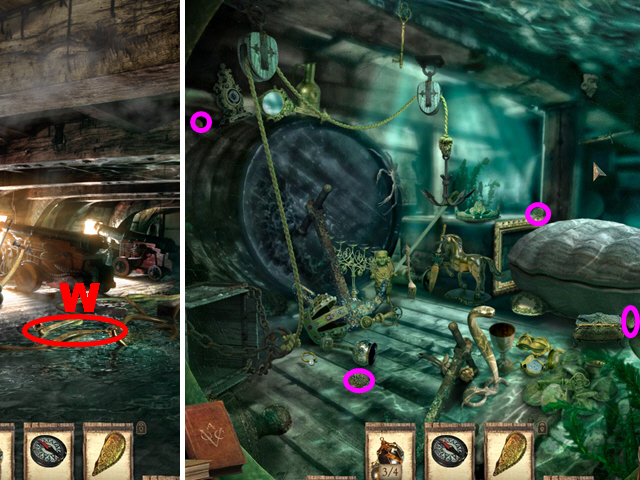
- Connect the AIR PUMP HOSE to the hose (W).
- Go down.
- Collect the 4 coins (purple).

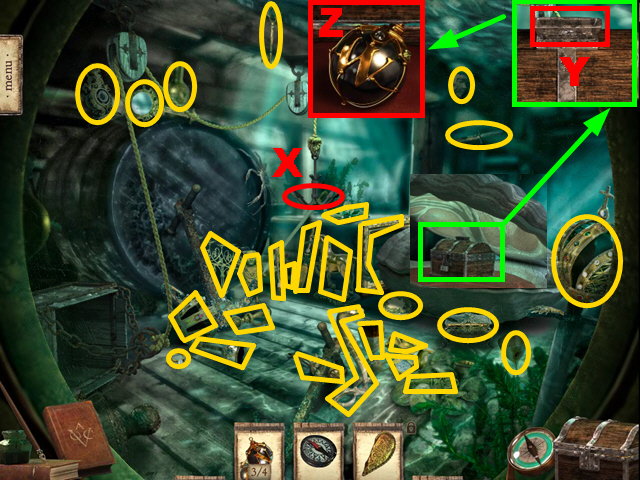
- Connect the anchor (X) to the large shell.
- Put the 28 items (yellow) into the crate.
- Zoom into the chest and insert 4 coins into the slot (Y); take the 4/4 BLACK PEARL (Z).
- Go to the Crypt.

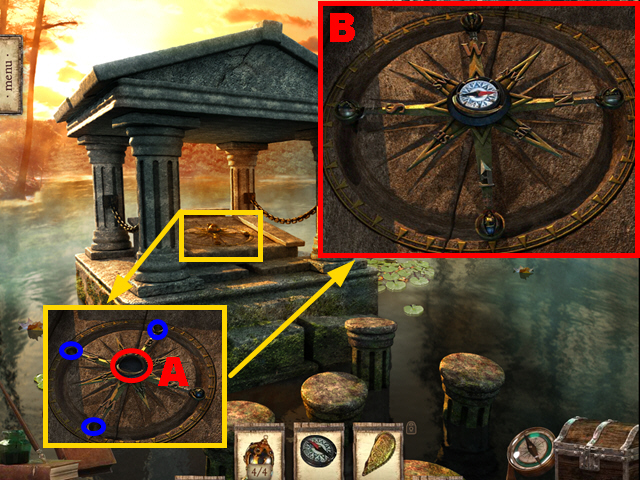
- Zoom into the crypt; insert the 3 BLACK PEARLS into the slots (dark blue) and the COMPASS into the niche (A).
- Play the mini-game.
- To solve this puzzle (B), align N on the big compass with the Red arrow on the smaller compass.
- Enter Isabelle’s Grave.

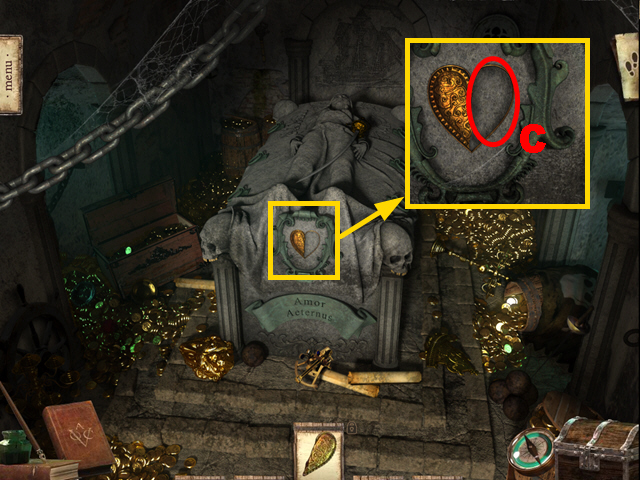
- Zoom into the grave; insert the BROKEN HEART into the niche (C).
- Congratulations, you have completed Legacy Tales: Mercy of the Gallows.



 Shaban Walkthrough, Guide, & Tips
 Mystery Trackers: Blackrow's Secret Walkthrough, Guide, & Tips
 Haunted Legends: The Bronze Horseman Walkthrough, Guide, & Tips
 Kaptain Brawe: A Brawe New World (Episode 1) Walkthrough, Guide, & Tips
 Vampireville Walkthrough, Guide, & Tips