Dark Sisterhood: The Initiation Walkthrough, Guide, & Tips
Dark Sisterhood: The Initiation Walkthrough

Welcome to the Dark Sisterhood: The Initiation Walkthrough
A peaceful island town erupts into a violent witch hunt and your friend’s daughter is the target! Can you protect her from the townspeople?
Whether you use this document as a reference when things get difficult or as a road map to get you from beginning to end, we’re pretty sure you’ll find what you’re looking for here.
This document contains a complete Dark Sisterhood: The Initiation game walkthrough featuring annotated screenshots from actual gameplay!
We hope you find this information useful as you play your way through the game. Use the walkthrough menu below to quickly jump to whatever stage of the game you need help with.
Remember to visit the Big Fish Games Forums if you find you need more help. Have fun!
This walkthrough was created by Nathaniel A., and is protected under US Copyright laws. Any unauthorized use, including re-publication in whole or in part, without permission, is strictly prohibited.
General Tips

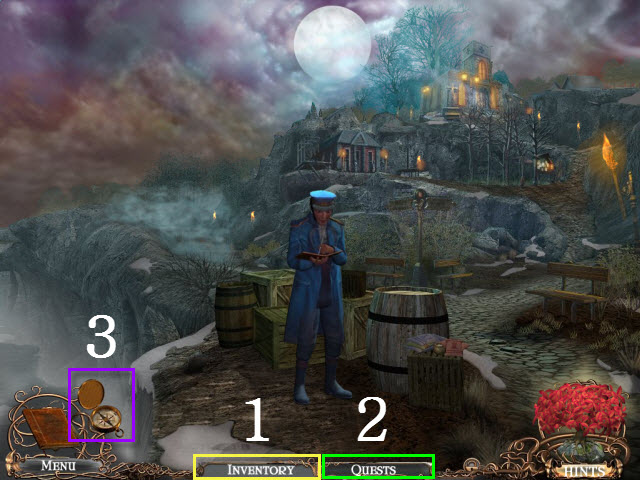
- This is the Official Guide for Dark Sisterhood: The Initiation.
- We will use the acronym HOP for Hidden-object puzzles. Interactive items will be color-coded and some will be numbered; please follow the numbers in sequence.
- This guide will not mention each time you have to zoom into a location; the screenshots will show each zoom scene.
- The HOP lists may be random; our lists may vary from yours.
- There are two difficulty levels: Regular and Advanced.
- The Inventory items are stored here (1).
- You may view your current Quests here (2).
- Use the compass to travel to a location (3).
Chapter 1: The Church

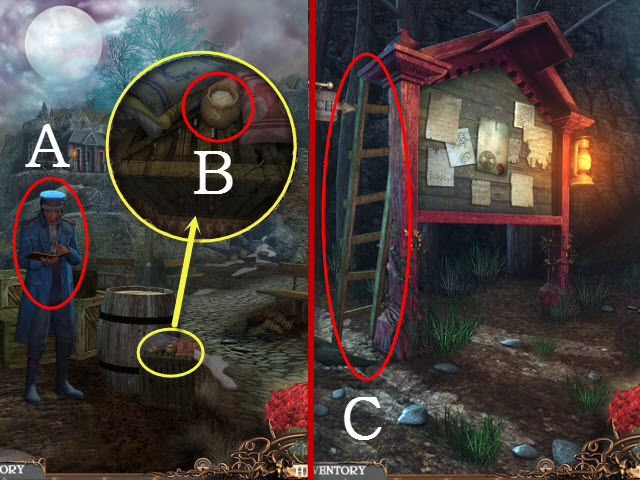
- Talk to the man (A).
- Examine the crate; take the BAG OF SALT (B).
- Walk forward to the Crossroads.
- Pick up the LADDER (C).
- Walk left to the Courthouse; walk down and right to the Church Plaza.

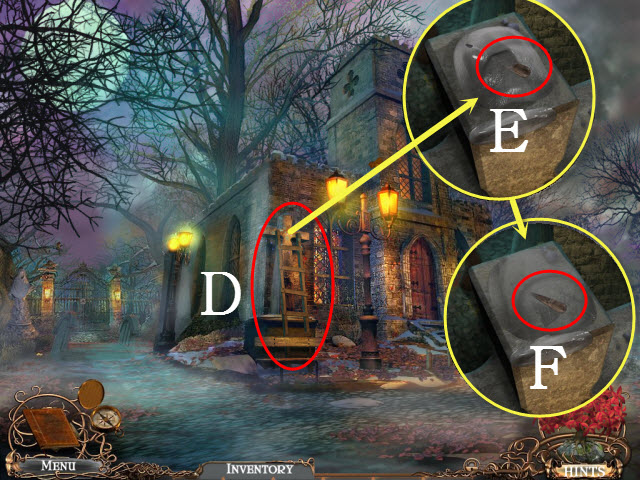
- Place the LADDER with the cross; examine the cross (D).
- Use the BAG OF SALT on the ice (E).
- Take the SCREWDRIVER (F).
- Return to the Courthouse.

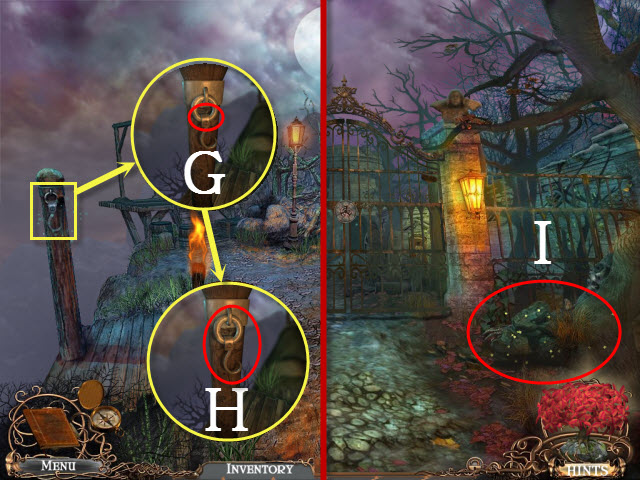
- Examine the hook; use the SCREWDRIVER on the screw (G).
- Take the HOOK (H).
- Return to the Church Plaza and walk forward to the Cemetery Gate.
- Examine the grass to activate a HOP (I).

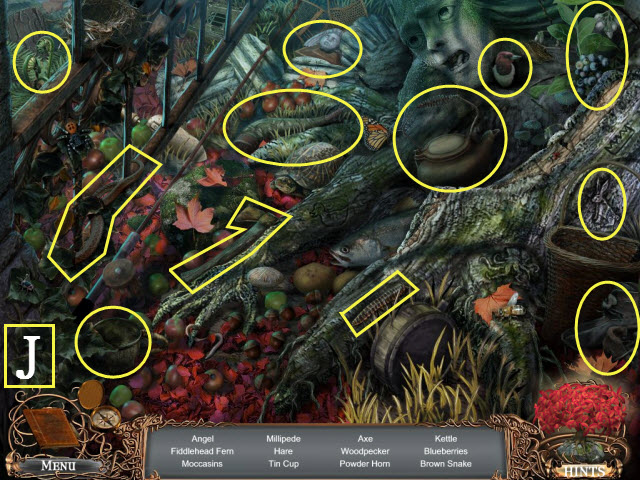
- Play the HOP (J).
- You receive the ANGEL.
- Walk down; examine the Church Entrance.

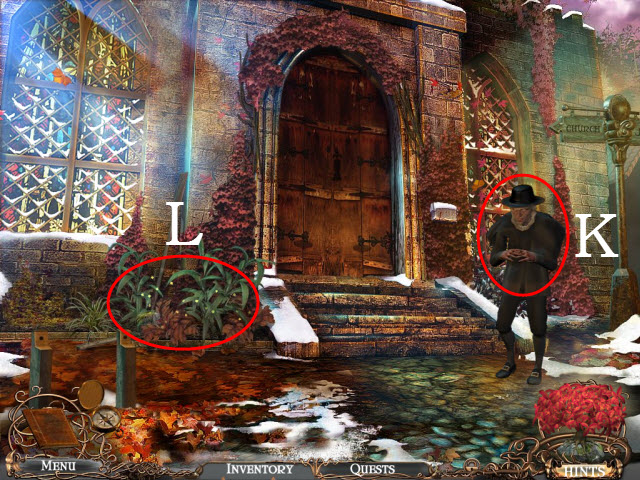
- Talk to the Reverend (K).
- Examine the plants to activate a HOP (L).

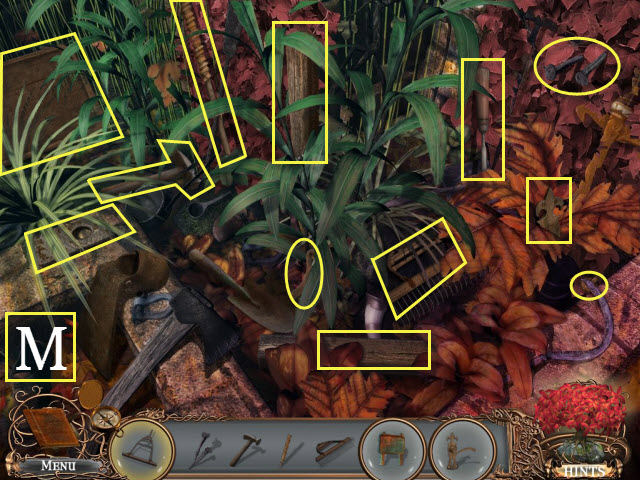
- Play the HOP (M).
- You receive the RAKE, the DOOR LATCH, and the CHURCH SIGN.

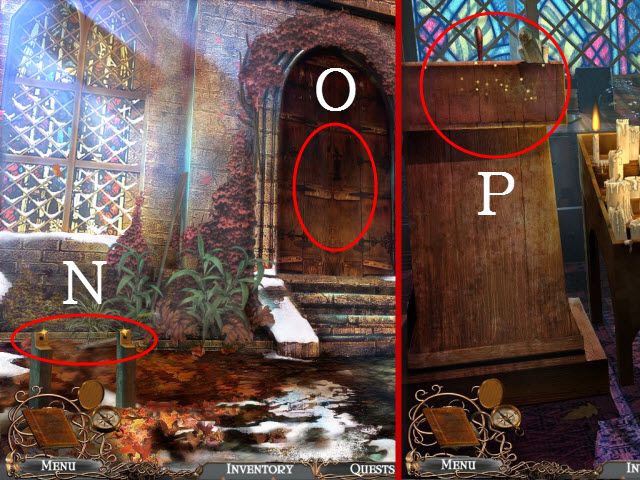
- Place the CHURCH SIGN on the poles (N).
- Place the DOOR LATCH on the door (O).
- Walk forward to the Main Hall and enter the Right Side.
- Examine the podium to activate a HOP (P).

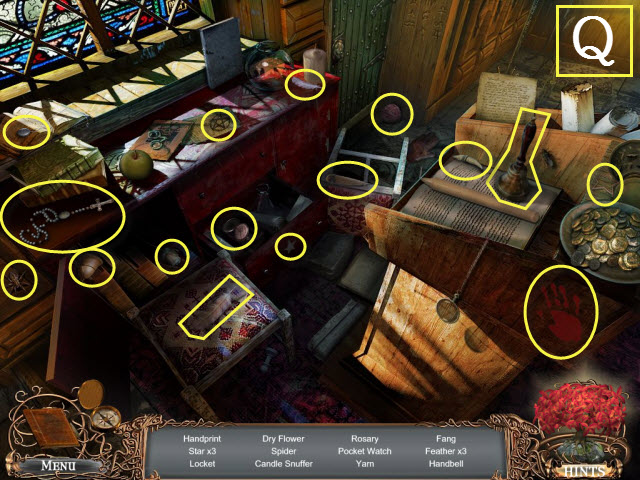
- Play the HOP (Q).
- You receive the ROSARY.
- Walk down and enter the Left Side; examine the candles to activate a HOP.

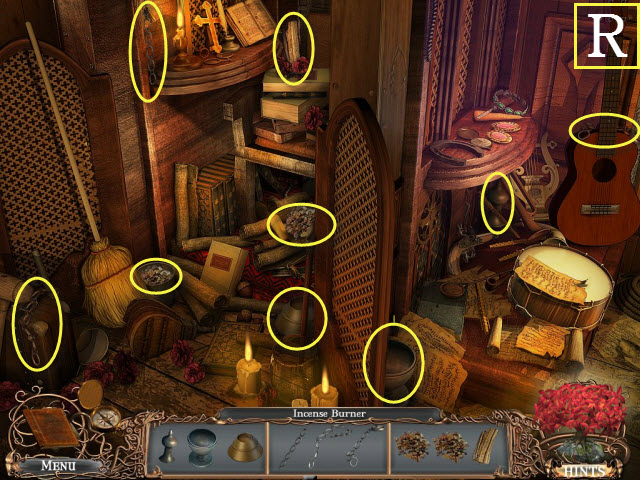
- Play the HOP (R).
- You receive the INCENSE BURNER.

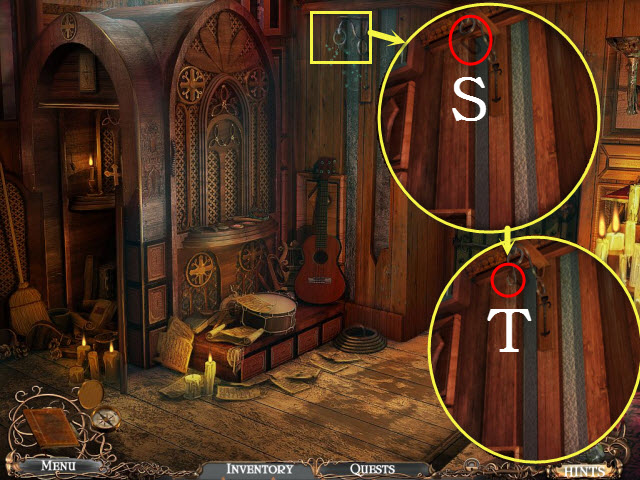
- Examine the link; place the HOOK on it (S).
- Place the INCENSE BURNER on the hook (T).
- Walk down twice.

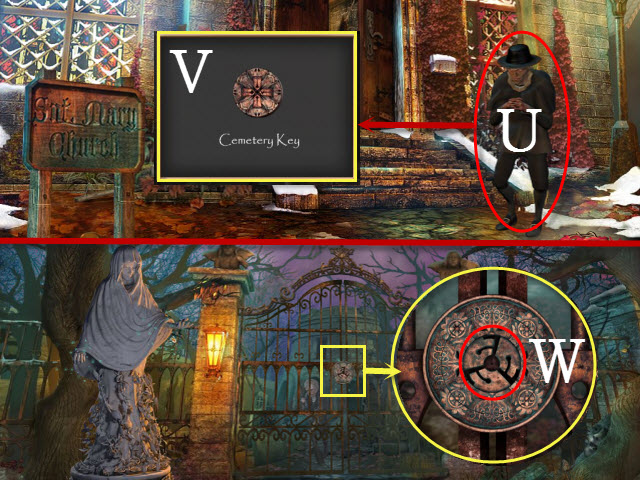
- Give the ROSARY to the Reverend (U).
- Take the CEMETERY KEY (V).
- Return to the Cemetery Gate.
- Select the gate; place the CEMETERY KEY in the keyhole (W).
- Enter the Graveyard.
Chapter 2: The Graveyard

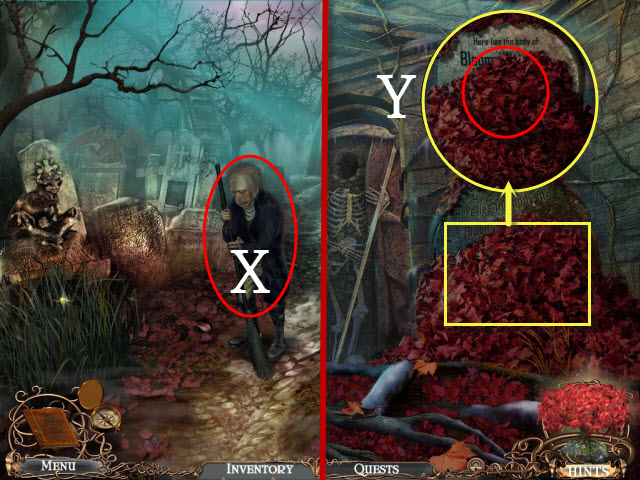
- Talk to the Sexton (X).
- Walk right.
- Examine the leaves; use the RAKE on them (Y).
- Walk down and then forward twice to the Mausoleum.

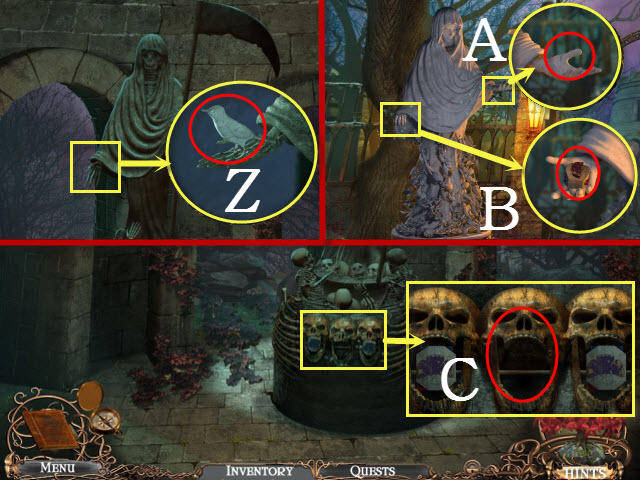
- Examine the hand; take the BIRD (Z).
- Return to the Cemetery Gate.
- Examine the right hand; place the BIRD in it (A).
- Examine the left hand; take the CUBE (B).
- Return to the Mausoleum.
- Examine the skulls; place the CUBE in the space to activate a mini-game (C).

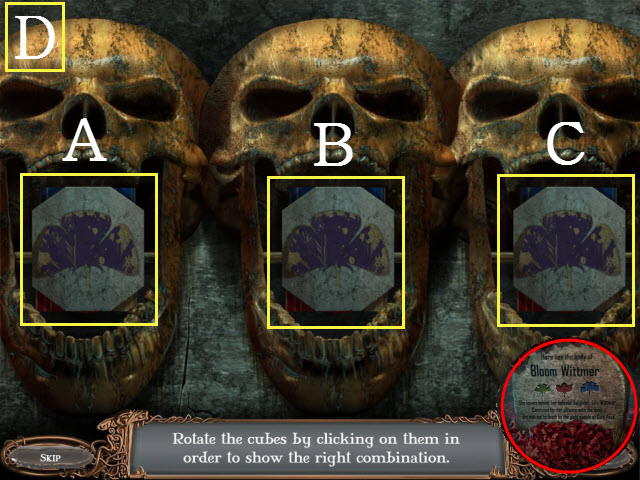
- To solve the mini-game, rotate the cubes so that they match the clue from the gravestone.
- Please see the screenshot for the solution: Ax2, Bx1, and Cx3 (D).
- Enter the Chamber and examine the candles to activate a HOP.

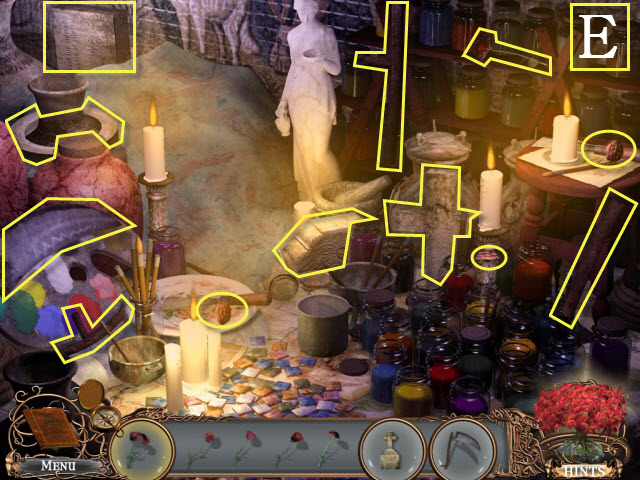
- Play the HOP (E).
- You receive the SCYTHE, the ROSES, and the HEADSTONE.
- Walk forward to the Crypt.

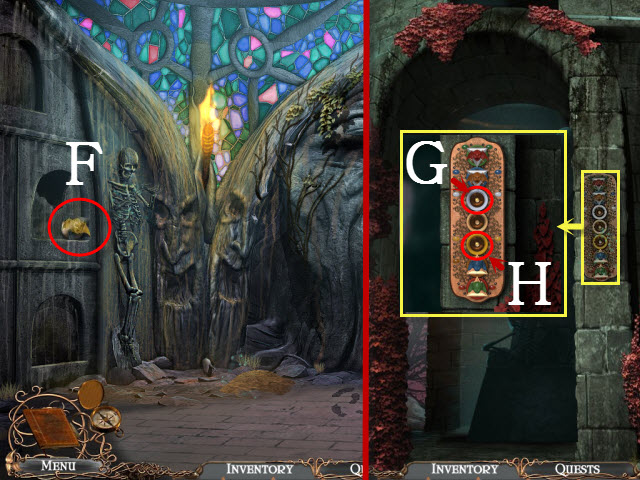
- Take the DEMON (F).
- Return to the Mausoleum and walk back once.
- Examine the device; place the DEMON (G) and the ANGEL (H) in the slots to activate a puzzle.

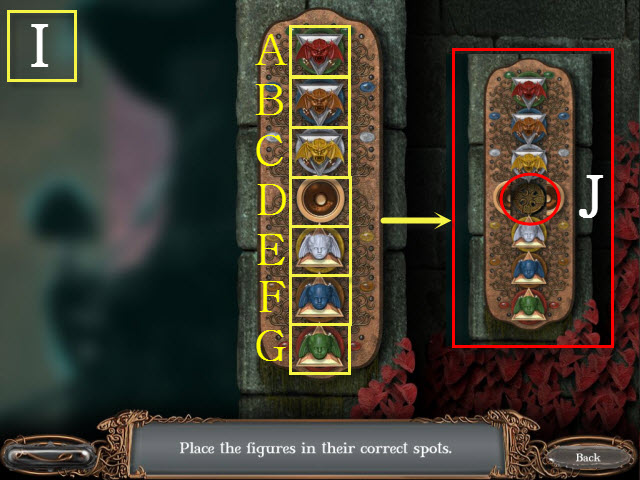
- Rearrange the faces so that their colors match the colors on the borders. The pieces may only be moved to an empty space.
- To solve the puzzle, select the pieces: C, D, E, C, D, E, A, D, G, A, D, G, B, D, F, B, D, and F (I).
- Take the TOMB CREST (J).
- Walk down.

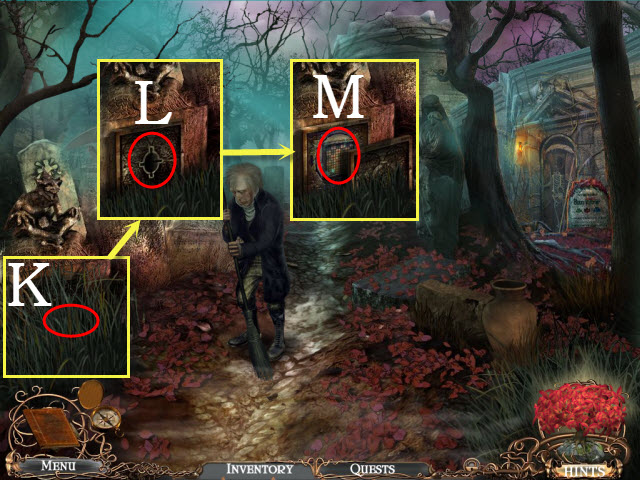
- Use the SCYTHE on the weeds (K).
- Place the TOMB CREST in the slot (L).
- Examine the board to activate a puzzle (M).

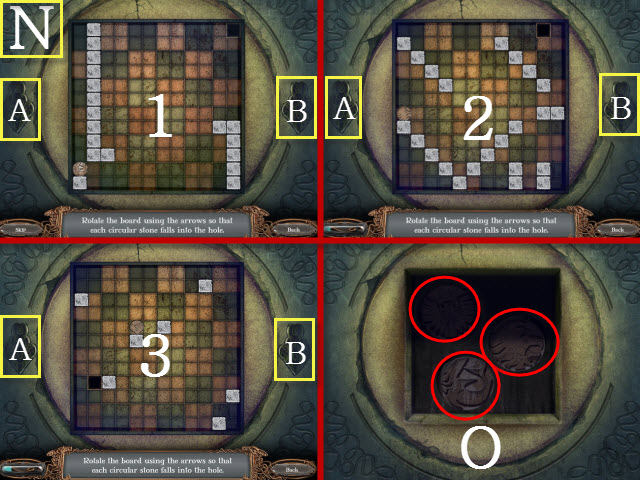
- To solve the puzzle, select the left and right arrows to rotate the board in order to guide the ball into the hole.
- Please follow steps 1-3 to solve (N).
- Phase one: B, B, B, A, and A (1).
- Phase two: B, B, B, A, and A (2).
- Phase three: A, B, B, B, B, and B (3).
- Take the SHARK CREST, the EAGLE CREST, and the LION CREST (O).
- Return to the Chamber.

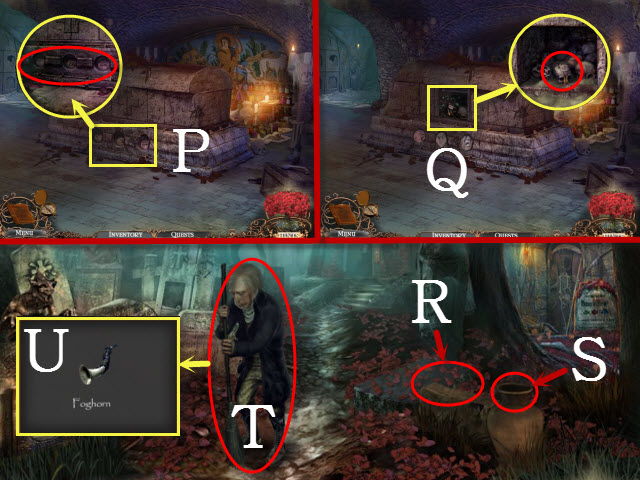
- Examine the sarcophagus; place the LION CREST, the EAGLE CREST, and the SHARK CREST in the slots (P).
- Examine the compartment; take the GHOST AMULET (Q).
- Return to the Graveyard.
- Place the HEADSTONE on the stone base (R).
- Place the ROSES in the vase (S).
- Give the GHOST AMULET to the Groundskeeper (T); take the FOGHORN (U).
- Return to the Crossroads; walk down and then left to the Misty Forest.

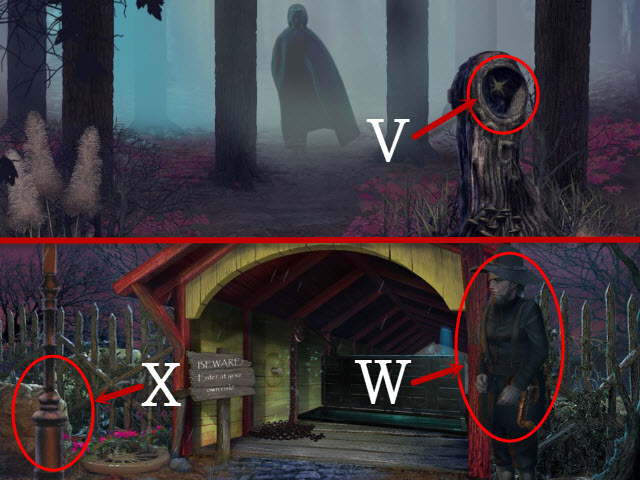
- Place the FOGHORN in the holder (V).
- Walk forward twice to the Forest Entrance.
- Talk to the man (W).
- Examine the lamp post to activate a HOP (X).

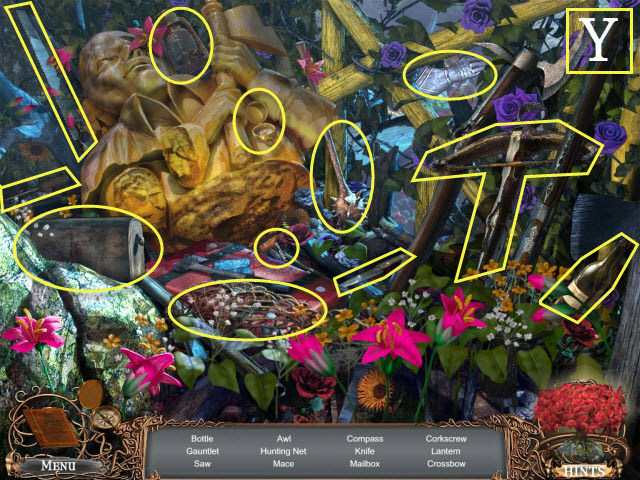
- Play the HOP (Y).
- You receive the MAILBOX.
- Walk down to the Town Outskirts.

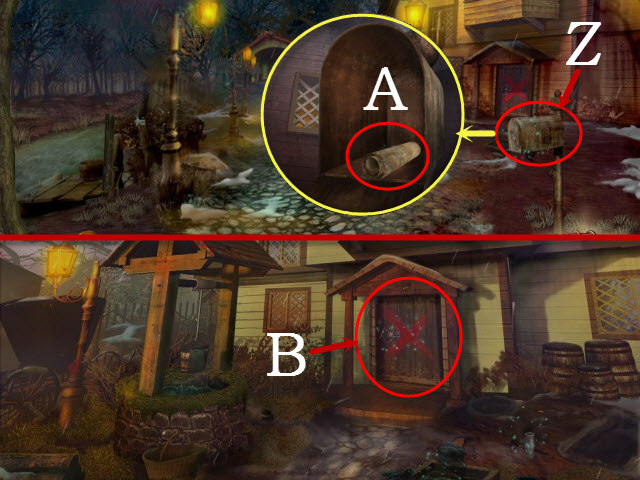
- Place the MAILBOX on the post (Z).
- Examine the mailbox; open it and select the paper (A).
- Walk right to the House Entrance.
- Examine the door to activate a mini-game (B).
Chapter 3: The Old House

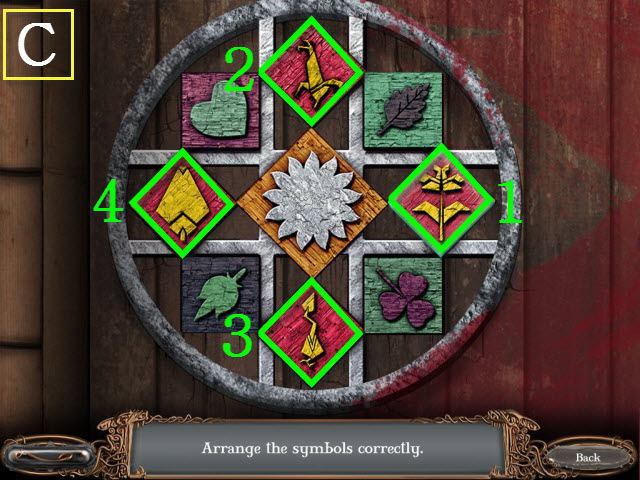
- To complete the mini-game, swap the symbols so that they match the note from the mailbox.
- Please see the screenshot for the solution; select the symbols in the order shown (C).
- Enter the Foyer; examine the desk to activate a HOP.

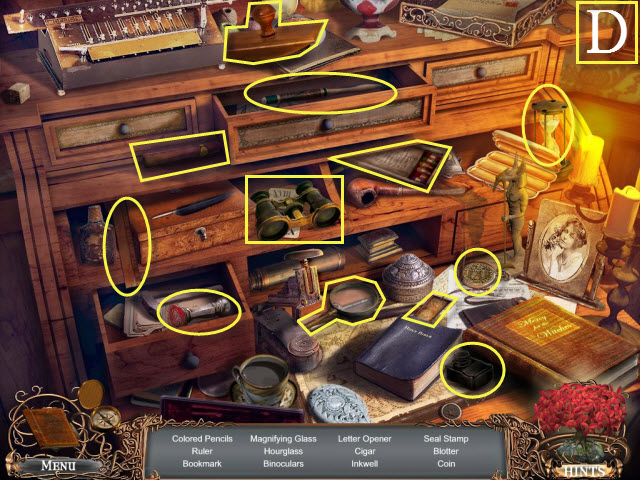
- Play the HOP (D).
- You receive the COLORED PENCILS.
- Walk forward to the Living Room; examine the fireplace to activate a HOP.

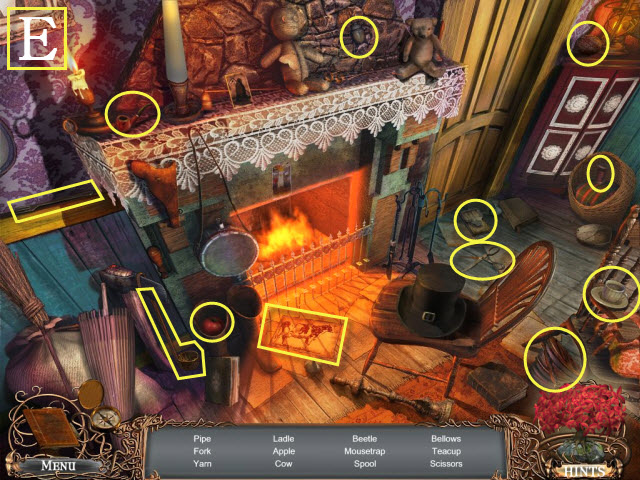
- Play the HOP (E).
- You receive the SCISSORS.
- Walk down and then upstairs to the Hallway.

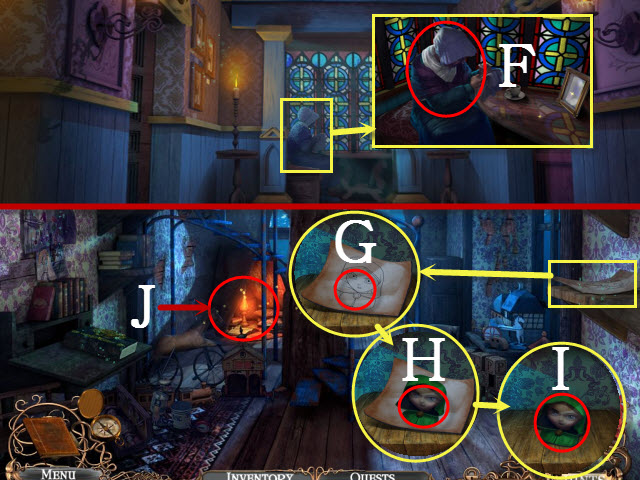
- Examine the old lady and talk to her (F).
- Walk left to the Bedroom.
- Examine the shelf; use the COLORED PENCILS on the drawing (G).
- Use the SCISSORS on the drawing (H).
- Take the PAPER WITCH (I).
- Examine the lamp to activate a HOP (J).

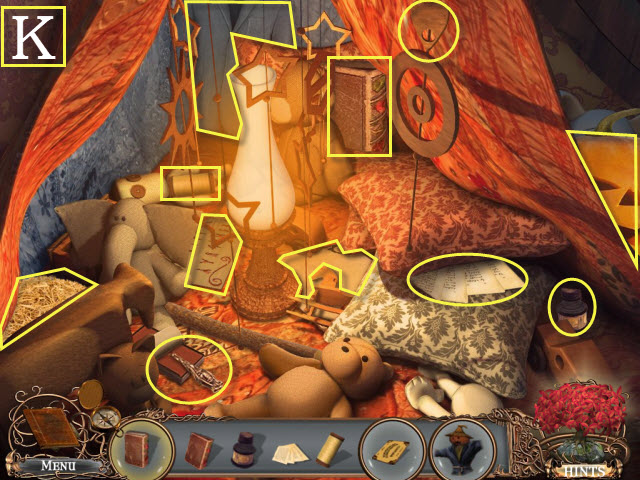
- Play the HOP (K).
- You receive the BOOK, the SPIRIT BOARD, and the SCARECROW.

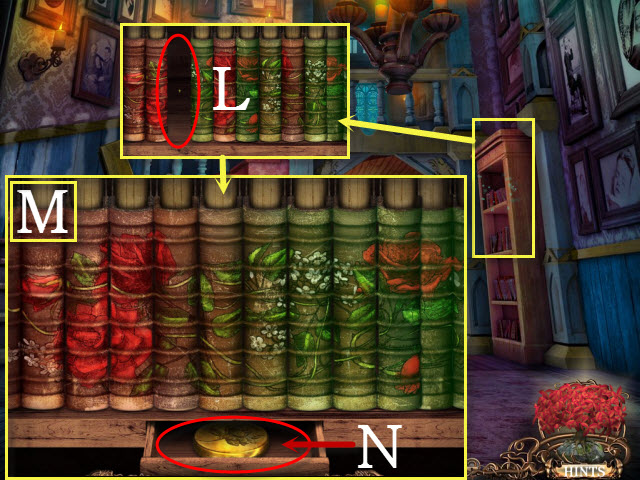
- Return to the Foyer; examine the bookcase; place the BOOK in the slot to activate a puzzle (L).
- To solve the puzzle, rearrange the books to form a complete image.
- Please see the screenshot for the solution (M).
- Take the ROSE COIN (N).
- Walk down.

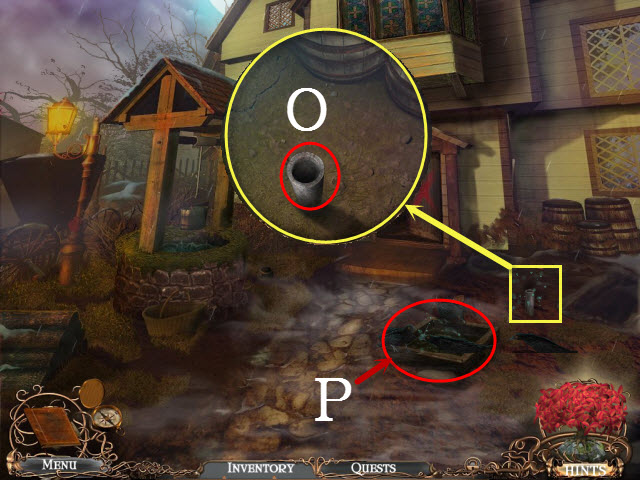
- Examine the pole; place the SCARECROW on it (O).
- Examine the pipes to activate a puzzle (P).

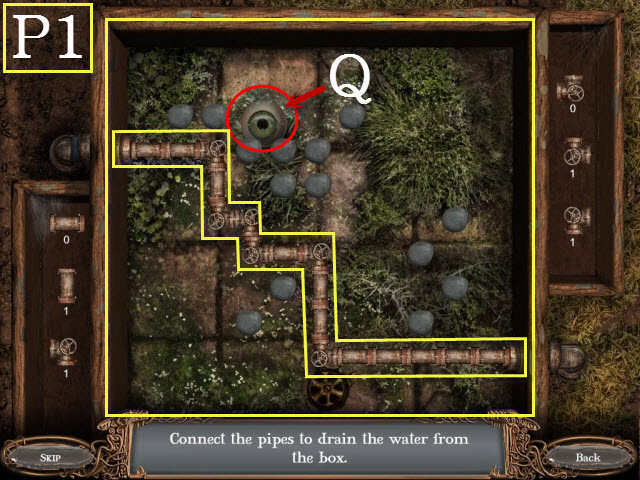
- To solve the puzzle, arrange the pipes so that they form a path from left to right. The numbers indicate the available quantity of each pipe.
- This puzzle is random; please see the screenshot for one possible solution (P1).
- Take the GLASS EYE (Q).
- Return to the Bedroom.

- Examine the book; place the ROSE COIN in the engraving (R).
- Place the PAPER WITCH on the book (S).
- Turn the page twice and take the PICTURE OF LILY (T).
- Walk down; examine the old lady.
- Place the SPIRIT BOARD on the table (U).
- Place the PICTURE OF LILY in the frame (V).
- Give the old lady the GLASS EYE (W); take the COPPER SPHERE (W1).
- Return to the Crypt.


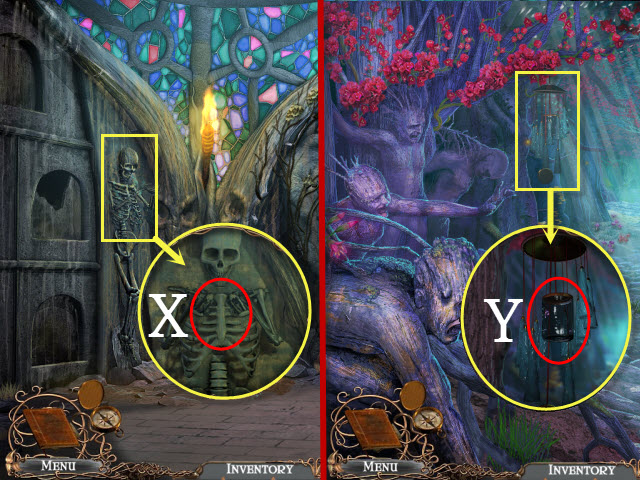
- Examine the skeleton; place the COPPER SPHERE in its hands (X).
- Walk forward to the Lair Tunnel.
- Examine the chime; take the GLASS JAR (Y).
- Walk forward three times to the Altar.
Chapter 4: The White Witch

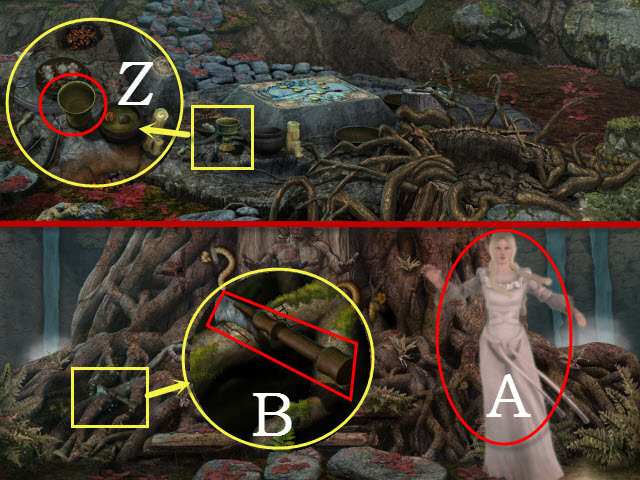
- Examine the ground; take the CHALICE (Z).
- Walk forward to the Tree Entrance.
- Talk to the White Witch (A).
- Examine the roots; take the HOOK BLADE KNIFE (B).
- Walk down three times to the Fountain.

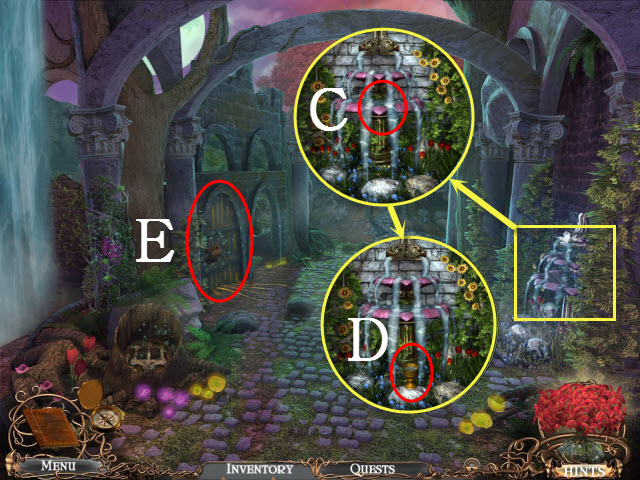
- Examine the fountain; use the CHALICE with the water (C).
- Take the CHALICE OF WATER (D).
- Examine the door to activate a puzzle (E).

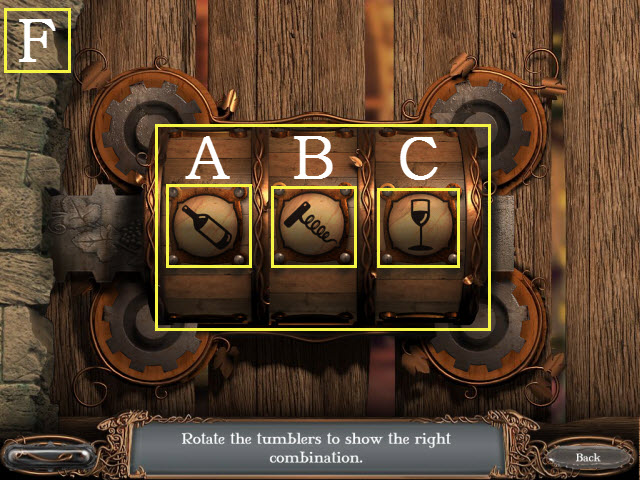
- To solve the puzzle, flip the symbols until the order matches the clue from the tree branch.
- Please see the screenshot for the solution: Ax2, Bx1, and Cx3 (F).
- Enter the Wine Cellar; examine the wine bottles to activate a HOP.

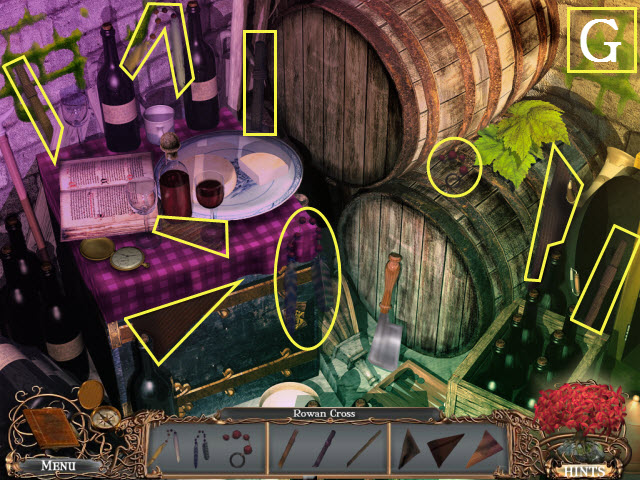
- Play the HOP (G).
- You receive the ROWAN CROSS.

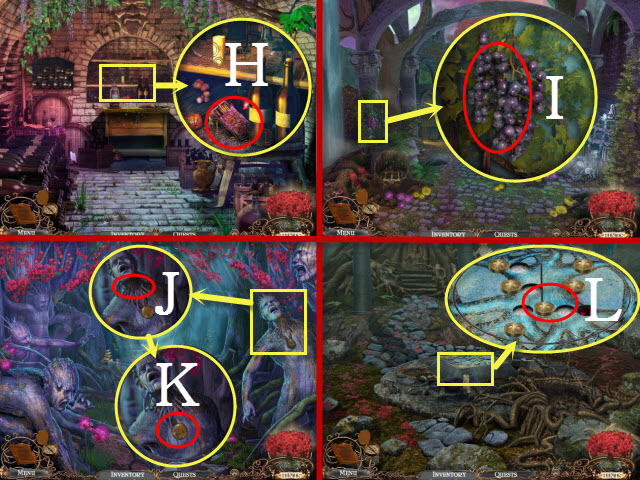
- Examine the shelf; take the MATCHES (H).
- Walk down.
- Examine the grapes; use the HOOK BLADE KNIFE on them and take the GRAPES (I).
- Walk down.
- Examine the tree man; use the MATCHES on the roots (J).
- Take the MEDAL (K).
- Return to the Altar; examine the altar and place the MEDAL on it to activate a puzzle (L).

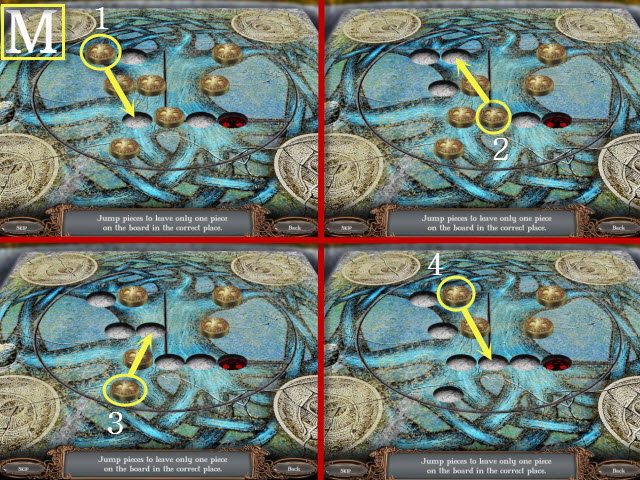

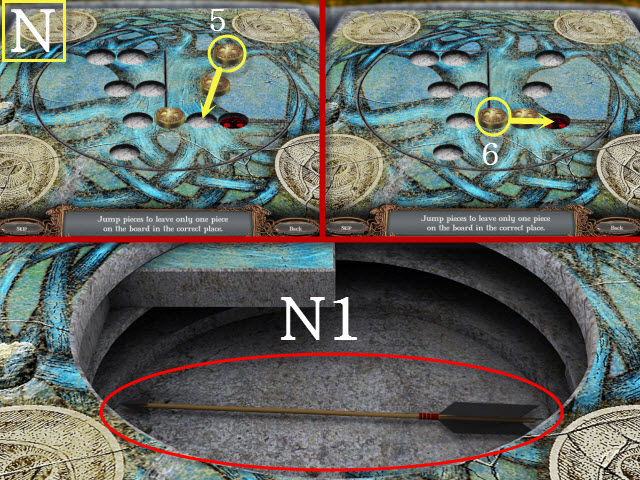
- To solve the puzzle, play the game of Chinese checkers; Pieces may only jump over each other to eliminate another piece and the last move must finish on the empty space.
- Follow steps 1-6 to solve (M, N).
- Take the ARROW (N1).
- Walk down to the Lair Glen.

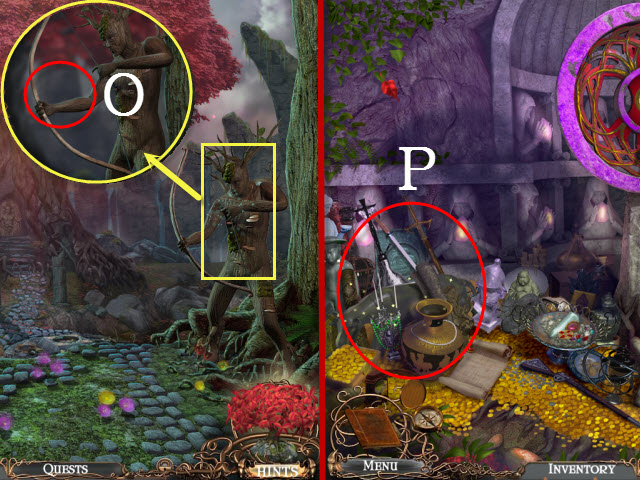
- Examine the archer; place the ARROW with the bow (O).
- Walk left to the Treasury.
- Examine the treasure to activate a HOP (P).

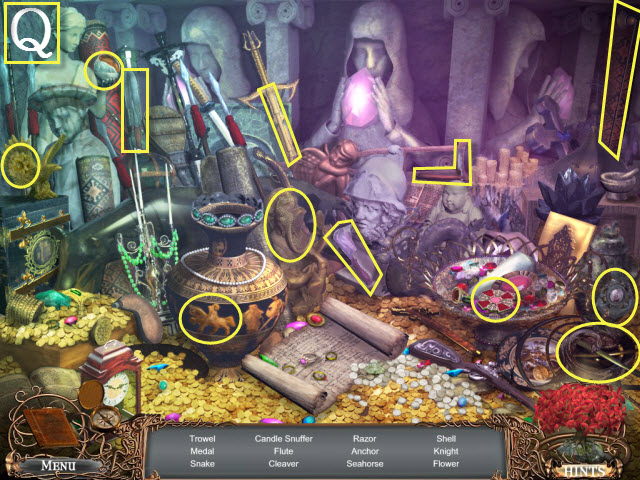
- Play the HOP (Q).
- You receive the TROWEL.

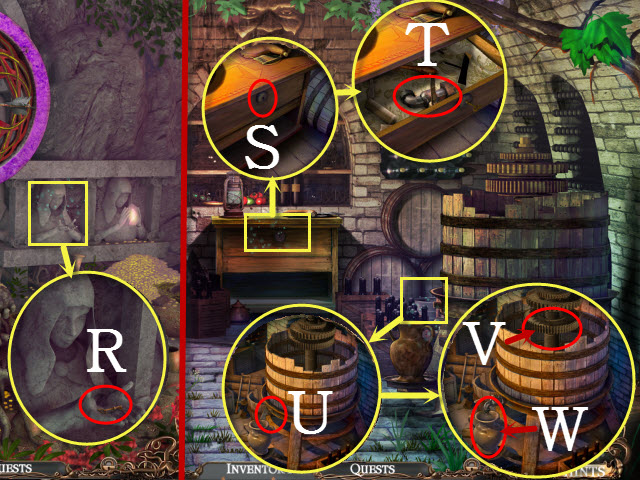
- Examine the statue; take the SMALL KEY (R).
- Return to the Wine Cellar.
- Examine the desk; use the SMALL KEY on the lock (S).
- Take the TAP (T).
- Examine the barrel; place the TAP the fixture (U).
- Place the GRAPES in the barrel (V); take the WINE JAR (W).
- Return to the Tree Entrance.

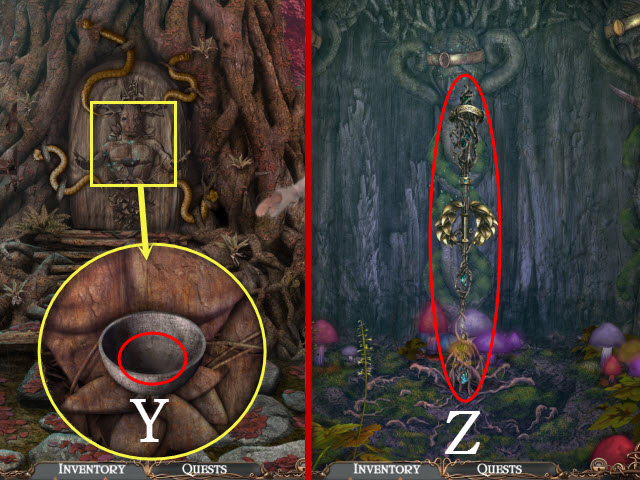
- Examine the door; use the WINE JAR on the bowl (Y).
- Enter the Great Tree.
- Examine the scepter to activate a mini-game (Z).

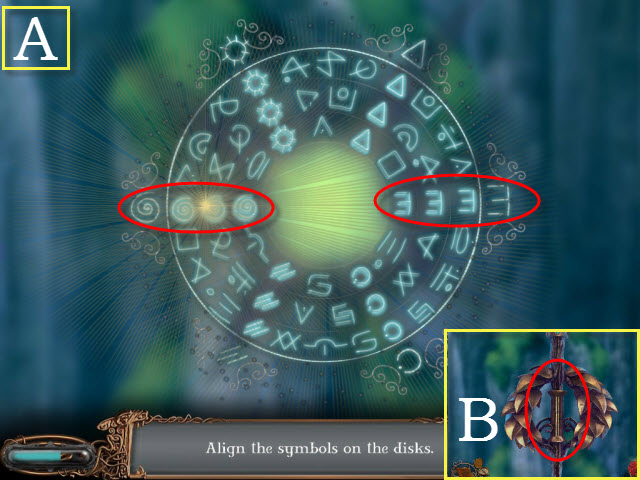
- To solve the mini-game, rotate each disk so the symbols are aligned with the symbols on the outer rim.
- Please see the screenshot for the solution (A).
- Take the MAGIC SCEPTER (B).
- Return to the Crypt.

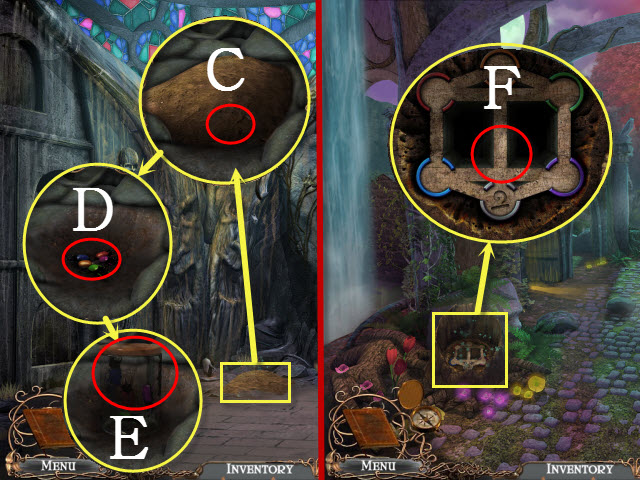
- Examine the soil; use the TROWEL on it (C).
- Use the GLASS JAR on the bugs (D).
- Take the JAR OF BEETLES (E).
- Return to the Fountain.
- Examine the tree stump; place the BEETLES on the game to activate a puzzle (F).

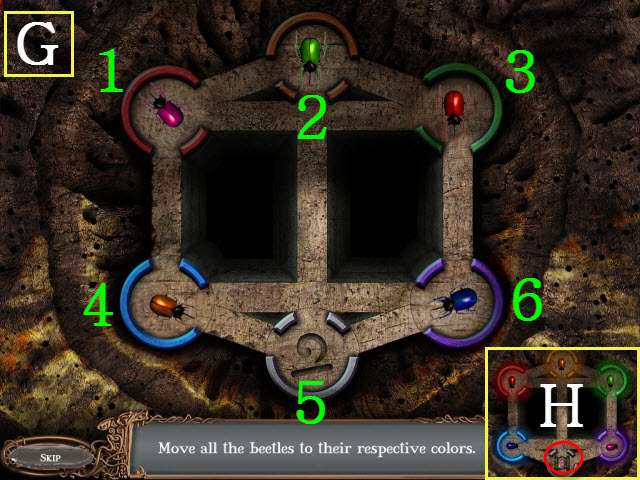
- To solve the puzzle, move the beetles to the spaces with corresponding colors.
- Please see the screenshot for the solution: 4, 1, 3, 2, 5, 4, 6, and 5 (G).
- Take the MAGIC SEED (H).
- Return to the Treasury.

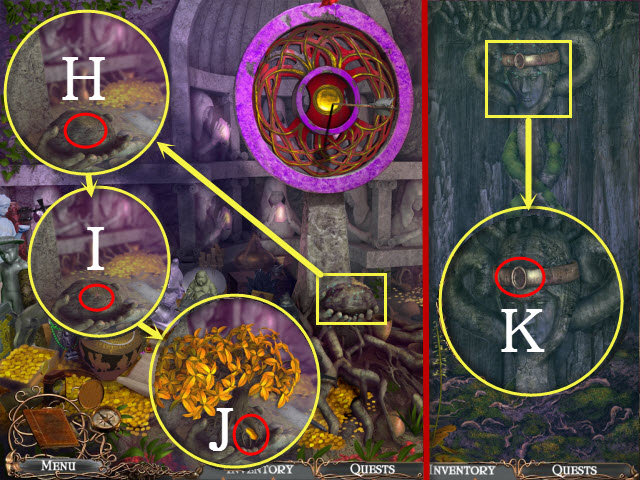
- Examine the stone; place the MAGIC SEED in it (H).
- Use the CHALICE OF WATER on the stone (I).
- Take the GOLDEN LEAF (J).
- Return to the Great Tree.
- Examine the crown; place the GOLDEN LEAF in the engraving (K).
- Return to the Altar.

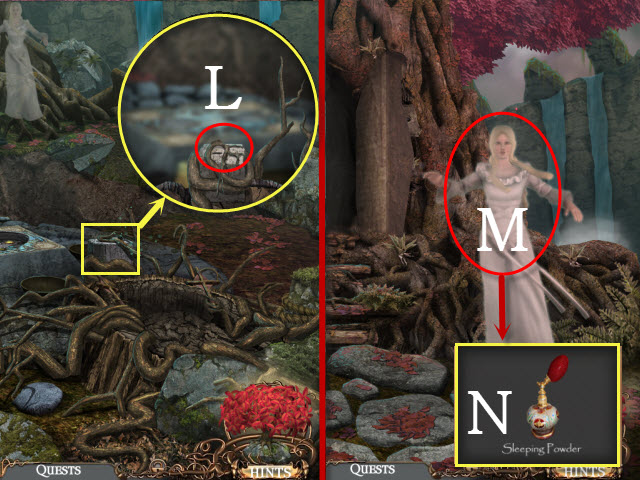
- Examine the base; place the ROWAN CROSS on it (L).
- Walk forward.
- Give the MAGIC SCEPTER to the White Witch (M).
- Take the SLEEPING POWDER (N).
- Return to the Forest Entrance.
Chapter 5: The Forest

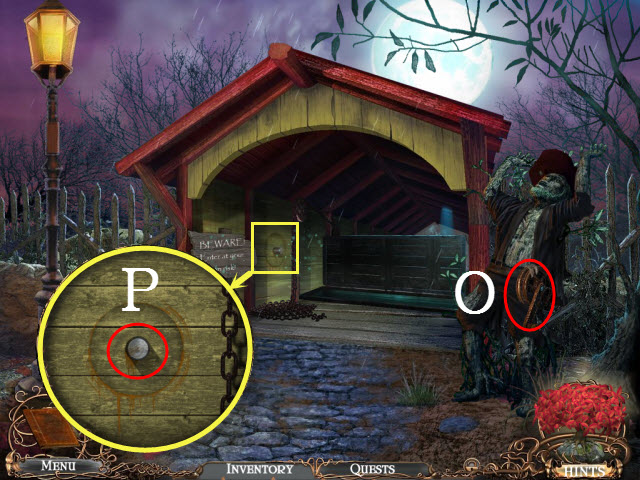
- Take the BRIDGE CRANK (O).
- Examine the knob; place the BRIDGE CRANK on it (P).
- Walk forward to the Black Woods.

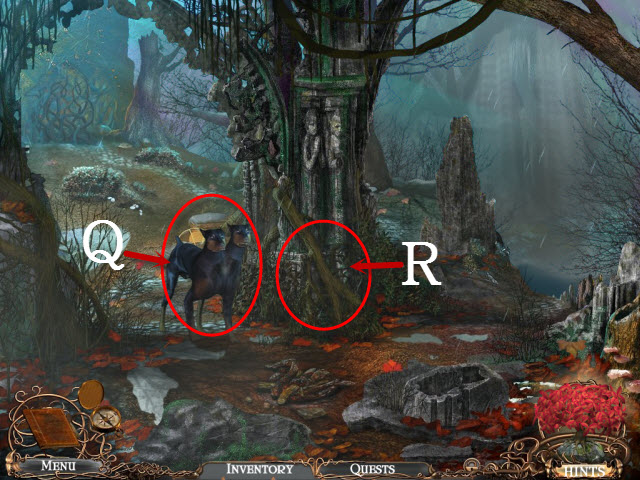
- Give the SLEEPING POWDER to the beast (Q).
- Examine the tree base to activate a HOP (R).

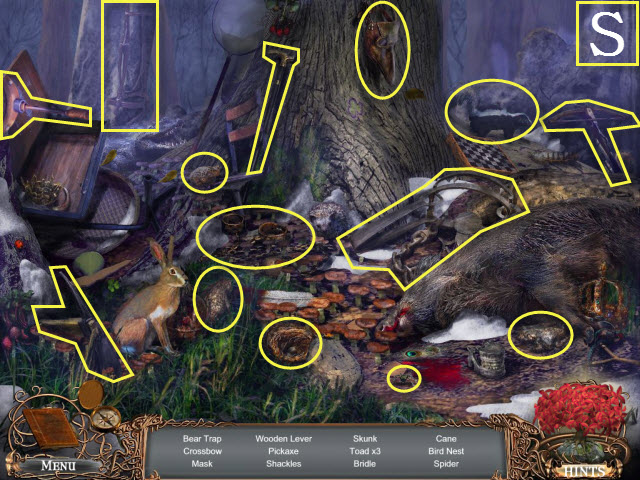
- Play the HOP (S).
- You receive the WOODEN LEVER.

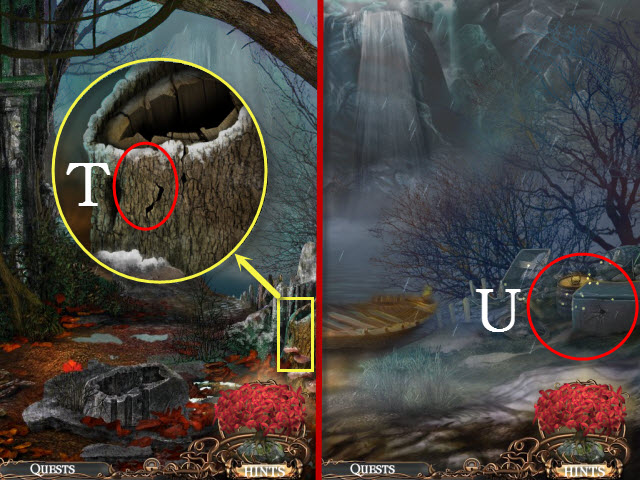
- Examine the stump; take the CANOE PATCH (T).
- Walk right.
- Examine the debris to activate a HOP (U).

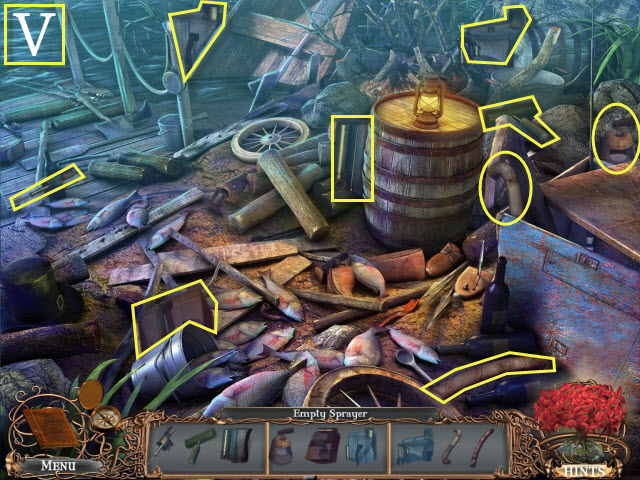
- Play the HOP (V).
- You receive the EMPTY SPRAYER.

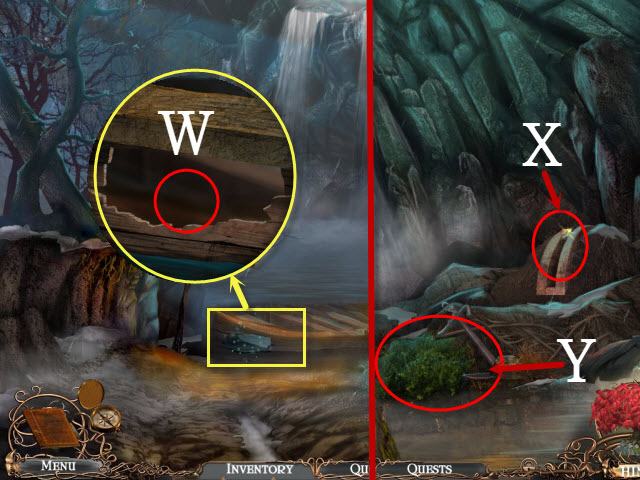
- Examine the canoe; place the CANOE PATCH over the hole (W).
- Walk forward to the Waterfalls.
- Place the WOODEN LEVER in the slot (X).
- Examine the shore to activate a HOP (Y).

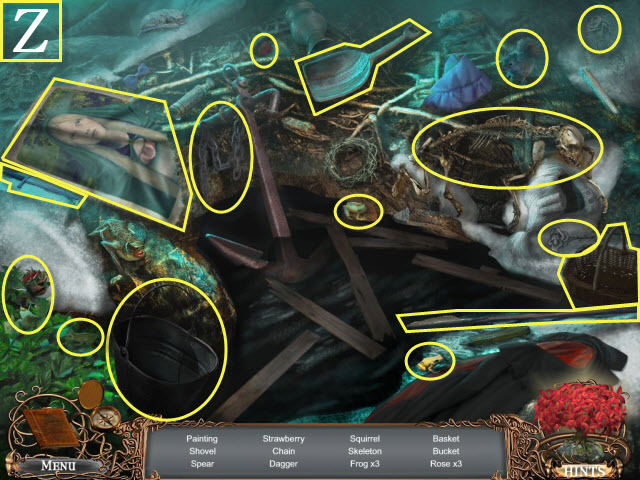
- Play the HOP (Z).
- You receive the PAINTING.
- Walk forward to the Cave.

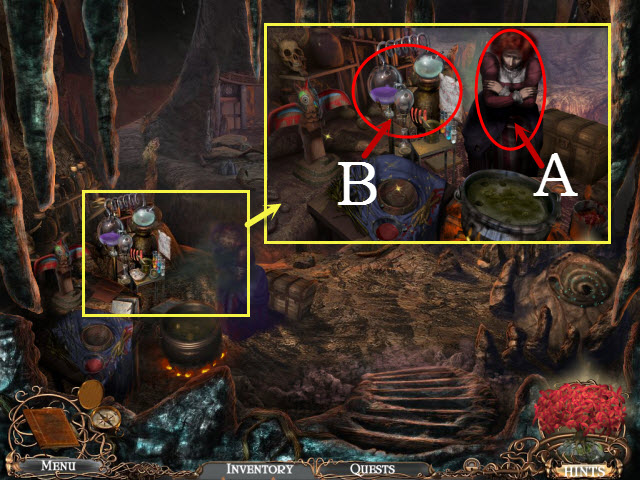
- Examine the camp; talk to Fatine (A).
- Examine the flasks to activate a puzzle (B).

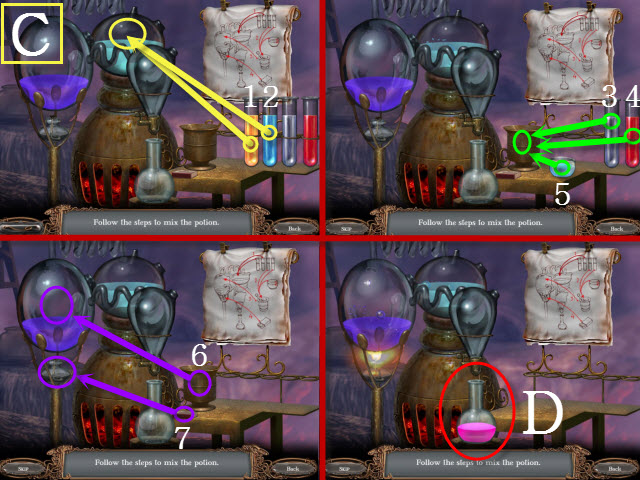
- To solve the puzzle, follow the steps 1-7 (C) to complete the recipe.
- Take the SPECIAL POTION (D).

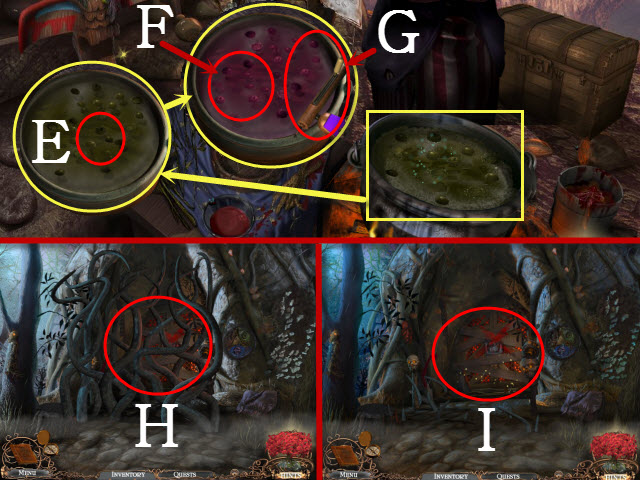
- Examine the cauldron; place the SPECIAL POTION in it (E).
- Use the EMPTY SPRAYER with the cauldron (F).
- Take the FILLED SPRAYER (G).
- Return to the Black Woods; walk left to the Cabin Entrance.
- Use the FILLED SPRAYER on the branches (H).
- Examine the doorway to activate a HOP (I).

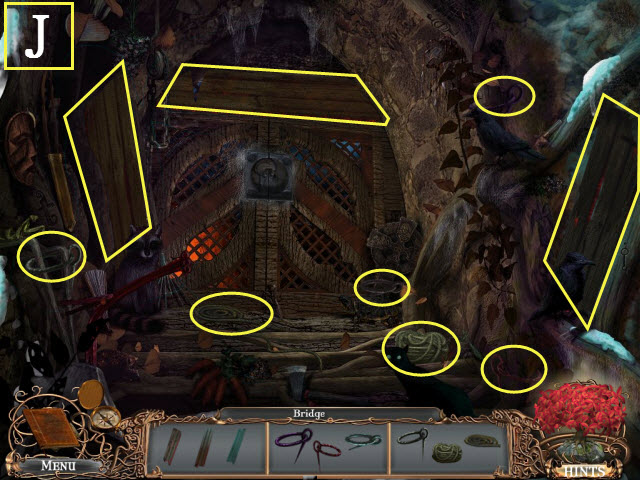
- Play the HOP (J).
- You receive the BRIDGE.
- Return to the Cave and walk forward to the Gap.
Chapter 6: The Cave

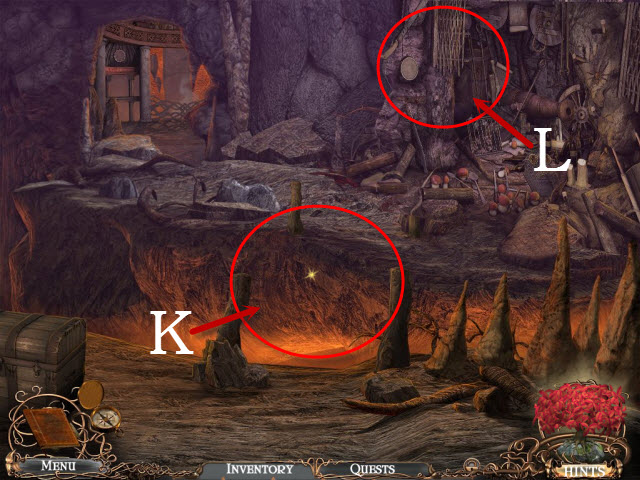
- Place the BRIDGE over the chasm (K).
- Examine the wall to activate a HOP (L).

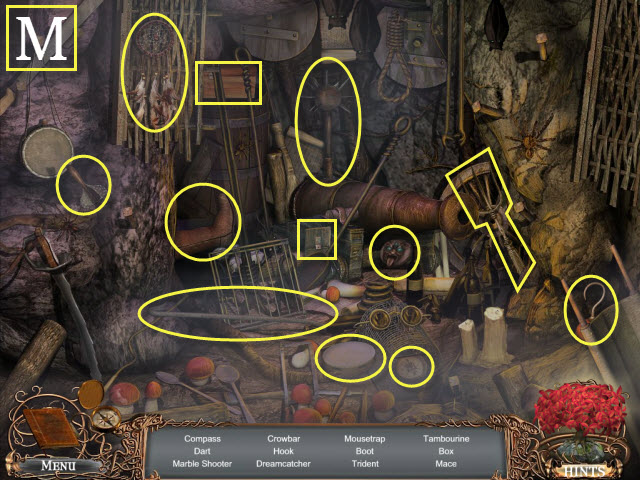
- Play the HOP (M).
- You receive the MARBLE SHOOTER.
- Walk down.

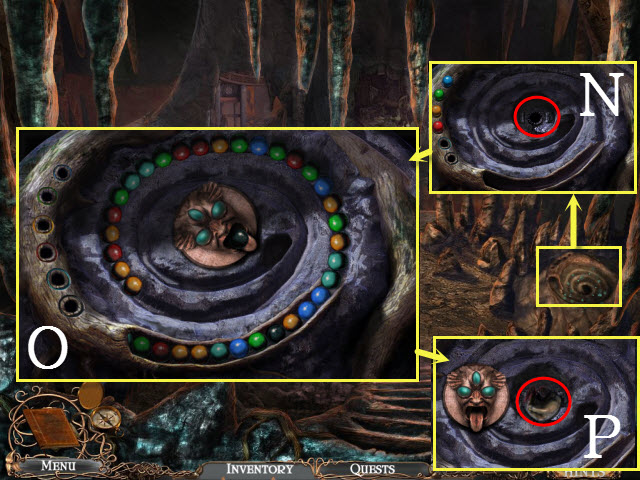
- Examine the mechanism; place the MARBLE SHOOTER on it to activate a mini-game (N).
- To complete the mini-game, shoot the marbles into groups of three of the same color until you win (O).
- Take the CABIN KEY (P).
- Return to the Cabin Entrance.

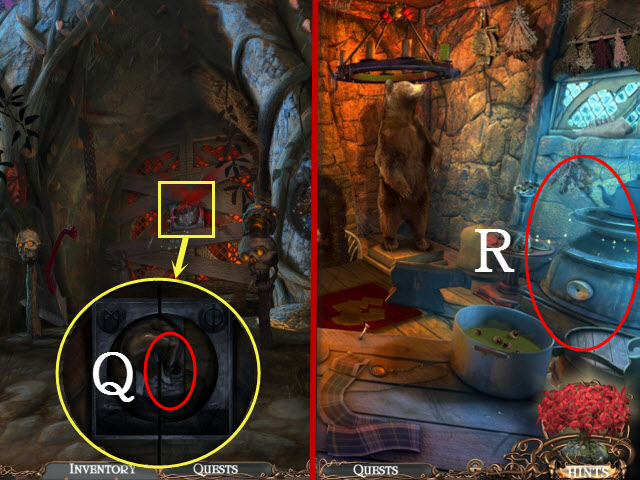
- Examine the door; place the CABIN KEY in the lock (Q).
- Enter the Cabin.
- Examine the stove to activate a HOP (R).

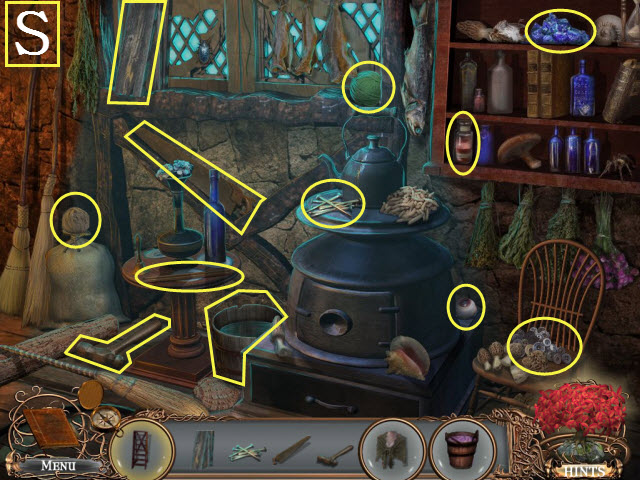
- Play the HOP (S).
- You receive the MAGIC LIQUID BUCKET, the SHAWL, and the STEPLADDER.

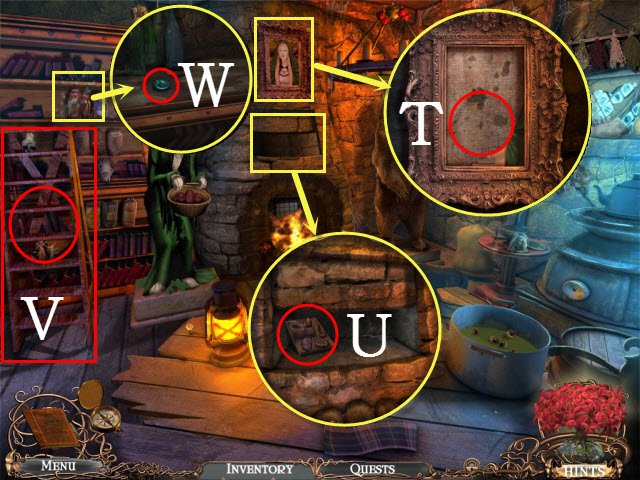
- Examine the frame; place the PAINTING in it (T).
- Examine the compartment; take the CAT CREST (U).
- Place the STEPLADDER with the shelves (V).
- Examine the shelves; take the WANING CRESCENT (W).
- Return to the Gap and walk forward to the Puzzle Room.

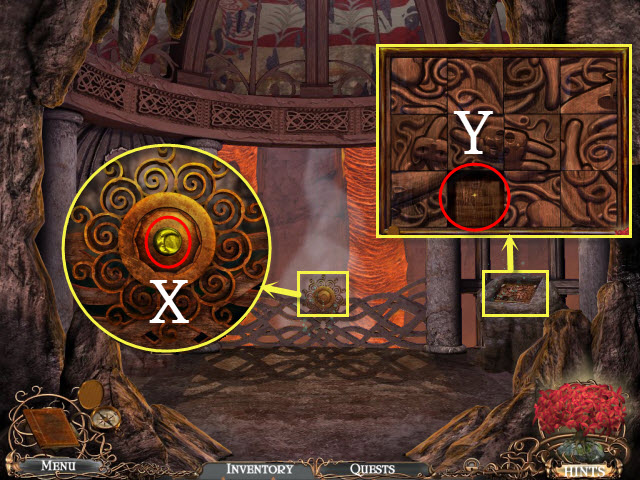
- Examine the engraving; take the WAXING CRESCENT (X).
- Examine the stone altar; place the CAT CREST in the empty space to activate a puzzle (Y).

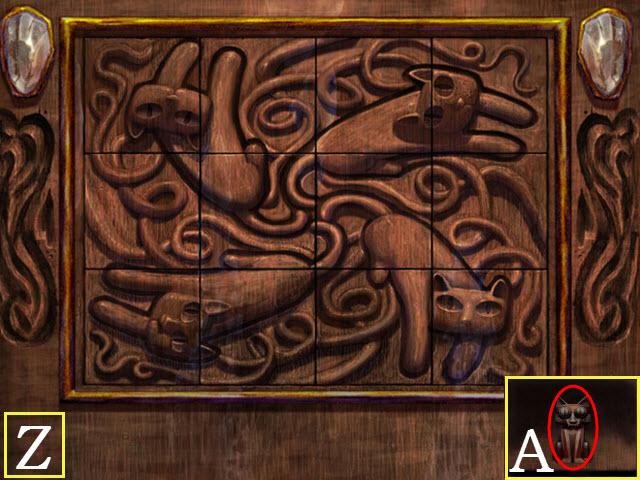
- To solve the puzzle, arrange the pieces to create a whole image.
- Please see the screenshot for the solution (Z).
- Take the CAT STATUE (A).
- Return to the Cabin Entrance.

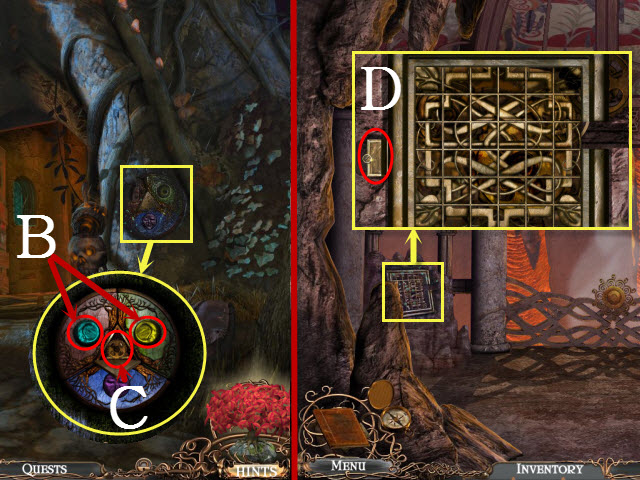
- Examine the plaque; place the WAXING CRESCENT and the WANING CRESCENT in the slots (B).
- Take the PUZZLE KEY (C).
- Return to the Puzzle Room.
- Examine the puzzle; use the PUZZLE KEY on the slot to activate a puzzle (D).

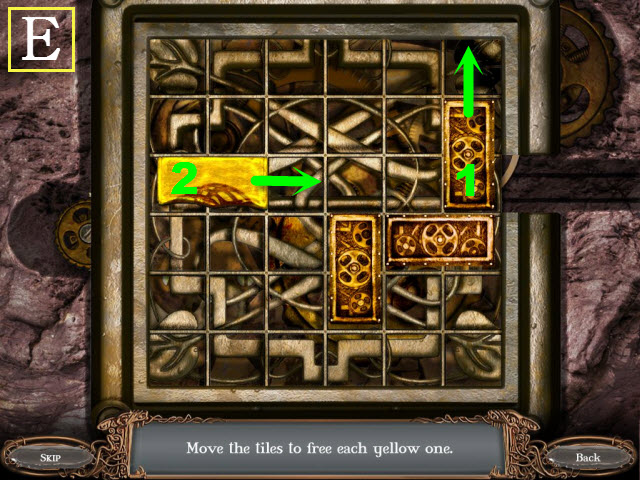

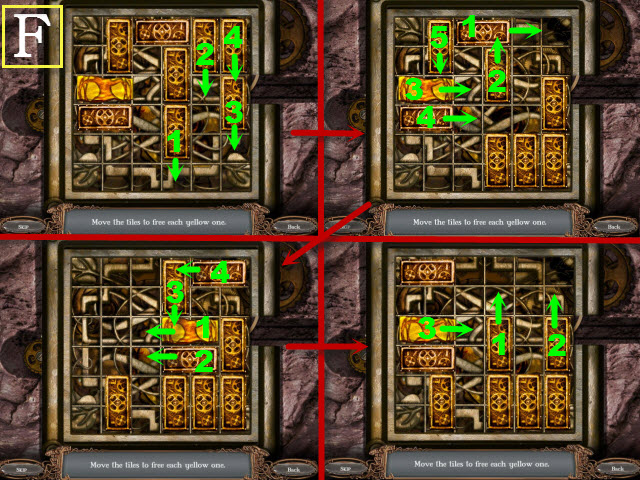

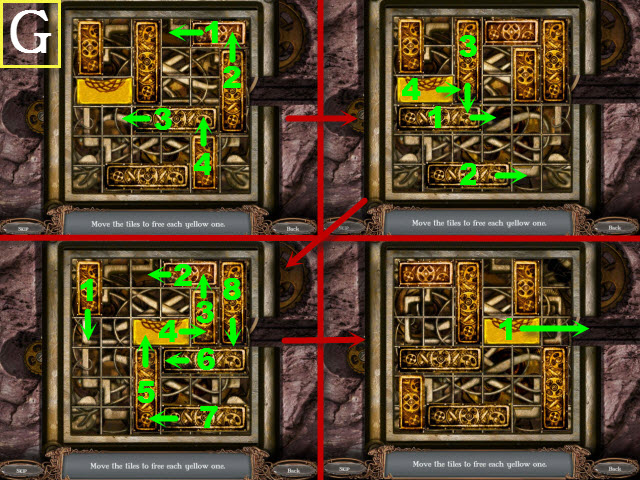
- To solve the puzzle, slide the rectangles so that the golden rectangle can be dragged through the opening on the side.
- For each phase, drag each rectangle as far as it can go in the indicated direction (E-G).

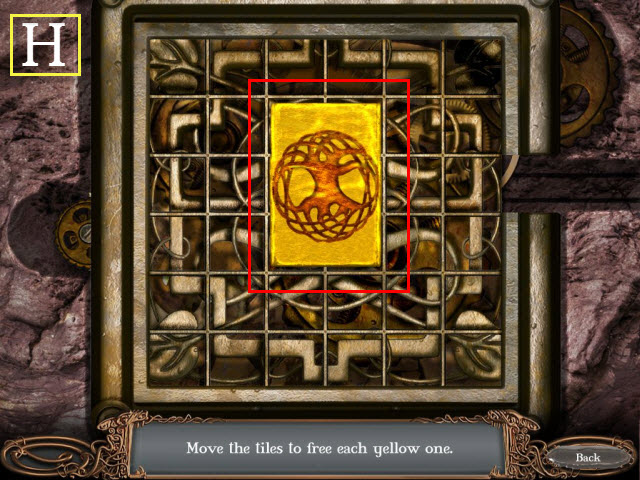
- Take the GOLDEN RECTANGLE (H).
- Return to the Cabin.

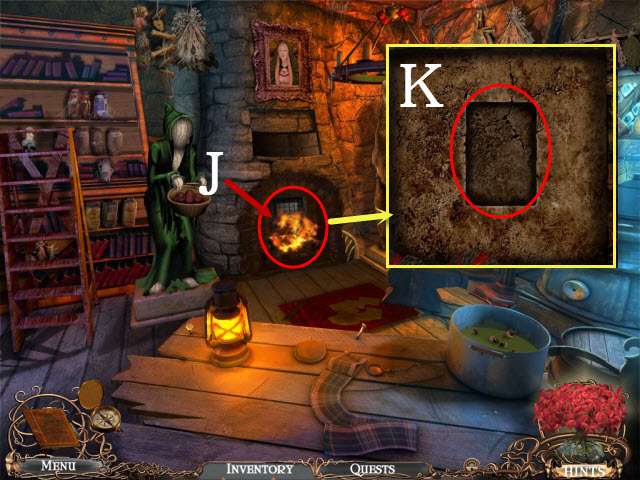
- Use the MAGIC LIQUID BUCKET on the fire (J).
- Examine the fireplace; place the GOLDEN RECTANGLE in the engraving to activate a puzzle (K).

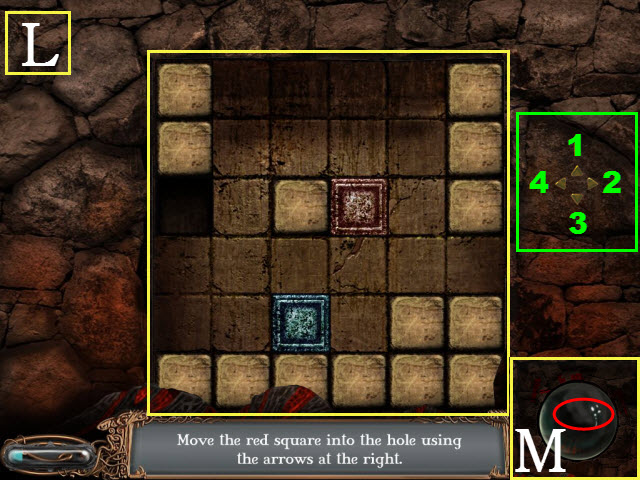
- To solve the puzzle, use the arrows to move the blue square; use the blue square to push the red square into the hole.
- Please see the screenshot for the solution: 4, 1, 1, 1, 2, 2, 3, 2, 3, 4, 4, 4, 3, 4, and 1 (L).
- Take the CRYSTAL BALL (M).
- Return to the Cave.

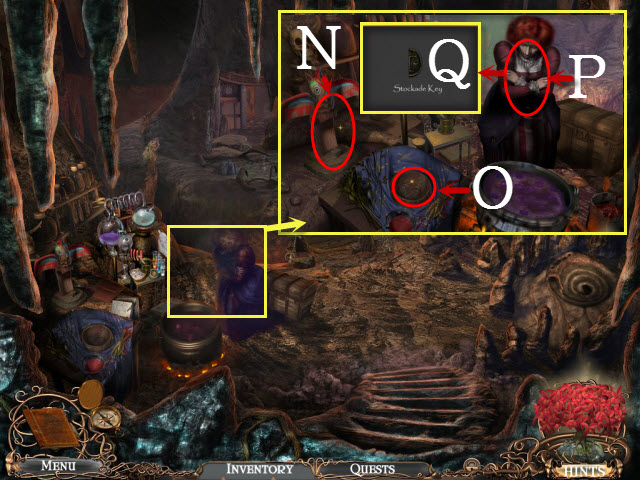
- Examine the camp; place the CAT STATUE with the totem (N).
- Place the CRYSTAL BALL on the pedestal (O).
- Give Fatine the SHAWL (P).
- Take the STOCKADE KEY (Q).
- Return to the Church Plaza and walk right to the Jail Plaza.
Chapter 7: The Jail

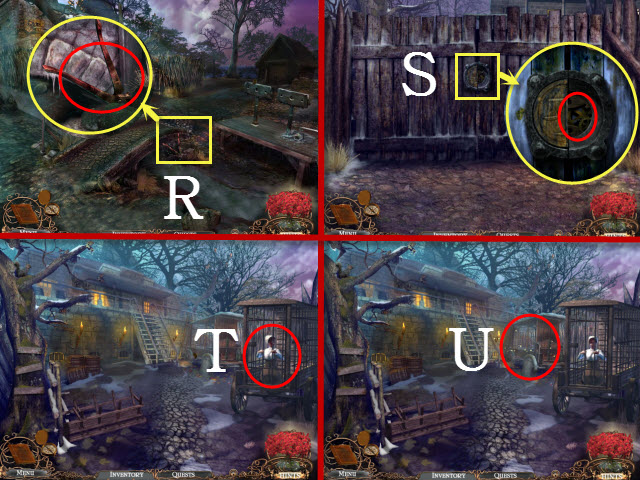
- Examine the bridge; take the BOLT CUTTERS (R).
- Walk forward.
- Examine the lock; place the STOCKADE KEY in the slot (S).
- Walk forward to the Jail Entrance.
- Talk to Daisy (T).
- Examine the cart to activate a HOP (U).

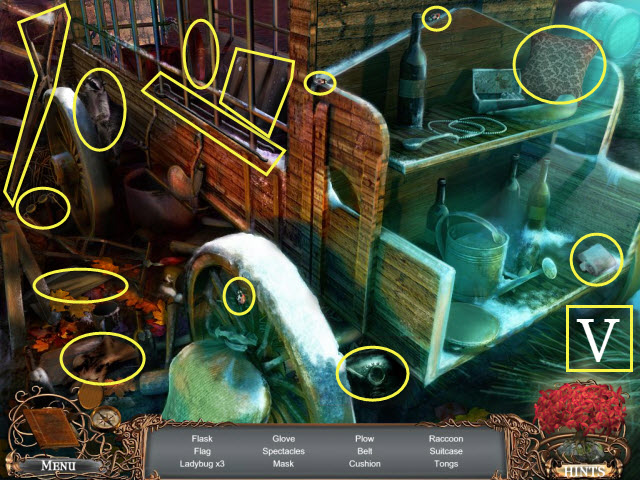
- Play the HOP (V).
- You receive the TONGS.
- Walk forward to the Stockade Entrance; examine the window to activate a HOP.

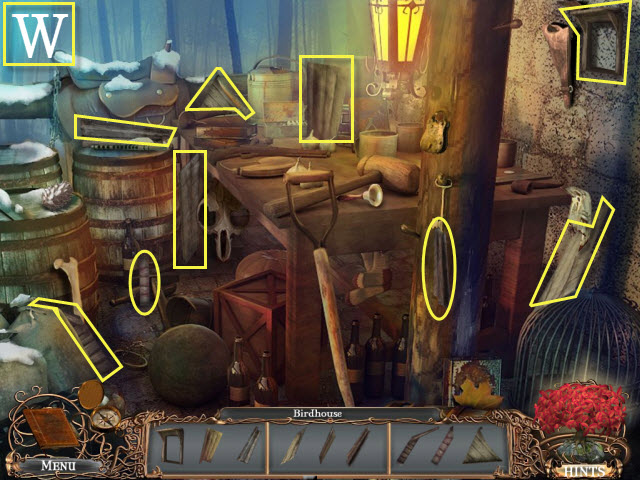
- Play the HOP (W).
- You receive the BIRDHOUSE.

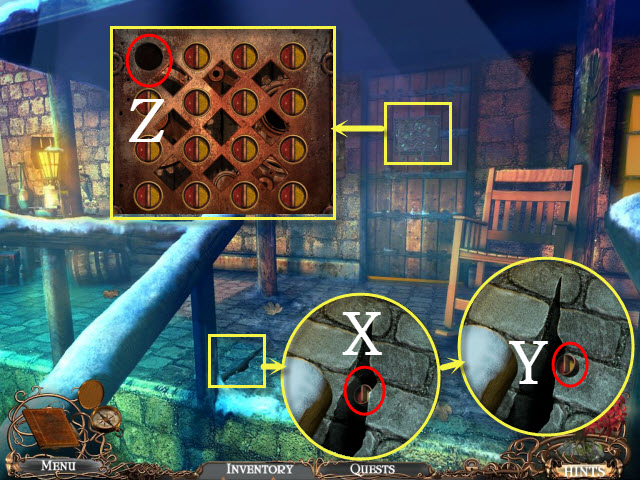
- Examine the crack; use the TONGS on the object (X).
- Take the KNOB (Y).
- Examine the door; place the KNOB in the slot to activate a puzzle (Z).

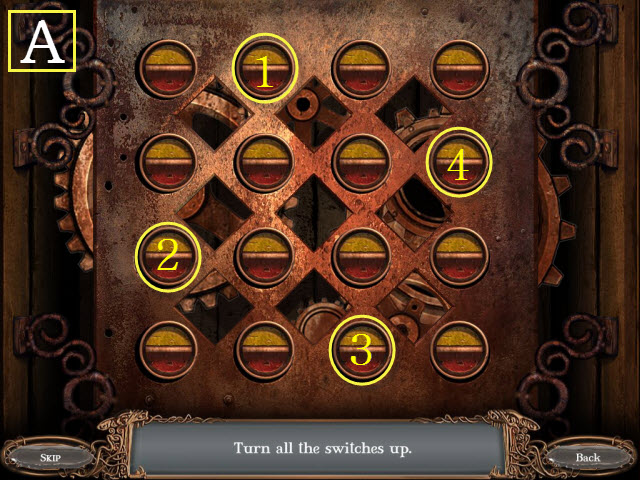
- To solve the puzzle, flip the switches until they are all in the up position. Pressing one switch will trigger adjacent switches.
- Please see the screenshot for the solution; select the switches in the order shown (A).
- Enter the Stockade.

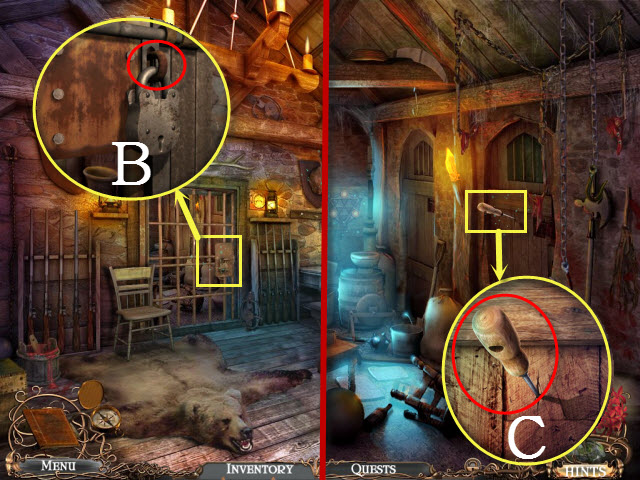
- Examine the door; use the BOLT CUTTERS on the padlock (B).
- Enter the Guard Room.
- Examine the door; take the ICE PICK (C).
- Return to the Jail Plaza.

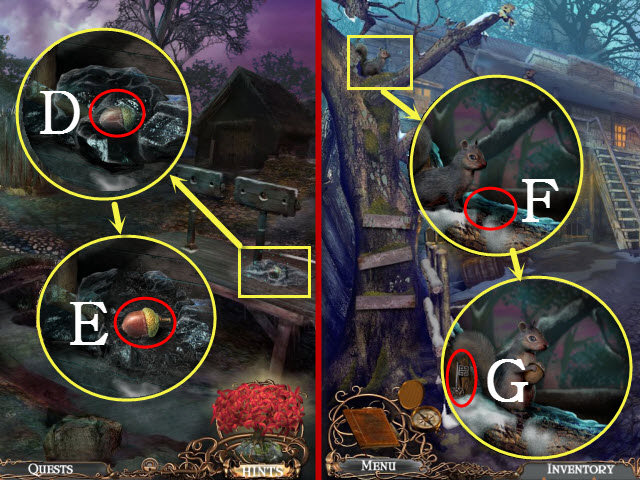
- Examine the ice; use the ICE PICK on it (D).
- Take the ACORN (E).
- Return to the Jail Entrance.
- Examine the tree branch; place the ACORN with the squirrel (F).
- Take the DRAWER KEY (G).
- Return to the Stockade.

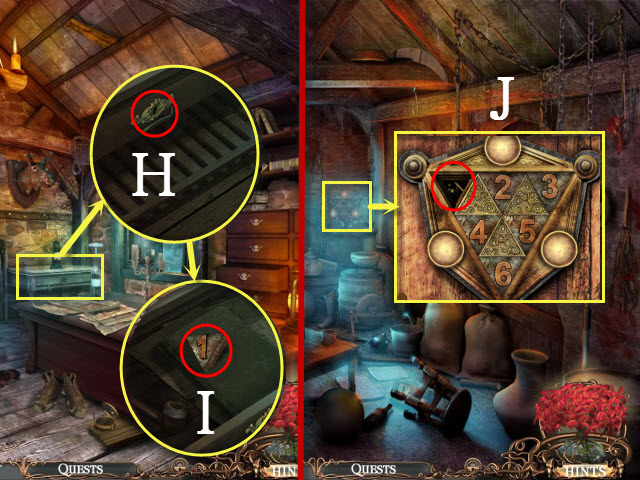
- Examine the drawer; place the DRAWER KEY in the lock (H).
- Take the METAL TRIANGLE (I).
- Walk forward.
- Examine the device; place the METAL TRIANGLE in the slot to activate a puzzle (J).

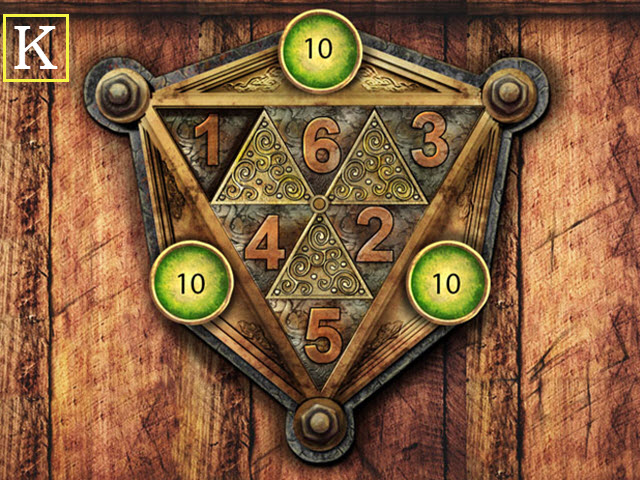
- To solve the puzzle, arrange the tiles so that each side is equal to the number ten.
- Please see the screenshot for the solution (K).
- Enter the Cell; examine the books to activate a HOP.

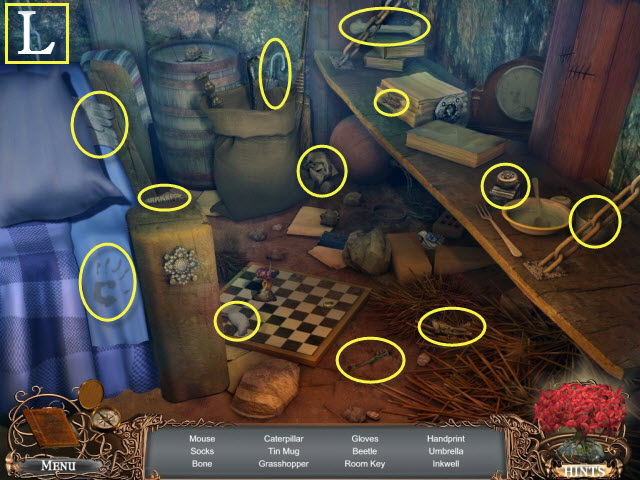
- Play the HOP (L).
- You receive the INKWELL.

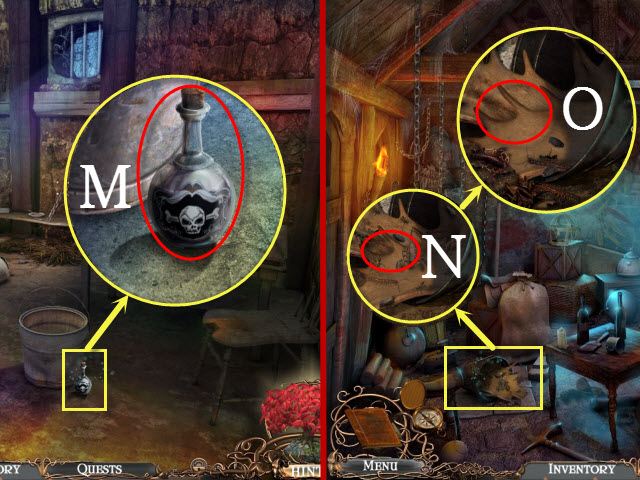
- Examine the flask; take the POISON FLASK (M).
- Walk down.
- Examine the bucket; use the POISON FLASK on the scorpions (N).
- Take the ANTLERS (O).
- Walk down.

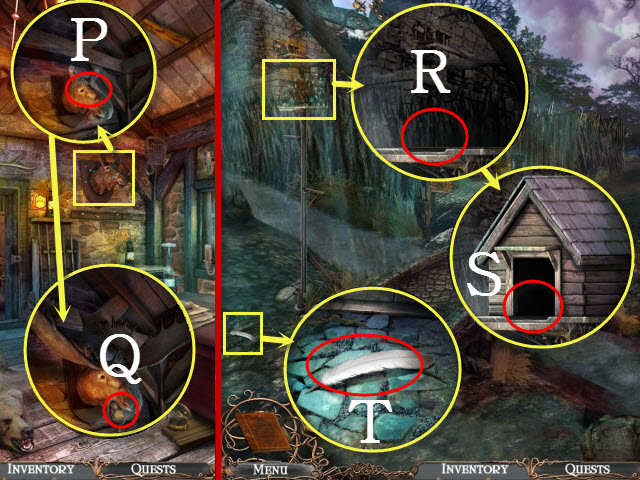
- Examine the moose; place the ANTLERS on it (P).
- Take the BIRD FOOD (Q).
- Return to the Jail Plaza.
- Examine the perch; place the BIRDHOUSE on it (R).
- Place the BIRD FOOD with the birdhouse (S).
- Examine the ground; pick up the FEATHER (T).
- Return to the Stockade.

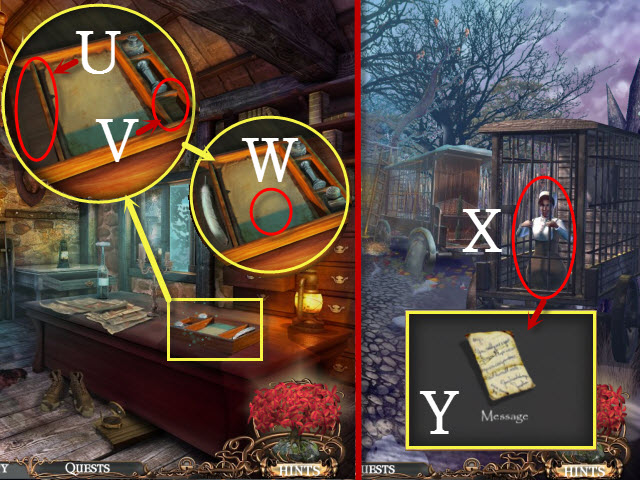
- Examine the table; place the FEATHER (U) and the INKWELL with the kit (V).
- Take the WRITING KIT (W).
- Walk down twice.
- Give the WRITING KIT to Daisy (X).
- Take the MESSAGE (Y).
- Walk down twice.

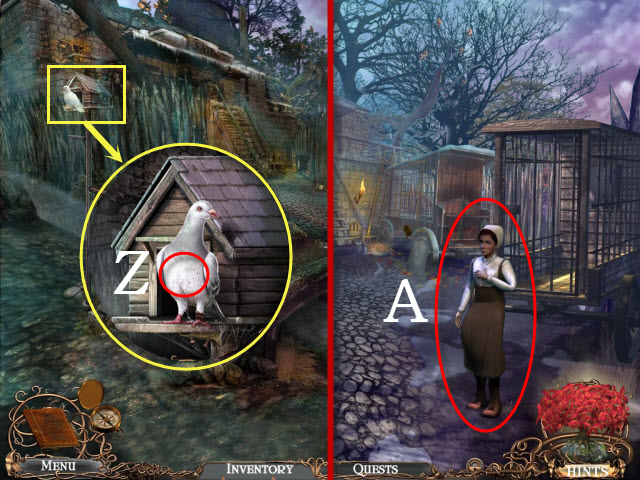
- Examine the birdhouse; place the MESSAGE with the bird (Z).
- Return to the Jail Plaza.
- Talk to Daisy (A).
- Return to the Church Main Hall and walk to the Left Side.
Chapter 8: The Spell Book

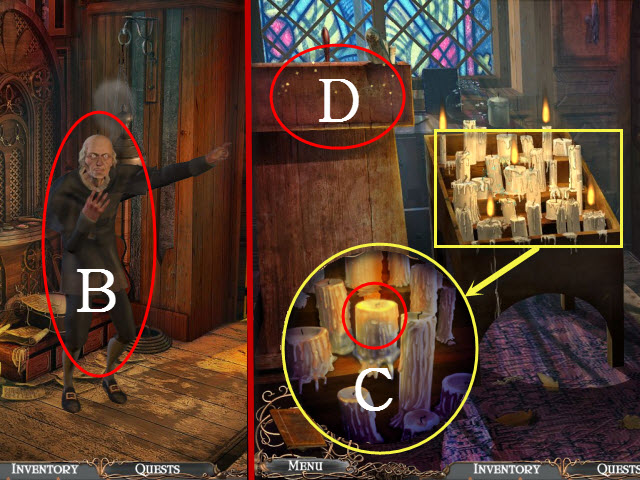
- Talk to the Reverend (B).
- Walk down; walk to the Right Side.
- Examine the candles; take the LIT CANDLE (C).
- Examine the pew to activate a HOP (D).

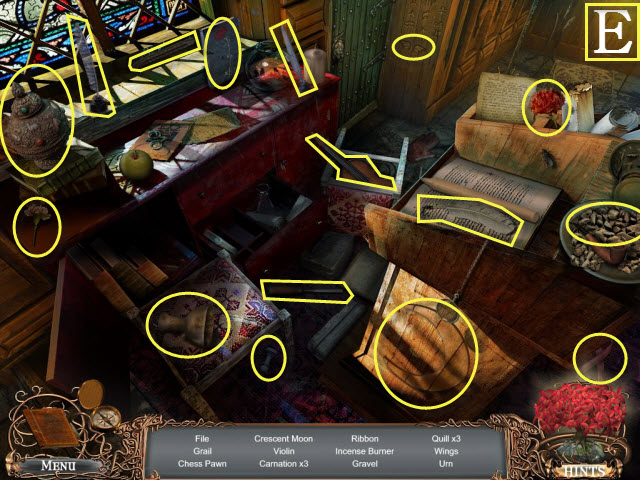
- Play the HOP (E).
- You receive the CHESS PAWN.
- Return to the Left Side and walk forward to the Office.

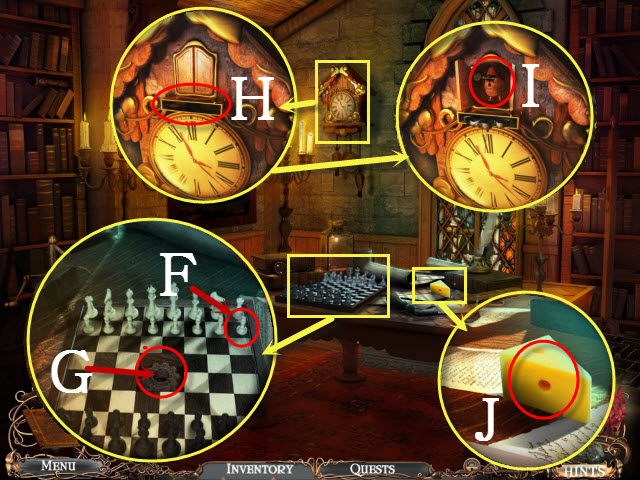
- Examine the chess board; place the CHESS PAWN on it (F).
- Take the GEAR (G).
- Examine the clock; place the GEAR in the slot (H).
- Take the BELFRY KEY (I).
- Examine the table; take the CHEESE (J).
- Return to the Right Side.

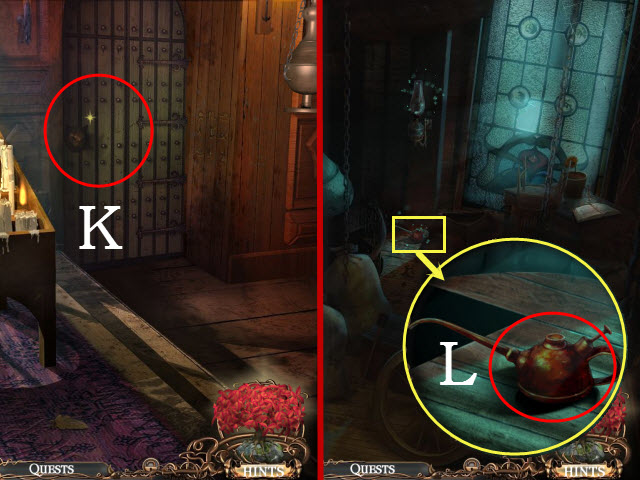
- Use the BELFRY KEY on the door (K).
- Walk forward to the Belfry.
- Examine the can; take the EMPTY OIL CAN (L).
- Return to the Office.

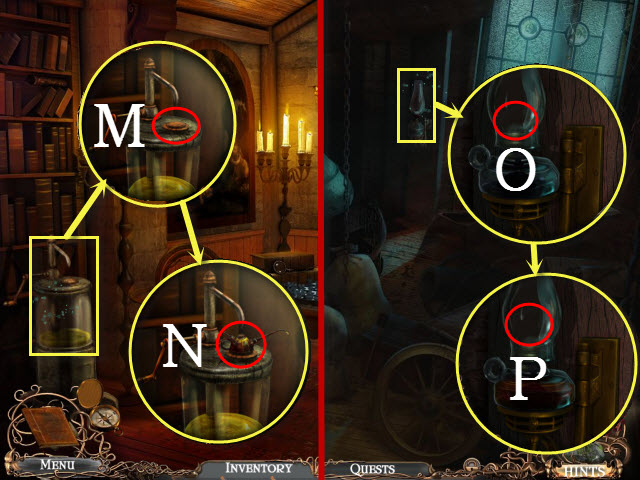
- Examine the dispenser; place the EMPTY OIL CAN with it (M).
- Take the FULL OIL CAN (N).
- Return to the Belfry.
- Examine the lamp; use the FULL OIL CAN on it (O).
- Place the LIT CANDLE in the lamp (P).
- Examine the table to activate a HOP.

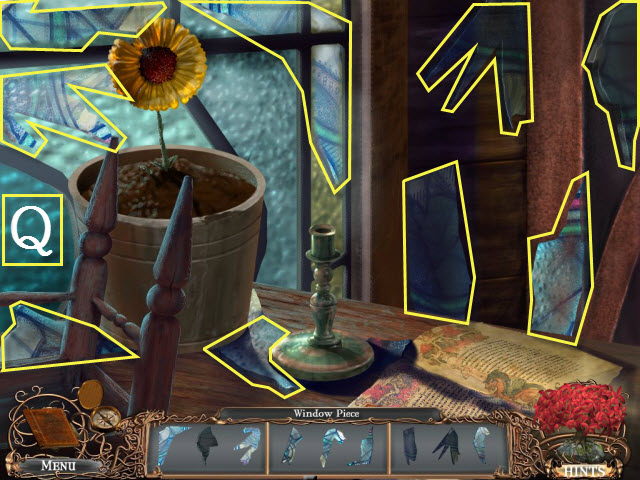
- Play the HOP (Q).
- You receive the WINDOW PIECE.

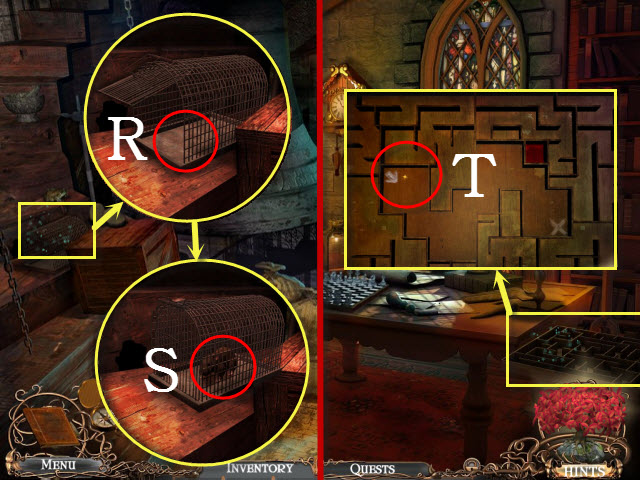
- Examine the mousetrap; place the CHEESE in it (R).
- Take the CAGED MOUSE (S).
- Return to the Office.
- Examine the maze; place the CAGED MOUSE in it to activate a mini-game (T).

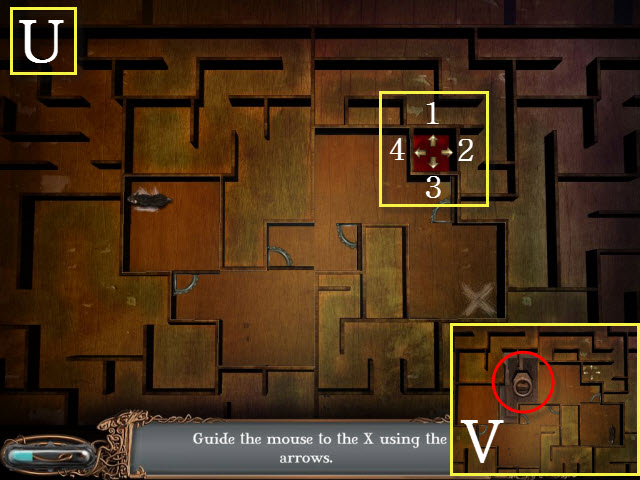
- To complete the mini-game, use the arrows to guide the mouse through the maze.
- Please see the screenshot for the solution: 2, 3, 2, 2, 1, 2, 1, 2, 2, 3, 2, and 1 (U).
- Take the HATCH HANDLE (V).
- Return to the Graveyard; examine the gravestone to activate a HOP.

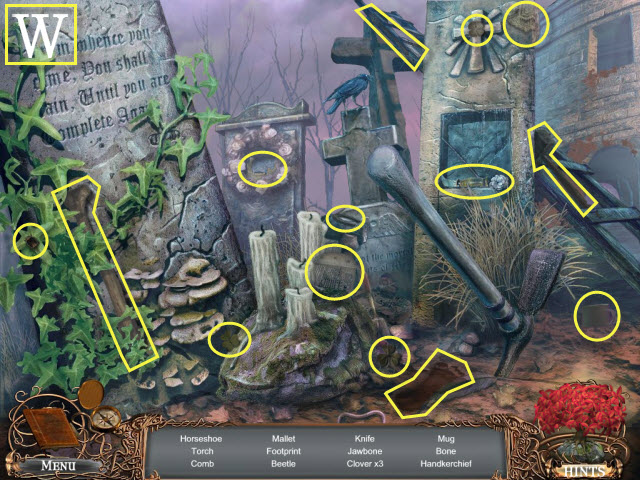
- Play the HOP (W).
- You receive the KNIFE.
- Return to the Church Main Hall.

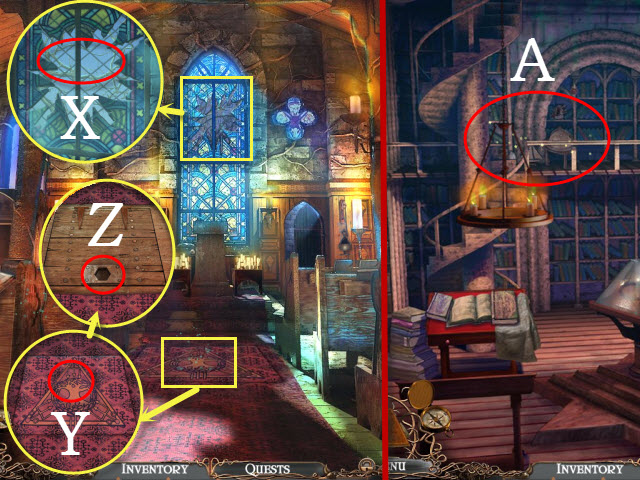
- Examine the window; place the WINDOW PIECE on the crack (X).
- Examine the carpet; use the KNIFE on it (Y).
- Place the HATCH HANDLE in the slot (Z).
- Go down to the Library; examine the balcony to activate a HOP (A).

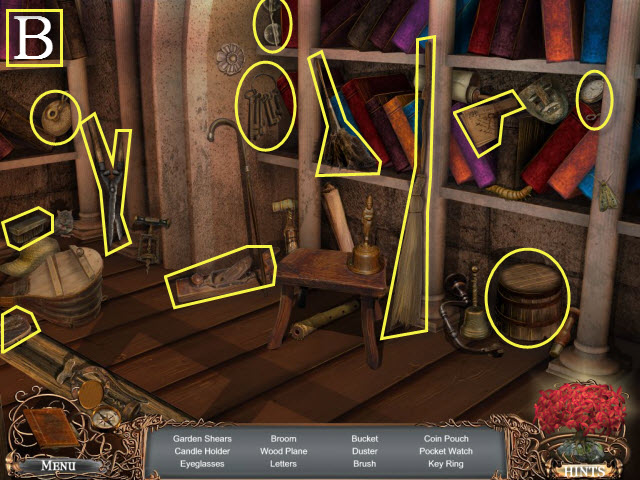
- Play the HOP (B).
- You receive the GARDEN SHEARS.
- Examine the shelves to activate a HOP.

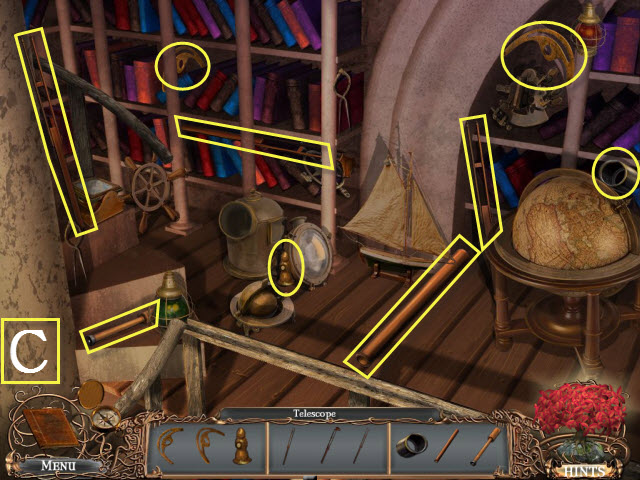
- Play the HOP (C).
- You receive the TELESCOPE.
- Return to the Church Entrance.

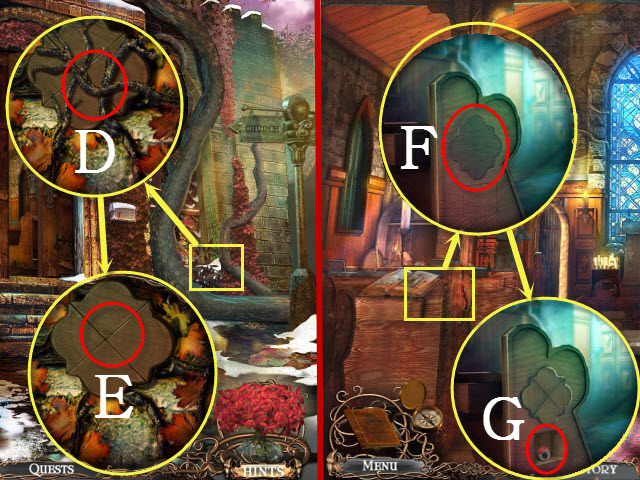
- Examine the vines; use the GARDEN SHEARS on them (D).
- Take the WOODEN ORNAMENT (E).
- Walk forward.
- Examine the bench; place the WOODEN ORNAMENT in the engraving (F).
- Take the REVEREND’S RING (G).
- Return to the Belfry.

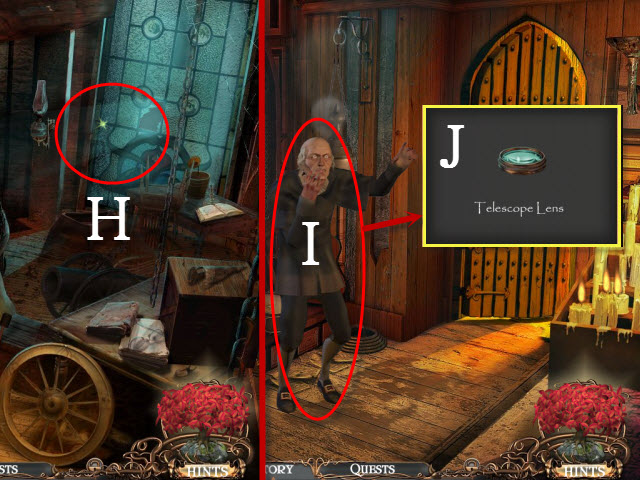
- Place the TELESCOPE with the window (H).
- Return to the Left Side.
- Give the Reverend the REVEREND’S RING (I).
- Take the TELESCOPE LENS (J).
- Return to the Belfry.

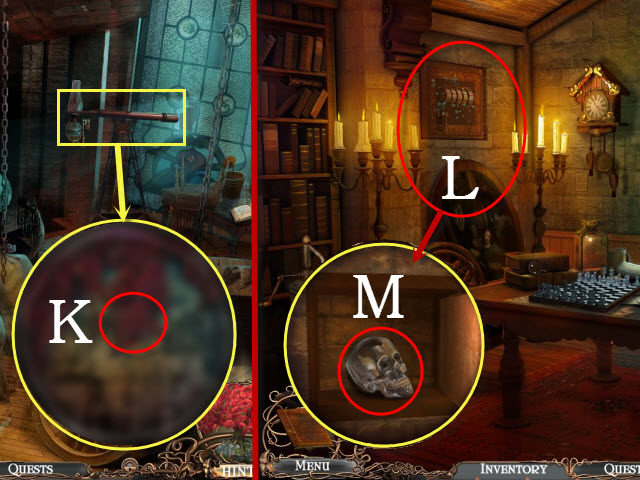
- Examine the telescope; place the TELESCOPE LENS on it (K).
- Return to the Office.
- Move the painting; examine the safe (L).
- Take the CRYSTAL SKULL (M).
- Return to the Graveyard and walk right.

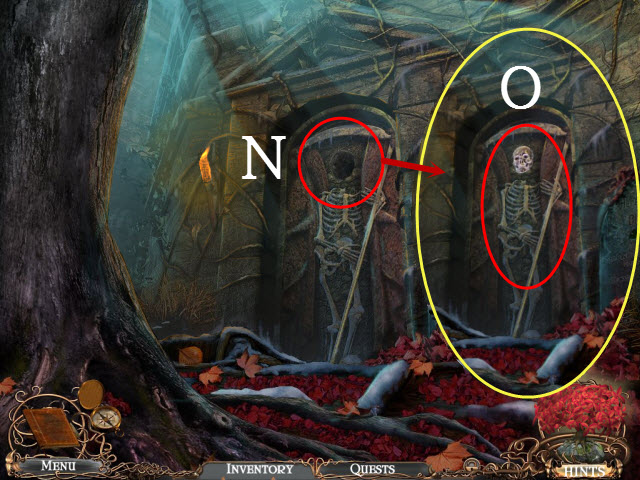
- Place the CRYSTAL SKULL in the crevice (N).
- Examine the skeleton to activate a mini-game (O).

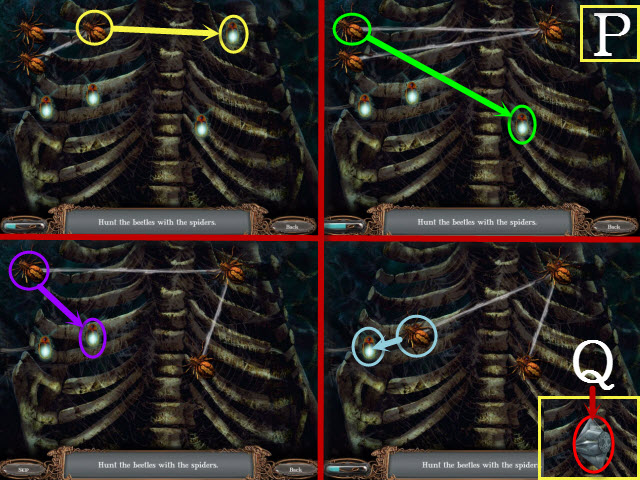
- To complete the mini-game, drag the spiders over the bugs.
- Please see the screenshot for the solution (P).
- Take the SPELL BOOK KEY (Q).
- Return to the Library.

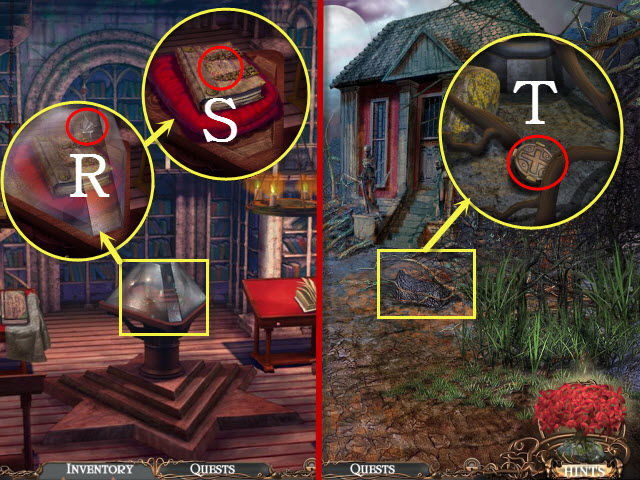
- Examine the case; place the SPELL BOOK KEY in the lock (R).
- Take the SACRED SPELL BOOK (S).
- Return to the Courthouse.
- Examine the branches; take the POSITIVE SEAL (T).
- Walk forward.

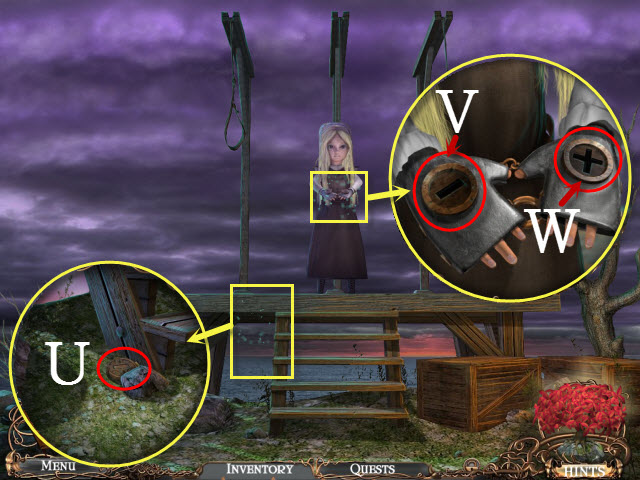
- Examine the steps; take the NEGATIVE SEAL (U).
- Examine the girl; place the NEGATIVE SEAL (V) and the POSITIVE SEAL (W) in the slots.

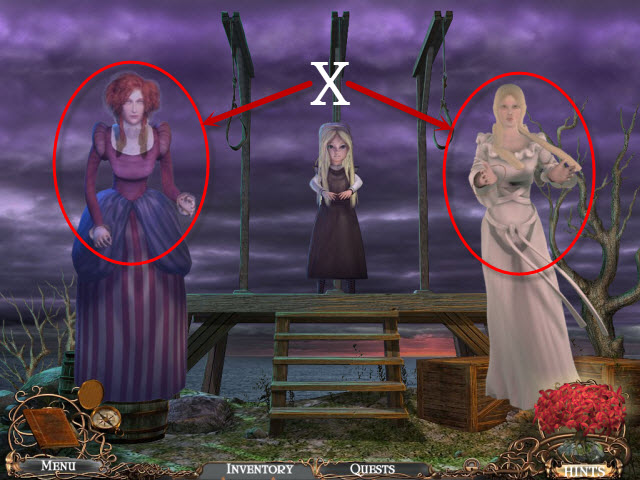
- Give the SACRED SPELL BOOK to Fatine or the White Witch (X).
- Congratulations! You have completed Dark Sisterhood: The Initiation!





 Eden's Quest: The Hunt for Akua Walkthrough, Guide, & Tips
 Mystery Trackers: Nightsville Horror Walkthrough, Guide, & Tips
 Dream Chronicles: The Book of Air Walkthrough, Guide, & Tips
 Relic Hunt Walkthrough, Guide, & Tips
 House of 1000 Doors: The Palm of Zoroaster Walkthrough, Guide, & Tips