Awakening: The Sunhook Spire Walkthrough, Guide, & Tips
Awakening: The Sunhook Spire Walkthrough

Welcome to the Awakening: The Sunhook Spire Walkthrough
Scale the heights of Sunhook Spire, rescue the Enchantress and uncover the tower’s mysteries as Queen Sophia’s journey continues!
Whether you use this document as a reference when things get difficult or as a road map to get you from beginning to end, we’re pretty sure you’ll find what you’re looking for here.
This document contains a complete Awakening: The Sunhook Spire game walkthrough featuring annotated screenshots from actual gameplay!
We hope you find this information useful as you play your way through the game. Use the walkthrough menu below to quickly jump to whatever stage of the game you need help with.
Remember to visit the Big Fish Games Forums if you find you need more help. Have fun!
This walkthrough was created by prpldva, and is protected under US Copyright laws. Any unauthorized use, including re-publication in whole or in part, without permission, is strictly prohibited.
General Tips

- This is the official guide for Awakening: The Sunhook Spire.
- This guide will not mention each time you have to zoom into a location; the screenshots will identify each location.
- Hidden-object puzzles are referred to as HOPs in this guide. Items listed in yellow are hidden, or they require additional actions to locate. Interactive items in HOPs are color-coded.
- Mini-games and HOPs are sometimes randomized; your solution may vary.
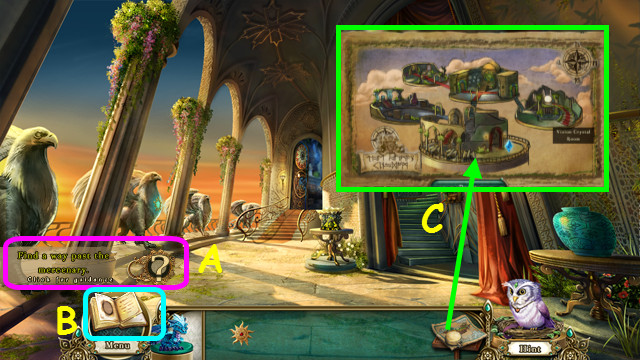
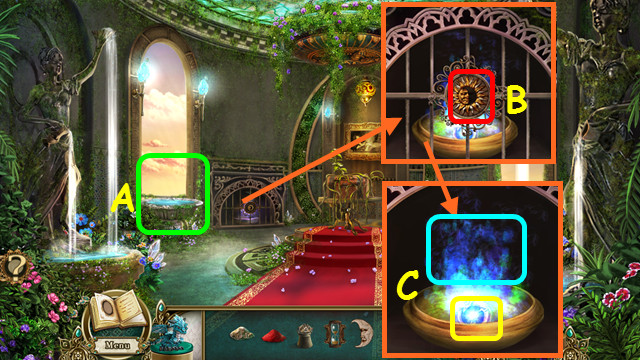
- Select the question mark for a nudge if you are stuck (A).
- Refer to your Journal for clues and objectives (B).
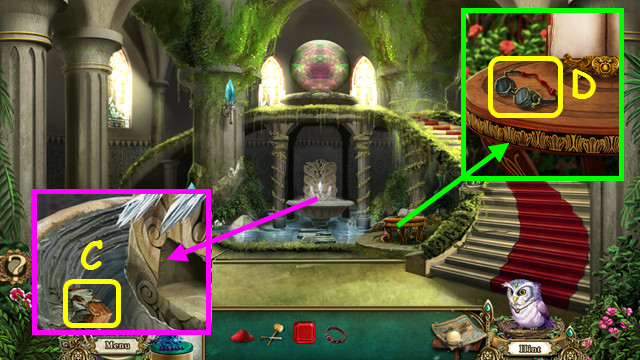
- Use your map to travel between locations (C).
Chapter 1: The Sunhook Spire
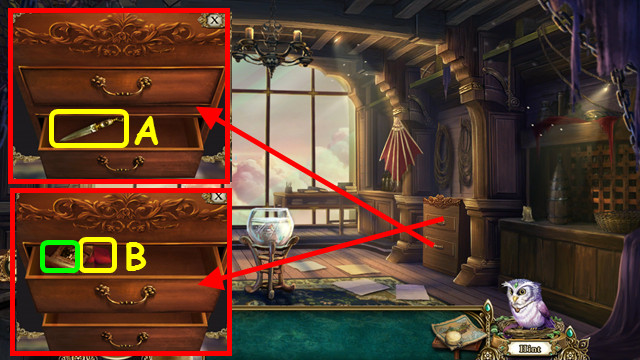
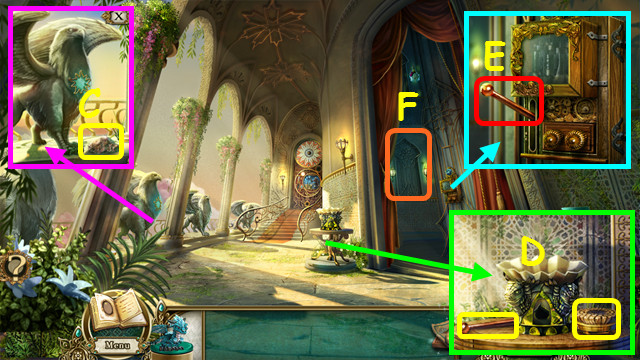
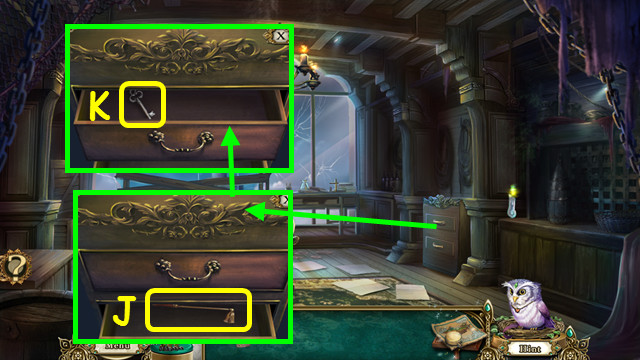
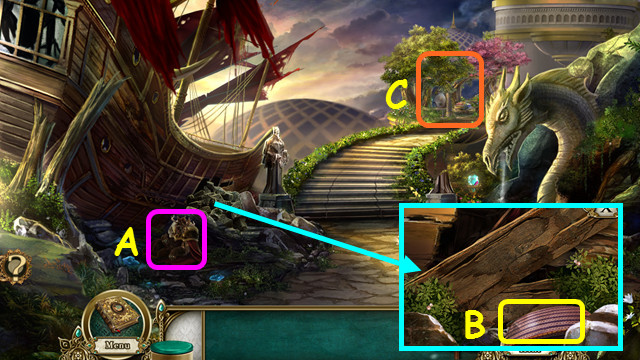
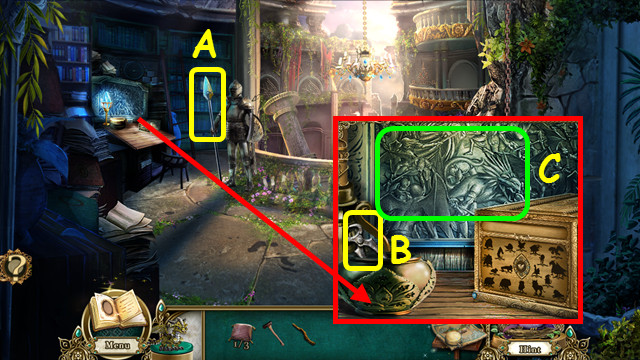
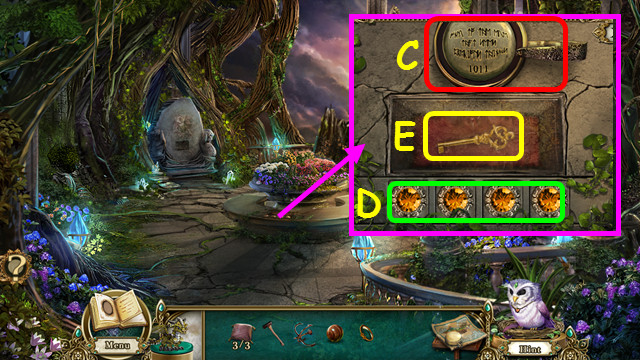
- Open the bottom drawer. Take the BLADE (A).
- Open the top drawer; take the note and CLOTH (B).
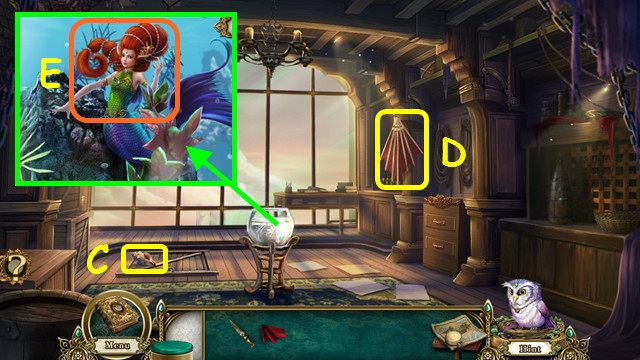
- Take the CONCH SHELL (C) and GLIDER (D).
- Give Shelsea the CONCH SHELL to receive the PIN (E).
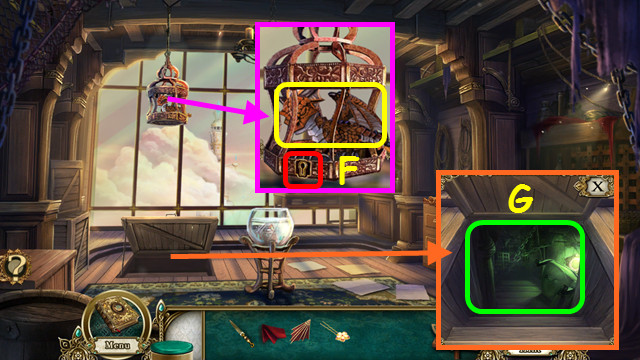
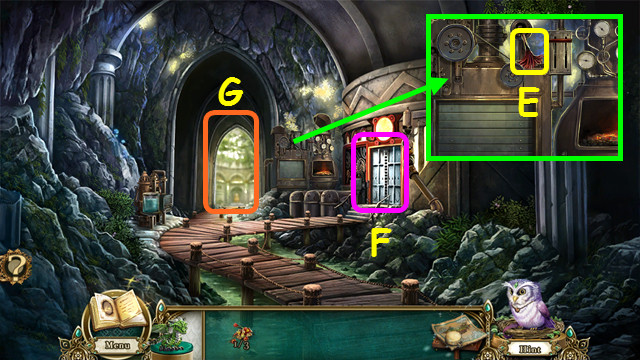
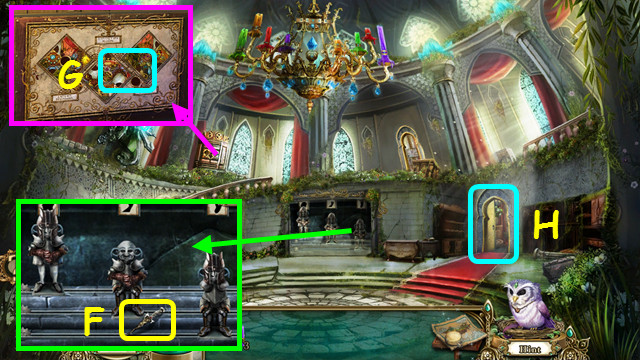
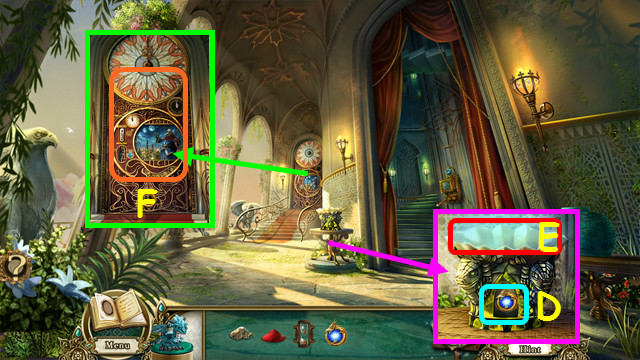
- Use the PIN in the lock. Take the DRAGON (F).
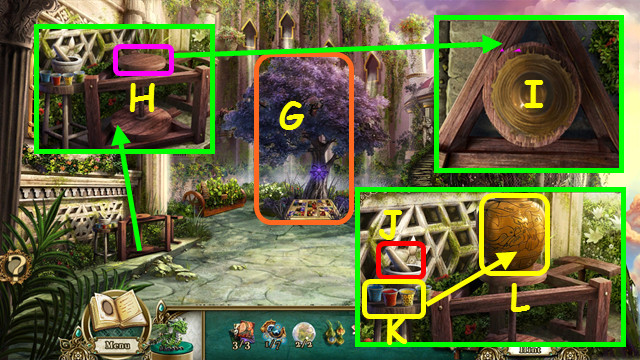
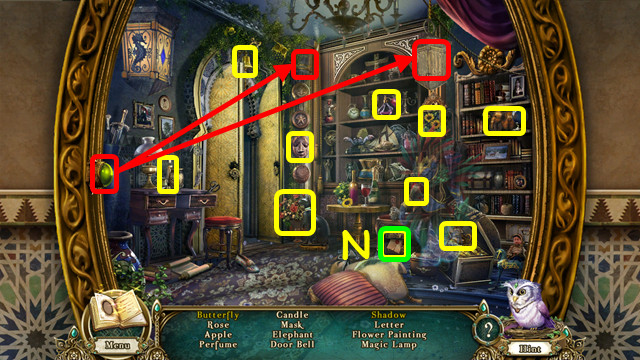
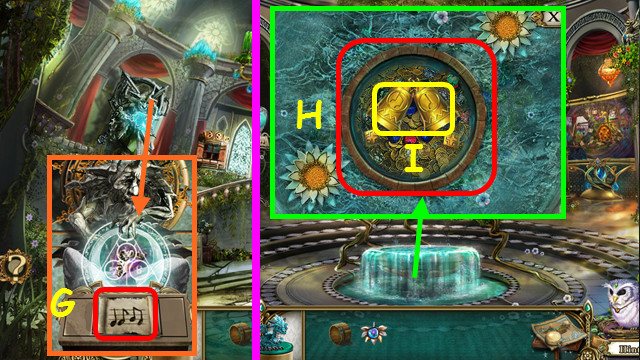
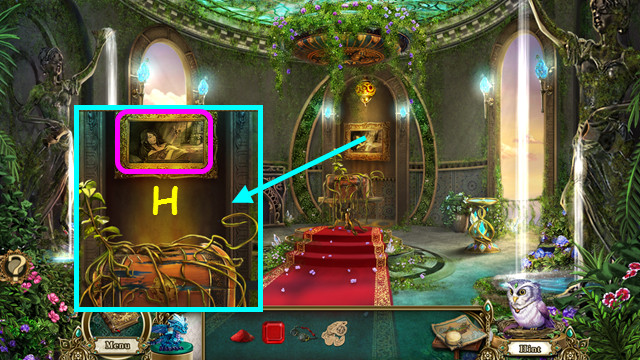
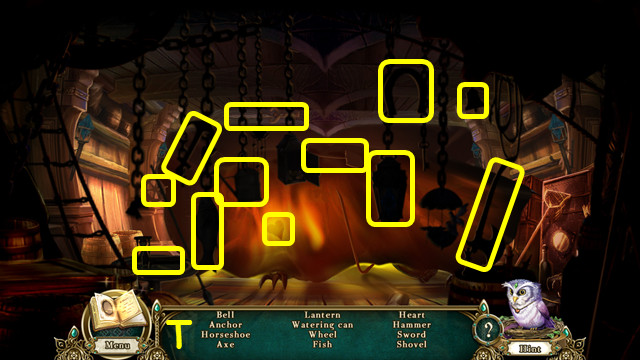
- Open the trap door. Go down the stairs for a HOP (G).
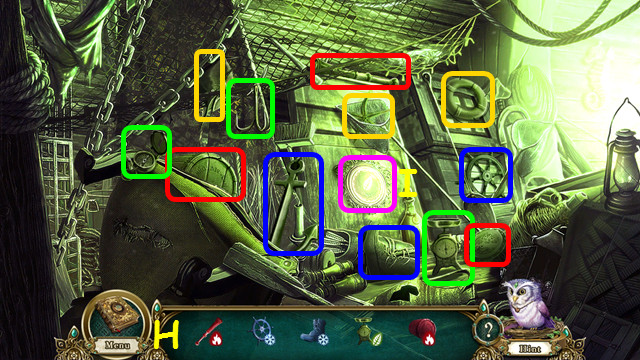
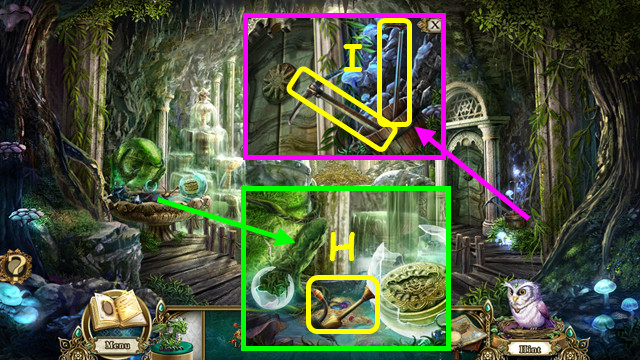
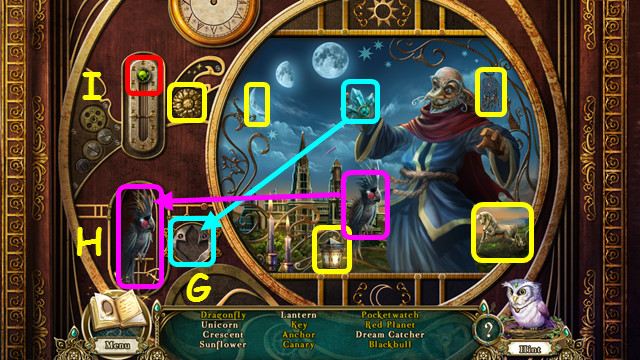
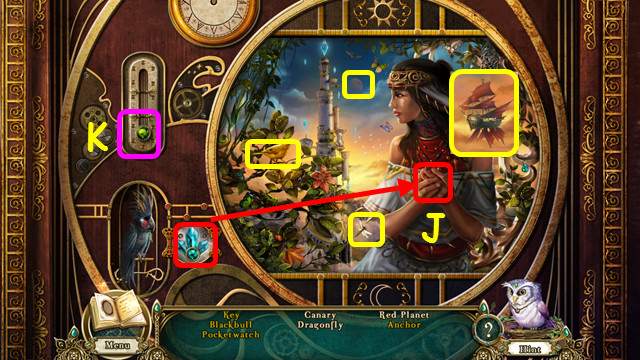
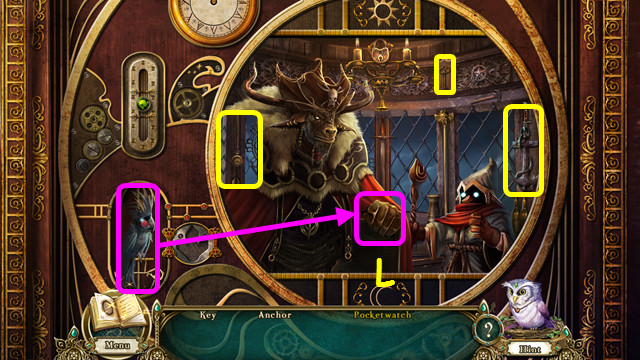
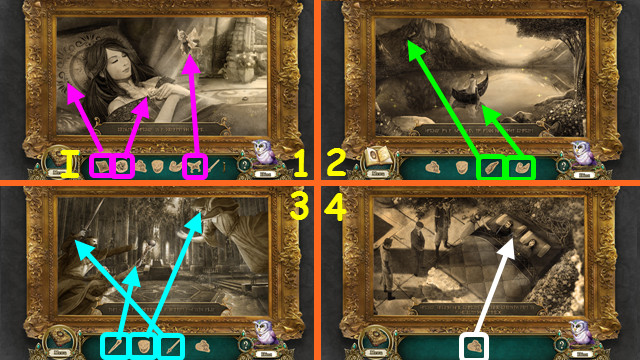
- Locate the objects (H) when the light is the same color.
- Press the mirror (I) to change the lighting color.
- You will earn the KEG OF GUNPOWDER.
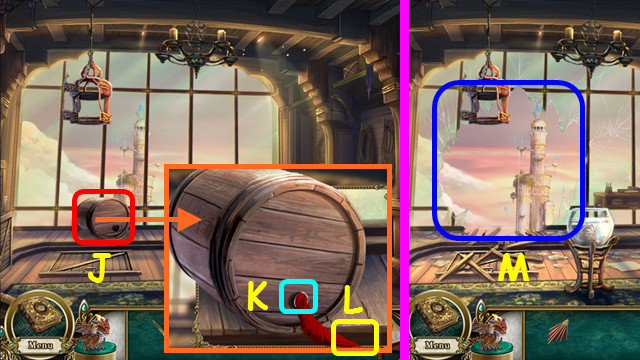
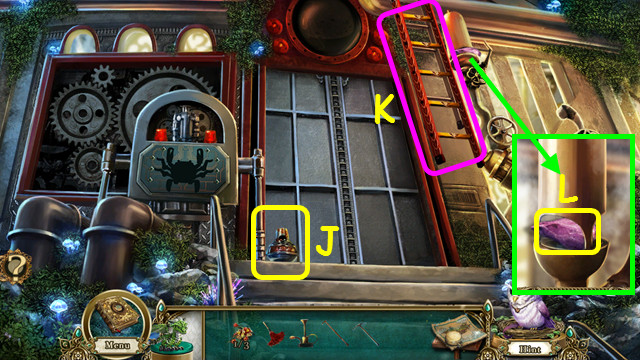
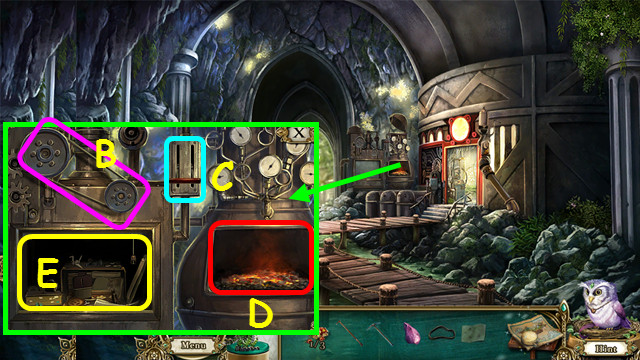
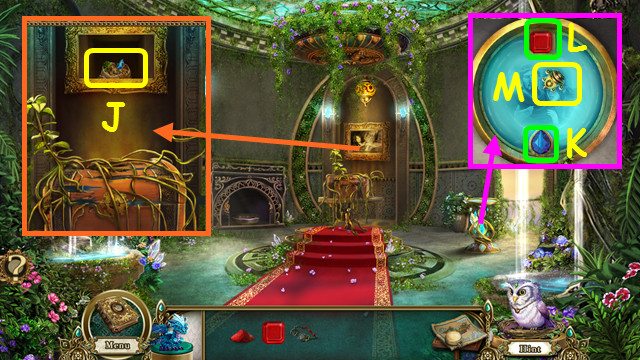
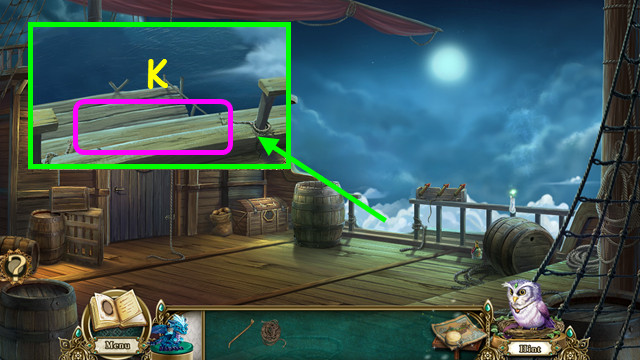
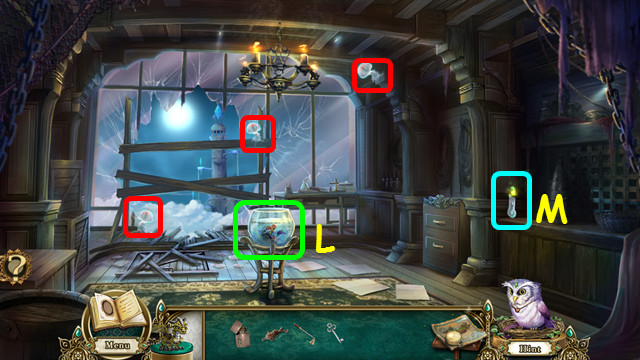
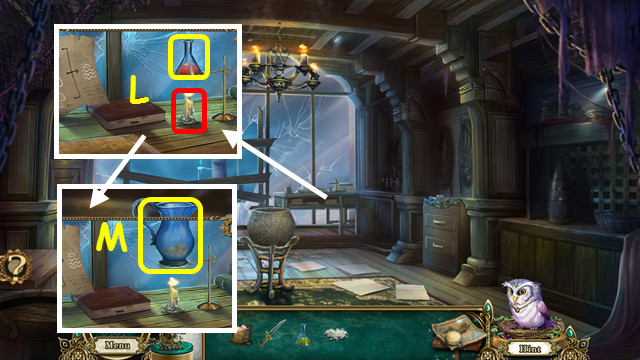
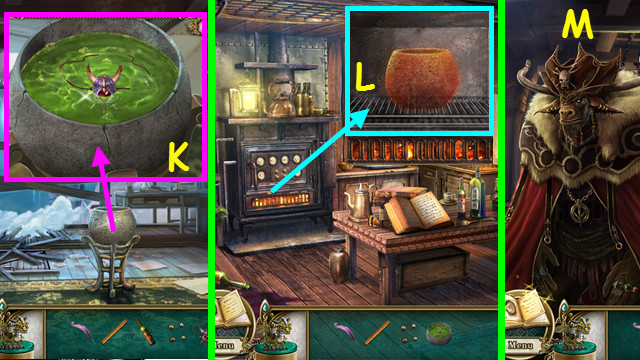
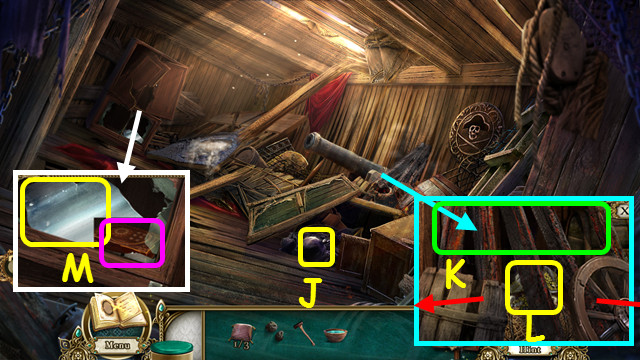
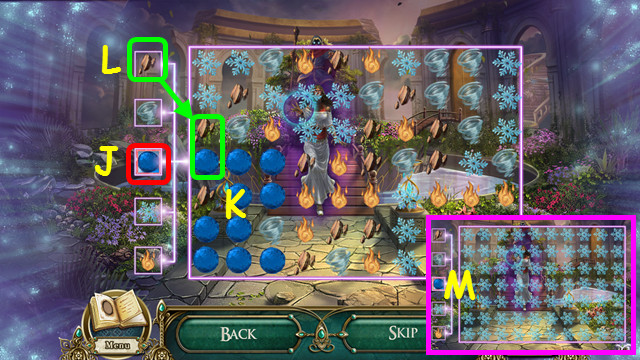
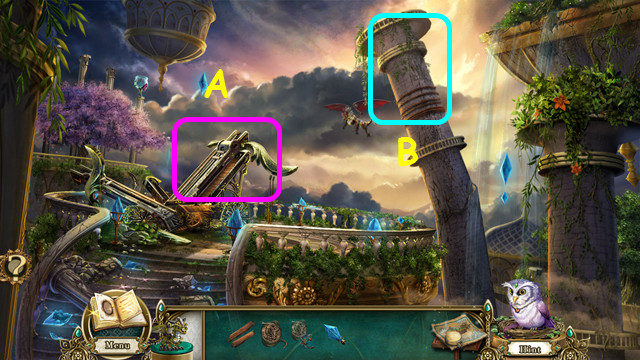
- Place the KEG OF GUNPOWDER by the window (J).
- Use the BLADE to remove the plug, and then place the CLOTH inside (K).
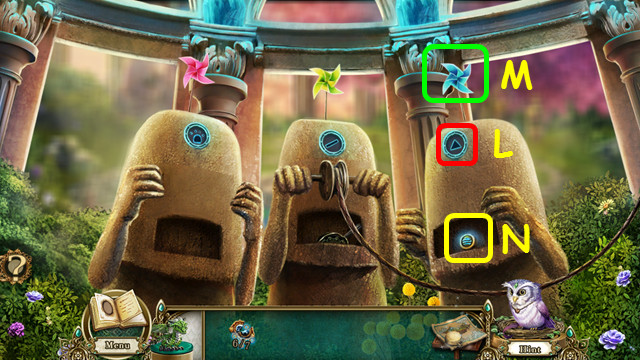
- Use the DRAGON on the cloth end (L).
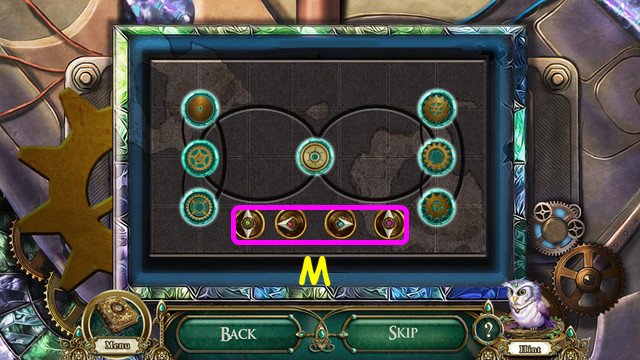
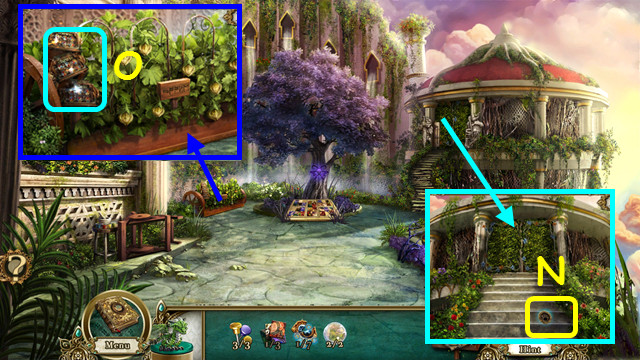
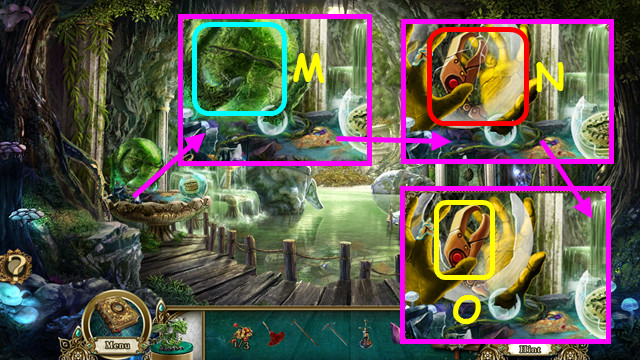
- Use the GLIDER on the broken window (M).
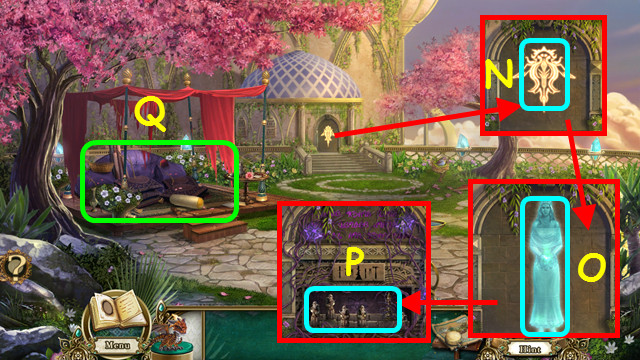
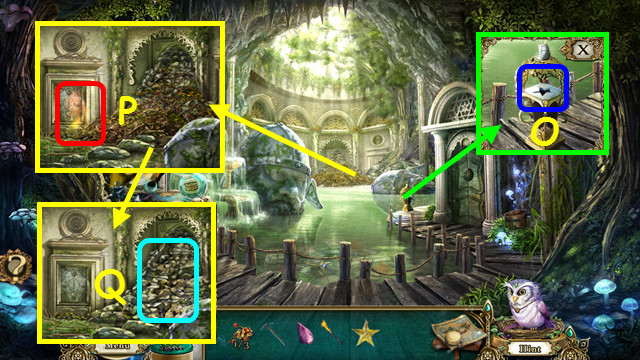
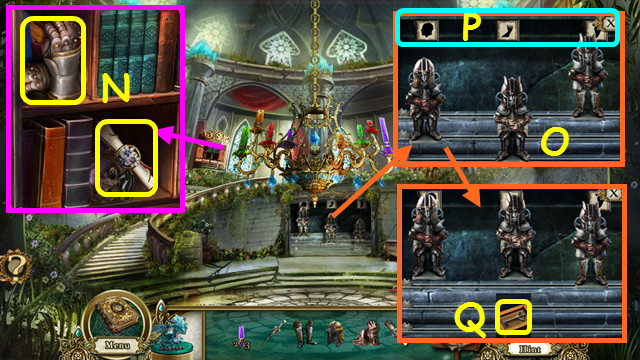
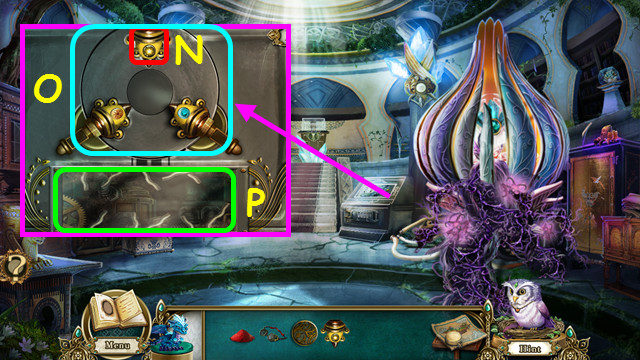
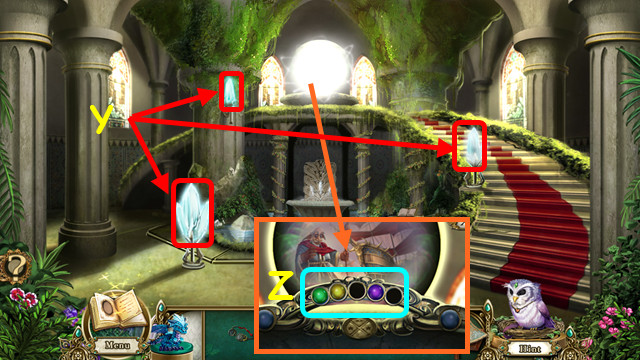
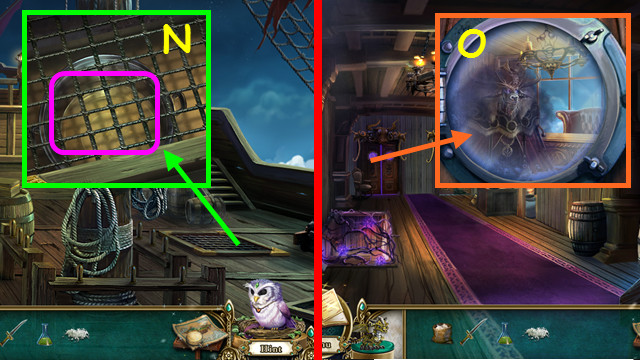
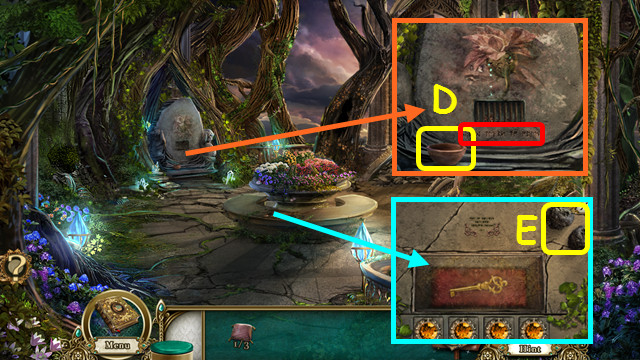
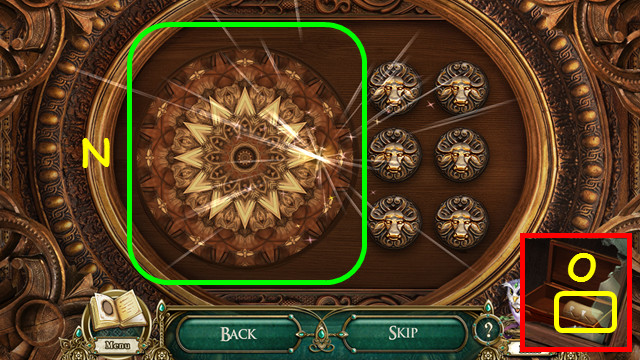
- Look at the door, touch the symbol (N), and talk to the Enchantress (O).
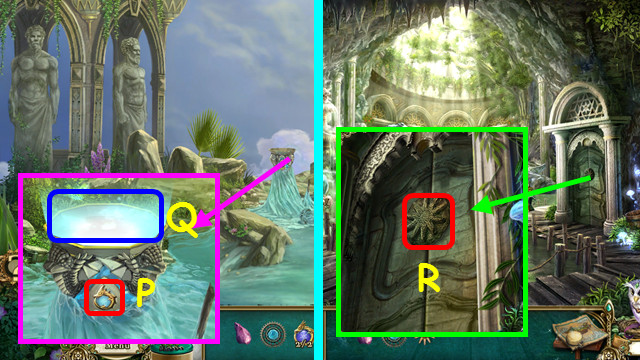
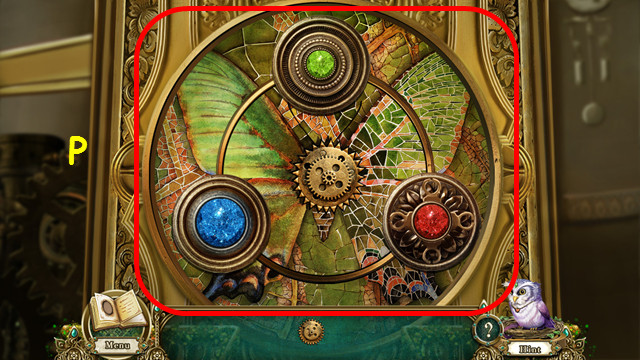
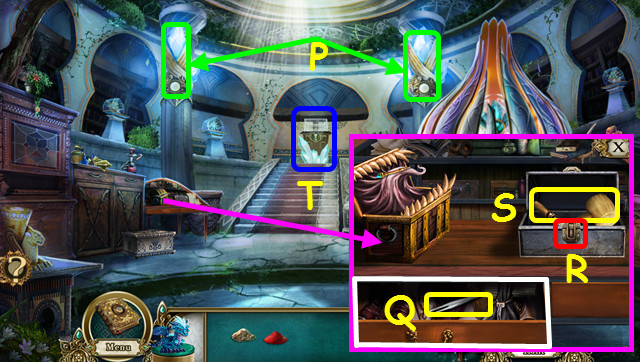
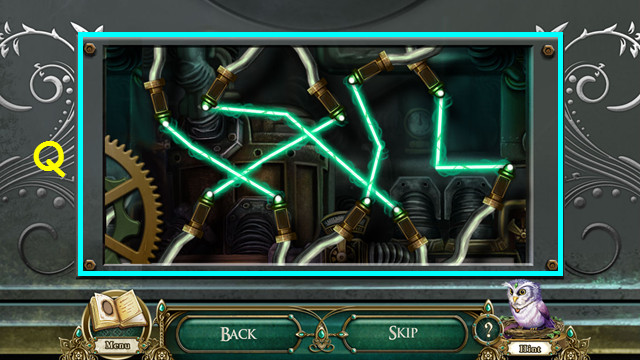
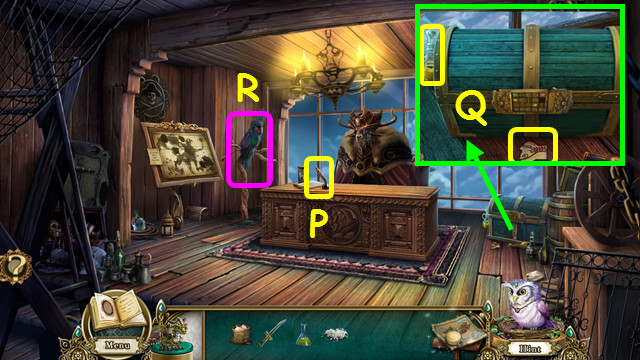
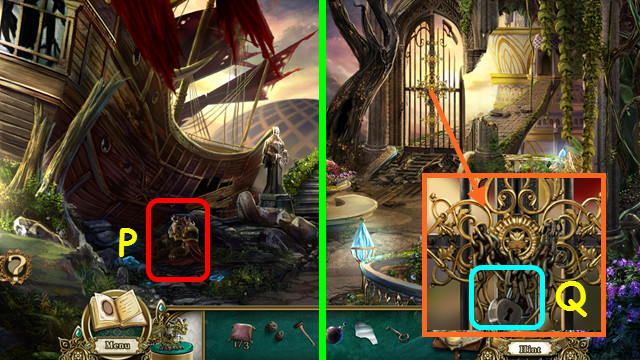
- Note the mini-game (P).
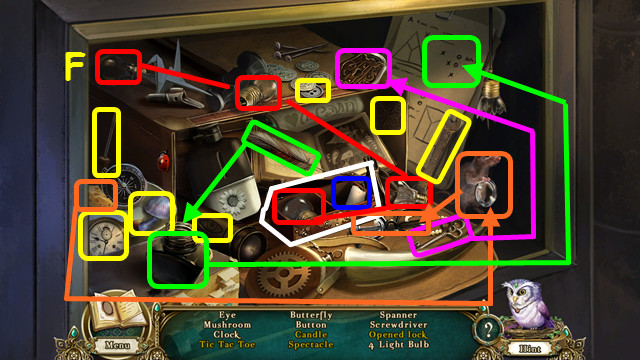
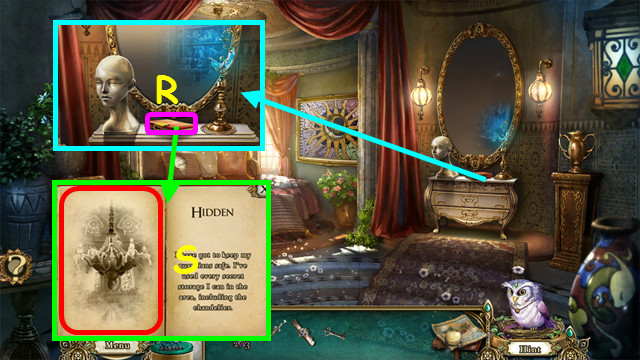
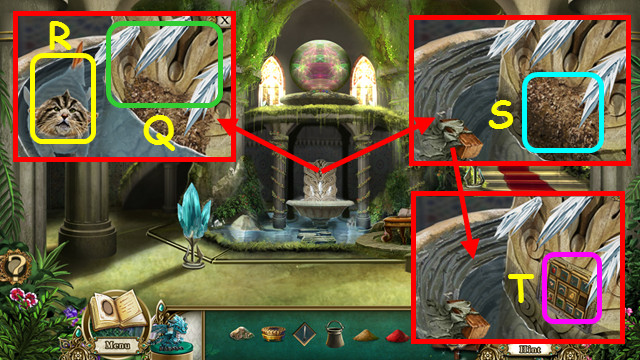
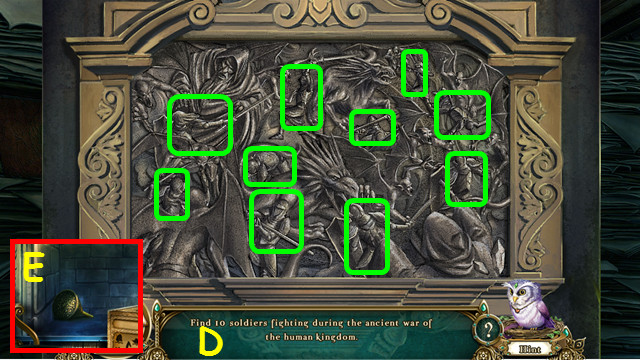
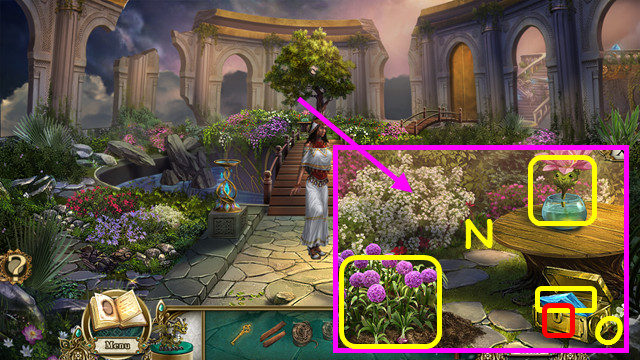
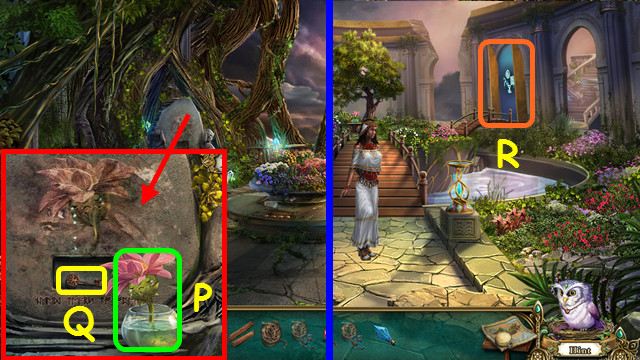
- Look at the Outdoor Haven for a HOP (Q).
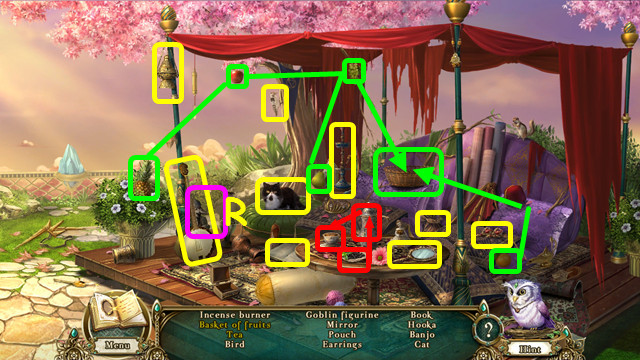
- Play the HOP to earn the FIGURINE (R).
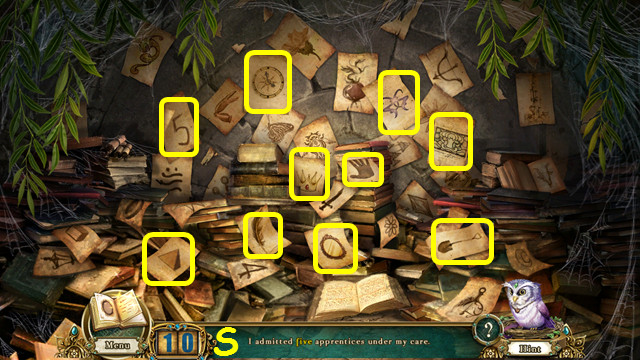
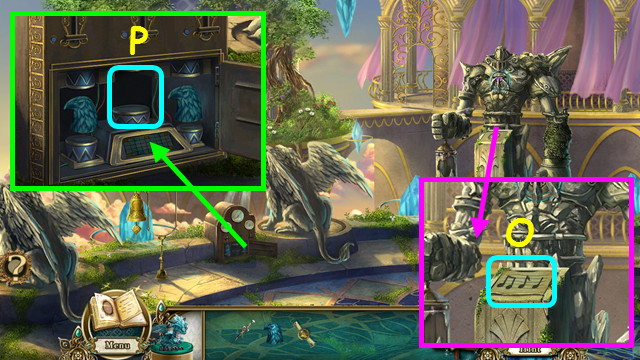
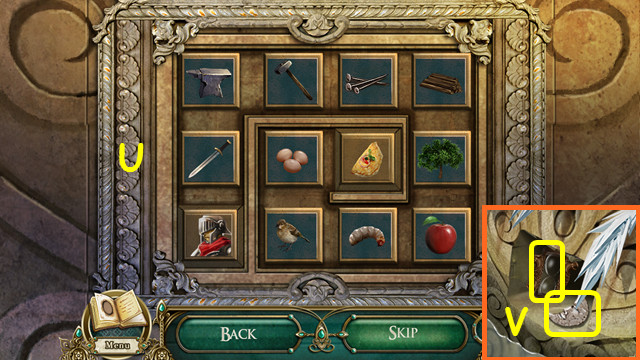
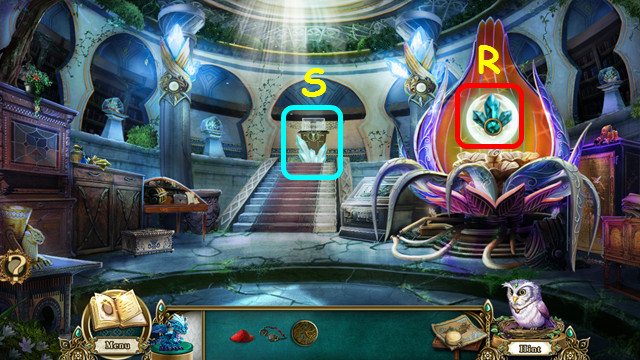
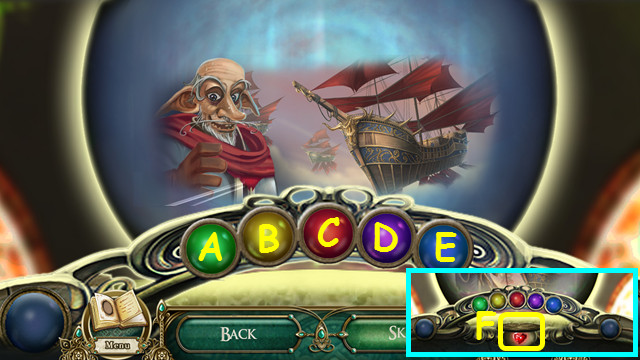
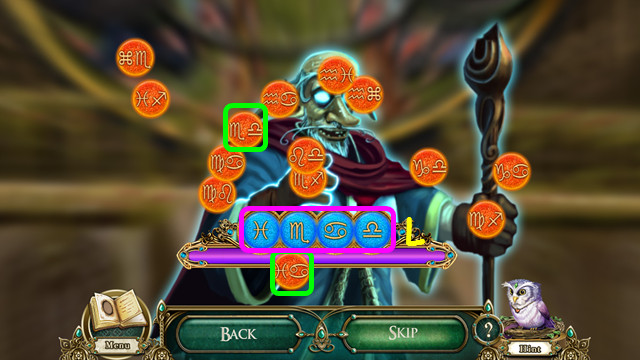
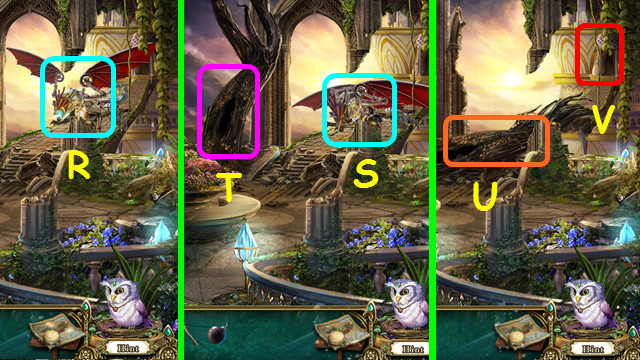
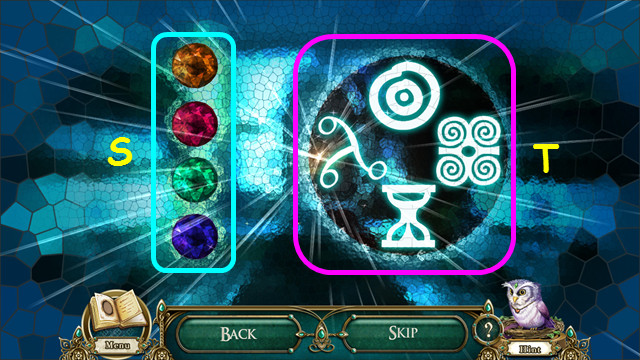
- Look at the mini-game on the wall.
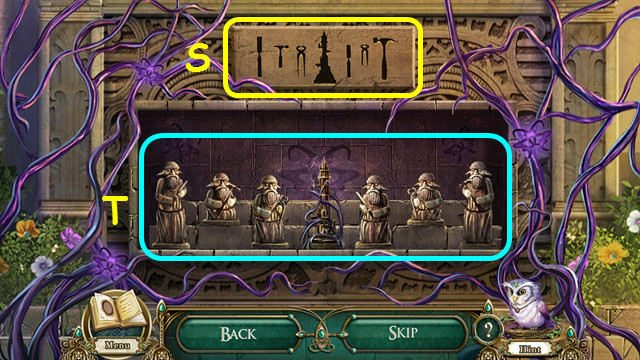
- Place the FIGURINE with the others, and then arrange the figurines (S) to match the carving (T).
- Select 2 figurines to swap positions.
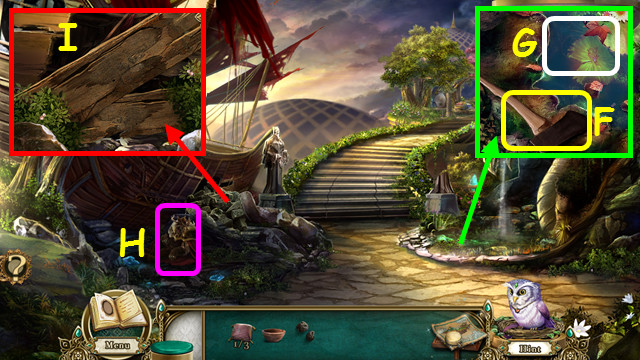
- Walk forward twice.
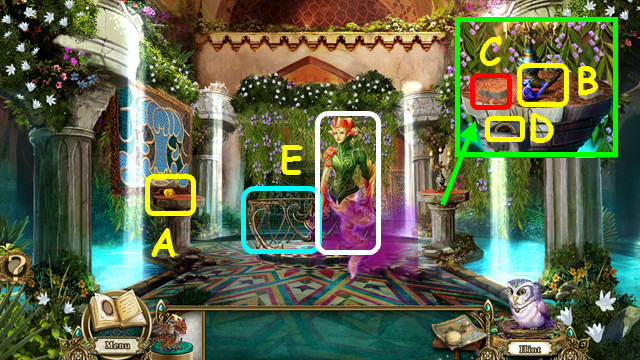
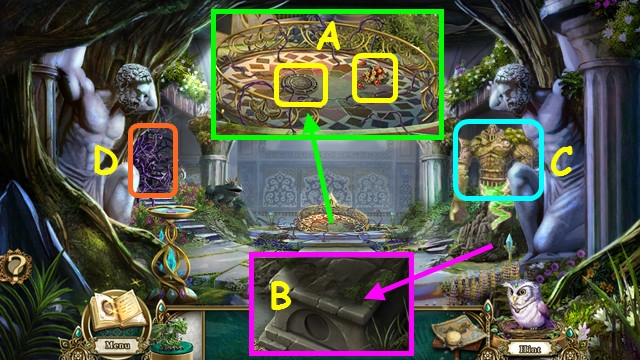
- Take the SUN GEM (A).
- Take the BIRD WHISTLE (B).
- Press the left button (C). Take the SLOT PIECE (D).
- Touch the lift, and talk to the Djinn of Change (E).
- Walk down.
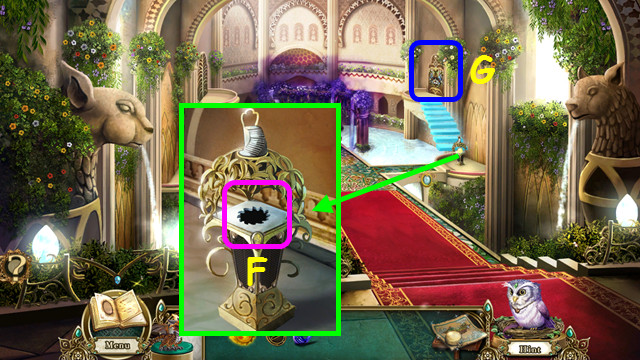
- Insert the SUN GEM into the device (F).
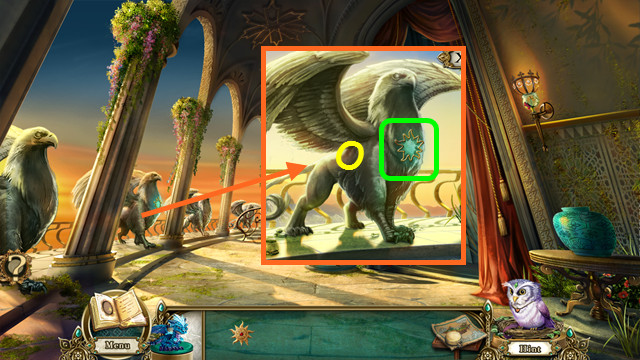
- Look at the right door (G).
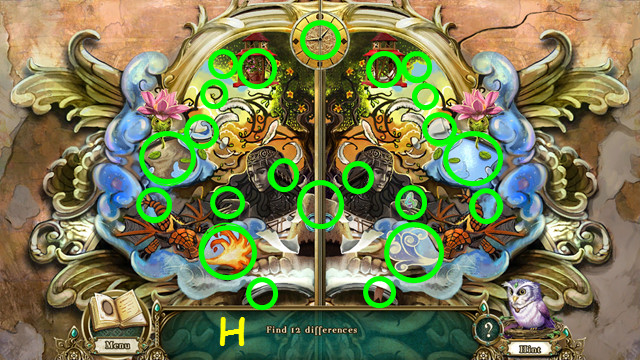
- Locate the 12 differences (H).
- Walk right.
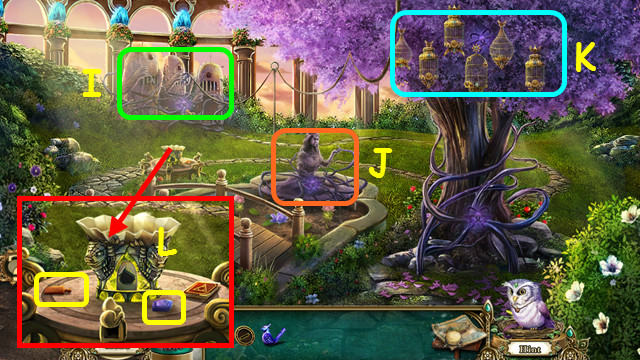
- Note the Pinwheel Machine (I), Pond (J), and Cages (K).
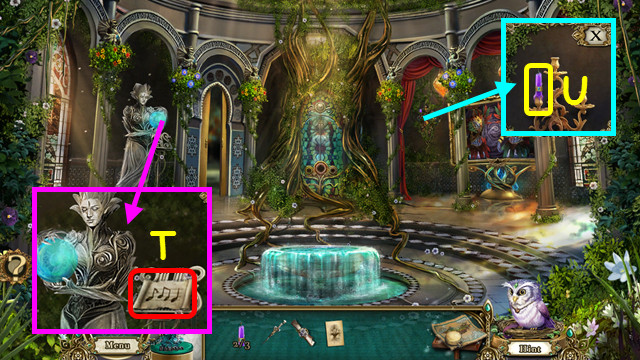
- Look at the Book; take the WOODEN WEDGE and the 1st MEMORY PRISM (L).
- Exit the close-up, walk down, and forward.
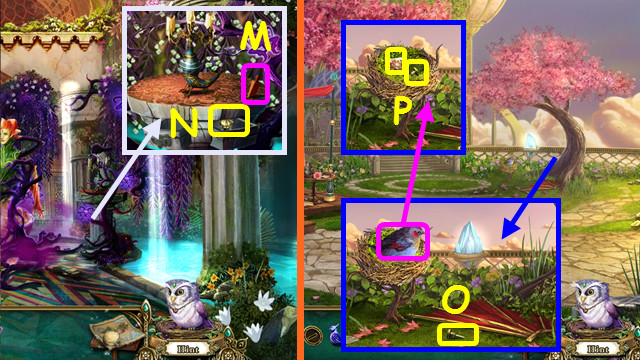
- Use the WOODEN WEDGE on the button (M); take the MAGIC INK (N).
- Walk down twice.
- Move the glider; take the 1/3 SCREW (O).
- Use the BIRD WHISTLE on the bird; take the 1/3 TILE and the 2/3 SCREW (P).
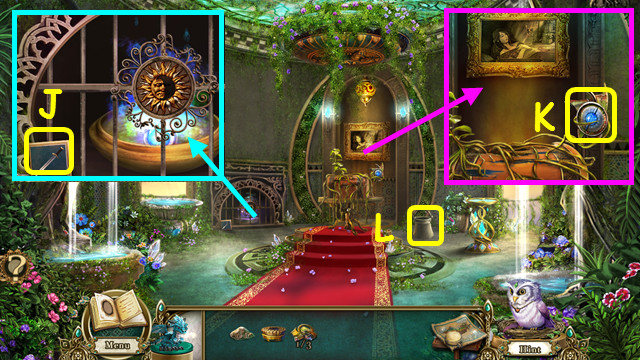
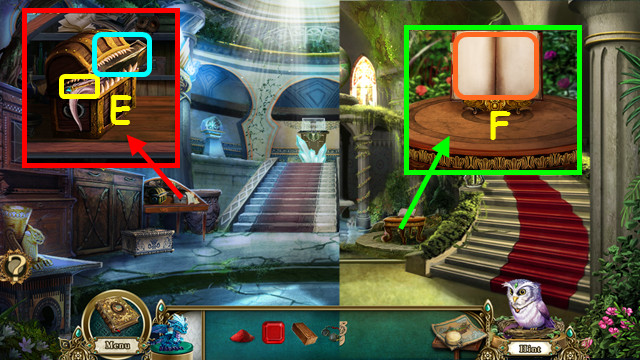
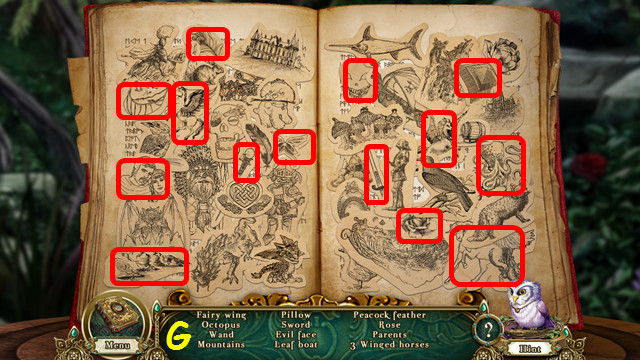
- Walk forward, go right, and look at the Book.
- Use the MAGIC INK on the pages of the blank book (Q).
- Turn the pages to find the DRAGON EMBLEM (R).
- Place the DRAGON EMBLEM in the altar (S).
- Place the DRAGON in the altar to make the WIND POCKET DRAGON (T).
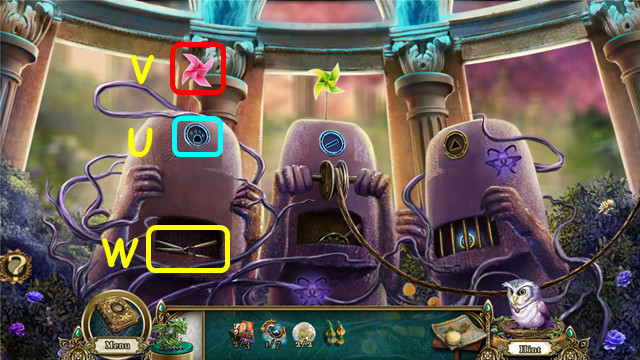
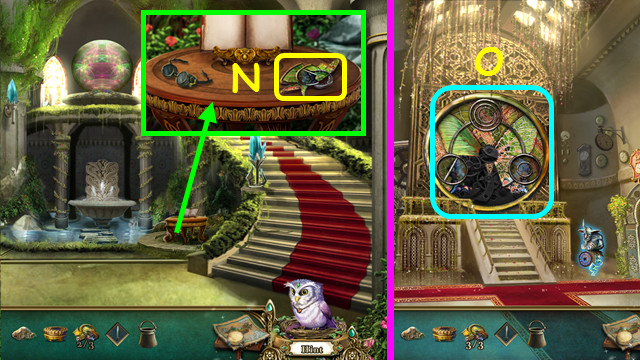
- Exit the close-up and look at the pinwheel machine.
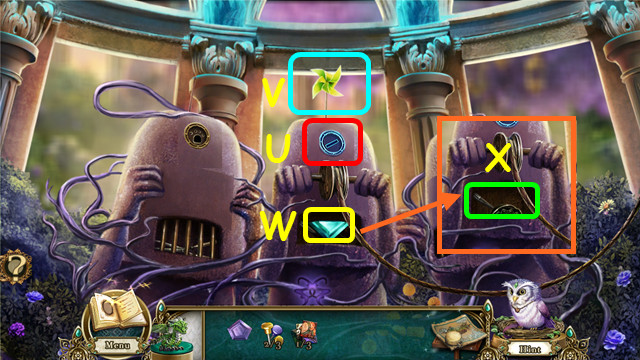
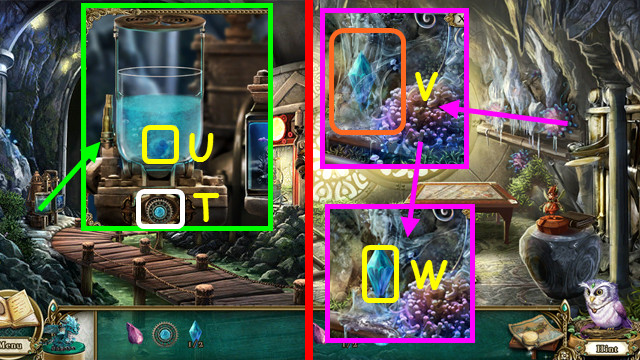
- Place the SLOT PIECE in the center structure (U).
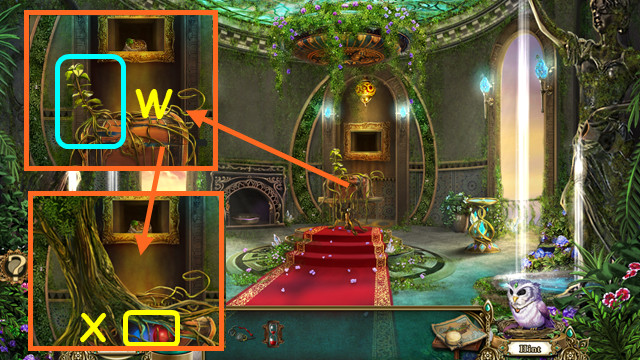
- Use the WIND POCKET DRAGON on the pinwheel (V).
- Take the 2nd MEMORY PRISM (W) and pull the lever (X).
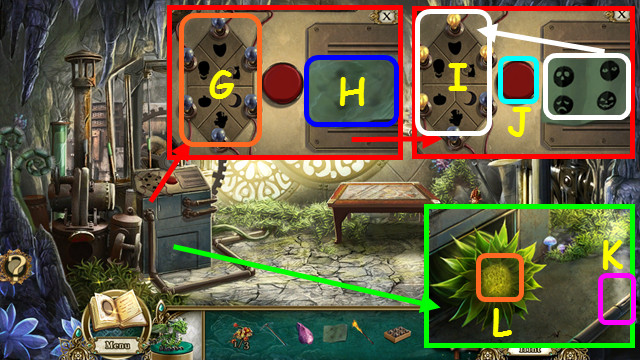
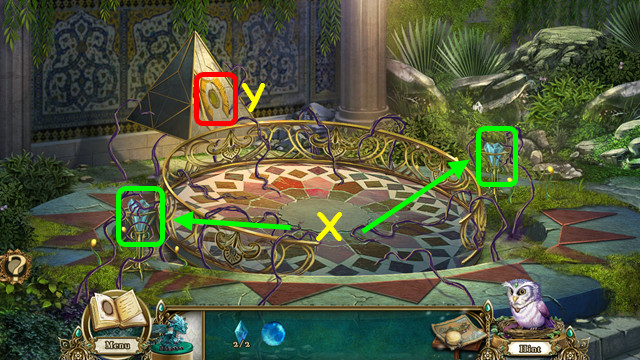
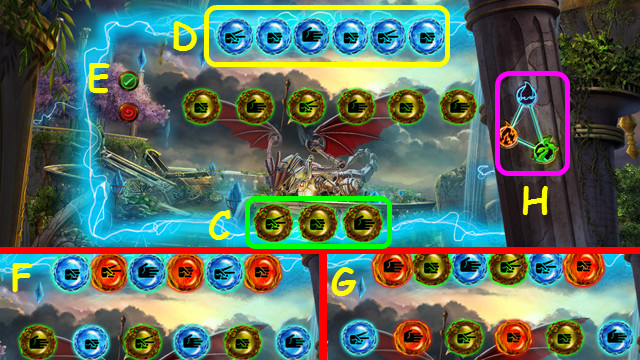
- Exit the close-up; select the cages for a mini-game.
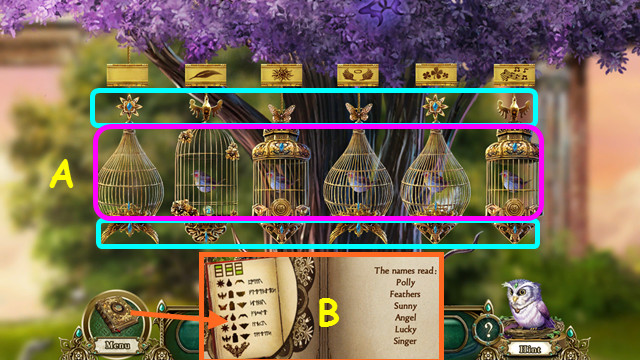
- Change the upper decorations, cage, and lower decorations (A) to match the journal (B).
- Select an element to change the configuration.
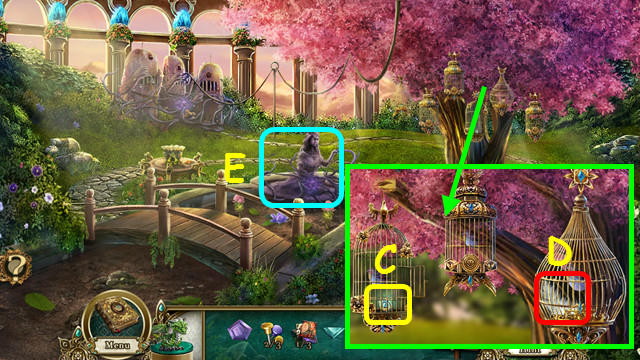
- Take the 1/7 CORE PIECE (C).
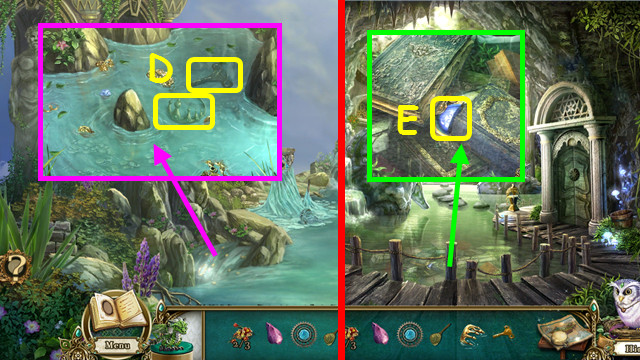
- Use the WIND POCKET DRAGON to get the FEATHER (D).
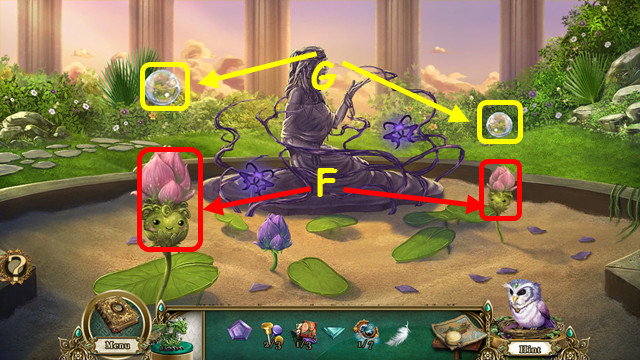
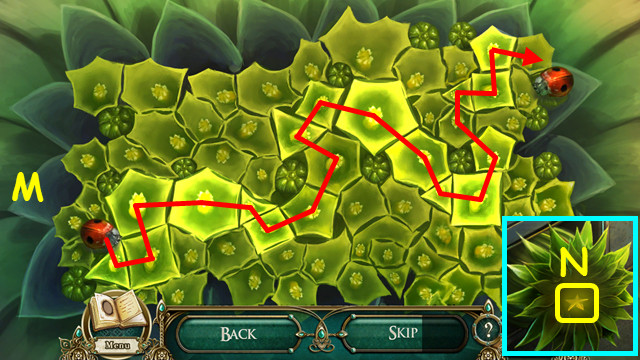
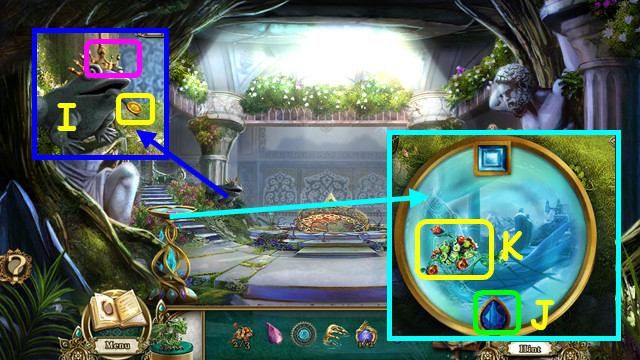
- Look at the Pond (E).
- Use the FEATHER on the 2 water lilies (F).
- Take the 2 WATER SPHERES (G).
- Leave the pond and walk down twice.
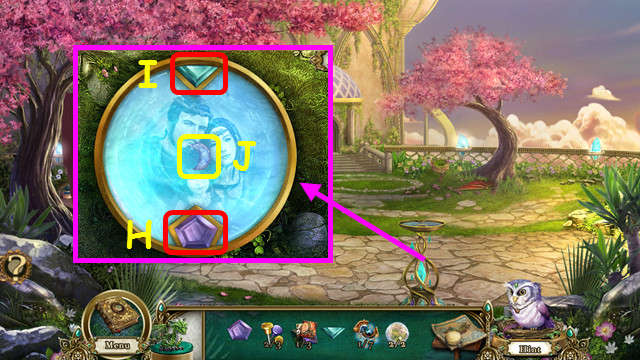
- Place the 1st MEMORY PRISM in the lower opening (H). Place the 2nd MEMORY PRISM in the upper opening (I).
- After the cut-scene, take the MOON GEM (J).
- Walk forward.
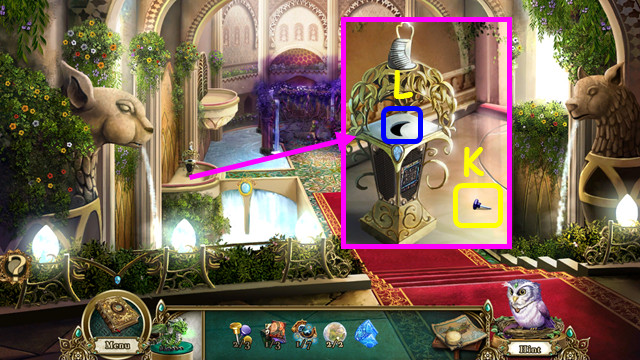
- Take the 3/3 SCREW (K).
- Insert the MOON GEM into the device (L).
- Use the buttons to move the gears to the correct positions (M).
- Move the gears to see the outlines underneath each gear.
- Walk left.
- Take the SLOT PIECE (N).
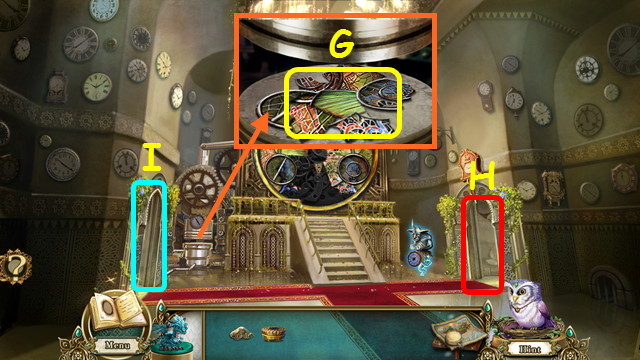
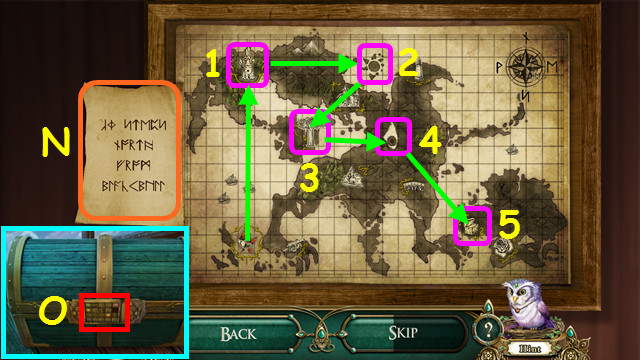
- Use the 3 SCREWS on the regulators for a mini-game (O).
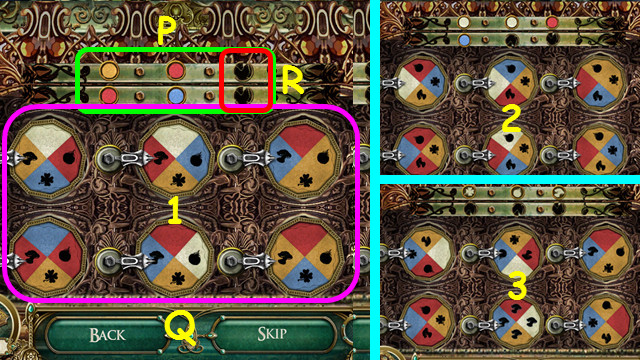
- Look at the clues (P), and turn the wheels to match (Q).
- Some clues will be broken (R); deduce the correct symbol/color.
- There are 3 patterns to complete (1-3).
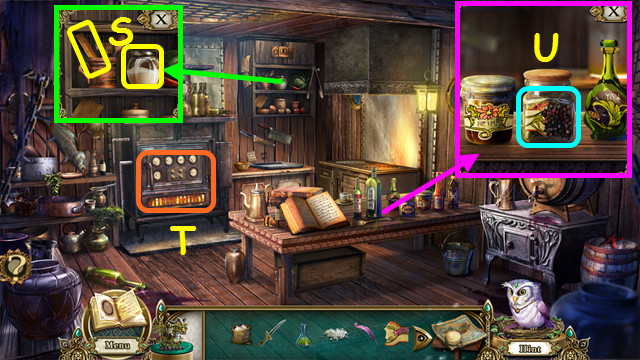
- Take the BERRIES (S).
- Look at the Potter’s Wheel; take the 2/3 TILE (T).
- Go to the Pinwheel Machine.
- Place the SLOT PIECE into the left structure (U).
- Use the WIND POCKET DRAGON on the pinwheel (V).
- Take the SHEARS (W).
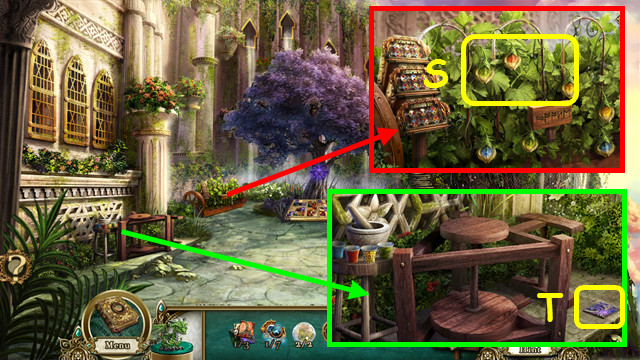
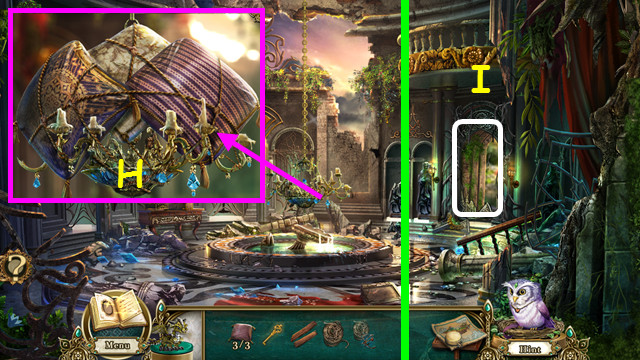
- Go to the Hanging Gardens.
- Note the vase display (A).
- Use the SHEARS on the doors (B).
- Walk forward.
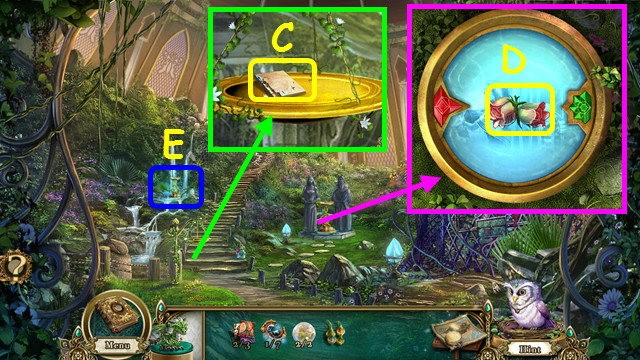
- Take the 3/3 TILE (C).
- Touch the water for a cut-scene, then take the MIDDAY BELLS (D).
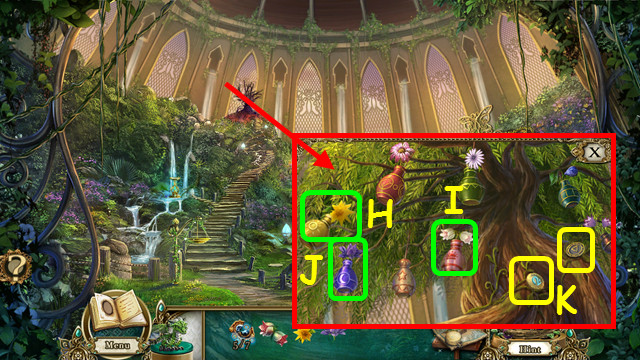
- Look at the Garden Pond for a HOP (E).
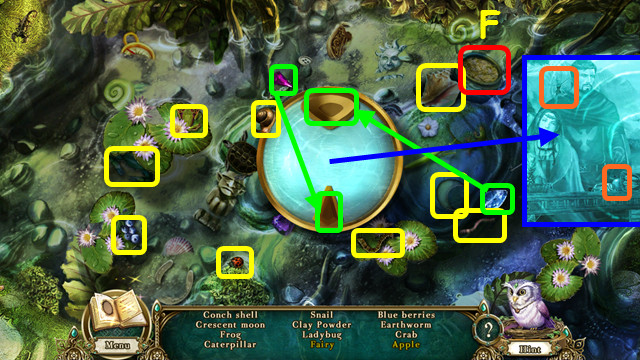
- Play the HOP to receive the CLAY POWDER (F).
- Walk down.
- Note the Tree (G).
- Look at the wheel (H); place the CLAY POWDER and a WATER SPHERE on the circle.
- Move the wheel back and forth until you return to the full view. (I).
- Place the BERRIES in the mortar (J). Take the DYE (K).
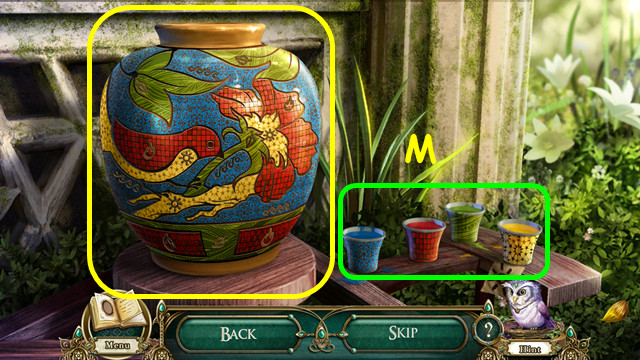
- Use the DYE on the vase (L).
- Color the sections of the vase, using the symbols as a guide (M).
- Use the blue dye on see the wave symbols, and use the red dye on the fire symbols.
- Use the green dye on the leaf symbols, and the yellow dye on the sun symbols.
- Take the VASE and look at the Vases on the right.
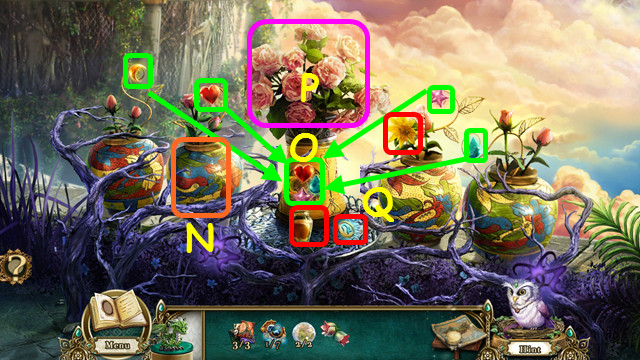
- Place the VASE in the space (N).
- Place the vase fragments on the center vase (O).
- Use the WATER SPHERE on the wilted flowers (P).
- Take the NECTAR, DAWNLIGHT FLOWER, and 2/7 CORE PIECE (Q).
- Look at the tree.
- Place the 3 TILES on the board.
- Swap the tiles to sort the pictures (R).
- Use the caption bars as a guide (S).
- Take the METAL PLATE and 3/7 CORE PIECE (T).
- Walk forward.
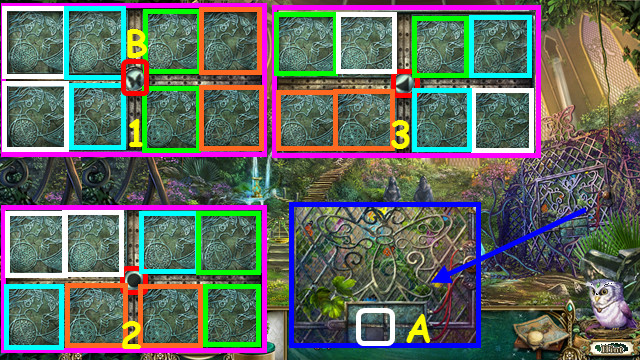
- Place the METAL PLATE in the opening (A).
- Look at the symbol in the center (B),then find the pairs of matching symbols.
- There are 3 sets to match (1-3).

- Take the 4/7 CORE PIECE (C).
- Pour the NECTAR into the bowl. Take the BUTTERFLY (D).
- Walk down twice, go right, and look at the Pond.

- Place the BUTTERFLY in the statue’s hand (E).
- Take the 5/7 CORE PIECE (F) and NIGHT LILY (G).
- Return to the Butterfly Sanctuary.
- Place the DAWNLIGHT FLOWER in the yellow jar (H), the MIDDAY BELLS in the pink jar (I), and the NIGHT LILY in the blue jar (J).
- Take the 6/7 CORE PIECE and SLOT PIECE (K).
- Return to the Pinwheel Machine.
- Place the SLOT PIECE in the top of right structure (L).
- Use the WIND POCKET DRAGON on the pinwheel (M).
- Take the 7/7 CORE PIECE (N).
- Walk down, go forward, and look at the Artifact of Change on the left.
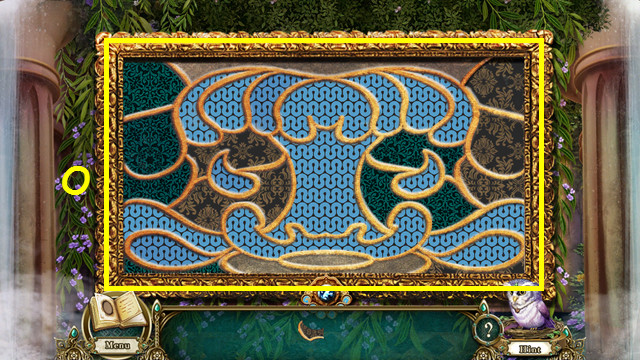
- Place the 7 CORE PIECES on the tapestry.
- Drag the pieces into the frame to complete the tapestry (O).
Chapter 2: The Underspire
- Take the STONE DISC and 1/3 BOUQUET (A).
- Place the STONE DISC in the circle (B).
- Talk to the Djinn to earn the STUDS (C).
- Look at the left door.
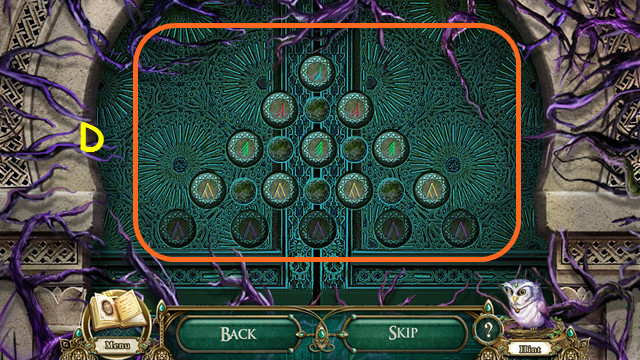
- Place the STUDS on the door.
- Use the buttons to move the runes to the correct locations (D).
- The number of each color determines the level of the runes.
- Walk to the left.
- Take the FEATHER DUSTER (E).
- Note the Mechanical Wall (F).
- Walk forward (G).
- Take the SPRAY HEAD (H).
- Take the WOODEN CANE and the PICKAXE (I).
- Walk down and look at the Mechanical Wall.
- Use the SPRAY HEAD on the bottle to get the MOSS KILLER (J).
- Pull down the ladder with the WOODEN CANE (K).
- Take the SHARP ROCK (L).
- Exit the close-up; walk forward.
- Use the MOSS KILLER on the moss (M).
- Use the SHARP ROCK on the sphere (N).
- Take the GOLDEN CLAW (O).
- Walk down.
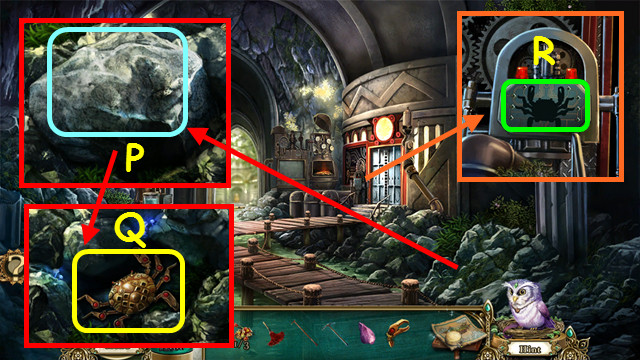
- Use the PICKAXE on the rocks (P).
- Move the broken rocks away, place the GOLDEN CLAW on the crab to get the GOLDEN CRAB (Q).
- Look at the Mechanical Wall; place the GOLDEN CRAB in the indentation for a mini-game (R).
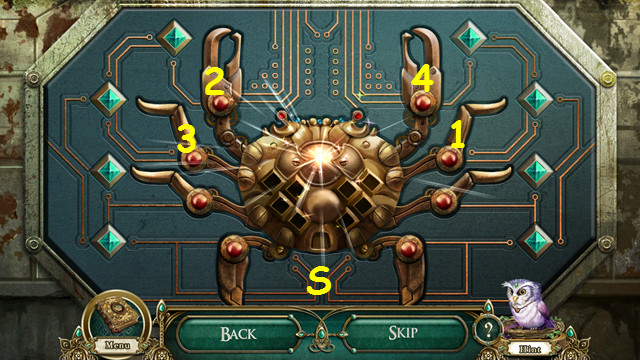
- Press the red buttons to turn on all the green lights (S).
- Press the buttons in numerical order (1-4).
- Walk right.
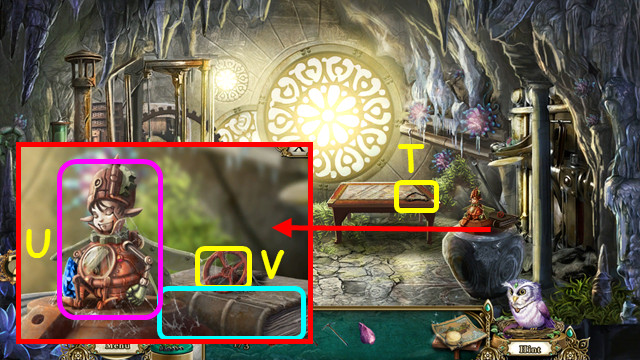
- Take the BELT (T).
- Use the FEATHER DUSTER on the fairy (U).
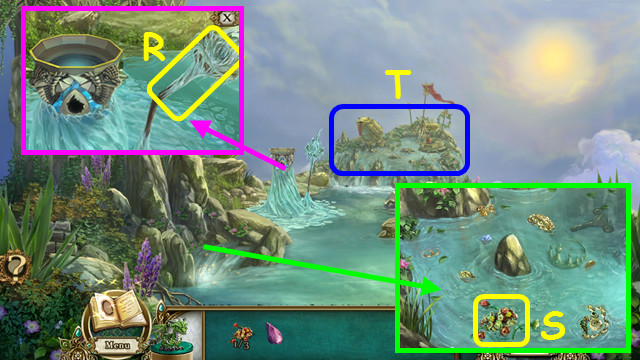
- Take the VALVE WHEEL and read the book (V).
- Walk down.
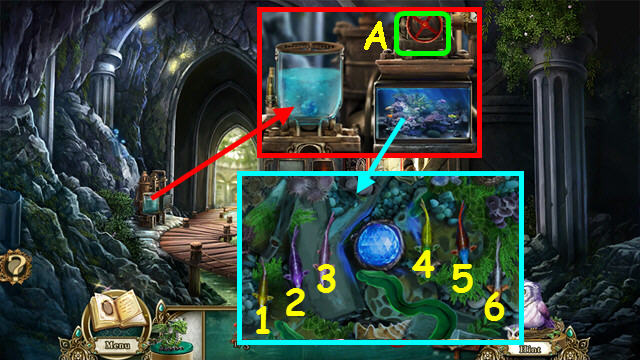
- Place the VALVE WHEEL on the right and turn the wheel (A).
- Select the fish in order (1-6) to earn the MACHINE CODE SEQUENCE.
- Place the BELT on the gears (B).
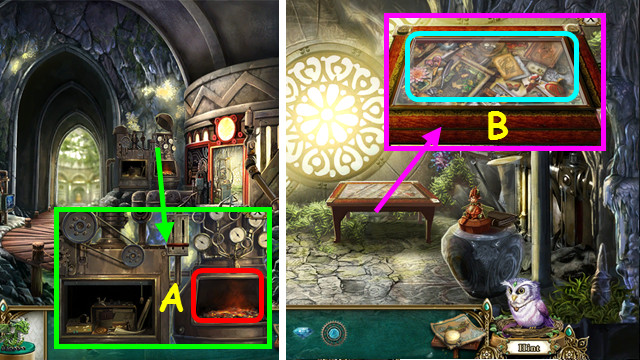
- Pull down the lever (C).
- Use the WOODEN CANE on the coals to get the FLAMING CANE (D).
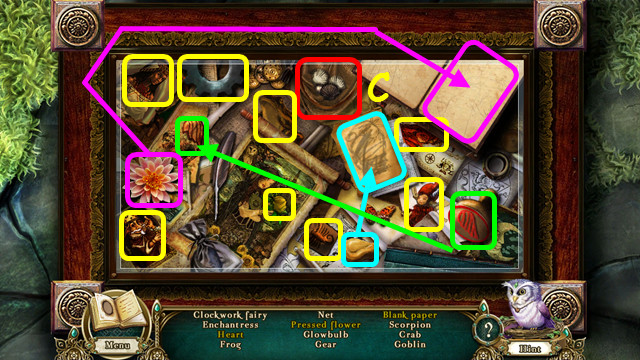
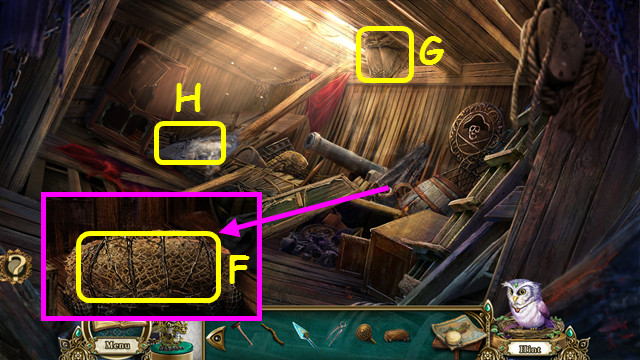
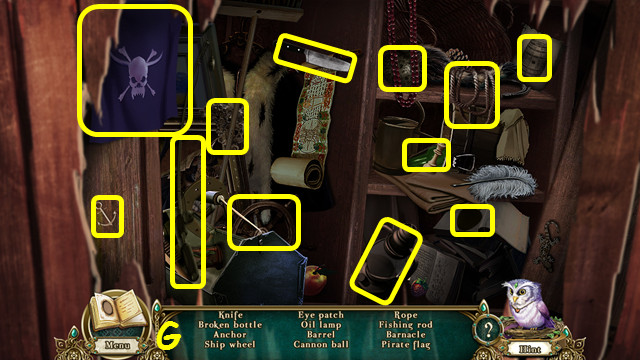
- Look in the compartment for a HOP (E).
- Play the HOP to receive the LIGHT BULBS (F).
- Walk right.
- Place the LIGHT BULBS on the console (G).
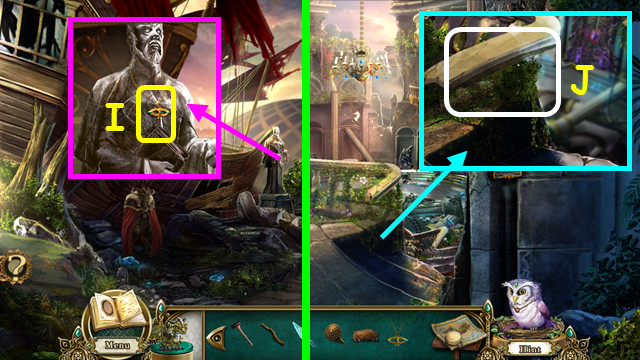
- Place the MACHINE CODE SEQUENCE on the console; use the WIND POCKET DRAGON to dry the paper (H).
- Select the symbols that represent cat, skull, mask, and pumpkin (I).
- Press the red button (J).
- Use the WIND POCKET DRAGON on the steam (K).
- Look at the bulb web (L).
- Create a path of polyogonals from the left to the right; start with the lowest number of sides to the highest, and then repeat the pattern (M).
- Select a figure to light it up in the path, select the figure again to remove it from your chain.
- Take the STAR GEM (N).
- Walk down and go forward.
- Place the STAR GEM in the indentation (O).
- Look across the water. Use the FLAMING CANE on the dry branches, then use the WIND POCKET DRAGON on the flames (P).
- Use the PICKAXE 3 times on the rocks (Q).
- Walk forward.
- Bend and then take the FROZEN TORCH (R).
- Take the 2/3 BOUQUET (S).
- Look at the Cliff Marks (T).
- Take the BUTTON (U).
- Exit the Cliff Marks and walk down.
- Place the BUTTON on the broken box; take the DIAMOND (V).
- Walk down.
- Place the FROZEN TORCH on the coals to get the MACHINE PART (A).
- Walk to the right.
- Use the DIAMOND on the glass (B).
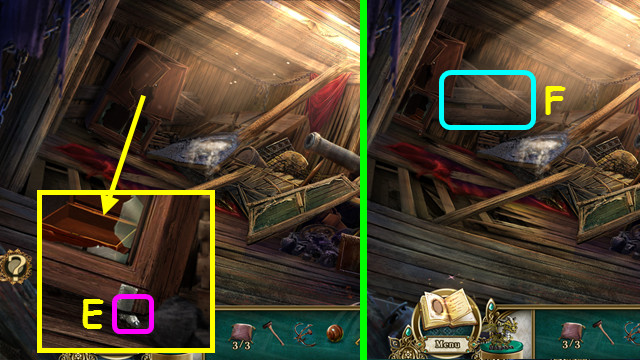
- Look inside the table.
- Play the HOP to receive the FISHING NET (C).
- Walk down and go forward twice.
- Use the FISHING NET to take the HALF-CROWN and the WINDER (D).
- Walk down.
- Use the FISHING NET to take the 1/2 DRAGON EMBLEM (E).
- Walk down and go right.

- Use the WINDER on the fairy (F).
- Restore the moving picture; select 2 tiles to swap positions (G).
- Talk to the fairy. Close the book to earn the MEMORY PRISM (H).
- Walk down twice.
- Place the HALF-CROWN on the frog; take the COIN (I).
- Place the MEMORY PRISM in the lower opening (J).
- After the cut-scene, take the 3/3 BOUQUET (K).
- Go left, walk forward twice, and look at the Cliff Marks.
- Use the 3 BOUQUETS on the Dragon Altar; take the WALL MOTIF (L).
- Use the COIN on the frog, then look at the box (M).
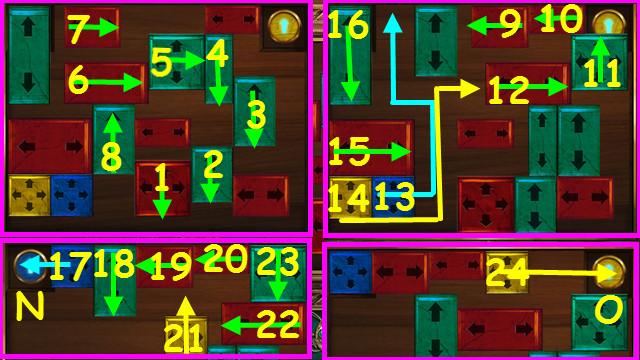
- Slide the tiles so you can move the blue tile to the upper left corner (N), and yellow tile to the upper right corner (O).
- Slide the tiles in the direction indicated in numerical order (1-24).
- Take the 2/2 DRAGON EMBLEM from the frog’s mouth.
- Place the DRAGON EMBLEM in the opening (P).
- Place the WIND POCKET DRAGON on the altar to get the ICE DRAGON (Q).
- Walk down.
- Place the WALL MOTIF on the marking (R).
- Look at the wall.
- Locate the items based on the highlighted word to receive the 1/2 LIGHT CRYSTAL (S).
- Walk down.
- Place the MACHINE PART in the base (T).
- Use the ICE DRAGON to cool the liquid, and then take the STALWART CORE (U).
- Walk to the right.
- Use the ICE DRAGON on the sticky jelly (V).
- Use the SHARP ROCK to break the ice, then take the 2/2 LIGHT CRYSTAL (W).
- Walk down twice and look at the lift.
- Replace the 2 LIGHT CRYSTALS (X).
- Place the STALWART CORE in the pyramid (Y).
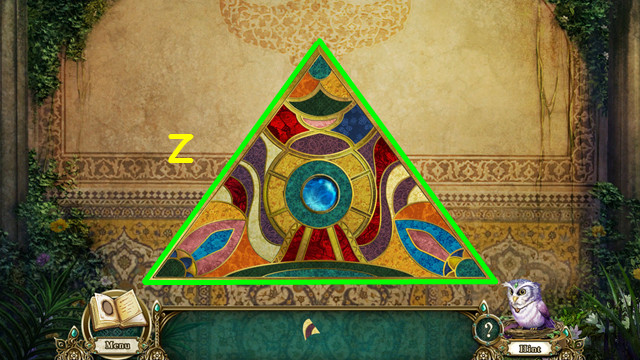
- Place the pieces in the triangle to complete the mosaic (Z).
- Pieces will snap into place when correct.
Chapter 3: The Enchantress
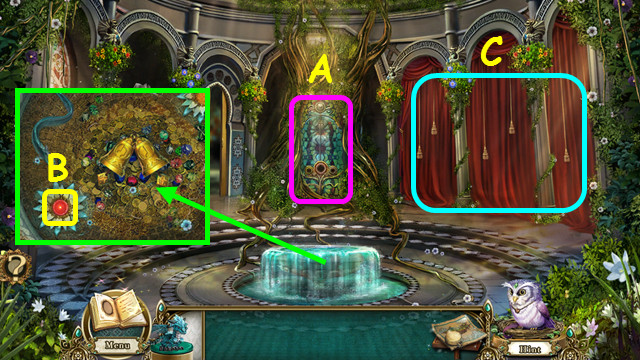
- Look at the Enchantress (A).
- Take the 1/3 CANDLE (B).
- Look at the curtains (C).
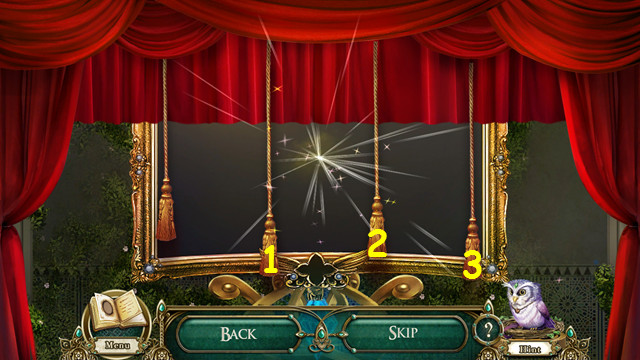
- Pull the cords to open all the curtains; one cord may open or close more than one curtain.
- Pull the cords in numerical order (1-3).
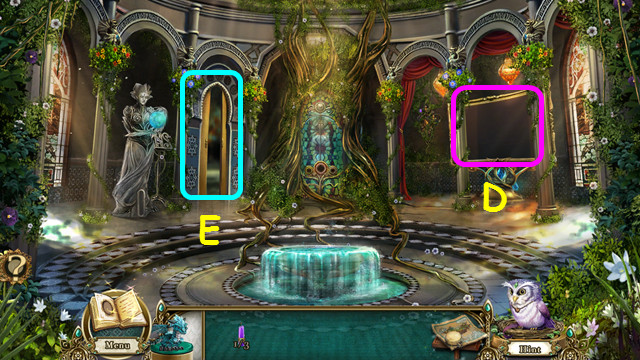
- Look in the mirror and speak to the twin Djinn (D).
- Walk left (E).
- Take the DAGGER (F).
- Flip the switch to lower the chandelier (G).
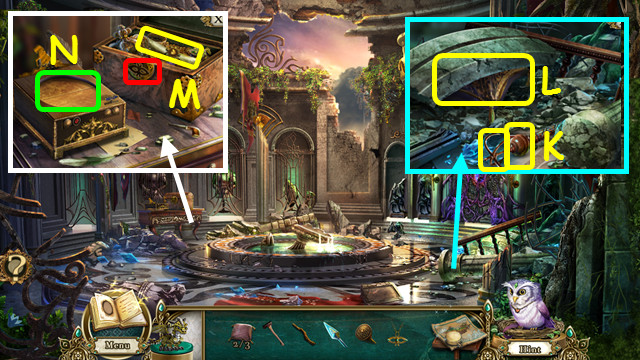
- Walk right (H).
- Take the GREAVES (I).
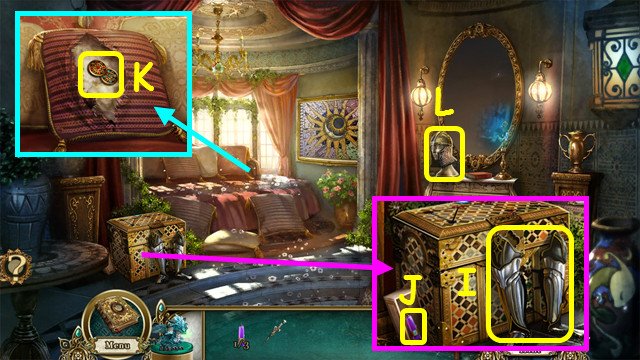
- Open the box. Take the 2/3 CANDLE (J).
- Use the DAGGER on the pillow; take the DISPLAY BUTTONS (K).
- Take the KNIGHT’S HELM (L).
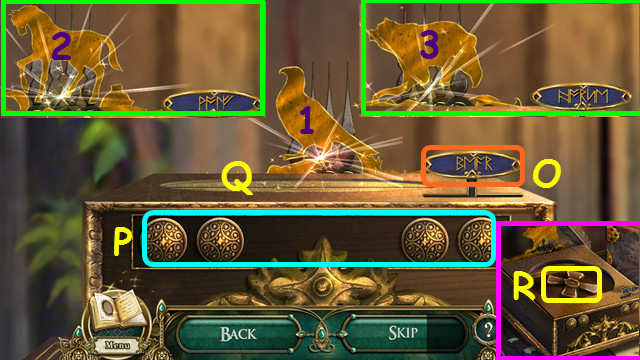
- Walk down. Look at the display cabinet.
- Use the DISPLAY BUTTONS on the cabinet.
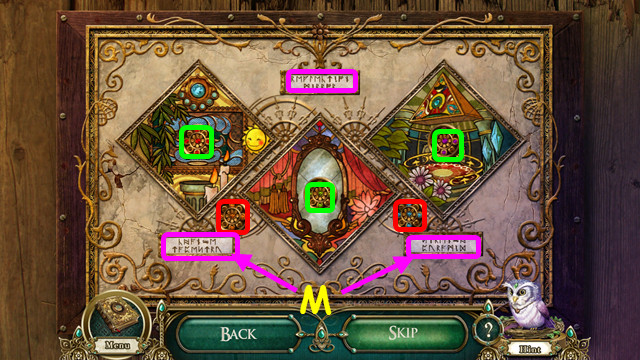
- Use the buttons to move the tiles and restore the 3 scenes.
- Use the titles as clues (M).
- The 3 center buttons (green) rotate the tiles in the frame; the 2 lower buttons swap a tile between frames (red).
- Take the GAUNTLETS and NATURE’S HYMN (N).
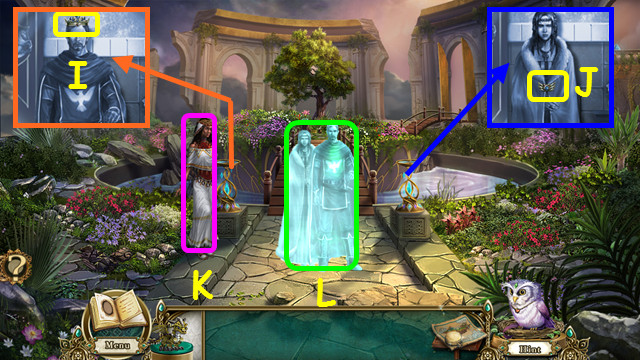
- Place the GREAVES on the left figure, the HELM on the center figure, and the GAUNTLETS on the right figure (O).
- Move the figures under the sign of the item they just received (P).
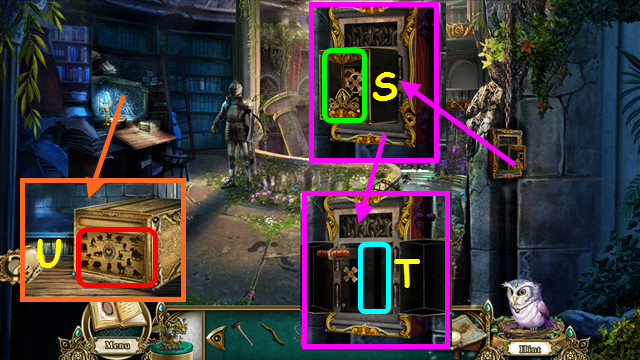
- Open the box; take the JOURNAL KEY (Q).
- Walk to the right.
- Use the JOURNAL KEY on the journal (R).
- Take the CHANDELIER SCROLL (S).
- Walk down twice.
- Place the NATURE’S HYMN on the stand (T).
- Use the DAGGER on the plants and take the 3/3 CANDLE (U).
- Walk to the left.
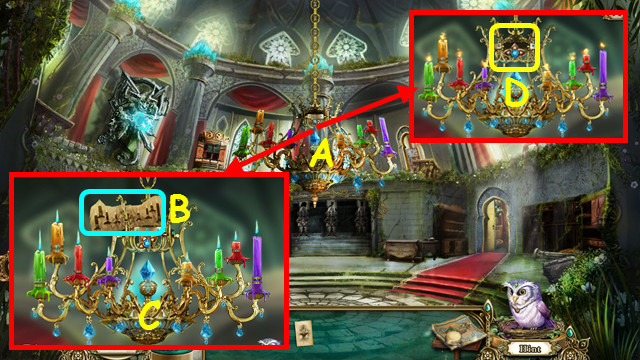
- Place the 3 CANDLES with the others (A).
- Use the CHANDELIER SCROLL on the chandelier (B).
- Swap the candles to match the diagram (C).
- Use the melted wax as a clue.
- Take the ILLUSORY TALISMAN (D).
- Walk down.
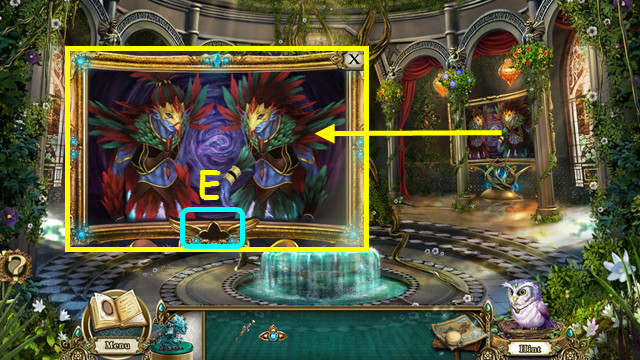
- Place the ILLUSORY TALISMAN in the mirror frame (E).
- This will trigger a HOP.
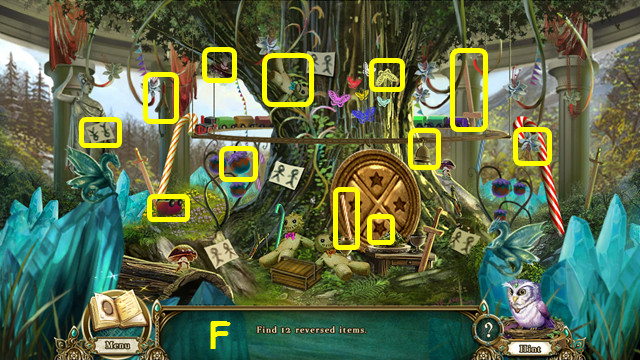
- Locate items that are backwards or upside down to receive the GLASS ROSE (F).
- Walk to the left.
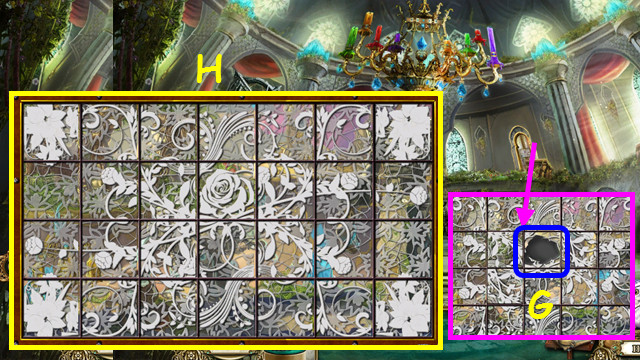
- Place the GLASS ROSE in the center of the door (G).
- Rotate the tiles to complete the pattern (H).
- Walk through the upper door.
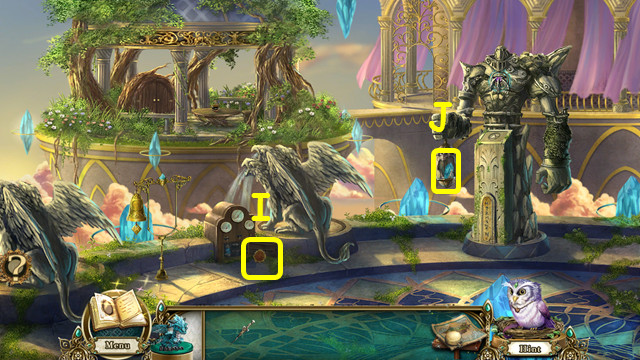
- Take the MURAL TILE (I).
- Take the LAMP CRYSTAL (J).
- Walk down and go right.
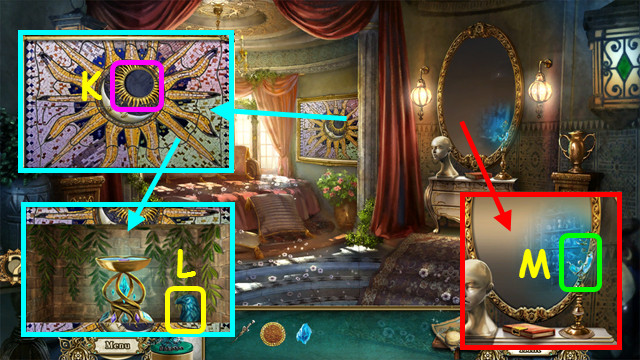
- Place the MURAL TILE in the center of the mural (K).
- Take the GRIFFON HEAD (L).
- Place the LAMP CRYSTAL in the lamp (M).
- Play the HOP to receive the SONG OF MOUNTAINS (N).
- Walk down and go out through the upper door.
- Place the SONG OF MOUNTAINS on the symbol (O).
- Place the GRIFFON HEAD on the pedestal (P).
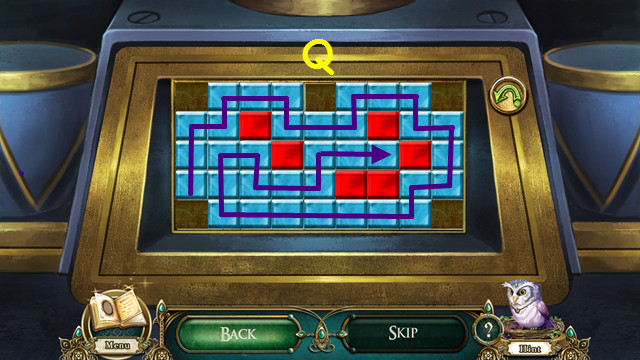
- Start on any square and make a path that covers all the tiles (Q).
- You will travel until reaching an obstacle.
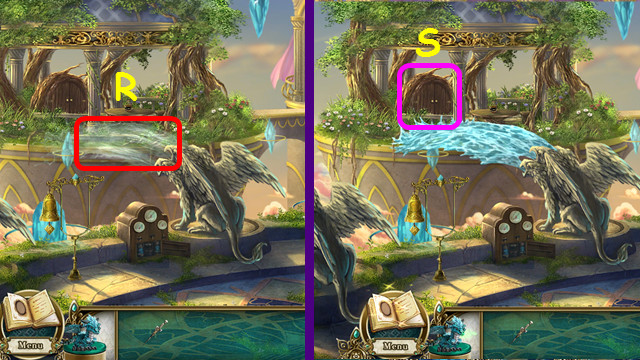
- Use the ICE DRAGON on the water stream (R).
- Cross the ice bridge (S).
- Take the MEMORY PRISM (T).
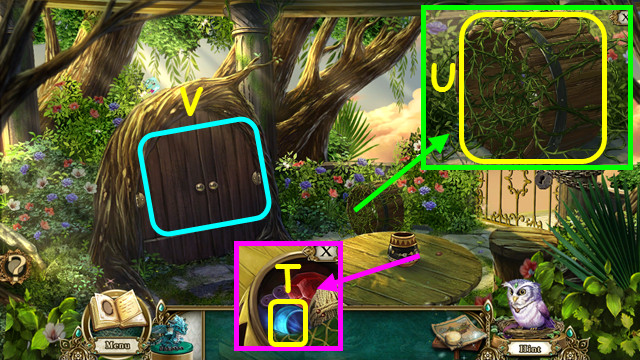
- Use the DAGGER 3 times on the thorns, then take the BOTTOMLESS BARREL (U).
- Open the cupboard and look inside (V).
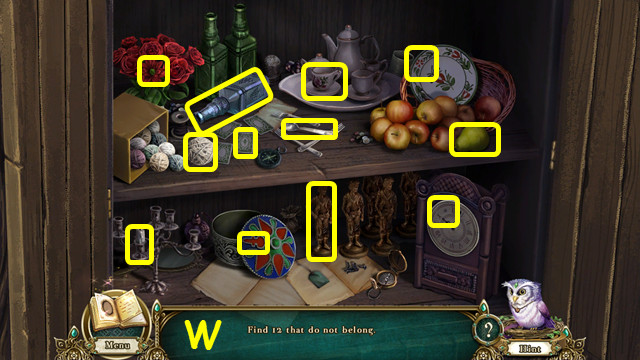
- Locate the 12 items that do not belong to receive the CHEST KEY (W).
- Walk down twice and go right.
- Place the MEMORY PRISM on the left (A).
- After the cut-scene, take the MELODY OF TIME (B).
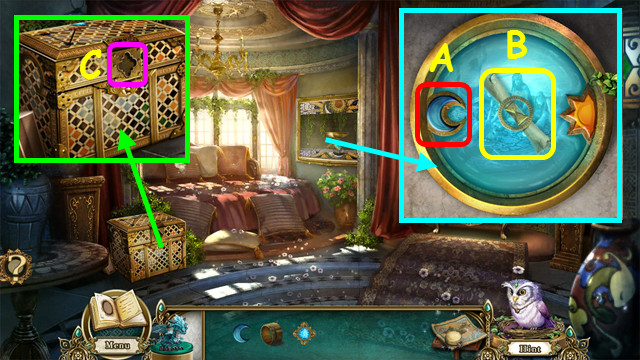
- Place the CHEST KEY in the lock (C).
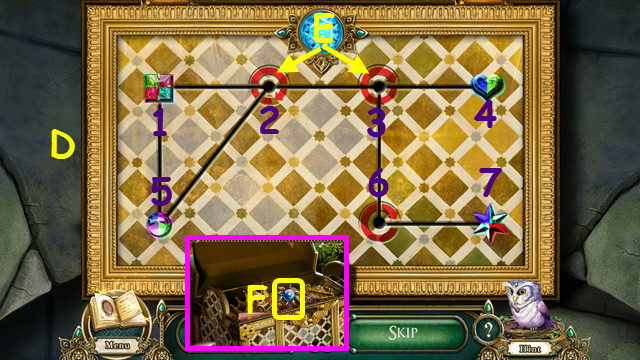
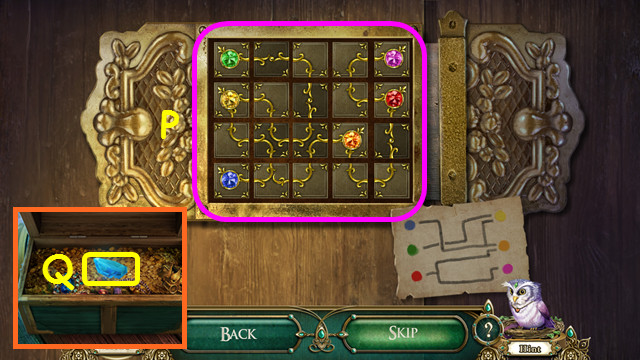
- Move the crystals to the correct base (D).
- Use the red circles to rotate the crystal to the correct orientation as seen on the bases (E).
- Select and release a piece, then move the mouse to the position you want. Select again to release the piece.
- Solution: (1-6), (5-1), (4-5), (6-2), (7-4), (2-3), (3-6), (6-7), (1-6), (4-1), (6-3), (3-2), 2-3), and (3-4).
- Take the blue COLORGLASS KEY (F).
- Walk down.
- Place the MELODY OF TIME on the symbol (G).
- Walk down.
- Place the BOTTOMLESS BARREL in the center of the fountain. Use the ICE DRAGON on the outer water (H).
- Take the BELLS (I).
- Return to the Outdoor Towers.
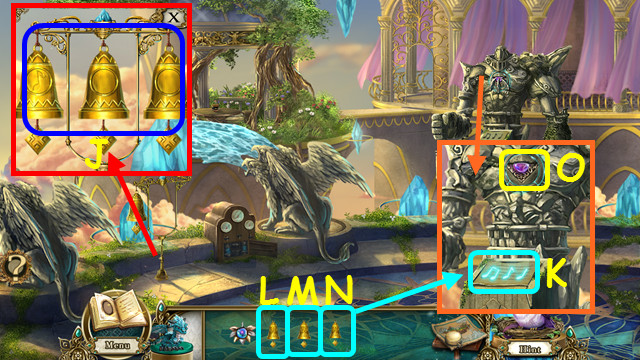
- Hang the BELLS on the frame; take the 3 BELLS (J).
- Use the 3 BELLS on the statue in the order shown by the melody (K).
- Use the 2nd BELL (M), the 3rd BELL (N), and the 1st BELL (L), and then take the 1/2 red COLORGLASS KEY (O).
- Walk down.
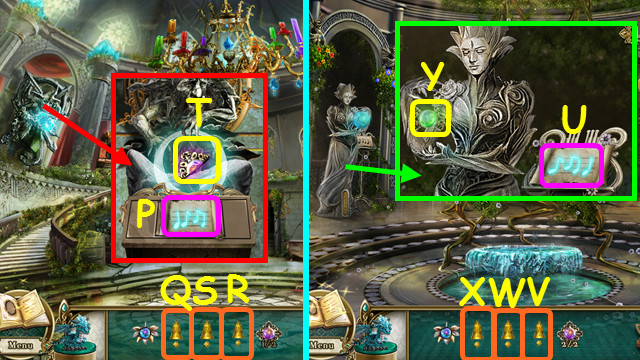
- Use the 3 BELLS on the statue in the order shown by the melody (P).
- Use the 1st BELL (Q), the 3rd BELL (R), and the 2nd BELL (S), then take the 2/2 red COLORGLASS KEY (T).
- Walk down.
- Use the 3 BELLS on the statue in the order shown by the melody (U).
- Use the 3rd BELL (V), the 2nd BELL (W), and the 1st BELL (X), then take the green COLORGLASS KEY (Y).
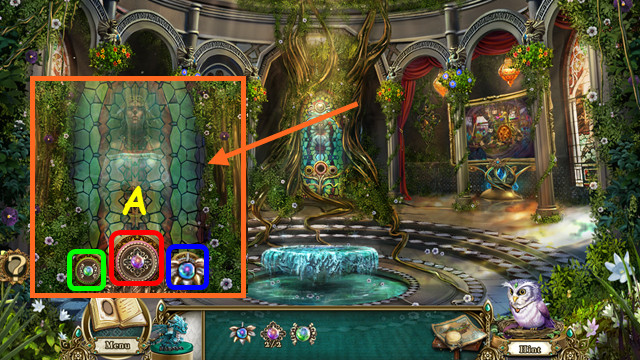
- Place the green COLORGLASS KEY on the left circle, the red COLORGLASS KEY in the center circle, and the blue COLORGLASS KEY in the right circle (A).
- After the cut-scene, you will earn the KEY TO THE OUTER TOWERS.
- Return to the Enchantress’ Haven.

- Use the KEY TO THE OUTER TOWERS on the lock (B).
- Walk forward to the Breezy Passage.
- Take the SANDSTONE (C).
- Take the LEVER HANDLE and the POLISH BRUSH (D).
- Attach the LEVER HANDLE to the control, then pull it (E).
- Walk up the inner stairs (F).
- Take the 1/3 CLOCK PIECE (G).
- Note the path to the Vision Crystal Room (H).
- Walk left to the Dome Overlook (I).
- Take the STONE SLAB (J).
- Take the 2/3 CLOCK PIECE (K).
- Take the BUCKET (L).
- Walk down and to the right.
- Take the 3/3 CLOCK PIECE (N).
- Walk down.
- Use the 3 CLOCK PIECES on the Artifact of Time (O).
- Restore the mosaic by placing the pieces in the frame (P).
- The Djinn of Time will give you the SAND OF SLOW and the SAND OF HASTE.
- Walk to the right.
- Use the ICE DRAGON on the falling water (Q).
- Use the BUCKET to take the CAT FISH (R).
- Use the POLISH BRUSH on the dirt (S).
- Place the STONE SLAB on the grid (T).
- Swap the tiles so each adjacent tile relates to its neighbor (U).
- Select 2 tiles to swap positions.
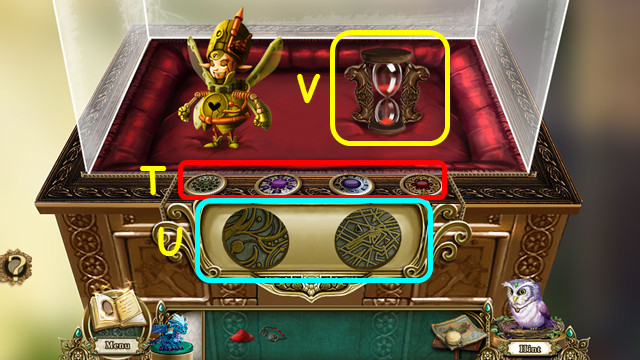
- Place the SAND OF SLOW in the hourglass; take the HOURGLASS OF SLOW and the SILVER HANDLE (V).
- Walk down and go to the left.
- Place the CAT FISH in the basin (A).
- Place the SILVER HANDLE in the grate (B).
- Use the ICE DRAGON on the flames, then take the ENERGY CREST (C).
- Walk down twice.
- Place the ENERGY CREST in the opening on the altar (D).
- Place the ICE DRAGON in the altar to make the ENERGY DRAGON (E).
- Use the HOURGLASS OF SLOW on the Timepiece Door (F).
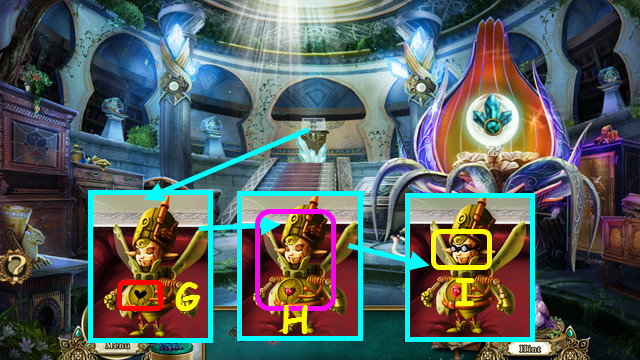
- Place the crystal in the opening and find the items in white (G).
- Move the bird to the stand (H) and select the green button (I).
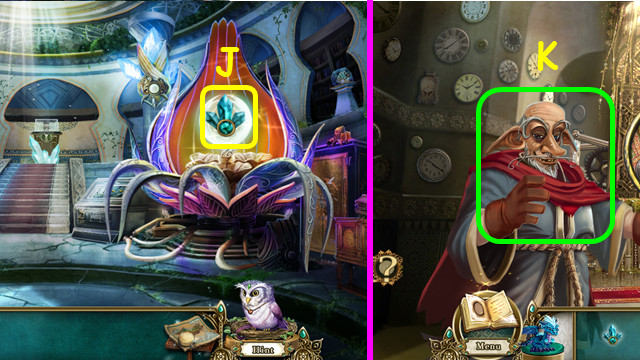
- Place the crystal in the Enchantress’ hands (J).
- Find the items in white, then press the green button (K).
- Place the bird on Captain Ironhoof (L). Locate the items in white.
- Walk forward on the left to the Dark Room.
- Use the ENERGY DRAGON on the 2 crystals (P).
- Open the drawer. Take the TWEEZERS (Q).
- Use the SANDSTONE on the rusty latch (R).
- Open the chest; take the CHISEL AND HAMMER (S).
- Note the Hourglass Display (T).
- Walk down and go up the stairs on the right.

- Use the TWEEZERS on the gears; take the PRISM and BIRD (A).
- Walk left.
- Give the BIRD to the catfish to receive the COLLAR (B).
- Walk down and right.
- Use the CHISEL AND HAMMER to take the BRICK (C).
- Use the COLLAR to repair the GOGGLES (D).
- Return to the Dark Room.
- Use the BRICK on the giggle box. Take the PENCIL (E).
- Return to the Vision Crystal Room.
- Use the PENCIL on the book (F).
- Play the HOP to receive the MAGICAL CUTOUTS (G).
- Walk down and go left.
- Place the MAGICAL CUTOUTS in the frame (H).
- This will trigger a mini-game.
- Place the cutouts (I) into the scene to restore the items.
- There are 4 scenes to correct (1-4).
- Remove the peeling canvas, open the bag, and take the COPPER PIECE and the MEMORY PRISM (J).
- Place the MEMORY PRISM in the lower opening (K), and the PRISM in the upper opening (L).
- After the cut-scene, take the ENERGY FUSE (M).
- Return to the Dark Room.
- Place the ENERGY FUSE in the opening (N).
- Use the ENERGY DRAGON on the fuses (O).
- Select the energy links for a mini-game (P).
- Rotate the beam to connect the upper beams with the lower beams (Q).
- Select a beam and use the mouse to move it to the position you want.
- Note the Gem of Power (R).
- Look at the Hourglass Display (S).
- Place the COPPER PIECE in the opening.
- Use the buttons (T) to rotate the copper pieces to form patterns (U).
- Place the SAND OF HASTE in the hourglass; take the HOURGLASS OF HASTE (V).
- Return to the Dome Overlook.
- Look at the painting; use the HOURGLASS OF HASTE on the tree (W).
- Take the COLORED ORBS (X).
- Walk down and right.
- Use the ENERGY DRAGON on the 3 crystals (Y).
- Look at the vision crystal; use the COLORED ORBS on the panel for a mini-game (Z).
- Press the colored buttons to bring the picture into focus.
- Our solution was Ax2, Bx4, Cx3, Dx1, and Ex1.
- Take the CLOCKWORK HEART (F).
- Return to the Dark Room; look at the Hourglass Display.
- Place the CLOCKWORK HEART in the clockwork fairy (G).
- Use the ENERGY DRAGON on the fairy (H).
- Place the GOGGLES on the fairy, then take the CLOCKWORK FAIRY (I).
- Use the CLOCKWORK FAIRY to take the GEM OF POWER (J).
- Walk down and go forward on the right.
- Grimbel will try to stop you (K).
- Find 2 discs (green) that contain the 4 symbols in blue (L).
- There are 7 sets to find.

- Place the GEM OF POWER in the piston (M).
- Talk to the Enchantress to receive the GRIFFON’S PENDANT (N).
- Walk down.
- Place the GRIFFON’S PENDANT on his chest (O).
- The statue will come to life.
Chapter 4: Close Quarters
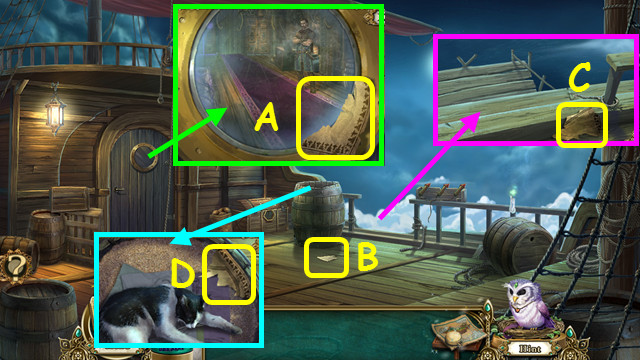
- Take the 1/4 BLUEPRINT PIECE (A).
- Take the 2/4 BLUEPRINT PIECE (B).
- Look down the side of the ship. Take the 3/4 BLUEPRINT PIECE (C).
- Take the 4/4 BLUEPRINT PIECE (D).
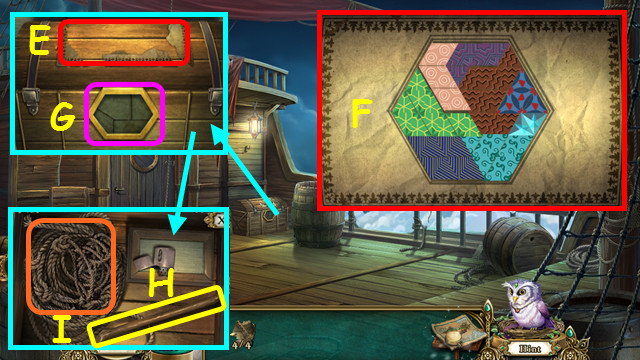
- Place the 4 BLUEPRINT PIECES on top of the chest (E).
- Place the colored pieces in the frame to form a hexagon (F).
- Select a piece to rotate it in place, then drag the piece into the frame.
- You will earn the GOBLIN RELIC; place it in the chest lock (G).
- Take the CROWBAR (H). Look at the rope ladder for a mini-game (I).

- Drag the knots so no lines cross (J).
- You will earn the ROPE LADDER.
- Look down the side of the ship and hang the ROPE LADDER (K).
- Go down to the Side of the Ship.
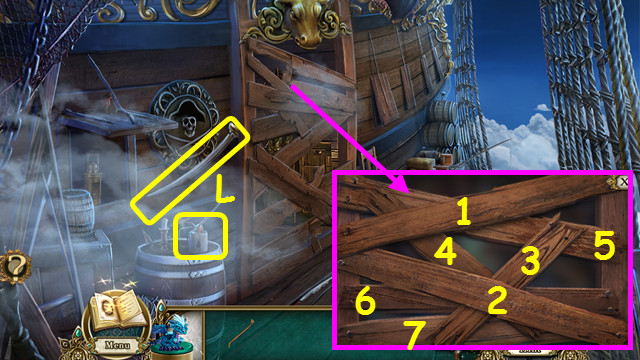
- Take the CUTLASS and LIGHTER FUEL (L).
- Look at the boarded-up hole. Use the CROWBAR on the boards in numerical order (1-7).
- Look in the opening.
- Play the HOP to receive the ANCHOR (M).
- The ENERGY DRAGON is now the STONE DRAGON.
- Walk down.
- Use the LIGHTER FUEL on it, then take the LIGHTER (N).
- Use the STONE DRAGON on the sail (O).
- Climb up the sail.
- Use the LIGHTER on the lamp, then turn the winch twice (P).
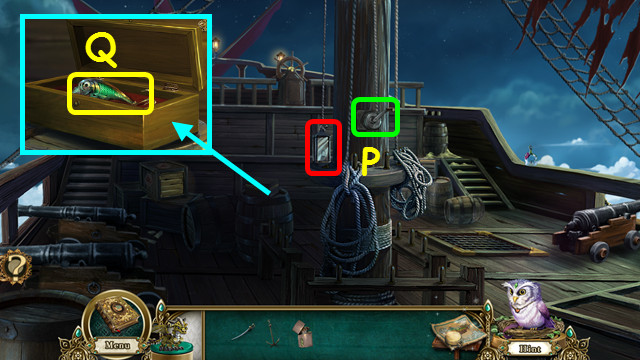
- Open the wooden box; take the FISHING LURE (Q).
- Return to the side of the ship.
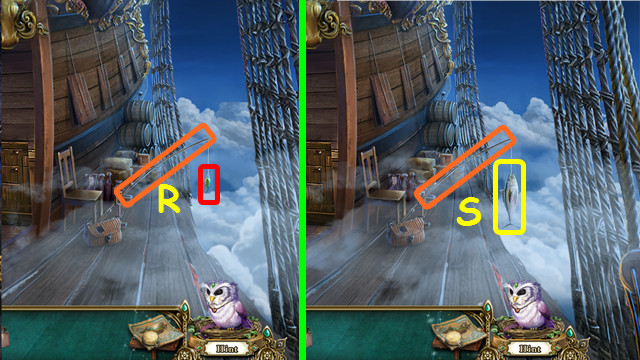
- Place the FISHING LURE on the fishing rod; select the rod to lower the line (R).
- Select the line again to bring up a FRESH FISH (S).
- Walk down.
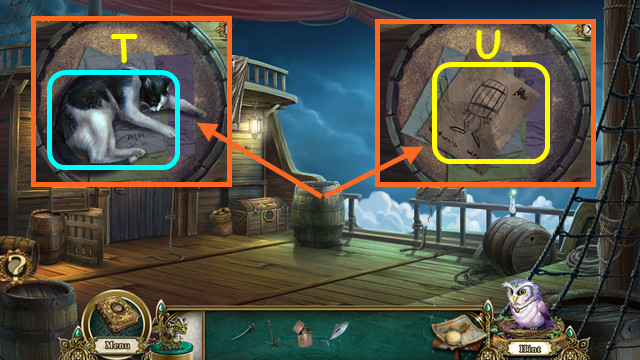
- Give the FRESH FISH to the cat (T).
- Look at the humorous drawings; take the BARREL (U).
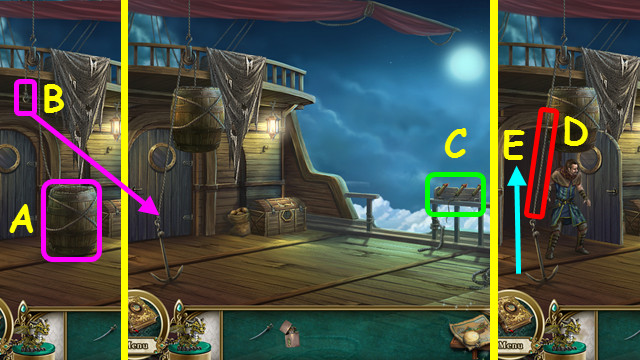
- Use the BARREL on the rope (A); use the ANCHOR on the short end of the rope (B).
- Use the LIGHTER on the fireworks (C).
- Use the CUTLASS to cut the rope (D).
- Enter the Ship Hallway (E).
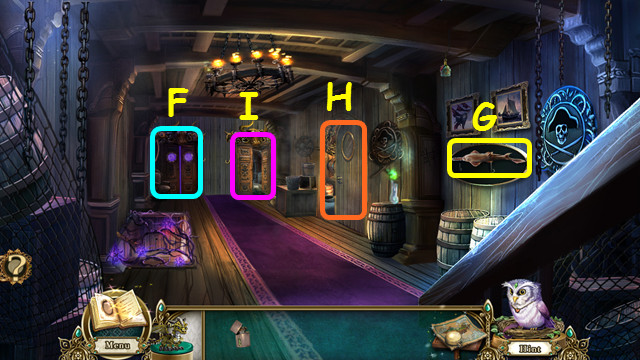
- Look at the door to the Captain’s Cabin (F).
- Take the SAWFISH (G).
- Note the door to the Galley (H).
- Go to the Brig (I).
- Open the bottom drawer and take the CANDLE SNUFFER (J).
- Open the top drawer and take the GALLEY CABINET KEY (K).
- Talk to Shelsea (L).
- Use the CANDLE SNUFFER on the spirit candle (M).
- Take the 1/8, 2/8, and 3/8 GHOST MUSHROOMS (red).
- Walk down.

- Use the CANDLE SNUFFER on the spirit candle (N).
- Take the 4/8 and 5/8 GHOST MUSHROOMS (green).
- Walk down.
- Use the CANDLE SNUFFER on the spirit candle (O).
- Take the 6/8, 7/8, and 8/8 GHOST MUSHROOMS (pink).
- Enter the Ship hallway, then go right to the Galley.

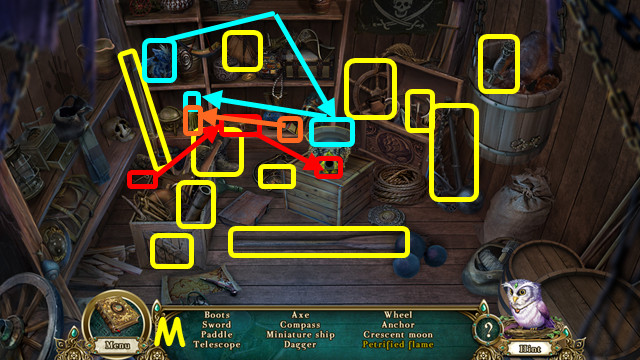
- Take the LADLE and read the cookbook (P).
- Use the GALLEY CABINET KEY on the cabinet and look inside (Q).
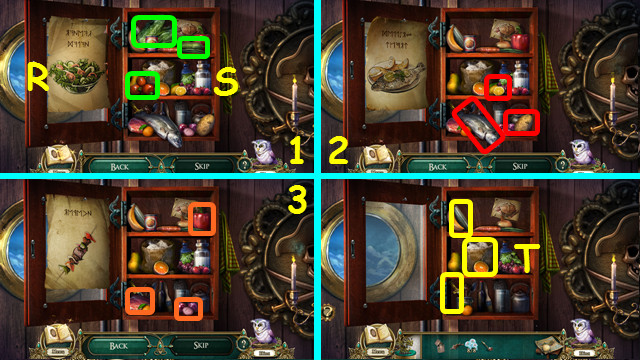
- Look at the picture on the left (R) and locate the ingredients on the right (S).
- There are 3 sets of ingredients to find (1-3).
- Take the PESTLE, FLOUR, and COOKING KNIFE (T).
- Walk down twice and go to the Upper Deck.
- Use the SAWFISH on the wooden cargo; take the PITCHER (A).
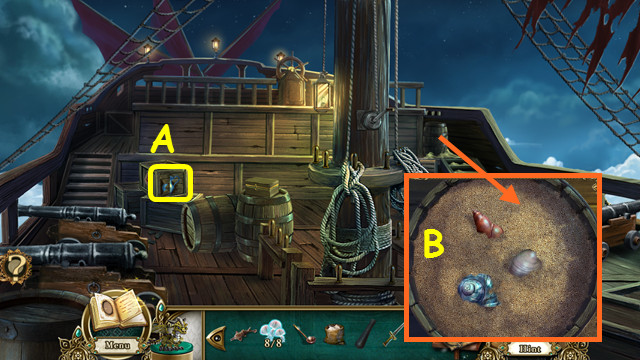
- Use the LADLE to uncover shells; select the shells for a mini-game (B).
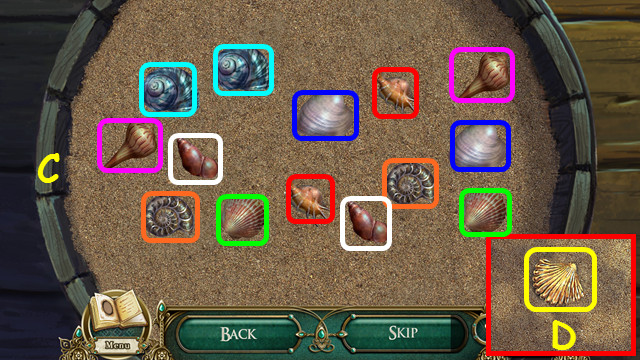
- Select the mounds to see the shells beneath; find all the matching pairs (C).
- Take the GOLDEN SHELL (D).
- Return to the Ship’s Brig.
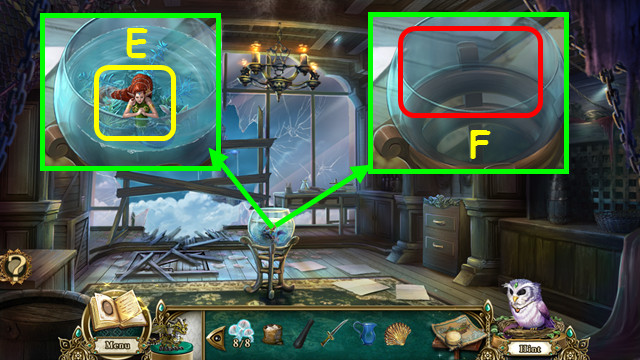
- Use the PITCHER to take SHELSEA (E).
- Use the STONE DRAGON on the bowl to make it a stone bowl (F).
- Return to the Side of the Ship.
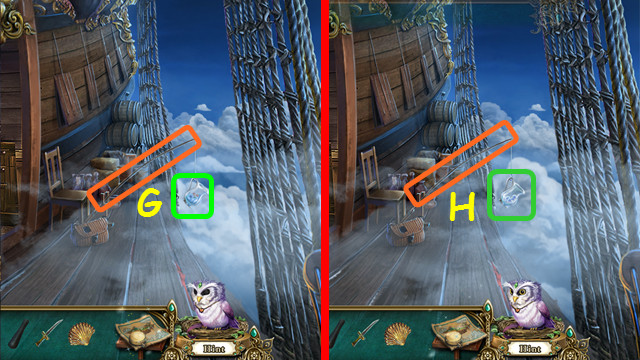
- Place SHELSEA on the fishing pole; select the rod to lower her down (G).
- Select the rod again; take the SEA WATER and MERMAID’S TEARS (H).
- Return to the Ship’s Brig.
- Place the 8 GHOST MUSHROOMS on the cutting board, then use the COOKING KNIFE to chop them up (I).
- Place the GOLDEN SHELL in the mortar and add the PESTLE (J).
- Move the chopped mushrooms and shellpowder to the flask; add the MERMAID’S TEARS (K).
- Use the LIGHTER on the candle, then take the flask of CURSE BEGONE (L).
- Place the SEA WATER over the burner, then take the SEA SALT (M).
- Travel to the Upper Decks.
- Look at the grate; pour the CURSE BEGONE into the stew (N).
- Walk down and enter the Ship Hallway.
- Look at the door to the Captain’s Cabin to see if the potion worked, then enter (O).
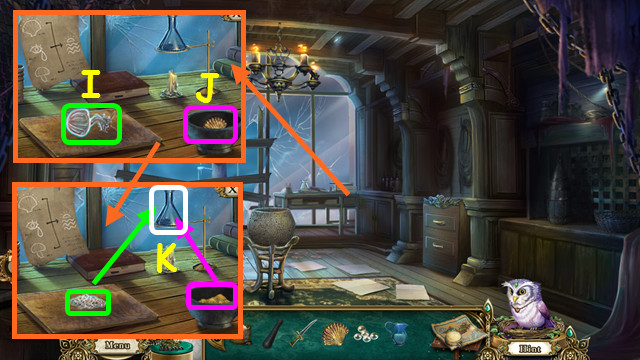
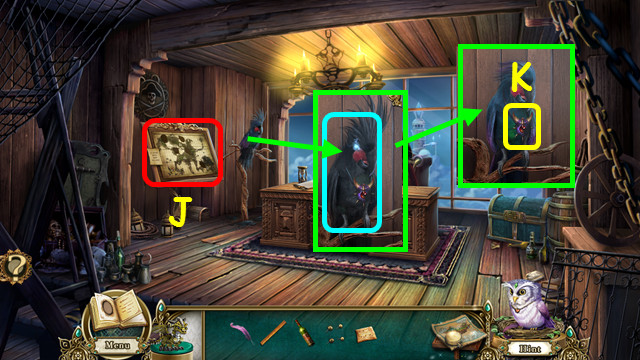
- Take the QUILL (P).
- Take the OIL and the BOTTLE LABEL (Q).
- Note the Evil Parrot (R).
- Walk down and enter the Galley.
- Take the RULER and the SUGAR (S).
- Note the oven (T).
- Place the BOTTLE LABEL on the center bottle (U).
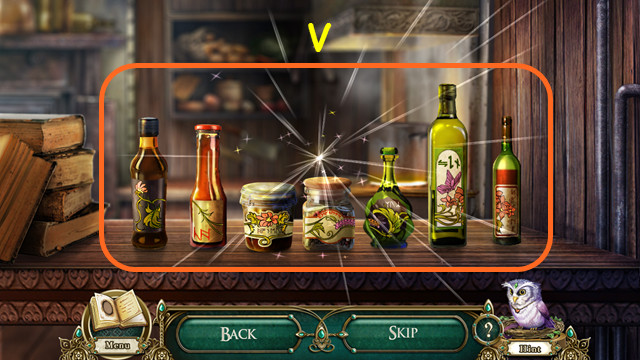
- Arrange the bottles according to the pictures on the labels (V).
- Select two bottles to swap positions.
- You will earn the CATOBLEPAS ACID.
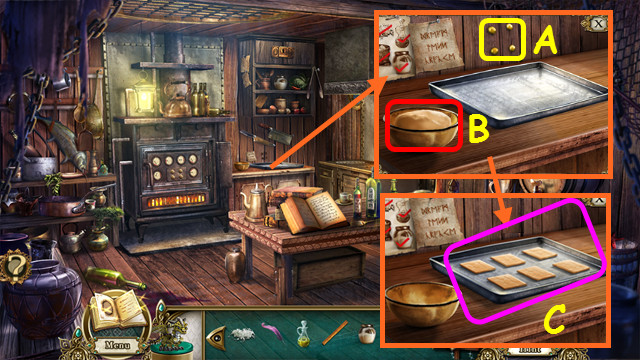
- Look at the cooking counter and take the PINS (A).
- Place the FLOUR, SEA SALT, OIL, SUGAR, and CURSE BEGONE in the bowl (B).
- Take the dough from the bowl, place it on the tray, then use the COOKING KNIFE to cut the dough (C).
- Take the TRAY and zoom into the oven for a mini-game.
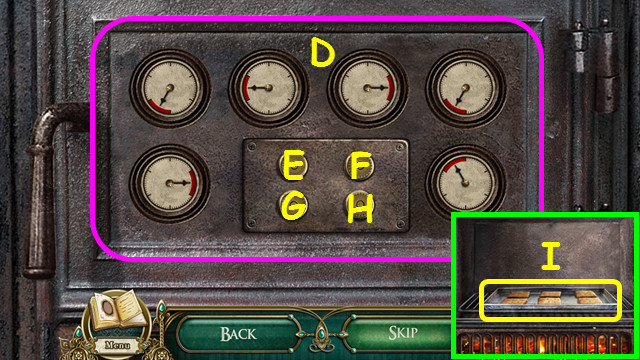
- Use the buttons in the center to move the needles so all are in the red (D).
- Press the buttons: Ex5, Fx5, Gx5, and Hx5.
- Place the TRAY in the oven, then take the CURSE BEGONE CRACKERS (I).
- Return to the Captain’s Cabin.
- Note the Strategy Board (J).
- Give the Evil Parrot the CURSE BEGONE CRACKERS and take GRIMBLE’S TRINKET (K).
- Go to the Ship’s Brig.
- Place GRIMBLE’S TRINKET and the CATOBLEPAS ACID inside the stone bowl, then take the TRINKET IN BOWL (K).
- Travel to the Galley.
- Place the TRINKET IN BOWL in the oven (L).
- Walk down; talk to the Captain to receive IRONHOOF’S GUIDE TO RICHES (M).
- Enter the Captain’s Cabin. Look at the Strategy Board.
- Place IRONHOOF’S GUIDE TO RICHES, QUILL, RULER, and PINS on the board for a mini-game.
- Read the clues on the left (N), and select the item on the map.
- There are 5 clues and 5 items (1-5).
- You will earn the CHEST TILE.
- Look at the Captain’s Stash; use the CHEST TILE on the lock for a mini-game (O).
- Rotate the tiles so all the gems are connected (P).
- Take the LIGHT CRYSTAL (Q).
- Walk down.
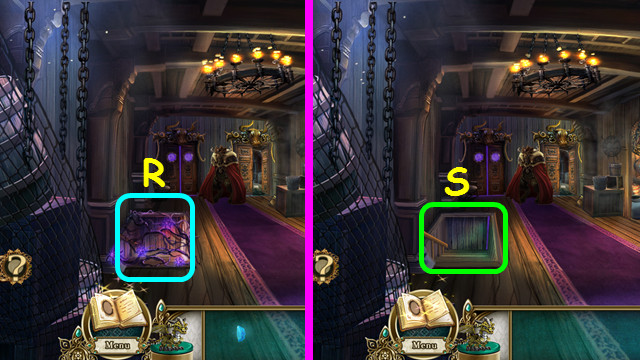
- Use the LIGHT CRYSTAL on the Cursed Door (R).
- Look at the Cargo Hold (S).
- Play the HOP to end the chapter (T).
- Note: you will not receive an inventory item.
Chapter 5: The Spire Battle
- Talk to the Captain (A).
- Move the rubble; take the 1/3 LARGE LIGHT PILLOW (B).
- Walk forward to the Rotunda Balcony (C).
- Take the BOWL OF WATER and read the Oath (D).
- Look at the garden bench; take the FLINT (E).
- Walk down.
- Use the FLINT on the dull axe to get the AXE (F).
- Use the BOWL OF WATER on the water to get the BOWL OF WATER (G).
- Give the Captain the BOWL OF WATER (H).
- Use the AXE on the wood, then go to the Ship’s Interior (I).
- Take the BOMB (J).
- Move the debris; use the BOWL OF WATER on the frame (K).
- Move the frame; take the STONE DRAGON (L).
- Take the MIRROR and look at the medicine box for a mini-game (M).
- Use the buttons to restore the pattern (N).
- Each button changes a different ring.
- Take the BANDAGES (O).
- Walk down.
- Use the BANDAGES on the Captain to receive the GATE KEY (P).
- Walk forward.
- Look at the gate; use the GATE KEY on the lock (Q).
- Use the MIRROR on the Clockwork Dragon (R).
- Use the BOMB and the FLINT on the Clockwork Dragon (S).
- Use the AXE on the dead tree to receive the SLENDER TWIG (T).
- Use the STONE DRAGON on the fallen tree (U).
- Walk forward (V).
- Take the SPEAR (A).
- Look at the desk; take the WIRE CUTTER (B).
- Select the soldier carving (C).
- Play the HOP (D).
- Take the GOLDEN KNOB (E).
- Return to the Ship Interior.
- Use the WIRE CUTTER on the straps, then take the LARGE FISHING NET (F).
- Use the SPEAR to take a SACK (G).
- Use the SACK on the MATTRESS to get the 2/3 LARGE LIGHT PILLOWS (H).
- Walk down.
- Look at the statue; use the WIRE CUTTER to take the PENDANT (I).
- Return to the Rotunda Loft.
- Look at the broken stairs and attach the LARGE FISHING NET (J).
- Go forward to the Rotunda Foyer.
- Use the AXE on the shaft twice to get the HOOK and WOODEN SPHERE (K).
- Use the SPEAR to move the large chunk; take the 3/3 LARGE LIGHT PILLOWS (L).
- Use the PENDANT on the right box; take the MENAGERIE SCROLL (M).
- Use the GOLDEN KNOB on the left box (N).
- Read the clue on the blue sign (O), then use the dials (P) to form the answer (Q).
- Solve the 3 riddle (1-3).
- Take the CHANDELIER CONTROLS PIECE (R).
- Walk down.
- Look at the chandelier control box; use the CHANDELIER CONTROLS PIECE to open the cover (S).
- Use the SLENDER TWIG as a lever and pull down (T).
- Look at the hobby desk; use the MENAGERIE SCROLL on the box for a mini-game (U).
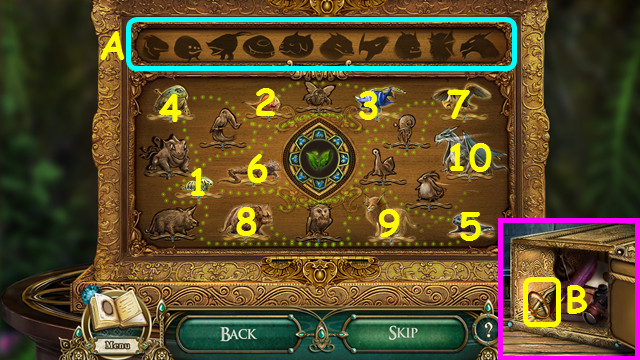
- Use the clues at the top (A) to select the animals in order (1-10).
- Take the LENS (B).
- Go to the Rotunda Balcony.
- Use the LENS on the small print (C).
- Press the 4 gems and take the GOLDEN KEY (D).
- Return to the Ship Interior.
- Look at the medicine cabinet; use the WOODEN SPHERE to replace the wheel (E).
- Use the AXE to take the STURDY PIECES OF WOOD (F).
- Look in the wall opening.
- Play the HOP to receive the ROPE (G).
- Part of the rope will combine with the HOOK to make the GRAPPLING HOOK.
- Travel to the Rotunda Foyer.
- Place the 3 LARGE LIGHT PILLOWS followed by the ROPE onto the chandelier, and then use the STONE DRAGON on them (H).
- Go to the Antechamber for a mini-game (I).
- Press the blue button (J).
- Select a symbol that is touching the blue dots (K) to change them (L).
- Repeat this process until all the symbols are the same (M), then press the blue button to finish.
- Take the ONIONS and the LAUGHING LILY (N).
- Use the GOLDEN KEY on the box and take the ARROWHEAD (O).
- Return to the Rotunda Balcony.
- Place the LAUGHING LILY on the step (P).
- Use the ONIONS on the lily, then take the KEY TO THE SPIRE DEFENSE TOWER (Q).
- Return to the Antechamber.
- Use the KEY TO THE SPIRE DEFENSE TOWER on the door, and then look at the barrier (R).
- Use the Jeweled buttons (S) to restore the symbol (T).
- Go forward to the Defenses Tower.
- Place the ARROWHEAD, STURDY PIECES OF WOOD, and the ROPE on the ballista (A).
- Use the GRAPPLING HOOK on the top of the pillar (B).
- Select the rock, paper, or scissors symbols (C) below that will beat the ones listed at the top (D) then press the green button (E).
- Rock beats scissors, scissors beats paper, and paper beats rock.
- The 2nd (F) and 3rd levels (G) of the game will also include elements; refer to the carving on the pillar (H).
- Water beats fire, fire beats plants, and plants beat water.
- Talk to the Clockwork Dragon, then walk down.
- Take the CROWN (I).
- Take the BROOCH (J).
- Talk to the Enchantress (K).
- Talk to your parents (L).
- Congratulations! You have completed Awakening: The Sunhook Spire!


 Fierce Tales: Feline Sight Walkthrough, Guide, & Tips
 Steve the Sheriff 2: The Case of the Missing Thing ™ Walkthrough, Guide, & Tips
 Dark Realm: Queen of Flames Walkthrough, Guide, & Tips
 Ghost Towns: The Cats of Ulthar Walkthrough, Guide, & Tips
 Mysterium: Lake Bliss Walkthrough, Guide, & Tips