James Patterson's Women's Murder Club: Little Black Lies Walkthrough, Guide, & Tips
James Patterson’s Women’s Murder Club: Little Black Lies Walkthrough

Welcome to the James Patterson’s Women’s Murder Club Little Black Lies Walkthrough!
After the murder of her friend, Regina Blackwell, Chief Medical Examiner Claire Washburn calls on the Women’s Murder Club to investigate. As they dig, a 30 year old unsolved murder comes to light as well as cultist sacrifices and secrets. Can you help the team solve the case?
Whether you use this document as a reference when things get difficult or as a road map to get you from beginning to end, we’re pretty sure you’ll find what you’re looking for here.
This document contains a complete James Patterson’s Women’s Murder Club Little Black Lies game walkthrough featuring annotated screenshots from actual gameplay!
We hope you find this information useful as you play your way through the game. Use the walkthrough menu below to quickly jump to whatever stage of the game you need help with.
Remember to visit the Big Fish Games Forums if you find you need more help. Have fun!
This walkthrough was created by prpldva, and is protected under US Copyright laws. Any unauthorized use, including re-publication in whole or in part, without permission, is strictly prohibited.
General Tips & Information

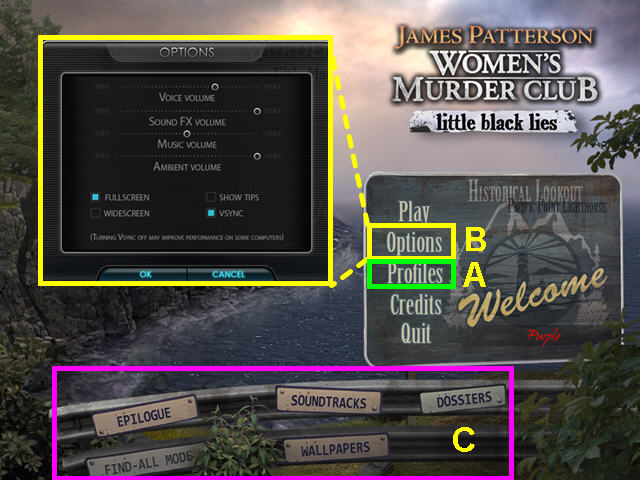
- Select profiles on the main screen to add or delete player profiles (A).
- You may play this game in full screen or windowed mode by changing the settings in the options menu (B).
- You may adjust the volume of voice, music, ambient noise and FX sounds in the options menu.
- You may turn on/off game tips in the options menu.
- You may play in fullscreen or windowed mode.
- This game supports widescreens.
- Select play to start your game.
- The options menu is accessible from both the main screen and the in-game menu.
- Once you complete the game you will have access to wallpapers, soundtracks, and a find all mode (C).

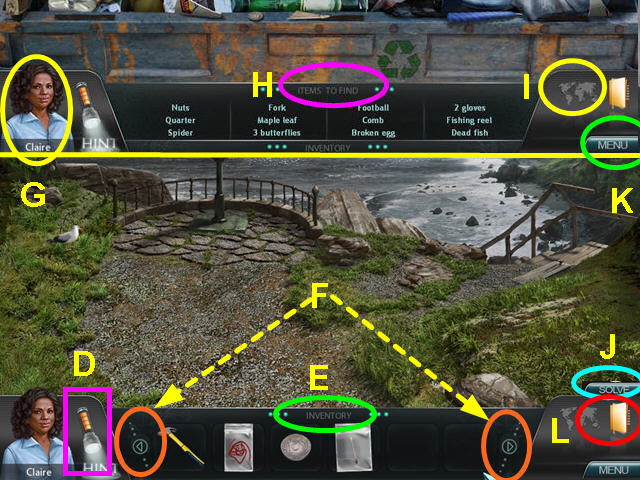
- Hints are unlimited, but you must wait for the flashlight to refill.
- The flashlight is in the lower left corner (D).
- You inventory in in the lower bar and will hide when not in use. (E).
- There are scroll buttons to move your inventory left or right (F).
- The character you are playing is displayed in the lower left. (G).
- When playing a hidden object scene, your inventory will recede (H).
- After a certain point in the game, you will have access to the map (I).
- Click on the map icon in the lower right corner, then select your destination.
- When playing a mini-game the ‘Solve’ button will appear, just above the map icon (J).
- There is no waiting to solve a mini-game.
- Below the map icon is the menu button (K).
- Use the menu button to access options or to return to the main menu.
- Above the menu button is the journal (L).

- The book in the lower right corner is your case journal (M).
- When you find clues to the case, they are added here.
- Select the tab at the top for an in-game strategy guide (N).
Investigation One

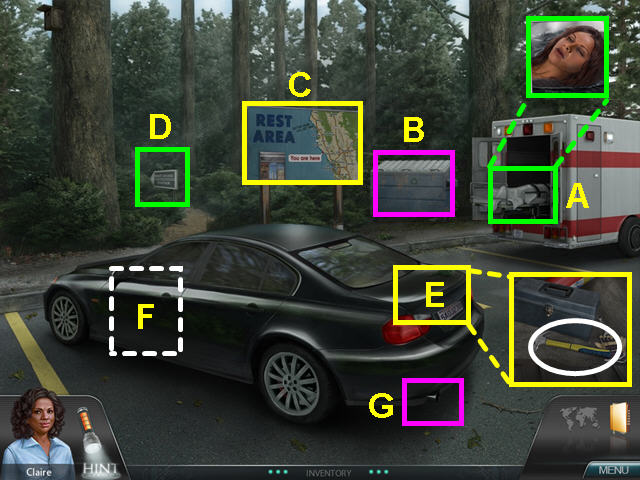
- You are now playing as Claire Washburn the medical examiner.
- After the officer speaks with you, click on the gurney in the ambulance to identify the body (A).
- The officer will speak with you again, then the ambulance will leave.
- Try to open the dumpster, but you need something to prop the lid open (B).
- Look at the rest area billboard and click on the map (C).
- Note the path to the scenic overlook (D).
- Look in the trunk of the car and take the HAMMER (E).
- Note the door of the car (F).
- Look at the tailpipe of the car (G).

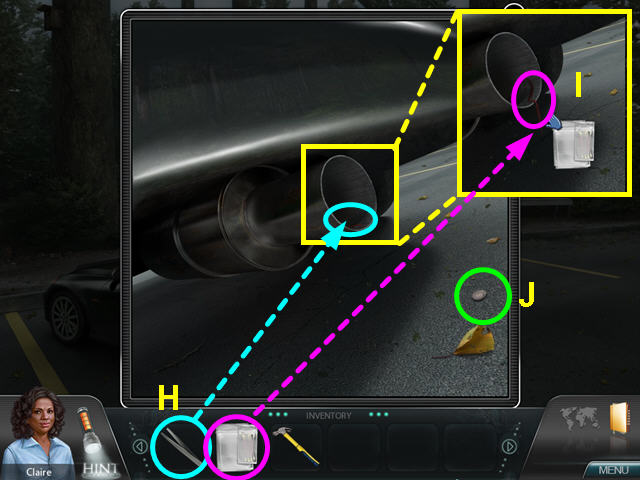
- Use the TWEEZERS to reach the items in the tailpipe (H).
- Use the TEST KIT to collect the red fiber (I).
- Take the QUARTER from the ground (J).

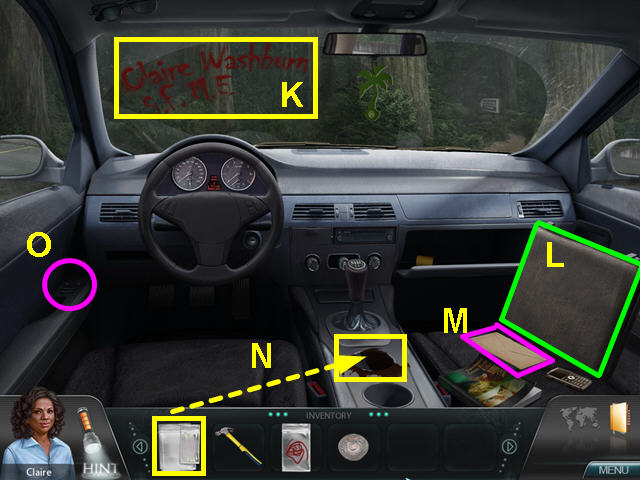
- Click on the driver’s door of the car to look inside.
- Look at the lipstick note on the windshield (K).
- Look at the briefcase to notice that Regina’s laptop is missing (L).
- Look at the picture and note you had recently sent Regina (M).
- Look at the window controls to notice that they are not working (N).
- Use the TEST KIT from your inventory to take a sample of the coffee (O).
- Exit the car and take the path to the scenic overlook.

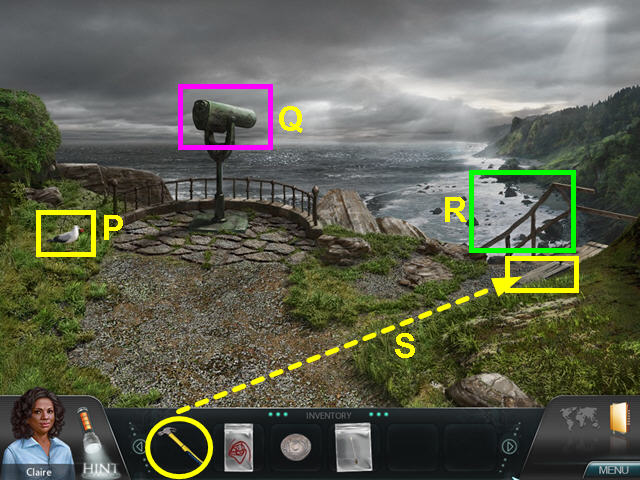
- Look at the seagull with something red in his mouth (P).
- Note the telescope (Q).
- Note the stairs down to the shoreline (R).
- Use the HAMMER to remove the nail and take the BOARD (S).


- Return to the crime scene and use the BOARD on the dumpster to prop open the lid.
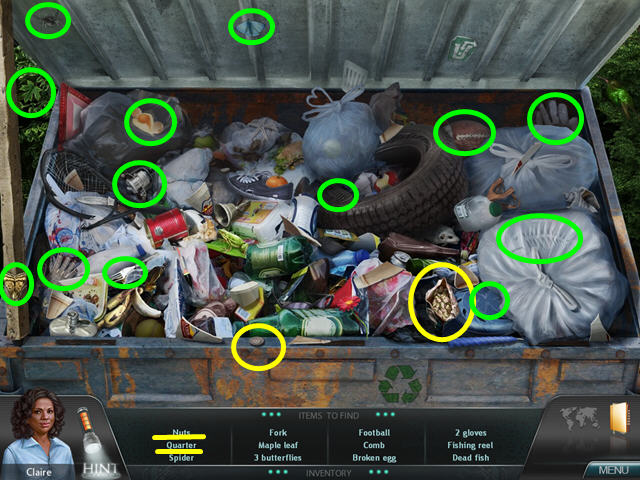
- Look inside the dumpster for a hidden object scene.
- Locate all the items on the list.
- The NUTS and QUARTER will go into your inventory.

- Take the path to the scenic over look and use a QUARTER on the telescope.
- Look at the telescope for a hidden object area.
- Use your mouse to move the viewer around the shoreline.
- You can move in all directions.
- Locate all the items on the list.
- You will spot Regina’s laptop during the search.

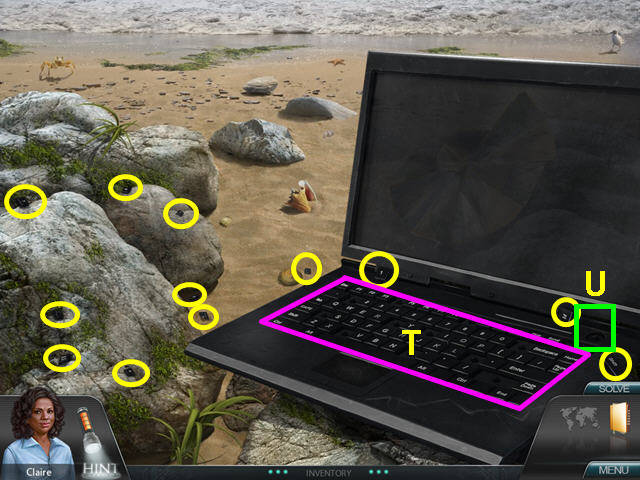
- Take the stairs down to the shoreline.
- Locate all the keyboard keys to the laptop and place them into the keyboard (T).
- Keys in the wrong position will be highlighted in red.
- You are able to locate all the keys except for the red power button (U).

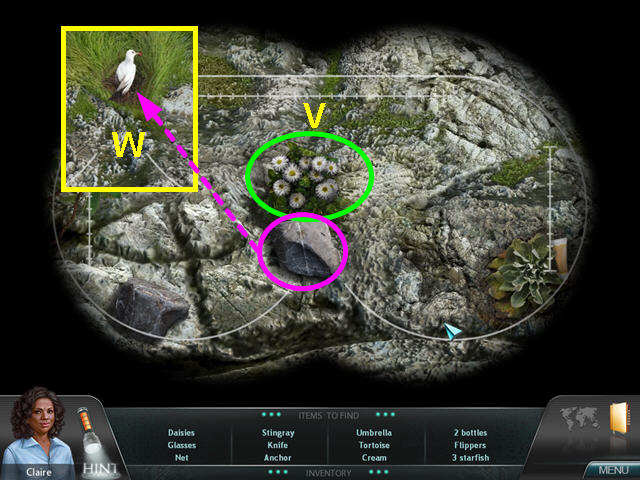
- Return to the scenic overlook to find the seagull is gone.
- Use a QUARTER on the telescope again.
- Locate all the items on the list.
- When you find the daisies (V), the rock will roll and disturb the seagull (W).

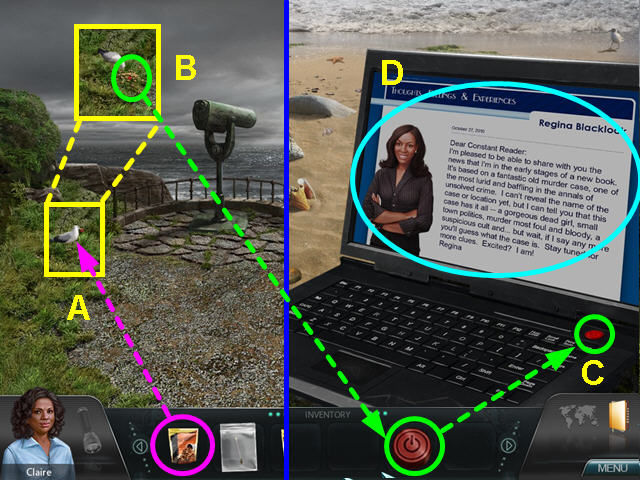
- Once you exit the telescope, you find the seagull has returned.
- Give the NUTS to the seagull (A).
- Take the RED POWER BUTTON (B).
- Go down the stairs to the shoreline.
- Place the RED POWER BUTTON on the laptop and turn it on (C).
- Look at Regina’s research for her new book (D).
- Take the laptop and leave for the lab.

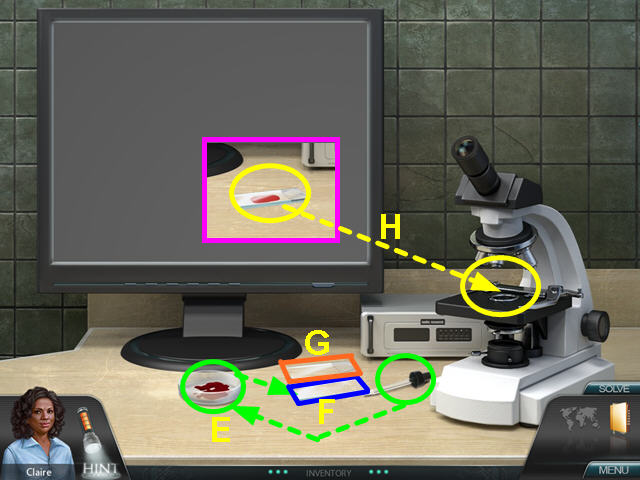
- Take the dropper and use it on the blood sample (E).
- Use the dropper on the closest slide (F).
- Place the second slide on top of the first (G).
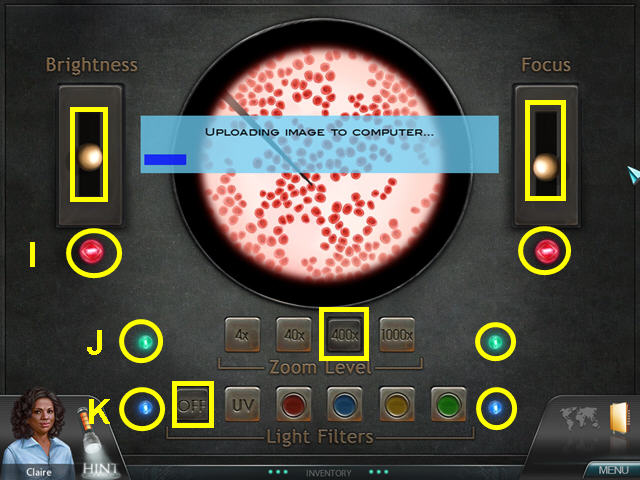
- Place the prepped sample on the microscope and look in the lens (H).


- Move the sliders on the brightness and focus until the light for each goes on (I).
- Push the button for 400x – the green lights will go on (J).
- Turn the light filters off- the blue lights will go on (K).

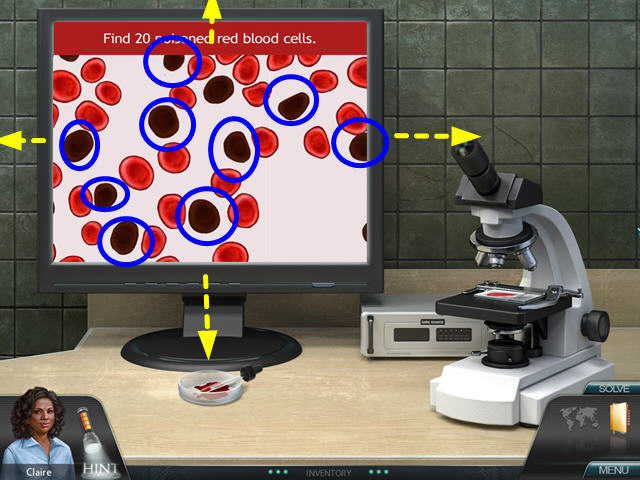
- Click on the 20 poisoned blood cells – they are of a darker color.
- Left-click and drag to the slide to find all the cells.

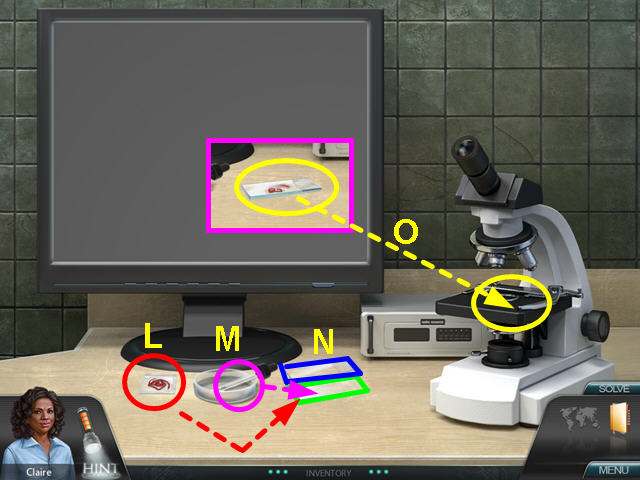
- Place the red fiber on the closest slide (L).
- Use the dropper to get and place a drop of water on the sample (M).
- Place the second slide onto the first (N).
- Place the prepped slide into the microscope and look into the lens (O).

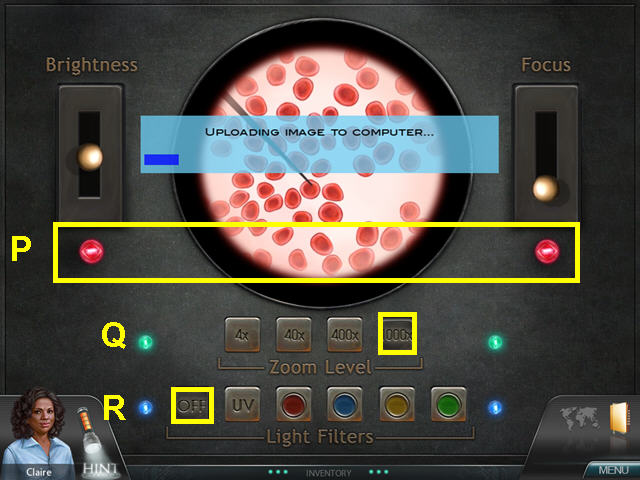
- Move the sliders on the brightness and focus until the light for each goes on (P).
- Push the button for 1000x – the green lights will go on (Q).
- Turn the light filters off- the blue lights will go on (R).

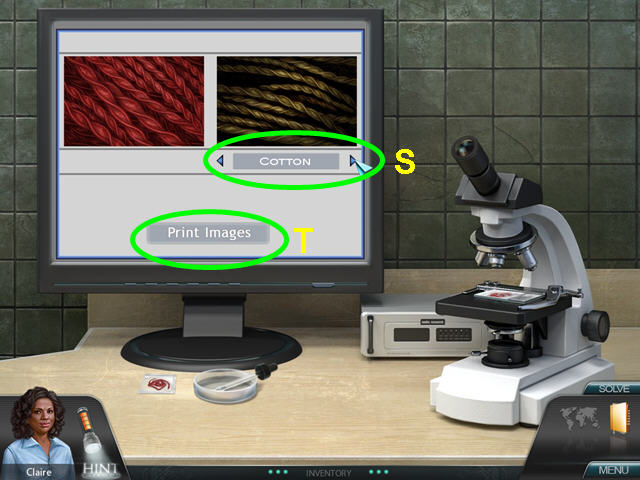
- Page through the database to determine a match for the sample, which is cotton (S).
- Click on the ‘Print Images’ button (T).

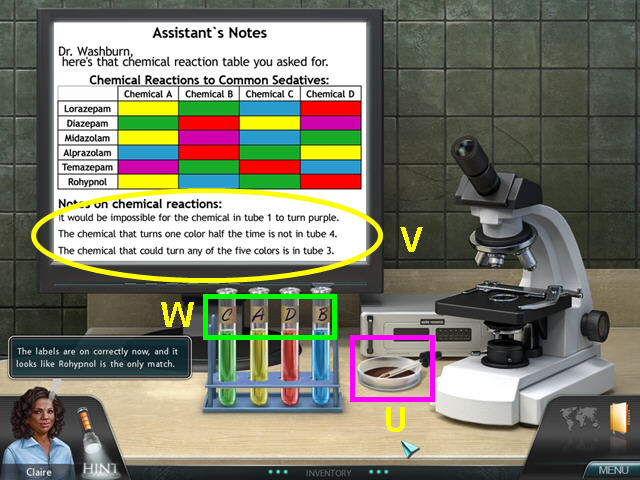
- Use the dropper to drop a coffee sample into each test tube (U).
- Based on your assistant’s notes (V), place the labels onto the test tubes.
- From left to right, the solution is: C-A-D-B (W).

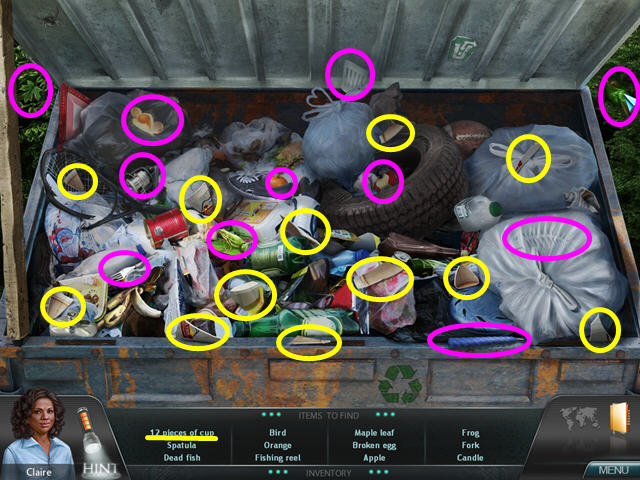
- Back at the crime scene look in the dumpster for another hidden object scene.
- Locate all the items on the list.
- The 12 COFFEE CUP PIECES will go into your inventory.

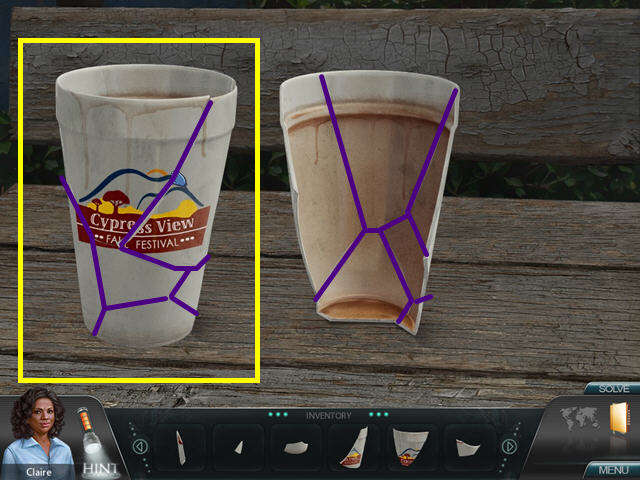
- Piece together the broken coffee cup.
- Begin with the back portion and build from the bottom up.
- Regina got the coffee from the Cypress View Fall Festival.
Investigation Two

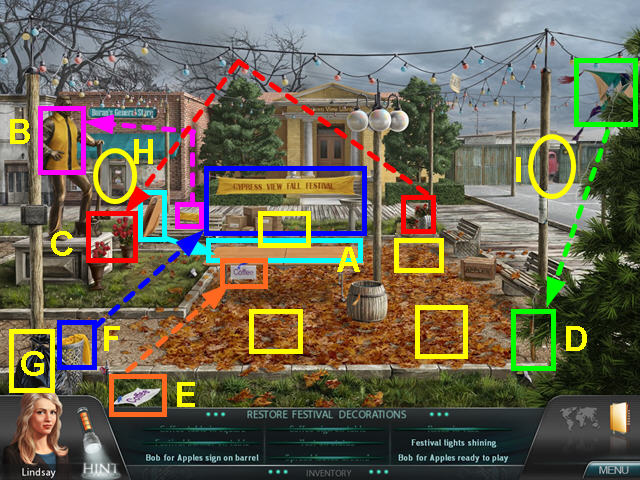
- Claire calls on her friend Detective Lindsay Boxer to help investigate.
- Use the items found in the square to recreate the festival setting.
- Take the folding table by the upper left bench and place it in the center of the square- look for the 4 holes in the ground from the table legs (A).
- Take the yellow vest from the upper left park bench and place it on the statue (B).
- Take the two bunches of roses just to the right of the birdbath and place them in the urns in front of the statue (C).
- Find the kite in the upper right corner and follow the string down to the stick (D).
- Take the STICK when it falls to the ground.
- Take the coffee sign from the lower left grass and place is on the left side of the table by the blue piece of tape (E).
- Take the yellow banner from the garbage can and use it on the table (F).
- Take the garbage bag and use it to spread leaves in the 4 corners of the square (G).
- Note the entrance to the general store (H).
- Walk to the mechanic’s shop (I).

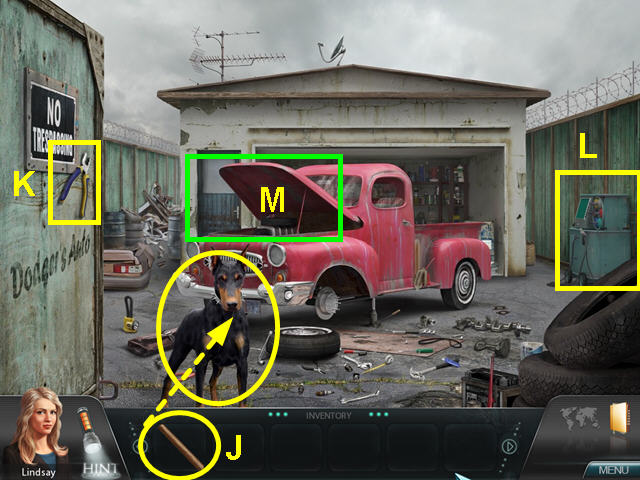
- Give the STICK to the dog (J).
- Take the PLIERS hanging on the door (K).
- Note the paint mixer against the right fence (L).
- Look under the hood of the truck for a hidden object scene (M).

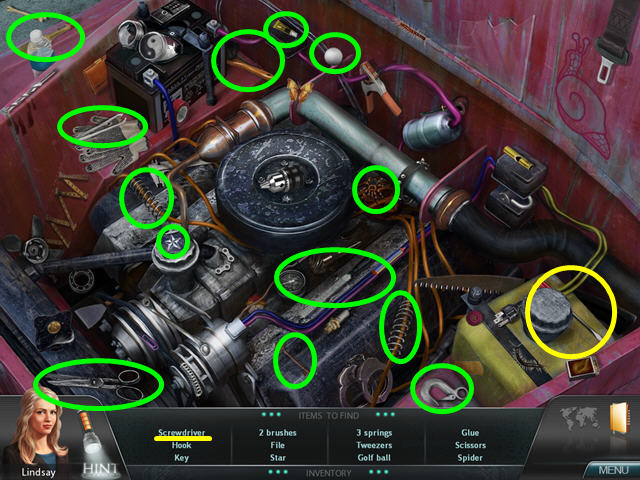
- Locate all the items on the list.
- The SCREWDRIVER will go into your inventory.
- After speaking with the mechanic, look at the paint mixer for a mini-game.

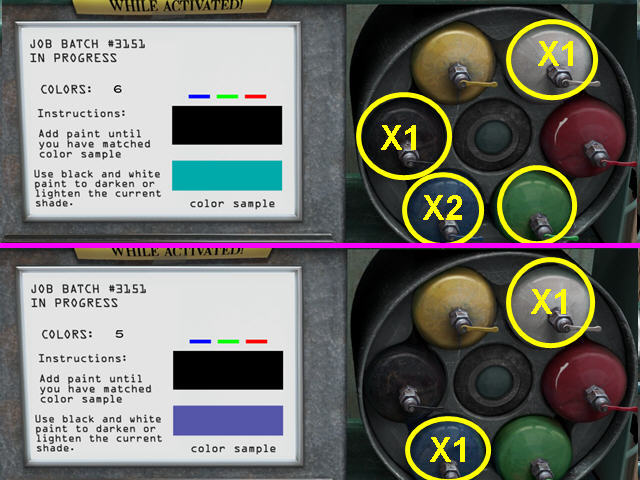
- The object of this mini-game is to release paint on the right to match the sample on the left.
- There are 6 samples to match.
- The number tells you how many sample remain.
- Click on the paint cans the number of times indicated.
- These are the solutions for teal and lavender.

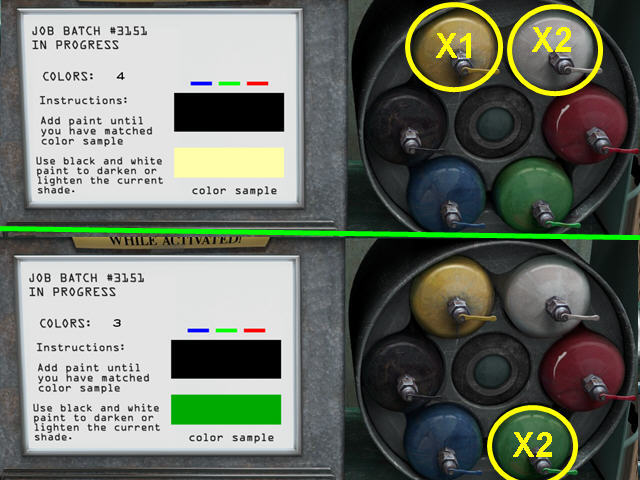
- These are the solutions for light yellow and green.

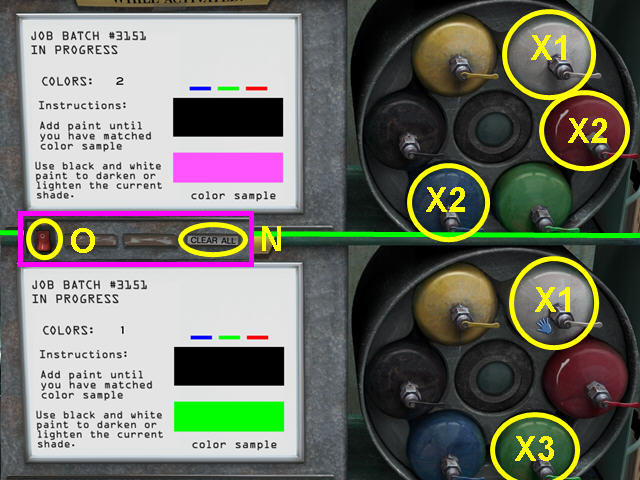
- These are the solutions for pink and bright green.
- Should you make a mistake, press the ‘Clear All’ button (N).
- When you are complete, press the red power button (O).
- Exit the paint mixer.
- Push the paint mixer away from the fence.
- Look at the patch on the fence.

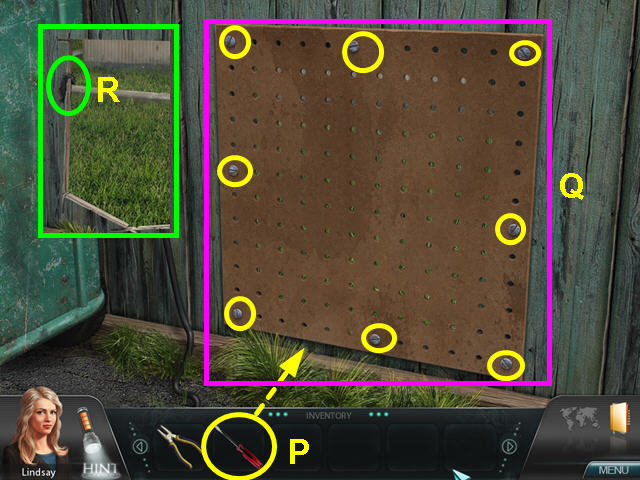
- Use the SCREWDRIVER to remove the 8 screws (P).
- Left-click on the screw, then move in a circular, counterclockwise direction.
- Once all the screws are removed, click on the piece of pegboard to remove it (Q).
- Take the FIBER SAMPLE from the left side of the hole (R).
- Exit the hole and the mechanic shop.
- Return to the square and enter the general store.

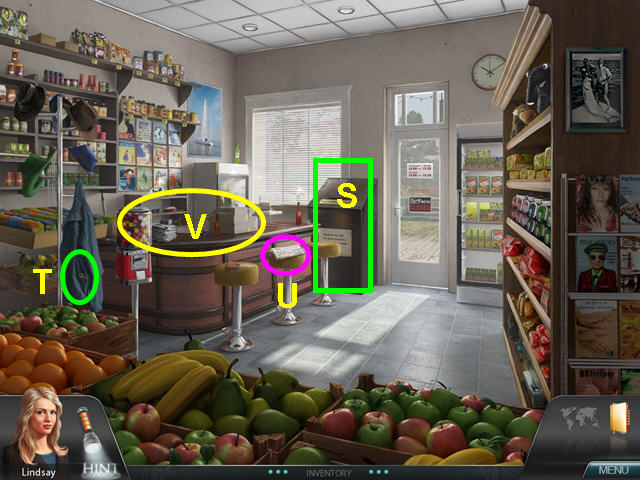
- Note the donation bin (S).
- Click on the jacket, then take the KEY (T).
- Look at the newspaper on the stool (U)/
- Select the counter for a hidden object scene (V).

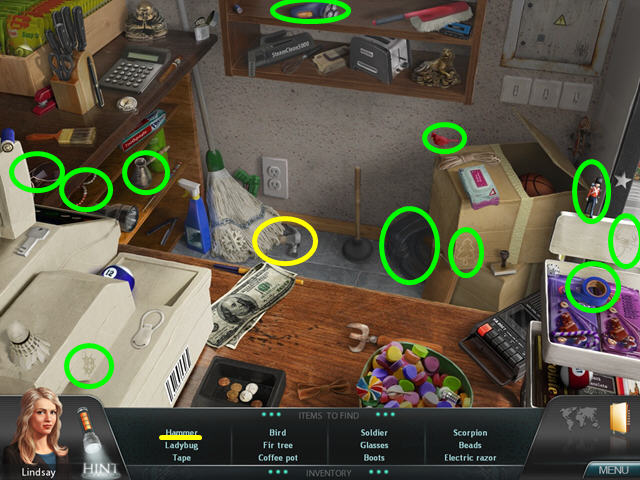
- Locate all the objects on the list.
- The HAMMER will go automatically into your inventory.

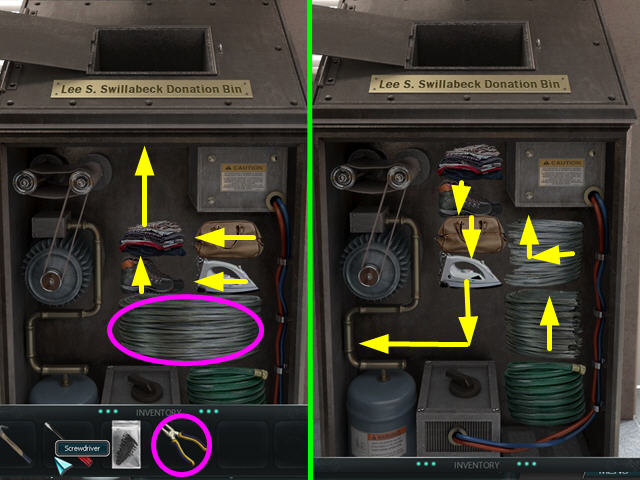
- Look at the close-up of the donation bin.
- Use the KEY on the lock for a mini-game.
- Move the items around inside the bin so the you can take the hose.
- Move the clothes and the boots up.
- Move the iron and the bag to the left.
- Use the PLIERS to cut the roll of wire.
- Move the right half of wire up and move the left half to the right and up.
- Move the iron down and to the left, then move the bag and the boot down.
- Push the right wire to the left and up, then move the left wire up.

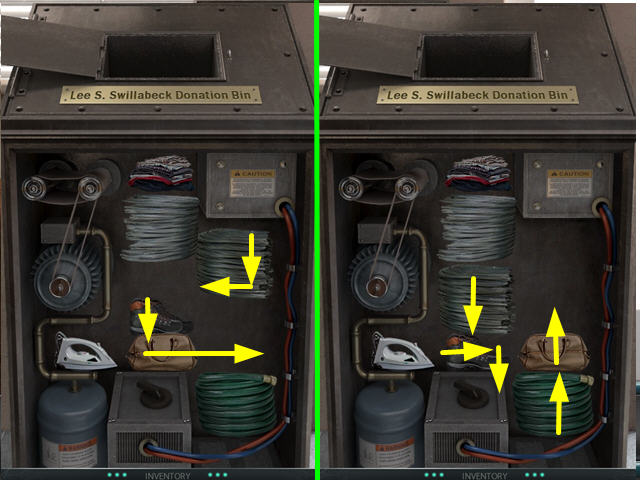
- Move the bag to the right and push the boot down.
- Move the left wire down and to the left.
- Move the bag and the hose up.
- Push the boot to the right and down.
- Move the left wire down.

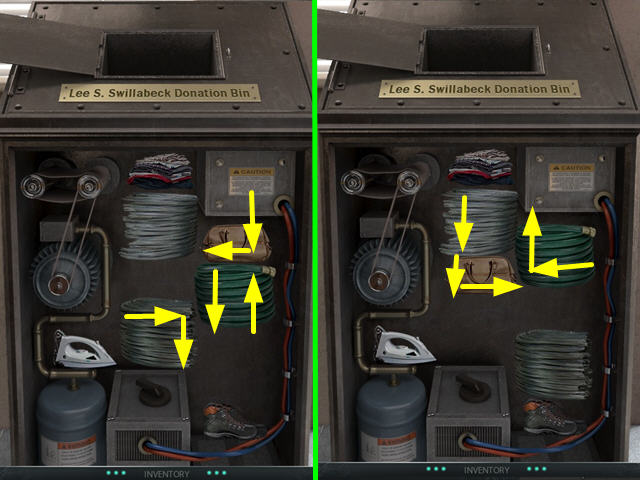
- Move the hose down and push the bag down and to the left.
- Push the hose up, then move the left wire to the right and down.
- Move the bag down and to the right.
- Push the right wire down, the move the hose to the left and up.

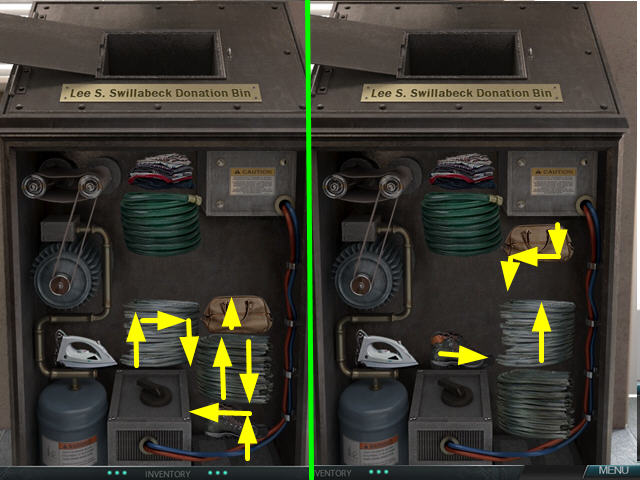
- Move the bag up, then push the right wire up.
- Push the left wire up, then move the boot up and to the left.
- Move the left wire down and the right wire should move to the right and down.
- Move the bag down and to the left.
- Push the right wire up and move the boot to the right.
- Move the bag down.

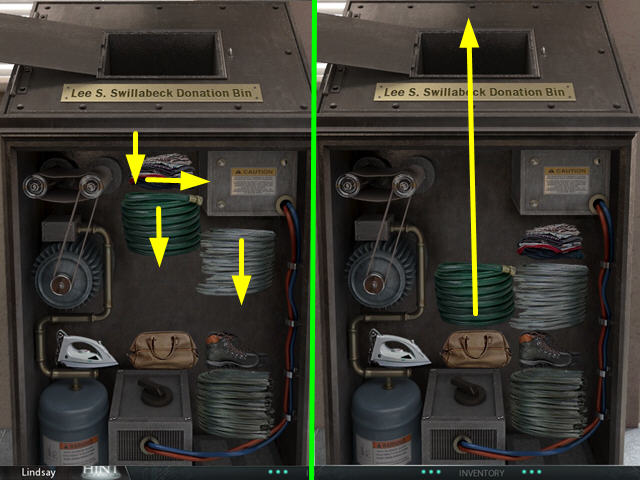
- Move the hose and the right wire down.
- Push the clothes down and to the right.
- Move the hose up and out of the bin.
- The HOSE will go automatically into your inventory.
- Exit the general store.

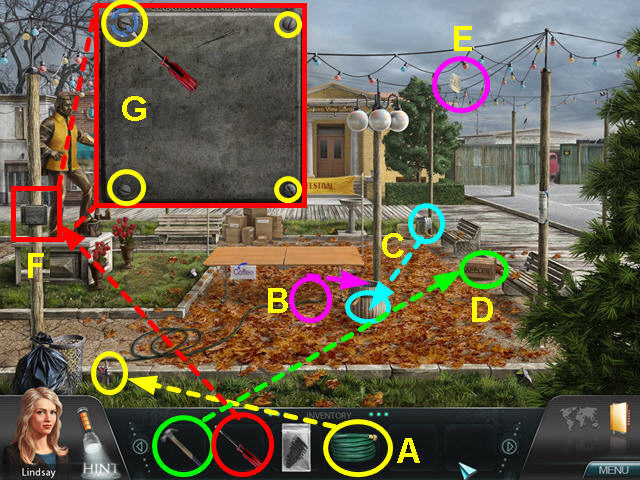
- Use the HOSE on the spigot (A).
- Pick up the end of the hose and use in on the barrel opening (B).
- Take the sign from the upper right garbage can and use it on the front of the barrel (C).
- Use the HAMMER to open the apple crate (D).
- Take APPLES from the crate- they will go automatically into your inventory.
- Use the APPLES on the barrel.
- Look at the close-up of the barrel and remove 3 apples.
- Take the paper that falls to the ground from the overhead wires (E).
- Look at the close-up of the circuit box (F).
- Use the SCREWDRIVER to remove the 8 screws (G).
- Left-click on the screw, then move in a circular, counterclockwise direction.

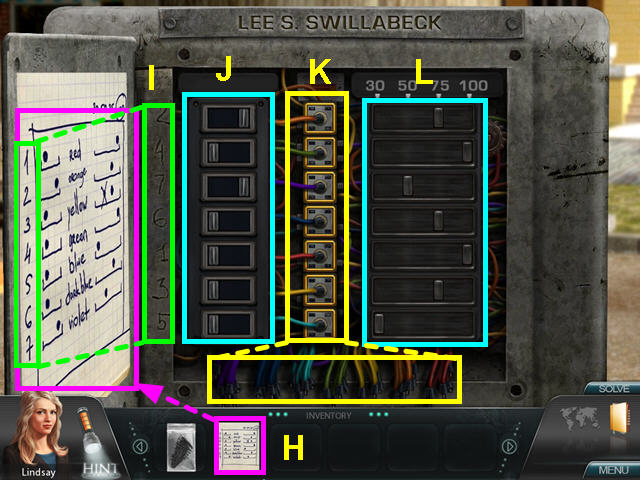
- Place the DIAGRAM on the door so it is easier to look at (H).
- Use the numbers scratched in the metal to determine which settings to use (I).
- Move the switches to the left or right (J).
- Take the correct colored wire from the bottom and use it on the connector (K).
- Moe the slide to the correct voltage (L).
- The connectors will light if correct.
- The town council secretary will come and speak with you.
Investigation Three

- Lindsay calls on reported Cindy to do some more digging in Cypress View.
- Enter the Library, which is the yellow building in the center of the scene.
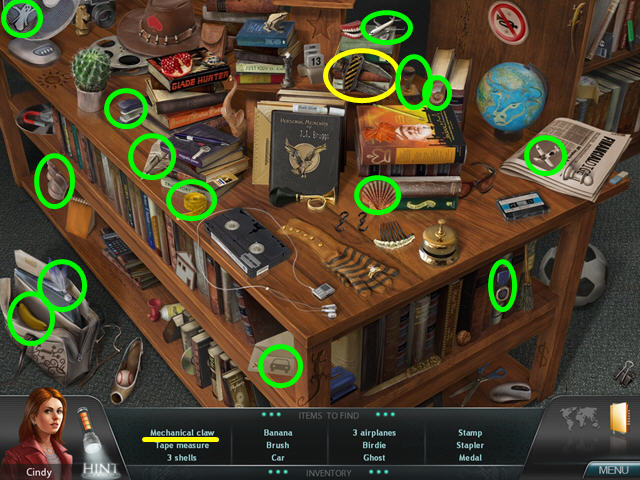
- Select the sparkling, short book case in the lower for a hidden object scene.
- Locate all the objects on the list.
- The MECHANICAL CLAW will go automatically into your inventory.

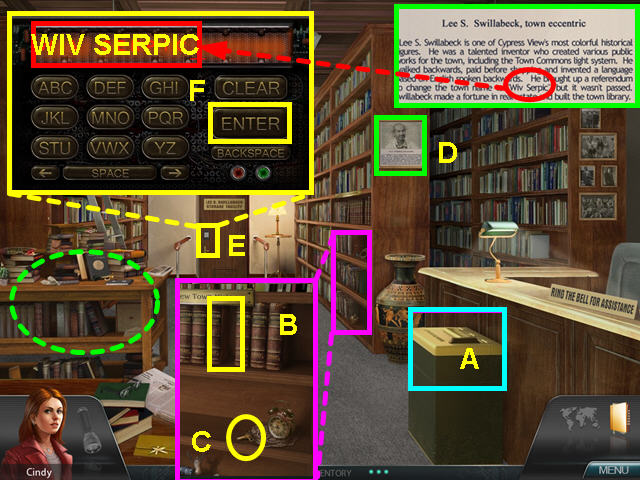
- Look at the floor safe to see you need an access card (A).
- Look at the center book case to see a book is missing from the town’s history (B).
- Take the WINDING KEY (C).
- The librarian will speak with you and you learn that the missing book is in storage and not available to the public.
- Read the plaque on the town inventor and see that he wanted to change the town’s name to Wiv Serpic (D).
- Look at the lock on the rear door (E).
- Enter the code ‘WIV SERPIC’, then press enter (F).

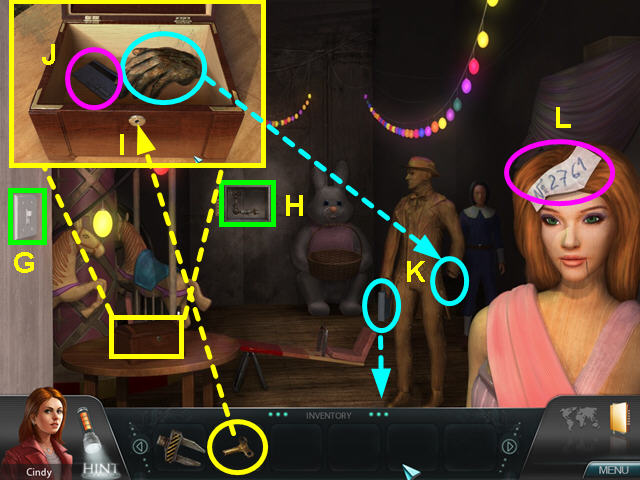
- Turn on the light switch (G).
- Look at the area illuminated by the light to learn you need some parts (H).
- Look at the small chest and use the WINDING KEY to open it (I).
- Take the WOODEN HAND and the KEY CARD (J).
- Use the WOODEN HAND on the wooden man and he will drop the locked clipboard (K).
- Note the number taped to the mannequin’s head (L).
- Exit the storage room and look at the floor safe.
- Use the KEY CARD to unlock the safe.
- Inside you find an envelope of photos.
- You need to find a way to steam open the envelope.
- Exit the library.

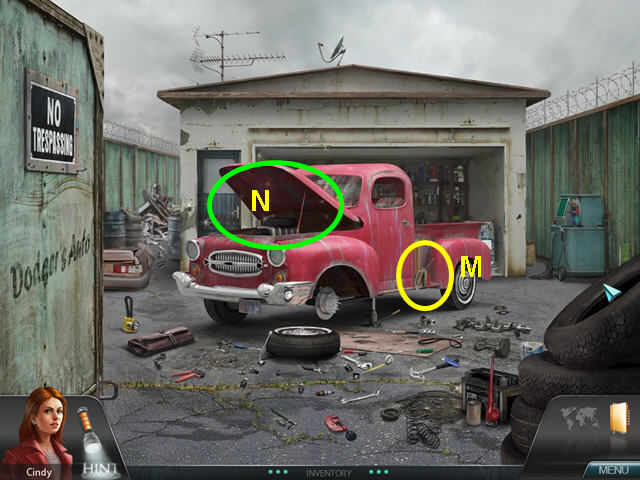
- Select the right fence to visit the mechanic’s shop.
- Look at the running board and move the brown cloth (M).
- Take the OIL CAN.

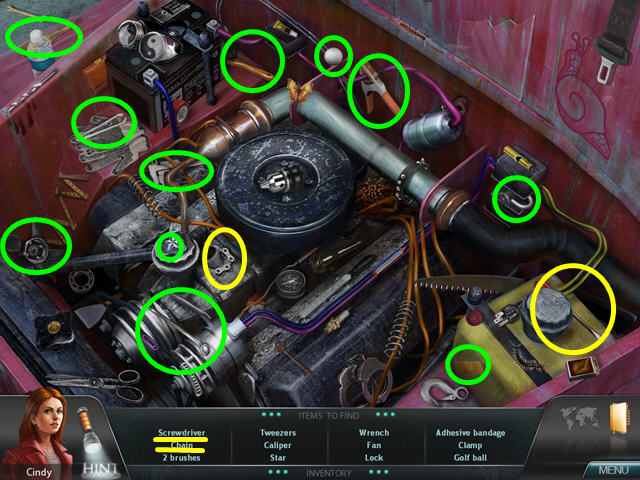
- Look under the hood of the truck for a hidden object scene (N).
- Locate all the items on the list.
- The SCREWDRIVER and the CHAIN will go automatically into your inventory.
- Return to the town square and enter the general store on the left.

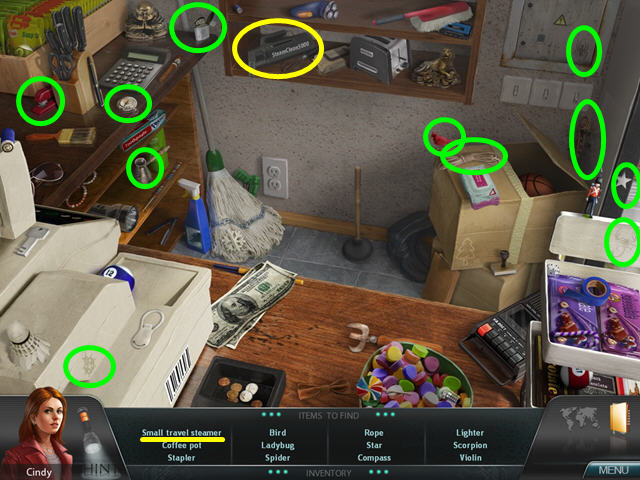
- Select the sparkling counter for a hidden object scene.
- Locate all the items on the list.
- The STEAMER will go automatically into your inventory.

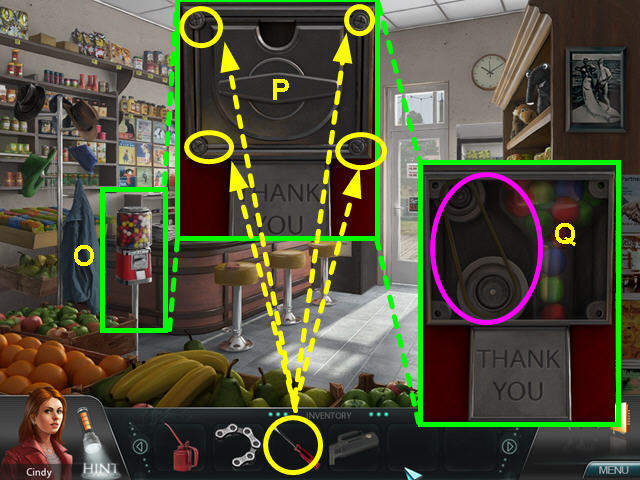
- Look at the close-up of the gumball machine (O).
- Use the SCREWDRIVER to remove the 4 screws (P).
- Left-click on the screw, then move in a circular, counterclockwise direction.
- Take the RUBBER BAND (Q).
- Exit the general store.

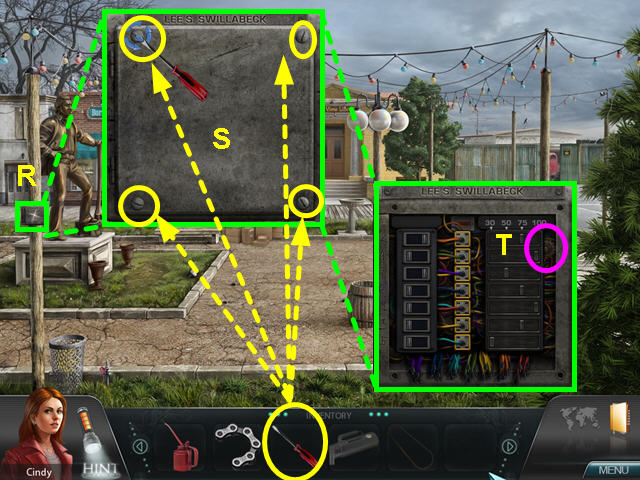
- Look at the close-up of the circuit box (R).
- Use the SCREWDRIVER to remove the 4 screws (S).
- Left-click on the screw, then move in a circular, counterclockwise direction.
- Take the GEAR (T).

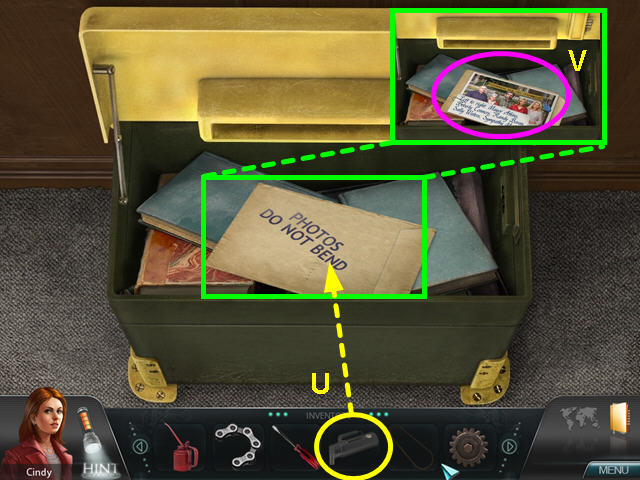
- Enter the library and look at the floor safe.
- Use the STEAMER on the photo envelope (U).
- Click on the open end of the envelope to remove the photo.
- Take the photo (V).
- Enter the storage room.

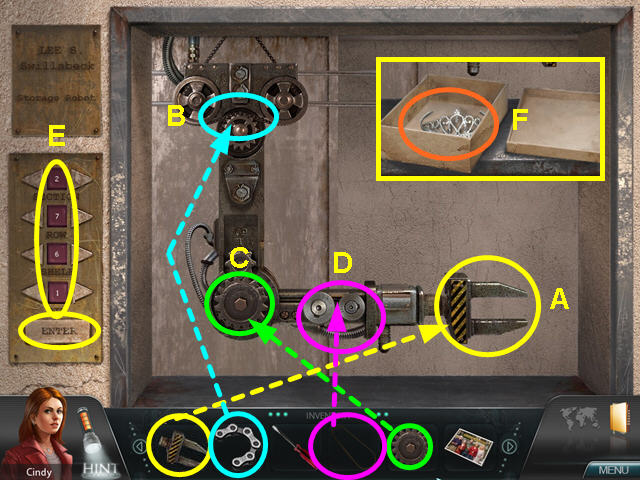
- Look at the close-up of the storage robot arm on the back wall.
- Place the MECHANICAL CLAW on the right end of the arm (A).
- Place the CHAIN at the top of the arm (B).
- The GEAR should be placed at the elbow of the mechanical arm (C).
- Place the RUBBER BAND between the gear and the claw (D).
- Enter the code from the mannequin’s head (2761), then press enter (E).
- Click on the box in the claw, then take the TIARA (F).
- Exit the storage robot.

- Place the TIARA on the mannequin’s head (G).
- Use the OIL CAN on the man mouth (H).
- Take the KEY from the mannequin’s mouth.
- Look at the close-up of the clipboard and use the KEY to unlock it (I).
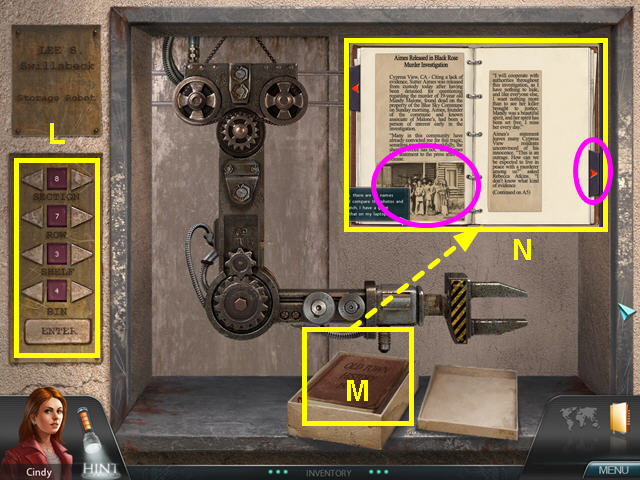
- Read the list inside and find the code (8734) for the missing 1970′s history book (J).
- Look at the close-up of the storage robot arm on the back wall (K).


- Key in the code 8734 and press enter (L).
- Click on the box in the robot claw, then click on the book (M).
- Turn the pages of the book until you reach the photograph (N).

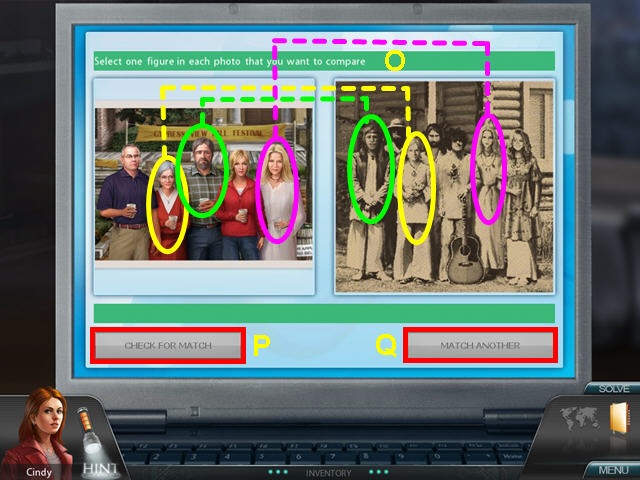
- Once Cindy’s laptop appears, click on the Photo Compare icon.
- Select a person in the right and left photos to compare (O).
- Press the ‘Check For Match’ button to see the are the same person (P).
- Press the ‘Match Another’ to compare another set (Q).
- Once you have 3 matches, the investigation will end.
Investigation Four

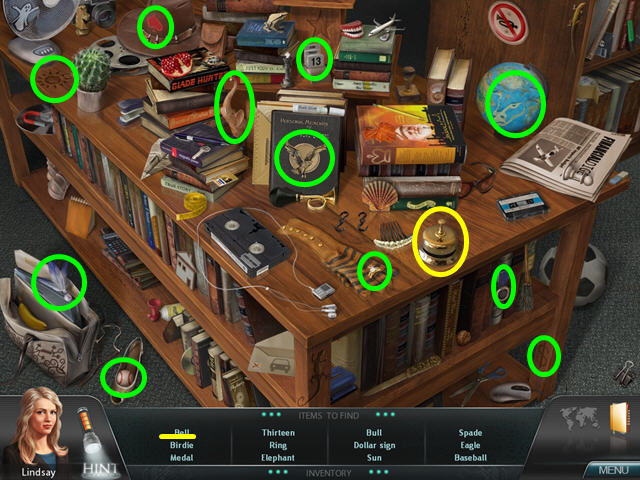
- You are now playing as Lindsay and are in Cypress View to follow up on Cindy’s leads.
- Enter the library and select the sparkling low book case on the left for a hidden object scene.
- Locate all the items on the list.
- The BELL will go automatically into your inventory.
- Place the bell on the library desk and the Beverly Connors, the librarian will appear.
- Speak to her thoroughly, using the dialog topics in the inventory bar and she will give you a map.
- The map icon next to the journal is now active- you can click on a location to travel there.

- Exit the library.
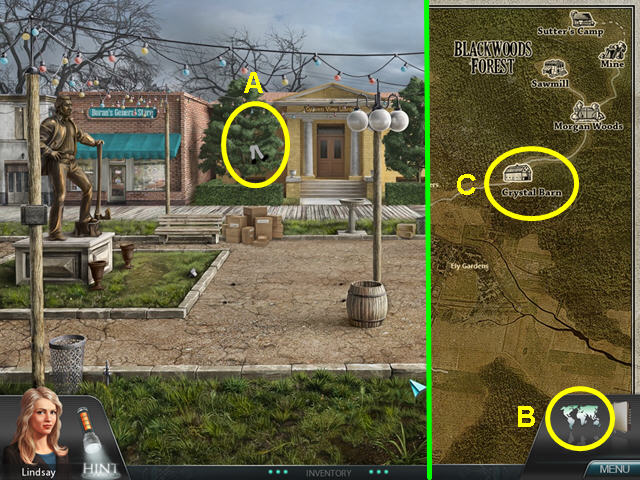
- Click on the figure in the tree to learn it is Randy Boren (A).
- Randy cannot come down until he removes the branch, but someone has stolen the chainsaw.
- Select the map icon in the lower right (B).
- Click on the Crystal barn to travel (C).

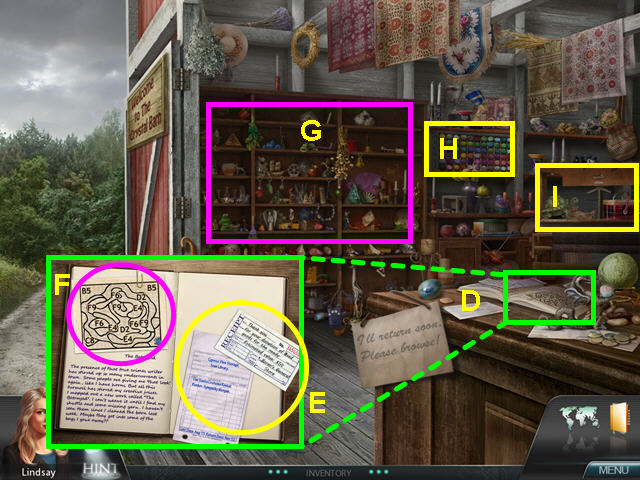
- Look at the close-up of the desk (D).
- Read the receipts for the Santa suit rental and the donation (E).
- Take the PATTERN (F).
- Note the shelving (G).
- Note the yarn display (H).
- Look at the close-up of the loom (I).

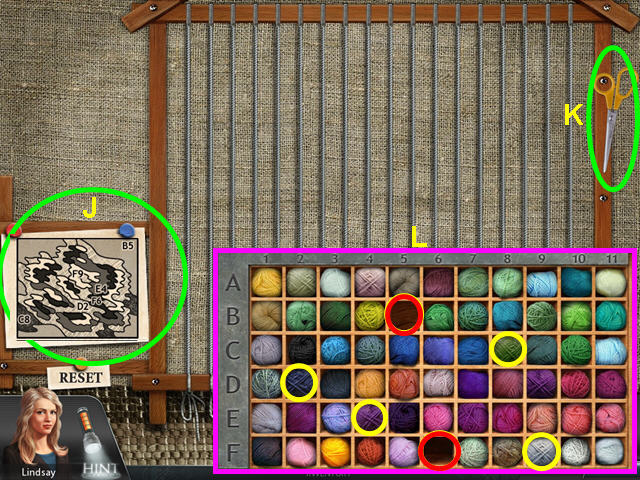
- Place the PATTERN into the holder on the left of the loom (J).
- Make note of the 6 yarn color codes needed for this pattern- B5, C8, D2, E4, F6, and F9.
- Take the SCISSORS (K).
- Look at the yarn display and take the 4 yarn colors that are available, leaving B5 and F6 as still needed (L).
- Look at the wall shelves for a hidden object scene.

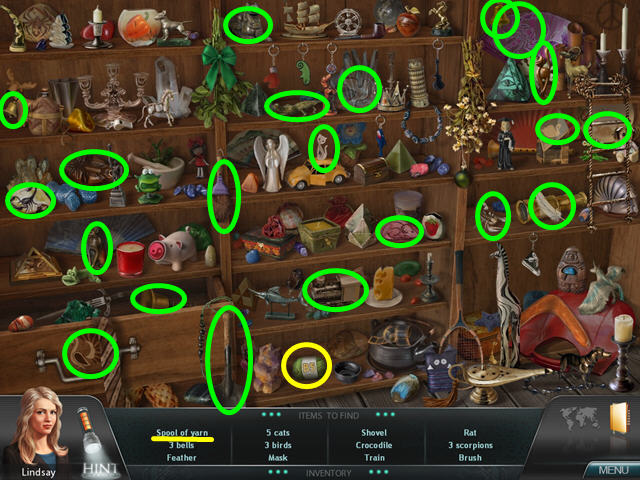
- Locate all the items on the list.
- The B5 YARN will go automatically into your inventory.
- Look at the maps and return to Cypress View.
- Click on Rand in the tree and he will give you the KEY to the store.
- Use the KEY on the front door and enter the general store.

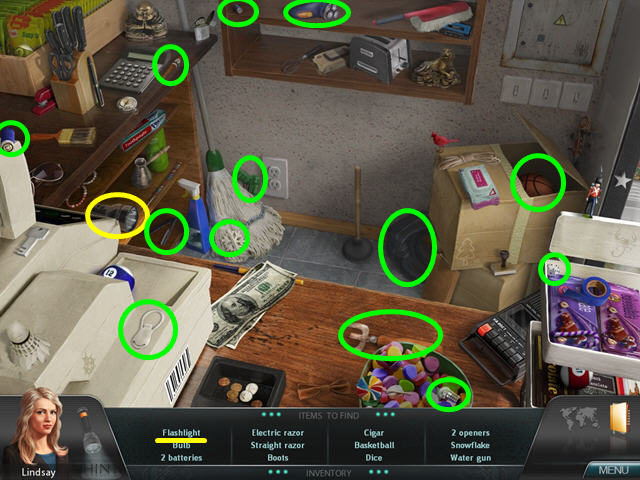
- Select the sparkling counter for a hidden object scene.
- Locate all the items on the list.
- The FLASHLIGHT will go automatically into your inventory.

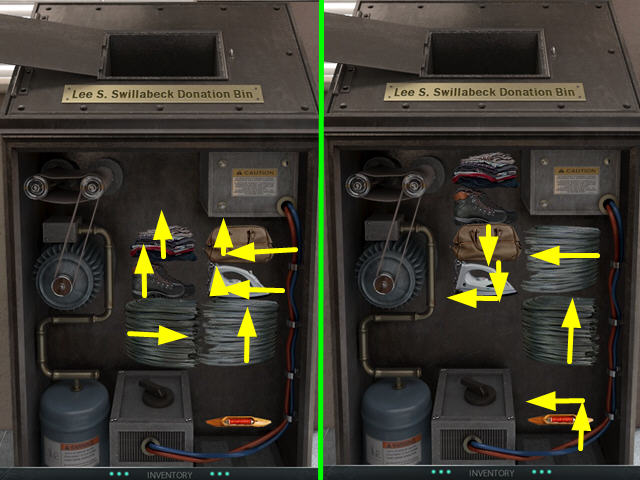
- Look at the donation bin for a mini-game.
- Move the clothes and boots up.
- Move the bag and iron left and up.
- Push the right wire up and the left wire to the right.
- Move the iron down and to the left.
- Move the bag down.
- Push the right wire to the left and the left wire up.
- Move the shuttle up and to the left.

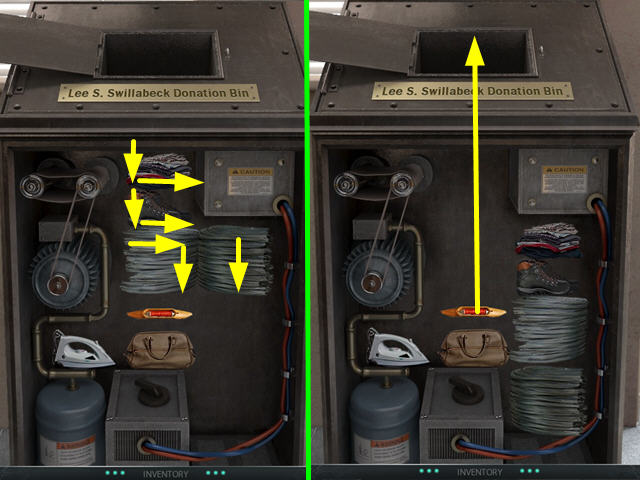
- Move the left wire down and the right wire will go to the right and down.
- Move the boots and clothes down and to the right.
- Push the SHUTTLE up and out of the bin.
- Click on the map icon, then click to return to the Crystal Barn.
- Follow the dirt road on the left to Morgan Woods.

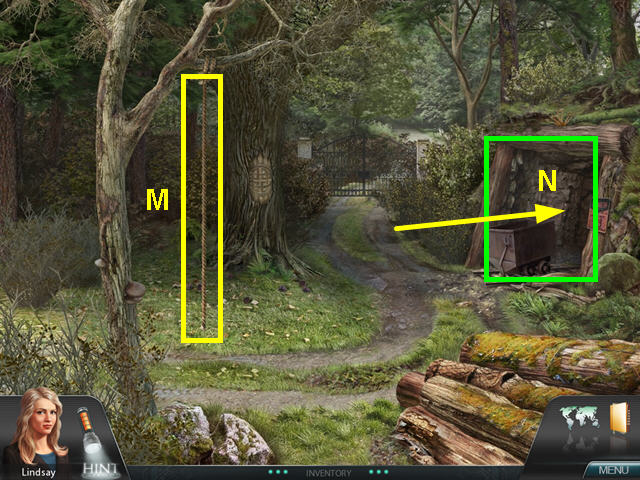
- Take the ROPE hanging from the tree (M).
- Enter the mine (N).

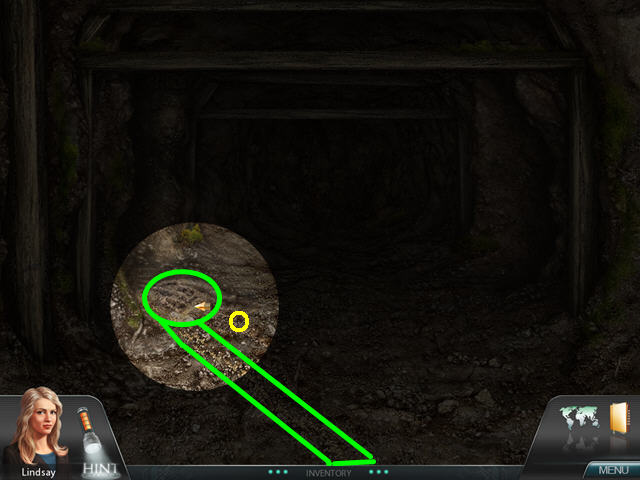
- Take the FLASHLIGHT and use it on the darkness.
- Walk forward and look for footprints and a trail of sawdust (O).
- Continue left and forward.

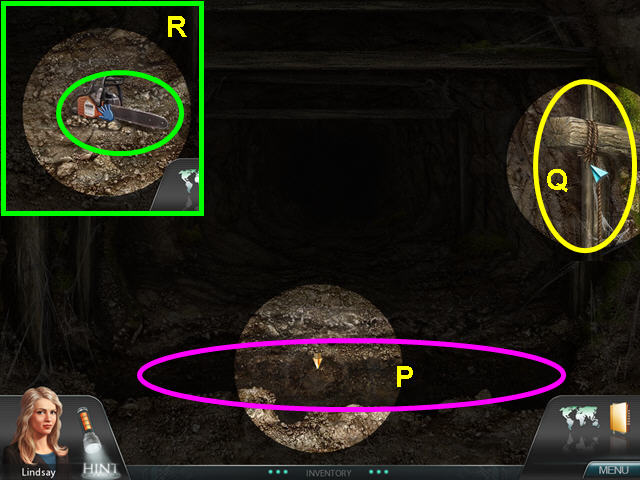
- There is a deep crevasse that you cannot jump (P).
- Use the ROPE on the wood beam on the right (Q).
- Walk forward, right, and right.
- Take the ELECTRIC SAW (R).
- Use the map to return to town.
- Give the ELECTRIC SAW to Randy in the tree and he will talk to you.
- Sympathy will also appear and talk to you.
- Enter the library.
- Go to the storage room door and key in Wiv Serpic then press enter.

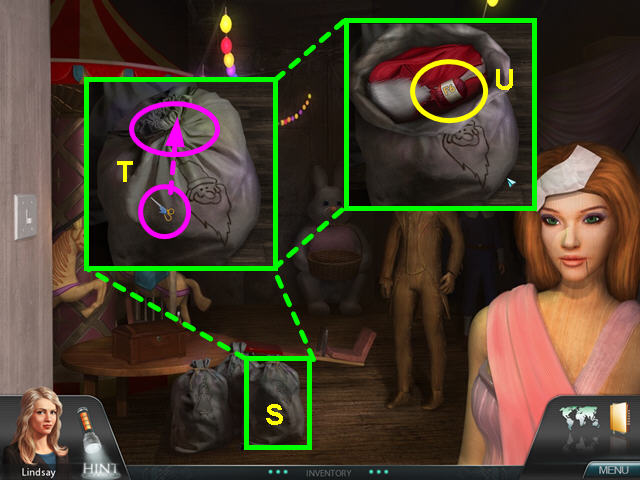
- Look at the close-up of the bag with the Santa (S).
- Use the SCISSORS to cut the drawstring (T).
- Take the F6 YARN from the bag (U).
- Use the map to return to the Crystal Barn and look at the close-up of the loom.

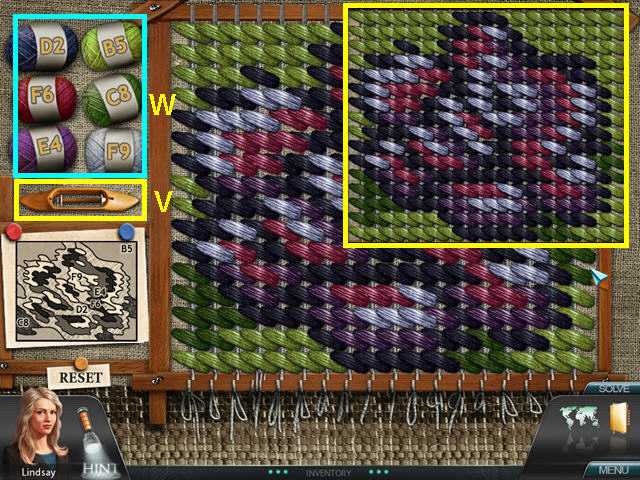
- Place the 6 YARN skeins and the SHUTTLE on the left side of the loom above the pattern.
- Take the shuttle (V) and click it on one of the yarn skeins (W).
- Look at the pattern and find the location where that color goes and click.
- Should you make a mistake, you can reset and start over, or choose another color and correct the mistake.
- Once you complete the pattern, Sympathy will appear and you can talk to her in depth.
Investigation Five

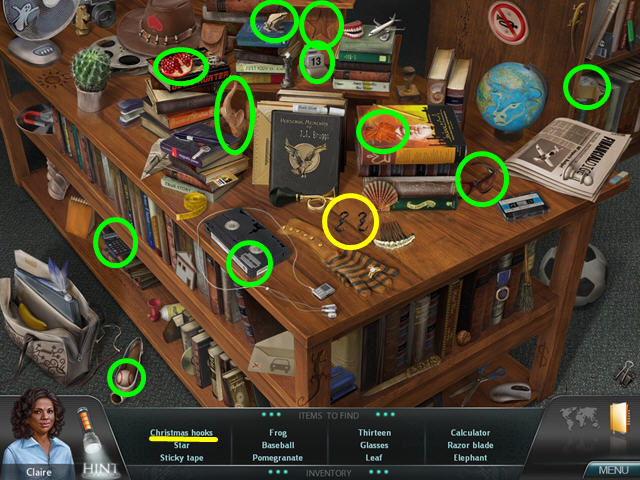
- Lindsay has called Claire in for her forensic expertise in finding the crime scene at the camp.
- Enter the library and select the sparkling low bookcase for a hidden object area.
- Locate all the items on the list.
- The CHRISTMAS HOOKS will go automatically into your inventory.
- Ring the bell on the desk to talk with the librarian.
- Look at the lock on the storage room door and key in Wiv Serpic, then press enter.

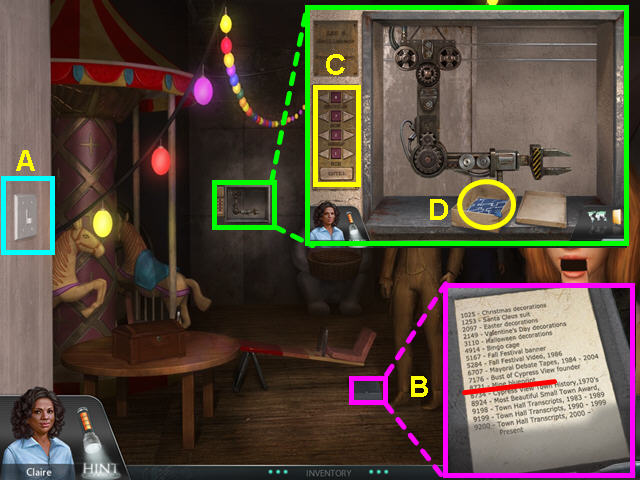
- Turn on the light switch for the robot arm (A).
- Look at the clipboard to find the mine blueprints are stored at 8721 (B).
- Look at the robot arm and key in 8721, then press enter (C).
- Click on the box then take the BLUEPRINTS (D).
- Use the map to travel to the Crystal Barn.

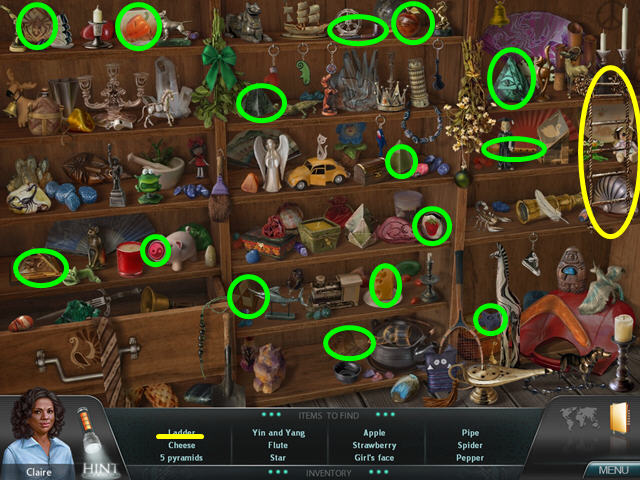
- Select the sparkling shelves for a hidden object scene.
- Locate all the items on the list.
- The LADDER will go automatically into your inventory.
- Look at the desk and note that Sutter’s birthday is 12-4-48.
- Walk forward to Morgan Woods, then enter the mine.

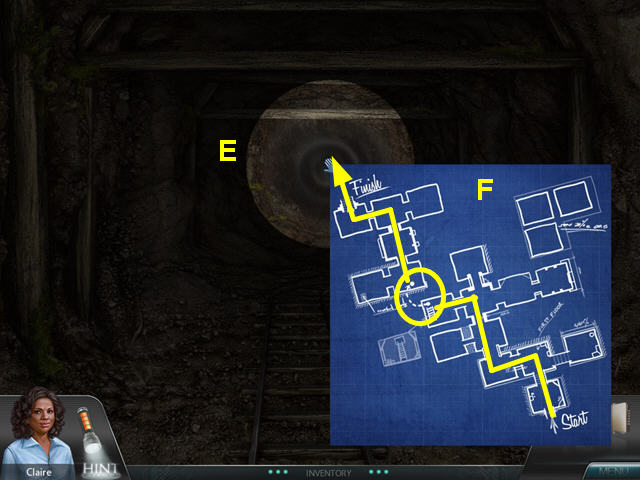
- Use the FLASHLIGHT, then use the BLUEPRINTS (E).
- Examine the BLUEPRINTS to find that the path for the first part is: forward, left, forward, forward, and left (F).

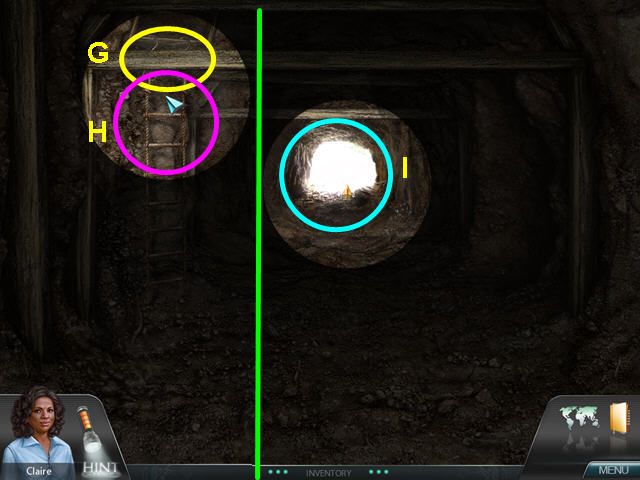
- Look at the opening in the ceiling and hang the HOOKS from the edge (G).
- Use the LADDER on the hooks (H).
- Climb up the ladder, the walk forward, forward, and left.
- Walk forward out of the mine (I).

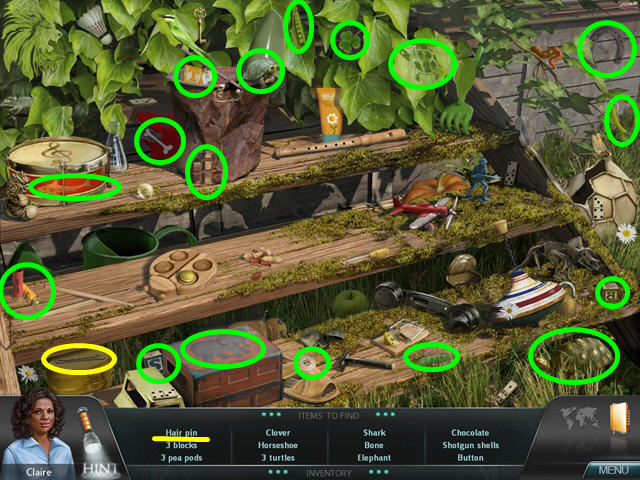
- Click on the sparkling steps of the left cabin for a hidden object scene.
- Locate all the objects on the list.
- The HAIRPIN will go automatically into your inventory.

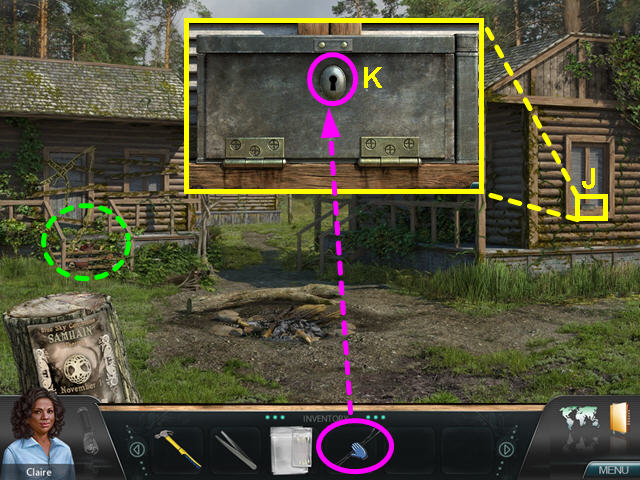
- Look at the base of the window on the right cabin (J).
- Use the HAIRPIN on the lock to trigger a mini-game (K).

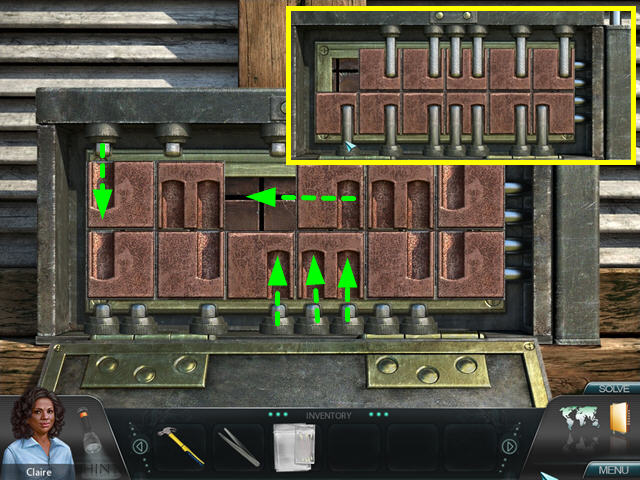
- The object of this mini-game is to slide the pieces so that you can extend all the rods.
- Click on a square to move it.
- When you have all the squares in place, click on each of the rods to extend them.


- Check out our video solution!
- Here is a video solution for one of the variations on the mini-game.

- Exit the lock and enter the window.
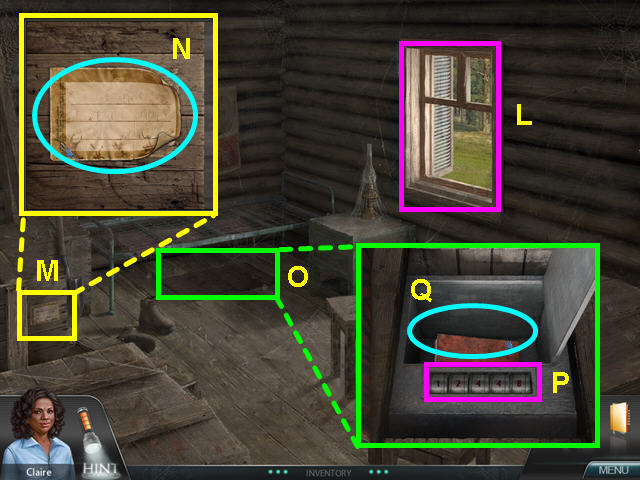
- Click on the shutter to let in some light (L).
- Look at the faded label (M).
- Use the TWEEZERS on the four corners of the label (N).
- Use the TEST KIT to collect the label.
- Move the rug and use the HAMMER to remove the plank (O).
- Key in Sutter’s birthday of 12-4-48 and open the safe (P).
- Read the journal about a sacrifice with the body buried under a tree (Q).

- Exit the camp to Morgan woods.
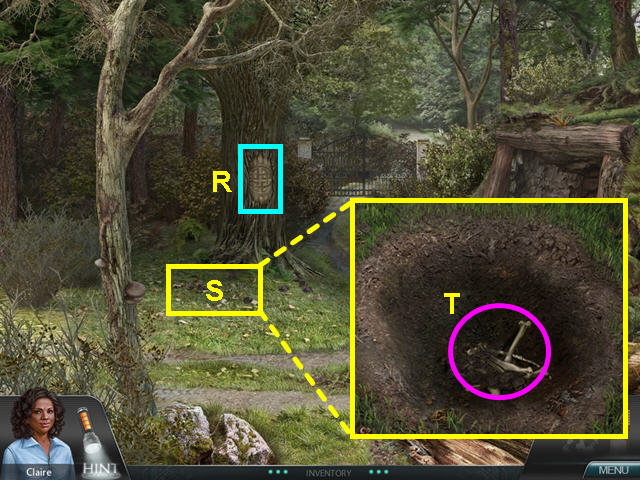
- Note the symbol on the tree (R).
- Look at the ground and use the shovel to dig (S).
- Take the BONES from the hole (T).

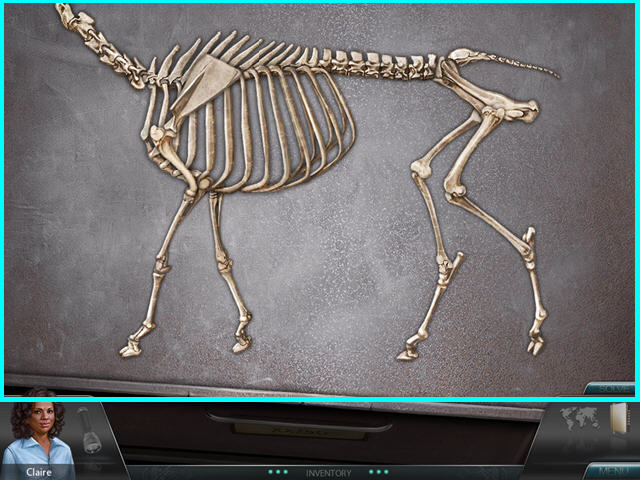
- Back at the lab, assemble the bones.
- Left-click to take or place a bone.
- Adjoining bones will stay together.

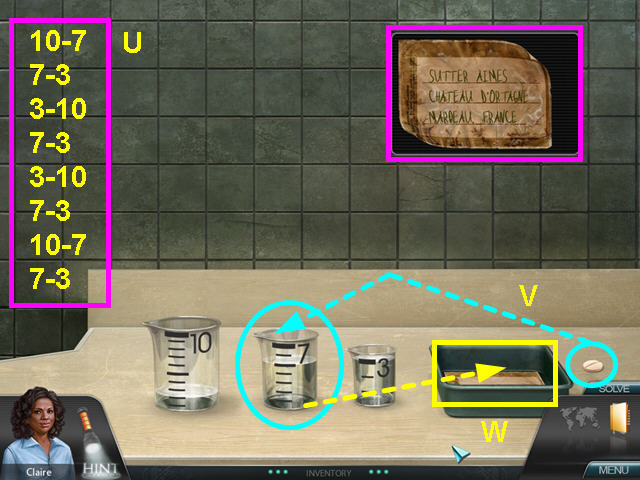
- Pour the liquid between the 3 containers until you have 5 cups in one container.
- Pour: 10-7, 7-3, 3-10, 7-3, 3-10, 7-3, 10-7, and 7-3 (U).
- Place the tablet into the 7 cup container which now has exactly 5 cups of liquid (V).
- Pour the mixture over the label to reveal Sutter’s destination (W).

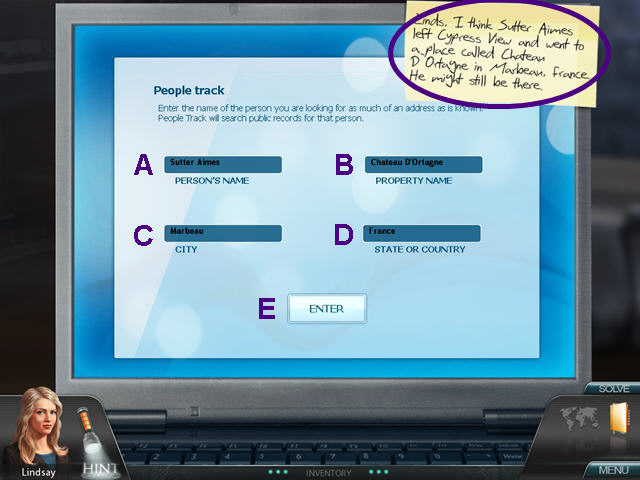
- You are once again playing Lindsay.
- Type in Sutter’s information from the label.
- The person’s name is Sutter Aimes (A).
- The location name is Chateau D’Ortagne (B).
- Type Marbeau for the city (C).
- The state or country is France (D).
- Click on enter (E).

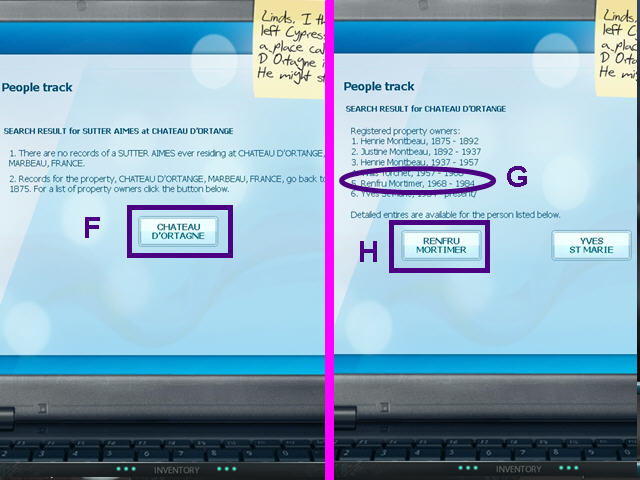
- The search results have no records of Sutter Aimes at that address, so press the button to search for previous owners (F).
- There was only one owner during the 1970′s (G).
- Select Renfru Mortimer (H).
- Click OK when you finish reading about Mr. Mortimer.
- Talk to Mr. Mortimer completely.
Investigation Six
- You are once again playing as Lindsay, back in Cypress View to check on the spreadsheet lead.
- Enter the general store and talk to Randy about Regina’s purchases.
- Per Randy, she bought a shovel and a map.
- Exit the store and walk to the library.
- Ring the bell on the desk and talk to the librarian.
- She will give you directions to the lighthouse.

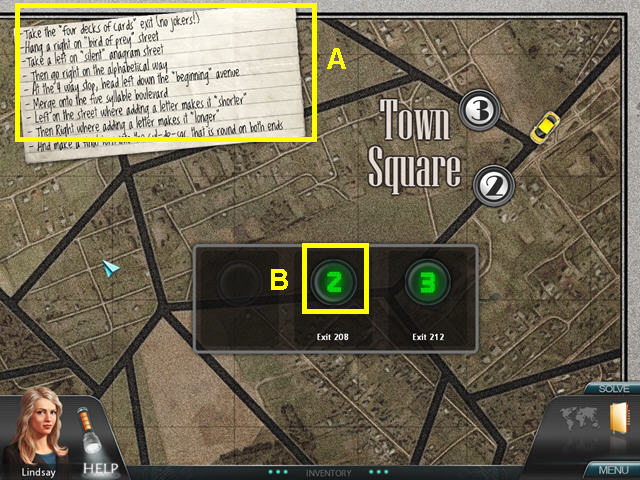
- The directions the librarian gave are a bit unusual (A).
- The first intersection calls for the four decks of cards exit.
- Multiply 4 x 52 to get 208.
- Click on #2, Exit 208 (B).
- The bird of prey street is #3 Eagle Drive.
- The ‘silent’ anagram street is #1 Listen Street.
- The alphabetic way means #3 Accent Way as all the letters in Accent are in order.
- The beginning avenue is #2 Alpha Avenue.
- The 5-syllable boulevard is #2 Serendipity Boulevard.
- Adding a letter to #2 Sorter Street will make it shorter.
- Adding a letter to #2 Loner Way will make it longer.
- The final turn is the road that is round on both ends- #2 Oslo Street.

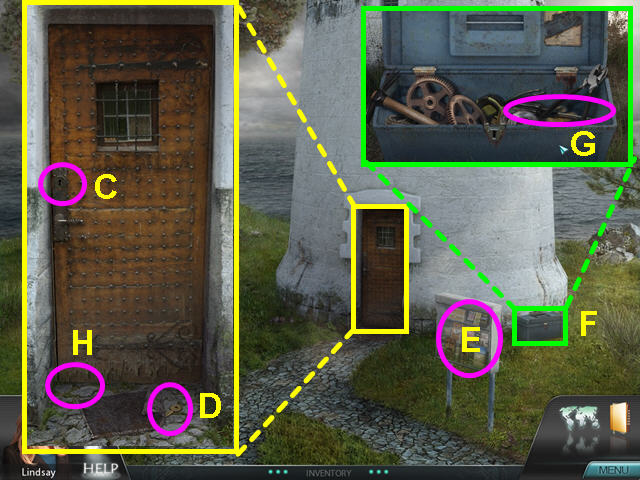
- Look at the lighthouse door to find it is locked.
- Look in the keyhole to see that the key may be in the keyhole (C).
- Look under the mat and take the TOOLBOX KEY (D).
- Take a FLYER from the stand (E).
- Look at the close-up of the toolbox and use the TOOLBOX KEY to open the lock (F).
- Take the SCREWDRIVER (G).
- Return to the door.
- Place the FLYER under the door (H).
- Use the SCREWDRIVER on the keyhole to push out the key.
- Pull the flyer from under the door and take the LIGHTHOUSE KEY.

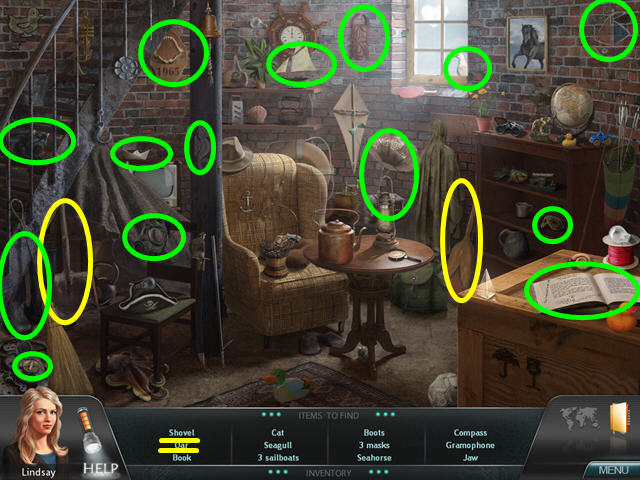
- Use the LIGHTHOUSE KEY to open the door.
- Select the door for a hidden object scene.
- Locate all the items.
- The OAR and SHOVEL will go automatically into your inventory.
- The book has notes about some rocks.

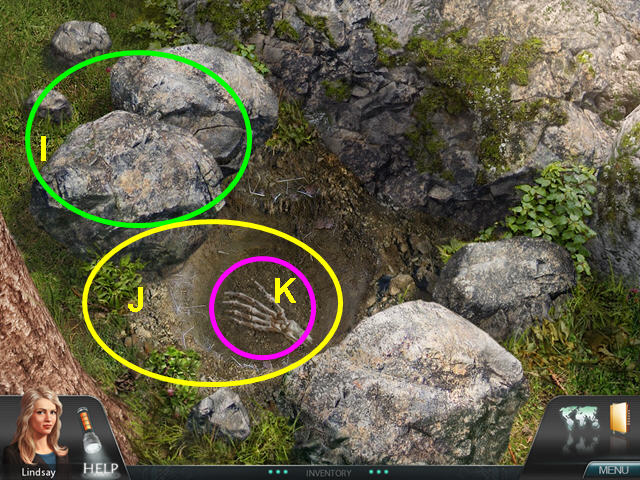
- Look at the close-up of the rocks to the left of the fireplace.
- Use the OARS to break apart the rocks (I).
- Use the SHOVEL on the ground (J).
- Look at the skeletal hand (K).
- Exit the rocks.

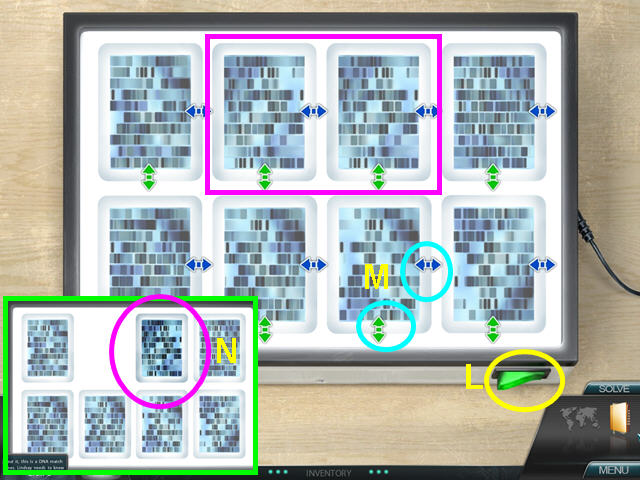
- You are now back at the lab, playing as Claire.
- Flip the switch on the light table (L).
- The object of this game is to find the pair of matching DNA samples.
- Use the blue and green arrow to flip and rotate the samples (M).
- Drop the the matching slide on top of the other (N).
Investigation Seven

- You are back in Cypress View as Lindsay.
- Try to talk to librarian sitting in the town square.
- You must help with her crossword puzzle first.
- Click on a blank square in the crossword and a letter grid will appear (A).
- The clue for that word will highlight in the list.
- Select the letter you want and the space will fill (B).
- After speaking to the librarian, select the map icon.
- Click on Hillcrest apartments on the lower half of the map.

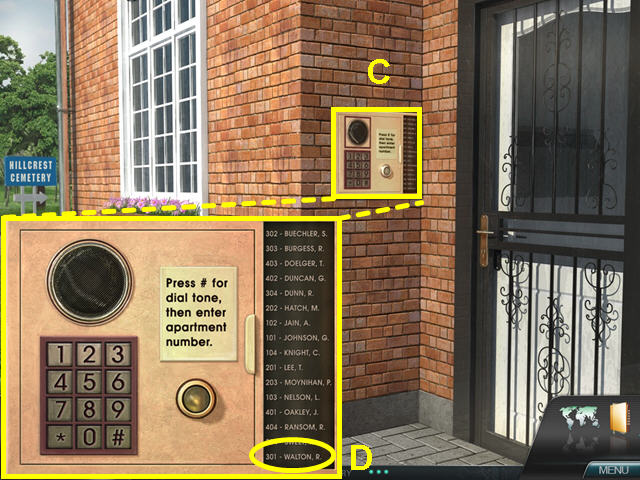
- Look at the close-up of the call box (C).
- Enter #301 to reach Mr. Walton (D).
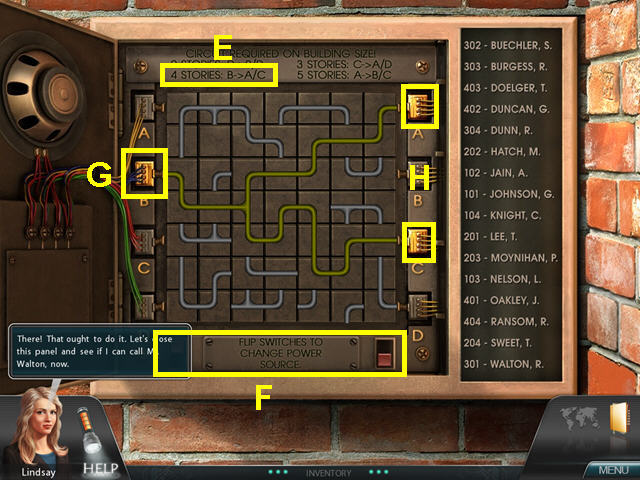
- The system seems to be out of order, so open the panel.


- Looking at the list of tenants tells us that there are 4 floors in the building.
- Per the requirements, the power must go from B to A and C (E).
- Use the 2 red switches at the bottom (F) to light up B on the left (G).
- Click on the squares to rotate them and complete the circuit from B to A and C (H).
- Click on the door to the panel to close it.
- Dial #301 and speak to Mr. Walton.
- Click on the door to enter the apartment.

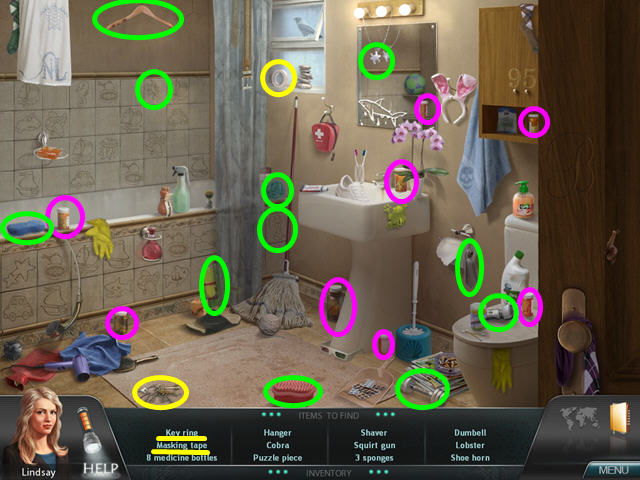
- The retired sheriff need his medications before he can talk.
- Click on the sparkling bathroom door for a hidden object scene.
- Locate all the items on the list.
- The KEY RING and MASKING TAPE will go automatically into your inventory.
- The sheriff gives you the names of his suspects, but they are buried in the cemetery next door.
- Exit the apartment and take the path on the left to Hillcrest Cemetery.

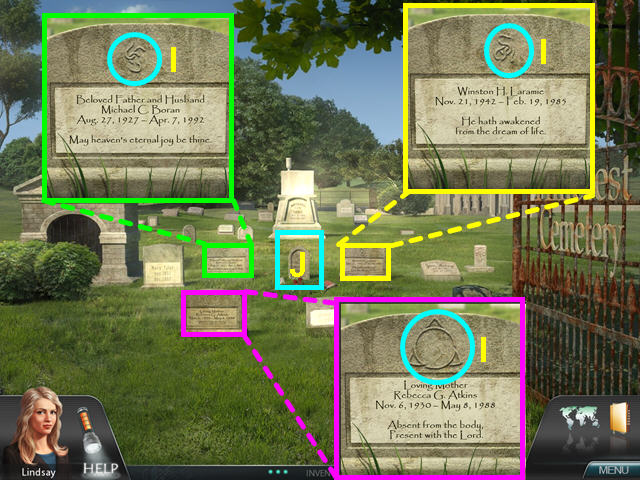
- Look at the close-ups of the three headstones and notice that each has a partial symbol at the top (I).
- Click on the sparkling headstone for a hidden object scene (J).

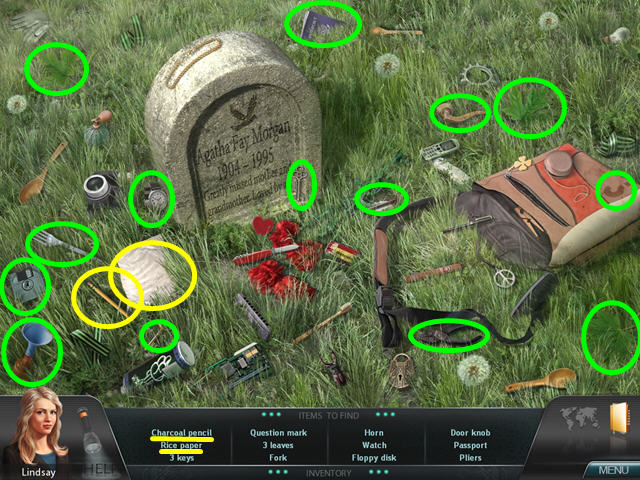
- Collect all the items on the list.
- The RICE PAPER and CHARCOAL PENCIL will go automatically into you inventory.

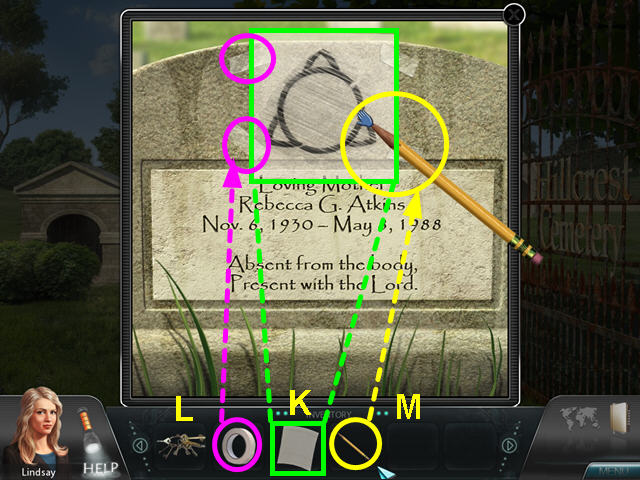
- Look at the close-up of one of the tombstones.
- Place the RICE PAPER over the marking (K).
- Use the MASKING TAPE to secure the paper (L).
- Left-click, hold and drag the CHARCOAL PENCIL over the symbol to make a rubbing (M).
- Repeat this process with the other 2 tombstones.

- Rotate the three pieces of paper to form the symbol.
- Each piece will lock in place when correct.

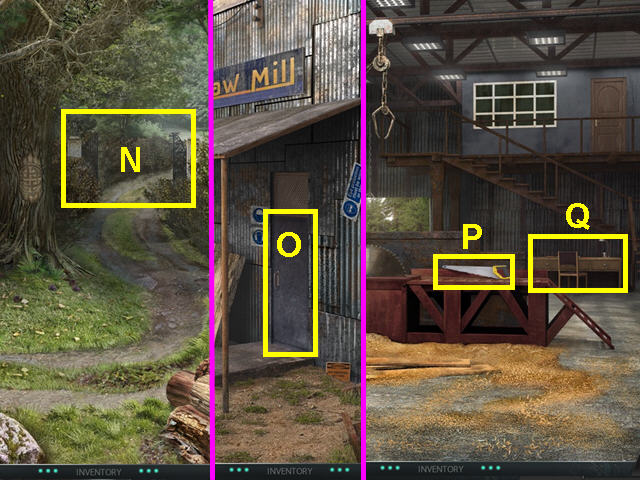
- Click on the map icon and go to Morgan Woods.
- Use the KEY RING to unlock the gate (N).
- Go through the gate to the mill.
- Enter the mill door (O).
- Talk to Adam Atkins and learn he needs a fuse before he can talk.
- Take the HAND SAW (P).
- Note the desk in the back (Q).
- Exit the mill.

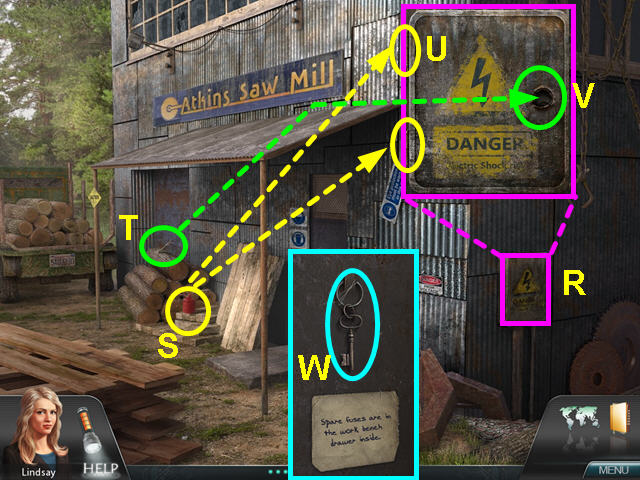
- Look at the close-up of the fuse-box to find it missing a handle and rusted shut (R).
- Take the OIL CAN (S).
- Use the HANDSAW on the top log to get a STICK (T).
- Go back to the close-up of the fuse box.
- Use the OIL CAN on each hinge (U).
- Use the STICK on the hole and open the fuse box (V).
- Take the KEY from inside the door (W).
- Enter the mill and look at the desk.
- Use the KEY to unlock the right drawer of the desk, then take the 2 fuses.
- Exit the mill.


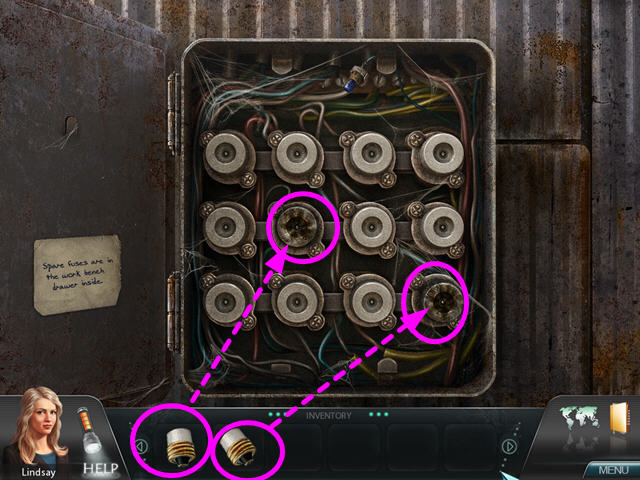
- Look at the close-up of the fuse-box.
- Replace the two burnt out fuses.
- Return to the mill and speak to Adam Atkins thoroughly.
- Use the map to return to town.
- Enter the general store.
- Select the sparkling counter for a hidden object scene.

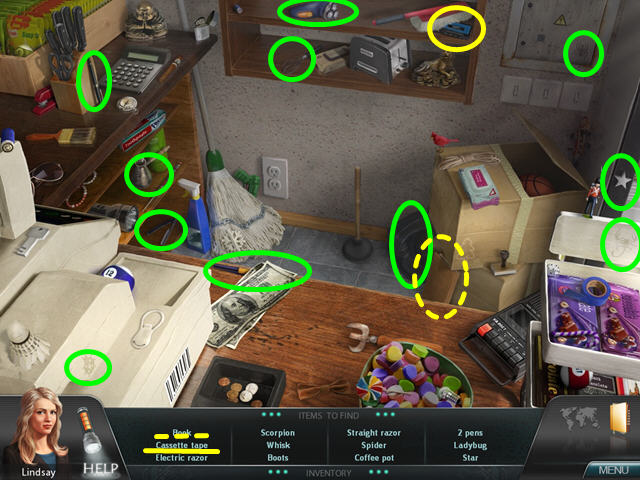
- Locate all the items on the list.
- Among the items is a book with the same symbol from the tombstones.
- The CASSETTE TAPE will go automatically into your inventory.

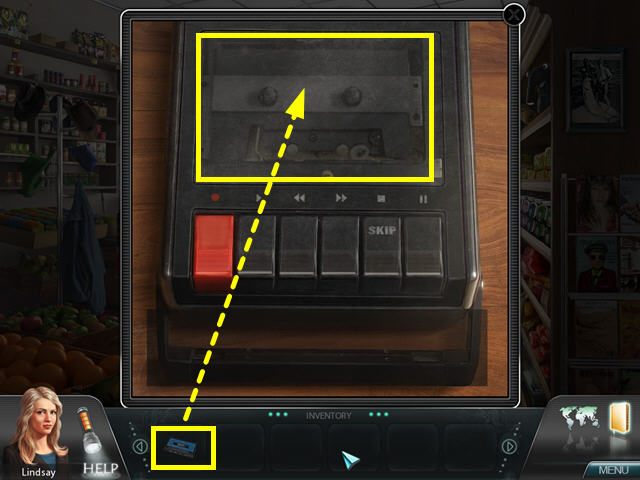
- Look at the counter to find a cassette player.
- Place the CASSETTE TAPE into the player.
- The tape will play automatically.
- Talk to Randy Boren completely and he will confess to the murder of Sutter Aimes.
Investigation Eight

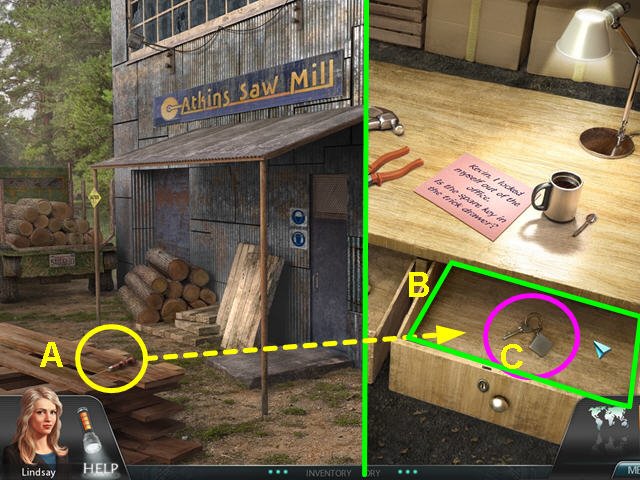
- Use the map to travel to Morgan woods.
- Walk through the gate to the front of the mill.
- Take the AWL from the pile of wood on the left (A).
- Enter the mill and look at the desk.
- Open the right drawer and use the AWL to remove the false bottom (B).
- Take the OFFICE KEY from the drawer (C).

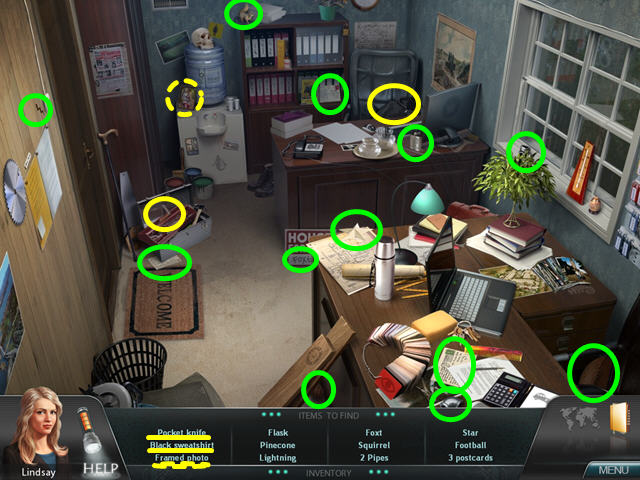
- Use the OFFICE key to unlock the door on the second level.
- Select the sparkling door for a hidden object scene.
- Locate all the items on the list.
- You find a photograph of Atkins and Mandy.
- The POCKET KNIFE and BLACK SWEATSHIRT will go automatically into your inventory.

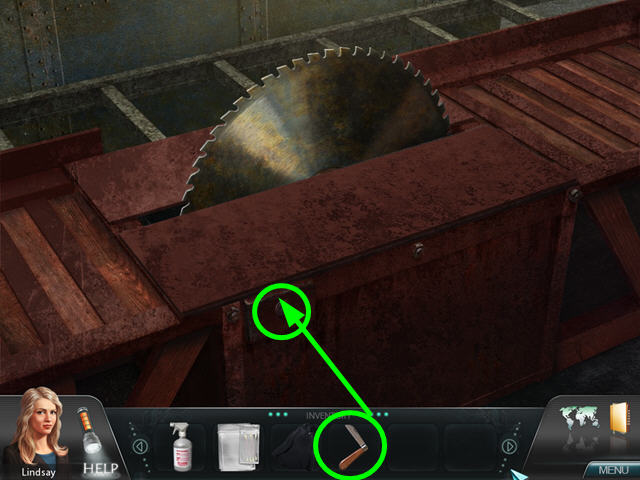
- Look at the large circular saw.
- Use the POCKET KNIFE on the keyhole to trigger a mini-game.

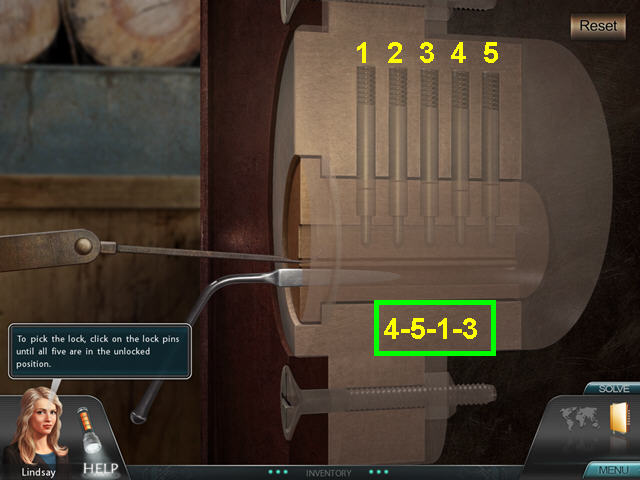
- The object is to push all the tumblers.
- Clicking on a tumbler effects another.
- Numbering the tumblers 1-5, click on 4-5-1-3.

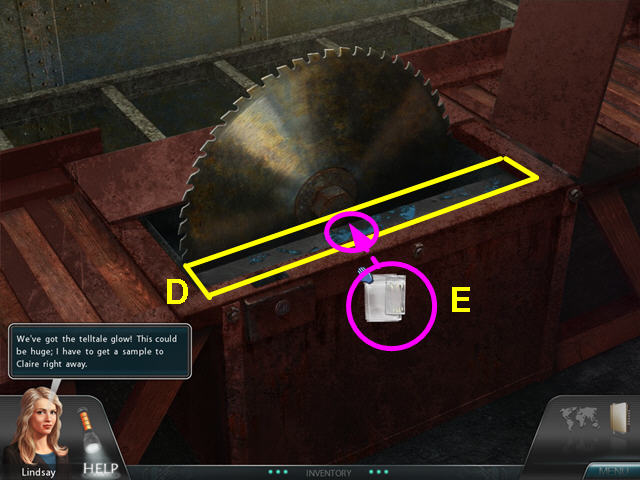
- Use the LUMINOL on the area in front of the blade (D).
- Spray until the bottle disappears.
- Use the TEST KIT on the glowing areas to collect a sample (E).

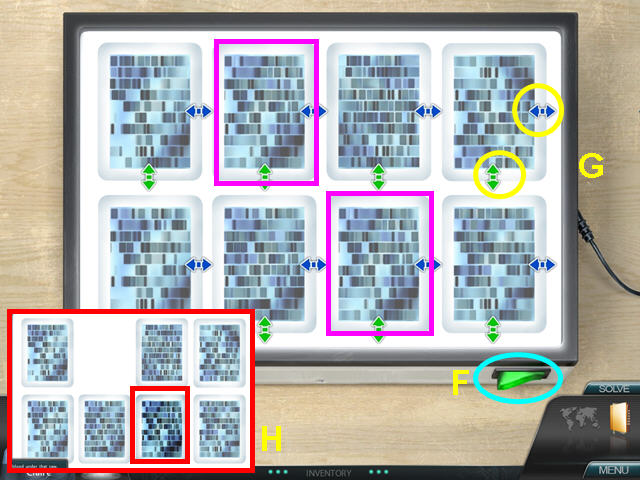
- You are now Claire back at the lab.
- Look at the light table and flip the green switch (F).
- The object of this game is to find the pair of matching DNA samples.
- Use the blue and green arrows to flip and rotate the samples (G).
- Drop the the matching slide on top of the other (H).

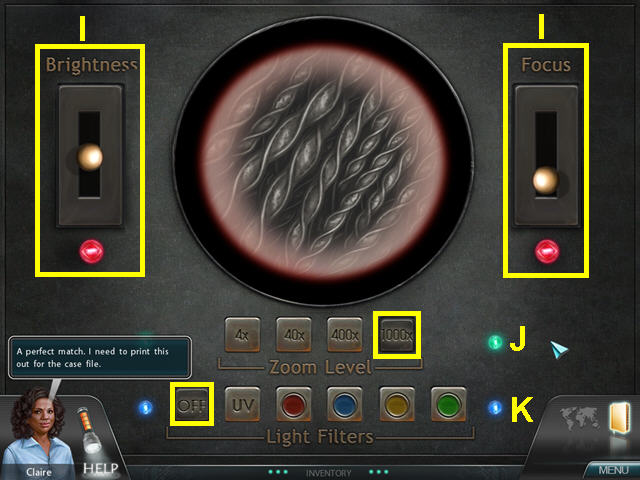
- Look at the microscope.
- Move the sliders on the brightness and focus until the light for each goes on (I).
- Push the button for 1000x – the green lights will go on (J).
- Turn the light filters off- the blue lights will go on (K).
- After Claire and Lindsay speak, you are playing as Lindsay.
- The DNA RESULTS and FIBER ANALYSIS are in your inventory.
- Enter the Mill and confront Atkins and he confesses to the accidental death of Mandy and the murder of Regina.
- Congratulations! You have completed James Patterson Women’s Murder Club: little black lies!
Epilogue
- After the end scene, return to the main menu and click on the epilogue button.

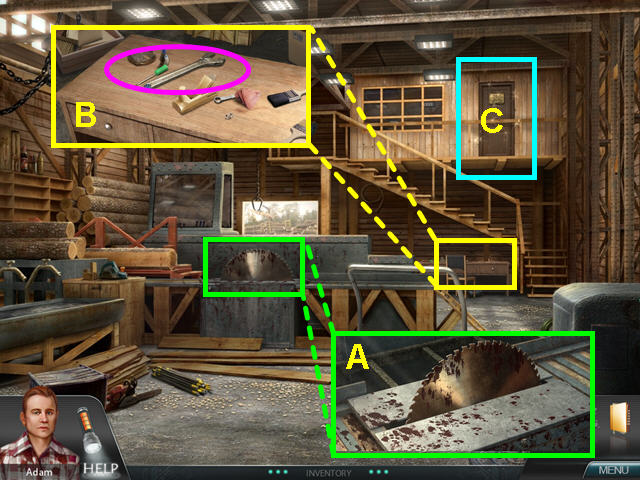
- You are now playing as Adam Atkins, 35 years ago.
- Look at the close-up of the saw to see you need bleach (A).
- Look at the close-up of the desk and take the WRENCH (B).
- Click on the sparkling door on the upper level for a hidden object scene (C).

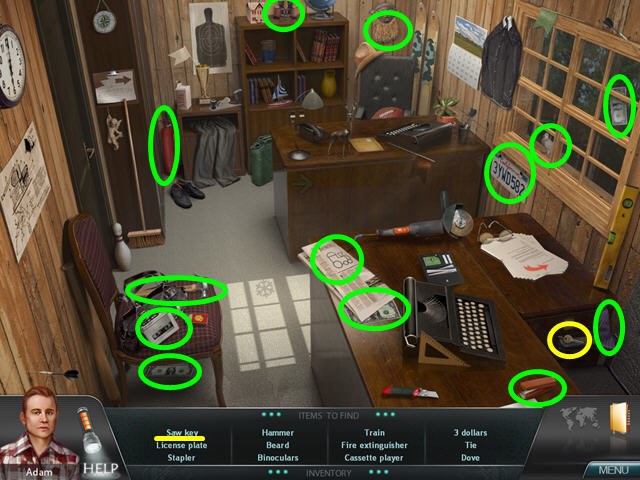
- Locate all the items on the list.
- The SAW KEY will go automatically into your inventory.
- Exit the mill.

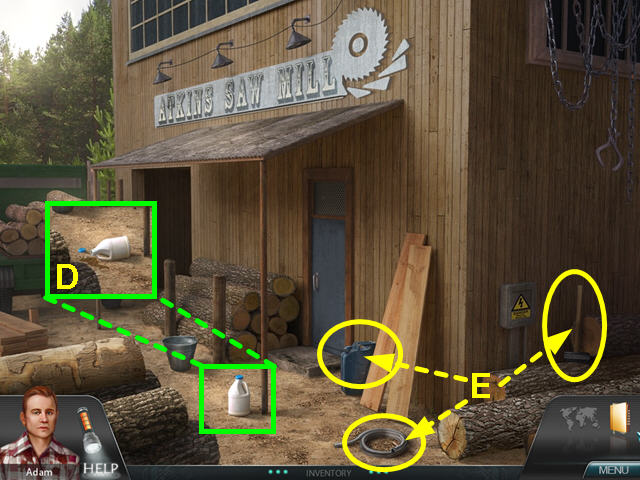
- Try to take the bleach, but you find the bottle is empty (D).
- Take the HOSE, SLEDGEHAMMER and GAS CAN (E).
- Enter the mill.

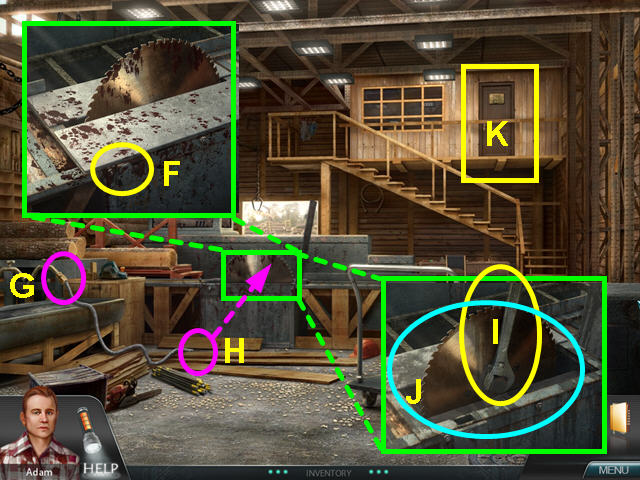
- Look at the close-up of the saw and use the SAW KEY on the keyhole to open the panel (F).
- Exit the close-up.
- Use the HOSE on the faucet (G).
- Take the end of the hose and use it on the saw (H).
- Look again at the close-up of the saw.
- Use the WRENCH on the large center bolt (I).
- Click on the wrench to move it to the right.
- Use the SLEDGEHAMMER on the wrench to finish removing the bolt.
- Take the SAW (J).
- Click on the sparkling door on the upper level for a hidden object scene (K).

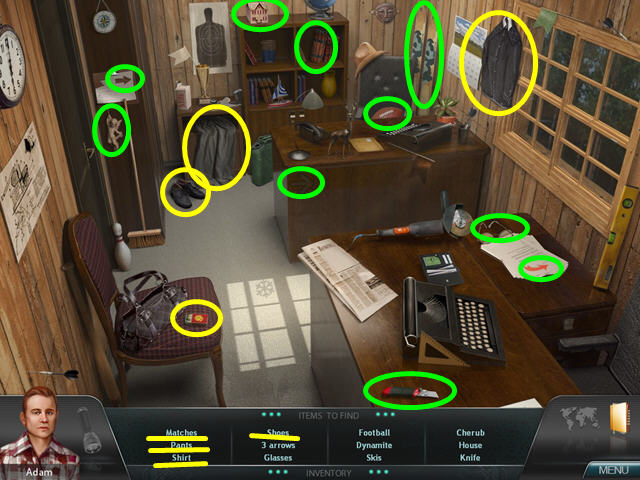
- Locate all the items on the list.
- The MATCHES, SHOES, PANTS, and SHIRT will go automatically into your inventory.
- Once you finish the scene, Adam will automatically change into the clean clothes and the bloody ones will be in your inventory.
- Exit the mill.

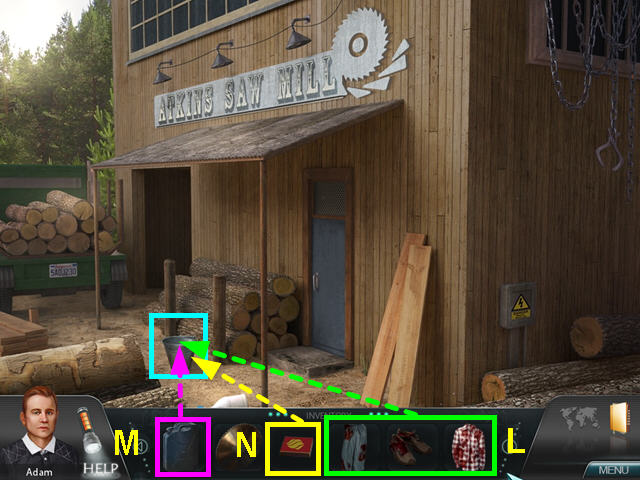
- Place the SHOES, PANTS, and SHIRT into the bucket (L).
- Use the GAS CAN on the bucket (M).
- Use the MATCHES to burn the clothes (N).




 Nightfall Mysteries: Haunted by the Past Walkthrough, Guide, & Tips
 The Secret Legacy: A Kate Brooks Adventure Walkthrough, Guide, & Tips
 Sarah Maribu and the Lost World Walkthrough, Guide, & Tips
 Haunted Hotel: Death Sentence Walkthrough, Guide, & Tips
 Royal Envoy: Campaign for the Crown Walkthrough, Guide, & Tips