Myths of the World: Spirit Wolf Walkthrough, Guide, & Tips
Myths of the World: Spirit Wolf Walkthrough

Welcome to the Myths of the World: Spirit Wolf Walkthrough
The wolf spirit still haunts… will you heed its call?
Whether you use this document as a reference when things get difficult or as a road map to get you from beginning to end, we’re pretty sure you’ll find what you’re looking for here.
This document contains a complete Myths of the World: Spirit Wolf game walkthrough featuring annotated screenshots from actual gameplay!
We hope you find this information useful as you play your way through the game. Use the walkthrough menu below to quickly jump to whatever stage of the game you need help with.
Remember to visit the Big Fish Games Forums if you find you need more help. Have fun!
This walkthrough was created by SeverineSnape, and is protected under US Copyright laws. Any unauthorized use, including re-publication in whole or in part, without permission, is strictly prohibited.
General Tips
- This is the official guide for Myths of the World: Spirit Wolf.
- The guide will not mention each time you have to zoom into a scene; the screenshots will show each zoom scene.
- We will use the acronym HOP for Hidden-object puzzles. Interactive objects will be color-coded and some will be numbered. Please follow the numbers in sequence.
- HOPs may be random: our lists may vary from yours.
- Use the binoculars in the bottom right of the screen to zoom into areas indicated by a binoculars icon.
Chapter 1: The Glowing Amulet

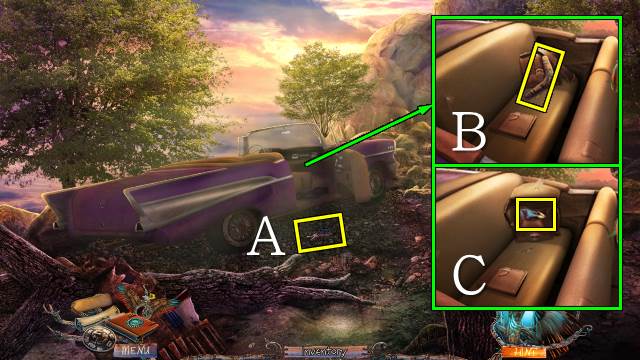
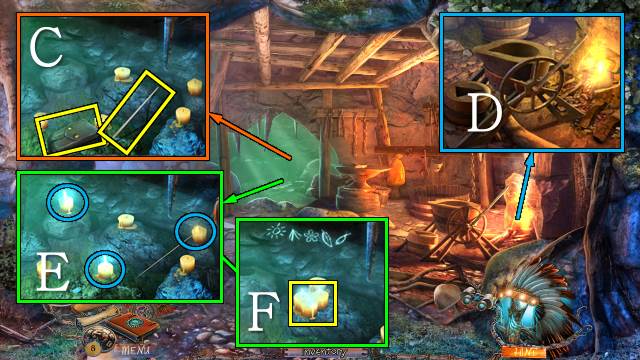
- Take the TRUNK KEYS (A).
- Take the BOOMERANG (B); open the bag and take the BATTERIES (C).

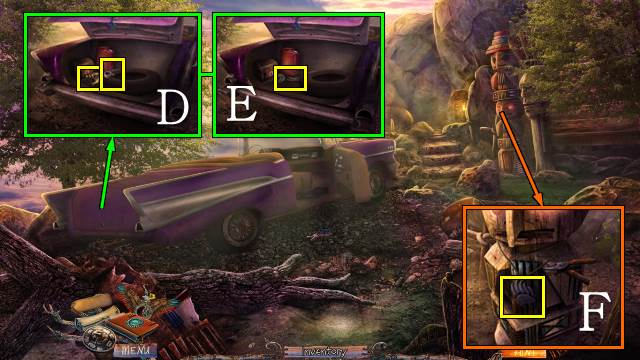
- Open the trunk with the TRUNK KEYS and take the DUCT TAPE and the Binoculars (D); move the tire and take the GARDEN SHEARS (E).
- Cut the string with the GARDEN SHEARS and take the WOODEN BEAR PAW (F).
- Walk forward.

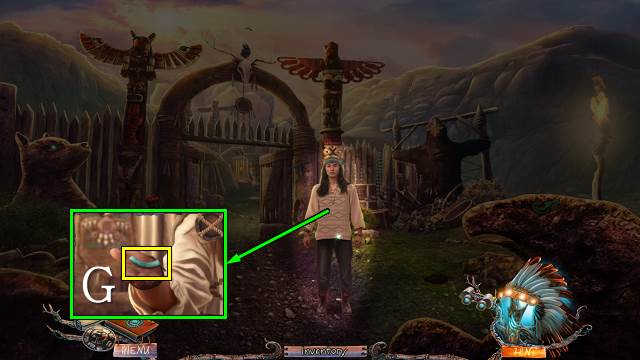

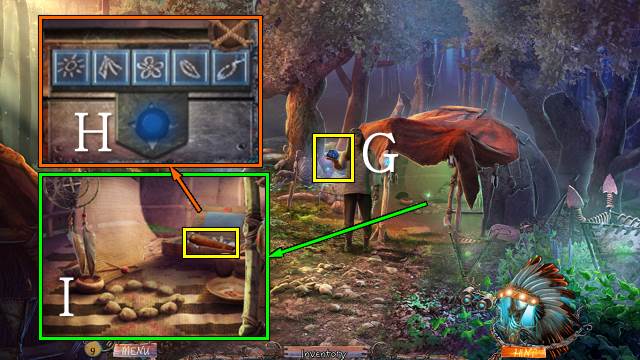
- Talk to Jesse; take the CROW TILE (G).
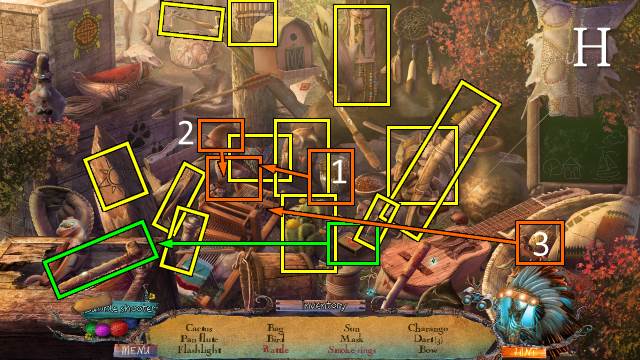
- Play the HOP (H).
- You receive the FLASHLIGHT.

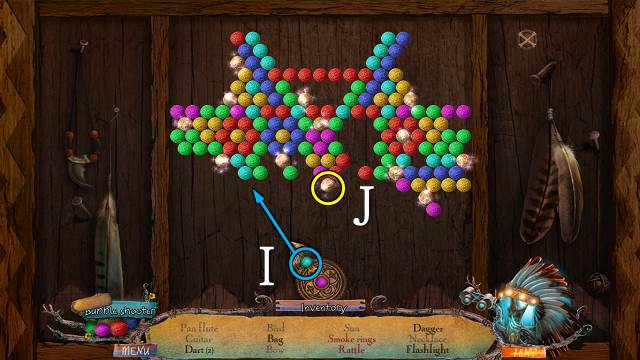
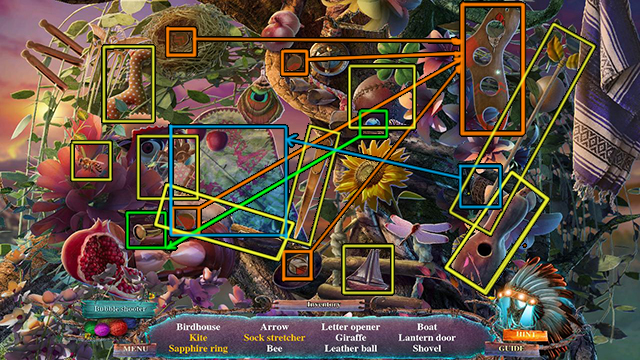
- Instead of HOPS, you can choose to play bubble shooter games.
- Shoot the bubbles to create groups of three or more of the same color (I).
- For every three gold bubbles you remove from the board (J), a HOP item will be removed from the list.

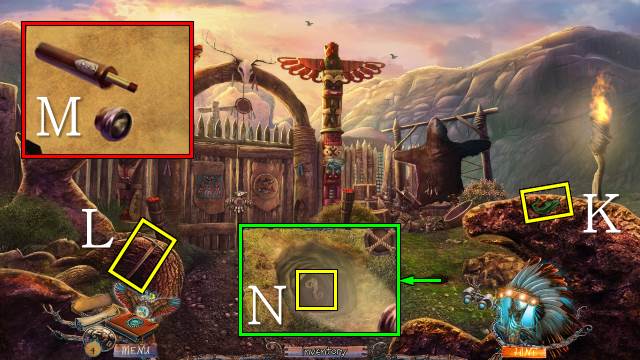
- Take the WOODEN FISH (K) and PICKAXE (L).
- Access the FLASHLIGHT and put the BATTERIES in it (M); take the FLASHLIGHT WITH BATTERIES.
- Light the hole with the FLASHLIGHT WITH BATTERIES; take the WOODEN LIZARD (N).

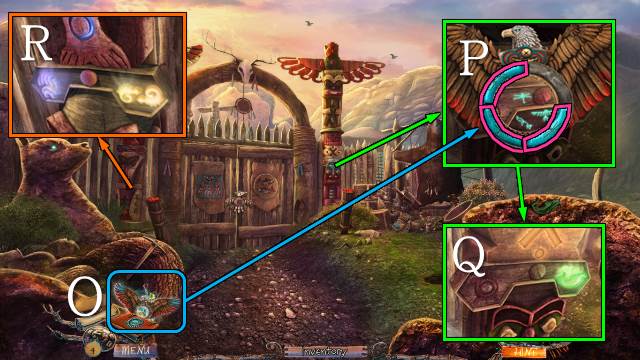
- Access your Amulet (O) and put the CROW TILE on it.
- Use the Amulet on the symbols and select the three symbols (P); put the WOODEN FISH on the totem pole (Q).
- Put the WOODEN BEAR PAW and WOODEN LIZARD on the other totem pole (R).

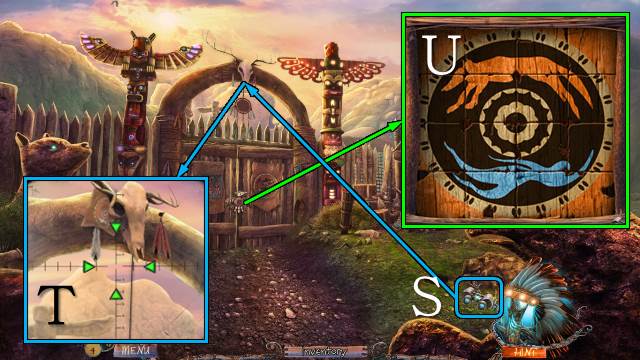
- Use the Binoculars on the skull for a mini-game (S).
- Focus the binoculars by moving the arrows until they’re all green (T).
- Play the mini-game on the gate.
- Swap the tiles around to make a complete picture (U).
- Walk forward.

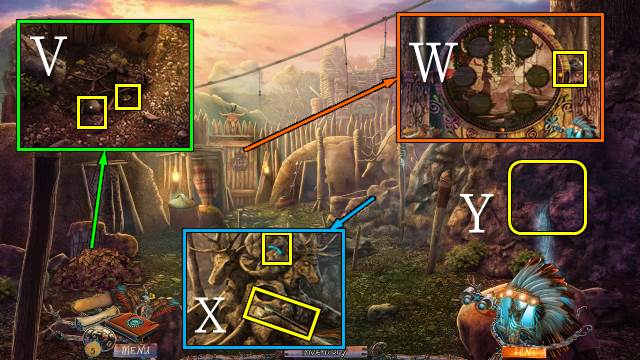
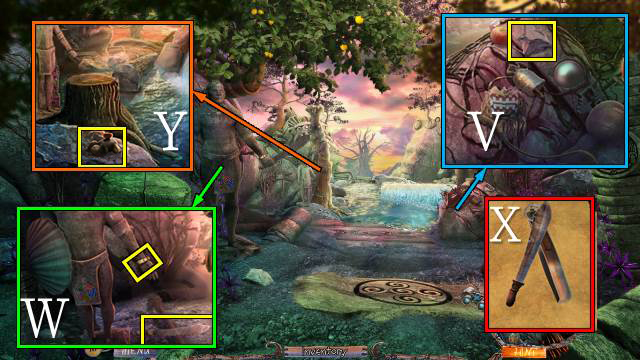
- Move the leaves and take the LEATHER THREAD and PUZZLE PIECES 1/6 (V).
- Take FLINT 1/2 (W).
- Take the DRUMSTICK and DEER TILE (X).
- Break the rock with the PICKAXE (Y).

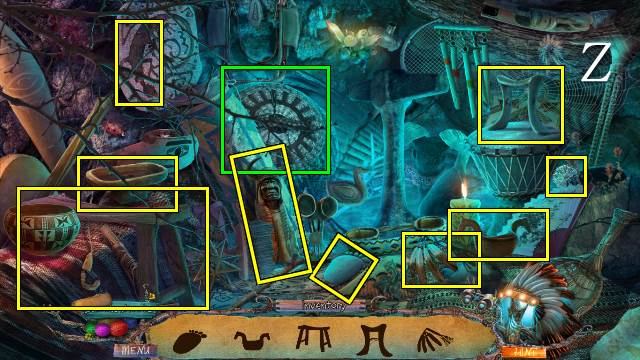
- Play the HOP (Z).
- You receive some LEATHER.

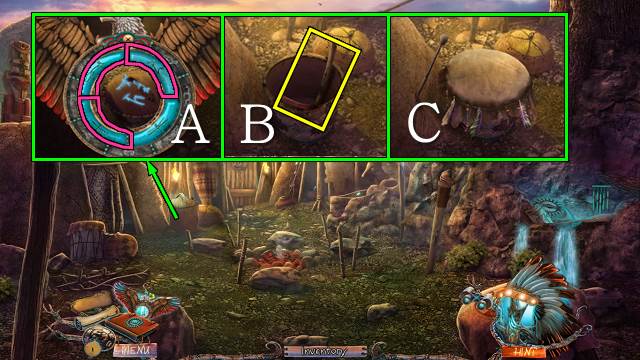
- Put the DEER TILE on the Amulet, use it on the symbols and select the three symbols (A).
- Open the basket and take the SICKLE (B); put the LEATHER and LEATHER THREAD on the basket and hit it with your DRUMSTICK (C).
- Go right.

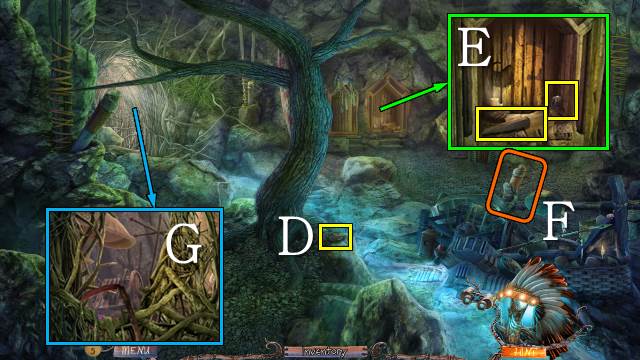
- Take PUZZLE PIECES 2/6 (D).
- Take the WEDGE and FLINT 2/2 (E).
- Light the torch with your FLINT (F).
- Cut the roots with the SICKLE (G).

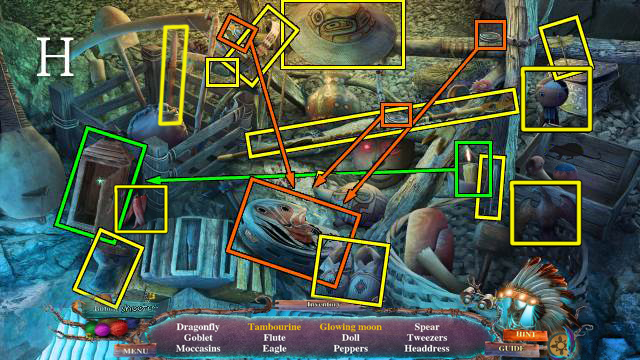
- Play the HOP (H).
- You receive the TWEEZERS.
- Go left.

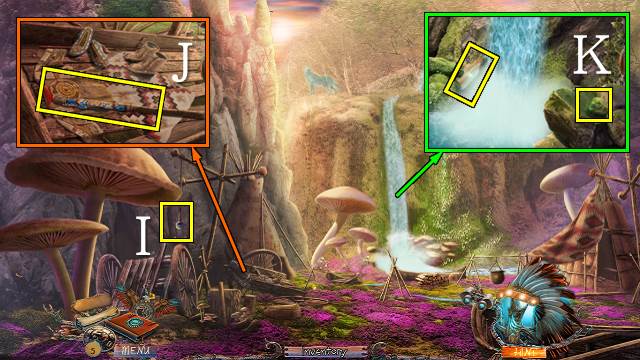
- Take the RATTLE DRUM (I).
- Take the CANE (J).
- Take the ROCK and MESSAGE IN A BOTTLE (K).

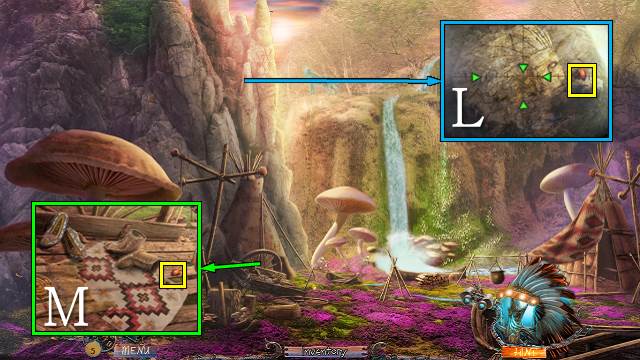
- Use the Binoculars on the rock and play the mini-game as before (L); use the BOOMERANG.
- Knock over the boot and take the RED GEM (M).
- Walk down.

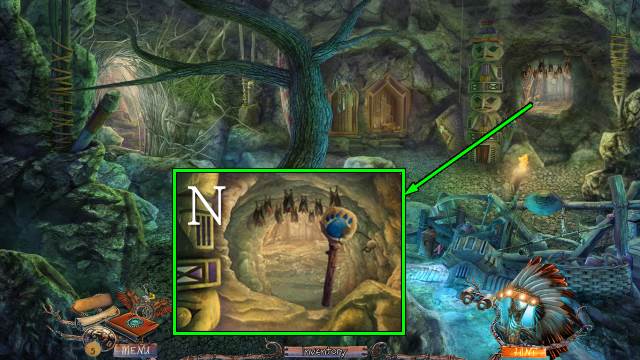
- Scare off the bats with the RATTLE DRUM (N).
- Walk forward.

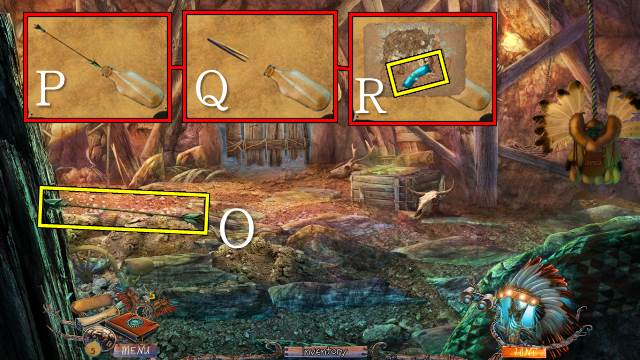
- Take the ARROW (O).
- Access the MESSAGE IN A BOTTLE and remove the cork with the ARROW (P) and the message with the TWEEZERS (Q); take the CRAB TILE and EMPTY BOTTLE (R).

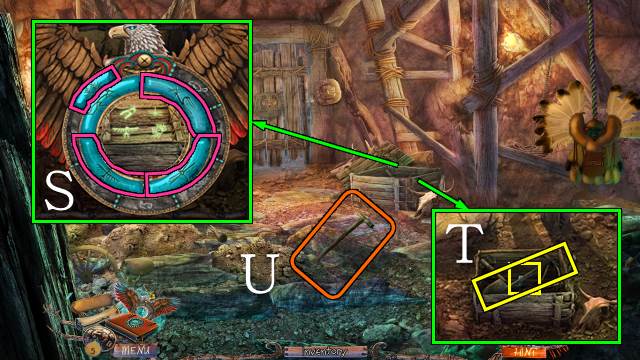
- Put the CRAB TILE on the Amulet and use it on the crate; select the four symbols (S).
- Open the crate with the WEDGE and ROCK; take the SHOVEL and LIZARD TILE (T).
- Use the SHOVEL three times (U).

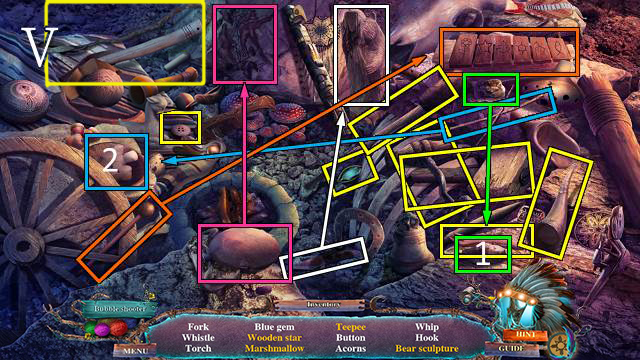
- Play the HOP (V).
- You receive the BLUE GEM.

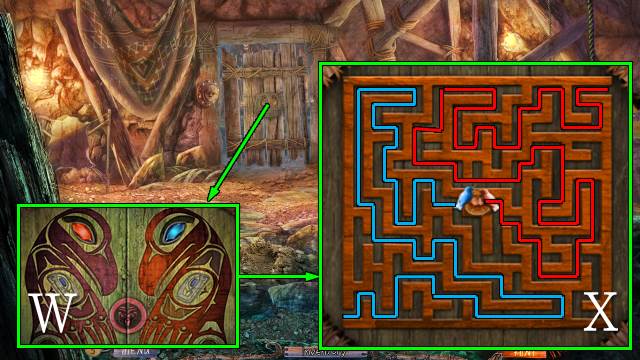
- Use the BLUE GEM and RED GEM on the door for a mini-game (W).
- Use the blue arrows to move the blue bird and the red arrows to move the red bird to the center (X).

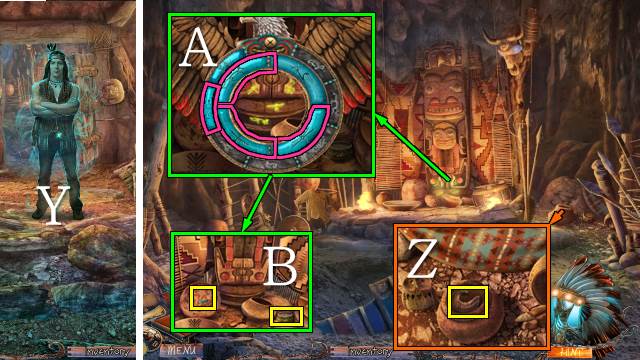
- Talk to Misu (Y).
- Walk forward.
- Take the NICHE PIECE (Z).
- Put the LIZARD TILE on the Amulet and use it on the symbols; select the four symbols (A).
- Take the BOWL OF LARD and SCORPION TILE (B).

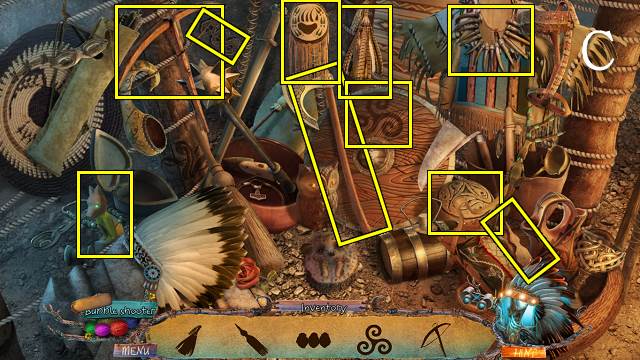
- Play the HOP (C).
- You receive the FOUNTAIN PIECE.

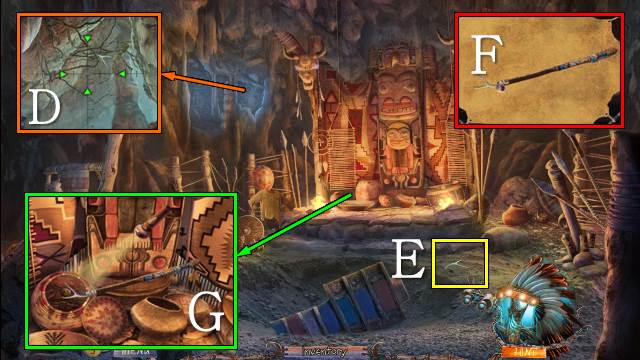
- Use the Binoculars in the distance and play the mini-game as before (D); use the BOOMERANG.
- Take the ANTLERS (E).
- Access the CANE and put the ANTLERS and DUCT TAPE on it; take the LONG HOOK (F).
- Open the basket, use the FLASHLIGHT and take PUZZLE PIECES 3/6 with the LONG HOOK (G).
- Walk down twice.

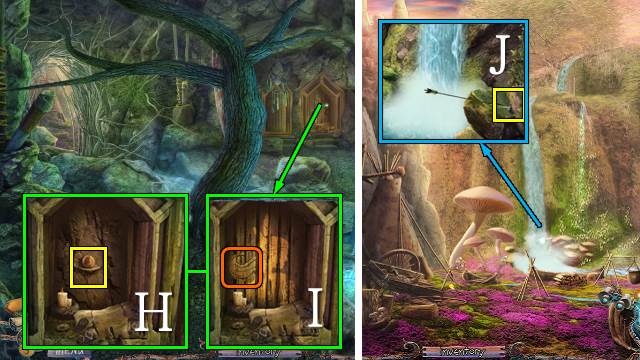
- Put the NICHE PIECE in the niche (H); take PUZZLE PIECES 4/6 (I).
- Walk left.
- Remove PUZZLE PIECES 5/6 with the ARROW (J).
- Walk down twice.

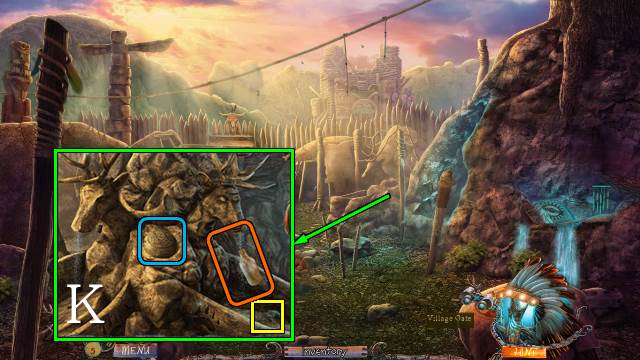

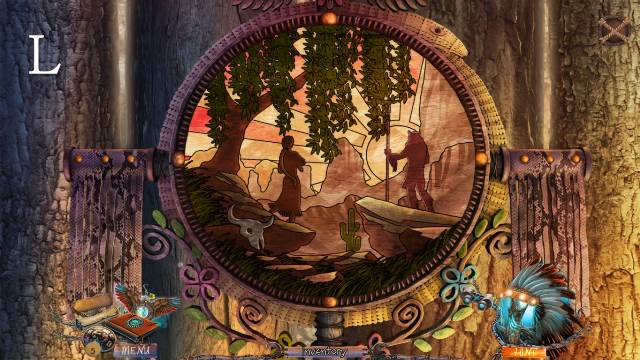
- Put the FOUNTAIN PIECE on the fountain and take PUZZLE PIECES 6/6; fill the EMPTY BOTTLE to receive a BOTTLE OF WATER (K).
- Put the PUZZLE PIECES on the door for a mini-game.
- Drag and drop the discs into place; select a disc to turn it (L).
- Walk forward.
Chapter 2: Ayana’s Dream Catcher

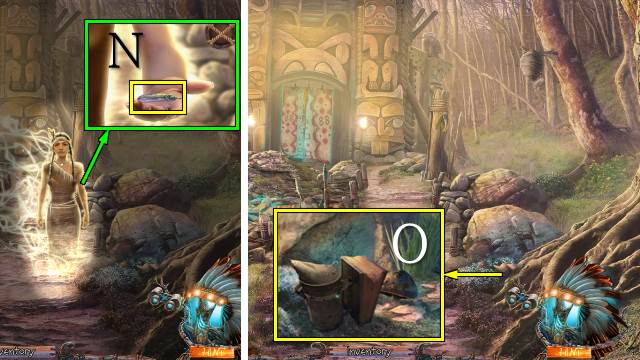
- Talk to Ayana; take the BLUE GEM FEATHER (N).
- Take the EMPTY BEE SMOKER (O).

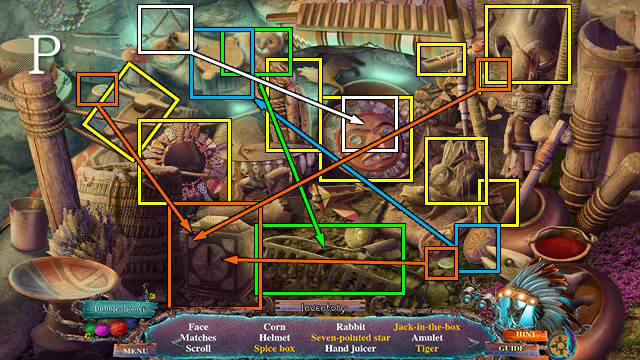
- Play the HOP (P).
- You receive the MATCHES.
- Walk forward.

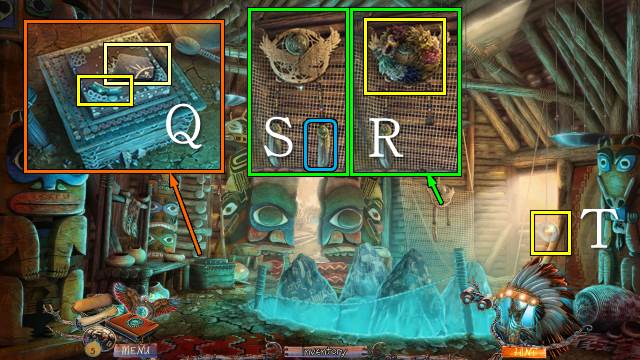
- Take the Story Tile and RABBIT TILE (Q).
- Take the DRY HERBS (R); put the BLUE GEM FEATHER on the dream catcher (S).
- Take the STONE WEIGHT (T).
- Walk forward.

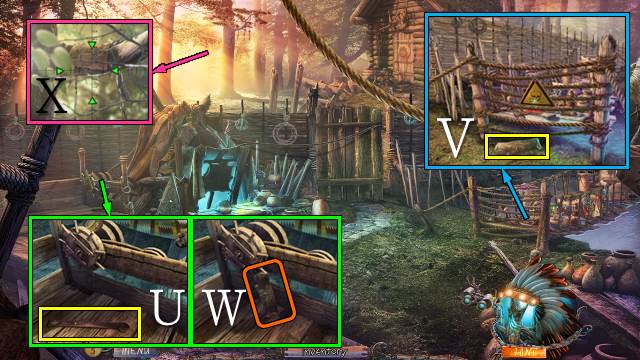
- Take the DECORATIVE HANDLE (U) and grease the mechanism with the BOWL OF LARD to receive an EMPTY BOWL; try to turn the wheel.
- Take the SMALL LOG (V).
- Put the SMALL LOG under the mechanism (W).
- Look through the Binoculars and play as before (X).
- Walk forward.

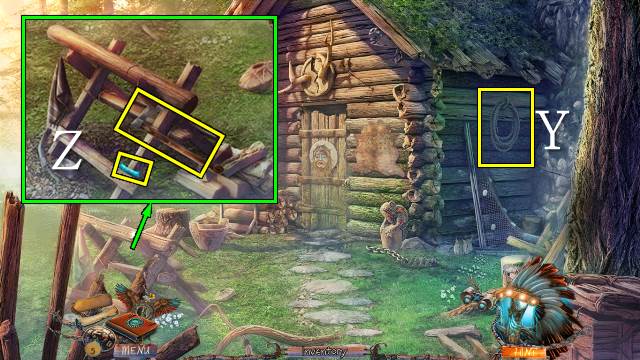
- Take the ROPE (Y).
- Put the DECORATIVE HANDLE on the blade to receive the TOMAHAWK; take the BAT TILE (Z).

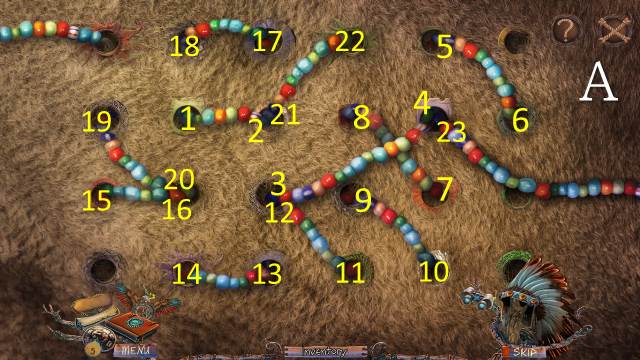
- Play the mini-game on the wall.
- Remove the string of beads by pulling it through the holes in the right order (A).
- You receive the BEADS.
- Walk down.

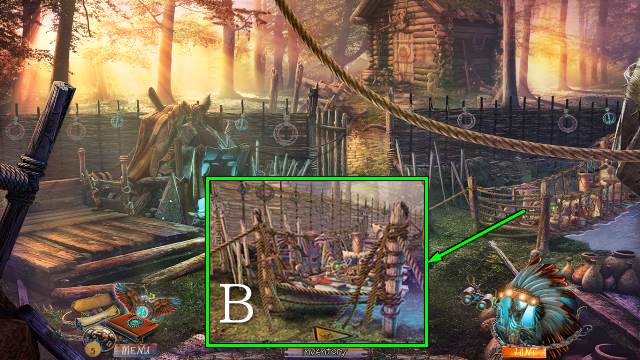

- Cut the ropes three times with the TOMAHAWK (B).
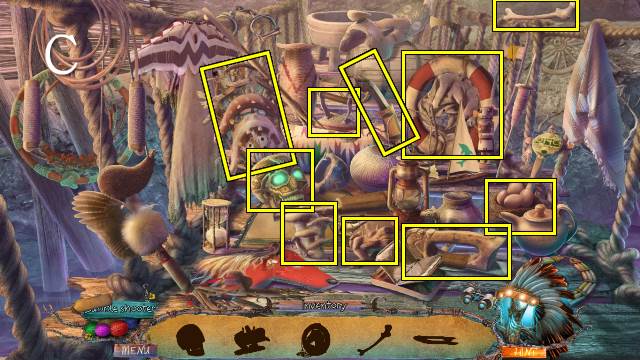
- Play the HOP (C).
- You receive the LEATHER HOLSTER.
- Walk forward.

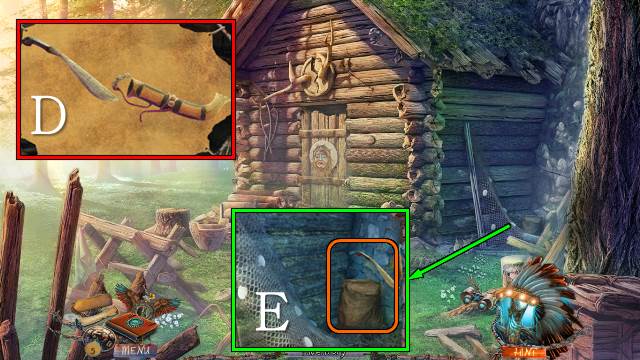
- Access the LEATHER HOLSTER and take the SHARP KNIFE (D).
- Cut off some BURLAP CLOTH with the SHARP KNIFE (E); use the EMPTY BOWL to get a BOWL OF CLAY DUST.
- Go to the Village Garden.

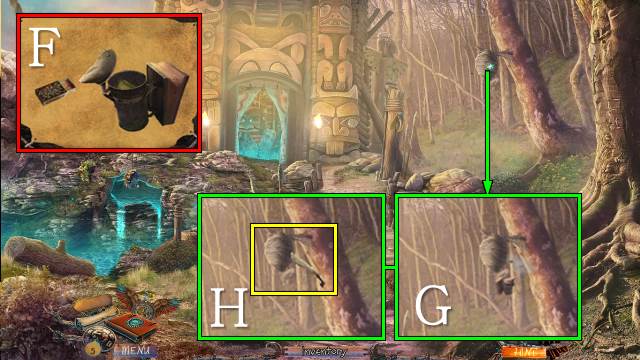
- Access the EMPTY BEE SMOKER, open it and put the BURLAP CLOTH in it; light it with the MATCHES to receive a FILLED BEE SMOKER (F).
- Use the FILLED BEE SMOKER (G) and SHARP KNIFE (H) on the nest; take the CHUNK OF WAX.
- Go to the area Outside the Lodge.

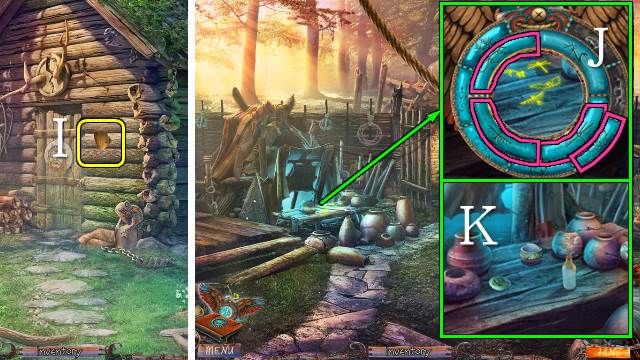
- Use the CHUNK OF WAX on the paw print to get a WOLF PAW MOLD (I).
- Walk down.
- Put the RABBIT TILE, BAT TILE and SCORPION TILE on the Amulet; select the four symbols (J).
- Put the BOTTLE OF WATER, BOWL OF CLAY DUST and WOLF PAW MOLD on the table; pour the water in the bowl, put the clay on the mold and take the WOLF PAW (K).
- Walk down.

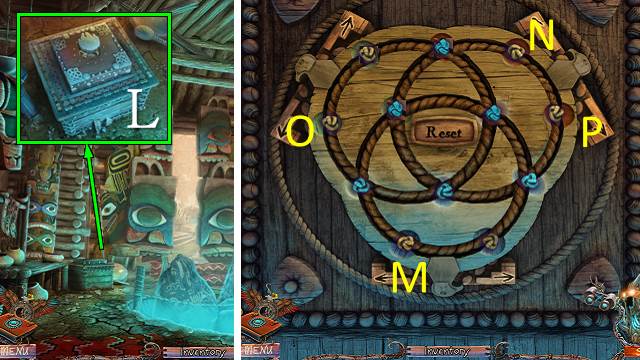

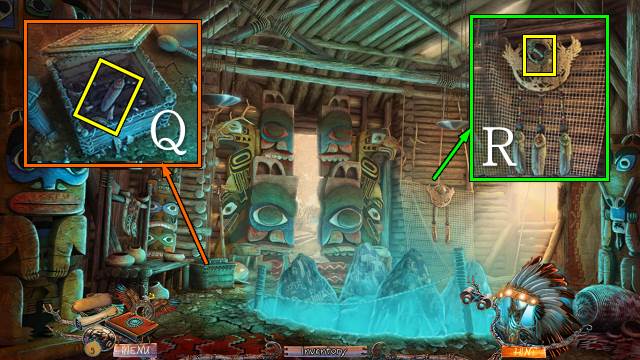
- Put the WOLF PAW on the chest (L).
- Access the chest for a mini-game.
- Use the arrows to turn the circles until all blue knots are on an intersection.
- Solution: M, N, N, O, O, M, P.
- Take the RED GEM FEATHER (Q).
- Put the BEADS and RED GEM FEATHER on the dream catcher; take the MUSTANG TILE (R).
Chapter 3: A Cure for Jesse

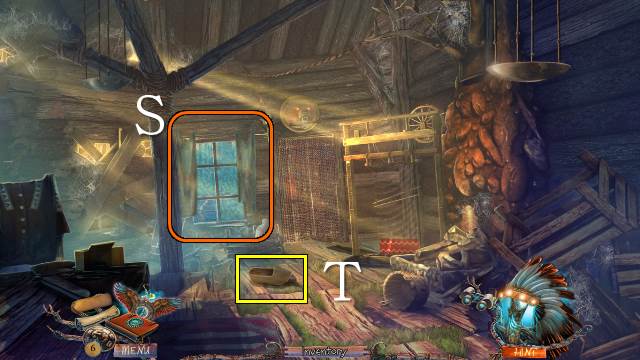
- Walk forward.
- Open the curtains (S).
- Take the WOODEN CLOG (T).

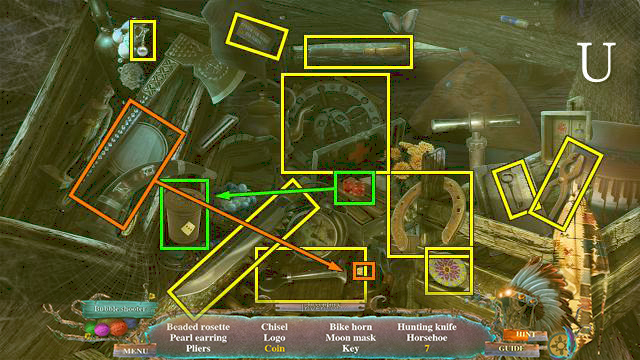
- Play the HOP (U).
- You receive the PLIERS.

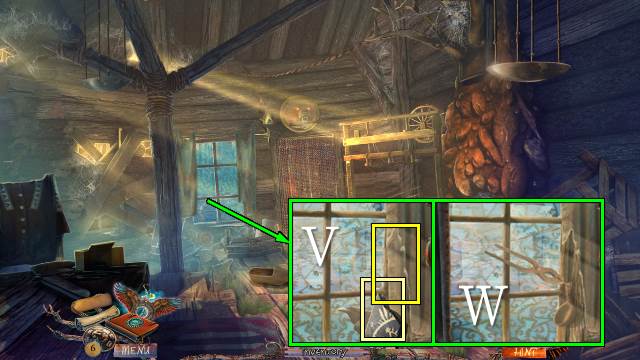
- Take the Story Tile and pull off a PIECE OF CLOTH (V); remove NAIL 1/4 with the PLIERS and take the LADLE (W).
- Walk forward.

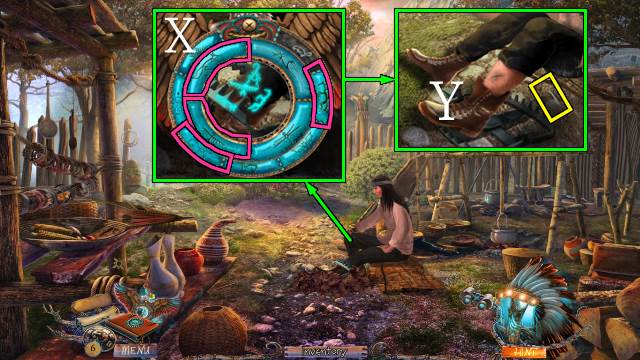
- Put the MUSTANG TILE on the Amulet and use it on Jesse’s leg; select the four symbols (X).
- Release Jesse’s leg and roll up his trouser leg; move the sand and take NAIL 2/4 (Y).

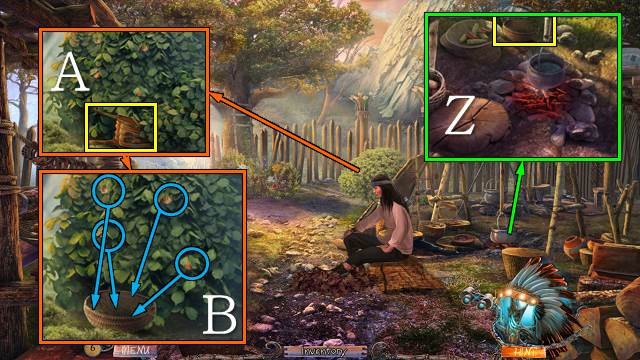
- Take the BASKET (Z).
- Move the leaves and take the BROKEN BELLOWS (A); put the BASKET under the shrub, drag the hazelnuts into it and take the BASKET WITH NUTS (B).

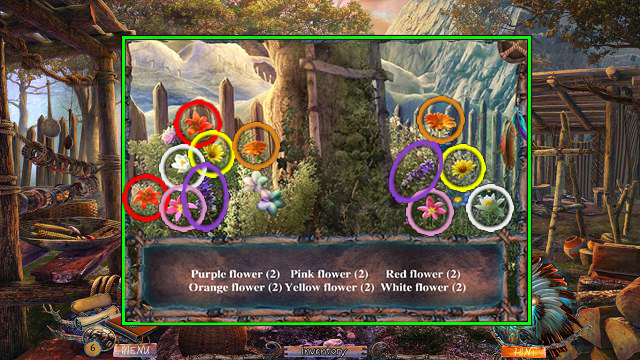
- Play the mini-HOP (C).
- You receive some LAVENDER.
- Walk forward.

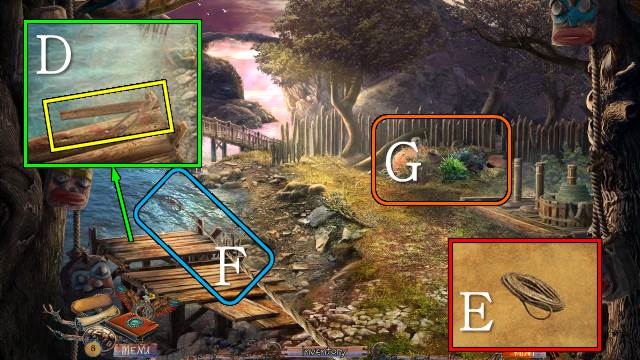
- Remove NAIL 3/4 with the PLIERS and take LADDER PART 1/2 (D).
- Access the ROPE and turn it into a LASSO (E).
- Retrieve the LOOM WHEEL with the LASSO (F).
- Move the shrubs three times (G).

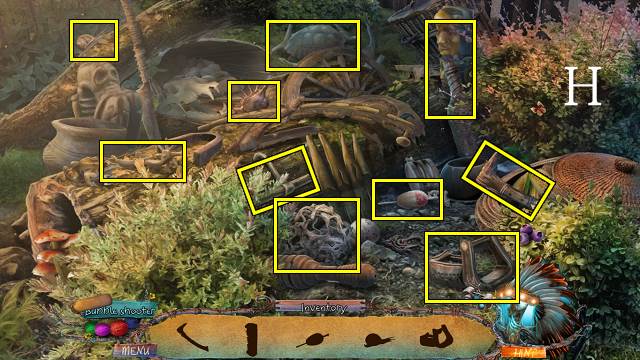
- Play the HOP (H).
- You receive the MEAT HOOK.

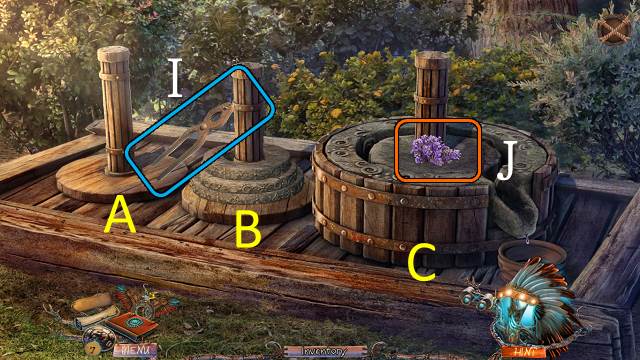
- Remove NAIL 4/4 with the PLIERS (I) and put the STONE WEIGHT and LAVENDER (J) on the press for a mini-game.
- Move the stone rings to the peg on the right; you can only move one weight at a time, and you can only stack smaller weights on bigger ones.
- Solution: B-A, B-C, A-C, B-A, C-B, C-A, B-A, B-C, A-C, A-B, C-B, A-C, B-A, B-C, A-C.
- You receive the LAVENDER OIL.
- Walk down twice.

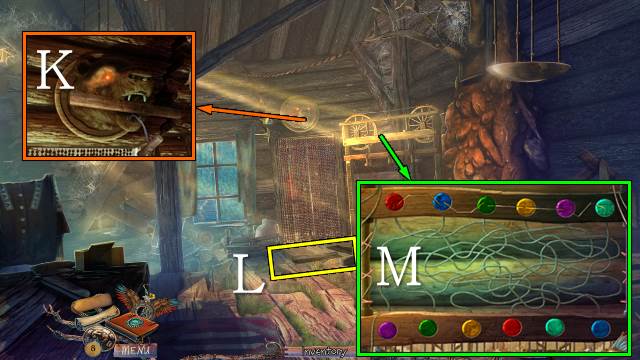
- Open the bear’s mouth with the MEAT HOOK (K).
- Take LADDER PART 2/2 (L).
- Put the LOOM WHEEL on the loom and access it for a mini-game (M).
- Put the colored discs in the holes at the top to complete the pattern.
- Then follow the threads on the loom and put a disc of the same color on the other end of the thread.
- You receive a NEEDLE.
- Walk forward.

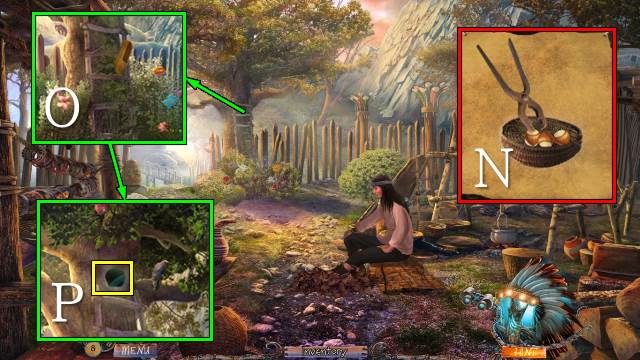
- Access the BASKET WITH NUTS and crack them with the PLIERS; take the NUTS (N).
- Put the LADDER PARTS and NAILS on the ladder, and nail them in place with the WOODEN CLOG (O); give the NUTS to the bird and take the BEAVER TILE (P).
- Walk forward.

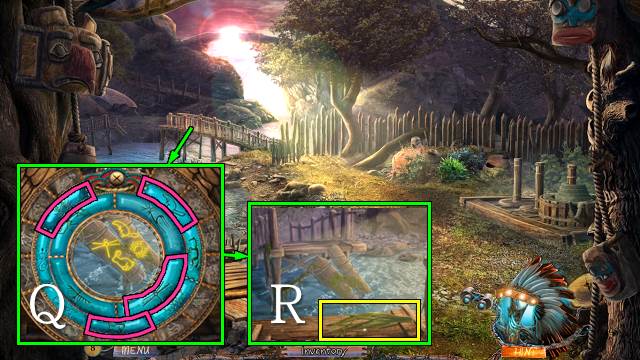
- Put the BEAVER TILE on the Amulet and use it on the bridge; select the four symbols (Q).
- Take the SEAWEED (R).
- Walk down.

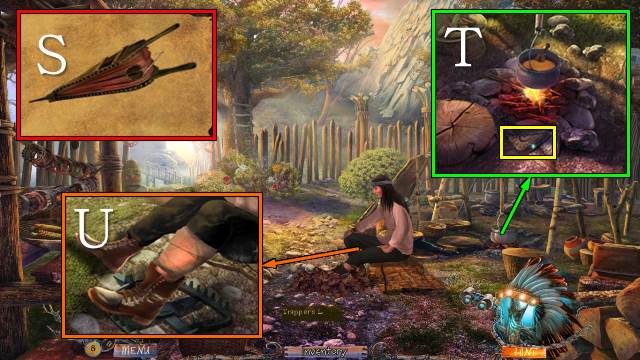
- Access the BROKEN BELLOWS and fix it with the NEEDLE; take the BELLOWS (S).
- Use the BELLOWS on the fire, put the LAVENDER OIL, DRY HERBS and SEAWEED in the pot and take the STONE FRAGMENT; stir with the LADLE and dip the PIECE OF CLOTH in the potion to get a SOAKED BANDAGE (T).
- Put the SOAKED BANDAGE on Jesse’s leg (U).

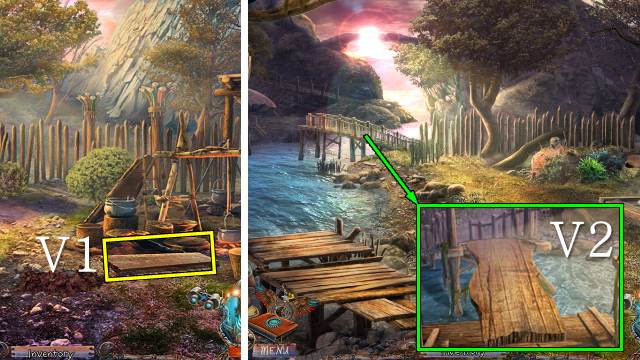
- Take the STURDY BOARD (V1).
- Walk forward.
- Put the STURDY BOARD across the gap (V2).
- Go left.
Chapter 4: The Shaman’s Tepee

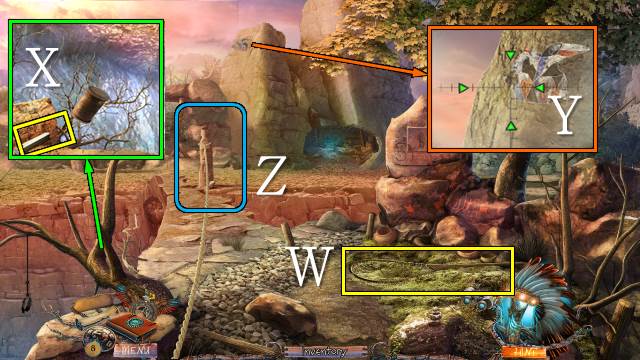
- Take the TORN LANDING NET (W).
- Take the CHALK (X).
- Look through the Binoculars and play as before (Y).
- Throw the LASSO across the bridge twice (Z).
- Move forward for a mini-game.

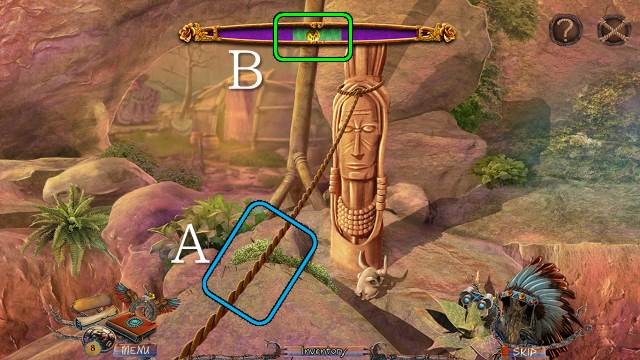
- Pull the rope (A) when the ball passes the green area (B); do this three times.
- Walk forward.

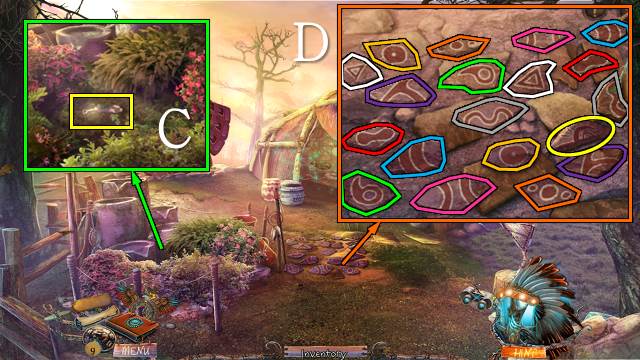
- Take the Story Tile; move the shrubs until you can take SILVER FEATHER 1/2 (C).
- Play the mini-game.
- Select pairs of matching tiles (D).
- Take the STONE PIECE.

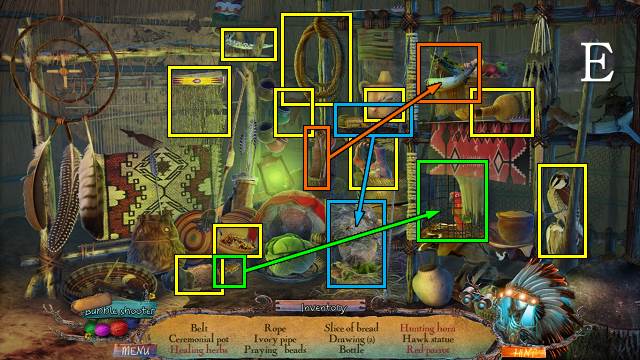
- Play the HOP (E).
- You receive the BREAD.
- Walk forward.

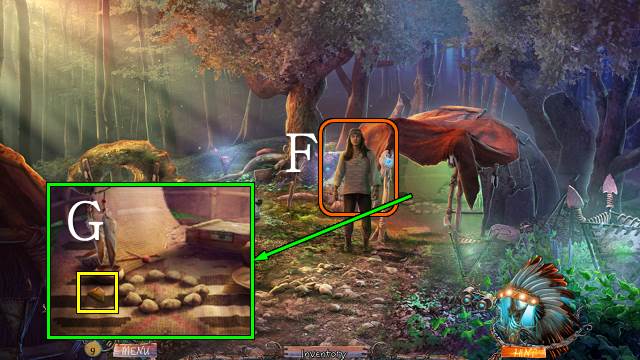
- Talk to Jesse (F).
- Take the BROKEN KEY (G).

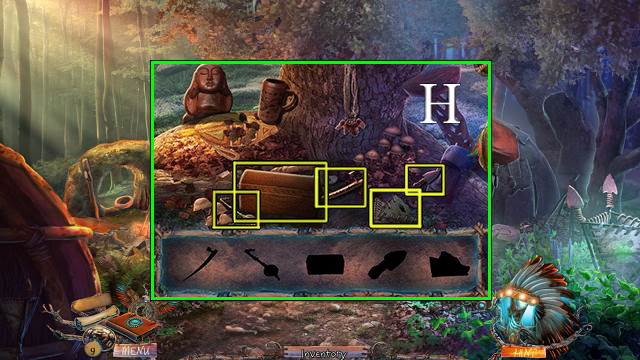
- Move the leaves and play the mini-HOP (H).
- You receive the SMALL CHEST.
- Walk down twice.

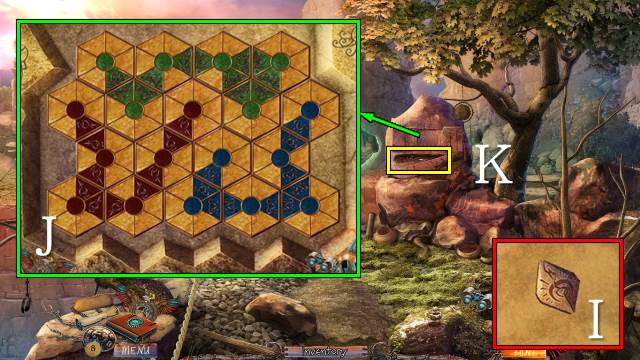
- Access the STONE FRAGMENT and put the STONE PIECE on it; take the CARVED STONE SYMBOL (I).
- Put the CARVED STONE SYMBOL on the rock for a mini-game.
- Move the tiles around to make unbroken strings of colored segments (J).
- Take the BEAD NECKLACE (K).
- Walk down.

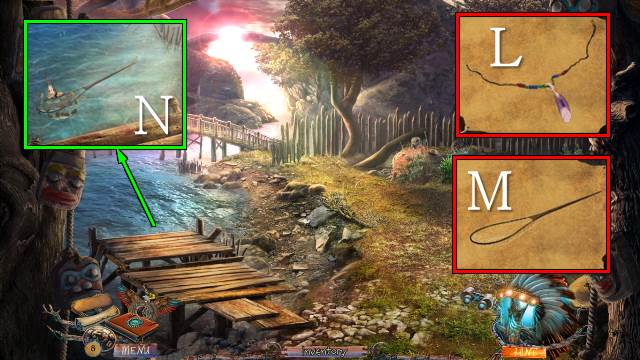
- Access the BEAD NECKLACE, untie it and take SILVER FEATHER 2/2, the NECKLACE BEADS and SINEW ROPE (L).
- Access the TORN LANDING NET and fix it with the SINEW ROPE; take the LANDING NET (M).
- Throw the BREAD in the water and catch a FISH with the LANDING NET (N).
- Go left and right.

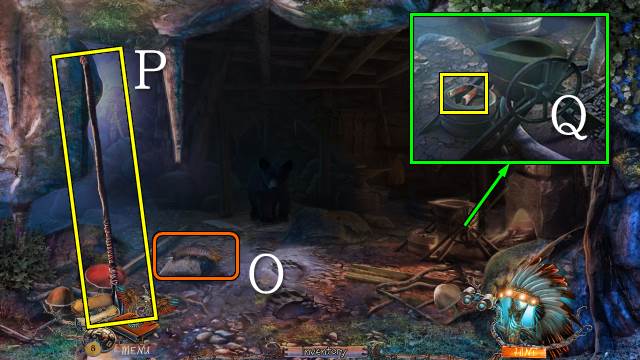
- Throw the FISH into the cave (O).
- Take the SPEAR (P).
- Take the MAGNET (Q).
- Walk down.

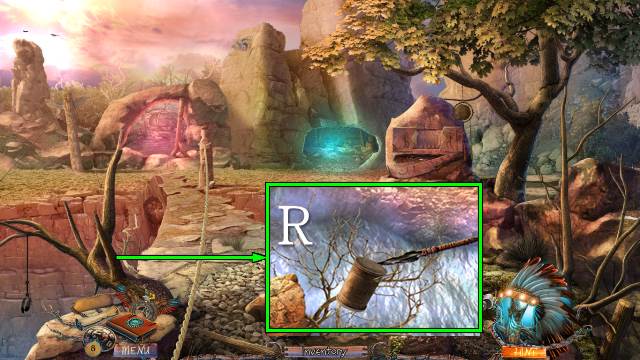
- Retrieve the METAL BOX with the SPEAR (R).
- Walk forward.

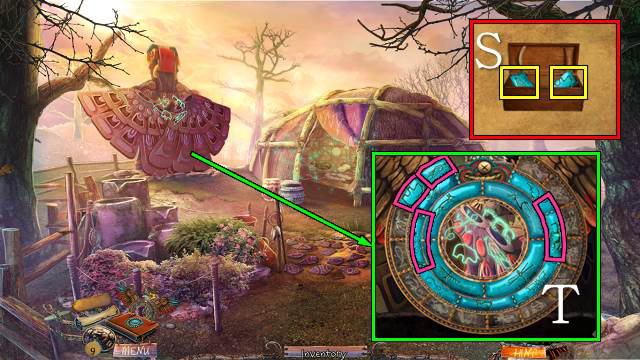
- Access the SMALL CHEST, open it and take the BEAR TILE and EAGLE TILE (S).
- Put the BEAR TILE and EAGLE TILE on the Amulet and use it on the totem pole; select the four symbols (T).

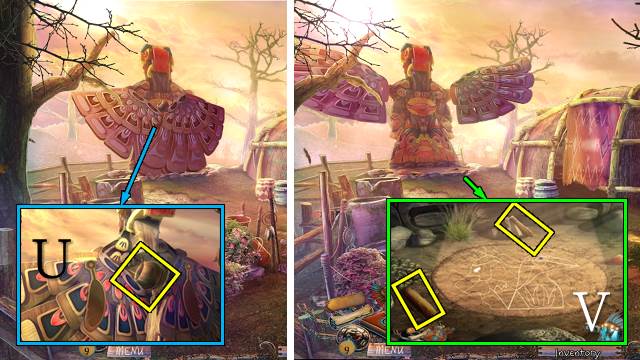
- Take the MORTAR and put the SILVER FEATHERS on the totem pole (U).
- Take the PESTLE and EAR OF CORN (V).
- Walk forward.

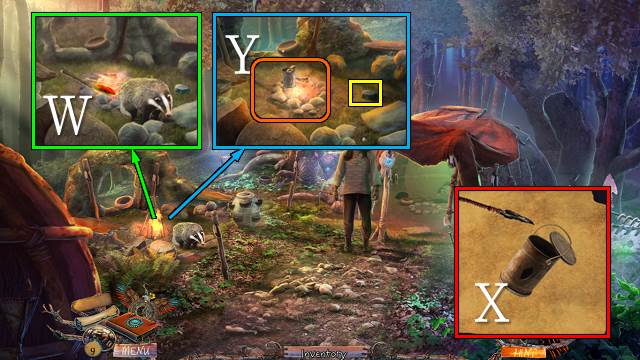
- Throw the EAR OF CORN on the fire (W).
- Access the METAL BOX and pierce it with the SPEAR; take the PIERCED METAL BOX (X).
- Take the COAL and a GLOWING EMBER with the PIERCED METAL BOX (Y).
- Go to the Bear’s Cave.

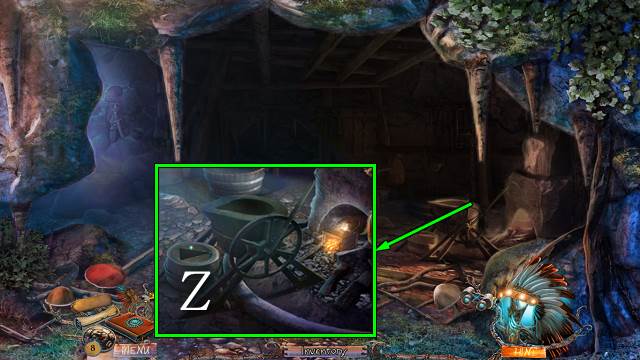
- Light the fire with the GLOWING EMBER (Z).

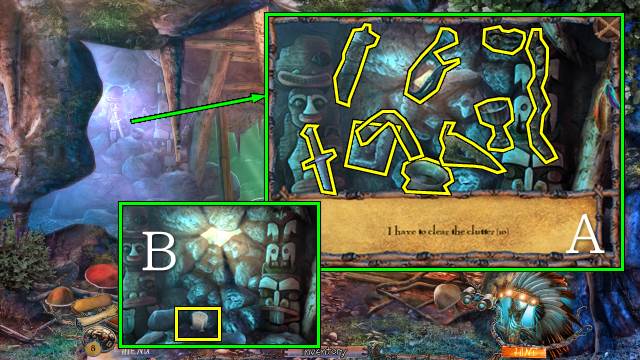
- Play the mini-HOP (A).
- Take the CANDLE (B).

- Take the POUCH and TAPER (C).
- Light the TAPER in the fire to get a LIT STICK (D).
- Put the CANDLE down and light three candles with the LIT STICK (E); take the BLUE CANDLES (F).
- Go to the Shaman’s Tepee.

- Give the BLUE CANDLES to Jesse.
- Take the BLUE STONE (G).
- Move the tiles according to the code from the Bear’s Cave (H); open the box and take the DYNAMITE STICK (I).
- Walk down.

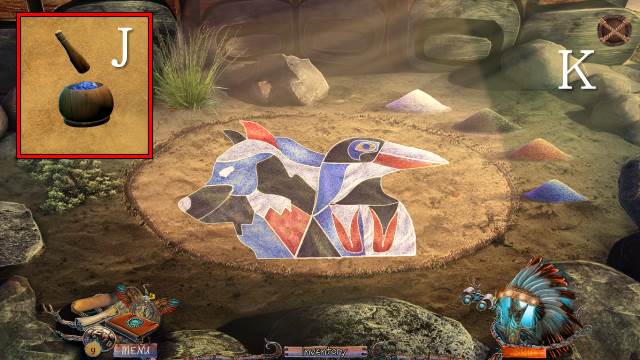
- Access the MORTAR and put the PESTLE in it; grind the CHALK to get WHITE POWDER, the COAL to get RED POWDER and the BLUE STONE to get the BLUE POWDER (J).
- Put the BLUE POWDER, BLACK POWDER and WHITE POWDER on the sand for a mini-game.
- Color the drawing according to the example from your journal (K).

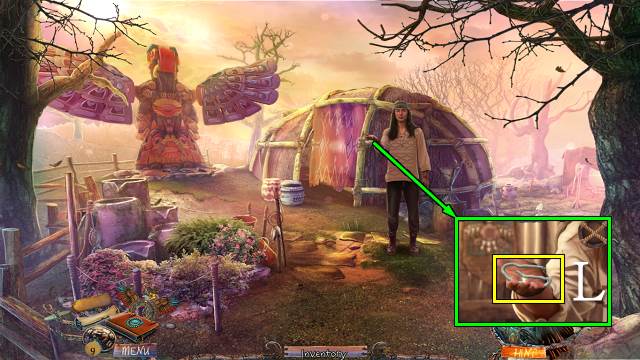
- Take the WICK (L).
- Go to the Bear’s Cave.

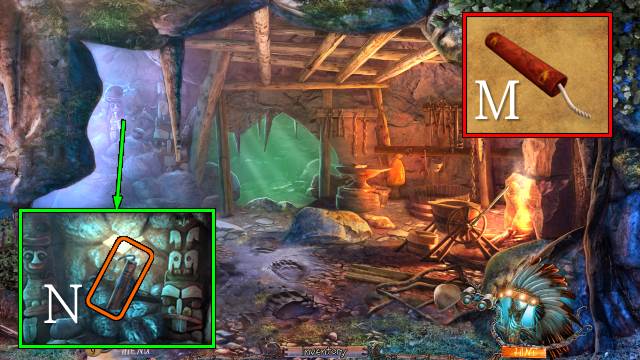
- Access the DYNAMITE STICK and attach the WICK to it; take the DYNAMITE (M).
- Put the DYNAMITE among the rocks and light it with the LIT STICK (N).
- Go left.

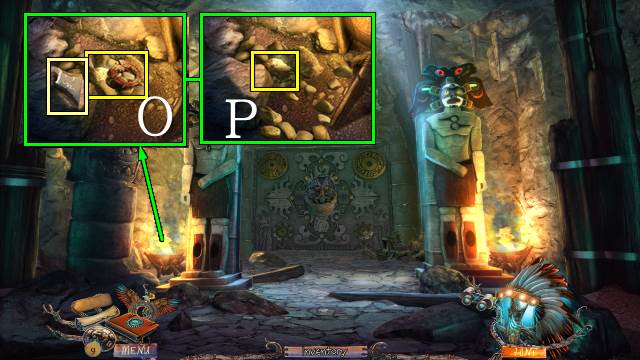
- Take the Story Tile and ALTARPIECE 1/2 (O); drag-and-drop the stones aside until you can take the GOLD NUGGET (P).

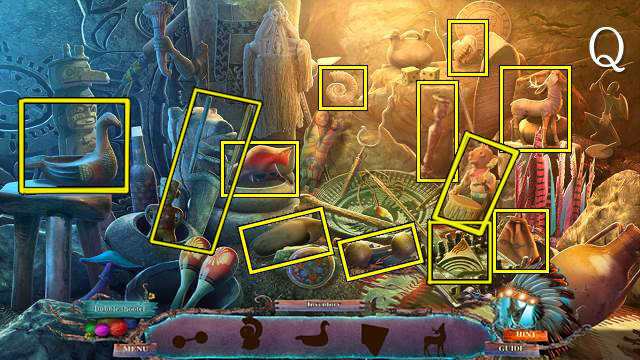
- Play the HOP (Q).
- You receive BROKEN KEY 2/2.
- Walk down.

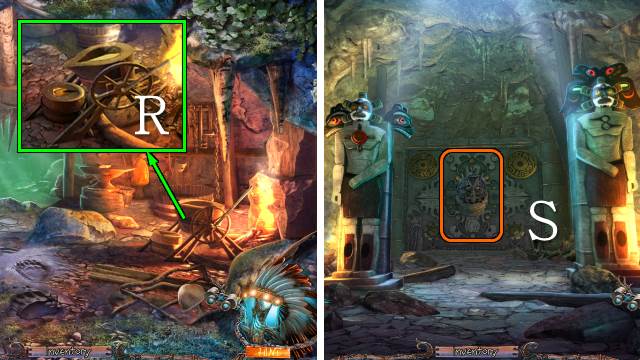

- Put the BROKEN KEY into the mold and the GOLD NUGGET into the crucible; tip the crucible to receive a GOLDEN KEY (R).
- Go left.
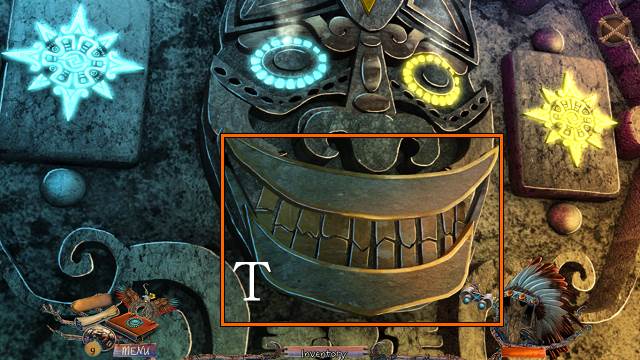
- Put the GOLDEN KEY on the gate for a mini-game (S).
- Match the upper teeth to the bottom teeth (T).
- Walk forward.
Chapter 5: The Lost City

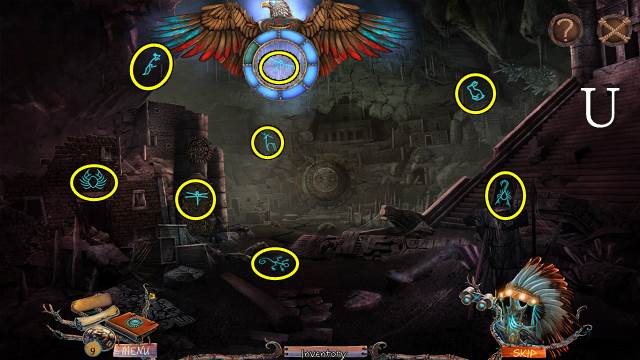



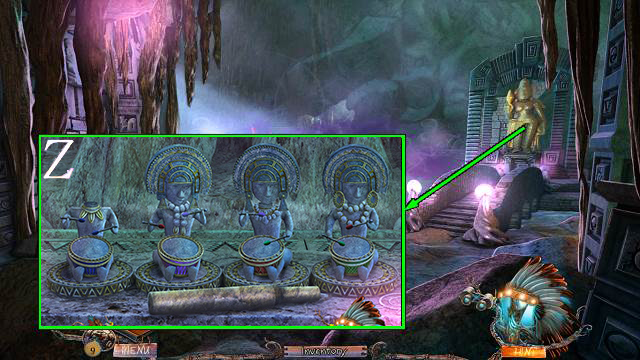
- Find the symbols with your Amulet (U).
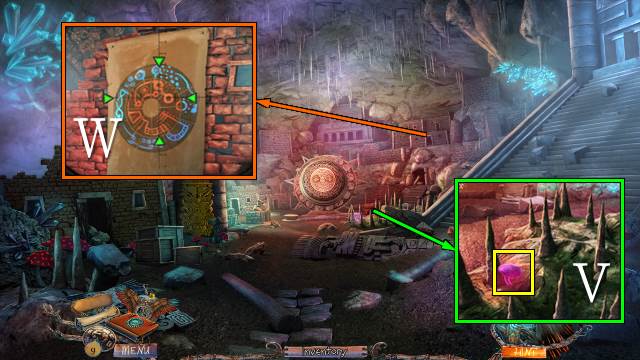
- Take the PURPLE MUSHROOM (V).
- Use your Binoculars and play as before (W).
- Go right.
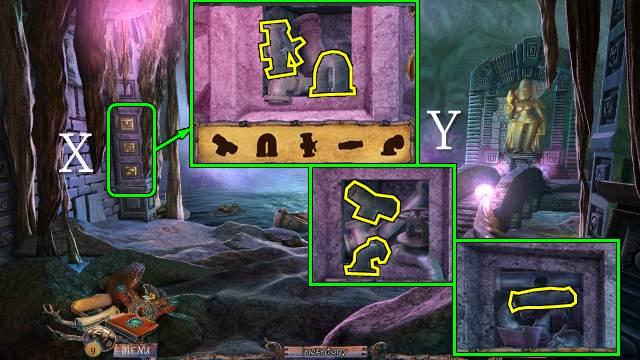
- Push the three tiles (X).
- Play the mini-HOP (Y).
- You receive a STONE VALVE.
- Take the STONE LEVER (Z).
- Walk down and left.

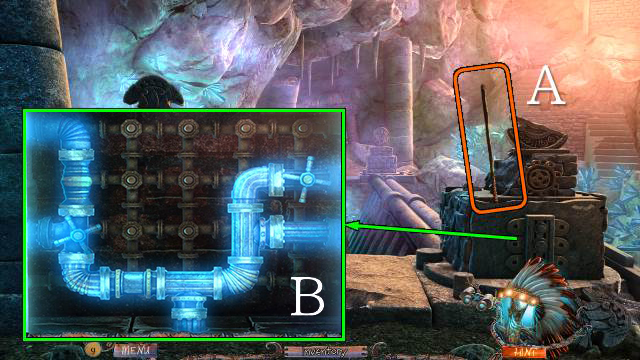
- Open the panel with the SPEAR (A).
- Put the STONE VALVE on the mechanism for a mini-game (B).
- Connect all pipes.

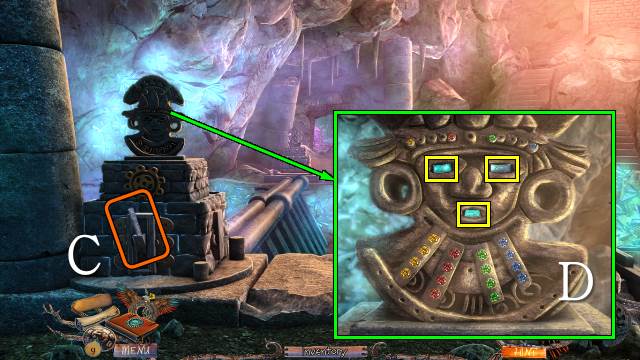
- Put the STONE LEVER in the holder (C).
- Take the Story Tile and put the NECKLACE BEADS on the statue for a mini-game.
- Move the beads into columns; yellow, red, green blue from left to right (D).
- Take the MOUSE TILE, WOLF TILE and SHELL TILE (D).
- Pull the lever (C).
- Walk forward.

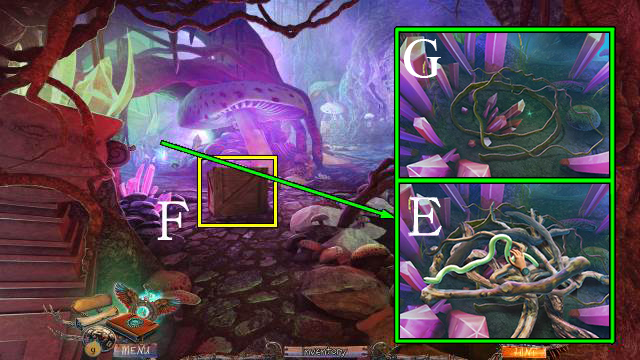
- Take SMALL CRATE 1/2 (E).
- Move the sticks one by one (E), until you can take the VINES (G); only the stick currently on top can be moved.

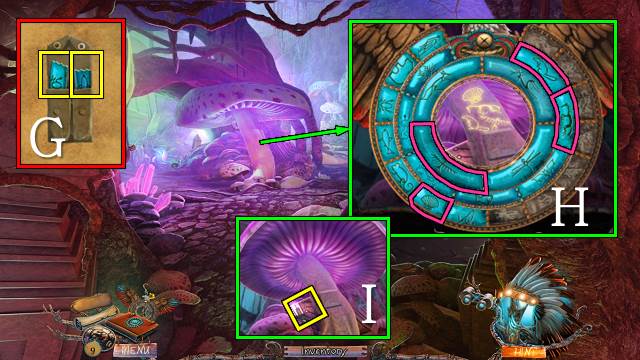
- Access the POUCH, open it and take the FROG TILE and SALMON TILE (G).
- Put the FROG TILE, SALMON TILE, MOUSE TILE, WOLF TILE and SHELL TILE on the Amulet and use it on the mushroom; select the four symbols (H).
- Take STAINED GLASS PIECE 1/2 (I).

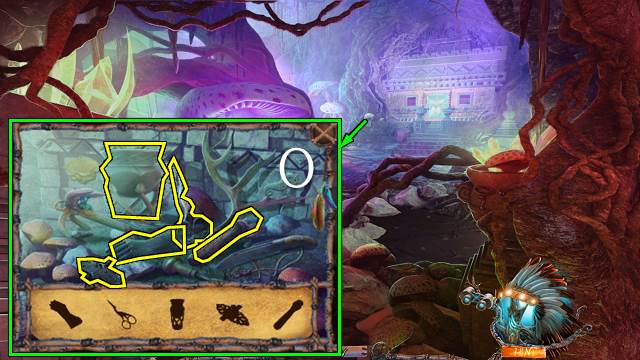
- Play the mini-HOP (J).
- You receive a HAMMER HANDLE.
- Go to the Lake Shore.

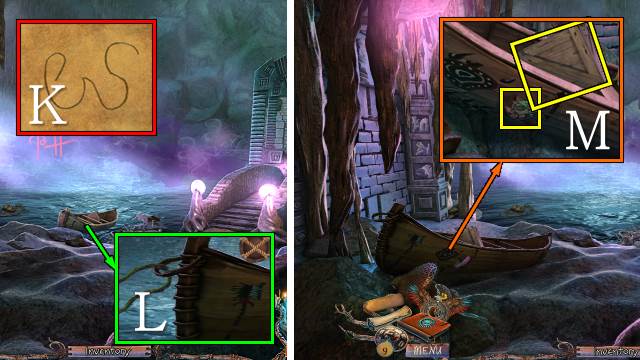
- Access the VINES and twist them into a VINE ROPE (K).
- Attach the VINE ROPE to the boat (L).
- Pull the boat ashore.
- Take SMALL CRATE 2/2 and STAINED GLASS PIECE 2/2 (M).

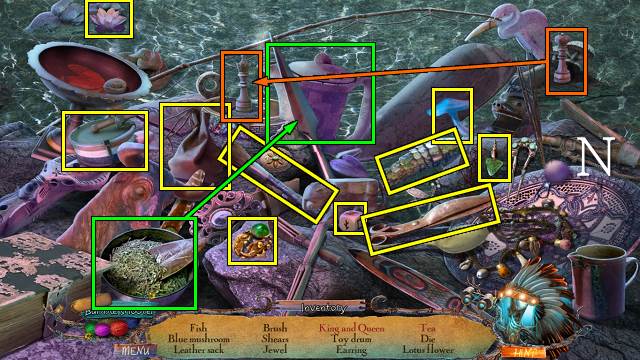
- Play the HOP (N).
- You receive the BLUE MUSHROOM.
- Walk down.

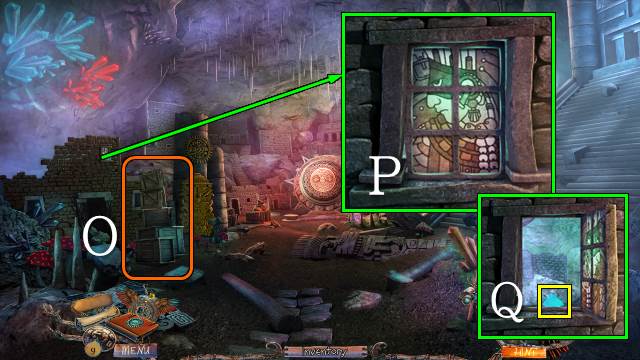
- Put the crate on top of the others and put your SMALL CRATES on top (O).
- Put the STAINED GLASS PIECES on the window for a mini-game.
- Turn the tiles until they make an image (P).
- Take the CRYSTAL (Q).
- Go left and forward.

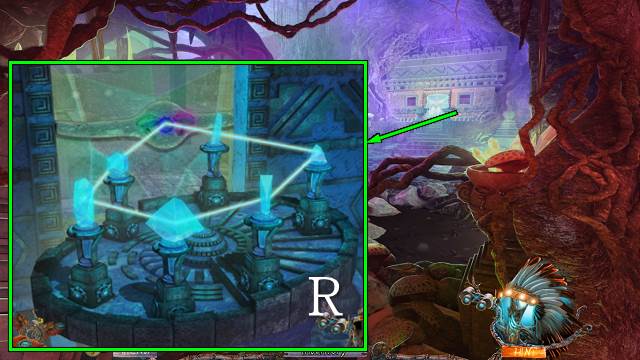
- Put the BLUE MUSHROOM, PURPLE MUSHROOM and CRYSTAL on the altar for a mini-game.
- Swap the crystals to make a ring of light (R).
- Walk forward.

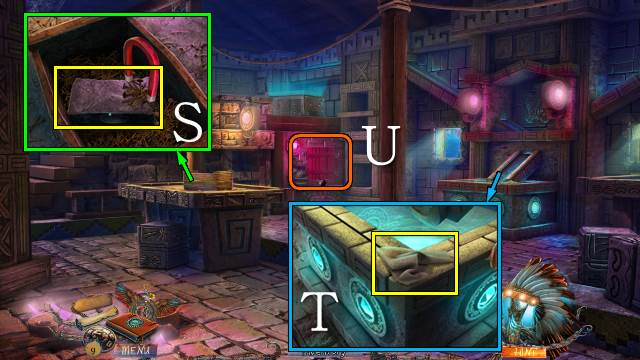
- Move the nails with the MAGNET four times and take the HAMMERHEAD (S).
- Take the RAG (T).
- Open the hatch (U).

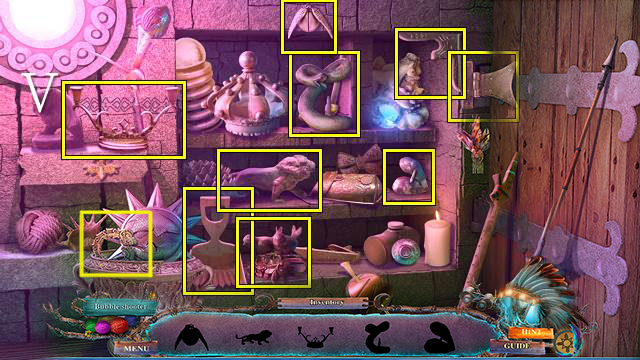
- Play the HOP (V).
- You receive ALTARPIECE 2/2.
- Walk down twice.

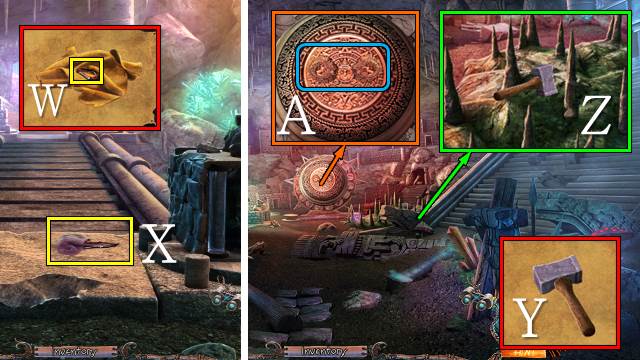
- Access the OLD RAG, open it and take the CARABINER and RAG (W).
- Take the OBSIDIAN SPEARHEAD with the RAG (X).
- Walk down.
- Access the HAMMER HANDLE and attach the HAMMERHEAD to it; take the HAMMER (Y).
- Use the HAMMER twice to knock over a STALAGMITE; pick it up (Z).
- Put the ALTARPIECES on the altar for a mini-game (A).

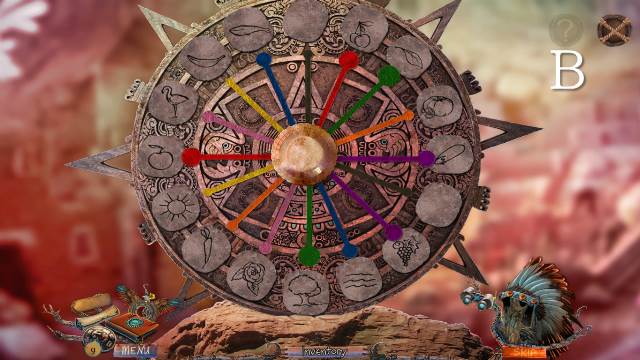
- Move the spokes to images of items with a matching color (B).
- You receive a PLATE.
- Go to the Mushroom Farm.

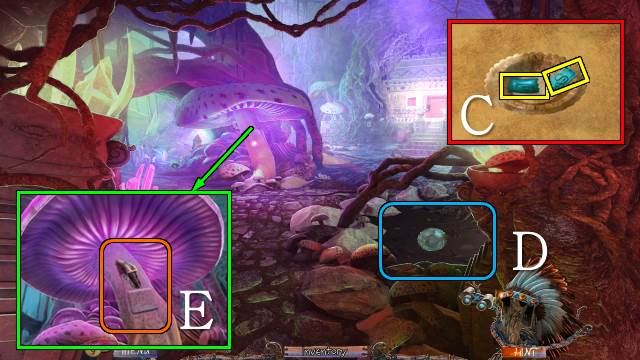
- Access the PLATE and take the RATTLESNAKE TILE, MANTIS TILE and GOLDEN PLATE (C).
- Take some TAR with the GOLDEN PLATE (D).
- Open the mushroom with the OBSIDIAN SPEARHEAD to receive the STONE DISK (E).
- Walk forward.

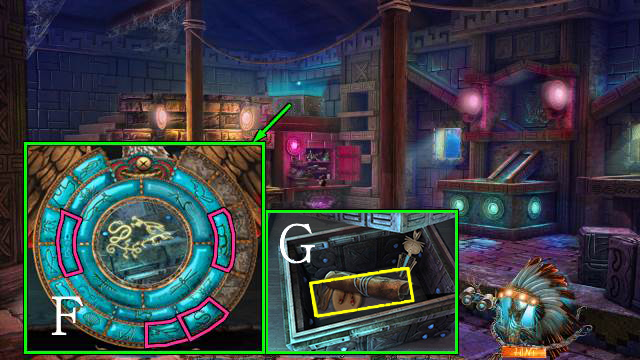
- Put the RATTLESNAKE TILE and MANTIS TILE on the Amulet and use it on the box; select the four symbols (F).
- Open the box with the STONE DISK; take the ROLLED-UP LEATHER (G).
- Go to the Lake Shore.

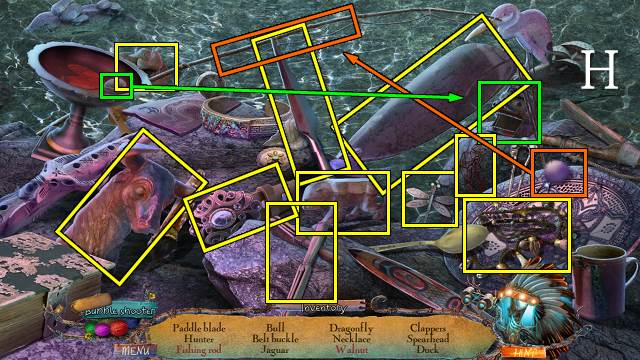
- Play the HOP (H).
- You receive the PADDLE BLADE.

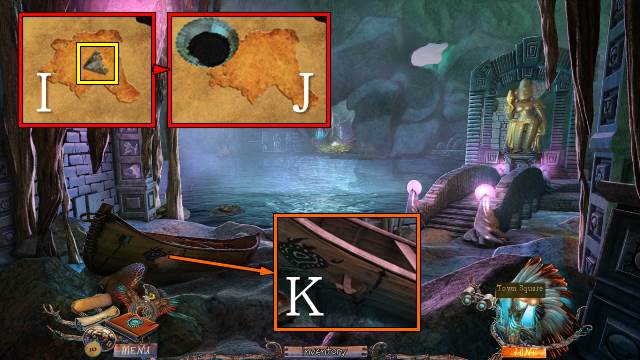
- Access the ROLLED-UP LEATHER, cut the PIECE OF STRING with the OBSIDIAN SPEARHEAD and take the MOSAIC PIECE (I); put the TAR on the leather to get STICKY LEATHER (J).
- Put the STICKY LEATHER on the boat (K).

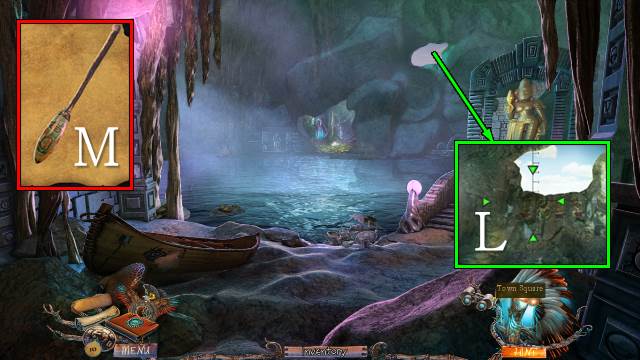
- Use your Binoculars and play as before (L).
- Access the SPEAR HANDLE; put the PADDLE BLADE and PIECE OF STRING on it to get a KAYAK PADDLE (M).
- Put the KAYAK PADDLE in the boat and put the boat in the water.
- Go forward.
Chapter 6: The Underground Shrine

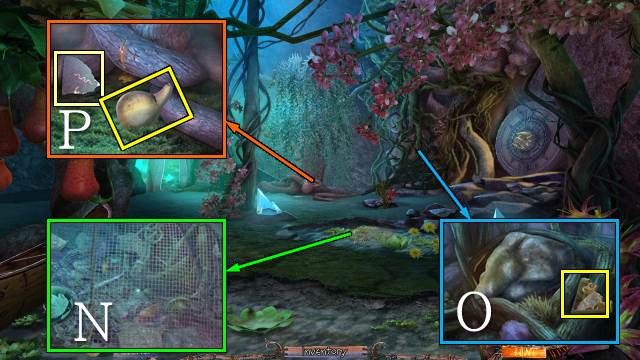
- Take the FISHING NET (N).
- Take the MOSAIC PART (O).
- Take the Story Tile and GOURD (P).
- Go left.

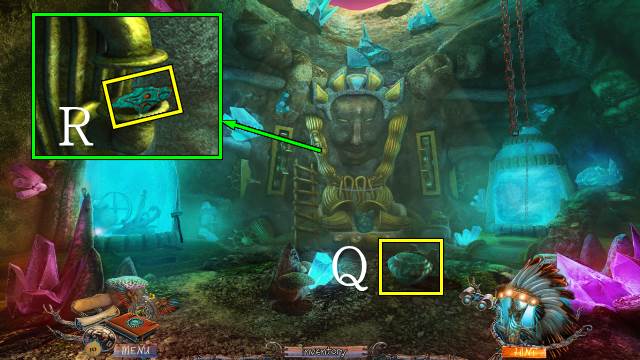
- Take the CRYSTAL BOWL (Q).
- Take the WOLF HEAD (R).
- Walk down.

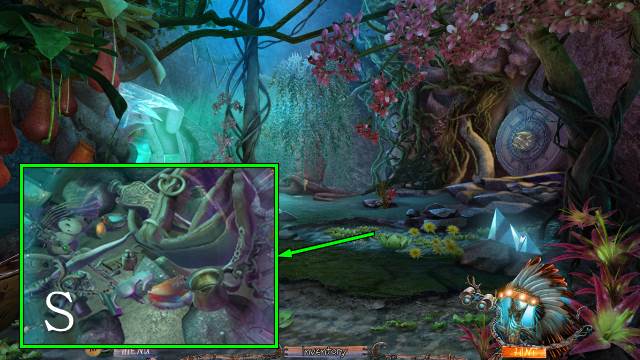

- Put the CRYSTAL BOWL in the water (S).
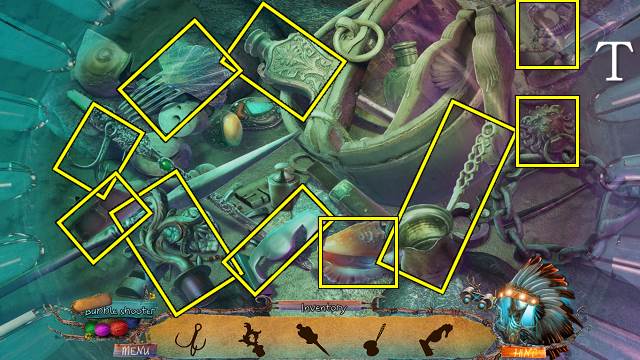
- Play the HOP (T).
- You receive a WEIGHT.
- Go left.

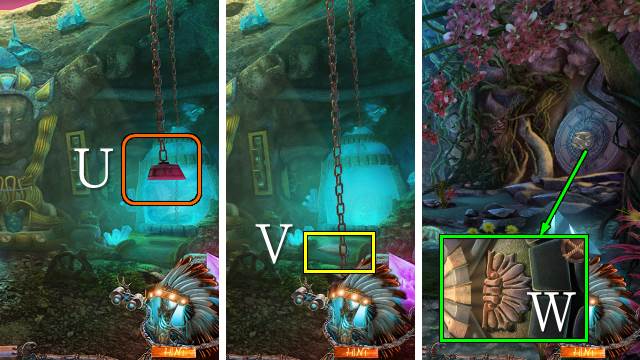
- Hang the WEIGHT from the right chain (U).
- Take the SHRINE DOOR KEY (V).
- Walk down.
- Put the SHRINE DOOR KEY on the door (W).
- Open the door and go right.

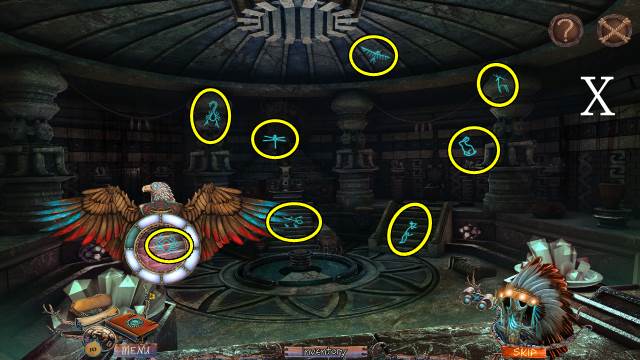

- Find the symbols with your Amulet (X).
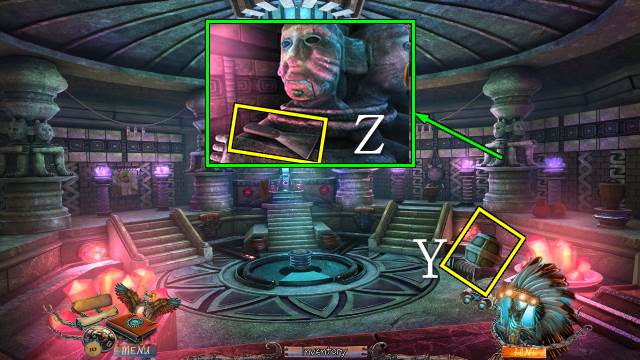
- Take the HEAVY WEIGHT (Y).
- Take the SCRAPER (Z).
- Walk down.

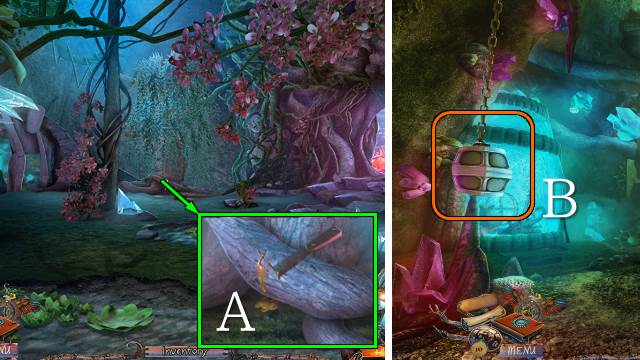
- Get some SAP with the SCRAPER (A).
- Go left.
- Hang the HEAVY WEIGHT from the left chain (B).

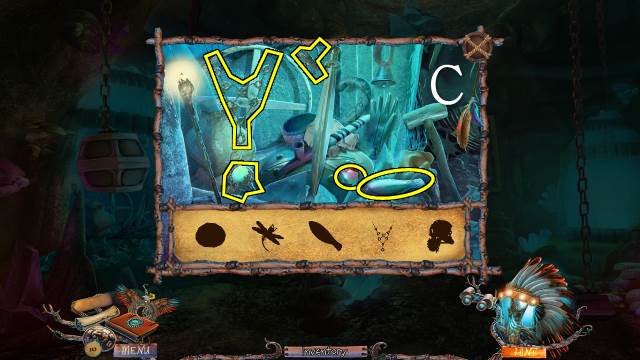
- Play the mini-HOP (C).
- You receive the FOUNTAIN CRYSTAL.
- Go down and right.

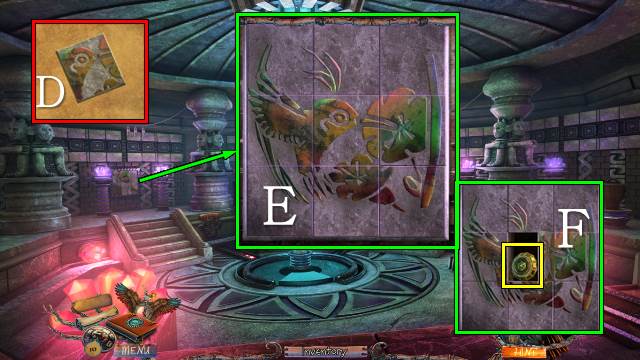
- Access the MOSAIC PIECE; put the SAP and MOSAIC PIECE on it to get a MOSAIC TILE (D).
- Put the MOSAIC TILE on the mosaic for a mini-game.
- Restore the mosaic by swapping the pieces (E).
- Take the SARCOPHAGUS KEY (F).

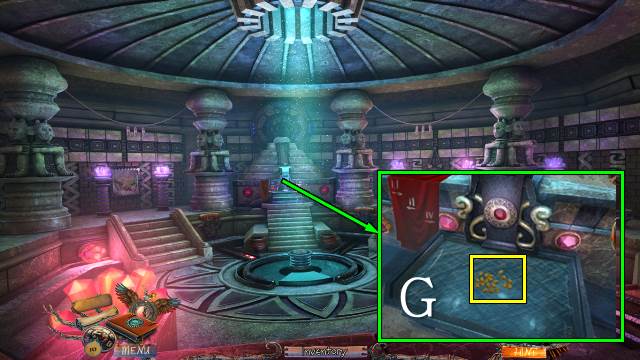
- Put the FOUNTAIN CRYSTAL on the fountain; take the DRIED CORN SEEDS (G).
- Walk down.

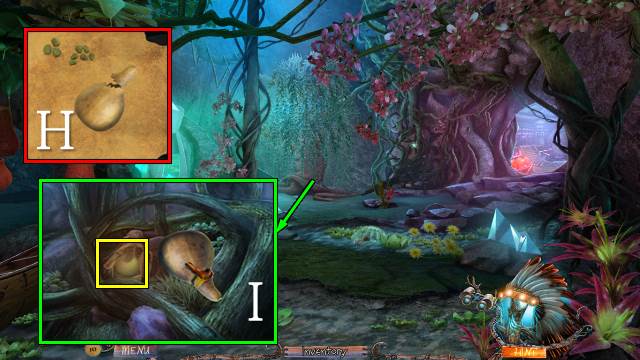
- Access the GOURD and open it, put the DRIED CORN SEEDS in it and close it with the SAP; take the RATTLE (H).
- Remove the stones with the STALAGMITE and try to take the orb; scare the spider with the RATTLE and take the GOLDEN ORB (I).
- Go right.

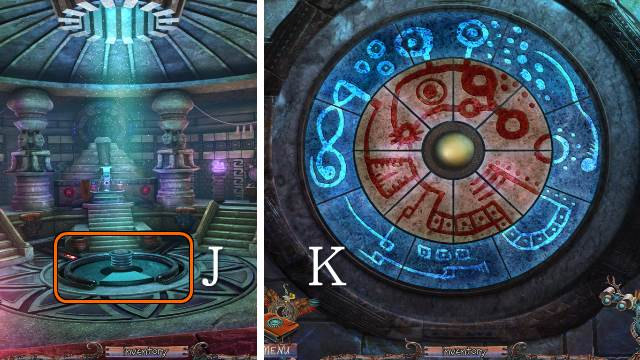
- Put the GOLDEN ORB on the floor for a mini-game (J).
- Swap adjacent tiles to make two rings forming one consecutive image (K).
- Go into the Crypt.

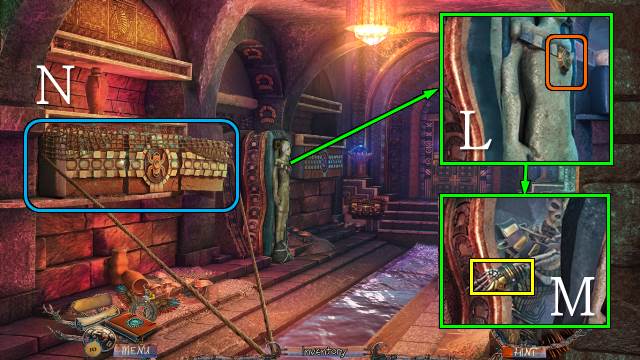
- Open the sarcophagus with the SARCOPHAGUS KEY (L); take the GOLDEN ARM BRACER (M).
- Dislodge the stones with the FISHING NET (N).

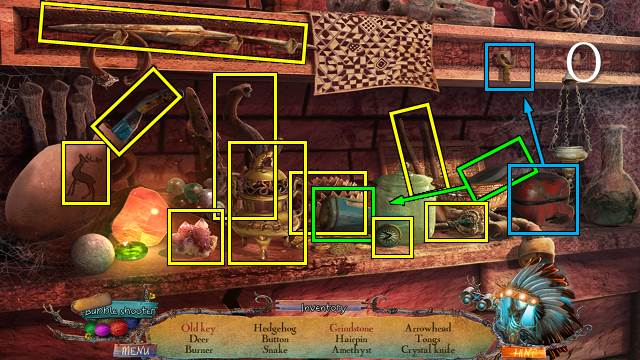
- Play the HOP (O).
- You receive a GOLDEN DISC.
- Go to the Resonating Cave.

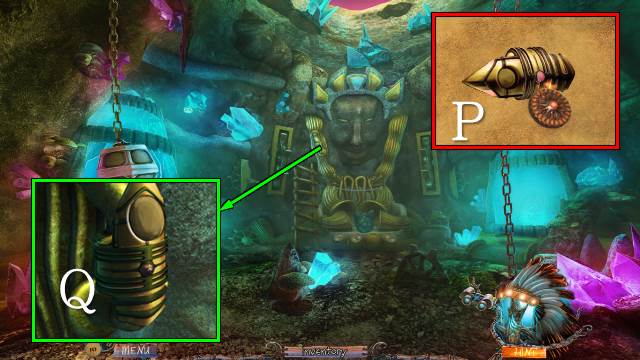
- Access the GOLDEN ARM BRACER and take STONE TOKEN 1/3 and the ARM BRACER (P).
- Put the ARM BRACER on the broken pipe (Q).

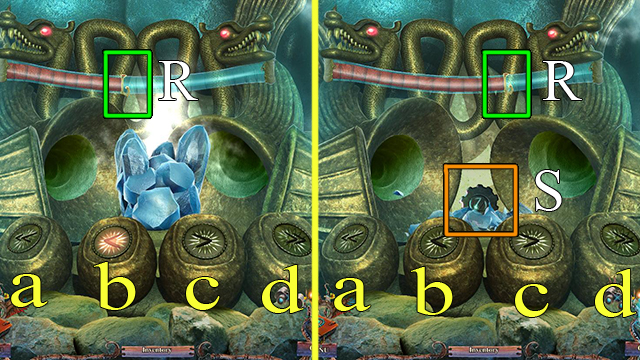
- Put the GOLDEN DISC on the statue for a mini-game.
- Use the arrows to move the liquid to the mark (R).
- Solution: First part: D, B, C, B. Second part: C, C, B, C, B, C, B.
- Take the TOKEN (S).
- Go to the Crypt.

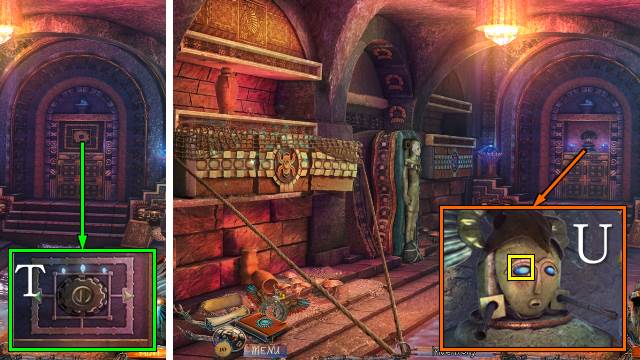
- Take the Story Tile; put the TOKEN on the door for a mini-game.
- Turn the knob 3 left, 2 right, 4 left (T).
- Take the EYE (U).
- Walk down.

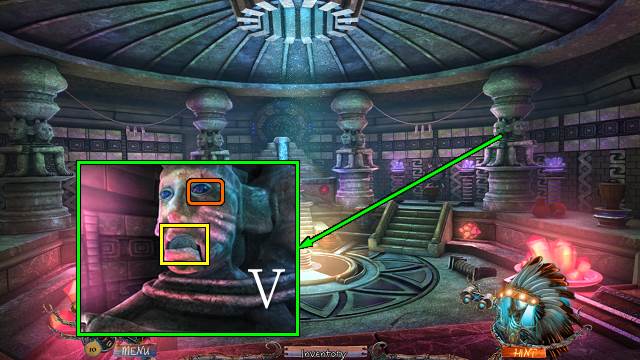

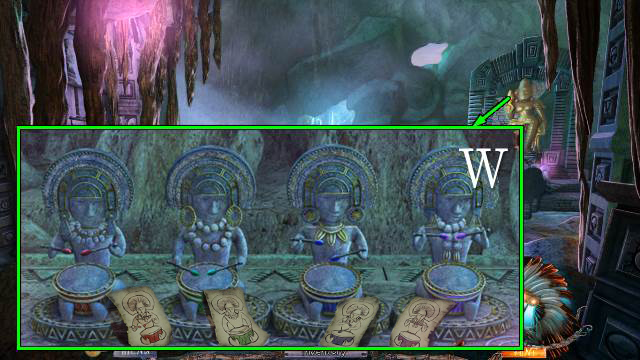
- Put the EYE on the statue; take the ALTAR KEY (V).
- Go to the Lake Shore.
- Put the ALTAR KEY on the altar.
- Swap pieces of the statues until they resemble the example in your diary (W).
- Go to the Pyramid Entrance.
Chapter 7: The Golden Compass

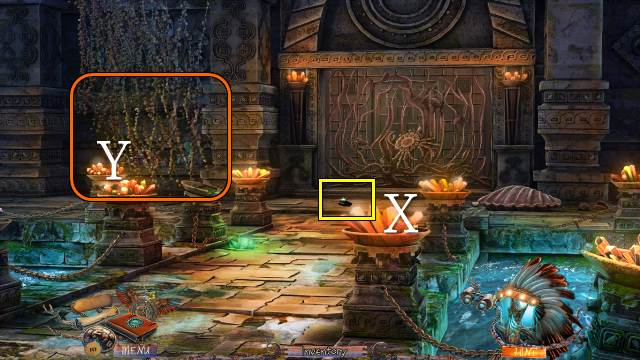
- Take the METAL PINCHER (X).
- Cut the vines with the METAL PINCHER (Y).

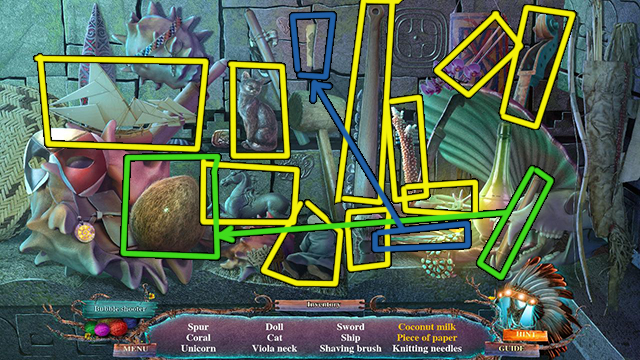
- Play the HOP (Z).
- You receive some CORAL.

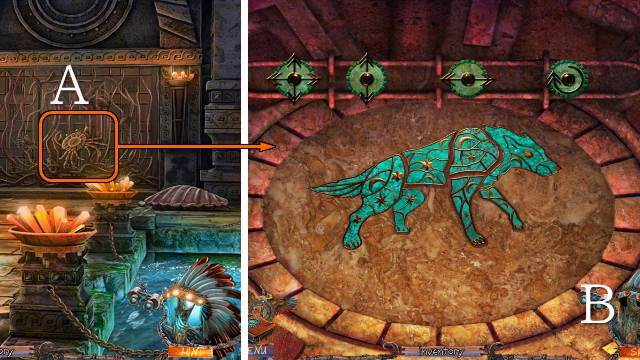
- Put the WOLF HEAD on the crab for a mini-game (A).
- Use the sliders to move and rotate the pieces according to the arrows, until a wolf is formed (B).
- Walk forward.

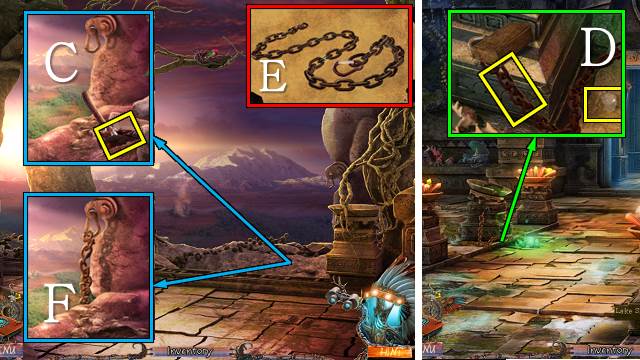
- Move the brick with the CORAL three times; take the BRICK (C).
- Walk down.
- Smash the hook twice with the BRICK; take the CHAIN and SALT (D).
- Walk forward.
- Access the CHAIN and attach the CARABINER to it; take the CHAIN WITH CARABINER (E).
- Hang the CHAIN WITH CARABINER from the hook (F).
- Walk forward.

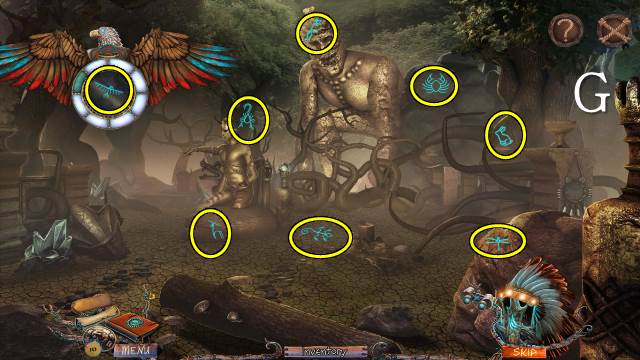

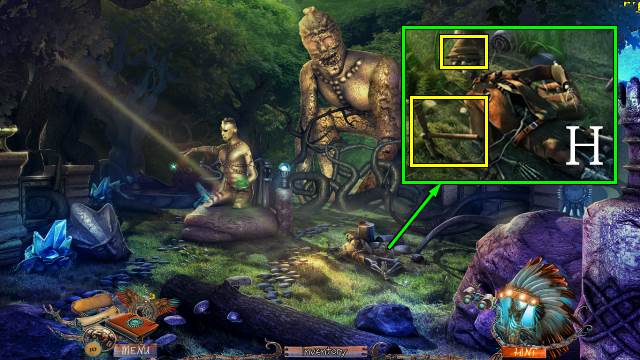
- Find the symbols with your Amulet (G).
- Take the PITH HELMET and OLD PICKAXE (H).
- Walk down.

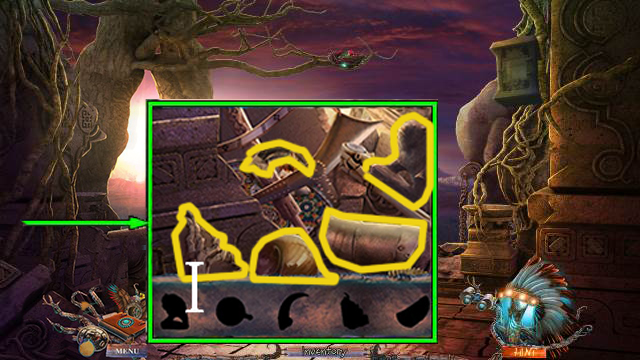
- Use the OLD PICKAXE on the crystals three times; play the mini-HOP (I). You receive a TALON.
- Walk forward.

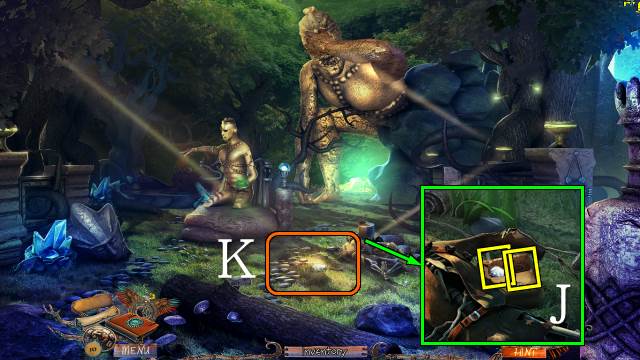
- Move the skeleton’s arm and open the bag with the TALON; take the SMALL MIRROR and RUBBER (J).
- Put the SMALL MIRROR under the beam of light (K).
- Walk forward.

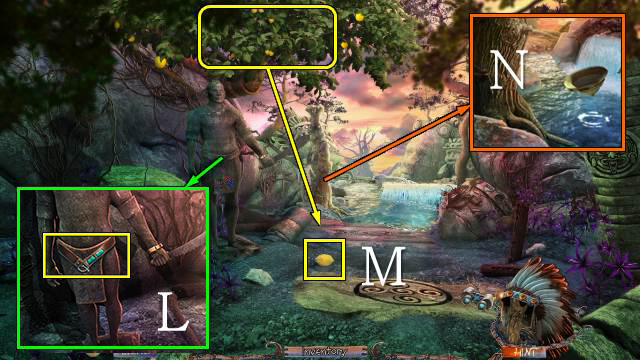
- Open and take the BELT (L).
- Shake the tree three times and take the LEMON (M).
- Fill the PITH HELMET to get a PITH HELMET WITH WATER (N).

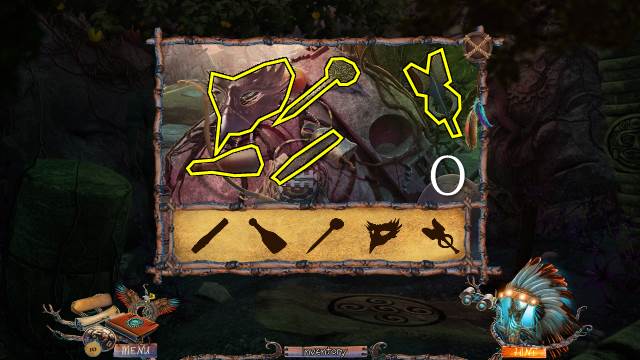
- Play the mini-HOP (O).
- You receive a CHISEL.
- Go to the Pyramid Entrance.

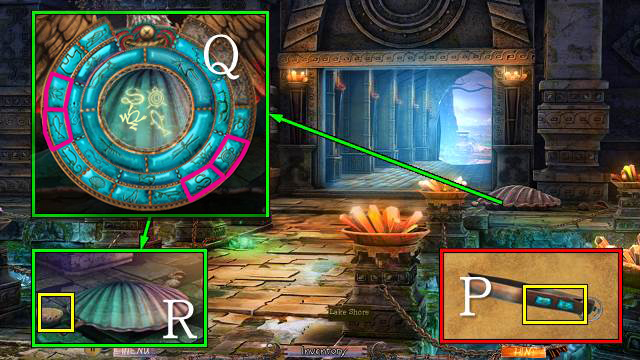
- Access the BELT and take the TURTLE TILE, TARANTULA TILE and LEATHER BELT (P).
- Put the TURTLE TILE and TARANTULA TILE on the Amulet and use it on the shell; select the four symbols (Q).
- Open the shell with the CHISEL; take the LARGE SHELL and SPONGE (R).

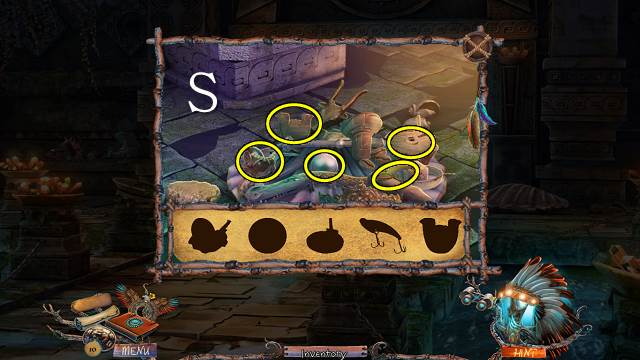
- Play the mini-HOP (S).
- You receive the LARGE PEARL.
- Walk forward.

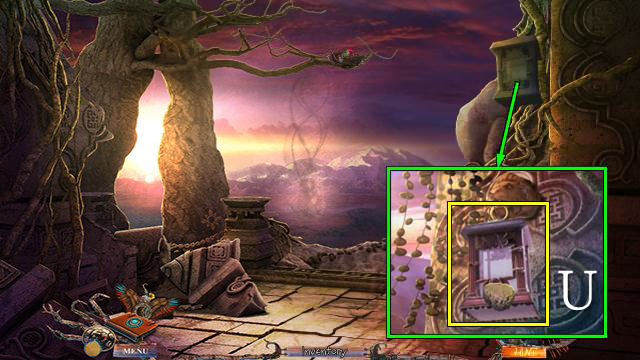
- Put the SALT, LEMON and SPONGE on the lantern; take the BROKEN LANTERN (U).
- Walk forward twice.

- Put the LARGE PEARL on the rock and take the LION’S MANE (V).
- Give the LARGE SHELL to the warrior and take the DULL SWORD and BRACELET 1/3 (W).
- Access the DULL SWORD and polish it with the LEATHER BELT; take the SWORD (X).
- Chop down the tree with the SWORD; take the PEBBLES (Y).
- Walk forward.

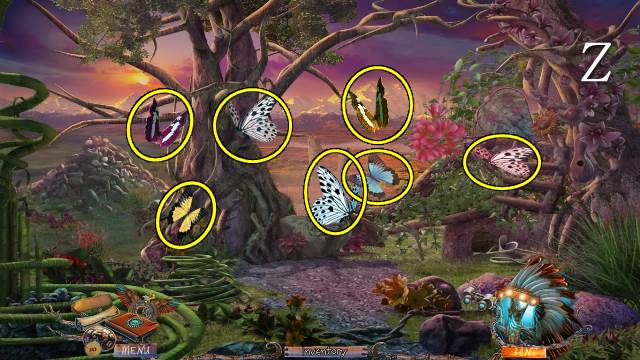

- Move the butterflies one by one (Z).
- Play the HOP (A).
- You receive the LANTERN DOOR.

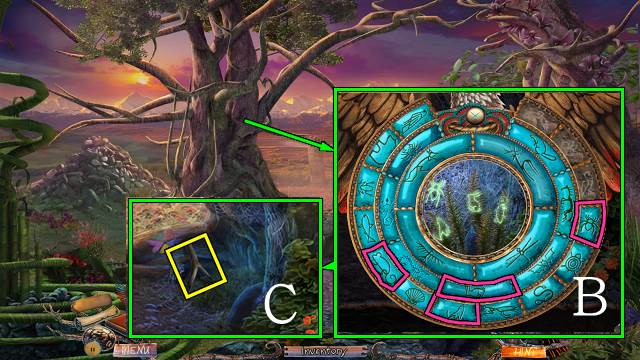
- Use the Amulet on the tree; select the four symbols (B).
- Move the cobwebs until you can take the Y-SHAPED STICK (C).
- Go to the Pyramid Exit.

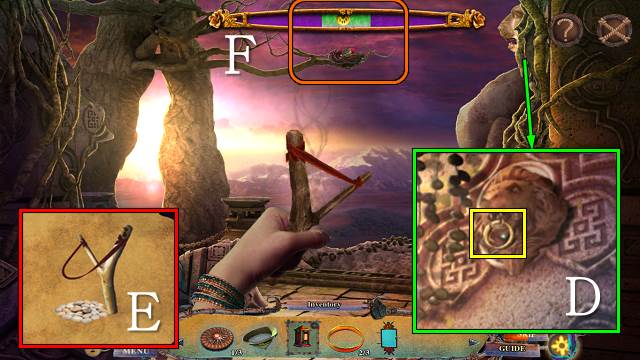
- Put the LION’S MANE on the lion; take BRACELET 2/3 (D).
- Access the V-STICK, and put the RUBBER and PEBBLES on it; take the SLINGSHOT (E).
- Shoot the SLINGSHOT at the nest when the ball is in the green zone (F).

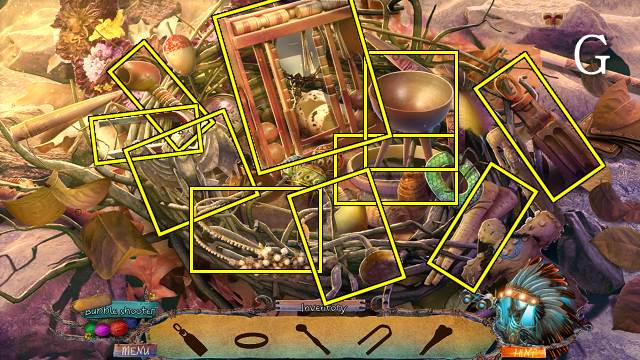
- Play the HOP (G).
- You receive BRACELET 3/3.
- Walk forward.

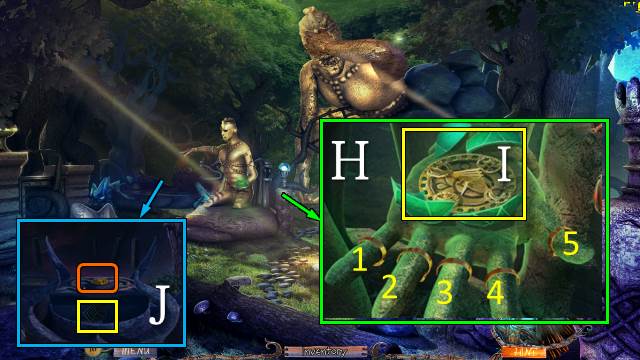
- Put the BRACELETS on the hand for a mini-game (H).
- Release all fingers; selecting one finger may move others.
- Solution: 4, 2, 3, 1.
- Open the crystal and take the GOLDEN COMPASS (I).
- Put the GOLDEN COMPASS on the altar; take the STONE PUZZLE PIECE (J).
- Walk forward twice.

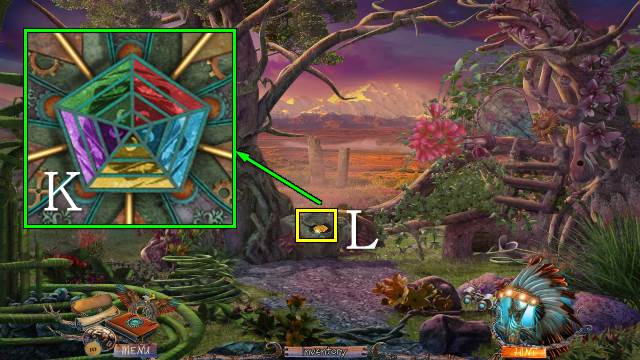
- Put the STONE PUZZLE PIECE on the puzzle for a mini-game.
- Create triangles of one color on the pentagon according to the example in your journal (K).
- Take the POLLEN (L).
- Walk down twice.

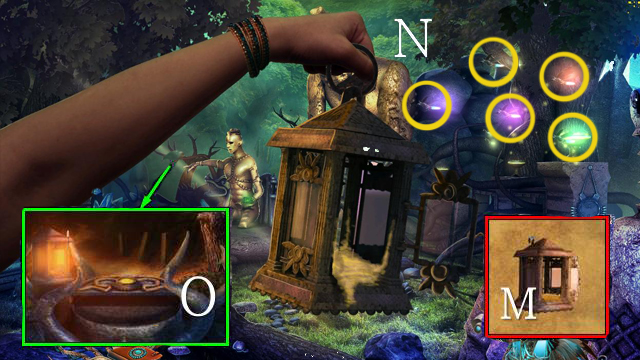
- Access the BROKEN LANTERN, put the LANTERN DOOR on it and the POLLEN in it; you receive a LANTERN WITH BAIT (M).
- Use the LANTERN WITH BAIT on the fireflies and catch five flies (N); you receive the LIT LANTERN.
- Put the LIT LANTERN by the altar (O).
Chapter 8: Spirit Wolf

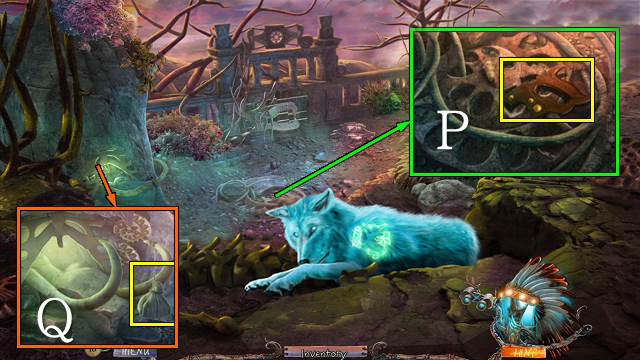
- Move the sand and take the SAW HANDLE (P).
- Take the LEATHER POUCH (Q).

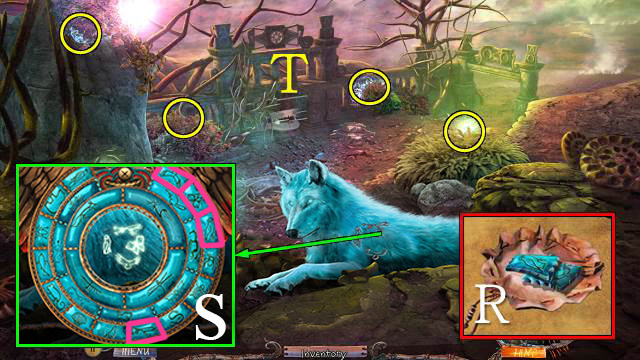
- Open the LEATHER POUCH and take the OWL TILE, BUTTERFLY TILE and HAWK TILE (R).
- Put the OWL TILE, BUTTERFLY TILE and HAWK TILE on the Amulet and use it on the wolf; select the four symbols (S).
- Catch the four essence orbs (T).
- Walk forward.


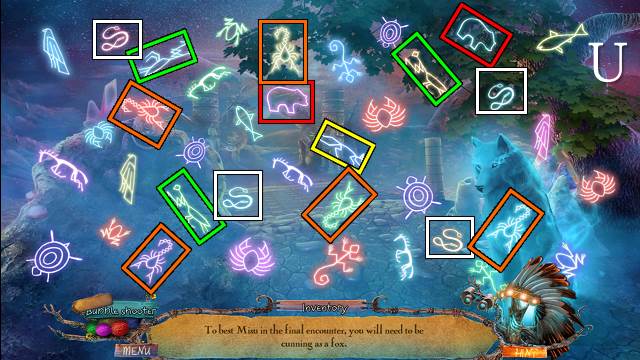

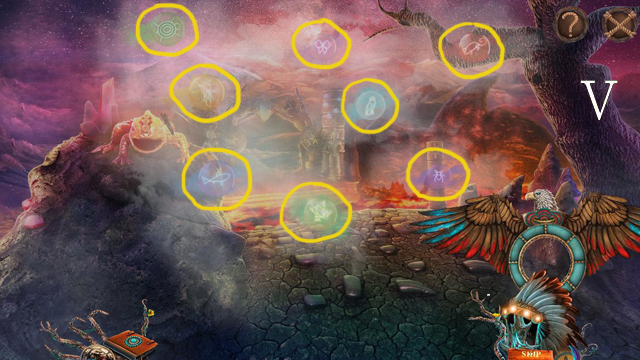
- Look through the Binoculars and play as before (X).
>
- Speak to the wolf. Find the symbols referred to in the riddles. The number in brackets shows how many of each to find (U).
- Pop the orbs with your amulet (V).

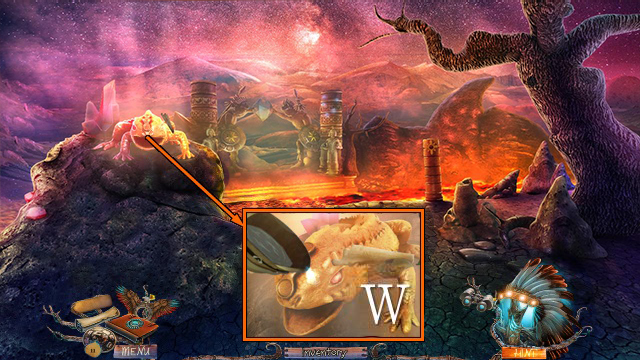
- Pour the PITH HELMET WITH WATER over the salamander (W); put the SAW HANDLE on the blade and receive the SAW.
- Walk down.

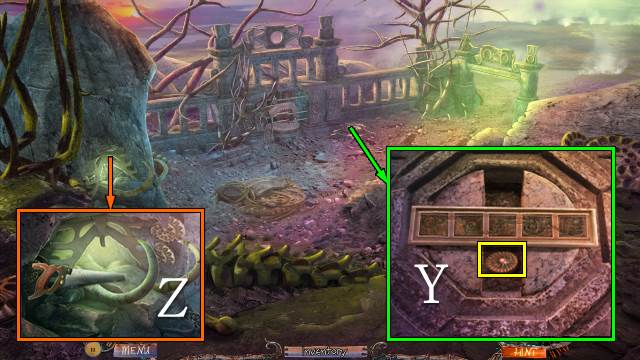
- Change the tiles to get the pattern from your journal; take STONE TOKEN 2/3 (Y).
- Remove a TUSK with the SAW (Z).

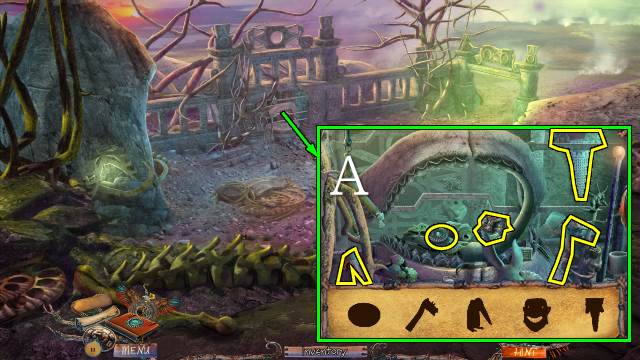
- Put the TUSK between the jaws for a mini-HOP (A).
- You receive STONE TOKEN 3/3.
- Walk forward.

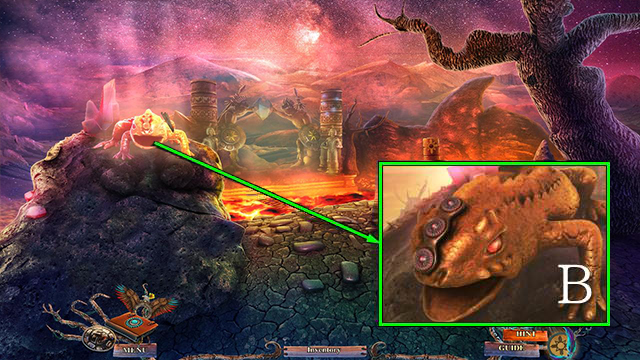
- Put the STONE TOKENS on the salamander (B).
- Access the bridge for a mini-game.

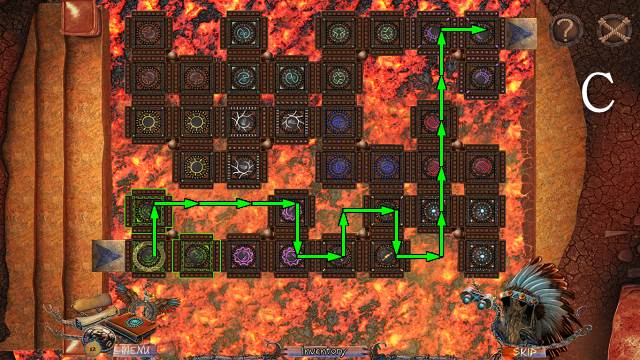
- Make your way across to the top right; note that tiles change in between moves, so try and avoid the lava (C).
- Walk forward.

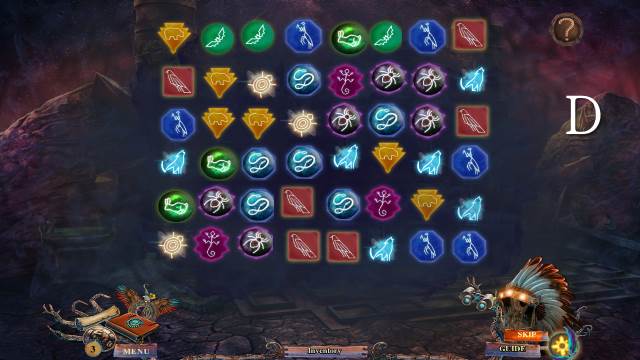

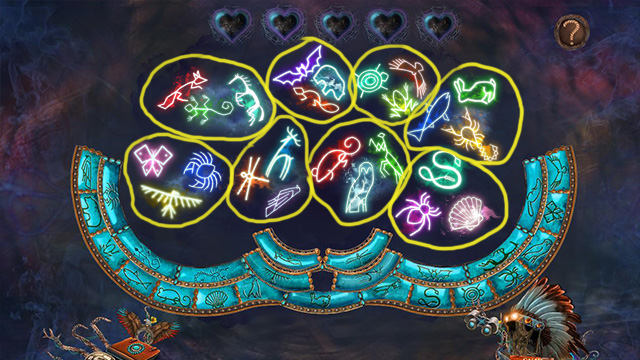

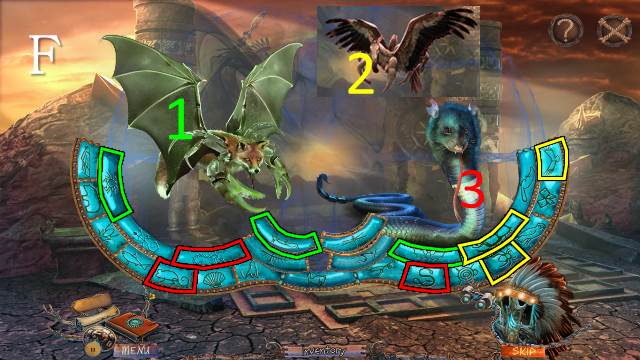
- Turn over tiles to find groups of three identical images (D).
- The symbols will appear from the fog in turn; you need to select the Amulet tiles matching three images shown is lit up.
- Select five correct groups of tiles; if you make a mistake your progress will be set back.
- Select the tiles of the three animals used to create the creature (F).
- Congratulations, you have completed Myths of the World: Spirit Wolf!



 The Agency of Anomalies: Mystic Hospital Walkthrough, Guide, & Tips
 Tamara the 13th Walkthrough, Guide, & Tips
 Haunted Hotel: Death Sentence Walkthrough, Guide, & Tips
 Riddles of Fate: Memento Mori Walkthrough, Guide, & Tips
 Grim Tales: Color of Fright Walkthrough, Guide, & Tips