Mystery Tales: The Lost Hope Walkthrough, Guide, & Tips
Mystery Tales: The Lost Hope Walkthrough

Welcome to the Mystery Tales: The Lost Hope Walkthrough
Free Emmett from an evil spell and save the townspeople from murderous demons.
Whether you use this document as a reference when things get difficult or as a road map to get you from beginning to end, we’re pretty sure you’ll find what you’re looking for here.
This document contains a complete Mystery Tales: The Lost Hope game walkthrough featuring annotated screenshots from actual gameplay!
We hope you find this information useful as you play your way through the game. Use the walkthrough menu below to quickly jump to whatever stage of the game you need help with.
Remember to visit the Big Fish Games Forums if you find you need more help. Have fun!
This walkthrough was created by Prpldva, and is protected under US Copyright laws. Any unauthorized use, including re-publication in whole or in part, without permission, is strictly prohibited.
General Tips

- This is the official guide for Mystery Tales: The Lost Hope.
- This guide will not mention each time you have to zoom into a location; the screenshots will identify each location.
- Hidden-object puzzles are referred to as HOPs in this guide. Items listed in blue are hidden or they require additional actions to locate. Interactive items in HOPs are color-coded.
- Mini-games and HOPs are sometimes randomized; your solution may vary.
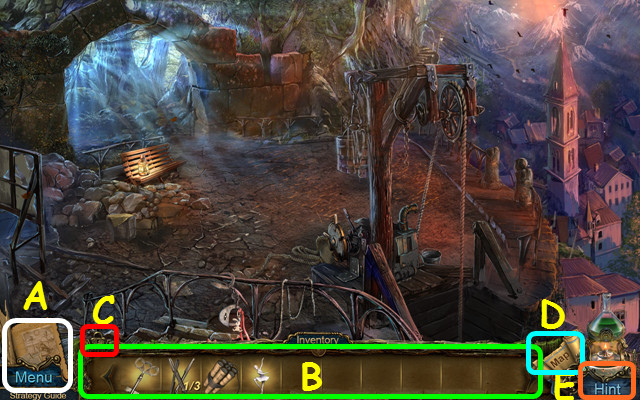
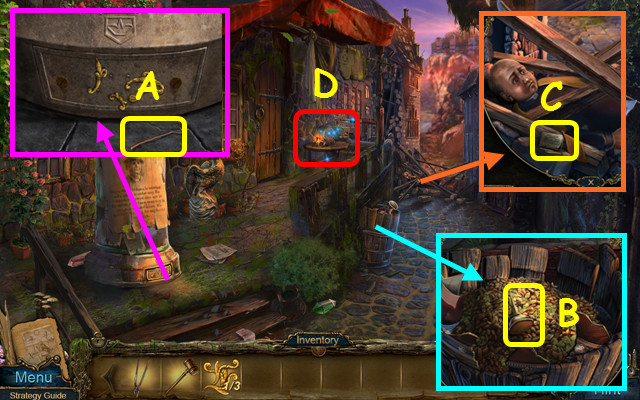
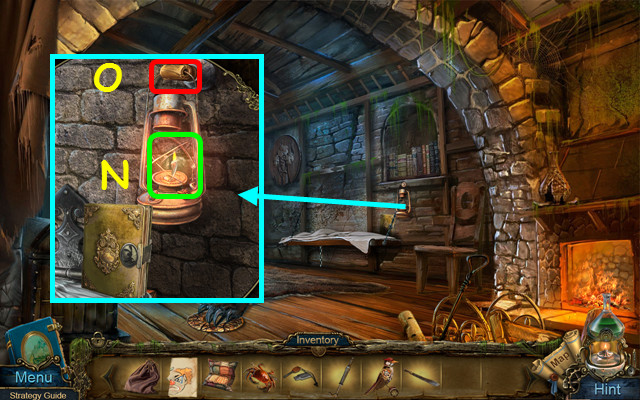
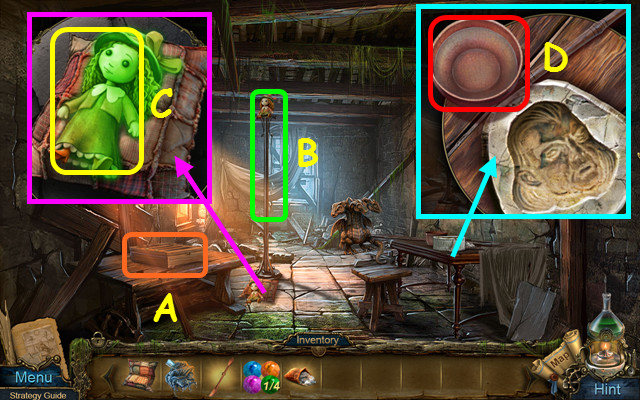
- Select the journal to read clues and notes (A).
- Move your mouse down to open the inventory panel; hover over an item in your inventory to see its name (B).
- Select the lock to keep the inventory panel open (C).
- Use your map to see where actions are available and quickly travel (D).
- Select the hint button for a hint (E).
Chapter 1: The Old Bridge Area
- You have the option of an interactive tutorial.
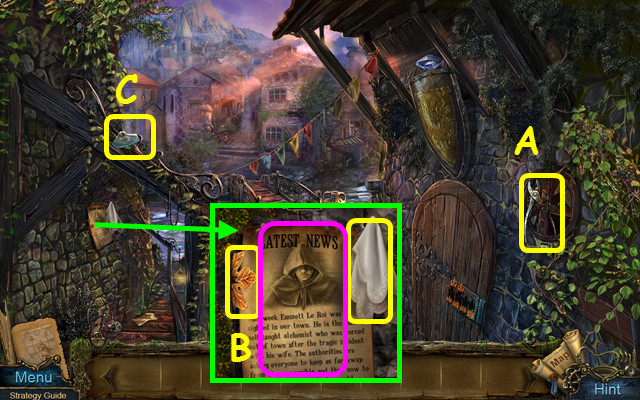
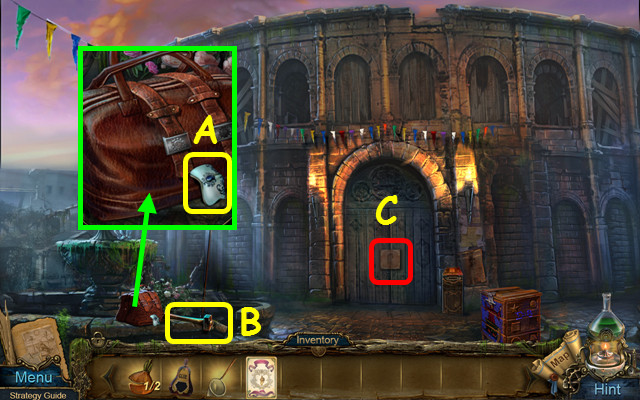
- Take the PLIERS (A).
- Read the news, take the HANDKERCHIEF, and use the PLIERS to take the 1/2 LEAF (B).
- Use the HANDKERCHIEF to take the GLASS (C).
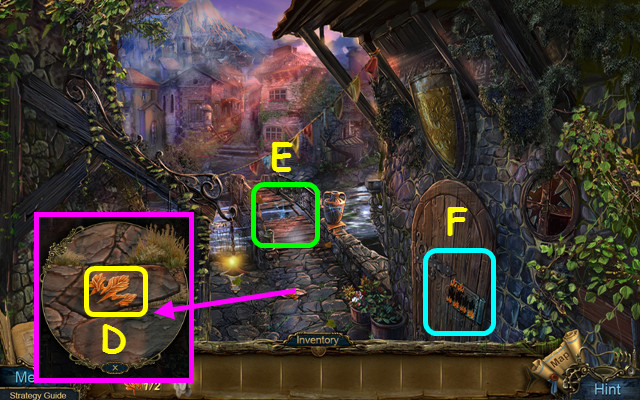
- Take the 2/2 LEAF (D).
- Note the bridge (E).
- Select the door (F).
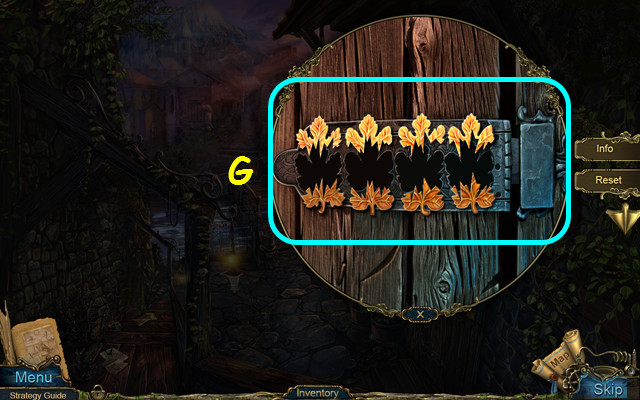
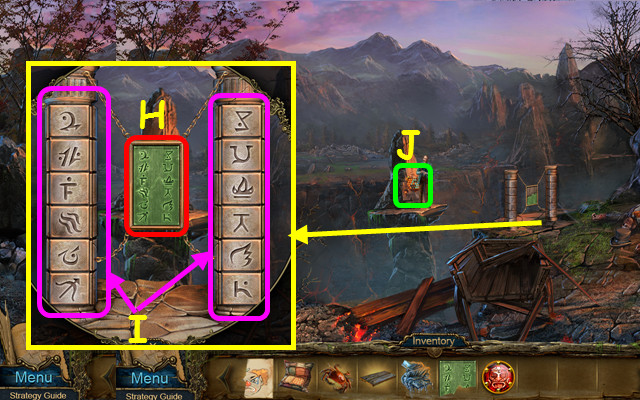
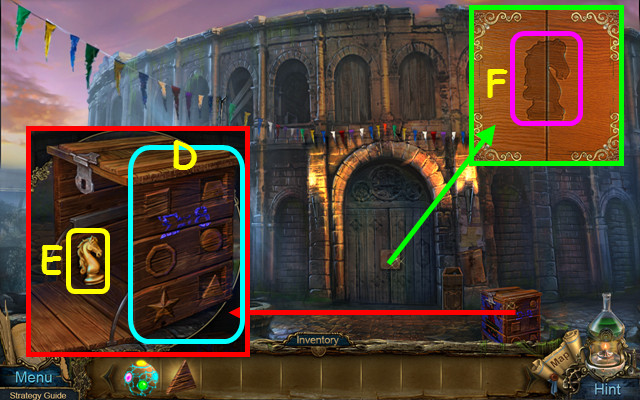
- Place the 2 LEAVES on the door lock.
- Swap the top pieces to match the outlines (G).
- Select 2 pieces to swap positions.
- Enter the door to the Guardian Post.
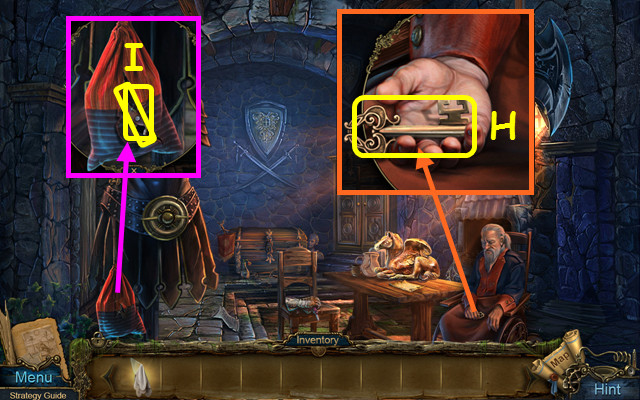
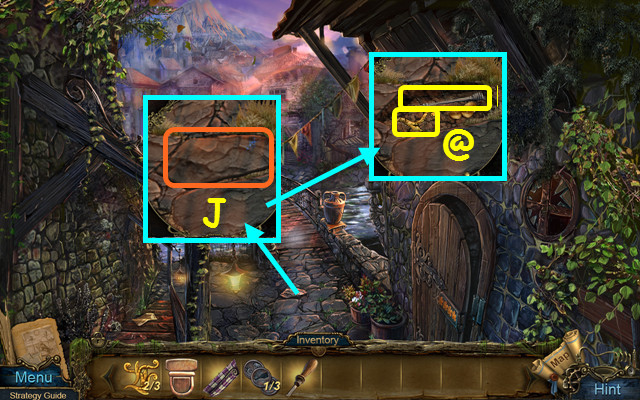
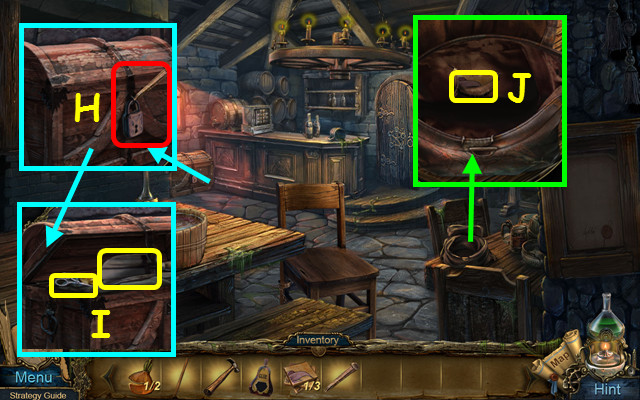
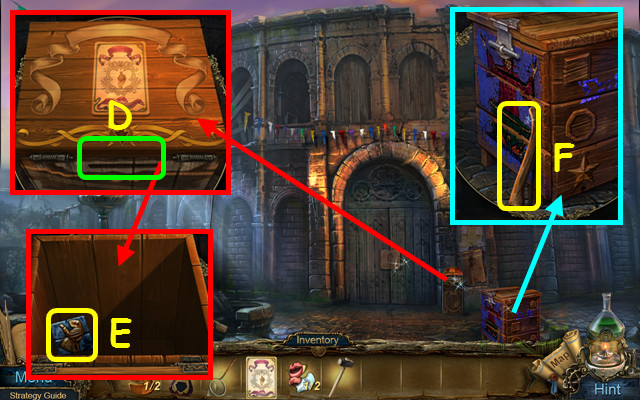
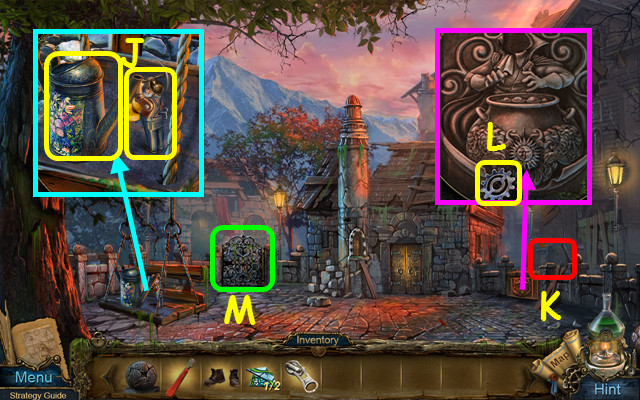
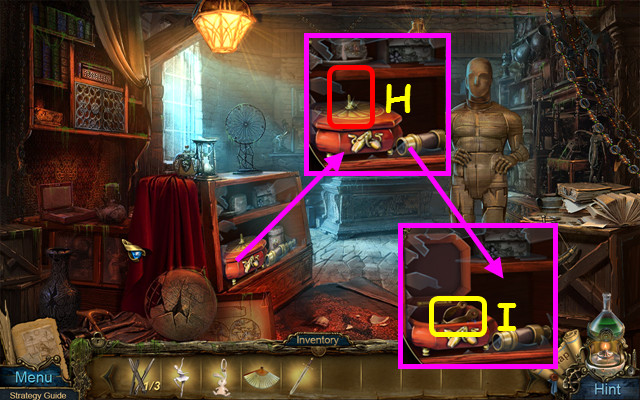
- Take the TRUNK KEY (H).
- Use the GLASS to make a hole; take the TONGS and the MALLET (I).
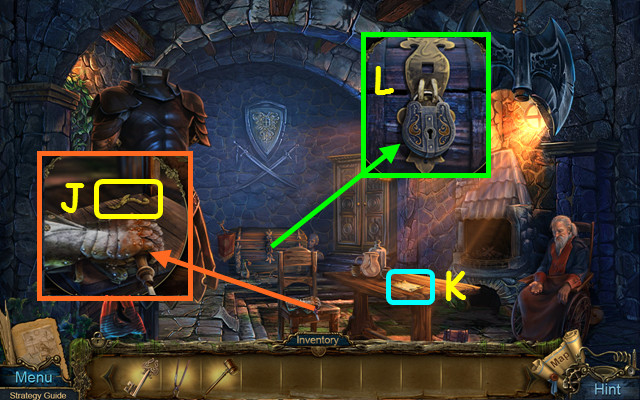
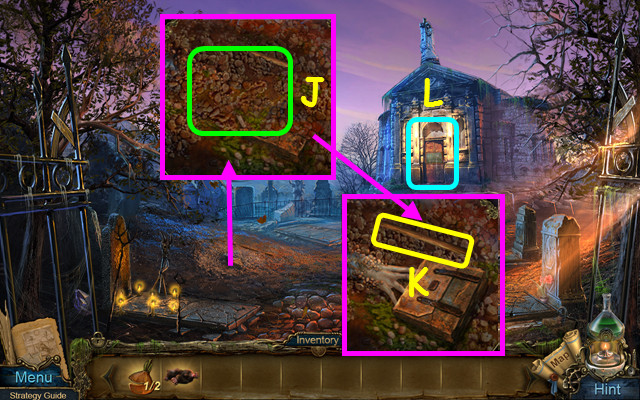
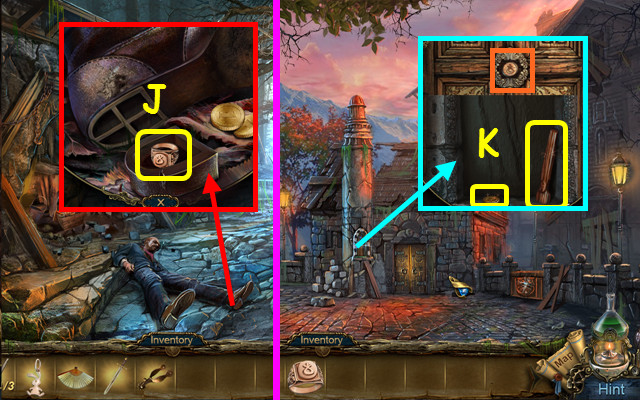
- Take the 1/3 PUZZLE PIECE (J).
- Read the memo (K).
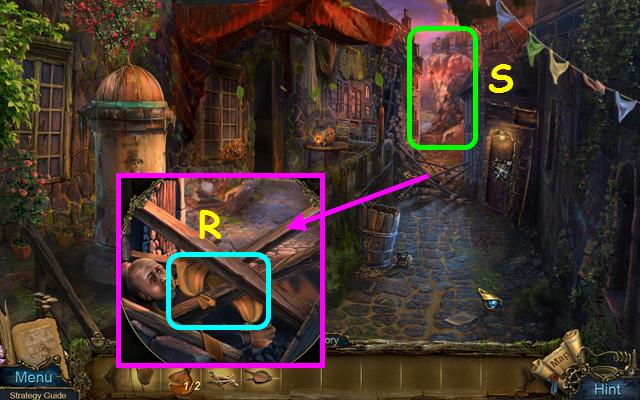
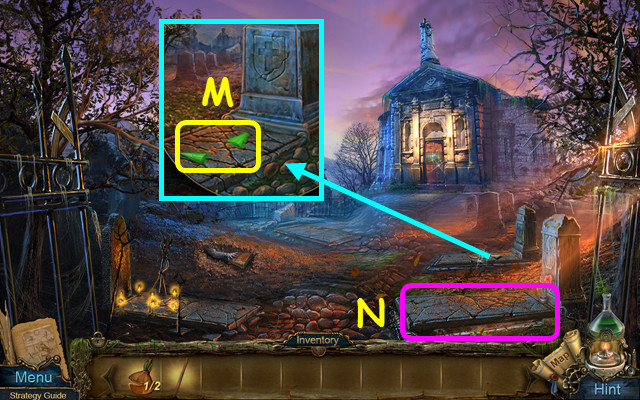
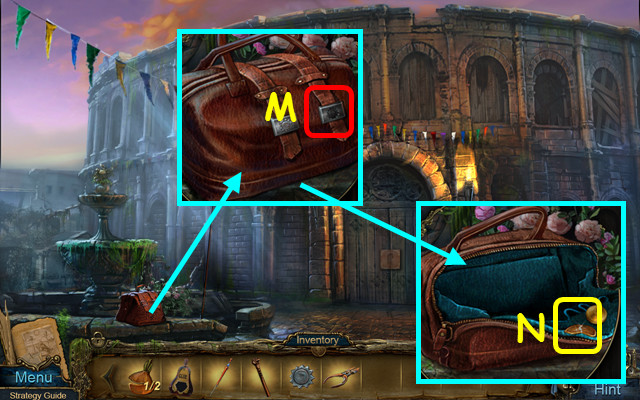
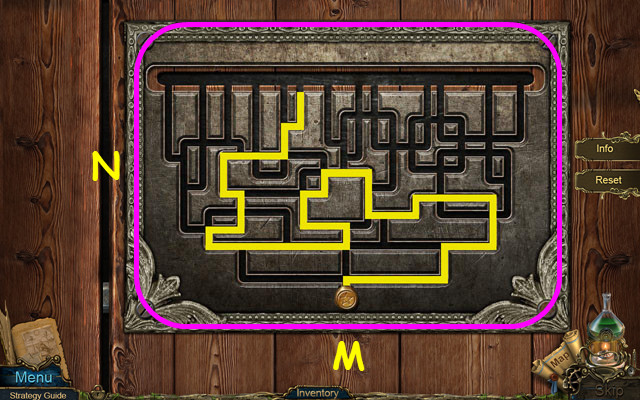
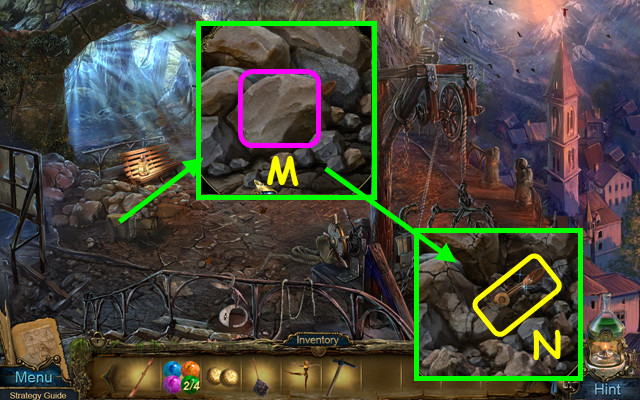
- Use the TRUNK KEY on the lock; select the trunk (L).
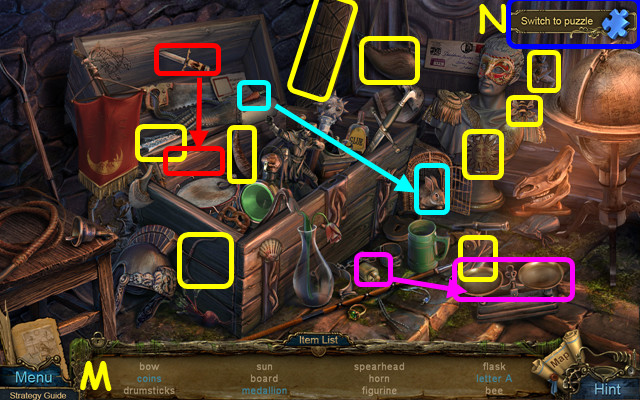
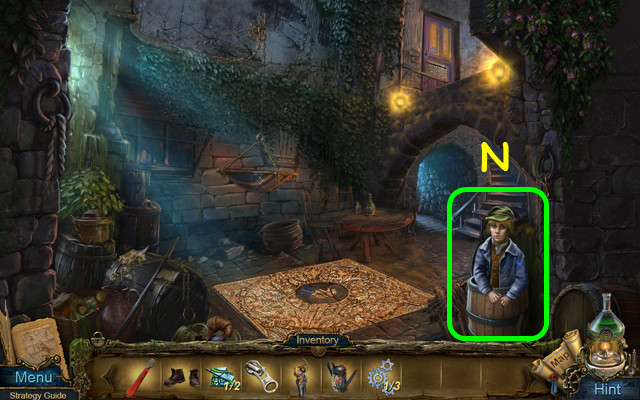
- Play the HOP to earn the BOARD (M).
- You can play a jigsaw puzzle instead of the HOP by selecting the icon in the upper right corner (N).
- Walk down and select the bridge.
- Place the BOARD in the opening.
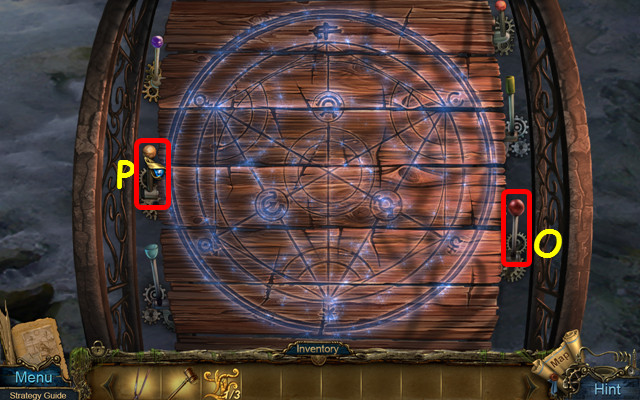
- Use the levers to remove the hazards from the bridge.
- Press the levers Ox3 and Px5.
- Walk forward to the Lane.
- Take the HOOK (A).
- Use the MALLET to break the pitcher; take the OILCAN (B).
- Take the MATCHES (C).
- Select the table (D).
- Play the HOP to earn the CLIP (E).
- Walk down and enter the Guardian Post.
- Use the HOOK on the latch (F).
- Take the MAT and the 2/3 PUZZLE PIECE (G).
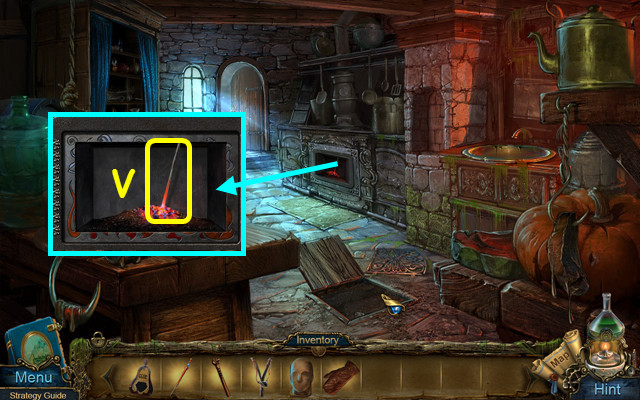
- Use the MATCHES to start the fire; use the TONGS to take the 1/3 CHIP (H).
- Use the OILCAN on the gauntlet; take the CHISEL (I).
- Walk down.
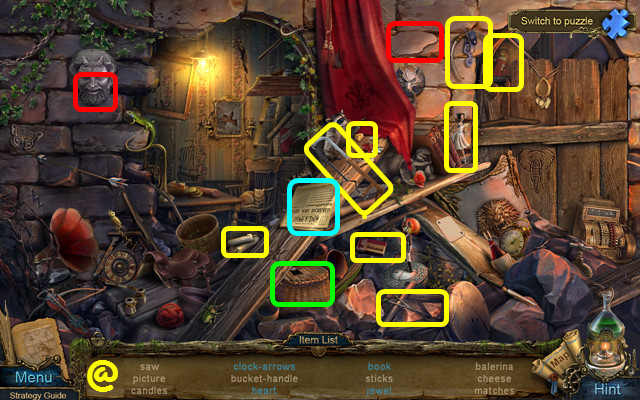
- Use the CHISEL to remove the stone (J).
- Take the 3/3 PUZZLE PIECE, and the PENCIL (@).
- Walk forward.
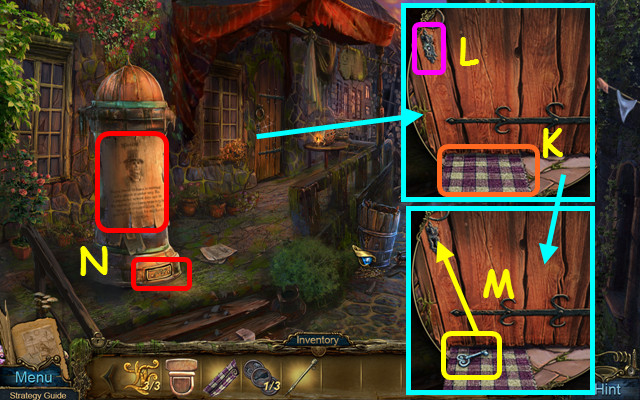
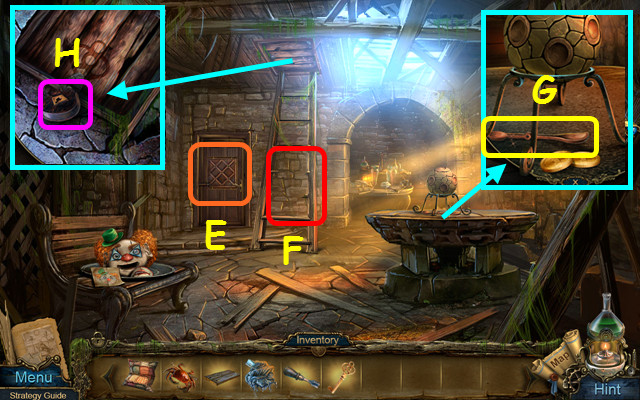
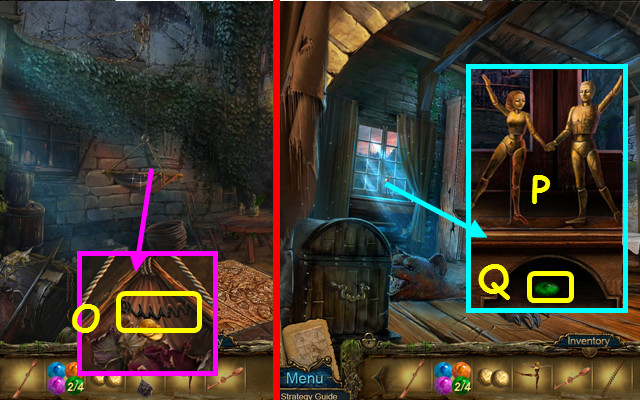
- Place the MAT under the door (K) and use the PENCIL in the lock (L).
- Take the TAVERN KEY and use it in the lock (M).
- Read the notice, and then select the base of the post (N).
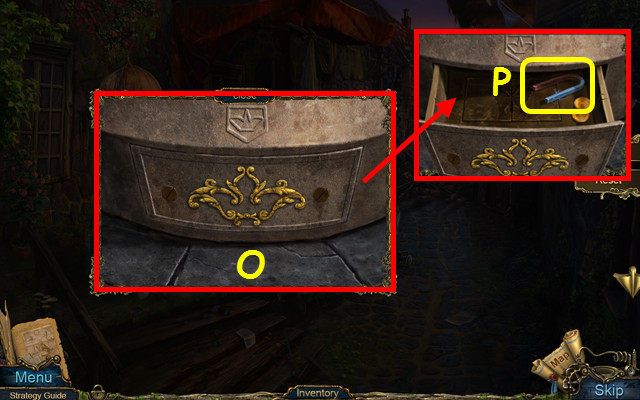
- Place the 3 PUZZLE PIECES on the panel.
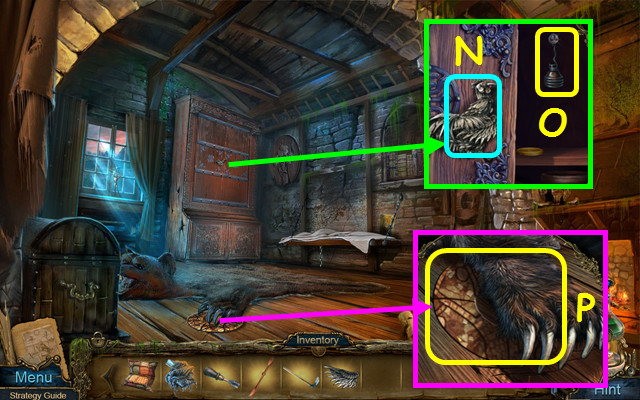
- Rotate the pieces to form a crown (O).
- Take the MAGNET (P).
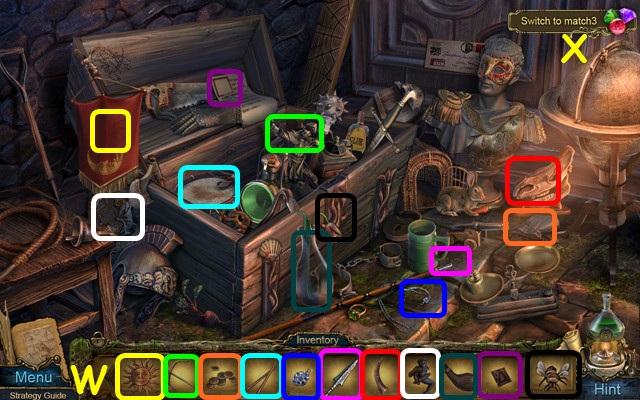
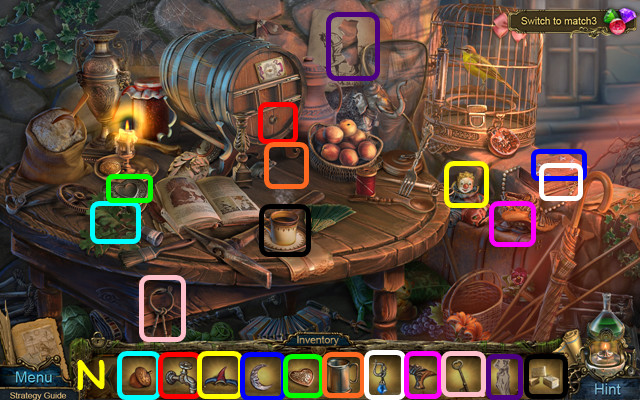
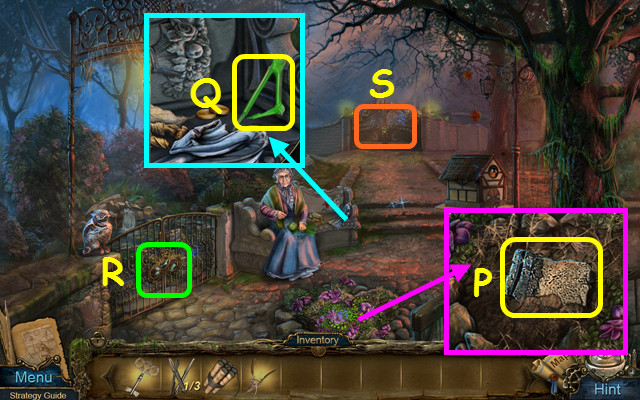
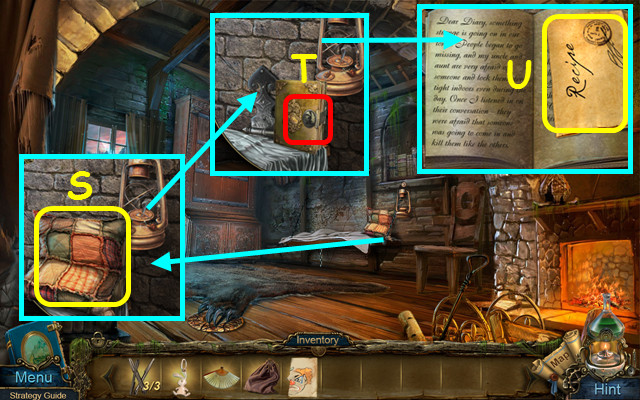
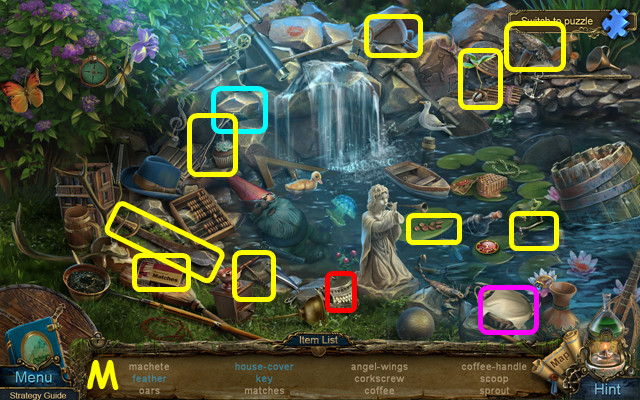
- Enter the Tavern on the left.
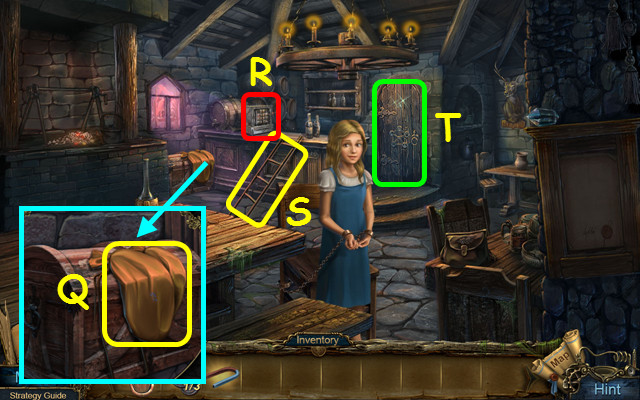
- Take the BALLOONS (Q).
- Note the cash register mini-game on the bar (R).
- Take the LADDER (S).
- Note the door to the Kitchen (T).
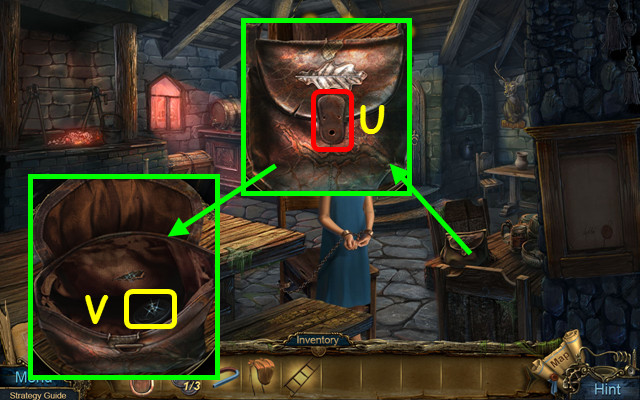
- Place the CLIP on the bag (U).
- Take the 2/3 CHIP (V).
- Walk down.
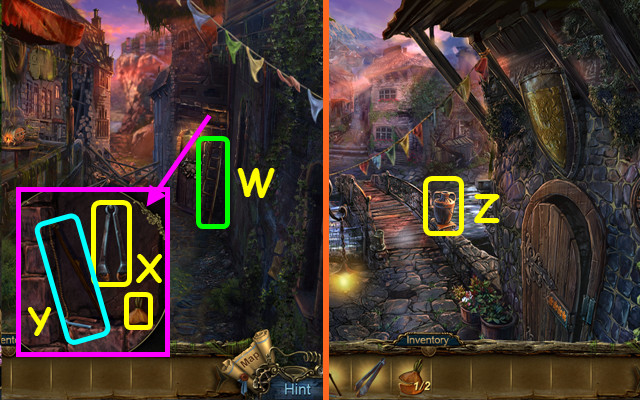
- Place the LADDER on the wall (W).
- Take the PINCERS and the 1/2 ONION (X).
- Place the MAGNET on the rope; take the MAGNET ROPE (Y).
- Walk down.
- Use the MAGNET ROPE on the vase to get the 3/3 CHIP (Z).
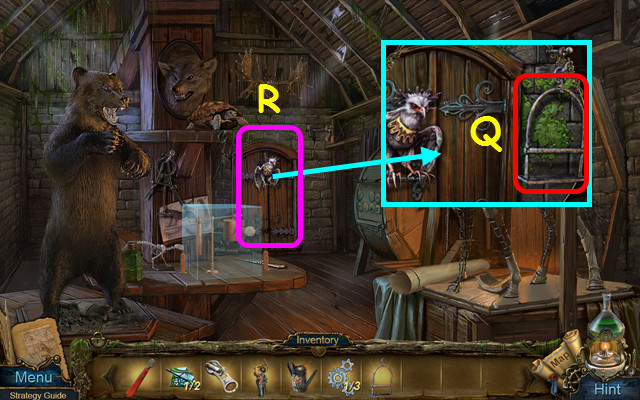
- Walk forward, enter the Tavern, and select the door to the Kitchen.
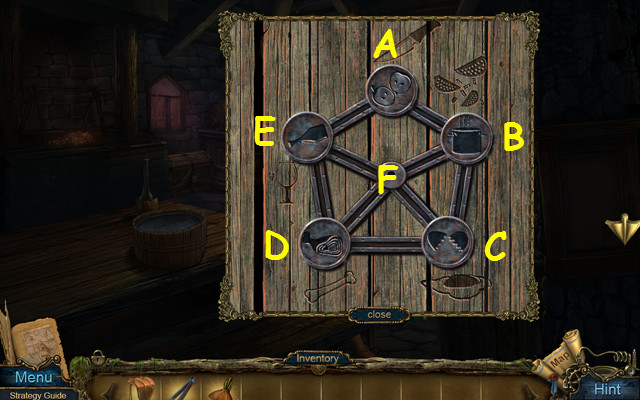
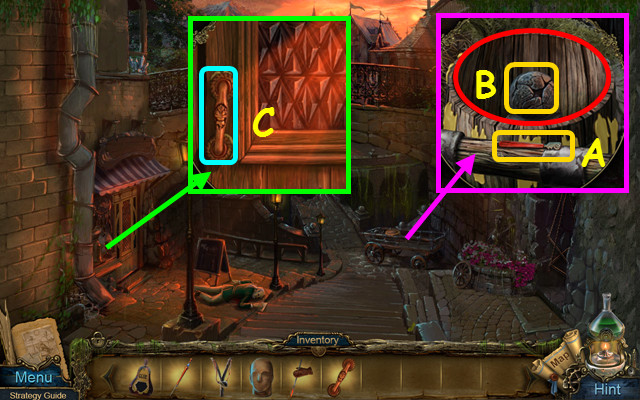
- Place the 3 CHIPS on the door.
- Move the chips to match the carvings on the door.
- Select B, A, E, F, D, C, B, and F.
- Enter the Kitchen.
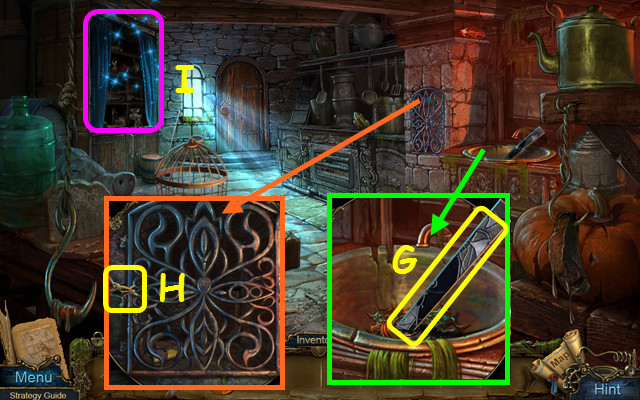
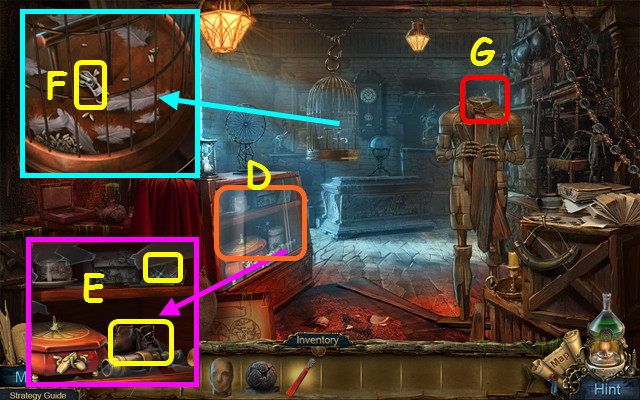
- Use the PINCERS to take the DIRTY STRIP (G).
- Take the GRASSHOPPER (H).
- Open the curtains and select the shelves (I).
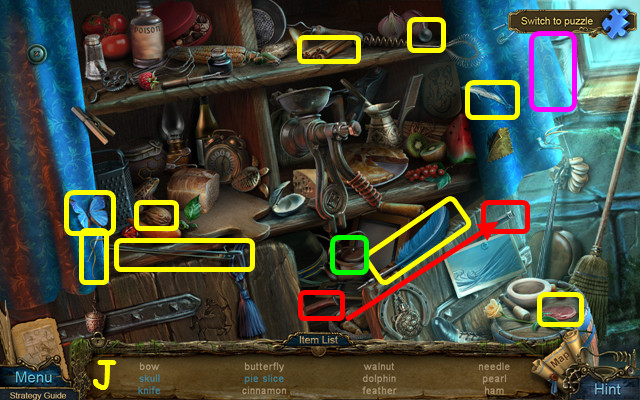
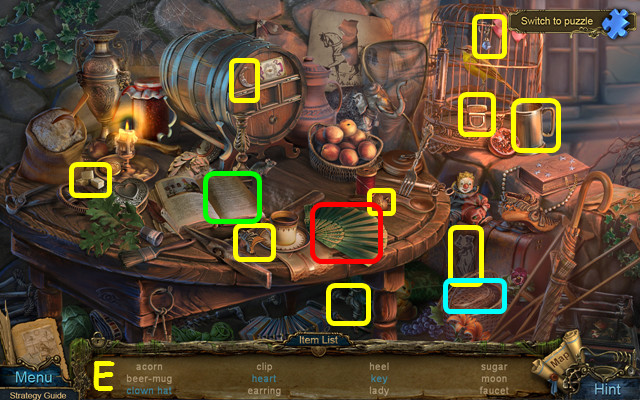
- Play the HOP to earn the WALNUT (J).
- Remember, you may play the jigsaw in place of the HOP by selecting the puzzle piece icon.
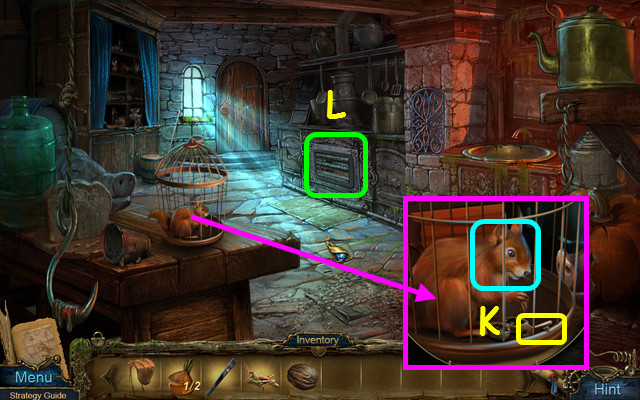
- Give the WALNUT to the squirrel; take the HANDCUFFS KEY (K).
- Note the oven (L).
- Walk down.
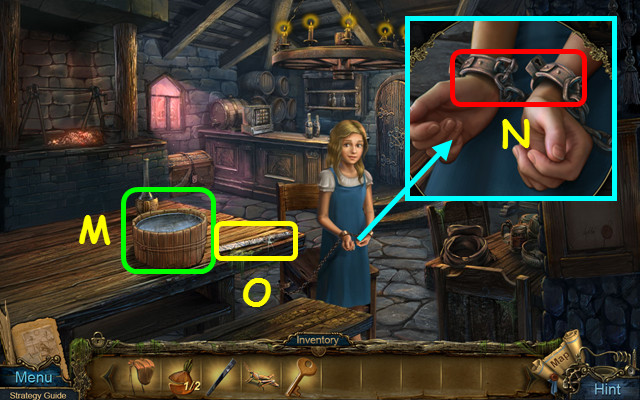
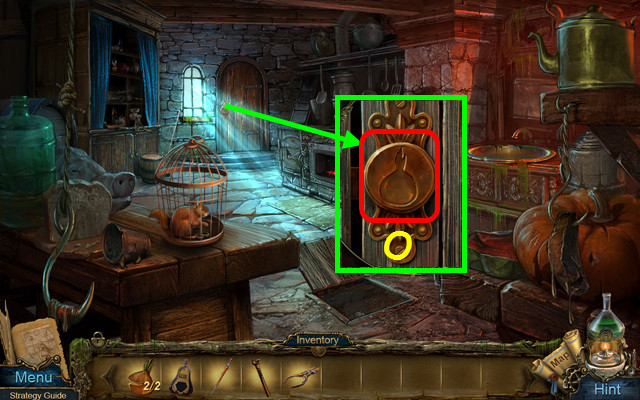
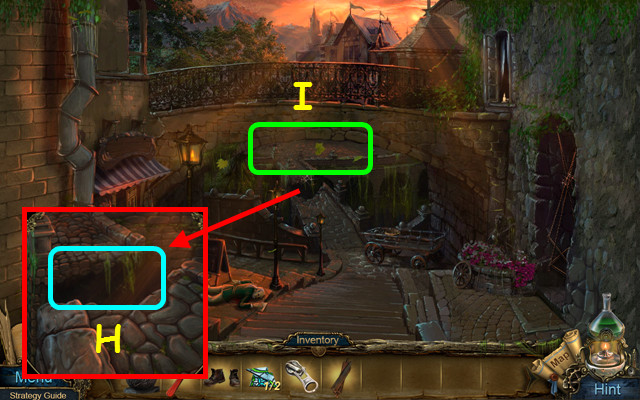
- Use the DIRTY STRIP on the tub of water to get the 1/2 OVEN STRIP (M).
- Use the HANDCUFFS KEY on the handcuffs (N).
- Take the 2/2 OVEN STRIP (O).
- Walk forward and select the oven.
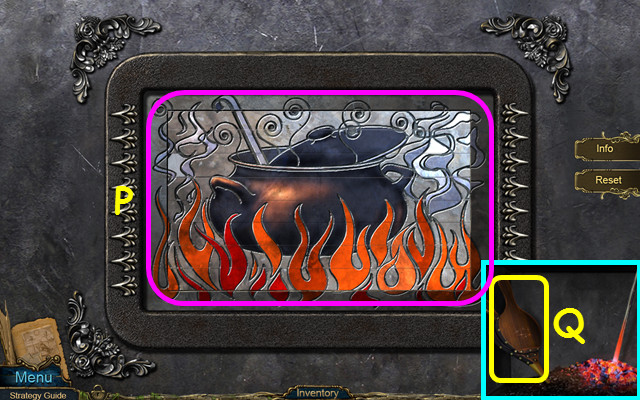
- Place the 2 OVEN STRIPS in the frame.
- Drag the strips to form the picture (P).
- Take the BELLOWS (Q).
- Walk down twice.
- Place the BALLOONS under the beams; use the BELLOWS on the balloons (R).
- Walk forward to the Crossroads (S).
Chapter 2: The Crossroads Area
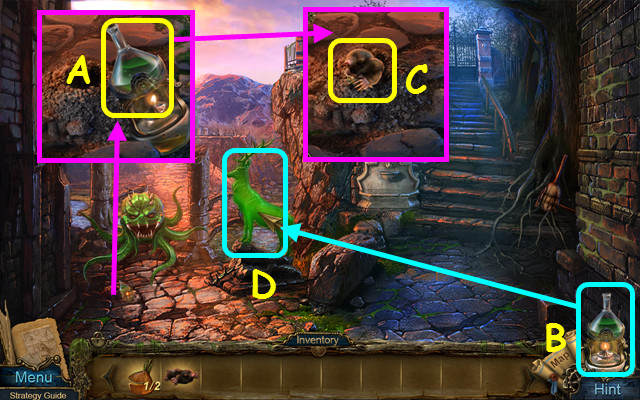
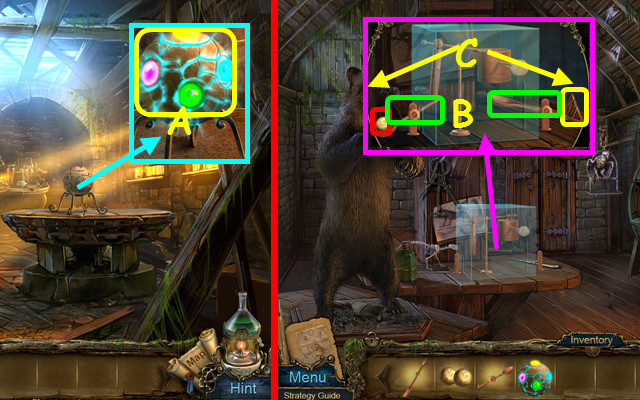
- Take the CRUCIBLE (A). It will now sit on the right side of your menu bar (B).
- Use the GRASSHOPPER on the hole; take the MOLE (C).
- Use the CRUCIBLE on the deer (D).
- Take the HORN (E).
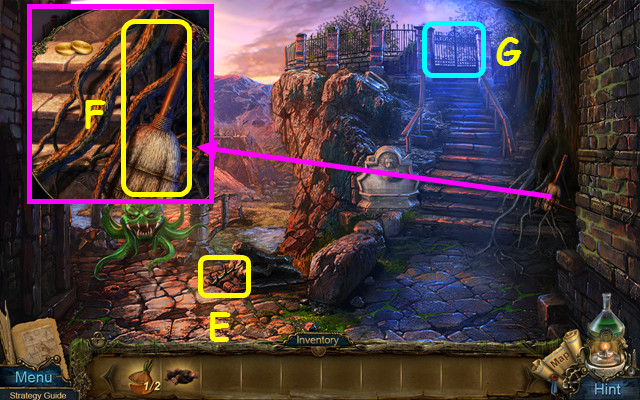
- Take the BROOM (F).
- Note the Cemetery gate (G).
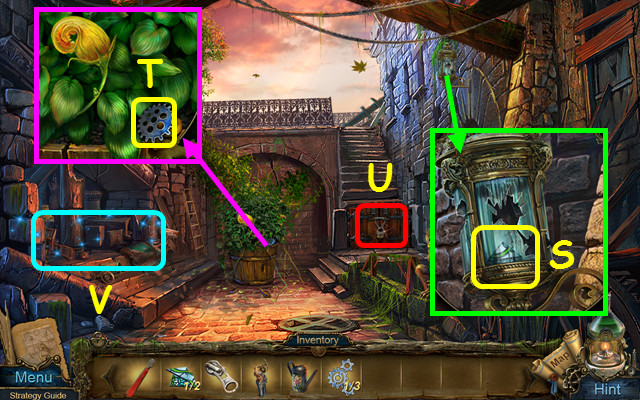
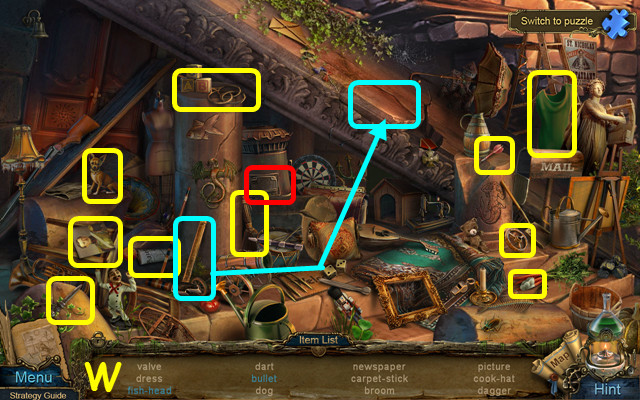
- Walk down, enter the Tavern, and go forward to the Kitchen.
- Use the BROOM to remove the dirt; take the EYE (H).
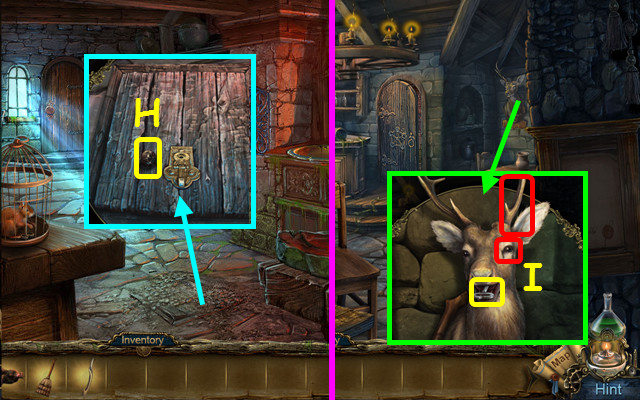
- Walk down.
- Place the HORN and the EYE on the deer; take the CEMETERY KEY (I).
- Walk down and forward.
- Use the CEMETERY KEY on the lock and walk forward.
- Use the MOLE on the soil (J).
- Take the STICK (K).
- Note the mini-game on the door (L).
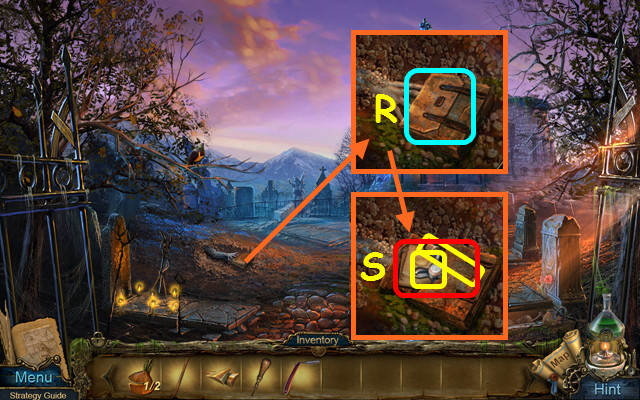
- Use the CRUCIBLE on the green spikes; take the GOLDEN SPIKES (M).
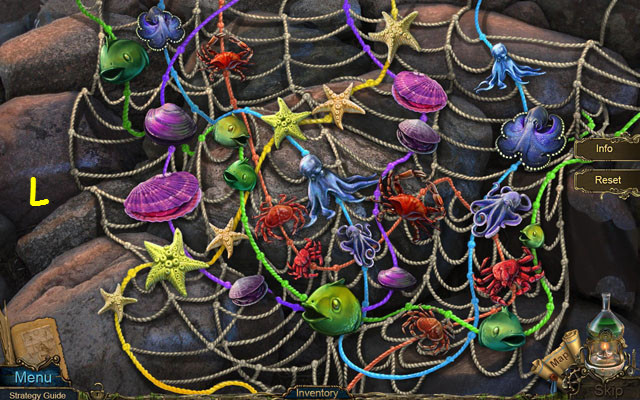
- Move the slab and select the grave (N).
- Play the HOP to earn the BUTTERFLY (O).
- Walk down twice.

- Place the BUTTERFLY in the drawer (P).
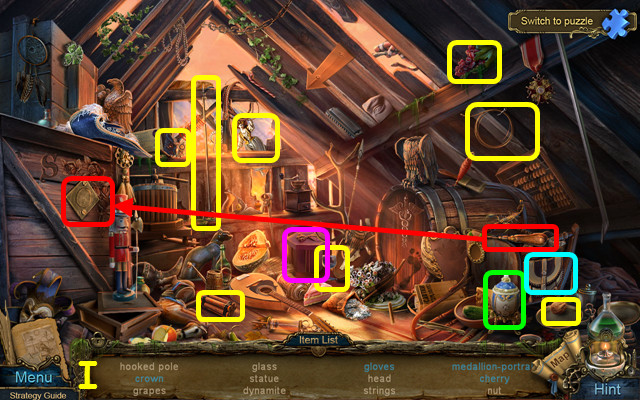
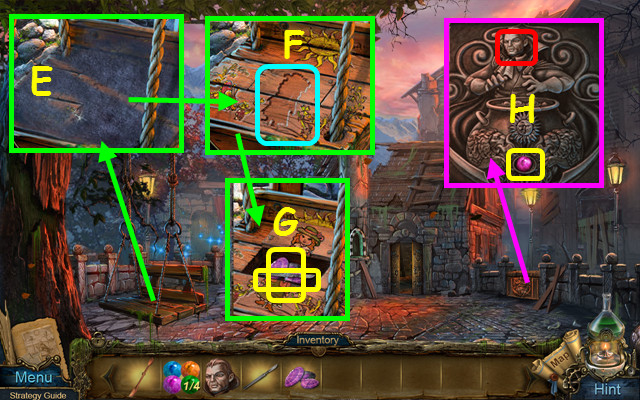
- Take the RAZOR and the 1st SCREWDRIVER (Q).
- Walk forward twice.
- Use the RAZOR on the case (R).
- Take the VALVE, the 2nd SCREWDRIVER, and read the note (S).
- Walk down 3 times and enter the Guardian Post.

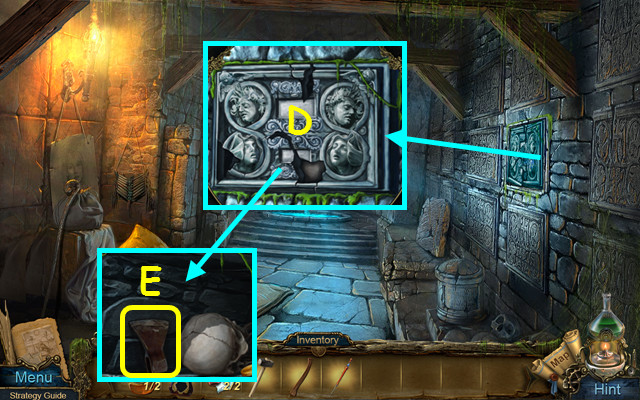
- Place the GOLDEN SPIKES on the buckle; take the RING (T).
- Place the VALVE on the gears; take the HAMMER (U).
- Select the chest (V).
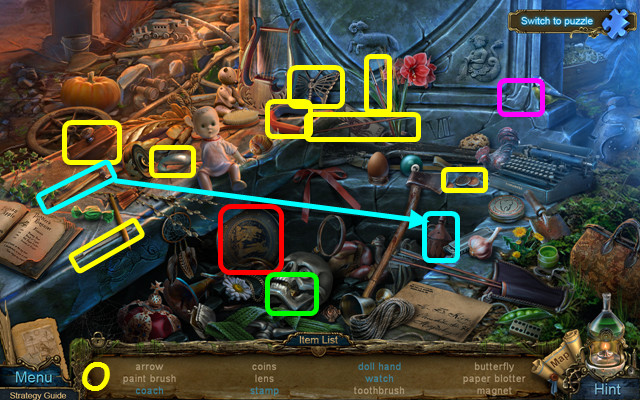
- Play the HOP to earn the GLUE (W).
- You may play a match 3 game instead of this HOP by selecting the upper right icon (X).
- Return to the Kitchen.
- Use the 1st SCREWDRIVER to remove the grate (A).
- Take the 1/3 CASH REGISTER PARTS (B).
- Select the shelves (C).
- Play the HOP to earn the BOLT (D).
- You may play a match 3 game in place of the HOP (E).
- Place the RING and the BOLT on the trapdoor; use the 2nd SCREWDRIVER on the bolt (F).
- Take the CHISEL (G).
- Walk down.
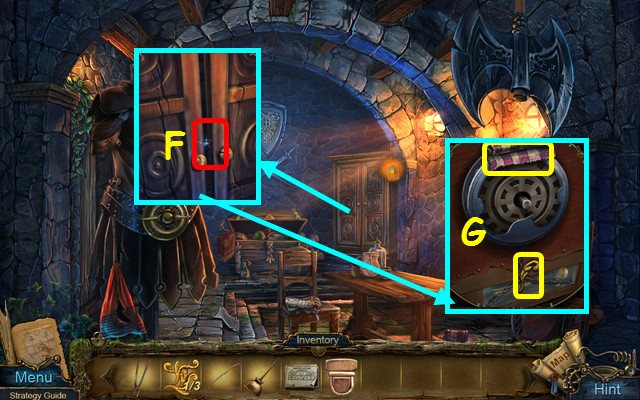
- Use the CHISEL, and then the HAMMER on the lock (H).
- Take the SCISSORS and the SCOOP (I).
- Use the SCISSORS on the hole; take the 2/3 CASH REGISTER PART (J).
- Walk down.

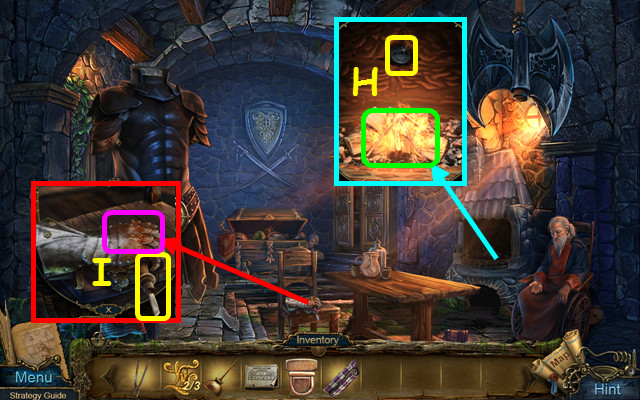
- Use the SCOOP to remove the grain (K).
- Take the 3/3 CASH REGISTER PART and use the STICK on the mesh to take the 1st NET (L).
- Select the table (M).
- Play the HOP to earn the CARD (N).
- Walk left to the Tavern and select the cash register.
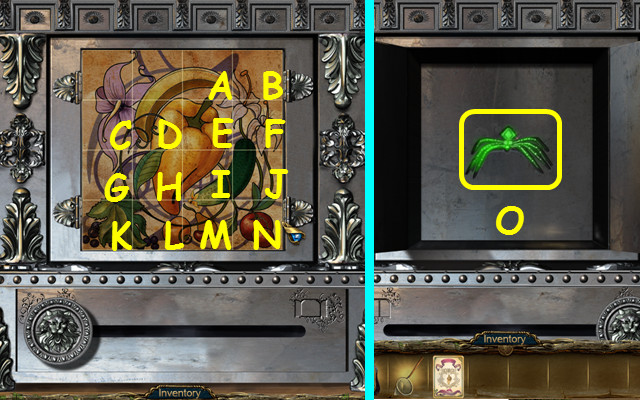
- Place the 3 CASH REGISTER PARTS on the grid.
- Select the pieces to restore the picture; adjacent pieces may also move at the same time.
- Select Ax3, Bx1, Cx3, Dx3, Ex2, Fx3, Gx1, Hx2, Ix2, Jx1, Kx2, Lx1, Mx2, and Nx2.
- Use the CRUCIBLE on the green spider; take the 2nd NET (O).
- Walk down and forward.
- Use the 2nd NET on the beast (P).
- Walk left to the Amphitheater (Q).
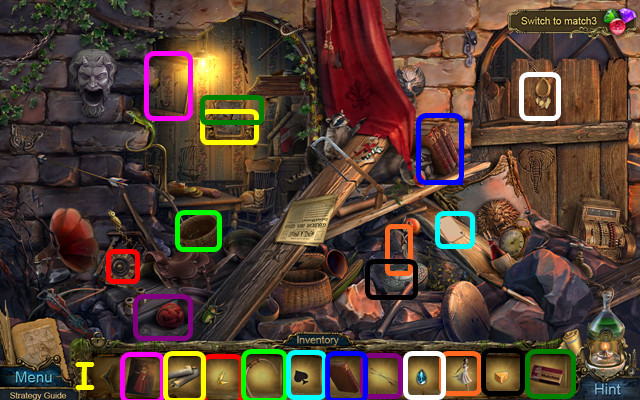
- Take the 1/2 MASK FRAGMENTS (A).
- Take the SLEDGE HAMMER (B).
- Note the lock on the door (C).
- Use the CARD on the opening (D).
- Take the PRIEST (E).
- Take the AXE HANDLE (F).
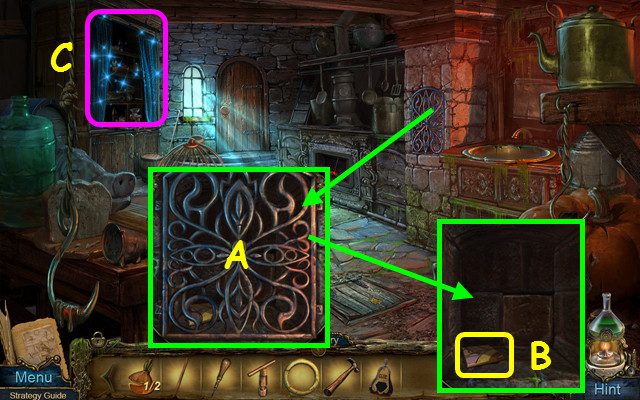
- Walk down, go forward to the cemetery, and select the door.
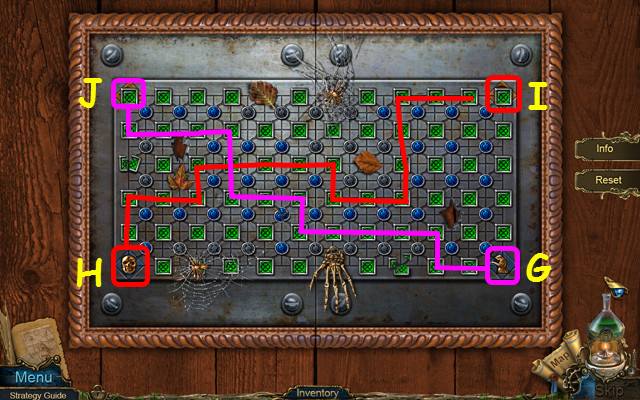
- Place the PRIEST on the grid (G).
- Move the skull (H) to the upper right corner (I), and move the priest to the upper left corner (J).
- Press the buttons move the tiles.
- Walk forward to the Crypt.
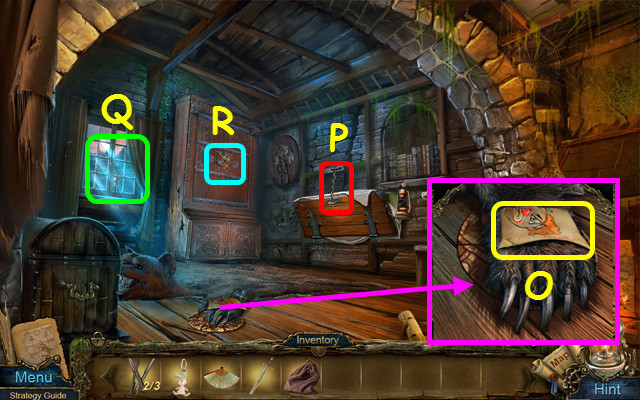
- Take the HOOK (A).
- Use the 1st NET to take the 2/2 MASK FRAGMENT (B).
- Note the stained glass window (C).
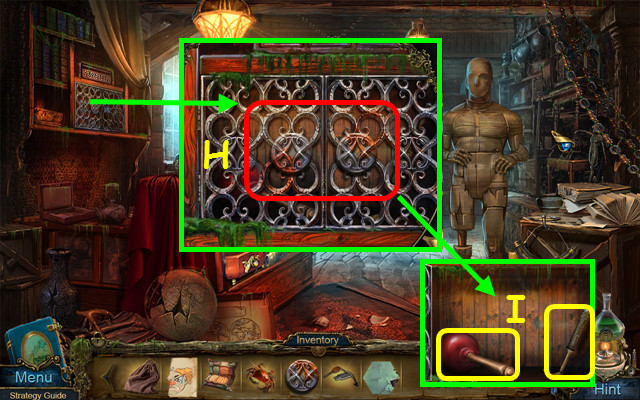
- Use the SLEDGE HAMMER on the panel (D).
- Use the AXE HANDLE on the head to make the AXE (E).
- Walk down twice.
- Use the AXE to take the LEVER (F).
- Walk down.
- Select the door (G).
- Place the 2 MASK FRAGMENTS on the board.
- Restore the masks by sliding the pieces into the frame (H).
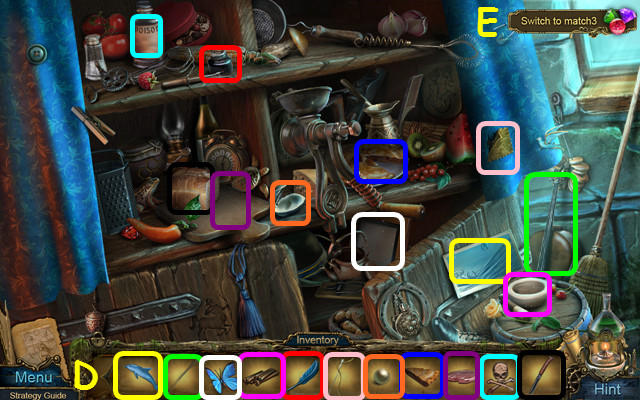
- Enter the Workroom.
- Take the SUN (I).
- Note the turtle (J).
- Note the tokens (K).
- Use the CRUCIBLE on the green bug; take the WIRE CUTTER (L).
- Walk down, forward, and left.
- Place the SUN in the strap (M).
- Take the 2/2 ONION (N).
- Travel to the Kitchen.
- Place the ONION into the lock (O).
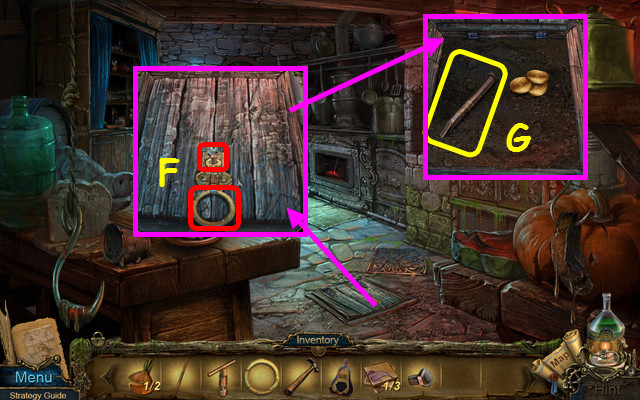
- Walk forward to the Enclosed Court.
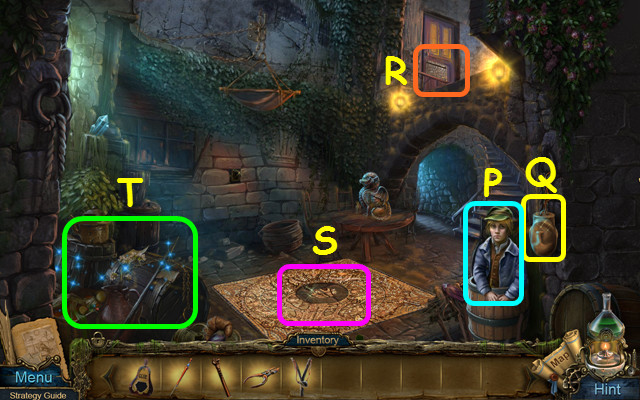
- Billy will give you the SLINGSHOT (P).
- Use the WIRE CUTTER to take the HEAD (Q).
- Note the door mini-game (R).
- Note the floor mini-game (S).
- Select the barrels (T).
- Play the HOP to earn the GLOVE (U).
- Walk down.

- Use the GLOVE to take the HOT LEVER (V).
- Walk forward.
- Use the LEVER in the slot (W).
- Take the HANDLE (X).
- Walk forward to the Ladder (Y).
Chapter 3: The Ladder Area
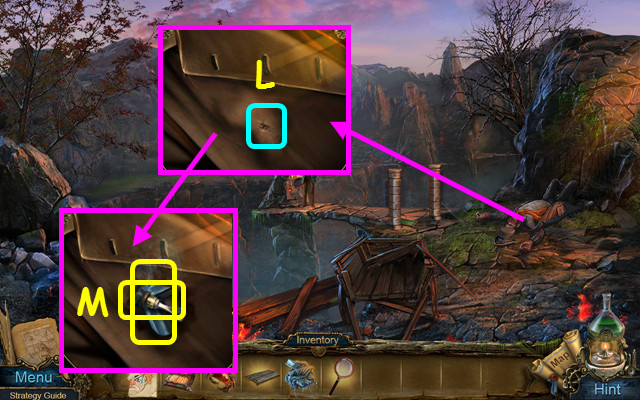
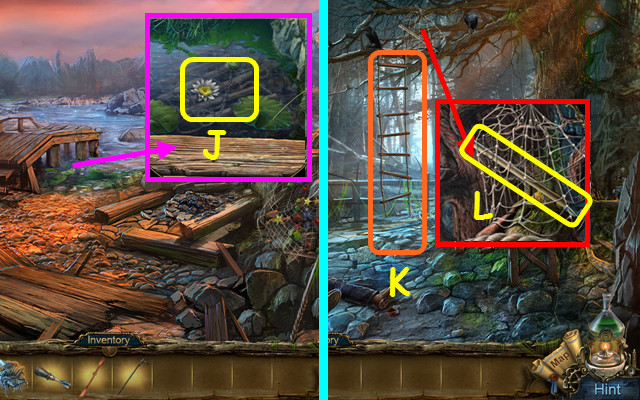
- Take the GLASSCUTTER (A).
- Use the HOT LEVER on the barrel lid; take the BALL (B).
- Use the GLUE, and then the HANDLE on the door (C).
- Walk left into the Store.
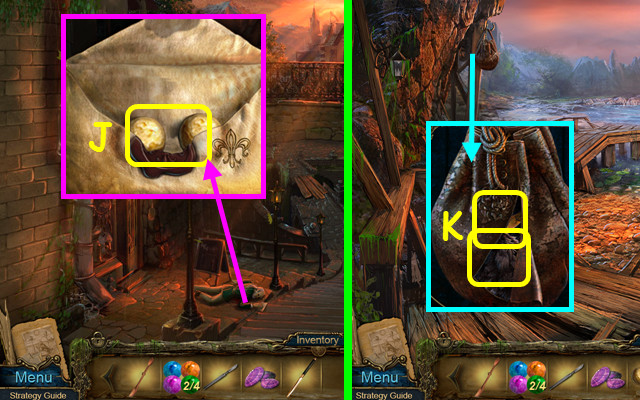
- Use the SLINGSHOT on the display case (D).
- Take the 1/2 GLASS PARTS and the BOOTS (E).
- Use the HOOK to take the ZIPPER PULL (F).
- Place the HEAD on the dummy to get the BOARDS (G).
- Walk down.
- Place the BOARDS on the bridge (H).
- Walk forward to the Square (I).
- Take the EMPTY WATERING CAN and the MINER (J).
- Place the BALL on the fencepost (K).
- Take the 1/3 GEAR (L).
- Note the gate (M).
- Walk down twice.
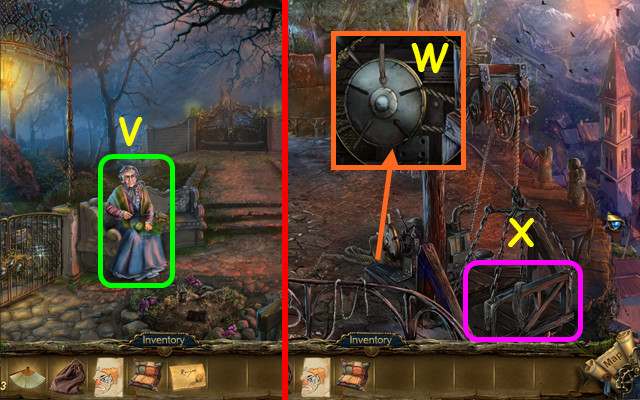
- Give the BOOTS to Billy (N).
- You will earn the THREE-CORNERED KEY.
- Walk forward twice and use the THREE-CORNERED KEY on the gate lock.
- Select the gate.
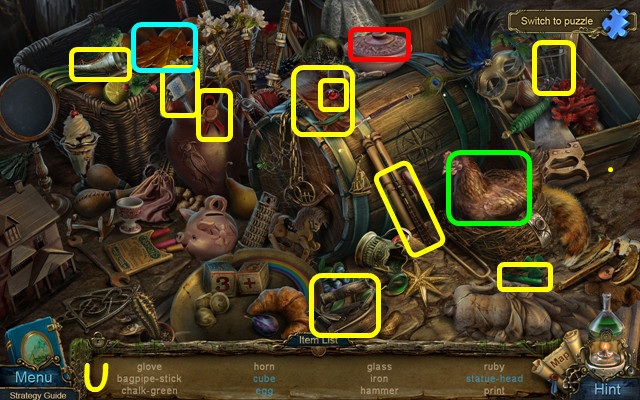
- Play the HOP to earn the SAW (@).
- Travel to the Cemetery.
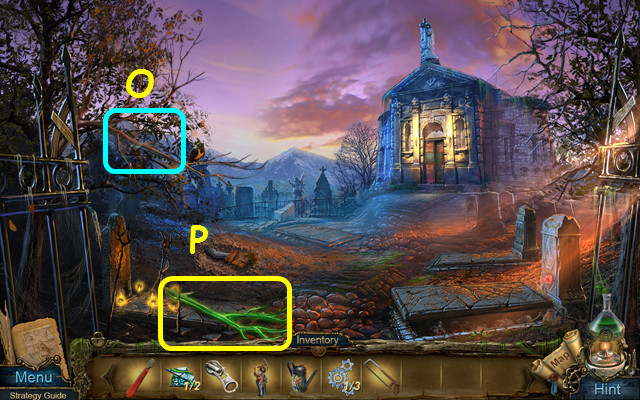
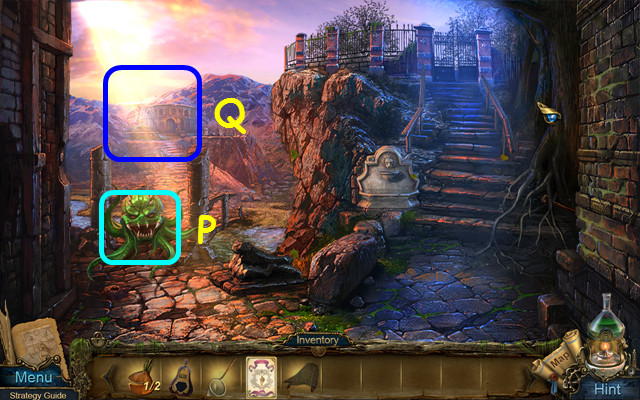
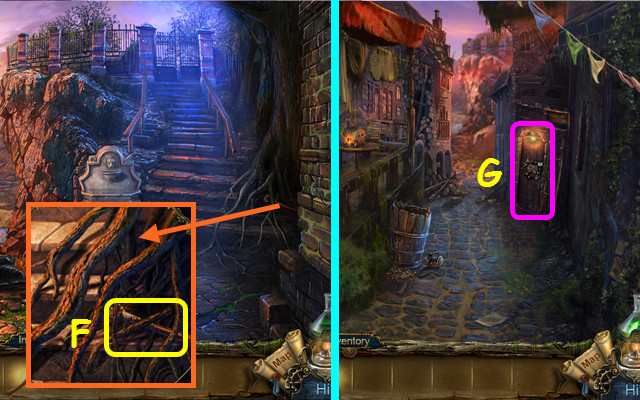
- Use the SAW on the tree branch (O).
- Use the CRUCIBLE on the green branch; take the PERCH (P).
- Walk down twice and enter the Workroom on the right.
- Hang the PERCH on the hook (Q).
- Walk forward to the Street (R).
- Use the GLASS CUTTER to take the 2/2 GLASS PARTS (S).
- Take the 2/3 GEAR (T).
- Note the lock on the gate (U).
- Select the debris (V).
- Play the HOP to earn the VALVE (W).
- Walk down twice and go forward to the Crossroads.
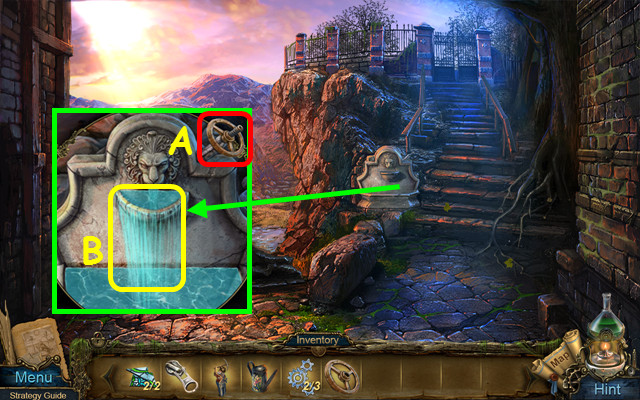
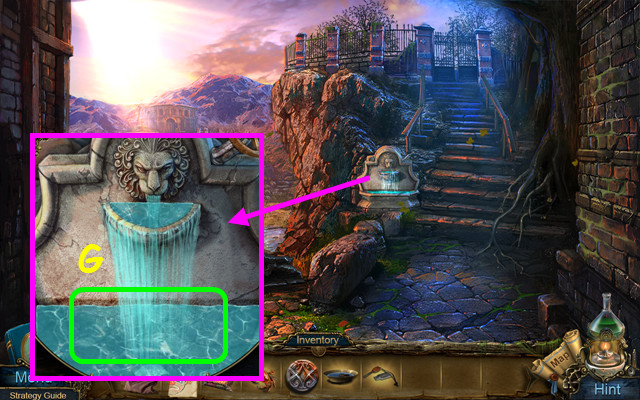
- Use the VALVE on the fountain (A).
- Use the EMPTY WATERING CAN on the water to get the FULL WATERING CAN (B).
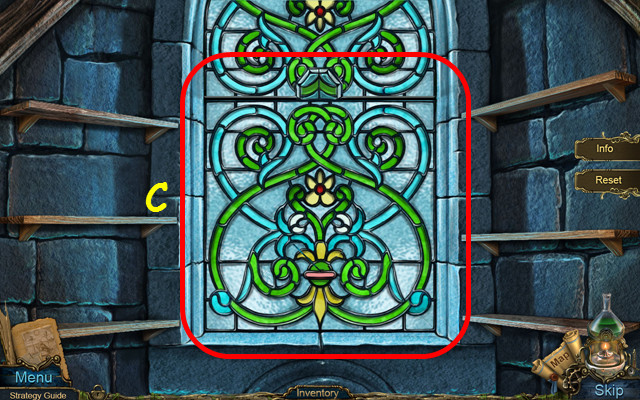
- Walk forward twice and select the stained glass window.
- Place the 2 GLASS PARTS on the shelves.
- Restore the window by placing the pieces into the frame (C).
- You will earn the 3/3 GEAR.
- Return to the Workrooom and select the turtle.
Chapter 4: The Workroom Area
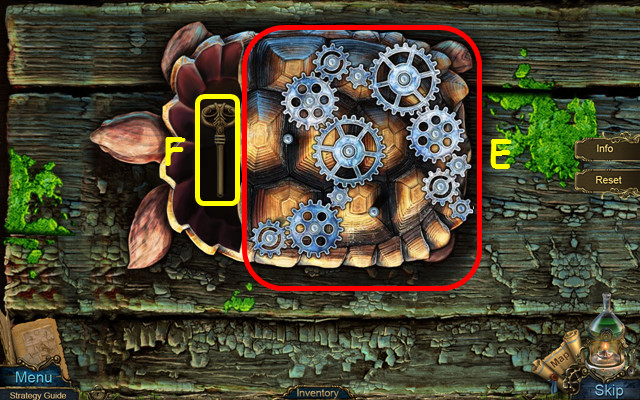
- Place the 3 GEARS on the table.
- Place all the gears into the mechanism (E).
- Take the WICKET KEY (F).
- Walk forward.

- Use the FULL WATERING CAN on the flower (G).
- Take the HANDCUFFS KEY (H).
- Use the WICKET KEY in the lock (I).
- Select the debris on the left.
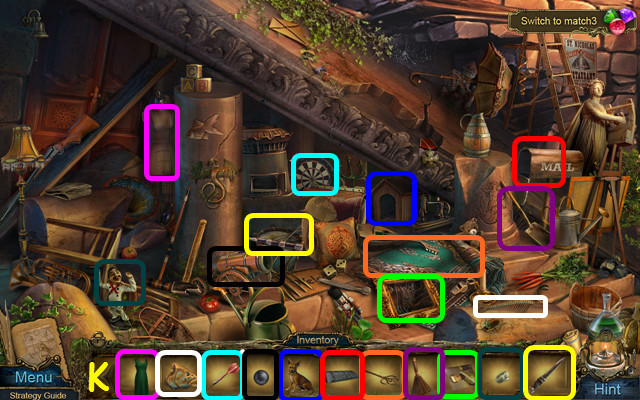
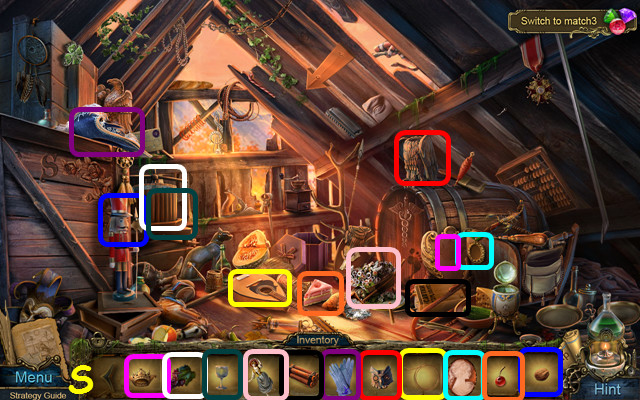
- Play the HOP to earn the 1/3 STICK (K).
- Walk forward to the Bridge.
- Use the ZIPPER PULL on the zipper and take the DYNAMITE (M).
- Use the MINER on the rock; take the PRUNERS (N).
- Walk left to the Park (O).
- Use the PRUNERS on the flowers; take the BRICK (P).
- Move the rag and use the CRUCIBLE on the green rods; take the BALLERINA (Q).
- Note the mini-game on the gate (R).
- Note the locked gate (S).
- Travel to the Ladder.
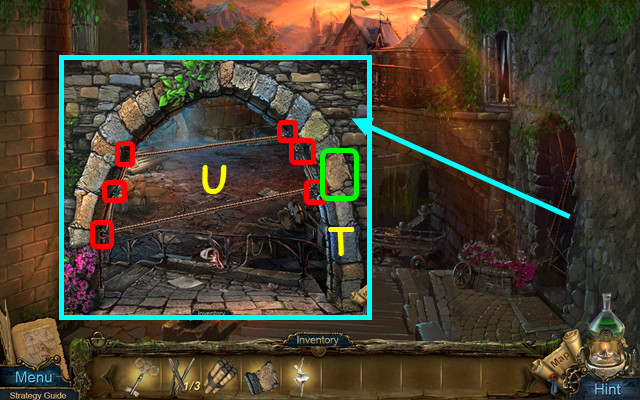
- Place the BRICK in the arch (T).
- Move the hooks (red) so the ropes do not cross (U).
- Walk right to the Terrace.
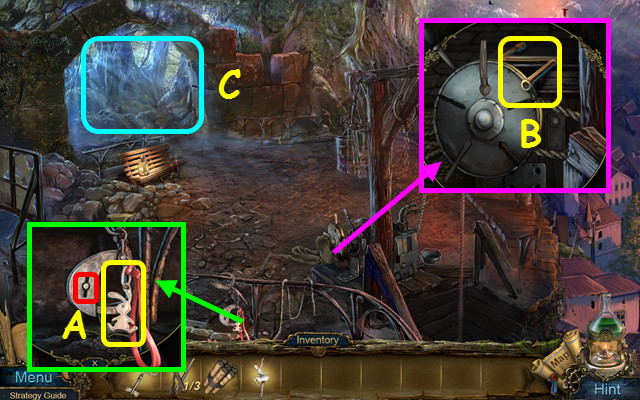
- Use the HANDCUFFS KEY in the lock and take the RABBIT (A).
- Take the HANDLE (B).
- Enter the Forest (C).

- Place the HANDLE on the stone wheel and take the FAN (D).
- Use the DYNAMITE on the rocks; select the debris (E).
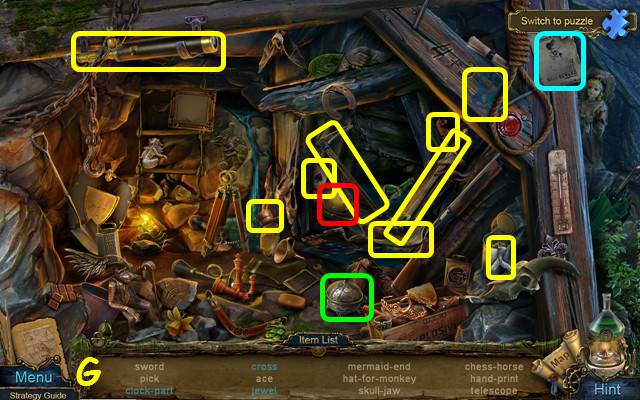
- Play the HOP to earn the SWORD (G).
- Use the SWORD on the stone wheel to get the SHARP SWORD.
- Walk down twice and go left into the Store.
- Place the BALLERINA on the box (H).
- Take the SPUR (I).
- Walk down, right, and left.
- Use the SPUR on the HEEL; take the RING (J).
- Walk down twice and go forward.
- Use the RING in the lock; take the STAR EMBLEM and the 2/3 STICKS (K).
- Walk down twice and select the barrels.

- Play the HOP to earn the SACK (L).
- Select the 2nd floor door.
- Place the STAR EMBLEM at the bottom of the board (M).
- Drag the button to the top of the grid; it will fall if you choose the wrong path.
- Use the path shown to solve (N).
- Enter Uncle’s Room.
- Take the PHOTO (O).
- Use the SHARP SWORD on the chain (P).
- Note the window (Q).
- Note the lock on the cabinet (R).
- Take the PILLOW (S).
- Use the RABBIT on the lock (T).
- Take the RECIPE (U).
- Return to the Park.
- Give the RECIPE to Samantha; you will receive the 3/3 STICK (V).
- Travel to the Terrace.
- Use the STICKS on the wheel (W).
- Enter the elevator to the Lowland (X).
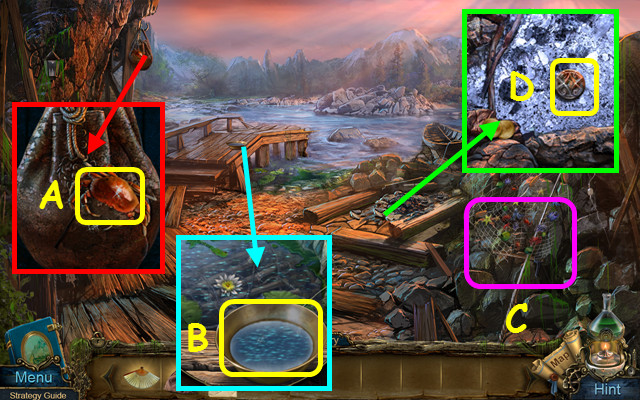
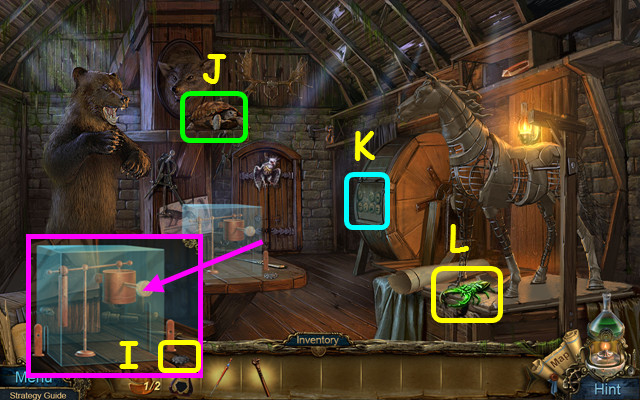
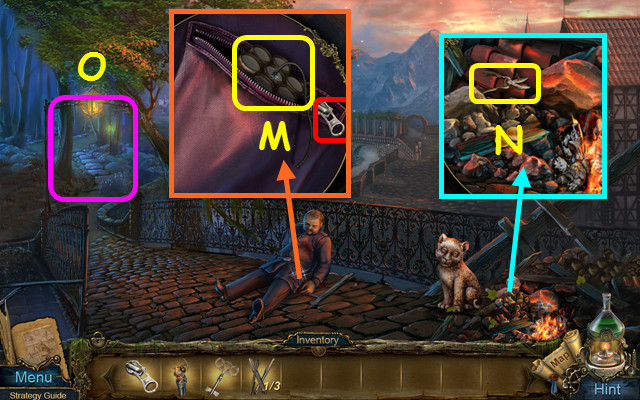
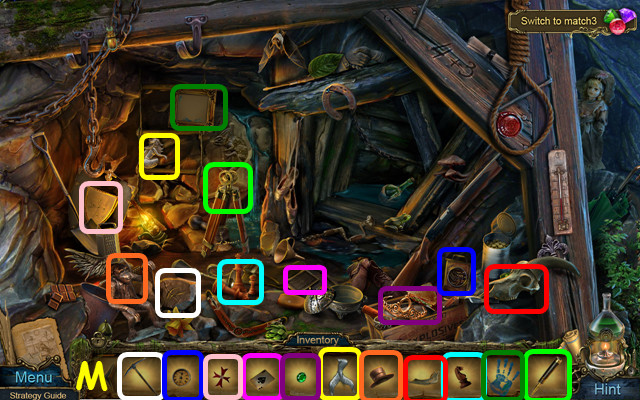
- Take the CRAB (A).
- Take the PLATE (B).
- Note the net (C).
- Use the FAN on the ash; take the HANDLE (D).
- Walk down.
- Use the PLATE on the frog; take the PLATE WITH FROG (E).
- Take the FLINT (F).
- Travel to the Crossroads.
- Use the PLATE WITH FROG on the water to get the HEX TILE (G).
- Travel to the Store.
- Place the HANDLE on the cabinet and rotate the handles to the correct position (H).
- Take the PLUNGER and the CROWBAR (I).
- Walk down 3 times.
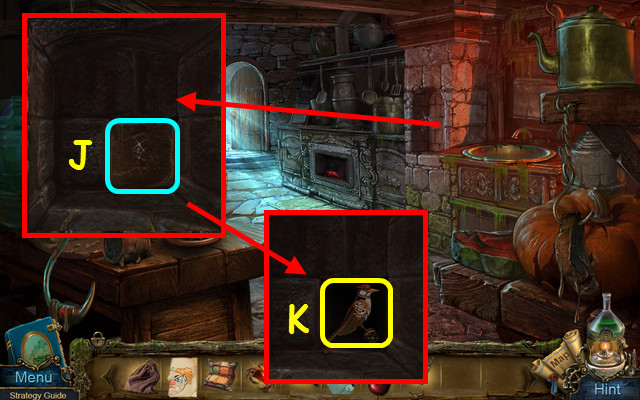
- Use the PLUNGER on the stone (J).
- Take the MECHANICAL WOOD PECKER (K).
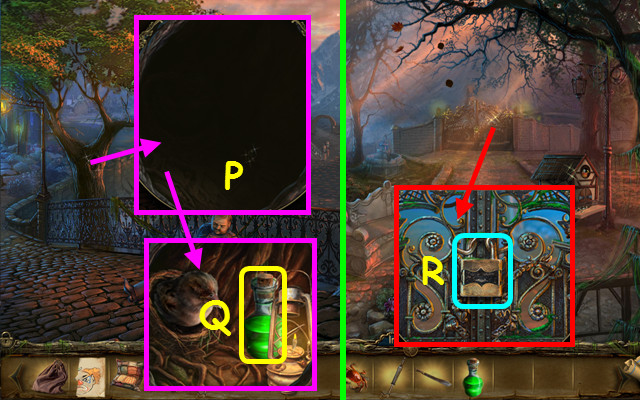
- Travel to the Park and select the left gate.
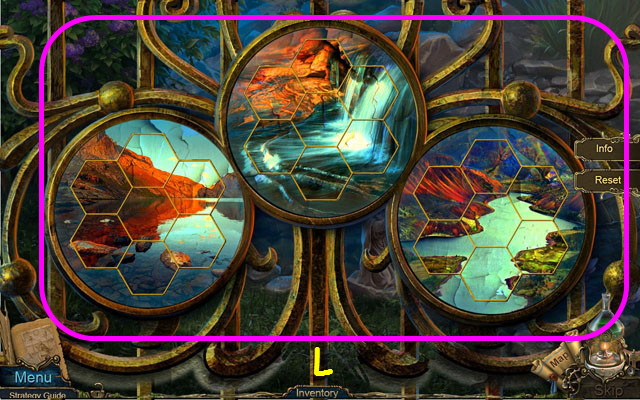
- Place the HEX TILE on the gate.
- Restore the 3 pictures; select 2 pieces to swap positions (L).
- Select the area behind the gate.
- Play the HOP to earn the MACHETE (M).
- Travel to Uncle’s Room.
- Use the FLINT on the lamp (N).
- Use the MECHANICAL WOODPECKER on the wood; take the LAMP (O).
- Return to the Bridge.
- Place the LAMP in the dark hole (P).
- Take the ACID (Q).
- Walk left.
- Use the ACID on the lock (R).
- Walk forward to the Ravine.
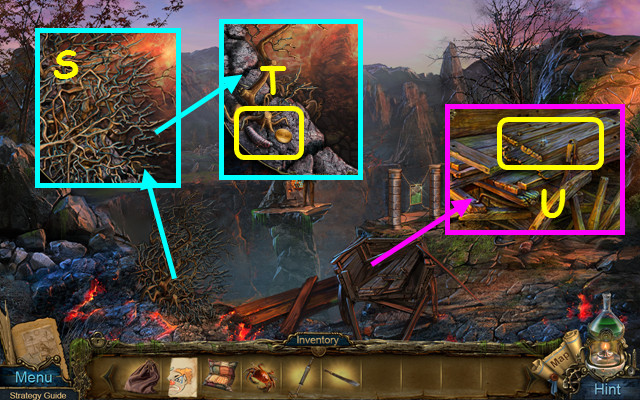
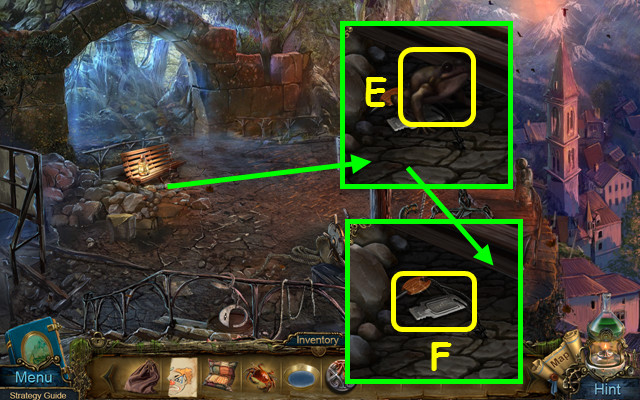
- Use the MACHETE on the brush (S).
- Take the CATERPILLAR (T).
- Use the CROWBAR to take the BOARDS (U).
- Return to the Bridge.
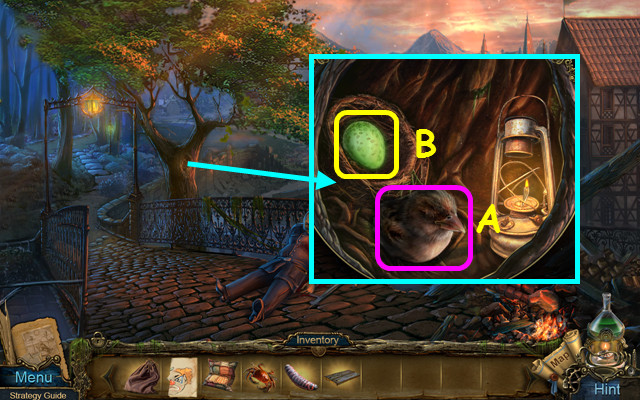
- Give the CATERPILLAR to the bird (A).
- Use the CRUCIBLE on the green egg; take the CHIP (B).
- Travel to the Workroom and select the tokens mini-game.
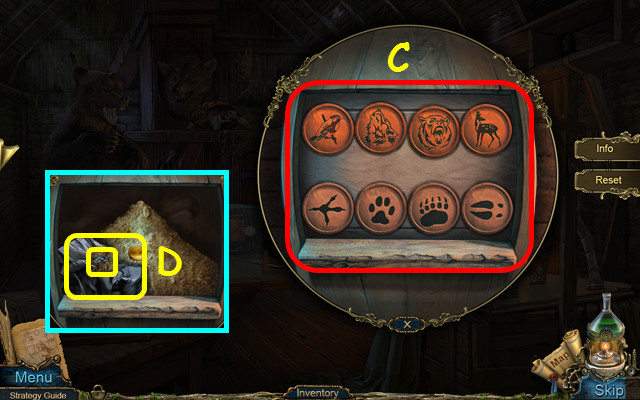
- Place the CHIP with the others.
- Move the upper tokens over the correct footprint (C).
- Take the RAG; use the SACK to collect the SEEDS (D).
- Walk down and forward.
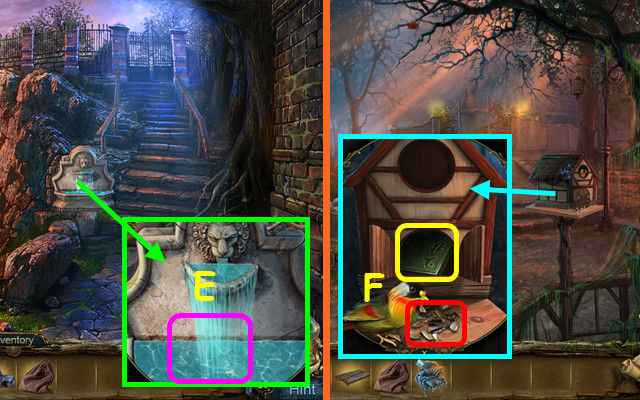
- Use the RAG on the fountain to get the WET RAG (E).
- Return to the Park.
- Give the SEEDS to the bird; take the SYMBOL (F).
- Select the pond on the left.
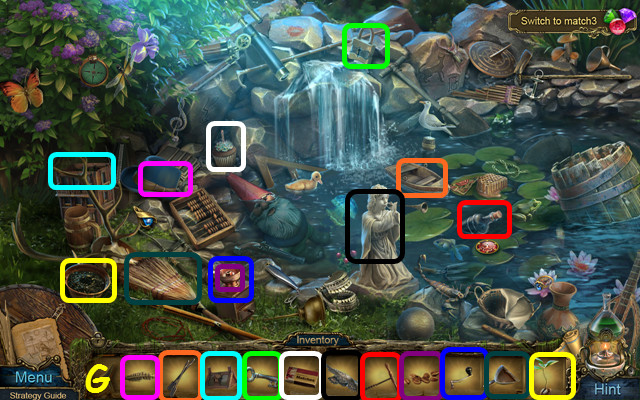
- Play the HOP to earn the ELEMENTAL (G).
- Walk forward to the Ravine.
- Place the SYMBOL in the frame (H).
- Change the symbols on the pillars to match those in the frame (I).
- Select the mini-game on the island (J).
- Place the ELEMENTAL on the board.
- You are red, playing against the blue chips.
- Move a chip one place to duplicate and change the surrounding chips red.
- You can also jump a blue chip; you will leave an empty space.
- Have more chips when the board is full to win.
- Our solution was: 1-6, 26-20, 6-7, 6-14, 1-2, 14-15, 26-21, 26-27, 27-28, 22-17, 24-25, 19-12, and 5-4.
- The mini-game is randomized; the blue chips will move differently each time you play.
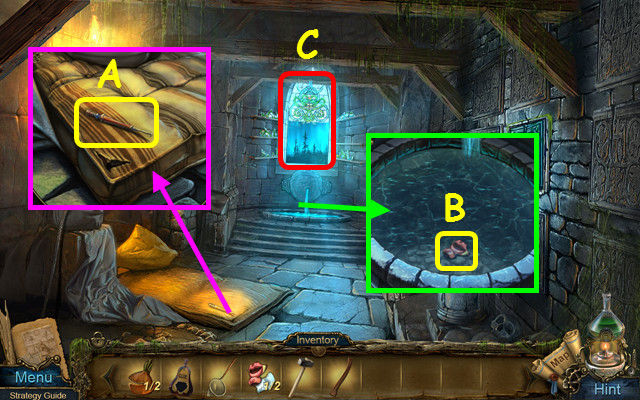
- Take the MAGNIFYING GLASS.
- Use the MAGNIFYING GLASS on the rip (L).
- Take the SCREWDRIVER and the CROSS (M).
- Travel to the Cemetery.
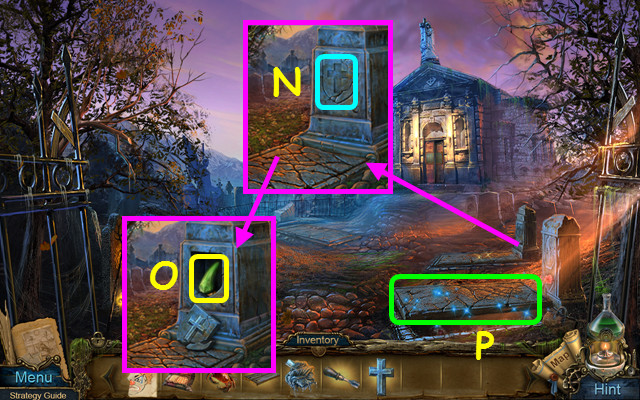
- Place the CROSS into the indentation (N).
- Use the CRUCIBLE on the green dragon’s tooth; take the KNIFE (O).
- Select the open grave (P).

- Play the HOP to earn the EYE (Q).
- Walk forward.
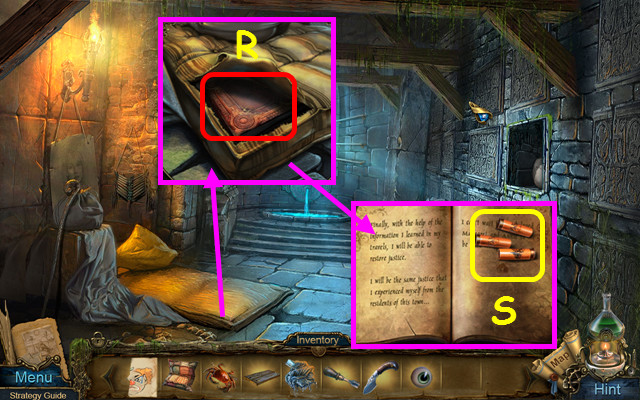
- Use the KNIFE on the mattress and read the book (R).
- Take the note and the SHOTGUN CARTRIDGES (S).
- Return to the Ravine.
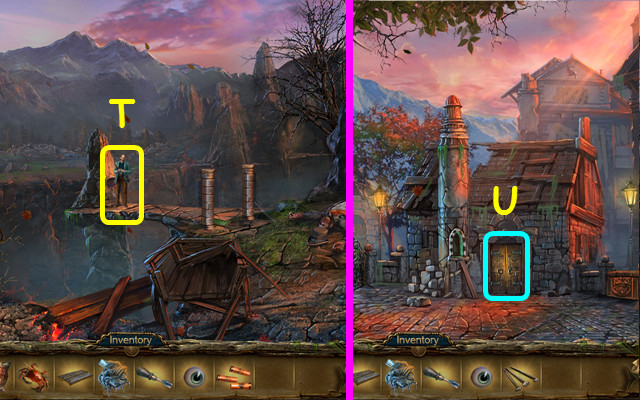
- Give the SHOTGUN CARTRIDGES to Robert (T).
- You will earn the NAILS.
- Travel to the Square.
- Select the door (U).
Chapter 5: The Alchemist
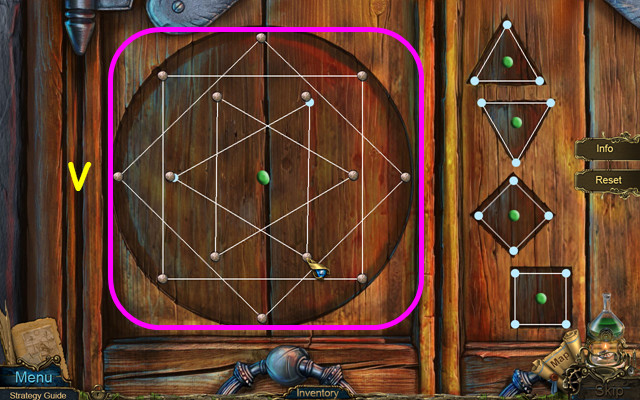
- Place the NAILS on the boards.
- Place the 4 figures onto the board (V).
- Stretch and rotate the figures so the points each hit a nail.
- Walk forward to the Hall.
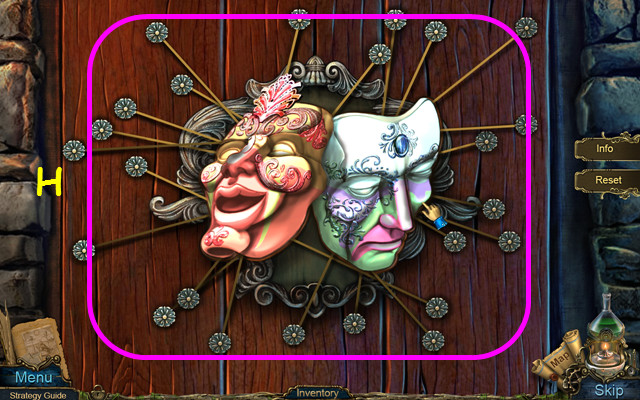
- Place the PHOTO next to the matching half (A).
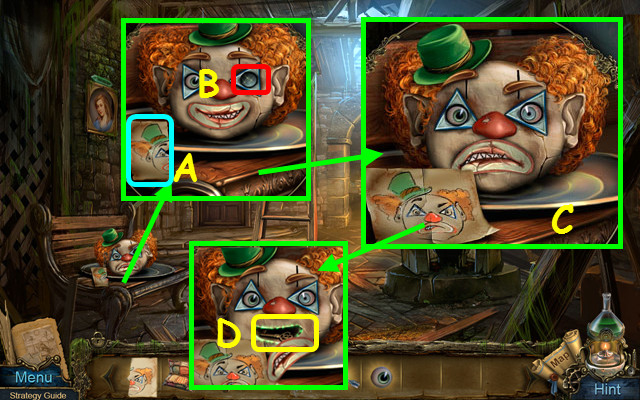
- Place the EYE on the clown face (B).
- Move the pieces of the face to match the photo (C).
- Take the HATCH KEY (D).
- Note the door mini-game (E).
- Place the BOARDS on the ladder (F).
- Take the 1st BALANCE (G).
- Use the HATCH KEY on the lock (H).
- Select the open hatch.
- Play the HOP to earn the GAFF (I).
- Return to the Lowland.
- Use the GAFF to take the LADDER (J).
- Use the map to travel to the Forest.
- Place the LADDER in the tree (K).
- Use the CRAB on the net; take the LEVER (L).
- Select the debris on the left.
- Play the HOP to earn the WING (M).
- Travel to Uncle’s Room.
- Place the WING on the rooster (N).
- Use the SCREWDRIVER to take the FUNNEL (O).
- Use the LEVER on the paw; take the CELL (P).
- Walk down and select the floor mini-game.
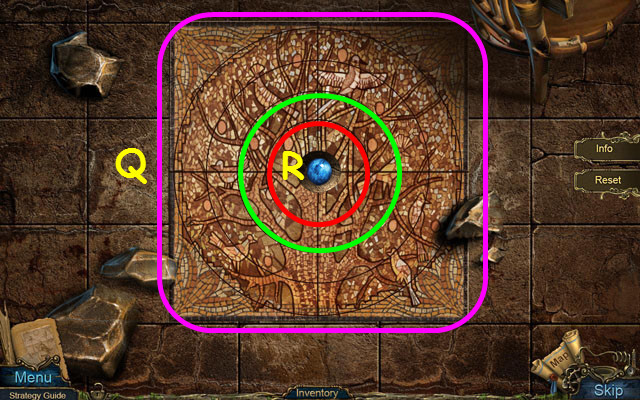
- Place the CELL in the center of the tile.
- Rotate the tiles to restore the mosaic (Q).
- Move the red ring clockwise 1/2 turn, and then turn the green ring 1/4 clockwise to solve.
- Take the 1/4 STONE (R).
- Return to the Hall and select the open hatch.
- Play the HOP to earn the PLASTER (S).
- Select the door mini-game.
- Place the FUNNEL on the tube (T).
- Place the spheres on the board to direct the air to all the fans (U).
- Walk forward to the Alchemist’s Room.
- Note the spring mini-game (A).
- Use the PILLOW on the pole (B).
- Use the CRUCIBLE on the green doll; take the GIRL EMBLEM (C).
- Use the PLASTER on the bowl to make the HEAD (D).
- Walk down twice to the Square.
- Use the WET RAG on the swing seat (E).
- Place the GIRL EMBLEM in the indentation (F).
- Take the SHELLFISH and the SCALPEL (G).
- Place the HEAD on the right gate; take the 2/4 STONE (H).
- Select the left gate area.
- Play the HOP to earn the PAPER KNIFE (I).
- Walk down.
- Use the PAPER KNIFE on the envelope; take the BALL (J).
- Return to the Lowland.
- Use the SCALPEL on the bag; take the BRUSH and the DOLL (K).
- Select the net on the right.
- Place the SHELLFISH on the net.
- Move all the animals to a rope with the same color (L).
- Take the PICK.
- Walk down.
- Use the PICK on the rocks (M).
- Take the 2nd BALANCE (N).
- Walk down twice.
- Use the BRUSH on the cobwebs; take the SPRING (O).
- Enter Uncle’s Room.
- Place the DOLL on the stand and move the dolls to match the carving (P).
- Take the 3/4 STONE (Q).
- Travel to the Alchemist’s Room and select the spring mini-game.
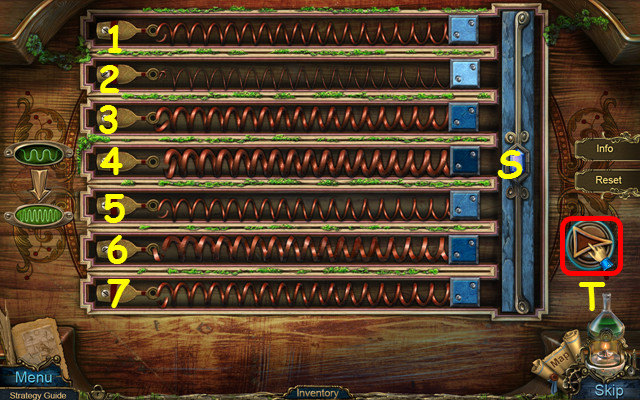
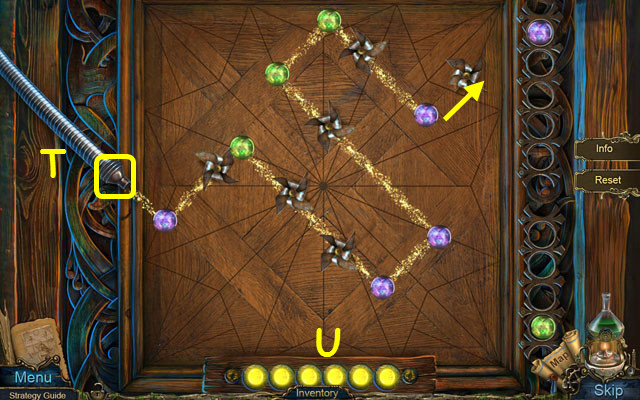
- Place the SPRING in the device.
- Swap the springs so the squares hit the right end at the same time (S).
- Press the button to test your solution (T).
- Swap springs 1-6, 2-7, 7-4, and 6-4.
- Take the 4/4 STONE.
- Walk down.
- Place the 4 STONES on the ball; take the ARTIFACT (A).
- Return to the Workroom.
- Place the 1st BALANCE on the right, and the 2nd BALANCE on the left (B).
- Place the BALL on the balances; take the TRIANGLE (C).
- Travel to the Amphitheater.
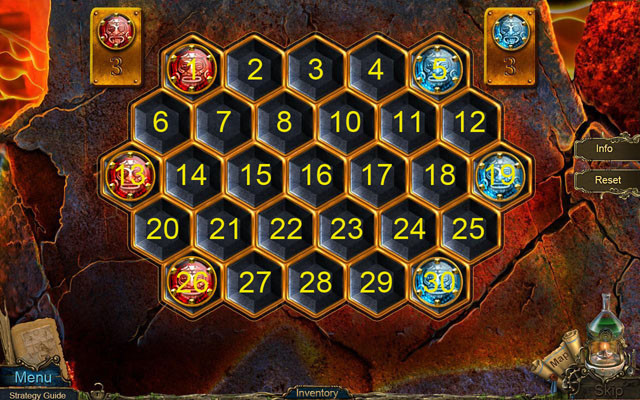
- Place the TRIANGLE on the box; swap the figures on the right to correspond to the left (D).
- Take the DOOR PART (E).
- Use the DOOR PART on the box (F).
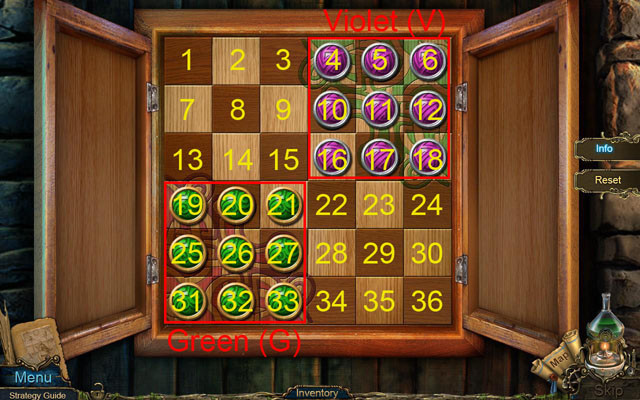
- Swap the location of the chips.
- Move the chips as a chess knight; 2 spaces ahead, and then a left or right.
- Move the chips: V16-V29, G20-G16, G21-G8, V17-V21, G27-G35, G33-G22, G26-G15, G32-G28, V29-V33, G28-G17, V18-V29, G22-G18, V10-V14, V14-V27, V21-V32, V29-V21, V11-V22.
- V22-V26, G35-G24, V12-V23, V5-V9, V9-V20, V6-V10, G25-G14, G17-G6, G15-G11, G14-G3, V10-V14, G19-G15, V14-V25, V20-V28, G31-G20, V27-V31, V4-V17, G8-G4, G16-G5.
- G20-G16, V23-V27, V28-V20, G16-G12, V17-V28, G3-G16, G15-G23, G23-G10, V27-V19, V28-V36, V36-V23, V23-V27, G24-G28, and G28-G17.
- Walk forward.
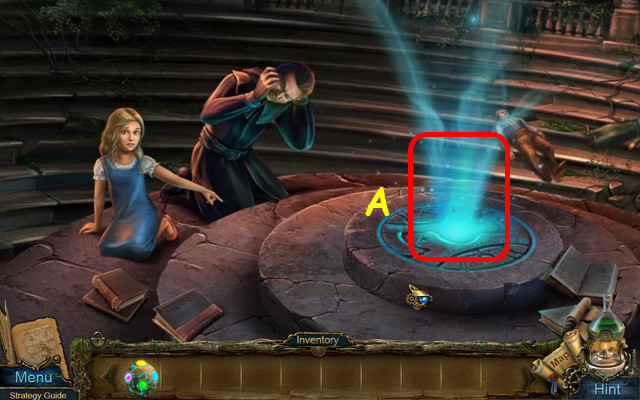
- Use the ARTIFACT on the blue glow (A).
- Congratulations! You have completed Mystery Tales: The Lost Hope!


 Relic Rescue Tips and Tricks, Guide, & Tips
 Amaranthine Voyage: The Shadow of Torment Walkthrough, Guide, & Tips
 Crime and Punishment: Who Framed Raskolnikov? Walkthrough, Guide, & Tips
 Bridge to Another World: Burnt Dreams Walkthrough, Guide, & Tips
 Bridge to Another World: The Others Walkthrough, Guide, & Tips