Alexandra Fortune: Mystery of the Lunar Archipelago Walkthrough, Guide, & Tips
Alexandra Fortune: Mystery of the Lunar Archipelago Walkthrough
Welcome to the Alexandra Fortune: Mystery of the Lunar Archipelago Walkthrough!
Join Alexandra Fortune as she sets out to find her missing grandfather!
Whether you use this document as a reference when things get difficult or as a road map to get you from beginning to end, we’re pretty sure you’ll find what you’re looking for here.
Enjoy this complete Alexandra Fortune: Mystery of the Lunar Archipelago game walkthrough, featuring annotated screenshots from actual gameplay!
We hope you find this information useful as you play your way through the game. Use the walkthrough menu below to quickly jump to whatever stage of the game you need help with.
Remember to visit the Big Fish Games Forums if you find you need more help. Have fun!
This walkthrough was created by Margie B.
WALKTHROUGH MENU
- GAME OVERVIEW
- CHAPTER 1: TEMPLE OF THE RISING SUN/ TWIN GUARDIANS
- CHAPTER 2: SANDYPOINT BEACH/ BOAT MAN’S CABIN
- CHAPTER 3: LUNAI VILLAGE/ ELDER’S HUT
- CHAPTER 4: RISING SUN/ TEMPLE PORTAL
- CHAPTER 5: RISING SUN/ TEMPLE HALL
- CHAPTER 6: BEACH HOUSE/ KITCHEN
- CHAPTER 7: BEACH HOUSE/STUDIO
- CHAPTER 8: JAGUAR CAVERN/ REFLECTIONS
- CHAPTER 9: BEACH HOUSE/GARDEN
- CHAPTER 10: MJOLNIA ISLAND/ SKULL ROCK
- CHAPTER 11: MJOLNIA ISLAND/ GRAVEYARD
- CHAPTER 12: DOIN’S THRONE/PIRATE LEGACY
- CHAPTER 13: MJOLNIA ISLAND/ THE WAY BACK
- CHAPTER 14: SANDY POINT BEACH/ REPAIRS
- CHAPTER 15: SHIPWRECK/ LOST TREASURE
- CHAPTER 16: CHRONOS ISLAND/ TOURIST GUIDE
- CHAPTER 17: CHRONOS ISLAND/ ATLAS TORMENT
- CHAPTER 18: CHRONUS ISLAND/ FORUM
- CHAPTER 19: CHRONOS ISLAND/ ATLAS TORMENT
- CHAPTER 20: OSIAIS ISLAND/ THE MARKET
- CHAPTER 21: OSIAIS ISLAND/ OASIS
- CHAPTER 22: OSIAIS ISLAND/ PYRAMID
- CHAPTER 23: BAYLON ISLAND/ PEEA
- CHAPTER 24: BABYLON ISLAND/ TOWER
- CHAPTER 25: HERMIT ISLAND/ TENT
- CHAPTER 26: HERMIT ISLAND/ THIRD EYE
- CHAPTER 27: LUNAI VILLAGE/ ELDER’S CHARTS
- CHAPTER 28: DRAGON ISLAND/ FIRE PATH
- CHAPTER 29: DRAGON ISLAND/ SAMURAI
- CHAPTER 30: SECRET ISLAND/ THE TRUTH
GAME OVERVIEW
- There are 30 chapters in this game, several Hidden Object scenes and some mini-games.
- All mini-games can be skipped.
- There is no timer in the game so you can take your time and play at your own leisure.
- The main map will show you your progress in the game.
HINT & CLUES

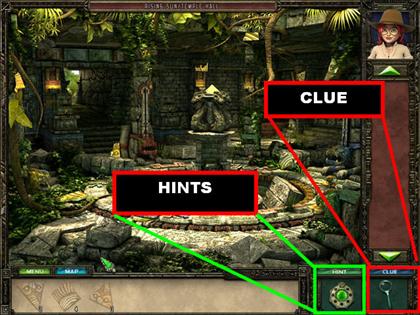
- Click on the Hint Pendant when you need to find an item.
- A random item will light up in the scene. If you can’t see it, use the hint pendant to look for it. The closer you are to finding the item, the faster it will spin.
- The hints are unlimited but you have to wait for them to recharge before you can use them again.
- If the hint icon is not recharging it is because there are no more items to find in that scene. You must perform other actions at that time.
- If the hint button is not on and you need to know what to do next, use the clue button.
- The clue button is the magnifying glass in the lower right corner. Pick it up and move it around the scene. You will be able to pick up valuable information this way.
INVENTORY ITEMS

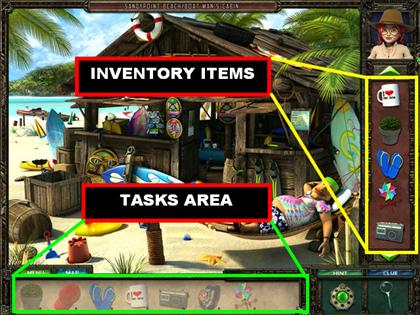
- The tasks area is located at the bottom of the scene. This contains a series of items that you must look for in the scene.
- Some items in the tasks section will be in the scene broken into several pieces. The amount of pieces you need to find is next to each item.
- Once all the pieces of an item have been found in the tasks area, they will move to the inventory tray on the right side of the scene.
- On some occasions you will have to combine your inventory items together in order to use them.
- To combine items, simply click one over the other. If the items are meant to be used together they will merge as one.
- To use an inventory item, drag it around the scene. Click on a spot when you see a set of blue gears appear near it.
CHAPTER 1: TEMPLE OF THE RISING SUN/ TWIN GUARDIANS
TWIN GUARDIANS

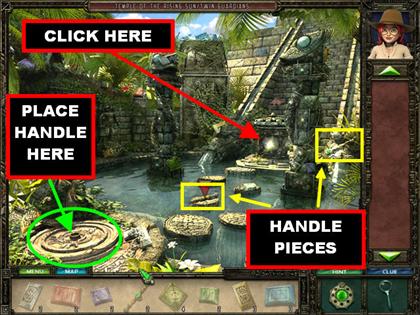

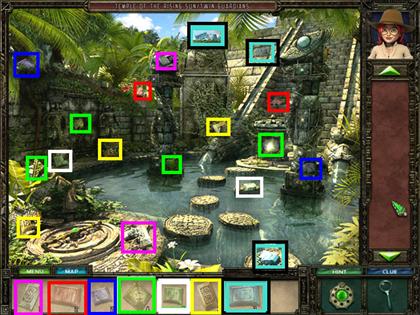
- The game will guide you through a brief tutorial.
- Grab the two handle pieces the game is pointing to.
- Place the completed handle on the mechanism in the lower left corner of the scene.
- The handle will start spinning and a structure will appear on the back wall.
- Click on the green piece that appears on the structure that just appeared on the back wall.
- Collect the rest of the fragmented pieces according to the image on the screenshot.

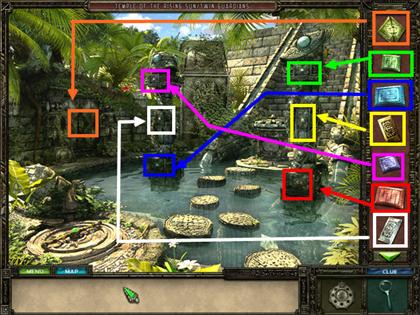
- Place the stone pieces according to the locations shown on the screenshot.

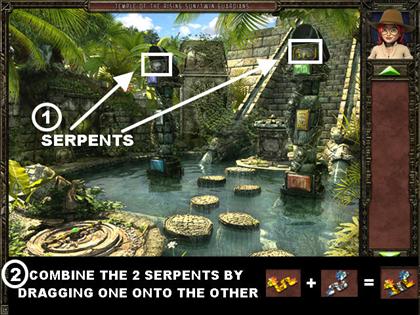
- After all the items have been placed, click on the 2 serpents shown in the screenshot.
- Combine both serpents by dragging one over the other in the inventory box.

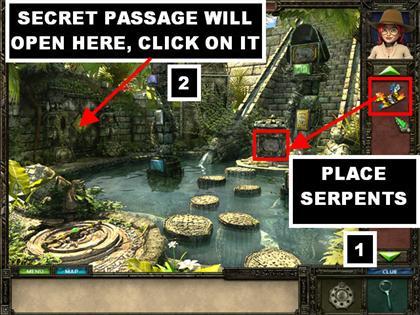
- Place the serpents in the location shown on the screenshot in the lower right and a secret passage will open up on the left side of the wall.
- Click on the secret passage to enter it.
SECRET CHAMBER PUZZLE

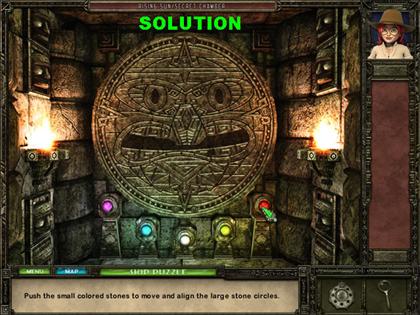

- Push the smaller colored stones at the bottom of the puzzle to move the stone circles.
- Each colored stone you click moves a particular circle. You will know a circle is in the right position when it turns green.
- Please look at the screenshot for the solution.
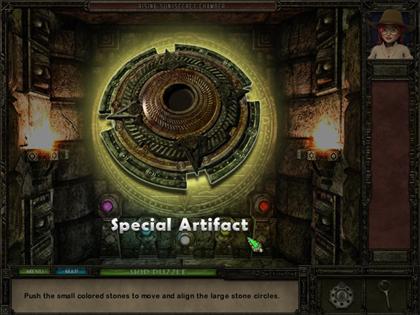
- Once the puzzle is complete, an artifact will be discovered; it will be incomplete and will be kept next to jour journal.
CHAPTER 2: SANDYPOINT BEACH/ BOAT MAN’S CABIN
FIND 8 WOODEN BOARDS

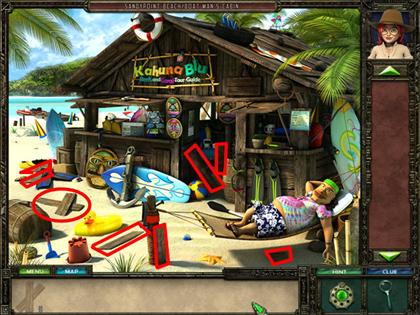
- Collect the wooden boards as shown in the screenshot.
- Once all the wooden boards have been collected a crate will enter your inventory.

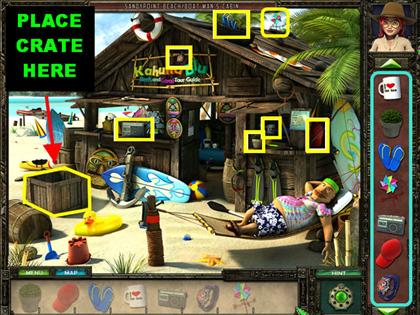
- Place the crate on the left side of the sand and the man will ask you to locate 7 items.
- The items are all shown in the screenshot.
- Drag all the items to the crate after all the items have been found.
- Click on the crate to trigger a mini-game.
PRECIOUS ITEMS PUZZLE

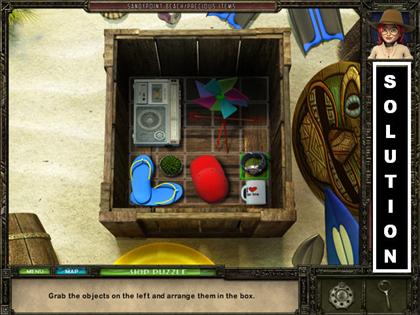
- Your goal in this puzzle is to fit all the items in the box without any of the items overlapping.
- Drag an item over to the box and a green highlight will show you how many spaces that item will take up.
- If you see a red highlight appear, it means that items are too close, find another spot for that item.
- Please look at the screenshot for the solution.
FIND LID, HAMMER & NAILS

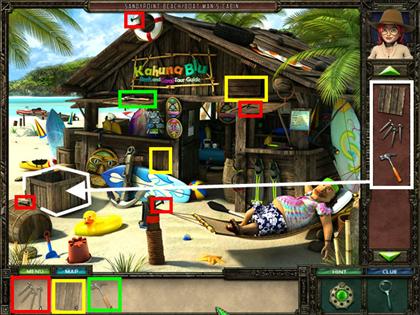
- The screenshot shows you the location of all the items.
- Place the lid on the crate.
- Place the nails on the crate.
- Place the hammer on the crate.
CHAPTER 3: LUNAI VILLAGE/ ELDER’S HUT
LUNAI VILLAGE/ ELDER’S HUT

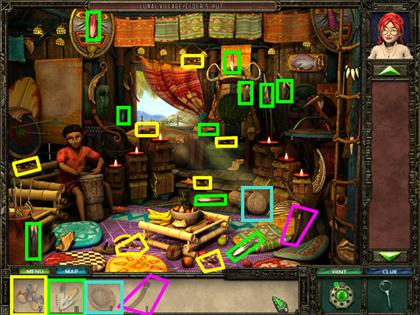
- You will be taken to the Rising Sun/ Temple Portal location at first but you will receive a message to explore other areas of the island.
- You will be taken back to the main map, click on the Play button in the lower right corner.
- In this section you are asked to find the 11 feathers, seeds, a bowl and a handle.
- You can only pick up 10 feathers at this point, to find the last feather you have to do a series of tasks.
PICK UP LAST FEATHER

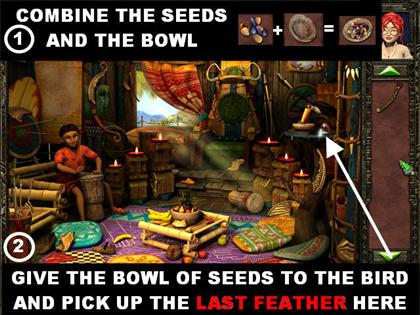

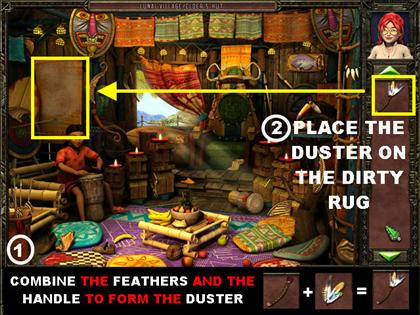
- From the inventory tray combine the seeds and the bowl.
- Place the bowl of seeds on the bird’s perch. The bird drops a feather next to the bowl.
- Pick up the last feather next to the bowl.
- From the inventory tray combine the feathers and the handle to form a duster.
- Place the duster on the dusty rug in the upper left side.
FIND 15 BRONZE PIECES

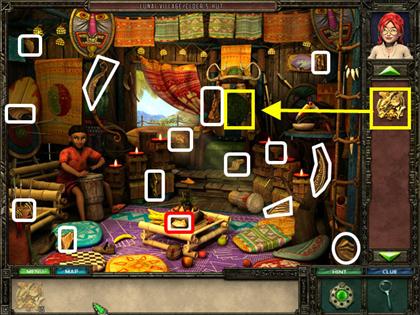
- Pick up all the bronze pieces as shown in the screenshot. They are all highlighted in white.
- Place the bronze pieces on the wood carving close to the entrance.
- Click on the wood carving to trigger a mini-game.
GOLDEN ECLIPSE PUZZLE

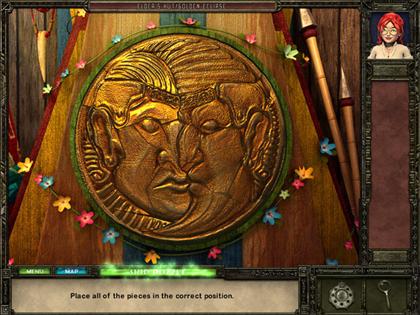
- Your goal is to put all the pieces in the correct places.
- Drag the pieces out of the way so you can start building your puzzle.
- When a piece is in the right spot it will lock itself into place. Incorrect pieces have a reddish tone.
- Please look at the screenshot for the solution.

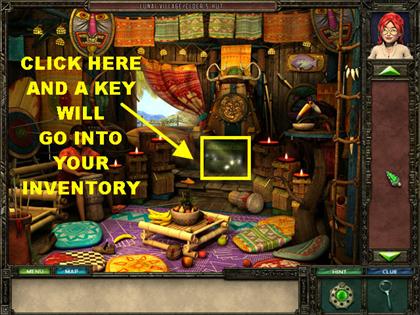
- Once the puzzle has been solved, click on the sparkly area in the main scene and a key will go into your inventory.
CHAPTER 4: RISING SUN/ TEMPLE PORTAL
FIND 12 CODE PIECES

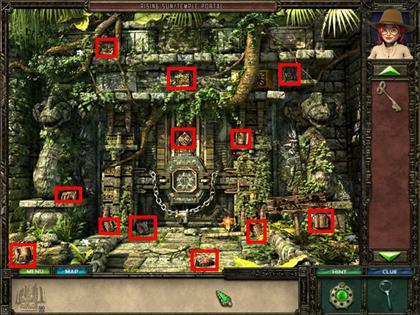

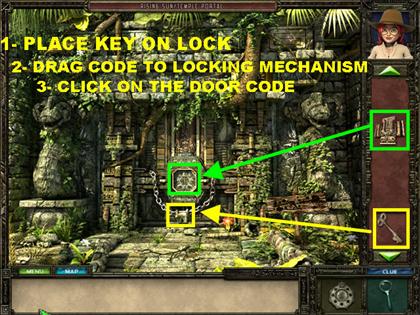
- The key will be in your inventory at the start of the level.
- The code pieces are highlighted in red. Pick up all the pieces as shown in the screenshot.
- Drag the key to the chain on the door to unlock it.
- Place the code on the locking mechanism in the center of the door.
- Click on the door code to trigger a puzzle.
THE PASSAGE PUZZLE

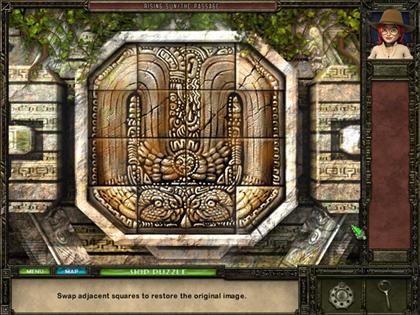
- Your goal is to swap the pieces around until you form the desired image.
- Click on two adjacent pieces and they will swap positions.
- The pieces in the corner do not move.
- Please look at the screenshot for the solution.
- Go through the door after the puzzle has been solved.
CHAPTER 5: RISING SUN/ TEMPLE HALL
SWORD

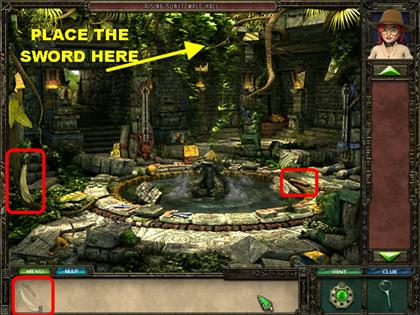
- The 2 sword pieces are in red.
- Place the completed sword on the ivy on top of the scene.
JAGUAR AND MONKEY PIECES

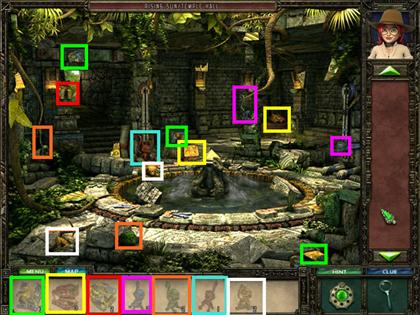
- You will be asked to find the fragmented pieces of several jaguars and monkeys in the scene.
- The screenshot shows you the location of all the pieces but one. The last piece of one of the jaguars will not be visible right away.
LAST PIECE OF THE JAGUAR

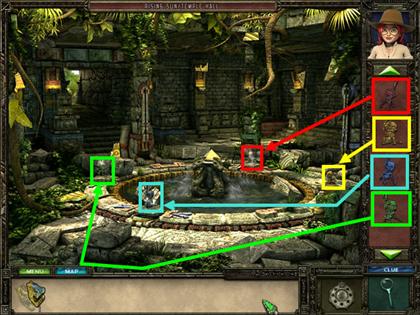

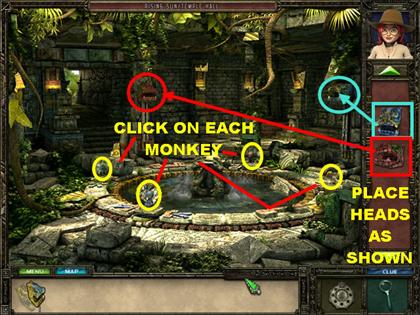
- You have to place all the monkeys on their corresponding platforms.
- Place the blue and the red jaguars in the 2 sockets in the scene.
- The blue jaguar goes in the upper right.
- The red jaguar goes in the upper left.
- Click on each of the 4 monkeys on the platform.
- Each time you click on a monkey one of the platforms will lower. Once all monkeys have been clicked, the water will drain out of the fountain.

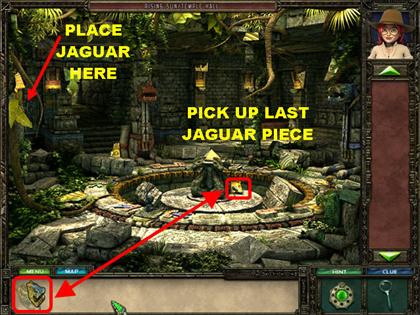
- Click on the last piece of the jaguar head that appears after the fountain has been drained.
- Place the last jaguar in the socket in the upper left side of the scene.

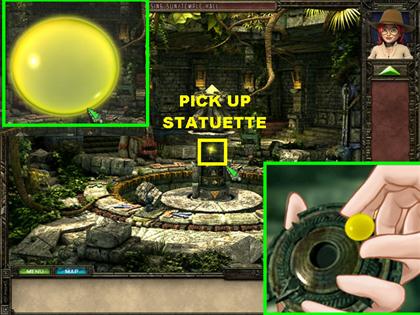
- Click on each of the 3 jaguar heads and they will each drop to the ground. A new structure will appear in the middle.
STONE FRAGMENTS

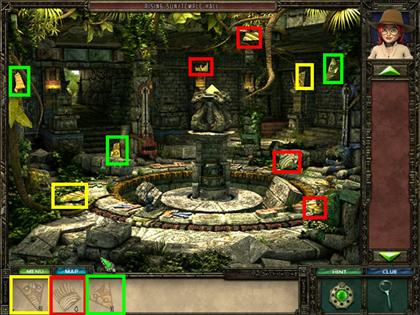

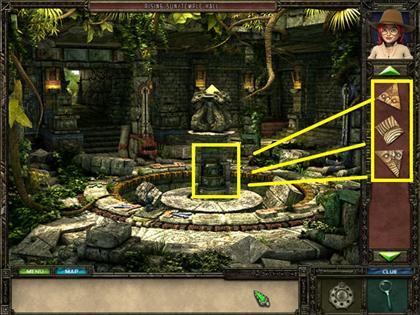
- Find all the fragmented pieces belonging to the stone fragments.
- Place the 3 stone fragments in the stone frame in the center of the fountain.


- Pick up the statuette that appears in the middle of the structure.
- A precious orb will appear in the middle of your screen.
CHAPTER 6: BEACH HOUSE/ KITCHEN
KITCHEN

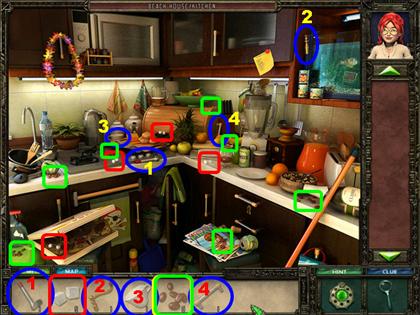
- You are taken to a quick cut scene of the studio on the beach house. The man at the desk is asleep. You need to get him some coffee to wake him up. You will be taken to the kitchen area next.
- Pick up all the items on the list. You will not be able to pick up all the sugar and coffee bean pieces right away.

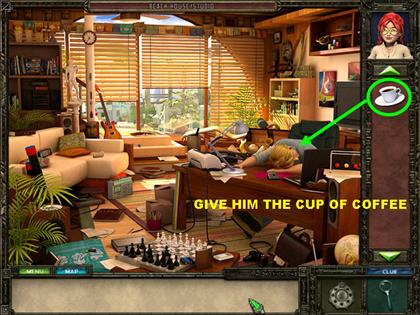
- Place the grinder handle on the coffee grinder on the right.
- Place the cup on the saucer on the counter.
- Place the cabinet handle on the cabinet in the upper center of the scene.
- Place the handle on the water faucet.
MAKE COFFEE

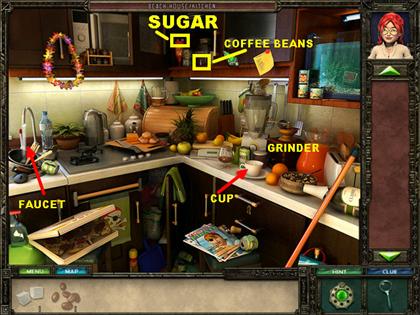
- Click on the cabinet in the upper center to open it.
- Click on the last of the coffee beans inside the cabinet.
- Pick up the last sugar cubes in the open cabinet. They are on top of the red container.
- Click on the water faucet to turn on the water.
- Place the coffee beans in the coffee grinder.
- Click on the coffee grinder to grind the beans, ground coffee will enter your inventory.
- Place the coffee grounds in the cup and you will receive the message that you need one more ingredient.
- Place the sugar cubes in the cup.

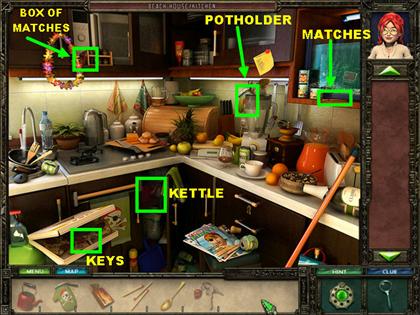
- Look for the new items on the list.

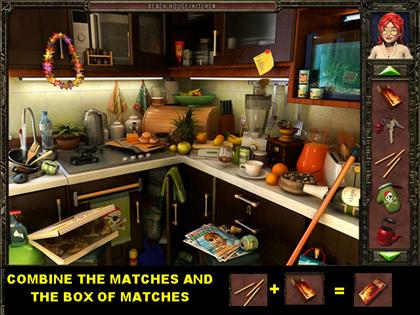

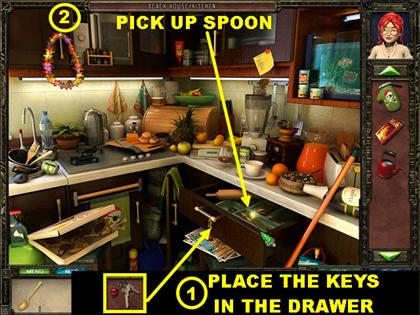
- From the inventory box combine the matches and the box of matches.
- Place the key in the drawer on the right to open it.
- Pick up the spoon inside the drawer.

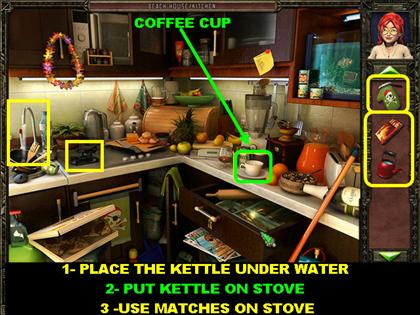
- Place the kettle under the running water. If you haven’t turned on the water, just click on the faucet. The kettle will go back into inventory full of water.
- Put the kettle on the gas stove.
- Place the box of matches on the gas stove to light it.

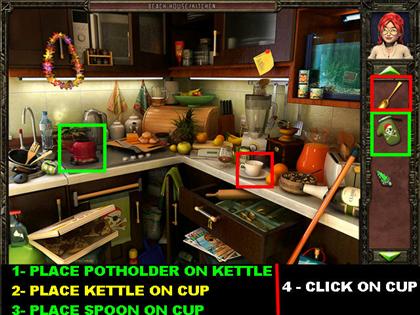
- Grab the potholder and place it on the kettle.
- Pour the hot water from the kettle on the coffee cup on the counter.
- Use the spoon to stir the coffee in the cup.
- Click on the cup of coffee to enter it into your inventory.
CHAPTER 7: BEACH HOUSE/STUDIO
STUDIO


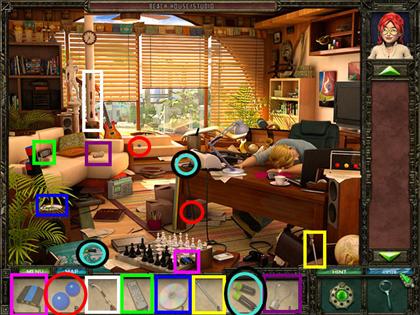
- Give the cup of coffee to the sleeping man on the desk. He still doesn’t wake up. You have to make a lot of noise to wake him up.
- Look for the items that appear at the bottom of the screen.
WAKE UP JAY

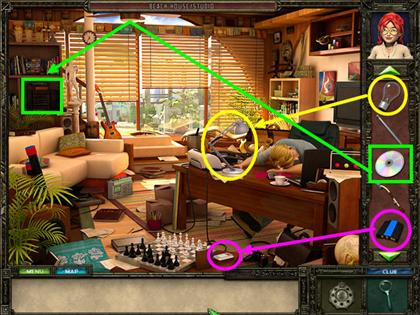
- Place the light bulb on the lamp desk.
- Click on the desk lamp to turn on the lights.
- Place the cell phone battery on the cellphone in the lower right.
- Click on the cellphone to make the alarm go off.
- Put the CD in the stereo on the top left side of the screen.
- Click on the stereo to turn on the music.

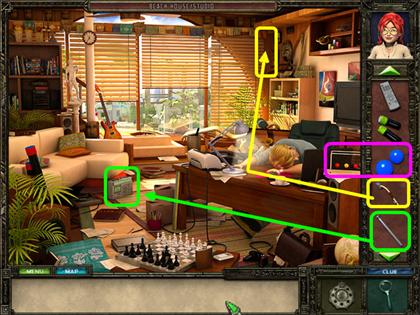
- Place the swinging balls on the other swinging ball contraption on the desk.
- Click on the swinging balls to make them move.
- Place the tilt wand on the top right side of the blinds.
- Click on the tilt wand to open the blinds.
- Place the antenna on the radio by the couch.
- Click on the radio to turn it on.

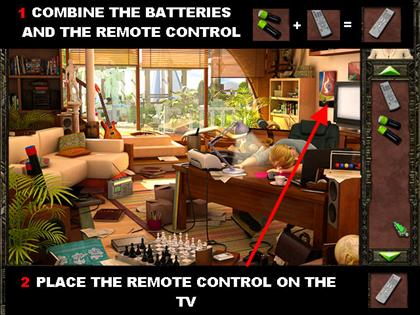
- From the inventory box combine the batteries and the remote.
- Place the remote on the TV to turn it on.
- Jay finally wakes up from his sleep.
RESEARCH PAPERS

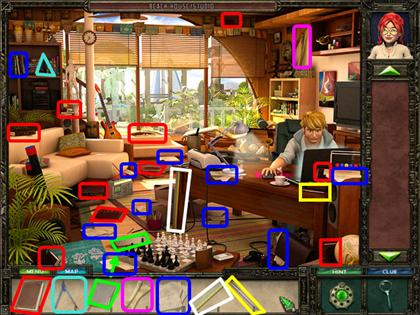

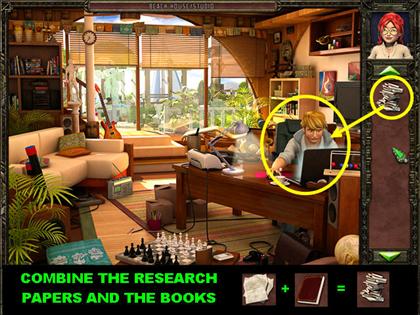
- Look for the items at the bottom of the page. Some items will go into inventory while others will disappear.
- From the inventory tray combine the research papers and the books.
- Give the research papers to Jay at the desk.
CHAPTER 8: JAGUAR CAVERN/ REFLECTIONS
LIGHT THE PLACE

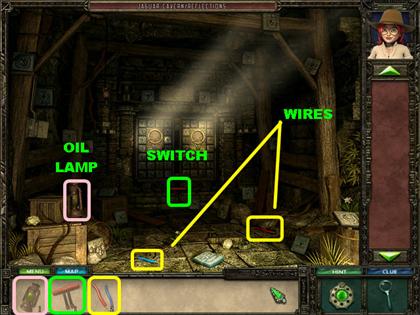

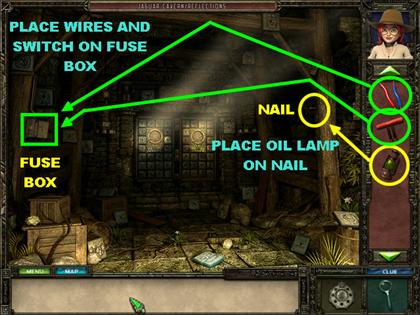
- Your goal is to light the place by finding the oil lamp, the wires and a switch.
- Please look at the screenshot for the location of these items.
- Put the oil lamp on the nail on the upper right side.
- There is a fuse box on the left side of the scene.
- Place the wires on the fuse box.
- Place the switch on the fuse box.
- Click on the fuse box.
- Click on the oil lamp to light up the place.
LIGHT FIREPLACE

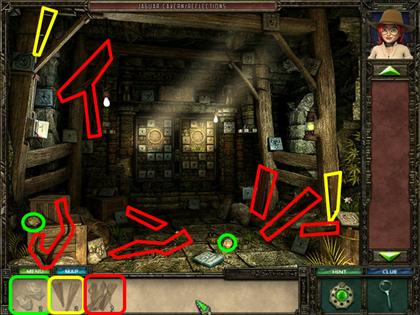

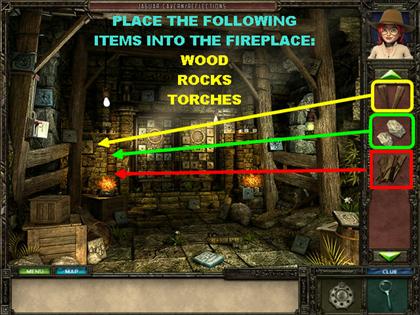
- Pick up the torches, the rocks and wood pieces. Please look at the screenshot for the location of all the items.
- Place the wood pieces in the fireplace.
- Place the rocks in the fireplace and fire will appear.
- Place the torches in the fireplace.
- The lit torches will go back into inventory.

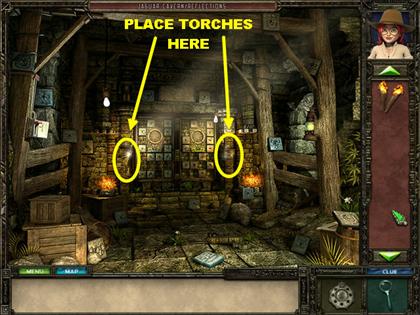
- Place the torches on the torch holder.
BLUE AND BROWN TILES

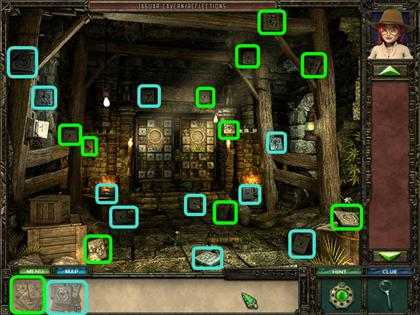

- The blue tiles are highlighted in blue in the screenshot.
- The brown tiles are highlighted in green in the screenshot.
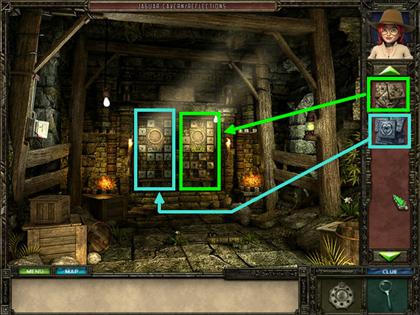
- Place the blue tiles on the blue panel on the left.
- Place the brown tiles on the gold panel on the right.
- Click on the panels to trigger a mini-game.
HIDDEN TREASURE MINI-GAME

- This is a matching game.
- Click on the panels of the door and a symbol will appear. Your goal is to find the matching symbol on the opposite door.
- Each time you find a match, both squares will light up and stay on the door.
- Find all matching pairs to win the game.

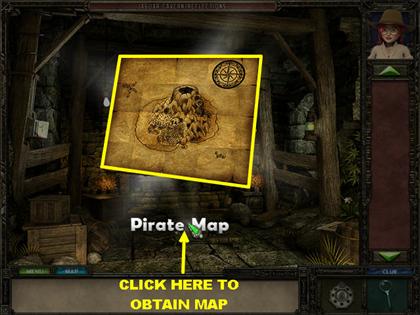
- After the puzzle has been solved, click on the highlighted tile on the ground and the Pirate Map will appear on the screen.
CHAPTER 9: BEACH HOUSE/GARDEN
GARDEN


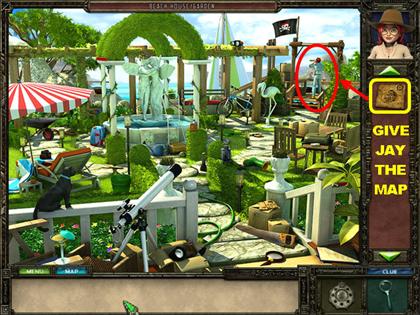
- When you enter this scene, Jay will be on the top right side of the scene.
- Give Jay the map from inventory.

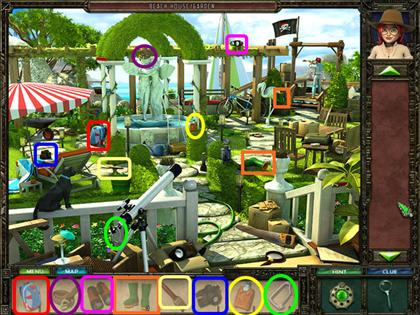
- Pick up all the items on the list. None of these items that you pick up will go into inventory.

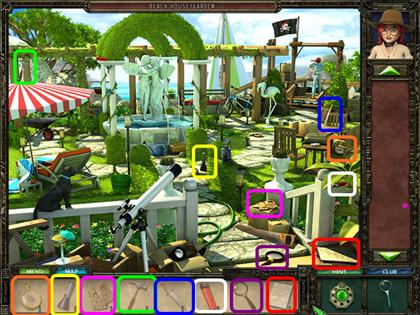
- As soon as all the items are picked up, a new list of items will appear. None of these items will go into your inventory either.

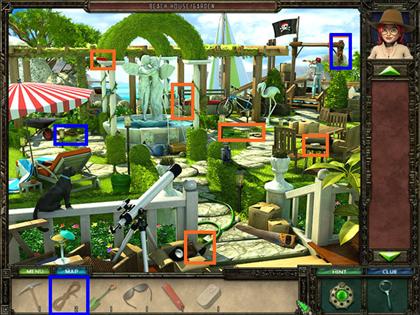
- There is a third list of objects you must find in this section. None of the items will go into your inventory.
CHAPTER 10: MJOLNIA ISLAND/ SKULL ROCK
GIVE ITEMS TO JAY

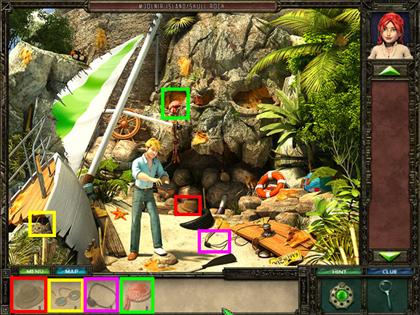
- Find all the items on the list.
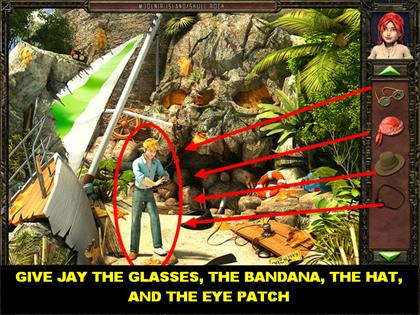
- Give Jay the glasses, the hat, the bandana and the eye patch.
FIND 14 MAP PIECES


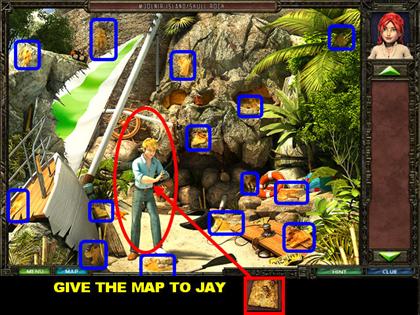
- Please look at the screenshot for the location of all the map pieces.
- Give the completed map to Jay to trigger a mini-game.
HIDEOUT MAP PUZZLE

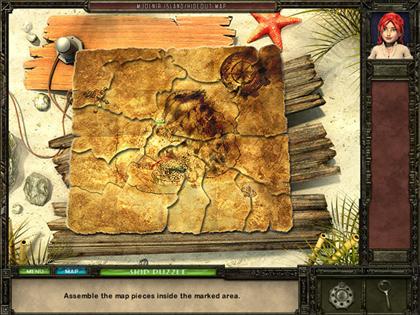
- Your goal is to reassemble the map.
- Drag the pieces into the outline of the map.
- When a piece is placed correctly, it will lock into place.
- Please look at the screenshot for the solution.
HIDDEN OBJECTS

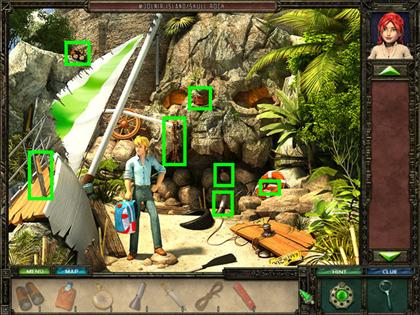
- Look for the items on the list. None of these items will stay in your inventory.
CHAPTER 11: MJOLNIA ISLAND/ GRAVEYARD
TOMBSTONES

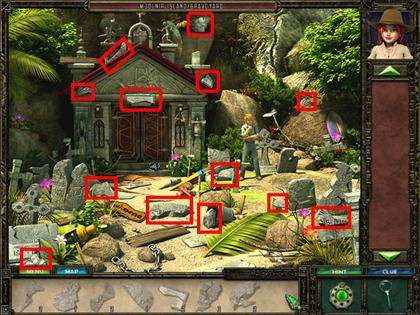

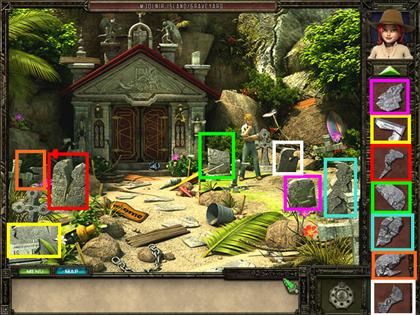
- Find all the tombstone fragments.
- Replace all the tombstone pieces from the broken tombstones.
- Please look at the screenshot for the correct placement of all the pieces.
FIND HOE, PICKAXE, AND SHOVEL

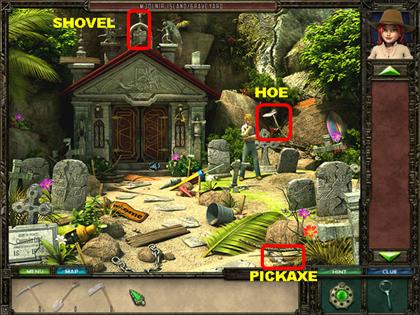

- The shovel is on the top left side.
- The hoe is in the upper right side.
- The pickaxe is on the lower right corner.
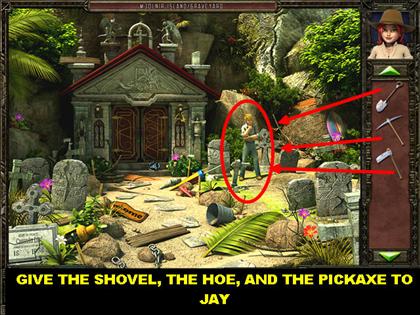
- Give Jay the shovel, the hoe, and the pickaxe.
FIND FLOWERS AND VASE

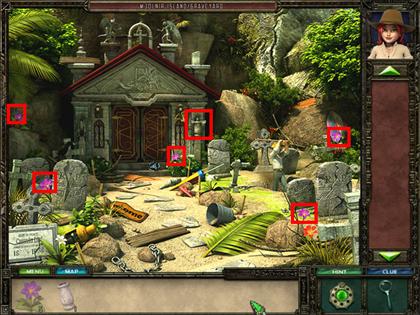
- Find the 5 flowers and the vase.
- Please look at the screenshot for the location of all the items.

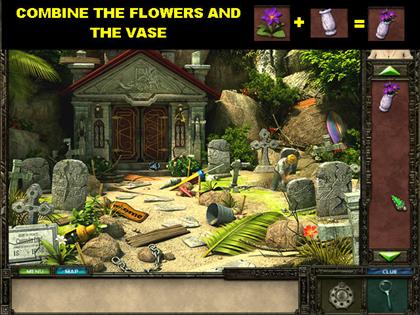
- Combine the vase and the flowers to form a vase with flowers.

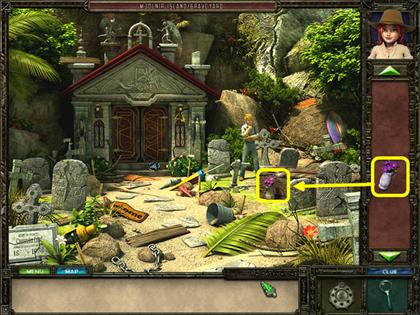
- Place the vase with flowers on the nameless grave close to where Jay is digging.

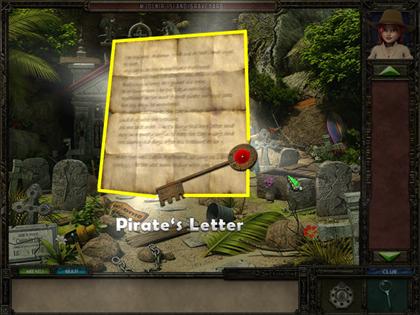
- Click on the coffin that appears after Jay is done digging, there’s no corpse inside.
- Click on the coffin again and the Pirate’s letter will appear on your screen.

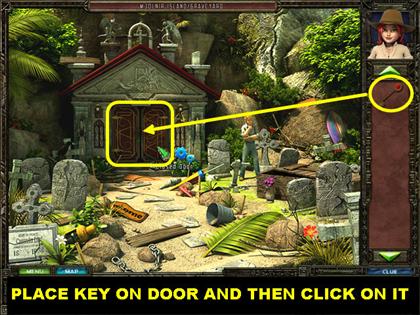
- Place the key on the closed door.
- Click on the door once it is open.
CHAPTER 12: DOIN’S THRONE / PIRATE LEGACY
FIND PIRATE ITEMS

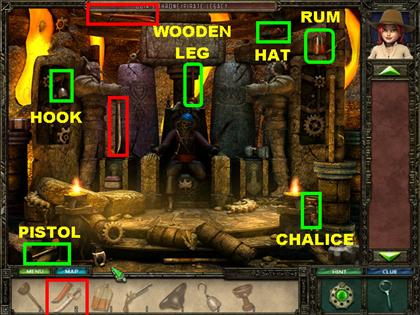

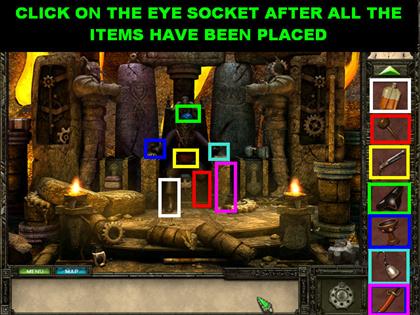
- Find all the pirate items.
- After all the items have been found you need to place them in the right spots on the pirate.
- Place the pirate hat on the pirate’s head.
- Place the pistol on the pirate’s belt.
- Place the wooden leg on the pirate’s RIGHT leg.
- Put the hook on the pirate’s RIGHT hand.
- The chalice goes on the pirate’s LEFT hand.
- Place the rum bottle on the pirate’s LEFT foot.
- Place the sword on the throne on the right.

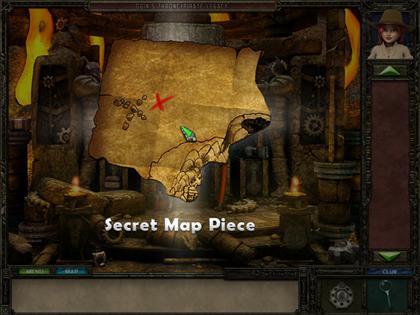
- Click on the pirate’s eye socket after all the items have been placed and a secret map piece will appear.
GEARS, THUNDER AND LIGHTNING

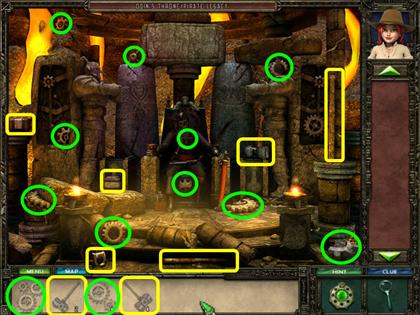
- Pick up all the gear, thunder, and lightning pieces in the scenes.
- All the gear pieces have been circled in green.
- All the thunder and lightning pieces have been highlighted in yellow.

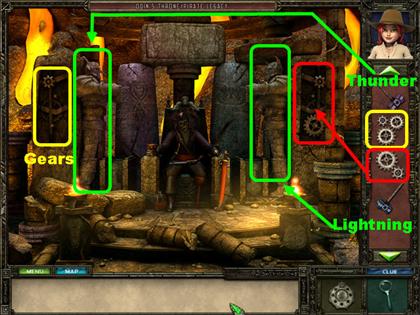
- Place the gear pieces on the left incomplete machine.
- Place the other gear pieces on the right incomplete machine.
- Place lightning on the RIGHT statue.
- Place thunder on the LEFT statue.

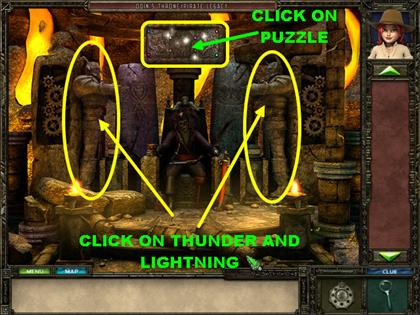
- Click on the lightning and thunder statues and a puzzle will appear in the top center of the scene.
- Click on the puzzle for a closer view.
MEMORIES OF WAR PUZZLE

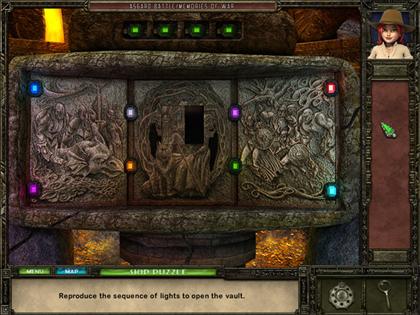

- Your goal in this puzzle is to click on the sequence of lights generated by the puzzle.
- You have to reproduce 4 sequences to win the game.
- Each time you match a sequence correctly, one of the green lights above the puzzle will light up.
- If you reproduce a sequence incorrectly, you will have to start over with a new sequence.
- The sequences are random so we cannot give you exact solutions for them.
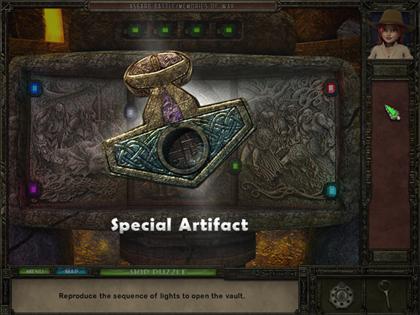
- Once the puzzle has been solved you will receive a special artifact.
CHAPTER 13: MJOLNIA ISLAND/ THE WAY BACK
AXE, NAILS, WOOD & ROPE PIECES

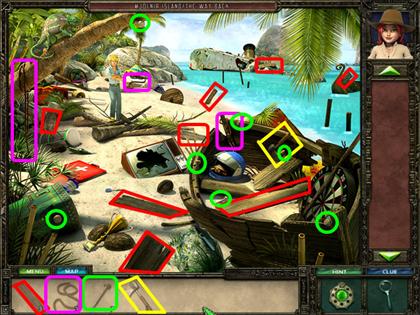

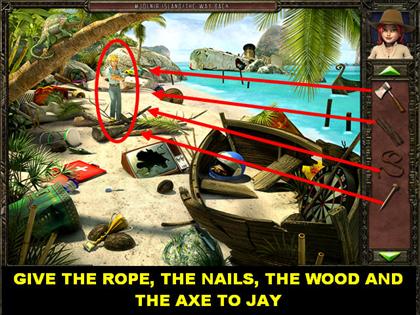
- The wood pieces are highlighted in red.
- The nails are circled in green.
- The axe is highlighted in yellow.
- The rope pieces are highlighted in purple.
- Give the nails, the wood pieces, the axe, and the rope pieces to Jay so he can build a raft.
NEEDLE, THREAD, PADDLES & FABRIC PIECES

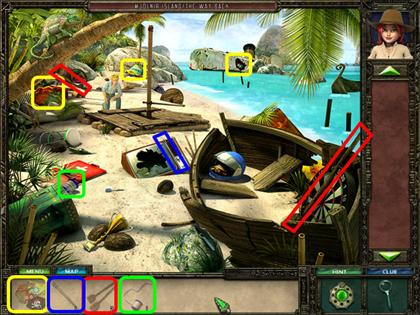
- Pick up all the items in the scene.
- The fabric pieces are in yellow.
- The needle is in blue.
- The paddle pieces are in red.
- The thread spool is in green.

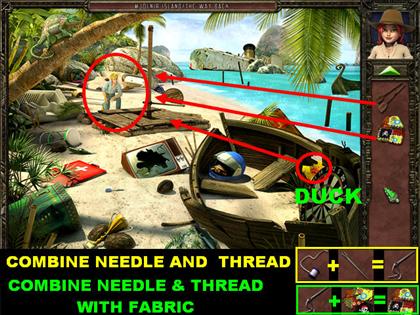
- From the inventory box combine the needle and the thread.
- From the inventory box combine the needle & thread with the fabric to form a sail.
- Give Jay the paddles.
- Give Jay the sail and you will be asked to find a duck.
- Pick up the duck inside the broken boat.
- Give the Duck to Jay.
CHAPTER 14: SANDY POINT BEACH/ REPAIRS
STICKS AND CROWBAR

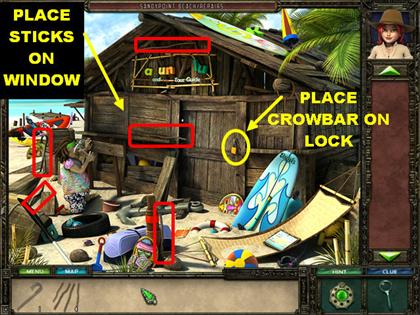
- Collect the sticks and the crowbar in the scene.
- Place the crowbar on the lock of the door.
- Place the stick on the window on the left side of the hut.
MISSING LETTERS

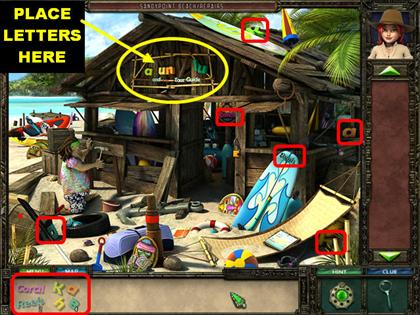
- Collect the words and the letters shown in the screenshot.
- Place the letters in the incomplete sign above the hut.
DIVING EQUIPMENT

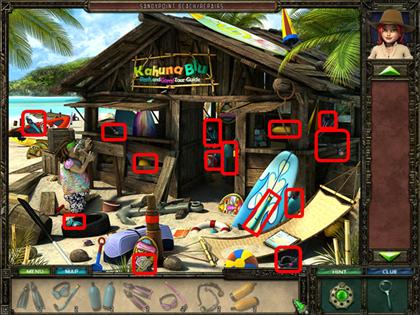
- Look for the diving equipment in the scene. None of these items will go into your inventory.
CHAPTER 15: SHIPWRECK/ LOST TREASURE
COINS AND BAG OF COINS

- The bag of coins is highlighted in red.
- The coins are highlighted in yellow.
- These items will not go into your inventory.
NET AND FLARES

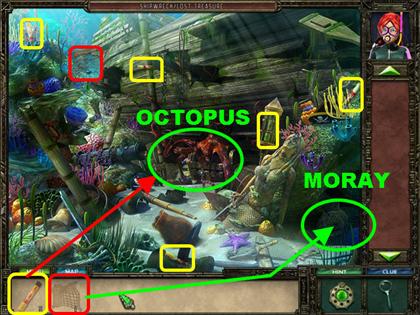
- The net is highlighted in red.
- The flares are highlighted in yellow.
- Place the net over the moray in the lower right corner.
- The flares go on the giant octopus in the lower center of the scene.
KEYS AND KNIFE

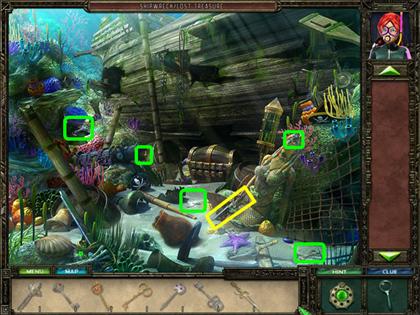

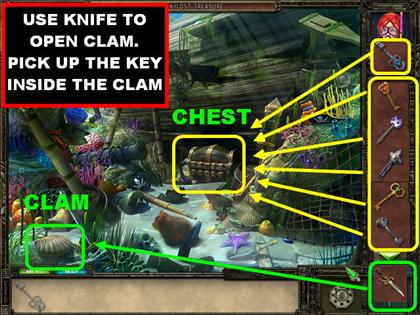
- Please look at the screenshot for the location of the keys and the knife.
- You will be able to find all the items except one of the keys.
- Place the knife on the clam in the lower left.
- Grab the key that appears inside the clam.
- Place all 6 keys into the chest.
- Click on the chest to trigger a mini-game.
SUBMERGED LOOT MINI-GAME

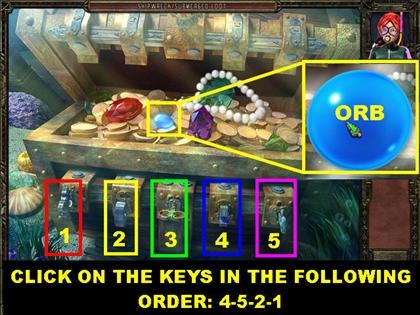
- Your goal is to click on the correct keys to unlock the chest.
- Each key you click affects another lock.
- I will number the keys from 1 to 5, starting from the left. We do not need to turn key #6 for this solution. Please click on the keys in the following order:4-5-2-1
- Once the combination has been entered correctly, the chest will open.
- Click on the blue orb inside the chest.
CHAPTER 16: CHRONOS ISLAND/ TOURIST GUIDE
FIRE EXTINGUISHER/ SCISSORS

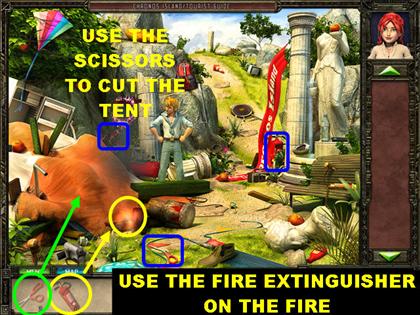
- Pick up the fire extinguisher and the scissor pieces.
- Place the fire extinguisher on the fire.
- Use the scissors to cut the tent open.
ROCK AND TUBE


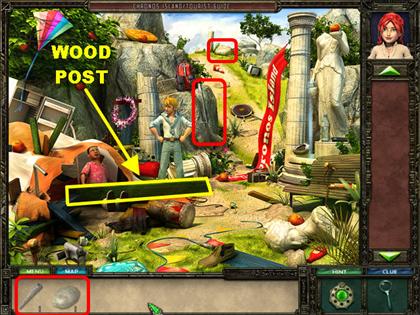
- Pick up the rock on top of the hill.
- Pick up the tube on the rock formation on the left side of the scene.
- Place the rock on the wood post.
- Place the tube on the wood post. The tube will act as a lever.
- Click on the lever to remove the post off the man’s legs.
HERBS, MORTAR & PESTLE

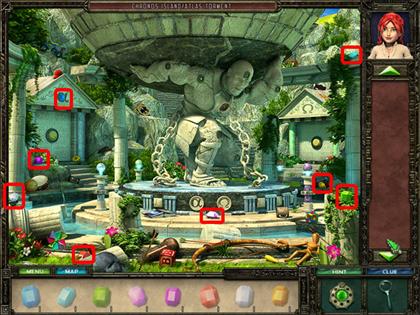

- Pick up the herb fragments and the mortar and pestle in the scene.
- From the inventory box combine the herbs and the mortar. You will now have a mortar with herbs.
- From the inventory box combine the mortar with herbs with the pestle in order to grind it. You will now have medicine in your inventory.
- Give the medicine to the guide under the tent. He will get up and move to the right side of the scene.
BOTTLE, CHOCOLATE & APPLES

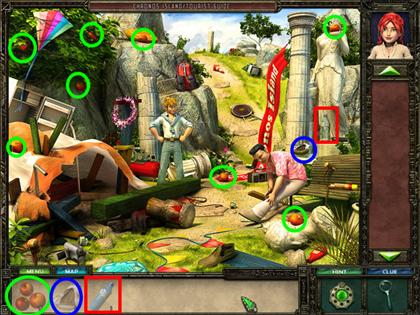
- The apples are circled in green.
- The empty bottle is in red.
- The chocolate is circled in blue.


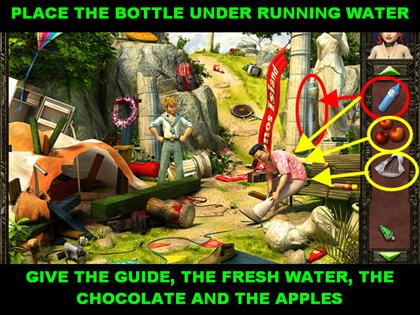
- Place the empty bottle under the running water on the right. The bottle will go back into inventory as fresh water.
- Give the guide the fresh water.
- Give the guide the chocolate.
- Give the guide the apples.
CHAPTER 17: CHRONOS ISLAND/ ATLAS TORMENT
MARBLE SPHERES AND GEARS

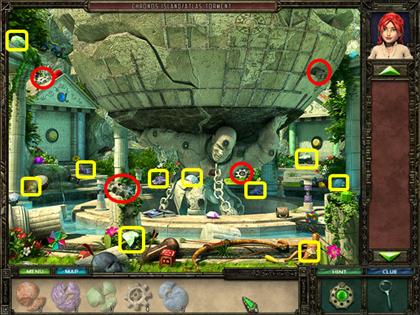
- The marble spheres are all in yellow.
- The gears are in red.
- You have to place the marble spheres on one of the 4 matching curved surfaces above the metal axis in the scene. Once you place the marble spheres on the right spots they become a marble post.

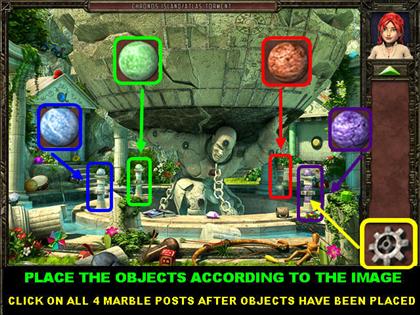
- Place the gears on the purple metal axis on the right side of the scene. You can actually place the gears on any metal axis.
- Place the red marble sphere on the curved surface above the red metal axis on the far right.
- Place the purple marble sphere on the curved surface above the purple metal axis on the right.
- Place the green marble sphere on the curved surface above the green metal axis on the far left.
- Place the blue marble sphere on the curved surface above the blue metal axis on the left.
- Click on all 4 marble posts after objects have been placed. The statue will rise and a new list of items to find will appear.
FIND 8 GEMS


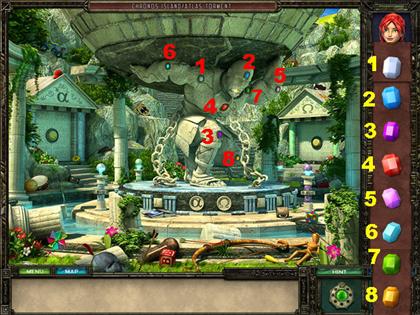
- Please look at the screenshot for the location of the 7 gems.
- Once all the gems have been found, you need to place them in the cavities of the statue.
- Please look at the screenshot for the solution. You cannot place a gem in the wrong cavity; a gem will not stick if it’s in the wrong cavity.
OMEGA SYMBOL

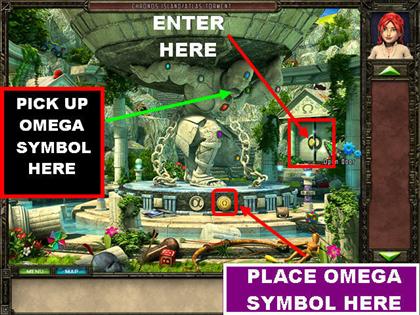
- Click on the statue’s mouth after all the gems have been placed. An Omega symbol will go into your inventory.
- Place the Omega symbol on the lower right side of the statue and the right door will open.
- Click on the right door to trigger a puzzle.
FOUNTAIN OF DEATH – OMEGA PUZZLE

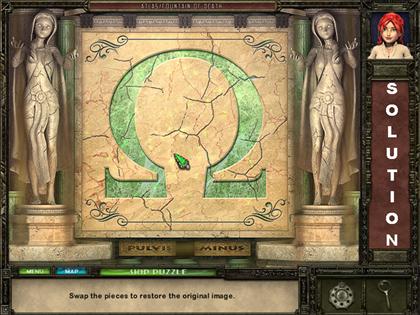

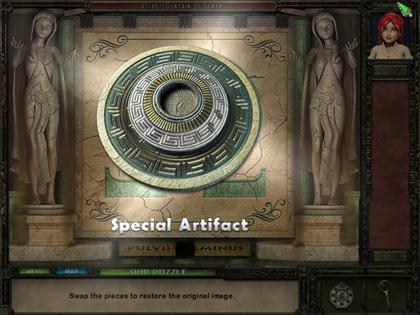
- Click on any 2 pieces and they will swap places.
- Please look at the screenshot for the solution.
- You will receive a special artifact after the puzzle has been solved.
CHAPTER 18: CHRONUS ISLAND/ FORUM
TILES

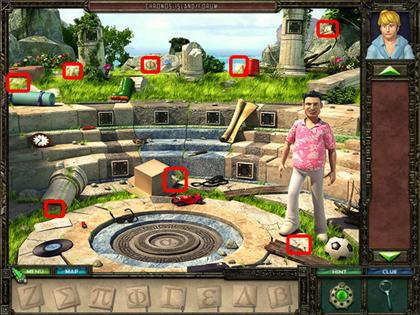

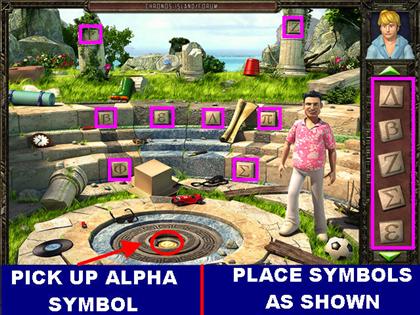
- Pick up the tiles around the scene.
- After you pick up all the tiles you have to place the tiles in the right spots on the steps.
- Each tile and spot on the steps will show you the name when you mouse over them.
- You cannot put a tile in the wrong spot.
- Pick up the Alpha symbol that appears in the middle of the ground.
CHAPTER 19: CHRONOS ISLAND/ ATLAS TORMENT
ALPHA SYMBOL

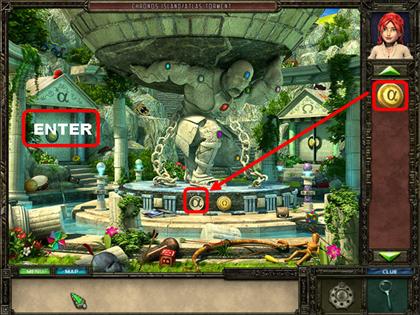
- Place the Alpha symbol on the left side of the base of the statue and the door on the left will open.
- Click on the left door to trigger a puzzle.
FOUNTAIN OF LIFE – ALPHA PUZZLE

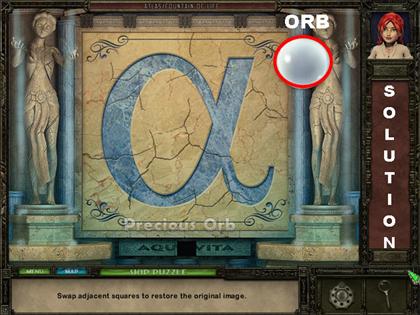
- Click on any 2 adjacent pieces and they will swap places.
- Please look at the screenshot for the solution.
- You will receive a special artifact after the puzzle has been solved.
CHAPTER 20: OSIAIS ISLAND/ THE MARKET
SADDLE, MUZZLE & FLUTE

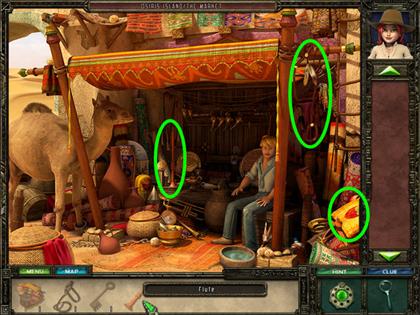

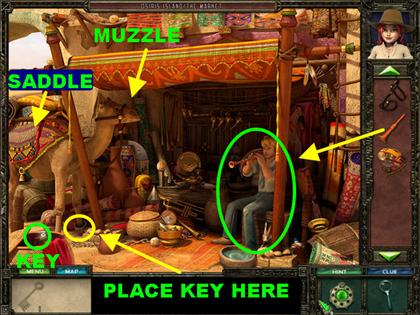
- Find all the items on the list. You will not be able to pick up the key right away.
- Place the saddle on the camel’s hump.
- Place the muzzle on the camel’s head.
- Give the flute to Jay so he can start playing it.
- As Jay plays the flute the snake in the lower left corner will come out of the basket.
- Grab the key from the snake’s basket.
- Place the key on the locked chain around the camel’s ankle.
CANTEEN, NUTS, FAN, & COMPASS

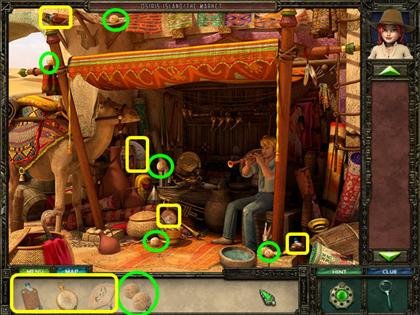
- The nuts are circled in green in the screenshot.
- All other items are in yellow.

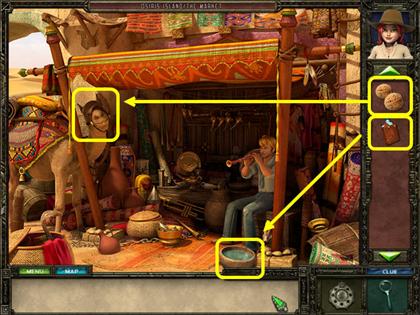
- Place the empty canteen in the bucket of water in the lower right corner.
- Place the nuts on the camel’s head.
CHAPTER 21: OSIAIS ISLAND/ OASIS
ANKH & HORUS

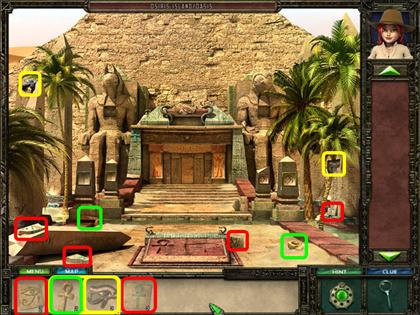
- The tiles are highlighted in red.
- The Eye of Horus items are in yellow.
- The ankh tile pieces are in green.

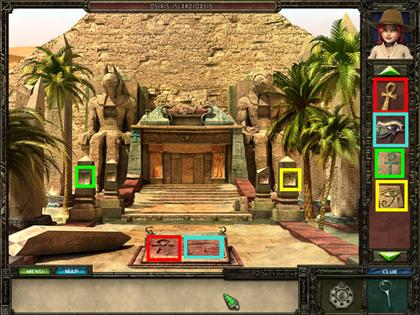
- Place the ankh TILE on the left socket.
- Place the Eye of Horus TILE on the right socket.
- Place the ankh symbol on the carving in the lower center of the scene.
- Place the Eye of Horus symbol on the carving in the lower center of the scene.
- Click on the ankh symbol in the ground.
- Click on the Eye of Horus symbol on the ground.

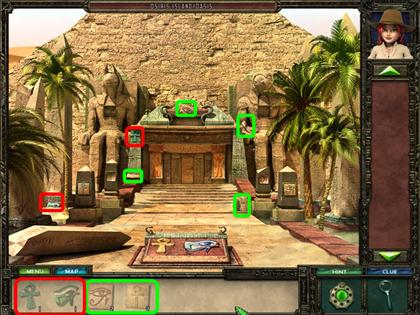

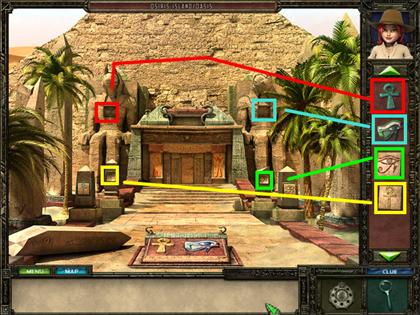
- Find the items that just appeared at the bottom of the scene.
- Place the Eye of Horus TILE on the socket on the far right.
- Place the ankh TILE on the socket on the far left.
- Place the ankh symbol on the left statue.
- Place the Eye of Horus symbol on the right statue.
- Click on the ankh and Eye of Horus symbols on BOTH statues.
- Enter through the doors in the pyramid.
CHAPTER 22: OSIAIS ISLAND/ PYRAMID
SCARAB & GEMS

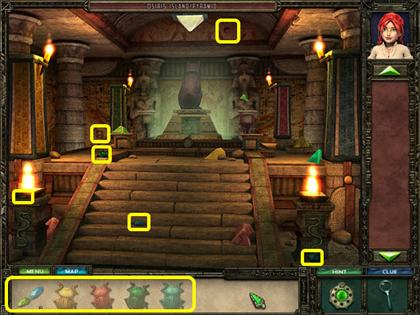

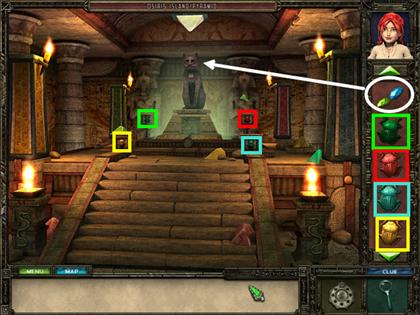
- Find all the items on the list.
- Place the scarabs on the beetle-shaped slots above the steps.
- Once all the scarabs have been placed, the cat statue will turn around.
- Place the pair of gems in the eye sockets of the cat statue.
PRISMS & GEM

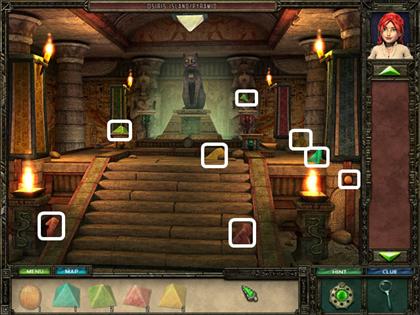

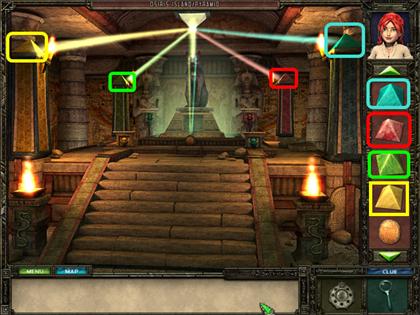
- Find all the prisms and the gem in the scene.
- Place the prisms on the matching obelisks inside the pyramid.
- Each prism that you place will emit a beam of light in the room.
- Place the Egyptian symbol in the oval slot below the cat.
CHAPTER 23: BAYLON ISLAND/ PEEA
FIND ITEMS

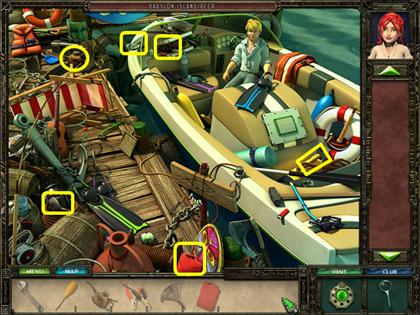
- Look for the items on the list. None of these objects will go into inventory.

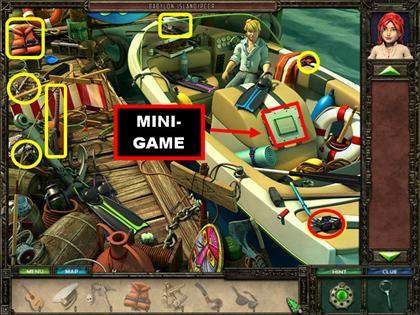
- Look for the items on the list. None of these objects will go into inventory.
- Click on the light green fuse box on the boat to trigger a mini-game.
FUSE BOX MINI-GAME

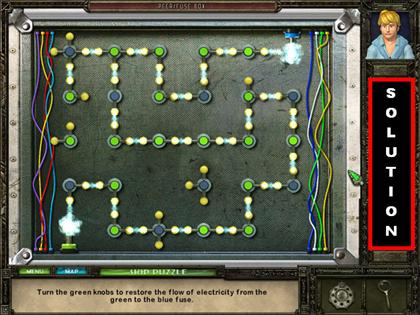
- Use the green knobs to move the wires around.
- Your goal is to restore the flow of electricity from the green to the blue fuse.
- The blue knobs cannot be moved.
- All the wires do not have to be connected to solve the puzzle. The puzzle will be solved when you see the spark appear on the blue fuse in the upper right corner.
- Please look at the screenshot for the solution.
CHAPTER 24: BABYLON ISLAND/ TOWER
FIND THE SYMBOLS

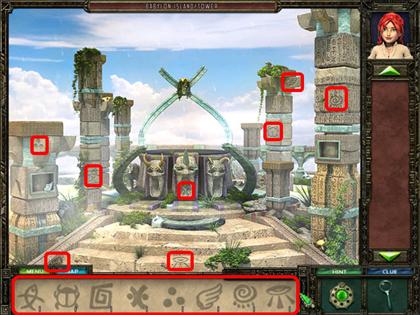
- Look for the items on the list. None of these objects will go into inventory.
FIND WINGS AND HEADS

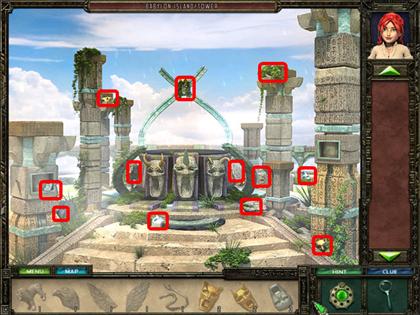

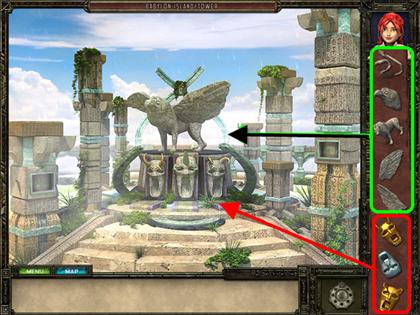
- Look for the items on the list.
- The heads and the wings will go into inventory.
- There are 3 mouths in the center of the scene. You have to place the heads in each mouth.
- You cannot place them in the wrong location, only the right one will stick.
- You now have to assemble the gryphon on the pedestal above the heads.
- Start from the bottom and work your way up. Please place the parts in the following order:GRYPHON’S BODY
GRYPHON’S RIGHT WING
GRYPHON’S LEFT WING
GRYPHON’S HEAD
GRYPHON’S TAIL
- You will not find an artifact at the end of this stage.
CHAPTER 25: HERMIT ISLAND/ TENT
TWO ARTIFACT PIECES

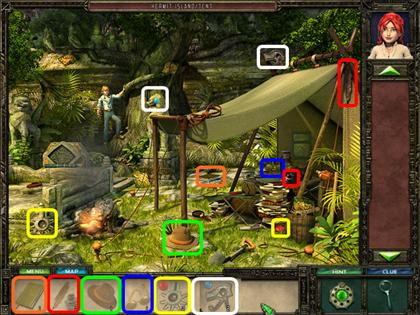

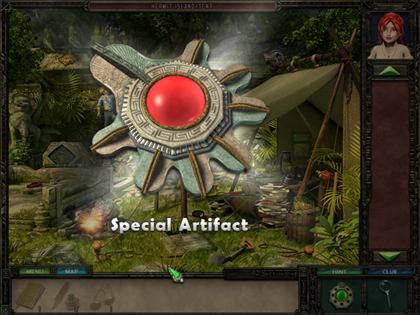

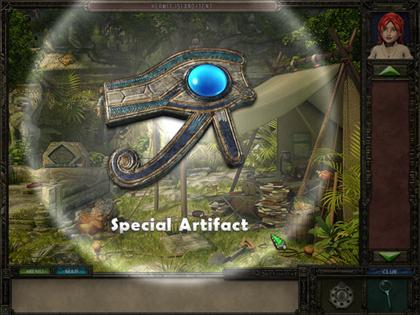
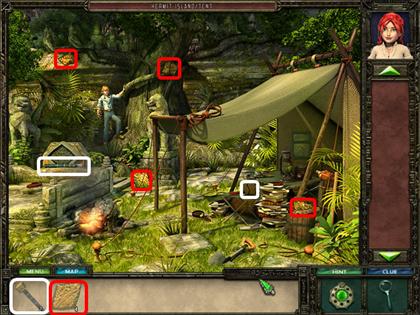
- Look for the items on the list.
- You will find an artifact in this scene amongst the items you need to look for. These artifact pieces are highlighted in yellow in the screenshot.
- As soon as you find both pieces of the artifact you will be asked to find another artifact. These artifact pieces are highlighted in white in the screenshot.
TABLET AND LEVER


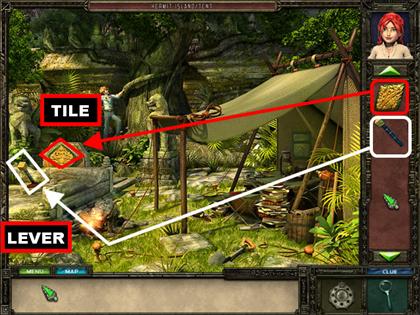
- Place the tile in the diamond-shaped slot on the left.
- Place the lever in the opening in the lower left.
- Click on the lever and a secret entrance will open up.
CHAPTER 26: HERMIT ISLAND/ THIRD EYE
TABLETS AND GEMS

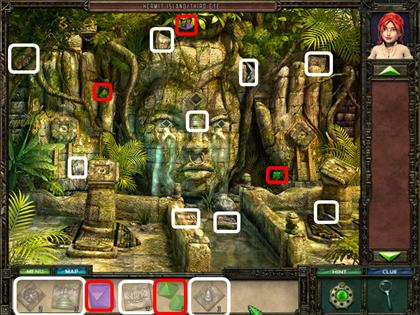
- The tablets are highlighted in white.
- The gems are highlighted in red.
- You will not be able to pick up the last piece of the flame tablet.

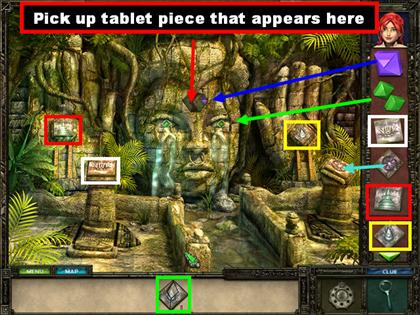
- Place the purple gem on the forehead (mind’s eye) of the large face.
- Place green gems on the eye sockets of the large face.
- Once the gems have been placed, the last piece of the flame tablet will appear in a secret compartment on the forehead, click on it to pick it up.
- Place the lotus tablet on the pedestal in the lower left.
- Place the wheel tablet on the pedestal in the lower right.
- Place the tower tablet on the pedestal in the upper left.
- Place the flame tablet on the pedestal in the upper right.
- Click on the flame and tower tablets and a secret compartment will be behind it.

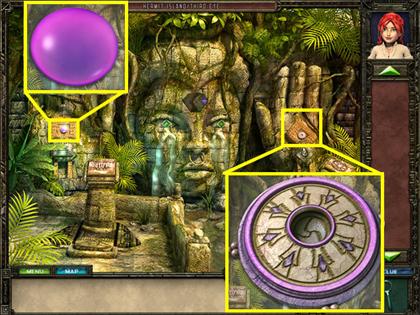
- Click on the flame tablet spot and pick up the artifact.
- Click on the tower tablet spot on the left and pick up the orb.
CHAPTER 27: LUNAI VILLAGE/ ELDER’S CHARTS
CHARTS

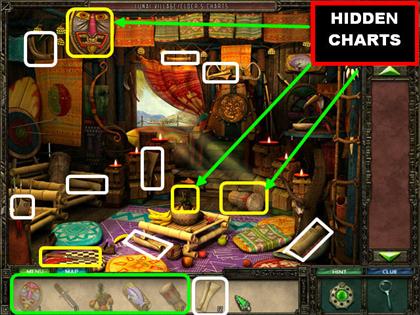
- The chart pieces are in white in the screenshot. All other pieces are in green.
- Some chart pieces will be hidden behind some of the items you remove. These items have green arrows pointing to them in the screenshot.
- You will not be able to pick up the last chart piece and the fish until other actions have been performed first.

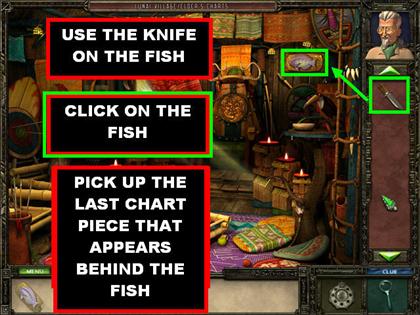
- Use the knife on fish plaque in the upper right side.
- Click on the fish to take it off your inventory.
- Pick up the last chart piece that appears in the spot behind the fish.
CHAPTER 28: DRAGON ISLAND/ FIRE PATH
SPHERES & SYMBOLS

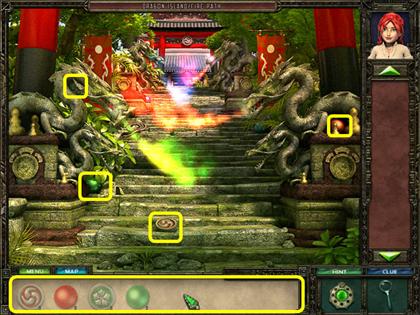

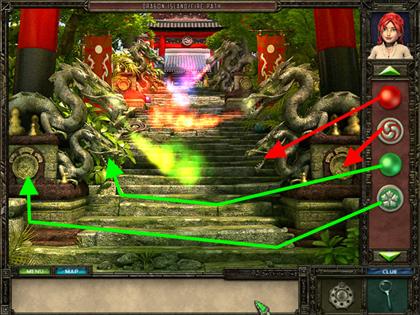
- Pick up the spheres and the symbols in the scene.
- Place the red sphere in the mouth of the red dragons on the right.
- Place the green sphere in the mouth of the green dragons on the left.
- Place the red symbol in the red dragon’s spot in the lower right.
- Place the green symbol in the green dragon’s spot in the lower left.
WHIP, SPHERE & SYMBOLS

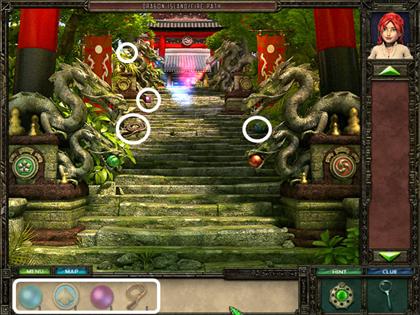

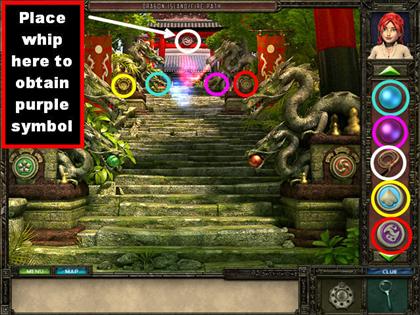
- Find all the items from the list.
- Place the purple sphere on the purple dragon in the upper right side.
- Place the whip on the purple symbol in the top center of the scene. The purple symbol will automatically go into your inventory.
- Place the blue sphere on the blue dragons in the upper left side.
- Place the blue symbol on the blue dragons in the upper left side.
- Place the purple symbol on the purple dragons in the upper left side.
CHAPTER 29: DRAGON ISLAND/ SAMURAI
STATUE HEADS & MALLETS

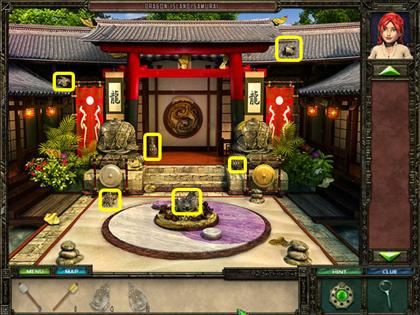
- At the beginning of this level you will be asked to find mallets and statue heads. You will not be able to pick up the mallets until other actions have been performed first.
- Place the statue heads on each of the headless statues on the left and right side of the scene.

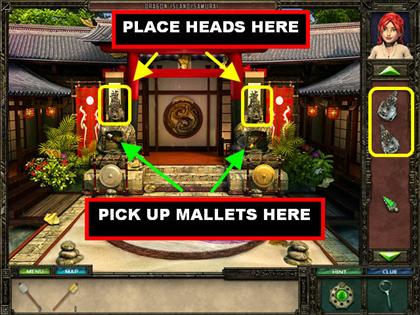
- Pick up the mallets that appear in the body of each of the TWO statues, the one on the left and the one on the right.

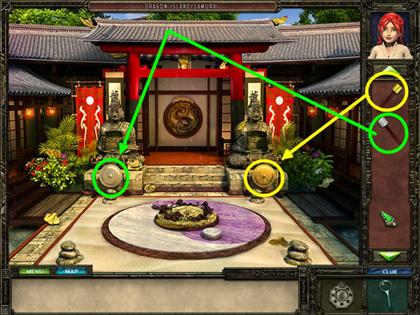
- Place the silver mallet on the silver gong.
- Place the golden mallet on the golden gong below the right statue and the wheel on the ground will start spinning.
FIND 15 SYMBOLS

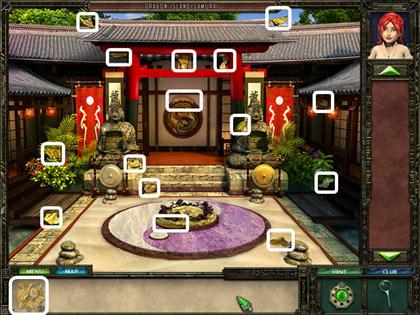

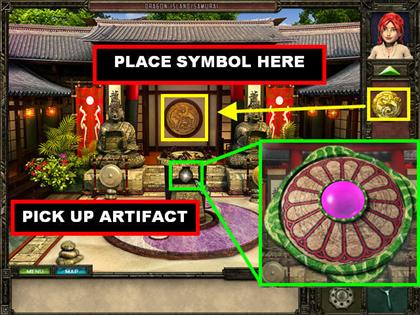
- Please look at the screenshot for the locations of all the symbols.
- Place the symbol on the back wall. A structure appears in the middle of the ground.
- Click on the artifact that’s in the middle of the structure.
SECRET ISLAND/ MONOLITH PUZZLE

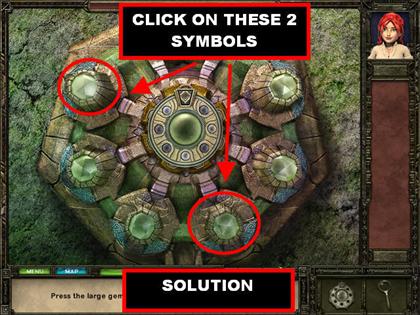
- Your goal is to press the large green gems in order to light up all the orbs in the pendant.
- Each time you press one of the green gems it stays lit. If you want to de-select that gem, click on it again.
- Click on the first and fourth green gem to solve the puzzle.
CHAPTER 30: SECRET ISLAND/ THE TRUTH
THE TRUTH PUZZLE

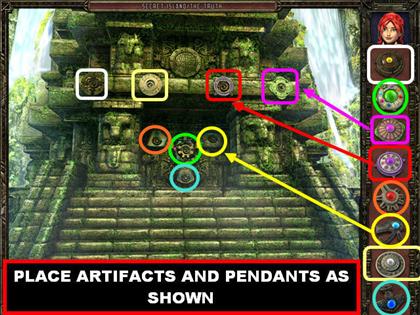
- Your goal in this section is to place the pendants and symbols into the right spots.
- Please look at the screenshot for the solution.
- THE END!



 Christmas Eve: Midnight's Call Walkthrough, Guide, & Tips
 Escape from Thunder Island Walkthrough, Guide, & Tips
 Silent Nights: The Pianist Walkthrough, Guide, & Tips
 PuppetShow: Lightning Strikes Walkthrough, Guide, & Tips
 Diamon Jones: Amulet of the World Handbuch, Guide, & Tips