Escape from Thunder Island Walkthrough, Guide, & Tips
Escape from Thunder Island Walkthrough

Welcome to the Escape from Thunder Island Walkthrough!
Join the more-brave-than-brilliant aviatrix Rita James on a quest to rescue her kidnapped father in Escape from Thunder Island!
Whether you use this document as a reference when things get difficult or as a road map to get you from beginning to end, we’re pretty sure you’ll find what you’re looking for here.
This document contains a complete Escape from Thunder Island game walkthrough featuring annotated screenshots from actual gameplay!
We hope you find this information useful as you play your way through the game. Use the walkthrough menu below to quickly jump to whatever stage of the game you need help with.
Remember to visit the Big Fish Games Forums if you find you need more help. Have fun!
This walkthrough was created by Chie, and is protected under US Copyright laws. Any unauthorized use, including re-publication in whole or in part, without permission, is strictly prohibited.
General Tips

- From the main menu you can play the game, adjust options, or see the credits and other games.
- In the options menu you can adjust the sound and music volume, set the cursor type, fullscreen mode or toggle sound off.
- At the bottom right of the screen you can change the current player or make a new player.
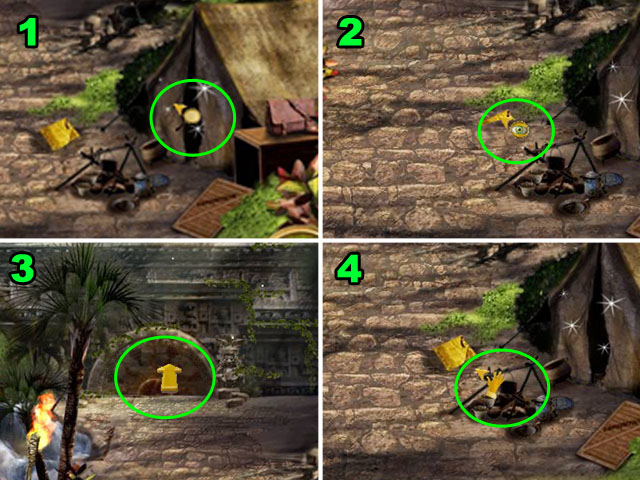
- There are 4 types of cursors in the game.
- The first cursor lets you inspect an area. This usually gives you a closer view or enters a Hidden Object Scene (1).
- The second cursor is an eye. It tells you more about an object and usually means the object can’t be taken without doing something first like digging it up with the shovel (2).
- The third cursor is the movement cursor (3).
- The last cursor is the hand cursor. It tells you when you can take an inventory item (4).
- The hidden objects in this game are not randomized.
- Some of the hidden objects require you to find three different pieces. One of the pieces will be the main piece that you have to drag the other pieces on to complete the object, before you can pick it up. There is only one of these types of objects per scene.
- Click on the map in the bottom right corner to see if the area you are in has been “cleared”. This is a good way to search for extra puzzle pieces that you may have missed.
- The Hint bar is on the left of the map, and slow recharges as you play. Clicking it will give you a hint on what to find next in the current location or tell you how to solve a puzzle.
Episode 1: The Island

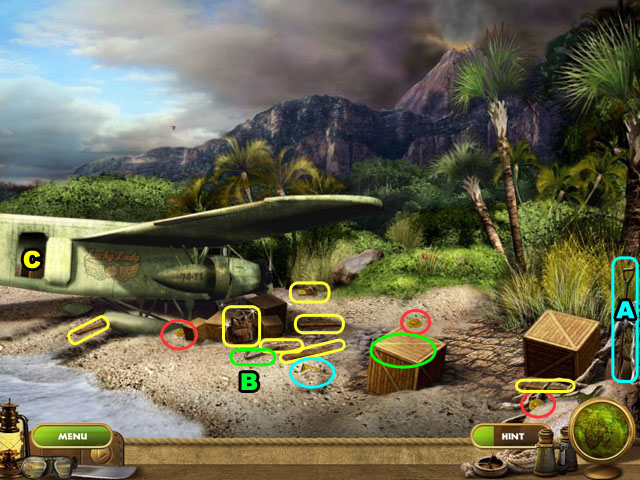
- First collect all of the debris circled in yellow.
- Collect the Bonus Coins circled in red as well – there are 80 of these in the game that you need to find.
- You can see how many Bonus Coins you have found by clicking on the map in the bottom left corner of the inventory panel.
- Take the SHOVEL and use it to uncover the PUZZLE PIECE circled in blue (A).
- Take the CROWBAR and use it to open the crate circled in green (B).
- Inside the crate collect the SLINGSHOT and the MATCHES.
- Enter the plane (C).

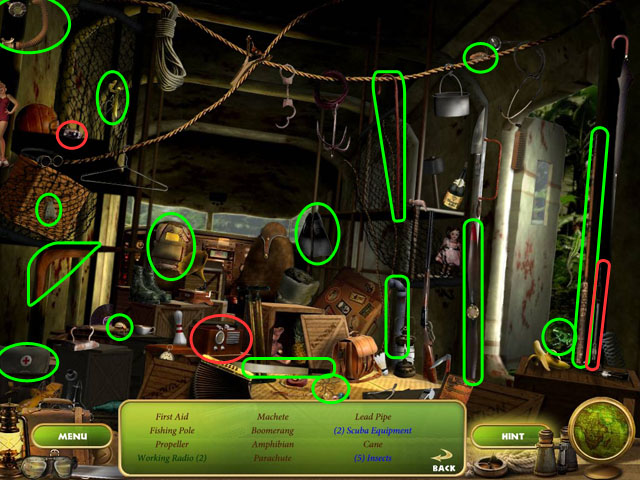
- Collect the objects 16 circled in green.
- Some objects need to be assembled from different pieces. They will be written in green.
- You will need to drag the pieces to each other and then click on the completed object.
- Some objects are part of a collection. They will be written in blue and require you to find multiple objects of the same type.
- After finding all of the objects you will receive a MACHETE.

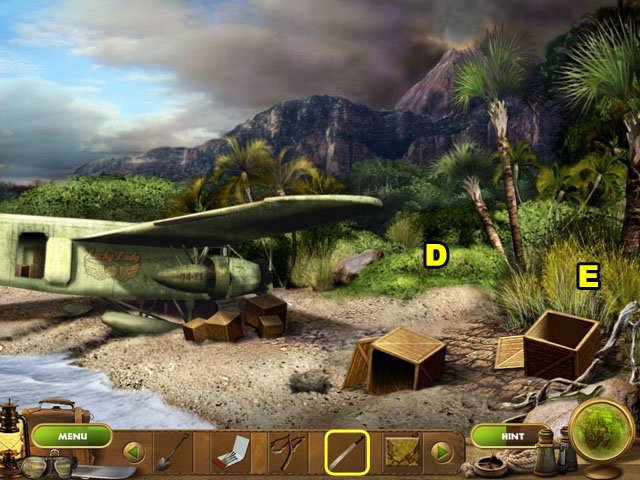
- Use the MACHETE on the bushes in front of the plane (D) and pick up another PUZZLE PIECE.
- Next use the MACHETE on the grass to open a path (E).
- Go to the next scene using the new path.

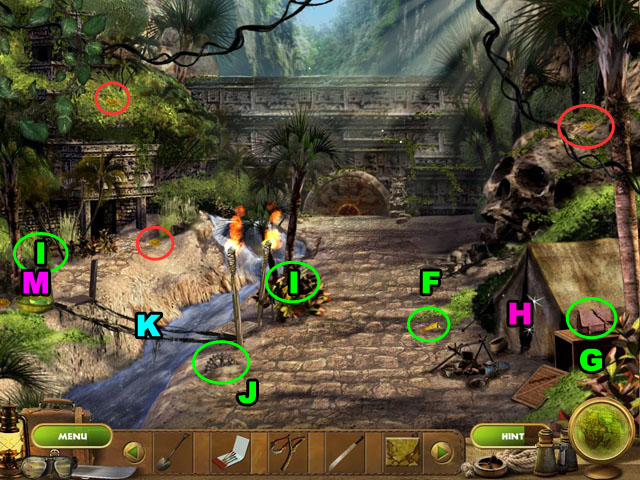
- Use the SHOVEL to uncover and collect the PUZZLE PIECE (F).
- Open the bag and take the BLUE GEM. You can also read the journal for story information.
- Use the SHOVEL to uncover and then collect the GEAR (J).
- Use the BOARDS from your inventory on the bridge (K).
- Clear the brush with the MACHETE in two places and collect another two PUZZLE PIECES (I).
- Collect all of the Bonus Coins.
- Enter the tent (H) Hidden Object Scene.

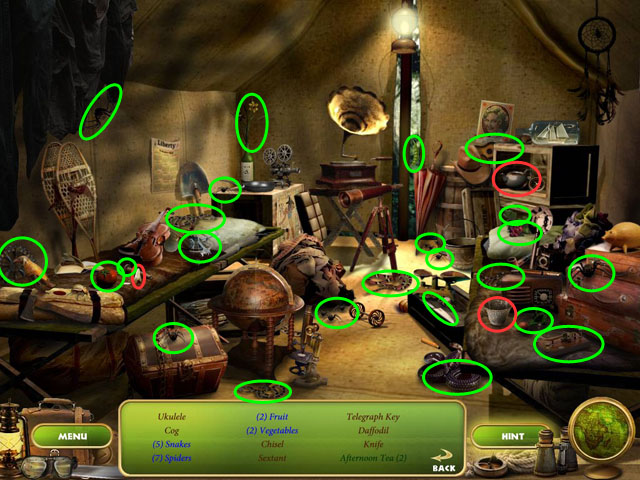
- Collect all of the Hidden Objects circled in green.
- Take the tea bag and the hot water and add them to the cup. Collect the cup to finish Afternoon Tea.
- You will receive an ANCIENT COG.

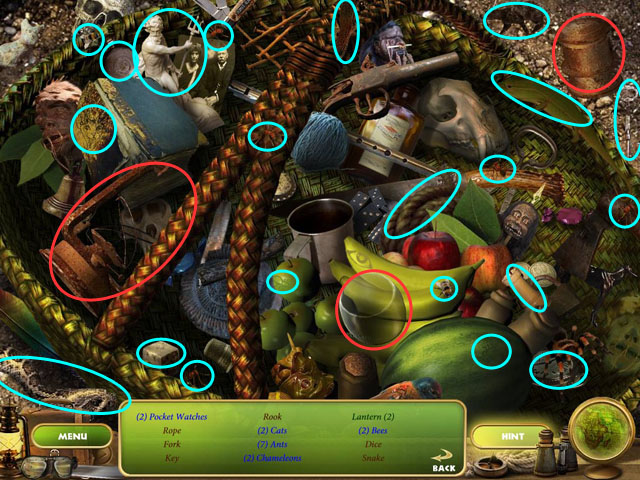
- Enter the Hidden Object Scene (M) past the bridge in the last scene.
- Collect all of the Hidden Objects circled in blue.
- Take the two objects circled in red and add them to the lantern base to the left. You can then collect the Lantern.
- After finding all of the objects you will receive a FRAYED ROPE.

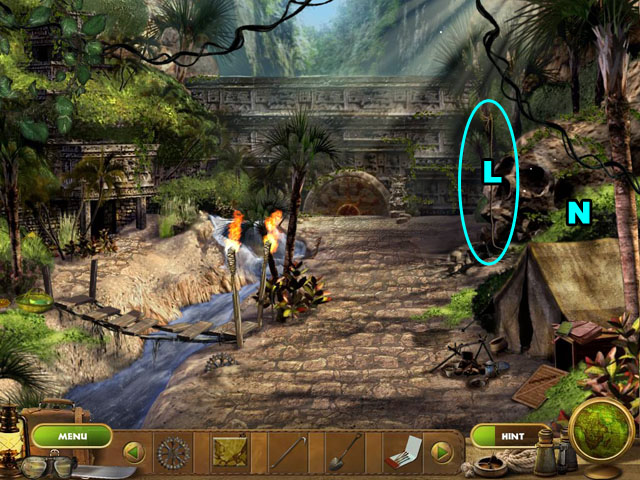
- Use the FRAYED ROPE on the large skull (L).
- Enter the new area (N).

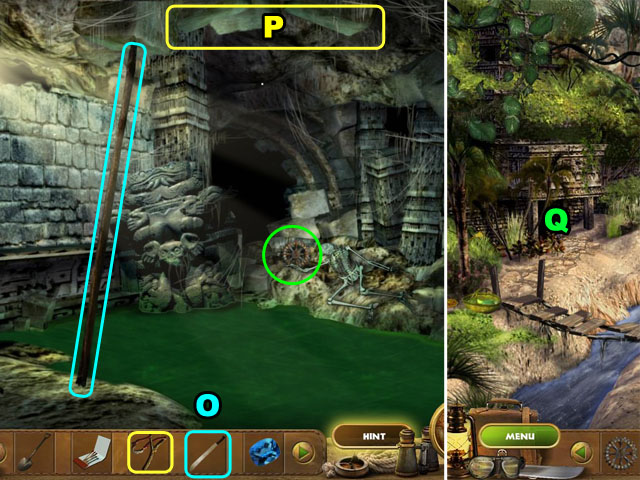
- Cut the board with the MACHETE (O).
- Use the SLINGSHOT on the three rocks above the pool (P).
- Take the COG.
- After returning to the top scene, enter the door on the left (Q).

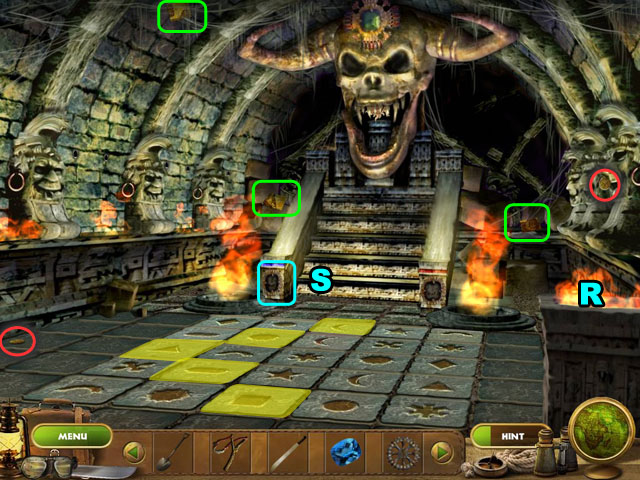
- Use the MATCHES on the oil (R) to light the room.
- Click the pattern in the tiles at the bottom of the screen. Start from the bottom and click one in each row to the top.
- Use the SLINGSHOT to shoot down the puzzle piece from the ceiling.
- Collect all three PUZZLE PIECES circled in green.
- Place the BLUE GEM in the empty space to the left of the stairs (S).
- Collect the two Bonus Coins.

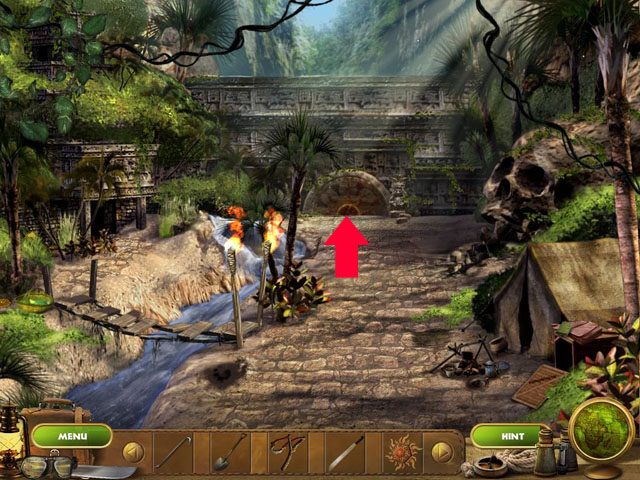
- Exit the room by clicking at the bottom right corner.
- Go forward to the next scene.

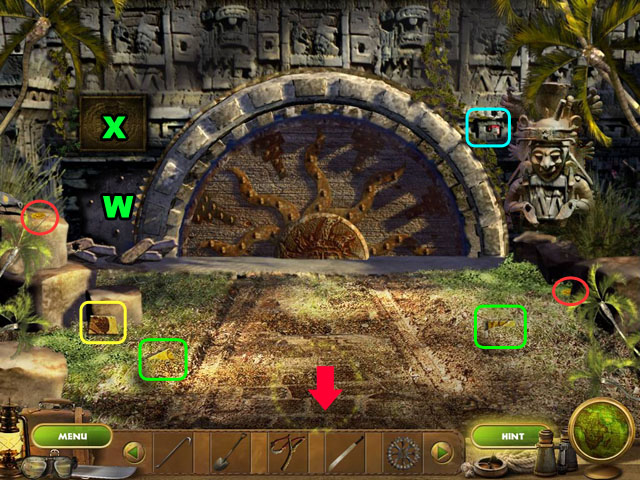
- Use the SHOVEL to uncover the two puzzle pieces in green.
- Collect three more PUZZLE PIECES, in yellow and green.
- Pry away the rocks in blue with the CROWBAR and collect a RED GEM.
- Collect the 2 Bonus Coins.
- The exit to this area is to the bottom.
- Place the three GEARS on the area to the left of the door (W).
- Click on the box above them to investigate (X).

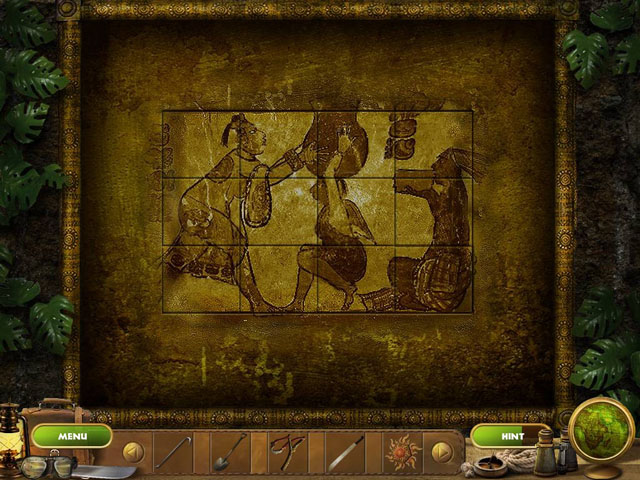
- Click and drag the pieces from the side of the puzzle to the correct places.
- The pieces do not rotate, but all of the pieces are the same size.
- Use the screenshot to see the completed puzzle.
- Go back after the puzzle is finished to the door across the wooden bridge in the previous scene.

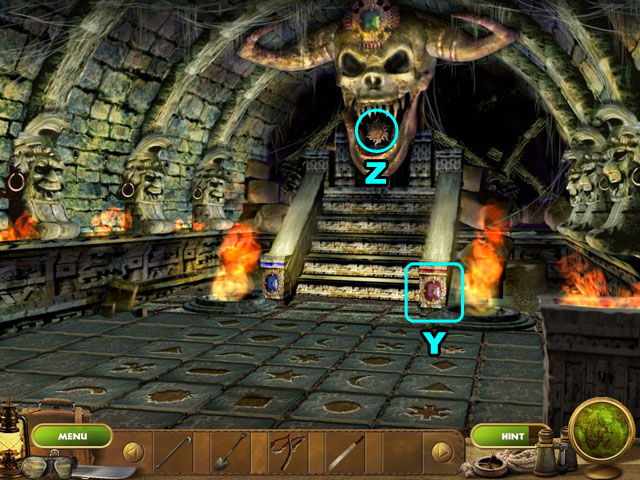
- Use the RED GEM on the right side of the stairs (Y).
- Take the SUN KEY from the statue’s mouth (Z).

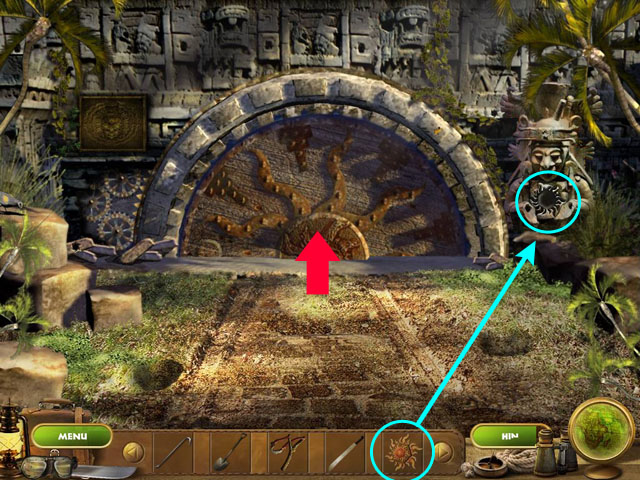
- Return to the sun door and place the SUN KEY on the statue circled in blue.
- Enter the door.
Episode 2: Ghost in the Darkness

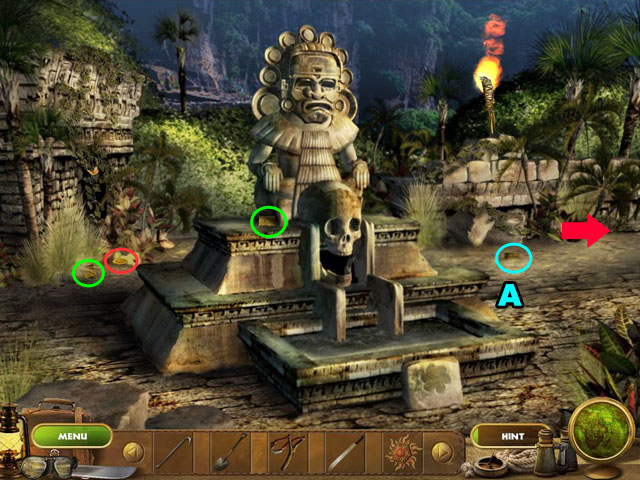
- Take the two PUZZLE PIECES circled in green.
- Collect the Bonus Coin.
- Use the SHOVEL to dig up the buried PUZZLE PIECE (A).
- Exit to the right.

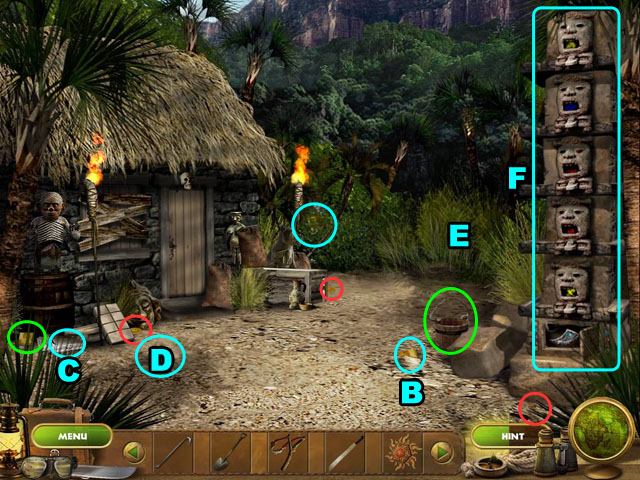
- Collect the two PUZZLE PIECES and the BUCKET circled in green.
- Use the SHOVEL to collect the PUZZLE PIECE (B).
- Red the journal (C) to find out how to extinguish the torches.
- Collect the three Bonus Coins.
- Use the SHOVEL to collect the WIND STONE (D).
- Use the MACHETE on the bushes to open a new path (E).
- Click all the different levels of the statue, rotating them until all of the faces are showing (F).
- Click on the statue faces until they match the color sequence in the screenshot: from the top, yellow, blue, red, red then yellow.
- This color sequence can be found at the bottom of the statue made out of gems.
- Take the WATER KEY from the base of the statue.

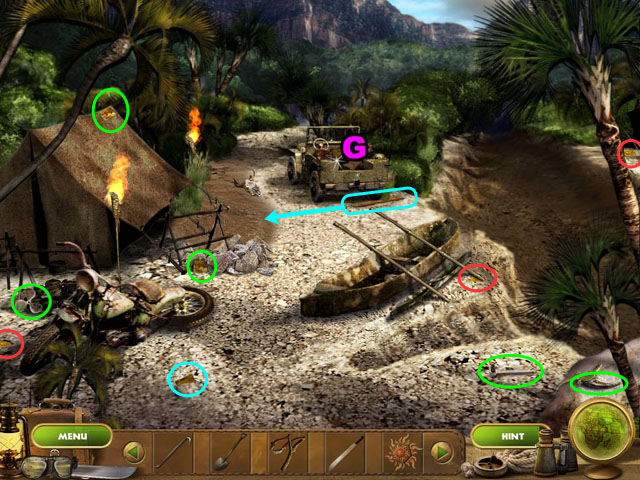
- Return to the previous scene and go to the left now.
- Collect all of the objects circled in green.
- Use the SHOVEL to collect the PUZZLE PIECE circled in blue.
- Take the BOARD from the back tire of the trunk and place it in the mud to the left of the truck.
- Collect the three Bonus Coins.
- Enter the truck Hidden Object scene.

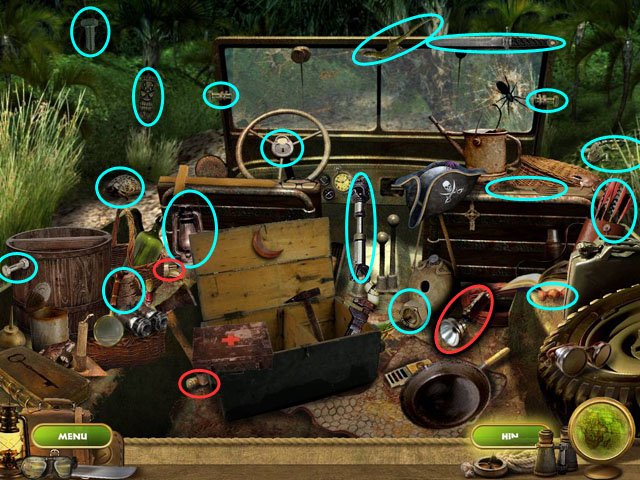
- Collect all the objects circled in blue.
- Add the light and the battery to collect the Flashlight.
- You will receive a DRIVE SHAFT.

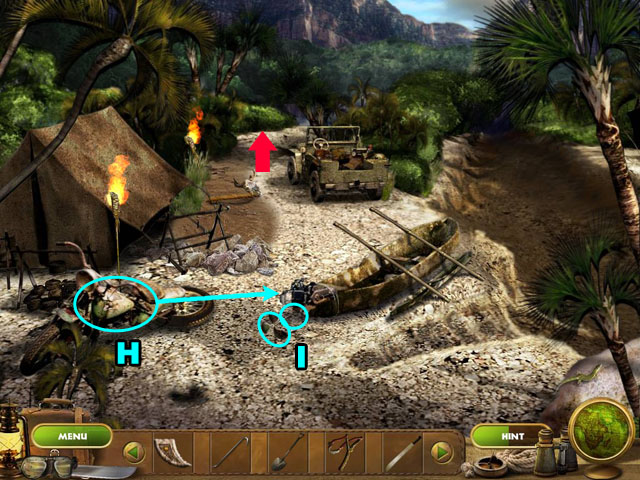
- Use the RATCHET on the motorcycle and collect the SMALL ENGINE (H).
- Use the SMALL ENGINE on the back of the BOAT (I).
- Add the DRIVE SHAFT and the PROPELLER to the boat’s engine.
- Move forward to the next scene.

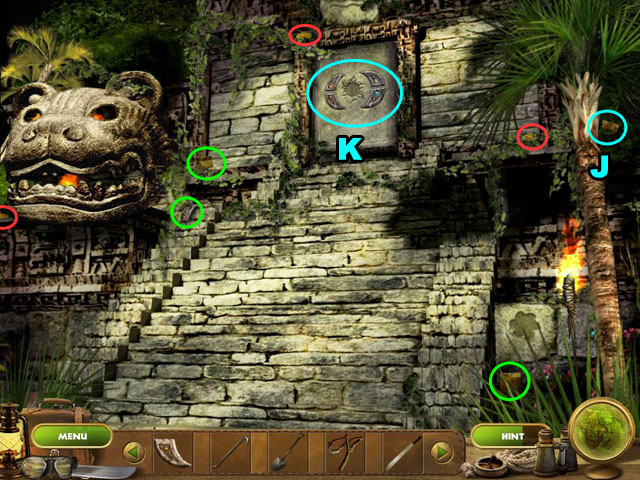
- Collect all the objects circled in green.
- Use the MACHETE to get the PUZZLE PIECE (J).
- Collect the three Bonus Coins.
- Use the WATER, AIR, WIND and FIRE STONES on the alter (K).
- Then use the SUN KEY on the altar to open it.
- Enter the temple.

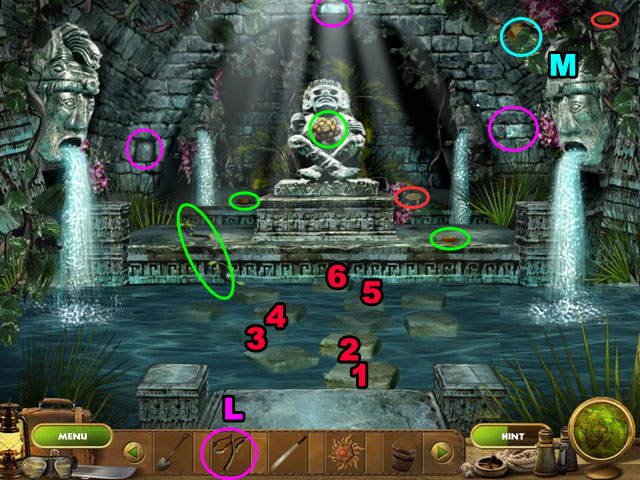
- Use the SLINGSHOT on the three rocks circled in purple (L).
- Then click the stone steps in the correct order to get across the water.
- Once you get the correct order, all of the steps will become solid.
- Collect the two Bonus Coins.
- Use the MACHETE to get the PUZZLE PIECE (M).
- Collect the WATER KEY from the chest of the statue and then collect all the other objects circled in green.

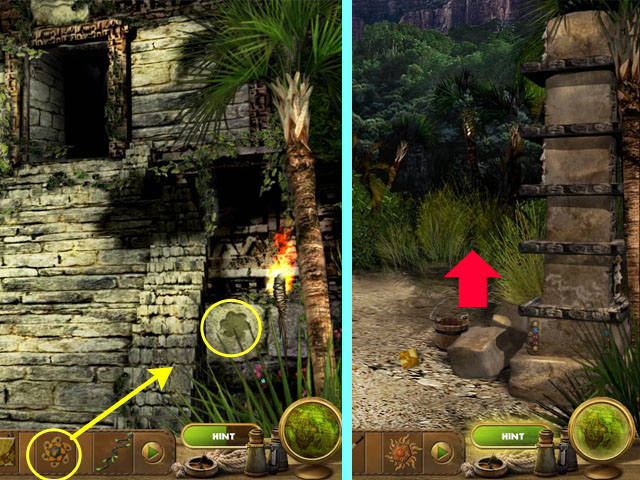
- Exit the temple and use the WATER KEY on the impression to the right.
- Return to the hut and go to the new area to the right.

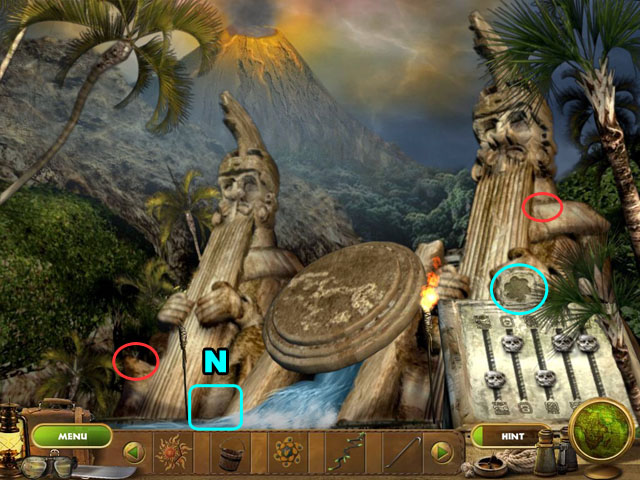
- Collect the Bonus Coin.
- Collect the last PUZZLE PIECE and click on the puzzle box (N).

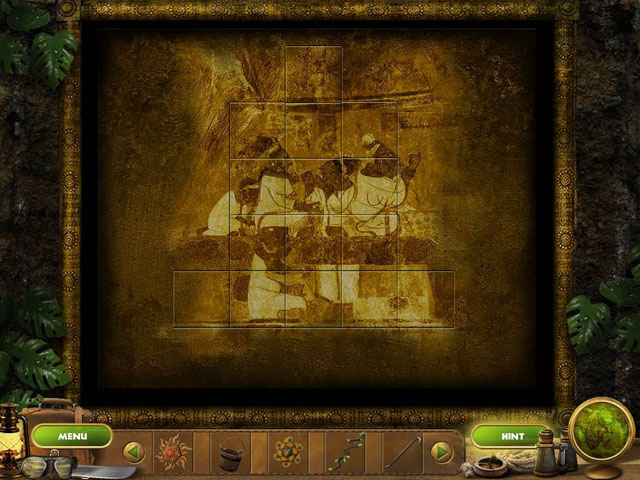
- Click and drag the pieces from the side of the puzzle to the correct places.
- The pieces do not rotate, but all of the pieces are the same size.
- Use the screenshot to see the completed puzzle.
- After the puzzle is finished a symbol will appear above the control panel to the right.
- Click once on each control to switch it to the opposite direction and use the WATER KEY on the symbol above it (O).
- The correct solution is: down, up, down, down, down.

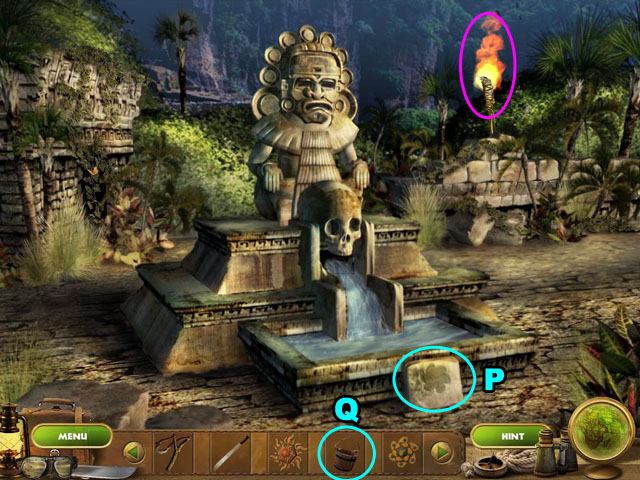
- Return to the first scene in this area.
- Use the WATER KEY on the base of the statue.
- Use the BUCKET on the water and collect the BUCKET OF WATER.
- Use the BUCKET OF WATER on the torch circled in purple.

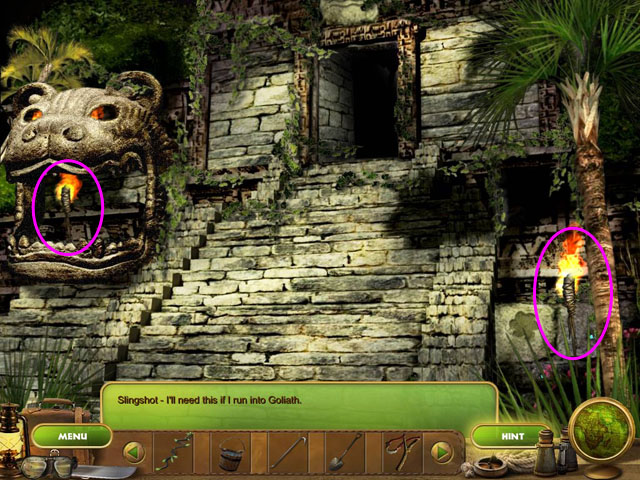
- Travel to the left and then up to the temple steps.
- Use the BUCKET OF WATER on the torches circled in purple.

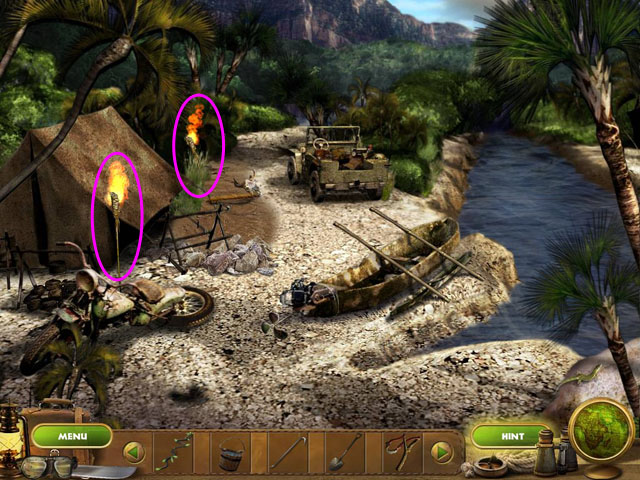
- Travel back one scene.
- Use the BUCKET OF WATER on the torches circled in purple.

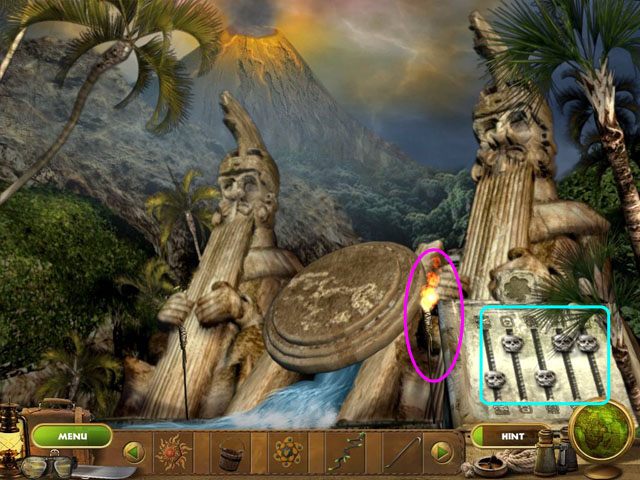
- Travel to water controls.
- Use the BUCKET OF WATER on the torch circled in purple.

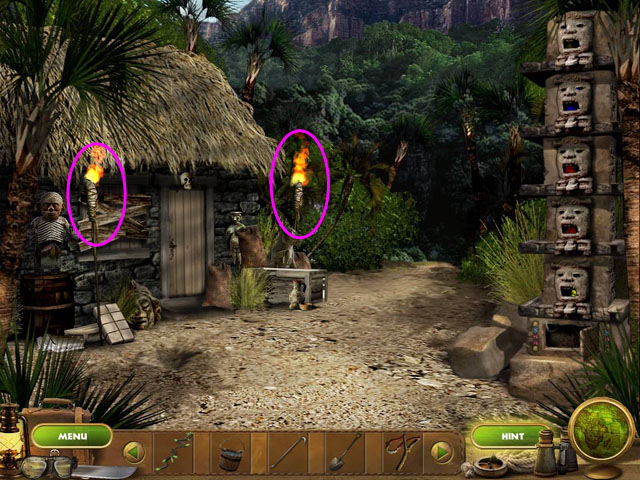
- Return to the hut.
- Use the BUCKET OF WATER on the torches circled in purple.
- After the cut scene, enter the hut.

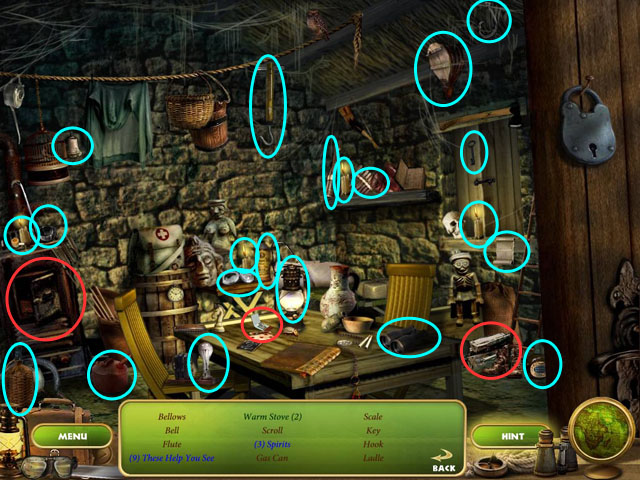
- Collect the objects circled in blue.
- “These Help You See” are objects that emit light, like candles and the lantern.
- Use the wood and the matches on the stove to get the “Warm Stove”.
- You will receive a GAS CAN.

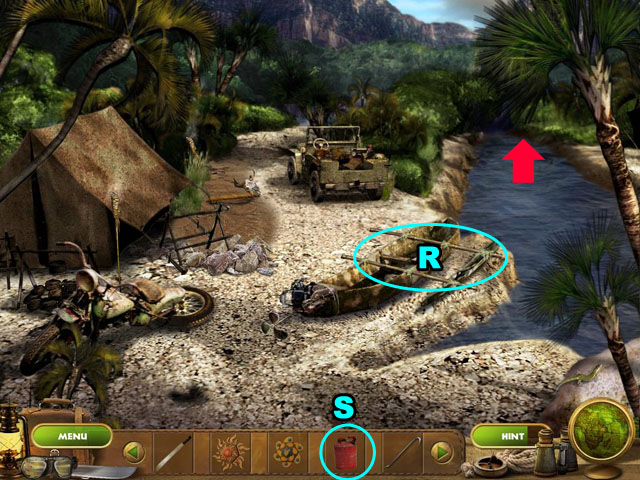
- Return to the boat with the small engine.
- Use the VINES on the boat (R) and then fill the engine with GAS (S).
- Click on the boat to travel down the river.
Episode 3: Break Neck Falls

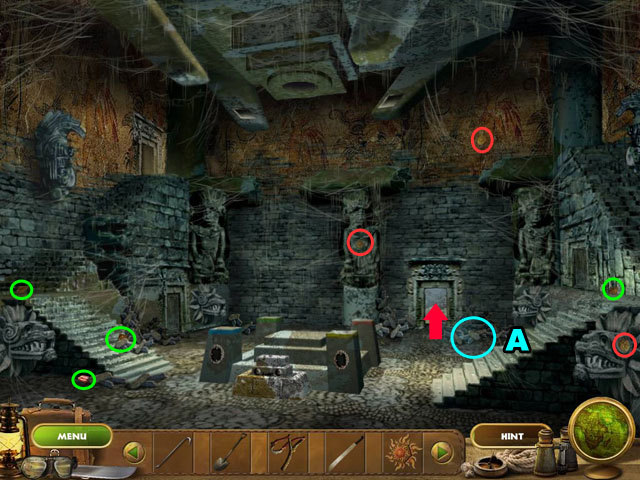
- Collect all the objects circled in green.
- Collect the three Bonus Coins.
- Use the CROWBAR to collect BLUE GEM under the rocks.

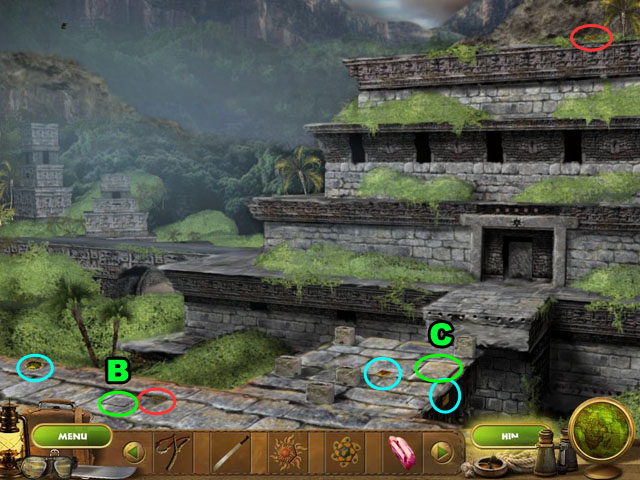
- Collect the objects circled in blue.
- Collect the two Bonus Coins.
- Use the CROWBAR to pry up a stone and get the PUZZLE PIECE (B).
- Use the CROWBAR again to pry up the other stone (C).

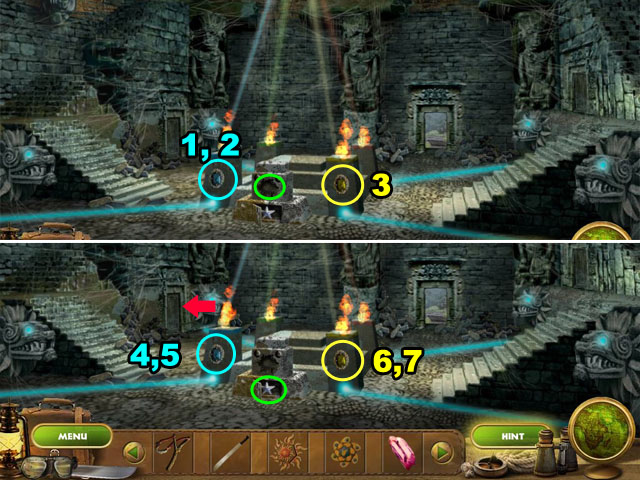
- Return to the previous room.
- Add the BLUE GEM to the left pillar and the YELLOW GEM to the hole on the right pillar.
- Use the SUN KEY in the middle to start the puzzle.
- The object of the puzzle is to get all of the pillars hit with the correct color of light for each pillar.
- Clicking on the blue stone changes the color of the light over the yellow stone.
- Clicking on the yellow stone rotates the light beam colors clockwise.
- From the starting position he correct answer can be reached by clicking blue twice, yellow once, blue twice and then yellow twice.
- If you get mixed up just set the colors one at a time in the order blue, yellow, red, and then green – making sure to rotate the colors once with the yellow stone after each time.
- Then all you need to do is rotate them to the correct position with the yellow stone to complete the puzzle.
- Take the CRYSTAL STAR circled in green.
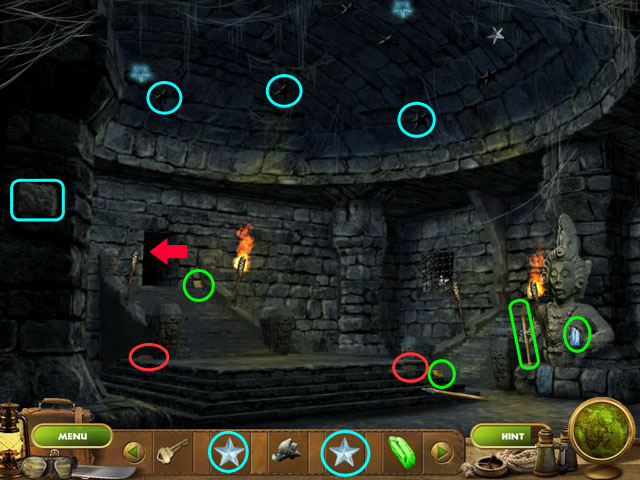
- Go through the door on the left.

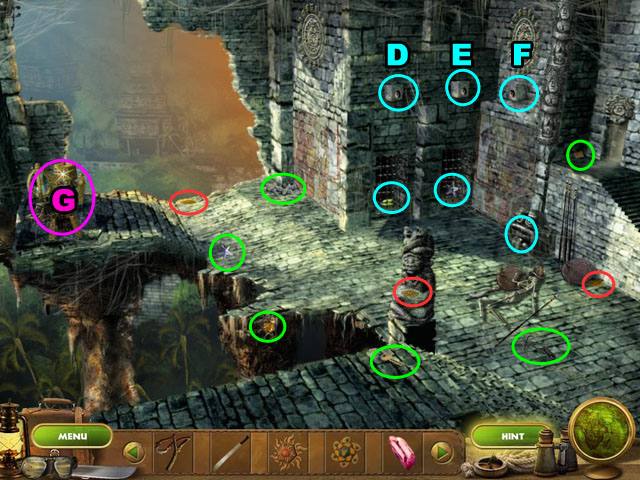
- Collect the item circled in green.
- Collect the three Bonus Coins.
- Use the SLINGSHOT on the buttons (D, E, F).
- Now you can collect the objects in blue that were unavailable before.
- Enter the Hidden Object Scene to the left (G).

- Collect all of the objects circled in green.
- Use the propeller and the key on the plane circled in red to be able to collect it.
- You will receive the LEFT ASTRONOMICAL DISK.

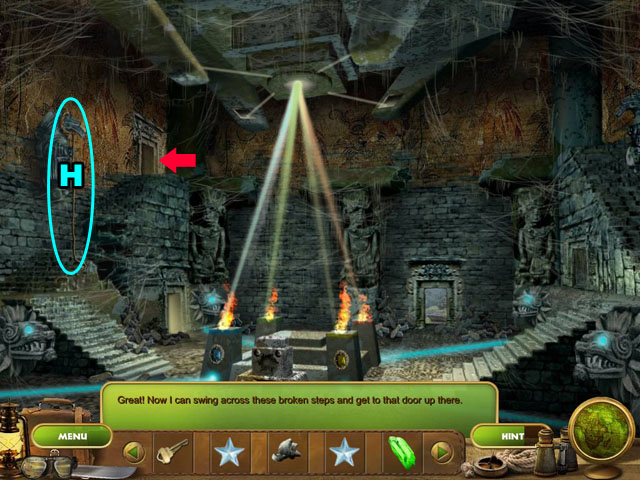
- Return to the first room and use the GRAPPELING HOOK on the statue (H).
- Go through the door in the upper left.


- Collect the items circled in green.
- Use the CROWBAR on the stone to the left to get a PUZZPE PIECE circled in yellow.
- Collect the two Bonus Coins.
- Use the CRYSTAL STARS from your inventory on the bottom star holes in the ceiling, circled in blue.
- Exit to the left.

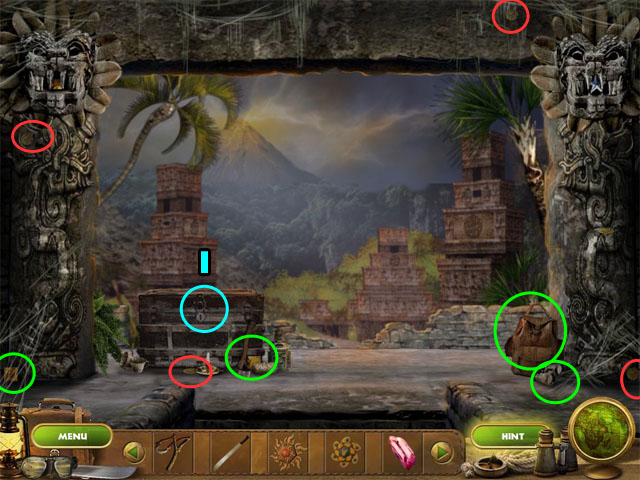
- Collect the items circled in green.
- Collect the three Bonus Coins.
- Use the KEY from your inventory on the chest (I).
- Examine the chest.

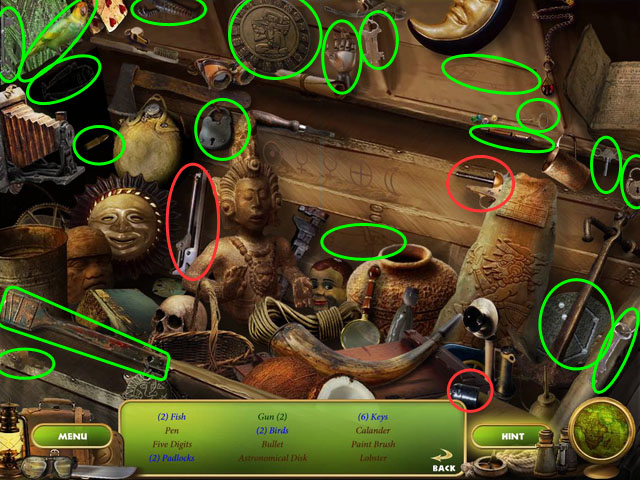
- Collect all of the objects circled in green.
- Use the objects in red on the gun stock to collect the Gun.
- You will receive the RIGHT ASTRONOMICAL DISK.

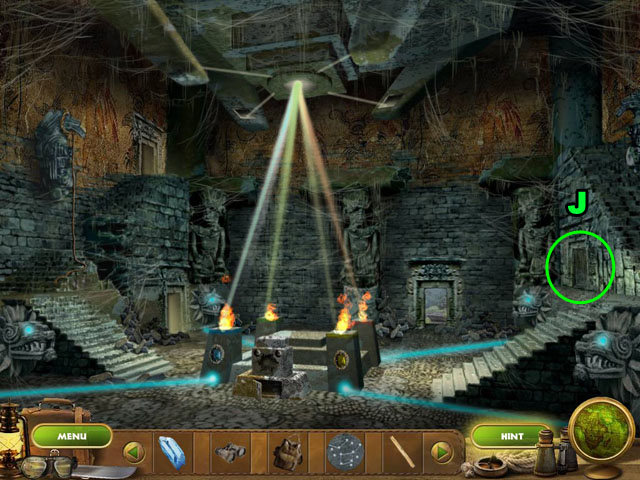
- Return to the first room and click on the door to the right (J).

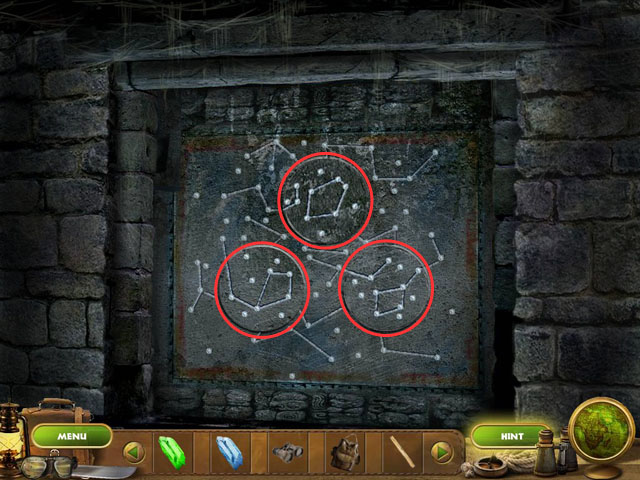
- Add the LEFT ASTRONOMICAL DISK and the RIGHT ASTRONOMICAL DISK to the left and right openings.
- Align the disks to match the screenshots, so that all of the constellations are pointing down and to the left.
- Go through the open door.

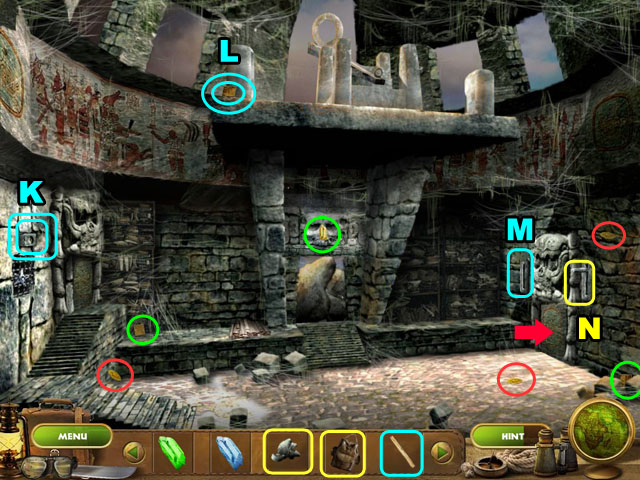
- Collect the objects circled in green.
- Collect the three Bonus Coins.
- Use the SLINGSHOT on the button to collect the CRYSTAL STAR and use it to collect the PUZZLE PIECE.
- Insert the WOODEN LEVER in the slot on the left (M).
- Use the BACKPACK on the right lever.
- Fill the BACKPACK with the HEAVY STONE to pull it down (N).
- Pull the lever on the left.
- Go through the door after it opens.

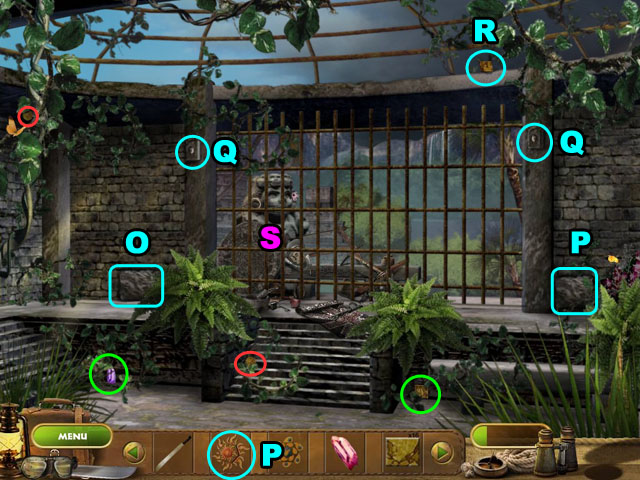
- Collect the objects circled in green.
- Collect the two Bonus Coins.
- Use the CROWBAR on the rock to the left and get a PUZZLE PIECE (O).
- Use the CROWBAR on the rock to the right.
- Hit the buttons (Q) on the left and right with the SLINGSHOT.
- Use the SLINGSHOT to get the PUZZLE PIECE at the top of the screen(R).
- Use the SUN KEY on the impression to the right (P).
- Enter the Hidden Object Scene (S).

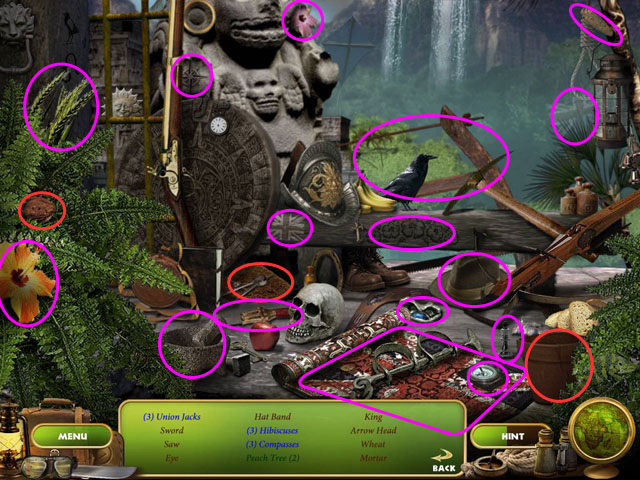
- Collect all of the objects circled in purple.
- Use the dirt and the seed on the pot to get the Peach Tree.
- You will receive the LEFT EYE.

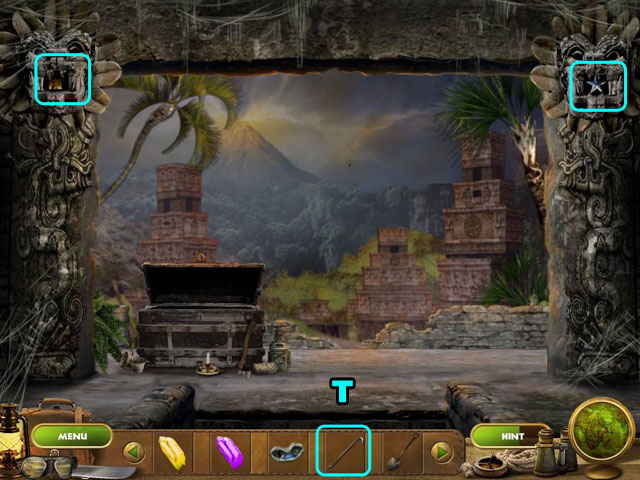
- Return to the first room and go to the left, at the top of the stairs.
- Go up the stairs to the room with the treasure chest.
- Use the crowbar on the mouths of the two statues (T).

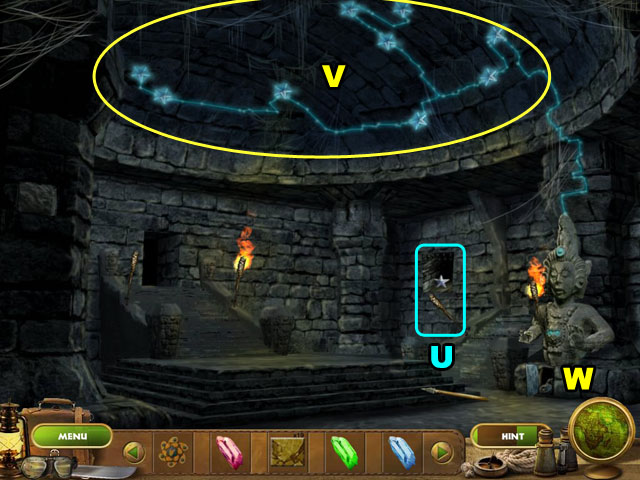
- Back out of the scene.
- Click on the lever (U) to release the last star. Take the CRYSTAL STAR.
- Add all of the CRYSTAL STARS to the ceiling (V).
- Take the RIGHT EYE from the base of the statue (W).

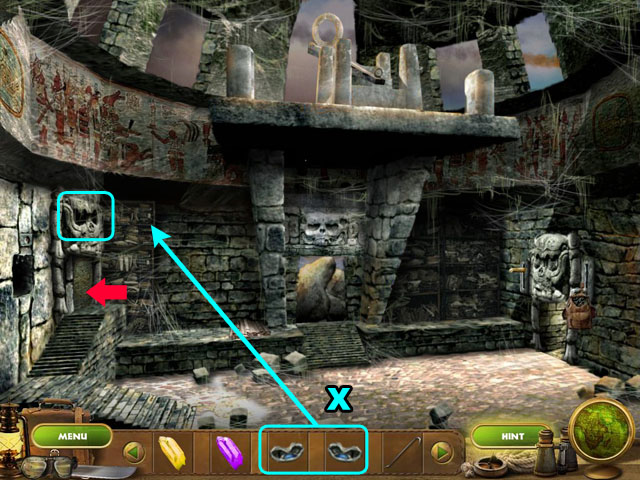
- Return to the first room and go to the right.
- Use the LEFT EYE and the RIGHT EYE on the statue (X).
- Go to the left.

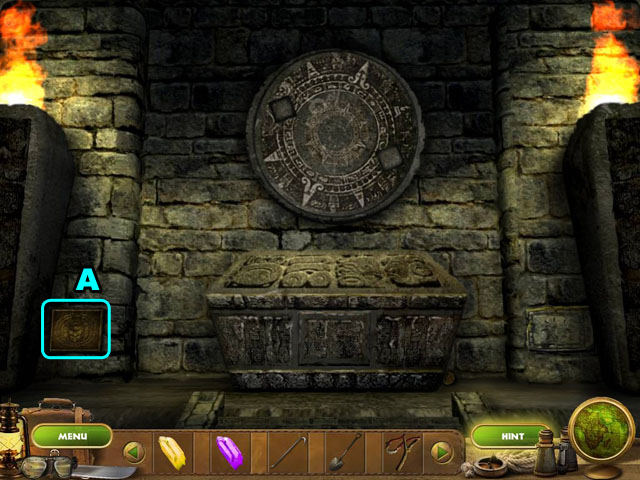
- Click on the puzzle box to the left (A).

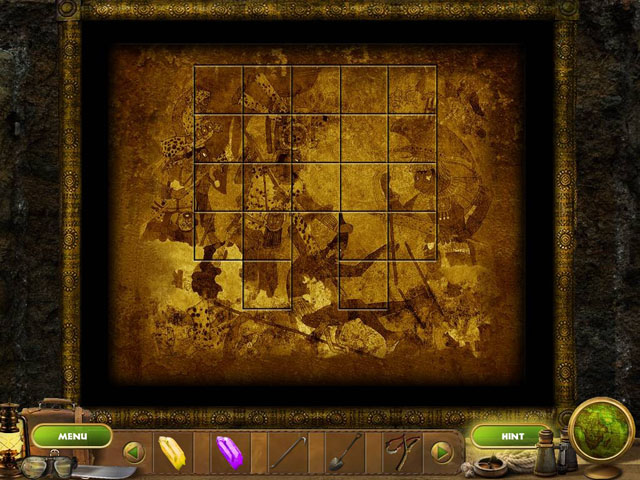
- Click and drag the pieces from the side of the puzzle to the correct places.
- The pieces do not rotate, but all of the pieces are the same size.
Use the screenshot to see the completed puzzle.

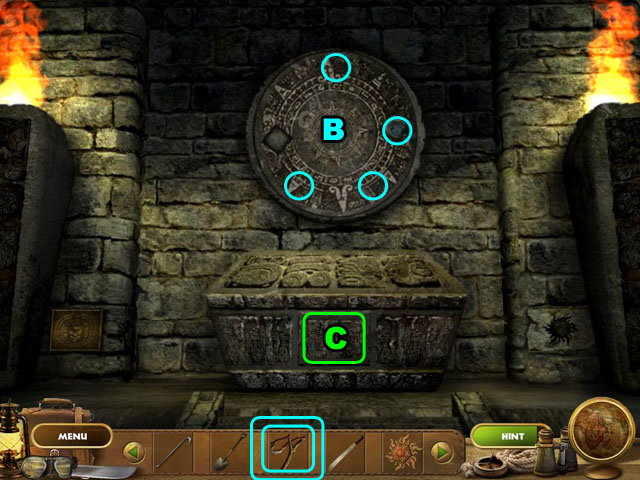
- After finishing the puzzle, use the SUN KEY on the impression to the right to start the wheel spinning.
- Shoot the SLINGSHOT at the gems behind the spinning wheel (B).
- You will have to time your shots correctly for when the gems can be seen through the holes.
- When all of the gems are dark, the wheel will stop.
- Take the MOON KEY from the bottom of the wheel (C).

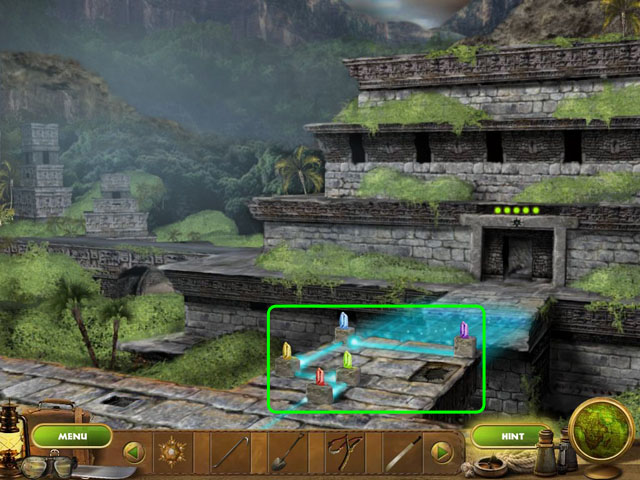
- Return to the first scene and go through the door in the back.
- Place the GEMS in the blocks at the base of the bridge and then use the MOON KEY in the depression.
- The lights on the top of the door will light up. This tells you how many of the gems are in the correct place.
- A green light means the gem is in the correct place and an orange light means it is incorrect.
- Align the gems the same way as the screenshot to finish the puzzle and extend the bridge.
- Go through the door on the other side.
Episode 4: The Devil’s Dungeon

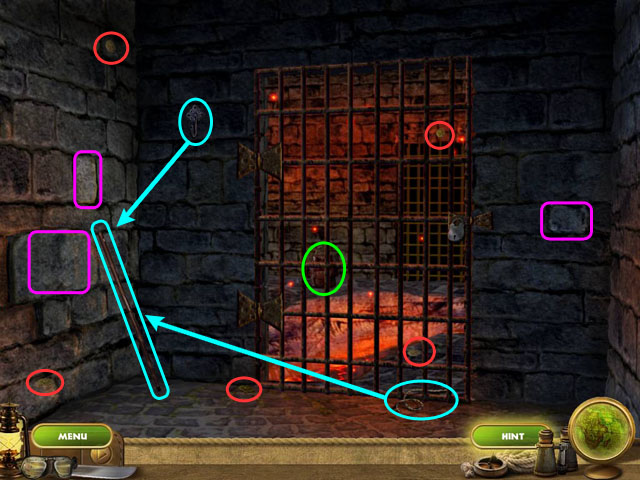
- Collect the five Bonus Coins.
- Use the rope and the hook on the stick circled in blue.
- Click the stick with hook and drag it to your backpack circled in green.
- Click your backpack to get your items.
- Use the CROWBAR on the stones circled in purple to get two PUZZLE PIECES and open the door to the next room.
- Exit to the left.

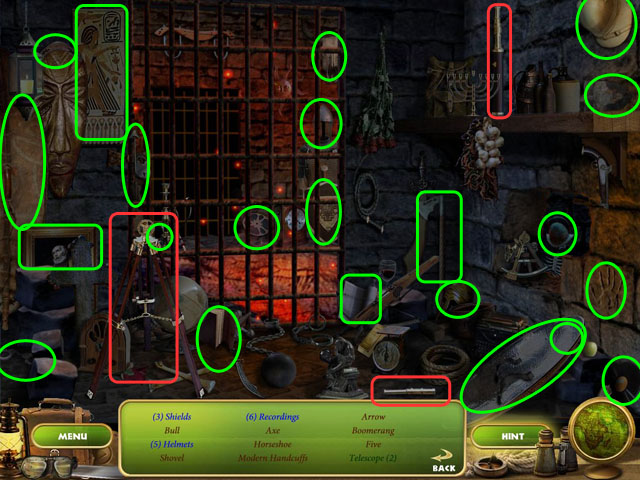
- Find the object circled in green.
- Use the objects circled in red together to make the Telescope.
- You will receive the VIKING BATTLE AX.

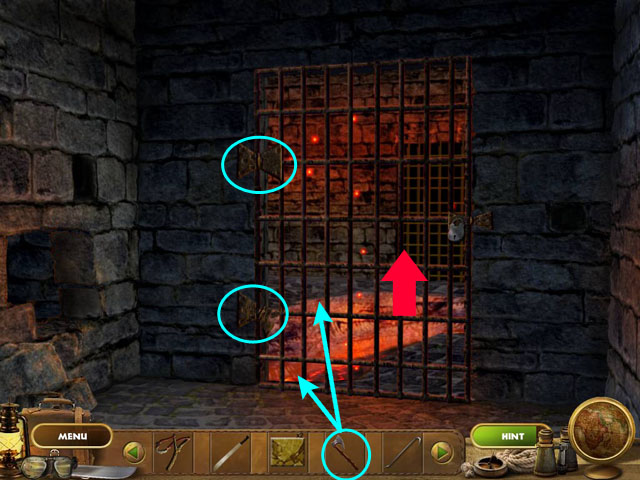
- Use the VIKING BATTLE AX on the hinges to the door.
- Exit the cell.

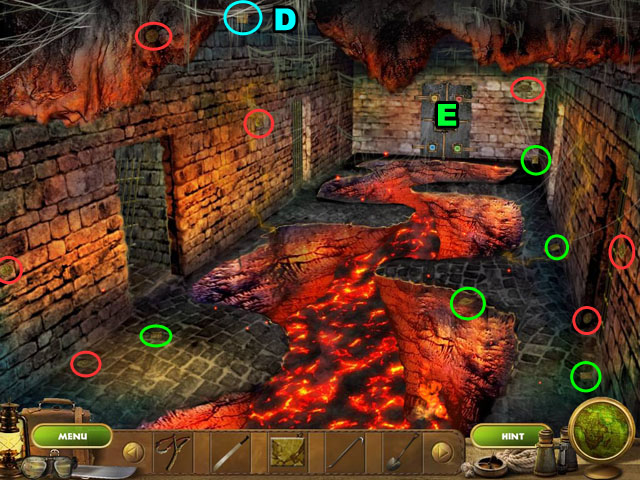
- Collect all of the items circled in green.
- Collect the seven Bonus Coins.
- Use the SLINGSHOT to get the PUZZLE PIECE (D).
- Move to the door (E).

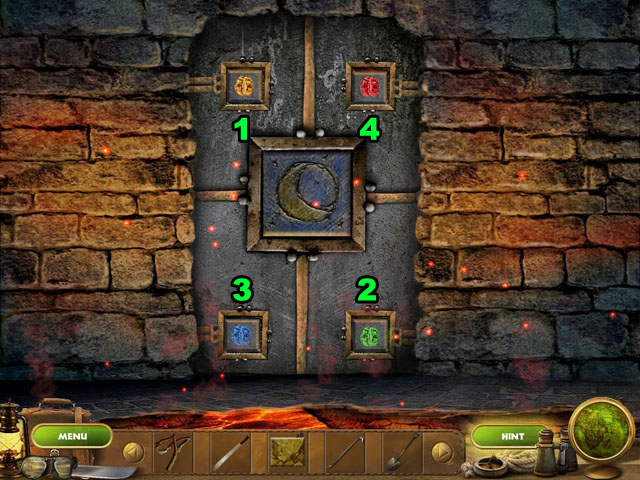
- Click the gems in the following order: YELLOW, GREEN, BLUE, and RED.
- Go through the door.

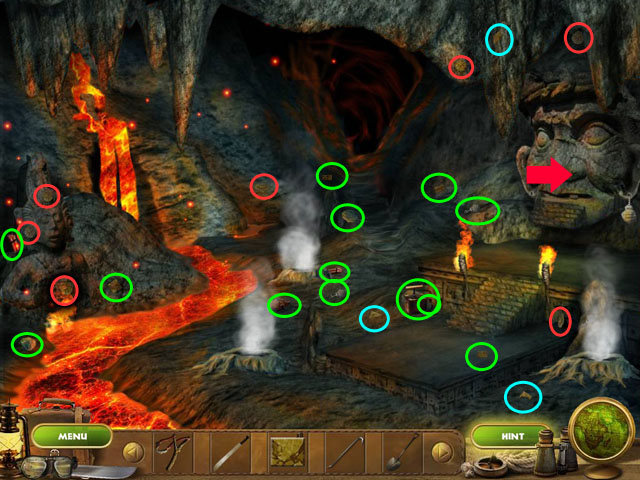
- Collect all of the items circled in green.
- Collect the seven Bonus Coins.
- Use the SLINGSHOT to get the high items in blue and the SHOVEL to get the low items.
- Click on the stone face to go the right.

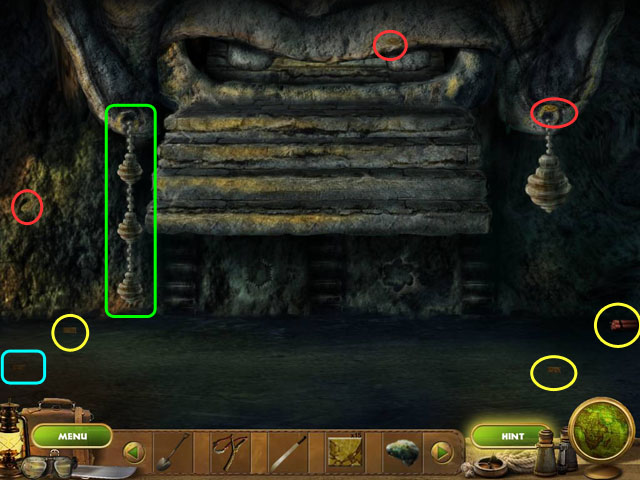
- Collect all of the objects on the ground circled in yellow.
- Collect the three Bonus Coins.
- Use the SHOVEL to collect the PUZZLE PIECE.
- Use the three EARRINGS on the left side of the stone head.
- Back out of the stone head scene and go forward.

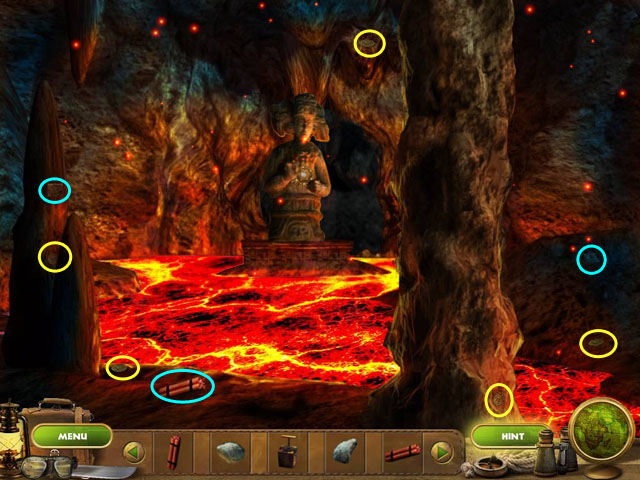
- Collect the five Bonus Coins.
- Collect the items circled in blue.
- Return to the previous scene.

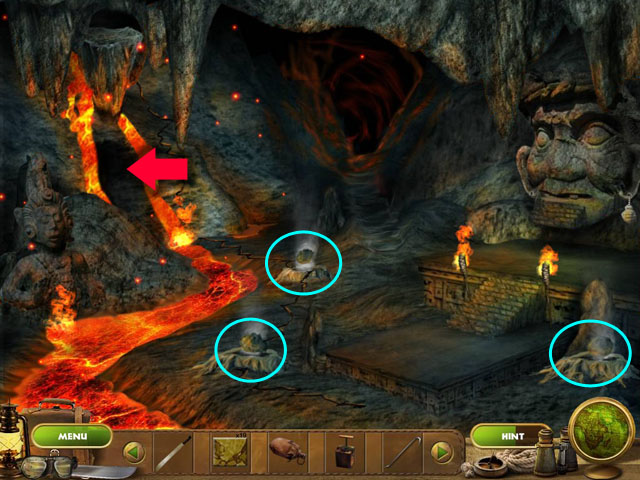
- Use the HEAVY STONES on the geysers.
- Exit the scene to the left, under the lava flow.

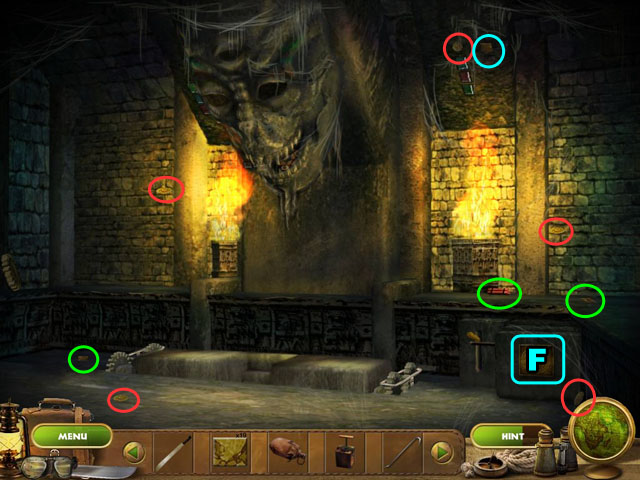
- Collect the objects circled in green.
- Collect the five Bonus Coins.
- Use the SLINGSHOT to get the PUZZLE PIECE circled in blue.
- The puzzle box is in this room (F).

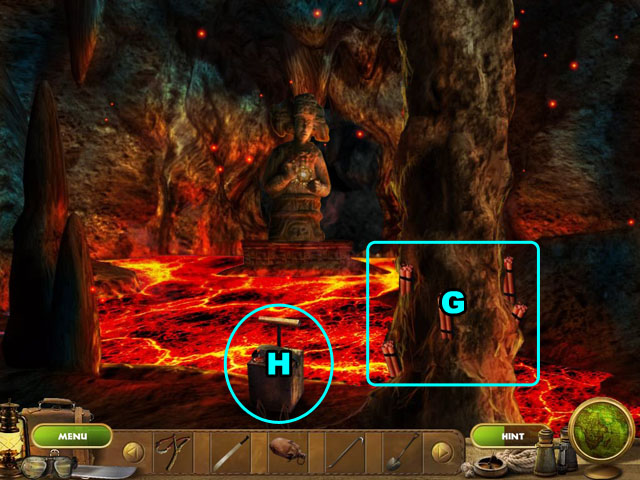
- Return to the previous room and go towards the top of the screen again.
- Use the DYNAMITE on the pillar to the right (G), and then use the EXPLOSIVE PLUNGER on the DYNAMITE.
- Go towards the statue.

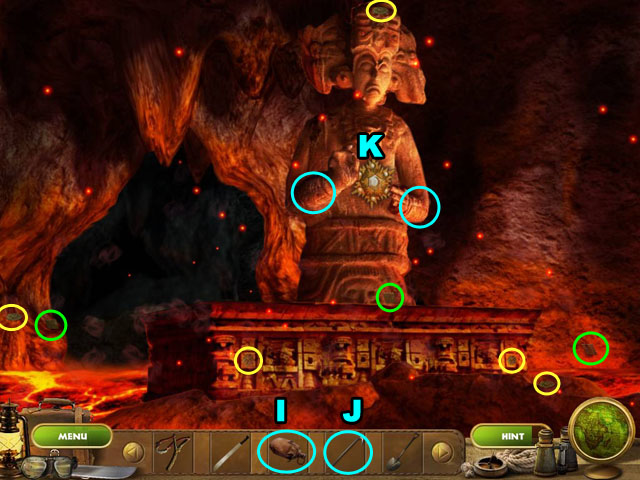
- Collect the objects circled in green.
- Collect the Bonus Coins. You will now have 80 coins and will have unlocked the bonus content.
- Use the WATER (I) on the arms of the statue (K).
- Next use the CROWBAR on the cracked arms and take the MOON KEY.

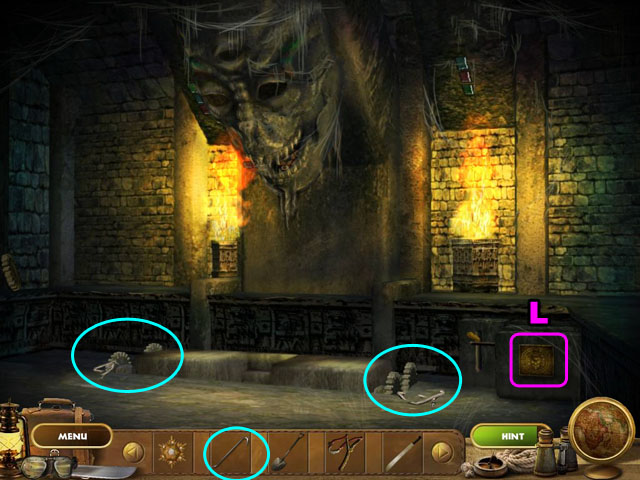
- Return to the puzzle box area under the lava waterfall.
- Use the CROWBAR on the gears.
- Solve the puzzle (L).

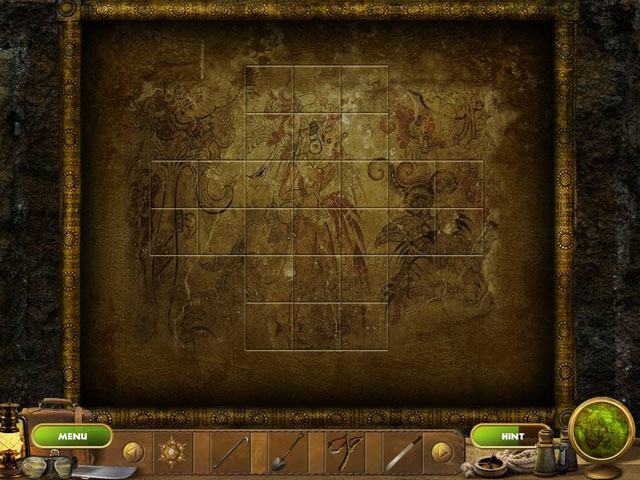
- Click and drag the pieces from the side of the puzzle to the correct places.
- The pieces do not rotate, but all of the pieces are the same size.
- Use the screenshot to see the completed puzzle.
- After finishing the puzzle, click the lever to the left of the box.
- Click on the large skull to get a close up of it.

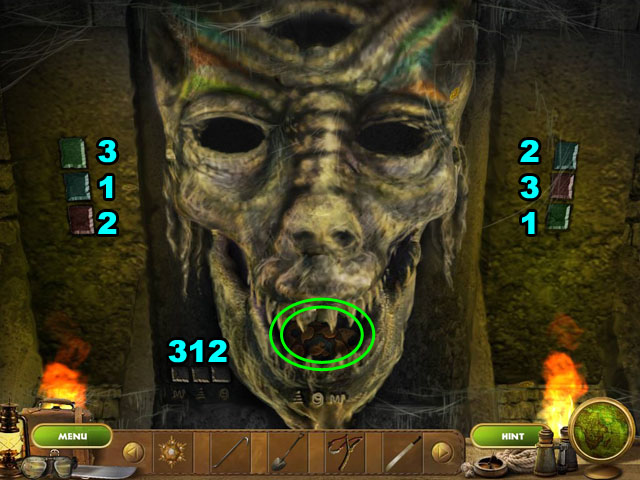
- Click the three sets of squares beside the skull in the correct order to light up its eyes.
- Each set of squares is made of three squares with different colors or symbols.
- Clicking the incorrect order will just start the puzzle over.
- Use the screenshot as a guide for what order to click the boxes. Each set is completely separate from another.
- Once all the eyes are lit you can take the WATER KEY from its mouth.

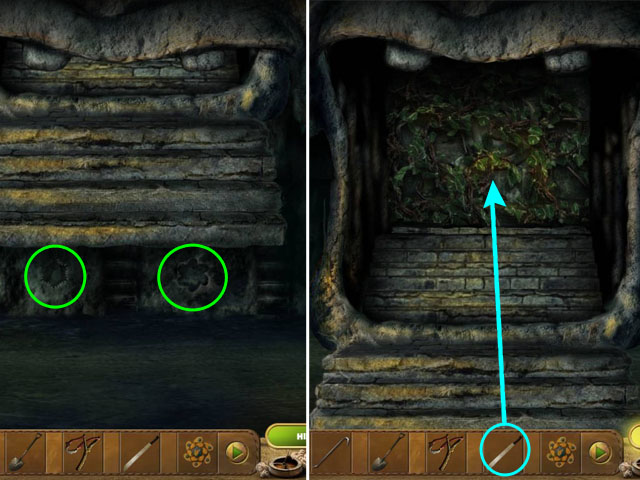
- Return to the large stone face with the earrings and add the WATER KEY and the MOON KEY to the impressions beneath it.
- Use the MACHETE to clear the vines and click the disk to open the next puzzle.

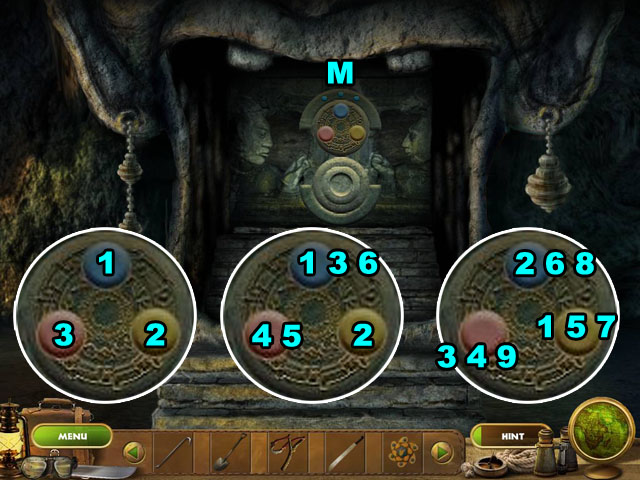
- This puzzle has you copy the pattern that plays on the colored circles.
- Watch the pattern and then click the circles to repeat it.
- There are three patterns, each one longer than the one before it.
- After you get one correct a light will light up behind the disk.
- If you get it incorrect the pattern will play again. You won’t have to start over from the beginning, just from the pattern that you are currently on.
- See the screenshot for the order of the three patterns.
- Enter the room.

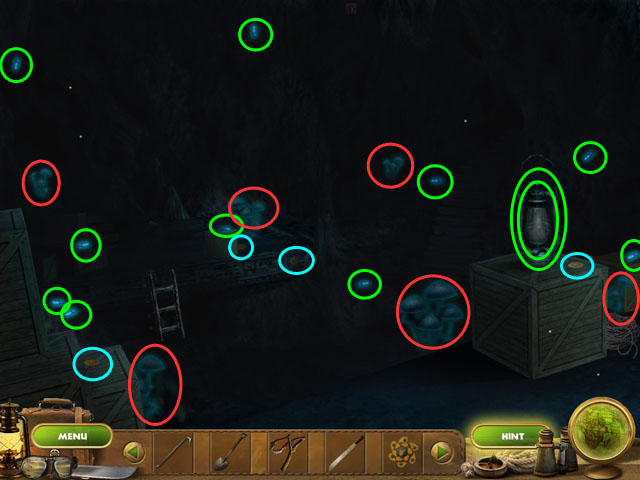
- Collect all of the BIOLUMINESCENT ANIMALS circled in green.
- Collect the 4 Bonus Coins.
- Use the BIOLUMINESCENT ANIMALS on the LANTERN and collect it.
- Use the LANTERN on all of the fungus circled in red to light the room.

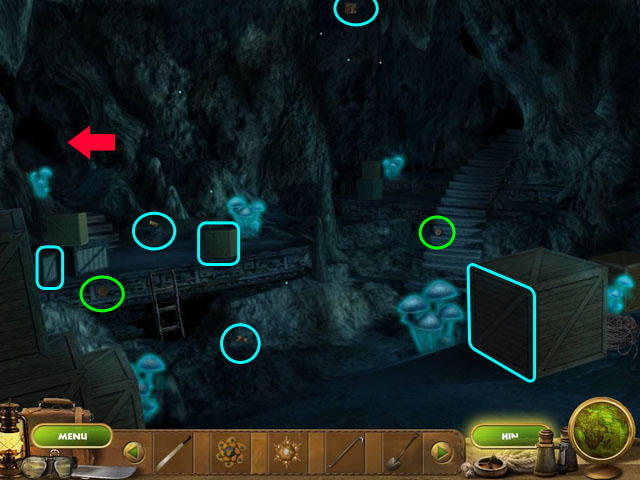
- Once the room is lit, you can find two more bonus coins.
- Collect the PUZZLE PIECE circled in blue.
- Use the SHOVEL to get the PUZZLE PIECE from the ground.
- Use the SLINGSHOT to get the PUZZLE PIECE from the ceiling.
- Open the three crates with the CROWBAR to get two more PUZZLE PIECES and a Hidden Object Scene.
- Enter the Hidden Object Scene.

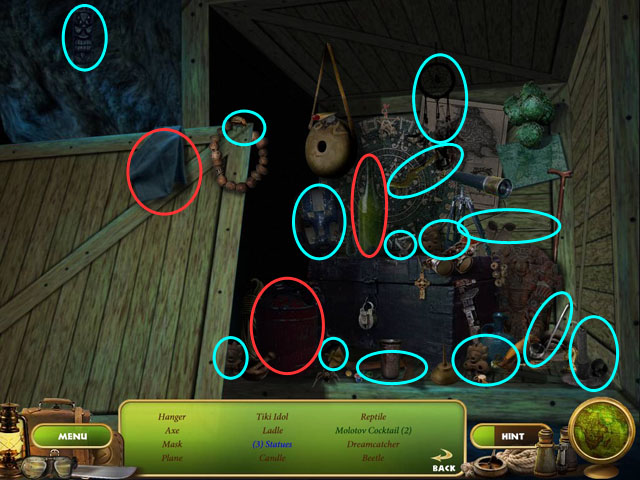
- Collect all of the items circled in blue.
- Use the oil and cloth on the bottle to get the Molotov cocktail.
- You will receive the MOLOTOV COCKTAIL.

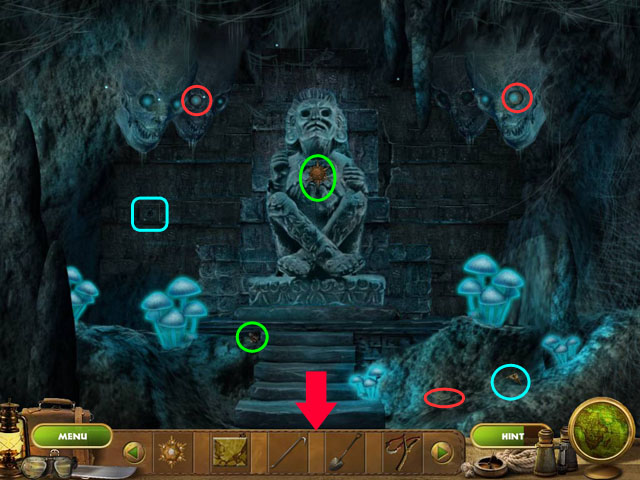
- After finishing the Hidden Object Scene go to the left.
- Collect the three Bonus Coins.
- Use the CROWBAR to get the PUZZLE PIECE on the left.
- Use the SHOVEL to get the PUZZLE PIECE on the right.
- Take the SUN KEY and the PUZZLE PIECE circled in green.
- Return to the previous scene.

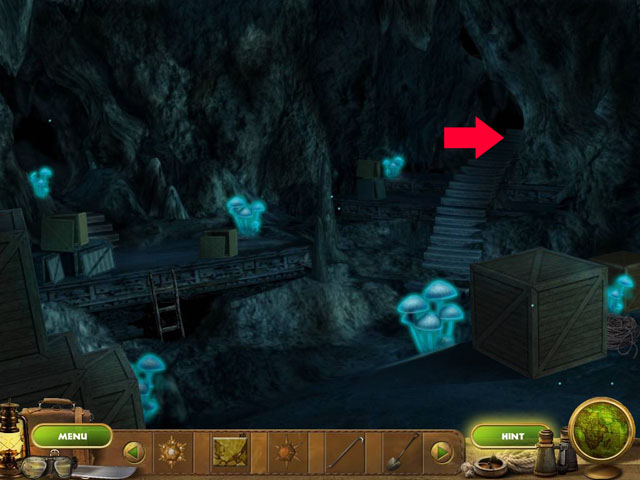
- Travel to the left of this scene.

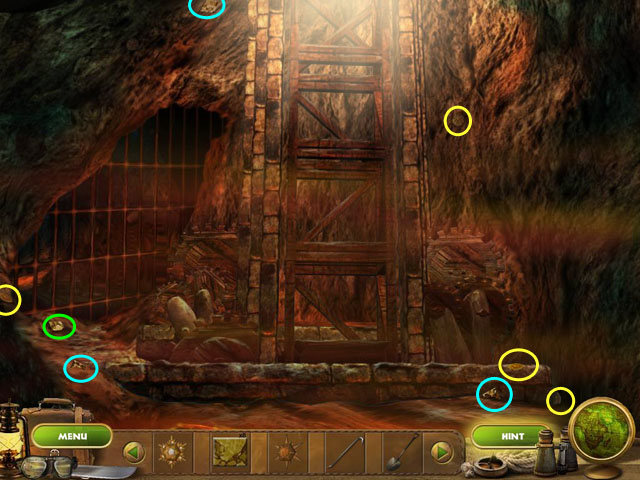
- Collect the four Bonus Coins.
- Collect the PUZZLE PIECES circled in blue with the SHOVEL.
- Collect the other PUZZLE PIECE on the ground circled in green.
- Use the SLING SHOT to get the PUZZLE PIECE on the ceiling.

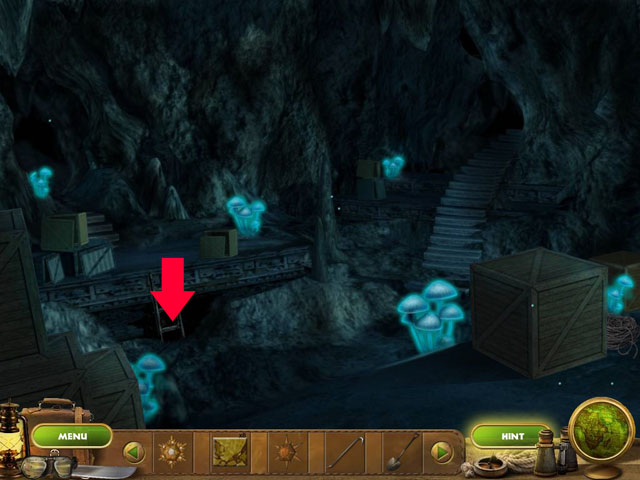
- Return to the previous scene and go down the ladder.

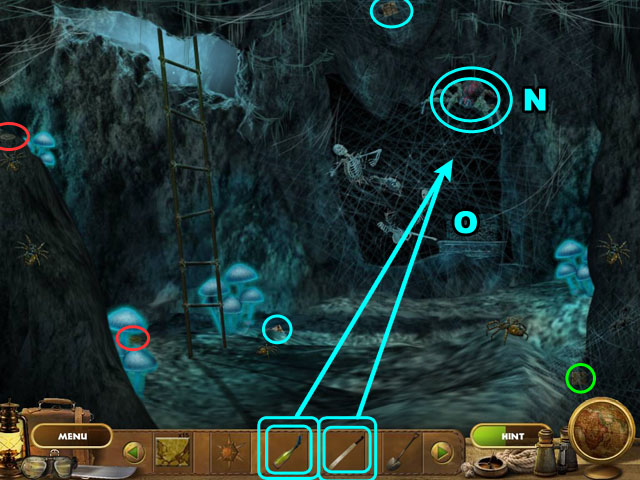
- Use the MOLOTOV COCKTAIL on the large spider (N).
- Clear away the spider webs with the MACHETE (O).
- Collect the two coins in red and the PUZZLE PIECE circled in green.
- Use the SLINGSHOT and the SHOVEL to get the other PIECES.
- Enter the Hidden Object Scene at the back of the room.

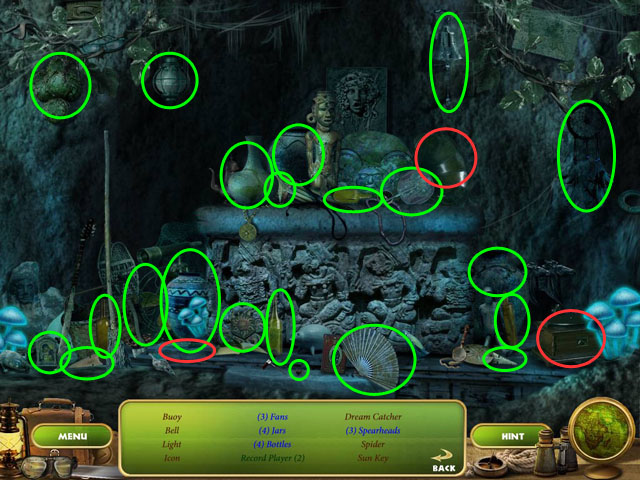
- Collect all of the objects circled in green.
- Use the record and the cone on the player to assemble the Record Player.
- After finding all of the objects you will receive the SUN KEY.

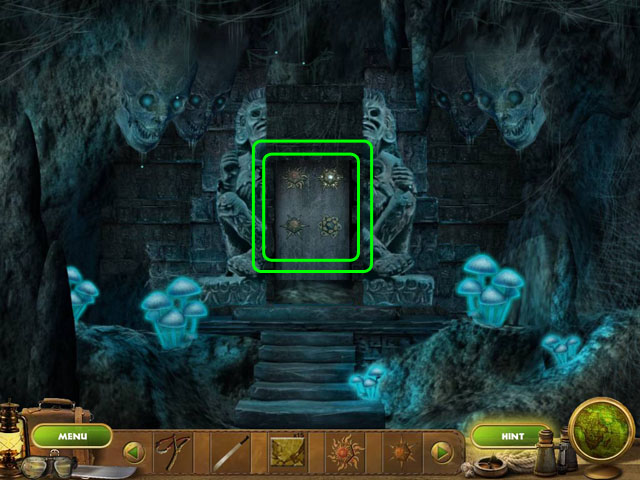
- Return to the first scene and go to the left.
- Use the four KEYS on the matching indentations in the door to open it.
- Go through the door.

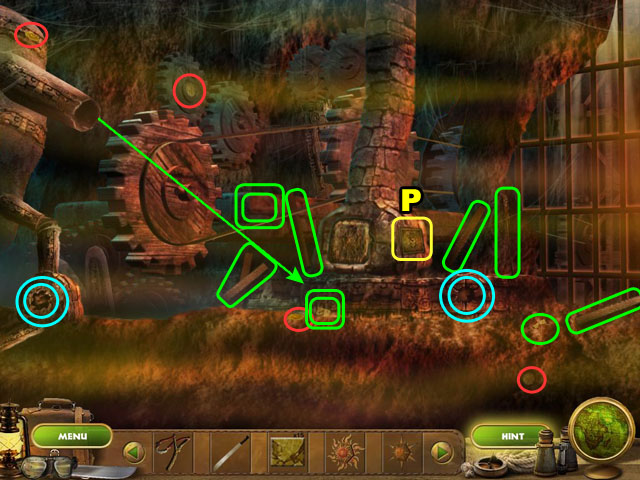
- Collect the all of the objects circled in green.
- Collect the five Bonus Coins.
- You will need to use the SHOVEL to get one of the PUZZLE PIECES.
- Use the CROWBAR to get another PUZZLE PIECE.
- Place the FIRE KEY on the indentation to the right to start a fire there.
- Place the WATER KEY on the indentation to the left and another PUZZLE PIECE will shoot out with the water.
- Click on the puzzle box (P).

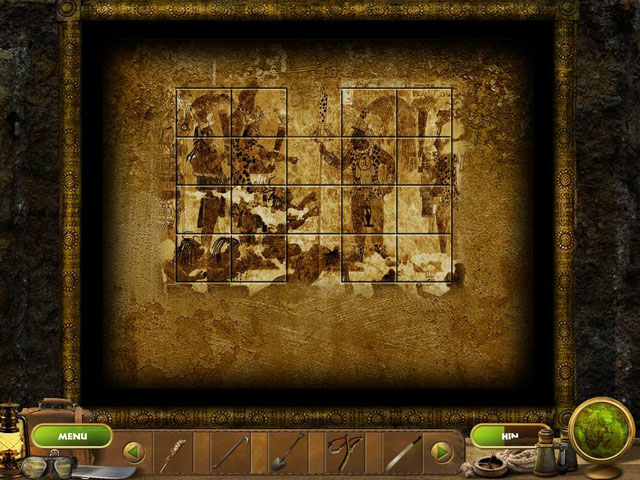
- Click and drag the pieces from the side of the puzzle to the correct places.
- The pieces do not rotate, but all of the pieces are the same size.
- Use the screenshot to see the completed puzzle.

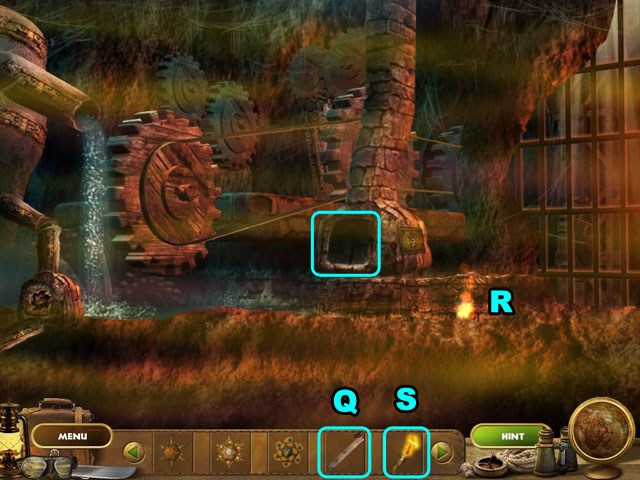
- After you finish the puzzle, the door the left will open.
- Put the BOARDS in the stove (Q).
- Use the TORCH (S) on the fire (R) to light it.
- Use the LIT TORCH on the wood in the stove.

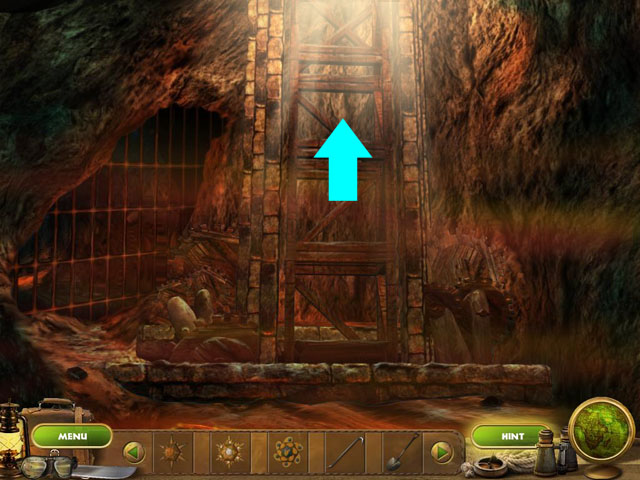
- Return to the first scene of this area and go up.
- In the next scene exit the cave by climbing the wooden structure.
Episode 5: Stairway to Heaven

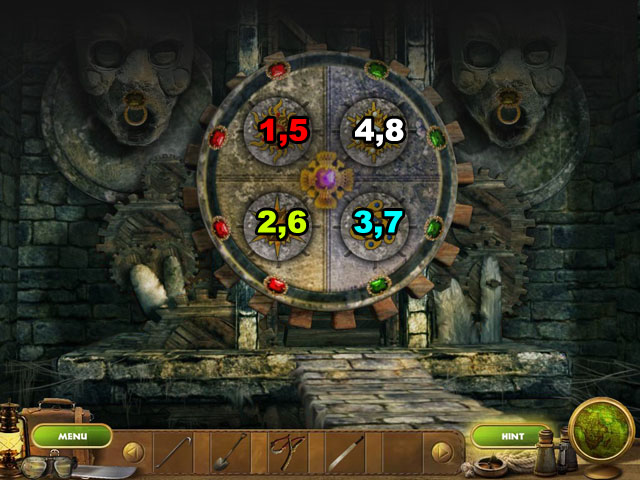
- Clicking the symbols in the middle will change the gem color.
- The gems cycle from red to yellow to green in that order.
- To solve the puzzle you need to have the right half of the wheel be all red gems and the left half all green – exactly the opposite from how it starts.
- Click on all of the symbols twice to switch the colors.

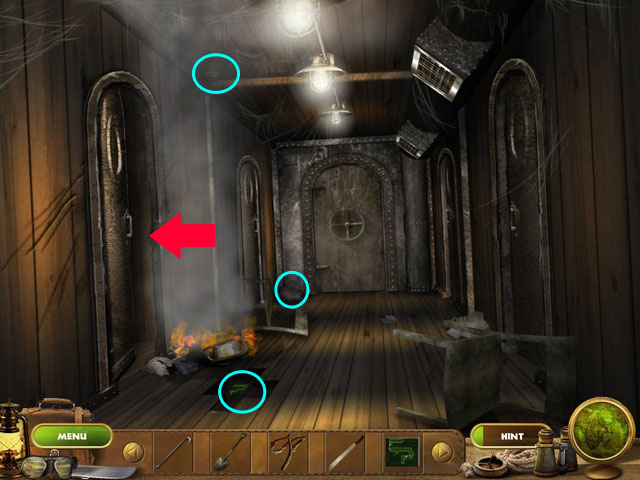
- Use the CROWBAR to pry up the boards circled in blue at the bottom of the screen.
- Collect all three CIRCUIT BOARDS.
- Exit the scene to the left.

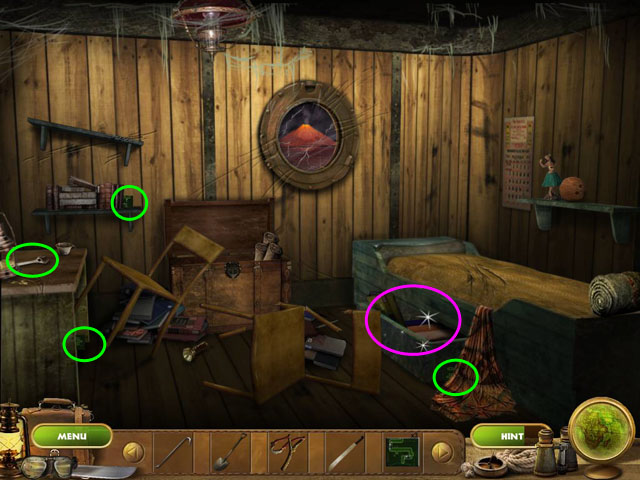
- Collect the objects circled in green.
- Investigate the Hidden Object Scene circled in purple.

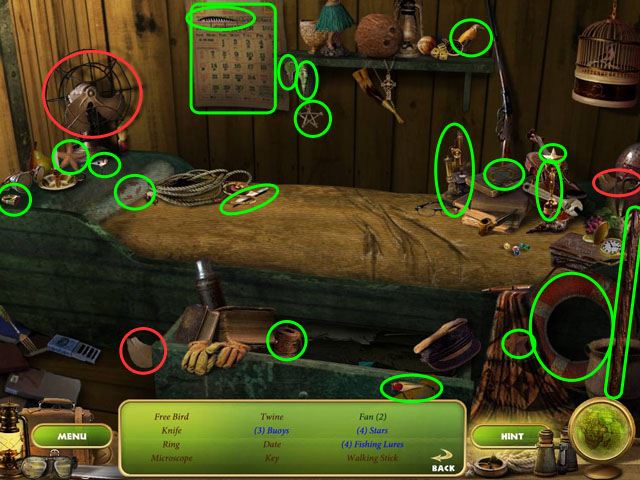
- Find all of the objects circled in green.
- Use the blades on the fan to be able to collect it.
- You will receive the MAP ROOM KEY.

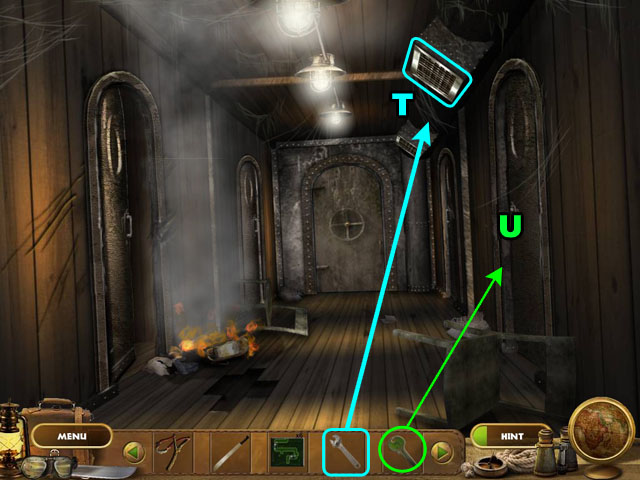
- Travel back to the hallway.
- Use the WRENCH on the grate at the top of the screen and collect the PASSWORD (T).
- Use the MAP ROOM KEY on the door to the right and go through it (U).

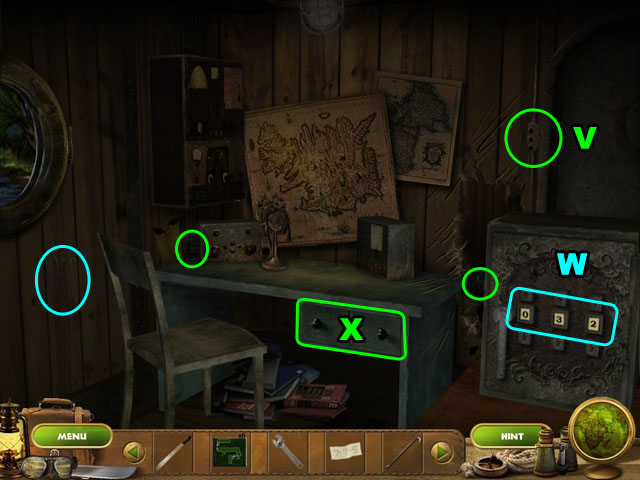
- Turn on the light switch (V).
- Use the CROWBAR to get the CIRCUIT BOARD on the left from the wall.
- Collect the CIRCUIT BOARDS in green.
- Type in the PASSWORD from your inventory on the safe: 7-7-5.
- Click the handle and then take ENGINE KEY 1 from inside the save.
- Open the drawer and enter the Hidden Object Scene inside it (X).

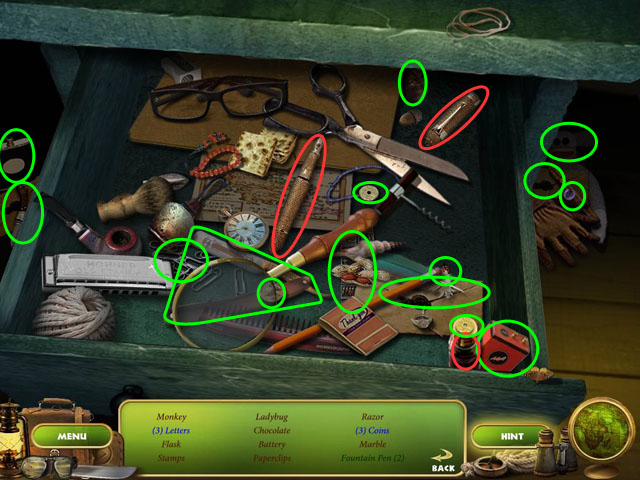
- Collect the objects circled in green.
- Use the cap and the ink to collect the pen.
- After finding all the objects, you will receive a BATTERY PACK.

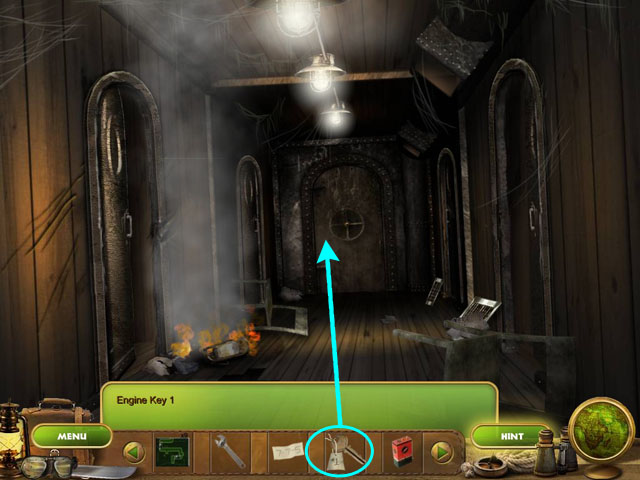
- Use the ENGINE KEY 1 on the door in the back and go through it.

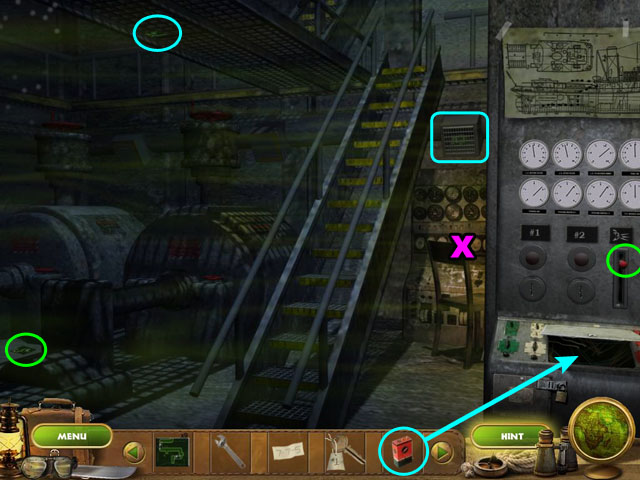
- Use the red lever on the very right of the screen to get rid of the gas in the room.
- Collect the CURCUIT BOARD highlighted in green.
- Use the WRENCH to get the CURCUIT BOARD behind the grate.
- Use the SLINGSHOT to get the CURCUIT BOARD from the catwalk above.
- Put the BATTERY PACK inside the machine on the right.
- Enter the Hidden Object Scene in the back (X).

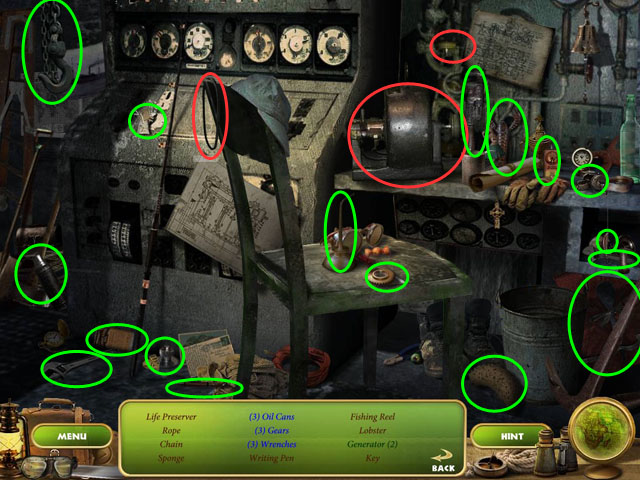
- Collect the objects circled in green.
- Use the belt and the gear on the generator to collect it.
- After finding all the objects, you will receive ENGINE KEY 2.

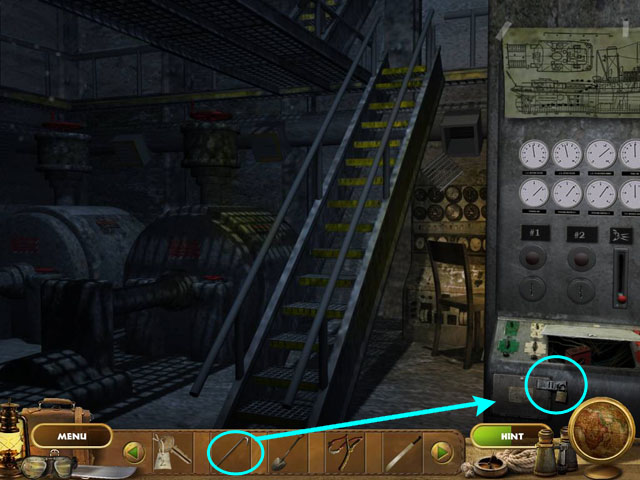
- Use the CROWBAR on the lock to open it.
- Click on the door to put together the circuit board puzzle.

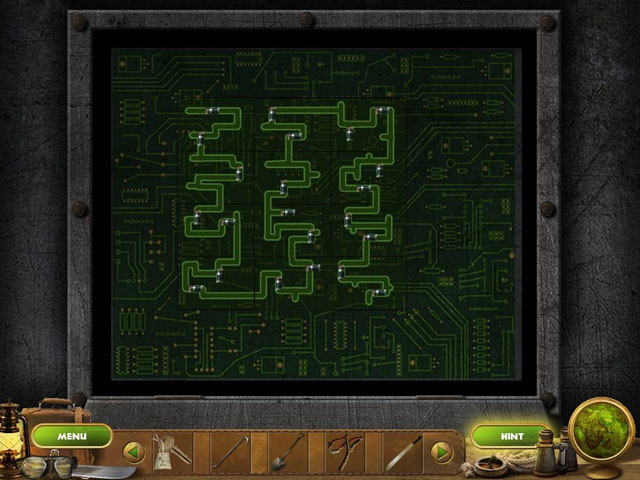
- Click and drag the pieces from the side of the puzzle to the correct places.
- The pieces do not rotate, but all of the pieces are the same size.
- All of the circuit boards connect to each other. There aren’t connections to the background boards.
- Use the screenshot to see the completed puzzle.

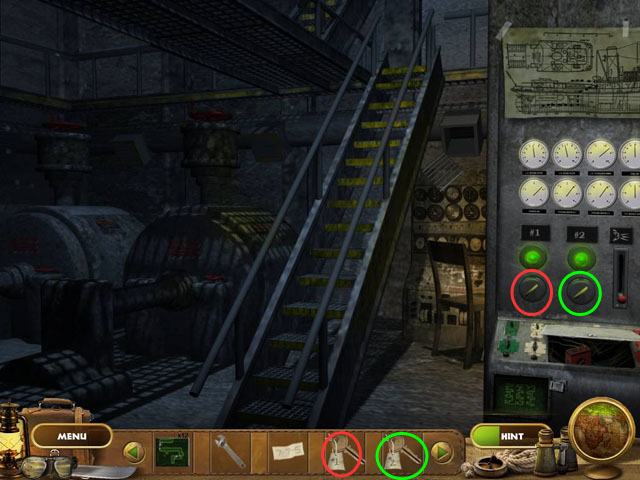
- Use the two ENGINE KEYS in the two numbered ignitions. The left key is ENGINE KEY 1 and the right one is ENGINE KEY 2.
- Turn them both to the on position.
- Congratulations! You’ve just finished Escape from Thunder Island!



 Final Cut: Fame Fatale Walkthrough, Guide, & Tips
 The Lost Cases of 221B Baker St. Walkthrough, Guide, & Tips
 Treasure Seekers: The Time Has Come Walkthrough, Guide, & Tips
 Enchantia: Wrath of the Phoenix Queen Walkthrough, Guide, & Tips
 Maestro: Notes of Life Walkthrough, Guide, & Tips