Secrets of the Dark: The Flower of Shadow Walkthrough, Guide, & Tips
Secrets of the Dark: The Flower of Shadow Walkthrough

Welcome to the Secrets of the Dark: The Flower of Shadow Walkthrough
Can you bring Maria back from a shadowy realm?
Whether you use this document as a reference when things get difficult or as a road map to get you from beginning to end, we’re pretty sure you’ll find what you’re looking for here.
This document contains a complete Secrets of the Dark: The Flower of Shadow game walkthrough featuring annotated screenshots from actual gameplay!
We hope you find this information useful as you play your way through the game. Use the walkthrough menu below to quickly jump to whatever stage of the game you need help with.
Remember to visit the Big Fish Games Forums if you find you need more help. Have fun!
This walkthrough was created by SeverineSnape, and is protected under US Copyright laws. Any unauthorized use, including re-publication in whole or in part, without permission, is strictly prohibited.
General Tips
- This is the official guide for Secrets of the Dark: The Flower of Shadow.
- This guide will not mention each time you have to zoom into a location; the screenshots will show each zoom scene.
- Hidden-object puzzles are referred to as HOPs. This guide will not show screenshots of the HOPs, but it will mention when a HOP is available and the inventory item you’ll collect from it.
- This guide will give step-by-step solutions for all puzzles that are not random. Please read the instructions in the game for each puzzle.
Chapter 1: Maria’s Magical Present

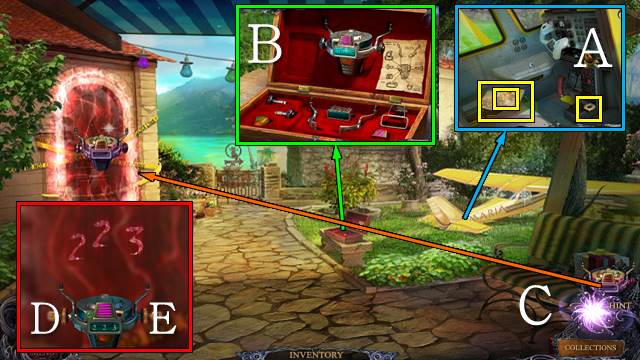
- Take the map, LOCK PART and FAUCET HANDLE PIECE (A).
- Open the box; assemble the device and take it (B).
- Use the Device (C) for a mini-game.
- Use the knobs to set the numbers on the device.
- Solution: (E-Dx2), (Ex2-D), (Ex2-Dx2).

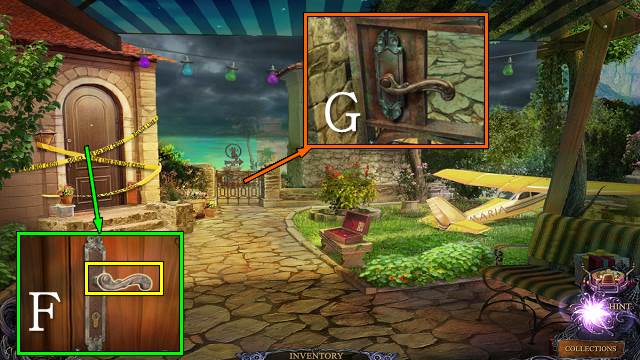
- Remove the tape.
- Take the HANDLE (F).
- Place the LOCK PART and HANDLE; open the gate (G).
- Go forward.

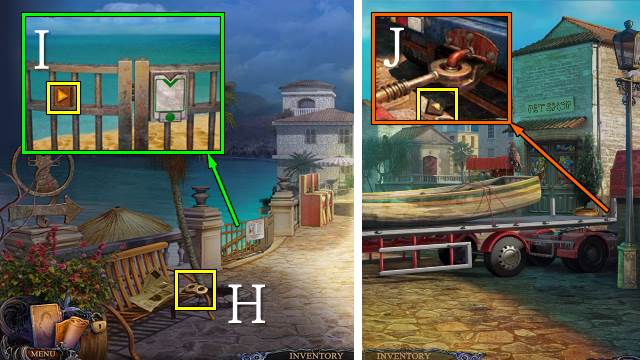
- Take the FAUCET HANDLE PIECE (H).
- Take the poster and WOODEN BUTTON (I).
- Walk forward.
- Take the WOODEN BUTTON (J).
- Walk down.

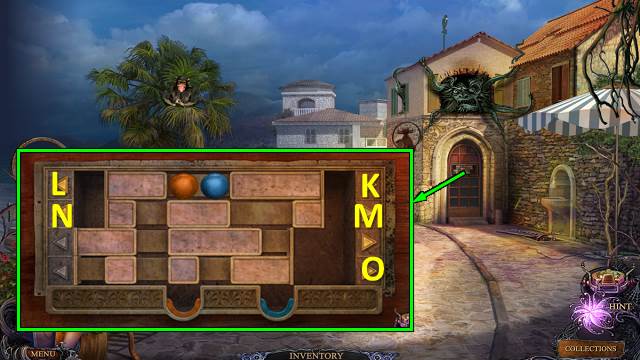
- Place the WOODEN BUTTONS for a mini-game.
- Move the sliders with the arrows to make the balls drop down into the buckets of the same color.
- Solution: K-Lx2-M-N-Ox2.
- Go into the café.

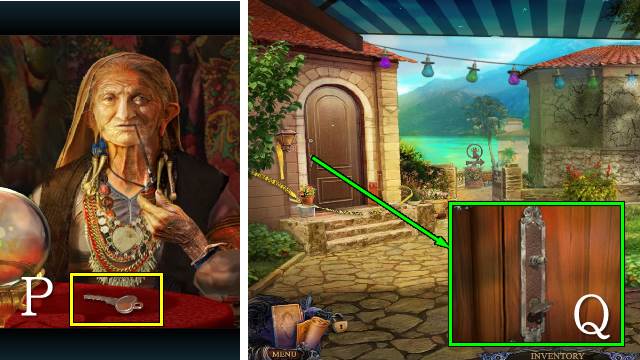
- Take the HOUSE KEY (P).
- Walk down twice.
- Open the door with the HOUSE KEY (Q).
- Go left.

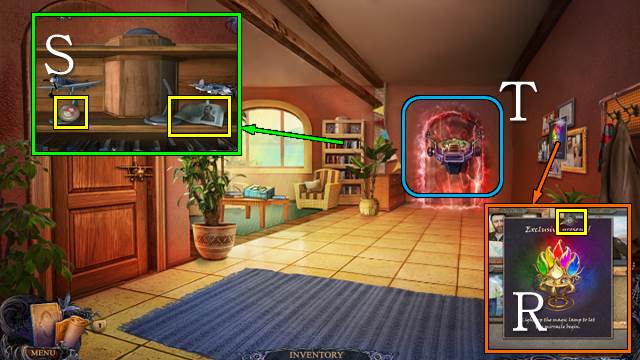
- Take the PIN and note (R).
- Take the BANKNOTE and MAGNET (S).
- Use the Device (T).
- Walk down.

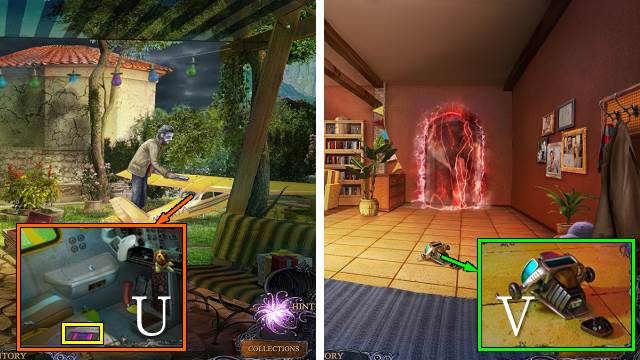
- Open the compartment with the PIN; take the BATTERY (U).
- Go left.
- Remove the battery and place your BATTERY; take the Device (V).
- Use the Device on the glowing door.
- Go forward.

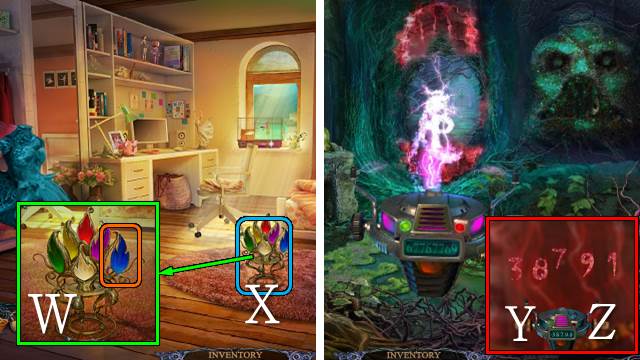
- Move the blue flame (W).
- Touch the Magic Lamp (X).
- Use the Device for a mini-game.
- Solution: (Z-Yx2), (Zx2), (Zx3), (Zx2-Y),(Zx2).

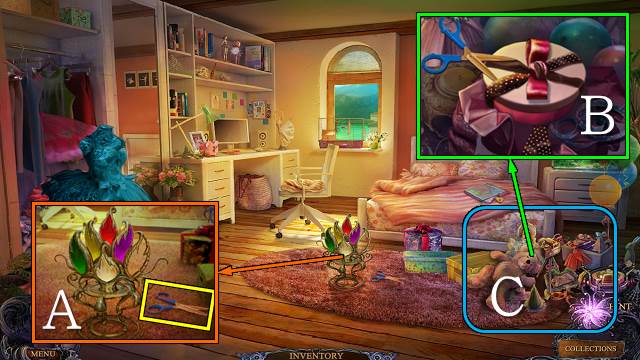
- Take the SCISSORS (A).
- Use the SCISSORS (B).
- Play the HOP to get the TOE SHOES (C).

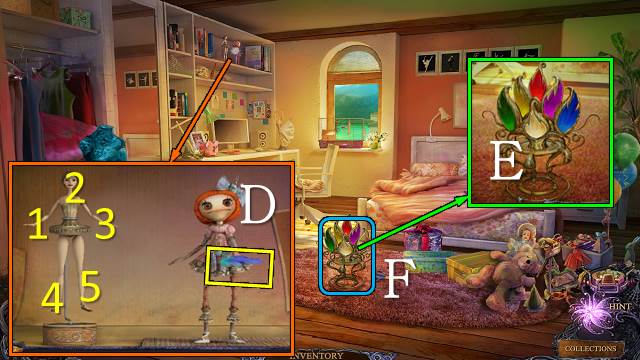
- Place the TOE SHOES for a mini-game (D).
- Repeat the ballerina’s movements with the rag doll.
- Solution: (1-3-4) (1-2-3-4-5) (1-4-3-2-5-1-4).
- Take the BALLERINA and LAMP PART.
- Place the LAMP PART (E).
- Touch the Magic Lamp (F).
- Walk forward.

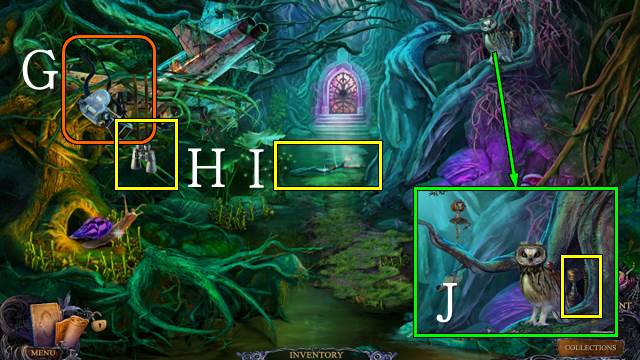
- Touch the plane; inspect the camera (G).
- Take the BINOCULARS (H).
- Take the BURNING BRANCH (I).
- Distract the owl with the BALLERINA; take the JACK (J).

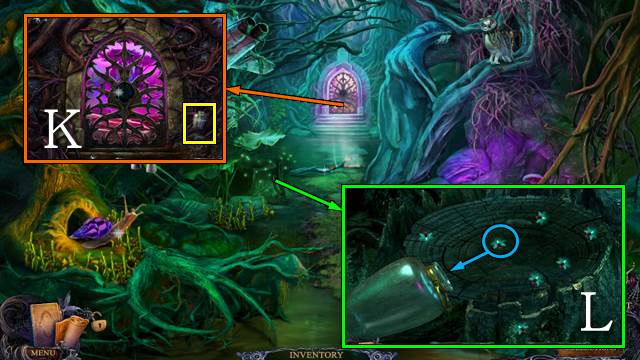
- Take the JAR (K).
- Place the JAR for a mini-game (L).
- Guide the fireflies into the jar with your cursor.
- Take the JAR WITH LIGHTENING BUGS.
- Walk down.

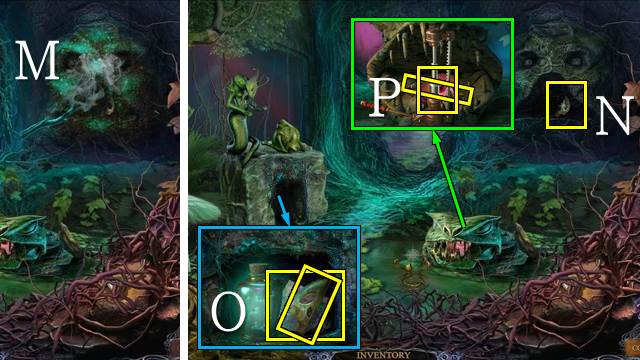
- Use the BURNING BRANCH on the bugs (M).
- Take the SKULL PART (N).
- Place the JAR WITH LIGHTENING BUGS; take the SKULL PART and BAS-RELIEF FRAGMENT (O).
- Open the jaws with the JACK; take MARIA’S PET and the CAGE KEY (P).
- Walk forward.

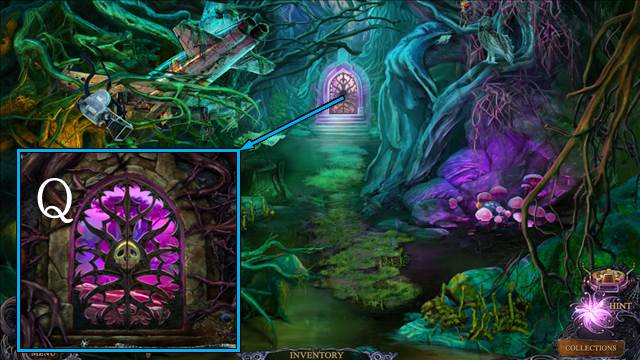
- Place the SKULL PARTS (Q).
- Walk forward.

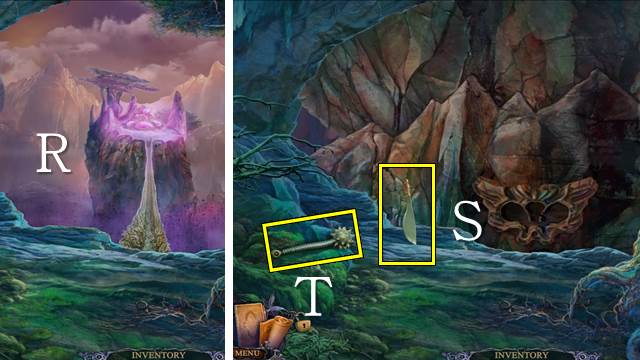
- Use the BINOCULARS (R).
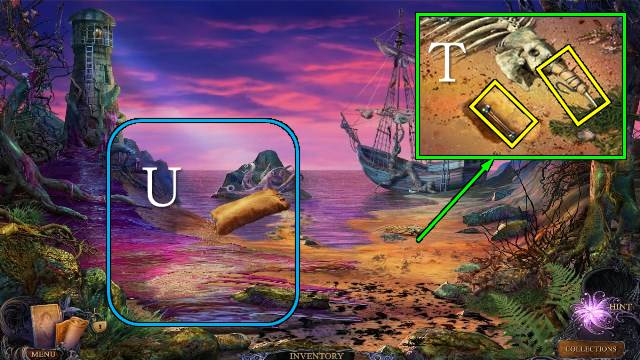
- Take the MACHETE (S) and MACE (T).
- Walk down twice.

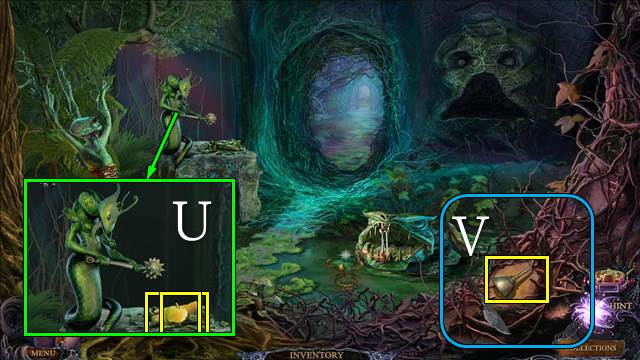
- Place the MACE; take the GOLDEN APPLE and GLOVE (U).
- Use the MACHETE; take the OIL CAN (V).

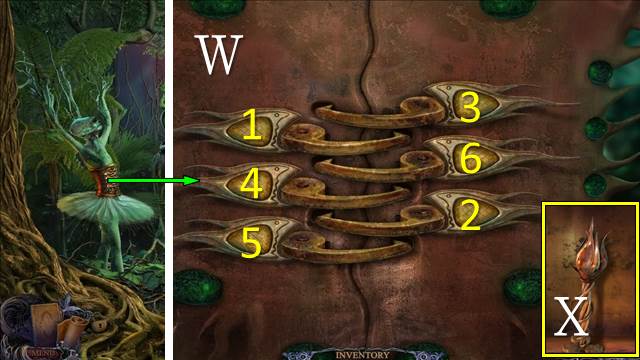
- Use the OIL CAN for a mini-game (W).
- Push the buttons in the correct order to unlock all hooks.
- Take the CAGE KEY (X).
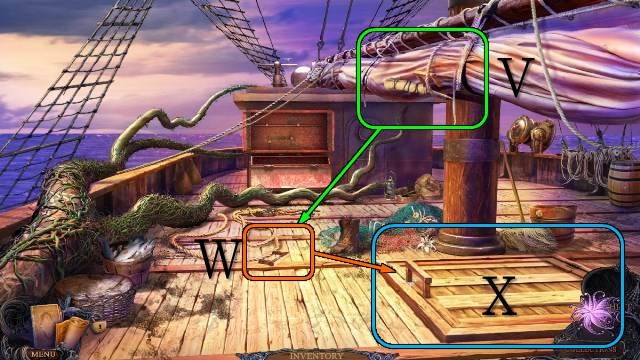
- Walk forward.

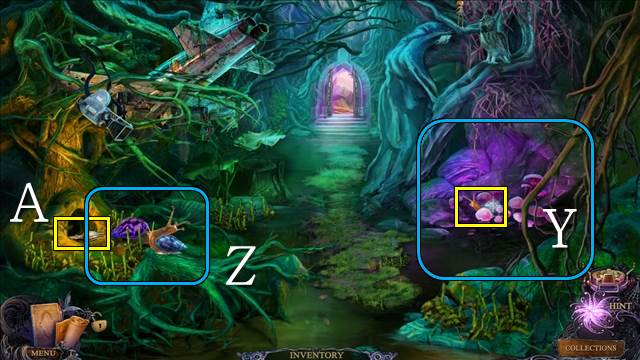
- Move the mushrooms with the GLOVE; take the SMALL SNAIL (Y).
- Place the SMALL SNAIL (Z).
- Take the CAGE KEY (A).
- Walk forward.

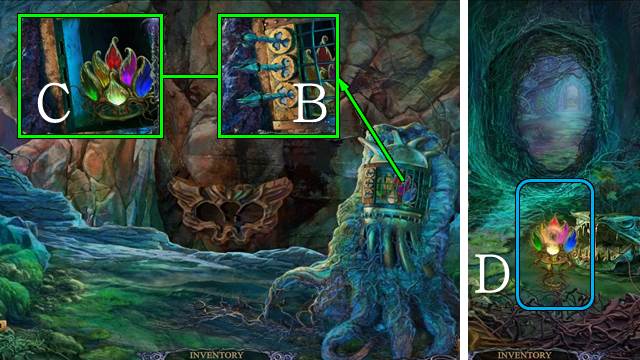
- Place the three CAGE KEYS (B); take the LAMP PART (C).
- Walk down twice.
- Place the LAMP PART; touch the Magic Lamp (D).
Chapter 2: The Fortune Teller

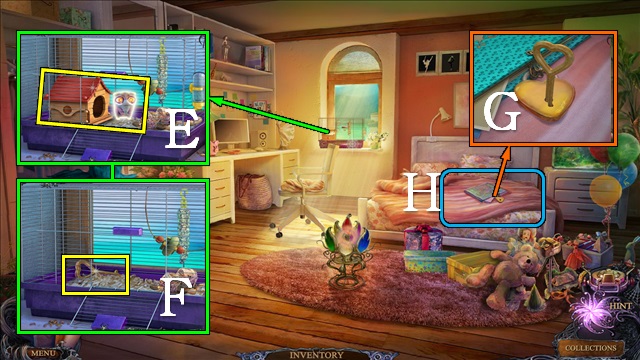
- Open the cage with the GOLDEN APPLE and place MARIA’S PET; take MARIA’S PET (E) and the PHOTO ALBUM KEY (F).
- Use the PHOTO ALBUM KEY (G).
- Play the reverse-HOP to get the PHOTO (H).
- Walk down.

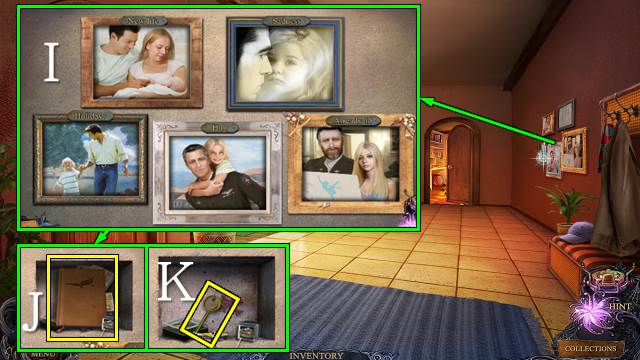
- Place the PHOTO for a mini-game (I).
- Put the photos in the correct frames.
- Take the album (J) and SMALL KEY (K).
- Walk down.

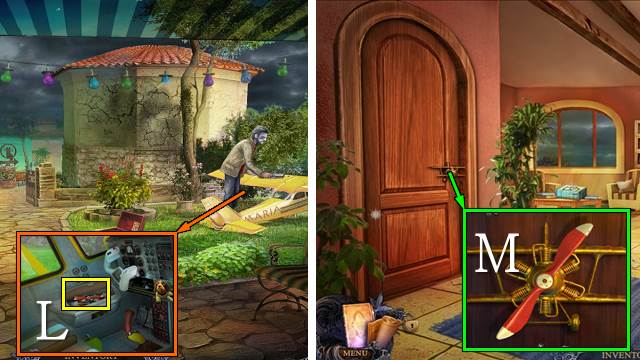
- Open the compartment with the SMALL KEY; take the PROPELLER (L).
- Go left.
- Place the PROPELLER (M).
- Go left.

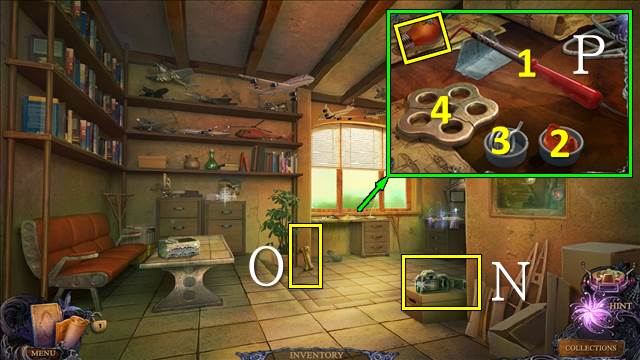
- Open the camera; take the FILM (N).
- Take the PLASTIC BONE (O).
- Put the FAUCET HANDLE PIECES down, dip the iron (1) in the wax (2), then the led (3), then use it on the valve (4); repeat twice and take the FAUCET HANDLE and BULB (P).

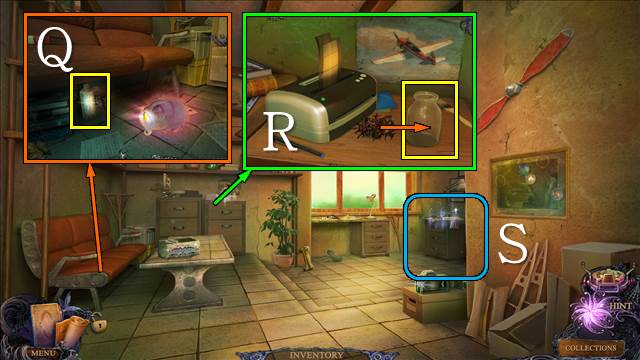
- Use MARIA’S PET; take the ACETONE (Q).
- Shred the paper, shred the FILM, put the film and ACETONE in the jar, take the GLUE (R).
- Play the HOP, GLUE the plane and take the PLANE (S).
- Walk down.

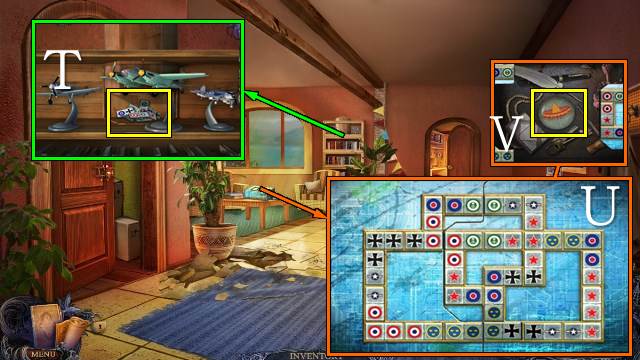
- Place the PLANE; take the DOMINOES (T).
- Place the DOMINOES for a mini-game (U).
- Place the dominoes so each end is next to an end with a matching image.
- Take the MAGNET (V).
- Go left.

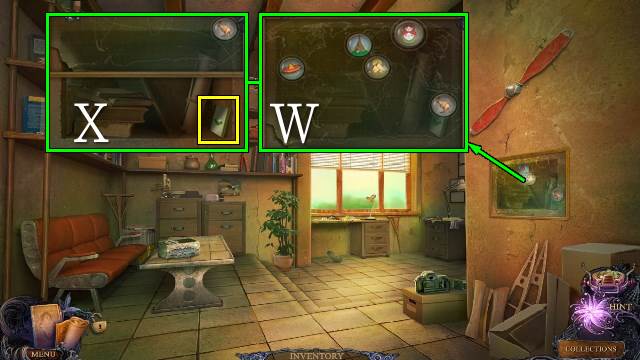
- Place the MAGNETS (W).
- Take the ACCESS CARD (X).
- Walk down twice.

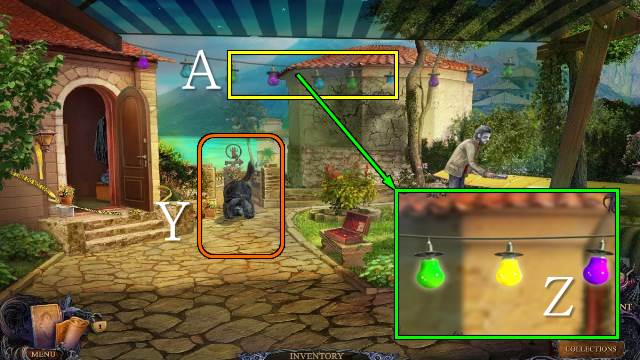
- Try to go forward.
- Throw the PLASTIC BONE (Y).
- Remove the old bulb and place the BULB (Z); take the STRING LIGHTS (A).
- Walk forward.

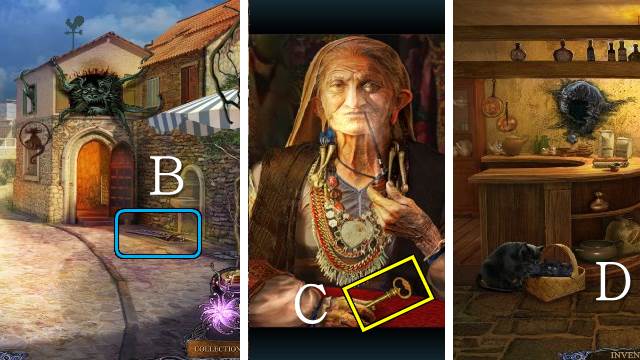
- Use MARIA’S PET; play the HOP to receive the KITTENS (B).
- Go into the café.
- Take the KEY (C).
- Put the KITTENS in the basket (D).
- Go right.

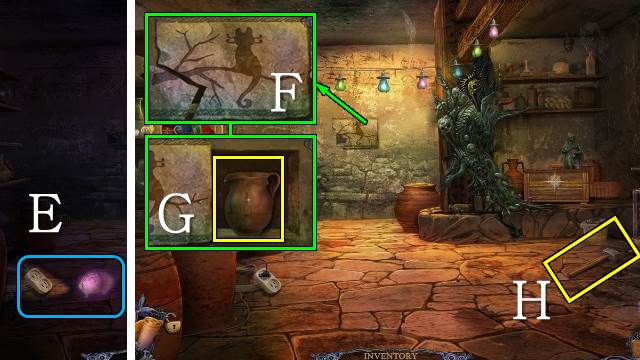
- Put down MARIA’S PET; plug in the STRING LIGHTS (E).
- Place the BAS-RELIEF FRAGMENT (F); take the CLAY JUG (G).
- Take the HAMMER (H).
- Walk down twice.

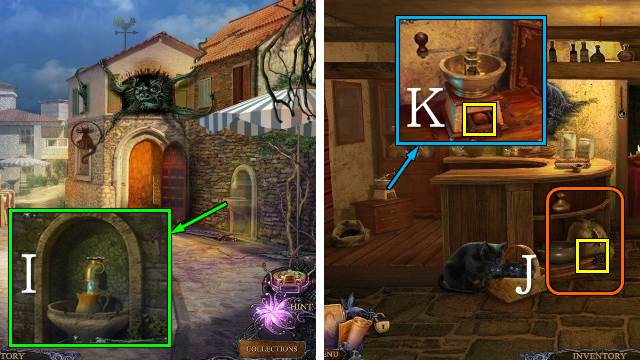
- Place the FAUCET HANDLE and CLAY JUG; turn the handle and take the WATER (I).
- Go into the café.
- Use the SCISSORS; take the COFFEE BEANS (J).
- Put the COFFEE BEANS in the grinder, grind, open the drawer and take the GROUND COFFEE (K).

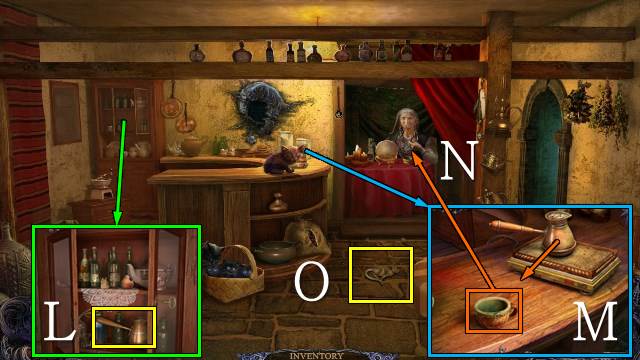
- Use the KEY; take the COFFEE POT (L).
- Place the COFFEE POT and put the GROUND COFFEE and WATER in it; place the pot on the heater, pour the coffee into the cup and take the CUP OF COFFEE (M).
- Give the CUP OF COFFEE to Stephania (N).
- Take the METAL CAT (O).
- Go right.

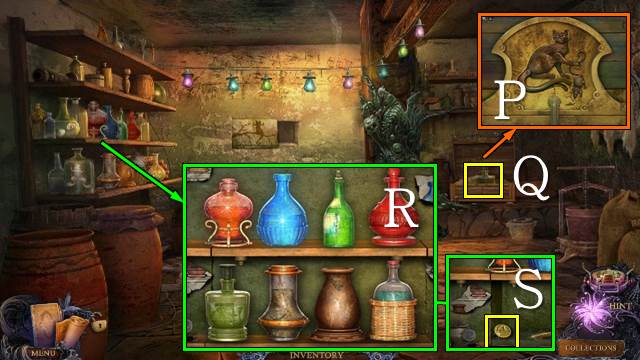
- Place the METAL CAT (P).
- Take the POTION (Q).
- Place the POTION for a mini-game (R).
- Put the bottles in the correct order.
- Take the GOLDEN COIN (S).
- Walk down twice.

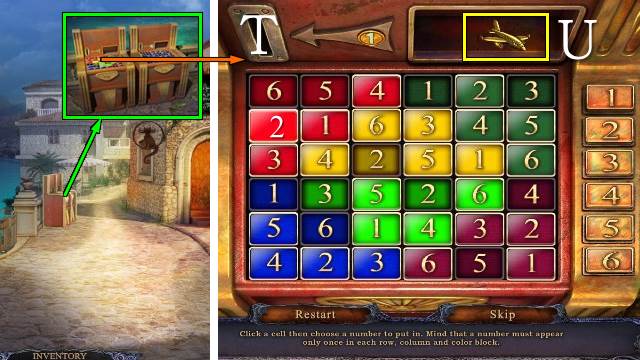
- Put the GOLDEN COIN in the slot for a mini-game (T).
- Each row, column or color block may only contain one of each number.
- Select a tile and then a number to place a number.
- Take the PLANE (U).


- Open the gate with the ACCESS CARD (V).
- Go left.
- Open the freezer; take the ICE CREAM (W).
- Put the rungs on the ladder; use the HAMMER and take the LADDER (X).
- Walk down.

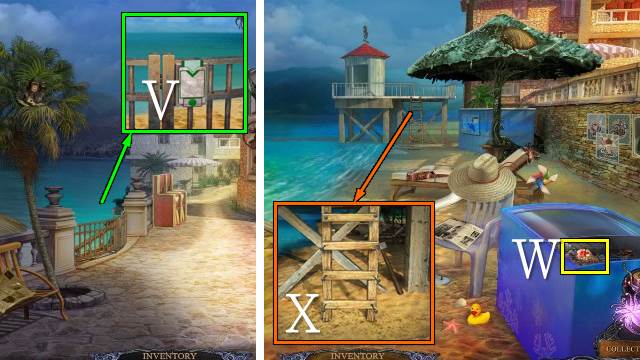
- Place the LADDER (Y).
- Give the ICE CREAM to the monkey; take the PLANE (Z).
- Go to the Workroom.

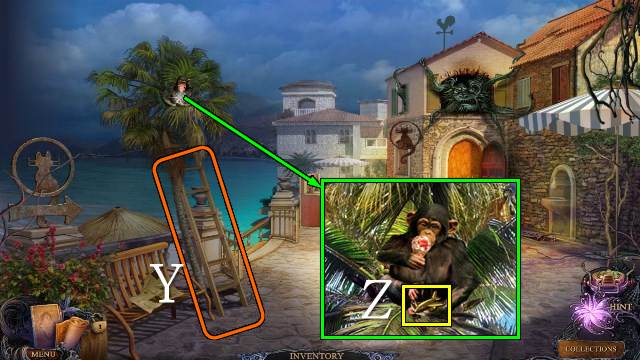
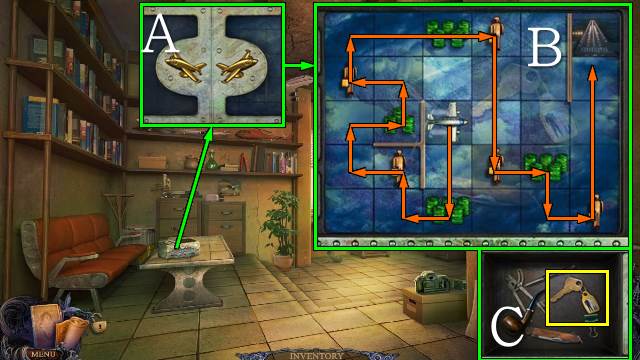
- Place the PLANES for a mini-game (A).
- Pick up all passengers and bring them to the landing strip; pick up fuel so the plane doesn’t run out (B).
- Take the KEY (C).
- Go to the Beach.

- Use the KEY (D); take the SCUBA GEAR (E).
- Use the SCUBA GEAR; take the WRENCH (F).
- Walk down and forward.
Chapter 3: Finding Davor

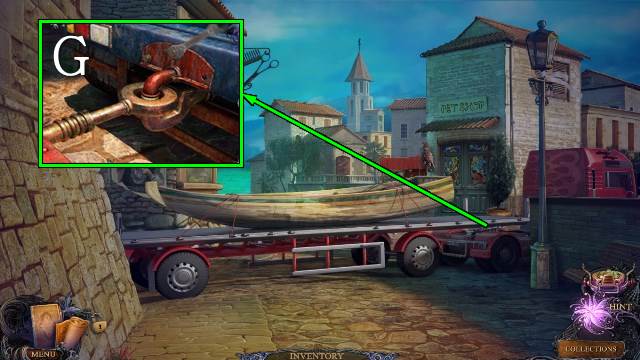

- Remove the bolts with the WRENCH (G).
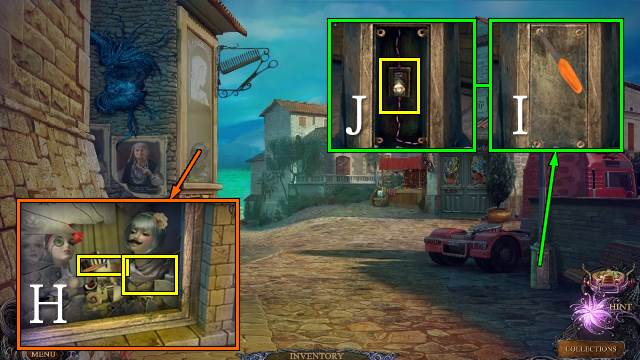
- Break the window with the HAMMER; take the NAIL FILE and RAG (H).
- Use the NAIL FILE (I); take FUSE 1/3 (J).
- Walk forward.

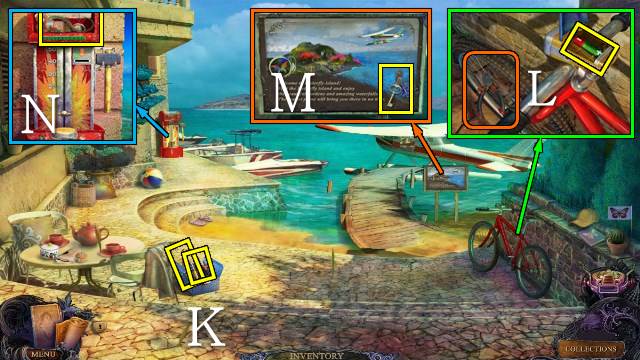
- Open the toolbox; take the PRUNER and PLIERS (K).
- Use the PLIERS, take the SPOKE, use the SPOKE on the lock and take the BATTERY (L).
- Take the CUPBOARD KEY (M).
- Put the BANKNOTE in the slot; use the hammer and take the TAIL (N).
- Walk down.

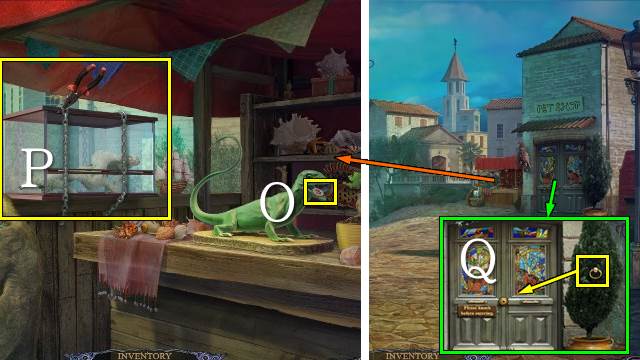
- Put the TAIL on the lizard; take the CASH REGISTER KEY (O).
- Cut the chains with the PLIERS; take the FISH TANK (P).
- Prune the tree with the PRUNER; take the RING and put it in the hole (Q).
- Go right and forward.

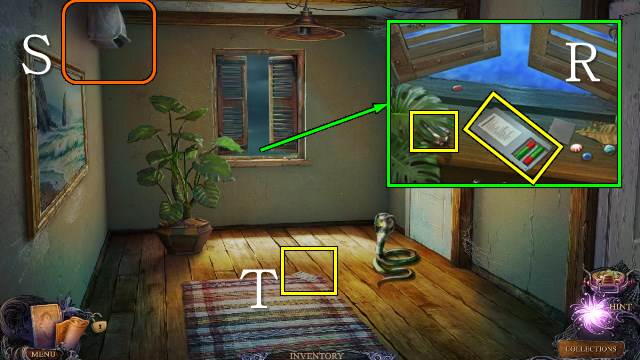
- Place the BATTERY; take the REMOTE CONTROL and FUSE 2/3 (R).
- Use the REMOTE CONTROL (S).
- Take the note (T).
- Walk down.

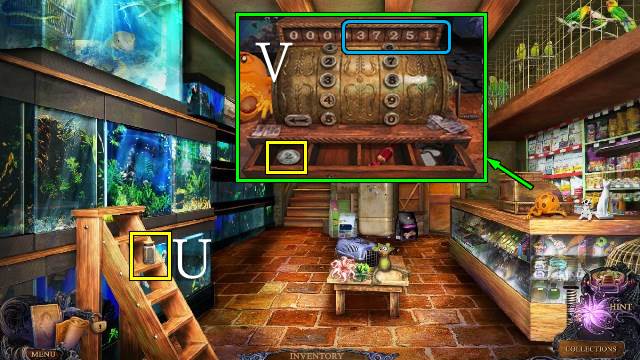
- Take the JAR (U).
- Place the CASH REGISTER KEY, enter 37251 and turn the handle; take the SILVER COIN (V).
- Walk down twice.

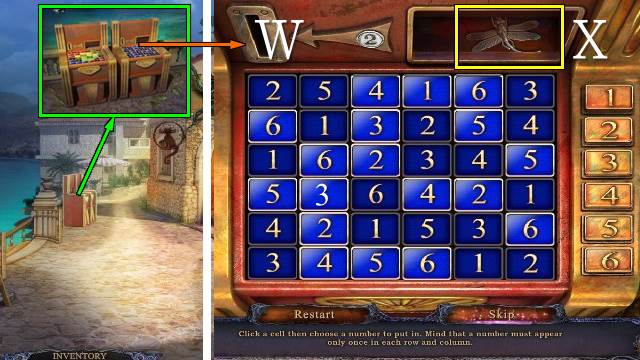
- Put the SILVER COIN in the slot for a mini-game (W).
- Play as before.
- Take the DRAGONFLY (X).
- Go to the Pet Shop.

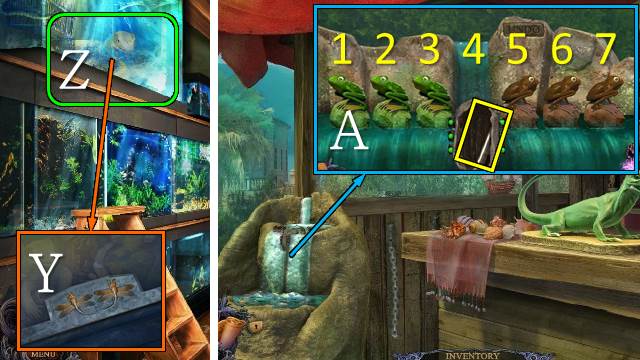
- Place the DRAGONFLY (Y).
- Play the HOP to receive the FROG (Z).
- Walk down.
- Place the FROG for a mini-game (A).
- Move the green frogs left and the brown frogs right; they can jump over each other.
- Move the frogs in the following order: 5-3-2-4-6-7-5-3-1-2-4-6-5-3-4.
- Take the REFRIGERATOR HANDLE.
- Go right.

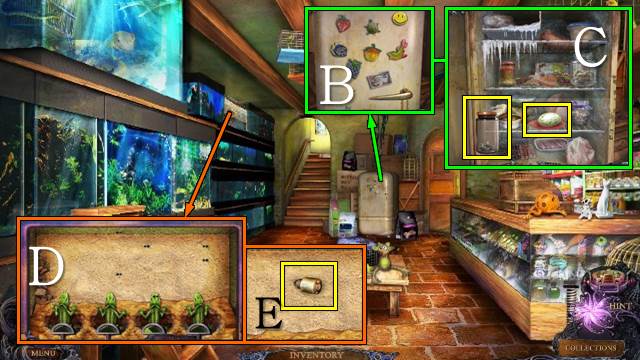
- Place the REFRIGERATOR HANDLE.
- Collect the FLIES in the JAR; take the EGG (C).
- Release the FLIES for a mini-game (D).
- Catch 4 flies with each lizard.
- Take FUSE 3/3 (E).
- Walk forward.

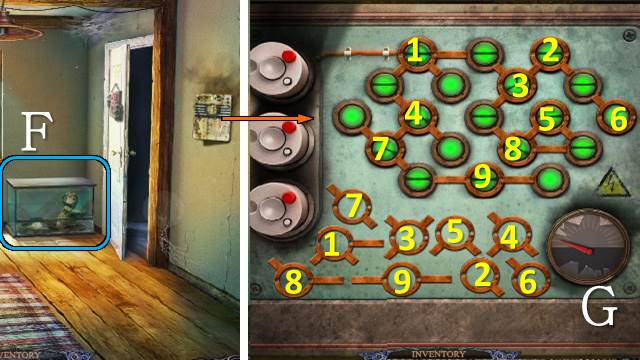
- Place the FISH TANK and EGG (F).
- Go right.
- Walk down.
- Remove the fuse and place the FUSES for a mini-game (G).
- Place the connectors until all lights are lit.
- Go right.

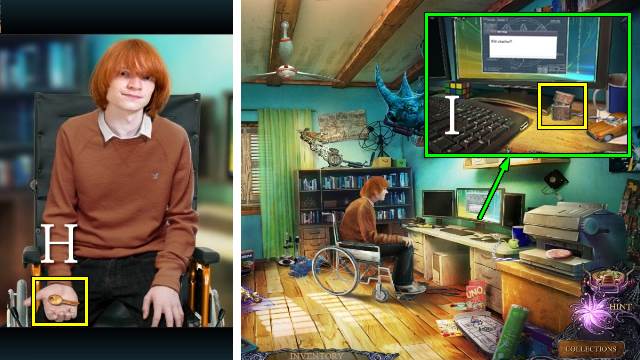
- Take the PLANE KEY (H).
- Take the LIGHTER (I).
- Go to the Dock.

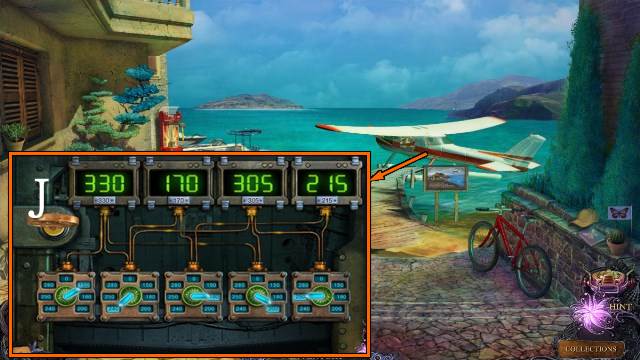
- Place the PLANE KEY for a mini-game (J).
- Turn the dials so the correct amount of power goes to each panel; the number is equally divided among the panels a dial is connected to.
- Enter the plane.
Chapter 4: The Island of Butterflies

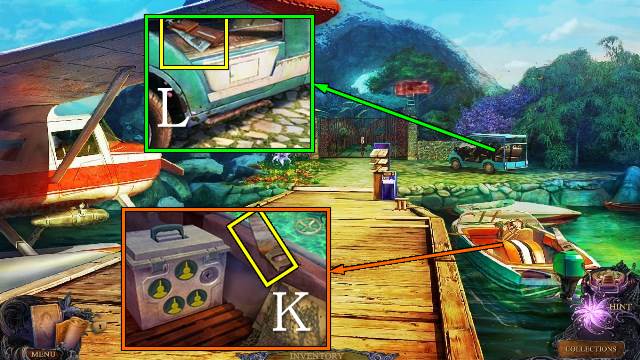
- Take the SAW (K).
- Open the wallet and take the BANKNOTE (L).

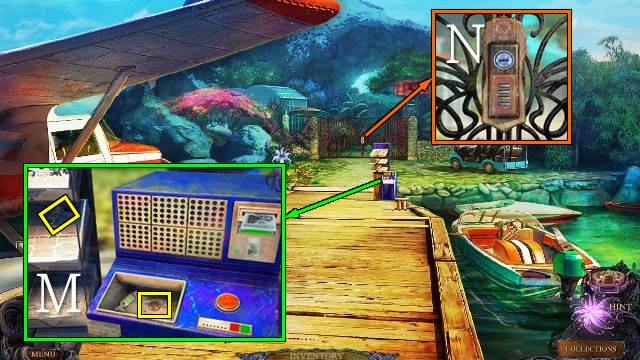
- Use the BANKNOTE; take the TOKEN, map and ZIPPER (M).
- Use the TOKEN (N).
- Walk forward.

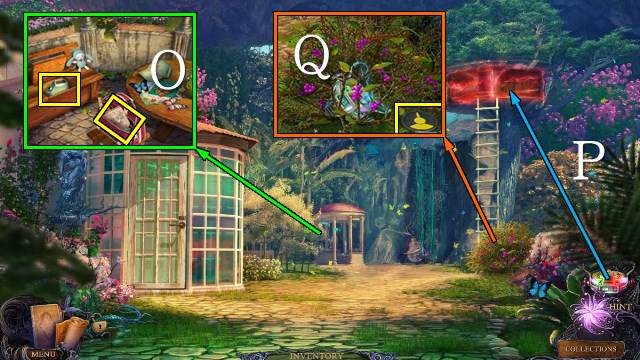
- Open the bench and take the GAS CAN. Open the bag with the ZIPPER and take INSTRUCTION (O).
- Use the Device (P).
- Take the BUTTON (Q).
- Walk down.

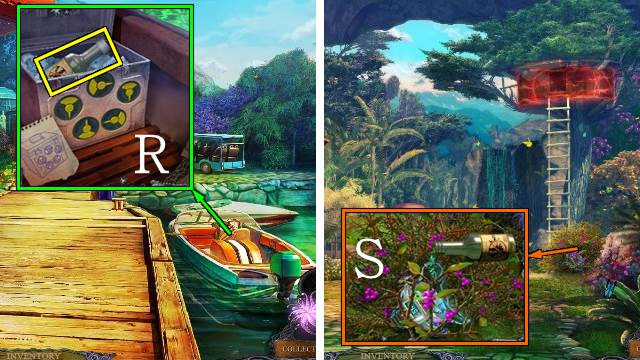
- Place the BUTTON and INSTRUCTION; turn the buttons according to the instructions and take the HERBICIDE (R).
- Walk forward.
- Use the HERBICIDE; take the Device (S).
- Use the Device.
- Walk forward.

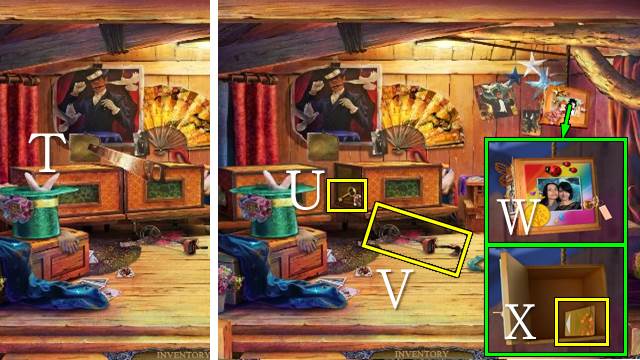
- Use the SAW (T); take the KEY (U).
- Take the METAL FINDER (V).
- Turn the box twice and open it with the KEY (W); take the CARD (X).
- Walk down.

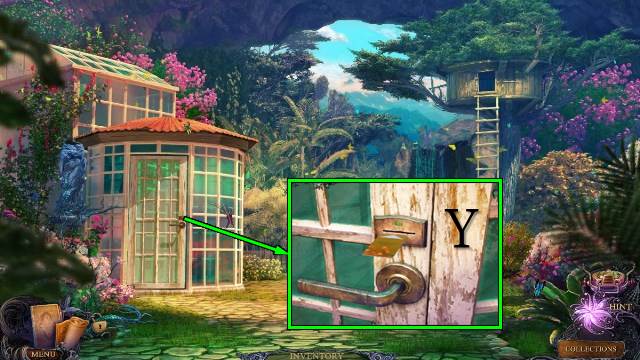
- Open the door with the CARD (Y).
- Go in.

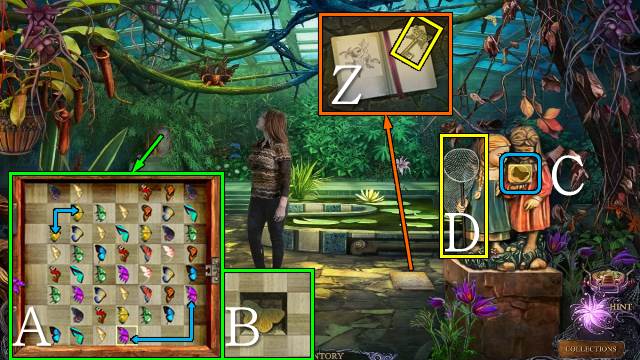
- Open the diary and take the note and KEY (Z).
- Open the cabinet with the KEY for a mini-game (A).
- Select two matching wings next to each other or separated by empty spaces.
- Take the STONE BUTTERFLY (B).
- Place the STONE BUTTERFLY (C); take the SCOOP NET (D).
- Walk down.

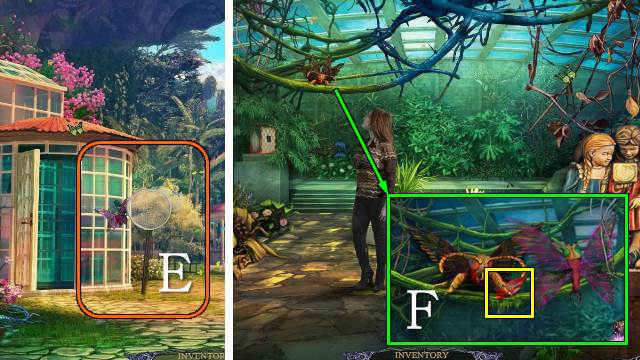
- Catch the BUTTERFLY with the SCOOP NET (E).
- Go left.
- Release the BUTTERFLY; take the LAMP PART (F).
- Go down and forward.

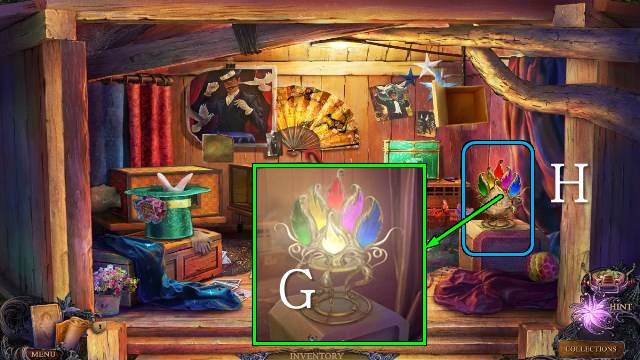
- Place the LAMP PART (G).
- Touch the Magic Lamp (H).

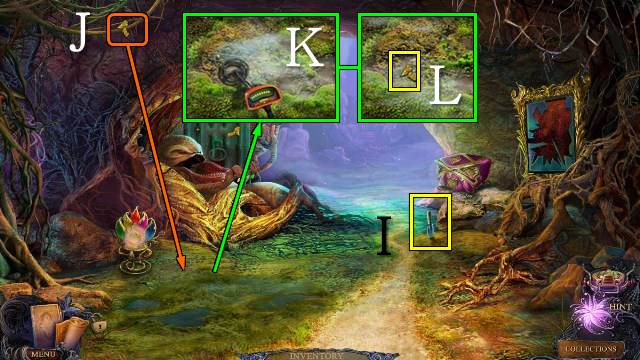
- Take the SHOVEL (I).
- Touch the switch (J).
- Use the METAL FINDER and move it until all lights are on (K); take SWITCH 1/2 (L).
- Walk forward.

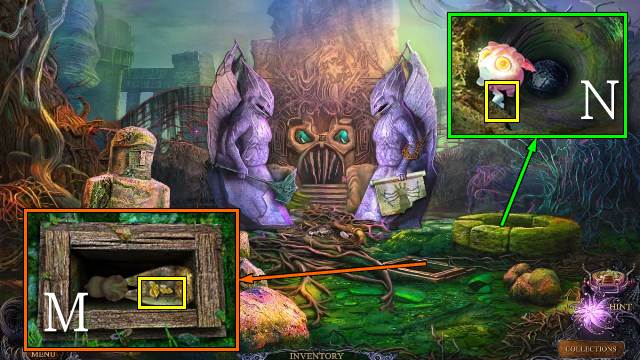
- Use MARIA’S PET; take SWITCH 2/2 and MARIA’S PET (M).
- Put MARIA’S PET down the well; take the MIRROR PART (N).
- Walk down.

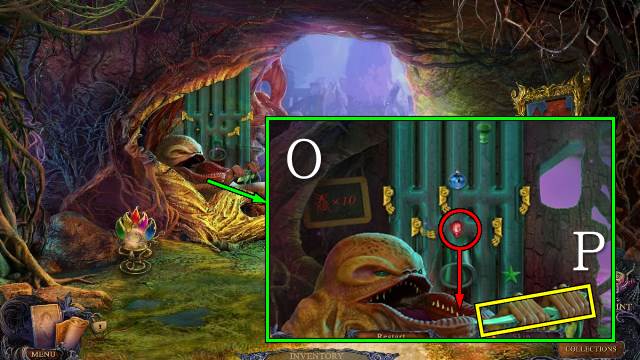
- Place the SWITCHES for a mini-game (O).
- Toggle the switches so only the red bugs are directed to the hole; the monster counts how many bugs it has eaten.
- Take BAS-RELIEF 1/3 (P).

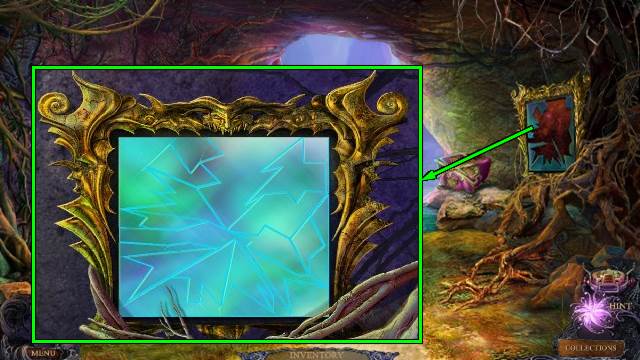
- Place the MIRROR PART for a mini-game (Q).
- Restore the mirror; select a piece to turn it.
- Take the MIRROR.
- Walk forward.

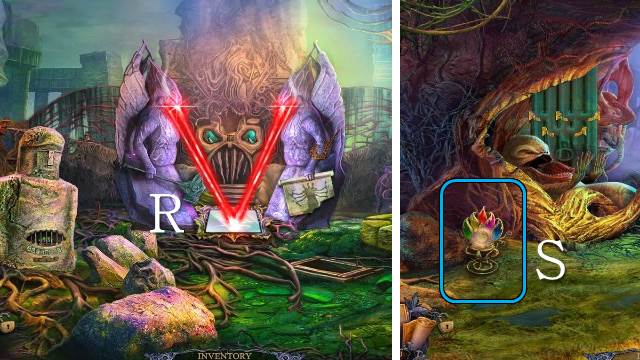
- Place the MIRROR (R).
- Walk down.
- Touch the Magic Lamp (S).
- Walk down and left.

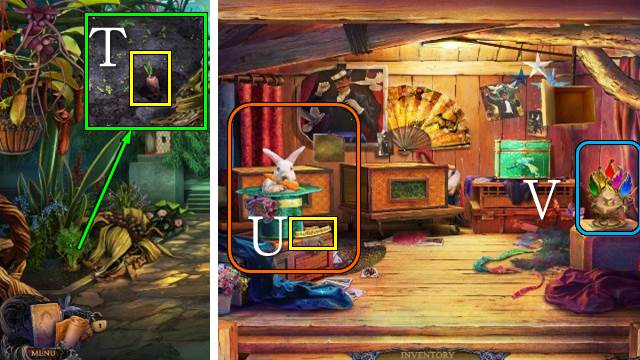
- Remove the greens, use the SHOVEL and take the CARROT (T).
- Walk down and up.
- Give the CARROT to the rabbit; take the PLAQUE (U).
- Touch the Magic Lamp (V).
- Walk forward.

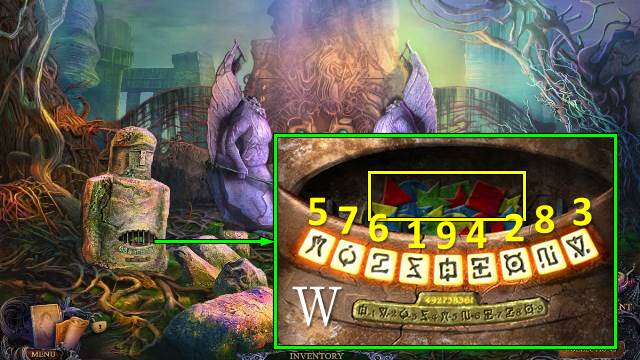
- Place the PLAQUE for a mini-game (W).
- Push the tiles according to the number code.
- Take the COLORED TILES.

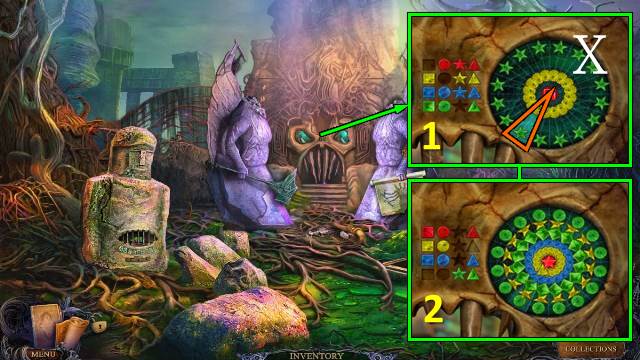
- Place the COLORED TILES for a mini-game.
- Place shapes in the lit part of the circle (X) to recreate the image on the left.
- Go forward.

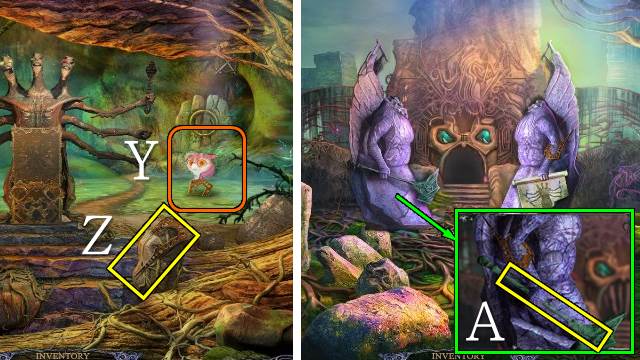
- Use MARIA’S PET (Y); take the MECHANISM PART (Z).
- Walk down.
- Place the MECHANISM PART; take the HAMMER (A).
- Walk forward.

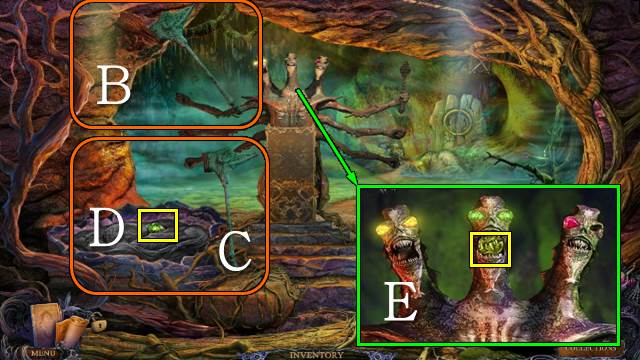
- Use the HAMMER (B).
- Use the HAMMER (C).
- Take the GREEN GEM (D).
- Place the GREEN GEM; take the BAS-RELIEF PART (E).

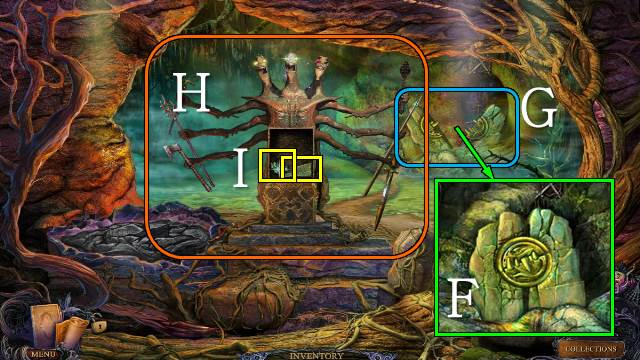
- Place the BAS-RELIEF PART (F).
- Play the HOP to receive the WEAPONS (G).
- Place the WEAPONS (H); take BAS-RELIEF 2/3 and the MURAL (I).
- Walk down.

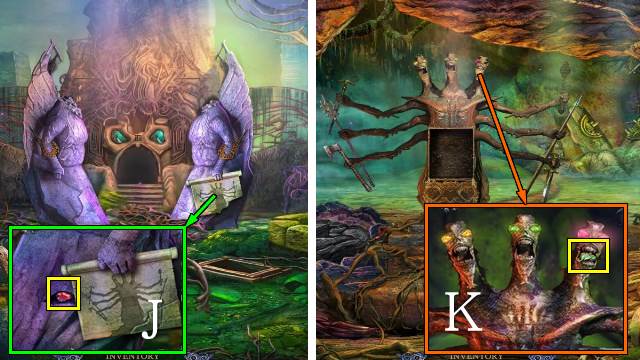
- Place the MURAL; take the RED GEM (J).
- Walk forward.
- Place the RED GEM; take BAS-RELIEF 3/3 (K).
- Walk down twice.

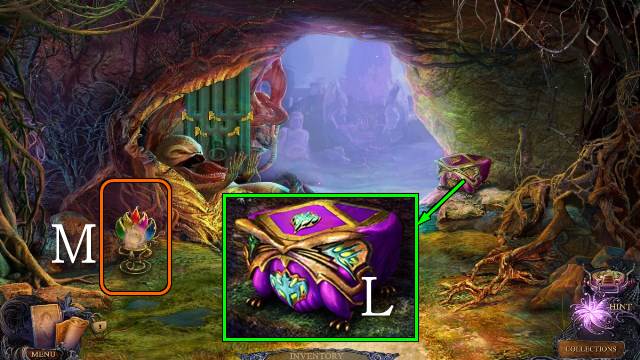
- Place the BAS-RELIEF (L).
- Touch the Magic Lamp (M).

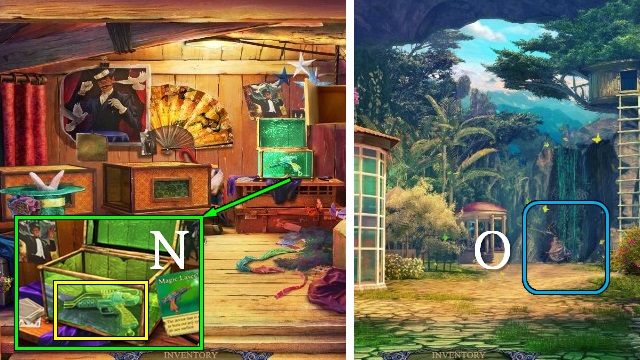
- Take the LASER (N).
- Walk down.
- Play the HOP to receive a ROPE (O).
- Walk down.

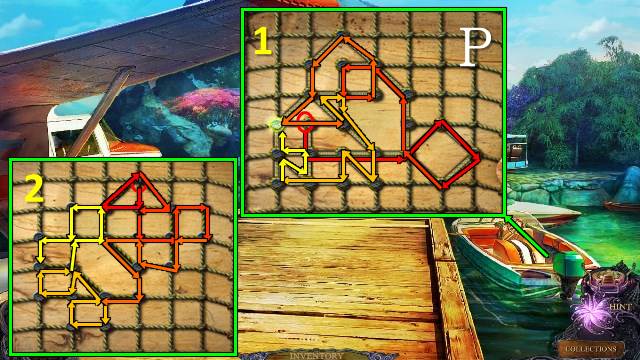
- Place the ROPE for a mini-game (P).
- Guide the rope around all nails; each track may only be used once.
- Follow the line from dark to light.
- Take the NET.

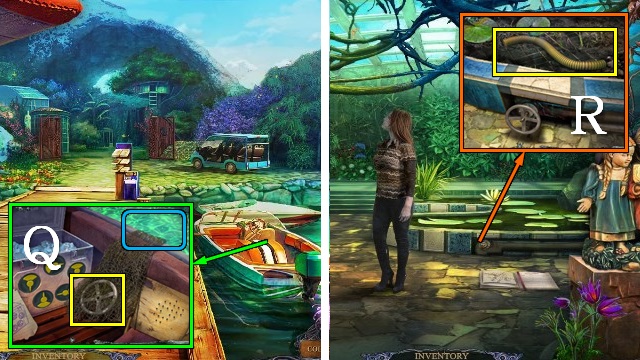
- Use the NET; take the VALVE (Q).
- Go forward and left.
- Place the VALVE; take the HOSE (R).
- Walk down twice.

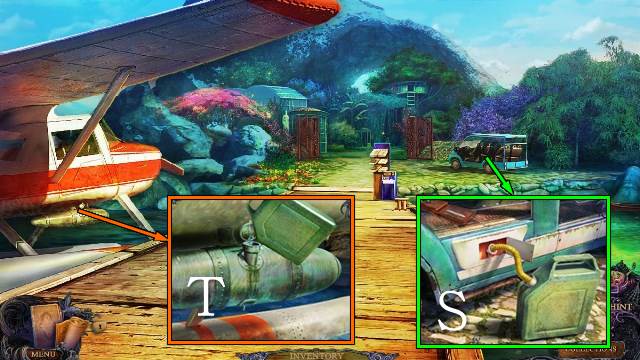
- Open the fuel tank, place the GAS CAN and HOSE, and take the GASOLINE (S).
- Use the GASOLINE (T).
- Enter the plane.
Chapter 5: Activating the Artifact

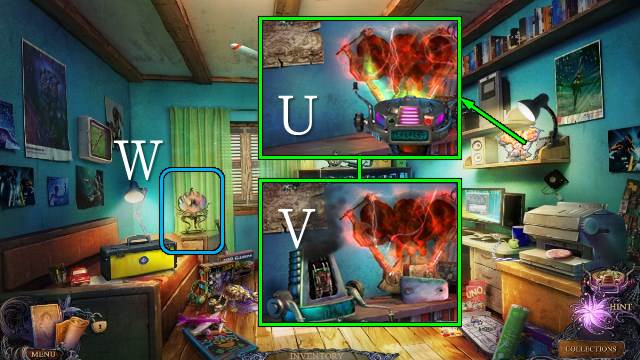
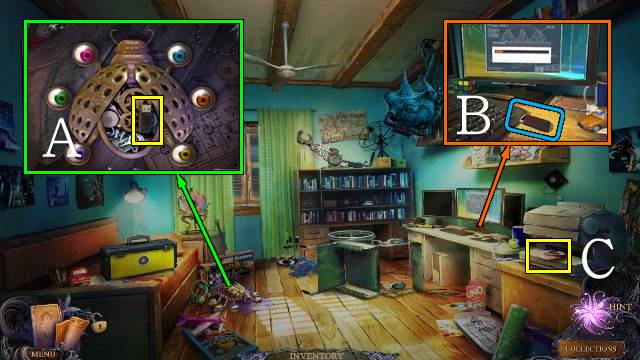
- Go to Davor’s Bedroom.
- Use the Device (U).
- Use the NAIL FILE; remove the circuit board (V).
- Touch the Magic Lamp (W).

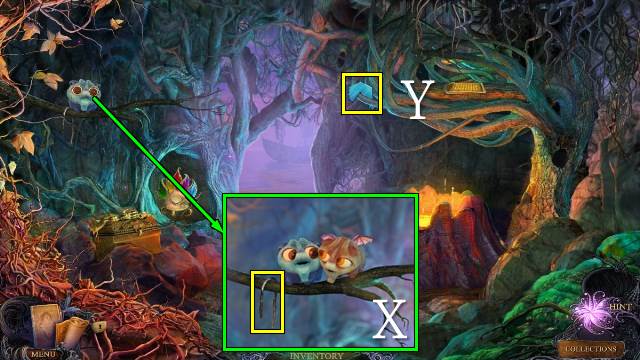
- Place MARIA’S PET; take the WIRE (X).
- Take the LENS (Y).
- Go forward.

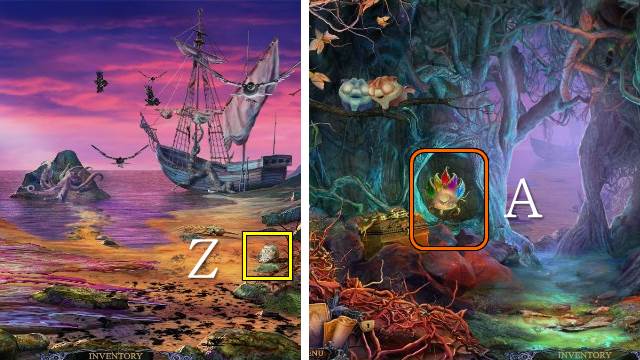
- Take the SILVER (Z).
- Walk down.
- Touch the Magic Lamp (A).
- Walk down twice.

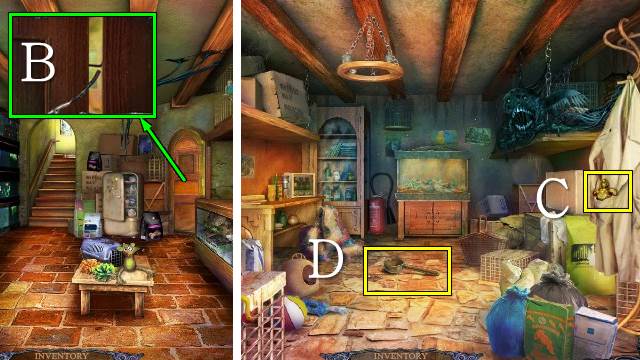
- Unlatch the door with the WIRE (B).
- Go right.
- Take the AQUARIUM KEY (C).
- Take the CAULDRON (D).

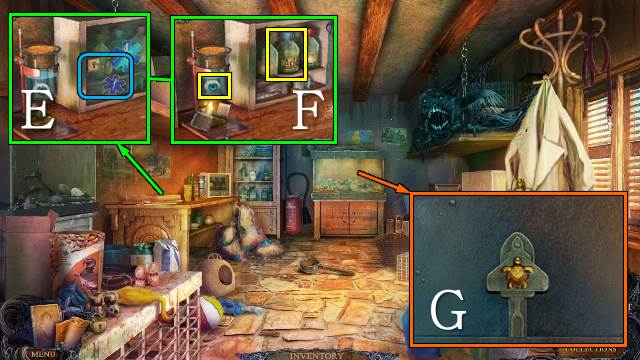
- Take the notebook and use the CUPBOARD KEY (E); light the burner with the LIGHTER and take the EYE and ACID (F).
- Place the AQUARIUM KEY for a mini-game (G).

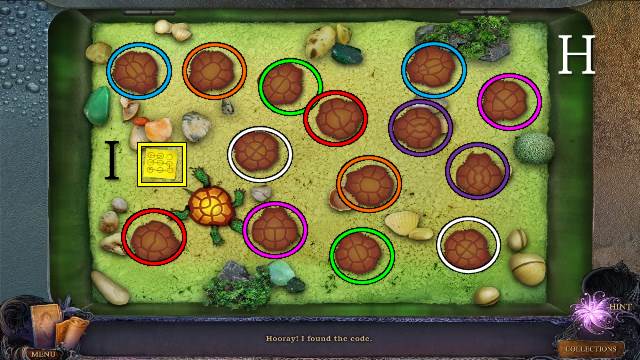
- Find pairs of turtles with the same shell (H).
- Take the CODE (I).
- Go to Davor’s Bedroom.

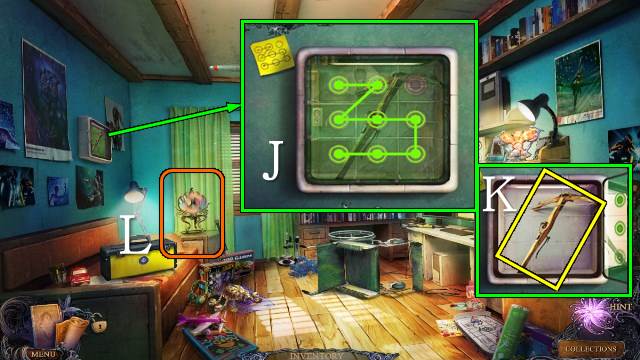
- Place the CODE; trace the code on the panel (J).
- Take the CROSSBOW (K).
- Touch the Magic Lamp (L).

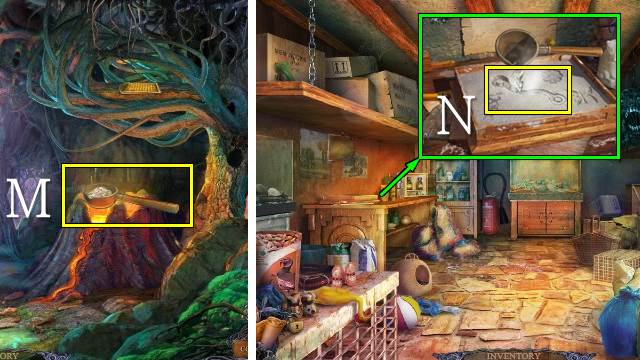
- Place the CAULDRON and SILVER; take the MOLTEN SILVER (M).
- Touch the Magic Lamp.
- Go to the Store Room.
- Use the MOLTEN SILVER; take the METAL PART (N).
- Go to Davor’s Bedroom.

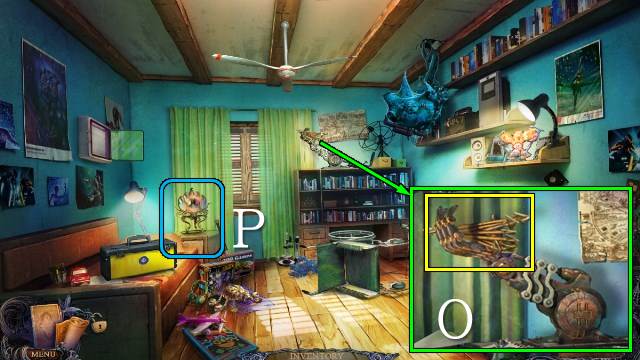
- Place the METAL PART; take the ARROWS (O).
- Touch the Magic Lamp (P).
- Walk forward.


- Place the CROSSBOW and ARROWS for a mini-game (Q).
- Shoot the birds.
- Walk forward.

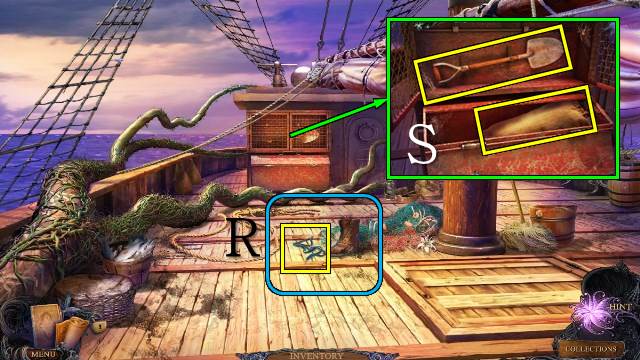
- Select the shoe twice; take the LACE (R).
- Use the ACID and open the cabinet; take the SAND and SPADE (S).
- Walk down.

- Place the RAG, LACE and SPADE; take the KNIFE and SPHERE HANDLE (T).
- Pour out the SAND (U).
- Go right.

- Use the KNIFE (V); put the handle on the hatch (W).
- Play the HOP to receive a LENS (X).
- Go down and left.

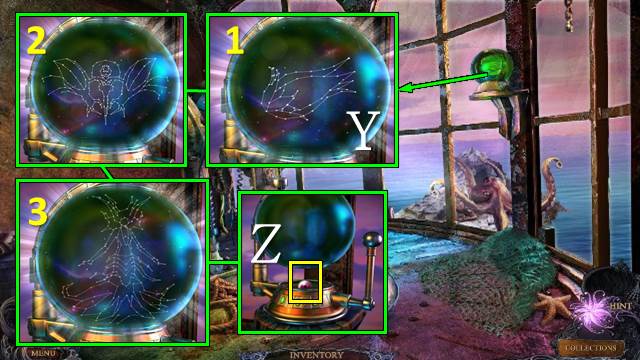
- Place the SPHERE HANDLE for a mini-game (Y).
- Drag and turn the sphere until you see the constellation.
- Take the EYE (Z).
- Walk down twice.
- Touch the Magic Lamp.

- Place the two EYES; take the FLASH CARD (A).
- Play the FLASH CARD (B).
- Take the WOODEN PLATE (C).
- Touch the Magic Lamp.

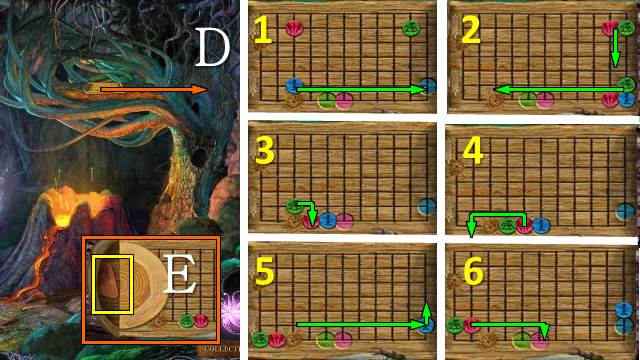
- Place the WOODEN PLATE for a mini-game (D).
- Drag the discs to the slots with the same color; all discs move in unison until they hit an obstacle.
- Take the THING (E).
- Walk forward and left.

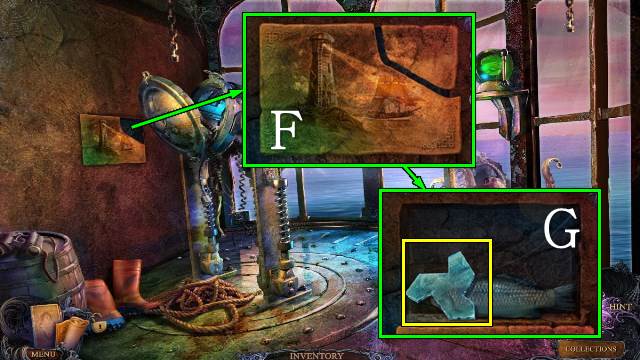
- Place the THING (F); take the LENS (G).
- Go down and right.

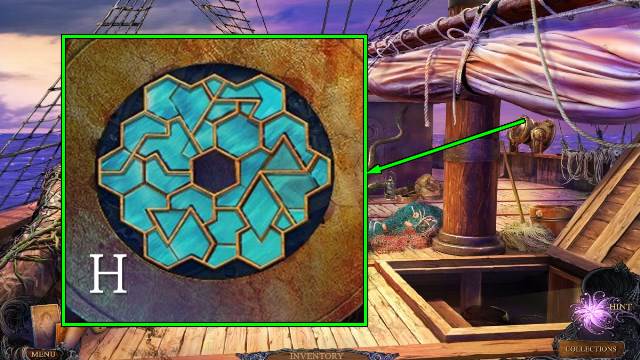
- Place the three LENSES for a mini-game (H).
- Place all the fragments in the frame.
- You receive a SPOTLIGHT.
- Go down and left.

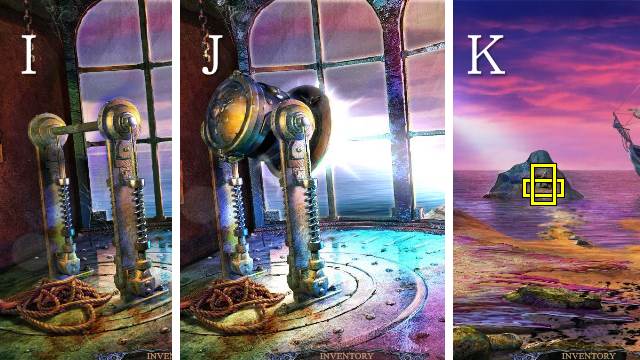
- Remove the old spotlight (I); place the SPOTLIGHT (J).
- Take the MACHETE and KEY (K).
- Walk down.

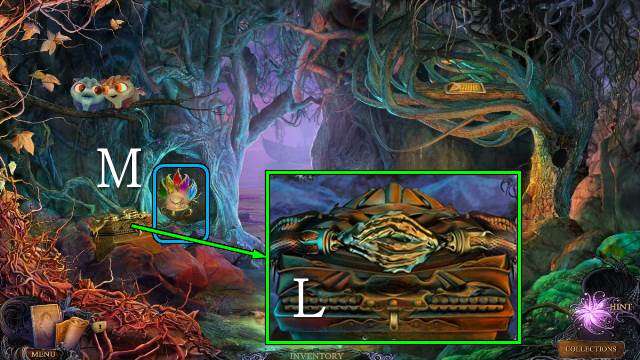
- Place the KEY (L).
- Touch the Magic Lamp (M).

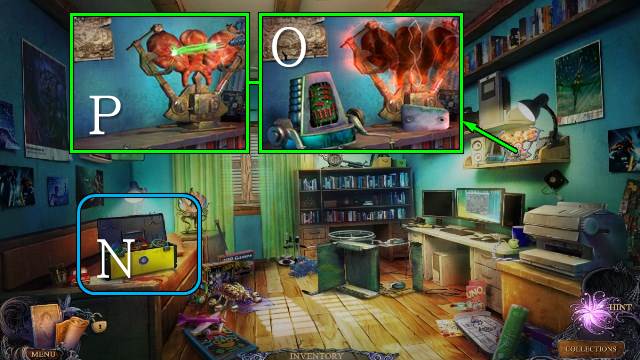
- Play the HOP; take the CIRCUIT BOARD (N).
- Place the CIRCUIT BOARD and take the Device (O); use the Device and Laser and take the ARTIFACT (P).
Chapter 6: Cold Fire

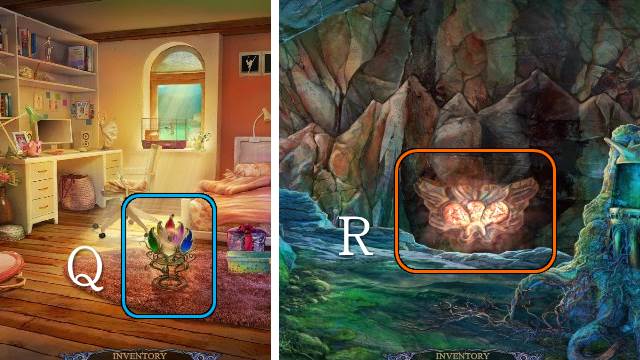
- Go all the way back to Maria’s Bedroom.
- Touch the Magic Lamp (Q).
- Go forward twice.
- Place the ARTIFACT (R).
- Go forward.

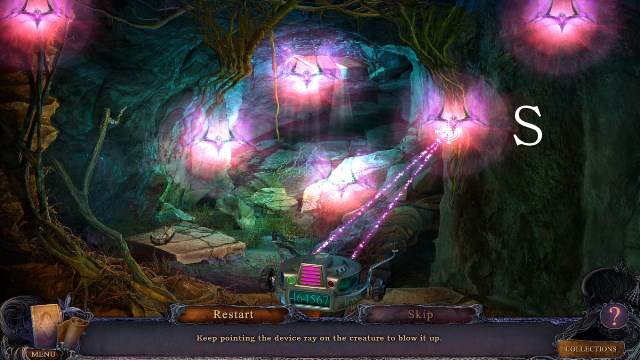
- Fire the Device at a creature until it is gone (S).

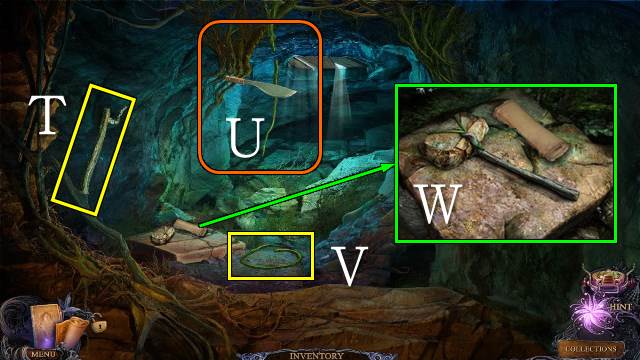
- Move the STICK until it comes off (T).
- Use the MACHETE (U).
- Take the ROPE (V).
- Take the note, place the STICK and ROPE and take the HAMMER (W).

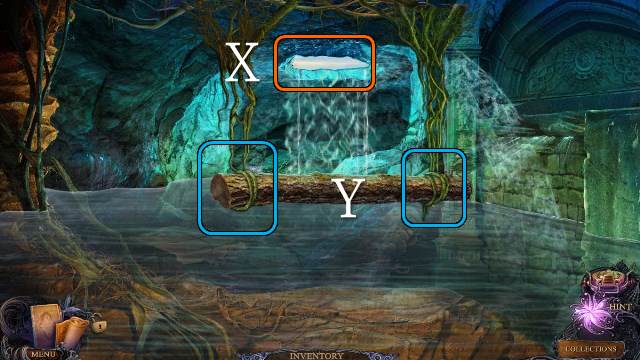
- Use the HAMMER (X).
- Attach the vines to the tree (Y).
- Break the wall with the tree.
- Go right.

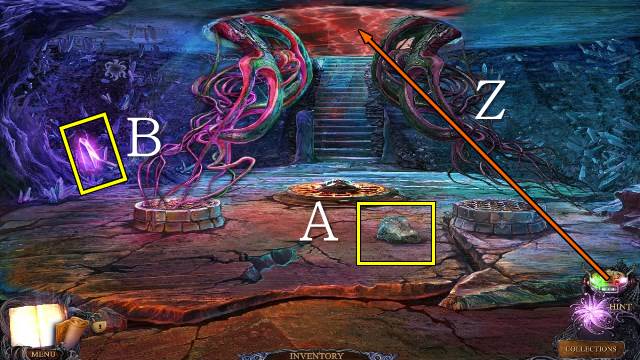
- Use the Device (Z).
- Take the STONE (A).
- Use the STONE and take the CRYSTAL (B).
- Walk down.

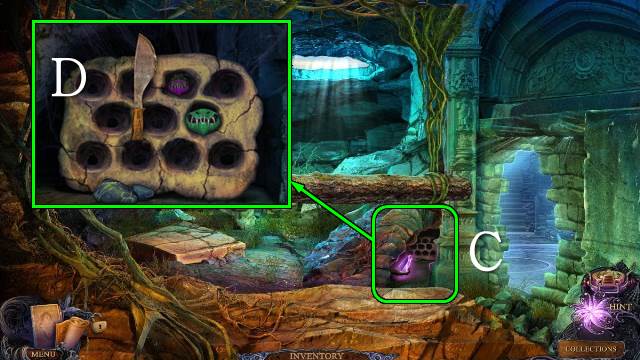
- Place the CRYSTAL (C).
- Place the MACHETE for a mini-game (D).
- Cut off all the heads.
- You receive the HEADS.
- Go right.

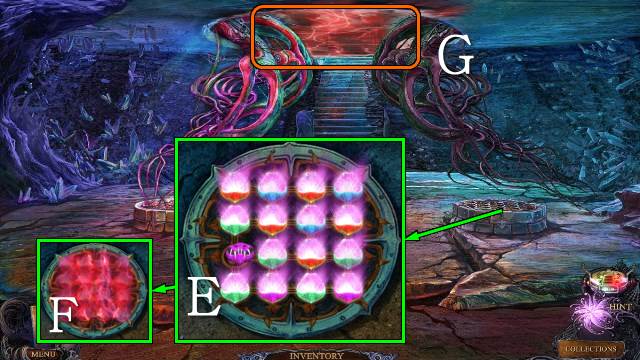
- Place the HEADS for a mini-game (E).
- Place the heads to make them all light up; not all colors may be next to each other.
- Take the ENERGY GRATE (F).
- Throw the ENERGY GRATE (G).
- Walk forward.

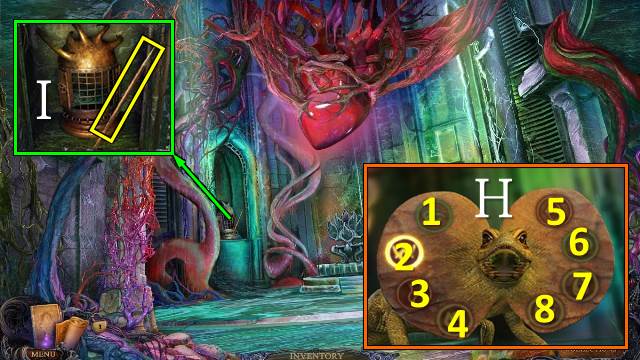
- Repeat the sequences (H).
- Solution: (4-2-7), (3-5-2-8), (6-4-8-7-1-5).
- Take the SHARP STICK (I).
- Go right.

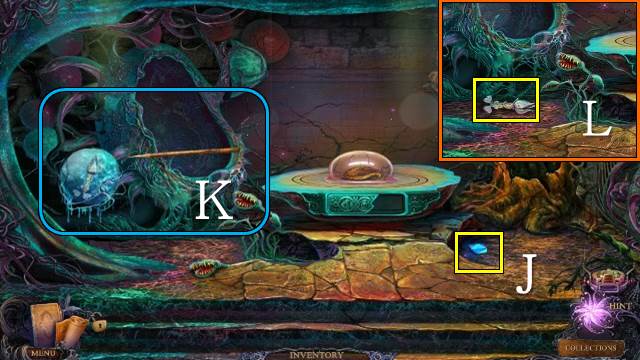
- Take the EYE (J).
- Use the SHARP STICK (K); take the CAGE KEY (L).
- Walk down.

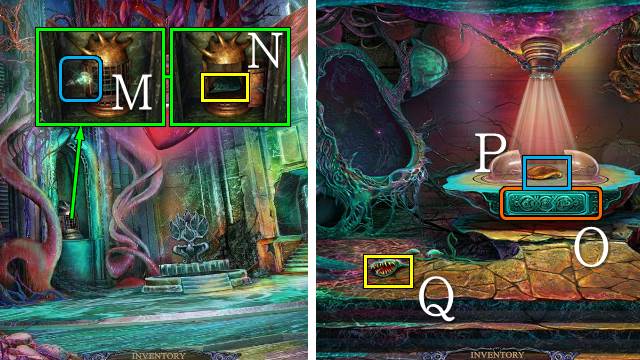
- Place the CAGE KEY (M); take the PLATE PART (N).
- Walk right.

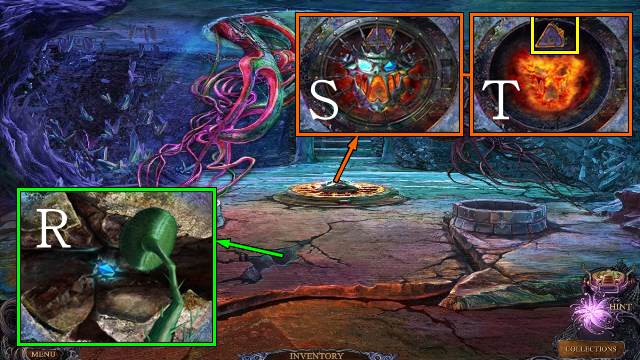
- Place the PLATE PART (O) and touch the lamp part (P); take the CARNIVOROUS PLANT (Q).
- Walk down twice.
- Use the CARNIVOROUS PLANT and take the EYE (R).
- Place the two EYES (S); take the GLASS PART (T).
- Go forward and right.

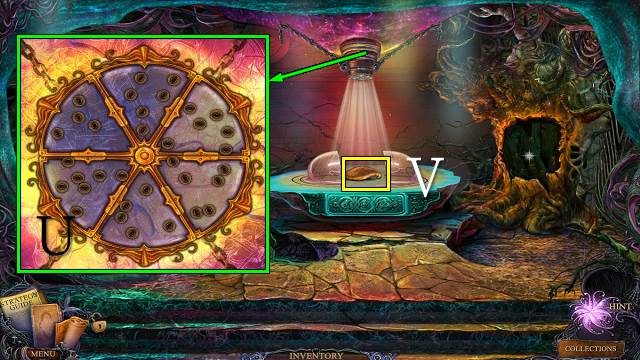
- Place the GLASS PART for a mini-game (U).
- Swap the wedges until all light is blocked.
- Take the LAMP PART (V).
- Walk down.

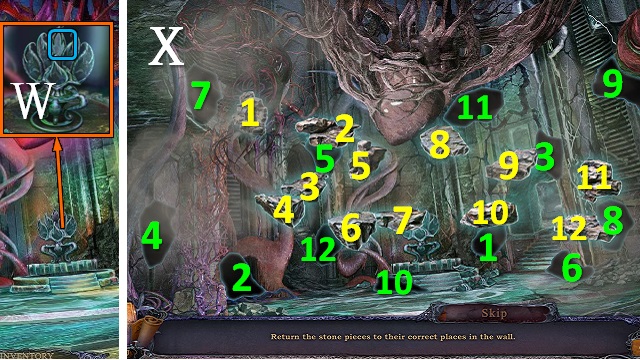
- Place the LAMP PART for a mini-game (W).
- Pick up pieces and put them where they belong (X).

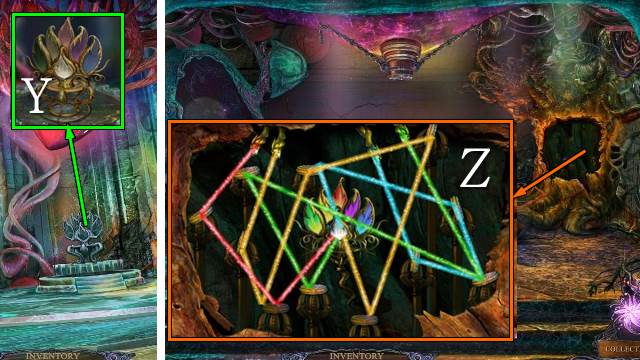
- Take the PETALS (Y).
- Go right.
- Place the PETALS for a mini-game (Z).
- Turn the mirrors to direct the beams to the lamp.
- Take the LAMP PART.
- Walk down.

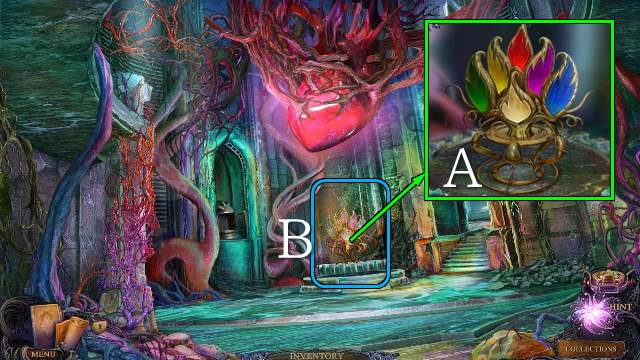
- Place the LAMP PART (A).
- Touch the Magic Lamp (B).

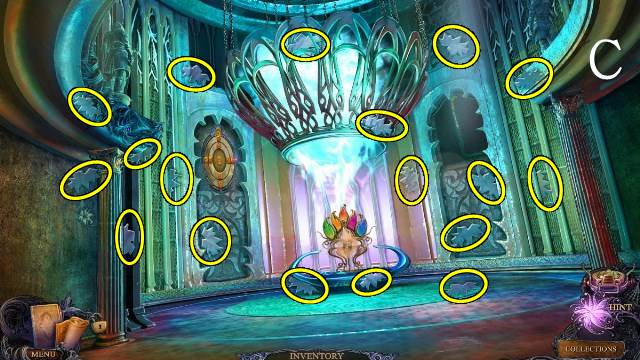

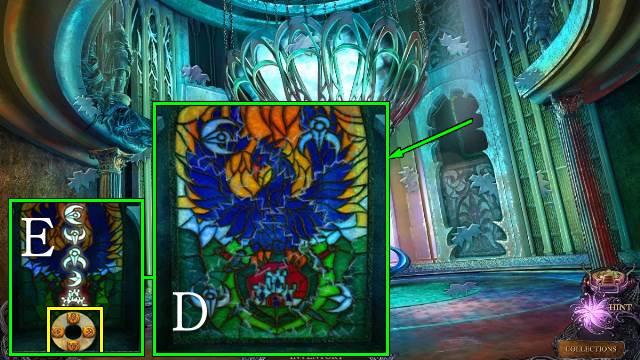
- Place the SHARDS for a mini-game (D).
- Move the shards over the frame to find out where they go.
- Take the BAS-RELIEF PART and note the symbols (E).

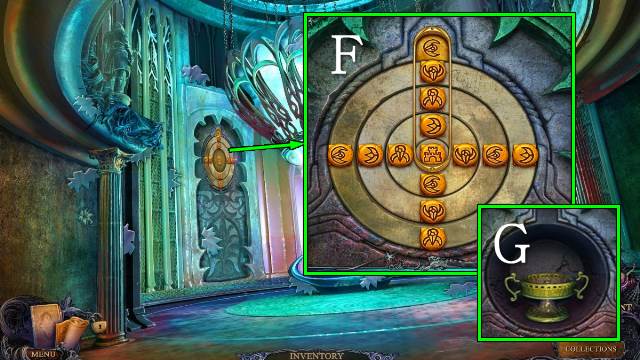
- Place the BAS-RELIEF PART for a mini-game (F).
- Turn the discs to line up the symbols as on the stained glass window.
- Take the CUP (G).

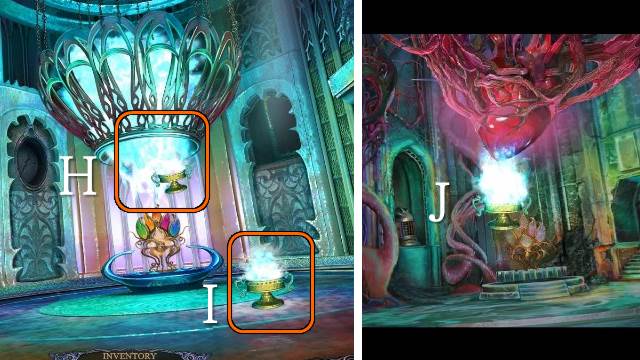
- Use the CUP (H); take the COLD FIRE (I).
- Touch the Magic Lamp.
- Release the COLD FIRE (J).
- Congratulations, you’ve completed Secrets of the Dark: The Flower of Shadow.


 Gemini Lost Walkthrough, Guide, & Tips
 Dead Reckoning: Silvermoon Isle Walkthrough, Guide, & Tips
 The Emerald Maiden: Symphony of Dreams Walkthrough, Guide, & Tips
 The Mystery of the Crystal Portal: Beyond the Horizon Walkthrough, Guide, & Tips
 Awakening: The Sunhook Spire Walkthrough, Guide, & Tips