Hidden Expedition: The Crown of Solomon Walkthrough, Guide, & Tips
Hidden Expedition: The Crown of Solomon Walkthrough

Welcome to the Hidden Expedition: The Crown of Solomon Walkthrough
The expedition continues… Track down the fragments of King Solomon’s crown and foil a madman’s plot in this exciting follow-up to the bestselling series!
Whether you use this document as a reference when things get difficult or as a road map to get you from beginning to end, we’re pretty sure you’ll find what you’re looking for here.
This document contains a complete Hidden Expedition: The Crown of Solomon game walkthrough featuring annotated screenshots from actual gameplay!
We hope you find this information useful as you play your way through the game. Use the walkthrough menu below to quickly jump to whatever stage of the game you need help with.
Remember to visit the Big Fish Games Forums if you find you need more help. Have fun!
This walkthrough was created by Margie B, and is protected under US Copyright laws. Any unauthorized use, including re-publication in whole or in part, without permission, is strictly prohibited.
General Tips
- This is the official guide for Hidden Expedition: The Crown of Solomon!
- This guide will not mention each time you have to zoom into a location; the screenshots will show each zoom scene.
- Hidden-object puzzles are referred to as HOPs. This guide will not show screenshots of the HOPs, however, it will mention when an HOP is available and the inventory item you’ll collect from it.
- This guide will give step-by-step solutions for all puzzles which are not random. Please read the instructions in the game for each puzzle.
- The Fact Cards are highlighted throughout the guide with the ‘@’ symbol.
Chapter 1: Istanbul

- Talk to the Captain.
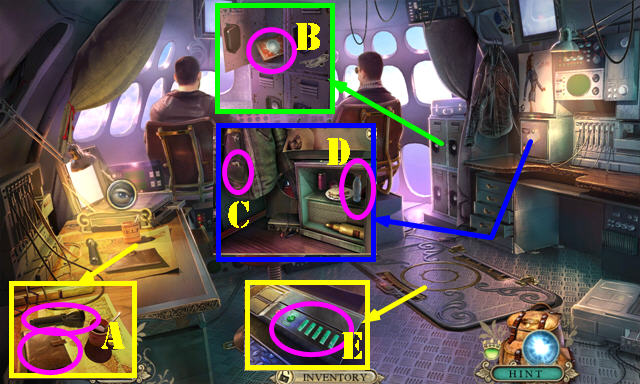
- Take the EMPTY FLASHLIGHT; touch the book (A).
- Open the locker; take the H.E.L.P. BOX and CARGO ACCESS CARD below it (B).
- Open the pocket; take the BATTERIES (C).
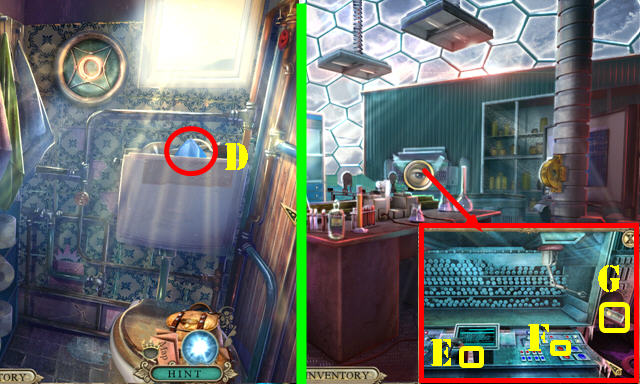
- Open the cover. Take the BOTTLE OF WATER (D) and SAFETY FUSE behind it.
- Use the CARGO ACCESS CARD (E). Go to the Cargo hold.
- Place the BATTERIES in the EMPTY FLASHLIGHT to get the FLASHLIGHT (inventory). Use the FLASHLIGHT on the scene.
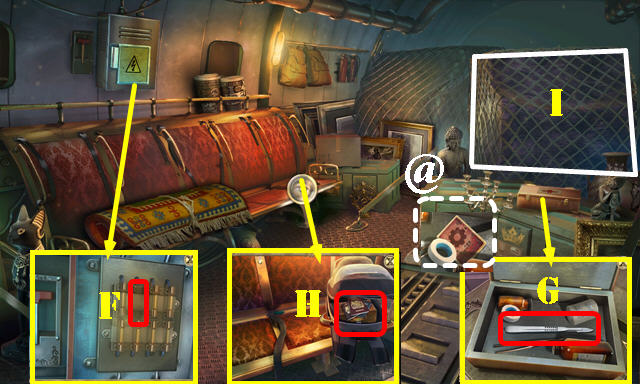
- Open the panel; remove the fuse and place the SAFETY FUSE (F).
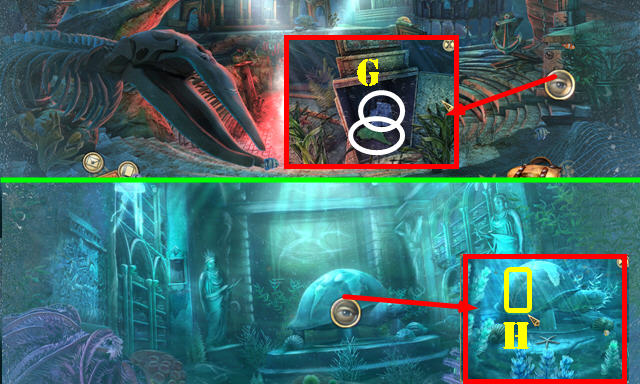
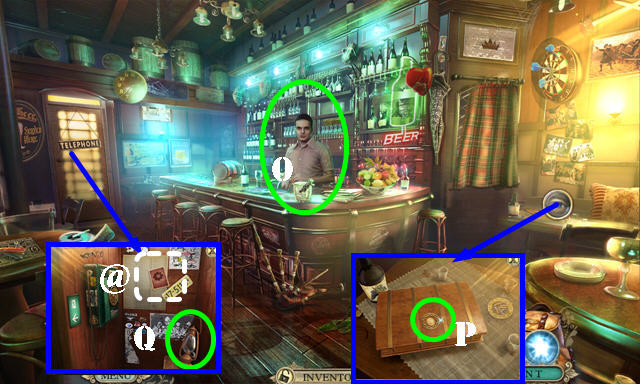
- Open the box; take the Fact Card 1/20 (@). Move all the items and take the SCALPEL (G).
- Touch the case and open it; take the WIRE, look at the passport and move the box (H).
- Remove the net (I).
- Bend the wire three times to get the BENT WIRE (inventory).
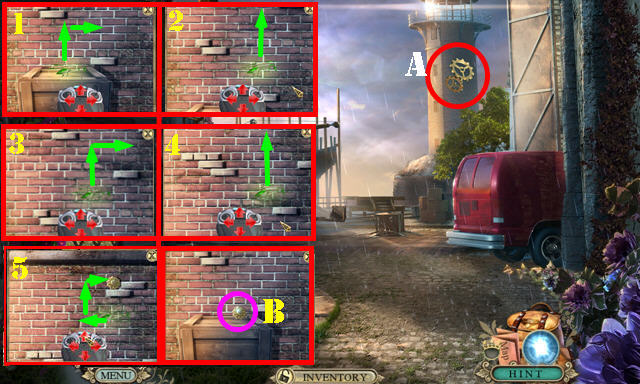
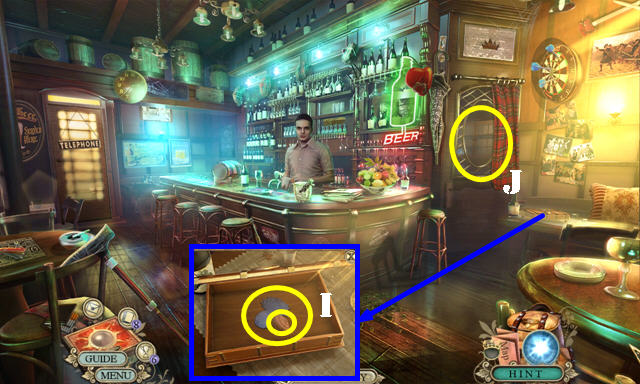
- Walk down.
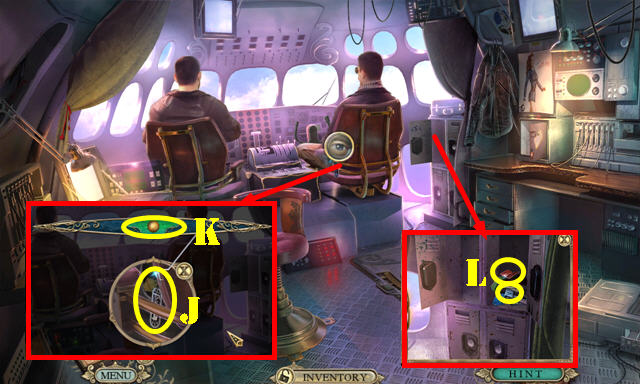
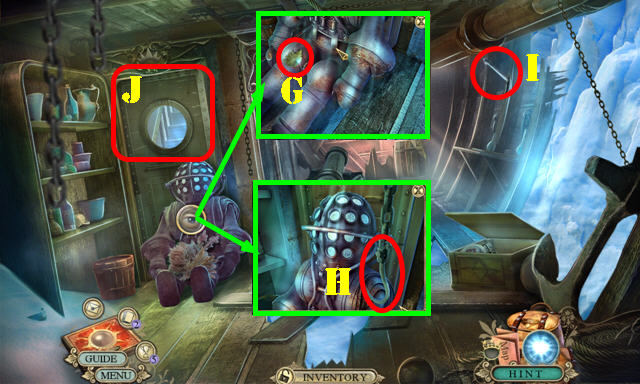
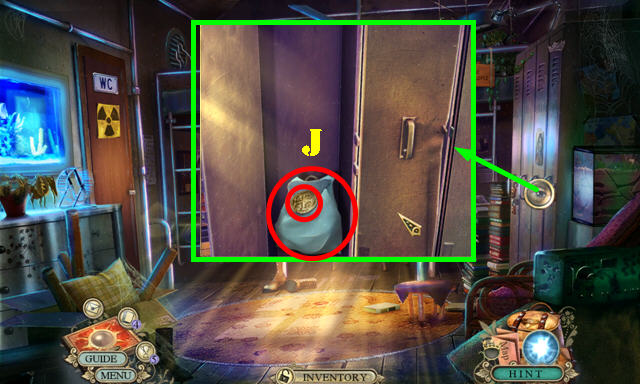
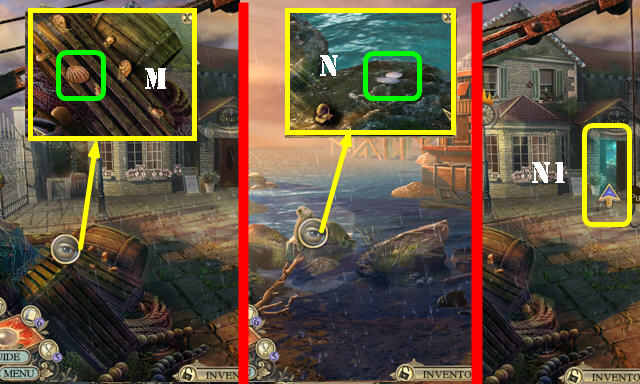
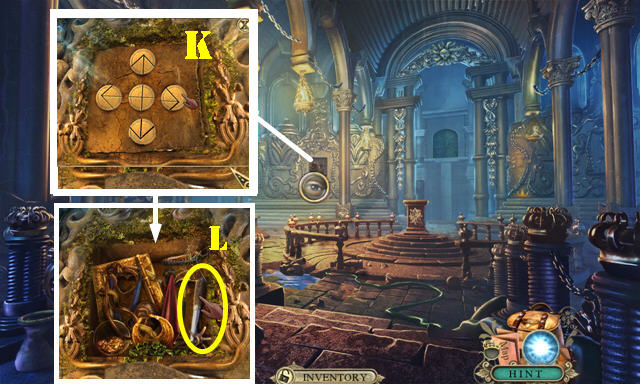
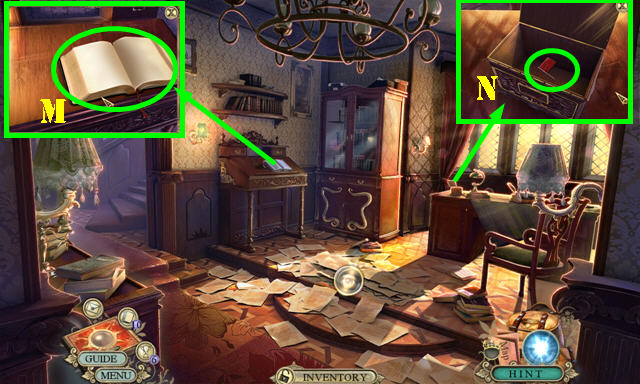
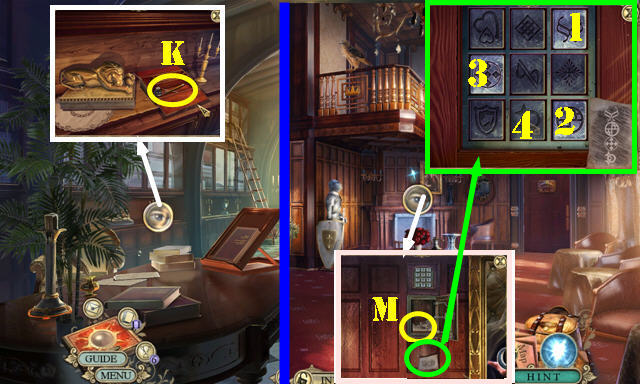
- Talk to both men; use the BENT WIRE on the key (J) once the ball is in the green section, take it (K); you receive the LOCKER KEY.
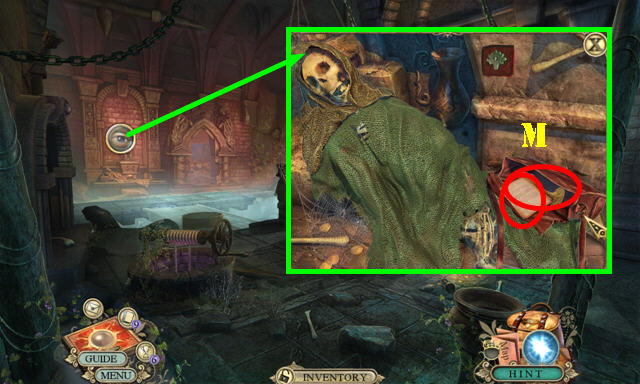
- Use the LOCKER KEY (L); take the CALLING CARD and TORN NOTE 1/2 (M).
- Go to the Cargo hold.
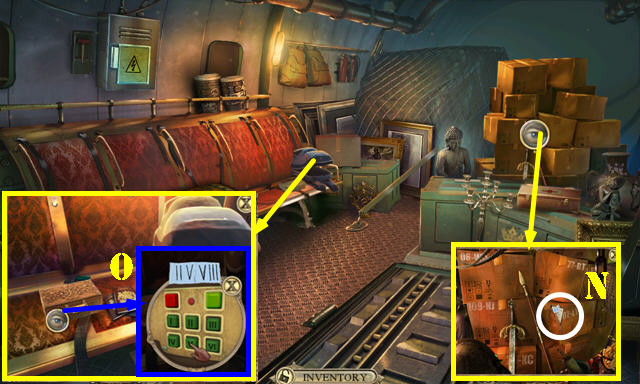
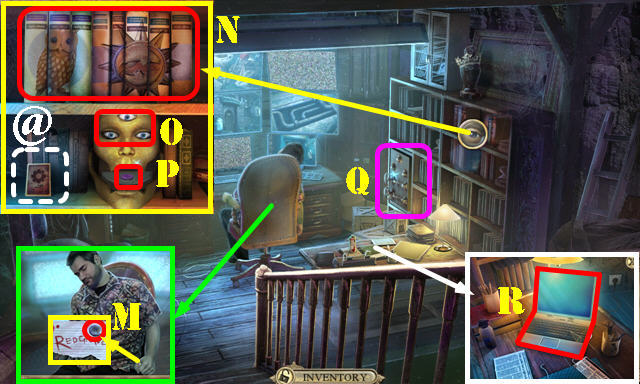
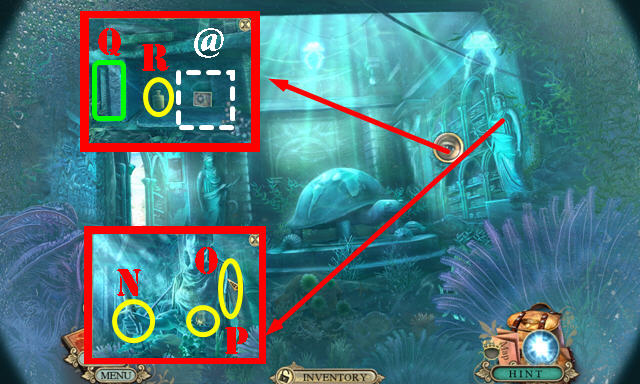
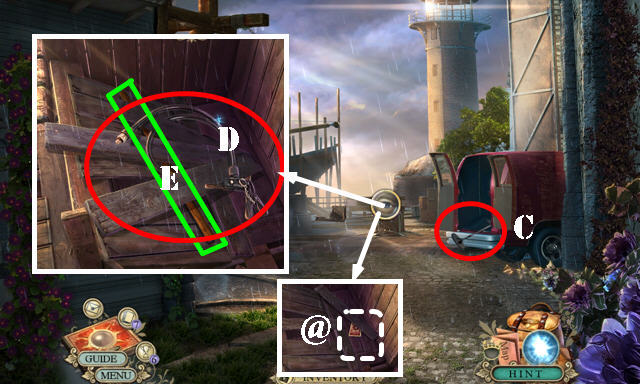
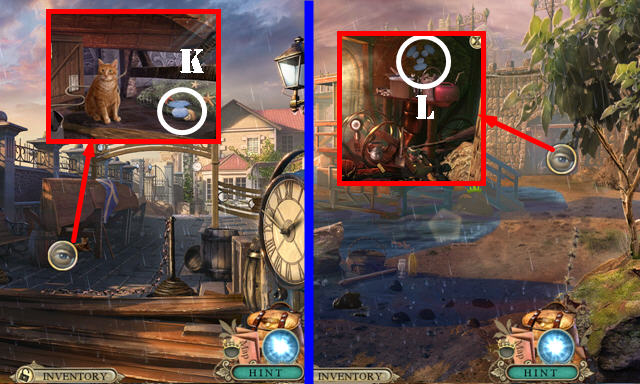
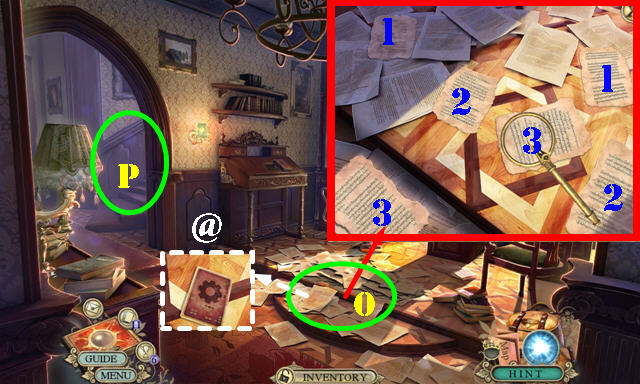
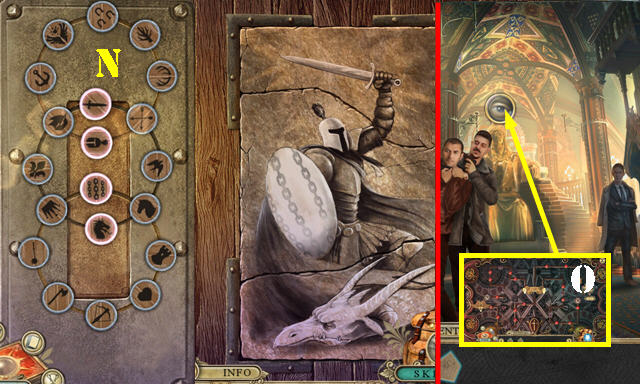
- Use the SCALPEL; take the TORN NOTE 2/2 and look at the clipboard (N).
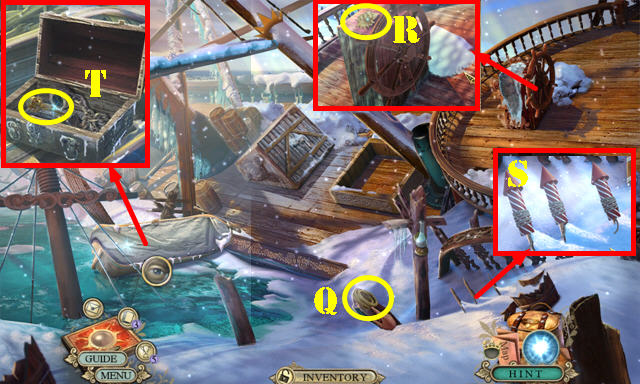
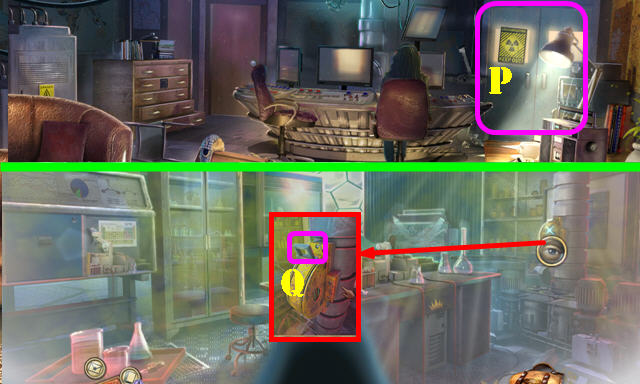
- Look at the box; place the 2 TORN NOTES on it (O). Press: II-V-V-III. Try to take the missing item in the box.
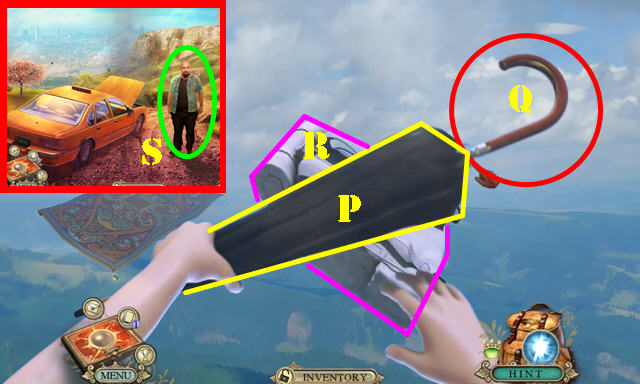
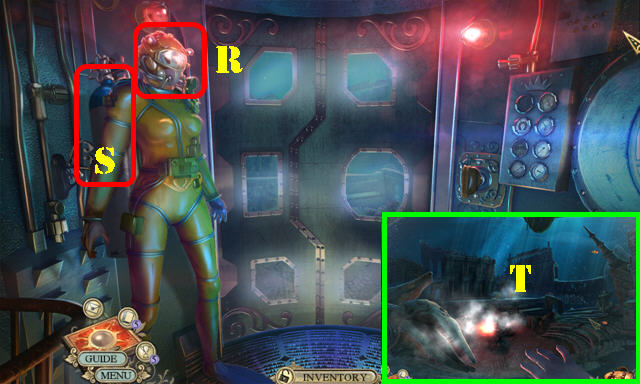
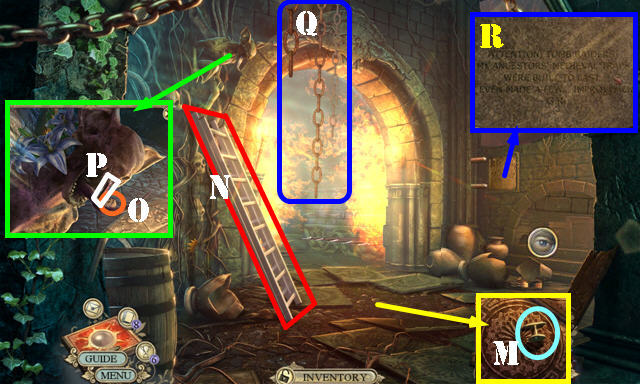
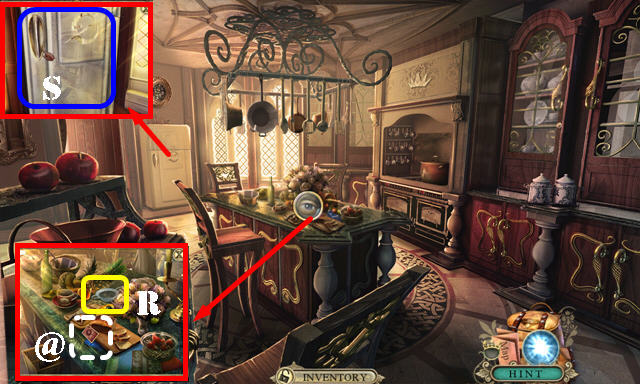
- Touch the umbrella twice (P), pull the handle (Q), then pull the backpack (R).
- Give the BOTTLE OF WATER and then the CALLING CARD to the driver (S).
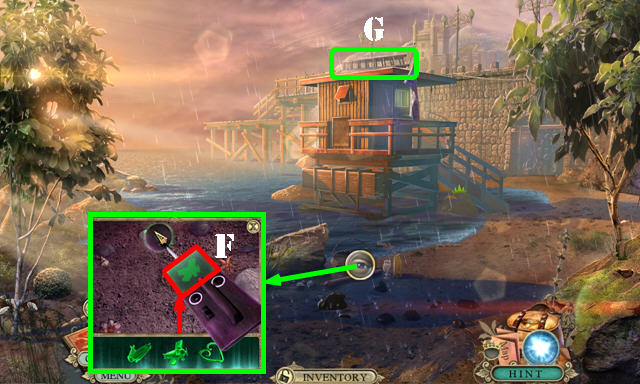
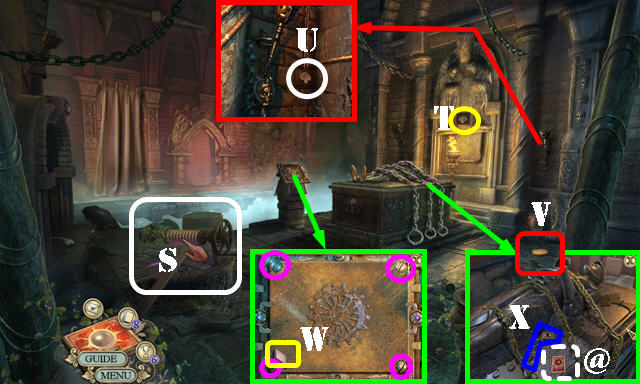
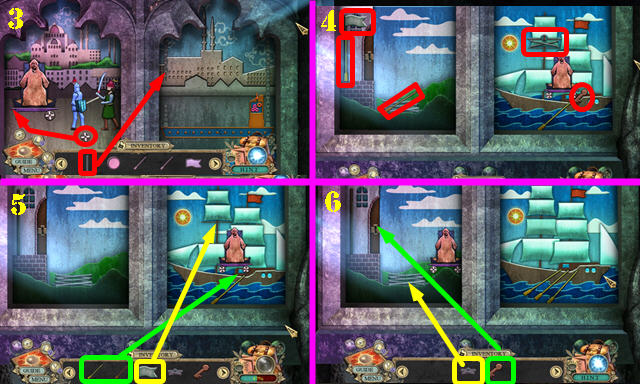
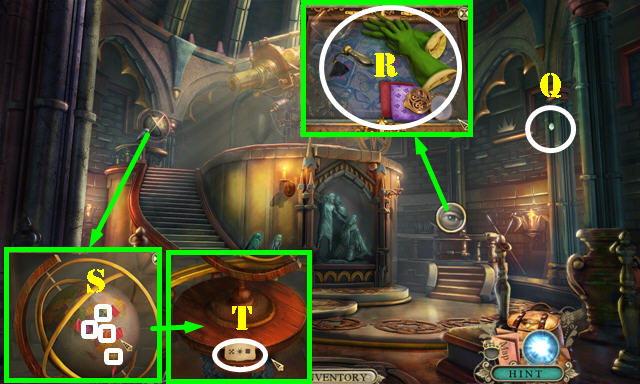
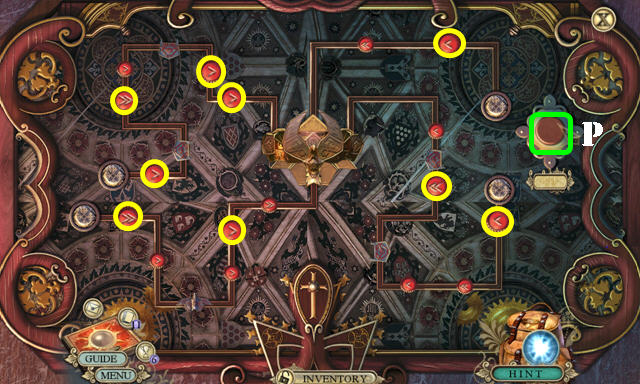
- Play the HOP to receive the BRASS PUZZLE (T).
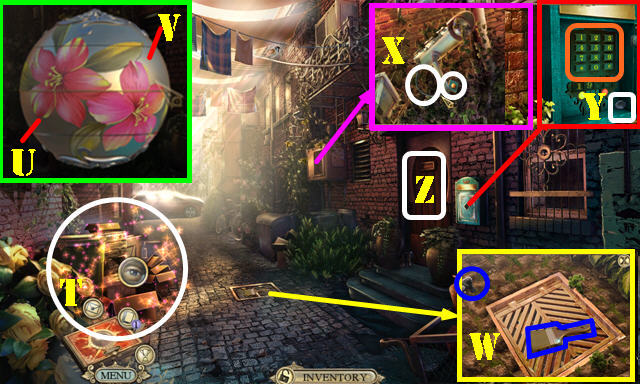
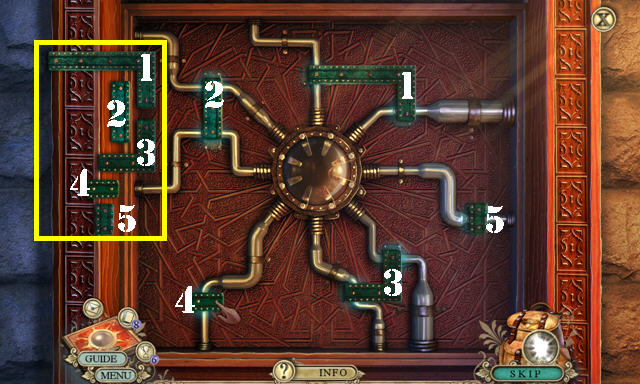
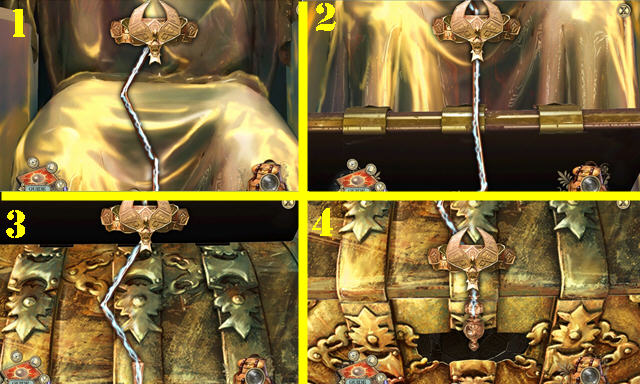
- Open the BRASS PUZZLE for a puzzle (inventory). Solution: Ux10-Vx4. Take the VINTAGE LIGHTER.
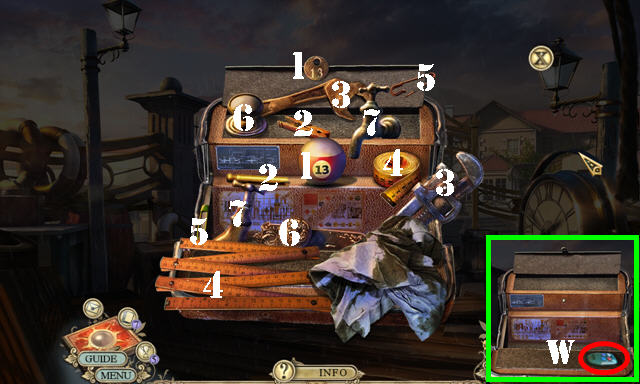
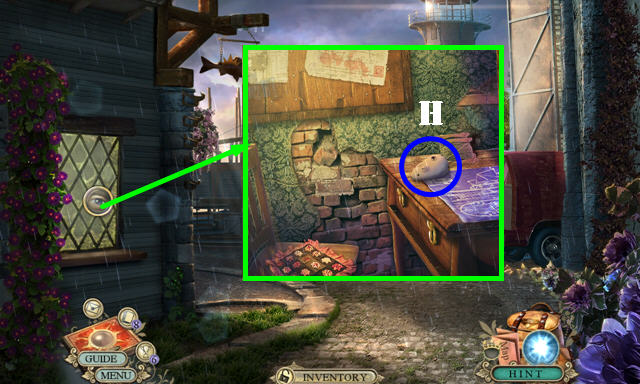
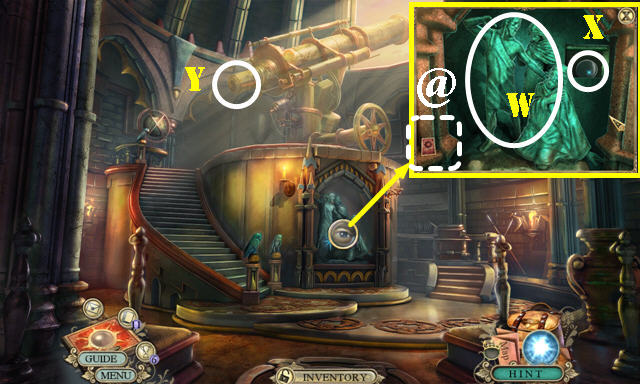
- Take the PAWN and ARCHAEOLOGY BRUSH (W).
- Remove the vines; take the STRANGE KEY and CABLE (X).
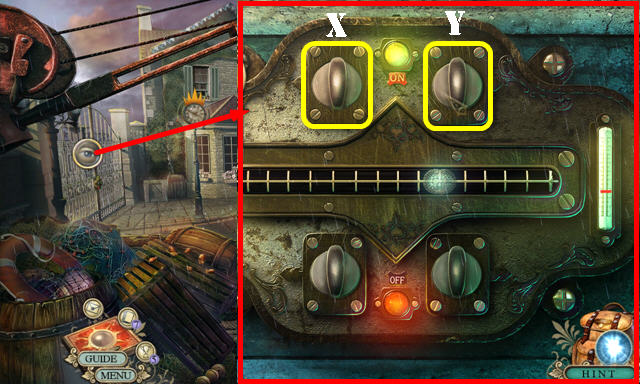
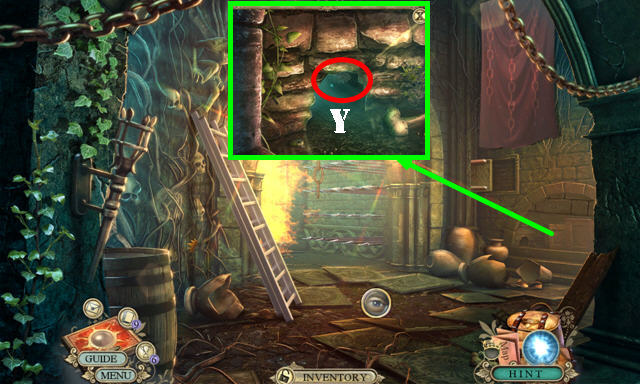
- Place the STRANGE KEY; take the GLASS EYE 1/3 (Y). Press 1958 (orange). Enter the Bathhouse (Z).

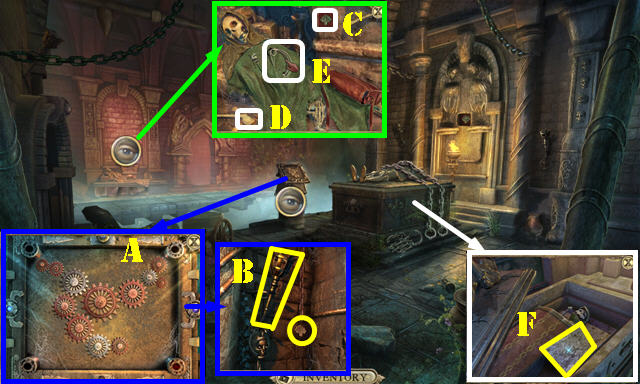
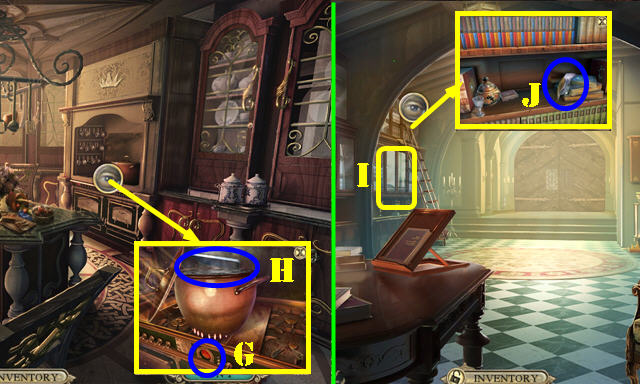
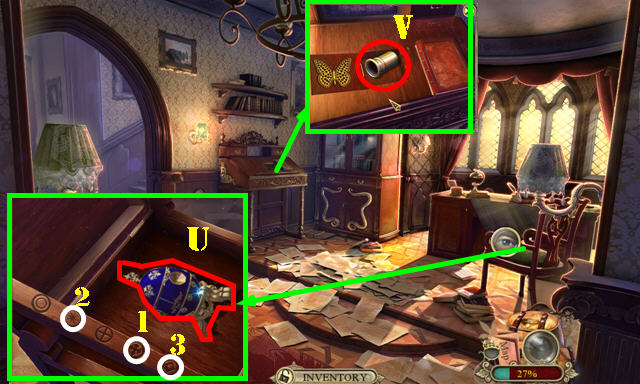
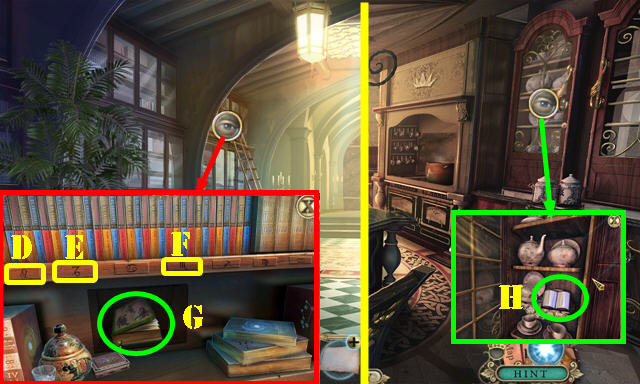
- Use the ARCHAEOLOGY BRUSH; take the SILVER COIN (A).
- Take the GOLD COIN (B) and THE SULTAN’S BOOK (C). Place the PAWN (D); take the GLASS EYE 2/3 (E).
- Place the GOLD COIN and SILVER COIN; take the STURDY ROPE (F) and Fact Card 2/20 (@).
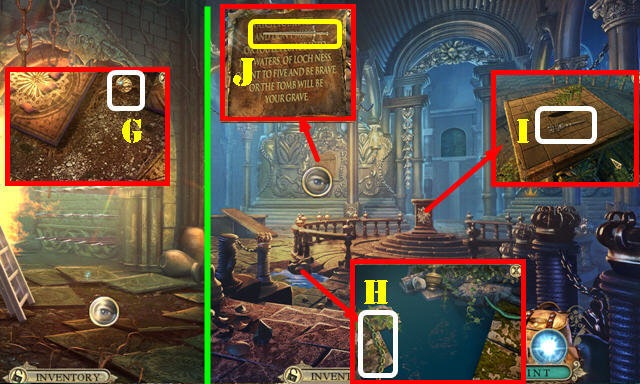
- Walk down.
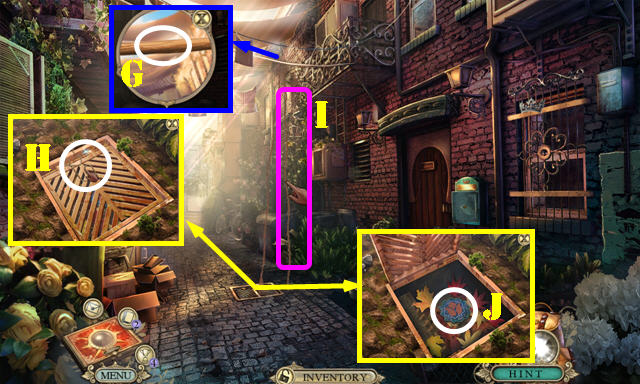
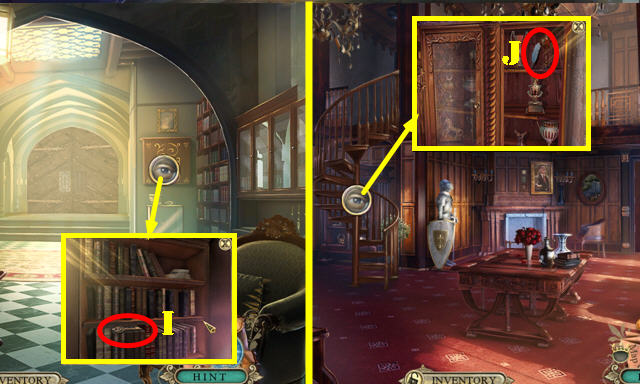
- Use the STURDY ROPE (G); pull it (H-I). Take the TULIP TILE (J).
- Enter the Bathhouse.
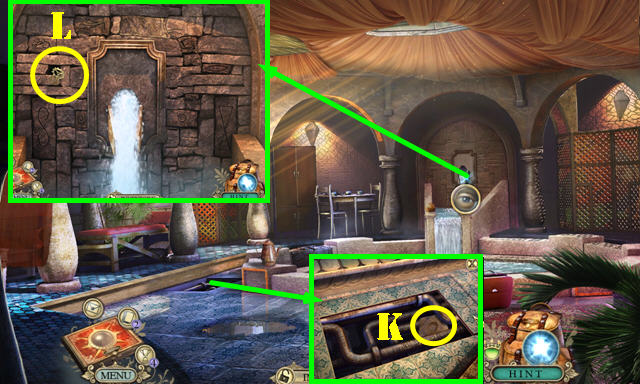
- Place the TULIP TILE; take the ROCK (K).
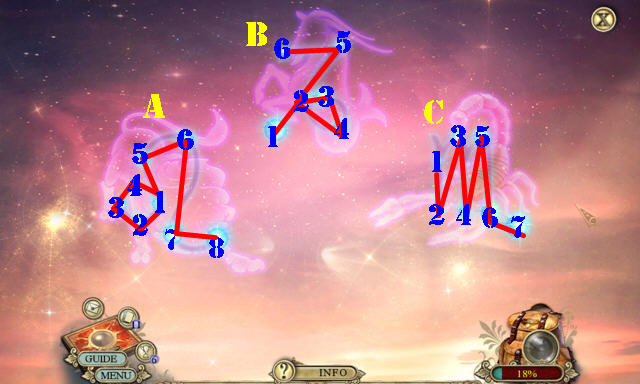
- Place the ROCK (L) for a puzzle. Recreate the images shown in the green section.
- Solutions: (4-5-9), (1-6-10), (2-7-8).
- Go to the Safe house.
- Turn the chair; take the GLASS EYE 3/3 (M).
- Take the Fact Card 3/20 (@).
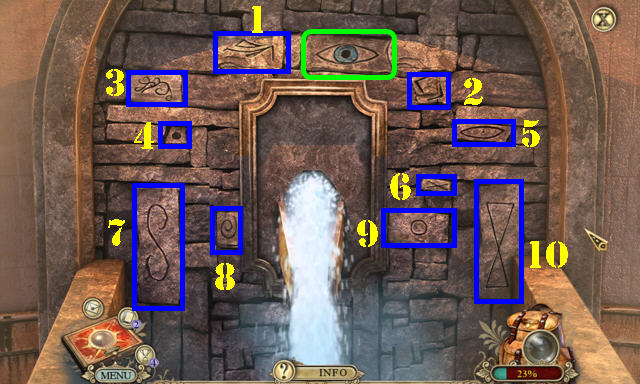
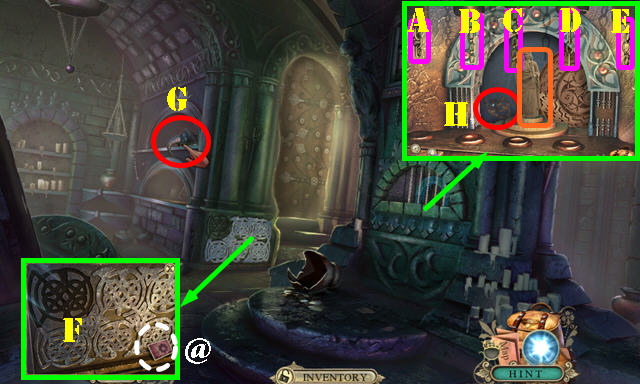
- Place THE SULTAN’S BOOK for a puzzle. Solution (N).
- Place the 3 GLASS EYES (O); push the button (P).
- Play the HOP (Q) to receive THE SULTAN’S CD.
- Open the laptop; plug in the CABLE and insert THE SULTAN’S CD (R). Read all the messages and touch the Emergency button.
- Walk down; take the ladder to the Rooftop.
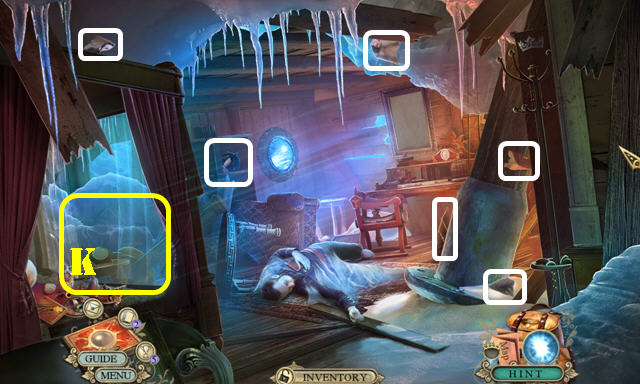
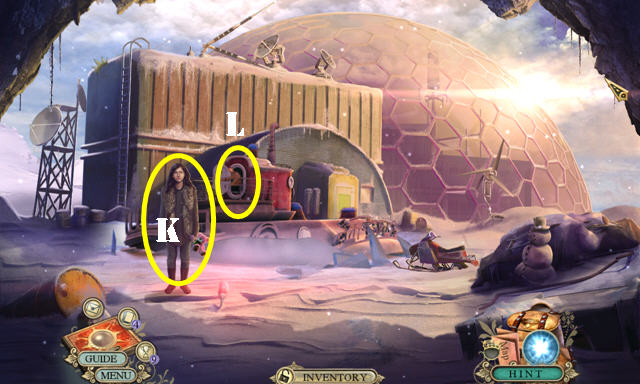
Chapter 2: Arctic Circle
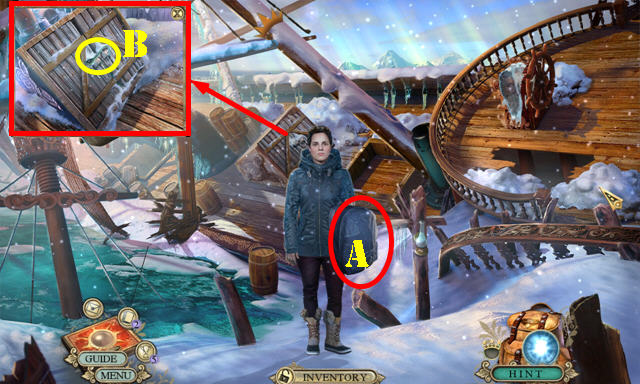
- Talk to Irene.
- Take the H.E.L.P. RUCKSACK (A).
- Take the HOOK (B).
- Open the H.E.L.P. RUCKSACK; take the LIGHTER FUEL, Map, and HACKSAW (inventory).
- Use the HACKSAW on the lock (B); open the doors and go to the Lower deck.
- Use the LIGHTER FUEL on the VINTAGE LIGHTER to get the WORKING LIGHTER (inventory).
- Take the GUNPOWDER POUCH (C).
- Use the WORKING LIGHTER on the fuse (D) to activate a HOP; play it (E) to get the RED GEAR.
- Place the RED GEAR; read the note. Take the EMPTY FIREWORKS, and CHECKERS TOKEN 1/2 (F).
- Move the items; take the SEASHELL 1/3 (G).
- Place the HOOK (H) and touch it. Pull the lever (I).
- Use the GUNPOWDER POUCH on the EMPTY FIREWORKS to get the LOADED FIREWORKS (inventory).
- Go through the door (J).
- Take the 6 PAINTING PIECES (white).
- Play the HOP to receive the SEASHELL 2/3 (K).
- Place the 6 PAINTING PIECES for a puzzle. Solution (L).
- Take the Fact Card 4/20 (@).
- Take the MERMAID KEY, note, and SHARP BONE (M).
- Look at the book (blue); take the H.E.L.P. SIGNET RING and CHECKERS TOKEN 2/2 (N).
- Walk down.
- Place the 2 CHECKERS TOKEN for a puzzle.
- Solution (O).
- Place the H.E.L.P. SIGNET RING; take the LOCKET and KRAKEN KEY (P).
- Walk down.
- Take the PIECE OF ROPE (Q).
- Use the SHARP BONE; take the SEASHELL 3/3 (R).
- Place the LOADED FIREWORKS and the PIECE OF ROPE (S). Use the WORKING LIGHTER on them.
- Remove the tarp. Place the 3 SEASHELLS; take the DEAD MAN’S KEYS (T).
- Return to the Captain’s cabin.
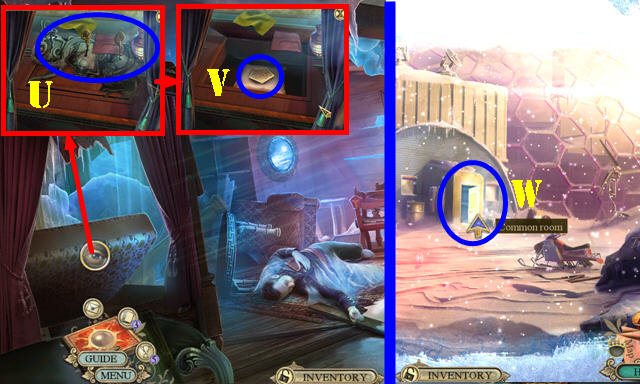
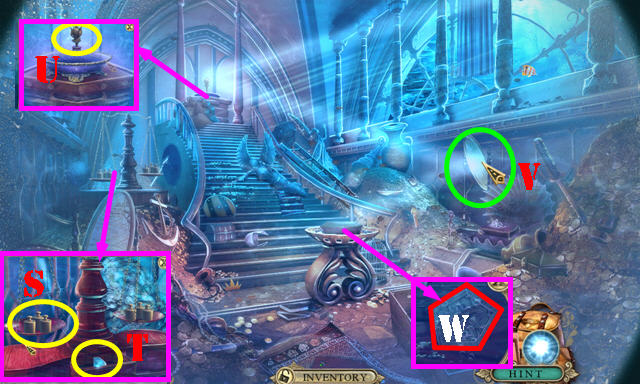
- Place the KRAKEN KEY, DEAD MAN’S KEYS, and MERMAID KEY (U); touch the item inside (V).
- Enter the Common room (W).
- Talk to the Irene to get the ANTENNA FUSE 1/3.
- Play the HOP (X) to receive the SCISSORS.
- Take the Fact Card 5/20 (@).
- Move the socks; take the MICROSCOPE LENS (Y).
- Go to the Bunk room (Z).
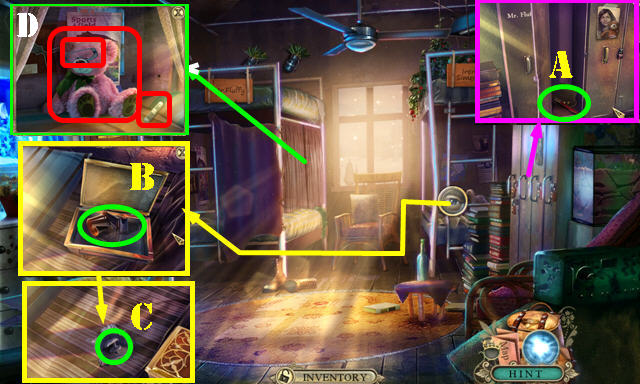
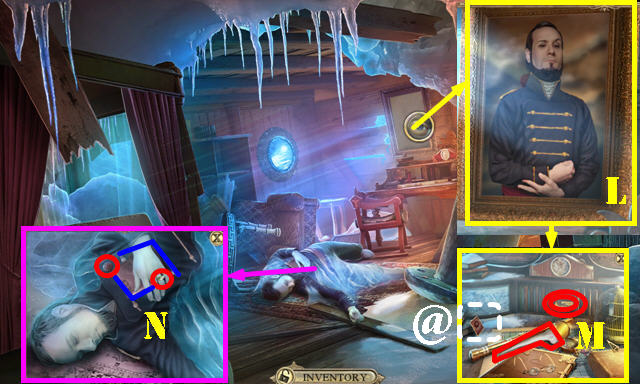
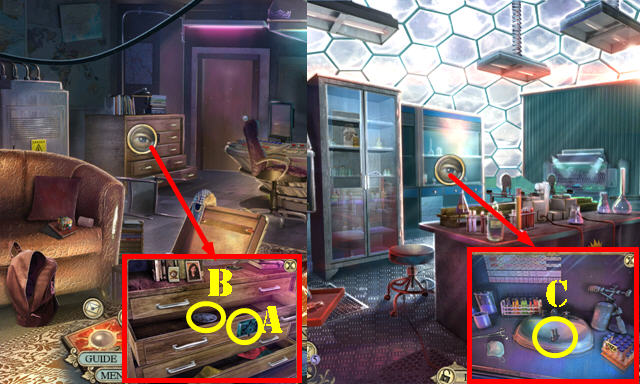
- Open the locker; read the diary and move all the books. Take the GLASS CUTTER (A).
- Open the box; take the MICROFILM (B). Use the SCISSORS; take the HANDLE (C).
- Open the curtain; take the SAFETY GOGGLES, MR. FLUFFY, and ANTENNA FUSE 2/3 (D).
- Walk down twice.
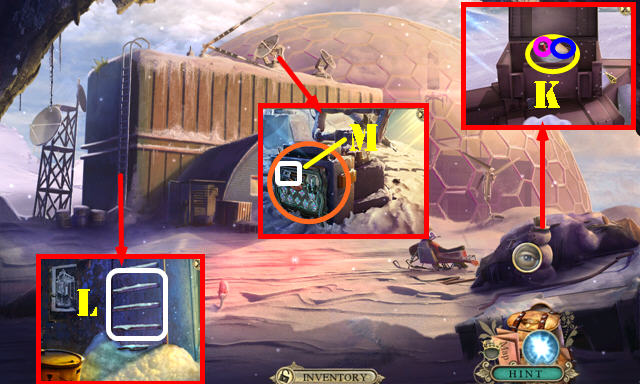
- Take the SCREWDRIVER (E).
- Place the HANDLE and turn it; take the ANTENNA FUSE 3/3, BATHROOM KEY, and TENT CORD (F).
- Return to the Bunk room.
- Use the BATHROOM KEY (G) and turn it. Go through the door.
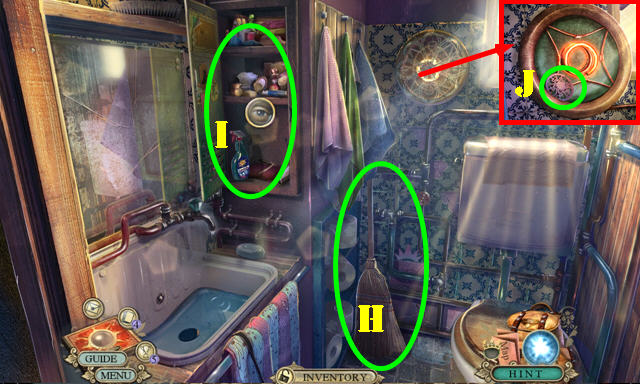
- Take the BROOM (H).
- Open the cabinet; play the HOP (I) to receive the METALLIC SPONGE.
- Use the SCREWDRIVER; take the WORKBENCH SYMBOL 1/2 (J).
- Walk down three times.
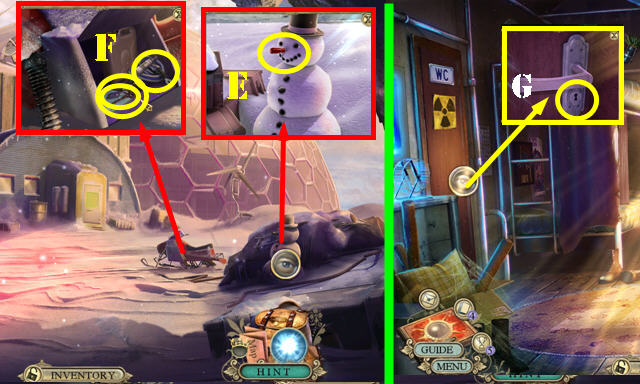
- Use the BROOM 3 times on the snow; open the lid; take the FLARE. Read the note; take the BAG OF SALT (K).
- Use the BAG OF SALT (L); take the LEVER (M).
- Place the 3 ANTENNA FUSES for a puzzle (orange).
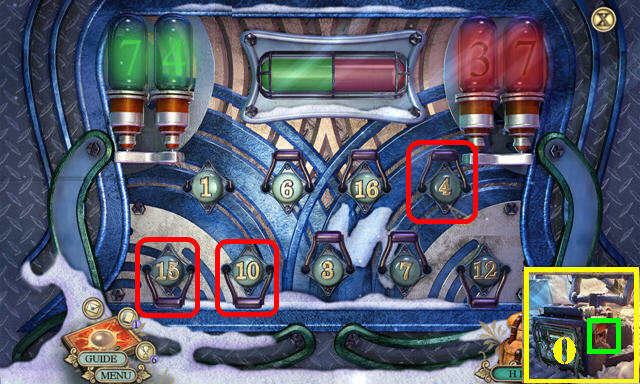
- Solution: 15-10-4 (N).
- Touch the tape (O).
- Go to the Common room.
- Talk to Irene.
- Go to the Lab (P).
- Use the SAFETY GOGGLES on the scene. Place the LEVER (Q) and pull it.
- Take the Fact Card 6/20 (@).
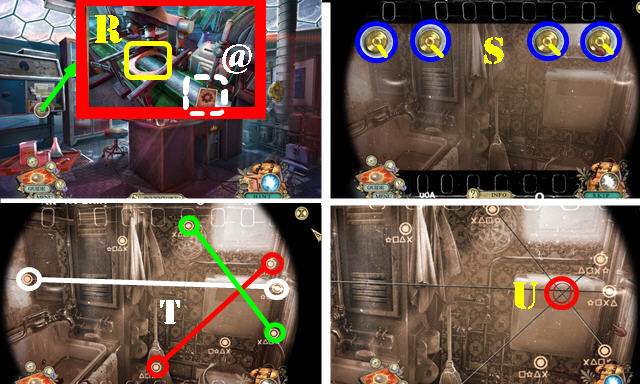
- Place the MICROSCOPE LENS and then the MICROFILM (R) for a puzzle.
- Turn the knobs to the positions shown (S).
- Connect the lines (T). Touch the intersection (U).
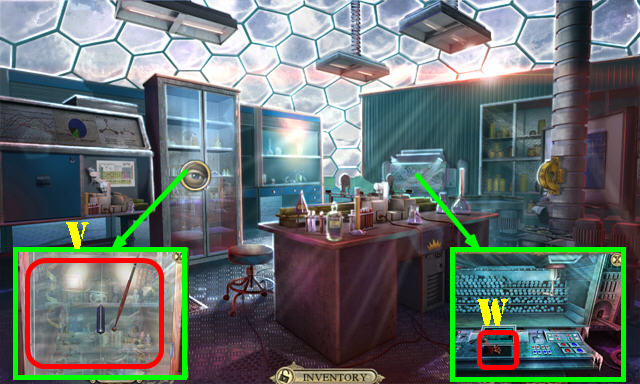
- Use the GLASS CUTTER to activate a HOP (V); play it to get the WOODEN COMPASS.
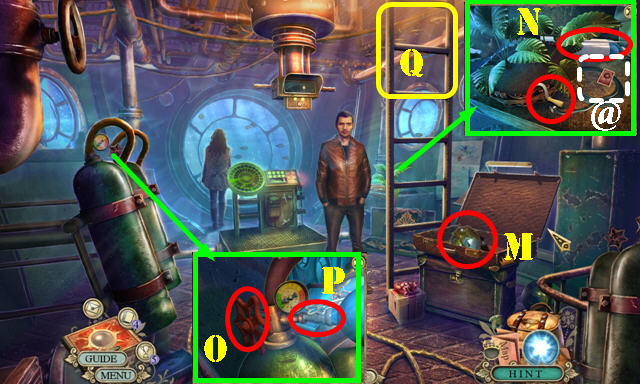
- Use the METALLIC SPONGE; take the OXYGEN VALVE (W).
- Walk down.
- Place the WOODEN COMPASS (A); take the WORKBENCH SYMBOL 2/2 (B).
- Return to the Lab.
- Place the 2 WORKBENCH SYMBOLS. Remove all the items; take the ARROWHEAD (C).
- Return to the Bathroom.
- Use the ARROWHEAD; lift the lid. Take the PLASTIC BAG (D).
- Open the PLASTIC BAG to get the SPECIMEN BAR CODE (inventory).
- Return to the Lab.
- Place the SPECIMEN BARCODE (E); push the button (F); take the FROZEN SPECIMEN (G).
- Go to the Bathroom.

- Place the FROZEN SPECIMEN (H); take the BRONZE AMULET PIECE and CROWN FRAGMENT (I).
- Go to the Common room.
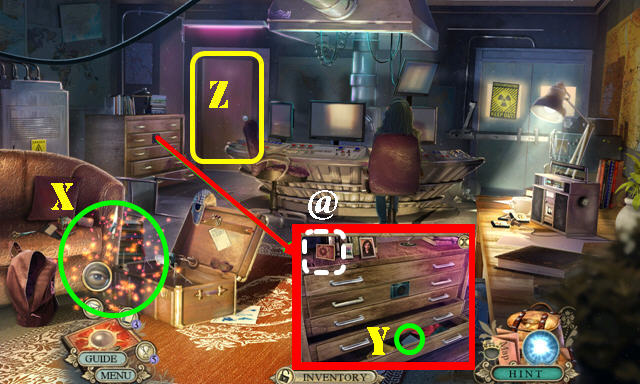
- Talk to Irene to get the CABINET KEY.
- Go to the Bunk room.
- Use the CABINET KEY; take the DOUBLOON and MR. FLUFFY’S BACKPACK (J).
- Place MR. FLUFFY’S BACKPACK on MR. FLUFFY (inventory).
- Walk down twice.
- Give MR. FLUFFY to Irene (K).
- Go to the Submarine Bridge (L).
Chapter 3: The Underwater Ruins
- Talk to Sam.
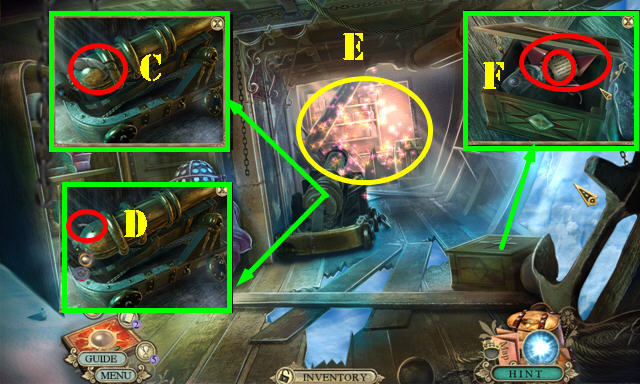
- Open the suitcase; take the HELMET (M).
- Take the Fact Card 7/20 (@), SICKLE, and EMPTY OXYGEN TANK (N).
- Place the OXYGEN VALVE (O) and the EMPTY OXYGEN TANK (P) to get the FULL OXYGEN TANK.
- Go to the Airlock (Q).
- Place the HELMET (R) and FULL OXYGEN TANK (S); touch the suit.
- Throw the FLARE (T).

- Take the TRIDENT (U).
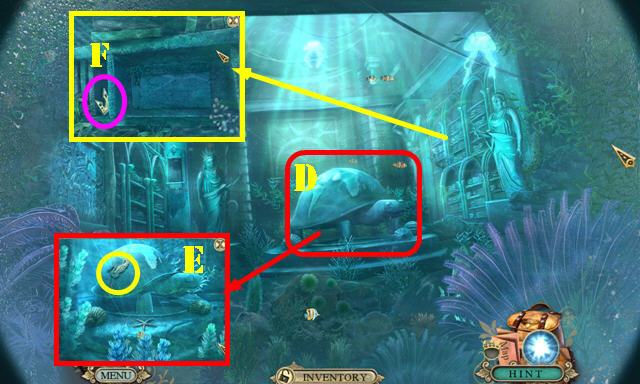
- Place the DOUBLOON; take the GOLDEN WEIGHT 1/3 (V).
- Move all the leaves; take the RELIEF PIECE 1/3 (W).
- Place the BRONZE AMULET PIECE in the LOCKET to get the BRONZE OCTOPUS LOCKET (inventory).
- Take the SHARK TOOTH (X). Place the BRONZE OCTOPUS LOCKET for a puzzle.

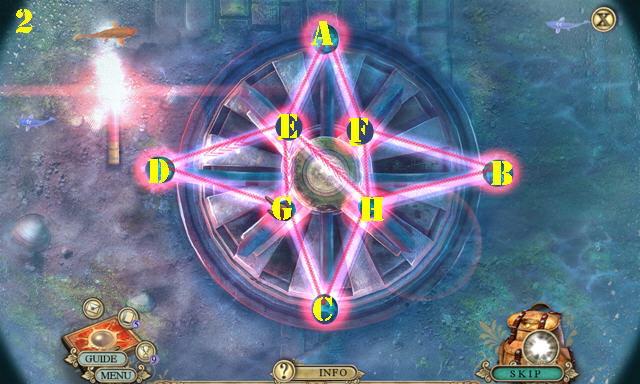
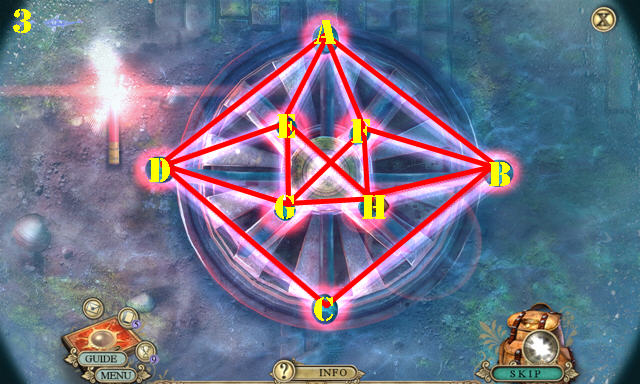
- Connect the lines.
- Solution 1: C-D-H-C-B-H-A-B.
- Solution 2: F-H-E-G-C-H-B-F-A-E-D-G.
- Solution 3: H-B-F-A-B-C-D-A-E-D-G-F-H-G-E-H.
- Go forward.
- Use the SICKLE; take the OLD BAG (A).
- Open the OLD BAG; take the SWAN and EMPTY OLD BAG (inventory).
- Walk down.
- Use the EMPTY OLD BAG to get the GLOWING JELLYFISH (B).
- Move the items; take the GOLDEN WEIGHT 2/3 (C).
- Return to the Underwater Library.
- Place the GLOWING JELLYFISH (D); touch all 3 jellyfish.
- Take the SWAN 2/2 (E) and CROWN SYMBOL (F).
- Walk down.
- Place the 2 SWANS; take the RELIEF PIECE 2/3 and CONTINENT PLATE (G).
- Go to the Underwater Library.
- Place the CONTINENT PLATE (H) for a puzzle.
- Solution (I).
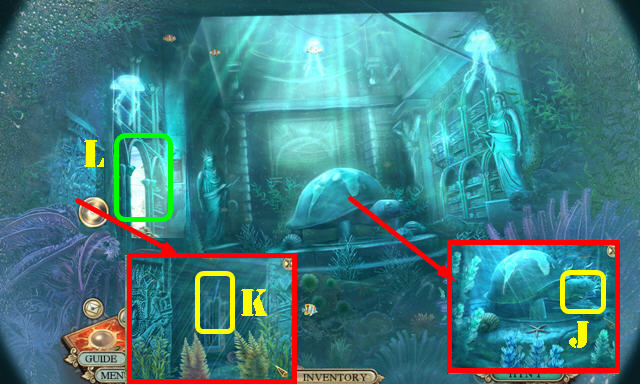
- Take the RELIEF PIECE 3/3 (J).
- Place the 3 RELIEF PIECES; pull the lever (K).
- Go to the Vault (L) to access a HOP; play it to receive the DAGGER.
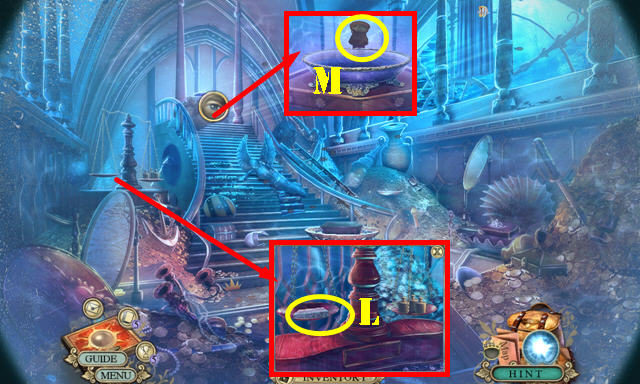
- Take the CLAY TABLET (L) and BAG OF ANCIENT COINS (M).
- Walk down.
- Place the DAGGER and TENT CORD (N). Pull the cord (O); take the INCOMPLETE SCEPTER (P).
- Place the CLAY TABLET (Q); take the GOLDEN WEIGHT 3/3 (R) and Fact Card 8/20 (@).
- Go to the Vault.
- Place the 3 GOLDEN WEIGHTS (S); take the DIAMOND (T).
- Place the DIAMOND on the INCOMPLETE SCEPTER to get the SCEPTER (inventory).
- Place the SCEPTER (U); tilt the mirror (V).
- Place the CROWN SYMBOL; take the CROWN FRAGMENT (W).
- Go to the Submarine bridge.
Chapter 4: Stonehaven, Scotland

- Talk to Sam.
- Play the HOP (A) to get the BROKEN AIR PUMP BODY.
- Remove the chain (B).
- Take the PUMP HANDLE (C).
- Go forward.
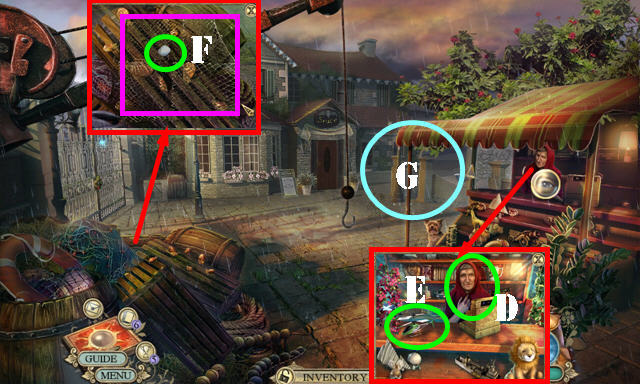
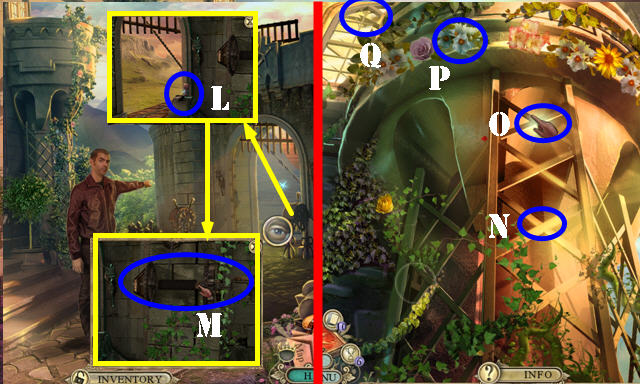
- Talk to the lady; give her the BAG OF ANCIENT COINS (D). Take the REMOTE CONTROL HELICOPTER (E).
- Take the PEBBLE (F). Use the SHARK TOOTH on the net (purple).
- Go to the Beach (G).
- Take the DEFLATED FLOAT (H), PUMP BASE (I), and BINOCULARS (J).
- Open the lid; look at the note and take the BOTTLE OPENER (K). Remove all other items.
- Use the BOTTLE OPENER; take the BATTERY PACK (L).
- Place the BATTERY PACK on the REMOTE CONTROL HELICOPTER to get the HELICOPTER TOY (inventory).
- Walk down.
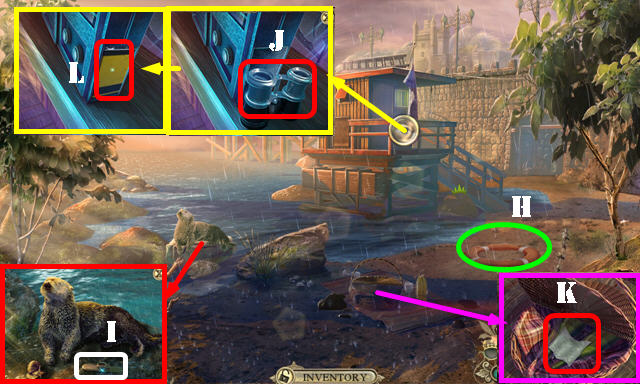
- Use the BOTTLE OPENER to get the CLAM (M).
- Return to the Beach.
- Give the CLAM to the otter; take the SILVER THISTLE CHARM 1/3 (N).
- Walk down; enter the Pub (N1).
- Talk to the bartender (O) to activate a HOP; play it to receive the SLINGSHOT.
- Take the GOLD COIN 1/4 (P).
- Open the door. Take the Fact Card 9/20 (@). Take the LANTERN and WIND-UP KEY behind it (Q).
- Place the PEBBLE on the SLINGSHOT to get the LOADED SLINGSHOT (inventory).
- Go to the Beach.

- Place the LANTERN (R); move all the items. Take the COG 1/3 (S).
- Walk down twice.
- Use the LOADED SLINGSHOT (T); take the TARTAN SHAWL (U).
- Use the TRIDENT to get the WORKER’S BAG (V).
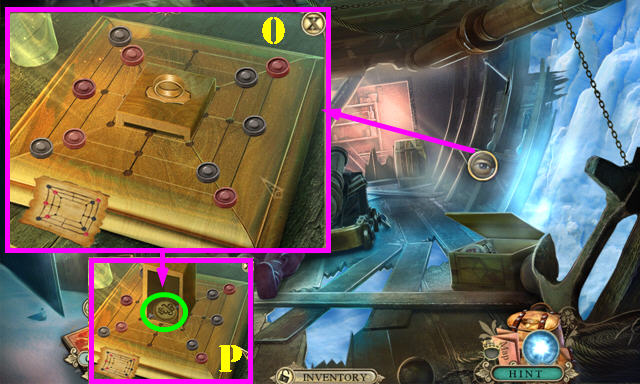
- Open the WORKER’S BAG (inventory) for a puzzle.
- Solution (1-7).
- Take the GATE REMOTE CONTROL (W).
- Go to the Pier.
- Use the GATE REMOTE CONTROL for a puzzle. Solution: X, Yx2.
- Go through the gate.
- Use the BINOCULARS (A). Place the HELICOPTER TOY for a puzzle.
- Solution (1-5). Take the CREST (B).
- Open the doors; take the METAL DETECTOR (C).
- Take the PUMP HOSE (D).
- Take the Fact Card 10/20 (@).
- Remove three boards; take the POLE (E).
- Return to the Beach.
- Use the METAL DETECTOR to activate a HOP; select the item once the silhouette appears (F). You receive the SMALL HOOK.
- Place the SMALL HOOK on the POLE to get the LONG HOOK (inventory).
- Use the LONG HOOK to get the LADDER (G).
- Return to the Shipyard.
- Place the PUMP HANDLE, PUMP BASE, and PUMP HOSE on the BROKEN AIR PUMP BODY to get the AIR PUMP (inventory).
- Place the DEFLATED FLOAT; use the AIR PUMP on it. Use the LONG HOOK to get the MOUSE TOY (H).
- Place the WIND-UP KEY on the MOUSE TOY (inventory).
- Return to the Pub.
- Place the CREST; take the SILVER THISTLE CHARM 2/3 and DOORKNOB (I).
- Talk to the bartender.
- Place the DOORKNOB to activate a HOP (J): play it to get the OLIVE OIL.
- Walk down twice.
- Place the MOUSE TOY on the cat; take the SILVER THISTLE CHARM 3/3 (K).
- Return to the Beach.
- Place the 3 SILVER THISTLE CHARMS (L). Enter the Catacombs entrance.
Chapter 5: Catacombs
- Take REDGRAVE’S CUFFLINK (M). Remove three tiles.
- Place the LADDER (N); take the MINIATURE HEAD (O). Use the OLIVE OIL (P) and pull the bar.
- Position the chains as shown (Q).
- Touch the wall twice for a puzzle (R).
- Solution (1-5).
- Go forward.
- Touch the mechanism to activate the HOP (S); play it to receive the COG 2/3.
- Push the button (T). Push the button twice (U).
- Take the Fact Card 11/20 (@).
- Take the GOLD COIN 2/4 (V), GEM (W), and MAGNETIC CHARM (X).
- Use REDGRAVE’S CUFFLINKS to remove the screws (purple).
- Walk down.
- Use the MAGNETIC CHARM to get the COG 3/3 (Y).
- Go forward.
- Place the 3 COGS (A); pull the lever (B). Push the button (C); take the GOLD COIN 3/4 (D) and KILT PIN (E).
- Open the coffin; read the slab (F); take the STONE ORNAMENT 1/4.
- Walk down.
- Use the KILT PIN (G); take the GOLD COIN 4/4.
- Go forward and then enter the Catacombs grand chamber.
- Talk to Sam.
- Take the GOLDEN CHAIN (H) and MINIATURE TORCH (I).
- Take the MINIATURE SWORD (J); touch the stone.
- Place the 4 GOLD COINS for a puzzle.
- Solution (K). Take the KILT KNIFE (L).
- Walk down.
- Use the KILT KNIFE; read the note and take the CHALICE (M).
- Go forward.

- Use the CHALICE (N) to get the FULL CHALICE.
- Use the FULL CHALICE (O); place the GEM (P).
- Go to the Catacombs exit (Q).
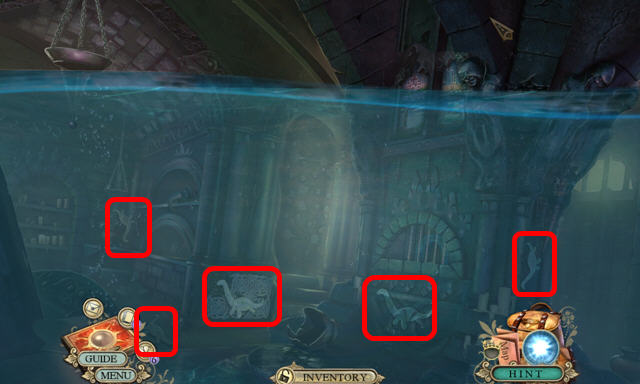
- Select the symbols (red) and dive down; repeat until the water disappears.
- Find the items as listed and place them back as shown (1-6).
- You receive the STONE ORNAMENT 2/4.
- Take the Fact Card 12/20 (@).
- Drag the TARTAN SHAWL over the cobwebs (F).
- Take the HELM (G).
- Place the MINIATURE HEAD, MINIATURE SWORD, and MINIATURE TORCH (orange).
- Place the GOLDEN CHAIN. Pull the chains: D-E-A. Take the STONE ORNAMENT 3/4 (H).
- Walk down.
- Play the HOP; use the HELM on the fire. Take the STONE ORNAMENT 4/4 (I).
- Go forward.
- Place the 4 STONE ORNAMENTS (J).
- Go to the Castle courtyard (K).
Chapter 6: The Castle
- Talk to Sam.
- Pull the lever (L) and then the mechanism (M).
- Go up the tower. Touch the tower to activate a puzzle.
- Climb in this order: N-O-P-Q.
- Open the curtains twice.
- Take the Fact Card 13/20 (@).
- Move the items; take the STRAINER (R).
- Open the door to activate a HOP (S); play it to get the CRESCENT MOON.
- Go to the Hall.

- Place the CRESCENT MOON; take the BROOCH (T).
- Flip the BROOCH; take the BROOCH PIN (inventory).
- Open the helmet; take the PUZZLE DISC 1/3 (U).
- Go to the Library (V).
- Take the MAGNIFIER (W).
- Walk down. Enter the Lounge (X).

- Open the curtains.
- Play the HOP (A) to get the PUZZLE DISC 2/3.
- Take the TAPESTRY PIECE (B).
- Take the Fact Card 14/20 (@).
- Break the glass with the TAPESTRY PIECE; take the ANCIENT MURAL PIECE 1/3 (C).
- Take the TABLET (D) and GOLF BAG (E).
- Use the STRAINER; take the STATUE PART 1/2 (F).
- Take the GOLF CLUB from the GOLF BAG. Use the BROOCH PIN on the GOLF BAG; take the PUZZLE DISC 3/3 and GOLF TEE (inventory).
- Return to the Kitchen.
- Push the button (G); remove the lid and place the TABLET over the steam to get the STEAMED TABLET (H).
- Push the button on the STEAMED TABLET (inventory); enter 340. Scroll through options. Take back the STEAMED TABLET.
- Return to the Library.
- Place the STEAMED TABLET on the glass (I).
- Open both doors; take the PAINTING PIECE (J).
- Walk down.
- Place the PAINTING PIECE (K) to activate a HOP; play it to get the FORK SYMBOL.
- Place the 3 PUZZLE DISCS (L) for a puzzle.
- Solution: 1-2-3.
- Enter the Study.
- Look at the book (M) and then close it.
- Use the GOLF TEE; move the papers and take the SMALL FLAG (N).
- Place the MAGNIFIER for a puzzle (O).
- Solution (1-3). Take the FAINT PAPER SHEET.
- Take the Fact Card 15/20 (@).
- Go to the Observatory (P).
- Use the GOLF CLUB to take the EMERALD (Q).
- Move the items to activate a HOP (R); play it to get the GOLDEN BUTTERFLY.
- Place the SMALL FLAG and touch all the spaces (S). Take the CHAIR CLUE (T).
- Walk down.
- Place the CHAIR CLUE; touch the symbols 1-3. Take the JEWELED EGG (U).
- Place the GOLDEN BUTTERFLY; take the TELESCOPE EYEPIECE (V).
- Place the EMERALD on the JEWELED EGG; take the STATUE PART 2/2 (inventory).
- Return to the Observatory.
- Take the Fact Card 16/20 (@).
- Place the 2 STATUE PARTS (W); take the TELESCOPE LENS (X).
- Place the TELESCOPE EYEPIECE and TELESCOPE LENS; touch it for a puzzle (Y).
- Drag the lines in the order shown: A-B-C.
- Take the CONSTELLATION SKETCH.
- Return to the Library.
- Place the CONSTELLATION SKETCH; touch the symbols (D-E-F). Take the ANCIENT MURAL PIECE 2/3 (G).
- Return to the Kitchen.
- Use the FORK SYMBOL; take the BOOK EMBLEM (H).
- Return to the Library.
- Place the BOOK EMBLEM; take the TROPHY CASE KEY (I).
- Walk down.
- Use the TROPHY CASE KEY; turn it and take the QUILL EMBLEM (J).
- Return to the Library.
- Place the QUILL EMBLEM; take the PENCIL (K).
- Use the PENCIL on the FAINT PAPER SHEET (inventory); take the SAFE CODE.
- Walk down.
- Place the SAFE CODE (L) and enter the code (1-4). Take the ANCIENT MURAL PIECE 3/3 (M).
- Return to the Library.
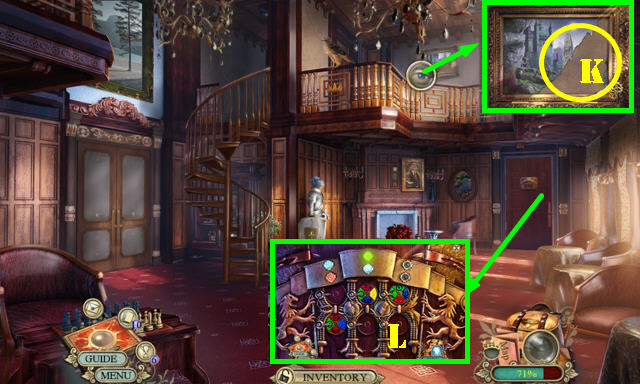
- Place the 3 ANCIENT MURAL PIECES on the back door to activate a puzzle.
- Solution (N).
- Enter the Grand chamber.
- Talk to the gentlemen.
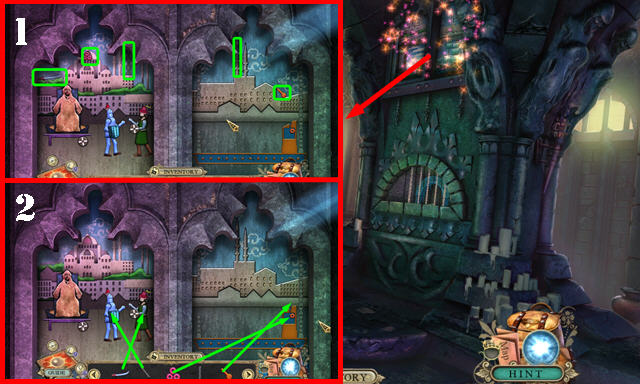
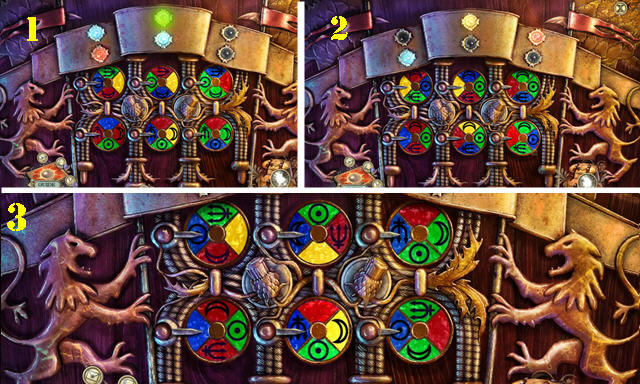
- Place the 2 CROWN FRAGMENTS for a puzzle (O).
- Solution (yellow). Push start (P).
- Take the CROWN.
- Place the CROWN at the base of the statue for a puzzle.
- Solution: 1-4.
- Congratulations, you’ve completed Hidden Expedition: The Crown of Solomon.


 Living Legends: Frozen Beauty Walkthrough, Guide, & Tips
 Valerie Porter and the Scarlet Scandal Walkthrough, Guide, & Tips
 The Secret Order: New Horizon Walkthrough, Guide, & Tips
 Nightfall Mysteries: Haunted by the Past Walkthrough, Guide, & Tips
 Twisted: A Haunted Carol Walkthrough, Guide, & Tips