Cursery: The Crooked Man and the Crooked Cat Walkthrough, Guide, & Tips
Cursery: The Crooked Man and the Crooked Cat Walkthrough

Welcome to the Cursery: The Crooked Man and the Crooked Cat Walkthrough
These nursery rhymes are cursed, and your sister’s been taken by the Crooked Man!
Whether you use this document as a reference when things get difficult or as a road map to get you from beginning to end, we’re pretty sure you’ll find what you’re looking for here.
This document contains a complete Cursery: The Crooked Man and the Crooked Cat game walkthrough featuring annotated screenshots from actual gameplay!
We hope you find this information useful as you play your way through the game. Use the walkthrough menu below to quickly jump to whatever stage of the game you need help with.
Remember to visit the Big Fish Games Forums if you find you need more help. Have fun!
This walkthrough was created by prpldva, and is protected under US Copyright laws. Any unauthorized use, including re-publication in whole or in part, without permission, is strictly prohibited.
General Tips

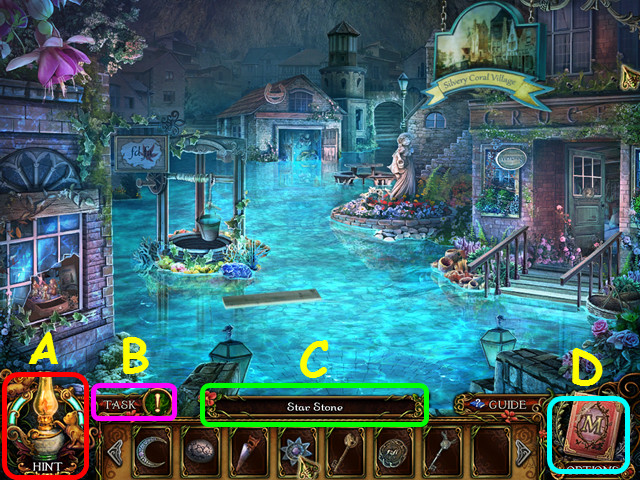
- This is the official guide for Cursery: The Crooked Man and the Crooked Cat.
- This guide will not mention each time you have to zoom into a location; the screenshots will identify each location.
- Hidden-object puzzles are referred to as HOPs in this guide. Items listed in green are hidden or they require additional actions to locate. Interactive items in HOPs are color-coded.
- Mini-games and HOPs are sometimes randomized; your solution may vary.
- Select the lamp for a hint (A).
- Select the Task bar to see your current objective (B).
- Hover oven an item in your inventory to see its name (C).
- Use your map to see where actions are available and quickly travel (D).
- You can use the map to travel only when the Crooked Man’s presence is not too strong.
Prologue

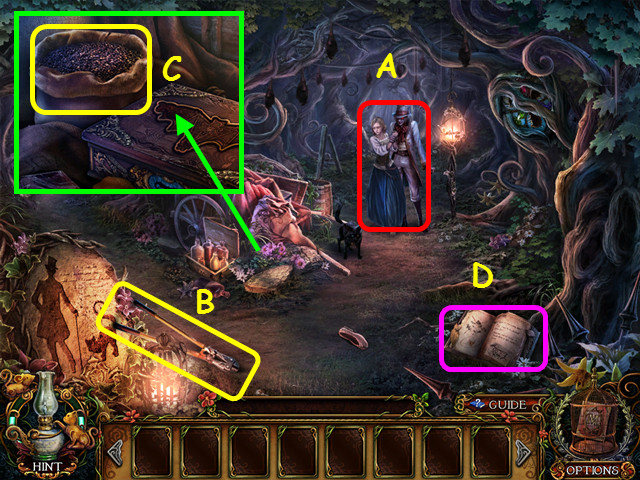
- Try to stop the Crooked Man (A).
- You have the option of an interactive tutorial.
- Take the BOLT CUTTER (B).
- Take the PEPPER (C).
- Read the journal (D).
- Walk to the left.

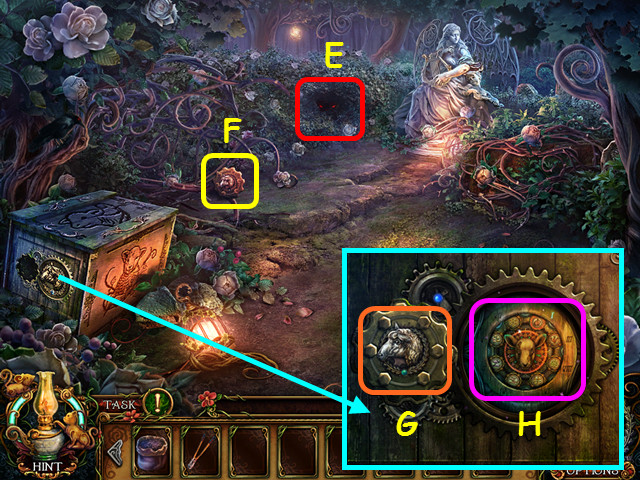
- Use the PEPPER on the beast (E).
- Take the WHITE LAMB GEAR (F).
- Place the WHITE LAMB GEAR on the chest (G); select the mini-game (H).

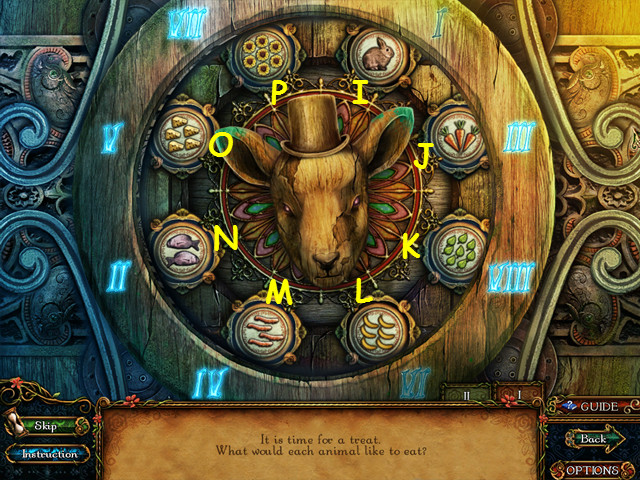

- Move the discs to the numbers that matches the amount on each disc.
- Select a disc, and then select a highlighted disc to swap locations.
- Select the discs in this order: J-N, K-P, M-P, J-M, P-L, P-M, O-L, and P-L.
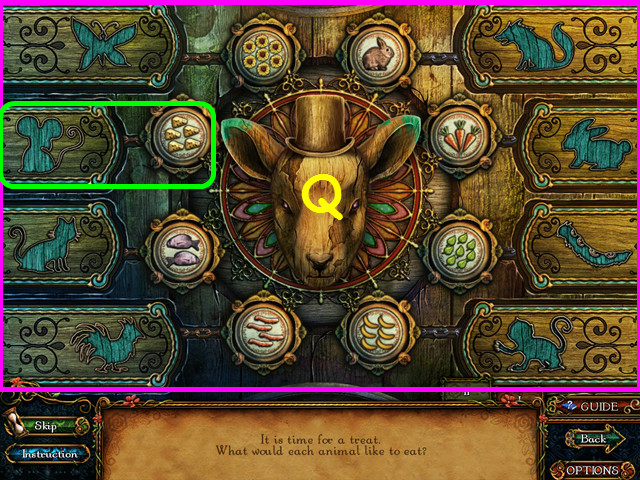
- Look at the animal on the panel and move it next to the food that animal eats (Q).
- Select 2 panels to swap locations.

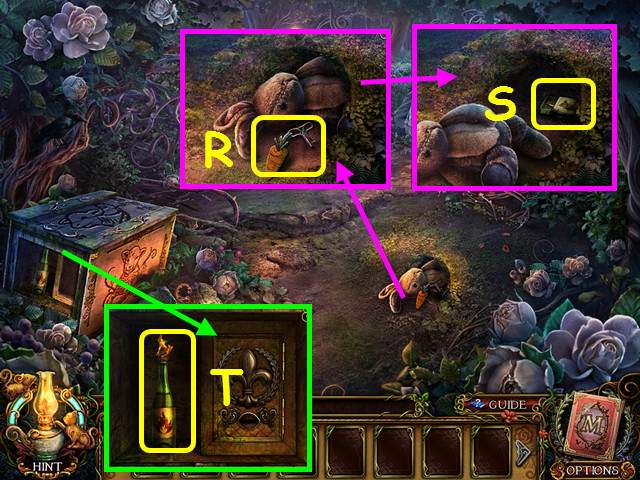
- Take the CARROT WINDING KEY (R).
- Move the rabbit and take the BOX WITH ONE MATCH (S).
- Use the BOX WITH ONE MATCH on the bottle; take the BOTTLE OF BURNING OIL (T).
- Walk down.

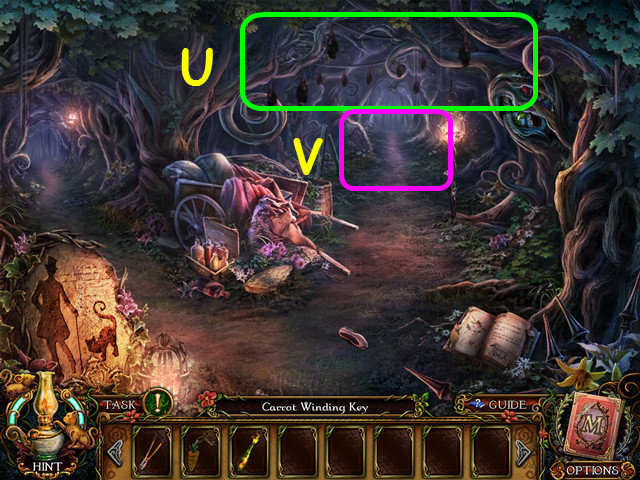
- Use the BOTTLE OF BURNING OIL on the bats (U).
- Walk forward (V).
Chapter 1: Day 1, 8:00 PM

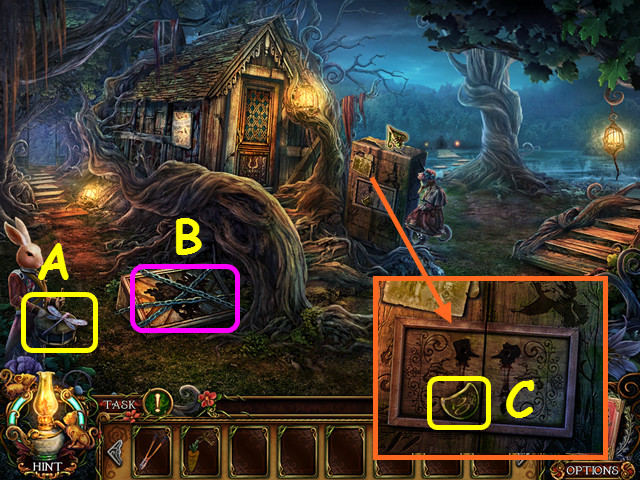
- Take the DRAGONFLY JEWEL (A).
- Use the BOLT CUTTER on the chains (B).
- Take the CROOKED SIXPENCE TAIL and look at the photo (C).
- Walk to the left.

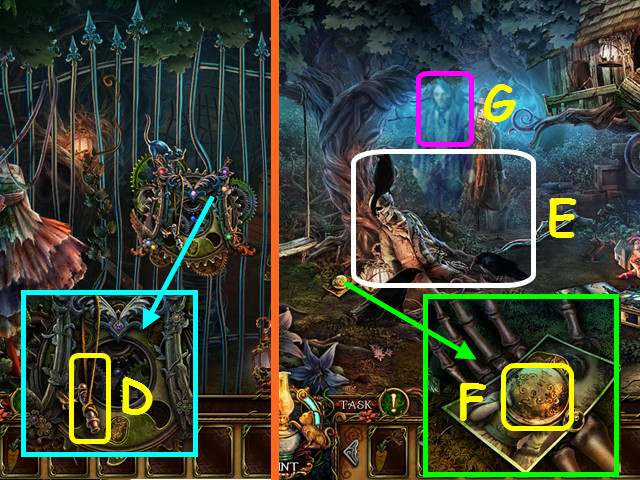
- Take the EAGLE WHISTLE (D).
- Walk down and right.
- Use the EAGLE WHISTLE on the crows (E).
- Move the 5 fingers and open the watch (F).
- Talk to the Ghost (G).

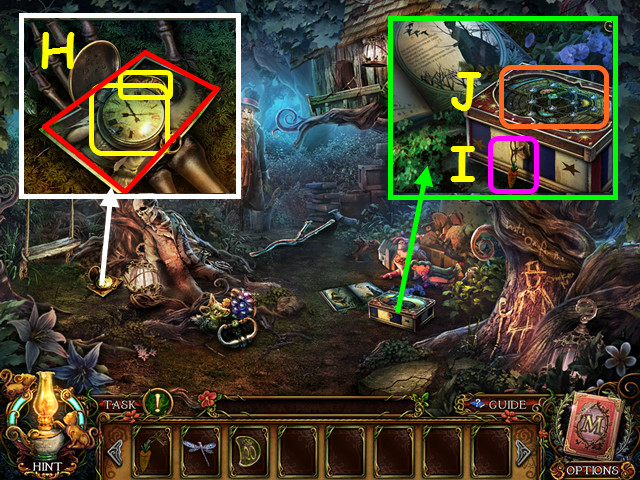
- Take LAURENT’S POCKET WATCH, the CROOKED SIXPENCE HEAD, and look at the photo (H).
- Use the CARROT WINDING KEY to open the box (I).
- Select the top of the box (J).

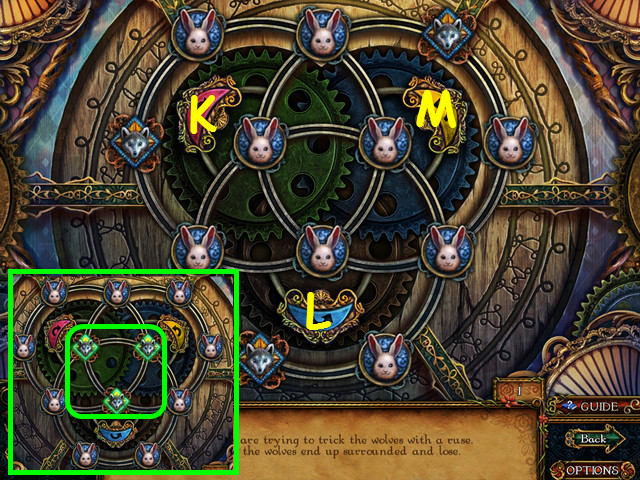
- Use the buttons to move the wolves to the 3 center locations (green).
- Press Kx2, Lx3, and Mx2.

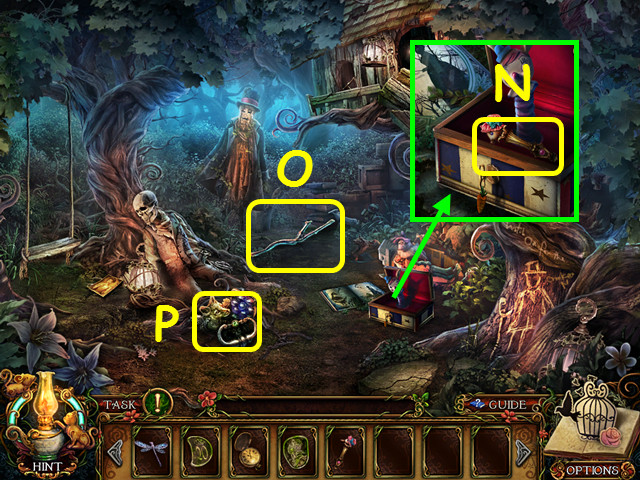
- Take the DUCK CABINET HANDLE (N).
- Take the TWIG (O).
- Take the FOX GRAPES KNOB (P).
- Walk down.

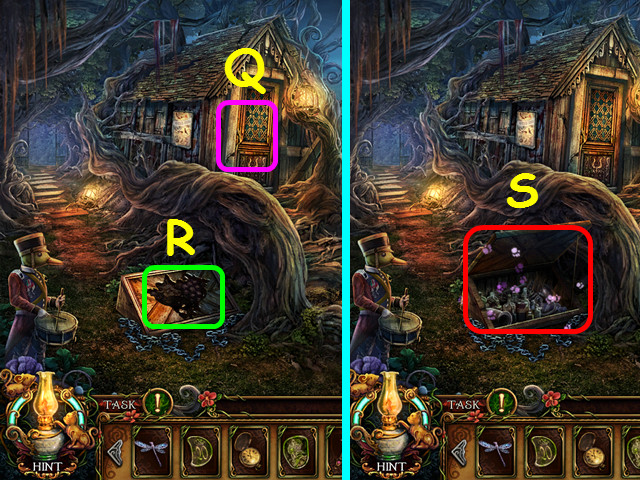
- Note the locked door (Q).
- Place the FOX GRAPES KNOB on the hatch (R).
- Select the open hatch (S).

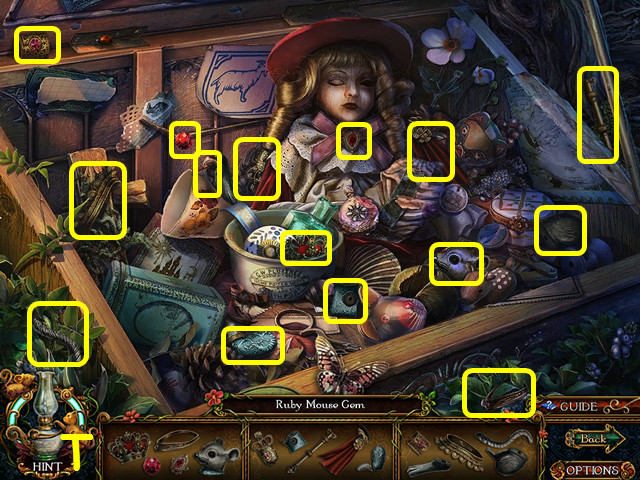
- Play the HOP to earn the RUBY MOUSE GEM (T).
- Walk to the left.

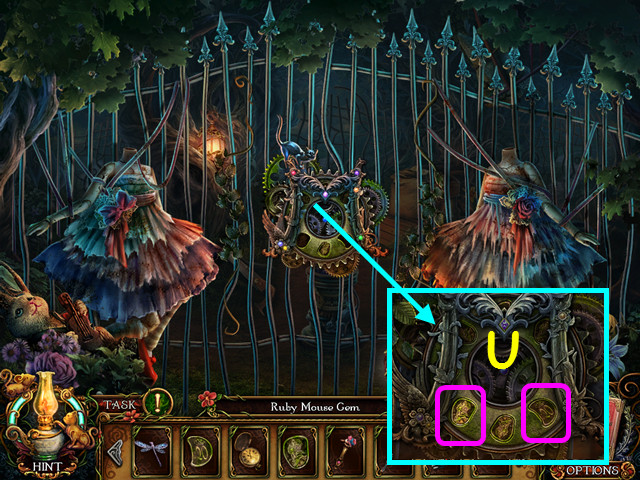
- Place the CROOKED SIXPENCE TAIL and the CROOKED SIXPENCE HEAD in the lock (U).
- You will automatically move forward.

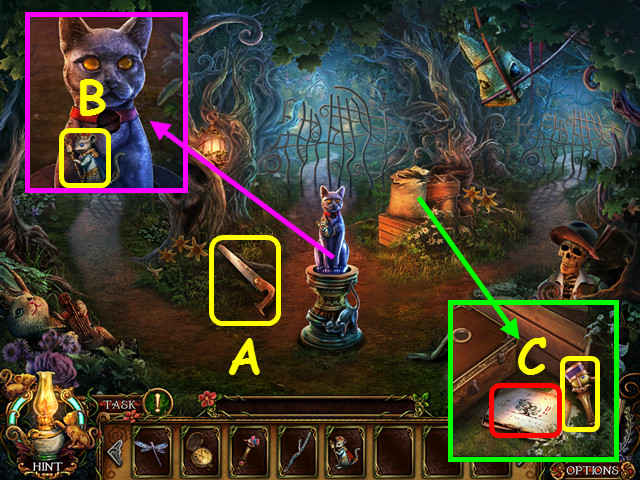
- Take the PRUNING SAW (A).
- Take the SAPPHIRE MOUSE GEM (B).
- Read the journal and take the DRAKE CABINET HANDLE (C).
- Walk down.

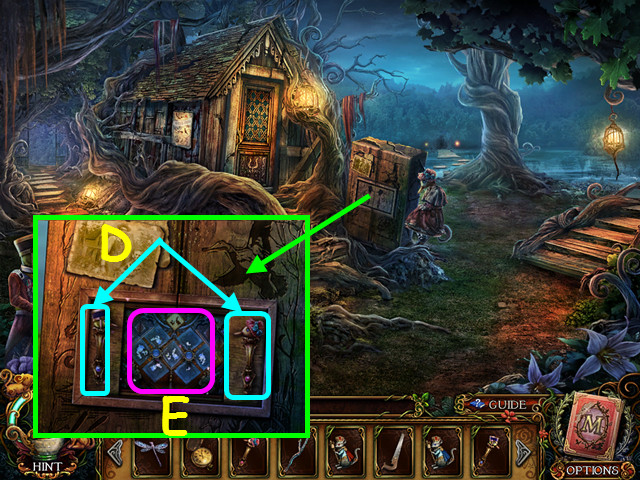
- Place the DRAKE CABINET HANDLE on the left and the DUCK CABINET HANDLE on the right (D).
- Select the mini-game (E).

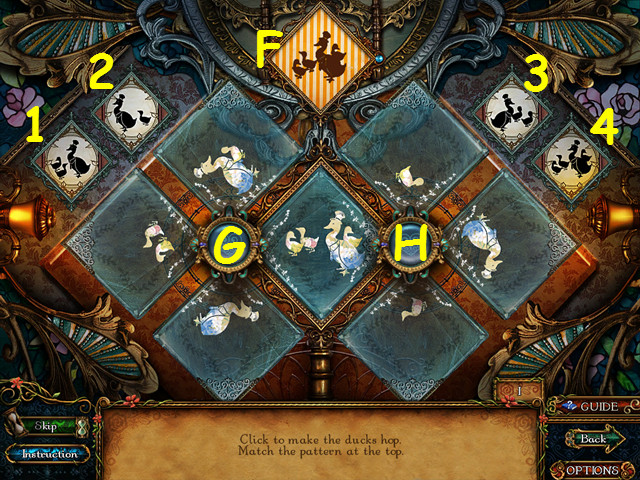
- Press the 2 buttons to rotate the slides and match the image at the top (F).
- There are 4 images to form (1-4). The way the slides rotate will change after the first 2 slides.
- Press the buttons Gx2, Hx3, Gx3, Hx1, Gx2, Hx2, Gx3, and Hx1.
- Take the LADDER.
- Walk to the right.

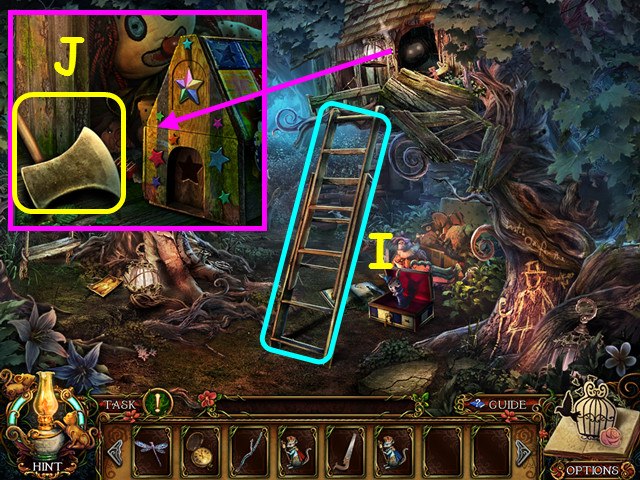
- Use the LADDER on the tree house (I).
- Take the AXE (J).
- Walk down.

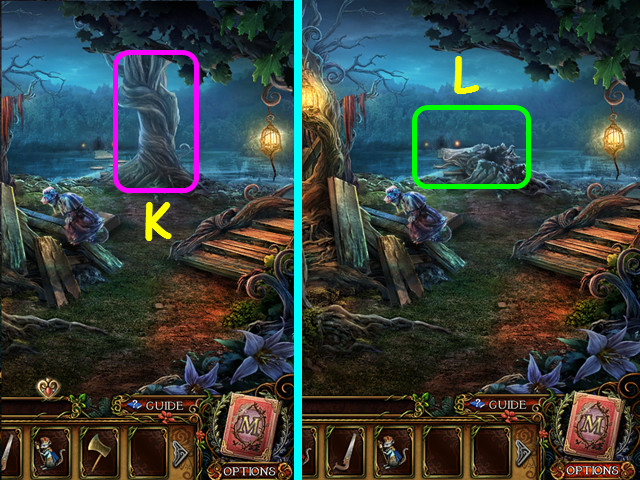
- Use the AXE on the tree (K).
- Walk forward (L).

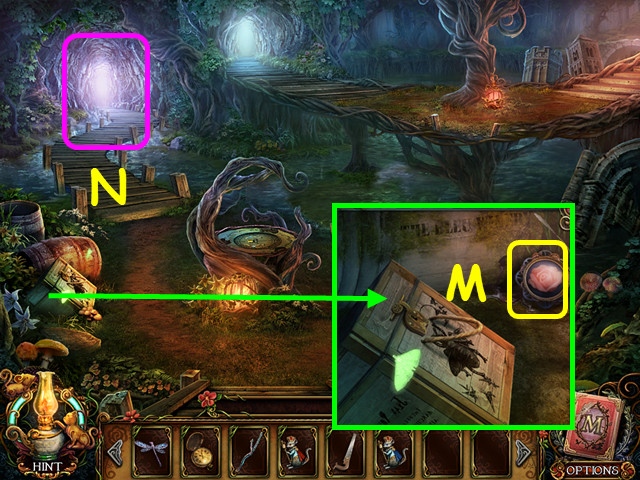
- Take the RED ROSE MEDALLION (M).
- Walk on the left path (N).

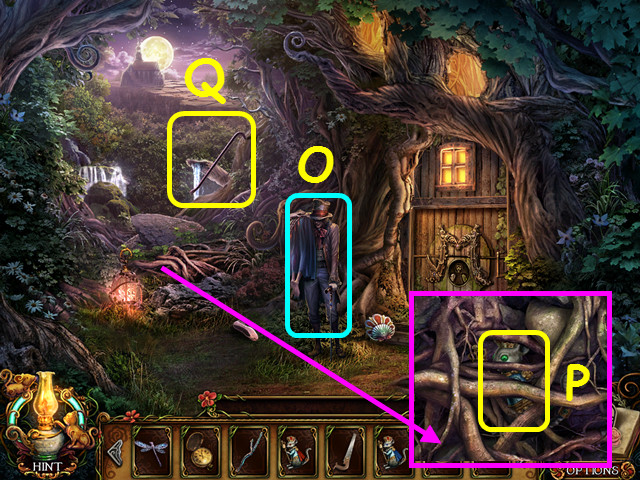
- Try to stop the Crooked Man (O).
- Use the PRUNING SAW to get the EMERALD MOUSE GEM (P).
- Take the CROWBAR (Q).
- Walk down.

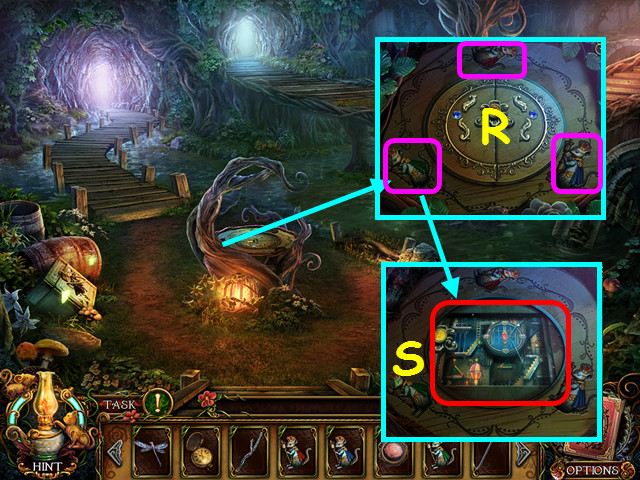
- Place the RUBY MOUSE GEM, EMERALD MOUSE GEM, and the SAPPHIRE MOUSE GEM in the indentations (R).
- Select the mini-game (S).

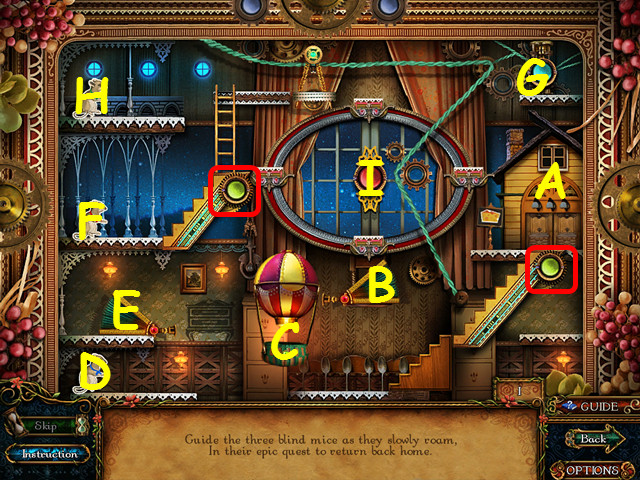
- Move the mice home (A).
- Press the right pump (B), select the balloon (C), move the lower mouse to the balloon (D), and select the left pump (E).
- Select the center mouse (F), press the blue button (G), and select the mouse again.
- Move both stairs (red), select the top mouse (H), press the red button twice (I), and select the mouse again.
- Walk to the right.

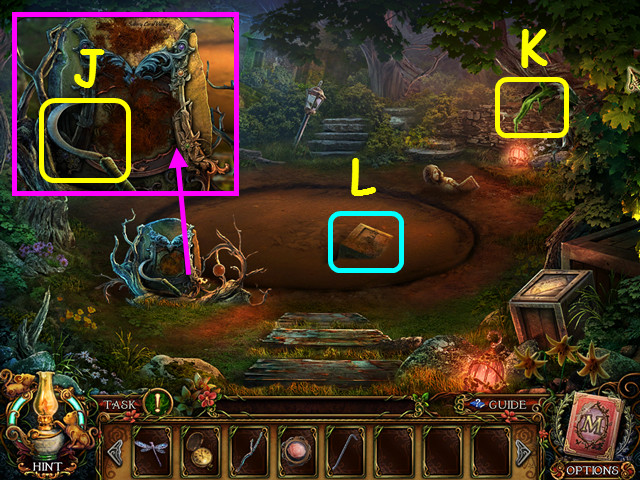
- Take the SICKLE (J).
- Use the TWIG on the sap to get the TWIG WITH SAP (K).
- Touch the item in the quicksand (L).

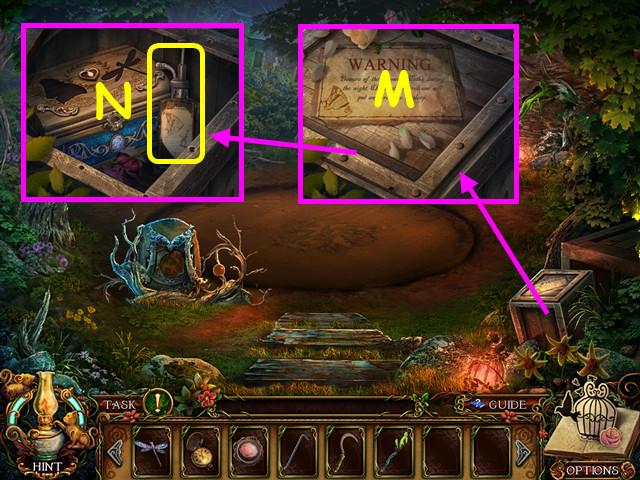
- Use the CROW BAR to open the crate (M).
- Take the INSECT REPELLANT (N).
- Walk down and go left on the center, elevated walkway to the Tree Tunnel.

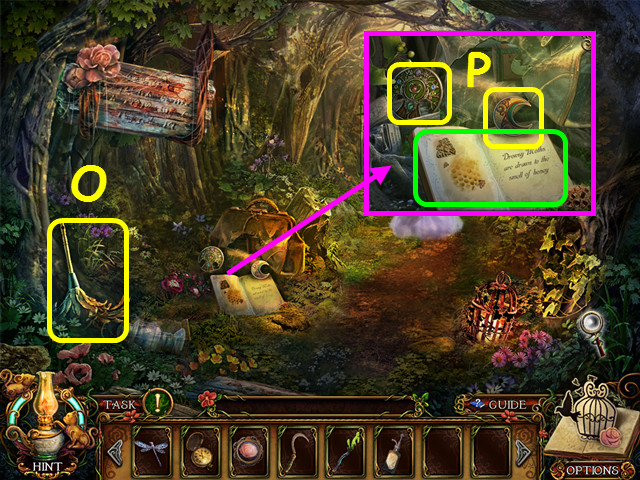
- Take the FEATHER DUSTER (O).
- Take the TREE EMBLEM, the MOON DECORATION, and read the book (P).

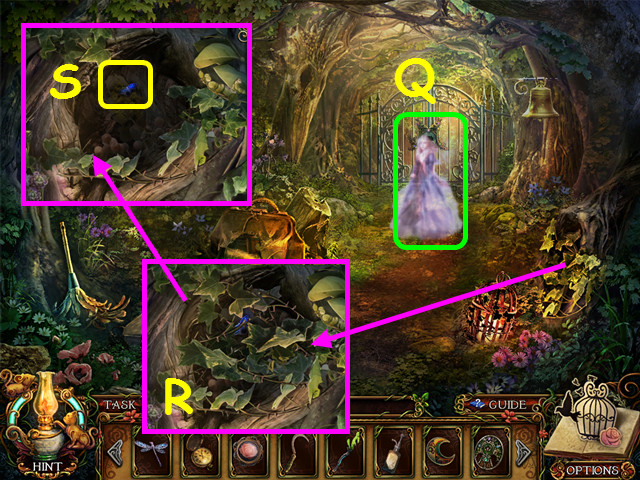
- Touch the ghost (Q).
- Use the SICKLE on the vines (R).
- Use the TWIG WITH SAP to take the MOTH JEWEL (S).
- Walk down and right.

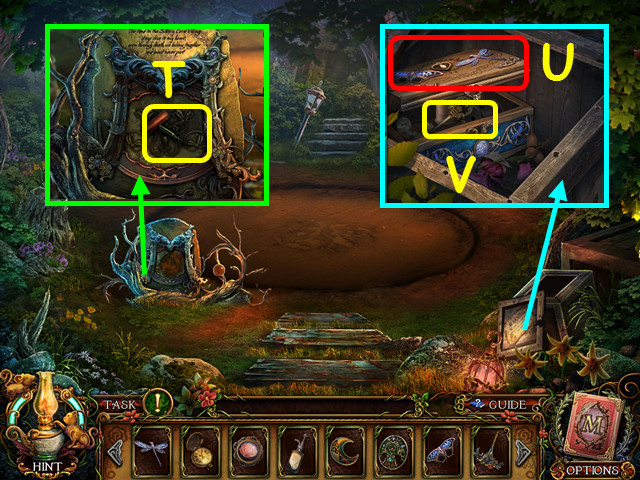
- Use the FEATHER DUSTER on the monument; take the CORKSCREW (T).
- Place the DRAGONFLY JEWEL and the MOTH JEWEL on the box (U).
- Take the BEE KEY (V).
- Walk down.

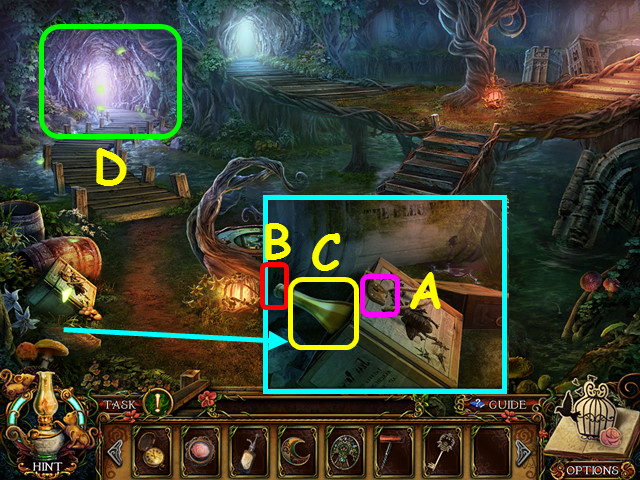
- Use the BEE KEY on the lock (A).
- Use the CORKSCREW on the cork (B).
- Take the HONEY WINE (C).
- Use the INSECT REPELLANT on the moths (D).
- Walk to the far left.

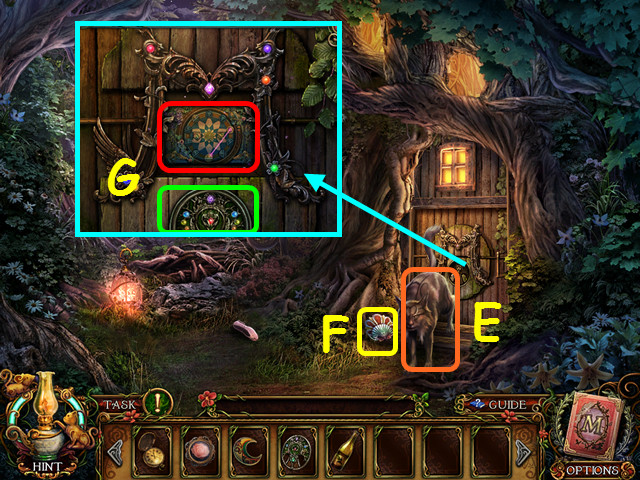
- Use the HONEY WINE on the lynx (E).
- Take the SHELL PLAQUE (F).
- Use the TREE EMBLEM on the door; select the mini-game (G).

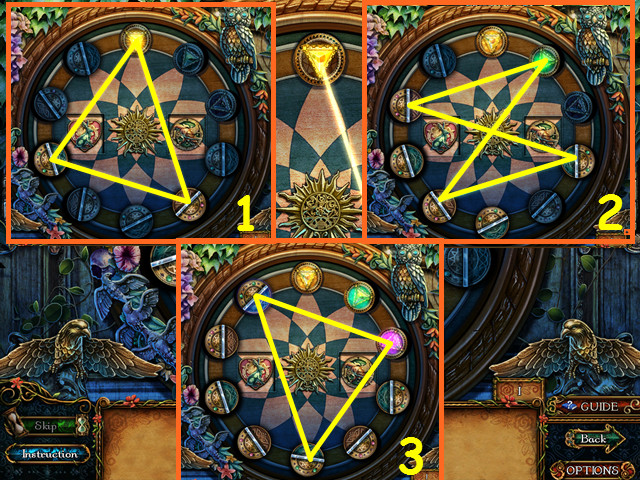
- Rotate the discs to reflect the light back to the start point.
- There are 3 patterns to complete (1-3).
- Enter the Tree Upstairs.
Chapter 2: Day 1, 10:00 PM

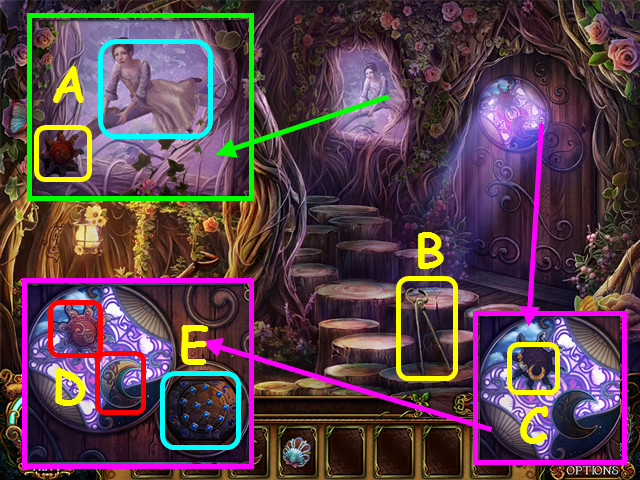
- Talk to Amile and take the SUN DECORATION (A).
- Take the NAIL PULLER (B).
- Take the MOON CUFF EARRING (C).
- Place the SUN DECORATION and the MOON DECORATION into the mosaic (D).
- Select the opening (E).

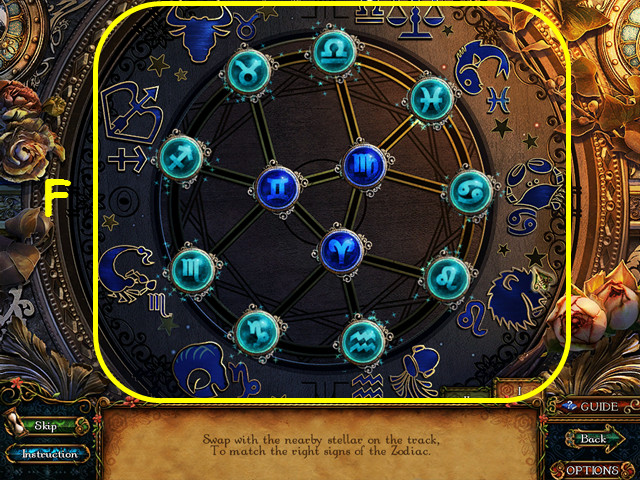

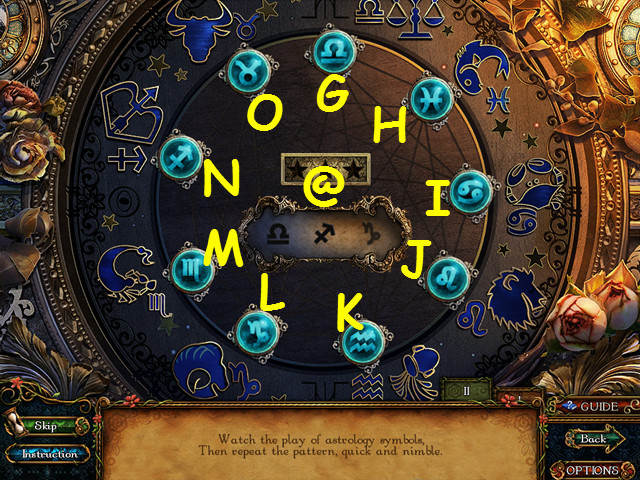
- Swap adjacent symbols to move them to the matching outer positions (F).
- Select the symbols in the order they are shown in the center (@).
- There are 3 sequences to select: (G, N, L), (G, I, K, M), and (M, O, H, J, L).
- Walk to the right.

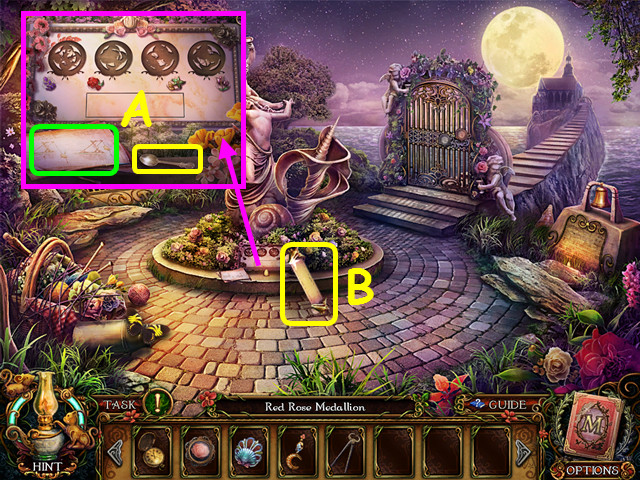
- Read the plans and take the TEA SPOON (A).
- Take the SHELL BLAZON (B).
- Walk down and left.

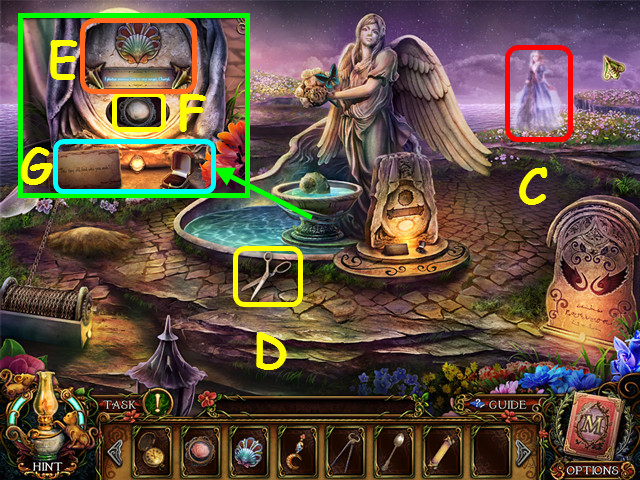
- Try to talk to the ghost (C).
- Take the SCISSORS (D).
- Place the SHELL PLAQUE and the SHELL BLAZON on the base (E).
- Take the WHITE ROSE MEDALLION (F).
- Read the note and look at the ring box (G).
- Walk down and right.

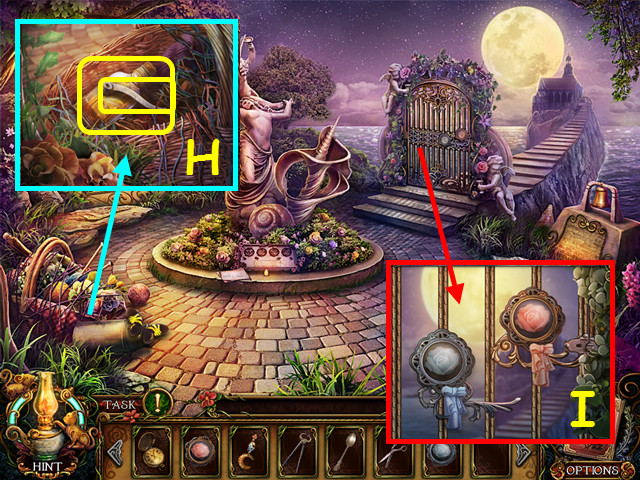
- Use the SCISSORS to cut the strings; take the WINDING CRANK and the OLIVE OIL BOTTLE (H).
- Place the RED ROSE MEDALLION and the WHITE ROSE MEDALLION in the gate (I).
- Walk to the right.

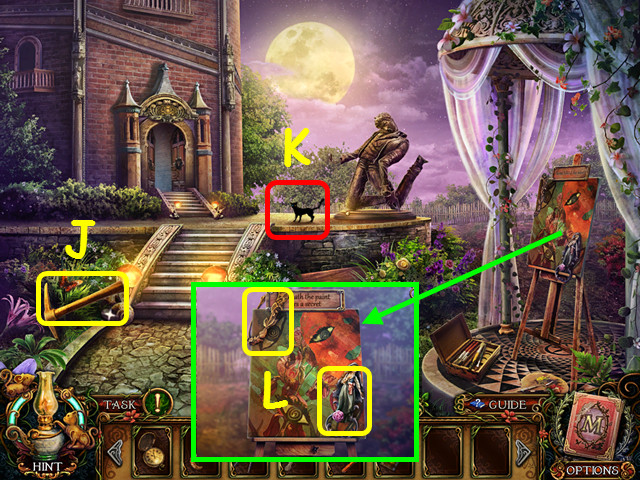
- Take the PICKAXE (J).
- Look at the cat (K).
- Take the LAUREL WREATH and the LADY DOOR HANDLE (L).

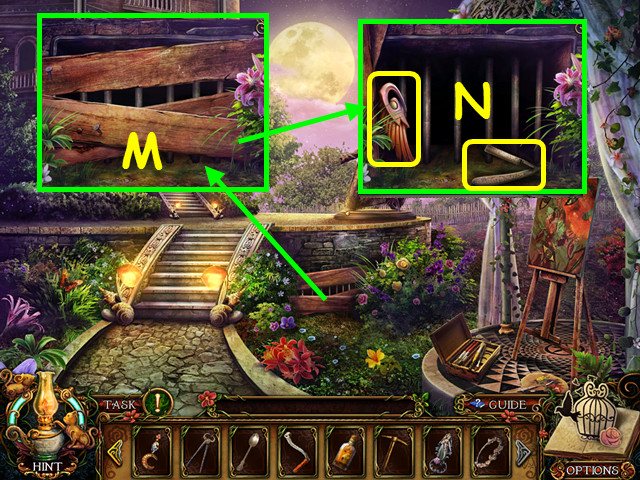
- Use the NAIL PULLER on the boards (M).
- Take the PEARL ANGEL WING and the RAZOR (N).
- Walk down.

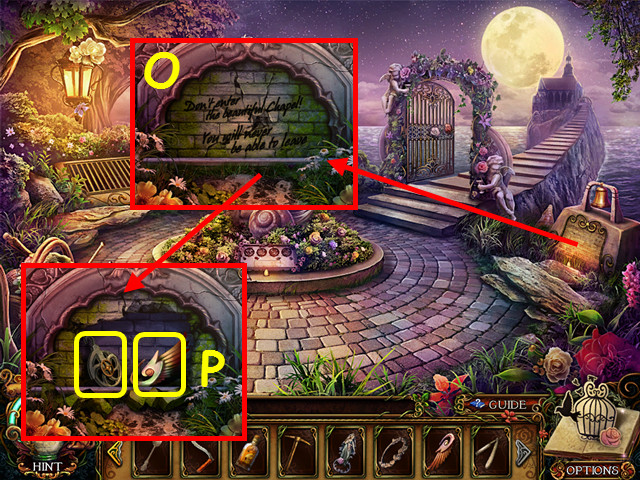
- Use the PICKAXE on the bricks (O).
- Take the PULLEY and the CORAL ANGEL WING (P).
- Walk down and left.

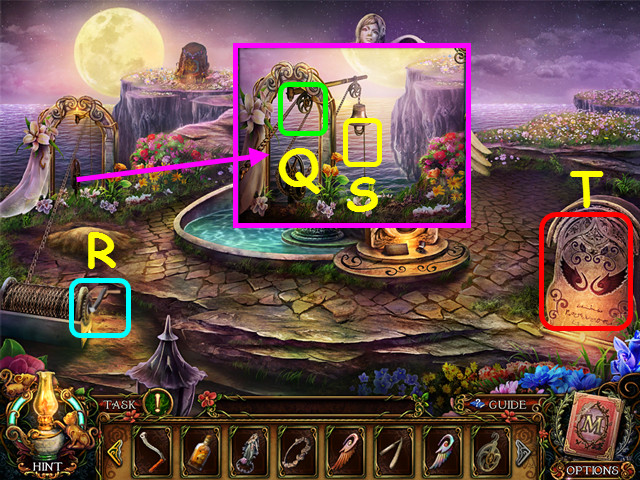
- Place the PULLEY on the device (Q).
- Place the WINDING CRANK on the winch and turn the handle (R).
- Use the RAZOR to take the ROPE (S).
- Place the CORAL ANGEL WING and the PEARL ANGEL WING on the monument; select the monument (T).

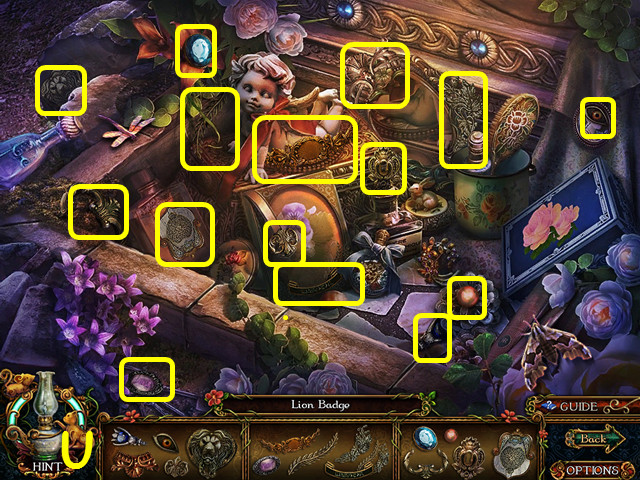
- Play the HOP to earn the LION BADGE (U).
- Walk down.

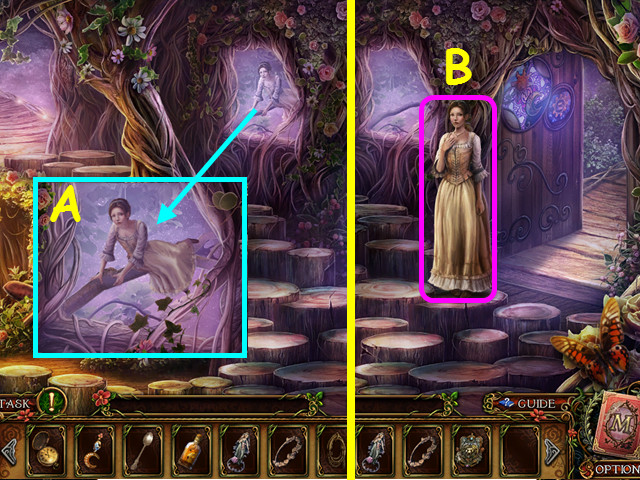
- Use the ROPE to save Amely (A).
- Talk to Amely (B).
- Give LAURENT’S POCKET WATCH to Amely; you earn the UNICORN BADGE.
- Walk to the right twice.

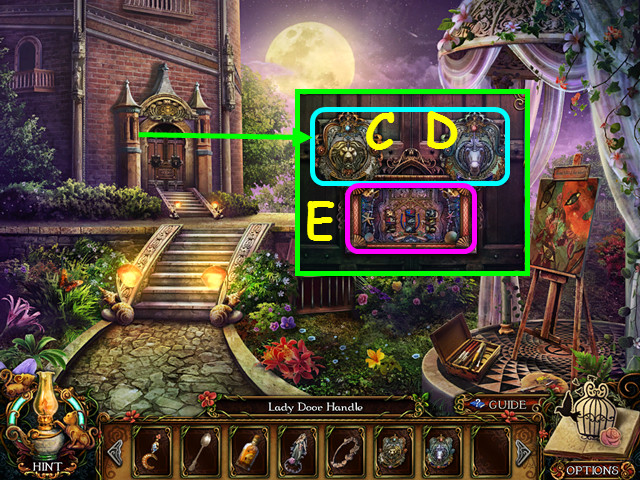
- Place the LION BADGE on the left (C) and the UNICORN BADGE on the right (D).
- Select the opening (E).

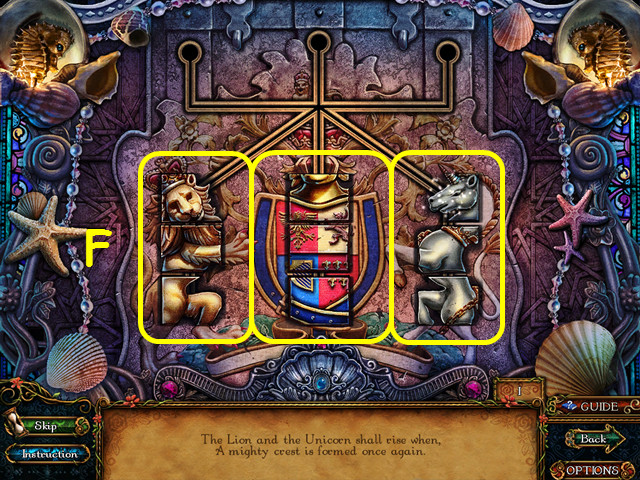
- Slide the tiles to restore the crest (F).
- Select a tile, and then select the highlighted empty position.
- Walk left to enter the Tower Loft.

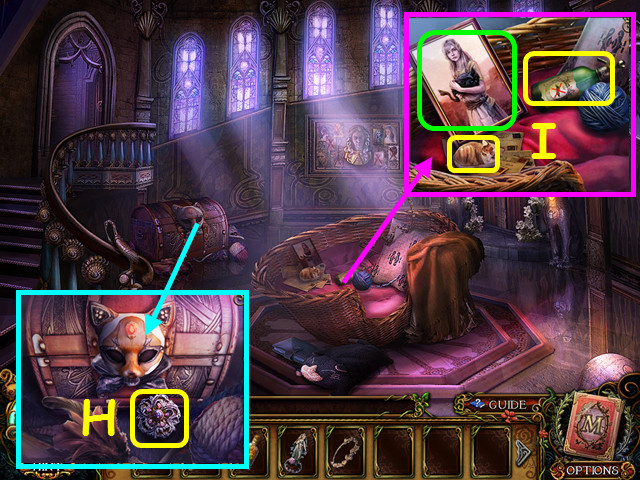
- Take the NIELLO FLEURON (H).
- Take the CERAMIC CAT DOLL, the MOSS REMOVER, and look at the photo (I).
- Walk down 3 times and go left.

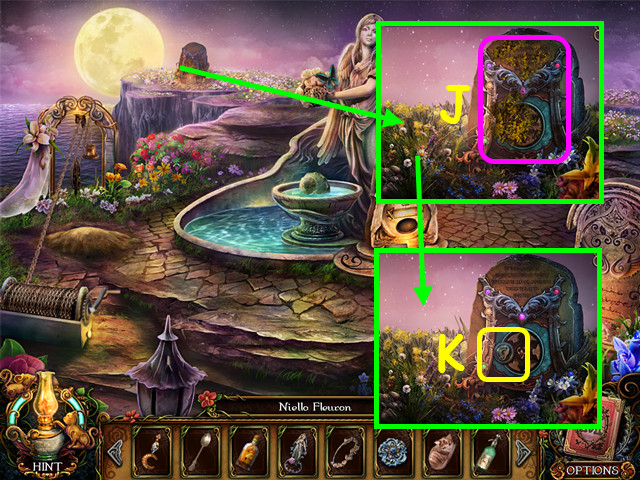
- Use the MOSS REMOVER on the stele (J).
- Take the SEAHORSE GEAR (K).
- Return to the Tower Loft and walk left.

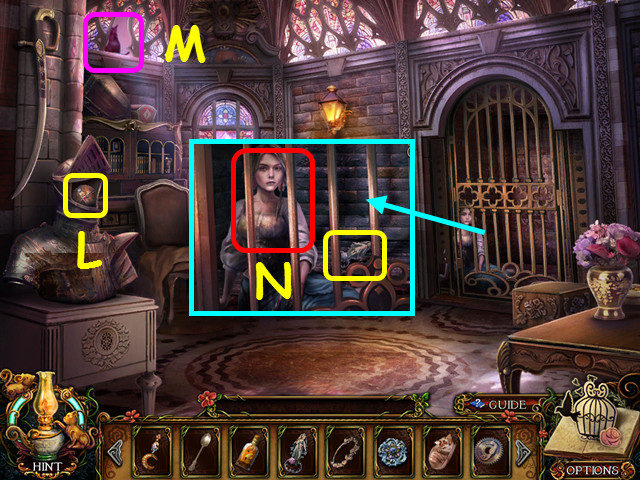
- Use the OLIVE OIL BOTTLE on the helmet; open the helmet and take the LAUREL ORB (L).
- Note the cat (M).
- Talk to Renee; take the GENTLEMAN DOOR HANDLE (N).

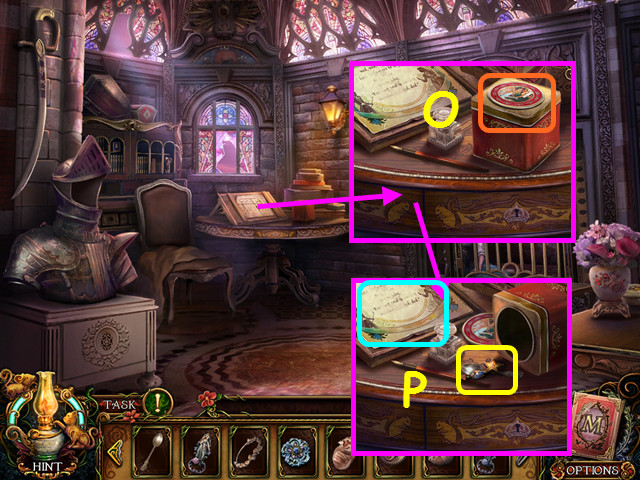
- Use the SPOON to open the canister (O).
- Take the STAR CUFF EARRING and read the poem (P).
- Walk down.

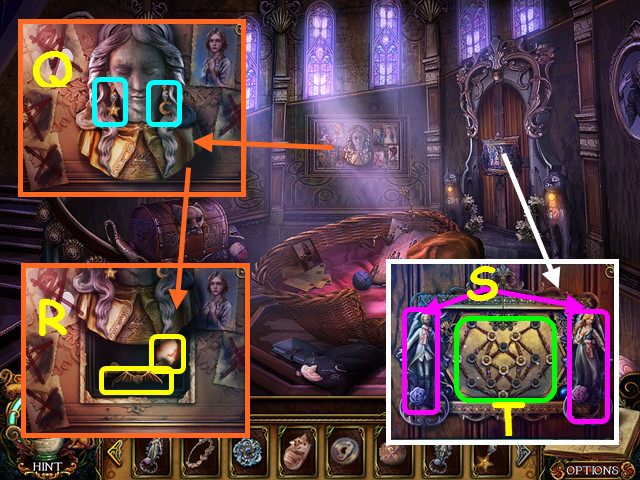
- Place the MOON CUFF EARRING and the STAR CUFF EARRING on the girl (Q).
- Take the BLACK WING HANDLE and the MAIDEN CAMEO (R).
- Place the GENTLEMAN DOOR HANDLE and the LADY DOOR HANDLE on the door (S).
- Select the mini-game (T).

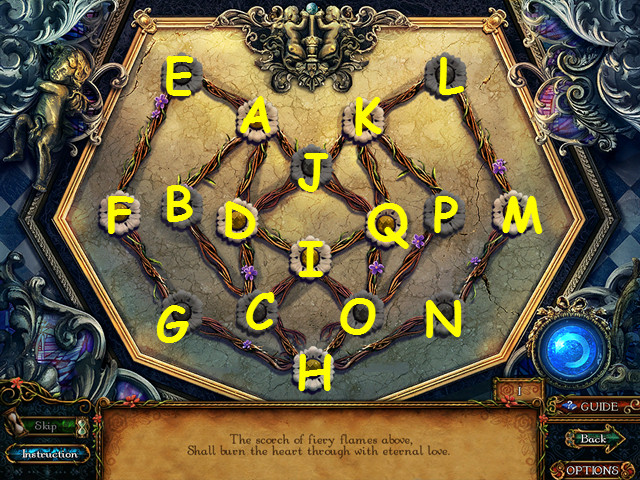
- Move the fire so it burns every vine once; press the flowers to move the fire.
- Press A, B, C, D, A, E, F, G, H, C, I, D, J, K, L, M, N, H, O, P, K, Q, O, I, Q, J, and A.
- Walk to the right.

- Look at the stained glass windows and the portrait (green).
- Place the NIELLO FLEURON on the book cover (A).
- Take the SILVER LEAF (B).
- Walk to the right.


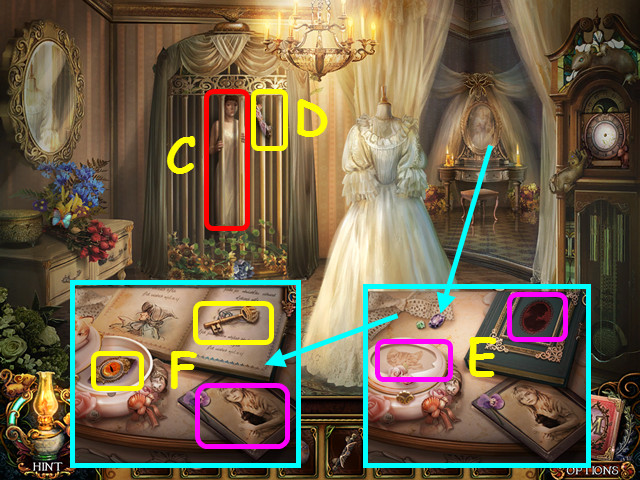
- Open the curtains and talk to the girl (C).
- Take the WHITE WING HANDLE (D).
- Place the CERAMIC CAT DOLL on the dish and the MAIDEN CAMEO on the book (E).
- Take the AMBER EYE GEM, the CROWN KEY, and look at the portrait (F).
- Walk down.

- Place the BLACK WING HANDLE on the left and the WHITE WING HANDLE on the right (J).
- Take the DAGGER (K).
- Walk down and left.


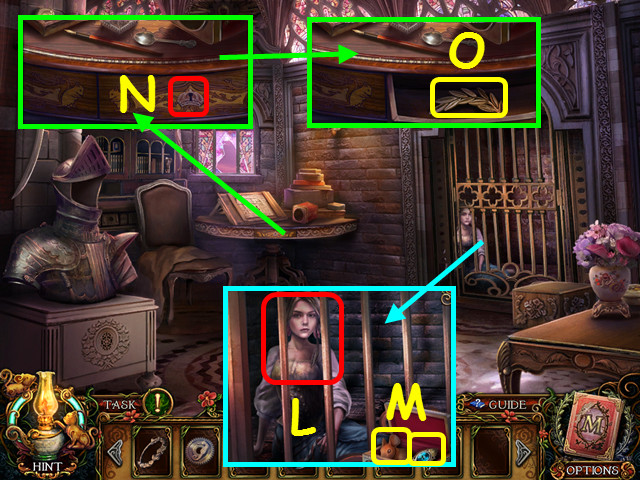
- Give the DAGGER to Renee (L).
- Take the TOPAZ EYE GEM and the MOUSE FIGURINE (M).
- Talk to Renee.
- Use the CROWN KEY to open the drawer (N).
- Take the GOLDEN LEAF (O).
- Walk down.

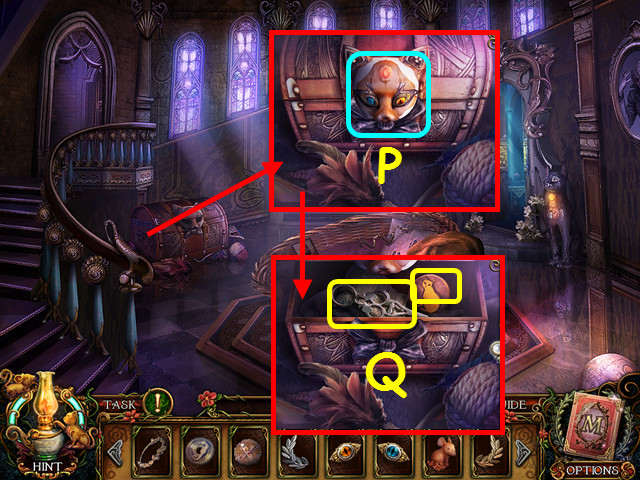
- Place the AMBER EYE GEM and the TOPAZ EYE GEM on the cat’s head (P).
- Take the HOUR HAND and the CAT TOKEN (Q).
- Walk right twice.

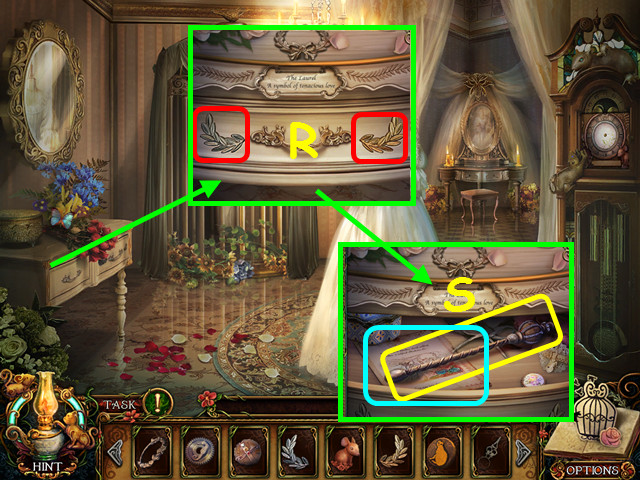
- Place the SILVER LEAF and the GOLDEN LEAF on the drawer (R).
- Take the LAUREL SCEPTER and read the note (S).
- Walk down.

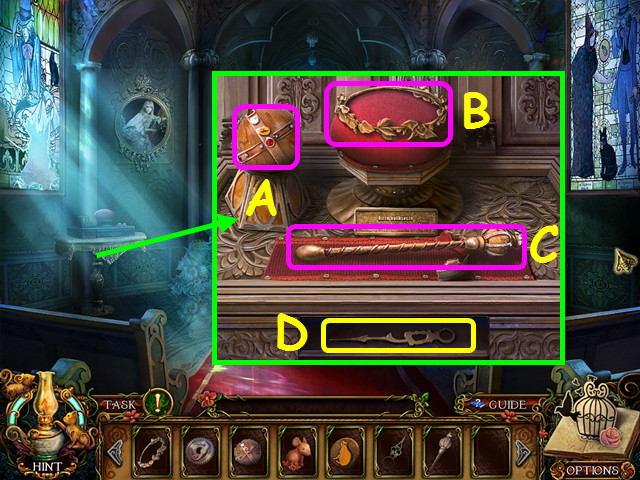
- Place the LAUREL ORB on the small stand (A).
- Place the LAUREL WREATH on the large stand (B).
- Place the LAUREL SCEPTER on the front stand (C).
- Take the MINUTE HAND (D).
- Walk to the right.

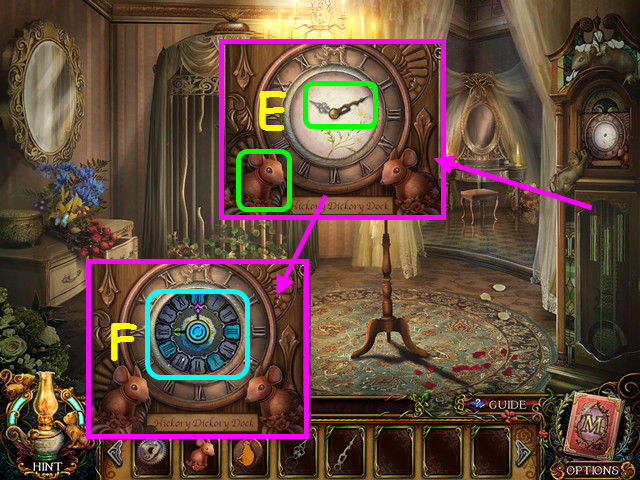
- Place the MOUSE FIGURINE, the HOUR HAND, and the MINUTE HAND on the clock (E).
- Select the mini-game (F).

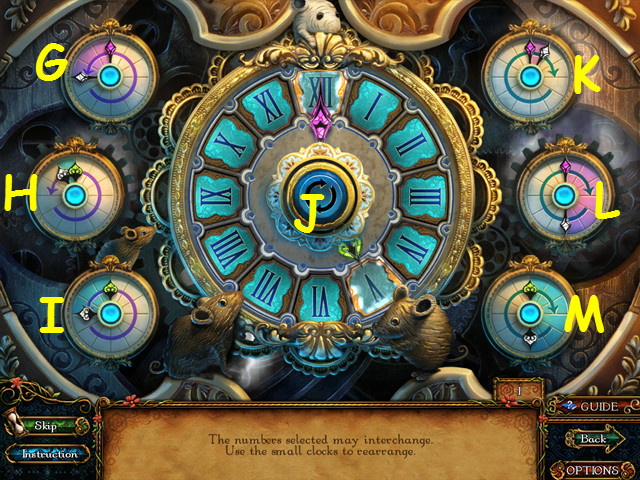
- Move the number tiles to the correct position.
- Use the 6 outer buttons to move the clock hands.
- The outer buttons will move the hands in the direction and the number of spaces noted.
- Press the center blue button to swap the tiles that the hands are pointing at.
- Press (G, K, J), (K, J), (K, L, J), (K, J), (K, I, J), (M, Hx2, J), (I, J).
- Take the PRISON KEY.
- Walk down.

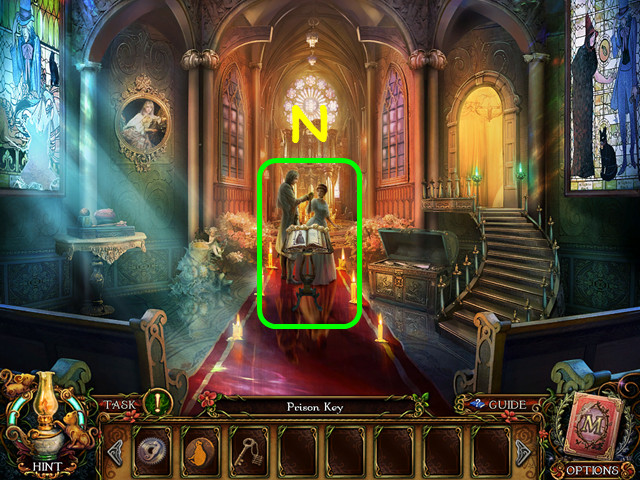
- Try to stop the Crooked Man (N).
- Watch the cut-scenes.
Chapter 3: Day 2, 0:00 AM

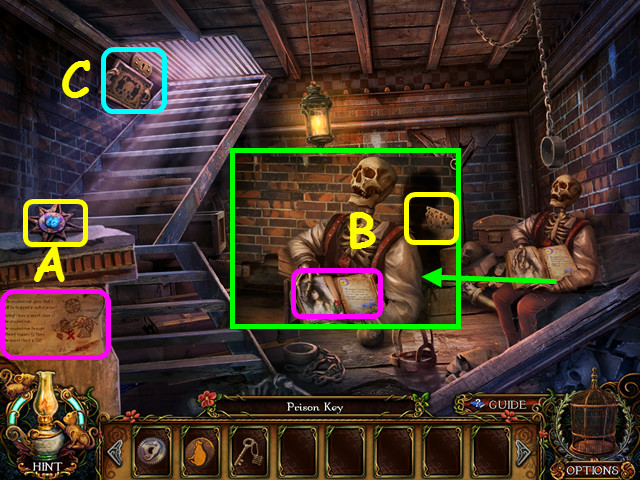
- Read the note and take the STAR ORNAMENT (A).
- Read the book and take the CHEESE (B).
- Use the PRISON KEY on the lock; select the lock (C).

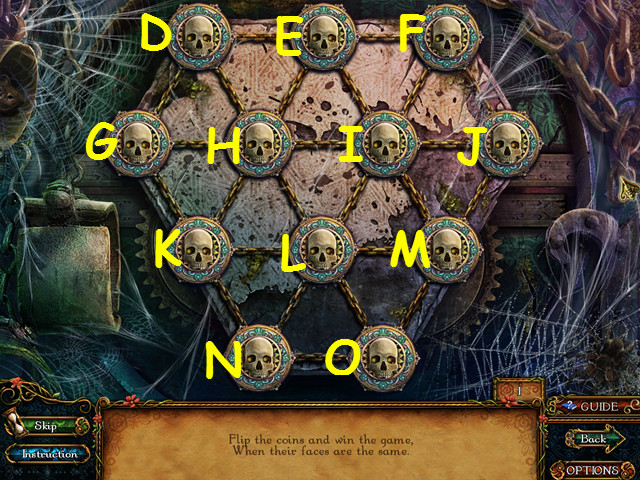
- Select a coin to ‘flip’ it and all connected coins until all are showing skulls.
- Press the coins L, N, O, M, F, I, G, H, I, and J.
- Walk forward.

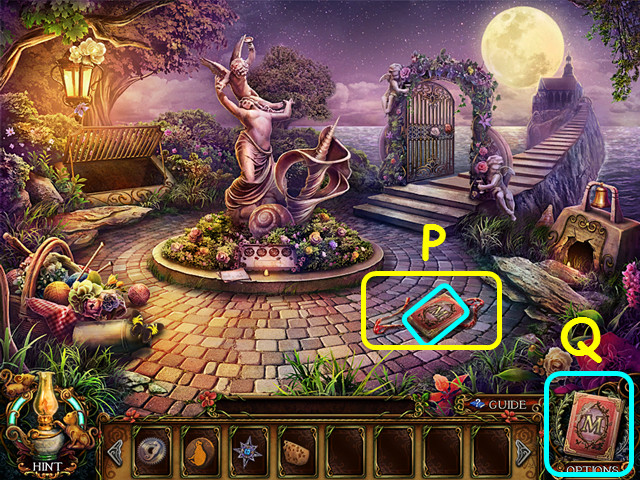
- Take your map and RENEE’S BELT (P).
- The map is now back in your menu bar (Q).
- Walk down.

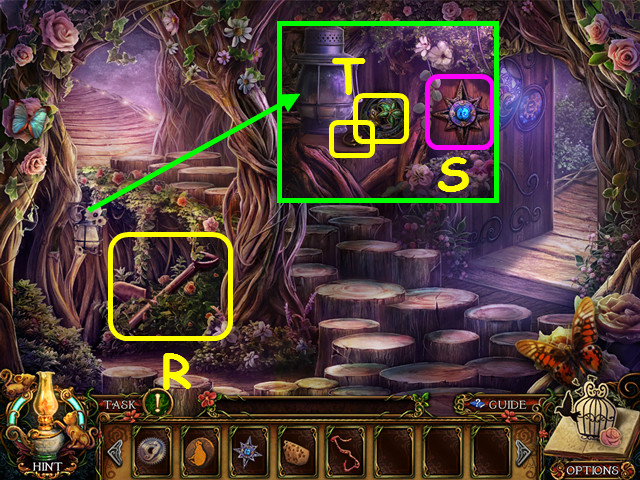
- Use RENEE’S BELT to repair the SPADE (R).
- Place the STAR ORNAMENT in the indentation (S).
- Take the ENAMEL LILY and the SKULL SEAL RING (T).
- Walk left.

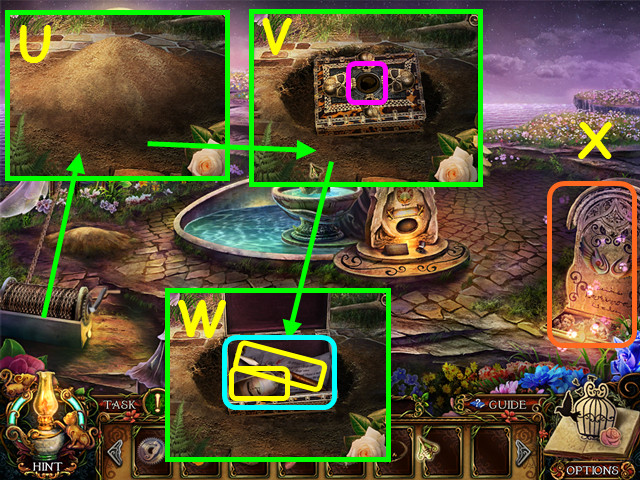
- Use the SPADE on the dirt (U).
- Place the SKULL SEAL RING on the top of the box (V).
- Read the note; take the STRONG ACID and the PAINTING KNIFE (W).
- Select the monument (X).

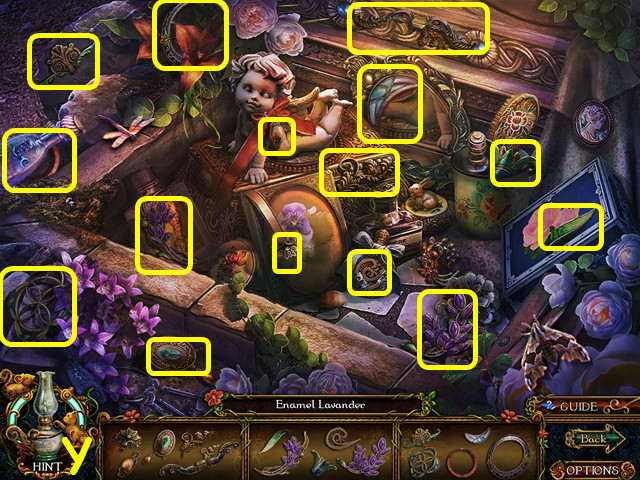
- Play the HOP to earn the ENAMEL LAVENDER (Y).
- Walk down, and go twice to the right.

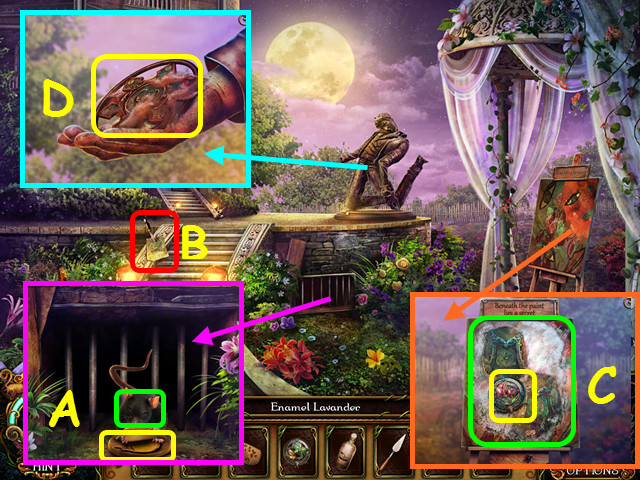
- Give the CHEESE to the mouse; take the MOUSE TOKEN (A).
- Look at the drawing (B).
- Use the PAINTING KNIFE on the painting; take the ENAMEL TULIP (C).
- Use the STRONG ACID to take the WATER EMBLEM (D).
- Walk down and enter the Prison.

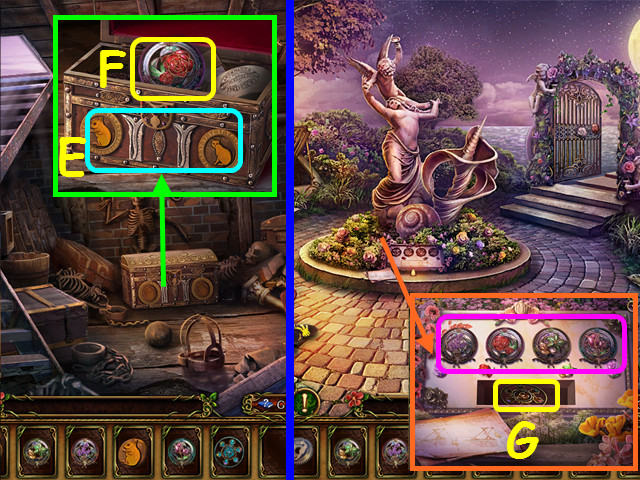
- Place the CAT TOKEN and the MOUSE TOKEN on the chest (E).
- Take the ENAMEL ROSE (F).
- Walk forward.
- Place the ENAMEL LILY, the ENAMEL LAVENDER, the ENAMEL TULIP, and the ENAMEL ROSE on the plaque; take the SAND EMBLEM (G).
- Walk down and left.

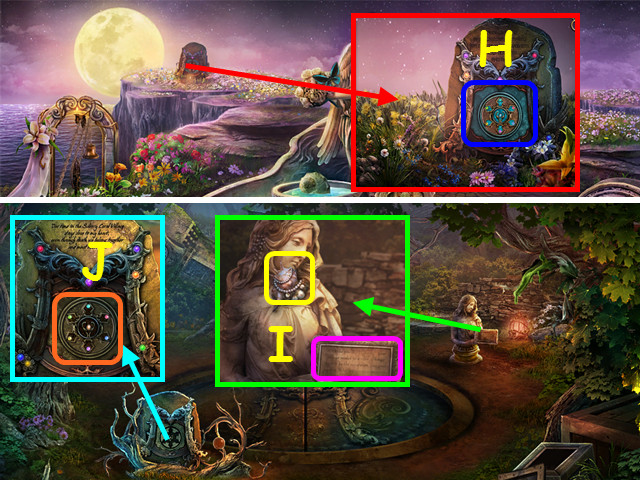
- Place the WATER EMBLEM on the monument (H).
- Walk down 3 times, and go to the right.
- Read the plaque and take the SHELL ORNAMENT (I).
- Place the SAND EMBLEM on the monument, and then select the mini-game beneath (J).

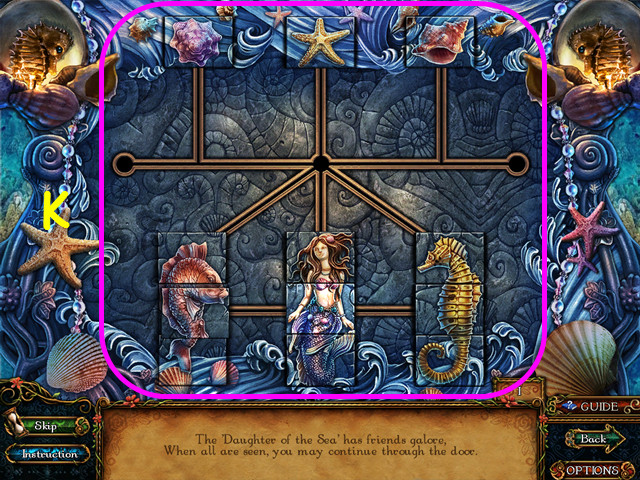
- Move the tiles to the correct location (K).
- Select a tile, and then select a highlighted position to move.
- Enter the hole in the ground.

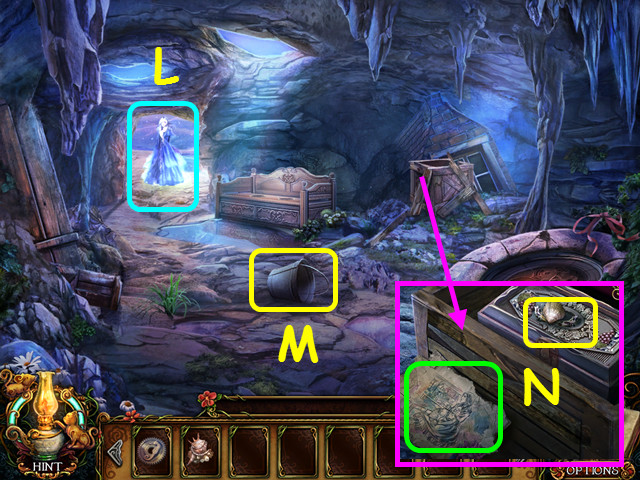
- Try to talk to the ghost (L).
- Take the BUCKET (M).
- Look at the drawing and take the CORAL CROWN (N).
- Walk forward.

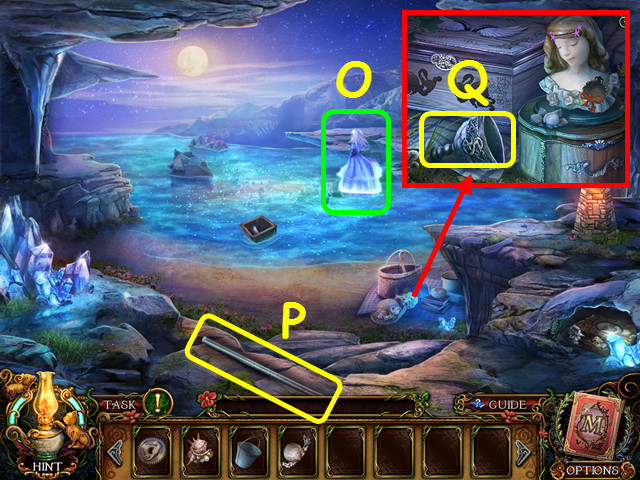
- Try to talk to the ghost (O).
- Take the IRON BAR (P).
- Take the SILVER GOBLET (Q).

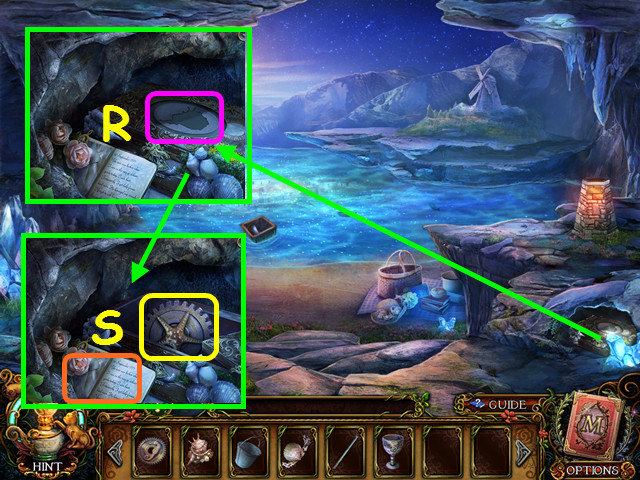
- Place the SHELL ORNAMENT on the box (R).
- Take the STARFISH GEAR and read the diary (S).
- Walk down.

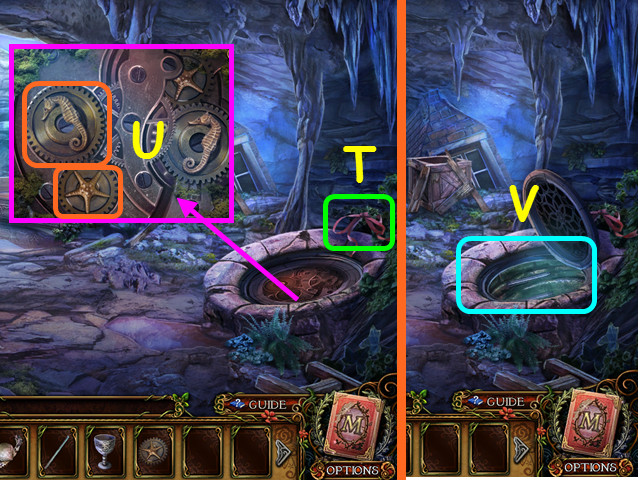
- Look at the ribbon (T).
- Place the SEAHORSE GEAR and the STARFISH GEAR in the mechanism (U).
- Enter the hatch (V).

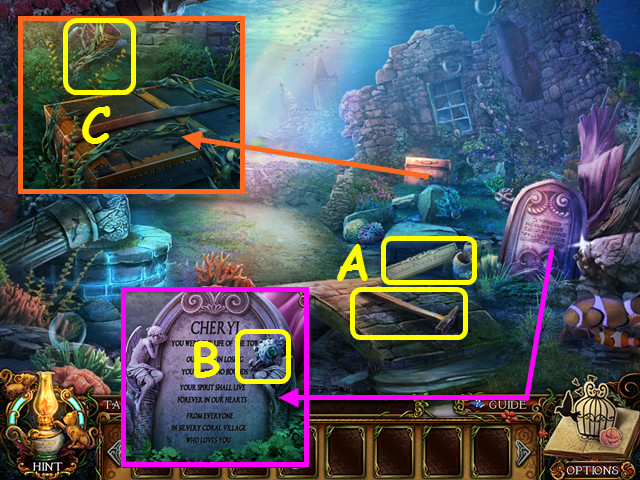
- Take the SHOP SIGN and the HAMMER (A).
- Take the CORAL BROOCH (B).
- Take the GOLDEN GOBLET (C).
- Walk down.

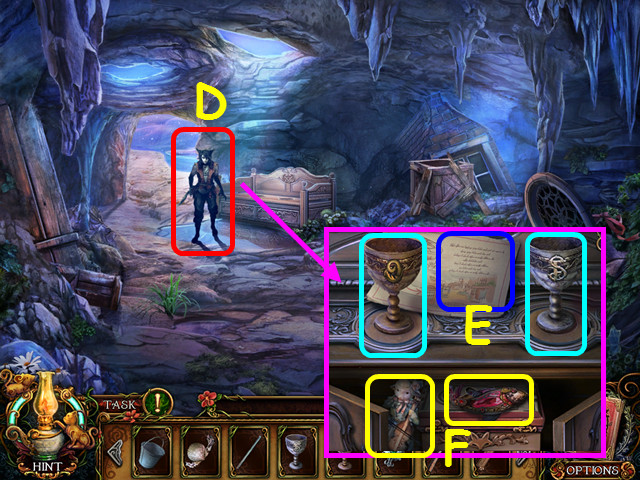
- Talk to the Crooked Cat (D).
- Read the note; place the GOLDEN GOBLET and the SILVER GOBLET on the chest (E).
- Take the CELLO SHEEP FIGURINE and the GARNET FISH PENDANT (F).
- Walk forward.

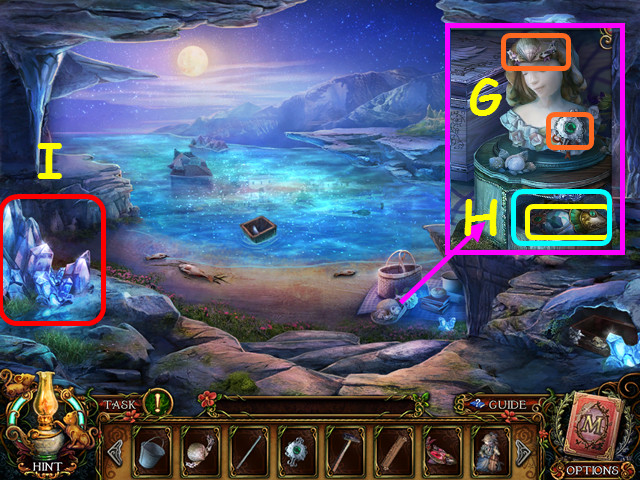
- Place the CORAL CROWN and the CORAL BROOCH on the bust (G).
- Take the BERYL FISH PENDANT and read the diary (H).
- Use the HAMMER on the crystal; select the broken crystal (I).

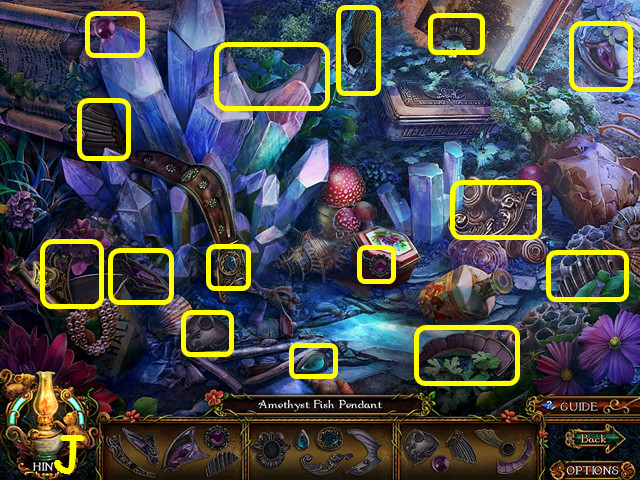
- Play the HOP to earn the AMETHYST FISH PENDANT (J).
- Walk down and enter the hatch.

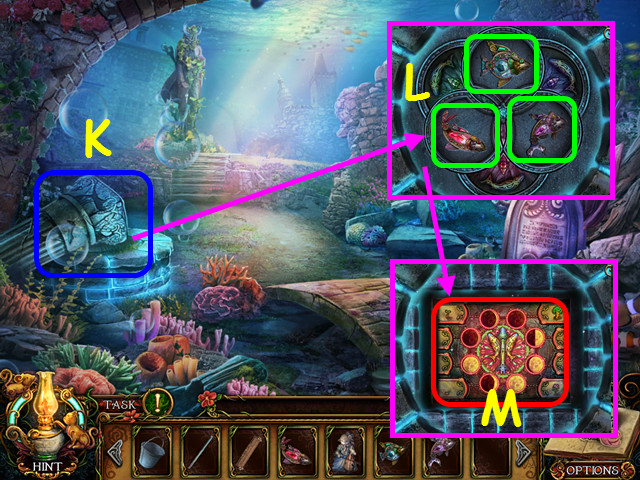
- Use the IRON BAR on the pillar (K).
- Place the AMETHYST FISH PENDANT, the BERYL FISH PENDANT, and the GARNET FISH PENDANT on the cover (L).
- Select the mini-game (M).

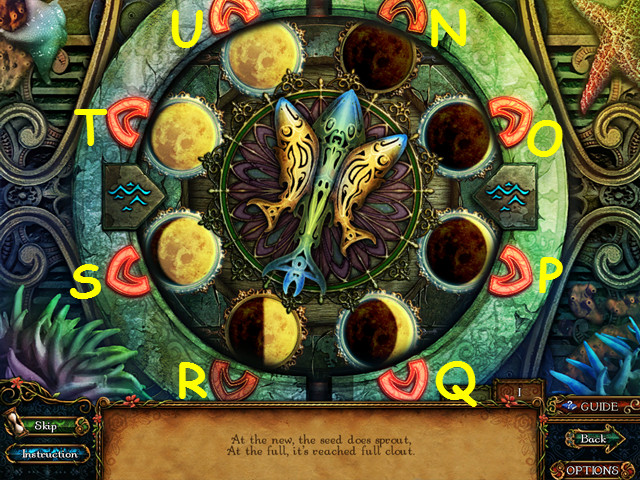

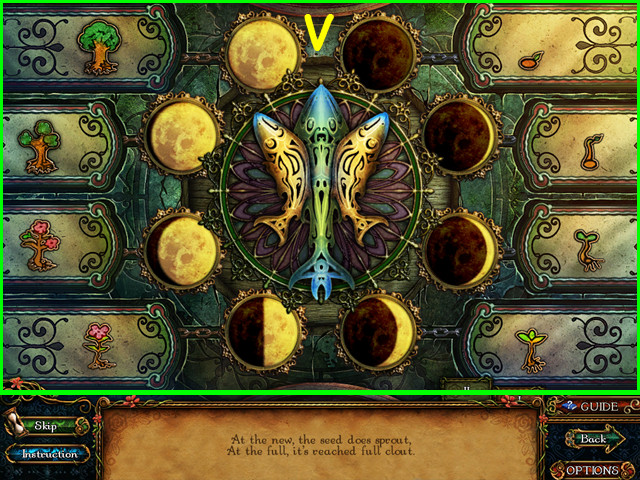
- Place the moons in order.
- Select a moon, and then select a highlighted moon to swap positions.
- Select (Q, U), (O, R), (Q, T), (P, S), (R, N), (Q, N) and (R, N).
- Put the plant tiles in order, matching the moons (V).
- Enter the well.
Chapter 4: Day 2, 1:00 AM

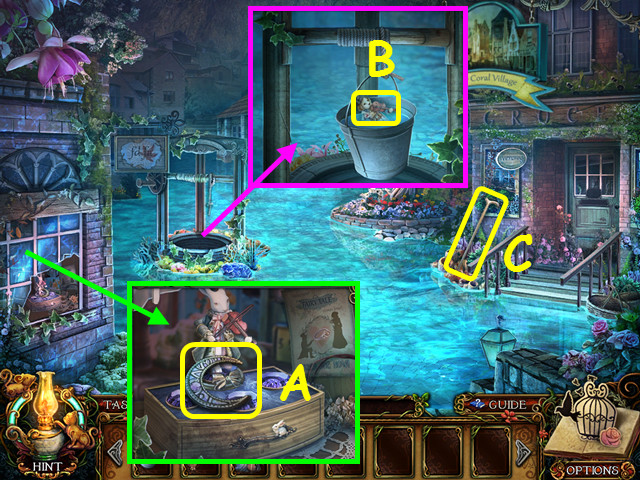
- Take the CRESCENT STONE (A).
- Place the BUCKET on the rope; take the VIOLA DOG FIGURINE (B).
- Take the CANE (C).
- Walk down twice and go forward.

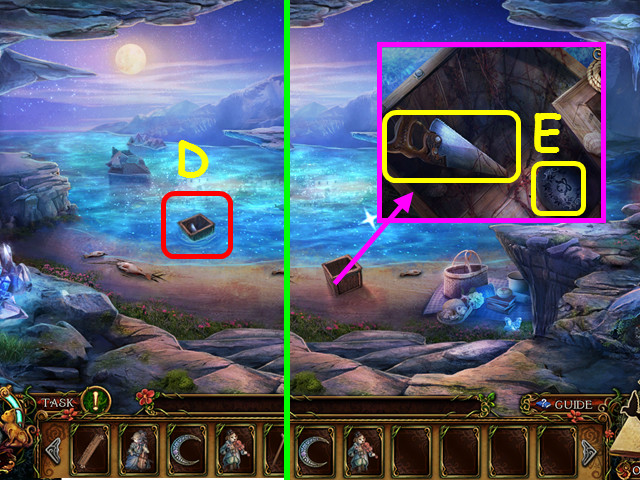
- Use the CANE on the crate (D).
- Take the HANDSAW and the BELL ENGRAVED PEBBLE (E).
- Return to the Village Square and walk forward.

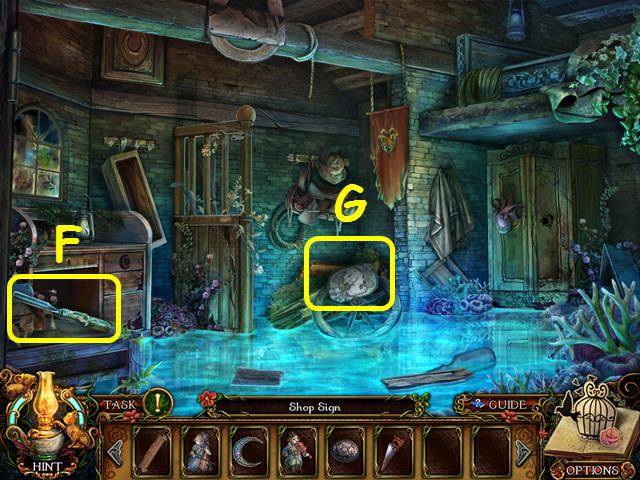
- Take the CHISEL (F).
- Take the WOMAN EMBOSSMENT (G).
- Walk down.

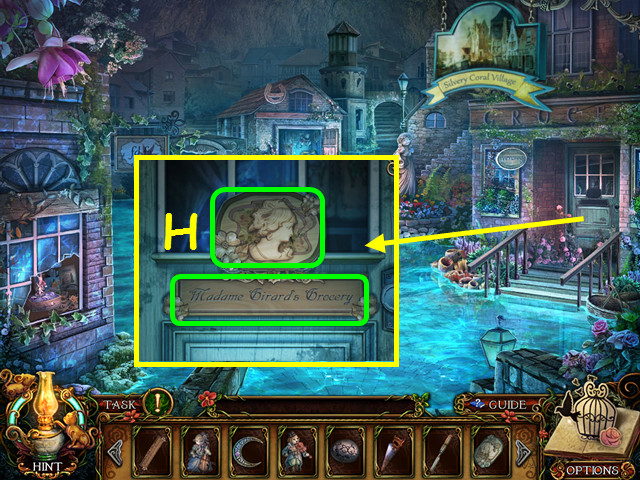
- Place the SHOP SIGN and the WOMAN EMBOSSMENT on the door (H).
- Walk to the right.

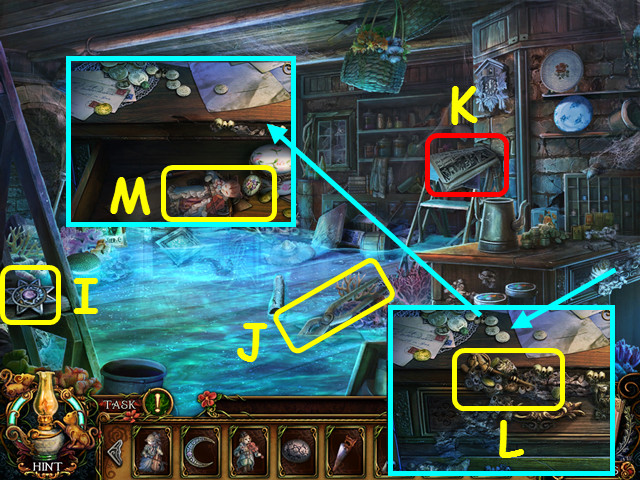
- Take the STAR STONE (I).
- Take the PLIERS (J).
- Read the newspaper (K).
- Use the CHISEL on the drawer; you earn the STABLE ROOF KEY (L).
- Read the note and take the VIOLIN CAT FIGURINE (M).
- Walk down.

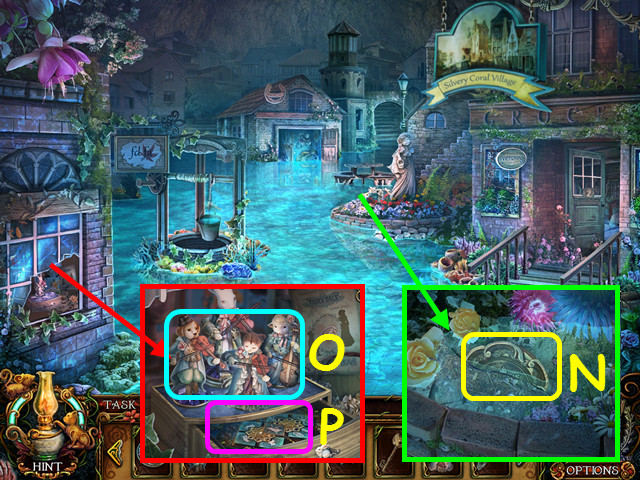
- Use the PLIERS to take the DONKEY DISC (N).
- Place the CELLO SHEEP FIGURINE, the VIOLIN CAT FIGURINE, and the VIOLA DOG FIGURINE on the box (O).
- Select the mini-game (P).

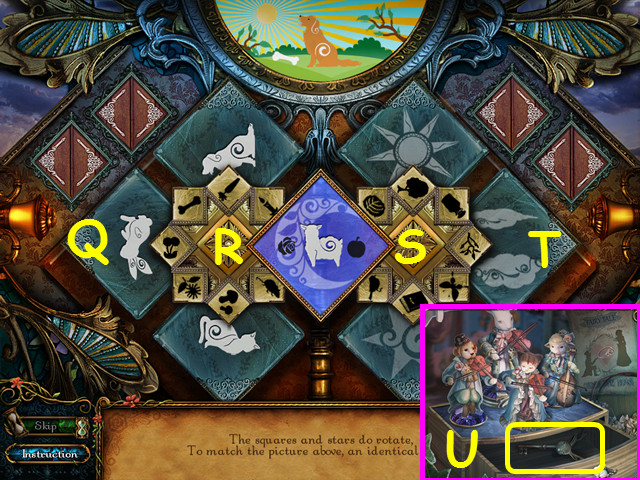
- Rotate the larger squares to match the picture at the top, and then rotate the smaller squares to add the 2 symbols.
- There are 4 sets to match.
- Selecting the left, large squares, moves them one space and the right side 2 spaces.
- Selecting the right, large squares moves them 1 space and the left side 2 spaces.
- Press (Q, Rx5, Sx4, Tx3), (Rx4, Sx3, Tx3), (Qx3, Rx2, Sx6), and (Rx3, Sx4, Tx1).
- Take the DEER CUPBOARD KEY (U).
- Walk forward.

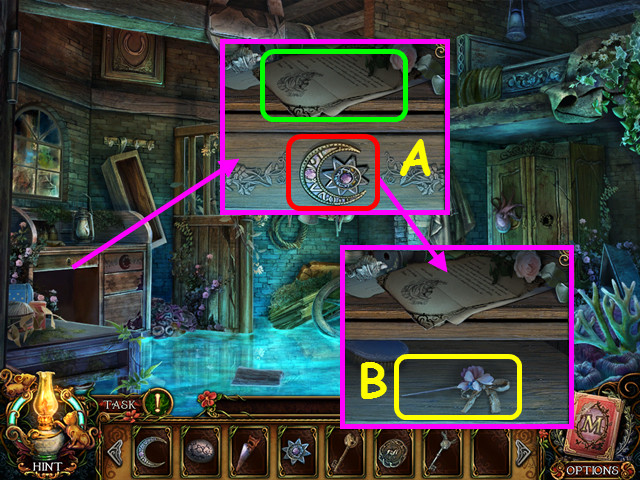
- Read the letter; place the CRESCENT STONE and the STAR STONE on the drawer (A).
- Take the HAIR PIN (B).
- Walk down and right.

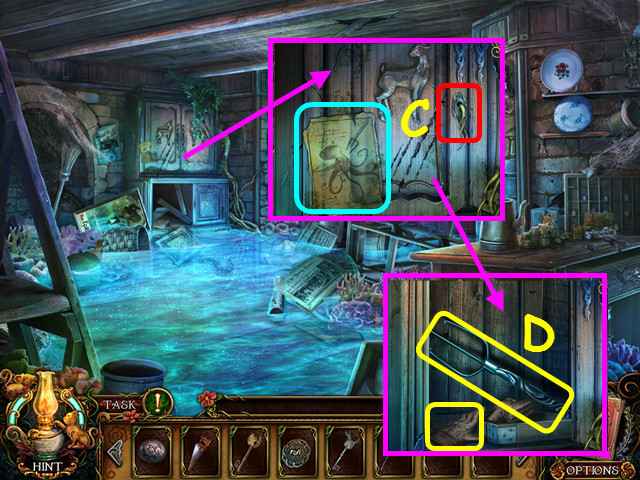
- Read the ad and use the HAIRPIN on the lock, followed by the DEER CUPBOARD KEY (C).
- Take the THICK LEATHER GLOVE and the TRIDENT (D).
- Walk down twice.

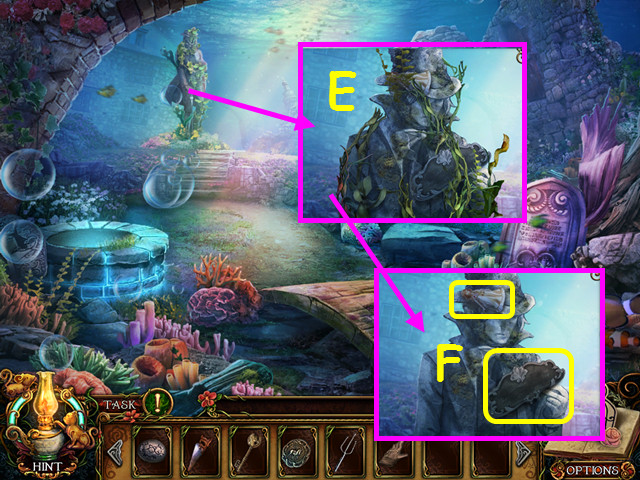
- Use the THICK LEATHER GLOVE to remove the vines (E).
- Take the MAIDEN FIGURINE and the MEMORIAL TABLET (F).
- Enter the well and walk forward.

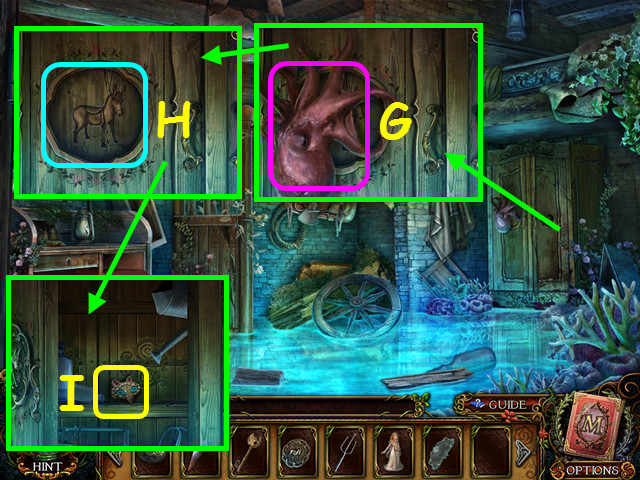
- Use the TRIDENT on the octopus (G).
- Place the DONKEY DISC in the opening (H).
- Take the FOX JEWEL (I).
- Walk down.

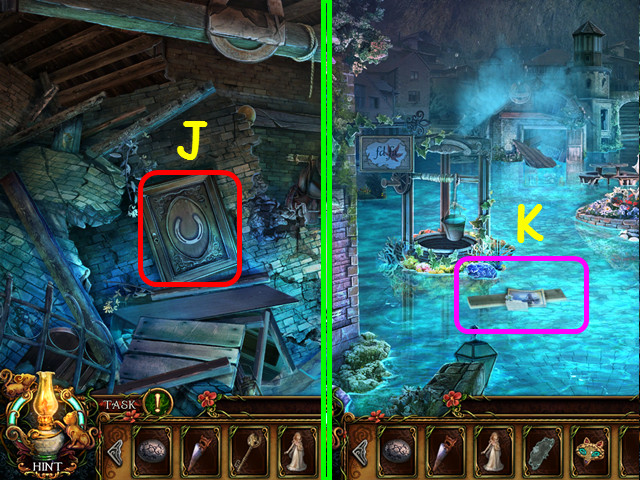
- Use the STABLE ROOF KEY on the hatch (J).
- Walk forward.
- Read the note (K).
- Walk down twice.

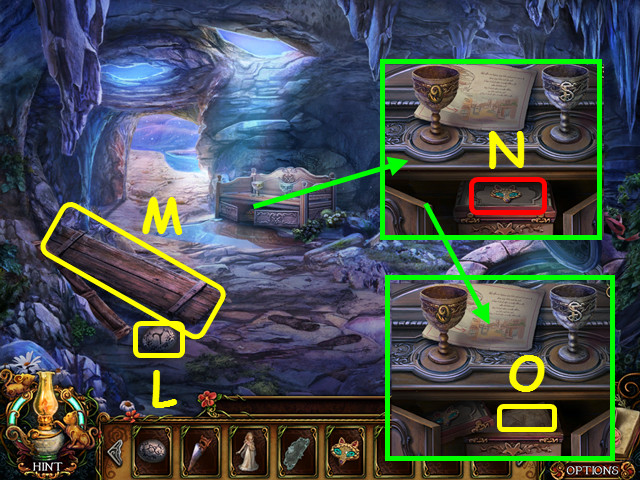
- Take the CANE ENGRAVED PEBBLE (L).
- Use the HANDSAW on the wood and take the PLANK (M).
- Place the FOX JEWEL on the chest (N).
- Take the PONIARD (O).
- Enter the hatch.

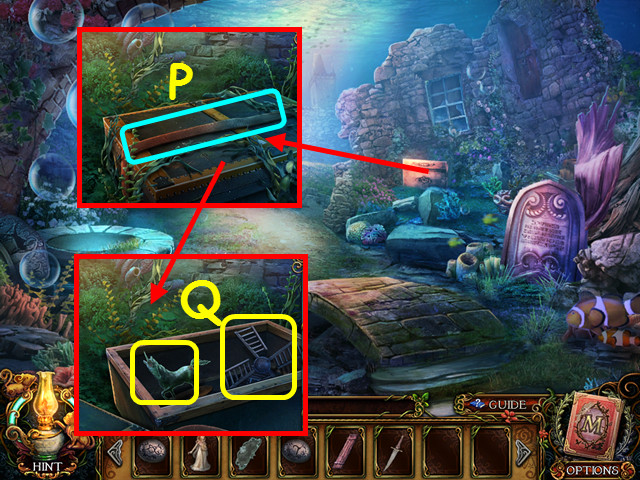
- Use the PONIARD on the strap (P).
- Take the BRASS UNICORN FIGURE and the WINDMILL MODEL (Q).
- Walk down and forward.

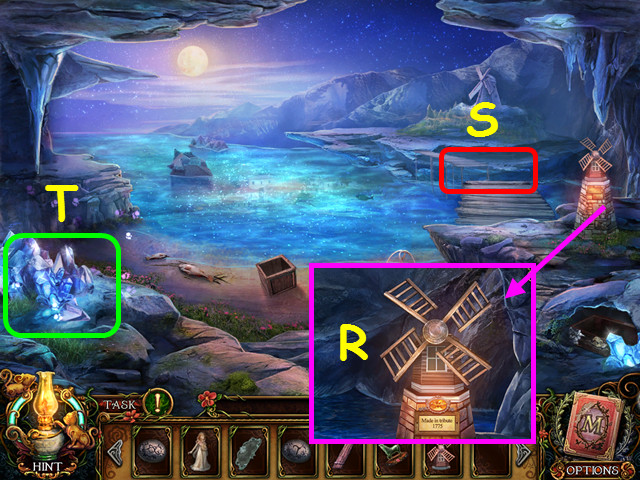
- Place the WINDMILL MODEL on the stand (R).
- Place the PLANK on the bridge (S).
- Select the crystals (T).

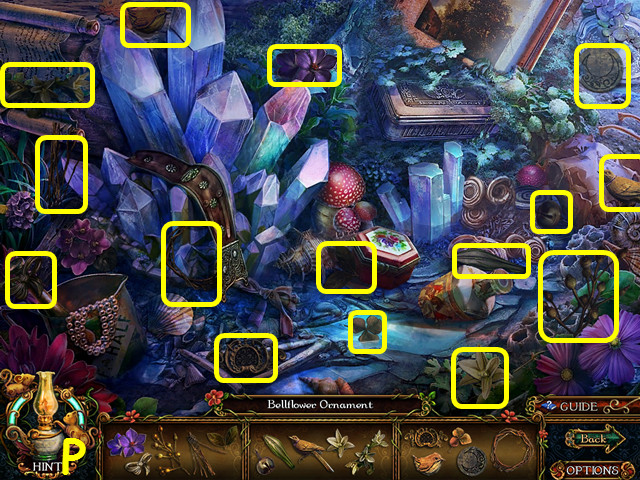
- Play the HOP to earn the BELLFLOWER ORNAMENT (P).
- Walk forward.

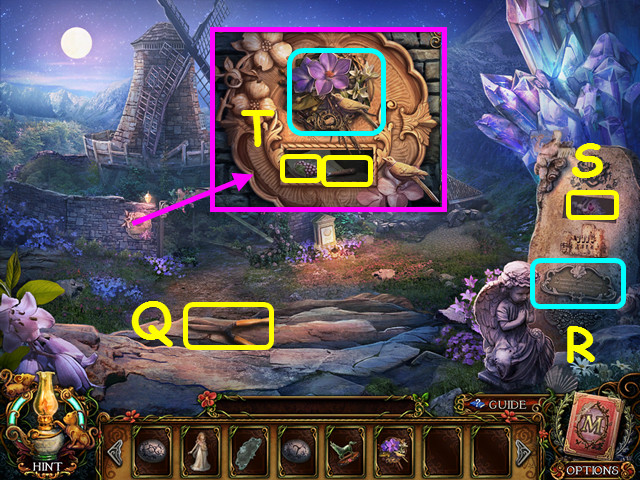
- Take the GARDEN SHEARS (Q).
- Place the MEMORIAL TABLET on the monument (R).
- Take the RIGHT SWAN EMBLEM (S).
- Place the BELLFLOWER ORNAMENT on the plaque; take the GRAPE MEDALLION and the SEAM RIPPER (T).
- Walk down twice.

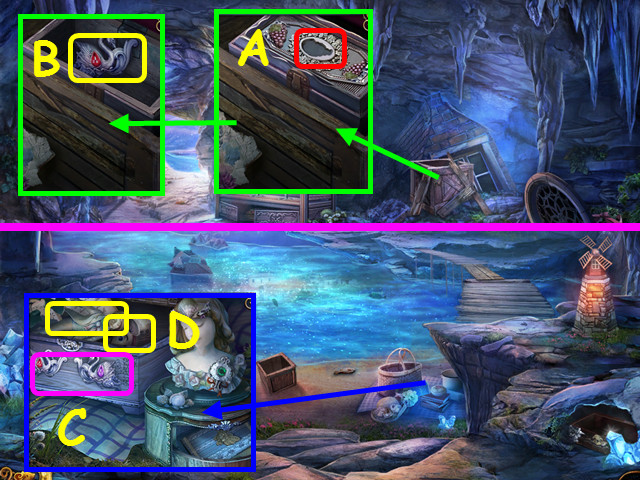
- Place the GRAPE MEDALLION on the box (A).
- Take the LEFT SWAN EMBLEM (B).
- Walk forward.
- Place the RIGHT SWAN EMBLEM and the LEFT SWAN EMBLEM on the box (C).
- Read the journal; take the MAN FIGURINE and the CROOKED MOUSE PUPPET (D).
- Walk forward.

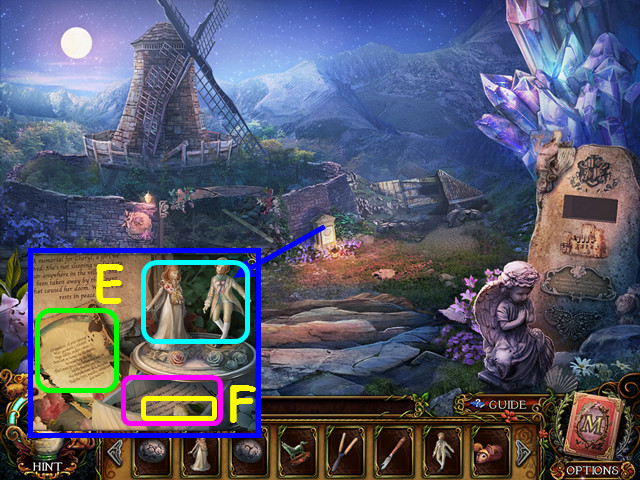
- Read the poem; place the MAIDEN FIGURINE and the MAN FIGURINE on the box (E).
- Take the CHATEAU EMBLEM and read the letter (F).
- Walk down 4 times, go forward on the elevated path.

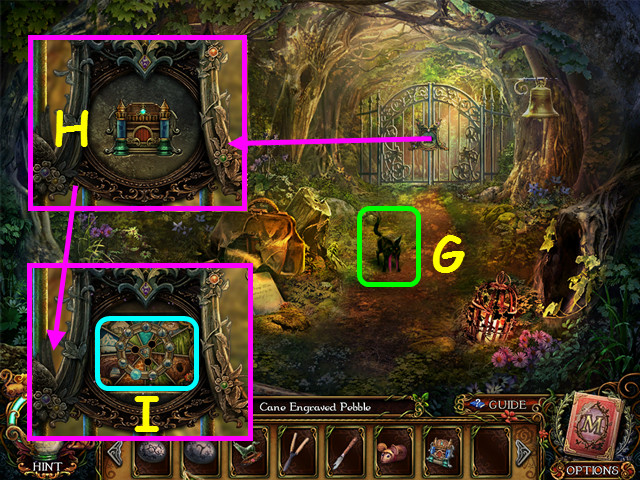
- Try to take the cat (G).
- Place the CHATEAU EMBLEM in the lock (H).
- Select the opening (I).

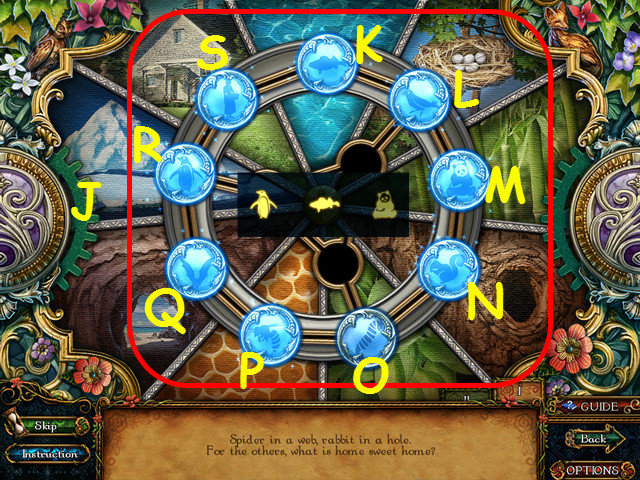
- Move the discs to the matching habitat (J).
- Select a disc and select the highlight position to move the disc.
- Next, press the discs to duplicate the pattern shown; there are 3 patterns to complete.
- Press (R, K, M), (N, Q, L, O), and (R, M, S, P, N).
- Walk forward.
Chapter 5: Day 2, 2:30 AM

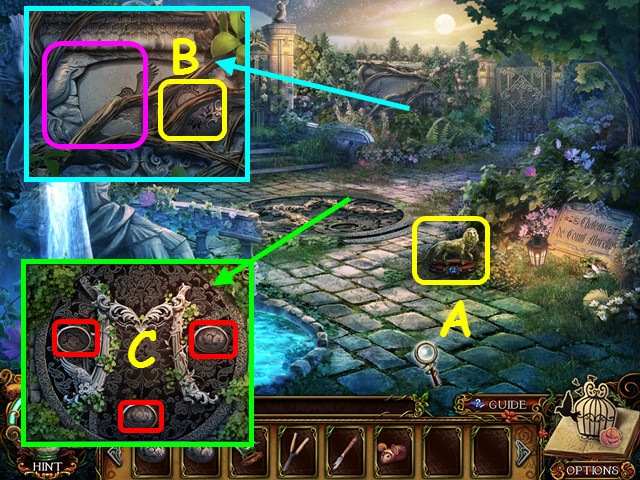
- Take the BRASS LION FIGURE (A).
- Use the GARDEN SHEARS on the vines and take the RING ENGRAVED PEBBLE (B).
- Place the CANE ENGRAVED PEBBLE, the BELL ENGRAVED PEBBLE, and the RING ENGRAVED PEBBLE in the panel (C).
- Select the mini-game under the panel.

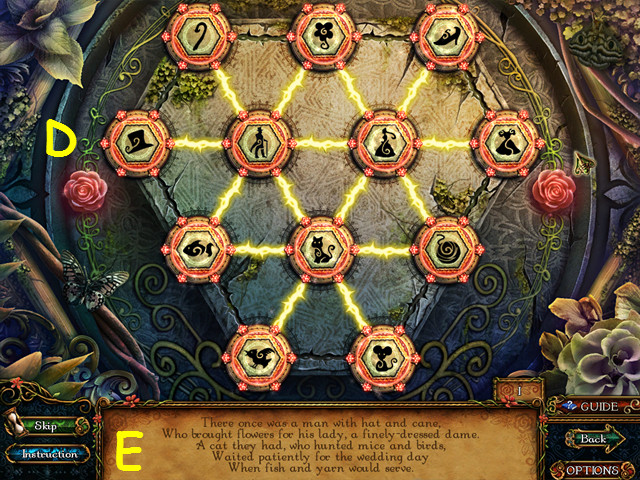
- Swap the tiles to form a connected web (D) using the poem as your guide (E).
- Walk forward.

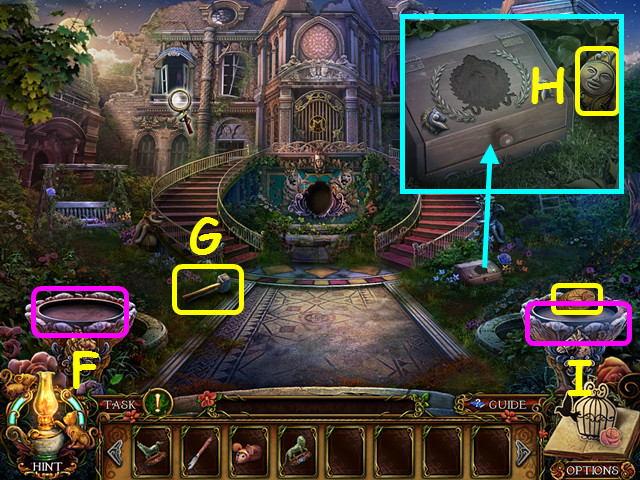
- Place the BRASS LION FIGURE on the left (F).
- Take the IRON MALLET (G).
- Take the SUN HALF PLATE (H).
- Take the GOOSE BADGE and place the BRASS UNICORN FIGURE on the right (I).
- Walk down and right.

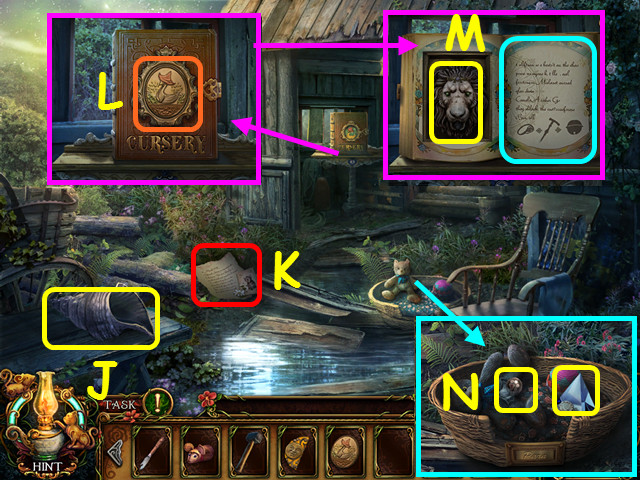
- Take the CONCH VASE (J).
- Read the letter (K).
- Place the GOOSE BADGE on the book (L).
- Take the LION HEAD FAUCET and read the book (M).
- Use the SEAM RIPPER on the bear; take the PAW CHARM and the MIRROR PRISM (N).
- Walk down.

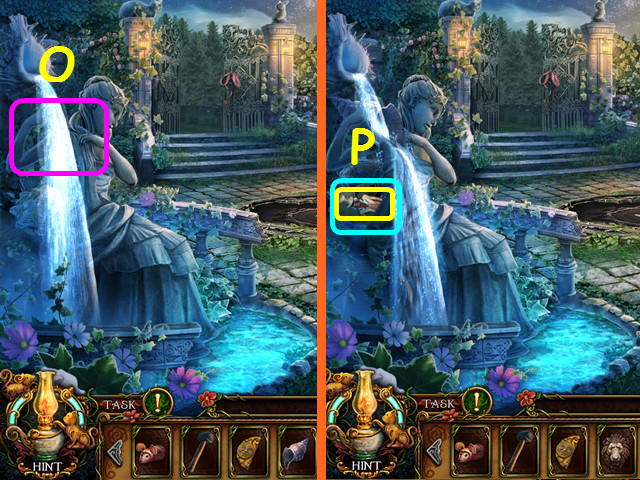
- Place the CONCH VASE on the fountain (O).
- Read the pages and take the CROOKED MAN PUPPET (P).
- Walk forward.

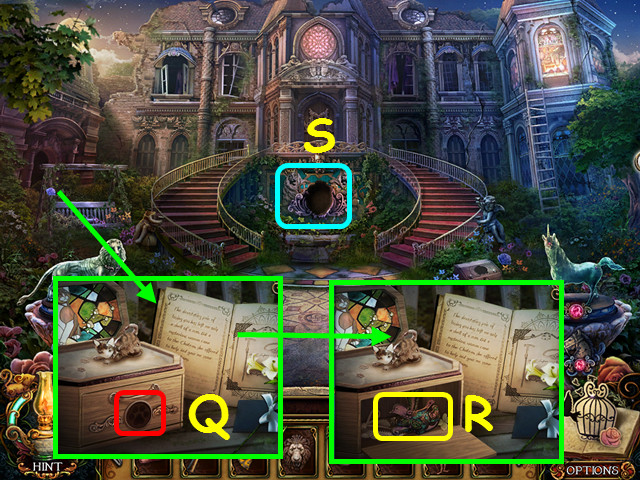
- Place the PAW CHARM on the box (Q).
- Take the NIGHTINGALE EMBOSS (R).
- Place the LION HEAD FAUCET on the fountain; select the fountain (S).

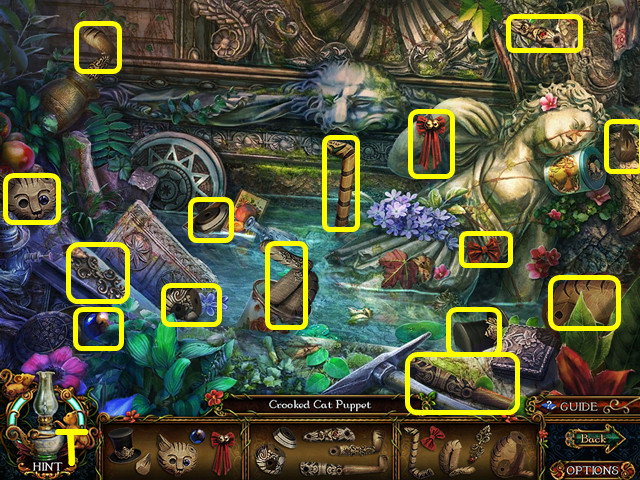
- Play the HOP to earn the CROOKED CAT PUPPET (T).
- Walk down.

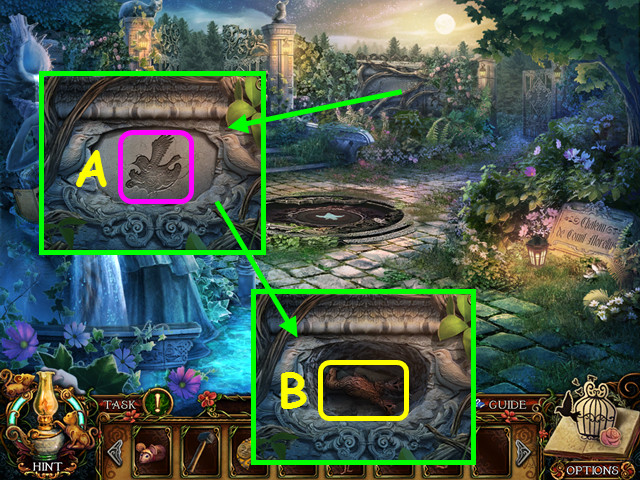
- Place the NIGHTINGALE EMBOSS on the wall (A).
- Take the EAGLE BLAZON (B).
- Walk right.

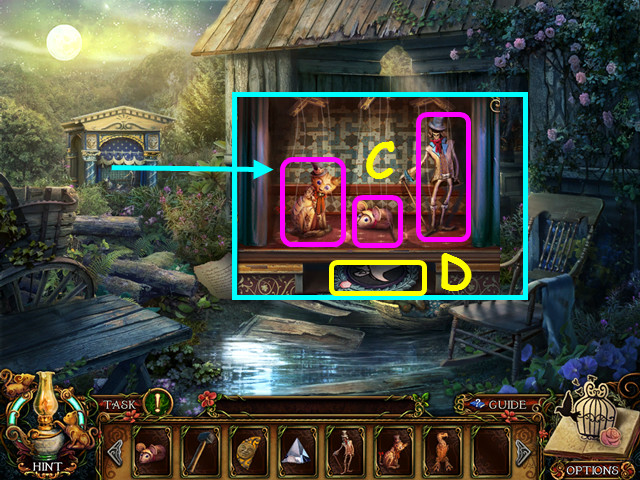
- Place the CROOKED MOUSE PUPPET, the CROOKED MAN PUPPET, and the CROOKED CAT PUPPET on the stage (C).
- Take the MOTHER GOOSE DISC (D).
- Walk down.

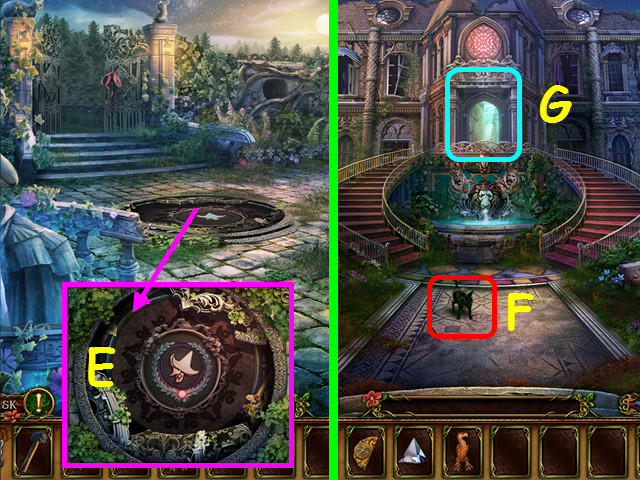
- Place the MOTHER GOOSE DISC in the center circle (E).
- Walk forward
- Shoo the cat (F).
- Walk forward (G).

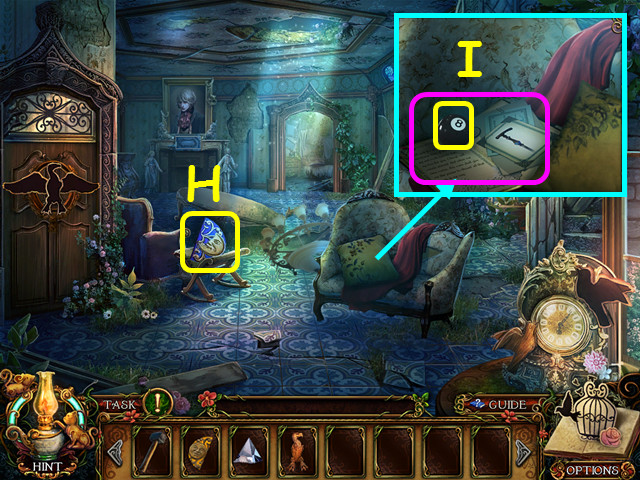
- Take the MOON HALF PLATE (H).
- Move the pillow; read the journal and take the EIGHT-BALL (I).
- Walk forward.

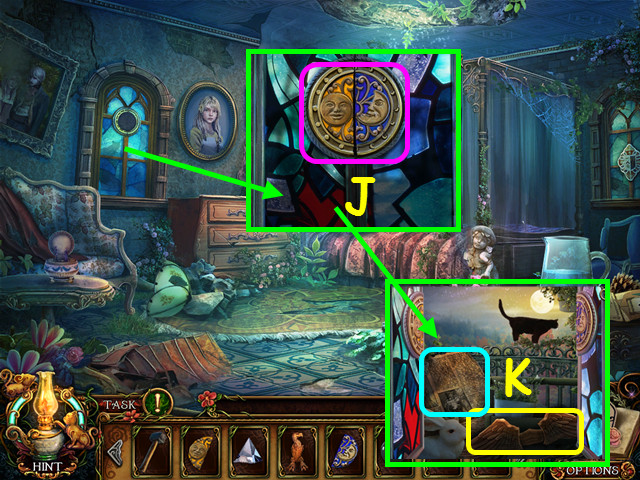
- Place the SUN HALF PLATE and the MOON HALF PLATE on the window (J).
- Read the paper and take the EAGLE’S WINGS (K).

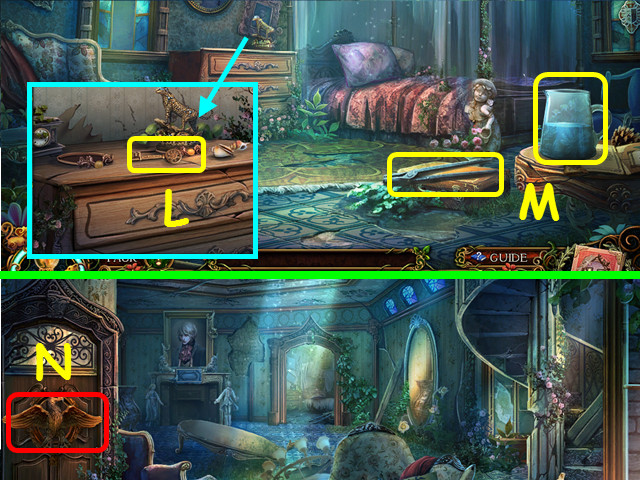
- Take the PIANO KEY (L).
- Take the FIRE TONGS and the PITCHER WITH WATER (M).
- Walk down.
- Place the EAGLE BLAZON and the EAGLE WINGS on the door (N).
- Walk left.

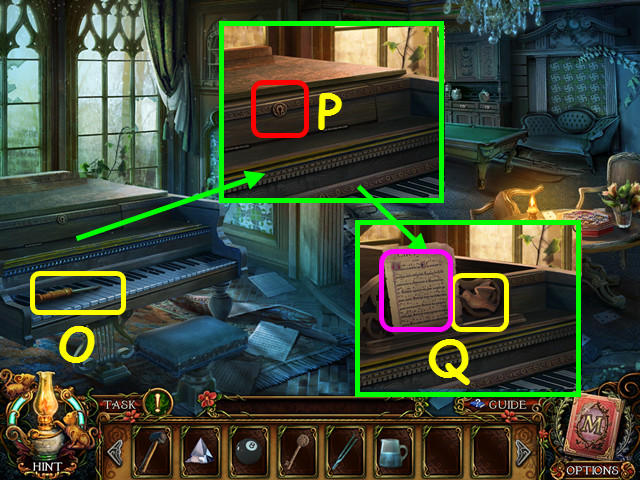
- Take the SCREWDRIVER (O).
- Use the PIANO KEY on the lock (P).
- Look at the music and take the CUCKOO ORNAMENT (Q).

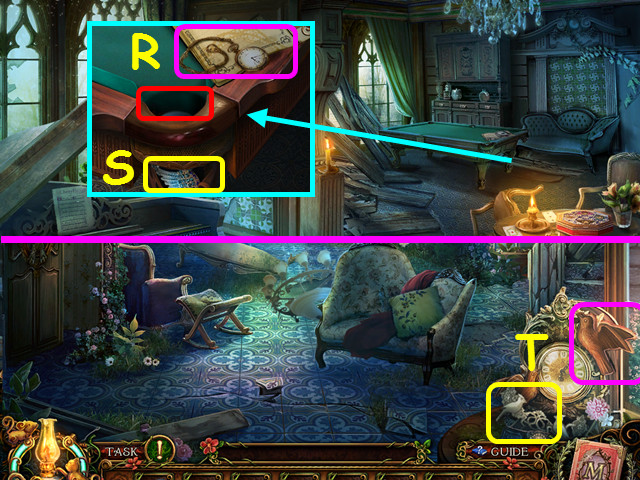
- Read the journal and place the EIGHT-BALL in the pocket (R).
- Take the CRYSTAL ANGEL WING (S).
- Walk down.
- Place the CUCKOO ORNAMENT on the clock and take the BIRD HANDLE (T).
- Walk down.

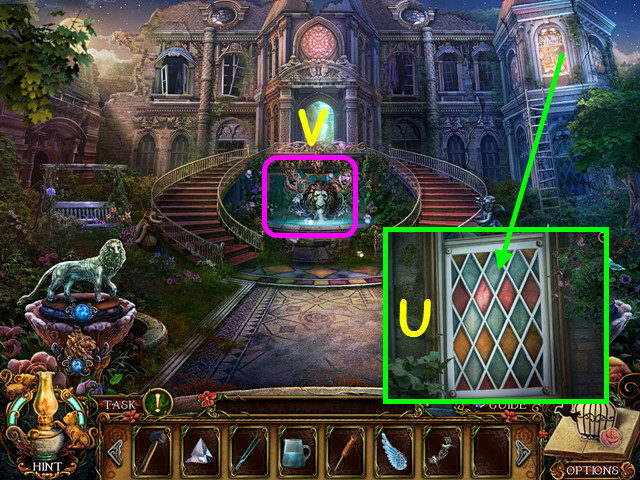
- Use the SCREWDRIVER on the window (U).
- Select the fountain (V).

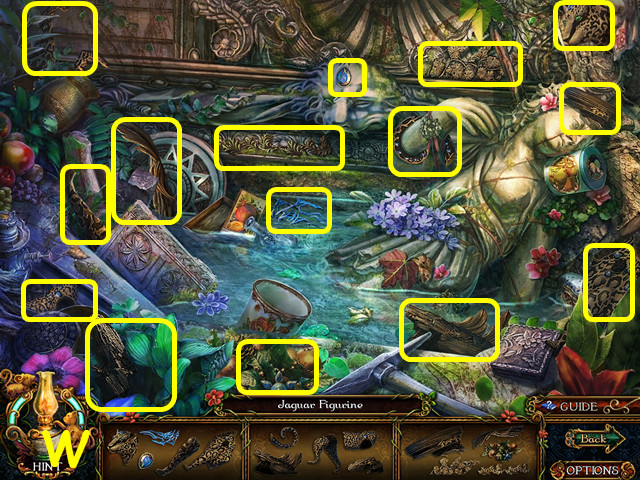
- Play the HOP to earn the JAGUAR FIGURINE (W).
- Enter the window.

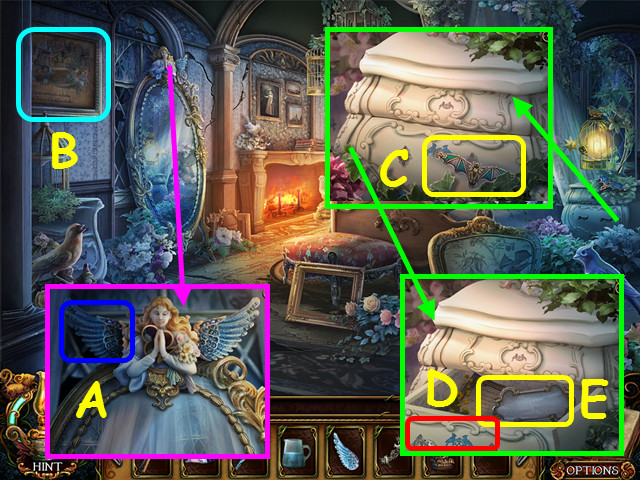
- Place the CRYSTAL ANGEL WING on the angel to earn the CLUB GEM (A).
- Look at the painting (B).
- Take the BAT EMBLEM (C).
- Place the BIRD HANDLE on the drawer (D).
- Take the COPPER NAMEPLATE and read the note (E).

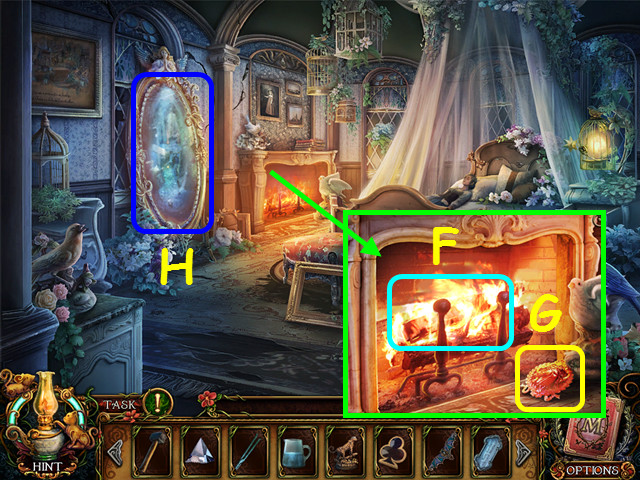
- Use the FIRE TONGS on the fire (F).
- Pour the PITCHER OF WATER on, and then take the BLACK HORSE MEDALLION (G).
- Note the mirror portal (H).
- Walk down.

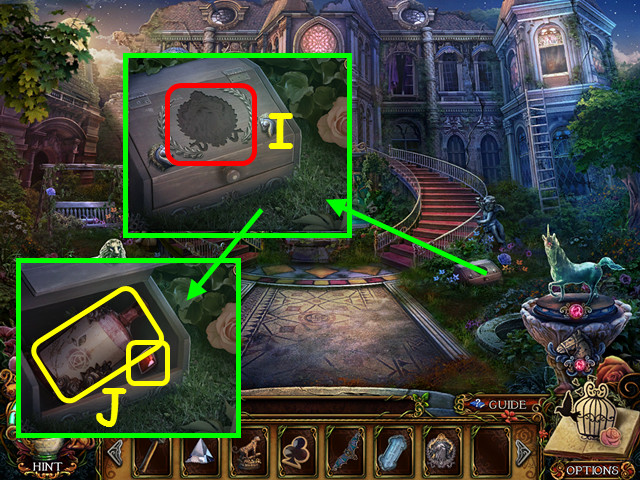
- Place the BLACK HORSE MEDALLION on the box (I).
- Take the BRIAR REMOVER and the DIAMOND GEM (J).
- Walk down 5 times.

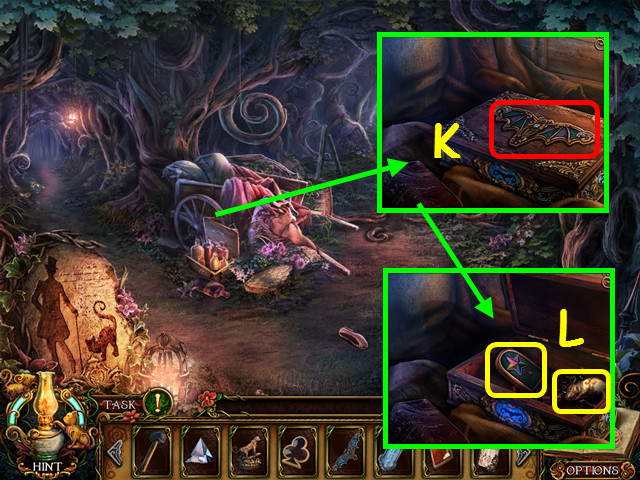
- Place the BAT EMBLEM on the box (K).
- Take the STAR DOOR and the CROOKED MOUSE KEY (L).
- Walk forward and right.

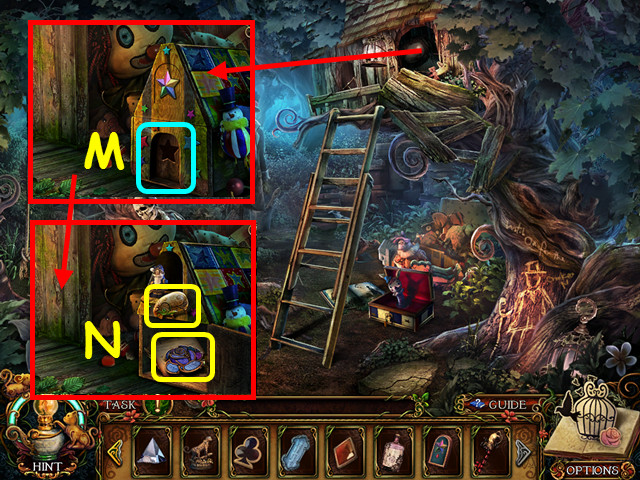
- Place the STAR DOOR in the door space (M).
- Take the Take the BROWN SHEEP CARVING and the BRIAR ROSE MEDAL; read the note (N).
- Walk down, forward, go forward on the raised path, and forward 3 more times.

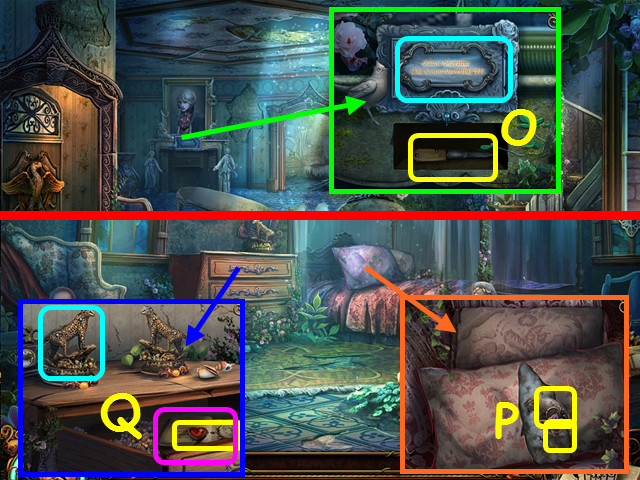
- Place the COPPER NAMEPLATE in the holder; take the SMALL KNIFE (O).
- Walk forward.
- Use the SMALL KNIFE on the pillow; take the BLACK SHEEP CARVING and the SPADE GEM (P).
- Place the JAGUAR FIGURINE on the dresser; take the HEART GEM and read the journal (Q).
- Walk down and left.

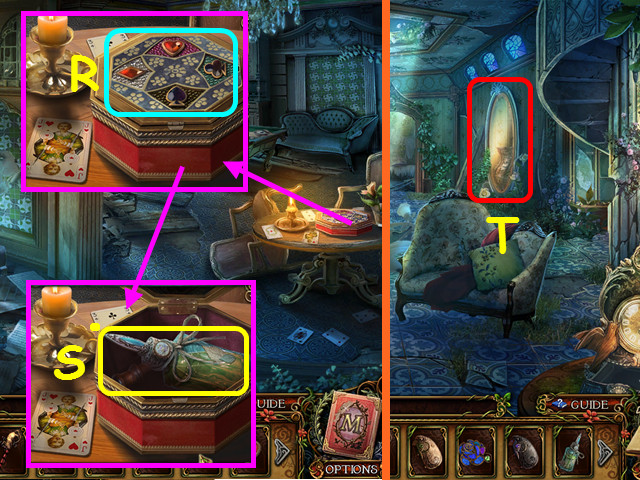
- Place the HEART GEM, then CLUB GEM, the SPADE GEM, and the DIAMOND GEM on the lid (R).
- Take the PEPPERMINT OIL (S).
- Walk down.
- Enter the mirror portal (T).

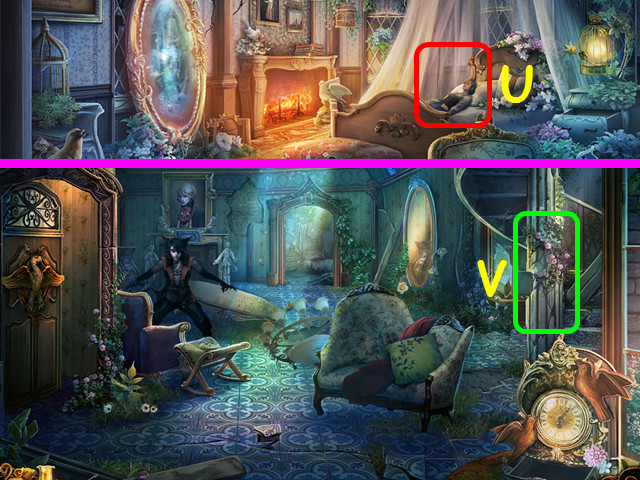
- Use the PEPPERMINT OIL on Renee (U).
- After the cut-scene, walk forward.
- Use the IRON MALLET on the column (V).

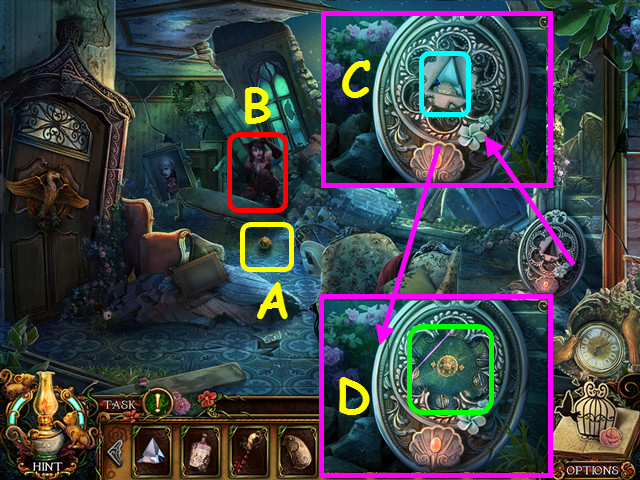
- Take the CAT BELL (A).
- Talk to Parn (B).
- Place the MIRROR PRISM in the indentation (C).
- Select the mini-game (D).

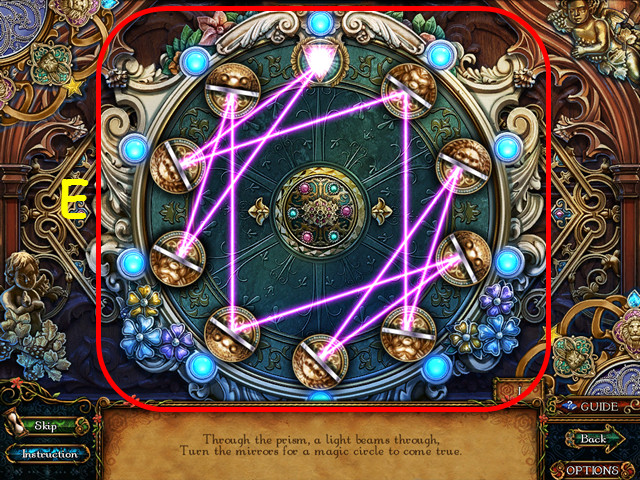
- Turn the mirrors so the light beam hits each mirror and returns back to the prism (E).
- Select a mirror to rotate it in place.
Chapter 6: Day 2, 4:00 AM

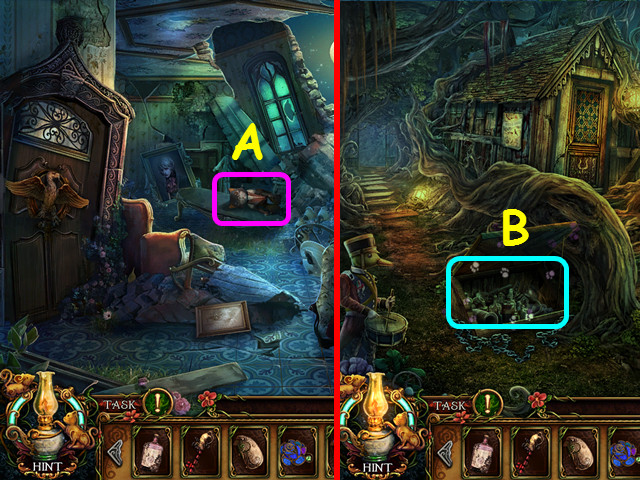
- Look at the CROOKED CAT (A).
- Walk down 5 times.
- Select the storage bin (B).

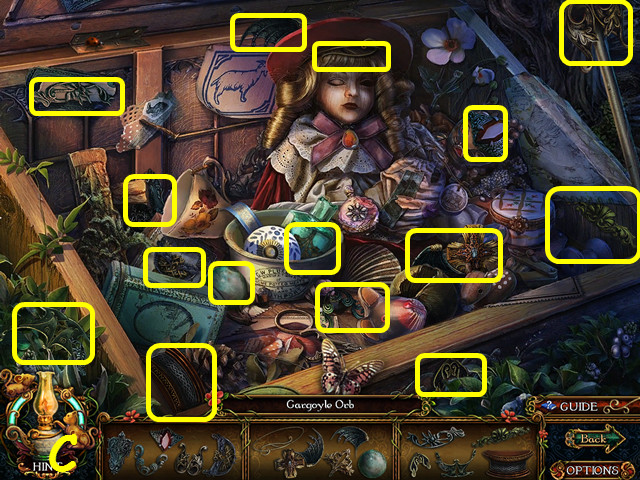
- Play the HOP to earn the GARGOYLE ORB (C).
- Walk down and left.

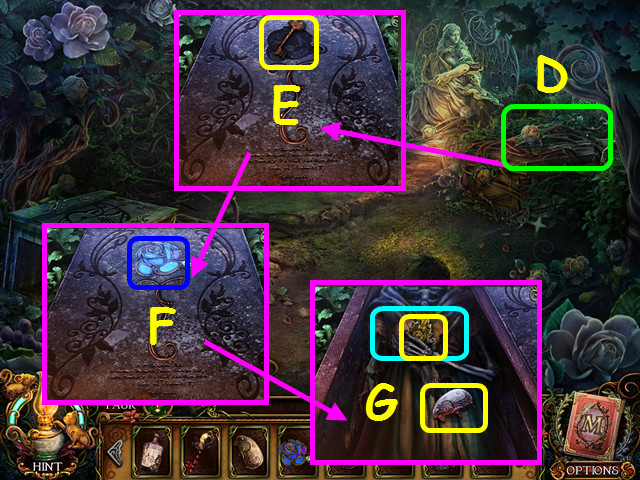
- Use the BRIAR REMOVER on the briars (D).
- Take the CRISSCROSS KEY (E).
- Place the BRIAR ROSE MEDAL on the lid (F).
- Take the CROOKED INSIGNIA and the WHITE SHEEP CARVING (G); read the note.
- Walk down.

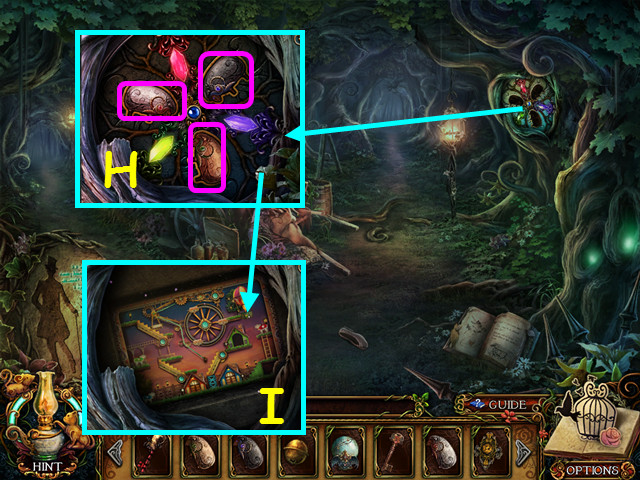
- Place the BLACK SHEEP CARVING, the BROWN SHEEP CARVING, and the WHITE SHEEP CARVING in the mosaic (H).
- Select the mini-game (I).

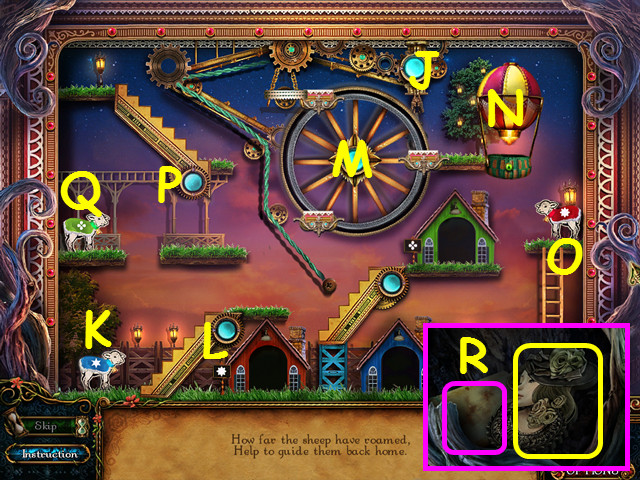

- Move the sheep home by using the devices in the scene.
- Press the lift button 3 times (J).
- Select the blue sheep (K), the lower left stairs (L), and then the blue sheep again.
- Select the lift button 5 times; select the blue sheep.
- Press the Ferris wheel button twice (M), select the blue sheep, and then select the balloon (N).
- Select the red sheep (O), and then the balloon.
- Press the Ferris wheel button, and then select the red sheep.
- Press the lift button 3 times and select the red sheep.
- Move the lower left stairs and select the red sheep.
- Move the upper left stairs (P), and select the green sheep (Q).
- Take the DOLL EMBLEM and read the maze directions (R). Walk forward
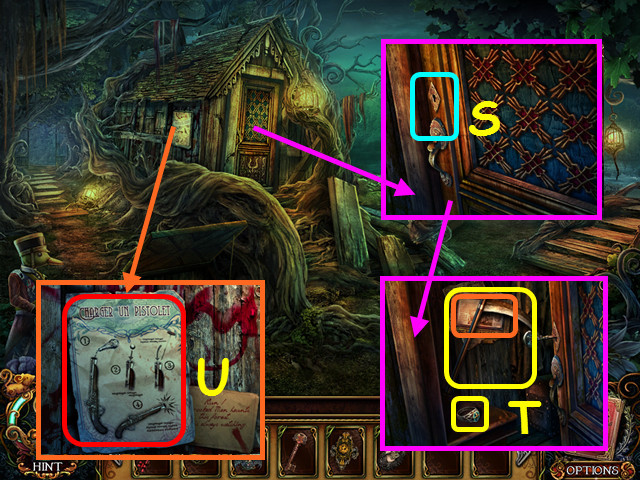
- Use the CRISSCROSS KEY in the lock (S).
- Take the FLEUR-DE-LIS RING and the SCYTHE; read the clipping (T).
- Turn the page and read about loading a pistol (U).
- Walk down and left.

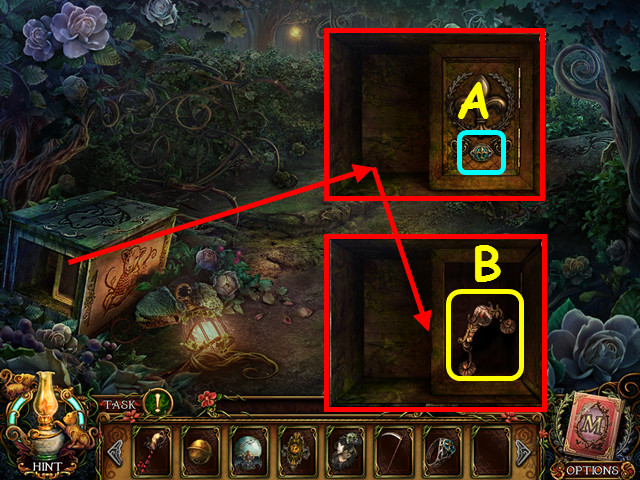
- Place the FLEUR-DE-LIS RING in the slot (A).
- Take the BUFFALO HANDLE (B).
- Walk down, forward, and left.

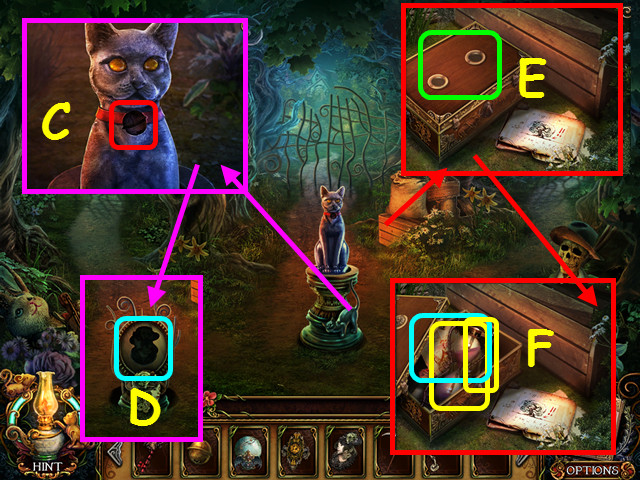
- Place the CAT BELL on the cat (C).
- Place the DOLL EMBLEM in the frame (D).
- Place the BUFFALO HANDLE on the box (E).
- Take the HOURGLASS and the POTTERY DOLL LEG; read the note (F).
- Per the maze instructions, walk up, left, left, up, right, right, and up.

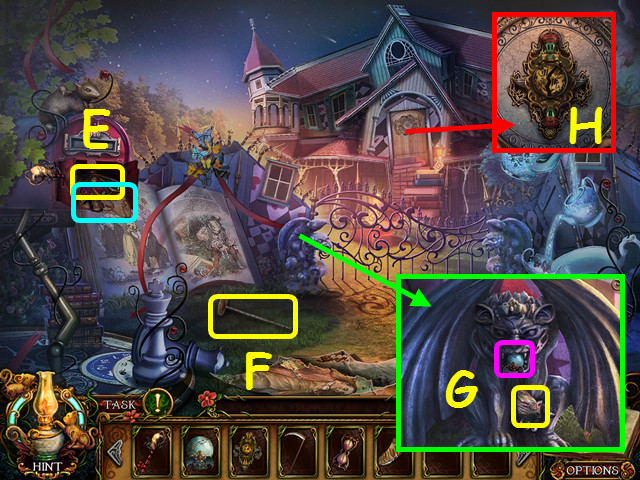
- Use the CROOKED MOUSE KEY on the lock; take the BUTTERFLY JEWEL and read the poem (E).
- Take the RAMROD (F).
- Give the GARGOYLE ORB to the gargoyle; take the POTTERY DOLL BODY (G).
- Place the CROOKED INSIGNIA in the door and select the mini-game (H).

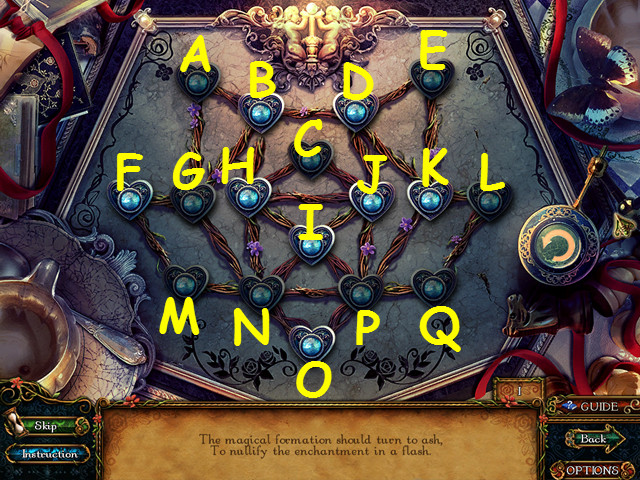
- Starting anywhere, select the hearts to trace a path through all the vines, hitting each only once.
- Select the hearts H, C, J, H, I, J, D, K, P, Q, L, K, E, D, B, H, N, G, B, A, G, F, M, N, O, P, N, I, P, and J.
- Walk forward.

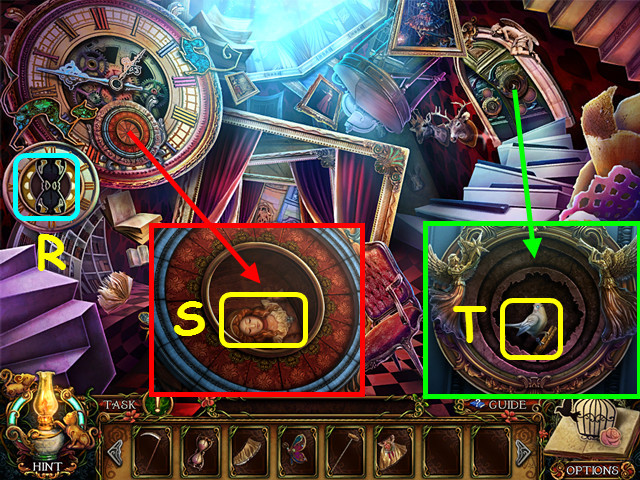
- Place the HOURGLASS in the holder (R).
- Take the POTTERY DOLL HEAD (S).
- Take the SONGBIRD FIGURINE (T).

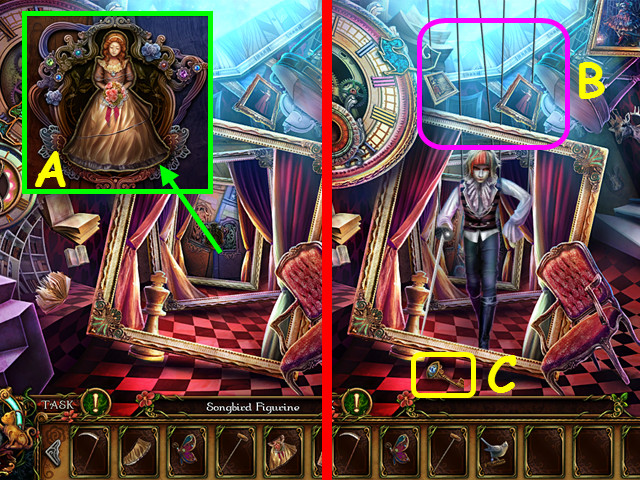
- Place the POTTERY DOLL LEG, the POTTERY DOLL BODY, and the POTTERY DOLL HEAD in the indentation (A).
- Use the SCYTHE on the strings (B).
- Take the GLASSY EYE KEY (C).
- Walk forward.

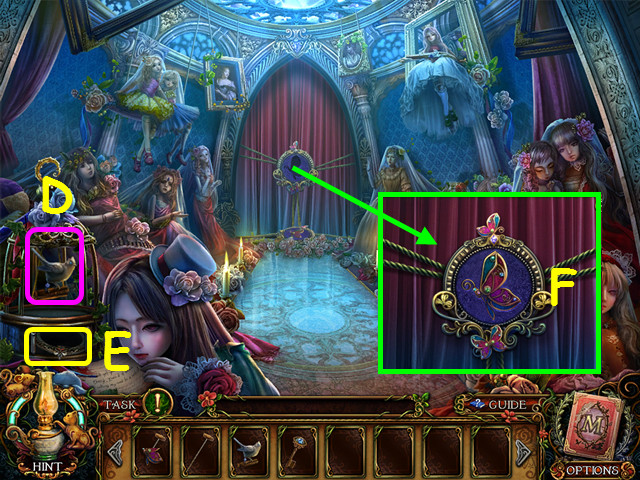
- Place the SONGBIRD FIGURINE in the cage (D).
- Take the ANGEL HALO DISC (E).
- Place the BUTTERFLY JEWEL in the disc (F).
- Walk forward.

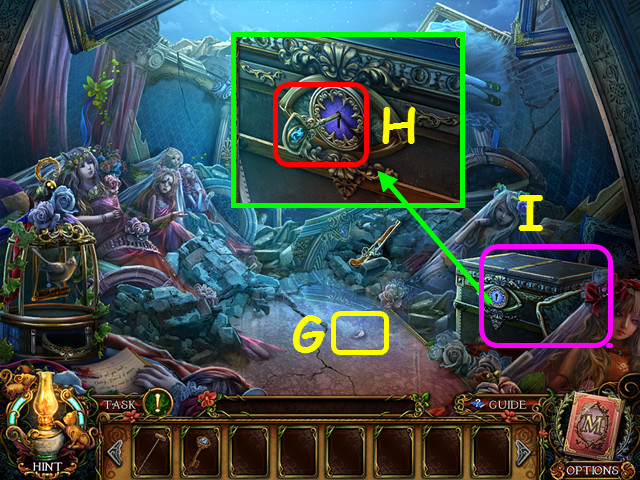
- Take the WEDDING RING (G).
- Use the GLASSY EYE KEY on the lock (H).
- Select the chest (I).

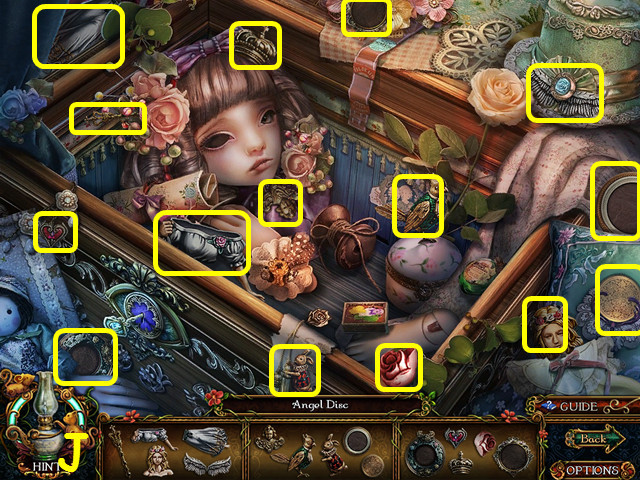
- Play the HOP to earn the ANGEL DISC (J).
- Walk down.

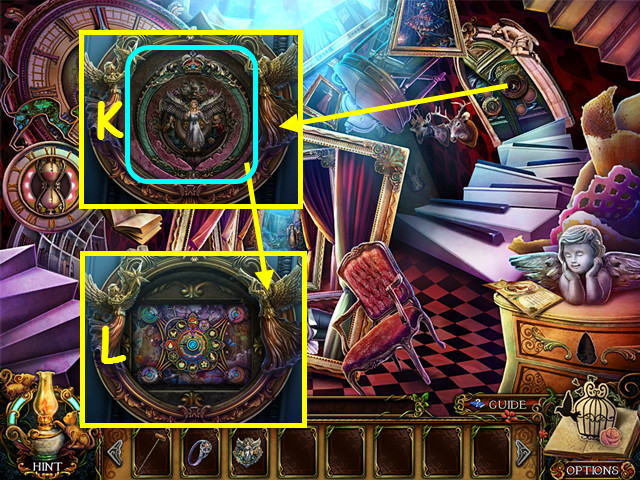
- Place the ANGEL DISC and the ANGEL HALO DISC in the frame (K).
- Select the mini-game (L).

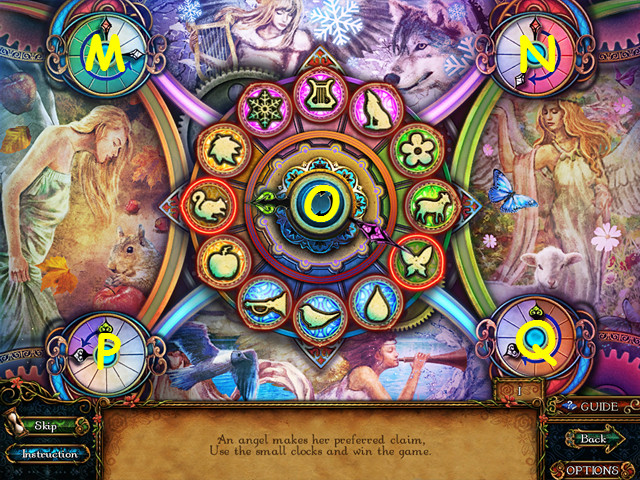
- Move the discs to the section that shows a picture of each.
- Use the outer buttons to move the arrows, and then push the center button to swap discs.
- Press O, N, Q, O, N, P, O, N, P, O, N, Q, O, Q, P, O, Px3, O, Mx2, Px2, and O.
- Walk right.

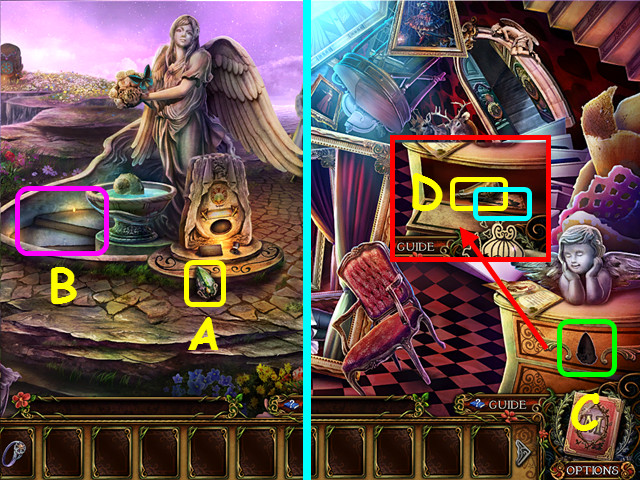
- Take the ANGEL TEAR (A).
- Go down the stairs (B).
- Place the ANGEL TEAR on the drawer (C).
- Take the GUNPOWDER FLASK and read the note (D).
- Walk forward.

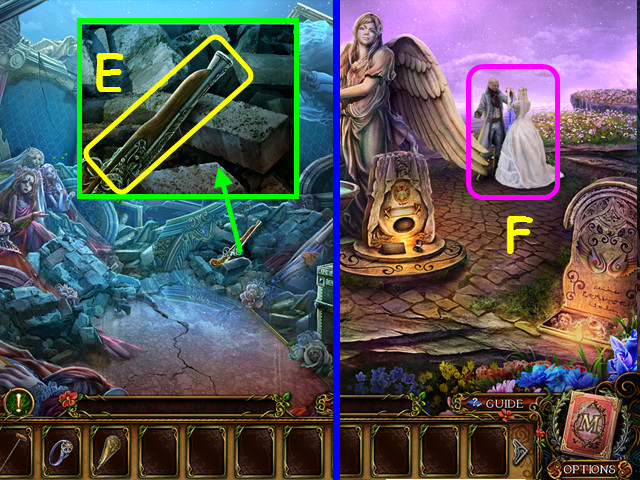
- Use the GUNPOWDER FLASK, and then the WEDDING RING on the pistol (E).
- Use the RAMROD on the pistol, and then take the LOADED PISTOL.
- Walk down and right.
- Use the LOADED PISTOL on the Crooked Man (F).
- Congratulations! You have completed Cursery: The Crooked Man and the Crooked Cat!






 Oddly Enough: Pied Piper Walkthrough, Guide, & Tips
 Nightmare Adventures: The Witch's Prison Walkthrough, Guide, & Tips
 Tesla's Tower: The Wardenclyffe Mystery Walkthrough, Guide, & Tips
 Hidden Expedition: Dawn of Prosperity Walkthrough, Guide, & Tips
 Grim Facade: Sinister Obsession Walkthrough, Guide, & Tips