Hidden Expedition: Dawn of Prosperity Walkthrough, Guide, & Tips
Hidden Expedition: Dawn of Prosperity Walkthrough

Welcome to the Hidden Expedition: Dawn of Prosperity Walkthrough
A mountain observatory is hiding a big secret!
Whether you use this document as a reference when things get difficult or as a road map to get you from beginning to end, we’re pretty sure you’ll find what you’re looking for here.
This document contains a complete Hidden Expedition: Dawn of Prosperity game walkthrough featuring annotated screenshots from actual gameplay!
We hope you find this information useful as you play your way through the game. Use the walkthrough menu below to quickly jump to whatever stage of the game you need help with.
Remember to visit the Big Fish Games Forums if you find you need more help. Have fun!
This walkthrough was created by MargieB, and is protected under US Copyright laws. Any unauthorized use, including re-publication in whole or in part, without permission, is strictly prohibited.
General Tips
- This is the official guide for Hidden Expedition: Dawn of Prosperity.
- This guide will not tell you when you have to zoom into a location; the screenshots will show each zoom scene.
- Hidden-object puzzles are referred to as HOPs. This guide will not show screenshots of the HOPs, however, it will mention when an HOP is available and the inventory item you’ll collect from it.
- Use the Map to fast travel to a location.
Chapter 1: Mountain Top

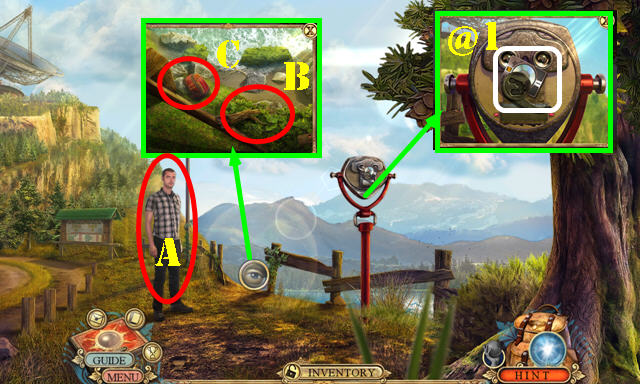
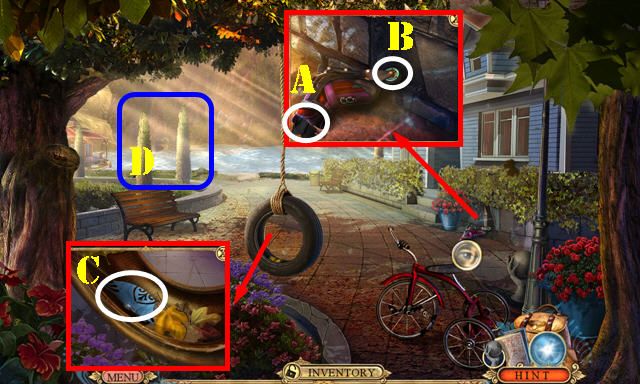
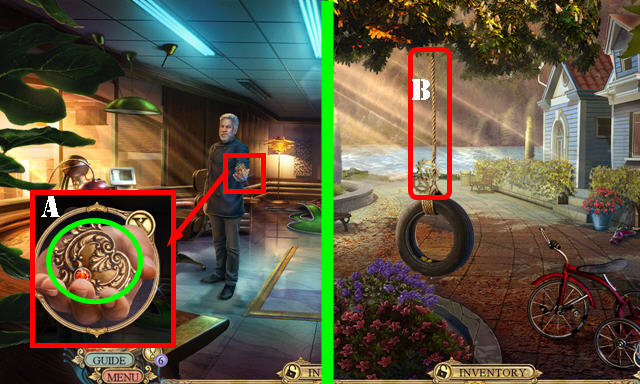
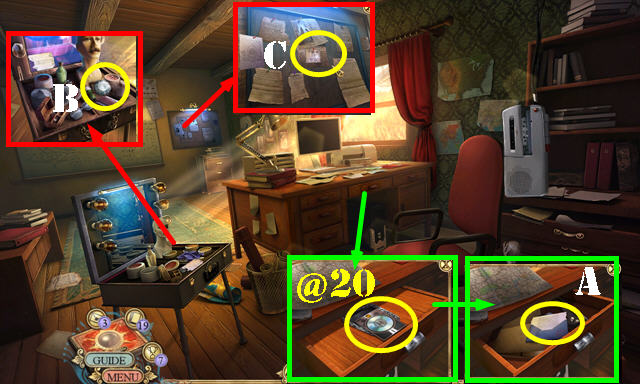
- Talk to Sam (A).
- Take the BRANCH (B) and use it to get the BACKPACK (C).
- Open the BACKPACK; read the note; take the FLOPPY DISK. Take the Map and STEEL RULER below (inventory).
- Take the Fact Card 1/20 (@1).
- Go left.
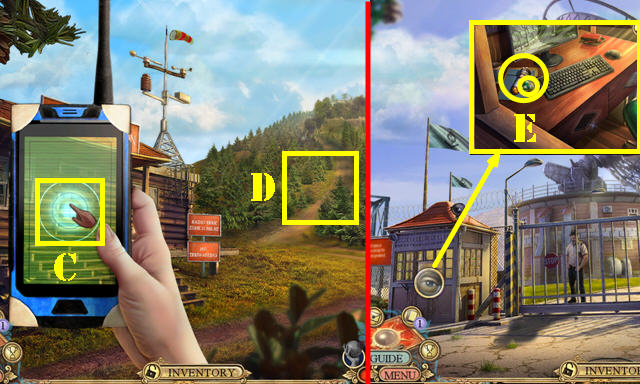
- Select the door (C).
- Go forward (D).
- Use the STEEL RULER; take the FLASHLIGHT and TOKEN 1/2 (E).
- Walk down.
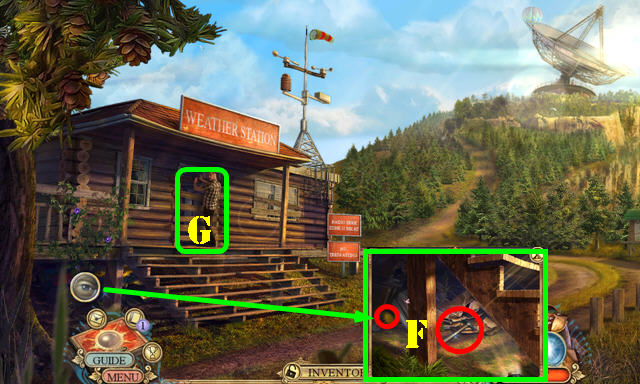
- Use the FLASHLIGHT; take the CLAW HAMMER and SUN SYMBOL (F).
- Use the CLAW HAMMER twice (G) and go through the door.
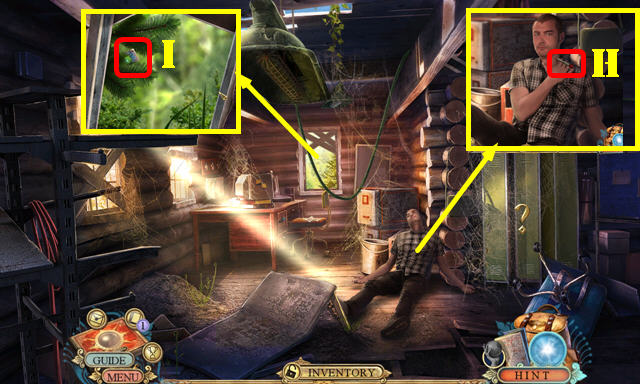
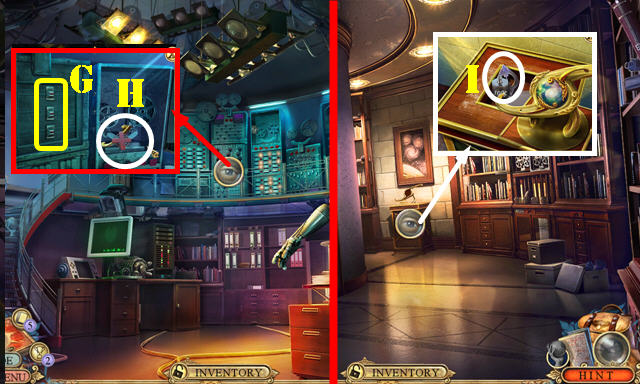
- Pull out the TRANQUILIZING DART (H).
- Open the FLASHLIGHT to get the BATTERIES 1/2 (inventory).
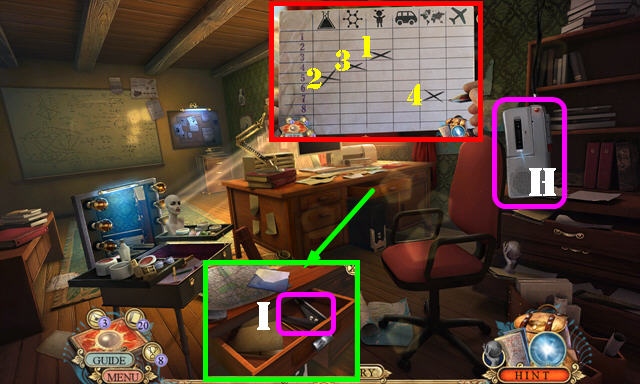
- Go forward. Take the ATOM PLAQUE (I).
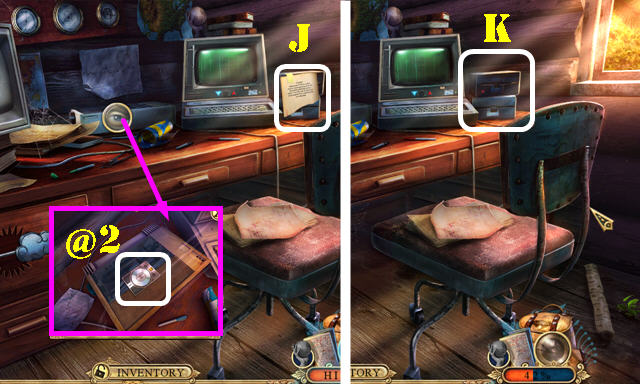
- Take the Fact Card 2/20 (@2).
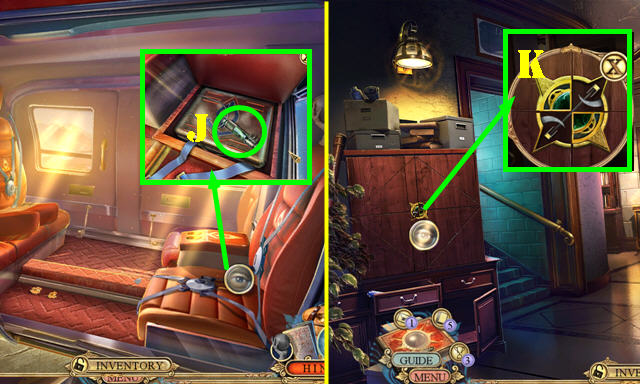
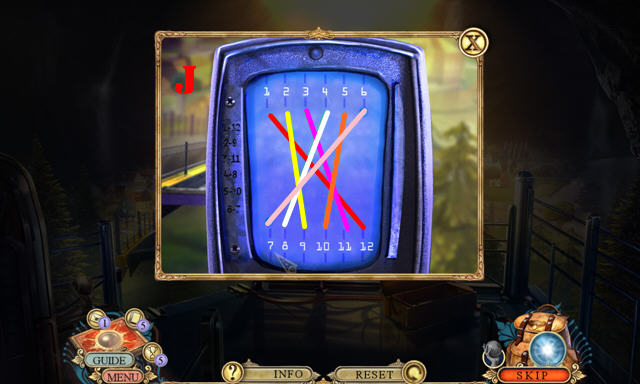
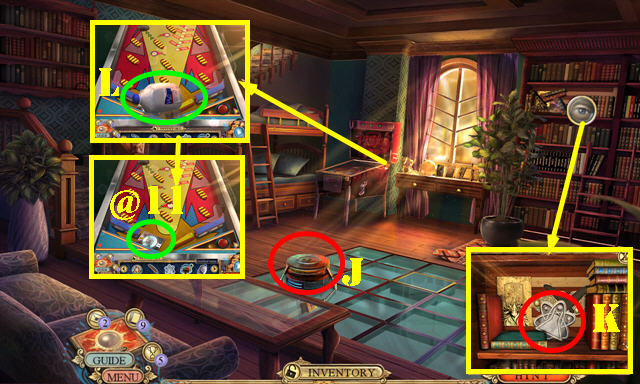
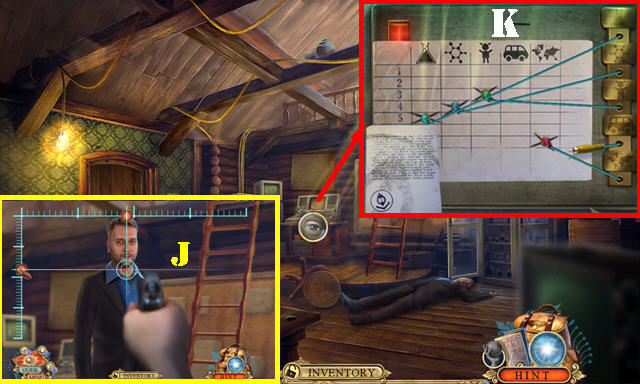
- Read the note (J).
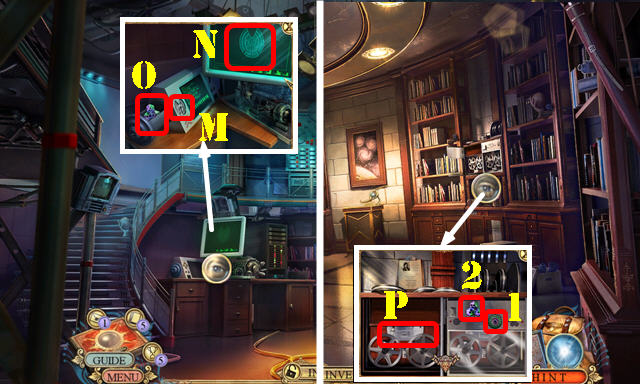
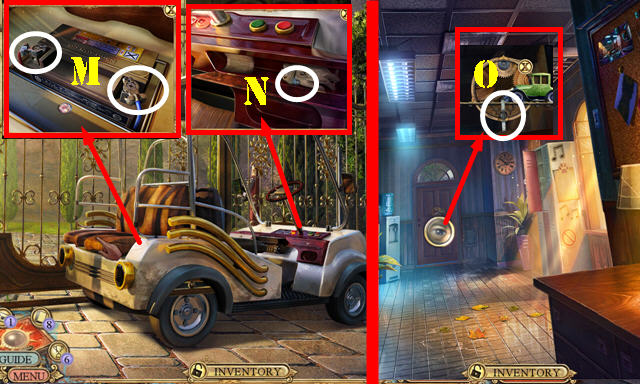
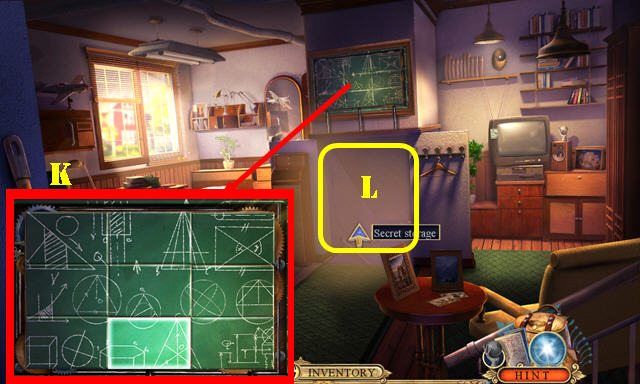
- Place the FLOPPY DISK for a puzzle (K).
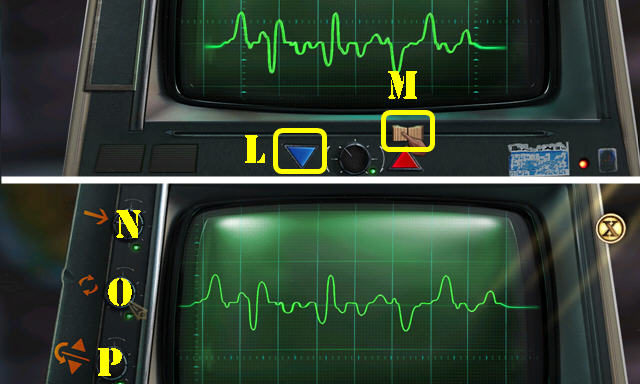
- Solution one: press (Lx2) and then slide (M) to the same spot on the screenshot.
- Solution two: Ox3-N-O-N-P-Ox2-N-O-P-N-O-N-P-N-Ox3-N-P-Ox2.
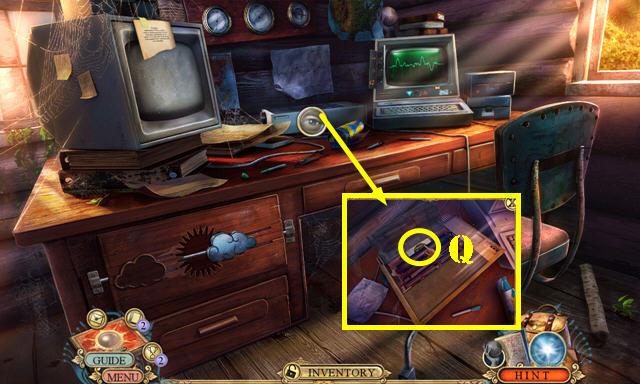
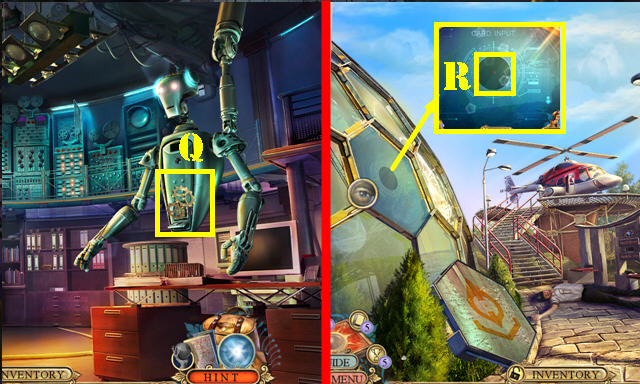
- Open the cover; take the BINOCULARS TOKEN (Q) and DECODED MESSAGE.
- Return to the Mountain Top and go right.

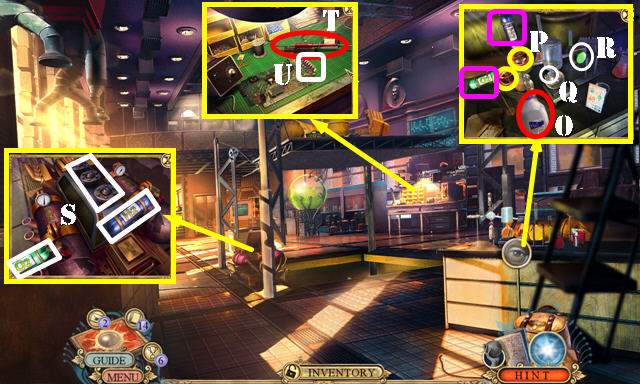
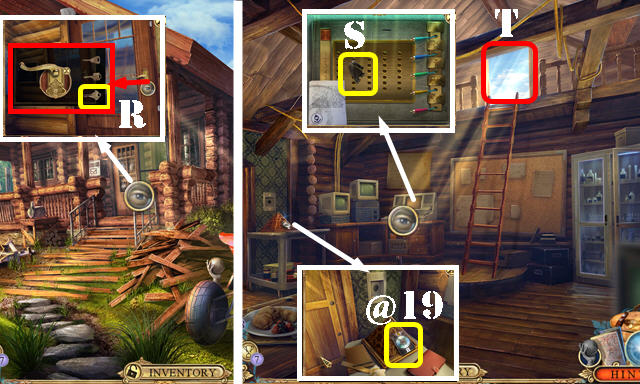
- Place the BINOCULARS TOKEN (R) twist the handle. Take the items as follows (1-8). Take the ORNATE PLATE (S).
- Return to the Observatory front.
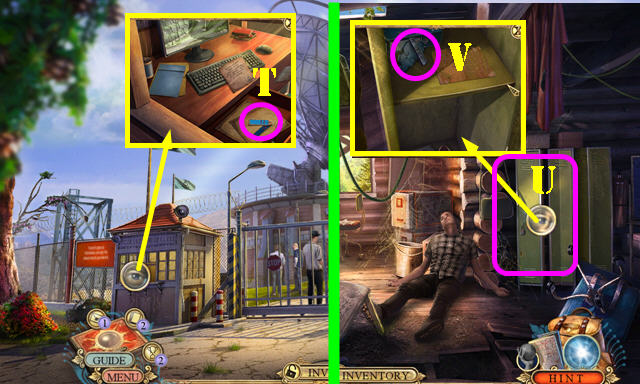
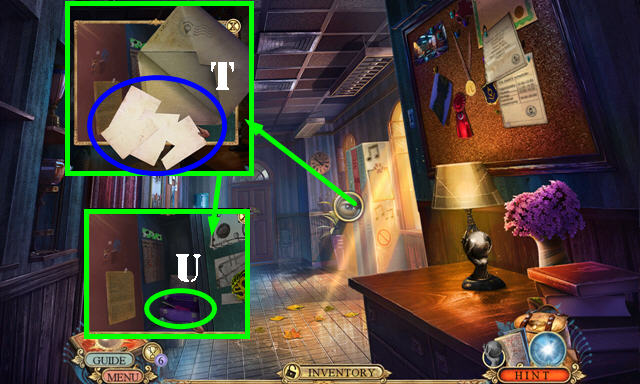
- Place the ORNATE PLATE; read the note and take the MAGNETIC KEY (T).
- Return to the Station interior.
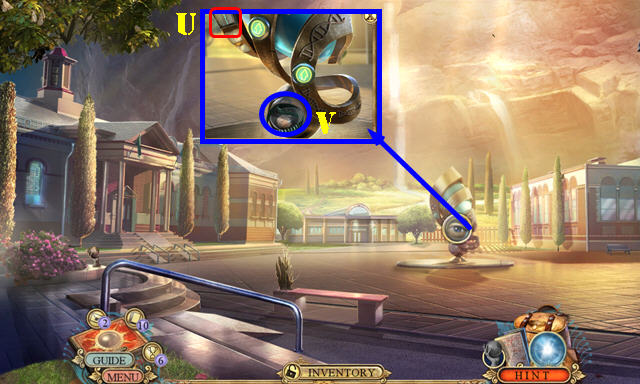
- Select the cobwebs twice (U). Use the MAGNETIC KEY on the lock; take the METAL INSIGNIA 1/3 and CLOUD SYMBOL (V).
- Go to the Monitoring desk.
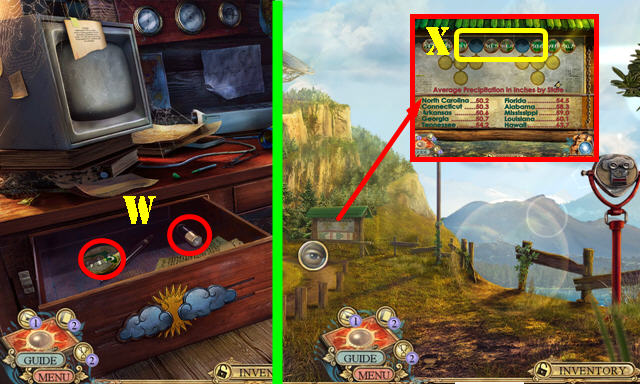
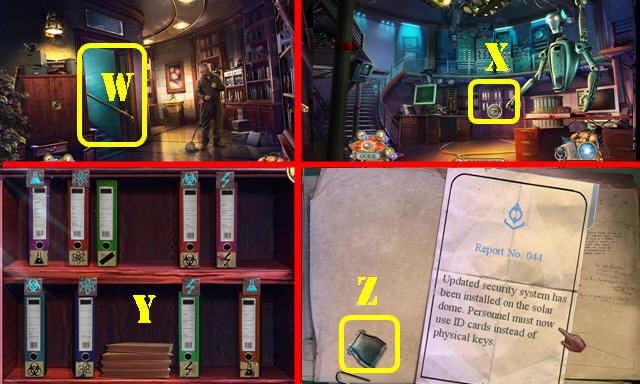
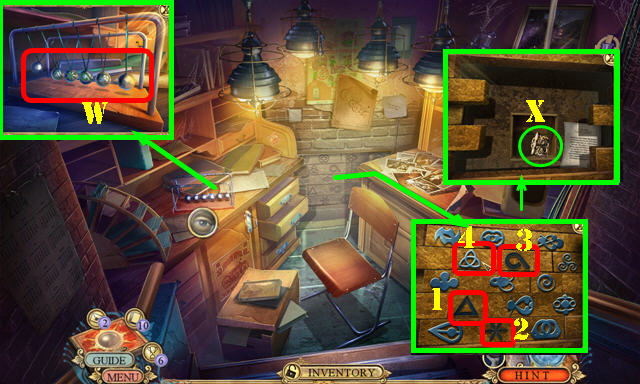
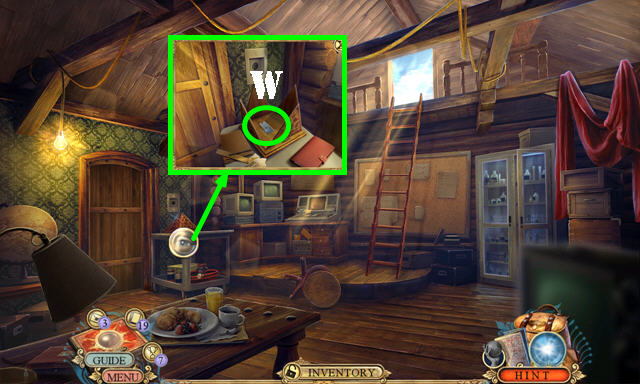
- Place the SUN SYMBOL and CLOUD SYMBOL; take the TOKEN 2/2 and BATTERIES 2/2 (W).
- Return to the Mountain top and go right.
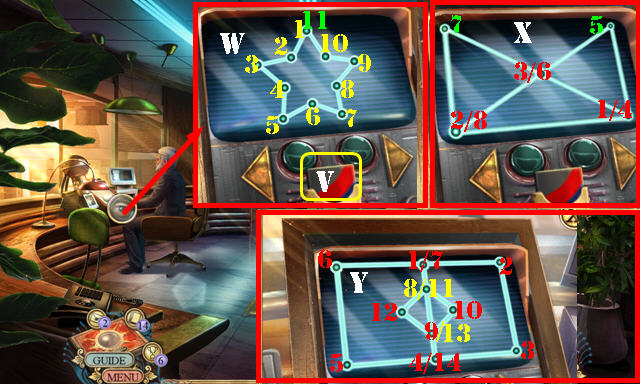
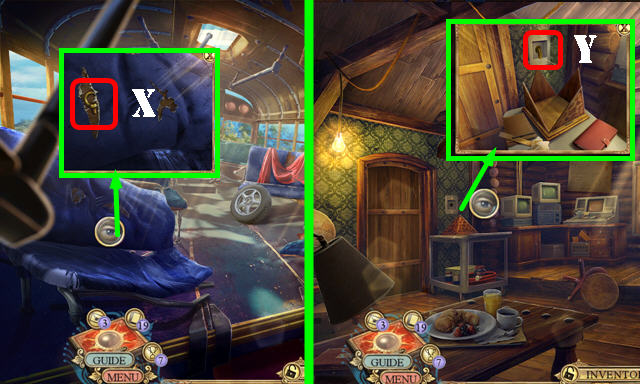
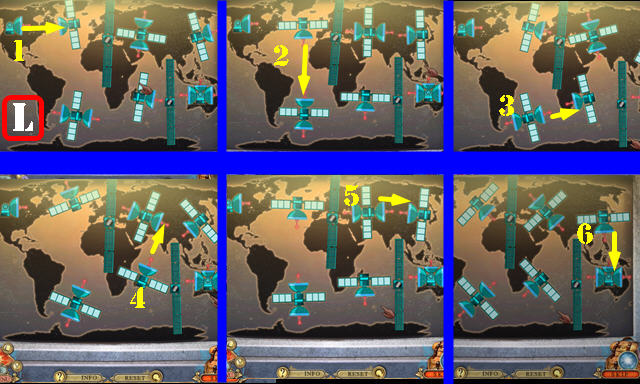
- Place the 2 TOKENS (X) for a puzzle.
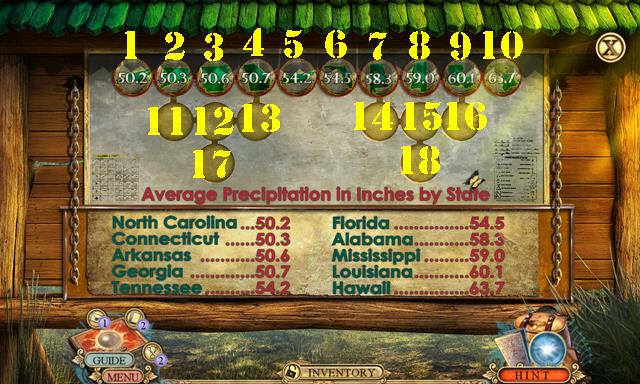
- Solution: (58.3-18)-(59.0-16)-(50.6-15)-(50.7-14)-(63.7-10)-(54.5-17)-(60.1-13)-(54.2-12)-(50.3-11)-(50.2-1)-(60.1-9).
- (54.2-2)-(54.5-3)-(50.7-17)- (50.6-13)-(59.0-8)-(58.3-7)-(54.5-6)-(54.2-5)-(50.3-2)-(50.6-3)-(50.7-4).
- Read the note and take the TARP.
- Go left, forward and then left to the Forest edge.
- Select the leaves twice.
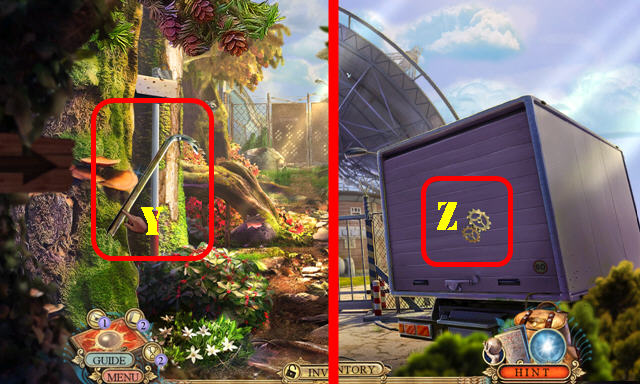
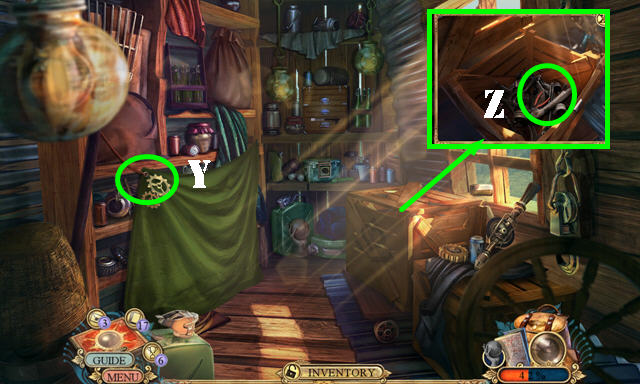
- Take the CROWBAR (Y).
- Walk down.
- Use the CROWBAR (Z) for a HOP; play it to get the HANDHELD LASER.
- Go left.
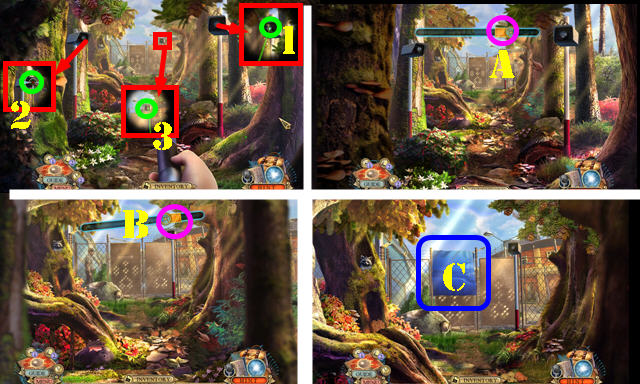
- Open the HANDHELD LASER and insert the 2 BATTERIES (inventory).
- Use the HANDHELD LASER on the scene. Shoot it at the three cameras once they’re facing you and you have an unobstructed view (1-3).
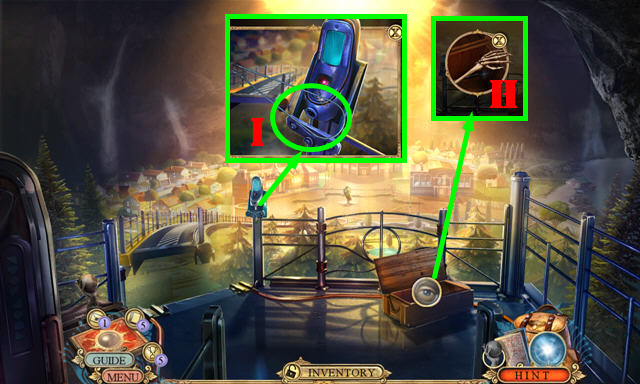
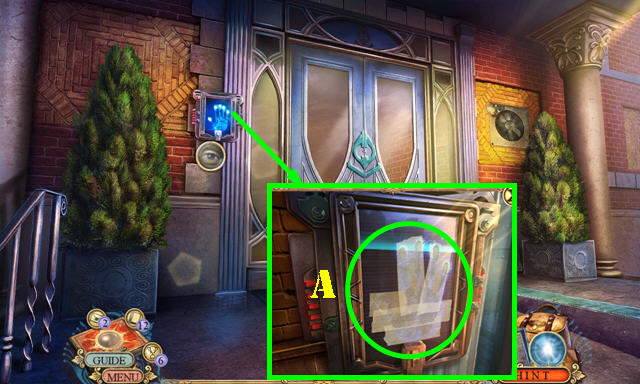
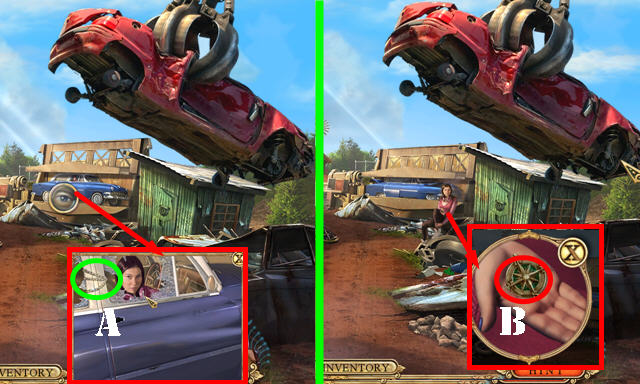
- Try to go forward. Select the ball once it’s on the target (A). Go forward and select the ball again once it’s in the target (B).
- Go forward. Place the TARP (C); go over the fence.
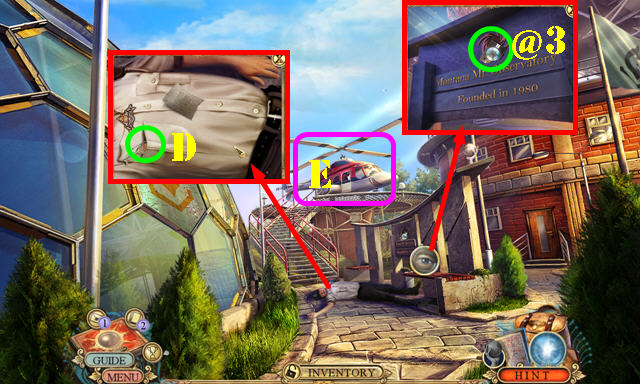
- Take the Fact Card 3/20 (@3).
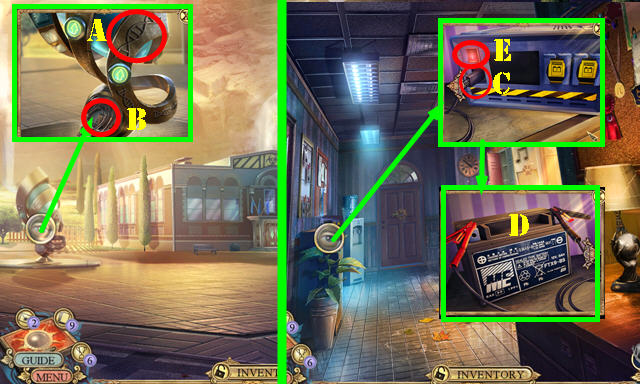
- Select the arrow on the close-up; open the pocket; read the note and take the HELICOPTER KEY (D).
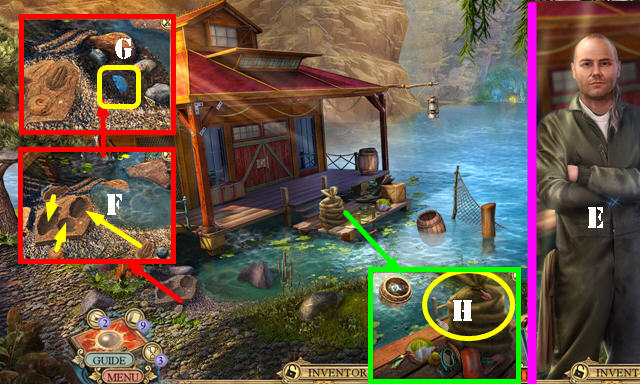
- Go to the Helicopter (E).
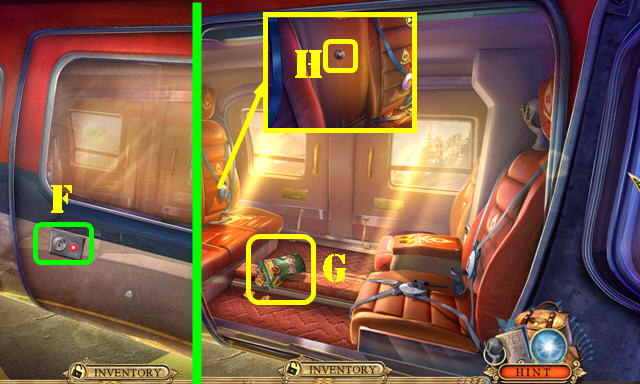
- Use the HELICOPTER KEY (F).
- Take the BAG OF WALNUTS (G).
- Use the TRANQUILIZING DART (H) for a HOP. Play it to get the GALAXY-MODEL PART.
- Return to the Forest edge.
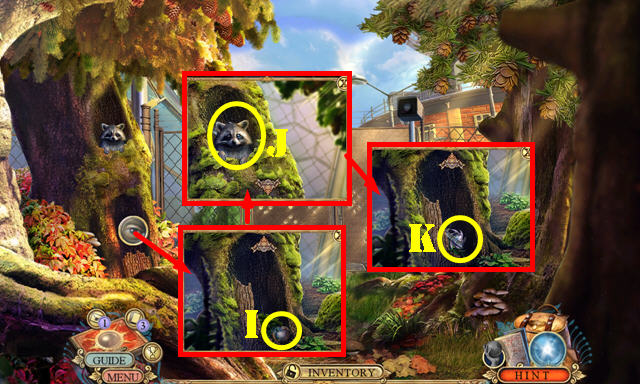
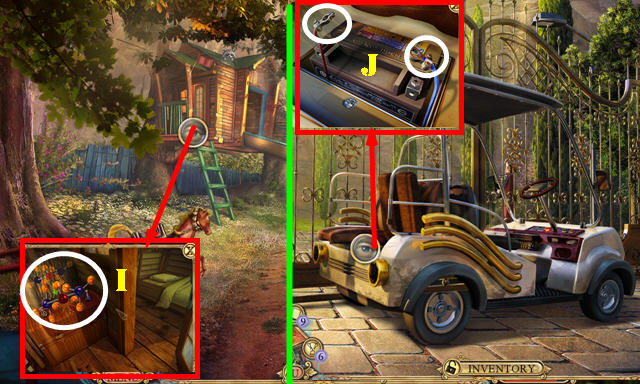
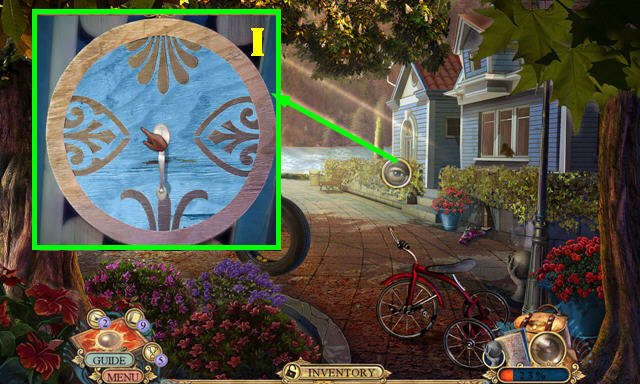
- Remove the bark; take the GALAXY (I). Select the arrow.
- Give the BAG OF WALNUTS (J). Select the arrow.
- Select the moss twice; take the METAL INSIGNIA 2/3 and NIGHT-SKY PENDANT (K).
- Go forward.
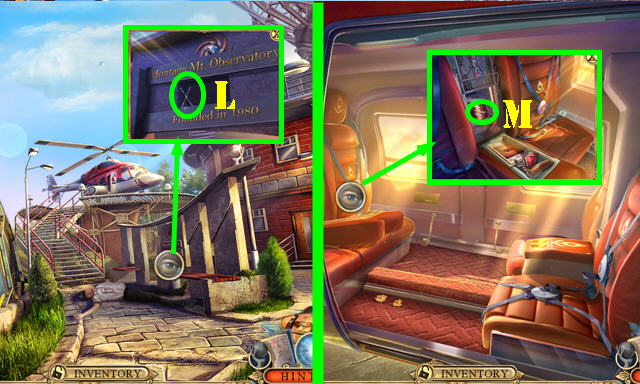
- Place the NIGHT-SKY PENDANT; take the PROPELLER (L).
- Go to the Helicopter.
- Place the PROPELLER; take the COPPER WIRE (M).
- Walk down.

- Place the COPPER WIRE for a puzzle. Solution: Rx2-O-Px2-U-V.
- Go through the door.
Chapter 2: Observatory
- Select anywhere on the scene.
- Go to the Office (W).
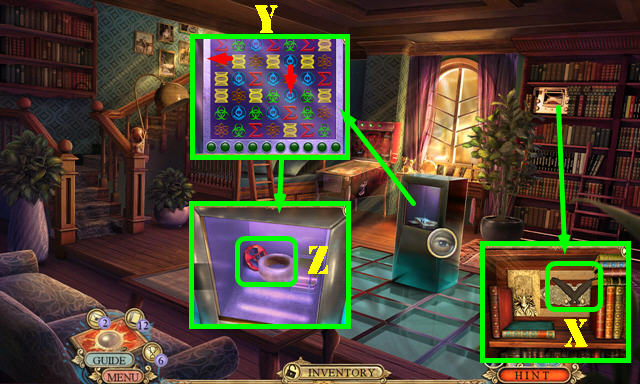
- Place the ATOM PLAQUE for a puzzle (X).
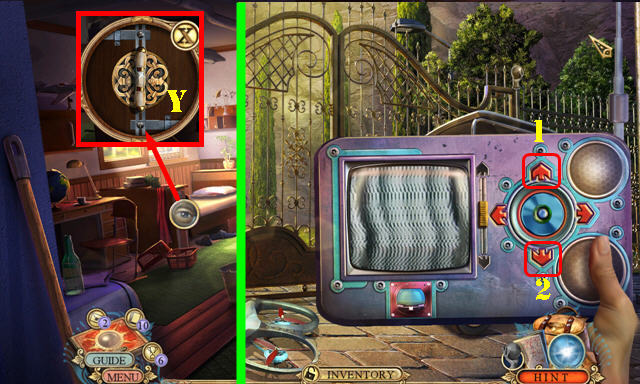
- Solution (Y).
- Open the book and touch the note; take the BELT-BUCKLE PART (Z).

- Take the Fact Card 4/20 (@4).
- Place the DECODED MESSAGE (A).Enter 8539 (B) to receive the ENCRYPTION KEY.
- Walk down.
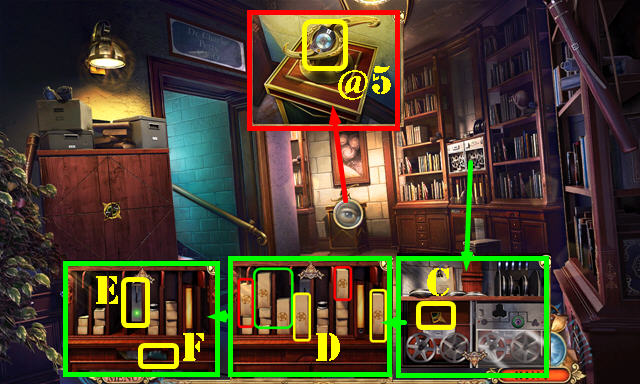
- Take the Fact Card 5/20 (@5).
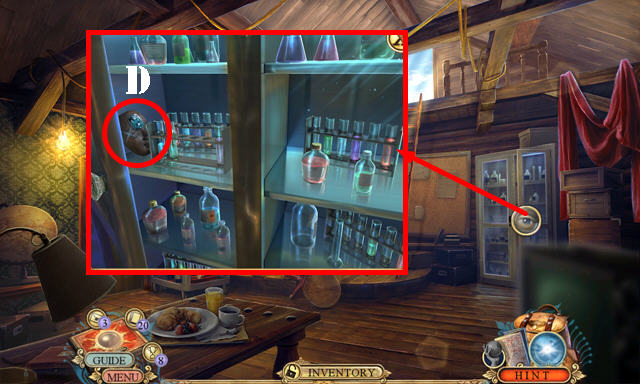
- Use the ENCRYPTION KEY; look at the clipboard and take the MEDALLION SEGMENT 1/2 (C).
- Select the arrow. Select matching pairs. Solution (D). Select the lever (E). Take the SLIDER (F). Arrow up.
- Go to the Office.
- Place the SLIDER and slide all buttons to the middle (G). Take the PLUS and GALAXY-MODEL PART (H).
- Walk down.
- Place the 2 GALAXY-MODEL PARTS on the GALAXY to get the GALAXY MODEL (inventory).
- Place the GALAXY MODEL; take the WEIGHTS 1/2 and METAL INSIGNIA 3/3 (I).
- Go to the Helicopter.
- Place the BELT-BUCKLE PART and select it; take the CYLINDER PENDANT and BRIEFCASE (J).
- Return to the Hallway.
- Place the 3 METAL INSIGNIAS on the BRIEFCASE; look at the newspaper and take the MEDALLION SEGMENT 2/2 (inventory).
- Place the 2 MEDALLION SEGMENTS (K) for a HOP; play it to get the LEATHER CASE.
- Go to the Office.
- Open the LEATHER CASE; read the note and take the METAL PLATE (inventory).
- Place the METAL PLATE (M). Select the three images on the screen (N) and take the MOSAIC PIECE (O).
- Walk down.
- Place the MOSAIC PIECE; select 1 and 2; take the ID REQUISITION FORM (P).
- Go to the Office.
- Use the ID REQUISITION FORM (Q) to get the ID CARD.
- Return to the Observatory Yard.
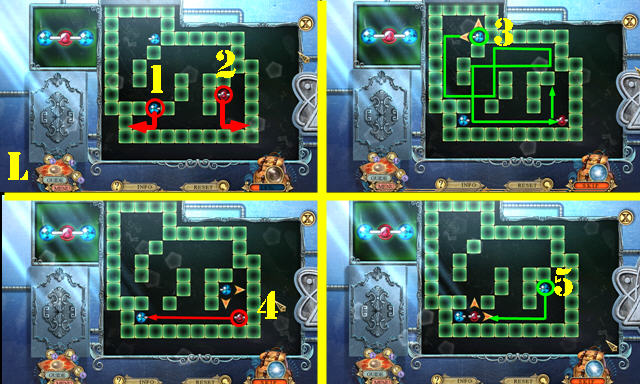
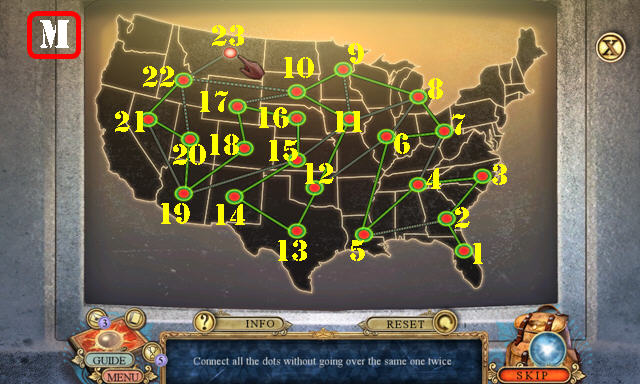
- Use the ID CARD for a puzzle (R).
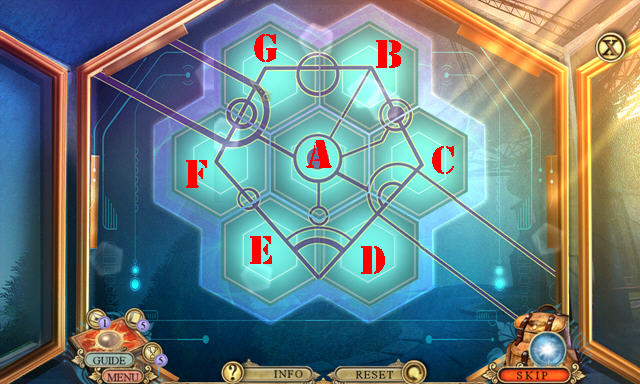
- Solution: (C-G)-(Cx4)-(D-F)-(Fx3)-(C-E)-(Ex3)-(Bx4)-(C-D)-(Dx4)-(Cx4)-(Ax2)-(Ex2)-Gx4).
Chapter 3: Town Square
- Talk to Nina.
- Open the box; take the SKELETON HAND (H).
- Use the CYLINDER PENDANT (I) for a puzzle.
- Solution (J): (1-12)-(2-9)-(3-11)-(4-8)-(5-10)-(6-7).
- Go forward to Town square and then enter the School corridor on the left.
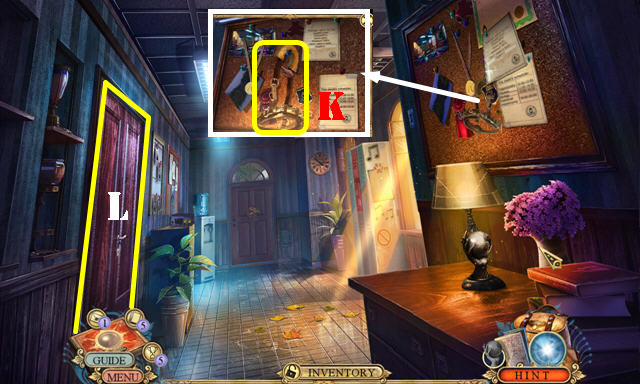
- Read the 2 notes; take the REINS (K).
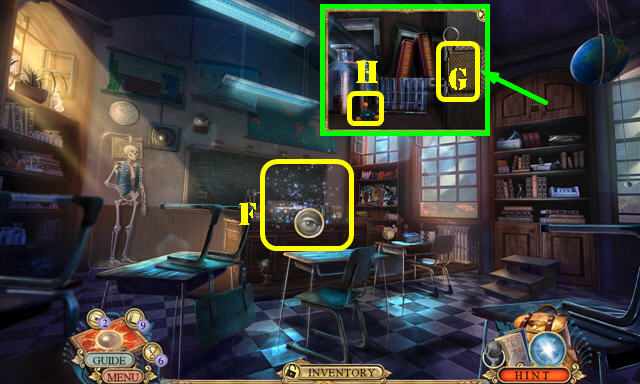
- Go to the Classroom (L).
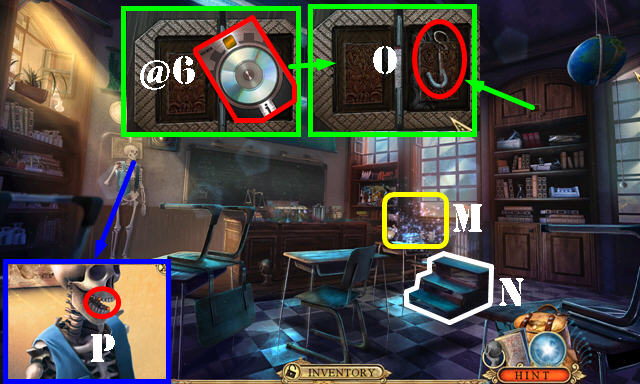
- Play the HOP (M) to get the SQUARE-ROOT SHAPE.
- Move the step (N).
- Take the Fact Card 6/20 (@6). Take the CLASP (O).
- Place the SKELETON HAND; take the MOLECULE MODEL 1/4 (P).
- Return to Town square.
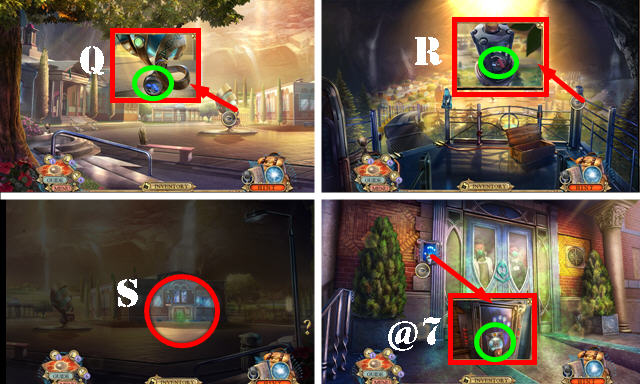
- Place the SQUARE-ROOT SHAPE; take the WIRE CONNECTORS and SIGNET RING (Q).
- Walk down.
- Use the SIGNET RING; take the MINUS (R).
- Go to Town square and then go to the Laboratory entrance (S).
- Take the Fact Card 7/20 (@7).
- Return to the School corridor.
- Place the PLUS and MINUS. Shake the letter and select each scrap (T); then read the note. Take the WRENCH (U).
- Return to the Laboratory entrance.
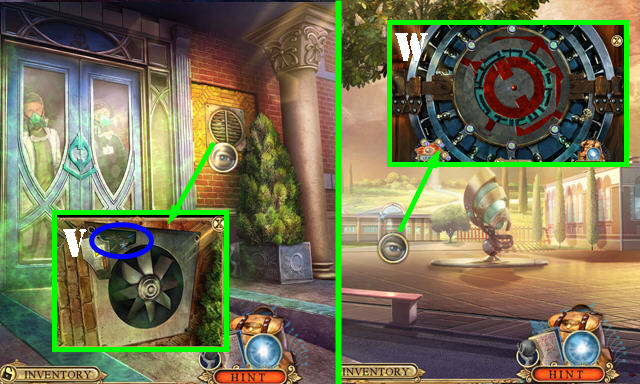
- Use the WRENCH; open the cover and place the WIRE CONNECTORS (V). You’ll receive the GATE RING.
- Walk down and go left.
- Place the GATE RING for a puzzle (W).
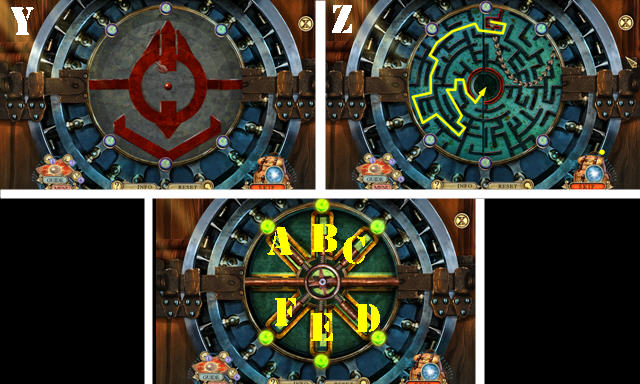
- Solution one (Y).
- Solution two (Z).
- Solution three: D-A-C-F-E-B.
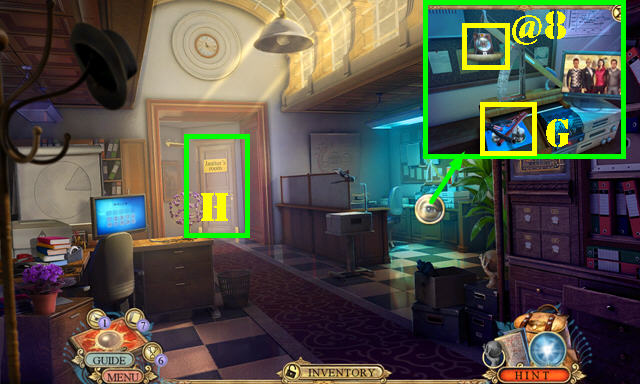
- Take the Fact Card 8/20 (@8) and CABLE CLAMPS (G).
- Go (H).
- Take the HANGER (I) and GOLF CLUB EMBLEM (J).
- Read the note; take the MOLECULE MODEL 2/4 (K).
- Return to Town square and go right to Lake gate (L).
- Lift the seat and both cables to get the DEAD BATTERY (M).
- Place the GOLF CLUB EMBLEM; read the note and take the WINDUP KEY (N).
- Return to the School corridor.
- Use the WINDUP KEY and turn it (O); enter the Playground.
- Select anywhere on the scene.
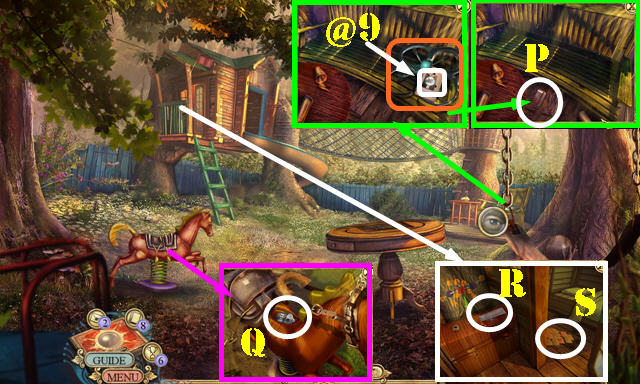
- Take the Fact Card 9/20 (@9).Take the INCOMPLETE DRONE (orange).
- Use the HANGER (P); open the wallet for a HOP; play it to get the REINFORCED PLATE.
- Place the REINS; take the WEIGHTS 2/2 (Q).
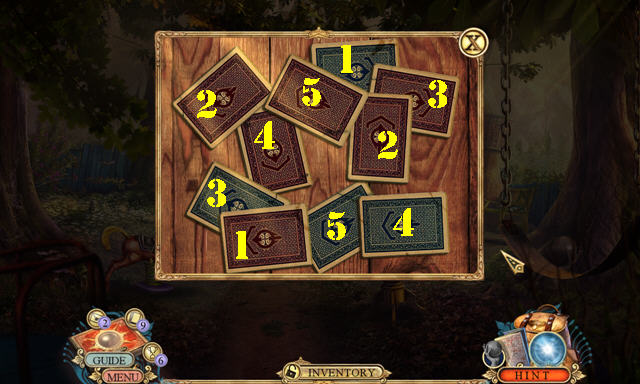
- Take the DROPPER (R). Open the door; look at the cards (S) and select matching pairs (1-5). Take the GAME TOKENS 1/3.
- Return to the Classroom.
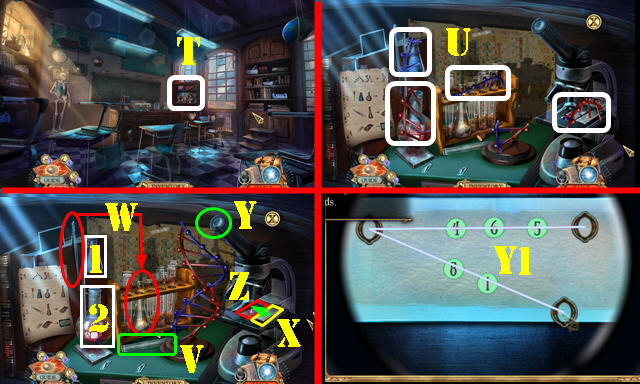
- Play the puzzle (T).
- Select the four molecules (U).
- Dip the DROPPER (V) in (1-2). Use the tweezers (W).
- Place the glass (X) and play the puzzle (Y). Solution (Y1).
- Remove the glass and take the ACCESS CODE (Z).
- Return to the Management office.
- Place the 2 WEIGHTS (A). Select the two weights (B). Take the GAME TOKENS 2/3 (C).
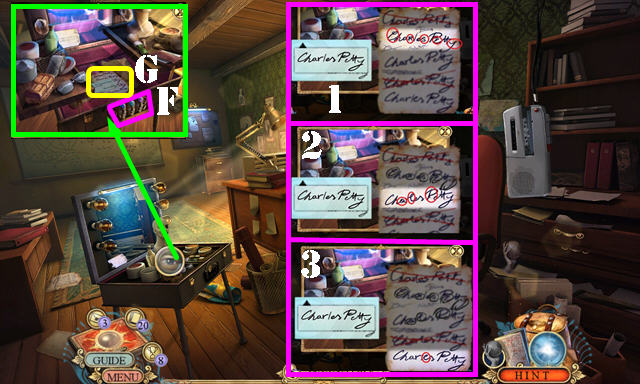
- Place the ACCESS CODE; enter 46581 (D) and select the arrow for a puzzle (E).
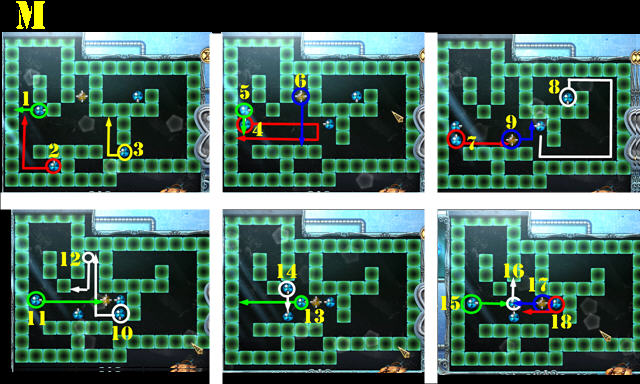
- Solution: H-O-G-Nx2-I-Ox4-J-O-M.
- Take the MOLECULE MODEL 3/4 (P).
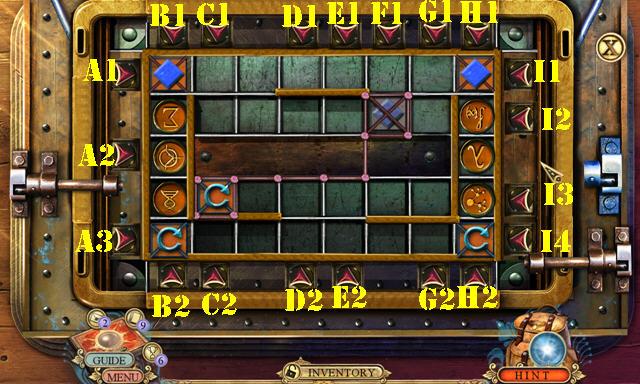
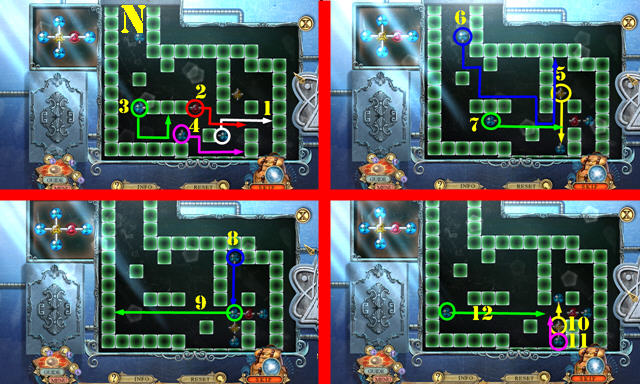
- Place the REINFORCED PLATE for a puzzle (Q).
- Solution: H2-I1-H2-I1-H2-(H1x4)-(I4x3)-(E2x3)-A1-H1-H2-(H1x4)-(I4x3)-(E2x2).
- (A2x2)-A1-H1-H2-(H1x4)-(I4x3)-(E2x2)-A2-E1-B2-A1-B2-A1-B2-(B1x4)-I1-B1.
- (A3x3)-B2-(B1x4)-(C1x3)-C2-A2-D2-(I3x2)-C2-(A3x3)-(D2x2).
- Open the folder; look at the photo and read the note; take the DNA PENDANT.
- Walk down.
- Place the DNA PENDANT (A). Take the CABLES and BOOK LOCKET (B).
- Place the CABLE CLAMPS on the CABLES; take the JUMPER CABLES (inventory).
- Return to the School corridor.
- Plug in the JUMPER CABLES (C). Select the arrow. Put down the DEAD BATTERY (D).
- Select the arrow and push the button (E). Take the CHARGED BATTERY.
- Enter the Classroom.
- Play the HOP (F) to get the DRONE CONTROLLER.
- Place the BOOK LOCKET (G) and select it. Open the door; take the CONSOLE KEYBOARD and MOLECULE MODEL 4/4 (H).
- Return to the Playground.
- Place the 4 MOLECULE MODELS for a HOP (I); play it to get the BOARD TILE 1/2.
- Walk down twice to talk to Duncan. Go to Lake gate.
- Place the CHARGED BATTERY and select each clamp to get the BOARD TILE 2/2 (J).
- Return to the Janitor’s room.
- Place the 2 BOARD TILES for a puzzle. Solution (K).
- Enter the Secret storage (L).
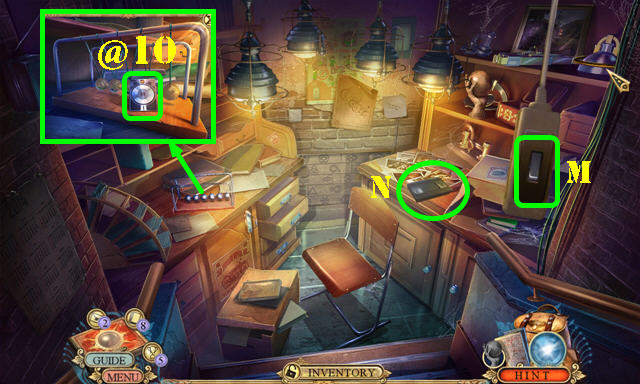
- Select the switch (M).
- Take the Fact Card 10/20 (@10).
- Take the VHS TAPE (N).
- Walk down.
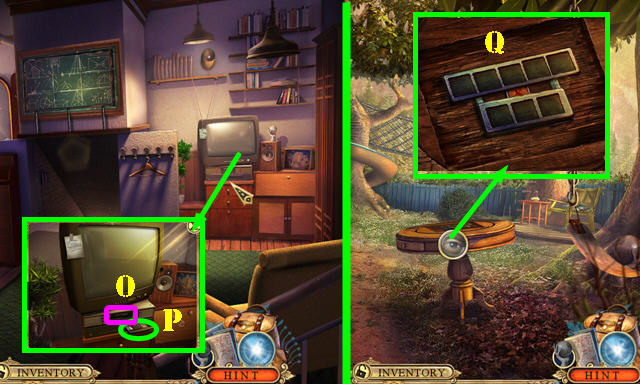
- Insert the VHS TAPE (O). Take the GAME TOKENS 3/3 and VHS TAPE (P).
- Return to the Playground.
- Place the 3 GAME TOKENS for a puzzle (Q).
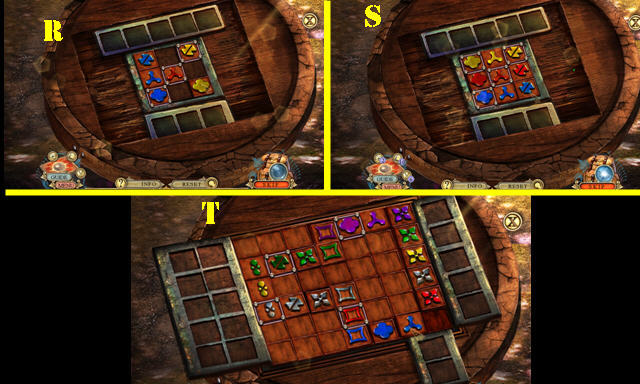
- Solution one (R).
- Solution two (S).
- Solution three (T).
- Take the MICROPROCESSOR.
- Return to Town square.
- Place the MICROPROCESSOR (U); take the TIMING BELT and STEEL SPHERE (V).
- Return to the Secret storage.
- Place the STEEL SPHERE and touch it for a clue (W). Select the shapes (1-4).
- Read the note; take the ALLEN KEY and HANDLE (X).
- Walk down.
- Place the HANDLE and spin it for a HOP (Y); play it to get the CAMERA.
- Return to Lake gate.
- Look at the note on the INCOMPLETE DRONE; place the CLASP and CAMERA to get the DRONE (inventory).
- Use the DRONE and the DRONE CONTROLLER on the gate. Press up (1) and then down (2) for a puzzle.
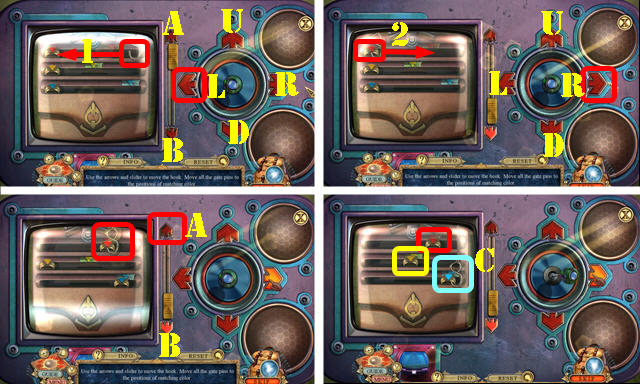
- Select (L) until the hook reaches the red gate pin (1). Select (B) and then (R) until you reach the red mark (2). Then select A.
- Follow the same steps above for the the yellow and blue gate pins.
- Final image (C).
- Go through the gate.
- Take the INSOLE (A). Use the ALLEN KEY to get the ROLLERBLADE WHEEL (B).
- Remove three leaves; take the WOODEN ARABESQUE 1/2 (C).
- Go (D).
- Talk to Gerard. Give him the VHS TAPE (E).
- Place the fossils in place (F). Use the INSOLE; take the WOODEN ARABESQUE 2/2 (G).
- Untie the bag for a HOP (H); play it to get the BRONZE QUILL.
- Walk down.
- Place the 2 WOODEN ARABESQUES and turn into place (I).
- Enter the Living quarters.
Chapter 4: Living Quarters
- Take the ROBO VACUUM CLEANER (J).
- Select the books 5x; take the SCIENCE BADGE (K).
- Take the DISTILLED WATER (L). Take the Fact Card 11/20 (@11).
- Take the stairs to the Upper room.
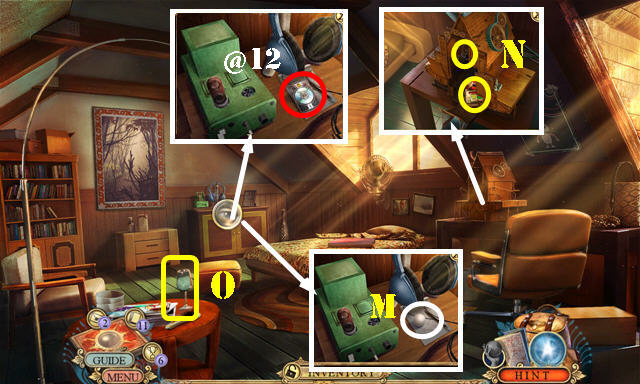
- Take the Fact Card 12/20 (@12).Take the GOLF BALLS 1/3 (M).
- Place the TIMING BELT; take the ROBO CLEANER’S HEAD and COAT HOOK (N).
- Take the WINE GLASS (O).
- Go to the Street corner.
- Place the ROBO CLEANER’S HEAD on the ROBO VACUUM CLEANER; attach the arms and antenna. Place the ROLLERBLADE WHEEL (inventory).
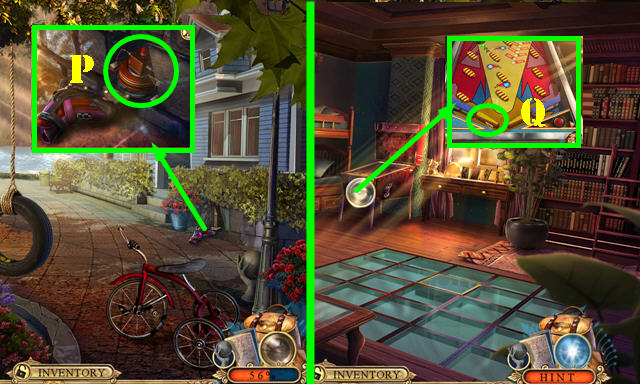
- Use the ROBO VACUUM CLEANER (P).
- Open the ROBO VACUUM CLEANER; take the FLIPPER and GOLF BALLS 2/3 (inventory).
- Enter the Living quarters.
- Place the FLIPPER for a puzzle (Q).
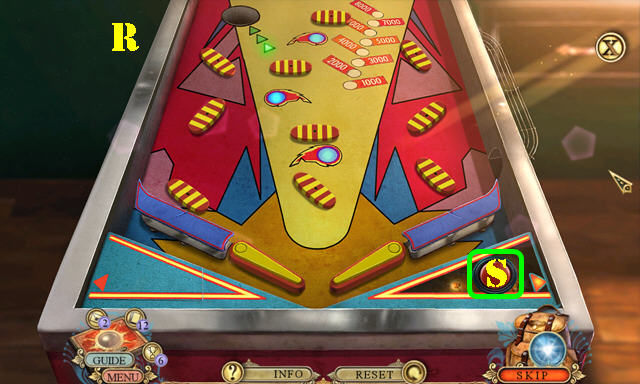
- Solution (R). Press the button (S).
- Take the FRAME ORNAMENT.
- Go to the Upper room.
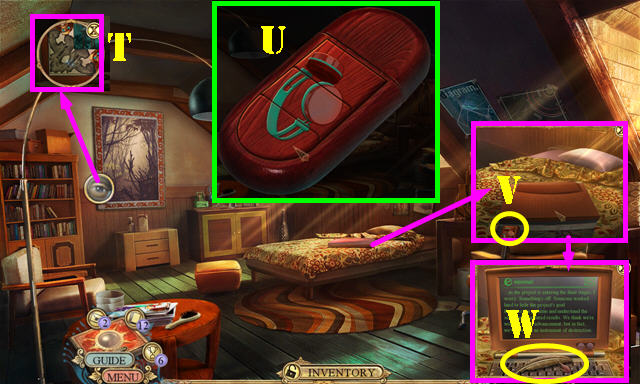
- Place the FRAME ORNAMENT for HOP (T); play it to get the USB LOCK.
- Solve the puzzle on the USB LOCK (inventory) (U).
- Use the USB LOCK (V); take the SILVER QUILL (W).
- Walk down.
- Place the BRONZE QUILL and SILVER QUILL (X).
- Place the CONSOLE KEYBOARD for a puzzle. Get a score of 10 solve the puzzle (Y). You receive the PORTABLE CONSOLE. Take the DUCT TAPE and VALVES 1/2 (Z).
- Return to the Laboratory entrance.
- Use the DUCT TAPE on the WINE GLASS; take the FAKE HANDPRINT (inventory).
- Use the FAKE HANDPRINT (A).
- Enter the Laboratory.
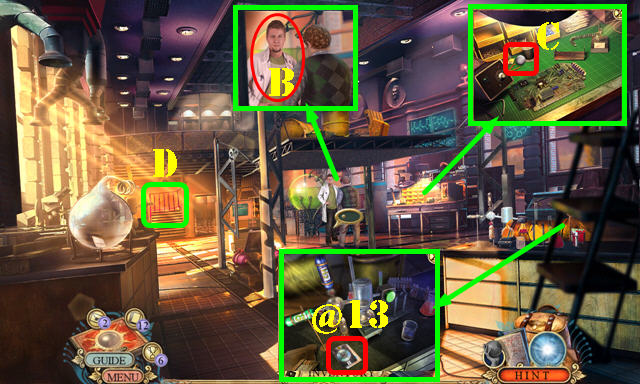
- Talk to Matthew (B).
- Take the Fact Card 13/20 (@13). Read the note.
- Take the GOLF BALLS 3/3 (C).
- Go (D).
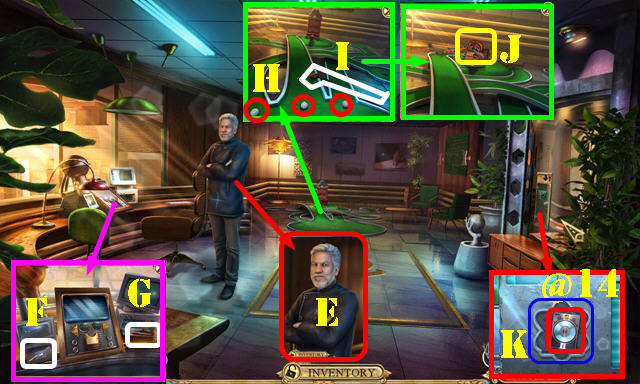
- Talk to Charles (E) and give him the PORTABLE CONSOLE.
- Take the SCALPEL (F). Push the compartment and take the SOLDERING IRON (G).
- Place the 3 GOLF BALLS (H) and hit each one with the golf club (I). Take the GUN TRIGGER and VALVES 2/2 (J).
- Take the Fact Card 14/20 (@14) and place the SCIENCE BADGE for a puzzle (K).
- Solution one (L).
- Solution two (M).
- Solution three (N).
- Read the note and take the CARBON MONOXIDE TANK.
- Walk down.
- Put down the DISTILLED WATER (O). Place the 2 VALVES (P). Pour the distilled water (Q). Press the button (R). Turn both valves.
- Take the OXYGEN TANK and the HYDROGEN TANK (purple).
- Place the CARBON MONOXIDE TANK, HYDROGEN TANK and OXYGEN TANK for a HOP (S); play it to get the MICRO SD CARD.
- Place the SOLDERING IRON (T) and select it; take the AUGER SHAFT (U).
- Go to the Overseer’s office.
- Place the MICRO SD CARD for a puzzle (V).
- Solution one (W).
- Solution two (X).
- Solution three (Y).
- Press the right arrow 3x and then the screen.
- Take the GOLDEN PENDANT from Charles (A).
- Go to the Street corner.
- Use the SCALPEL to get the ROPE (B).
- Go to the Pier.
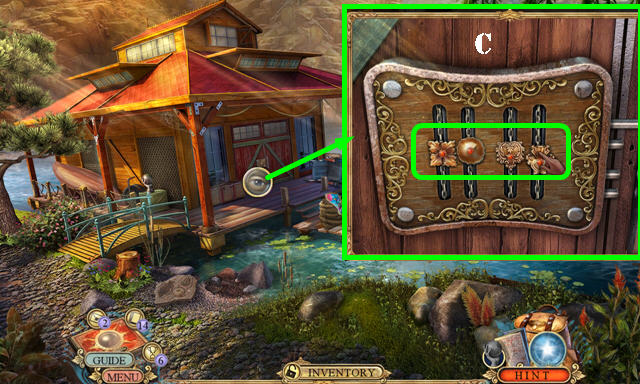
- Place the GOLDEN PENDANT. Slide all the pieces to the center (C).
- Enter the Boathouse.
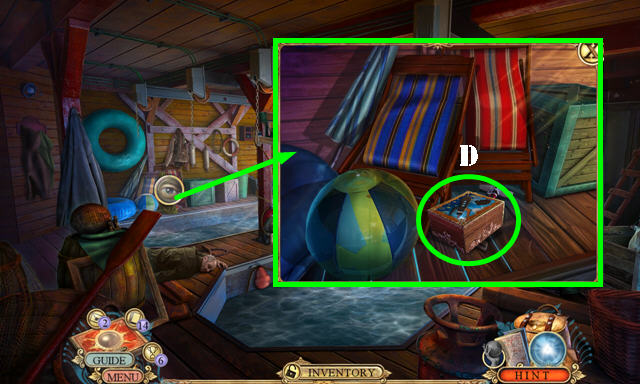
- Talk to the man. Remove the towel; take the ORNAMENTED BOX (D) and SAILING EMBLEM 1/2.
- Walk down.
- Open the case; read the note and take the SAILING EMBLEM 2/2 (E).
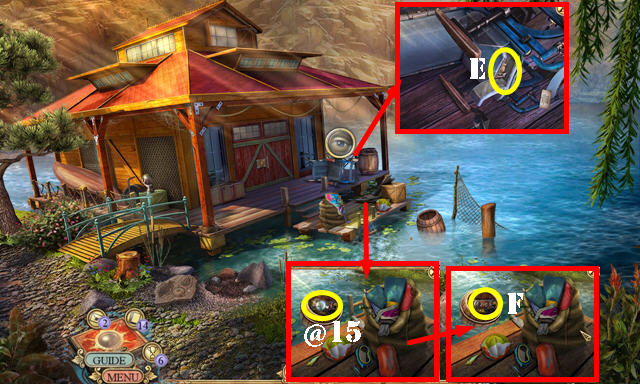
- Place the ROPE on the COAT HOOK to get the HOOKED ROPE (inventory).
- Use the HOOKED ROPE; take the Fact Card 15/20 (@15) and VACUUM TUBE (F).
- Return to the Upper room.
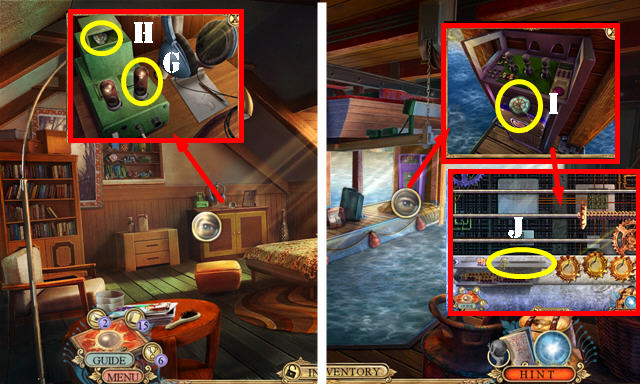
- Place the VACUUM TUBE (G); take the BOAT HOIST KEY (H).
- Return to the Boathouse.
- Place the BOAT HOIST KEY (I).
- Place the AUGER SHAFT (J) for a puzzle.
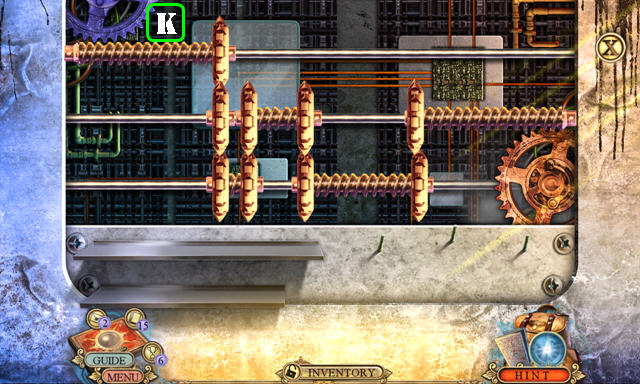
- Solution (K).
- Go forward.
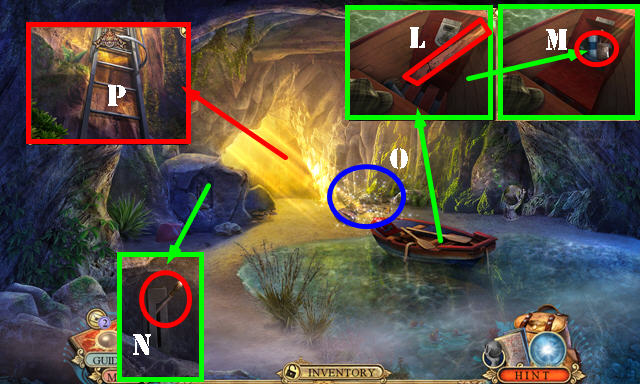
- Take the PLANKS 1/4 (L).
- Place the 2 SAILING EMBLEMS; take the BRASS ORNAMENT 1/2 and LEVER (M).
- Remove the rock; place the LEVER (N) and pull it.
- Play the HOP (O) to get the FOLDING SHOVEL.
- Select the FOLDING SHOVEL twice to get the SHOVEL (inventory).
- Use the SHOVEL (P). Select the arrow and go up to the Mountain glade.
Chapter 5: Mountain Glade
- Take the PLANKS 2/4, 3/4 and 4/4 (orange).
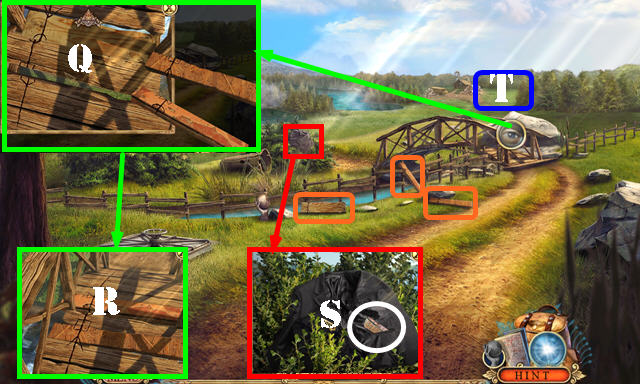
- Put down the 4 PLANKS. Arrange the first two as shown (Q). Arrow up. Place the next two planks as shown (R).
- Select the jacket 3x; take the LOCKPICK and CIRCUIT DIAGRAM (S).
- Go (T).

- Open the panel; take the Fact Card 16/20 (@16).
- Use the LOCKPICK for a puzzle. Solution (1-3).
- Enter the Supply shack.
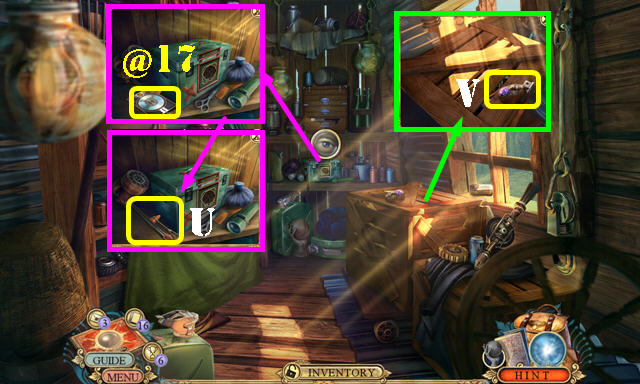
- Remove the binoculars and gloves; take the Fact Card 17/20 (@17).
- Take the METAL BAR (U) and MASKS 1/3 (V).
- Walk down.
- Use the METAL BAR (W); take the CAR LIGHTER (X).
- Go to the Supply shack.
- Use the CAR LIGHTER for a HOP (Y); play it to get the AWL.
- Use the AWL; take the WIRE CUTTERS (Z).
- Walk down.
- Use the WIRE CUTTERS (A).
- Take the COMPASS PENDANT (B).
- Go to the Supply shack.
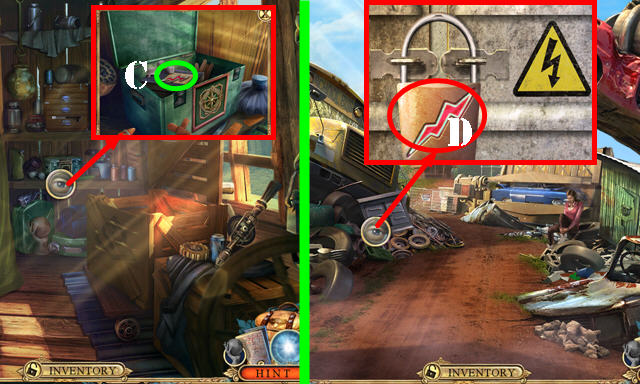
- Place the COMPASS PENDANT; take the LIGHTNING TOKEN (C).
- Walk down.
- Place the LIGHTNING TOKEN and then the CIRCUIT DIAGRAM (D).
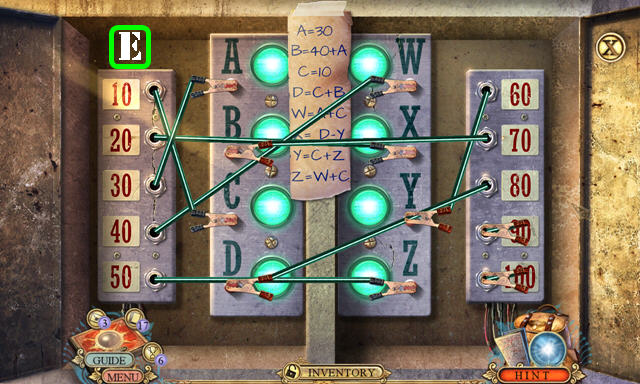
- Solution (E).
- Go forward.
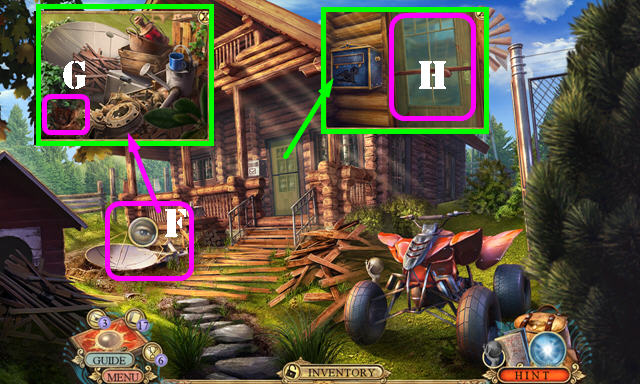
- Play the HOP (F) to get the BUTTON.
- Use the SHOVEL; take the EMBLEM BASE (G).
- Select the screen door (H).
- Walk down.
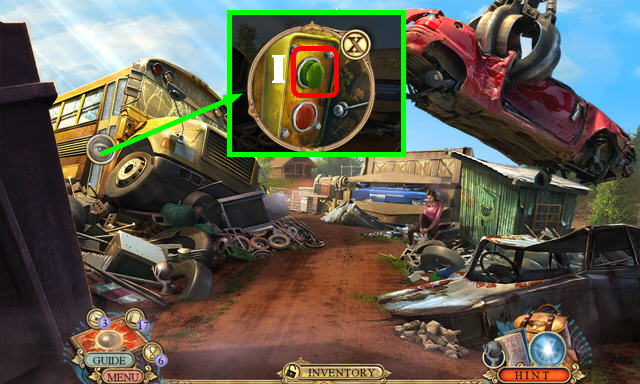
- Place the BUTTON and press it (I).
- Enter the School bus.
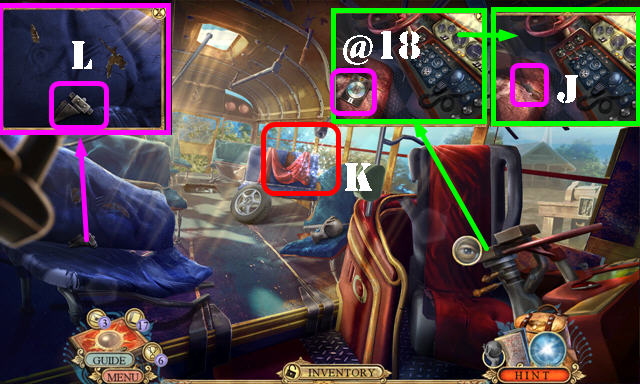
- Take the Fact Card 18/20 (@18). Take the GUN HAMMER and PENCIL (J).
- Play the HOP (K) to get the PUZZLE PIECES SACK.
- Take the EMBLEM PART (L).
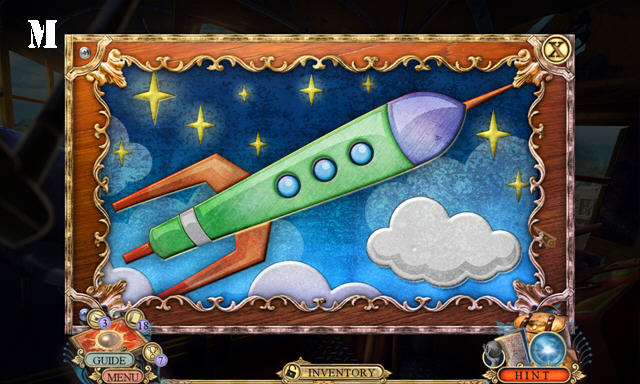
- Place the PUZZLE PIECES SACK on the ORNAMENTED BOX for a puzzle (inventory).
- Solution (M). Read the note and take the MAGNET.
- Return to the House front.
- Use the MAGNET to get the BRASS ORNAMENT 2/2 (N).
- Place the 2 BRASS ORNAMENTS; take the HATCH LATCH (O).
- Return to the School bus.
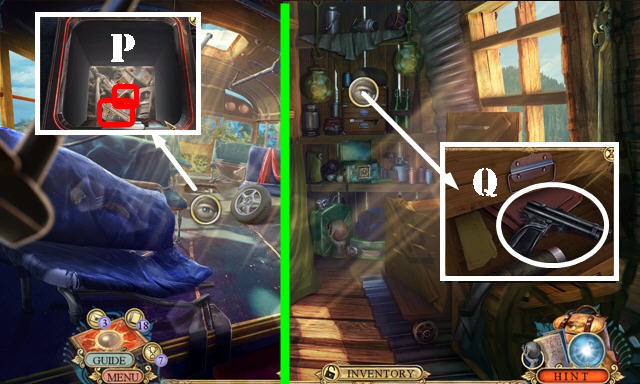
- Place the HATCH LATCH; take the GUN PLAQUE and PYRAMID ORNAMENT 1/2 (P).
- Return to the Supply shack.
- Place the GUN PLAQUE; take the BROKEN TRANQUILIZER GUN and BUNDLE OF KEYS (Q).
- Place the GUN HAMMER and GUN TRIGGER on the BROKEN TRANQUILIZER GUN to get the TRANQUILIZER GUN (inventory).
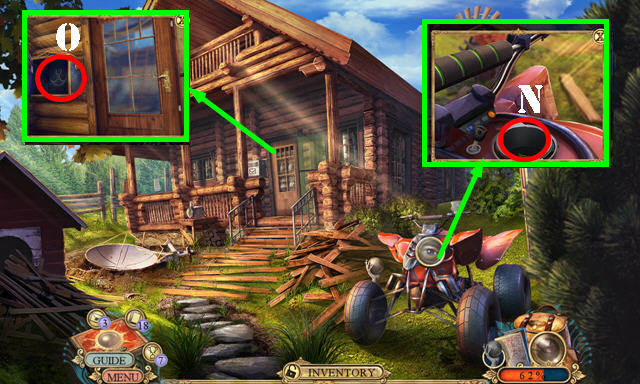
- Return to the House front.
- Place the BUNDLE OF KEYS and select them, then select the third key (R).
- Enter the Operations room.
- Look at the note and take the EMBLEMS PART (S).
- Place the 2 EMBLEM PARTS on the EMBLEM BASE to get the ROBOT EMBLEM (inventory).
- Take the Fact Card 19/20 (@19).
- Go to the Roof balcony (T).
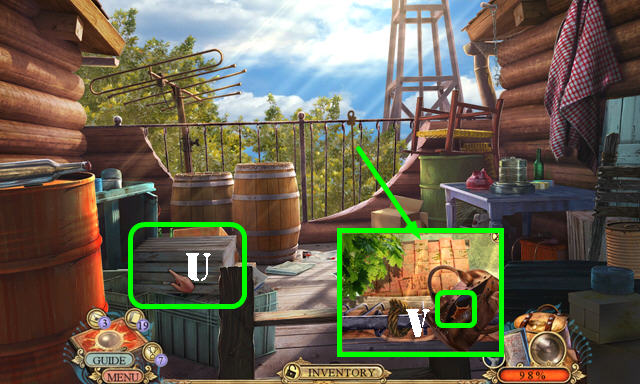
- Move the crate (U) for a HOP; play it to get the RUINED CASSETTE.
- Pull the rope and open the bag; take the PYRAMID ORNAMENT 2/2 (V).
- Use the PENCIL on the RUINED CASSETTE to get the CASSETTE (inventory).
- Walk down.
- Place the PYRAMID ORNAMENT; take the RAZOR (W).
- Return to the Scrapyard and then enter the School bus.
- Use the RAZOR; take the RING SCREW (X).
- Return to the Operations room.
- Place the RING SCREW (Y); enter the Secret room.
- Open the drawer; take the Fact Card 20/20 (@20).
- Place the ROBOT EMBLEM and read the note (A).
- Read the note. Remove the handkerchief and take the GLASS KNOB (B).
- Read the note; take the PARAMETERS (C).
- Walk down.
- Place the GLASS KNOB; take the MASKS 2/3 (D).
- Return to the Roof balcony.
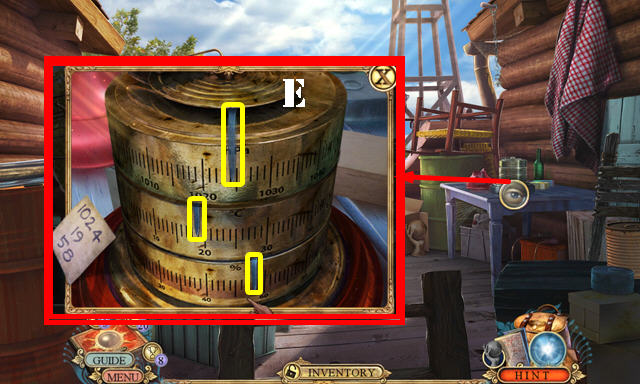
- Place the PARAMETERS for a puzzle. Solution (E).
- Take the MASKS 3/3.
- Return to the Secret room.
- Place the 3 MASKS (F) and select the notes (G) for a puzzle.
- Solutions 1, 2, and 3.
- Take the BLANK SETTINGS CARD.
- Place the CASSETTE and BLANK SETTINGS CARD for a puzzle (H).
- Solution 1-4. Take the PUNCH CARD.
- Place the PUNCH CARD (I) to get the CODE SEQUENCE.
- Walk down.
- Place the TRANQUILIZER GUN on Duncan and align it as shown (J).
- Place the CODE SEQUENCE for a puzzle.
- Solution (K).
- Solution one (L).
- Solution two (M).
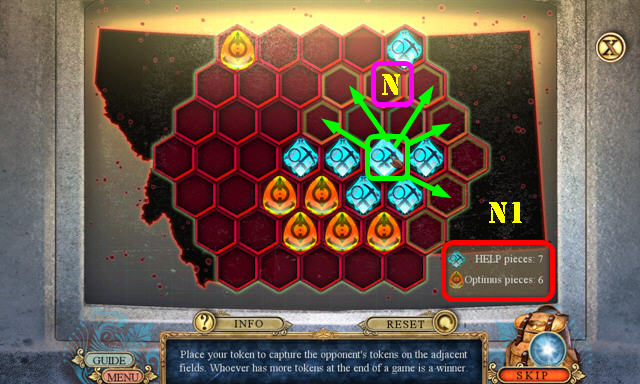
- Solution three (N) is random. Select one of your HELP tokens (blue) and then place it on one of the lit spots. The goal is to have more of your tokens on the field than your opponent. You can view each total here (N1).
- Congratulations, you have completed Hidden Expedition: Dawn of Prosperity.


 Haunted Hotel: The X Walkthrough, Guide, & Tips
 Kaptain Brawe: A Brawe New World - Episode II Walkthrough, Guide, & Tips
 The Chronicles of Shakespeare: Romeo and Juliet Walkthrough, Guide, & Tips
 Weird Park: Scary Tales Walkthrough, Guide, & Tips
 Phantasmat: Crucible Peak Walkthrough, Guide, & Tips