Haunted Hotel: The X Walkthrough, Guide, & Tips
Haunted Hotel: The X Walkthrough

Welcome to the Haunted Hotel: The X Walkthrough
The crimes of the past keep haunting the Lexington Hotel!
Whether you use this document as a reference when things get difficult or as a road map to get you from beginning to end, we’re pretty sure you’ll find what you’re looking for here.
This document contains a complete Haunted Hotel: The X game walkthrough featuring annotated screenshots from actual gameplay!
We hope you find this information useful as you play your way through the game. Use the walkthrough menu below to quickly jump to whatever stage of the game you need help with.
Remember to visit the Big Fish Games Forums if you find you need more help. Have fun!
This walkthrough was created by Amanda Barrera, and is protected under US Copyright laws. Any unauthorized use, including re-publication in whole or in part, without permission, is strictly prohibited.
General Tips
- This is the official guide for Haunted Hotel: The X.
- This guide will not show when you have to zoom into a location; the screenshots will show each zoom scene.
- Hidden-object puzzles are referred to as HOPs. This guide will not show screenshots of the HOPs, however, it will mention when an HOP is available and the inventory item you’ll collect from it.
- Use the Map to fast travel to a location.
Chapter 1: Samantha

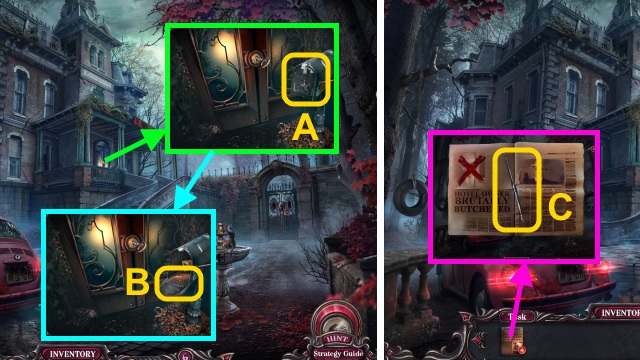
- Open the mailbox (A).
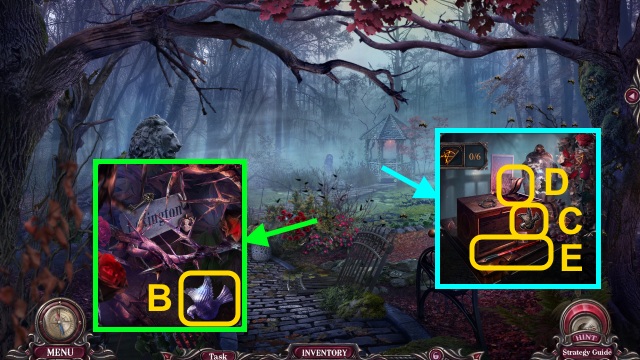
- Move the mail; take the NEWSPAPER (B).
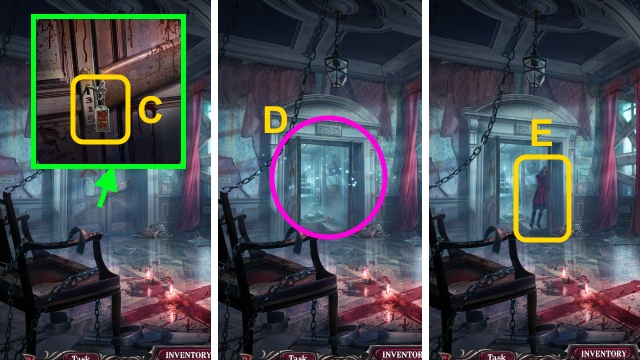
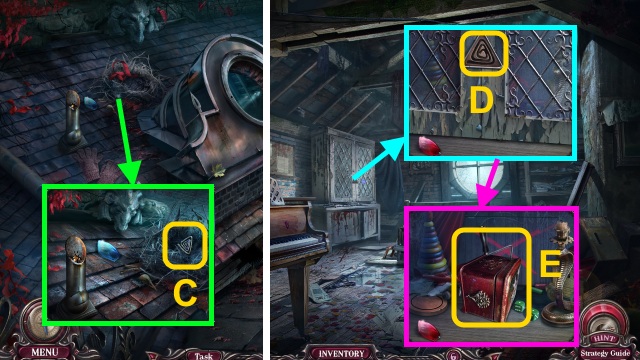
- Read the NEWSPAPER; take the HAIRPIN (C).
- Use the HAIRPIN (D).
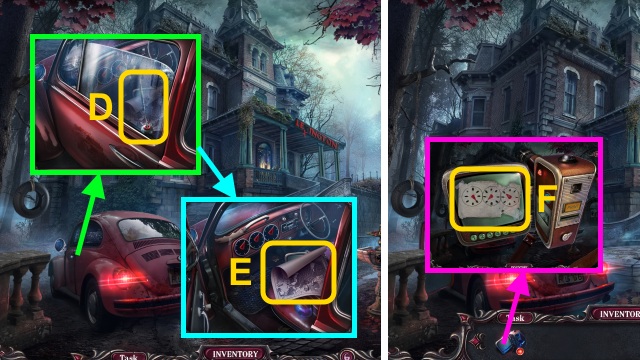
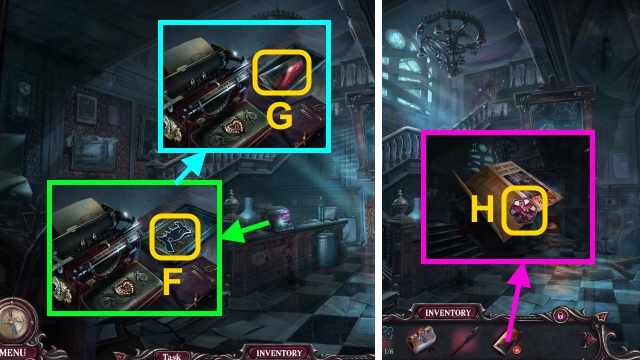
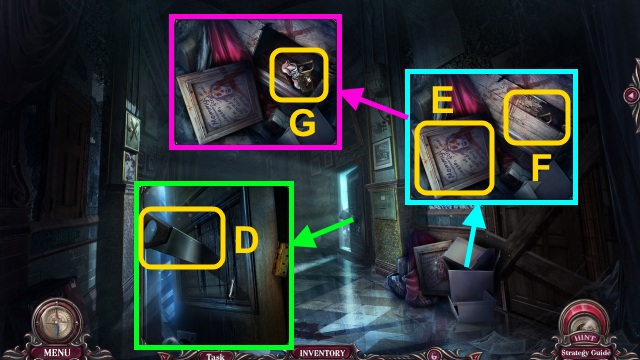
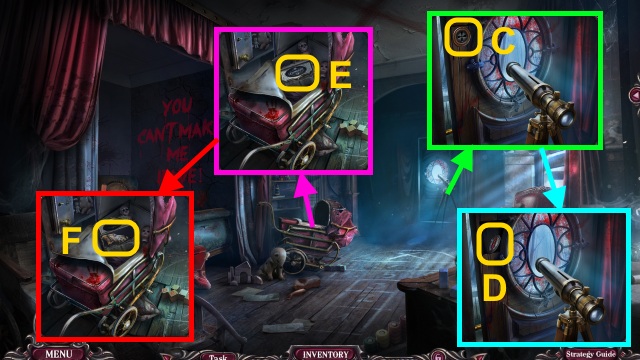
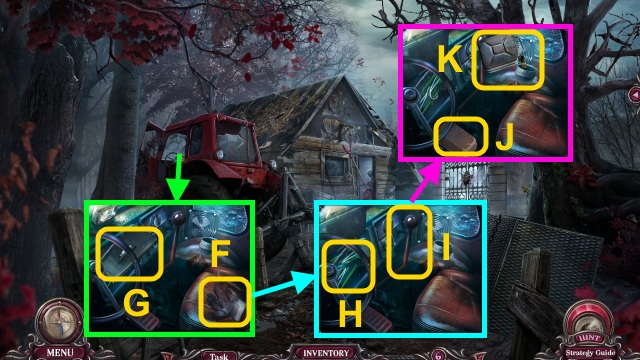
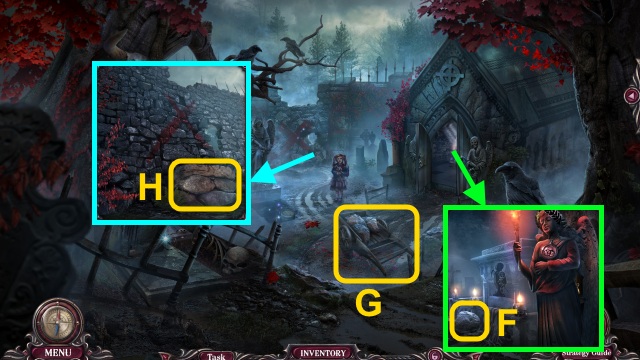
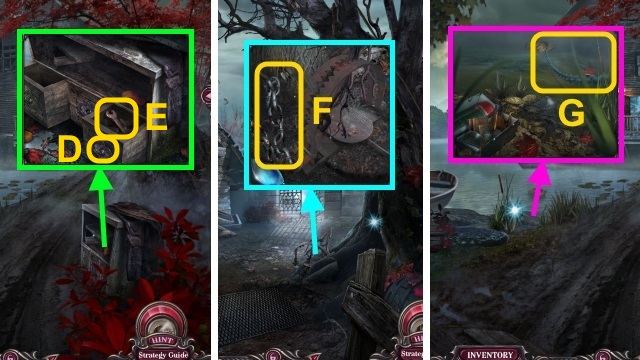
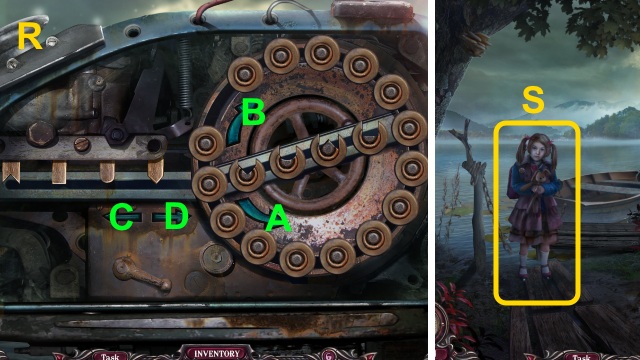
- Take the Map and CAMERA (E).
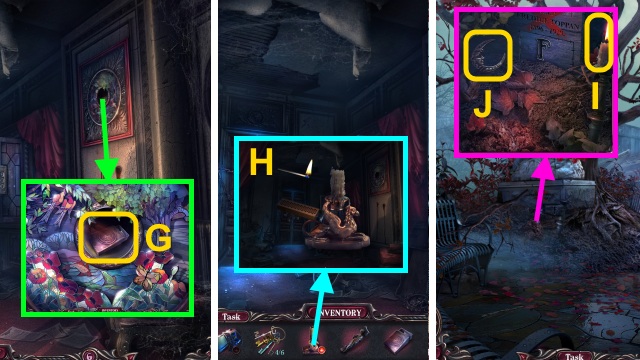
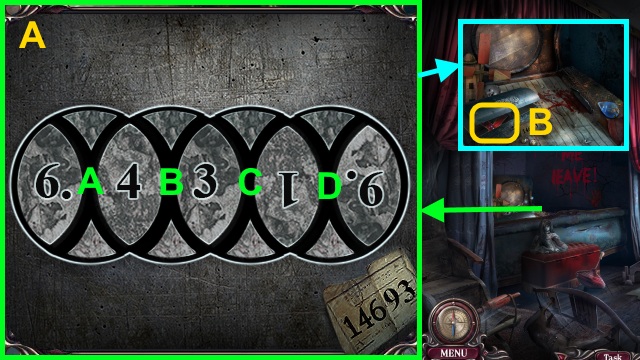
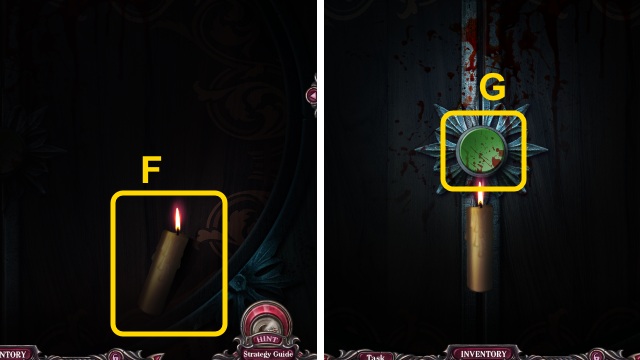
- Examine the CAMERA; take the COMBINATION (F).
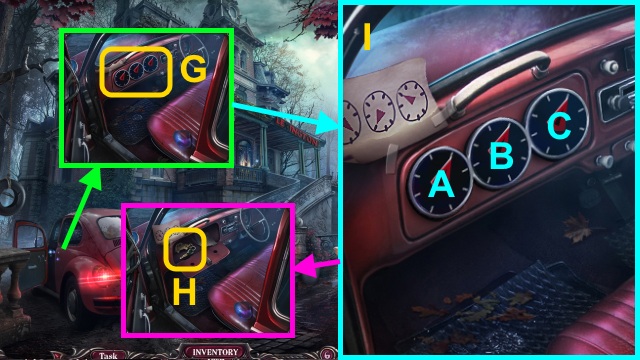
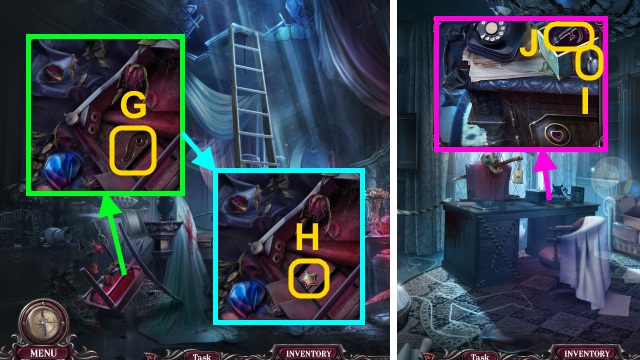
- Place the COMBINATION for a mini-game (G).
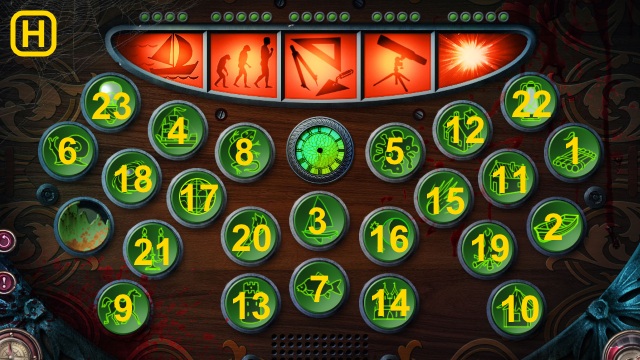
- Solution (H): Ax2-Bx4-Cx6.
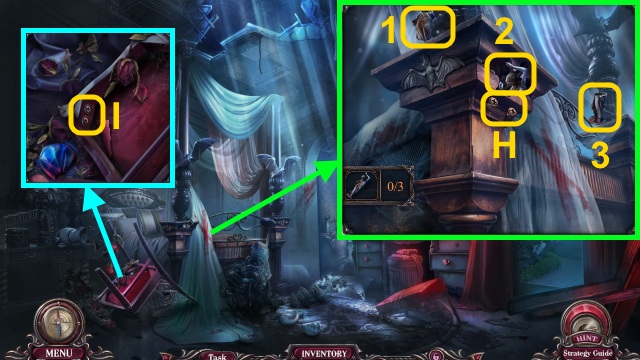
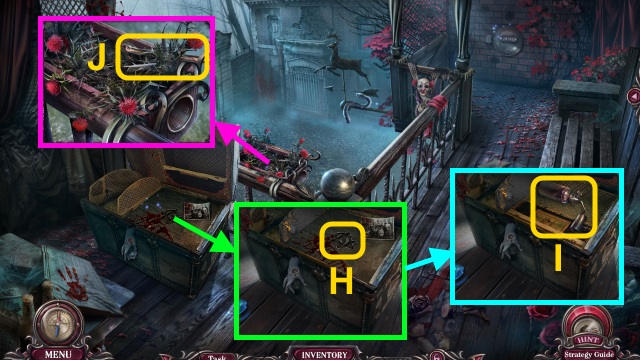
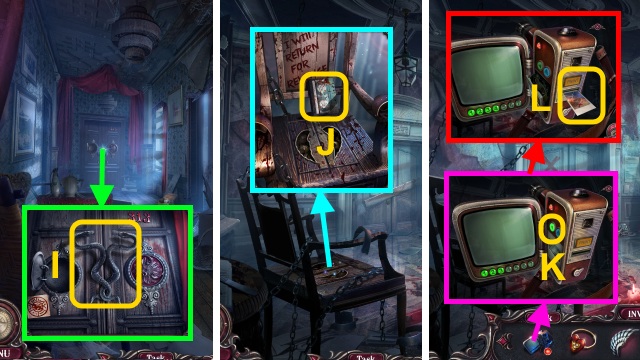
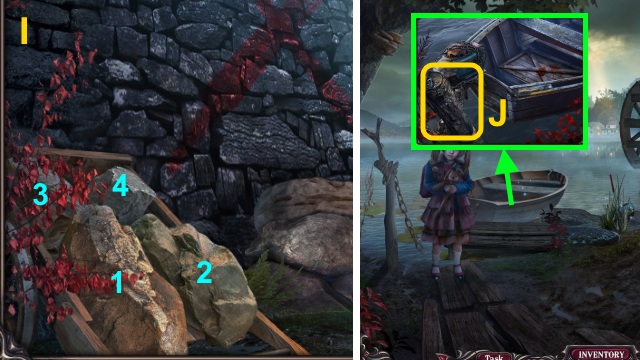
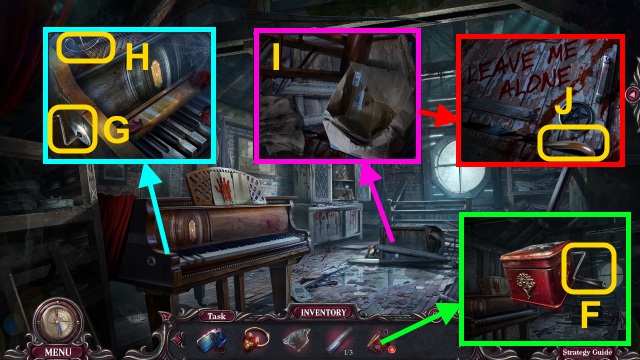
- Take the TRUNK KEY (I).
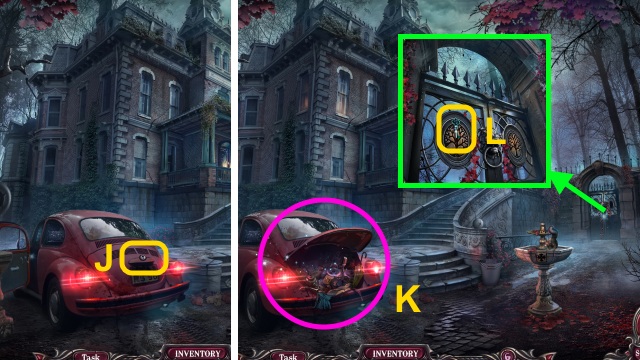
- Use the TRUNK KEY (J).
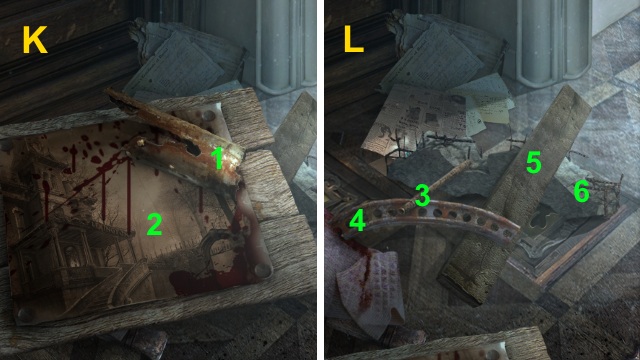
- Play the HOP to receive the PLIERS (K).
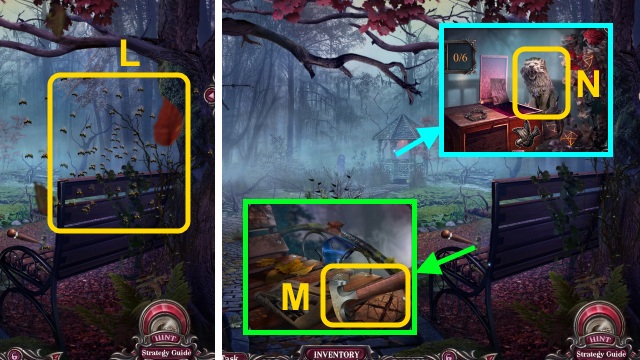
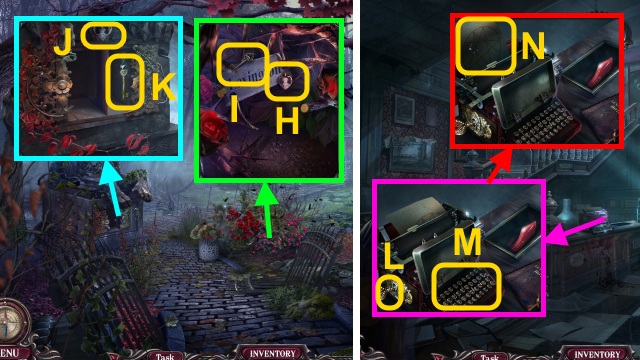
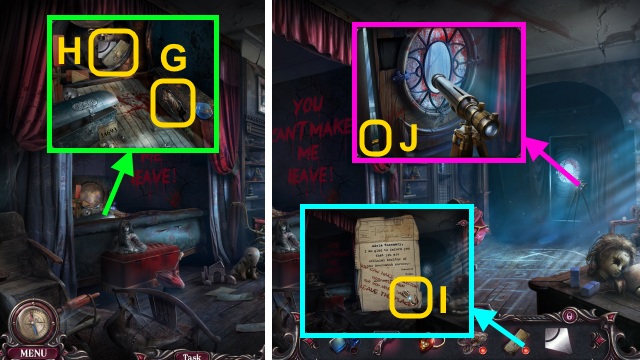
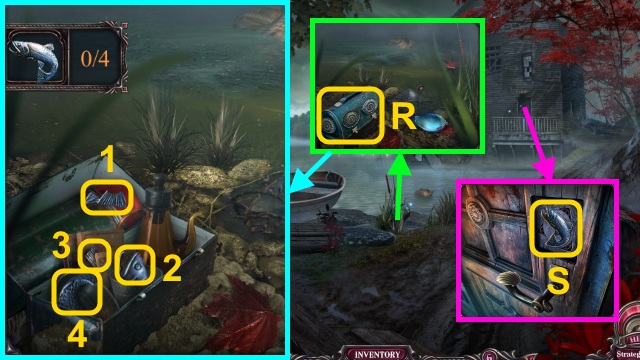
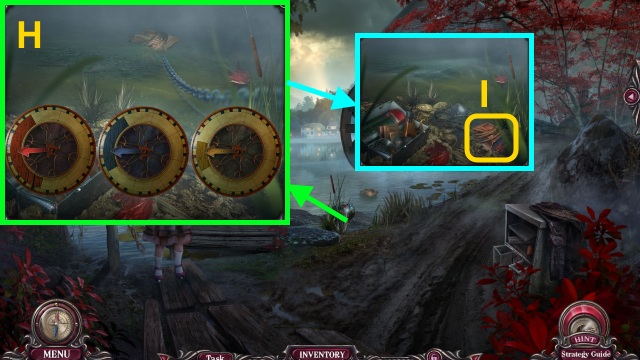
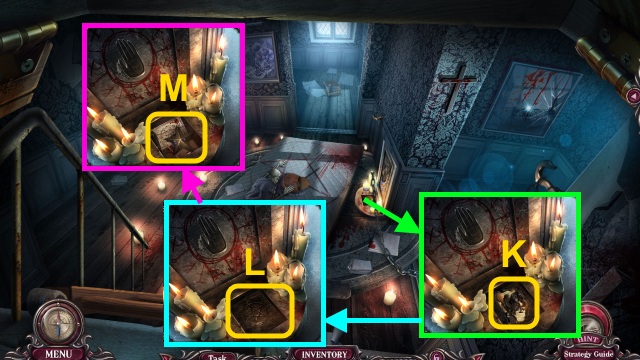
- Take the OLD KEYS (1/6) (L).
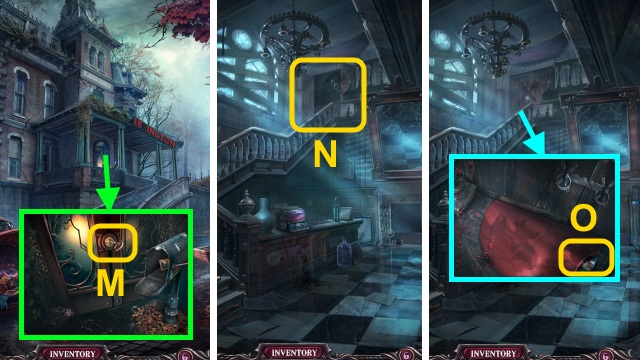
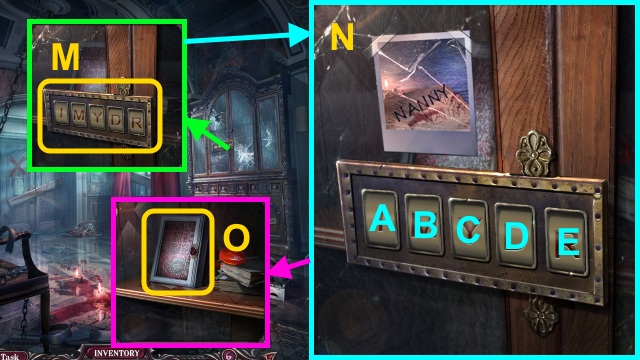
- Examine the key (M); use the PLIERS.
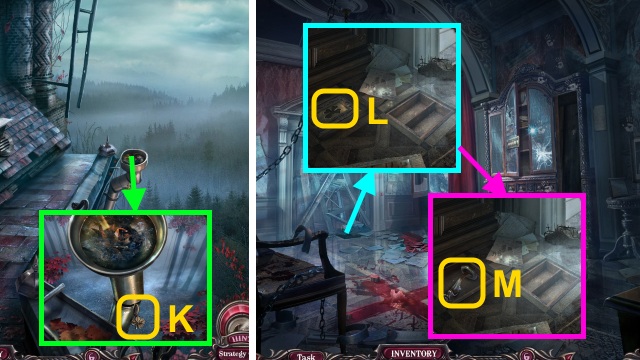
- Walk forward.
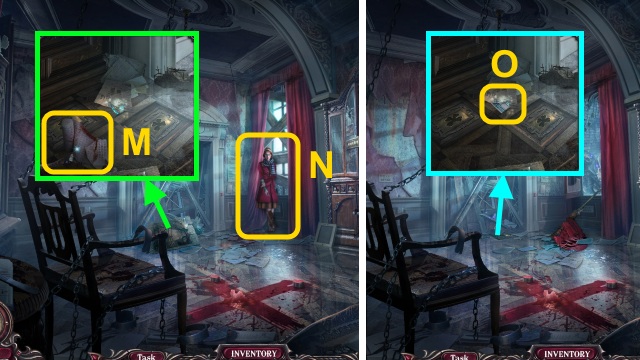
- Examine the door (N).
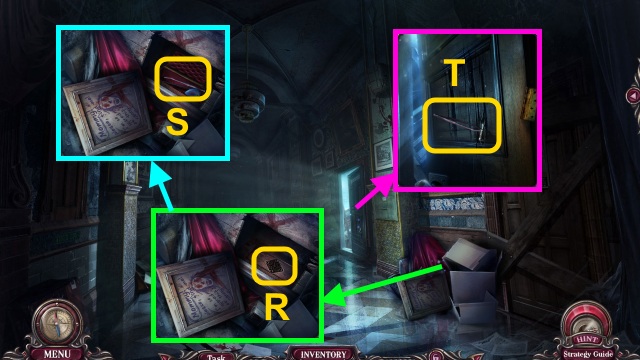
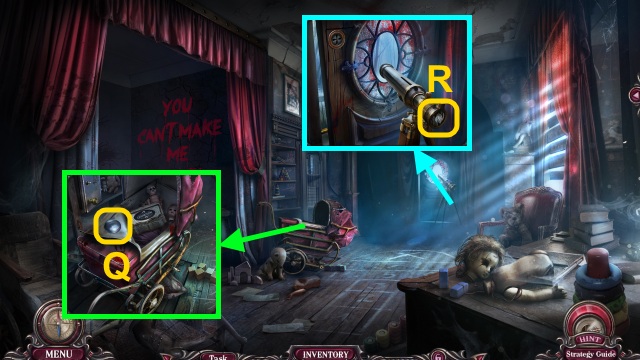
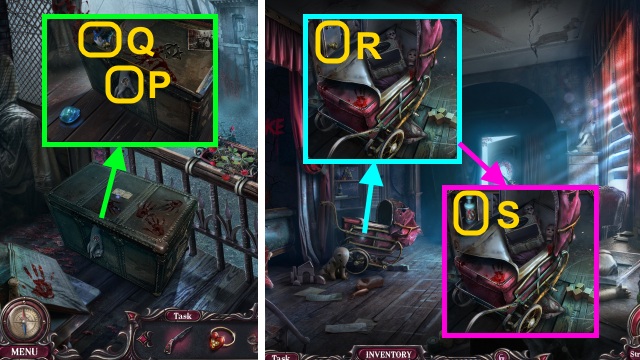
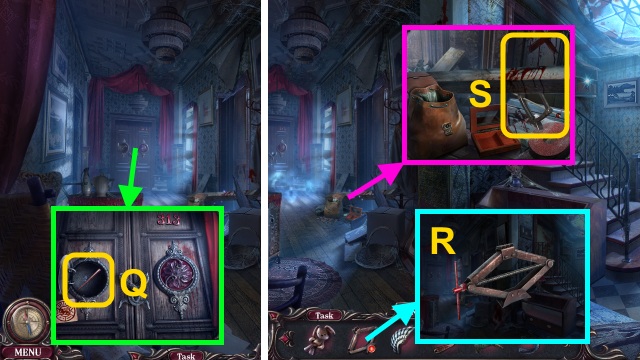
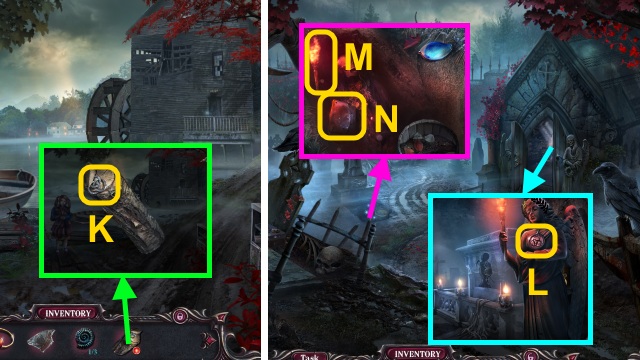
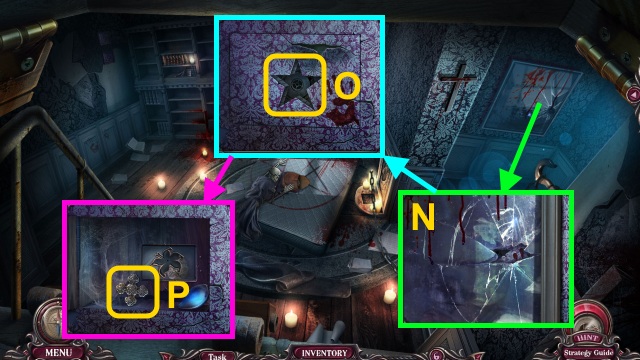
- Examine the rug (O); take the CASSETTE.
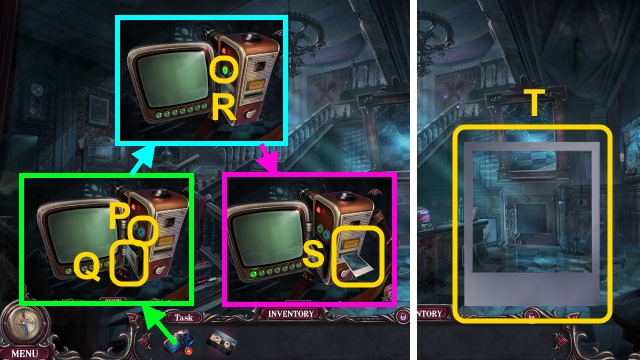
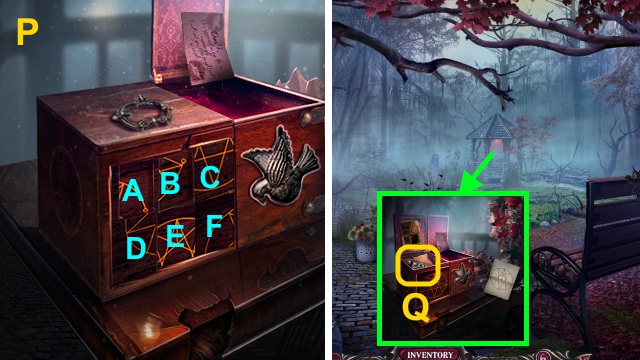
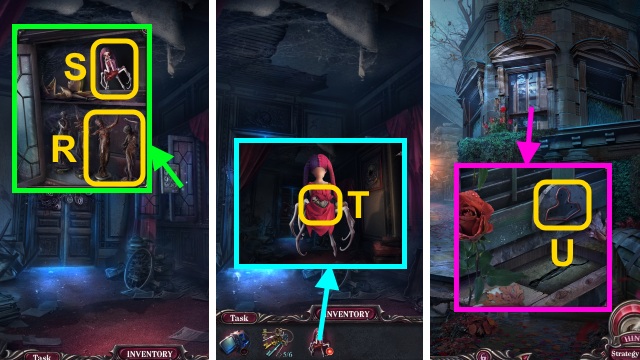
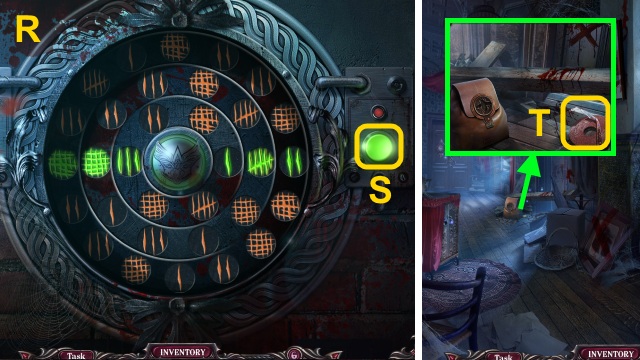
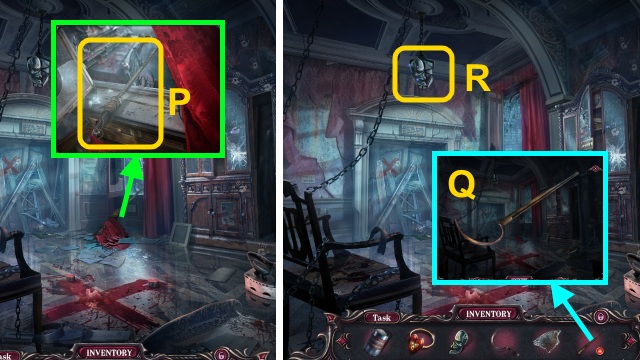
- Examine the CAMERA; press the button (P).
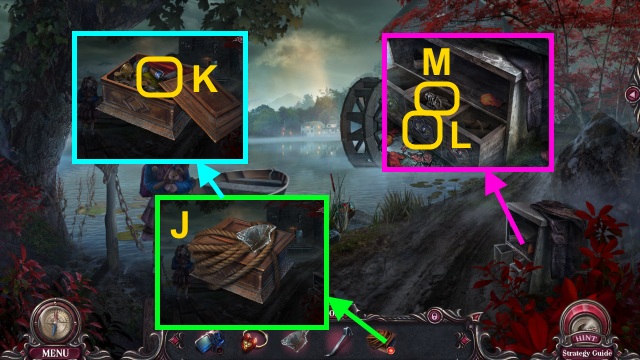
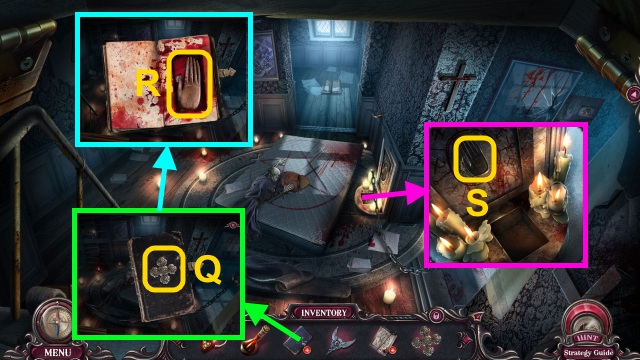
- Place the CASSETTE (Q); close the case.
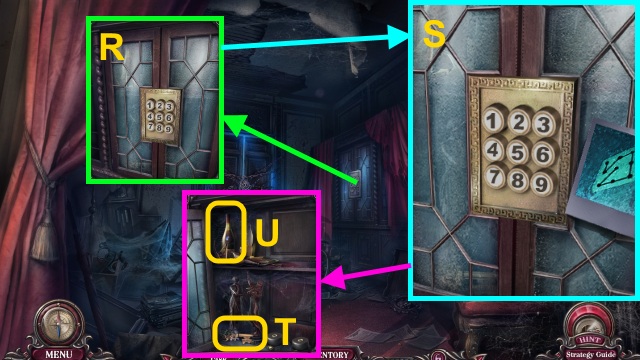
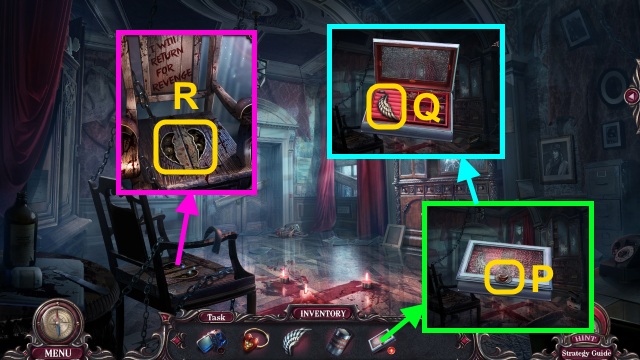
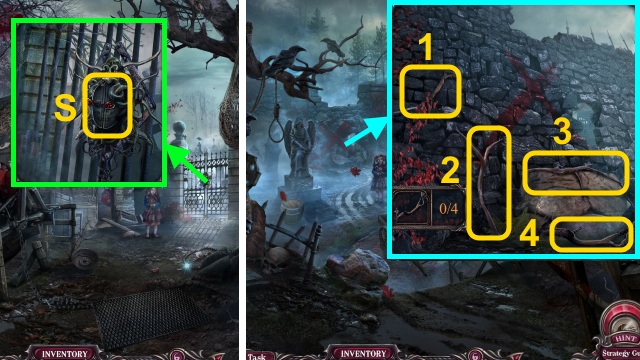
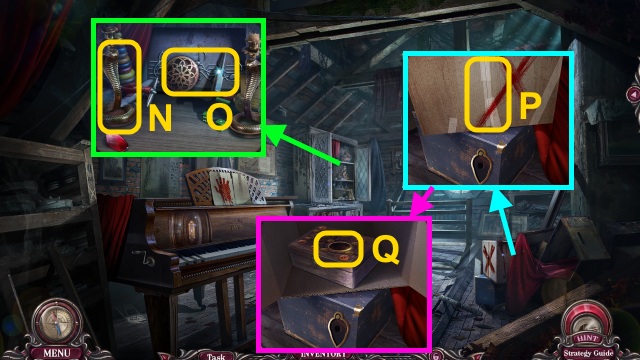
- Press the button (R).
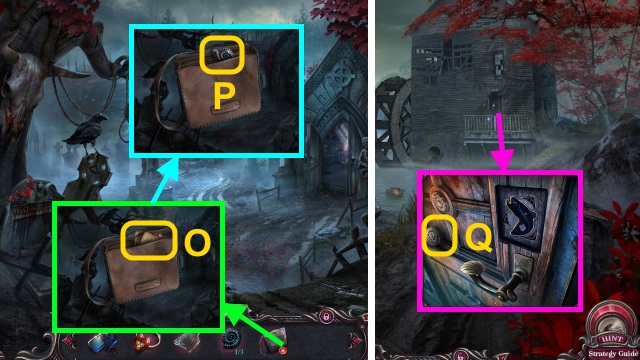
- Press Print; take the PHOTO (S).
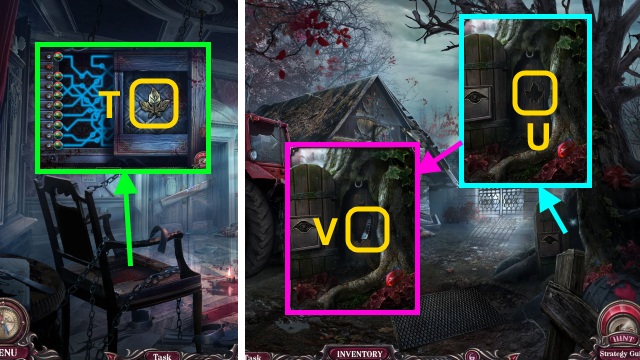
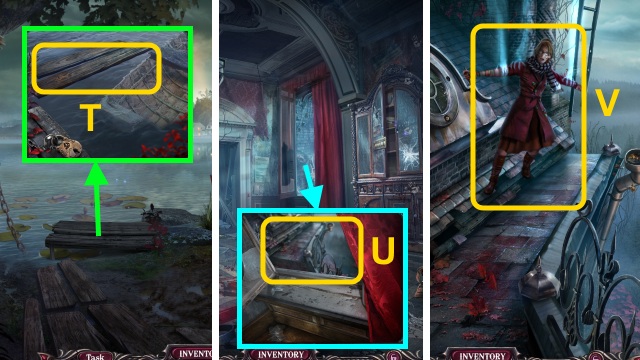
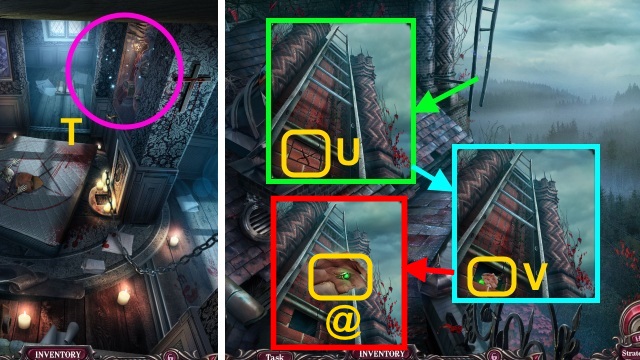
- Use the PHOTO (T).
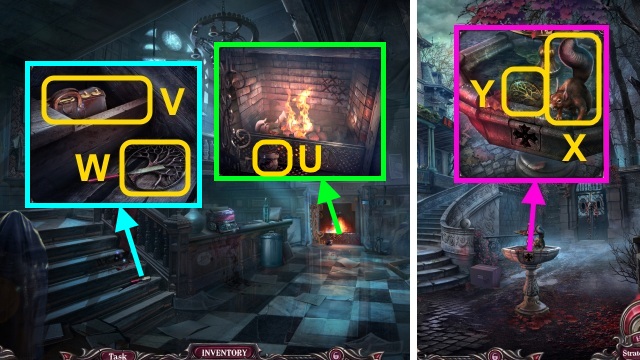
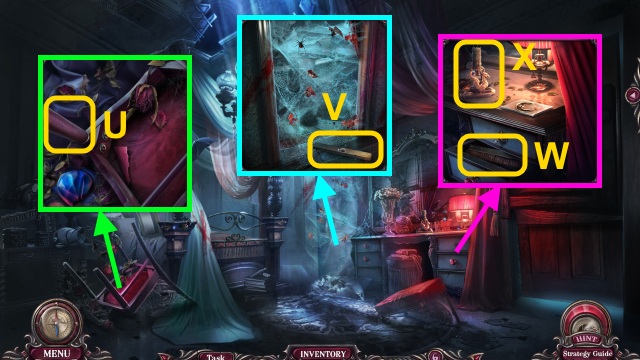
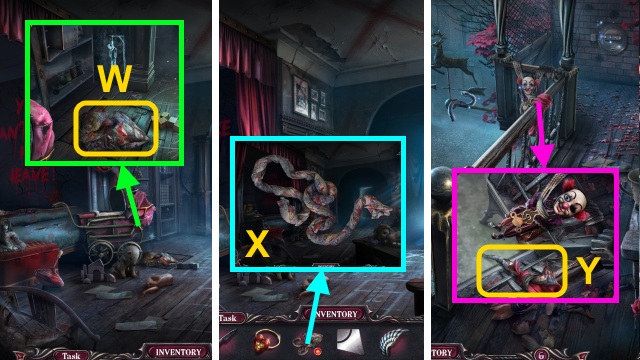
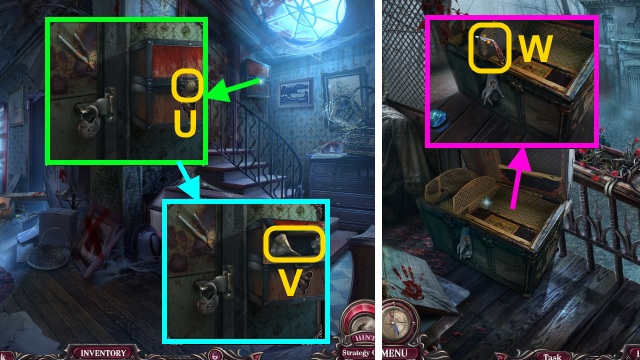
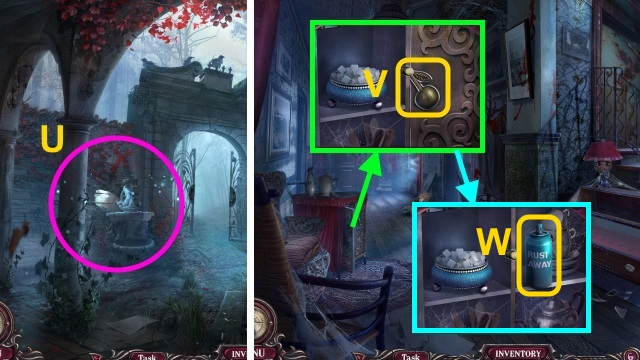
- Take the FEED (U).
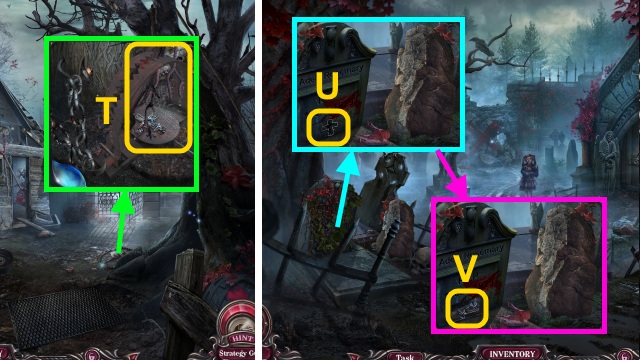
- Move the plank; take the FIRST-AID KIT (V) and TREE AMULET (W).
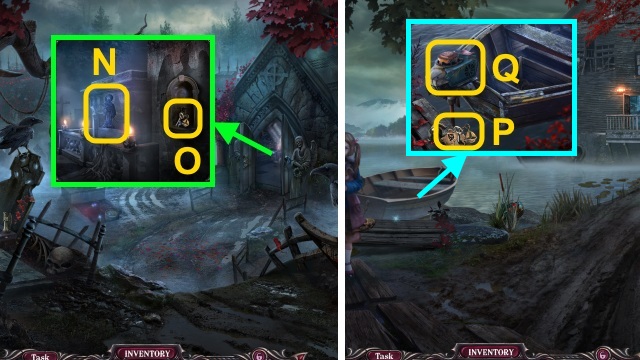
- Walk down.
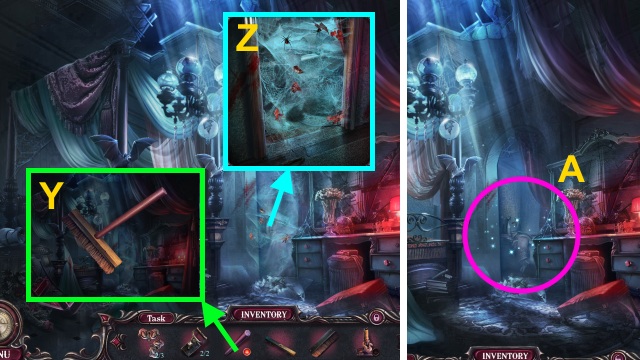
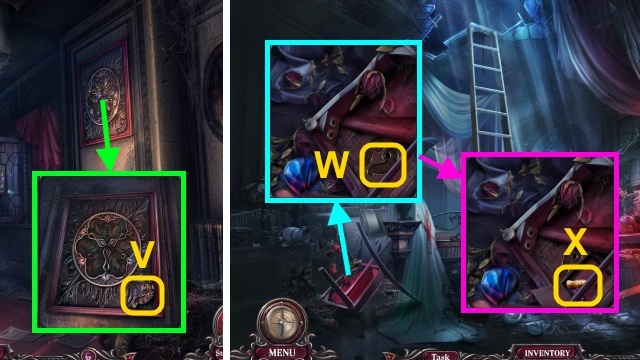
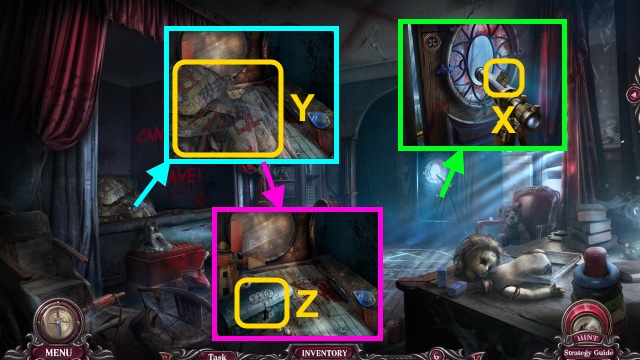
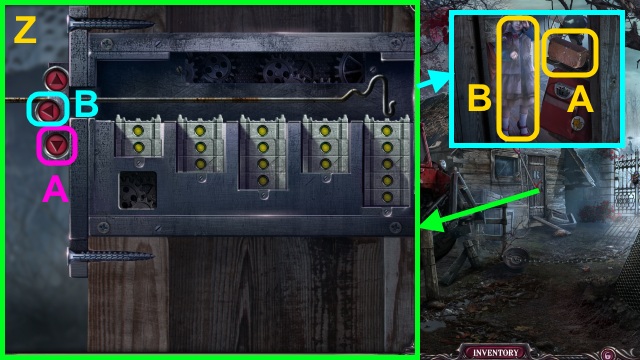
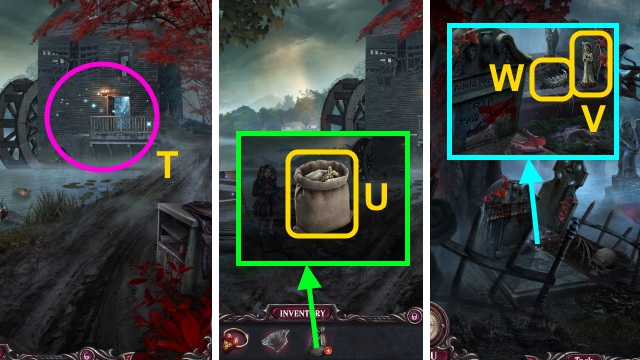
- Give the FEED (X); take the TREE AMULET (Y).
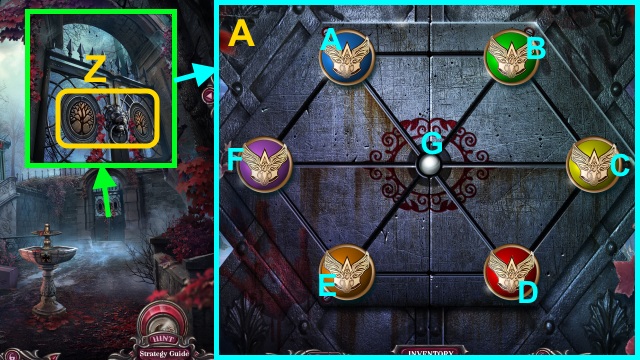
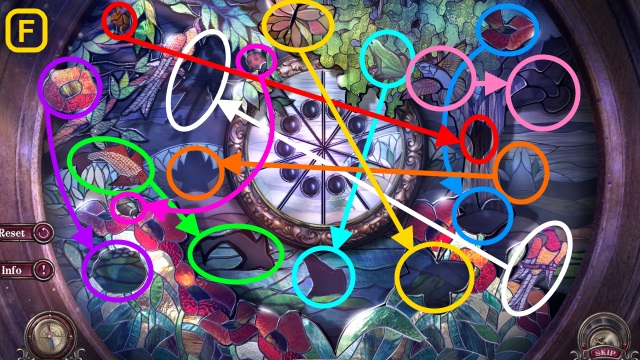
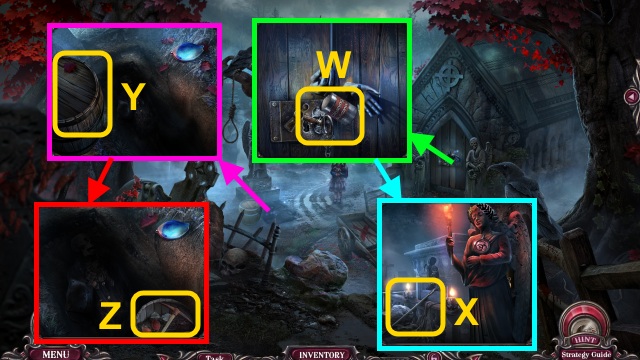
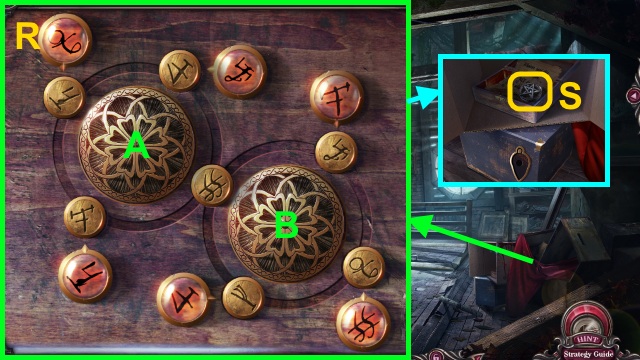
- Place the 2 TREE AMULETS for a mini-game (Z).
- Solution (A): B-A-F-G-E-D-C-B-G-A-F-E-D-G-A-F-E-G-A-F-G.
- Walk right.
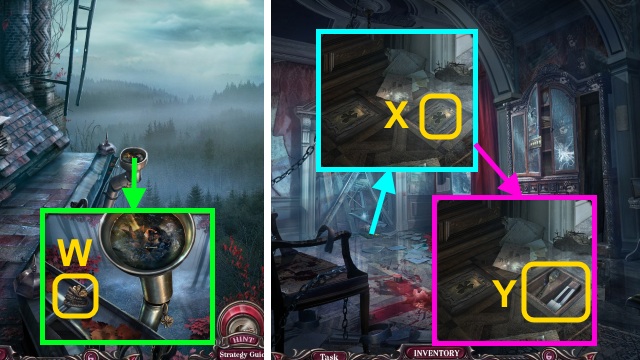
- Move the leaves; take the PIGEON EMBLEM (B).
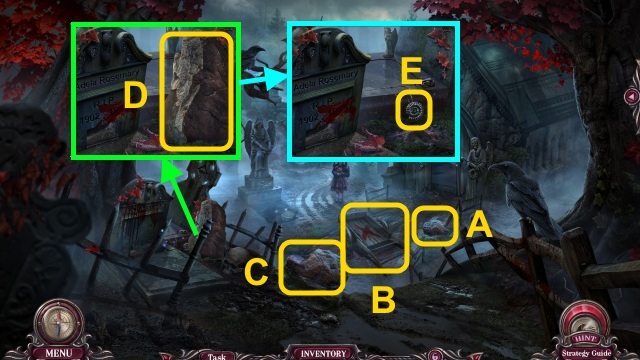
- Place the PIGEON EMBLEM (C); take the LETTER L (D) and PAINTBRUSH (E).
- Walk down, then forward.
- Place the LETTER L (F).
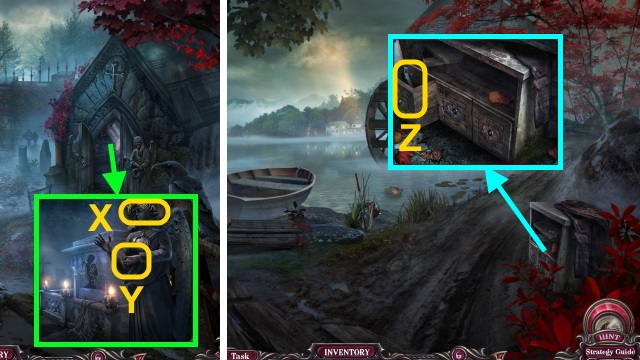
- Take the BROCHURE (G).
- Open the BROCHURE; take the MEDICAL EMBLEM (H).

- Place the MEDICAL EMBLEM on the FIRST-AID KIT for a mini-game (I).
- Solution (J).
- Take the INSECTICIDE (K).
- Walk down, then right.
- Use the INSECTICIDE (L).
- Take the HAMMER (M).
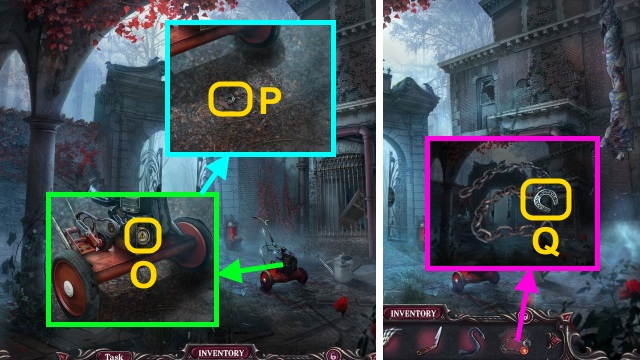
- Use the HAMMER; take the STONE LION (N).
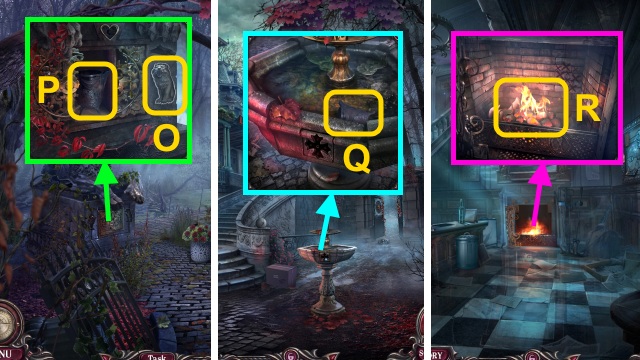
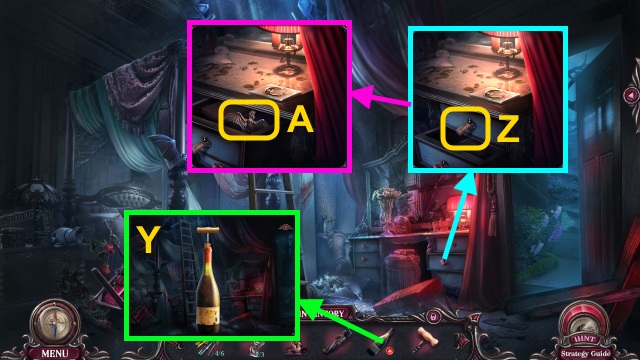
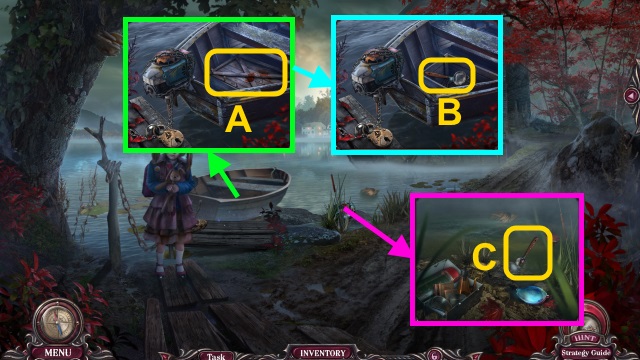
- Place the STONE LION (O); take the JUG (P).
- Walk down.
- Use the JUG (Q); receive the JUG WITH WATER.
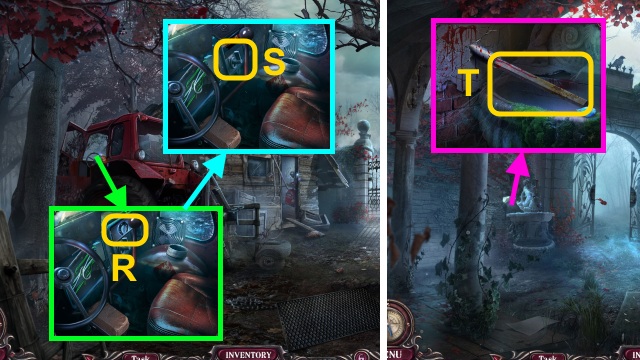
- Walk forward.
- Pour the JUG WITH WATER (R).
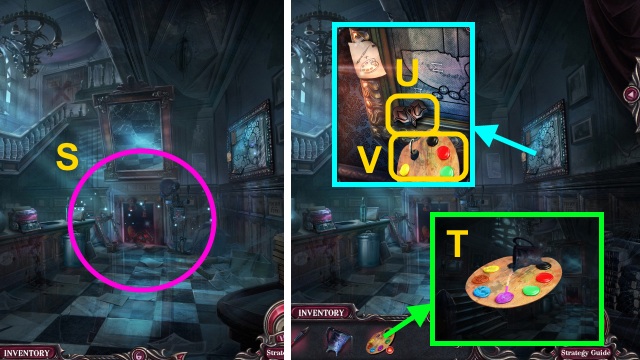
- Play the HOP to receive the PALETTE (S).
- Combine the PALETTE and JUG WITH WATER (T); take the PAINTS.
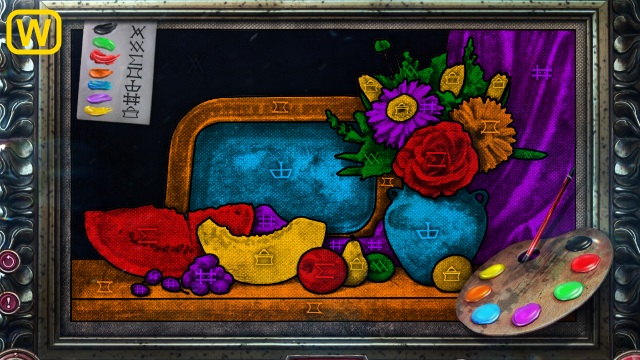
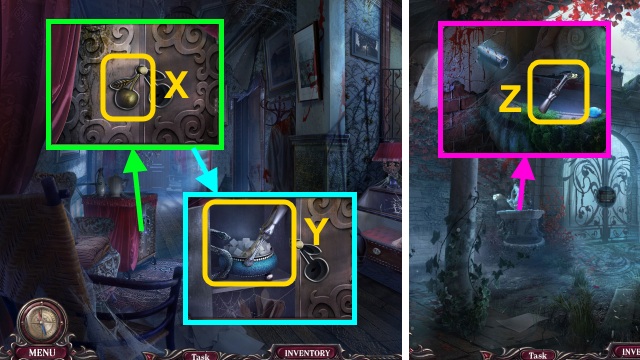
- Take the MOSAIC PARTS (1/3) (U); place the PAINTS and PAINTBRUSH for a mini-game (V).
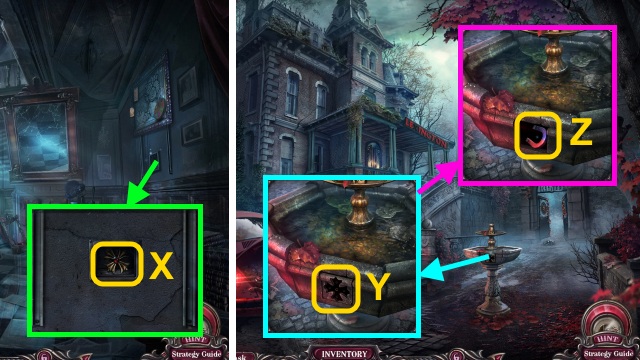
- Take the CROSS AMULET (X).
- Walk down.
- Place the CROSS AMULET (Y).
- Take the MAGNET (Z).
- Walk forward.
- Use the MAGNET (A); receive the FILE.
- Use the FILE (B).
- Walk forward.
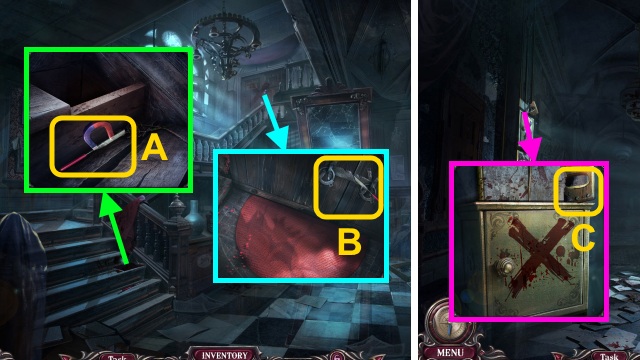
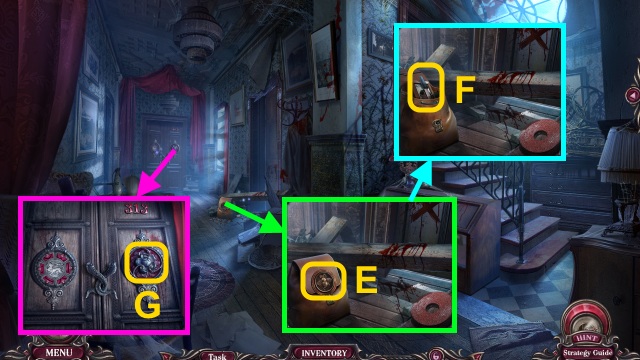
- Take the SAW HANDLE (C).
- Place the SAW HANDLE (D); take the SAW.
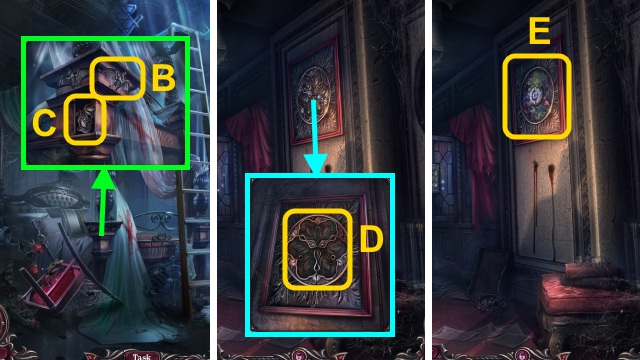
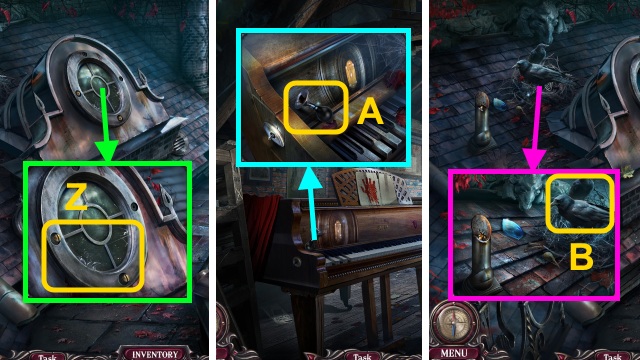
- Move the picture (E); use the SAW (F).
- Take the SWITCHES (1/2) and MOSAIC PARTS (2/3) (G).
- Go to the Garden.
- Use the SAW; take the HEART LOCKET (H) and OLD KEYS (2/6) (I).
- Place the HEART LOCKET (J); take the JEWELED KEY (K).
- Walk down, then forward.
- Use the JEWELED KEY (L); press the keys (M).
- Take the SOLUTION (N).
- Walk down, then right.

- Gather the pieces (1-6).
- Place the SOLUTION for a mini-game (O).
- Solution (P): (F-C)-(C-B-)-(B-A)-(B-C)-(B-E)-(E-F).
- Take the METAL TILE (Q).
- Walk down, then forward twice.
- Place the METAL TILE (R); take the TWEEZERS (S).
- Use the TWEEZERS (T); take the SWITCHES (2/2).
Chapter 2: The Lexington
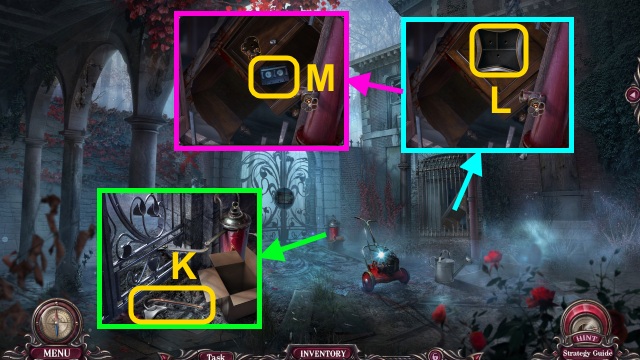
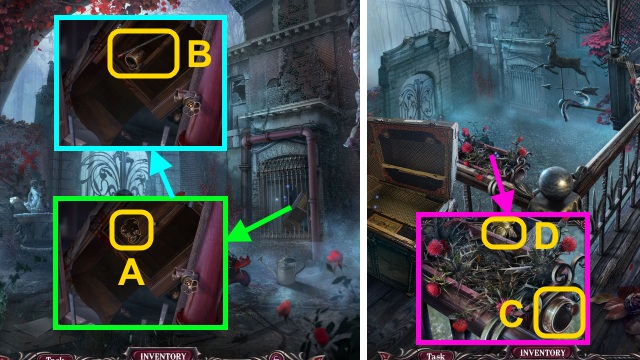
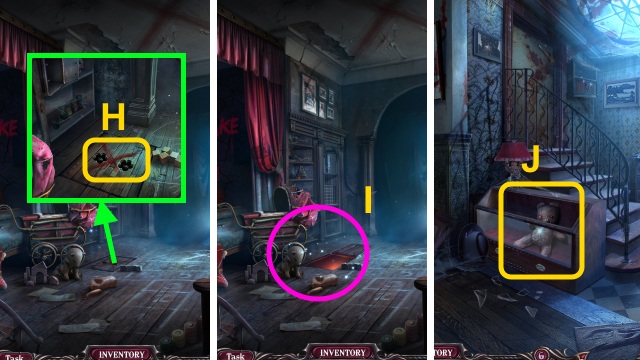
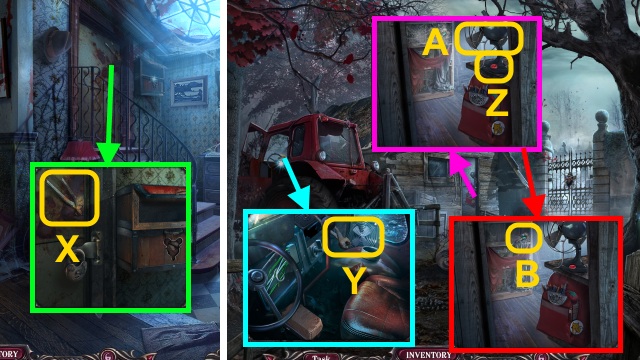
- Take the STICK (U).
- Take the BROOM PART (V).
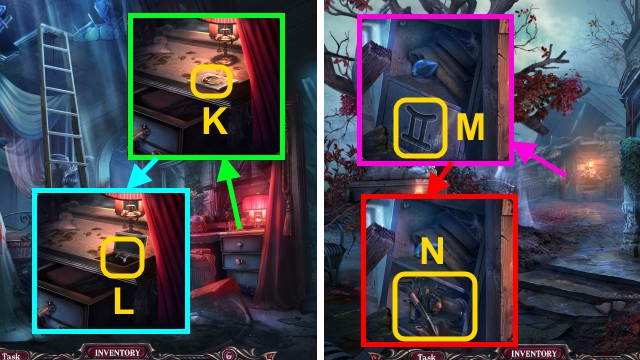
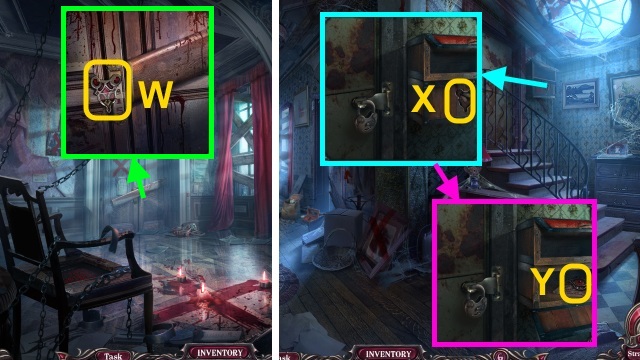
- Open the drawer; take the BRUSH (W) and CANDLE (X).
- Combine the STICK, BROOM PART, and BRUSH (Y); take the BROOM.
- Use the BROOM (Z).
- Play the HOP to receive the CROWBAR (A).
- Use the CROWBAR (B).
- Walk right.
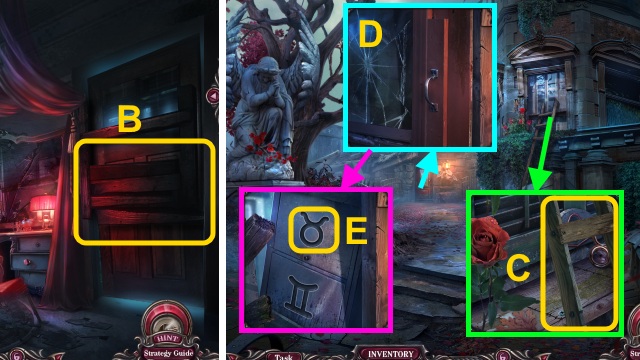
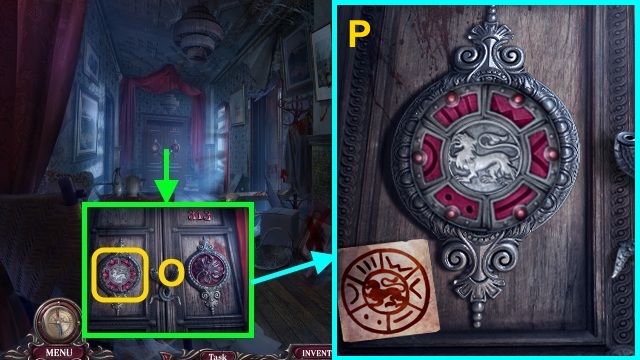
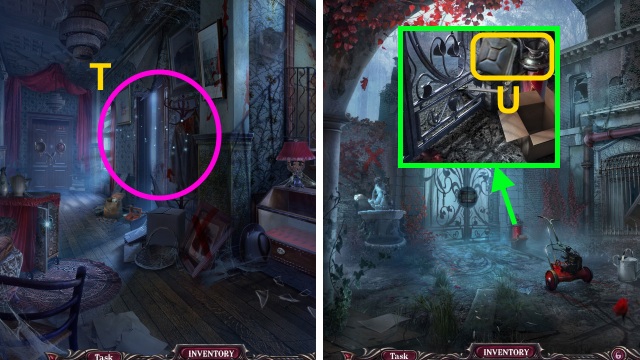
- Take the BROKEN LADDER and TAURUS AMULET (C).
- Open the door (D).
- Place the TAURUS AMULET (E).
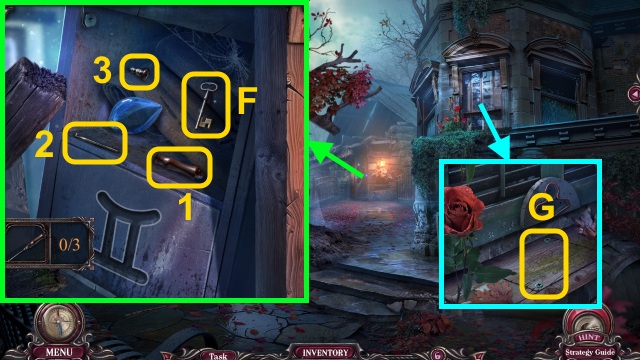
- Gather the parts (1-3); receive the SCREWDRIVER.
- Take the OLD KEYS (3/6) (F).
- Use the SCREWDRIVER (G); receive the SCREWS (2/6).
- Walk down.
- Use the SCREWDRIVER (H); receive the SCREWS (4/6).
- Gather the pieces (1-3); receive the STATUETTE.
- Use the SCREWDRIVER (I); receive the SCREWS (6/6).
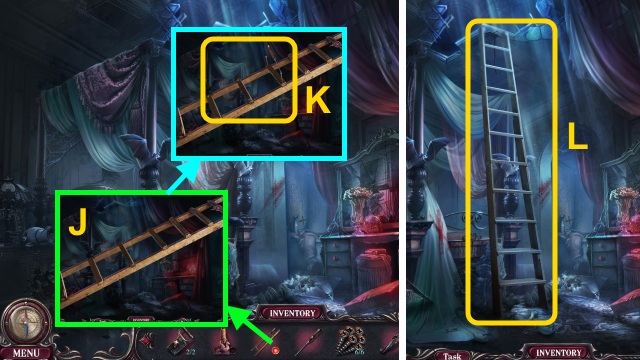
- Examine the LADDER; place the planks (J).
- Use the SCREWS (6/6); use the SCREWDRIVER (K).
- Take the LADDER.
- Use the LADDER (L).
- Go up.
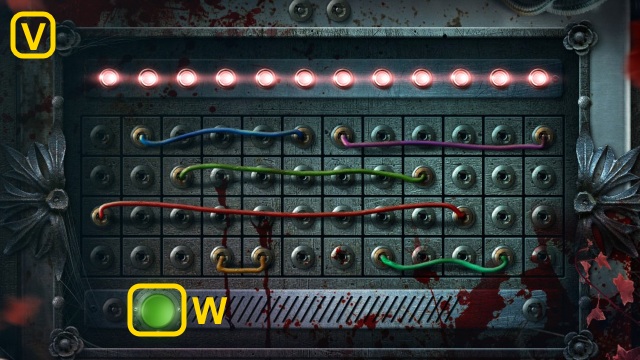
- Open the door; place the SWITCHES (2/2) for a mini-game (M).
- Solution (N).
- Walk forward.
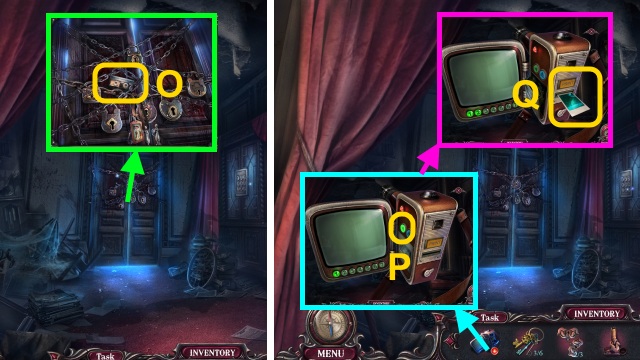
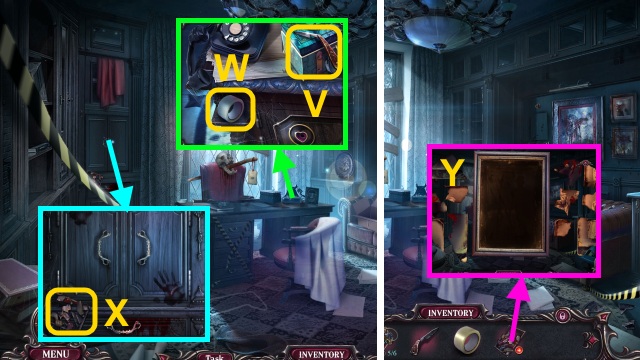
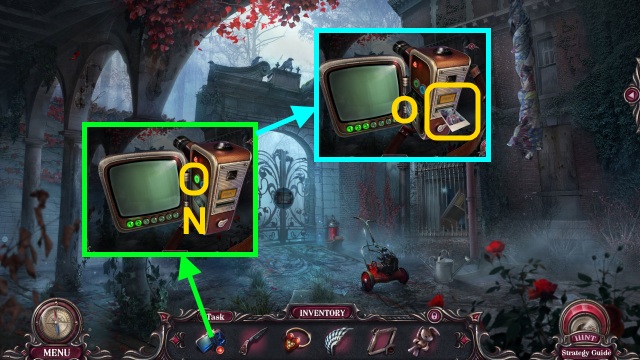
- Take the CASSETTE (O).
- Combine the CAMERA and CASSETTE; press play (P).
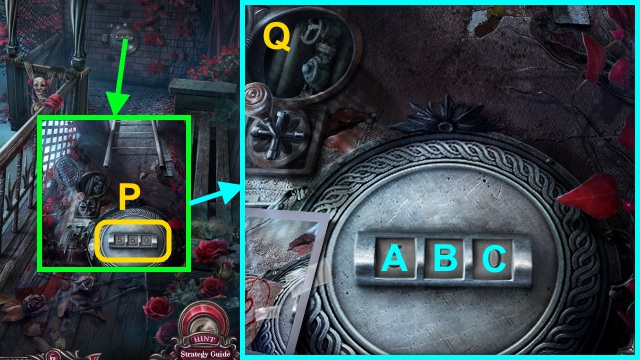
- Press Print; take the SHELVES CODE (Q).
- Use the SHELVES CODE for a mini-game (R).
- Solution (S): 1-4-2-3-6-9-8-7-5.
- Take the OLD KEYS (4/6) (T) and BOTTLE (U).
- Take the WOODEN PATTERN (V).
- Go to the Ground Floor.
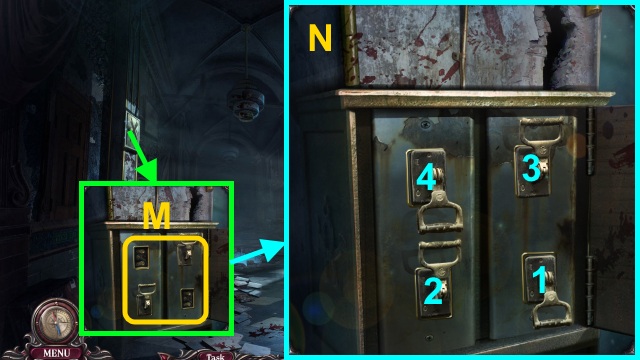
- Move the cloth; place the WOODEN PATTERN (W).
- Take the CORKSCREW (X).
- Use the CORKSCREW on the BOTTLE (Y); receive the CORK.
- Place the CORK (Z); open the drawer.
- Take the BAT AMULET (A).
- Place the BAT AMULET (B); take the MOSAIC PARTS (3/3) (C).
- Go up, then forward.
- Place the MOSAIC PARTS (3/3) (D).
- Examine the mosaic for a mini-game (E).
- Take the MATCHES (G).
- Combine the CANDLE and MATCHES (H); take the BURNING CANDLE.
- Go to the Backyard.
- Place the BURNING CANDLE (I); take the COPPER MOON (J).
- Walk down.
- Place the COPPER MOON (K).
- Take the GEMINI AMULET (L).
- Walk right.
- Place the GEMINI AMULET (M).
- Take the SHOVEL and BLOWTORCH (N).
- Use the SHOVEL (O); receive the CLAY.
- Take the OLD KEYS (5/6) (P).
- Place the CLAY; use the BLOWTORCH (Q).
- Receive the CLAY STATUETTE.
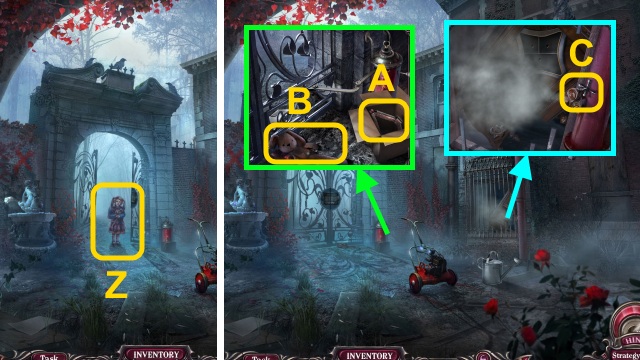
- Go to the Dead End.
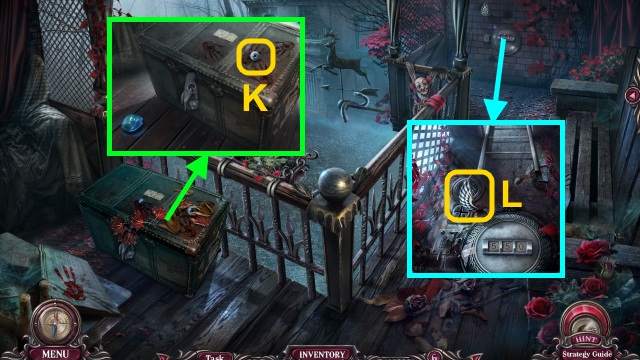
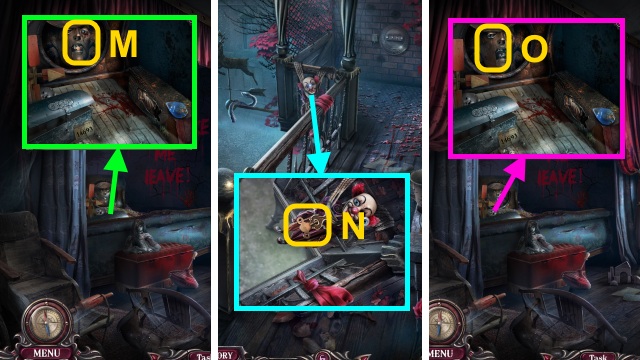
- Place the STATUETTE and CLAY STATUETTE (R); take the TOY (S).
- Examine the TOY 2x; take the SKULL AMULET (T).
- Go to the Backyard.
- Place the SKULL AMULET (U).
- Go right.
- Take the BLUNT BLADE (V) and TAPE (W).
- Take the TORN PHOTO (X).
- Examine the TORN PHOTO for a mini-game (Y).
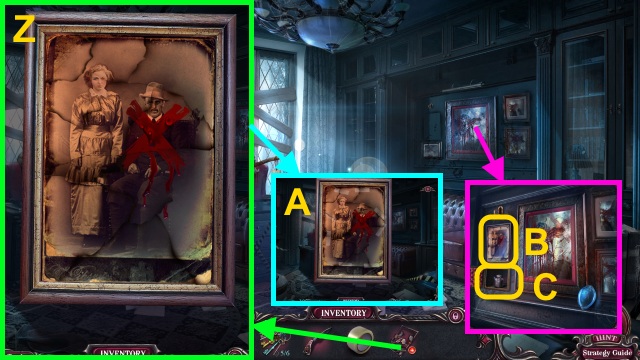
- Solution (Z).
- Use the TAPE (A); take the OLD PHOTO.
- Place the OLD PHOTO (B); take the WEIGHT (C).
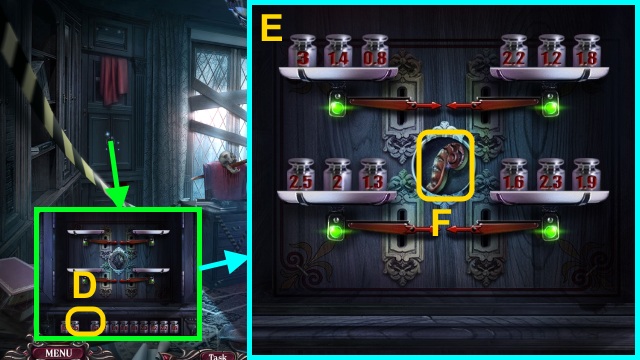
- Open the cupboard and drawer; place the WEIGHT for a mini-game (D).
- Solution (E).
- Take the WOODEN PATTERN (F).
- Walk down twice.
- Place the WOODEN PATTERN (G).
- Take the GOLDEN STAR (H).
- Walk right twice.
- Place the GOLDEN STAR (I); take the LETTER F (J).
- Walk down.
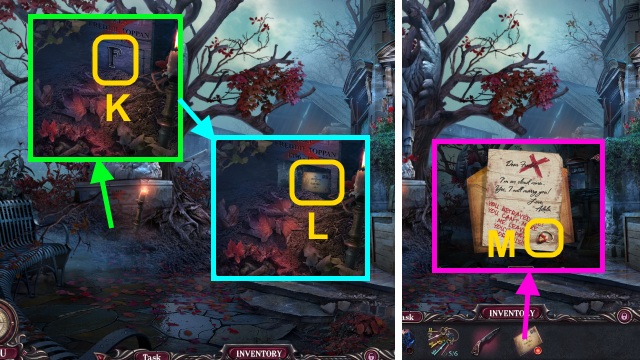
- Place the LETTER F (K).
- Take the LETTER (L).
- Read the LETTER; take ADELA’S RING (M).
- Walk right.
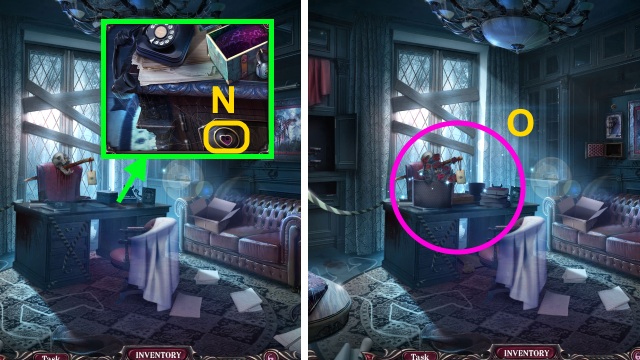
- Use ADELA’S RING (N).
- Play the HOP to receive the OLD KEYS (6/6) (O).
- HOP puzzle solution (@): A-D-E-F-C-B-A-D-E-B-A.
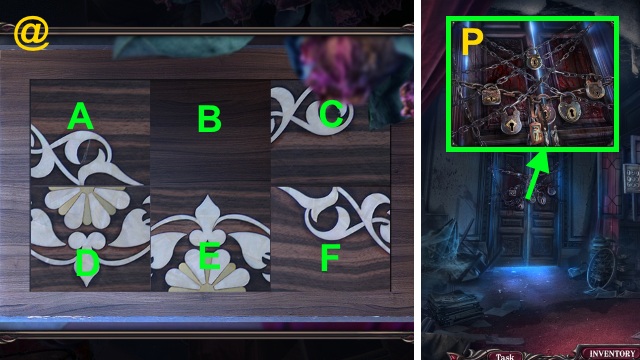
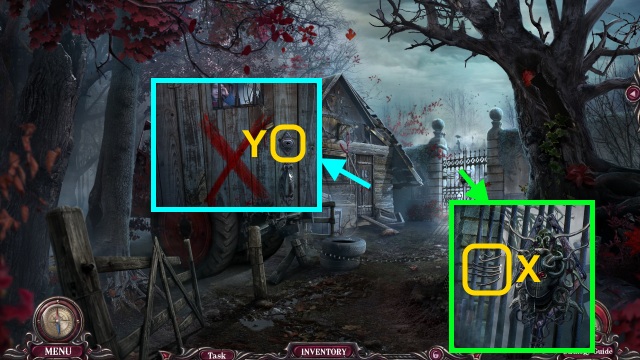
- Go to the Dead End.
- Use the OLD KEYS (6/6) (P).
Chapter 3: The Nursery
- Take the LENS (Q).
- Remove the lens (R); place the LENS for a mini-game.
- Solution (S-T).
- Press and hold (U) to zoom in all the way.
- Solution (V-W).
- Take the NUMBERS SET (X).
- Take the BED SHEET (Y).
- Place the NUMBERS SET for a mini-game (Z).
- Solution (A): C-B-A-B-D.
- Take the CROSS SEAL (B).
- Place the CROSS SEAL (C).
- Take the LEXINGTON BROOCH (D).
- Place the LEXINGTON BROOCH (E).
- Take the FIGURINE (F).
- Move the mattress; place the FIGURINE (G).
- Take the MESSAGE and METALLIC PART (H).
- Open the MESSAGE; take the HOOK (I).
- Use the HOOK (J).
- Walk forward.
- Move the leaves; take the EYE (K).
- Take the WING EMBLEM (L).
- Walk down.
- Place the EYE; take the WIND-UP KEY (M).
- Walk forward.
- Use the WIND-UP KEY (N); receive the EYE.
- Walk down.
- Place the EYE (O); take the ROYAL EMBLEM.
- Walk forward.
- Place the ROYAL EMBLEM (P).
- Take the EMPTY SPRAYER and KNOB (Q).
- Walk down.
- Place the KNOB (R).
- Take the HERBICIDE BOTTLE (S).

- Combine the EMPTY SPRAYER and HERBICIDE BOTTLE (T); receive the WEED KILLER.
- Walk forward.
- Use the WEED KILLER; take the WHEEL (U).
- Walk down.
- Place the WHEEL (V).
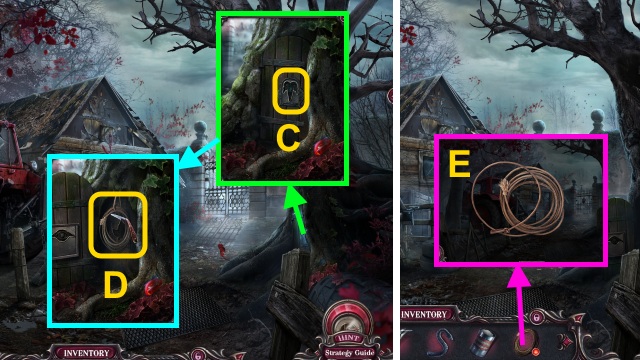
- Take the SHEET (W).
- Examine the BED SHEET 3x; attach the SHEET (X).
- Take the CLOTH ROPE.
- Walk forward.
- Use the CLOTH ROPE (Y).
- Go forward.
- Examine the girl (Z).
- Open the box; take the BROKEN JACK (A) and BUNNY (B).
- Take the CROSS KEY (C).
- Take the METALLIC PART (D).
- Walk down.
- Place the CROSS KEY; take the VALVE (E).
- Go forward.
- Place the VALVE (F); take the FIRE AMULET (G).
- Walk down.
- Place the FIRE AMULET (H).
- Take the BURNER (I).
- Use the BURNER; take the HOOKED ROD (J).
- Go forward.
- Use the HOOKED ROD; take the METALLIC PART (K).
- Place the 3 METALLIC PARTS (L).
- Take the CASSETTE (M).
- Combine the CAMERA and CASSETTE; press the button (N).
- Press Print; take the CODE (O).
- Walk down.
- Place the CODE for a mini-game (P).
- Solution (Q): Ax8-Bx4-Cx9.
- Solution (R).
- Press the button (S).
- Go right.
- Use the BLUNT BLADE; take the BLADE (T).
- Use the BLADE (U); pull the handle.
- Take the FUNNEL and METAL FLOWER (V).
- Walk down.
- Use the BLADE; take the CHERRY AMULET (W).
- Walk right.
- Place the CHERRY AMULET (X); press the button.
- Open the cupboard; take the TONGS and METAL SNAKE (Y).
- Walk down, then forward.
- Use the TONGS (Z); take the LILY AMULET.
- Place the LILY AMULET (A).
- Take the ROLLER and JACK PART (B).
- Walk down.
- Place the ROLLER (C); take the BEE MEDALLION (D).
- Walk right.
- Place the BEE MEDALLION (E); examine it.
- Take the NAIL FILE; move the box (F).
- Use the NAIL FILE; take the METAL FLOWER (G).
- Walk down twice.
- Place the 2 METAL FLOWERS (H).
- Play the HOP to receive the MALLET (I).
- Walk forward, then right.
- Use the MALLET; take the TEDDY BEAR (J).
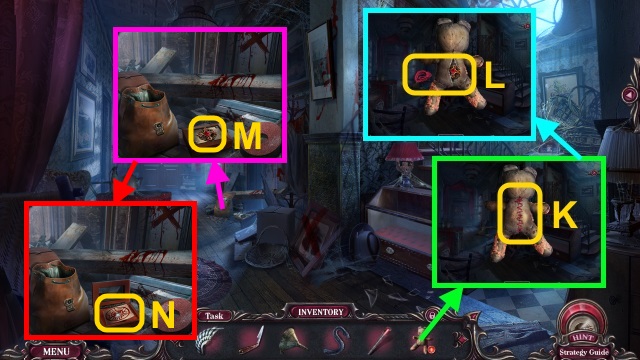
- Examine the TEDDY BEAR; use the BLADE (K).
- Take the CROSS AMULET and THREAD (L).
- Place the CROSS AMULET (M); open the box.
- Take the PICTURE (N).
- Place the PICTURE for a mini-game (O).
- Solution is random (P).
- Take the JACK PART (Q).
- Combine the BROKEN JACK and 2 JACK PARTS (R); take the JACK.
- Use the JACK; open the door (S).
- Play the HOP to receive the GASOLINE (T).
- Go to the Courtyard.
- Use the FUNNEL and GASOLINE for a mini-game (U).
- Solution (V).
- Press the button (W).
- Walk forward.
Chapter 4: The Graveyard
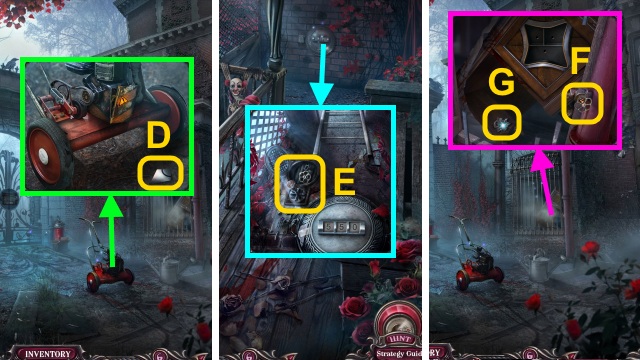
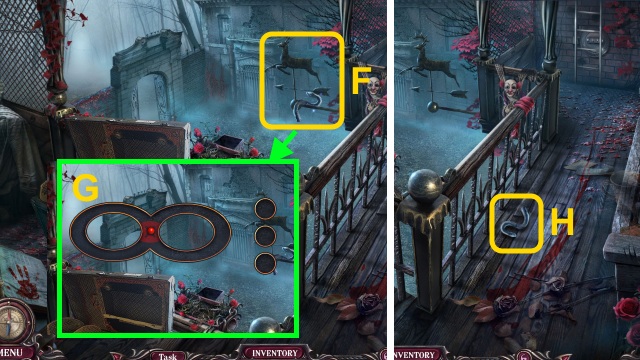
- Take the WIRE PIECE (X).
- Use the WIRE PIECE for a mini-game (Y).
- Solution (Z): Ax3-B-Ax2-B-Ax4-B-A-B-Ax2-B.
- Take the BRICK (A); give the BUNNY (B).

- Talk to Becky (C); receive the DIADEM.
- Place the DIADEM (D); take the NEEDLE (E).
- Take the TORN GLOVE (F); open the cover (G).
- Examine the wires (H); pull the handle (I).
- Place the BRICK (J); pour the GASOLINE (K).

- Examine the TORN GLOVE; use the THREAD and NEEDLE (L).
- Take the GLOVE.
- Use the GLOVE (M); take the MOWER BUTTON (N).
- Walk down.
- Remove the cover; place the MOWER BUTTON (O).
- Press the button; take the CHARM BRACELET (P).
- Examine the CHARM BRACELET; take the HORSESHOE CHARM (Q).
- Walk forward.
- Remove the cover; place the HORSESHOE CHARM (R).
- Take the METAL ROD (S).
- Walk down.
- Use the METAL ROD (T).
- Play the HOP to receive the CHERRY AMULET (U).
- Walk down, then right.
- Place the CHERRY AMULET (V); press the button.
- Open the cupboard; take the ANTI-RUST SPRAY (W).
- Use the ANTI-RUST SPRAY (X); take the CUTTERS.
- Go to the Forest.
- Use the CUTTERS (Y); take the FAN.
- Press the button (Z); place the FAN (A).
- Press the button; take the EMERALD AMULET (B).
- Place the EMERALD AMULET (C).
- Use the BLADE (D); receive the ROPE.
- Examine the ROPE 3x (E); take the LASSO.
- Walk down twice.
- Use the LASSO for a mini-game (F).
- Solution (G): Stop the balls inside the markers 3x.
- Take the METAL SNAKE (H).
- Walk right.
- Place the 2 METAL SNAKES (I); examine them.
- Walk forward.
- Take the CASSETTE (J).
- Combine the CAMERA and CASSETTE; press the button (K).
- Press Print; take the PAPER NOTE (L).
- Place the PAPER NOTE for a mini-game (M).
- Solution (N): Ax9-Cx8-B-Dx7-Ex3.
- Open the cupboard; take the JEWELRY BOX (O).
- Use ADELA’S RING on the JEWELRY BOX (P); take the WING EMBLEM (Q).
- Place the 2 WING EMBLEMS for a mini-game (R).
- Take the CARVED LEAF (T).
- Go to the Forest.
- Place the CARVED LEAF (U).
- Take the SURGICAL SAW (V).
- Go to Room 313.
- Use the SURGICAL SAW; take the ANGRY AMULET (W).
- Walk down.
- Place the ANGRY AMULET (X).
- Take the EYE EMBLEM (Y).
- Go to the Forest.

- Place the EYE EMBLEM (Z).
- Take the KEY KEEPER (A).
- Examine the KEY KEEPER; move the keys (B).
- Take the ROOM 315 KEY.
- Go to Room 313.
- Use the ROOM 315 KEY (C).
- Play the HOP to receive the CONTRACT (D).
- Talk to Samantha (E).
Chapter 5: Becky
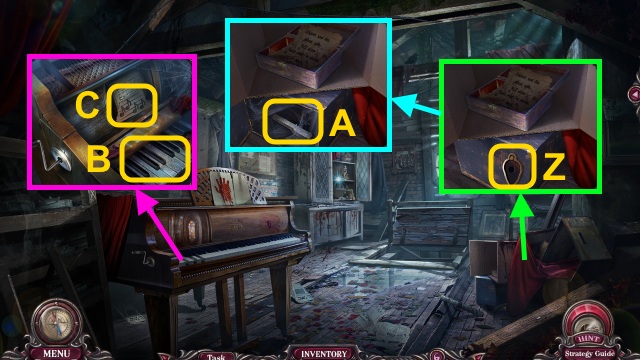
- Take the candle (F).
- Press the button for a mini-game (G).

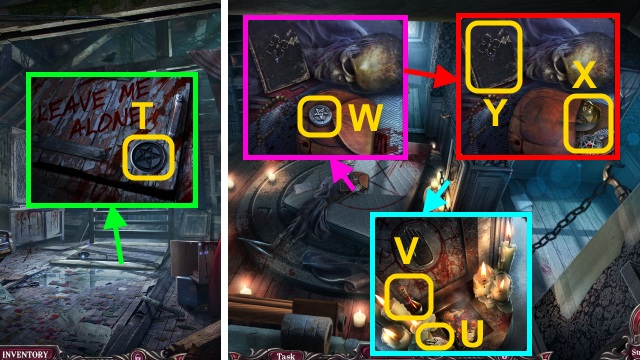
- Read the CONTRACT; take the SKULL HALF (I).
- Examine the debris for a mini-game (J).
- Take the BANDAGE and SICKLE (M).
- Use the BANDAGE (N); talk to Samantha.
- Receive the HANDKERCHIEF.
- Use the HANDKERCHIEF (O); take the SHARP SHARD.
- Use the SHARP SHARD (P); take the CURTAIN ROD.
- Examine the CURTAIN ROD; place the SICKLE (Q).
- Take the STICK WITH HOOK.
- Use the STICK WITH HOOK (R); receive the SKULL HALF.
- Go to the Forest.
- Place the 2 SKULL HALVES (S).
- Walk forward.
- Gather the BRANCHES (1-4).
- Walk down.
- Place the BRANCHES; take the CROSS (T).
- Walk forward.
- Move the plants 5x; place the CROSS (U).
- Take the RUSTY KEY (V).
- Use the RUSTY KEY and ANTI-RUST SPRAY (W); turn the key.
- Take the BOAT HOOK (X).
- Move the barrel (Y); examine it.
- Use the BOATHOOK; take the PICKAXE (Z).
- Use the PICKAXE (A); take the HEAVY ROCK.
- Place the HEAVY ROCK (B).
- Use the PICKAXE (C); take the HEAVY ROCK.
- Place the HEAVY ROCK (B).
- Use the PICKAXE; take the HEAVY ROCK (D) and DECORATIVE SHELL (E).
- Place the HEAVY ROCK (B).
- Use the PICKAXE (F); take the HEAVY ROCK.
- Place the HEAVY ROCK (G); take the HEAVY ROCKS.
- Place the HEAVY ROCKS for a mini-game (H).
- Solution (I).
- Walk forward.
- Take the ROTTEN WOOD PIECE (J).
- Examine the ROTTEN WOOD PIECE; take the STONE AMULET (K).
- Walk down.
- Place the STONE AMULET (L); receive the TORCH.
- Examine the grave; place the TORCH (M).
- Take the LEATHER BAG (N).
- Open the LEATHER BAG; take the letter (O) and DECORATIVE SHELL (2/3) (P).
- Walk forward.
- Take the DECORATIVE SHELL (3/3) (Q).
- Place the DECORATIVE SHELL (3/3) (R); open the case.
- Gather the pieces (1-4); receive the FISH AMULET.
- Place the FISH AMULET (S); open the door.
- Play the HOP to receive the FLOUR SACK (T).
- Examine the FLOUR SACK 3x (U); take the ANGEL FIGURINE.
- Walk down.
- Place the ANGEL FIGURINE (V); take the LAUREL WREATH (W).
- Place the LAUREL WREATH (X); take the WOODEN BUTTON (Y).
- Walk forward.
- Place the WOODEN BUTTON; take the CROWBAR (Z).
- Use the CROWBAR (A); open the crate.
- Take the STRAINER (B).
- Use the STRAINER (C); take the WOODEN BUTTON.
- Place the WOODEN BUTTON (D); take the WRENCH (E).
- Walk down twice.
- Use the WRENCH (F); take the CHAIN.
- Walk forward twice.
- Use the CHAIN for a mini-game (G).
- Solution (H): Stop the arrows inside the markers.
- Take the BOX (I).
- Use the SHARP SHARD on the BOX (J); open it.
- Take the WOODEN BUTTON (K).
- Use the WOODEN BUTTON (L); take the DEATH AMULET (M).
- Walk down.
- Place the DEATH AMULET (N); take the BOAT KEY (O).
- Walk forward.
- Use the BOAT KEY (P); examine the motor for a mini-game (Q).
- Solution (R): C-B-C-B-C-B-C-Ax3-D-B-D-Bx2-D-A-D-Ax4-Cx5.
- Talk to Becky (S).
Chapter 6: The Ritual
- Take the PLANKS (T).
- Go to Room 313.
- Place the PLANKS (U).
- Walk forward.
- Examine Samantha (V).
- Use the SHARP SHARD (W); take the CLOVER.
- Walk down.
- Place the CLOVER (X).
- Take the TABLE SPOON and PIANO KEY (1/3) (Y).
- Walk forward.
- Use the TABLE SPOON (Z).
- Walk forward.
- Take the HORN (A).
- Walk down.
- Use the HORN (B).
- Take the SILVER TRIANGLE (C).
- Walk forward.
- Place the SILVER TRIANGLE (D); open the cupboard.
- Take the MUSIC BOX (E).
- Examine the MUSIC BOX; turn the crank 3x (F).
- Receive the CRANK.
- Place the CRANK (G); turn it.
- Take the PIANO WIRE (H).
- Move the furniture (I).
- Use the PIANO WIRE (J); receive the UMBRELLA.
- Walk down.
- Use the UMBRELLA (K); take the CLOVER.
- Walk down.
- Place the CLOVER (L).
- Take the CANDLESTICK (M).
- Walk forward twice.
- Place the CANDLESTICK (N); take the PIANO KEY (2/3) and DISC (O).
- Use the SHARP SHARD (P).
- Place the DISC for a mini-game (Q).
- Solution (R): B-Ax2-Bx2-Ax2-Bx2-Ax2-Bx2.
- Take the EXORCISM PENDANT (S).
- Place the EXORCISM PENDANT (T).
- Walk forward.
- Take the COPPER PENDANT (U) and BLOOD VIAL (V).
- Place the EXORCISM PENDANT (W); open the bag.
- Take the LUCKY AMULET, BOWL (X), and EXORCIST’S DIARY (Y).
- Walk down.
- Place the COPPER PENDANT (Z).
- Take the PIANO KEY (3/3) (A).
- Place the PIANO KEY (3/3) (B); take the MUSIC CODE (C).

- Place the MUSIC CODE for a mini-game (D).
- Solution (E).

- Play the HOP to receive the BOOK SET (F).
- Walk forward.
- Place the BOOK SET for a mini-game (G).
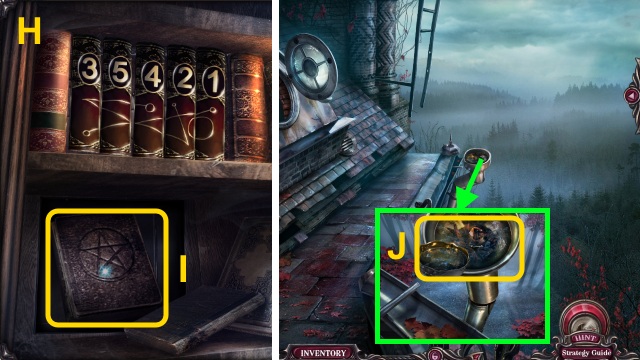
- Solution (H).
- Take the RITUAL BOOK (I).
- Walk down twice.
- Use the BOWL (J); take the BOWL OF WATER.
- Walk forward twice.
- Pour the BOWL OF WATER; move the pieces (K).
- Place the RITUAL BOOK (L).
- Take the BRONZE STAR and RITUAL DIAGRAM (M).
- Move the mirror (N).
- Place the BRONZE STAR (O); examine it.
- Take the EXORCIST’S PENDANT (P).
- Combine the EXORCIST’S DIARY and EXORCIST’S PENDANT (Q); read the notes.
- Take the HAND (R).
- Place the HAND (S).
- Play the HOP to receive the CHISEL (T).
- Walk down twice.
- Use the CHISEL (U).
- Take the ACID (V).
- Open the note; take FREDDIE’S WEDDING RING (@).

- Pour the ACID (W); take the SILVER LILY (X).
- Walk forward twice.
- Place the SILVER LILY (Y); examine it.
- Take FREDDIE’S CONFESSION (Z).

- Combine the RITUAL DIAGRAM, ADELA’S RING, BLOOD VIAL, FREDDIE’S CONFESSION, and FREDDIE’S RING (A); take the RITUAL ITEMS.
- Take the METAL RODS (B).
- Walk down twice.
- Place the METAL RODS (C).
- Go up.
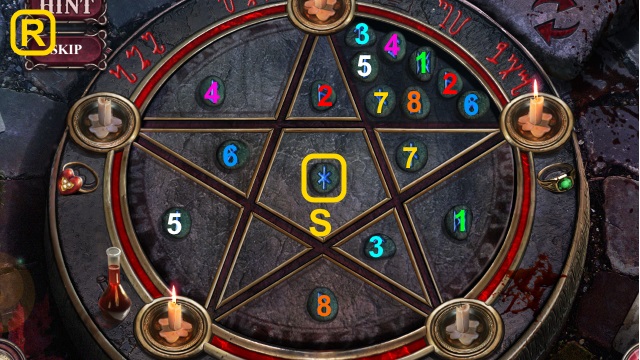
- Examine Adela; use the LUCKY AMULET for a mini-game (D).
- Solution (E): Block the skulls in between phases.
- Solution (F-H).
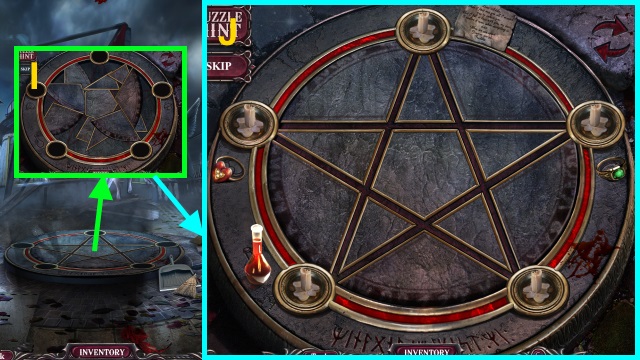
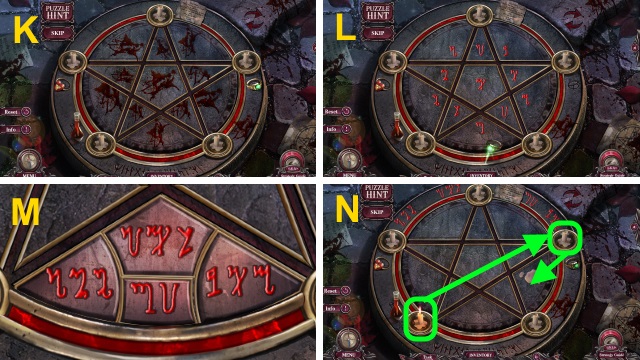
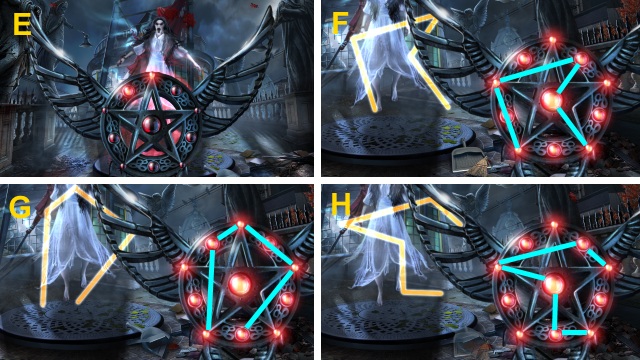
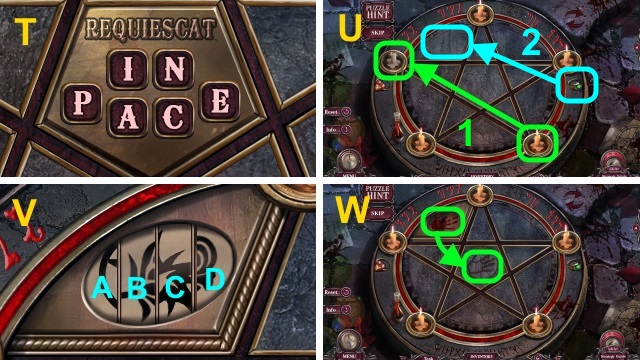
- Place the RITUAL SET for a mini-game (I).
- Solution (J-N).

- Solution (O-R).
- Solution (P): (Ax2-B-E-D)-(E-C-A-Bx2-D)-(C-B-C-B-A-E-D-E).
- Solution (R); press (S) 6x.
- Solution (T-Y).
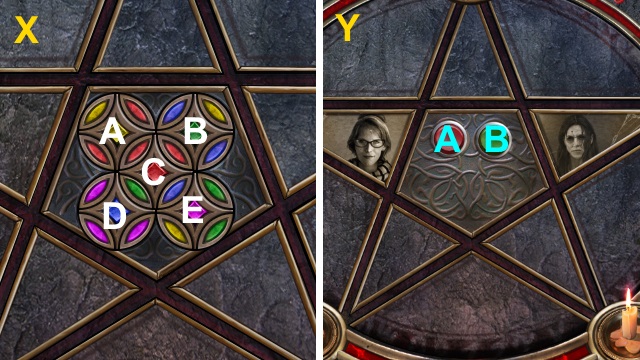
- Solution (V): Cx3-Dx4-B.
- Solution (X): Bx2-Cx3-A-E-Cx2-Ax2-D-B-Cx2-D-Bx2.
- C-D-C-Dx3-E-C-E-C-Bx2-E-C-B-E-C-B-C-B.
- Solution (Y): Ax4-B.
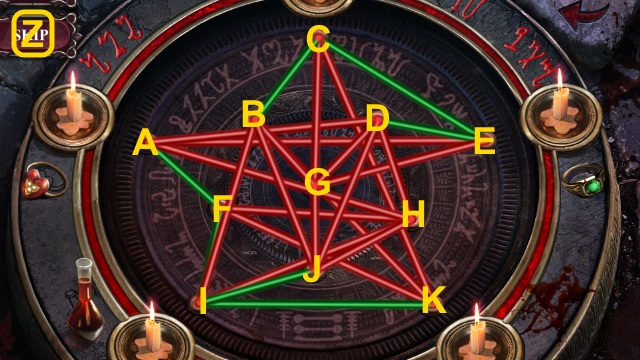
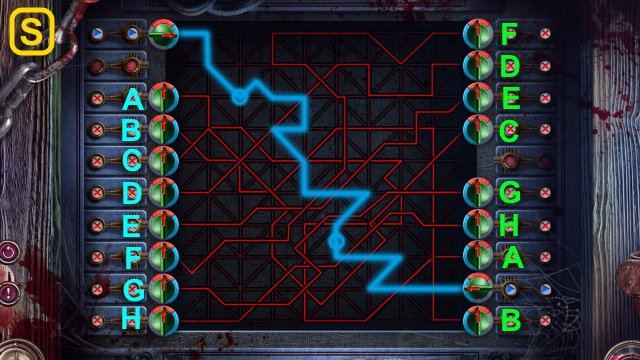
- Solution (Z): (A-K)-(C-F)-(E-K)-(I-F)-(F-B)-(D-H)-(J-G).
- Congratulations! You have completed Haunted Hotel: The X.


 Mystery Case Files: Dire Grove, Sacred Grove Walkthrough, Guide, & Tips
 Final Cut: The True Escapade Walkthrough, Guide, & Tips
 Nightmares from the Deep: Davy Jones Walkthrough, Guide, & Tips
 Incredible Dracula: Chasing Love Walkthrough, Guide, & Tips
 Life Quest 2: Metropoville Walkthrough, Guide, & Tips