Nightmares from the Deep: Davy Jones Walkthrough, Guide, & Tips
Nightmares from the Deep: Davy Jones Walkthrough

Welcome to the Nightmares from the Deep: Davy Jones Walkthrough
Escape the cold incarceration of Davy Jones’ brig and discover the otherworldly origins of his galleon in this thrilling Hidden Object adventure.
Whether you use this document as a reference when things get difficult or as a road map to get you from beginning to end, we’re pretty sure you’ll find what you’re looking for here.
This document contains a complete Nightmares from the Deep: Davy Jones game walkthrough featuring annotated screenshots from actual gameplay!
We hope you find this information useful as you play your way through the game. Use the walkthrough menu below to quickly jump to whatever stage of the game you need help with.
Remember to visit the Big Fish Games Forums if you find you need more help. Have fun!
This walkthrough was created by Daniel Lee Peach, and is protected under US Copyright laws. Any unauthorized use, including re-publication in whole or in part, without permission, is strictly prohibited.
General Tips

- This is the official guide for Nightmares from the Deep: Davy Jones.
- This guide will not mention each time you have to zoom into a location; the screenshots will show each zoom scene.
- We will use the acronym HOP for Hidden-object puzzles. Interactive items will be color-coded and some will be numbered; please follow the numbers in sequence when appropriate.
- The HOP lists may be random; our lists may vary from yours.
- You may choose to play a Mah-jong game instead of an HOP.
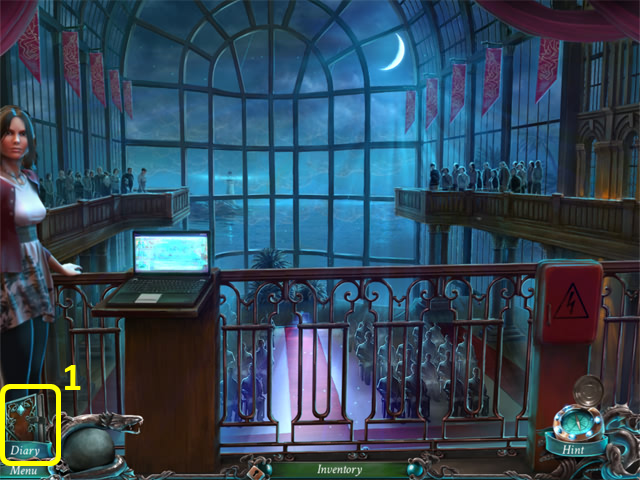
- Select the diary (1) for story updates and objectives.
Chapter 1: The Ship

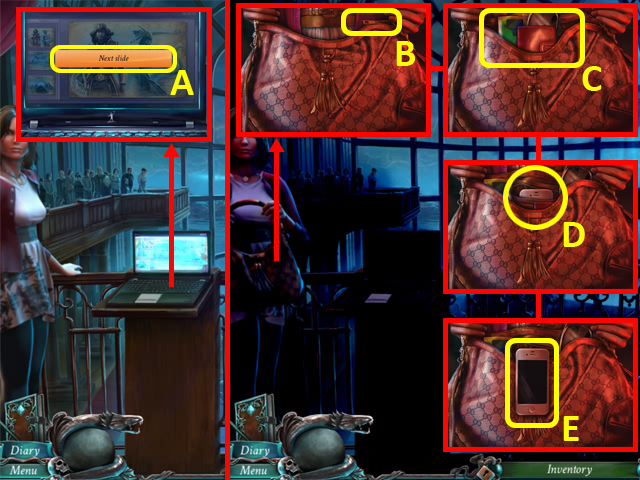
- Select the button (A).
- Unzip the bag (B); move the items (C). Remove the phone (D); use it (E).

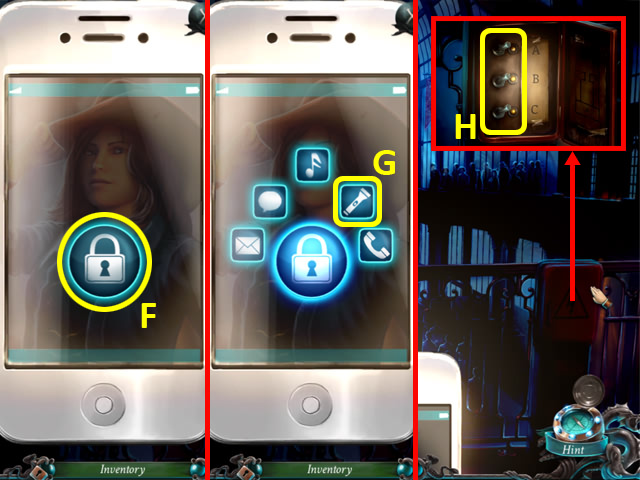
- Press the button (F); select the flashlight (G).
- Open the panel; flip all switches (H) down.
- Select Next Slide on the computer.

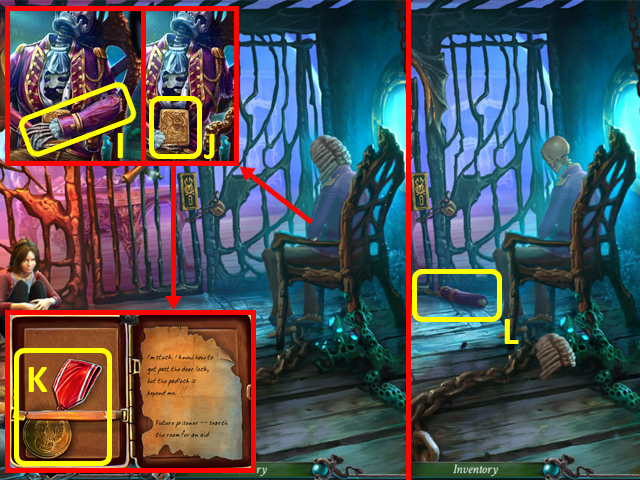
- Nudge the Admiral; move the arm (I).
- Open the case (J); take the MEDAL (K).
- Grab the ADMIRAL’S HAND (L).

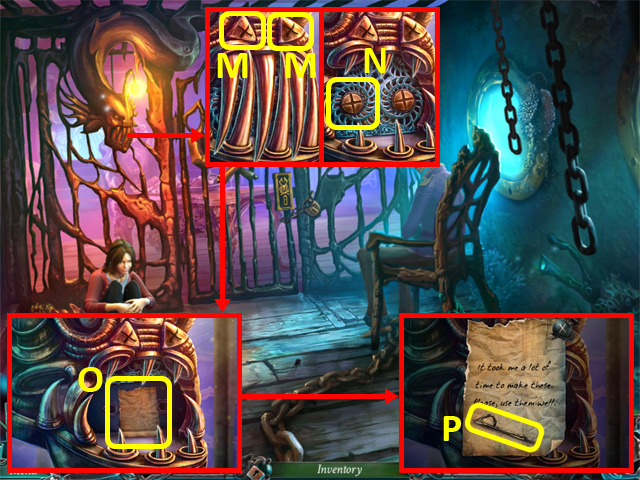
- Press the buttons (M).
- Unscrew the grill (N) with the MEDAL.
- Read the note (O); grab the LOCKPICKS (P).

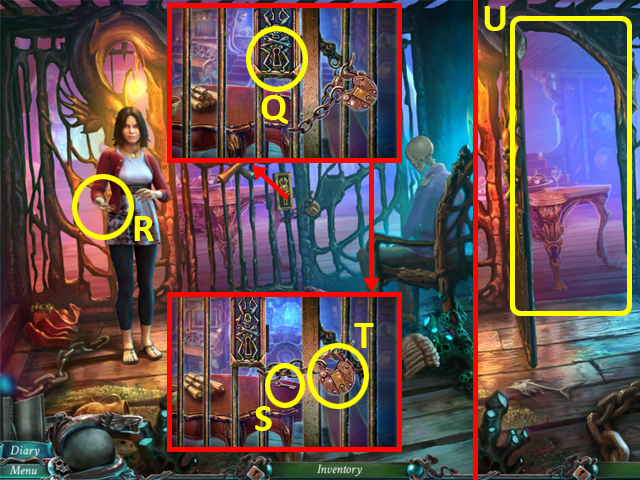
- Insert the LOCKPICKS into the lock (Q).
- Take the HAIRPIN (R); insert it into the lock (Q).
- Use the ADMIRAL’S HAND on the KEY (S).
- Unlock the padlock (T) with the KEY.
- Walk forward into the Captain’s Cabin (U).

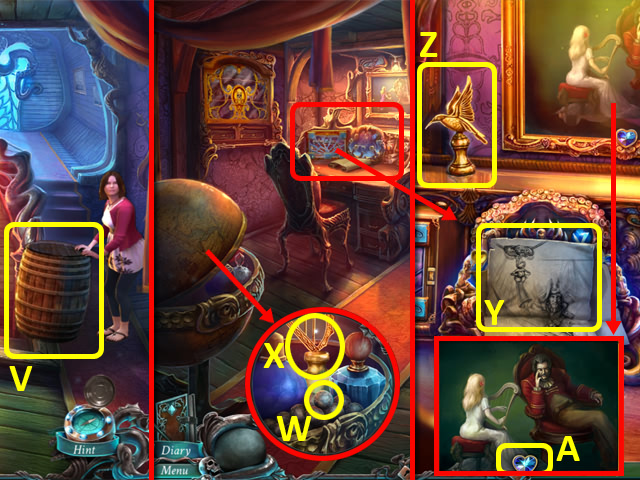
- Push the barrel (V).
- Open the globe; grab the BULLET (W) and HARP WEIGHT (X).
- Look at the picture (Y); take the BIRD WEIGHT (Z) and HEART 1/3 (A).
- Back out.

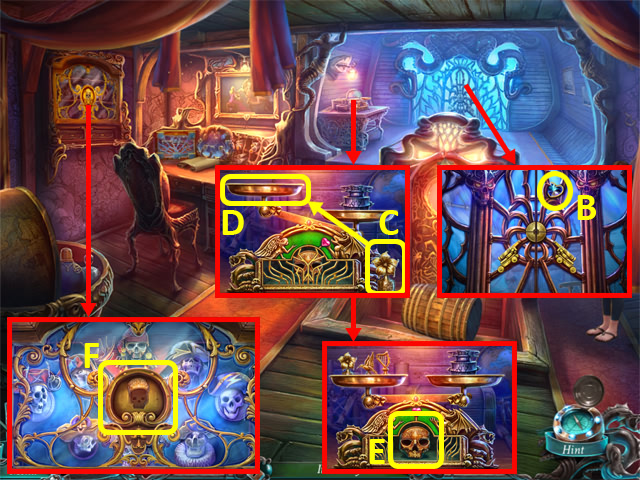
- Take the HEART 2/3 (B).
- Put the weight (C), HARP WEIGHT and BIRD WEIGHT on the scale (D).
- Take the SKULL (E).
- Place the SKULL into the space (F) to trigger a puzzle.

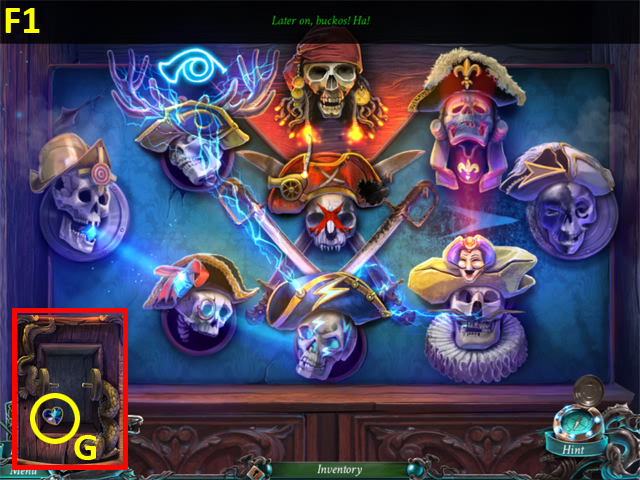
- Sort the hats.
- Solution (F1).
- Take the HEART 3/3 (G).
- Back out.

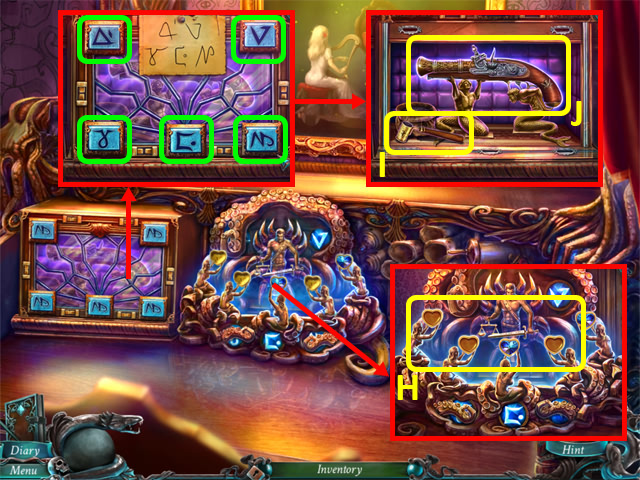
- Place the HEARTS into the holes (H).
- Set the symbols (green).
- Use the scoop (I) and BULLET on the blunderbuss; take the BLUNDERBUSS (J).
- Back out.

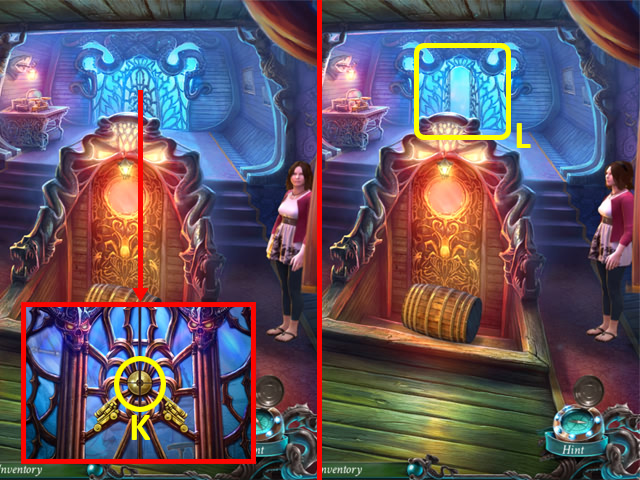
- Shoot the lock (K) with the BLUNDERBUSS.
- Walk forward onto the Balcony (L).

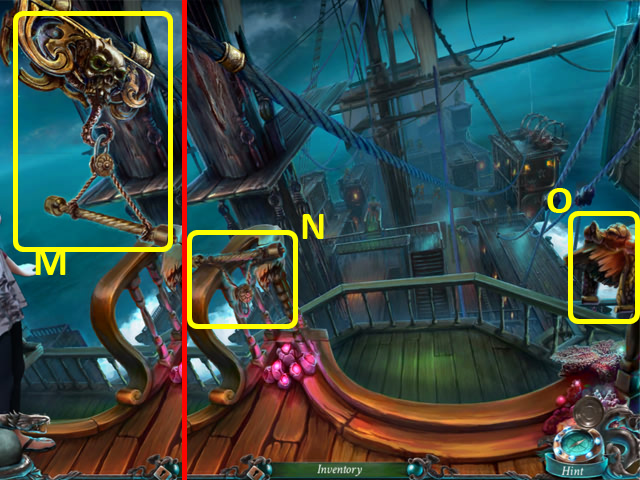
- Select the zipline (M).
- Take the ZIPLINE HANDLE (N) and LEVER (O).
- Back out.

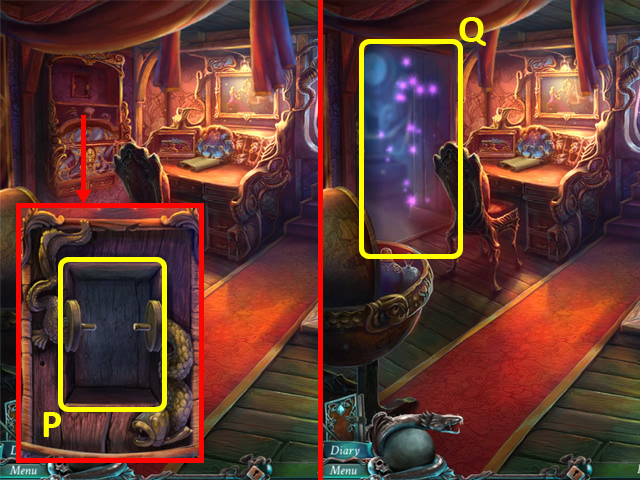
- Place the LEVER into the opening (P).
- Go through the door (Q) to access a HOP.

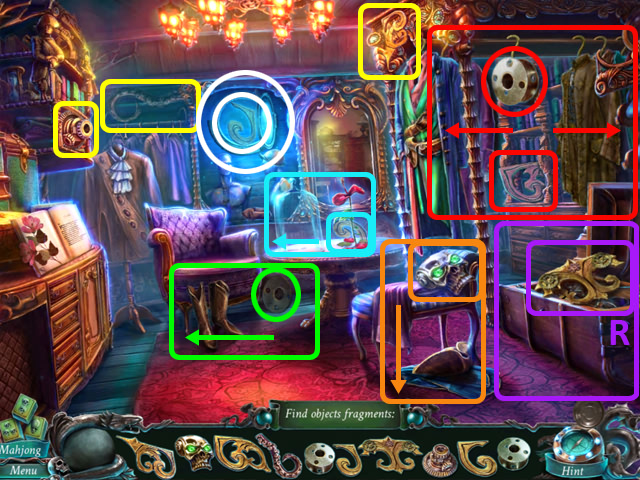
- Play the HOP.
- You receive a ZIPLINE REEL (R).
- Walk forward.

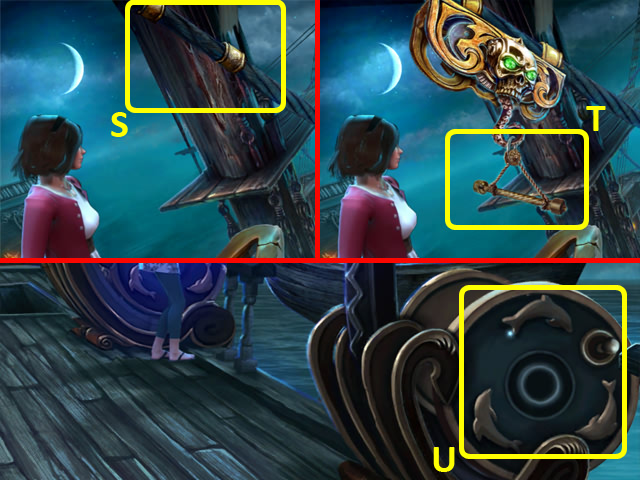
- Add the ZIPLINE REEL and the ZIPLINE HANDLE to the zipline (S); use it (T).
- Use the crank three times (U).

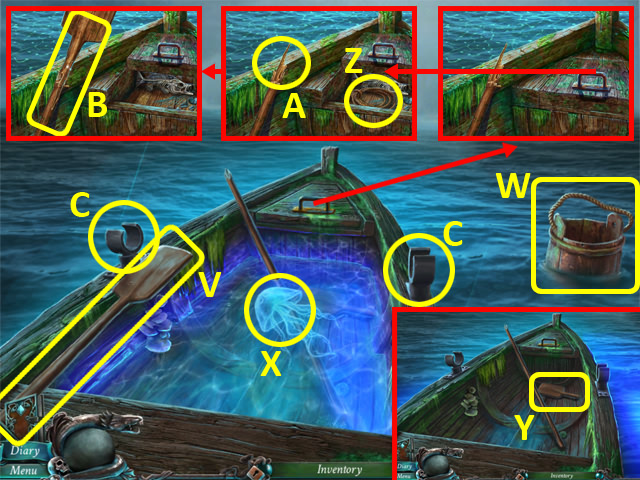
- Use the OAR (V) to get the BUCKET (W) and remove the jellyfish (X).
- Use the BUCKET on the water; grab the OAR PART (Y).
- Take the ROPE (Z).
- Use the OAR PART and ROPE on the handle (A); take the FIXED OAR (B).
- Put the OAR and FIXED OAR into the holders (C).
- Select the boat.
Chapter 2: The Beach

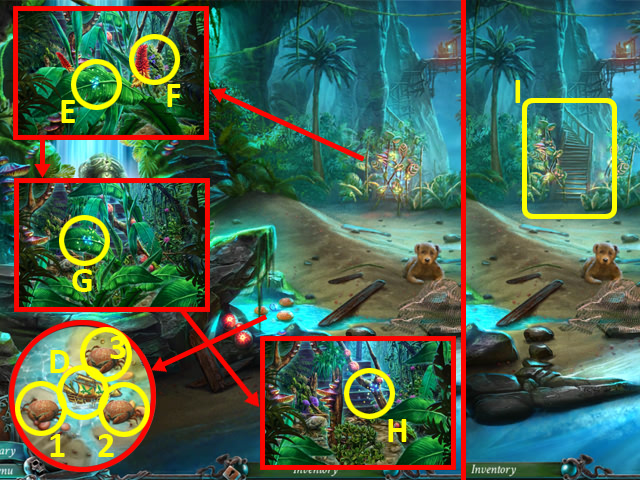
- Select the GALLEON (D) and the crabs (1-3). Take the GALLEON (D).
- Move the items (E -H).
- Walk forward to the Crow’s Nest (I).

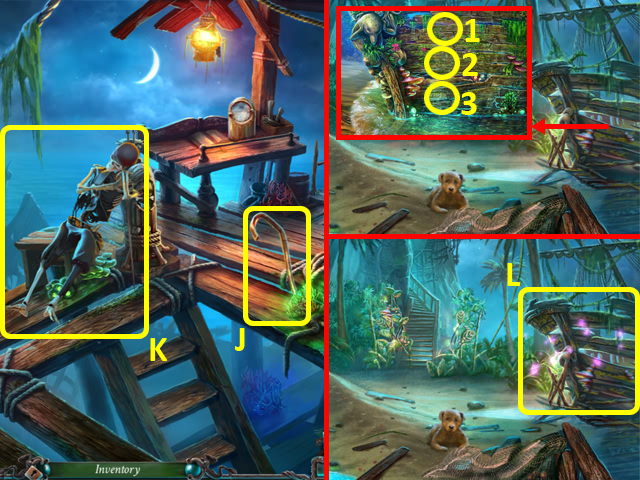
- Grab the STEEL ROD (J).
- Talk to the pirate (K).
- Back out.
- Use the STEEL ROD on the planks (1-3).
- Examine the boat to access a HOP (L).

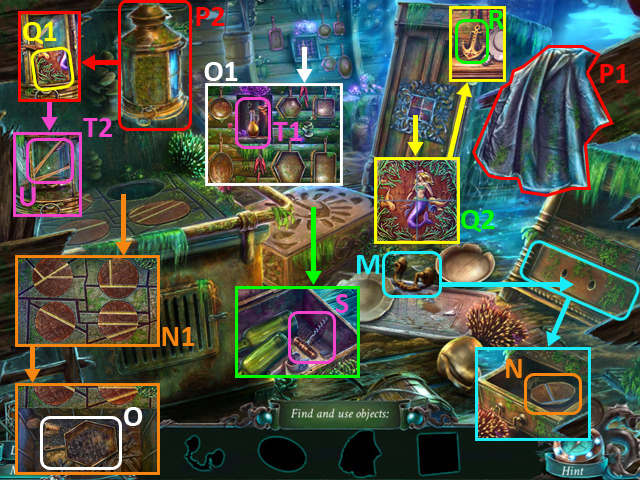
- Move the items; use the drawer handle (M) on the drawer and take the stove cover (N).
- Place the stove cover on the stove and rotate them (N1).
- Move the ash; grab the frying pan (O).
- Hang the frying pan; swap them as shown (O1).
- Use the rag (P1) on the lantern (P2); drag it to clean the lantern.
- Insert the puzzle piece (Q1) into the puzzle; complete the picture (Q2).
- Open the cupboard; take the anchor (R).
- Place the anchor on the box; take the corkscrew (S).
- Use the corkscrew on the oil bottle (T1); take it.
- Use the oil bottle on the lantern (T2); open it and take the WOODEN TONGS (U).

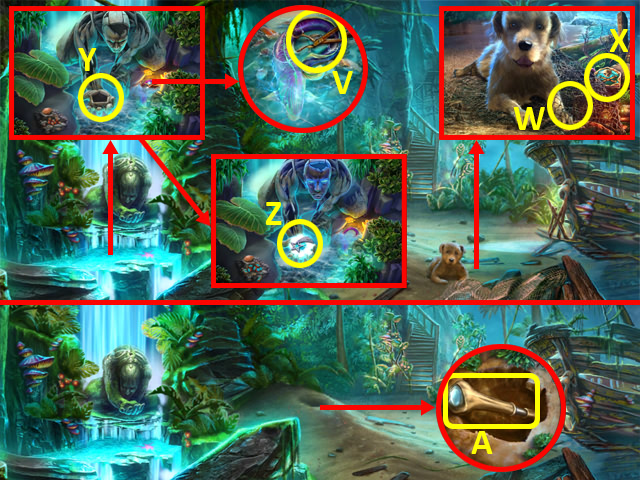
- Use the WOODEN TONGS to grab the SCISSORS (V).
- Use the SCISSORS on the net (W); grab the DOUBLOON (X).
- Place the DOUBLOON into the guardian’s hand (Y); take the FALLING STAR (Z).
- Take the SPYGLASS (A).
- Walk up, and give the SPYGLASS to the pirate; talk to him to trigger a puzzle.

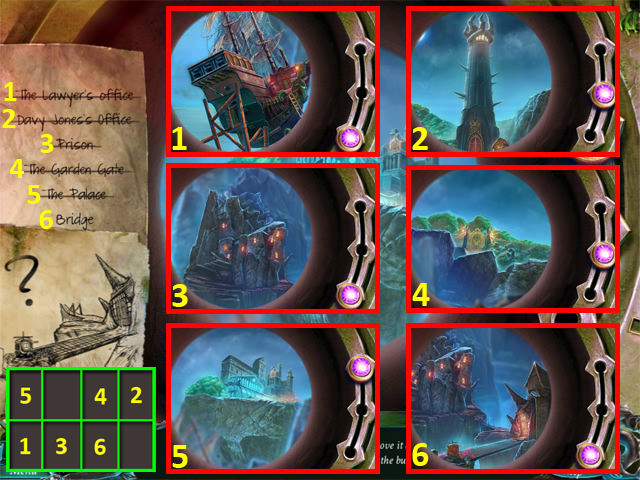
- Find the locations.
- Solution (1-6).

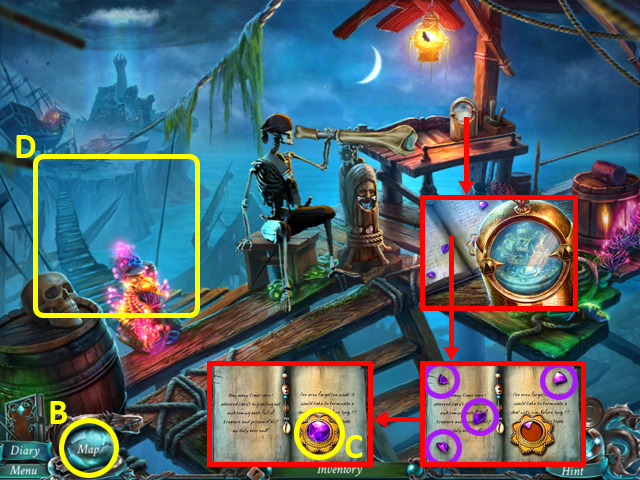
- A map is added to your toolbar (B).
- Select the fragments (purple); take the PURPLE JEWEL (C).
- Walk forward (D) to the Bridge.

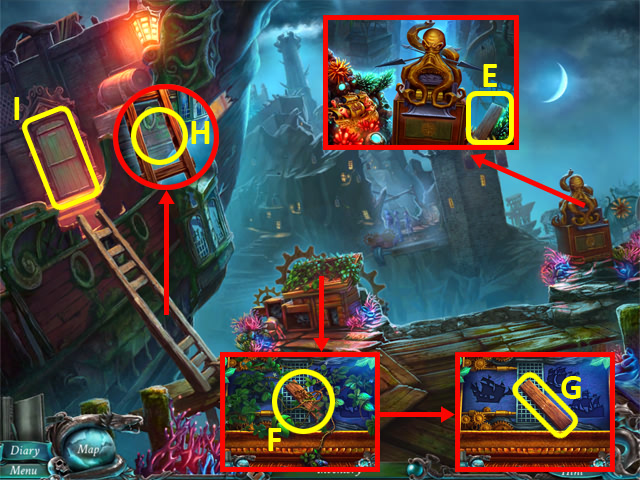
- Take the RUNG 1/2 (E).
- Use the SCISSORS on the vines (F); move them and take the RUNG 2/2 (G).
- Use the RUNGS on the ladder (H).
- Enter the Lawyer’s Office (I).

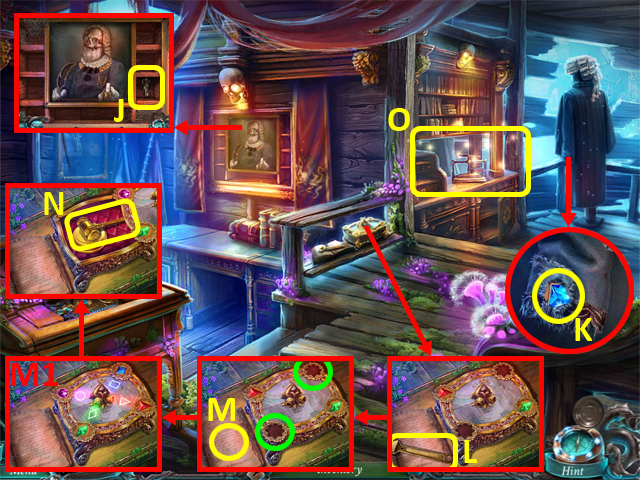
- Take the CELL KEY (J).
- Use the SCISSORS on the sleeve; take the BLUE JEWEL (K).
- Take the TRIANGLE SHAPED WRENCH (L); read the book (M).
- Insert the PURPLE JEWEL and BLUE JEWEL on the box (green); swap as shown (M1).
- Open the box; take the GAVEL (N).
- Examine the shelves (O) for a HOP.

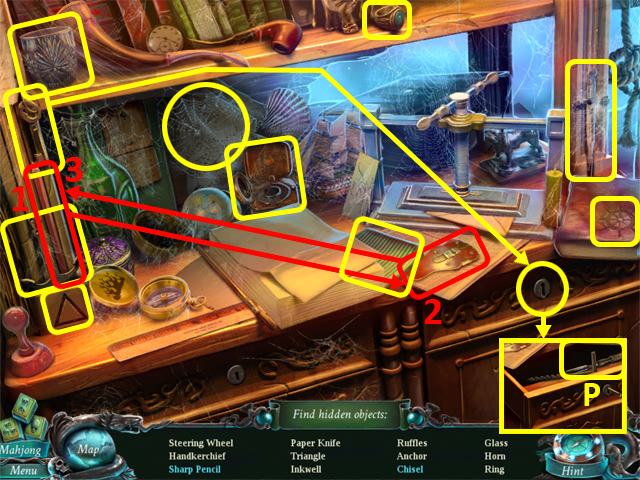
- Play the HOP.
- You receive a CHISEL (P).
- Return to the Crow’s Nest.

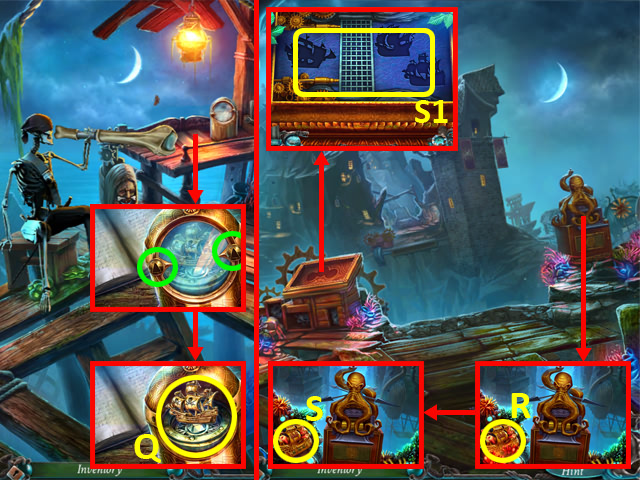
- Unscrew the bolts (green) with the SQUARE SHAPED WRENCH. Open the cover; take the BRIGANTINE (Q).
- Walk forward to the Bridge.
- Use the CHISEL on the ship (R); use the GAVEL on the chisel. Take the FRIGATE (S).
- Place the GALLEON, BRIGANTINE, and FRIGATE to trigger a puzzle (S1).

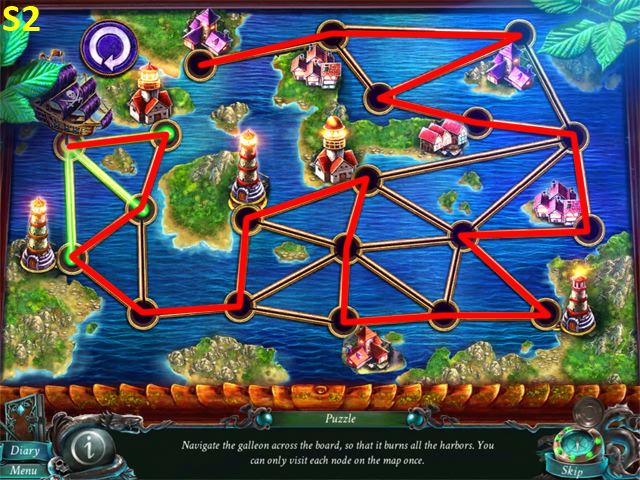
- Move the galleon along the path.
- Solution (S2).
Chapter 3: The Prison

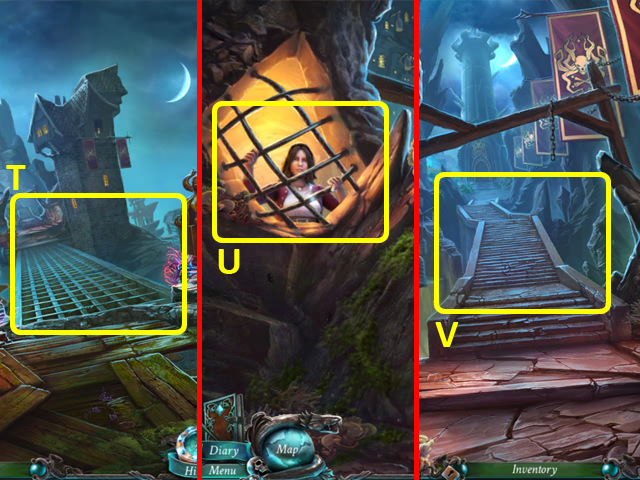
- Walk forward (T).
- Talk to Cory (U).
- Walk forward (V).

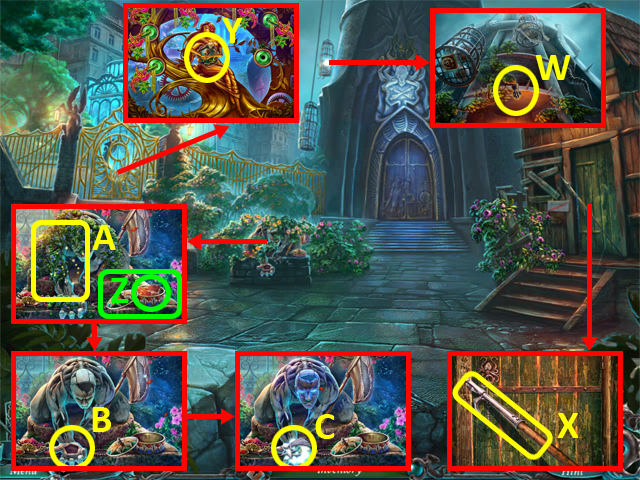
- Grab the GLOVE (W).
- Select the BOAT HOOK (X) twice.
- Take the DOUBLOON (Y).
- Move the lid; take the STEAK (Z).
- Move the flowers (A); place the DOUBLOON into the guardian’s hand (B) and take the FALLING STAR (C).
- Back out.

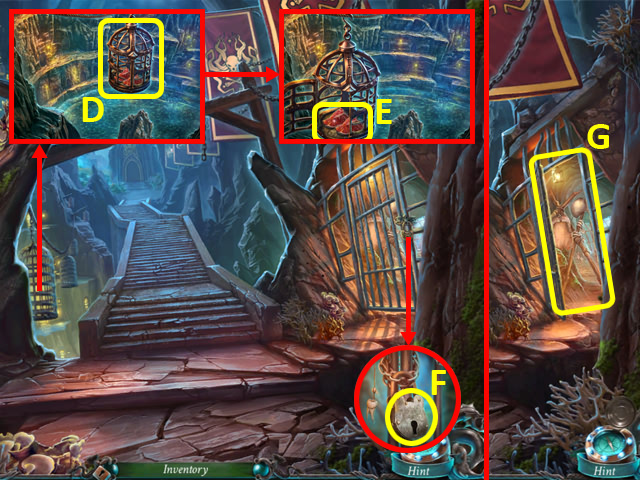
- Use the BOAT HOOK on the cage (D) and open it; take the STEAKS (E).
- Unlock the lock (F) with the CELL KEY; enter O’Malley’s Cell (G).

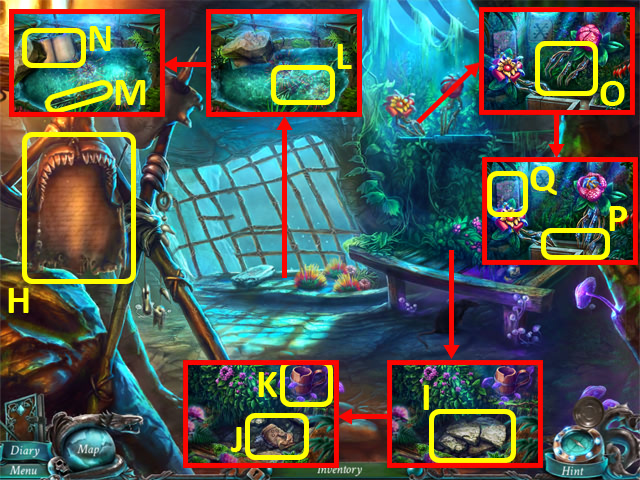
- Read the parchment (H).
- Move the stones (I); read the note. Take the BAG OF SALT (J) and WOODEN CUP (K).
- Use the GLOVE on the water (L); take the WEATHERVANE NEEDLE (M).
- Move the rock; read the book (N).
- Use the WOODEN CUP on the water; receive a CUP OF WATER.
- Move the roots (O), then pour the CUP OF WATER into the trough (P); take the CODEX PART (Q).
- Return to the Courtyard.

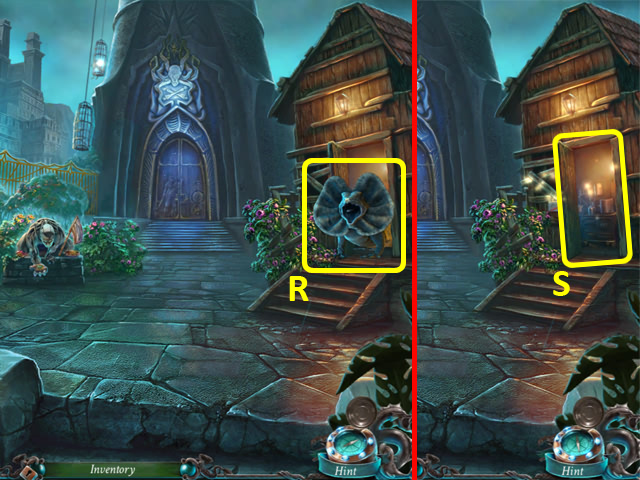
- Give the STEAKS to the lizard 3x (R).
- Go through the door (S) to access a HOP.

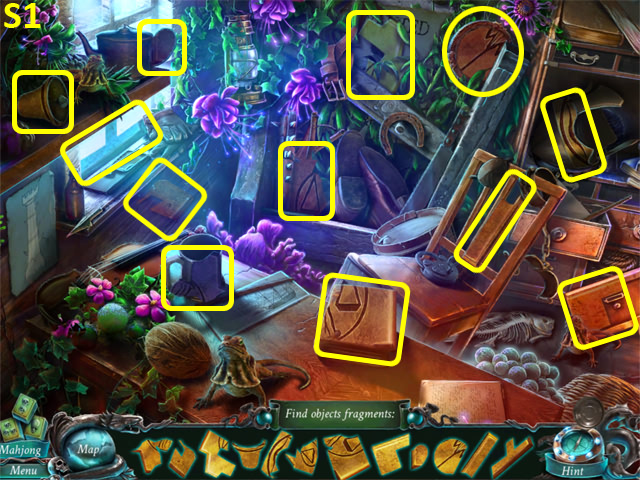
- Play the HOP.
- You receive an EMPTY PASS (S1).
- Return to the Bridge.

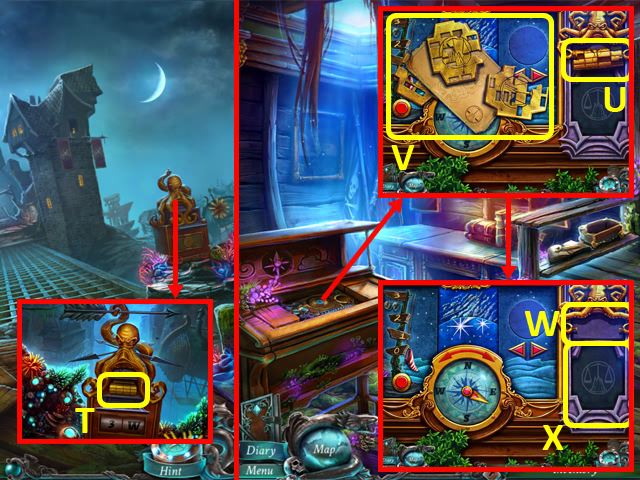
- Attach the WEATHERVANE NEEDLE to the weathervane; take the PRINTING ROLL (T).
- Enter the Lawyer’s Office.
- Remove the roll (U) and passes; read the note (V).
- Insert the PRINTING ROLL (W) and EMPTY PASS (X) to trigger a puzzle.

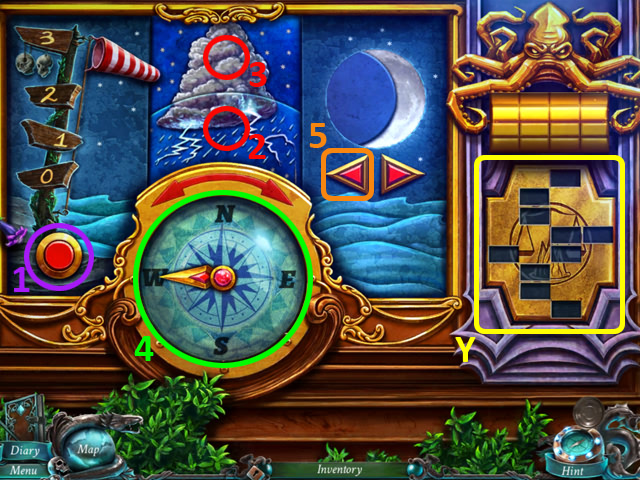
- Solution: Press 1×3, 2×3, 3×2, rotate 4 to West and press 5.
- Take the TOWER PASS (Y).
- Return to the Courtyard.

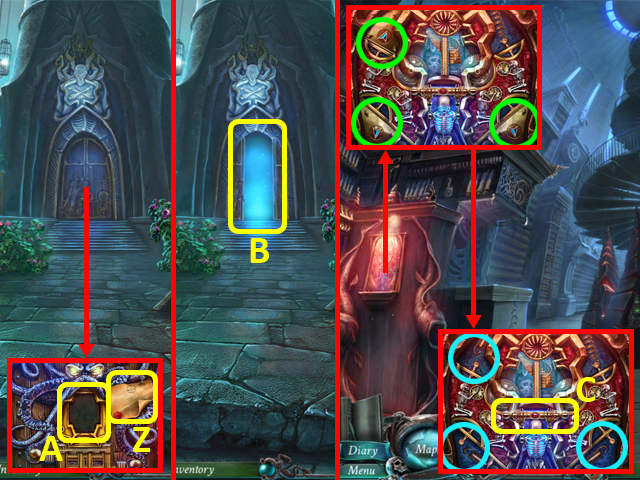
- Read the note (Z); insert the TOWER PASS into the door (A).
- Go forward (B).
- Examine the podium, and then open the compartments (green) and attach the springs (blue); pull the lever (C).

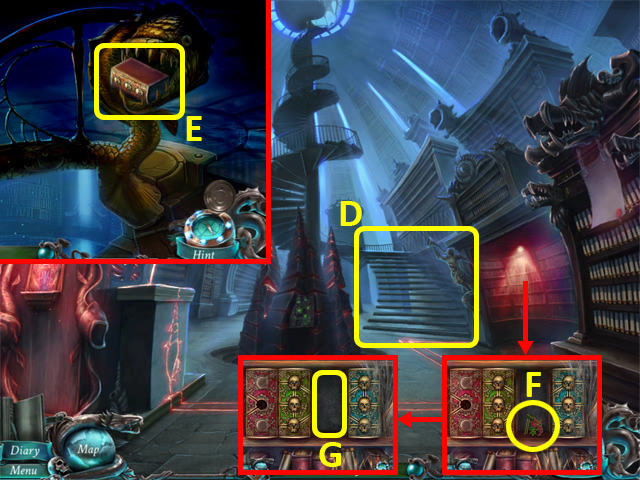
- Go to Davy Jones’ Office (D); grab the TOME (E), and back out.
- Grab the CHIME BELLS (F); put the TOME on the shelf (G) to trigger a puzzle.

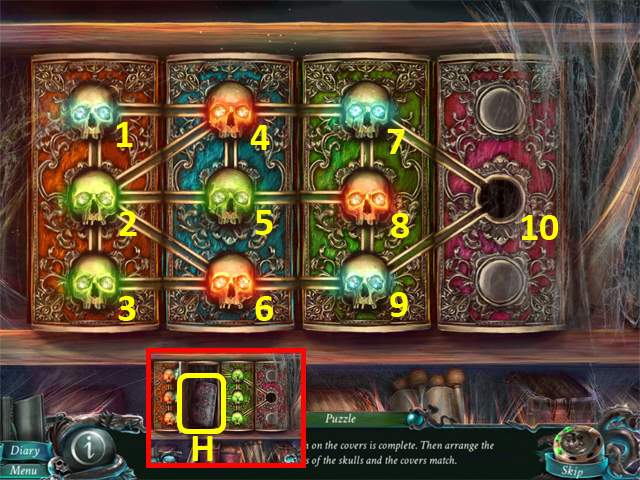
- Sort the books as shown.
- Move the skulls as follows: 9,6, 3, 2, 1, 4, 7, 8, 9, 6, 3, 2, 4, 7, 8, 9, 6, 3, 2, 4, 7, 10, 9, 6, 3, 2, 4, 7, 8, 5, 4, 7, 10, 9, 8, 7, 10, 9, 8, 5, 4, 7, 8, 5, 4, 7, 10.
- Take the CODEX PART 2/3 (H).
- Back out.

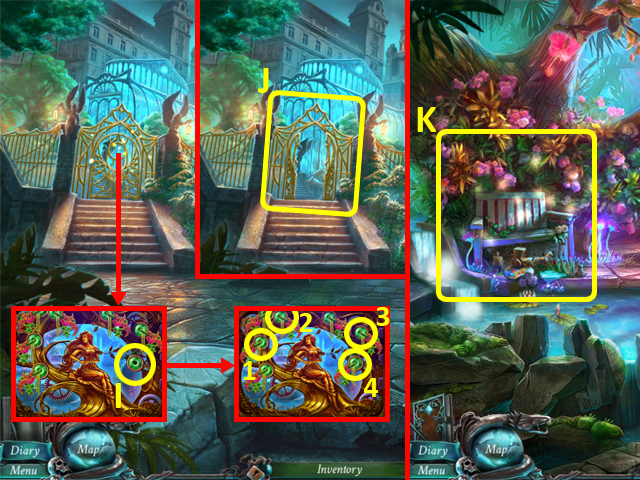
- Attach the CHIME BELLS to the gate(I); ring them (1-4).
- Enter the Garden (J).
- Examine the seat (K) to access a HOP.

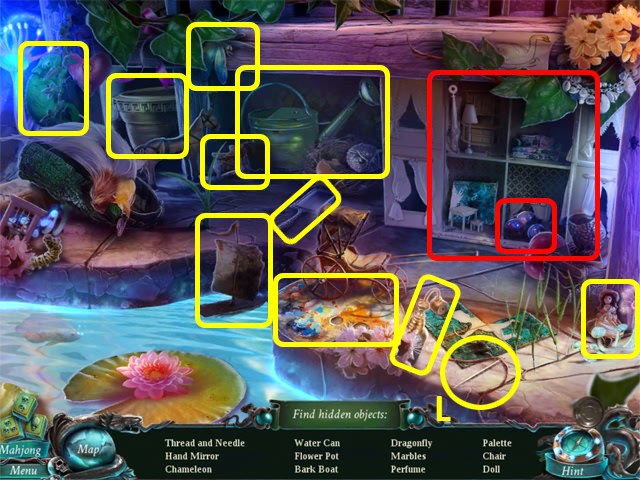
- Play the HOP.
- You receive a THREAD AND NEEDLE (L).
- Back out.

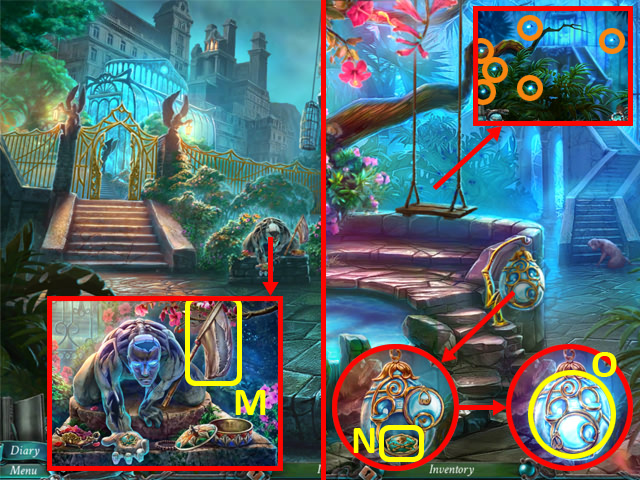
- Use the THREAD AND NEEDLE on the BUTTERFLY NET (M); take it.
- Return to the Garden.
- Use the BUTTERFLY NET to catch the FIREFLIES (orange).
- Open the lamp; take the DOUBLOON (N) and place the FIREFLIES inside. Take the FIREFLY LAMP (O).
- Return to Davy Jones’ Office.

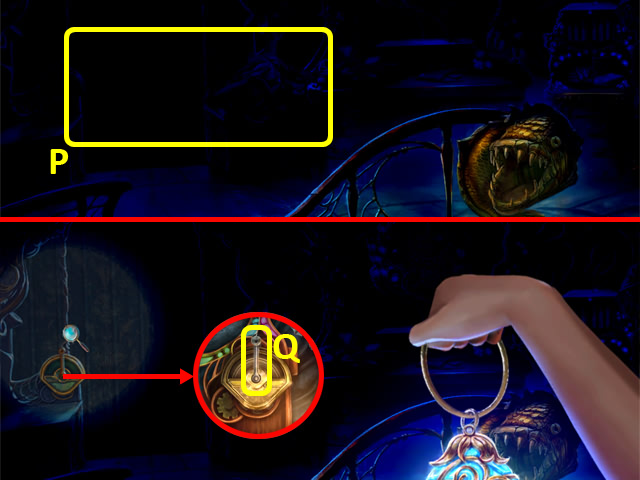
- Use the FIREFLY LAMP in the darkness (P).
- Pull the lever (Q).

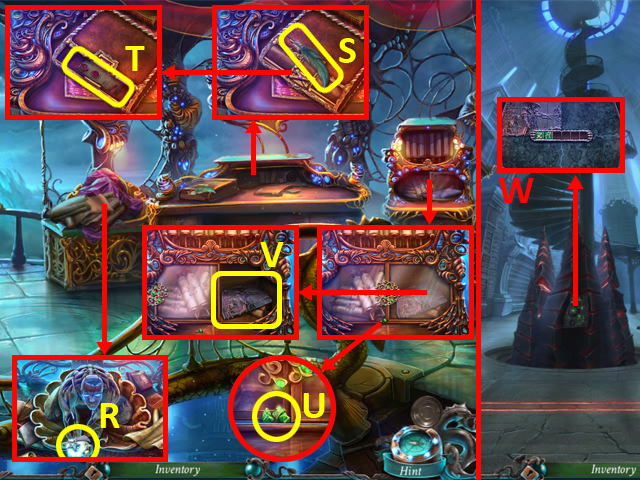
- Move the papers and cover, and put the DOUBLOON into the guardian’s hand; take the FALLING STAR (R).
- Take the QUILL PEN (S); open the folder and take CORY’S PACT (T).
- Use the NEEDLE on the panel twice (U); slide the panel and take the CODEX PART 3/3 (V).
- Back out.
- Add the CODEX PARTS to the codex (W) to trigger a puzzle.

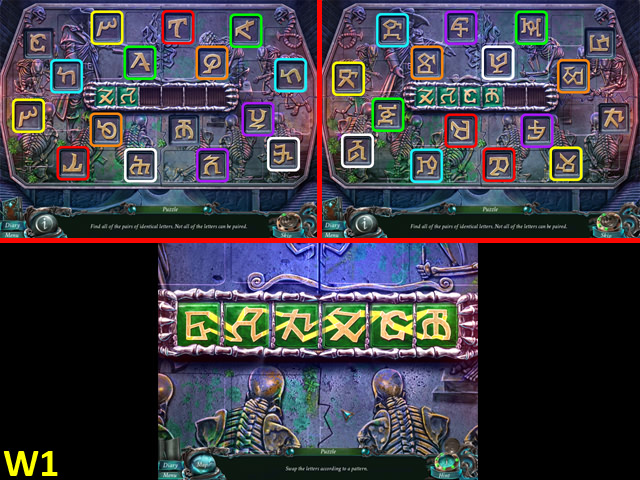
- Select matching pairs of symbols, then match the center pieces.
- Solution (W1).

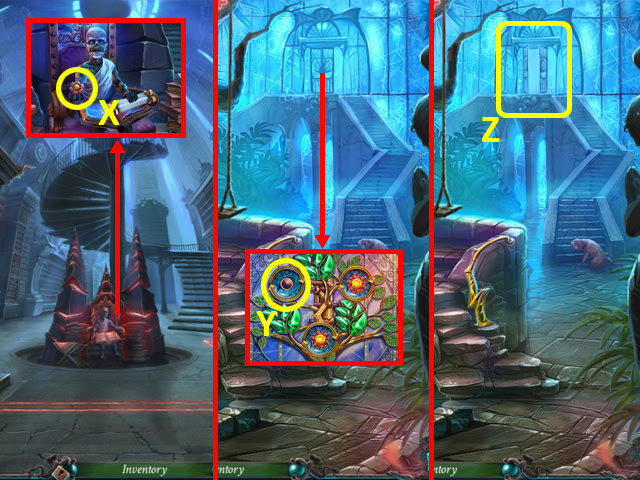
- Give CORY’S PACT to the man; take the FLOWER TOP (X).
- Return to the Garden.
- Use the BAG OF SALT on the door; place the FLOWER TOP (Y), and then select the three flowers.
- Walk up to the ICEHOUSE (Z).

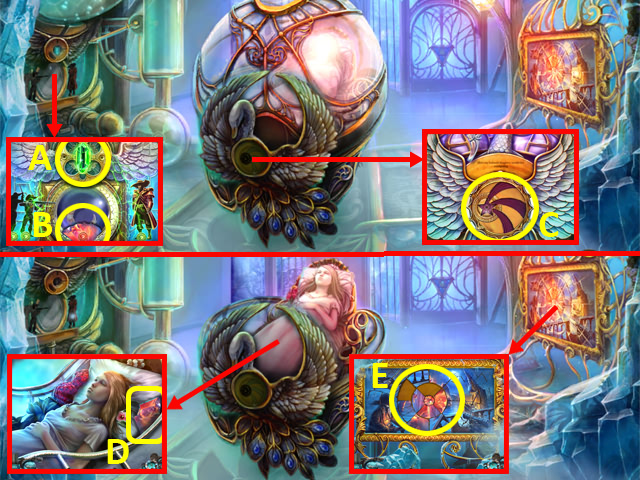
- Grab the GREEN CRYSTAL (A) and RELIEF TILE 1/2 (B).
- Place the FALLING STARS (C).
- Take the RELIEF TILE 2/2 (D).
- Place the RELIEF TILES (E) to trigger a puzzle.

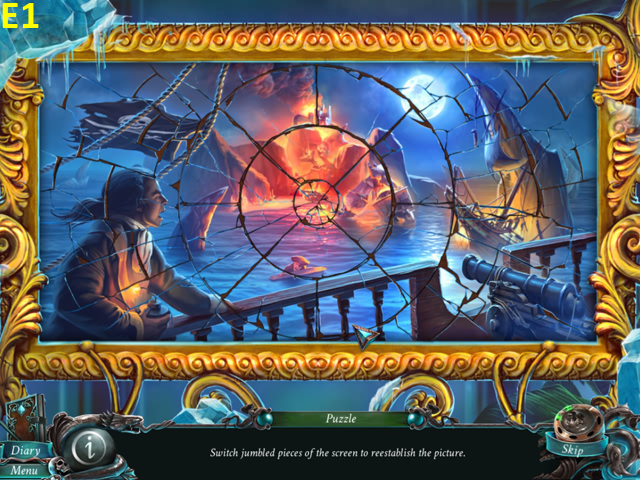
- Switch two tiles at a time to make a complete picture.
- Solution (E1).

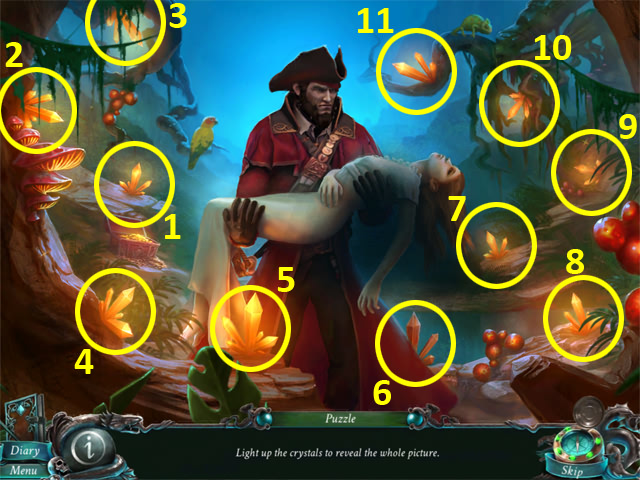
- Light up the crystals in the order shown (1-11).
Chapter 4: The Palace

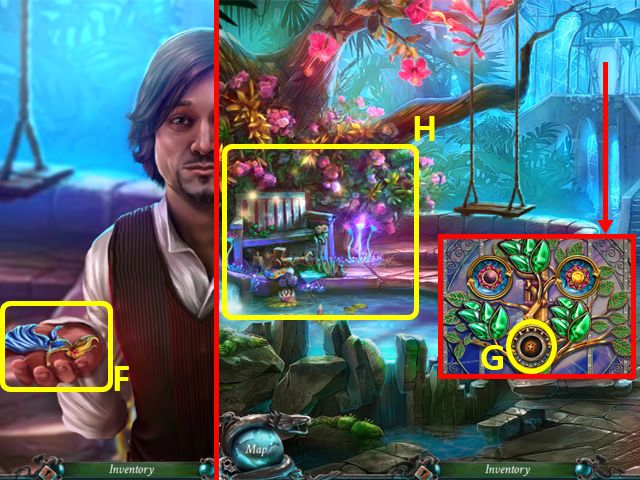
- Grab the GIRL FIGURINE (F).
- Take the COG 1/2 (G); select the three flowers to unlock the door.
- Examine the bench (H) to access a HOP.

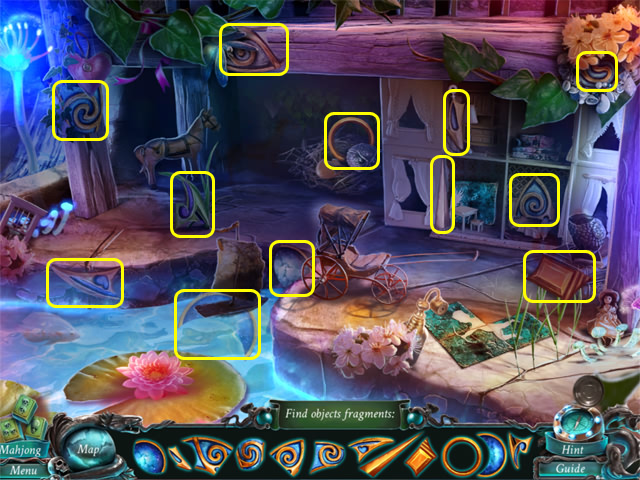
- Play the HOP.
- You receive an HOUR HAND (I).

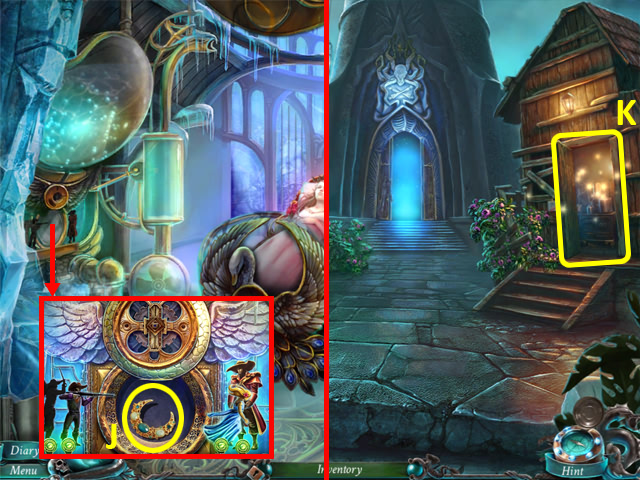
- Return to the Icehouse.
- Place the GIRL FIGURINE between the figurines; open the cover and take the CRESCENT (J).
- Return to the Courtyard.
- Go through the door to access a HOP (K).

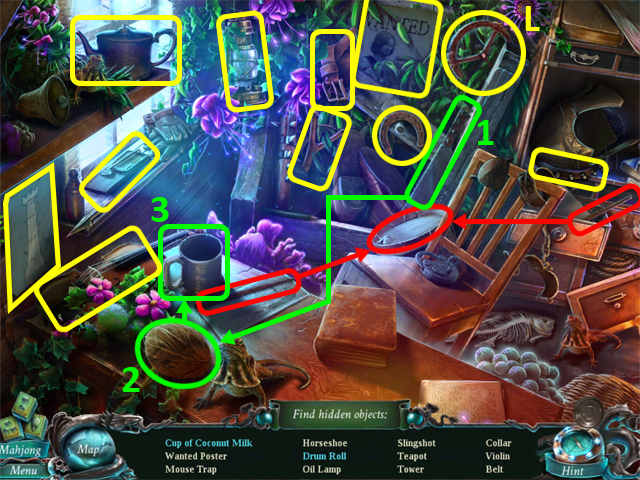
- Find the listed items.
- You receive a VALVE (L).

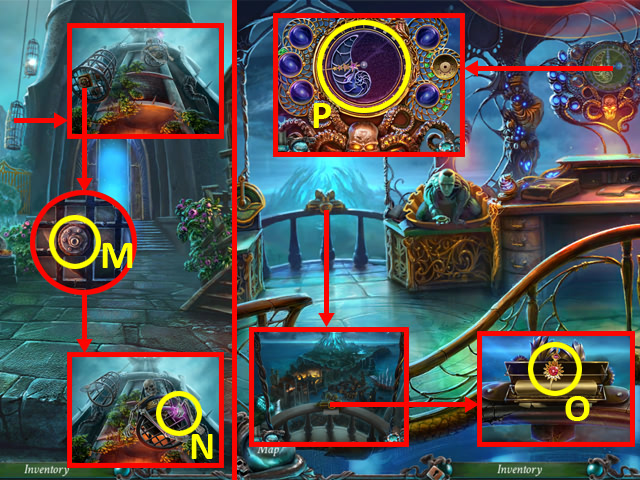
- Place the VALVE (M) and turn it; talk to the prisoner, and take the ALCHEMICAL SYMBOL (N).
- Return to Davy Jones’ Office.
- Place the CRESCENT in the printer to receive a map; take the MINUTE HAND (O).
- Back out.
- Place the MINUTE HAND and HOUR HAND (P) to trigger a puzzle.

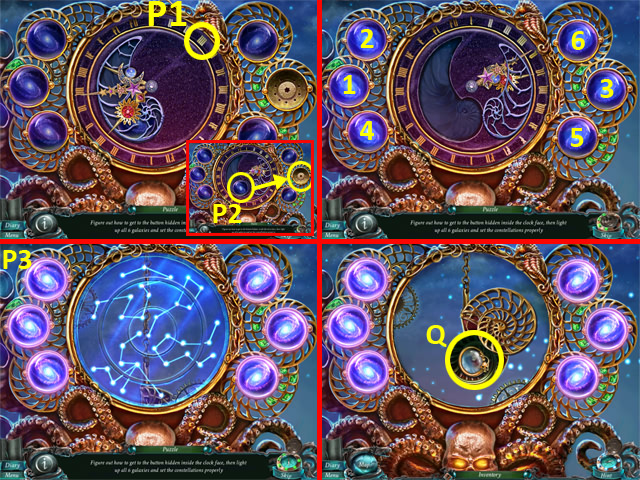
- Move the hands into position (P1); place the button (P2).
- Select the buttons in the order shown (1-6).
- Rotate the dials until they match the image shown (P3).
- Open the cover; take the MONOCLE (Q).
- Return to O’Malley’s Cell.

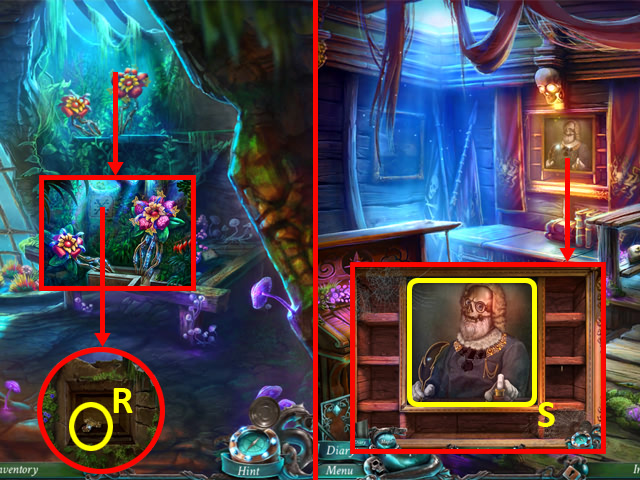
- Place the ALCHEMICAL SYMBOL into the slot; press the symbol and take the NECKLACE (R).
- Return to the Lawyer’s Office.
- Place the QUILL PEN, MONOCLE, and NECKLACE (S) to trigger a puzzle.

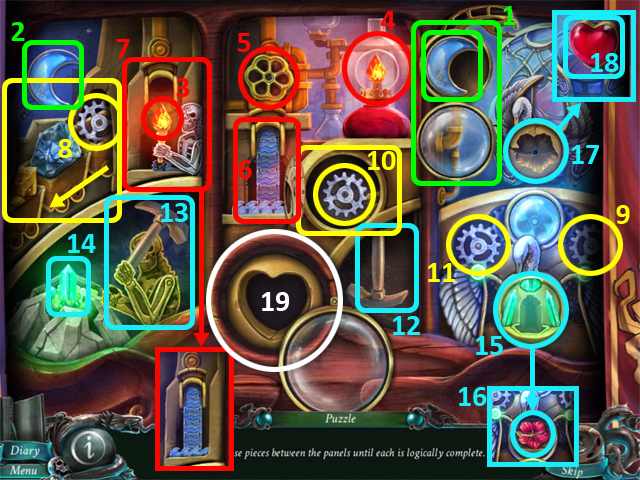
- Open the cover, take the moon (1); place it (2).
- Take the torch (3); place it (4).
- Turn the valve (5); take the water (6) and place it (7).
- Move the carts; take the cog (8) and place it (9).
- Open the cover; take the cog (10) and place it (11).
- Grab the hammer (12), and give it to the skeleton (13); grab the crystal (14).
- Place the crystal (15); take the flower (16).
- Place the flower (17); take the heart (18).
- Place the heart (19).

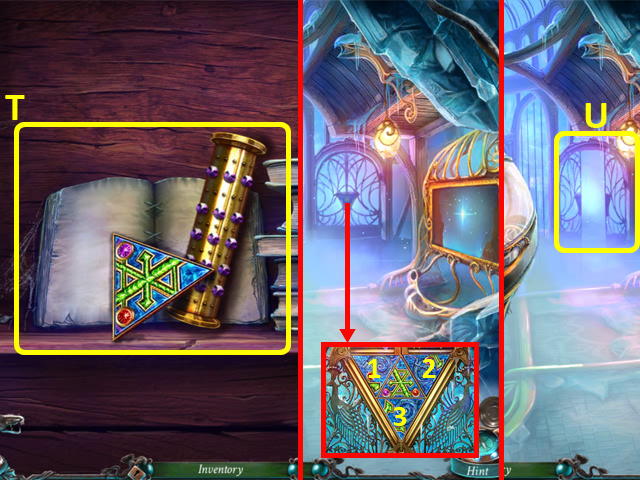
- Grab the TRIANGLE, read the note, and take the DIARY ROLL (T).
- Return to the Icehouse (without using map).
- Place the TRIANGLE in the door; select the tiles: 1×2, 2×2, 3×1.
- Walk forward to the Atrium (U).

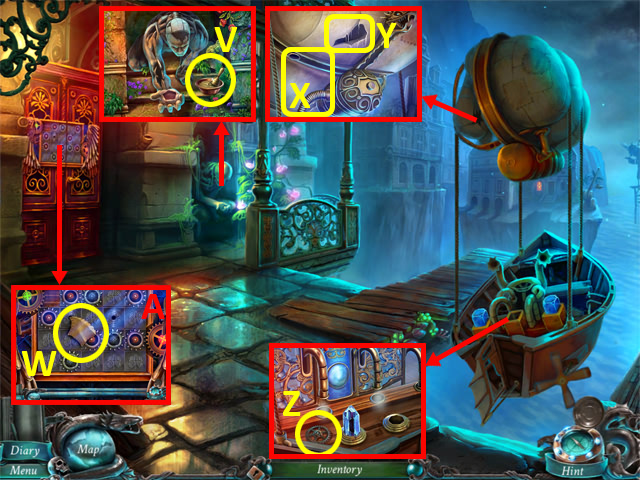
- Grab the GLUE (V).
- Take the PATCH (W).
- Attach the pipe (X); apply the GLUE and PATCH (Y).
- Grab the COG 2/2 (Z).
- Add the COGS to the door (A) to trigger a puzzle.

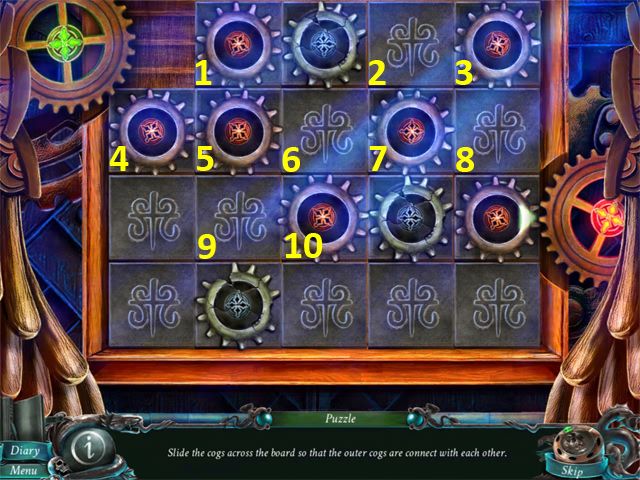
- Slide the tiles to connect the outer cogs.
- Solution: 1, 5, 6, 7, 2, 3, 8, 7, 2, 3, 8, 7, 6, 10, 9, 5, 4.

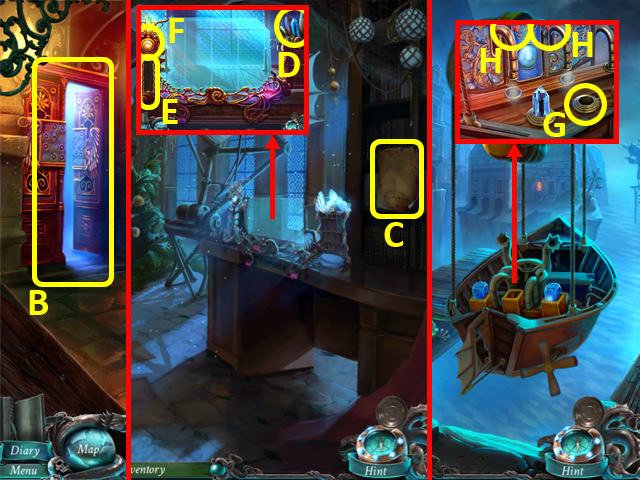
- Walk forward into the Laboratory (B).
- Read the notice (C).
- Grab the SQUARE CRYSTAL (D); place the DIARY ROLL (E), and press the button (F).
- Back out twice.
- Place the SQUARE CRYSTAL (G); flip switches down (H).
- Use the ship.

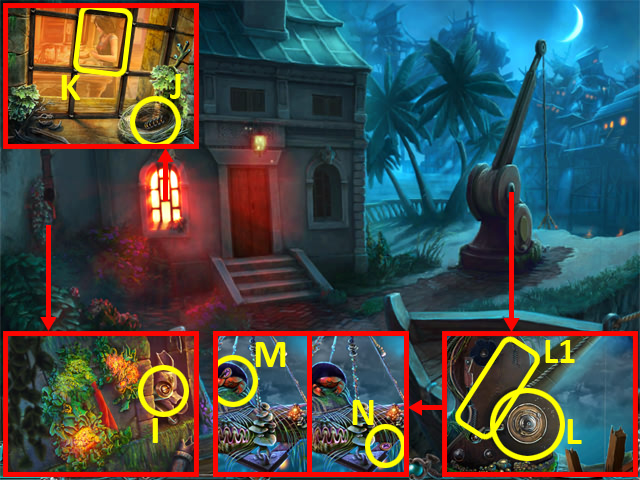
- Grab the CRANE CRANK (I).
- Clear the nest; take the SPRING (J).
- Talk to Cory (K).
- Attach the CRANE CRANK to the crank and turn it (L); remove the broken springs and attach the SPRING (L1).
- Disturb the crab (M); take the MISSING KEY (N).
- Return to the Laboratory.

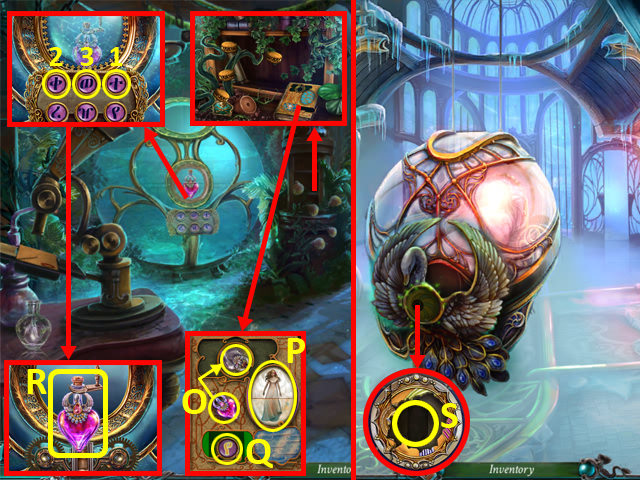
- Examine the book; place the potion (O), swap the tiles to match the picture shown (P), take the MISSING KEY (Q).
- Place the MISSING KEYS into the keypad, and then select the keys in the order shown (1-3); take the REVIVING POTION (R).
- Return to the Icehouse.
- Remove the broken green crystal; place the GREEN CRYSTAL (S).

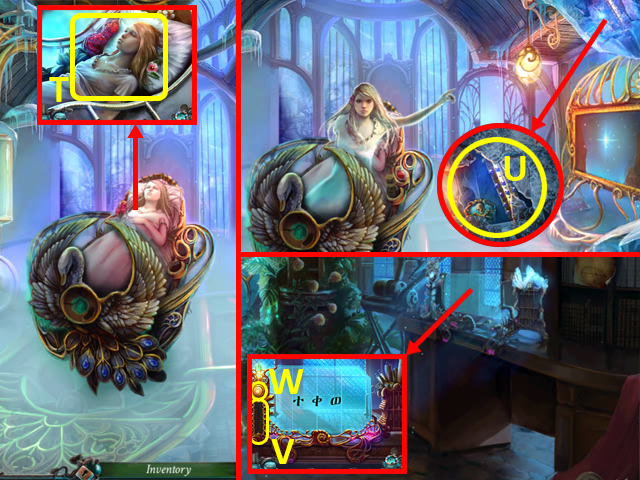
- Use the REVIVING POTION (T).
- Grab the DOUBLOON and DIARY ROLL TWO (U).
- Return to the Laboratory.
- Place the DIARY ROLL TWO (V); press the button (W) to access a HOP.

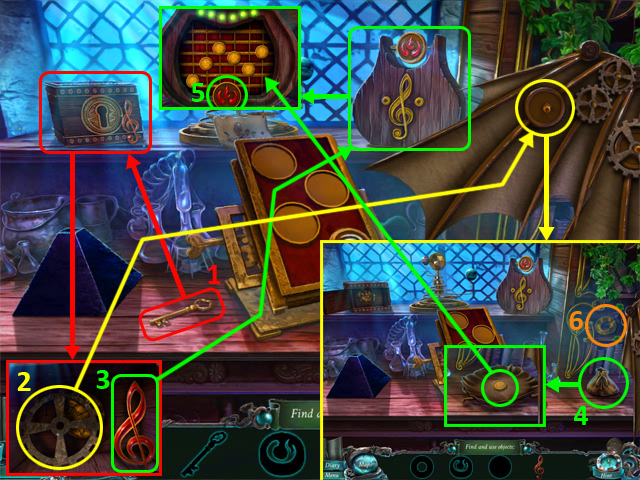

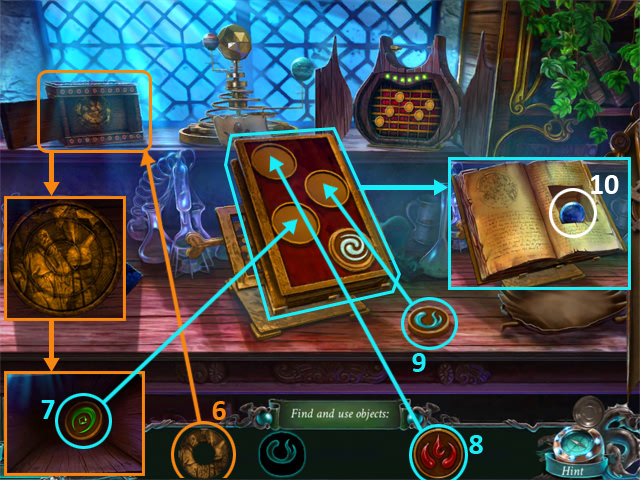

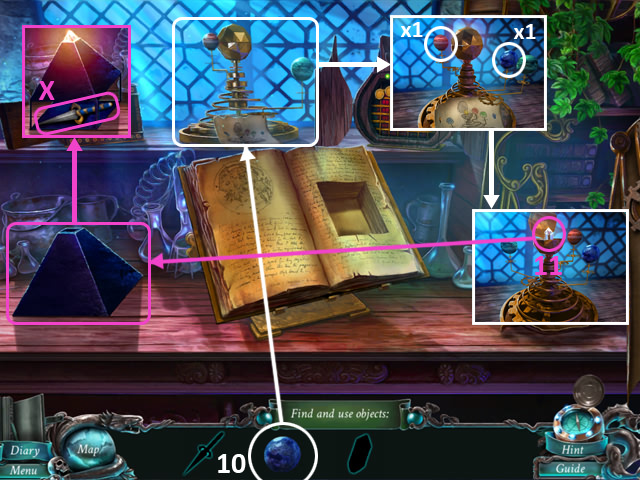
- Play the HOP (1-6) (7-10) (X1 X2, 11).
- You receive a DAGGER (X).
- Return to the Palace Backdoor.

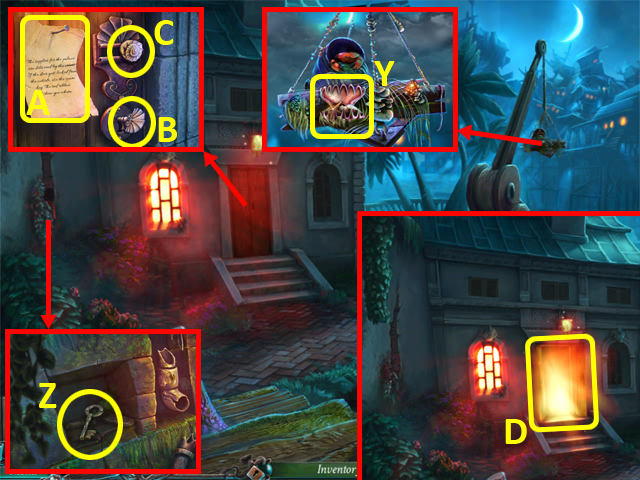
- Pry open the clam with the DAGGER; take the FAUCET (Y).
- Cut away the overgrowth with the DAGGER, pull out the stone, and take the KITCHEN KEY (Z).
- Read the note (A); put the KITCHEN KEY in the lock (B), turn it, and then slide the shell (C).
- Enter the Kitchen (D).

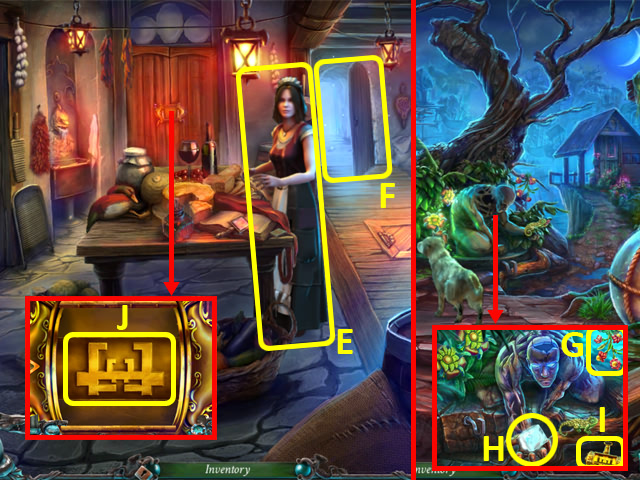

- Talk to Cory twice (E).
- Walk forward to the Road (F).
- Shake the flowers (G) to move the lizard.
- Place the DOUBLOON into the guardian’s hand; take the PUZZLE PIECE 1/3 (H) and the CABINET TILE (I).
- Return to the kitchen.
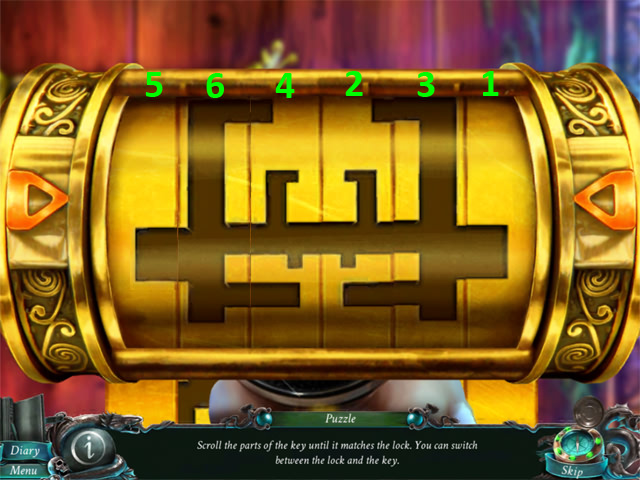
- Place the CABINET TILE (J) to trigger a puzzle.
- Scroll the dials in the order shown (1-6).

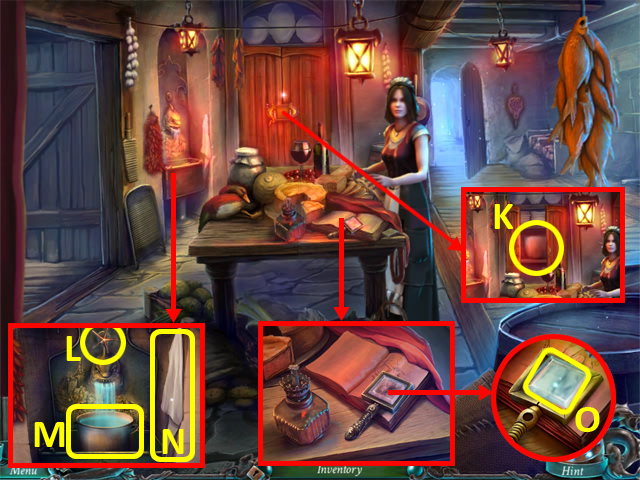
- Take the LARGE POT (K).
- Place the LARGE POT in the sink; attach the FAUCET (L) and turn it. Take the POT WITH WATER (M) and CLOTH (N).
- Unscrew the lens frame with the DAGGER, clean the lens with the CLOTH, and take the LENS (O).
- Walk forward to the Road.

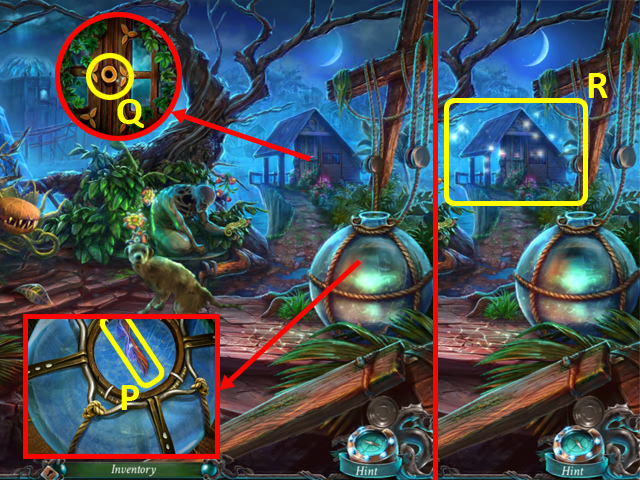
- Use the POT OF WATER on the jar; take the DOOR KNOB (P).
- Attach the DOOR KNOB (Q); open the door.
- Enter the hut (R) to access a HOP.

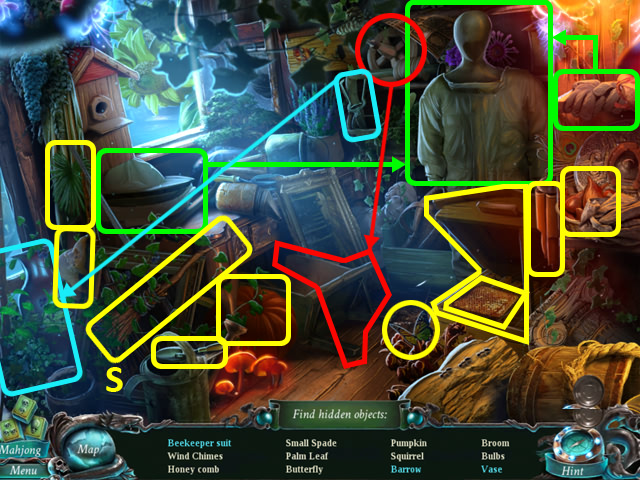
- Play the HOP.
- You receive a BROOM (S).

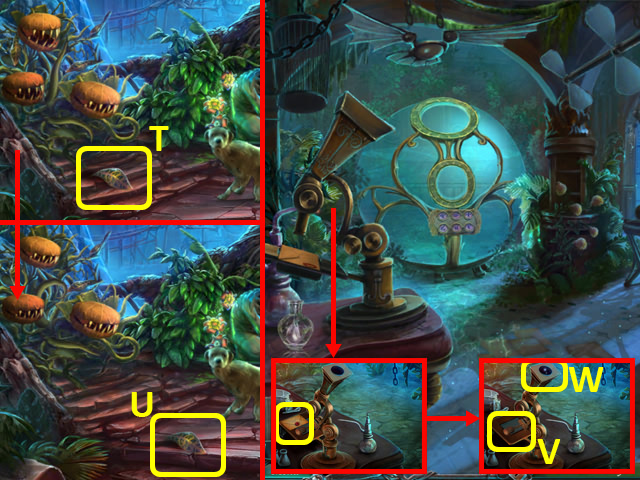
- Use the BROOM on the leaf (T); take the WEED LEAF (U).
- Return to the Laboratory.
- Read the note; place the WEED LEAF (V) and LENS (W).
- Examine the microscope again to trigger a puzzle.

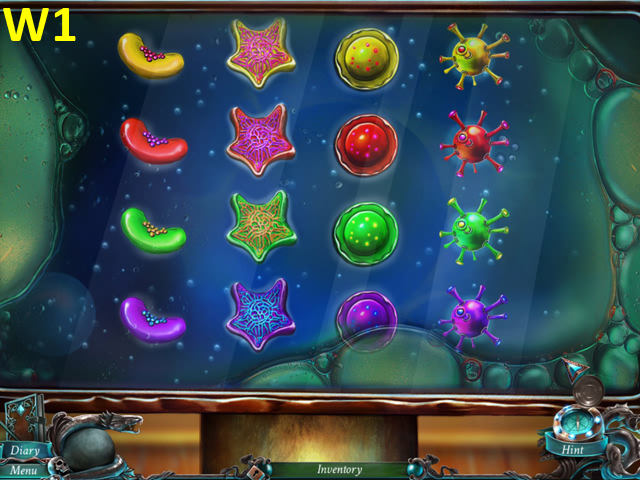
- Re-arrange the cells.
- Solution (W1).

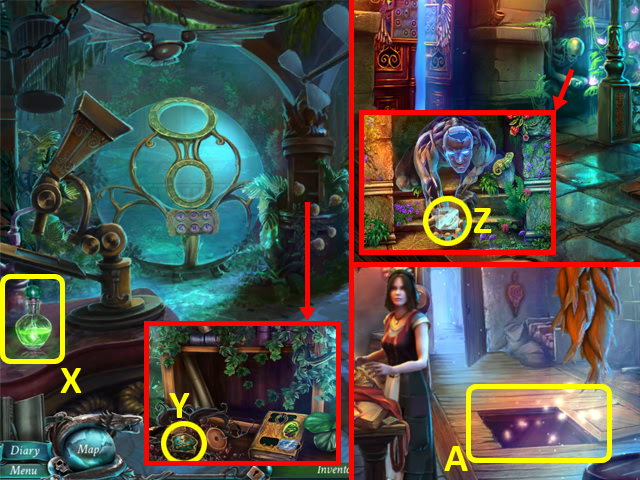
- Grab the WEEDING POTION (X).
- Use the WEEDING POTION on the weeds; take the DOUBLOON (Y).
- Back out.
- Place the DOUBLOON in the guardian’s hand; take the PUZZLE PIECE 2/3 (Z).
- Return to the Kitchen.
- Pull up the trapdoor to access a HOP (A).

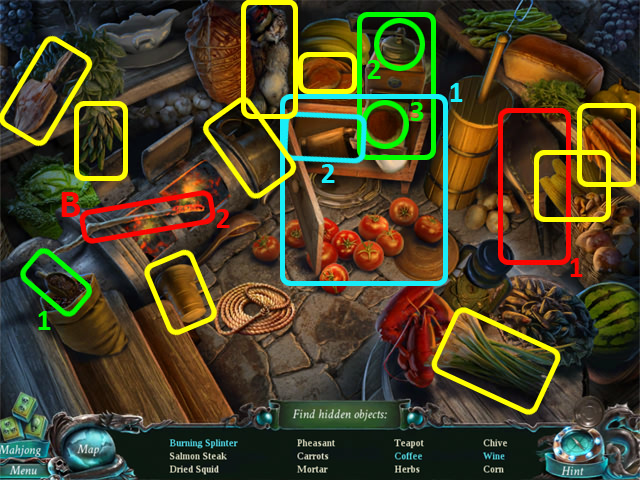
- Play the HOP.
- You receive a BURNING SPLINTER (B).
- Walk forward to the Road.

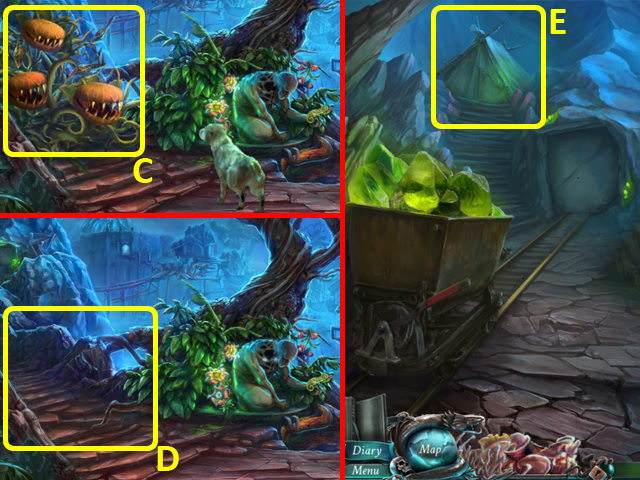
- Use the WEEDING POTION on the weeds (C).
- Walk left to the Entrance (D).
- Open the tent to access a HOP (E).

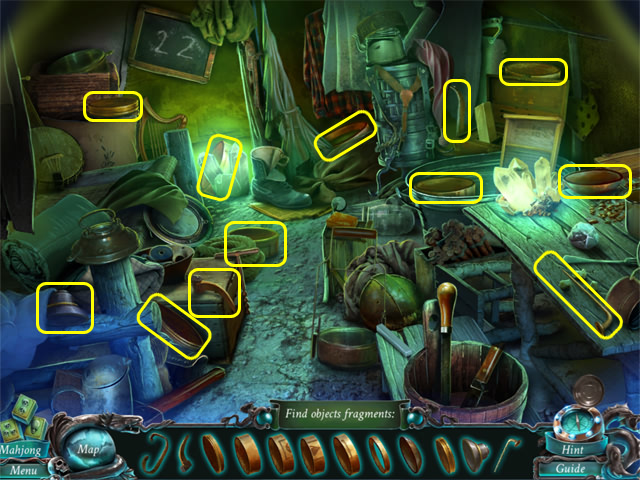
- Play the HOP.
- You receive an OILCAN (F).

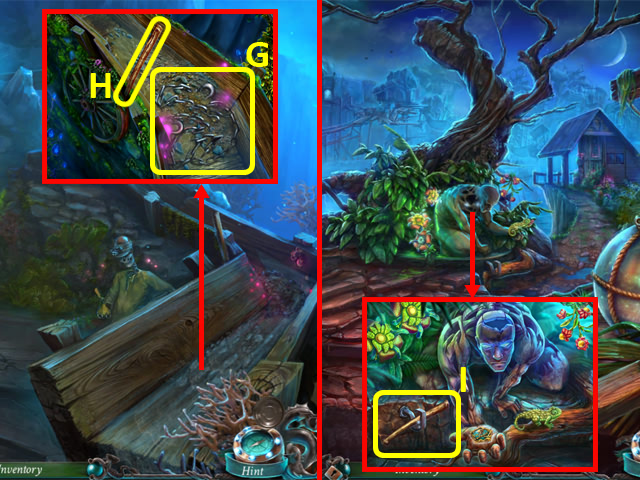
- Grab the CHAIN (G) and ROD (H).
- Return to the Road.
- Place the ROD into the screw and turn it (I); you receive a SCREW WITH EYE.
- Return to the Entrance.

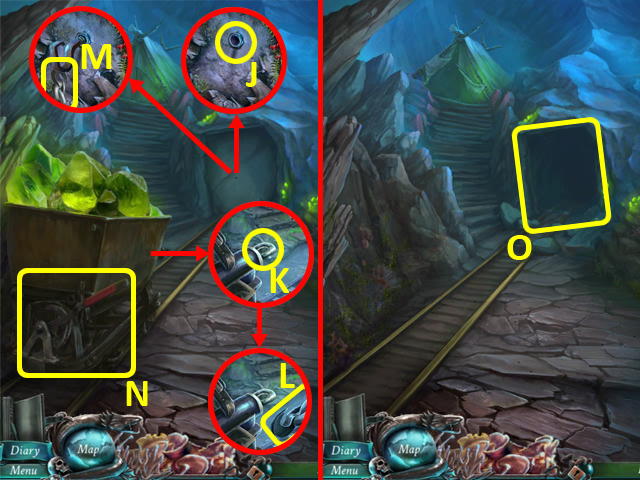
- Place the SCREW WITH EYE (J).
- Place the CHAIN (K).
- Hook the chain onto the loop (L).
- Hook the chain onto the hook (M).
- Use the OILCAN on the brake (N).
- Enter the Tunnels (O).
Chapter 5: The Mines

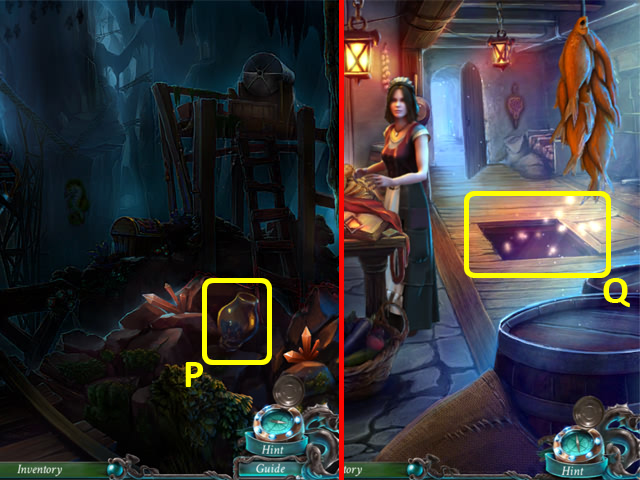
- Grab the LAMPSHADE (P).
- Return to the Kitchen.
- Examine the trapdoor to access a HOP (Q).

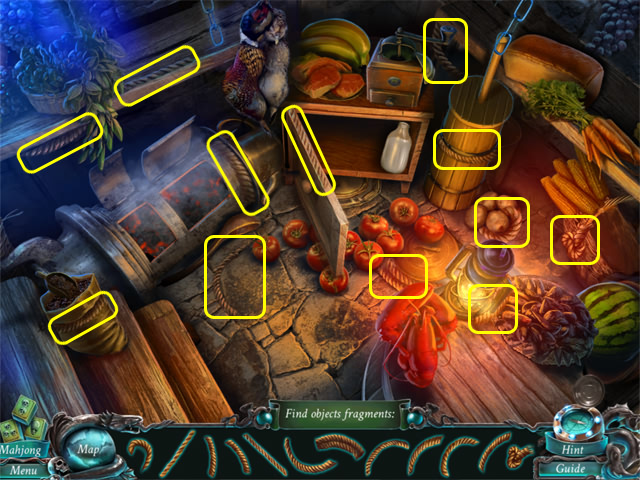
- Play the HOP.
- You receive some LOOPED ROPE (R).

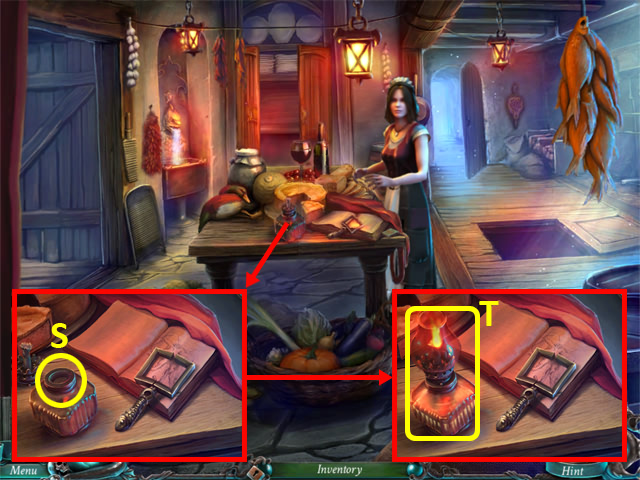
- Remove the lid of the lamp; use the OIL CAN (S).
- Replace the lid, light the wick with the BURNING SPLINTER, and attach the LAMPSHADE; take the OIL LAMP (T).
- Return to the Tunnels.

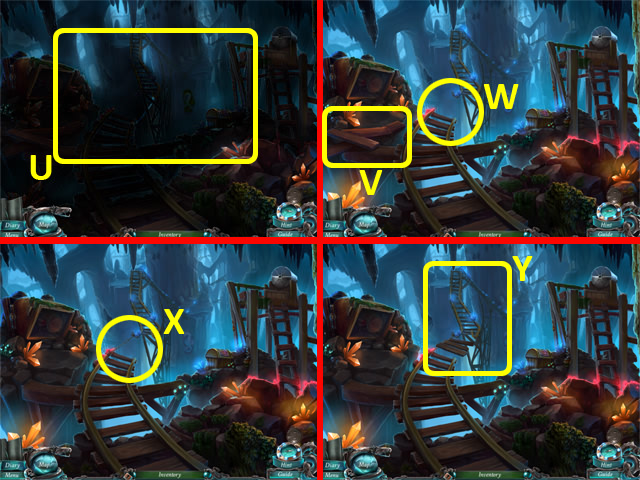
- Use the OIL LAMP in the darkness (U).
- Grab the PLANKS (V).
- Place the LOOPED ROPE (W) and the PLANKS (X).
- Enter the Labyrinth (Y).

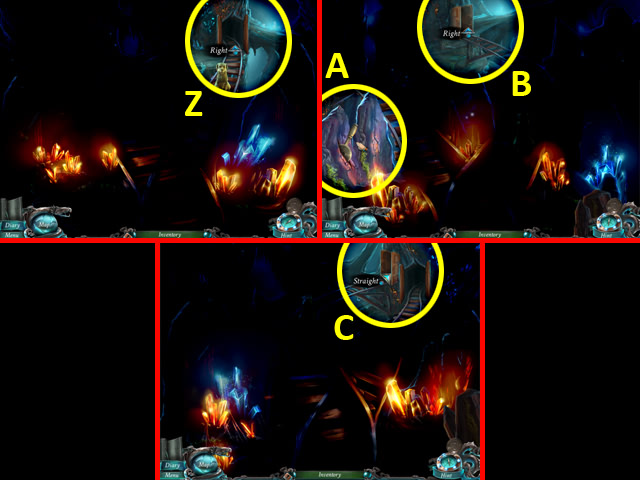

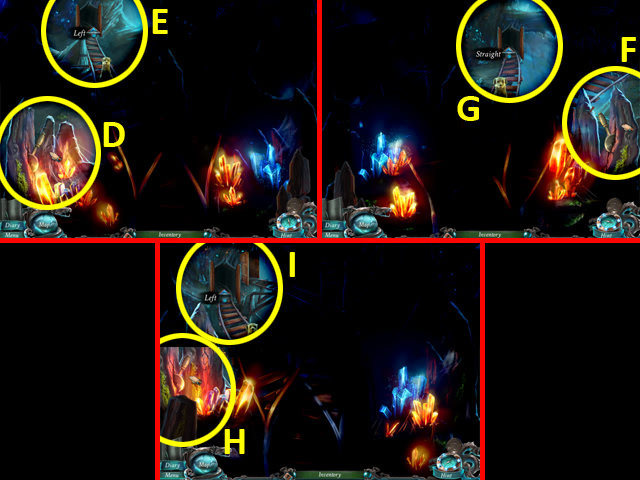
- Use the OIL LAMP in the dark.
- Follow the dog right (Z).
- Uncover and pull the lever (A); walk right (B).
- Walk straight (C).
- Uncover and pull the lever (D); walk left (E).
- Uncover and pull the lever (F); walk straight (G).
- Uncover and pull the lever (H); walk left (I).

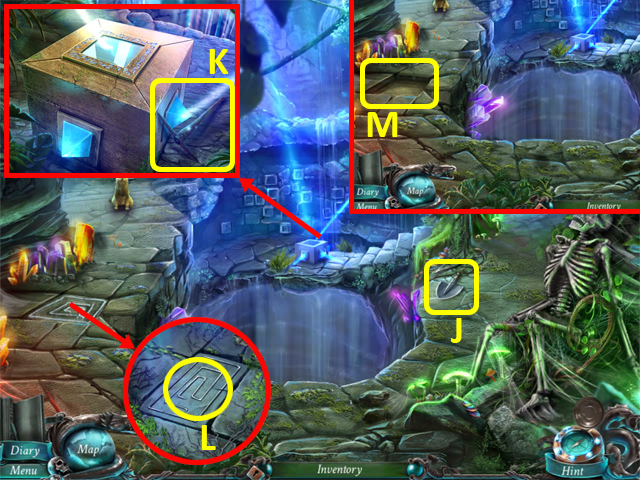
- Grab the SPADE (J) and PICKAXE (K).
- Use the PICKAXE on the slab (L).
- Examine the hole (M) to trigger a puzzle.

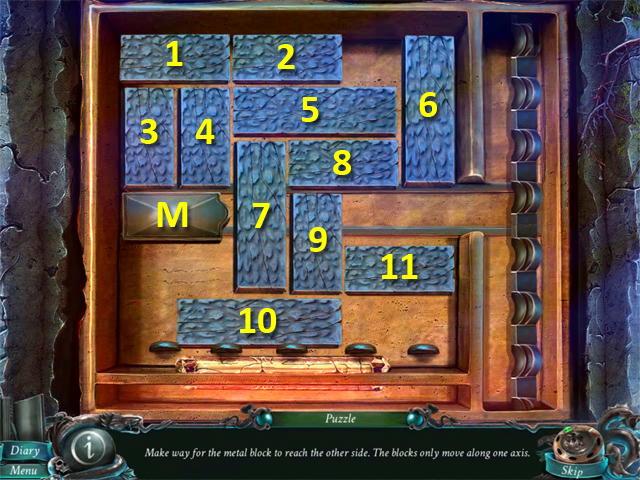
- Move the blocks to free the metal block.
- Solution: 6Dx1, 2Rx2, 1Rx2, 3Ux1, 4Ux1, 10Rx2, 7Dx1, 8Lx3, 7Ux1, 10Lx3, 9Ux1, 11Lx1, 6Dx2, 5Rx1, 7Ux1, 11Lx3, 9Dx2, 7Dx1, 9Ux1, 10Rx2, 6Ux1, 10Rx1, 7Dx1, 8Rx3, 7Ux1, 3Dx1, 4Dx1, 1Lx2, 7Ux2, MRx1, 3Dx1, 10Lx3, 9Dx1, MRx2, 4Dx1, 7Dx2, 2Lx1, 5Lx1, 6Ux2.

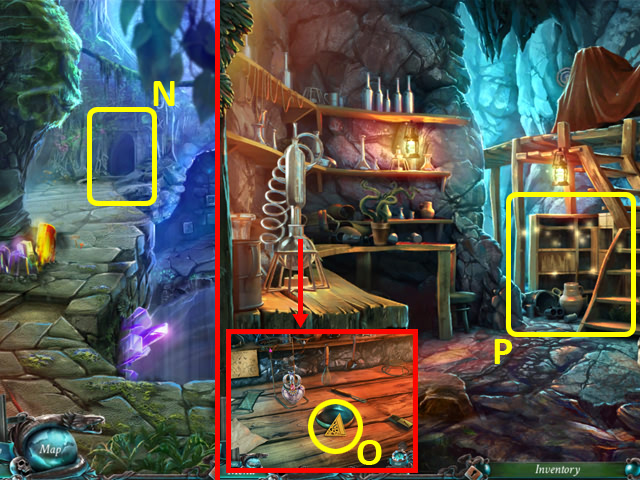
- Walk forward into O’Malley (N).
- Grab the EMBLEM (O).
- Examine the shelves to access a HOP (P).

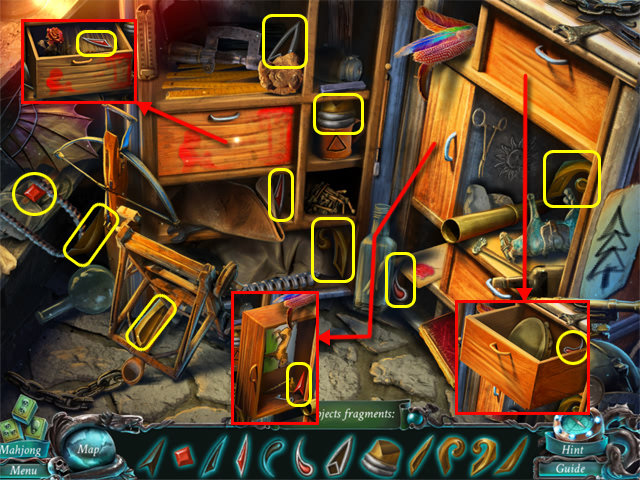
- Play the HOP.
- You receive a TRIDENT’S TOOTH 1/2 (P1).
- Return to the Tunnels.

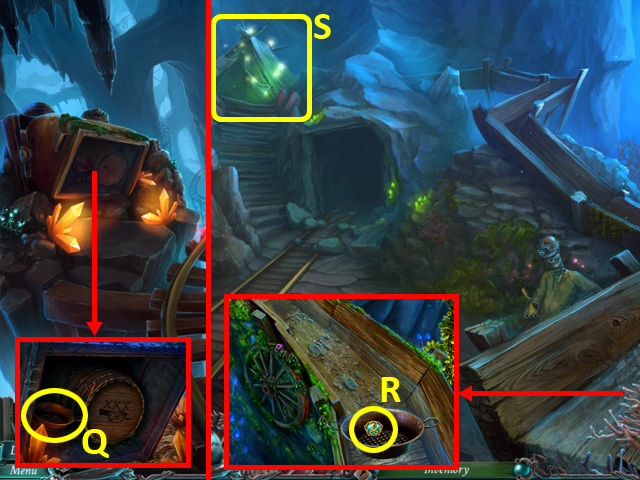
- Use the OIL LAMP in the darkness; grab the STRAINER (Q).
- Back out.
- Use the STRAINER with the chute; take the DOUBLOON (R).
- Examine the tent to access a HOP (S).

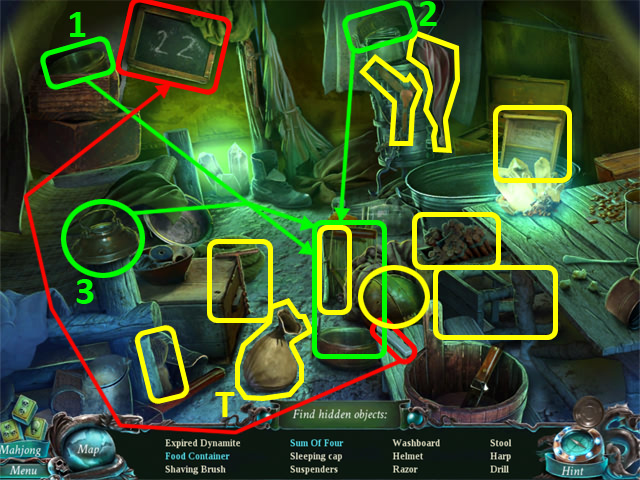
- Play the HOP.
- You receive a HARP (T).

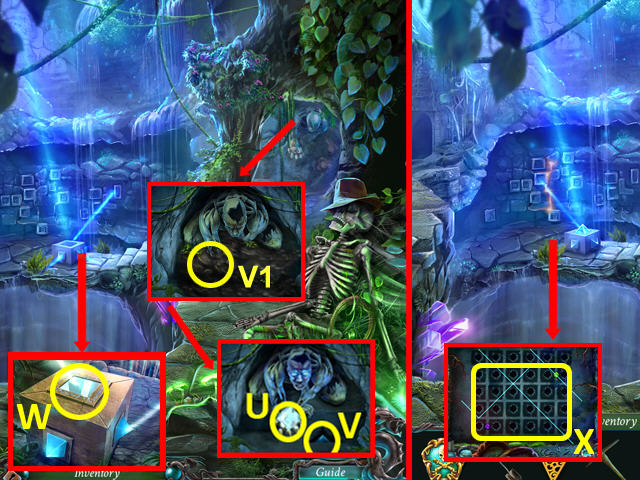
- Return to the Chamber.
- Use the SPADE on the dirt around the statue (V1).
- Place the EMBLEM into the slot; take the PYRAMID (V).
- Place the DOUBLOON into the guardian’s hand; take the PUZZLE PIECE 3/3 (U).
- Place the PYRAMID (W), back out.
- Place the PUZZLE PIECES (X) to trigger a puzzle.

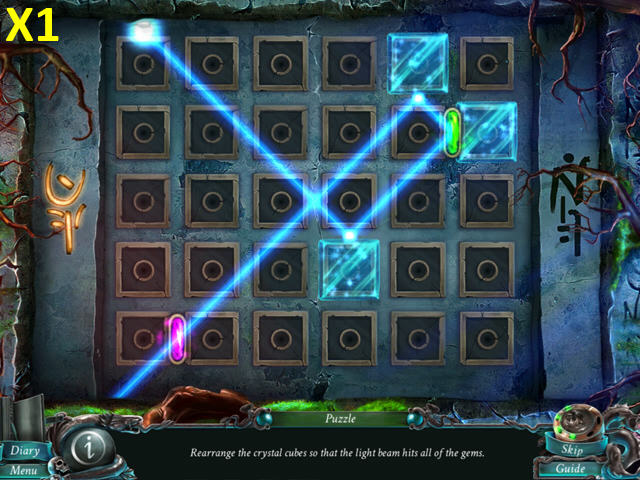

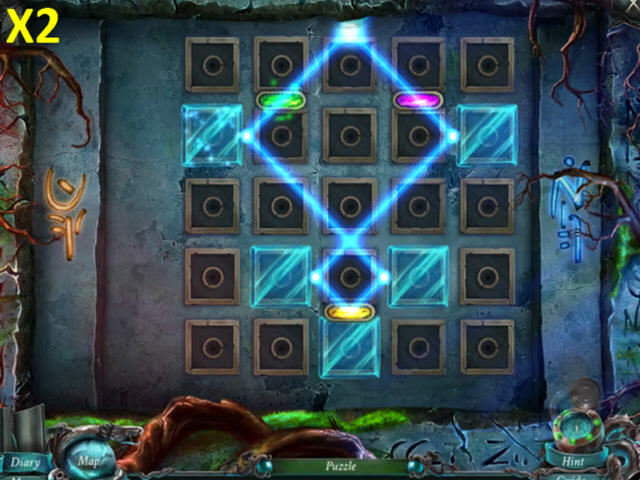

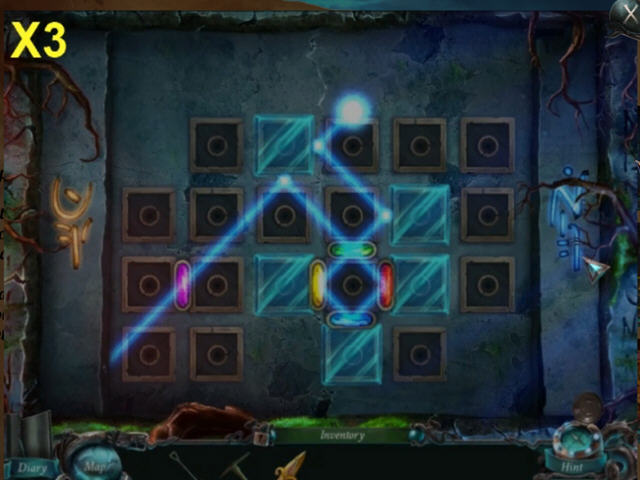
- Arrange the crystals. Solution differs in Expert Mode.
- Solution (X1) and (X2).
- Expert Solution (X1) and (X3).

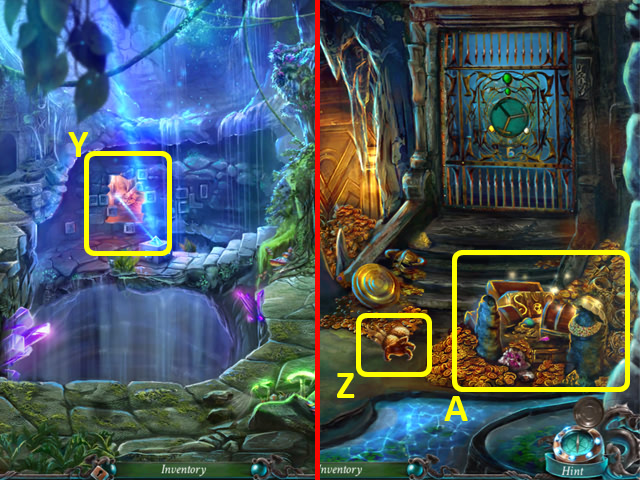
- Enter the Niche (Y).
- Pick up the DRAGON’S CLAW (Z).
- Examine the treasure to access a HOP (A).

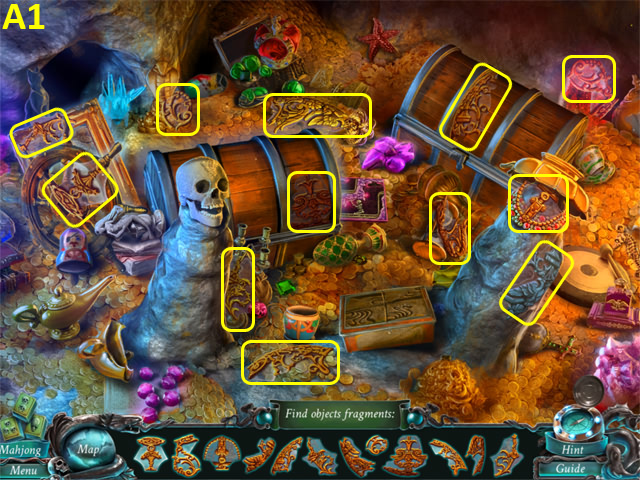
- Play the HOP.
- You receive an HOURGLASS BULB (A1).
- Return to O’Malley.

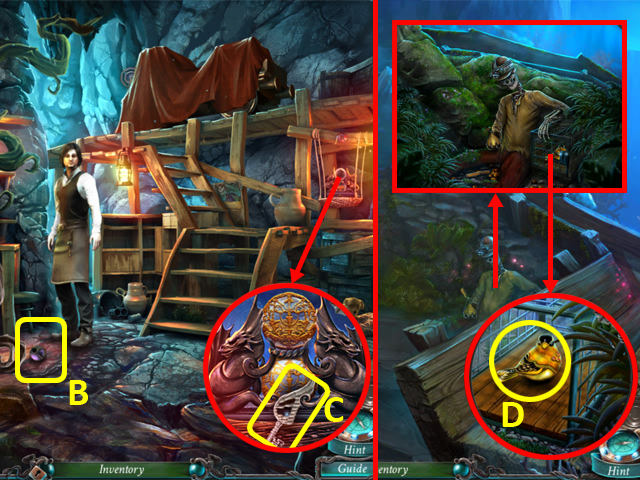
- Pick up the POTION VIAL (B).
- Place the HOURGLASS BULB into the hourglass; take the CAGE KEY (C).
- Return to the Entrance.
- Open the cage with the CAGE KEY; grab the DECORATIVE BIRD (D).
- Return to the Niche.

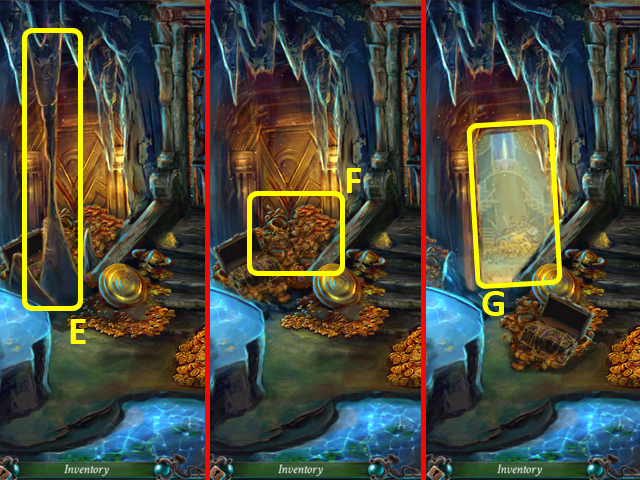
- Use the PICKAXE on the stalagmite (E).
- Use the SPADE on the gold and jewels (F).
- Open the door and enter the Golden Cave (G).

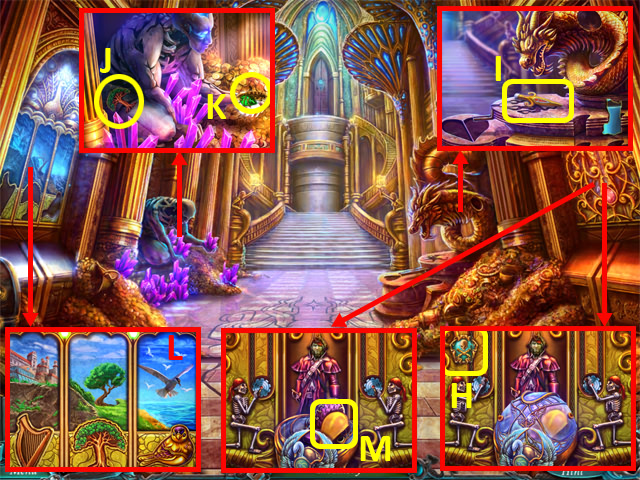
- Take the DOUBLOON (H) and TRIDENT’S TOOTH (I).
- Grab the TREE (J), use the PICKAXE on the crystals in the statue’s hand, place the DOUBLOON in the hand; take the VOODOO CRYSTAL 1/4 (K).
- Place the TREE, DECORATIVE BIRD, and HARP into the picture, and swap the background tiles as shown (L).
- Open the sarcophagus; take the GOLDEN HEART (M).
- Back out.

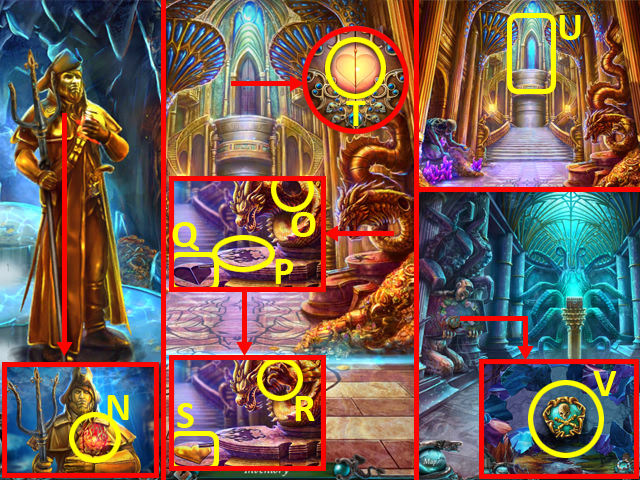
- Attach the TRIDENT’S TEETH to the trident; take DAVY JONES’S SYMBOL (N).
- Walk forward.
- Place the DRAGON’S PAW (O), DAVY JONES’S SYMBOL (P), and GOLDEN HEART (Q).
- Twist the dragon’s paw (R); take the WHOLE HEART (S).
- Place the WHOLE HEART (T); enter the SECRET VAULT (U).
- Take the DOUBLOON (V) to trigger a puzzle.

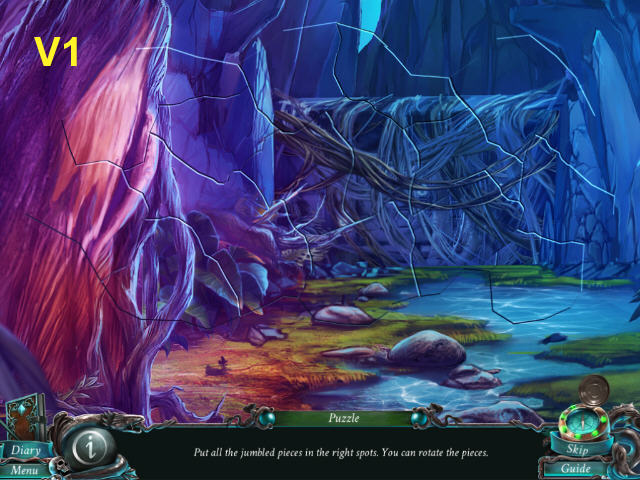
- Re-arrange the pieces to make a complete picture.
- Solution (V1).

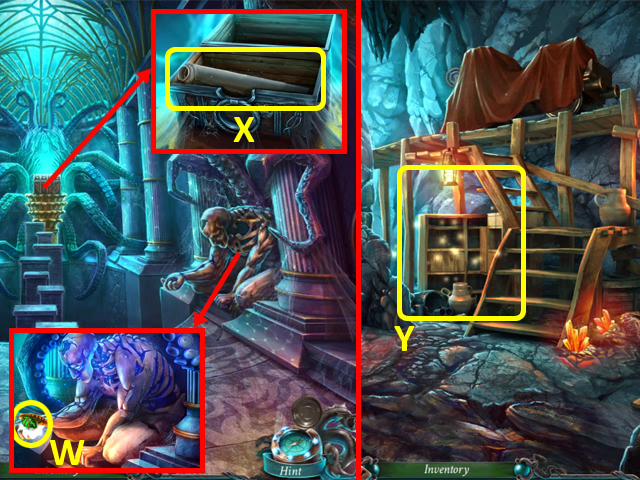
- Clear the cobwebs from the guardian, and place the DOUBLOON in his hand; take the Voodoo Crystals 2/4 (W).
- Open the chest and clear away the cobwebs; take the PAINTING (X).
- Return to O’Malley.
- Examine the shelves to access a HOP (Y).

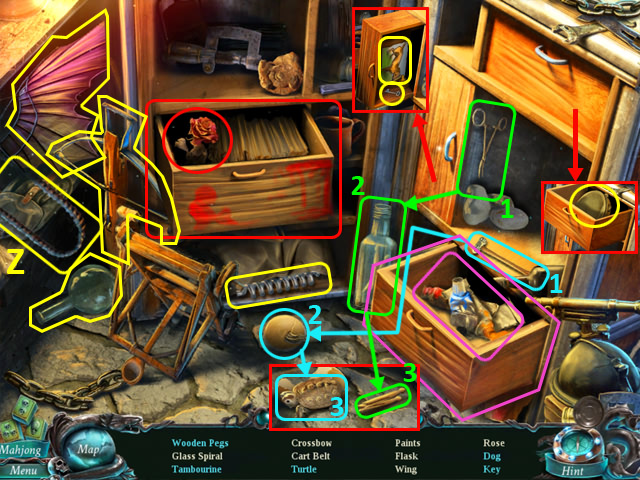
- Play the HOP.
- You receive a CART BELT (Z).
Chapter 6: The Town

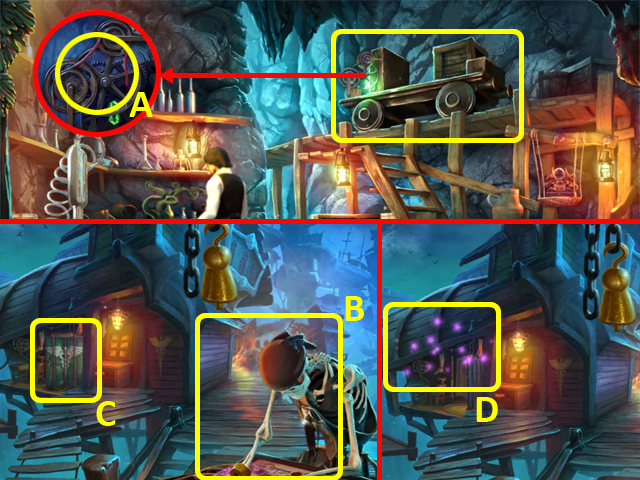
- Uncover the cart, and attach the CART BELT (A); select the cart to travel to the Crossroads.
- Talk to the pirate (B) twice.
- Move the curtain (C).
- Enter the building to access a HOP (D).

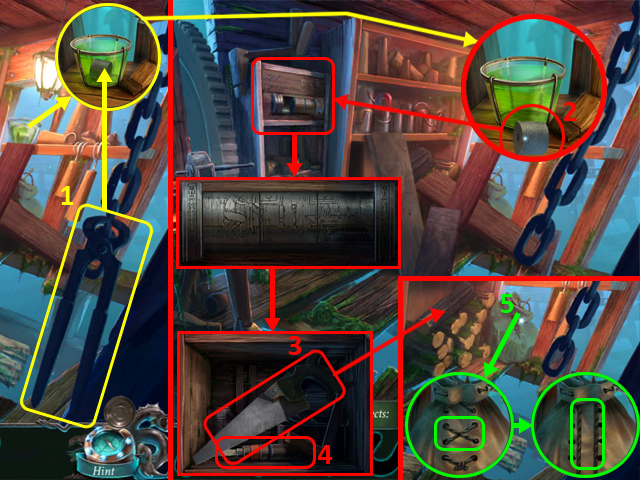

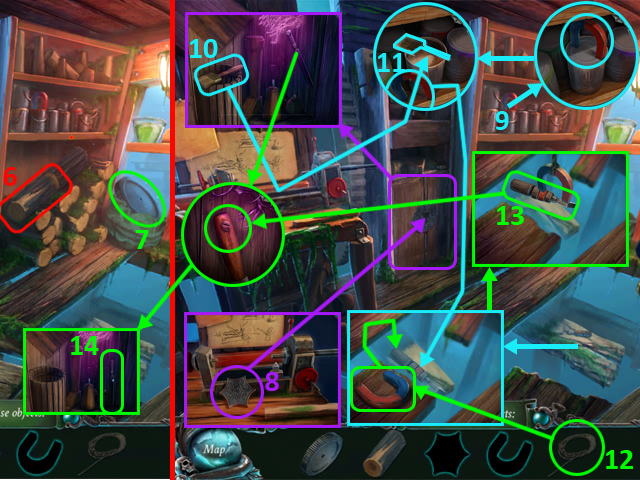

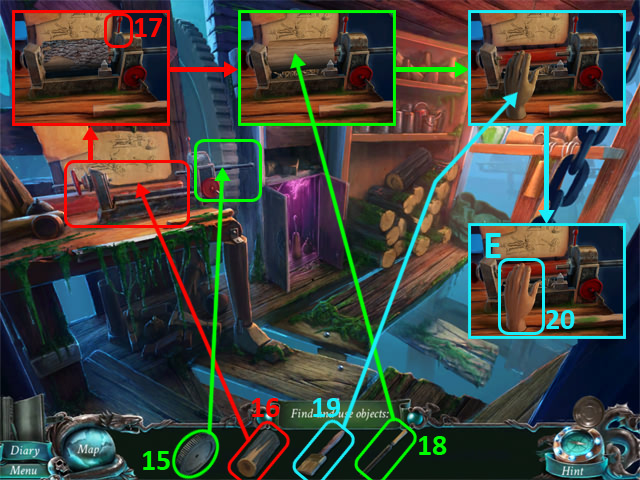
- Find and use the objects (1-20).
- You receive a PROSTHESIS (E).

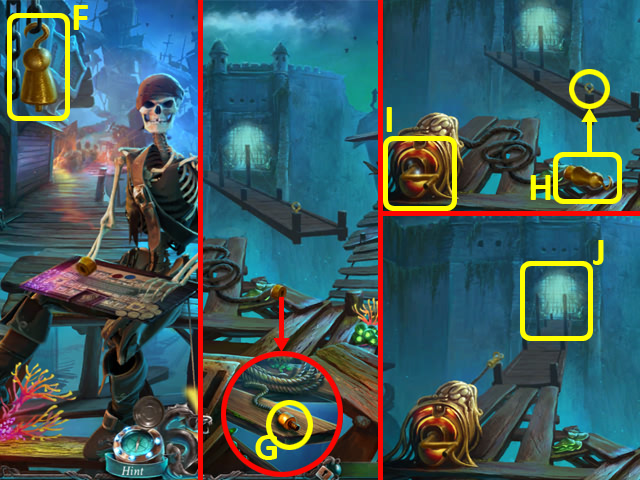
- Give the PROSTHESIS to the pirate; grab the HOOK (F).
- Attach the HOOK to the rope (G).
- Attach the hook (H) to the loop; turn the handle (I).
- Walk forward into the Forbidden Gate (J).

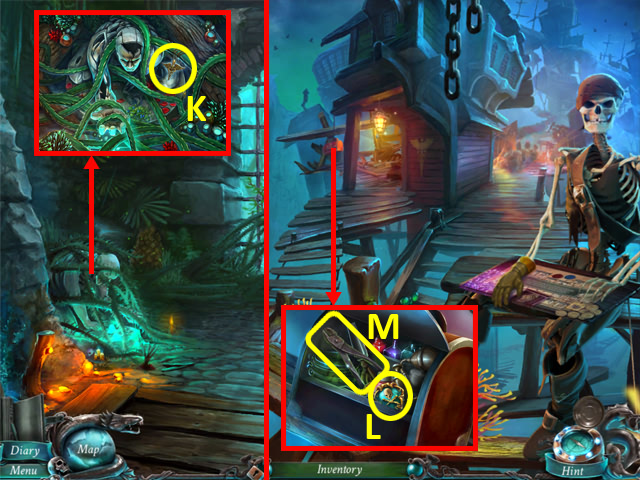
- Grab the CADECEUS (K).
- Back out.
- Use the CADECEUS on the toolbox; take the DOUBLOON (L) and PINCERS (M).
- Walk forward to the Forbidden Gate.

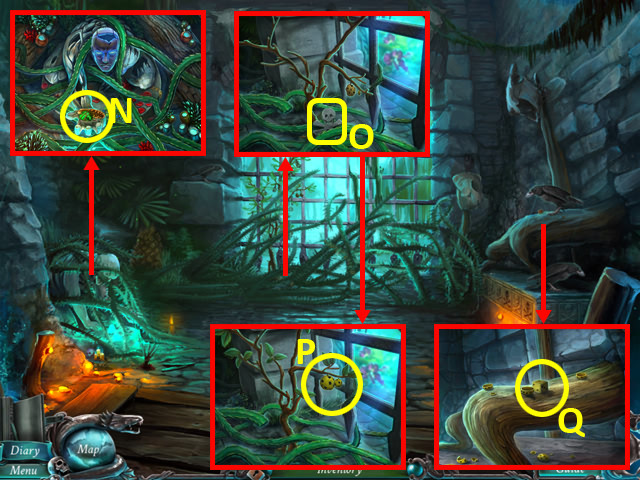
- Cut away the overgrowth with the PINCERS, and place the DOUBLOON into the guardian’s hand; take the VOODOO CRYSTALS 3/4 (N).
- Cut away the overgrowth with the PINCERS, and grab the SKULL ORNAMENT (O); pour the POTION VIAL onto the tree, and take the NUTS (P).
- Place the NUTS onto the branch; grab the DICE (Q).
- Back out.
- Give the DICE to the pirate to trigger a puzzle.

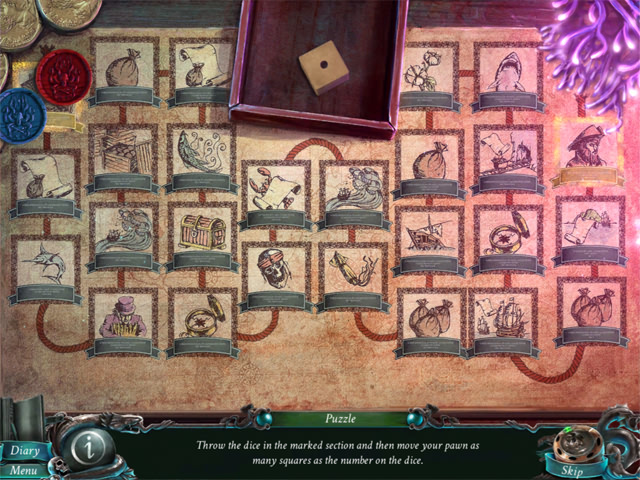

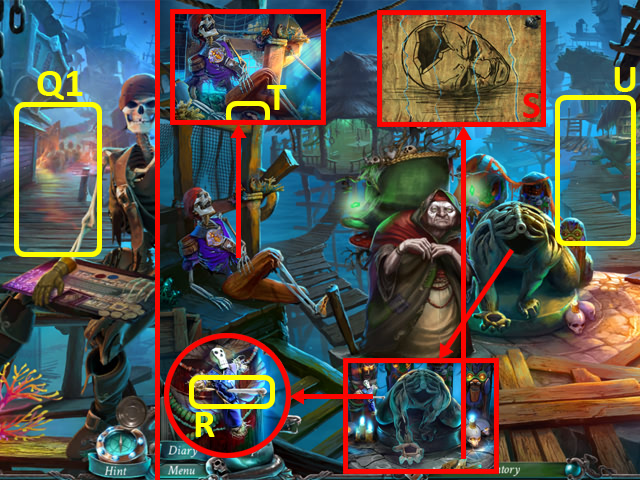
- Roll the dice, and move your pawn accordingly. Move forward to the Town (Q1).
- Pull the LONG NEEDLE (R) twice to take it; re-arrange the note pieces as shown to read it (S).
- Grab the FOLK PORTRAIT 1/3 (T).
- Walk forward to the Town Square (U).

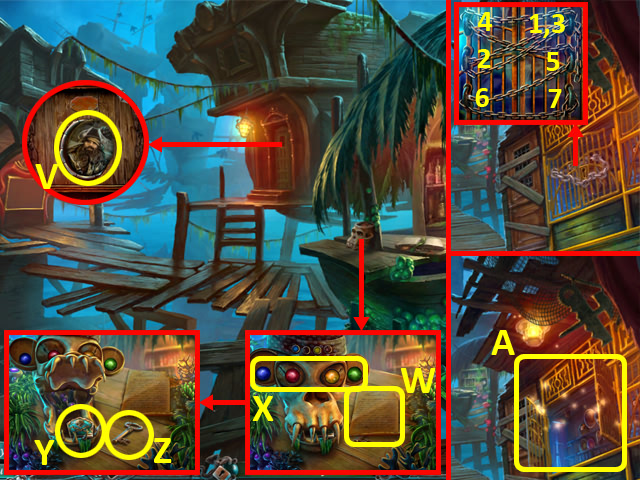
- Use the LONG NEEDLE on the FOLK PORTRAIT 2/3 (V); take it.
- Read the note (W), and set the colours on the skull as shown (X); take the DOUBLOON (Y) and SHOP KEY (Z).
- Back out.
- Unlock the padlock with the SHOP KEY; move the chains in the order shown (1-6).
- Enter the shop to access a HOP (A).

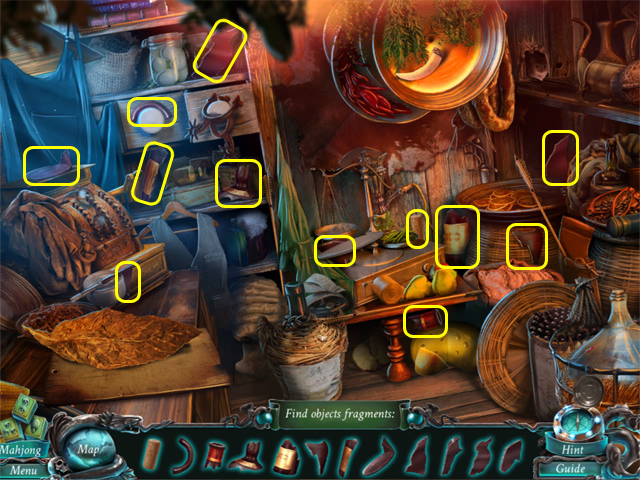
- Play the HOP.
- You receive a RUM BOTTLE (B).
- Return to Town Square.

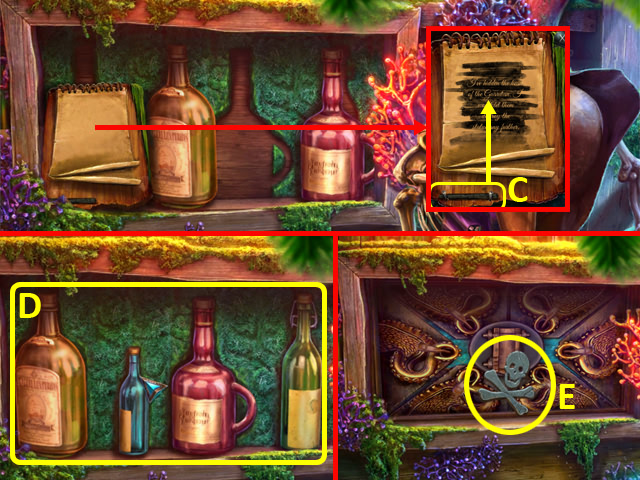
- Drag the charcoal (C) over the page to reveal the previous note.
- Add the RUM BOTTLE to the display (D); arrange the bottles in the order shown.
- Grab the SKULL ORNAMENT 2/2 (E).
- Return to the Forbidden Gate.

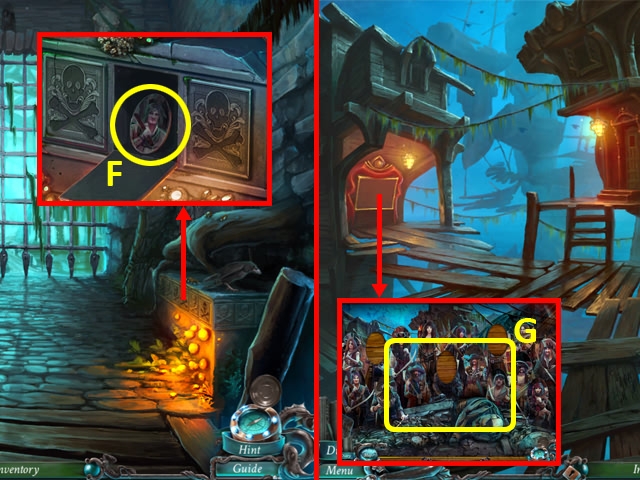
- Place the SKULL ORNAMENTS in the slots, and press each of the skulls; take the FOLK PORTRAIT 3/3 (F).
- Return to the Town Square.
- Add the FOLK PORTRAITS to the portrait to trigger a puzzle (G).

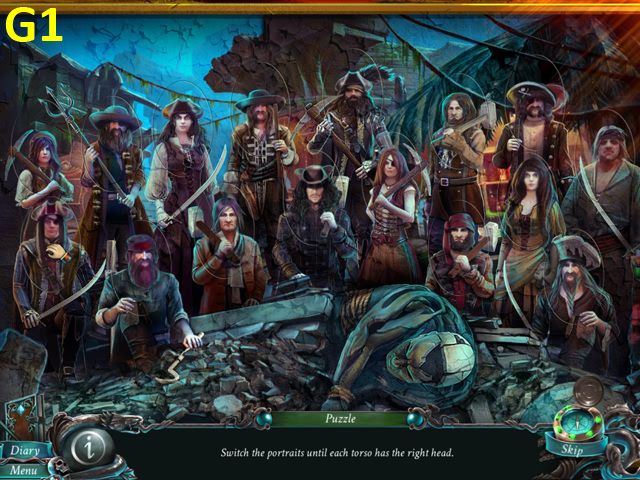
- Swap the portrait heads onto the correct bodies.
- Solution (G1).

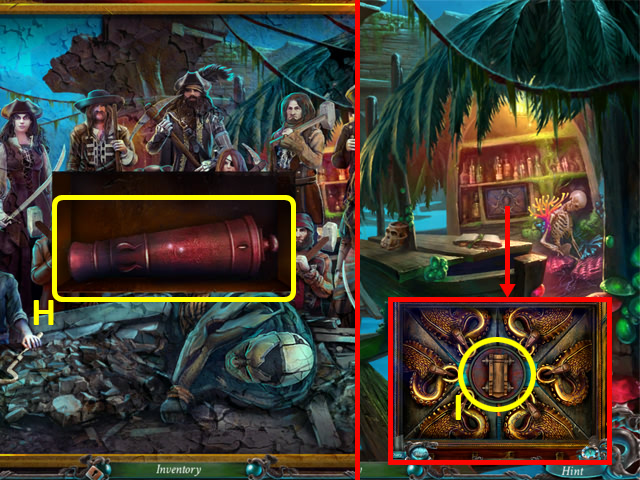
- Grab the SAFE KNOB (H).
- Place the SAFE KNOB onto the safe to trigger a puzzle (I).

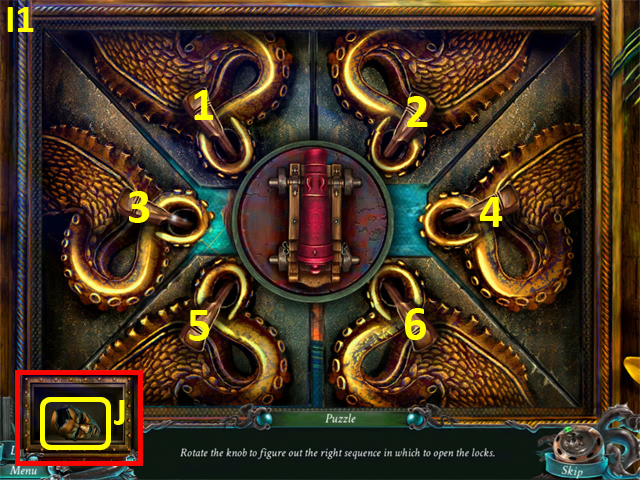
- Rotate and aim the canon in the correct sequence.
- Solution (I1).
- Grab the GUARDIAN’S HEAD (J).
- Back out.

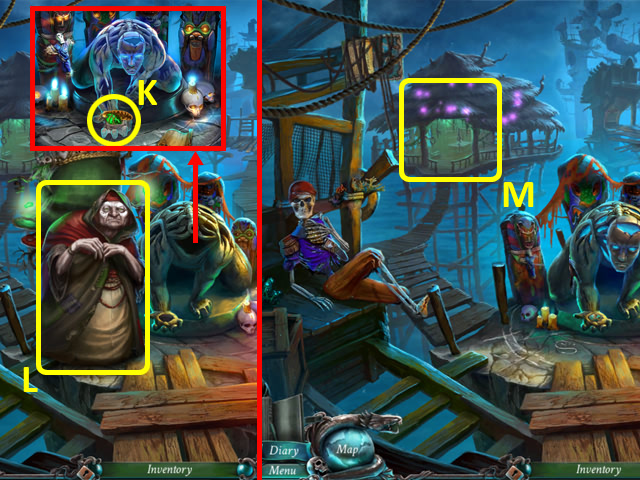
- Attach the GUARDIAN’S HEAD, and place the DOUBLOON in his hand; take the VOODOO CRYSTALS 4/4 (K).
- Give the VOODOO CRYSTALS to the witch (L).
- Enter the cabin to access a HOP (M).

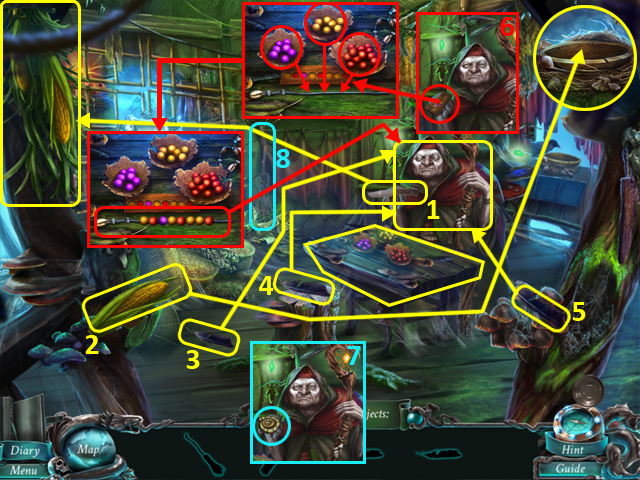

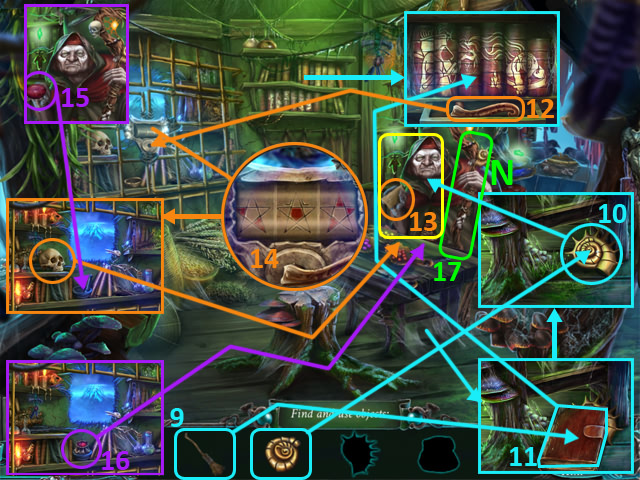
- Find and use the items (1-16).
- You receive a VOODOO STICK (N).

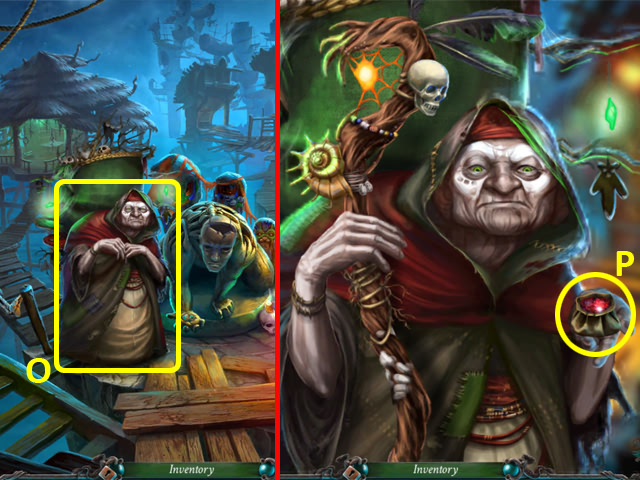
- Give the VOODOO STICK and PAINTING to the witch (O).
- Take the STARDUST (P).
- Return to O’Malley; receive the NICHE KEY.
- Return to the Niche.

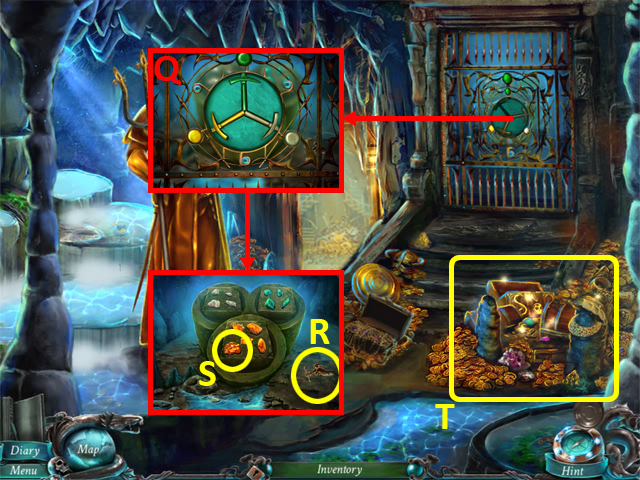
- Place the NICHE KEY into the lock; turn the lock as shown (Q).
- Take the GOLDEN TAP (R) and AMBER (S).
- Examine the treasure to access a HOP (T).

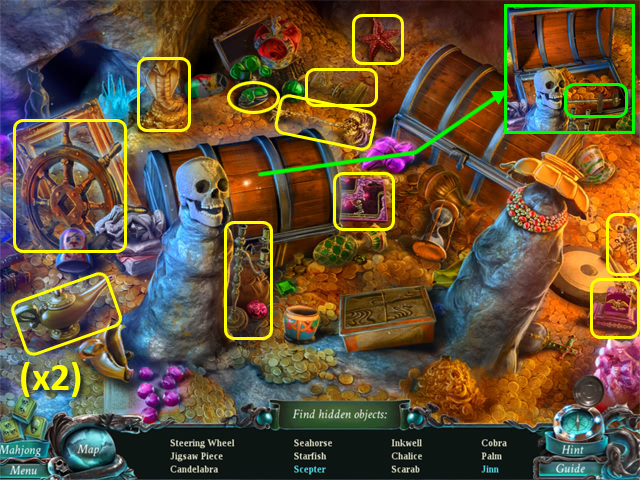
- Play the HOP.
- You receive a JIGSAW PIECE (T1).
- Return to the Tunnels.

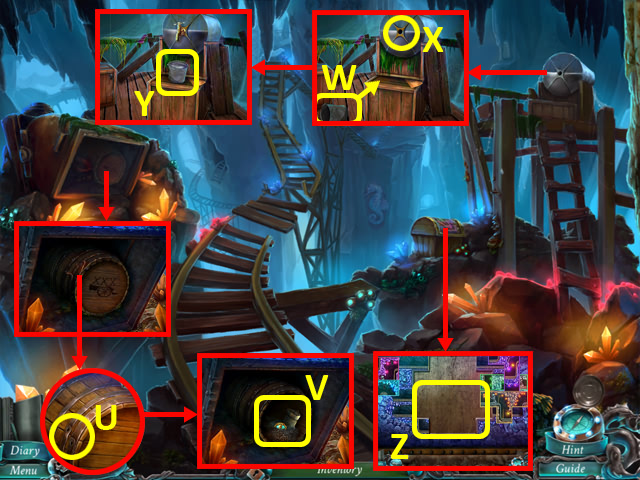
- Use the PINCERS on the barrel (U); grab the DOUBLOON and GUN POWDER (V).
- Place the bucket (W) and GOLDEN TAP (X); turn the tap, and take the BUCKET OF MERCURY (Y).
- Place the JIGSAW PIECE to trigger a puzzle (Z).

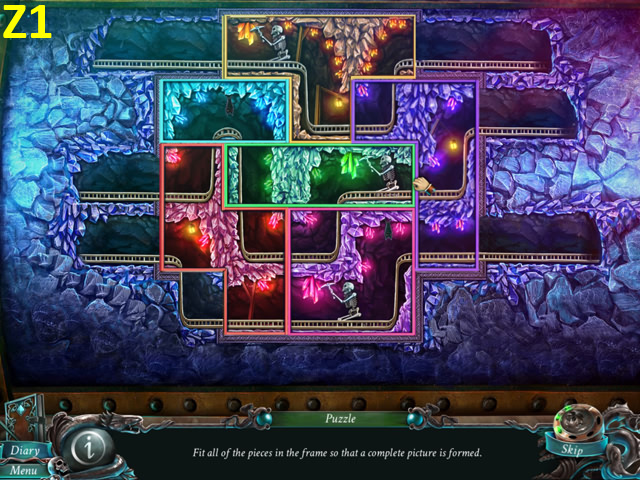
- Fit the pieces together to make a complete picture.
- Solution (Z1).

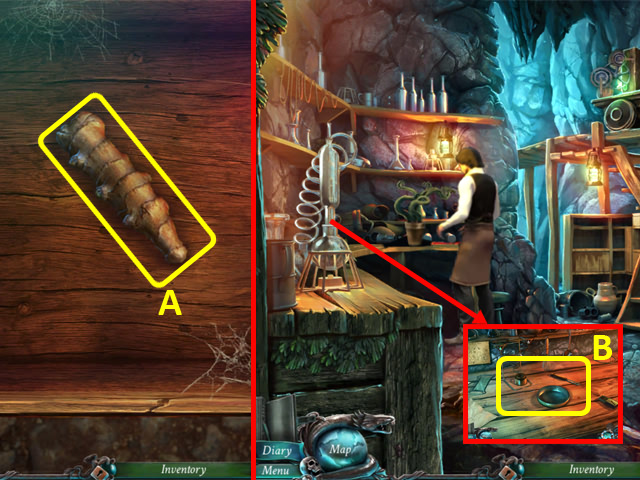
- Grab the ROOT OF LIFE (A).
- Return to O’ Malley.
- Place the ROOT OF LIFE, BUCKET OF MERCURY, AMBER, GUN POWDER, and STARDUST to trigger a puzzle (B).

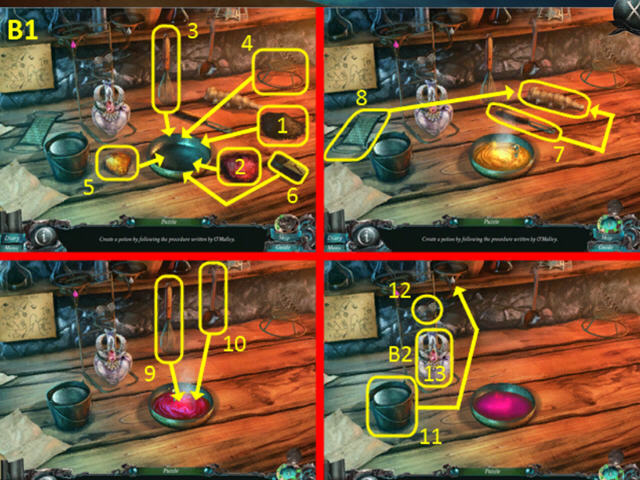
- Make the reviving potion.
- Refer to screenshot for solution (B1).
- You receive the REVIVING POTION (B2).
- Return to the Forbidden Gate.
Chapter 7: The Swamp

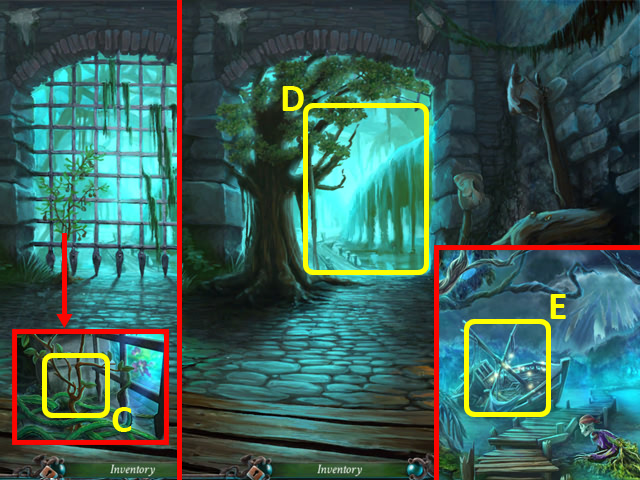
- Pour the REVIVING POTION on the tree (C).
- Enter the Swamp (D).
- Move the sail, and enter the ship to access a HOP (E).

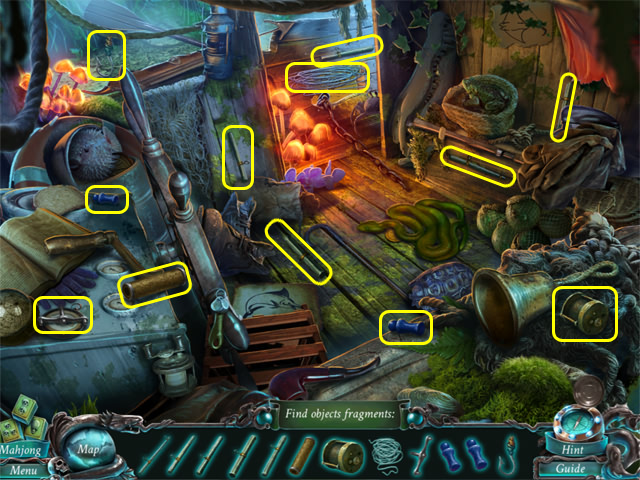
- Play the HOP.
- You receive a FISHING ROD (F).

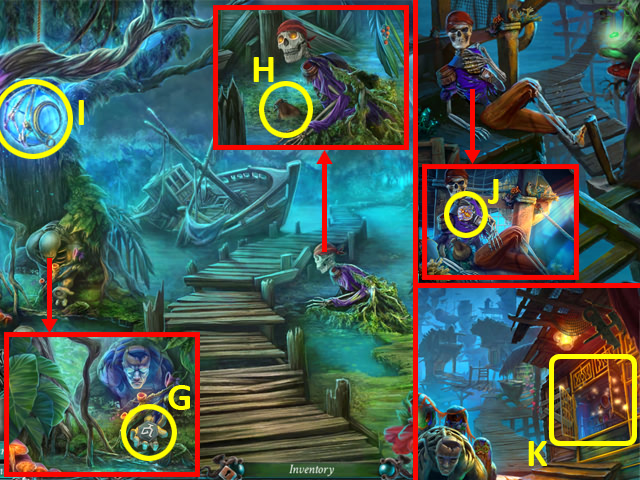
- Place the DOUBLOON in the guardian’s hand; take the RUNE (G).
- Wake up the pirate; grab the SATCHEL (H).
- Use the FISHING ROD on the lantern to release the fireflies (I).
- Return to the Town.
- Give the SATCHEL to the pirate; take the TALISMAN (J).
- Look in the shop window to access a HOP (K).

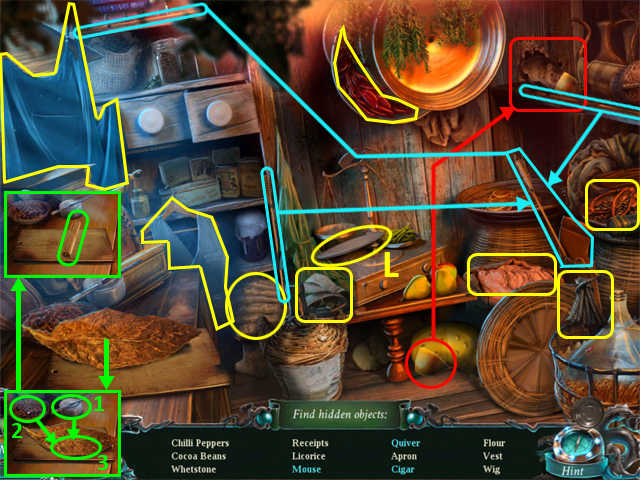
- Play the HOP.
- You receive a WHETSTONE (L).
- Return to the Swamp.

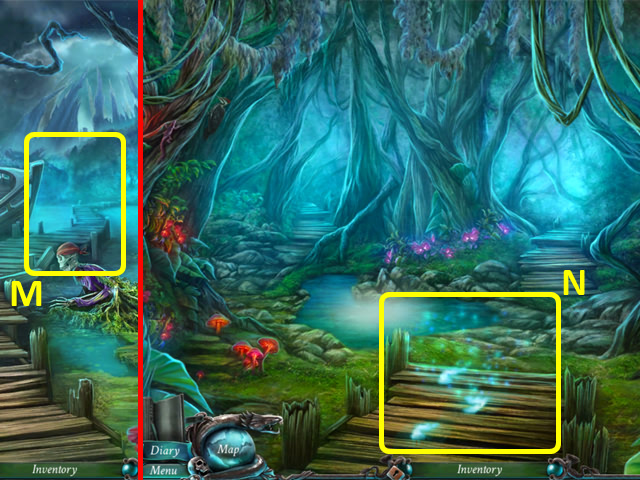
- Enter the Marsh (M).
- Use the TALISMAN on the fireflies (N).
- Shine the light over the ground near the exits to spot footprints to follow; directions: R, R, L, R, L, L.

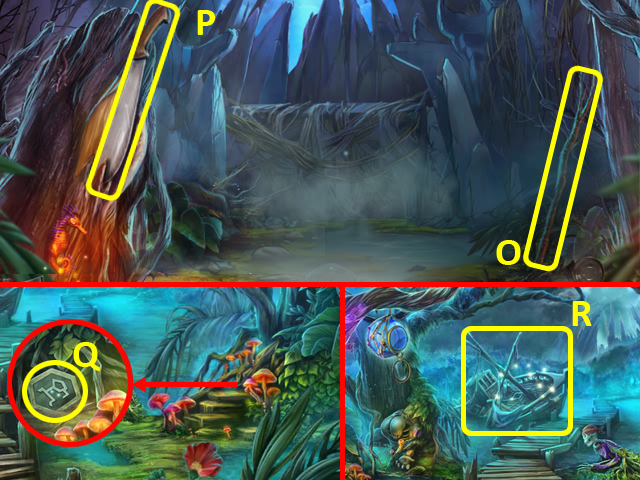
- Grab the WOODEN STICK (O).
- Use the WOODEN STICK on the machete and then use the WHETSTONE; take the MACHETE (P).
- Go back.
- Cut away the roots with the MACHETE; take the RUNE (Q).
- Enter the ship to access a HOP (R).

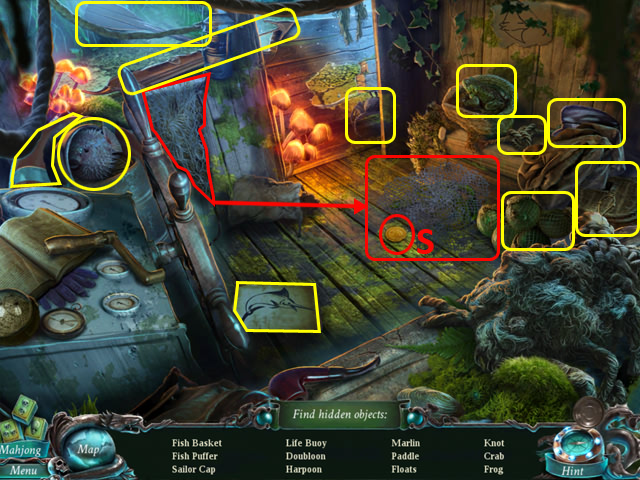
- Play the HOP.
- You receive a DOUBLOON (S).
- Return to the Dark Gate.

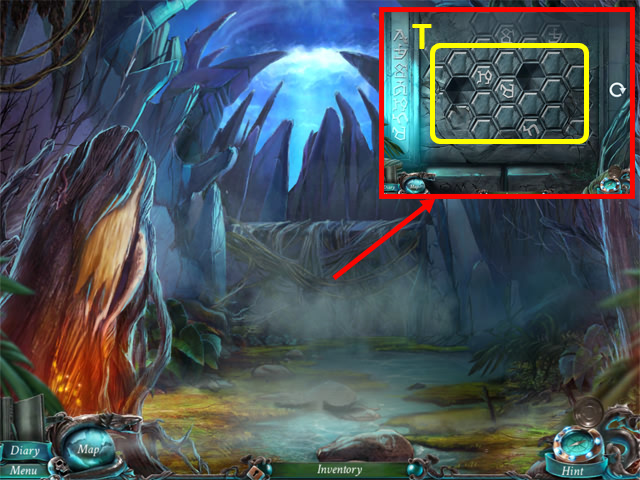
- Cut away the roots with the MACHETE, and place the RUNET (T) to trigger a puzzle.

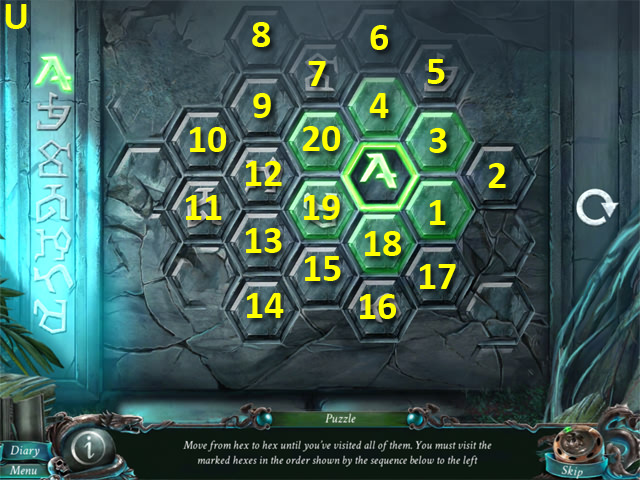
- Move across the hexes, visiting each one, and visiting the marked hexes in the order shown on the left.
- Solution (U1).
Chapter 8: The Shore

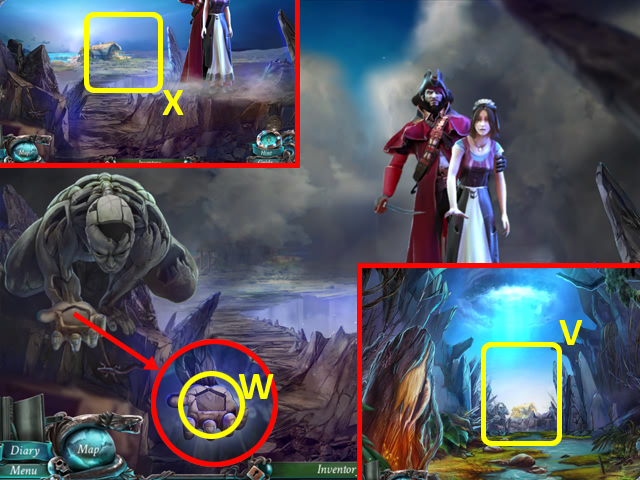
- Walk forward to The Rocks (V).
- Place the DOUBLOON in the guardian’s hand (W).
- Walk forward to the Shore (X).

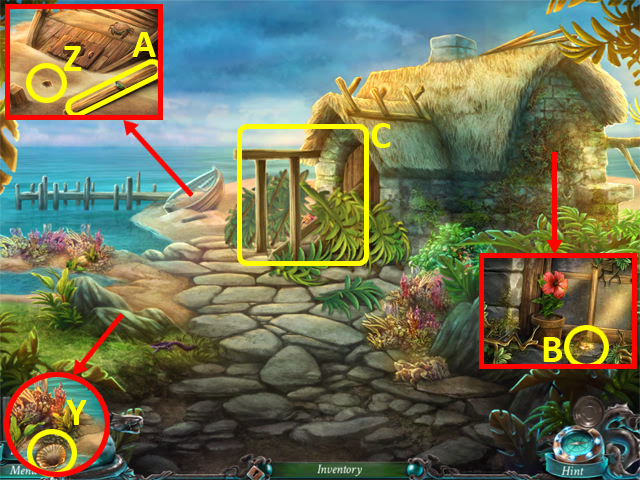
- Release the SHELL with the MACHETE; take it (Y).
- Scoop out the sand with the SHELL; grab the DOOR KNOB (Z) and BEAM (A).
- Move the branches and the flower; take the HUT KEY (B).
- Use the BEAM with the hut entrance (C).

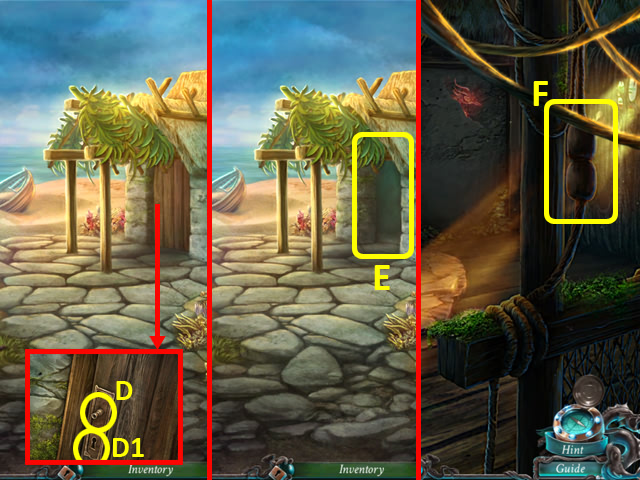
- Place the DOOR KNOB (D) and KEY (Ds).
- Enter the Hut (E).
- Pull the chord (F).

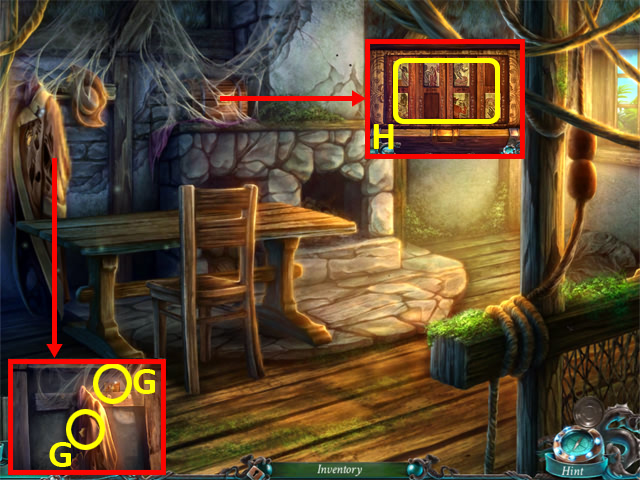
- Dust the cobwebs; grab the WOODEN PICTURES (G).
- Move the chair and table, dust the cobwebs, open the box; place the WOODEN PICTURES to trigger a puzzle (H).

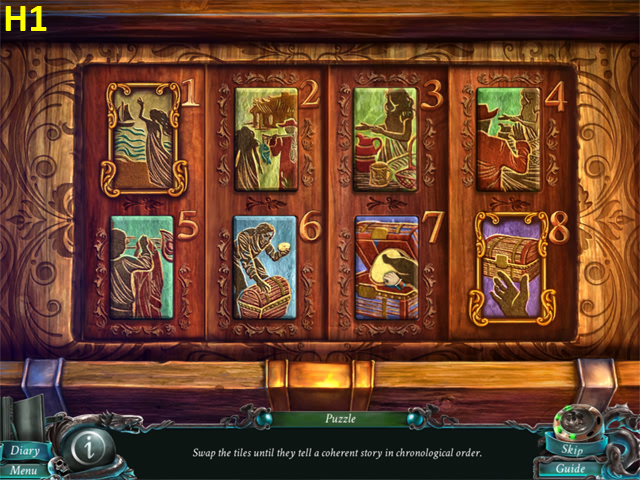
- Swap the pictures until they tell a story in chronological order.
- Solution (H1).

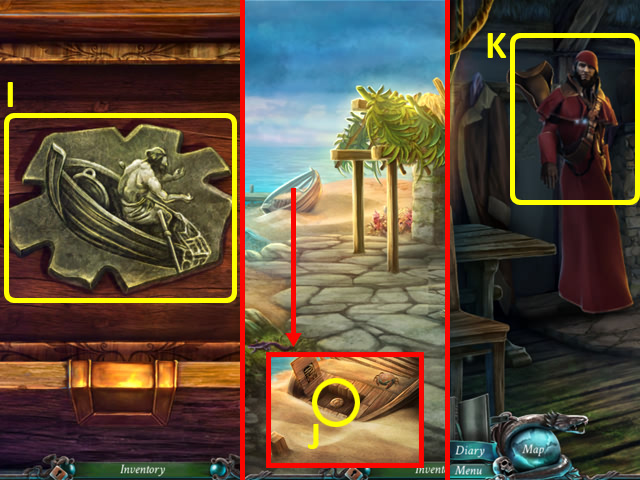
- Grab the FISHERMAN TOKEN (I).
- Back out.
- Place the FISHERMAN TOKEN into the boat; take the MEDALLION (J).
- Enter the Hut.
- Give the MEDALLION to Davy Jones (K).
- Congratulations, you have completed Nightmares from the Deep: Davy Jones.




 The Mysterious Past of Gregory Phoenix Walkthrough, Guide, & Tips
 Dark Parables: Ballad of Rapunzel Walkthrough, Guide, & Tips
 The Tarot's Misfortune Walkthrough, Guide, & Tips
 Mystic Legacy: The Great Ring Walkthrough, Guide, & Tips
 Reincarnations: Uncover the Past Walkthrough, Guide, & Tips