Fright Walkthrough, Guide, & Tips
Fright Walkthrough

Welcome to the Fright Walkthrough
After a suspicious accident, you find yourself stranded at a run-down motel. But you soon realize the area hides a terrifying secret…
Whether you use this document as a reference when things get difficult or as a road map to get you from beginning to end, we’re pretty sure you’ll find what you’re looking for here.
This document contains a complete Fright game walkthrough featuring annotated screenshots from actual gameplay!
We hope you find this information useful as you play your way through the game. Use the walkthrough menu below to quickly jump to whatever stage of the game you need help with.
Remember to visit the Big Fish Games Forums if you find you need more help. Have fun!
This walkthrough was created by prpldva, and is protected under US Copyright laws. Any unauthorized use, including re-publication in whole or in part, without permission, is strictly prohibited.
General Tips
- This is the official guide for Fright.
- This guide will not mention each time you have to zoom into a location; the screenshots will show each zoom scene.
- Hidden-object puzzles are referred to as HOPs. This guide will not show screenshots of the HOPs, however, it will mention when an HOP is available to play.
- This guide will give solutions for all puzzles which are not random. Please read the instructions in the game for each puzzle.
Chapter 1: The Crash

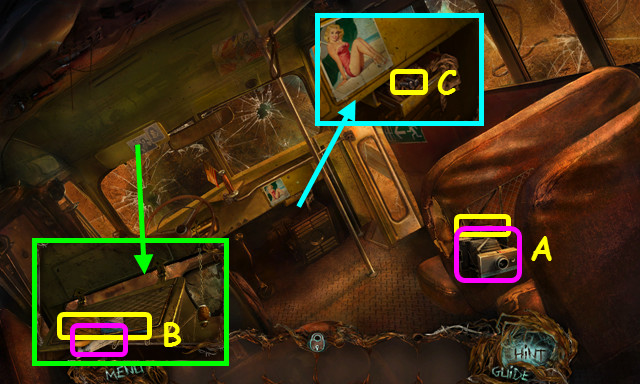
- Take the CAMERA and the SCREWDRIVER (A).
- Take the OILCAN and read the license (B).
- Take the BOLTS (C).

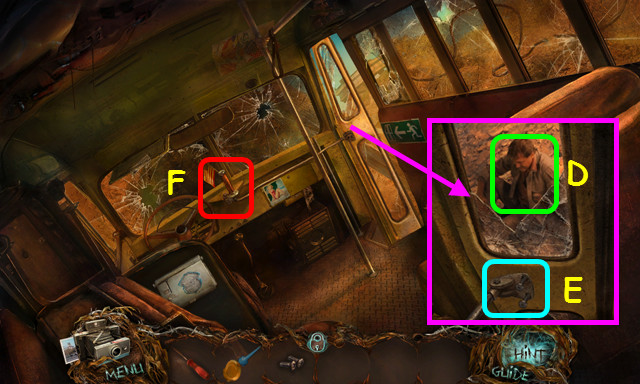
- Talk to the Bus Driver (D).
- Use the BOLTS and the SCREWDRIVER on the hinge (E).
- Pull the lever (F).
- Walk right.

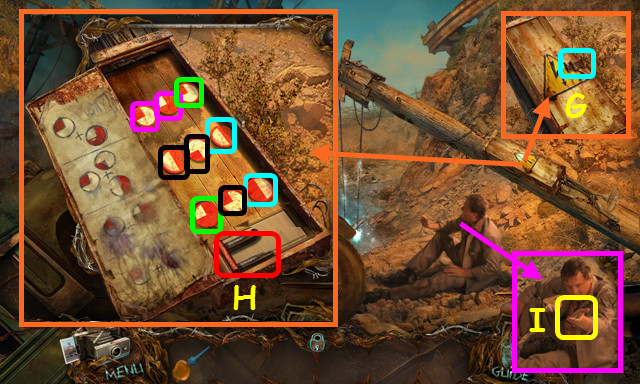
- Use the OILCAN on the lock (G).
- Select the color-coded sets of discs.
- Pull the lever (H).
- Take the BUS KEYS (I).
- Walk left.

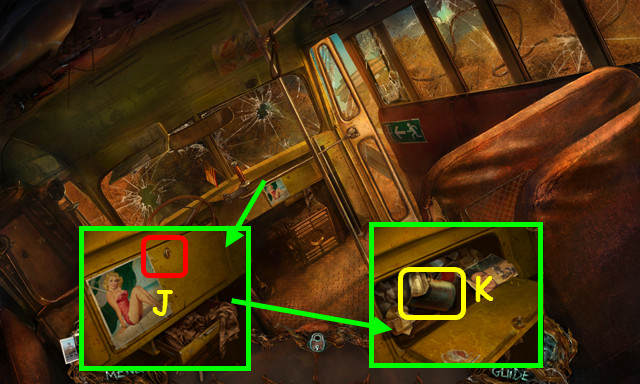
- Use the BUS KEYS on the lock (J).
- Take the TIN CAN (K).
- Walk right and forward to the Road Fork.

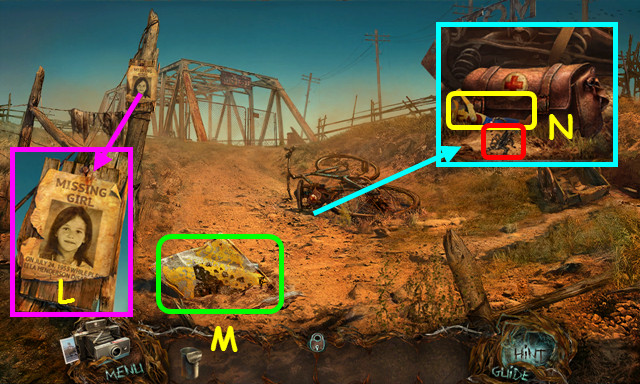
- Read the poster (L).
- Move the sign and note the farm mini-game (M).
- Use the TIN CAN on the scorpion; take the COWBOY FIGURINE (N).
- Walk right to the Bunker Door.

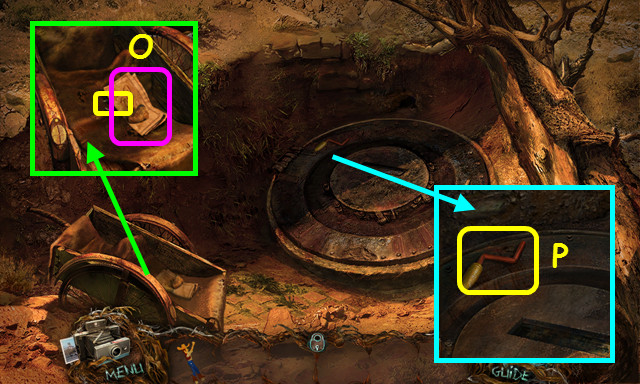
- Take the MAP and the CAN OPENER (O).
- Take the CORNCOB HANDLE (P).
- Walk down and forward to the Bridge.

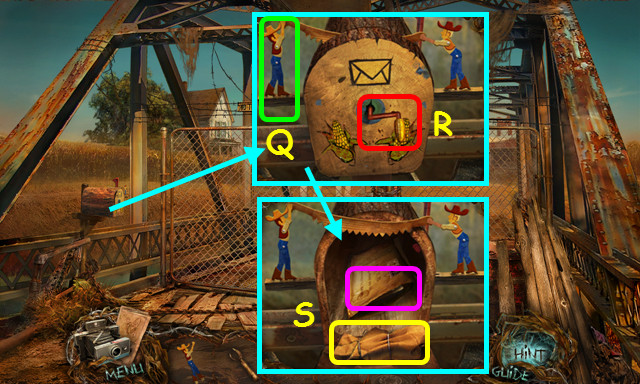
- Place the COWBOY FIGURINE on the mailbox (Q).
- Place the CORNCOB HANDLE on the door and turn it (R).
- Open the package; read the letter and take the KNIFE (S).
- Walk down.

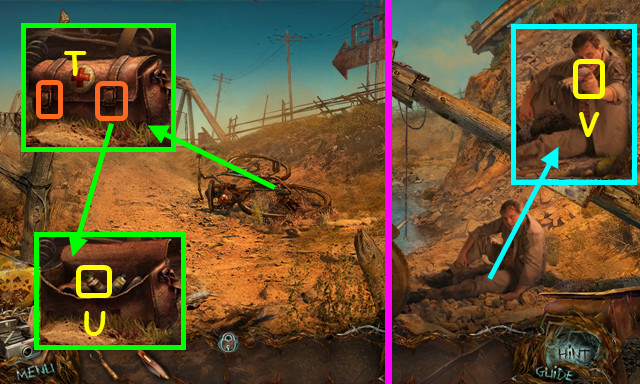
- Use the KNIFE on the 2 straps (T).
- Open the bag; take the PAIN-KILLERS (U).
- Walk down.
- Give the PAIN-KILLERS to the Bus Driver; take the BADGE (V).
- Walk left.

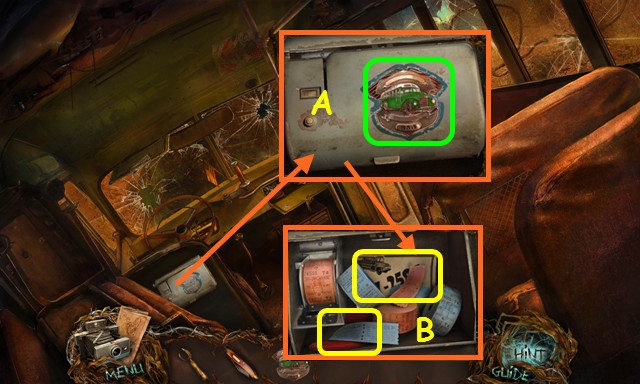
- Place the BADGE on the cover (A).
- Move the tickets; take the EMERGENCY NUMBER and the NIPPERS (B).
- Travel to the Bridge.

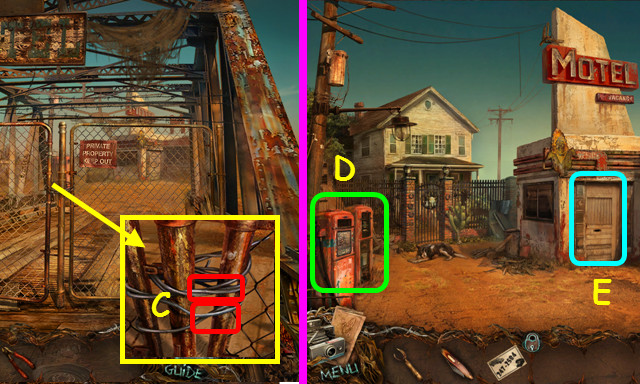
- Use the NIPPERS twice on the wires (C).
- Walk forward to the Motel Yard.
- Note the gas pump mini-game (D).
- Enter the Motel Office (E).

- Turn the page and take the SUN TOKEN (F).
- Take the HEATER and the MAGNET (G).
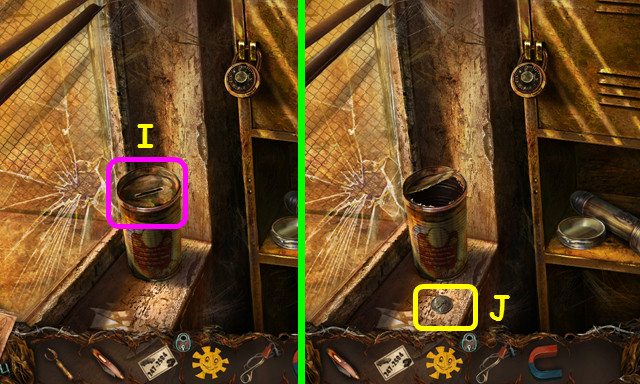
- Select the window area (H).


- Use the CAN OPENER on the can (I).
- Tip the can and take the 1/3 NICKEL (J).
- Return to the Road Fork and select the farm mini-game.

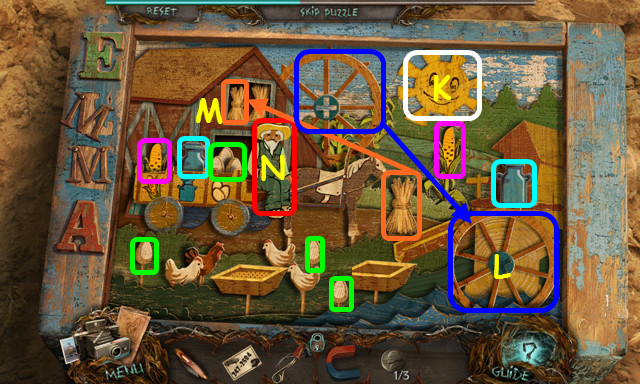
- Place the SUN TOKEN in the sky (K).
- Place the wheel in the water (L).
- Place the wheat in the barn (M).
- Place the corn, milk, and 3 eggs in the wagon (color-coded).
- Select the farmer (N).

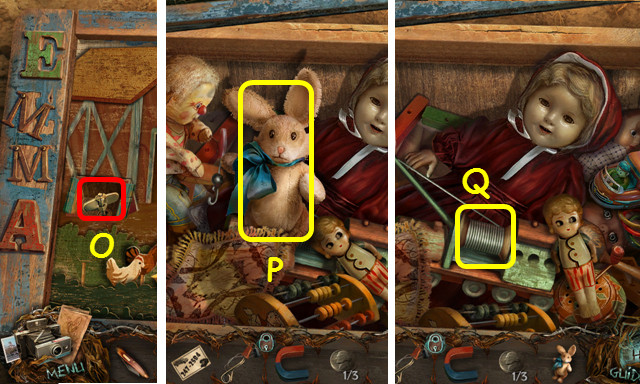
- Open the cellar doors and turn the knob (O).
- Take the PLUSH BUNNY (P) and the HOOK ON A WIRE (Q).
- Travel to the Motel Yard and select the gas pump mini-game.

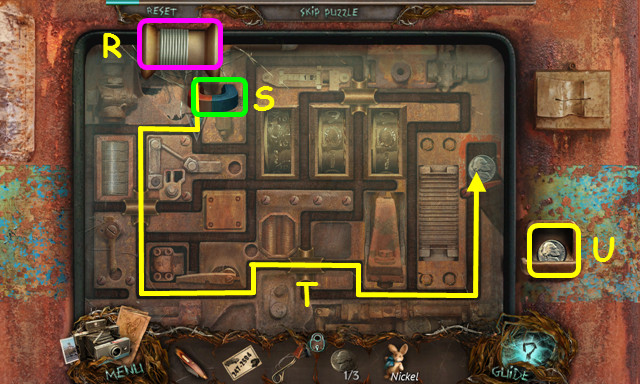
- Remove the twig and place the HOOK ON A WIRE in the hole (R).
- Place the MAGNET on the hook (S).
- Use the arrows to move the hook along the marked path (T).
- Take the 2/3 NICKEL (U).
- Enter the Motel Office.

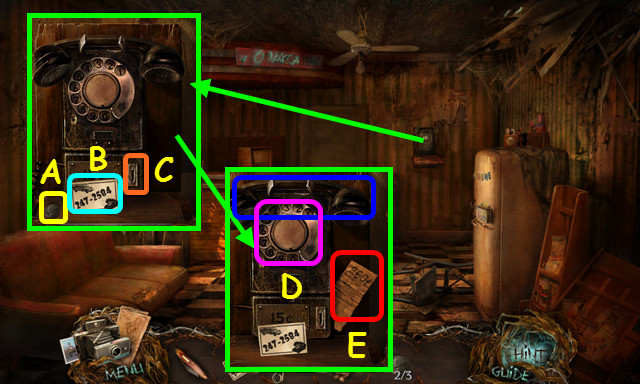
- Take the 3/3 NICKEL (A).
- Place the EMERGENCY NUMBER on the shelf (B).
- Place the 3 NICKELS in the slot (C).
- Remove the receiver and dial the emergency number (D).
- Touch the phone to hang up; answer it once it rings.
- Look at the combination 2601 (E).
- Go to the window area.

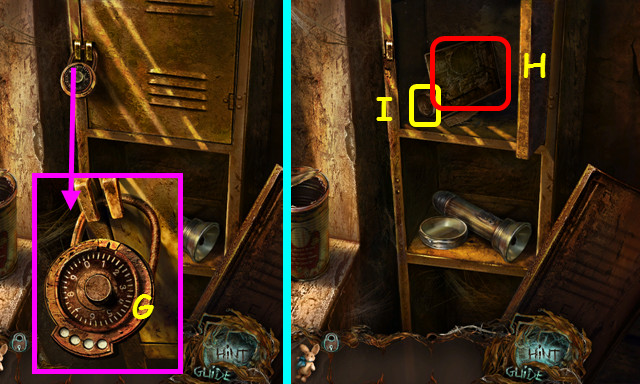
- Move the lock dial to 2-6-0-1 (G).
- Open the locker; take the photograph to play a HOP (H).
- Take the BANDAGE (I).
- Walk down and talk to the Motel Owner.
- Return to the Crash Site.

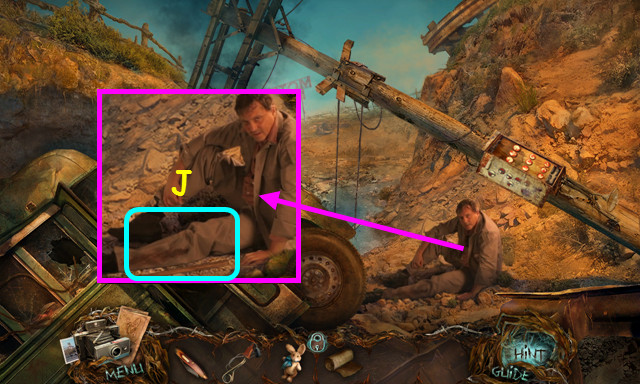
- Use the BANDAGE on the Bus Driver (J).
- Go to the Bridge.

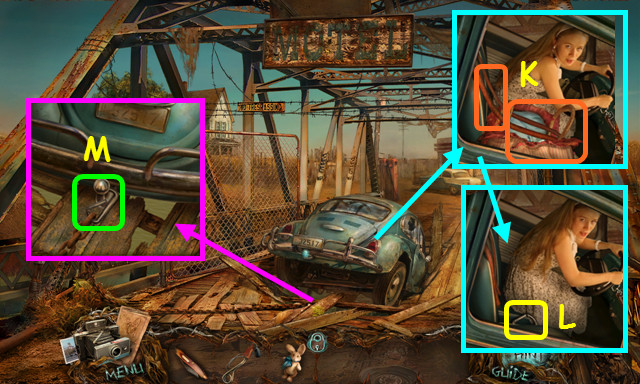
- Use the KNIFE on the straps and take the baby (K).
- Take the CARABINER (L).
- Place the CARABINER on the chain, and then on the hitch (M).
- Walk forward.
Chapter 2: The Guest Rooms

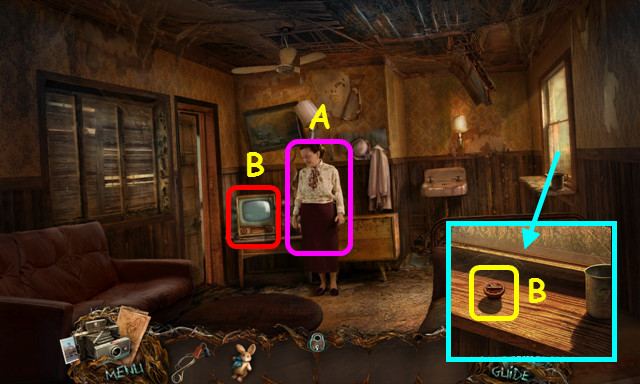
- Talk to Betty (A).
- Take the TV KNOB (B).
- Note the TV (C).
- Walk left.

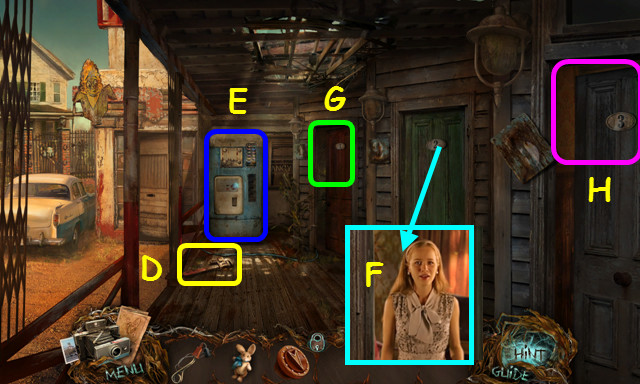
- Take the MONKEY WRENCH (D).
- Note the vending machine mini-game (E).
- Talk to Brenda in Room 2 (F).
- Note Room 1 (G).
- Enter Room 3 (H).

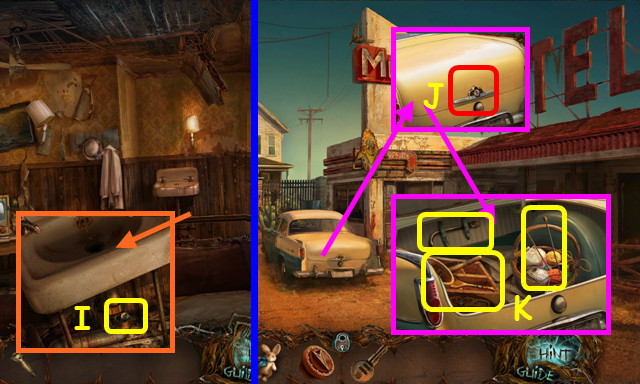
- Use the MONKEY WRENCH on the pipe; take the TRUNK KEY (I).
- Walk left twice.
- Use the TRUNK KEY on the lock (J).
- Take the POTION KIT, CROWBAR, and the KNITTING NEEDLES (K).
- Walk to Room 3 and select the TV.

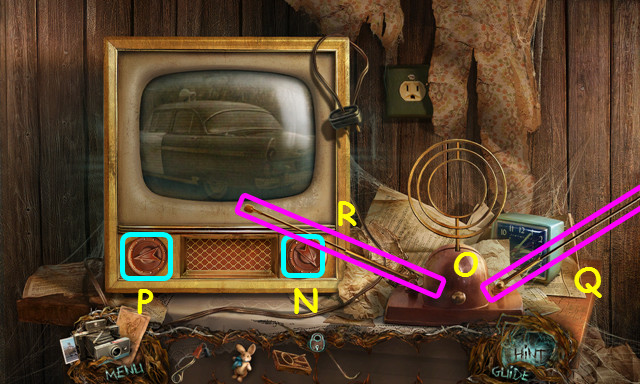
- Place the right TV KNOB on the TV (N) and the KNITTING NEEDLES on the antenna (O).
- Turn the left knob 3 times (P).
- Turn the right knob once.
- Move the right antenna to the position shown (Q).
- Move the left antenna to the position shown to play a HOP (R).
- Exit the TV area.

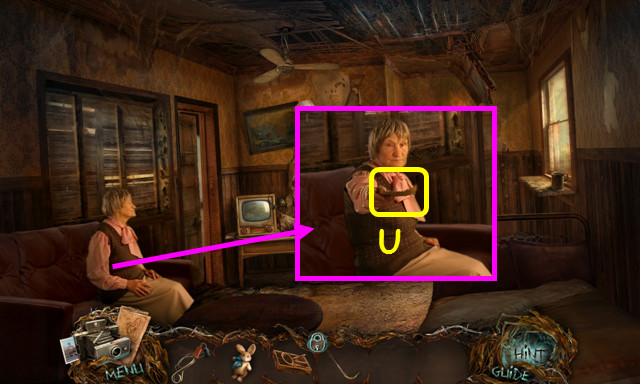
- Talk to Betty and take the POTION RECIPE (U).
- Travel to Room 1.

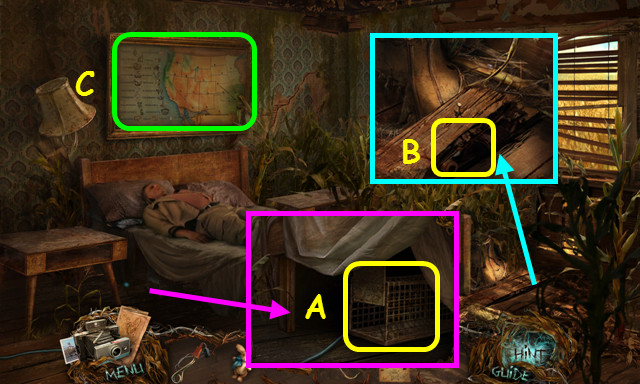
- Take the TRAP (A).
- Use the CROWBAR on the board and take the TOBACCO PIPE (B).
- Note the map mini-game (C).
- Travel to the Bridge.

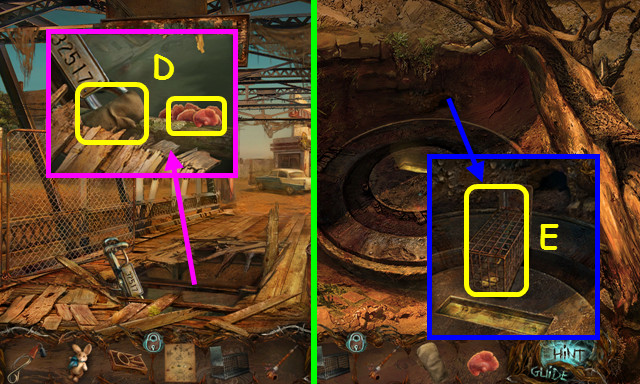
- Take the THICK GLOVE and the MUSHROOM (D).
- Walk down and right.
- Use the TRAP on the lizard; take the trap to earn the LIZARD TAIL (E).
- Go to the Motel Yard and walk forward to the House Gate.

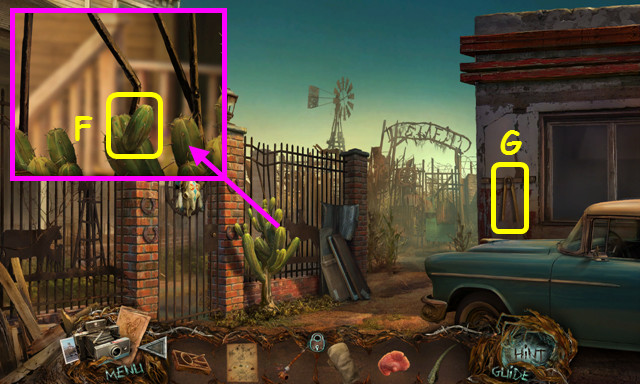
- Use the THICK GLOVE to take the CACTUS (F).
- Take the TONGS (G).
- Walk to the right.

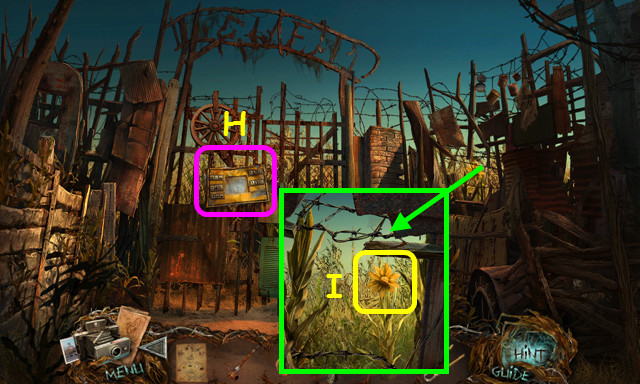
- Note the gate mini-game (H).
- Use the TONGS to take the FLOWER (I).
- Go to Room 3.

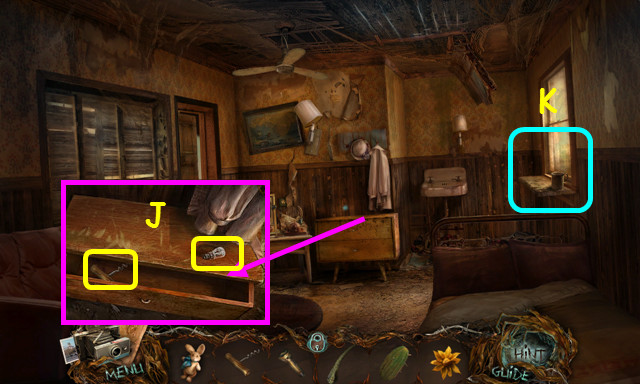
- Take the LIGHT BULB and the CORKSCREW (J).
- Note the window area (K).
- Go to the Motel office; select the window area.

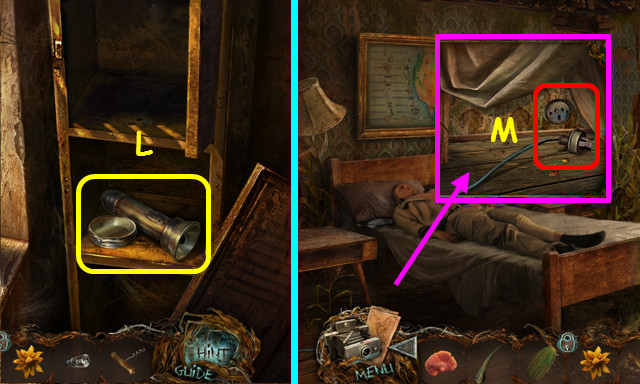
- Place the LIGHT BULB in the opening to make the FLASHLIGHT (L).
- Go to Room 1.
- Use the FLASHLIGHT under the bed; plug the cord into the wall socket (M).
- Walk down and select the vending machine mini-game.

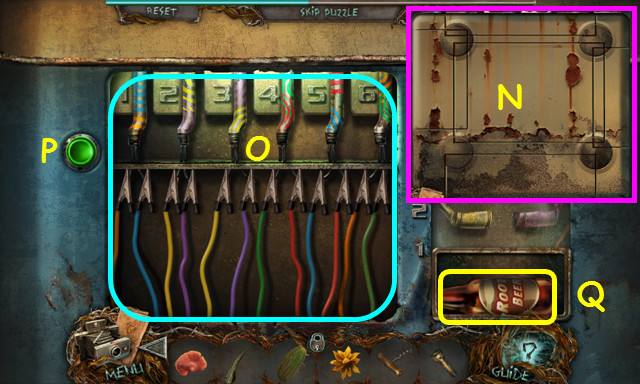
- Rotate the discs to complete the pattern on the cover (N).
- Place the wires as shown (O).
- Press the green button (P).
- Take the ROOT BEER (Q).
- Enter Room 3 and select the window area.

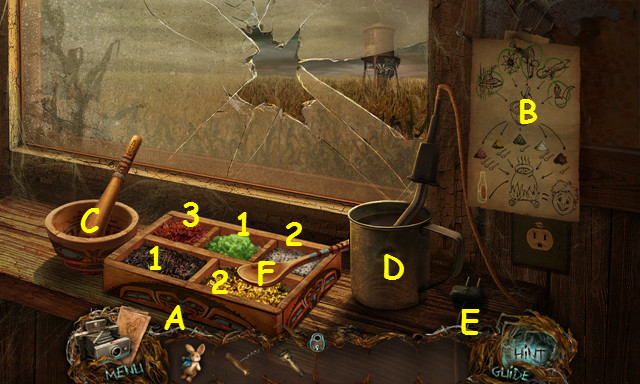
- Place the POTION KIT on the shelf (A).
- Place the POTION RECIPE on the wall (B).
- Place the LIZARD TAIL in the mortar and grind it up (C).
- Do the same for the FLOWER, CACTUS, MUSHROOM, and the TOBACCO PIPE.
- Place the ROOT BEER and then the HEATER in the cup (D).
- Plug in the heater (E).
- Use the spoon to put the correct number of scoops into the cup (F).
- Remove the heater and take the POTION.
- Go to Room 1.

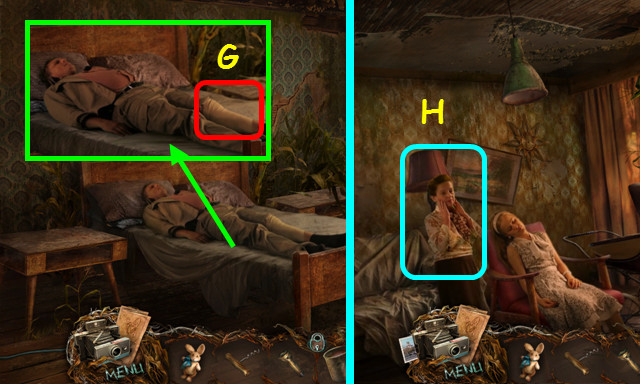
- Use the POTION on the Bus Driver (G).
- Go to Room 2.
- Talk to Betty (H).
- Go to the House Gate.

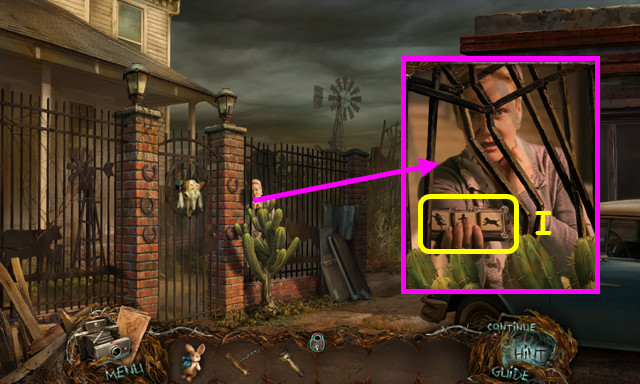
- Talk to the Motel Owner’s Wife and take the BUTTON PANEL (I).
- Walk right and select the gate mini-game.

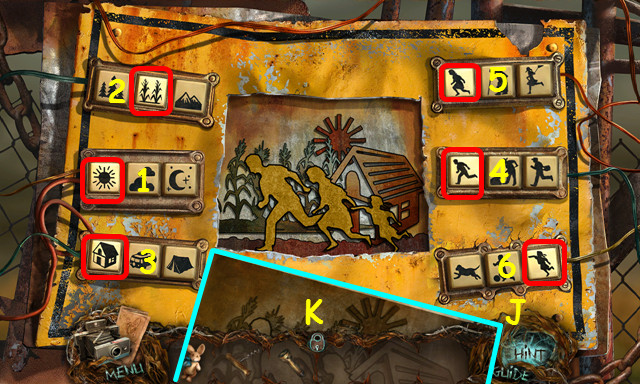
- Place the BUTTON PANEL on the lower right (J).
- Look at the diagram (K).
- Press the buttons to recreate the diagram (1-6).
- Walk forward to the Scarecrows.

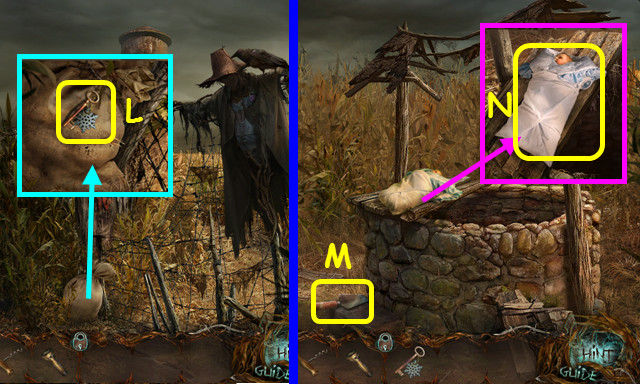
- Take the FRIDGE KEY (L).
- Walk left to the Well.
- Take the SHOVEL (M).
- Take the baby (N).
- Travel to the Motel Office.

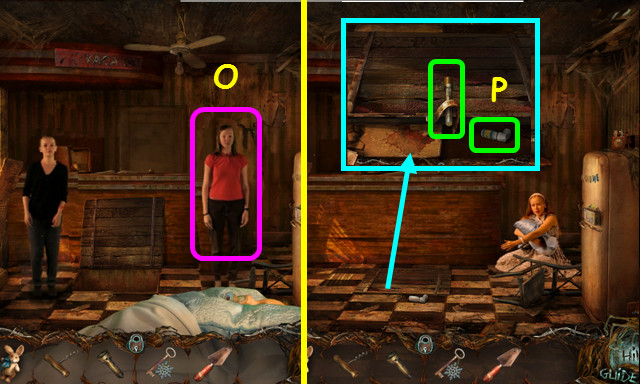
- Talk to Brenda (O).
- Try to take the inhaler; open the latch (P).
- Enter the trapdoor.
Chapter 3: The Basement

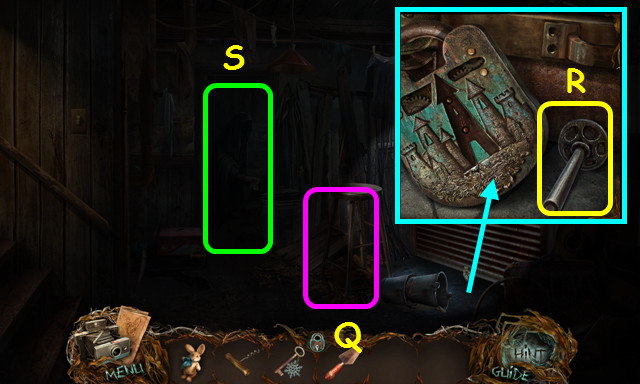
- Use the FLASHLIGHT on the scene (Q).
- Take the HANDLE (R).
- Walk forward (S).

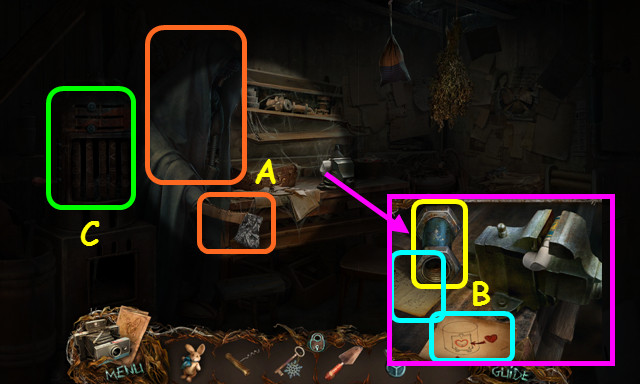
- Remove the axe and cape (A).
- Read the 2 diagrams and take the ADAPTER (B).
- Select the furnace (C).

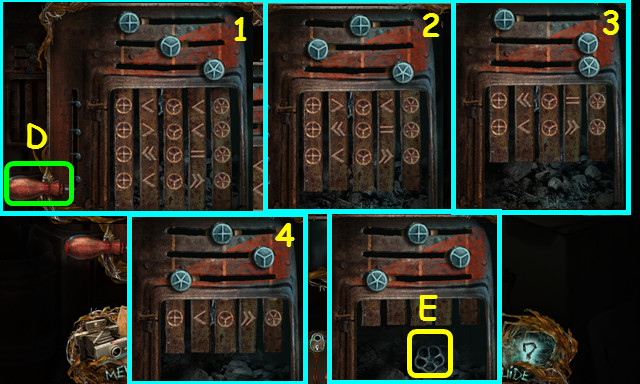
- Place the HANDLE on the furnace.
- Move the handles to each position and lift the lever (D) up one space (1-4).
- Take the VALVE (E).

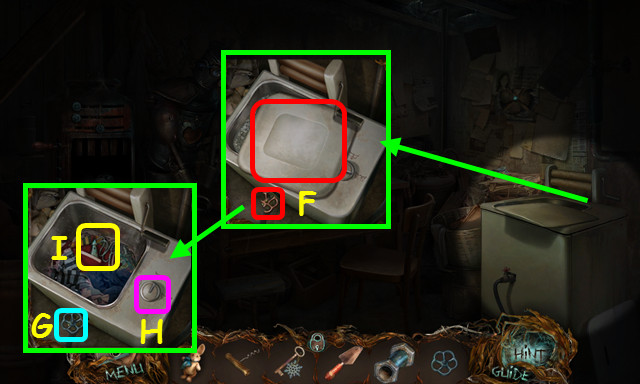
- Remove the cover and the broken valve (F).
- Place the VALVE on the stem and turn it (G).
- Select the switch (H).
- Take the TOWER-SHAPED KEY (I).
- Walk down.

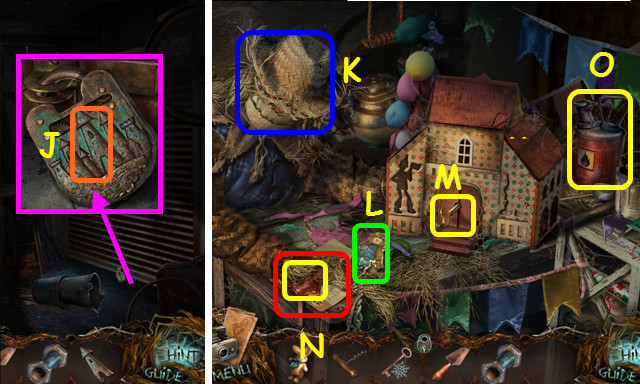
- Use the TOWER-SHAPED KEY in the lock (J).
- Open the door and walk right.
- Knock over the head (K) and take the SCARECROW FIGURINE (L).
- Take the RADIO KEY (M).
- Move the straw, take the BENT TIN HEART, and read the letter (N).
- Take the FUEL CANISTER (O).
- Walk down and go forward.

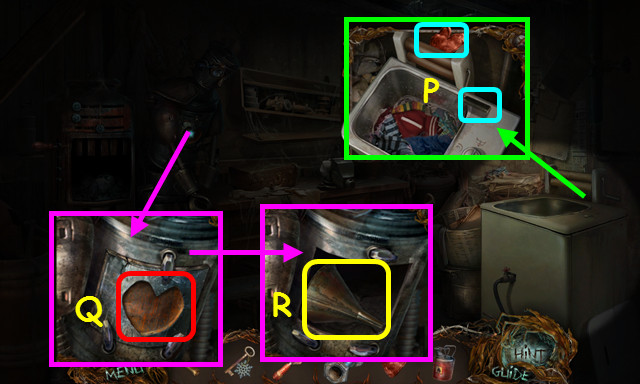
- Place the BENT TIN HEART in the rollers and turn the handle to receive the TIN HEART (P).
- Place the TIN HEART on the cover (Q).
- Take the FUNNEL (R).
- Walk down.

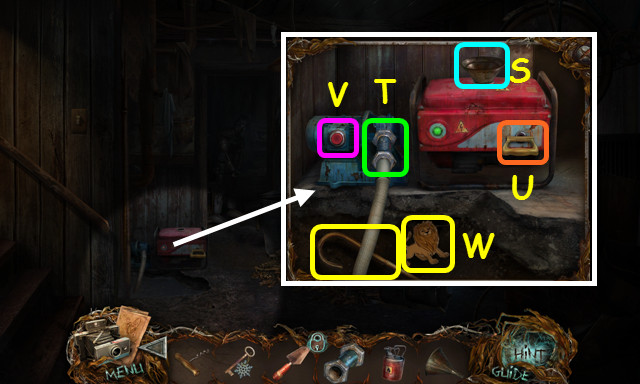
- Use the FUNNEL, and then the FUEL CANISTER on the generator (S).
- Use the ADAPTER on pump and attach the hose (T).
- Pull the start cord (U) and push the button (V).
- Take the BROKEN WALKING STICK and the LION FIGURINE (W).
- Walk forward.

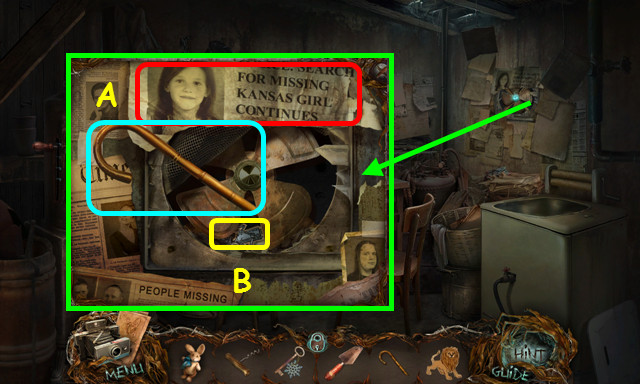
- Read the clipping and place the BROKEN WALKING STICK in the fan blades (A).
- Take the TIN MAN FIGURINE (B).
- Walk down and right.

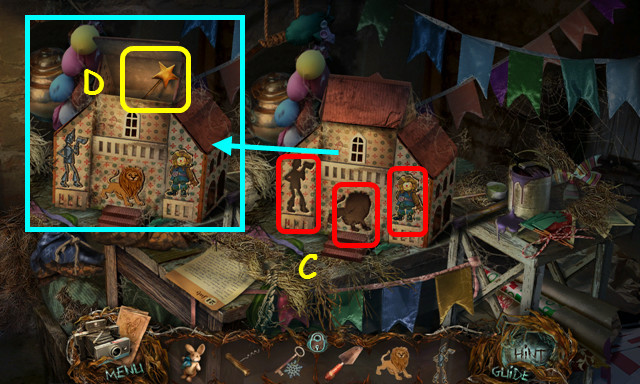
- Place the TIN MAN FIGURINE, the SCARECROW FIGURINE and the LION FIGURINE on the house (C).
- Take the METAL WAND (D).
- Walk down and forward.

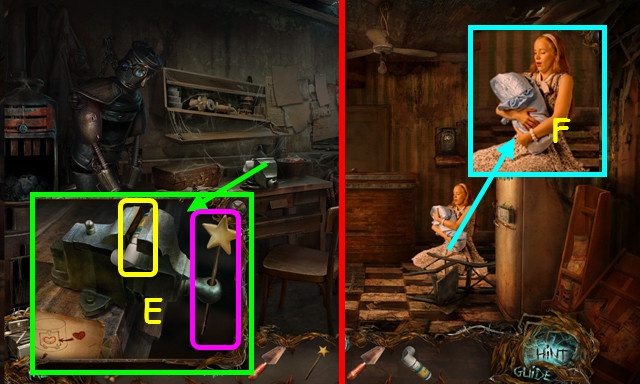
- Place the METAL WAND in the hole and turn it to release the INHALER (E).
- Walk down.
- Give the INHALER to Brenda (F).

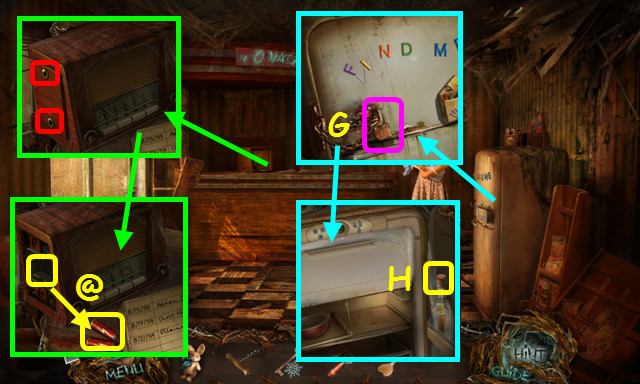
- Use the RADIO KEY twice on the panel (red).
- Take the BATTERIES (@).
- Use the FRIDGE KEY on the lock (G).
- Use the corkscrew to take the CORK (H).
- Walk down.
- After the cut-scene, go to Room 1.

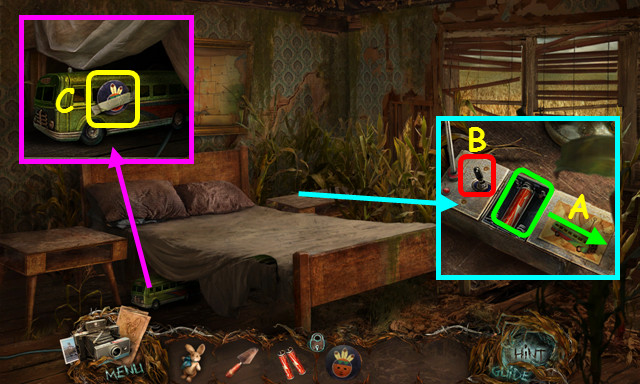
- Slide the lid, place the BATTERIES inside, and close the lid (A).
- Flip the switch (B).
- Take the 1st TOKEN (C).
- Go to Room 2.

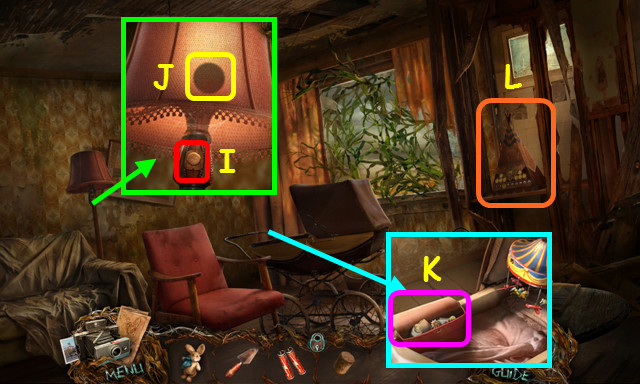
- Place the CORK on the switch and push (I).
- Take the 2nd TOKEN (J).
- Open the purse and read the prescription (K).
- Select the mini-game (L).

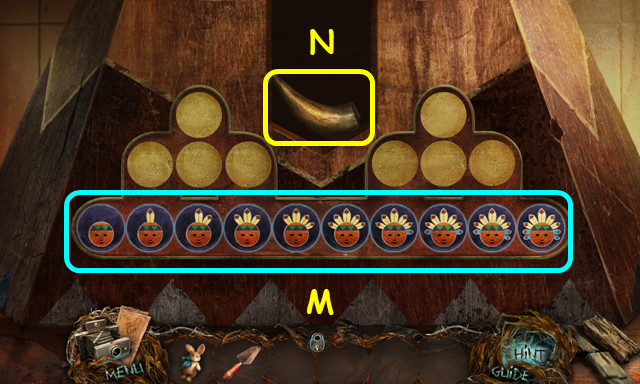
- Move the tokens to the shown positions (M).
- Take the HORN (N).
- Walk to the House Gate.

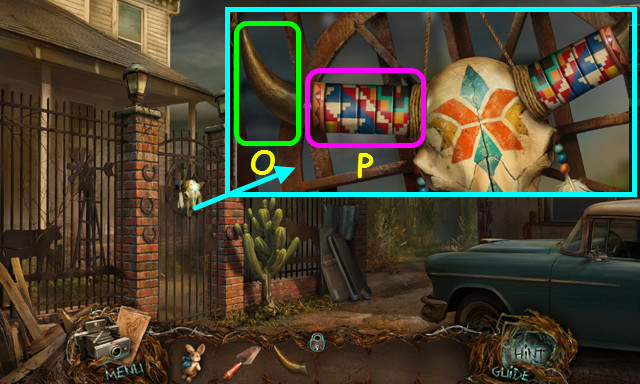
- Place the HORN on the skull (O).
- Turn the wheels to match the right horn (P).
- Walk left.
Chapter 4: The House

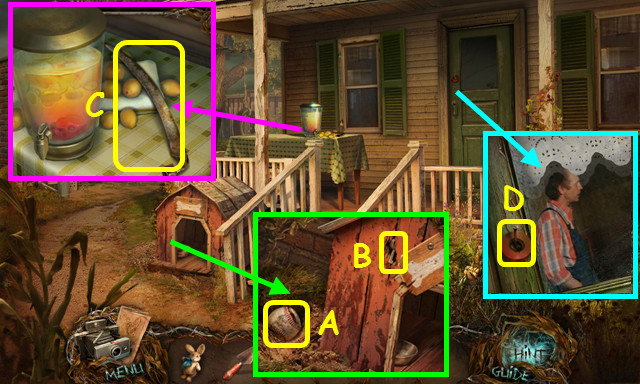
- Use the SHOVEL on the dirt to find the BASEBALL (A).
- Move the sign and take the SHED KEY (B).
- Take the DULL BLADE (C).
- Take the ADHESIVE TAPE (D).
- Walk left.

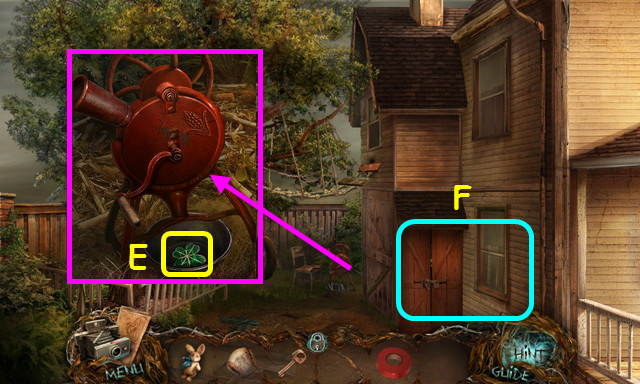
- Take the CLOVER (E).
- Select the window area (F).

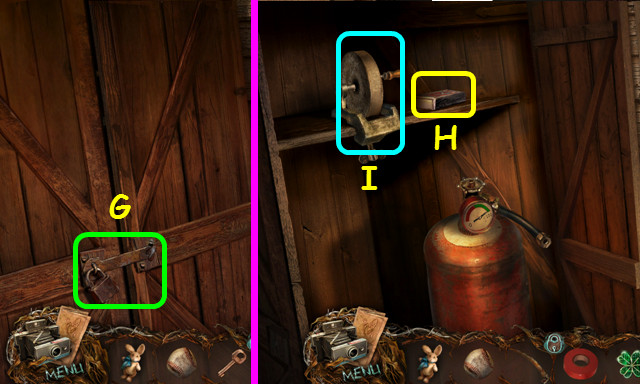
- Use the SHED KEY on the lock (G).
- Take the MATCHES (H).
- Use the DULL BLADE on the sharpener to make the SHARP BLADE (I).
- Walk down twice.

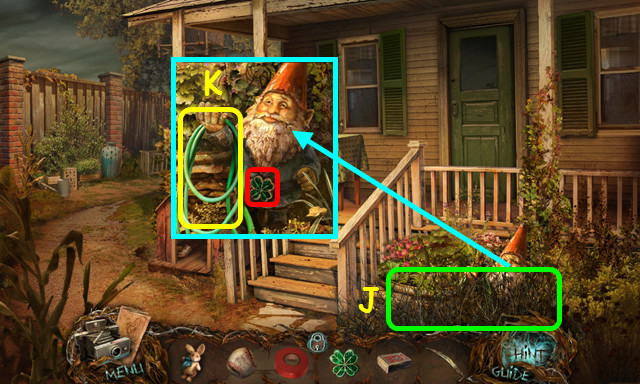
- Use the SHARP BLADE on the weeds (J).
- Place the CLOVER and take the HOSE (K).
- Walk to the Scarecrows.

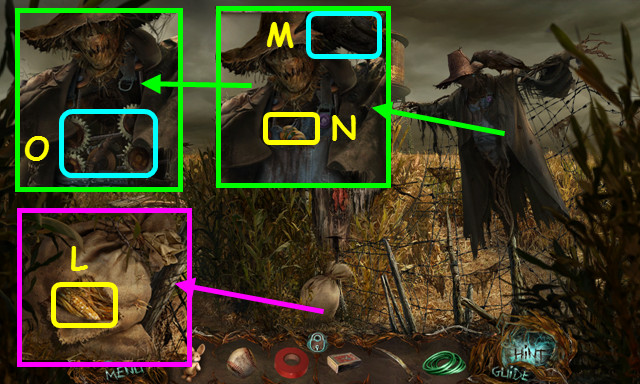
- Use the SHARP BLADE on the sack; take the CORNCOB (L).
- Use the BASEBALL on the crow (M).
- Take the STATE PINS (N).
- Open the overalls and note the gears (O).
- Return to Room 1; select the map mini-game.

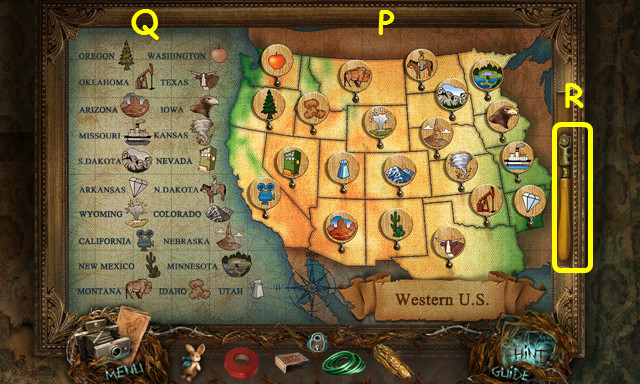
- Place the STATE PINS on the map.
- Move the pins (P) to match the list (Q).
- Take the GLASS CUTTER (R).
- Travel to the Backyard.

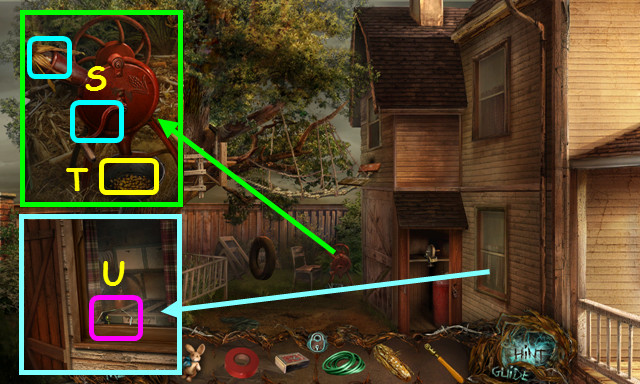
- Place the CORNCOB in the corn sheller and turn the crank (S).
- Take the CORN KERNELS (T).
- Use the GLASS CUTTER on the window; pull the latch and enter the house (U).

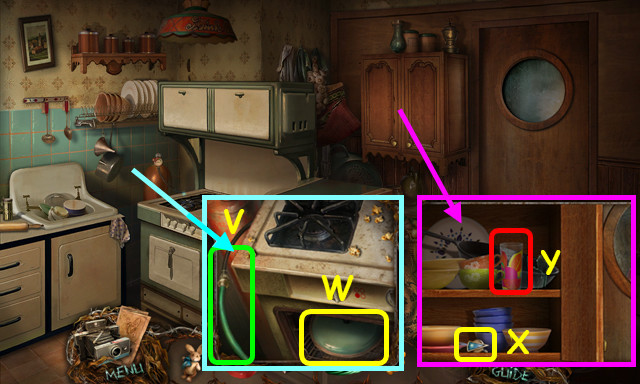
- Place the HOSE on the gas cylinder (V).
- Open the oven and take the PAN LID (W).
- Take the SWITCH (X).
- Touch the glass (Y).

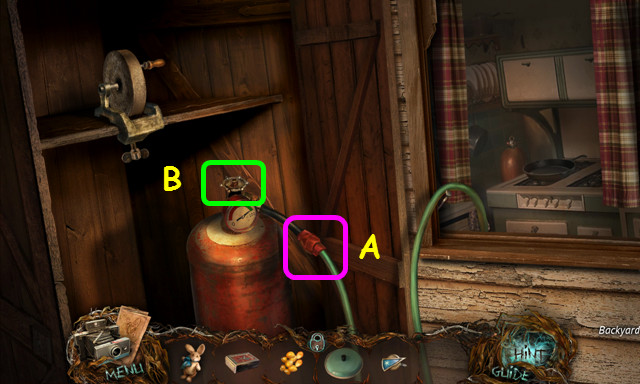
- Place the hose on the tube, and then use the ADHESIVE TAPE to secure it (A).
- Turn the valve (B).
- Go to the Motel Office.

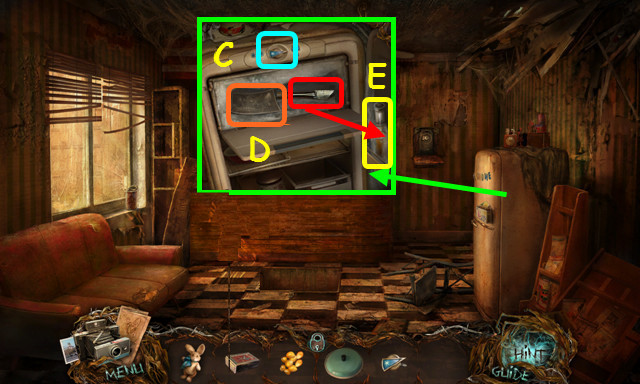
- Place the SWITCH and turn it once (C).
- Open the freezer and take the photo for a HOP (D).
- Use the ice chisel to take the OIL BOTTLE (E).
- Take the GLASSES and the 1st PLANK (F).
- Return to the Kitchen.

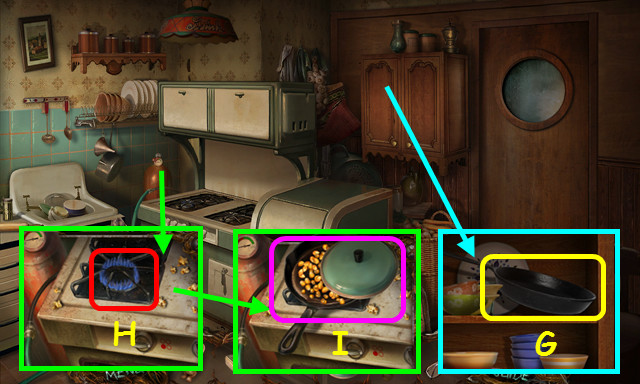
- Move the items and take the FRYING PAN (G).
- Use the MATCHES on the burner (H).
- Place the FRYING PAN on the burner; use the OIL BOTTLE, CORN KERNELS, and then the PAN LID on the pan (I).
- Walk down twice and enter the house.

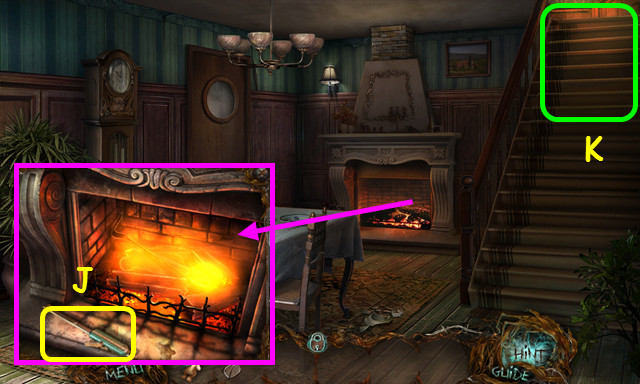
- Take the LIGHTER (J).
- Walk up the stairs (K).

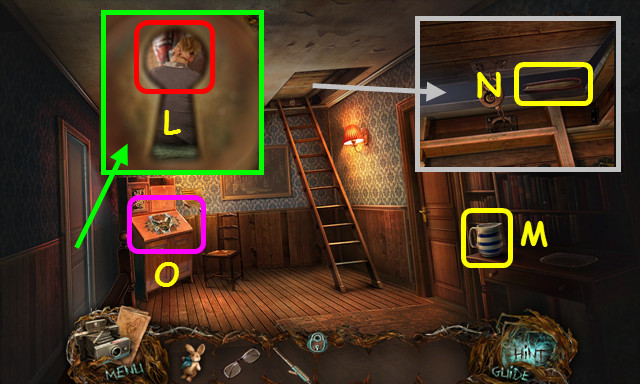
- Talk to the Motel Owner’s Wife (L).
- Take the EMPTY JUG (M).
- Lift the trap door and take the ORIGAMI BOOK (N).
- Select the desk (O).

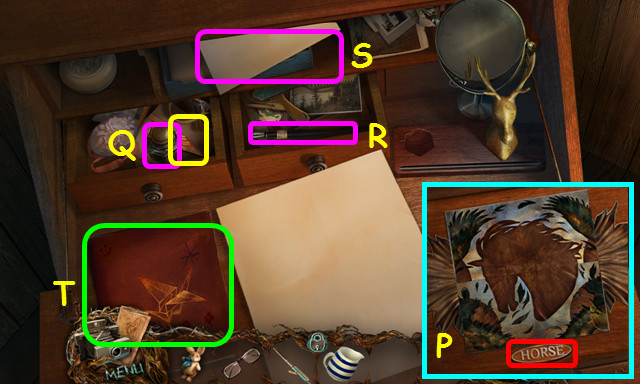
- Rotate the tiles to form a horse, and then press the ‘HORSE’ button (P).
- Open and sort through the left drawer until touching the inkwell; take the LEFT OWL WING (Q).
- Open and sort through the right drawer until touching the pen (R).
- Touch the paper (S).
- Place the ORIGAMI BOOK on the desk and open it (T).
- Walk to the Porch.

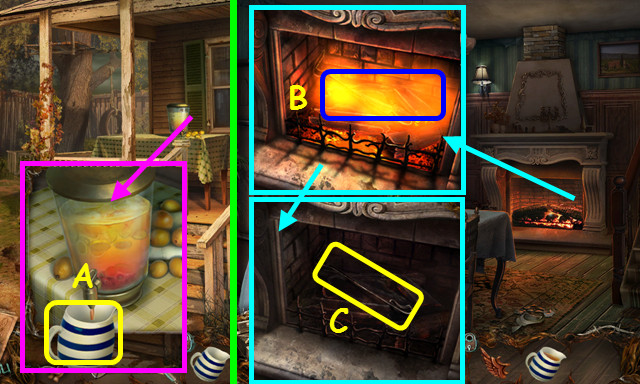
- Use the EMPTY JUG on the dispenser to get the JUG OF LEMONADE (A).
- Enter the house.
- Use the JUG OF LEMONADE on the flames (B).
- Take the POKER (C).

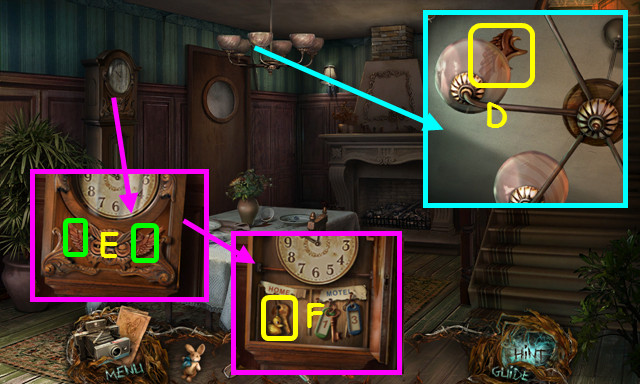
- Use the POKER on the chandelier; take the RIGHT OWL WING (D).
- Place the LEFT OWL WING and the RIGHT OWL WING on the clock (E).
- Take the BATHROOM KEY (F).
- Walk up the stairs.

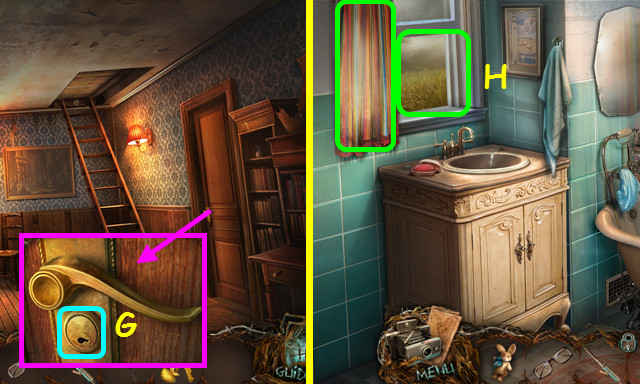
- Use the BATHROOM KEY on the lock (G).
- Walk right.
- Open the curtain and the window (H).

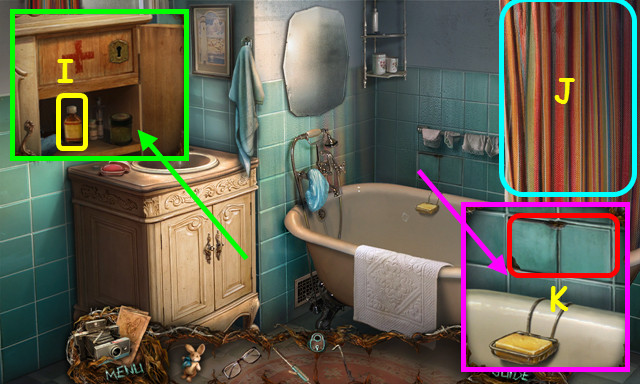
- Take the IODINE (I).
- Move the shower curtain (J).
- Use the POKER on the tiles twice (K).
- Walk down and select the desk.

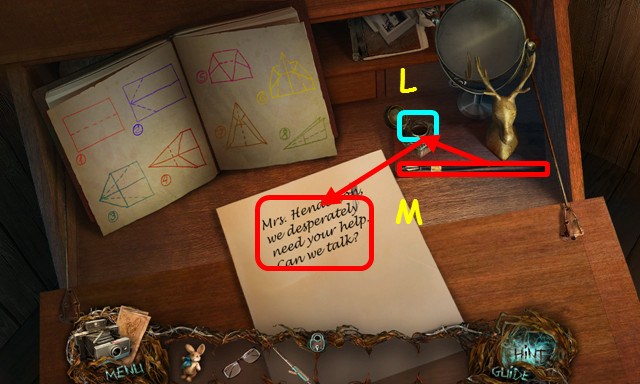
- Pour the IODINE in the inkwell (L).
- Take the pen; use it on the inkwell, and then the paper (M).

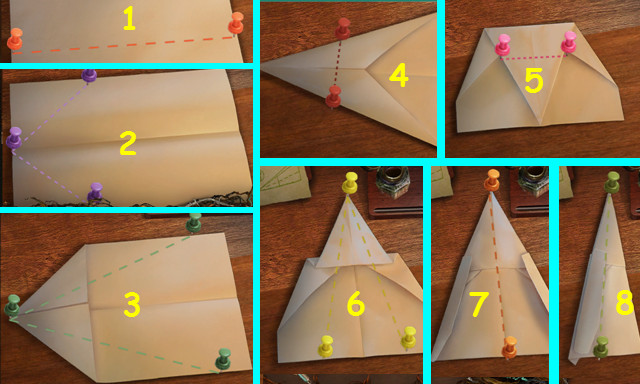
- Move the pins to match the drawing in the origami book (1-8).
- Lowering the menu bar allows more movement of the pins.

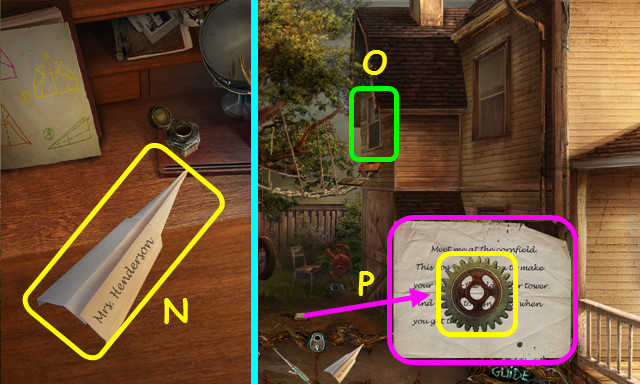
- Take the PAPER PLANE (N).
- Travel to the Backyard.
- Use the PAPER PLANE on the window (O).
- Take the GEAR and read the note (P).
- Walk down twice.
Chapter 5: The Water Tower, Shelter, and Treehouse

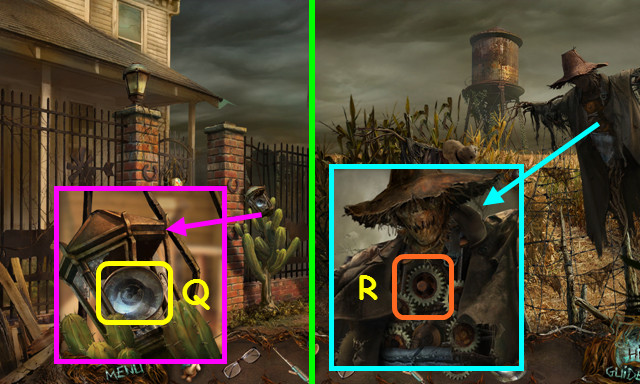
- Take the REFLECTOR (Q).
- Walk to the Scarecrows.
- Place the GEAR in the mechanism (R).
- Walk forward.

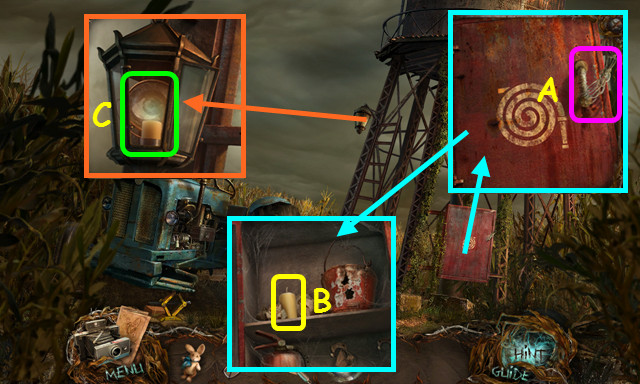
- Use the LIGHTER on the ties (A).
- Take the CANDLE (B).
- Open the light and remove the old candle; place the REFLECTOR and CANDLE inside, and then use the LIGHTER on the candle (C).

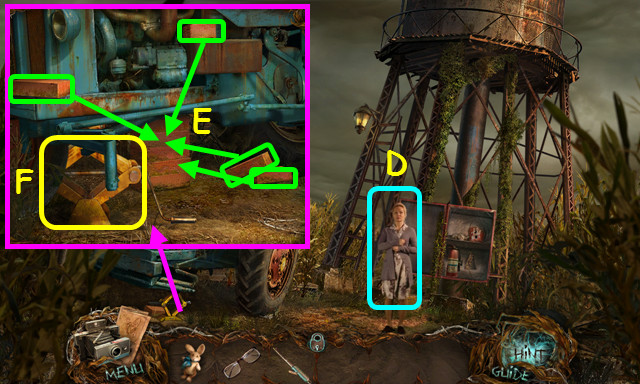
- Talk to Mrs. Henderson (D).
- Stack all the bricks (E).
- Take the JACK (F).
- Return to the Second Floor of the house, and then walk left.

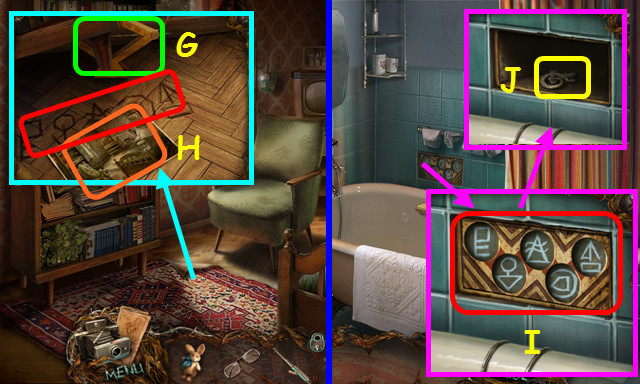
- Place the JACK under the and turn the crank (G).
- Move the carpet, note the symbols, the bookcase nd select the photo for a HOP (H).
- Walk down and right.
- Change the symbols as shown (I).
- Take the LIZARD-SHAPED KEY (J).
- Walk down.

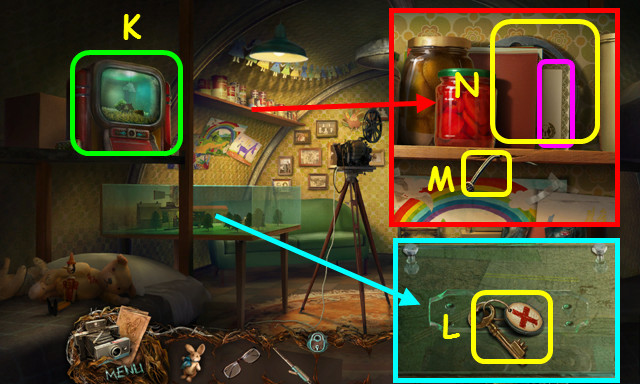
- Note the TV mini-game (K).
- Take the MEDS CABINET KEY and note the diorama beneath the glass (L).
- Take the NAIL (M).
- Move the jars, read the adoption certificate, and take the FILM (N).

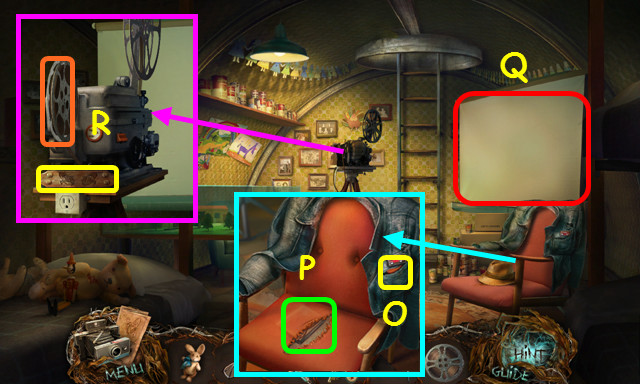
- Take the SPRING BUTTON (O).
- Move the hat; use the NAIL on the seat and read the diary (P).
- Pull down the screen (Q).
- Place the FILM on the reel and take the CORN NAMEPLATE (R).
- Select the TV mini-game.

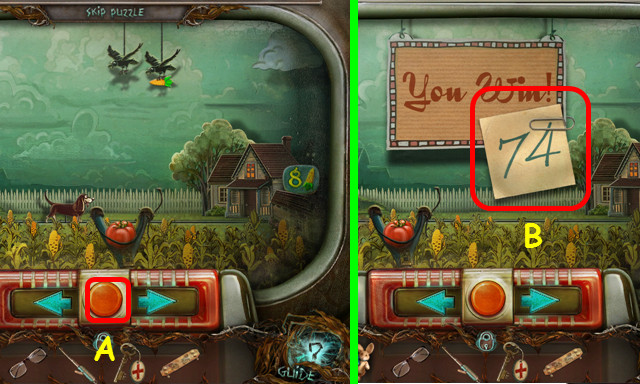
- Place the SPRING BUTTON in the center (A).
- Press the spring button to knock down the corn 8 times.
- Use the arrows to slide the slingshot left or right.
- Note the number 74 on the note (B).
- Select the diorama.

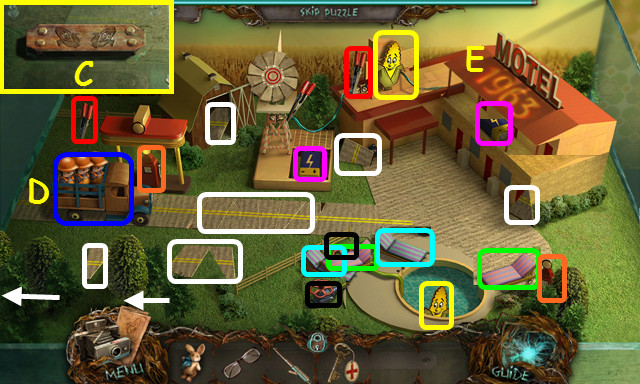
- Place the CORN NAMEPLATE in the holder (C).
- Replace the scenery items as shown (color-coded).
- Push the truck (D).
- Note the code 1963 on the roof (E).

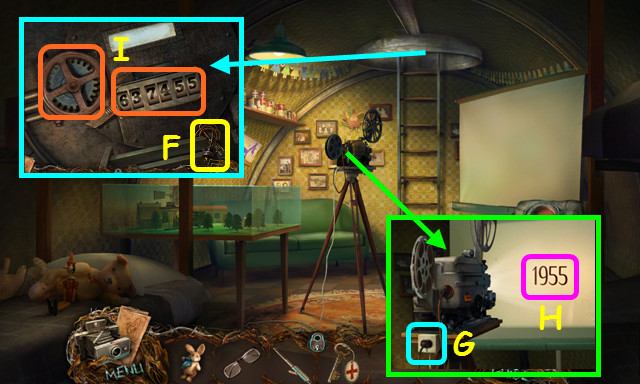
- Take the CABLE (F).
- Use the CABLE on the plug (G).
- Note the code 1955 on the screen (H).
- Enter 63-74-55 in the lock and turn the wheel (I).

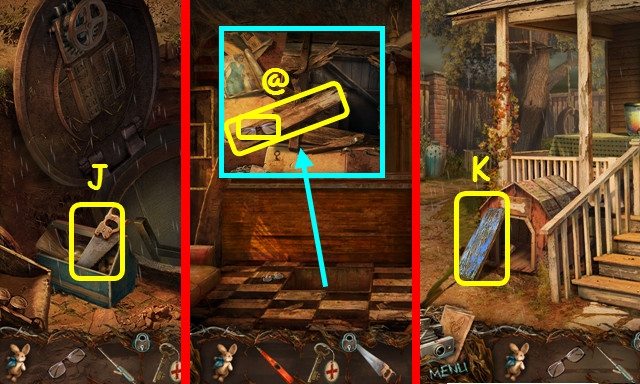
- Take the SAW (J).
- Walk to the Motel Office.
- Take the 1st PLANK and the GLASSES (@).
- Return to the Front Porch.
- Take the 2nd PLANK (K).
- Walk to the Bathroom.

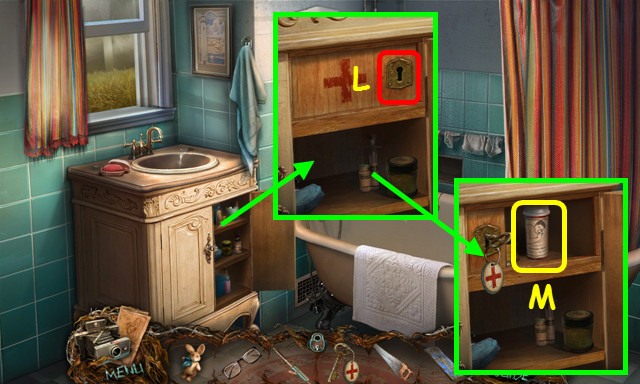
- Use the MEDS CABINET KEY on the lock (L).
- Take the SLEEPING PILLS (M).
- Return to the Backyard.

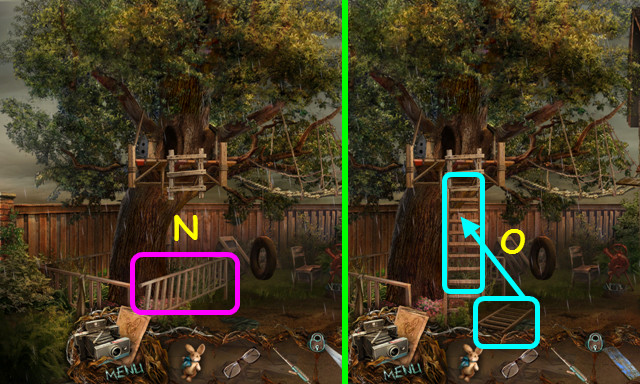
- Use the SAW on the fence (N).
- Place the ladder on the treehouse (O).
- Go up the ladder.

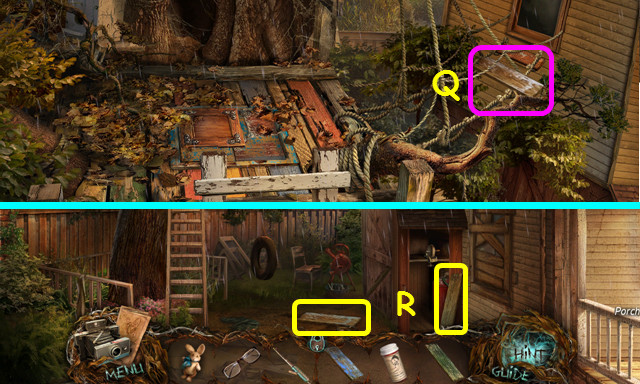
- Touch the plank (Q).
- Walk down.
- Take the 3rd and 4th PLANK (R).
- Return to the treehouse.

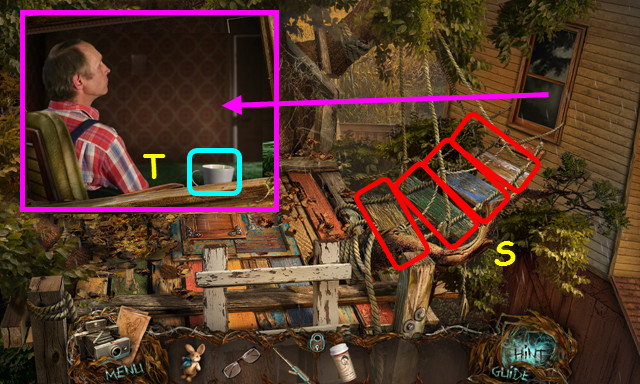
- Place the 4 PLANKS on the ropes (S).
- Use the SLEEPING PILLS on the cup (T).
- Return to the Second Floor and walk left.

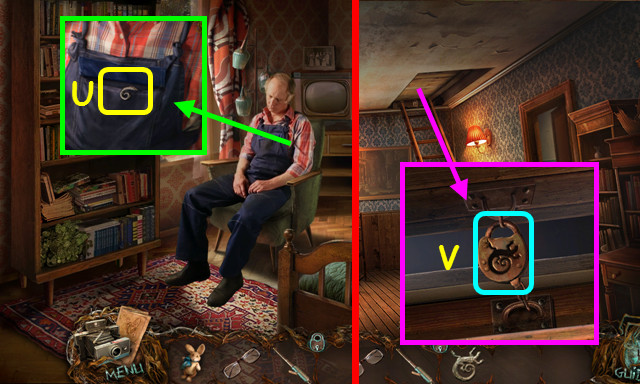
- Talk to the Motel Owner and take the LIZARD-SHAPED KEY (U).
- Walk down.
- Use the LIZARD-SHAPED KEY in the lock (V).
- Climb up.
Chapter 6: The Attic and the Well

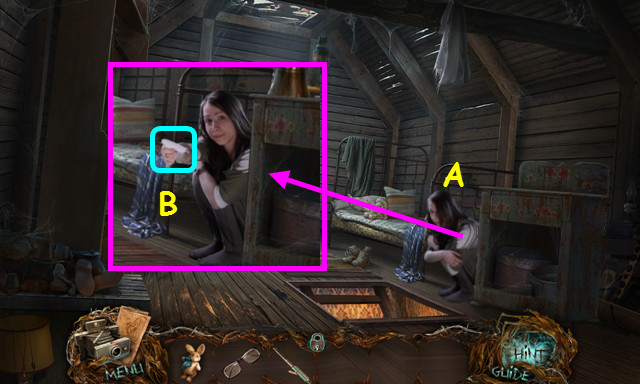
- Talk to Emma (A).
- Take the photo for a HOP (B).

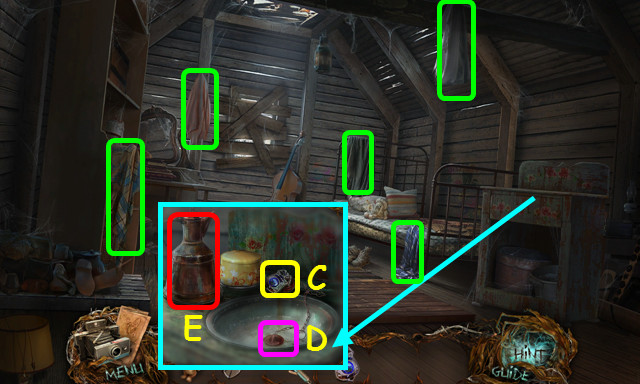
- Move the items and take the POLICE BADGE (C).
- Place the plug in the sink (D).
- Pour the water (E).
- Collect the 5 RAGS to make the CLOTH ROPE (green).

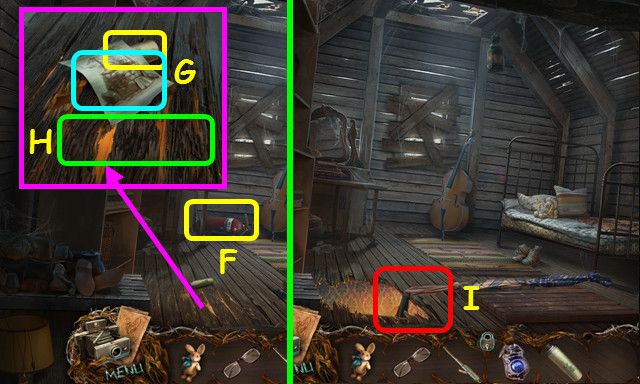
- Take the EXTINGUISHER (F).
- Look at the drawing and take the AEROSOL (G).
- Use the EXTINGUISHER on the planks (H).
- Use the CLOTH ROPE on the hole, and then climb down (I).
- Return to the Scarecrows.

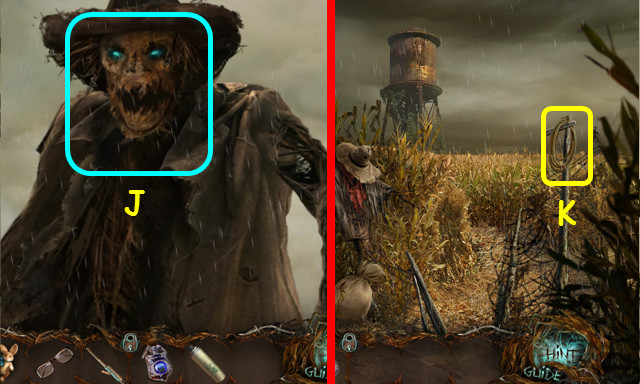
- Use the AEROSOL or the LIGHTER on the scarecrow (J).
- You need both items in your inventory.
- Take the ROPE (K).
- Walk left and look at the Well.

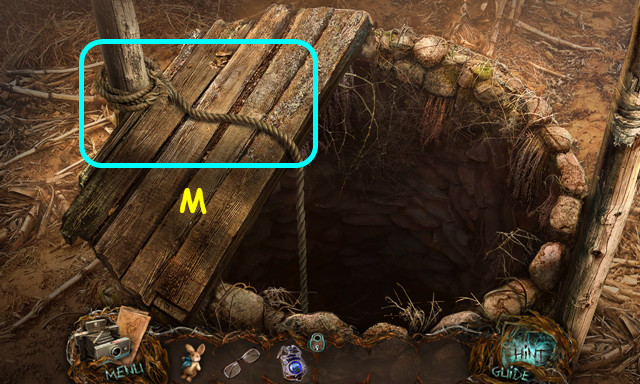
- Use the ROPE on the well (M).
- Climb down.

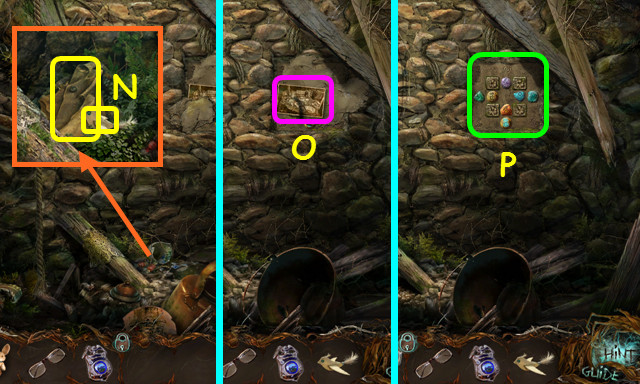
- Move the branch; take the BIRD MASCOT and the COAT (N).
- Remove the mud; take the photo for a HOP (O).
- Select the mini-game (P).

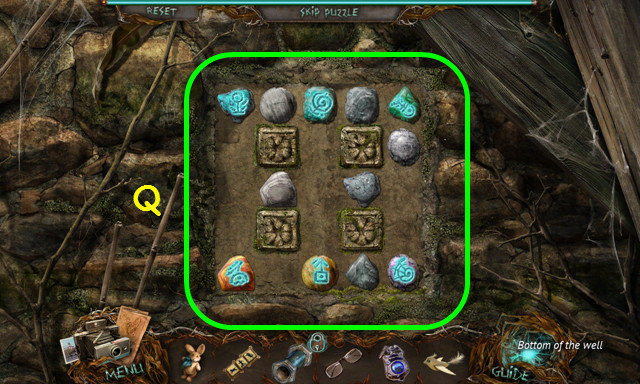
- Use the COAT to clean the area.
- Slide the symbols to the positions shown (Q).
- Walk forward.

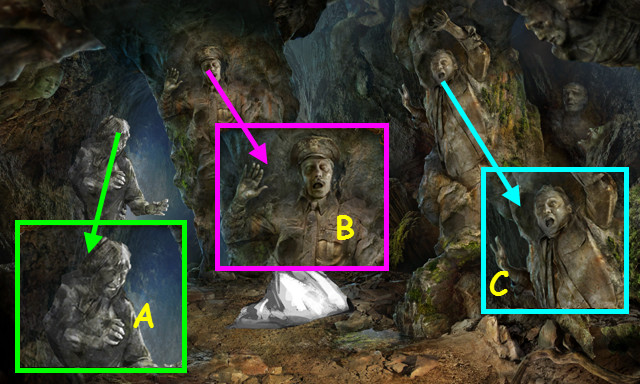
- Use the GLASSES on the left statue (A).
- Use the POLICE BADGE on the center statue (B).
- Use the BIRD MASCOT on the right statue (C).
- Congratulations, you’ve completed Fright.



 Where Angels Cry Walkthrough, Guide, & Tips
 Vampire Saga: Pandora's Box Walkthrough, Guide, & Tips
 Shrouded Tales: Revenge of Shadows Walkthrough, Guide, & Tips
 Christmas Stories: Hans Christian Andersen's Toy Soldier Walkthrough, Guide, & Tips
 Witch Hunters: Full Moon Ceremony Walkthrough, Guide, & Tips