Shrouded Tales: Revenge of Shadows Walkthrough, Guide, & Tips
Shrouded Tales: Revenge of Shadows Walkthrough

Welcome to the Shrouded Tales: Revenge of Shadows Walkthrough
Adventure into the unknown to save a city from evil!
Whether you use this document as a reference when things get difficult or as a road map to get you from beginning to end, we’re pretty sure you’ll find what you’re looking for here.
This document contains a complete Shrouded Tales: Revenge of Shadows game walkthrough featuring annotated screenshots from actual gameplay!
We hope you find this information useful as you play your way through the game. Use the walkthrough menu below to quickly jump to whatever stage of the game you need help with.
Remember to visit the Big Fish Games Forums if you find you need more help. Have fun!
This walkthrough was created by Laurie Murphy, and is protected under US Copyright laws. Any unauthorized use, including re-publication in whole or in part, without permission, is strictly prohibited.
General Tips
- This is the official guide for Shrouded Tales: Revenge of Shadows.
- This guide does not mention each time you have to zoom into a location; the screenshots show each zoom scene.
- Hidden-object puzzles are referred to as HOPs. This guide does not show screenshots of the HOPs. However, it is mentioned when a HOP is available and the inventory item collected.
- This guide gives step-by-step solutions for all puzzles that are not random. Please read the instructions in the game for each puzzle.
Chapter 1: Repairing the Portal

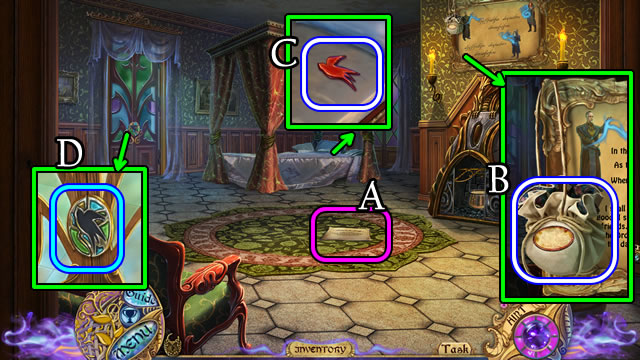
- Read the note (A).
- Take the SEEDS (B).
- Move the blanket; take the BIRD EMBLEM (C).
- Place the BIRD EMBLEM (D).

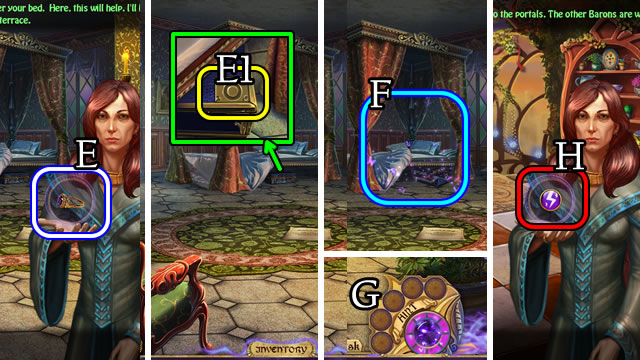
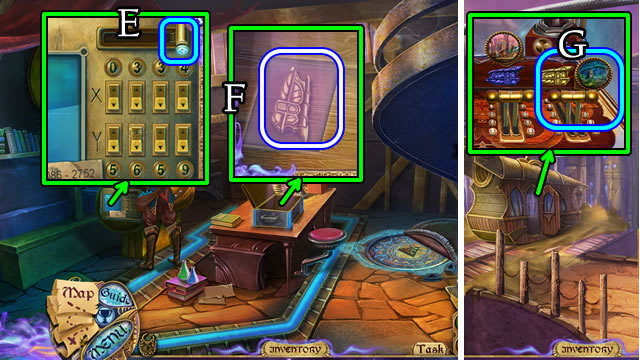
- Take MOTHER’S RING (E).
- Place MOTHER’S RING (E1); play the HOP (F) to receive the Amulet (G).
- Walk left.
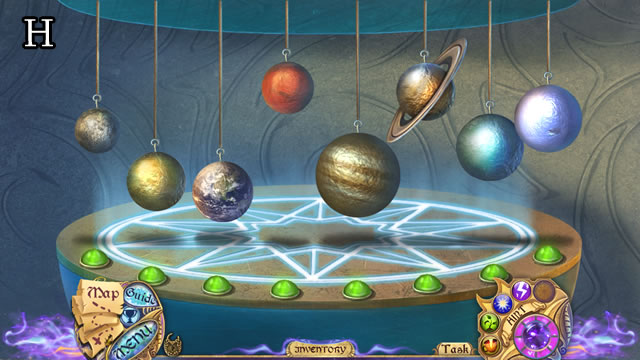
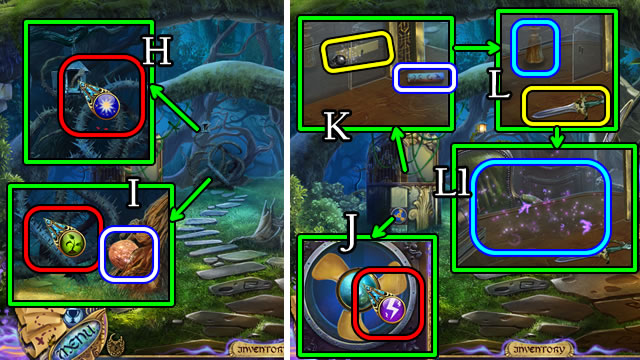
- Speak to your mother; receive the Electra spell (H).

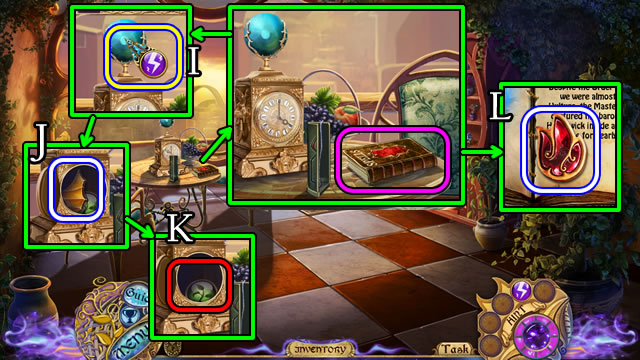
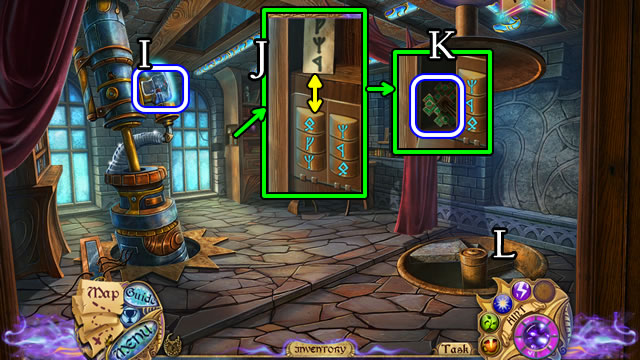
- Use the Electra spell (I).
- Take the DRAGON WING (J) and Germina spell (K).
- Read the book; take the FIRE EMBLEM (L).

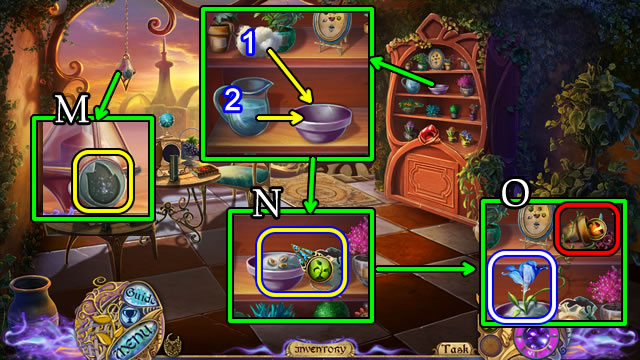
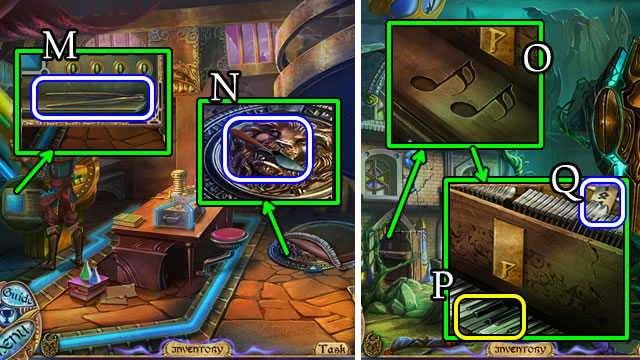
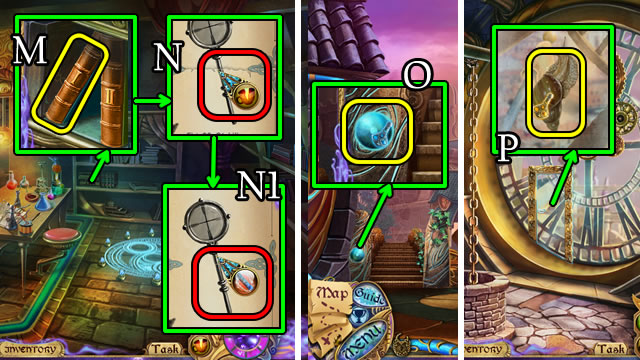
- Place the FIRE EMBLEM (M); take the RED CANDLE.
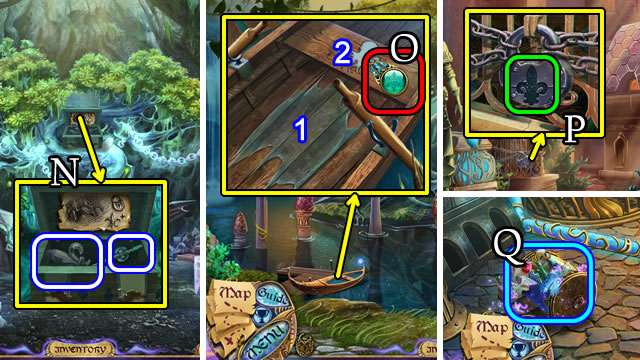
- Place the cotton (1) and water (2); add SEEDS. Use the Germina spell (N); take the BLUE FLOWER and Restora spell (O).
- Walk right.

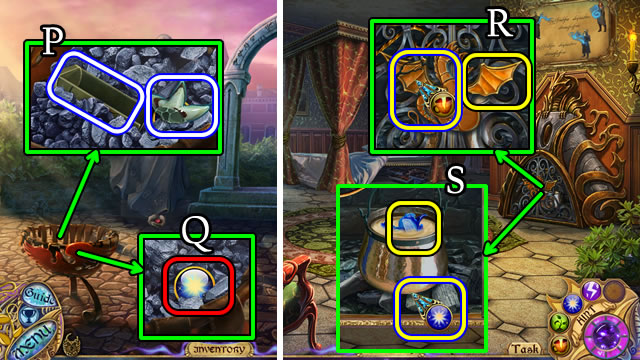
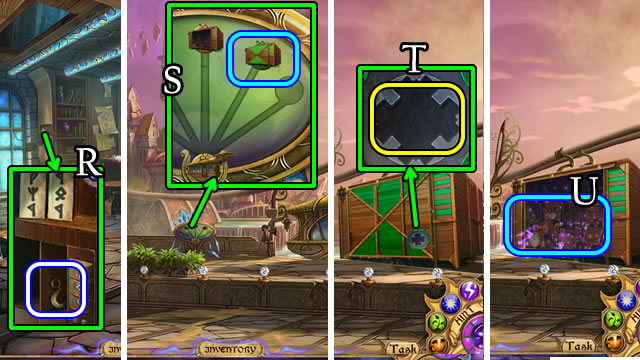
- Take the MOLD HALF and STAR HALF (P). Uncover and take the Combusta spell (Q).
- Walk down 2x.
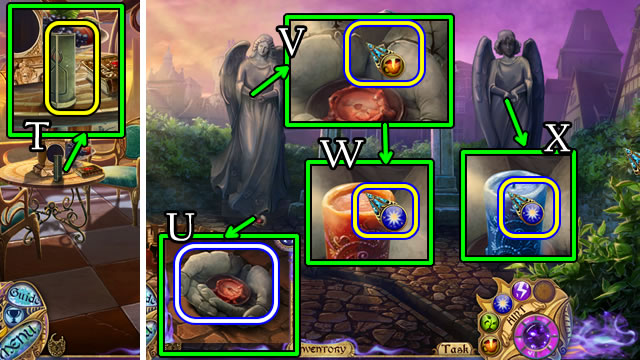
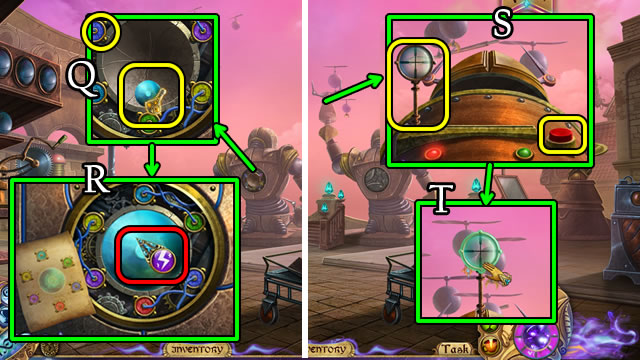
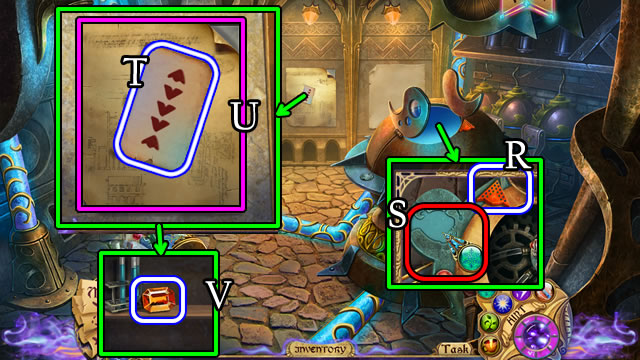
- Select the grate, place the DRAGON WING; use the Restora spell (R).
- Place the BLUE FLOWER; use the Combusta spell (S). Take the BLUE WAX.
- Walk left.

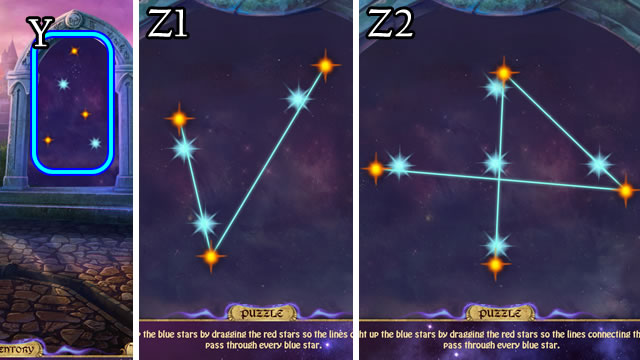
- Place the MOLD HALF (T); add the BLUE WAX; take the BLUE CANDLE.
- Walk right.
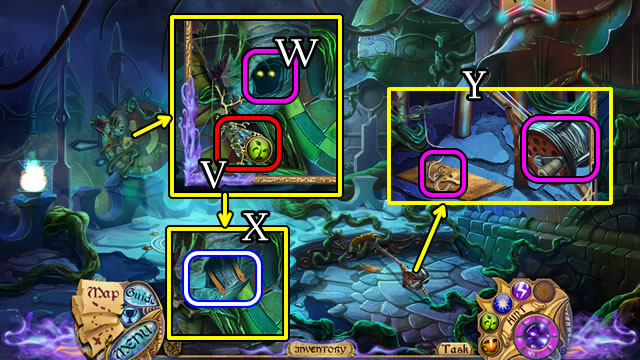
- Take the STATUE HANDS (U). Place the STATUE HANDS; use the Restora spell (V).
- Place the RED CANDLE; use the Combusta spell (W).
- Place the BLUE CANDLE; use the Combusta spell (X).


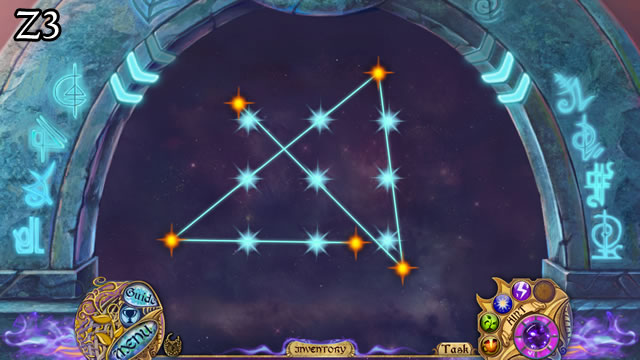
- Select (Y).
- Solution (Z1-Z2-Z3).
- Walk forward.
Chapter 2: Volarden

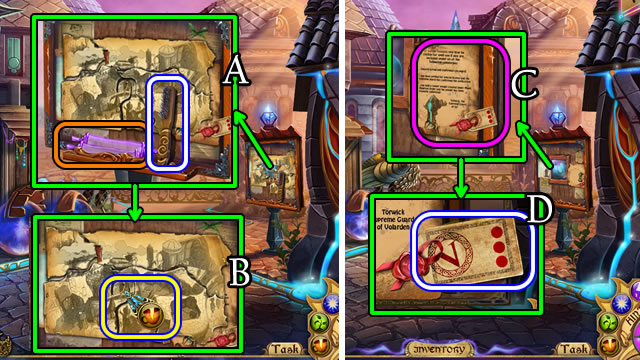
- Select each paper piece; take the BRUSH and Scroll (A).
- Use the Restora spell (B); take the Map.
- Read the notice (C); take the UNPUNCHED CARD (D).

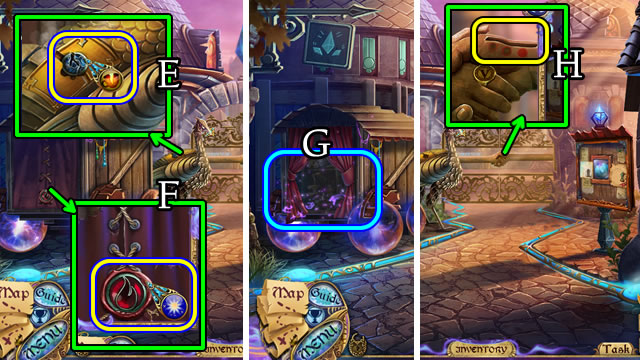
- Use the Restora spell (E); take the GEAR EMBLEM.
- Use the Combusta spell (F); take the FIRE EMBLEM.
- Open the laces; play the HOP (G) to receive a PUNCHED PASS.
- Place the PUNCHED PASS (H).
- Walk forward.

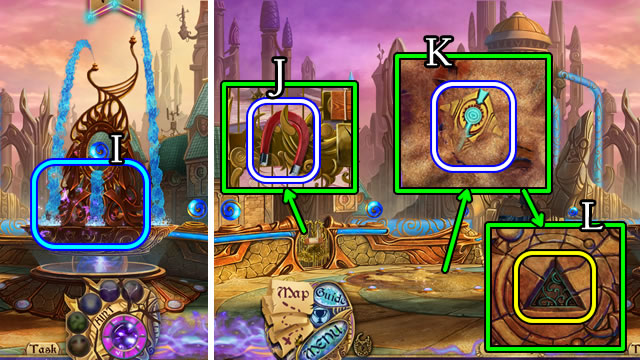
- Play the HOP (I) to receive a SHADOW STONE.
- Take the MAGNET (J).
- Take the COPPER AMULET (K); use the BRUSH; place the SHADOW STONE (L). Touch the Shadow Stone.

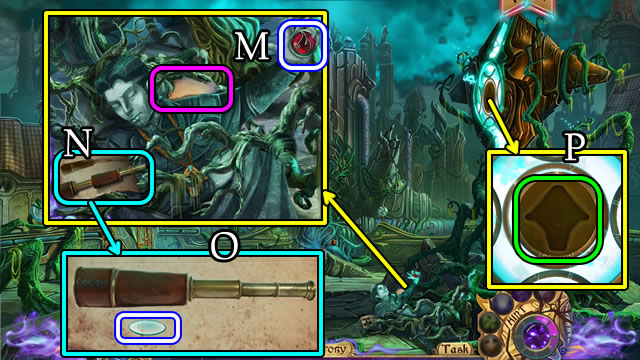
- Take FIRE EMBLEM 2 and read the note (M); assemble the spyglass (N); take the LENS (O).
- Place the COPPER AMULET (P).

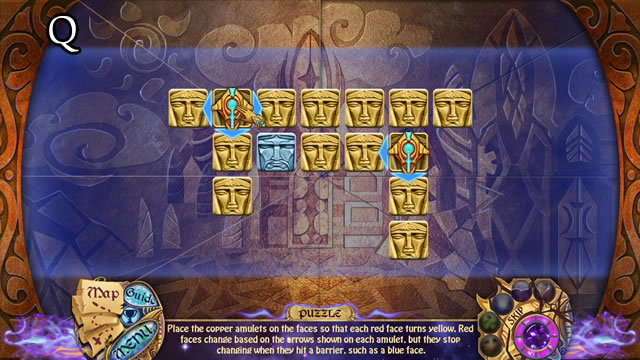

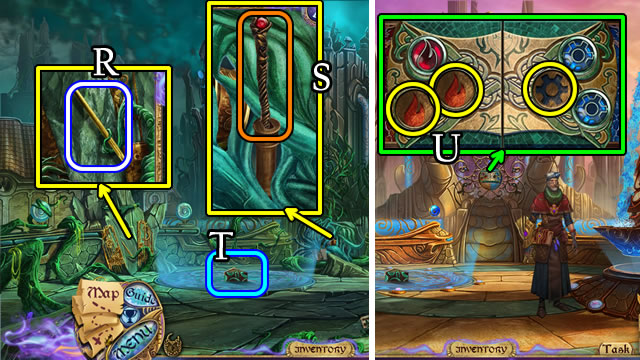
- Take the METAL ROD (R).
- Pull the lever (S); touch the Shadow Stone (T).
- Place both FIRE EMBLEMS and GEAR EMBLEM (U).

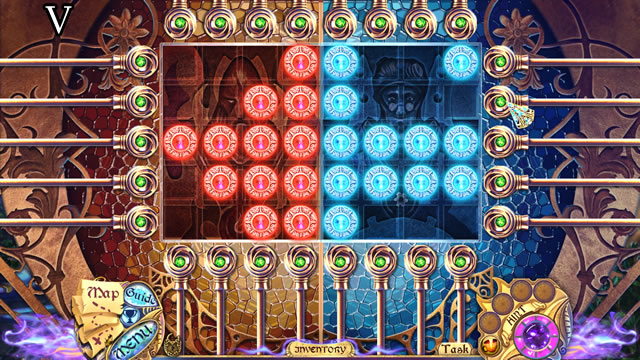
- Solutions vary. One possible solution (V).
- Walk forward.
- Attempt to walk forward.

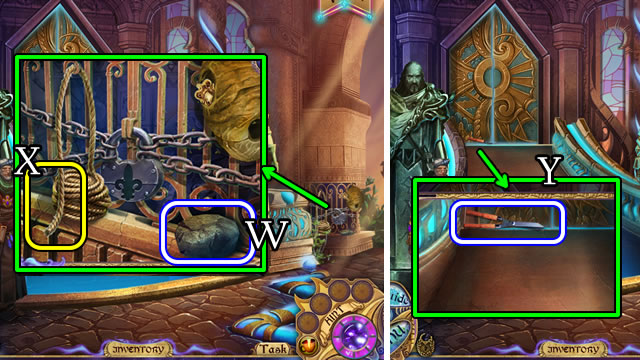
- Take the ROCK (W).
- Place the MAGNET (X) to receive a ROPE WITH MAGNET.
- Use the ROPE WITH MAGNET to receive PRUNERS (Y) and ROPE.
- Walk down.

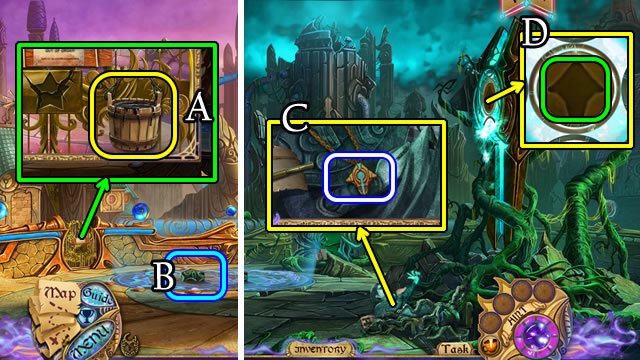
- Place the ROPE (A) to receive a ROPE WITH OIL.
- Touch the Shadow Stone (B).
- Use the PRUNERS; take the COPPER AMULET (C).
- Place the COPPER AMULET (D).

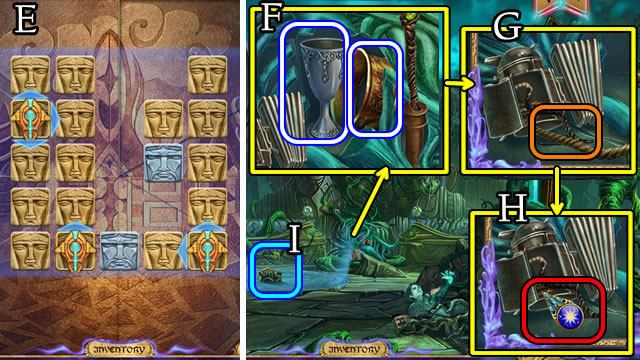
- Solution (E).
- Use the PRUNERS; take the GOBLET and COPPER HOOP (F).
- Open the smoker; place the ROPE WITH OIL; use the PRUNERS (G). Use the Combusta spell (H). Take the SMOKER.
- Touch the Shadow Stone (I).

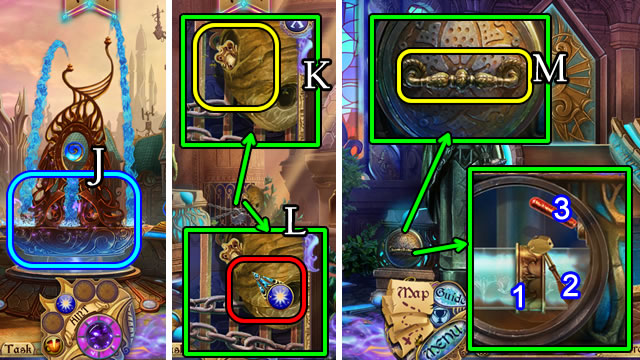
- Play the HOP (J) to receive a GOBLET OF WATER.
- Walk forward.
- Place the SMOKER (K); use the Combusta spell (L). Take the HANDLE.
- Place the METAL ROD (M); place the COPPER HOOP (1), take the GLASS CUTTER (2), use the GOBLET OF WATER (3); pull the lever.
- Walk forward.

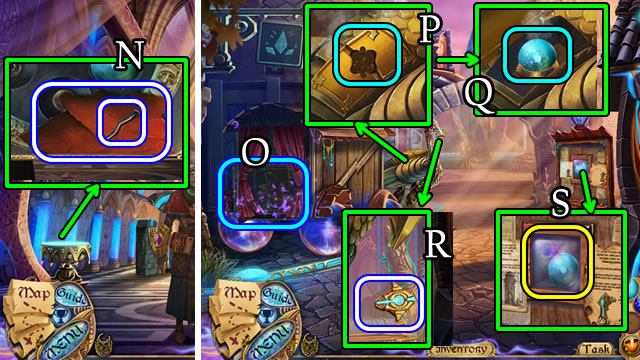
- Take the BENT NAIL and RAG (N).
- Walk down 3x.
- Play the HOP (O) to receive an ENERGY CORE.
- Place the HANDLE (P); use the RAG to take ENERGY CORE 2 (Q). Take the COPPER AMULET (R).
- Use the GLASS CUTTER (S); take ENERGY CORE 3.

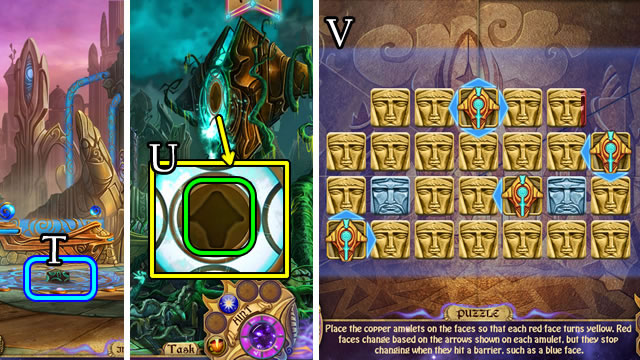
- Walk forward. Touch the Shadow Stone (T).
- Place the COPPER AMULET (U).
- Solution (V).
- Touch the Shadow Stone; walk forward 2x.

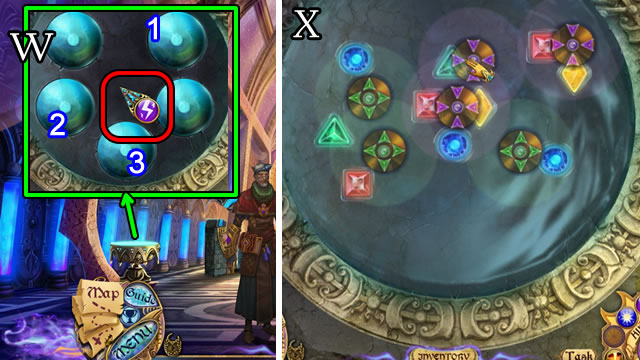
- Place the three ENERGY CORES (1-2-3). Use the Electra spell (W).
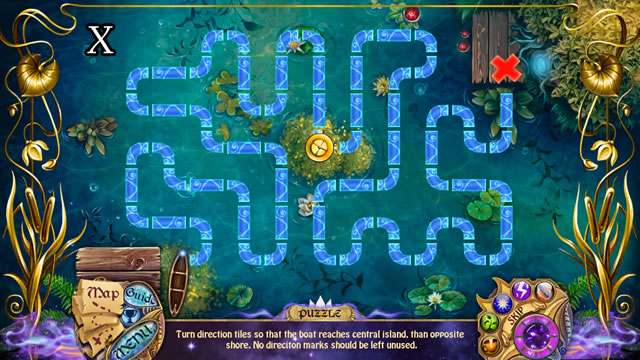
- Solution (X).

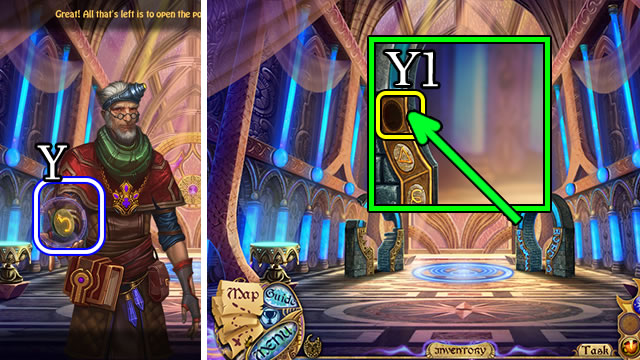

- Take the PORTAL STONE (Y).
- Place the PORTAL STONE (Y1).
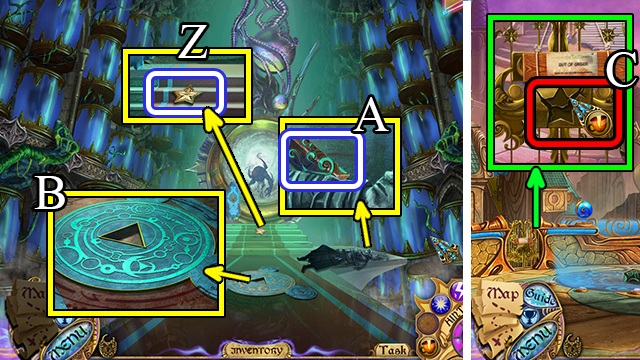
- Take the STAR CREST (Z).
- Take (A), then place (B) the SHADOW STONE. Touch the Shadow Stone.
- Walk down 2x.
- Use the Restora spell (C); place the STAR CREST.
- Walk left.

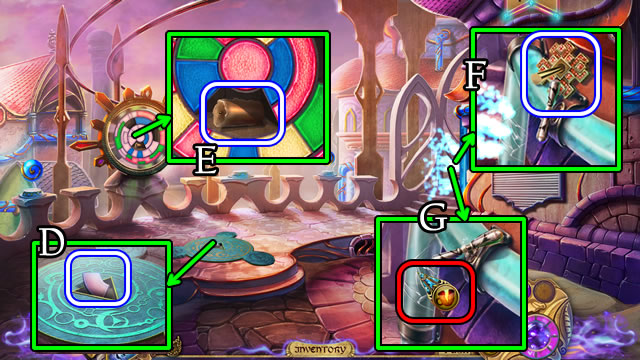
- Take the STAINED GLASS (D).
- Take the CANDLE (E).
- Take the RED KEY (F); turn the handle; use the Restora spell (G); select the handle.
- Walk right.

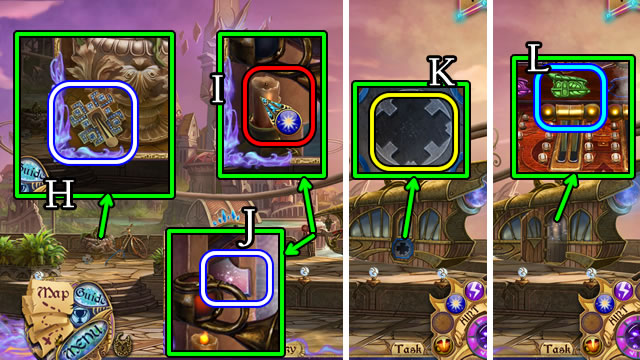
- Grab the BLUE KEY (H).
- Place the CANDLE and use the Combusta spell (I). Take STAINED GLASS 2 (J).
- Use the BLUE KEY (K). Pull the green symbol handle (L).
Chapter 3: Old Town

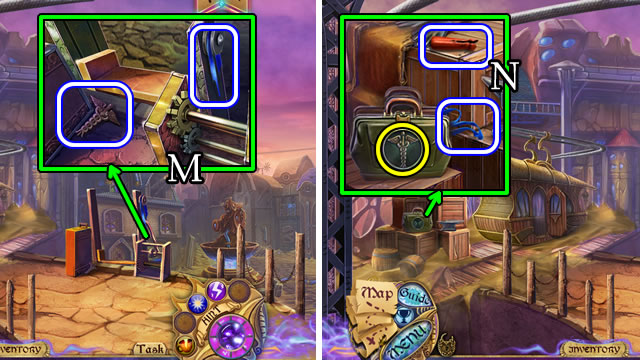
- Take the CADUCEUS and BELT PART (M).
- Remove the cover. Take the BROKEN HANDLE; place the CADUCEUS; take BELT PART 2 (N).
- Climb down the ladder.

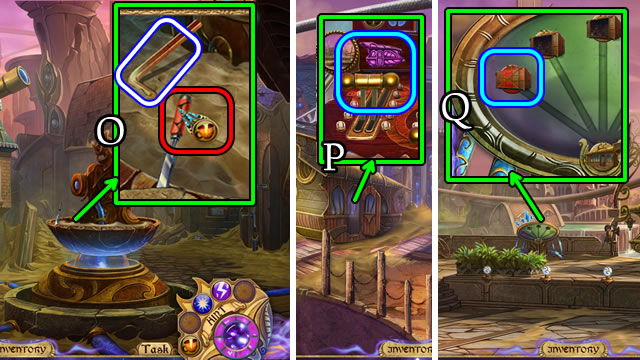
- Place the BROKEN HANDLE; use the Restora spell; take the CHISEL. Grab the HEX KEY (O).
- Walk down.
- Select the pink symbol handle (P).
- Select the red box (Q).

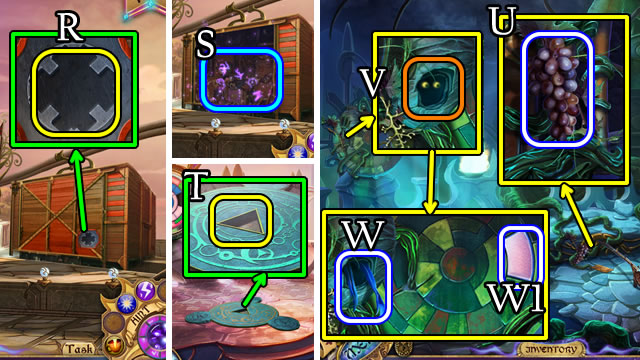
- Use the RED KEY (R).
- Play the HOP (S) to receive the SHADOW STONE.
- Walk down.
- Place (T), then touch the SHADOW STONE.
- Take (U), then place (V) the GRAPES; Take BELT PART 3 (W).
- Use the CHISEL to receive STAINED GLASS 3 (W1).

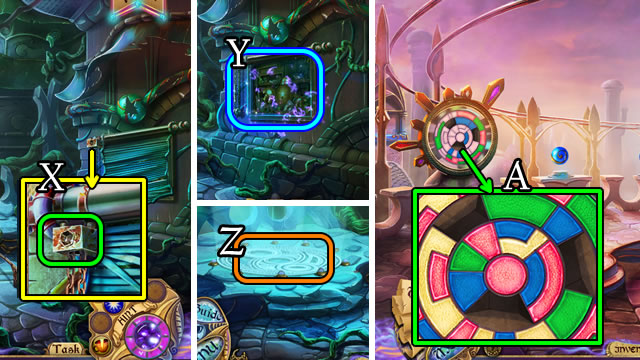
- Use the HEX KEY (X); play the HOP (Y) to receive a SIEVE.
- Touch the portal (Z).
- Place (A) the 3 STAINED GLASS pieces.

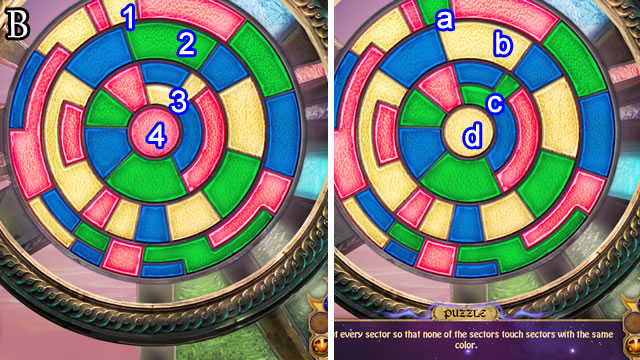
- Solution (B). 1-a, 2-b, 3-c, 4-d.

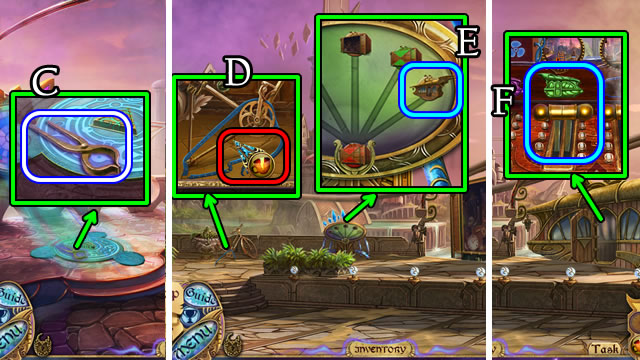
- Take the PLIERS (C).
- Walk right.
- Place the 3 BELT PARTS; use the Restora spell (D); take the BELT.
- Select the Skytram symbol (E).
- Select the green symbol handle (F).
- Climb down the ladder.

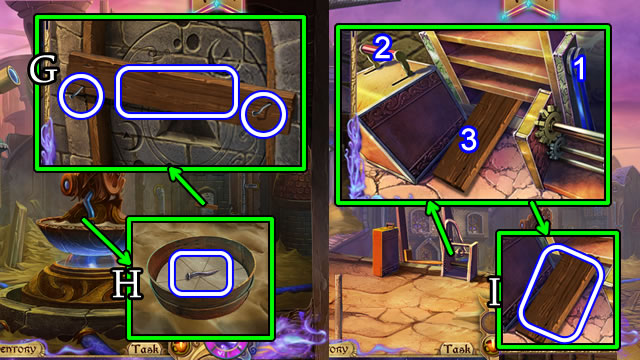
- Use the PLIERS 2x to receive BENT NAIL 2 and BENT NAIL 3; take the LONG PLANK (G).
- Use the SIEVE; take BENT NAIL 4 (H).
- Walk down.
- Place the BELT (1); pull the lever (2); place the LONG PLANK (3). Pull the lever; take a SMALL PLANK (I). Select the lever; take SMALL PLANK 2.

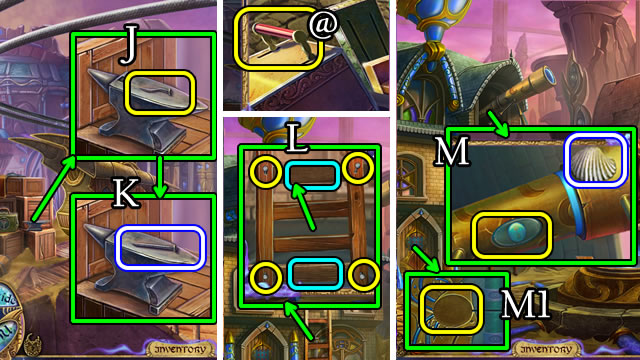
- Place a BENT NAIL (J); use the ROCK; take the NAIL (K). Repeat 3x to make NAIL 4.
- Select the lever (@); climb down the ladder.
- Place the 2 SMALL PLANKS and 4 NAILS (L). Use the ROCK on the nails 4x.
- Select the ladder; take the SHELL. Use the ROCK to take TORWICK’S HOUSE KEY (M).
- Place TORWICK’S HOUSE KEY in the door slot (M1).

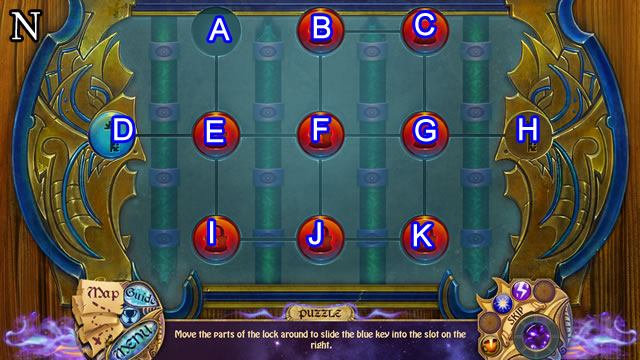
- Solution (N). G-H, E-A, E-D, E-I, G-H, E-A, J-I, G-K, B-C, F-B, K-J, G-K, B-C, E-D, F-B, K-J, G-K, G-H.
- Walk left.

- Play the HOP (O) to receive a COPPER AMULET.
- Take the LINK SPREADER and PAPER AND PENCIL (P). Use the CHISEL (Q); take the SHADOW STONE (R).
- Walk down.
- Place (S), then touch the SHADOW STONE.


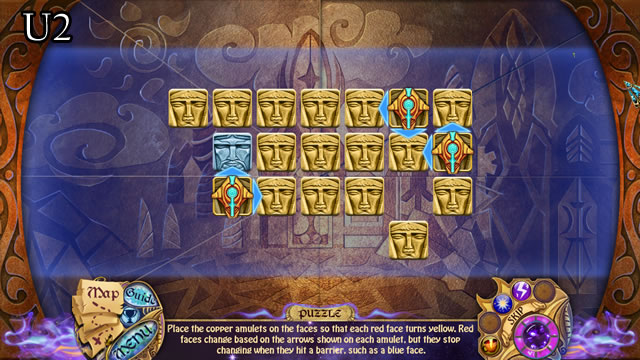
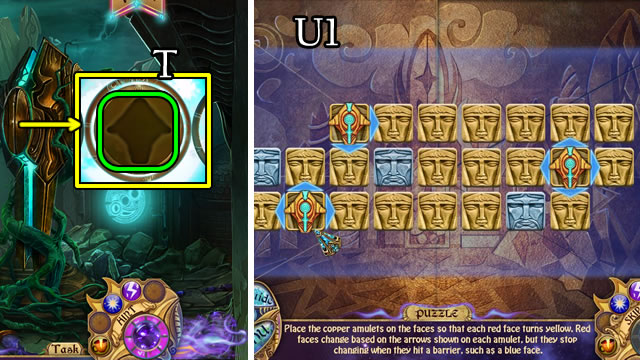
- Place the COPPER AMULET (T).
- Solution (U1-U2).

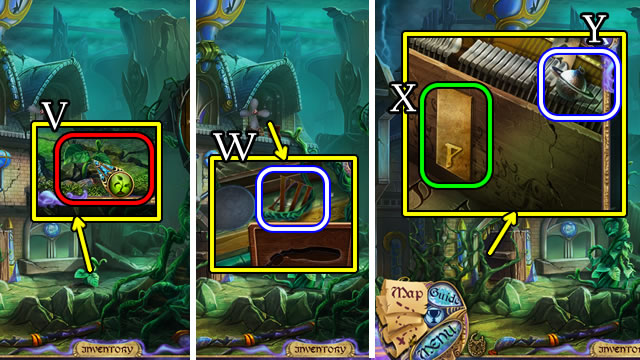
- Use the Germina spell (V); take the TWELVE (W).
- Place the PAPER AND PENCIL (X) for a SYMBOLS SKETCH. Use the CHISEL; take SATURN (Y).
- Return to the Skytram Station.

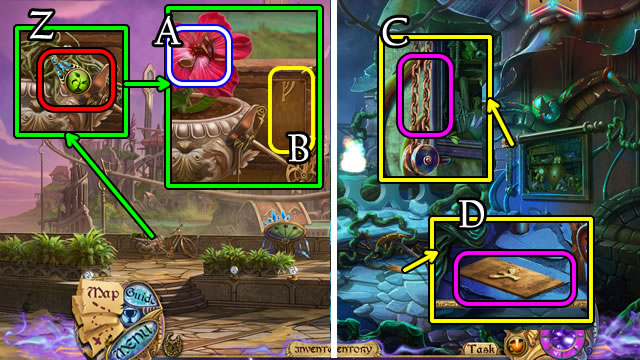
- Use the Germina spell (Z).
- Take the NOTE (A). Place the SYMBOLS SKETCH (B); receive an updated SYMBOLS SKETCH.
- Walk down; touch the Shadow Stone.
- Use the LINK SPREADER (C) to receive a CHAIN.
- Place the SYMBOLS SKETCH (D); receive SYMBOLS.
- Touch the portal.

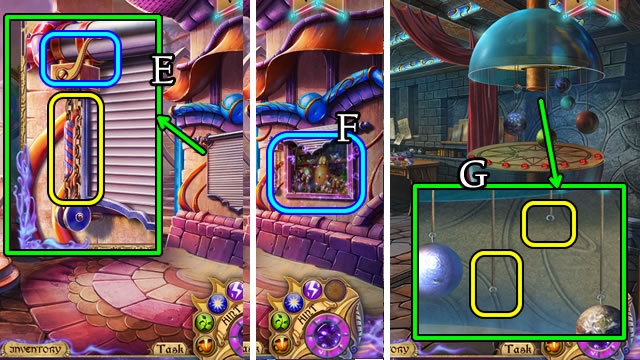
- Place the CHAIN, pull the lever (E) to play a HOP (F). Receive VENUS.
- Return to the Torwick’s House.
- Place VENUS and SATURN (G).


- Take NOTE 2 (I).
- Match the SYMBOLS and runes (J); take the GREEN KEY (K).
- Enter the Basement (L).

- Grab the PINCERS (M).
- Move the carpet; take the PALETTE KNIFE (N).
- Walk down 2x; touch the Shadow Stone.
- Place 2 NOTES (O); use the PALETTE KNIFE (P); take the SYMBOLS (Q).
- Touch the portal; walk left.

- Match the SYMBOLS and runes; take the HOOK (R).
- Return to the Skytram Station.
- Slide the green box (S).
- Use the GREEN KEY (T); play the HOP (U) to receive a TOOL HANDLE.
- Walk down and touch the Shadow Stone.

- Use the Germina spell (V). Take, then place the GRAPES (W); take the FISHING LINE (X).
- Place the FISHING LINE and HOOK (Y).

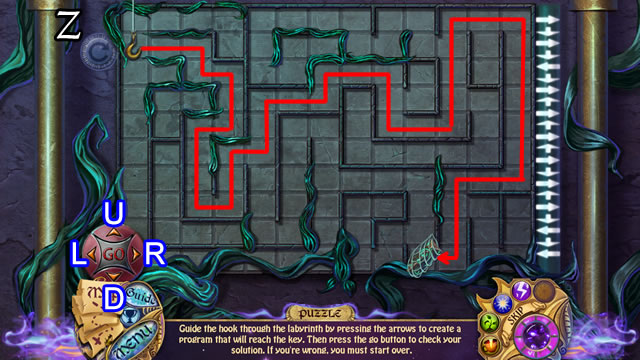
- Solution (Z). R-D-R-D-L-D-R-U-R-U-R-U-R-D-R-U-R-D-L-D-L. Press Go.
- Take a SHADOW STONE.
- Return to shadow Old Town.

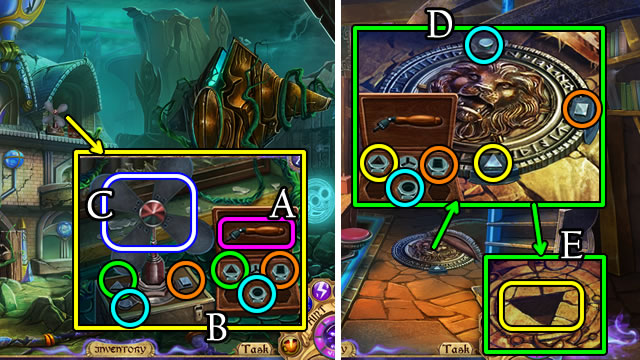
- Place the TOOL HANDLE (A); use the wrench heads (B); to receive the FAN (C). Take the WRENCH SET.
- Return to the Basement.
- Place the WRENCH SET. Use the wrench heads (D).
- Place, then touch the SHADOW STONE (E).

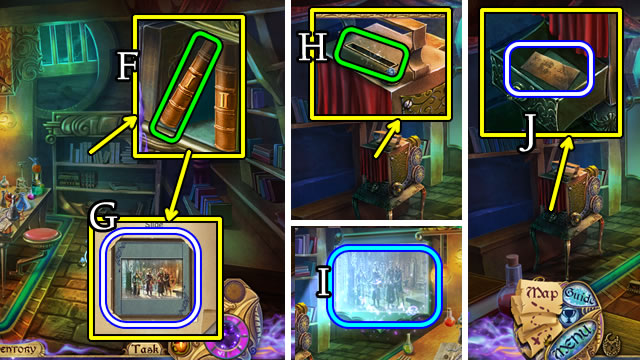
- Select book I (F); turn the pages 2x; take the SLIDE (G).
- Place the SLIDE (H) to play a HOP (I); take the COORDINATES (J).

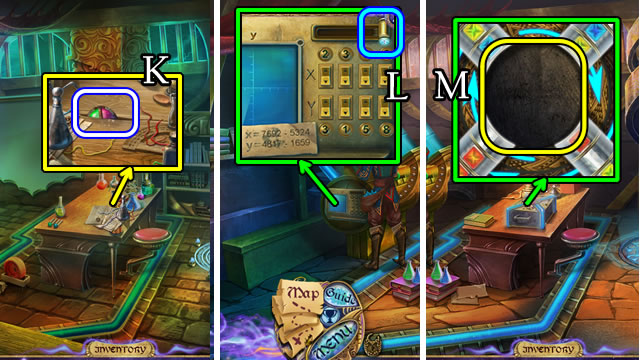
- Uncover the crack; use the PINCERS to receive a COLOR LOCK PIECE (K).
- Touch the portal.
- Enter coordinates. X: 2368 and Y: 3158. Slide the lever (L).
- Place the COLOR LOCK PIECE (M).

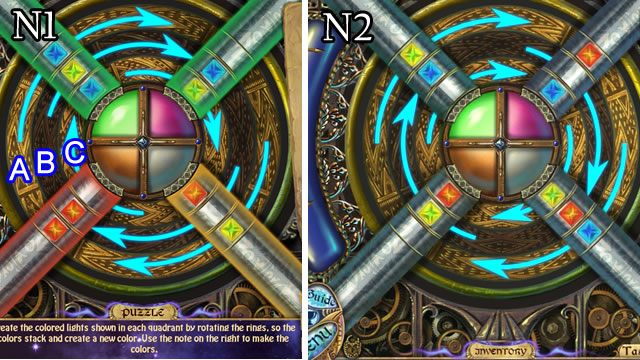
- Solution (N1-N2). Ax2-Bx3-C.

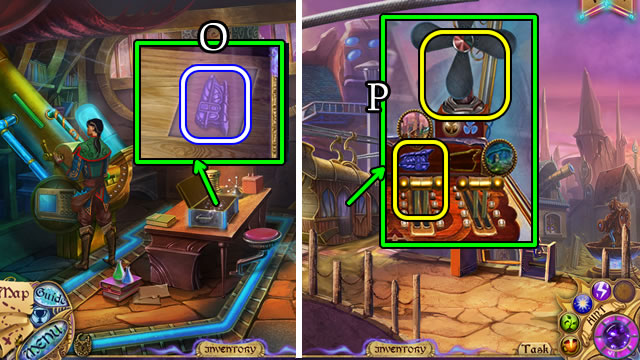
- Take the TECH DISTRICT KEY (O).
- Walk down 3x.
- Place the FAN. Place TECH DISTRICT KEY; pull the handle (P).
Chapter 4: The Tech District

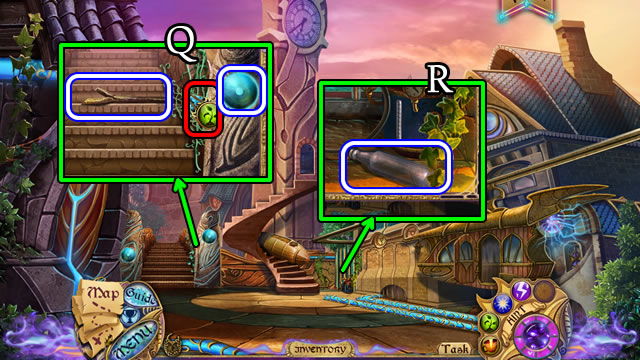
- Take the FORKED BRANCH. Use the Germina spell; receive a POWER CORE (Q).
- Grab the BOTTLE (R).
- Walk forward.

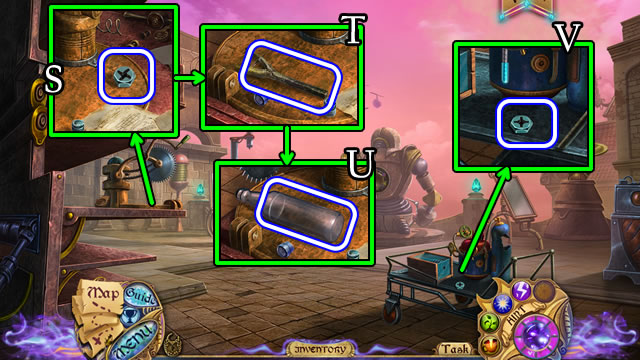
- Take the WRENCH HEAD (S).
- Place the FORKED BRANCH; take the BRACE (T). Place the BOTTLE; take the GLASS TUBE (U).
- Grab another WRENCH HEAD (V).
- Walk down.

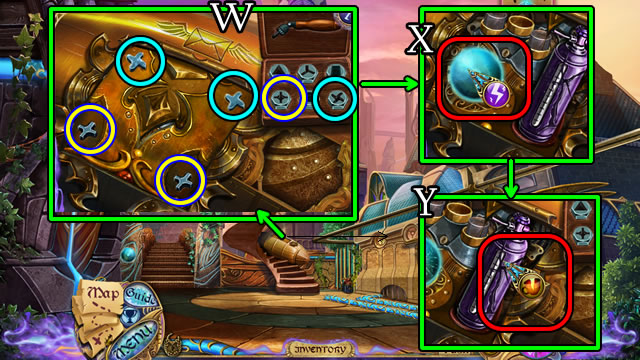
- Place the WRENCH SET. Add the two WRENCH HEADS. Select and use the wrench heads 2x (W).
- Place the POWER CORE. Use the Electra Spell (X).
- Use the Restora spell (Y). Take the EMPTY TANK.

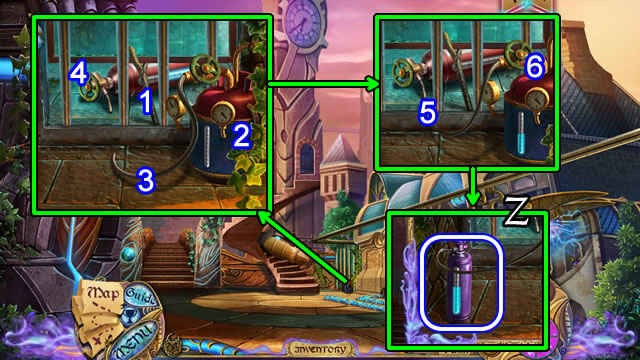
- Raise the window; place the BRACE (1). Place the EMPTY TANK (2). Select the tube (3); turn the valve (4); select the tube (5), turn the valve (6). Take the HALF-EMPTY TANK (Z).
- Walk forward.

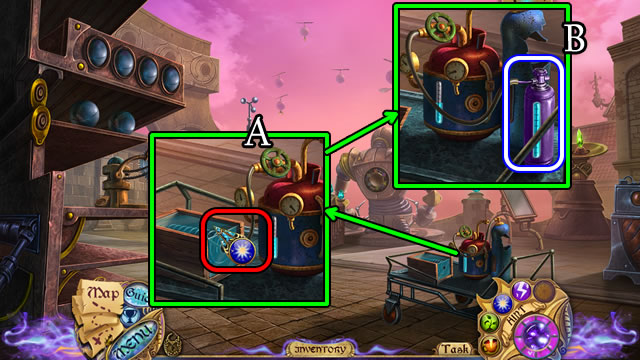
- Select the tube; turn the valve; use the Combusta spell (A); take the SPRING.
- Place the HALF-EMPTY TANK, select the tube; turn the valve. Take the FULL TANK (B).
- Walk down.

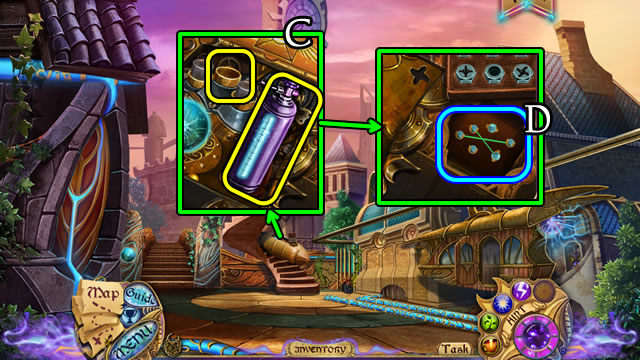
- Place the FULL TANK and GLASS TUBE (C). Select (D).

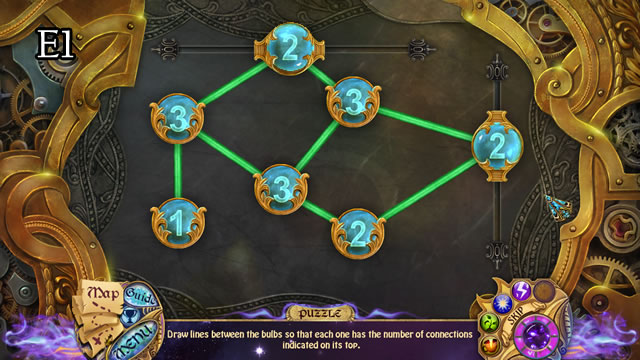

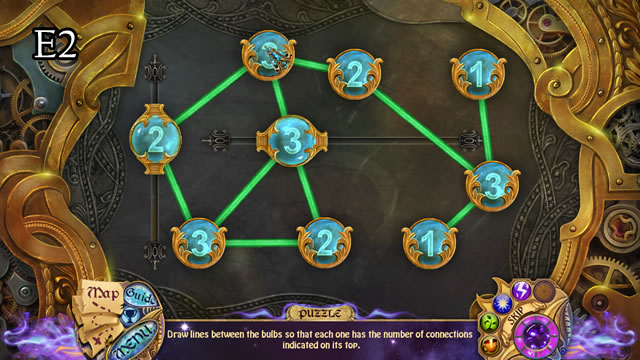

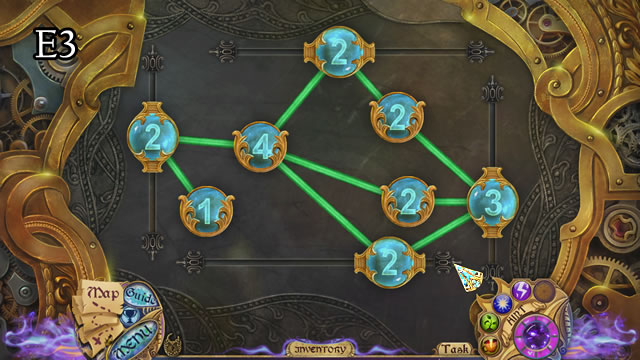
- Solution (E1-E2-E3).
- Walk to the Control Tower Basement.

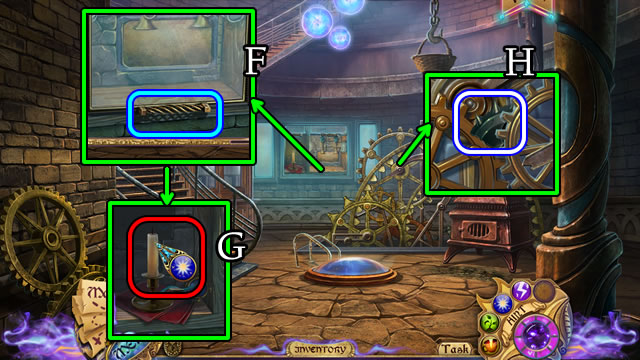
- Open (F), use the Combusta spell (G); take the WIRE.
- Take the BROKEN GEAR (H).
- Walk up the stairs.

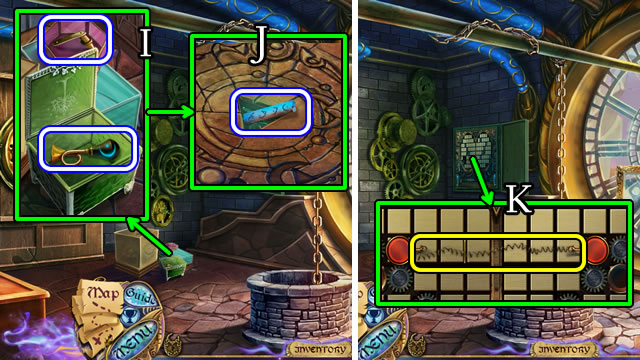
- Open and take the DOOR HANDLE, open and take the HORN (I); move all boxes to take the MAGIC CHALK (J).
- Remove and replace the SPRING (K).

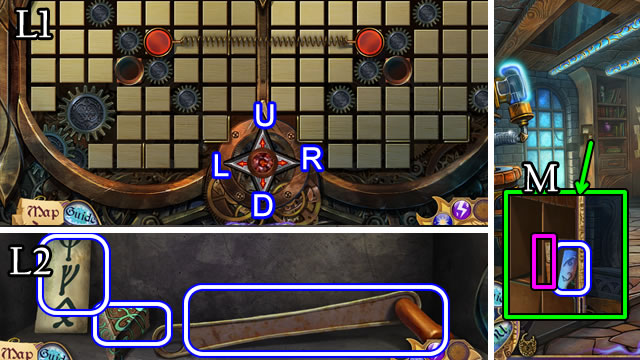
- Solution (L1). Lx2-Dx3-Rx2-Dx3-Lx3-Ux2-Rx2-Ux2.
- Take SYMBOLS, SHADOW STONE and the CRANK (L2).
- Return to Torwick’s House.
- Match the SYMBOLS and runes; take MAGIC CHALK 2; read the note (M).
- Return to the Control Tower.

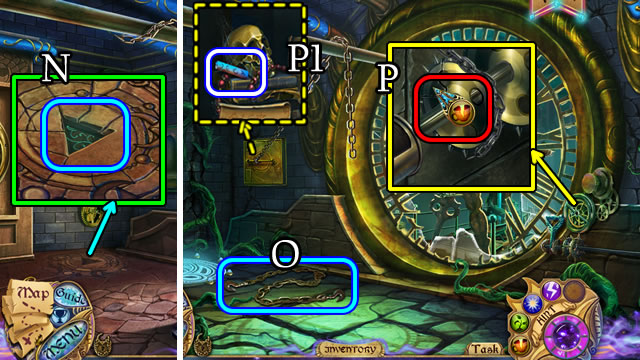
- Place and touch the SHADOW STONE (N).
- Select the chain (O). Place the BROKEN GEAR; use the Restora spell (P). Select the chain; pull the lever.
- Take MAGIC CHALK 3 (P1).
- Touch the portal.
- Walk down.

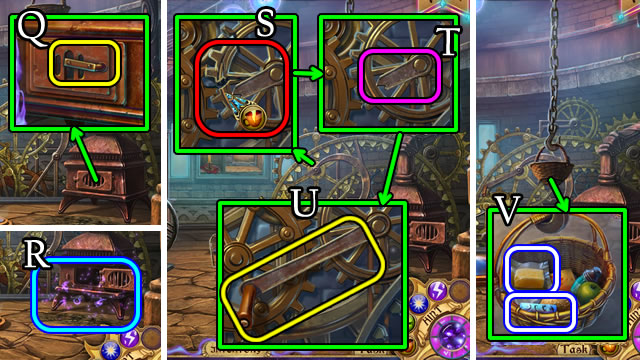
- Place the DOOR HANDLE (Q) to play a HOP (R). Receive another HORN.
- Use the Restora spell (S). Remove (T), then place the CRANK (U). Select the handle. Take MAGIC CHALK 4 and BUTTER (V).

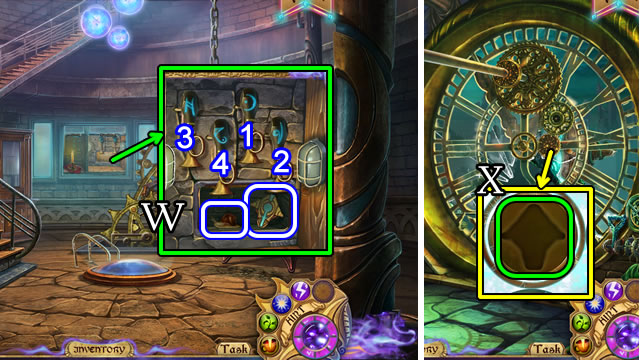
- Place both HORNS. Select 1-2-3-4. Take the COPPER AMULET; place the BUTTER; take the SNAIL (W).
- Walk forward; touch the Shadow Stone.
- Place the COPPER AMULET (X).

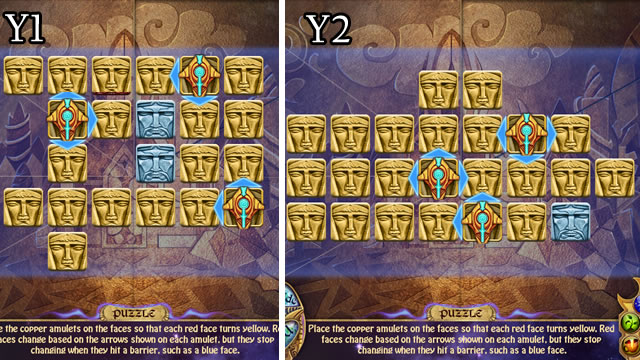

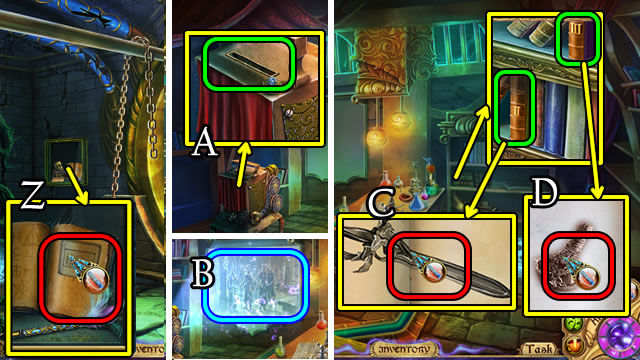
- Use the Vivida spell (Z); take the SLIDE.
- Return to the shadow Basement.
- Place the SLIDE (A).
- Play the HOP (B); take the COORDINATES.
- Select Book II. Turn the page. Use the Vivida spell (C); take the DAGGER.
- Select Book III. Use the Vivida spell (D); take the SHRINKING POTION. Turn the page. Use the Vivida spell; take the GROWTH POTION.
- Touch the portal.

- Enter coordinates. X: 0334 and Y: 5659. Slide the lever (E).
- Take the OASIS DISTRICT KEY (F).
- Walk down 3x.
- Place the OASIS DISTRICT KEY; pull the handle (G).
Chapter 5: The Oasis District

- Use the Combusta spell (H).
- Use the Germina spell; take the COCONUT (I).
- Use the Electra spell (J). Place the COCONUT; receive BLUE INK.
- Grab the MAGIC CHALK. Use the DAGGER (K).
- Use the GROWTH POTION; take the SWORD. Pull the cord (L).
- Play the HOP (L1); receive a PAPER HALF.

- Return to the shadow Basement.
- Select Book I (M). Turn back 1 page. Place the PAPER HALF. Use the Restora spell (N) Use the Vivida spell (N1). Take the SCOPE.
- Return to the Tech District Station.
- Use the SHRINKING POTION (O) to receive a TINY POWER CORE.
- Return to the Control Tower.
- Place the SNAIL; use the GROWTH POTION (P). Take the MANUAL.
- Go to the Tech District.

- Place the WIRE and TINY POWER CORE; Use the GROWTH POTION (Q).
- Match the wire colors to the manual. Use the Electra spell (R).
- Place the SCOPE and touch the red button (S).
- Touch the scope when it turns green (T) to shoot down, then take the OAR, COPPER AMULET and MOON.
- Return to the Oasis Station.

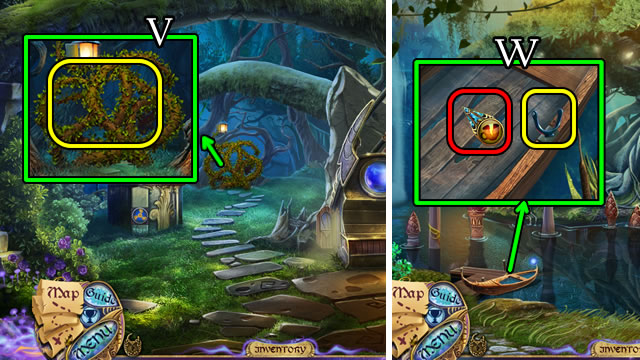
- Use the SWORD (V).
- Walk forward.
- Use the Restora spell. Place the OAR (W).


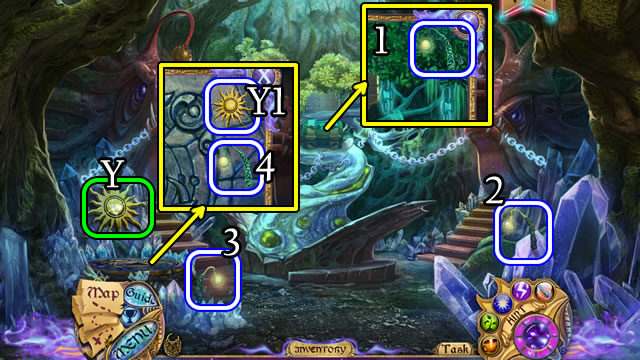
- Collect ANGLER LIGHTS 1-2-3.
- Use the SHRINKING POTION (Y).
- Take ANGLER LIGHTS 4 and the SUN (Y1).
- Walk down.

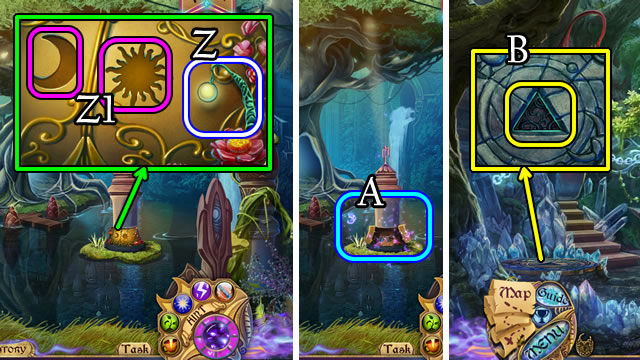
- Grab ANGLER LIGHTS 5 (Z). Place the MOON and SUN (Z1) for a HOP (A). Receive a SHADOW STONE.
- Walk forward.
- Place (B) and touch the SHADOW STONE.

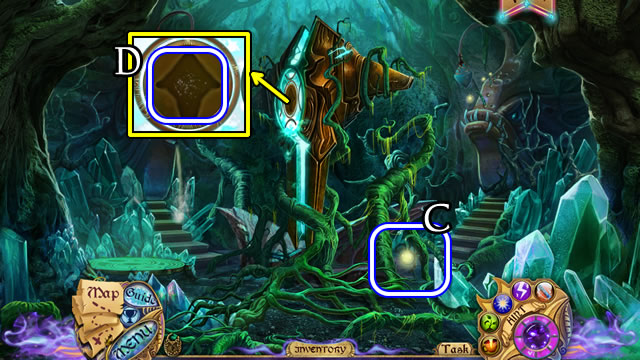
- Take ANGLER LIGHTS 6 (C).
- Place the COPPER AMULET (D).

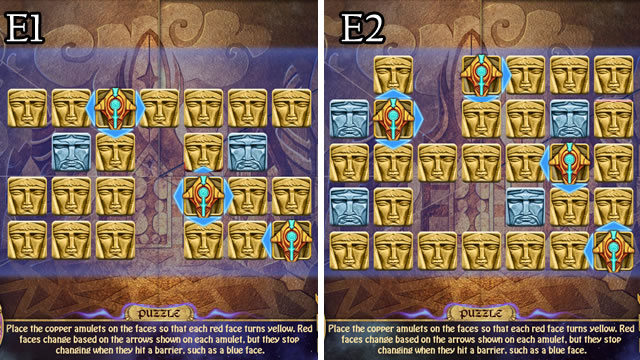

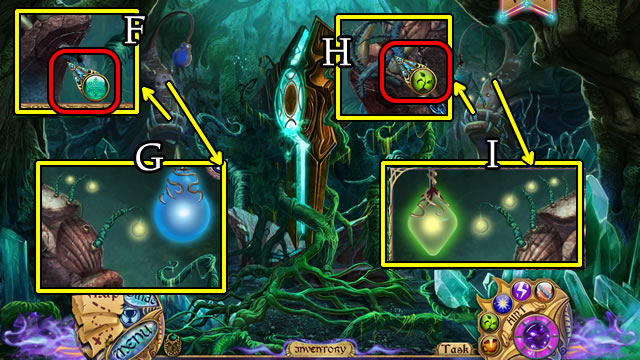
- Use the Glacia spell (F).
- Place 2 ANGLER LIGHTS (G).
- Use the Germina spell (H).
- Place 1 ANGLER LIGHT (I).
- Touch the portal.

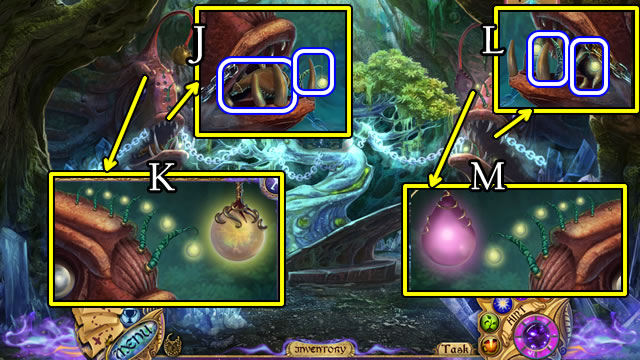
- Take the WINESKIN and ANGLER LIGHTS 4 (J).
- Place 4 ANGLERS LIGHT (K).
- Take 2 ANGLERS LIGHT (L).
- Place 2 ANGLERS LIGHT (M).

- Take the FLEUR-DE-LIS EMBLEM and GLASS CUTTER (N).
- Walk down.
- Place the WINESKIN (1) to receive a FULL WINESKIN. Place the FULL WINESKIN (2). Use the Glacia spell (O); take the OCTOPUS EMBLEM.
- Return to the Outside Planar Chamber.
- Place the FLEUR-DE-LIS EMBLEM (P).
- Enter the Chamber Basement; play the HOP (Q) to receive a DOWN ARROW.

- Take the UP ARROW (R).
- Place the FULL WINESKIN; use the Glacia spell (S); take the FISH EMBLEM.
- Take the COMBINATION (T) and remove the paper (U).
- Use the GLASS CUTTER; take the ORANGE GEM (V).
- Return to the Lake.

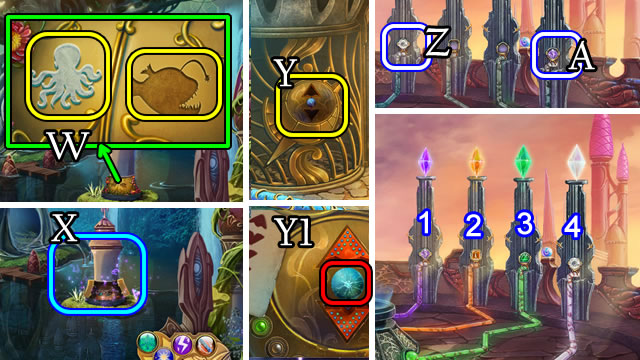
- Place the OCTOPUS EMBLEM and FISH EMBLEM (W) to play a HOP (X). Receive a GREEN GEM.
- Return to the Chamber Basement.
- Place the UP ARROW and DOWN ARROW (Y).
- Use the Electra spell (Y1). Touch the up arrow, down arrow 3x and up arrow.
- Walk forward.
- Take the WHITE GEM (Z) and PURPLE GEM (A).
- Place the PURPLE GEM (1), ORANGE GEM (2), GREEN GEM (3) and WHITE GEM (4).
- Walk down.

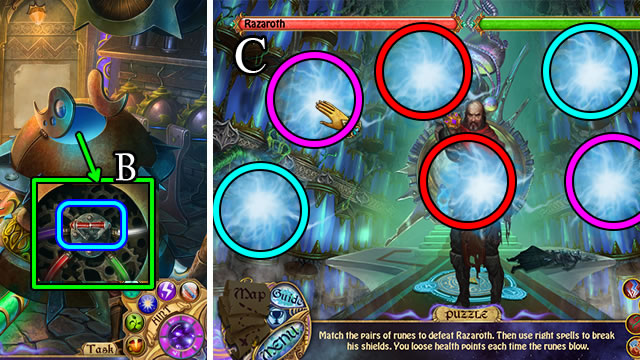
- Pull the lever (B).
- Walk down, then enter the Inside Planar Chamber; touch the Shadow Stone.
- Solution (C).

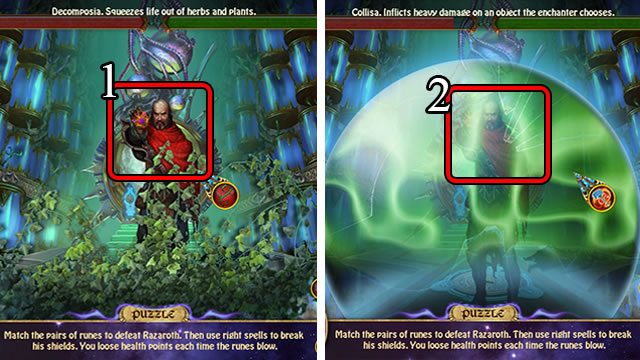
- Use Decomposia spell (1), then Collisa spell (2).
- Solution (D).

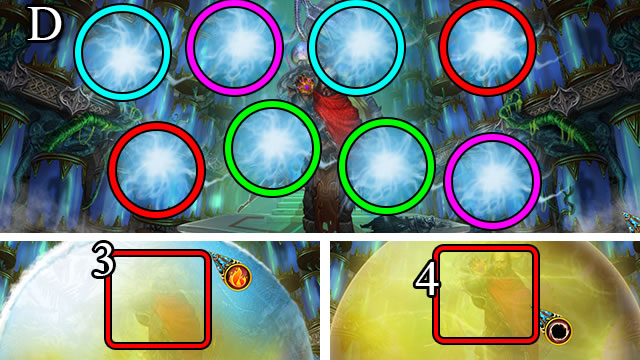
- Use Arsonia spell (3) and Absorba spell (4).
- Solution (E).

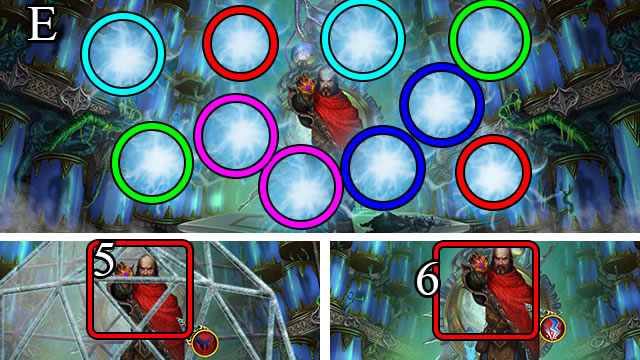
- Use the Envoida spell (5), then Ice Arrow spell (6).
- Congratulations! You have completed Shrouded Tales: Revenge of Shadows.





 Timeless: The Forgotten Town Walkthrough, Guide, & Tips
 Awakening: The Skyward Castle Walkthrough, Guide, & Tips
 Gothic Fiction: Dark Saga Walkthrough, Guide, & Tips
 Time Mysteries: Inheritance Walkthrough, Guide, & Tips
 Sable Maze: Norwich Caves Walkthrough, Guide, & Tips