Sable Maze: Norwich Caves Walkthrough, Guide, & Tips
Sable Maze: Norwich Caves Walkthrough
Welcome to the Sable Maze: Norwich Caves Walkthrough
Your students have gone missing during an expedition under the university. Can you track them down before the water rises?
Whether you use this document as a reference when things get difficult or as a road map to get you from beginning to end, we’re pretty sure you’ll find what you’re looking for here.
This document contains a complete Sable Maze: Norwich Caves game walkthrough featuring annotated screenshots from actual gameplay!
We hope you find this information useful as you play your way through the game. Use the walkthrough menu below to quickly jump to whatever stage of the game you need help with.
Remember to visit the Big Fish Games Forums if you find you need more help. Have fun!
This walkthrough was created by BrownEyedTigre, and is protected under US Copyright laws. Any unauthorized use, including re-publication in whole or in part, without permission, is strictly prohibited.
General Tips

- This is the official guide for Sable Maze: Norwich Caves.
- This guide will not mention each time you have to zoom into a location; the screenshots will show each zoom scene.
- We will use the acronym HOP for Hidden-object puzzles. Interactive items will be color-coded and some will be numbered; please follow the numbers in sequence.
- The HOP lists may be random; our lists may vary from yours.
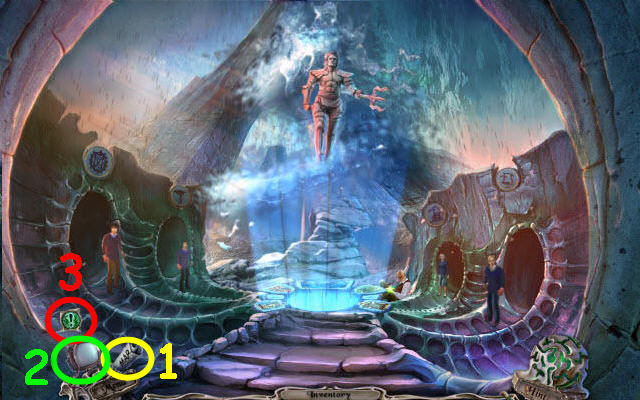
- Use the map (1) to travel to a location.
- You can view the videos from the game on the TV screen (2).
- Select the exclamation mark to see your current task (3).
Chapter 1: University

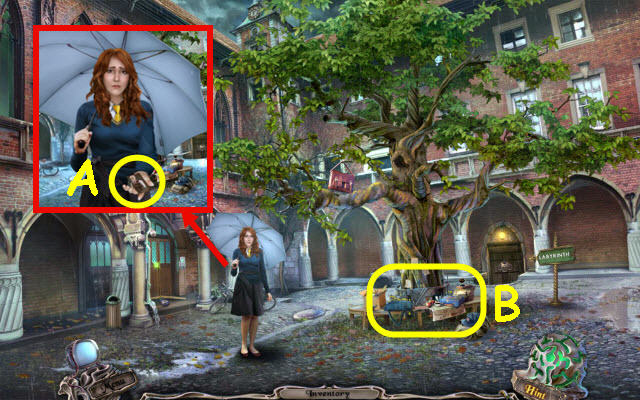
- Speak to Diana; take the PHOTO FRAGMENT (A).
- Examine the bench to access a HOP (B).

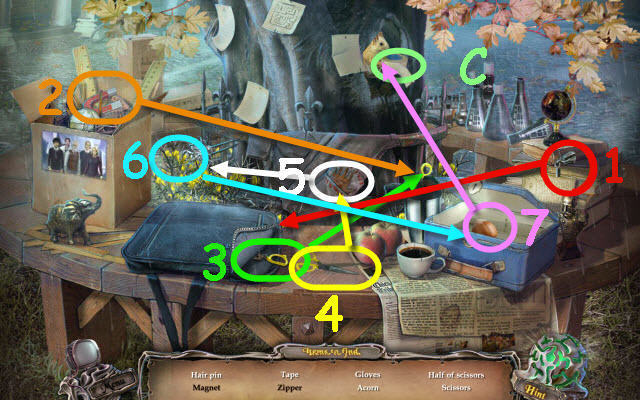
- Play the HOP.
- You receive a TAPE ROLL (C).

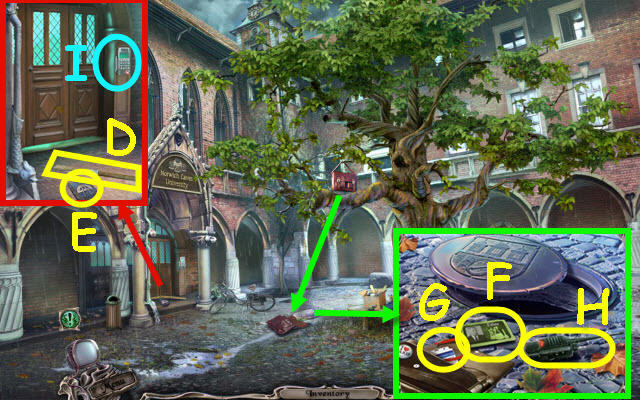
- Use the TAPE ROLL on the yardstick; take the YARDSTICK (D) and MATHEMATICS SHIELD (E).
- Use the YARDSTICK on the bag; take FABER’S CARD (F) and ID CARD (G).
- Remove the manhole cover; select the walkie-talkie (H).
- Use the ID CARD on the panel (I).
- Enter the building.

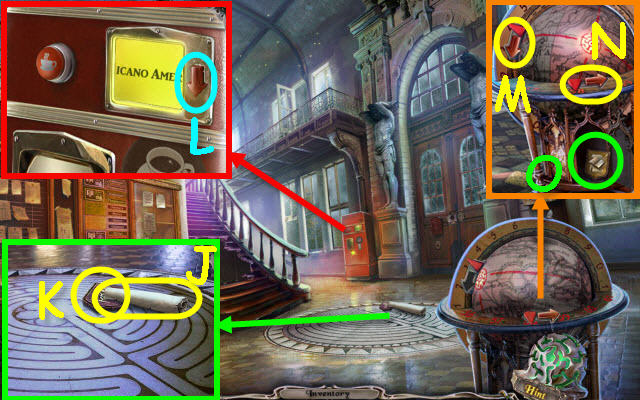
- Take the map (J), which will now be located on the bottom left of your toolbar.
- Take the MEDICINE SHIELD (K).
- Take the BUTTON (L).
- Place the BUTTON in the left slot. Select it twice (M) and the right facing arrow (N) once.
- Select the glowing area on the globe; take the LITERATURE SHIELD (O).
- Back out.

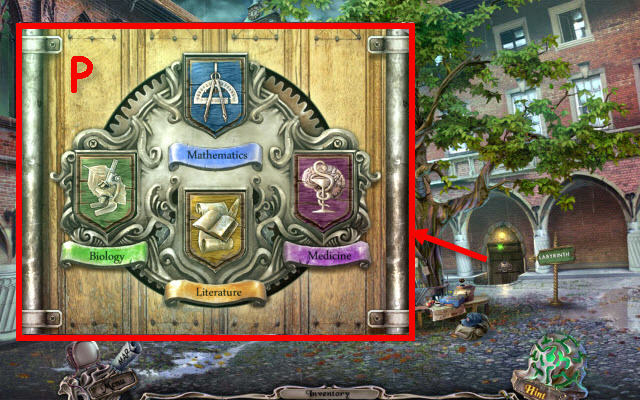
- Place the MATHEMATICS SHIELD, LITERATURE SHIELD and MEDICINE SHIELD in their matching slot (P).
- Enter the cellar.

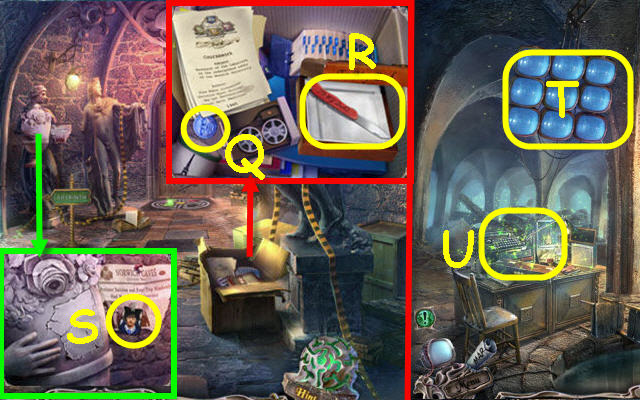
- Select the papers; take the FACE TOKEN 1/3 (Q).
- Place the PHOTO FRAGMENT on the box; take the KNIFE (R).
- Take the STUDENT PHOTOS 1/3 (S).
- Go left.
- Select the monitors twice (T).
- Examine the desk to access a HOP (U).

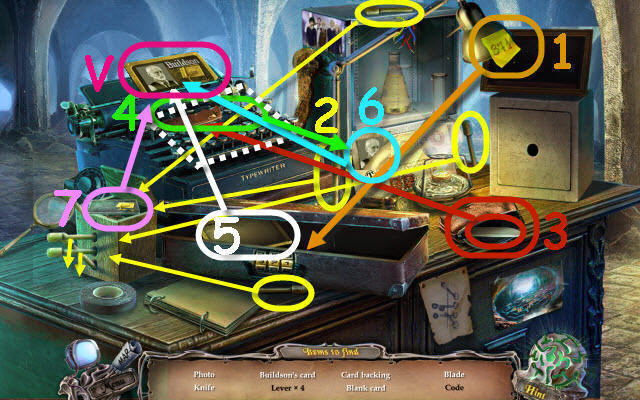
- Play the HOP.
- You receive BUILDSON’S CARD (V).
- Go to Hudson Hall.

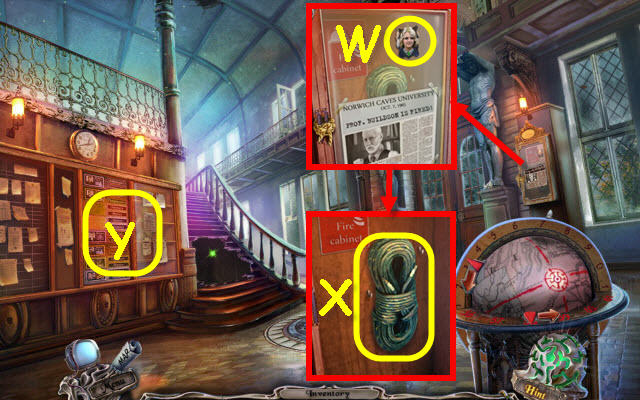
- Take the STUDENT PHOTOS 2/3 (W).
- Use the KNIFE on the rope and remove it; take the ROPE (X).
- Place FABER’S CARD and BUILDSON’S CARD on the board to trigger a puzzle (Y).

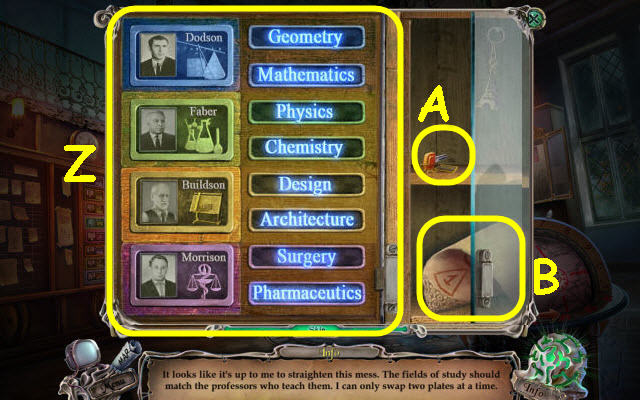
- Arrange the classes on the right to match the professor’s on the left.
- The starting placement is random.
- See screenshot for solution (Z).
- Take the KEY (A) and PAPER (B).

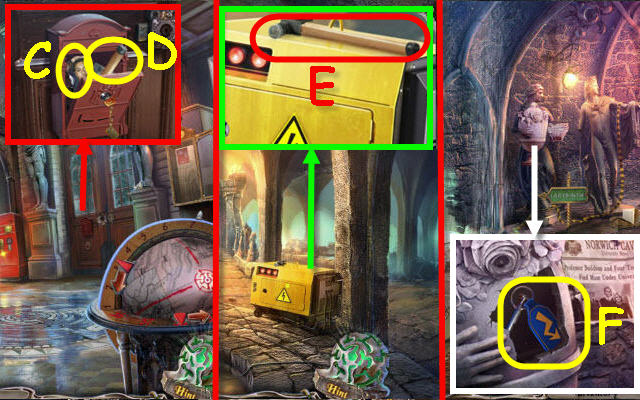
- Use the KEY on the mailbox and turn it. Take the STUDENT PHOTOS 3/3 (C) and HANDLE (D).
- Go to the basement.
- Place the HANDLE on the hammer head. Take the HAMMER (E).
- Back out.
- Use the HAMMER on the vase. Take the KEY (F).
- Go left.
- Examine the desk to access a HOP.

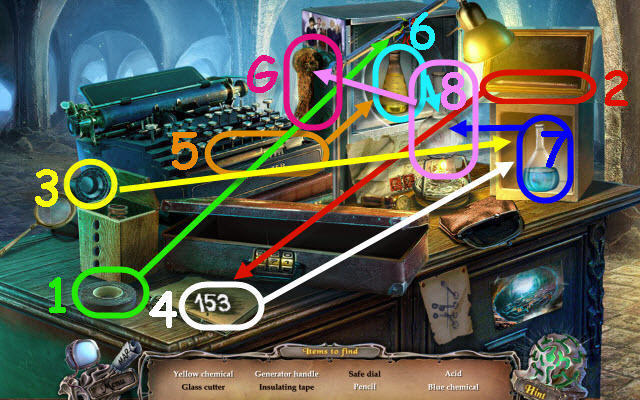
- Play the HOP.
- You receive a GENERATOR HANDLE (G).

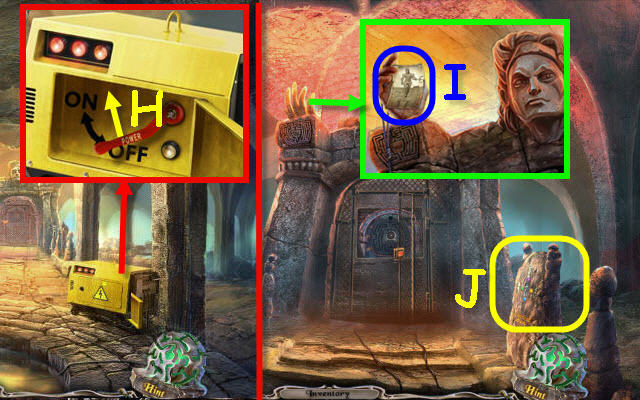
- Use the KEY in the generator lock and turn it. Place the GENERATOR HANDLE on the stem and move it (H).
- Go forward.
- Use the ROPE on the hand; take the PHOTO (I).
- Examine the stone to trigger a puzzle (J).

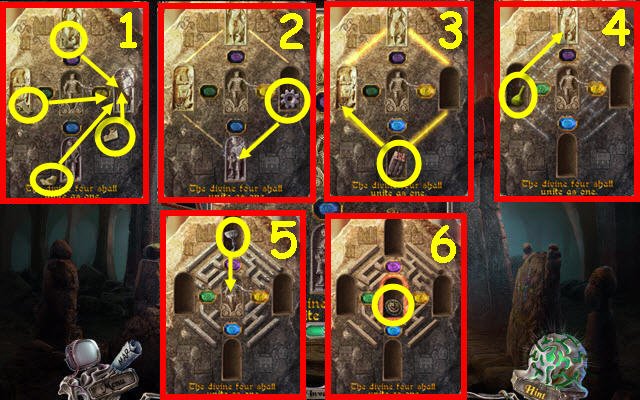
- Give the founder’s the items they are missing.
- See screenshot for solution (1-6).
- You receive a TILE.

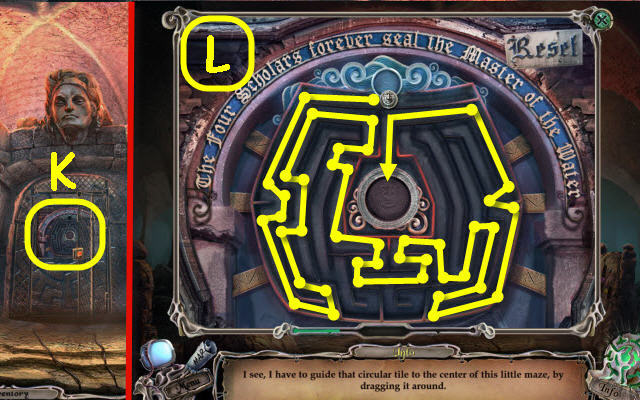
- Place the TILE on the door to trigger a puzzle (K).
- Guide the token to the center of the maze.
- See screenshot for solution (L).
- Go forward.

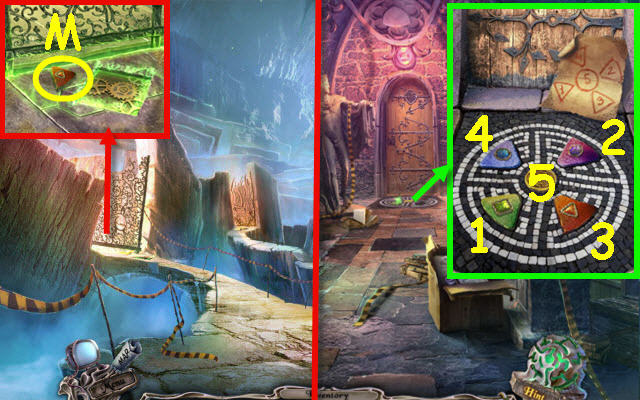
- Take the RED STONE (M).
- Go to the Cellar.
- Examine the tiles and the PAPER will automatically go on it. Place the RED STONE in the slot and select the stones as listed (1-5).
- Go forward.
Chapter 2: Buildson’s Office

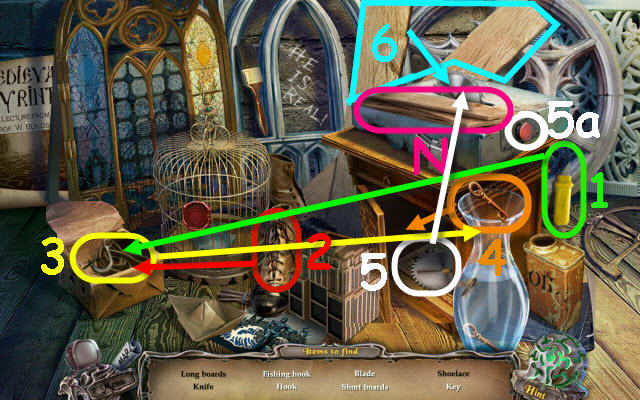
- Examine the window frames to trigger a HOP.
- Play the HOP.
- You receive BOARDS (N).

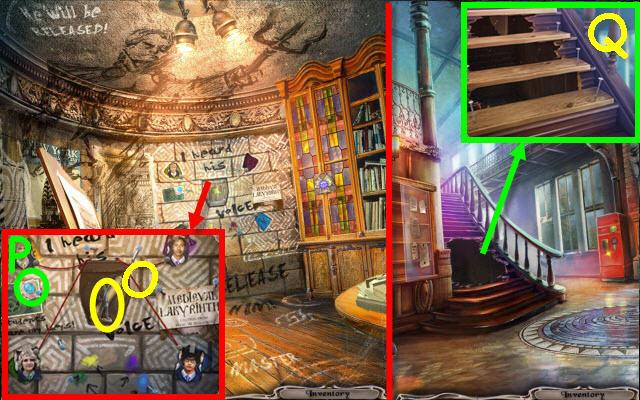
- Place the PHOTO in the master recess and 3 STUDENT PHOTOS on the sides; take the STATUETTE (O).
- Use the HAMMER on the wall to get the NAILS (P) and examine the scroll.
- Go to Hudson Hall.
- Use the BOARDS, NAILS and HAMMER on the stairs (Q).
- Go upstairs.

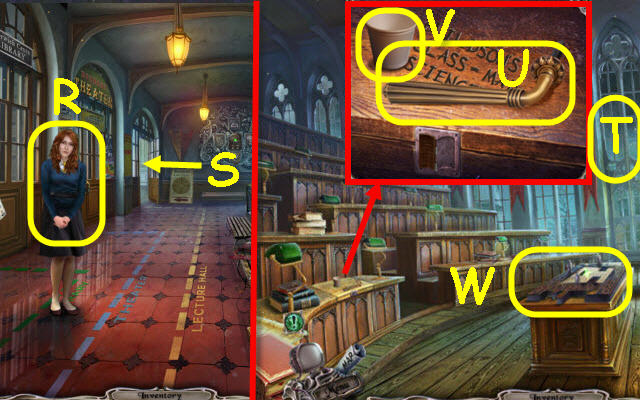
- Speak to Diana (R).
- Go through the door (S).
- Select the window (T).
- Take the BOLT HANDLE (U) and CUP (V).
- Place the STATUETTE on the table to trigger a puzzle (W).

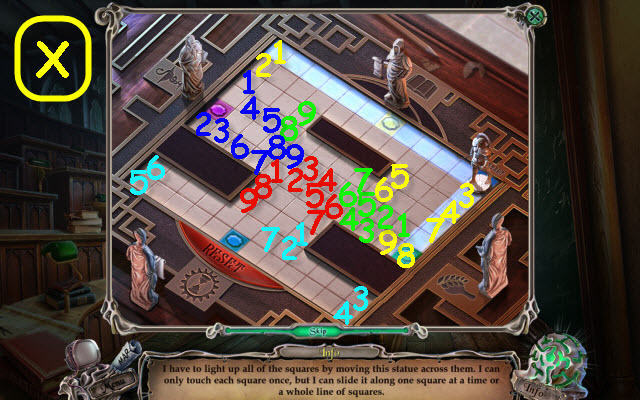
- Cover all the squares with the statue.
- Select the squares in numerical order and by the following colors: Yellow, green, blue, red and cyan (X).
- Take the FACE TOKEN 2/3 and DIAMOND.
- Go to Hudson Hall.

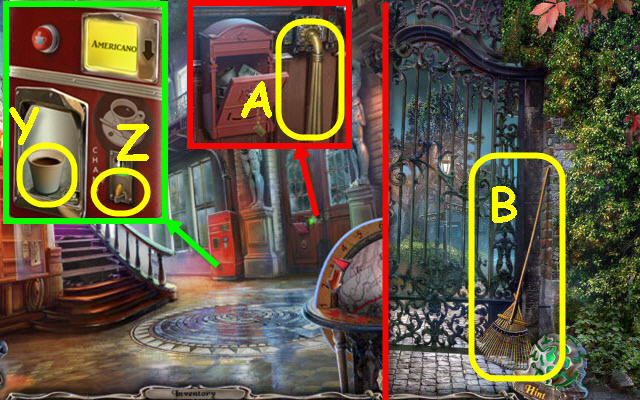
- Place the CUP in the holder; press the red button. Take the CUP OF COFFEE (Y) and QUARTER 1/2 (Z).
- Place the BOLT HANDLE on the door; turn it (A).
- Go through the door. Go forward up the right path.
- Take the RAKE (B).
- Back out.

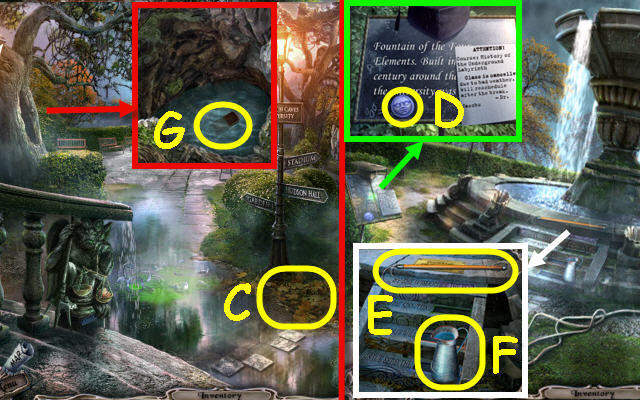
- Use the RAKE on the leaves (C).
- Go up on the left path.
- Take the FACE TOKEN 3/3 (D).
- Take the LOOP GRABBER (E) and PITCHER OF WATER (F).
- Back out.
- Use the PITCHER OF WATER in the tree hollow; take the LOCK PART (G).
- Go to Lecture Hall.

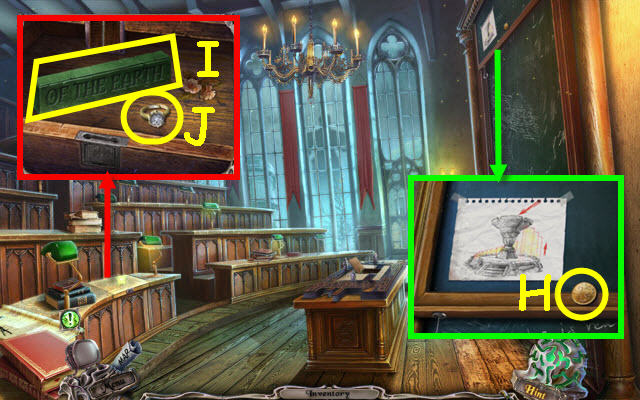
- Use the LOOP GRABBER on the hook. Take the QUARTER 2/2 (H) and examine the diagram.
- Use the LOCK PART on the desk and select it. Place the DIAMOND in the ring; take the EARTH TILE (I), and DIAMOND RING (J).
- Back out.

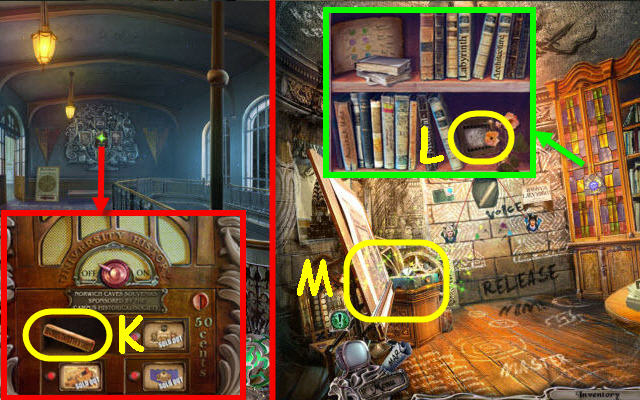
- Place the 2 QUARTERS in the coin slot. Open the upper left compartment. Take the FIRE TILE (K).
- Go to Buildson’s Office.
- Place the 3 FACE TOKENS on the cabinet lock. Take the SLIDE 1/5 (L) and read the diagram.
- Examine the window frames to access a HOP (M).

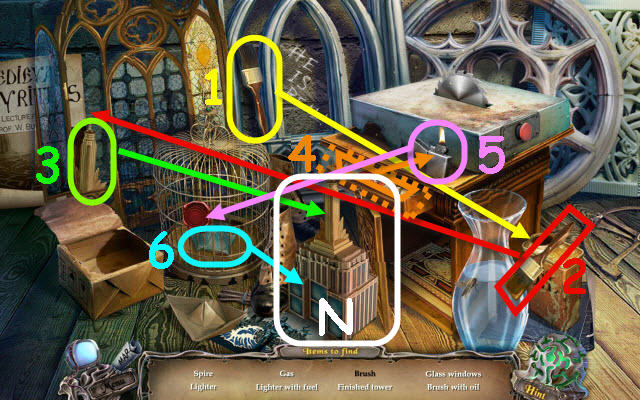
- Play the HOP.
- You receive the TOWER TOP (N).

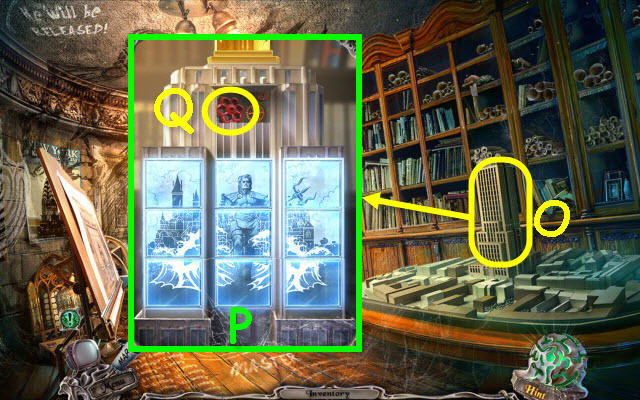
- Place the TOWER TOP on the building to trigger a puzzle (O).
- Swap the tiles to complete the image (P).
- Take the VALVE (Q).
- Go to the Fountain.

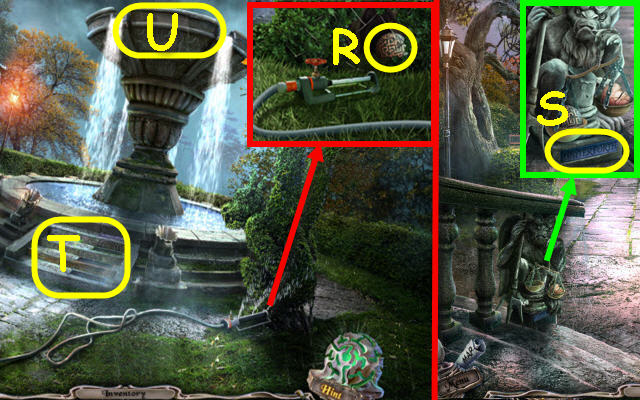
- Place the VALVE on the sprinkler stem and turn it. Take the STONE LABYRINTH (R).
- Back out.
- Place the STONE LABYRINTH on the scale; take the WATER TILE (S).
- Return to the Fountain.
- Place the FIRE TILE, EARTH TILE and WATER TILE on the steps (T).
- Examine the fountain to trigger a puzzle (U).

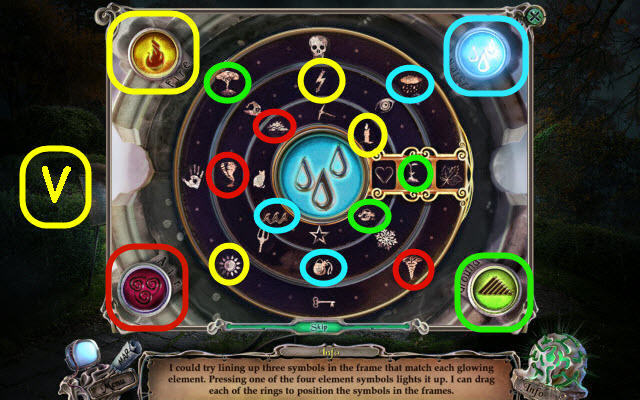
- Line up the correct symbols to match the lit element.
- See screenshot for matching elements (V).
- You receive an ORNATE TILE.
- Go to the Labyrinth.
Chapter 3: Christine

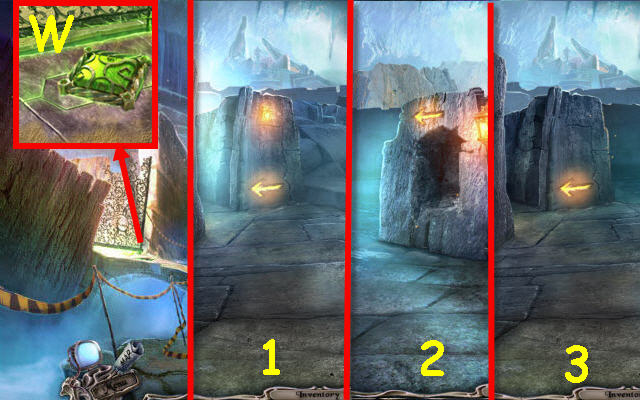
- Examine the left gate and place the ORNATE TILE in the recess (W).
- Go left three times (1-3).

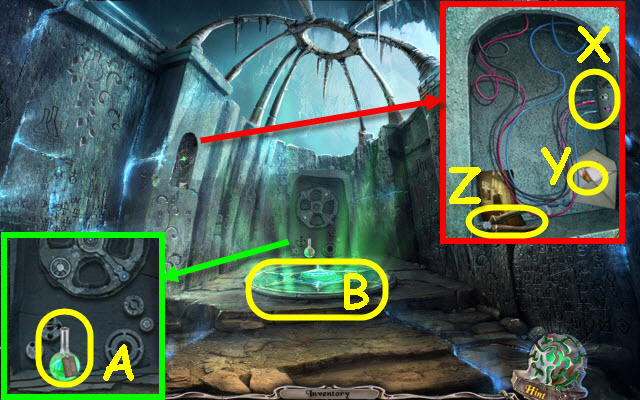
- Select the wires and connect them (X).
- Open the envelope; take the MOSAIC PART (Y) and read the note.
- Take the NIPPERS (Z) and examine the picture.
- Take the GROWTH FORMULA (A).
- Use the DIAMOND RING on the crystal to trigger a puzzle (B).

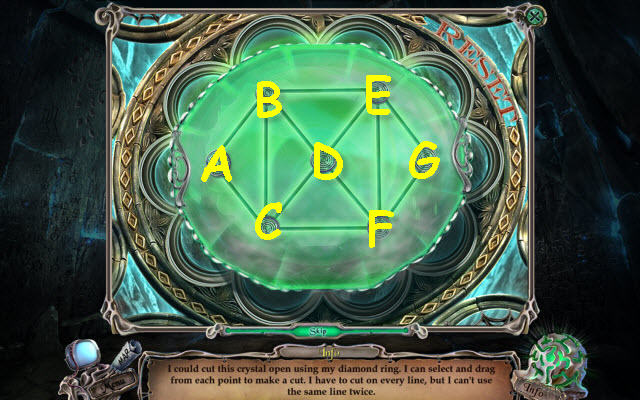
- Follow all the lines.
- Select the following connectors: C, A, B, C, D, B, E, D, F, E, G, F and C.

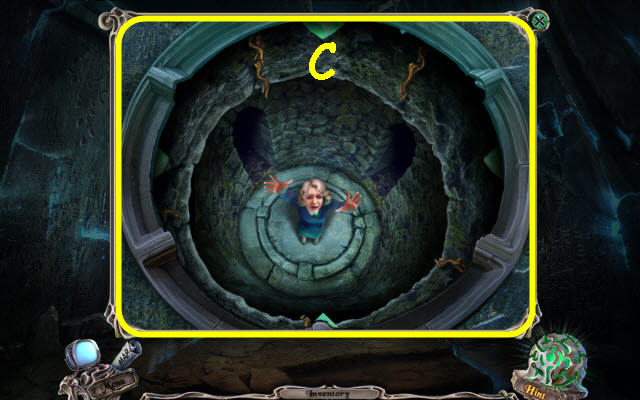
- Use the GROWTH FORMULA in the well (C).
- Go to the 2nd Floor.

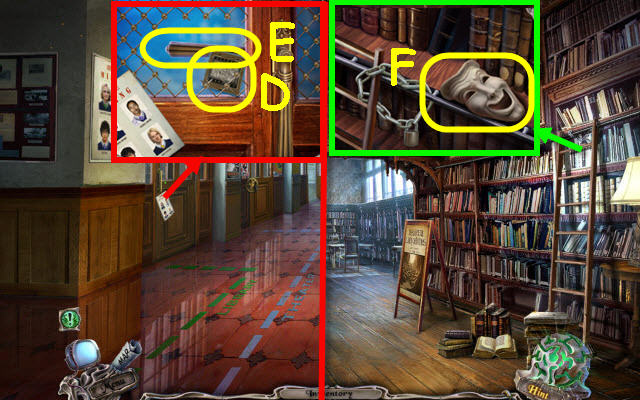
- Use the NIPPERS on the door wire and take the SLIDE 2/5 (D).
- Turn the handle (E).
- Enter the library.
- Take the MASK (F).
- Examine the desk to trigger a HOP.

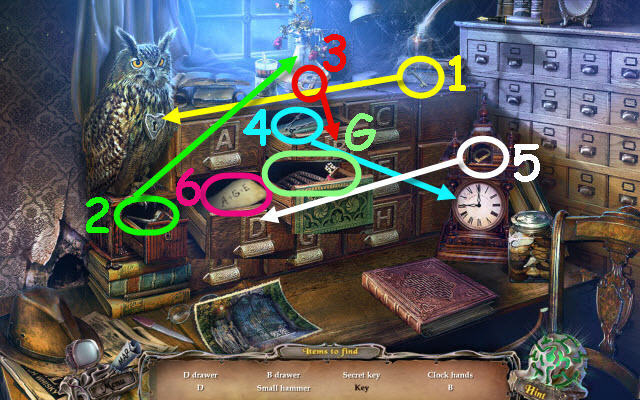
- Play the HOP.
- After you get the code (6) you need to close all the drawers and then open the A, G and E drawers.
- You receive the SCROLL KEY (G).
- Back out.

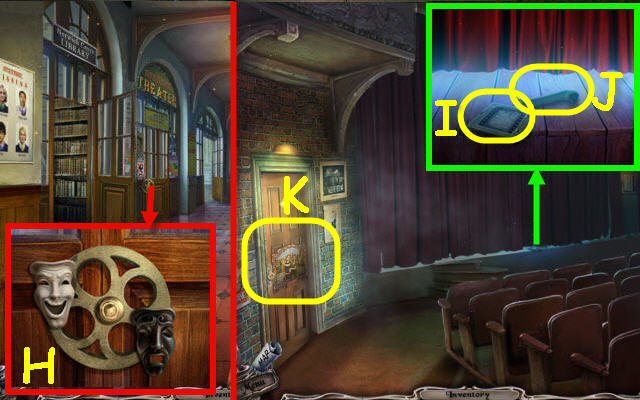
- Place the MASK on the door (H).
- Enter the Theater.
- Take the SLIDE 3/5 (I) and HANDLE (J).
- Place the MOSAIC PART on the door to trigger a puzzle (K).

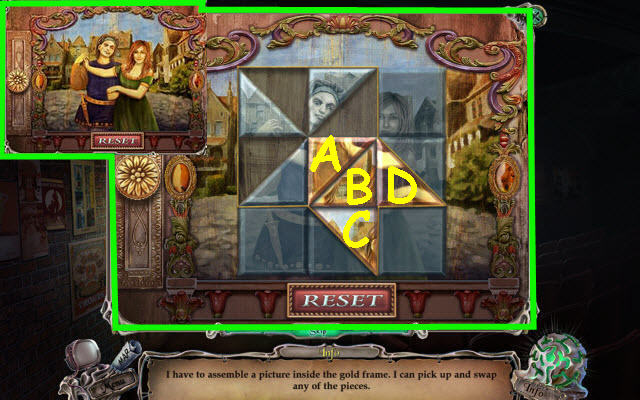
- Move the puzzle pieces to their proper places.
- Select the following tiles and arrows: A, left, B, left, C, up, left, B, right, up, D and left.

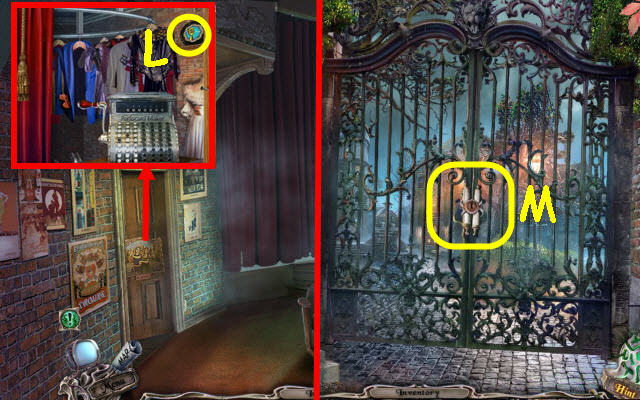
- Take the RECORD (L).
- Go to the Yard.
- Use the SCROLL KEY in the lock; turn the key (M).
- Go forward to the stadium on the right.
Chapter 4: Stadium

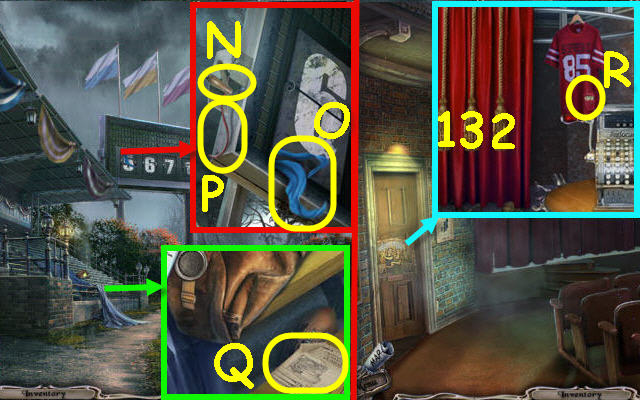
- Place the HANDLE on the lever box and pull it (N).
- Take the SCARF (O).
- Use the NIPPERS to get the WIRE (P).
- Take the SCHEME (Q).
- Go to the Theater.
- Examine the door; you will automatically apply the SCHEME. Pull the ropes (1-3); take the CONTROL PANEL (R).
- Return to the Stadium.

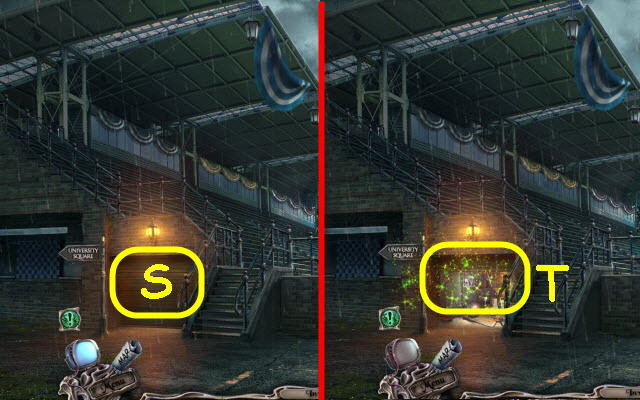
- Use the CONTROL PANEL on the door (S).
- Examine the opened door to access a HOP (T).

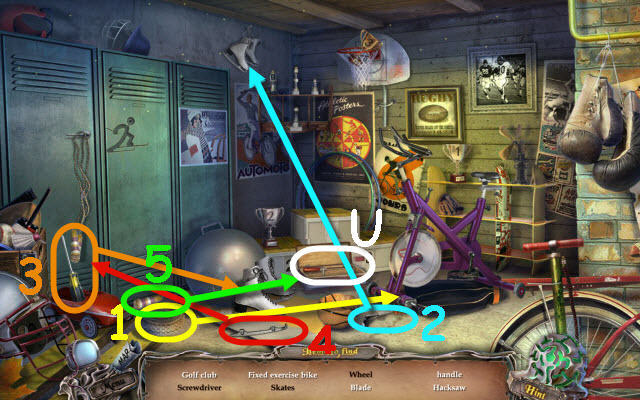
- Play the HOP.
- You receive the HACKSAW (U).
- Go to the Library.
- Examine the desk to access a HOP.

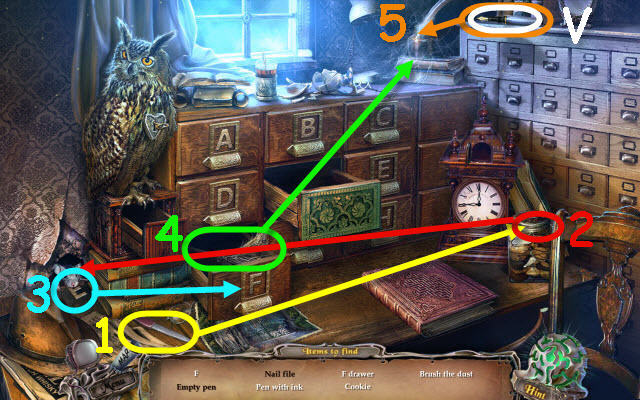
- Play the HOP.
- Find and use the items in the order listed.
- You receive the PEN (V).

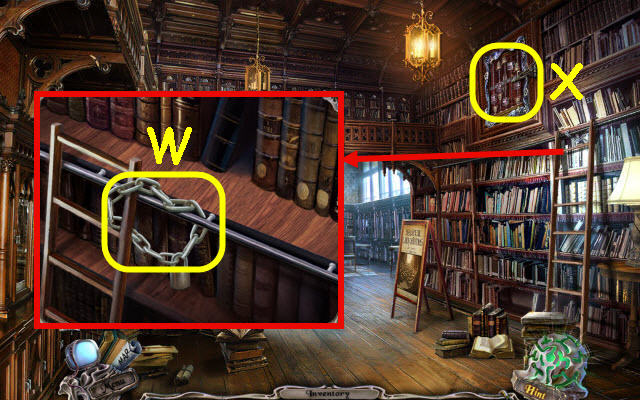
- Use the HACKSAW on the chain (W).
- Examine the door panel to trigger a puzzle (X).

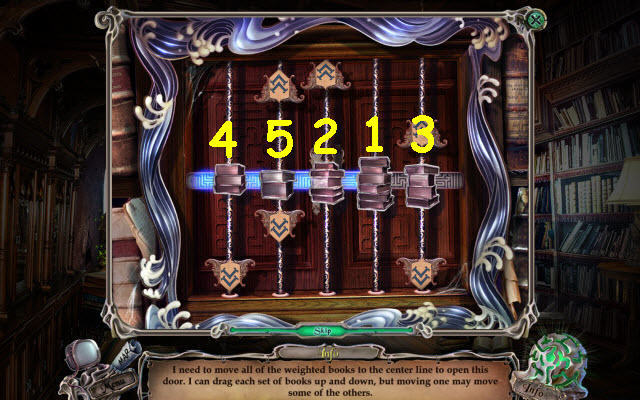
- Arrange all the books in a row.
- Move the books to the center bar in the order marked (1-5).
- Go through the secret door.

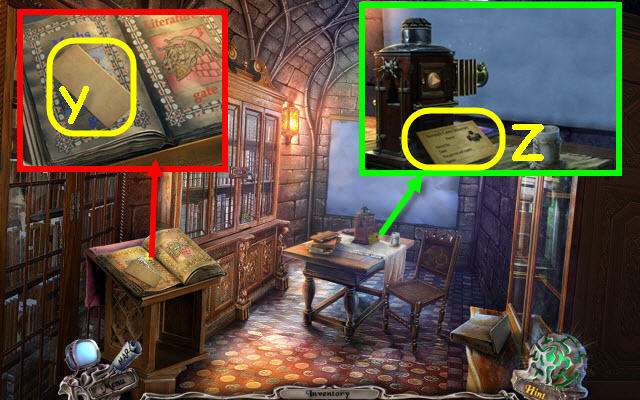
- Take the BLANK PUNCHCARD (Y).
- Select the blank pass and use the PEN on it to get a PASS (Z).
- Go to the Theater.

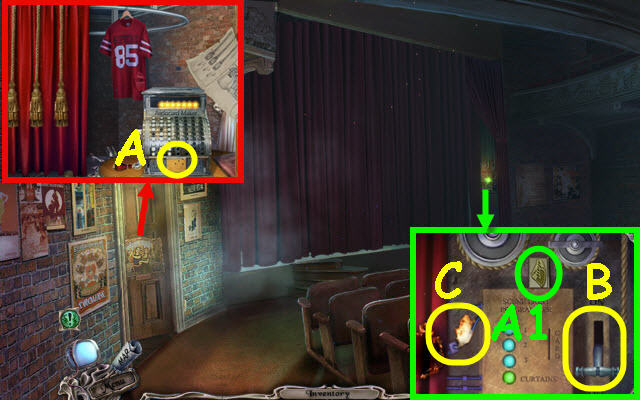
- Place the BLANK PUNCHCARD in the top of the maker. Pull the handle; take the PUNCHCARD (A).
- Take the TILE 1/7 (A1).
- Place the PUNCHCARD in the card slot and pull up the lever (B).
- Use the CUP OF COFFEE on the fire (C). Use the WIRE on the burnt wire; pull up the lever.

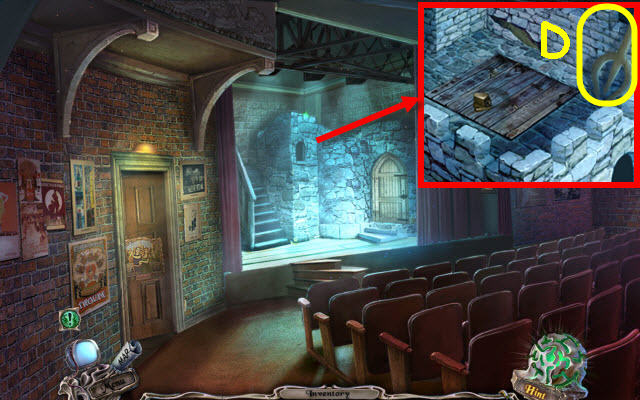
- Take the TRIDENT (D).
- Go to the Yard. Go up the left path to the Square.

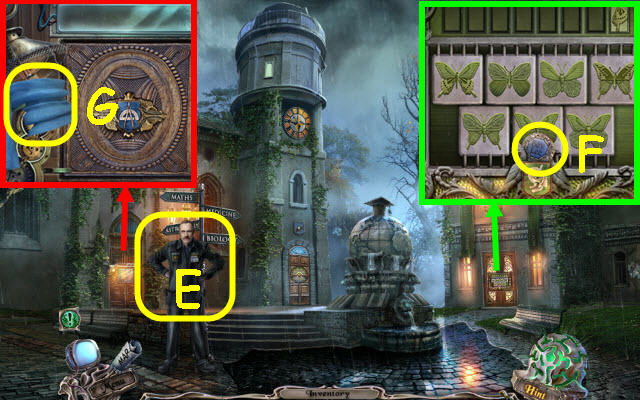
- Give the PASS to the officer (E).
- Take the TILE (F).
- Use the SCARF on the bulb. Take the LIGHT BULB (G).
- Go right to the Stadium.

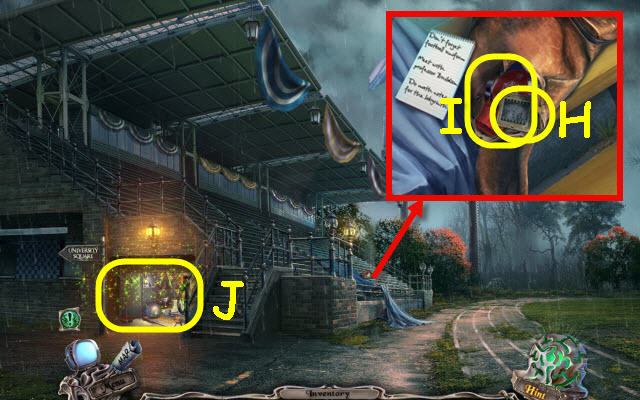
- Place the Bey Lee TILE on the bag lock. Open the bag; take the SLIDE 4/5 (H) and MITTEN (I).
- Examine the locker room to access a HOP (J).

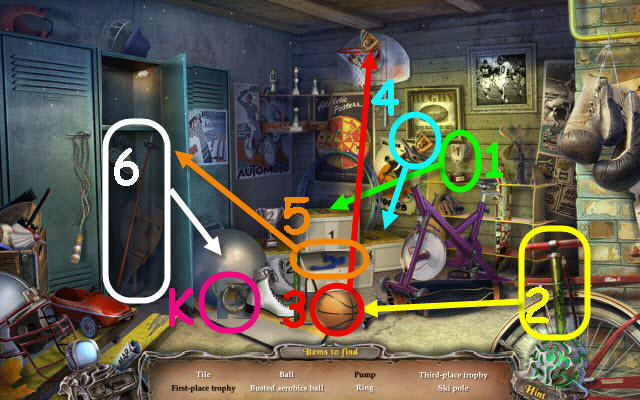
- Play the HOP.
- You receive a RING (K).
- Go to the Theater.

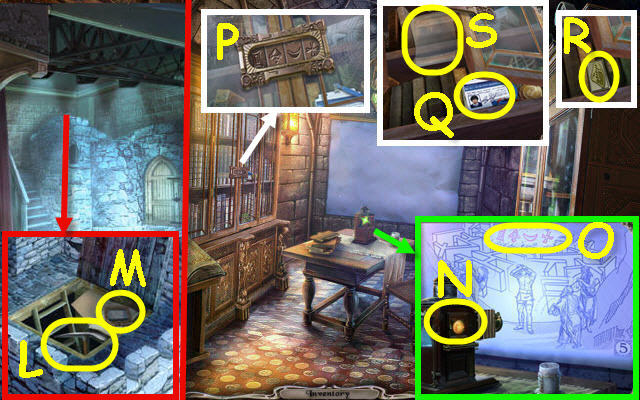
- Place the RING on the latch. Open the hatch; take the CLIMBING PICK (L).
- Open the book; take the SLIDE 5/5 (M).
- Go to the Hidden Niche.
- Open the side projector panel and place the LIGHT BULB inside (N).
- Place the 5 SLIDES on it and select the button to scroll through the 5 slides; observe the code (O).
- Enter the code from the slide on the cabinet lock (P).
- Take the ID CARD (Q), TILE 2/7 (R) and TRACING PAPER (S).
- Go to the Square.

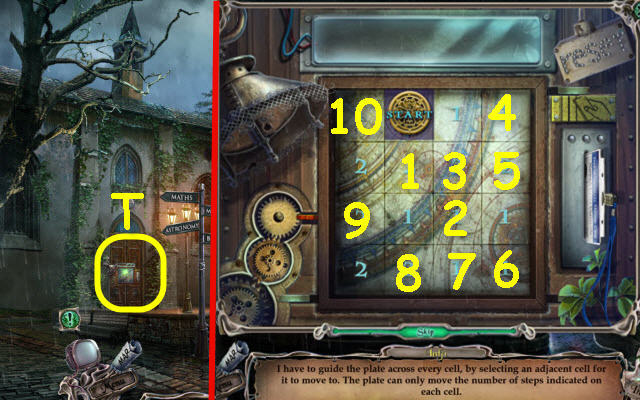
- Use the ID CARD in the slot of the door to trigger a puzzle (T).
- Move the plate across all the cells.
- Select the squares in the order listed (1-10).
- Go through the door.
Chapter 5: Bey Lee

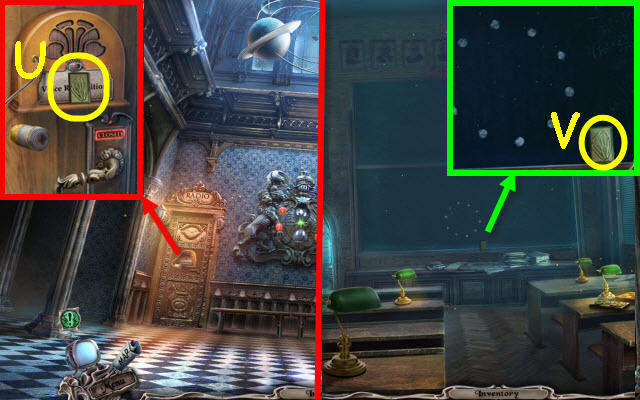
- Take the TILE 3/7 (U).
- Go forward through the door on the right.
- Examine the chalkboard; take the TILE 4/7 (V).
- Go through the door on the rear left.

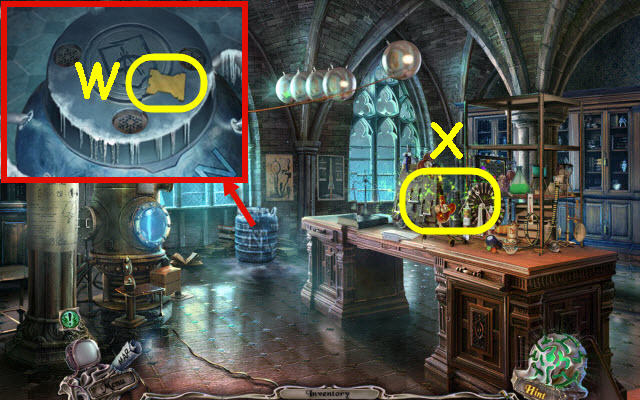
- Take the KEY (W).
- Examine the desk to access a HOP (X).

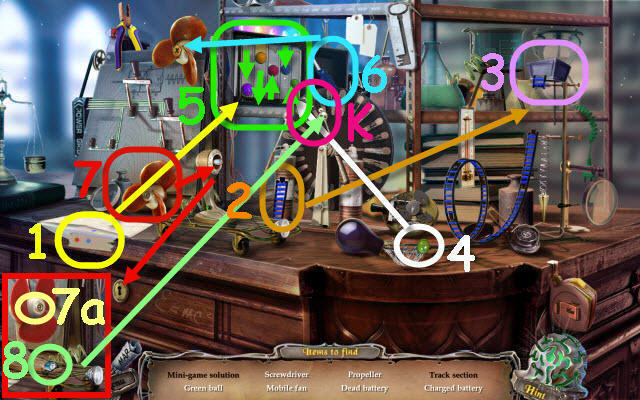
- Play the HOP.
- You receive a BATTERY (K).
- Back out.

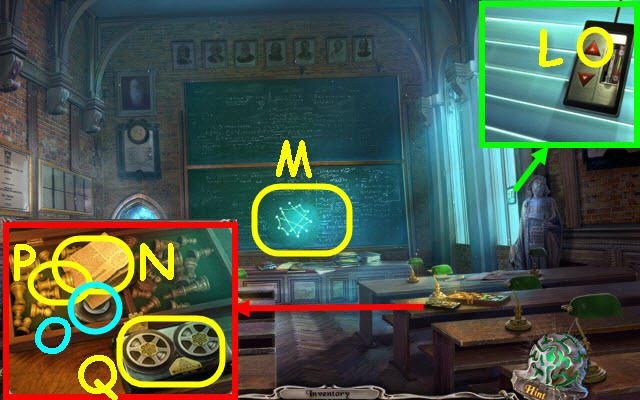
- Place the BATTERY on the controls; push the up button (L).
- Place the TRACING PAPER on the chalkboard. Use the PEN on the paper to get INSTRUCTIONS (M).
- Use the KEY on the chessboard. Take the CHESS GAME (N), AUDIOTAPE (O) and CHESS PIECE (P).
- Place the AUDIOTAPE on the RECORDER (Q) and take it.
- Back out.

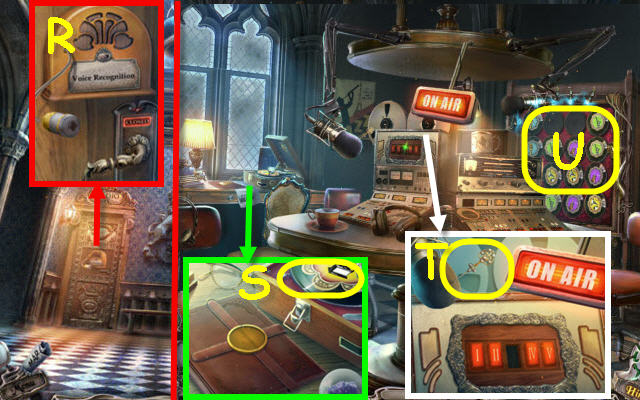
- Use the RECORDER on the door (R).
- Go through the door.
- Take the 2nd RECORD (S).
- Take the PIN (T).
- Place the 2 RECORDS on the wall to trigger a puzzle (U).

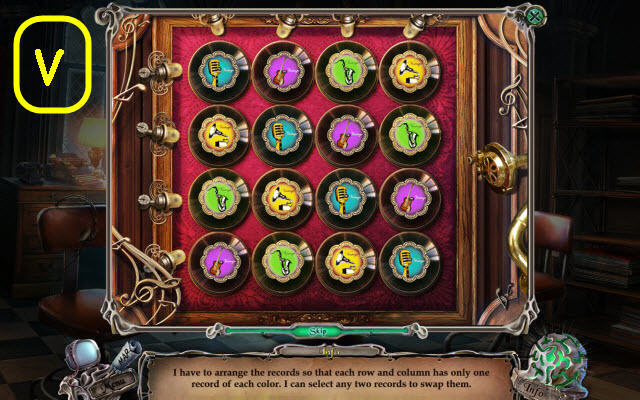
- Arrange the records so no two of the same are in a row or column.
- See screenshot for solution (V).
- Take the SNOWFLAKE KEY.
- Go to the Physics Classroom.

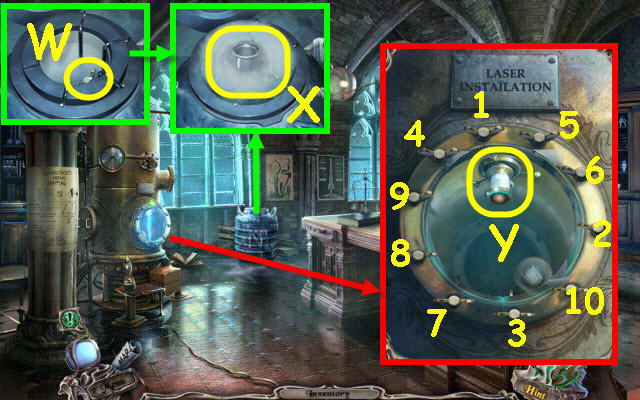
- Use the SNOWFLAKE KEY on the tank lid. Use the MITTEN to get the BULB WITH NITROGEN (W).
- Take the VALVE (X).
- Examine the portal and you will automatically place the INSTRUCTIONS on it. Place the VALVE on it and turn the valves as shown; take the LASER (Y).
- Go to Larner Hall.

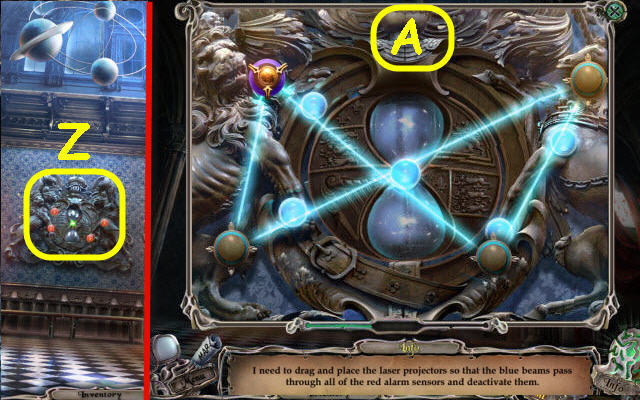
- Place the LASER on the coat of arms to trigger a puzzle (Z).
- Move the lasers so it passes through the sensors.
- See screenshot for solution (A).
- Take the ORNATE TILE.
- Go to the Labyrinth.

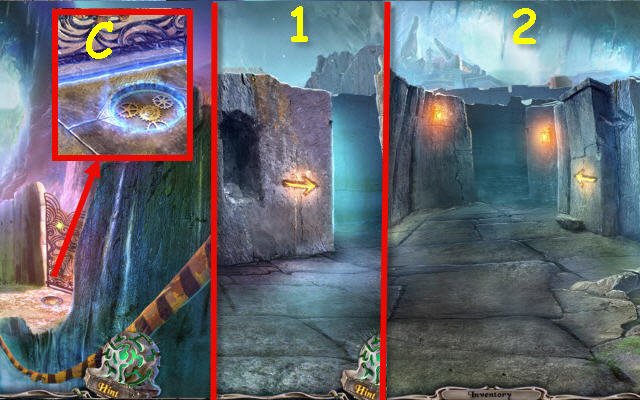
- Examine the right gate and place the ORNATE TILE in the recess (C).
- Enter the labyrinth.
- Go right and then straight (1-2).

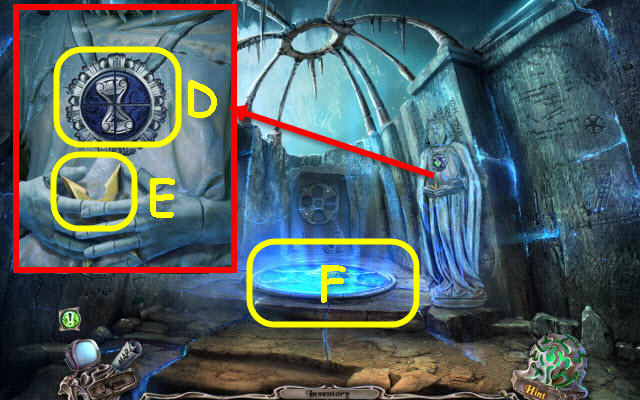
- Select the medallion pieces to turn them and complete the image (D).
- Take the THROWING STAR (E).
- Use the DIAMOND RING on the crystal to trigger a puzzle (F).

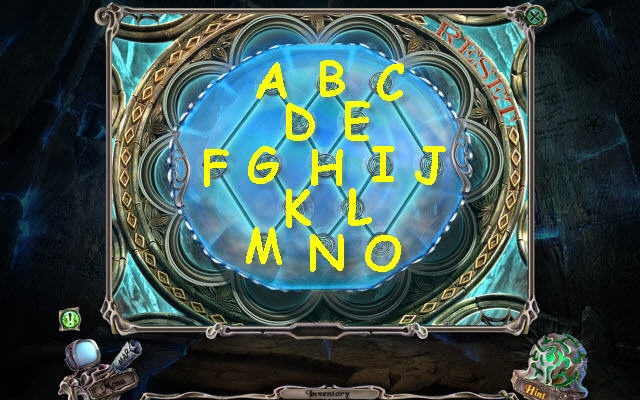
- Follow all the lines once.
- To solve the puzzle, select the following connectors: A, F, M, K, G, D, H, K, N, L, H, E, I, L, O, J, C, E, B, D and A.

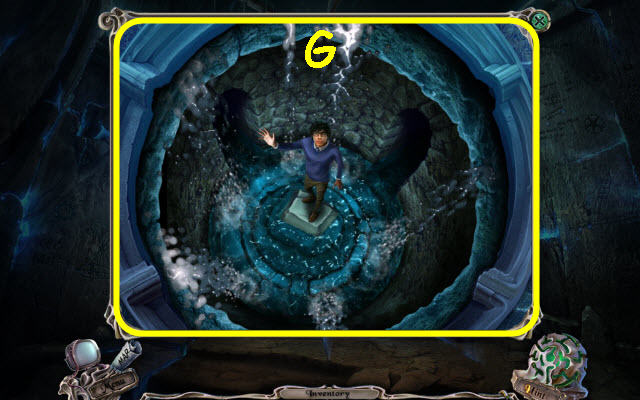
- Use the BULB WITH NITROGEN and then the CLIMBING PICK in the well (G); you will receive an AQUARIUS.
- Go to the Physics Classroom.
Chapter 6: Observatory

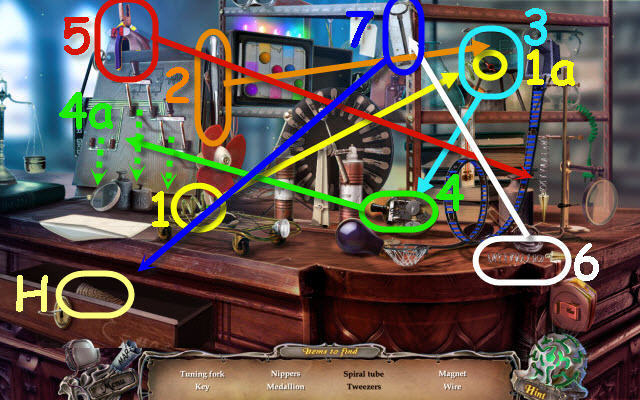
- Examine the desk to access a HOP.
- Play the HOP.
- You receive a MEDALLION 1/2 (H).

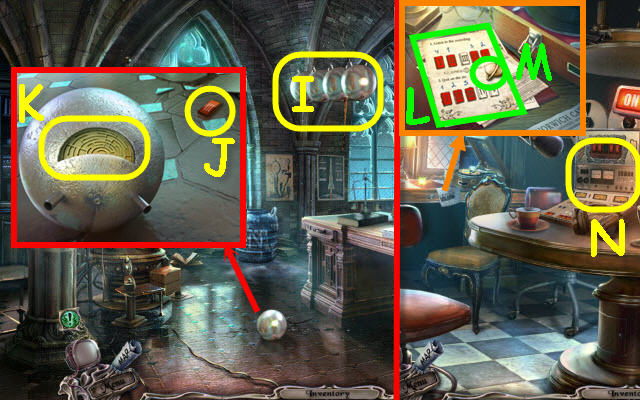
- Use the THROWING STAR on the balls (I).
- Take the BUTTON (J).
- Use the PIN to get the MEDALLION 2/2 (K).
- Go to the University Radio Station.
- Place the MEDALLION on the diary cover. Take the PAPER (L) and PLANET TILE (M).
- Examine the controls and you will automatically place the PAPER on it. Place the BUTTON on it to trigger a puzzle (N).

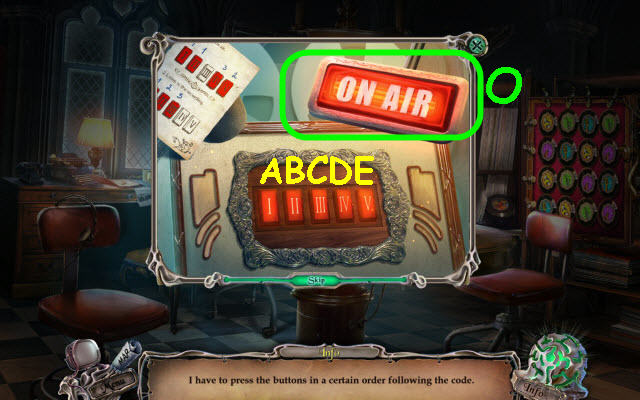
- Press the buttons in the correct order.
- Select the buttons in this order: B, E, D and A.
- Second set: A, B and C.
- Take the LAMP (O).
- Back out.

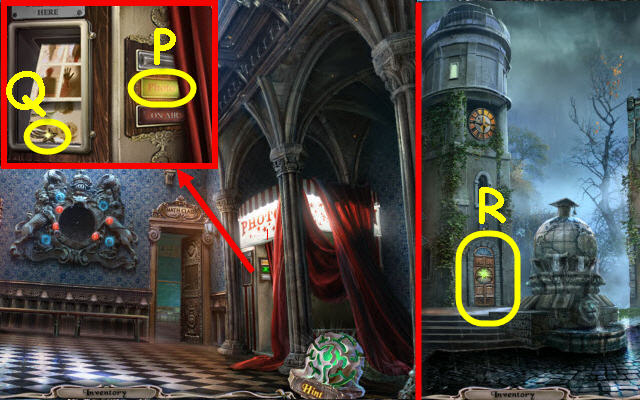
- Place the LAMP on the ‘on air’ button; press the photo button (P).
- Take the STAR (Q) and examine the photos.
- Back out.
- Place the STAR and PLANET TILE on the door (R).
- Go through the door.

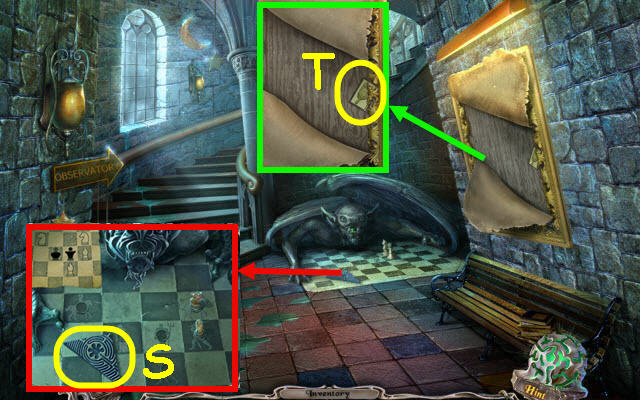
- Examine the chessboard and you will automatically place the CHESS GAME on it; take the TILE 1/2 (S).
- Take the TILE 5/7 (T).
- Go upstairs.

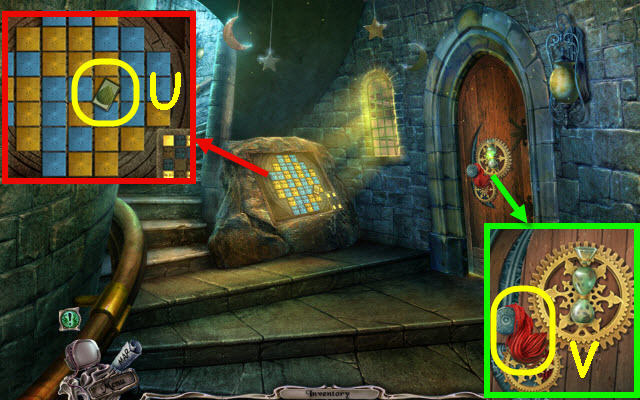
- Take the TILE 6/7 (U).
- Take the STRING (V).
- Go upstairs.
- Examine the left bookcase to access a HOP.

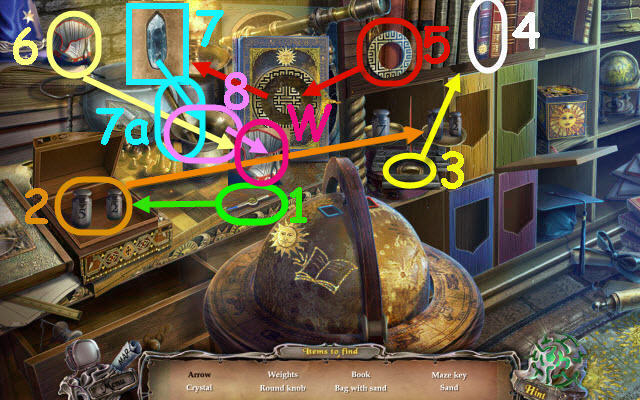
- Play the HOP.
- You receive SAND (W).
Chapter 7: Alex

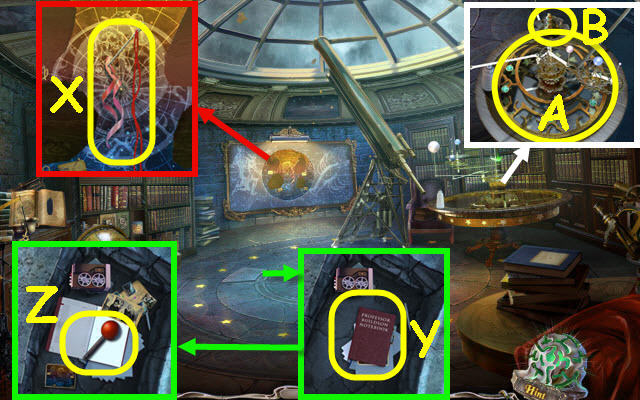
- Use the STRING on the needle and take the NEEDLE AND THREAD (X).
- Remove the loose stone and select the book (Y).
- Reexamine the removed tile; take the HANDLE (Z) and look at the pictures.
- Use the TRIDENT on the astrolabe; take the ASTROLABE (A).
- Open the sphere; take the 2nd CHESS PIECE (B).
- Back out.

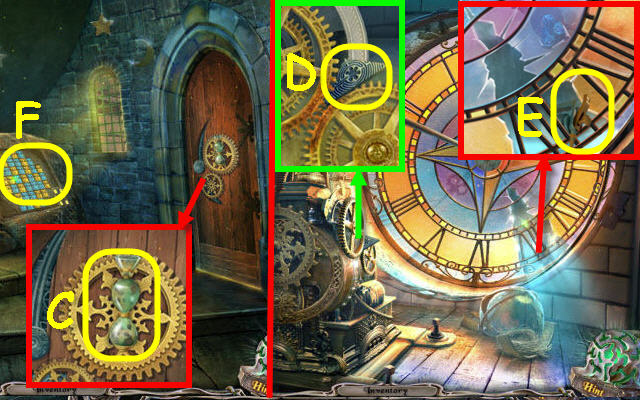
- Place the SAND in the glass (C).
- Go through the door.
- Take the TILE 2/2 (D).
- Take the SPRAY BOTTLE PART (E).
- Back out.
- Place the 2 TILES on the tile board to trigger a puzzle (F).

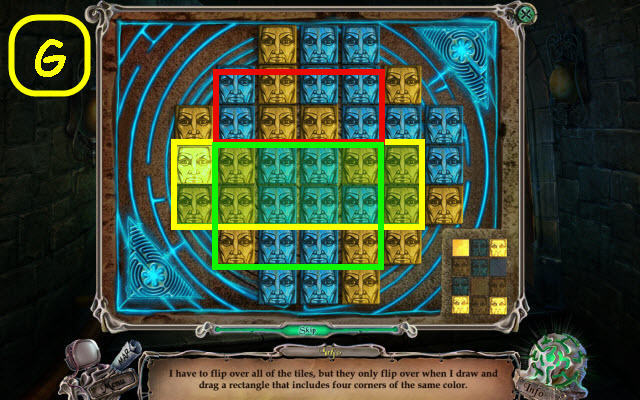
- Select areas that have matching colored corners until all tiles are turned over.
- Tip: Selecting areas that have already been turned will change their color.
- The starting layouts are random.
- See screenshot for examples (G).
- Take the OIL and SCORPIO SYMBOL.
- Go up the stairs.

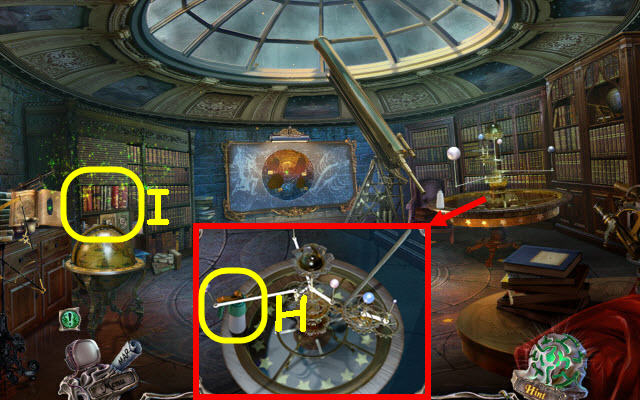
- Place the SPRAY BOTTLE PART on the bottle; take the SPRAY BOTTLE (H).
- Examine the bookshelf to access a HOP (I).

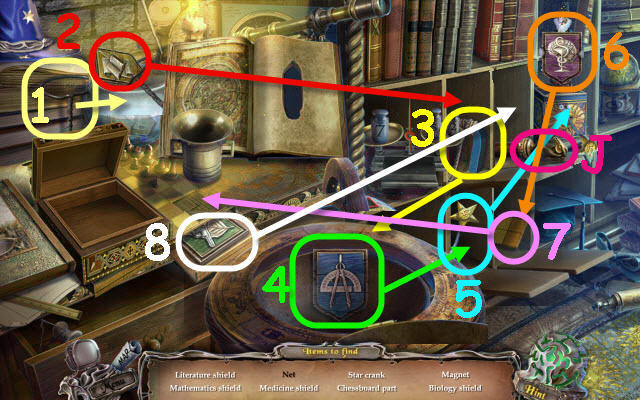
- Play the HOP.
- You receive the KNIGHT (J).
- Go to the Clocktower.

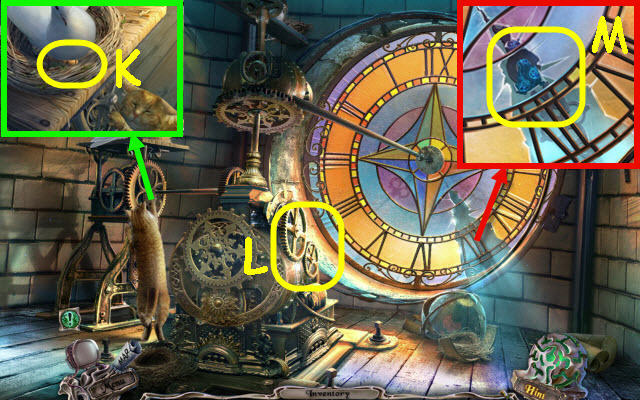
- Use the SPRAY BOTTLE on the cat; take the 3rd CHESS PIECE (K).
- Use the OIL on the gears (L).
- Take the LIBRA SYMBOL (M).
- Back out twice.

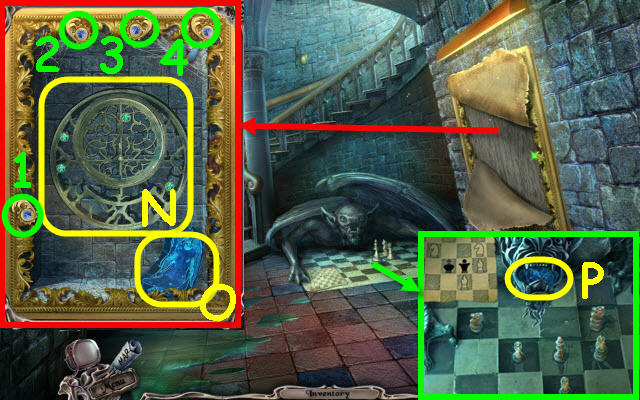
- Use the NEEDLE AND THREAD on the picture; select the four tabs to remove the picture (1-4).
- Place the ASTROLABE on the smaller astrolabe; take the ASTROLABE (N) and VIRGO SYMBOL (O).
- Place the 3 CHESS PIECES and KNIGHT on the chessboard. Take the LEO SYMBOL (P).
- Go upstairs twice.

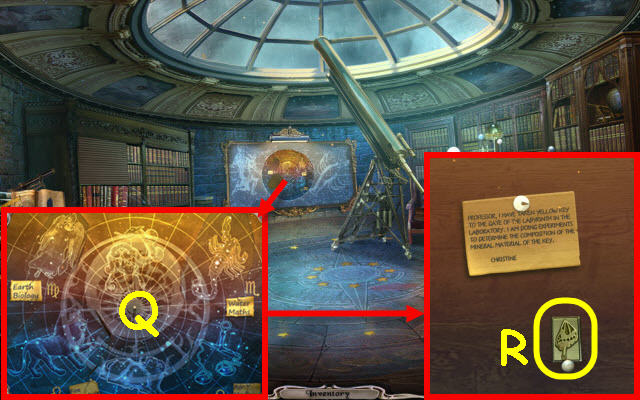
- Place the SCORPIO SYMBOL, LIBRA SYMBOL, VIRGO SYMBOL, and LEO SYMBOL in their respective slots. Place the ASTROLABE and the AQUARIUS in the center and receive a STAR CHART (Q).
- Take the TILE 7/7 (R).
- Go to the Square.

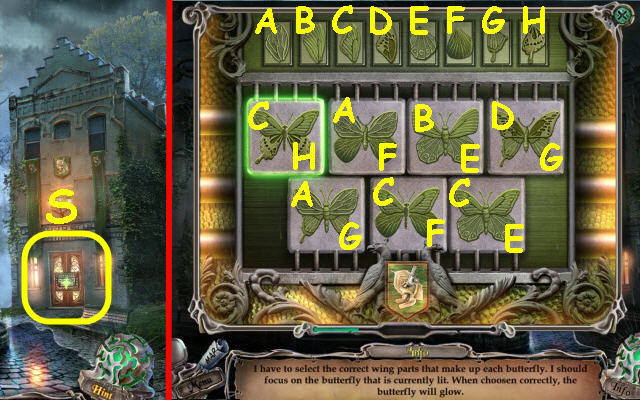
- Place the 7 TILES on the door to trigger a puzzle (S).
- Assemble the butterflies by choosing the matching wings.
- See screenshot for matching wings (A-H).
- Go through the door.

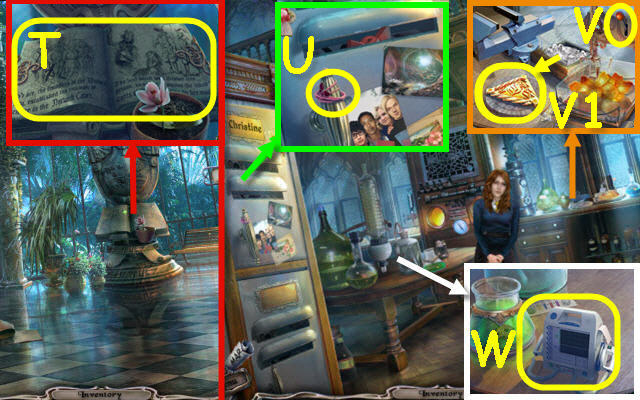
- Select the book twice to receive the STONE BOOK (T).
- Go left.
- Take the SCRUNCHY (U).
- Place the HANDLE on the crane and move it (V).
- Place the ice on the tile; take the ORNATE TILE (V1).
- Take the DEFIBRILLATOR (U).
- Go to the Labyrinth.

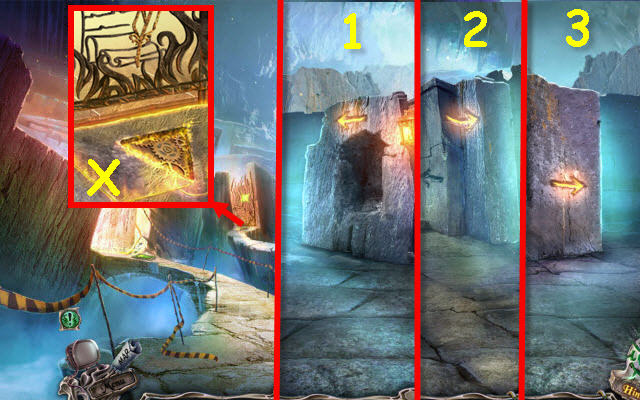
- Place the ORNATE TILE in the recess (X).
- Enter the labyrinth.
- Go left and then right two times (1-3).

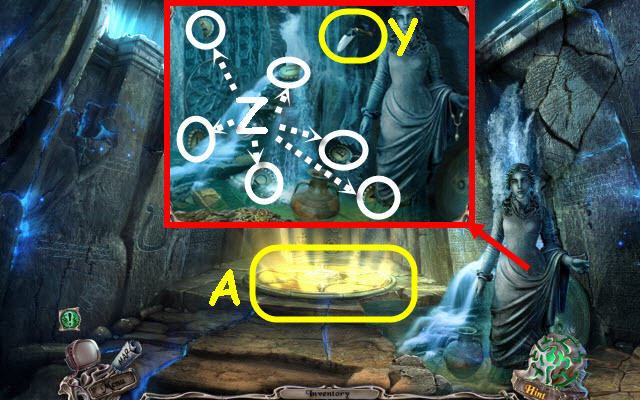
- Take the BENT SPADE (Y) and the N, E, D, R, I, A (Z).
- Use the DIAMOND RING on the crystal to trigger a puzzle (A).

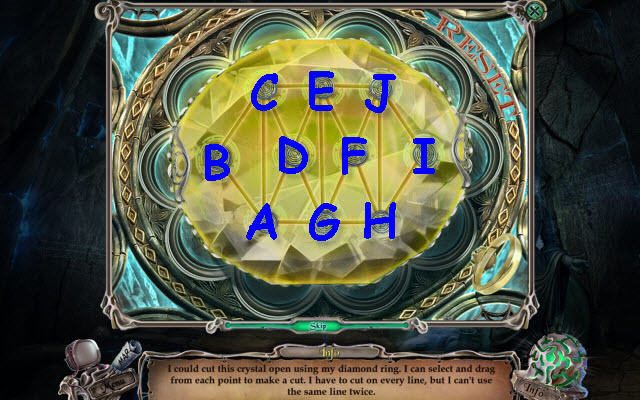
- Follow all the lines once.
- Select the following connectors: G, A, B, C, A, D, C, E, D, G, E, F, G, H, F, J, H, I, J and E.

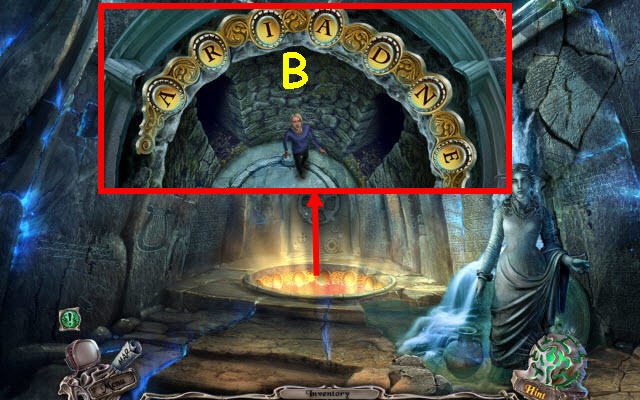
- From left; place the A, R, I, D, N and E (B).
- You receive a TILE.
- Go to the Smith Hall; go right.
Chapter 8: Buildson

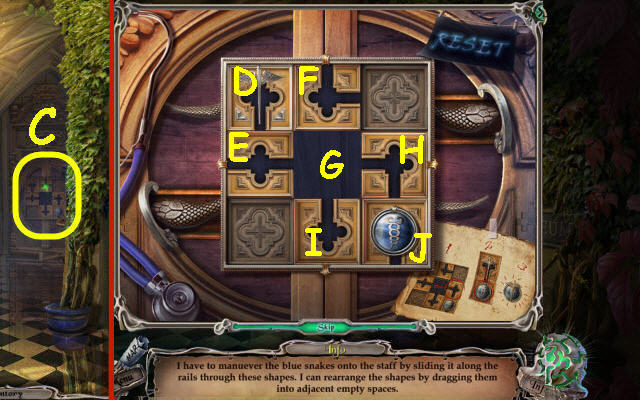
- Place the TILE on the door to trigger a puzzle (C).
- Move the snake tile to the winged rod.
- Move the following tiles: H, J, I, medallion down, J, medallion up and left, H, G, E, medallion right, G, F, D, medallion left and up.
- Go through the door.
- Examine the bookcase to access a HOP.

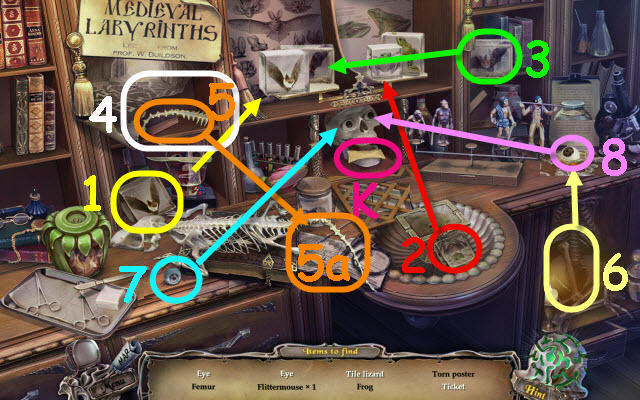
- Play the HOP.
- You receive a TICKET (K).

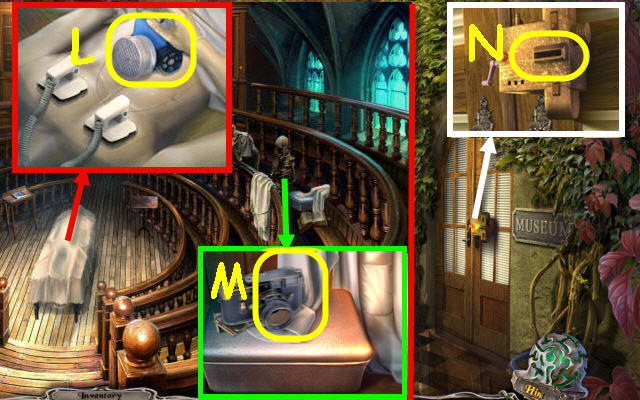
- Remove the sheet. Place the DEFIBRILLATOR on the dummy and select it; take the RESPIRATOR (L).
- Select the camera; take the SLEEVE (M).
- Back out.
- Use the TICKET in the slot (N).
- Go through the door.

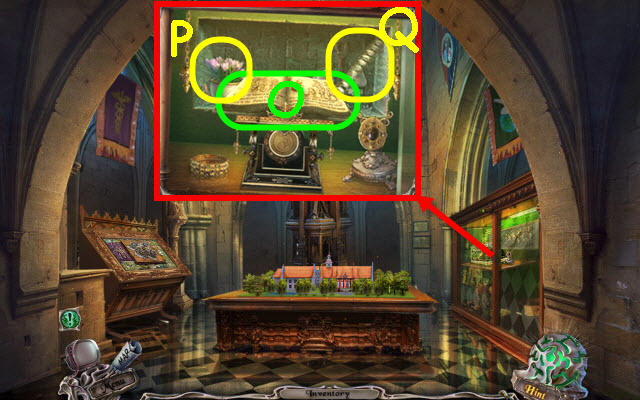
- Open the glass case; place the STONE BOOK on the holder (O).
- Open the back wall; take the FLOWERS (P) and TUBE (Q).
- Go to the Auditorium.
- Examine the bookcase to access a HOP.

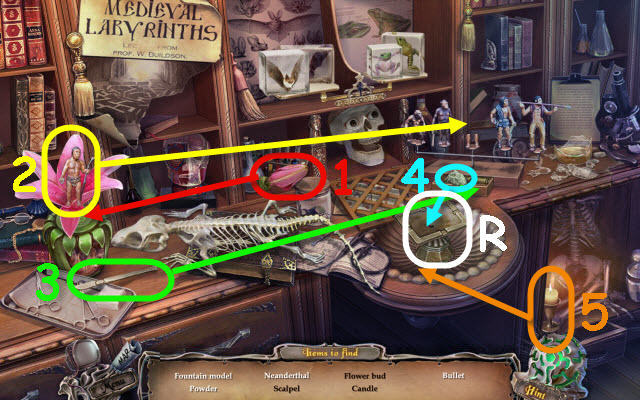
- Play the HOP.
- You receive a FOUNTAIN MODEL (R).
- Go to the History Exhibit.

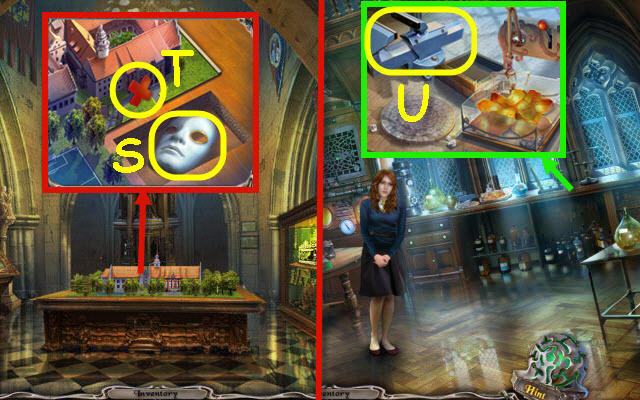
- Place the FOUNTAIN MODEL on the base; take the MASK PART (S) and TILE (T).
- Go to the Laboratory.
- Place the BENT SPADE in the vise receive a SPADE (U).
- Go to the Auditorium.

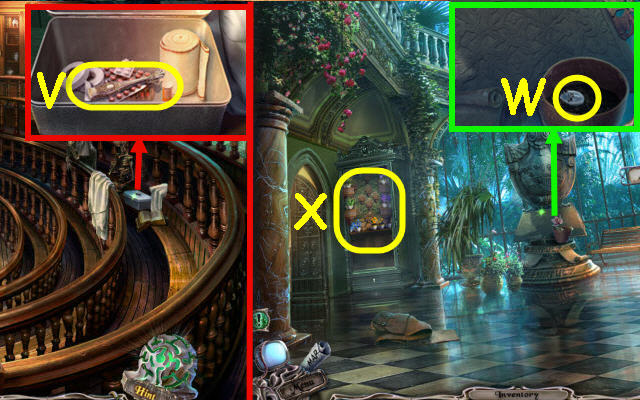
- Place the TILE on the chest; take the TWEEZERS (V).
- Go to Smith Hall.
- Use the SPADE on the flower; take the LENSES 1/2 (W).
- Place the FLOWERS in the display to trigger a puzzle (X).

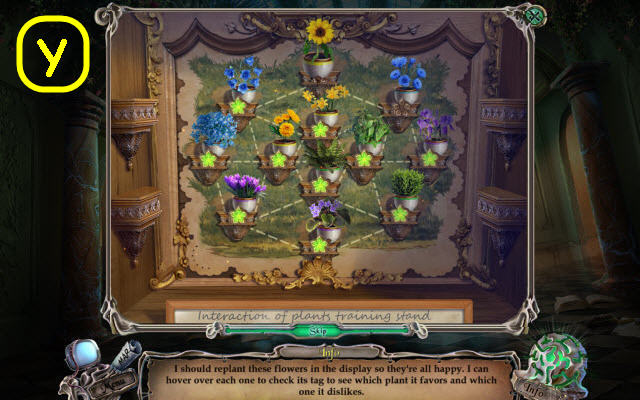
- Place the flowers in their correct locations.
- See screenshot for solution (Y).
- Take the TEST TUBES.
- Go left.

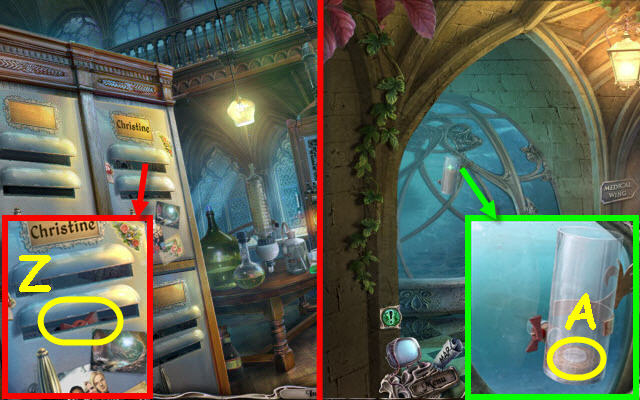
- Use the TWEEZERS to get the VALVE (Z).
- Go to the Medical Wing.
- Place the VALVE on the feeder; turn it. Take the LENSES 2/2 (A).
- Go to Laboratory.

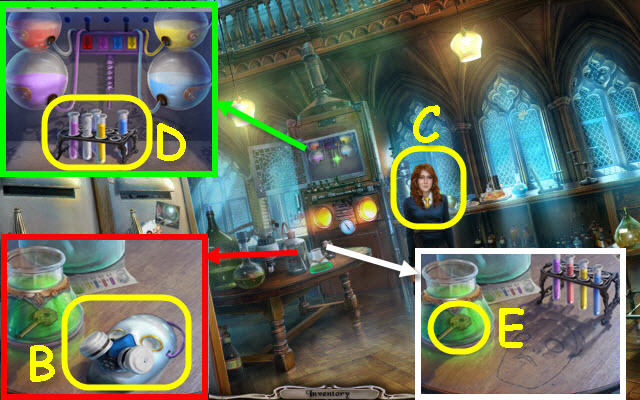
- Place the MASK PART on the outline. Place the 2 LENSES, RESPIRATOR and SCRUNCHY on it; take the MASK (B).
- Use the MASK on the girl (C).
- Examine the chemicals; place the TEST TUBES on the shelf and the TUBE under the arrows. Press each of the arrows; receive the CHEMICALS (D).
- Place the CHEMICALS on the table and, in this order; add the yellow, blue, red and purple test tubes to the beaker. Take the PUZZLE KEY (E).
- Go to the History Exhibit.

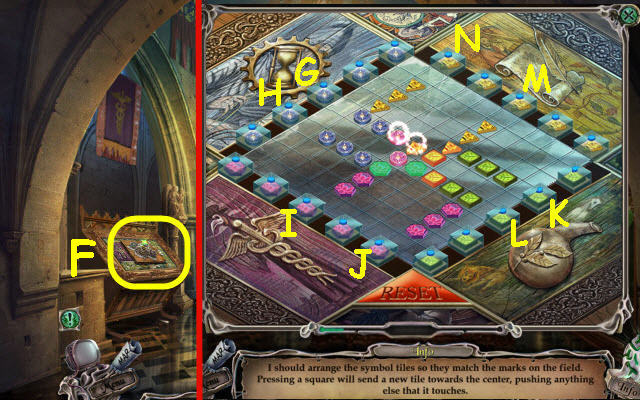
- Use the PUZZLE KEY in the lock to trigger a puzzle (F).
- Place the symbols over the matching area.
- Select the following: Hx4, Ix3, Jx4, Lx3, Kx4, Mx3, Nx4 and Gx3.
- Receive the ORNATE TILE.
- Go to the Labyrinth.

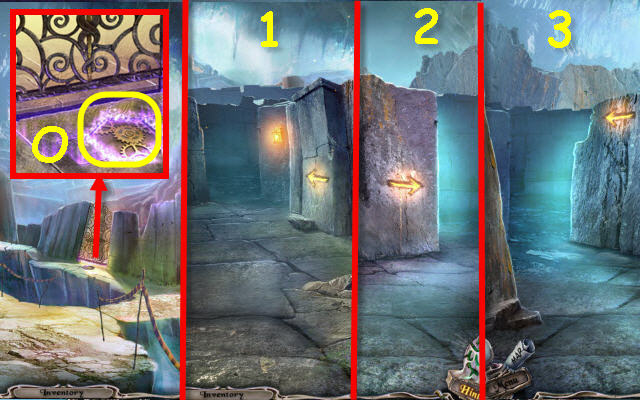
- Place the ORNATE TILE in the recess (O).
- Enter the labyrinth.
- Go forward, right and left (1-3).

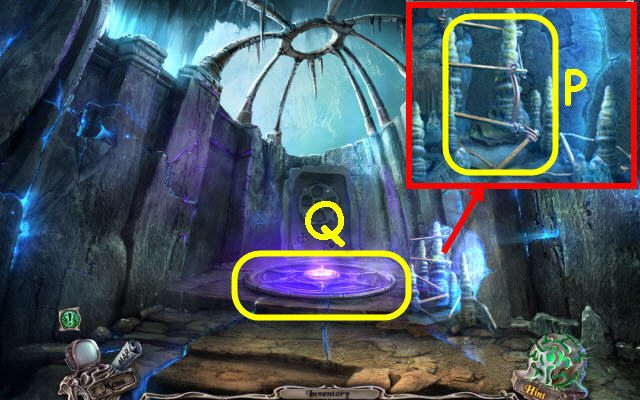
- Place the SLEEVE on the LADDER (P); take it.
- Use the DIAMOND RING on the crystal to trigger a puzzle (Q).

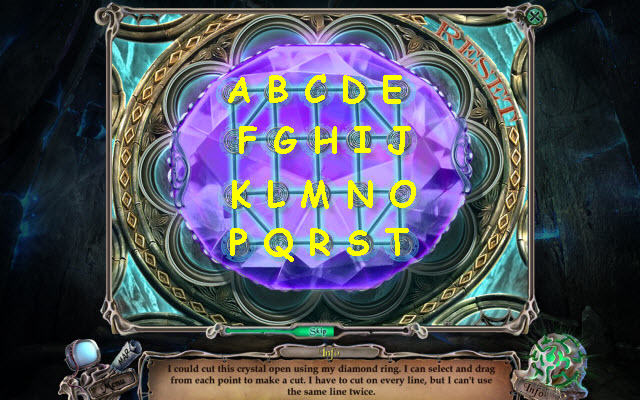
- Follow all the lines once.
- Select the following connectors: C, B, A, F, B, G, F, K, L, Q, K, P, Q, R, S, T, O, S, N, O, J, E, D, J, I, N, M, H, I, D, C, H, G, L, M and R.

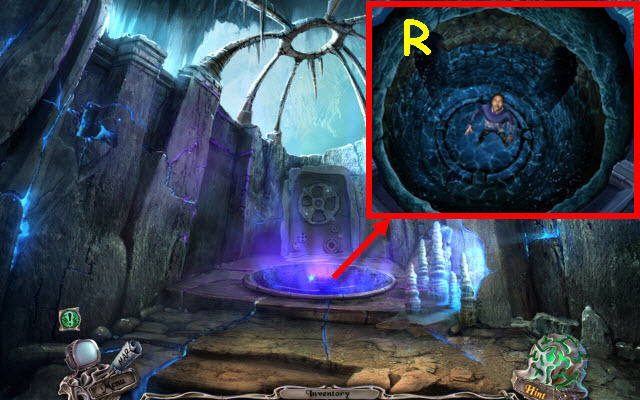
- Use the LADDER in the well (R).
- You receive SMELLING SALTS.

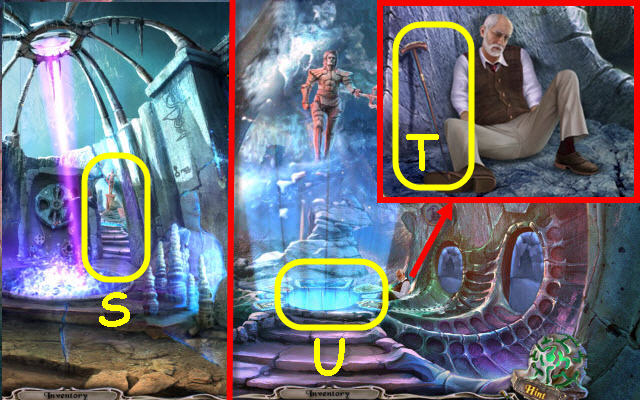
- Go through the passage (S).
- Select anywhere.
- Use the SMELLING SALTS on the professor; take the STICK (T).
- Place the STAR MAP on the pool (U).

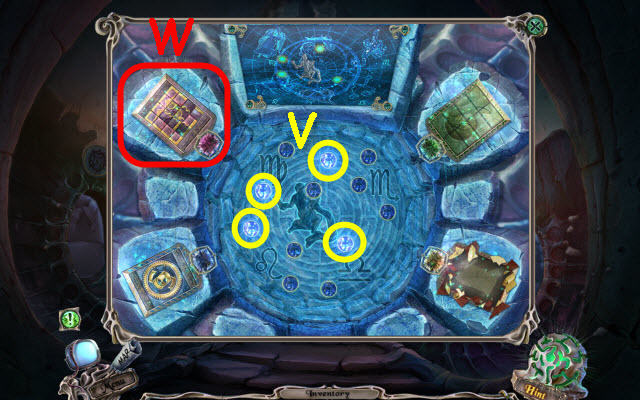
- Use the STICK on the stars matching the map (V).
- Select the medical emblem to trigger a puzzle (W).

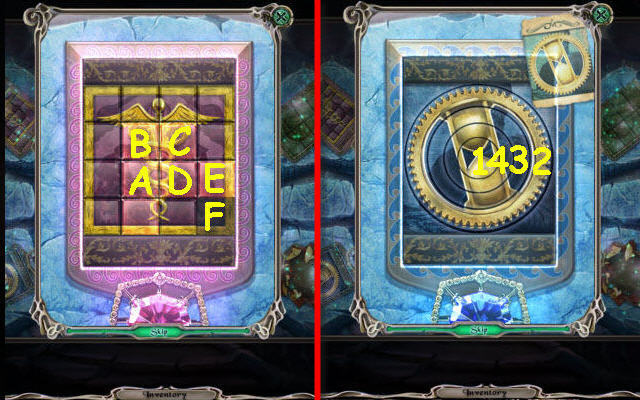
- Move the tiles to complete the image.
- Select the following: A, B, C D, E and F.
- Select the bottom left emblem to trigger a puzzle.
- Complete the image by rotating the disks.
- The starting layout is random.
- Set them in place in the order listed (1-4).
- Select the top right emblem to trigger a puzzle.

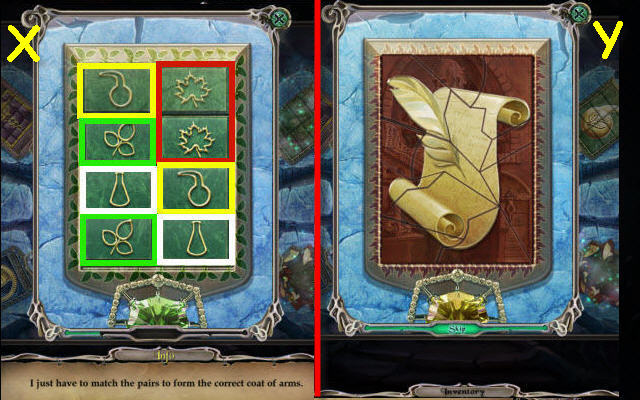
- Find the matching pairs.
- See screenshot for solution (X).
- Select the bottom right emblem to trigger a puzzle.
- Assemble the pieces to complete the image.
- See screenshot for solution (Y).

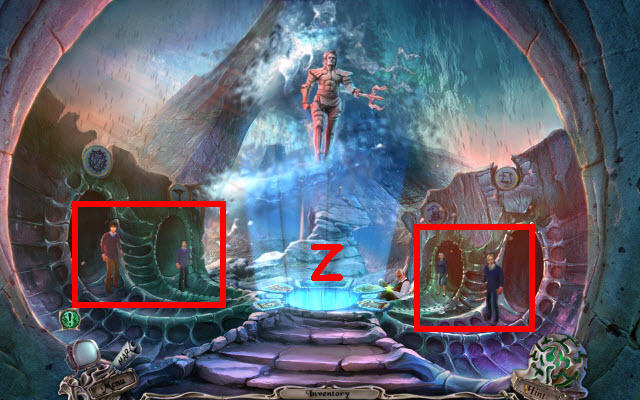
- You have released the students (Z).
- Congratulations! You have successfully completed Sable Maze: Norwich Caves.





 Death at Fairing Point: A Dana Knightstone Novel Walkthrough, Guide, & Tips
 Web of Deceit: Deadly Sands Walkthrough, Guide, & Tips
 Forest Legends: The Call of Love Walkthrough, Guide, & Tips
 Mystery Case Files: Fate's Carnival Collector's Edition Walkthrough, Guide, & Tips
 Alabama Smith in the Quest of Fate Walkthrough, Guide, & Tips