Witch Hunters: Full Moon Ceremony Walkthrough, Guide, & Tips
Witch Hunters: Full Moon Ceremony Walkthrough

Welcome to the Witch Hunters: Full Moon Ceremony Walkthrough
Defeat the evil witches and save the world from eternal darkness!
Whether you use this document as a reference when things get difficult or as a road map to get you from beginning to end, we’re pretty sure you’ll find what you’re looking for here.
This document contains a complete Witch Hunters: Full Moon Ceremony game walkthrough featuring annotated screenshots from actual gameplay!
We hope you find this information useful as you play your way through the game. Use the walkthrough menu below to quickly jump to whatever stage of the game you need help with.
Remember to visit the Big Fish Games Forums if you find you need more help. Have fun!
This walkthrough was created by BrownEyedTigre, and is protected under US Copyright laws. Any unauthorized use, including re-publication in whole or in part, without permission, is strictly prohibited.
General Tips
- This is the official guide for Witch Hunters: Full Moon Ceremony.
- This guide will not mention each time you have to zoom into a location; the screenshots will show each zoom scene.
- Hidden-object puzzles are referred to as HOPs. This guide will not show screenshots of the HOPs, however, it will mention when an HOP is available and the inventory item you’ll collect from it.
- This guide will give step-by-step solutions for all puzzles which are not random. Please read the instructions in the game for each puzzle.
Chapter 1: Witches

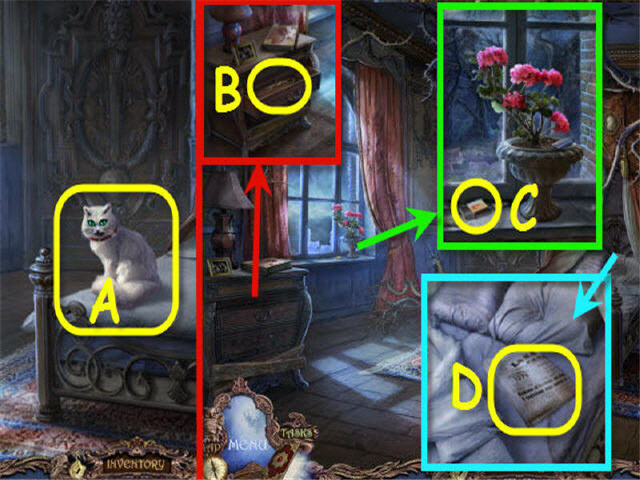
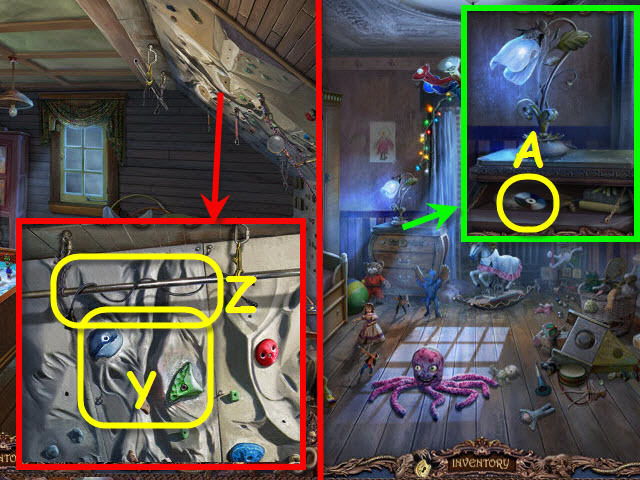
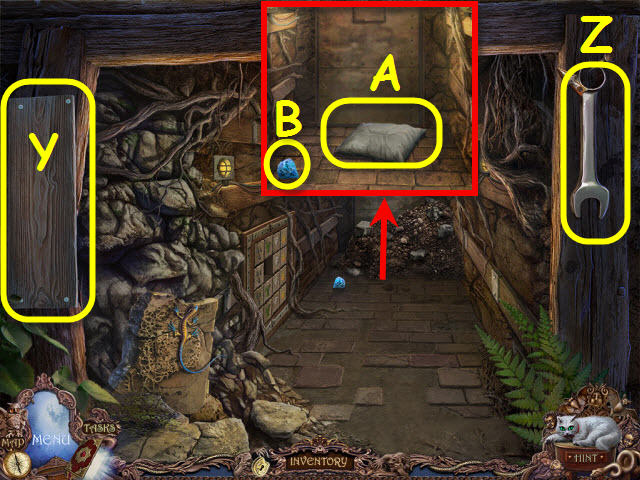
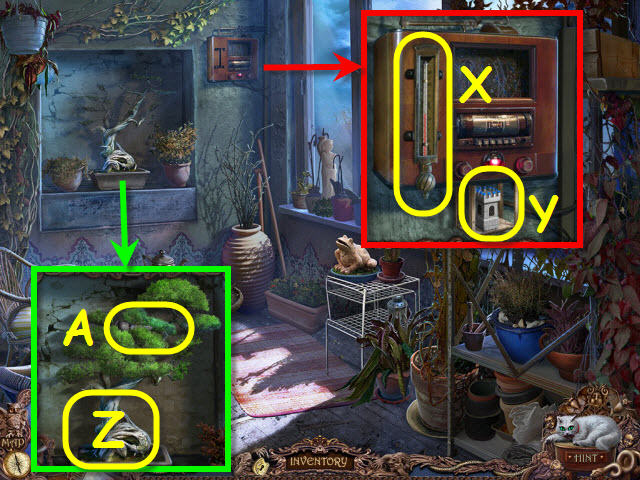
- Pet the cat (A).
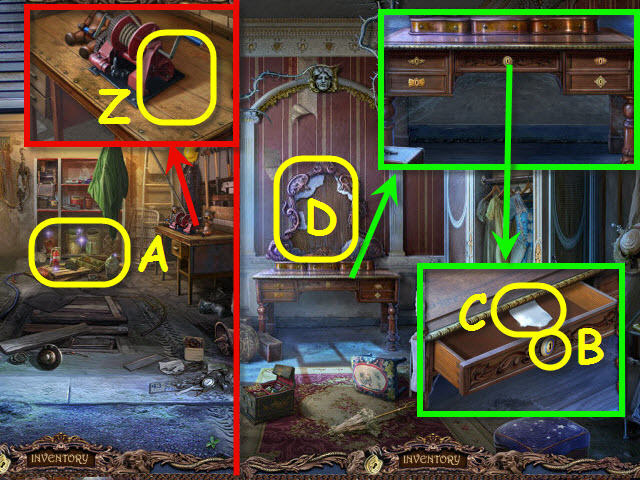
- Open the drawer; take the SCISSORS (B).
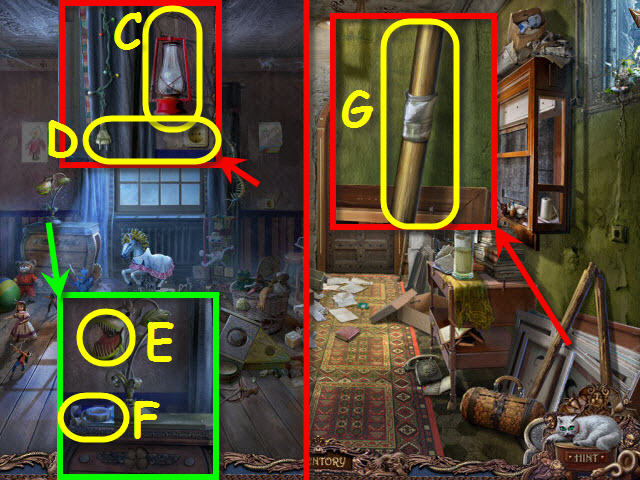
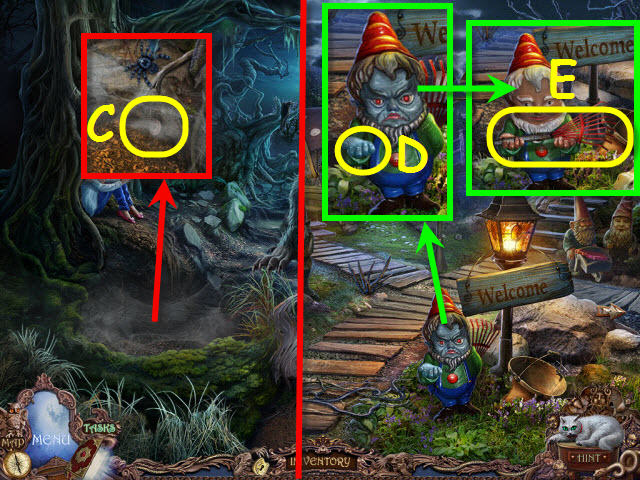
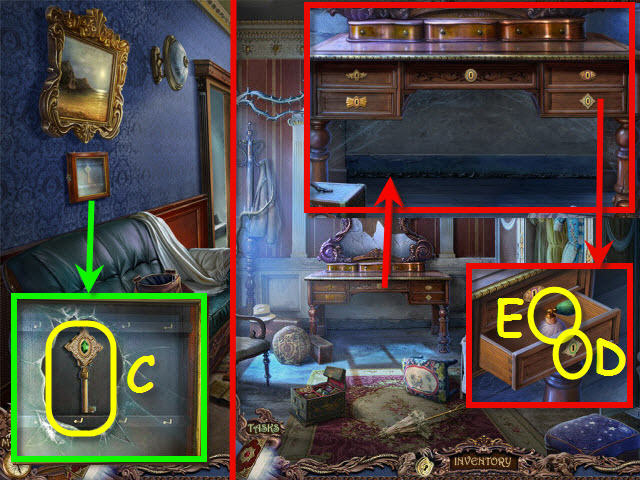
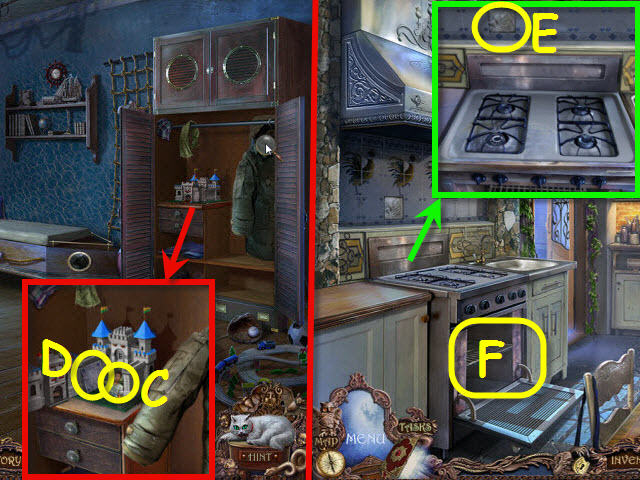
- Take the EMPTY MATCHBOX (C).
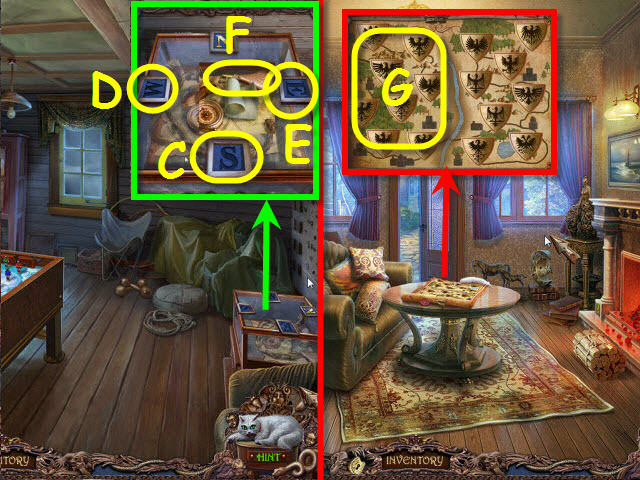
- Move the covers; take the NEWSPAPER (D).
- Select the picture (E); take the CANDLE (F).
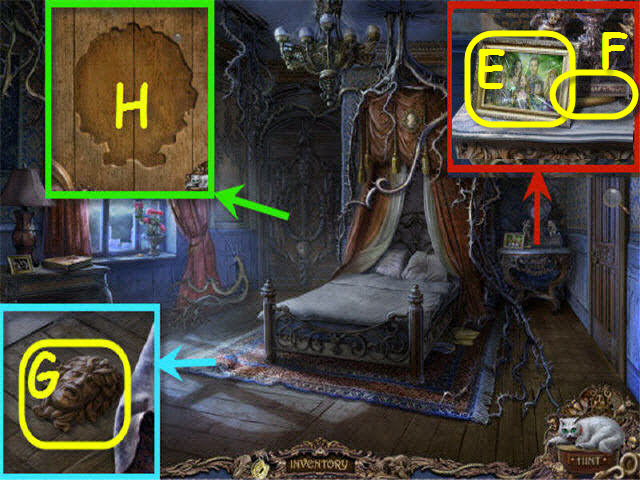
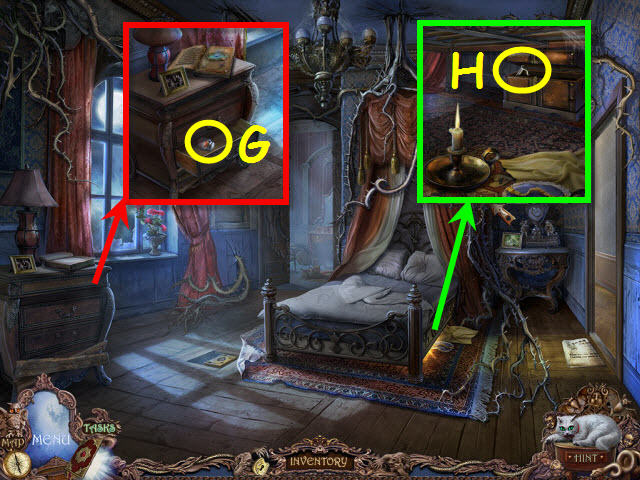
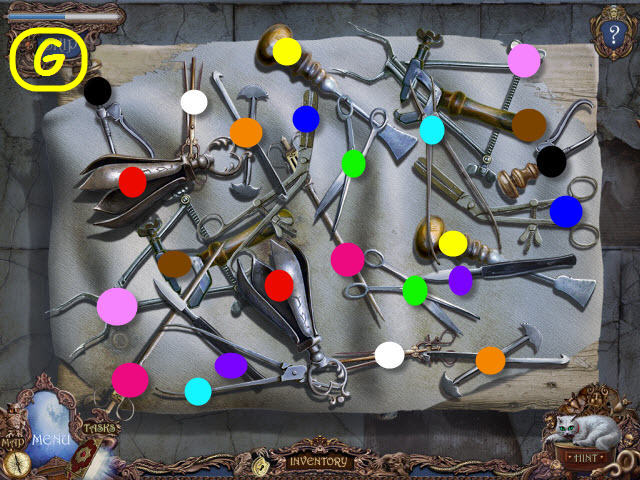
- Flip the carpet; take the WOODEN FACE (G).
- Place the WOODEN FACE to trigger a puzzle (H).

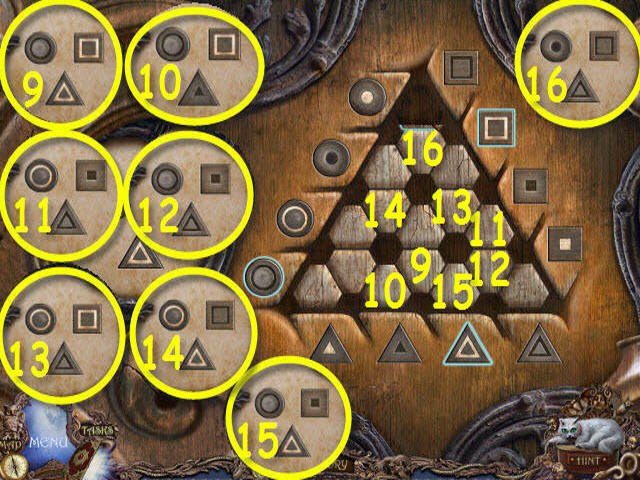
- Find the correct tile.
- Order of appearance is random. Solution (1-16).
- Go through the door.
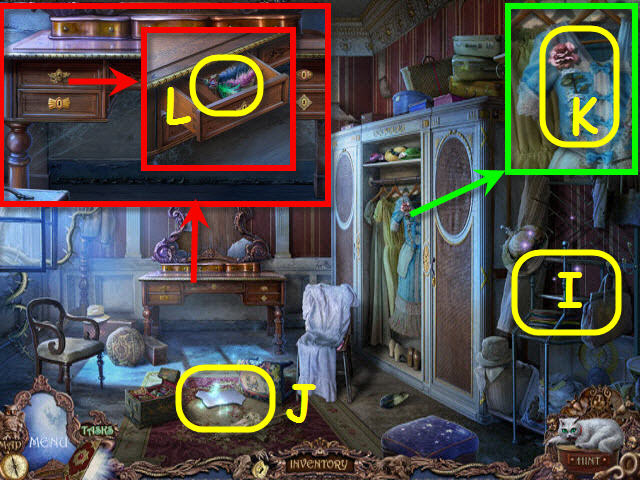
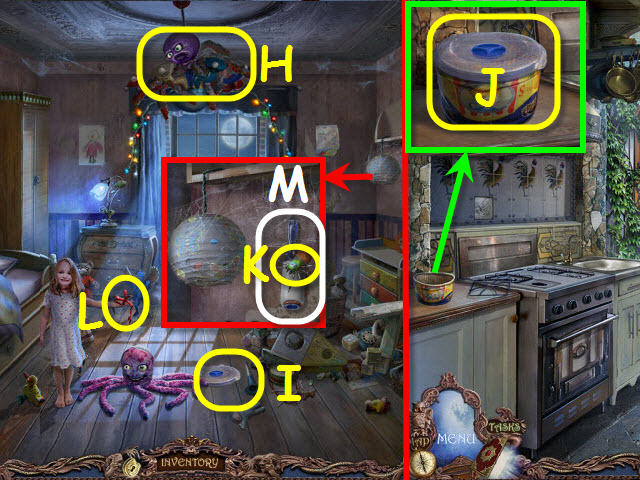
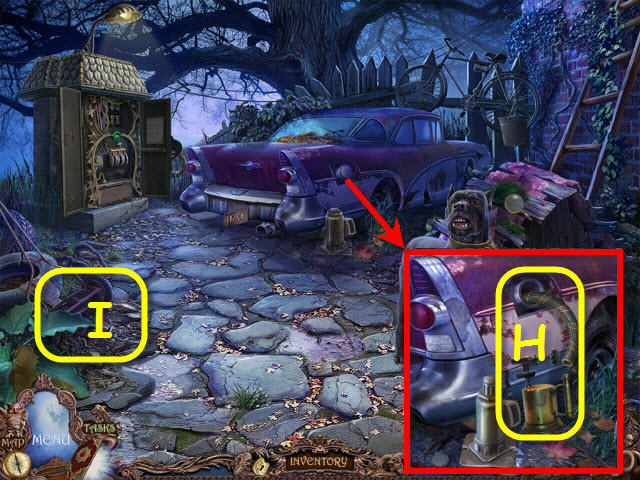
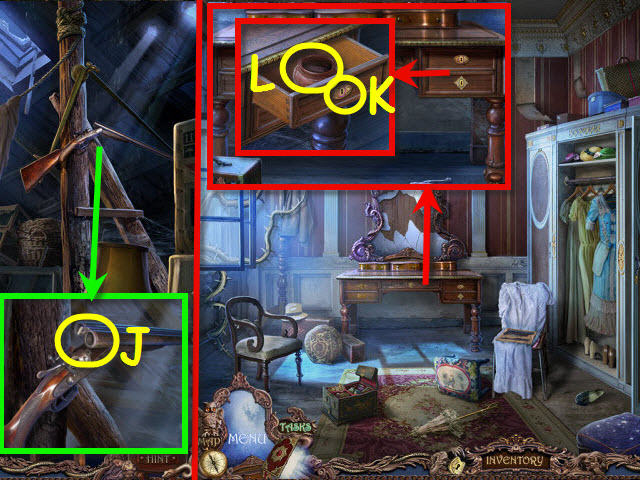
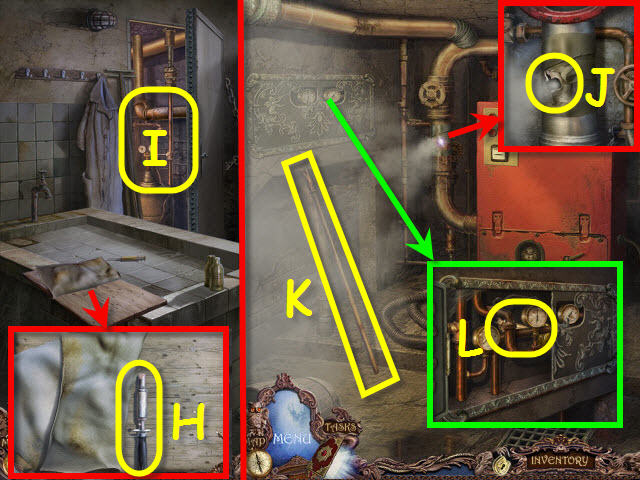
- Play the HOP to receive a HATPIN (I).
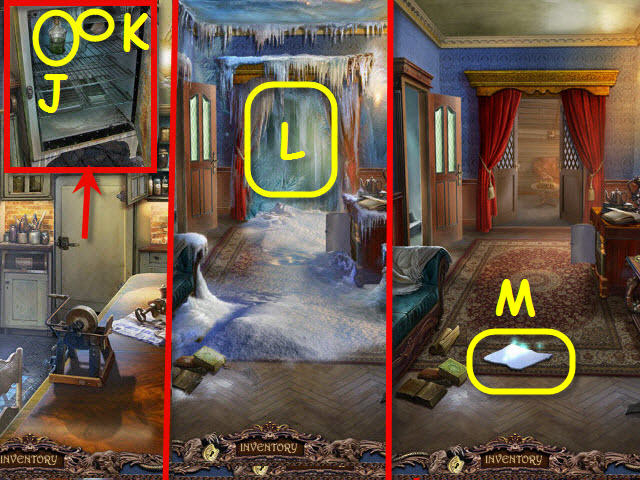
- Take the MIRROR SHARD 1/15 (J).
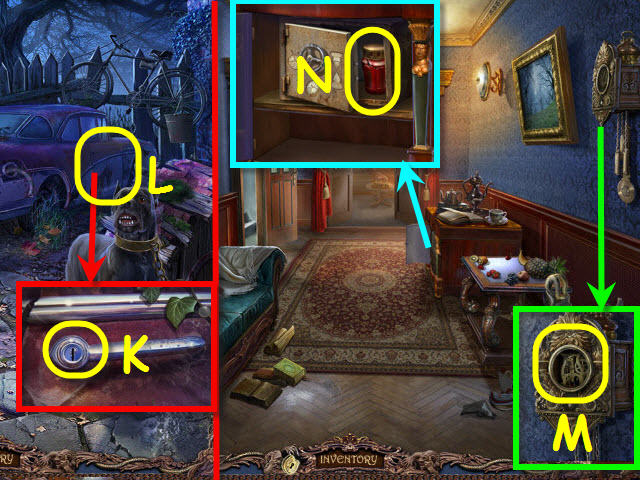
- Use the SCISSORS; take the ROSE (K).
- Turn the key; take the DUSTER (L).
- Back out.
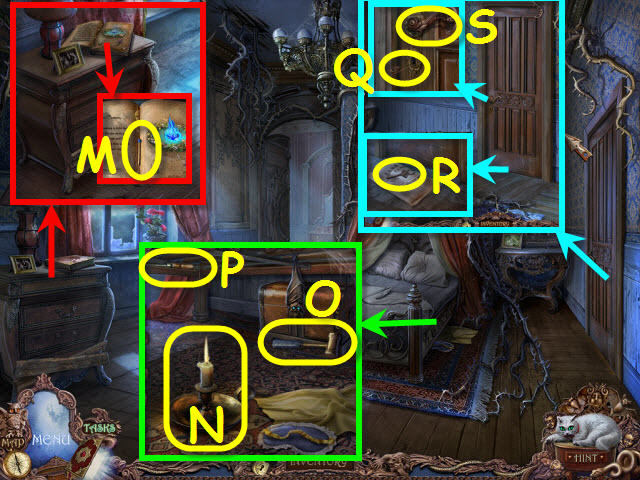
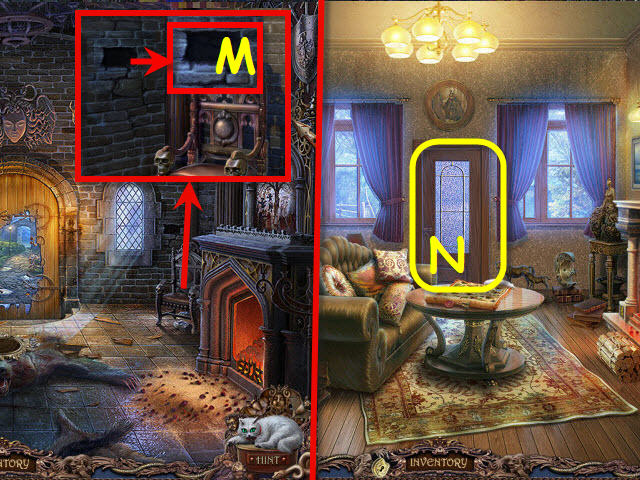
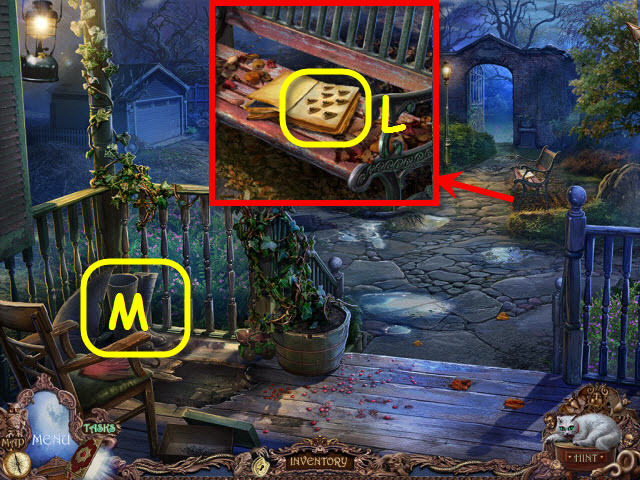
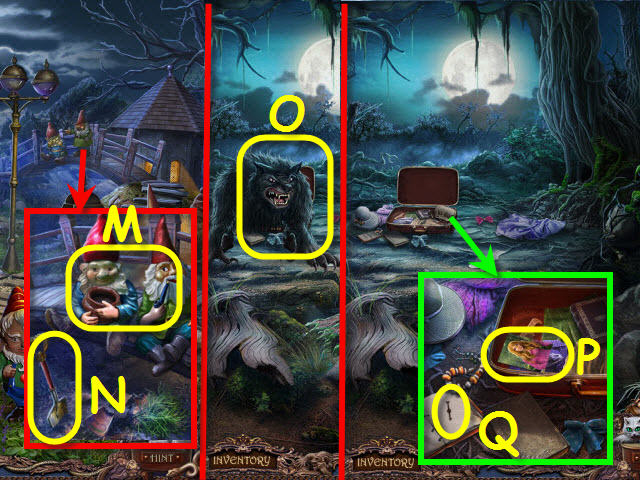
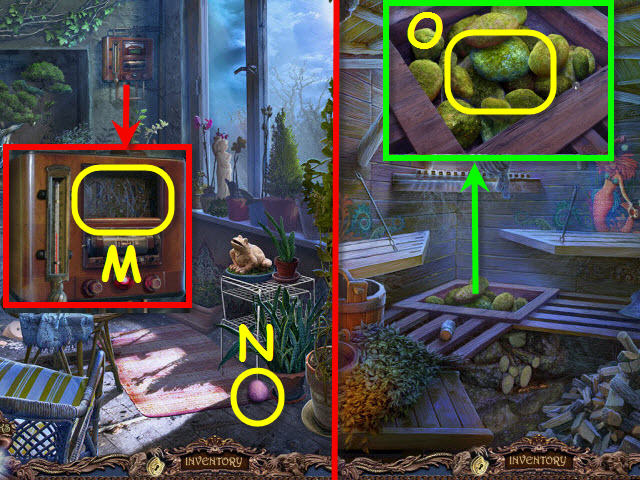
- Place the ROSE on the cover; take the MATCH (M) and read the recipe. Automatically combine EMPTY MATCHBOX and MATCH to create a MATCHBOX WITH A MATCH.
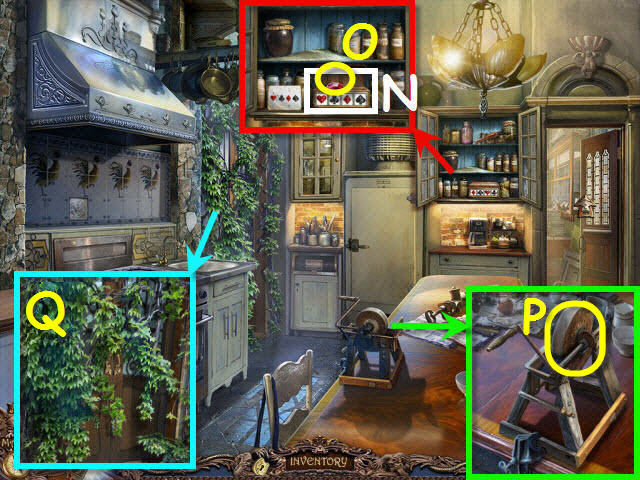
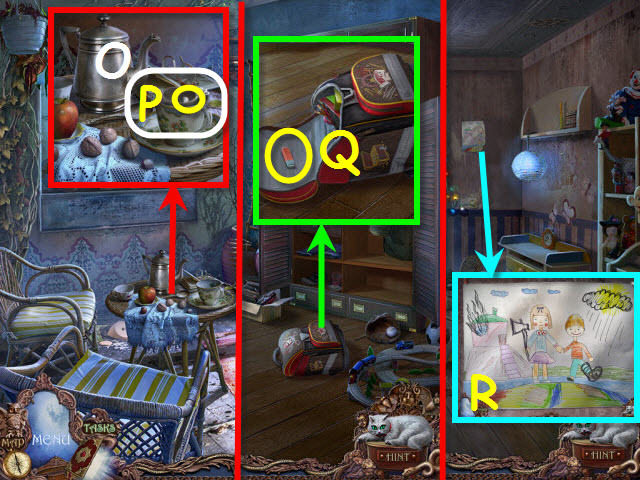
- Use the CANDLE and MATCHBOOK WITH A MATCH (N); take the HAMMER (O).
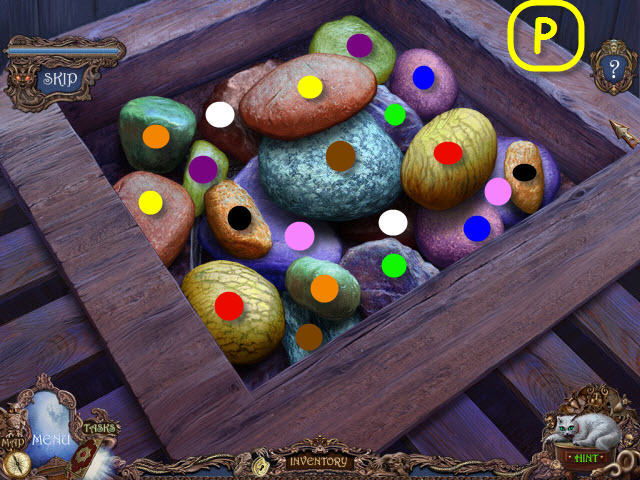
- Use the DUSTER; take the SCREWDRIVER (P).
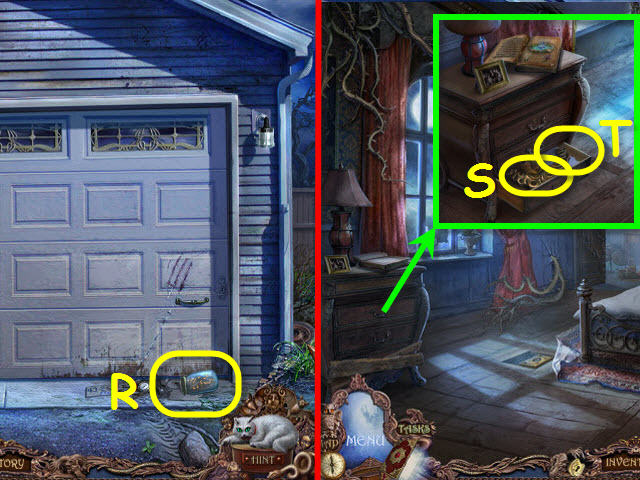
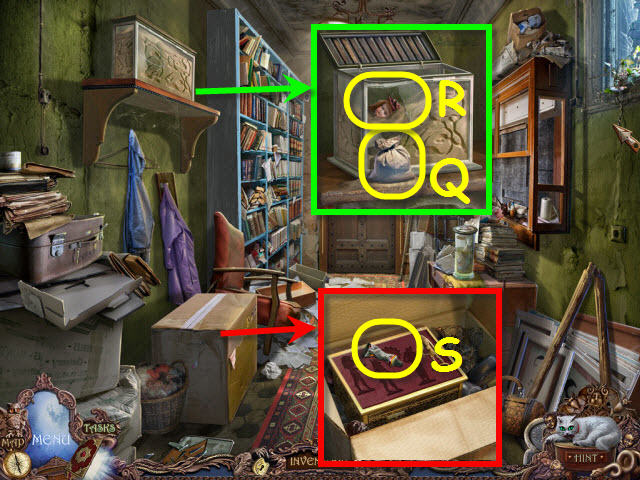
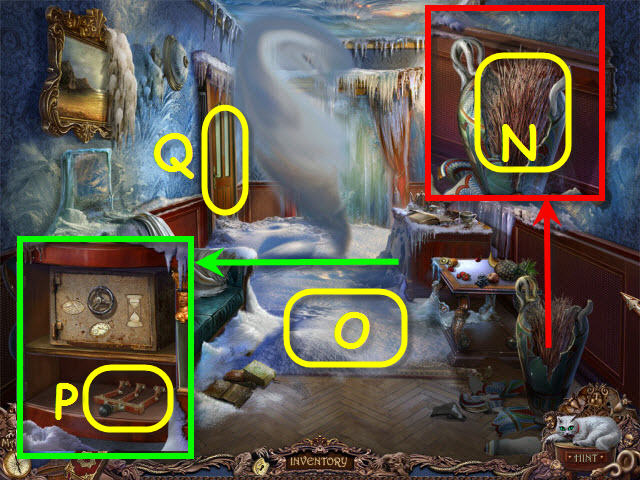
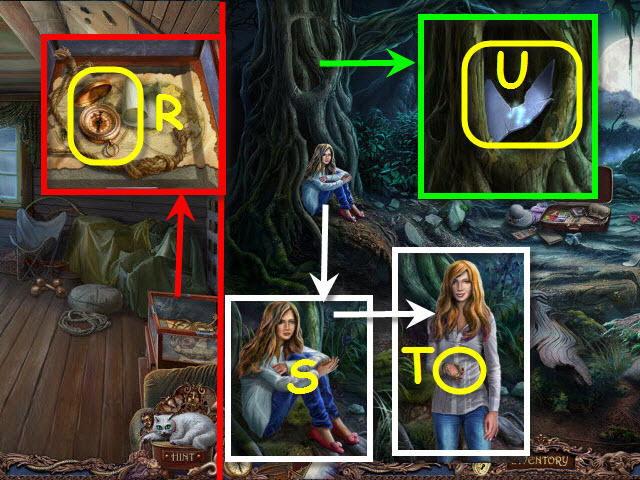
- Place the NEWSPAPER under the door; use the HATPIN in the lock (Q). Pull the newspaper and take the HALL KEY (R).
- Use the HALL KEY on the lock; turn the handle (S).
- Go through the door; go right.
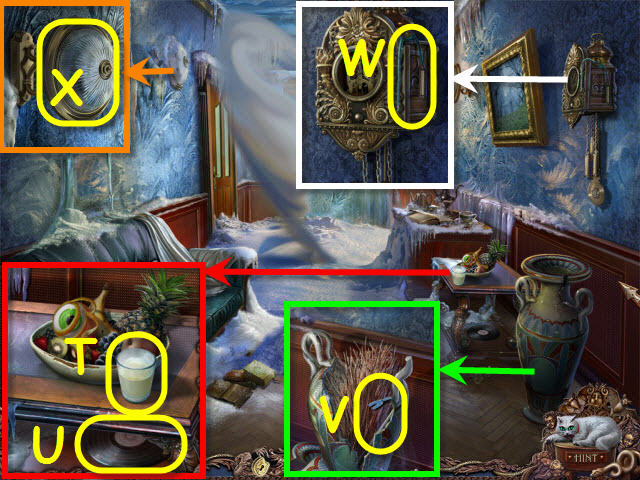
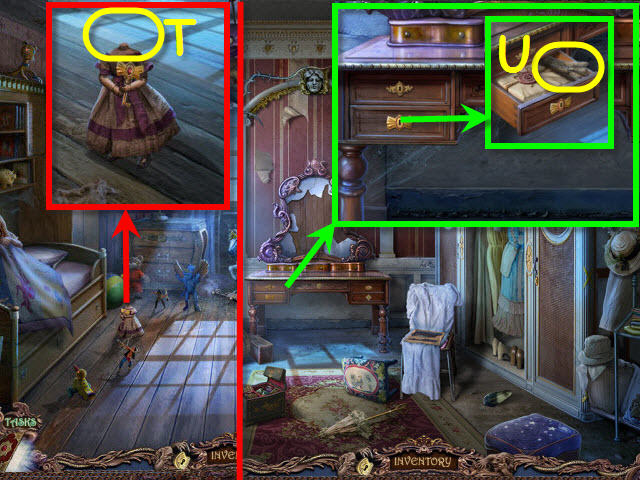
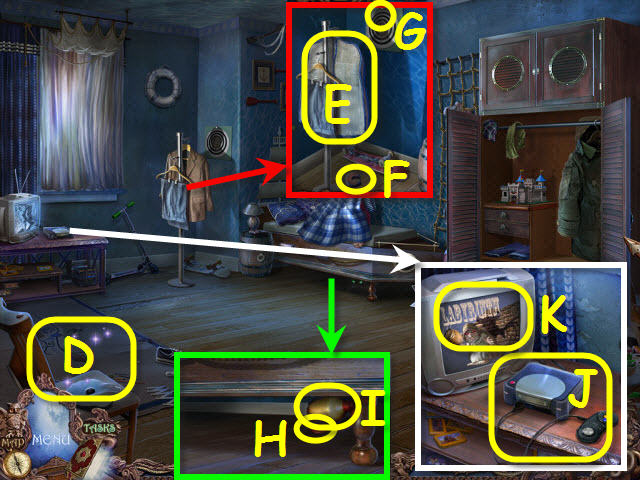
- Take the GLASS OF MILK (T) and RECORD (U).
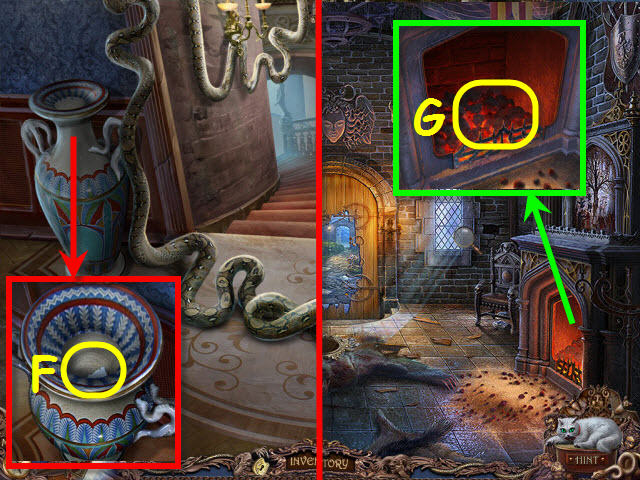
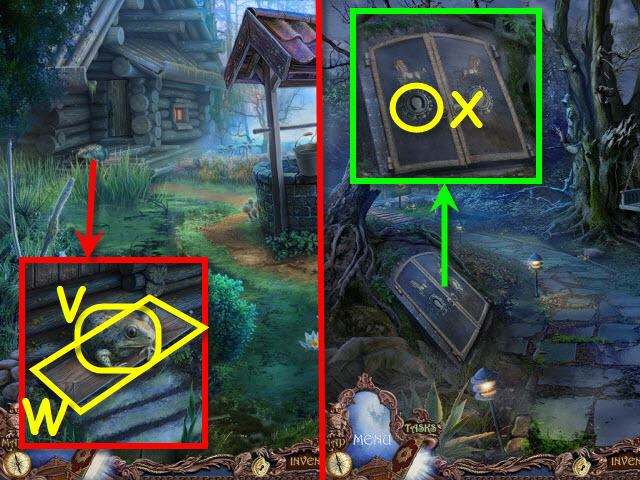
- Use the HAMMER on the vase; take the CROWBAR (V).
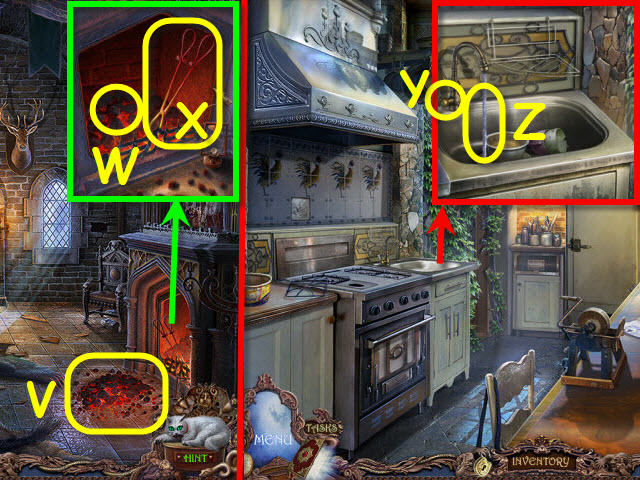
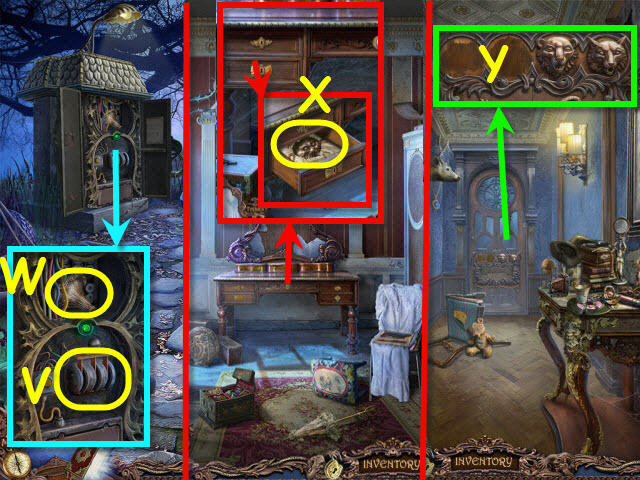
- Take the LAMP CORD (W).
- Use the DUSTER on the cover and select it (X) to receive a LIGHT BULB.
- Back out twice.
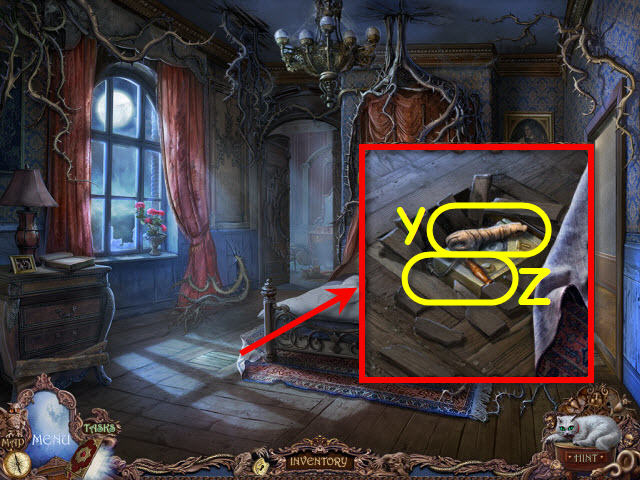
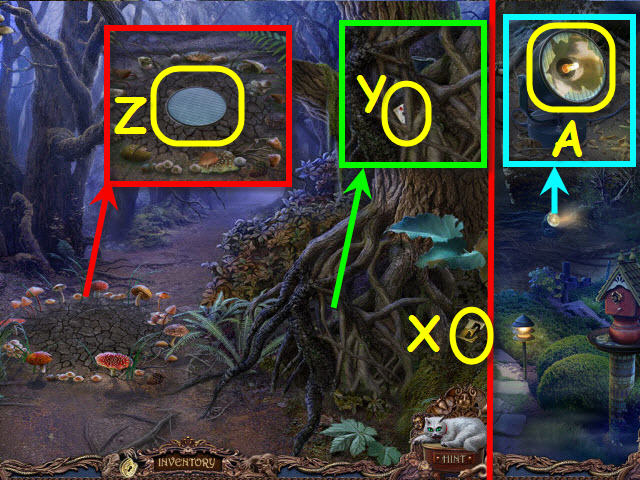
- Use the CROWBAR on the planks; take the STONE HAND (Y) and GRAMOPHONE HANDLE (Z).
- Go right, then left.
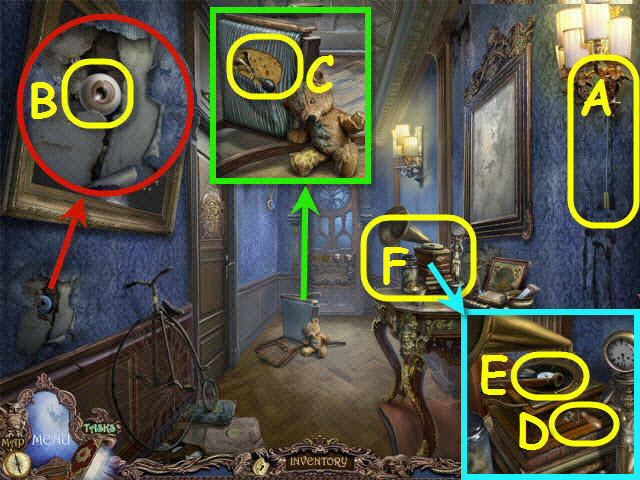
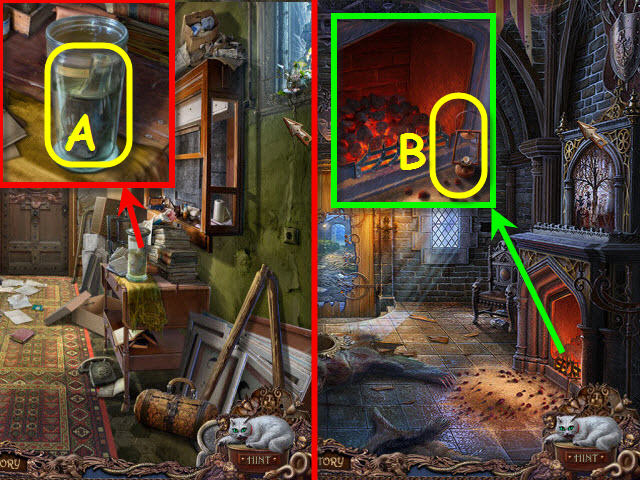
- Place the LAMP CORD (A); pull it.
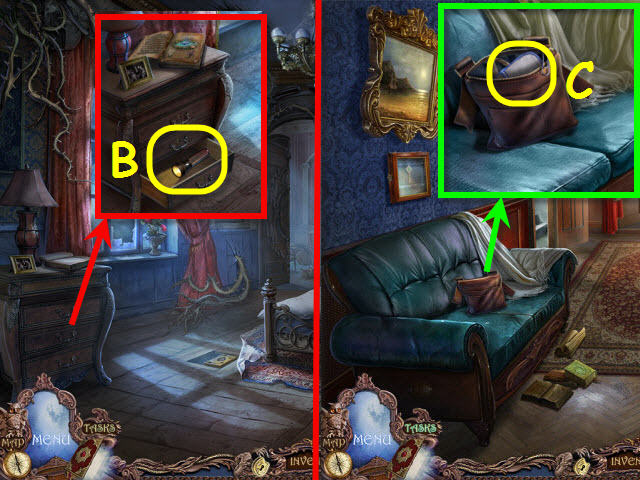
- Use the SCREWDRIVER; take the BROWN DOLL EYE (B).
- Rip the cloth; take the KLAXON (C).
- Place the GRAMOPHONE HANDLE (D) and RECORD (E); turn the handle.
- Play the HOP to receive a DRESSER HANDLE (F).
- Back out twice.
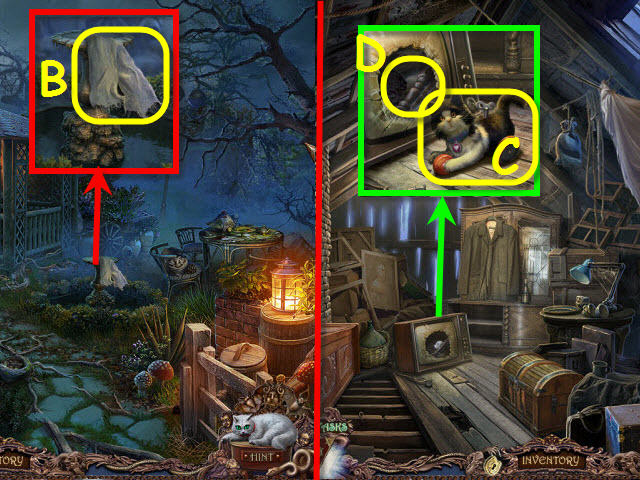
- Use the DRESSER HANDLE on the drawer; open it and take the SLEEPING PILLS (G).
- Use the KLAXON on the bat; open the chest and take the PEELER (H).
- Go right twice.
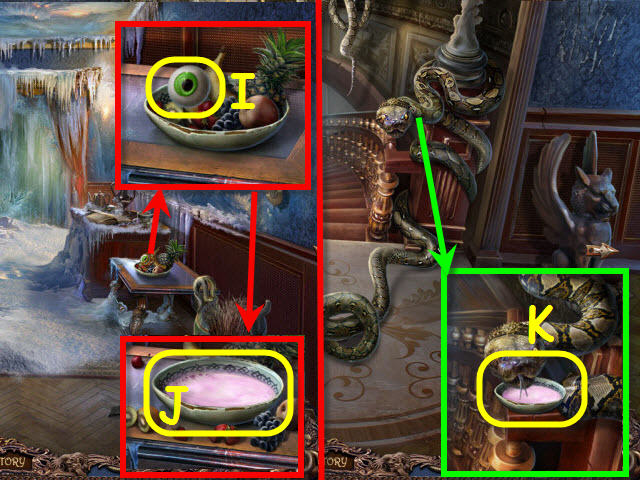
- Use the PEELER; take the GREEN DOLL EYE (I).
- Empty the bowl; place the GLASS OF MILK and SLEEPING PILLS on it. Take the DRUGGED MILK (J).
- Back out.
- Place the DRUGGED MILK (K).
- Go forward.
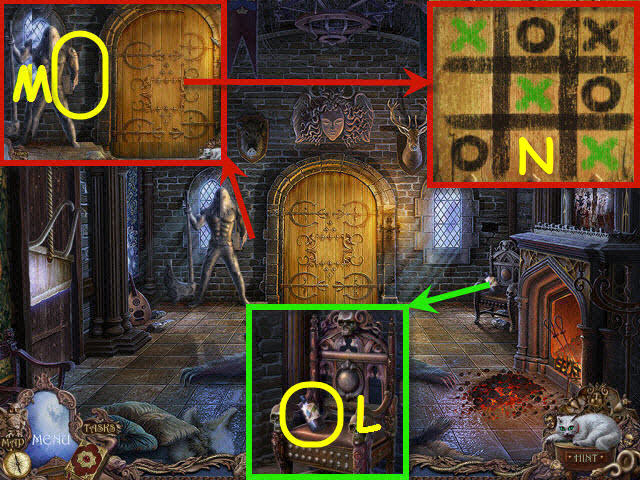
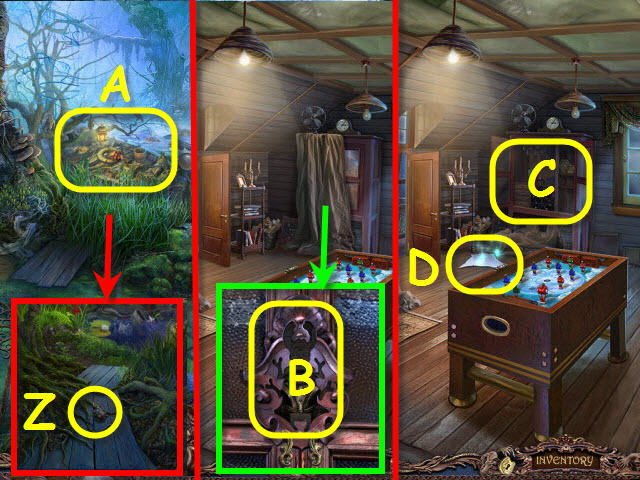
- Take the PAINT THINNER (L).
- Attach the STONE HAND (M).
- Play the tic-tac-toe (N).
- Go forward.
Chapter 2: Daughter
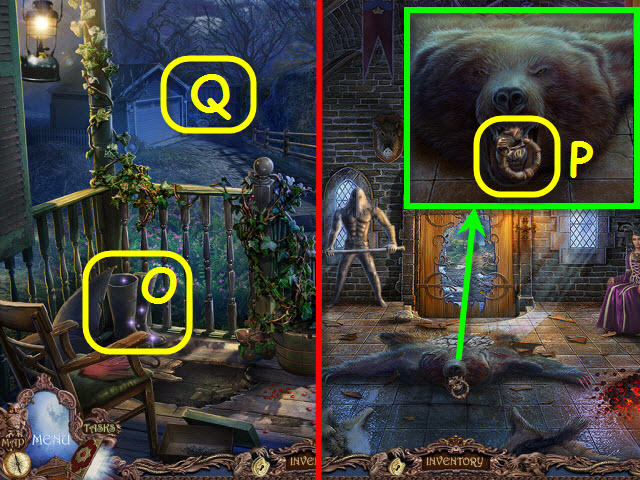
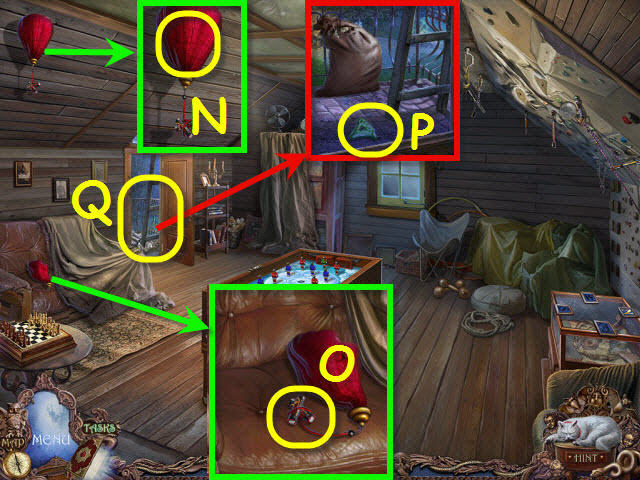
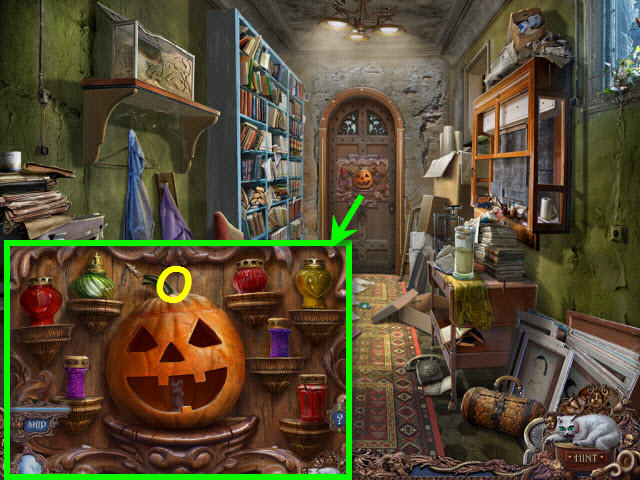
- Play the HOP to receive the PLIERS (O).
- Back out.
- Use the PLIERS to get the LION PART (P).
- Go forward; go left (Q).
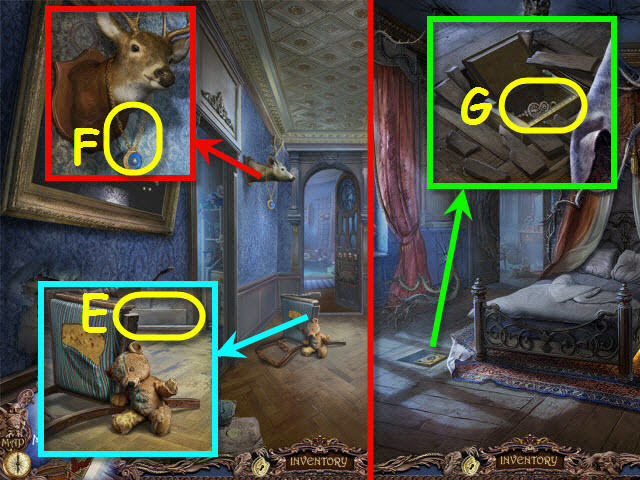
- Take the TERMITES (R).
- Go to the BEDROOM.
- Use the TERMITE on the wood; open the drawer and take the 2nd LION PART (S) and MIRROR SHARD 2/15 (T).
- Go to the TERRACE; go right.
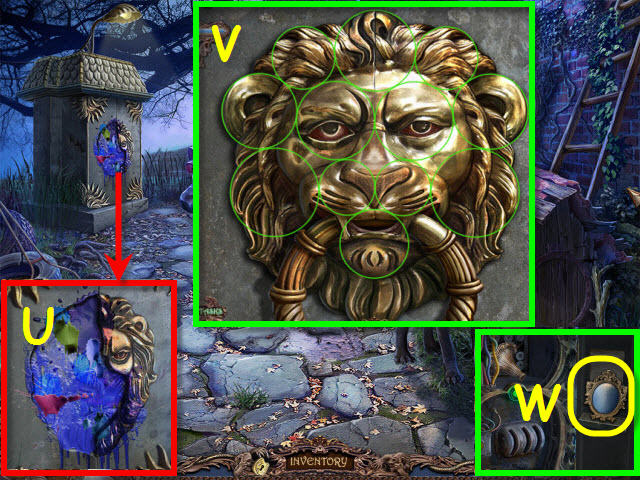
- Use the PAINT THINNER and 2 LION PARTS (U).
- Complete the image (V).
- Take the MIRROR (W).
- Go to the LIVING ROOM.
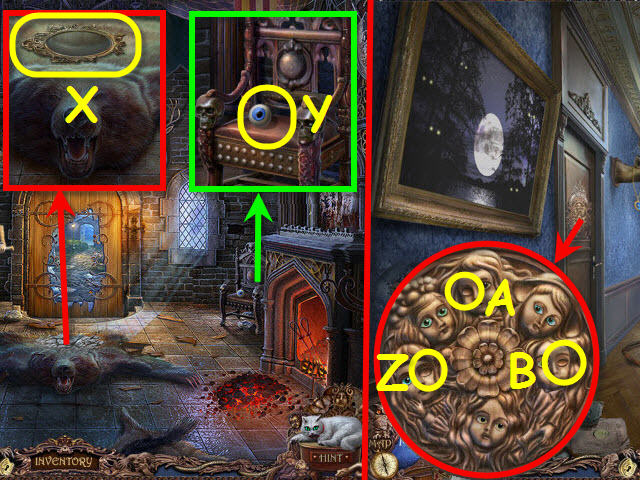
- Place the MIRROR (X).
- Take the BLUE DOLL EYE (Y).
- Go to the LEFT WING HALL.
- Place the BLUE DOLL EYE (Z), BROWN DOLL EYE (A) and GREEN DOLL EYE (B) to trigger a puzzle.
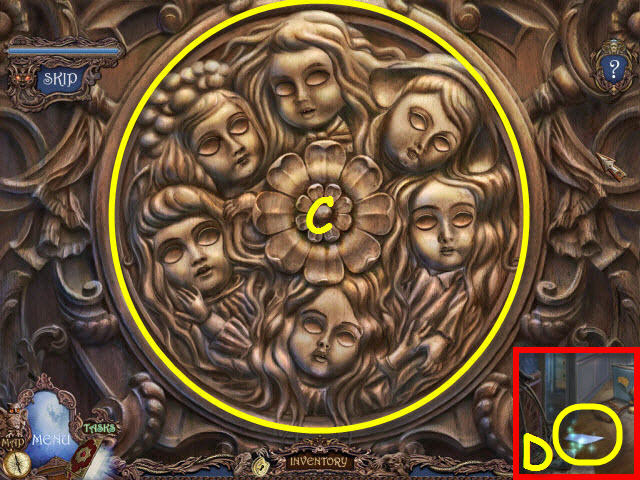
- Duplicate the blinking eyes.
- Solution is random (C).
- Take the MIRROR SHARD 3/15 (D).
- Go left.
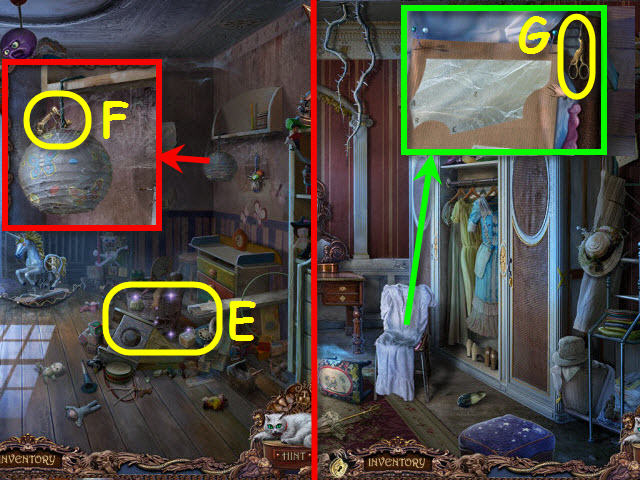
- Play the HOP to receive a PATTERN (E).
- Take the BELT BUCKLE (F).
- Go to the WARDROBE.
- Place the PATTERN on the dress; select the scissors (G) to trigger a puzzle.
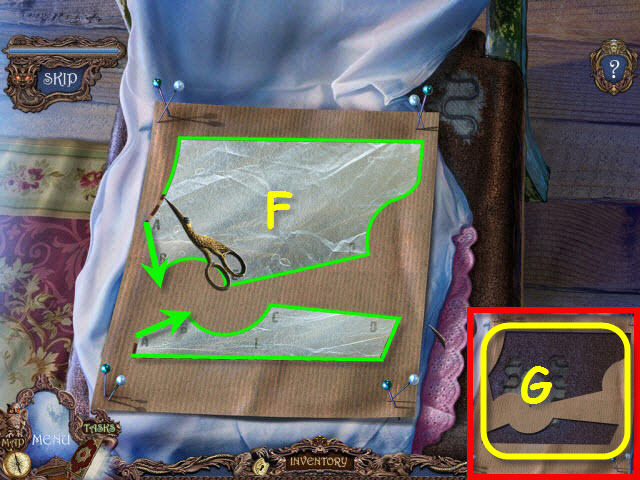
- Trace the pattern.
- Solution (F).
- Take the HORSECLOTH (G).
- Go to the DAUGHTER’S ROOM.
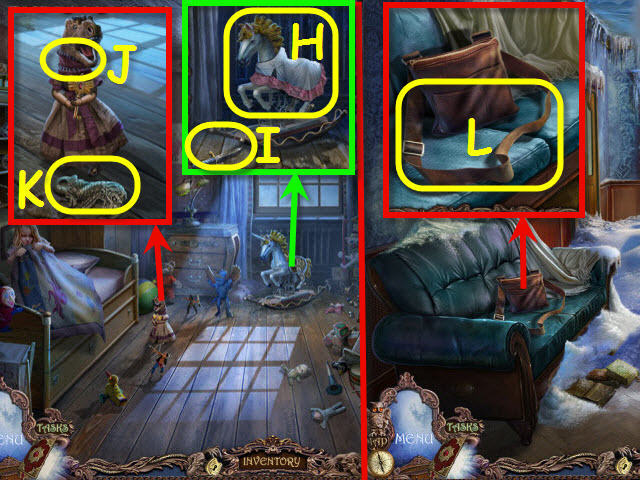
- Place the HORSECLOTH (H); take the KNIFE (I).
- Use the KNIFE (J); take the JAR OPENER (K).
- Go to the RIGHT WING HALL.
- Use the KNIFE on the BELT (L); take it.
- Back out; go forward.
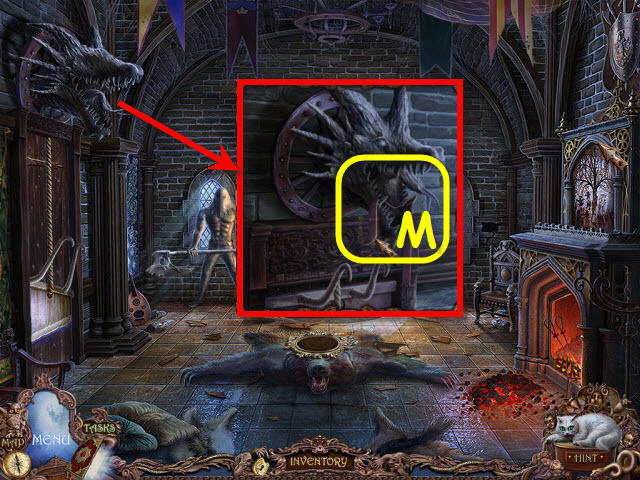
- Use the BELT and BUCKLE on the jaw (M).
- Go left.

- Open the cabinet; take the EMPTY BAG (N).
- Take the STICK WITH ICE (O).
- Open the door (P); go through.
- Open the container; place the EMPTY BAG by it. Take the BAG WITH SAND (Q) and DOLL HEAD (R).
- Use the KNIFE on the box; open it and take the GLUE (S).
- Go to the DAUGHTER’S ROOM.
- USE the GLUE and DOLL HEAD (T); receive a RED KEY.
- Go to the WARDROBE.
- Use the RED KEY on the lock; take the THICK GLOVES (U).
- Go to the LIVING ROOM.
- Use the BAG WITH SAND (V).
- Place the STICK WITH ICE (W); receive a POPSICLE STICK.
- Use the THICK GLOVES to take the HOT FIRE TONGS (X).
- Go left.
- Turn the tap (Y); use the HOT FIRE TONGS (Z) to receive FIRE TONGS.
- Go to the ARCHIVE.
- Use the JAR OPENER on the lid; use the FIRE TONGS to get the LAMP GLASS (A).
- Back out twice.
- Place the LAMP GLASS (B) to receive a LAMP.
- Go to the DAUGHTER’S ROOM.
- Hang the LAMP (C); plug in the cord (D).
- Use the POPSICLE STICK and LIGHT BULB on the lamp (E); take the TAPE (F).
- Go to the ARCHIVE.
- Use the TAPE on the stick; take the POLE (G).
- Return to the DAUGHTER’S ROOM.
- Use the POLE (H).
- Take the LUNCHBOX LID (I).
- Go to the KITCHEN.
- Place the LUNCHBOX LID on the container; take the LUNCHBOX (J).
- Return to DAUGHTER’S ROOM.
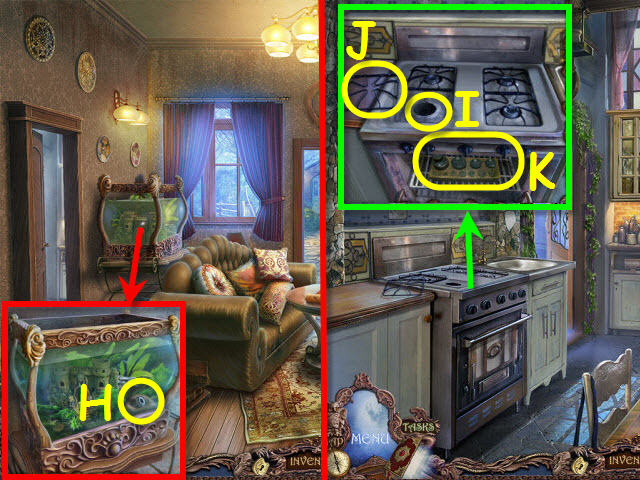
- Use the LUNCHBOX on the spider (K).
- Take the RED RIBBON (L).
- Take the LINT ROLLER (M).
- Go to the RIGHT WING HALL.
Chapter 3: Son
- Use the RED RIBBON (N); receive a BROOM.
- Use the BROOM (O).
- Open the cabinet; take the KNIFE SWITCH HANDLE (P).
- Open the door; enter (Q).
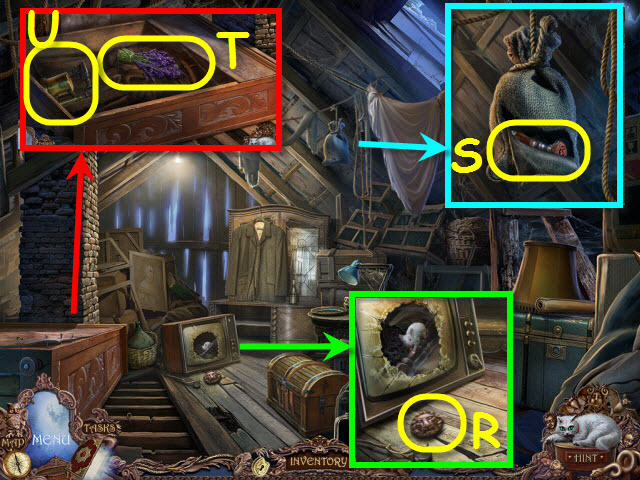
- Take the WOODEN LION HEAD (R).
- Use the KNIFE on the sack; take the STAMP (S).
- Use the CROWBAR on the nails; take the LAVENDER (T) and EMPTY BLOWTORCH (U).
- Go to the BACKYARD.
- Place the KNIFE SWITCH HANDLE (V); pull down and take the TORCH TOP (W).
- Go to the WARDROBE.
- Open the drawer and use the STAMP on the seal; take the WOODEN CAT HEAD (X).
- Go to the LEFT WING HALL.
- Place the WOODEN LION HEAD and WOODEN CAT HEAD (Y) to trigger a puzzle.
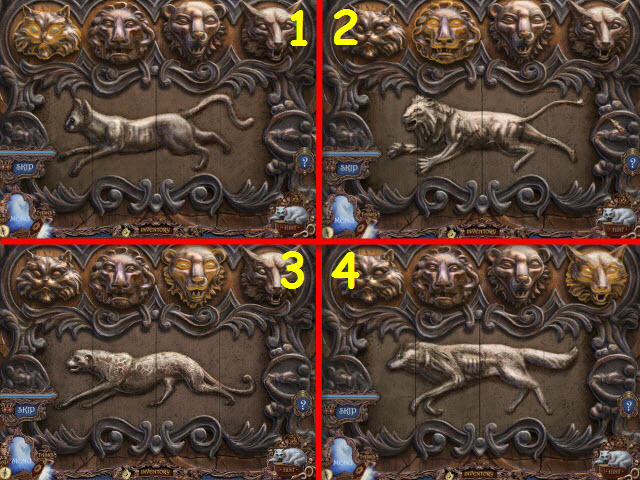
- Complete the images.
- Solution (1-4).
- Go forward.
- Take the MIRROR SHARD 4/15 (Z).
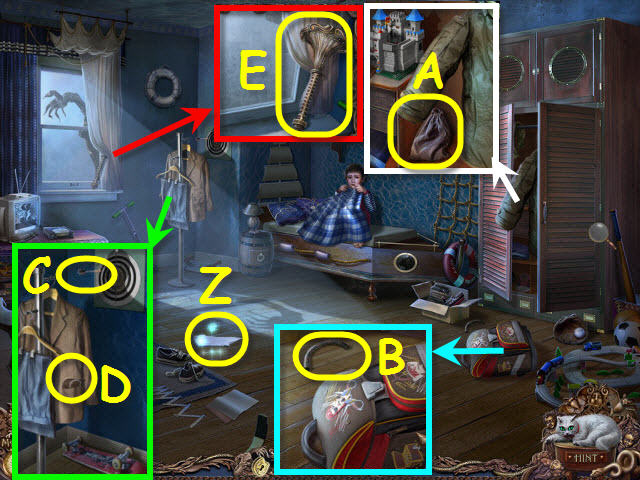
- Open the door and move the coat; take the GARBAGE BAG (A).
- Take the HOSE (B).
- Take the DART (C).
- Use the LINT ROLLER on the jackets; open the pocket and take the FISHHOOK (D).
- Place the TORCH TOP on the base; take the UNLIT TORCH (E).
- Back out twice.
- Use the FISHHOOK to get the MIRROR SHARD 5/15 (F).
- Go forward.
- Use the UNLIT TORCH (G) to receive a TORCH.
- Go to the BACKYARD.
- Remove the cap, attach the HOSE and EMPTY BLOWTORCH (H) to receive a BLOWTORCH.
- Play the HOP to receive a MIRROR SHARD 6/15 (I).
- Go to the KITCHEN.
- Open the refrigerator and use the BLOWTORCH; take the SAGEBRUSH TINCTURE (J) and EGGSHELL (K).
- Go to the RIGHT WING HALL.
- Use the BLOWTORCH (L); open the door.
- Take the MIRROR SHARD 7/15 (M).
- Go forward.
- Use the DART (N).
- Move the balloon; take the BATTERIES (O).
- Open the door and use the GARBAGE BAG on the debris; take the GREEN CLIMBING HOLD (P).
- Go up (Q).
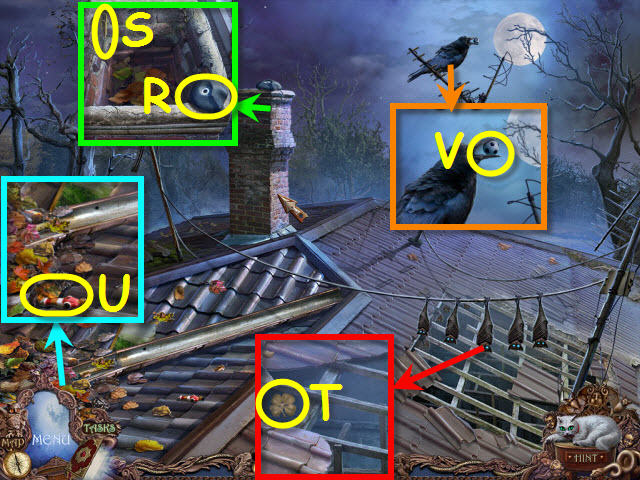
- Take the BLUE CLIMBING HOLD (R) and PAPERCLIP (S).
- Use the TORCH on the bats; take the CLOVER SIGN (T).
- Take the FOOTBALL PLAYER (U).
- Exchange the EGGSHELL for the SOCCER BALL (V).
- Back out.
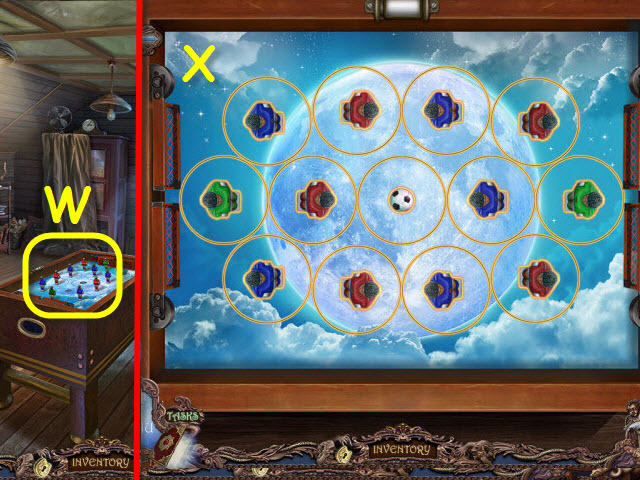
- Place the FOOTBALL PLAYER and SOCCER BALL to trigger a puzzle (W).
- Restore the moon.
- Solution (X). Starting layout is random.
- Take the CONTROLLER.
- Place the GREEN CLIMBING HOLD and BLUE CLIMBING HOLD (Y); take the GAME CONSOLE CORD (Z).
- Go to the DAUGHTER’S ROOM.
- Place the CLOVER SIGN on the panel; take the VIDEO-GAME DISK (A).
- Go to the BEDROOM.
- Open the drawer; place the BATTERIES in the FLASHLIGHT (B) and take it.
- Go to the RIGHT WING HALL.
- Use the PAPERCLIP on the zipper; take the SUIT COVER (C).
- Go to the SON’S ROOM.
- Play the HOP to receive a WALL STONE (D).
- Place the SUIT COVER (E); take the MAGNET (F).
- Use the MAGNET to get the PUSHPIN (G).
- Use the FLASHLIGHT; take the PORCELAIN BUTTON (H) and WEED POISON (I).
- Place the GAME CONSOLE CORD, CONTROLLER and VIDEO-GAME DISK on the player (J).
- Select the TV (K) to trigger a puzzle.

- Blow up the goblin.
- Solution (L).
- Receive a GARAGE KEY.
- Speak to the boy; receive a TOY CAT.
- Go to the LIVING ROOM.
Chapter 4: Garden Dwarves
- Place the WALL STONE (M); receive a MIRROR SHARD 8/15.
- Open the door (N); go forward.
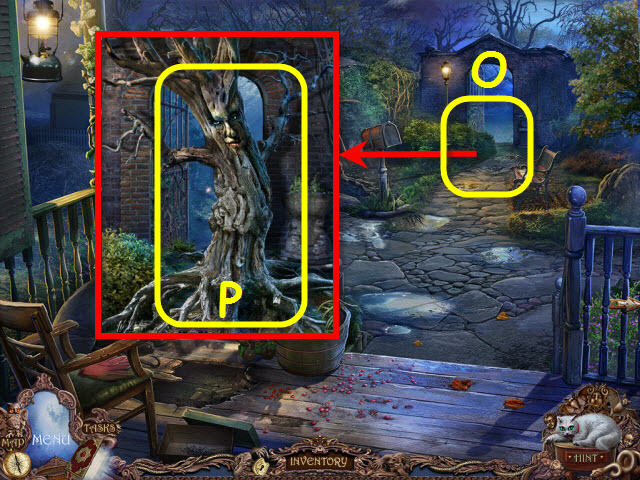
- Select the archway (O); speak to the witch and use the WEED POISON on the roots (P).
- Go forward.
- Use the MAGNET to get the JACK HANDLE (Q).
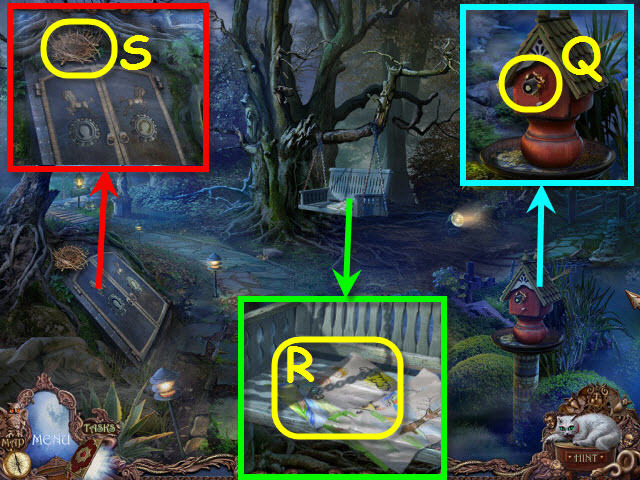
- Move the drawings; take the DRAWING HALF (R).
- Take the BIRD NEST (S).
- Go forward.
- Use the WEED POISON on the thorns (T).
- Open the windows; play the HOP to get a WINDOW SHARD 9/15 (U).
- Place the PORCELAIN BUTTON (V); take the PHOENIX (W).
- Go right.
- Take the EAST SIGN (X).
- Take the CARD SUITS CODE (Y).
- Use the PHOENIX, LAVENDER and SAGEBRUSH TINCTURE on the ground; take the LENS (Z).
- Back out twice.
- Place the LENS (A).
- Go right.
- Take the SILK CLOTH (B).
- Go to the Attic.
- Place the TOY CAT and select it (C); take the CHAIR LEG (D).
- Go to the LEFT WING HALL.
- Place the CHAIR LEG (E).
- Take the CRESCENT MEDALLION (F).
- Go to the BEDROOM.
- Place the CRESCENT MEDALLION on the chest; take the PRECIOUS KEY (G).
- Go right.
- Use the PRECIOUS KEY (H); take the GOLDEN SUN (I).
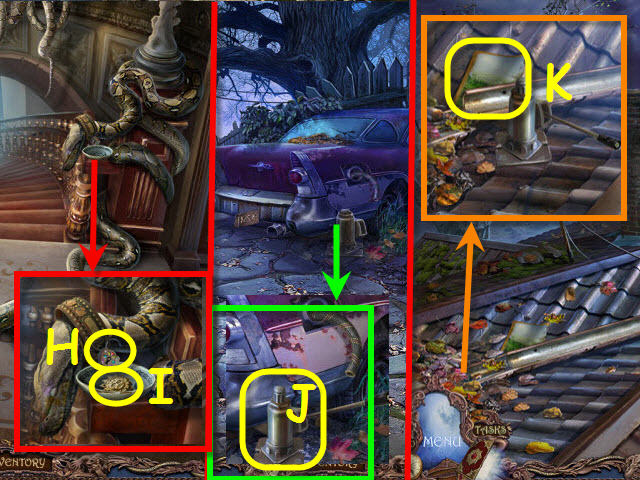
- Go to the BACKYARD.
- Place the JACK HANDLE on the JACK (J); take it.
- Go to the ROOF.
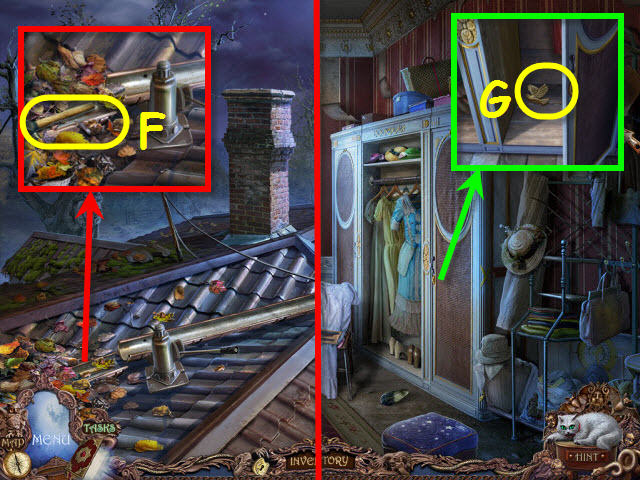
- Use the JACK on the gutter; take the DIARY PAGE (K).
- Go to the TERRACE.
- Place the DIARY PAGE in the diary; turn the page and take the SHIELD PATTERN (L).
- Play the HOP to receive a BLUNT MACHETE (M).
- Go to the KITCHEN.
- Use the CARD SUITS CODE on the box; set the correct code (N) and take the RUBY (O).
- Select the wheel; use the BLUNT MACHETE (P) to receive a SHARP MACHETE.
- Use the SHARP MACHETE (Q).
- Go to the SWAMPY GLADE.
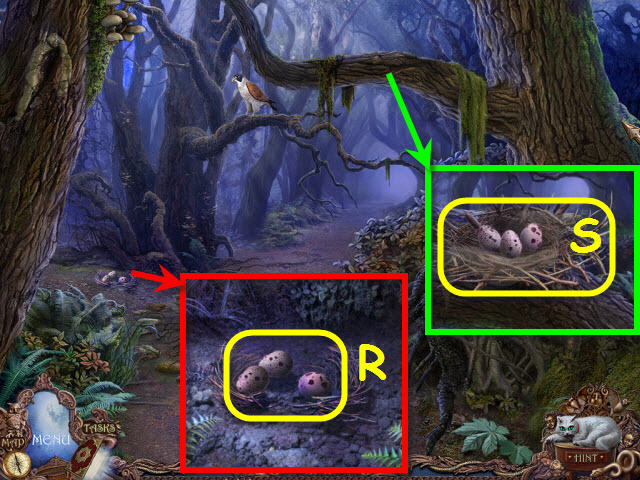
- Use the SILK CLOTH to get BIRD EGGS (R).
- Place the BIRD NEST and BIRD EGGS (S).
- Go left.
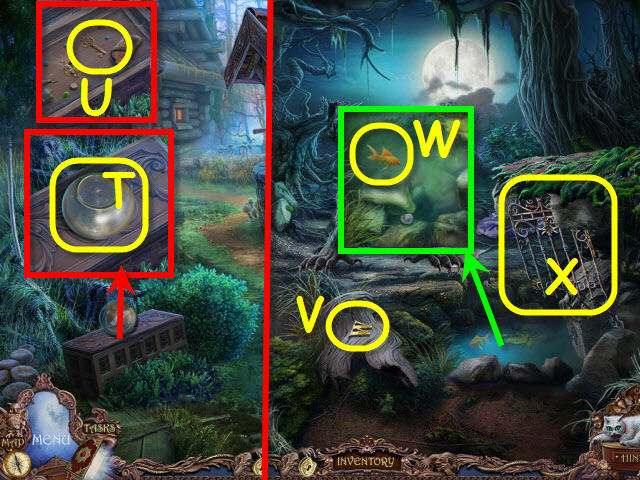
- Take the AQUARIUM (T).
- Open the lid; take the CLOSET KEY (U).
- Back out; go forward.
- Take the WEST SIGN (V).
- Use the AQUARIUM on the fish to get an AQUARIUM WITH FISH (W).
- Take the GRILLE (X).
- Return to the SWAMP.

- Zoom in and place the GRILLE (Y).
- Take the METAL PLATE (Z).
- Back out twice.
- Give the RUBY (A); take the AWL (B).
- Go to the WOODS.
- Use the AWL to get the COIN (C).
- Back out twice.
- Give the COIN (D); take the RAKE (E).
- Go to the ROOF.
Chapter 5: Sister
- Use the RAKE; take the HAMMER (F).
- Go to the WARDROBE.
- Use the CLOSET KEY in the lock; take the GOLDEN BIRD (G).
- Go to the LIVING ROOM.
- Use the AQUARIUM WITH FISH; take the BURNER (H).
- Go left.
- Place the BURNER (I); select the grate (J) and take the SET OF WEIGHTS (K).
- Go to the GARAGE.
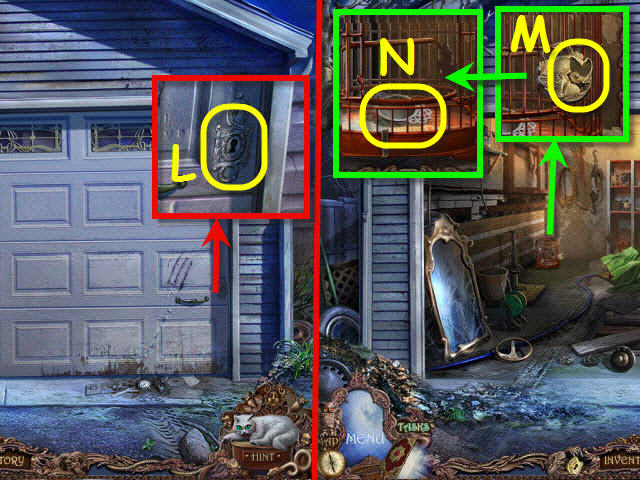
- Use the GARAGE KEY (L).
- Place the GOLDEN BIRD (M); take the SIEVE (N).
- Go to the BALCONY.
- Place the SIEVE (O); take the PEARL (P).
- Go to the SON’S ROOM.
- Use the AWL on the lock; take the ERASER (Q).
- Go to the DAUGHTER’S ROOM.
- Place the DRAWING HALF, PUSHPIN and ERASER on the drawing (R) to trigger a puzzle.
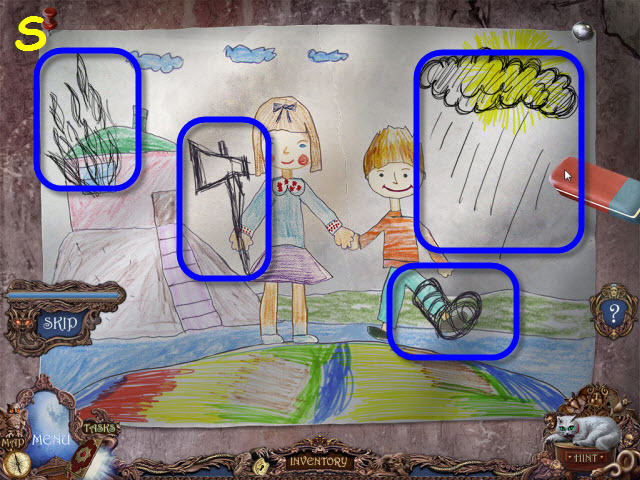
- Erase the bad.
- Solution (S).

- Take the WATER WAND (T).
- Go to the GNOME LAWN.
- Place the SET OF WEIGHTS to trigger a puzzle (U).
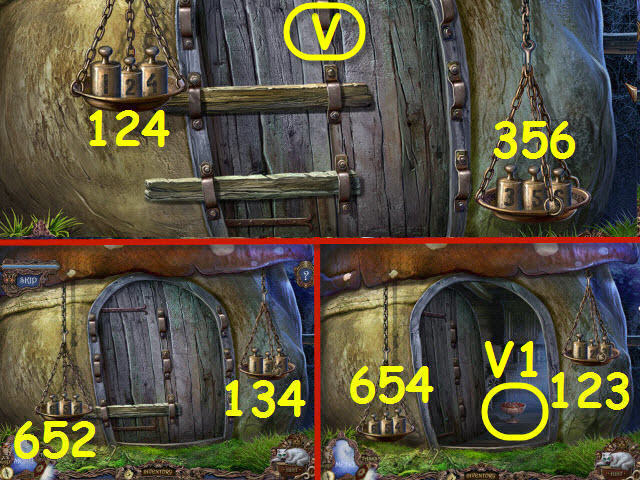
- Set the scales 3x.
- Solution (V).
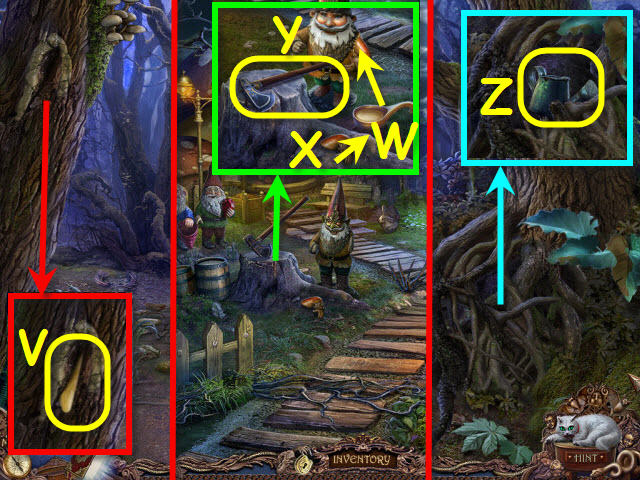
- Take the JAM (V1).
- Go to the REST AREA.
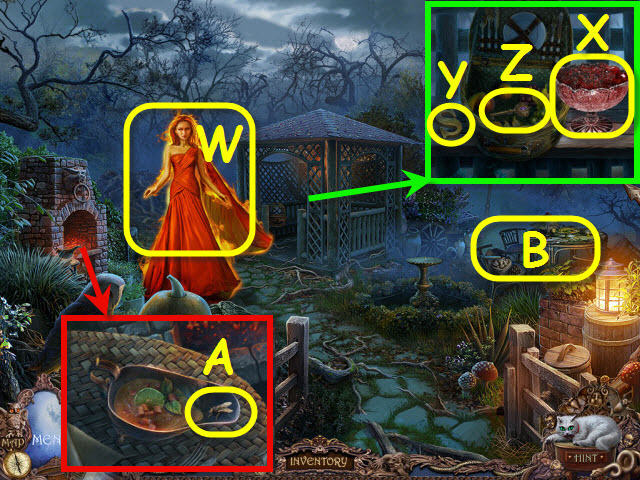
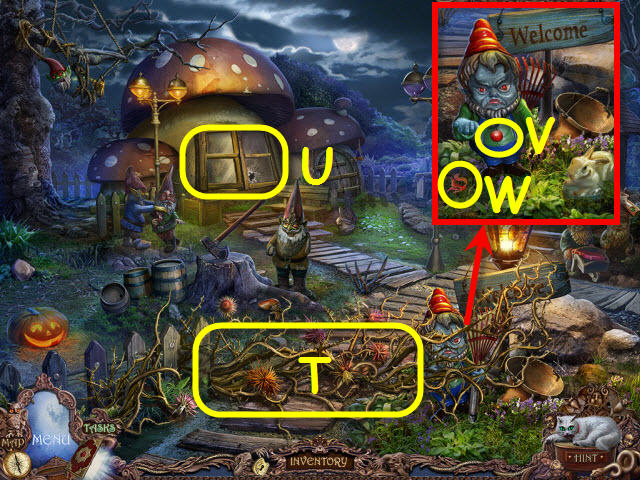
- Use the WATER WAND (W).
- Place the JAM (X); take the SOUTH SIGN (Y) and PURPLE KEY (Z).
- Take the FLY (A).
- Play the HOP to receive a GEAR (B).
- Go to the MANSARD.
- Place the SOUTH SIGN (C), WEST SIGN (D) and EAST SIGN (E); take the POWDER FLASK (F).
- Go to the LIVING ROOM.
- Place the SHIELD PATTERN to trigger a puzzle (G).

- Find the matches.
- Solution (H).
- Use the POWDER FLASK (I); receive a BULLET.
- Go to the ATTIC.
- Place the BULLET (J); take the GUN.
- Go to the WARDROBE.
- Use the PURPLE KEY (K); take the POT (L).
- Go to the GNOME LAWN.
- Give the POT (M); take the SHOVEL (N).
- Go to the WOODS.
- Use the GUN (O).
- Take the SISTER’S PHOTO (P) and COMPASS ARROW (Q).
- Go to the MANSARD.
- Place the COMPASS ARROW; take the COMPASS (R).
- Return to the WOODS.
- Give the COMPASS (S); take the HORSESHOE (T).
- Remove the bark; take the MIRROR SHARD 10/15 (U).
- Go to the SWAMP.
- Give the FLY (V); take the BOARD WITH NAILS (W).
- Go to the Garden.
- Use the HORSESHOE (X); enter.
Chapter 6: Husband
- Use the BOARD WITH NAILS and HAMMER (Y).
- Take the WRENCH (Z).
- Use the SHOVEL on the rubble; take the PILLOW (A) and DIAMOND (B).
- Go forward to unlock the area on the map and then head to the RIGHT WING HALL.
- Use the DIAMOND on the glass; take the GREEN KEY (C).
- Go to the WARDROBE.
- Use the GREEN KEY (D); take the BOTTLE OF PERFUME (E).
- Go to the BASEMENT.
- Use the BOTTLE OF PERFUME (F).
- You will trigger a puzzle.
- Find the pairs.
- Solution (G).
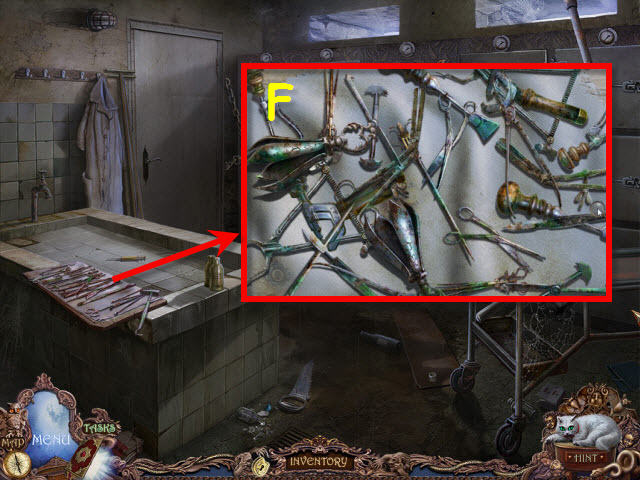
- Move the cloth; take the SOLDERING IRON (H).
- Go through (I).
- Use the METAL PLATE and SOLDERING IRON (J).
- Take the PIKE POLE (K).
- Remove the cover; take the BASTET (L).
- Go to the GARAGE.
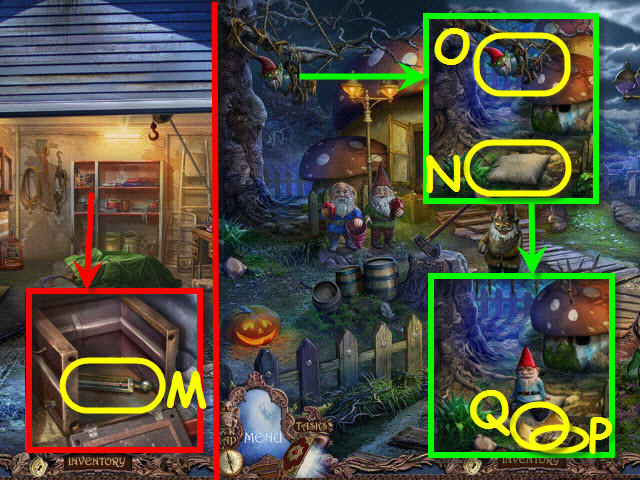
- Use the WRENCH on the bolts; take the THERMOMETER (M).
- Go to the GNOME LAWN.
- Place the PILLOW (N); use the PIKE POLE (O).
- Take the RA (P) and CODE FOR CELL (Q).
- Go to the BASEMENT.
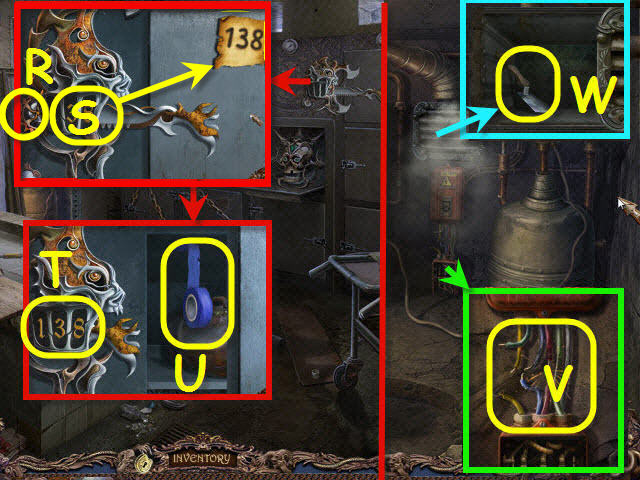
- Place the GEAR (R) and CODE FOR CELL (S).
- Set the code 138 (T).
- Take the INSULATING TAPE (U).
- Go left.
- Use the INSULATING TAPE (V).
- Remove the grate; take the SCRAPER (W).
- Go to the BALCONY.
- Place the THERMOMETER (X); take the CASTLE PIECE (Y).
- Use the WATER WAND (Z); take the CAR KEY (A).
- Go to the SON’S ROOM.
- Place the CASTLE PIECE on the castle; take the SON’S PHOTO (C) and TILE (D).
- Go to the KITCHEN.
- Place the TILE (E).
- Play the HOP to receive an ANUBIS (F).
- Go to the ARCHIVE.

- Place the BASTET, RA, ANUBIS and GOLDEN SUN (G); take the GOLDEN TOOTH (H).
- Go to the BASEMENT.
- Place the GOLDEN TOOTH (I); take the CHIMNEY BRUSH (J).
- Go to the ROOF.
- Use the CHIMNEY BRUSH; take the FLAT LIGHT BULB (L).
- Go to the BASEMENT.
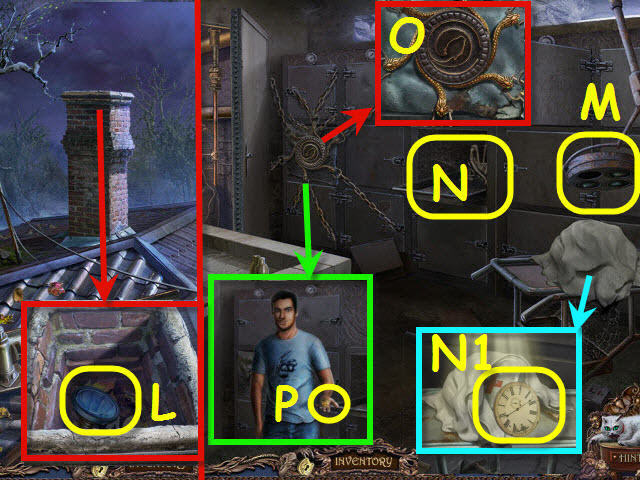
- Place the FLAT LIGHT BULB (M); select it.
- Play the HOP to receive a SNAKE SEGMENT (N).
- Move the cloth; take the CLOCK FACE (N1).
- Place the SNAKE SEGMENT (O).
- Take the SIGNET RING (P).

- Take the MIRROR SHARD 11/15 (Q).
- Open the door (R); go through.
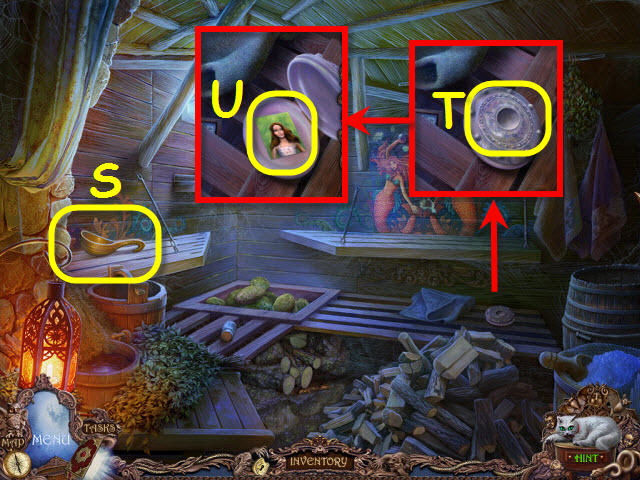
- Take the SCOOP (S).
- Place the PEARL (T); take the DAUGHTER’S PHOTO (U).
- Go to the SWAMPY GLADE.
- Use the SCOOP (V); receive a SCOOP WITH RESIN.
- Go to the GNOME LAWN.
- Place the SCOOP WITH RESIN (W); drag the arm (X) to the scoop, release it and then drag it to the socket. Take the AXE (Y).
- Return to the SWAMPY GLADE.
- Use the AXE on the roots; take the EMPTY WATERING CAN (Z).
- Go to the KITCHEN.
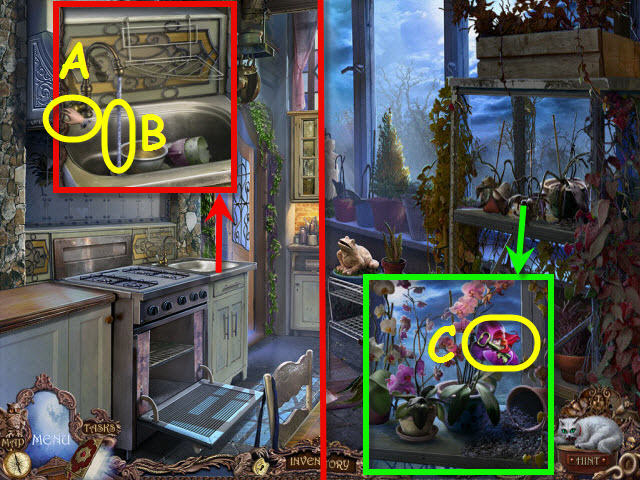
- Select the tap (A); use the EMPTY WATERING CAN (B) and receive a WATERING CAN.
- Go left.
- Use the WATERING CAN on the plants; take the CHEST KEY (C).
- Go to the BASEMENT.
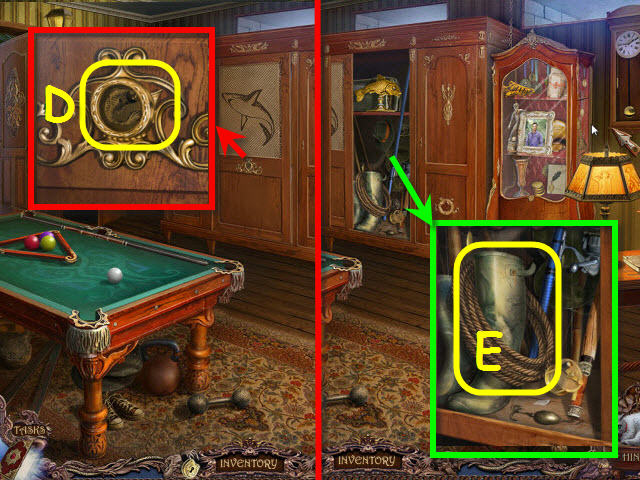
- Use the SIGNET RING (D).
- Take the ROPE (E).
- Go to the GARAGE.
Chapter 7: Mother
- Use the ROPE (F); receive a WINDLASS.
- Go to the SWAMP.
- Use the CHEST KEY (G); take the ORANGE BILLIARD BALL (H).
- Place the WINDLASS (I); take the YELLOW JAR (J).
- Go to the BACKYARD.
- Use the CAR KEY (K).
- Play the HOP to receive a GREEN JAR (L).
- Go to the RIGHT WING HALL.
- Place the CLOCK FACE (M); take the RED JAR (N).
- Go to the ARCHIVE.
- Place the GREEN JAR, YELLOW JAR and RED JAR to trigger a puzzle (O).
- Repeat the sequences.
- The order is random.
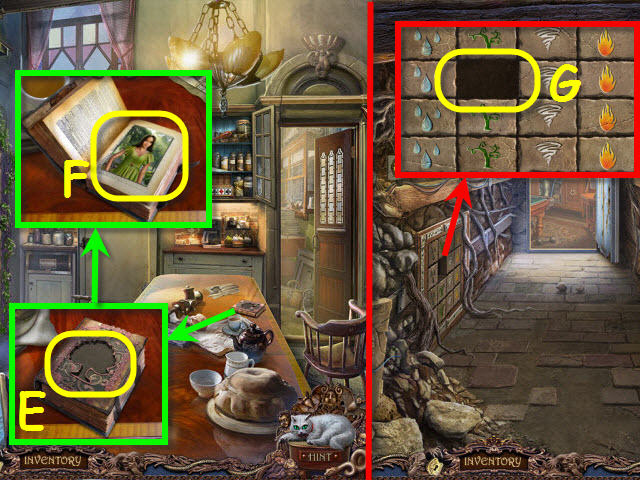
- Go forward.

- Open the book; take the BRICK WITH TREE (P).
- Take the GARDENING TROWEL (Q).
- Take the KNITTING NEEDLE (R).
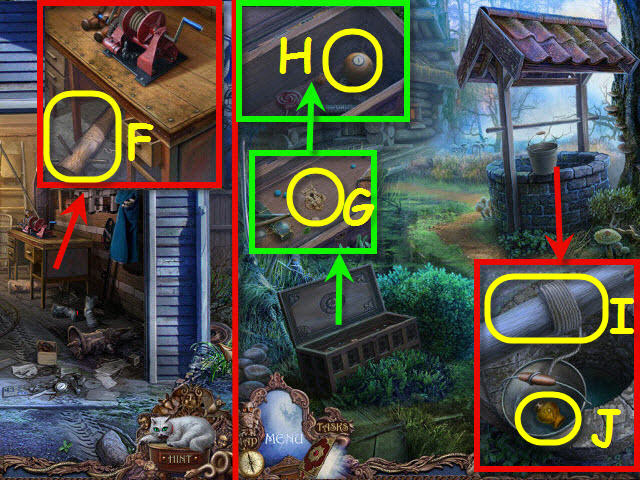
- Go to the WOODS.
- Use the GARDENING TROWEL to get the BONE (S).
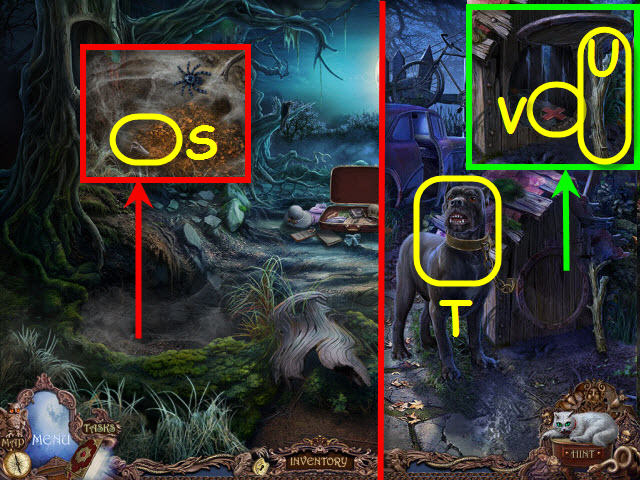
- Go to the BACKYARD.
- Give the BONE to the dog (T).
- Select the stick (U); take the CROSS (V).
- Go to the BEDROOM.
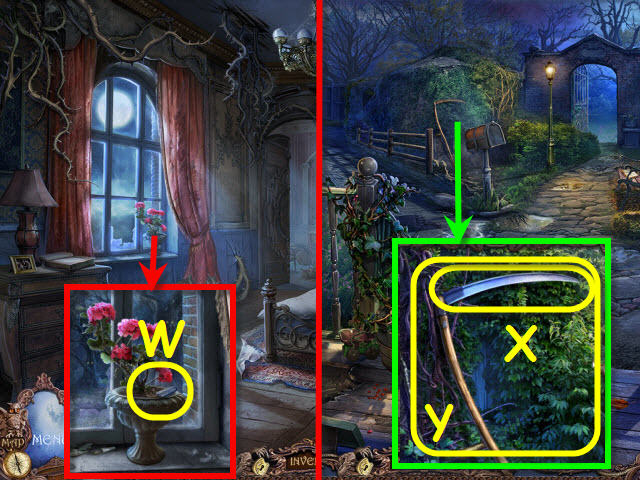
- Use the GARDENING TROWEL to retrieve the WHETSTONE (W).
- Go to the TERRACE.
- Use the WHETSTONE (X); take the SCYTHE (Y).
- Go to the SWAMP.
- Use the SCYTHE on the grass; take the STONE BEETLE (Z).
- Play the HOP to receive a MIRROR SHARD 12/15 (A).
- Go to the MANSARD.
- Remove the cloth; place the STONE BEETLE (B).
- Play the HOP to receive a SILVER TREE (C).
- Take the MIRROR SHARD 13/15 (D).
- Go to the KITCHEN.
- Place the SILVER TREE (E); take the MY PHOTO (F).
- Go to the UNDERGROUND TUNNEL.
- Place the BRICK WITH TREE (G) to trigger a puzzle.
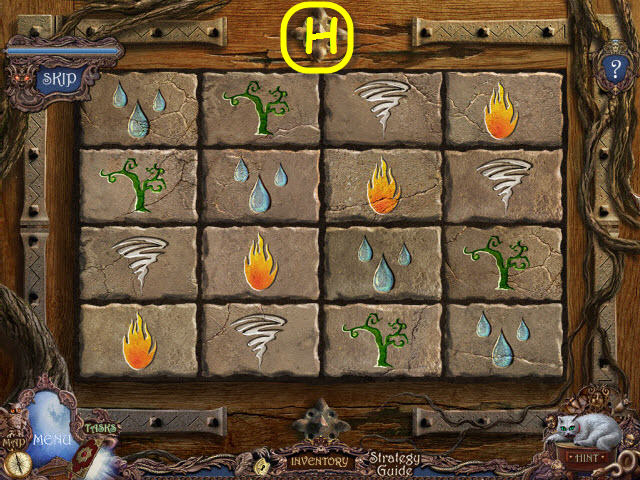
- Arrange the bricks.
- Solution (H).
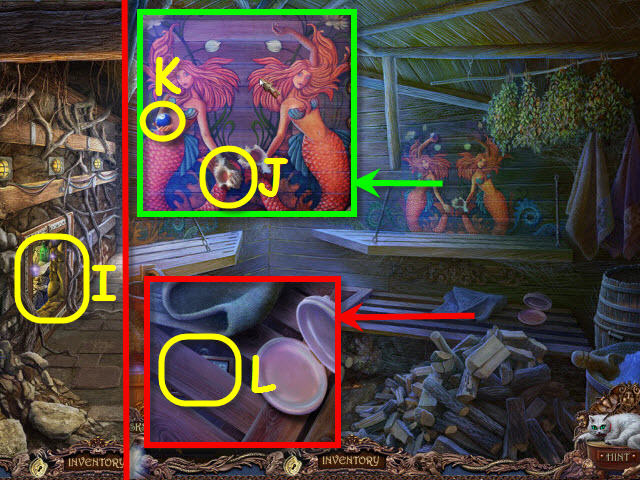
- Play the HOP to receive a SEASHELL (I).
- Go to the SAUNA.
- Place the SEASHELL (J); take the BLUE BILLIARD BALL (K).
- Use the KNITTING NEEDLE to get the DISPLAY (L).
- Go to the BALCONY.
- Place the DISPLAY (M); take the SAUNA STONE (N).
- Go to the SAUNA.
- Use the SCRAPER and add the SAUNA STONE to trigger a puzzle (O).
- Find the pairs.
- Solution (P).
- Take the PICKAX.
- Go to the Underground Tunnel.
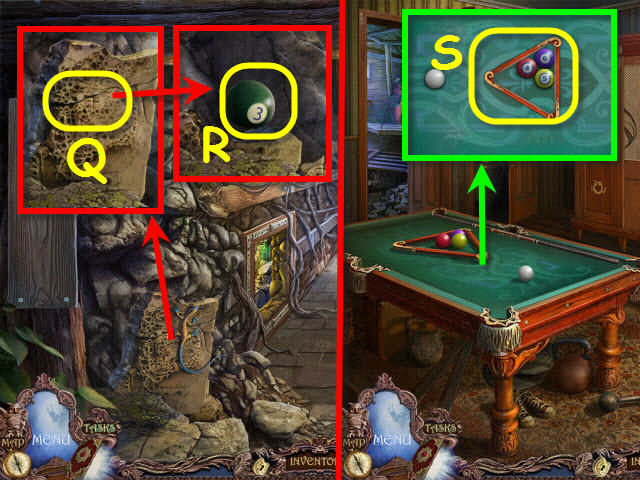
- Select the lizard; use the PICKAX (Q) and take the GREEN BILLIARD BALL (R).
- Go forward.
- Place the ORANGE BILLIARD BALL, BLUE BILLIARD BALL, and GREEN BILLIARD BALL (S) to trigger a puzzle.
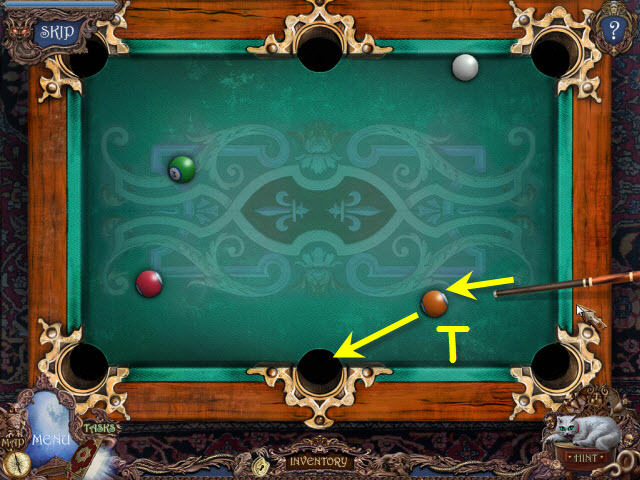
- Drag and release the cue stick to place all balls in the pockets.
- Solution (T).
- Take the HUSBAND’S PHOTO (U).
- Go to MOTHER’S ROOM.
- Place the CROSS (V); take the WOODEN BEAR (W).
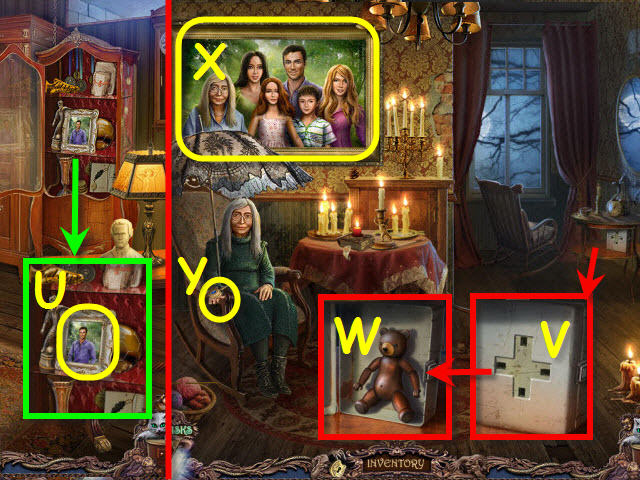
- Zoom in and place the SISTER’S PHOTO, SON’S PHOTO, DAUGHTER’S PHOTO, MY PHOTO and HUSBAND’S PHOTO (X).
- Take the BLUE KEY (Y).
- Go to the GARAGE.
- Place the WOODEN BEAR (Z).
- Play the HOP to receive the MIRROR SHARD 14/15 (A).
- Go to the WARDROBE.
- Use the BLUE KEY (B); take the MIRROR SHARD 15/15 (C).
- Zoom in and place the 15 MIRROR SHARDS (D).
- Congratulations! You have successfully completed Witch Hunters: Full Moon Ceremony.


 Dangerous Game: Illusionist Walkthrough, Guide, & Tips
 Silent Nights: Children's Orchestra Walkthrough, Guide, & Tips
 The Lost City: Chapter One Walkthrough, Guide, & Tips
 Dark Parables: Queen of Sands Walkthrough, Guide, & Tips
 Dream Chronicles: The Book of Air Walkthrough, Guide, & Tips