Diamon Jones: Devil's Contract Walkthrough, Guide, & Tips
Diamon Jones: Devil’s Contract Walkthrough

Welcome to the Diamon Jones: Devil’s Contract Walkthrough!
Go on an adventure with Diamon Jones! After retiring from his crazy life, Diamon is thrust into another journey around the globe!
Whether you use this document as a reference when things get difficult or as a road map to get you from beginning to end, we’re pretty sure you’ll find what you’re looking for here.
This document contains a complete Diamon Jones: Devil’s Contract game walkthrough featuring annotated screenshots from actual gameplay!
We hope you find this information useful as you play your way through the game. Use the walkthrough menu below to quickly jump to whatever stage of the game you need help with.
Remember to visit the Big Fish Games Forums if you find you need more help. Have fun!
This walkthrough was created by prpldva, and is protected under US Copyright laws. Any unauthorized use, including re-publication in whole or in part, without permission, is strictly prohibited.
General Tips

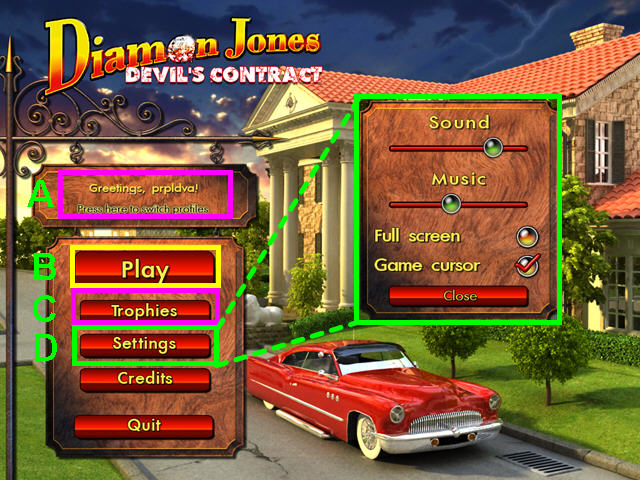
- Click on the profile panel on the main screen to add or delete player profiles (A).
- Select ‘Play’ to begin or continue your game (B).
- The ‘Trophies’ button will show all the artifacts you have collected over the course of the game (C).
- You may play this game in full screen or windowed mode by changing the options in the Settings menu (D).
- You may adjust the volume of sounds, music, and turn off the custom cursor in the Settings menu.
- The Settings menu is accessible from both the main screen and the in-game menu.

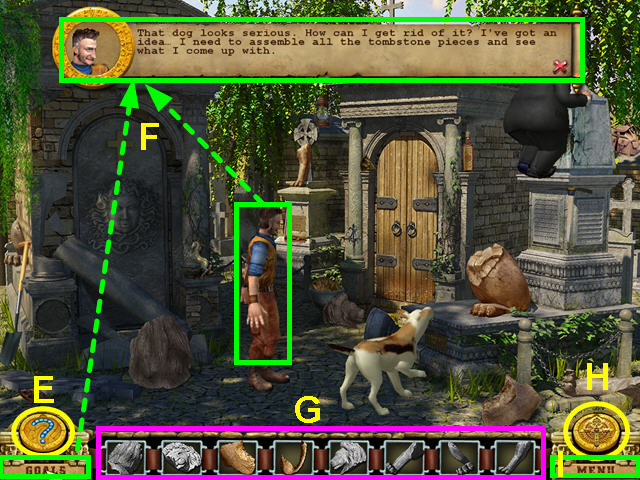
- Hints are unlimited, but you must wait for the question mark to re-fill (E).
- The Goals button will give you a hint on what need to be done (F).
- You can also talk to Diamon for information.
- Your inventory/hidden object list is at the bottom center (G).
- Grayed-out items have not yet been found.
- The gold disc on the right will take you to the Trophy room (H).
- Click the menu button to access the settings menu (I).
- There is a brief tutorial at the start of the game.
Chapter One: The Restaurant

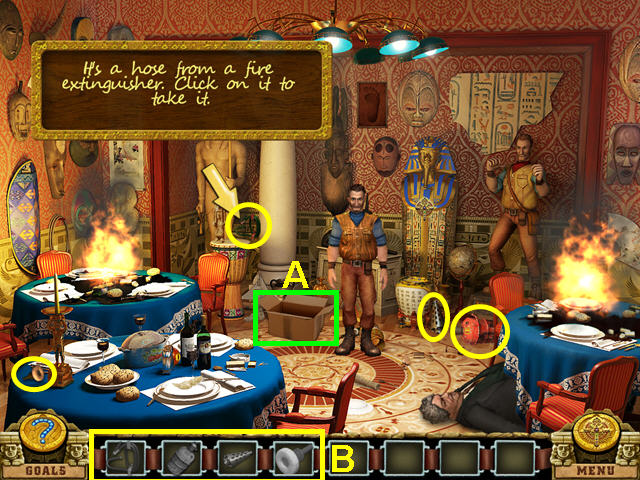
- Select the cardboard box (A).
- Locate each item and place it in the box per the tutorial (B).

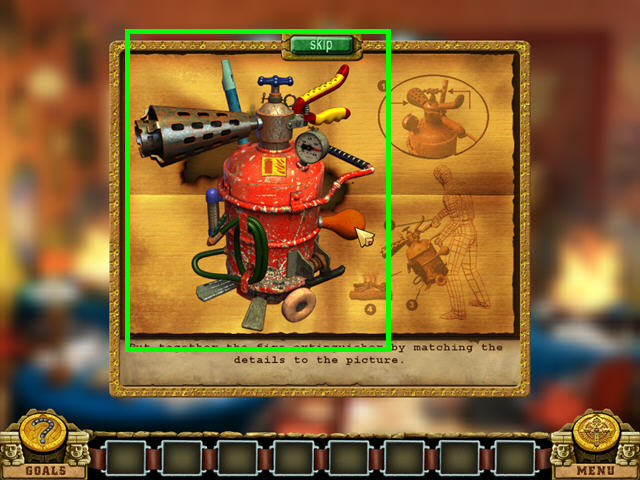
- Drag the extinguisher components to the matching outlined areas.
- Left-click to take or place a piece.

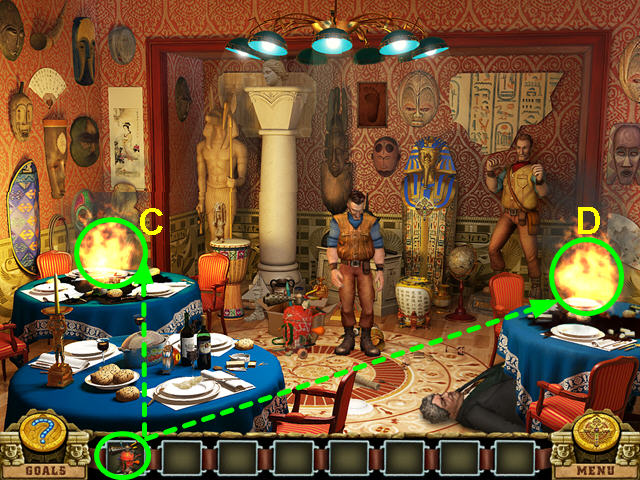
- Take the FIRE EXTINGUISHER and use it on the left table (C).
- Take the FIRE EXTINGUISHER and use it on the right table (D).

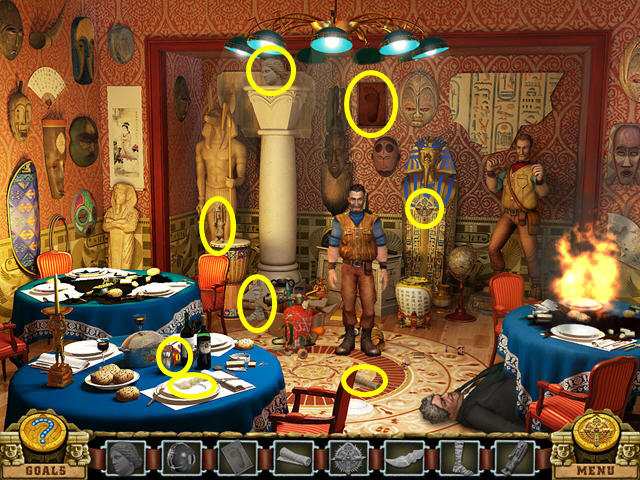
- Locate all the hidden objects.
Chapter Two: The Fire

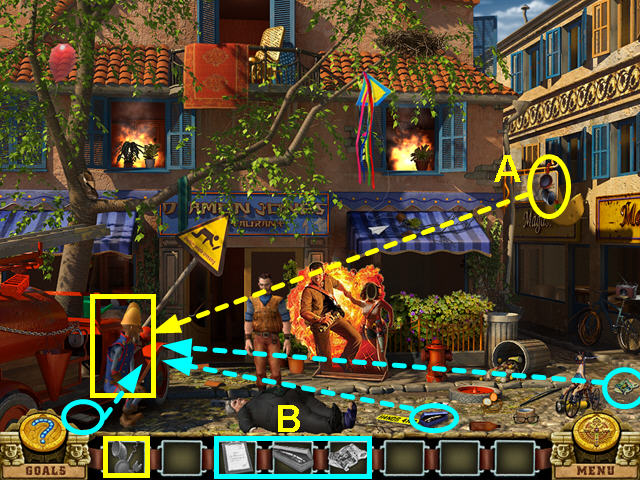
- Find the HEARING AID and give it to the fireman (A).
- Locate the 3 items and give them to the fireman (B).

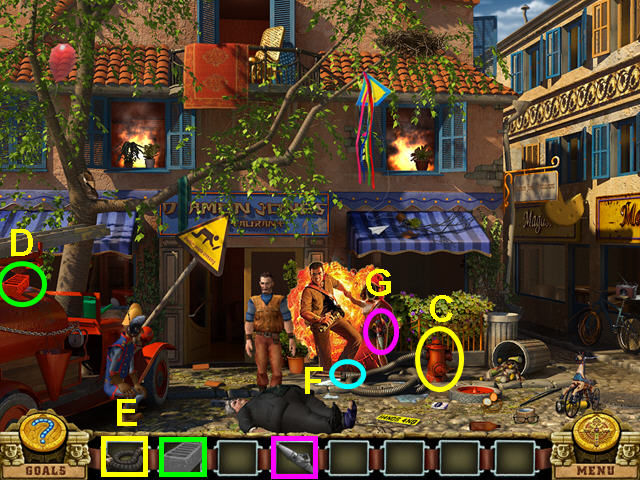
- After the fireman give you the HOSE, look at the hydrant (C).
- Find the BRICK and use it on the hydrant (D).
- Use the HOSE on the hydrant (E).
- Look at the end of the hose (F).
- Locate the HOSE END CAP and use it on the hose (G).

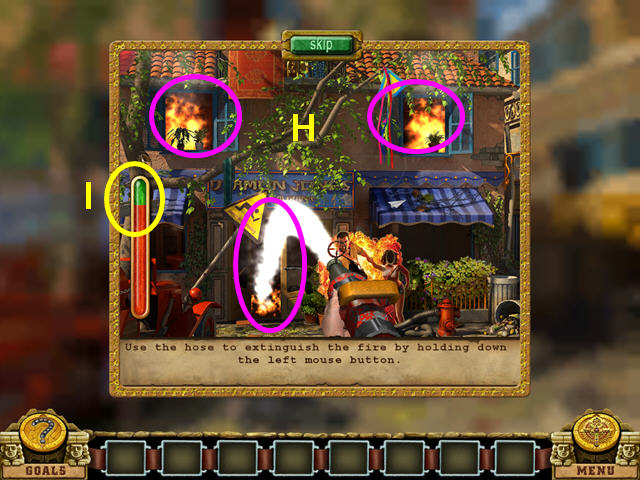
- The object of this mini-game is to put out the 3 fires (H).
- Hold down the left mouse button and aim the water so it arcs into each area.
- You will see the meter add green when you are correct (I).
- If you take too long on the next areas, a previous area can spark back to life.

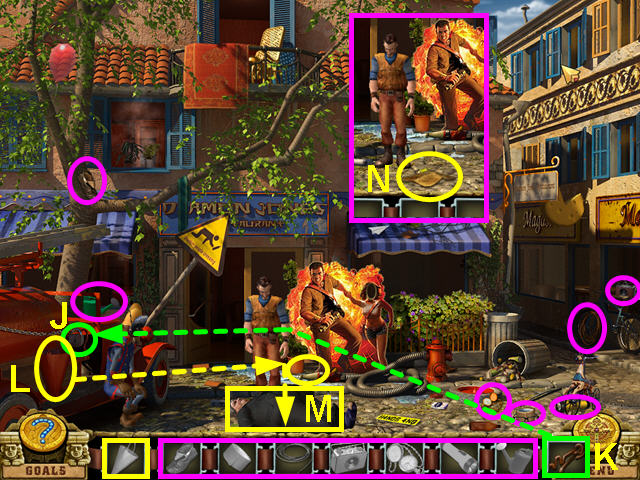
- Look at the lock holding the bucket in place (J).
- Locate all the items.
- Use the LOCKPICK on the lock (K).
- Take the BUCKET and use it on the hose (L).
- Use the BUCKET with WATER on the man (M).
- Look at the map the man dropped (N).
Chapter Three: The Cheese Shop

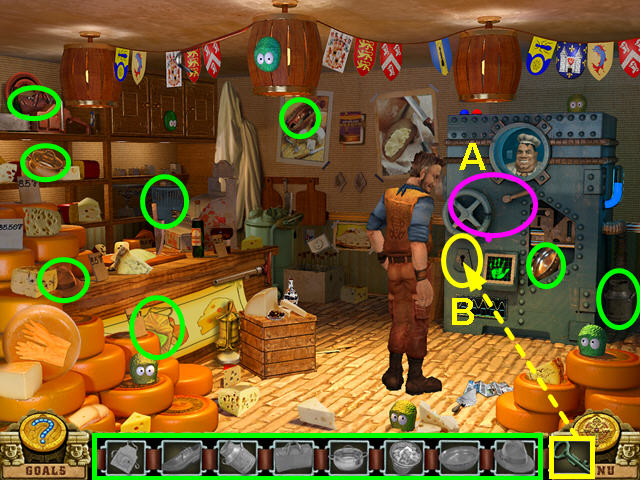
- Try to open the chamber (A).
- Locate all the items.
- Use the key on the lock (B).

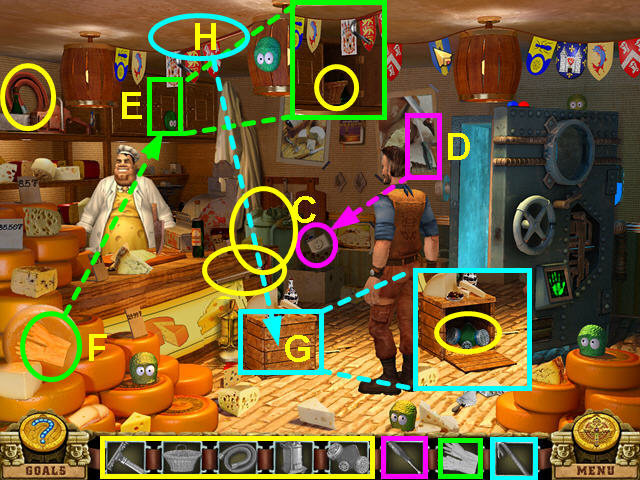
- Look at the wall socket (C).
- Find the SCREWDRIVER and use if on the wall socket (D).
- Look at the cabinet (E).
- Find the GLOVES and use them to open the cabinet (F).
- Look at the crate (G).
- Find the CROWBAR and open the crate (H).
- Locate the remainder of the items.

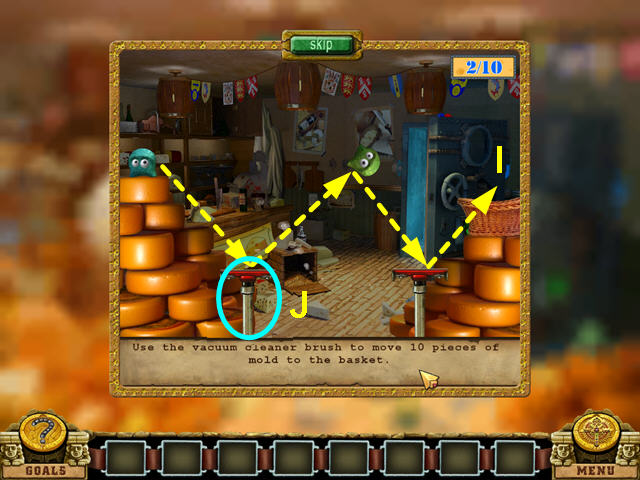
- The object of this mini-game is to bounce the 10 cheese molds into the basket (I).
- Move your cursor so that the mold bounces on the vacuum brush (J).

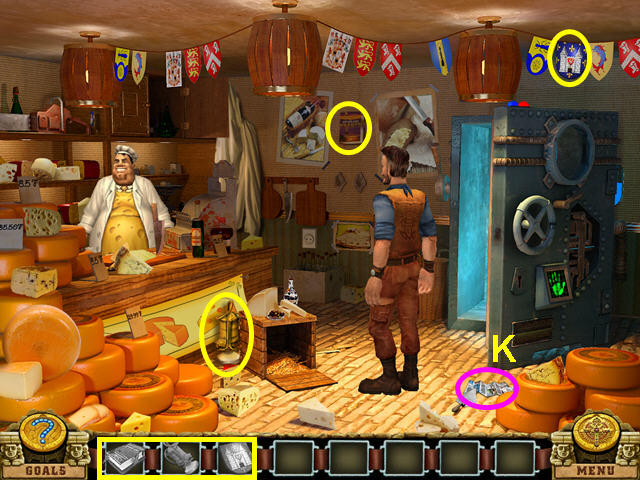
- Look at the brochure (K).
- Locate all the items.
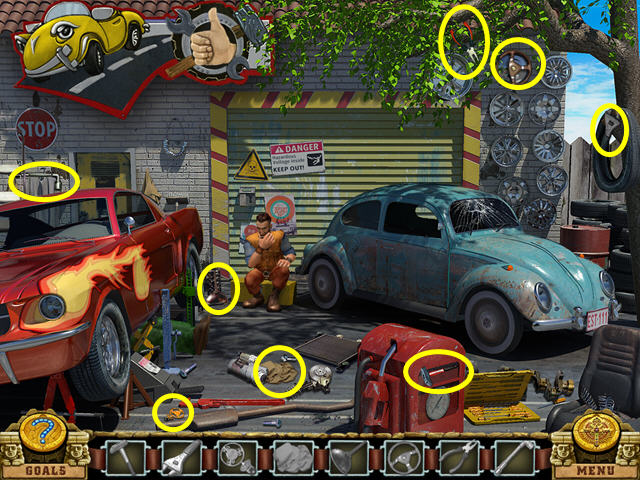
Chapter Four: The Service Station

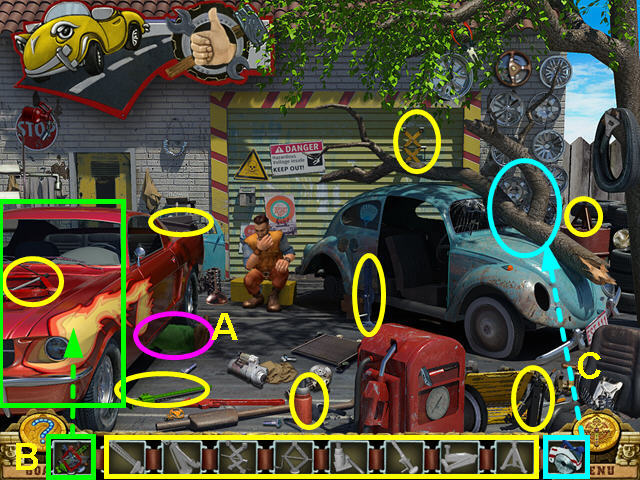
- Talk to the mechanic (A).
- Locate all the jacks.
- Use the JACKS on the car (B).
- Use the SAW to cut the tree (C).

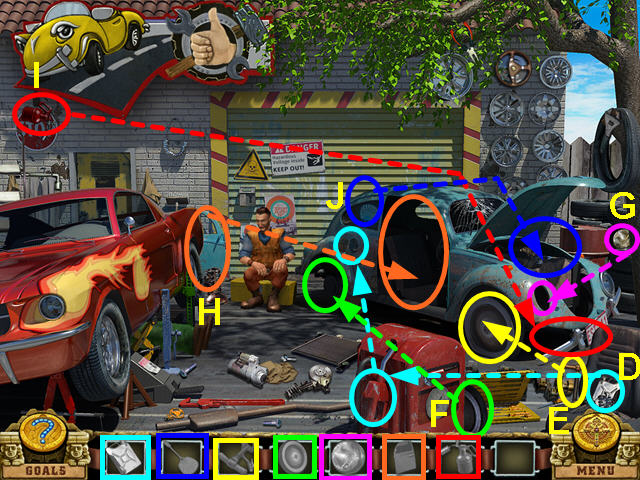
- Locate the GAS CAN, use it on the gas pump, then pour the gas in the car. (D).
- Find the PUMP and use it on the flat tire (E).
- Find the WHEEL and place it on the car (F).
- Locate the HEADLIGHT and place it on the car (G).
- Find the DOOR and place it on the car (H).
- Find the BURNER and use is on the front bumper (I).
- Locate the FLYSWATTER and use it on the engine for a mini-game (J).

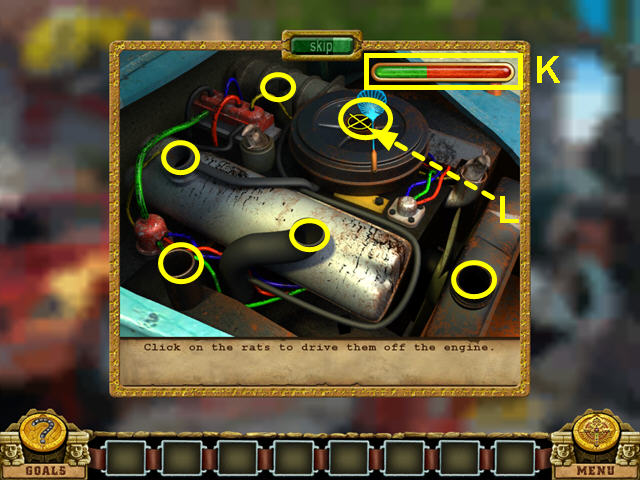
- The object of this mini-game is to get rid of the rats.
- Use the flyswatter on the rats as they pop out of the 6 holes.
- Fill the meter to full green to win the mini-game (K).
- Use the yellow cross-hair to aim and click the left mouse button to hit the rats(L).

Chapter Five: The Cemetery

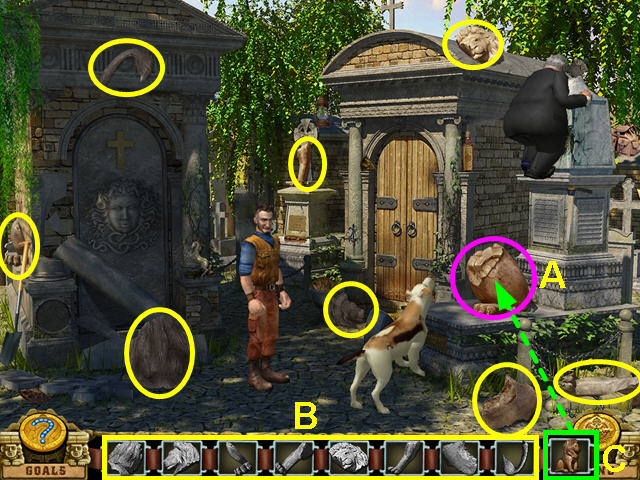
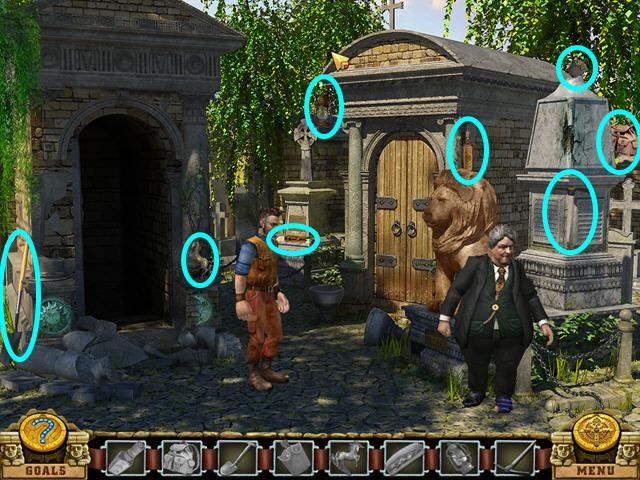
- Look at the statue base under the strange man (A).
- Locate all the lion statue pieces (B).
- Place the LION STATUE on the base (C).

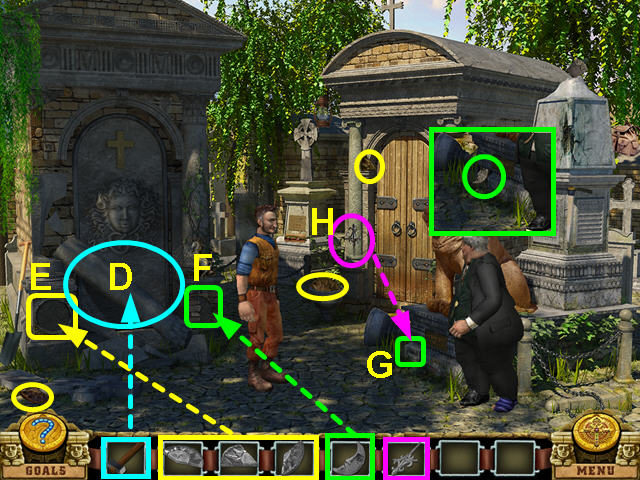
- Use the SLEDGEHAMMER on the pillar (D).
- Look at the circular indentation (E).
- Locate the 3 pieces and place them into the indentation.
- Look at the moon indentation (F).
- Look at the loose stone (G).
- Find the FENCE ROD and pry the stone open (H).
- Take the MOON and place it into the indentation.

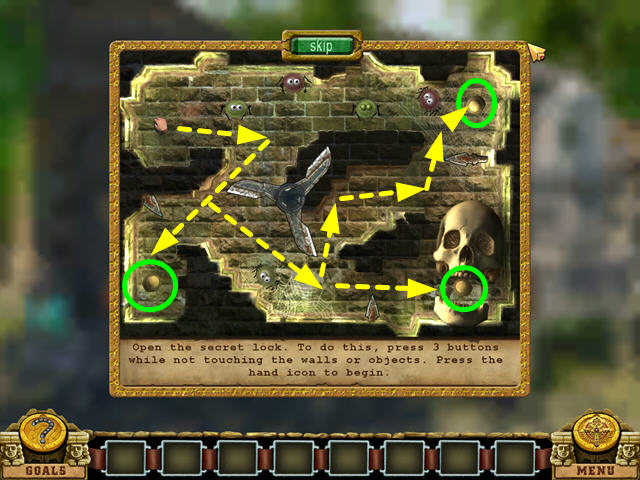
- Move the hand through the maze without touching anything.
- You must push down the 3 buttons.
- If you touch anything your hand will go back to the beginning.

Chapter Six: Inside the Crypt

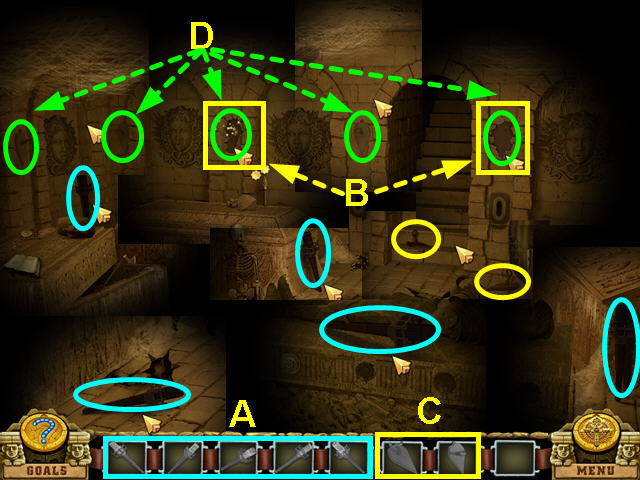
- Locate the 5 torches (A).
- Look where the 2 holders are missing (B).
- Find the 2 holders and place them back on the wall (C).
- Place the torches in the holders (D).

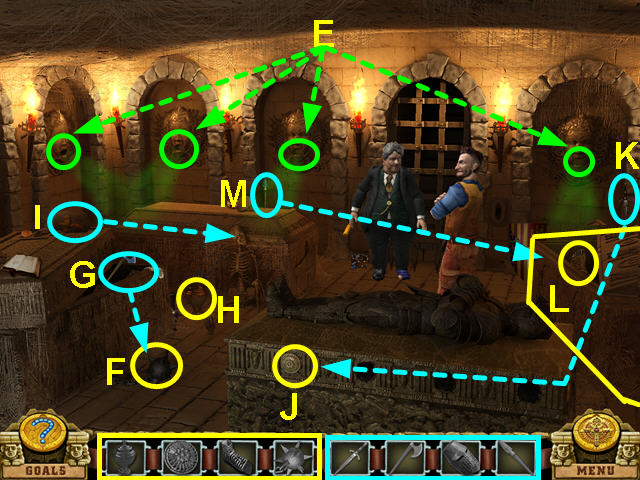
- Look at one of the Medusa head’s mouths (E).
- Look at the MACE (F).
- Find the AXE and use it on the MACE (G).
- Look at the BOWL (H).
- Find the HELMET and place it on the skeleton (I).
- Look at the PATTERN PIECE (J).
- Find the DAGGER and use it on the pattern piece (K).
- Look at the sarcophagus (L).
- Find the SPEAR and use it to open the sarcophagus (M).
- Collect all the items .
- Place an item in each Medusa mouth.

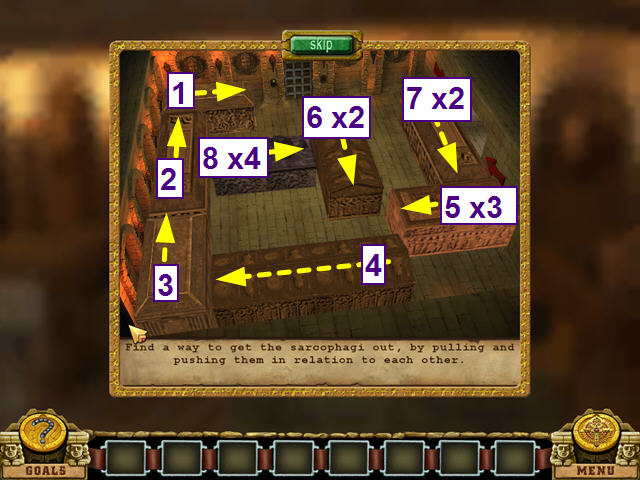
- The object of this mini-game is to remove the black sarcophagus from the room.
- Move the other pieces by clicking on a directional arrow that appears when you place you mouse over the piece.
- Move the pieces in numerical order (1-8).
Chapter Seven: The Underground Hall

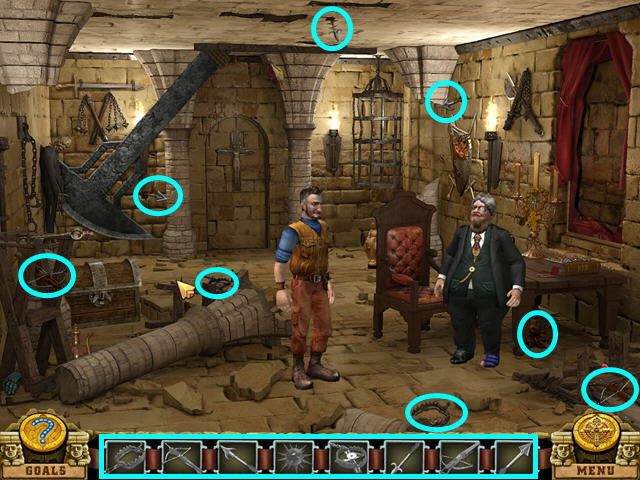

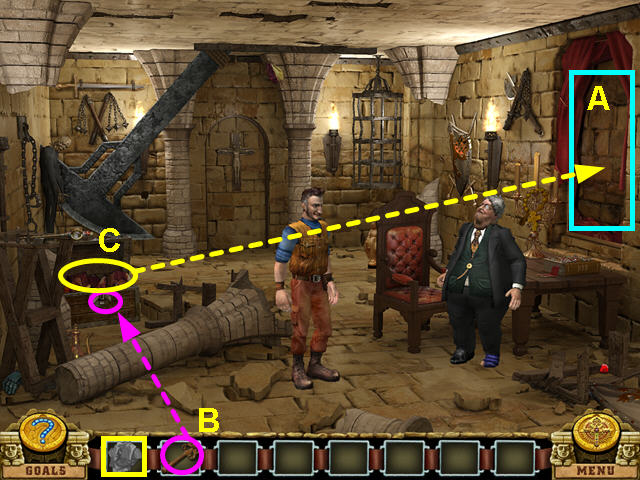
- Look at hole in the wall (A).
- Use the KEY on the chest (B).
- Take the MOSAIC PIECES and use them on the hole in the wall (C).

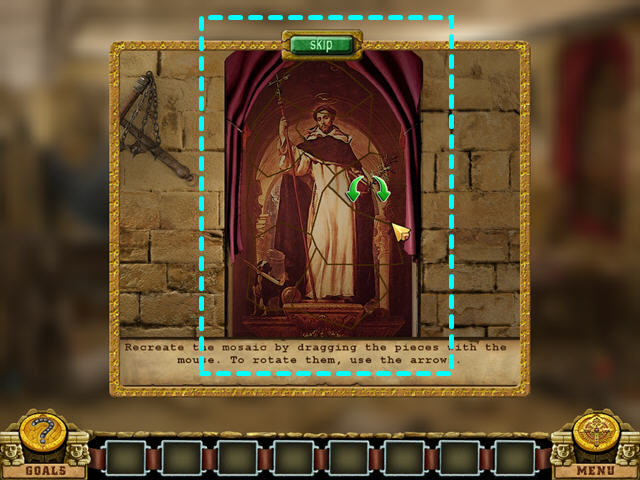
- Recreate the mosaic by replacing the pieces.
- Left-click, hold and drag a piece into place.
- Use the arrows to rotate a piece.

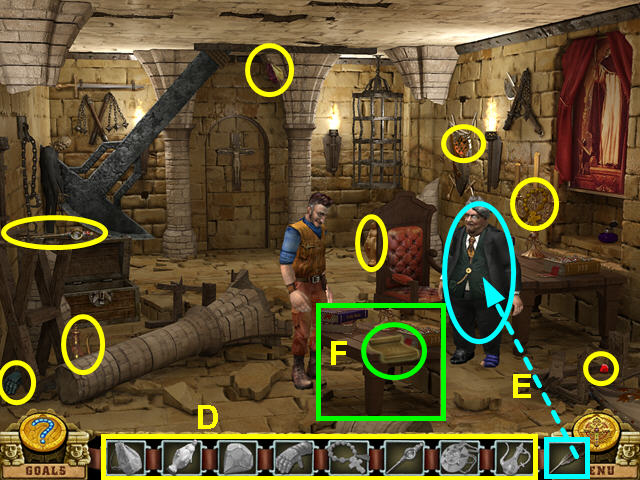
- Locate all the items (D).
- Give the PEN to the man (E).
- Look at the parchment he left behind (F).

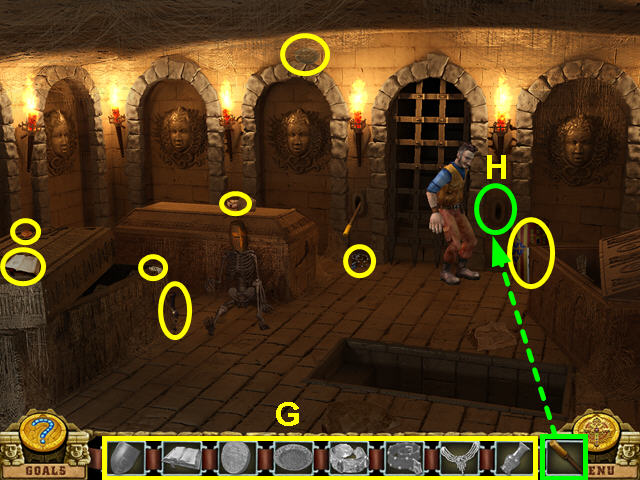
- Locate all the items (G).
- Use the LEVER in the slot (H).

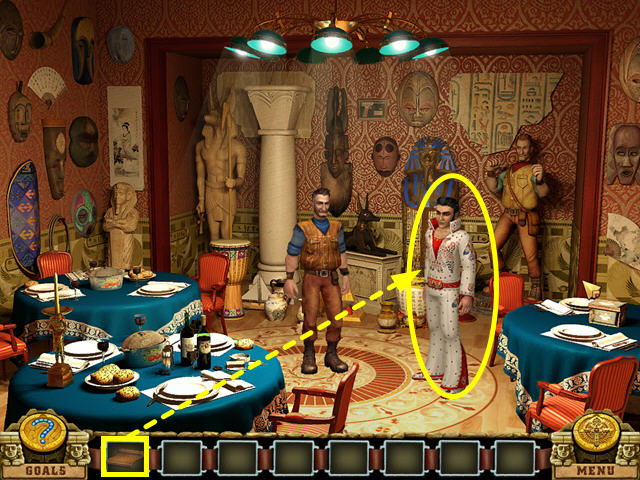
- Give the contract to the Devil (I).
Chapter Eight: The Director

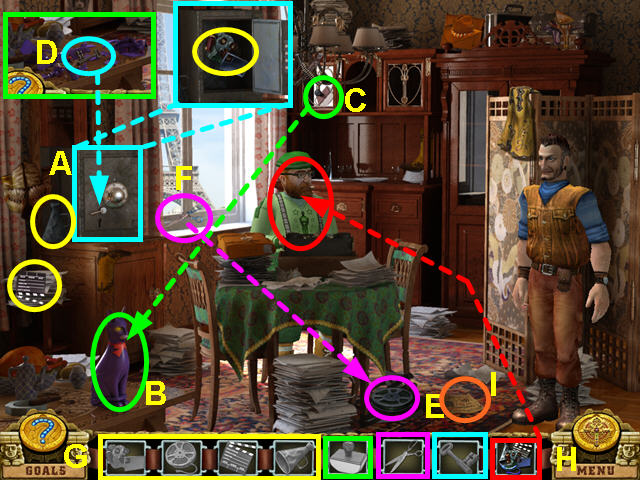
- Look at the safe (A).
- Look at the cat (B).
- Find the PAPERWEIGHT and use it on the cat (C).
- Take the KEY and use it on the safe (D).
- Look at the FILE REEL (E).
- Find the SCISSORS and use them on the FILM REEL (F).
- Locate all the items (G).
- Give the EQUIPMENT to the director (H).
- Look at the script (I).

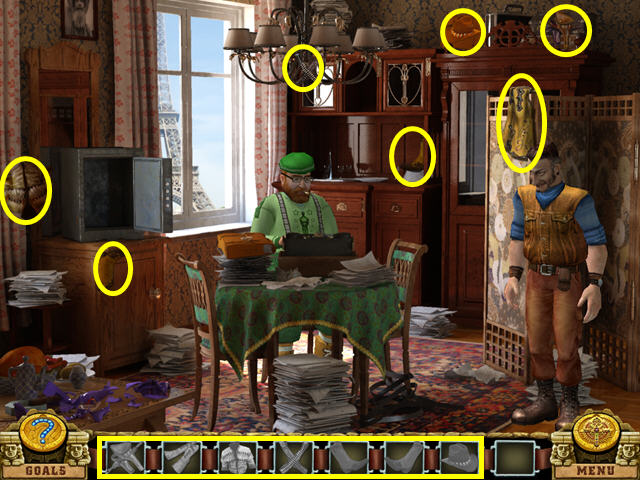
Chapter Nine: The Movie Set

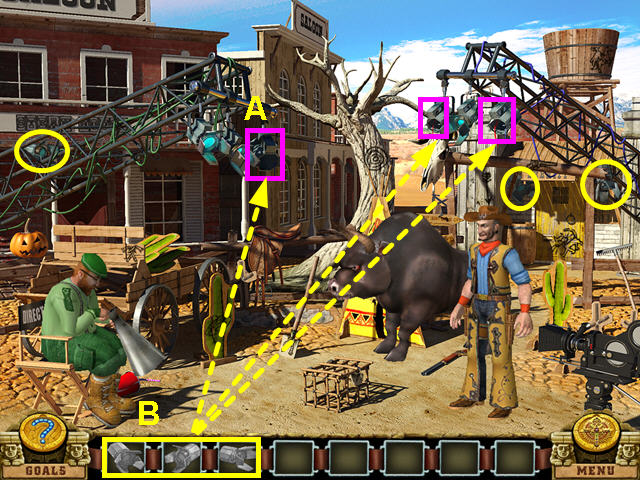
- Look at the empty light holder (A).
- Find the lights and place them in the holders (B).

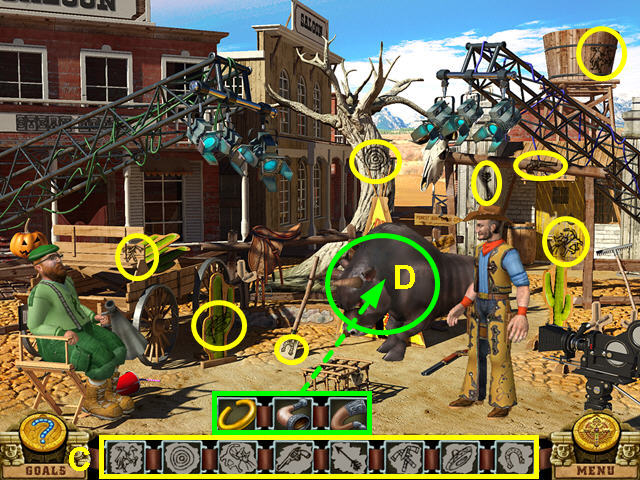
- Locate all the graffiti (C).
- Place the 2 horns and the ring on the bull (D).

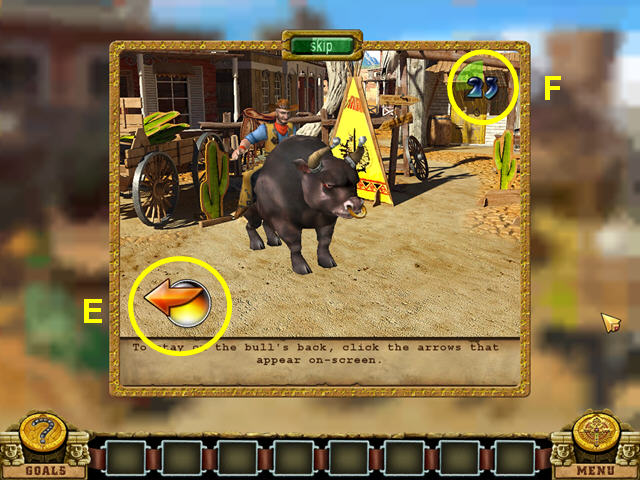
- Click on the arrows as they appear to stay on the bull (E).
- You need to stay on the bull for 30 seconds (F).
- Miss 3 arrows and you will be thrown and have to start over.

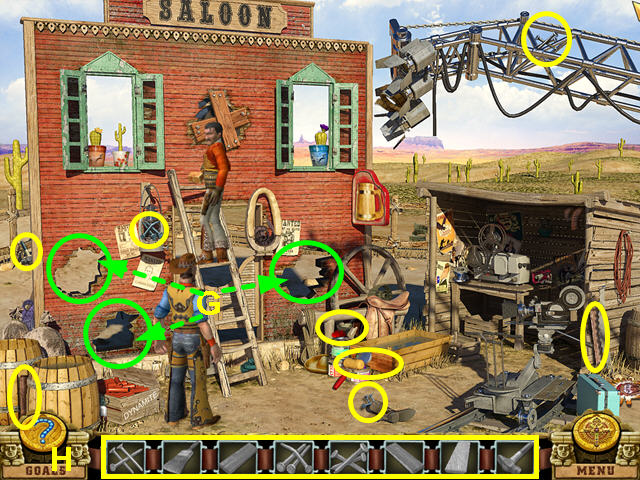
- Look at the holes in the set (G).
- Collect all the items (H).
- Place a BOARD on each hole, followed by NAILS.
- Use the HAMMER on each hole.
- Use the PAINTBRUSH on each hole.

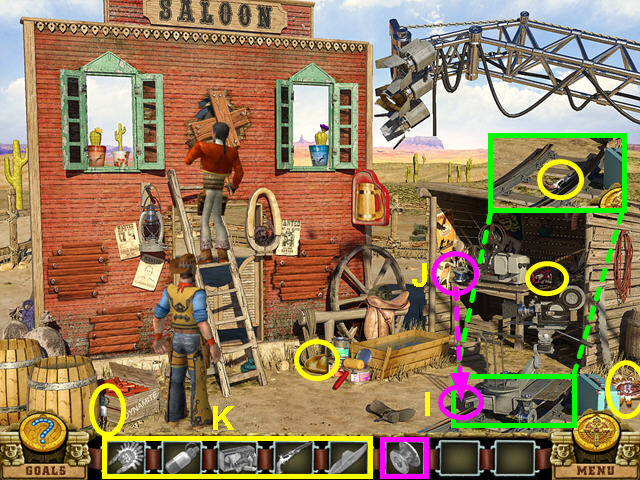
- Look at the camera trolley (I).
- Find the WHEEL and place it on the trolley (J).
- Locate all the items (K).

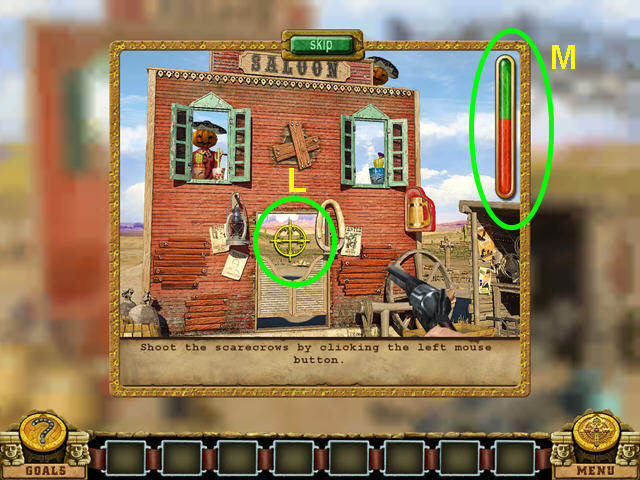
- The object of this mini-game is to shoot all the scarecrows.
- Use the yellow cross-hair to aim and click the left mouse button to fire (L).
- Fill the meter with green to win (M).

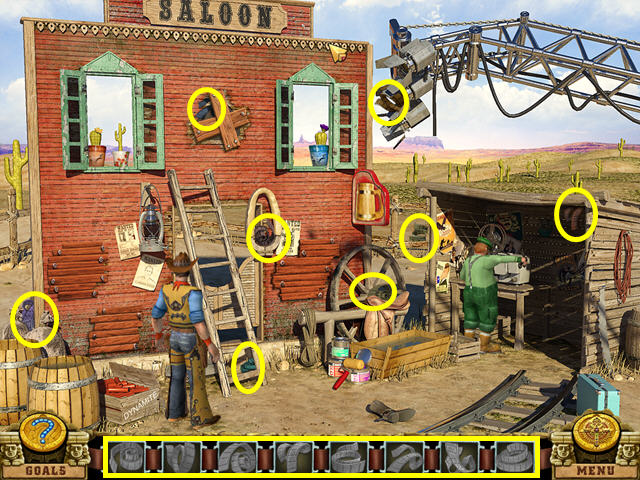
- Locate all the film pieces.
Chapter Ten: Hollywood

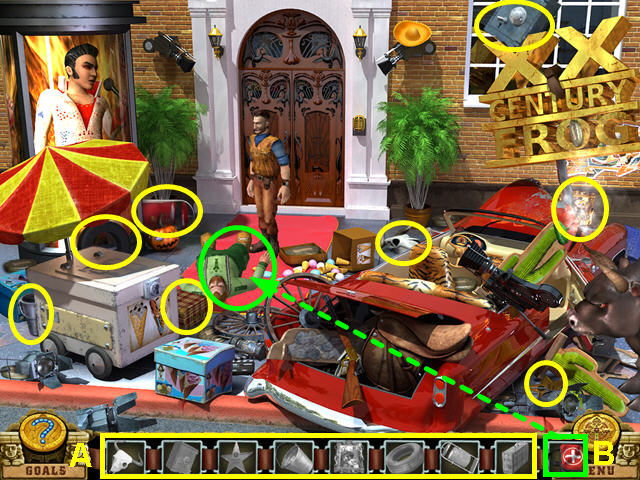
- Locate all the items on the list (A).
- Use the FIRST AID KIT on the director (B).

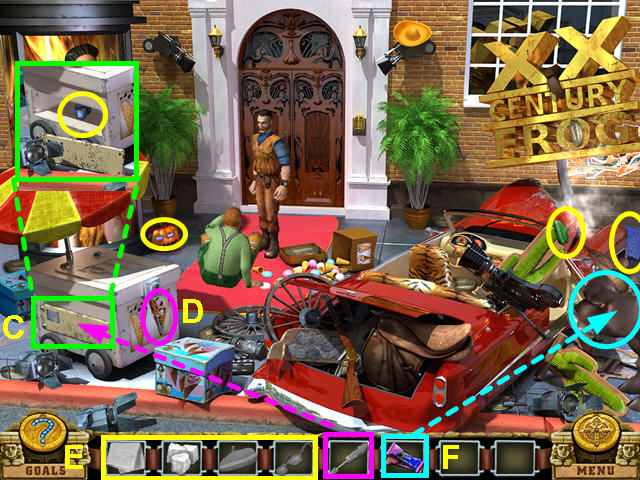
- Look at the side panel on the ice cream cart (C).
- Find the SCREWDRIVER and use it on the panel (D).
- Locate all the items (E).
- Use the BERET, GLASSES and COMPRESS on the director.
- Give the CHOCOLATES to the bull (F).

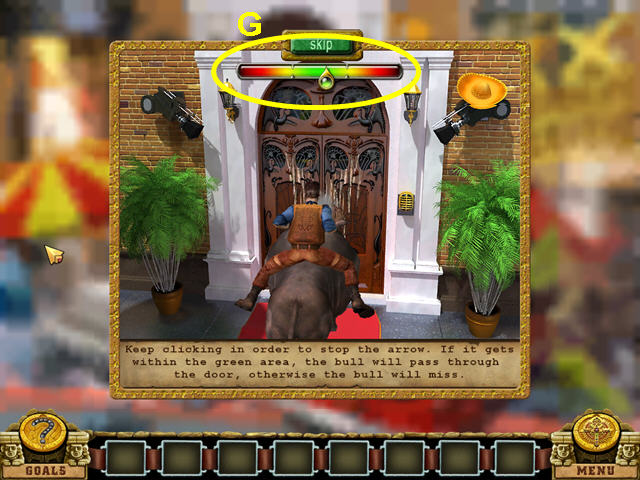
- The object is to break down the door with the bull.
- Click when the pointer is in the green area to have the bull hit the door (G).
- You must hit the door about 6 times.

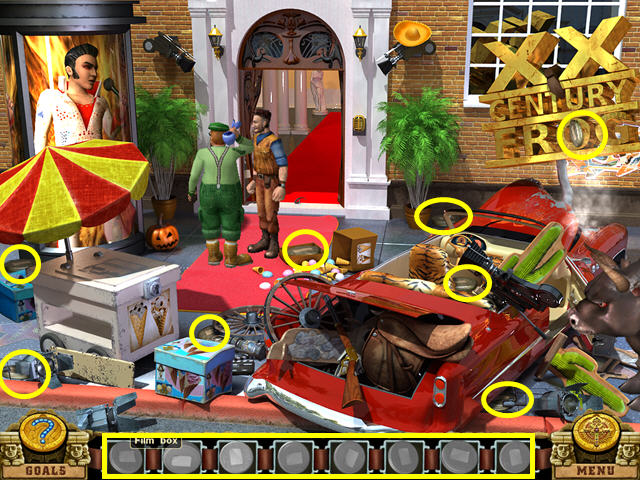
- Locate all the film reels.
Chapter Eleven: The Producer

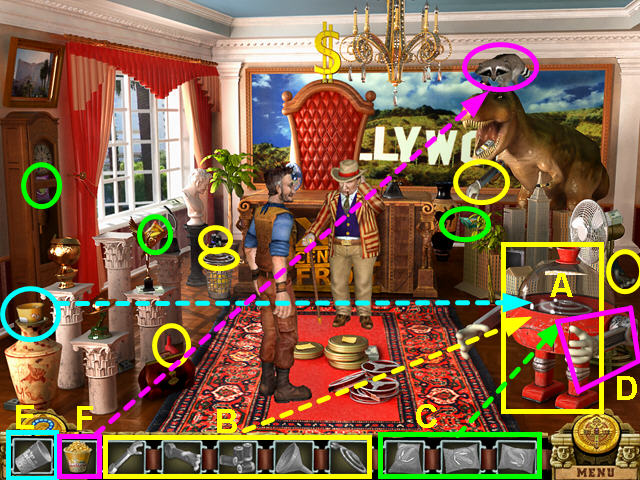
- Look at the popcorn machine (A).
- Locate the 5 parts and use them on the machine (B).
- Find the 3 POPCORN BAGS and use them on the machine (C).
- Pull the arm of the machine to pop the corn (D).
- Locate the SMALL CUP and use it on the machine (E).
- Give the POPCORN to the raccoon (F).

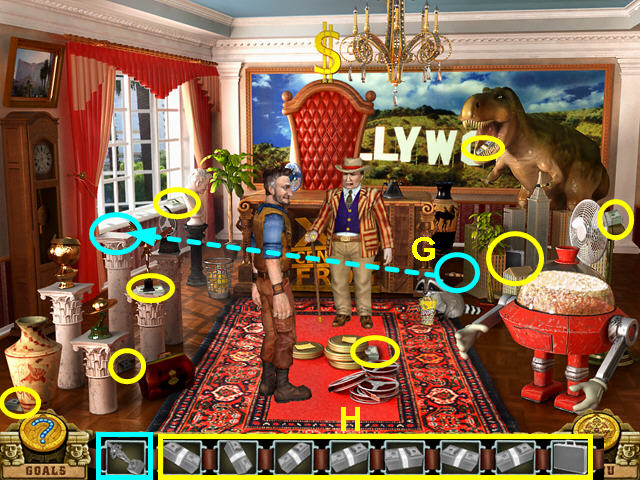
- Find the OSCAR and place it on the pedestal (G).
- Locate the cash and the case (H).
Chapter Twelve: Outside the Mansion

- Look at the trash can (A).
- Look at the LAWNMOWER HANDLE stuck in the bushes (B).
- Find the PRUNING SHEARS and cut the bushes (C).
- Look at the LOCK (D).
- Look at the grate (E).
- Find the GARDEN TROWEL and use it on the grate (F).
- Use the KEY on the LOCK (G).
- Find the GARBAGE CAN COVER and the LAWNMOWER HANDLE and place them on the garbage can.
- Place the lock on the garbage can.

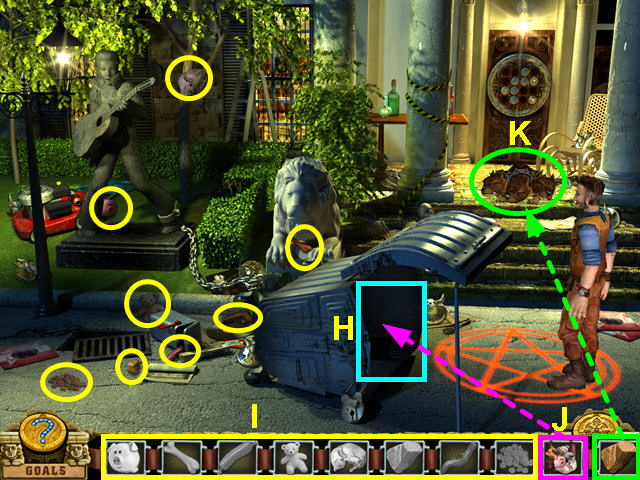
- Look at the inside of the garbage can (H).
- Locate all the items on the list (I).
- Use the BAIT on the garbage can (J).
- Toss the STONE at the 3-headed dog (K).

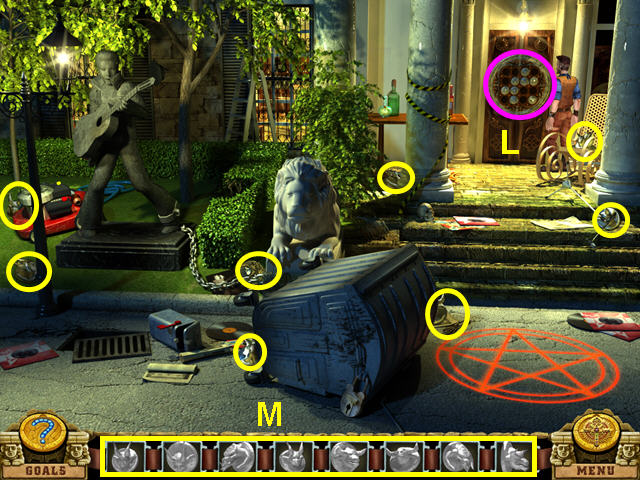
- Look at the door (L).
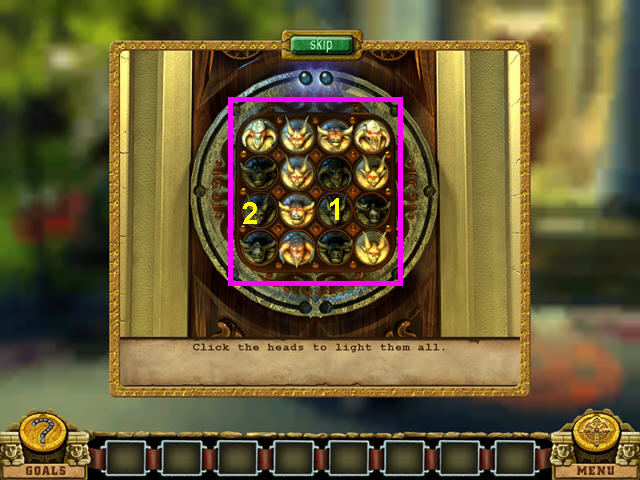
- Locate the 8 heads (M).
- Use the heads on the door.


- The object is to turn on all the lights.
- Press the heads in numerical order (1-2).
- This is the first of 4 in this mini-game.

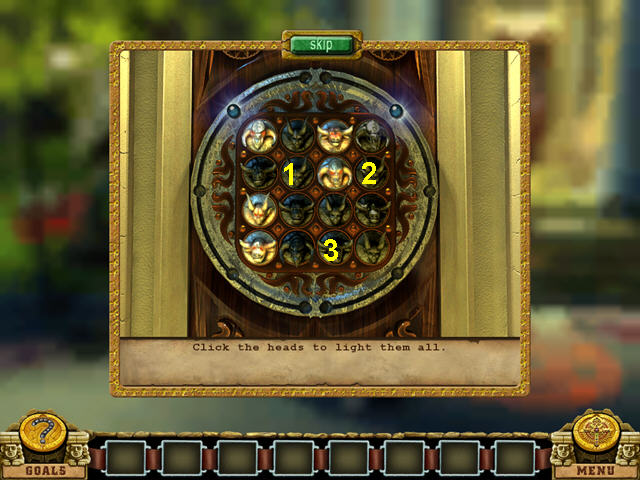
- Press the heads in numerical order (1-3).
- This is the second of 4 in this mini-game.

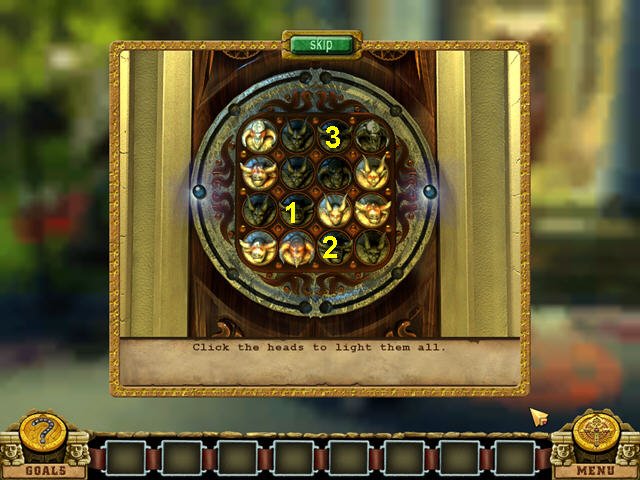
- Press the heads in numerical order (1-3).
- This is the third of 4 in this mini-game.

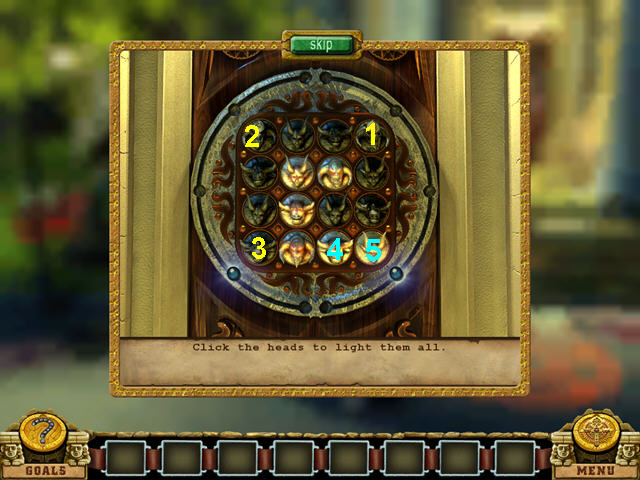
- Press the heads in numerical order (1-5).
- This is the fourth of 4 in this mini-game.
Chapter Thirteen: Inside the Mansion

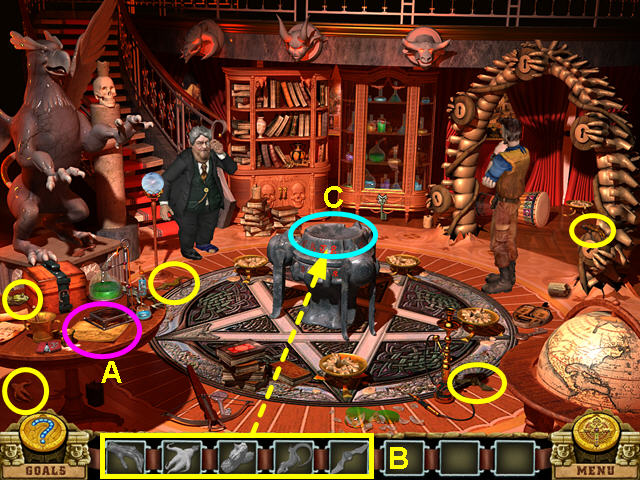
- Look at the instructions on the table (A).
- Collect the items (B).
- Place the items on the altar (C).

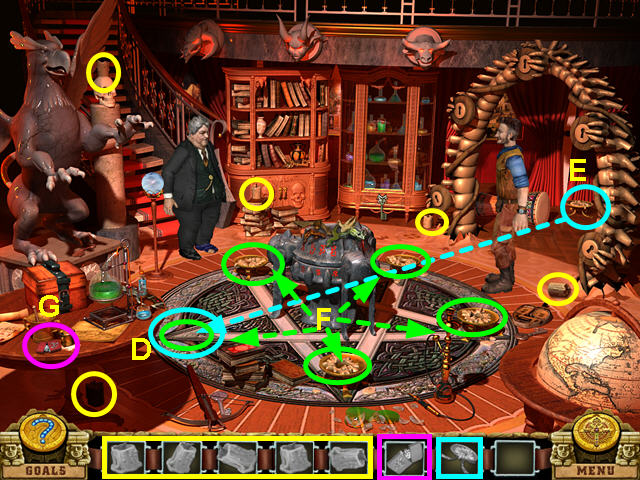
- Look at the spot missing a CANDLE HOLDER (D).
- Find the CANDLE HOLDER and place it on the spot (E).
- Locate all the CANDLES and place them into the candle holders (F).
- Use the LIGHTER to light all the candles (G).

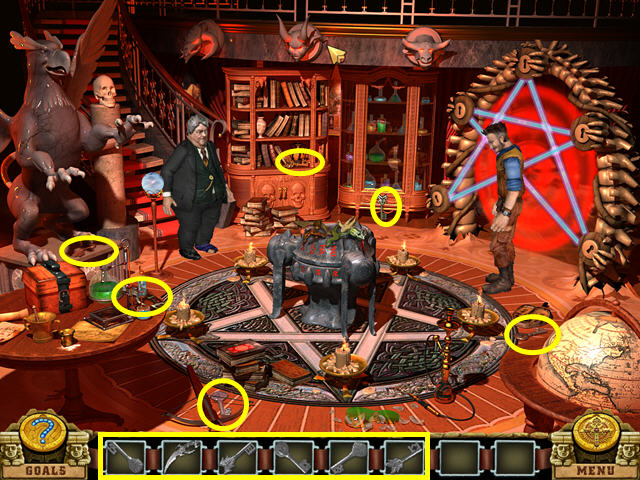

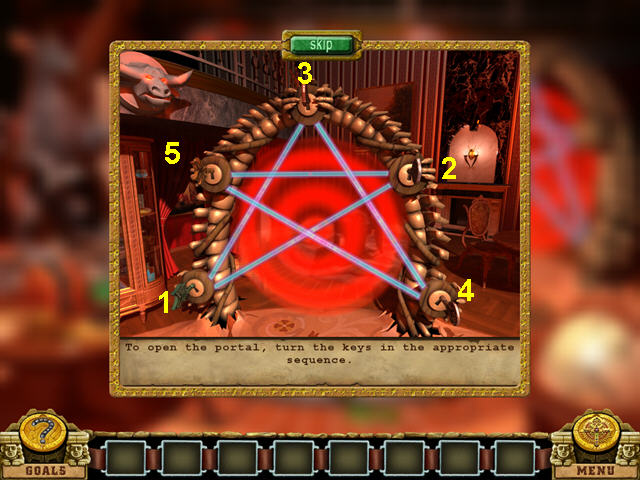
- The object of this mini-game is to turn the keys in the correct order.
- Should you turn the wrong key, it will reset and you need to start over.
- Try a key until you find one that stays turned.
- Turn the keys in numerical order (1-5).
Chapter Fourteen: The Devil’s Office

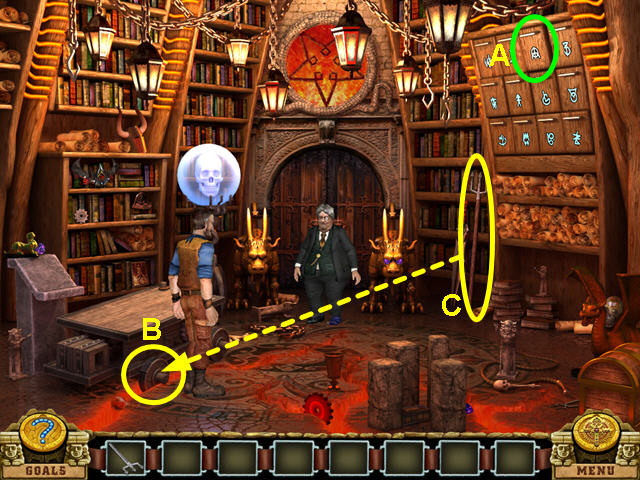
- Look at the high drawer (A).
- Look at the elevator wheel (B).
- Find the TRIDENT and use it on the stuck wheel (C).

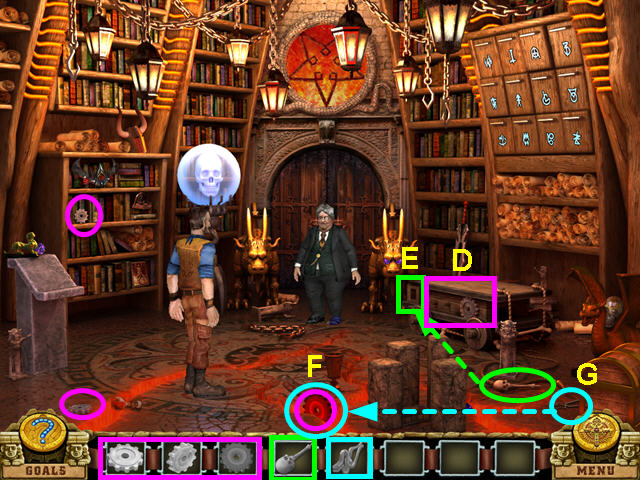
- Look at the side of the elevator by the gear (D).
- Look at the far left side of the elevator (E).
- Look at the GEAR stuck in the lava (F).
- Find the PINCERS and use them on the GEAR in the lava (G).
- Locate the 2 remaining GEARS and the ELEVATOR LEVER.
- Place the 3 GEARS on the side of the elevator.
- Place the ELEVATOR LEVER on the far left side of the elevator.

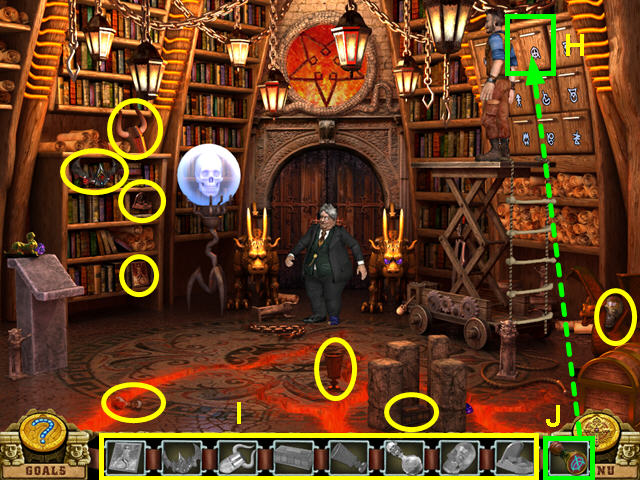
- Look at the drawer (H).
- Locate all the items (I).
- Use the SEAL on the drawer (J).

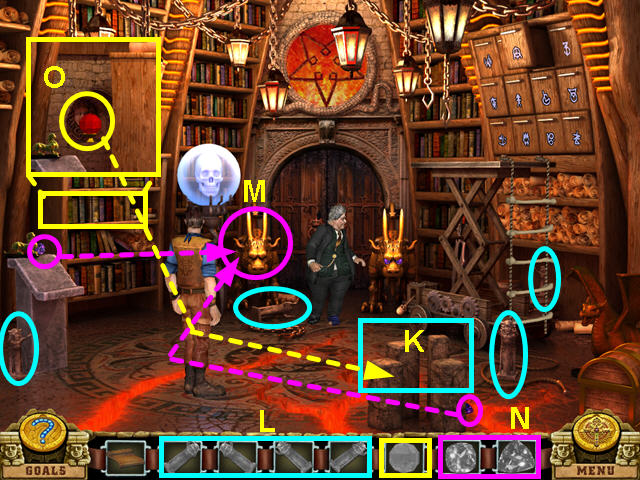
- Look at the stone pillars (K).
- Locate the 4 STATUES and place them on the pillars (L).
- Look at the left chimera (M).
- Locate the 2 EYE GEMS and place them in the chimera (N).
- Take the CRYSTAL and use it on the stone pillars (O).

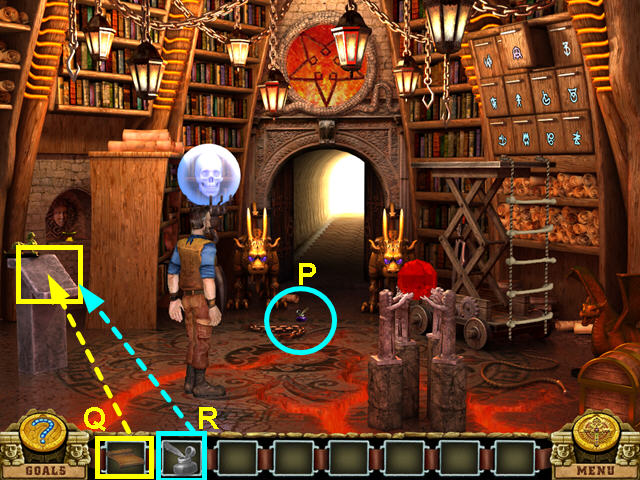
- Take the SACRED INK (P).
- Place the CONTRACT on the book stand (Q).
- Use the SACRED INK on the contract (R).

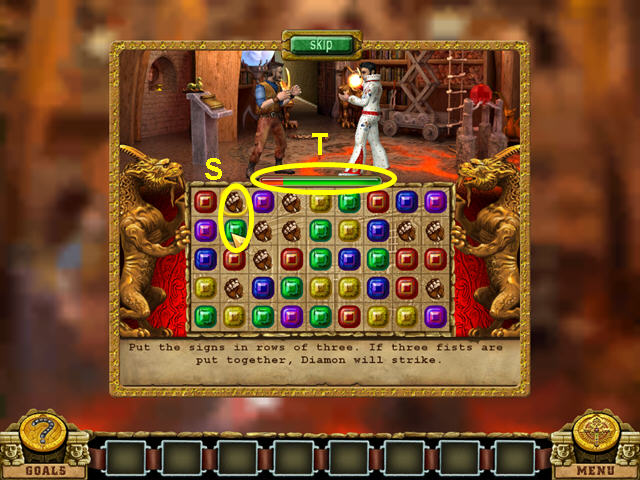
- The object of this mini-game is to make chains of 3 or more fists.
- Swap two adjacent items to make chains (S).
- Deplete the green bar to defeat the devil (T).
- Congratulations! You have completed Diamon Jones: Devil’s Contract!



 Dangerous Game: Illusionist Walkthrough, Guide, & Tips
 Fierce Tales: Feline Sight Walkthrough, Guide, & Tips
 Phenomenon Meteorite Walkthrough, Guide, & Tips
 Mystery of the Earl Walkthrough, Guide, & Tips
 Rita James and the Race to Shangri La Walkthrough, Guide, & Tips