Mystery of the Earl Walkthrough, Guide, & Tips
Mystery of the Earl Walkthrough

Welcome to the Mystery of the Earl Walkthrough!
With the help of the Fairy Queen, it’s up to you to solve the Mystery of the Earl!
Whether you use this document as a reference when things get difficult or as a road map to get you from beginning to end, we’re pretty sure you’ll find what you’re looking for here.
This document contains a complete Mystery of the Earl game walkthrough featuring annotated screenshots from actual gameplay!
We hope you find this information useful as you play your way through the game. Use the walkthrough menu below to quickly jump to whatever stage of the game you need help with.
Remember to visit the Big Fish Games Forums if you find you need more help. Have fun!
This walkthrough was created by Margie B, and is protected under US Copyright laws. Any unauthorized use, including re-publication in whole or in part, without permission, is strictly prohibited.
Introduction
General Tips
- There are several Puzzles in the game which can be skipped once the Skip button is fully charged.
- If you need to read the instructions for a Puzzle, click on the Help button in the upper left corner.
- Click on the Hint button in the lower right to receive item-finding assistance from a fairy! The Hint will not tell you where to place an inventory item though.
- If there are no more items to find in a scene, the Hint will guide to another location.
- Each scene contains 10 Diamonds. Find all the Diamonds to unlock screensavers. You will get a notification each time a screensaver has been unlocked.
- The counter in the lower right side displays the number of Diamonds left in each scene. This information can also be found on the map screen.
- The items written in gray can be found by zooming into other areas. Once that hidden area has been opened, the writing will turn black.
Map

- Click on the Map button in the upper right to view all available locations.
- Click on a Map section to travel to that location.
- The Map screen shows you how many quests need to be completed, how many diamonds have been found, and the amount of fragmented items left to find.
- The sections on the Map with golden locks attached to them will be revealed after certain tasks have been completed.
Chapter 1
The Garden

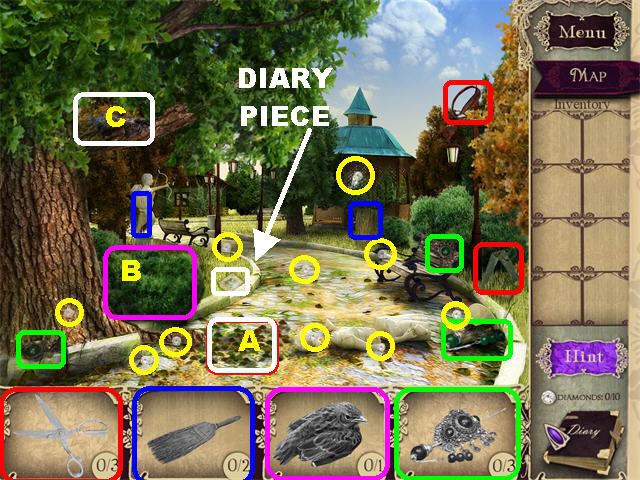
- The 10 DIAMONDS are circled in yellow.
- Pick up all the fragmented items in the scene.
- Place the BROOM on the LEAVES (A) to zoom into that section. Drag your cursor around the leaves to reveal the last GARDEN SHEARS fragment.
- Cut the BUSHES (B) on the left with the GARDEN SHEARS to add the BLUEBIRD to your inventory.
- Place the BLUEBIRD on the NEST (C) in the upper left.
- April will appear in the lower right corner from now on; click on her to obtain Hints.
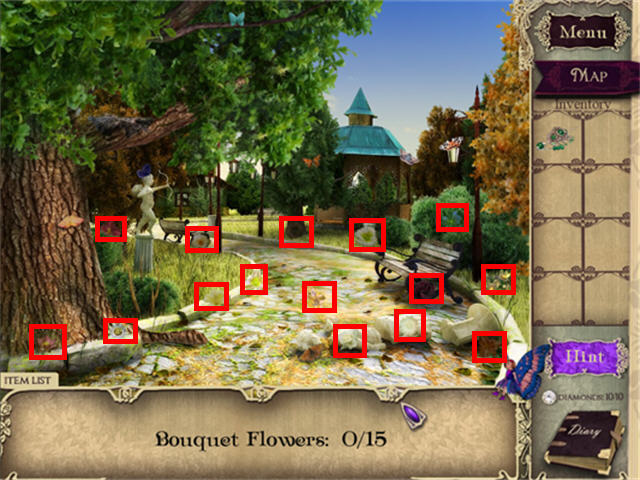
- Pick up A PIECE OF LILLIAN’S DIARY on the left side of the ground.


- Pick up the 10 BOUQUET FLOWERS marked in red.
- Click at the bottom of the scene to move to the next location.
Lillian’s Chamber

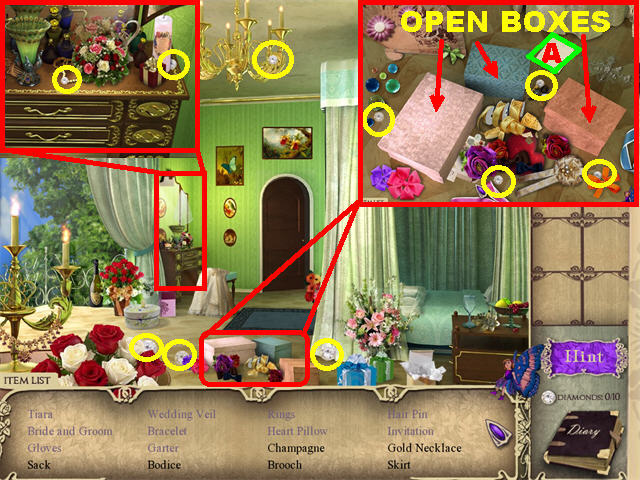
- There are several hidden areas in this scene. Move your cursor around the scene, clicking on the glowing areas to view them.
- The 10 DIAMONDS are circled in yellow.
- Pick up the rest of the items on the list.
- Make sure to open the boxes on the ground (once you’ve zoomed in) to find items on your list.
- Pick up the DIARY PAGE (A) in the close-up view of the boxes.

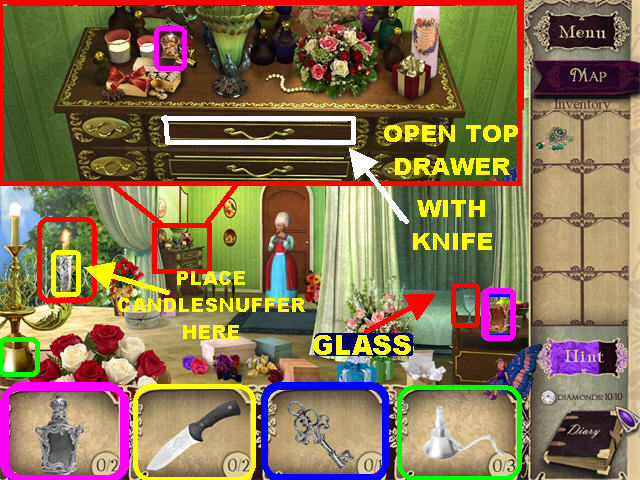

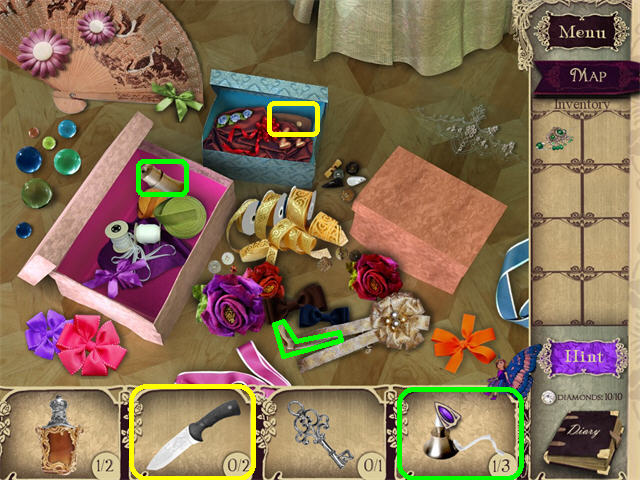
- Pick up all the fragmented items in the scene.
- Place the CANDLESNUFFER on the CANDLE on the left to extinguish the fire and complete the KNIFE.
- Zoom into the dresser on the left; pick up the last FLASK fragment.
- Open the TOP DRAWER with the KNIFE to trigger a puzzle.

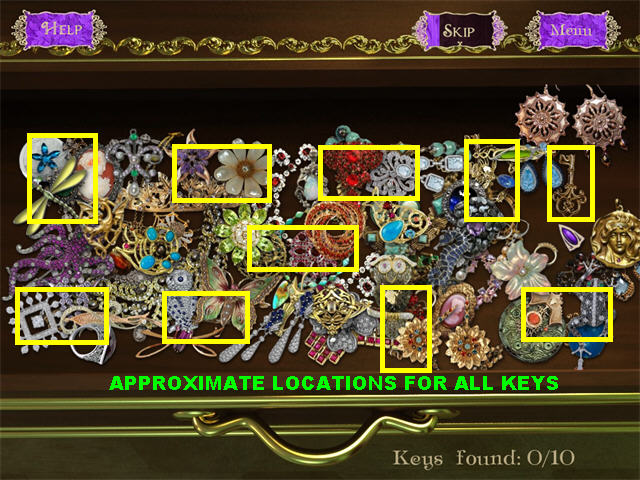
- Run your cursor over the gems, clicking on the 10 KEYS as you find them.
- Once that puzzle is solved another will appear.

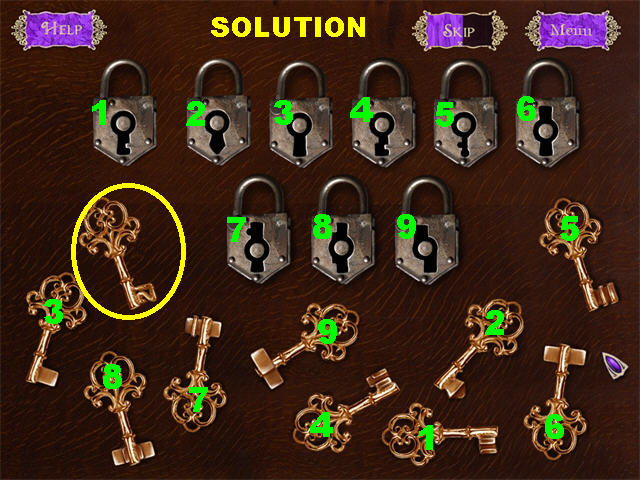
- Place the keys into the correct locks. The last key without a match is the key you need.
- The KEY will be added to inventory.
- Pour the FLASK contents into the GLASS in the lower right to create the POTION.
- Give the POTION to the lady by the door.
- Open the door with the DOOR KEY to return to the Garden. Go to the Cottage on the left.
The Cottage

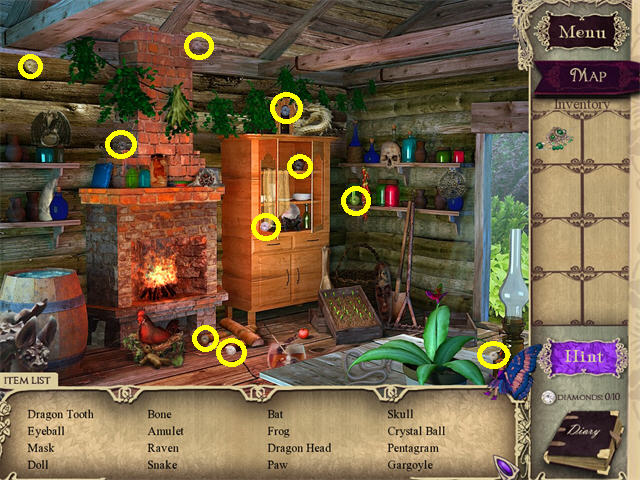
- The 10 DIAMONDS are circled in yellow.

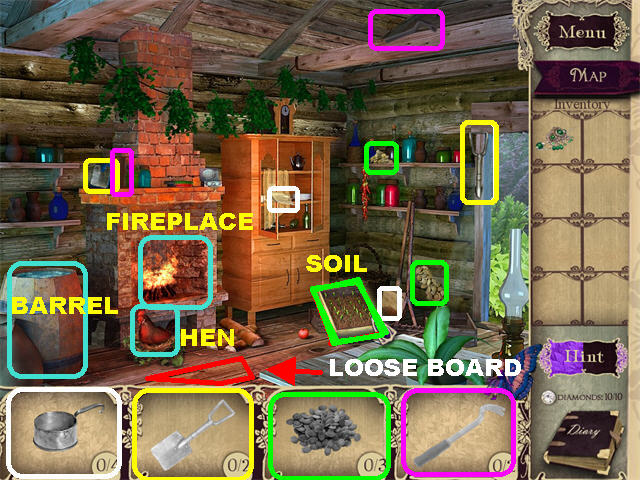
- Pick up all the fragmented items in the scene.
- Dig up the SOIL in the lower right with the TROWEL to obtain the last SEED fragment.
- Give the SEEDS to the HEN to add a piece of the EMPTY LADLE to inventory.
- Pry open the LOOSE BOARD in the lower left with the CROWBAR to obtain the last EMPTY LADLE fragment.
- Place the EMPTY LADLE on the barrel on the left.
- Place the FULL LADLE in the fireplace.
- Use the HAIRPIN to unlock the BOX in the fireplace and obtain a DIARY PAGE.
Chapter 2
Christian’s Parlor

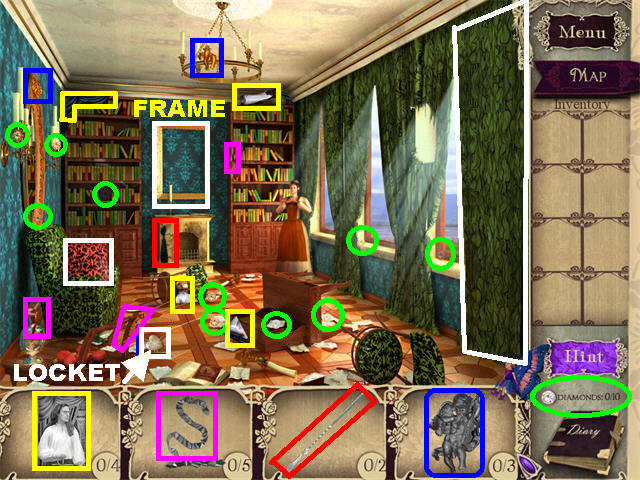
- The 10 DIAMONDS are circled in green.
- Pick up all the fragmented items in the scene.
- Place the PORTRAIT on the FRAME in the back wall to trigger a puzzle.

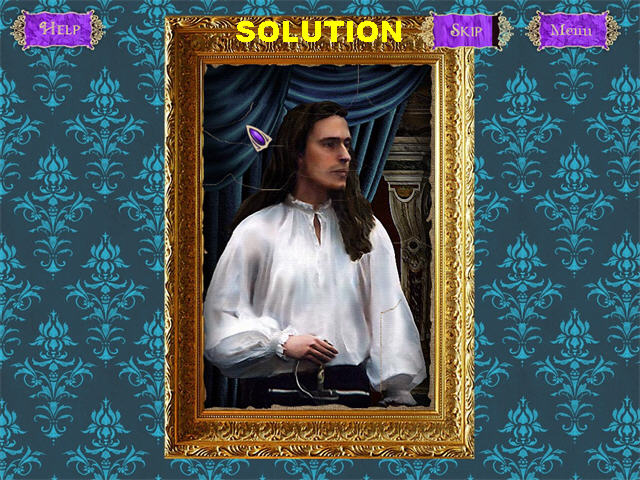
- Reconstruct the painting by dragging the pieces into the correct spots.
- Correct pieces will lock into place.
- A RIBBON fragment will be added to inventory after the puzzle has been solved.
- This is all you can find for now; click at the bottom of the scene for the next location.
Christian’s Chamber

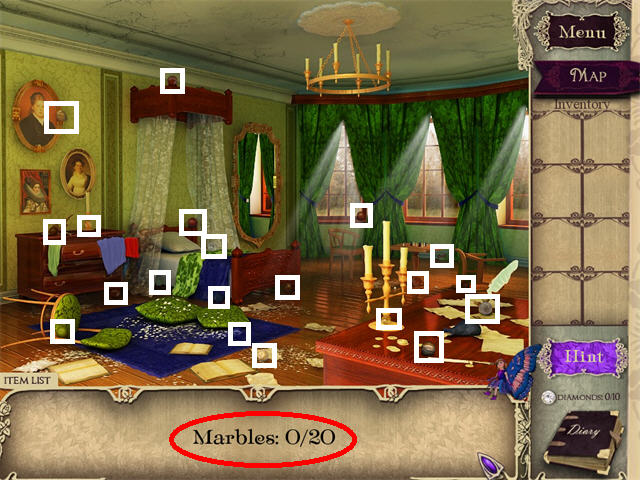
- The MARBLES are marked in white. You cannot pick up the Diamonds in this scene at the moment.

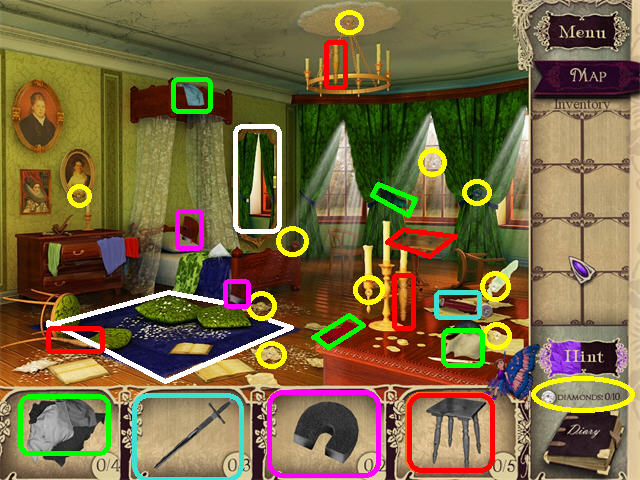

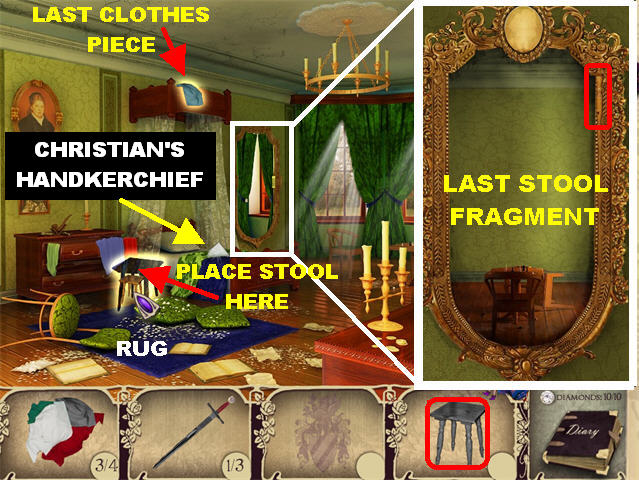
- Look for all the fragmented items in the scene.
- The 10 DIAMONDS are circled in yellow.
- Zoom into the MIRROR on the wall and pick up the last STOOL fragment in the upper right side of the frame.
- Place the STOOL in front of the dresser to obtain the last fragment of the CLOTHES PILE.
- Place the MAGNET on the BLUE RUG to obtain a fragment of the SWORD.
- Pick up CHRISTIAN’S HANDKERCHIEF from the bed.
- Place the CLOTHES PILE in the drawer on the left to complete the SWORD.
- Go left to return to Christian’s Parlor.

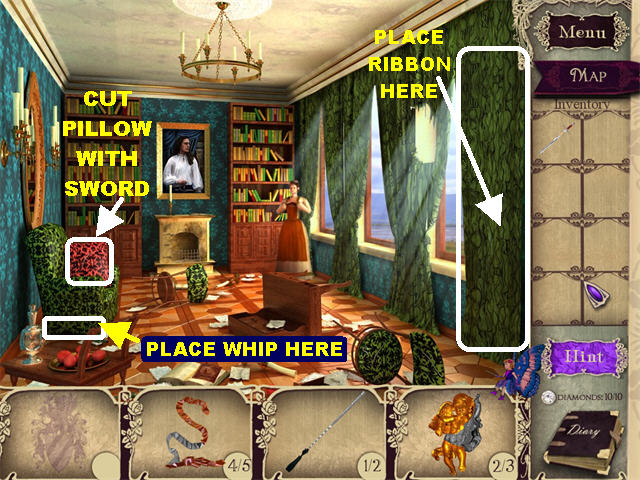
- Cut the PILLOW on the armchair with the SWORD to find the last RIBBON FRAGMENT.
- Tie up the RIGHT CURTAIN with the RIBBON to obtain the last WHIP fragment.
- Place the WHIP below the ARMCHAIR on the left to obtain the last GOLDEN ANGEL fragment.
- Go down to return to Christian’s Chamber.
Sequence Puzzle

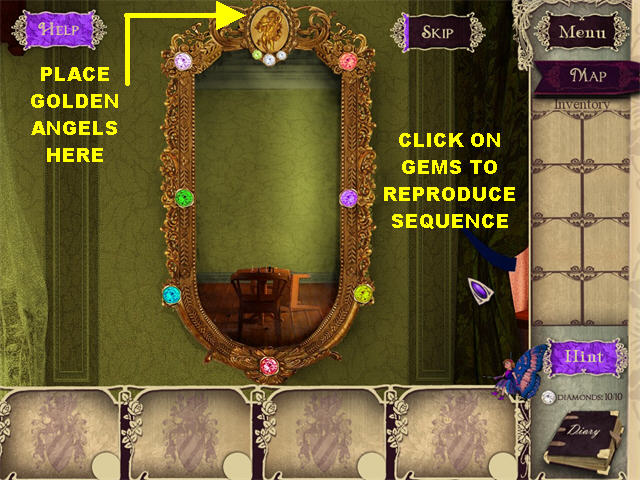
- Zoom into the MIRROR on the right and place the GOLDEN ANGEL in the top center to trigger a puzzle.
- Look at the sequence in which the gems light up; click on the gems around the frame in the same order.
- Repeat three sequences to beat the game.
- Go through the mirror.
Secret Room

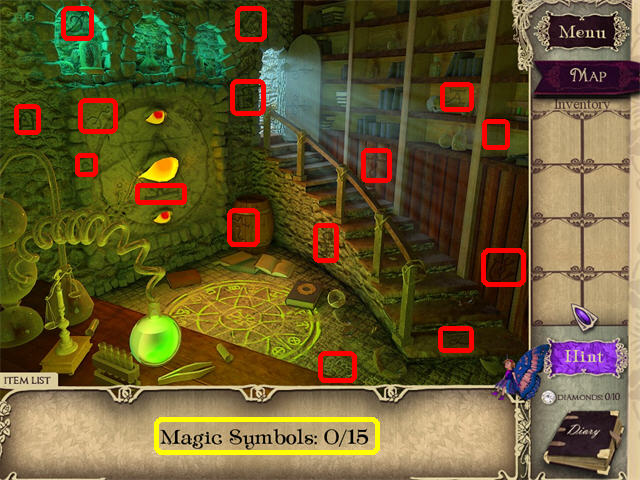
- You cannot pick up DIAMONDS at this time.
- Pick up the 15 MAGIC SYMBOLS marked in red.

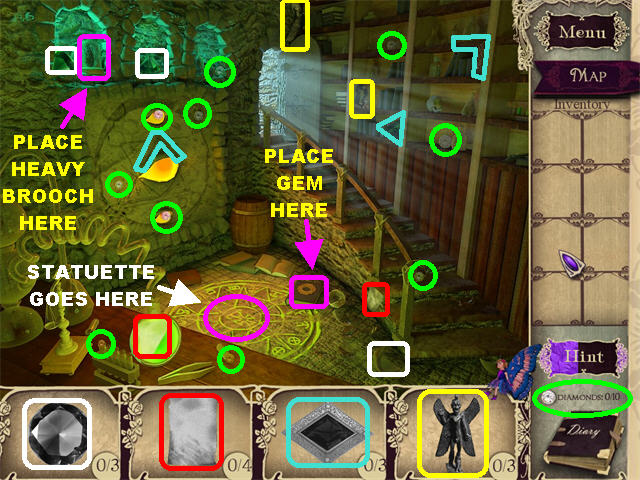
- Pick up the 10 DIAMONDS circled in green.
- Pick up the fragmented items in the scene.
- Place the GEM on the BOOK next to the diagram on the ground to receive a fragment of CHRISTIAN’S NOTE.
- Place the HEAVY BROOCH on the JAR in the upper left to receive the last STATUETTE fragment.
- Place the STATUETTE on the ground to trigger a puzzle.
Stone Puzzle

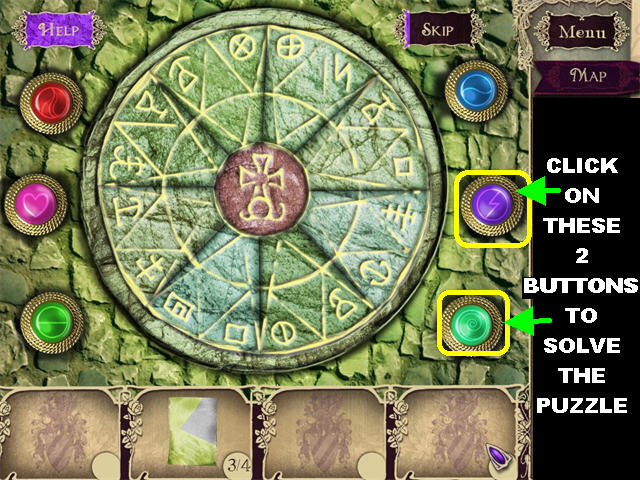
- Press on the Buttons in the right order to solve the puzzle.
- Click on the two bottom buttons on the right side (numbers 5 and 6).
- You will receive the last fragment of CHRISTIAN’S NOTE after completing the puzzle.

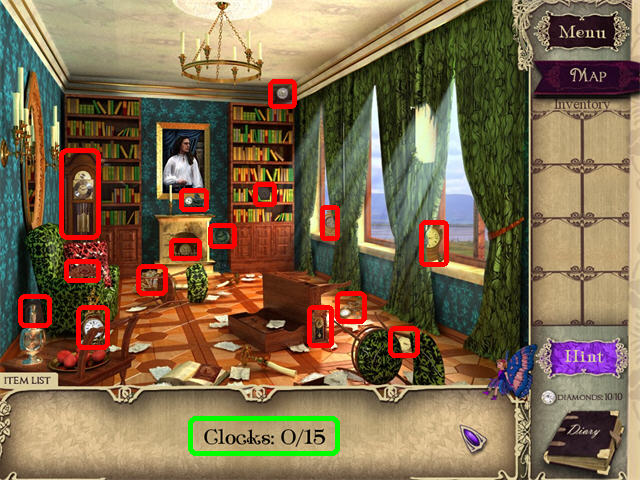
- You are automatically returned to Christian’s Parlor.
- Click on the Maid and the Witch will place a spell.
- Pick up the 15 CLOCKS marked in red to break the spell.
- You will be transported back to the Castle.
Chapter 3
Lillian’s Chamber

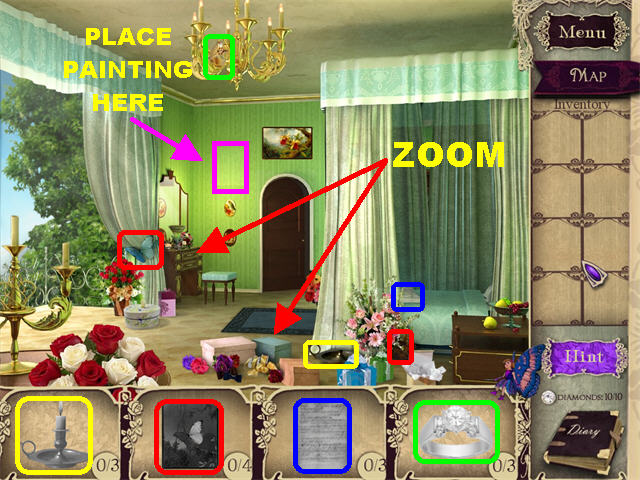

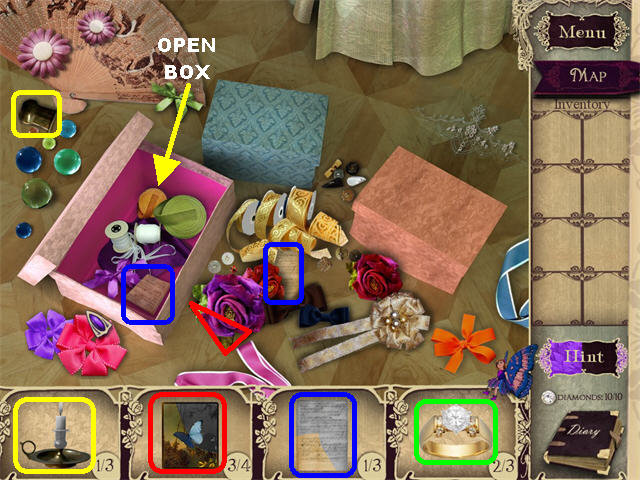

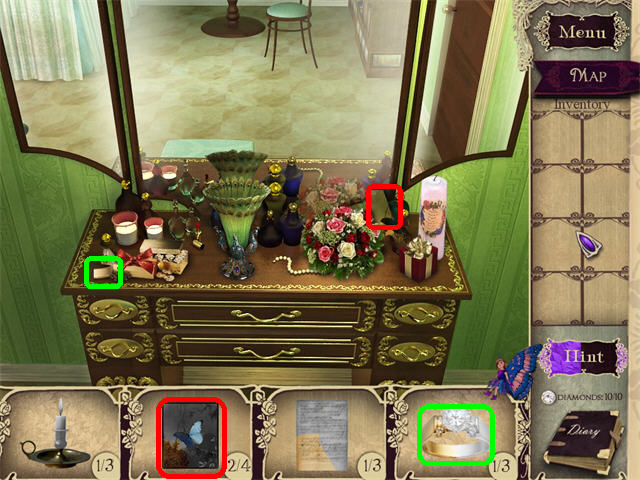
- You don’t have to find the DIAMONDS in this scene (you found them previously).
- Pick up all the fragmented items in the scene.
- Zoom into the BOXES on the floor; pick up the fragmented items.
- Zoom into the DRESSER on the left; pick up the fragmented items.
- Place the PAINTING on the spot in the back wall to light up the candles in the lower left.
- Go through the back door.
Garden

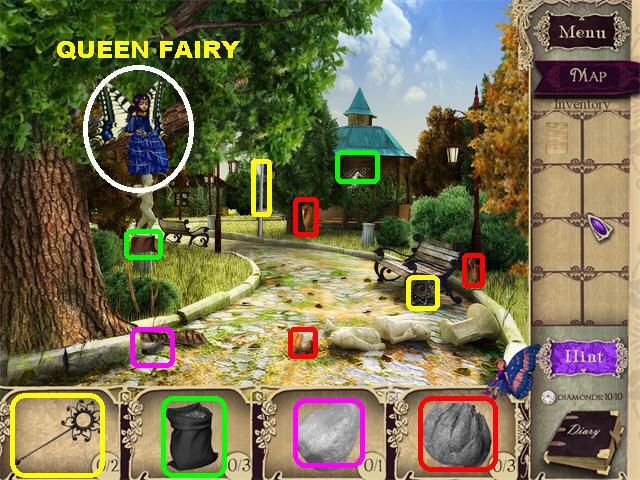
- Pick up all the fragmented items.
- Give the MAGIC WAND to the Queen Fairy to receive the last fragment of the GROWING POWDER.
- Go back to the Cottage.
The Cottage

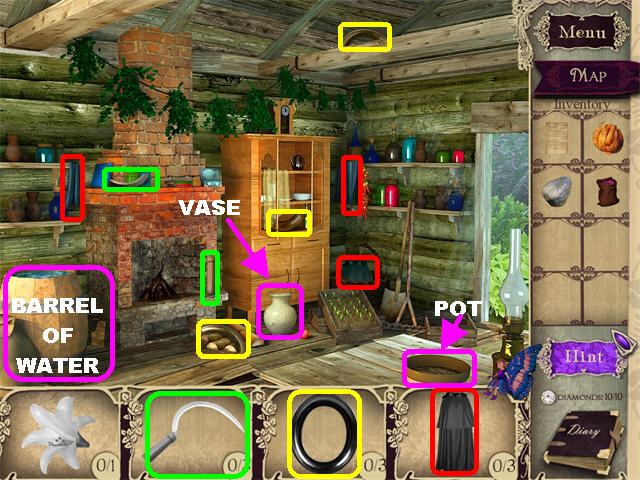
- Pick up the fragmented items in the scene.
- Place the LILY BULB and the GROWING POWDER in the pot in the lower right corner.
- The LILY is added to your inventory.
- Break the VASE with the STONE to obtain the last SICKLE fragment.
- Place the LILY in the BARREL OF WATER on the left.
- Go right; then down.
Lillian’s Chambers

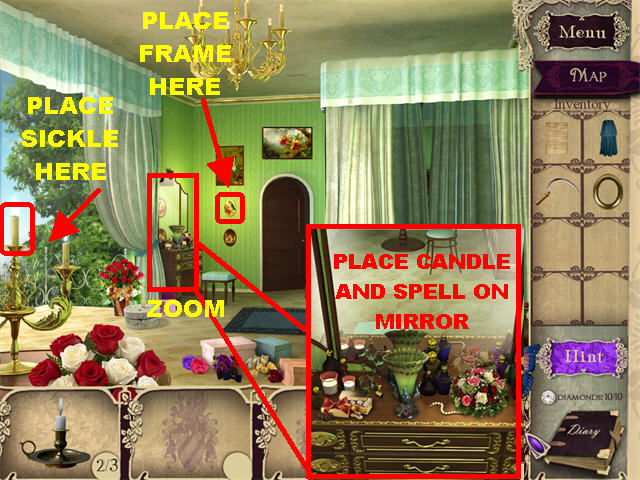
- Cut the CANDLE on the left, with the SICKLE, to obtain the last CANDLE fragment.
- Place the FRAME around the small oval painting on the back wall to obtain the last RING fragment.
- Zoom into the dresser on the left.
- Place the CANDLE and the SPELL on the mirror; the MYSTERIOUS SPELL will be added to inventory.
- Go back to the Cottage.
- Place the MYSTERIOUS SPELL and the CLOAK in the BARREL OF WATER in the lower left.
Chapter 4
The Drawing Room

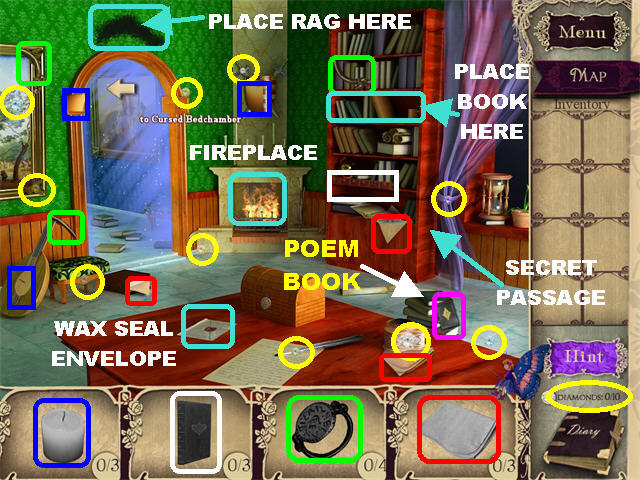
- The 10 DIAMONDS are circled in yellow.
- Pick up CHRISTIAN’S POEM BOOK, marked in magenta, in the lower right corner.
- Clean the SOOT above the doorway with the CLEANING RAG to obtain a BOOK fragment.
- Light the CANDLE in the FIREPLACE.
- Open the ENVELOPE WITH WAX SEAL with the LIT CANDLE to obtain the last BOOK FRAGMENT.
- Place the BOOK on the BOOKCASE SHELF to discover the secret passage to the Witch’s Lair.
- Go through the back door to enter the Cursed Bedchamber.

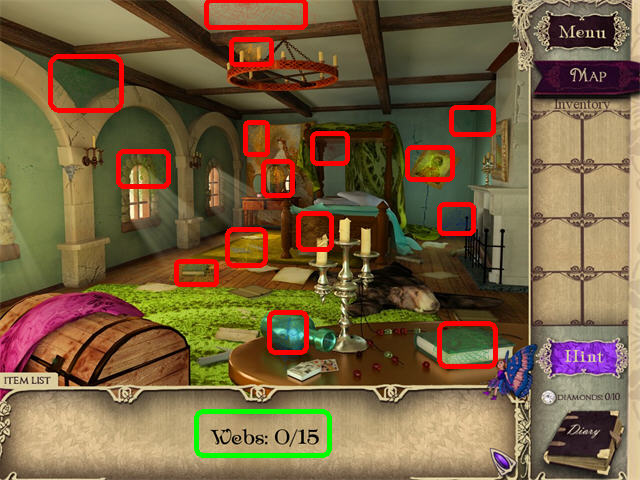
- Pick up the 15 WEBS marked in red.

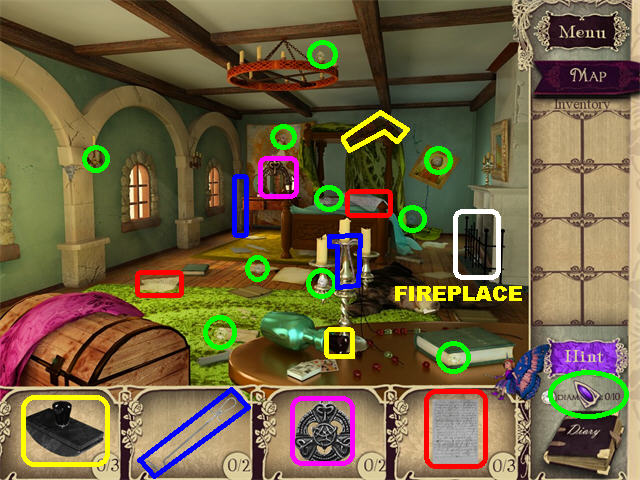
- The DIAMONDS are circled in green.
- Pick up all the fragmented items.
- Place the POKER in the FIREPLACE to receive the last PAPERWEIGHT fragment.
- Go to the Witch’s Lair behind the bookcase in the Drawing Room.
Witch’s Lair

- Pick up the MISLETOE in the lower center.
- Pick up the 20 FAIRY WINGS marked in white.

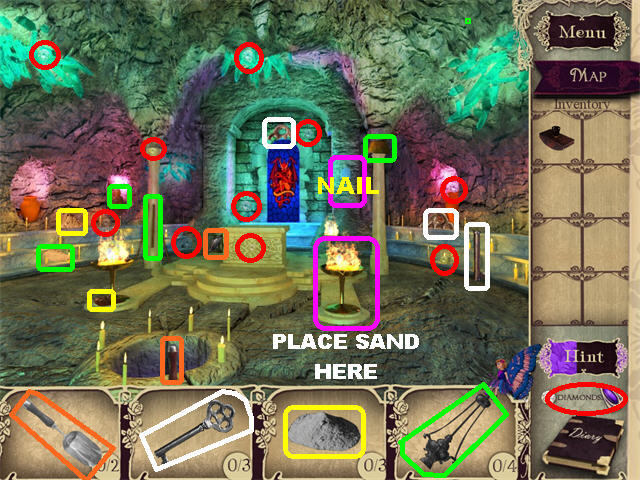
- Pick up the 10 DIAMONDS circled in red.
- Pick up all the fragmented items in the scene.
- Extinguish the FIRE on the right with the SAND to obtain the last CENSER fragment.
- Hang the CENSER on the NAIL in the back of the scene to rid the place of evil magic.
- Go back to the Drawing Room.


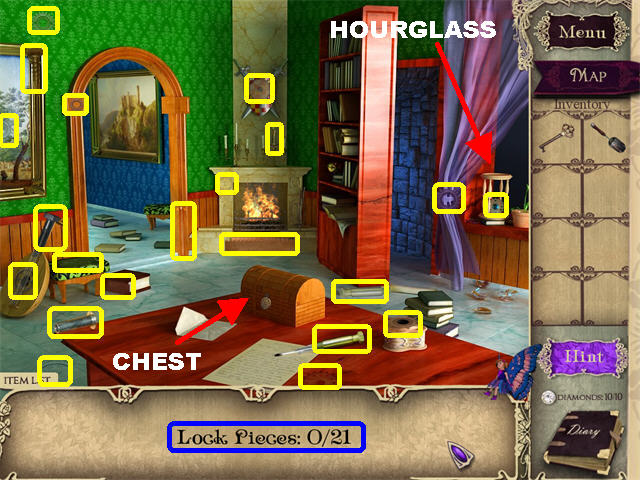
- Place the PAPERWEIGHT on the HOURGLASS to obtain the last RING fragment.
- Place the RING on the CHEST to break the lock.
- Collect 21 LOCK PIECES marked in yellow.
Gear Puzzle

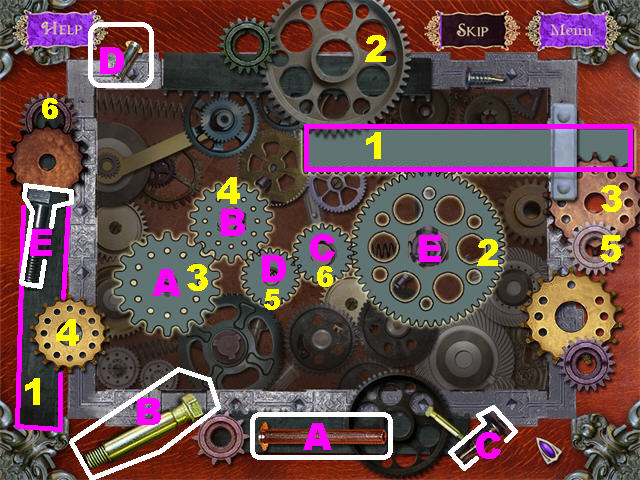

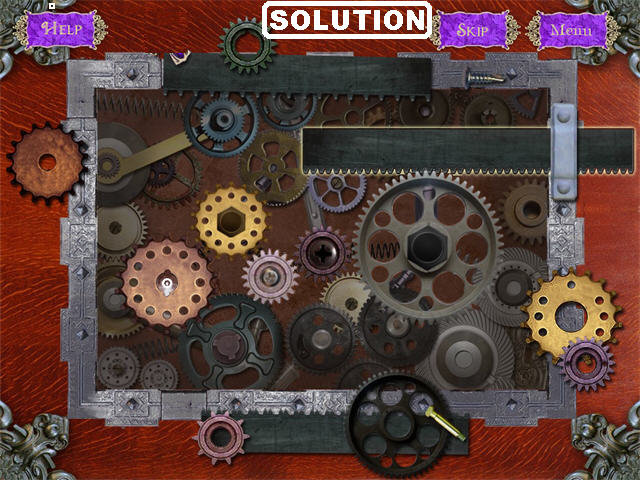
- Click on the scene after all the pieces have been collected to trigger a puzzle.
- Place all the GEAR pieces into the correct slots.
- Click on the pieces to attach them to your cursor; click the spot in which you want to place it (look for the glow around the item before you click it in place).
- Some pieces will automatically rotate when placed in the correct spot.
- The SCREWS belong in the center of the gears.
- Not all pieces will be used.
- Click on the DIARY PAGE inside the box.
- Go to the Cursed Chamber.

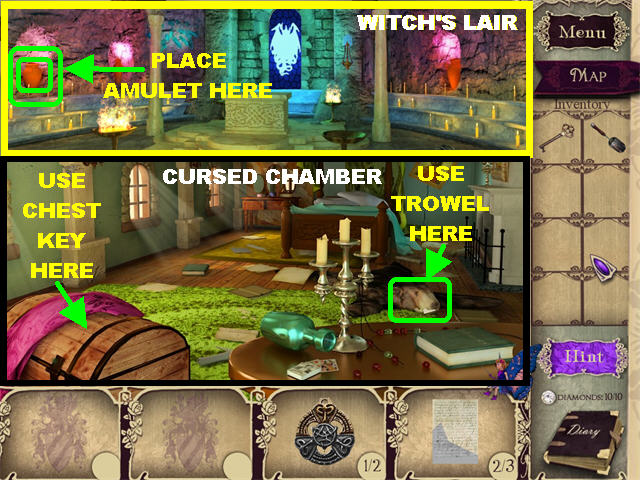
- Open the CHEST with the CHEST KEY to obtain the last AMULET fragment.
- Place the TROWEL on the bear’s head, in the lower right, to obtain the last fragment of the DIARY PAGE.
- Go back to the Witch’s Lair.
- Place the AMULET on the JAR on the left to trigger a puzzle.
Fairy Wings Puzzle

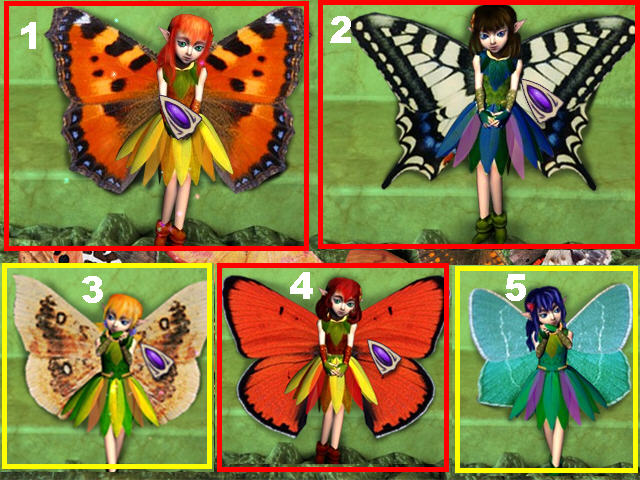
- Find the set of wings that belong to each of the Fairies.
- Move your mouse around the wings to sort through them. Pick up the correct wing and attach it to the Fairy once you see the wing silhouette glow.
Chapter 5
Castle Hall

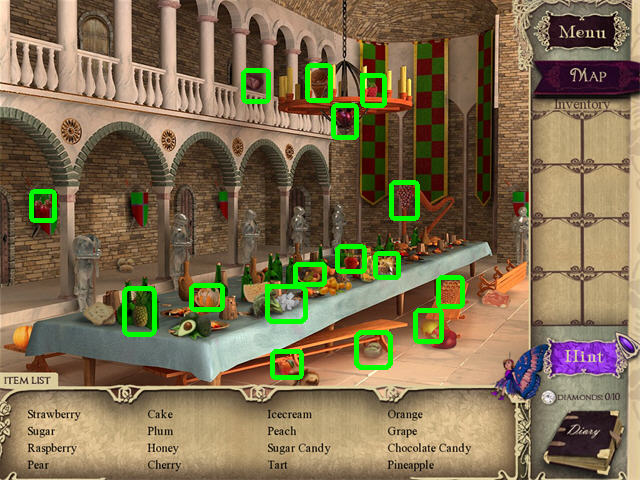
- Pick up all the food items on the list.

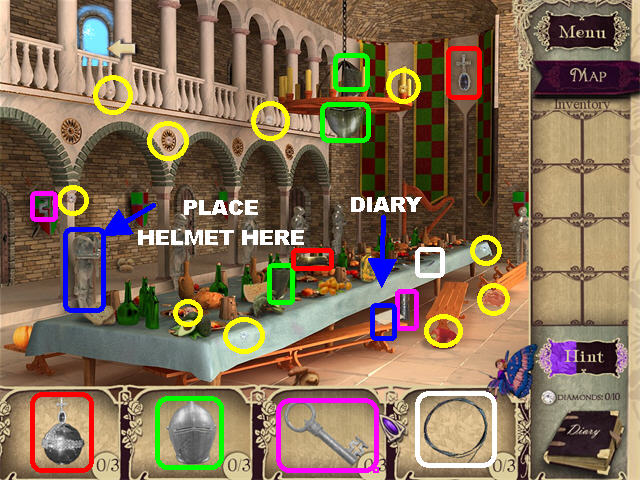
- The 10 DIAMONDS are circled in yellow.
- Pick up the fragmented items in the scene.
- Pick up the DIARY PAGE on the first bench.
- Place the HELMET on the HEADLESS KNIGHT on the left to obtain the last ORNAMENT fragment.
- Click on the door in the upper left.
The Observatory

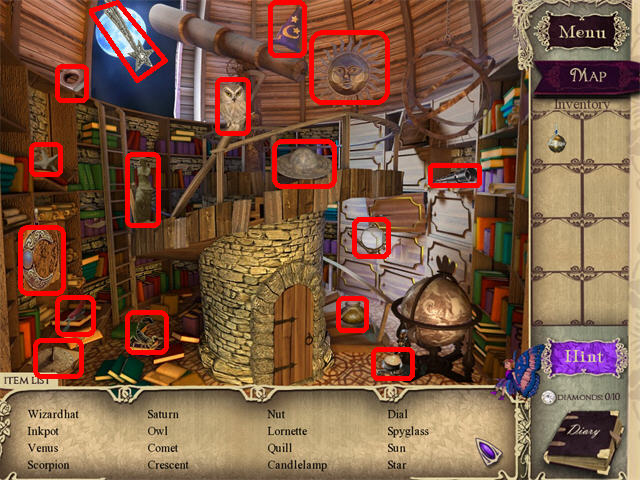
- Pick up all the items on the list.
- You do not have to find diamonds in this section.

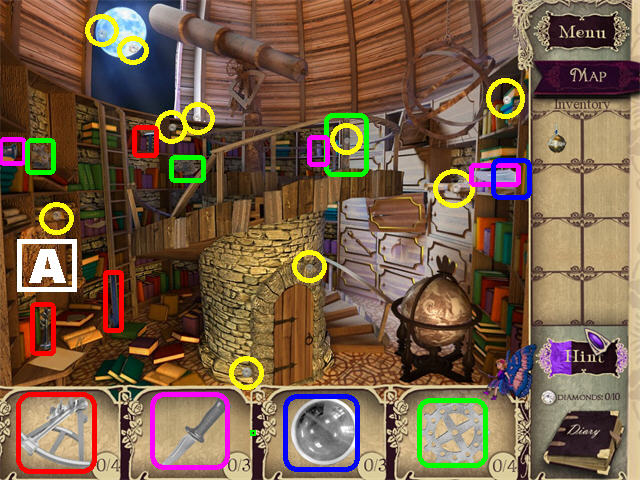
- The 10 DIAMONDS are circled in yellow.
- Pick up the fragmented items in the scene.
- Click on the SKETCH (A) on the lower left to trigger a puzzle.

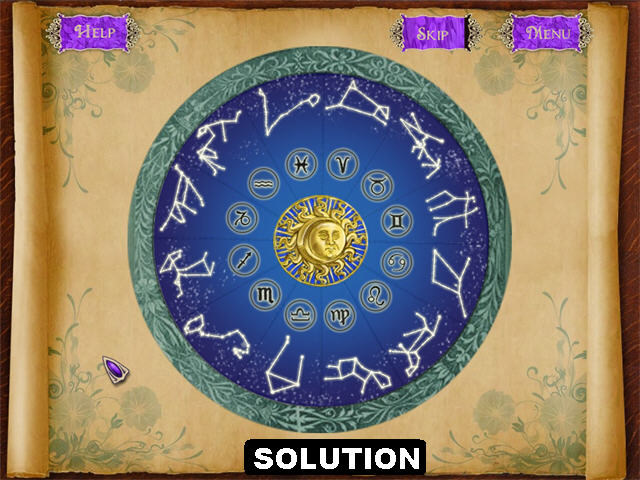
- Place the Zodiac Constellations in their corresponding spots.
- Correct pieces will lock in place.

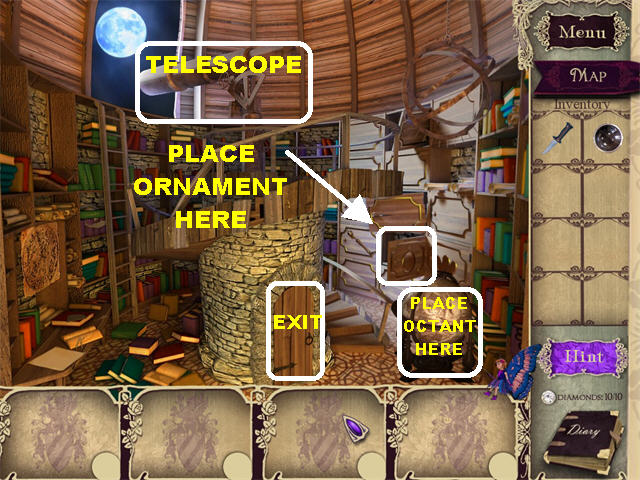
- The last GEAR fragment will be added to inventory after the puzzle has been solved.
- Place the GEAR on the TELESCOPE to obtain a fragment of the LENS.
- Open the DRAWER on the right with the ORNAMENT to obtain the last OCTANT piece.
- Place the OCTANT on the GLOBE in the lower right to obtain the last LENS fragment.
- Go back to the Library.
Library

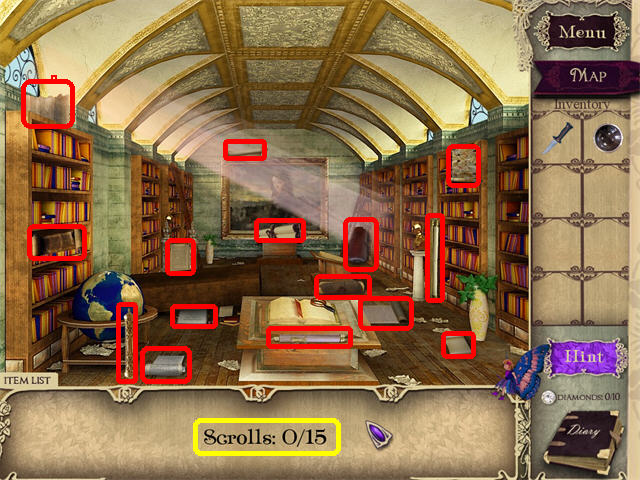
- Find the 15 SCROLLS marked in red.
- You cannot find DIAMONDS in this section.

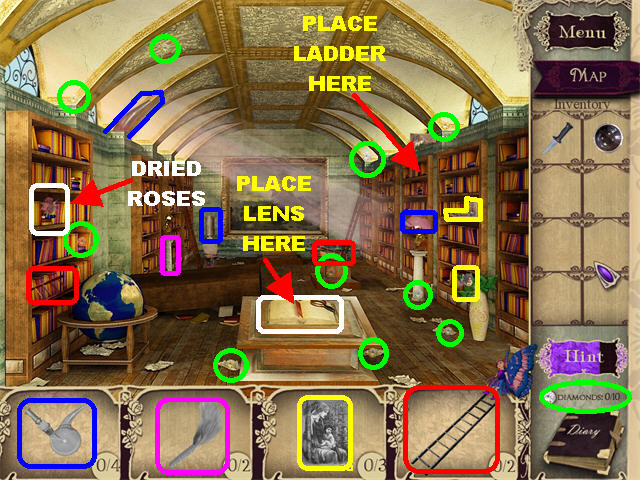
- The DIAMONDS are circled in green.
- Pick up the fragmented items in the scene.
- Click on the DRIED ROSES on the third shelf of the leftmost bookcase.
- Place the LADDER on the center bookcase on the right side to obtain the last TAPESTRY fragment.
- Place the LENS on the MAGNIFYING GLASS in the lower center.
- Exit on the right.
Castle Hall

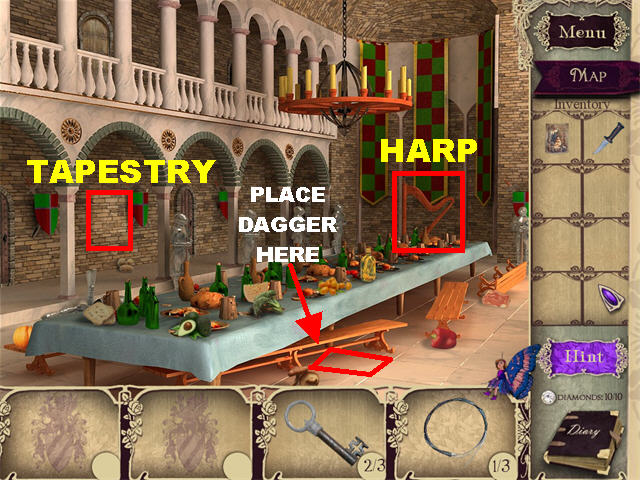
- Place the TAPESTRY on the left side of the wall to obtain a fragment of the STRINGS.
- Remove the STONE on the ground with the DAGGER to receive the last STRINGS fragment.
- Zoom into the HARP on the right.

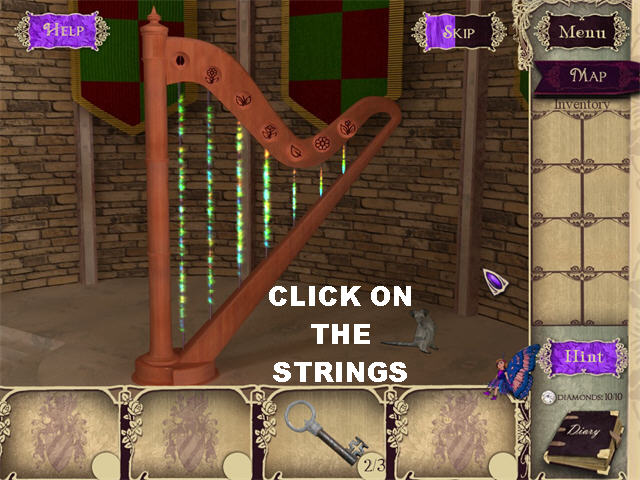
- Place the STRINGS on the Harp to trigger a puzzle.
- Repeat the sequence shown by clicking on the harp strings.
- Only correct strings will light up when touched.
- The solutions for this puzzle are random.
- The last KEY fragment will be added to inventory after the puzzle has been solved.
- Return to the Library.
Library & Observatory

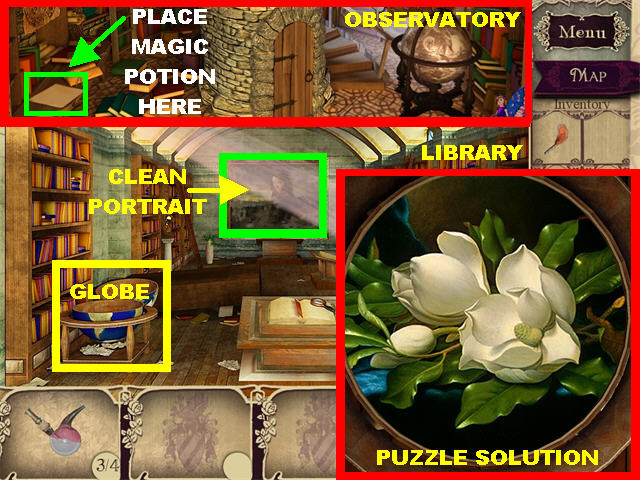
- Place the KEY on the GLOBE in the lower left to trigger a puzzle.
- Rotate the discs until the image is restored.
- Start from the center and work your way out.
- Correct pieces will lock in place.
- The last FEATHER DUSTER fragment will appear after the puzzle has been solved.
- Clean the large PORTRAIT with the FEATHER DUSTER to complete the MAGIC POTION.
- Go back to the Observatory.
- Place the MAGIC POTION on the LETTER WITH INVISBLE INK in the lower left corner.
Chapter 6
Dining Hall

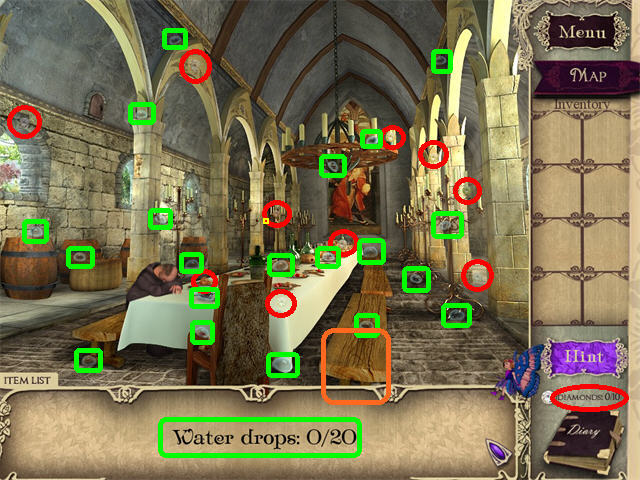
- Pick up the 20 WATER DROPS marked in green.
- Pick up the 10 DIAMONDS circled in red.

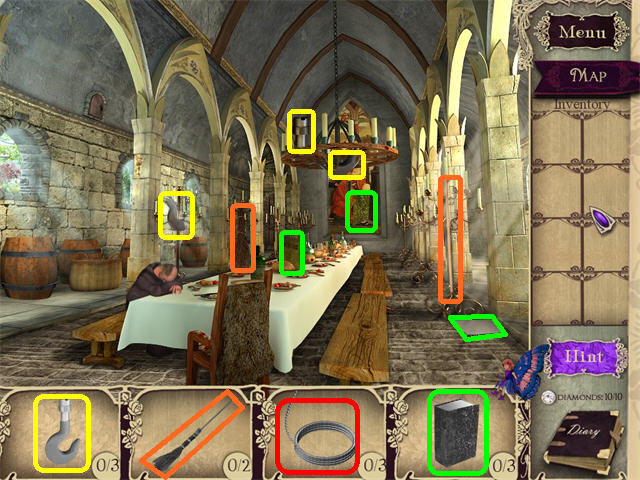
- Pick up the fragmented items in the scene.
- You will not pick up any ROPE pieces at this time.
- Go right.
Cellar

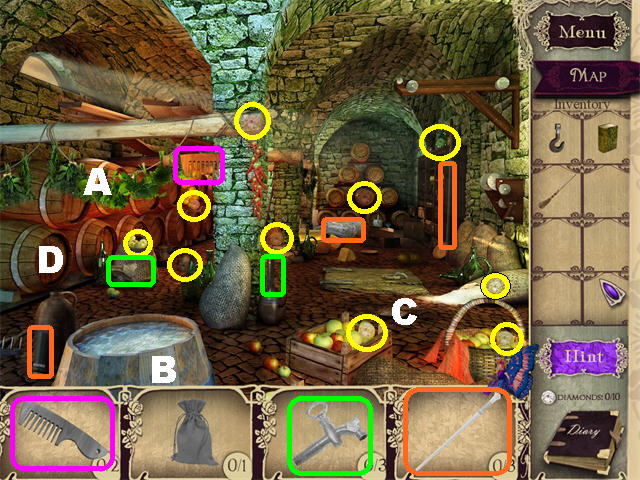
- The 10 DIAMONDS are circled in yellow.
- Pick up the fragmented items.
- Place the POTION BOOK on the HERBS (A) hanging on the left to add them to inventory.
- Place the HERBS in the BARREL (B) in the lower left to add the POTION to your inventory.
- Sweep the GARBAGE PILE (C) on the right with the BROOM to obtain the last OPENER fragment.
- Place the OPENER on the LOOSE BARREL TOP (D) on the left to obtain the last COMB fragment.
- A chest appears in the center of the scene. The Philosopher’s Stone is missing from the necklace.

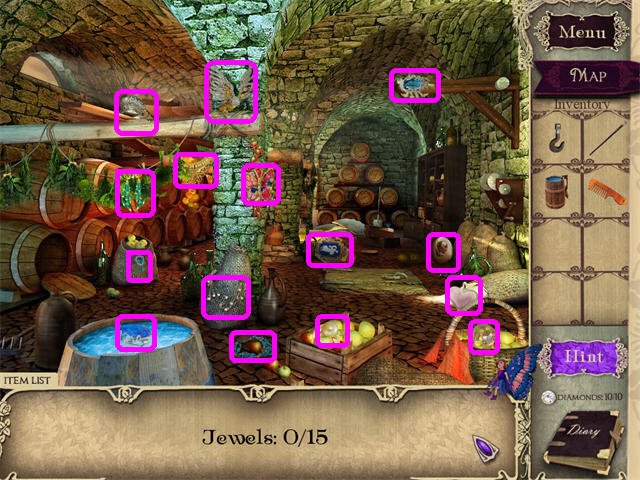
- Pick up the 15 JEWELS marked in magenta.
- Go back to the Dining Hall.

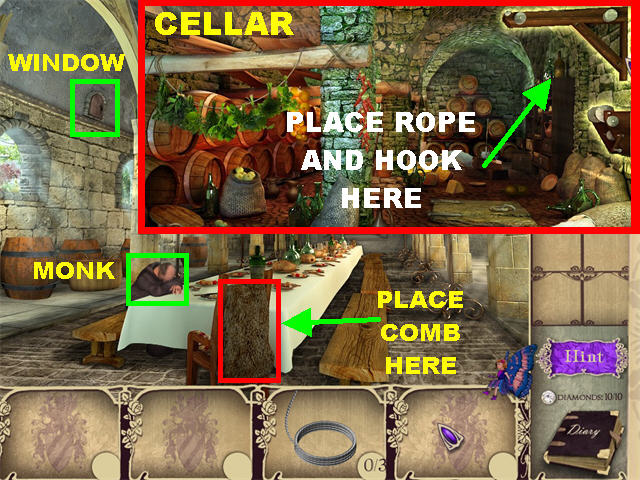
- Talk to the Monk.
- Untangle the PELT behind the chair in the lower center with the COMB to obtain a ROPE fragment.
- Give the POTION to the MONK at the table to obtain another ROPE fragment.
- Place the SHAFT on the WINDOW in the upper left to obtain the last ROPE fragment.
- Go back to the Cellar.
- Place the ROPE and the HOOK on the PULLEY in the upper right to open the trapdoor to the Dungeon.
- Go to the Dungeon.
- You will be transported back to Castle Hall.
Chapter 7
Castle Hall

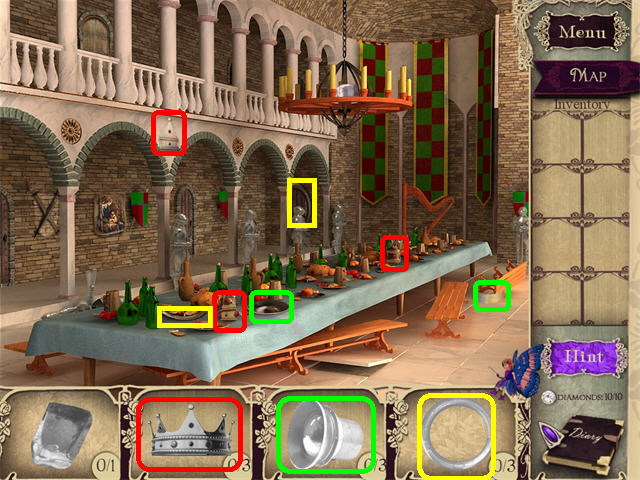
- Look for the fragmented items in the scene.
- The CROWN will be added to inventory at the end of your search.
- Go to the Observatory.

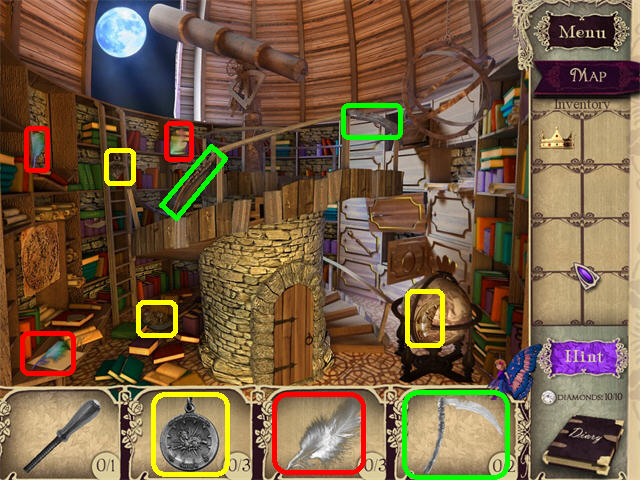
- Pick up all the fragmented items in the scene.
- The FEATHER, SCYTHE, and MEDALLION will be added to your inventory.
- Go to the Library.

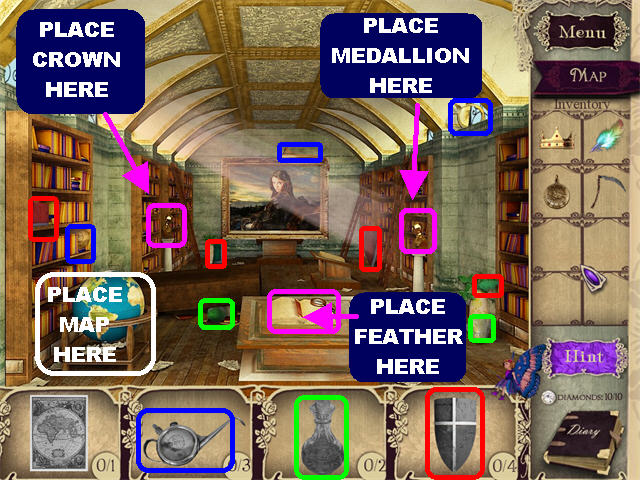
- Pick up all the fragmented items from the scene.
- The OILER, POTION, and SHIELD will be added to inventory.
- Place the CROWN on the LEFT GOLD BUST.
- Give the MEDALLION to the RIGHT GOLD BUST.
- Place the FEATHER on the BOOK in the lower center to obtain the MAP.
- Place the MAP on the GLOBE in the lower left for the missing bookcase on the right to appear.
- Go back to Castle Hall.
Castle Hall, Library & Observatory

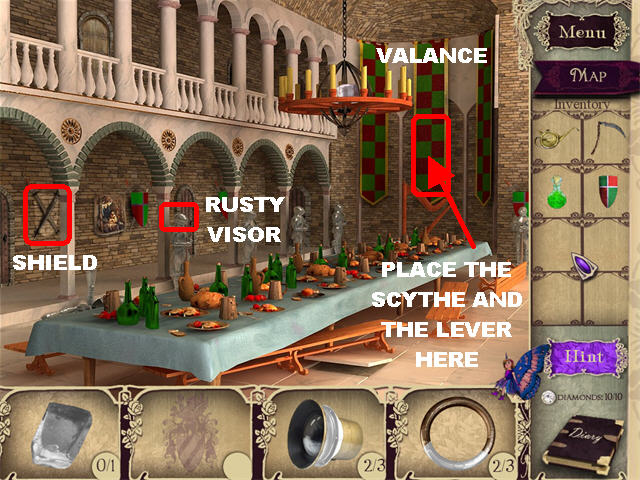

- Place the SHIELD on the left side of the wall to obtain the last RING fragment.
- Place the OILER on the RUSTY VISOR, on the knight on the left, to obtain the last LENS fragment.
- Cut the VALANCE on the right with the SCYTHE.
- Go to the Observatory.
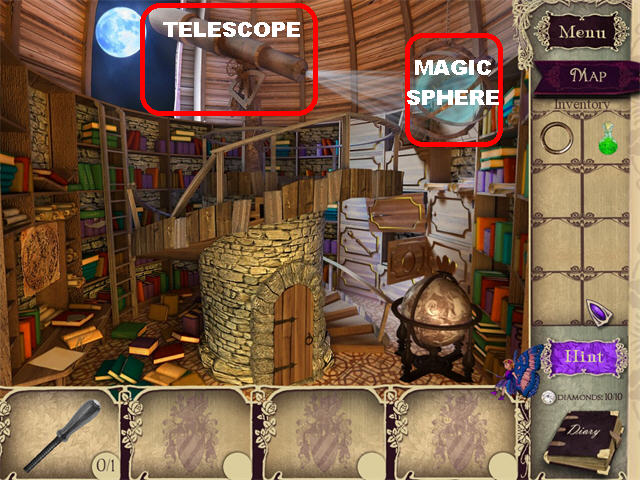
- Place the LENS on the TELESCOPE and beam of light will shine on the right SPHERE.
- Place the RING and the POTION on the MAGIC SPHERE in the upper right to obtain the LEVER.
- Go back to Castle Hall.
- Place the LEVER on the right side of the wall to obtain the CRYSTAL.
- Go to the Observatory.
- Place the CRYSTAL on the MAGIC SPHERE in the upper right to obtain the CHARGED CRYSTAL.
- Go to the Library.

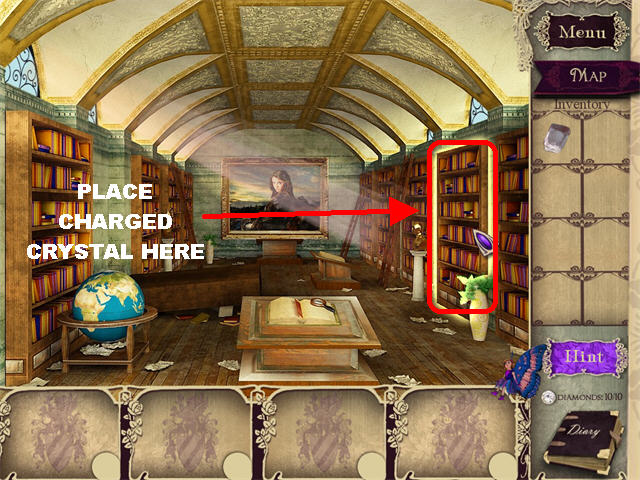
- Place the CHARGED CRYSTAL on the bookcase on the right.
Chapter 8
Christian’s Parlor

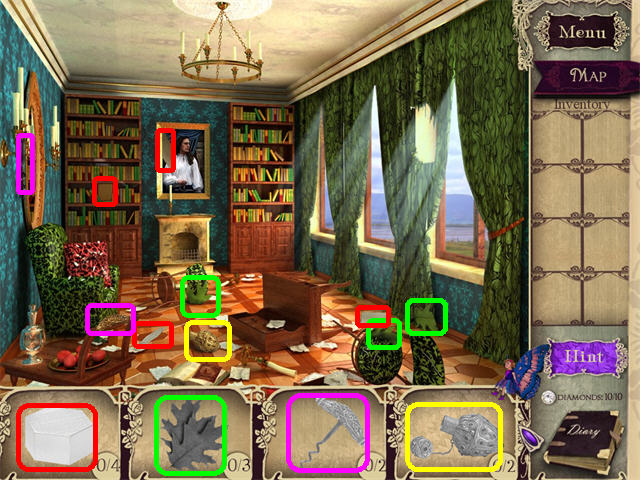
- Pick up all the fragmented items in the scene.
- The ½ oz. WEIGHT, LEAVES, and CORKSCREW will be added to inventory.
- Go to Christian’s Chamber.

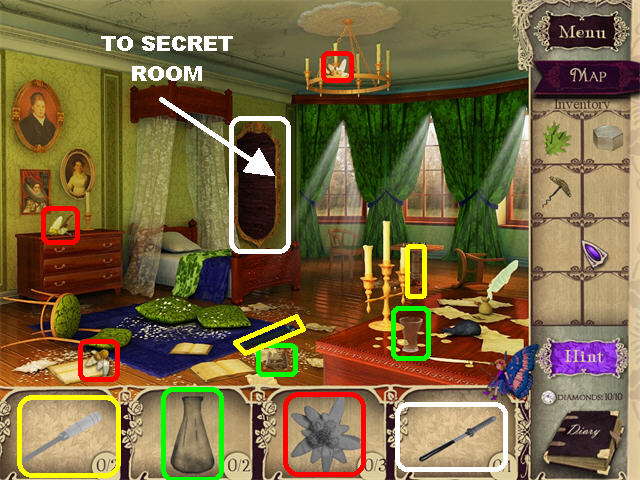
- Pick up all the fragmented items in the scene.
- The MEASURING GLASS, EDELWEISS, and CHISEL will be added to inventory.
- Go through the mirror to the Secret Room.

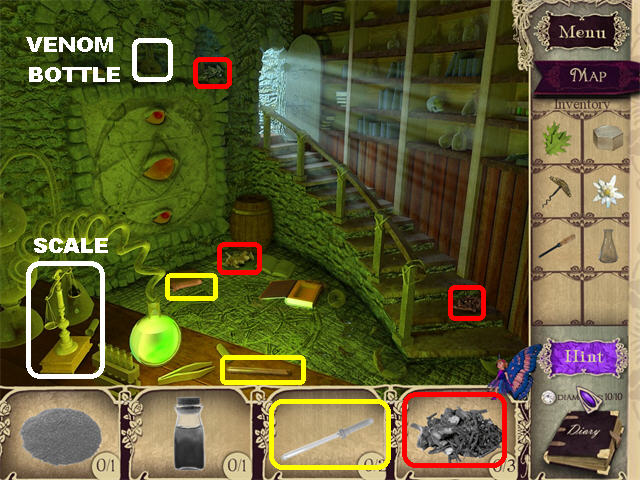
- Pick up all the fragmented items in the scene.
- The PIPETTE and MANDRAKE ROOT will be added to inventory.
- Place the ½ oz. WEIGHT on the SCALE in the lower left to obtain the ASH.
- Use the CORKSCREW on the CORKED BOTTLE WITH SNAKE VENOM in the upper left to obtain the SNAKE VENOM.
- Go to Christian’s Parlor.

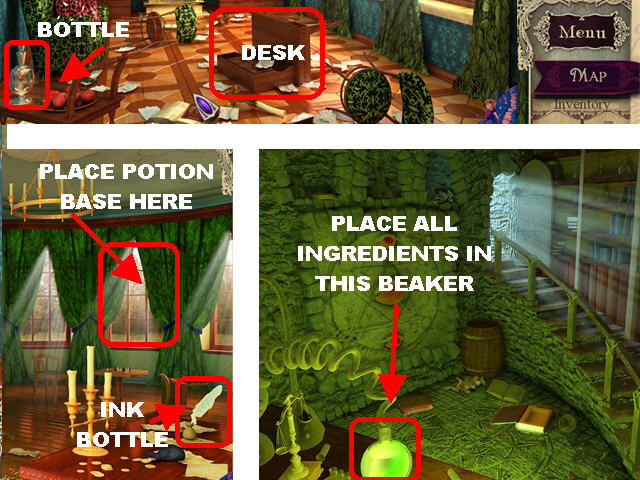
- Use the MEASURING GLASS on the BOTTLE in the lower left to obtain the POTION BASE.
- Use the CHISEL on the DESK to obtain the last BOTTLE fragment.
- Go to Christian’s Chamber.
- Place the PIPETTE on the INK BOTTLE in the lower right to obtain the INK.
- Place the POTION BASE in the center window to obtain the SUN TINCTURE.
- Go to the Secret Room.
- Place the LEAVES, EDELWEISS, MANDRAKE ROOT, SUN TINCTURE, INK, SNAKE VENOM, ASH, and BOTTLE in the BEAKER in the lower left.
- The EARL’S POTION will be added to inventory.
- You are transported back to the Dungeon.
The Dungeon

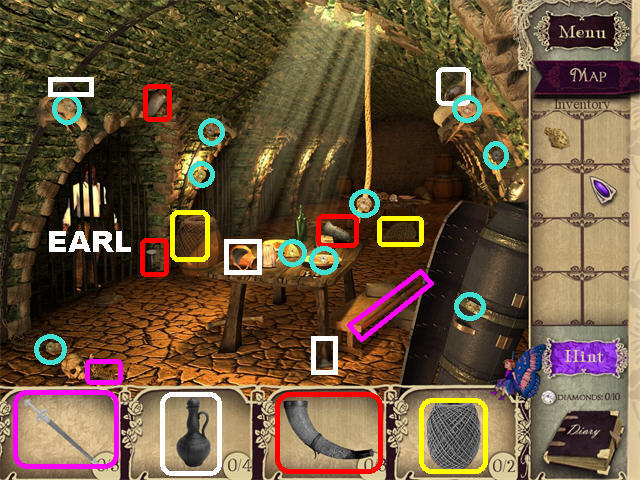
- The 10 DIAMONDS are circled in light blue.
- Pick up all the fragmented items in the scene.
- The TWINE, HORN, and JUG will be added to inventory.
- Give the POTION to EARL CHRISTIAN.

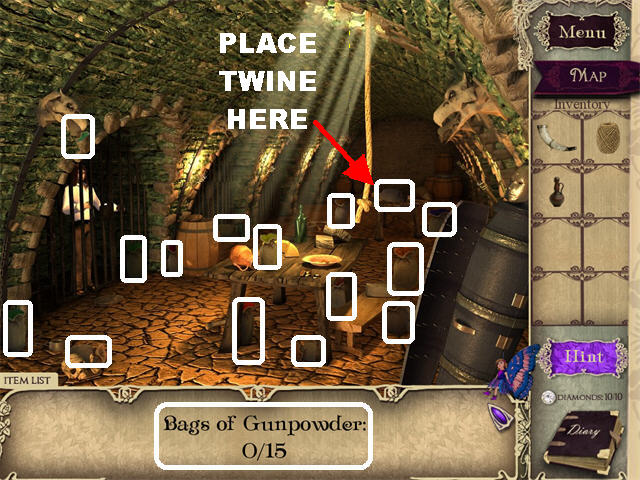
- Pick up the 15 BAGS OF GUNPOWDER marked in white.
- Place the TWINE on the GUNPOWDER in the back table.
- Go to the CULTIC CAVE in the back of the scene.
Cultic Cave

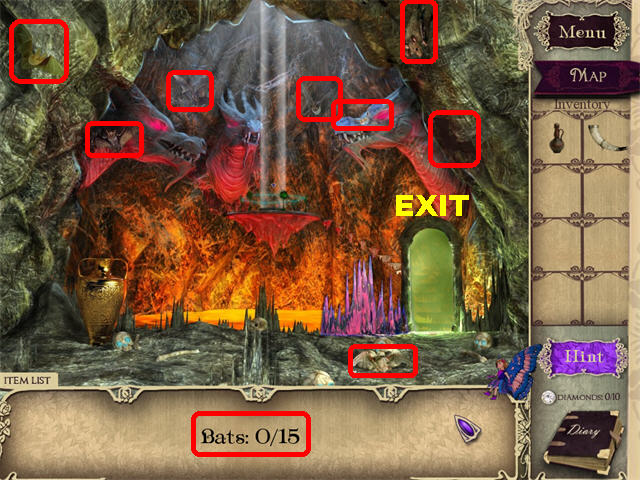

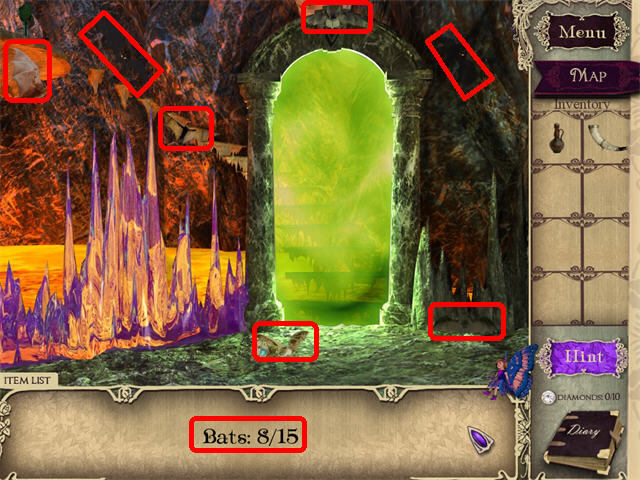
- You cannot find the DIAMONDS at this time.
- Find the first BATS (marked in red in this scene) and go through the door on the right.
- Find the rest of the BATS in this section.

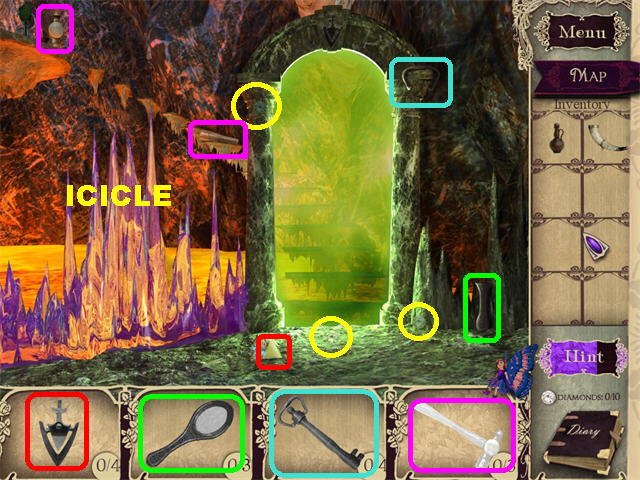
- Pick up the DIAMONDS circled in yellow.
- Place the JUG on the JAR in the lower left to obtain a fragment of the AMULET.
- Go through the entryway on the right.


- Pick up the 3 DIAMONDS circled in yellow.
- Break the ICICLE on the left with the HAMMER to obtain a GLASS fragment.
- Unlock the entryway with the AMULET. Go through the entryway.

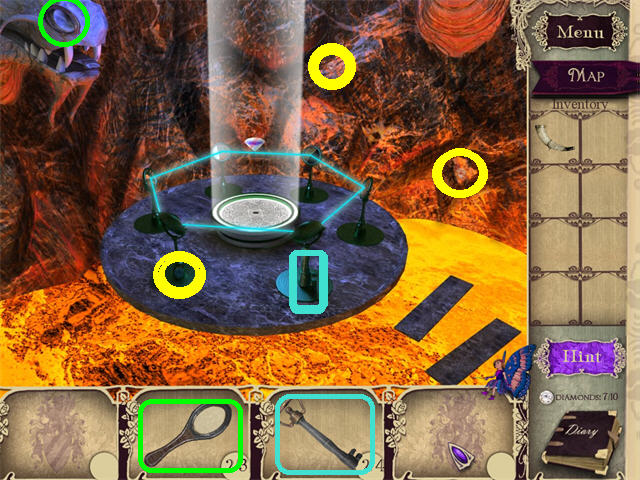
- Pick up the DIAMONDS circled in yellow.
- Pick up the last GLASS fragment in the upper left.
- Place the GLASS on the beam of light in the center.
- Pick up the CELL KEY fragment marked in light blue.
- Go back to the Dungeon.
Cave & Dungeon

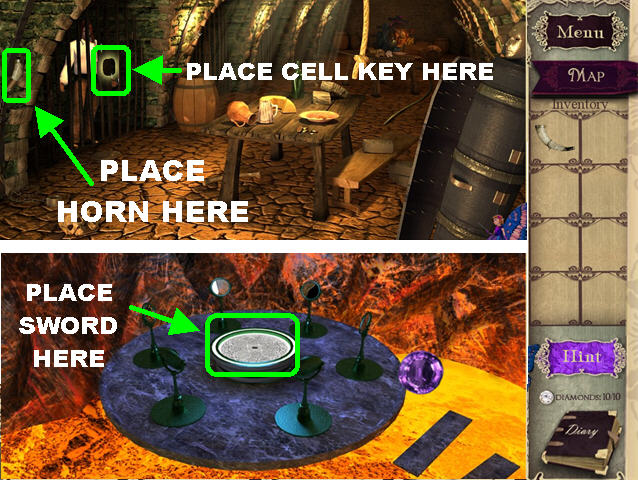
- Place the HORN on the left side of the CELL to complete the SWORD.
- Go back to the Cave.
- Place the SWORD in the center of the mechanism to complete the CELL KEY.
- Go back to the Dungeon.
- Place the CELL KEY on the LOCK on the bars to free Earl Christian.
- You are transported back to the Cursed Bedchamber .
Cursed Bedchamber

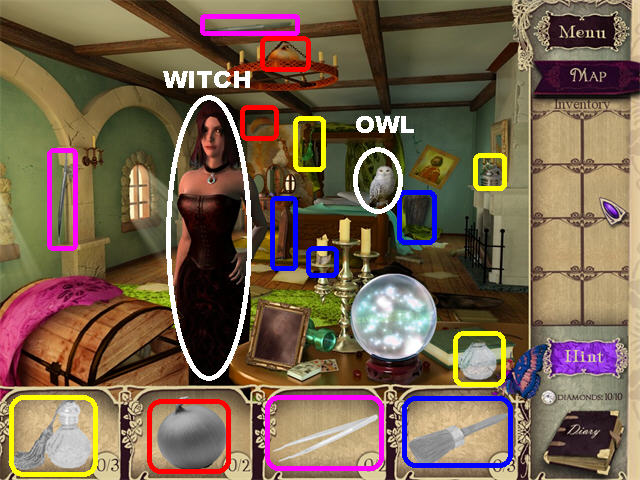
- Pluck a FEATHER from the OWL with the TWEEZERS.
- DUST the FRAMED PORTRAIT on the table to make the Witch sigh. Give the BOTTLE to the Witch to capture that emotion.
- Give the ONION to the Witch to make her cry. Give her the SIGH BOTTLE to capture that emotion.
- Tickle the Witch with the FEATHER to make her laugh. Give her the BOTTLE to capture that emotion.
- Place the EMOTIONS on the CRYSTAL BALL.
- Congratulations! You Have Completed Mystery of the Earl!





 Dangerous Game: Illusionist Walkthrough, Guide, & Tips
 Hidden Expedition: Dawn of Prosperity Walkthrough, Guide, & Tips
 Dreampath: The Two Kingdoms Walkthrough, Guide, & Tips
 Fiction Fixers: The Curse of Oz Walkthrough, Guide, & Tips
 Hidden Mysteries: Notre Dame - Secrets of Paris, Guide, & Tips