Amanda Rose: The Game of Time Walkthrough, Guide, & Tips
Amanda Rose: The Game of Time Walkthrough

Welcome to the Amanda Rose: The Game of Time Walkthrough!
Amanda Rose is standing at the entrance to an abandoned mine. Are you brave enough to walk boldly with her into the unknown?
Whether you use this document as a reference when things get difficult or as a road map to get you from beginning to end, we’re pretty sure you’ll find what you’re looking for here.
This document contains a complete Amanda Rose: The Game of Time game walkthrough featuring annotated screenshots from actual gameplay!
We hope you find this information useful as you play your way through the game. Use the walkthrough menu below to quickly jump to whatever stage of the game you need help with.
Remember to visit the Big Fish Games Forums if you find you need more help. Have fun!
This walkthrough was created by Robin, and is protected under US Copyright laws. Any unauthorized use, including re-publication in whole or in part, without permission, is strictly prohibited.
General Tips
- This is a Hidden Object Puzzle Adventure game.
- There is no timer.
- The game autosaves automatically.
- There are unlimited Hints, just wait for the HINT Button the recharge. When it is glittering, click on the HINT Button, then click on the item in the Find List you want to find.
- The Journal Icon in the lower Right will glitter when it has new information for you.
- When you hover your cursor over an item in the Find List or the Inventory Tray, you will see its text label.
- Click on the INVENTORY icon once to open the Inventory Tray (brown background). Click the INVENTORY Icon again to return to the Find List (white background).
- When an item in the Inventory Tray is marked with a “+,” it can be combined with one of the other items in the tray.
- When an item is locked in the Find List, you will need to do something in the scene to make it available. This might be using an Inventory item or moving another object.
- As you move your cursor over the screen, some items will glow and show a text label. These are areas where you can interact with the scene. Click once. The items will either move or you will get more information about what to do there.
- Different parts of the scene may be interactive for different Find Lists so check the scene again when you get a new Find List.
- You can use the HINT Button to tell you what to do with an Inventory item. Click on the Inventory Icon to open the Inventory Tray. Click on the HINT Button, then click on an item in the Inventory tray to find out what to use it for.
- Some chapters have more than one room. Inventory items found in one room might be needed in another.
- When you use a HINT and the Arrow pointing to another room is glowing, click on it, then look for a glowing circle in the next room to show you where the object is.
- Skip a mini-game by clicking the SKIP Button once it has recharged.
- The walkthrough marks places where you can interact with the scene with a letter.
- The walkthrough marks inventory items with a number.
- Different players may complete the tasks in different order, particularly in the chapters that have more than one room. However all players will have completed the same tasks by the end of each chapter.
- Use the walkthrough by reading through the entire chapter from the beginning in case you skipped a step that we completed earlier.
Chapter 1: the Plane Crash

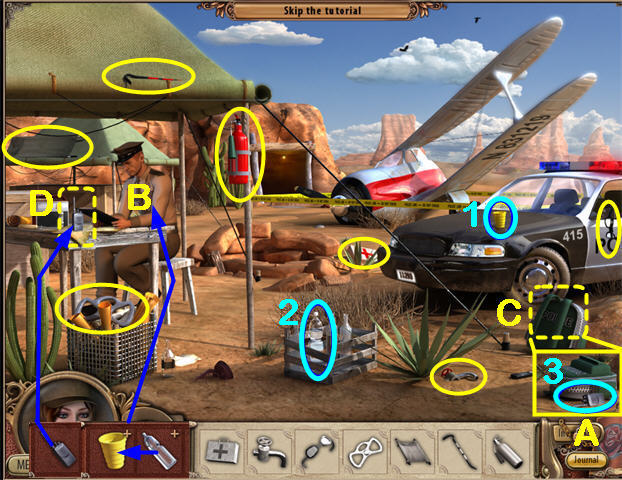
- Take the CUP (1) off the car.
- Click on the Journal icon (A). You can read the story and see your current goals.
- Collect the remaining items from the Find List.
- Collect the BOTTLE (2).
- Click on the INVENTORY Icon in the lower right to view the Inventory Tray.
- Combine the BOTTLE and the CUP to get a CUP OF WATER.
- Give the CUP OF WATER to the Policeman (B) and he will turn his back.
- Open the Backpack (C). The BROKEN WALKIE TALKIE (3) will fall out. Collect it.
- Pick up the BROKEN WALKIE TALKIE from your Inventory Tray and click on the Walkie Talkie on the table (D) to swap them.
Chapter 2: An Unfamiliar Place

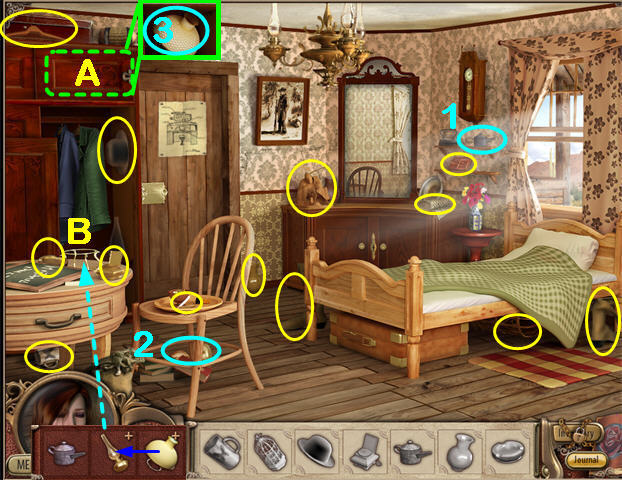
- Collect the items from the Find List including the OILER (1).
- Collect the OIL LAMP (2).
- Open the top Cabinet (A) to reveal the LAMP SHADE (3).
- Put the LAMP SHADE on the OIL LAMP in your Inventory.
- Put the ASSEMBLED LAMP on the Metal Stand (B).

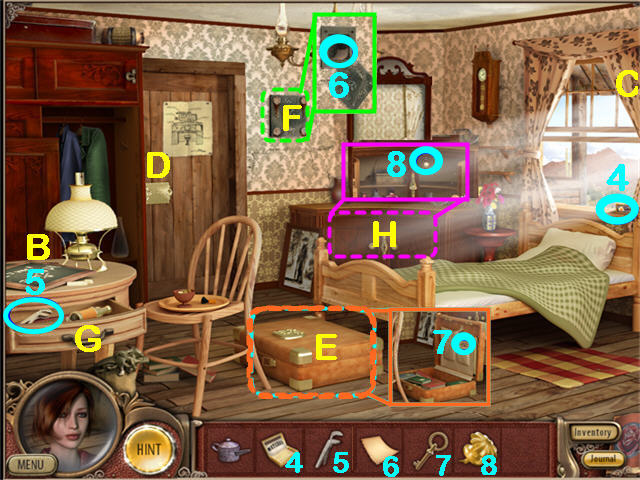
- Move the Curtains (C) to find the MATCHES (4).
- Use the MATCHES on the LAMP (B) to light it.
- Try the Door (D)—it needs a handle.
- Pull the Suitcase (E) out from under the bed. It’s locked.
- Move the Painting to reveal a Cache (F).
- Open the Drawer (G) to reveal the WRENCH (5).
- Use the OILER on the Cache (F).
- Use the WRENCH on the oiled Cache (F) to reveal a PAPER (6).
- Put the PAPER on the Lit Lamp (B) to reveal the CODE.
- Put the CODE on the Suitcase (E) to open it.
- Take the KEY (7) from the Suitcase and unlock the CABINET (H).
- Take the DOOR KNOB (8) from inside the Cabinet and put it on the Door (D), triggering a mini-game.

- Reassemble the picture.
- Pieces lock in place and turn dark when set correctly.
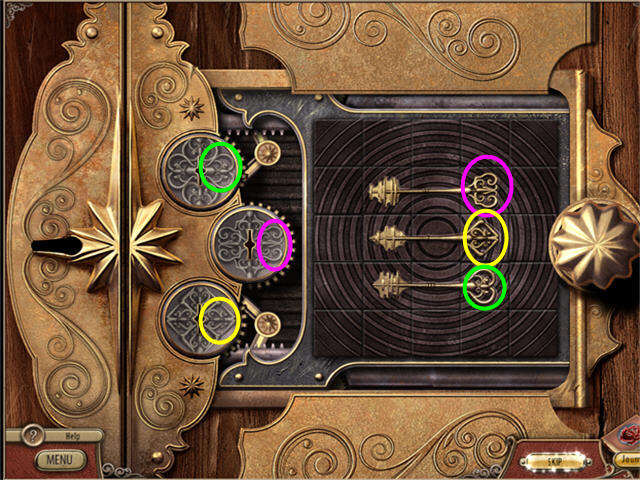
- Now you have 3 KEYS. The handle of each KEY matches a pattern on the right side of a Lock.
- Put the KEYS in the matching Locks. You can do them in any order.
- The door will open. Watch the cut scene to end the chapter.
Chapter 3: the Search Begins

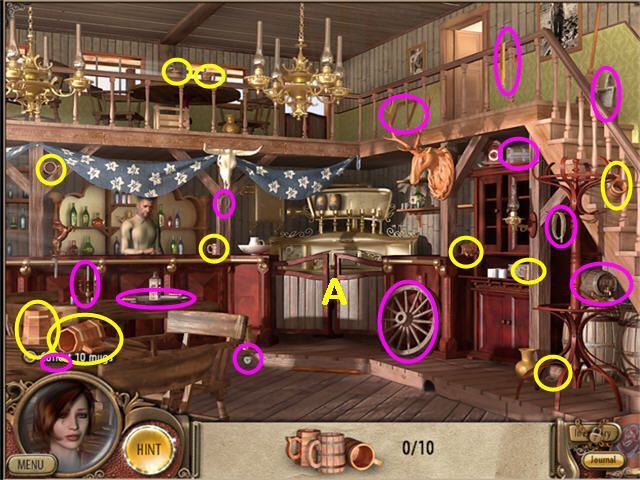
- Collect the 10 Mugs (yellow).
- Collect as many items from the Find List as you can.
- Go through the Bar Doors (A).

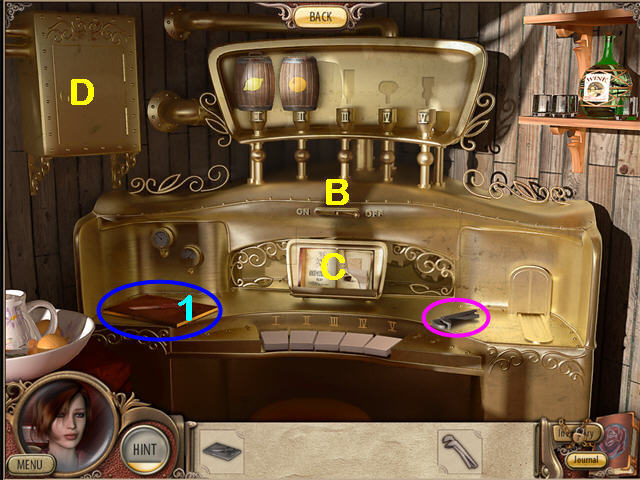
- Collect the Wrench and the CUTTING BOARD (1).
- Turn on the machine (B). It is missing several parts.
- Examine the Recipe Book (C). Part of a page is missing.
- Try the Refrigerator Door (D). It is locked.
- Use the BACK Button at the top of the screen to return to the main room.

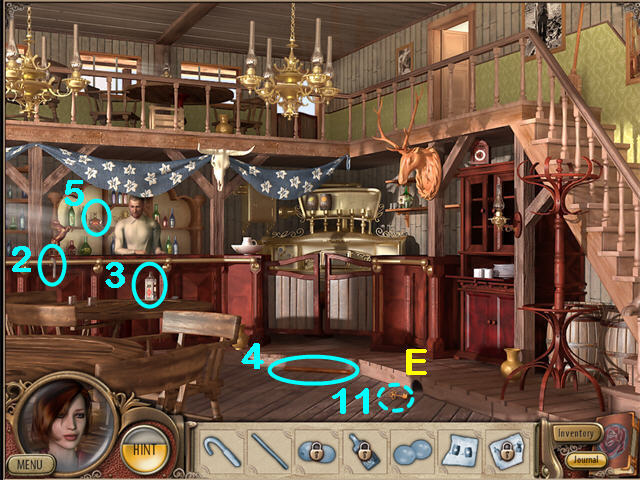
- Collect the HOOK (2), GIN (3), POLE (4), and BRANDY (5).
- Combine the HOOK and the POLE to get a POLE WITH A HOOK.
- Use the POLE WITH A HOOK on the Mouse hole (E).
- Collect the KEY (11) that comes out of the Mouse hole.
- Go through the Bar Doors.

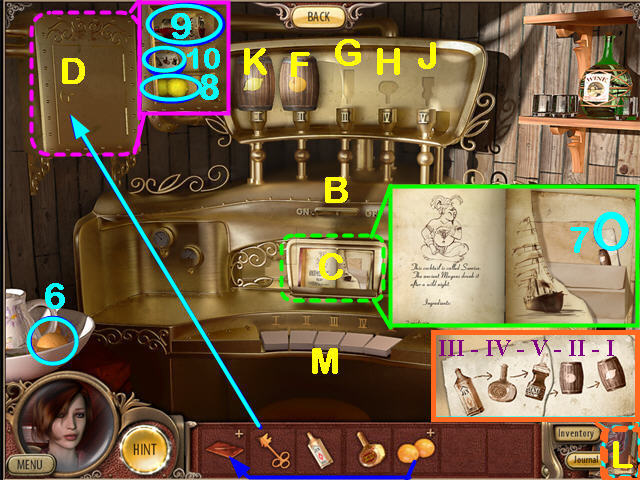
- Collect the ORANGES (6).
- Examine the Recipe Book (C) and collect the loose page (7).
- Click on the Inventory Icon.
- Combine the ORANGES and the CUTTING BOARD to get CUT ORANGES.
- Put the CUT ORANGES in the ORANGE BARREL (F).
- Put the GIN BOTTLE in slot III (G).
- Put the BRANDY BOTTLE in Slot IV (H).
- Use the KEY from the Mouse hole on the Refrigerator (D).
- Collect the LEMONS (8), the GRENADINE BOTTLE (9) and the torn RECIPE (10).
- Put the GRENADINE BOTTLE in Slot V (J).
- Combine the LEMONS and the CUTTING BOARD to get CUT LEMONS.
- Put the CUT LEMONS in the LEMON BARREL (K).
- Turn the Machine (B) on if you haven’t already.
- Click on the JOURNAL ICON (L) and turn to the NOTES section to read the RECIPE.
- Play the Keys (M) to match the recipe: III – IV – V – II – I.
- Take the ORANGE DRINK from the right side of the machine.
- When you drink it, you will get the Wardrobe Key.
Chapter 4: the Bank

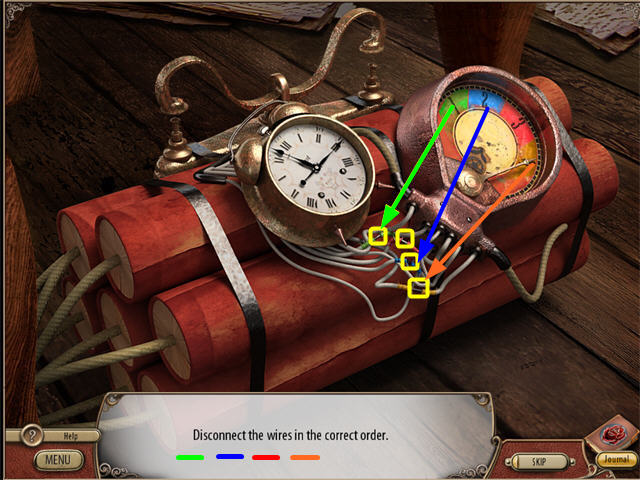
- Each of the colored wires has an exposed area in the center.
- Wait until the Pointer on the meter is pointing to the next wire to cut, then click on the exposed area of that wire while the Pointer is still in that color block on the meter.
- The order is Green – Blue – Red – Yellow..
- Should you cut the wires in the wrong order, or if the Pointer is not on the right color block, you will get another chance.

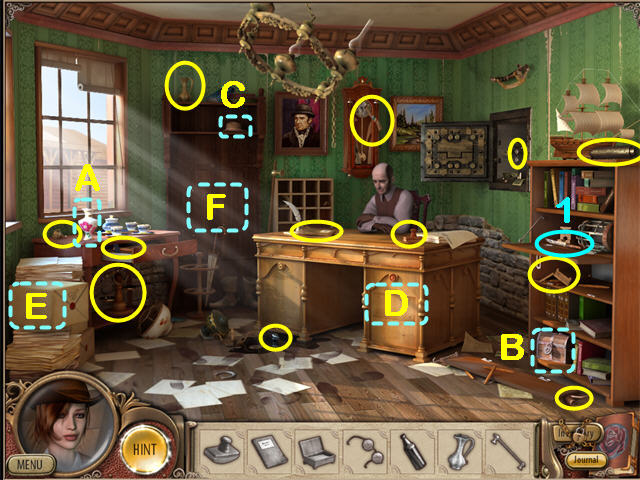
- Collect the items from the Find List, including the DULL KNIFE (1).
- Pick up the Vase (A). It will fall and break, revealing a KEY.
- Use the KEY on the small Chest (B) and you will receive a 2nd KEY.
- Move the Hat (C) to reveal the TONGS.
- Use the TONGS on the Desk Panel (D).
- Collect the GRINDSTONE from behind the Desk Panel.
- Use the 2nd KEY from the Vase on the Cache Door (D).
- Collect the CODE from the Cache.
- Combine the GRINDSTONE and the DULL KNIFE to get a SHARP KNIFE.
- Use the SHARP KNIFE to open the Package (E).
- Take the SCREWDRIVER out of the Package (E).
- Zoom in on the Cabinet (F).
- Use the SCREWDRIVER from the Package to remove the Cabinet Handle and reveal the Secret Safe (F).
- Use the CODE from the Desk on the Secret Safe (F) to zoom in.

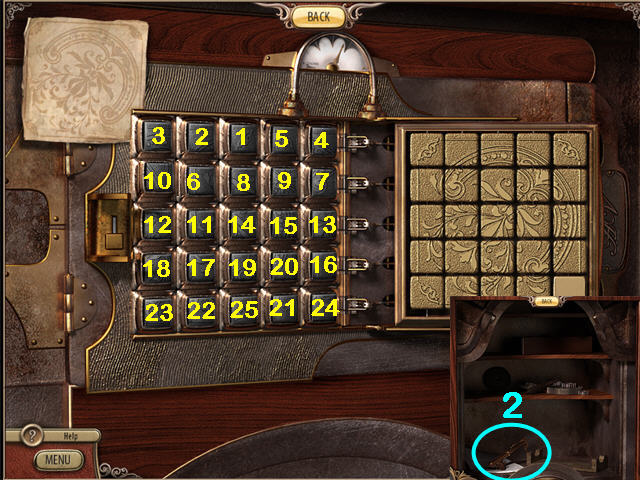
- The code picture is in the upper left.
- The tiles for each row have been jumbled.
- Click on the tiles on the left in the correct order to reveal the code picture on the right. You will work one row at a time.
- When you make a mistake you have to start over at the beginning of that row.
- The solution is shown in the screenshot.
- The Secret Safe will open. Read about the TRAIN KEY.
- Collect the 1ST PART OF THE TRAIN KEY (2) from the Safe.
Chapter 5: the Mystery of the Horseshoe

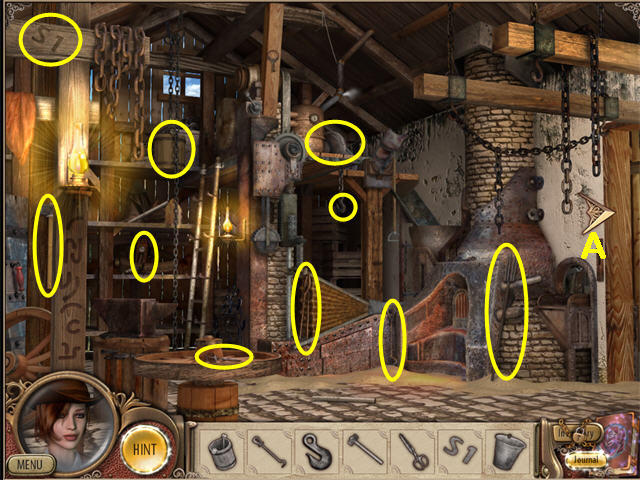
- Collect as many items as you can from the Find List.
- Use the Right Arrow icon (A) to go to the next room.

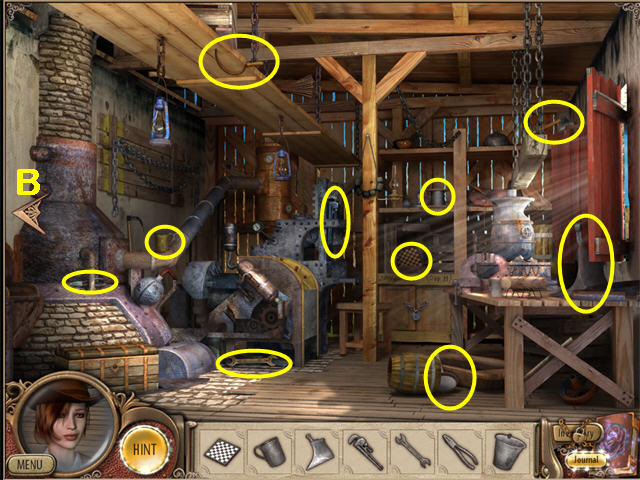
- Collect the remaining items on the Find List. You will automatically receive the TONGS once everything else is collected.
- Use the Left Arrow icon (B) to return to the first room.

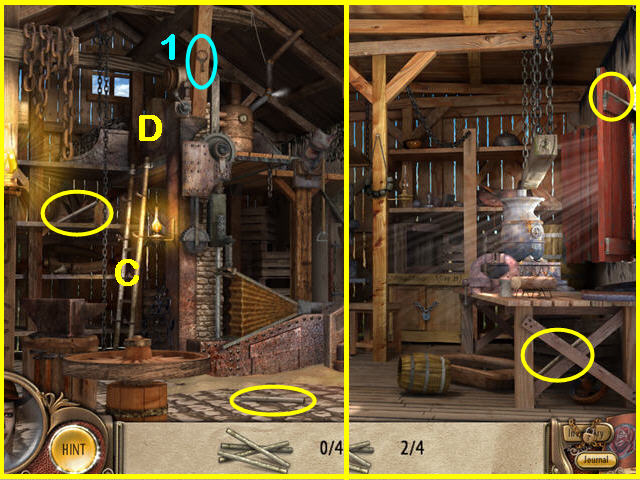
- Examine the Ladder (C) and you will get a new Find List.
- Collect the LADDER PIECES from both rooms, then put them on the Ladder (C).
- Examine the Axis (D) at the top of the Ladder and you will get a new Find List.
- Collect the KEY (1) from the top center of the left room.
- Return to the right room.

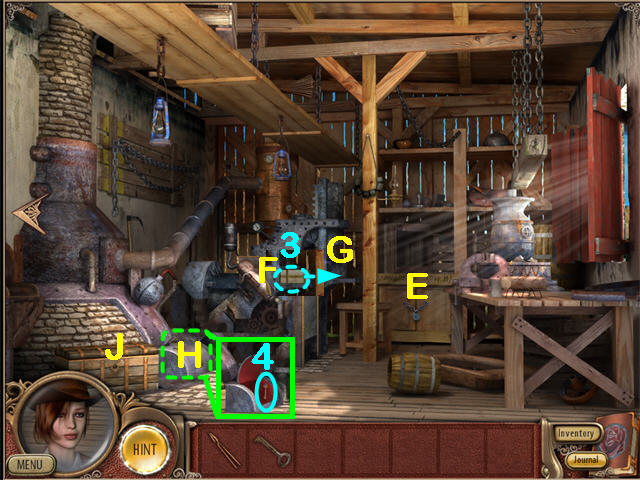
- Use the KEY on the Padlock (E). Collect the BELT.
- Zoom in on the Mechanism (F) to reveal a puzzle.

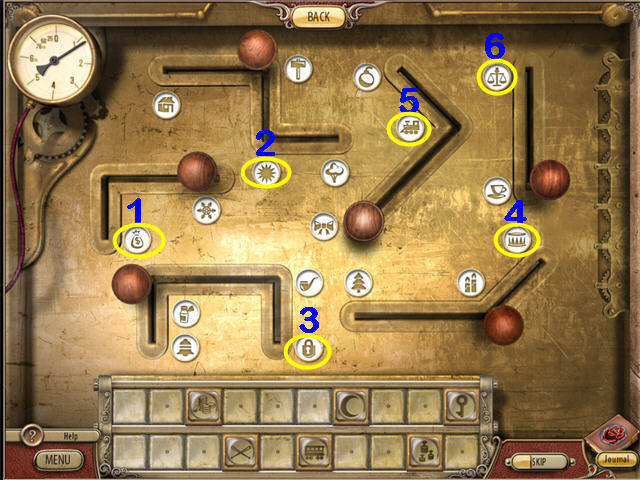
- Find the icons above that match the icons on the keys.
- Solution: Money, Sun, Padlock, Drum, Train, Scales.
- When the puzzle is complete, the HORSESHOE MOLD (3) will slide out of the Machine (G) so you can collect it.
- The Gray Box (H) will open and reveal the CHEST KEY (4).
- Unlock the CHEST (J) and collect the WHEEL.
- Return to the left room.

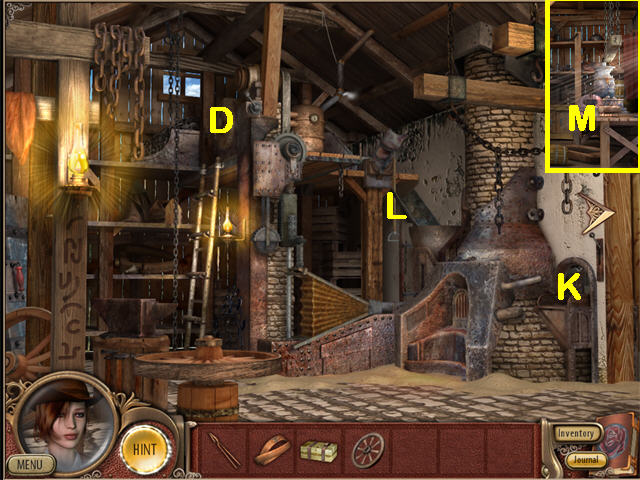
- Put the WHEEL and the BELT on the Axis (D).
- Put the HORSESHOE MOLD on the Stand (K).
- Pull the Handle (L) to fill the MOLD with hot ore.
- Use the TONGS to pick up the HOT MOLD from the Stand (K).
- Go into the right room.
- Put the HOT MOLD into the Tub of Water (M) under the table.
Chapter 6: Justice

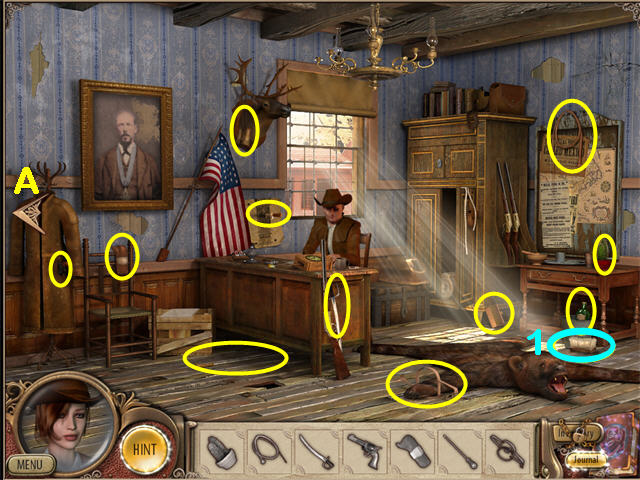
- Collect as many items as you can from the Find List including the BRUSH (1).
- Use the Left Arrow icon (A) to go to the Jail.

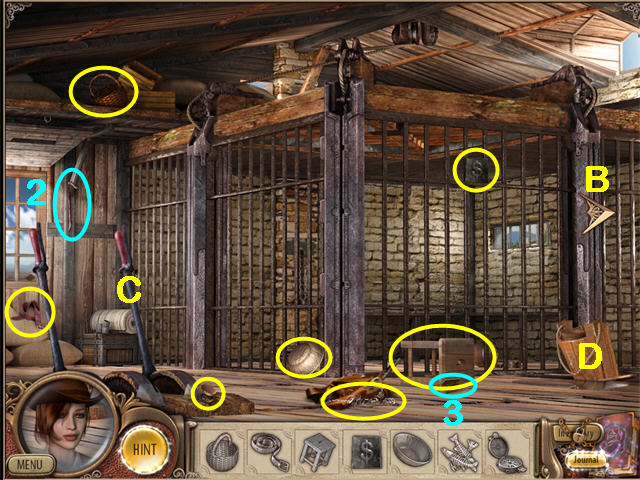
- Collect the remaining items from the Find List.
- Examine the Levers (C), but you can’t do anything with them yet.
- You will get a new Find List. Collect the CROW BAR (2) and the MATCHES (3).
- Dip the BRUSH into the Bucket (D) to get a WET BRUSH.
- Return to the Sheriff’s Office.

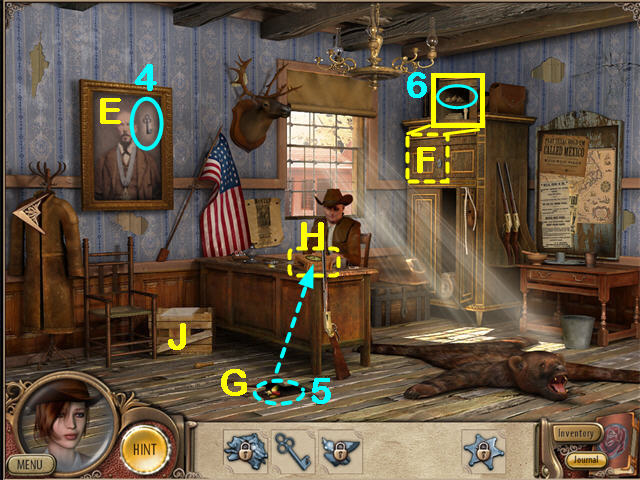
- Use the WET BRUSH on the Painting (E) and collect the KEY (4).
- Use the CROWBAR on the Loose Floorboard (G) to reveal the CUCKOO (5).
- Put the CUCKOO on the Cuckoo Clock (H) and the Sheriff will give you a LEVER.
- Use the KEY on the Cupboard (F) and collect the TORN PAPER (6).
- Zoom in on the Crate (J).
- Move the Glass (7).

- Combine the MATCH and the MATCHBOX in your Inventory to get a LIT MATCH.
- Use the LIT MATCH to light the 3 Candles in the Crate (K).
- Put the Glass (7) which is leaning on the left side of the Crate back on top of it.
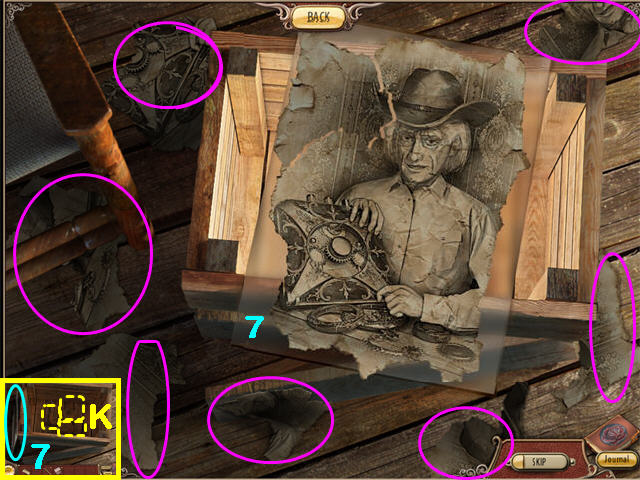
- Put the TORN PAPER on the Glass to trigger a mini-game.
- The TORN PAPER will scatter around the scene. There are 7 pieces on the floor and 2 on the Glass.
- Collect the pieces of torn paper and use them to reconstruct the jigsaw puzzle.
- The two pieces on the glass can be moved.
- The pieces automatically rotate to the correct position.
- Pieces lock in place when set correctly.
- Once you complete the puzzle, the Schematic for the Levers will be copied to the NOTES page of your Journal.
- Go left to the Jail.
- Zoom in on the Levers (C).

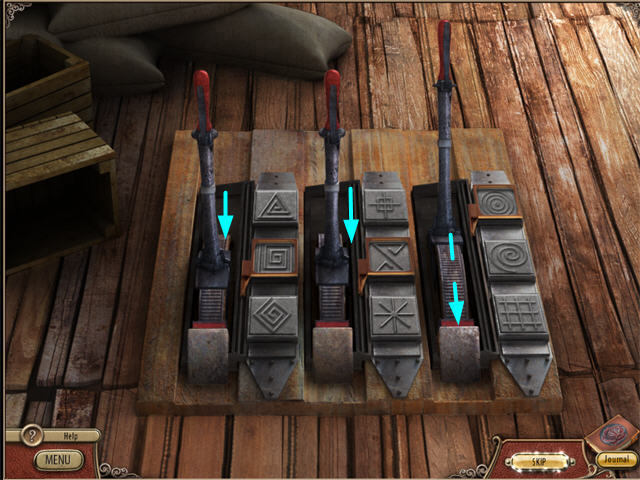
- Put the LEVER that the Sheriff gave you into the middle slot.
- Put the Tiles in place according to the Schematic in your Journal.
- The Tiles do not lock into place, but you will hear a musical chime each time you place one correctly.
- Put the Levers into position according to the Schematic.
- The left Lever goes down one click.
- The middle Lever goes down one click.
- The right Lever goes down two clicks.
- You will automatically return to the Sheriff’s Office.

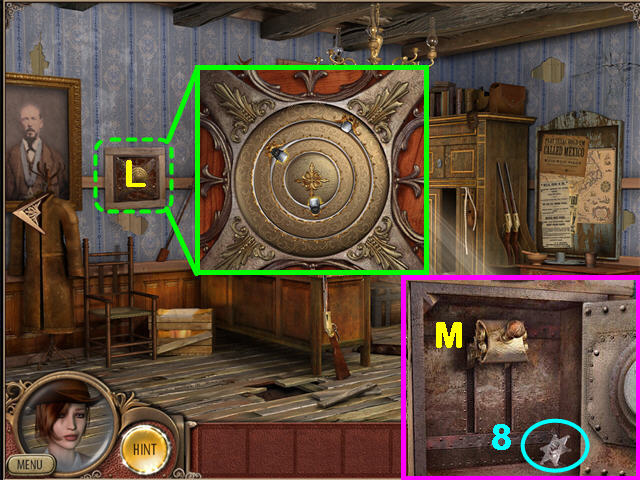
- There is a Safe (L) on the wall.
- Zoom in on the Safe to view a puzzle.
- The solution is random, but the method is the same.
- There are three rings. Rotate one ring at a time until a silver tab pops out and you hear a lock click.
- Then rotate the next ring until its tab pops out.
- Finish with the third ring.
- When all three tabs are out, the Safe will open.
- Collect the SHERIFF’S BADGE (8).
- Pull the Lever (M) inside the Safe to open the Cell Gates.
- Give the SHERIFF’S BADGE to the Sheriff.
- When the cutscene ends you will receive the 2nd part of the TRAIN KEY
Chapter 7: Doc’s Hangar

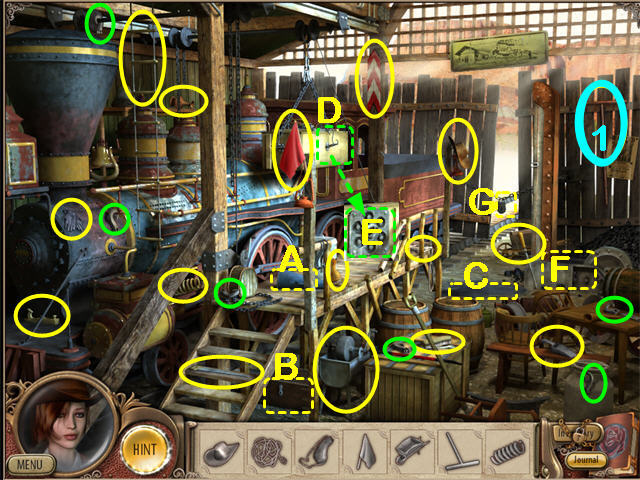
- Collect the items from the Find List, including the MOP HANDLE (1).
- Move the Megaphone (A) to reveal a SMALL KEY.
- Use the SMALL KEY on the Chest (B) to reveal the red CLOTH.
- Combine the CLOTH and the MOP HANDLE in your Inventory to get a MOP.
- Use the MOP on the Oil Spill (C) to reveal the BIG KEY.
- Click on the Crate (D). It will fall down onto the platform revealing a Lock (E), and you will get a new Find List.
- Find the 6 HOOKS marked in green.
- Once you have all 6 HOOKS, put them on the Lock (E) to reveal the GEAR.
- Put the GEAR on the Coal Loader (F) and it will fill the Train with fuel.
- Use the BIG KEY on the Padlock (G).
- When everything is done, you will trigger a mini-game.

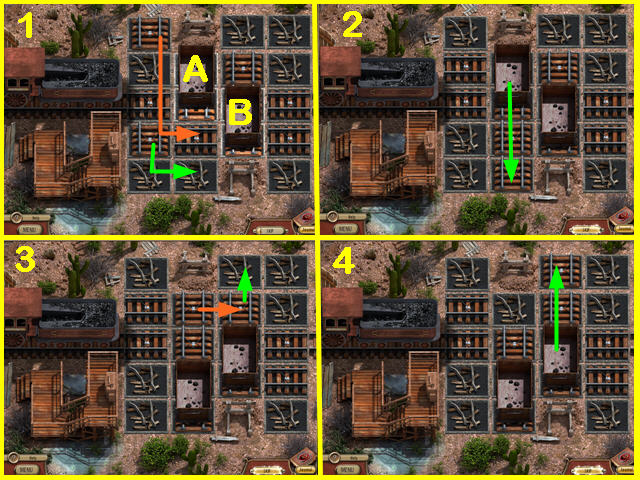
- You can swap two tiles at a time. The tiles must be right next to each other.
- First move the two Coal Cars (A and B) out of the way using vertical straight track, then lay horizontal straight track so the Train can move.
- There are many possible solutions.
- The screenshot gives one example.
- For each picture, first swap tiles along the green path, then swap tiles along the orange path if there is one.
- Click on a Coal Car to make it move.

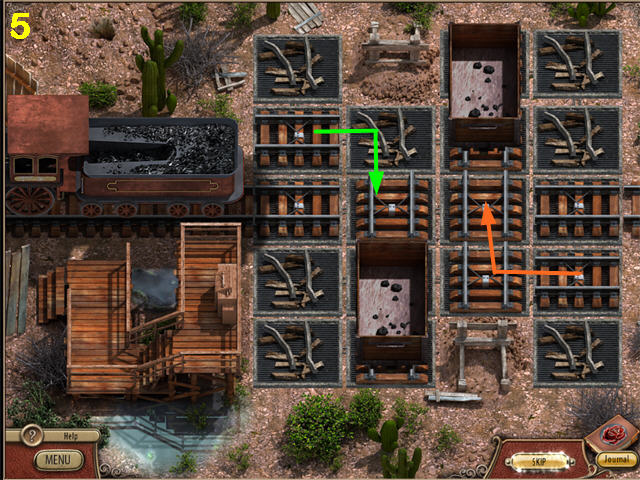
- The Train will move on its own once the track is ready.
Chapter 8: the Hideout

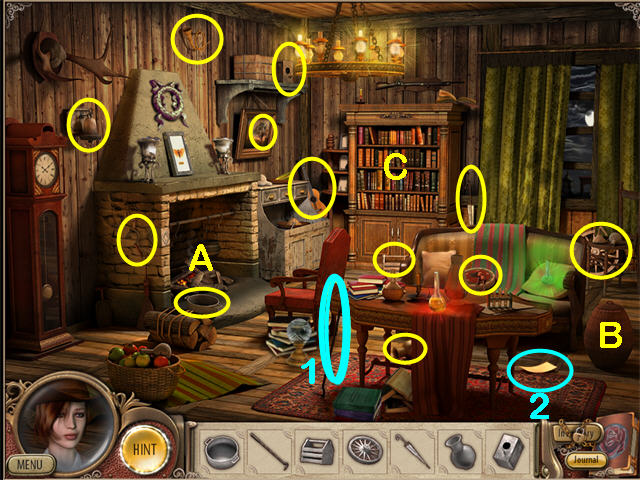
- Collect the items from the Find List, including the POKER (1).
- The Drum is red.
- Collect the piece of PAPER (2).
- Use the POKER on the Burning Logs (A) to retrieve the GAUNTLET.
- Examine the Basket (B). The KEY is inside, but so is a Snake!.
- Zoom in on the Bookcase (C).

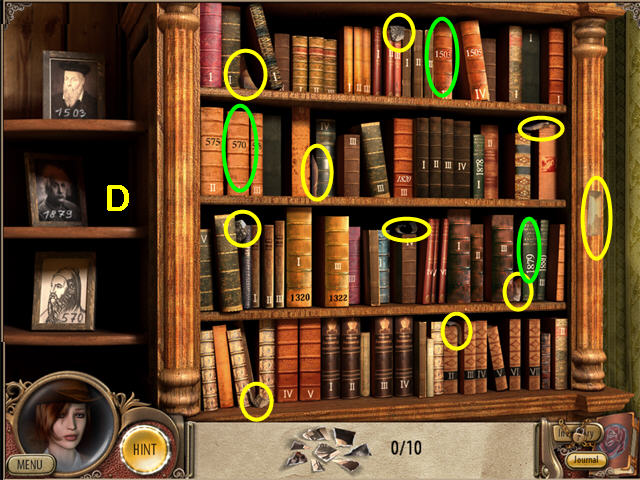
- Collect the PHOTO PIECES.
- Put the PHOTO PIECES on the Frames (D). You can put them anywhere in the area where the text label appears.
- Each Photo has a number on it. Select the 3 Books that have those numbers.
- You will return to the Study. A secret passage has opened on the left. Click on the Left Arrow icon to go to the Basement.

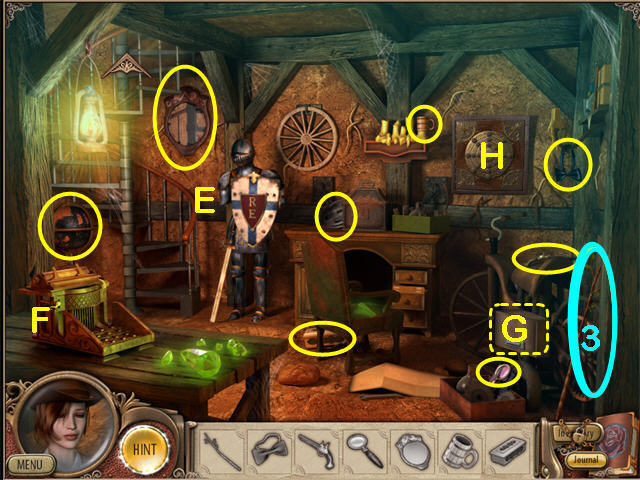
- Collect the items on the Find List, including the BRANCH (3).
- Put the GAUNTLET on the Knight (E) to reveal the KEYBOARD.
- Put the KEYBOARD on the Printing Press (F).
- Put the PAPER from the Study on the Printing Press (F) to get the CODE.
- Use the CODE on the Storage Compartment (G) and collect the ROPE WITH A HOOK.
- Zoom in on the Safe (H). This will trigger a mini-game.

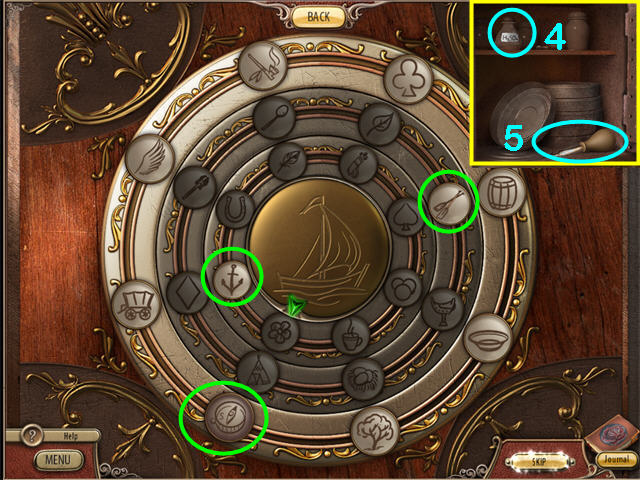
- Rotate each ring clockwise until the icon that is related to the Ship in the center is lined up with the red Arrow.
- The Arrow will turn green when you have the icon in the right place.
- Should you make a mistake, you will get a different center picture to work with.
- Ship Solution: Anchor, Oars, Compass.
- Bird Solution: Feather, Nest, Wing.
- Teapot Solution Teacup, Spoon, Bowl.
- The Safe will open. Collect the ACID (4) and the EYEDROPPER (5).

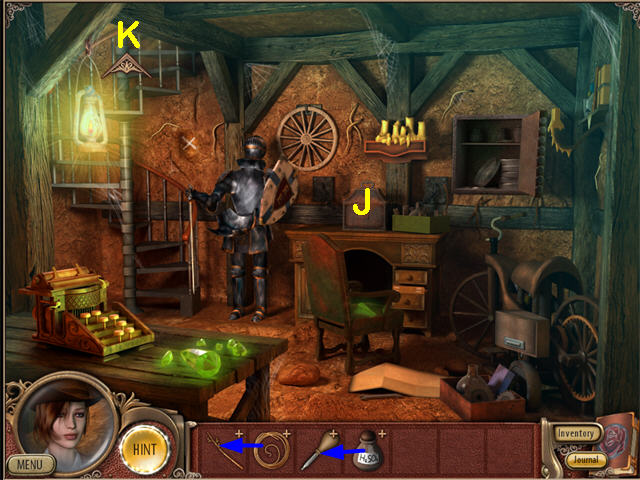
- Combine the ACID and the EYEDROPPER.
- Use the EYEDROPPER with Acid on the Rusted Chest (J). You need a KEY.
- Use the Up Arrow icon (K) to return to the Study.
- Combine the BRANCH and the ROPE to make a FISHING POLE.
- Use the FISHING POLE on the Snake Basket (B) and you will receive the KEY.
- Return to the Basement.
- Use the KEY on the CHEST (J).
- Collect DOC’S JOURNAL.
Chapter 9: Indian Settlement

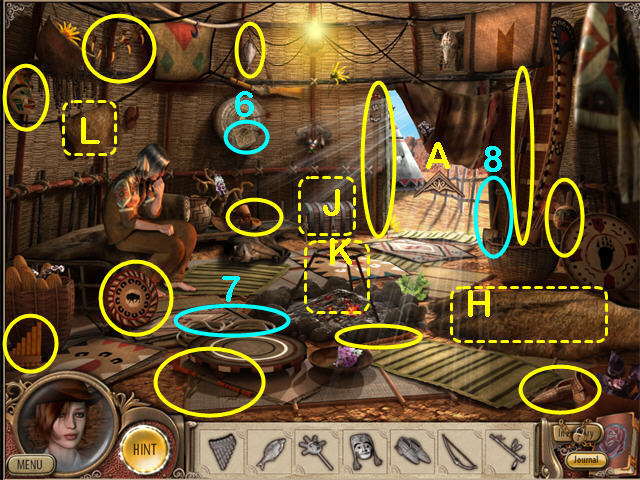
- Collect as many items from the Find List as you can.
- The Bow is in the back by the Canoe. The easiest part of it to see is the black hand grip.
- Use the Arrow icon (A) to leave the dwelling and go outside.

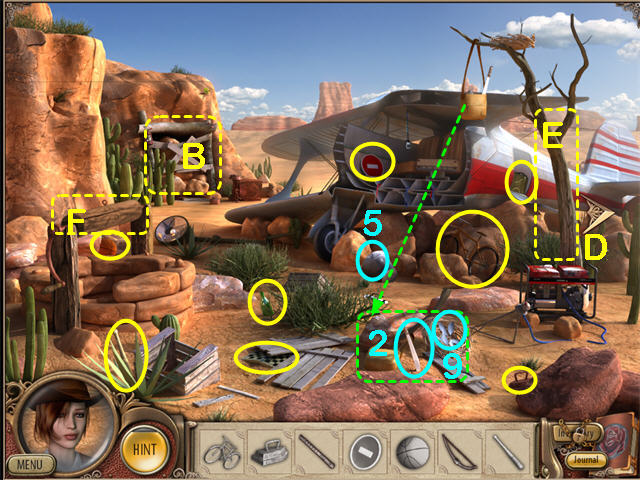
- Collect as many items from the Find List as you can.
- Use the Arrow icon (D) if you want to return to the dwelling.
- Zoom in on the Mine (B).

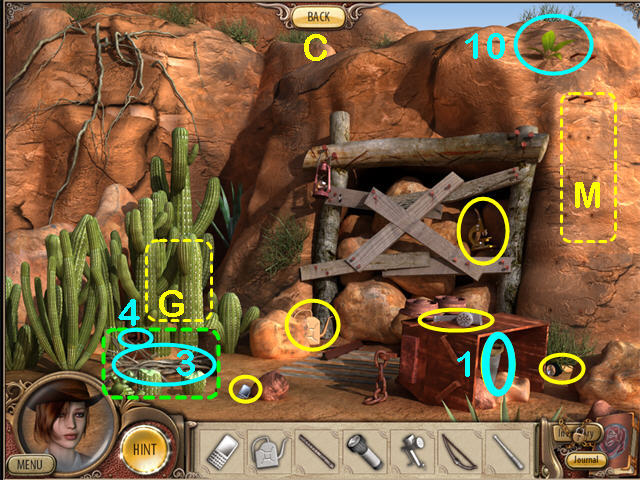
- Continue collecting items from the Find List including the SAW (1).
- Use the BACK Button (C) to return to the Plane.
- Use the SAW from the Mine to cut down the Dead Tree (E).
- The Bag will fall to the ground and you will be able to collect the MACHETE (2).
- Zoom in on the Mine (B) and use the MACHETE to cut away the Cactus (G) revealing the FIREWOOD (3).
- The METAL STEPS (4) are the red rusted item behind the FIREWOOD.
- Use the METAL STEPS on the right rock wall (M) and collect the SORREL (10).
- Return to the Plane.
- Collect the BUCKET (5).
- Return to the Dwelling.
- Collect the SCHEMATIC (6), ROPE (7) and SPADE (8).
- Move the Big Animal Skin (H) on the floor and you will see a pile of Loose Dirt underneath.
- Use the SPADE on the Loose Dirt to reveal the KEY.
- Use the KEY on the Chest (J) to reveal the CAULDRON.
- Put the CAULDRON on the Metal Stand (K).
- Put the FIREWOOD from the Mine underneath the Metal Stand (K).
- Move the Small Animal Skin (L) on the wall behind Bear Heart to reveal the RINGS.
- Go back out to the Plane.
- Collect the FEATHERS (9) from the area where the Bag fell.
- Combine the FEATHERS and the RINGS to make a DREAMCATCHER.
- Put the ROPE from the Dwelling on the top of the Well (F).
- Put the BUCKET on the end of the ROPE.
- Turn the Handle of the Well and you will get a BUCKET OF WATER.
- Return to the Dwelling.
- Give the DREAMCATCHER to Bear Heart.
- You will get a new Find List – 9 HERBS.

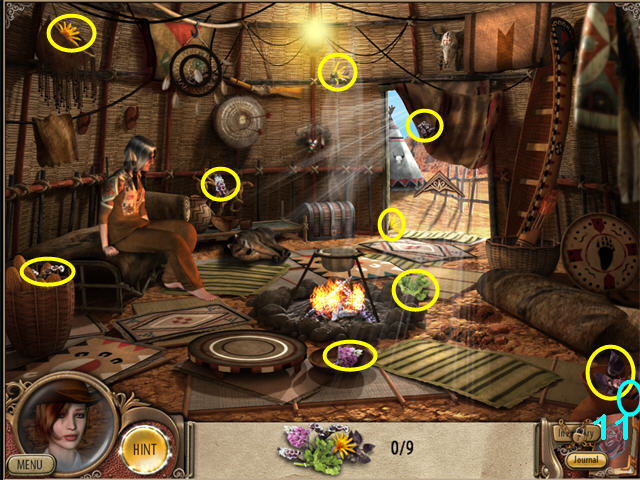
- After you collect all the HERBS, put the BUCKET OF WATER from the Well, the SORREL from the Mine and the HERBS into the CAULDRON over the fire.
- Collect the DIPPER (11).
- Use the DIPPER to get potion from the Cauldron and give it to Yokki the dog.
- Bear Heart will give you a letter from Doc.
Chapter 10: Indian Locket Part 1

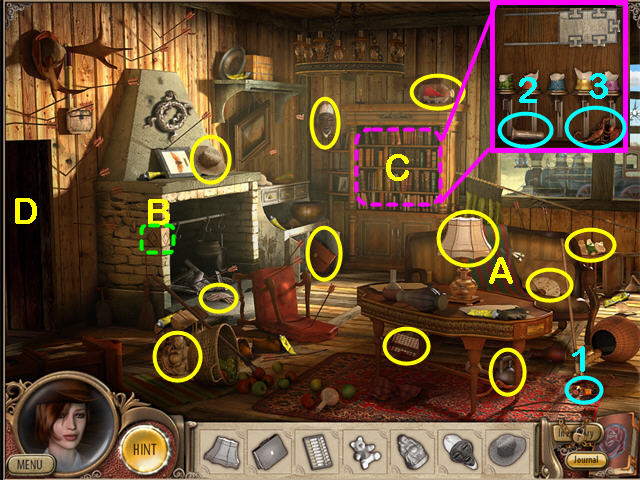
- Collect the items on the Find List, including the BATTERIES (1).
- Move the Blanket (A) to reveal the TOMAHAWK.
- Move the Brick (B) and the Bookcase will slide open.
- Zoom in on the Bookcase (C).
- Collect the EMPTY FLASHLIGHT (2) and the SCORPION FIGURINE (3).
- Combine the BATTERIES and the EMPTY FLASHLIGHT to get a working FLASHLIGHT.
- Use the FLASHLIGHT on the Basement Door (D) to enter the Basement.

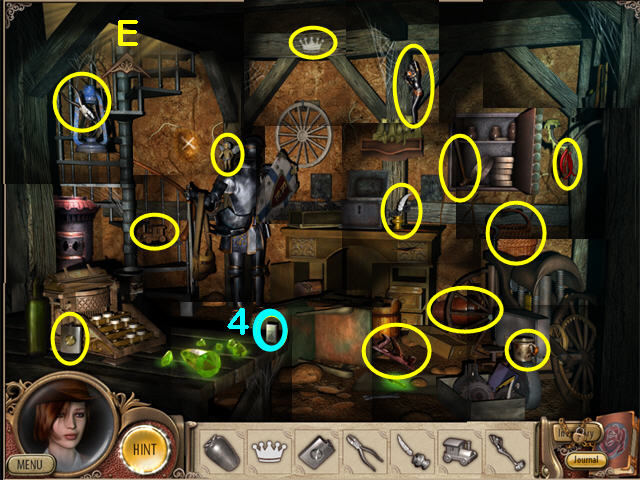
- The screenshot is a composite. You will only see one small section illuminated at a time.
- Collect the items on the Find List including the LIGHTER (4).
- The Candles will light automatically.

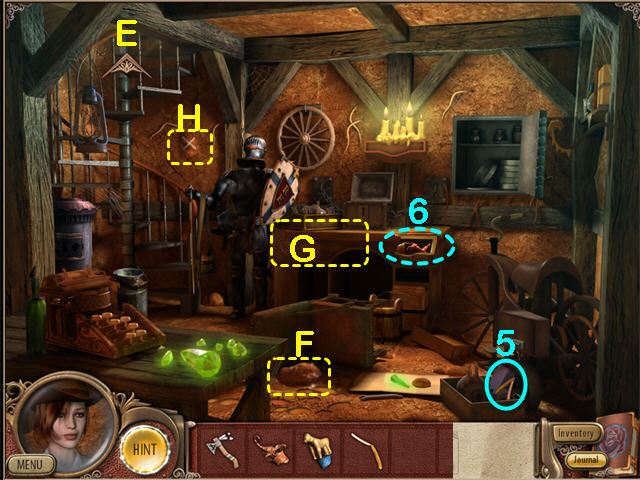
- Collect the RAZOR (5)..
- Move the Stone (F) to reveal the GORILLA FIGURINE.
- Use the TOMAHAWK to smash the top of the Desk (G) and reveal the HORSE FIGURINE (6).
- Use the TOMAHAWK again on the X on the Wall (H) and reveal the CAMEL FIGURINE.
- Use the Up Arrow icon (E) to return to the Study.
- Use the RAZOR from the Basement on the tipped over Chair (B) to reveal the ELEPHANT FIGURINE.
- Zoom in on the Bookcase (C).
- When you try to place the first FIGURINE, you will find out that you need GLUE.
- Use the BACK Button to return to the Study.

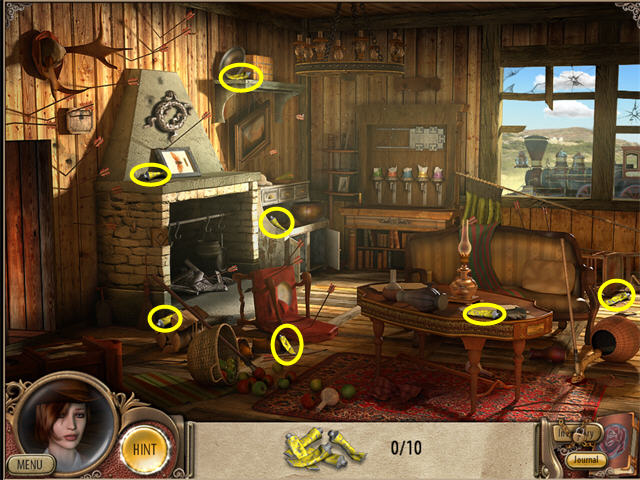
- Collect 7 tubes of GLUE in the Study.
- Zoom in on the Bookcase again.

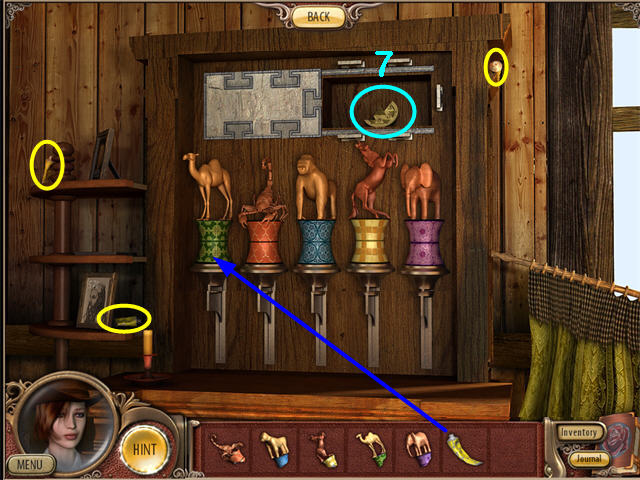
- Collect the last 3 tubes of GLUE.
- Apply GLUE to each Base.
- Place the FIGURINES on the matching color base.
- Solution:
- Camel (green) from the Basement Wall.
- Scorpion (orange) from the Bookcase.
- Gorilla (blue) from under the Stone on the Basement Floor.
- Horse (gold) from the Desk in the Basement.
- Elephant (purple) from the tipped over Chair in the Study.
- Collect the LOCKET PIECE (7).
Chapter 11: Indian Locket Part 2

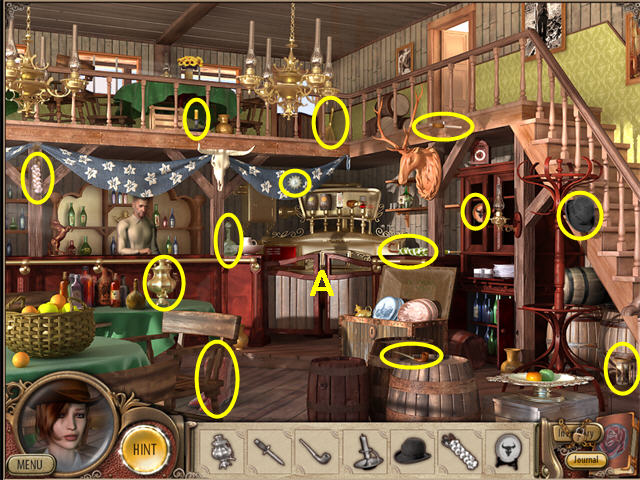
- Collect as many items as you can from the Find List.
- Go through the Bar Doors (A).

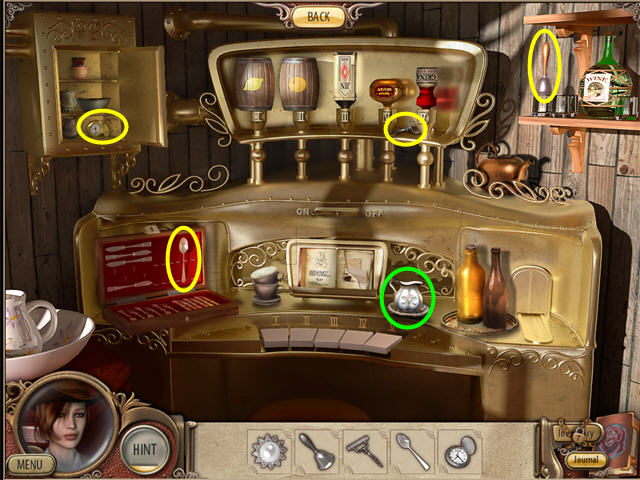
- Continue collecting items from the Find List.
- When you collect the Teapot (green), you will reveal the 2nd LOCKET PIECE.
Chapter 12: the Abandoned Mine

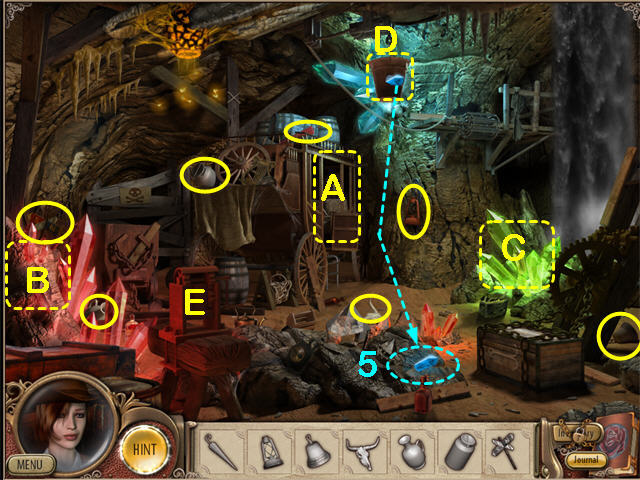
- Collect as many items as you can from the Find List.
- Enter the Coach (A).

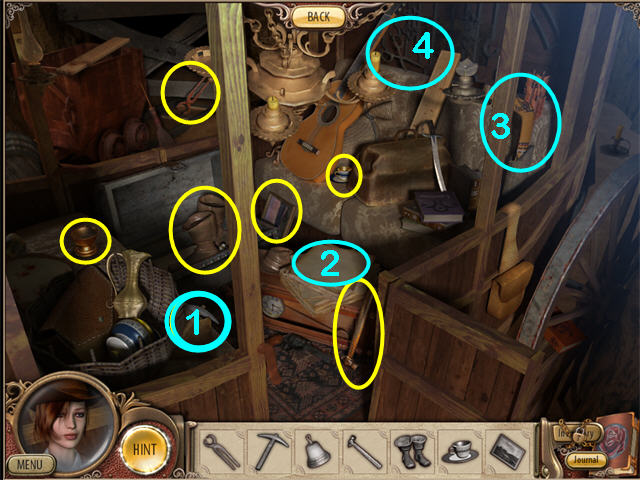
- Continue collecting items from the Find List, including the PICKAXE (1).
- You will get a new Find List.
- Click on the PAPER (2) twice until you get a DIAGRAM that will be copied into your journal.
- Collect the BOOMERANG (3) and the SCISSORS (4).
- Return to the Main Scene.
- Use the PICKAXE to collect a RED GEM (B) and a GREEN GEM (C).
- Use the BOOMERANG on the Bucket (D). A BLUE GEM (5) will fall down so you can collect it.
- Put the GEMS into the Grinder (E).

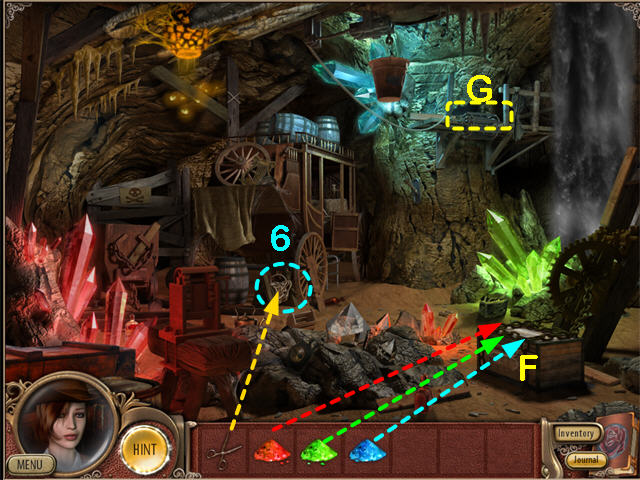
- Put all 3 GROUND GEMS on top of the Chest (F).
- The Fireflies will come to the Chest. Wait until it has finished burning.
- Collect the HOOK from inside the Chest.
- Use the SCISSORS from the Coach to cut off a piece of the ROPE (6).
- Combine the HOOK and the ROPE.
- Use the HOOK on the Rope Ladder (G).
- Click on the Right Arrow icon that appears above the Rope Ladder to enter the Upper Level of the Mine.

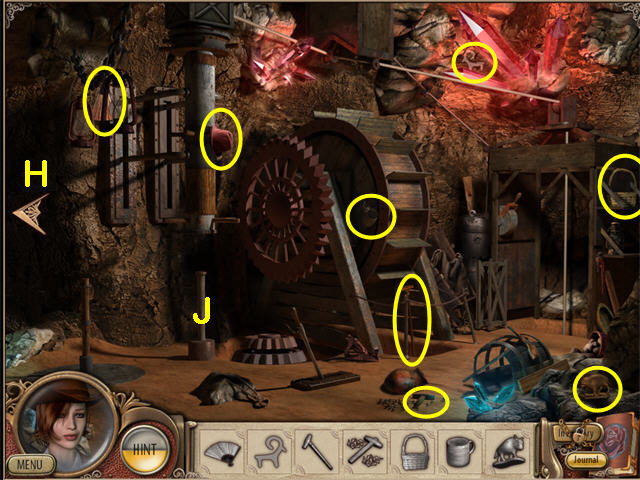
- Collect the items on the Find List and you will receive a HAMMER AND NAILS.
- Examine the Mechanism (J). This will trigger a mini-game.

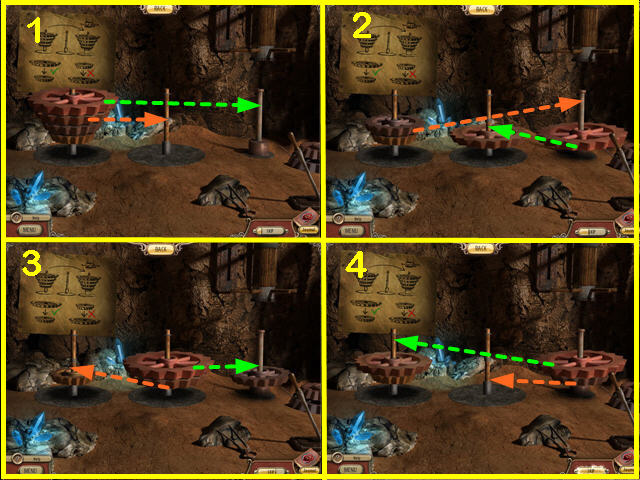
- This is a Towers of Hanoi game, except that you are building the towers with the smallest piece on the bottom.
- Each screenshot shows two moves.
- Make the green move first, then the orange one.

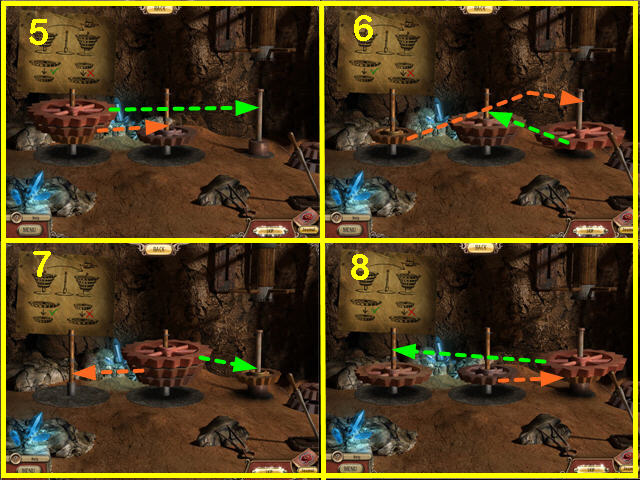
- There are many possible solutions.

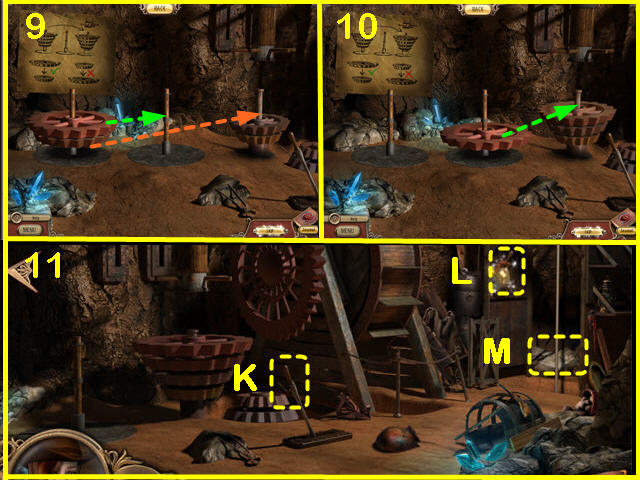
- Once the tower is complete on the right pole, you will return to the main scene.
- Move the left Lever (K).
- Move the right Lever (L). The Broken Elevator will rise (M).
- Click on the Broken Elevator and you will get a new Find List.

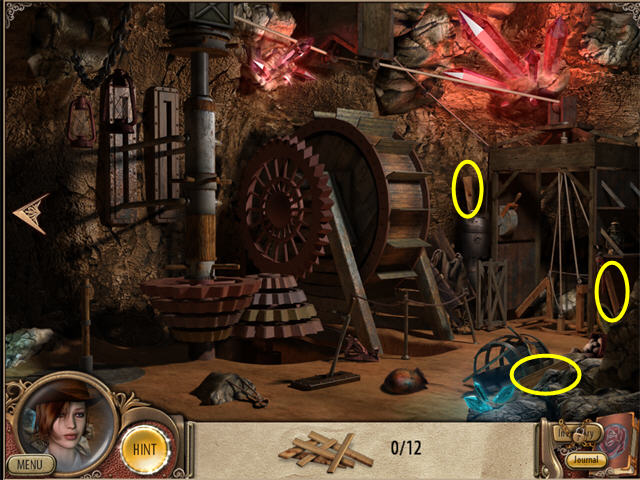
- Collect 3 PLANKS on the Upper level.
- Use the Left Arrow icon to return to the lower level of the Mine.

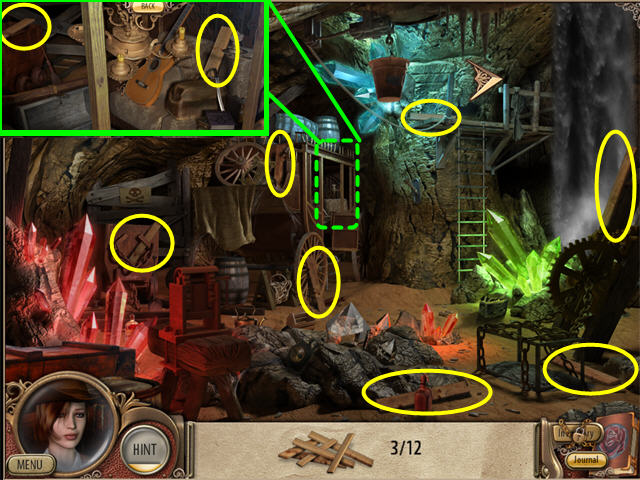
- Collect 7 more PLANKS.
- Enter the Coach.
- Collect the last 2 PLANKS.
- Return to the Upper Level of the Mine.
- Put the PLANKS on the Broken Elevator (M).
- Use the HAMMER to nail the PLANKS.
Chapter 13: the Temple of Atlas

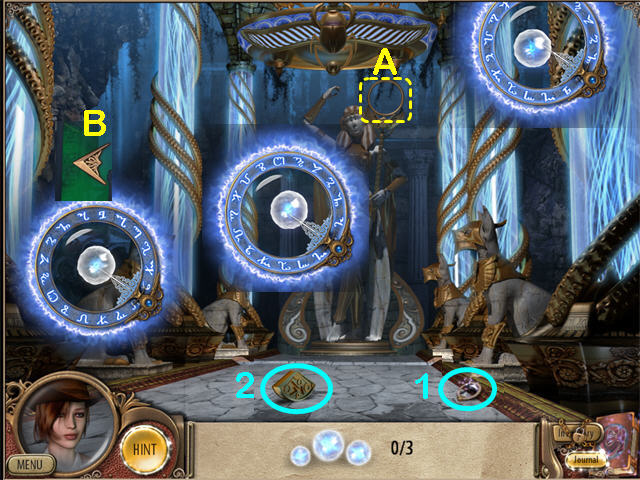
- You start in the Blue Room. Collect the RING (1).
- The RING will automatically attach to your cursor. As you move the RING slowly around the scene you will be able to see the three SPHERES.
- You will hear a noise when you are close to one of the SPHERES.
- Our screenshot is a composite. You will only see one SPHERE at a time.
- After you collect the SPHERES they will automatically combine into an ENERGY BALL.
- Put the ENERGY BALL in the Statue’s Ring (A).
- Complete the Pairs Matching mini-game and the Statue will reveal the 1st PART OF TOT’S LOCK (2).
- Stairs will appear on the left side of the room.
- Use the Left Arrow icon (B) to exit to the Green Room.

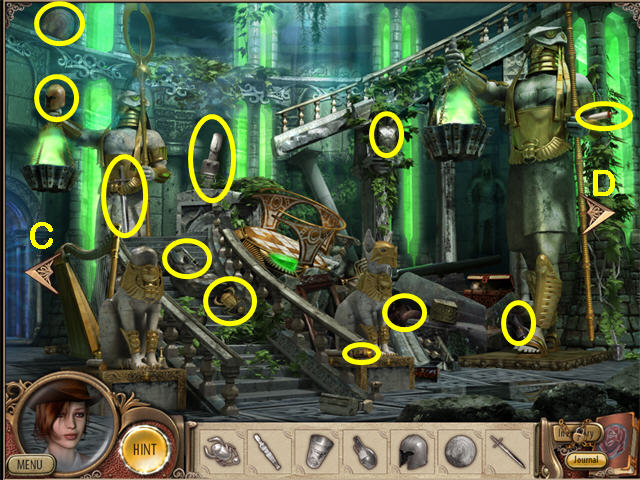
- Collect as many items on the Find List as you can find..
- The Left Arrow icon (C) leads back to the Blue Room.
- The Right Arrow icon (D) leads to the Scarab Room.
- Enter the Scarab Room.

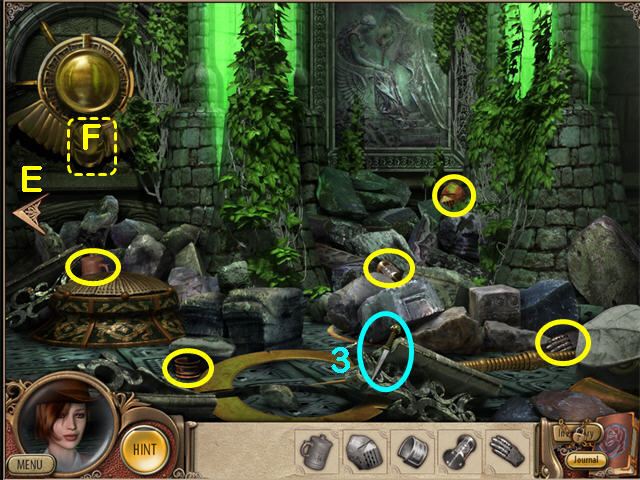
- Collect the remaining items on the Find List.
- When you have collected all the items, you will automatically receive the SCARAB.
- Collect the DAGGER (3).
- Use the Left Arrow icon (E) to return to the Green Room.

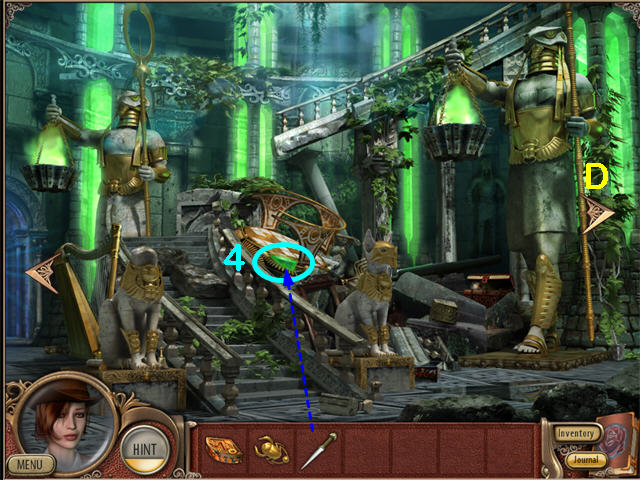
- Use the DAGGER (3) from the Scarab Room to remove the Green Gem (4) on the Broken Elevator.
- Use the Right Arrow icon to return to the Scarab Room.
- Put the SCARAB on the Ancient Lock (F). It will open and reactivate the RING.

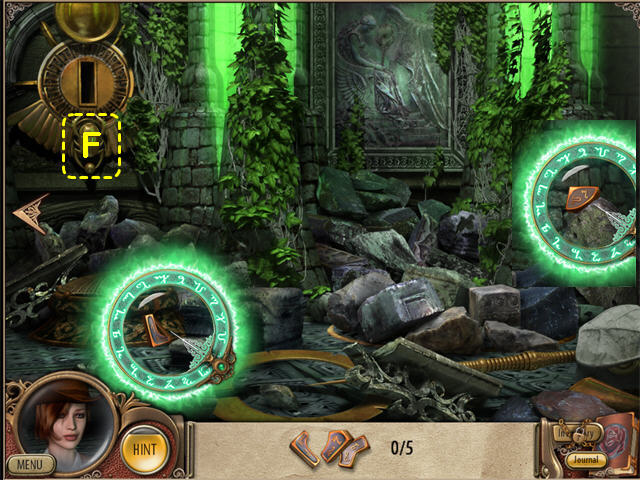
- Search the room for 5 PLATE PIECES.
- The screenshot is a composite—you will see one piece at a time.
- There are two pieces in the Scarab Room.
- Return to the Green Room.

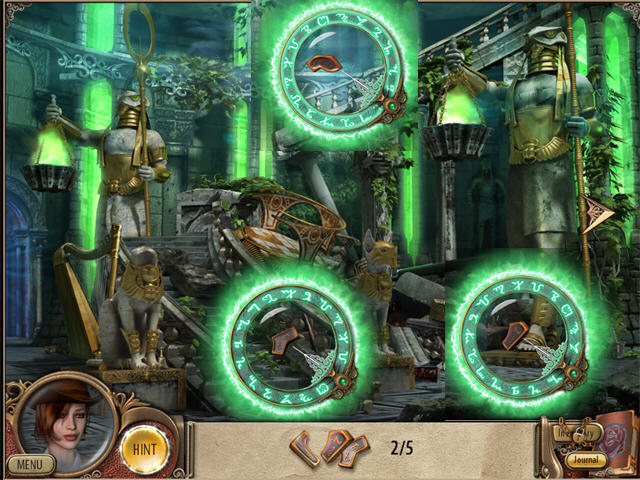
- Collect the remaining 3 PIECES OF PLATE.
- The 5 pieces will automatically combine giving you an ANCIENT PLATE.
- Return to the Scarab Room.

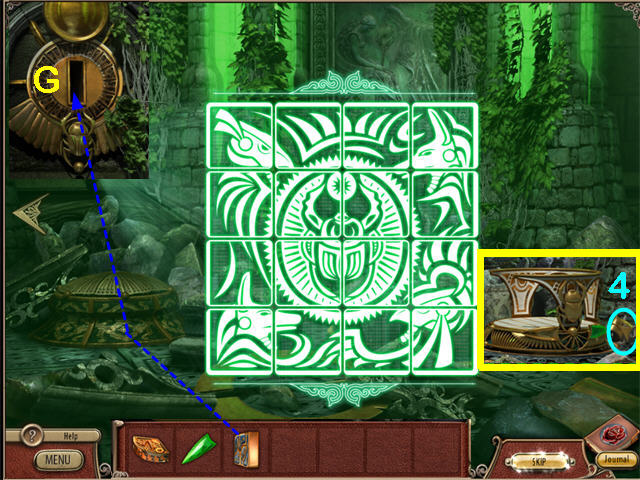
- Put the ANCIENT PLATE in the Ancient Keyhole (G).
- Reassemble the picture as shown.
- Pieces will lock in place when set correctly.
- Another Elevator will appear on the right side of the room.
- Collect the STATUE’S HEAD (4).
- Return to the Green Room.

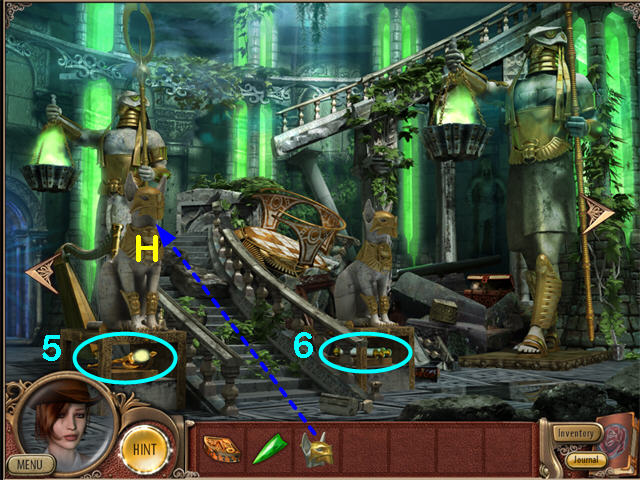
- Put the HEAD on the left Statue (H).
- Collect the STAFF (5) and the SCROLL (6).
- The SCROLL shows how to use the STAFF. It will be copied to your Journal.
- Return to the Scarab Room.

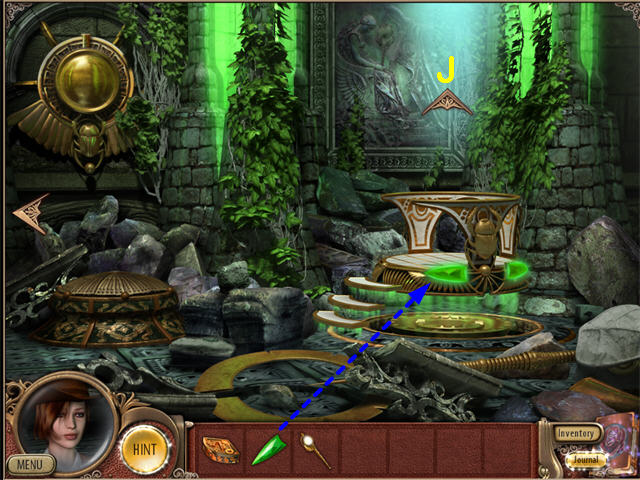
- Put the GREEN GEM on the Elevator.
- Use the Up Arrow icon (J) to go to the Red Room.

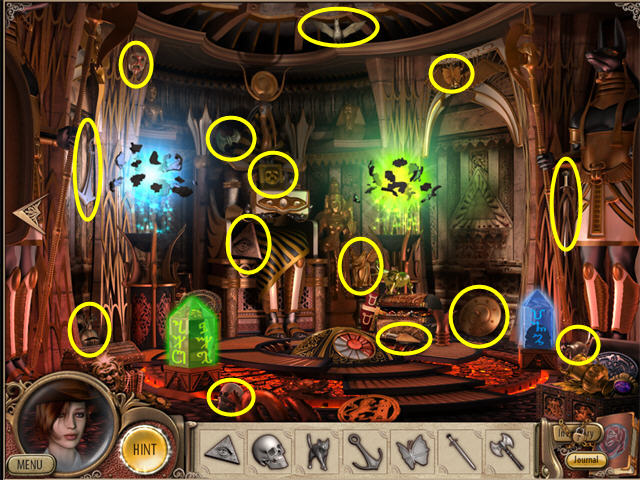
- Collect the items on the Find List.
- When the cutscene ends you will receive the Ancient Key and be automatically sent to the Indian Village.
Chapter 14: the Mystery of the Ancient Key

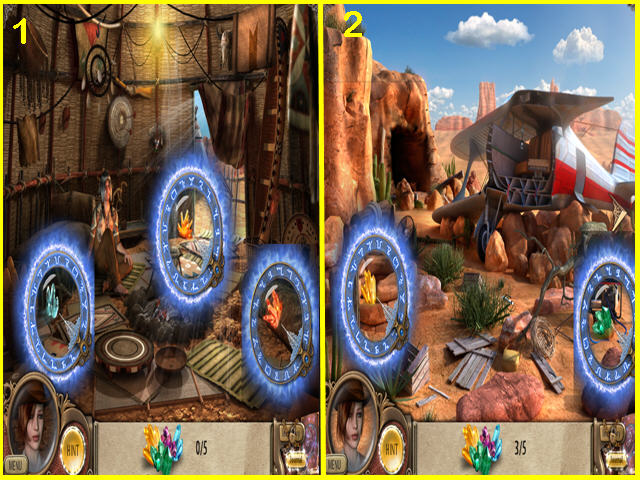
- Find the five GEMS.
- The screenshot is a composite—you will only see one GEM at a time.
- There are three GEMS in the Dwelling and two outside.
- Once you have collected all five you will automatically receive the ANCIENT KEY and return to the Temple.
Chapter 15: the Time Portal

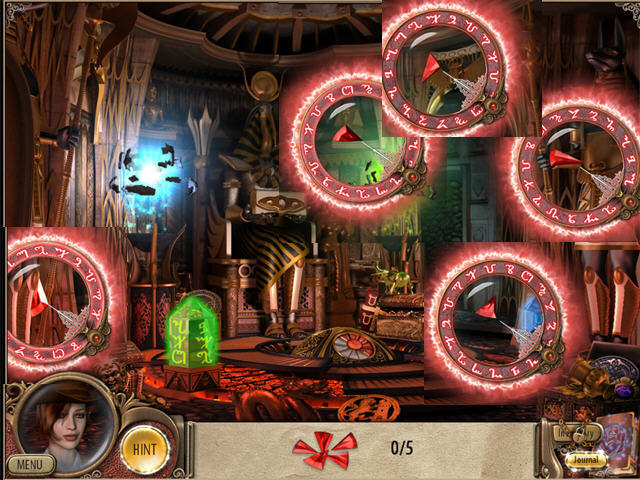
- Use the RING to find the 5 RED SHARDS OF GLASS. The screenshot is a composite.

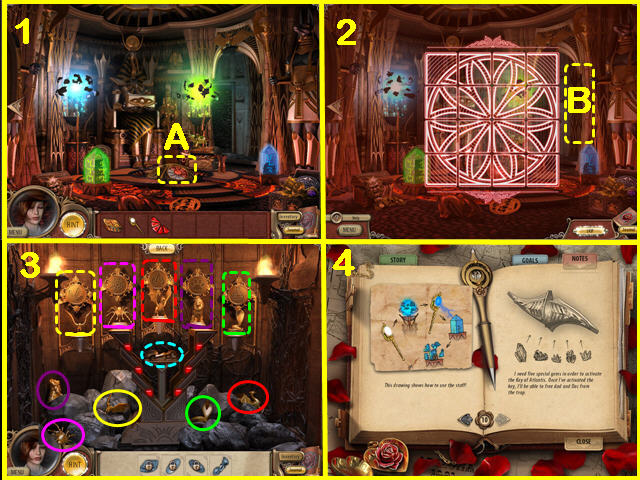
- Put the RED GLASS on the Pedestal (A). This will trigger a mini-game.
- Assemble the picture as shown (Picture 2). The Pedestal for the lock pieces will rise.
- Go through the Passage (B).
- Put the 5 FIGURINES on the matching Pedestals (Picture 3).
- Solution: Feathers = Bird, Web = Spider, Pawprint = Lion, Flame = Dragon, Poison Bottle = Snake.
- Collect the LEVER.
- Return to the Red Room.
- Open your Journal and read the instructions for using the STAFF (Picture 4).

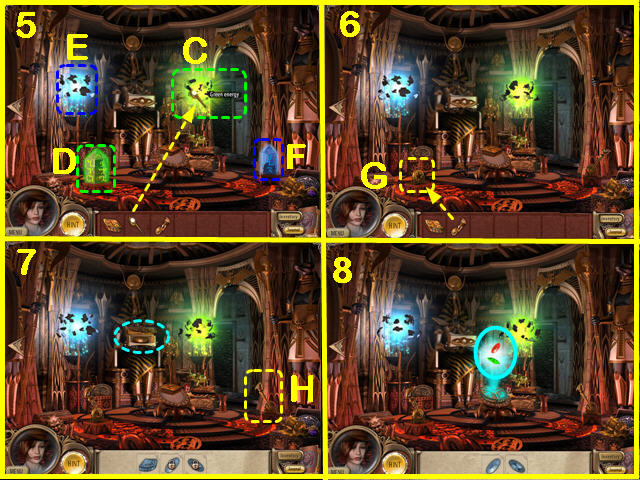
- Use the STAFF on the Green Energy (C) to get a STAFF WITH GREEN ENERGY (Picture 5). You must place the STAFF so that the Energy is slowly blinking yellow or you won’t be able to collect the energy.
- Use the STAFF WITH GREEN ENERGY on the Green Column (D) to reveal a Slot for the Lever.
- Use the STAFF on the Blue Energy (E) to get a STAFF WITH BLUE ENERGY.
- Use the STAFF WITH BLUE ENERGY on the Blue Column (F). It will break, revealing a Lever.
- Put the LEVER from the Passage in the Slot (G). (Picture 6).
- Pull the Left Lever. You will see a vision of the Blue Room.
- Pull the Right Lever (H)(Picture 7).
- The chest that the Statue is holding will open to reveal the 3rd PIECE OF TOT’S LOCK.
- Place the two PIECES OF TOT’S LOCK on the Pedestal.
- Collect the two GEMS. (Picture 8).
- Use the Left Arrow icon 3 times to return to the Blue Room.

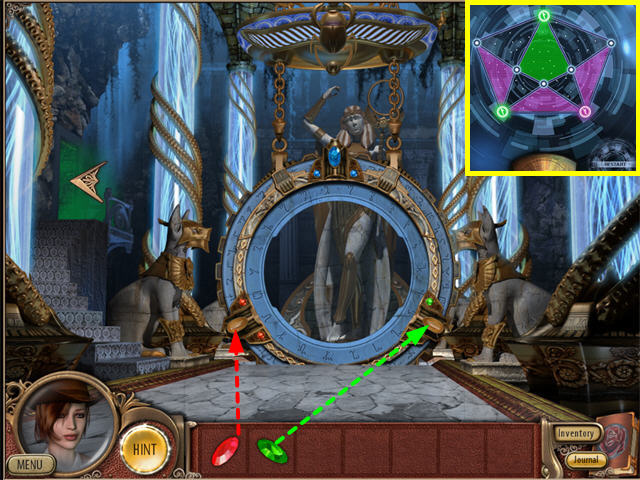
- Put the Red GEM in the Red Slot and the Green GEM in the Green Slot.
- Zoom in on the Time Portal. This will trigger a mini-game.
- There are many possible solutions.
- When you have purple Icons at all points of a purple shape, it will be removed.
- When you have green Icons on each pinot of a green shape, it will be removed.
- Your goal is to remove all the shapes.
- New Icons appear randomly.
- You can use the Restart Button if you get stuck.
- Watch the ending.






 Black Circle: A Carol Reed Mystery Walkthrough, Guide, & Tips
 Margrave: Curse of the Severed Heart Walkthrough, Guide, & Tips
 Kaptain Brawe: A Brawe New World - Episode II Walkthrough, Guide, & Tips
 Chronoclasm Chronicles Walkthrough, Guide, & Tips
 The Secrets of Arcelia Island Walkthrough, Guide, & Tips