The Secret Order: Beyond Time Walkthrough, Guide, & Tips
The Secret Order: Beyond Time Walkthrough
Welcome to the The Secret Order: Beyond Time Walkthrough
Trapped in the past, Sarah must find a way home.
Whether you use this document as a reference when things get difficult or as a road map to get you from beginning to end, we’re pretty sure you’ll find what you’re looking for here.
This document contains a complete The Secret Order: Beyond Time game walkthrough featuring annotated screenshots from actual gameplay!
We hope you find this information useful as you play your way through the game. Use the walkthrough menu below to quickly jump to whatever stage of the game you need help with.
Remember to visit the Big Fish Games Forums if you find you need more help. Have fun!
This walkthrough was created by Laurie Murphy, and is protected under US Copyright laws. Any unauthorized use, including re-publication in whole or in part, without permission, is strictly prohibited.
General Tips
- This is the official guide for The Secret Order: Beyond Time!
- This guide does not mention each time you have to zoom into a location; the screenshots show each zoom scene.
- Hidden-object puzzles are referred to as HOPs. This guide does not show screenshots of the HOPs, however, it is mentioned when a HOP is available and the inventory item collected.
- This guide gives step-by-step solutions for all puzzles that are not random. Please read the instructions in the game for each puzzle.
- Use the map to quickly travel to a location.
Chapter 1: Creating the Portal

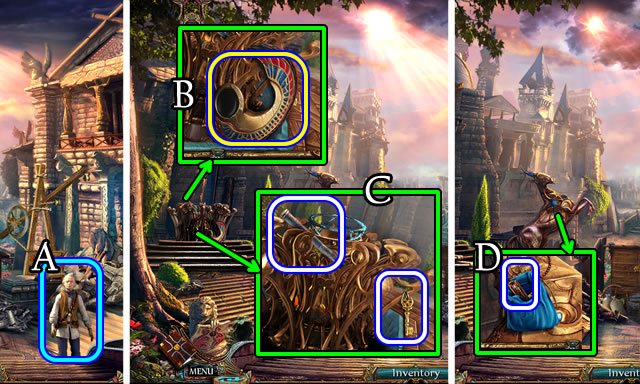
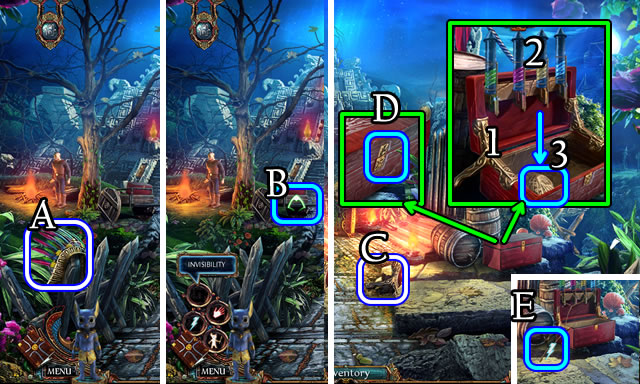
- Speak to Flavius (A).
- Take the Hint wing (B) for the user interface.
- Take the ROD and KEY (C).
- Open the bag; take the HANDLE (D).

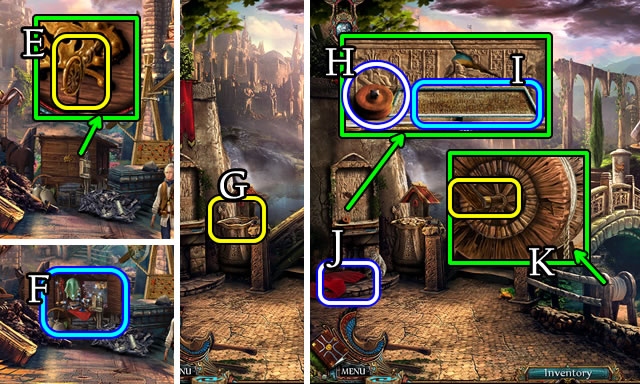
- Insert and turn the KEY (E) for a HOP (F). Receive BREAD.
- Walk forward.
- Place the BREAD (G).
- Take the PULLEY (H); read the plaque (I).
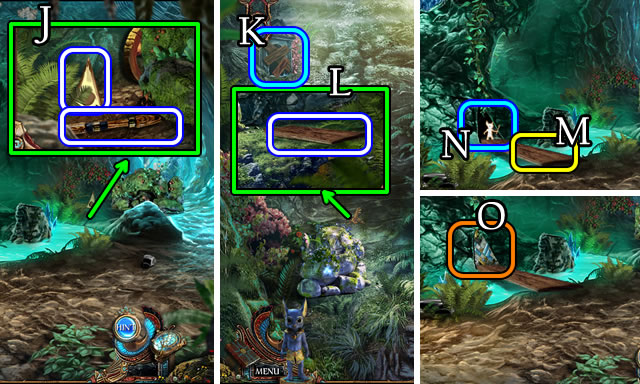
- Take the TORN BANNER (J).
- Place the HANDLE (K); receive a ROPE.

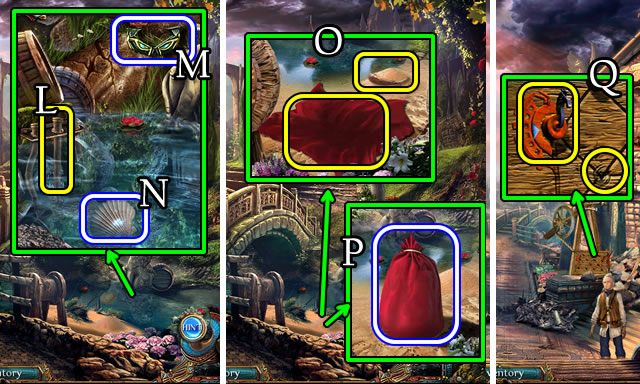
- Place the ROD (L); take ANUBIS EYES (M) and SHELL (N).
- Place the SHELL and TORN BANNER (O).
- Select the SHELL; place the sand on the banner; select the TORN BANNER; take a SANDBAG (P).
- Walk down.
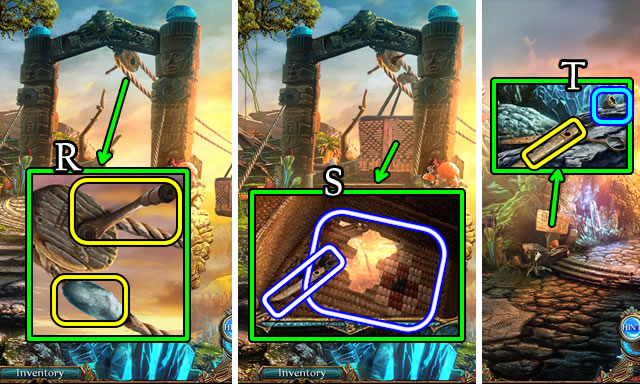
- Place the PULLEY and ROPE (Q) for a puzzle.

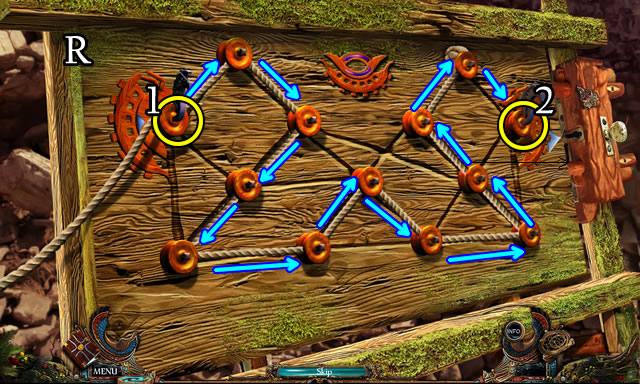
- Solution, part one (R). 1-2.

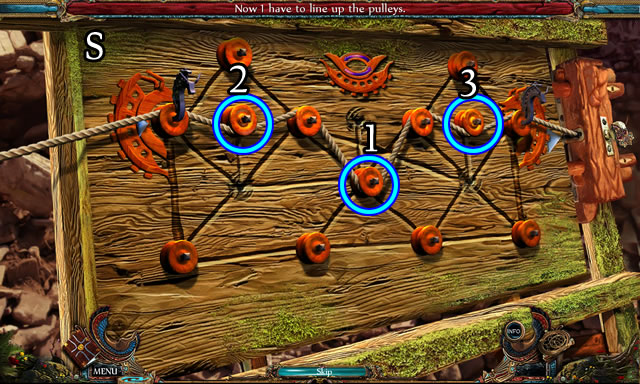
- Solution, part two (S). 1-2-3.

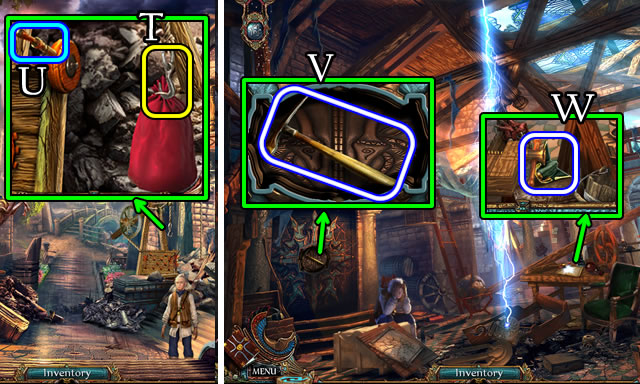
- Place the SANDBAG (T); pull the lever (U).
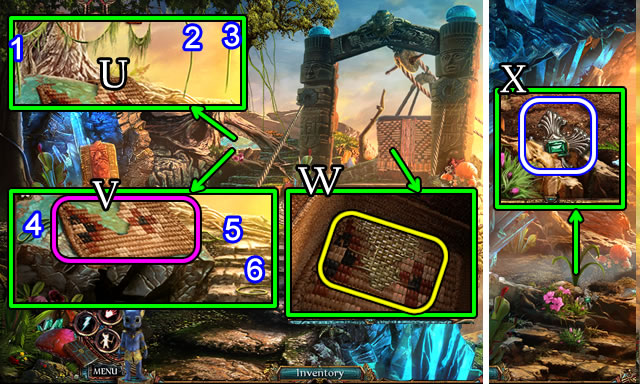
- Walk right.
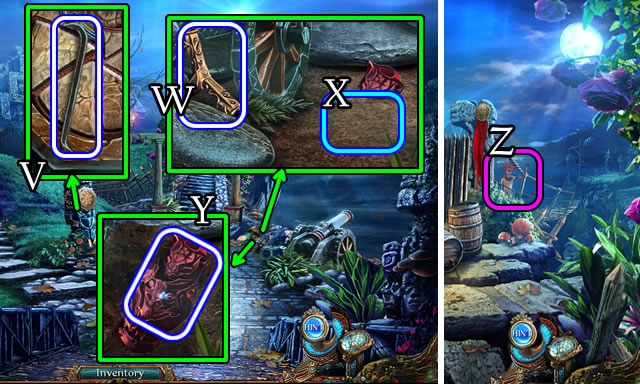
- Take the PICKAXE (V).
- Take the ANUBIS MUZZLE (W).
- Return to the Garden.

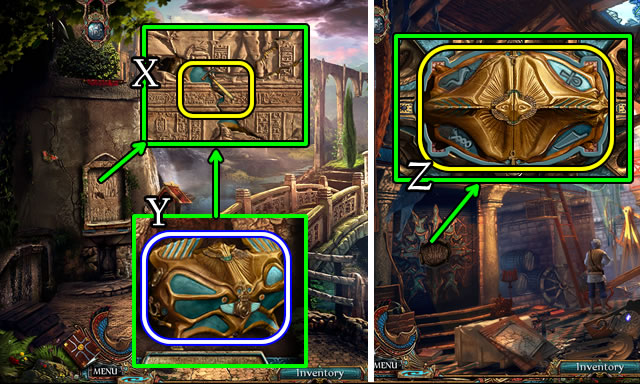
- Use the PICKAXE 2x (X).
- Select, then take the CHEST (Y).
- Return to Flavius’s Workshop.
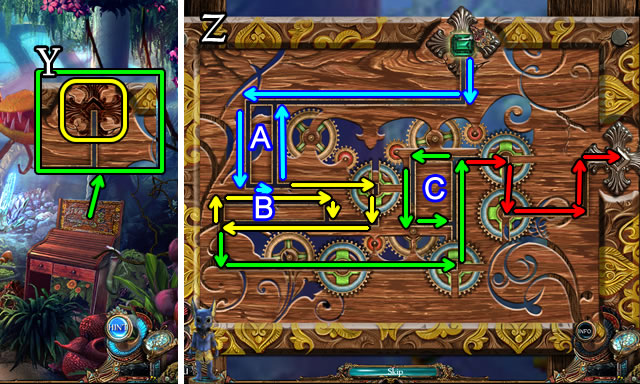
- Place the CHEST (Z) for a puzzle.

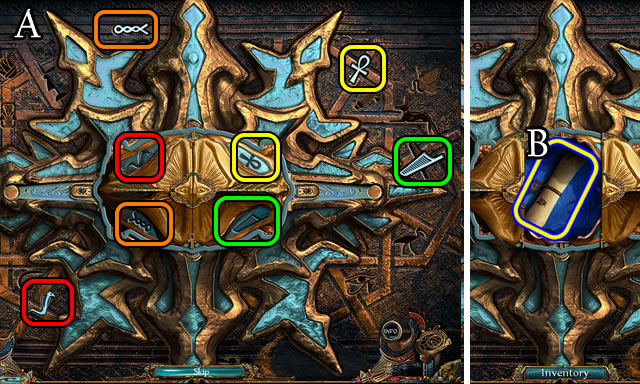
- Solution (A).
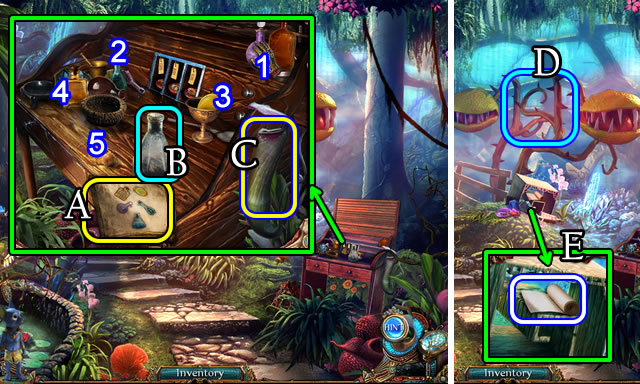
- Select the scroll (B), then take the user interface Map.
- Return to the Garden; walk forward.

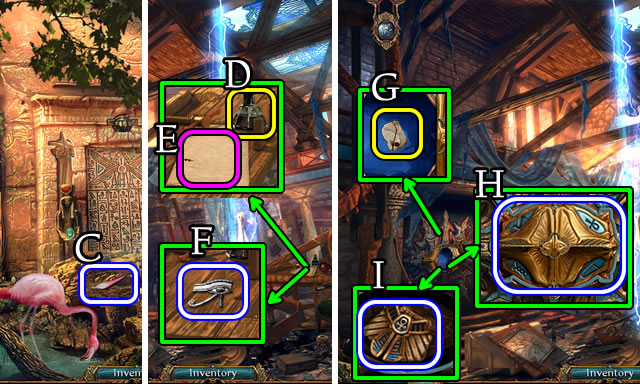
- Select the flamingo; take the FEATHER (C).
- Return to Flavius’s Workshop.
- Place the FEATHER (D).
- Select and place the FEATHER (E). Read, then take the LETTER.
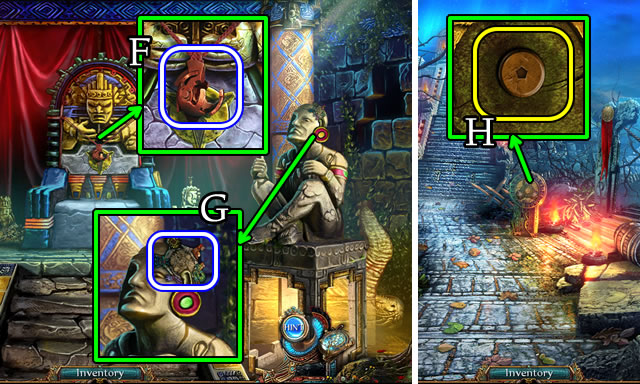
- Take the EYE OF HORUS (F).
- Place the LETTER (G); take the CHEST (H).
- Take the SHENDYT (I).

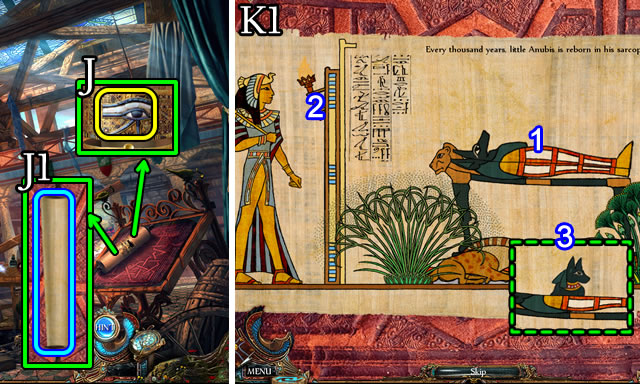


- Place the EYE OF HORUS (J); open the case; select the scroll (J1) for a mini-game.
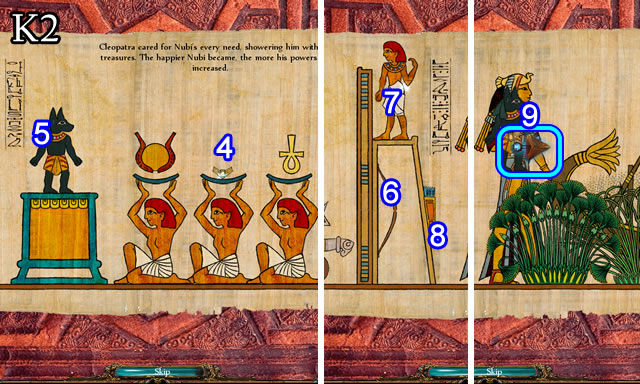
- Solution, part one (K1). Open the sarcophagus (1). Select the torch (2). Select (3).
- Solution, part two (K2). Place (4) on Nubi (5). Select Nubi. Place the bow (6) on the archer (7), place arrows (8) on the archer and select (7). Scroll right (9).
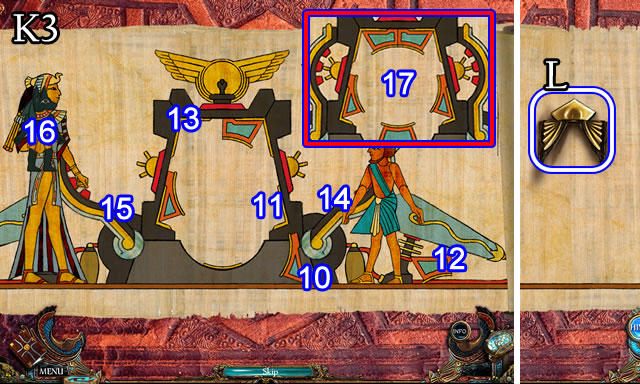
- Solution, part three (K3). Place part (10) at position (11), part (12) at position (13). Select (14) and (15). Select Nubi (16) for the portal (17). Take ANUBIS EARS (L).
- Return to Omar’s Shelter.

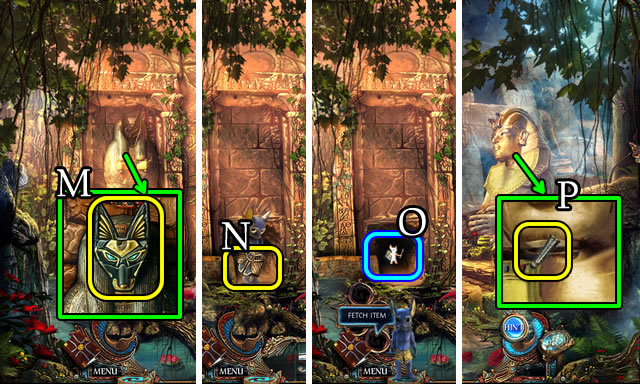
- Place the ANUBIS EARS, ANUBIS EYES and ANUBIS MUZZLE (M).
- Place the SHENDYT (N); receive Nubi for the user interface.
- Select Nubi; select and place the Fetch Item skill (O); receive a STONE BEARD.
- Place the STONE BEARD (P) for a mini-game.

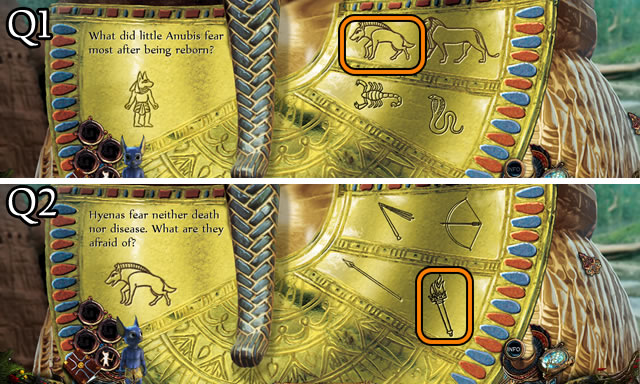

- Solution. Q1-Q2.
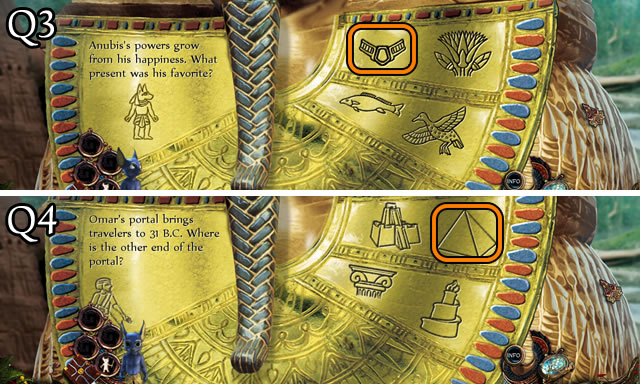
- Solution. Q3-Q4.
- Walk forward.

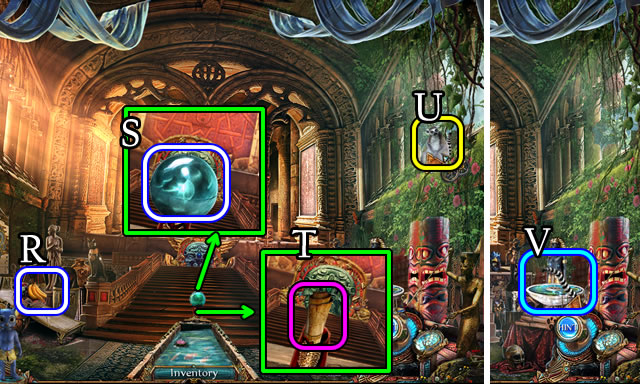
- Take the BANANA (R).
- Take the METALLIC ORB (S).
- Select and examine the scroll (T).
- Give the BANANA (U) for a HOP (V). Receive a BLUE TRIANGLE.
- Walk down.

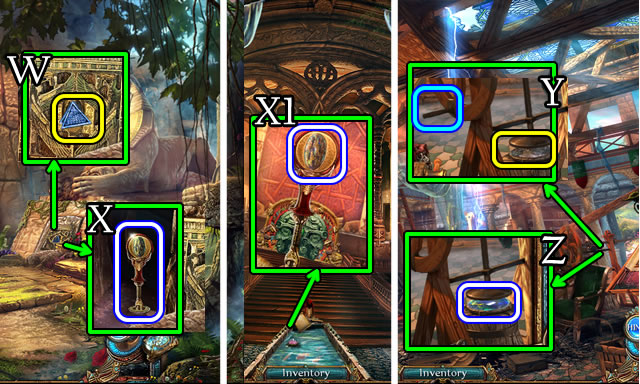
- Place the BLUE TRIANGLE (W). Take the OPAL STAFF (X).
- Walk forward.
- Place the OPAL STAFF; remove the TARNISHED OPAL (X1).
- Return to Flavius’s Workshop.
- Place the TARNISHED OPAL, turn the handle 2x (Y); take a POLISHED OPAL (Z).
- Return to the Portal.

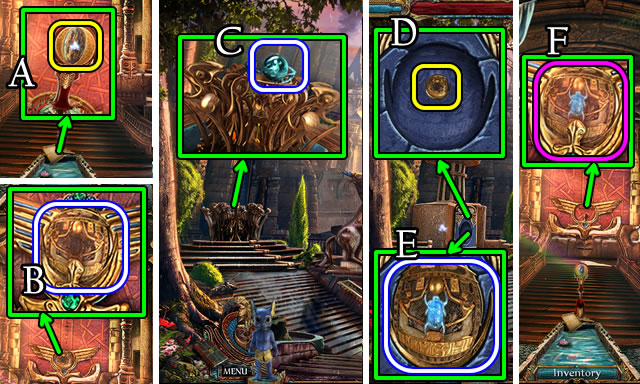
- Place the POLISHED OPAL (A).
- Select the altar; take KHONSU’S MOON DISC (B).
- Return to the Courtyard.
- Place the METALLIC ORB (C).
- Place KHONSU’S MOON DISC (D). Take the CHARGED MOON DISC (E).
- Return to the Portal.
- Place the CHARGED MOON DISC (F).
- Walk forward.
Chapter 2: Ancient Egypt

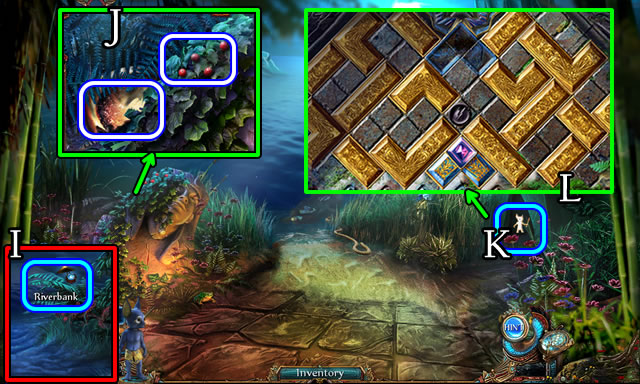
- Walk left (I).
- Move the fronds 3x; take the GOLDEN FRAGMENT and RED BERRIES (J).
- Select and place Nubi’s Fetch Item skill. (K).
- Select the sealed entrance for a puzzle (L).

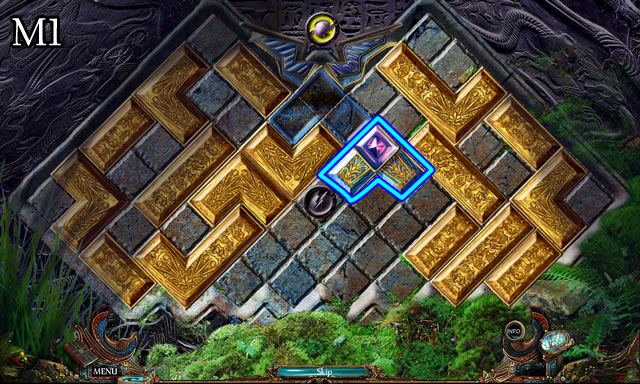

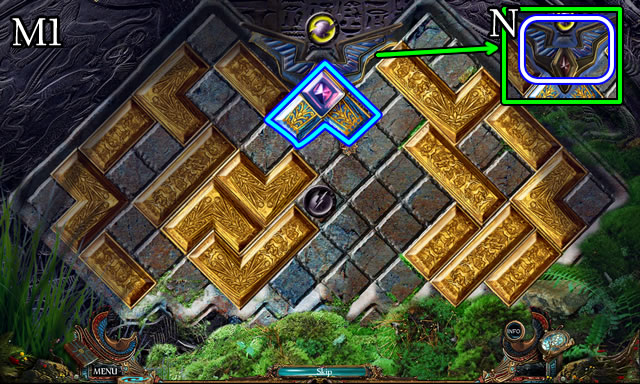
- Solution, part 1 (M1).
- Solution, part two (M2).
- Take Nubi’s item (N).

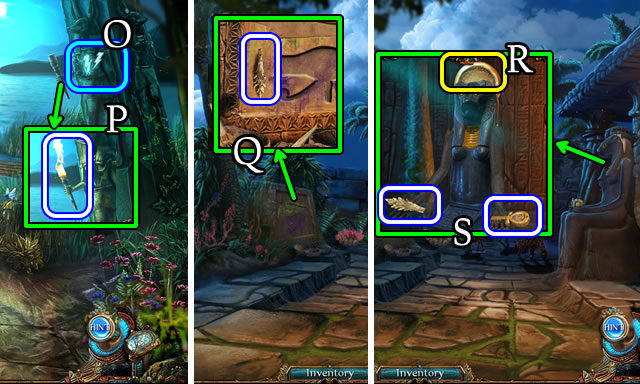
- Select and place the lightning skill (O). Take the BURNING TORCH (P).
- Walk down.
- Take STONE LEAF 1/2 (Q).
- Place the GOLDEN FRAGMENT (R). Take the ANKH and STONE LEAVES 2/2 (S).
- Walk left.

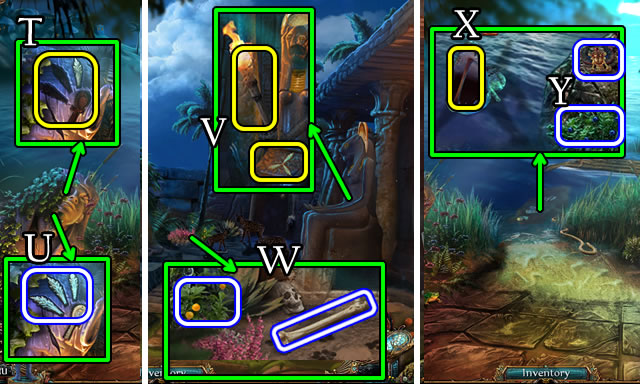
- Place the ANKH and STONE LEAVES 2/2 (T). Take the LEAVES SYMBOL (U).
- Walk down.
- Place the LEAVES SYMBOL and BURNING TORCH (V).
- Take the FEMUR and YELLOW BERRIES (W).
- Walk left.
- Select the water; place the FEMUR (X); take the BLUE BERRIES and SCARAB (Y).
- Walk down, then forward.

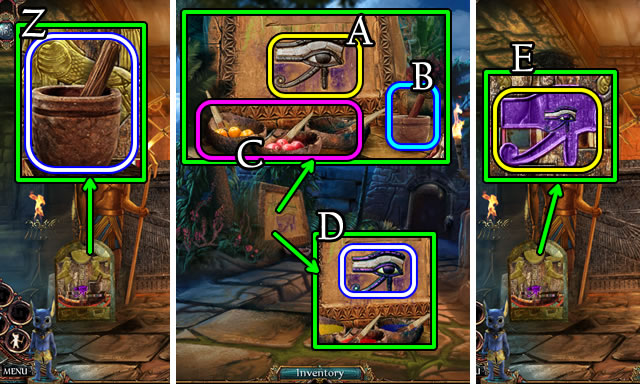
- Take the PESTLE (Z).
- Walk down.
- Place the EYE OF HORUS (A), PESTLE (B), YELLOW BERRIES, RED BERRIES and BLUE BERRIES (C).
- Crush the berries with the pestle; apply red and blue paint; take the PAINTED HORUS EYE (D).
- Walk forward.
- Place the PAINTED HORUS EYE (E) for a puzzle.

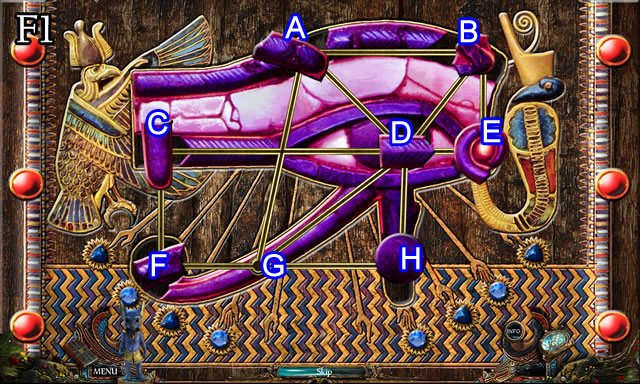
- Solution (F1). H-D-E-B-A-G-F-C-D-H-G-F-C-D-A-G-H-D-G-A-D-H-G.

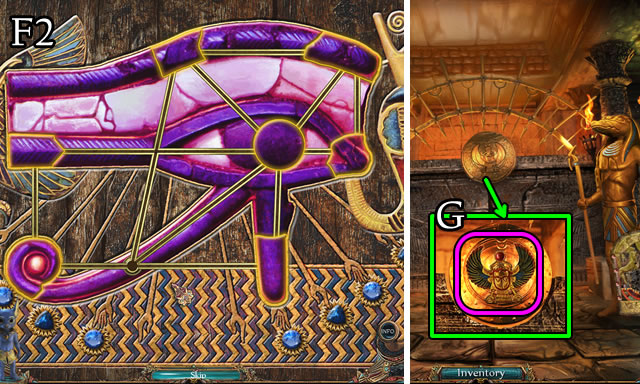
- Solved (F2).
- Place the SCARAB (G).
- Walk forward.

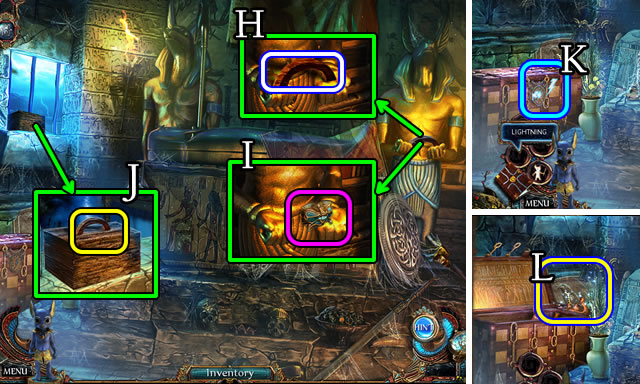
- Take the HANDLE (H); place the CHEST (I).
- Place the HANDLE (J), open, take the SCRAPER.
- Select and place Nubi’s lightning skill (K).
- Play the HOP (L); receive a SOBEK SYMBOL.
- Walk down twice.

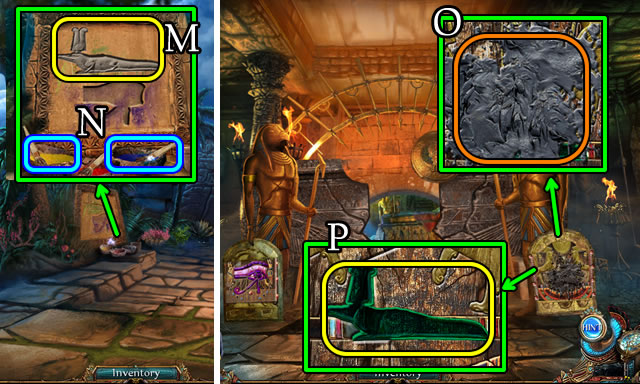
- Place the SOBEK SYMBOL (M); apply yellow and blue paint (N); take the COLORED SOBEK SYMBOL.
- Walk forward.
- Use the SCRAPER 3x (O).
- Place the COLORED SOBEK SYMBOL (P) for a puzzle.

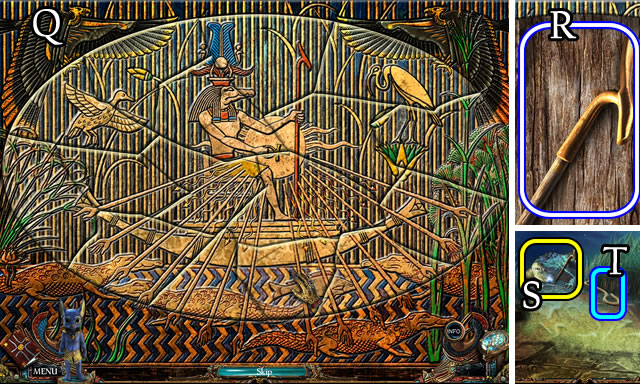
- Solution (Q).
- Take SOBEK’S STAFF (R).
- Return to the Riverbank.
- Place SOBEK’S STAFF (S); grab the rope (T); approach the ship.

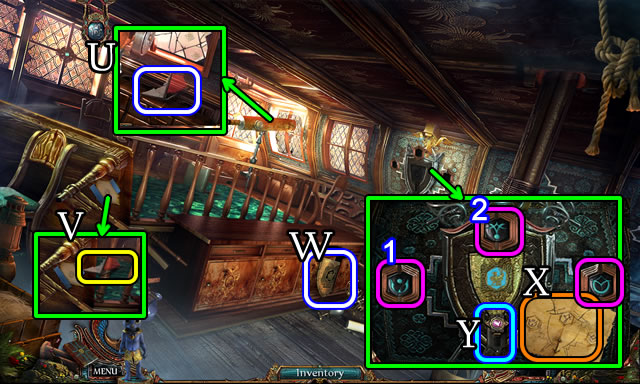
- Select the telescope; take the GLASS (U).
- Use the GLASS (V); take the CODE.
- Take the SHIELD (W).
- Place the SHIELD and CODE (X).
- Scroll the symbol buttons (1-2-3) to match the code.
- Slide the control (Y).
- Enter the Secret Room.

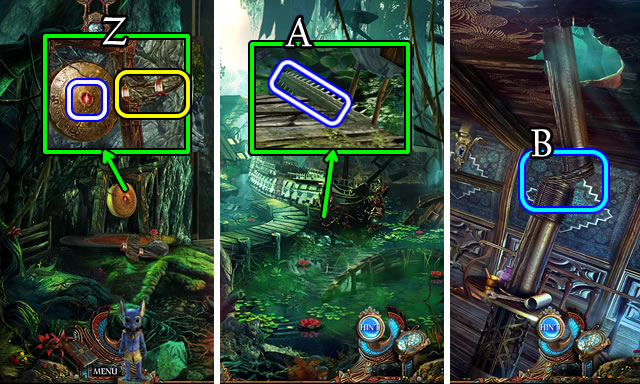
- Select and place the gong striker; take the JAGUAR EYE (Z).
- Take the SAWFISH ROSTRUM (A).
- Enter the Royal Griffin.
- Use the SAWFISH ROSTRUM (B).
- Walk down.

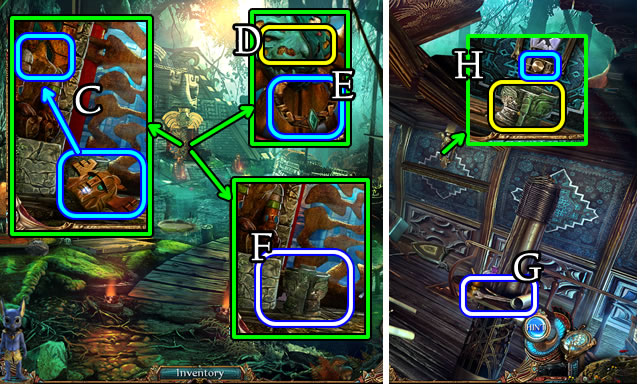
- Replace the head (C).
- Place the JAGUAR EYE (D); select the knocker (E).
- Take the BOWL (F).
- Return to the Royal Griffin.
- Grab the WRENCH (G).
- Place the BOWL; use the WRENCH (H); take the BOWL OF OIL.
- Walk down.

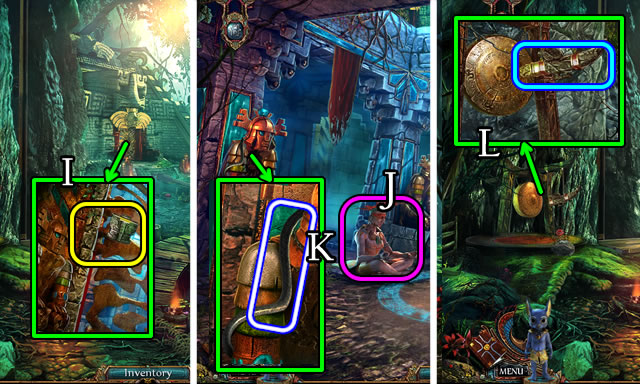
- Use the BOWL OF OIL (I).
- Walk forward.
- Speak to the Priest (J); receive a GONG HAMMER HEAD.
- Take GAS COLLECTOR KIT 1/5 (K).
- Walk down.
- Place the GONG HAMMER HEAD; select the striker (L).
- Return to the Royal Griffin.

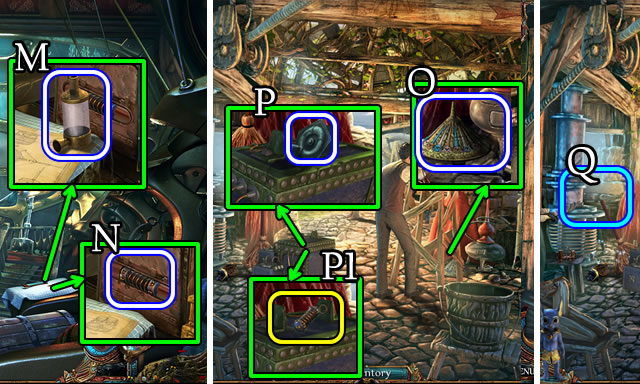
- Take GAS COLLECTOR KIT 2/5 (M) and the DRAINED BATTERY (N).
- Walk down; enter the Peristyle.
- Take GAS COLLECTOR KIT 3/5 (O).
- Take GAS COLLECTOR KIT 4/5 (P); place the DRAINED BATTERY (P1).
- Play the HOP (Q); receive a CHARGED BATTERY.
- Return to the Royal Griffin.

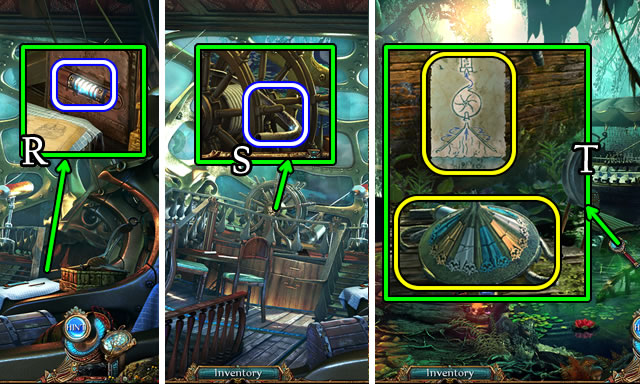
- Place the CHARGED BATTERY (R). Receive a SKETCH.
- Take GAS COLLECTOR KIT 5/5 (S).
- Walk down.
- Place the GAS COLLECTOR KIT 5/5 and the SKETCH (T) for a mini-game.

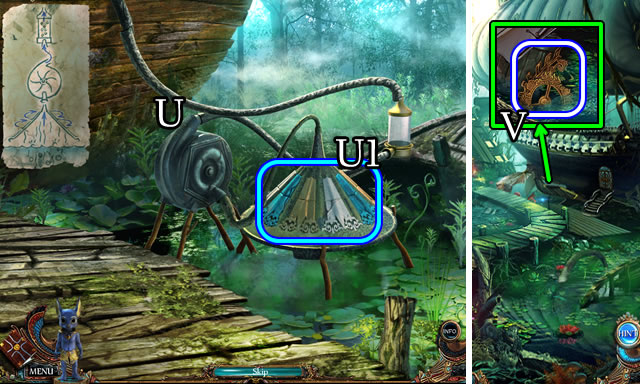
- Solution (U). Align the colored panels and base (U1).
- Take the TOKEN OF ALLIANCE (V).
- Walk forward.

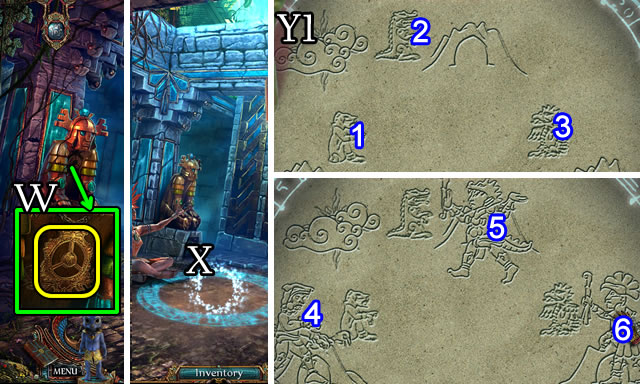
- Place the TOKEN OF ALLIANCE (W).
- Select (X) for a mini-game.
- Solution, part one (Y1). Select each tribe (1-2-3), then elders (4-5-6).

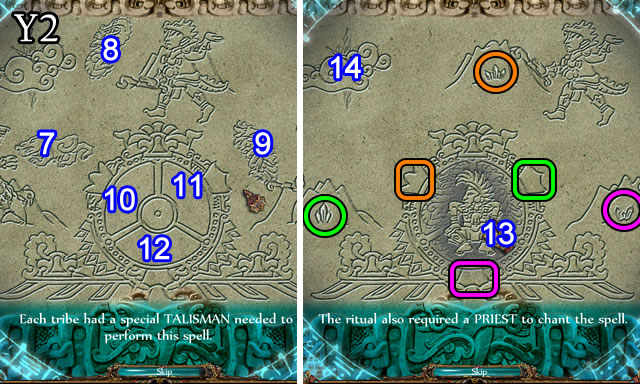
- Solution, part 2 (Y2). Place the talismans in sections (7-12, 8-10, 9-11). Select the priest (13). Place the crystals in their corresponding color area. Move the clouds (14); select the sun.

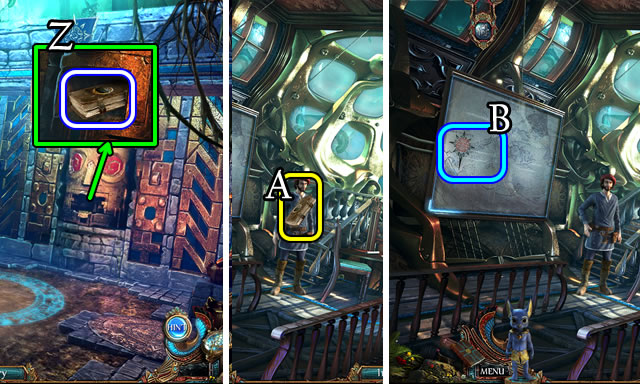
- Take the CROCODILE TRIBE BOOK (Z).
- Return to the Royal Griffin.
- Give the CROCODILE TRIBE BOOK (A).
- Enter the map (B).
Chapter 3: Crocodile Tribe

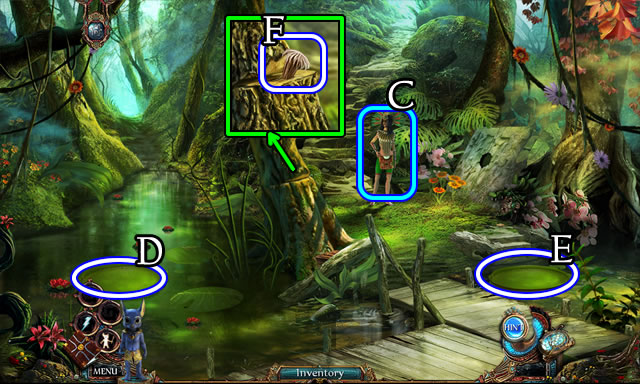
- Speak with the Princess (C).
- Take LILY PAD 1/2 (D) and LILY PAD 2/2 (E).
- Remove and take the WEDGE (F).
- Walk forward.

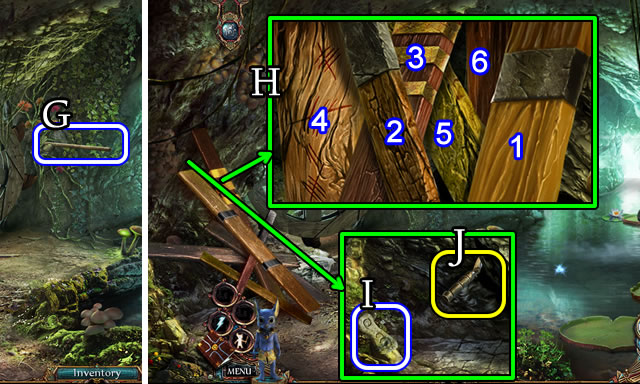
- Take the ROD (G).
- Remove the boards (H) in order (1-2-3-4-5).
- Take CARVED STONE 1/2 (I). Place the ROD (J); receive a SICKLE.

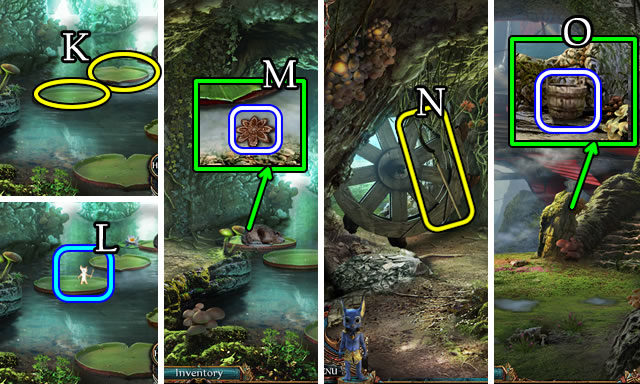
- Place LILY PAD 2/2 (K).
- Select and place Nubi’s Fetch Item skill. (L).
- Take the WOODEN FLOWER (M).
- Use the SICKLE (N).
- Walk forward.
- Take the BUCKET (O).
- Walk down 2x.

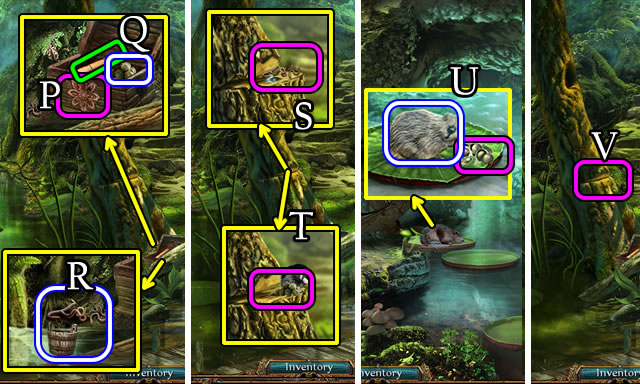
- Place the WOODEN FLOWER (P). Examine the scroll; take the SEEDS (Q).
- Place the BUCKET (R); receive WORMS.
- Place the WORMS (S); place the SEEDS (T). Take the SHELLED SEEDS.
- Walk forward.
- Give the SHELLED SEEDS; take the BEAVER (U).
- Walk down.
- Place the BEAVER (V).
- Walk left.
- Speak to the Princess.

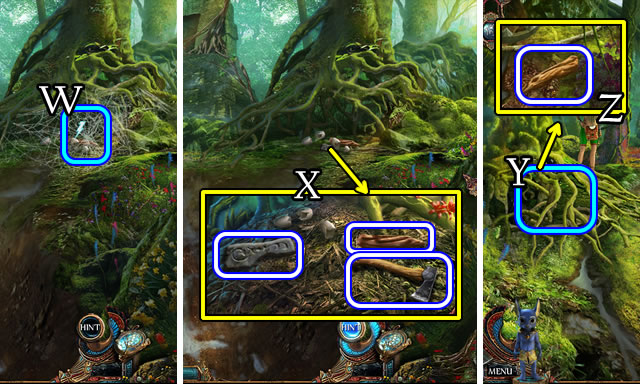
- Select and place Nubi’s lightning skill (W).
- Take the CARVED STONE 2/2, HATCHET and RUNG 1/3 (X).
- Move the roots (Y); take RUNG 2/3 (Z).
- Return to the Cliff.

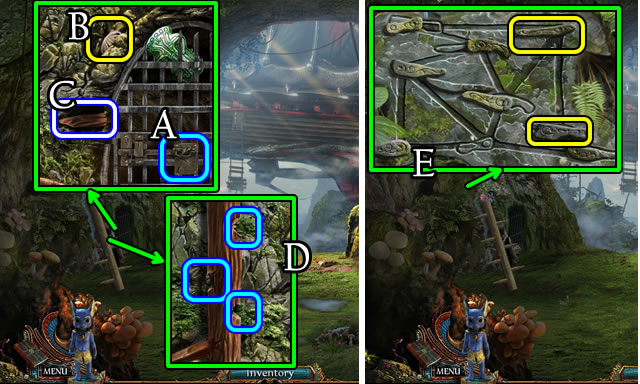
- Select the latch (A); place the WEDGE (B); take RUNG 3/3 (C).
- Use the HATCHET 3x (D); place RUNG 3/3.
- Place CARVED STONE 2/2 (E). for a puzzle.

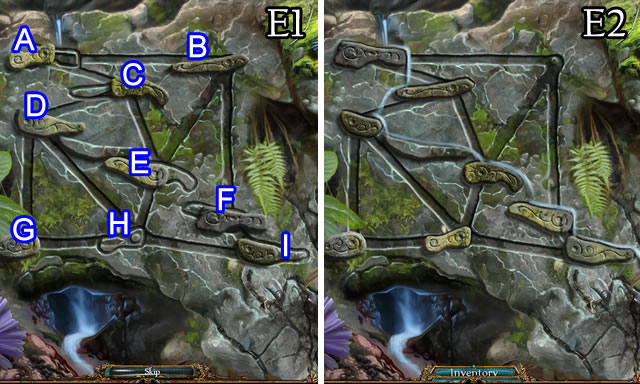
- Solution (E1). D-C-A-B-F-I-H-D-C-A-B-F-I-H-E-B-A-C E-H-D-C-A-B-E-H-G-D-H-I-F-B-E-H-D-G.
- Solved (E2).

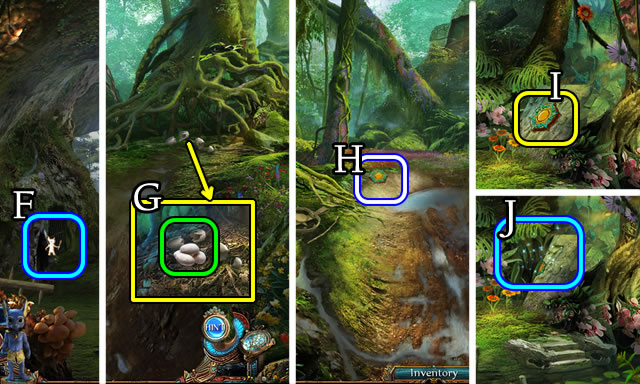
- Select and place Nubi’s Fetch Item skill (F). Receive CROCODILE EGGS.
- Return to the Nest.
- Place the CROCODILE EGGS (G).
- Take the STONE SUN (H).
- Walk down.
- Place the STONE SUN (I).
- Play the HOP (J); receive a SACK.
- Walk forward.

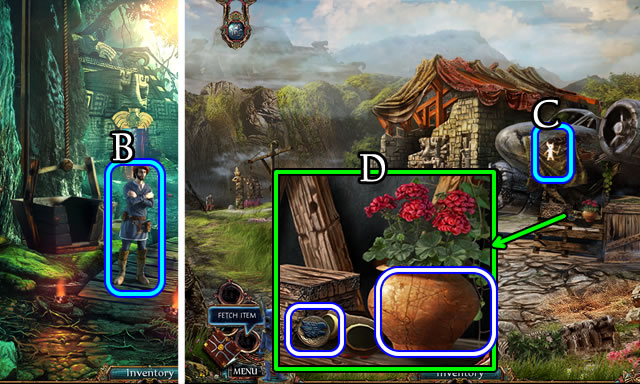
- Place the SACK (K).
- Select and place the rocks 3x (L). Select, then take the HEAVY SACK.
- Walk forward.
- Place the HEAVY SACK (M); use the HATCHET (N).
- Enter Cortes’s Airship.
- Take the COIN (O); play the HOP (P); receive a LEVER.
- Return to the Nest.

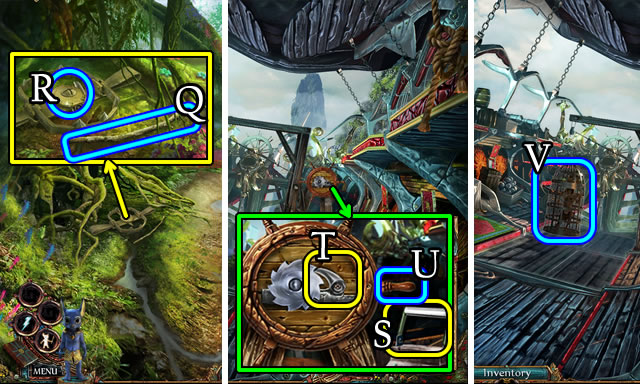
- Place the stick (Q) on the trap; use the COIN (R).
- Take the PAWL and BOLT.
- Return to Cortes’s Airship.
- Place the LEVER (S), PAWL and BOLT (T). Select the handle (U). Pull the lever.
- Select the cage (V) for a puzzle.

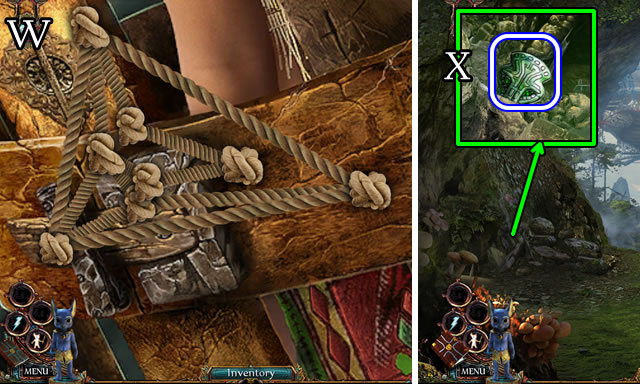
- Solution (W).
- Walk down.
- Take the CROCODILE SYMBOL (X).
- Return to the Nest.

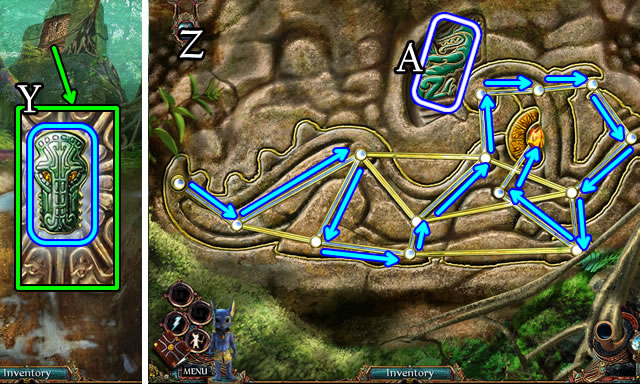
- Place and select the CROCODILE SYMBOL (Y) for a puzzle.
- Solution (Z).
- Take the CROCODILE TALISMAN (A).
- Select the scene to return to the Swamp.


- Speak to Leonardo (B).
- Enter the Peristyle; walk forward.
- Select and place Nubi’s Fetch Item skill (C). Receive a CLOTH.
- Take DISC 1/3. Remove the flowers; take the POT (D).
- Walk left. Speak to the caged man.

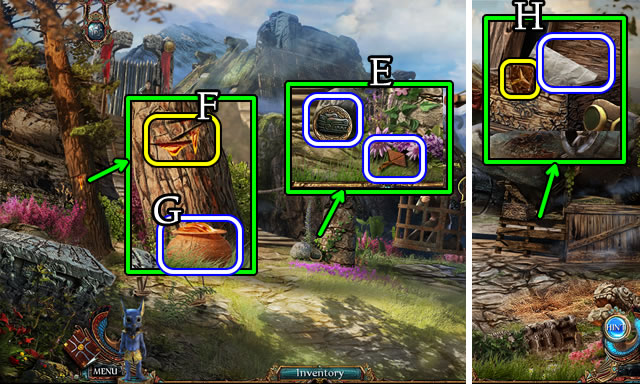
- Take the SPECIAL-SHAPED KEY and DISCS 2/3 (E).
- Place the POT (F); take the POT OF RESIN (G).
- Walk down.
- Use the SPECIAL-SHAPED KEY; take the CODE (H).
- Return to the Sanctuary.

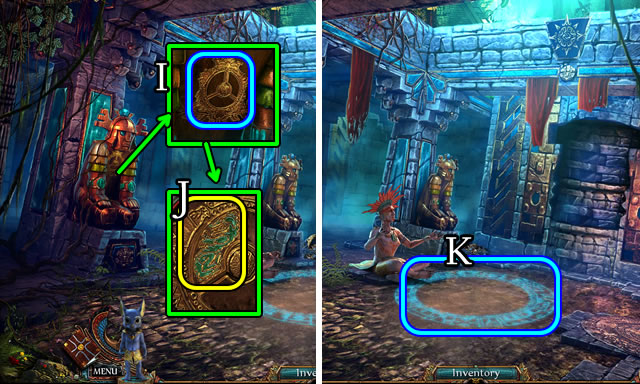
- Select (I) and place the CROCODILE TALISMAN (J).
- Select (K) for a mini-game.

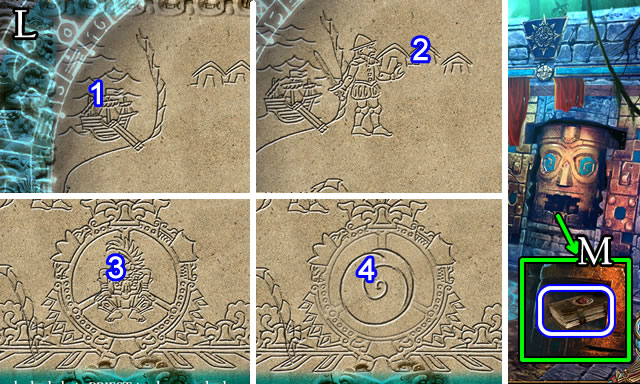
- Solution (L). Select the ship (1), the village (2), the priest (3), then the hole (4).
- Take the JAGUAR TRIBE BOOK (M).
- Return to the Royal Griffin.

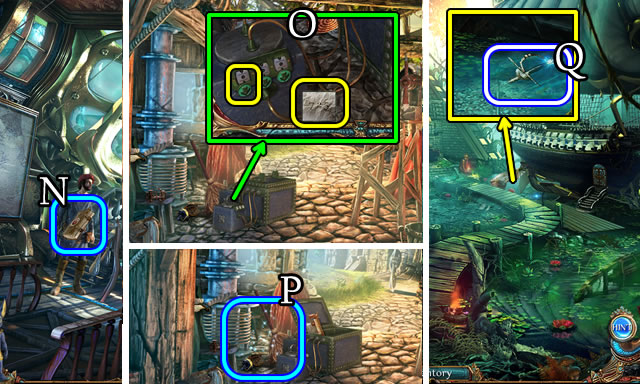
- Give the JAGUAR TRIBE BOOK (N); receive a CYLINDER.
- Return to the Peristyle.
- Place the CYLINDER and CODE (O). Set the cylinders to 7-2-5.
- Play the HOP (P). Receive a MAGNET ROD.
- Walk down.
- Place the MAGNET ROD (Q); receive a SWORD.
- Return to the Suspension Bridge.

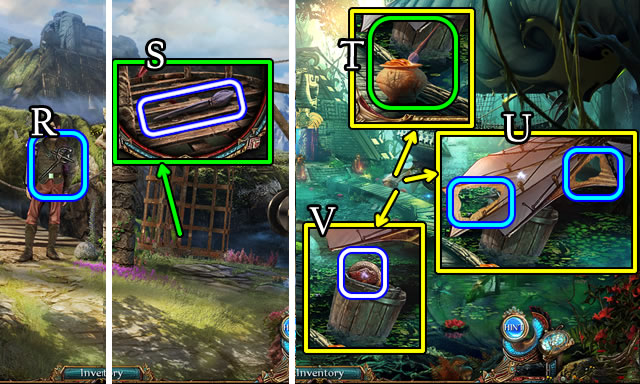
- Give the SWORD (R).
- Take the BRUSH (S).
- Walk down 3x.
- Place the POT OF RESIN and BRUSH (T). Use the BRUSH (U). Place the CLOTH.
- Take DISCS 3/3 (V).
- Return to the Main Square.

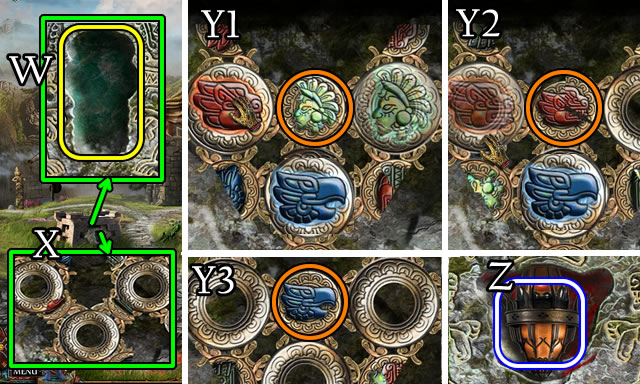
- Place the CROCODILE SYMBOL (W).
- Place DISCS 3/3 (X) for a puzzle.
- Solution (Y1-Y2-Y3).
- Take the LANTERN (Z).
- Return to the Royal Griffin.

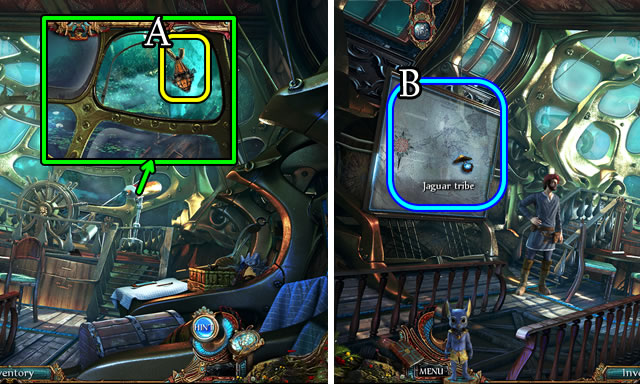
- Open the window; place the LANTERN (A).
- Enter the map (B).
Chapter 4: Jaguar Tribe

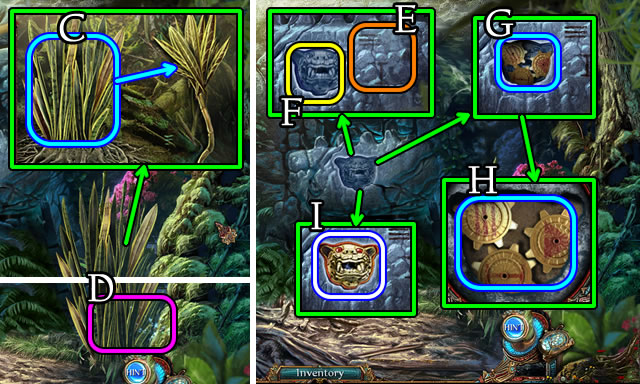
- Place the leaves (C) 3x; take the BROOM.
- Play the HOP (D); receive a JAGUAR SYMBOL.
- Use the BROOM (E); place the JAGUAR SYMBOL (F).
- Select the gears (G), select 2x (H); take the JAGUAR SYMBOL (I).
- Walk forward.

- Take the CRYSTAL FACET and ROD (J).
- Walk down.
- Use the ROD (K). Take the WOODEN PLANK (L).
- Walk forward.
- Place the WOODEN PLANK (M).
- Select and place Nubi’s Fetch Item skill (N).
- Select (O) for a puzzle.

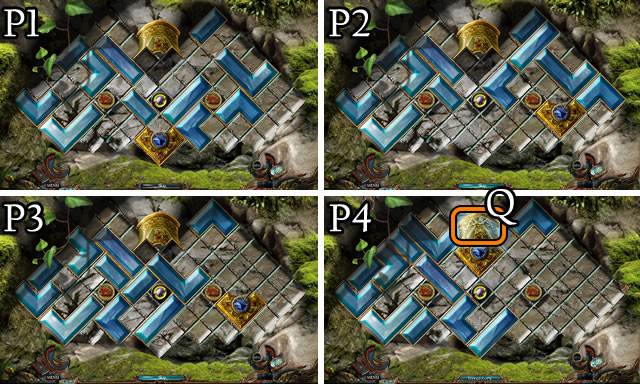
- Solution (P1-P2-P3-P4).
- Take Nubi’s item (Q).

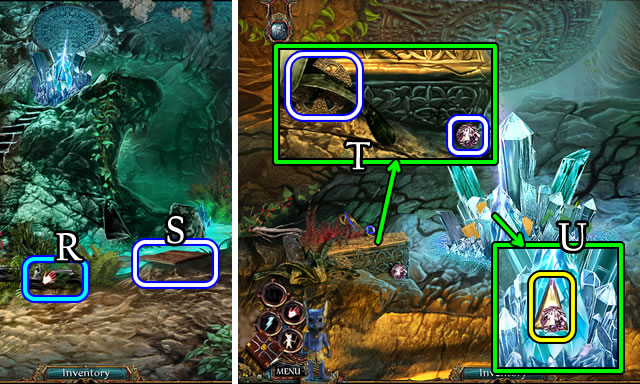
- Select and place Nubi’s Levitation skill (R).
- Take the HALF PLANK (S).
- Walk forward.
- Take the CRYSTAL and BROWN STANDARD SYMBOL (T).
- Place the CRYSTAL FACET; insert the CRYSTAL (U).
- Take the RECHARGED CRYSTAL.
- Walk down, then left.

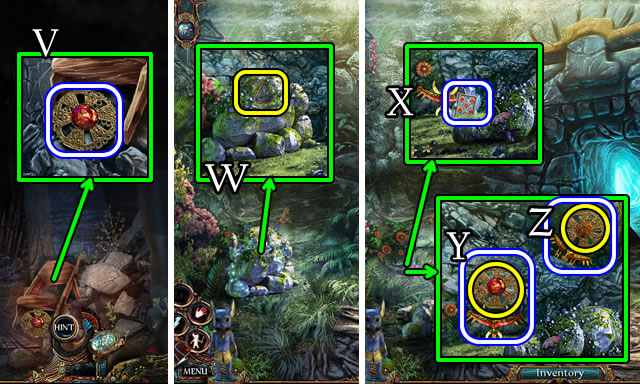
- Take the RED STANDARD SYMBOL (V).
- Walk down 2x.
- Place the RECHARGED CRYSTAL (W).
- Take the PUZZLE PIECE (X).
- Place the RED STANDARD SYMBOL (yellow); take the RED STANDARD (Y).
- Place the BROWN STANDARD SYMBOL (yellow); take the BROWN STANDARD (Z).
- Return to the Crystal Precipice.

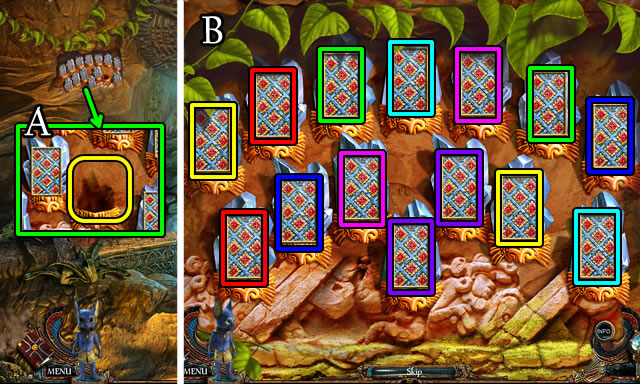
- Place the PUZZLE PIECE (A) for a puzzle.
- Solution (B).
- Walk down.

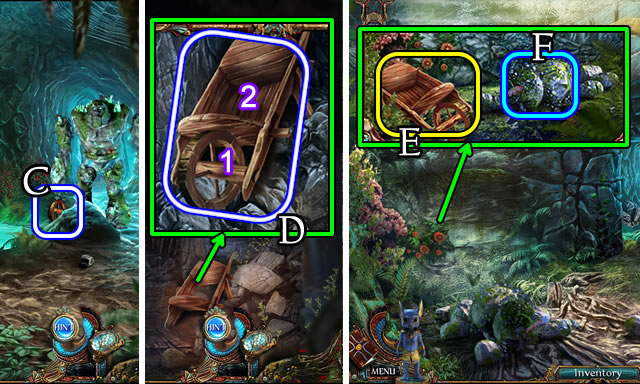
- Take the WHEEL (C).
- Walk left.
- Place the WHEEL (1) and HALF PLANK (2). Take the EMPTY WHEELBARROW (D).
- Walk down 2x.
- Place the EMPTY WHEELBARROW (E).
- Select and place the rocks 3x (F). Take the FULL WHEELBARROW.
- Walk forward.

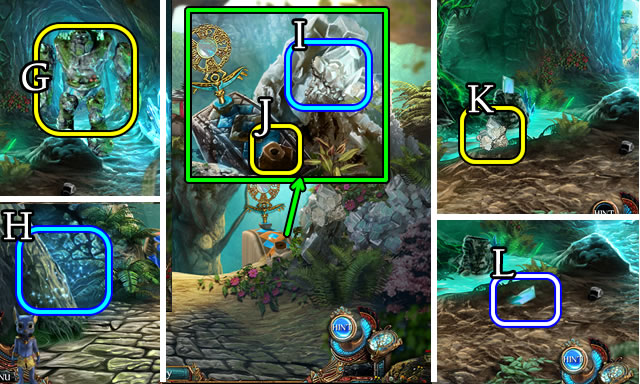
- Give the FULL WHEELBARROW (G).
- Enter the Valley.
- Play the HOP (H); receive a JAGUAR HEAD.
- Use the ROD (I); take the SALT BLOCK.
- Place the BROWN STANDARD (J).
- Walk down.
- Place the SALT BLOCK (K); take the CRYSTAL (L).
- Walk to the Crystal Precipice.

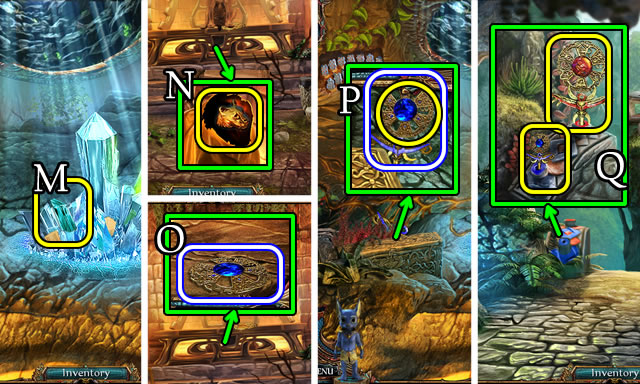
- Place the CRYSTAL (M).
- Return to Jaguar Hall.
- Place the JAGUAR HEAD (N).
- Take the BLUE STANDARD SYMBOL (O).
- Return to the Crystal Precipice.
- Place the BLUE STANDARD SYMBOL (yellow); take the BLUE STANDARD (P).
- Return to the Valley.
- Place the RED STANDARD and BLUE STANDARD (Q).
- Return to Jaguar Hall.

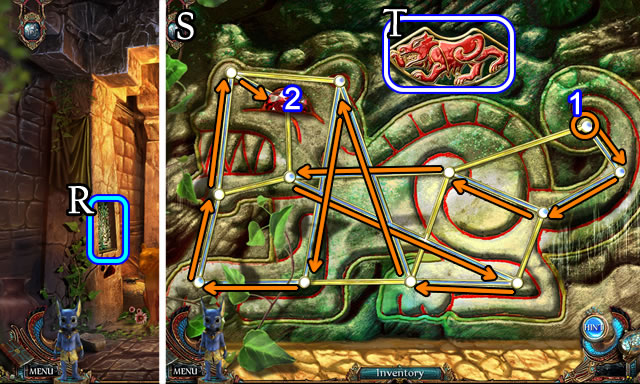
- Select (R) for a puzzle.
- Solution (S). 1-2.
- Take the JAGUAR TALISMAN (T).
- Select the scene to return to the Swamp.

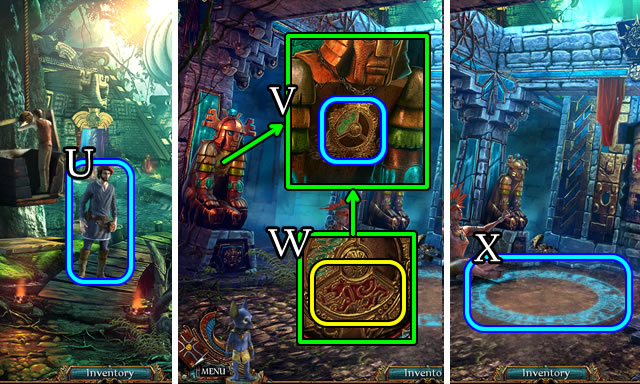
- Speak to Leonardo (U).
- Enter the Sanctuary.
- Select (V) and place the JAGUAR TALISMAN (W).
- Select (X) for a mini-game.

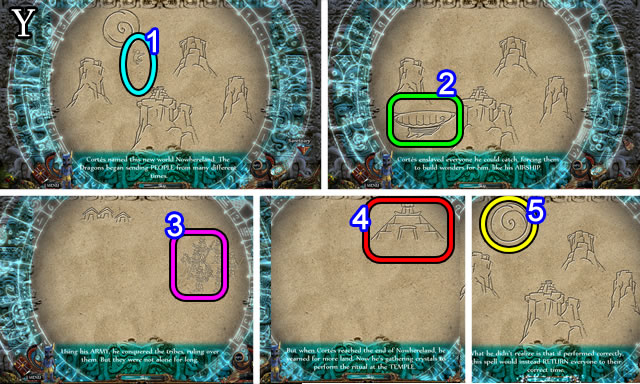
- Solution. (Y) Select the people (1), airship (2), army (3), temple (4) and hole (5).

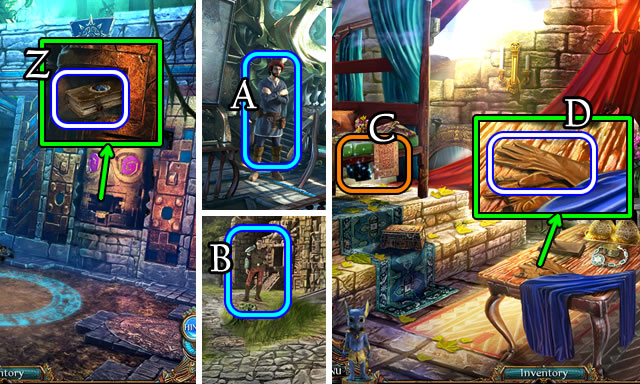
- Take the EAGLE TRIBE BOOK (Z).
- Walk to the Royal Griffin.
- Give (A) the EAGLE TRIBE BOOK.
- Walk to the Main Square.
- Speak to the man (B); receive a PHIAL.
- Enter Cleopatra’s House.
- Play the HOP (C); receive FLOWER 1/3.
- Take the GLOVE (D).
- Walk to the Suspension Bridge.

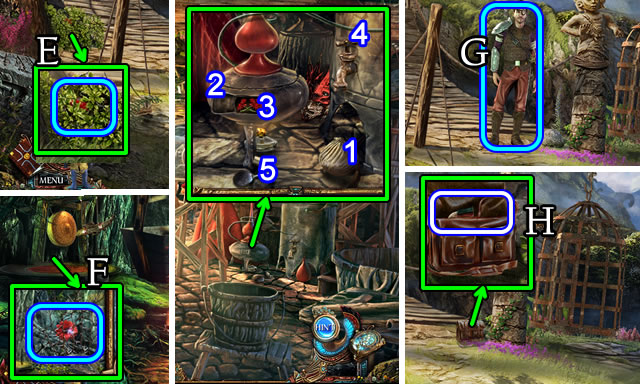
- Use the GLOVE (E); take FLOWERS 2/3.
- Return to the Swamp.
- Use the GLOVE (F); take FLOWERS 3/3.
- Walk to the Peristyle.
- Place the PHIAL (1); open the hatch (2); place FLOWERS 3/3 (3); close the hatch and turn the tap (4); place the attachment (5); take the PERFUME.
- Return to the Suspension Bridge.
- Give the PERFUME (G).
- Open the satchel; take the WOODEN DONKEY PART (H).
- Return to Cleopatra’s House.

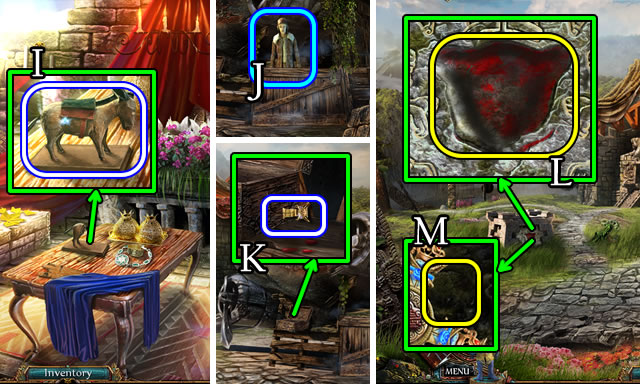
- Place the WOODEN DONKEY PART; take the WOODEN DONKEY (I).
- Walk down.
- Give the WOODEN DONKEY (J); take the PUZZLE FIGURINE (K).
- Place the JAGUAR SYMBOL (L).
- Place the PUZZLE FIGURINE (M) for a puzzle.

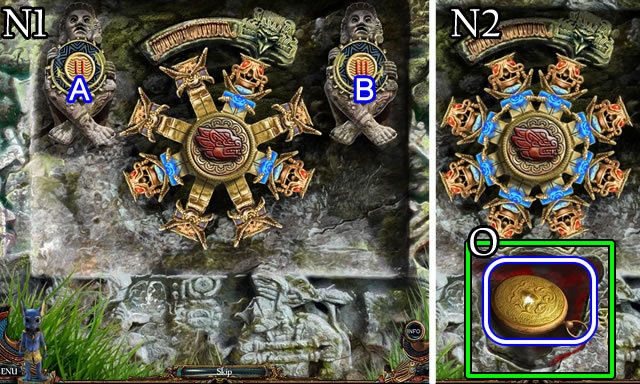
- Solution (N1). Bx5.
- Solved (N2).
- Take the COMPASS (O).
- Return to the Royal Griffin.

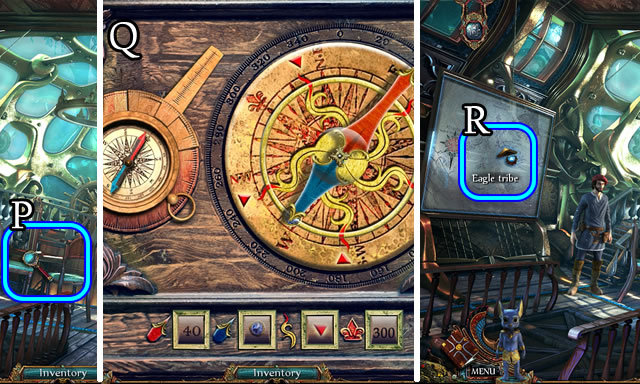
- Place the COMPASS (P) for a puzzle.
- Solution (Q).
- Enter the map (R).
Chapter 5: Eagle Tribe

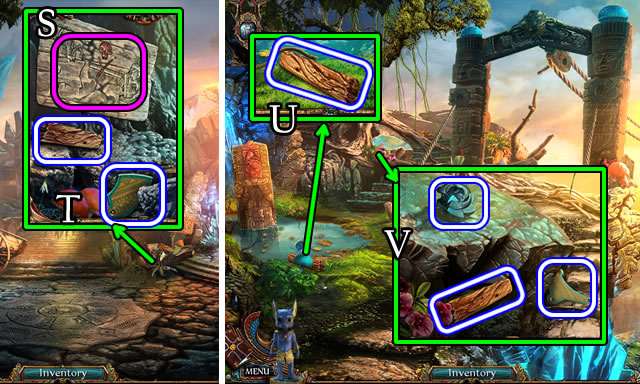
- Read the sign (S). Take FIREWOOD 1/3 and LOCK PIECE 1/2 (T).
- Walk right.
- Take FIREWOOD 2/3 (U).
- Take FIREWOOD 3/3, LOCK PIECES 2/2 and KEY 1/2 (V).
- Walk down.

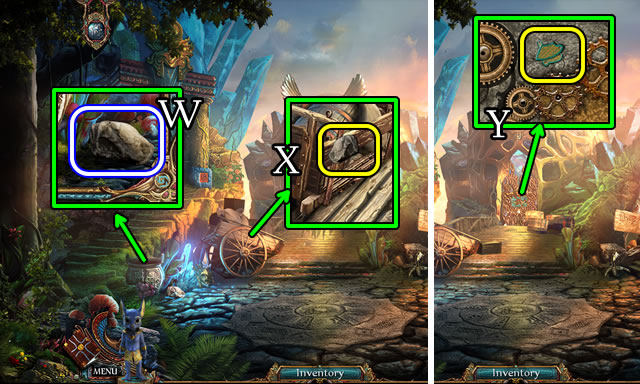
- Take the ROCK (W).
- Use the ROCK (X).
- Place LOCK PIECES 2/2 (Y) for a puzzle.

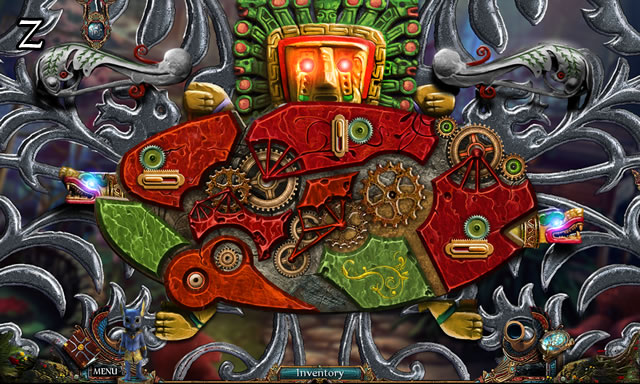
- Solution (Z).
- Enter the Greenhouse.

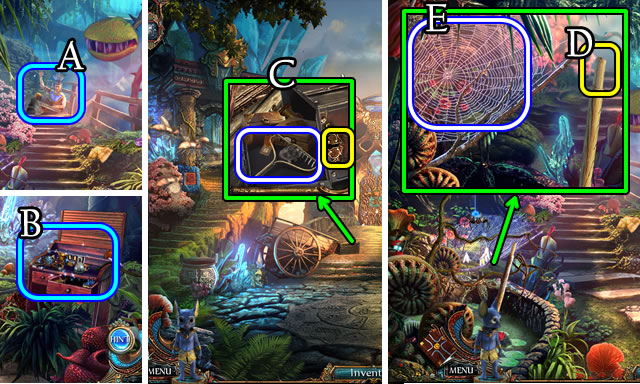
- Speak to the Shaman (A).
- Play the HOP (B); receive a KEY.
- Walk down.
- Use the KEY; take the RAKE HEAD (C).
- Walk forward.
- Place the RAKE HEAD (D). Take the RAKE and SPIDER SILK (E).
- Return to the Ravine.

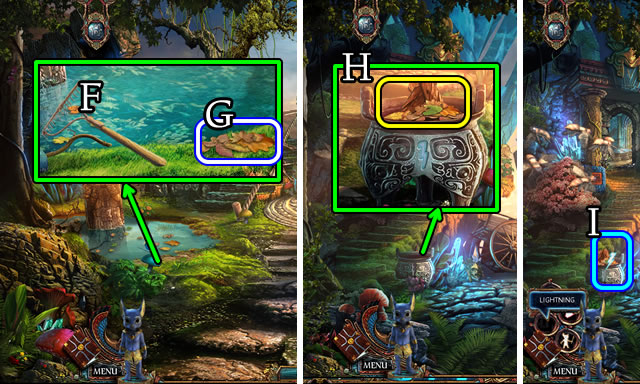
- Use the RAKE 3x (F). Take the WET LEAVES (G).
- Walk down.
- Place FIREWOOD 3/3 and WET LEAVES (H).
- Select and place Nubi’s lightning skill (I).
- Walk left.

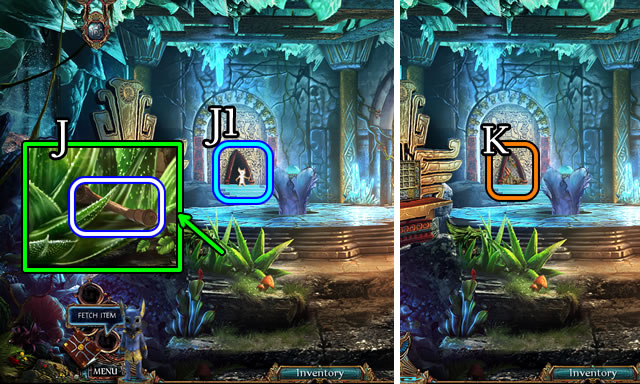
- Take the HANDLE (J).
- Select and place Nubi’s Fetch Item skill (J1).
- Select (K) for a puzzle.

- Solution (L1-L2-L3-L4).
- Take Nubi’s item (M).
- Return to the Greenhouse.


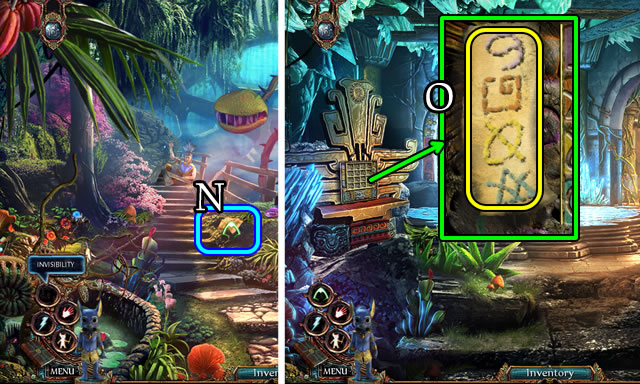
- Select and place Nubi’s Invisibility skill (N); receive NOTES.
- Walk down, then left.
- Place the NOTES (O) for a puzzle.

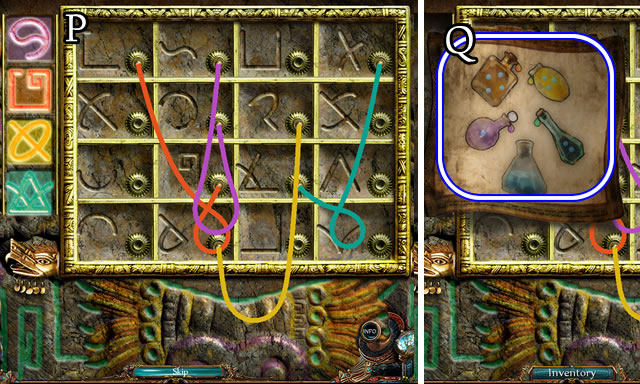
- The symbol positions are random. One possible Solution (P).
- Take the RECIPE (Q).
- Return to the Ravine.

- Place the HANDLE and SPIDER SILK (R); turn the handle.
- Take the SCISSORS HALF and FRAME (S).
- Walk down.
- Place the SCISSORS HALF, add the bolt (T); take the SCISSORS.
- Walk right.

- Place the FRAME (U). Use the SCISSORS (1-2-3). Place the vines (4-5-6) on the frame (V); take the FIXED BOTTOM.
- Place the FIXED BOTTOM (W).
- Ride to the Pedestal.
- Take the DESK PUZZLE PIECE (X).
- Return to the Greenhouse.

- Place the DESK PUZZLE PIECE (Y) for a puzzle.
- Solution (Z). Ax2-Bx2-Cx3.

- Place the RECIPE (A). Place (1-2-3-4) in the bottle (B), add the cork (5). Take the ANTIDOTE.
- Use the SCISSORS (C); take the PITCHER PLANT.
- Place the ANTIDOTE (D).
- Take the BANDAGE (E).
- Walk down, then left.

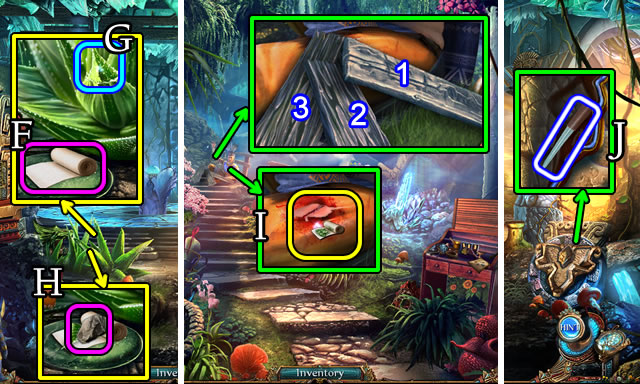
- Place the BANDAGE (F); select the plant part (G) and place on the bandage; use the ROCK 2x (H). Take the HERBAL BANDAGE.
- Return to the Greenhouse.
- Remove the boards (1-2-3); place the HERBAL BANDAGE (I).
- Walk down, then left.
- Take the PIPETTE (J).
- Return to the Greenhouse.

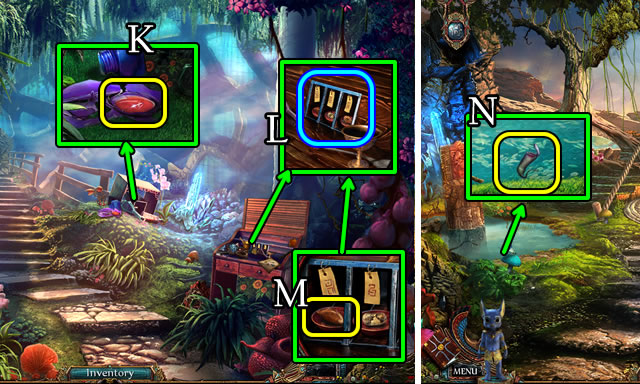
- Place the PIPETTE (K); receive SERUM.
- Select (L); place the SERUM (M); take the MAGIC SEED.
- Return to the Ravine.
- Place the PITCHER PLANT (N); receive a FILLED PITCHER PLANT.
- Return to the Pedestal.

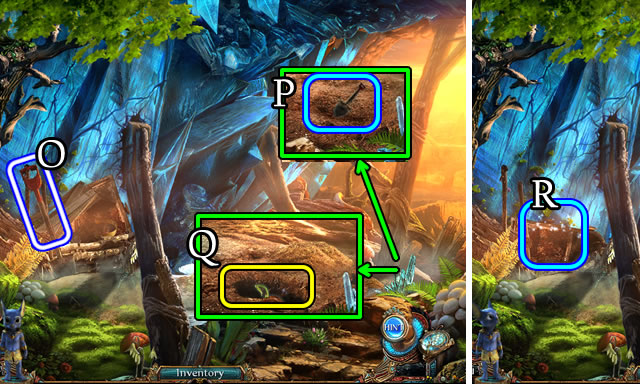
- Grab the SPADE (O).
- Use the SPADE (P); place the MAGIC SEED (Q); use the SPADE 2x; place the FILLED PITCHER PLANT.
- Play the HOP (R); receive the EAGLE SYMBOL.
- Return to the Hall of Eagles.

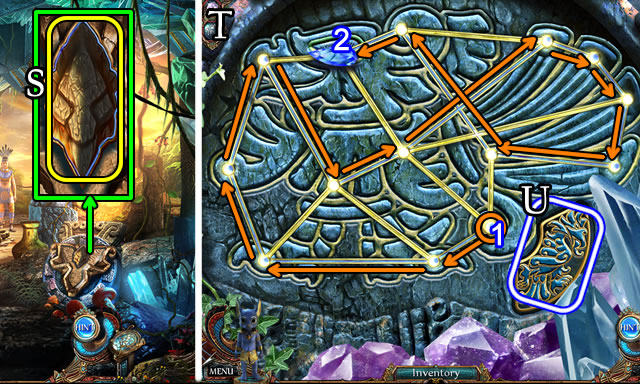
- Place the EAGLE SYMBOL (S) for a puzzle.
- Solution (T).
- Take the EAGLE TALISMAN (U).
- Select the scene to launch the airship.
Chapter 6: The Ceremony

- Take the CROWBAR (V).
- Take BRACE 1/2 (W). Use the SPADE 2x (X); take the JAGUAR STATUE (Y).
- Walk forward.
- Speak with the Priest (Z).

- Take the RED HEADDRESS (A).
- Select and place Nubi’s Invisibility skill (B).
- Pick up BRACE 2/2 (C).
- Use the CROWBAR (D).
- Place BRACE 2/2 (1) Place the color-coded rockets (2); place the fuse (3).
- Select and place Nubi’s lightning skill (E).
- Walk forward.

- Take KEY 2/2 (F).
- Take the PUZZLE PIECE (G); place the RED HEADDRESS.
- Walk down.
- Place the PUZZLE PIECE (H) for a puzzle.

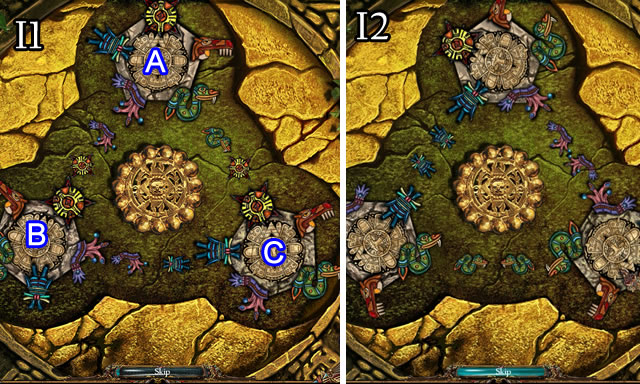
- Solution (I1). A-Bx2-Cx3.
- Solved (I2). Take the CROCODILE STATUE.
- Walk down.

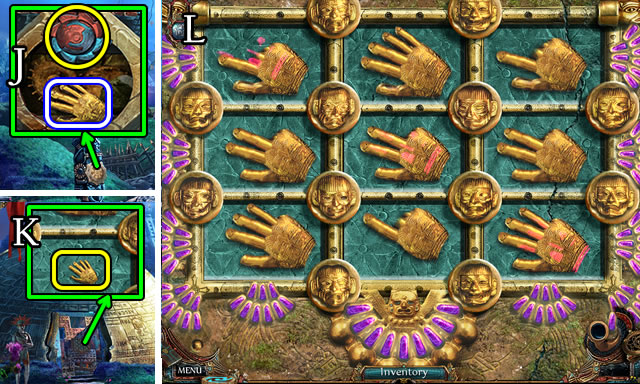
- Place KEY 2/2; take the HAND TOKEN (J).
- Place the HAND TOKEN (K) for a puzzle.
- This puzzle solution is random. One possible solution (L).
- Enter the Ritual Sphere.

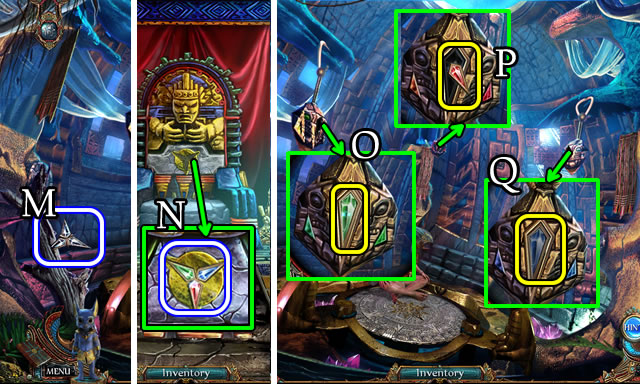
- Grab the STAR SYMBOL (M).
- Return to the Main Temple.
- Place the STAR SYMBOL (N); take the RED CRYSTAL, GREEN CRYSTAL and BLUE CRYSTAL.
- Return to the Ritual Sphere.
- Place the GREEN CRYSTAL (O), RED CRYSTAL (P) and BLUE CRYSTAL (Q).

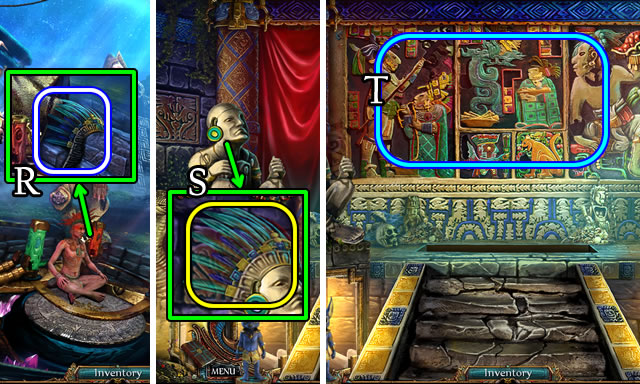
- Take the BLUE HEADDRESS (R).
- Return to the Main Temple.
- Place the BLUE HEADDRESS (S) for a puzzle (T).

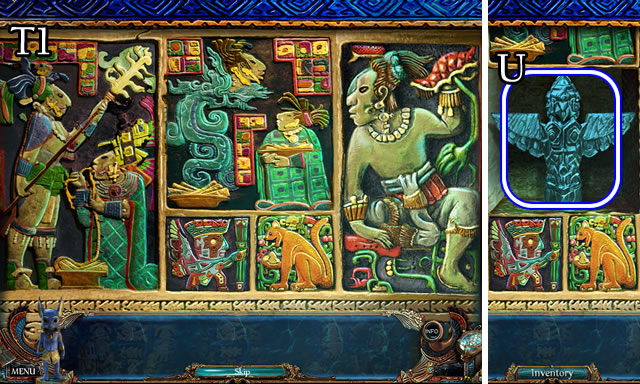
- Solution (T1).
- Take the EAGLE STATUE (U).
- Return to the Ritual Sphere.

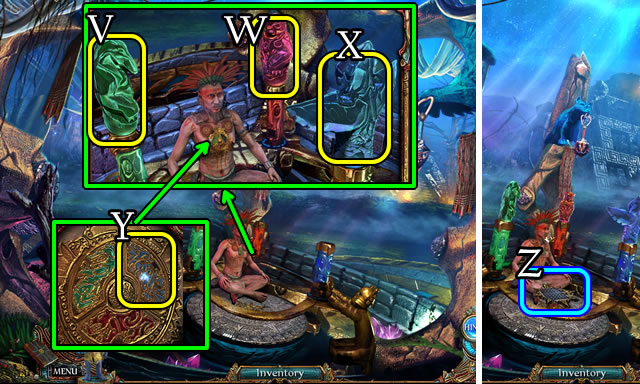

- Place the CROCODILE STATUE (V), JAGUAR STATUE (W) and EAGLE STATUE (X).
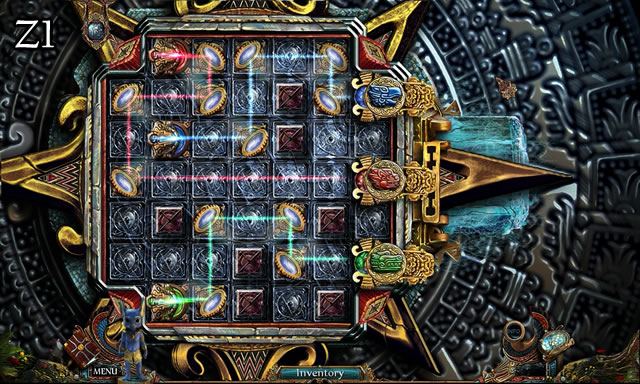
- Place the EAGLE TALISMAN (Y) to open a puzzle (Z).
- Solution (Z1).
- Congratulations! You have completed playing The Secret Order: Beyond Time.





 The Keepers: Lost Progeny Walkthrough, Guide, & Tips
 Lost in the City: Post Scriptum Walkthrough, Guide, & Tips
 Robinson Crusoe and the Cursed Pirates Walkthrough, Guide, & Tips
 Mystery Murders: The Sleeping Palace Walkthrough, Guide, & Tips
 Pachinko Pop Tips and Tricks, Guide, & Tips