House of 1000 Doors: Evil Inside Walkthrough, Guide, & Tips
House of 1000 Doors: Evil Inside Walkthrough

Welcome to the House of 1000 Doors: Evil Inside Walkthrough
A meteorite devastates a town, yanking Emily from her normal life.
Whether you use this document as a reference when things get difficult or as a road map to get you from beginning to end, we’re pretty sure you’ll find what you’re looking for here.
This document contains a complete House of 1000 Doors: Evil Inside game walkthrough featuring annotated screenshots from actual gameplay!
We hope you find this information useful as you play your way through the game. Use the walkthrough menu below to quickly jump to whatever stage of the game you need help with.
Remember to visit the Big Fish Games Forums if you find you need more help. Have fun!
This walkthrough was created by Alawar, and is protected under US Copyright laws. Any unauthorized use, including re-publication in whole or in part, without permission, is strictly prohibited.
General Tips
- Welcome to the official strategy guide for House of 1000 Doors: Evil Inside.
- This guide DOES NOT mention each time you have to zoom into a location; instead, screenshots identify these locations.
- Hidden-object puzzle scenes are referred to as HOPS. This guide DOES mention when a HOPS is available and the inventory item you’ll find.
- This guide provides step-by-step solutions for every puzzle that isn’t random. Please read the in-game instructions for each mini-game.
Chapter 1: New Family

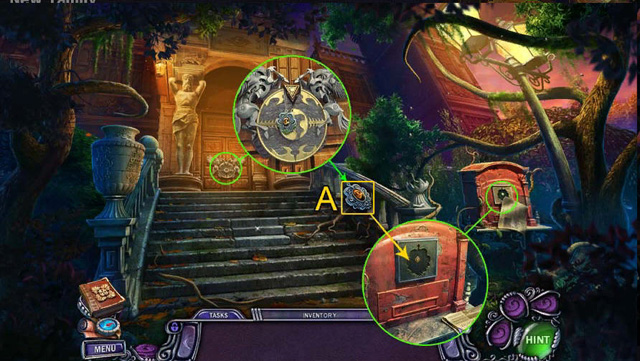
- Take the locket (A) that’s on the front door.
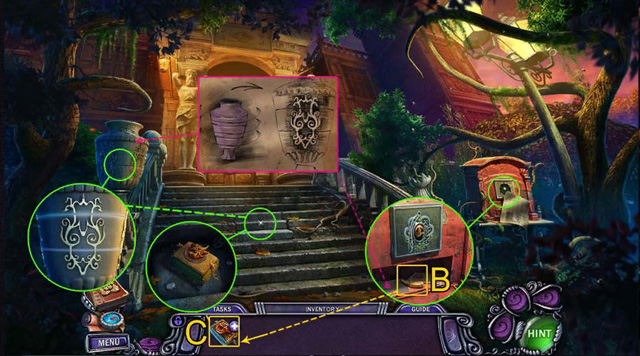
- Place the locket (A) on the mailbox. Read the hint regarding the vase.
- Take the horn (B).
- Rotate the parts of the vase according to the hint.
- Take the case (C). Select it in your inventory. Place the horn (B) on it.
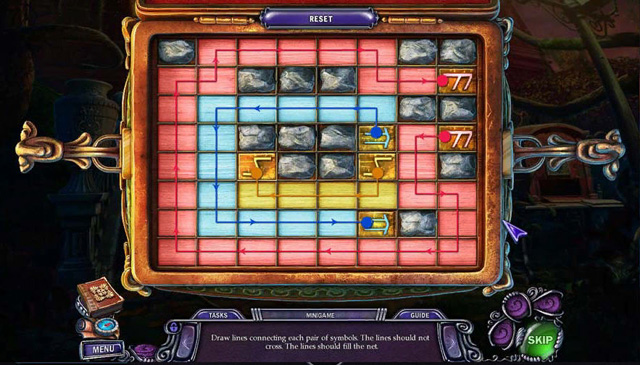
- Complete the mini-game.
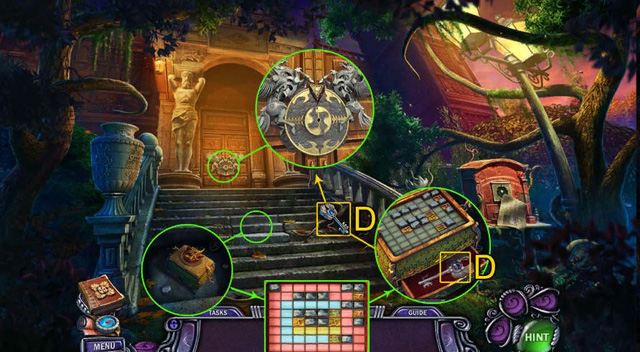
- Take the door key (D).
- Use the door key (D) to open the front door.
- Enter the lobby.
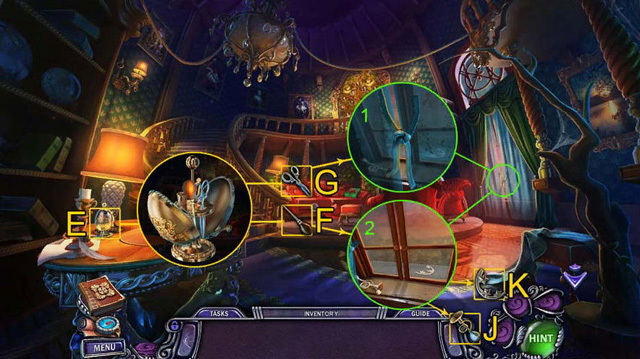
- Take the golden egg (E) that’s on the table. Select it in your inventory. Open the egg. Take the awl (F) and the scissors (G).
- Use the scissors (G) to cut the knot on the curtain.
- Take the bicycle horn (J) that’s on the window sill.
- Use the awl (F) to lift the hook on the window.
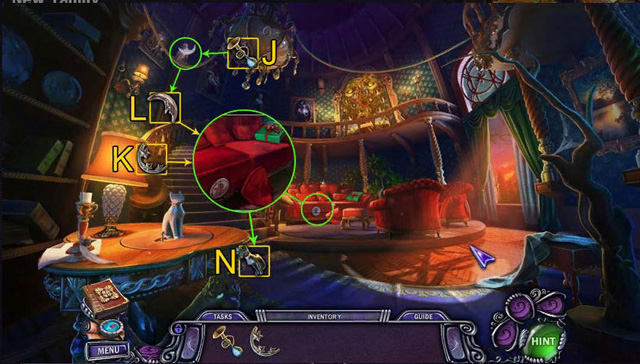
- Take the stars (K).
- Use the bicycle horn (J) to startle the bird. Take the crescent moon (L).
- Insert the stars and the crescent moon (K and L) into the lock on the sofa. Take the cat figurine (N).
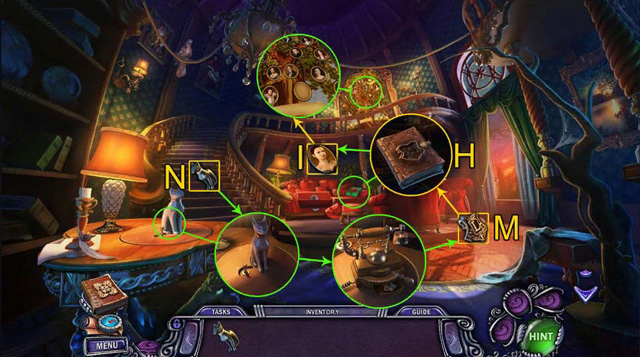
- Place the cat figurine (N) on the table. The phone will ring. Answer the phone.
- Take the coat of arms (M) that’s in the secret compartment.
- Take the gift (H) that’s on the sofa. Open it.
- Place the coat of arms (M) on the book (H). Flip through the pages. Take Emily’s photo (I).
- Place Emily’s photo (I) on the family tree located at the top of the stairs.
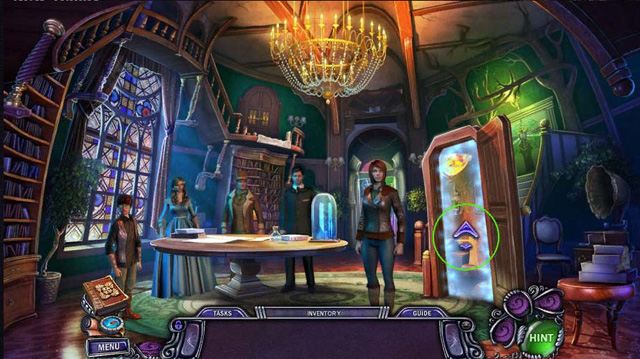
- Enter the main hall.
- Step through the portal.
Chapter 2: Photo Studio
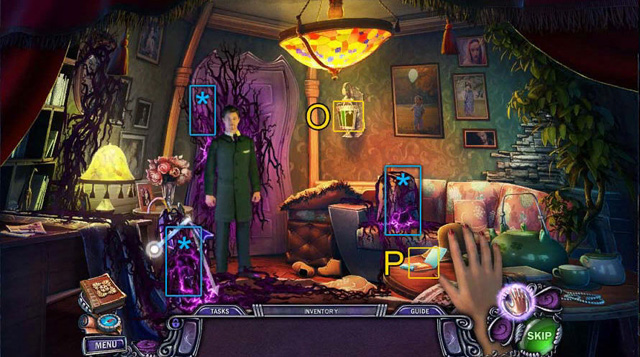
- Heal the bag of groceries, the umbrella basket, and the door (*).
- Take the lantern (O) that’s on the wall.
- Take the matches (P) that are on the table.
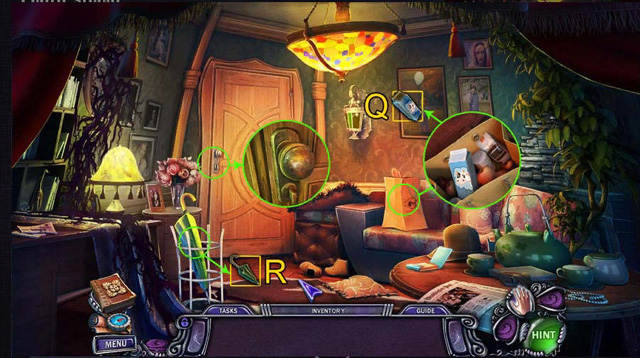
- Take the milk (Q) that’s in the bag of groceries.
- Take the umbrella (R) that’s in the basket.
- Open the door.
- Enter the studio.
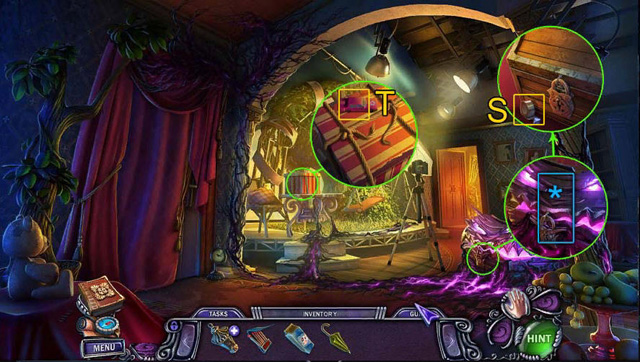
- Heal the chest (*).
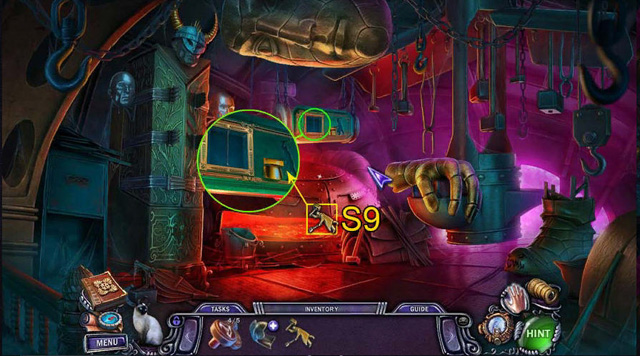
- Take the duct tape (S).
- Take the wind-up car (T) that’s on the box.
- Select the curtain. Open the door.
- Go to the dressing room.
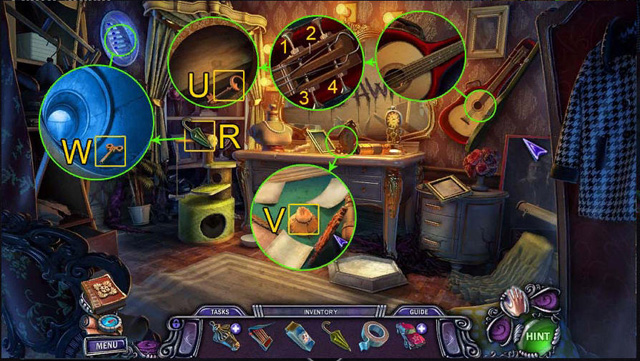
- Select the guitar case.
- Select the tuning pegs.
- Take the chest key (U).
- Move the papers that are on the vanity. Take the candle (V) that’s under them.
- Select the vent. The cover will fall off.
- Use the umbrella (R) to retrieve the wind-up key (W).
- Go to the studio. Use the chest key (U) to open the chest.
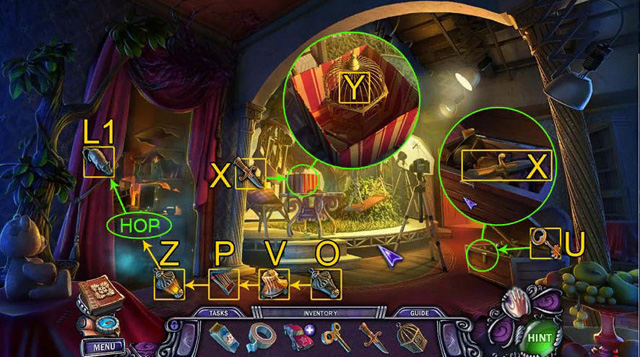
- Take the dagger that’s in the chest (X).
- Use the dagger (X) to cut the rope on the box (X). Take the bird cage that’s inside the box (Y).
- Select the lantern in your inventory. Open it (O). Place the candle (V) inside of it. Use the matches (P) to light the candle.
- Hang the lit lantern (Z) in the dark room.
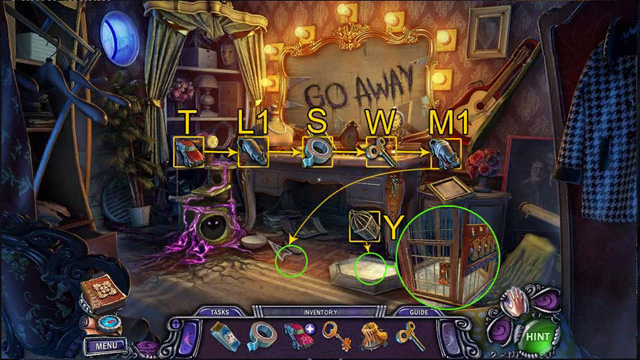
- Open the HOPS to get the stuffed mouse (L1).
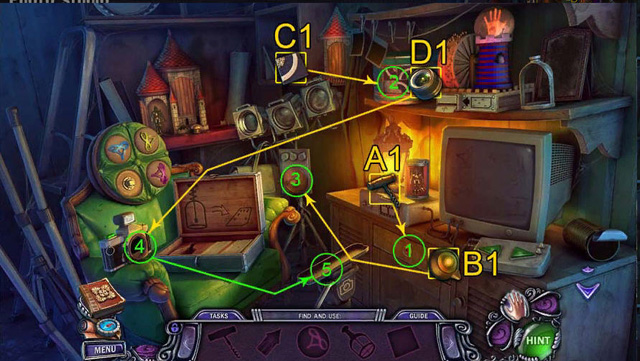
- Take the corkscrew (A1). Use it to open the drawer (1).
- Take the knob (B1). Place it on the studio lights (3). Turn the knob.
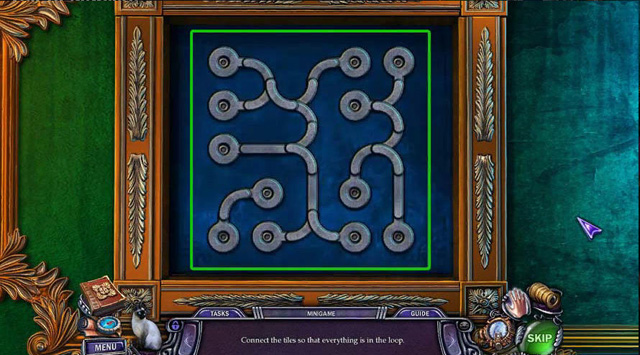
- Take the tile (C1). Place it on the case (2). Solve the puzzle.
- Take the camera lens (D1). Place it on the camera (4). Take the camera.
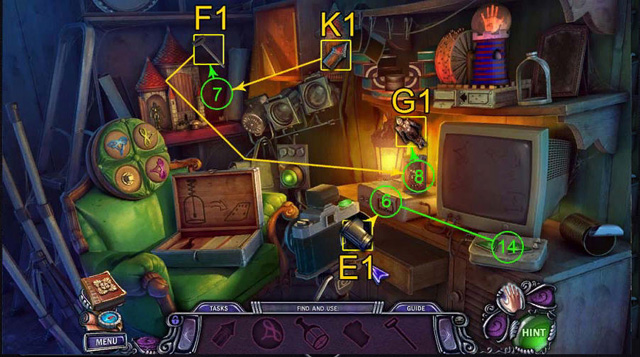
- Place the camera (4) on the tripod (5). Take a picture. Take the film (E1). Place the film (E1) in the photo developer (6). Click through the photos.
- Take the toy tower (K1). Place it with the castle (7).
- Take the can opener (F1) out of the toy tower (7).
- Use the can opener (F1) to open the tin can (8). Take the knight (G1).
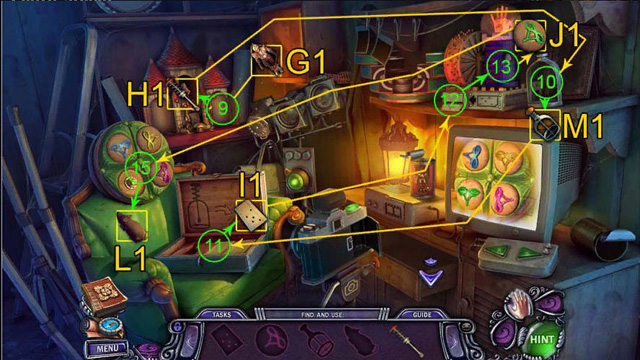
- Place the knight (G1) in the castle gates (9). Take the hole puncher pin (H1) that’s in the central tower.
- Place the hole puncher pin (H1) in the hole puncher (10). Take the hole puncher (M1).
- Use the hole puncher (M1) on the punch card (11). Take the punch card (I1).
- Place the punch card (I1) in the music box (12). Take the chair part (J1) out of the music box (13).
- Place the chair part (J1) on the chair (15). Select the chair decorations until they match the photo. Take the stuffed mouse (L1).
- Go to the dressing room.
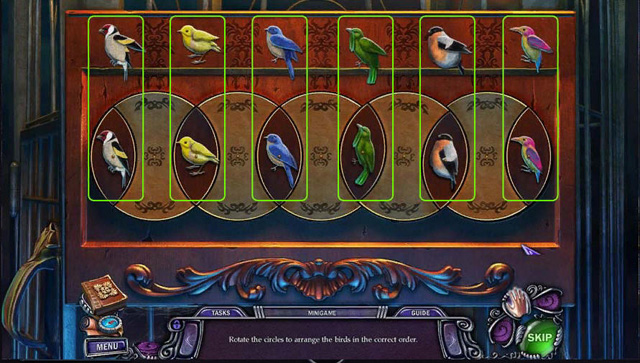
- Place the bird cage (Y) on the stand.
- Complete the mini-game to open the cage.
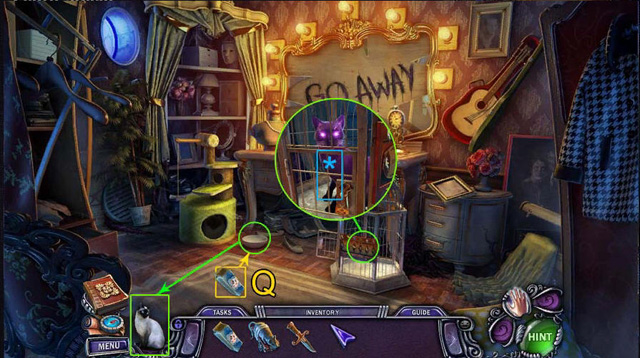
- To assemble the bait, select the car in your inventory, place the mouse (L1) on the car (T), use the duct tape (S) to secure the mouse to the car, and then insert the wind-up key (W) into the car.
- Select the wind-up key (M1). Place the mobile mouse between the cage and the cat’s bowl.
- The cat chases the car into the cage.
- Heal the cat (*).
- Pour the milk (Q) into the bowl. Select the cage (Y) to open it.
- The cat will drink the milk and then crawl onto the game panel.
- Go to the main hall.

- Two locations are now available – Dark Tower and Portal Room. Visit them both.
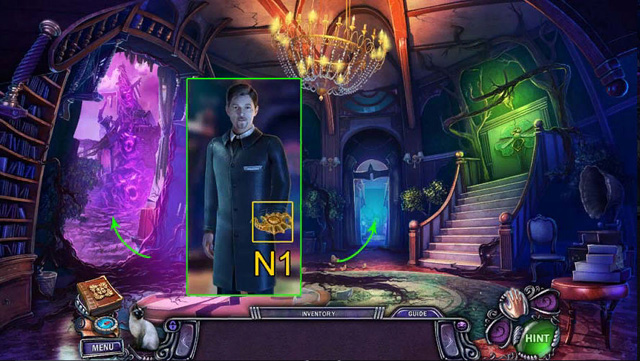
- Talk with Gabriel.
- Take the portal key (N1).
- Move forward. Place the portal key in the portal lock on the left (N1).
- Use the Hand of Light (*) to heal the infection on the lock and open the portal.
- Step through the portal to travel to the train station.
Chapter 3: Robotown
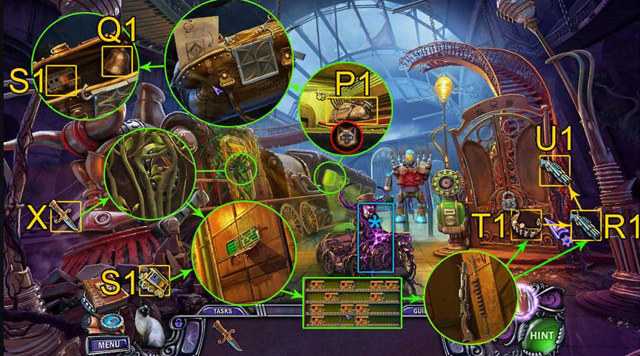
- Heal the robot (*).
- Use the dagger (X) to cut the vines on the train door. Open the door.
- Place the cat in the coach window to move the bag closer to you. Take the bag (P1).
- Select the bag (P1) in your inventory. Select the note sticking out of it to obtain the lock code. Unlock the bag.
- Take the bell (Q1) and the coach (S1) that are inside the bag.
- Place the coach (S1) on the cabinet in the engine room.
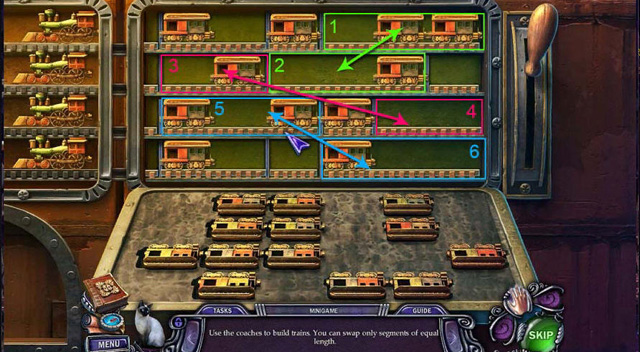
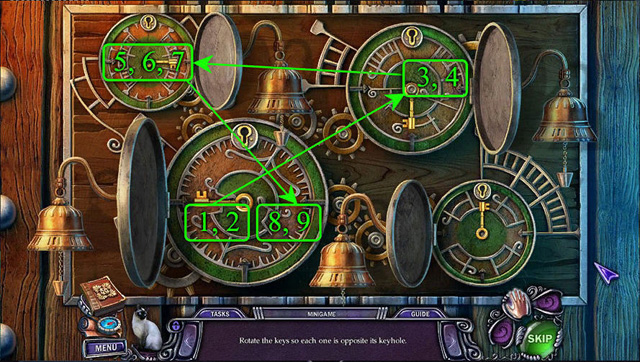
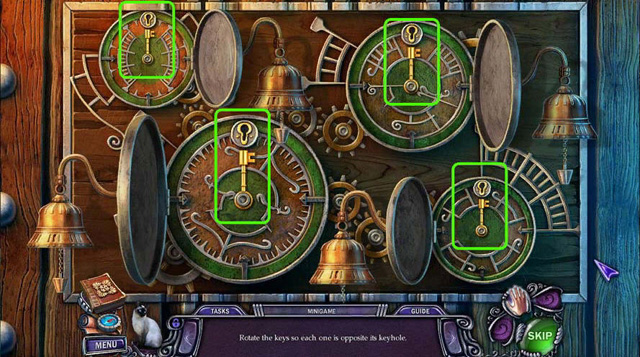
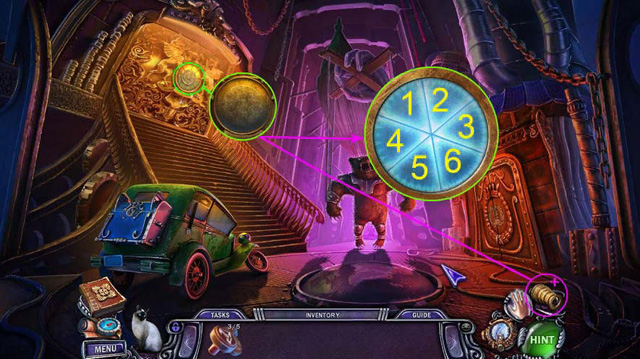
- Complete the mini-game with trains. Swap the following coaches: 1 and 2, 3 and 4, 5 and 6. Pull the lever.
- Take the shotgun (R1) and the ammo belt (T1) that are in the cabinet.
- Select the shotgun (R1) in your inventory. Open it. Place the ammo (T1) in it. Close it.
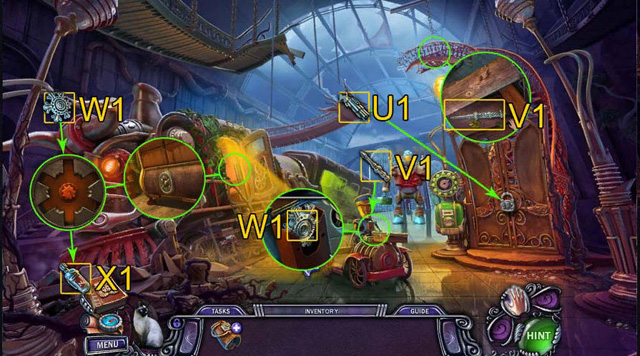
- Fire the loaded shotgun (U1) at the padlock.
- Go up the stairs. Move the plank. Take the screwdriver (V1).
- Use the screwdriver (V1) to unscrew the screws on the luggage carrier’s chest pack. Take the snowflake key (W1).
- Place the snowflake key (W1) on the drawer in the engine room.
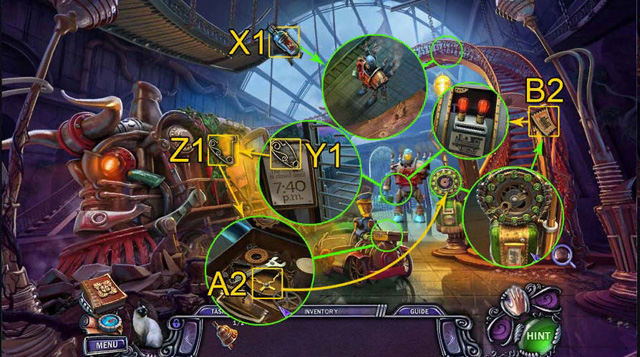
- Take the nitrogen (X1).
- Go back up the stairs. Drop the nitrogen (X1) on the robot guard.
- Take the safety pin (Y1). Remember the time (7:40).
- Select the safety pin (Y1) in your inventory. Select it three times to get the lock pick (Z1).
- Use the lock pick (Z1) to open the case in the luggage carrier’s hands.
- Take the clock hands (A2).
- Place the clock hands (A2) on the clock face.
- Set the time to 7:40. Take the ticket (B2).
- Place the ticket (B2) in the machine by the gate. Go outside.
- Heal the tree (*).
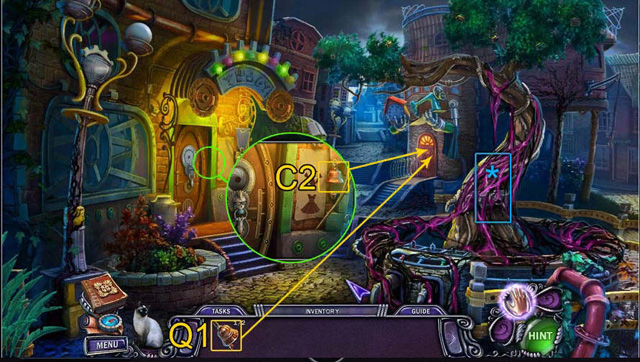
- Knock on the door to the pub. Note the robot’s hint. Take the bell (C2).
- Place the bells (Q1 and C2) on the workshop door.
- Complete the mini-game. Enter the workshop.
- Heal the robot (*).
- Collect 12 robot parts.
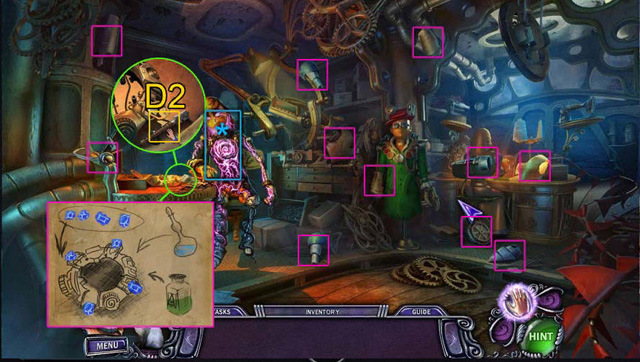
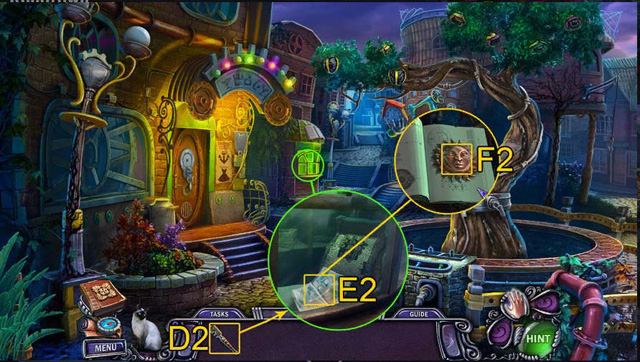
- Look at the diagram. Take the glass cutter (D2). Go to the town garden.
- Use the glass cutter (D2) on the ticket booth window. Take the copy of Robots Magazine (E2).
- Open the magazine (E2). Flip through it. Take the sun symbol (F2). Go to the town square.
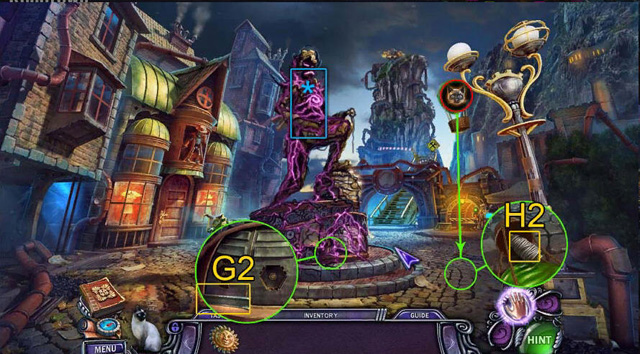
- Heal the statue (*). Take the section of rail (G2).
- Send the cat to pop the balloon at the top of the street light. Take the thread (H2).
- Go to the mine.
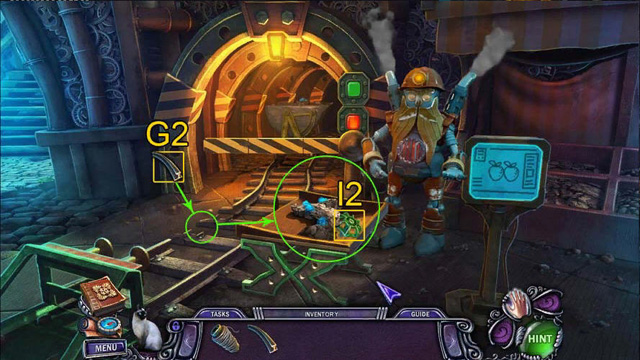
- Place the section of rail (G2) on the rails. The mine car will roll out of the mine.
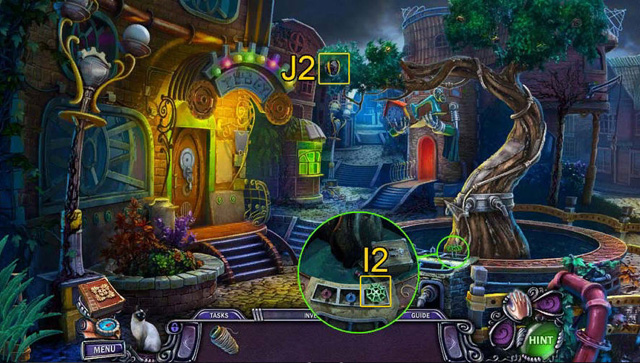
- Take the green valve handle (I2). Go to the town garden.
- Place the green valve handle (I2) on the green faucet to turn on the water.
- Take the coal apple (J2) that falls out of the tree. Go to the workshop.
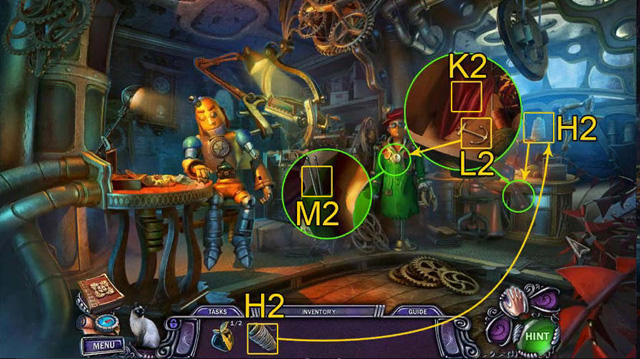
- Place the thread (H2) on the sewing machine.
- The seamstress will open a drawer. Take the red cloth (K2) and the anchor (L2).
- Place the anchor (L2) on the mannequin. Take the drum sticks (M2).
- Go to the town square.
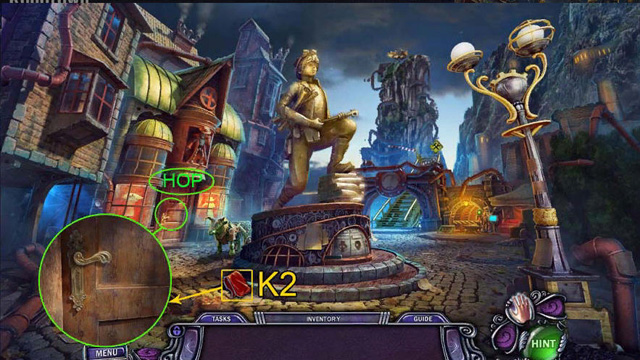
- Place the red cloth (K2) on the door. The bull will rip off the door.
- Complete the hidden object scene to get the dress.
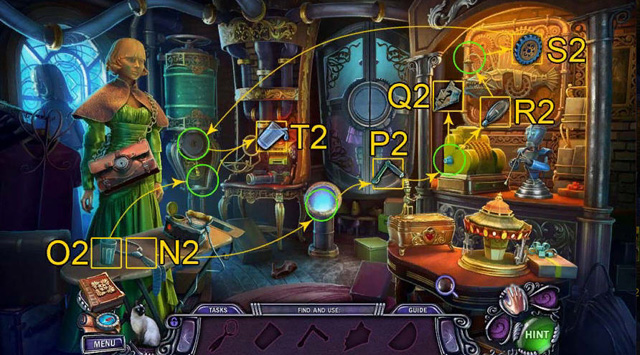
- Take the necktie (N2) and the glass (O2). Lower the necktie (N2) into the pipe. Take the cash register handle (P2).
- Place the cash register handle (P2) on the cash register to get the crumpled receipt (Q2) and the light bulb (R2).
- Screw in the light bulb (R2) above the fish to get the gear (S2).
- Place the gear (S2) and the glass (O2) on the water cooler. Fill the glass with water (T2). Take the glass of water.
- Place the crumpled receipt (Q2) on the ironing board. Pour the glass of water (T2) into the iron.
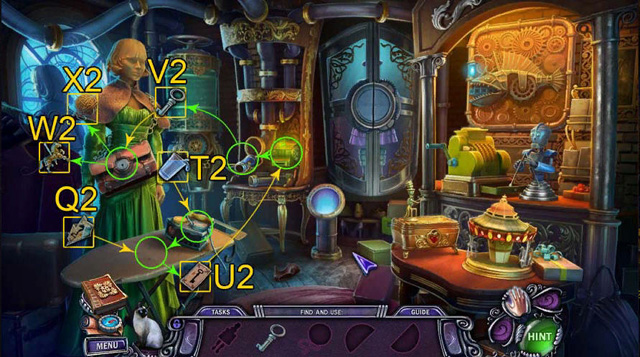
- Select the iron. Take the receipt (U2). Place the receipt (U2) in the slot on the pneumatic machine. Take the bag key (V2).
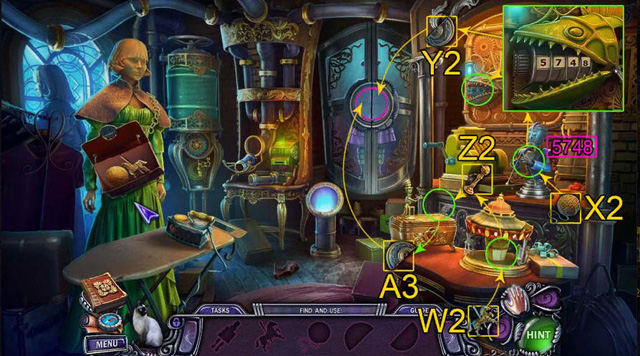
- Use the bag key (V2) to open the bag. Take the yarn (X2) and the horse (W2).
- Give the yarn (X2) to the knitting robot to get the code to the fish: 5748. Enter the code into the fish to get the first half of the wardrobe key (Y2).
- Place the horse (W2) on the carousel. Take the robogirl (Z2).
- Place the robogirl (Z2) on the case. Take the second half of the wardrobe key (A3).
- Place the two halves of the wardrobe key (Y2 and A3) on the wardrobe. Take the dress.
- Go back to the town garden. Knock on the pub door. Enter the pub.
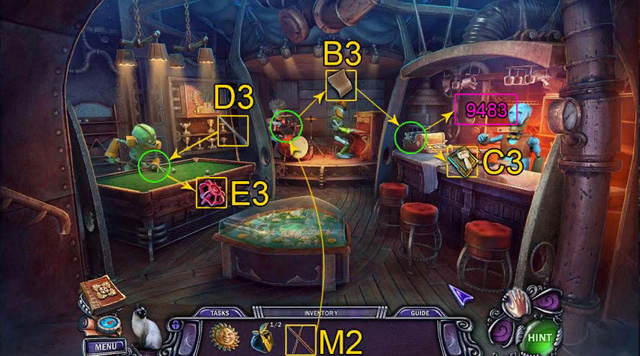
- Give the drum sticks to the drummer (M2). Take the sheet of paper (B3). Place the sheet of paper (B3) in the typewriter and then Select the button with the key symbol on it to get the code to the cash register in the ticket booth: 9483. Take the symbol of labor (C3).
- Take the pool cue (D3). Give the pool cue (D3) to the pool player.
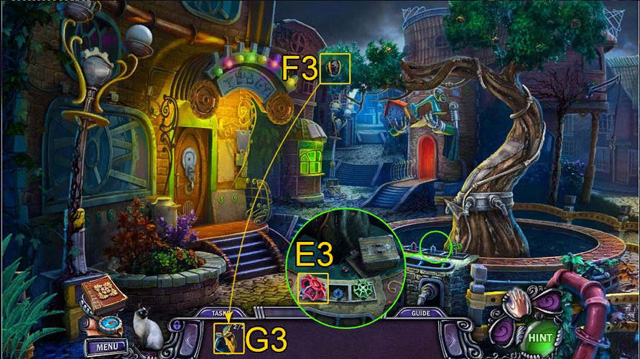
- Take the red valve handle (E3). Go to the town garden.
- Place the red valve handle (E3) on the red faucet to turn on the water.
- Take the coal apple that falls out of the tree (F3). You now have two coal apples (G3).
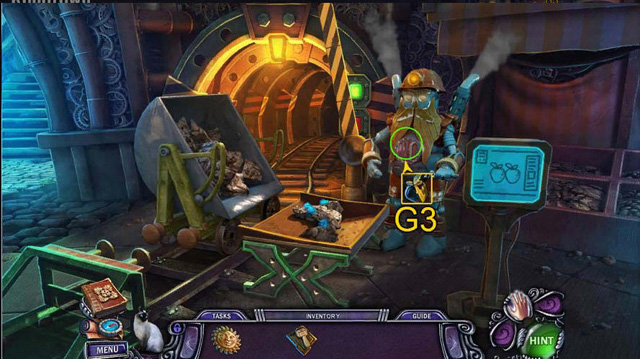
- Go to the mine. Give the coal apples to the miner (G3).
- Return to the town garden.
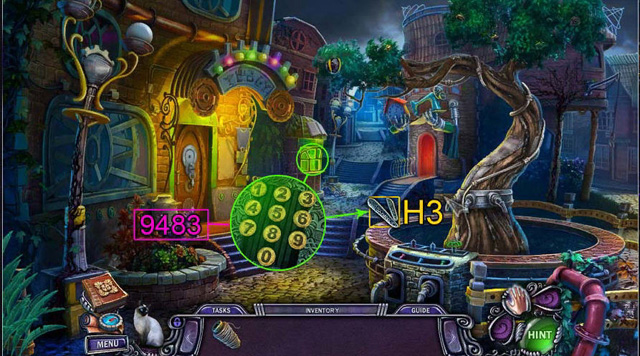
- Select the cash register. Enter the code (9483). Take the dragonfly wings (H3) and the lighter (HH3).
- Go to the main hall.
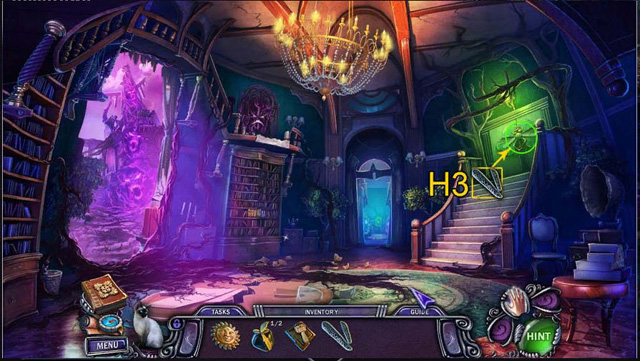
- Place the dragonfly wings on the door (H3). Enter the observatory garden.
- Select the rope on the right to lower it. Climb the rope. Remove the sheet from the case.
- Push the lever to turn on the light inside the tree house. Open the door.
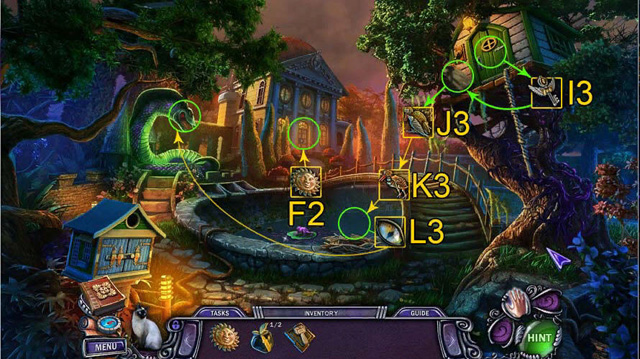
- Take the key with wings (I3).
- Place the key with wings (I3) on the case. Take the heron (J3).
- Select the heron (J3) in your inventory. Extend its neck and legs.
- Take the snake eye (L3) that’s near the pond. Place the heron (K3) in the nest.
- Insert the snake eye (L3) into the statue of the snake.
- Insert the sun symbol (F2) into the observatory door.
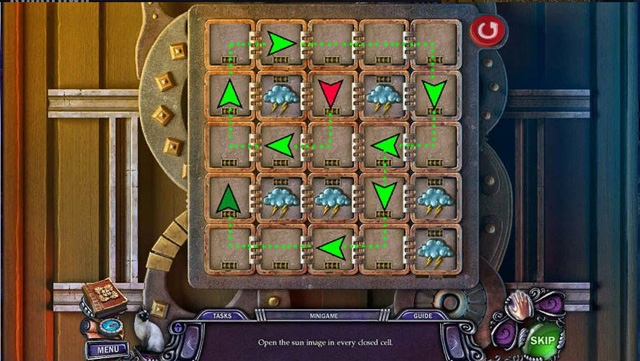
- Complete the mini-game.
- Enter the observatory.
- Heal the desk (*).
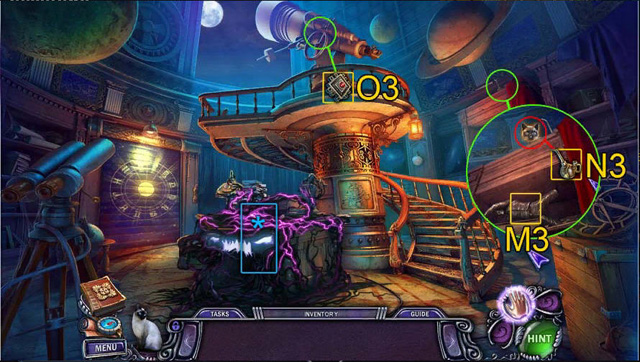
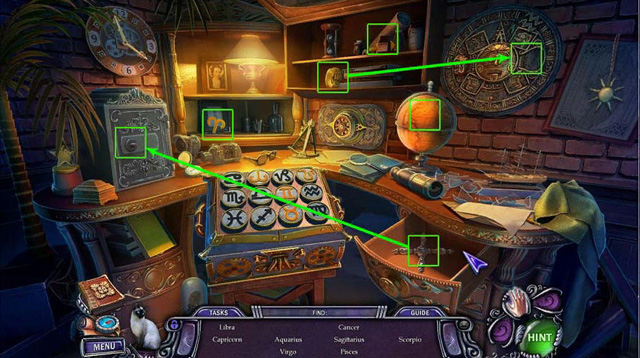
- Take the warrior figurine (M3) that’s on the shelves to the right.
- Send the cat to knock down the oiler on top of the shelves (N3).
- Open the telescope. Take the case part (O3). Remove the broken lens.
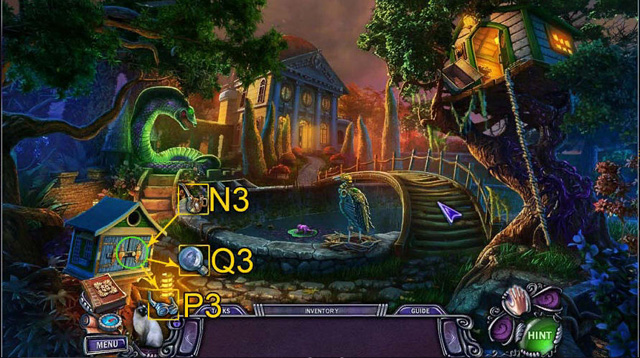
- Go to the observatory garden.
- Use the oiler (N3) on the birdhouse. Take the goggles (P3) and the light bulb (Q3).
- Go to the observatory.
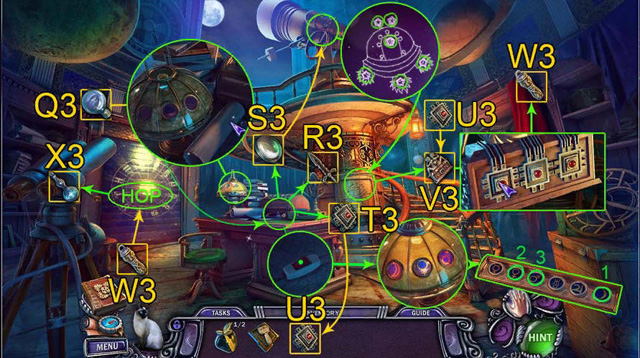
- Select the top of the lamp on the desk. Screw the light bulb into the socket (Q3).
- To turn on the light, select the switch.
- Note the symbols on the lamp. Select those symbols on the storage case on the desk.
- Take the sword (R3), the lens (S3), and the case part (T3). You now have two case parts (U3).
- Place the lens (S3) on the telescope. Look into the eyepiece.
- Move the stars until you see a constellation. Close that window.
- Select the base of the telescope (beside the bottom of the stairs). Select the stars you saw in the telescope.
- Take the Twins case (V3) that’s in the secret compartment.
- Select the Twins case (V3) in your inventory. Place the two case parts (U3) on the case.
- Align the case parts to get the weight (W3).
- Place the weight (W3) on the locked door.
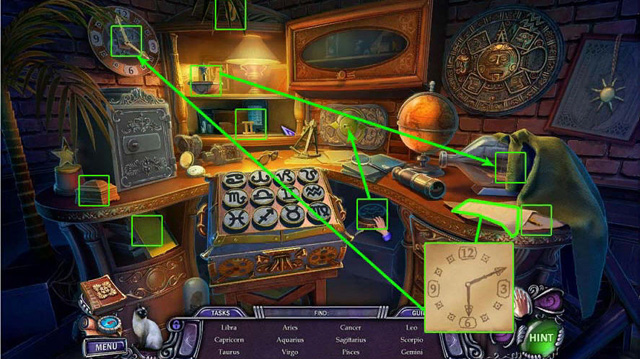
- Complete the hidden object scene to get star dust. (X3). Find items 1-12. Take the star dust.
- Go to the observatory garden.
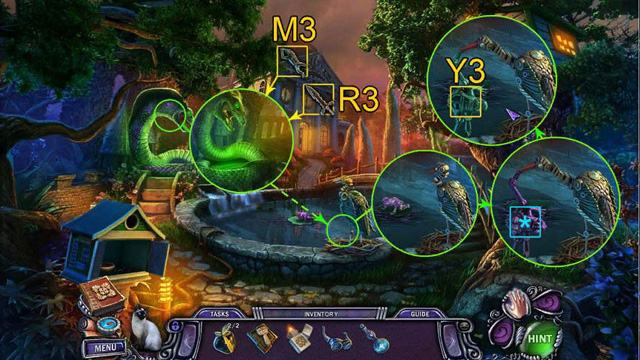

- Place the warrior figurine (M3) near the statue of the snake.
- Give the sword (R3) to the warrior. Water will fill the pond.
- Push the button on the heron. The heron will catch the mechanical frog.
- Heal the frog (*). Take the frog (Y3).
- Go to the pub.
- Give the goggles (P3) to the bartender.
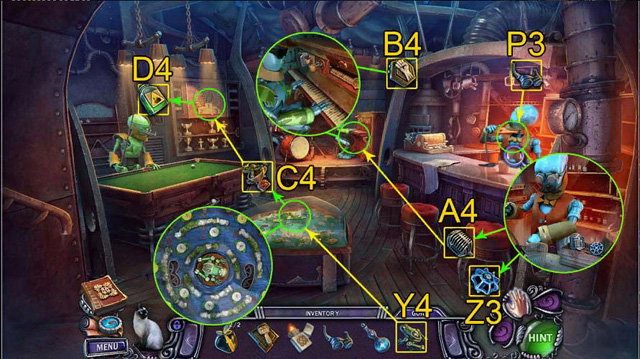
- Take the blue valve handle (Z3) and the microphone (A4).
- Give the microphone (A4) to the pianist. Take the symbol of strength (B4).
- Place the frog (Y3) where it belongs to activate a mini-game.
- Complete the mini-game and take the frog goblet (C4).
- Place the frog goblet on the trophy case (C4). Take the acid (D4).
- Go outside.
- Place the blue valve handle (Z3) on the blue faucet. The water will rise.
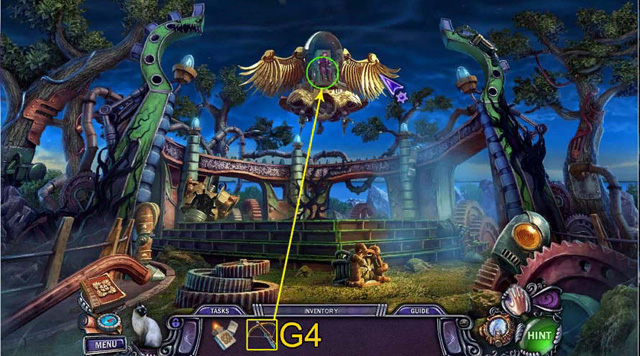
- Take the crate (E4) and the symbol of power (F4). Examine the crate (E4). Assemble the crossbow (G4). Take the crossbow.
- Go to the town square.
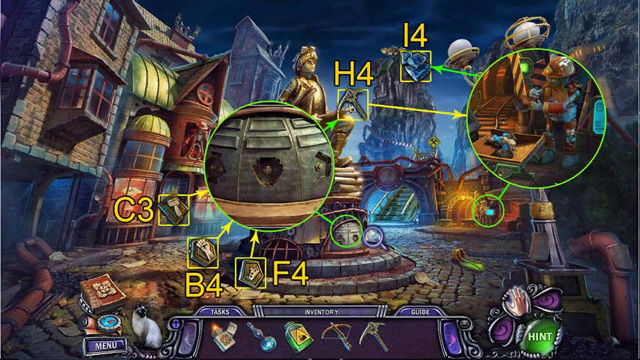
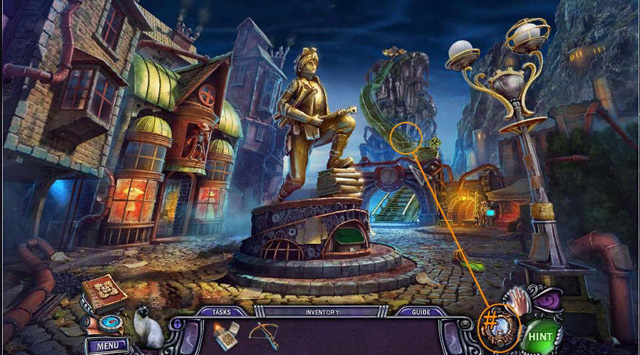
- Place the symbol of power (F4), the symbol of strength (B4), and the symbol of labor (C3) where they belong at the base of the statue.
- Take the pickaxe (H4).
- Go to the mine. Give the pickaxe to the miner (H4).
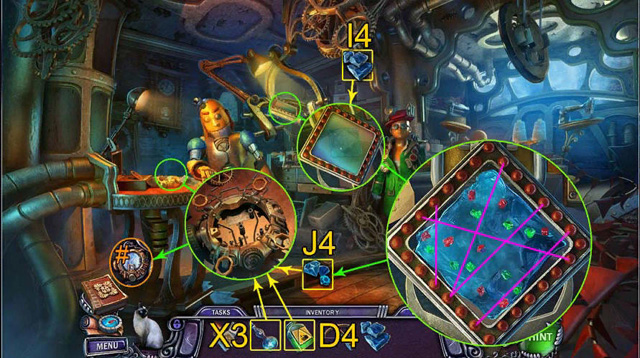
- Take the uncut gems (I4).
- Go to the workshop. Place the uncut gems (I4) on the cutting machine.
- Complete the mini-game to cut the gems (J4).
- Place the star dust (X3) and the acid (D3) on the table.
- Place the cut gems (J4) on the chronograph.
- Take the chronograph (#). It will be placed on the game panel. Go to the town square.
- Use the chronograph (#) to fix the broken staircase. Go to Sammy’s throne.
- Fire the crossbow (G4) at Sammy.
- Send the cat to attack the ravens. Take the raven (K4).
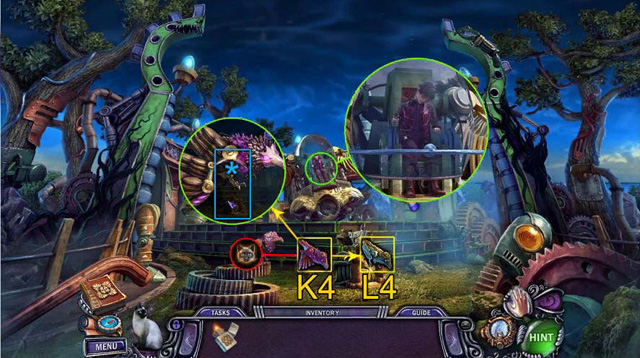
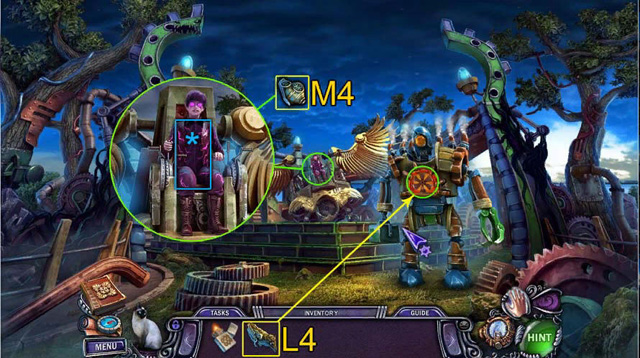
- Select the infected raven (K4) in your inventory. Heal it (*).
- Fold the raven’s wings (L4).
- Examine Sammy’s throne.
- Send the raven (L4) to attack the robot guard. Heal Sammy (*).
- Take the light grenade (M4). Go to the Dark Tower.
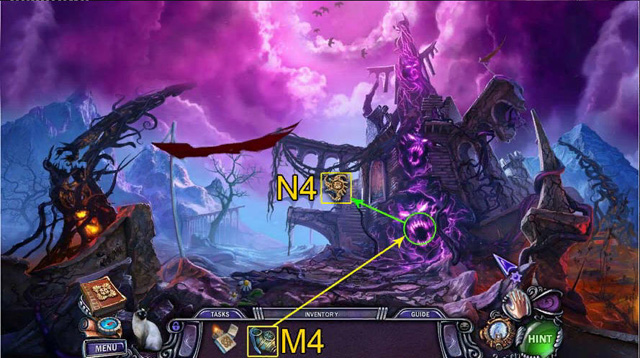
- Use the light grenade (M4) at the base of the tower.
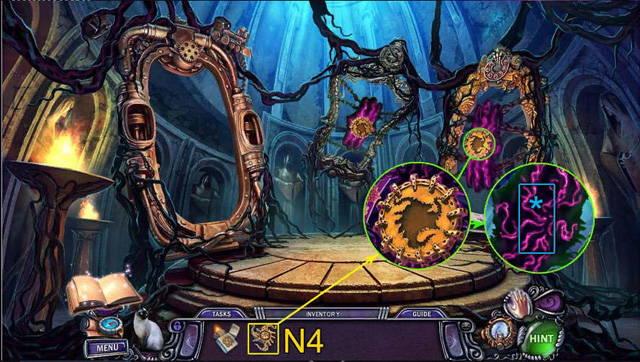
- Take the portal key (N4). Go to the Portal Room.
- Place the portal key (N4) on the portal on the right.
- Heal the portal after the lock explodes.
- Step through the portal.
Chapter 4: Not quite Paris
- Select the cover on the statue.
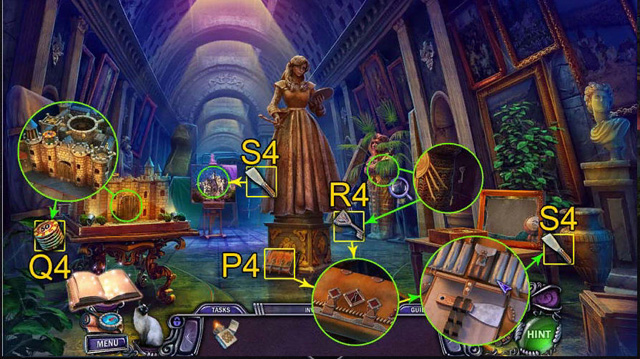
- Take the tool kit (P4) that’s at the base of the statue.
- Take the casino tokens (Q4) that are on the castle.
- Take the tool kit key (R4) that’s beside the sarcophagus.
- Select the tool kit in your inventory. Use the tool kit key (R4) to unlock the tool kit (P4). Take the putty knife (S4).
- Use the putty knife (S4) to scrape the top layer of paint off the painting. Step into the painting.
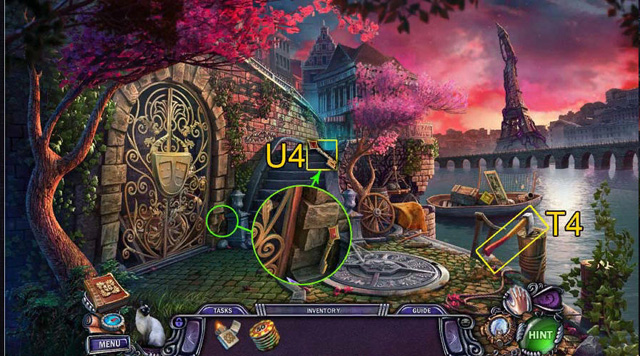
- Take the axe (T4).
- Take the key of diamonds (U4) that’s beside the locked gate.
- Walk up the stairs to the boulevard.
- Use the chronograph (#) to fix the broken car.
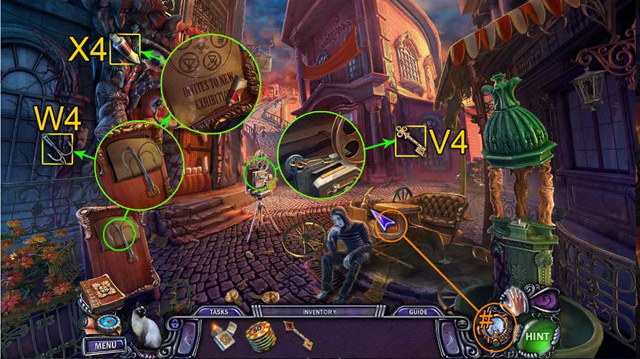
- Take the key of clubs (V4) that’s on the projector.
- Take the hook (W4) and the tube of red paint (X4).
- Go to the cable car.
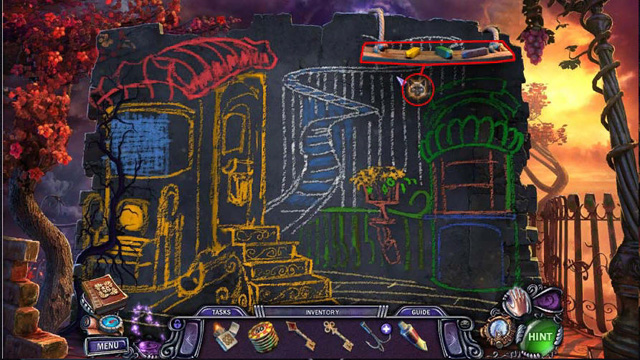
- Send the cat to lower the shelf on which the chalk is lying.
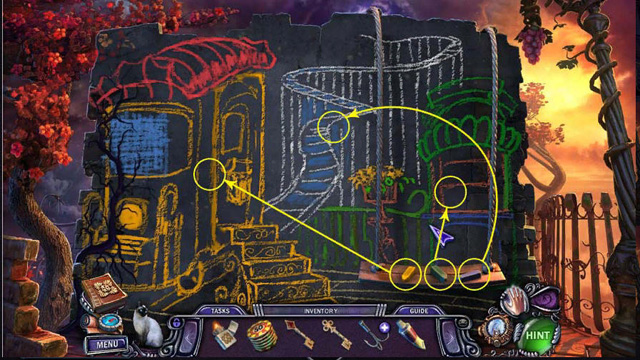
- Use the yellow chalk to color in the sketch of the cable car.
- Use the green chalk to color in the sketch of the ticket booth.
- Use the blue chalk to color in the sketch of the railway and the sky.
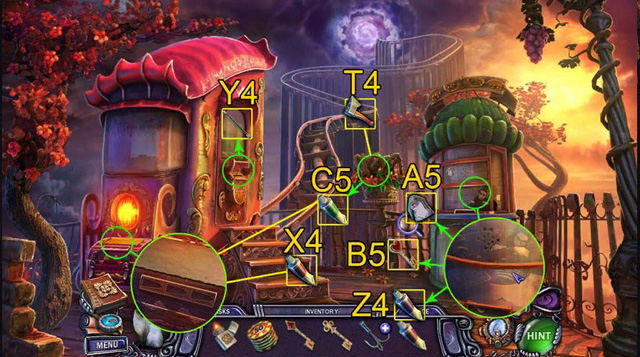
- Take the magic wand sticker (Y4) that’s on the cable car door.
- Take the tube of purple paint (Z4), the rabbit sticker (A5), and the key of hearts (B5) at the ticket booth.
- Use the axe (T4) to cut the roots of the flower in the pot. Take the tube of green paint (C5).
- Place the tube of red paint (X4), the tube of purple paint (Z4), and the tube of green paint (C5) on the chest at the end of the cable car.
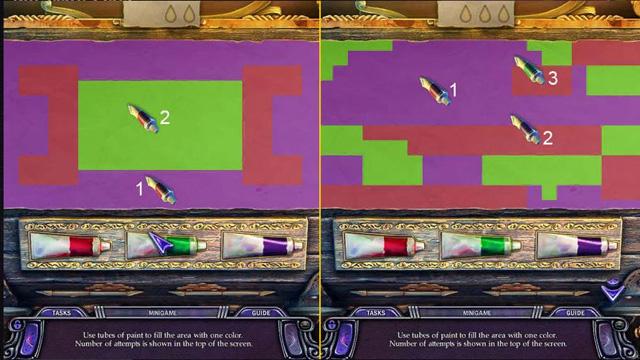
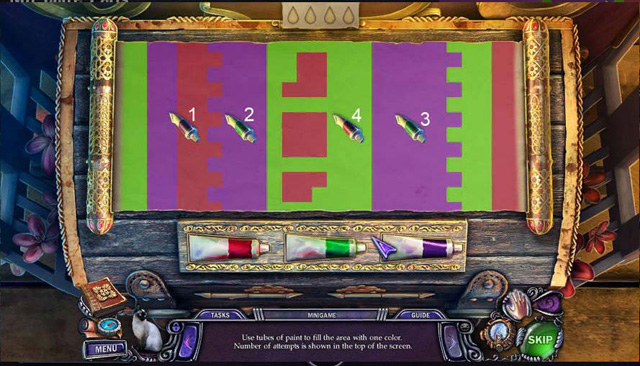
- Complete the mini-game with the paints. Open the chest.
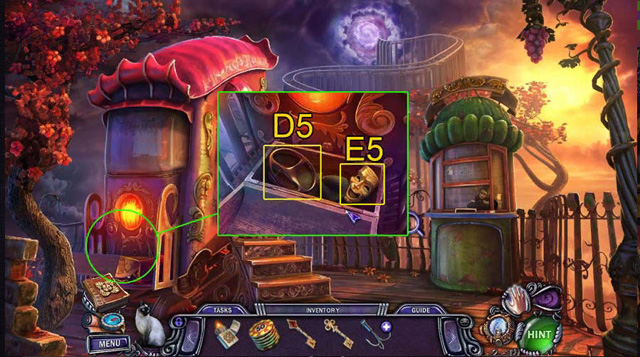
- Take the steering wheel (D5) and the first of two masks (E5).
- Return to the boulevard.
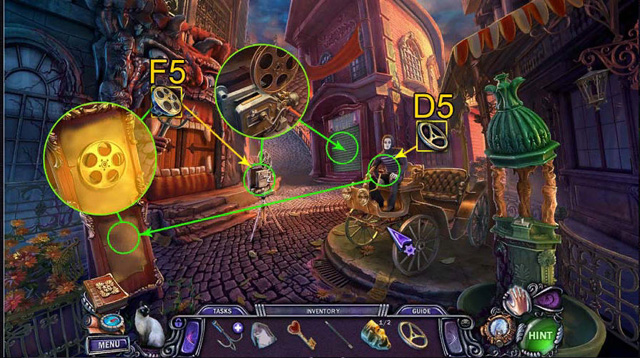
- Give the steering wheel (D5) to the mime in the car.
- Take the film reel (F5) that appears on the museum sign.
- Place the film reel (F5) on the projector. Turn the projector handle.
- Go to the Museum of Magic.
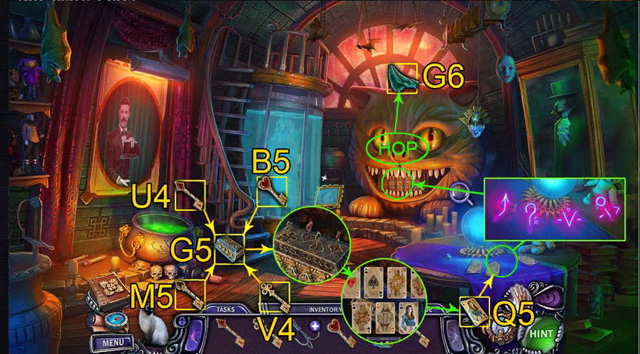
- Take the case with the card suits (G5). Turn over the three playing cards.
- Take the bowtie sticker (H5) that’s on the doll.
- Place the magic wand sticker (Y4), the rabbit sticker (A5), and the bowtie sticker (H5) on the poster with the magician to get the dragon eye (I5).
- Take the old book (J5) near the cauldron… Select the book in your inventory. Place the dragon eye (I5) on it.
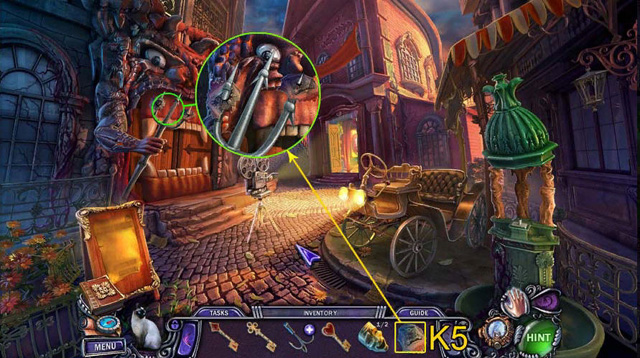
- Take the casino invitation (K5) that’s in the book.
- Take the tower of Louvre 2 (L5) near the tank with water. Go to the boulevard.
- Place the casino invitation (K5) on the pitchfork. Enter to the Casino from Hell.
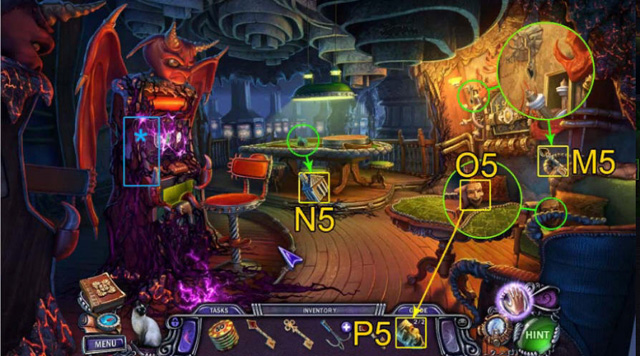
- Heal the slot machine (*).
- Take the key of spades (M5) that’s next to the safe on the wall.
- Take the tower of Louvre 1 (N5) near the roulette. Take the second mask (O5). It’s on the sofa.
- Go to the Museum of Magic.
- Use the key of clubs (V4), the key of diamonds (U4), the key of spades (M4), and the key of hearts (B5) into the case with the card suits.
- Turn all of the keys. Flip all of the cards. Take the playing card (Q5).
- Place the playing card (Q5) on the table.
- Note the combination of symbols. Press the correct combination of symbols in the cat’s mouth.
- Complete the hidden object scene to get the magic veil (G6).

- Remove the needle (R5) from the voodoo doll. Take the witch’s hat (S5). Place the witch’s hat (S5) on the witch’s head.
- Take the suction cup (T5). Place it on the table drawer. Open the drawer.
- Insert the needle (R5) onto the spool of thread that’s in the drawer. Take the needle and thread (U5).
- Use the needle and thread (U5) to fix the voodoo doll. Take the lantern (V5). Hang the lantern (V5) with the other lanterns. Select the lanterns.
- Remember and repeat the sequence of lights. Take the bucket (W5).
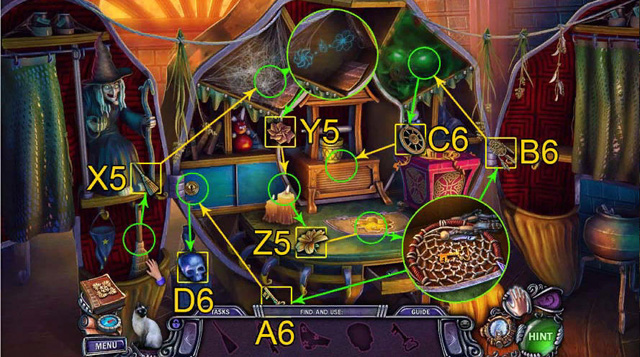
- Place the bucket (W5) on the well. Pull the fabric out from under the witch. Take the broom (X5). Use the broom (X5) to brush away the cobwebs.
- Fold the sheet of paper several times to turn it into a paper flower (Y5). Place the paper flower (Y5) by the candle to get the lily (Z5). Take the lily. Place the lily (Z5) in the slot on the table. Take the golden key (A6) and the dream catcher (B6).
- Use the dream catcher (B6) to catch the ghost. Take the well wheel (C6).
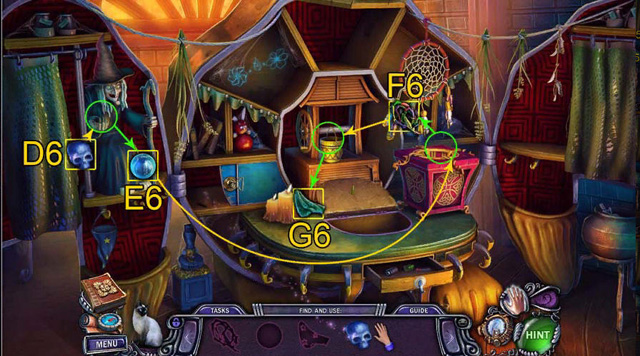
- Place the well wheel (C6) on the well. Use the golden key (A6) to unlock the cabinet. Take the skull (D6).
- Place the skull (D6) in the witch’s hand. Take the crystal ball (E6).
- Place the crystal ball (E6) on the surprise box. Take the hand-made rope (F6). Apply the hand-made rope (F6) to the well. Select the bucket to attach it to the rope. Select the well wheel to lower the bucket into the well. Take the magic veil (G6).
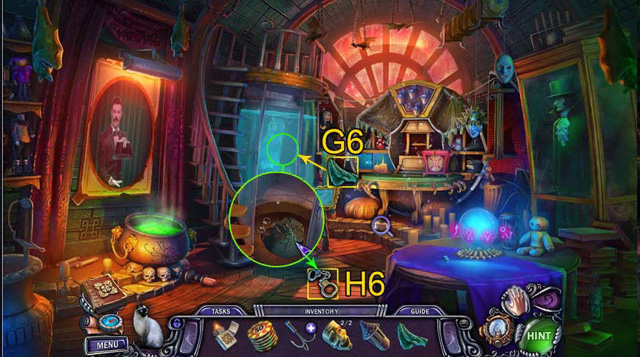

- Place the magic veil (G6) on the water tank. Open the tank.
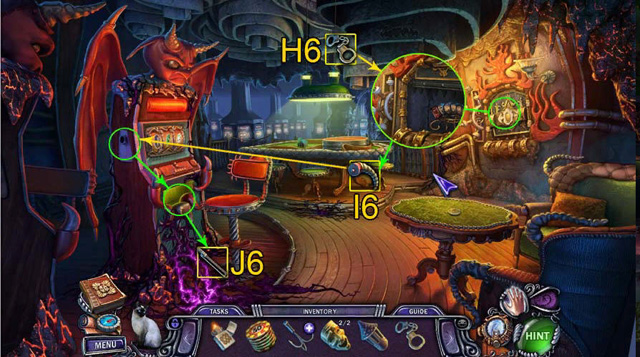
- Take the handcuffs (H6) that are in the tank. Go to the Casino from Hell.
- Select the safe wheel. Use the handcuffs (H6) to secure the wheel.
- Take the slot machine lever (I6).
- Place the slot machine lever (I6) on the slot machine.
- Pull the handle three times. Take the violin bow (J6).
- Return to the River Seine.
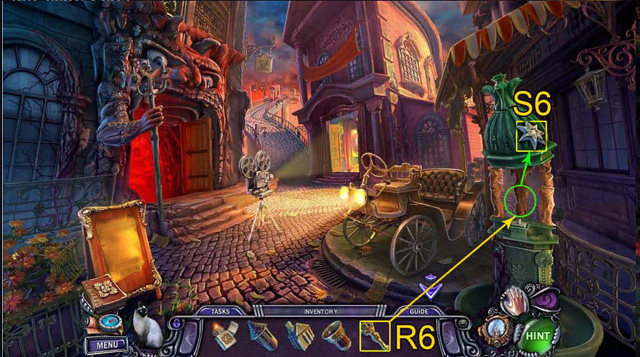
- Place the masks (P5) on the locked gate. Take the rope (K6) that’s behind the gate.
- Use the violin bow (J6) to play the violin. Open the chest. Remove the sheet. Take the tube of magic glue (L6).
- Select the hook (W4) in your inventory. Place the rope (K6) on it to get the grappling hook (M6).
- Toss the grappling hook (M6) at the boat.
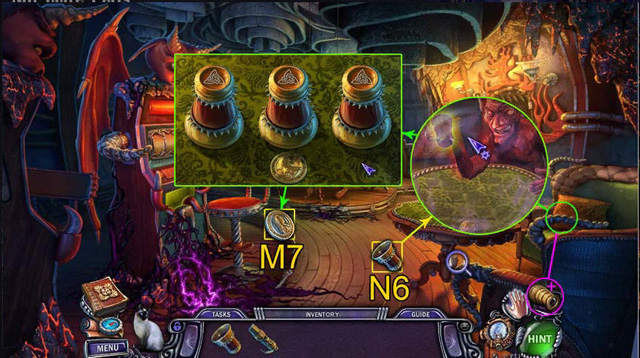
- Complete the hidden object scene to get the empty drinking vessel (N6).
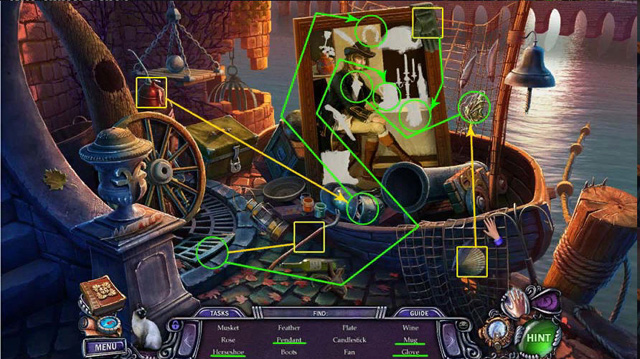
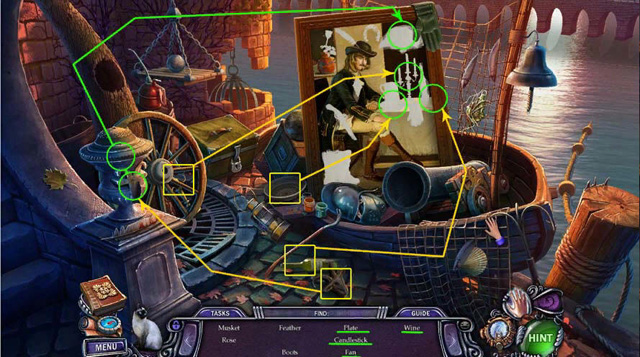
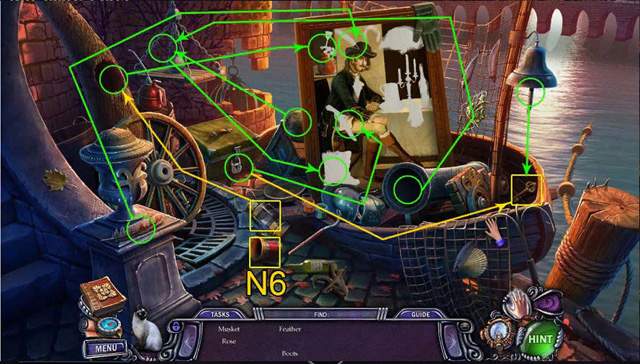
- Take the empty drinking vessel (N6).


- Fill the empty drinking vessel (N6) with water. Take the vessel of water (O6).
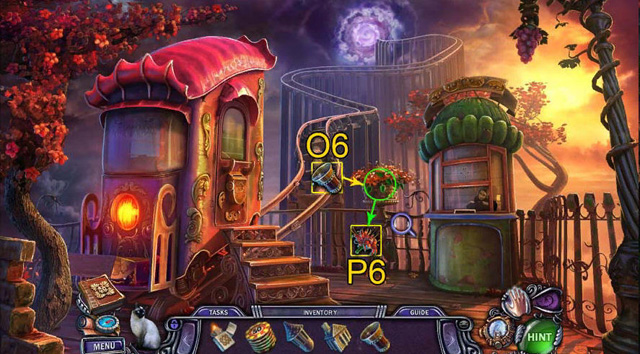
- Go to the cable car.
- Pour the cup of water (O6) on the withered flowers. Take the licorice blossom (P6).
- Go to the Museum of Magic.
- Place the licorice blossom (P6) in the boiling pot.
- Take the roulette turret (Q6) from the cauldron. Go to the Casino from Hell.
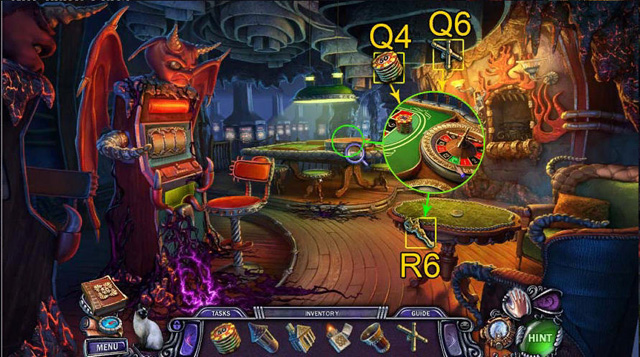
- Place the roulette turret (Q6) on the roulette wheel. Place the casino tokens (Q4) on the zero. Spin the roulette wheel.
- Take the fountain figurine (R6) from the roulette table.
- Go to the boulevard.
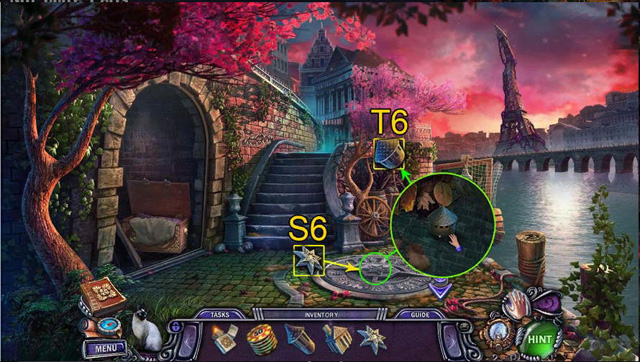
- Place the fountain figurine (R6) on the fountain. Take the star-shaped key (S6).
- Go to the River Seine.
- Place the star-shaped key (S6) on the hatch. Take the tower of Louvre 3 (T6) inside.
- Go to the Louvre.
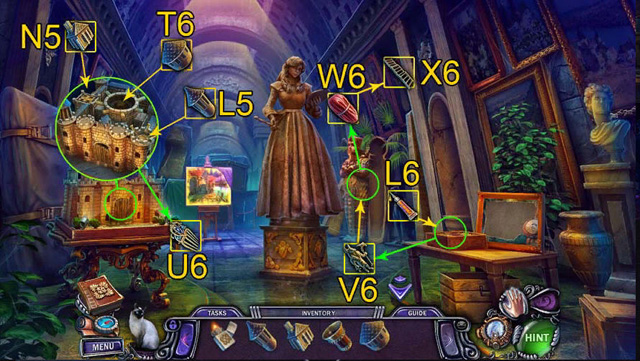

- Place the tower of Louvre pieces 1, 2 and 3 (L3, N5, and T6) onto the model.
- Select the coach. Open the coach door. Take the comb-shaped key (U6).
- Place the magic glue (L6) on the box with the disassembled figurine.
- Assemble the Anubis figurine (V6).
- Place the Anubis figurine (V6) on the sarcophagus. Take the bundle (W6).
- Select the bundle (W6) in the inventory. Unwrap it. Select the tag that reads ‘Stairway to Heaven.’ Select the ladder several times to extend it (X6).
- Go to the main hall.
- Lean the ladder (X6) against the bookshelf. Examine the door at the top of the bookshelf.
- Heal the door (*). Slide the lock to the left.
- Step onto the terrace.
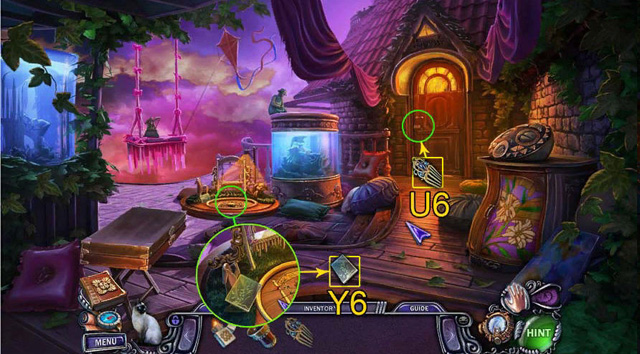
- Search the table. Take the first of two glass tiles (Y6).
- Use the comb-shaped key (U6) in the lock on the door.
- Enter the loft.
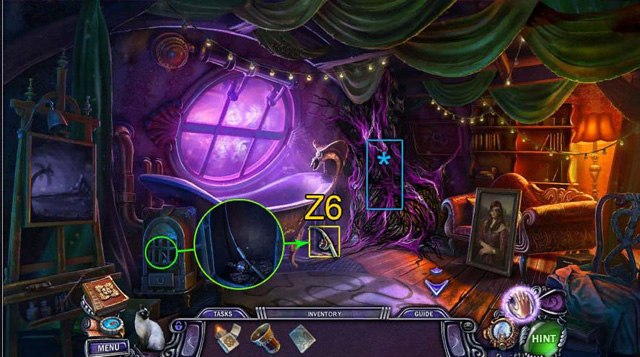
- Open the stove. Take the fishing rod (Z6).
- Heal the chest of drawers in the corner (*).
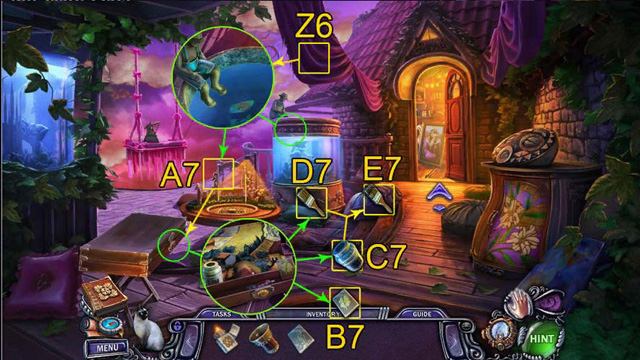
- Return to the terrace.
- Give the fishing rod (Z6) to the fisherman. Take the palette-shaped key (A7).
- Place the palette-shaped key (A7) in the slot on the painter’s case.
- Take the glass tile 2 (B7), the black paint (C7), and the paintbrush (D7).
- Select the black paint (C7) in inventory, and open it.
- Dip the paintbrush (D7) in the black paint to get the brush with paint (E7).
- Go to the loft.
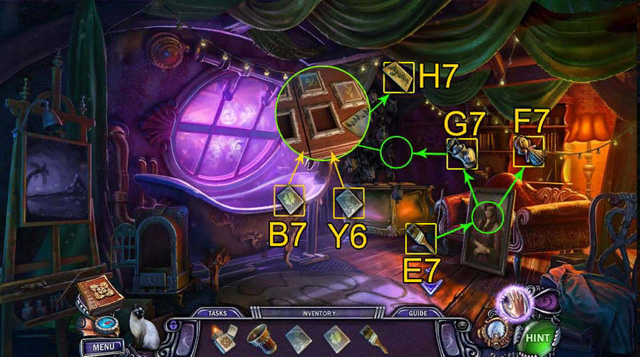
- Use the brush with paint (E7) on Amanda’s portrait.
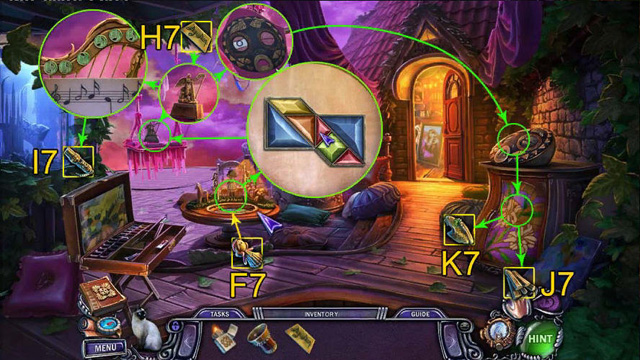
- Take the doll (F7) and the lantern (G7). Place the lantern (G7) near the bats. Search the chest of drawers, take the sheet music (H7).
- Place the glass tiles (Y6 and B7) on the chest of drawers. Return to the terrace.
- Place the doll (F7) on the swing on the table. Complete the mini-game. A platform will appear under the swing over the chasm.
- Examine the swing on the terrace, place the sheet music (H7) on the harp. Using the sheet music as a guide, Select the correct sequence of notes.
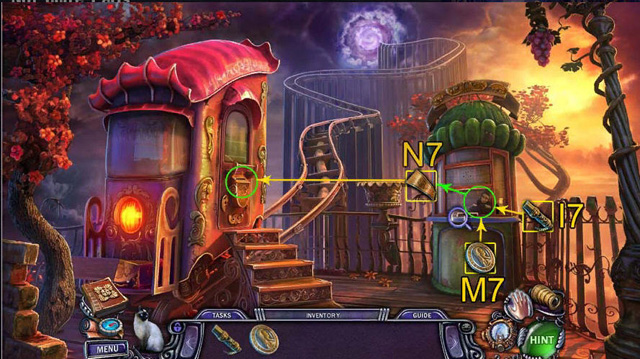
- Take the whistle (I7). Examine the kite. Make the mask on the table look like the face on the kite.
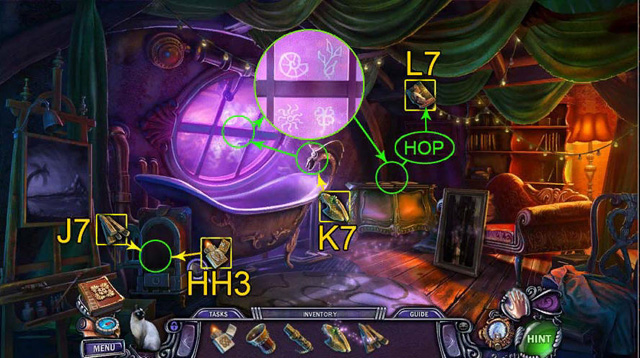
- Take the firewood (J7) and the snake head (K7). Return to the loft.
- Place the firewood (J7) in the stove. Use the lighter to start the fire (HH3).
- Use the snake head (K7) on the faucet to turn on the water.
- The steam will reveal the buttons you need to press on the chest of drawers.
- Select the buttons on the chest of drawers in the correct order.
- Complete the hidden object scene to get the part of a canvas (L7).
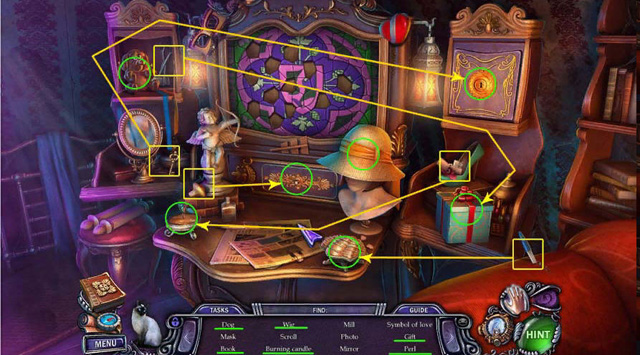
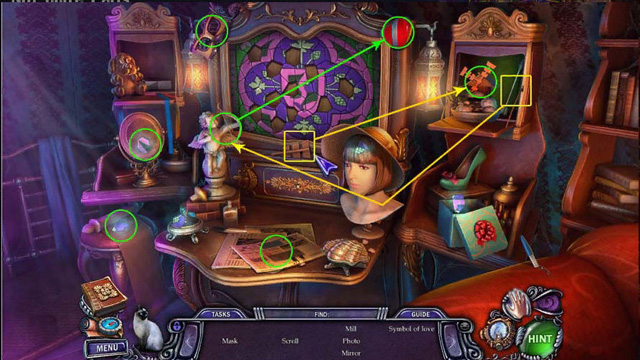
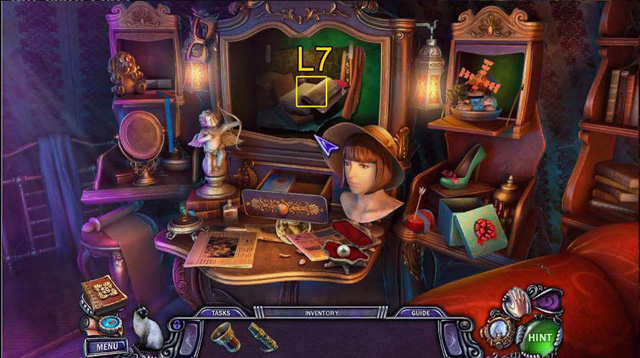
- Take the part of a canvas (L7).
- Go to the Louvre.
- Place the part of a canvas on the empty frame on the table.
- Move the items inside the canvas. Open the red case.
- Take the True Vision device (+) that’s in the case. Go to the Casino from Hell.
- Point the True Vision device (+) behind the table with a coin.
- Find the red imp. Give the drinking vessel (N6) to the imp.
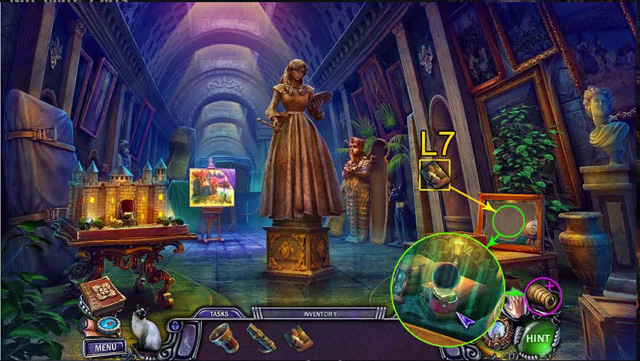
- Play the shell game (the solution is random). Take a gold coin (M7). Go to the cable car.
- Blow the whistle (I7) at the mime in the ticket booth to wake him up.
- Give the gold coin (M7) to the mime.
- Take the cable car ticket (N7). Insert it in the slot on the cable car door.
- Open the cable car door. Go to the Hall of Art.
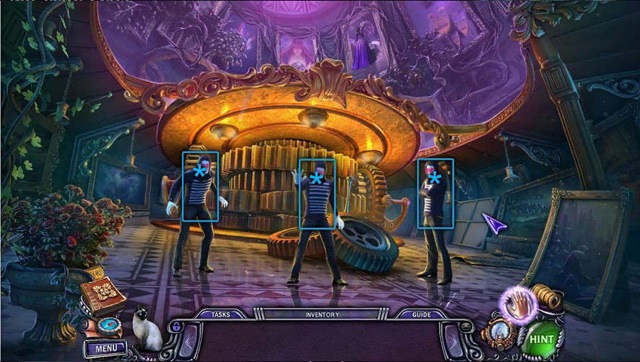
- Examine every mime. Use the True Vision device (+) on each one.
- Select the matching symbols on each barrier to remove the barriers.
- Heal every mime (*).
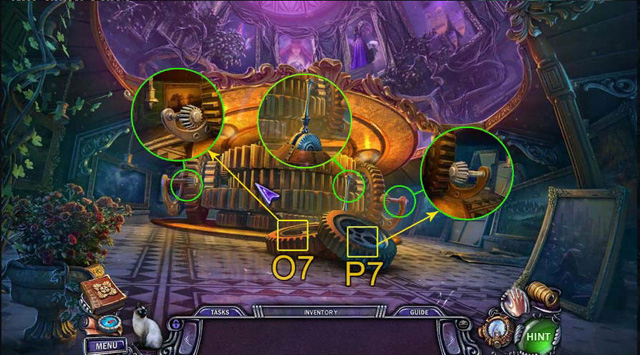
- Pick up both gears (O7, P7) and use them on the lift.
- Pull the lever. Amanda will descend.
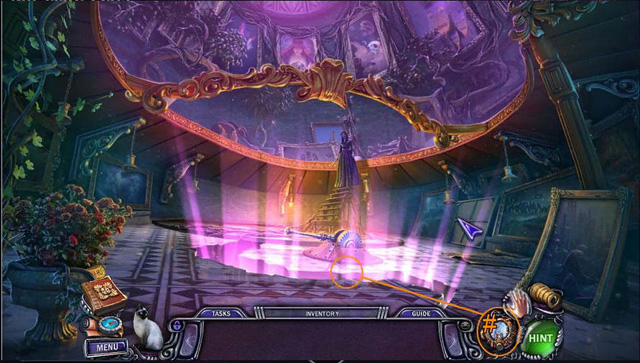
- Use the Chronograph (#) on the crack in the floor.
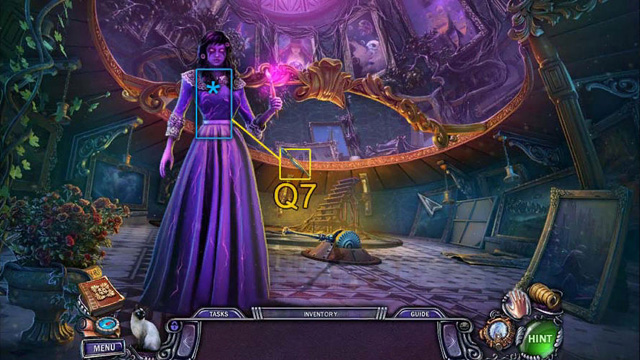
- Heal Amanda (*). Take the Paintbrush of Emptiness (Q7). Go to the main hall.
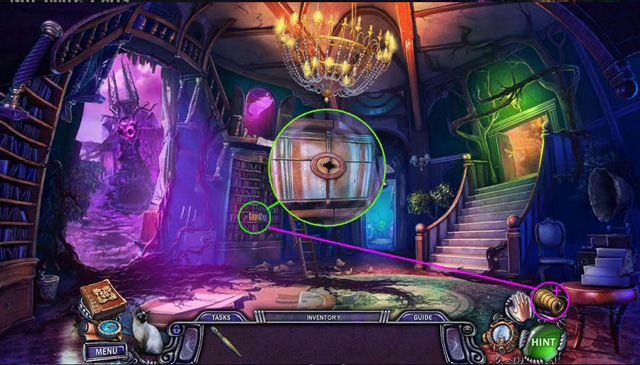
- Examine the bookshelves. Use the True Vision device (+) to find the keyhole.
- Go to the Dark Tower.

- Use the Paintbrush of Emptiness on the Dark Tower (Q7).
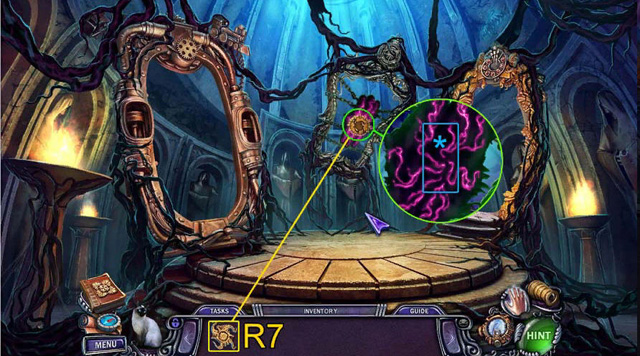
- Take the portal key (R7). Go to the Portal Room.
- Place the portal key (R7) on the middle portal. Heal the portal door (*).
- Step through the portal.
Chapter 5: trip to Nowhere
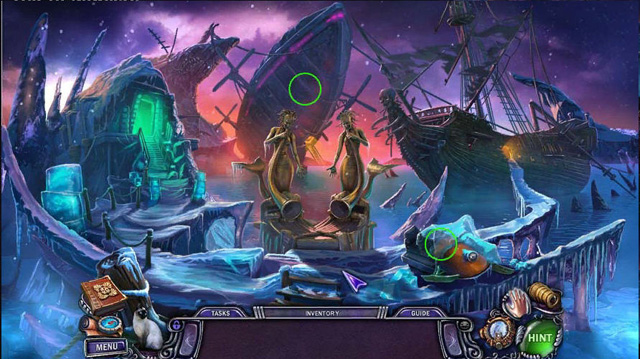
- Examine the airship and the snowmobile. Go to the pirate ship.
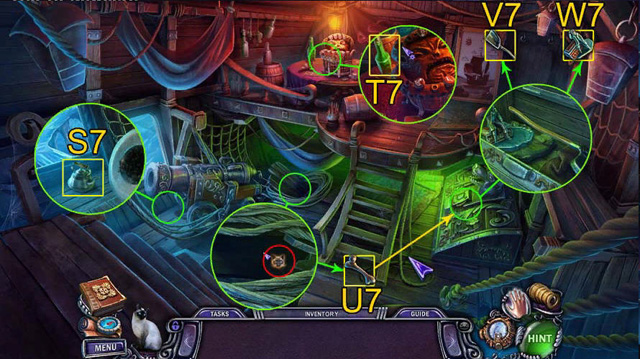
- Take the empty kettle (S7) near the cannon. Search the table. Take the round bottle (T7).
- Send the cat into the hole in the floor of the ship. Take the iron bone (U7).
- Use the iron bone (U7) to open the chest with the dog’s head.
- Take the shovel (V7) and the pirate figurine (W7). Return to the coast.
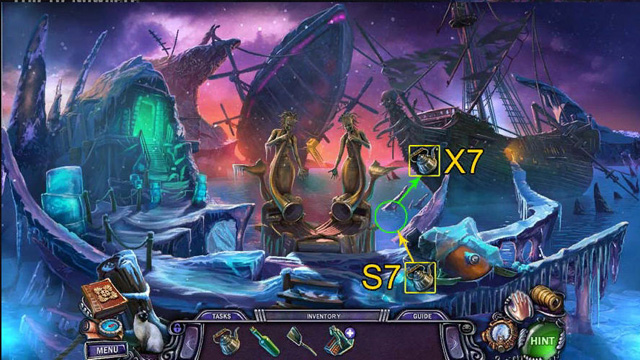
- Fill the empty kettle (S7) with water to get the kettle of cold water (X7). Go to the cave.
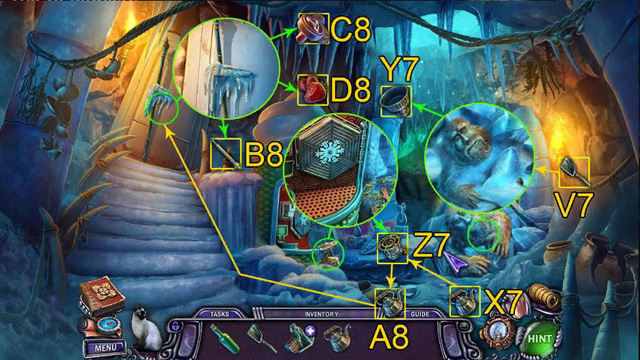
- Examine the Yeti. Use the shovel (V7) to remove the snow in which he’s buried.
- Take the bowl (Y7). Take the gas stove (Z7) that’s next to the ice cream machine.
- Select the gas stove (Z7) in your inventory. Place the kettle of cold water (X7) on it.
- Rotate the gas stove valve to get the kettle of boiling water (A8).
- Use the kettle of boiling water (A8) on the refrigerator handle.
- Take the axe handle (B8). Open the refrigerator.
- Take octopus case button 1 (C8), and the strawberry (D8).
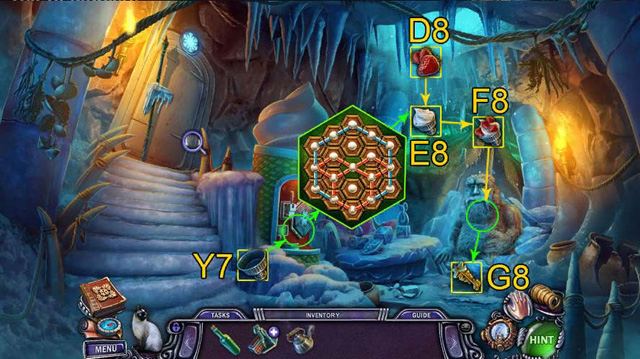
- Place the bowl (Y7) on the ice cream machine.
- Complete the mini-game to get the ice cream (E8).
- Select the ice cream (E8) in the inventory. Place the strawberry (D8) on it.
- Give the strawberry ice cream (F8) to the Yeti. Take the trophy room key (G8).
- Select the trophy room key (G8) in your inventory. Turn the key parts to match the silhouettes.
- Go to the main hall.
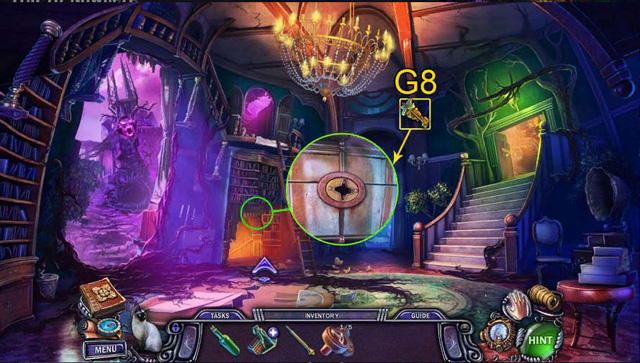
- Use the trophy room key (G8) on the invisible keyhole. Enter the trophy room.
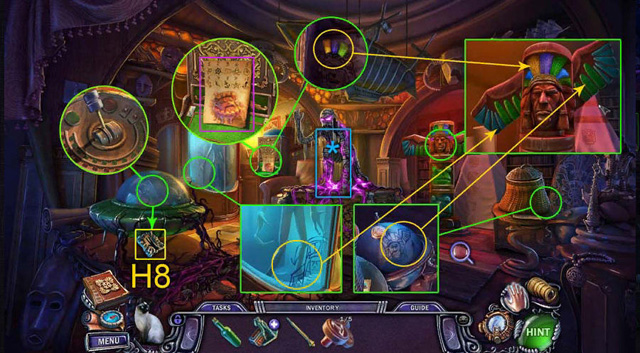
- Heal the mummy (*).
- Zoom into the safe on the wall. Take the note with the code for the octopus case.
- Zoom into the flying saucer. Pull the lever to get the alien device (H8).
- Search the room for the drawings that show how to arrange the totem.
- Zoom into the totem. Make it look like it does in the drawings to open the secret passage.
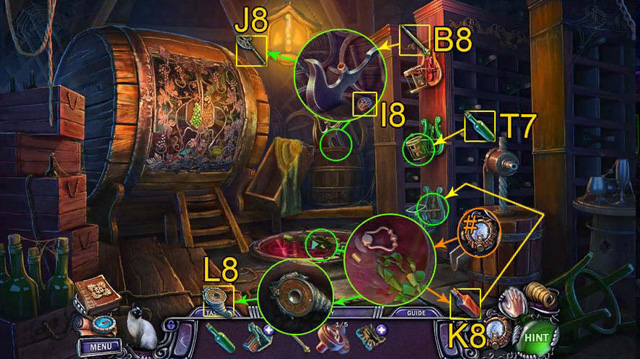
- Enter the wine cellar.
- Zoom into the barrel. Take the second octopus case button (I8).
- Use the axe handle (B8) on the halberd blade, take the halberd (J8).
- Place the round bottle (T7) in the green bottle holder.
- Zoom into the floor. Use the Chronograph (#) on the broken bottle.
- Take the square bottle (K8). Place it in the blue bottle holder.
- Lift the hatch on the floor. Take the horn of plenty (L8). Go to the trophy room.

- Use the halberd (J8) to open the sarcophagus.
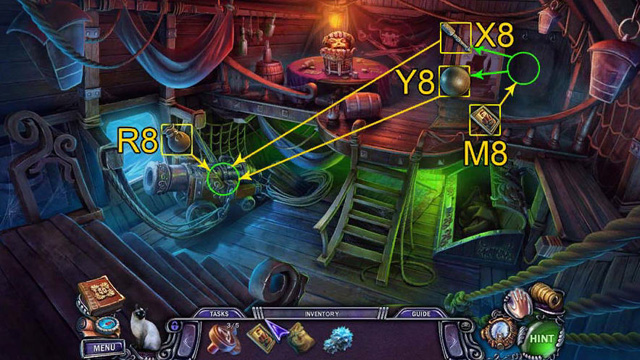
- Take the painting (M8), the tricorn (N8), and the triangular bottle (O8).
- Select the pirate figurine (W7) in the inventory, apply the tricorn (N8) to it.
- Take the diamond ring (P8). Use the ring (P8) to cut the glass on the case with the alien. Take the alien hand (Q8).
- Select the alien device (H8) in the inventory, apply the alien hand (Q8).
- Take the gunpowder (R8). Go to the wine cellar.
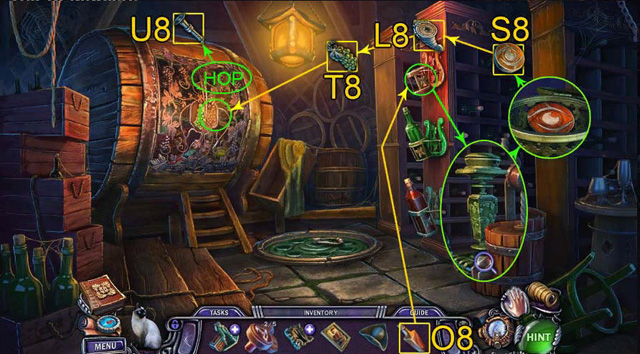
- Place the triangular bottle (O8) on the yellow bottle holder to open the secret area. Open the case that’s in the secret area. Take the horn of plenty part (S8).
- Select the horn of plenty (L8) in your inventory. Apply the horn of plenty part (S8) to it. Align the rings, and take the bunch of grapes (T8).
- Zoom into the barrel. Place the bunch of grapes on it (T8).
- Complete the hidden object scene to receive the flute (U8).
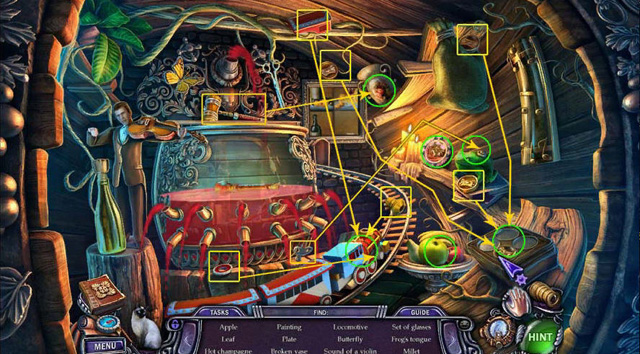
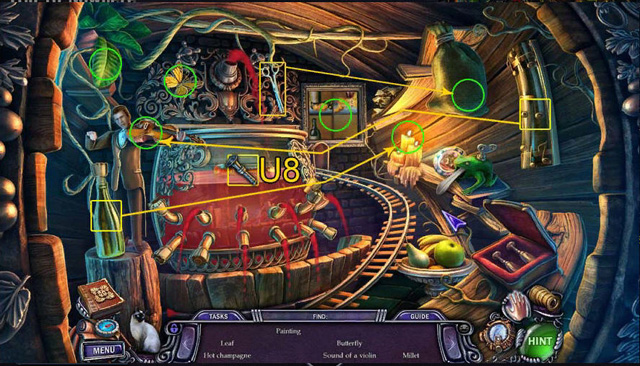
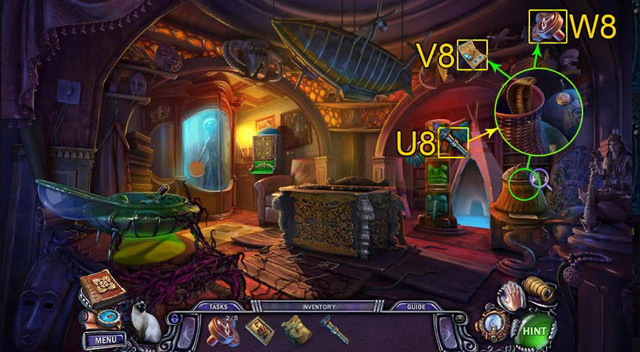
- Take the flute (U8). Return to the trophy room.
- Play the flute (U8) for the snake that’s in the basket.
- Take the crystal diagram (V8) and the octopus case button (W8).
- Go to the cave.
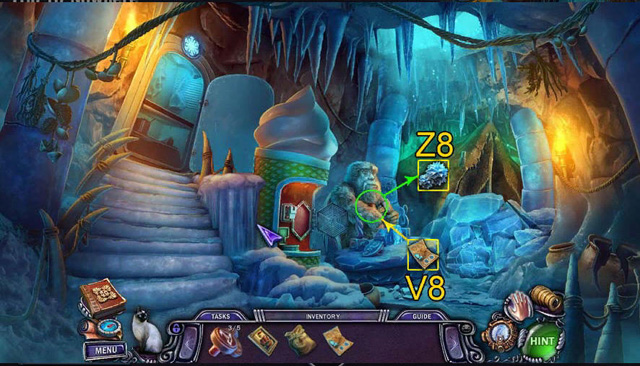
- Give the crystal diagram (V8) to the Yeti. Take the ice crystals (Z8).
- Go to the pirate ship.
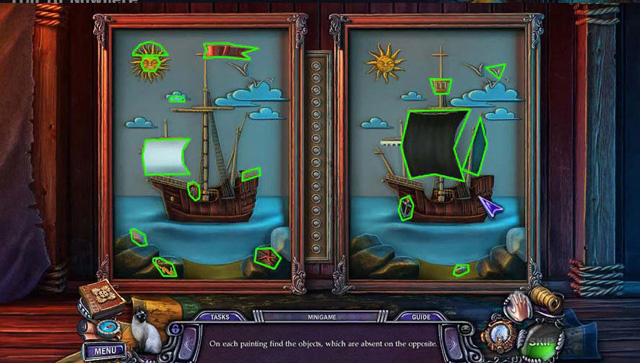
- Hang the painting (M8) on the wall.
- Complete the mini-game in which you must find the differences between the two paintings. Take the cannon swab (X8) and the cannonball (Y8).
- Use the cannon swab (X8) on the cannon. Pour the gunpowder (R8) into the cannon. Place the cannonball in the cannon (Y8).
- Select the matches. The cannon will fire and break the ice in which the snowmobile is encased.
- Go to the coast.
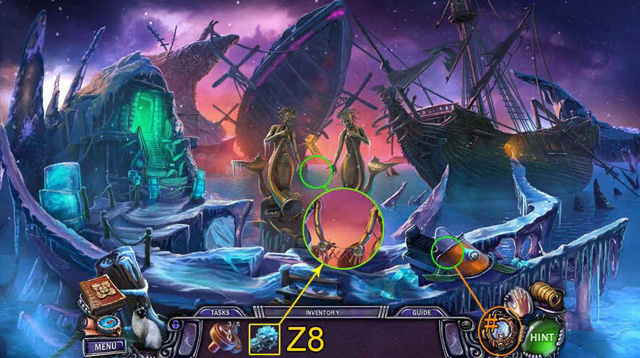
- Place the ice crystals (Z8) in the hands of the sirens.
- Use the Chronograph (#) on the broken snowmobile.
- Go to the airship.
- Use the True Vision device (+) to find the lock on the gate to the left. Guess the sequence that opens the lock. Select the opened lock.
- Enter the treasury.
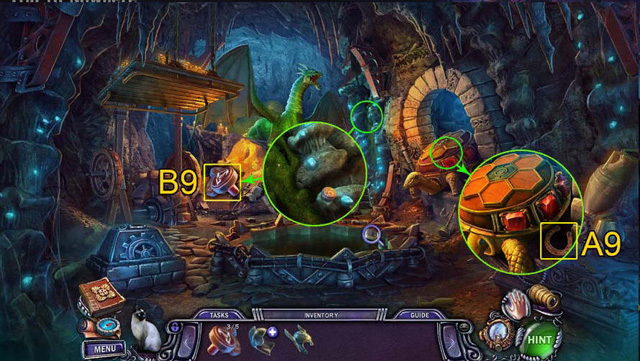
- Zoom into the turtle. Take the horseshoe (A9).
- Take the fourth octopus case button (B9) that’s on the wall of glowing stones.
- Return to the central chamber.
- Slip the cat through the half-open car window. The front passenger-side door will open.
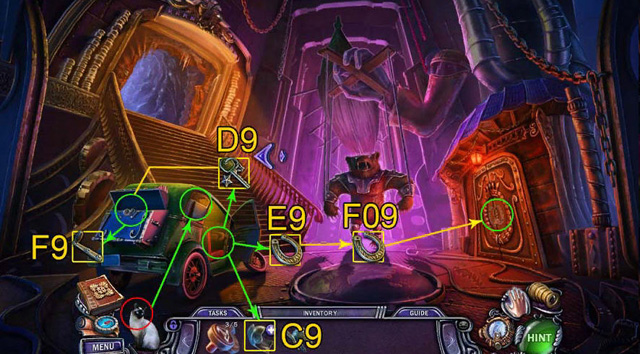
- Take the helmet 3 (C9) and the car key (D9).
- Open the glove compartment. Take the horseshoe (E9) to get the horseshoes (F09).
- Use the car key (D9) to open the trunk.
- Take the wine press handle (F9).
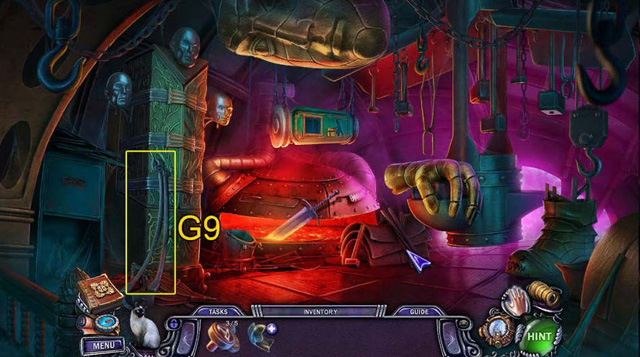
- Place the horseshoes (F09) on the door to the forge. Enter the forge.
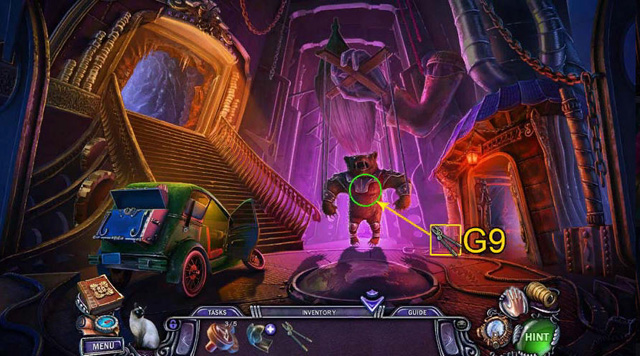
- Take the shears (G9). Go to the central chamber.
- Use the shears (G9) to cut the ropes around the bear.
- Enter the small tower.
- Remove the cloth from the crate near the window on the right.
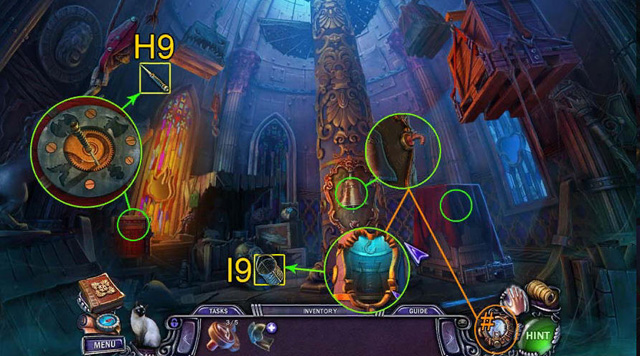
- Zoom in on the barrel on the left. Take the dagger (H9).
- Use the Chronograph (#) to straighten the bolts on the column in the middle of the room.
- Remove the wing nuts that are on the bolts. Remove the column cover. Take the fish basket (I9) inside. Go to the treasury.
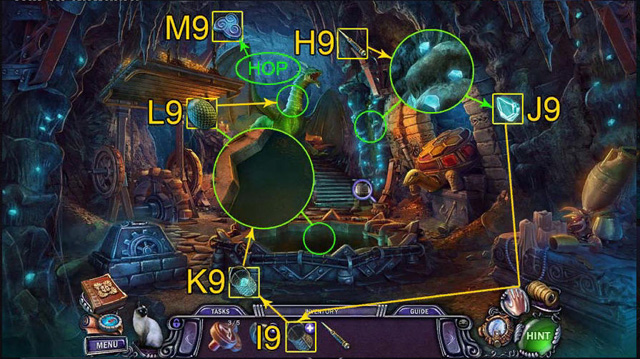
- Examine the wall with the glowing stones. Use the dagger (H9) to pry the stones loose. Take the stones (J9).
- Zoom in to the fish basket (I9), put the glowing stones (J9) in it. Take the homemade light (K9).
- Use the homemade light (K9) to search the pool. Take the dragon egg (L9).
- Place the dragon egg (L9) on the ground in front of the dragon.
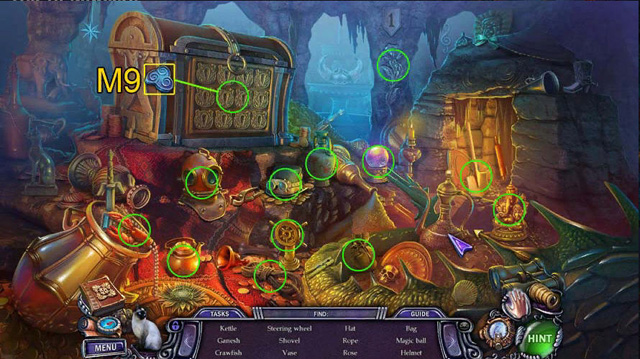
- Complete the hidden object scene. Take the air symbol (M9). Go the small tower.
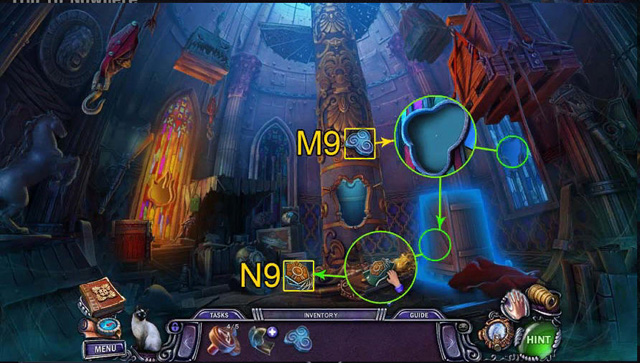
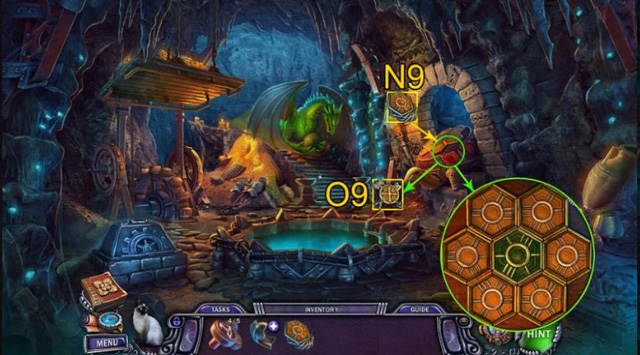
- Zoom into the window on the right. Place the air symbol (M9) in the slot. Light will shine on the crate and open it.
- Take the turtle parts (N9) from the opened crate. Go to the treasury.
- Place the turtle parts (N9) on the turtle.
- Line up all of the hexagonal parts.
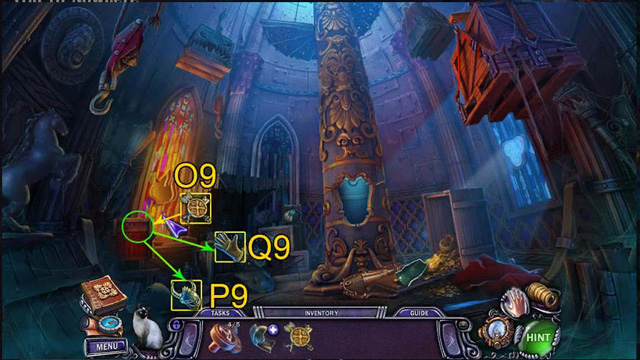
- Take the shield-shaped key, select it in the inventory, rotate its parts (O9). Go to the small tower.
- Apply the shield-shaped key (O9) to the round barrel. Take the helmet 1 (P9) and the glove (Q9) inside it. Go to the forge.
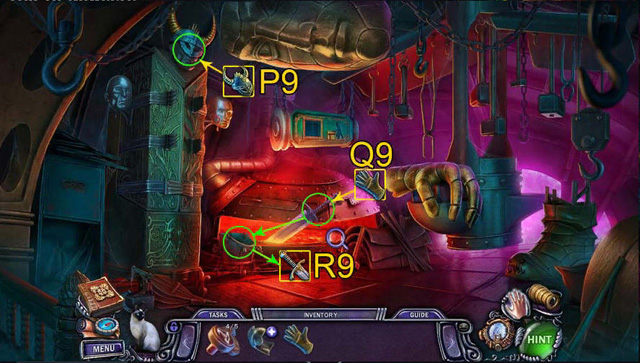
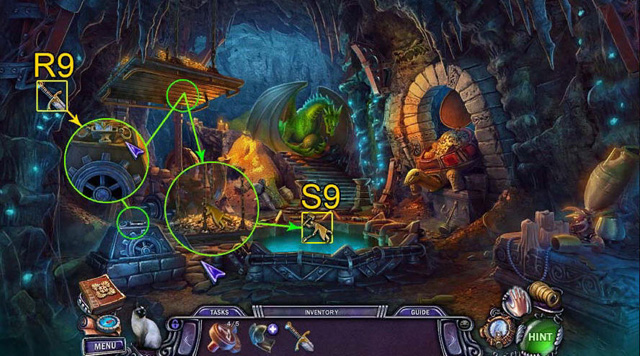
- Use the glove (Q9) to pick up the red-hot sword and cool the sword in the water. Take the sword (R9).
- Apply the helmet 1 (P9) to the iron safe. Go to the treasury.
- Zoom in to the lifting mechanism of the platform. Apply the sword (R9) and press it down.
- Take the blacksmith figurine (S9) that’s on the platform you just lowered. Go to the forge.
- Place the blacksmith figurine (S9) on the iron capsule above the stove.
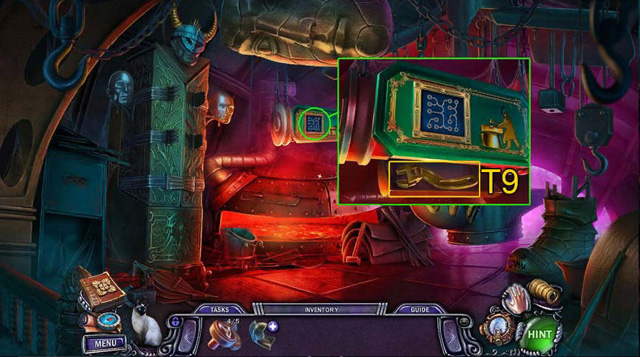
- Complete the mini-game. Take the wrench (T9).
- Go to the central chamber.
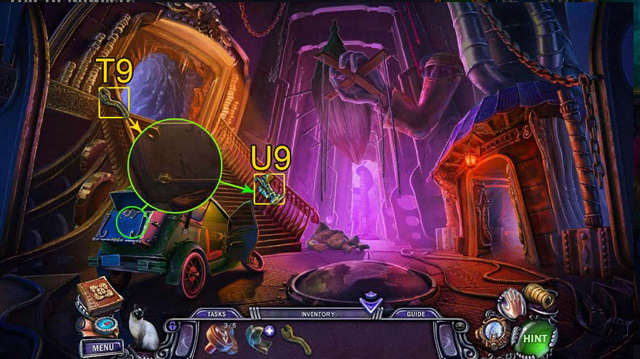
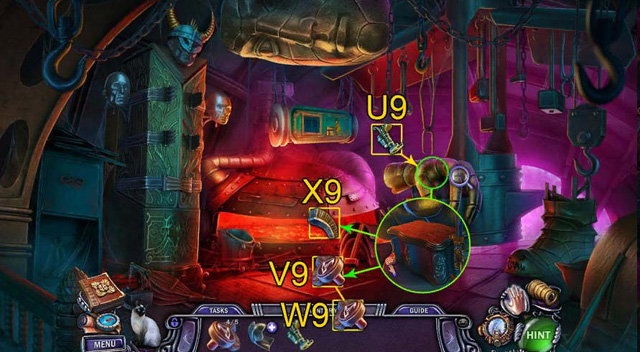
- Use the wrench (T9) to remove the bolts in the car trunk. Take the jack (U9).
- Go to the forge.
- Use the jack (U9) to raise the giant iron hand.
- Take the octopus case button (V9). You now have 5 octupus case buttons (W9).
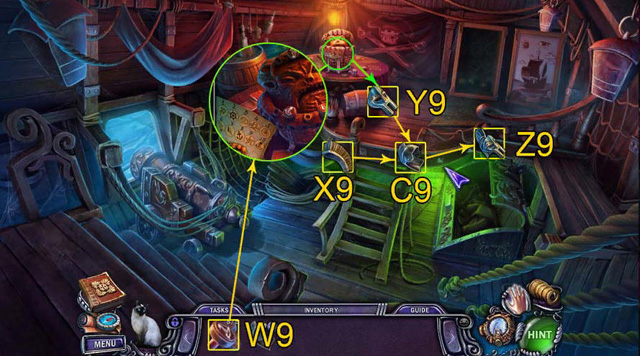
- Open the case that was under the hand. Take the helmet comb (X9).
- Go to the pirate ship.
- Place the octopus case buttons (W9).
- Using the code, press the buttons in the correct order to get the helmet visor (Y9).
- Select the helmet 3 (C9) in the inventory. Place the helmet comb (X9) and the helmet visor (Y9) on it.
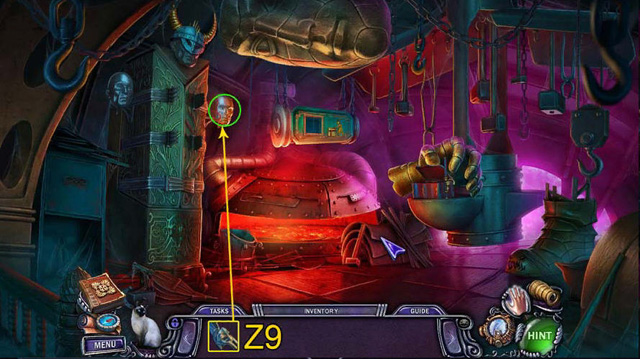
- Take the helmet 3 (Z9). Go to the forge.
- Apply the helmet 3 (Z9) to the iron safe. Go to the wine cellar.

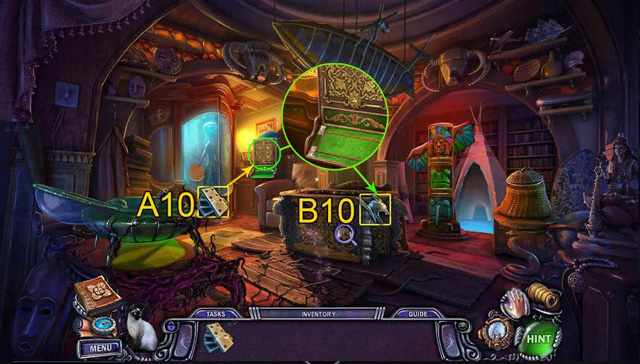
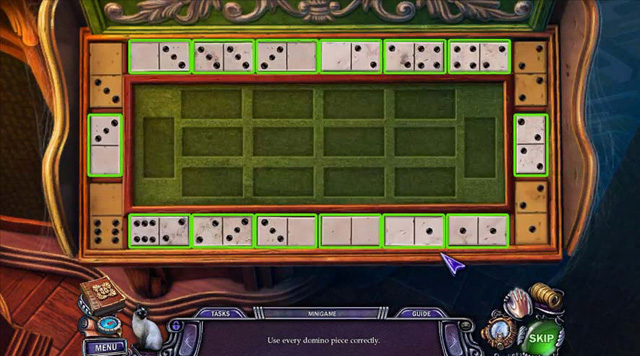
- Place the wine press handle (F9) on the wine press. Take the dominoes (A10).
- Go to the trophy room.
- Place the dominoes (A10) on the safe with dominoes.
- Complete the mini-game to open the safe.
- Take the helmet 2 (B10) in the safe. Go to the forge.

- Place the third helmet (B10) on the iron safe.
- Take the fire symbol (C10).
- Go to the small tower.
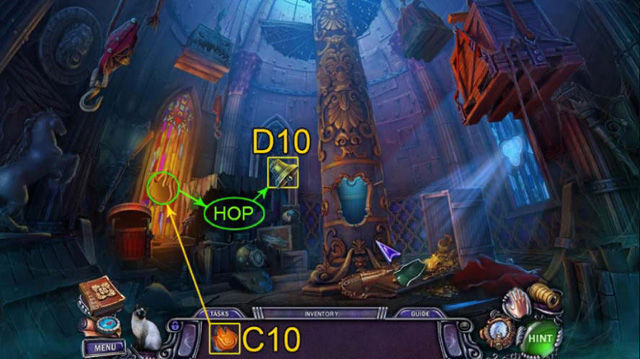
- Zoom into the wall on the left. Place the fire symbol (C10) in the slot.
- Complete the hidden objects scene to get the golden bell.
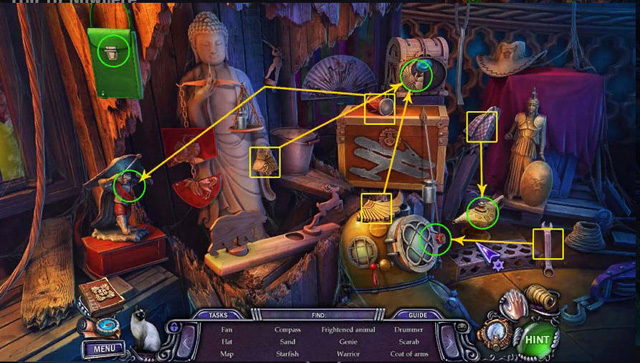
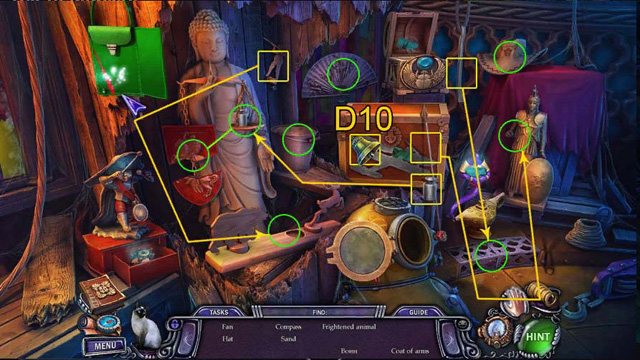
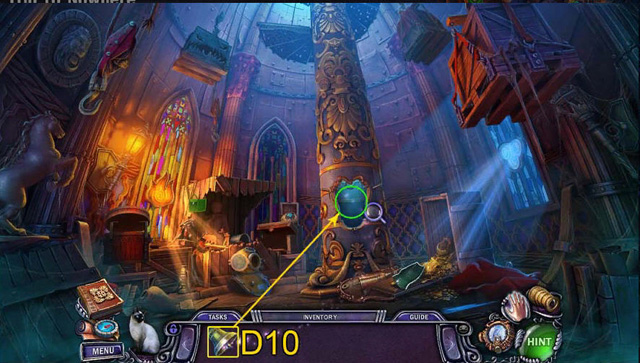
- Take the golden bell (D10).
- Place the golden bell (D10) on the hook inside the column to lower the ladder. Ring the bell.
- Go to the warehouse.
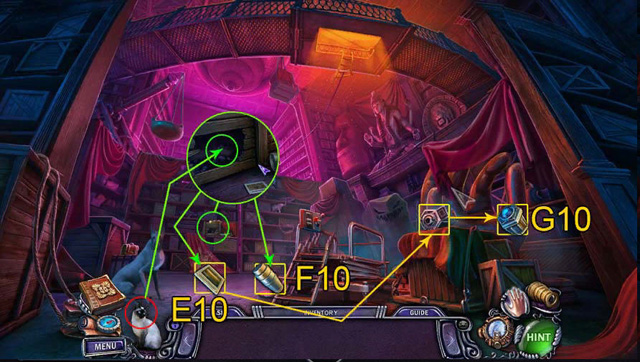
- Search the rack, take the holograph slide (E10).
- Send the cat into the hole in the crate to get the first of two fuses (F10).
- Zoom into the holograph. Apply the holograph slide (E10); take the holograph (G10).
- Use the holograph (G10) next to the dog.
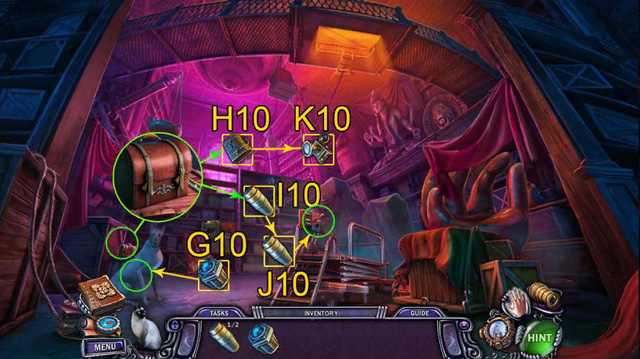
- Zoom into the crate on the left. Take the case (H10).
- Take the second fuse (I10) to get the fuses you need (J10).
- Select the case in the inventory (H10), open it. Take the artifact camera (K10).
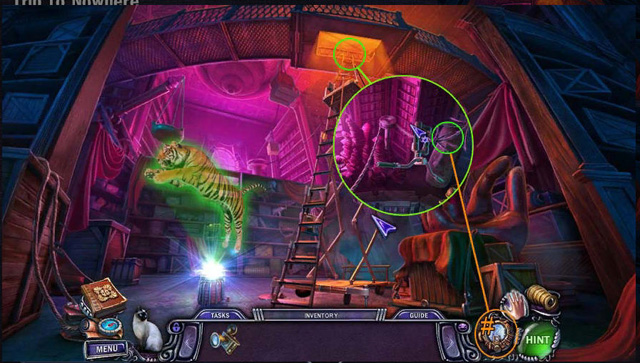
- Place the fuses (J10) in the slots on the ladder lift. Pull the lever.
- Zoom into the platform.
- Use the Chronograph (#) to fix the damaged rope. Zip line down to Simon’s office.
- Use the True Vision device (+) on the magic barrier in front of Simon.
- Select the barrier’s weak spots to destroy it.
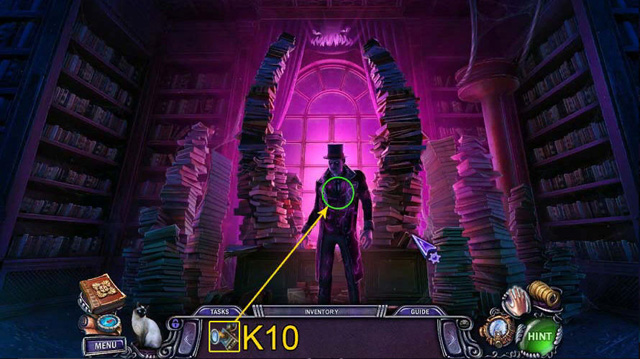
- Use the artifact camera on Simon (K10).
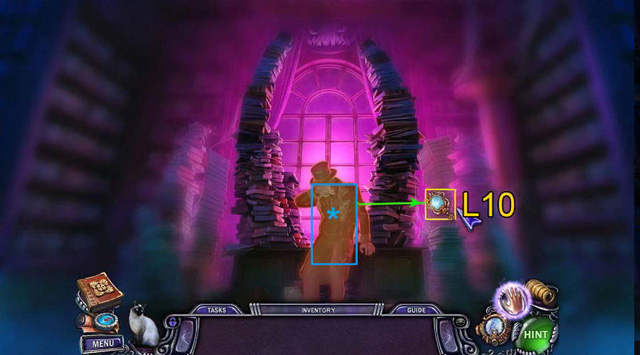
- Heal Simon (*) to get the artifact mirror (L10).
- Go to the Dark Tower.
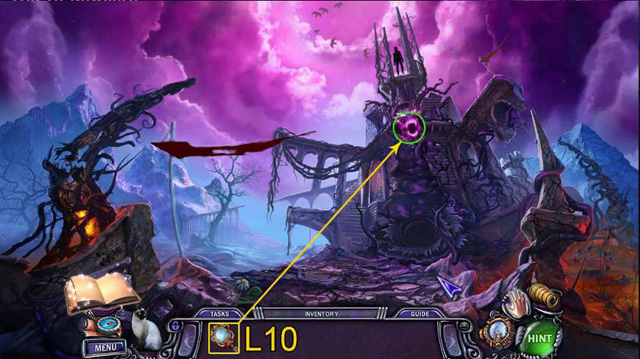
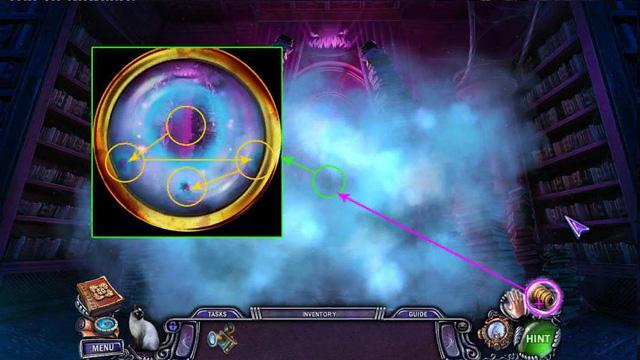
- Use the artifact mirror (L10) on the Dark Tower.
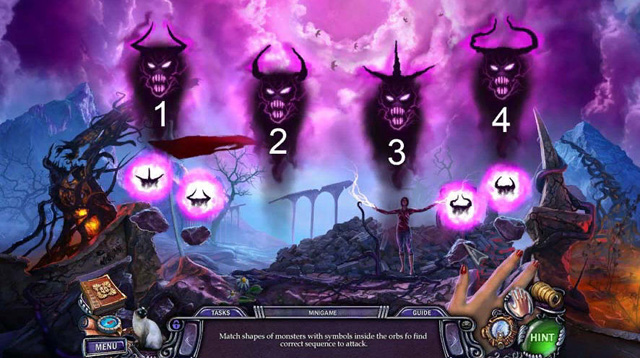
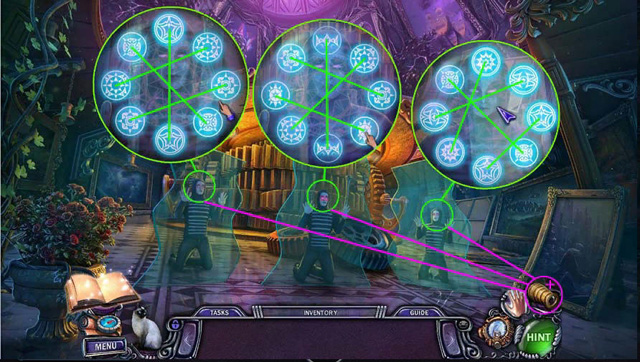
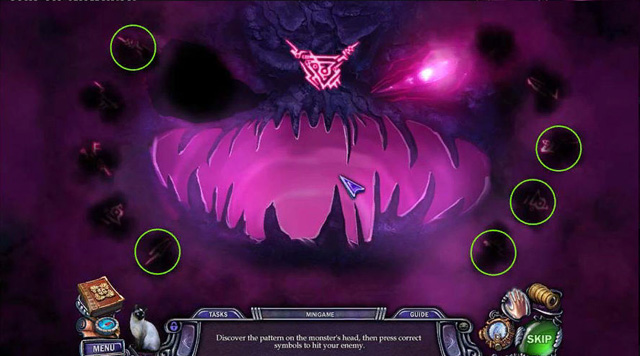
- Destroy the monsters. The circles at the bottom of the screen contain the shapes of their horns. Beginning with the far left circle and moving to the right, Select the monster that matches each circle. Here’s the order: 3, 1, 4, 2.
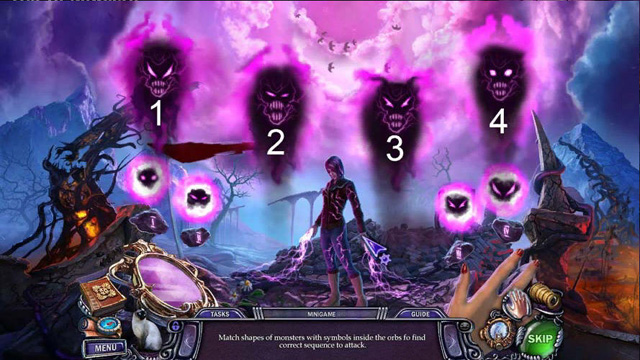
- Destroy the monsters. The circles at the bottom of the screen contains the shapes of their eyes. Beginning with the far left circle and moving to the right, Select the monster that matches each circle. Here’s the order: 4, 2, 3, 1.
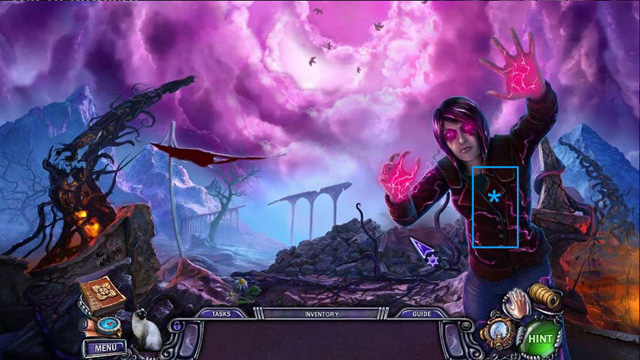
- Select Kate to heal (*) her.
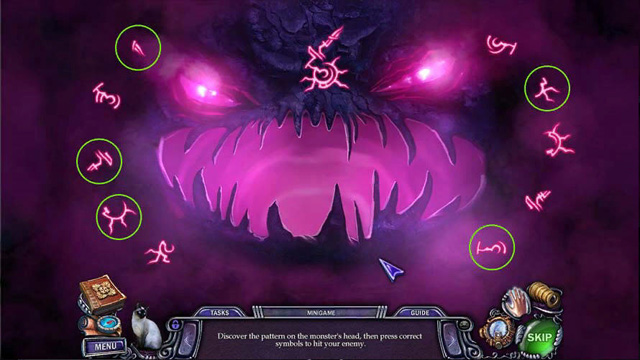
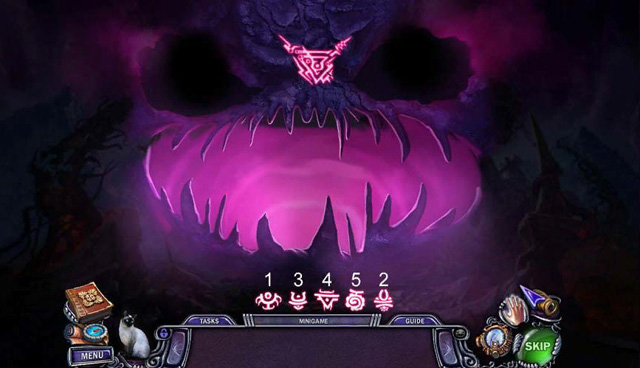
- Find and select the symbols that make up the image on the . You will need to do this twice.
- Select the symbols in the correct order.
- Congratulations, you’ve completed House of 1000 Doors: Evil Inside.


 Redemption Cemetery: Bitter Frost Walkthrough, Guide, & Tips
 Twisted: A Haunted Carol Walkthrough, Guide, & Tips
 Millennium: A New Hope Walkthrough, Guide, & Tips
 Reincarnations: Uncover the Past Walkthrough, Guide, & Tips
 Nancy Drew: Secret of Shadow Ranch Walkthrough, Guide, & Tips