Sacra Terra: Kiss of Death Walkthrough, Guide, & Tips
Sacra Terra: Kiss of Death Walkthrough

Welcome to the Sacra Terra: Kiss of Death Walkthrough
Experience a story about love so strong, it can overcome the most powerful evil! Explore visually stunning mystical dimensions and rescue your fiance!
Whether you use this document as a reference when things get difficult or as a road map to get you from beginning to end, we’re pretty sure you’ll find what you’re looking for here.
This document contains a complete Sacra Terra: Kiss of Death game walkthrough featuring annotated screenshots from actual gameplay!
We hope you find this information useful as you play your way through the game. Use the walkthrough menu below to quickly jump to whatever stage of the game you need help with.
Remember to visit the Big Fish Games Forums if you find you need more help. Have fun!
This walkthrough was created by Alawar, and is protected under US Copyright laws. Any unauthorized use, including re-publication in whole or in part, without permission, is strictly prohibited.
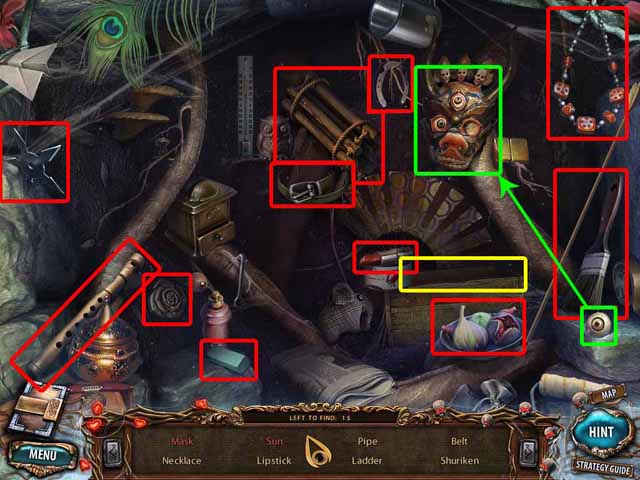
Chapter 1: Sacra Terra Island

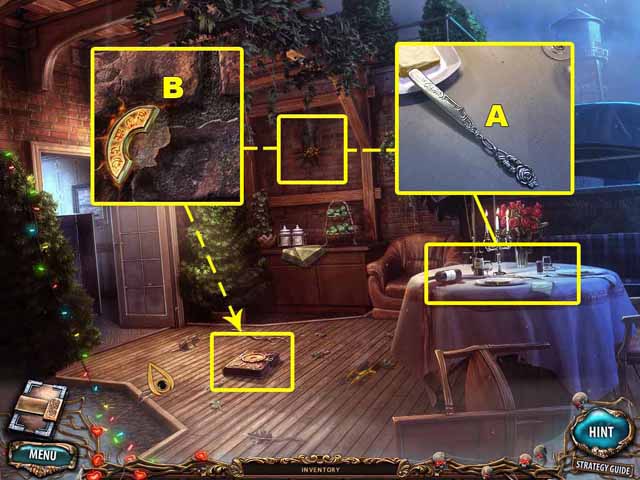
- Take the KNIFE (A) that’s on the table.
- Use the KNIFE (A) to pry the first LOCK PART (B) out of the wall.
- Place the first LOCK PART (B) on the book.
- Go to the Living Room.
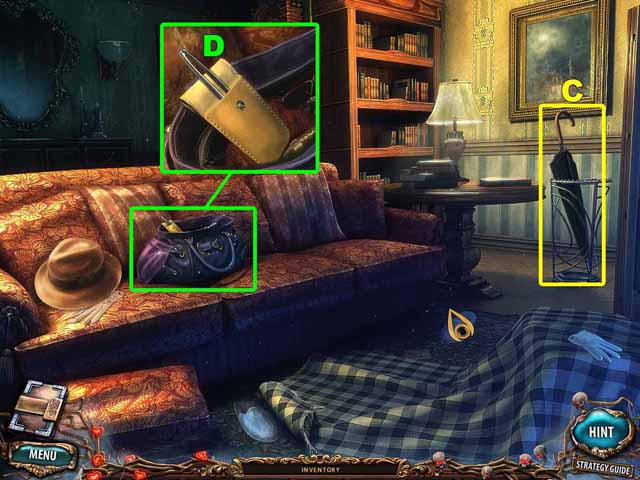
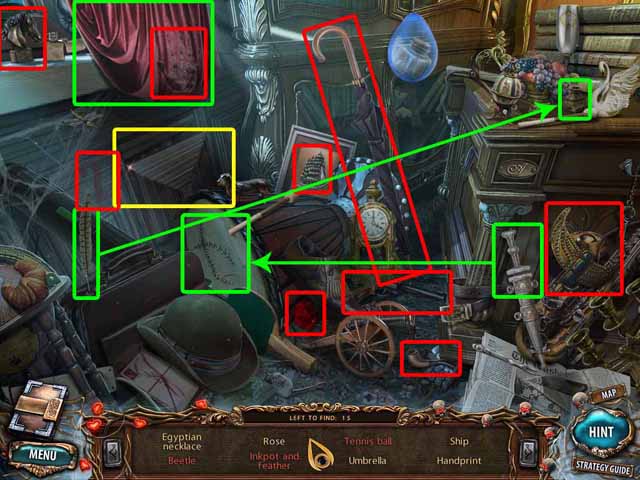
- Move the room divider. Take the UMBRELLA (C).
- Take the TWEEZERS (D) that are in the purse on the sofa.
- Return to the Deck.
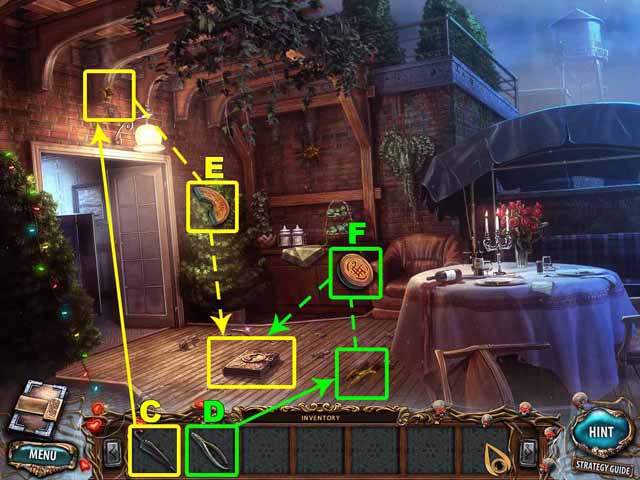
- Use the UMBRELLA (C) to knock down the second LOCK PART (E).
- Use the TWEEZERS (D) to retrieve the third LOCK PART (F) out of the hole in the floor.
- Place the LOCK PARTS (E and F) on the book.
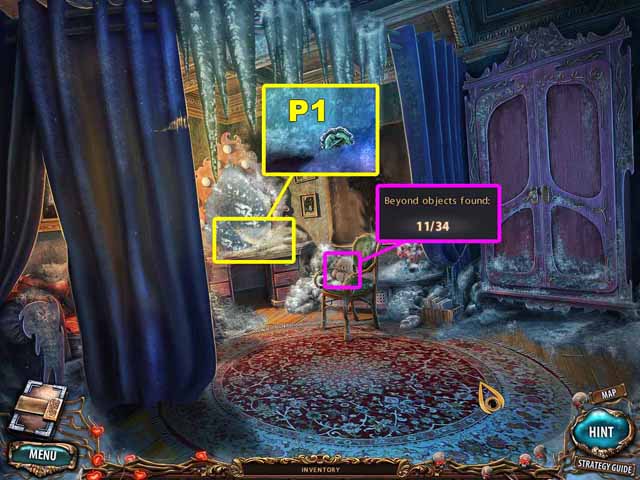
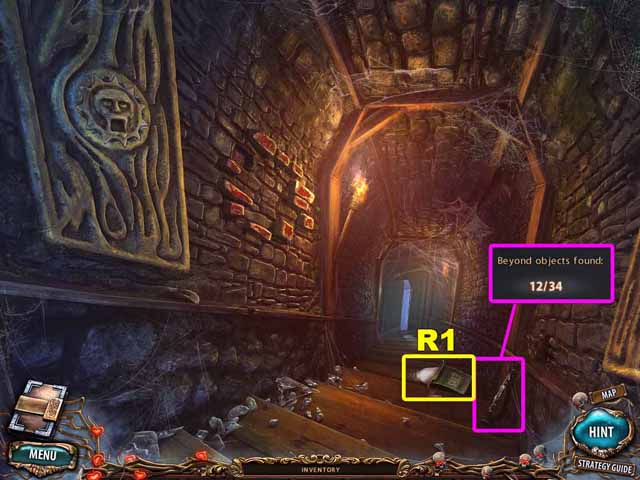
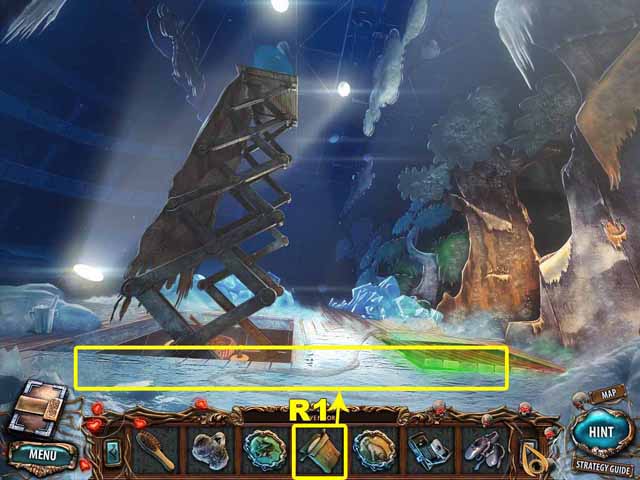
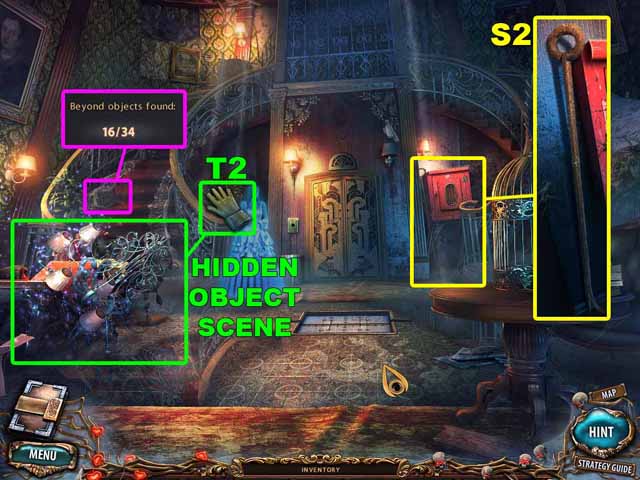
- Take the first Beyond Object.
- Take the MAP on the metal skull.
- Take the METAL SKULL (G).
- Take the SLINGSHOT (H).
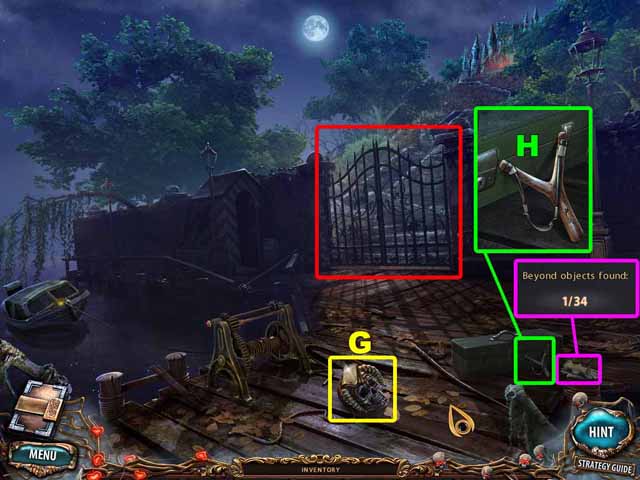
- Go to the Castle Entrance.

- Take the second Beyond Object.
- Take the PAPERCLIP (I).
- Take the GREEN BALL (J).
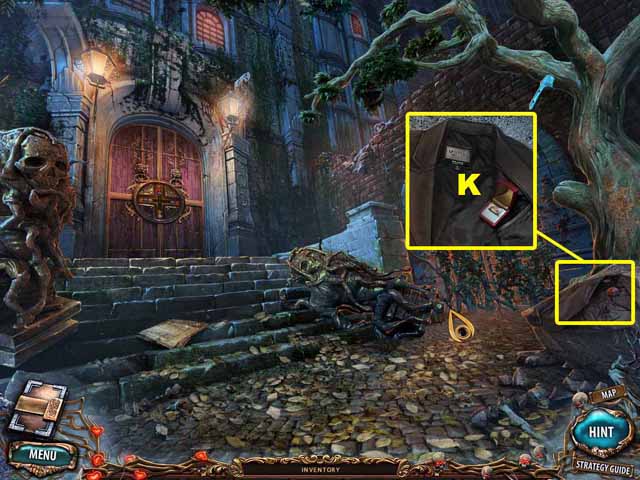
- Take the RING (K).
- Return to the Dock.
- Use the PAPERCLIP (I) to open the tackle box. Take the MACHETE (L).
- Return to the Castle Entrance.
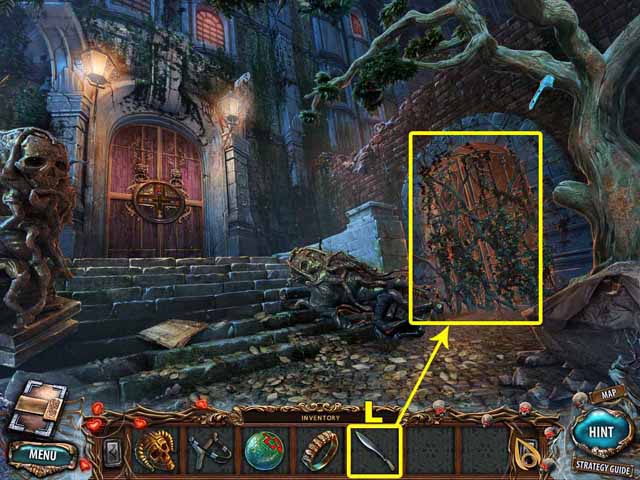
- Use the MACHETE (L) to open the gate.
- Enter the Garden.
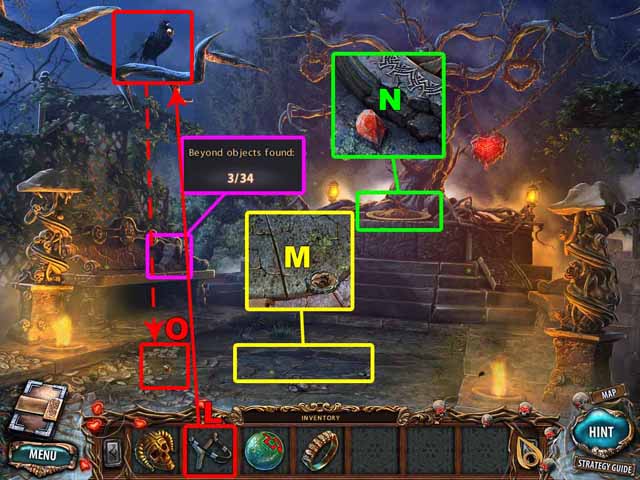
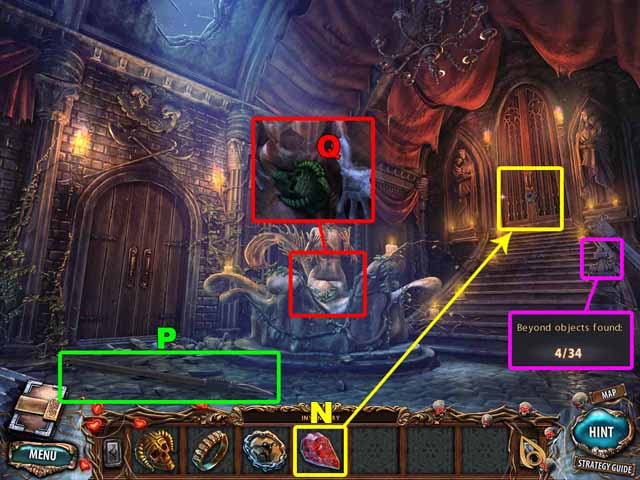
- Take the third Beyond Object.
- Take the TOKEN (M).
- Take the HALF OF A GEM (N).
- Use the SLINGSHOT (L) to shoot the crow. Take the RED BALL (O).
- Return to the Castle Entrance.
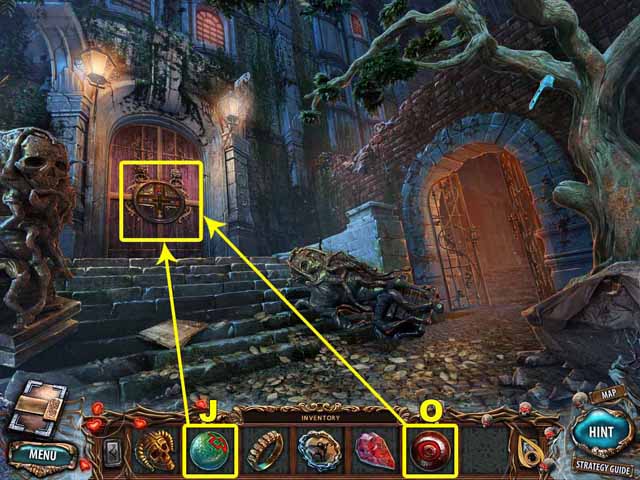
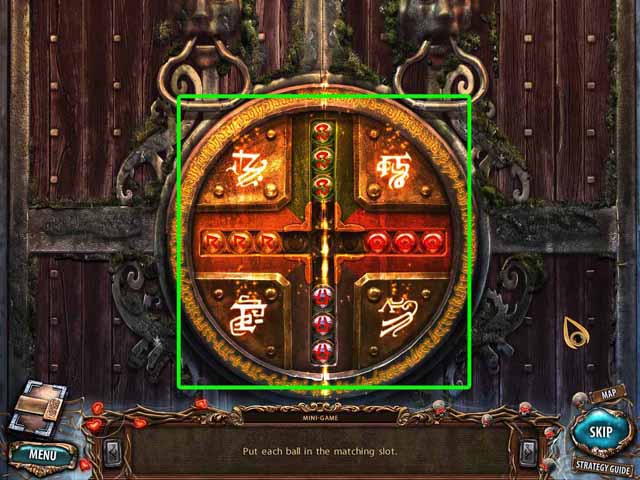
- Place the BALLS (J and O) on the castle door.
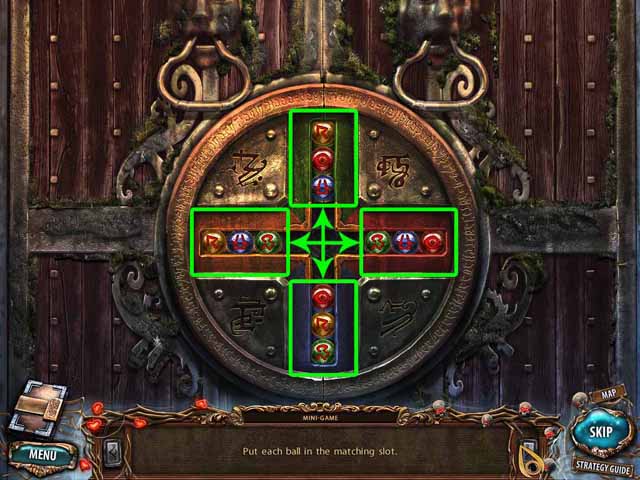
- Move each ball into a matching slot.
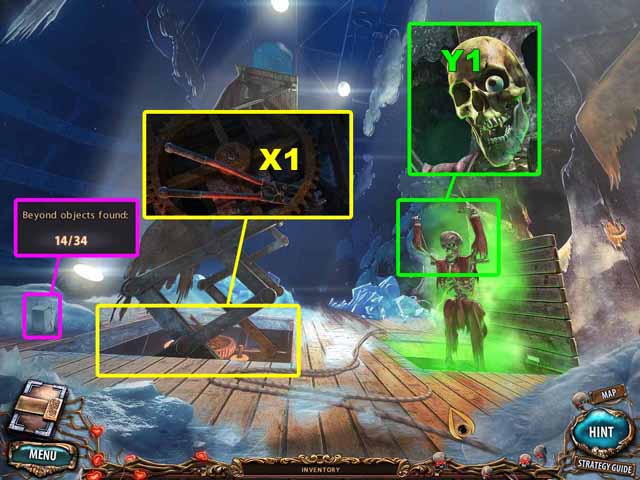
- Take the fourth Beyond Object.
- Take the SPEAR (P).
- Take the METAL SKULL (Q).
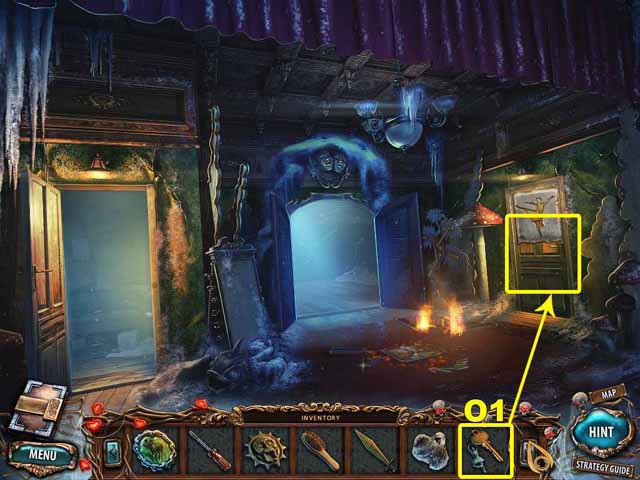
- Place the HALF OF A GEM (N) in the lock on the door at the top of the stairs.
- Go to the Castle Entrance.
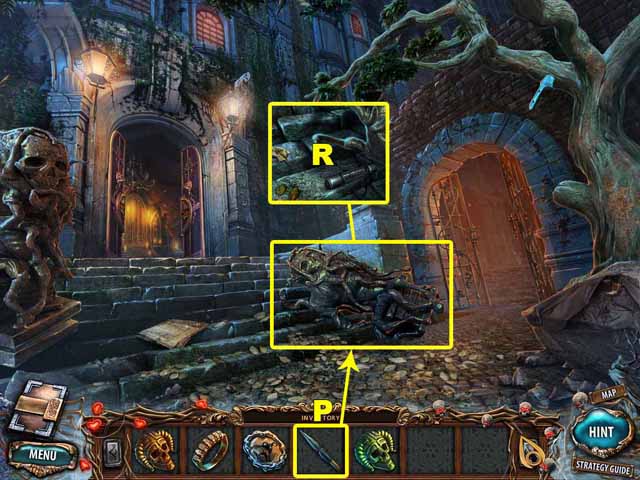
- Use the SPEAR (P) to raise the statue. Take the FUSE (R).
- Go to the Dock.
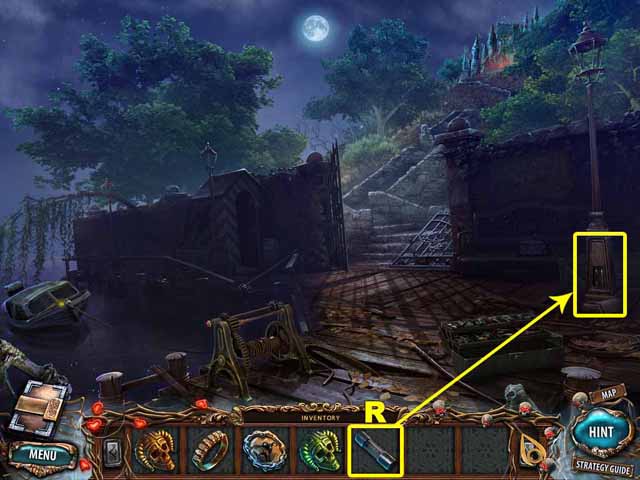
- Place the FUSE (R) in the lamppost.
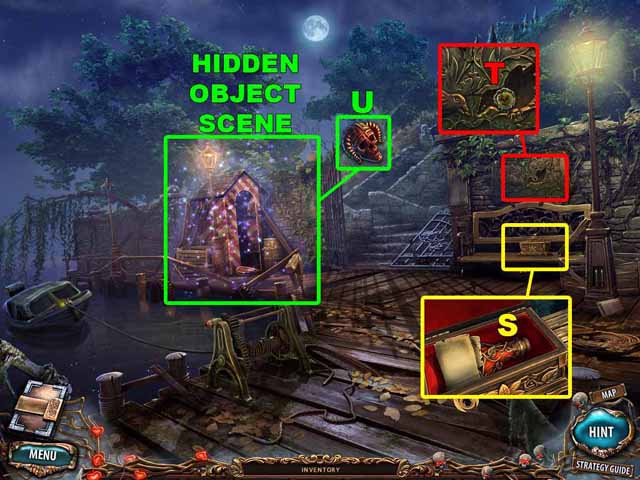
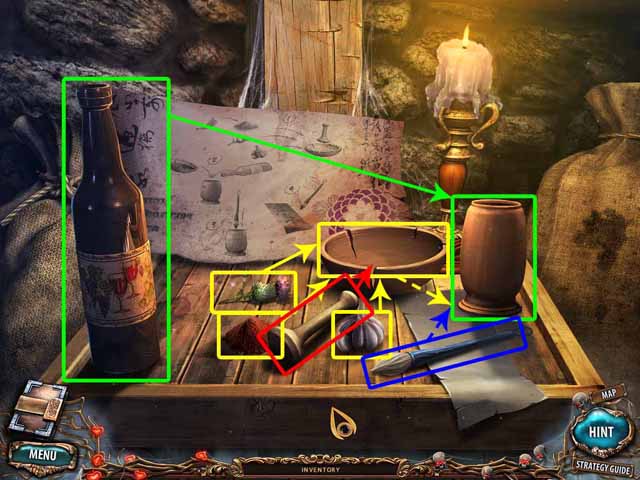
- Click on the case on the bench. Take the ELIXIR (S).
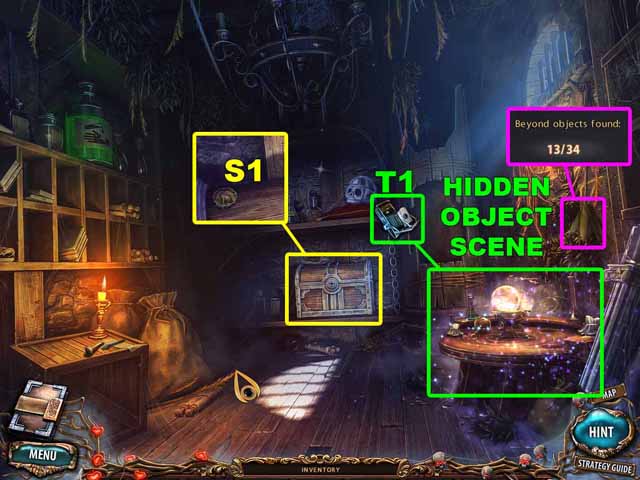
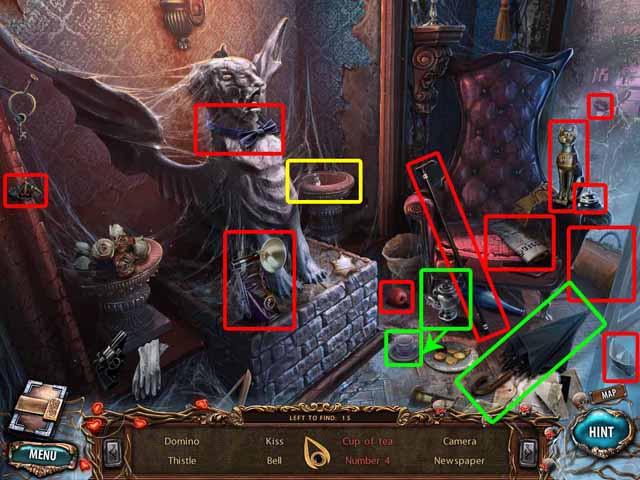
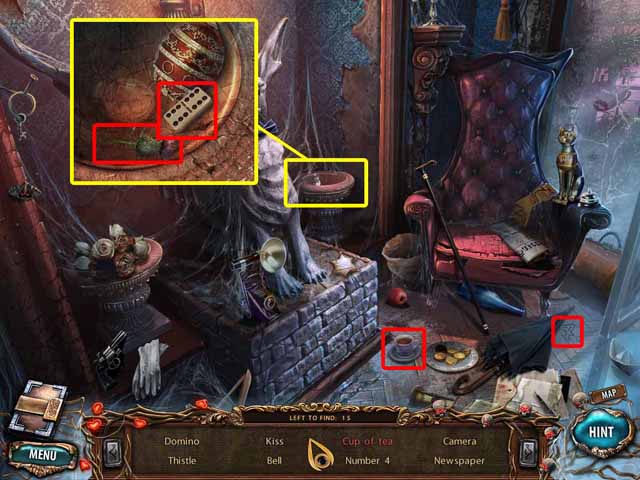
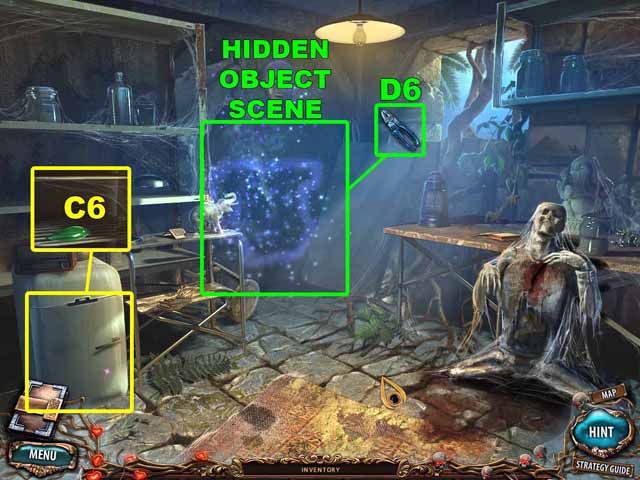
- Take the TOKEN (T) that’s stuck in the bas-relief.
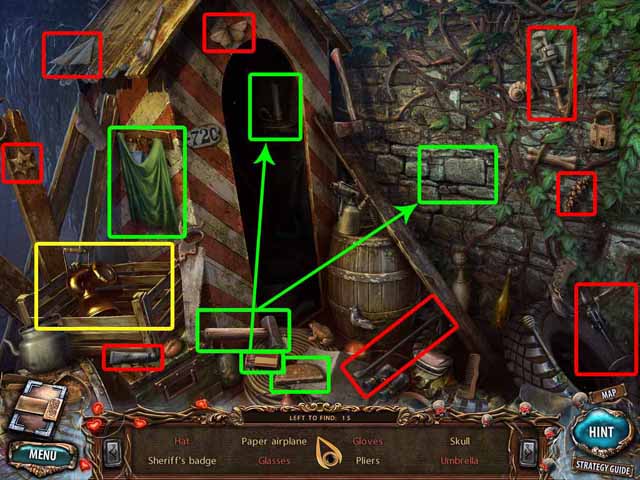
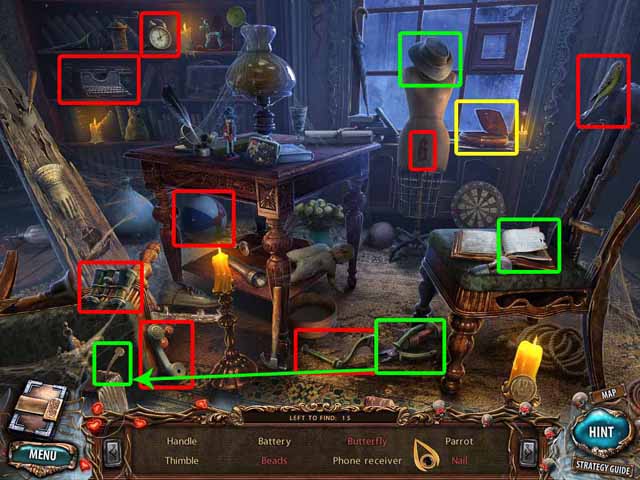
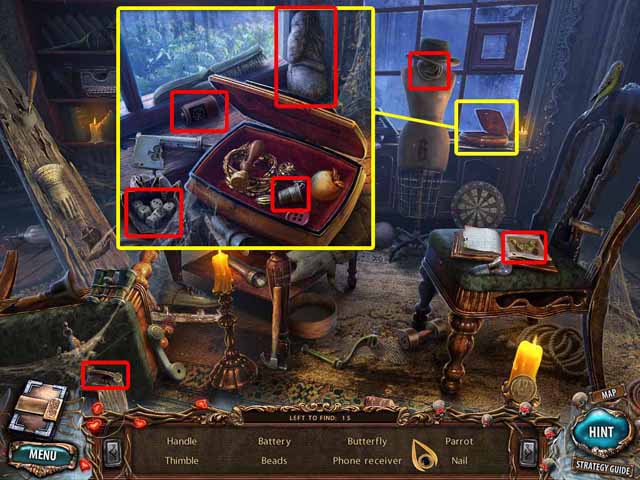
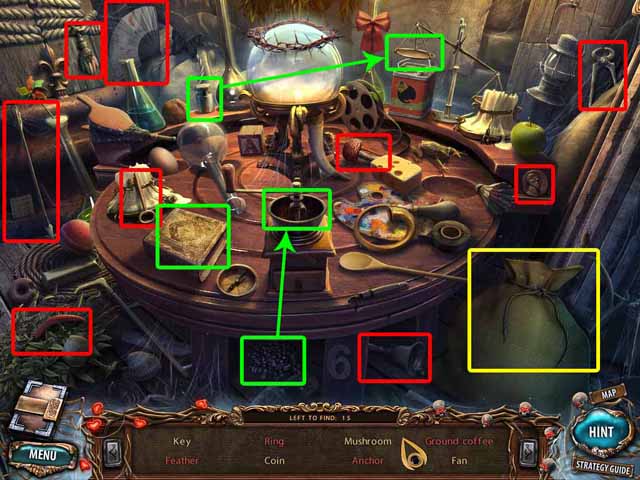
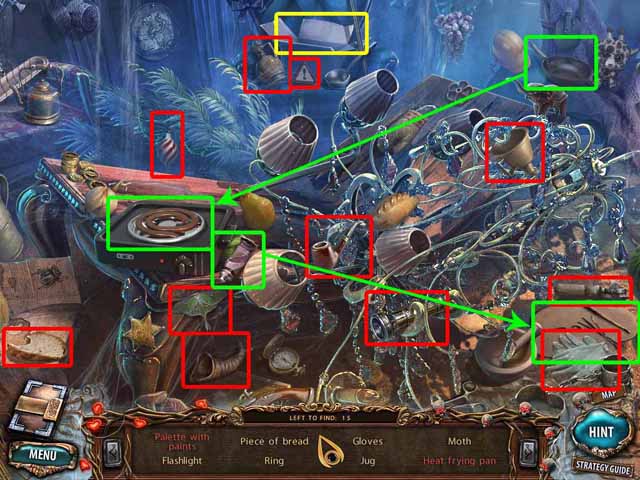
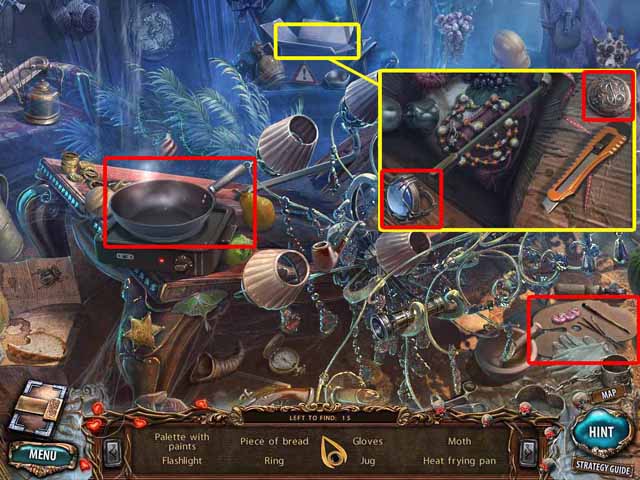
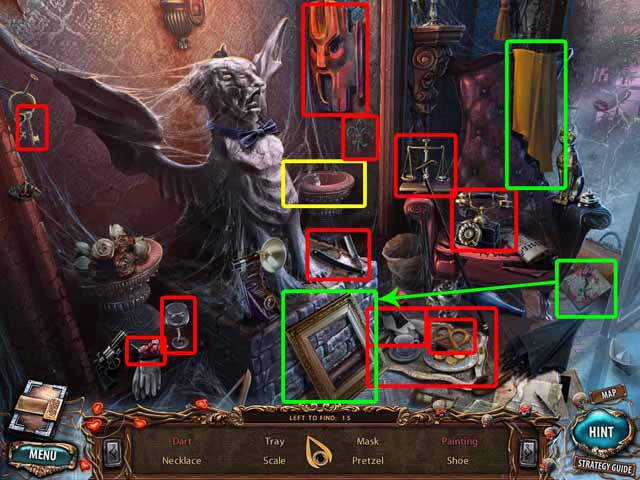
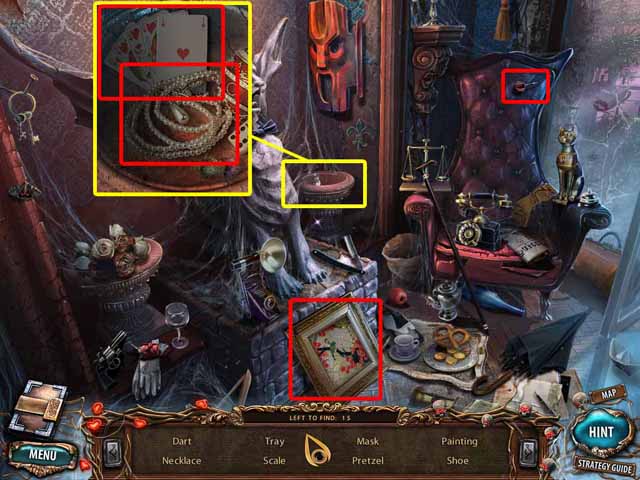
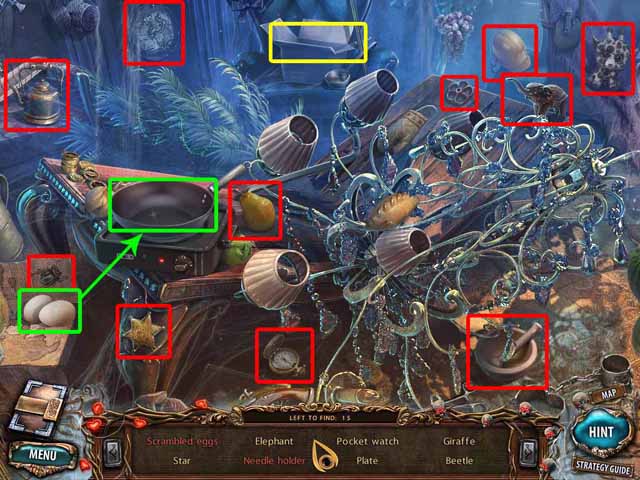
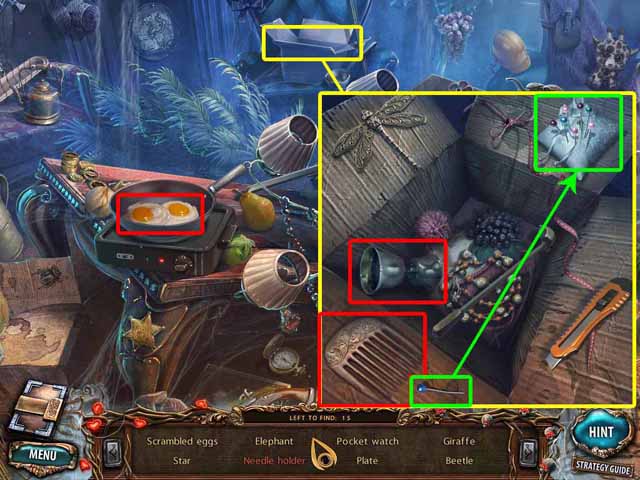
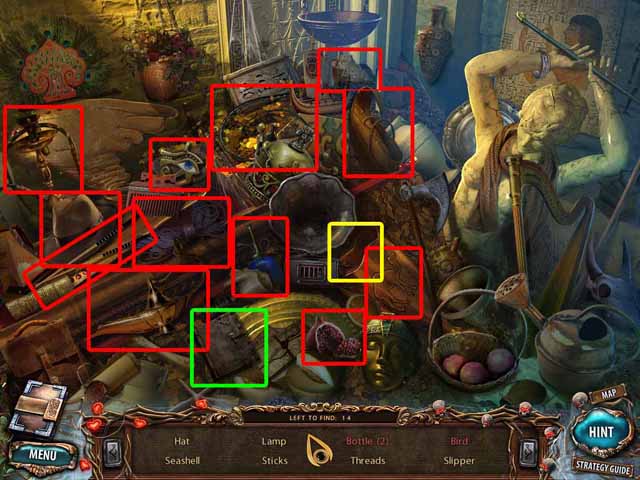
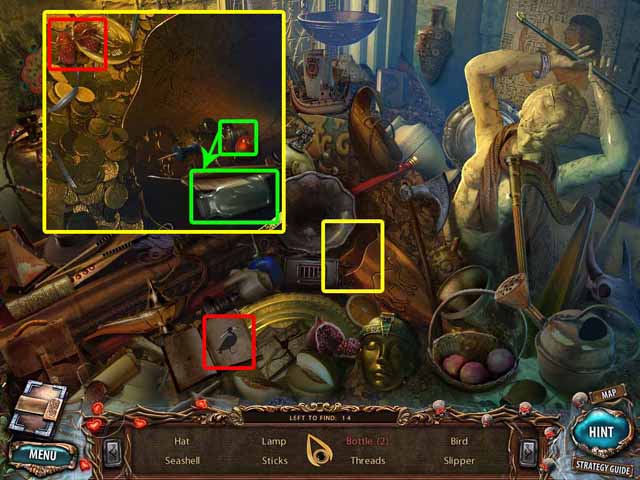
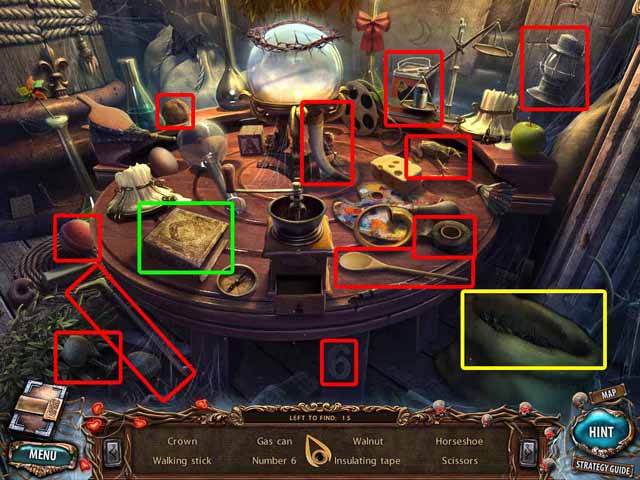
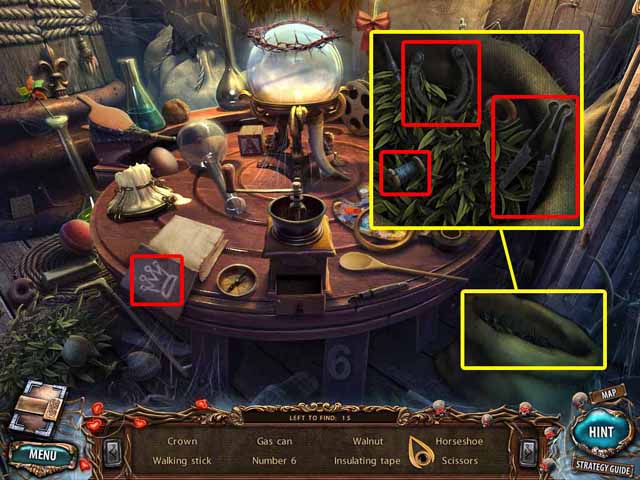
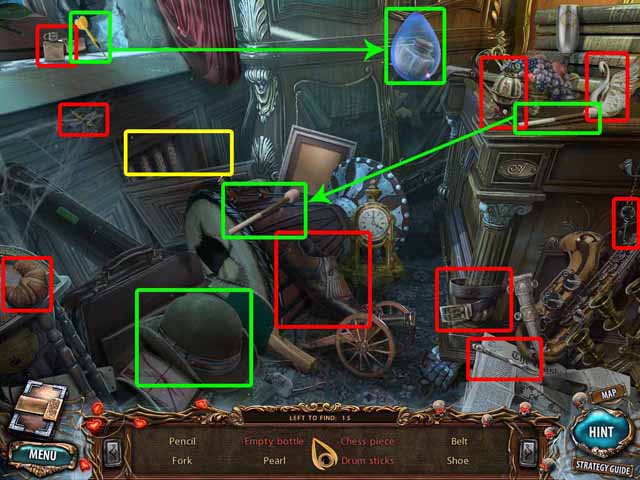
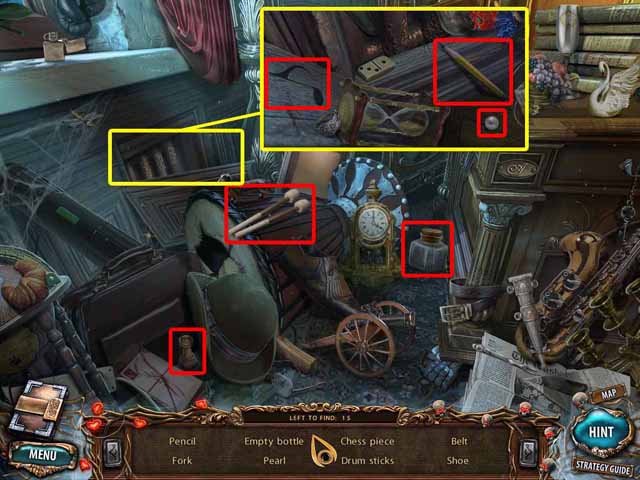
- Click on the shed on the dock to launch a Hidden Object scene. Collect every object on the list at the bottom of the screen.
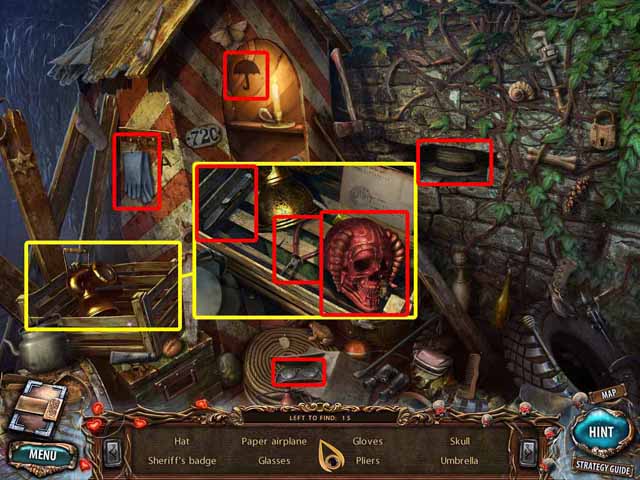
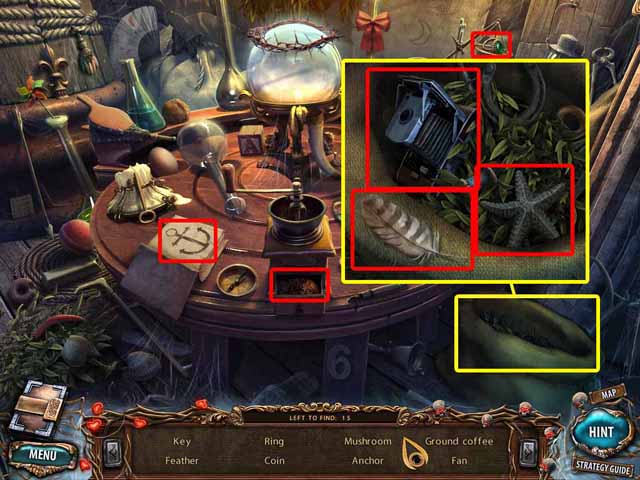
- Open the close-up scene and collect the rest of the objects on the list at the bottom of the screen.
- Upon completing the Hidden Object Scene, you’ll acquire the METAL SKULL (U).
- Go to the Garden.

- Pour the ELIXIR (S) on the sprout.
- Take the STONE BOOK (V).
- Go to the Castle Foyer.
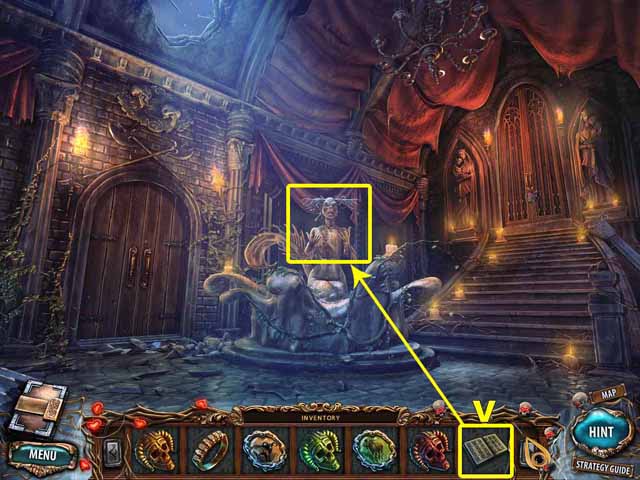
- Place the STONE BOOK (V) in the hands of the mermaid statue.
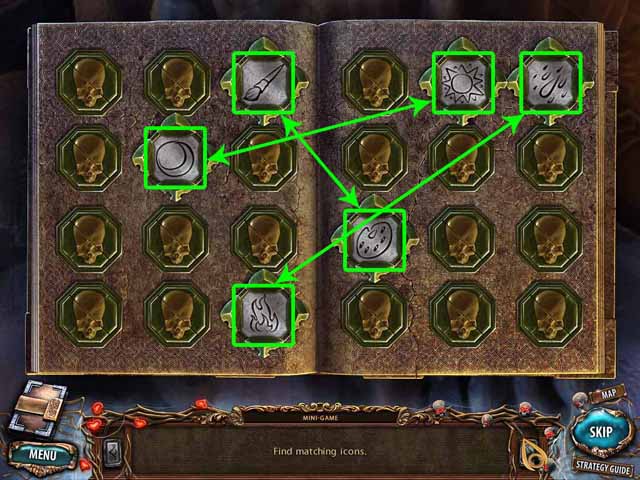
- Find the matching icons to complete the mini-game.
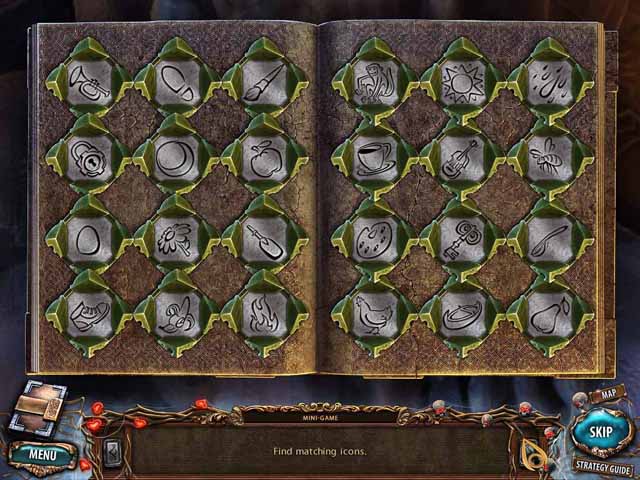
- If you do everything correctly, the bars on the book will open.
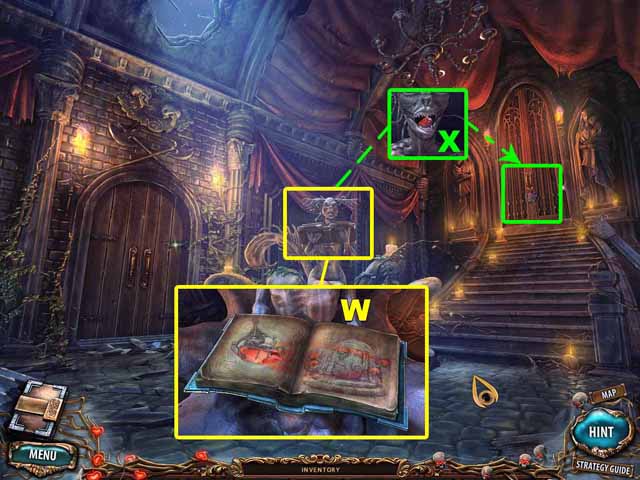
- Take the MAGIC BOOK (W).
- Take the HALF OF A GEM (X) from the mouth of the statue.
- Place the HALF OF A GEM (X) in the lock on the door at the top of the stairs.
- Enter the Library.
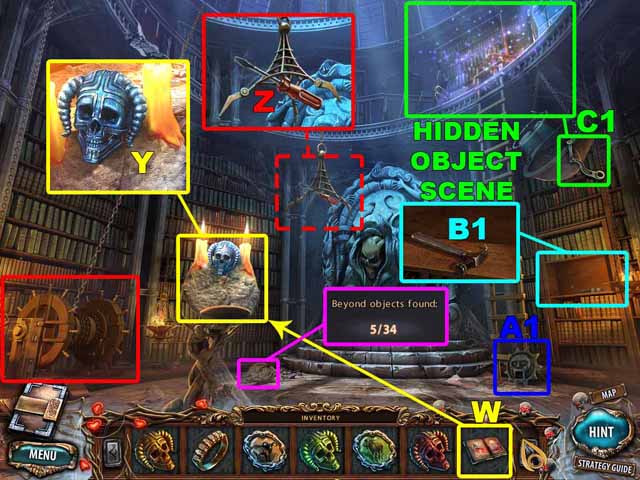
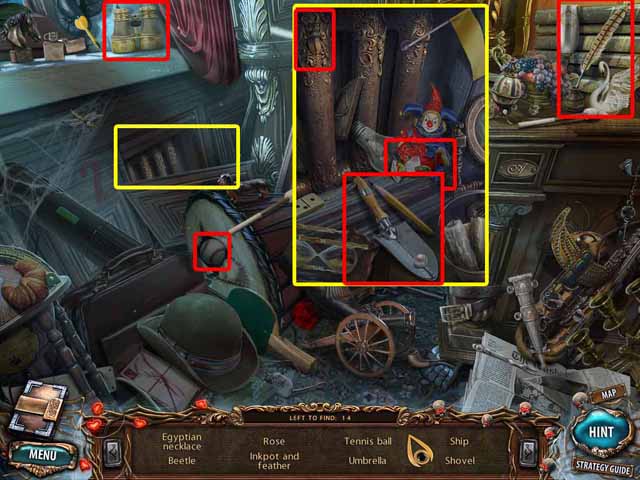
- Take the fifth Beyond Object.
- Take the METAL SKULL (Y) that’s on the candlelit pedestal.
- Place the MAGIC BOOK (W) on the pedestal.
- Click on the winch on the left to drop the claw. Take the SCREWDRIVER (Z).
- Take the MASK (A1) that’s on the floor.
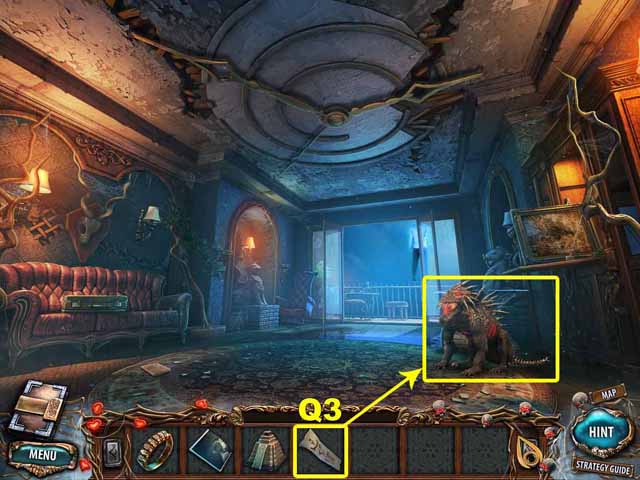
- Take the HAMMER (B1) that’s on the bookshelves.
- Click on the top of the ladder next to the bookshelves to launch a Hidden Object scene. Collect every object on the list at the bottom of the screen.
- Open the close-up scene and collect the rest of the objects on the list at the bottom of the screen.
- Upon completing the Hidden Object Scene, you’ll acquire the WINCH HANDLE (C1).
- Go to the Dock.
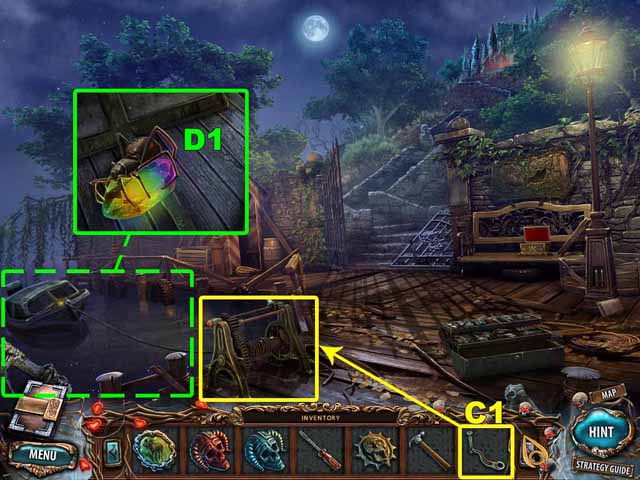
- Zoom in on the winch. Place the WINCH HANDLE (C1) on the winch. Click on the handle to reel in the boat. Take the SPIDER GEM (D1).
- Go to the Library.
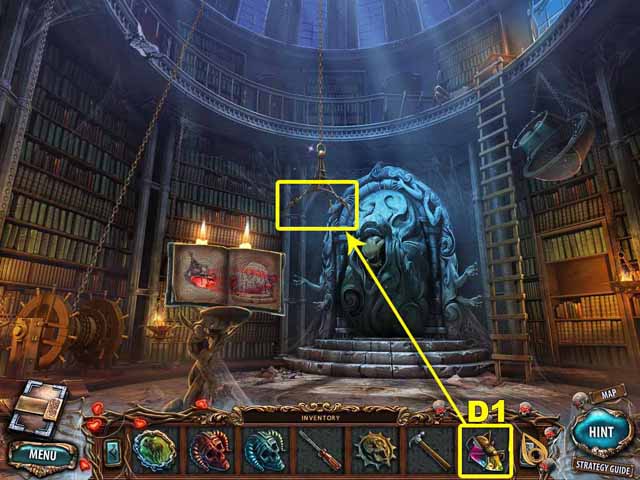
- Place the SPIDER GEM (D1) in the claw.
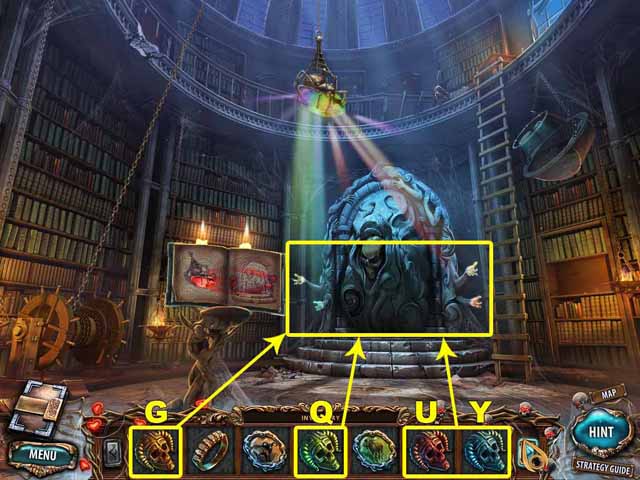
- Place the METAL SKULLS (G, Q, U, and Y) in the hands extending out of the portal. The color of the skull must match the color of the hand.
- Step through the portal.
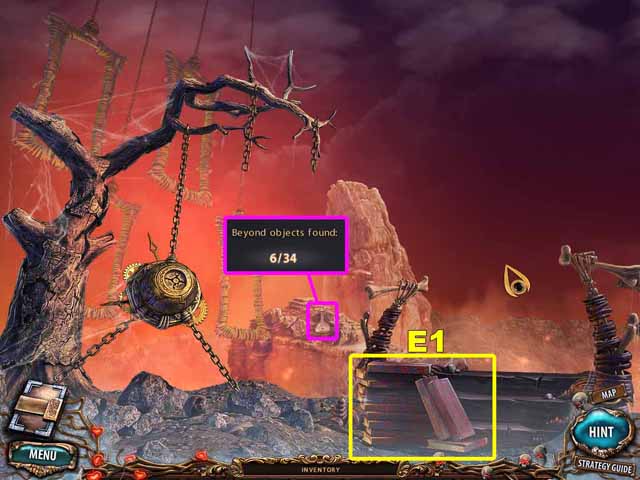
- Take the sixth Beyond Object.
- Pick up the PILE OF BOOKS (E1) that’s on the ground.
- Go to the Library.
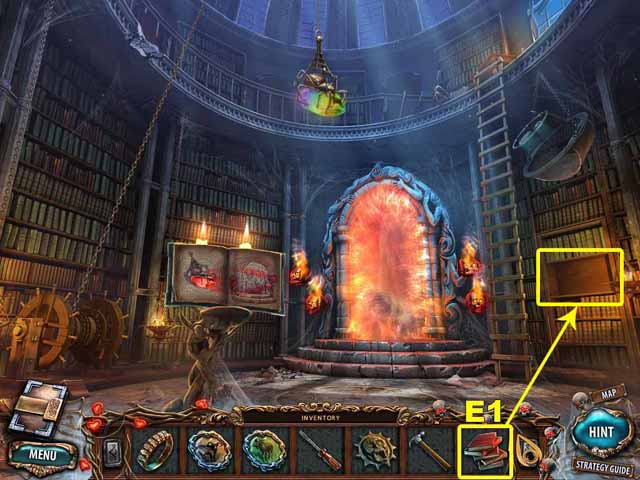
- Place the PILE OF BOOKS (E1) on the empty bookshelf.
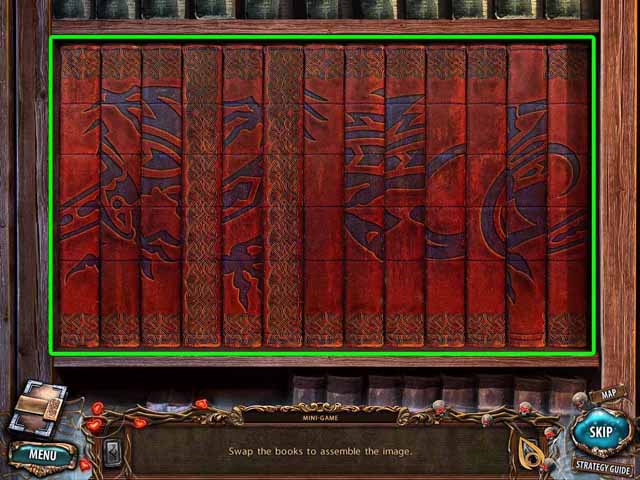
- Swap the books to assemble the image.
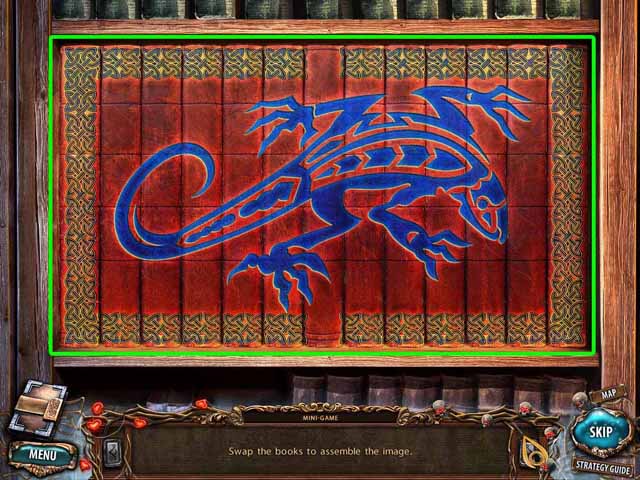
- After you assemble the image, you’ll see a lizard.
- Enter the Meeting Hall.
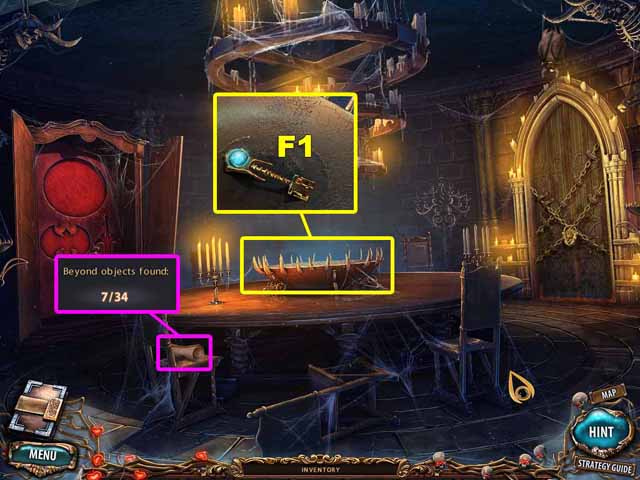
- Take the seventh Beyond Object.
- Pick up the PORTAL KEY (F1) that’s on the table.
- Go to the Portals.
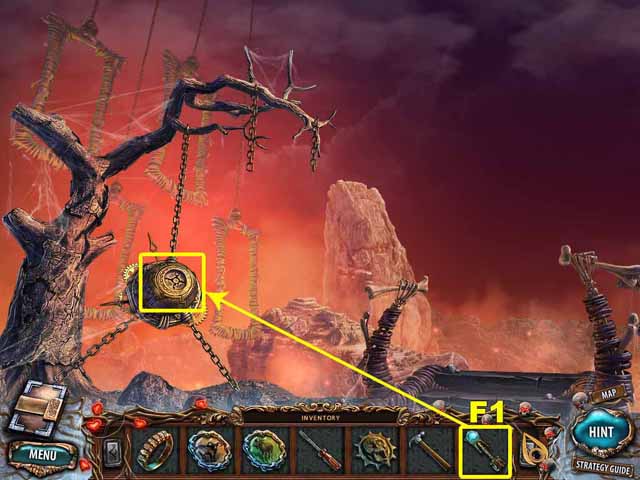
- Insert the PORTAL KEY (F1) into the mechanism to activate it.
- Step through the portal.
Chapter 2: Theatre
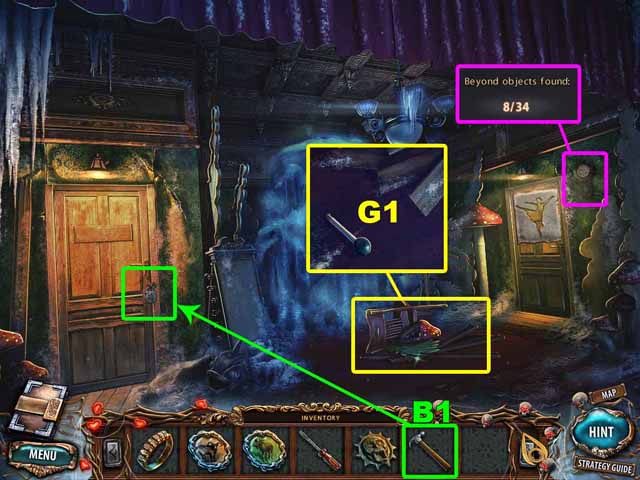
- Take the eighth Beyond Object.
- Search the trash on the floor to find the LEVER (G1).
- Use the HAMMER (B1) to break the padlock on the door.
- Enter the Security Room.

- Take the ninth Beyond Object.
- Open the journal. Make a mental note of the code for the safe.
- Open the safe.
- Take the LIGHTER (H1) and the HAIRBRUSH (I1) that are in the safe.
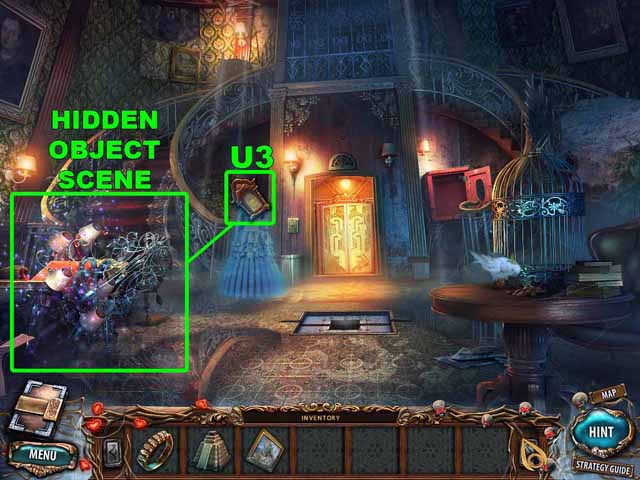
- Click near the sofa to launch a Hidden Object scene.
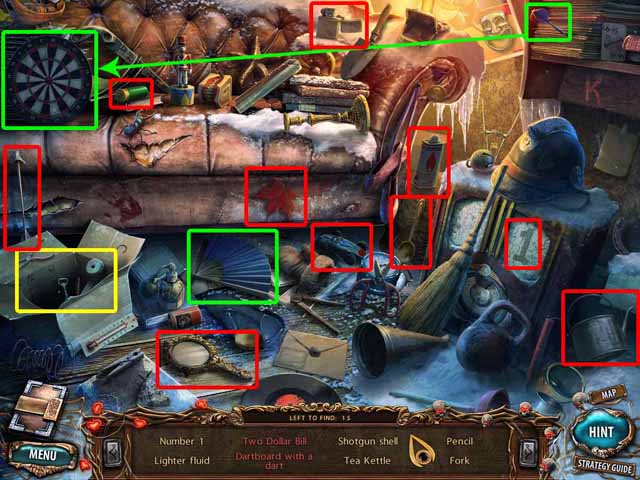
- Collect every object on the list at the bottom of the screen.
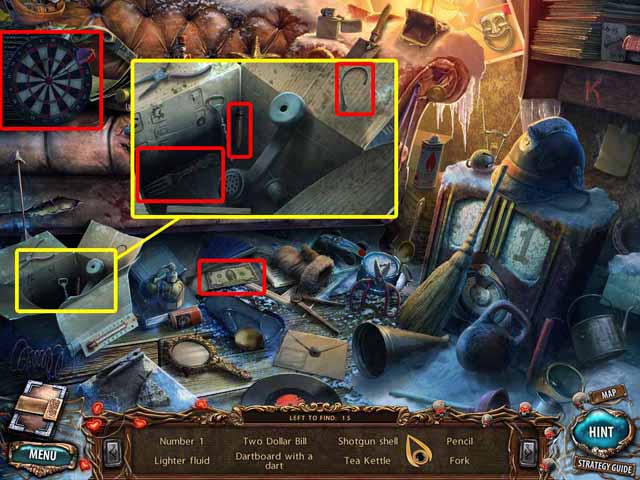
- Open the close-up scene and collect the rest of the objects on the list at the bottom of the screen.
- Upon completing the Hidden Object Scene, you’ll acquire the LIGHTER FLUID (J1).
- Go to the Theatre Lobby.
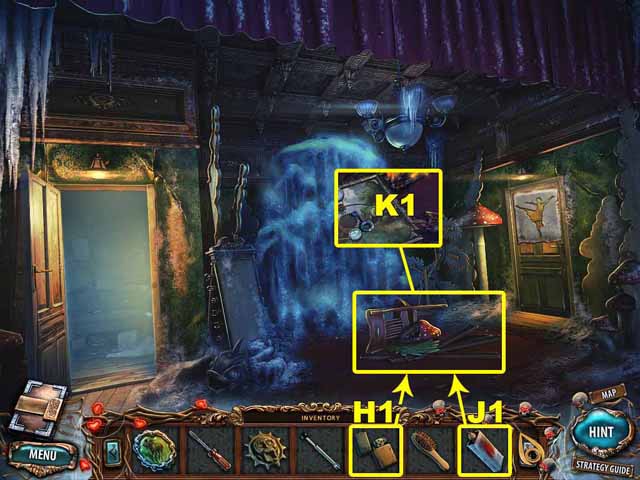
- Use the LIGHTER FLUID (J1) and the LIGHTER (H1) to ignite the pile of trash.
- Take the KEY (K1) that’s in the debris.
- Go to the Castle Foyer.

- Use the KEY (K1) to open the cellar door.
- Step through the open door.
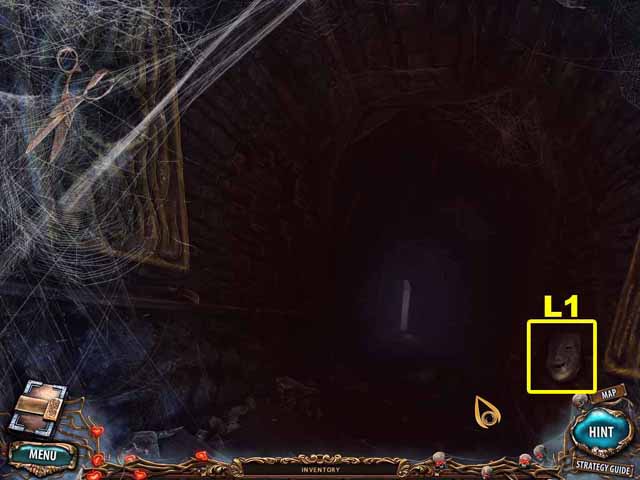
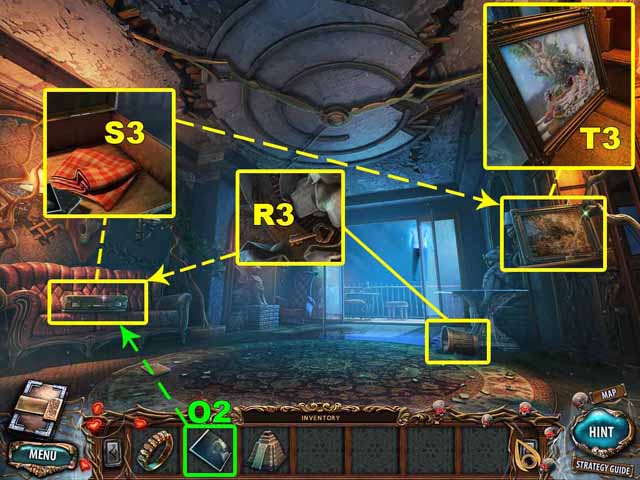
- Take the MASK (L1) on the right.
- Go to the Theatre Lobby.
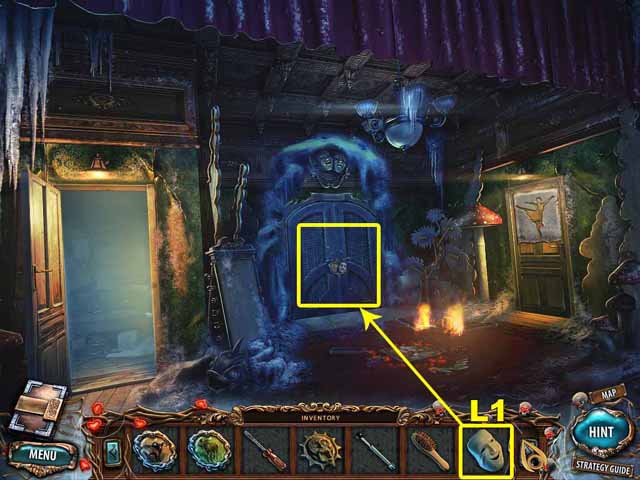
- Put the MASK (L1) on the door with one mask missing.
- Enter the Backstage area.
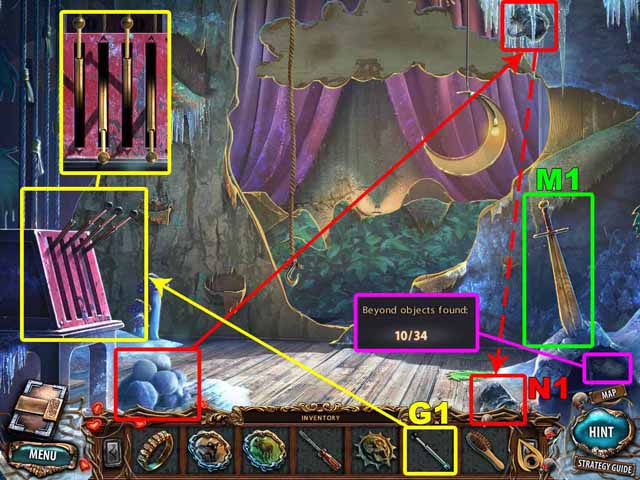
- Take the tenth Beyond Object.
- Pull the SWORD (M1) out of the stone.
- Throw three snowballs at the FROSTY MUG (N1) to knock it down. Take the mug.
- Place the LEVER (G1) where it belongs.
- Set the levers correctly to move the backdrops out of the way.
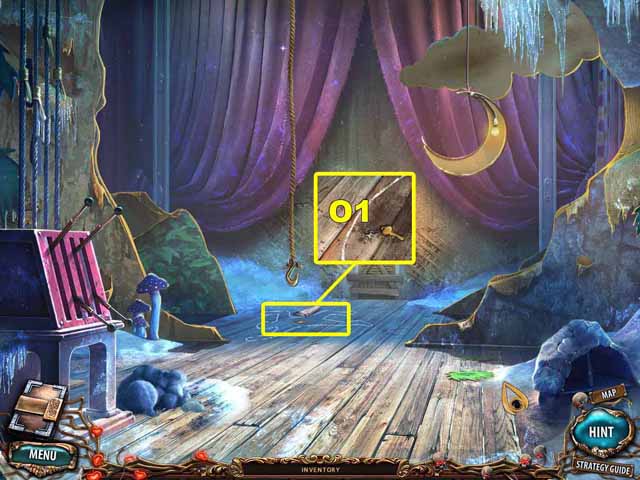
- Take the DRESSING ROOM KEY (O1) that’s on the floor.
- Go to the Theatre Lobby.
- Use the DRESSING ROOM KEY (O1) to unlock the door.
- Enter the Dressing Room.
- Take the 11th Beyond Object.
- Take the TOKEN (P1) that’s on the vanity.
- Go to the Cellar Stairs.
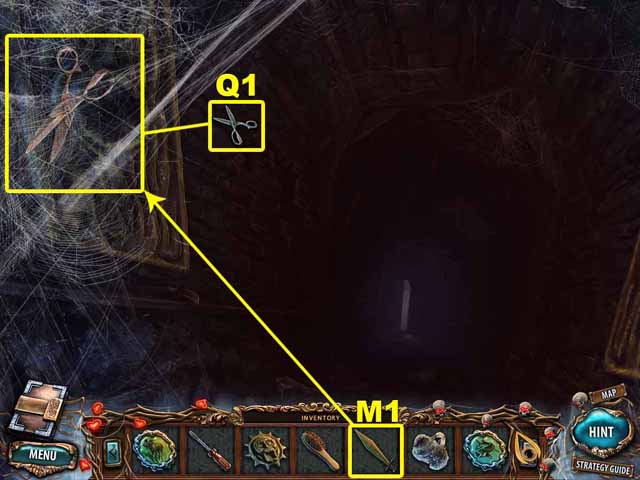
- Use the SWORD (M1) to remove the cobwebs on the left.
- Take the SCISSORS (Q1).
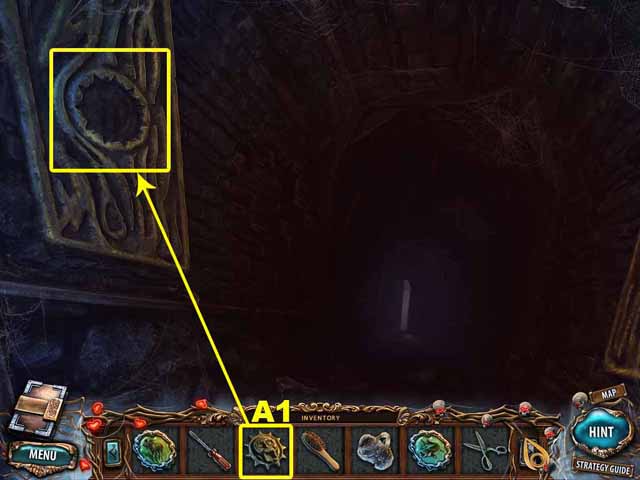
- Place the sun-shaped MASK (A1) in the niche on the wall.
- Take the 12th Beyond Object.
- Take the BAG OF SALT (R1) that’s on the stairs.
- Go down to the Cellar.
- Take the 13th Beyond Object.
- Take the TOKEN (S1) that’s on the chest.
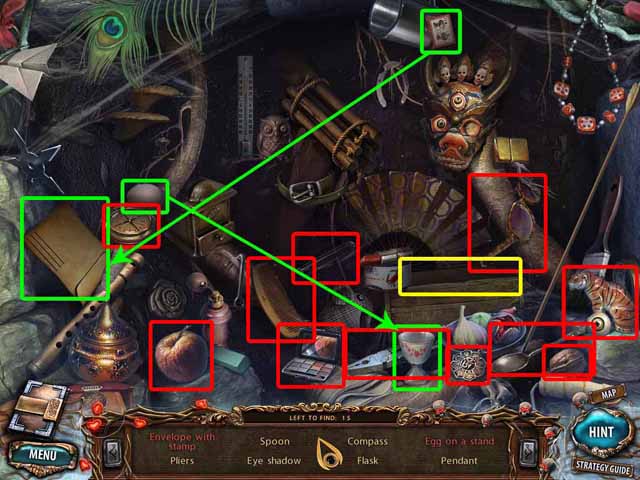
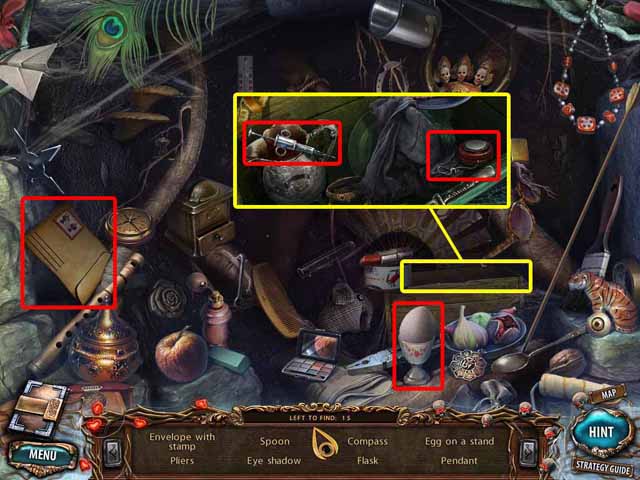
- Click on the table on the right to launch a Hidden Object scene.
- Collect every object on the list at the bottom of the screen.
- Open the close-up scene and collect the rest of the objects on the list at the bottom of the screen.
- Upon completing the Hidden Object Scene, you’ll acquire the CAMERA (T1).
- Go to the Dressing Room.
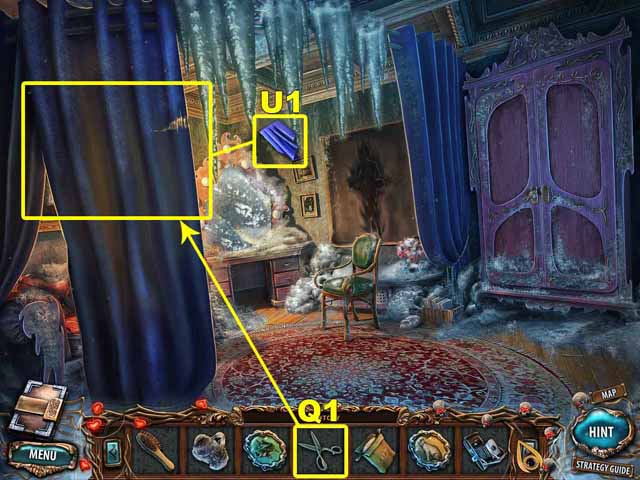
- Use the SCISSORS (Q1) to cut a PIECE OF CLOTH (U1) off the curtain.
- Go to the Security Room.
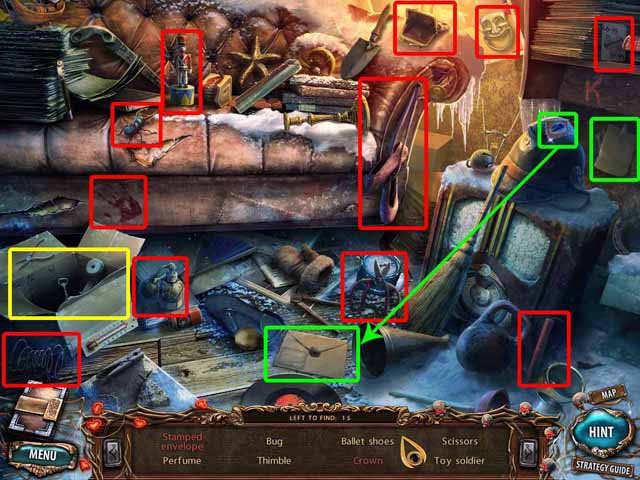
- Wrap the PIECE OF CLOTH (U1) around the BLOCK OF ICE (V1) and take it.
- Click near the sofa to launch a Hidden Object scene.
- Collect every object on the list at the bottom of the screen.
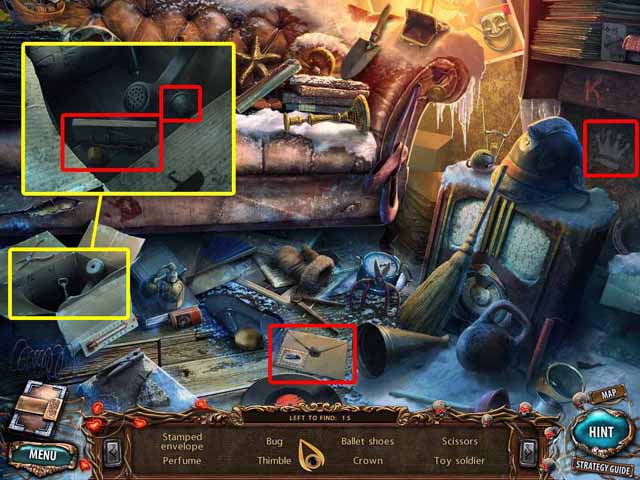
- Open the close-up scene and collect the rest of the objects on the list at the bottom of the screen.
- Upon completing the Hidden Object Scene, you’ll acquire the BALLET SHOES (W1).
- Go to the Backstage area.
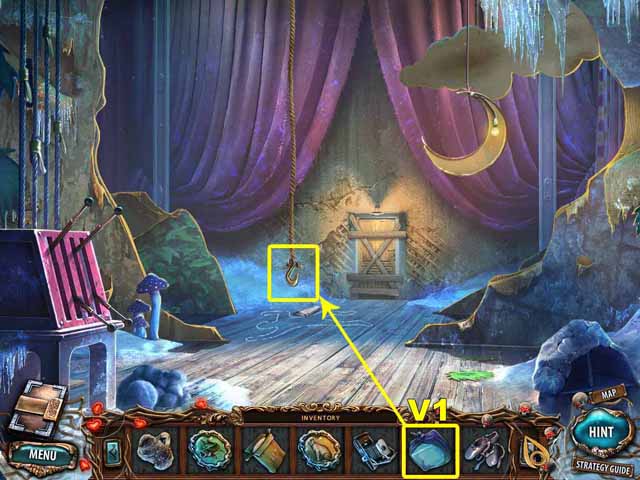
- Hang the BLOCK OF ICE (V1) on the hook on the end of the rope.
- Push the BLOCK OF ICE (V1) to demolish the door that opens onto the stage.
- Walk onto the Stage.
- Scatter the BAG OF SALT (R1) on the floor of the stage.
- Take the 14th Beyond Object.
- Take the WIRE CUTTERS (X1) that are under the platform.
- Click on the trap door on the right. Click on the skeleton. Take its EYE (Y1).
- Go to the Cellar.
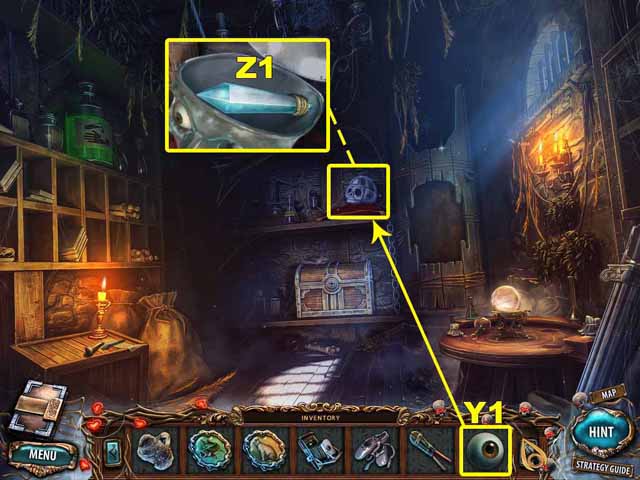
- Place the EYE (Y1) in the skull. Take the DIAMOND (Z1).
- Go to the Theatre Lobby.
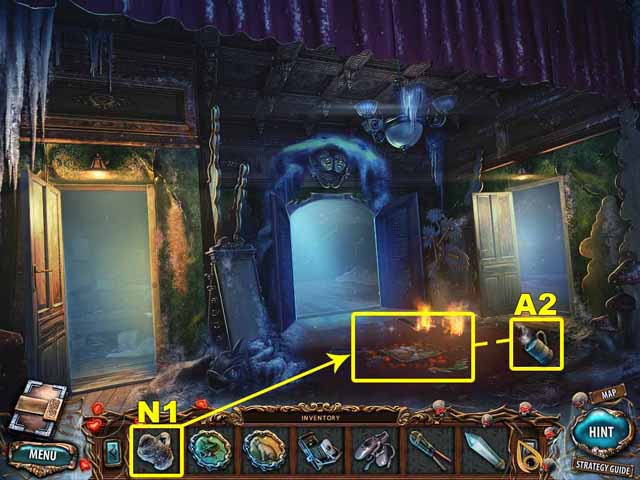
- Put the FROSTY MUG (N1) in the fire to melt the ice. Take the MUG OF HOT WATER (A2).
- Go to the Dressing Room.
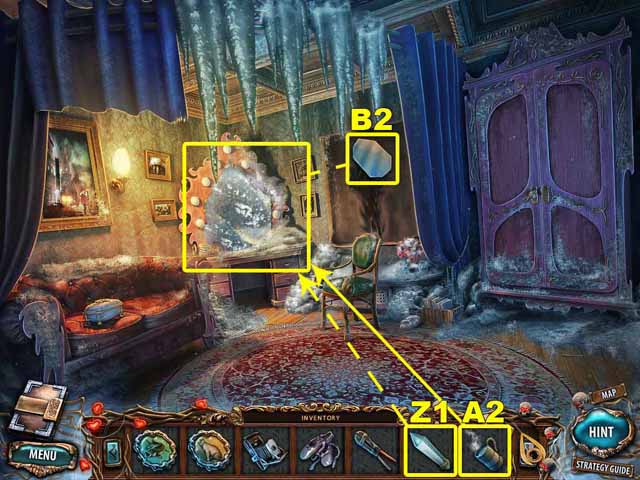
- Pour the MUG OF HOT WATER (A2) on the vanity to melt the ice on the mirror.
- Use the DIAMOND (Z1) to cut the mirror (B2) out of the frame. Take the mirror.
- Go to the Cellar.
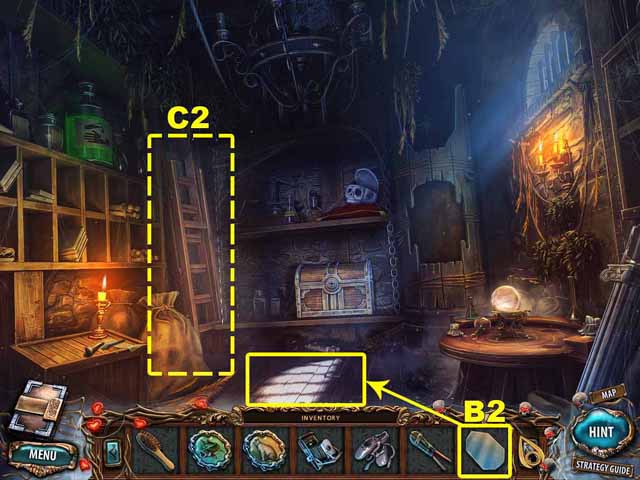
- Place the mirror on the floor.
- Take the STEPLADDER (С2) that’s in the corner the mirror illuminated.
- Go to the Backstage area.
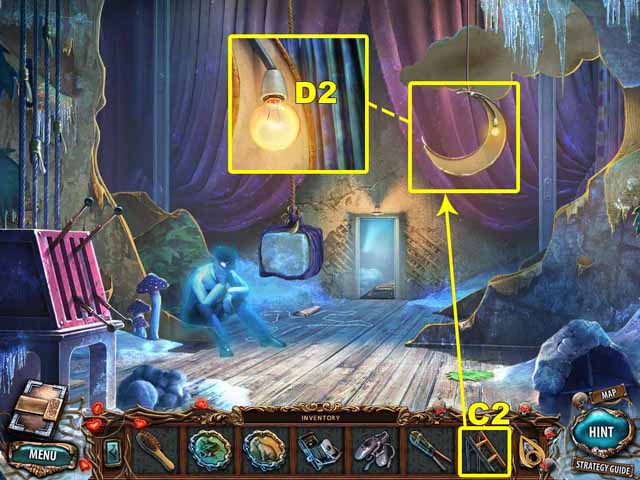
- Place the STEPLADDER (C2) under the crescent moon. Take the LIGHT BULB (D2).
- Go to the Security Room.
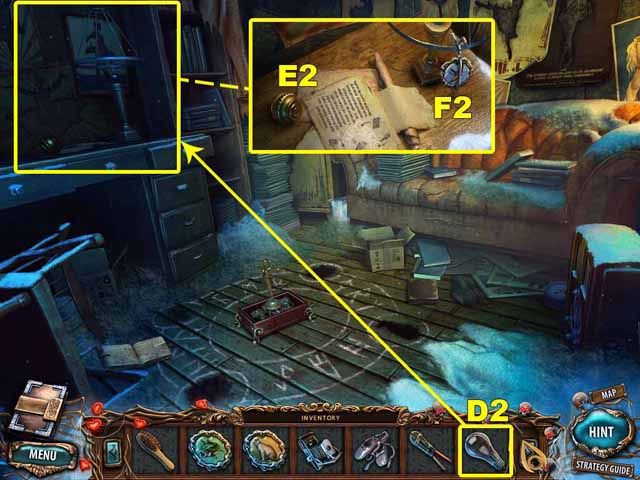
- Screw the LIGHT BULB (D2) into the lamp.
- Take the TOKEN (F2) and the WARDROBE KNOB (E2).
- Go to the Dressing Room.
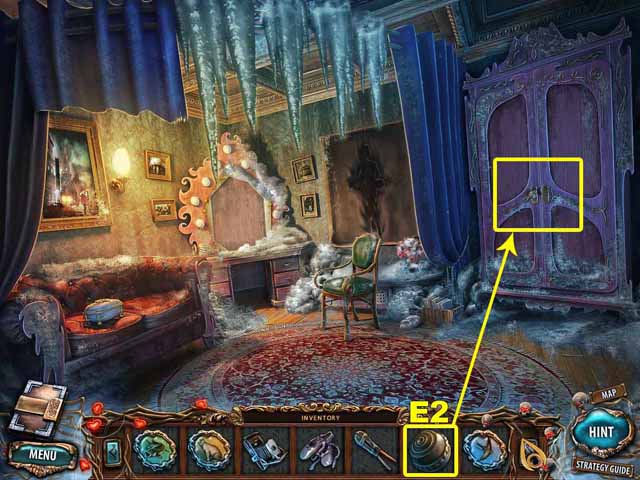
- Place the WARDROBE KNOB (E2) on the wardrobe.
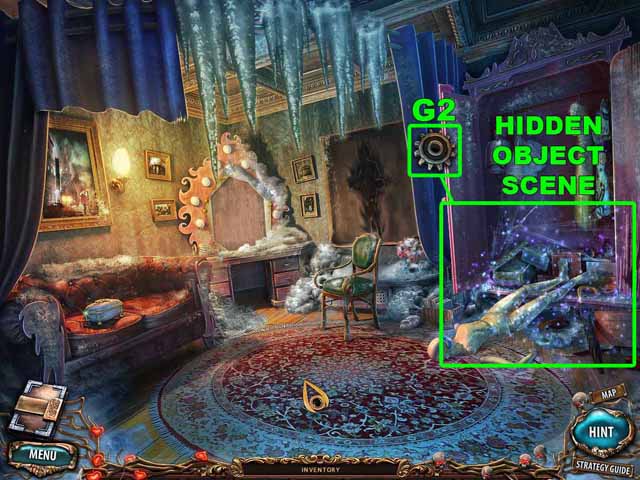
- Click on the wardrobe to launch a Hidden Object scene.
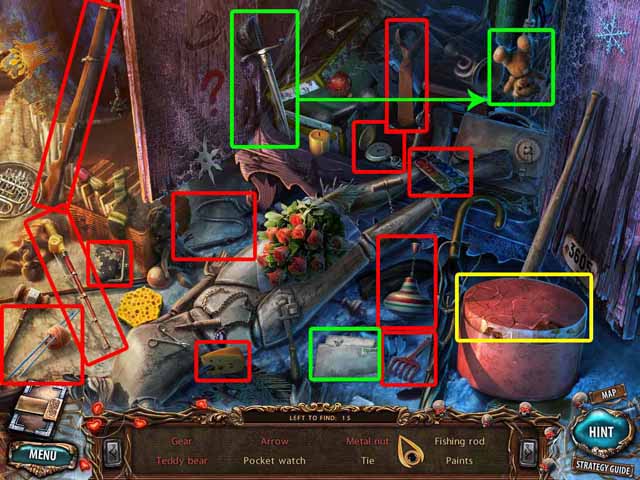
- Collect every object on the list at the bottom of the screen.

- Open the close-up scene and collect the rest of the objects on the list at the bottom of the screen.
- Upon completing the Hidden Object Scene, you’ll acquire the GEAR (G2).
- Go to the Stage.
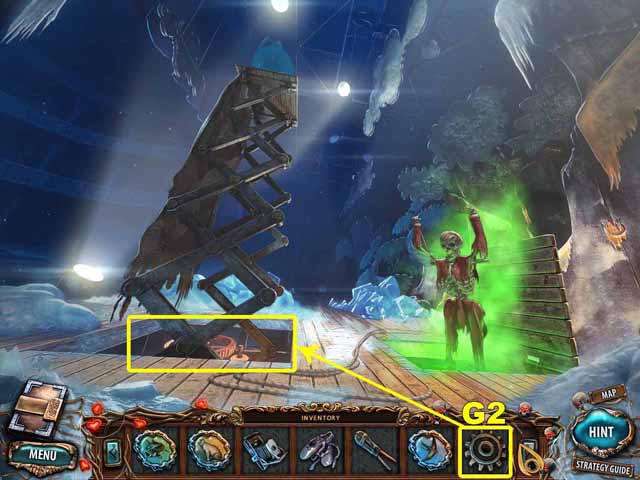
- Place the GEAR (G2) in the mechanism under the platform.
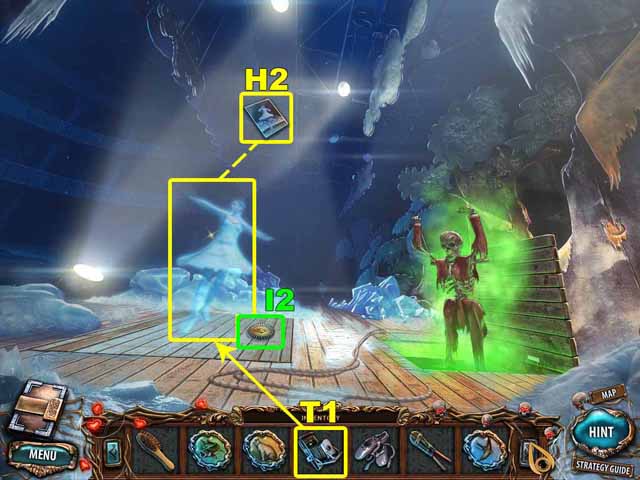
- Use the CAMERA (T1) to take a PHOTO (H2) of the ballerina.
- Take the PUZZLE PART (I2) that’s on the platform.
- Go to the Theatre Lobby.
- Place the TOKENS (M, T, P1, S1 and F2) and the PUZZLE PART (I2) in the cache on the floor.
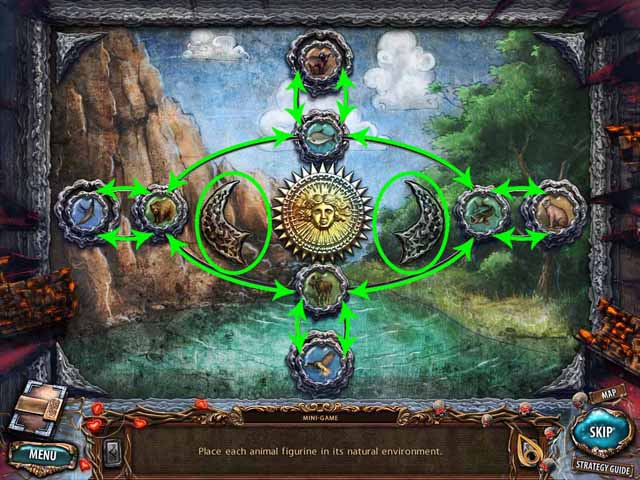
- Click on the puzzle to load a mini-game.
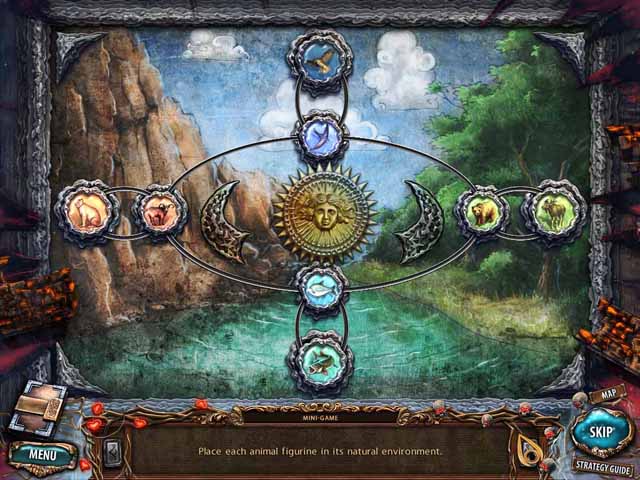
- Place each animal in its natural environment.
- Take the LOCKET (J2).
- Go to the Dressing Room.
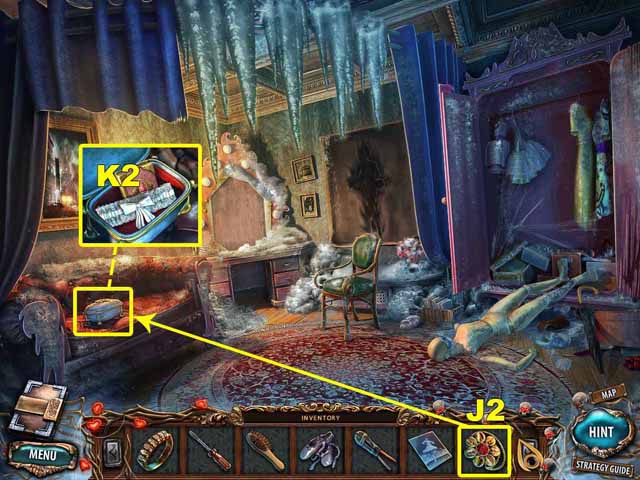
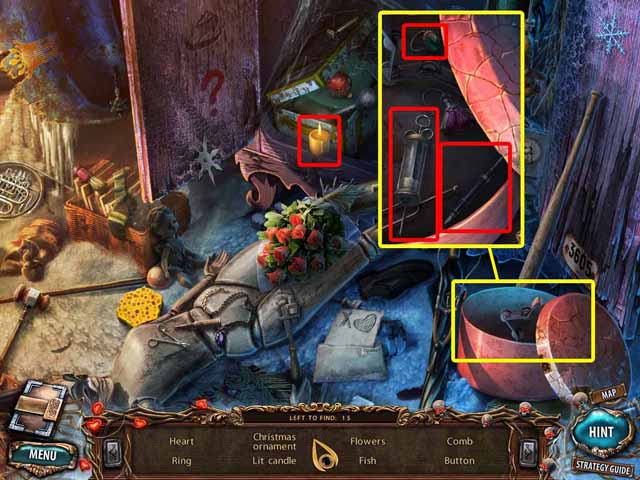
- Place the LOCKET (J2) on the case on the couch to open it. Take the SILK GARTER (K2).
- Go to the Security Room.
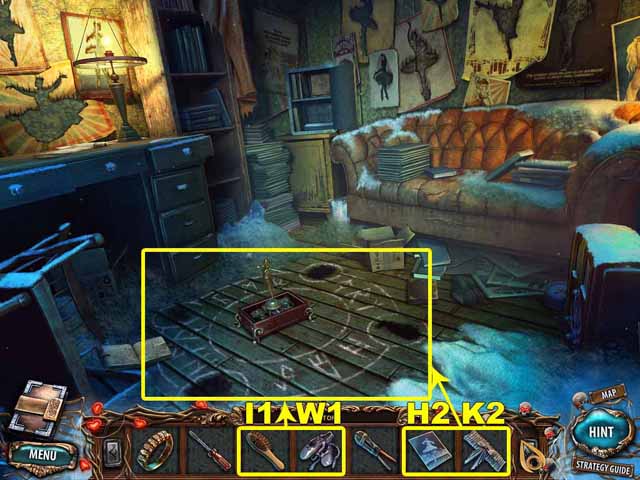
- Click on the spell instructions on the desk.
- Place the HAIRBRUSH (I1), the BALLET SHOES (W1), the PHOTO (H2) and the SILK GARTER (K2) in the ritual circle.
- Go to the Dressing Room.
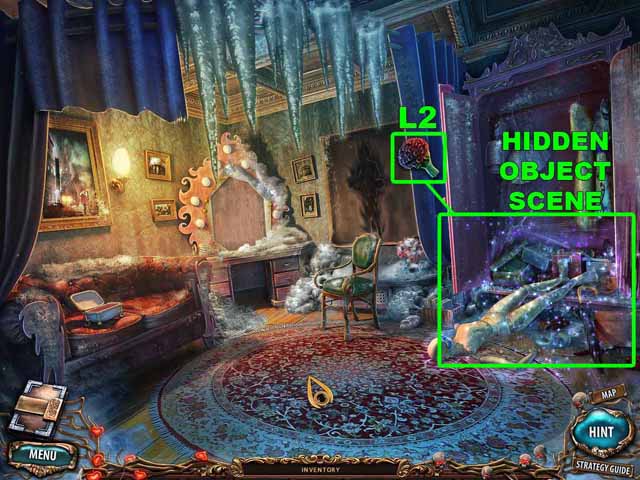
- Click on the wardrobe to launch a Hidden Object scene.
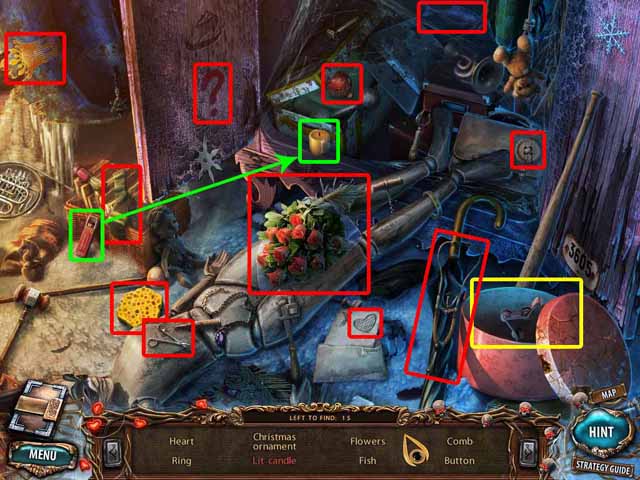
- Collect every object on the list at the bottom of the screen.
- Open the close-up scene and collect the rest of the objects on the list at the bottom of the screen.
- Upon completing the Hidden Object Scene, you’ll acquire the FLOWERS (L2).
- Go to the Stage.
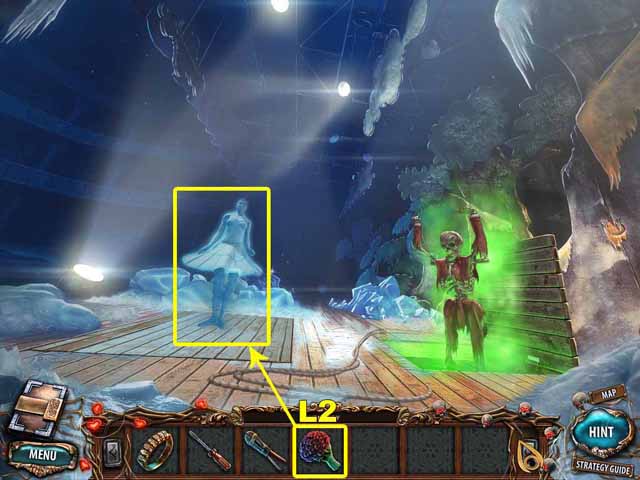
- Give the FLOWERS (L2) to the ballerina.
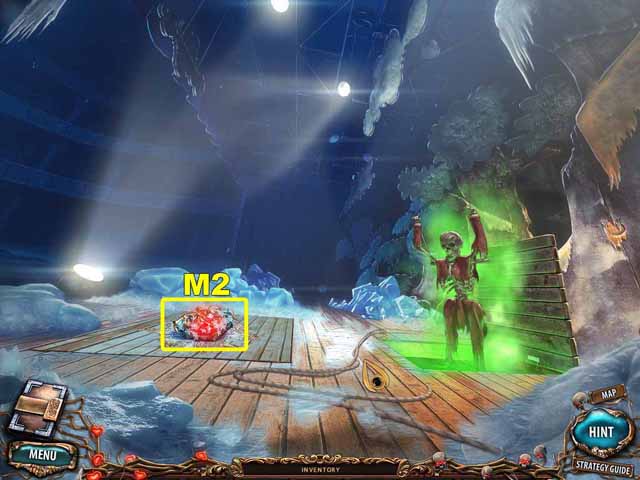
- Pick up the HEART (M2).
- Go to the Garden.
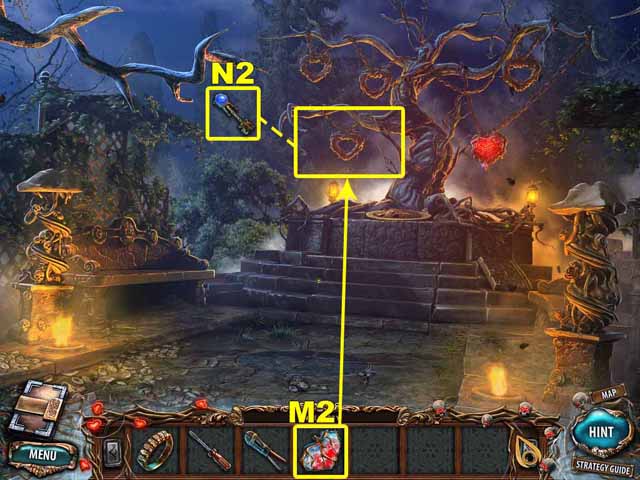
- Place the HEART (M2) in the frame hanging from the tree.
- Take the PORTAL KEY (N2).
- Go to the Portals.

- Insert the PORTAL KEY (N2) into the mechanism to activate it.
- Step through the portal.
Chapter 3: Tower
- Take the 15th Beyond Object.
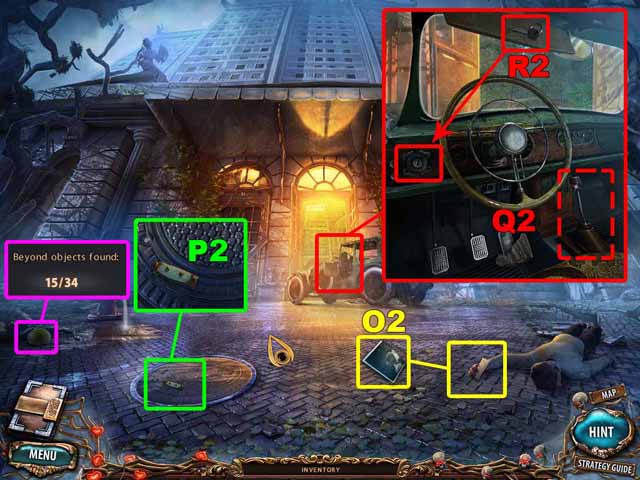
- Take the PHOTO FRAGMENT (O2) out of the hand of the corpse.
- Take the KNIFE HANDLE (P2) that’s on the manhole cover.
- Take the IGNITION KEY (R2) and the STONE DOOR FRAGMENT (Q2) that are in the car.
- Use the IGNITION KEY (R2) to start the car. Pull the gear shift and press the gas pedal.
- Enter the Apartment Building Lobby.
- Take the 16th Beyond Object.
- Take the HOOK (S2) that’s by the fire hose cabinet.
- Find and launch a Hidden Object scene.
- Collect every object on the list at the bottom of the screen.
- Open the close-up scene and collect the rest of the objects on the list at the bottom of the screen.
- Upon completing the Hidden Object Scene, you’ll acquire the RUBBER GLOVE (T2).
- Go Outside the Apartment Building.
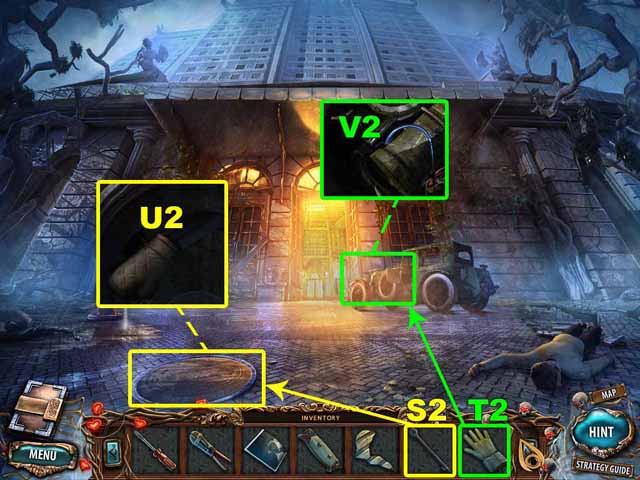
- Use the HOOK (S2) to lift the cover off the manhole. Take the OVEN MITT (U2).
- Use the RUBBER GLOVE (T2) to retrieve the WIRE (V2) from under the hood of the car.
- Go to the Castle Entrance.

- Place the KNIFE HANDLE (P2) on the blade sticking out of the tree to get the KNIFE (W2).
- Go to the Apartment Building Lobby.
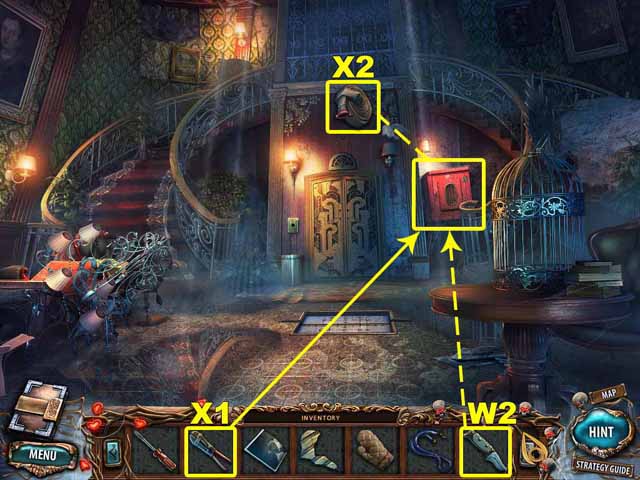
- Use WIRE CUTTERS (X1) to cut the wire wrapped around the handle of the fire hose cabinet.
- Use the KNIFE (W2) to cut off the fire hose (X2).
- Go Outside the Apartment Building.
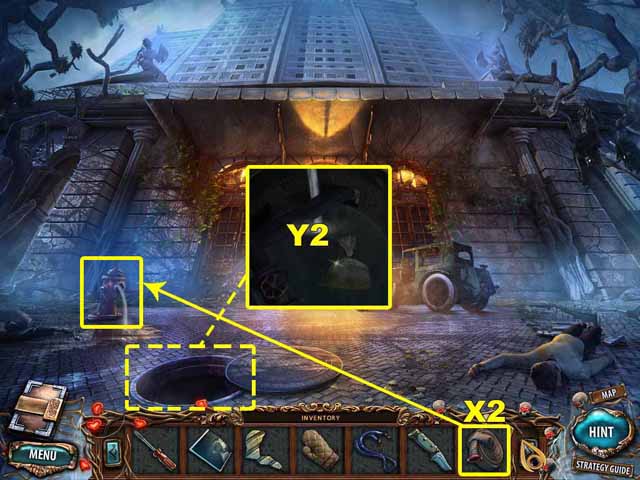
- Place the FIRE HOSE (X2) on the fire hydrant. Click and drag the other end of the hose into the manhole.
- Take the SEEDS (Y2) floating on top of the water.
- Go to the Apartment Building Lobby.
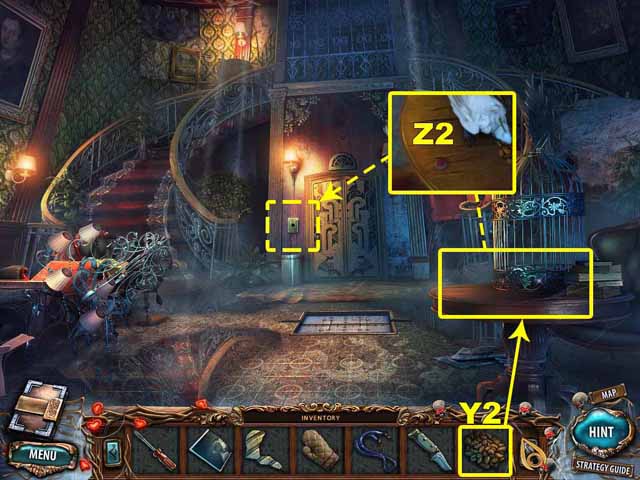
- Place the SEEDS (Y2) on the table on which the bird cage is sitting. The parrot will fly over to eat the seeds, bringing the ELEVATOR BUTTON (Z2) with it. Take the button.
- Insert the ELEVATOR BUTTON (Z2) where it belongs. Click on the button.
- Enter the Elevator.
- Take the 17th Beyond Object.
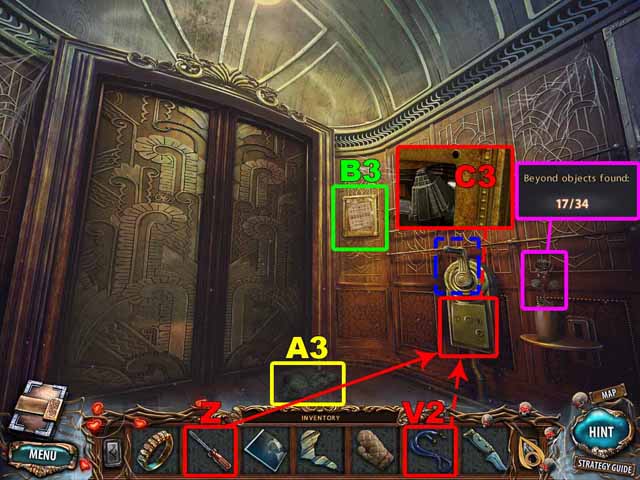
- Take the DOOR FRAGMENT (A3) that’s on the floor.
- Take the DIAGRAM (B3) that’s on the wall.
- Use the SCREWDRIVER (Z) to remove the cover of the elevator control panel.
- Take the PYRAMID (C3).
- Insert the WIRE (V2) into the control panel.
- Pull the lever to go upstairs.
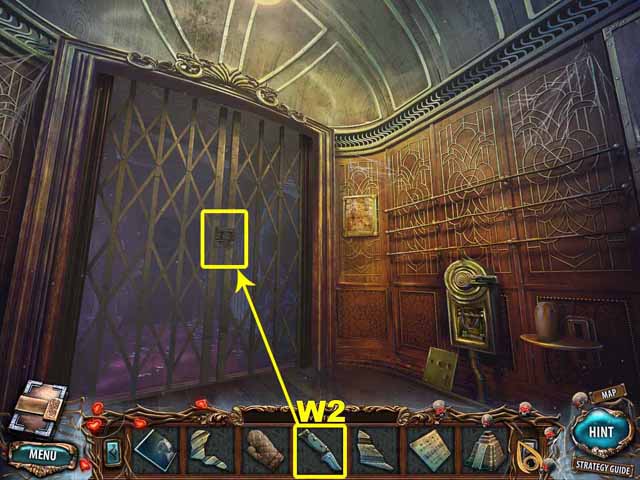
- Use the KNIFE (W2) to cut the rope wrapped around the elevator’s doors.
- Enter the Apartment Hallway.
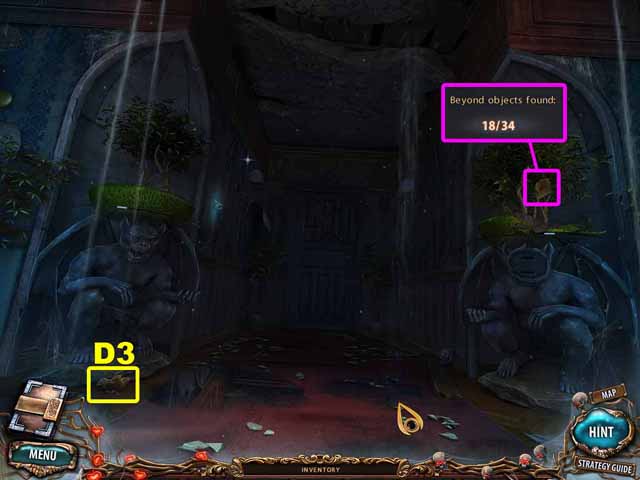
- Take the 18th Beyond Object.
- Take the BIRD (D3).
- Go to the Dock.

- Insert the BIRD (D3) into the bas-relief.
- Take the GARLIC (E3) that’s in the cache.
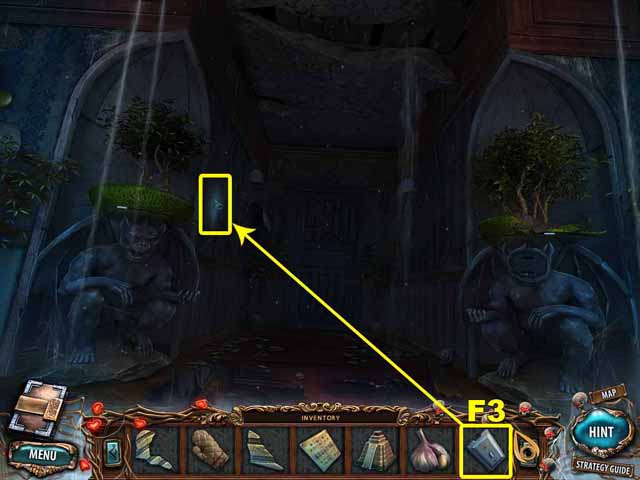
- Find and launch a Hidden Object scene.
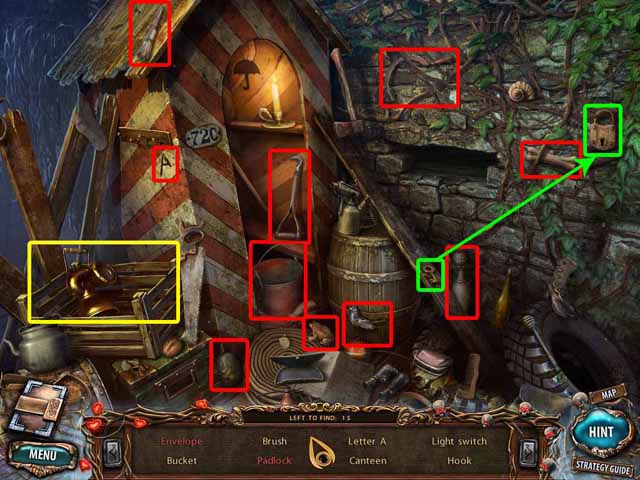
- Collect every object on the list at the bottom of the screen.
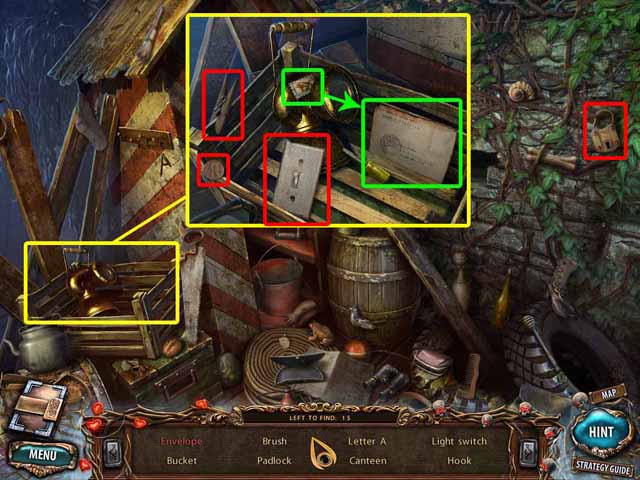
- Open the close-up scene and collect the rest of the objects on the list at the bottom of the screen.
- Upon completing the Hidden Object Scene, you’ll acquire the LIGHT SWITCH (F3).
- Return to the Apartment Hallway.
- Install the LIGHT SWITCH (F3) on the wall.
- Turn on the lights.
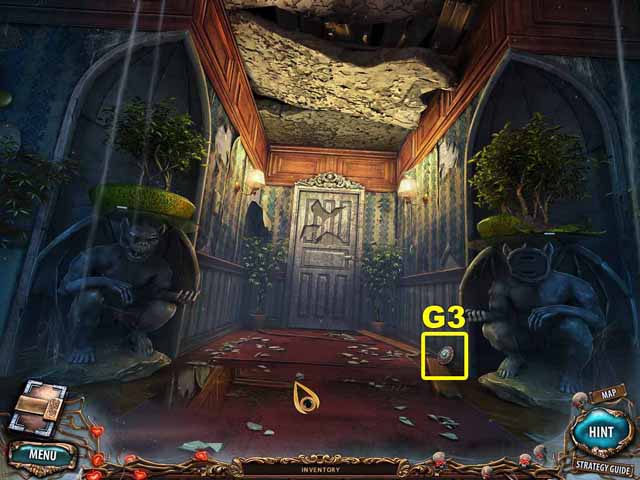
- Take the PUZZLE PART (G3) that’s on the floor.
- Go to the Apartment Building Lobby.
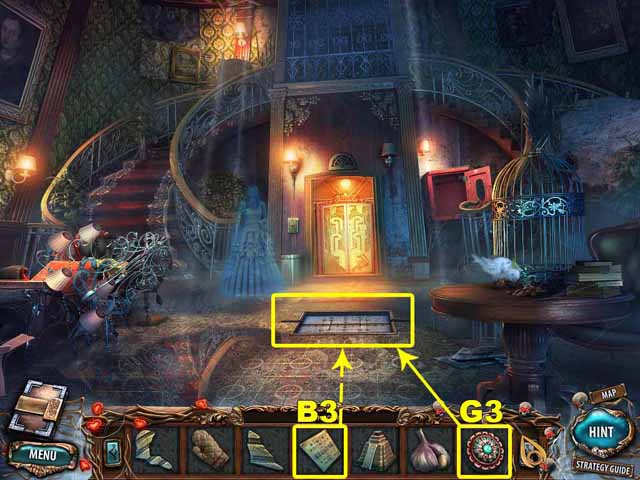
- Place the PUZZLE PART (G3) on the puzzle on the floor. Place the DIAGRAM (B3) next to it.
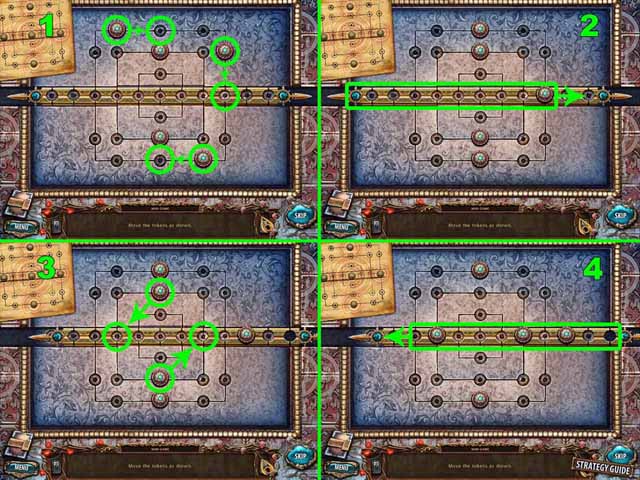
- Move the tokens along the squares. Use the central part to move the tokens between squares.
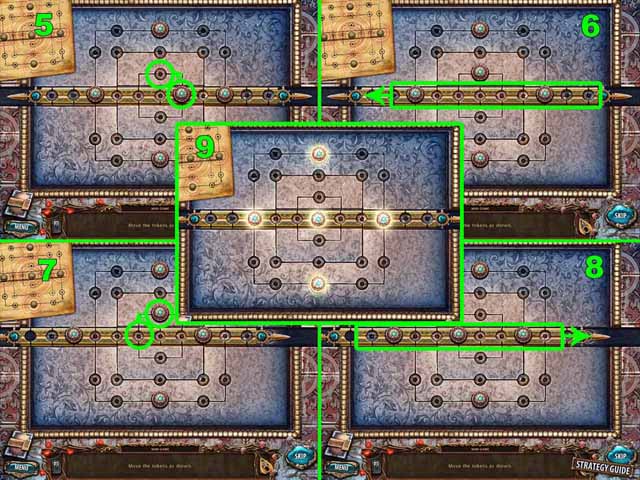
- Continue to move the tokens until their positions correspond to the layout in the upper left corner.
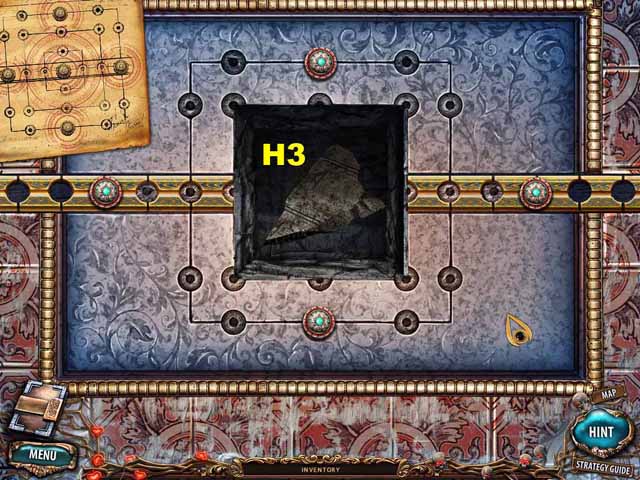
- Take the DOOR FRAGMENT (H3) from the opened cache.
- Go to the Apartment Hallway.
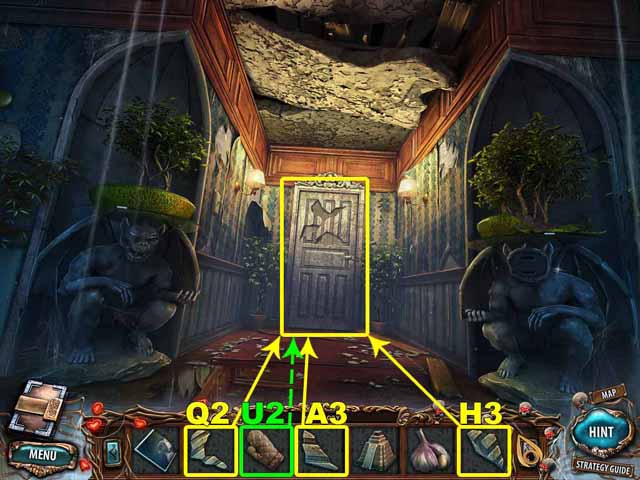
- Insert the DOOR FRAGMENTS (Q2, A3 and H3) into the door.
- Use the OVEN MITT (U2) to turn the hot door handle and open the door.
- Enter Frank’s Apartment.
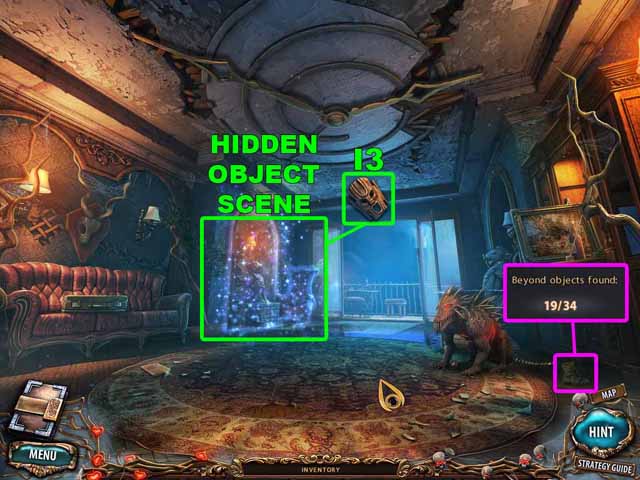
- Take the 19th Beyond Object.
- Find and launch a Hidden Object scene.
- Collect every object on the list at the bottom of the screen.
- Open the close-up scene and collect the rest of the objects on the list at the bottom of the screen.
- Upon completing the Hidden Object Scene, you’ll acquire the MASK (I3).
- Go to the Cellar.
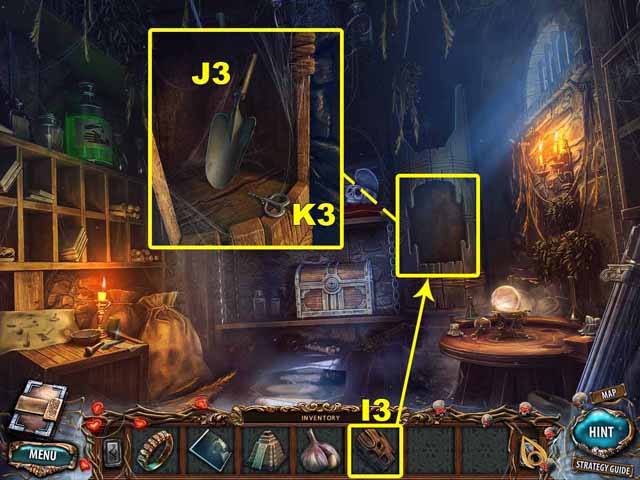
- Insert the MASK (I3) into the totem. Take the SHOVEL (J3) and the CORKSCREW (K3) that are in the cache.
- Go to the Apartment Hallway.

- Use the SHOVEL (J3) to dig up the STONE FACE (L3) buried in the flower pot.
- Place the STONE FACE (L3) on the statue on the right. The hand of the statue will open. Take the CHILI PEPPER (M3).
- Enter Frank’s Apartment.
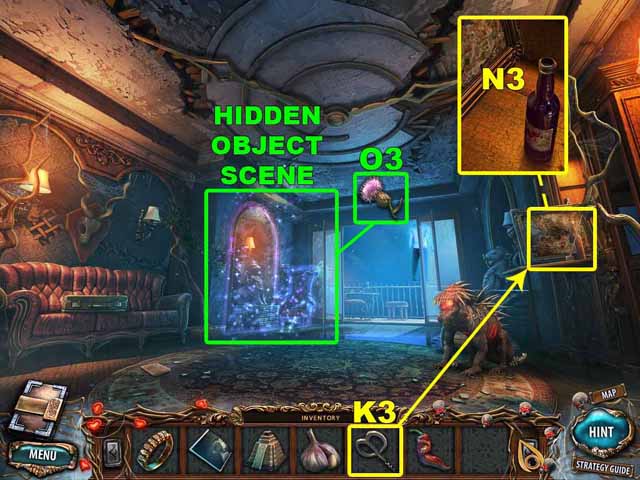
- Use the CORKSCREW (K3) to open the bottle of RED WINE (N3).
- Find and launch a Hidden Object scene.
- Collect every object on the list at the bottom of the screen.
- Open the close-up scene and collect the rest of the objects on the list at the bottom of the screen.
- Upon completing the Hidden Object Scene, you’ll acquire the THISTLE (O3).
- Step onto the balcony.
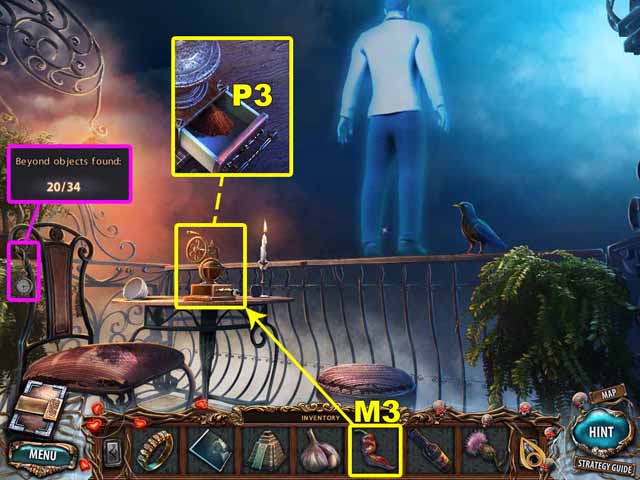
- Take the 20th Beyond Object.
- Grind the CHILI PEPPER (M3) in the coffee mill. Open the mill. Take the CHILI POWDER (P3).
- Go to the Cellar.
- Click on the recipe on the crate.
- Place the RED WINE (N3), the GARLIC (E3), the THISTLE (O3) and the CHILI POWDER (P3) on the crate.
- Prepare the potion according to the recipe:
- Place the CHILI POWDER (P3), GARLIC (E3) and THISTLE (O3) into the mortar. Use the pestle to grind up the ingredients. Pour the powder into the cup. Add the RED WINE (N3).
- Dip the paint brush into the potion. Write the spell on the strip of paper.
- Take the SPELL (Q3).
- Go to Frank’s Apartment.
- Place the SPELL (Q3) on the demon.
- Find the SUITCASE KEY (R3) in the tipped-over trash can.
- Use the SUITCASE KEY (R3) to open the suitcase. Take the KERCHIEF (S3).
- Place the PHOTO FRAGMENT (Q2) in the suitcase, next to the other half of the photo.
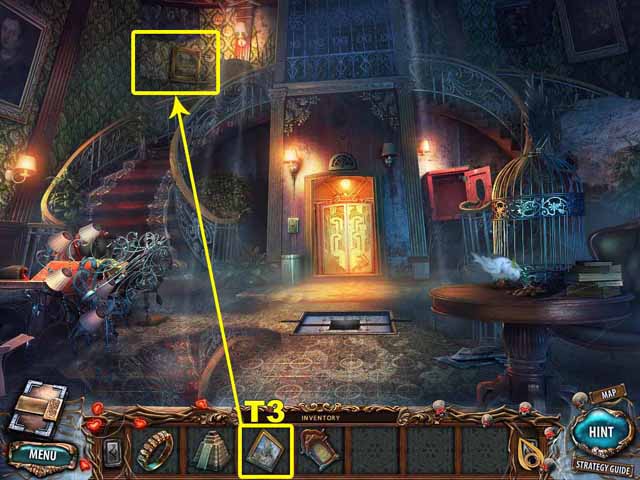
- Use the KERCHIEF (S3) to clean the dirty painting. Take the PAINTING (T3).
- Go to the Apartment Building Lobby.
- Find and launch a Hidden Object scene.
- Collect every object on the list at the bottom of the screen.
- Open the close-up scene and collect the rest of the objects on the list at the bottom of the screen.
- Upon completing the Hidden Object Scene, you’ll acquire the CLOCK (U3).
- Place the PAINTING (T3) on the wall.
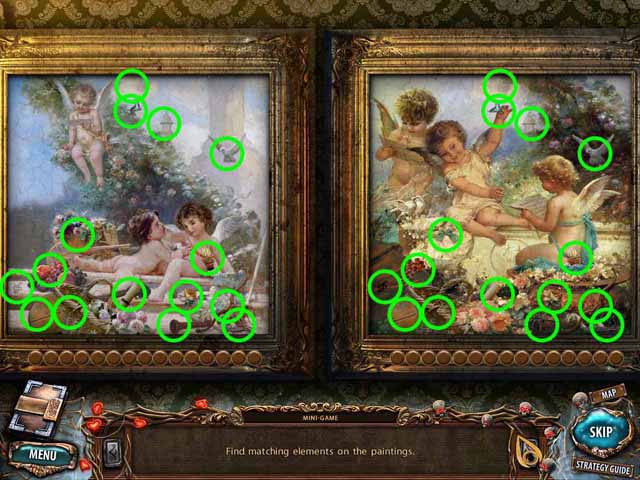
- Find the parts of the paintings that match.
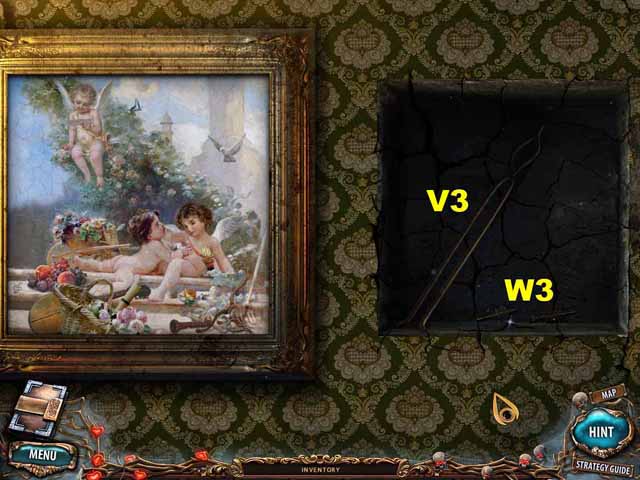
- Take the TONGS (V3) and the CLOCK HANDS (W3) from the cache.
- Go to Frank’s Apartment.
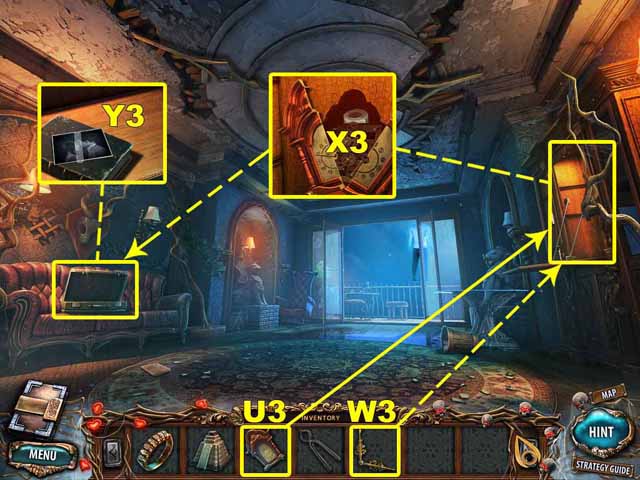
- Put the CLOCK (U3) where it belongs. Place the CLOCK HANDS (W3) on the clock. Take the STICKY TAPE (X3) from the open clock.
- Use the STICKY TAPE (X3) to repair the photo. Take the PHOTO (Y3).
- Go to the Balcony.
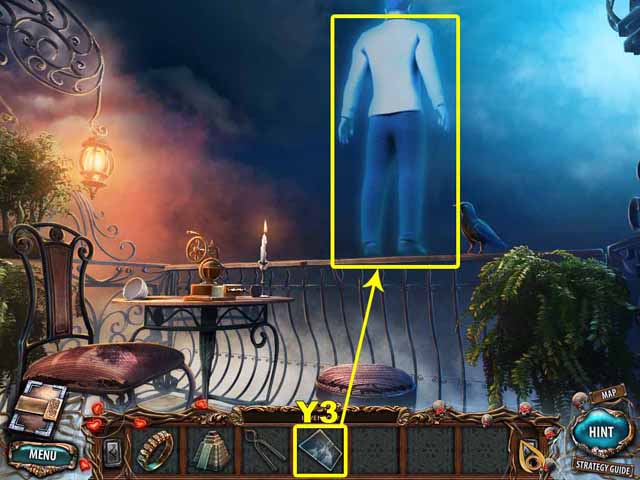
- Give the PHOTO (Y3) to the ghost of Frank.
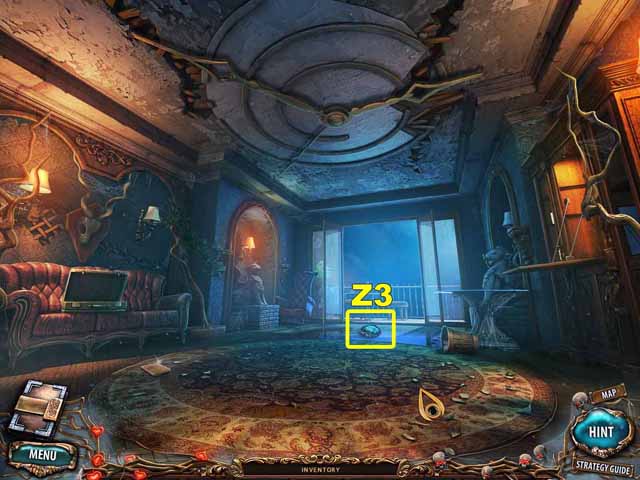
- Take the HEART (Z3).
- Go to the Garden.
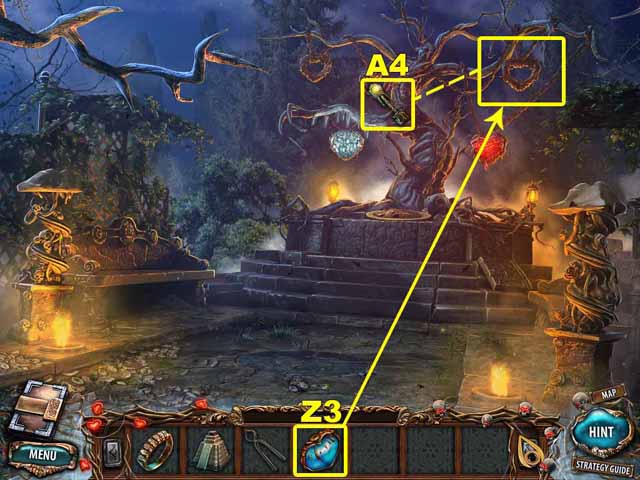
- Place the HEART (Z3) in the frame hanging from the tree.
- The PORTAL KEY (A4) will be added to the inventory.
- Go to the Portals.
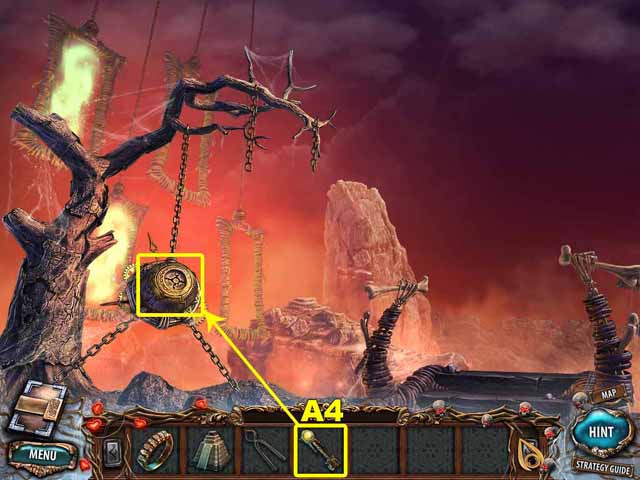
- Insert the PORTAL KEY (A4) into the mechanism to activate it.
- Step through the portal.
Chapter 4: Mummy
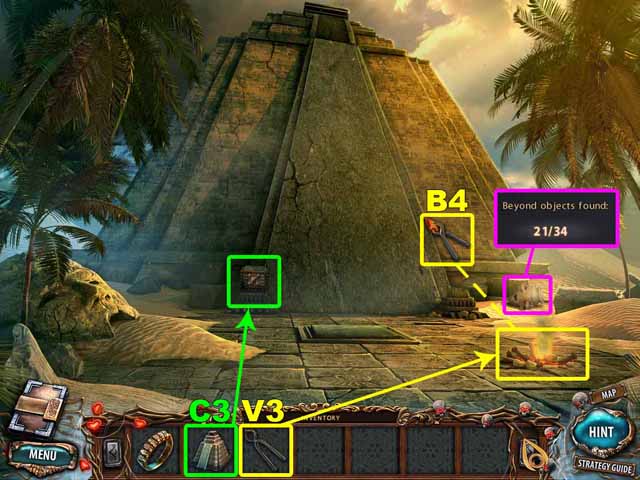
- Take the 21st Beyond Object.
- Use the TONGS (V3) to retrieve the HOT STONE (B4) from the fire.
- Place the PYRAMID (C3) on the pedestal at the base of the pyramid.
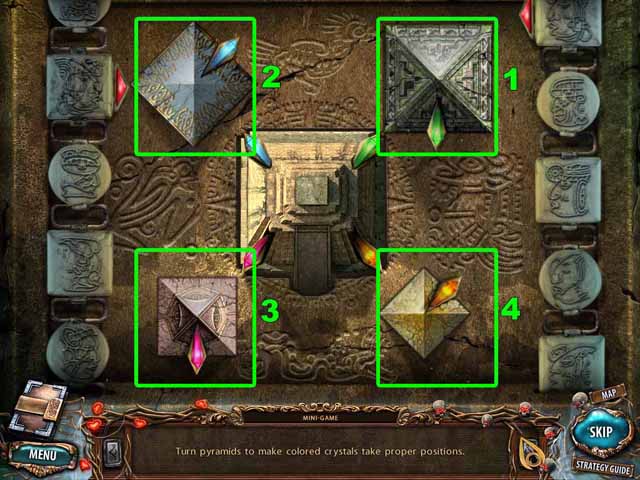
- Rotate the pyramids until each crystal is pointing at its match.
- Go to the Top of the Pyramid.
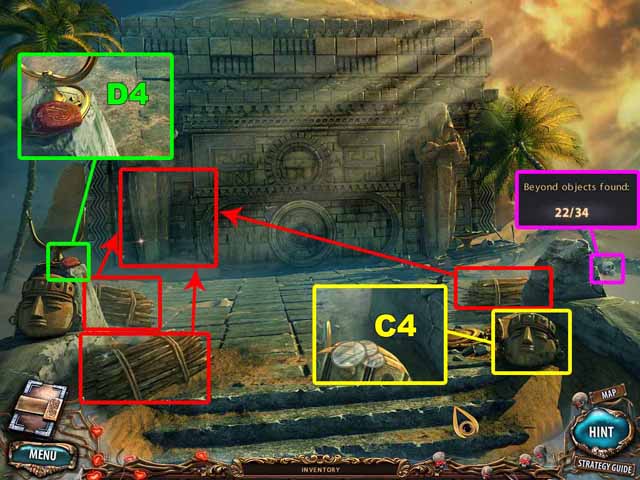
- Take the 22nd Beyond Object.
- Take the LENSES (C4) that are on top of the stone head.
- Take the STONE (D4) that’s by the mirror frame.
- Place the bundles of cane at the base of the statue.
- Go to the Library.
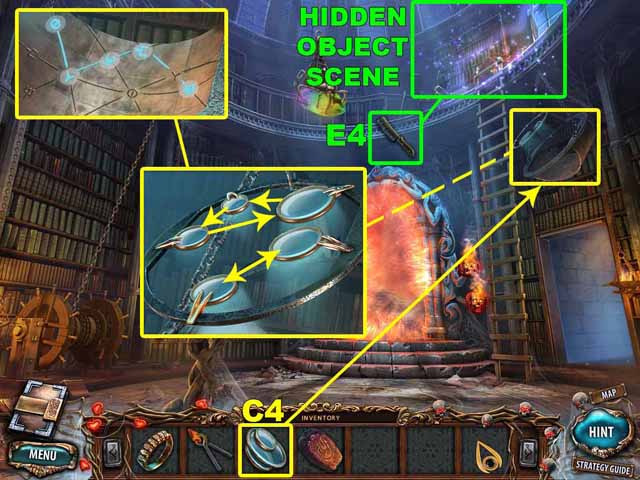
- Insert the LENSES (C4) into the astrolabe above the door on the right.
- Swap the lenses to focus the rays of light.
- Find and launch a Hidden Object scene.
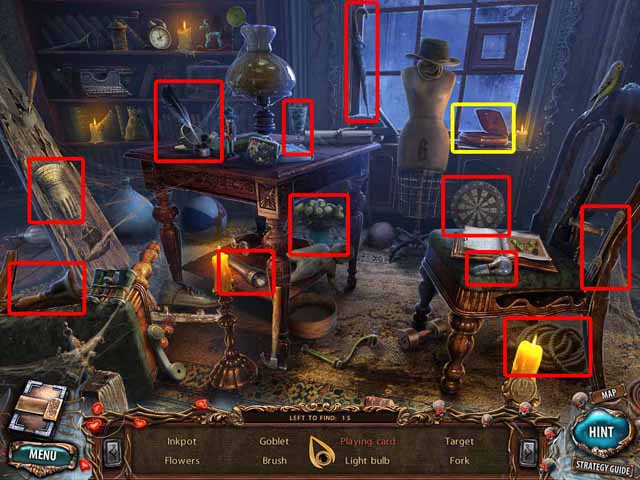
- Collect every object on the list at the bottom of the screen.
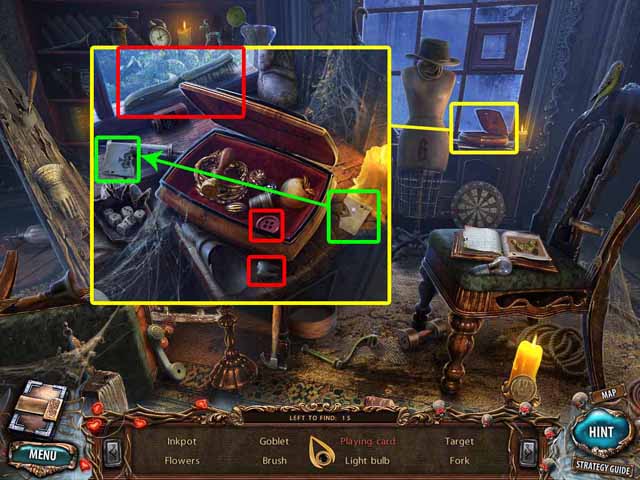
- Open the close-up scene and collect the rest of the objects on the list at the bottom of the screen.
- Upon completing the Hidden Object Scene, you’ll acquire the BRUSH (E4).
- Go to the Cellar Stairs.
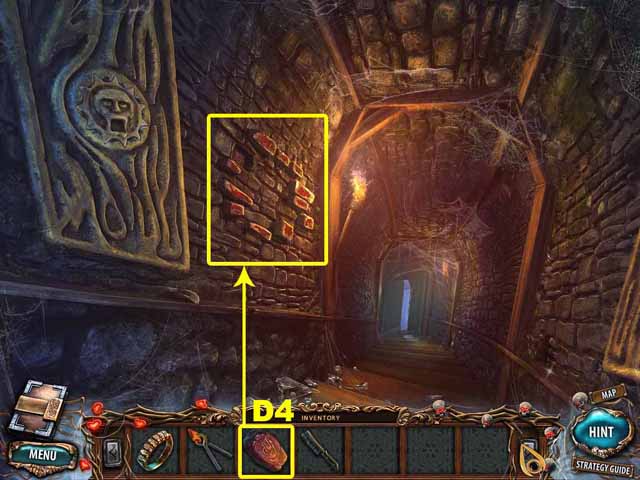
- Insert the STONE (D4) into the wall on the left.
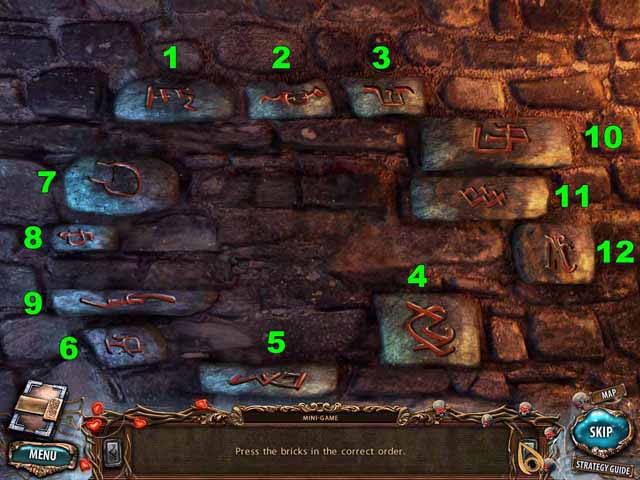
- Press the bricks in correct order, as shown in the screenshot.
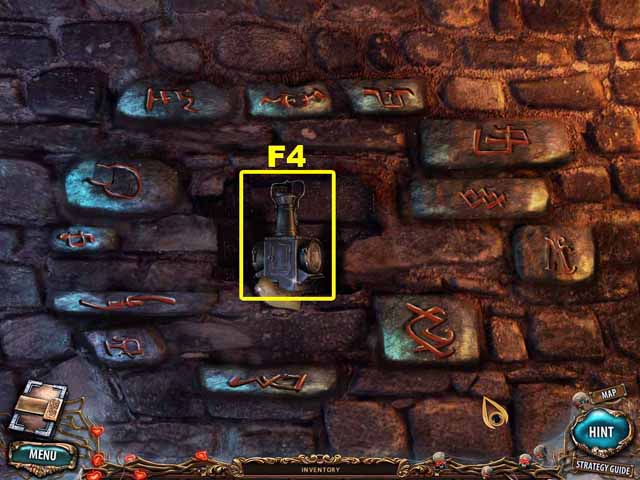
- Take the LANTERN (F4) from the open cache.
- Go to the top of the pyramid.
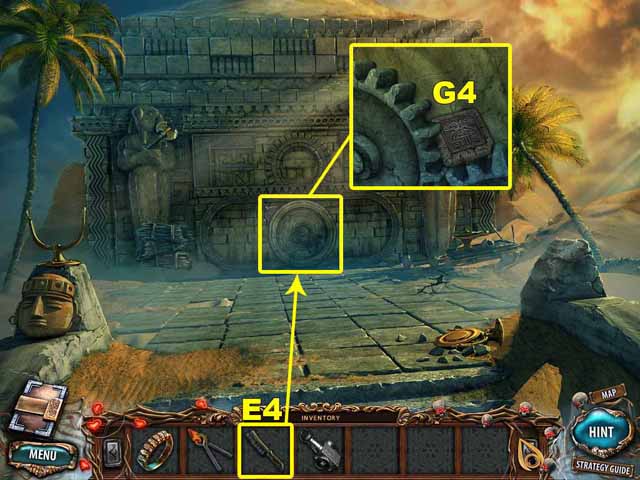
- Use the BRUSH (E4) to remove the sand clogging up the mechanism on the pyramid door. Take the HATCH SEAL (G4).
- Go to the Base of the Pyramid.
- Take the PENDANT (H4) from the fallen stone head.
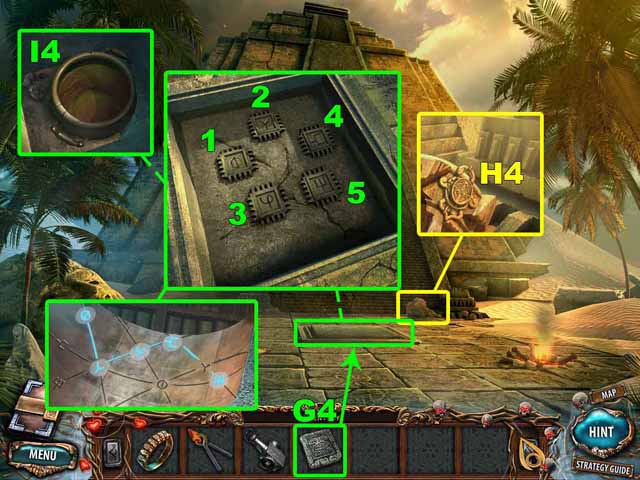
- Insert the HATCH SEAL (G4) into the cache at the bottom of the stairs.
- Push the buttons in the correct order, as shown in the screenshot.
- Take the POT OF OIL (I4) from the open cache.
- Go to the Top of the Pyramid.
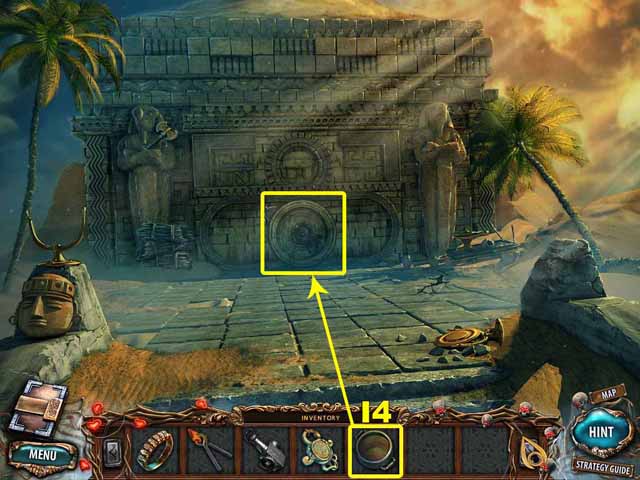
- Pour the POT OF OIL (I4) on the mechanism on the pyramid door.
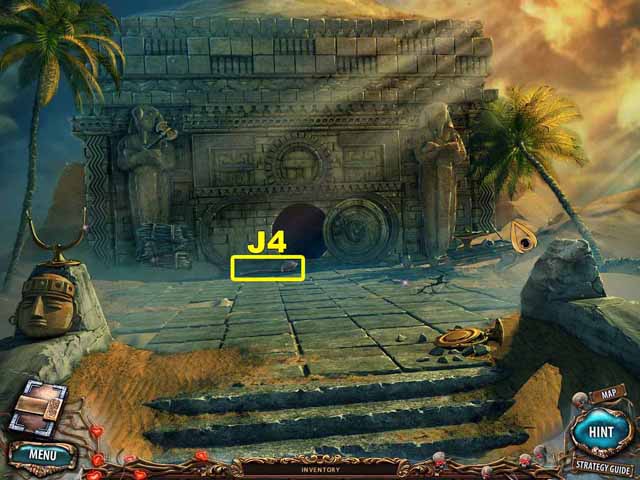
- Take the SHOVEL (J4) that fell out of the door.
- Go to the Base of the Pyramid.
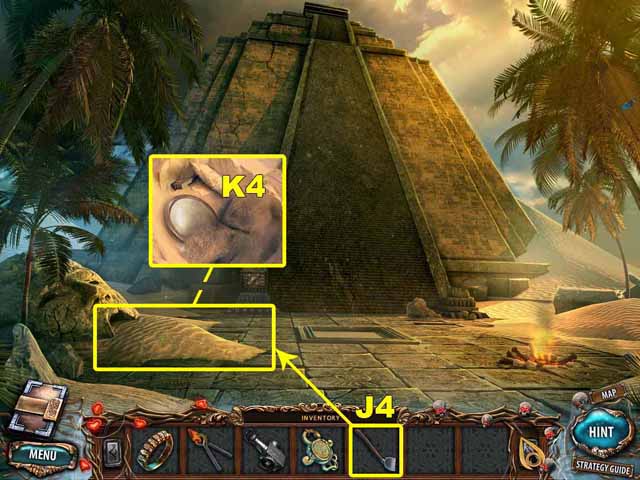
- Use the SHOVEL (J4) to dig the MIRROR (K4) out of the sand.
- Go to the Top of the Pyramid.
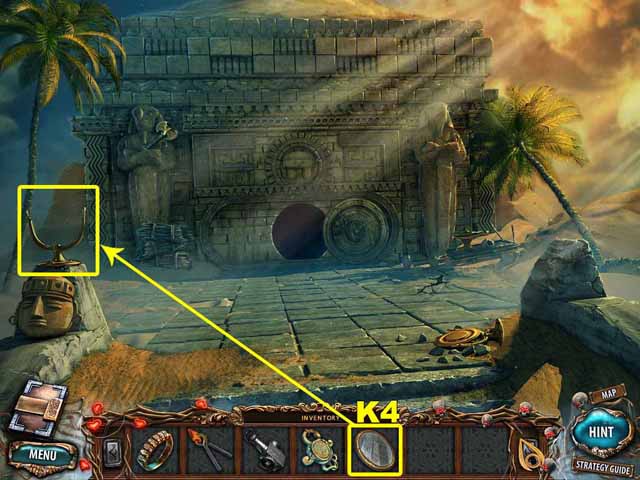
- Place the MIRROR (K4) on the frame. Click on the mirror until it reflects sunlight into the pyramid.
- Enter the Ceremonial Hall.
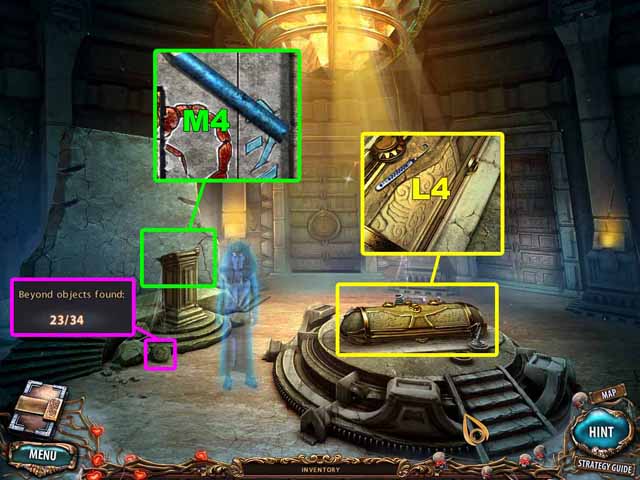
- Take the 23rd Beyond Object.
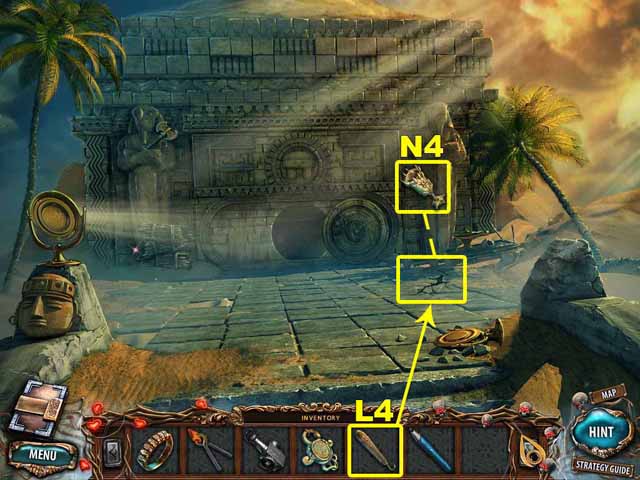
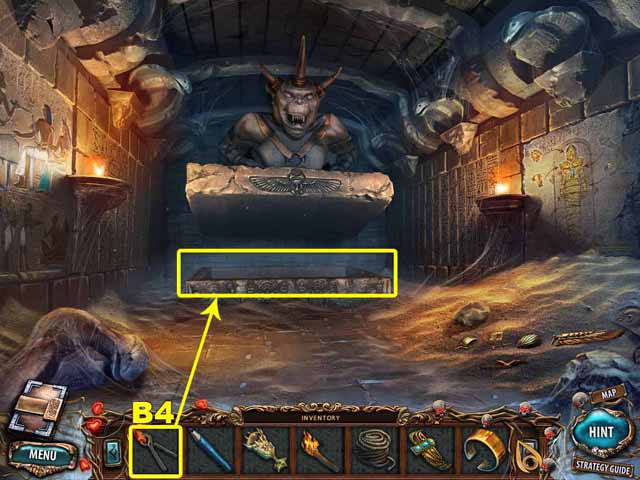
- Take the HOOK (L4) that’s on the sarcophagus.
- Take the PENCIL (M4) that’s on the podium.
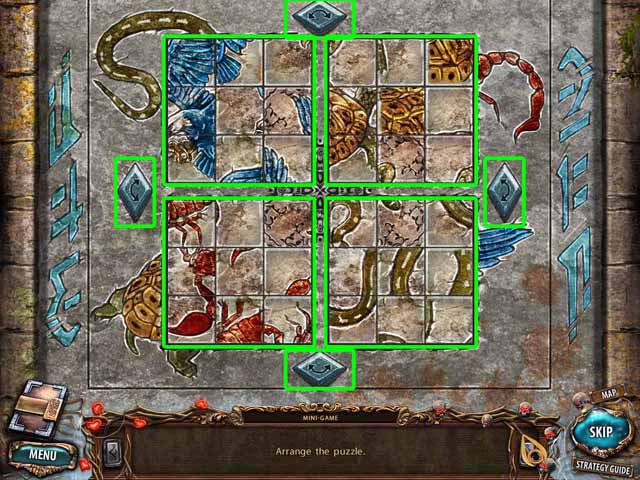
- Assemble the image on the podium.
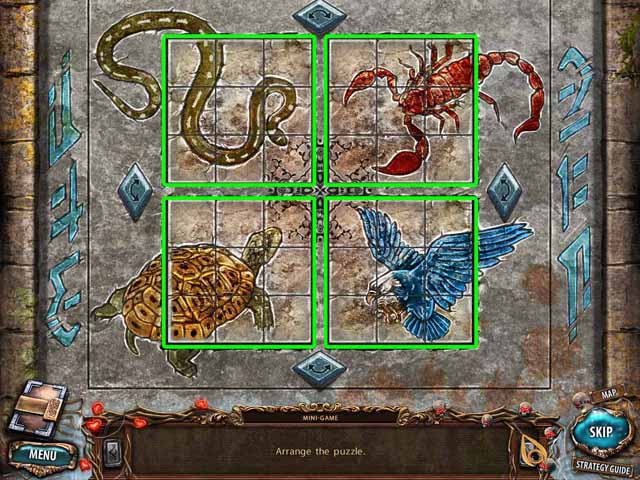
- After you assemble the puzzle, you’ll see four images with animals.
- Go to the Top of the Pyramid.
- Use the HOOK (L4) to retrieve the GOBLET (N4) from the crack in the stone blocks.
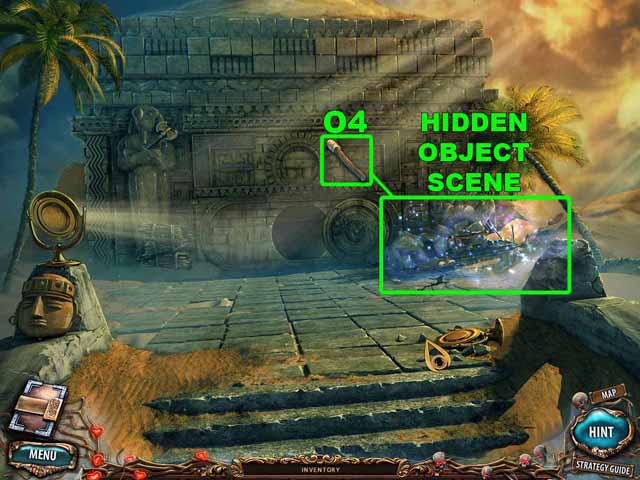
- Find and launch a Hidden Object scene.
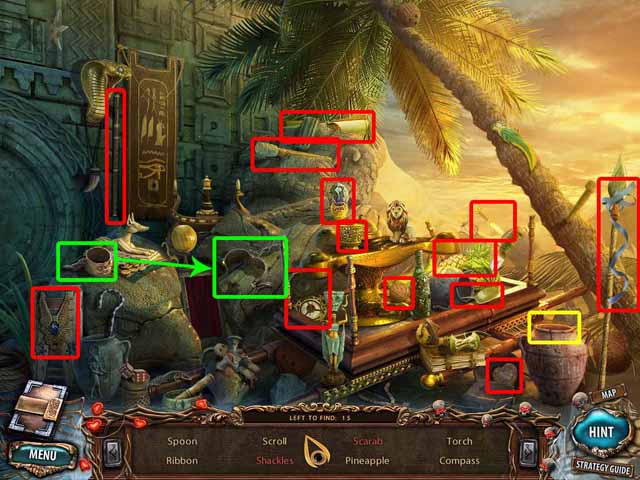
- Collect every object on the list at the bottom of the screen.
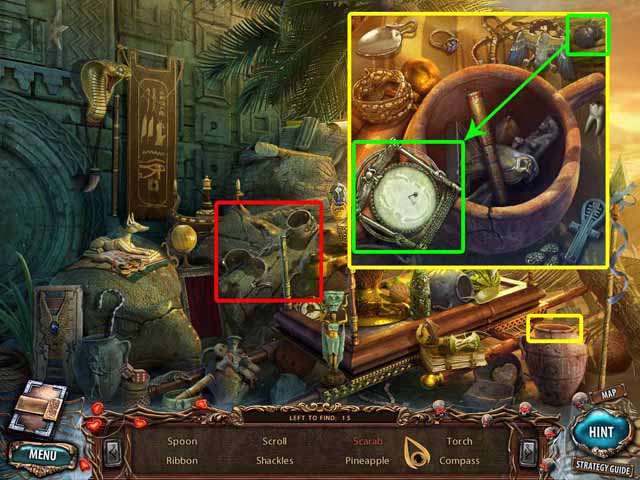
- Open the close-up scene and collect the rest of the objects on the list at the bottom of the screen.
- Upon completing the Hidden Object Scene, you’ll acquire the UNLIT TORCH (O4).
- Go to the Base of the Pyramid.
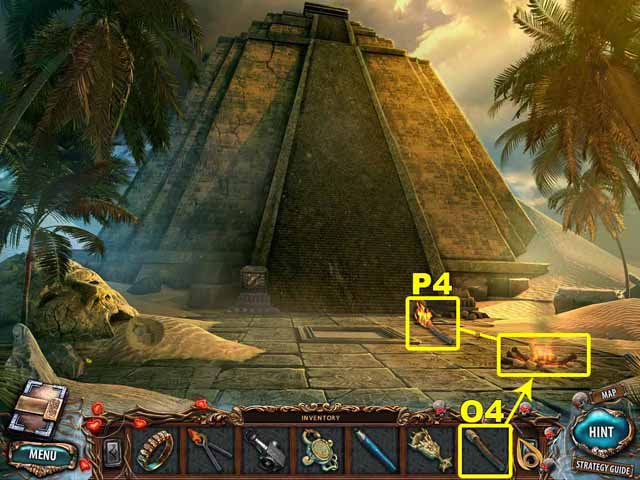
- Place the UNLIT TORCH (O4) in the fire to get the BURNING TORCH (P4).
- Go to the Tomb.
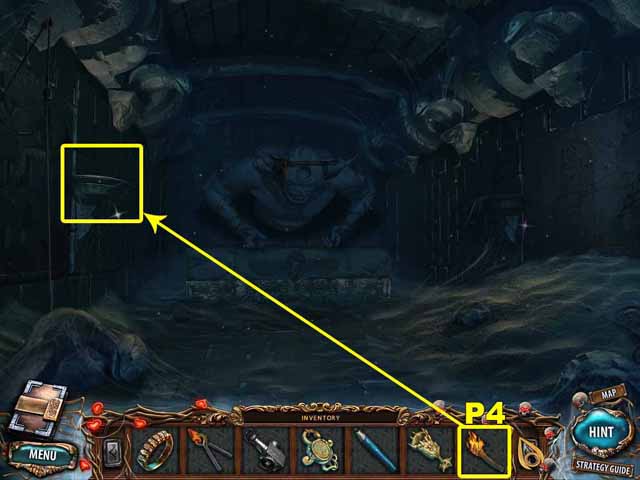
- Light the lamps with the BURNING TORCH (P4).
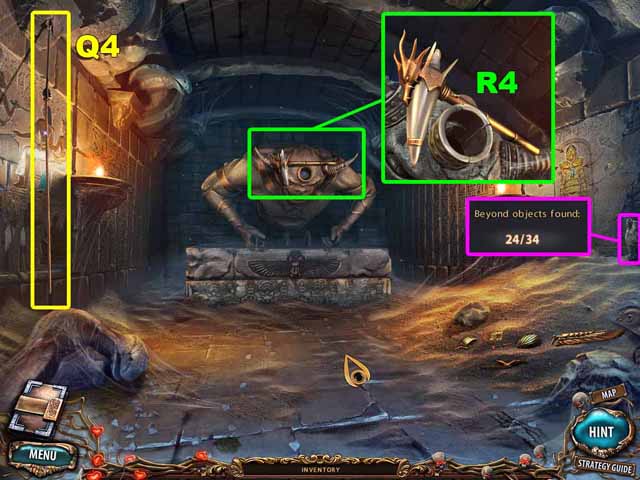
- Take the 24th Beyond Object.
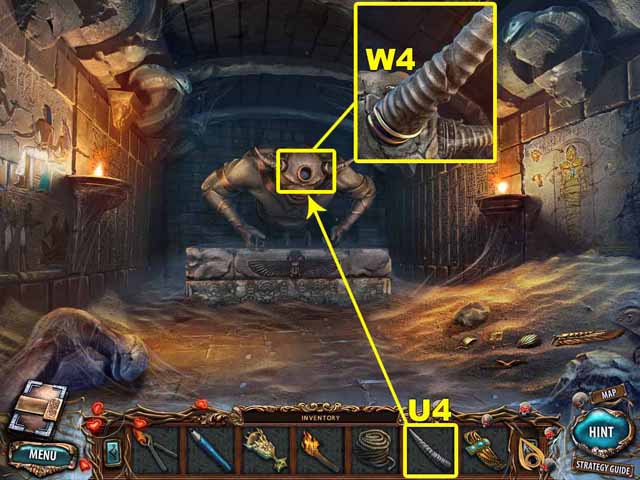
- Take the ARROW ON A ROPE (Q4).
- Take the HELLHOUND TOOTH HAMMER (R4).
- Go to the Meeting Room.
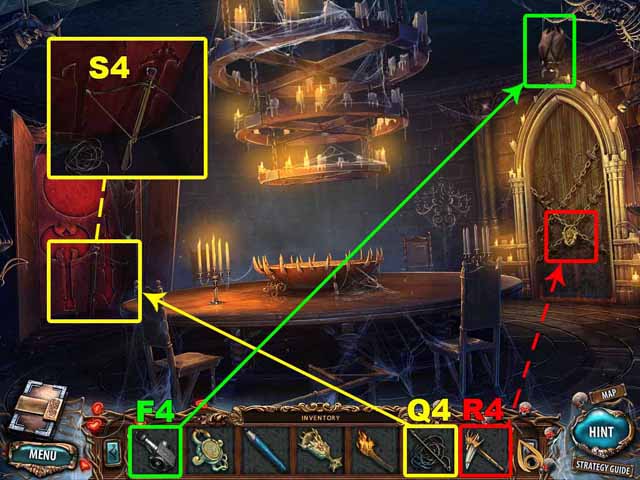
- Load the crossbow with the ARROW ON A ROPE (Q4) to get the LOADED CROSSBOW (S4).
- Shine the LANTERN (F4) at the bat.
- Use the HELLHOUND TOOTH HAMMER (R4) to break the lock on the door.
- Enter the Office.
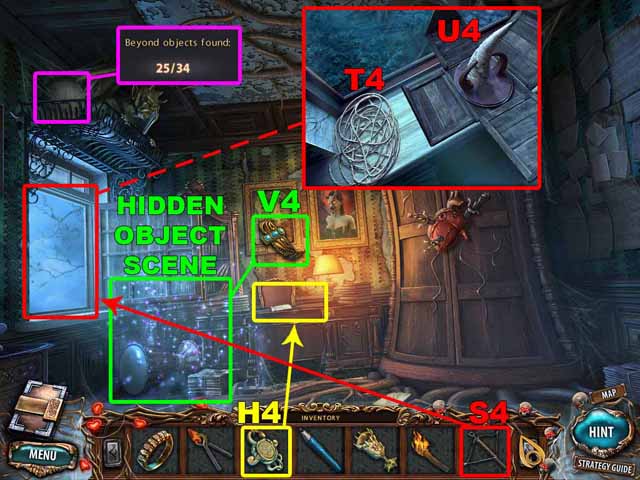
- Take the 25th Beyond Object.
- Use the PENDANT (H4) to open the cache on the desk.
- Shoot the crossbow (S4) at the crate outside the window. Pull the crate to the windowsill. Take the rope (T4). Click on the crate to open it. Take the STONE HORN (U4).
- Find and launch a Hidden Object scene.
- Collect every object on the list at the bottom of the screen.
- Open the close-up scene and collect the rest of the objects on the list at the bottom of the screen.
- Upon completing the Hidden Object Scene, you’ll acquire the MUMMY’S NECKLACE (V4).
- Go to the Tomb.
- Place the STONE HORN (U4) on the guardian’s head.
- Take the MUMMY’S BRACELET (W4).
- Place the HOT STONE (B4) in the water.
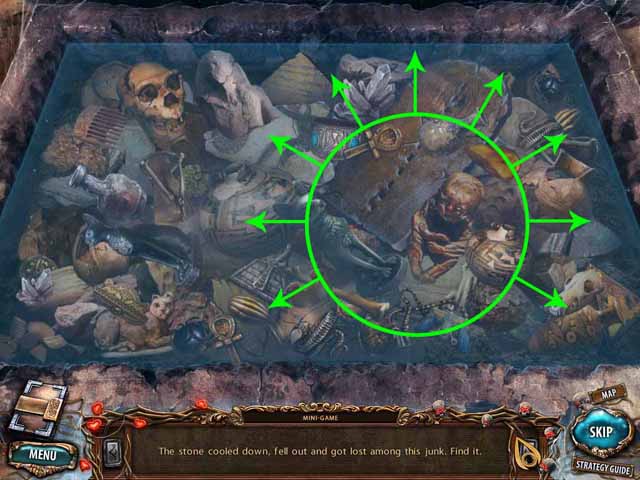
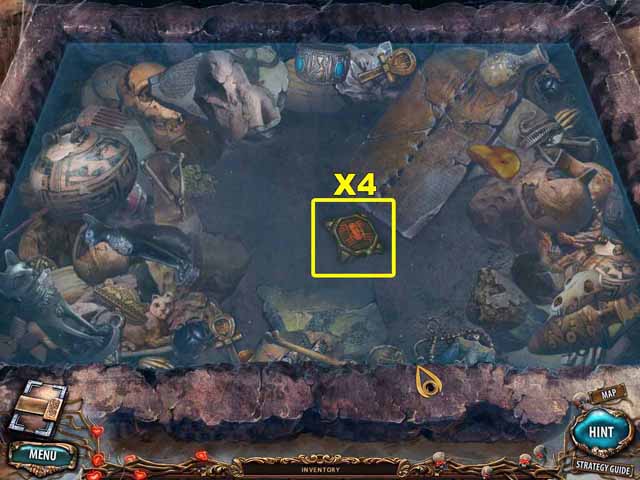
- Take the COOLED STONE (X4).
- Go to the Ceremonial Hall.
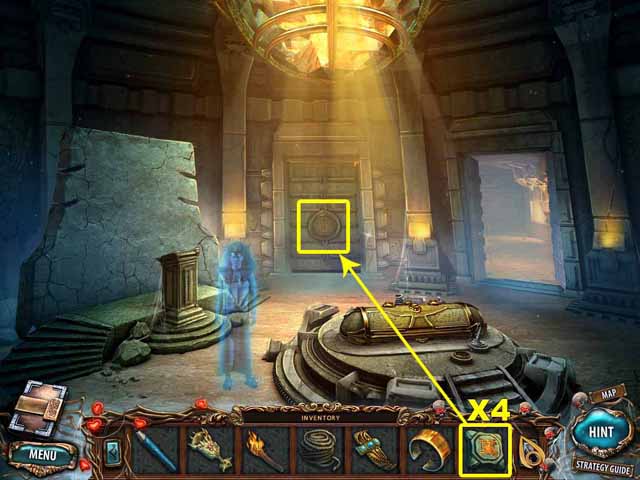
- Place the COOLED STONE (X4) on the closed door.
- Enter the Treasury.
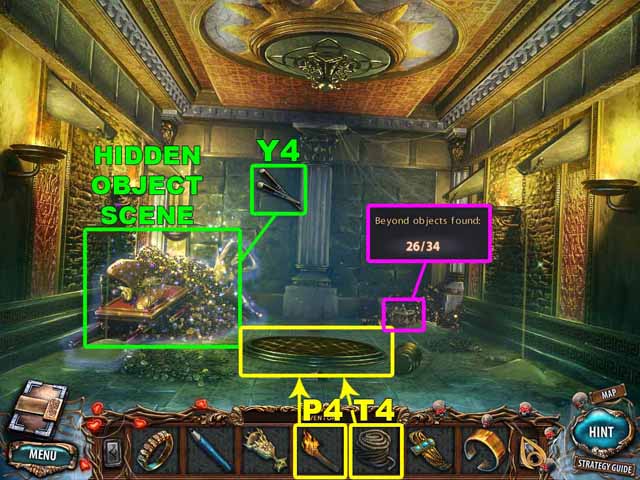
- Take the 26th Beyond Object.
- Remove the grill covering the pit on the floor. Throw the BURNING TORCH (P4) and the ROPE (T4) into the pit.
- Find and launch a Hidden Object scene.
- Collect every object on the list at the bottom of the screen.
- Open the close-up scene and collect the rest of the objects on the list at the bottom of the screen.
- Upon completing the Hidden Object Scene, you’ll acquire the CHOPSTICKS (Y4).
- Go to the Office.
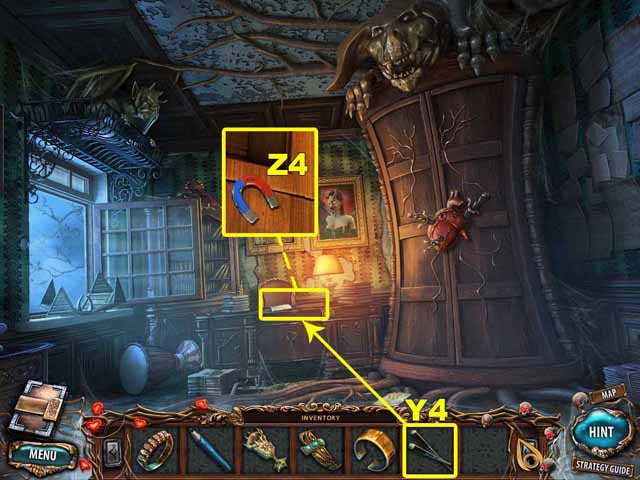
- Use the CHOPSTICKS (Y4) to retrieve the MAGNET (Z4) from the cache.
- Go to the Tomb.
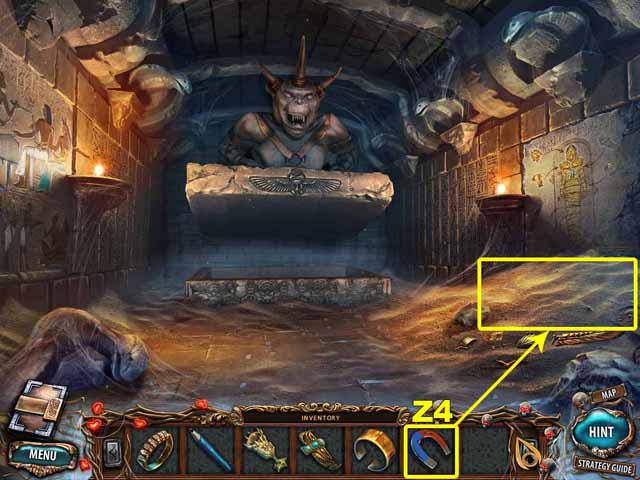
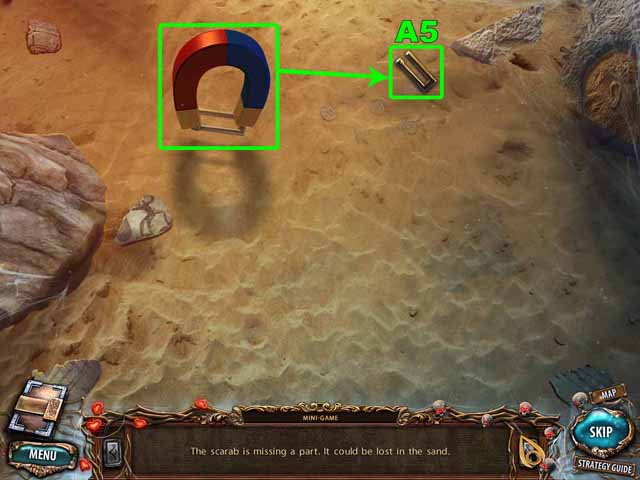
- Move the magnet until you find the SCARAB PIN (A5) in the sand.
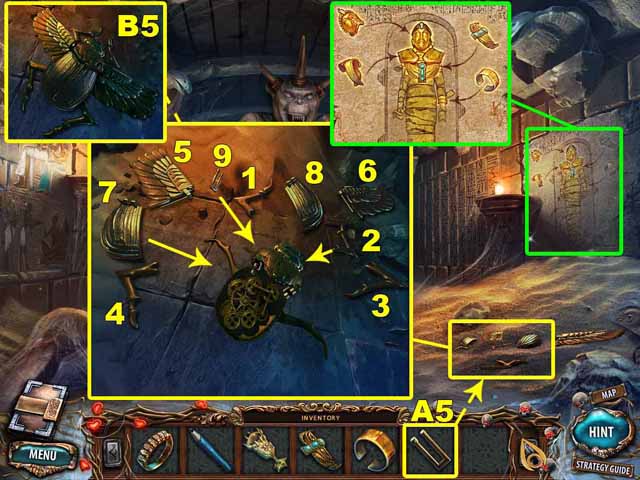
- Assemble the scarab. Place the SCARAB PIN (A5) where it belongs. Take the scarab (B5).
- Go to the Ceremonial Hall.
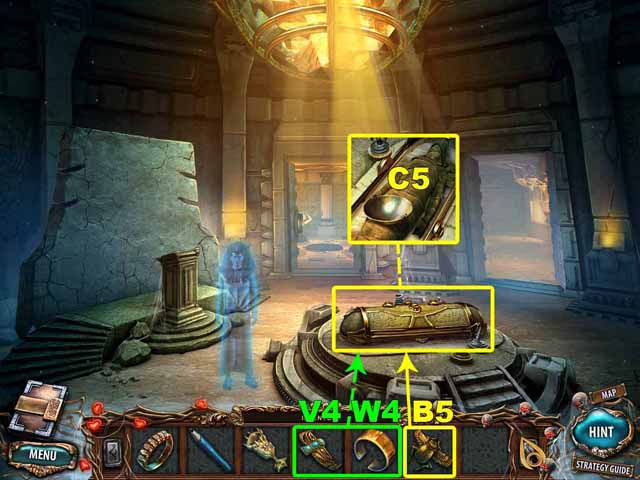
- Place the SCARAB (B5) on the sarcophagus.
- Take the BRONZE BOWL (C5) from the open sarcophagus.
- Place the MUMMY’S NECKLACE (V4) and the MUMMY’S BRACELET (W4) on the mummy.
- Go to the Treasury.
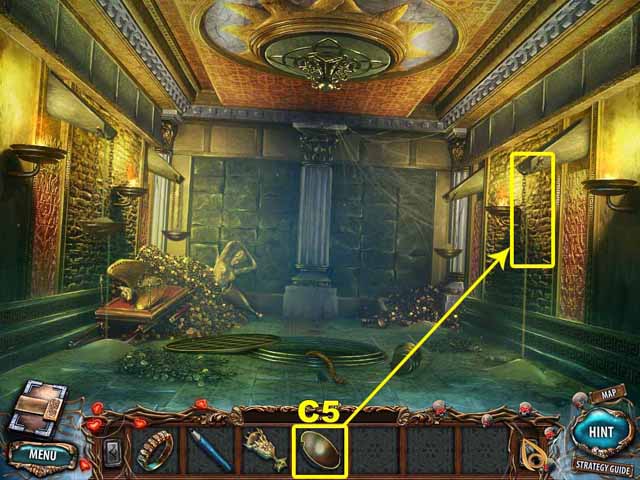
- Hang the BRONZE BOWL (C5) on the chain on the right.
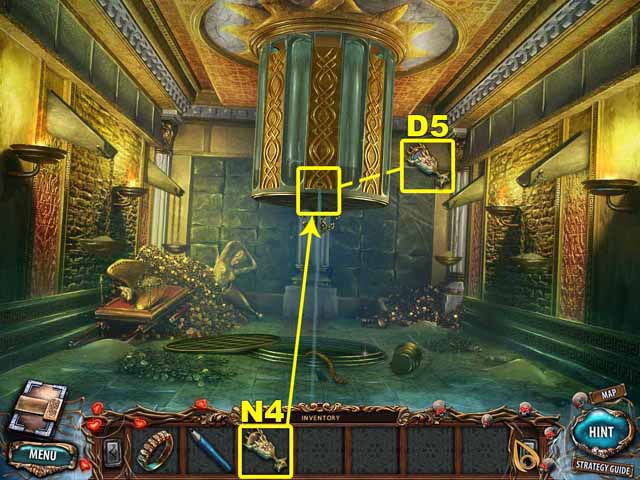
- Fill the GOBLET (N4) with water to get the GOBLET WITH WATER (D5).
- Go to the Top of the Pyramid.
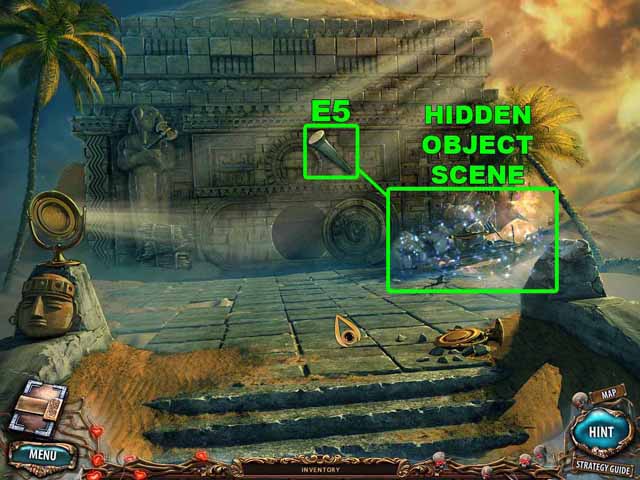
- Find and launch a Hidden Object scene.
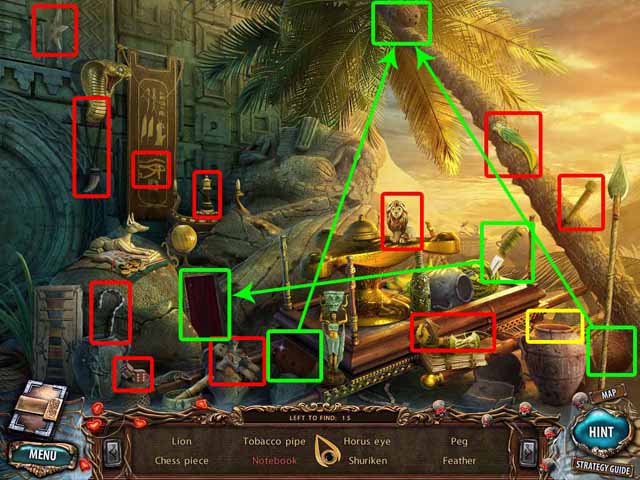
- Collect every object on the list at the bottom of the screen.
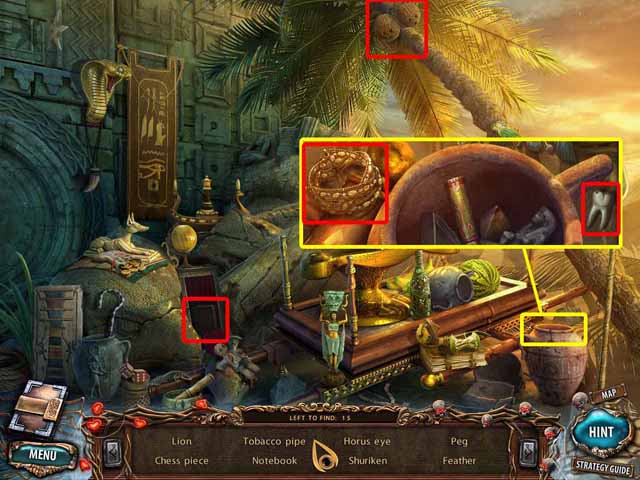
- Open the close-up scene and collect the rest of the objects on the list at the bottom of the screen.
- Upon completing the Hidden Object Scene, you’ll acquire the PEG (E5).
- Go to the Treasury.
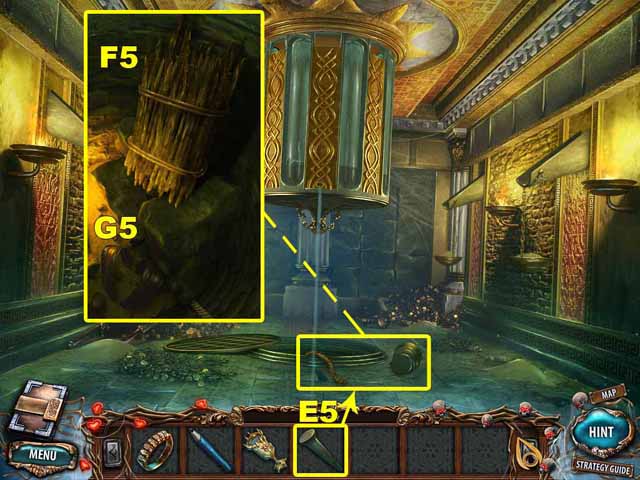
- Use the heavy gold object next to the pit to hammer the PEG (E5) into the floor. Attach the rope to the peg.
- Retrieve the BUNDLE OF CANE (F5) and the MUMMY’S SHOULDER ARMOR (G5) from the pit.
- Go to the Top of the Pyramid.
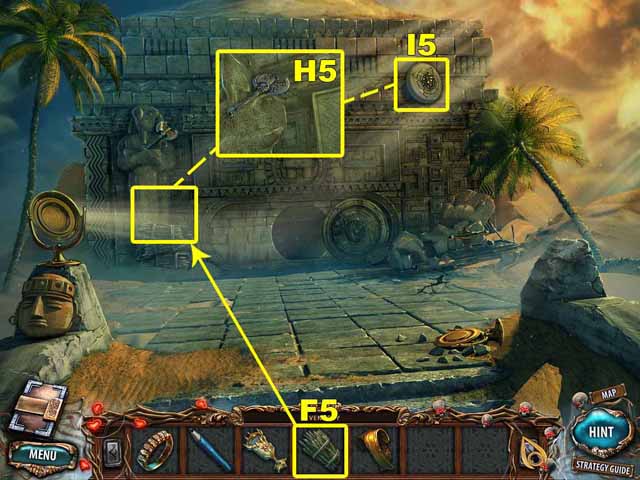
- Place the BUNDLE OF CANE (F5) on top of the other bundles. Take the AXE (H5) and the STOPPER (I5) from the statue.
- Go to the Treasury.

- Insert the STOPPER (I5) into the hole from which the water is leaking.
- Take the TURTLE IDOL (J5).
- Find and launch a Hidden Object scene.
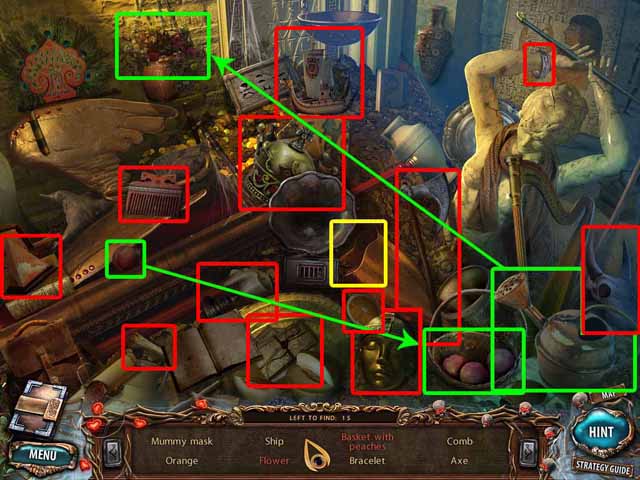
- Collect every object on the list at the bottom of the screen.
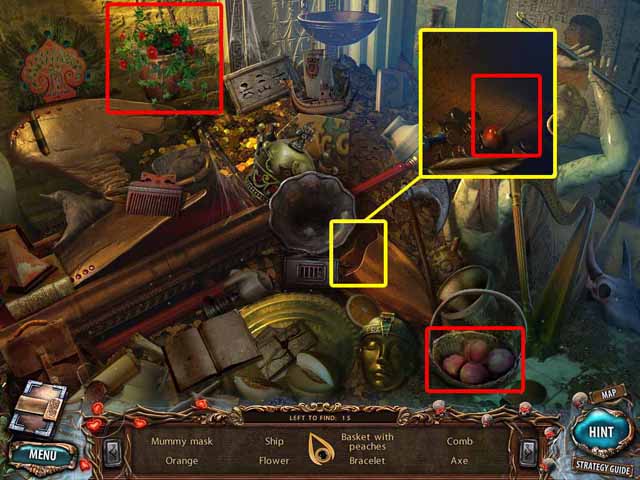
- Open the close-up scene and collect the rest of the objects on the list at the bottom of the screen.
- Upon completing the Hidden Object Scene, you’ll acquire the MUMMY’S MASK (K5).
- Go to the Ceremonial Hall.
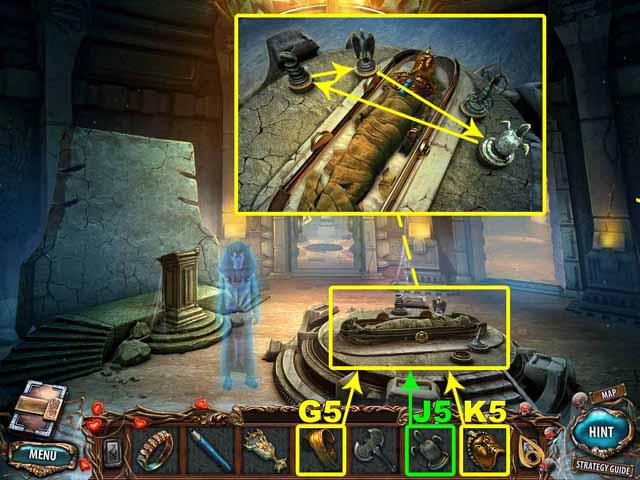
- Place the MUMMY’S SHOULDER ARMOR (G5) and the MUMMY’S MASK (K5) on the mummy.
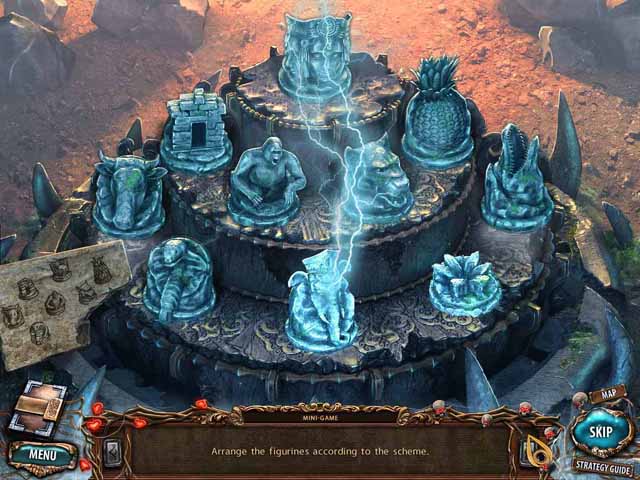
- Place the TURTLE IDOL (J5) where it belongs.
- Arrange the animal idols in the correct order.
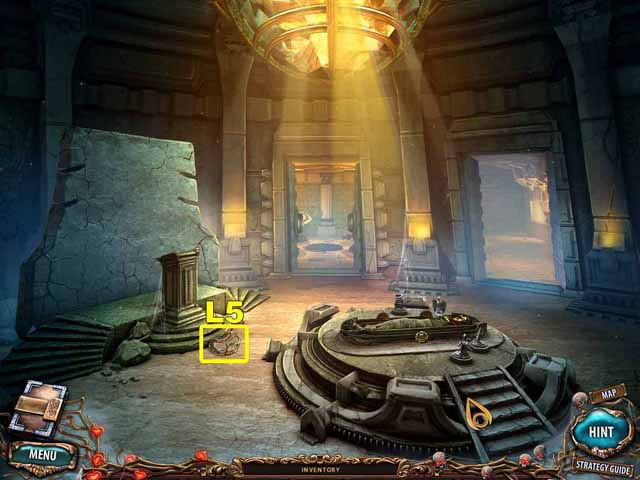
- Take the HEART (L5).
- Go to the Garden.
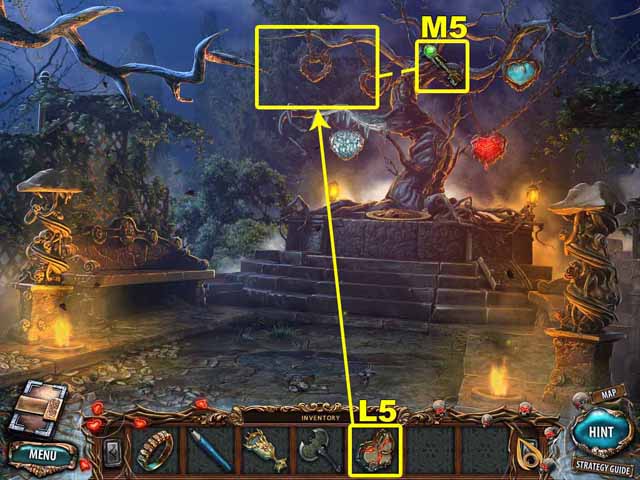
- Place the HEART (L5) in the frame hanging from the tree.
- The PORTAL KEY (M5) will be added to the inventory.
- Go to the Portals.
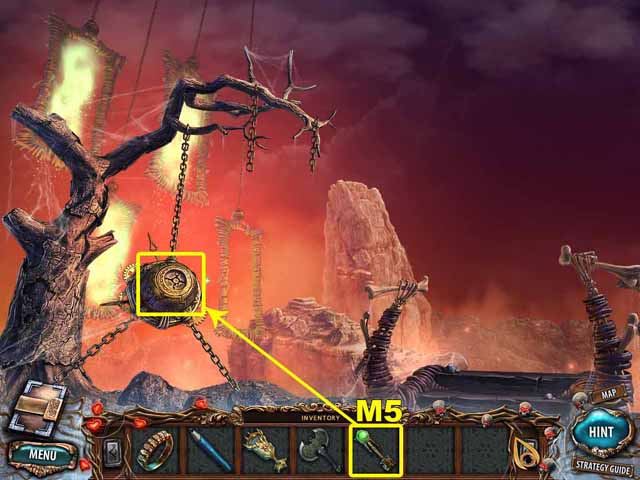
- Insert the PORTAL KEY (M5) into the mechanism to activate it.
- Step through the portal.
Chapter 5: Buddha Palm
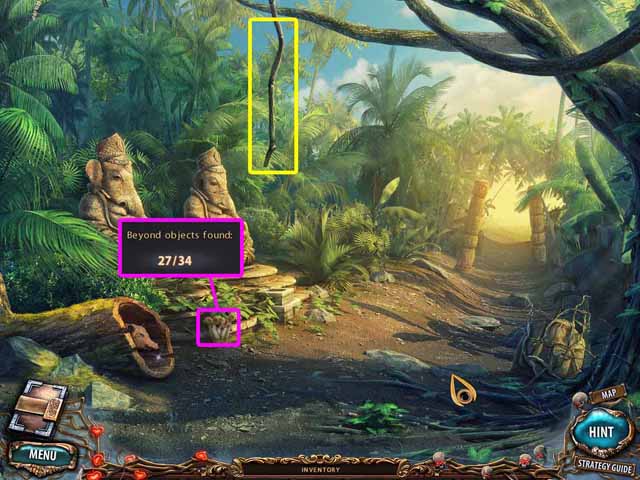
- Take the 27th Beyond Object.
- Pull the vine hanging from the tree.
- Go to the Storage Hut Entrance.
- Take the 28th Beyond Object.
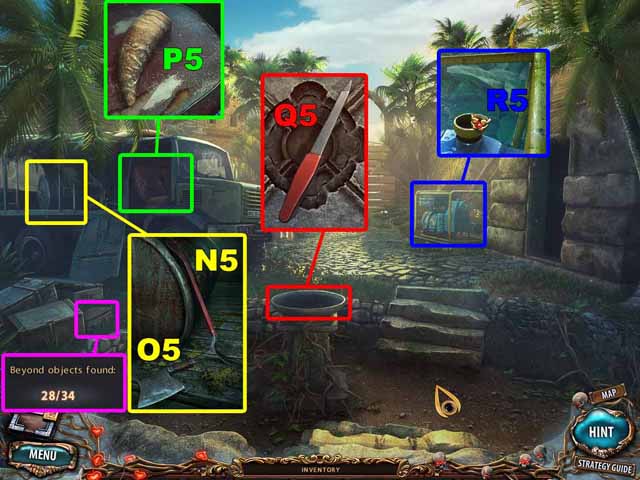
- Take the HATCHET (O5) and the CROWBAR (N5) in the truck bed.
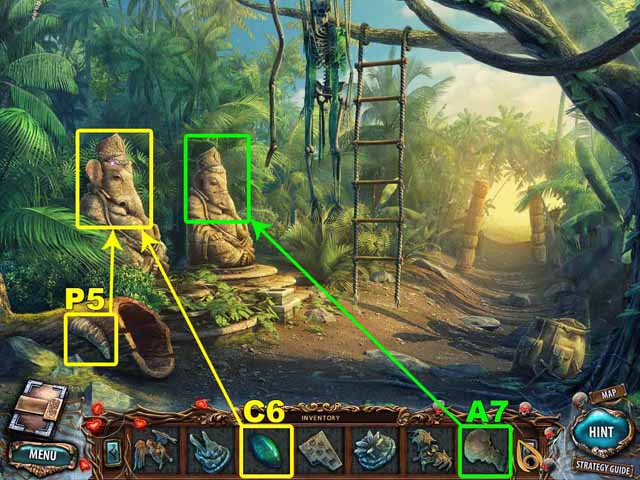
- Take the ELEPHANT TUSK (P5) on the driver’s seat.
- Take the NAIL FILE (Q5) in the stone bowl.
- Take the RING (R5) on the generator.
- Go to the Path.
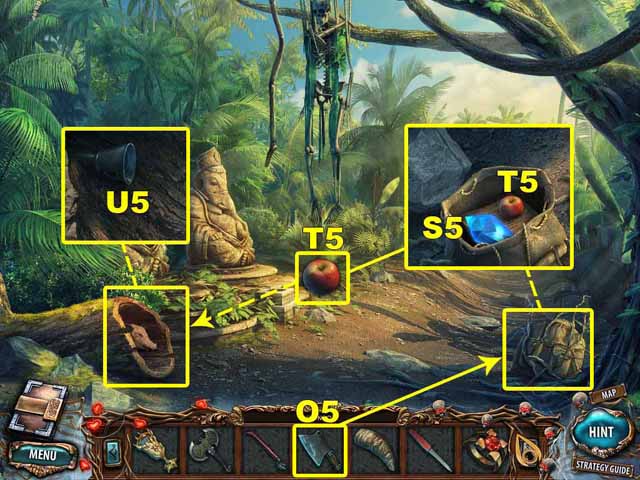
- Use the HATCHET (O5) to cut the roots wrapped around the bag.
- Take the BLUE CRYSTAL (S5) and the APPLE (T5) from the bag.
- Use the APPLE (T5) to lure the warthog out of the tree trunk.
- Take the FUNNEL (U5) from the trunk.
- Go to the Cellar.
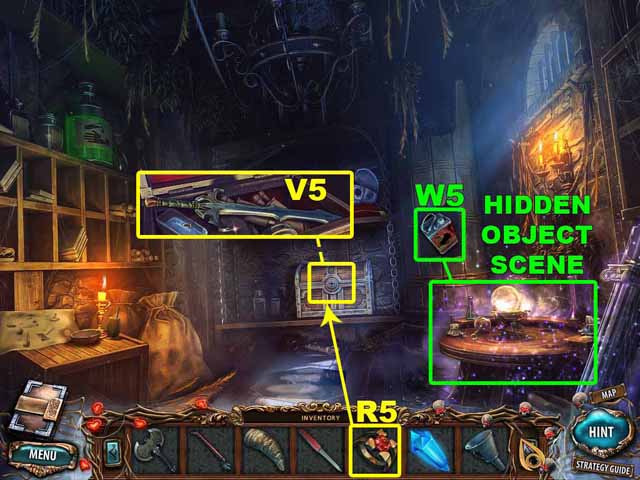
- Insert the RING (R5) into the lock on the chest.
- Take the SWORD (V5) from the chest.
- Find and launch a Hidden Object scene.
- Collect every object on the list at the bottom of the screen.
- Open the close-up scene and collect the rest of the objects on the list at the bottom of the screen.
- Upon completing the Hidden Object Scene, you’ll acquire the EMPTY GAS CAN (W5).
- Go to the Storage Hut Entrance.
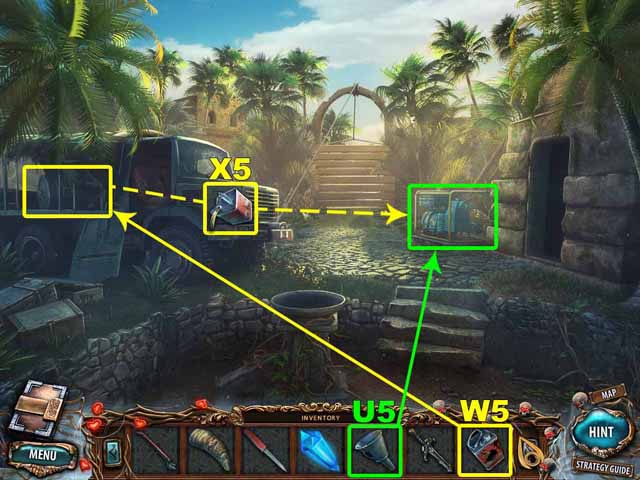
- On the truck bed, remove the lid from the barrel to allow fuel to pour into the EMPTY GAS CAN (W5). Take the FULL GAS CAN (X5).
- Insert the FUNNEL (U5) into the generator. Pour the fuel in the FULL GAS CAN (X5) into the generator. Pull the handle to start the generator.
- Enter the Storage Hut.
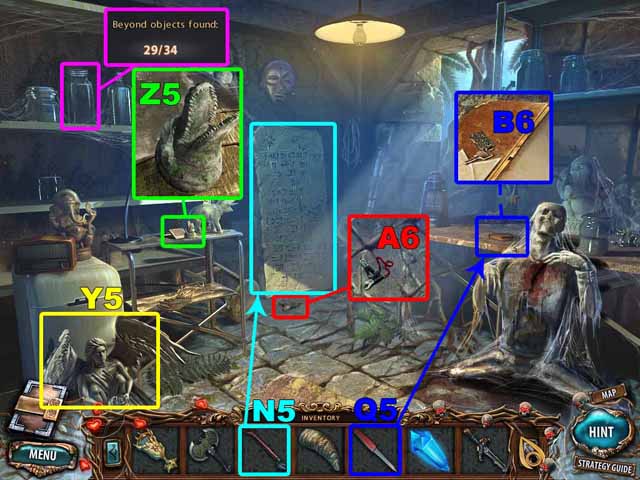
- Take the 29th Beyond Object.
- Take the STONE BUST (Y5).
- Take the ALLIGATOR FIGURINE (Z5) on the table.
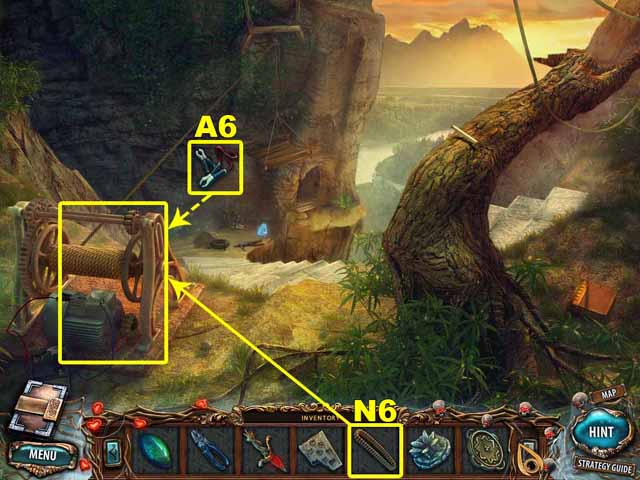
- Take the JUMPER CABLES (A6) on the floor.
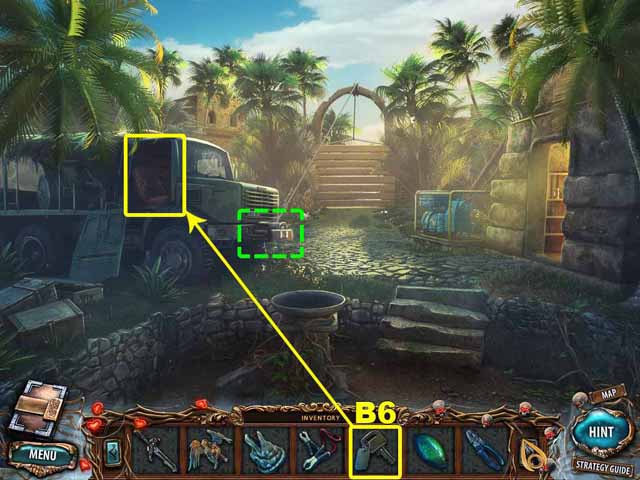
- Use the nail file (Q5) to open the book on the table. Take the TRUCK KEY (B6) inside of the book.
- Use the crowbar (N5) to move the stone slab.
- Take the ELEPHANT EYE (C6) from the fridge.
- Find and launch a Hidden Object scene.
- Collect every object on the list at the bottom of the screen.
- Open the close-up scene and collect the rest of the objects on the list at the bottom of the screen.
- Upon completing the Hidden Object Scene, you’ll acquire the PLIERS (D6).
- Go to the Storage Hut Entrance.
- Use the TRUCK KEY (B6) to start the truck.
- Turn on the winch.
- Go to the Top of the Cliff.
- Take the 30th Beyond Object.
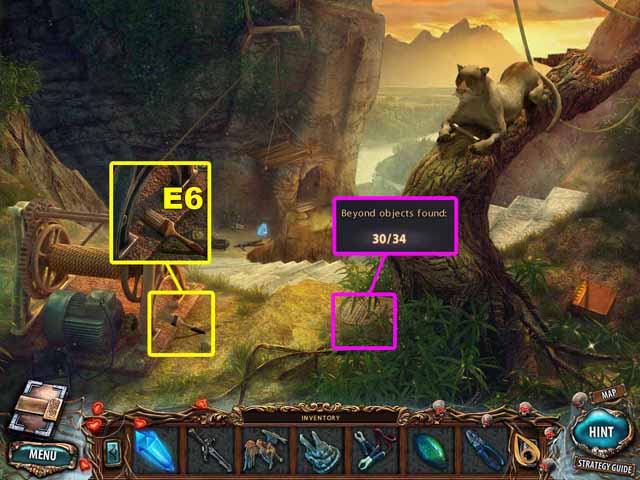
- Take the PAINT BRUSH (E6) by the pulley.
- Go to the Bottom of the Cliff.

- Take the 31st Beyond Object.
- Take the CHEESE (F6) on the rock.
- Take the DAGGER (G6) on the ground.
- Go to the Cellar Stairs.
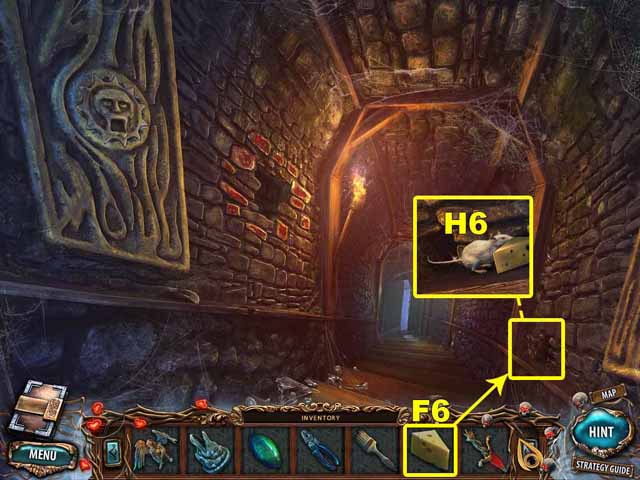
- Place the cheese (F6) near the hole in the wall. Take the RAT (H6).
- Go to the Top of the Cliff.
- Place the RAT (H6) near the panther.
- Take the BUG ZAPPER ELEMENT (I6).
- Go to the Storage Hut.
- Insert the BUG ZAPPER ELEMENT (I6) into the bug zapper.
- Take the DEAD MOSQUITOES (J6).
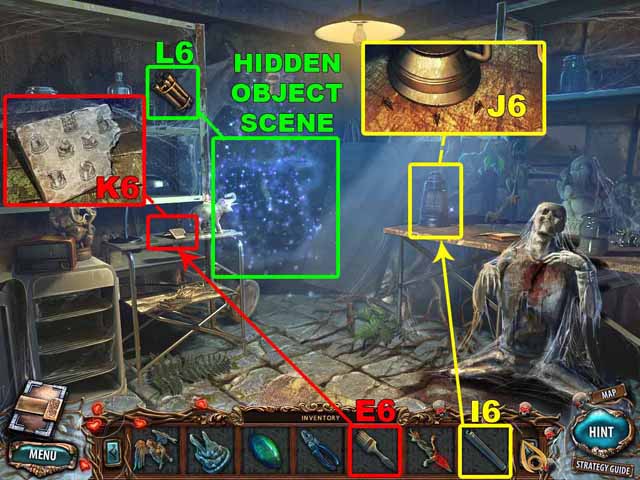
- Use the PAINT BRUSH (E6) to remove dust from the stone tile. Take the DIAGRAM (K6).
- Find and launch a Hidden Object scene.
- Collect every object on the list at the bottom of the screen.
- Open the close-up scene and collect the rest of the objects on the list at the bottom of the screen.
- Upon completing the Hidden Object Scene, you’ll acquire the ROPE LADDER (L6).
- Go to the Path.
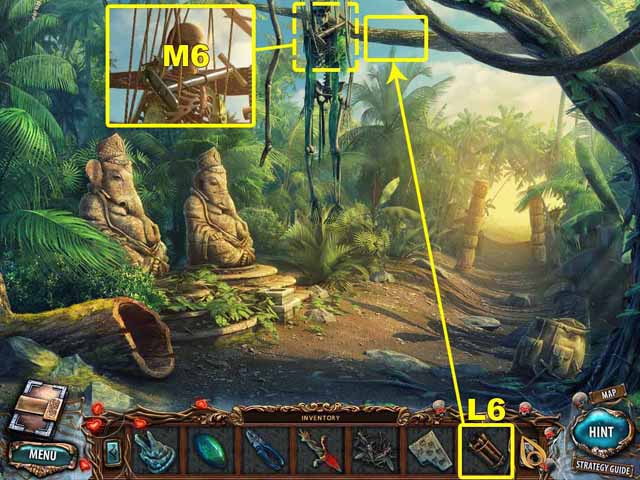
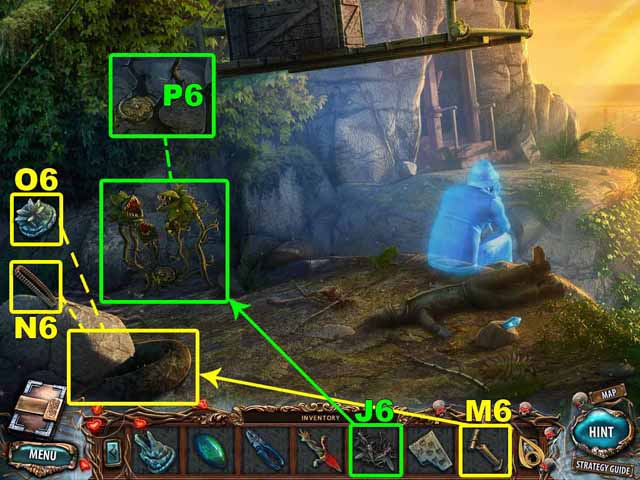
- Place the ROPE LADDER (L6) on the tree. Take the AIR PUMP (M6) from the unfortunate paratrooper.
- Go to the Bottom of the Cliff.
- Use the AIR PUMP (M6) to inflate the inner tube. Take the CHAIN (N6) and the LOTUS FIGURINE (O6) under the rock.
- Feed the predatory flowers the DEAD MOSQUITOES (J6). Take the CENTER PUZZLE PIECE (P6) the flowers were guarding.
- Go to the Top of the Cliff.
- Place the CHAIN (N6) on the pulley.
- Attach the JUMPER CABLES (A6) to the battery and the pulley.
- Go to the Storage Hut Entrance.
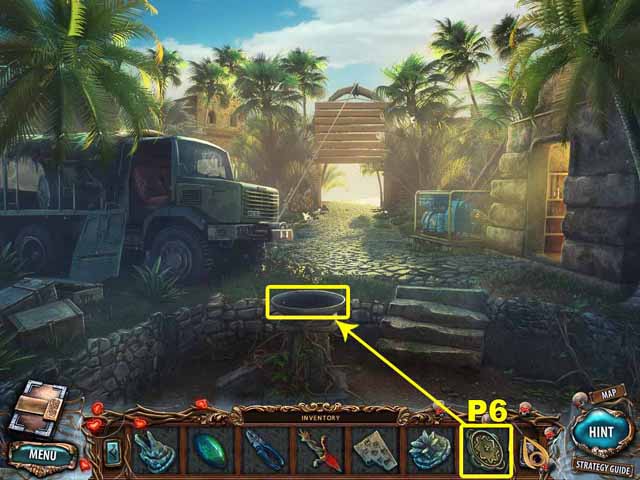
- Place the CENTER PUZZLE PIECE (P6) in the stone bowl.
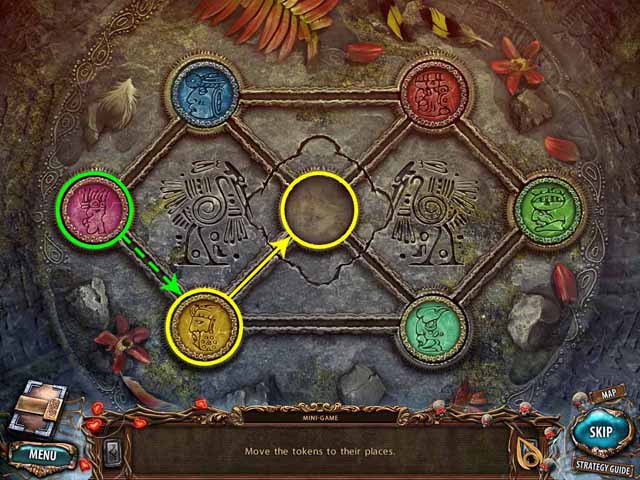
- Move each token to where it belongs.
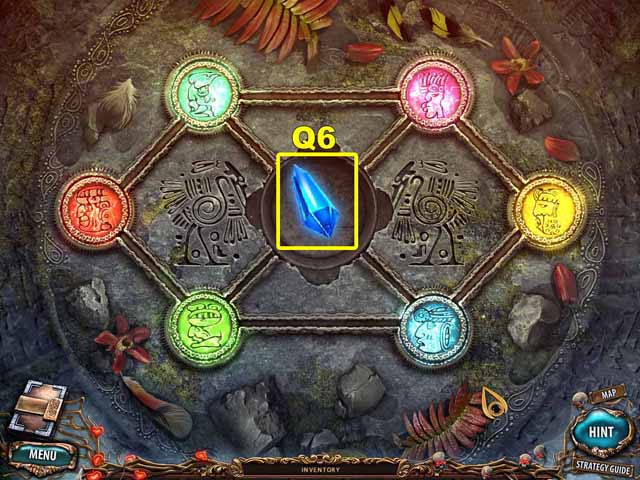
- Take the BLUE CRYSTAL (Q6) from the cache.
- Go to the Bottom of the Cliff.

- Take the STONE BUST (R6) on the crate.
- Use the CROWBAR (N5) to open the crate. Take the DYNAMITE (S6) in the crate and the CRATE LID (T6).
- Enter the Cave.
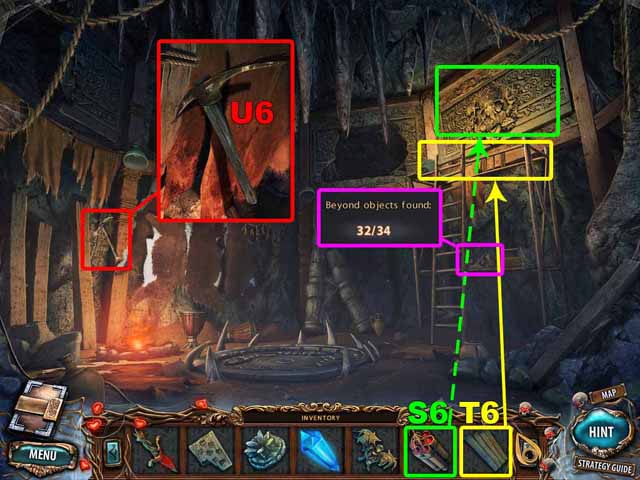
- Take the 32nd Beyond Object.
- Place the CRATE LID (T6) on the scaffolding.
- Place the DYNAMITE (S6) in the crack in the bas-relief.
- Take the PICKAXE (U6).
- Go to the Bottom of the Cliff.
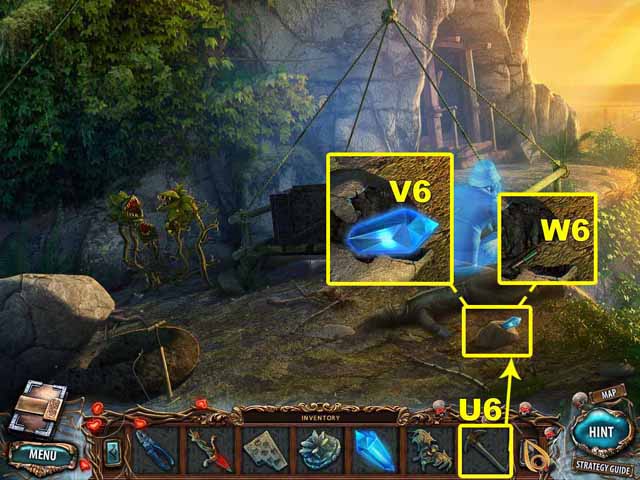
- Use the PICKAXE (U6) to break the stone.
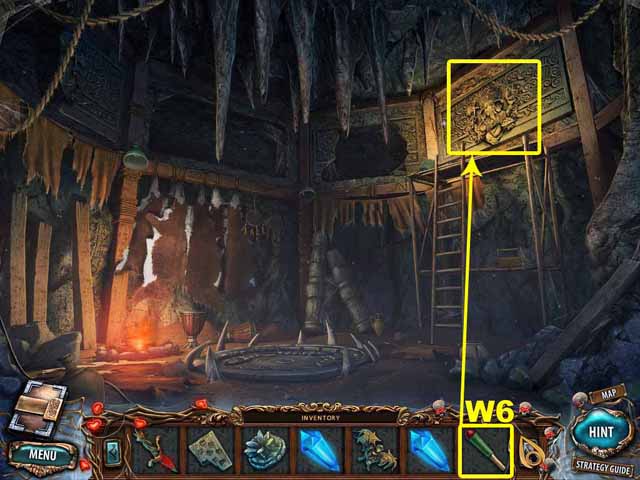
- Take the BLUE CRYSTAL (V6) and the MATCH (W6) under the broken stone.
- Go to the cave.
- Use the MATCH (W6) to light the dynamite.
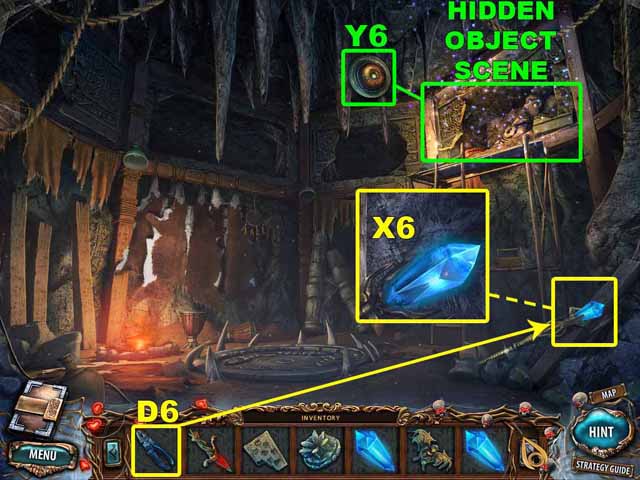
- Use the PLIERS (D6) to bend back the prongs on the staff. Take the BLUE CRYSTAL (X6).
- Find and launch a Hidden Object scene.
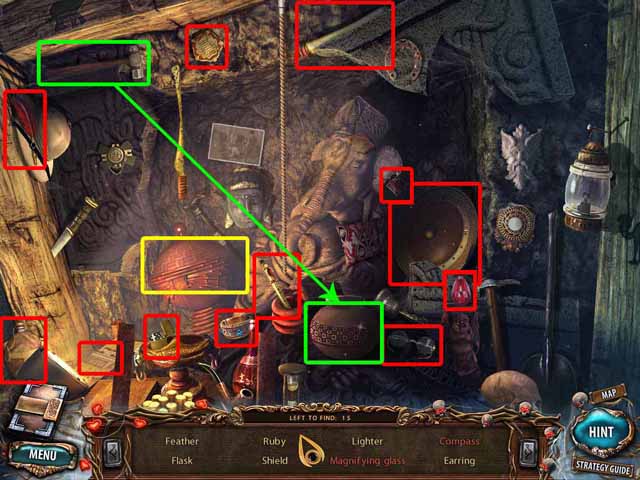
- Collect every object on the list at the bottom of the screen.
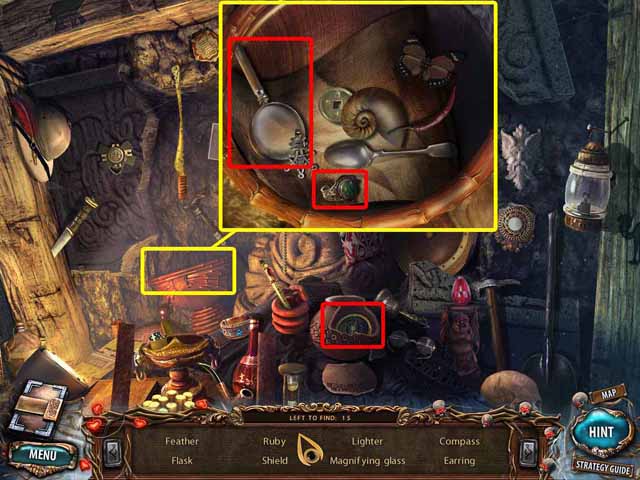
- Open the close-up scene and collect the rest of the objects on the list at the bottom of the screen.
- Upon completing the Hidden Object Scene, you’ll acquire the SHIELD (Y6).
- Go to the Meeting Room.
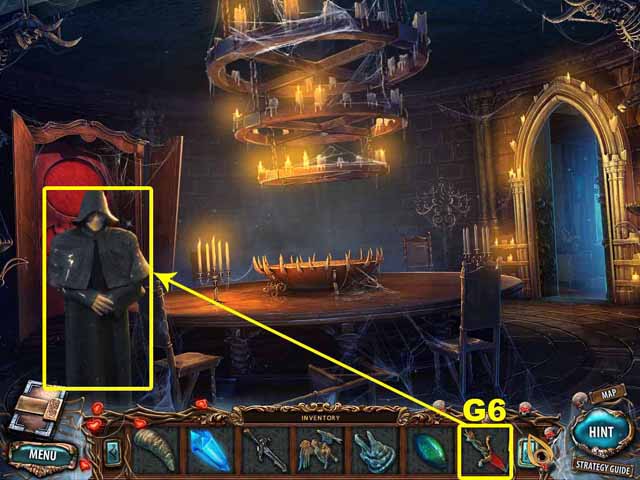
- Give the DAGGER (G6) to the boatman.
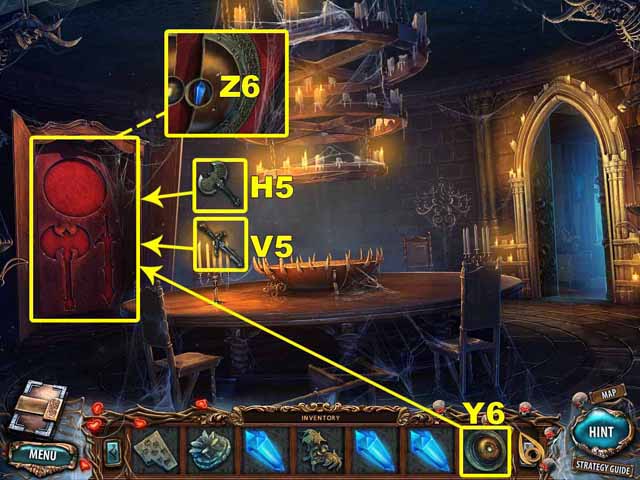
- Insert the AXE (H5), SWORD (V5), and SHIELD (Y6) into the empty case.
- Take the BLUE CRYSTAL (Z6) from the shield.
- Go to the Cave.
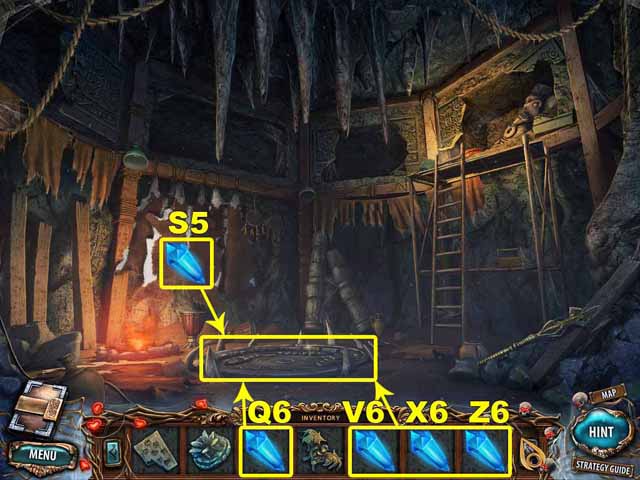
- Insert the BLUE CRYSTALS (S6, Q6, V6, X6 and Z6) into the slots on the platform.
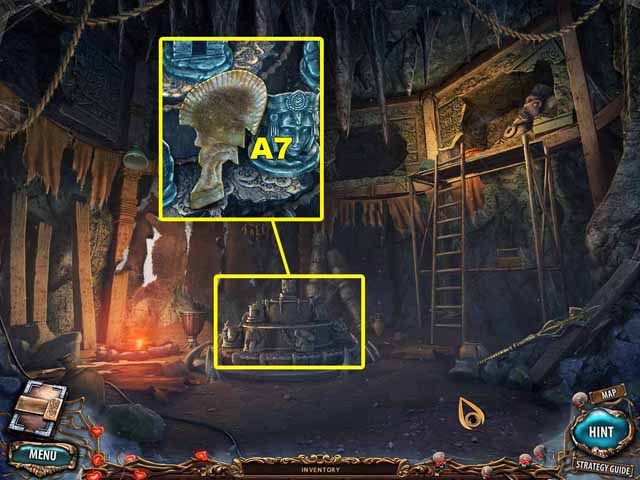
- Take the ELEPHANT EAR (A7) from the altar that rose out of the ground.
- Go to the Path.
- Place the ELEPHANT TUSK (P5), ELEPHANT EYE (C6) and ELEPHANT EAR (A7) on the elephant totems.
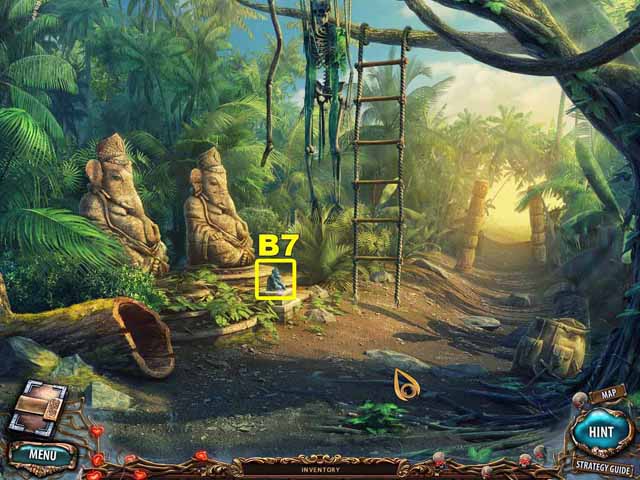
- Take the ELEPHANT FIGURINE (B7) from the cache.
- Go to the Cave.
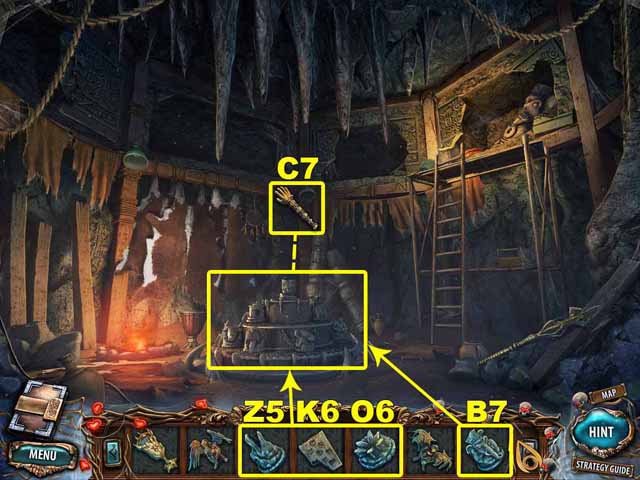
- Place the FIGURINES (Z5, O6 and B7) on the altar. Place the DIAGRAM (K6) next to the altar.
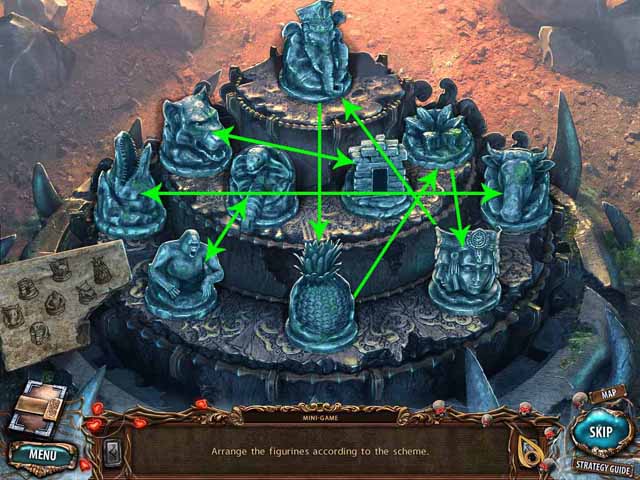
- Arrange the figurines according to the diagram.
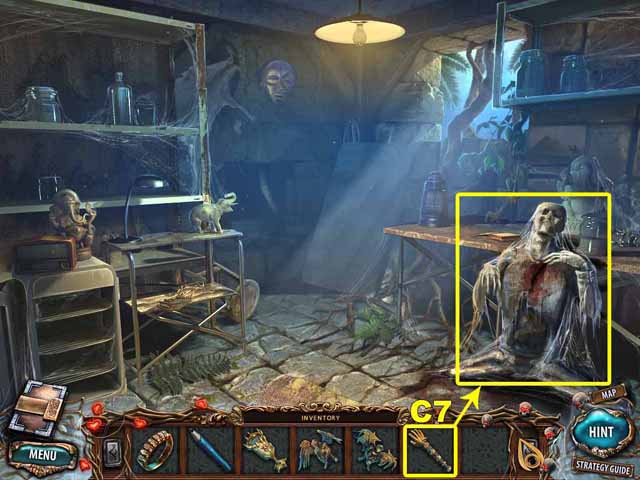
- Take the SCEPTER (C7).
- Go to the Storage Hut.
- Place the SCEPTER (C7) on the corpse.
- Go to the Garden.
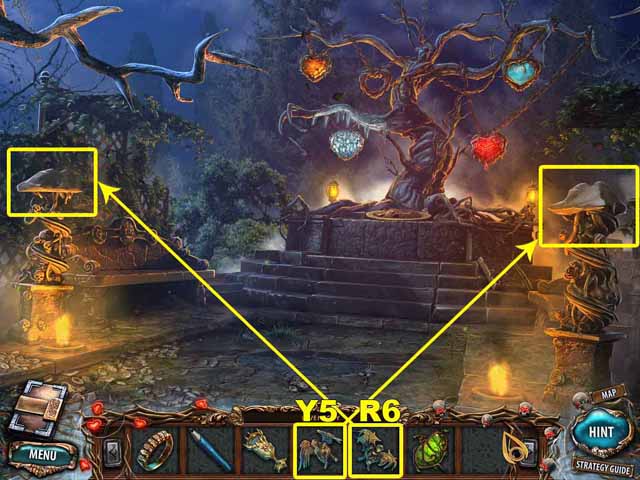
- Place the STONE BUSTS (Y5 and R6) where they belong.

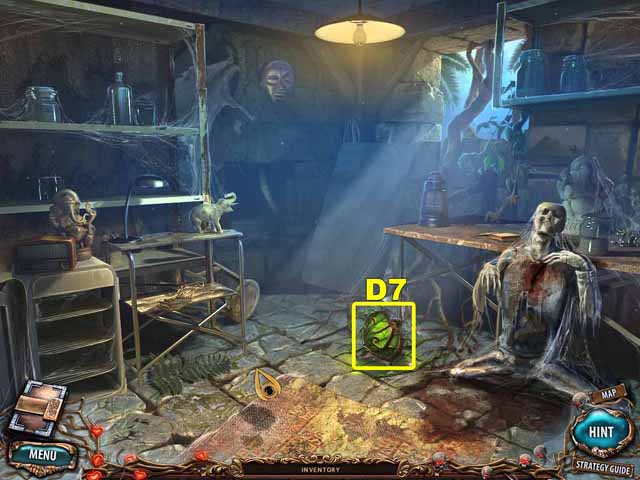
- Take the RUNE (E7) from the cache on the ground.
- Place the HEART (D7) in the frame hanging from the tree.
- Enter the Tunnel to the Altar.
Chapter 6: Prince of Darkness
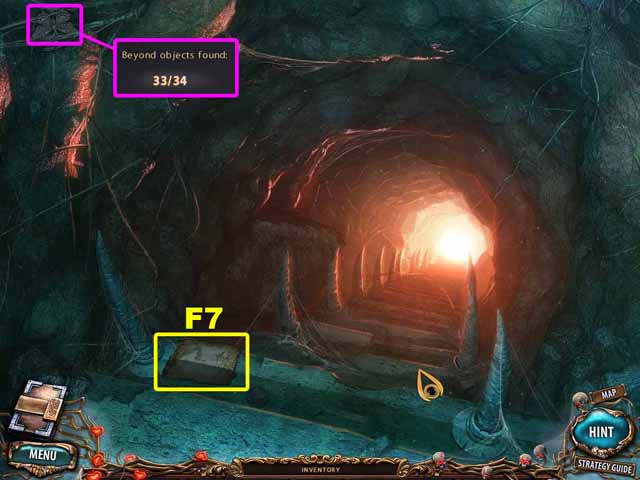
- Take the PARCHMENT (F7) on the stairs.
- Take the 33rd Beyond Object.
- Go to the Garden.
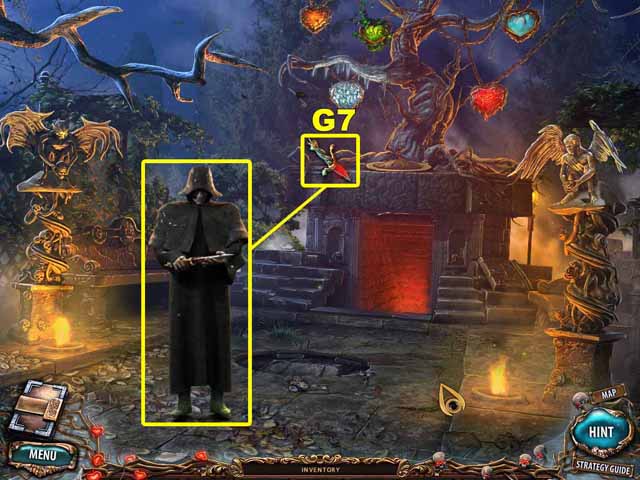
- Take the BLOOD-FILLED DAGGER (G7) from the boatman.
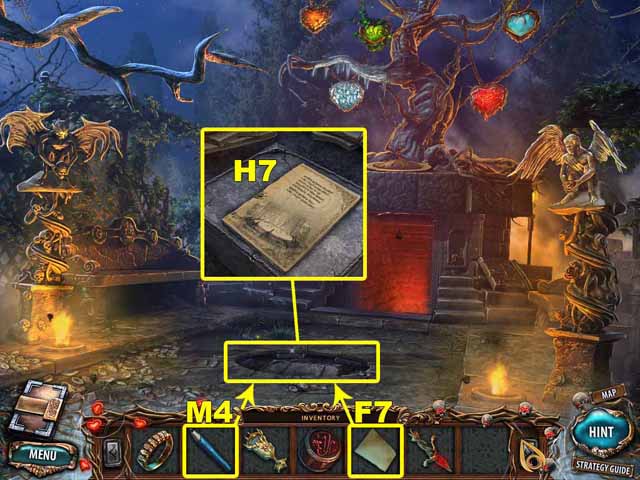
- Place the PARCHMENT (F7) on the stone image in the cache on the ground. Rub the PENCIL (M4) on the parchment to get the FINAL INSTRUCTIONS (H7).
- Go to the Office.
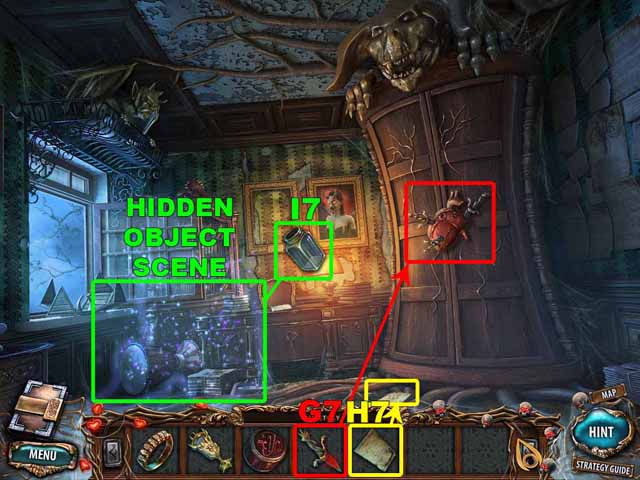
- Attach the FINAL INSTRUCTIONS (H7) to the torn parchment.
- Plunge the BLOOD-FILLED DAGGER (G7) into the heart on the cupboard door.
- Find and launch a Hidden Object scene.
- Collect every object on the list at the bottom of the screen.
- Open the close-up scene and collect the rest of the objects on the list at the bottom of the screen.
- Upon completing the Hidden Object Scene, you’ll acquire the JAR (I7).
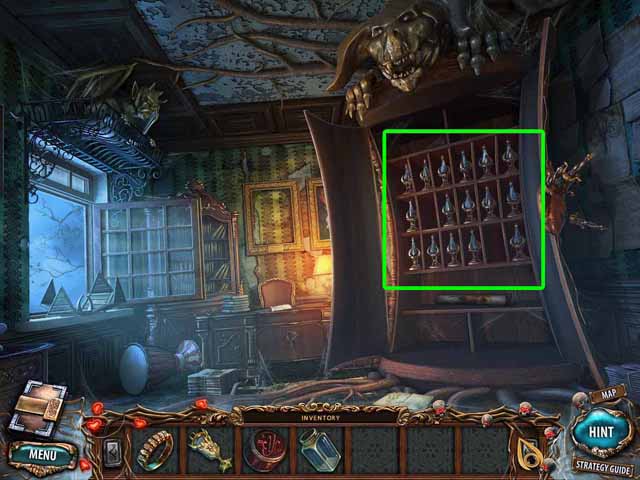
- Open the closet with the soul vials.
- Take the PORTRAIT OF DR. MORBILE (J7) from the cupboard.
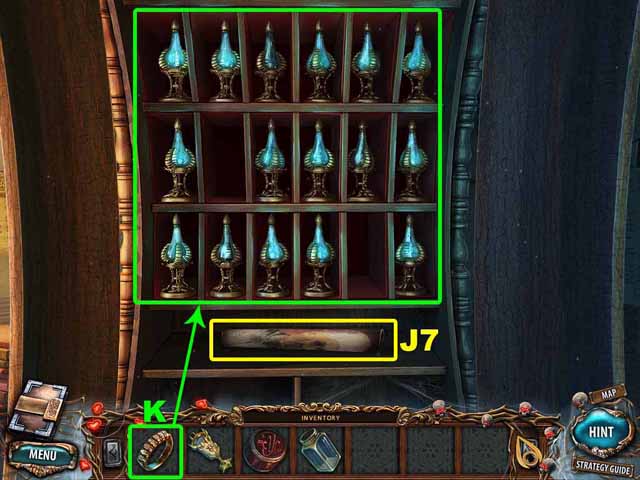
- Place the RING (K) near the blue vials.
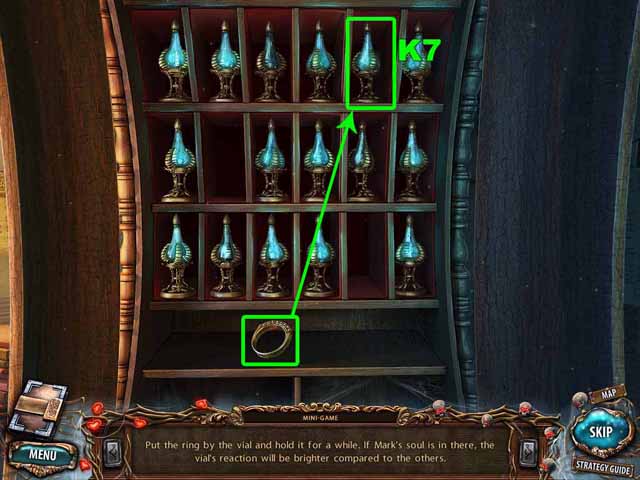
- Use the ring to find MARK’S SOUL (K7).
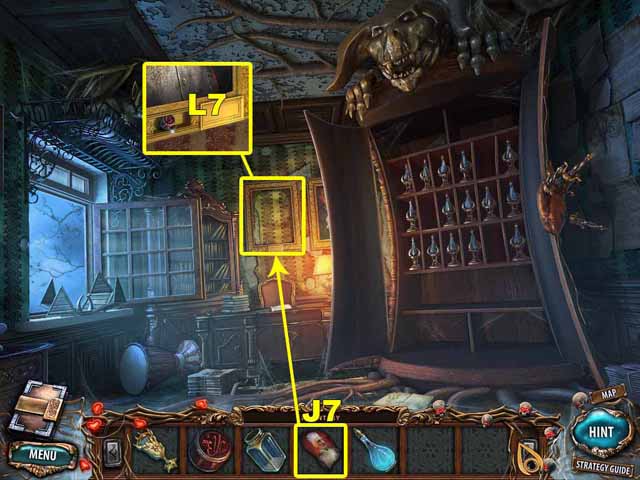
- Place the PORTRAIT OF DR. MORBILE (J7) in the empty frame.
- Take the RUNE (L7) from the cache.
- Go to the Cellar.
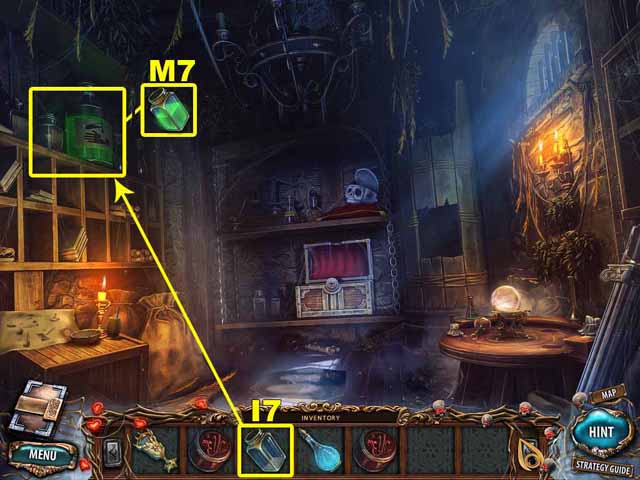
- Fill the JAR (I7) with acid. Take the ACID (M7).
- Go to the Altar.

- Take the 34th Beyond Object.
- Throw the GOBLET OF WATER (D5) into the fiery pit.
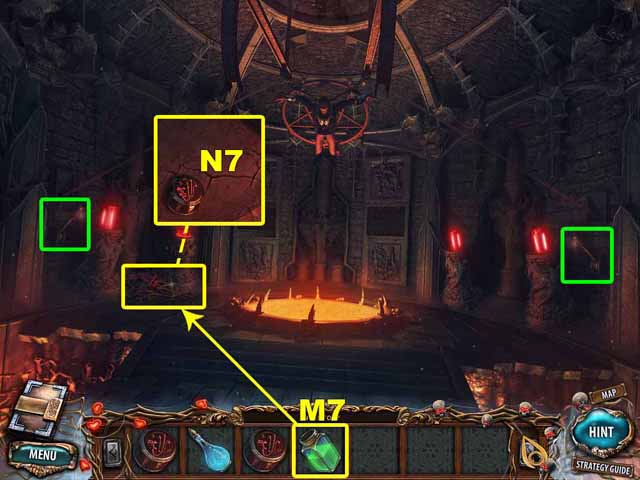
- Pour the ACID (M7) on the roots on the left to dissolve them. Take the RUNE (N7).
- Use the levers to lower Mark’s body.
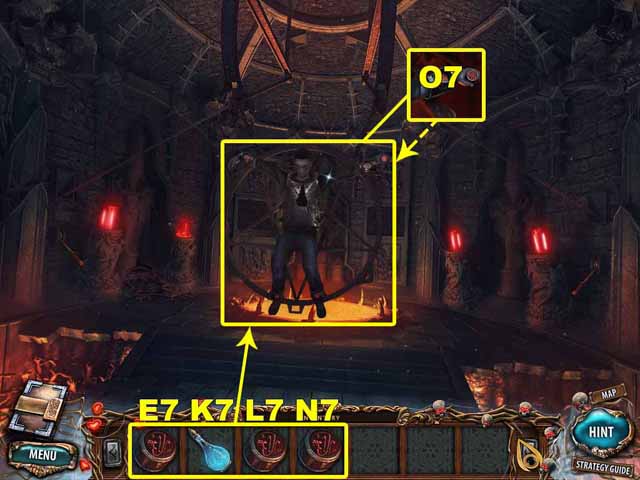
- Take the RUNE (O7) in Mark’s hand.
- Insert MARK’S SOUL (K7) into the metal vest Mark is wearing.
- Insert the RUNES (E7, L7, N7 and O7) into the locks.


 Shadow Wolf Mysteries: Under the Crimson Moon Walkthrough, Guide, & Tips
 Natural Threat Ominous Shores Walkthrough, Guide, & Tips
 Shiver Vanishing Hitchhiker Walkthrough, Guide, & Tips
 Golden Trails 2: The Lost Legacy Walkthrough, Guide, & Tips
 Legacy Tales: Mercy of the Gallows Walkthrough, Guide, & Tips